Proofing Your Negatives Digitally - SilverFast · PROOFING YOUR NEGATIVES DIGITALLY JEAN-CHRISTIAN...
4
PROOFING YOUR NEGATIVES DIGITALLY JEAN-CHRISTIAN ROSTAGNI You are not alone; I still shoot film, too. Actually that is mostly what I shoot, mainly because most of my cameras or black and white films don’t have a good digital equivalent. My goal is to proof my films into full frame files that I can use for sub- missions or on my website, without apologies or large expenditure of time. Hardware Planarity is an absolute requirement when scanning film. There are only three ways to achieve that: · Drum scan, obviously not an option for proofing · Imacon/Hasselblad scanners, which flex the film, thereby achieving excellent planarity; aside from sizeable investment, not really a productivity-oriented choice · Scanning between two glasses I choose the latter for proof scanning. In essence, this is a variation on the contact sheet process, allowing absolute full frame, a must, yet not easily achieved by most film holders. For this, the Epson V750 paired with SilverFast Ai 6.5 is the best choice I know. It is a flatbed scanner, less than perfect for film, but quite good, efficient and adaptable for about $850. It is superior to the V700, which does not have a fluid mount or high pass optics addressing flare issues in unmasked scans. Setting Up First, set the options accessed in the main dialogue general tab. Auto is the least intuitive, but I can’t see why one would need other settings, short of being a prepress specialist. Check the “Levels” boxes when scanning press clippings or the like in order Proofing Your Negatives Digitally Jean-Christian Rostagni Lance Armstrong hitting the ground racing, prologue of Tour de France 2009, Monaco, Shot with Noblex 135U, Kodak Ektar 100. See additional Tour de France photographs from proofing scans made using the Epson V750 paired with Silverfast Ai 6.5 software at jean-christian.net/art/socialistvacation/letour/letour. phototechmag.com 19
Transcript of Proofing Your Negatives Digitally - SilverFast · PROOFING YOUR NEGATIVES DIGITALLY JEAN-CHRISTIAN...
PROOFING YOUR NEGATIVES DIGITALLY JEAN-CHRISTIAN ROSTAGNI
You are not alone; I still shoot film, too. Actually that is mostly what I shoot, mainly because most of my cameras or black and white films don’t have a good digital equivalent. My goal is to proof my films into full frame files that I can use for sub-missions or on my website, without apologies or large expenditure of time.
HardwarePlanarity is an absolute requirement when scanning film. There are only three ways to achieve that:
· Drum scan, obviously not an option for proofing · Imacon/Hasselblad scanners, which flex the film, thereby achieving excellent planarity; aside from sizeable investment, not really a productivity-oriented choice · Scanning between two glasses
I choose the latter for proof scanning. In essence, this is a variation on the contact sheet process, allowing absolute full frame, a must, yet not easily achieved by most film holders.
For this, the Epson V750 paired with SilverFast Ai 6.5 is the best choice I know. It is a flatbed scanner, less than perfect for film, but quite good, efficient and adaptable for about $850. It is superior to the V700, which does not have a fluid mount or high pass optics addressing flare issues in unmaskedscans.
Setting UpFirst, set the options accessed in the main dialogue general tab. Auto is the least intuitive, but I can’t see why one would need other settings, short of being a prepress specialist. Check the “Levels” boxes whenscanning press clippings or the like in order
Proofing Your Negatives DigitallyJean-Christian Rostagni
Lance Armstrong hitting the ground racing, prologue of Tour de France 2009, Monaco, Shot with Noblex 135U, Kodak Ektar 100. See additional Tour de France photographs from proofing scans made using the Epson V750 paired with Silverfast Ai 6.5 software at jean-christian.net/art/socialistvacation/letour/letour.
phototechmag.com 19
to get a whiter background. Then calibrate yourscanner; the Epson V750 ships with IT8 targets. SilverFast targets make the calibration even easier.
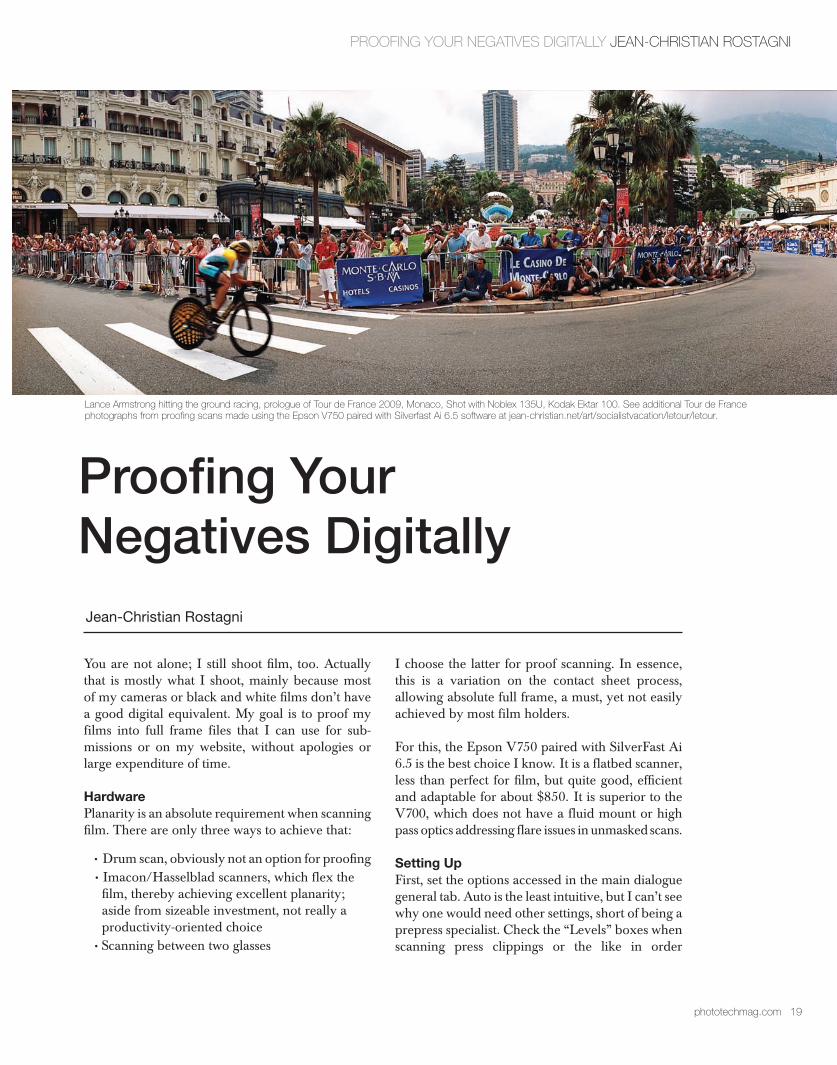
Scanning Area & HoldersThe scanner has two film modes; the full area allows scanning directly on the bed in an 8x10 zone. The lens used then is of lesser performance. When using the holders or the fluid mount, the lens system changes to a higher resolution that focusesabout 2mm above the bed. I only use the fluid mount, with a top glass (not delivered). I get full frame and the film is perfectly flat, hence the sharp-ness is optimized. Fluid would make the whole process a little more involved, so I don’t use it.
Instead I use Anti Newton glass in order to avoid Newton rings. In black and white, one A.N. glass is enough, as the emulsion side will not generate rings. A top A.N glass is then the way to go. But in color, the emulsion is often too slick and an A.N. glass is necessary on both sides. One A.N. glass is of no consequence to sharpness, but two will add some noise that has to be compensated for later with noise reduction software.
Replacing the bottom glass in the fluid mount requires removing 14 screws with a 2mm Allen wrench. Focal Point (http://www.fpointinc.com) isthe source for A.N. glass. Whether one scans emul-sion down (best), or up, does not matter, as SilverFast can be set to flip the image (Fig.1). The yellow thread is here for an easy lift of the top glass. The semi opaque strips on three sides create a space between the two glasses allowing air to escape without blowing the strips out when positioning the top glass.
Note: Because of the lamp movement and the ab-sence of mask around the frames, it is necessary to position 35mm strips parallel to the shorter side of the fluid mount. In the other direction, scans getprojections of the perforations. Without masking,no matter what, there will be a slight orange color-ation of the edges of the strips (color). Aperture 3 has some brushes that can take care of that.
SilverFast WorkflowThe most comprehensive way to scan with SilverFast is the HDR format. This means doingRAW scans at 64-bit in multiple exposures, harves-ting all the data that the scanner can extract. The
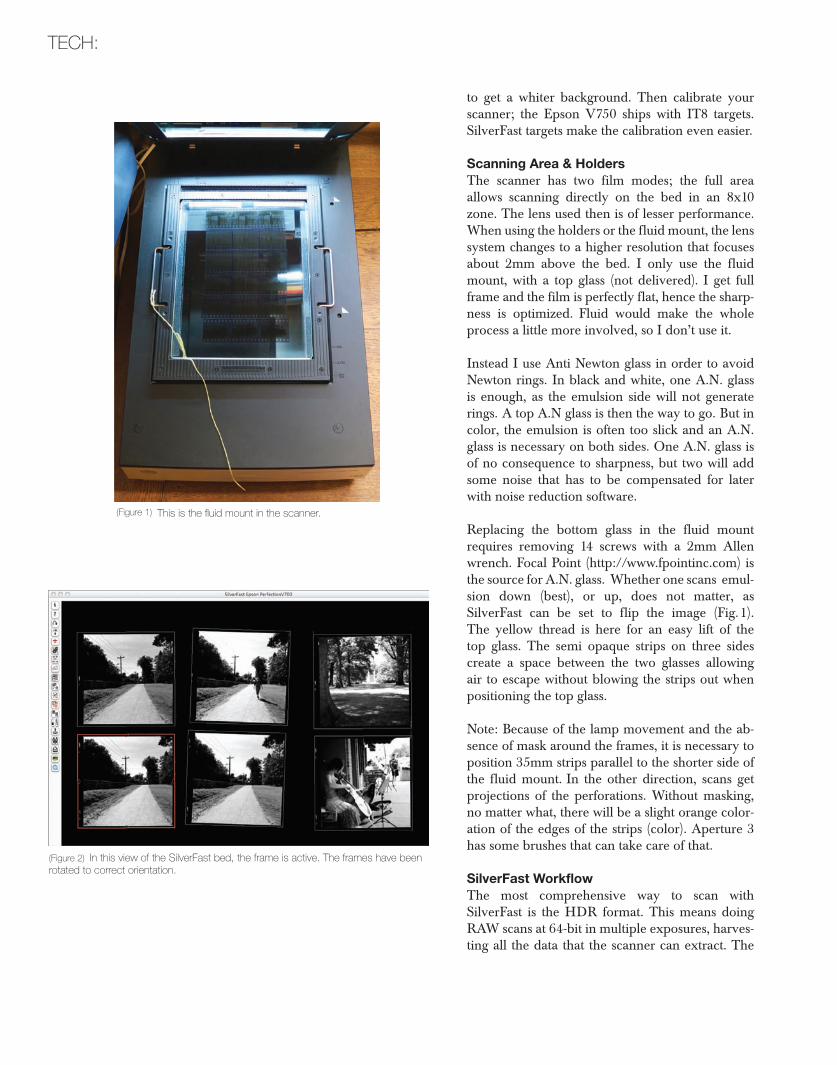
(Figure 2) In this view of the SilverFast bed, the frame is active. The frames have been rotated to correct orientation.
TECH:
(Figure 1) This is the fluid mount in the scanner.
PROOFING YOUR NEGATIVES DIGITALLY JEAN-CHRISTIAN ROSTAGNI
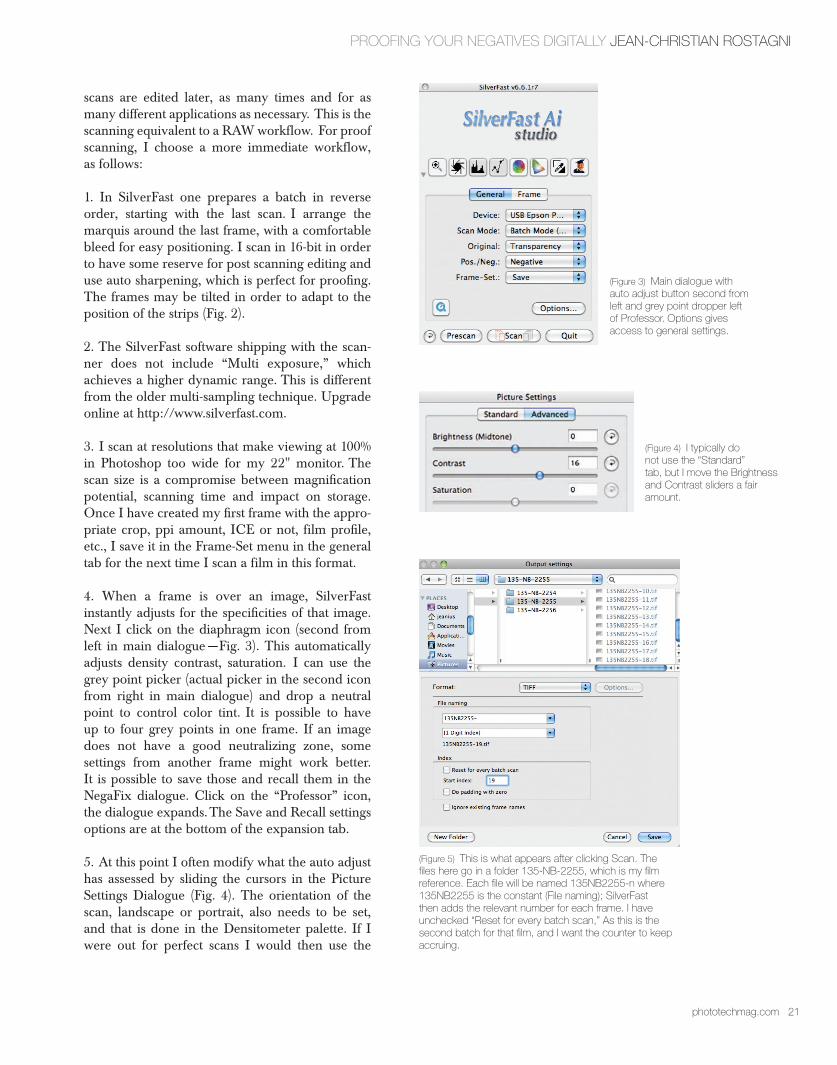
(Figure 3) Main dialogue with auto adjust button second from left and grey point dropper left of Professor. Options gives access to general settings.
(Figure 4) I typically do not use the “Standard” tab, but I move the Brightness and Contrast sliders a fair amount.
(Figure 5) This is what appears after clicking Scan. The files here go in a folder 135-NB-2255, which is my film reference. Each file will be named 135NB2255-n where 135NB2255 is the constant (File naming); SilverFast then adds the relevant number for each frame. I have unchecked “Reset for every batch scan,” As this is the second batch for that film, and I want the counter to keep accruing.
scans are edited later, as many times and for as many different applications as necessary. This is the scanning equivalent to a RAW workflow. For proofscanning, I choose a more immediate workflow, as follows:
1. In SilverFast one prepares a batch in reverse order, starting with the last scan. I arrange the marquis around the last frame, with a comfortable bleed for easy positioning. I scan in 16-bit in order to have some reserve for post scanning editing and use auto sharpening, which is perfect for proofing. The frames may be tilted in order to adapt to the position of the strips (Fig. 2).
2. The SilverFast software shipping with the scan-ner does not include “Multi exposure,” which achieves a higher dynamic range. This is different from the older multi-sampling technique. Upgrade online at http://www.silverfast.com.
3. I scan at resolutions that make viewing at 100% in Photoshop too wide for my 22" monitor. The scan size is a compromise between magnification potential, scanning time and impact on storage. Once I have created my first frame with the appro-priate crop, ppi amount, ICE or not, film profile, etc., I save it in the Frame-Set menu in the general tab for the next time I scan a film in this format.
4. When a frame is over an image, SilverFast instantly adjusts for the specificities of that image. Next I click on the diaphragm icon (second from left in main dialogue —Fig. 3). This automatically adjusts density contrast, saturation. I can use the grey point picker (actual picker in the second icon from right in main dialogue) and drop a neutral point to control color tint. It is possible to have up to four grey points in one frame. If an image does not have a good neutralizing zone, some settings from another frame might work better. It is possible to save those and recall them in the NegaFix dialogue. Click on the “Professor” icon, the dialogue expands. The Save and Recall settings options are at the bottom of the expansion tab.
5. At this point I often modify what the auto adjust has assessed by sliding the cursors in the Picture Settings Dialogue (Fig. 4). The orientation of the scan, landscape or portrait, also needs to be set, and that is done in the Densitometer palette. If Iwere out for perfect scans I would then use the
phototechmag.com 21
22 photo technique J/A 2010
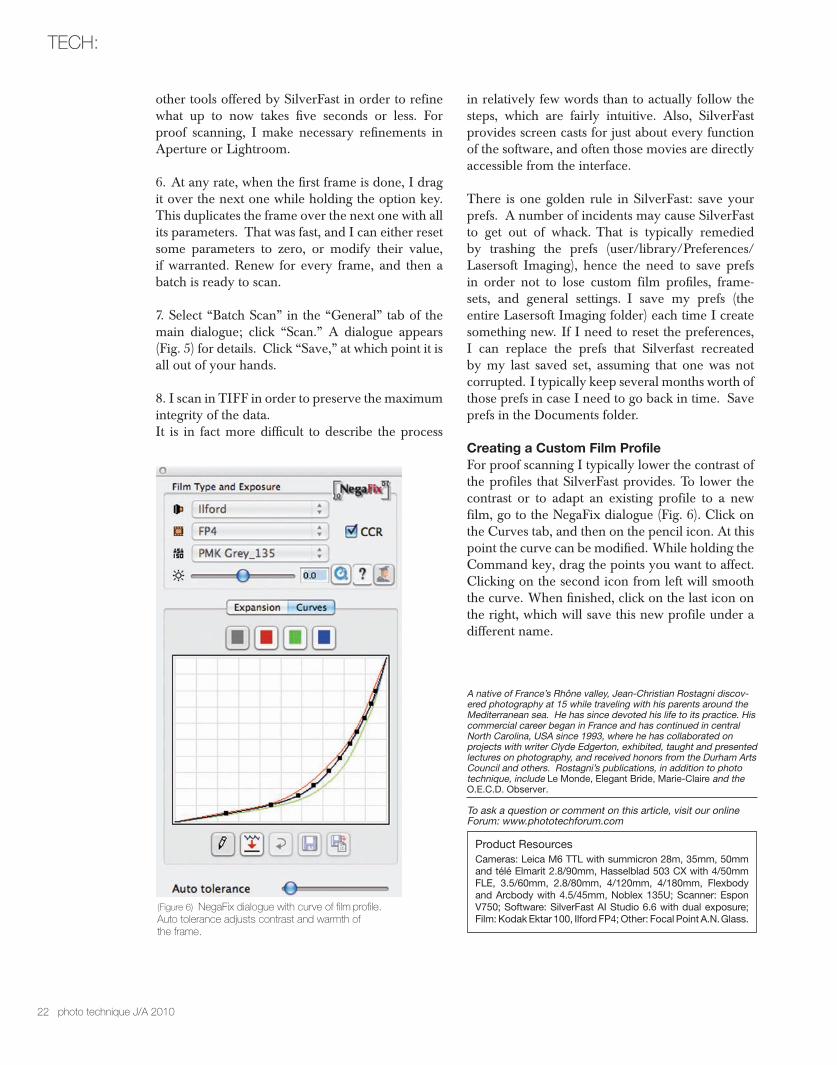
(Figure 6) NegaFix dialogue with curve of film profile.Auto tolerance adjusts contrast and warmth of the frame.
other tools offered by SilverFast in order to refine what up to now takes five seconds or less. For proof scanning, I make necessary refinements in Aperture or Lightroom.
6. At any rate, when the first frame is done, I drag it over the next one while holding the option key. This duplicates the frame over the next one with all its parameters. That was fast, and I can either reset some parameters to zero, or modify their value, if warranted. Renew for every frame, and then a batch is ready to scan.
7. Select “Batch Scan” in the “General” tab of the main dialogue; click “Scan.” A dialogue appears (Fig. 5) for details. Click “Save,” at which point it is all out of your hands.
8. I scan in TIFF in order to preserve the maximum integrity of the data.It is in fact more difficult to describe the process
in relatively few words than to actually follow the steps, which are fairly intuitive. Also, SilverFast provides screen casts for just about every function of the software, and often those movies are directly accessible from the interface.
There is one golden rule in SilverFast: save your prefs. A number of incidents may cause SilverFast to get out of whack. That is typically remedied by trashing the prefs (user/library/Preferences/Lasersoft Imaging), hence the need to save prefs in order not to lose custom film profiles, frame-sets, and general settings. I save my prefs (the entire Lasersoft Imaging folder) each time I create something new. If I need to reset the preferences, I can replace the prefs that Silverfast recreated by my last saved set, assuming that one was not corrupted. I typically keep several months worth of those prefs in case I need to go back in time. Save prefs in the Documents folder.
Creating a Custom Film ProfileFor proof scanning I typically lower the contrast of the profiles that SilverFast provides. To lower the contrast or to adapt an existing profile to a new film, go to the NegaFix dialogue (Fig. 6). Click on the Curves tab, and then on the pencil icon. At this point the curve can be modified. While holding the Command key, drag the points you want to affect. Clicking on the second icon from left will smooth the curve. When finished, click on the last icon on the right, which will save this new profile under a different name.
TECH:
A native of France’s Rhône valley, Jean-Christian Rostagni discov-ered photography at 15 while traveling with his parents around the Mediterranean sea. He has since devoted his life to its practice. His commercial career began in France and has continued in central North Carolina, USA since 1993, where he has collaborated on projects with writer Clyde Edgerton, exhibited, taught and presented lectures on photography, and received honors from the Durham Arts Council and others. Rostagni’s publications, in addition to photo technique, include Le Monde, Elegant Bride, Marie-Claire and the O.E.C.D. Observer.
To ask a question or comment on this article, visit our online Forum: www.phototechforum.com
Product ResourcesCameras: Leica M6 TTL with summicron 28m, 35mm, 50mm and télé Elmarit 2.8/90mm, Hasselblad 503 CX with 4/50mm FLE, 3.5/60mm, 2.8/80mm, 4/120mm, 4/180mm, Flexbody and Arcbody with 4.5/45mm, Noblex 135U; Scanner: Espon V750; Software: SilverFast AI Studio 6.6 with dual exposure; Film: Kodak Ektar 100, Ilford FP4; Other: Focal Point A.N.Glass.