ProjectWise User Guide - AECOM · PDF fileThis manual is an introduction to the use of...
26
Transcript of ProjectWise User Guide - AECOM · PDF fileThis manual is an introduction to the use of...


ProjectWise User Guide Document BTS-PW002
This document is proprietary to AECOM and should not be distributed in any form outside of AECOM without the prior written consent of the BTS group. This document is intended for the use of AECOM employees only.
Page | 2
Issue and Revision History
Version Description Date Issued Originator Approver
01 Draft version 08.11.11.xx
9/27/2013 K Albright
Copyright
Copyright © 2013 AECOM Technology Corporation. All Rights Reserved
Many of the designations used by manufacturers and sellers to identify their products are claimed as trademarks. ProjectWise, MicroStation, Microsoft and AutoCAD are trademarks of Bentley Systems Inc., Microsoft and Autodesk respectively. Where other designations appear in this document, that the author was aware of, a trademark claim has been designated. While precaution has been taken in the preparation of this document, AECOM or any of its affiliates assume no responsibility for errors or omissions or damages resulting from the use of this information. This information is subject to change without notice.
Disclaimer
Notice of Disclaimer: AECOM provides this document on an “as-is” basis. All warranties and representations of any kind with regard to this document are disclaimed, including warranties and representations of any kind. Under no circumstances will AECOM or any of its affiliates be liable for any consequential, incidental, special or exemplary damages even if apprised of the likelihood of such damages occurring. The use of this document for work under contract with AECOM does not relieve the contractor from any obligation assumed by the contract, or from complete and proper fulfillment of the terms of their contract with AECOM, nor does it entitle the contractor to compensation for damages or loss that may be attributed to the use of this document. This document does not supersede any project documentation or project specific agreements.

ProjectWise User Guide Document BTS-PW002
This document is proprietary to AECOM and should not be distributed in any form outside of AECOM without the prior written consent of the BTS group. This document is intended for the use of AECOM employees only.
Page | 3
Table of Contents
1.0 Introduction
Support Levels
2.0 Accessing ProjectWise
ProjectWise Explorer Login (AECOM Single Sign-On)
ProjectWise Explorer Login (Log in Dialog)
Integrated Software Login
Set Auto Single Sign-on
3.0 ProjectWise Explorer Interface
PWExplorer Interface Window Panes
ProjectWise Toolbars
4.0 ProjectWise Templates
5.0 ProjectWise Folders
Folder Types
Folder Menu Commands
6.0 ProjectWise Documents
Creating a New Document
Opening a Document
Checking-In a Document
Printing a Document
Sending an Email Link
Document Icons
Create Document Lists
7.0 Standard Workflows
Quick Start Guide

ProjectWise User Guide Document BTS-PW002
This document is proprietary to AECOM and should not be distributed in any form outside of AECOM without the prior written consent of the BTS group. This document is intended for the use of AECOM employees only.
Page | 4
1.0 Introduction
At AECOM ProjectWise is part of an enterprise level project team collaboration system, which is used to manage content from complex CAD and BIM data to Microsoft Office documents. ProjectWise enables AECOM to share work globally in virtual project teams, the system is specifically designed to support engineering and construction projects. ProjectWise enables external parties to access project content through web internet connections, while still providing a high level of security and content control. It works like a file check-in / check-out system that maintains and manages multiple copies of a file to keep files close to the user but users see a single (single source of truth) file in the system. The system manages the difference in all the files by moving only the bits of information that have been changed between locations as opposed to entire files, this is called delta file transfer. There are several modules in ProjectWise that add additional functionality for document control, cost control, quality, and many others. For more information on the AECOM ProjectWise system see the Document Management Site (DMS) on MyAECOM http://tec.aecomnet.com/tsn/CollabTech/EC/Pages/default.aspx
This manual is an introduction to the use of ProjectWise at AECOM and only covers the basic functions available and how they have been configured for use at AECOM. For more in-depth learning of the advanced tools refer to the ProjectWise advanced user manuals and Bentley learning (PWPA Guide and Regional ProjectWise Administrator Guide).
Support Levels
There are four levels of administration support of ProjectWise at AECOM
Level
Required Learning
Responsibilities User
Project Admin
RTA BTS
Admin
PW User X Use the AECOM processes per the user training material on DMS site
PW Project Admin (PWPA)
X X Setup and configure projects, train, support & coach ProjectWise users
RPA X X X Support and coach PWPAs with more complex configurations and systems issues
BTS Admin Professionally trained to support the overall system, DB, Servers and networks, provide training and coaching for RPAs
All users are encouraged to us the Bentley support features such as chat with an analyst. This support can be
accessed at: http://selectservices.bentley.com

ProjectWise User Guide Document BTS-PW002
This document is proprietary to AECOM and should not be distributed in any form outside of AECOM without the prior written consent of the BTS group. This document is intended for the use of AECOM employees only.
Page | 5
2.0 Accessing ProjectWise
ProjectWise is a secure environment to work in so you will be required to login when you wish to use documents stored in ProjectWise.
note
When ProjectWise is integrated with any software application, a ProjectWise login dialog box will appear when you choose the Open or Save As command from the application. If you wish to store the file outside of ProjectWise click the Cancel button and the standard Windows dialog box will appear.
ProjectWise Explorer Login (AECOM Single Sign-On)
If you do not have an AECOM user account contact your PWPA to obtain one before you login. If you have an AECOM user account synced with AECOM ProjectWise and you are working from an AECOM office you will be able to login automatically by clicking on a Datasource.
A Datasource is where ProjectWise saves and retrieves data. When you are logged into a Datasource you will see your user account ID listed next to the Datasource name, and the Datasource icon will have a green check next to it.
Datasource icon
Datasource icon when you are logged into it
ProjectWise Explorer Login (Log in Dialog)
If you are logging into ProjectWise and your ProjectWise account is not synced with AECOM ProjectWise, or you are not an AECOM employee, follow these steps. Select the Datasource to log into, right button and click Log in…
The ProjectWise Explorer Login dialog will open. Type in your AECOM user name and password (this is the same username and password that you used to login to your AECOM computer, or the username and password your PW Project Administrator provided). Then, click log in.

ProjectWise User Guide Document BTS-PW002
This document is proprietary to AECOM and should not be distributed in any form outside of AECOM without the prior written consent of the BTS group. This document is intended for the use of AECOM employees only.
Page | 6
Integrated Software Login
If you use Microstation, AutoCAD, MS Office, or another application that integrates with ProjectWise, you will have to log into ProjectWise if you want to access files in a Datasource. When you select Open a File from the software the ProjectWise Log in dialog will open. Notice the application icon in the corner of the dialog box.
The Datasource field indicates where you want ProjectWise to find your files. The user name and password are the same as what you would use to log into ProjectWise. If you want to work on files that are not in ProjectWise click the cancel button to access files from a different location. This same process is followed when selecting File > Open, or File > Save As for the first time.
Set Auto Single Sign-on
You can set ProjectWise to automatically use the Single sign-on by placing a check mark in the “Use Windows Single Sign-On for authentication” check box. This will eliminate the need to enter your user credentials the next time you log in.

ProjectWise User Guide Document BTS-PW002
This document is proprietary to AECOM and should not be distributed in any form outside of AECOM without the prior written consent of the BTS group. This document is intended for the use of AECOM employees only.
Page | 7
3.0 ProjectWise Explorer Interface
The ProjectWise Interface (PWExplorer) is very similar to the Windows Explorer. There is a folder tree in the left pane and a document tree in the right pane. The Windows commands can be used in PWExplorer (cut, copy, paste, delete, and move).
PWExplorer Interface Window Panes
There are three main areas in the ProjectWise interface.
Datasource Pane - The Datasource Pane is located on the left side of the PWExplorer window. This Pane will list all the Datasources found on your network. After logging into a Datasource it will open and display available projects and folders.
Document Pane – The Document Pane is located to the right in the PWExplorer window. This Pane displays all subfolders and documents in the folder selected in the Datasource Pane. This is where documents are opened, closed and manipulated.
Properties Pane – This Pane is located below the Document Pane. This Pane can be turned on/off by selecting View > Preview Pane. The tabs at the top of the Properties Pane display properties, previews and access control.

ProjectWise User Guide Document BTS-PW002
This document is proprietary to AECOM and should not be distributed in any form outside of AECOM without the prior written consent of the BTS group. This document is intended for the use of AECOM employees only.
Page | 8
Document Properties Tab – when a file is selected in the Document Pane the Document’s property information is displayed in the Preview Pane.
Project Properties Tab – In this tab you can view the properties of the project that the selected document is located in.
Folder Properties Tab – The Folder Properties tab displays information about the folder environment, location, ownership and additional folder specific information.
Photo Preview Tab – Selecting the Photo Preview tab will display a preview of many image formats. If this feature has been configured for your workstation the Photo Preview will display Word documents, CAD files, Excel files and PDF files in read-only mode.
Access Control Tab – This tab is used to display and set user folder and document security privileges. These settings are reserved for your PW Project Administrator. If you have sufficient privileges you will be able to control who has access to folders and files within the folder displayed in the Document Pane. View Control – view control options are listed at the top of the Pane below the tabs. There are AECOM standard views: Default and Email. There may be project specific view options for your project listed as well. By changing the View, the property information listed changes in the Preview Pane.
ProjectWise Toolbars
Navigate back to a previously selected folder, project or datasource
Navigate forward to get back to the folder, project or Datasource you were in before you clicked Navigate back
Navigate up one level to the parent folder or project of the item currently selected
Create new Document
Open Document
Document Properties
Local Document Organizer (see items you have checked out)
Display Thumbnails
Display Large Icons
Display Small Icons

ProjectWise User Guide Document BTS-PW002
This document is proprietary to AECOM and should not be distributed in any form outside of AECOM without the prior written consent of the BTS group. This document is intended for the use of AECOM employees only.
Page | 9
Display in List
Display Details
Help
This toolbar is used to change the active interface. An interface will determine which environment attributes display in the Attributes and More Attributes tabs of the Document Properties dialog
The View toolbar is used to set the active view. This controls what columns are displayed in the document list when a document is selected
The search toolbar consolidates the Quick Search and Advanced Search tools into one location in PWExplorer
The Address toolbar informs you of where you are in the Datasource. A full folder path is displayed that includes the folder and document. The address can be copied and pasted as a link in an email, Microsoft Office documents and desktop shortcuts to launch PWExplorer to a predefined location or document

ProjectWise User Guide Document BTS-PW002
This document is proprietary to AECOM and should not be distributed in any form outside of AECOM without the prior written consent of the BTS group. This document is intended for the use of AECOM employees only.
Page | 10
4.0 ProjectWise Templates
AECOM standard project templates for small projects, large projects, and Business Line specific templates are in development and will be added to this section when they are released.

ProjectWise User Guide Document BTS-PW002
This document is proprietary to AECOM and should not be distributed in any form outside of AECOM without the prior written consent of the BTS group. This document is intended for the use of AECOM employees only.
Page | 11
5.0 ProjectWise Folders
It is AECOM’s policy that all folders created in ProjectWise are part of a project. Folders created outside of a project are not permitted. ProjectWise folders differ from Windows folders in that each ProjectWise folder has a type, properties and security assigned to it. However, you can perform similar tasks with ProjectWise folders as you can with Windows folders, such as: copy, paste, delete, etc.
Folder Types Unlike Windows, ProjectWise has different types of folders. The primary type of folders are those that contain subfolders and documents. There are folders that contain searches and those that contain messages as well. Folder types can be identified by the folder’s icon. This is a list of the different folder types.
Icon Description
ProjectWise Datasource – not logged in
ProjectWise Datasource – logged in
Project Folder
Subfolder
Search folder
Message folder – not currently used by AECOM

ProjectWise User Guide Document BTS-PW002
This document is proprietary to AECOM and should not be distributed in any form outside of AECOM without the prior written consent of the BTS group. This document is intended for the use of AECOM employees only.
Page | 12
Folder Menu Commands
All the general use commands listed in the Folder menu found in the main menu bar or by right-clicking on a folder are described below. The folder commands available to you are based on the security applied to the existing folder and the privileges granted. You will be able to create and delete folders in some locations of a project but not in others. The purpose for this is to securely manage the project folder structure.
New Folder
The New Folder command allows you to create a folder to contain documents. Follow the steps below to create a new folder.
1. Click on the existing folder where you would like to create a subfolder.
2. Select from the menu Folder > New Folder (or right click on the existing folder)
3. Select New Folder and the Create Folder dialog opens.
4. In the Name field enter a name for the folder. The name field is limited to 63 characters.
5. (Optional) In the Description field, enter a description for the new folder. The Description field is limited to 127 characters.
6. (Optional) you can change the location of where you want the folder to be

ProjectWise User Guide Document BTS-PW002
This document is proprietary to AECOM and should not be distributed in any form outside of AECOM without the prior written consent of the BTS group. This document is intended for the use of AECOM employees only.
Page | 13
created. Select Change… and navigate to the location you want the folder to be created.
7. (Optional) Assign an Environment to the folder. By default the evironment will be set to the AECOM standard (or <none>). You should only change this setting if required by the project. Changing this setting will affect future searches for documents in this folder.
8. The Storage for the folder should never be changed. Leave this setting as is.
9. (Optional) By default you will be set as the Owner of the folder you are creating. You can leave this or assign someone else.
10. Click the OK button to create the folder.
Open in New Window
This option will open the selected folder in a new window. All the document functions are still available by right-clicking in the new window and selecting from the options menu.
Cut, Copy, Paste
Similar to Windows Explorer, in ProjectWise Explorer you can use the Cut, Copy and Paste commands from the Folder menu or by using key-ins.
Cut <ctrl-X>
Paste <ctrl-V>
Copy <ctrl-C>
To move a folder use the Cut and the then Paste in the new location
Rename
The Rename command allows you to change the folder Name and Description. In ProjectWise the folder name is required, but the folder description is optional.
Delete
The Delete folder command will open the Delete Folder dialog, which is used to determine the way a folder and its contents are deleted. The Delete Folder dialog consists of two tabs; General and Advanced.

ProjectWise User Guide Document BTS-PW002
This document is proprietary to AECOM and should not be distributed in any form outside of AECOM without the prior written consent of the BTS group. This document is intended for the use of AECOM employees only.
Page | 14
General Tab Options
Delete Folders – when on, all folders are deleted. The effect of this setting also depends on the settings for Delete documents and Delete sets. If these options are not turned on only the empty folders will be deleted.
Delete documents – When on, documents in the folder are deleted. The effect of this setting also depends on the setting for Delete sets. If Delete sets is turned on all documents except the parent files of logical sets and flat files are deleted.
Delete sets – When on, all documents and sets in the folder re deleted, if delete documents is also turned on. If delete documents is not turned on this setting does not delete any documents.
Delete all subfolders – When on, subfolders of the selected folder will also be deleted.
Delete corresponding workspace variables – Any custom workspace variables set for this folder will also be deleted.
Advanced Tab Options
Ignore checked out documents – when on, documents are deleted even if some of those documents are members of sets that exist outside the folder selected for deletion. When off, if there are documents in the folder that are checked out to you or locked by another user they will not be deleted. The folder deletion will fail when it reaches the first of these documents.
Free and delete own checkouts – When on, documents checked out to the current user are freed then deleted even when Ignore checked out documents is on.
Ignore members of undeleted sets – When on, documents are deleted even if some of those documents are members of sets that exist outside the folder selected for deletion. When off, documents that are members of sets outside the selected folder are not deleted and the folder deletion fails when it reaches the first of these documents.
Delete old document versions only – When on, only previous versions of documents are deleted. The currently active version is retained.
Exclude source folder – When on, the selected source folder itself is not deleted, but the items in it that are specified to be deleted are deleted.
Update GUI on each operation – When on, the ProjectWise Explorer window updates after each deletion. Otherwise the ProjectWise Explorer window updates once after all deletions are completed.

ProjectWise User Guide Document BTS-PW002
This document is proprietary to AECOM and should not be distributed in any form outside of AECOM without the prior written consent of the BTS group. This document is intended for the use of AECOM employees only.
Page | 15
Properties
The Properties command opens the Folder Properties dialog, which is used to change various properties of the selected folder. Depending on the privileges granted to you, you could see up to 12 tabs on this dialog. For a complete description of these tabs refer to the ProjectWise Advance user manuals (ProjectWise Project Administrator & Regional ProjectWise Administrator)

ProjectWise User Guide Document BTS-PW002
This document is proprietary to AECOM and should not be distributed in any form outside of AECOM without the prior written consent of the BTS group. This document is intended for the use of AECOM employees only.
Page | 16
6.0 ProjectWise Documents
In ProjectWise documents are files associated with a project. The documents in the projects folder could be drawings, design details, correspondence, reference files, digital pictures, sets, or even empty records that are just place-holders for future documents.
There are a number of ways to create or place documents in project folders. You can create a new document with the Advanced Document Creation Wizard, you can create a document in an Application such as MicroStation or AutoCAD and save it to a ProjectWise folder, you can copy a file from ProjectWise, or you can copy a file from your computer into ProjectWise.
Below are the most common tasks that would be performed with documents in ProjectWise. Commands not listed here are considered as either Advanced or for CAD use only and are covered in the appropriate manuals.
Creating a New Document
With ProjectWise there are a number of ways to create new documents. For the purpose of this manual and audience it is directed to, this manual will only focus on the less complex methods of creating new documents in ProjectWise.
Drag & Drop
The simplest way of creating documents in ProjectWise is by the Drag & Drop method where you locate an existing document in Windows Explorer and Drag the document into a ProjectWise folder.
Save As from an Integrated Application
If ProjectWise is integrated with applications such as Word, Excel, PowerPoint, etc… you can save your newly created document into ProjectWise. The following steps assume that you have created a new Word document and you are ready to save it to a folder in ProjectWise.
1. From Word, select the Save
command.
2. If you are not already logged into
ProjectWise, then the ProjectWise
login dialog will open.
3. Select a Datasource from the drop-
down list where you would like to
save the document.
4. Click the Log in button.
5. Make sure your AECOM network ID
has been entered in the User Name
field.
6. Enter your password.
7. If the Select a Wizard dialog opens, select the No Wizard option and then click the OK button.
8. If you select the Make this wizard the default, then future attempts to save a new document into
ProjectWise will not open this dialog.
ProjectWise User Guide Document BTS-PW002
This document is proprietary to AECOM and should not be distributed in any form outside of AECOM without the prior written consent of the BTS group. This document is intended for the use of AECOM employees only.
Page | 17
9. Next the Save Document As
dialog will open. This dialog
allows you to select a
ProjectWise folder, provide a
document record Name,
Description and File Name.
10. Select a folder to save your
document to by clicking on
the Select button.
11. Click the Save button.
12. A progress bar will display the percent complete. Once the progress bar closes, your
document save has completed and your document is now located in ProjectWise.
Opening a Document
Open a Document for Editing
Opening a document from ProjectWise is as simple as opening a document from Windows Explorer. You navigate to the document you wish to open and double-click the document to open it. Opening a document using a double-click will check the document out to you. Additionally you can right-click the document in ProjectWise and select Open from the popup menu. Using either of the methods above to open a document, ProjectWise will check the document out to you and lock it in ProjectWise. This guarantees that no one else can modify the document until you have checked the document back into ProjectWise.
note ProjectWise is aware of the correct application that should be used to open a document. If you have a document that will not open from ProjectWise, you should contact your PW Project Administrator.
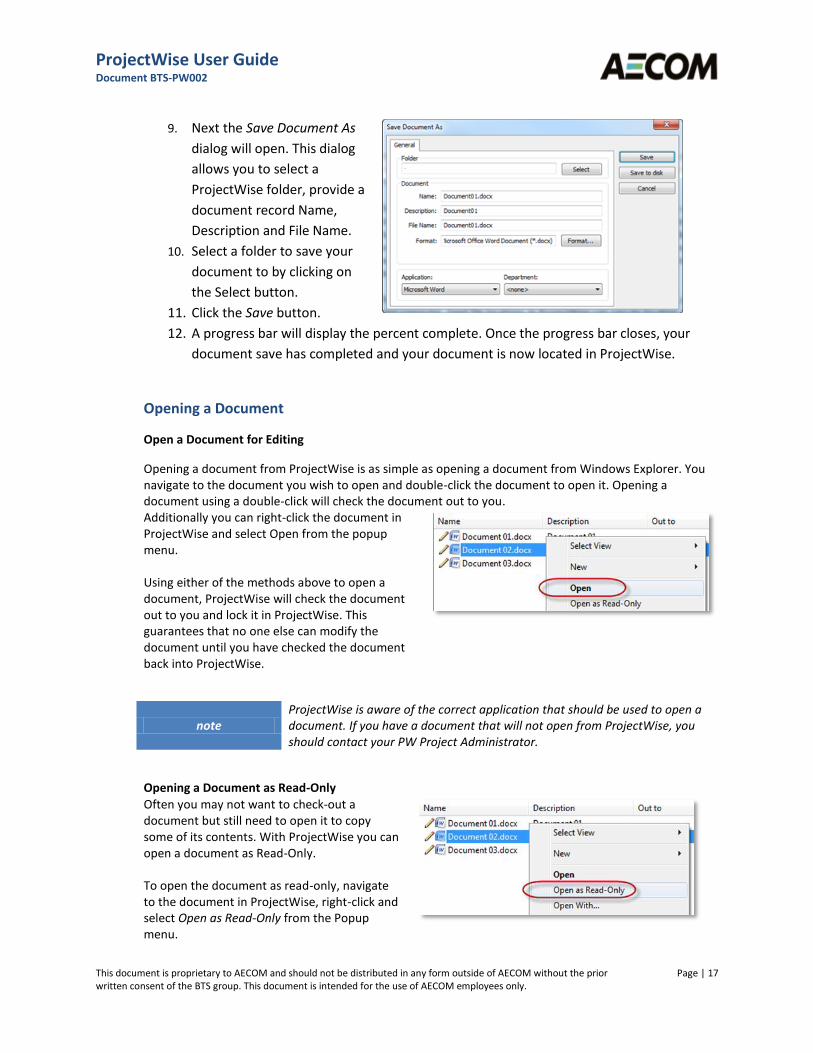
Opening a Document as Read-Only
Often you may not want to check-out a document but still need to open it to copy some of its contents. With ProjectWise you can open a document as Read-Only. To open the document as read-only, navigate to the document in ProjectWise, right-click and select Open as Read-Only from the Popup menu.

ProjectWise User Guide Document BTS-PW002
This document is proprietary to AECOM and should not be distributed in any form outside of AECOM without the prior written consent of the BTS group. This document is intended for the use of AECOM employees only.
Page | 18
Checking-In a Document
The Check-In dialog box will open when you close an application after editing a document.
When this dialog appears, you are presented with options that can be performed on the current
document. Each option is covered below.
Check-In
Usually Checking-In a document
follows editing the document. You
make changes to the document, save
the changes and then close the
application. ProjectWise is aware
that you have edited the document
and that you have closed the
application.
When the application has closed,
ProjectWise will present you with a
Check-In dialog box. By clicking the
Check-In button, the document will be checked back into ProjectWise and update the master
document with your changes.
Update Server copy
Upon closing the application, you may not always want to check the document back into
ProjectWise, however you may want to allow others to view the latest changes you’ve made.
Selecting the Update Server Copy
will update the master copy in
ProjectWise and leave the
document checked out to you.
Another way to update the server
copy so that everyone can see
your latest changes is to right-click
the document in the Documents
Pane in ProjectWise Explorer and
select Update Server Copy from
the popup menu.

ProjectWise User Guide Document BTS-PW002
This document is proprietary to AECOM and should not be distributed in any form outside of AECOM without the prior written consent of the BTS group. This document is intended for the use of AECOM employees only.
Page | 19
Free
Everyone makes mistakes and the Free
option allows you to disregard all changes
you’ve made to the document since it was
checked out, provided you haven’t used
the Update Server Copy option. Selecting
this option will return the document to its
original state and check it back into
ProjectWise.
An additional way to Free a document is to
right-click the document in the Documents
Pane in ProjectWise Explorer and select
Free from the popup menu.
Cancel
Selecting the Cancel option will simply
leave the document checked out to you.
Create New Version
The Version option allows you to create a new version of the document upon check-in and the
original document in ProjectWise
automatically becomes read-only
maintaining the condition it was in before
editing and protects it from further
modifications.
After clicking the Check-In button the new
version will be created in ProjectWise using
the Version information you provided. The
version information can now be seen in the

ProjectWise User Guide Document BTS-PW002
This document is proprietary to AECOM and should not be distributed in any form outside of AECOM without the prior written consent of the BTS group. This document is intended for the use of AECOM employees only.
Page | 20
Documents Pane in ProjectWise Explorer. Notice in
the image to the right that the original version is now
read-only.
Cut, Copy and Paste
ProjectWise provides the same tools; Cut, Copy and Paste, that you are already familiar with in
Windows Explorer. You can use the short-cut key-ins; Ctrl-X = Cut, Ctrl-C = Copy, and Ctrl-V =
Paste.
Additionally you can use the commands from the Right-Click popup
menu.
There are exceptions with the Cut and Paste commands. Because most projects in ProjectWise
utilize folder and document security you must have permissions to perform these two
commands. In order to use the Cut command, you must have Delete Document privileges in the
current folder. In order to use the Paste command, you must have Create Document privileges
in the current folder.
Rename
ProjectWise allows you to rename a document that is maintained in the ProjectWise document
repository. The following steps outline how to rename a document.
1. Right-click the document in the Documents Pane to open the popup menu.
2. Select Rename from the menu to open the
Rename Document dialog.
3. Enter the new values for Name, Description
and File Name.
4. Click the OK button.
Delete
Deleting a document in ProjectWise can be accomplished in different ways, however it requires
that you have delete document privileges in the current folder. The most common is to select
the document in the Documents Pane and then hit the Del key. The other is to right-click the
document and select Delete from the popup menu.
Using either method, ProjectWise will display a message box
asking you if you want to delete the document. Clicking the
Yes button will delete the selected document.

ProjectWise User Guide Document BTS-PW002
This document is proprietary to AECOM and should not be distributed in any form outside of AECOM without the prior written consent of the BTS group. This document is intended for the use of AECOM employees only.
Page | 21
ProjectWise will allow you to delete multiple documents by selecting multiple documents in the
Documents Pane and using one of the commands from above.
Printing a Document
Printing one or multiple documents that are maintained in ProjectWise makes use of your
Windows Default Printer. To print one document, right-click the document and select Send To >
Printer from the popup menu.
To print multiple documents, in the Documents Pane select all documents that are to be printed
and right-click and select Send To > Printer from the popup menu.
Sending an Email Link
There are a couple options available for emailing a link to a ProjectWise document. The less
preferred way is to right-click the document in the Documents Pane and selecting Send To >
Mail Recipient as Link. The reason for this is that this command uses the URL (Uniform Resource
Locator) path in ProjectWise to the document. If the document is ever moved, then the link in
the email will no longer work.
A better way to email a link to a document, is to
use the documents URN (Uniform Resource
Name). To get the documents URN, select the
document in the Documents Pane, then right-
click the information displayed in the Address
Bar. From the popup menu select Copy URN.
Next paste the information into your email. The link information
pasted will be represented by the name of the document in
ProjectWise.
Document Icons
In the Document Pane each document has two icons associated with it. The first indicates permissions
and status of the document. The second indicates the application the document is associated with. Below
is a list of the document permission and status icons.
Icon Description
Read / Write — The pencil icon indicates that the document is checked in, and you have permission to modify the document's properties
Read Only — The open book icon indicates that you have read-only access to the document
Locked — Document is either checked out, or has been exported, by another

ProjectWise User Guide Document BTS-PW002
This document is proprietary to AECOM and should not be distributed in any form outside of AECOM without the prior written consent of the BTS group. This document is intended for the use of AECOM employees only.
Page | 22
user. You can still open this document as read-only
Checked Out — Document is checked out to you
Exported — Document has been exported by you
Final Status of a Document — Someone has set Final Status on this document
Final Status of a Version — Someone has set Final Status on this version
Create Document Lists
The Copy List To commands are used for sending document lists to the Windows clipboard, or to
a printer. The document list is the contents of the Documents Pane in ProjectWise Explorer. If
no documents are selected, Copy List To selects all of the documents at the root of the folder; if
some documents are selected then the information for only the selected documents is taken.
Once copied to the clipboard, you can then paste the list into the application of your choice. The
purpose of these options are to have reporting of document information, which can easily
create reports about ProjectWise documents.
The possible commands available for coping list are covered below.
Copying Document List as Tab Separated
1. In ProjectWise Explorer, select a folder, a project, or one or more documents. 2. Right-click and from the popup menu select Copy List To > Clipboard Tab
Separated. The selected documents list information is sent to the clipboard in 'tab-separated' format. This option is useful when you want to paste the information into an application such as Excel, enabling the list information to be displayed in separate cells, as columns and rows.
3. Open the application to be used for saving/displaying the document list information and paste the information from the clipboard, for example Edit > Paste. The document list information is pasted into the application, with the column heading at the top and the document information displayed below, in the appropriate column.
Copying Document List as Space Separated
1. In ProjectWise Explorer, select a folder, a project, or one or more documents. 2. Right-click and from the popup menu select Copy List To > Space Separated.
The selected documents list information is sent to the clipboard in 'space-

ProjectWise User Guide Document BTS-PW002
This document is proprietary to AECOM and should not be distributed in any form outside of AECOM without the prior written consent of the BTS group. This document is intended for the use of AECOM employees only.
Page | 23
separated' format. This option is useful when you want to paste the information into a text editor or word processing application, enabling the list information to be displayed in separate rows with each column of information displayed with spaces between, to separate the information.
3. Open the application to be used for saving/displaying the document list information and paste the information from the clipboard, for example Edit > Paste. The document list information is pasted into the application, with the column heading at the top and the document information displayed below, in the appropriate column.
Sending Document Lists to the Printer
1. In ProjectWise Explorer, select a folder, a project, or one or more documents. 2. Right-click and from the popup menu select Copy List To > Printer.
The selected documents list information is sent directly to the printer. If more than one system printer is installed on the local computer, the system default Select Printer dialog opens and you are required to select the printer to be used. The document list information prints to the printer with the column heading at the top and the document information displayed below, in the appropriate column.

ProjectWise User Guide Document BTS-PW002
This document is proprietary to AECOM and should not be distributed in any form outside of AECOM without the prior written consent of the BTS group. This document is intended for the use of AECOM employees only.
Page | 24
7.0 Standard Workflows
AECOM standard workflows for business line specific templates are in development and will be added to this section when they are released.

ProjectWise User Guide Document BTS-PW002
This document is proprietary to AECOM and should not be distributed in any form outside of AECOM without the prior written consent of the BTS group. This document is intended for the use of AECOM employees only.
Page | 25
Quick Start Guide
Login 1. Double Click on the ProjectWise Explorer
shortcut on your desktop. 2. Click on the “+” sign to the left of the
datasource where your project files reside. 3. You should be automatically logged in.
Page 2
Creating a New Document 1. Open an MS Office application 2. Start new document 3. Select either Save or Save As 4. Enter login ID and Password 5. Select ProjectWise folder 6. Click the OK button to save document
Page 19
Customizing your View 1. Go to View and then Manage Views.
Select New, give your view a name. 2. Expand Basic Columns, choose your
columns. 3. If you want this new view to be the
default, select the Set Defaults tab and add a check mark to the Document List View for the Datasource and click OK.
4. Go under View and choose Details to turn on the columns you set up.
5. You can move columns by dragging and dropping them in the order you want.
6. Views can be changed at any time. You can create multiple views and they will be listed in the View drop-down list.
Managing Files with the Document Organizer
The easiest way to manage multiple files that you have checked out or exported is with the Document Organizer. Click on the
Document Organizer icon on the ProjectWise toolbar. The Organizer will initially have the red check mark depressed and show you all the files you have checked out. Click on the floppy disk icon
to display the files you have exported. Manage your checked out and exported files by highlighting them, clicking on Action and choosing what you want to do with the file(s).

ProjectWise User Guide Document BTS-PW002
This document is proprietary to AECOM and should not be distributed in any form outside of AECOM without the prior written consent of the BTS group. This document is intended for the use of AECOM employees only.
Page | 26
Commonly used tasks on the right-click menu for documents
New – Create new document
Open – Open document for editing
Open as Read-Only – Open document, cannot be edited
Open With – Open document with different application
Markup – Used to Reline-Documents
View – View document
Check Out – Check out document for edit
Check In – Check in the edited document
Free – Check in document – Loose edits
Copy Out – copies document to working DMS folder
Export – checks file out to user selected local or network folder
Import – imports the exported file
Update Server Copy – updates the PW copy with latest updates
Refresh Local Copy – overwrites local copy with the latest server version
Purge Local Copy – removes selected files from the local PC that have been copied
Purge Workspace – purges the managed CAD workspace from the local workstation
Cut – cut the document. Used when moving document to different folder
Copy – create a copy of the selected document. Used with the Past command
Paste – paste the cut or copied document same or different folder
Copy To – used to copy document to different folder
Move To – used to move document to different folder
Rename – rename the selected document
Delete – delete the selected document
Modify – change the value of selected attributes across multiple documents
Modify Spatial Attributes – used to modify spatial attributes
Delete Audit Trail – Admin Function Only
Add Comment – add a comment to the file audit trail
Set – create and manage flat document sets
Send To – send document or link to document to email recipient or printer
Copy List To – copy the displayed list of documents to clipboard to paste into Excel
Attributes – copy and paste environment attributes between files
Change State – change the workflow state of a selected document
Properties – view / modify file attribute properties