Project.net - Administrators Guide v2
102
© 2004-2006 Project.net, Inc Page 1 of 102 Version No. 3.1.0.A All Rights Reserved. March 2006 A DMINISTRATOR ’ S G UIDE FOR V ERSION 7.5
-
Upload
igor-ledovski -
Category
Documents
-
view
232 -
download
3
description
Administrators Guide
Transcript of Project.net - Administrators Guide v2

© 2004-2006 Project.net, Inc Page 1 of 102 Version No. 3.1.0.A All Rights Reserved. March 2006
ADMINISTRATOR’S GUIDE
F O R V E R S I O N 7 . 5

ADMINISTRATOR’S GUIDE T a b l e o f C o n t e n t s
© 2004-2006 Project.net, Inc. Page 2 of 102 Version 7.5 rev1 All Rights Reserved. March 2006
TABLE OF CONTENTS
1. INTRODUCTION 6
1.1. Important 6
1.2. Conventions 6
1.3. Online Help 7
2. LICENSING 8
2.1. License Key Creation Procedure 8
2.2. Manage Licenses 8
2.2.1 Filter Licenses 8 2.2.2 Search in Licenses 11
2.3. Expiration of a License Key 11
2.3.1 License Key Expired 11 2.3.2 License Key Void 12
3. SECURITY GUIDE 13
3.1. Introduction 13
3.1.1 Login 13 3.1.2 Space Administrators 13 3.1.3 Module Permissions 13 3.1.4 Object Permissions 13 3.1.5 New Object Permissions 13
3.2. General 14
3.3. Roles 14
3.3.1 Role ‘Space Administrator’ 14 3.3.2 Role ‘Team Member’ 15 3.3.3 Role ‘Power User’ 15 3.3.4 Inherited Roles 15
3.4. Permissions 16
3.4.1 Activate / Deactivate Permissions 16 3.4.2 Role-based Permissions 16 3.4.3 Individual Permissions 17 3.4.4 Module Permissions 18 3.4.5 New Object Permissions 19

ADMINISTRATOR’S GUIDE T a b l e o f C o n t e n t s
© 2004-2006 Project.net, Inc. Page 3 of 102 Version 7.5 rev1 All Rights Reserved. March 2006
3.4.6 ‘Object’ Permissions 20
3.5. Modules and Objects 20
3.5.1 Listing of Modules and Appropriate Objects 20 3.5.2 Permitted Actions of Modules and Appropriate Objects 21
3.6. Security Settings 25
3.6.1 Security Manager 25 3.6.2 Setting Permissions for a Role or Person 27 3.6.3 Setting Object Permissions 28
3.7. Summary – Security and Permissions 33
4. QUICK REFERENCES 35
4.1. Form Designer 35
4.1.1 Create a New Form 35 4.1.2 Create New Form Data 36
4.2. Workflows 36
4.2.1 Create a New Workflow 36 4.2.2 Add a Document to a Workflow 37 4.2.3 Add a Form to a Workflow 38
5. FORM DESIGNER 39
5.1. Introduction 39
5.1.1 Why Use a Form? 39 5.1.2 What Are Lists? 39 5.1.3 Edit a Form 39
5.2. Create a New Form 39
5.2.1 Form Design Tips 39 5.2.2 Definition Tab 40 5.2.3 Fields Tab 41 5.2.4 Lists Tab 54 5.2.5 Workflow Tab (optional) 56 5.2.6 Preview 57 5.2.7 Activate Tab 58
5.3. Modify an Existing Form 59
5.3.1 Edit a Field 59
5.4. Remove a Form 59
5.5. Copy a Form 60
5.6. Create Notification 60

ADMINISTRATOR’S GUIDE T a b l e o f C o n t e n t s
© 2004-2006 Project.net, Inc. Page 4 of 102 Version 7.5 rev1 All Rights Reserved. March 2006
5.7. Setting Object Permissions for Forms 61
6. APPLY FORMS 62
6.1. Create a New Form Data 62
6.2. Edit an Existing Form Data 63
6.3. Export / Import Function 65
6.3.1 Export Function – Excel Report 66 6.3.2 Export Function – CSV File 68 6.3.3 Import Function – CSV File 69
7. WORKFLOW DESIGNER 76
7.1. Introduction 76
7.1.1 What is a Workflow? 76 7.1.2 When to Use a Workflow? 77 7.1.3 What is an Envelope? 77 7.1.4 What are Steps? 77 7.1.5 What are Transitions? 77
7.2. Create a Workflow 78
7.3. Workflow Designer 80
7.3.1 Definition Tab 80 7.3.2 Steps Tab 81 7.3.3 Transitions Tab 83 7.3.4 Publish Tab 86
7.4. Modify Existing Workflows 86
7.5. Remove a Workflow 87
7.6. Workflow Properties 87
7.6.1 View Workflow Properties 87 7.6.2 View Workflow Envelopes 88
7.7. Setting Object Permissions for Workflows 88
8. APPLY WORKFLOWS 89
8.1. Send a Document Through a Workflow 89
8.1.1 Create a New Envelope 89 8.1.2 The Results 91
8.2. Send a Form Through a Workflow 96
8.2.1 Define a Form to a Workflow 97

ADMINISTRATOR’S GUIDE T a b l e o f C o n t e n t s
© 2004-2006 Project.net, Inc. Page 5 of 102 Version 7.5 rev1 All Rights Reserved. March 2006
8.2.2 The Results 98

ADMINISTRATOR’S GUIDE 1 . I N T R O D U C T I O N
© 2004-2006 Project.net, Inc. Page 6 of 102 Version 7.5 rev1 All Rights Reserved. March 2006
1 . I N T R O D U C T I O N
This Administrator’s Guide provides a detailed description of the functionality offered by the Project.net application for the administrator and other privileged users. After reading this manual, users should be in the position to understand the Project.net application security system as well as to handle licenses, workflows, and forms. General information about common modules is provided within the Project.net User’s Guide. More detailed information about special modules will be provided in the Administrator's Guide. It contains the following main features:
• Design Forms
• Design Workflows
• Setup Security Permissions
• Licensing
1.1. Important
This manual and any examples contained herein are provided “as is” and are subject to change without notice. This manual can be used only under the General Business Conditions (GBC), which each user has accepted during the registration process.
The Terms of Use can be reviewed at any time in the section ‘General Information’ in the Online Help.
1.2. Conventions
The same conventions used in the User’s Guide are also used within this manual to convey instructions and information:
• User actions such as clicking on a button or keying-in information are in boldface text.
• Italic text indicates optional elements.
Shows important information for the reader.
Shows examples to ease understanding.
In this manual, we provide an internal link, indicated as Figure 1-1 for the cross-reference to a figure, or 2 Licensing for a cross-reference to a chapter. You can also use the back or forward buttons in the web tool bar to navigate between pages; refer to the image below.

ADMINISTRATOR’S GUIDE 1 . I N T R O D U C T I O N
© 2004-2006 Project.net, Inc. Page 7 of 102 Version 7.5 rev1 All Rights Reserved. March 2006
Figure 1-1
If the web tool bar is not visible in your MS World Program, you can activate it by clicking View Tool bar Web
1.3. Online Help
Supplementary to this Administrator’s Guide there is additional help for the user available Online:
• General Help – located on the top right of the GUI below the user’s name.
• Context-sensitive Help – accessible via the help button on the action tool bar.

ADMINISTRATOR’S GUIDE 2 . L I C E N S I N G
© 2004-2006 Project.net, Inc. Page 8 of 102 Version 7.5 rev1 All Rights Reserved. March 2006
2 . L I C E N S I N G
The Project.net software license key is a long string of characters and contains information about what sort of license is submitted, how many users the license supports, whether the license expires, and various pieces of billing information.
The license keys are created by Project.net and will be shipped to the customer via mail or email. The customer’s System Administrator is responsible for following the terms of the license keys. Only a specified number of users are assigned to the license key.
Invitations of participants to the Business Workspace, as well as the transmission of the license key, have to be done by the System Administrator.
It is possible that a company can obtain and use more than one license key, due to the following situations:
• One of the license keys will expire.
• The first license key is only valid for a certain number of users and the company needs more licenses.
• Some licenses are necessary for a determined time period (e.g. project phase).
2.1. License Key Creation Procedure
Below we describe the common license key creation procedure when entering into a contract with a customer: Project.net creates a new Business.
The named System Administrator of the company will be invited to the business.
Project.net creates a license key according to the terms of contract.
Project.net submits the license key to the customer’s System Administrator.
The System Administrator registers him/herself in the Business by using the license key.
The System Administrator invites all other participants of the Business.
Furthermore, the System Administrator is responsible for conveying the license key to the participants.
The participants have to register by using the license key.
2.2. Manage Licenses
To manage the licenses in the Personal workspace, channel licensing is provided; refer to item in Figure 2-1.
Only the workspace system administrator or the persons who are responsible for licenses have the ability to manage the licenses.
2.2.1 Filter Licenses To display or filter licenses according to criteria you are responsible for please use the following process:
Go to the Personal workspace.
Click the Setup module on the navigation bar.
The Setup window appears; refer to Figure 2-1.
Click the Manage Licenses link in the Responsible Licenses Setup channel.

ADMINISTRATOR’S GUIDE 2 . L I C E N S I N G
© 2004-2006 Project.net, Inc. Page 9 of 102 Version 7.5 rev1 All Rights Reserved. March 2006
The View Licenses window appears; refer to Figure 2-2.
In this window, the system administrator can filter the licenses according to the license type (All, Trial, Non
Trial) and status (All, Enabled, Disabled, Cancelled).
The licenses will be displayed once the Filters button is clicked.
To see the Licensing Details as well as the associated user you have to click the License Key.
The View licenses window appears; refer to Figure 2-3.
In the first channel you see the license information including:
° the responsible user
° the maximum number of users
In the second channel, you see all participants who are currently assigned to the license.
Figure 2-1

ADMINISTRATOR’S GUIDE 2 . L I C E N S I N G
© 2004-2006 Project.net, Inc. Page 10 of 102 Version 7.5 rev1 All Rights Reserved. March 2006
Figure 2-2
Figure 2-3

ADMINISTRATOR’S GUIDE 2 . L I C E N S I N G
© 2004-2006 Project.net, Inc. Page 11 of 102 Version 7.5 rev1 All Rights Reserved. March 2006
2.2.2 Search in Licenses You have the ability to search the licenses according to the following filter criteria:
• Username
• First or Last Name
• Email address
To search for licenses using filter criteria, use the following process: Go to the Personal workspace.
Click the Setup module on the navigation bar.
The Setup window appears; refer to Figure 2-1.
Click the Manage Licenses link in the Responsible Licenses Setup channel.
The View Licenses window appears; refer to Figure 2-2.
Enter the filter criteria you would like to search for (Username, Name, Email Address).
A display of the matching licenses will appear after the Search button has been clicked.
To see the Licensing details as well as all other associated users you have to click the License Key number.
The License Details window appears; refer to Figure 2-3.
In the first channel you see the license information, including:
° the responsible user
° the maximum user amount
In the second channel, you see all participants who are currently assigned to the license.
2.3. Expiration of a License Key
2.3.1 License Key Expired If the license key is expired, the user will receive the following message from the Project.net application:
Figure 2-4
If a license key is expired, the user has to contact the System Administrator to retrieve a new license key.

ADMINISTRATOR’S GUIDE 2 . L I C E N S I N G
© 2004-2006 Project.net, Inc. Page 12 of 102 Version 7.5 rev1 All Rights Reserved. March 2006
2.3.2 License Key Void If the license key is void due to disabling or canceling by the System Administrator, the user will receive the following message from the Project.net application:
Figure 2-5
If a license key is void, the user has to contact the System Administrator to retrieve a valid license key.

ADMINISTRATOR’S GUIDE 3 . S E C U R I T Y G U I D E
© 2004-2006 Project.net, Inc. Page 13 of 102 Version 7.5 rev1 All Rights Reserved. March 2006
3 . S E C U R I T Y G U I D E
3.1. Introduction
The Project.net application offers several types of security:
• Password-based authentication (login)
• Role-based security settings
• User-based access controls to information
• 128-bit SSL encryption between the client and the server (optional)
3.1.1 Login Only registered and licensed users can access the Project.net application by logging in. Only people that have been added (invited) to the team directory of a workspace are allowed to enter that space and access the information stored there.
3.1.2 Space Administrators Each workspace has at least one “Space Administrator”.
The Space Administrators are responsible for:
• defining roles
• adding people to roles
• setting access permissions
This is done from the workspace directory module and within the Setup module in the workspace.
3.1.3 Module Permissions Within each workspace, the Space Administrator can set general access permissions (Module Permissions) for each module.
3.1.4 Object Permissions Most Project.net users will only use the Security button on the action tool bar to view and change Object Permissions on a specific object. By default, users can only view and change these permissions if they created the object.
3.1.5 New Object Permissions The Space Administrator can also set New Object Permissions for the various object types in the workspace. New Object Permissions determine the access rules that are applied to objects by default when a user creates an object.
The Creator of the object or the Space Administrator can change the individual Object Permissions after the object creation.

ADMINISTRATOR’S GUIDE 3 . S E C U R I T Y G U I D E
© 2004-2006 Project.net, Inc. Page 14 of 102 Version 7.5 rev1 All Rights Reserved. March 2006
3.2. General
Before inviting users to a project, the Space Administrator should review and edit the Module Permissions and New Object Permissions for all roles in the project.
All invitees are automatically assigned to the Team Member role.
Recommendation: When setting up a new project, create roles (i.e., vendors, customers) and assign permissions to the roles BEFORE inviting people to the project. This allows people to be assigned to their roles (and respective security settings) at the same time they are invited to the project. Change a role or an individual’s settings as needed, to customize the security settings further.
A reasonable procedure for the creation of a new project would be:
• Create roles
• Assign permission to these roles
• Invite participants
• Assign participants to the roles
3.3. Roles
The Space Administrator can apply access permissions to specific individuals as well as to specific roles. These roles allow Space Administrators to easily set and change permissions for groups of people in one step.
Security is one of the most important reasons why team members should be divided into roles.
At the creation of a new workspace (a sub-business, project, or sub-project) the following roles with the permission setting defined by Project.net will be applied:
• Space Administrator
• Team Member
• Power User
These roles cannot be deleted from a workspace, by the Space Administrator, but they are individually adjustable by the Space Administrator within a workspace.
3.3.1 Role ‘Space Administrator’ The Space Administrator is a special system-defined role in each workspace. The Space Administrator has full access to the entire workspace and controls permissions to all modules and objects within the workspace. The Space Administrator has the ability to control security and security permissions throughout the workspace.
Security settings allow the Space Administrator to control which roles or individual team members can view, modify, create, or delete items in a project. The Space Administrator also controls who has the right to modify permissions for each module or object in the project. Space Administrators can apply security at the Module level as well as at the New Object level.

ADMINISTRATOR’S GUIDE 3 . S E C U R I T Y G U I D E
© 2004-2006 Project.net, Inc. Page 15 of 102 Version 7.5 rev1 All Rights Reserved. March 2006
3.3.2 Role ‘Team Member’ When participants (also known as ‘users’ or ‘team members’) are initially invited to a project or business workspace, they automatically become members with the ‘Team Members’ role. All participants of a workspace are members of this role and cannot be removed from the Team Members role unless they are removed from the workspace. For this reason, it is important to limit the permissions for the Team Member role, especially if external participants (companies) are involved in the project. The Team Member role can be compared with the basic role of each workspace.
The Space Administrator has the ability to control the permissions of the Team Member role.
It is important to limit the permissions for the Team Member role, especially if external participants (companies) are involved in the project.
Any team member who creates an object automatically has the right to modify all permissions for that object. The role of Team Member cannot be removed from the workspace and no participant can be removed from the role of Team Member.
3.3.3 Role ‘Power User’ The ‘Power User’ is also a system-defined role in each workspace. When participants are initially invited to a project or business workspace, they can become members of the ‘Power User’ role. The Power User role can also be compared with the standard role of each workspace.
This Role cannot be removed from the workspace. For this reason, it is important to limit the permissions for the Power User role.
The Space Administrator has the ability to control the permissions of the Power User role.
It is important to limit the permissions for the Power User role, especially if external participants are involved in the project and assigned to this role. The Power User role cannot be removed from the workspace.
3.3.4 Inherited Roles Due to the use of an inherited role, an invited participant who has been assigned to that role in the superior workspace will be automatically assigned to the inherited role in the current workspace too. An inherited role is applicable only in a sub-workspace. Therefore, it does not matter if the workspaces are businesses or projects.
In principle, no permissions will be inherited with inherited roles. That means that an inherited role can have completely different permissions in the new workspace than in the superior workspace.
It is practical to use the inherited roles when a user of a superior workspace will also be invited to a current workspace. In this case, the individual user will be assigned to the inherited role, yet with the permissions of the role in the current workspace.
ADMINISTRATOR’S GUIDE 3 . S E C U R I T Y G U I D E
© 2004-2006 Project.net, Inc. Page 16 of 102 Version 7.5 rev1 All Rights Reserved. March 2006
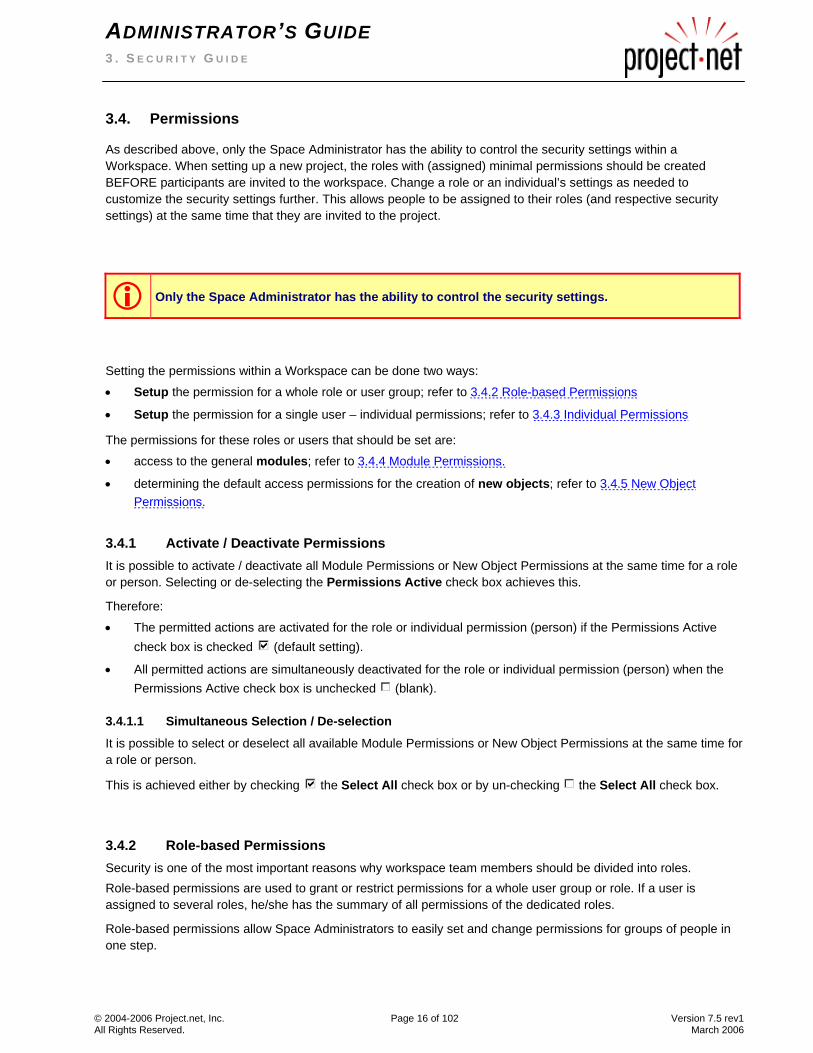
3.4. Permissions
As described above, only the Space Administrator has the ability to control the security settings within a Workspace. When setting up a new project, the roles with (assigned) minimal permissions should be created BEFORE participants are invited to the workspace. Change a role or an individual’s settings as needed to customize the security settings further. This allows people to be assigned to their roles (and respective security settings) at the same time that they are invited to the project.
Only the Space Administrator has the ability to control the security settings.
Setting the permissions within a Workspace can be done two ways:
• Setup the permission for a whole role or user group; refer to 3.4.2 Role-based Permissions
• Setup the permission for a single user – individual permissions; refer to 3.4.3 Individual Permissions
The permissions for these roles or users that should be set are:
• access to the general modules; refer to 3.4.4 Module Permissions.
• determining the default access permissions for the creation of new objects; refer to 3.4.5 New Object Permissions.
3.4.1 Activate / Deactivate Permissions It is possible to activate / deactivate all Module Permissions or New Object Permissions at the same time for a role or person. Selecting or de-selecting the Permissions Active check box achieves this.
Therefore:
• The permitted actions are activated for the role or individual permission (person) if the Permissions Active check box is checked (default setting).
• All permitted actions are simultaneously deactivated for the role or individual permission (person) when the Permissions Active check box is unchecked (blank).
3.4.1.1 Simultaneous Selection / De-selection
It is possible to select or deselect all available Module Permissions or New Object Permissions at the same time for a role or person.
This is achieved either by checking the Select All check box or by un-checking the Select All check box.
3.4.2 Role-based Permissions Security is one of the most important reasons why workspace team members should be divided into roles. Role-based permissions are used to grant or restrict permissions for a whole user group or role. If a user is assigned to several roles, he/she has the summary of all permissions of the dedicated roles.
Role-based permissions allow Space Administrators to easily set and change permissions for groups of people in one step.

ADMINISTRATOR’S GUIDE 3 . S E C U R I T Y G U I D E
© 2004-2006 Project.net, Inc. Page 17 of 102 Version 7.5 rev1 All Rights Reserved. March 2006
Role-based permissions are additive. The user has all permissions of all assigned roles.
It is important to try to use role-based permissions instead of personal permissions whenever possible. Please be aware that all invitees are automatically assigned to the Team Member role; refer to 3.3.2 Role ‘Team Member.
If a participant belongs to two roles and one role has permission to view and modify a specific object, and the second role has permission only to view it, then that participant will have permission to both view and modify the object.
3.4.2.1 Tab Module Permissions Activate / Deactivate
When the Permissions Active check box is checked for a role (group):
• Any person belonging to that role will be granted the module permissions checked for that role in addition to permissions granted to that person through other roles.
• Permissions granted by roles are additive.
• An individual person’s permissions will override any role permissions for the module.
When the Permissions Active check box is unchecked for a role (group):
• Any person belonging to that role will no longer have permissions for the modules granted by that role. However, if a person belongs to a role other than the deactivated role, the permissions granted for the other role will still apply.
• An individual’s permissions will override any role permissions for the module.
3.4.2.2 Tab New Objects Permissions Activate / Deactivate
When the Permissions Active check box is checked for a role (group):
• Any person belonging to that role will be given the selected access permissions to newly created objects in the workspace via that particular role.
• These new object permissions are in addition to any other new object permissions granted by other roles.
• Changes to new object permissions do not affect previously created objects.
When the Permissions Active check box is unchecked for a role (group):
• Any person belonging to that role will not be given access to any newly created objects in the workspace via that particular role.
• However, if a person belongs to other roles, the New Object permissions granted for the other roles will still apply.
• Changes to new object permissions do not affect previously created objects.
3.4.3 Individual Permissions The Individual (personal) permission is useful for granting or restricting extra permissions for a single user where creating a special group would be cumbersome.
For the Space Administrator (Project Manager or Business Manager), the personal permissions are harder to keep track of and manage. Therefore, it is important to try to use role-based permissions instead of personal permissions whenever possible.
ADMINISTRATOR’S GUIDE 3 . S E C U R I T Y G U I D E
© 2004-2006 Project.net, Inc. Page 18 of 102 Version 7.5 rev1 All Rights Reserved. March 2006
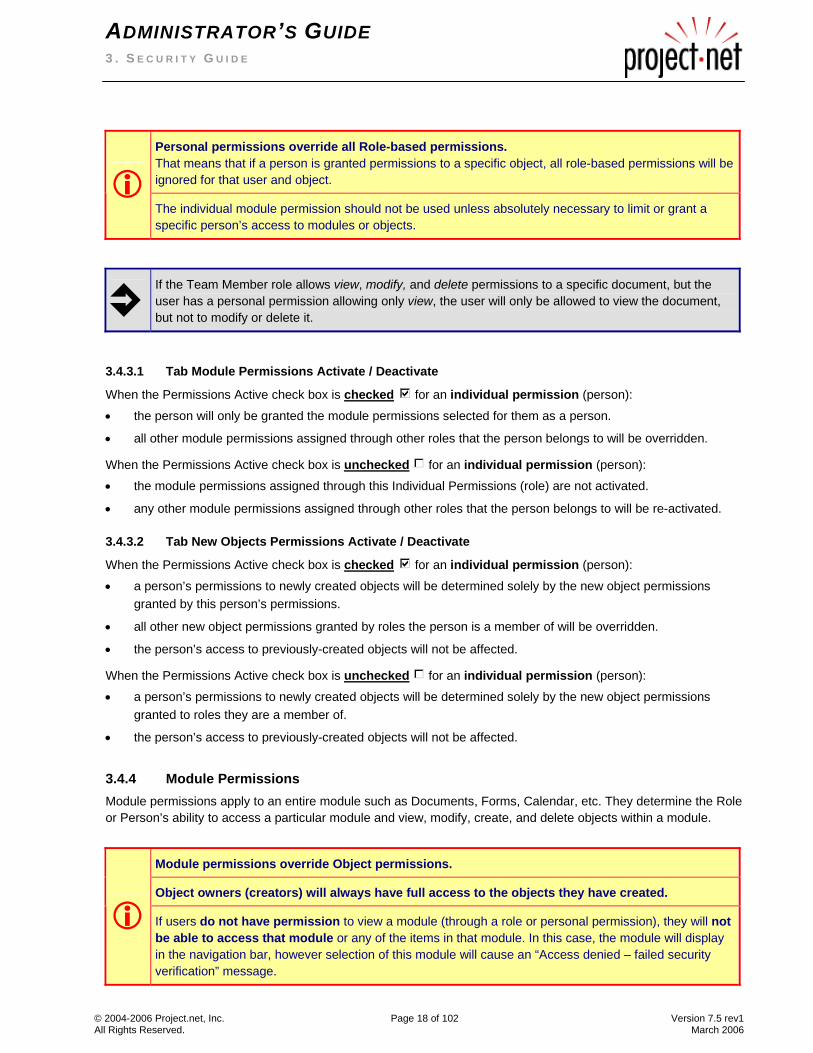
Personal permissions override all Role-based permissions. That means that if a person is granted permissions to a specific object, all role-based permissions will be ignored for that user and object. The individual module permission should not be used unless absolutely necessary to limit or grant a specific person’s access to modules or objects.
If the Team Member role allows view, modify, and delete permissions to a specific document, but the user has a personal permission allowing only view, the user will only be allowed to view the document, but not to modify or delete it.
3.4.3.1 Tab Module Permissions Activate / Deactivate
When the Permissions Active check box is checked for an individual permission (person):
• the person will only be granted the module permissions selected for them as a person.
• all other module permissions assigned through other roles that the person belongs to will be overridden.
When the Permissions Active check box is unchecked for an individual permission (person):
• the module permissions assigned through this Individual Permissions (role) are not activated.
• any other module permissions assigned through other roles that the person belongs to will be re-activated.
3.4.3.2 Tab New Objects Permissions Activate / Deactivate
When the Permissions Active check box is checked for an individual permission (person):
• a person’s permissions to newly created objects will be determined solely by the new object permissions granted by this person’s permissions.
• all other new object permissions granted by roles the person is a member of will be overridden.
• the person’s access to previously-created objects will not be affected.
When the Permissions Active check box is unchecked for an individual permission (person):
• a person’s permissions to newly created objects will be determined solely by the new object permissions granted to roles they are a member of.
• the person’s access to previously-created objects will not be affected.
3.4.4 Module Permissions Module permissions apply to an entire module such as Documents, Forms, Calendar, etc. They determine the Role or Person’s ability to access a particular module and view, modify, create, and delete objects within a module.
Module permissions override Object permissions.
Object owners (creators) will always have full access to the objects they have created.
If users do not have permission to view a module (through a role or personal permission), they will not be able to access that module or any of the items in that module. In this case, the module will display in the navigation bar, however selection of this module will cause an “Access denied – failed security verification” message.

ADMINISTRATOR’S GUIDE 3 . S E C U R I T Y G U I D E
© 2004-2006 Project.net, Inc. Page 19 of 102 Version 7.5 rev1 All Rights Reserved. March 2006
The permitted actions for each module are:
ACTION DESCRIPTION OF PERMITTED ACTIONS
View View the content of objects.
Modify Modify the content or properties of objects. To review and change documents, they have to be first checked out.
Create Creation of Objects or Posts in a module.
Delete Removal of Objects.
Modify Permission Give users the ability to define the permission of these objects. It is possible for one user to restrict another user to view the objects or documents.
Table 3-1
If a user does not have view permission for the Document module, they cannot even enter that module to see a listing of documents.
If a user has view access but not create access for the Document module, they can enter the document module, see the list of documents, and view document contents, but they cannot create a new document or folder.
For the modules that permissions can be applied to (in accordance with the order in the Security module), please refer to 3.5 Modules and Objects.
Changes in the Module Permissions for a role or a user concern all objects within the corresponding module, irrespective of whether the objects are created before or after.
3.4.5 New Object Permissions New Object Permissions determine the default access permissions that will be assigned to each new object created within a workspace.
It would be tedious for a user to apply permissions manually to every object that is created. The New Object Permissions allow the Space Administrator to set reasonable default permissions for each type of object in a workspace. A user can then change the permissions on a newly created object only if non-typical permissions are required.
For information on the objects that can be created and secured in a specific module, please refer to 3.5.1 Listing of Modules and Appropriate Objects.

ADMINISTRATOR’S GUIDE 3 . S E C U R I T Y G U I D E
© 2004-2006 Project.net, Inc. Page 20 of 102 Version 7.5 rev1 All Rights Reserved. March 2006
Changes to New Object permissions are not retroactive to previously created objects.
Changes will only apply to new objects that are created in the future. Items added prior to the change in security must be changed individually by selecting the object and then clicking the Security Icon.
For example, the new object permissions should be set up so that a Customer role has view access to all documents and the Team Member role has view, modify, and remove permissions.
If a team member adds a document to the Document Vault and the Space Administrator later changes the New Object Permission for Documents, the team member’s access to existing documents in the Document Vault will be unaffected.
3.4.6 ‘Object’ Permissions Object permissions determine a role or user’s ability to view, modify, create, delete, or modify permissions for objects such as documents, forms, folders, and calendar events and are set by clicking the Security button on the action tool bar.
Only the Space Administrator has the ability to control the security settings for all objects. The ability of team members to set permissions for individual objects (such as folders, documents, or forms) is determined by the permissions granted in the New Objects Permissions by the Space Administrator.
By default, team members only have the ability to modify the security of those objects that they have created.
3.5. Modules and Objects
3.5.1 Listing of Modules and Appropriate Objects
MODULE & ASSOCIATED OBJECTS DESCRIPTION OF APPLICATION
Document Management Module Document vault used for storing files and URLs. Folder/subfolder configuration.
Document Upload Files or URLs in the document vault
Document Folder Folders to organize documents.
Discussion Forums Area to enter topics for discussion. Discussion Group To create Topics in the discussion forum.
Table continues on next page

ADMINISTRATOR’S GUIDE 3 . S E C U R I T Y G U I D E
© 2004-2006 Project.net, Inc. Page 21 of 102 Version 7.5 rev1 All Rights Reserved. March 2006
MODULE & ASSOCIATED OBJECTS DESCRIPTION OF APPLICATION
Form Databases Data entered into a form template created in the Form Designer. Form Type A list of fields, created with the Form Designer.
Form Data Data entered in a form data.
Project Process Lifecycle of the project.
Where tasks and deliverables are defined. Process: A Project Process For the definition of the project. Each process only has one.
Project Schedule (workplan) The detailed project plan. Task or Milestone What needs to be done to complete the project.
Deliverable: A Phase Deliverable A tangible outcome produced by the project.
Calendar For scheduling tasks, meetings, and events. Event An occurrence that is of interest to all workspace participants.
Meeting An occurrence that is only of interest to a group of workspace participants.
News A bulletin board for recording items of interest to the team. News Item A news item that will be shown on the dashboard of all workspace
participants.
Directory Lists team members who have accepted or been invited to the project.
Project Space (workspace) The modules, channel bars, tabs, navigation bar, tabs, and action toolbar.
Configuration The look and feel of the workspace.
Security (modify permissions) Used to set permissions and access throughout the workspace. Security Group A group of workspace participants with the same permissions.
Methodology (templates) Work Processes Templates A standardized pattern for a project.
Workflow (workflow designer) To create an authorization or approval path for documents or forms. Sends an electronic “envelope” to a participant’s inbox.
Table 3-2
3.5.2 Permitted Actions of Modules and Appropriate Objects In this chapter, the effects of activating and de-activating the permitted actions in the modules will be described.

ADMINISTRATOR’S GUIDE 3 . S E C U R I T Y G U I D E
© 2004-2006 Project.net, Inc. Page 22 of 102 Version 7.5 rev1 All Rights Reserved. March 2006
MODULE WITH ASSOCIATED ACTION DESCRIPTION OF THE CONNECTED ABILITY
Document Management Document vault used for storing files and URLs. Folder / subfolder configuration.
View View documents or the properties of documents.
Modify Modify the properties of documents. Check in, Check out, Undo Check out, Add link, move documents.
Create Create a new Folder. Import a Document.
Remove Remove a Folder. Remove a Document.
Modify permission Modify the security permissions for a document.
Discussion Forums Area to enter topics for discussion. View View discussion group.
View group properties. View detail information.
Modify Modify the group properties. Add link.
Create Create a new Discussion Group. Create a new Post.
Remove Remove a Discussion group.
Modify permission This function is not applicable.
Form Databases Data entered into a form template created in the Form Designer. View View Form Types.
View List View.
Modify Modify Form Types in the form designer. Create a new Form Data.
Create Create a new Form Type in the form designer.
Remove Remove a Form Type in the form designer. Remove an existing Form Data.
Modify permission Modify the security permissions for a form type, only available in the form designer - not available in the form type listing page.
Project Process Lifecycle of the project.
Where tasks and deliverables are defined. View View the Process itself.
View the associated phases. View the gates, deliverables, milestones, and tasks in the phases.
Modify Modify the Process properties.
Modify the properties of the associated phases. Modify Gates and Deliverables.
Table continues on next page

ADMINISTRATOR’S GUIDE 3 . S E C U R I T Y G U I D E
© 2004-2006 Project.net, Inc. Page 23 of 102 Version 7.5 rev1 All Rights Reserved. March 2006
MODULE WITH ASSOCIATED ACTION DESCRIPTION OF THE CONNECTED ABILITY
Create Create a new Phase. Create gates and deliverables.
Remove Remove a Phase (if the Remove icon in the action tool bar is inactive).
Modify permission Modify the security permissions of a phase.
Project Schedule (workplan) The tasks of the detailed project plan. View View the Task.
View the properties of a Task or Milestone.
Modify Modify the Task or Milestone. Modify the properties of the Task. View and Modify the Resources Tab, the Dependencies Tab, and the Advanced Tab.
Create Create a new Task or Milestone.
Remove Remove a Task or Milestone.
Modify permission Modify the security permissions of a task or milestone.
Calendar For scheduling tasks, meetings, and events. View View the Calendar in graphical view.
View the calendar in list view (day, week, month, year). View the Meetings or Events.
Modify Modify the Items (Meetings, Events).
Create Create new Items (Meetings, Events).
Remove Remove the Items (Meetings, Events).
Modify permission Modify the security permissions of a meeting or event.
News A bulletin board for recording items of interest to the team. View View the News.
Modify Modify the News.
Create Create new News.
Remove Remove News.
Modify permission This function is not applicable.
Directory Lists team members who have accepted or been invited to the project. View View the Participants Tab.
View the Org Charts Tab *. View the Assignments Tab *. View the Roles Tab. * only available in a project workspace.
Modify Modify the Properties of a participant. Modify the Documents in the Org Charts Tab *. Modify the Properties of Roles in the Roles Tab * only available in a project workspace.
Create Create a new Participant.
Table continues on next page

ADMINISTRATOR’S GUIDE 3 . S E C U R I T Y G U I D E
© 2004-2006 Project.net, Inc. Page 24 of 102 Version 7.5 rev1 All Rights Reserved. March 2006
MODULE WITH ASSOCIATED ACTION DESCRIPTION OF THE CONNECTED ABILITY
Remove Remove a Participant in the Participants Tab. Remove a document in the Org Charts Tab *. Remove Roles in the Roles Tab. * only available in a project workspace.
Modify permission This function is not applicable.
Project Space (workspace) The modules, channel bars, tabs, navigation bar, tabs, and action toolbar.
View View the Workspace of a project. View the project information.
Modify Modify the project information.
Create Create a new sub-project – in the project list.
Remove This function is not applicable.
Modify permission This function is not applicable.
Security (modify permissions) Used to set permissions and access throughout the project. View View Module Permissions Tab.
View New Objects Permissions Tab.
Modify Modify the Module Permissions. Modify the New Objects Permissions.
Create This function is not applicable.
Remove This function is not applicable.
Modify permission This function is not applicable.
Methodology (Templates) Lifecycle or Work Processes View In a Business workspace – view the Module Templates
In a Project workspace – view the Module Setup – Project templates.
Modify Modify Templates – only applicable in a business workspace.
Create In a Business workspace – Create a new template (from scratch). In a project workspace – Create a template from a workspace, or create a new template (from scratch).
Remove Remove Templates – only applicable in a business workspace.
Modify permission This function is not applicable.
Workflow (workflow designer) Used to create an authorization or approval path for a document or form. Sends an electronic “envelope” to a participant’s inbox.
View View the defined Workflows, properties, and associated Envelopes of a workflow.
Modify Modify the Workflow (Workflow Designer) and properties of a workflow.
Create Create a new Workflow (Workflow Designer).
Remove Remove a Workflow – only active in the Workflow Designer.
Modify permission Change the security permission of a workflow. This function is only active in the Workflow Designer.
Table continues on next page

ADMINISTRATOR’S GUIDE 3 . S E C U R I T Y G U I D E
© 2004-2006 Project.net, Inc. Page 25 of 102 Version 7.5 rev1 All Rights Reserved. March 2006
MODULE WITH ASSOCIATED ACTION DESCRIPTION OF THE CONNECTED ABILITY
Reports Module Creation of reports in a project. View View the types of reports and create a specified report.
Modify This function is not applicable.
Create This function is not applicable.
Remove This function is not applicable.
Modify permission This function is not applicable.
Table 3-3
3.6. Security Settings
The Space Administrator can modify security in three ways:
• by clicking Setup in the navigation bar and then Security to modify Module permissions.
• by clicking Setup in the navigation bar and then Security to modify New Object permissions.
• by clicking the Security button (when it is active) in the action toolbar to set permissions on individual objects.
Security can be modified by the other Team Members only (if the security permission is given) by:
• clicking the Security button (when it is active) in the action toolbar to set permissions on individual objects.
3.6.1 Security Manager The Security Manager can change the permission of roles or persons for Modules and New Objects.
To navigate to the Security Manager, use the following process: Go to the Project Workspace.
The list of projects you are a member of appears.
Select and click the desired project.
The project’s Dashboard appears.
Click Setup in the left navigation bar.
The Setup window appears.
Click Security under the Project Administrator Settings tab.
The Security Manager window appears, defaulting to the Module Permissions tab; refer to Figure 3-1.
Click the New Object Permissions tab.
The New Object Permissions window appears; refer to Figure 3-2.

ADMINISTRATOR’S GUIDE 3 . S E C U R I T Y G U I D E
© 2004-2006 Project.net, Inc. Page 26 of 102 Version 7.5 rev1 All Rights Reserved. March 2006
Figure 3-1

ADMINISTRATOR’S GUIDE 3 . S E C U R I T Y G U I D E
© 2004-2006 Project.net, Inc. Page 27 of 102 Version 7.5 rev1 All Rights Reserved. March 2006
Figure 3-2
3.6.2 Setting Permissions for a Role or Person For instructions on setting up roles, please see the Project.net User’s Manual section 5.4.4 Roles Tab.
Security can be set-up for roles or for persons who are participants in a project.
A person’s individual security settings will override any settings that the person has been assigned through the role(s) he/she belongs to.
To set permissions for a Role or Person, the following steps have to be done: Go to the Project Workspace.
Navigate to the Security Manager; refer to the description in 3.6.1 Security Manager and Figure 3-1.
Select a role or person from the Person / Role drop-down list.
Review the permissions and de-select those permissions that the Person / Role should not have.
Select those permissions that the Person / Role should have.
Click the Submit button to finish the occurrence.
You are returned to the Setup window.
On the Setup window, click Security again.
Click the New Object Permissions tab.

ADMINISTRATOR’S GUIDE 3 . S E C U R I T Y G U I D E
© 2004-2006 Project.net, Inc. Page 28 of 102 Version 7.5 rev1 All Rights Reserved. March 2006
The New Object window appears; refer to Figure 3-2.
Select the role from the Person / Role drop-down list.
Review the permissions and de-select those new object permissions that the selected Person / Role
should not have.
Select those new object permissions that the Person / Role should have.
Click the Submit button to return to the Setup window.
If external participants, such as vendors, are going to be added to the project, set the Team Member permissions to View only those items an outside party can have access to and de-select all other permissions. All participants to a project automatically belong to the Team Member role. Set the vendor role to the same minimal permissions. You can add additional permissions to participants or other roles as needed.
3.6.3 Setting Object Permissions The ability for team members to set permissions for individual objects (such as folders, documents, or forms) is determined by the permissions granted in the New Objects Permissions by the Space Administrator.
Team members can modify security for the objects they created by clicking the Security button (when it is active) in the action tool bar.

ADMINISTRATOR’S GUIDE 3 . S E C U R I T Y G U I D E
© 2004-2006 Project.net, Inc. Page 29 of 102 Version 7.5 rev1 All Rights Reserved. March 2006
Figure 3-3

ADMINISTRATOR’S GUIDE 3 . S E C U R I T Y G U I D E
© 2004-2006 Project.net, Inc. Page 30 of 102 Version 7.5 rev1 All Rights Reserved. March 2006
Figure 3-4
Below we give an example for setting object permissions for a document: Go to the desired workspace.
Click the Documents module on the navigation bar.
The Document Vault page opens; refer to Figure 3-3.
Go to the desired folder.
Select the radio button of the document whose security you wish to modify; refer to Figure 3-4.
Click the Security button on the action tool bar.
The Edit Role Entry pop-up window appears; refer to Figure 3-5.
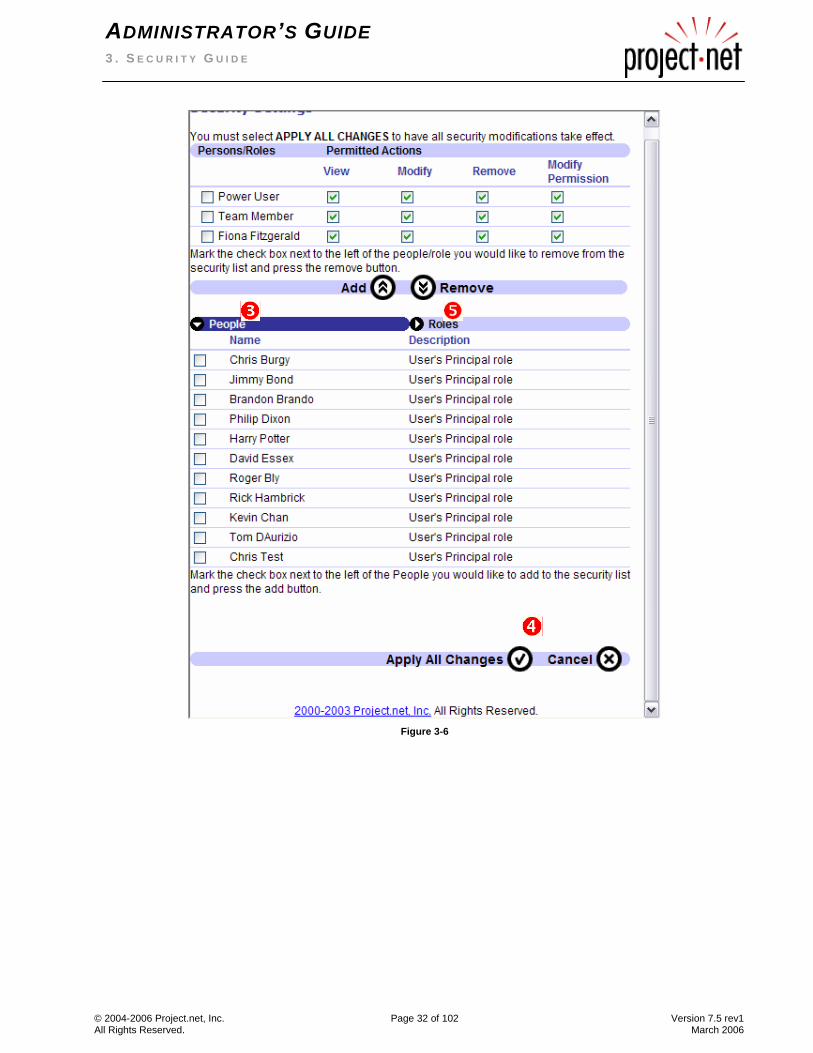
To add or remove participants to/from the Permitted Actions, click the People tab .
The names of the participants are displayed; refer to Figure 3-6.
Select the check boxes from the People list to add participants and then click the Add button. In this
example, we decided to add no participants.
To remove participants from the Permitted Actions list, select their check boxes and then click the
Remove button.
When you are finished with the settings, click the Apply All Changes button .
If you wish to change the roles assigned to ‘permitted actions’, click the Roles tab ; refer to Figure 3-7.
Select the check boxes from the Roles list for the roles you wish to add and then click the Add button. In
this example, we decided to add all available roles.

ADMINISTRATOR’S GUIDE 3 . S E C U R I T Y G U I D E
© 2004-2006 Project.net, Inc. Page 31 of 102 Version 7.5 rev1 All Rights Reserved. March 2006
To remove roles from the Permitted Actions list, select their check boxes and then click the Remove
button. In this example, we decided to remove the ‘Team Member’ and ‘Power User’ role.
Click the Apply All Changes button .
The pop-up window automatically closes.
Only modify an individual’s permissions to a specific object if the person does not already have permissions through an assigned role.
Figure 3-5
ADMINISTRATOR’S GUIDE 3 . S E C U R I T Y G U I D E
© 2004-2006 Project.net, Inc. Page 32 of 102 Version 7.5 rev1 All Rights Reserved. March 2006
Figure 3-6

ADMINISTRATOR’S GUIDE 3 . S E C U R I T Y G U I D E
© 2004-2006 Project.net, Inc. Page 33 of 102 Version 7.5 rev1 All Rights Reserved. March 2006
Figure 3-7
3.7. Summary – Security and Permissions
• Module permissions affect a Role or a Person’s ability to enter a module and view, modify, create, and delete objects in a particular module.
• Changes to Module permissions limit the users’ access to all objects within the module regardless of whether those objects were created before or after the changed module permission. The only exceptions are objects that were created by a user they can still accessed by the user through links and channels outside the module. This access can also be revoked by the Space Administrator, but must be done individually for each object using the Security button in the toolbar.
• The creator of an object always has all permissions granted for that object, unless the Space Administrator specifically removes those permissions.

ADMINISTRATOR’S GUIDE 3 . S E C U R I T Y G U I D E
© 2004-2006 Project.net, Inc. Page 34 of 102 Version 7.5 rev1 All Rights Reserved. March 2006
• Module permissions override Object permissions.
• Changes to New Object Permission settings do not affect previously created objects. Changes will only apply to new objects that are created in the future. Items added prior to the changed security must be secured individually by selecting the object and then clicking the security icon in the action tool bar.
• New Object Permissions determine the default permissions that will be given to an object when it is created. Changes to New Object permissions are not retroactive to previously created objects.
• Object permissions are set from the tool bar for individual objects and determine a role or participant’s ability to view, modify, create (not always applicable – therefore sometimes not available), delete, or modify permissions for objects such as documents, forms, folders, and calendar events.
• The administrator can remove personal document permissions from the user by clicking the specific document and altering the security settings, but this action will have to be done for each document the user created before the new settings took place.
• A person’s individual security settings will override any settings that the person has been assigned through the role(s) he/she belongs to. Therefore, participant permissions override Role permissions.

ADMINISTRATOR’S GUIDE 4 . Q U I C K R E F E R E N C E S
© 2004-2006 Project.net, Inc. Page 35 of 102 Version 7.5 rev1 All Rights Reserved. March 2006
4 . Q U I C K R E F E R E N C E S
4.1. Form Designer
4.1.1 Create a New Form Below you will find the process to create a new form, with cross references to the appropriate chapters:
Go to the desired workspace.
Click the Forms module on the navigation bar.
Click the Form Designer button above the channel header.
Click the Create New Form button in the lower channel header or
Click the Create button in the action tool bar.
Enter the Form Name and a Form Abbreviation in the Definition Tab; refer to 5.2.2 Definition.
Click the Submit button.
Click the Fields Tab; refer to 5.2.3 Fields
The defined fields window opens (first, you will see a window empty except for the channel header).
Click the Create button in the action tool bar.
The Add Field window opens; refer to Figure 5-2.
Select the desired field type.
The Add Field window will change accordingly.
Enter your data.
Click the Submit button.
Repeat the steps above for each field you want to add.
Click Preview button anytime to view the form design.
After finishing the creation fields, click the List Tab; refer to 5.2.4 Lists.
Click the Create button in the action tool bar.
The Add Form List window opens.
Create at least one List view for the form.
Enter your data, select the fields that should appear in the list view, and designate the order in which those
fields should appear.
Click the Submit button to finish the list creation.
You can define one Workflow to the form; refer to 5.2.5 Workflow Tab (optional).
Click the Workflow Tab.
Select the Workflow from the list or
Click on the Clear selection button to deselect a workflow.
Click the Activate Tab; refer to 5.2.7 Activate Tab.
In this Tab, click the Submit button again to activate the Form type.
The form can be edited after the form data has been entered.

ADMINISTRATOR’S GUIDE 4 . Q U I C K R E F E R E N C E S
© 2004-2006 Project.net, Inc. Page 36 of 102 Version 7.5 rev1 All Rights Reserved. March 2006
4.1.2 Create New Form Data To create new form data, you have to perform the following actions:
Go to the desired workspace.
Click the Forms module in the navigation bar.
The available forms list page appears.
Click the desired form name (here ‘Example’).
The List View of the desired form name appears.
Click the Create button in the Action tool bar.
An empty form data appears.
Enter the necessary information in the fields.
Click the Submit button to verify your work.
The form data appears for Example under the List View; refer to Figure 6-1.
For more information on how to create new form data, please refer to the chapter Forms in the Project.net User’s Manual.
4.2. Workflows
4.2.1 Create a New Workflow Below is a description of the process used to create a new workflow, with cross references to the appropriate chapters:
Go to the desired workspace.
Click the Workflow module on the navigation bar.
If this is your first workflow, click the Create first workflow button ; refer to Figure 7-2.
Otherwise, you have to click the Create button in the action tool bar or
Click the Workflow Designer button at the top right of the window and
Click the Create button in the action tool bar.
The Workflow Designer in the Definition tab opens.
Fill out the Definition information ; refer to item Figure 7-3.
You can designate if the workflow will apply only to forms or to documents, or to all types of objects.
Click the Submit button.
Notice that the name of the workflow appears at the top right of the window.
The Step tab will appear automatically; refer to 7.3.2 Steps and Figure 7-4.
Click the Create button or the Create first step link .
Fill in the Step information.
° If this is the first step in the workflow process, select the Initial Step radio button.
Click the Submit button.
The Roles at this step channel appears at the bottom of the window.
Click the Modify button or the Add roles link.
Select the check box next to the name(s) of the participant(s) who should be involved in this step.
Click the Add button.

ADMINISTRATOR’S GUIDE 4 . Q U I C K R E F E R E N C E S
© 2004-2006 Project.net, Inc. Page 37 of 102 Version 7.5 rev1 All Rights Reserved. March 2006
Select Yes or No from the drop-down lists for Participant and Notify.
° Select Yes for Participant if an envelope for this workflow should appear in the Workflow Inbox for all members of a role.
° Select Yes for Notify if all members of a role should be notified by email when an envelope enters this step.
Click the Submit button.
Verify your work. The first step of the workflow is created.
Now you can create numerous further steps by using the same procedure, but you must define at least one
final step!
° When you create a final step, set the Step Type to Final Step by clicking the Final Step radio button. Be sure that the appropriate status for each final step is selected. Set the status to either Completed or Cancelled. Otherwise, the envelope or workflow can never be finished or deleted.
° The first step is marked with . The last step is marked with .
To define a Transition you must enter the Transition tab; refer to 7.3.3 Transitions.
The Create Transition window opens; refer to Figure 7-6.
Click the Create button or the Create first transition link .
The new Transition window appears.
Fill in the Transition information; refer to Figure 7-7.
You have to choose the From Step and To Step from the selection menu.
Click the Submit button.
The Rules channel bar appears.
Click the Create button.
Select the check box next to the name(s) of the participants who may perform this transition.
° Click the Remove button or Remove link to remove this rule and allow all participants to perform the transition.
Click the Submit button.
Verify your work. The first Transition is created.
NOTE: You can go back anytime to add, edit, or delete steps by clicking Steps.
You can create further transitions by using the same procedure.
When you have completed the workflow steps and transitions, click the Publish tab.
Click the Publish Workflow button. Project.net states that this workflow is currently published.
NOTE: To edit this workflow, change the status to NOT published.
To verify your work, click the Workflow module in the left navigation bar.
The workflow appears under the channel heading Defined Workflows.
4.2.2 Add a Document to a Workflow Below you will find the procedure to add a document to a workflow:
Go to the desired workspace.
Click the Documents module on the navigation bar.
Select the radio button of the desired Document.

ADMINISTRATOR’S GUIDE 4 . Q U I C K R E F E R E N C E S
© 2004-2006 Project.net, Inc. Page 38 of 102 Version 7.5 rev1 All Rights Reserved. March 2006
Click the Add to Workflow button in the action tool bar.
Select the appropriate workflow and define the Envelope Title. Click the Next button.
Specify the rule enforcement, priority, and status, as well as enter your initial message for the envelope.
Click the Finish button.
The Envelope enters the Inbox of the Participant named in the first step.
4.2.3 Add a Form to a Workflow Create a new form in the form designer and designate the workflow to be used for this created form; refer to Figure 4-1. Each form that you create next automatically includes the selected workflow. The workflow envelope is then sent to the participant(s) designated in the Initial Step of the workflow.
Figure 4-1
You cannot add already existing form data to a workflow.

ADMINISTRATOR’S GUIDE 5 . F O R M D E S I G N E R
© 2004-2006 Project.net, Inc. Page 39 of 102 Version 7.5 rev1 All Rights Reserved. March 2006
5 . F O R M D E S I G N E R
5.1. Introduction
5.1.1 Why Use a Form? Forms help make data entry easier. They are used in a project or business to gather data into a database. A database makes it easy to sort information for analysis.
Whenever form data is entered, an Excel file (*.csv) can be created from the database.
Some examples of reasons to use a form include:
• Recording decisions made during a project.
• Storing contact or vendor information.
• Reporting an amendment on a site.
5.1.2 What Are Lists? The List function allows you to create various views of a database. You can create as many list views as you wish.
The List function allows you to select the fields that appear in a list view, designate the order that the fields appear (in columns), and sort by up to three different fields.
At least one list must be created for a form design to be activated.
If you apply filters to a list, the criteria must match ALL selected filters in order to be displayed.
5.1.3 Edit a Form When you modify a form design by adding, editing, or deleting fields, all forms already created from that form design will be updated to reflect the changes.
You cannot designate which team members can fill in specific fields in a form. Any team member with security access to form databases can change information in all the form fields.
5.2. Create a New Form
Below you will find a detailed description of the different tabs of the Form designer. For the new form creation sequence, please refer to 4.1 Form Designer.
5.2.1 Form Design Tips Before creating the fields for your form, it is a good idea to:
• Write down a list of all the fields you want to include. We suggest an Excel sheet for this task.
• Decide which fields need to be grouped together.
• Write down the title for each section (group of fields), if applicable.
• For a selection menu, determine all the items to be included in the drop-down list and the order in which you want them to appear. If you want a default value to be chosen, decide which item should be the default value.
ADMINISTRATOR’S GUIDE 5 . F O R M D E S I G N E R
© 2004-2006 Project.net, Inc. Page 40 of 102 Version 7.5 rev1 All Rights Reserved. March 2006
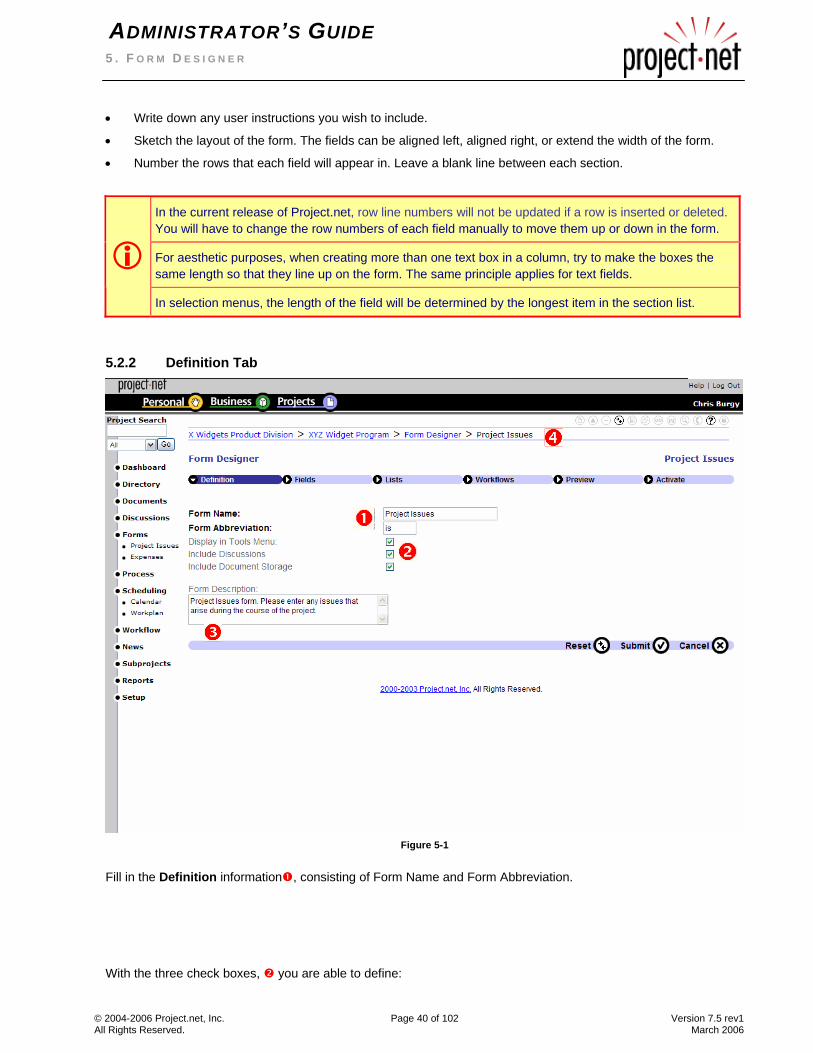
• Write down any user instructions you wish to include.
• Sketch the layout of the form. The fields can be aligned left, aligned right, or extend the width of the form.
• Number the rows that each field will appear in. Leave a blank line between each section.
In the current release of Project.net, row line numbers will not be updated if a row is inserted or deleted. You will have to change the row numbers of each field manually to move them up or down in the form.
For aesthetic purposes, when creating more than one text box in a column, try to make the boxes the same length so that they line up on the form. The same principle applies for text fields.
In selection menus, the length of the field will be determined by the longest item in the section list.
5.2.2 Definition Tab
Figure 5-1
Fill in the Definition information , consisting of Form Name and Form Abbreviation.
With the three check boxes, you are able to define:

ADMINISTRATOR’S GUIDE 5 . F O R M D E S I G N E R
© 2004-2006 Project.net, Inc. Page 41 of 102 Version 7.5 rev1 All Rights Reserved. March 2006
• whether the ‘new’ form should be displayed in the navigation bar.
• whether a discussion should be added to each form data.
• whether document storage should be added to each form data.
In the Form Description text box , you can fill in a description of the form, which will be displayed in the form list after selecting the Forms module.
Notice the “breadcrumbs” at the top of the page that tell you where you are in Project.net.
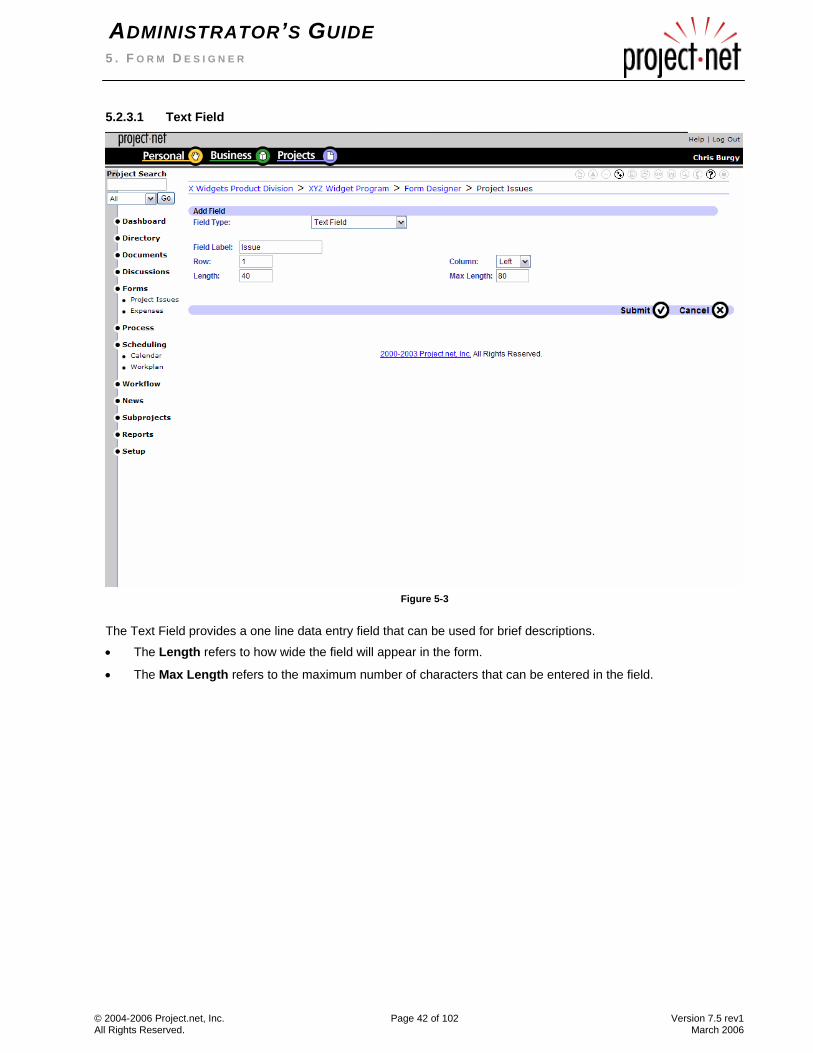
5.2.3 Fields Tab Fields allow you to enter data into the form; refer to Figure 5-2.
Figure 5-2
The Project.net application currently has twelve (12) field types.
General instructions: • The Field Label refers to the name of the field.
• The Row refers to the row where the field will appear in the form.
• The Column refers to the alignment of the field (left, right, or both).
• The Length refers to how wide the field will appear in the form.
• The Max Length refers to the maximum number of characters that can be entered in the field.
ADMINISTRATOR’S GUIDE 5 . F O R M D E S I G N E R
© 2004-2006 Project.net, Inc. Page 42 of 102 Version 7.5 rev1 All Rights Reserved. March 2006
5.2.3.1 Text Field
Figure 5-3
The Text Field provides a one line data entry field that can be used for brief descriptions.
• The Length refers to how wide the field will appear in the form.
• The Max Length refers to the maximum number of characters that can be entered in the field.

ADMINISTRATOR’S GUIDE 5 . F O R M D E S I G N E R
© 2004-2006 Project.net, Inc. Page 43 of 102 Version 7.5 rev1 All Rights Reserved. March 2006
5.2.3.2 Text Box
Figure 5-4
The Text Box provides a field that can be more than one line high and could be used for longer descriptions or user comments.
• The Length refers to how wide the field will appear in the form.
• The Height refers to the number of rows you want the text box to span in the form.

ADMINISTRATOR’S GUIDE 5 . F O R M D E S I G N E R
© 2004-2006 Project.net, Inc. Page 44 of 102 Version 7.5 rev1 All Rights Reserved. March 2006
5.2.3.3 Selection Menu
Figure 5-5
The Selection Menu allows you to create a multiple-choice drop-down list. You can also set a default choice that will be selected automatically unless the user changes it.
If you select the Allow Multiple Selection check box , users will be able to select more than one item from the drop-down list.
The selection menu is useful for creating a Status list, such as Not Started, In Progress, Completed, Authorized, and Cancelled.
You can sort the choice names in the order you want them to appear in the list by using the up and down arrows .
Otherwise, you have the ability to sort the list alphabetically by clicking the Alphabetize button . Once you have submitted the drop-down list, you cannot edit an item. If you want to edit it, you will have to delete the old choice name and then enter a new choice name. All selections of the old name are lost.

ADMINISTRATOR’S GUIDE 5 . F O R M D E S I G N E R
© 2004-2006 Project.net, Inc. Page 45 of 102 Version 7.5 rev1 All Rights Reserved. March 2006
5.2.3.4 Date Field
Figure 5-6
If you select the Default to creation date/time check box , the form will automatically fill in the current date in this field.
You have three options to define the date:
• Date only – only the date will be displayed.
• Date and time – the date and time will be displayed.
• Time only – only the time will be displayed.

ADMINISTRATOR’S GUIDE 5 . F O R M D E S I G N E R
© 2004-2006 Project.net, Inc. Page 46 of 102 Version 7.5 rev1 All Rights Reserved. March 2006
5.2.3.5 Checkbox
Figure 5-7
Checkboxes allow you to create items that, when selected, will show up as check marks in the list view.

ADMINISTRATOR’S GUIDE 5 . F O R M D E S I G N E R
© 2004-2006 Project.net, Inc. Page 47 of 102 Version 7.5 rev1 All Rights Reserved. March 2006
5.2.3.6 Person Selection Menu
Figure 5-8
The Person Selection Menu will automatically create a drop-down list of all team members for the current workspace.

ADMINISTRATOR’S GUIDE 5 . F O R M D E S I G N E R
© 2004-2006 Project.net, Inc. Page 48 of 102 Version 7.5 rev1 All Rights Reserved. March 2006
5.2.3.7 Milestone
Figure 5-9
The Milestone field automatically creates a drop-down list of milestones, which will appear in the Workplan.

ADMINISTRATOR’S GUIDE 5 . F O R M D E S I G N E R
© 2004-2006 Project.net, Inc. Page 49 of 102 Version 7.5 rev1 All Rights Reserved. March 2006
5.2.3.8 Number Field
Figure 5-10
Number fields allow you to create items that are used in connection with the calculation field. With the calculation field, the number fields can be summed or subtracted; refer to 5.2.3.12 Calculated Fields.
The attributes of the number field are:
• Length – indicates the displayed length of the field.
• Total number of Digits – indicates the number of digits which can be entered before and after the decimal point. The number of digits that can be entered before the decimal point will result from the total number of digits minus the number of decimal digits.
• Number of Decimal Digits – indicates the number of decimal digits.

ADMINISTRATOR’S GUIDE 5 . F O R M D E S I G N E R
© 2004-2006 Project.net, Inc. Page 50 of 102 Version 7.5 rev1 All Rights Reserved. March 2006
5.2.3.9 Currency Field
Figure 5-11
The currency field allows you to create items that are also used in connection with the calculation field. With the calculation field, currency fields can be summed or subtracted; refer to 5.2.3.12 Calculated Fields.
The currency fields have the same attributes as the number fields.

ADMINISTRATOR’S GUIDE 5 . F O R M D E S I G N E R
© 2004-2006 Project.net, Inc. Page 51 of 102 Version 7.5 rev1 All Rights Reserved. March 2006
5.2.3.10 Horizontal Section Title
Figure 5-12
The Horizontal Section Title is useful for creating headings on your form that divide the form into easy-to-understand sections.
Select “Both” as the column alignment if you want the Section Title to extend across the width of the form.

ADMINISTRATOR’S GUIDE 5 . F O R M D E S I G N E R
© 2004-2006 Project.net, Inc. Page 52 of 102 Version 7.5 rev1 All Rights Reserved. March 2006
5.2.3.11 User Instructions
Figure 5-13
User Instructions allow you to add specific instructions for team members who are filling out the form. Instructions might be added underneath a Section Title to help with filling out a particular area of the form.
ADMINISTRATOR’S GUIDE 5 . F O R M D E S I G N E R
© 2004-2006 Project.net, Inc. Page 53 of 102 Version 7.5 rev1 All Rights Reserved. March 2006
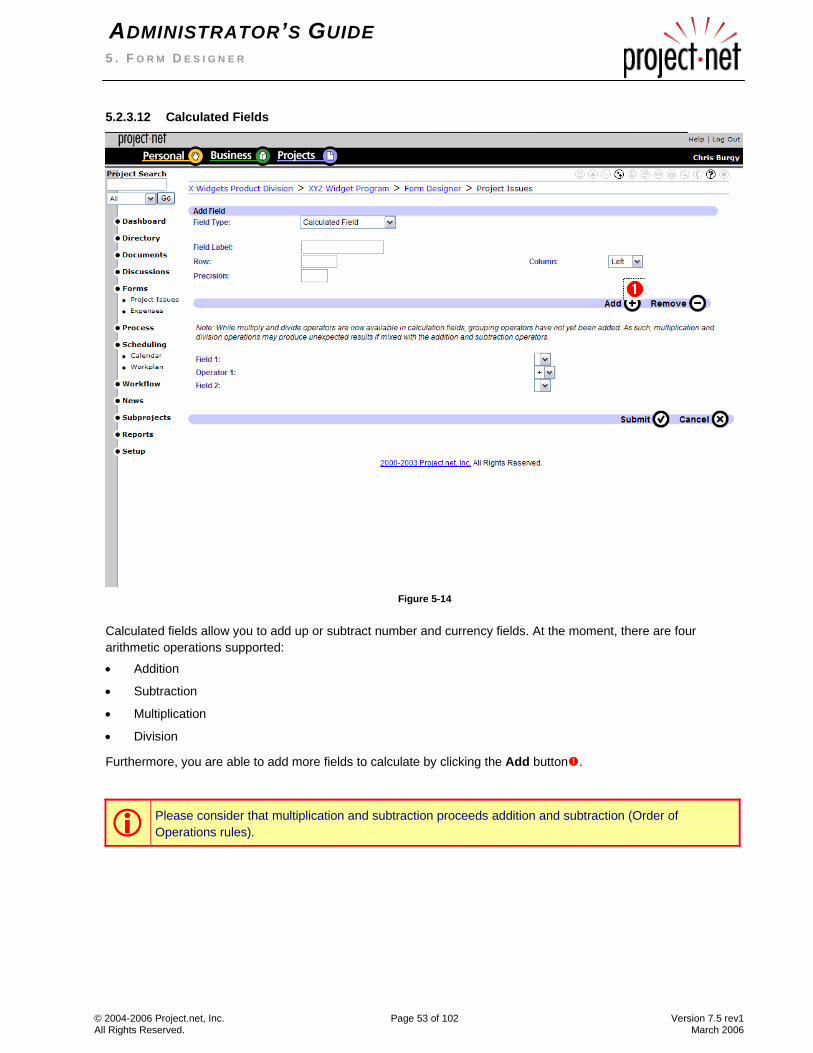
5.2.3.12 Calculated Fields
Figure 5-14
Calculated fields allow you to add up or subtract number and currency fields. At the moment, there are four arithmetic operations supported:
• Addition
• Subtraction
• Multiplication
• Division
Furthermore, you are able to add more fields to calculate by clicking the Add button .
Please consider that multiplication and subtraction proceeds addition and subtraction (Order of Operations rules).

ADMINISTRATOR’S GUIDE 5 . F O R M D E S I G N E R
© 2004-2006 Project.net, Inc. Page 54 of 102 Version 7.5 rev1 All Rights Reserved. March 2006
5.2.4 Lists Tab Lists allow you to create customized views of the form data.
Figure 5-15
You need to create at least one list to activate the form. Other lists can be added while creating the form or after the form is activated.
Below are the instructions for creating a list for a form:
Click Lists in the Form Designer.
Click the Create button in the Action toolbar.
The Add Form List window appears; refer to Figure 5-15.
Under the Description channel bar, enter the List Name and Description .
If you want this to be the default list, click the Set as default list check box .
Under the Select Fields channel bar, select the Include Field check boxes next to the fields you want to
include in the list view.
Enter the numbers for the Column Order .
Enter in the Column Width percentages , if desired.
Check the No Wrap check boxes if you want the entered field text to appear on one line.
Check the Indented Subfields check boxes if you want certain fields to be indented in the list view.
Check the Calculated Total check boxes if you want certain fields to be add totally up in the list view.
ADMINISTRATOR’S GUIDE 5 . F O R M D E S I G N E R
© 2004-2006 Project.net, Inc. Page 55 of 102 Version 7.5 rev1 All Rights Reserved. March 2006
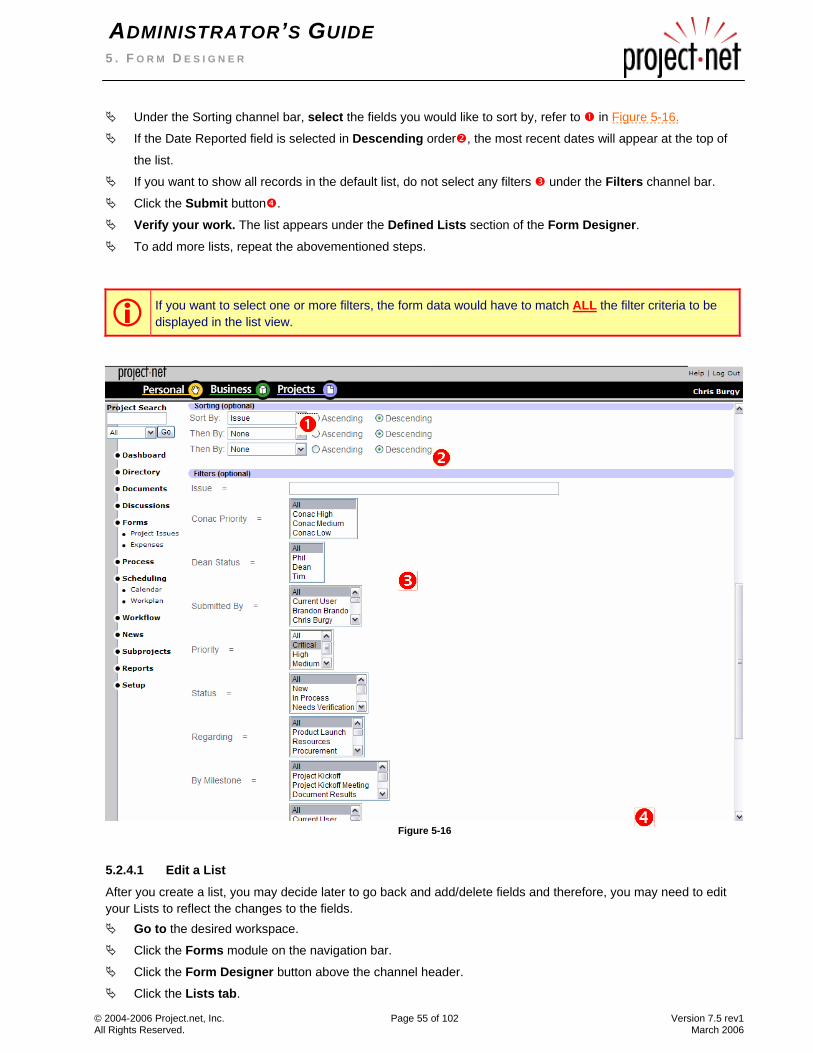
Under the Sorting channel bar, select the fields you would like to sort by, refer to in Figure 5-16.
If the Date Reported field is selected in Descending order , the most recent dates will appear at the top of
the list.
If you want to show all records in the default list, do not select any filters under the Filters channel bar.
Click the Submit button .
Verify your work. The list appears under the Defined Lists section of the Form Designer. To add more lists, repeat the abovementioned steps.
If you want to select one or more filters, the form data would have to match ALL the filter criteria to be displayed in the list view.
Figure 5-16
5.2.4.1 Edit a List
After you create a list, you may decide later to go back and add/delete fields and therefore, you may need to edit your Lists to reflect the changes to the fields.
Go to the desired workspace.
Click the Forms module on the navigation bar.
Click the Form Designer button above the channel header.
Click the Lists tab.

ADMINISTRATOR’S GUIDE 5 . F O R M D E S I G N E R
© 2004-2006 Project.net, Inc. Page 56 of 102 Version 7.5 rev1 All Rights Reserved. March 2006
The defined lists (window) appear.
To edit a list, select the list by clicking the radio button next to the list name.
Click the Modify button in the Action tool bar.
The Edit List channel bar appears.
Edit the appropriate information and then click the Submit button.
5.2.5 Workflow Tab (optional)
Adding a workflow to a Form is optional.
When you do add a workflow to a Form, all form data subsequently entered will immediately go into the selected workflow. The forms will then appear in the participants’ workflow inboxes.
If you have already created form data, then decide to add a workflow in the Form Designer later, only form data entered afterwards will go into the workflow. Forms existing prior to adding the workflow will not go into the workflow.
For more information on Workflows, see the Workflow Designer training document.
Figure 5-17

ADMINISTRATOR’S GUIDE 5 . F O R M D E S I G N E R
© 2004-2006 Project.net, Inc. Page 57 of 102 Version 7.5 rev1 All Rights Reserved. March 2006
Below are the instructions for adding a workflow to a form: In the Form Designer, click Workflows.
Click the Create button in the Action toolbar.
Click the Select link next to the workflow name.
Verify your work. A check mark appears next to the workflow.
To remove a workflow, click the Clear Selection link .
Verify your work. The check mark is removed from the workflow.
5.2.6 Preview Click Preview in the channel bar any time to view the form.
To go back to the Fields section at any time you have to click the Fields tab.
Figure 5-18

ADMINISTRATOR’S GUIDE 5 . F O R M D E S I G N E R
© 2004-2006 Project.net, Inc. Page 58 of 102 Version 7.5 rev1 All Rights Reserved. March 2006
5.2.7 Activate Tab
5.2.7.1 Activate a Form
After you have added the necessary fields and at least one list view, the form can be activated. Additional changes to the form can be done after the form is activated, but be careful not to delete fields which already have data entered in them.
To activate a new form you have to perform the following actions: Click the Activate tab in the Form Designer. The activate window appears, refer to Figure 5-19.
Select Activated from the Change form status drop-down list .
Click the Submit button .
The form is now in use.
To verify your work click the Forms Module in the left navigation toolbar.
The form should appear under Forms - Available Forms.
Figure 5-19
5.2.7.2 Deactivate a Form
It is reasonable to deactivate a form during the design phase of the form so that no user can select the form that is being designed from the form list and enter data into it.

ADMINISTRATOR’S GUIDE 5 . F O R M D E S I G N E R
© 2004-2006 Project.net, Inc. Page 59 of 102 Version 7.5 rev1 All Rights Reserved. March 2006
To deactivate an existing form you have to perform the following actions: Click the Activate tab in the Form Designer. The activate window appears; refer to Figure 5-19.
Select Hidden from the Change form status drop-down list .
Click the Submit button .
The form is now hidden.
Verify your work.
Click Forms in the left navigation toolbar.
The form should no longer appear under Forms - Available Forms.
5.3. Modify an Existing Form
To modify an existing form you have to perform the following actions: Go to the desired workspace.
Click the Forms module in the navigation bar.
Click the Form Designer button above the channel header.
A list of the available forms appears.
Click the radio button next to the desired form, and then click the Modify button.
The Definition window appears.
Click the desired section and edit the information as necessary.
° To add or edit fields, refer to 5.2.3 Fields.
° To add or edit lists, refer to 5.2.4 Lists.
° To select or deselect a workflow, refer to 5.2.5 Workflow Tab (optional).
° To activate or deactivate a form, refer to 5.2.7 Activate Tab.
Click the Submit button after completing each section.
5.3.1 Edit a Field During the editing phase, you also have the ability to edit a field.
To edit a field, you have to: Select the field by clicking the radio button next to the field name.
Click the Modify button in the Action tool bar.
The Edit Field channel bar appears.
Edit the appropriate information.
Click the Submit button.
5.4. Remove a Form
Please note that you can only remove a form if you have the security permission for this specific task.
To remove a form, use the following steps: Go to the desired Workspace; it can be a business workspace as well as a project workspace.
Click the Form module on the navigation bar.

ADMINISTRATOR’S GUIDE 5 . F O R M D E S I G N E R
© 2004-2006 Project.net, Inc. Page 60 of 102 Version 7.5 rev1 All Rights Reserved. March 2006
The Forms list page opens.
Click the Form Designer link at the top right of the window (below the Action toolbar).
A listing of the available Forms appears.
Choose the form you would like to remove.
Select the radio button of the specific Form.
In the action tool bar, click the Remove button.
A Confirmation window opens.
To remove the Form, click the OK button, or
to abort, click the "Cancel" button.
After clicking the OK button, the Form is removed.
You are returned to the Form listing page.
5.5. Copy a Form
With the Copy command, you are able to copy a Form within the actual workspace.
Please be informed that if you copy an original form where form data was already entered, only an empty copy of this form will be created. Furthermore, the new Form will have the same name and the status will be deactivated. To use the copy of the form, you have to rename the new form and set the status to activated.
To copy an existing form you have to: Go to the desired Workspace; it can be a business workspace as well as a project workspace.
Click the Form module in the navigation bar.
The Forms list page opens.
Click the Form Designer link at the top right of the window (below the Action toolbar).
A list of the available Forms appears.
Choose the form you would like to duplicate.
Select the radio button of the specific Form.
In the action tool bar, click the Copy button.
A Confirmation window opens.
To copy the Form, click the OK button, or
to abort, click the "Cancel" button.
After clicking the OK button, the Form is copied.
You are returned to the Form listing page.
Please remember that the form is deactivated and should be renamed.
5.6. Create Notification
There are several types of notifications available within the form module that can be configured individually for each user. The title of the notifications is self-explanatory to ease any definition of new subscriptions and to allow a better overview of the existing notifications.
Each subscription can be named individually and a unique subscription message can be added. The notifications can be created by selecting the link notifications in the Setup module of each workspace. Another way to set up notifications is to select an object with the radio button and click on the notification symbol in the action tool bar. Creating a notification in this way shows only those types of notifications that can be applied to this object.
ADMINISTRATOR’S GUIDE 5 . F O R M D E S I G N E R
© 2004-2006 Project.net, Inc. Page 61 of 102 Version 7.5 rev1 All Rights Reserved. March 2006
The objects which belong to a specific notification type of the form module are listed below:
• Create form
• Modify form
• Delete form
• Create form data
• Modify form data
• Remove form data
For more information on how to use the Notification, please refer to the Chapter Notification in the Project.net User’s Manual.
To create a notification for the ‘modify form' follow the steps below: Go to the desired Workspace; it can be a business workspace as well as a project workspace.
Click the Form module on the navigation bar.
The Forms list page opens.
Click the Form Designer link at the top right of the window (below the Action toolbar).
A list of the available Forms appears.
Choose the form you would like to track.
Select the radio button of the specific Form you would like to be notified about.
Click the Notify button in the action tool bar.
The Create New Subscription page opens.
Select "modify form" as a trigger event.
Click the Next button.
The page for Defining Subscription Details opens.
Key in a subscription name and (optional) a subscription message.
Select the delivery schedule.
Choose the notification recipients. Note that external email addresses can also be added.
Click the Finish button.
You are returned to the Document Vault.
5.7. Setting Object Permissions for Forms
The ability of team members to set permissions for forms is determined by the permissions granted in the New Objects Permissions by the Space Administrator. Team members can modify security for the forms they created by clicking the Security button (when it is active) in the action tool bar.
For more information on how to use the security system, please refer to 3.6.3 Setting Object Permissions.

ADMINISTRATOR’S GUIDE 6 . A P P L Y F O R M S
© 2004-2006 Project.net, Inc. Page 62 of 102 Version 7.5 rev1 All Rights Reserved. March 2006
6 . A P P L Y F O R M S
Once a form has been created and activated, the participants of the workspace with the necessary permissions are able to fill out this form and create form data.
By clicking on a form, you will be able to see a list of forms that have already been created (filled out). You will see the form data number and other details of each form data. You will also be able to view selected form data using the list view feature. You can also click on each of the headings to sort by that heading.
6.1. Create a New Form Data
To create a new form data you have to perform the following actions: Go to the desired workspace.
Click the Forms module in the navigation bar.
The available forms list page appears.
Click the desired form name (here we used ‘Example’).
The List View of the desired form name appears.
Click the Create button in the Action tool bar.
An empty form data appears.
Enter the (necessary) information in the fields.
Click the Submit button to verify your work.
The form data appears under the List View; refer to Figure 6-1.

ADMINISTRATOR’S GUIDE 6 . A P P L Y F O R M S
© 2004-2006 Project.net, Inc. Page 63 of 102 Version 7.5 rev1 All Rights Reserved. March 2006
Figure 6-1
For each form data, a unique number is assigned.
These fields are selected as indented fields in the list view ‘First view’. For these fields the Calculate Total check boxes are activated. For calculated fields this is not necessary these fields will be added up automatically.
6.2. Edit an Existing Form Data
Form data can be edited at any point after it has been submitted.
To edit an existing form data, you need to perform the following actions: Go to the desired workspace.
Click the Forms module on the navigation bar.

ADMINISTRATOR’S GUIDE 6 . A P P L Y F O R M S
© 2004-2006 Project.net, Inc. Page 64 of 102 Version 7.5 rev1 All Rights Reserved. March 2006
The available forms list page appears.
Click the desired form name (here we used ‘Example’).
The default List View of the desired form appears; refer to Figure 6-1.
Click the form name to enter the form data or
Select the radio button next to the form data name and
Then click the Modify button in the Action tool bar.
The form data appears; refer to Figure 6-2.
Notice that the form data shows which team member created the form as well as which participant modified
it the last time and when.
Edit the necessary information in the fields.
You can also add links to the form data.
To add a link you have to click the Modify button at the bottom of the form.
A new window opens and shows you the current object links.
To add a new link, click the Add New Link button.
Select the desired Link type and search for the objects.
Select an object by clicking the radio button next to the object name.
Click the Add Link button to designate the object.
Repeat the transaction to add more links.
To finish linking, click the Close button.
You are returned to the Form data.
Click the Submit button to finish the procedure.
ADMINISTRATOR’S GUIDE 6 . A P P L Y F O R M S
© 2004-2006 Project.net, Inc. Page 65 of 102 Version 7.5 rev1 All Rights Reserved. March 2006
Figure 6-2
6.3. Export / Import Function
Whenever form data is entered, a file (*.CSV, comma separated value) can be created from the database. Alternatively, a .CSV file can be imported to create a form data. This is useful when you want to create or import your own ‘customized’ reports.

ADMINISTRATOR’S GUIDE 6 . A P P L Y F O R M S
© 2004-2006 Project.net, Inc. Page 66 of 102 Version 7.5 rev1 All Rights Reserved. March 2006
6.3.1 Export Function – Excel Report
Figure 6-3
To create a new Excel report you have to perform the following actions: Go to the desired workspace.
Click the Forms module on the navigation bar.
The available forms list page appears.
Click the desired form name (here we use ‘Example’).
The default List View of the desired form name appears; refer to Figure 6-3.
Use the default List View or select another List View .
Click the Export button to export the content of all the form data of the list view.
Perform a Form Search by clicking the Form Search button .
The Custom Search Result list appears.
Click the Export button to export only the form data of the Custom Search Result list.
The file download confirmation window opens; refer to Figure 6-5.
Select the answer to the question ‘What would you like to do with this file?’
° Open this file from its current location or
° Save this file to disk.
In this example, we selected ‘Open this file from its current location’. Click the OK button.

ADMINISTRATOR’S GUIDE 6 . A P P L Y F O R M S
© 2004-2006 Project.net, Inc. Page 67 of 102 Version 7.5 rev1 All Rights Reserved. March 2006
The software you have designated to open CSV files will open the file. In this example, MS Excel was used to
open the CSV files.
Notice that the first row contains the field name and subsequent rows contain the associated form data.
To save the file, select File and then Save As from the menu.
The File ‘save as’ window opens.
Select the directory to save the file to.
Enter the file name.
Select the type of file to save it as; we recommend ‘Excel’ or ‘Comma Separated Value’.
Click the Save button.
The file is saved to the directory.
Figure 6-4

ADMINISTRATOR’S GUIDE 6 . A P P L Y F O R M S
© 2004-2006 Project.net, Inc. Page 68 of 102 Version 7.5 rev1 All Rights Reserved. March 2006
Figure 6-5
6.3.2 Export Function – CSV File You have also the ability to create a CSV file. To do this, you have to perform the following actions:
Go to the desired workspace.
Click the Forms module on the navigation bar.
The available forms list appears.
Click the desired form name (here we used ‘Example’).
The default List View of the desired form name appears; refer to Figure 6-3.
Use the default List View or select another List View .
Click the Export button to export the content of all the form data in the list view.
Perform a Form Search by clicking the Form Search button .
The Custom Search Result list appears.
Click the Export button to export only the form data of the Custom Search Result list.
The file download confirmation window opens; refer to Figure 6-5.
Select the answer to the question ‘What would you like to do with this file?’
° Open this file from its current location.
° Save this file to disk.
In this case, we selected ’Save this file to disk’. Click the OK button.
The ‘Save file to’ window opens.
Browse to the location where you wish to save the file.
Enter the file name.
Click the Save button.
The file is saved to the directory.

ADMINISTRATOR’S GUIDE 6 . A P P L Y F O R M S
© 2004-2006 Project.net, Inc. Page 69 of 102 Version 7.5 rev1 All Rights Reserved. March 2006
6.3.3 Import Function – CSV File
Figure 6-6
To import a CSV file you need to do the following steps: Go to the desired workspace.
Click the Forms module in the navigation bar.
The available forms list appears.
Click the desired form name (here we used ‘Example’).
The default List View of the desired form name appears; refer to Figure 6-6.
Click the Import button to start the import procedure.
The Step 1 window appears; refer to Figure 6-7.
Select the Browse button to search for the *.CSV file .
The Select file Window appears.
Select the File and click the Open File button .
Both Windows are closed and the Step 2 window appears; refer to Figure 6-8.
Map the values that should be imported to the existing values .
This has to be done for all values that should be inserted. For all values that should not be inserted the
selection menu has to be left to unassigned!
Click the Next button .

ADMINISTRATOR’S GUIDE 6 . A P P L Y F O R M S
© 2004-2006 Project.net, Inc. Page 70 of 102 Version 7.5 rev1 All Rights Reserved. March 2006
The Step 3 window appears; refer to Figure 6-9.
In this step, you have to enter or select additional information for several fields .
Click the Next button to enter the next step .
The Step 4 window appears; refer to Figure 6-10.
In this step, you will see the validation report. Only when the validation is successful is data import possible.
Click the Import button to start inserting the data.
Now you will see a message > Importing data. Do not click Stop or Back on your Web Browser. <
When the data has been imported, you will enter the next step.
The Step 5 window appears; refer to Figure 6-11.
In this step, you see the import report.
Click the Close button to finish the import procedure.
See the result of this process in Figure 6-12. The number Ex5 to Ex8 are newly imported and all existing data
are unchanged.
Figure 6-7

ADMINISTRATOR’S GUIDE 6 . A P P L Y F O R M S
© 2004-2006 Project.net, Inc. Page 71 of 102 Version 7.5 rev1 All Rights Reserved. March 2006
Figure 6-8

ADMINISTRATOR’S GUIDE 6 . A P P L Y F O R M S
© 2004-2006 Project.net, Inc. Page 72 of 102 Version 7.5 rev1 All Rights Reserved. March 2006
Figure 6-9

ADMINISTRATOR’S GUIDE 6 . A P P L Y F O R M S
© 2004-2006 Project.net, Inc. Page 73 of 102 Version 7.5 rev1 All Rights Reserved. March 2006
Figure 6-10

ADMINISTRATOR’S GUIDE 6 . A P P L Y F O R M S
© 2004-2006 Project.net, Inc. Page 74 of 102 Version 7.5 rev1 All Rights Reserved. March 2006
Figure 6-11
ADMINISTRATOR’S GUIDE 6 . A P P L Y F O R M S
© 2004-2006 Project.net, Inc. Page 75 of 102 Version 7.5 rev1 All Rights Reserved. March 2006
Figure 6-12
The importation of a CSV file only works if the data values of the file to be imported are separated by a comma ‘,’. Other separators such as a semicolon ‘;’ or colon ‘:’ cause errors and unexpected results.

ADMINISTRATOR’S GUIDE 7 . W O R K F L O W D E S I G N E R
© 2004-2006 Project.net, Inc. Page 76 of 102 Version 7.5 rev1 All Rights Reserved. March 2006
7 . W O R K F L O W D E S I G N E R
7.1. Introduction
7.1.1 What is a Workflow?
A workflow automates project-related business processes.
A workflow is used, for example, for a review or approval process for documents or forms.
A workflow is an automation of a process, in whole or part, during which documents, information, or tasks are passed from one participant to another for action, according to a set of procedural rules.
In order to apply an existing workflow to something, you must enter that respective module.
When a document or form is assigned to a workflow, the application places it in a routing "envelope" for the purpose of transporting it through the different steps of the workflow; refer to Figure 7-1. Whenever a person is assigned a role for a step, the envelope is delivered to that participant's workflow inbox. Once that participant completes the step, he/she determines an appropriate transition, and the envelope is delivered to the next person in the workflow. This process continues until the workflow is complete.
Figure 7-1

ADMINISTRATOR’S GUIDE 7 . W O R K F L O W D E S I G N E R
© 2004-2006 Project.net, Inc. Page 77 of 102 Version 7.5 rev1 All Rights Reserved. March 2006
7.1.2 When to Use a Workflow?
Use the workflow when you have a document or form that needs to go through a process organization.
The workflow designer allows you to design a path through the process organization, with the flexibility to add actions (transitions) that send the item back through the process to any step as many times as needed until the item completes the final step.
7.1.3 What is an Envelope?
An envelope is a cover for a workflow. It forwards the workflow through the process.
When a document or form is assigned to a workflow, the application places it in a routing "Envelope" for the purpose of transporting it through the various steps of the workflow.
Whenever a person is assigned to a role or group for a step, the envelope is delivered to that participant's workflow inbox. An envelope can be delivered to multiple participants’ inboxes simultaneously.
7.1.4 What are Steps?
A step defines the scope of work and assigns it to a role or group of participants who need to view the document or form during the workflow process. Each workflow can consist of several steps, but must have at least one initial step and one final step.
Steps move a document or form through the workflow from the initial step to the final step(s). Upon transitioning to a new step in a workflow, the status may change depending on what you selected in the workflow.
You can create only one initial step but multiple final steps, such as “Approved,” “Rejected,” or “Cancelled”.
7.1.5 What are Transitions?
Transitions are actions, results, or decisions that occur after a step is completed. Transitions describe alternative ways of how an envelope can pass through the steps of a workflow.
Furthermore, transitions allow you to specify the workflow path from one step to another. You can create multiple transitions from each step to other steps.
Transitions must be defined between each step in order for the workflow to function properly.
ADMINISTRATOR’S GUIDE 7 . W O R K F L O W D E S I G N E R
© 2004-2006 Project.net, Inc. Page 78 of 102 Version 7.5 rev1 All Rights Reserved. March 2006
7.2. Create a Workflow
Figure 7-2
Below you will find a detailed description on how to create a new workflow, with cross references to the appropriate chapters:
Go to the desired workspace.
Click the Workflow module in the navigation bar.
If this is your first workflow, click the Create first workflow button ; refer to Figure 7-2.
Otherwise, click the Create button in the action tool bar or
Click the Workflow Designer button at the top right of the window and
Click the Create button in the action tool bar.
The Workflow Designer in the Definition tab opens.
Fill out the Definition information ; refer to item Figure 7-3.
Designate if the workflow should apply only to forms, to documents, or to all types of objects.
Click the Submit button.
Notice that the name of the workflow appears at the top right of the window.
The Steps tab will open automatically; refer to item 7.3.2 Steps and Figure 7-4.
Click the Create button or the Create first step link .
Fill in the Step information.
° If this is the first step in the workflow process, select the Initial Step radio button.

ADMINISTRATOR’S GUIDE 7 . W O R K F L O W D E S I G N E R
© 2004-2006 Project.net, Inc. Page 79 of 102 Version 7.5 rev1 All Rights Reserved. March 2006
Click the Submit button.
The Roles at this step channel appears at the bottom of the window.
Click the Modify button or the Add roles link.
Select the check box next to the name(s) of the participant(s) who should be involved in this step.
Click the Add button.
Select Yes or No from the drop-down lists for Participant and Notify.
° Select Yes for Participant if an envelope for this workflow should appear in the Workflow Inbox for all members of a role.
° Select Yes for Notify if all members of a role should be notified via email when an envelope enters this step.
Click the Submit button.
Verify your work. The first Step is created.
Now you can create further steps (if desired) by using the same procedure. However, you must define at least
one final step.
° When you create a final step, set the Step Type to Final Step by clicking the Final Step radio button. Be sure that the appropriate status for each final step is selected. Set the status to either Completed or Cancelled; otherwise, the envelope or workflow can never be finished or deleted.
° The first step is marked with a green flag . The last steps are marked with a checkered flag .
To define a Transition you must enter the Transition tab; refer to item 7.3.3 Transitions.
The Create Transition window opens; refer to Figure 7-6.
Click the Create button or the Create first transition link .
The new Transition window appears.
Fill in the Transition information; refer to Figure 7-7.
You have to choose the From Step and To Step from the selection menu.
Click the Submit button.
The Rules channel bar appears.
Click the Create button.
Select the check box next to the name(s) of the participants who may perform this transition.
° Click the Remove button or Remove link to remove this rule and allow all participants to perform the transition.
Click the Submit button.
Verify your work. The first Transition is created.
NOTE: You can go back at any time to add, edit, or delete the steps by clicking Steps.
You can now create further transitions by using the same procedure.
When you have completed the workflow steps and transitions, click the Publish tab.
Click the Publish Workflow button. ENW states that this workflow is currently published.
NOTE: To edit this workflow, change the status back to NOT published.
To verify your work, click the Workflow module in the left navigation bar.
The workflow appears under the channel heading Defined Workflows.

ADMINISTRATOR’S GUIDE 7 . W O R K F L O W D E S I G N E R
© 2004-2006 Project.net, Inc. Page 80 of 102 Version 7.5 rev1 All Rights Reserved. March 2006
7.3. Workflow Designer
7.3.1 Definition Tab
Figure 7-3
Fill in the Definition information . You have to select a workflow name, owner, a rule enforcement (Relaxed or Strict), and the kind of objects that may be moved through this Workflow, refer to . If desired, you can add a workflow description which will be displayed in the workflow listing page.
With the selection menu ‘kind of objects that may be workflowed’, you can determine which type of object can be designated to this workflow. Your choices include:
• all types of objects
• only documents
• only a selected form
• a bookmark
Notice the “breadcrumbs” at the top of the page that tell you where you are in the Workflow Designer.

ADMINISTRATOR’S GUIDE 7 . W O R K F L O W D E S I G N E R
© 2004-2006 Project.net, Inc. Page 81 of 102 Version 7.5 rev1 All Rights Reserved. March 2006
7.3.2 Steps Tab
Figure 7-4

ADMINISTRATOR’S GUIDE 7 . W O R K F L O W D E S I G N E R
© 2004-2006 Project.net, Inc. Page 82 of 102 Version 7.5 rev1 All Rights Reserved. March 2006
Figure 7-5
Each workflow consists of several steps. There has to be at least one initial step and one final step; refer to in Figure 7-5. A step defines the scope of the work and assigns it to a role or group of participants .
Steps move a document or form through the workflow from the initial step to the final step(s). Upon transitioning to a new step in a workflow, the status may change depending on what you selected in the workflow.
Be sure that the appropriate status for each final step is selected. Otherwise, the envelope or workflow can never be finished or deleted; refer to in Figure 7-5.
• set the status to Completed (Closed) – e.g. the document was approved.
• set the status to Cancelled (Closed) – e.g. the document was rejected or if the approval was cancelled.
You can create only one initial step but multiple final steps, such as “Approved,” “Rejected,” or “Cancelled”.
7.3.2.1 Definitions
Step name: The name of the step - should be a number and a short name; refer to in Figure 7-5.
Step Description: The general definition of the scope of work.
Step type: Defines the type of step.

ADMINISTRATOR’S GUIDE 7 . W O R K F L O W D E S I G N E R
© 2004-2006 Project.net, Inc. Page 83 of 102 Version 7.5 rev1 All Rights Reserved. March 2006
Instructions: Describe the scope of work in detail. These instructions are shown to the participant who receives the envelope in his/her workflow inbox. The instructions should clearly state what the participant should do before he/she selects a transition.
Roles at this step: The roles or groups that are assigned or responsible for this step.
7.3.3 Transitions Tab
Figure 7-6

ADMINISTRATOR’S GUIDE 7 . W O R K F L O W D E S I G N E R
© 2004-2006 Project.net, Inc. Page 84 of 102 Version 7.5 rev1 All Rights Reserved. March 2006
Figure 7-7
Transitions are actions, results, or decisions that occur after a step is completed. Transitions describe alternative ways that an envelope can pass through the steps of a workflow.
Furthermore, transitions allow you to specify the path from one step to another; refer to in Figure 7-7. You can create multiple transitions from each step to other steps.
Transitions must be defined between each step in order for the workflow to function properly.
There is also space for any comments regarding this particular step or transitions.
7.3.3.1 Definitions
Transition name: The name of the transition. It should be a sub-number and a short name; refer to in Figure 7-7.
Transition Description: A description of the actions, results, or decisions that can be selected after finishing the actual step.
From Step: Will define the actual step.
To Step: Will define the next step of the workflow.
Rules: Rules allow you to select the participants who can perform a transition. Only the selected groups can perform this transition. However, if no rule is defined, all participants of the actual step can perform this transition.

ADMINISTRATOR’S GUIDE 7 . W O R K F L O W D E S I G N E R
© 2004-2006 Project.net, Inc. Page 85 of 102 Version 7.5 rev1 All Rights Reserved. March 2006
Figure 7-8
The From Step column includes all the steps at least once, except for the Final Steps.
The To Step column includes each step at least once, including the Final Steps but excluding the First Step.
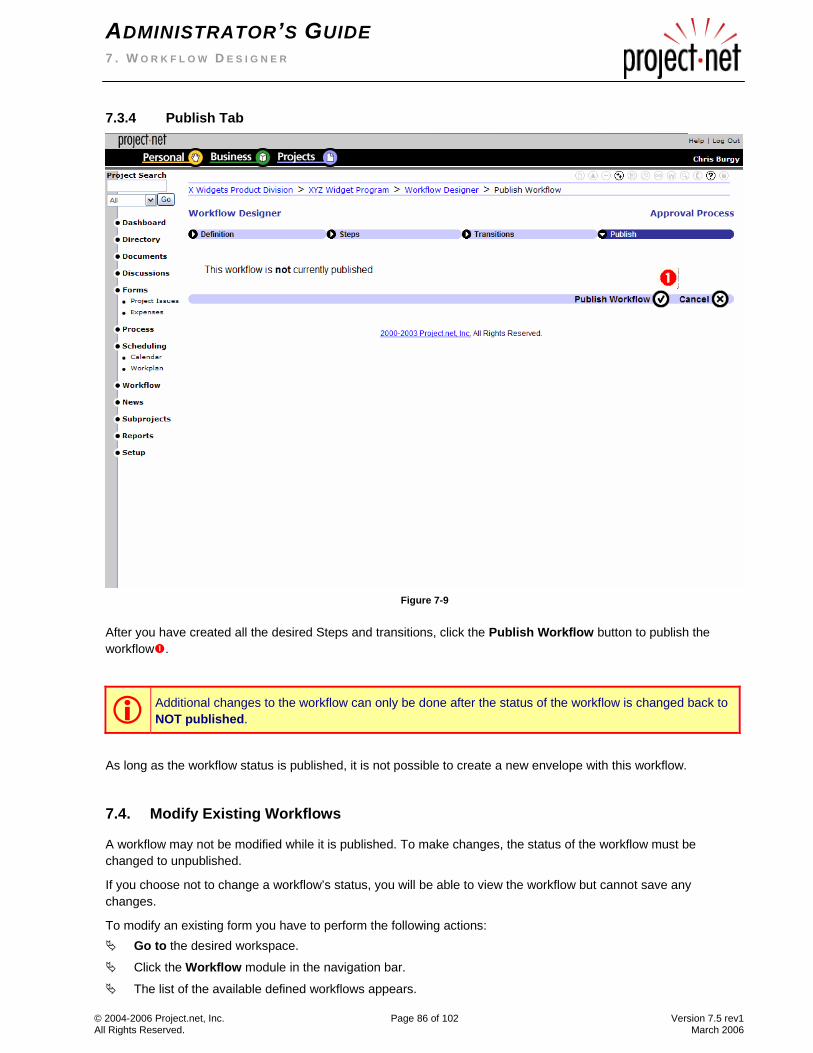
ADMINISTRATOR’S GUIDE 7 . W O R K F L O W D E S I G N E R
© 2004-2006 Project.net, Inc. Page 86 of 102 Version 7.5 rev1 All Rights Reserved. March 2006
7.3.4 Publish Tab
Figure 7-9
After you have created all the desired Steps and transitions, click the Publish Workflow button to publish the workflow .
Additional changes to the workflow can only be done after the status of the workflow is changed back to NOT published.
As long as the workflow status is published, it is not possible to create a new envelope with this workflow.
7.4. Modify Existing Workflows
A workflow may not be modified while it is published. To make changes, the status of the workflow must be changed to unpublished.
If you choose not to change a workflow’s status, you will be able to view the workflow but cannot save any changes.
To modify an existing form you have to perform the following actions: Go to the desired workspace.
Click the Workflow module in the navigation bar.
The list of the available defined workflows appears.

ADMINISTRATOR’S GUIDE 7 . W O R K F L O W D E S I G N E R
© 2004-2006 Project.net, Inc. Page 87 of 102 Version 7.5 rev1 All Rights Reserved. March 2006
Click the Workflow Designer button above the channel header.
The list of the defined workflows appears again, but now with radio buttons at the left.
Click the radio button next to the desired workflow and then click the Modify button.
If the workflow is unpublished, the Workflow Designer in the Definition tab will open or
If the workflow is currently published, you will be asked to unpublish it or only have the ability to view the
workflow.
Click the desired section and edit the information as necessary.
° To add, edit, or remove steps, refer to 7.3.2 Steps.
° To add, edit, or remove transitions, refer to 7.3.3 Transitions.
° To publish or unpublish a workflow, refer to 7.3.4 Publish.
Click the Submit button after finishing the occurrences.
7.5. Remove a Workflow
Please note that you can only remove a workflow if you have the security permission for this specific task.
To remove a workflow, follow the steps below: Go to the desired Workspace; it can be a business workspace as well as a project workspace.
Click the Workflow module in the navigation bar.
The Workflow list page opens.
Click the Workflow Designer link at the top right of the window (below the Action toolbar)
A list of the available workflows appears.
Choose the workflow you would like to remove.
Select the radio button of the specific workflow.
Click the Remove button in the action tool bar.
A Confirmation window opens.
To remove the workflow, click the OK button, or
to abort, click the "Cancel" button.
After clicking the OK button, the workflow is removed.
You are returned to the Workflow list page.
7.6. Workflow Properties
With the Properties command, definition information as well as some other additional information such as creation and last modification dates will be displayed.
You will have the ability to view the active and inactive envelopes within this workflow in the Envelopes Tab.
7.6.1 View Workflow Properties Go to the desired workspace.
Click the Workflow module in the navigation bar.
The list of available defined workflows appears.
Click the Workflow Designer button above the channel header.

ADMINISTRATOR’S GUIDE 7 . W O R K F L O W D E S I G N E R
© 2004-2006 Project.net, Inc. Page 88 of 102 Version 7.5 rev1 All Rights Reserved. March 2006
A list of the available workflows appears.
Select the radio button of the desired workflow.
Click the Properties button in the action tool bar.
The workflow properties window with the workflow definition information appears.
In this tab, you will also see the creation and last modification information.
7.6.2 View Workflow Envelopes Go to the desired workspace.
Click the Workflow module in the navigation bar.
The list of available defined workflows appears.
Click the Workflow Designer button above the channel header.
A list of the available workflows appears.
Select the radio button of the desired workflow.
Click the Properties button in the action tool bar.
The workflow properties window appears.
To see the current active envelopes, click the Envelopes Tab.
The workflow envelopes window with the active envelopes appears.
If no envelopes are displayed, it means that there are currently no active envelopes.
To show the inactive envelopes, you have to change the envelope status to ‘active & inactive'.
You will see a list of all the envelopes that have been passed through this workflow in the past.
7.7. Setting Object Permissions for Workflows
The ability of team members to set permissions for workflows is determined by the permissions granted in the New Objects Permissions by the Space Administrator. Team members can modify security for the workflows they created by clicking the Security button (when it is active) in the action tool bar.
For more information on how to use the security system, please refer to 3.6.3 Setting Object Permissions.

ADMINISTRATOR’S GUIDE 8 . A P P L Y W O R K F L O W S
© 2004-2006 Project.net, Inc. Page 89 of 102 Version 7.5 rev1 All Rights Reserved. March 2006
8 . A P P L Y W O R K F L O W S
8.1. Send a Document Through a Workflow
If a document should be sent through a workflow, an envelope has to be created for the purpose of transporting the document through the different steps of the workflow.
Whenever a person is assigned to a role or group for a workflow step, the envelope is delivered to that participant's workflow inbox. The Project.net application automatically sends an email notification, letting the participant know that the item is in his/her workflow inbox. Once that participant completes the step, the envelope is delivered to the next person, role, or group in the workflow.
This process continues until the workflow is complete.
8.1.1 Create a New Envelope To add a document to a workflow and therefore create an envelope, please use the following procedure:
Go to the desired workspace; it can be a business workspace as well as a project workspace.
Click the Documents module in the navigation bar.
The Document list page opens; refer to Figure 8-1.
Go to the folder of the document that should be "workflowed".
Select the radio button of the requested document .
Click the Add to Workflow button in the action tool bar.
The Start Workflow Wizard appears; refer to .
Choose the requested Workflow from the dropdown list.
Key in the Envelope Title and a description (optional) .
Click the Next button to finish the first step.
The second window opens, refer to in Figure 8-2.
Choose the Rule Enforcement, Priority, and Status .
You can enter an initial comment if desired.
Click the Finish button to finish occurrence.
The document is marked with the workflow symbol in Figure 8-1.
Those participants who are involved in the workflow will then receive the envelope in their workflow inbox.
You are returned to the Document Folder.

ADMINISTRATOR’S GUIDE 8 . A P P L Y W O R K F L O W S
© 2004-2006 Project.net, Inc. Page 90 of 102 Version 7.5 rev1 All Rights Reserved. March 2006
Figure 8-1
Figure 8-2

ADMINISTRATOR’S GUIDE 8 . A P P L Y W O R K F L O W S
© 2004-2006 Project.net, Inc. Page 91 of 102 Version 7.5 rev1 All Rights Reserved. March 2006
8.1.2 The Results
8.1.2.1 … from the view of the project management
To review the current status of an envelope in a workflow, please proceed according to the following procedure: Go to the desired workspace; it can be a business workspace as well as a project workspace.
Click the Workflow module in the navigation bar.
The defined Workflow list appears.
Select the workflow you want to review.
The workflow properties window opens.
To see all current envelopes of this workflow you have to enter the Envelopes tab.
Now a list of all ongoing envelopes with a description, the current step and status, as well as the date of the
last modification will be displayed; refer to Figure 8-3.
To see the properties of an envelope, you have to select the Envelope Title link .
The Envelope properties window opens; refer to Figure 8-4.
Here you see a lot of information, such as:
° The description of the envelope.
° The instructions for the current step.
° The current step with the available transitions.
° The associated document(s), with some descriptive information as well a link to the document.
° An overview of the comments from the responsible participants.
To see all the history details, you have to click the More Details button in the channel header.
To leave the Envelope, select one module in the navigation bar.

ADMINISTRATOR’S GUIDE 8 . A P P L Y W O R K F L O W S
© 2004-2006 Project.net, Inc. Page 92 of 102 Version 7.5 rev1 All Rights Reserved. March 2006
Figure 8-3

ADMINISTRATOR’S GUIDE 8 . A P P L Y W O R K F L O W S
© 2004-2006 Project.net, Inc. Page 93 of 102 Version 7.5 rev1 All Rights Reserved. March 2006
Figure 8-4
8.1.2.2 … from the view of the participants
Figure 8-5
Below we describe the most common occurrence of a workflow procedure: The first participant(s) in the workflow will see the Envelope appear in their personal Inbox (es); refer to in
Figure 8-5.
° NOTE: If the participants’ notification was set to “Yes”, they will receive an email notification that the workflow has entered their personal inboxes.
The participant clicks the workflow envelope to view the current step.
The Envelope Properties appears; refer to Figure 8-4.
The current step is highlighted in the window.
The participants read the step instructions and perform the task.
After completing the task (step), the participant should add some Comments to the performance.

ADMINISTRATOR’S GUIDE 8 . A P P L Y W O R K F L O W S
© 2004-2006 Project.net, Inc. Page 94 of 102 Version 7.5 rev1 All Rights Reserved. March 2006
° Note that the comment appears at the bottom of the window.
The participants have to select the appropriate transition (action) .
° Notice that the available transitions are listed underneath the Current Step box and under Select Action at the bottom of the window.
With the selection of a transition, the current step will be ‘closed’ and the next step – according to the
definition of the transition - will be entered.
The next participant(s) of the workflow will receive the envelope in their personal Inboxes; refer to Figure 8-6.
° Notice that in this step, the status as well as the Last Changed information has changed.
The participant clicks the workflow envelope to view the current step.
The Envelope Properties appear; refer to Figure 8-7.
The current step is highlighted in the window.
The participant reads the instruction of the step and performs the task.
After completing the task (step), the participant should add some Comments to the performance.
Participants have to select the appropriate transition (action) .
With the selection of a transition the current step will be ‘closed’ and the next step – according to the definition
of the transition - will be entered.
This procedure will be continued until the final step is reached and the envelope is closed.
The workflow symbol will disappear in the document line.
The final step can have the following statuses:
° Completed (Closed).
° Cancelled (Closed).
Figure 8-6

ADMINISTRATOR’S GUIDE 8 . A P P L Y W O R K F L O W S
© 2004-2006 Project.net, Inc. Page 95 of 102 Version 7.5 rev1 All Rights Reserved. March 2006
Figure 8-7

ADMINISTRATOR’S GUIDE 8 . A P P L Y W O R K F L O W S
© 2004-2006 Project.net, Inc. Page 96 of 102 Version 7.5 rev1 All Rights Reserved. March 2006
Figure 8-8
8.2. Send a Form Through a Workflow
If a form should be sent through a workflow, the form first has to be assigned to a workflow. Specific participants who have the necessary permissions are the only people who can form a workflow. The assignment will be done in the Form Designer module.
If you defined a form and designated a workflow to be used for this form, each form that you create automatically includes the selected workflow. The automatically created envelope is sent to the participant(s) assigned in the Initial Step of the workflow.
Sending a form through the workflow is done in the same manner as for sending documents (described above).
You cannot add an existing form data to a workflow.
If the form design is already used, only the form data from the time when the workflow is designated and later will be sent through the workflow. Due to the fact that the envelope will be created automatically, you have to define the status as “New” or as another status when entering the step. However, you cannot define the status “Do not change the status”, because an Error Message will occur.

ADMINISTRATOR’S GUIDE 8 . A P P L Y W O R K F L O W S
© 2004-2006 Project.net, Inc. Page 97 of 102 Version 7.5 rev1 All Rights Reserved. March 2006
8.2.1 Define a Form to a Workflow To have a form managed by a workflow, the following steps should be followed:
Go to the desired workspace; it can be a business workspace as well as a project workspace.
Click the Form module in the navigation bar.
The list of available Forms appears.
Select the Form Designer above the channel header.
The list of available Forms reappears.
Select the Form you want to be workflowed by clicking the Form name or
by selecting the radio button next to the Form name and clicking the Modify button in the action tool bar.
The Form Designer for the chosen form in the Definition tab opens.
Click the Workflow tab.
A list of all available Workflows appears, but only those that are released for this form; refer to item 7.3.1
Definition and Figure 7-3.
By clicking the Workflow name, you will be forwarded to the workflow properties in the workflow module.
To go back to the form designer, click the Back button on your keyboard or browser.
Select the desired workflow by clicking the Select button next to the workflow name; refer to Figure 8-9.
After selection, the workflow is designated to the form and a check mark appears in the column of the
current selection.
There is no need to activate the form again. You can go back to the forms directly by clicking the Forms
module.
All form data created after you select a workflow will be sent through the workflow. The Envelope will be
created automatically.

ADMINISTRATOR’S GUIDE 8 . A P P L Y W O R K F L O W S
© 2004-2006 Project.net, Inc. Page 98 of 102 Version 7.5 rev1 All Rights Reserved. March 2006
Figure 8-9
8.2.2 The Results
8.2.2.1 … from the view of the project management
To review the current status of an envelope of a form, please proceed according to the following procedure: Go to the desired workspace; it can be a business workspace as well as a project workspace.
Click the Workflow module in the navigation bar.
The defined Workflow list appears.
Select the workflow you want to review.
The workflow properties window opens.
To see all current envelopes of this workflow you have to enter the Envelopes tab.
A list of all ongoing envelopes with descriptions, the current step and status, as well as the date of the last
modifications will be displayed; refer to Figure 8-3.
To see the properties of an envelope, you have to select the Envelope Title link .
The Envelope properties window opens; refer to Figure 8-10.
Here you see a lot of information, such as:
° The description of the envelope.
° The instructions for the current step.
° The current step with the available transitions.

ADMINISTRATOR’S GUIDE 8 . A P P L Y W O R K F L O W S
© 2004-2006 Project.net, Inc. Page 99 of 102 Version 7.5 rev1 All Rights Reserved. March 2006
° The abbreviation with the number of the form ; the form creator, creation date, who performed the last modification, and when; refer to Figure 8-11.
° The associated form with content
° An overview of the comments from the responsible participants .
° To see all of the history details, you have to click the More Detail button in the channel header. This button is not displayed in Figure 8-10 or Figure 8-11.
To leave the Envelope, select a module in the navigation bar.
Figure 8-10

ADMINISTRATOR’S GUIDE 8 . A P P L Y W O R K F L O W S
© 2004-2006 Project.net, Inc. Page 100 of 102 Version 7.5 rev1 All Rights Reserved. March 2006
Figure 8-11
8.2.2.2 … from the view of the participants
Figure 8-12
Below we describe the most common occurrence of a workflow procedure:
The first participant(s) in the workflow will see the Envelope appear in their personal Inbox (es); refer to in
Figure 8-12.
° NOTE: If the participants’ notification was set to “Yes”, they will receive an email notification that the workflow has entered their personal inboxes.
The participant clicks the workflow envelope to view the current step.
The Envelope Properties appear; refer to Figure 8-10.
The current step is highlighted in the window.
The participant reads the step instructions and performs the task.
° Note the associated form is displayed at the bottom of the window.
° The participants are able to key in data in this area, but they are not stored unless a transition is selected to finish the occurrence.
After completing the task (step), the participant should add some Comments to the performance.

ADMINISTRATOR’S GUIDE 8 . A P P L Y W O R K F L O W S
© 2004-2006 Project.net, Inc. Page 101 of 102 Version 7.5 rev1 All Rights Reserved. March 2006
° Note that the comment appears at the bottom of the window.
The participants have to select the appropriate transition (action) ; refer to Figure 8-11.
° Notice that the available transitions are listed underneath the Current Step box and under Select Action at the bottom of the window.
With the selection of a transition, the current step will be ‘closed’ and the next step – according to the
definition of the transition - will be entered.
The next participant(s) of the workflow will receive the envelope in their personal Inboxes; refer to Figure 8-13.
° Notice that in the current step, the status as well as the last changed data have changed.
The participant clicks the workflow envelope to view the current step.
The Envelope Properties appears; refer to Figure 8-14.
The current step is highlighted in the window.
The participant reads the step instructions and performs the task.
° Note that the associated form is displayed at the bottom of the window; refer to Figure 8-11.
° The participants are able to key in data in this area, but they are not stored unless a transition is selected to finish the occurrence.
After completing the task (step), the participants should add some Comments to the performance.
Participants have to select the appropriate transition (action) ; refer to Figure 8-11.
With the selection of a transition, the current step will be ‘closed’ and the next step – according to the
definition of the transition - will be entered.
This procedure will be continued until the final step is reached and the envelope is closed.
The final step can have the following statuses:
° Completed (Closed).
° Cancelled (Closed).
Figure 8-13

ADMINISTRATOR’S GUIDE 8 . A P P L Y W O R K F L O W S
© 2004-2006 Project.net, Inc. Page 102 of 102 Version 7.5 rev1 All Rights Reserved. March 2006
Figure 8-14