Project inStall a neW WindlaSS -...
6
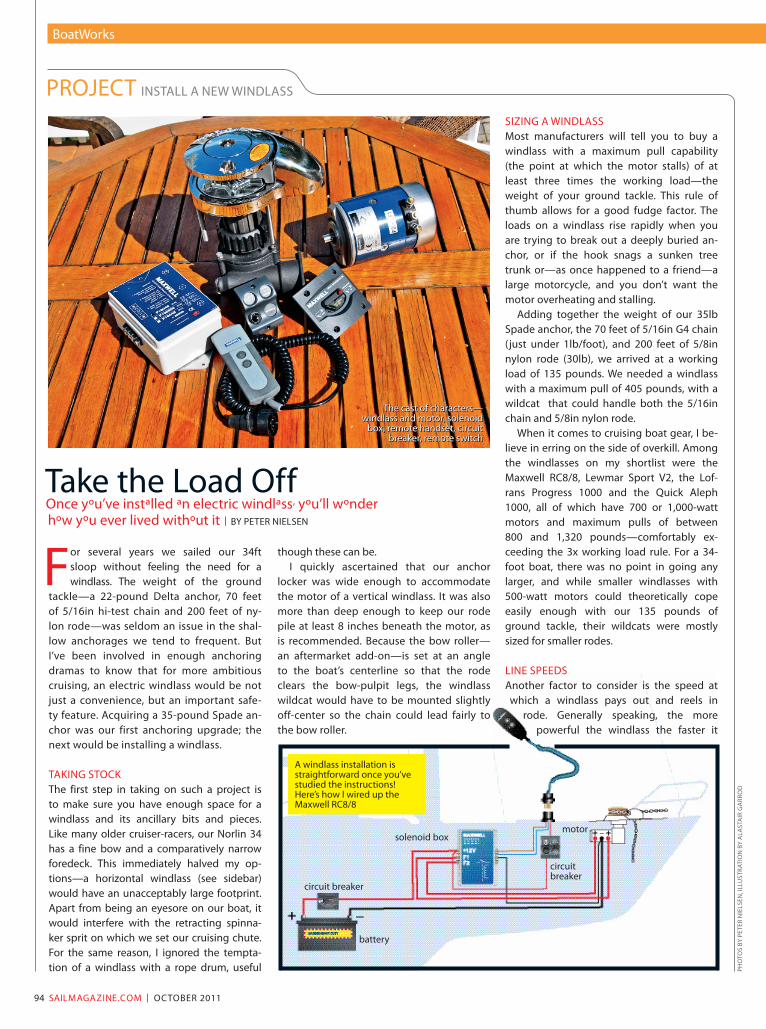
94 SAILMAGAZINE.COM | OCTOBER 2011 BoatWorks PROJECT INSTALL A NEW WINDLASS F or several years we sailed our 34ft sloop without feeling the need for a windlass. The weight of the ground tackle—a 22-pound Delta anchor, 70 feet of 5/16in hi-test chain and 200 feet of ny- lon rode—was seldom an issue in the shal- low anchorages we tend to frequent. But I’ve been involved in enough anchoring dramas to know that for more ambitious cruising, an electric windlass would be not just a convenience, but an important safe- ty feature. Acquiring a 35-pound Spade an- chor was our first anchoring upgrade; the next would be installing a windlass. TAKING STOCK The first step in taking on such a project is to make sure you have enough space for a windlass and its ancillary bits and pieces. Like many older cruiser-racers, our Norlin 34 has a fine bow and a comparatively narrow foredeck. This immediately halved my op- tions—a horizontal windlass (see sidebar) would have an unacceptably large footprint. Apart from being an eyesore on our boat, it would interfere with the retracting spinna- ker sprit on which we set our cruising chute. For the same reason, I ignored the tempta- tion of a windlass with a rope drum, useful though these can be. I quickly ascertained that our anchor locker was wide enough to accommodate the motor of a vertical windlass. It was also more than deep enough to keep our rode pile at least 8 inches beneath the motor, as is recommended. Because the bow roller— an aftermarket add-on—is set at an angle to the boat’s centerline so that the rode clears the bow-pulpit legs, the windlass wildcat would have to be mounted slightly off-center so the chain could lead fairly to the bow roller. Take the Load Off Once you’ve installed an electric windlass, you’ll wonder how you ever lived without it | BY PETER NIELSEN PHOTOS BY PETER NIELSEN, ILLUSTRATION BY ALASTAIR GARROD The cast of characters— windlass and motor, solenoid box, remote handset, circuit breaker, remote switch The cast of characters— windlass and motor, solenoid box, remote handset, circuit breaker, remote switch The cast of characters— windlass and motor, solenoid box, remote handset, circuit breaker, remote switch The cast of characters— windlass and motor, solenoid box, remote handset, circuit breaker, remote switch SIZING A WINDLASS Most manufacturers will tell you to buy a windlass with a maximum pull capability (the point at which the motor stalls) of at least three times the working load—the weight of your ground tackle. This rule of thumb allows for a good fudge factor. The loads on a windlass rise rapidly when you are trying to break out a deeply buried an- chor, or if the hook snags a sunken tree trunk or—as once happened to a friend—a large motorcycle, and you don’t want the motor overheating and stalling. Adding together the weight of our 35lb Spade anchor, the 70 feet of 5/16in G4 chain (just under 1lb/foot), and 200 feet of 5/8in nylon rode (30lb), we arrived at a working load of 135 pounds. We needed a windlass with a maximum pull of 405 pounds, with a wildcat that could handle both the 5/16in chain and 5/8in nylon rode. When it comes to cruising boat gear, I be- lieve in erring on the side of overkill. Among the windlasses on my shortlist were the Maxwell RC8/8, Lewmar Sport V2, the Lof- rans Progress 1000 and the Quick Aleph 1000, all of which have 700 or 1,000-watt motors and maximum pulls of between 800 and 1,320 pounds—comfortably ex- ceeding the 3x working load rule. For a 34- foot boat, there was no point in going any larger, and while smaller windlasses with 500-watt motors could theoretically cope easily enough with our 135 pounds of ground tackle, their wildcats were mostly sized for smaller rodes. LINE SPEEDS Another factor to consider is the speed at which a windlass pays out and reels in rode. Generally speaking, the more powerful the windlass the faster it battery circuit breaker circuit breaker solenoid box A windlass installation is straightforward once you’ve studied the instructions! Here’s how I wired up the Maxwell RC8/8 remote motor
Transcript of Project inStall a neW WindlaSS -...
94 Sailmagazine.com | october 2011
boatWorks
Project inStall a neW WindlaSS
For several years we sailed our 34ft sloop without feeling the need for a windlass. the weight of the ground
tackle—a 22-pound delta anchor, 70 feet of 5/16in hi-test chain and 200 feet of ny-lon rode—was seldom an issue in the shal-low anchorages we tend to frequent. but i’ve been involved in enough anchoring dramas to know that for more ambitious cruising, an electric windlass would be not just a convenience, but an important safe-ty feature. acquiring a 35-pound Spade an-chor was our first anchoring upgrade; the next would be installing a windlass.
taking Stockthe first step in taking on such a project is to make sure you have enough space for a windlass and its ancillary bits and pieces. like many older cruiser-racers, our norlin 34 has a fine bow and a comparatively narrow foredeck. this immediately halved my op-tions—a horizontal windlass (see sidebar) would have an unacceptably large footprint. apart from being an eyesore on our boat, it would interfere with the retracting spinna-ker sprit on which we set our cruising chute. For the same reason, i ignored the tempta-tion of a windlass with a rope drum, useful
though these can be. i quickly ascertained that our anchor
locker was wide enough to accommodate the motor of a vertical windlass. it was also more than deep enough to keep our rode pile at least 8 inches beneath the motor, as is recommended. because the bow roller—an aftermarket add-on—is set at an angle to the boat’s centerline so that the rode clears the bow-pulpit legs, the windlass wildcat would have to be mounted slightly off-center so the chain could lead fairly to the bow roller.
take the load off once you’ve installed an electric windlass, you’ll wonder how you ever lived without it | by Peter nielSen
Pho
toS
by P
eter
nie
lSen
, ill
uSt
rati
on
by
ala
Sta
ir g
arr
od
the cast of characters—windlass and motor, solenoid
box, remote handset, circuit breaker, remote switch
the cast of characters—windlass and motor, solenoid
box, remote handset, circuit breaker, remote switch
the cast of characters—windlass and motor, solenoid
box, remote handset, circuit breaker, remote switch
the cast of characters—windlass and motor, solenoid
box, remote handset, circuit breaker, remote switch
Sizing a WindlaSSmost manufacturers will tell you to buy a windlass with a maximum pull capability (the point at which the motor stalls) of at least three times the working load—the weight of your ground tackle. this rule of thumb allows for a good fudge factor. the loads on a windlass rise rapidly when you are trying to break out a deeply buried an-chor, or if the hook snags a sunken tree trunk or—as once happened to a friend—a large motorcycle, and you don’t want the motor overheating and stalling.
adding together the weight of our 35lb Spade anchor, the 70 feet of 5/16in g4 chain (just under 1lb/foot), and 200 feet of 5/8in nylon rode (30lb), we arrived at a working load of 135 pounds. We needed a windlass with a maximum pull of 405 pounds, with a wildcat that could handle both the 5/16in chain and 5/8in nylon rode.
When it comes to cruising boat gear, i be-lieve in erring on the side of overkill. among the windlasses on my shortlist were the maxwell rc8/8, lewmar Sport V2, the lof-rans Progress 1000 and the Quick aleph 1000, all of which have 700 or 1,000-watt motors and maximum pulls of between 800 and 1,320 pounds—comfortably ex-ceeding the 3x working load rule. For a 34-foot boat, there was no point in going any larger, and while smaller windlasses with 500-watt motors could theoretically cope easily enough with our 135 pounds of ground tackle, their wildcats were mostly sized for smaller rodes.
line SPeedSanother factor to consider is the speed at which a windlass pays out and reels in
rode. generally speaking, the more powerful the windlass the faster it
battery
circuit breaker
circuit breaker
solenoid box
a windlass installation is straightforward once you’ve studied the instructions! here’s how i wired up the maxwell rc8/8
remote
motor
oc tober 2011 | Sailmagazine.com 95
boatWorks
inStall a neW WindlaSS Projectwill get your anchor back on board. chain/line speeds differ markedly between differ-ent makes of windlass, and if you’ve ever had to get an anchor up in a hurry you’ll know that faster is better. be aware that quoted speeds are sometimes calculated with no load on the windlass; look for the working-load speed.
the maxwell rc8/8’s quoted working-load speed of 105ft/minute for chain re-trieval and 92ft/minute for rope was one of the highest. i haven’t verified the accuracy of this claim, but that, combined with the comparatively light weight of 36lb, was enough to swing the balance towards the new zealand-made windlass.
keePing controlSome windlasses are retrieve-only, meaning you must manually disengage a clutch to let chain freefall when you drop anchor. i sup-pose this simplifies the switching, but as long as the windlass you choose has a free-fall option as well as a powered release, you can still enjoy the best of both worlds. Some day your safety may depend on getting the hook on the bottom as quickly as possible.
most windlasses can be manually oper-ated in extremis, although cranking in chain with a winch handle will be slow and tedious work. our ground tackle is not too heavy for me to retrieve hand-over-hand (though i’d really rather not), and given enough adrenaline i can get it up on deck in no time at all.
the real question was whether to go for foot-operated switches or a handheld re-mote control. i didn’t want any more holes in the deck, and there’s something about foot switches i instinctively distrust. We went for a handheld that i would install in the V-berth and access through the hatch. a remote cockpit switch was also included, and although i was tempted to install it, i’ve held off for the time being.
moduS oPerandia windlass motor is either a permanent-magnet or series-wound type. most small-er units are of the former variety, because at low loading a permanent-magnet motor consumes less power. it will also generate more heat, and as it heats up it will draw more current, even as its power drops. a se-ries-wound motor’s power draw is initially higher, but remains constant as the load varies. both types have equal power to be-gin with, but a series-wound motor gener-
For a video tutorial on this project, go to sailmag.com/video_gallery and click on “boatworks”
more online:
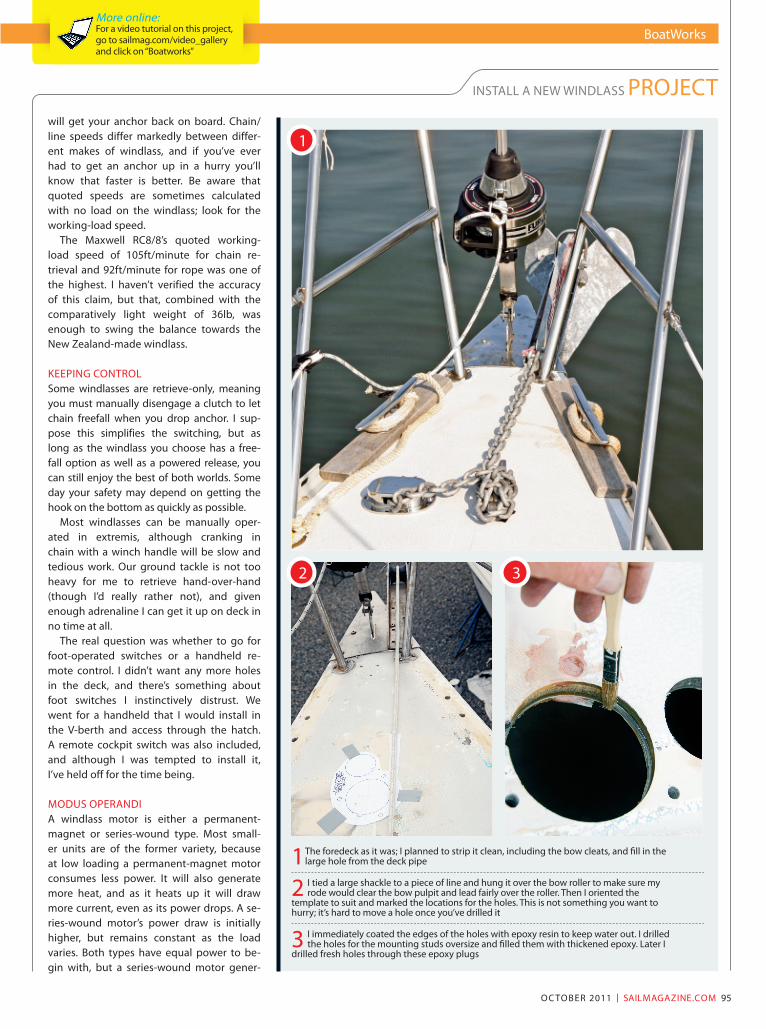
1the foredeck as it was; i planned to strip it clean, including the bow cleats, and fill in the large hole from the deck pipe
2 i tied a large shackle to a piece of line and hung it over the bow roller to make sure my rode would clear the bow pulpit and lead fairly over the roller. then i oriented the
template to suit and marked the locations for the holes. this is not something you want to hurry; it’s hard to move a hole once you’ve drilled it
3 i immediately coated the edges of the holes with epoxy resin to keep water out. i drilled the holes for the mounting studs oversize and filled them with thickened epoxy. later i
drilled fresh holes through these epoxy plugs
1
2 3
96 Sailmagazine.com | october 2011
ates more torque, is less likely to overheat, and is generally more robust.
a permanent-magnet motor has two ca-ble connections; to reverse the motor the polarity of the terminals is reversed. a se-ries-wound motor has three connections, two positive and one negative. the motor’s direction depends on which positive cable is engaged. either type of motor is usually
controlled via a switch that activates a so-lenoid, which either changes polarity (per-manent-magnet) or directs current to one or other of the positive cables running to the motor (series-wound).
there are various other permutations, some of which involve high current passing through the switching gear rather than a solenoid. Some windlasses are one-way—
that is, they only haul in ground tackle. to me, a windlass controlled by a low-current switch and a two-way solenoid that han-dles the high current—up to several hun-dred amps—makes more sense. Push a but-ton to lower your anchor, another to raise it; what could be simpler? cableS and connectionScable size is critical when you’re working with current-hungry electric motors that can suck up 100 amps or more. at issue is voltage drop, power loss in long runs of ca-ble. the smaller the cable, the greater the voltage drop, and a motor can be damaged if it tries to draw more power than a cable can supply. undersized cables can overheat and possibly burst into flame.
to calculate voltage drop (no more than 10 percent, according to maxwell) you first must measure the length of the cable run and double it—it is the there-and-back measurement that’s critical. then find out the current rating of the motor—the rc8/8’s is 83 amps. after that you can use an online calculator that lets you enter all your pa-rameters and then spits out a recommend-ed wire size. blue Sea Systems has a good one (beta.circuitwizard.bluesea.com).
i cheated and used the cable-sizing table in the maxwell installation manual, which informed me that for the 46ft round trip from my battery to the windlass motor, 4 aWg cable would be sufficient. When you’re paying several dollars a foot for bat-tery cable, it behooves you to make your measurements carefully. i had a few yards of 2 aWg stashed in the garage, so used that for the longer runs.
of course, i could have installed a dedicat-ed windlass battery in the bow and thereby gone down a size in cable, but i could not see the point. either way, i’d have had to snake cables through the boat, and the hassle was the same no matter the size of the wire.
attack!With the new windlass sitting in a box in the garage and the boat still ashore, it was
boatWorks
Project inStall a neW WindlaSS
illu
Stra
tio
nS
by a
laSt
air
ga
rro
d
reSourceSgoiot, plastimousa.com
ideal Windlass, idealwindlass.com
imtra (lofrans and muir), imtra.com
lewmar, lewmar.com
lighthouse manufacturing, lighthouse-mfg-usa.com
Quick S.p.a., quickitaly.com
r.c. Plath, rcplathco.com
Vetus america (maxwell), vetus.com
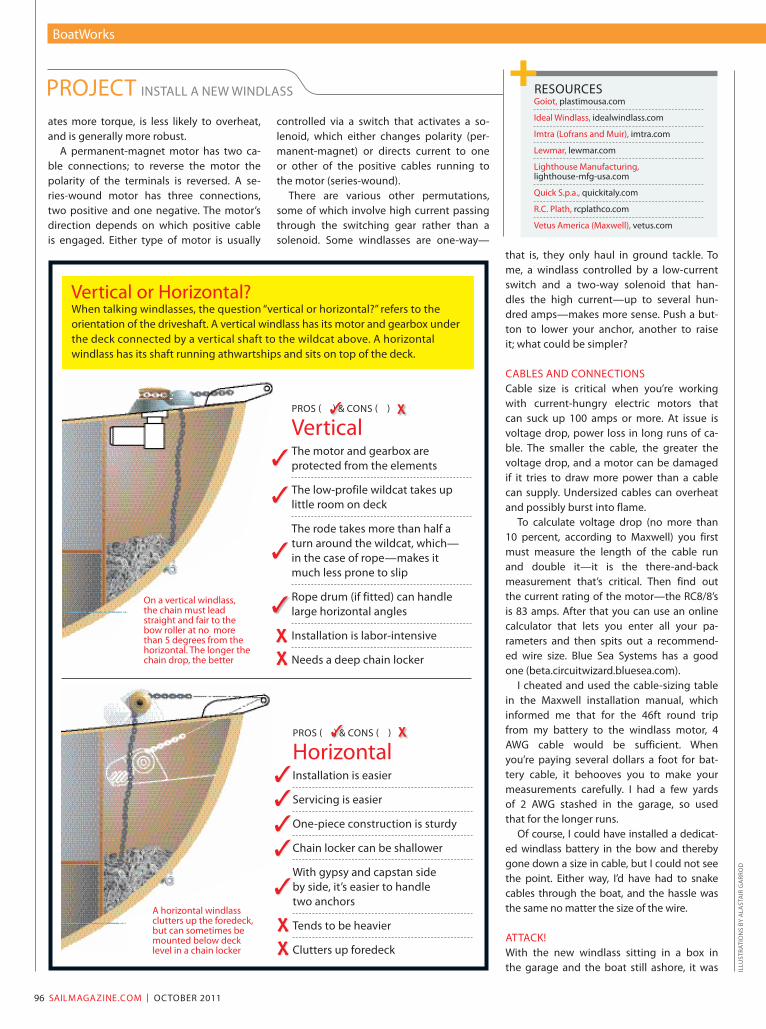
Vertical or horizontal?When talking windlasses, the question “vertical or horizontal?” refers to the orientation of the driveshaft. a vertical windlass has its motor and gearbox under the deck connected by a vertical shaft to the wildcat above. a horizontal windlass has its shaft running athwartships and sits on top of the deck.
ProS ( ) & conS ( )
horizontalinstallation is easier
Servicing is easier
one-piece construction is sturdy
chain locker can be shallower
With gypsy and capstan side by side, it’s easier to handle two anchors
tends to be heavier
clutters up foredeck
ProS ( ) & conS ( )
Vertical the motor and gearbox are protected from the elements
the low-profile wildcat takes up little room on deck
the rode takes more than half a turn around the wildcat, which—in the case of rope—makes it much less prone to slip
rope drum (if fitted) can handle large horizontal angles
installation is labor-intensive
needs a deep chain locker
on a vertical windlass, the chain must lead straight and fair to the bow roller at no more than 5 degrees from the horizontal. the longer the chain drop, the better
a horizontal windlass clutters up the foredeck, but can sometimes be mounted below deck level in a chain locker
oc tober 2011 | Sailmagazine.com 97
boatWorks
inStall a neW WindlaSS Project
time to act. i ordered the cable and rele-vant terminals from an online supplier, then purchased a terrifyingly large hole saw to make what i not-so-laughingly called the cut of no return.
that aside, it all looked simple enough. basically, all the installation involved was running cables through the boat,
connecting lugs to the cables and cables to the proper terminals, and making sure the windlass wildcat was oriented cor-rectly and was secured with a suitably large backing plate to help distribute the loads. i took my time, double-checked ev-erything before pressing the hole saw into service, and set to.
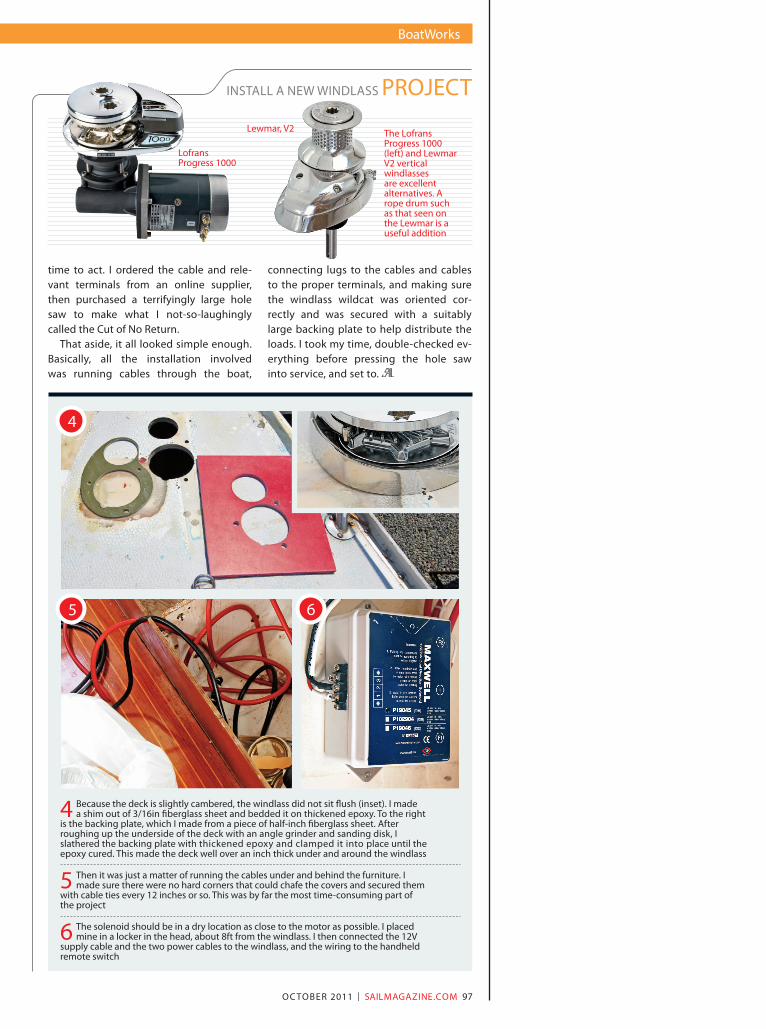
4 because the deck is slightly cambered, the windlass did not sit flush (inset). i made a shim out of 3/16in fiberglass sheet and bedded it on thickened epoxy. to the right
is the backing plate, which i made from a piece of half-inch fiberglass sheet. after roughing up the underside of the deck with an angle grinder and sanding disk, i slathered the backing plate with thickened epoxy and clamped it into place until the epoxy cured. this made the deck well over an inch thick under and around the windlass
5 then it was just a matter of running the cables under and behind the furniture. i made sure there were no hard corners that could chafe the covers and secured them
with cable ties every 12 inches or so. this was by far the most time-consuming part of the project
6 the solenoid should be in a dry location as close to the motor as possible. i placed mine in a locker in the head, about 8ft from the windlass. i then connected the 12V
supply cable and the two power cables to the windlass, and the wiring to the handheld remote switch
4
5 6
lofrans Progress 1000
lewmar, V2 the lofrans Progress 1000 (left) and lewmar V2 vertical windlasses are excellent alternatives. a rope drum such as that seen on the lewmar is a useful addition

98 Sailmagazine.com | october 2011
boatWorks
Project inStall a neW WindlaSS
8 9 7
7 the foredeck has been painted and the cleats and the collar for our removable sprit have been re-installed. now we’re ready to install the windlass. i used the
gasket supplied with the windlass, with a smear of caulk on either side
8 a view from underneath shows the windlass in place and bolted securely to the backing plate
9 i’ve bolted the power cables and the negative cable to the clearly marked terminals on the motor. the small black wire is the negative from the remote
handheld switch

october 2011 | Sailmagazine.com 99
boatWorks
inStall a neW WindlaSS Project
10 11
10 now i had to insert myself upside down into the anchor locker, lift the 25lb motor and gearbox over my head with
one hand, slide it onto the shaft, and tighten up the collar to hold it in place. amazingly, i managed it first time!
11 and we’re all done! all that remains is to see if it works… For a full step-by-step, go to sailmag.com/boatworks