Project Build A Solar Panel
14
http://www.virtualsecrets.com/build-a-solar-panel.html Project "Build A Solar Panel" Purpose The purpose of this project is to demonstrate how to build a solar panel from individual components (not to mention that I was curious). With the correct components, the cost of constructing a solar panel with longevity against environmental degredation can cost up to 30% less than commercial solar panels of the same Watt rating (not to mention that what you create, based on your assessment of the environment a solar panel would be used in, could actually be more resiliant than a "cookie cutter" manufactured solar panel). Introduction A solar cell's purpose is to generate electricity through the release of electrons from a material that is bombarded by electromagnetic radiation or photons. Most crystalline solar cells are sensitive to visible radiation from 400 - 700 nanometers, which correspond to 3.1 - 1.8 electron volts, of the visible region as shown by ACEPT W3 Group (1999) and also into the near infrared spectrum. As the wavelength of the electromagnetic radiation increases, the amount of electron volts decreases. This means that infrared radiation has less electron volts than the visible spectrum of light (because it has a larger wavelength than visible light) and ultraviolet and gamma radiation has more electron volts than both the visible spectrum of light and infrared radiation (because they have a smaller wavelength than both infrared and visible light). Abramowitz, M., Davidson, M., Neaves, S. (2003) wrote that all forms of electromagnetic radiation originate from the atom which contain orbiting electrons around its nucleus. When those electrons absorb more external energy than they can contain in order to be stable, the extra energy is released in the form of an electromagnetic wave. That electromagnetic wave contains a magnetic field and an electric field, one offset by ninety degrees to the other along the propagation plane. Noted by Seale, E. (2003) the first silicon solar cell was developed by Russel Ohl in 1941, was similar to a photodiode with a large light-sensitive area. Aldous, S. (2007) wrote that pure silicon, the main component of silicon solar cells, is a poor conductor of electricity in itself. In fact, the silicon atom is missing four electrons in its outer shell. A phosphorous atom, on the other hand, contains five electrons in its outer shell meaning that it can bond with silicon atoms and since it has an extra electron which can be displaced by electromagnetic radiation, energy is created in the process. However, capturing this energy is not possible without creating an electric field. This is done by introducing impurities in the silicon material. As previously mentioned, silicon mixed with phosphorous creates an N-Type semiconductor; N-Type or negative because the phosphorous contains free electrons. Silicon mixed with boron atoms (which contain only three electrons in its outer shell) represents an absence of electrons and becomes the P-Type semiconductor; P-Type or positive. At the plane of where the N-Type and P-Type are joined is where the electric field is generated and the solar cell reaches electrical neutrality. The introduction of photons (electromagnetic radiation) on the N-Type semiconductor (silicon and phosphorous) frees electrons that try to travel to the P-Type semiconductor (silicon and boron) where the photon would remove an electron. The presence of the magnetic field between the two
Transcript of Project Build A Solar Panel
http://www.virtualsecrets.com/build-a-solar-panel.html
Project "Build A Solar Panel"
Purpose
The purpose of this project is to demonstrate how to build a solar panel from individual
components (not to mention that I was curious). With the correct components, the cost of
constructing a solar panel with longevity against environmental degredation can cost up to 30%
less than commercial solar panels of the same Watt rating (not to mention that what you create,
based on your assessment of the environment a solar panel would be used in, could actually be
more resiliant than a "cookie cutter" manufactured solar panel).
Introduction
A solar cell's purpose is to generate electricity through the release of electrons from a material
that is bombarded by electromagnetic radiation or photons. Most crystalline solar cells are
sensitive to visible radiation from 400 - 700 nanometers, which correspond to 3.1 - 1.8 electron
volts, of the visible region as shown by ACEPT W3 Group (1999) and also into the near infrared
spectrum. As the wavelength of the electromagnetic radiation increases, the amount of electron
volts decreases. This means that infrared radiation has less electron volts than the visible
spectrum of light (because it has a larger wavelength than visible light) and ultraviolet and
gamma radiation has more electron volts than both the visible spectrum of light and infrared
radiation (because they have a smaller wavelength than both infrared and visible light).
Abramowitz, M., Davidson, M., Neaves, S. (2003) wrote that all forms of electromagnetic
radiation originate from the atom which contain orbiting electrons around its nucleus. When
those electrons absorb more external energy than they can contain in order to be stable, the extra
energy is released in the form of an electromagnetic wave. That electromagnetic wave contains a
magnetic field and an electric field, one offset by ninety degrees to the other along the
propagation plane.
Noted by Seale, E. (2003) the first silicon solar cell was developed by Russel Ohl in 1941, was
similar to a photodiode with a large light-sensitive area. Aldous, S. (2007) wrote that pure
silicon, the main component of silicon solar cells, is a poor conductor of electricity in itself. In
fact, the silicon atom is missing four electrons in its outer shell. A phosphorous atom, on the
other hand, contains five electrons in its outer shell meaning that it can bond with silicon atoms
and since it has an extra electron which can be displaced by electromagnetic radiation, energy is
created in the process. However, capturing this energy is not possible without creating an electric
field. This is done by introducing impurities in the silicon material. As previously mentioned,
silicon mixed with phosphorous creates an N-Type semiconductor; N-Type or negative because
the phosphorous contains free electrons. Silicon mixed with boron atoms (which contain only
three electrons in its outer shell) represents an absence of electrons and becomes the P-Type
semiconductor; P-Type or positive. At the plane of where the N-Type and P-Type are joined is
where the electric field is generated and the solar cell reaches electrical neutrality. The
introduction of photons (electromagnetic radiation) on the N-Type semiconductor (silicon and
phosphorous) frees electrons that try to travel to the P-Type semiconductor (silicon and boron)
where the photon would remove an electron. The presence of the magnetic field between the two

http://www.virtualsecrets.com/build-a-solar-panel.html
layers prevents this travel from occurring to a degree directly from the N-Type semiconductor to
the P-Type semiconductor. This means that when we connect a load to the P and N
semiconductors, we observe current (from electron flow) and voltage (from the magnetic field)
as the free electrons move from one semiconductor to the other through the load.
Significance of Solar Panels
A solar cell, in itself, is of little value in our energy consumptive world. Only when solar cells
are joined together into arrays or panels do we commonly see their true benefit in delivering
mass volumes of energy. Depending on what requires power determines the number of solar
panels required. For instance, if you were interested in powering your entire house you would
undoubtedly need a lot of solar panels; there is an online calculator that you can use to get an
idea of how many solar panels and other components you may need, which you can find at the
solar panel battery calculator page.
Now that we know how a solar cell is made, let's see how a solar panel is made since a panel is
made from a collection of solar cells. In this example, the following items will be used:
Quan
tity
Item
1 48 x 48 x 1/8 inch Acrylite UV stabilized transparent sheet; this is used in place of the
glass top sheet
(http://www.usplastic.com/catalog/variant.asp?catalog_name=usplastic&category_name=
21314&product_id=10477&variant_id=44308). Lexan could also be used.
1 48 x 48 x 3/16 inch ABS white sheet
(http://www.interstateplastics.com/detail.aspx?ID=ABSsheetGP-SW1018)
4 72 x 1/4 x 1/4 inch clear extruded acrylic bar
(http://www1.mscdirect.com/CGI/GSDRVSM?PACACHE=000000076797329)
1 Adhesive glue (http://www.vandykes.com/product/sb110008/gorilla-glue-4-ounce)
1 Silicone sealant/adhesive
(http://www.liquidnails.com/products/product.jsp?productId=48)
2 Eight ounce Rosin core solder
(http://www.radioshack.com/product/index.jsp?productId=2062713)
1 ERC81S-004 40V, 5A Schottky Barrier Diode
(http://www.fujisemi.com/html/table/91500/91502.htm)
5 .060 x .002 inch by 25 feet solar cell PV tinned interconnection ribbon
(http://windandsunpower.com/store/index.php?main_page=product_info&products_id=6)
36 Monocrystalline 6 inch (156mm) solar cell rated at .5VDC, 6 Amp Peak. You can get new
156mm solar cells in bulk from http://www.dmsolar.com; however, if you are interested in
a set of 36 smaller solar cells, you can get a set from
http://www.solarblvd.com/product_info.php?info=p1343_Polycrystaline-Solar-Cells-36-
Pieces-0-55-V--4-2A.html. You could also try to locate solar cells from a seller at
http://www.ebay.com or http://www.ecrater.com.
1 Four position dual row barrier strip
(http://www.radioshack.com/product/index.jsp?productId=2103982)
1 Sixteen #8 insulated ring tongue terminals
(http://www.radioshack.com/product/index.jsp?productId=2103306)
http://www.virtualsecrets.com/build-a-solar-panel.html
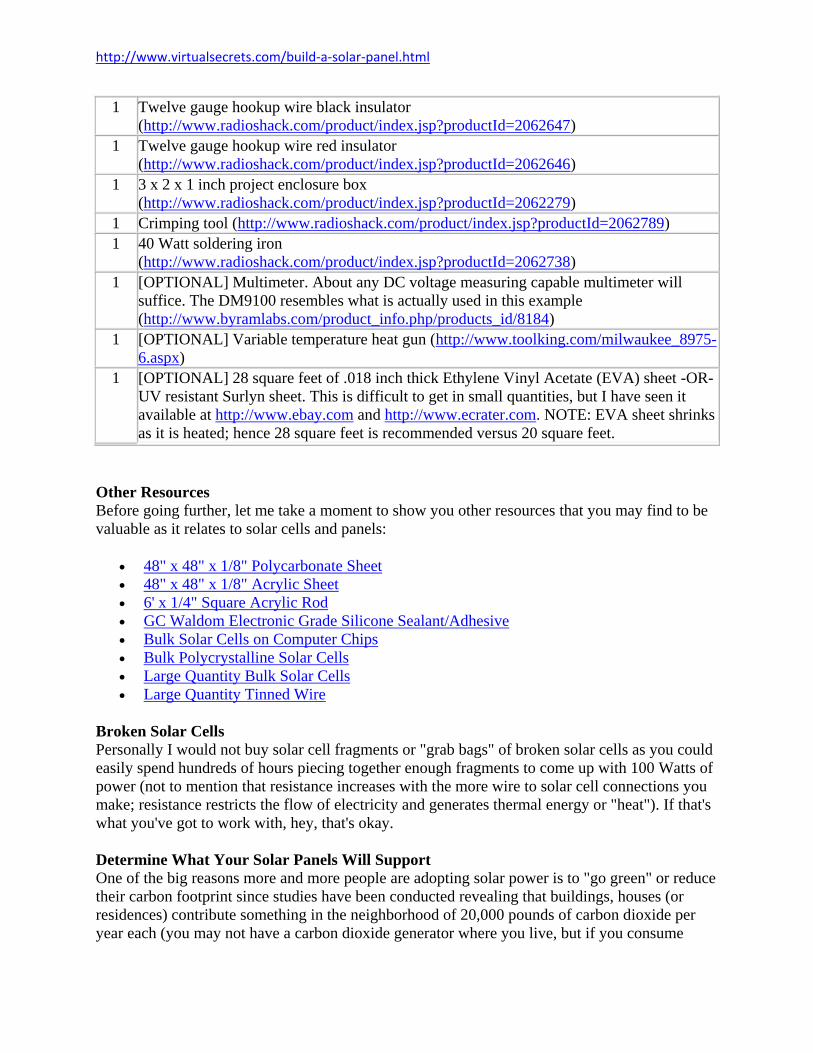
1 Twelve gauge hookup wire black insulator
(http://www.radioshack.com/product/index.jsp?productId=2062647)
1 Twelve gauge hookup wire red insulator
(http://www.radioshack.com/product/index.jsp?productId=2062646)
1 3 x 2 x 1 inch project enclosure box
(http://www.radioshack.com/product/index.jsp?productId=2062279)
1 Crimping tool (http://www.radioshack.com/product/index.jsp?productId=2062789)
1 40 Watt soldering iron
(http://www.radioshack.com/product/index.jsp?productId=2062738)
1 [OPTIONAL] Multimeter. About any DC voltage measuring capable multimeter will
suffice. The DM9100 resembles what is actually used in this example
(http://www.byramlabs.com/product_info.php/products_id/8184)
1 [OPTIONAL] Variable temperature heat gun (http://www.toolking.com/milwaukee_8975-
6.aspx)
1 [OPTIONAL] 28 square feet of .018 inch thick Ethylene Vinyl Acetate (EVA) sheet -OR-
UV resistant Surlyn sheet. This is difficult to get in small quantities, but I have seen it
available at http://www.ebay.com and http://www.ecrater.com. NOTE: EVA sheet shrinks
as it is heated; hence 28 square feet is recommended versus 20 square feet.
Other Resources
Before going further, let me take a moment to show you other resources that you may find to be
valuable as it relates to solar cells and panels:
48" x 48" x 1/8" Polycarbonate Sheet
48" x 48" x 1/8" Acrylic Sheet
6' x 1/4" Square Acrylic Rod
GC Waldom Electronic Grade Silicone Sealant/Adhesive
Bulk Solar Cells on Computer Chips
Bulk Polycrystalline Solar Cells
Large Quantity Bulk Solar Cells
Large Quantity Tinned Wire
Broken Solar Cells
Personally I would not buy solar cell fragments or "grab bags" of broken solar cells as you could
easily spend hundreds of hours piecing together enough fragments to come up with 100 Watts of
power (not to mention that resistance increases with the more wire to solar cell connections you
make; resistance restricts the flow of electricity and generates thermal energy or "heat"). If that's
what you've got to work with, hey, that's okay.
Determine What Your Solar Panels Will Support
One of the big reasons more and more people are adopting solar power is to "go green" or reduce
their carbon footprint since studies have been conducted revealing that buildings, houses (or
residences) contribute something in the neighborhood of 20,000 pounds of carbon dioxide per
year each (you may not have a carbon dioxide generator where you live, but if you consume
http://www.virtualsecrets.com/build-a-solar-panel.html
electricity, natural gas, water, sewer service and so on then those "services" create carbon
dioxide as a byproduct of what you are consuming). Others may be adopting solar power because
they have no choice (maybe you live on an island, for instance, where there is no power).
Regardless of the reason for getting or making your own solar panels, determine what they will
be used for. If you want to provide power for an electric fence, you may only need one 100 Watt
solar panel so your investment will be quite low. On the other hand, if you are trying to power
your residence with solar panels, you will need more than 100 Watts. What I have found is that
for a 1000 square foot residence, you would need roughly eight 100 Watt solar panels per person
(this judgement is by no means scientific but a starting ballpark number to look into). To get a
more precise reading on the amount of solar panels you would need, use this solar power
calculator. Here's a quick glimpse of what to expect, in terms of power needs, if you use 350kwh
of power in a month...you'll need 2700 Watts of power (27 - 100 Watt solar panels) and roughly
16 - 12VDC, 100Ah deep cycle batteries (batteries incase you plan to use electricity when the
sun is not shining).
As you can see, defining the purpose of the solar panels and doing a little research may help a lot
in getting an approximation of what it will cost. But, going back to the purpose of this project (to
create a solar panel from component parts) can shave upwards of 30% of the cost of the solar
panels. But, be ready to put in some work to create a solar panel. It does take time (90% of that
time spent soldering like there is no tomorrow). It took me about 12 hours to tin wire, solder that
to the solar cells, and then solder the solar cells together...for a single 100 Watt solar panel.
Let's Make A Solar Panel
The type of solar cell that I will be using for this guide is the blemished (or class 'b') six inch
diameter, Siemen's (now Shell) PowerMax monocrystalline solar cell...you can get class 'a' cells
but they are more expensive. A perfect operating solar cell (class 'a') will normally generate a
maximum of approximately .55 VDC, 5.6 Amps and 3 Watts of power (a watt is calculated by
multiplying voltage and amperage together). Just as a side note, one horsepower is equal to just
over 700 Watts.
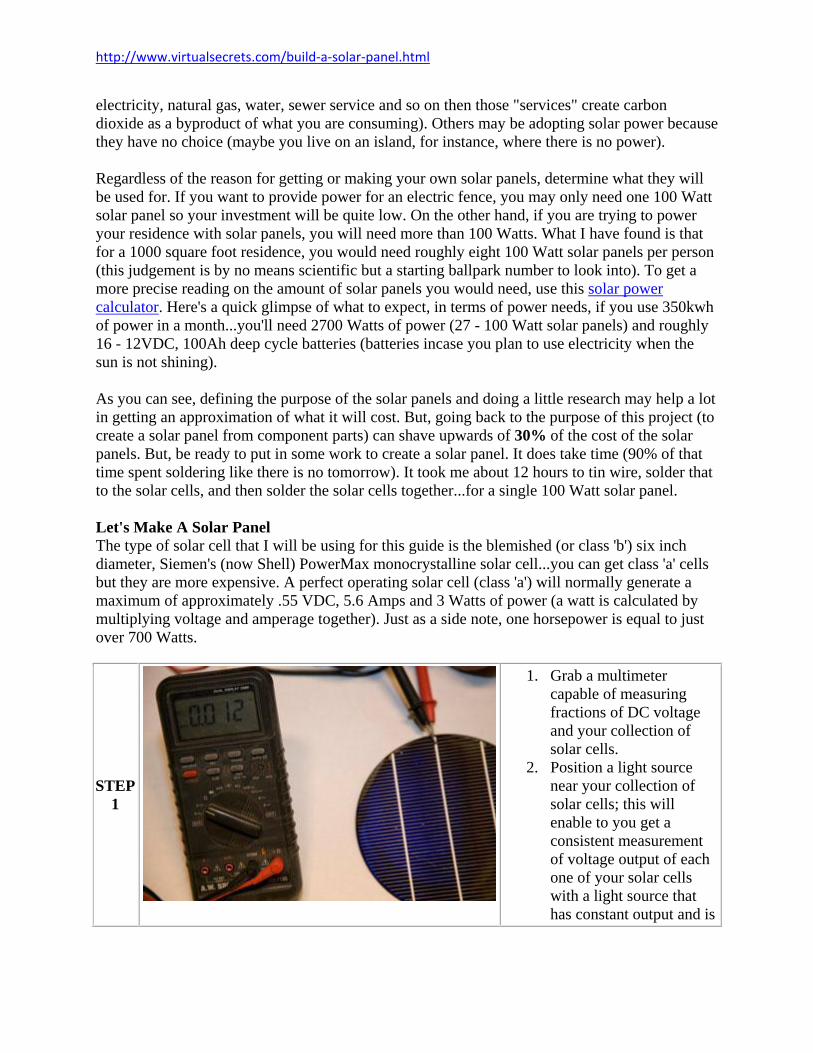
STEP
1
1. Grab a multimeter
capable of measuring
fractions of DC voltage
and your collection of
solar cells.
2. Position a light source
near your collection of
solar cells; this will
enable to you get a
consistent measurement
of voltage output of each
one of your solar cells
with a light source that
has constant output and is

http://www.virtualsecrets.com/build-a-solar-panel.html
a fixed distance away.
STEP
2
1. Set the multimeter to
measure DC voltage.
2. Place the negative test
lead (usually black) on
the side of the solar cell
which indicates negative
voltage (usually the
front).
3. Place the positive test
lead (usually red) on the
side of the solar cell
which indicates positive
voltage (usually the
back).
4. Observe what the
maximum voltage output
is. Don't move the solar
cell around to try to get a
higher reading since you
will be grouping the solar
cells together according
to how much voltage they
generate at the same
position from your light
source.
5. Separate your solar cells
into groupings of .05 volt
increments as you are
taking voltage
measurements.
6. This will allow you to
take maximum advantage
of solar cell output by
grouping solar cells
together (each group
would be a solar panel).
For example, if you had
35 solar cells which had
an output of .45 volts and
you had one which had an
output of .35 volts, the
output of your solar panel
will suffer.
http://www.virtualsecrets.com/build-a-solar-panel.html
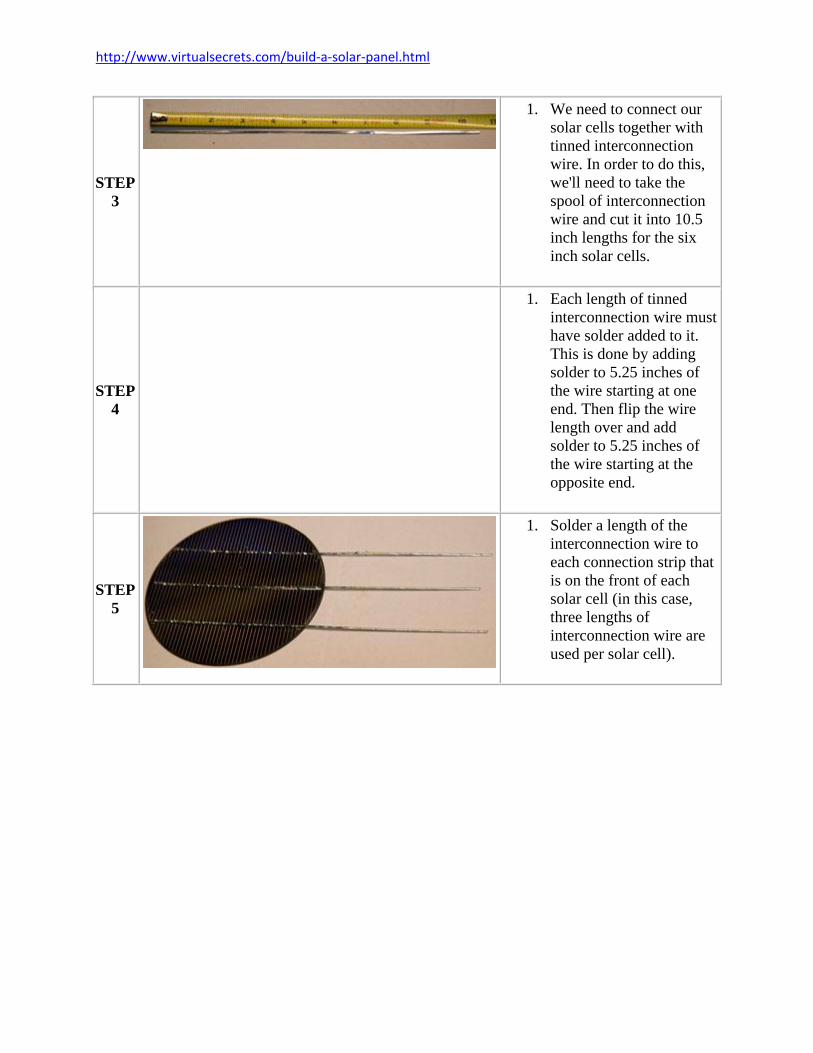
STEP
3
1. We need to connect our
solar cells together with
tinned interconnection
wire. In order to do this,
we'll need to take the
spool of interconnection
wire and cut it into 10.5
inch lengths for the six
inch solar cells.
STEP
4
1. Each length of tinned
interconnection wire must
have solder added to it.
This is done by adding
solder to 5.25 inches of
the wire starting at one
end. Then flip the wire
length over and add
solder to 5.25 inches of
the wire starting at the
opposite end.
STEP
5
1. Solder a length of the
interconnection wire to
each connection strip that
is on the front of each
solar cell (in this case,
three lengths of
interconnection wire are
used per solar cell).
http://www.virtualsecrets.com/build-a-solar-panel.html
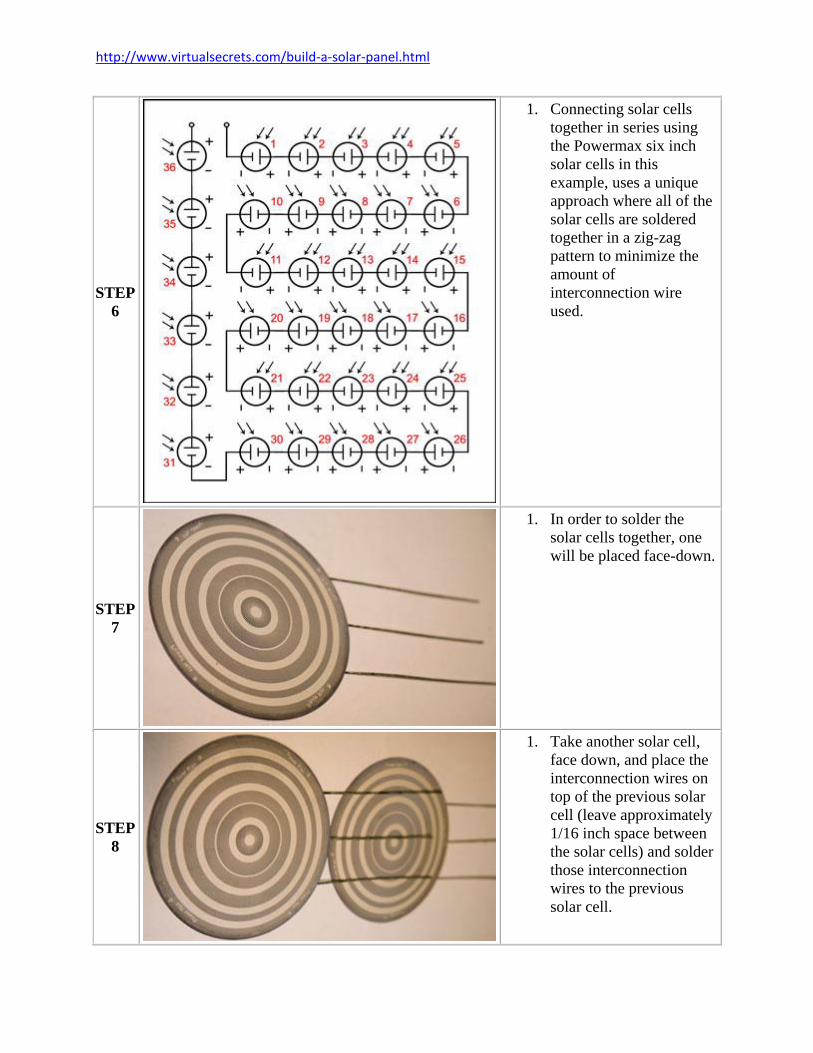
STEP
6
1. Connecting solar cells
together in series using
the Powermax six inch
solar cells in this
example, uses a unique
approach where all of the
solar cells are soldered
together in a zig-zag
pattern to minimize the
amount of
interconnection wire
used.
STEP
7
1. In order to solder the
solar cells together, one
will be placed face-down.
STEP
8
1. Take another solar cell,
face down, and place the
interconnection wires on
top of the previous solar
cell (leave approximately
1/16 inch space between
the solar cells) and solder
those interconnection
wires to the previous
solar cell.
http://www.virtualsecrets.com/build-a-solar-panel.html
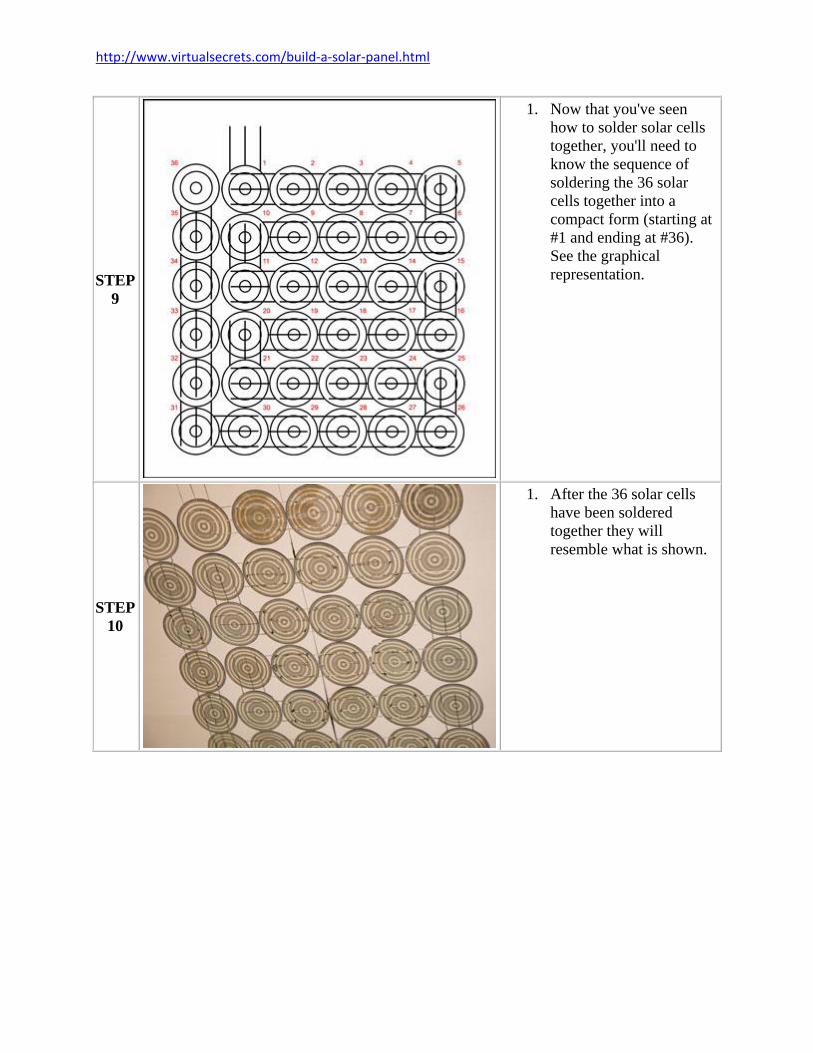
STEP
9
1. Now that you've seen
how to solder solar cells
together, you'll need to
know the sequence of
soldering the 36 solar
cells together into a
compact form (starting at
#1 and ending at #36).
See the graphical
representation.
STEP
10
1. After the 36 solar cells
have been soldered
together they will
resemble what is shown.
http://www.virtualsecrets.com/build-a-solar-panel.html
STEP
11
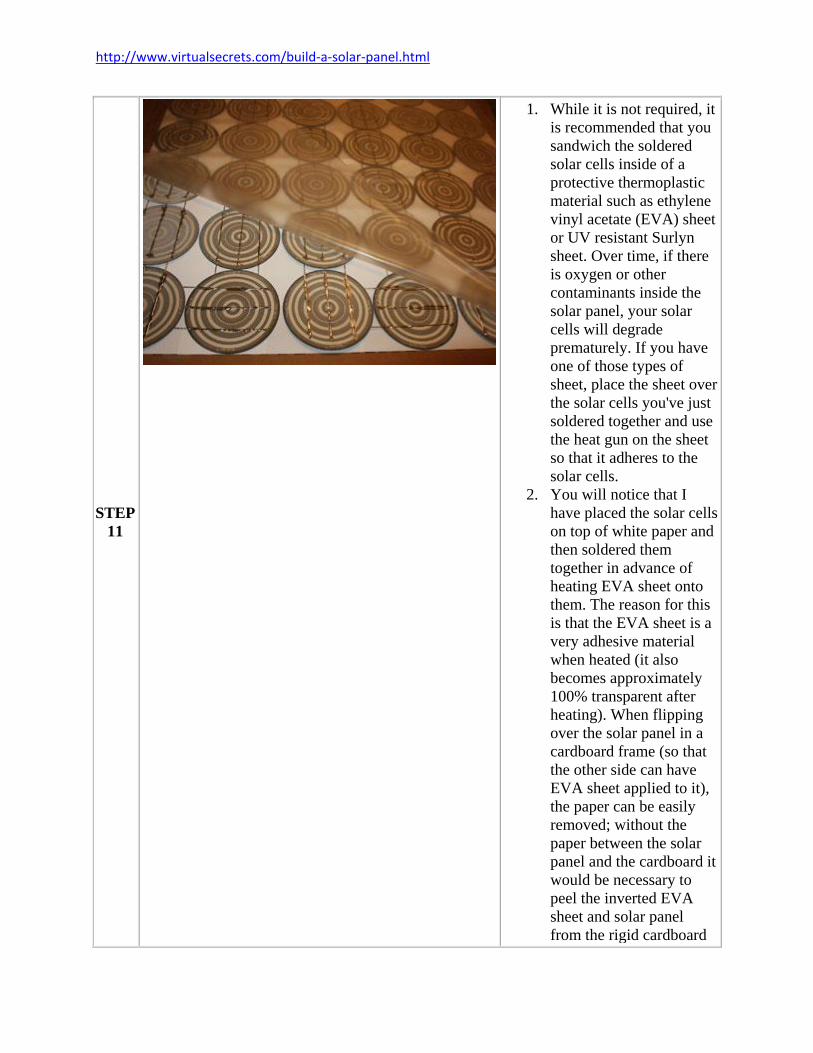
1. While it is not required, it
is recommended that you
sandwich the soldered
solar cells inside of a
protective thermoplastic
material such as ethylene
vinyl acetate (EVA) sheet
or UV resistant Surlyn
sheet. Over time, if there
is oxygen or other
contaminants inside the
solar panel, your solar
cells will degrade
prematurely. If you have
one of those types of
sheet, place the sheet over
the solar cells you've just
soldered together and use
the heat gun on the sheet
so that it adheres to the
solar cells.
2. You will notice that I
have placed the solar cells
on top of white paper and
then soldered them
together in advance of
heating EVA sheet onto
them. The reason for this
is that the EVA sheet is a
very adhesive material
when heated (it also
becomes approximately
100% transparent after
heating). When flipping
over the solar panel in a
cardboard frame (so that
the other side can have
EVA sheet applied to it),
the paper can be easily
removed; without the
paper between the solar
panel and the cardboard it
would be necessary to
peel the inverted EVA
sheet and solar panel
from the rigid cardboard
http://www.virtualsecrets.com/build-a-solar-panel.html
causing damage to
individual solar cells.
3. You will want to overcut
the sheet since it will
shrink as it is heated.
STEP
12
1. Carefully turn the sheet
of solar cells over, place
the sheet over the top of
the solar cells and use the
heat gun on the sheet so
that it adheres to the solar
cells and the sheet.
STEP
13
1. Take the 48 x 48 x 3/16
inch ABS white sheet
and, using a cutting tool,
cut it down to a 38 5/16 x
38 5/16 x 3/16 inch sheet.
Then drill a 5/16 inch
hole through the sheet six
inches from the right-top
edge and one inch down
from the right-top edge.
STEP
14
1. Place the 36 solar cells,
which were soldered
together, face up onto the
ABS white sheet and
center them on the sheet.
Cut off excess EVA or
Surlyn sheet (if you
applied it to the solar
cells) so that it is
approximately an inch
less on each side than the
size of the ABS white
sheet.
STEP
15
1. Solder approximately 3
inches of the color-coded
wire to the appropriate
positive and negative
interconnection wire on
the #1 and #36 solar cells.

http://www.virtualsecrets.com/build-a-solar-panel.html
Push the other end of the
wires through the 5/16
inch drilled hole.
STEP
16
1. Cut two 72 x 1/4 x 1/4
inch clear extruded
acrylic bars to a length of
38.3125 inch. Cut the
remaining two 72 x 1/4 x
1/4 inch clear extruded
acrylic bars to a length of
37.8125 inch.
STEP
17
1. Glue one 38.3125 inch
clear extruded acrylic bar
to the top of the ABS
white sheet, lining the bar
up with the edge of the
ABS white sheet. Allow
the glue to dry. Then take
the second 38.3125 inch
clear extruded acrylic bar
to the bottom of the ABS
white sheet, lining the bar
up with the edge of the
ABS white sheet. Allow
the glue to dry.
STEP
18
1. Glue one 37.8125 inch
clear extruded acrylic bar
to the left of the ABS
white sheet, lining the bar
up with the edge of the
ABS white sheet. Allow
the glue to dry. Then take
the second 37.8125 inch
clear extruded acrylic bar
to the right of the ABS
white sheet, lining the bar
up with the edge of the
ABS white sheet. Allow
the glue to dry.
STEP
19
1. Cut the remaining clear
extruded acrylic bar into
http://www.virtualsecrets.com/build-a-solar-panel.html
1 x 1/4 x 1/4 inch blocks.
Glue each block,
centered, in between each
solar cell in an alternating
pattern (this will provide
strength to the solar
panel).
STEP
20
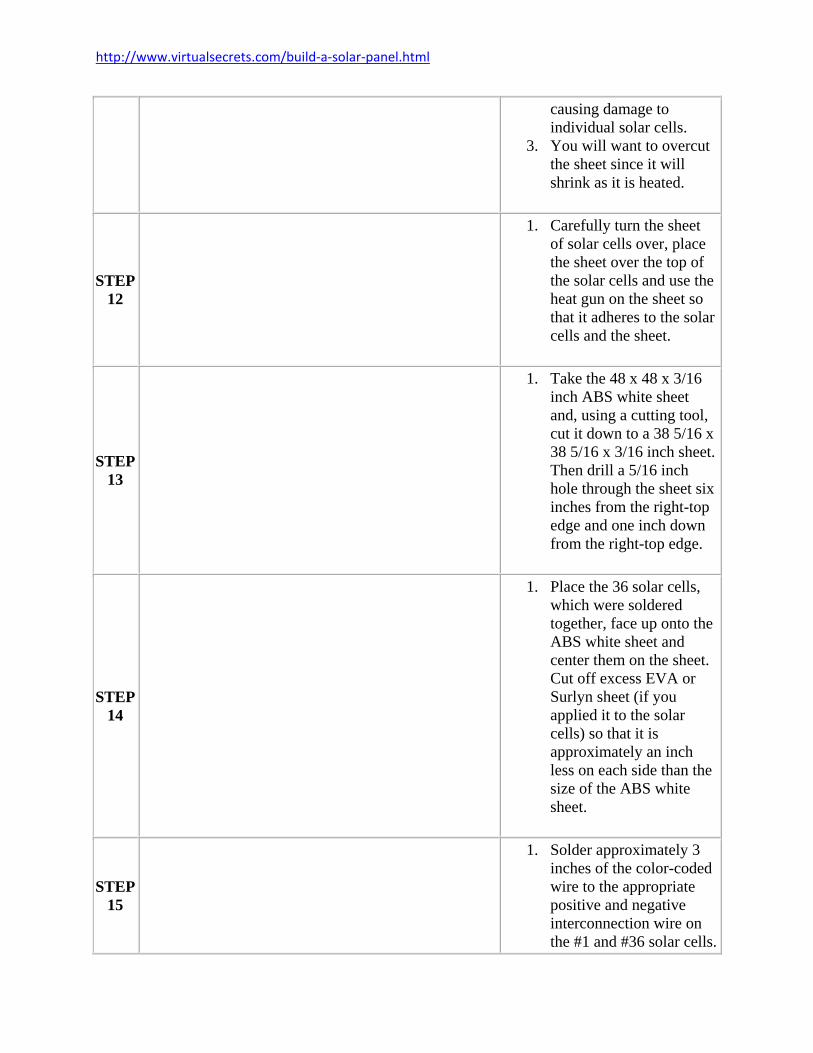
1. Take the 48 x 48 x 1/8
inch Acrylite UV
stabilized transparent
sheet and, using a cutting
tool, cut it down to a 38
5/16 x 38 5/16 x 3/16
inch sheet. Place glue
along the top of the four
acrylic bars which were
glued to the ABS white
sheet. Place glue on top
of each of the 1 x 1/4 x
1/4 inch blocks. Line up
the Acrylite sheet with
the edges of the four
acrylic bars and place it
firmly on top. Allow the
glue to dry.
What's Next
Congratulations, one solar panel has been created! The next section is here in the event that you
want to protect your solar panel from reverse current. Current flowing into a solar panel will
damage the solar cells and make them incapable of generating electricity (this typically can
happen when you have the solar panel connected directly to a battery; if you have a charge
controller, the controller will prevent this from happening). Assuming you don't have a charge
controller, you'll need to add a rectifier diode to one of the wires coming out of your solar panel
to block reverse current. This section will focus on adding the rectifier diode to the back of the
solar panel.
STEP
1
1. Drill one 5/16 inch hole
in the bottom of the 3 x 2
x 1 inch project enclosure
box. Drill another 5/16
inch hole into the side of
the box. Apply glue to the
http://www.virtualsecrets.com/build-a-solar-panel.html
back of the box. Feed the
wire, sticking out of the
back of the solar panel,
through the bottom hole
of the box. Seat the box
firmly onto the back of
the panel and allow to
dry.
STEP
2
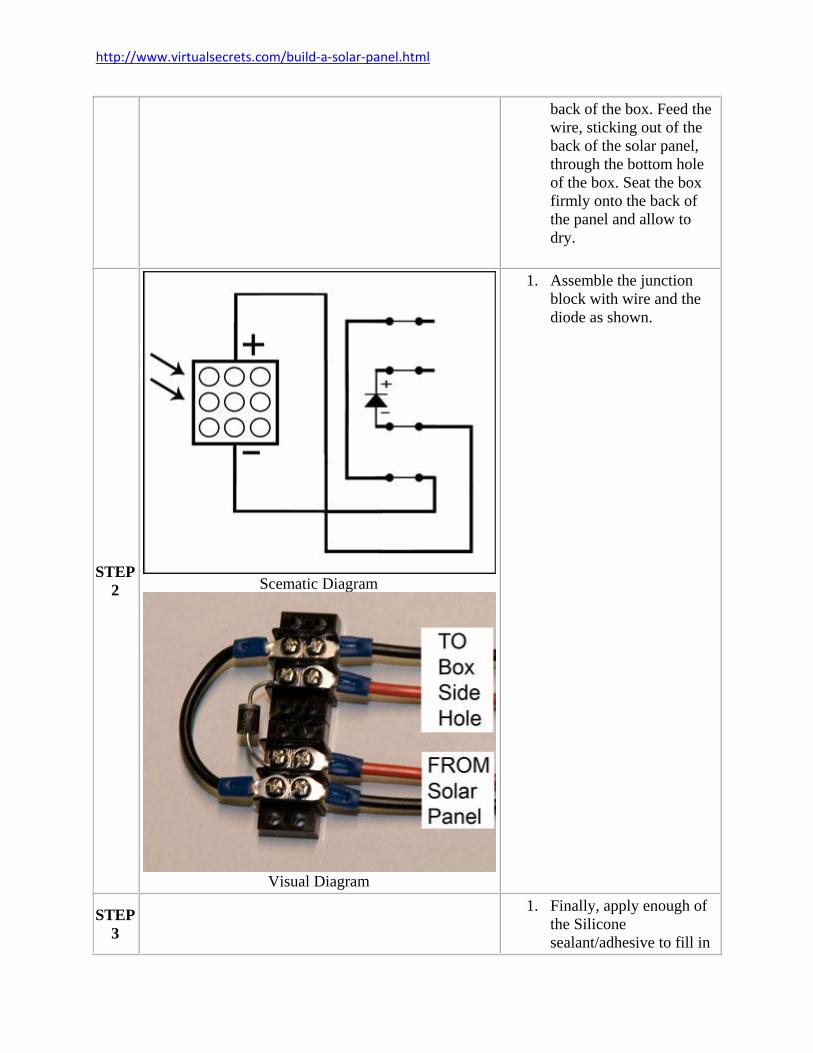
Scematic Diagram
Visual Diagram
1. Assemble the junction
block with wire and the
diode as shown.
STEP
3
1. Finally, apply enough of
the Silicone
sealant/adhesive to fill in
http://www.virtualsecrets.com/build-a-solar-panel.html
the hole in the bottom and
side of the enclosure box.
Allow the
sealant/adhesive to dry.
References
Abramowitz, M., Davidson, M., Neaves, S. (2003). The Frequency and Wavelength of Light.
Retrieved from http://micro.magnet.fsu.edu/optics/lightandcolor/frequency.html.
ACEPT W3 Group (1999). Patterns in Nature: Light and Optics. Retrieved from
http://acept.asu.edu/PiN/rdg/color/color.shtml.
Aldous, S. (2007). How Solar Cells Work. Retrieved from
http://science.howstuffworks.com/solar-cell2.htm.
Seale, E. (2003). Solar Cells. Retrieved from
http://encyclobeamia.solarbotics.net/articles/solar_cell.html.