Project & Portfolio Management Software
84
Project & Portfolio Management Software
Transcript of Project & Portfolio Management Software

Project & Portfolio Management Software

• Roles• How to create and edit a project:
– General details– Resources– Expense Types– Time Types
• How to create/edit a project components– The plan (the list of tasks and the timeline)– The issues
• My Time Card in My Work application• Reports• Usage and customization of the Desktop• Best Practices
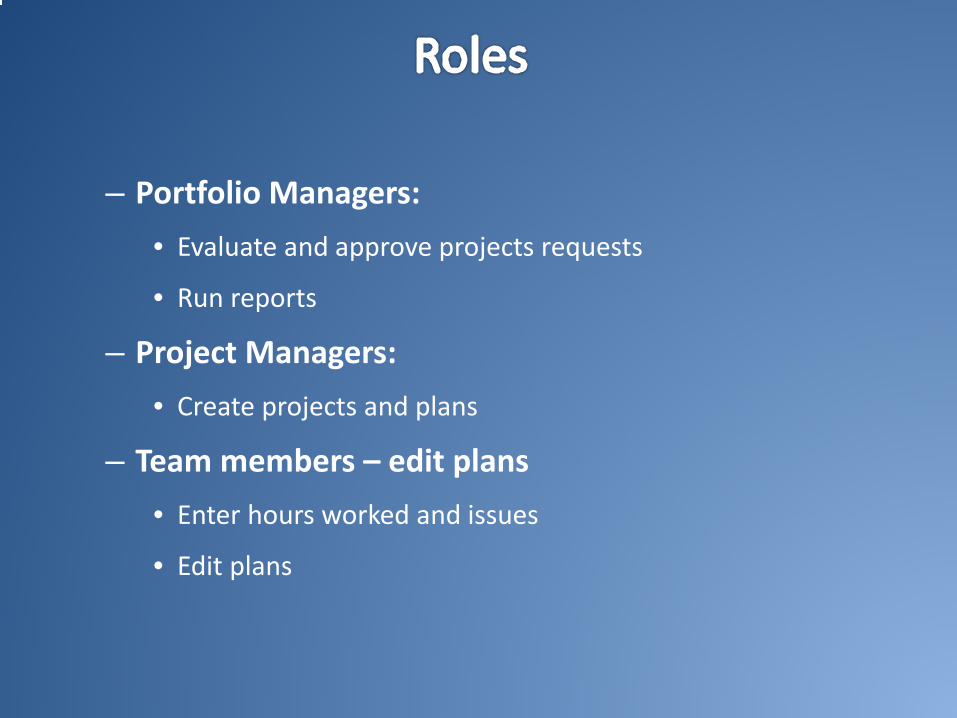
– Portfolio Managers:• Evaluate and approve projects requests
• Run reports
– Project Managers: • Create projects and plans
– Team members – edit plans• Enter hours worked and issues
• Edit plans

https://ppm.mcgill.ca/tdnext/login.aspx
McGill usernameMcGill password
Browsers:
– Internet Explorer 9 and up
– Firefox
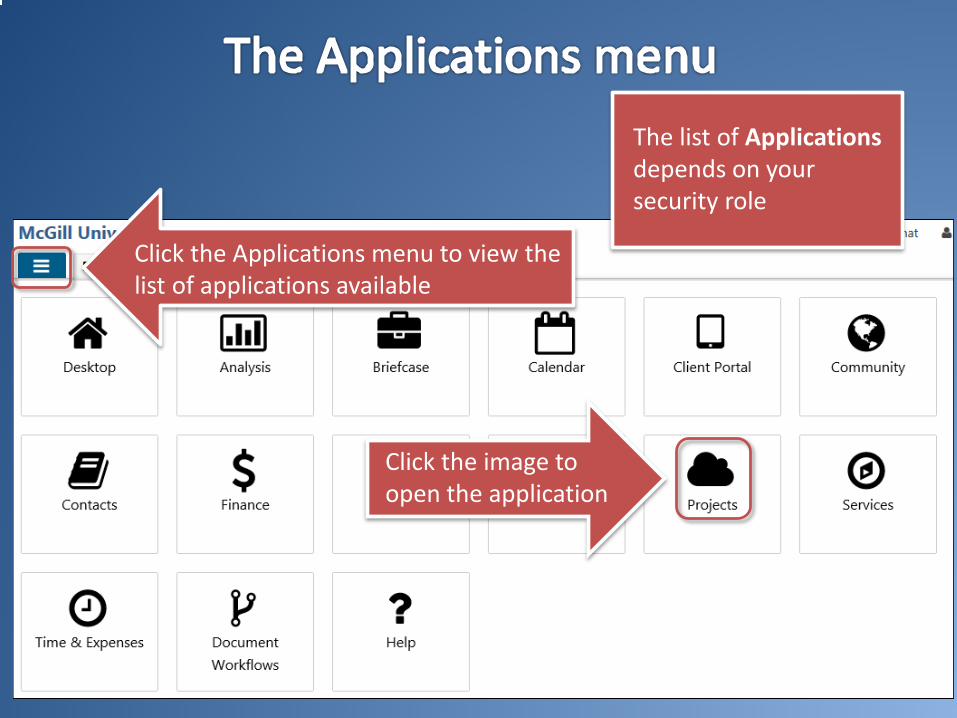
The list of Applicationsdepends on your security role
Click the image to open the application
Click the Applications menu to view the list of applications available


Types of project:
• Evolution: e.g. a new function for an existing application
• Support: ongoing operations (for units that have staff who work on major projects and “keep the lights on” activities)
• Project: Major project with a beginning and an ende.g. implementation of a new application

Resources
• Managed by project:• Resources managed at the project level• If there is no plan• May be used to book resources time
• Managed by plan (recommended)• Resources managed at the plan level• Hours entered in the plan will overwrite
the number of hours at the project level
Project Plan

Click New > Project

Sections of the form

A required field has a red asterisk
Click Save before changing section

Click the arrow to view a description of the field
Click the magnifier icon to search

Information needed for the General section of the project:
• Project Name• Sponsor• Acct/Dept (the client
account)• Type ( e.g. Evolution)• A Start and End Date

Information needed for the General section of the project:
• Project Template: select a plan template (optional)
• Type of Time and Expense Approval (by the project manager is recommended)
• Choose the Resource Management type (By Plan recommended)
• Lead IT Unit ( the project manager’s unit)

Click Add Resources
Click Actions > Add Resources
Add resources:• IT Services people• People added to the list by the
PPM administrator

2. Click Search
1. Type a part of the name
3. Check off the resource
4. Click Next

Save
Send a notification by email to the resource by checking off Notify resources…
Do not change the schedule. It will be updated by the plan

Time Accounts: options of time type when a team member reports his hours
For a project type ‘Project’, the time type ‘Projects – Participation’ should be the only type

To add a time type1. Click a time type2. Click Add
Click Delete to remove a Time type

View the list of projects that you manageEdit a project to:
• Add/Remove Resources• Update the project Health (Status in not in use)
Click the project name to edit the Project details
To change Health, click in the Statuscolumn of the project

1. Click the project name in the left panel
2. Click Manage

Click Update Status
To fill in the form, refer to the document ‘ITS Project Management Guide’ in CenterStage

Click a link to edit the informatione.g. add or remove resources

Actions > Change Manager
Add an alternate Manager or change Manager

• Actions > Deactivate : removes the project from the active project list
• Actions > Close: closes the project if it is completed or cancelled
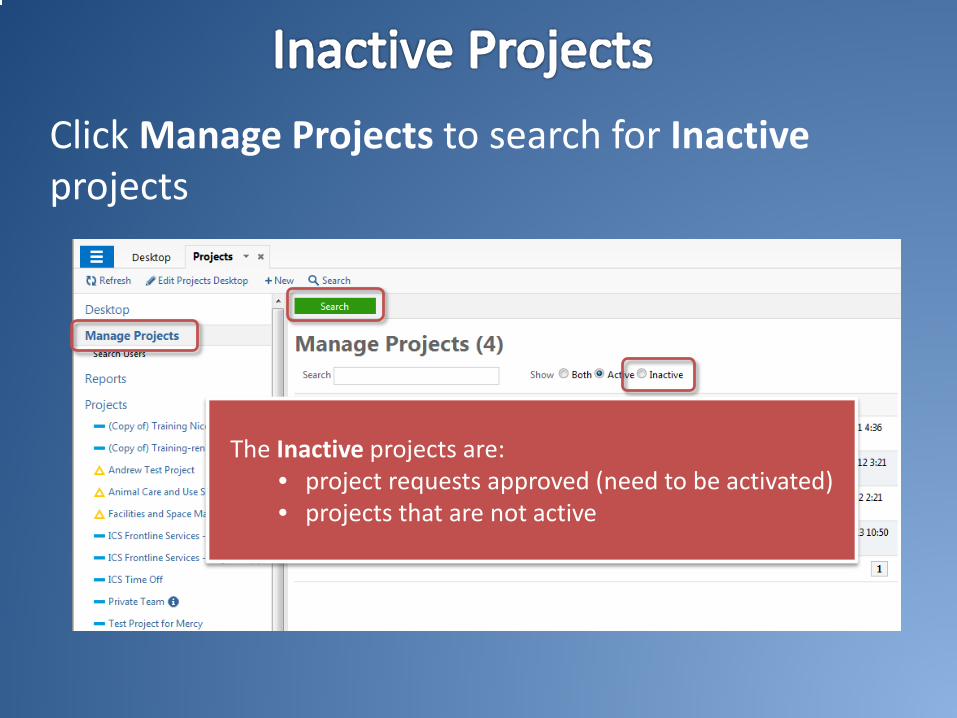
Click Manage Projects to search for Inactiveprojects
The Inactive projects are:• project requests approved (need to be activated)• projects that are not active

Add more resources to your project:
1. Click Manage Projects2. Click the project name3. Click Resources4. Click Actions > Add Resources5. Search for resources and select them6. Click Next7. Click Save8. Close the window

List of projects that you are involved in:• As a project manager
or• As a team member


Click Plans to create or modify a plan
Click the project name

Existing plans list
Click New to create a new plan
Click the plan’s name to edit the plan

Click Check Out to edit a plan

Click the arrow of a parent task to see its children

To add a new task, click on an empty line in the Title column and enter the title
Hover over a column heading to see a description

To insert a new task, above another one:1. Click on the task2. Click Insert

To create a sub-task1. Click on the task2. Click Indent

To reorder tasks, you can move them up or down1. Click on the task2. Click Move up or Move down

To edit the task details,1. Click on a column entry to select it2. Click it again3. Start typing

Right click on a task to see a menu

Task Details: view/change any details of the task

Enter the % completion of the task o the remaining hours
Add a Milestone

To assign resources:1. Click in the Resources column for the
desired task2. Click twice again to display the list3. Check off the resources in the list
Resources cannot be added to parent tasks
To add a new resource to the list, go to Manage Projects > Resources
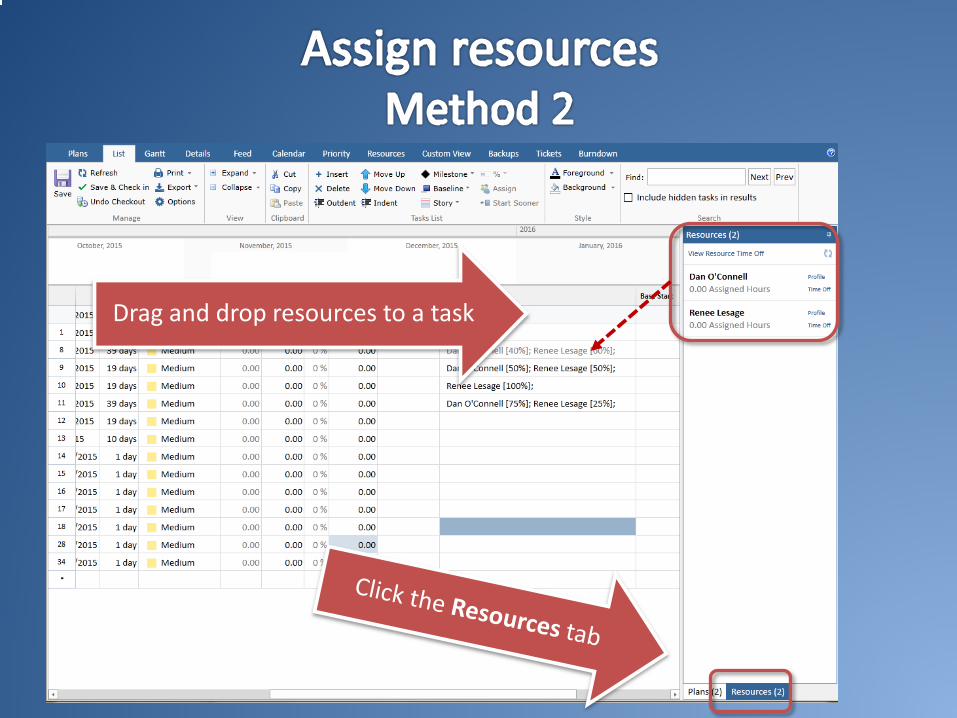
Drag and drop resources to a task

Click on a task and click Assign
1. Check off the desired resource2. Set up the % of the task
assigned

Enter the line number of a task that must be done before in the Predecessors column
In this example:• the task Define new processes must be completed before the task
Requirements starts• The task Determine KPI plus 2 days must be completed before the task
Product/Vendor selection
To enter a lag, enter the line number plus the number of days

2. Click the Relationships tab
4. Select a type of relationship
3. Enter the line number of the predecessor task
1. Right click on a task and click Task Details

Enter a lag if needed
If you want a task to end-start the same day, the Lag must be 0

Hover over an icon to see its description

• To keep track of the original start and end date• If the dates are changed, the Baseline Variance column
shows the delay

To baseline a plan, click Baseline > Plan/iteration > Set > Set Baseline 1

To display the columns related to the Baseline:1. Right click on any column heading2. Click a column name: e.g. Baseline Variance

Gantt chart
Click the Gantt tab

Show critical path

Click the bar’s border and drag it to change the end date
Click the bar and drag it to change the start date

Shift/Copy/Delete a planDetails


To enter a New Issue:Click New > Issue

To fill in the form, refer to the document ‘ITS Project Management Guide’ in CenterStage

To search for issues:1. Click Issues under your project name to see a
list of searches2. Click on a search name

To edit an issue, click the Issue Title
Click Edit

1. Open your plan2. Right click on a task3. Click Task Details4. Click the Issues tab5. Click New

The time card

Applications Menu tab > My Work

Click Add to add a task to your time card
Click My Assignments to see the list of tasks assigned to you

To enter hours, click the + sign in front of a task
Select the week
Click My Time Card to enter your hours

Click the number of hours to edit or delete
Click Submit as Final to have your time card approvedThe hours are not editable after they are submitted

Click Time Off
Click Add Time
Enter your time off

Click Remove
To remove a task from the Time Card, click MY Work

The Projects Reports

Click Reports and select a report type

Enter your criteria
Click Run Report


Click a blue link to view and/or update the information
Desktop: shortcuts to applications
Customize the Desktop

Create a New Desktop

Change the layout

Click an application to see the list of modules available

Click and drag modules to reorder, or change column
Click and drag a module to Column 1 or Column 2

To remove a module, drag it to the left side of the window

Application opens in a new tab
• The Projects application has its own desktop
• Click Edit Projects Desktop to add Projects modules (shortcuts) to the desktop

Support

CenterStage:‘ITS Project Management Guide’
IT Knowledge Base:www.mcgill.ca/it: article #1457 - ‘Project and Portfolio Management ’

• Please evaluate the training:
Minerva > Employee > IT Customer Services (ICS) Menu > Training Evaluations


![[Relevant Software] Portfolio](https://static.fdocuments.in/doc/165x107/588685151a28ab962a8b7be5/relevant-software-portfolio.jpg)