Anthropic Arguments Science and Religion in Schools Project - Unit 4b.
Upload
nguyenduongCategory
view
213download
0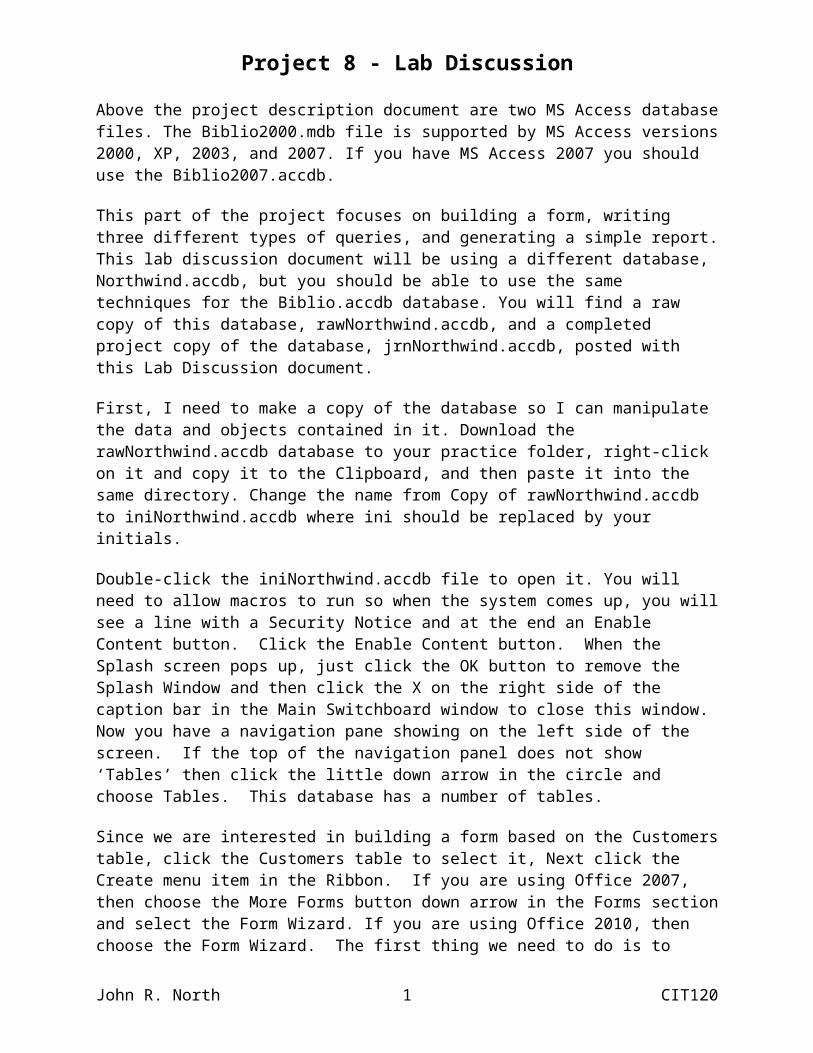
Project 8 - Lab Discussion
Above the project description document are two MS Access database files. The Biblio2000.mdb file is supported by MS Access versions 2000, XP, 2003, and 2007. If you have MS Access 2007 you should use the Biblio2007.accdb.
This part of the project focuses on building a form, writing three different types of queries, and generating a simple report. This lab discussion document will be using a different database, Northwind.accdb, but you should be able to use the same techniques for the Biblio.accdb database. You will find a raw copy of this database, rawNorthwind.accdb, and a completed project copy of the database, jrnNorthwind.accdb, posted with this Lab Discussion document.
First, I need to make a copy of the database so I can manipulate the data and objects contained in it. Download the rawNorthwind.accdb database to your practice folder, right-click on it and copy it to the Clipboard, and then paste it into the same directory. Change the name from Copy of rawNorthwind.accdb to iniNorthwind.accdb where ini should be replaced by your initials.
Double-click the iniNorthwind.accdb file to open it. You will need to allow macros to run so when the system comes up, you will see a line with a Security Notice and at the end an Enable Content button. Click the Enable Content button. When the Splash screen pops up, just click the OK button to remove the Splash Window and then click the X on the right side of the caption bar in the Main Switchboard window to close this window. Now you have a navigation pane showing on the left side of the screen. If the top of the navigation panel does not show ‘Tables’ then click the little down arrow in the circle and choose Tables. This database has a number of tables.
Since we are interested in building a form based on the Customers table, click the Customers table to select it, Next click the Create menu item in the Ribbon. If you are using Office 2007, then choose the More Forms button down arrow in the Forms section and select the Form Wizard. If you are using Office 2010, then choose the Form Wizard. The first thing we need to do is to select the underlying table or query that will supply the fields and data items to be used on this form. The Customers table should already be the one in the Tables/Queries dropdown control. If it is not, use the dropdown arrow to find the Table: Customers and then click this item. Tables appear before Queries in the Tables/Queries dropdown box so you may need to scroll up to find the Tables: Customers. The fields listed under the Available Fields list box now show all the fields in the Customers table. We can now move the fields into the Selected Fields list box that we want on the form. Many times it is easier to move all the fields using the >> button, and then just move the few unneeded fields back using the < button. In this exercise, I moved all the fields over and then moved back the ContactTitle, Region, and Fax fields.
Press the Next button to move to the next choice supplied by the Wizard. We will use the Columnar layout since this is most compatible with displaying one record at a time. Click the Next button to move to the next Wizard dialog window. MS supplies a number of backgrounds for the form; just pick one that looks good to you. Click next to proceed to the dialog window where you can give the form a more meaningful name than the Table or Query name. In my case I named it CustInfo. Before clicking Finish, I suggest that you click the radio button for Modify the form's design. Now click the Finish button.
John R. North 1 CIT120

Project 8 - Lab Discussion
The form generated by the system looks like the above. We need to make some room on the form for adding an image and placing a rectangle around the address fields. Besides that we want to be able to modify the Form Header and add Form Footer content. To expand the height of the form, move the cursor to the top edge of the Form Footer gray separator. When the cursor becomes a horizontal line with an up arrow and a down arrow, pull the cursor down to open up some space low in the form. Go to the right edge of the form, and when the cursor becomes a vertical line with a left arrow and a right arrow, drag the cursor to the right to increase the width of the form.
John R. North 2 CIT120

Project 8 - Lab Discussion
To expose some space on the Form Footer, position the cursor at the bottom of the Form Footer and drag down once you get the horizontal bar and up/down arrow cursor. Your form should look similar to that below.
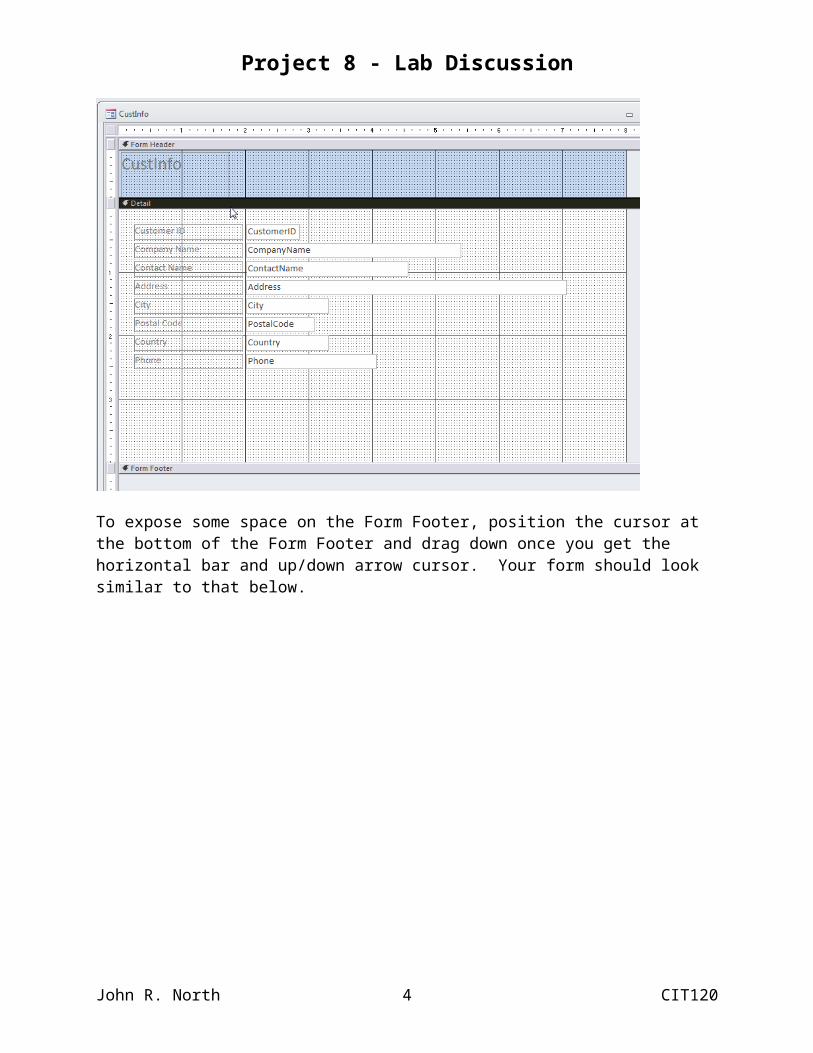
The Address text box width is too long. Click in the white Address text box to select it. Move your cursor to the right edge, position it around the middle, and when the cursor becomes the vertical bar with a left and right arrow, drag the right edge of the Address text box to be about the same size as the Company Name text box.
John R. North 3 CIT120
Project 8 - Lab Discussion
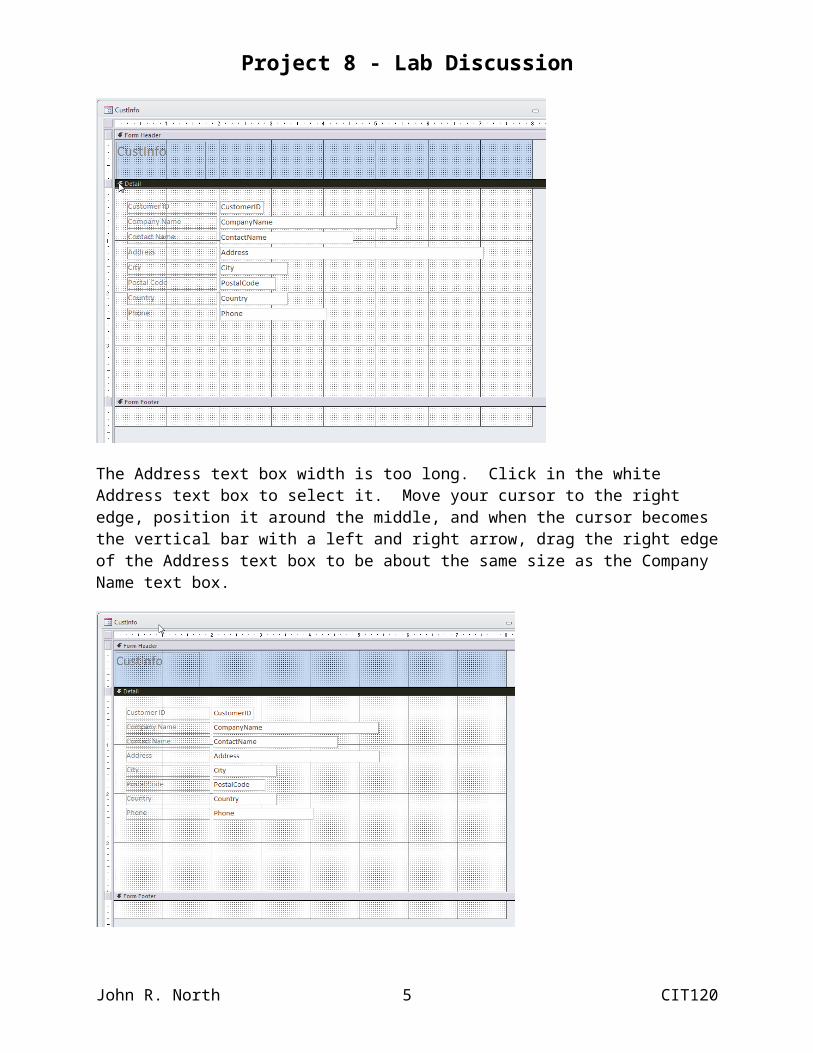
You can control where you want the fields positioned on the form. If you have Office 2007, MS chose to group all the fields on a form but if you have Office 2010, MS did not group the fields. To break this grouping in Office 2007, click in one of the text boxes. You will now see a little plus sign in a rectangle just to the left and a little above the group of labels and text boxes. Click on this plus sign to select all of the grouped items, select the Form Design Tools / Arrange tab, and click on the Remove option under the Control Layout section. Once the grouping has been removed, you can use the mouse to resize or move around. Now you can manipulate the individual labels and text boxes, moving them, and adjusting their sizes. Click on the text box and move both the label and text box for that field. Click on just the little square in the upper left corner to move just the label or just the text box. Click on one of the sizing handles to adjust the size of the label or text box. We will start by selecting the Phone label and text box by positioning the cursor to the left of the label for the Phone text box and dragging it so the selection box includes the label and the text box for the Phone field. Now both the label and text box are selected, we can move them down by positioning the cursor in the selected area and when the cursor becomes the 4-way arrow, click it and drag the selection near the bottom of the Detail section of the form. Next we need to move the address fields, address, city, postal code, and country, down and to the right so we have room to draw a box around these fields. Position the cursor in the vertical ruler across from the upper most field, the address field.. Holding the left button, drag the cursor down inside the ruler area to contain the desired fields and release the button. When you move the cursor into one of the fields’ areas, the cursor turns into a four-way arrow. Clicking this four-way arrow cursor and holding down, you can move all the fields and in this case, move them all down and a little to the right. Click outside any of the fields to deselect all the fields. The form should now look similar to the form below.
John R. North 4 CIT120
Project 8 - Lab Discussion
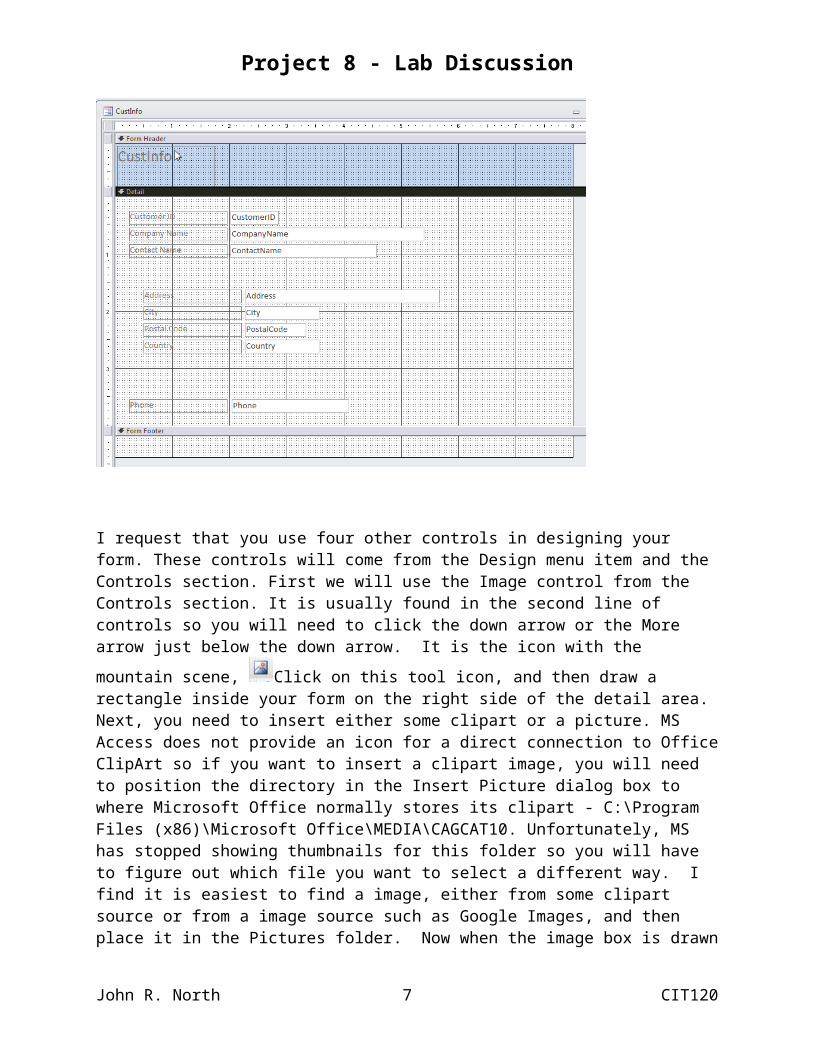
I request that you use four other controls in designing your form. These controls will come from the Design menu item and the Controls section. First we will use the Image control from the Controls section. It is usually found in the second line of controls so you will need to click the down arrow or the More arrow just below the down arrow. It is the icon with the mountain
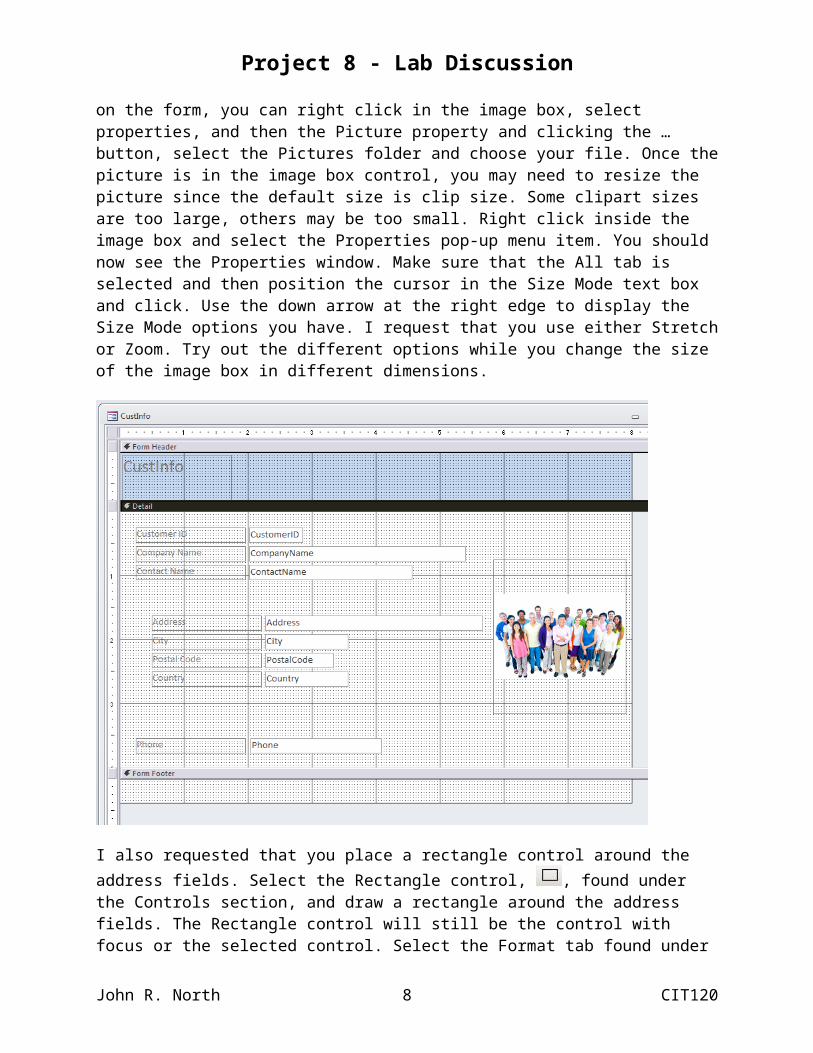
scene, Click on this tool icon, and then draw a rectangle inside your form on the right side of the detail area. Next, you need to insert either some clipart or a picture. MS Access does not provide an icon for a direct connection to Office ClipArt so if you want to insert a clipart image, you will need to position the directory in the Insert Picture dialog box to where Microsoft Office normally stores its clipart - C:\Program Files (x86)\Microsoft Office\MEDIA\CAGCAT10. Unfortunately, MS has stopped showing thumbnails for this folder so you will have to figure out which file you want to select a different way. I find it is easiest to find a image, either from some clipart source or from a image source such as Google Images, and then place it in the Pictures folder. Now when the image box is drawn on the form, you can right click in the image box, select properties, and then the Picture property and clicking the … button, select the Pictures folder and choose your file. Once the picture is in the image box control, you may need to resize the picture since the default size is clip size. Some clipart sizes are too large, others may be too small. Right click inside the image box and select the Properties pop-up menu item. You should now see the Properties window. Make sure that the All tab is selected and then position the cursor in the Size Mode text box and click. Use the down arrow at the right edge to display the Size Mode options you have. I request that you use either Stretch or Zoom. Try out the different options while you change the size of the image box in different dimensions.
John R. North 5 CIT120
Project 8 - Lab Discussion
I also requested that you place a rectangle control around the address fields. Select the Rectangle control, , found under the Controls section, and draw a rectangle around the address fields. The Rectangle control will still be the control with focus or the selected control. Select the Format tab found under the Form Design Tools on the Ribbon, use the Pail of Paint toolbar icon
found under the Font section to select a color for the background of the rectangle. Since the rectangle is sitting on top of the text boxes for the address fields, you will need to use the Arrange tab and in the Sizing and Ordering section choose the Send to Back item to move the rectangle behind the text boxes.
Depending upon the color you chose for the rectangle’s background and the font color of the enclosed label fields, you may need to change the labels’ font color. In this sample, I am changing the font color to white. Click outside the rectangle in an empty part of the form to deselect it, and then click on the first label control in the enclosing rectangle. Press the control key and click on the other three label controls ending up with your form design looking like
John R. North 6 CIT120
Project 8 - Lab Discussion
. Using the Format tab under the Form Design Tools Ribbon entry, choose the icon with the letter A under
the Font section, , and choose a color. I chose white.
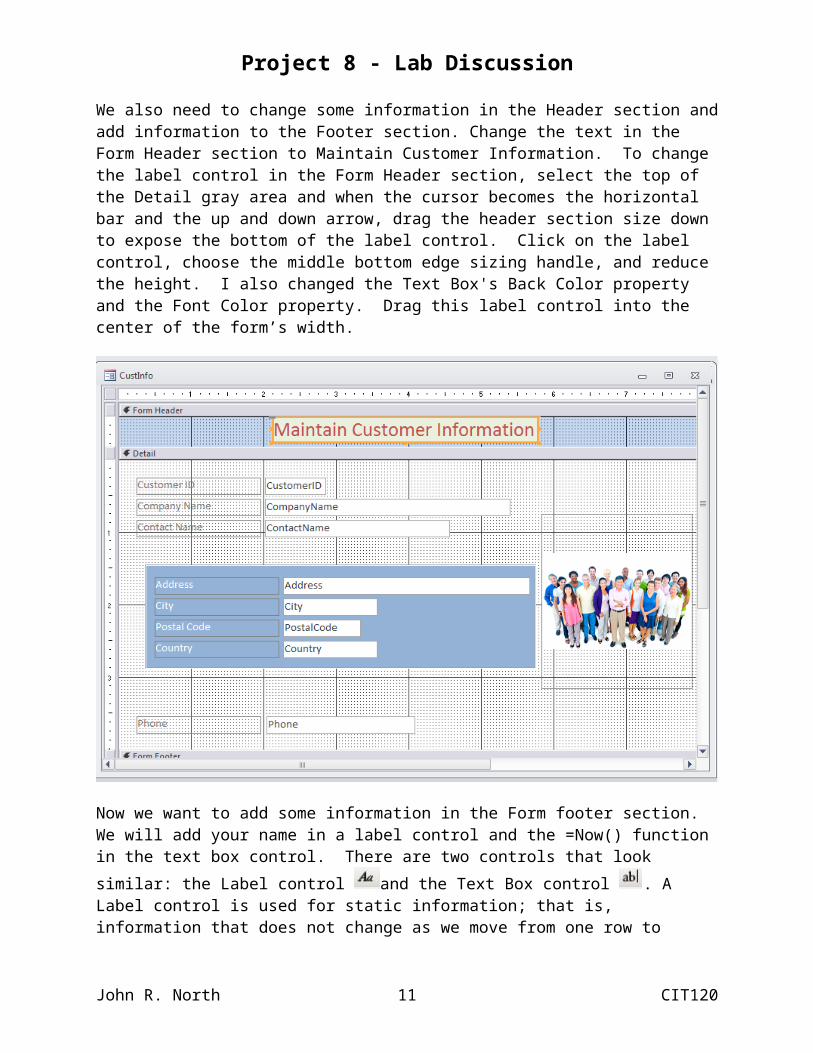
We also need to change some information in the Header section and add information to the Footer section. Change the text in the Form Header section to Maintain Customer Information. To change the label control in the Form Header section, select the top of the Detail gray area and
John R. North 7 CIT120
Project 8 - Lab Discussion
when the cursor becomes the horizontal bar and the up and down arrow, drag the header section size down to expose the bottom of the label control. Click on the label control, choose the middle bottom edge sizing handle, and reduce the height. I also changed the Text Box's Back Color property and the Font Color property. Drag this label control into the center of the form’s width.
Now we want to add some information in the Form footer section. We will add your name in a label control and the =Now() function in the text box control. There are two controls that look
similar: the Label control and the Text Box control . A Label control is used for static information; that is, information that does not change as we move from one row to another. A Text Box control is usually bound to one of the fields coming from the data source, usually a table or query. The Text Box control can also be bound to a formula or expression. Click on the Text Box control in the Control Section and then draw a rectangle on the right side of the Form Footer area. A label control is automatically associated with a Text Box control.
John R. North 8 CIT120

Project 8 - Lab Discussion
Click or double click inside the Text Box with Unbound showing so the cursor is at the left side of this text box. Type in =Now().
Click in the label control associated with this text box. Move the cursor over the big sizing rectangle on the label
John R. North 9 CIT120

Project 8 - Lab Discussion
and drag the label control closer to the left edge. Click inside the label and change the text to
show your name.
The =Now() function will use the system clock to retrieve the date and time and then display it in the text box. This date and time will be refreshed each time the form moves to a different record in the data source.
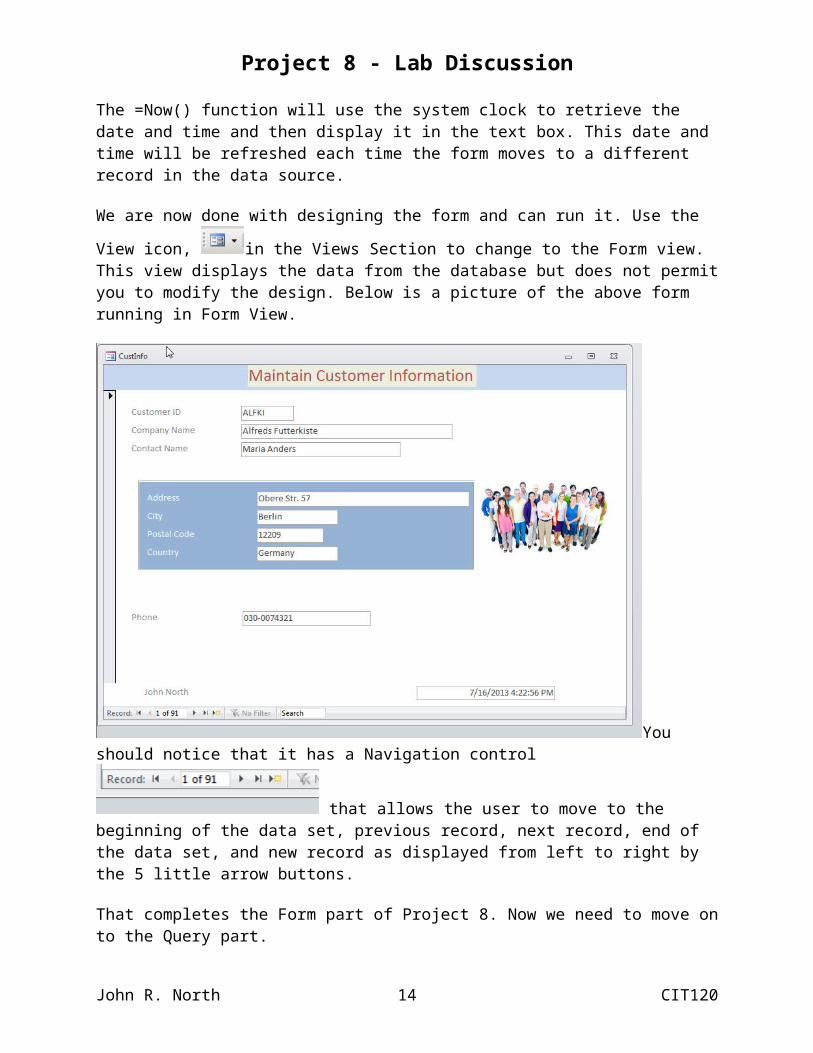
We are now done with designing the form and can run it. Use the View icon, in the Views Section to change to the Form view. This view displays the data from the database but does not permit you to modify the design. Below is a picture of the above form running in Form View.
John R. North 10 CIT120
Project 8 - Lab Discussion
You should
notice that it has a Navigation control that allows the user to move to the beginning of the data set, previous record, next record, end of the data set, and new record as displayed from left to right by the 5 little arrow buttons.
That completes the Form part of Project 8. Now we need to move on to the Query part.
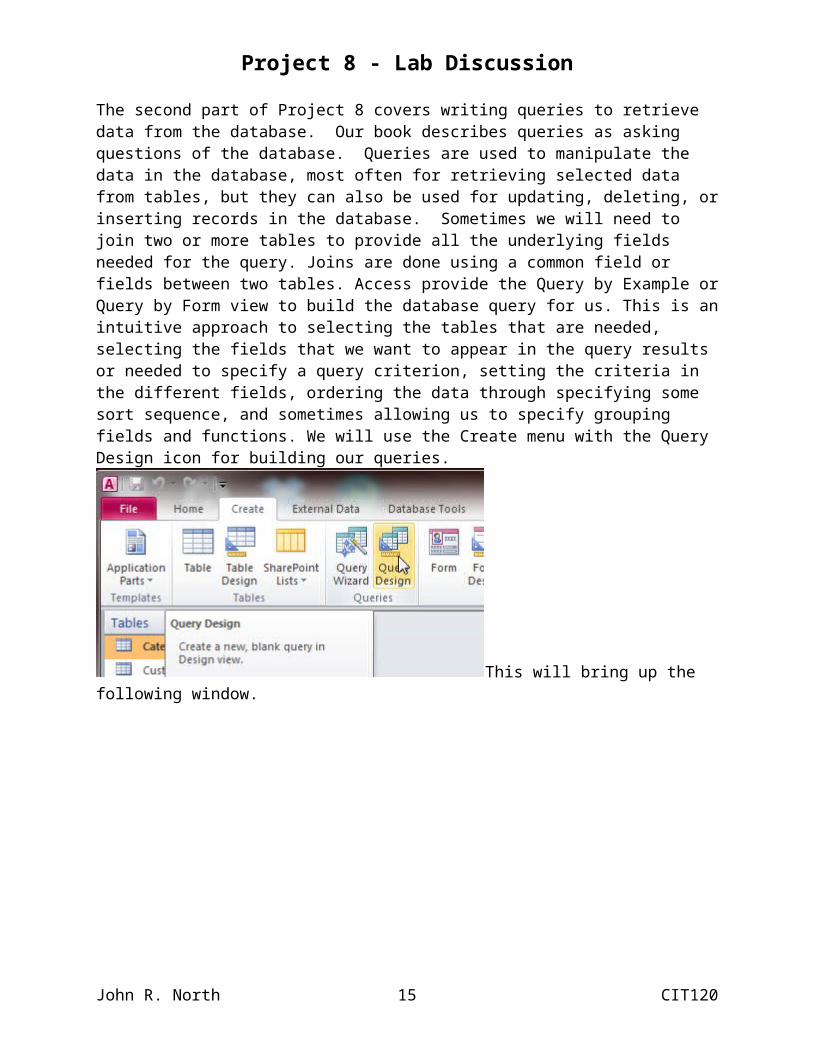
The second part of Project 8 covers writing queries to retrieve data from the database. Our book describes queries as asking questions of the database. Queries are used to manipulate the data in the database, most often for retrieving selected data from tables, but they can also be used for updating, deleting, or inserting records in the database. Sometimes we will need to join two or more tables to provide all the underlying fields needed for the query. Joins are done using a common field or fields between two tables. Access provide the Query by Example or Query by Form view to build the database query for us. This is an intuitive approach to selecting the tables that are needed, selecting the fields that we want to appear in the query results or needed to specify a query criterion, setting the criteria in the different fields, ordering the data through specifying some sort sequence, and sometimes allowing us to specify grouping fields and functions. We will use the Create menu with the Query Design icon for building our queries.
John R. North 11 CIT120

Project 8 - Lab Discussion
This will bring up the following window.
John R. North 12 CIT120

Project 8 - Lab Discussion
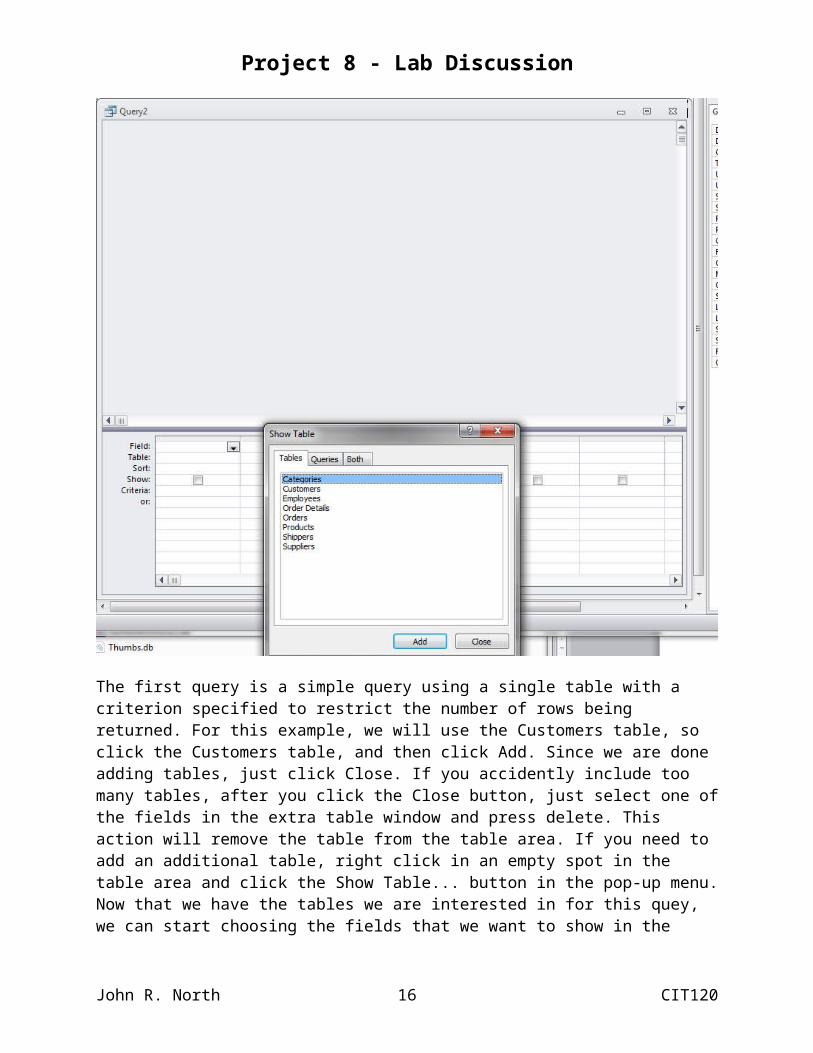
The first query is a simple query using a single table with a criterion specified to restrict the number of rows being returned. For this example, we will use the Customers table, so click the Customers table, and then click Add. Since we are done adding tables, just click Close. If you accidently include too many tables, after you click the Close button, just select one of the fields in the extra table window and press delete. This action will remove the table from the table area. If you need to add an additional table, right click in an empty spot in the table area and click the Show Table... button in the pop-up menu. Now that we have the tables we are interested in for this quey, we can start choosing the fields that we want to show in the query output. The fields will be shown in the order that we drop them into the grid and not in the order that they are in the table. There are three different ways to place a field into a grid column. You can drag the field from the table to a column in the grid. You can double click a field in the table window which will place that field in the next available column. You can go to the Field cell in the desired column and use the down arrow to see the list of possible fields that can be selected.
Below you will find a picture of the first sample query. Notice that the Show check box in the Country column is unchecked. This means that this column will not show in the query results. We still needed to include Country in the selected columns since we needed to apply the "Germany" criteria to this field. If we had left the Country field out of the query, there would be no way to supply the criteria. You will have to do the same with the State field in your first query since you need to supply the "IN" criteria to select only publishers in the state of Indiana.
John R. North 13 CIT120
Project 8 - Lab Discussion
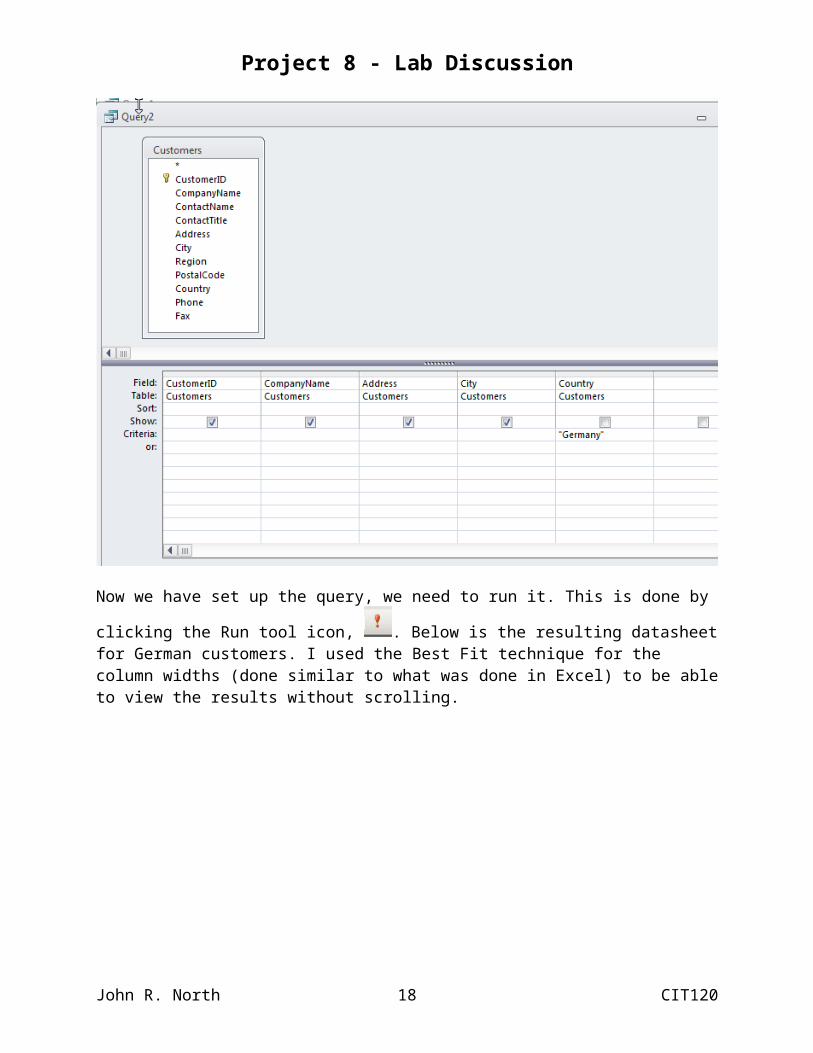
Now we have set up the query, we need to run it. This is done by clicking the Run tool icon, . Below is the resulting datasheet for German customers. I used the Best Fit technique for the column widths (done similar to what was done in Excel) to be able to view the results without scrolling.
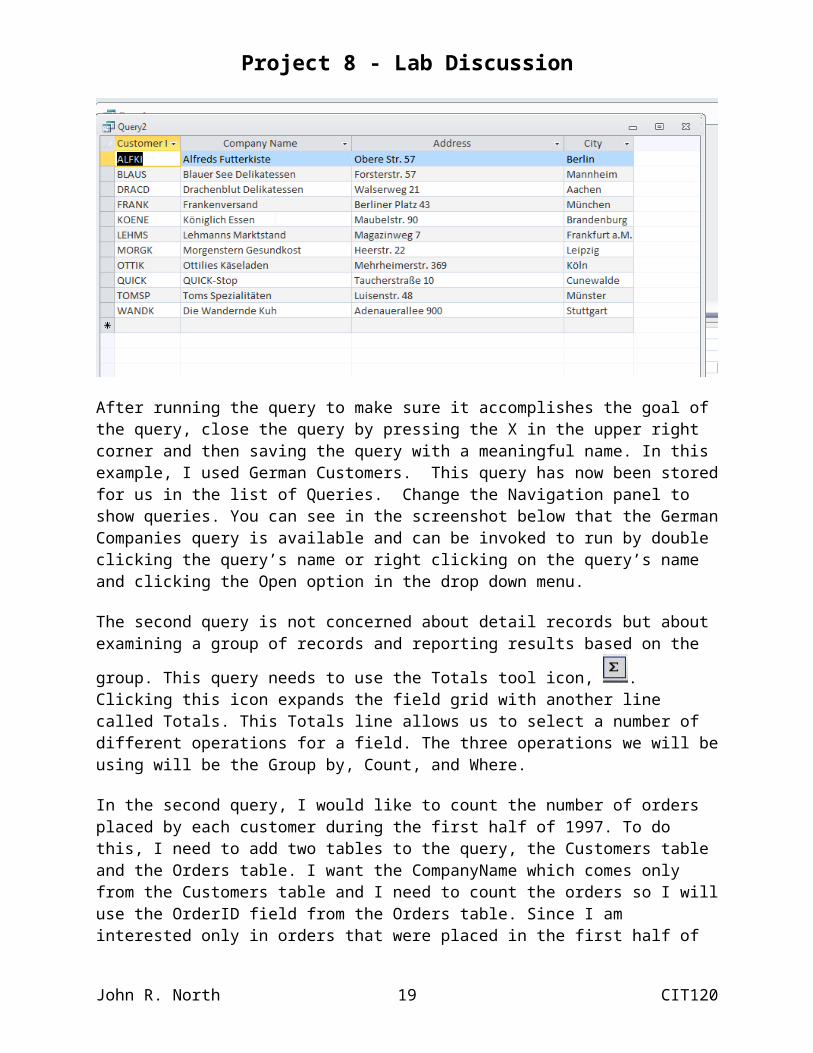
After running the query to make sure it accomplishes the goal of the query, close the query by pressing the X in the upper right corner and then saving the query with a meaningful name. In this example, I used German Customers. This query has now been stored for us in the list of Queries. Change the Navigation panel to show queries. You can see in the screenshot below that the German Companies query is available and can be invoked to run by double clicking the query’s name or right clicking on the query’s name and clicking the Open option in the drop down menu.
The second query is not concerned about detail records but about examining a group of records
and reporting results based on the group. This query needs to use the Totals tool icon, . Clicking this icon expands the field grid with another line called Totals. This Totals line allows us to select a number of different operations for a field. The three operations we will be using will be the Group by, Count, and Where.
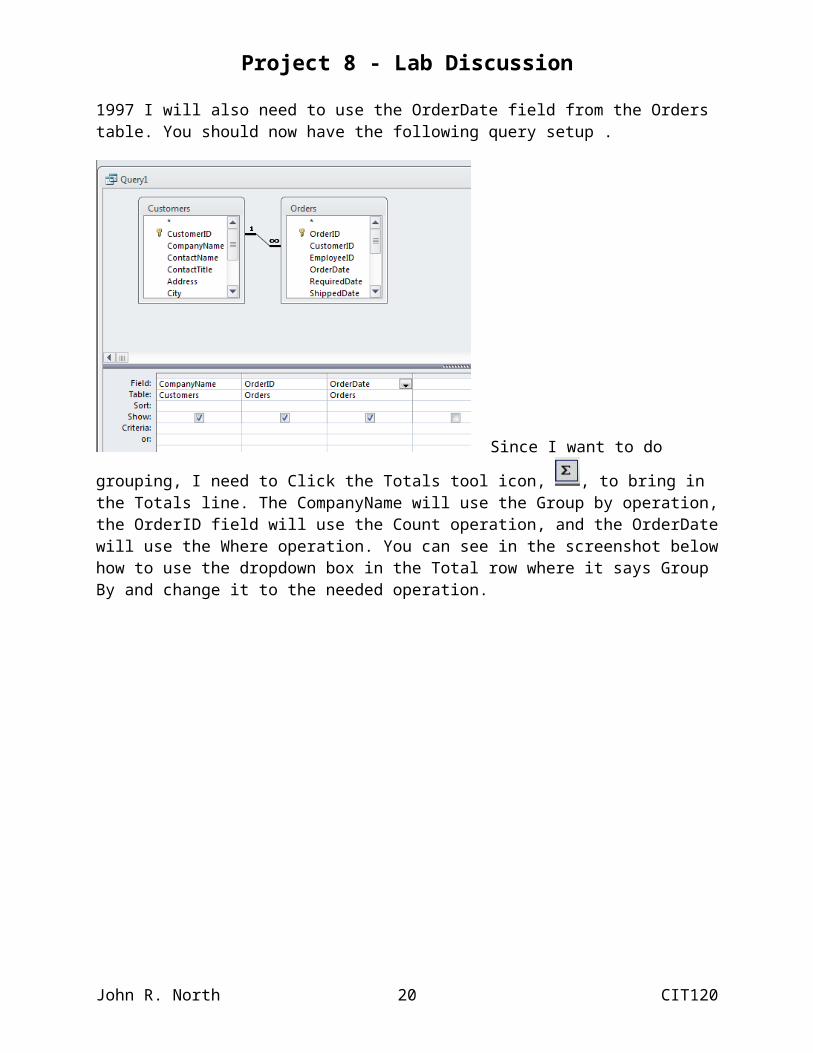
In the second query, I would like to count the number of orders placed by each customer during the first half of 1997. To do this, I need to add two tables to the query, the Customers table and the Orders table. I want the CompanyName which comes only from the Customers table and I need to count the orders so I will use the OrderID field from the Orders table. Since I am interested only in orders that were placed in the first half of 1997 I will also need to use the OrderDate field from the Orders table. You should now have the following query setup .
John R. North 14 CIT120
Project 8 - Lab Discussion
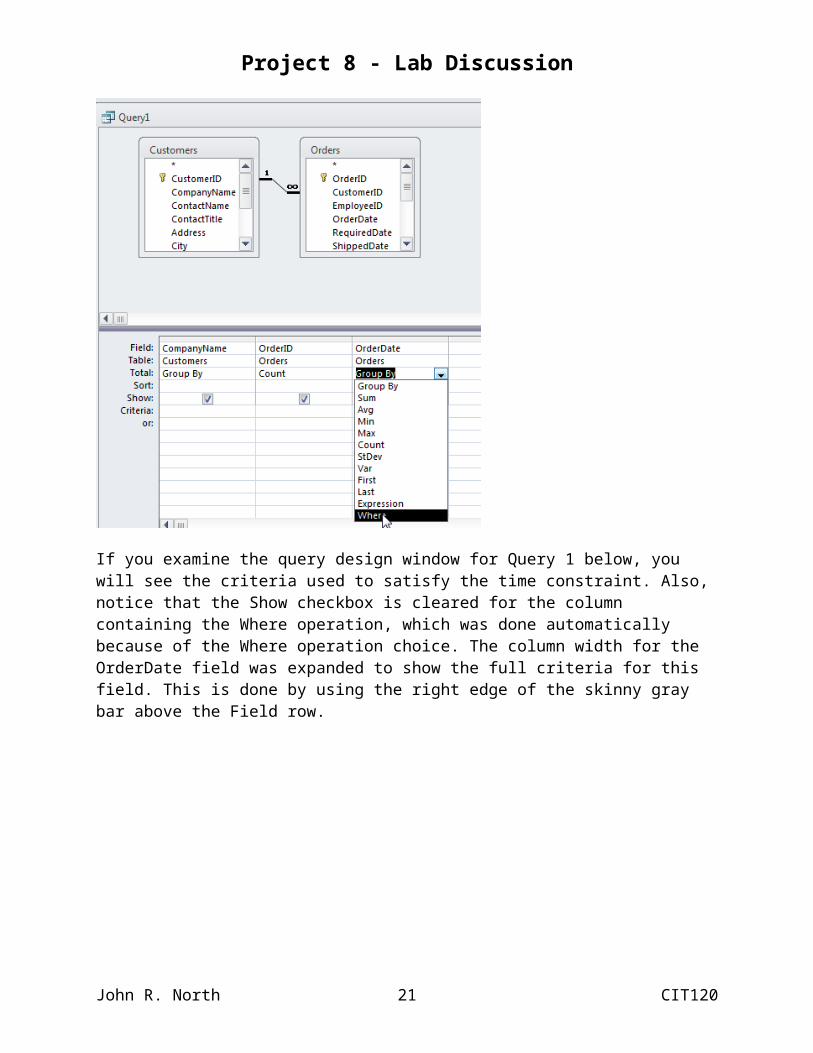
Since I want to do grouping, I need
to Click the Totals tool icon, , to bring in the Totals line. The CompanyName will use the Group by operation, the OrderID field will use the Count operation, and the OrderDate will use the Where operation. You can see in the screenshot below how to use the dropdown box in the Total row where it says Group By and change it to the needed operation.
John R. North 15 CIT120
Project 8 - Lab Discussion
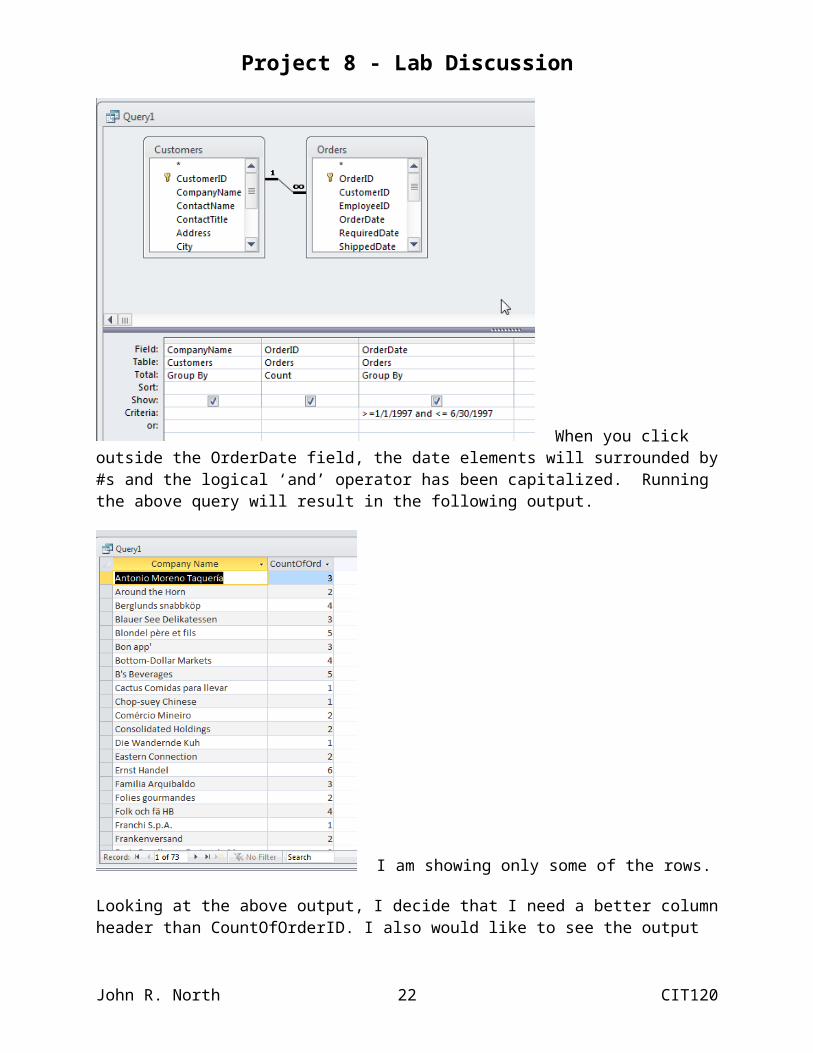
If you examine the query design window for Query 1 below, you will see the criteria used to satisfy the time constraint. Also, notice that the Show checkbox is cleared for the column containing the Where operation, which was done automatically because of the Where operation choice. The column width for the OrderDate field was expanded to show the full criteria for this field. This is done by using the right edge of the skinny gray bar above the Field row.
When you click outside the OrderDate field, the date elements will surrounded by #s and the logical ‘and’ operator has been capitalized. Running the above query will result in the following output.
I am showing only some of the rows.
John R. North 16 CIT120

Project 8 - Lab Discussion
Looking at the above output, I decide that I need a better column header than CountOfOrderID. I also would like to see the output sorted descending by count since I want to see who my best customers are. There are two ways of changing a column heading. The first method involves assigning an alias to the column. This is done by typing in the alias you want to use followed by a colon before the field name used to retrieve the data. For example, it would be Number of Orders:OrderID in the Field cell of the OrderID column.
The other method involves positioning your cursor in the small gray bar above the field name that needs a different column heading, right-clicking, and
selecting the Properties item from the pop-up menu and then assigning a new column name to the Caption field like below where I put Orders Placed in the caption field.
John R. North 17 CIT120
Project 8 - Lab Discussion
Although restricting the number of returned rows to a certain number is not part of your
assignment, you can do so by using the Return icon, , in the Query Setup section.
The second issue is easily handled by assigning the Descending option in the Sort cell of the OrderID column since this is the column where the count is being taken.
The next picture shows the completed query design using the column alias method along with the descending sort.
John R. North 18 CIT120
Project 8 - Lab Discussion
In either case, the results would look like the datasheet shown below. Of course, the Return value is still set at 10 instead of all of the records satisfying the rest of the query criteria.
Give this query a meaningful name; I used Best Customers First Half 1997 as the query name.
The last query for Project 8 involves searching for rows that contain a term within a text field but the term is not the whole value in that text field. The Title field in the Titles table contains the full title of a book. Many times we are looking for a book where the Title field contains a specific word but it is not a one word title. For example, if we were looking for all the books that had the term "oil" in the title. Several possibilites would be
Oil Production in Middle Eastern CountriesLubrication and Motor OilBuilding Oil RigsToiling in the Hot Sun
Now this will not happen if we just put the word "oil" in the Title criteria since Access will assume you are looking for an exact match rather than a "contains" match. Rather, you need to enter Like "*oil*" in the criteria cell. The Like operator tells the application that if it sees an * in the text string, then it should use the * as a wild card control character. So the "*oil*" part states that I do not care if anything or nothing comes before the oil and I do not care if anything or nothing comes after the oil.
Another concept in Query 3 is knowing the difference between and and or logical operators. The and operator is true if and only if both it is true for both expressions. The or operator is true if one or the other or both expressions are true. So the and operator is more restrictive and the or operator is more expansive.
John R. North 19 CIT120
Project 8 - Lab Discussion
The last concept is that sometimes you may need to bring in a third table in order to get a connection between the two tables. This is true for the Titles and Authors tables since there is no direct relationship between these two tables other than through using the Title Author table to tie the Titles to the Authors.
Below is an example using or rather than and for examining a text field for a combination of words.
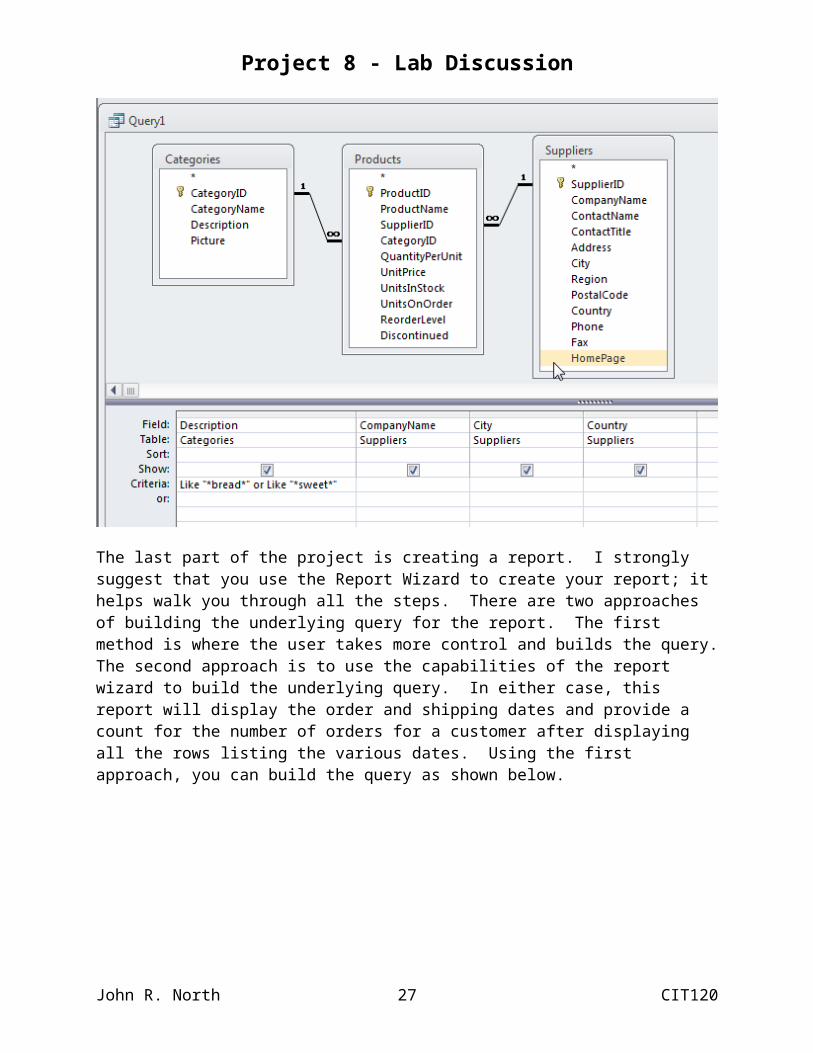
The last part of the project is creating a report. I strongly suggest that you use the Report Wizard to create your report; it helps walk you through all the steps. There are two approaches of building the underlying query for the report. The first method is where the user takes more control and builds the query. The second approach is to use the capabilities of the report wizard to build the underlying query. In either case, this report will display the order and shipping dates and provide a count for the number of orders for a customer after displaying all the rows listing the various dates. Using the first approach, you can build the query as shown below.
John R. North 20 CIT120
Project 8 - Lab Discussion
You can see that I already saved this query as ShipDatesReportQuery. Now using Create / Report Wizard, select the ShipDatesReportQuery and move all the fields over to be used in the report.
John R. North 21 CIT120
Project 8 - Lab Discussion
Using the second approach where we let the Report Wizard build the query for us and embed it in the properties of the report, we can get to the same point above. When we build the query and save it, that query name will show up in the Queries list. When the Report Wizard builds it for us, there is no name associated with the query and it does not show up in the query list. The Report Wizard allows us to select fields from multiple tables. First, select the CompanyName field from the Customers table.
This was done by setting the element in the Tables/Queries drop-down box to Customers and then picking the
CompanyName field and using the icon to move that field to the Selected Fields list box from the Available Fields list box. Go back to the Tables/Queries drop-down box and select the Table: Orders. Move the OrderID, OrderDate, RequiredDate, and ShippedDate fields to the
Selected Fields list box using the icon again. Your Report Wizard dialog window should
John R. North 22 CIT120

Project 8 - Lab Discussion
look like this . You can see we have the same set of fields in the Selected Fields list box whether we explicitly create and name a query or we let the Report Wizard build the underlying query.
Clicking Next gets us to where we can pick our primary grouping; in this case, it will be by the CompanyName field from Customers which is already selected so just click Next. The next step in the wizard allows us to choose additional groupings which we do not need for this report so click Next again. The next step provides for some sorting of the data within CompanyName - choose OrderDate. In the next wizard screen, leave the choices as stepped layout and portrait orientation. Make sure the Adjust field widths so all fields fit on a page is checked. Change the name and leave the Previes the report radio button selected. Clicking Finish will bring up the
following report. You can see that it has a group header but no group footer. Let’s add a group footer. To do that we
John R. North 23 CIT120

Project 8 - Lab Discussion
need to be in Design View. Right click on the caption bar of the report or the tab is you are using tabbed window option, and select Design view.
The report is almost complete. You can see that the title on the Group Header section is CustomerID even though that field was not selected. The group header line itself will show the CompanyName. I would like a group footer with the Company Name field and a display of the count of the orders for the company. You can see the Group and Sort button on the first screen below. The second screen shows some options at the bottom of the screen to manipulate the header and footer information.
John R. North 24 CIT120

Project 8 - Lab Discussion
Click on the More option under the Group on CustomerID and when the window below is displayed click on the without footer option downarrow and choose with footer. This should now add a CustomerID Footer section to the report as shown below.
Using the Report Design Tools Ribbon entry and the Design tab, select a Text Box control and add it to the new CustomerID Footer section. Click on the label of the new text box and change the content to "The Number of Orders for " and move this to the left. Make sure to leave enough room so you can copy the CompanyName text box from the CompanyName header to the Clipboard and then paste it between the label and the text box you are working on. To do this copy and paste, you right click on the text box in the CustomerID Header section and select Copy. This places the text box in the Clipboard. Click within the CustomerID Footer area and then paste the CompanyName text box from the Clipboard to this area. You will need to move the elements in the CustomerID Footer section around to get them formatted correctly. It is important to repeat the CompanyName in the footer since often, the CompanyName value appears on one page and the count in the footer appears on a later page since there are so many
John R. North 25 CIT120

Project 8 - Lab Discussion
detail records for that group. In the text box itself, type in =Count(*). You should end up with something like this
Save the report and then double click on it to run it.
John R. North 26 CIT120
Project 8 - Lab Discussion
This lab used a different database than that required by the Project 8 description. Follow the instructions in the project description, make sure to rename the database properly for your project, and verify you have done everything by reviewing your project against the Project 8 rubric.
John R. North 27 CIT120