Predicting Protein–Protein Interaction Sites Using Sequence ...

Project 2: Protein Design
Project Overview Bromodomains are protein domains that specifically recognize acetylated lysines. Given the prevalence of
acetylated lysines in complexes involved in chromatin-remodeling, DNA damage and cell-cycle control,
bromodomains play a key role in a variety of cellular processes. In this project, we will use computational tools to
mutate an existing bromodomain such that it has a higher affinity for a novel acetylated peptide compared to its
actual biological peptide substrate. The project will consist of four stages:
1. Use PyMol and PyRosetta to visualize the original bromodomain-ligand complex
(Assigned: 10/25 Due: 11/2 at 11:59 a.m.)
2. Outline the thermodynamic cycle required to calculate the difference in the binding energy between a
mutant bromodomain and the novel peptide and a mutant bromodomain and the original peptide.
(Assigned: 11/8 Due: 11/13 at 11:59 a.m.)
3. Utilize PyRosetta to replace the original peptide ligand with the new peptide ligand and optimize the
resulting interface without mutating the bromodomain.
(Assigned: 11/15 Due: 11/27 at 11:59 a.m.)
4. Assigned: 11/26 Due: 12/6 at 11:59 a.m.
a. Utilize PyRosetta to optimize the interface of the new complex by mutating the bromodomain.
b. Compute the change in binding energy/affinity mentioned above using thermodynamic cycles
and the energetics obtained from PyRosetta
In contrast to the previous project, your final grade for each
part will be based solely on what you turn in at the part’s
deadline.
1

Getting Started
To get PyMOL up and running, open up a bash shell by clicking on the Debian button in the lower left corner and following the sequence of links Programs->Applications->Shells->Bash. To open PyMol, just type pymol into the bash shell and the appropriate windows should open up.
To get PyRosetta up and running, in another bash shell window (not already in use for PyMOL) type python and this will open up a python client. Load the libraries necessary for PyRosetta using the commands
from rosetta import *
init()
Because we’re going to make extensive use of these shell scripts, it helps to be proficient in using UNIX commands.
Plenty of tutorials exist online to help familiarize you with the basic commands so we’re going to briefly mention
two of them:
ls : Lists all of the files located in your current directory
cd dir_name : Changes the current directory to dir_name. cd ../ causes you to change into your parent directory.
cd ~ takes you to your home directory
If you ever run into a problem where your program complains about not being able to find a file, you can use these
commands to check that you’re indeed in the right directory and that your file is located where it’s supposed to be.
You can use these commands inside of PyMOL but not inside of python. To view your current directory or change
directories in python, use the commands:
import os
os.getcwd()
os.chdir(‘your_new_directory_goes_here’)
2

In addition, you can click on the third button from the left on the bottom of the screen to launch a graphical
interface to the file system that should be similar to what you are used to on Windows and Macs.
Part 1: Visualizing the Original Complex
Assigned: 10/25 Due: 11/2 at 11:59 a.m.
In this part of the project, we’re going to use PyMol to visualize our initial complex. To familiarize yourself with
PyMOL, we strongly suggest you read Appendix A before beginning this problem/project.
1. Use the Chrome browser on the server (third button from the left on the bottom) to download your PDB
file. The P DB file is named 2DVQ_project.pdb. Move the file from your downloads folder into
the directory /home/yournamegoeshere/. See Appendix A if you need more help in doing so. We
recommend that you look up this PDB in the database www.rcsb.org as this will provide additional
information about your structure that you may find useful, particularly the number of bromodomain and
peptide residues.
2. Load your .pdb file into PyMOL. Use the show and hide options such that the bromodomain is displayed in
green in cartoon format and the peptide is displayed in red in dot format. The peptide in this structure is
labeled as Sequence Q and is found at the end of your amino acid sequence. Everything in the sequence
other than Sequence Q corresponds to the bromodomain.
3. Use the ray command to generate a ray-traced image of your initial complex and peptide. This will render
a higher-quality image that you can then copy into your report.
It should look something like this when you’re done:
What to submit:
Turn in a PDF report named LASTNAME_FIRSTNAME_PART1.pdf including:
1. A ray traced image of your bromodomain/peptide complex as described above
2. In the PDB database (www.rcsb.org), look up the structure next to your name (see below for
4 letter acronym). Write a paragraph or two describing the function of both the
3

bromodomain and its bound peptide ligand in their cellular environment. Use only complete
sentences, please. Only use this assigned structure for the purposes of this description. For
the rest of the project, including the ray-traced image above, use 2DVQ_project.pdb as your
structure.
2WP1: Aboud-Escobar
2DVQ: Fan-Koirala
1JSP: Landeros-Sheu
1JM4: Shoukat-Zhu + de Geus
Part 2: Outlining Free Energy Calculations
Assigned: 11/8 Due: 11/13 at 11:59 a.m.
This part of the project will focus on motivating the calculations we will perform in the parts that follow. Later on,
we will replace the WT peptide with a peptide of interest and then mutate the bromodomain in an attempt to
increase affinity. Ultimately, we want to know whether these mutations were successful by calculating the
difference in affinity between the mutant bromodomain and the novel peptide and the mutant bromodomain and
the WT peptide. In this part, please use the following nomenclature:
1. Draw the thermodynamic cycle relating the binding of Q to both bromodomains. Label each free
energy change using nomenclature consistent with what was introduced in lecture.
2. Using this thermodynamic cycle, describe how you would calculate
where is the free energy of binding between the mutated bromodomain and the new
ligand and is the free energy of binding between the original bromodomain and the new
ligand.
a. List all species whose energy you need to calculate to perform this calculation
b. How would you obtain the energy of each of these species using PyRosetta?
c. Write out the equation giving in terms of the energies of each species you listed in part a.
Use nomenclature consistent with what was described above.
Turn in a PDF report named LASTNAME_FIRSTNAME_PART2.pdf that addresses each of the questions posed
above. Name your sections in the same way the problems are labeled above. This report must be in paragraph
format and only complete sentences are allowed.
4

Appendix A: Basic PyMOL
PyMOL is a viewer for macromolecular structures, typically derived from x-ray crystallography or NMR
experiments. These structures are typically obtained from the RCSB Protein Data Bank (www.pdb.org) and come in
pdb format. The full PyMOL manual is available at http://pymol.sourceforge.net/newman/userman.pdf , and is
relatively thorough. Most PyMOL commands are available either through drop-down menus or a command line.
Here I'll typically address the way to do things via drop-down menus.
Let's start by obtaining a pdb file to play with. First download the pdb file of the bromodomain that was assigned
to you (all pdb entries are named with a 4-character code). To do so, use the following instructions:
1. Open chrome in your nomachine client by clicking on the chrome icon in the lower left hand corner. 2. Download the relevant PDB structure. This should place the file in your Downloads fold. You
most likely want to move it into the directory /home/yournamehere. To do so, use the graphical file interface provided by the third button in the bottom left of your screen. a. Note that you can also play around with any other .pdb file. You can get them from
http://www.rcsb.org/pdb/home/home.do for any structure in the database. Open it with PyMOL. A mass of sticks should appear on the screen. You can change your viewpoint by left-clicking and dragging to rotate the object. If you are on a laptop, one-button mode is probably easiest for viewing. Select this from the mouse menu. If you have a 3-button mouse, select 3-button viewing. Note that 2-button viewing can be helpful if your mouse wheel is troublesome.
Here are some basic mouse actions (these are also noted in the lower left corner of the viewing window).
Desired Action 1-button mode 3-button mode zoom in and out control and drag up/down Right click and drag translate the object in the alt and drag Center button and drag viewing plane PyMOL will show the sequence of the protein if you select 'sequence' under the Display menu on the command line window. You can then select particular residues by clicking on the letter in the sequence at the top of the viewer window. You can also select residues by simply clicking on them in the viewer. The atoms will have pink dots on them to indicate they are selected. You can modify the properties of whatever you have currently selected by using the drop down menus to the right of '(sele)' in the right column. Another way to select things is via the command line. The syntax is select <name>, <category> <identifier>
<name> is what you want to name your new selection. <category> can be any of:
resn - residue type res - residue number name - atom in amino acid: N, C, O, Ca, Cb, etc. symbol - element name chain - chain A, B, C, etc. ss - secondary structure type: 'h', 's' or 'l'
Selection criteria (in the form of <category> <identifier>) can be linked together by boolean operators: and, or, and not. When you create a new selection, it will show up in the right hand panel and you can access the drop down menus to manipulate only the atoms in that selection. For example, type select chainA, chain A. This way, you can modify only chain A of the molecule. For example, on “all,” click on H and choose everything, then chainA, click S and “cartoon” to show the cartoon version of only chain A. In addition to creating a new selection, the above
5

syntax for selecting parts of the structure is generally used throughout pymol. For example, color red, res 40 will color residue 40 red. Appendix B: Basic PyRosetta Open a terminal window, and type python To load the PyRosetta library, type
from rosetta import * rosetta.init()
Load a protein from a PDB file (a cleaned pdb you made using grep as shown in Part 1 above)
pose = Pose() pose_from_pdb(pose, “3ihw.clean.pdb”)
Examine the protein using a variety of query functions:
print pose print pose.sequence() print pose.total_residue() print pose.residue(5).name()
How many residues does this protein have? What type of residue is residue 5? Note that this is the 5th residue in the PDB file, but not necessary “residue number 5” in the protein. Sometimes the residue numbering follows a convention from a family of homologous proteins, and often several residues of the N-terminus do not show up in a crystal structure. Find out the chain and PDB residue number of residue 5:
print pose.pdb_info().chain(5) print pose.pdb_info().number(5)
This protein has one chain, labeled chain A. Lookup the Rosetta internal number for residue 91 of chain A: print pose.pdb_info().pdb2pose("A",91) print pose.pdb_info().pose2pdb(25)
Protein geometry Find the , ψ, and χ1 angles of residue 5:
print pose.phi(5) print pose.psi(5) print pose.chi(1,5)
We can also alter the geometry of the protein. Perform each of the following manipulations, and give the coordinates of the N atom of residue 6 afterward.
pose.set_phi(5,-60) pose.set_psi(5,-43) pose.set_chi(1,5,180)
To see the Cartesian coordinates of the N atom, use the command: pose.residue(5).xyz(“N”)
Using Score Functions Score functions are Rosetta’s way of calculating energies – similar to a ΔG (but not including an entropy term and energies are unitless). Here, we will explore the types of energy Rosetta considers, and use an energy function to score our protein.
scorefxn = create_score_function('standard') The option for standard tells Rosetta to load the standard all-atom energy terms. To see these terms, you can print the score function:
print scorefxn
6

Set up your own custom score function which includes just van der Waals, solvation, and hydrogen bonding terms, all with weights of 1.0. Use the following to start:
scorefxn2=ScoreFunction() scorefxn2.set_weight(fa_atr,1.0) scorefxn2.set_weight(fa_rep,1.0)
Enter the other weights and then confirm that the weights are set correctly by printing your score function. Evaluate the energy of pose with your score function
scorefxn2(pose) Evaluate the energy of pose with the standard score function:
scorefxn(pose) Break the energy down into its individual pieces:
scorefxn.show(pose)
These represent a brief introduction to PyRosetta but you’ll need to
use more complex functions to complete this assignment. The
PyRosetta tutorials (http://www.pyrosetta.org/tutorials) provide a
really great reference and Workshop #’s 1, 2, 3 and 6 should be
sufficient for you to complete this assignment.
Here are some commands you might find useful:
7
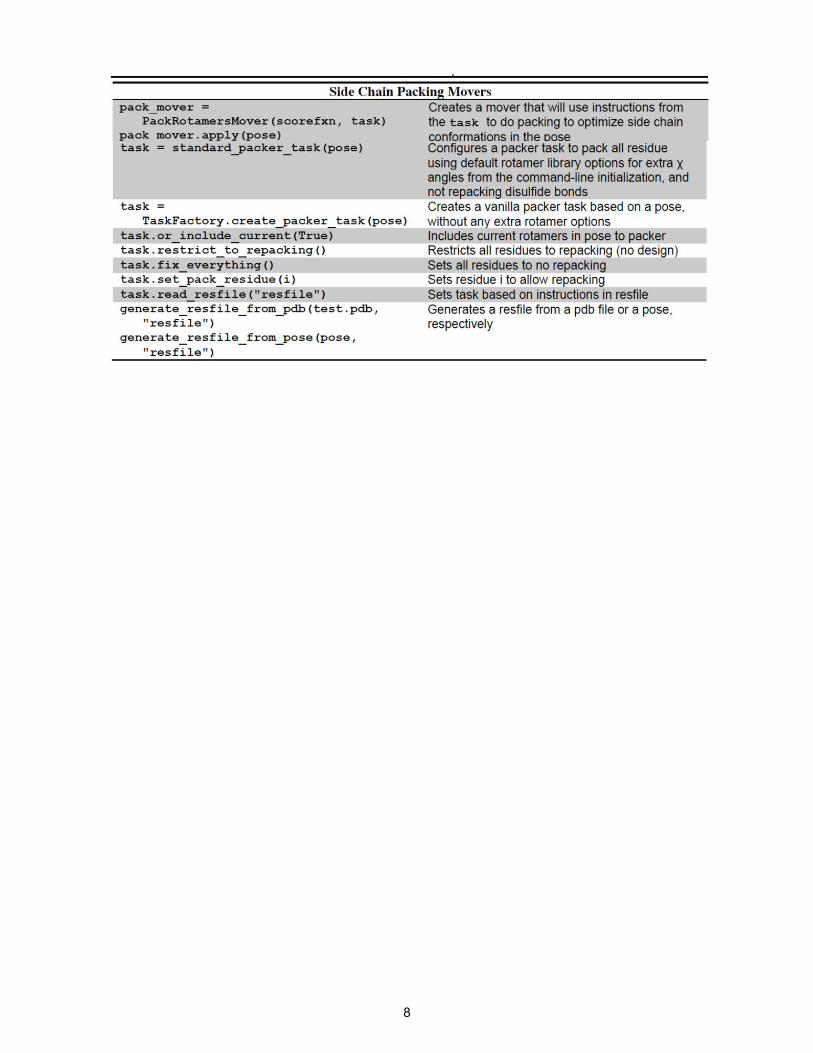
8
MIT OpenCourseWarehttp://ocw.mit.edu
20.320 Analysis of Biomolecular and Cellular SystemsFall 2012
For information about citing these materials or our Terms of Use, visit: http://ocw.mit.edu/terms.