
Evaluation progression from preliminary task to full product
Upload
rhiannahensonsmithCategory
view
85download
1
Progression from the preliminary task
Rhianna Henson-Smith

• Before filming we made a short scene for a preliminary task, in which we tried to test out different camera angles and editing. This was approximately 30 seconds long, demonstrating how to use shot reverse shot, 180 degrees shot and match on action. These are commonly used in different films and certainly the thriller genre that we are focusing on. Along with these shots there are certain rules that follow them.
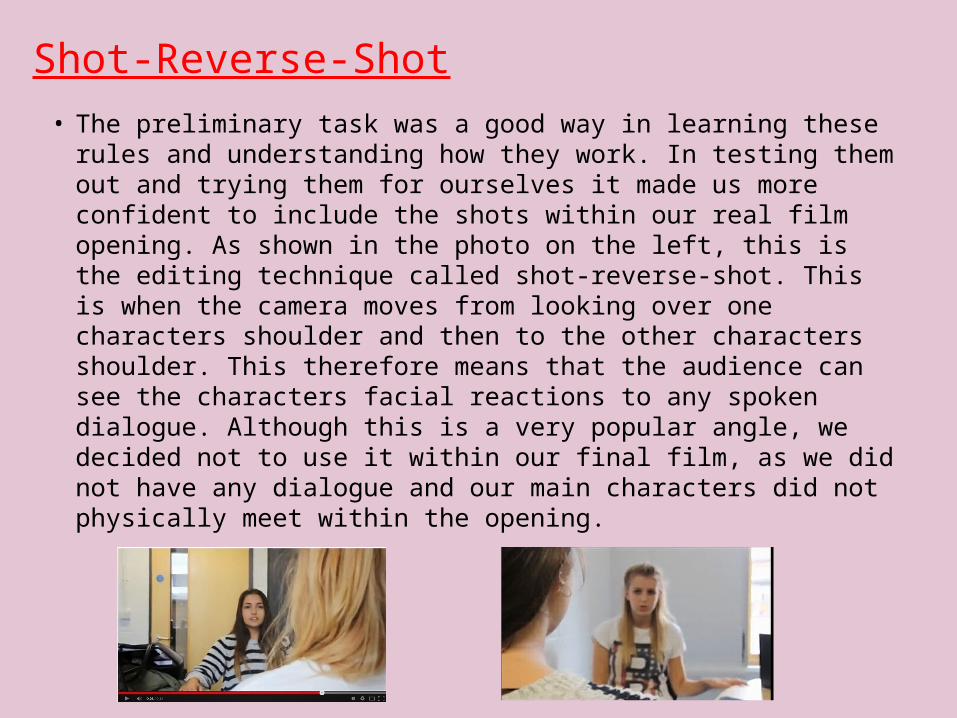
Shot-Reverse-Shot• The preliminary task was a good way in learning these rules and
understanding how they work. In testing them out and trying them for ourselves it made us more confident to include the shots within our real film opening. As shown in the photo on the left, this is the editing technique called shot-reverse-shot. This is when the camera moves from looking over one characters shoulder and then to the other characters shoulder. This therefore means that the audience can see the characters facial reactions to any spoken dialogue. Although this is a very popular angle, we decided not to use it within our final film, as we did not have any dialogue and our main characters did not physically meet within the opening.

Match on Action• Within our preliminary task we also tried a technique called Match-on-
action; this is where the editor cuts from one shot to another view that matches the first shot's action. We showed this within our task by showing a girl walk up to a door and then cut the scene, before showing the girl then inside the room. This therefore speeds up the scene and allows the audience to know she has entered the door without the need to show what has happened. This was then applied to our final film, shown when Joseph Damien is sat inside his car and is holding the knife for the murder. We show him shift to open the car door, cut the scene, then show his feet from a low angel shot getting out of the car. This is good as it speeds up the scene leading to the murder, creating the fast-paced tension we want and also allows the audience to know he got out of the car, without the need to actually physically see it happen.

180 degree Rule• Another shot type we tested in our task was the 180 degree rule, which is a
basic guideline regarding the on-screen spatial relationship between a character and another character or object within a scene. We watched a short clip of each being demonstrated within a film and learnt the ways to safely film each. For example with the 180 degrees shot the camera man would have to stay one side of a‘line’ and not cross it or it would be breaking the shot. However if the camera shows the line being broken the effect doesn’t drop and the viewer does not get confused. By watching the videos and learning how an effective shot is used we could thereby start putting our knowledge into action and start filming. In filming the 180 degrees shot I and a fellow media student sat on a bench at either side facing each other while our other partner used the camera along an imaginary line so we would always be in the same position on the screen while having a conversation and the audience would not be confused. After we demonstrated the camera moving from along the line and then breaking the line which appeared to mix up the positions of the two people and confuse the audience. We did this so that we therefore knew how to film the shot in the right way so we could use it properly within our story we would produce.

180 degree rule:• In our final film we decided to use this shot in our opening as
although we again did not have dialogue for the shot to be used in. We did use the 180 degree rule in the scene where joseph is now inside his car and driving out of the car park to start his killing spree.
• I feel that I now know how to use it effectively in any future events and can progress in my knowledge of different camera angles.

Techniques• Techniques that we used in our final film that we didn’t in the
preliminary were over laps of different scenes. For example within our film we changed the opacity of the scene and over lapped another on top of it. With the use of this technique allowed us to show the victim and the killer at the same time, helping us to effectively create a time lapse of two events. Of course in our preliminary task we did not cover how to do this and learned how to by discovering for ourselves how to use final cut express effectively.

Final Cut Express
• The preliminary task was the first real time that we practiced editing on final cut express, from this we learnt how to cut and add text to the scenes. This therefore was then helpful in our final piece especially for creating tension and our titles. Furthermore towards the progression of our final product we also had some challenges. These included some of our shots being too dark for the audience to see the main features of events. We then learnt how to change the lighting and brightness on each scene so that we could effectively use the scene and not re-shoot and waste editing time.
Example of Progression
• In the preliminary task we did not have music, nor experiment at that stage in time with adding music to scenes. I was also unaware of how to use different sounds effectively, especially in a thriller film where music is a key convention for adding suspense and tension. However in the stages of editing the final product we effectively learnt as a group how to use Garage Band and different sound effects to apply them to our thriller.

Basic techniques
Some basic shots such as a close up or a long shot was also new to us, so the preliminary task was a good way in practising how to shot and where to use the shots effectively. Although we were unaware at the time, but even these simple shots are difficult to shot, especially in learning different camera settings and how to hold and move the camera. In learning this we then applied this to our own film, which now includes lots of close ups, mostly of Joseph’s face. For example a close up shot is commonly used to show a characters emotion and show their facial features.


