Programming Without Coding Technology (PWCT) - RMChart ActiveX
38
PWCT 1.9 Art Documentation ( http://doublesvsoop.sourceforge.net ) 2006-2013, Mahmoud Fayed ( [email protected] ) _____________________________________________________________________________________ Table of contents 1 - Introduction 2 - Implementation steps 3 - Final Steps Tree 4 - Application during the runtime 1 - Introduction In this lesson we are going to learn how to use the RMChart ActiveX control. 2 - Implementation Steps Fig. (1) Goal Desginer - Steps Tree Select the step (The First Step) We will start now new interaction process to generate new steps to our steps tree. The slow way (Using Mouse): 1 - Click Interact to open the components browser 2 - Select the domain (Windows) 3 - Select the component (Define New Window) The fast way (Using Keyboard shortcuts): 1 - Get the component using its name by typing (Define New Window) Note : Stop typing when you see the required component is selected
-
Upload
mahmoud-fayed -
Category
Software
-
view
33 -
download
2
Transcript of Programming Without Coding Technology (PWCT) - RMChart ActiveX

PWCT 1.9 Art Documentation ( http://doublesvsoop.sourceforge.net ) 2006-2013, Mahmoud Fayed ( [email protected] ) _____________________________________________________________________________________
Table of contents
1 - Introduction 2 - Implementation steps 3 - Final Steps Tree 4 - Application during the runtime
1 - Introduction
In this lesson we are going to learn how to use the RMChart ActiveX control.
2 - Implementation Steps
Fig. (1) Goal Desginer - Steps Tree
Select the step (The First Step) We will start now new interaction process to generate new steps to our steps tree. The slow way (Using Mouse): 1 - Click Interact to open the components browser 2 - Select the domain (Windows) 3 - Select the component (Define New Window) The fast way (Using Keyboard shortcuts): 1 - Get the component using its name by typing (Define New Window) Note : Stop typing when you see the required component is selected

Fig. (2) Component Browser – Select the component (Define New Window)
After selecting the component click Ok or press ENTER
Fig. (3) Interaction page - Set the properties and enter the required data as in the image above

Fig. (4) Form Designer
Fig. (5) Goal Desginer - Steps Tree
Select the step (Window Events) We will start now new interaction process to generate new steps to our steps tree. The slow way (Using Mouse): 1 - Click Interact to open the components browser 2 - Select the domain (Windows) 3 - Select the component (Window Events) The fast way (Using Keyboard shortcuts): 1 - Get the component using its name by typing (Window Events) Note : Stop typing when you see the required component is selected

Fig. (6) Component Browser – Select the component (Window Events)
After selecting the component click Ok or press ENTER
Fig. (7) Interaction page - Set the properties and enter the required data as in the image above

Fig. (8) Form Designer
Fig. (9) Goal Desginer - Steps Tree
Select the step (Window Controls) We will start now new interaction process to generate new steps to our steps tree. The slow way (Using Mouse): 1 - Click Interact to open the components browser 2 - Select the domain (ActiveX) 3 - Select the component (Define ActiveX control) The fast way (Using Keyboard shortcuts): 1 - Get the component using its name by typing (Define ActiveX control) Note : Stop typing when you see the required component is selected

Fig. (10) Component Browser – Select the component (Define ActiveX control)
After selecting the component click Ok or press ENTER
Fig. (11) Interaction page - Set the properties and enter the required data as in the image above

Fig. (12) Form Designer
Fig. (13) Goal Desginer - Steps Tree
Select the step (Procedures) We will start now new interaction process to generate new steps to our steps tree. The slow way (Using Mouse): 1 - Click Interact to open the components browser 2 - Select the domain (Structure Programming) 3 - Select the component (Define Procedure) The fast way (Using Keyboard shortcuts): 1 - Get the component using its name by typing (Define Procedure) Note : Stop typing when you see the required component is selected
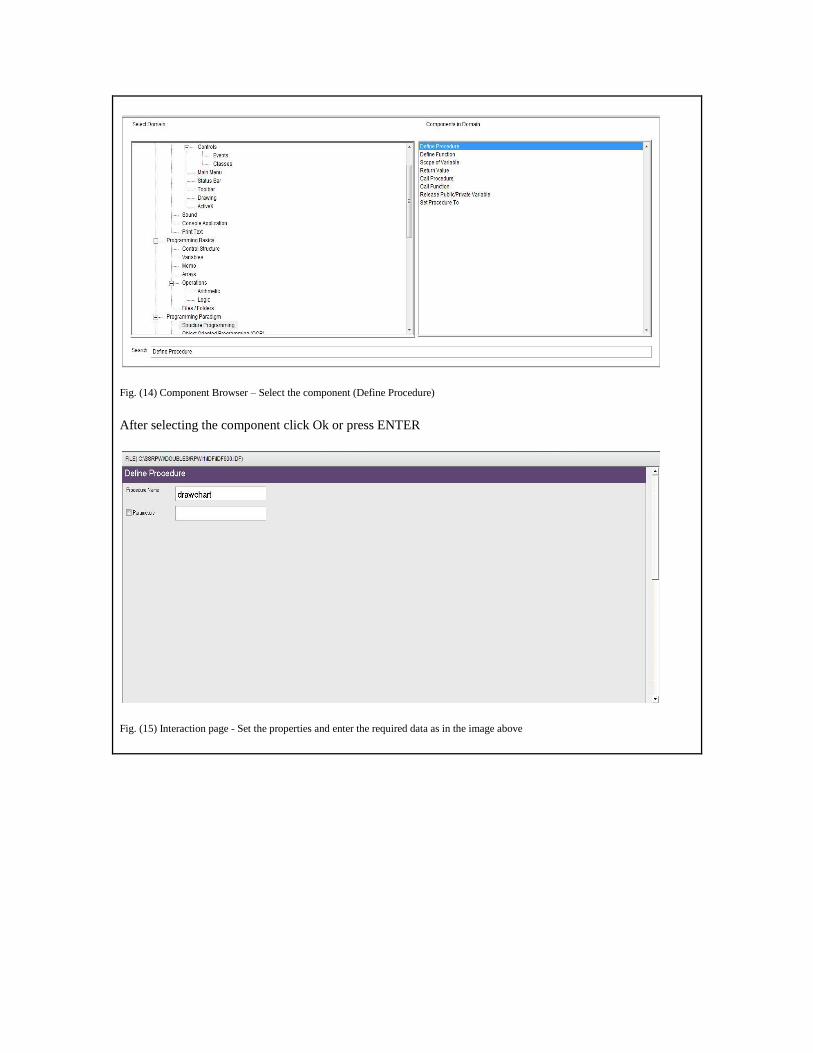
Fig. (14) Component Browser – Select the component (Define Procedure)
After selecting the component click Ok or press ENTER
Fig. (15) Interaction page - Set the properties and enter the required data as in the image above

Fig. (16) Goal Desginer - Steps Tree
Select the step (Start Here) We will start now new interaction process to generate new steps to our steps tree. The slow way (Using Mouse): 1 - Click Interact to open the components browser 2 - Select the domain (ActiveX) 3 - Select the component (ActiveX Object) The fast way (Using Keyboard shortcuts): 1 - Get the component using its name by typing (ActiveX Object) Note : Stop typing when you see the required component is selected
Fig. (17) Component Browser – Select the component (ActiveX Object)
After selecting the component click Ok or press ENTER

Fig. (18) Interaction page - Set the properties and enter the required data as in the image above
Fig. (19) Goal Desginer - Steps Tree
Select the step (Start Here) We will start now new interaction process to generate new steps to our steps tree. The slow way (Using Mouse): 1 - Click Interact to open the components browser 2 - Select the domain (ActiveX) 3 - Select the component (ActiveX Object) The fast way (Using Keyboard shortcuts): 1 - Get the component using its name by typing (ActiveX Object) Note : Stop typing when you see the required component is selected

Fig. (20) Component Browser – Select the component (ActiveX Object)
After selecting the component click Ok or press ENTER
Fig. (21) Interaction page - Set the properties and enter the required data as in the image above
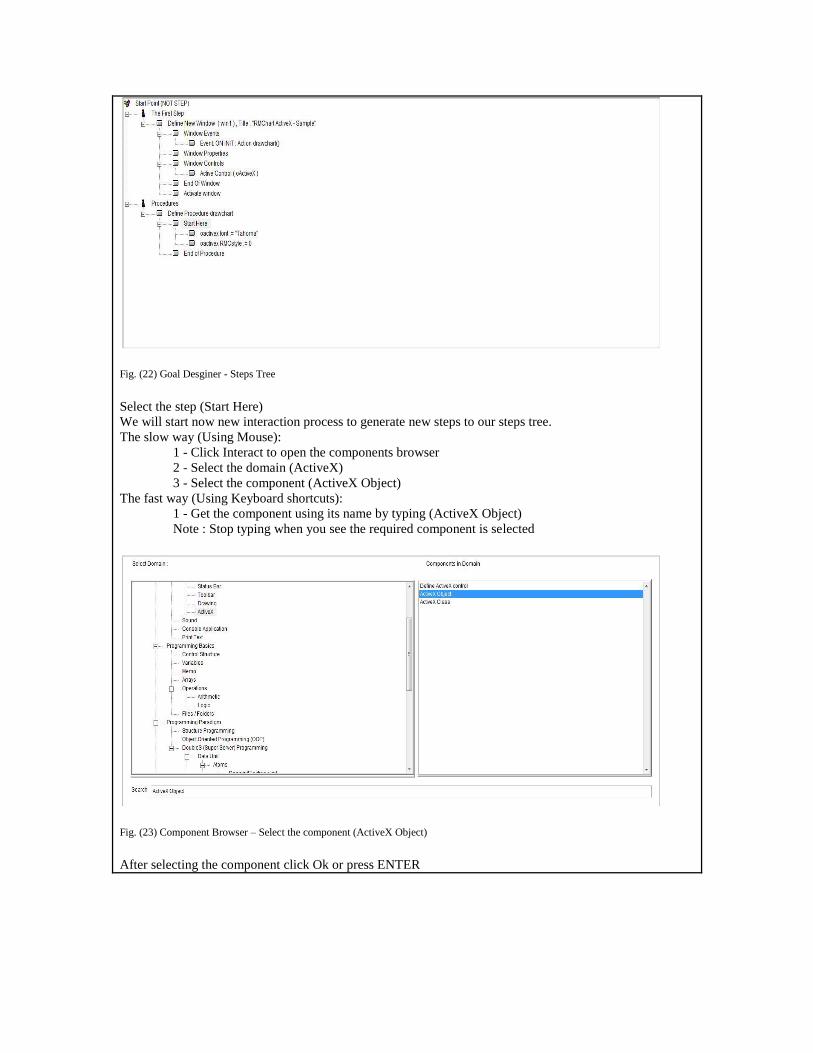
Fig. (22) Goal Desginer - Steps Tree
Select the step (Start Here) We will start now new interaction process to generate new steps to our steps tree. The slow way (Using Mouse): 1 - Click Interact to open the components browser 2 - Select the domain (ActiveX) 3 - Select the component (ActiveX Object) The fast way (Using Keyboard shortcuts): 1 - Get the component using its name by typing (ActiveX Object) Note : Stop typing when you see the required component is selected
Fig. (23) Component Browser – Select the component (ActiveX Object)
After selecting the component click Ok or press ENTER

Fig. (24) Interaction page - Set the properties and enter the required data as in the image above
Fig. (25) Goal Desginer - Steps Tree
Select the step (Start Here) We will start now new interaction process to generate new steps to our steps tree. The slow way (Using Mouse): 1 - Click Interact to open the components browser 2 - Select the domain (ActiveX) 3 - Select the component (ActiveX Object) The fast way (Using Keyboard shortcuts): 1 - Get the component using its name by typing (ActiveX Object) Note : Stop typing when you see the required component is selected

Fig. (26) Component Browser – Select the component (ActiveX Object)
After selecting the component click Ok or press ENTER
Fig. (27) Interaction page - Set the properties and enter the required data as in the image above
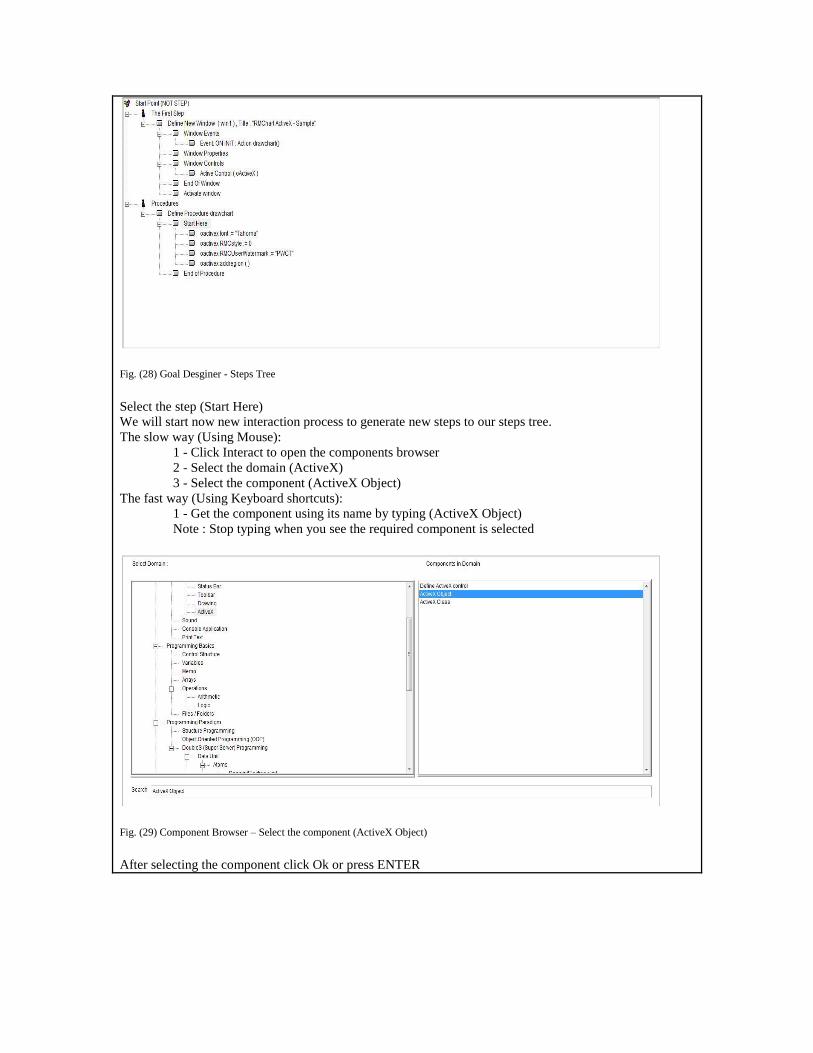
Fig. (28) Goal Desginer - Steps Tree
Select the step (Start Here) We will start now new interaction process to generate new steps to our steps tree. The slow way (Using Mouse): 1 - Click Interact to open the components browser 2 - Select the domain (ActiveX) 3 - Select the component (ActiveX Object) The fast way (Using Keyboard shortcuts): 1 - Get the component using its name by typing (ActiveX Object) Note : Stop typing when you see the required component is selected
Fig. (29) Component Browser – Select the component (ActiveX Object)
After selecting the component click Ok or press ENTER

Fig. (30) Interaction page - Set the properties and enter the required data as in the image above
Fig. (31) Goal Desginer - Steps Tree
Select the step (Start Here) We will start now new interaction process to generate new steps to our steps tree. The slow way (Using Mouse): 1 - Click Interact to open the components browser 2 - Select the domain (ActiveX) 3 - Select the component (ActiveX Object) The fast way (Using Keyboard shortcuts): 1 - Get the component using its name by typing (ActiveX Object) Note : Stop typing when you see the required component is selected

Fig. (32) Component Browser – Select the component (ActiveX Object)
After selecting the component click Ok or press ENTER
Fig. (33) Interaction page - Set the properties and enter the required data as in the image above

Fig. (34) Goal Desginer - Steps Tree
Select the step (Start Here) We will start now new interaction process to generate new steps to our steps tree. The slow way (Using Mouse): 1 - Click Interact to open the components browser 2 - Select the domain (ActiveX) 3 - Select the component (ActiveX Object) The fast way (Using Keyboard shortcuts): 1 - Get the component using its name by typing (ActiveX Object) Note : Stop typing when you see the required component is selected
Fig. (35) Component Browser – Select the component (ActiveX Object)
After selecting the component click Ok or press ENTER

Fig. (36) Interaction page - Set the properties and enter the required data as in the image above
Fig. (37) Goal Desginer - Steps Tree
Select the step (Start Here) We will start now new interaction process to generate new steps to our steps tree. The slow way (Using Mouse): 1 - Click Interact to open the components browser 2 - Select the domain (ActiveX) 3 - Select the component (ActiveX Object) The fast way (Using Keyboard shortcuts): 1 - Get the component using its name by typing (ActiveX Object) Note : Stop typing when you see the required component is selected

Fig. (38) Component Browser – Select the component (ActiveX Object)
After selecting the component click Ok or press ENTER
Fig. (39) Interaction page - Set the properties and enter the required data as in the image above

Fig. (40) Goal Desginer - Steps Tree
Select the step (Start Here) We will start now new interaction process to generate new steps to our steps tree. The slow way (Using Mouse): 1 - Click Interact to open the components browser 2 - Select the domain (ActiveX) 3 - Select the component (ActiveX Object) The fast way (Using Keyboard shortcuts): 1 - Get the component using its name by typing (ActiveX Object) Note : Stop typing when you see the required component is selected
Fig. (41) Component Browser – Select the component (ActiveX Object)
After selecting the component click Ok or press ENTER

Fig. (42) Interaction page - Set the properties and enter the required data as in the image above
Fig. (43) Goal Desginer - Steps Tree
Select the step (Start Here) We will start now new interaction process to generate new steps to our steps tree. The slow way (Using Mouse): 1 - Click Interact to open the components browser 2 - Select the domain (ActiveX) 3 - Select the component (ActiveX Object) The fast way (Using Keyboard shortcuts): 1 - Get the component using its name by typing (ActiveX Object) Note : Stop typing when you see the required component is selected

Fig. (44) Component Browser – Select the component (ActiveX Object)
After selecting the component click Ok or press ENTER
Fig. (45) Interaction page - Set the properties and enter the required data as in the image above

Fig. (46) Goal Desginer - Steps Tree
Select the step (Start Here) We will start now new interaction process to generate new steps to our steps tree. The slow way (Using Mouse): 1 - Click Interact to open the components browser 2 - Select the domain (ActiveX) 3 - Select the component (ActiveX Object) The fast way (Using Keyboard shortcuts): 1 - Get the component using its name by typing (ActiveX Object) Note : Stop typing when you see the required component is selected
Fig. (47) Component Browser – Select the component (ActiveX Object)
After selecting the component click Ok or press ENTER

Fig. (48) Interaction page - Set the properties and enter the required data as in the image above
Fig. (49) Goal Desginer - Steps Tree
Select the step (Start Here) We will start now new interaction process to generate new steps to our steps tree. The slow way (Using Mouse): 1 - Click Interact to open the components browser 2 - Select the domain (ActiveX) 3 - Select the component (ActiveX Object) The fast way (Using Keyboard shortcuts): 1 - Get the component using its name by typing (ActiveX Object) Note : Stop typing when you see the required component is selected

Fig. (50) Component Browser – Select the component (ActiveX Object)
After selecting the component click Ok or press ENTER
Fig. (51) Interaction page - Set the properties and enter the required data as in the image above

Fig. (52) Goal Desginer - Steps Tree
Select the step (Start Here) We will start now new interaction process to generate new steps to our steps tree. The slow way (Using Mouse): 1 - Click Interact to open the components browser 2 - Select the domain (ActiveX) 3 - Select the component (ActiveX Object) The fast way (Using Keyboard shortcuts): 1 - Get the component using its name by typing (ActiveX Object) Note : Stop typing when you see the required component is selected
Fig. (53) Component Browser – Select the component (ActiveX Object)
After selecting the component click Ok or press ENTER

Fig. (54) Interaction page - Set the properties and enter the required data as in the image above
Fig. (55) Goal Desginer - Steps Tree
Select the step (Start Here) We will start now new interaction process to generate new steps to our steps tree. The slow way (Using Mouse): 1 - Click Interact to open the components browser 2 - Select the domain (ActiveX) 3 - Select the component (ActiveX Object) The fast way (Using Keyboard shortcuts): 1 - Get the component using its name by typing (ActiveX Object) Note : Stop typing when you see the required component is selected
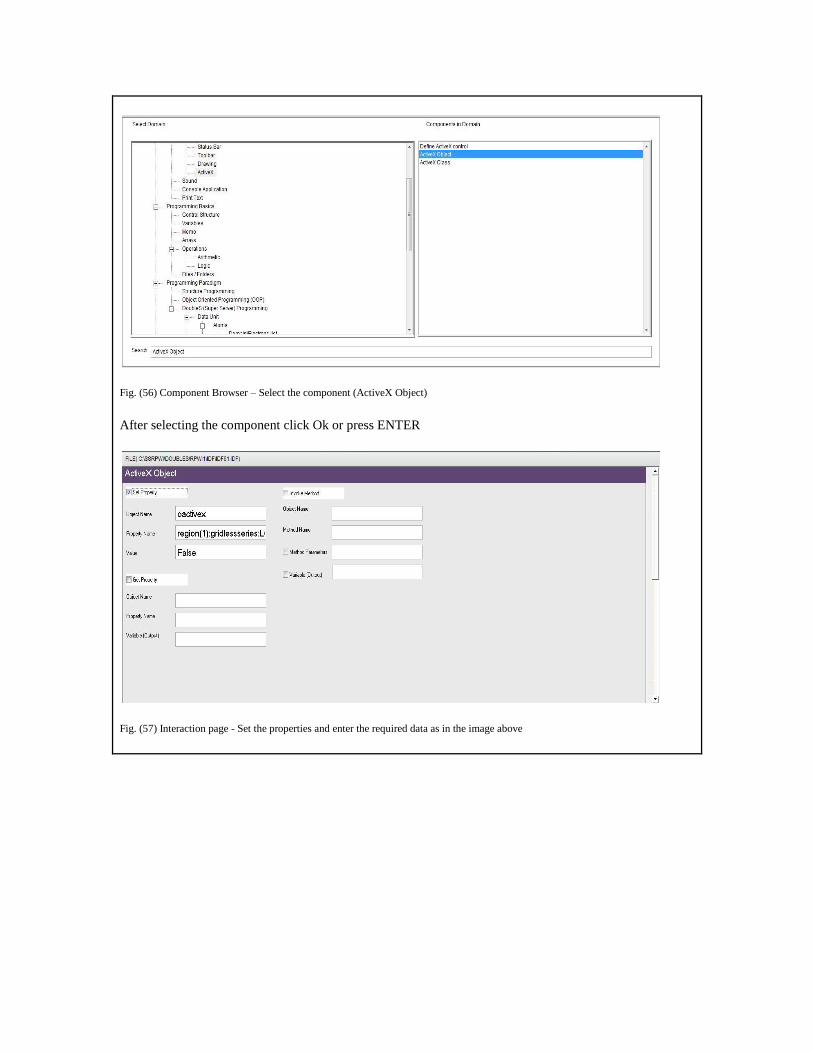
Fig. (56) Component Browser – Select the component (ActiveX Object)
After selecting the component click Ok or press ENTER
Fig. (57) Interaction page - Set the properties and enter the required data as in the image above

Fig. (58) Goal Desginer - Steps Tree
Select the step (Start Here) We will start now new interaction process to generate new steps to our steps tree. The slow way (Using Mouse): 1 - Click Interact to open the components browser 2 - Select the domain (ActiveX) 3 - Select the component (ActiveX Object) The fast way (Using Keyboard shortcuts): 1 - Get the component using its name by typing (ActiveX Object) Note : Stop typing when you see the required component is selected
Fig. (59) Component Browser – Select the component (ActiveX Object)
After selecting the component click Ok or press ENTER
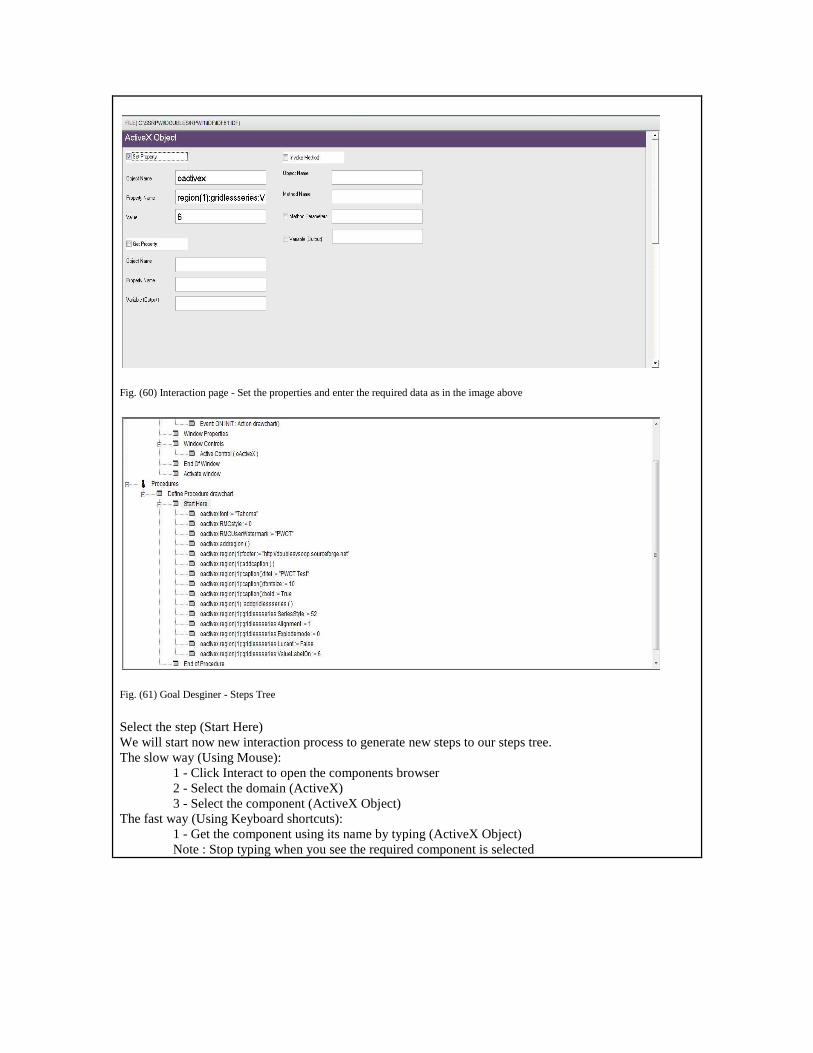
Fig. (60) Interaction page - Set the properties and enter the required data as in the image above
Fig. (61) Goal Desginer - Steps Tree
Select the step (Start Here) We will start now new interaction process to generate new steps to our steps tree. The slow way (Using Mouse): 1 - Click Interact to open the components browser 2 - Select the domain (ActiveX) 3 - Select the component (ActiveX Object) The fast way (Using Keyboard shortcuts): 1 - Get the component using its name by typing (ActiveX Object) Note : Stop typing when you see the required component is selected

Fig. (62) Component Browser – Select the component (ActiveX Object)
After selecting the component click Ok or press ENTER
Fig. (63) Interaction page - Set the properties and enter the required data as in the image above
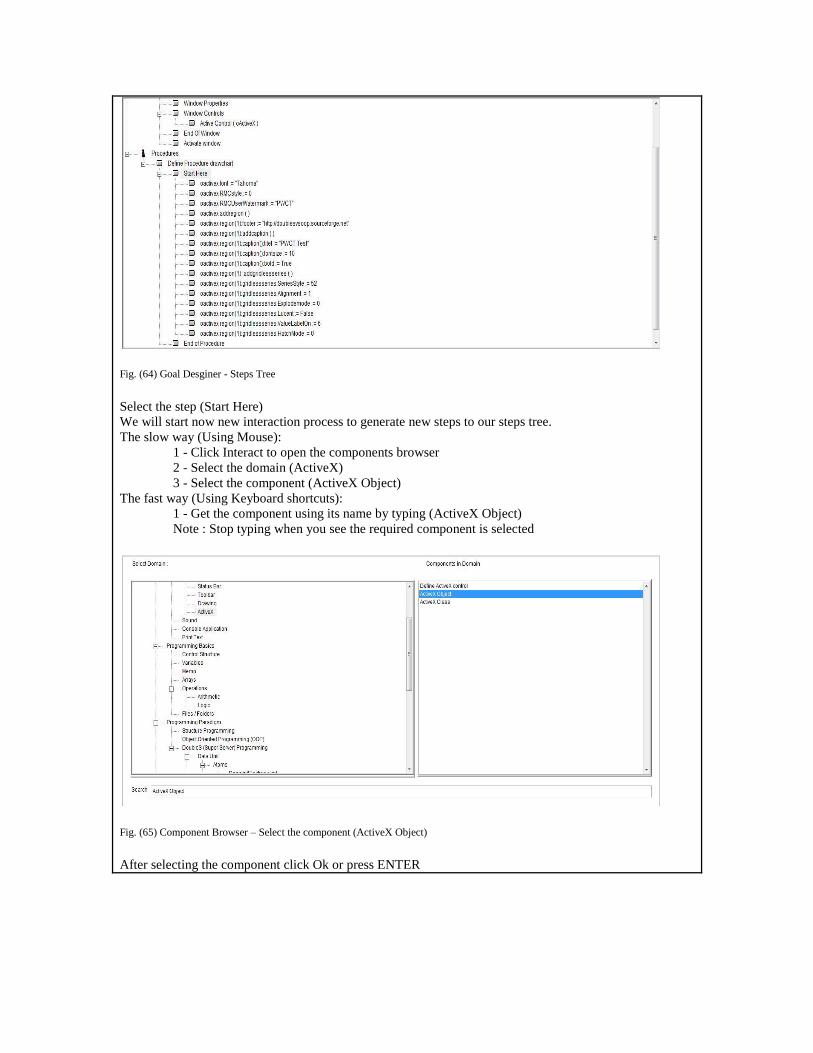
Fig. (64) Goal Desginer - Steps Tree
Select the step (Start Here) We will start now new interaction process to generate new steps to our steps tree. The slow way (Using Mouse): 1 - Click Interact to open the components browser 2 - Select the domain (ActiveX) 3 - Select the component (ActiveX Object) The fast way (Using Keyboard shortcuts): 1 - Get the component using its name by typing (ActiveX Object) Note : Stop typing when you see the required component is selected
Fig. (65) Component Browser – Select the component (ActiveX Object)
After selecting the component click Ok or press ENTER

Fig. (66) Interaction page - Set the properties and enter the required data as in the image above
Fig. (67) Goal Desginer - Steps Tree
Select the step (Start Here) We will start now new interaction process to generate new steps to our steps tree. The slow way (Using Mouse): 1 - Click Interact to open the components browser 2 - Select the domain (ActiveX) 3 - Select the component (ActiveX Object) The fast way (Using Keyboard shortcuts): 1 - Get the component using its name by typing (ActiveX Object) Note : Stop typing when you see the required component is selected

Fig. (68) Component Browser – Select the component (ActiveX Object)
After selecting the component click Ok or press ENTER
Fig. (69) Interaction page - Set the properties and enter the required data as in the image above

Fig. (70) Goal Desginer - Steps Tree
Select the step (Start Here) We will start now new interaction process to generate new steps to our steps tree. The slow way (Using Mouse): 1 - Click Interact to open the components browser 2 - Select the domain (ActiveX) 3 - Select the component (ActiveX Object) The fast way (Using Keyboard shortcuts): 1 - Get the component using its name by typing (ActiveX Object) Note : Stop typing when you see the required component is selected
Fig. (71) Component Browser – Select the component (ActiveX Object)
After selecting the component click Ok or press ENTER

Fig. (72) Interaction page - Set the properties and enter the required data as in the image above
Fig. (73) Goal Desginer - Final Steps Tree
3 - Final Steps Tree
The First Step Define New Window ( win1 ) , Title : "RMChart ActiveX - Sample" Window Events Event: ON INIT : Action drawchart() Window Properties Window Controls Active Control ( oActiveX ) End Of Window Activate window Procedures Define Procedure drawchart Start Here oactivex.font := "Tahoma" oactivex.RMCstyle := 0 oactivex.RMCUserWatermark := "PWCT" oactivex.addregion ( )

oactivex.region(1):footer := "http://doublesvsoop.sourceforge.net" oactivex.region(1):addcaption ( ) oactivex.region(1):caption():titel := "PWCT Test" oactivex.region(1):caption():fontsize := 10 oactivex.region(1):caption():bold := True oactivex.region(1) :addgridlessseries ( ) oactivex.region(1):gridlessseries:SeriesStyle := 52 oactivex.region(1):gridlessseries:Alignment := 1 oactivex.region(1):gridlessseries:Explodemode := 0 oactivex.region(1):gridlessseries:Lucent := False oactivex.region(1):gridlessseries:ValueLabelOn := 6 oactivex.region(1):gridlessseries:HatchMode := 0 oactivex.region(1):gridlessseries:StartAngle := 0 oactivex.region(1):gridlessseries:DataString := "30*15*40*35" oactivex.draw ( True ) End of Procedure
4 - Application during the runtime
Fig. (74) Application during the runtime