ProForm Emotion - Dedicated Support Website manual... · Model No. PFICVU369607.0 Serial No. _____!...
12
Model No. PFICVU369607.0 Serial No. ___________ ! WARNING Read all precautions and instructions in this manual before using this equipment. Save this manual for future reference. USER’S MANUAL QUESTIONS ? As a manufacturer, we are committed to providing com- plete customer satisfaction. If you have questions, or if there are missing or damaged parts, please call: : 08457 089 009 or write: ICON Health & Fitness, Ltd. Customer Service Department Unit 4 Revie Road Industrial Estate Revie Road Beeston Leeds, LS118JG UK email: [email protected] Serial Number decal Please visit our website for more information on the product www.iconsupport.eu
Transcript of ProForm Emotion - Dedicated Support Website manual... · Model No. PFICVU369607.0 Serial No. _____!...

Model No. PFICVU369607.0Serial No. ___________
! WARNINGRead all precautions and instructions in this manual before using this equipment. Save this manual for future reference.
USER’S MANUAL
QUESTIONS ?As a manufacturer, we are committed to providing com-plete customer satisfaction. If you have questions, or if there are missing or damaged parts, please call: :
08457 089 009or write:
ICON Health & Fitness, Ltd.Customer Service DepartmentUnit 4Revie Road Industrial EstateRevie RoadBeestonLeeds, LS118JGUK
email: [email protected]
Serial Number decal
Please visit our website for more information on the product
www.iconsupport.eu
REVISION E2008-03-06Sticker PFICVU39607
PFICVU39607 Main StickerProForm Emotion
Create by Claude CEARD
400 mm
83 mm
Monotype Corsiva Regular plus contour à 2pts

1
TABLE OF CONTENTS
IMPORTANT PRECAUTIONS . . . . . . . . . . . . . . . . . . . . . . . . . . . . . . . . . . . . . . . . . . . . . . . . . . . . . . . . . . . . . . . . . . . .2BEFORE YOU BEGIN . . . . . . . . . . . . . . . . . . . . . . . . . . . . . . . . . . . . . . . . . . . . . . . . . . . . . . . . . . . . . . . . . . . . . . . . . . .3ASSEMBLY . . . . . . . . . . . . . . . . . . . . . . . . . . . . . . . . . . . . . . . . . . . . . . . . . . . . . . . . . . . . . . . . . . . . . . . . . . . . . . . . . . .4CONSOLE DETAILS . . . . . . . . . . . . . . . . . . . . . . . . . . . . . . . . . . . . . . . . . . . . . . . . . . . . . . . . . . . . . . . . . . . . . . . . . . . 5PROGRAM DETAILS . . . . . . . . . . . . . . . . . . . . . . . . . . . . . . . . . . . . . . . . . . . . . . . . . . . . . . . . . . . . . . . . . . . . . . . . . . 6EXERCISE DETAILS . . . . . . . . . . . . . . . . . . . . . . . . . . . . . . . . . . . . . . . . . . . . . . . . . . . . . . . . . . . . . . . . . . . . . . . . 7EXERCISE GUIDE . . . . . . . . . . . . . . . . . . . . . . . . . . . . . . . . . . . . . . . . . . . . . . . . . . . . . . . . . . . . . . . . . . . . . . . . 8EXPLODED DRAWING . . . . . . . . . . . . . . . . . . . . . . . . . . . . . . . . . . . . . . . . . . . . . . . . . . . . . . . . . . . . . . . . . . . . . . . . 9 PARTS LIST. . . . . . . . . . . . . . . . . . . . . . . . . . . . . . . . . . . . . . . . . . . . . . . . . . . . . . . . . . . . . . . . . . . . . . . . . . . . . . . . . . . 10ORDERING REPLACEMENT PARTS . . . . . . . . . . . . . . . . . . . . . . . . . . . . . . . . . . . . . . . . . . . . . . . . . . . . .Back Cover

2
IMPORTANT PRECAUTIONS
1. It is the responsibility of the owner to ensure that all users of the vibration platform are adequate-ly informed of all warnings and precautions.
2. Operate the vibration platform only as de-scribed in this manual.
3. Do not operate the vibration platform until it is properly assembled.
4. Keep the vibration platform indoors, away from moisture and dust. Do not place the vibration platform in a garage or covered patio, or near water.
5. Place the vibration platform on a level sur-face. To protect the floor or carpet from damage, place a mat beneath the vibration platform.
6. Regularly inspect and tighten all parts of the vibration platform.
7. Keep children under the age of 12 and pets away from the vibration platform at all times.
8. The vibration platform should not be used by persons weighing more than 110 kg.
9. Never allow more than one person on the vibration platform at a time.
10. Always wear appropriate exercise clothes and athletic shoes when operating the vibration platform. Do not wear loose clothes that could be-come caught on the vibration platform.
11. Keep your back straight when using the vibration platform; do not arch your back. When standing on the vibration platform, bend your knees slightly and balance your weight on the balls of your feet.
12. If you feel pain or dizziness while exercising, stop immediately and cool down.
13. The following is a list of factors and condi-tions that may make exercising on the vibration platform inadvisable (this list is not exhaustive; it is intended only for reference). If one or more factors
or conditions apply to you, consult your physician before using the vibration platform.
• Knee or hip implant • Pacemaker • Recently placed screws, pins, bolts, orspirals • Acute hernia, discopathy, or spondylitis • Serious heart or vascular disease • Acute thrombosis • Tumor • Serious migraine • Epilepsy • Serious diabetes • Recent wound due to operation • Fresh inflammation • Pregnancy
14. It is recommended that you use the vibration platform no more than 15 minutes per day and no more than 3 times per week.
15. Be careful when stepping down from the vibration platform; your muscles will feel different after you exercise on the vibration platform.
16. When connecting the power cord, No other appliance should be on the same circuit as the vibration platform.
17. Do not modify the power cord or use an adapter to connect the power cord to an unsuit-able power socket. Keep the power cord away from heated surfaces. Do not use an extension cord.
18. Never leave the vibration platform unattended while it is running.
19. Never insert or drop any object into any open-ing on the vibration platform.
20.DANGER: Always unplug the power cord before cleaning the vibration platform and before performing the maintenance and adjustment pro-cedures described in this manual. Servicing other than the procedures in this manual should be performed by an authorized service representative only.
! WARNING:To reduce The risk of serious injury, read The following imporTanT pre-
cauTions and informaTion before operaTing The vibraTion plaTform.
! WARNING: Before beginning this or any exercise program, consult your physician. This is especially important for persons over the age of 35 or persons with pre-existing health problems. Read all instruc-tions before using. Icon Health & Fitness assumes no responsibility for personal injury or property damage sustained by or through the use of this product.
SAVE THESE INSTRUCTIONS

3
BEFORE yOU BEGIN
Congratulations for selecting the revolutionaryWESLO® ENERGY PLATE vibration platform. The vibration platform offers whole body vibra-tion options that will make your workouts effec-tive and enjoyable.For your benefit, read this manual carefully before using the WESLO® ENERGY PLATE vibration platform. If you have questions af-
ter reading this manual, please see HOW TO CONTACT CUSTOMER CARE the back cover. To help us assist you, note your product model number and serial number before contacting us. The model number and serial number can be found on a decal attached to the vibration platform (see the front cover of this manual for the location of the decal).
4
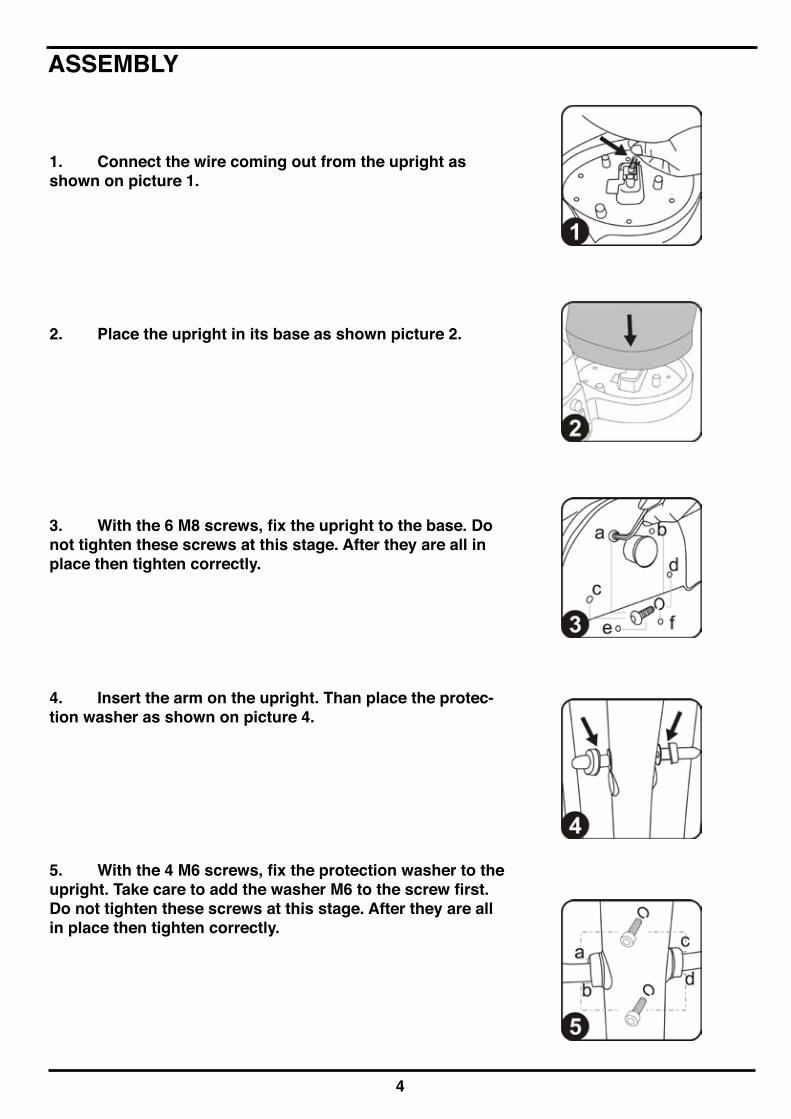
ASSEMBLy
1. Connect the wire coming out from the upright as shown on picture 1.
2. Place the upright in its base as shown picture 2.
3. With the 6 M8 screws, fix the upright to the base. Do not tighten these screws at this stage. After they are all in place then tighten correctly.
4. Insert the arm on the upright. Than place the protec-tion washer as shown on picture 4.
5. With the 4 M6 screws, fix the protection washer to the upright. Take care to add the washer M6 to the screw first. Do not tighten these screws at this stage. After they are all in place then tighten correctly.

5
CONSOLE DETAILS“ON/OFF” Button : Turn on electrical source, press this key and the machine begins the workout. Press thiskey again and this will stop the machine.
“Mode” Button : 9 different modes. 88 is a manual mode.This function you can manually adjust speed and time.P1,P2,P3,P4,P5,P6,P7 and P8 are automatic modes. When you select these modes, speed and time will runautomatically. (Timing and speed cannot be adjusted).
“Time” Button : Press this key and you can adjust theTime. Each press adds one minute to the time of exer-sice up to a maximum of 15 minutes.
“Speed up +” Button : Press this key to increase the speed“Speed down -” Button : Press this key to decrease the speed
USAGE INSTRUCTIONSConnect the power supply and press the “On” switch at the back of the machine. Then the ma-chine is ready to use. Press “xxxx” button, the machine begins to workout. Press this button again and the machine will return stop.
Please refer to the control details instruction to operate the machine
If you intend to adopt a standing position to use this machine, please stand on the machine be-fore you switch it on.
Please refer to the exercise example on page 10 for the ideal position on the machine. Icon Health & Fitness accept no responsibility for injury caused by misuse of this product.Many exercises are possible with this product, seek a professional advice from either a personal trainer or doctor.
For your safety and wellness, please do not use this product more than 15 minutes per day and 3 time per week.
MODE
TIME
SPEED

6
PROGRAM DETAILS
Program 88 : Manual Program : Allows you to adjust the vibration speed between 1 to 16
Program 1 or speed Pyramidal : The speed will increase one by one to 16 then reduce one by one and return to 1. Each point will last 0,5 seconds.
Program 2 or step by step resistance : The speed will increase to 16 by even numbers then reduce also by even numbers each point will last 5 seconds
Program 3 or Interval training : The speed runs only 1 or 16 and alternate between. Each point will last 5 seconds.
Program 4 or Interval inverse : The speed will increase to 16 only by odd numbers then reduce also by odd numbers each point will last 1 Second.
Program 5 or Interval training Endurance : The speed will change only to 1,8,1,16 at those 4 points each point will last 1,5 seconds.
Program 6 or long resistance Interval training : The speed will only increase from 1 to 16, each point will last 3 seconds.
Program 7 or back Resistance : The speed will only circulate from 16 to 1 each point will last 2,5 seconds
Program 8 or Interval training endurance : The speed will change only at 1,5,9,13,9,5 and just alternate, each point will last 2 seconds.
All programs run for 10 minutes only.

7
EXERCISE DETAILS
CALF RAISE※ Posture: place the feet in the middle of the plate and lift the heels. Knees slighty bent, the back is straight and the position is maintained while looking straight ahead. Tense abdomen.※ Affected area: tibialis and calves.
SQUAT (HORSEBACK RIDING POSITION)※ Posture: place feet in the middle of the plate, shoulder width apart. The knees bend approximately 80 degree (the user should be able to see the toes and part of the feet). Back straight, maintain balance. Keep weight mostly on forefoot.※ Affected area: quadriceps, tibialis, and calves.
SINGLE LEG SQUAT※ Posture: step on the plate with the main foot. Place other foot along side the Vibration machine next to it. One leg is held up as shown in the diagram (90 degree or more). Hold the handle bar to maintain a straight chest and back. Maintain balance, chin slightly tilted upward.※ Affected area: quadriceps.
BICEPS CURL※ Posture: step on the plate, hold the rope and main-tain the tension of the arms. Bend the knees and the hip slightly. Maintain the back straight and the head is tilted upward.※ Affected area: trapezius, biceps, forearms, quadri-ceps, and tibialis
LATERAL SIDE RAISE※ Posture: hold the rope, and lift the arms slightly. The knees are bent 20~30 degree. Tension is placed on the hip and the abdomen.※ Affected area: trapezius, deltoids, tibialis, and calves.
PRESS UP※ Posture: place hands in the middle of the plate at shoulder width. Keep legs and knees straight. Bend elbows about 90 degree, and retract to the starting postion.※ Affected area: deltoid, pectorals, forearms, and triceps.
TRICEP DIPS※ Posture: place hands in the middle of the plate at shoulder width apart. The fingers point away from the user. Hold the feet near the machine, lift the heels, sustain the body with only the feet and the arms.※ Affected area: trapezius, deltoids, forearms, triceps and pectorals.
CRUNCH SIT※ Posture: place a small mat or towel on the plate and sit on the plate. Lift the legs (together and slight-ly bent), move upper body toward the knees as they come up (you could put feet on step at hip width).※ Affected area: abdominal.
PELVIS STABILIzATION※ Posture: place a mat on the floor. Place the toes on the plate, and keep feet together. Hold the body in a straight position.※ Affected area: abdominals.
ABDOMINAL BEND※ Posture: Sit on the plate, both hands backward and hold the plate to maintain body balance. Legs bend up about 45degree angle.※ Affected area: abdominal.
HIP MASSAGE※ Posture: Face to the machine. Put a mat or towel on the plate, sit on it and place each leg on either side of the machine. Hold the handlebar. Keep the back straight.※ Affected area: Gluteus Maximus
SHOULDER PRESS※ Place both hands on the middle of the plate, shoul-der width apart, with the fingers pointing away from the user. The feet are held near the machine, sus-taining the body with only the feet and the arms.※ Affected area: Pectoralis Major.
SIDE LUNGE※ Posture: keep the back straight and pressure is Place one foot on the middle of the plate, hold the handlebar and bend the knees approximately 60-90degrees. Maintain the back straight. Balance is maintained in this position, chin slightly titled upward.※ Affected area: quadriceps.
FRONT RAISE※ Posture: Place one foot on the middle of the plate, hold the handlebar and bend the knees slightly. Maintain the back straight. Balance is maintained in this position, chin slightly titled upward.※ Affected area: Lateral Deltoid
8
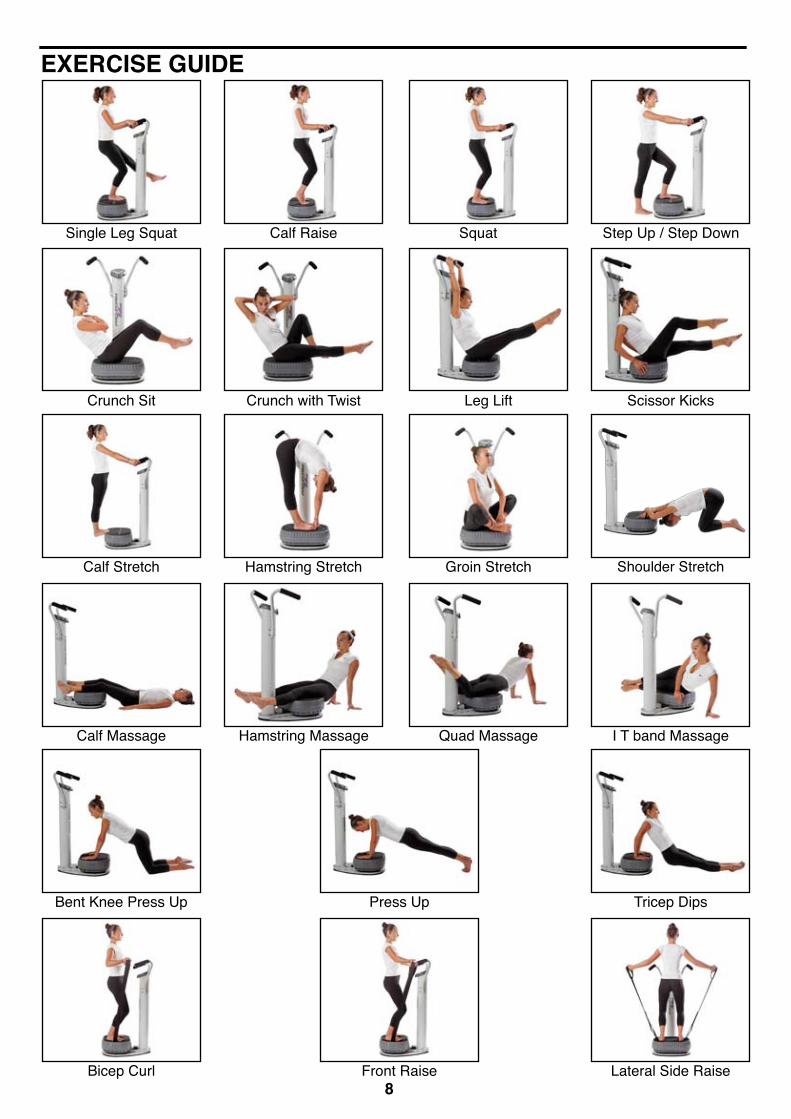
EXERCISE GUIDE
Single Leg Squat Calf Raise Squat Step Up / Step Down
Bent Knee Press Up Press Up Tricep Dips
Crunch Sit Crunch with Twist Leg Lift Scissor Kicks
Calf Massage Hamstring Massage Quad Massage I T band Massage
Calf Stretch Hamstring Stretch Groin Stretch Shoulder Stretch
Bicep Curl Front Raise Lateral Side Raise

EXPLODED DRAWING—Model No. PFICVU39607.0
9

10
PART LIST—Model No. PFICVU39607.0Item282930313233343536373839404142434445464748495051525354
PartsFrame of Circuit BoardRubber CushionIron PlateGB/T845 ST6x20 Self-tapping ScrewGB/T845 ST4x12 Self-tapping ScrewGB/T818 M6x12 ScrewPower CordFrame of Power SupplySide cover lineGB/T845 ST3x12 Self-tapping ScrewFrame of AdaptorAdaptorAdapter fixerGB/T3632 M6 NutGB/T93 6 Spring washerPower cord fixerSwitchFuseCable StandCableLower Control BoardGB/T845 ST3X30 Self-tapping screwGB/T845 ST3X20 Self-tapping screwGB/T70.1 M6X20 BoltHandle CoverControl BoardPanel
Qty.2121412121121111111121112
Item123456789101112131415161718192021222324252627
PartsLong CablePanel StickerShort CableHandle BarUpright TubeSecond Panel StickerComponents forVibration PlateBearing CoverBearing SetRubber cushionFlat BlockMotorGB/T5780 M8x40 BoltGB/T5780 M6x40 BoltWasherRubber washerMotor BasePVC CushionMotor CoverBig washerGB/T93 8 Spring washerGB/T3632 M8 NutGB/T818 M5x20 Screw WasherGB/T93 5 Spring WasherGB/T845 ST3x10 Self-tapping ScrewPower Supply Board
Qty.15
13161
12331
242241143162141121

ORDERING REPLACEMENT PARTS
To order replacements parts, please see the front cover of this manual for contact information. To help us assist you, be prepared to provide the following information when calling :
- Model number of the product (PFICVU39607.0)- The Key number and description of the product of the desired parts ( see the part list)- The proof of purchase
IMPORTANT RECyCLING INFORMATION FOR E. U. CUSTOMERS
This electronic product must not be disposed of in municipal waste. To pre-serve the environment, this product must be recycled after its useful life as required by law. Please use recycling facilities that are authorized to collect this type of waste in your area. In doing so, you will help to conserve natural resources and improve European standards of environmental protection. If you require more information about safe and correct disposal methods, please contact your local city office or the establishment where you purchased this product.
Printed in China © 2008 Icon Health & Fitness, Inc.
Important Recycling Information for E. U. Customers
This electronic product must not be disposed of in municipal waste. To preservethe environment, this product must be recycled after its useful life as required bylaw. Please use recycling facilities that are authorized to collect this type of waste inyour area. In doing so, you will help to conserve natural resources and improveEuropean standards of environmental protection. If you require more information aboutsafe and correct disposal methods, please contact your local city office or the establish-ment where you purchased this product.
Importante Información Sobre Reciclaje para los Clientes de la U.E.
Este producto electrónico no deberá arrojarse en ningún caso a los cubos de basura municipales. Conel fin de preservar el medio ambiente, este producto deberá reciclarse una vez concluida su vida útilsegún lo estipulado en la legislación vigente. Utilice las instalaciones de reciclaje autorizadas para recopilareste tipo de residuos en su zona. Al hacerlo, estará ayudando a conservar los recursos naturales y a mejorarlos estándares europeos de protección medioambiental. Si desea obtener más información sobre métodosseguros y correctos para deshacerse de este tipo de productos, póngase en contacto con la oficina municipal ocon el establecimiento en el que adquirió este producto.
Informação Importante Sobre Reciclagem para Clientes da União Europeia
Este produto electrónico não deve ser depositado numa lixeira municipal. Para preservar o ambiente,este produto deve ser reciclado após o fim da sua vida útil, tal como exigido por lei. Por favor, use asinstalações de reciclagem que estejam autorizadas a recolher este tipo de resíduos na sua área. Ao fazê-lo,estará a ajudar a preservar os recursos naturais e a melhorar os padrões europeus de protecção ambiental. Seprecisar de mais informações sobre métodos seguros e correctos de eliminação de resíduos, contacte o depar-tamento municipal adequado ou o estabelecimento onde adquiriu este produto.
Informazioni Importanti per il Riciclaggio per i Clienti dell’UE
Questo prodotto elettronico non deve essere smaltito unitamente ai rifiuti urbani. Al fine della conser-vazione dell’ambiente, questo prodotto deve essere riciclato al termine del suo utilizzo secondo lemodalità previste dalla legge. Rivolgersi alle opportune strutture locali di riciclaggio autorizzate al ritiro diquesto tipo di rifiuti. In questo modo, si contribuisce alla preservazione delle risorse naturali e al miglioramentodegli standard europei di protezione ambientale. Qualora si necessiti di ulteriori informazioni sui metodi sicuri ecorretti per lo smaltimento, rivolgersi all’ufficio locale preposto o all’azienda da cui è stato acquistato questoprodotto.
�ажные сведения по утилизации для заказчиков из �вросоюза
�анное электронное изделие нельзя выбрасывать вместе с бытовым мусором. � целях защиты окружающейсреды по истечении срока службы данное изделие должно быть утилизировано в соответствии сзаконодательством. Обратитесь в службу по утилизации, авторизованную для утилизации данного типа мусора ввашем регионе. Этим вы поможете сохранению природных ресурсов и повышению европейских стандартов по защитеокружающей среды. �ри необходимости получения дополнительной информации о безопасной и правильной утилизацииотходов обратитесь в местный городской офис по утилизации или по месту приобретения данного изделия.