Professional Shoulder Mount Deer - Auto Tanner, LLC Today, we have focused on the professional...
6
First off, let’s take the carding off our ears. This carding has held the edge of the ear in perfect alignment throughout the drying process. The edge is crisp and clean – just like we want it! Brush-out the inner ear hairs with a wire brush. This helps remove any debris from the hair as well as get the inner-ear hair pattern in proper place- ment. With the nose fully dried, we can remove the plastic that we inserted into the nostril to lock the inner nostril skin in place during drying. The plastic has done it’s job perfectly! The inner nostril skin is locked in place throughout the concave inner nostril structure. WELCOME BACK! We are almost at the completion of our professional deer mount. Throughout the past three issues of Taxidermy Today, we have focused on the professional mounting tech- niques I use when skinning, fleshing, auto tanning, manikin prep and mounting a deer shoulder mount. From the very beginning of Part #1 of this article series, I made it clear that the purpose of this article series was to concentrate on the specific techniques involved in creating a high quality professional mount for your customer. Providing you with techniques that can be repeated a thousand times to satisfy the American sportsman has been my goal from the beginning. Techniques that you can build a business upon and satisfy your customers is the heart and soul of the taxidermy industry. It’s not the competitions and the “thousand hour” deerhead that makes the taxidermy industry GREAT. Instead, it’s the consistent quality of a “repeatable” professional whitetail mount that keeps the finan- cial gears of this industry turning. It’s the professional taxidermists (full- time or part-time) across America in their taxidermy studios, basements or garages that have built our industry and created a strong livelihood that we enjoy today. This article series is dedicated to you. YOU are the reason America has the strongest taxidermy industry in the world! Professional Shoulder Mount Deer Part 4 — Finishing By Dan Rinehart Dan Rinehart is a taxidermist and owner of Rinehart Taxidermy School & Supply, WI. Dan also performs wholesale fish taxidermy for taxidermists throughout the United States. If you would like information about Dan’s wholesale fish mounting service, sup- plies or the Rinehart Taxidermy School, you can contact him at Rinehart Taxidermy School & Supply, 203 South Main St., Edgerton, WI 53534 or call toll free 866-296-2782 or 608-884-3047. Our deer has dried and is ready for finishing work. In general, I like to give a deer mount at least two weeks to dry. If you live in a humid climate, I strongly recommend an air conditioner and de-humidifier to achieve complete drying. For those of you in a dry climate such as Arizona, a few days to a week might be all the time needed for drying. Be aware of your climate and judge your drying time accordingly.
-
Upload
hoanghuong -
Category
Documents
-
view
216 -
download
2
Transcript of Professional Shoulder Mount Deer - Auto Tanner, LLC Today, we have focused on the professional...

First off, let’s take the carding off ourears. This carding has held the edge ofthe ear in perfect alignment throughoutthe drying process. The edge is crispand clean – just like we want it!
Brush-out the inner ear hairs with awire brush. This helps remove anydebris from the hair as well as get theinner-ear hair pattern in proper place-ment.
With the nose fully dried, we canremove the plastic that we inserted intothe nostril to lock the inner nostril skinin place during drying.
The plastic has done it’s job perfectly!The inner nostril skin is locked in placethroughout the concave inner nostrilstructure.
WELCOME BACK!We are almost at the completion ofour professional deer mount.Throughout the past three issues ofTaxidermy Today, we have focusedon the professional mounting tech-niques I use when skinning, fleshing,auto tanning, manikin prep andmounting a deer shoulder mount.From the very beginning of Part #1of this article series, I made it clearthat the purpose of this article serieswas to concentrate on the specifictechniques involved in creating ahigh quality professional mount foryour customer. Providing you withtechniques that can be repeated athousand times to satisfy theAmerican sportsman has been mygoal from the beginning. Techniquesthat you can build a business uponand satisfy your customers is theheart and soul of the taxidermyindustry. It’s not the competitionsand the “thousand hour” deerheadthat makes the taxidermy industryGREAT. Instead, it’s the consistentquality of a “repeatable” professionalwhitetail mount that keeps the finan-cial gears of this industry turning. It’sthe professional taxidermists (full-time or part-time) across America intheir taxidermy studios, basements orgarages that have built our industryand created a strong livelihood thatwe enjoy today. This article series isdedicated to you. YOU are the reasonAmerica has the strongest taxidermyindustry in the world!
ProfessionalShoulder Mount
DeerPart 4 — Finishing
By Dan Rinehart
Dan Rinehart is a taxidermist and owner ofRinehart Taxidermy School & Supply, WI.Dan also performs wholesale fish taxidermyfor taxidermists throughout the UnitedStates. If you would like information aboutDan’s wholesale fish mounting service, sup-plies or the Rinehart Taxidermy School, youcan contact him at Rinehart Taxidermy School& Supply, 203 South Main St., Edgerton, WI 53534or call toll free 866-296-2782 or 608-884-3047.
Our deer has dried and is ready for finishing work. In general, I liketo give a deer mount at least two weeks to dry. If you live in a humidclimate, I strongly recommend an air conditioner and de-humidifier toachieve complete drying. For those of you in a dry climate such asArizona, a few days to a week might be all the time needed for drying.Be aware of your climate and judge your drying time accordingly.
Taxidermy Today — November/December 2006, page 2
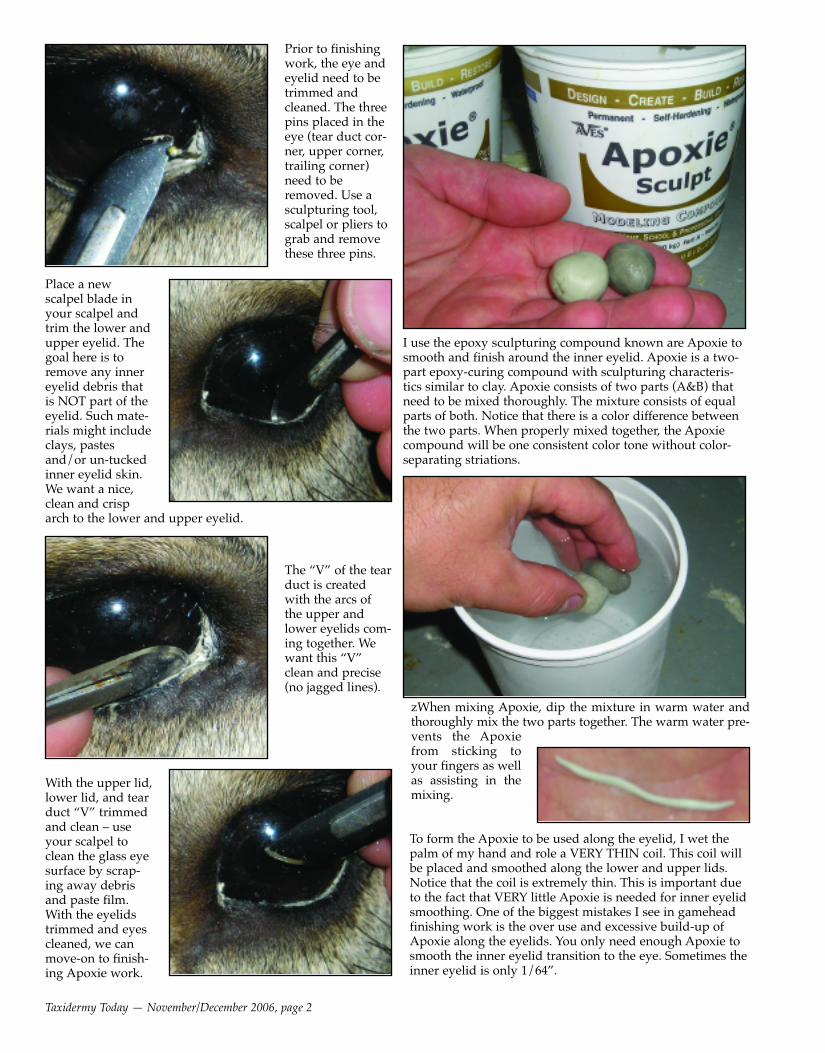
The “V” of the tearduct is createdwith the arcs ofthe upper andlower eyelids com-ing together. Wewant this “V”clean and precise(no jagged lines).
Place a newscalpel blade inyour scalpel andtrim the lower andupper eyelid. Thegoal here is toremove any innereyelid debris thatis NOT part of theeyelid. Such mate-rials might includeclays, pastesand/or un-tuckedinner eyelid skin.We want a nice,clean and crisparch to the lower and upper eyelid.
Prior to finishingwork, the eye andeyelid need to betrimmed andcleaned. The threepins placed in theeye (tear duct cor-ner, upper corner,trailing corner)need to beremoved. Use asculpturing tool,scalpel or pliers tograb and removethese three pins.
With the upper lid,lower lid, and tearduct “V” trimmedand clean – useyour scalpel toclean the glass eyesurface by scrap-ing away debrisand paste film.With the eyelidstrimmed and eyescleaned, we canmove-on to finish-ing Apoxie work.
I use the epoxy sculpturing compound known are Apoxie tosmooth and finish around the inner eyelid. Apoxie is a two-part epoxy-curing compound with sculpturing characteris-tics similar to clay. Apoxie consists of two parts (A&B) thatneed to be mixed thoroughly. The mixture consists of equalparts of both. Notice that there is a color difference betweenthe two parts. When properly mixed together, the Apoxiecompound will be one consistent color tone without color-separating striations.
zWhen mixing Apoxie, dip the mixture in warm water andthoroughly mix the two parts together. The warm water pre-vents the Apoxiefrom sticking toyour fingers as wellas assisting in themixing.
To form the Apoxie to be used along the eyelid, I wet thepalm of my hand and role a VERY THIN coil. This coil willbe placed and smoothed along the lower and upper lids.Notice that the coil is extremely thin. This is important dueto the fact that VERY little Apoxie is needed for inner eyelidsmoothing. One of the biggest mistakes I see in gameheadfinishing work is the over use and excessive build-up ofApoxie along the eyelids. You only need enough Apoxie tosmooth the inner eyelid transition to the eye. Sometimes theinner eyelid is only 1/64”.

Taxidermy Today — November/December 2006, page 3
I simply start at the back corner andplace the coil along the lower eyelid,ending at the tear duct “V”.
Once the coil is placed, I use a stainlesssteel sculpturing tool to smooth theApoxie and remove any excess.
I then place the remainder of the coilalong the upper eyelid, starting at theback corner and ending at the tear duct“V”. Again, I use a sculpturing tool tosmooth, sculpture and remove excessApoxie.
Sometimes the BEST sculpturing tool isa quality sable brush. I find that I cansmooth and feather Apoxie best with asmall flat edged sable brush. I use thisbrush 360 degrees around the eyelidand tear duct to smooth the Apoxieperfectly with the eyelid skin.
I am purposely placing the tip of mymetal sculpturing tool on the insideedge of the lower eyelid to demon-strate that the inner eyelid drops downto the surface of the eye. Over filling ofthis inner eyelid would un-naturallyfill-in this area. So, be conservativewith the Apoxie rebuilding.
I use my flat sable brush to smooththese lines – changing the “edgy” linesto smooth full folds. The lower lip isdone.
With both eyes cleaned and sculpted,let’s move on to the lower lip. It’s easyto see that the lower lip has shrunkenduring the drying process. This lowerlip should be full and fleshy. Therefore,we are going to need to rebuild thisarea with Apoxie to recreate the naturalfleshiness.
The lower lip has vertical creases andfolds. I recreate these by using a pin tosculpture these creases in the lower lip.The pin creates un-natural “edgy” linesin the lip.
Similar to the coil placed along the eye-lid, another Apoxie coil is placed alongthe lower lip. Again, I grab my “trusty”flat sable brush to smooth and featherthe Apoxie throughout the lower lip.

Taxidermy Today — November/December 2006, page 4
Again, use the sable brush to perfectlyfeather the Apoxie at the nostril skinand septum juncture.
I’ve taken a “straight-on” photo of thenostril so that you can see the depth ofthe nostril. You can see that the nostrilcavity remains open and deep. This“disappearing” nostril matches the livedeer and is an excellent “selling-point”to show your customers—they will beimpressed! Notice that the nose pad isflat and un-textured. We are about tochange that!
This is a side-view of the finished nos-tril. This angle shows the feathering atthe septum juncture.
I’m going to show you a fast and easyway to recreate nose pad structure.First, grind the point of a syringe flat.
Place the needle in rebuilding gel andslowly pull the plunger, drawing thegel into the syringe. NOTE: I used ourwhite fin glue to rebuild the nose padstructure. Any rebuilding material thatflows into a syringe will do just fine.
Applying slight pressure to thesyringe plunger and movingthe tip of the flattened syringefrom nodule to nodule createsquick and easy nose-pad struc-ture. I rebuild every-other nod-ule over the entire nose padsurface. These individual nod-ules need to start to dry beforeI fill in the remaining nodules –completing the nose pad struc-ture. NOTE: If the nodulestouch when they are wet, thesmaller nodules will flowtogether, creating one un-natu-rally large pad. Therefore, letthe first nodules dry and thencome back and complete byplacing the remaining nodules.
Moving-on to the inner nostrils, we cansee that there is a gap between theinner nostril skin and the fleshy-pinkseptum. Manikin foam is visible in thisarea. Using Apoxie, we need to smoothand bridge the gap between the innernostril skin and the septum.
Mix and roll a small coil of Apoxie anduse a sculpturing tool to place Apoxiebetween the end of the inner nostrilskin and the septum. Use a sculpturingtool to press, sculpture and feather theApoxie between these two points.

Taxidermy Today — November/December 2006, page 5
When airbrushing around the eyes, Iuse Dark Brown by Lifetone. Lifetonecomes pre-mixed and ready for the air-brush. For small airbrushing jobs suchas deer finishing, I use a Paasche H1airbrush with a color cup for the paint.
A light fade along the tear duct and theeye is done.
It is important to use as little paint as possible when performing the air-brush coloration around eyes, nose, lips and ears. A common mistake I seeis the over coloring of these areas, resulting in a “Tammy Faye” Deerhead.In my school I use the term “toning” to describe the coloration aroundeyes, lips, nose and ears. The term “painting” represents a heavier applica-tion of paint that I work to lead my students away from. When coloringaround the eye, I adjust my airbrush to a very light spray and apply coloraround the eye. Notice that I keep paint off the hair and I create a smoothsubtle fade. The color is dark along the juncture of the eye but fades as youmove away from the eye. Also notice that even less paint is used on theupper eyelid.
Apply gel along the vertical folds inthe lower lip to enhance the fullness ofthe sculpted folds. Allow the Apoxieand gel to set (approximately 3 hours)and then you are ready for airbrushfinishing.
I start the coloration of the inner earwith Pure White.
You can see that Ihave moved thehair and toned thetop two inner earcreases. It’s impor-tant to move thehair out of the wayso that you canachieve an eventoning throughoutthe inner ear sur-face and keeppaint build-up offthe inner ear hair.
While we have the PureWhite in the color cup,lightly mist the inside ofthe nostril. Keep PureWhite off the dark coloredhair of the inner nostrilskin. Also, do not overpaint the septum. We stillwant to see some of thefleshy pink of the septum.
Taxidermy Today — November/December 2006, page 6
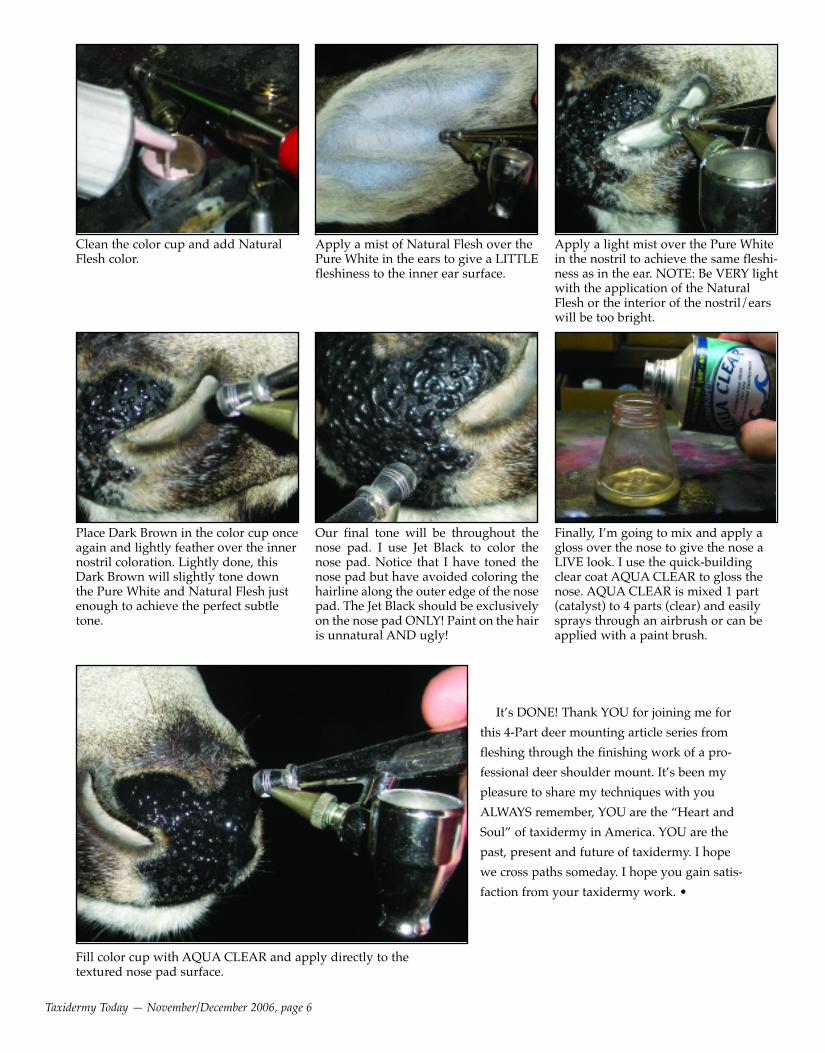
Clean the color cup and add NaturalFlesh color.
Apply a mist of Natural Flesh over thePure White in the ears to give a LITTLEfleshiness to the inner ear surface.
Apply a light mist over the Pure Whitein the nostril to achieve the same fleshi-ness as in the ear. NOTE: Be VERY lightwith the application of the NaturalFlesh or the interior of the nostril/earswill be too bright.
Place Dark Brown in the color cup onceagain and lightly feather over the innernostril coloration. Lightly done, thisDark Brown will slightly tone downthe Pure White and Natural Flesh justenough to achieve the perfect subtletone.
Our final tone will be throughout thenose pad. I use Jet Black to color thenose pad. Notice that I have toned thenose pad but have avoided coloring thehairline along the outer edge of the nosepad. The Jet Black should be exclusivelyon the nose pad ONLY! Paint on the hairis unnatural AND ugly!
Finally, I’m going to mix and apply agloss over the nose to give the nose aLIVE look. I use the quick-buildingclear coat AQUA CLEAR to gloss thenose. AQUA CLEAR is mixed 1 part(catalyst) to 4 parts (clear) and easilysprays through an airbrush or can beapplied with a paint brush.
Fill color cup with AQUA CLEAR and apply directly to thetextured nose pad surface.
It’s DONE! Thank YOU for joining me forthis 4-Part deer mounting article series fromfleshing through the finishing work of a pro-fessional deer shoulder mount. It’s been mypleasure to share my techniques with youALWAYS remember, YOU are the “Heart andSoul” of taxidermy in America. YOU are thepast, present and future of taxidermy. I hopewe cross paths someday. I hope you gain satis-faction from your taxidermy work. •