Product Provisioning - VMware Workspace ONE UEM 1905 · UEM server and the rugged device for...
129
Product Provisioning VMware Workspace ONE UEM 1905
Transcript of Product Provisioning - VMware Workspace ONE UEM 1905 · UEM server and the rugged device for...
Product Provisioning
VMware Workspace ONE UEM 1905

You can find the most up-to-date technical documentation on the VMware website at:
https://docs.vmware.com/
If you have comments about this documentation, submit your feedback to
VMware, Inc.3401 Hillview Ave.Palo Alto, CA 94304www.vmware.com
Copyright © 2019 VMware, Inc. All rights reserved. Copyright and trademark information.
Product Provisioning
VMware, Inc. 2
Contents
1 Introduction to Product Provisioning 6Supported Devices, OS, and Agents, Product Provisioning 6
2 Relay Servers 8Configure a Relay Server 10
Batch Import Relay Servers 13
Pull Service Based Relay Server Configuration 14
Create a Windows Based Pull Relay Server 15
Create a Linux Based Pull Relay Server 16
Move an Existing Pull Relay Server From One Organization Group to Another 17
View Remote Files on Relay Server 18
3 Device Staging 19Use the Enrollment Configuration Wizard 19
Generate a QR Code with the Enrollment Configuration Wizard, Android 20
Generate a Barcode Staging Package with the Enrollment Configuration Wizard 21
Generate a Sideload Staging Package with the Enrollment Configuration Wizard, Android andWindows Rugged 23
Enroll with Web Enrollment, Windows Rugged 24
Create a Manual Staging Package 24
Configure Advanced Staging 25
Wi-Fi Profiles for Staging 26
Barcode Staging 26
Generate a Barcode Staging Package 27
Sideload Staging Packages 28
Generate a Sideload Staging Package with the Configuration Wizard 29
Install a Sideload Staging Package, Android 29
Install a Sideload Staging Package, WinRugg 30
Enroll Honeywell Devices with Sideload Staging, Android 31
Create Sideload Staging Bundle with Platform OEM Service 32
Use the Sideload Staging Utility, WinRugg 33
Uninstall a Sideload Staging Package, WinRugg 34
AirWatch CAB Creator, WinRugg 35
Create a Custom CAB, WinRugg 36
Android Device Enrollment with the Workspace ONE Intelligent Hub 38
Enroll Zebra Devices with Stage Now Barcode, Android 39
Zebra Stage Now Special Characters, Android 40
VMware, Inc. 3

4 Product Provisioning 42Create a Product 43
Product Provisioning Profiles 46
Delete a Product Provisioning Profile 46
Product Verification 47
Product Persistence, Android and WinRugg 47
Product Push Automatic Retry 48
Application Provisioning, Android 48
Upload an Application to Provision, Android 48
Add New Application Versions to Provision, Android 49
Delete Applications from Provisioning, Android 50
Product Conditions 50
Copy or Delete Conditions in List View 51
Create a Condition 51
Detach a Condition from a Product 59
Event Actions, Android and WinRugg 60
Create an Event Action, Android and WinRugg 60
Configure Download and Upload Actions for Event Actions, Android and WinRugg 63
File Servers for Event Actions, Android 64
Files-Actions for Products 64
Create a Files-Actions Component 65
Editing Files-Actions 73
Delete Files-Actions 74
Import Motorola Packages in Files-Actions, Android and WinRugg 74
Create an XML Provisioning File, Android, Win7, WinRugg 74
Workspace ONE Intelligent Hub Upgrading a File-Action 76
Upgrade the OS, File-Action for Android 79
Upgrade the OS, File-Action for WinRugg 81
Product Sets 86
Create a Product Set 86
Add a Product to a Product Set 87
Remove a Product from a Product Set 88
Activate and Deactivate Products in a Product Set 88
Viewing Product Sets in Device Details 89
Change the Product Ranking in a Product Set 89
Custom Attributes 90
Create Custom Attributes 91
Create a Custom Attributes Profile, macOS 92
Custom Attributes Importing 92
Assign Organization Groups Using Custom Attributes 93
Custom Attributes, Android 94
Product Provisioning
VMware, Inc. 4
Custom Attributes, macOS 95
Custom Attributes, Win7 96
Custom Attributes, WinDesk 98
Custom Attributes, WinRugg 99
5 Product Management 102Products Dashboard 102
Products List View 105
View Information About Products in Device Details 106
Product Job Statuses 107
Configure the Collection of Job Logs for Specific Devices 108
Define How Much Data to Collect, Product Job Log 109
Target a Device Log Level for Troubleshooting Purposes, Android and WinRugg 109
6 Device Management, Product Provisioning 111Device Details Page, QNX 111
Device Details Page, WinRugg 112
Device Details Page, WinDesk 116
Device Details Page, Win7 119
Configure Settings, QNX 120
AWTrigger Commands, QNX 121
Enterprise Reset a Rugged Device, Android and WinRugg 123
Enable AirWatch Cloud Messaging, Android Rugged 124
Advanced Remote Management 124
Platform OEM Service, Android Provisioning 125
Batch (BAT) File Guidelines, Win7 and WinDesk 126
7 Lookup Values 128
Product Provisioning
VMware, Inc. 5

Introduction to ProductProvisioning 1Product provisioning enables you to create, through Workspace ONE UEM powered by AirWatch,products containing profiles, applications, files/actions, and event actions (depending on the platform).These products follow a set of rules, schedules, and dependencies as guidelines for ensuring yourdevices remain up-to-date with the content they need.
Product provisioning encompasses the use of relay servers. These are FTP(S) servers designed to workas a go-between for devices and the UEM console. Create these servers for each store or warehouse tostore product content for distribution to your devices.
Another product provisioning feature is the staging methods of enrollment. Depending on the device type,you can perform device staging that quickly enrolls a device and downloads the Workspace ONEIntelligent Hub, Wi-Fi profile, and any other important content. The methods of staging a device vary byplatform.
As this guide focuses on the functionality provided by product provisioning, it does not contain all thefeatures and functionality that Workspace ONE UEM offers for managing devices of any specific platform.
Visit docs.vmware.com and search for the Platform Guide of your choice. For more information ongeneral MDM and UEM console functionality, see the Managing Devices Documentation and ConsoleBasics Documentation available on docs.vmware.com.
This chapter includes the following topics:
n Supported Devices, OS, and Agents, Product Provisioning
Supported Devices, OS, and Agents, Product ProvisioningThe product provisioning functionality supports different devices and operating systems. The availablefunctionality changes based on the supported rugged device.
Workspace ONE UEM supports product provisioning for devices with the following operating systems.
Androidn Android Legacy devices running Android 4.1 (Jelly Bean) and later with Workspace ONE Intelligent
Hub.
n Zebra devices running Android 4.4 (Kit Kat) and later.
n Android Enterprise Work Managed devices running Workspace ONE Intelligent Hub.
VMware, Inc. 6

macOSn macOS 10.7 Lion+ devices:
n MacBook Pro
n MacBook Air
n Mac Mini
n iMac
n Mac Pro
QNX Devicesn QNX 6.5 devices.
Windows Desktop, Windows 7, and Windows Ruggedn Windows CE 5, 6, and 7.
n Windows Mobile 5.x/6.1/6.5 (Professional and Standard).
n Windows Embedded 6.5.
n Motorola and Zebra Windows Rugged devices require the Rapid Deployment Client v2.0+.
n Windows 7 (32 bit and 64 bit).
n Windows 10 devices with Workspace ONE Intelligent Hub installed.
Product Provisioning
VMware, Inc. 7

Relay Servers 2Relay servers act as a content distribution node that provides help in bandwidth and data use control inWorkspace ONE UEM powered by AirWatch. Relay servers act as a proxy between the Workspace ONEUEM server and the rugged device for product provisioning.
Source Server Versus Relay ServerA source server is the original location of the data, usually a database, or content repository. After thedata is downloaded from the source server to the UEM console, it is then transferred to the relay server.The data is then downloaded from the relay server to devices.
Relay Server BasicsThe relay server acts as an FTP/Explicit FTPS/SFTP server that distributes products to the device fordownload and installation. You can distribute to all devices without consuming all the bandwidth to themain/central MDM server.
n Push Relay Servers
This method is typically used in on-premises deployments. The UEM console pushes content andapplications contained in the product or staging to the relay server.
n Pull Relay Servers
This method is typically used in SaaS deployments. A web-based application stored in the relayserver pulls content and applications contained in the product or staging from the UEM consolethrough an outbound connection.
FTP and FTPS servers must be compliant with RFC 959 and RFC 2228 set by the Internet EngineeringTask Force.
Relay servers are required for Motorola Rapid Deployment Barcode Enrollment, supported by Androidand Windows Rugged. Otherwise, relay servers are optional, but recommended, for pushing products todownloaded apps and content – as opposed to downloading directly from the server that hosts theWorkspace ONE UEM console.
Relay servers also add redundancy through the fallback feature. If a device's relay server is down, thedevice falls back to the next relay server in the hierarchy system until it finds a working server or connectsto the Workspace ONE UEM console server.
If you are not using a relay server, the device downloads apps and content directly from the UEM consoleserver.
VMware, Inc. 8

Relay Server and Job Status UpdatesWhile relay servers greatly enhance the performance in a product provisioning environment, they tend tocomplicate the task of reporting the status of a job. For more information, see Product Job Statuses.
Relay Server List ViewNavigate to Devices > Provisioning > Relay Servers > List View to see all the push and pull relayservers in your environment. After creating a relay server, refresh the relay server list view to get thestatus of the connection.
The Source Server and Relay Server statuses are defined as follows:
Indicator Source Server Relay Server
Last retrieval from server succeeded. Last file sync with server succeeded.
Retrieval from server in progress. File sync with server in progress.
Last retrieval failed. Last file sync failed.
Once the check mark displays for both source server and relay server, the product components areavailable for distribution to the end-user device.
Advanced InfoYou can access the Advanced Info action for more detailed information pertaining to the server. Thisaction can be found in the More Actions options drop-down available after selecting a relay server. TheAdvanced Info action displays the Queued Count of files, the Last Error Code displayed, and the LastError Description.
Product Provisioning
VMware, Inc. 9

This chapter includes the following topics:
n Configure a Relay Server
n Batch Import Relay Servers
n Pull Service Based Relay Server Configuration
n View Remote Files on Relay Server
Configure a Relay ServerConfigure a relay server by selecting an FTP, Explicit FTPS, Implicit FTPS (Pull only), SFTP file server, orHTTPS protocol and integrating it with Workspace ONE UEM.
Important If you use the pull service to create a pull-based relay server, you must give SYSTEM fullaccess to the home directory. This configuration means the pull service stores and removes files from thedirectory.
Client-server applications such as Workspace ONE UEM use the transport layer security (TLS)cryptographic protocol to communicate across a network. TLS is supported by the file transfer protocol(FTP), file transfer protocol over SSL (FTPS), and SSH file transfer protocol (SFTP).
These file transfer protocols only secure those parts of the process where data is in transit between theclient and the server. Because of this limitation, VMware recommends the use of OS-level diskencryption. There are several operating system-specific tools available (for example BitLocker forWindows, GnuPG for Linux).
Prerequisites
Only Android supports Implicit FTPS relay servers instead of Explicit FTPS relay servers and only in a pullconfiguration. Workspace ONE UEM console is not compatible with Implicit FTPS Push Relay Servers.
n An FTP, Explicit FTPS, Implicit FTPS in Pull configuration (Android only), or SFTP server.
n Pull service bandwidth needs and minimum hardware requirements are negligible whencompared to pushing products to devices. Such needs are entirely dependent upon 1) thenumber of products you are pushing, 2) how often they are pushed, and 3) the size of theproducts in MBs.
Product Provisioning
VMware, Inc. 10

n When assessing hardware and bandwidth needs for FTP servers, consider following generalguidelines and adjust their specifications as your needs change.
n General FTP Server Guidelines: 2 GHz x86 or x64 processor and 4 GB RAM.
n You must create an FTP user with a home directory. This user must have read/write/deletepermissions for both the directory and the files used in the relay server. This FTP user must have auser name and password for authentication.
n Workspace ONE UEM supports SFTP servers, however, the supported staging clients, Stage Now(Android), and Rapid Deployment, do not support SFTP servers for use with barcode staging.
n If selecting HTTPS protocol (pull configuration only), you must configure the HTTPS endpoint usingthe web server configuration tool of choice (for example, IIS). The root directory you opt in the webserver config must be the same as the Pull Local Directory of the relay server.
n FTP and FTPS servers must be compliant with RFC 959 and RFC 2228 set by the InternetEngineering Task Force.
Procedure
1 Navigate to Devices > Provisioning > Relay Servers > List View and select Add, followed by AddRelay Server.
2 Complete all applicable settings in the tabs that are displayed.
Setting Description
Name Enter a name for the relay server.
Description Enter a description for the relay server.
Relay Server Type Select either Push or Pull as the relay server method.
Push – This method is typically used in on-premises deployments. The UEMconsole pushes content and applications contained in the product or staging to therelay server.
Pull – This method is typically used in SaaS deployments. A web-basedapplication stored in the relay server pulls content and applications contained in theproduct or staging from the UEM console through an outbound connection.
For more information on installing a pull server, see Pull Service Based RelayServer Configuration.
Restrict Content Delivery Window Enable to limit content delivery to a specific time window. Provide a Start Time andEnd Time to restrict the delivery of content.
The start time and end time of the restriction window is based on CoordinatedUniversal Time (UTC), which the system obtains by converting the console servertime into Greenwich Mean Time (GMT).
Please set the system time on the console server accurately to ensure your contentis delivered on time.
Managed By Select the organization group that manages the relay server.
Android and Windows Rugged Only: If you want to use the FTPS server forBarcode Enrollment only and not for Product Provisioning, remove all assignedorganization groups under the Production Server section.
Product Provisioning
VMware, Inc. 11

Setting Description
Staging Server Assign the organization groups that use the relay server as a staging server.
A staging server only works for the staging process involving the supported stagingclients, Stage Now (Android) and Rapid Deployment.
Production Server Assign the organization groups that use the relay server as a production server.
A production server works with any device with the proper Hub installed on it.
Protocol This is the information the device uses to authenticate with the FTP(s) server whendownloading apps and content.
Select between FTP, Explicit FTPS, Implicit FTPS in Pull configuration(Android only), SFTP, or HTTPS (Pull only) as the Protocol for the relay server.
Only Android supports Implicit FTPS relay servers instead of Explicit FTPS relayservers and only in a pull configuration.
If using Explicit FTPS, your Explicit FTPS server must have a valid SSL certificate.Configure the SSL certificate on the Explicit FTPS server.
If selecting HTTPS protocol, you must configure the HTTPS endpoint using theweb server configuration tool of choice (for example, IIS).
Hostname Enter the name of the server that hosts the device connection.
Port Select the port established for your server.
Important The ports you configure when you create your FTP, Explicit FTPS,Implicit FTPS (Android only), or SFTP server must be the same ports you enterwhen creating a relay server in the Workspace ONE UEM console.
User Enter the server username.
Password Enter the server password.
Path Enter the path for the server.
This path must match the home directory path of the ftp user. For example, if theftp user's home directory is C:\ftp\home\jdoe, the path entered into this field mustbe C:\ftp\home\jdoe.
Passive Mode Enable to force the client to establish both the data and command channels.
Verify Server This setting is only visible when Protocol is set to FTPS.
Enable to ensure the connection is trusted and there are no SSL errors.
If left unchecked, then the certificate used to encrypt the data can be untrusted anddata can still be sent.
3 For a push server, select the Console Connection tab and complete the settings.
This is the information that the UEM console uses to authenticate with the FTP(S) server whenpushing apps and content. The settings are typically identical to the Device Connection tab.
a Press the Test Connection button to test your Console Connection to the push server.
Each step of the connection is tested and the results are displayed to help with troubleshootingconnection issues.
b Press the Export button on the Test Connection page to export the data from the test as an XLSXor CSV (comma separated values) file.
Product Provisioning
VMware, Inc. 12

4 For a pull server, select the Pull Connection tab and complete the settings.
Settings Descriptions
Pull Local Directory Enter the local directory path for the server.
The directory you enter here must be the same as the root directory you opt whenconfiguring an HTTPS endpoint on the webserver. For example, if you'veconfigured an HTTPS endpoint and selected c:/rootfolder as your root directory inIIS, then you must use c:/rootfolder for your Pull Local Directory.
Pull Discovery Text Enter the IP addresses or the MAC addresses of the server. Separate eachaddress with commas.
IP addresses use periods as normal but MAC addresses do not use anypunctuation in this form.
Pull Frequency Enter the frequency in minutes that the pull server should check with the UEMconsole for changes in the product.
5 Select Save.
Batch Import Relay ServersThe Relay Server Batch Import feature loads relay servers into the system in bulk. This can save time ifyou have several relay servers to add. The Batch Import screen serves two purposes, 1) download ablank relay server batch file template and 2) import a completed relay server batch file template.
Download a blank relay server batch file template, fill it out, then upload the completed template by takingthe following steps.
Procedure
1 Navigate to Devices > Provisioning > Relay Servers > List View then select Add and BatchImport.
The Batch Import screen displays.
2 Select the Show Server Function Codes and Show Relay Server Types links to see the codes youwill need as you fill in the relay server batch import template.
3 Select the Download template link and save the template to your device.
4 Open the template with MS Excel or your favorite text editor.
The template features two sample entries. These entries allow you to see what kinds of values andtheir formats the system expects to find in each field (or column) when you import your completedtemplate.
5 You must associate the relay server users with an organization group (GroupID).
The columns that feature an asterisk are required.
6 Remove the sample entries before you save your completed template.
7 Save the template in CSV format.
Product Provisioning
VMware, Inc. 13

8 Return to the Workspace ONE UEM console and navigate once again to Devices > Provisioning >Relay Servers > List View then select Add and Batch Import.
9 Enter a Batch Name.
10 Enter a Batch Description.
11 Select Choose File to upload the completed Batch File.
Batch files must be in CSV format.
12 Select Import to upload the file and begin the batch import process.
All the relay servers in the correctly filled out template are now available to host product content inWorkspace ONE UEM.
Pull Service Based Relay Server ConfigurationPull service-based relay servers periodically contact the Workspace ONE UEM console to check for newproducts, profiles, files, actions, and applications assigned to devices under the pull relay serverspurview. Configure a pull server to deliver content to devices without excessive bandwidth use.
The server creates an outbound https connection on port 443 to the UEM console and periodically pollsfor changes or additions. If the server finds changes or additions, then it downloads the new content ontothe server before pushing it to its devices.
Pull service is best used when traversing any NAT firewall or SaaS to on-premises hybrid environmentsbecause SaaS customers typically do not want the service to tie up bandwidth when content is deliveredfrom Workspace ONE UEM to the store server.
Note The IP configured in the pull connection / pull discovery must be an internal IP address for theserver. The service does not configure correctly if an external IP or NAT IP address is used.
Pull Relay Server SecurityClient-server applications such as Workspace ONE UEM use the transport layer security (TLS)cryptographic protocol to communicate across a network. TLS is supported by the file transfer protocol(FTP), file transfer protocol over SSL (FTPS), and SSH file transfer protocol (SFTP).
These file transfer protocols only secure those parts of the process where data is in transit between theclient and the server. Because of this limitation, VMware recommends the use of OS-level diskencryption. There are several operating system-specific tools available (for example BitLocker forWindows, GnuPG for Linux).
To create a pull relay server, you must first have an FTP, Explicit FTPS, or SFTP server to function as therelay server. FTP and FTPS servers must be compliant with RFC 959 and RFC 2228 set by the InternetEngineering Task Force.
Important The ports you configure when you create your FTP, Explicit FTPS, Implicit FTPS (Androidonly), or SFTP server must be the same ports you enter when creating a relay server in the WorkspaceONE UEM console.
Product Provisioning
VMware, Inc. 14

The process covers the installation of one server at a time. For bulk installation, you must use a third-party application. Workspace ONE UEM supports importing servers in bulk through the Batch Importoption. See Batch Import Relay Servers for more information.
Create a Windows Based Pull Relay ServerConfigure a pull service relay server using a Windows FTP, Explicit FTPS, or SFTP server for use withproduct provisioning and staging. The pull service must be installed before you integrate the server withthe Workspace ONE UEM console.
Prerequisites
n An FTP, Explicit FTPS, or SFTP server. Workspace ONE UEM does not support Implicit FTPSWindows-based relay servers.
n .NET must be installed on Windows-based servers.
n The pull relay server requires outbound network access on https 443 to the Workspace ONE UEMconsole.
n Each server requires disk storage of 2 MB for the pull server installer and hard disk space for all thecontent pulled to the server.
Procedure
1 Configure an FTP, Explicit FTPS, or SFTP server.
You must create an FTP user with read/write/delete permissions for both the directory and the filesused in the relay server. This FTP user must have a user name and password for authentication.Note the home directory of the user for use in configuring the pull service.
2 Navigate to Groups & Settings > All Settings > System > Enterprise Integration > Pull ServiceInstallers.
3 Download the Windows Pull Service Installer and the Configuration file onto the server using yourpreferred server management system.
4 Open the XML config file and update the IP Address with your console server FQDN.
For cn274.awmdm.com
<PullConfiguration>
<libraryPath>C:\AirWatch\PullService\</libraryPath>
<endPointAddress>https://[endpoint URL]/contentpull /</endPointAddress>
</PullConfiguration>
5 Run the WindowsPullServiceInstaller.exe. .NET is installed before the MSI is extracted.
6 Navigate to Devices > Provisioning > Relay Servers > Undiscovered Pull Relay Servers.
If you have configured the FTP, Explicit FTPS, or SFTP server correctly, it provides feedback to thiseffect. If you do not see your server displayed, check your configuration settings.
Product Provisioning
VMware, Inc. 15
7 Configure the relay server as a pull relay server in the UEM console.
See Configure a Relay Server for more details.
8 If you are using the silent install from the command prompt, use the following commands.
a WindowsPullServiceInstaller.exe /s /v"/qn/"
b To include log: WindowsPullServiceInstaller.exe /s /v"/qn" /l WindowsPullServiceInstaller.txt”
The installer looks for the PullserviceInstaller.config file in the installer execution directory. If the file ismissing, the installer prompts you to let you know the file is missing.
Create a Linux Based Pull Relay ServerConfigure a pull service relay server using a Linux FTP, Explicit FTPS, or SFTP server for use withproduct provisioning and staging. The pull service must be installed before you integrate the server withthe Workspace ONE UEM console.
Prerequisites
n An FTP, Explicit FTPS, Implicit FTPS in Pull configuration (Android only), or SFTP server. OnlyAndroid supports Implicit FTPS relay servers.
n Linux-based servers must run either CentOS or SLES 11 SP3.
n Java 8+ must be installed on Linux-based servers.
n The pull relay server requires outbound network access on https 443 to the Workspace ONE UEMconsole
n Each server requires disk storage of 2 MB for the pull server installer and hard disk space for all thecontent pulled to the server.
Procedure
1 Configure an FTP, Explicit FTPS, or SFTP server. You must create an FTP user with read/write/deletepermissions for both the directory and the files used in the relay server. Note the home directory ofthe user for use in configuring the pull service.
This FTP user must have a user name and password for authentication.
2 Navigate to Groups & Settings > All Settings > System > Enterprise Integration > Pull ServiceInstallers.
3 Download the Linux Pull Service Installer and the Configuration file onto the server using yourpreferred server management system.
Product Provisioning
VMware, Inc. 16
4 Open the XML config file and update the IP Address with your console server FQDN.
cn274.awmdm.com
<PullConfiguration>
<libraryPath>C:\AirWatch\PullService\</libraryPath>
<endPointAddress>https://[endpoint URL]/contentpull /</endPointAddress>
</PullConfiguration>
5 In the command prompt, enter the command.
sudo ./LinuxPullServerInstaller.bin
Alternatively, enter the following command to install silently.
sudo ./LinuxPullServerInstaller.bin -I silent
6 Follow the instructions prompted by the installer, including the optional configuration of a proxy server.
a If you want to use a proxy server, supply the host, port, and authentication information whenprompted.
7 Navigate to Devices > Provisioning > Relay Servers > Undiscovered Pull Relay Servers.
If you have configured the FTP, Explicit FTPS, or SFTP server correctly, it provides feedback to thiseffect. If you do not see your server displayed, check your configuration settings.
8 Configure the relay server as a pull relay server in the UEM console.
See Configure a Relay Server for more details.
The installer looks for the PullserviceInstaller.config file in the installer execution directory. If the file ismissing, the installer prompts you that the file is missing.
Move an Existing Pull Relay Server From One Organization Groupto AnotherYou can move an existing pull relay server installed with the Windows or new Linux installer by taking thefollowing steps.
Procedure
1 Delete the existing pull relay server from the original OG on the console. Once it is deleted, the pulldiscovery text that belongs to the pull service starts appearing on the undiscovered pull discoverypage at Global OG.
2 Navigate to Devices > Provisioning > Relay Servers > Undiscovered Pull Relay Servers andlocate the server by searching for your IP address (only available for On-premises).
3 Copy the pull discovery text that includes the IP address of your selected server.
4 Create a relay server in the new OG and activate it. After activating the relay server in the new OG,the pull service discovery text listed in the Undiscovered Pull Relay Servers page disappears.
Product Provisioning
VMware, Inc. 17
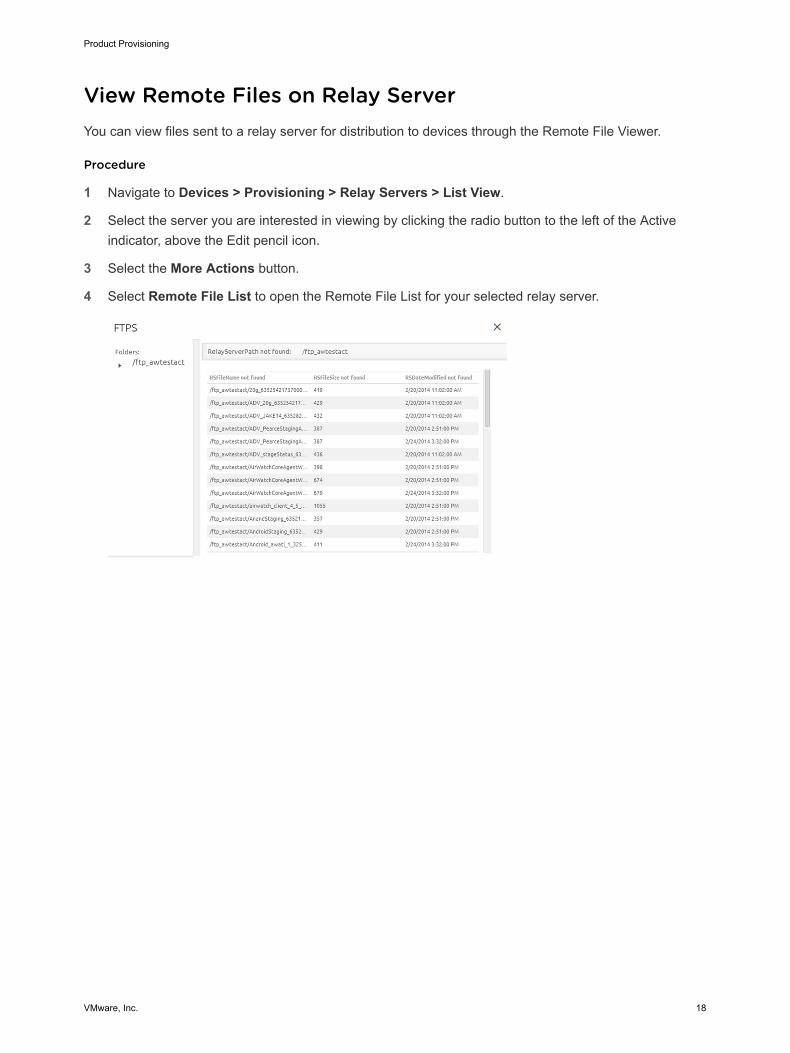
View Remote Files on Relay ServerYou can view files sent to a relay server for distribution to devices through the Remote File Viewer.
Procedure
1 Navigate to Devices > Provisioning > Relay Servers > List View.
2 Select the server you are interested in viewing by clicking the radio button to the left of the Activeindicator, above the Edit pencil icon.
3 Select the More Actions button.
4 Select Remote File List to open the Remote File List for your selected relay server.
Product Provisioning
VMware, Inc. 18

Device Staging 3You can stage a device quickly to enroll it and prepare it for production use in Workspace ONE UEMpowered by AirWatch. A staging package connects a device to a Wi-Fi connection, installs the WorkspaceONE Intelligent Hub, and enrolls the device without end-user input.
Staging BasicsThe Rugged Enrollment Configuration Wizard simplifies creating staging packages. With the wizard,everything you need for a staging package is created in a step-by-step process.
Staging packages are created as part of the product provisioning process. You can include profiles,applications, and files/actions as part of the staging package depending on the device platform.
You have several methods for enrolling a rugged device through staging. Barcode Enrollment creates astaging package associated with a barcode that you scan to stage the device. The Stage Now client isexclusive to Android devices with Zebra MX version 7.1+ under Android Nougat and later. Sideloadingpackages are transferred to a device instead of being scanned or downloaded.
This chapter includes the following topics:
n Use the Enrollment Configuration Wizard
n Create a Manual Staging Package
n Configure Advanced Staging
n Wi-Fi Profiles for Staging
n Barcode Staging
n Sideload Staging Packages
n AirWatch CAB Creator, WinRugg
n Android Device Enrollment with the Workspace ONE Intelligent Hub
n Enroll Zebra Devices with Stage Now Barcode, Android
Use the Enrollment Configuration WizardSimplify rugged device enrollment through the Enrollment Configuration wizard. This wizard helps youcomplete each step in creating a staging package for your Android and Windows Rugged devices.
Procedure
1 Navigate to Devices > Lifecycle > Staging and select the Configure Enrollment button.
VMware, Inc. 19

2 Select the device platform you want.
3 Select the staging enrollment type.
The settings you must configure change based on the enrollment type selected.
n Generate a QR Code with the Enrollment Configuration Wizard, Android (Android only) – Createa QR Code to scan with your Android Work Managed devices to quickly stage the device. Thewizard simplifies the configuration process.
n Generate a Barcode Staging Package with the Enrollment Configuration Wizard – Create abarcode to scan with your Zebra rugged devices to quickly stage the device. The wizard simplifiesthe barcode configuration process.
n Generate a Sideload Staging Package with the Enrollment Configuration Wizard, Android andWindows Rugged – Create a sideload staging package to download and install onto a device toautomatically configure and enroll the rugged device.
n Enroll with Web Enrollment, Windows Rugged (Windows Rugged only) – Create a stagingpackage to download and install from a web URL onto a device to automatically configure andenroll the rugged device.
4 Select Configure.
Generate a QR Code with the Enrollment Configuration Wizard,AndroidAfter selecting QR Code enrollment in the Enrollment Configuration wizard, create a QR Code to scanwith your Android 7.0 or later devices to stage the device quickly. The wizard simplifies the stagingconfiguration process.
Procedure
1 After taking note of the prerequisites, select Configure to begin.
2 You can connect the device to Wi-Fi prior to enrollment by enabling the Wi-Fi toggle. This enablingaction displays the following options.
Setting Description
SSID Enter the Service Set Identifier, more commonly known as the name of the Wi-FiNetwork.
Password Enter the Wi-Fi password for the entered SSID.
3 Select Next.
4 Select the Workspace ONE Intelligent Hub to push to devices during staging. The default selection isUse latest Workspace ONE Intelligent Hub.
If you do not have an Workspace ONE Intelligent Hub added, select Hosted on an external URL andenter the address in the URL text box to point to an externally-hosted Workspace ONE Intelligent HubPackage.
Product Provisioning
VMware, Inc. 20

5 Select Next.
6 Set the Enrollment Details settings. To use token-based authentication, leave both options disabled.
Setting Description
Organization Group Enable and select the organization group the QR Code staging package uses.
User name Enable to configure login credentials. Enter the Workspace ONE UEM accountuser name.
Password Enter the corresponding password.
7 Select Next.
8 The Summary page allows you to Download File of the PDF. You can also View PDF to see apreview of your QR Code Format selections.
Generate a Barcode Staging Package with the EnrollmentConfiguration WizardAfter selecting Barcode enrollment in the Enrollment Configuration Wizard, create a barcode to scan withyour Zebra rugged devices to stage the device quickly. The wizard simplifies the staging configurationprocess.
Procedure
1 After taking note of the prerequisites, select Configure to begin.
2 Select the Relay Server to use to stage the devices.
a If you do not have a relay server created, select Add Relay Server.
The list of relay servers populates from any relay servers created for the organization group or theparent organization groups.
3 Select Next.
4 Select a Wi-Fi Profile that devices use to connect to the relay server and download the WorkspaceONE Intelligent Hub.
a If you do not have a Wi-Fi profile created, select Add Wi-Fi profile.
You cannot create a Wi-Fi profile through the wizard that uses certificate authentication. The Wi-Fiprofile created is used for staging and remains on the device after enrollment.
5 Select Next.
6 Select the Workspace ONE Intelligent Hub to push to devices during staging.
a If you do not have an Workspace ONE Intelligent Hub added, select Add Workspace ONEIntelligent Hub to upload an Workspace ONE Intelligent Hub Package if necessary.
b Download the latest version of the Workspace ONE Intelligent Hub.
c Contact your Account Manager or Workspace ONE UEM Support for access.
Product Provisioning
VMware, Inc. 21
7 Select Next.
8 Enter the Stage User credentials.
Settings Descriptions
Name Enter the name of the staging package.
Description Enter a description of the staging package.
Owned By Select the organization group that owns the staging package.
Enrollment User Enter the user name of the user.
If you do not have a user, select Add User.The user must be a basic user account. Do not use staging users or multi-userstaging.
Password Android only. Enter the password of the user.
9 Select Next.
10 Set the Barcode settings.
Setting Description
Organization Group Select the organization group the staging package uses.
Universal Barcode Enable to create a universal barcode enrollment so devices can be enrolled withoutautomatically assigning an organization group. This allows you to enroll deviceswithout needing a Barcode enrollment for each organization group.
Android Only Note: With this setting enabled, the Workspace ONE Intelligent Hubprompts you to enter an organization group after beginning the staging process. Ifyou are enrolling devices into Android (Legacy) with this barcode, care should betaken to only select an OG that is configured for Android (Legacy) enrollment.
Require Password Enable to create an alphanumeric password (maximum 99 characters) to use tounlock the staging package encryption on the end-user device immediately afterenrollment.
Barcode Format Select the barcode format for the devices you want to enroll.
11 Select Save.
What to do next
The Summary page allows you to Download File of the PDF.
You can also View PDF to see a preview of your Barcode Format selections.
Android Only Note: If you want to make a Stage Now barcode for Zebra devices using the options youhave selected above, you must close the Enrollment Wizard and proceed to the Generate a BarcodeStaging Package step.
Product Provisioning
VMware, Inc. 22

Generate a Sideload Staging Package with the EnrollmentConfiguration Wizard, Android and Windows RuggedYou can create a sideload staging package to configure and enroll the Android (only legacy devicessupported) or Windows Rugged device. The wizard simplifies the staging configuration process.
After selecting Sideload enrollment in the Use the Enrollment Configuration Wizard, create a sideloadstaging package using the wizard.
Procedure
1 Select a Wi-Fi profile that devices use to connect to the relay server and download the WorkspaceONE Intelligent Hub.
a If you do not have a Wi-Fi profile created, select Create Wi-Fi profile.
You cannot create a Wi-Fi profile that uses certificate authentication through the wizard. The Wi-Fi profile created is used for staging and remains on the device after enrollment.
2 Select Next.
3 Select the Workspace ONE Intelligent Hub to push to devices during staging.
a If you do not have an Workspace ONE Intelligent Hub added, select Add Workspace ONEIntelligent Hub to upload an Workspace ONE Intelligent Hub Package if necessary.
b Download the latest version of the Workspace ONE Intelligent Hub.
c Contact your Account Manager or Workspace ONE UEM Support for access.
4 Select Next.
5 Enter the Stage User credentials.
Settings Descriptions
Name Enter the name of the staging package.
Description Enter a description of the staging package.
Owned By Select the organization group that owns the staging package.
Enrollment User Enter the user name of the user.
The user must be a basic user account. Do not use staging users or multi-userstaging.
Password Enter the password of the user.
6 Select Next.
Product Provisioning
VMware, Inc. 23
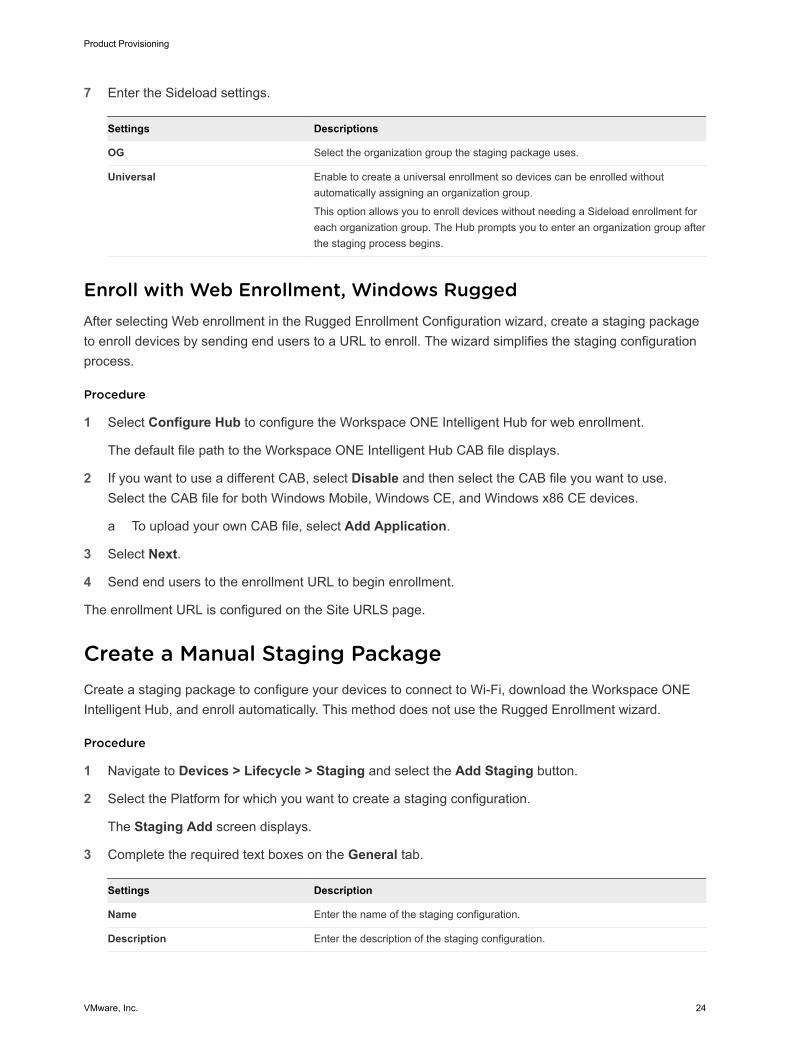
7 Enter the Sideload settings.
Settings Descriptions
OG Select the organization group the staging package uses.
Universal Enable to create a universal enrollment so devices can be enrolled withoutautomatically assigning an organization group.
This option allows you to enroll devices without needing a Sideload enrollment foreach organization group. The Hub prompts you to enter an organization group afterthe staging process begins.
Enroll with Web Enrollment, Windows RuggedAfter selecting Web enrollment in the Rugged Enrollment Configuration wizard, create a staging packageto enroll devices by sending end users to a URL to enroll. The wizard simplifies the staging configurationprocess.
Procedure
1 Select Configure Hub to configure the Workspace ONE Intelligent Hub for web enrollment.
The default file path to the Workspace ONE Intelligent Hub CAB file displays.
2 If you want to use a different CAB, select Disable and then select the CAB file you want to use.Select the CAB file for both Windows Mobile, Windows CE, and Windows x86 CE devices.
a To upload your own CAB file, select Add Application.
3 Select Next.
4 Send end users to the enrollment URL to begin enrollment.
The enrollment URL is configured on the Site URLS page.
Create a Manual Staging PackageCreate a staging package to configure your devices to connect to Wi-Fi, download the Workspace ONEIntelligent Hub, and enroll automatically. This method does not use the Rugged Enrollment wizard.
Procedure
1 Navigate to Devices > Lifecycle > Staging and select the Add Staging button.
2 Select the Platform for which you want to create a staging configuration.
The Staging Add screen displays.
3 Complete the required text boxes on the General tab.
Settings Description
Name Enter the name of the staging configuration.
Description Enter the description of the staging configuration.
Product Provisioning
VMware, Inc. 24

Settings Description
Owned By Select the organization group under which the staging package applies.
Enrollment User Enter the user name of the enrollment user.
You can search for and select an existing user by clicking the magnifying glassicon. You can also add a user by selecting Add User at the bottom of the drop-down menu.
Password Enter the password for the enrollment user.
You have the option of keeping the password redacted or displaying it as written.
Hub Select an existing Workspace ONE Intelligent Hub package from the drop-downlisting to download during staging.
You can also add the Workspace ONE Intelligent Hub package by selecting AddWorkspace ONE Intelligent Hub at the bottom of the drop-down menu.
These agents are uploaded as the Workspace ONE Intelligent Hub Package. SeeUpload the Workspace ONE Intelligent Hub APF File, Upgrade File-Action for moreinformation.
4 Select Save.
Configure Advanced StagingAfter creating a staging package, install product components as part of a staging package using theadvance staging options.
Establish a list of ordered steps during staging.
Procedure
1 After finishing the General tab of the Staging window, navigate to Devices > Lifecycle > Stagingthen select the Add Staging button and continue to the Manifest tab.
2 Select the Add button.
3 Select the action you want to take place during staging.
Settings Description
Action Types Select an action type.
Profile Select the profile to use in the staging configuration.
Application Android only. Select the application to use in the staging configuration.
Persistent through enterprise reset Android and Windows Rugged only. Enable to keep the profile, application, or files/actions on the device through enterprise resets. For more information, see ProductPersistence, Android and WinRugg.
4 Select Add again to add additional actions to the manifest.
5 When you are finished adding actions, select Save.
Product Provisioning
VMware, Inc. 25

What to do next
View the newly created staging profile in the List View. Take additional actions on the profile from themenus on the right.
n Edit your configuration.
n Copy your profile.
n Android and Windows Rugged only: select Barcode and complete the text boxes on the GenerateBarcode subpage.
Wi-Fi Profiles for StagingIt is mandatory that your staging configuration includes a Wi-Fi profile. This configuration is the networkthe device uses to connect to the relay server to download the Workspace ONE Intelligent Hub.
A Wi-Fi profile is either a staging or production profile. The staging Wi-Fi profile is created under theProducts section and connects the device to the relay server so the device can receive the stagingconfiguration. The production Wi-Fi profile is a normal Wi-Fi profile used at the device's daily uselocations.
To create a Wi-Fi profile, navigate to the General settings of the profile. Set the Profile Scope of the Wi-Fi profile:
n Staging Wi-Fi Profile – Connects a device to the Wi-Fi used for staging.
n Production Wi-Fi Profile – Connects a device to the Wi-Fi used for everyday use. Production Wi-Fiprofiles are under Device > Profiles > List View > Add. You must use auto deployment and publishthe profile before staging a device with it.
Barcode StagingYou can create a barcode and use it to auto-enroll your Motorola and Zebra rugged devices. Barcodesreduce the process to a quick scan which configures the device using a staging package.
You can also create universal barcode staging which does not automatically assign an organization groupwhile enrolling the device. This generic barcode allows you to create one staging enrollment for alldevices and assign the device to an organization group later, as needed.
Barcode enrollment is only available on devices running the Rapid Deployment Client or Zebra's StageNow client. The Rapid Deployment client supports FTP and FTPS relay servers. Zebra's Stage Now clientsupports FTP, FTPS, and HTTPS relay servers.
Use the Rugged Enrollment wizard to simplify the creation of barcode staging packages. The wizardenables you to create all the necessary components of a staging package in one place. For moreinformation, see Use the Enrollment Configuration Wizard.
Barcode enrollment is only supported on the following devices.
Product Provisioning
VMware, Inc. 26
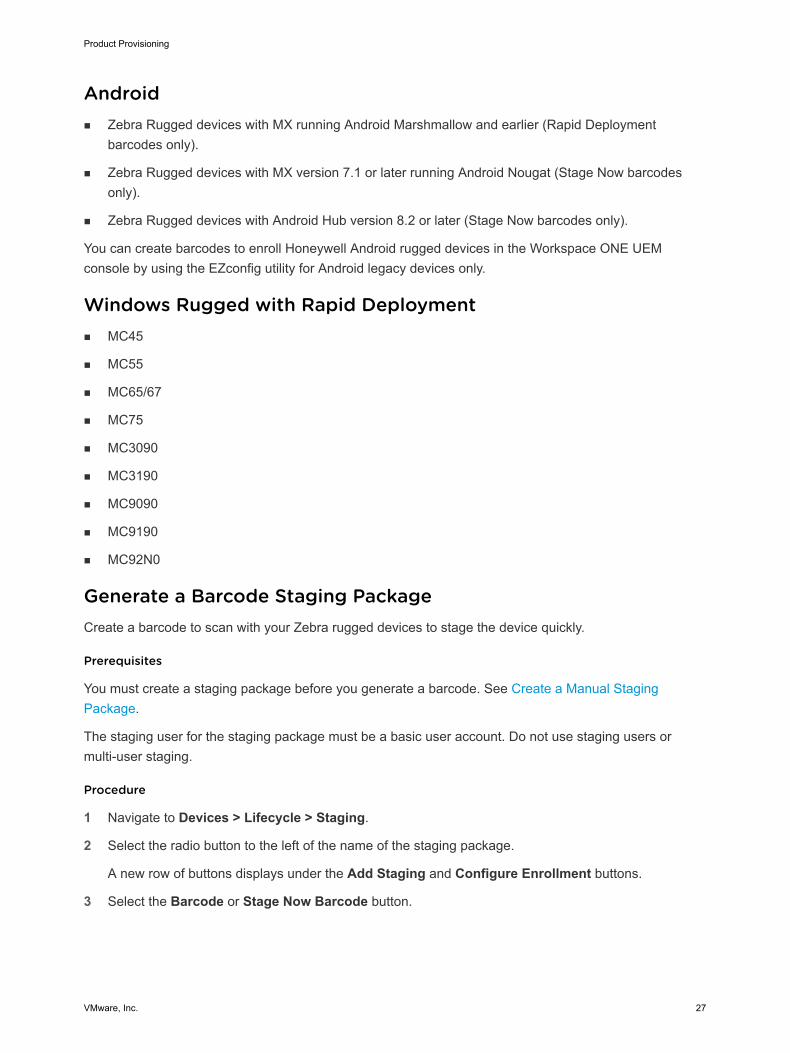
Androidn Zebra Rugged devices with MX running Android Marshmallow and earlier (Rapid Deployment
barcodes only).
n Zebra Rugged devices with MX version 7.1 or later running Android Nougat (Stage Now barcodesonly).
n Zebra Rugged devices with Android Hub version 8.2 or later (Stage Now barcodes only).
You can create barcodes to enroll Honeywell Android rugged devices in the Workspace ONE UEMconsole by using the EZconfig utility for Android legacy devices only.
Windows Rugged with Rapid Deploymentn MC45
n MC55
n MC65/67
n MC75
n MC3090
n MC3190
n MC9090
n MC9190
n MC92N0
Generate a Barcode Staging PackageCreate a barcode to scan with your Zebra rugged devices to stage the device quickly.
Prerequisites
You must create a staging package before you generate a barcode. See Create a Manual StagingPackage.
The staging user for the staging package must be a basic user account. Do not use staging users ormulti-user staging.
Procedure
1 Navigate to Devices > Lifecycle > Staging.
2 Select the radio button to the left of the name of the staging package.
A new row of buttons displays under the Add Staging and Configure Enrollment buttons.
3 Select the Barcode or Stage Now Barcode button.
Product Provisioning
VMware, Inc. 27

4 Select the Staging Options.
Settings Descriptions
Organization Group Select the organization group the staging package uses.
Universal Barcode Enable to create a universal barcode enrollment so devices can be enrolled withoutautomatically assigning an organization group. This allows you to enroll deviceswithout needing a Barcode enrollment for each organization group.
Android Only Note: With this setting enabled, the Workspace ONE Intelligent Hubprompts you to enter an organization group after beginning the staging process. Ifyou are enrolling devices into Work Managed Mode with this barcode, care shouldbe taken to select only an OG that has configured Android EMM Registrationsettings.
Enabling this box repopulates the Staging Relay Server and Staging Profile withapplicable options.
Staging Relay Server Select the staging relay server that hosts the staging content.
Staging Profile Select the staging Wi-Fi profile to apply to the enrolled device.
Require Password Enable to create an alphanumeric passphrase (maximum 99 characters) to use tounlock the staging package encryption on the end-user device.
Device Owner Mode Android Only. Enable to enroll the device into Android Work Managed mode. Thisoption can only be enabled when the Universal Barcode option is enabled.
5 Select the Barcode Format options. Android Only Note: Android admins can enter the optional
Barcode Instructions to be included on the barcode PDF output page.
6 Select View PDF.
This generates a preview of the barcode PDF output page for end users to scan.
7 Select Save to save the PDF file.
Sideload Staging PackagesYou can create a sideload staging package to download and install onto devices to begin the auto-enrollment process for your rugged devices. Sideload staging simplifies enrollment by combining all therequired components into one package.
Android Only Note: sideload staging packages are only supported by Android legacy devices.
You can also create universal barcode staging to stage devices with a generic barcode that does notautomatically assign an organization group when enrolling the device. This allows you to create onestaging enrollment for all devices and assign the device to an organization group as needed.
Simplify creating a barcode staging package by using the Rugged Enrollment wizard. The wizard allowsyou to create all the necessary components of a staging package in one place. For more information, seeUse the Enrollment Configuration Wizard.
You can use the Sideload Staging Utility for Windows Rugged devices to sideload a staging packageeasily. The utility simplifies the process of installing a sideloading package onto the device with simplestep-by-step instructions.
Product Provisioning
VMware, Inc. 28
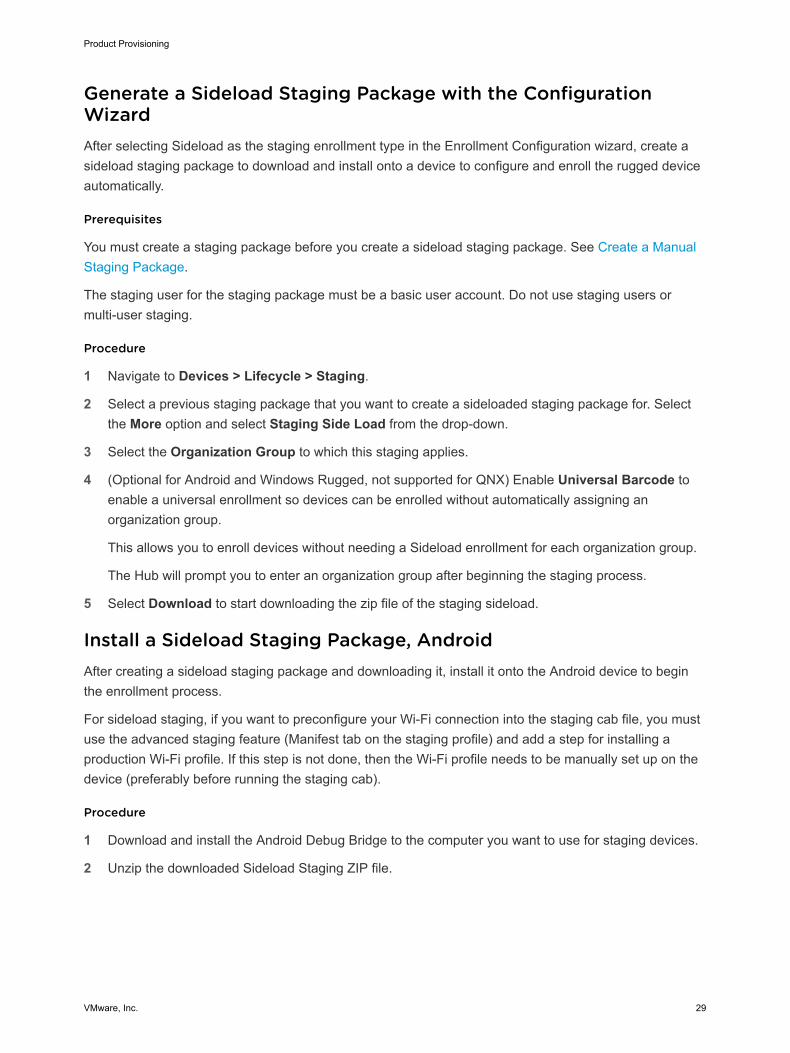
Generate a Sideload Staging Package with the ConfigurationWizardAfter selecting Sideload as the staging enrollment type in the Enrollment Configuration wizard, create asideload staging package to download and install onto a device to configure and enroll the rugged deviceautomatically.
Prerequisites
You must create a staging package before you create a sideload staging package. See Create a ManualStaging Package.
The staging user for the staging package must be a basic user account. Do not use staging users ormulti-user staging.
Procedure
1 Navigate to Devices > Lifecycle > Staging.
2 Select a previous staging package that you want to create a sideloaded staging package for. Selectthe More option and select Staging Side Load from the drop-down.
3 Select the Organization Group to which this staging applies.
4 (Optional for Android and Windows Rugged, not supported for QNX) Enable Universal Barcode toenable a universal enrollment so devices can be enrolled without automatically assigning anorganization group.
This allows you to enroll devices without needing a Sideload enrollment for each organization group.
The Hub will prompt you to enter an organization group after beginning the staging process.
5 Select Download to start downloading the zip file of the staging sideload.
Install a Sideload Staging Package, AndroidAfter creating a sideload staging package and downloading it, install it onto the Android device to beginthe enrollment process.
For sideload staging, if you want to preconfigure your Wi-Fi connection into the staging cab file, you mustuse the advanced staging feature (Manifest tab on the staging profile) and add a step for installing aproduction Wi-Fi profile. If this step is not done, then the Wi-Fi profile needs to be manually set up on thedevice (preferably before running the staging cab).
Procedure
1 Download and install the Android Debug Bridge to the computer you want to use for staging devices.
2 Unzip the downloaded Sideload Staging ZIP file.
Product Provisioning
VMware, Inc. 29

3 Depending upon the version of the OS that your device is running, you might need to download anupdated stage.bat file from my Workspace ONE ™ Resource Portal.
a Visit https://my.workspaceone.com.
b Search for "VMware AirWatch Stage.bat for Zebra Sideload Staging" and download this file.
c Verify that this stage.bat file is in the root folder of the unzipped Sideload Staging ZIP file.
4 Establish a USB debug connection to the Android device.
USB debugging must be enabled on the Android device. The setting to enable this is in the devicesystem settings under Developer Options.
5 Start the stage.bat file from the root folder of the unzipped Sideload Staging ZIP file.
The stage.bat file copies files to the device and then uses intents to start the auto-enrollment process.
The Workspace ONE UEM auto-enrollment screen displays on the device and shows progress.
When auto-enrollment is complete, the Workspace ONE Intelligent Hub displays the main detailsscreen.
This script installs the MX Service and Hub then applies the Wi-Fi profile you defined in the stagingmanifest and any other manifest items. Once the Wi-Fi connects, the device auto-enrolls into WorkspaceONE UEM.
Install a Sideload Staging Package, WinRuggAfter creating a sideload staging package and downloading it, install it onto the Windows Rugged deviceto begin the enrollment process.
You can also use the Sideload Staging Utility for Windows Rugged devices to simplify the sideloadstaging process. See Use the Sideload Staging Utility, WinRugg.
Important For sideload staging, if you want to preconfigure your Wi-Fi connection into the staging cabfile, you must use the advanced staging feature (Manifest tab on the staging profile) and add a step forinstalling a production Wi-Fi profile. If this step is not done, then the Wi-Fi profile needs to be manually setup on the device (preferably before running the staging cab).
Procedure
1 Unzip the file and connect your device to the staging machine through USB once the download iscomplete.
2 Manually create "\Program Files\AirWatch\Staging" directory on your device. You must add both theAirWatch and staging directories.
3 Copy the content of the unzipped staging file to the directory you created.
The staging file should contain several directory folders.
4 Open the "\Program Files\AirWatch\Staging\agent" directory and manually run the Workspace ONEIntelligent Hub cab file.
Product Provisioning
VMware, Inc. 30

The cab file installs the Workspace ONE Intelligent Hub, then the enrollment process completes and theWorkspace ONE Intelligent Hub enrolls the device, assuming the device has network connectivity.
Enroll Honeywell Devices with Sideload Staging, AndroidEnroll your Honeywell Android devices using a sideload staging package. Sideload staging configuresyour Honeywell Android devices to download the Workspace ONE Intelligent Hub and enrollautomatically.
Prerequisites
n You must create a staging package before you create a sideload staging package. See Create aManual Staging Package.
n Download the staging package and unzip the file to access the credentials.bin file.
n Download the latest Hub APK available on Workspace ONE UEM Resources. Contact yourWorkspace ONE UEM account manager for access to the APK.
n Download the latest Honeywell APK available on Workspace ONE UEM Resources. Contact yourWorkspace ONE UEM account manager for access to the APK.
n Download and install the Android Debug Bridge (ADB).
Procedure
1 Create a folder containing the following.
n Latest Workspace ONE Intelligent Hub for Android APK.
n Latest Honeywell APK.
n Credentials.bin from the staging package.
2 Open a text editor such as Notepad. Copy the following chunk of text and paste it into the blanknotepad.
adb push credentials.bin /sdcard/credentials.bin
adb install HoneywellService.apk
adb shell am start -a android.intent.action.MAIN -n
com.airwatch.admin.honeywell/.HoneywellActivity
adb install Hub.apk
adb shell am start -a android.intent.action.MAIN -n com.airwatch.androidagent/
com.airwatch.agent.ui.activity.SplashActivity -e hideui true
adb shell pm grant com.airwatch.androidagent android.permission.READ_EXTERNAL_STORAGE
adb shell am broadcast -a com.airwatch.agent.action.IMPORT_CREDENTIAL_XML -e file /sdcard/
credentials.bin --user 0
adb shell am broadcast -a com.airwatch.agent.action.AUTO_ENROLL --user 0
a Change the filenames and storage locations as needed.
3 Save the file as autoenroll_Honeywell.bat in the same directory as the other files.
4 Connect a Honeywell Android device to your PC using an ADB connection. Ensure that the device isconnected to Wi-Fi.
Product Provisioning
VMware, Inc. 31

5 Run the autoenroll_Honeywell.bat file.
Create Sideload Staging Bundle with Platform OEM ServiceYou can set up a Sideload Staging bundle for devices using the Generic OEM Service. This procedure isnot supportive of Advanced Staging.
Procedure
1 Get the enrollment credentials.
a Create a Staging bundle in the console.
b Download the Sideload Staging Package.
c Unzip the Sideload Staging Package file and copy the 'credentials.bin' file inside the enrollmentfolder. Save this file for later.
2 Collect the necessary files for the device.
a Get the latest Hub APK.
b Get the OEM Service APK for your device.
For more information, see Platform OEM Service, Android Provisioning.
c Get the credentials.bin from the preceding step.
d Place all these files in a folder on your PC.
3 Create your auto-enroll BAT file.
a Using a text editor, add the following lines (change the filenames and storage locations based onyour own configuration).
adb push credentials.bin /sdcard/credentials.bin
adb install OEMService.apk
adb shell am start -a android.intent.action.MAIN -n com.airwatch.admin.awoem.[OEM_NAME]/
com.airwatch.admin.awoem.PlatformOEMActivity -e hideui true
*If you are using POEM v3.2 or higher, use this intent instead:
adb shell am start -a com.airwatch.START_AIRWATCH_SERVICE
adb install Agent.apk
adb shell am start -a android.intent.action.MAIN -n com.airwatch.androidagent/
com.airwatch.agent.ui.activity.SplashActivity -e hideui true
adb shell am broadcast -a com.airwatch.agent.action.IMPORT_CREDENTIAL_XML -e file /sdcard/
credentials.bin --user 0
adb shell am broadcast -a com.airwatch.agent.action.AUTO_ENROLL --user 0
b Save the file as autoenroll_OEM.bat in the same directory as the other files.
*On Mac, it must be an SH file and run in Terminal.
Product Provisioning
VMware, Inc. 32

4 Auto-enroll the device.
a Connect the device to Wifi.
b Connect the device to the PC via an ADB connection.
c Run the autoenroll_OEM.bat file.
Use the Sideload Staging Utility, WinRuggYou can easily sideload your Windows Rugged device through the AirWatch Sideload Staging Utility. Theutility simplifies the process of installing a sideloading package onto the device with simple step-by-stepinstructions.
Procedure
1 Download the "VMware AirWatch Windows Mobile/CE Sideloader Utility" from the my WorkspaceONE ™ documentation repository.
The download URL is https://resources.workspaceone.com/view/dpzpbh2cvvnztcc9nkv3/en.
2 Install the utility after the download completes.
3 Start the AirWatch Sideloader Utility after the installation completes.
4 Connect the device to your computer.
The Choose Side Staging and Stage File to Device buttons become available for use after theutility detects the device connection.
Product Provisioning
VMware, Inc. 33

5 Select Choose Side Staging and select the .Zip file you want to stage to a device.
6 Select Stage File to Device to begin staging the device.
The .Zip file unzips, folders and directories are created, and the CAB file installs.
Uninstall a Sideload Staging Package, WinRuggUse the Sideload Staging Utility for Windows Rugged to uninstall a sideload staging package from adevice.
Procedure
1 Start the Sideload Staging Utility.
2 Connect the device to your computer.
3 Once the Sideload Staging Utility detects connection with the device that has existing staging, selectany of the following options.
Setting Description
Uninstall Hub. Select to remove the Workspace ONE Intelligent Hub for Windows Rugged fromthe device.
Remove Persistence. Select to remove any products marked for persistence through Enterprise Reset.
Remove Registry Key. Select to remove all registry key entries for the staging.
Selecting the uninstall options displays a status message when the action completes.
Product Provisioning
VMware, Inc. 34

AirWatch CAB Creator, WinRuggThe AirWatch Cab Creator for Windows Rugged allows you to create custom CAB files for use onWindows Rugged devices. These custom CAB files consist of any files or applications you add from yourcomputer.
Simplify the install process combining all the files and applications you want on your Windows Ruggeddevice into a custom CAB file. You can import CAB files into your own custom CAB file.
This feature allows you to create one custom CAB file that contains all the CAB files you must install on adevice. You can also use the AirWatch Cab Creator to edit any existing CAB file on your PC. TheAirWatch Cab Creator also supports importing files that you can then convert to CAB file upon saving.
Product Provisioning
VMware, Inc. 35

Create a Custom CAB, WinRuggSimplify installation of files onto your Windows Rugged devices by creating custom CAB files using theAirWatch Cab Creator for Windows Rugged. These custom CABs can contain your business files or thefiles necessary to upgrade your Windows Rugged devices.
Prerequisites
To use the AirWatch Cab Creator for Windows Rugged, you must meet the following requirements.
n A Windows device running Windows 7+
n .NET Framework 4.5
Procedure
1 Download the "AirWatch Cab Creator" for Windows Rugged from the MyWorkspaceONE portal.
2 Unzip the file to your preferred directory.
Product Provisioning
VMware, Inc. 36
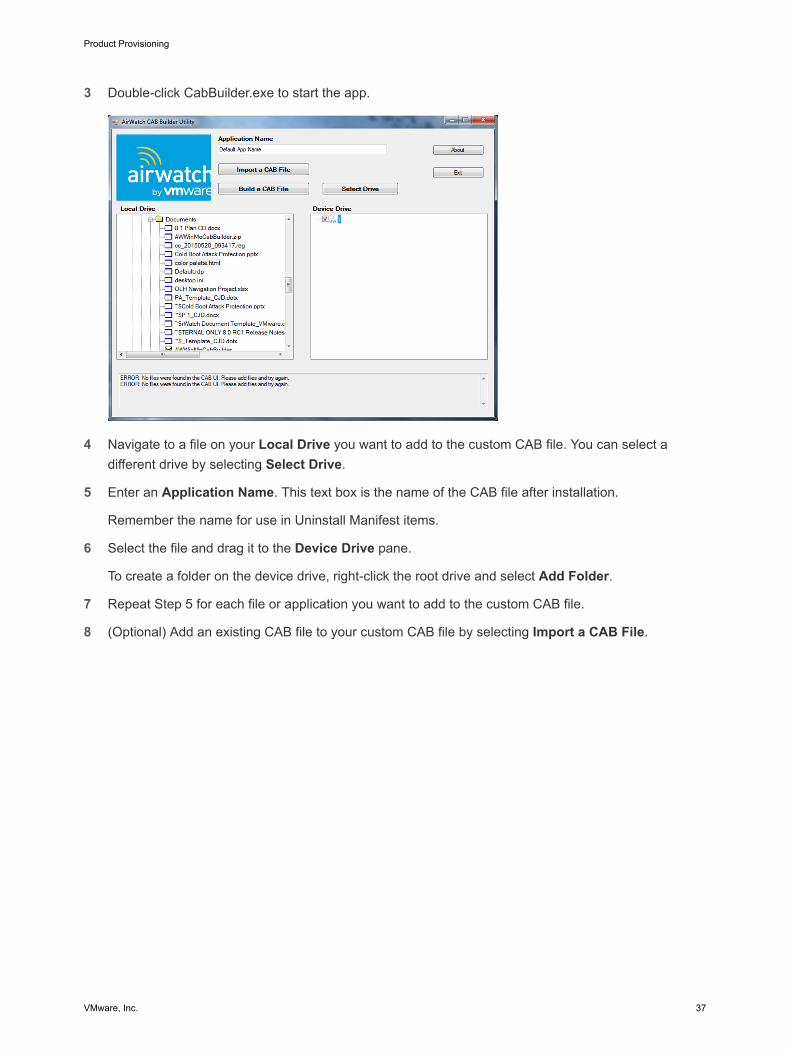
3 Double-click CabBuilder.exe to start the app.
4 Navigate to a file on your Local Drive you want to add to the custom CAB file. You can select adifferent drive by selecting Select Drive.
5 Enter an Application Name. This text box is the name of the CAB file after installation.
Remember the name for use in Uninstall Manifest items.
6 Select the file and drag it to the Device Drive pane.
To create a folder on the device drive, right-click the root drive and select Add Folder.
7 Repeat Step 5 for each file or application you want to add to the custom CAB file.
8 (Optional) Add an existing CAB file to your custom CAB file by selecting Import a CAB File.
Product Provisioning
VMware, Inc. 37

9 Select Build a CAB File to save the CAB file and select a name for the file.
10 Select Save to create a custom CAB file.
Android Device Enrollment with the Workspace ONEIntelligent HubThe Workspace ONE Intelligent Hub application facilitates enrollment and allows for real-timemanagement and access to relevant device information. The enrollment process secures a connectionbetween Android devices and your Workspace ONE UEM environment.
Android devices also support using the Workspace ONE Intelligent Hub for enrollment purposes.Workspace ONE UEM recommends using the Product Provisioning system to enroll devices throughstaging packages as the Workspace ONE Intelligent Hub enrollment method does not support someProduct Provisioning functionality.
n WifiConfig cannot configure Fusion settings for Motorola devices. You must push the WifiConfig.apkas an internal app after enrollment to configure the settings. Extract the WifiConfig.apk from asideload staging bundle inside the Workspace ONE Intelligent Hub folder of a device and upload it tothe Workspace ONE UEMconsole as an internal app.
n Product Persistence does not support Workspace ONE Intelligent Hub enrollment method. Productsmarked for persistence still download to the device but an Enterprise Reset removes all products.Persisted products do not automatically reinstall following an Enterprise Reset when the devicereboots.
n Android Work Managed enrollment is supported provided Zebra's Stage Now staging client is used.
For additional enrollment considerations and details about configuring enrollment options includingenforcing enrollment restrictions, see the Device Enrollment topic in Managing Devices documentation.
Product Provisioning
VMware, Inc. 38

Enroll Zebra Devices with Stage Now Barcode, AndroidThe Stage Now staging client is Zebra's next generation Android solution for staging Zebra devices andpreparing them for production use.
Workspace ONE UEM supports Stage Now given the following conditions and limitations.
For more information on Zebra Mobility, see Zebra Mobility Extensions (MX) and Full MX Feature Matrix.
If you plan to enroll Zebra devices in Work Managed Device Mode with a Stage Now barcode, take thefollowing steps.
Prerequisites
n Zebra devices must be running Android Nougat with MX version 7.1 or later.
n Zebra devices running Android Marshmallow and below must continue to use Rapid Deploymentas the default staging client.
n You must have Android Hub version 8.2 or later uploaded to the console as the Workspace ONEIntelligent Hub Package.
n Relay Servers
n FTP Relay Servers set to passive mode only are supported. FTP Relay servers in active modeare not supported and do not function with the Stage Now client.
n HTTPS endpoints for the relay server are supported so long as they are configured using the webserver of your choice (for example IIS). You must also select the HTTPS protocol when youConfigure a Relay Server.
n Ensure the Stage Now URL setting, found in Groups & Settings > All Settings > System >Advanced > Site URLs, is set to the appropriate URL.
n If your on premises environment is configuring your own Stage Now server, then place yourcustom URL in this field.
n If your on premises environment is not configuring your own Stage Now server, then you simplymust open your networks to allow access to the URL listed here.
n SaaS environments do not need to change this text box.
n There must be no Google account present on the device while attempting Stage Now enrollment inWork Managed Mode.
Procedure
1 Use the Organization Group selector to select the OG you want to configure for your Android devices.
2 Navigate to Groups & Settings > All Settings > Devices & Users > Android > Android EMMRegistration and select the Enrollment Restrictions tab.
Product Provisioning
VMware, Inc. 39

3 Complete the following settings.
Setting Description
Current Setting Select Override to affect changes to the OG you selected in step 1.
Define devices that will use Android(Legacy) in this organization group
This setting determines how this OG treats Android (Legacy) devices. Select fromamong the following settings.
Don't use Android (Legacy) – This setting enables the Device Owner Modeslider on the Generate Stage Now Barcode screen and makes it uneditable. Thisforces all Android (Legacy) devices that enroll in this OG to be in Device OwnerMode (or Work Managed Device Mode).
Always use Android (Legacy) – This setting disables the Device Owner Modeslider from the Generate Stage Now Barcode screen and makes it uneditable.This forces all Android (Legacy) devices that enroll in this OG to be in DeviceAdmin Mode.
Exempt smart groups from Android (Legacy) – This setting enables the DeviceOwner Mode slider on the Generate Stage Now Barcode screen and makes iteditable, allowing you the choice of enrolling Android devices in Device OwnerMode (Work Managed Device Mode) or enrolling them in Device Admin Mode.
4 Direct your end-user to take the following steps once they take possession of the newly-enrolled
device.
a Start the device from a "factory settings" state.
b Ensure there is no Google account on the device.
c Proceed through the Setup Wizard or scan the "skip setup wizard" barcode provided by Zebra.
d Open the Stage Now app.
e Scan the barcode.
The device is automatically enrolled into Work Managed mode.
What to do next
You can optionally continue to the next step of making a Stage Now barcode by proceeding to the nextstep, Generate a Barcode Staging Package with the Enrollment Configuration Wizard.
Zebra Stage Now Special Characters, AndroidWhile configuring relay servers for Zebra StageNow barcode enrollment, you are not allowed to usecertain characters for the login password.
Customers who have any special characters in the Relay Server > Device Connection for stagingconfiguration will experience issues with StageNow barcode enrollment of Zebra devices.
Do not use any of the following characters in the FTP/FTPS password.
“@” | “/” | “\” | “:” | “;” | “,” | “?” | “$” | “&” | “=” | “+” | "!"
Product Provisioning
VMware, Inc. 40

If a domain user is authenticating with the FTP/FTPS server, then configure the FTP/FTPS server to usea default domain so that one does not need to be provided in the Relay Server configuration. Edit theRelay Server > Device Connection details to remove the domain. Simply supply the user name andpassword.
Product Provisioning
VMware, Inc. 41

Product Provisioning 4The main feature of the Product Provisioning system in Workspace ONE UEM powered by AirWatch iscreating an ordered installation of profiles, applications, and files/actions into one product to be pushed todevices based on the conditions you create.
Important You must upload the content of the product before a product can be created.
Product Provisioning BasicsOnce products are created and activated, they are pushed to the device based on the conditions set.Conditions are an optional tool that determine when a product is downloaded and when it is installed.Content and Application (Android only) provisioning by products can be pushed to devices throughoptional relay servers.
Products are pushed to devices that are chosen by smart group assignments. These groups controlwhich devices get which product based on how the group is created. You can also use Assignment Rulesto further target your products to devices.
Note Windows Rugged Only: In addition, you can ensure the product you provision from the consoleor from an API call is the exact same product that gets received by the Windows Rugged device. Thisproduct verification is built into the provisioning process; if the product status is Compliant, then theproduct on the device matches the product provisioned. If file validation discovers a mismatch, theconsole pushes the content to the device again to ensure compliance between the product and thedevice. In this way, the product ensures that your devices remain up-to-date.
This chapter includes the following topics:
n Create a Product
n Product Provisioning Profiles
n Product Verification
n Product Persistence, Android and WinRugg
n Product Push Automatic Retry
n Application Provisioning, Android
n Product Conditions
n Event Actions, Android and WinRugg
n Files-Actions for Products
VMware, Inc. 42

n Product Sets
n Custom Attributes
Create a ProductAfter creating the content you want to push to devices, create a product that controls when the content ispushed. Creation of the product also defines the order in which the product is installed.
Prerequisites
To edit a product, the product must be deactivated in the list view first.
Procedure
1 Navigate to Devices > Provisioning > Product List View > Add Product.
2 Select the Platform you want to create a staging configuration for.
3 Complete the General text boxes.
Setting Description
Name Enter a name for the product. The name cannot be longer than 255 characters.
Description Enter a short description for the product.
Managed By Select the organization group that can edit the product.
Assigned Smart Groups Enter the smart groups the product provisions.
4 Select Add Rules to use Assignment Rules to control which devices receive the product.
Application rules can be applied to unmanaged applications installed on the device. These rules allowyou to use system apps and third-party apps that are not managed by Workspace ONE UEMconsole.
Setting Description
Add Rule Select to create a rule for product provisioning. Displays the Attribute/Application, Operator, and Value drop-down menus.
Add ApplicationRule (AndroidOnly)
Android Only: Select to create an application rule for product provisioning. This allows you to requireapplications to have specific versions install on the device for the rule to pass. Displays the Attribute/Application, Operator, and Value drop-down menus.
Add LogicalOperator
Select to display a drop-down menu of logical operators such as AND, OR, NOT, and parentheses. Allows formore complex rules.
Attribute/Application
This is the custom attribute or application used to designate which devices receive the product. Customattributes are created separately.
Android Only: Only internal applications display in the drop-down menu. You can use Enter Manually to enterthe package ID of any application that should be present on the device.
For more information, see Custom Attributes.
Product Provisioning
VMware, Inc. 43
Setting Description
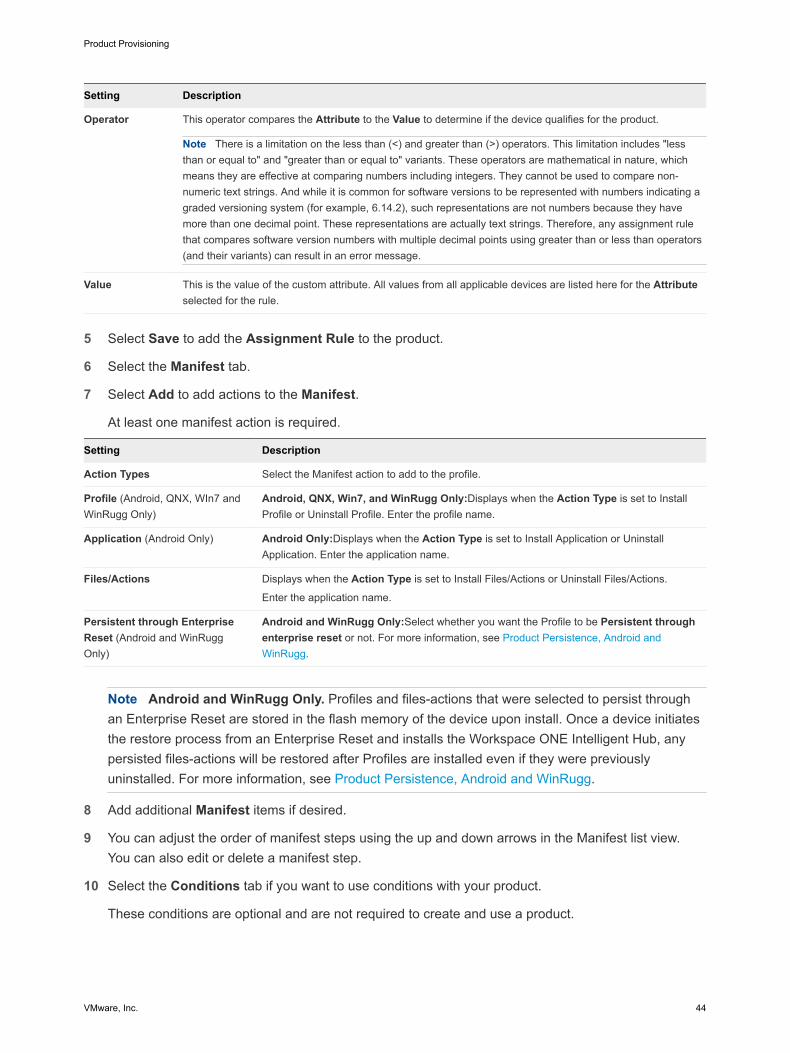
Operator This operator compares the Attribute to the Value to determine if the device qualifies for the product.
Note There is a limitation on the less than (<) and greater than (>) operators. This limitation includes "lessthan or equal to" and "greater than or equal to" variants. These operators are mathematical in nature, whichmeans they are effective at comparing numbers including integers. They cannot be used to compare non-numeric text strings. And while it is common for software versions to be represented with numbers indicating agraded versioning system (for example, 6.14.2), such representations are not numbers because they havemore than one decimal point. These representations are actually text strings. Therefore, any assignment rulethat compares software version numbers with multiple decimal points using greater than or less than operators(and their variants) can result in an error message.
Value This is the value of the custom attribute. All values from all applicable devices are listed here for the Attributeselected for the rule.
5 Select Save to add the Assignment Rule to the product.
6 Select the Manifest tab.
7 Select Add to add actions to the Manifest.
At least one manifest action is required.
Setting Description
Action Types Select the Manifest action to add to the profile.
Profile (Android, QNX, WIn7 andWinRugg Only)
Android, QNX, Win7, and WinRugg Only:Displays when the Action Type is set to InstallProfile or Uninstall Profile. Enter the profile name.
Application (Android Only) Android Only:Displays when the Action Type is set to Install Application or UninstallApplication. Enter the application name.
Files/Actions Displays when the Action Type is set to Install Files/Actions or Uninstall Files/Actions.
Enter the application name.
Persistent through EnterpriseReset (Android and WinRuggOnly)
Android and WinRugg Only:Select whether you want the Profile to be Persistent throughenterprise reset or not. For more information, see Product Persistence, Android andWinRugg.
Note Android and WinRugg Only. Profiles and files-actions that were selected to persist throughan Enterprise Reset are stored in the flash memory of the device upon install. Once a device initiatesthe restore process from an Enterprise Reset and installs the Workspace ONE Intelligent Hub, anypersisted files-actions will be restored after Profiles are installed even if they were previouslyuninstalled. For more information, see Product Persistence, Android and WinRugg.
8 Add additional Manifest items if desired.
9 You can adjust the order of manifest steps using the up and down arrows in the Manifest list view.You can also edit or delete a manifest step.
10 Select the Conditions tab if you want to use conditions with your product.
These conditions are optional and are not required to create and use a product.
Product Provisioning
VMware, Inc. 44

11 Select Add to add either Download Conditions, Install Conditions, or both.
n A Download Condition determines when a product should be downloaded but not installed on adevice.
n An Install Condition determines when a product should be installed on a device.
12 Select the Deployment tab if you want to control the time and date that products are activated anddeactivated.
This tab is optional and is not required to create and use a product.
Setting Description
Activation Date Enter the time when a product automatically activates for device job processing.
If the activation date is defined and the product is saved, the product stays inactive until the activation date ismet according to the Workspace ONE UEM server time. The policy engine wakes up and automatically activatesthe product. You can manually activate products with activation dates beforehand. Manually activating a productoverrides the activation date.
DeactivationDate
Enter the time when a product automatically deactivates from current and new device job processing.
If the deactivation date is defined and the product is saved and currently active, it stays active until thedeactivation date is met according to the Workspace ONE UEM server time. The policy engine wakes up andautomatically deactivates the product. You can manually deactivate products with deactivation datesbeforehand. Manually deactivating a product overrides the deactivation date.
A deactivation date cannot be set earlier than the activation date.
Pause/Resume Enable to ensure that an interrupted product provisioning due to Wi-Fi connectivity issues will be retried in thefollowing manner.
The Workspace ONE Intelligent Hub makes 5 attempts to contact the relay server to download the product. Incase of download failure or Wi-Fi connectivity failure, the Hub then makes 5 attempts to connect to the DeviceServices URL via HTTPS (configure this setting at Groups & Settings > All Settings > Admin > ContentDelivery Settings > File Sources Include HTTPS set to enabled). If the product is still unavailable, then the jobis moved to a Paused state.
After a while, the Hub changes the job state to Started and makes another 5 attempts to connect to the relayserver and another 5 attempts on the Device Services (provided the option is enabled).
It repeats this process for a maximum 24 hours after the very first connection failure. If, after this 24 hour period,the download is still not complete, the job is set to Failed.
Product Type Determine if a product is Required or Elective.
A required product provisions to assigned devices when deployment settings are met. An elective product is onlyprovisioned when it is manually activated on the Device Details View of a provisioned device.
DeploymentMode
Select from the following how the product is to be deployed.
Relay Server with Workspace ONE Server as Backup – This is the default deployment mode. The deviceattempts to receive the product from the relay server initially, making 5 separate attempts, then falling back todevice services as a secondary source.
Relay Server Only – The device only makes attempts to receive the product from the relay server. In a scenariowhere the relay server is not configured or deactivated, the fallback source is device services.
Auto Retry Enables the automatic retry of a product push when it detects a push failure rate of up to 5%, making amaximum of three retries per device. For details, see Product Push Automatic Retry.
Product Provisioning
VMware, Inc. 45

13 Select the Dependencies tab if you want to set the product to only provision devices that have otherproducts provisioned as well.
a Select Add to add a dependent product.
You can add as many dependent products as you want.
14 Select to deploy the product immediately by selecting Activate or wait to deploy later and selectSave.
Product Provisioning ProfilesThe product provisioning system allows you to create profiles for your rugged devices. The profilescreated for rugged devices are installed or uninstalled as part of a product. Unlike profiles created fortypical MDM deployments, profiles for product provisioning have different rules governing editing anddeleting.
Profiles created under Products are different than those created through Workspace ONE UEM. Thissection lists the differences between profiles created for normal device use and those created for use inproduct provisioning.
Profile Creation and General SettingsProfiles for use with product provisioning must be created by navigating to Devices > Provisioning >Components > Profiles and select Add.
While creating these product provisioning profiles, the general tab will be different than the normal generaltab for profiles.
Note Assignment of profiles happens at the product level and not at the profile level as it is insmartphone profiles.
Saving Product Provisioning ProfilesAfter configuring your product provisioning profile, select Save instead of Save & Publish.
Profiles names cannot be longer than 255 characters.
Update ProfilesWhen you edit an existing profile, the version number increases. After saving the edits, Workspace ONEUEM runs a check on all active products to find any that contain the newly edited profile.
If any active products contain the profile, a warning prompt displays listing all active products affected bythe edited profile. You can then select to Activate or Deactivate a product using the profile.
Delete a Product Provisioning ProfileYou can delete an unwanted or unused product provisioning profile provided it is not attached to aproduct. Workspace ONE UEM checks any attempt to delete a profile against the list of active products.
Product Provisioning
VMware, Inc. 46
Prerequisites
Before you can delete a product provisioning profile, you must detach it from all products.
Procedure
1 Select the Profile listed in the Warning prompt.
2 Select Edit.
3 Remove the profile from the product.
4 Select Save.
5 Repeat the steps above for all products containing the profile.
6 Once the profile detaches from all products, you can delete the profile.
If a profile is part of an active product, a warning prompt displays listing any product that uses the profile.
Product VerificationYou can ensure the product you provision from the console or from an API call is the exact same productthat gets received by the device. This product verification is built into the provisioning process.
Verification happens on the device Hub side but both the device end user and the administrator on theconsole side is made aware of the product's status.
Product Persistence, Android and WinRuggProduct Provisioning allows you to enable profiles, files-actions, and applications to remain on a devicefollowing an enterprise reset. Content marked to persist following an enterprise reset reinstalls followingthe device restart after the Workspace ONE Intelligent Hub installs.
Supported DevicesProduct Persistence is ideal for help desk type support as it allows the device to be wiped to clear awayany problems without needing the device to be re-enrolled and products provisioned again.
n Product Persistence for Windows Rugged only applies to Motorola, Honeywell, Psion, Pideon, andIntermec devices running Windows Mobile.
n Product Persistence for Android only applies to legacy Motorola, Zebra, and Honeywell devices.
How Persistence Worksn A device must contain a staging configuration so that the Workspace ONE Intelligent Hub and
enrollment reinstall following the enterprise reset. Staging configurations automatically persist on adevice.
n Set to persist any profiles, files-actions, or apps that you want to remain on the device after theenterprise reset.
Product Provisioning
VMware, Inc. 47

n The device resets when the Enterprise Reset command is sent (see Chapter 5 ProductManagement). After resetting, the restore process starts.
n The Workspace ONE Intelligent Hub for the device reinstalls during the restore process.
n After the Workspace ONE Intelligent Hub is installed, any persisted profiles, such as Wi-Fi, reinstall.
n Any persisted files-actions or apps are reinstalled.
Product Push Automatic RetryWhen a device fails to process a provisioned product for whatever reason, the product push isautomatically retried up to three times per device.
The product push automatic retry helps to minimize the amount of force reprocessing you must request.Enable this feature when you make a new product by navigating to Devices > Provisioning > ProductList View and select the Add Product button followed by the platform selection. The Auto Retry checkbox is in the Deployment tab.
Automatic Retry TriggerThe automatic retry trigger audits each product job by making a rolling calculation of the product pushfailure rate. If the amount of failed product pushes is 5% or less, then an automatic retry is triggered. Atthis stage, individual devices are sampled and if the auto retry fails again, then another retry is attempted.This retry happens a maximum of three times per device.
If the amount of failed pushes is greater than 5% (or the rolling calculation increases to greater than 5%),then automatic retry is not triggered or the retry stops.
Manual Force ReprocessYou can monitor for product push failures by navigating to Devices > Provisioning > ProductDashboard.
For details on how to request a Force Reprocess, see Products List View.
Application Provisioning, AndroidProduct provisioning allows you to upload applications to the console for distribution as part of a product.Through product provisioning, you can upgrade applications and remove them remotely.
Silent install of applications is supported on Android Legacy devices with an OEM service application andAndroid Work Managed devices.
Note Smart group assignment happens on the Product level and not on the Application level.
Upload an Application to Provision, AndroidApplications added through product provisioning use the rules and restrictions of the product to manageinstallation. Add applications that you want installed onto devices as part of a product.
Product Provisioning
VMware, Inc. 48

Procedure
1 Navigate to Devices > Provisioning > Components > Applications and select Add Application.
2 Enter who the application is Managed By.
3 Select Upload to browse for the Application File.
4 Select Choose File to add a local file or select Link to enter a link.
5 Select Save to finish uploading the application.
6 Select Continue to add the application to the Product Provisioning application list.
Add New Application Versions to Provision, AndroidYou can add a new version of an already uploaded application. This action enables you to push thenewest version of an application to end users using the existing products you have already created.
Procedure
1 Navigate to Devices > Provisioning > Components > Applications and select More.
2 Select the Add Version option from the drop-down menu.
3 Upload the new version of the application as described in Upload an Application to Provision,Android.
4 Select Save.
5 Navigate to Devices > Provisioning > Product List View and find the product that contains the appyou want to update. If necessary, use the filters to narrow your search.
6 Select the radio button to the left of the product name.
This radio button selection displays some action buttons at the top of the List View.
7 Select the Edit action button.
The Edit product screen displays.
8 In the Manifest tab, find the Install Application Action Type that contains the app you want toupdate and select the small blue pencil icon to the right of the Description column.
The Edit Manifest screen displays.
9 In the Application text box, delete the app name.
This action causes the drop-down menu to appear which now displays all versions of all applicationsin your entire Applications library.
10 Select the new version of the app that you uploaded earlier.
11 Select the Save button.
The Edit product screen now shows the Manifest that includes the new version of the app.
Product Provisioning
VMware, Inc. 49

12 Select the Activate button.
This action pushes the new version of the app to the devices provisioned with this product.
Delete Applications from Provisioning, AndroidRemove unwanted applications from your products. The Workspace ONE UEM console checks anyattempt to delete an application against the list of active products.
Prerequisites
Before you are able to delete an application, it must be detached from all products.
Procedure
1 Navigate to Devices > Provisioning > Applications.
2 Locate the Application you want to delete from the List View.
3 Select the down arrow button to the far-right of the row belonging to the application.
4 Select Delete.
5 The Restricted Action screen displays. This is a security feature designed to prevent accidentalapplication deletions. Enter your 4-digit security PIN to proceed with the deletion.
6 If the application you selected is part of a product, then you are not allowed to delete it until theapplication is detached from the product. A green warning prompt appears. At the bottom of thewarning prompt lists all the products to which the selected application belongs. Take note of theseproducts.
7 Navigate to Devices > Provisioning > Product List View.
8 Select the Product listed in the warning prompt.
9 Select the Edit button. The Edit Product screen displays.
10 Switch to the Manifest tab.
11 Select the delete button (x) to detach the application from the product. You are prompted to confirm.
12 Select Save.
13 Repeat steps 8 to 12 for all products containing the application.
What to do next
Once the application detaches from all products, you can delete the application by returning to completesteps 1 to 5.
Product ConditionsA condition determines when the product or OS upgrade package should be downloaded and installed.Conditions are checked when a product is pushed to a device.
Product Provisioning
VMware, Inc. 50

Your device fleet is not always readily available for maintenance. You could have devices in different timezones or countries. Since you cannot always ensure that a device is not in use when you push a product,you can use conditions to delay the download and installation.
These conditions defer the product download or installation until the device meets the criteria of theassigned condition. You can set the products to only download based on battery life, power adapters,user confirmation, and other criteria. The available conditions for your products vary based on the deviceplatform.
Copy or Delete Conditions in List ViewYou can view all conditions in a list view. You can also edit and delete conditions from the list view.
Prerequisites
Before you can delete a condition, you may have to detach it from one or more products. For moreinformation, see Detach a Condition from a Product.
Procedure
1 Navigate to Devices > Provisioning > Components > Conditions.
2 Select the pencil icon ( ) to the left of the name of the condition to open the Edit Condition screen.
3 Select the radio button to the far left of the condition to display the Copy and Delete buttons, offeringmore actions.
Create a ConditionConditions enable you to set products to download and install on your device only when preset conditionsare met. Create a condition to determine when a product downloads and installs onto your devices.
Procedure
1 Navigate to Devices > Provisioning > Components > Conditions and select the Add Conditionbutton.
2 Select the Platform you want to create a condition for.
3 Complete the Create Condition Type settings.
Settings Description
Name Enter a name for the condition. The name cannot be longer than 255 characters.
Description Enter a description for the condition.
Condition Select from the drop-down list of platform-specific conditions. The type of conditionaffects the parameters on the Details tab to follow. For more information, seeConditions Defined.
Managed By Select the organization group that manages the condition.
4 Select Next.
Product Provisioning
VMware, Inc. 51
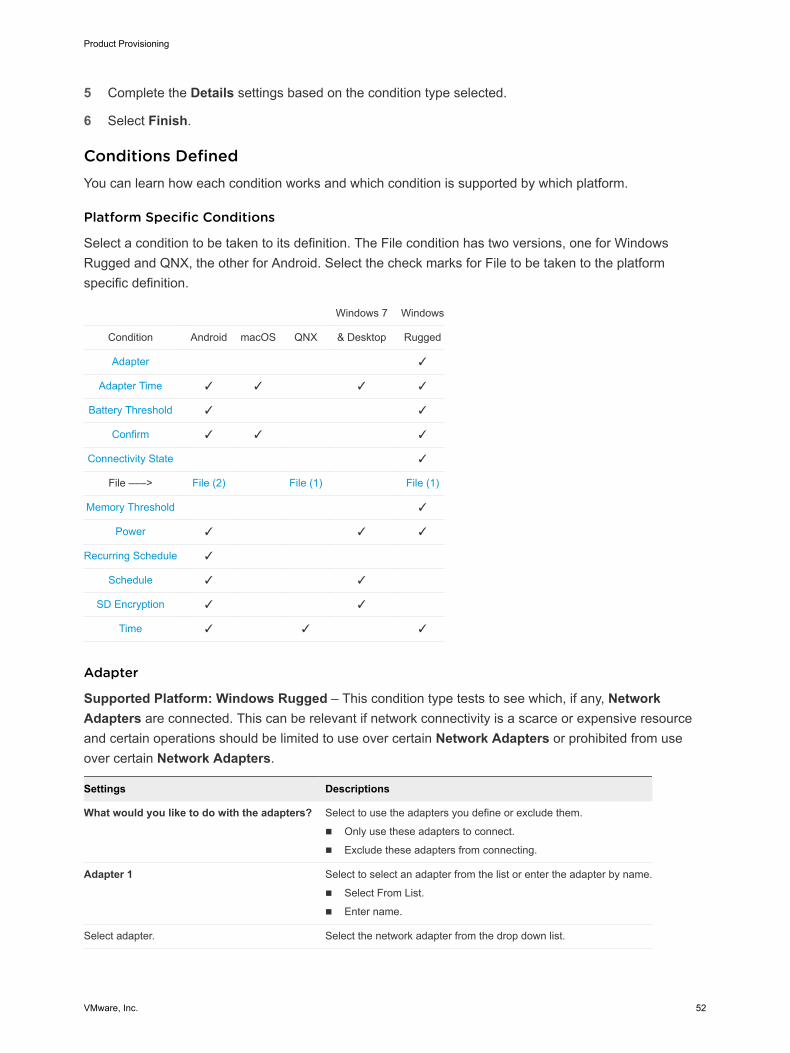
5 Complete the Details settings based on the condition type selected.
6 Select Finish.
Conditions DefinedYou can learn how each condition works and which condition is supported by which platform.
Platform Specific Conditions
Select a condition to be taken to its definition. The File condition has two versions, one for WindowsRugged and QNX, the other for Android. Select the check marks for File to be taken to the platformspecific definition.
Windows 7 Windows
Condition Android macOS QNX & Desktop Rugged
Adapter ✓
Adapter Time ✓ ✓ ✓ ✓
Battery Threshold ✓ ✓
Confirm ✓ ✓ ✓
Connectivity State ✓
File –––> File (2) File (1) File (1)
Memory Threshold ✓
Power ✓ ✓ ✓
Recurring Schedule ✓
Schedule ✓ ✓
SD Encryption ✓ ✓
Time ✓ ✓ ✓
Adapter
Supported Platform: Windows Rugged – This condition type tests to see which, if any, NetworkAdapters are connected. This can be relevant if network connectivity is a scarce or expensive resourceand certain operations should be limited to use over certain Network Adapters or prohibited from useover certain Network Adapters.
Settings Descriptions
What would you like to do with the adapters? Select to use the adapters you define or exclude them.
n Only use these adapters to connect.
n Exclude these adapters from connecting.
Adapter 1 Select to select an adapter from the list or enter the adapter by name.
n Select From List.
n Enter name.
Select adapter. Select the network adapter from the drop down list.
Product Provisioning
VMware, Inc. 52

Settings Descriptions
Specify Adapter. Enter the adapter name to use or exclude.
Adapter 2/Adapter 3 Select to use or exclude additional adapters.
Adapter Time
Supported Platforms: Android, macOS, All Windows – This condition type tests for variouscombinations of constraints related to Network Adapters including local date, time, and frequency on thedevice.
Settings Description
Specify scenario #1? Set to Specify this scenario to begin configuring the condition scenario.
Up to 5 scenarios may be entered, each with their own constraint choices.
Each Scenario is an OR statement and each option inside a Scenario is an AND statement. For example,a device will check to see if Scenario #1 OR Scenario #2 is true. If Scenario #1 is true, it will check if allthe constraints listed are true because they are AND statements.
Scenario description Enter a description for the adapter time scenario.
Constrain NetworkAdapters?.
Set to Constrain based on the Best Connected Network Adapter and configure the following.
n Specify any Included or Excluded Network Adapters.
n Choose to either Select Network Adapter Class from a drop-down list or Type in a NetworkAdapter Name.
n Up to five network adapters may be selected in the Adapter selection method? setting.
n For each adapter you want to include/exclude, choose between Select a Network Adapter Classdrop-down list and entering a specific Adapter name.
If you want to skip this kind of constraint, then select Don't constrain based on the Best ConnectedNetwork Adapter. Then you can proceed with defining another kind of constraint.
Constrain days ofweek?.
For each day of the week, choose whether it will be included or excluded.
Constrain months?. For each month, choose whether it will be included or excluded.
Constrain days ofmonth?.
Enter a Start day of month? and an End day of month?.
Constrain years?. Enter a Start year? and an Last year?.
Constrain time ofday?.
Enter the Start hour?, Start minute?, End hour?, and End minute?.
Set frequency limit?. Ranges from Every 15 Minutes to Every 1 Week.
Set frequency limit?. Ranges from Every 15 Minutes to Every 1 Week.
Set frequency limit is a mandatory setting. The Adapter Time condition will not function correctly withoutit.
Note ActiveSync and VPN Network Adapters are not supported under the Android platform.
Product Provisioning
VMware, Inc. 53
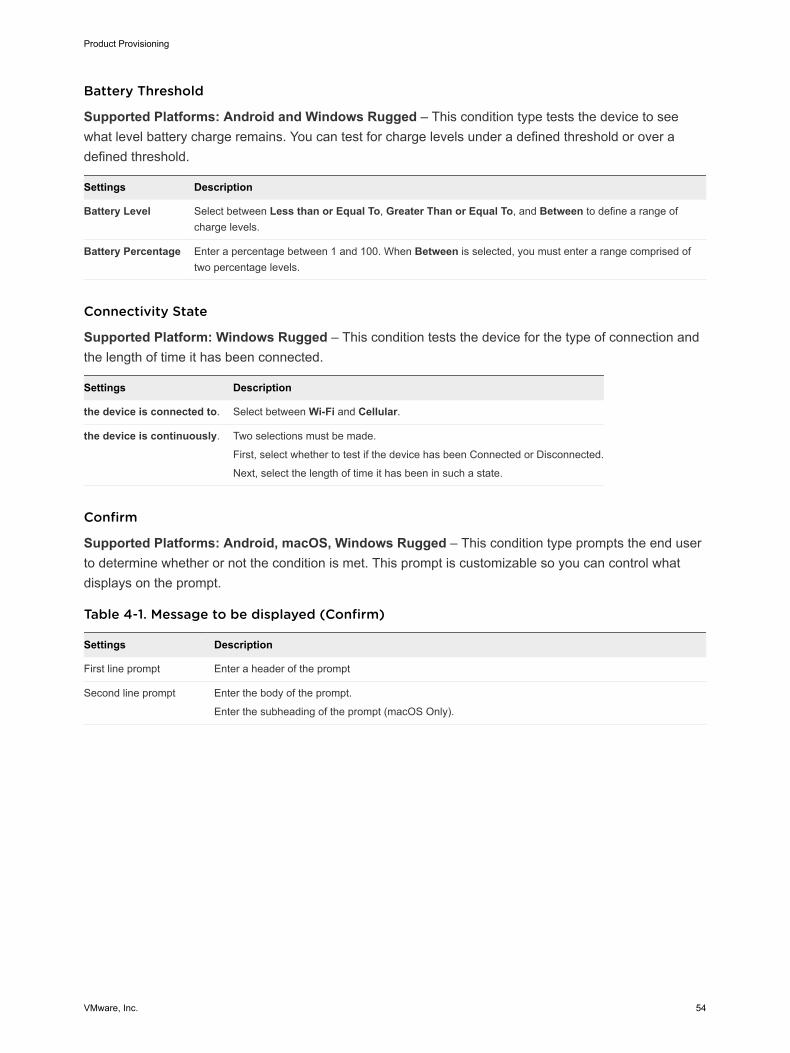
Battery Threshold
Supported Platforms: Android and Windows Rugged – This condition type tests the device to seewhat level battery charge remains. You can test for charge levels under a defined threshold or over adefined threshold.
Settings Description
Battery Level Select between Less than or Equal To, Greater Than or Equal To, and Between to define a range ofcharge levels.
Battery Percentage Enter a percentage between 1 and 100. When Between is selected, you must enter a range comprised oftwo percentage levels.
Connectivity State
Supported Platform: Windows Rugged – This condition tests the device for the type of connection andthe length of time it has been connected.
Settings Description
the device is connected to. Select between Wi-Fi and Cellular.
the device is continuously. Two selections must be made.
First, select whether to test if the device has been Connected or Disconnected.
Next, select the length of time it has been in such a state.
Confirm
Supported Platforms: Android, macOS, Windows Rugged – This condition type prompts the end userto determine whether or not the condition is met. This prompt is customizable so you can control whatdisplays on the prompt.
Table 4-1. Message to be displayed (Confirm)
Settings Description
First line prompt Enter a header of the prompt
Second line prompt Enter the body of the prompt.
Enter the subheading of the prompt (macOS Only).
Product Provisioning
VMware, Inc. 54

Settings Description
Third line prompt If you enable a countdown, you can enter a countdown phrase into this setting.
For example, "You have %count% seconds to comply" where %count% is the countdown.
Enter the body of the prompt into the Third Line Prompt (Mac OSX Only).
Allow users to cancelaction(s)?
Select Yes if you want to give users a chance to opt out of the action upon which this condition is placed.
Select No to obligate users to accept the action.
Table 4-2. Delay (Confirm)
Settings Description
Delay (seconds) Use this to delay for a specified time or until the end user makes a selection.
If you enter a non-zero value, the prompt will wait for that value worth of seconds. Then if the end user does notmake a selection in the time allowed, the condition is automatically considered not met.
If a value of zero is entered, then the prompt displays indefinitely until the user makes a selection.
Enablecountdown?
Select Yes to allow the delay time to be “counted” down on the device so the end user knows how much time isremaining to make a selection.
Select No to hide the delay countdown.
Product Provisioning
VMware, Inc. 55

Table 4-3. Defer Action (Confirm)
Settings Description
Defer time. This controls the minimum time after the condition is not met before the end user will be prompted again todetermine the state of this condition.
If a non-zero value is entered, the end user will not be prompted again for at least that number of seconds.
If a value of zero is entered, then the end user could be prompted again as soon as the next execution of theCheck-In command.
Maximumnumber of defers
This controls the maximum number of times the condition is not met.
Once the condition has not been met this number of times, it will either be met or failed, depending on thesetting of the next feature.
If a value of zero is entered, then the condition will be met or failed on the first time.
Action aftermaximum defers.
Select the action to trigger after the maximum number of defers is met.
n Fail Condition.
n Display Cancel Button.
n Pass Condition.
File (1)
Supported Platforms: QNX and Windows Rugged – This condition type tests the device to see if a fileis present or not. You can set the condition to test if the file is on the device, and if it is, test true. You mayalso set the condition to test true if a file is not on the device. Finally, you may set the condition to create aflag file and save it on the device for use with third-party programs.
Settings Description
Specify Flag File Set to Specify Flag File to enable the use of a flag file for use with third-party programs.
Specify Flag File Location Enter a location path for the flag file.
Specify Flag File Contents Enter the content you want in the flag file.
Specify Scenario #1 Set to Specify this scenario to enable testing a file's existence on the device.
Test File Enter the name of the test file the condition tests.
Test Type Choose to test whether to test if the File Exists or if the File Does Not Exist.
Remove File Choose to either Remove File or Do Not Remove File when the test completes.
File (2)
Supported Platform: Android – This iteration of the file condition is specific to Android, but it still teststhe device to see if a file is present or not. You can set the condition to test if the file is on the device, andif it is, test true. You may also set the condition to test true if a file is not on the device.
Settings Description
File Name Enter the name of the file the system searches for, including device path. The system searches for thisfile before it downloads or installs product components.
Condition Met When Select whether the system downloads or installs based on the existence of the file (File Found) ornonexistence of the file (File Not Found).
Frequency Select how often the system searches for this file.
Product Provisioning
VMware, Inc. 56

Settings Description
Duration Select how long this condition performs the action.
After Duration Exceeded Choose how to proceed after the condition duration period elapses.
Memory Threshold
Supported Platform: Windows Rugged – This condition type tests the device for available memorylevel.
Settings Description
Available memory is less than Enter a percentage of available memory such that your action only executes if the device hasless than the indicated amount.
Power
Supported Platforms: Android and All Windows – This condition type tests how a device is beingpowered, including whether the device is plugged in or has a suitably high battery level. Use a Powercondition type to prompt users to place the device into the cradle or to insert a charged replacementbattery. If your testing needs are particular, the Battery Threshold condition (Android and WindowsRugged only) offers more granular battery tests than Power offers.
Table 4-4. Message to be displayed (Power)
Settings Description
First line prompt Enter a header for the prompt.
Second line prompt Enter the body of the prompt.
Third line prompt If you enable a countdown, you can enter a countdown phrase into the Third line prompt field.
For example, "You have %count% seconds to comply" where %count% will be the countdown clock.
Table 4-5. Condition (Power)
Settings Description
Required power level Enter the required power level for the condition to test true.
n A/C.
n A/C or Full Battery.
Table 4-6. Delay (Power)
Settings Description
Delay (seconds). Use this to delay for a specified time or until the end user makes a selection.
If you enter a non-zero value, the prompt will wait for that value worth of seconds. If the end user does notmake a selection in the time allowed, the condition is automatically considered not met.
If a value of zero is entered, then the prompt will display indefinitely until the end user makes a selection.
Enablecountdown?
This allows delay time to be “counted” down on the device so the end user knows how much time is remainingfor the user to make a selection.
Product Provisioning
VMware, Inc. 57

Recurring Schedule
Supported Platform: Android – Rather than set an event action to begin based on a specific devicecondition, you can simply assign it to a recurring schedule.
Settings Description
Scheduled Interval Select from Hourly, Daily, and Weekly as the basis for the recurrence.
Number of hours /days / weeksbetween events
Enter the number of hours, days, or weeks between events.
For example, if you want an event action to run every other Wednesday, then select Weekly, enter 2 in thisfield, then select Wednesday as the Day of event occurrence.
Once the product with this condition is activated, the recurring schedule begins as soon as isadministratively possible. Continuing the above example, the recurring schedule begins the firstWednesday after you activate the product that uses this condition.
Table 4-7. Days of event occurrence (Weekly only), Recurring Schedule
Settings Description
Sunday through Saturday Select Yes for each day you would like the event action to start.
Table 4-8. Start and End Time (Daily and Weekly only), Recurring Schedule
Settings Description
Start Time. Enter the time of day the event action starts.
End Time. Many things can delay an event action from starting such as the device being offline or a previous event still inprogress. When the device is ready, you can allow the event action to always start or set an end time at whichpoint the device waits until the next start time.
Enter the time of day the event action will stop making attempts to start until the next scheduled start time.
Disable endtime.
Select Yes to disable end time. This causes the device to make continued attempts to start the event actionuntil it succeeds.
Schedule
Supported Platforms: Android, Windows 7, and Windows Desktop – This condition type tests thedevice date and time against a specific date/time entered. When the date/time is met, the conditionpasses and allows the download.
Settings Description
Date Select the specific date from the drop-down calendar.
Time Select the specific hour and minute from the drop-down menu.
SD Encryption
Supported Platforms: Android, Windows 7, and Windows Desktop – This condition type testswhether the device's SD card is encrypted or not encrypted. This can be relevant if you need to wait forthe SD card to be encrypted before downloading a file.
Product Provisioning
VMware, Inc. 58

Settings Description
SD card is Select Encrypted or Unencrypted to limit the product based on the state of the SD card encryption.
Time
Supported Platforms: Android, QNX, and Windows Rugged – This condition type tests the local dateand time on a device.
Table 4-9. First Time Slot (Time)
Settings Description
Select the month, day and yearStartFinish. Select Month, Day, and Year for both Start and Finish.
Select hour and minuteStartFinish. Select Hour and Minute for Start and Finish.
Table 4-10. Second Time Slot (Time)
Settings Description
Enable time check 2?. Select Yes to display a second set of options identical to the First Time Slot.
Table 4-11. Third Time Slot (Time)
Settings Description
Enable time check 3?. Select Yes to display a third set of options identical to the First Time Slot.
Detach a Condition from a ProductRemove unwanted conditions from your product. The Workspace ONE UEM console checks any attemptto delete a condition against the list of active products.
To delete a condition, it must be detached from all products as detailed below.
Procedure
1 Select the Product listed in the Warning prompt.
2 Select Edit.
3 Remove the condition from the product.
4 Select Save.
5 Repeat the steps above for all products containing the condition.
6 Once the condition detaches from all products, you can delete the condition. For more information,see Copy or Delete Conditions in List View.
If a condition is part of an active product, a warning prompt appears listing any product that uses thecondition.
Product Provisioning
VMware, Inc. 59

Event Actions, Android and WinRuggEvent actions allow you to take action on an Android or Windows Rugged device when predeterminedconditions are met. An 'event' ocurrs followed by the prescribed 'action'. The Event Actions wizard guidesyou through creating the conditions and actions together.
In cases where you want to perform a device action only when certain conditions are met, event actionsallow you to control the timing of these actions. For example, your devices might need new files downloadto them but only until the device is not in use. A device event can wait until the device is connected to itscharger before installing files. In another example, you can set a connectivity condition to wait for thedevice to connect to Wi-Fi before sending in a device check-in.
Event actions act as a device-based "if-this-then-that" configuration which controls the recurrence ofactions on a device. A product only processes once on a device. Event actions, however, process anytime the conditions are met.
Push event actions to devices as a component of a product.
Create an Event Action, Android and WinRuggYou can create event actions that run on a device when certain conditions are met.
Procedure
1 Navigate to Devices > Provisioning > Components > Event Actions and select the Add EventAction button.
The Add Event Action wizard displays.
2 Select your device platform.
The available conditions and actions for the platform display.
3 Select Next.
4 Complete the Details settings and select Next when complete.
Settings Descriptions
Name Enter a name for the event action. The name cannot be longer than 255characters.
Description Enter a short description for the event action.
Managed By Select the organization group that can edit the event action.
5 Select a Condition to trigger the device action.
You can select a previously created condition or create a new one.
a To create a condition, select Create Condition from the drop-down menu.
b Select Next when complete.
For more information, see Create a Condition.
Product Provisioning
VMware, Inc. 60

Windows Rugged Only: You can select multiple conditions, but only one condition of each type canbe selected.
n Adapter – Supported Platform: Windows Rugged – select which network adapters to allow/disallow.
n Battery Threshold – Supported Platforms: Android and Windows Rugged – select to takeactions for specified battery limits.
n Connectivity – Supported Platform: Windows Rugged – select to take actions whenconnectivity requirements are met.
n Memory – Supported Platform: Windows Rugged – select to take actions when the availablememory of the device is lower than a specific limit.
n Schedule – Supported Platform: Android – Schedule your actions to run on a recurring basis.
n Time – Supported Platform: Windows Rugged – Schedule your actions to take place oncertain dates, days of the week, and within time-slots.
6 Supported Platform: Android - Complete the required option Minimum Time Between Actions(hours) –
This option limits the number of times the action is run when triggered by the prescribed event.
This option is not available when Recurring Schedule is included in the selected conditions.
7 Select an Action to perform. The actions available depend on the device platform.
Action Description
Custom Settings (Android Only) Apply custom, OEM-specific device settings based on the selected XML file, whichmust be delivered to the device through a separate File/Action.
If the file entered in the File Path text box is not found, then the Event Action doesnot run. However, the Event Action remains active, making attempts to run thecustom setting XML file each time the condition is met.
Supported Devices:
n Android MSI devices with the Android Hub v7.1+
n Upload the ZIP file created by MSI.
n Android Zebra devices with the Android Hub v7.2+
n Upload the XML configuration file created by the Zebra Stage Nowprogram.
Copy Files (Windows Rugged Only) Copy files from one location to another on the WinRugg device.
Create Folder (Windows RuggedOnly)
Create a folder on the WinRugg device.
Delete Files (Windows Rugged Only) Delete folders from the WinRugg device.
Device Check-In (Windows RuggedOnly)
Command the Workspace ONE Intelligent Hub to check the WinRugg device inwith the Workspace ONE UEM console for updates.
Download Files (Android Only) You can download a file from the selected File Server source path onto theselected Destination folder of your Android or Windows Rugged device.
For details, see Configure Download and Upload Actions for Event Actions,Android and WinRugg.
Product Provisioning
VMware, Inc. 61

Action Description
Install (Windows Rugged Only) Install files on the Windows Rugged device. You must use the Run manifest actionto install files or applications. This is accomplished using command lines. Supportsthe following file types:
Windows Rugged: .reg, .cab, and .xml.
Move Files (Windows Rugged Only) Move files from one location to another on the WinRugg device.
Reboot (Android Only) Restart the Android device.
Remove Folder (Windows RuggedOnly)
Remove a folder from the WinRugg device.
Rename File (Windows Rugged Only) Rename a file on the WinRugg device.
Rename Folder (Windows RuggedOnly)
Rename a folder located in the WinRugg device.
Run (Windows Rugged Only) Run command lines and arguments on the WinRugg device.
If you want to install executable files (EXE), then you must use the Run manifestaction on Windows Rugged devices. This is accomplished using command lines.The Run command must use the syntax of "\[full file path]". For example, \programfiles\program.exe.
Run Intent (Android Only) Run command lines and arguments on the Android device. See RunIntent Action,File-Action Android for more information.
Send Sample Data (Windows RuggedOnly)
Send the WinRugg device data sample to the UEM console.
Terminate (Windows Rugged Only) End a process or application running on the WinRugg device.
Uninstall (Windows Rugged Only) Uninstall a program or application on the WinRugg device. You must enter theapplication name.
The application name must match the name that appears in the Uninstall menu inthe Control Panel.
Note The Uninstall Manifest is for deleting files when a product is removed. If youremove a product from a device, any files installed remain on the device untiluninstalled using an Uninstall Manifest.
Upload Files (Android Only) You can upload a file from a source file path on your Android device to the selectedFile Server destination folder.
For details, see Configure Download and Upload Actions for Event Actions,Android and WinRugg.
Warm Boot (Windows Rugged Only) Restart the WinRugg device.
8 Select Update to add the action to the event action. You can add additional actions to the eventaction. Select Next.
9 Review the Summary and select Save.
What to do next
To push event actions to devices, add them as a component to a product. For more information, seeCreate a Product.
Product Provisioning
VMware, Inc. 62
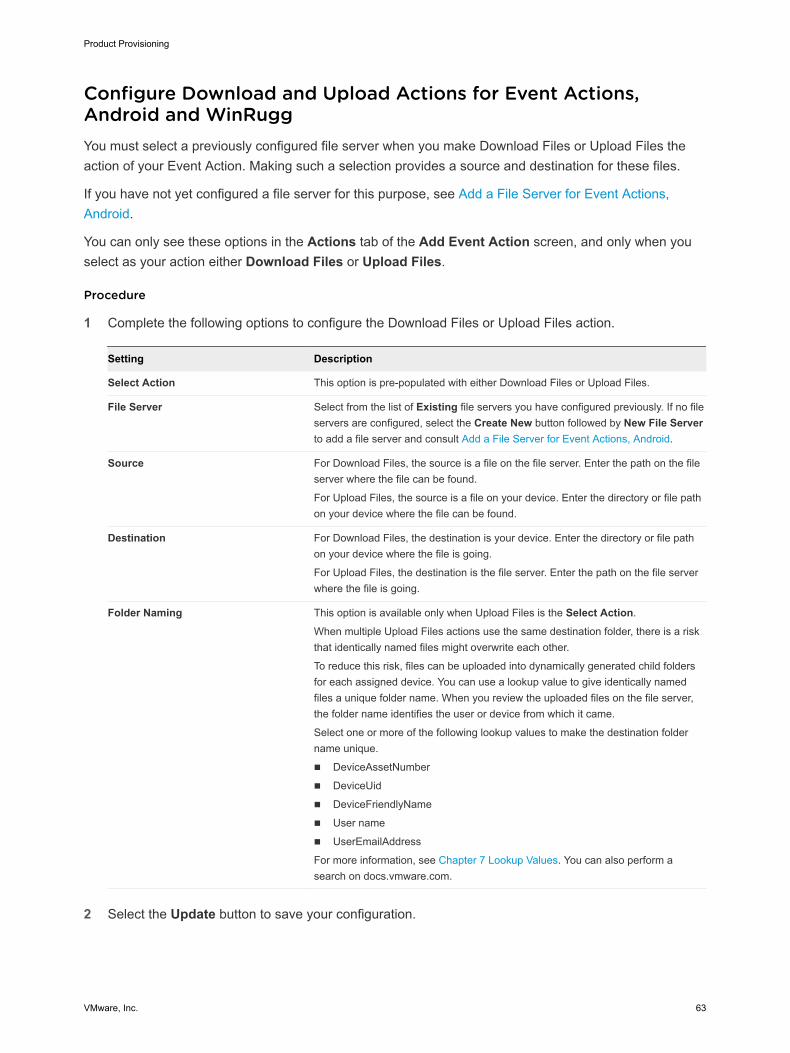
Configure Download and Upload Actions for Event Actions,Android and WinRuggYou must select a previously configured file server when you make Download Files or Upload Files theaction of your Event Action. Making such a selection provides a source and destination for these files.
If you have not yet configured a file server for this purpose, see Add a File Server for Event Actions,Android.
You can only see these options in the Actions tab of the Add Event Action screen, and only when youselect as your action either Download Files or Upload Files.
Procedure
1 Complete the following options to configure the Download Files or Upload Files action.
Setting Description
Select Action This option is pre-populated with either Download Files or Upload Files.
File Server Select from the list of Existing file servers you have configured previously. If no fileservers are configured, select the Create New button followed by New File Serverto add a file server and consult Add a File Server for Event Actions, Android.
Source For Download Files, the source is a file on the file server. Enter the path on the fileserver where the file can be found.
For Upload Files, the source is a file on your device. Enter the directory or file pathon your device where the file can be found.
Destination For Download Files, the destination is your device. Enter the directory or file pathon your device where the file is going.
For Upload Files, the destination is the file server. Enter the path on the file serverwhere the file is going.
Folder Naming This option is available only when Upload Files is the Select Action.
When multiple Upload Files actions use the same destination folder, there is a riskthat identically named files might overwrite each other.
To reduce this risk, files can be uploaded into dynamically generated child foldersfor each assigned device. You can use a lookup value to give identically namedfiles a unique folder name. When you review the uploaded files on the file server,the folder name identifies the user or device from which it came.
Select one or more of the following lookup values to make the destination foldername unique.
n DeviceAssetNumber
n DeviceUid
n DeviceFriendlyName
n User name
n UserEmailAddress
For more information, see Chapter 7 Lookup Values. You can also perform asearch on docs.vmware.com.
2 Select the Update button to save your configuration.
Product Provisioning
VMware, Inc. 63
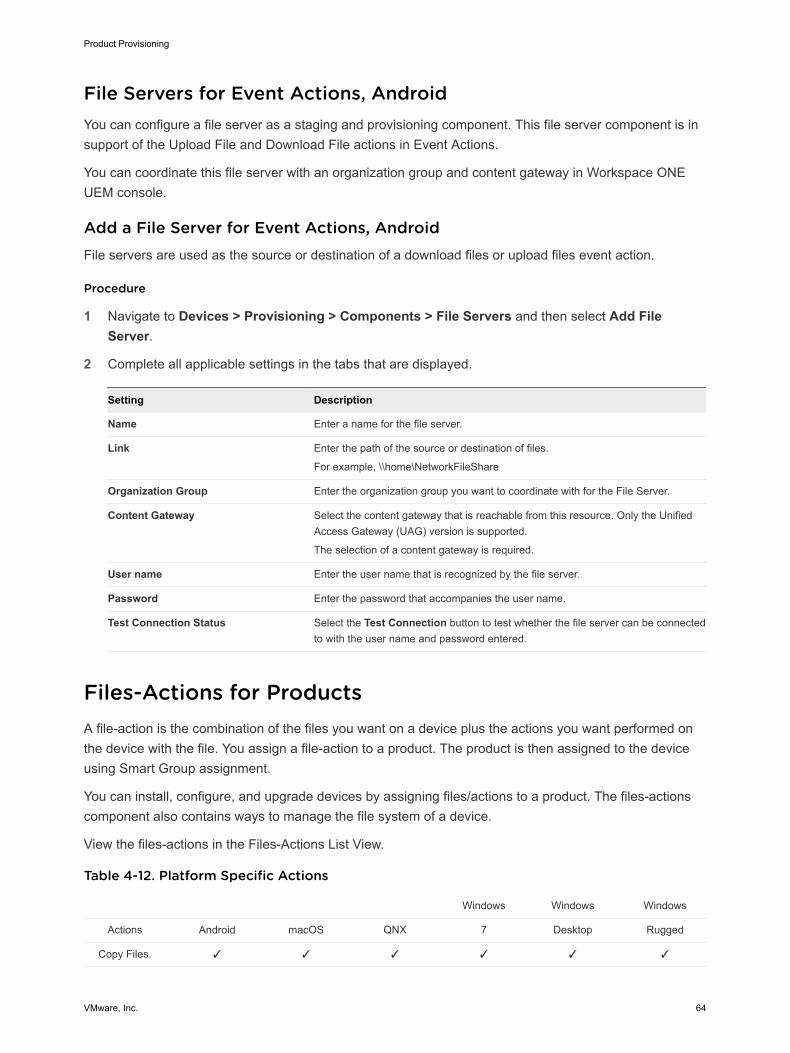
File Servers for Event Actions, AndroidYou can configure a file server as a staging and provisioning component. This file server component is insupport of the Upload File and Download File actions in Event Actions.
You can coordinate this file server with an organization group and content gateway in Workspace ONEUEM console.
Add a File Server for Event Actions, AndroidFile servers are used as the source or destination of a download files or upload files event action.
Procedure
1 Navigate to Devices > Provisioning > Components > File Servers and then select Add FileServer.
2 Complete all applicable settings in the tabs that are displayed.
Setting Description
Name Enter a name for the file server.
Link Enter the path of the source or destination of files.
For example, \\home\NetworkFileShare
Organization Group Enter the organization group you want to coordinate with for the File Server.
Content Gateway Select the content gateway that is reachable from this resource. Only the UnifiedAccess Gateway (UAG) version is supported.
The selection of a content gateway is required.
User name Enter the user name that is recognized by the file server.
Password Enter the password that accompanies the user name.
Test Connection Status Select the Test Connection button to test whether the file server can be connectedto with the user name and password entered.
Files-Actions for ProductsA file-action is the combination of the files you want on a device plus the actions you want performed onthe device with the file. You assign a file-action to a product. The product is then assigned to the deviceusing Smart Group assignment.
You can install, configure, and upgrade devices by assigning files/actions to a product. The files-actionscomponent also contains ways to manage the file system of a device.
View the files-actions in the Files-Actions List View.
Table 4-12. Platform Specific Actions
Windows Windows Windows
Actions Android macOS QNX 7 Desktop Rugged
Copy Files. ✓ ✓ ✓ ✓ ✓ ✓
Product Provisioning
VMware, Inc. 64

Create Folder. ✓ ✓ ✓ ✓ ✓ ✓
Delete Files. ✓ ✓ ✓ ✓ ✓ ✓
Execute Script. ✓
Install ✓ ✓ ✓ ✓ ✓
Move Files. ✓ ✓ ✓ ✓ ✓ ✓
Remove Folders. ✓ ✓ ✓ ✓ ✓ ✓
Rename File. ✓ ✓ ✓ ✓ ✓ ✓
Run. ✓ ✓ ✓ ✓ ✓
Run Intent. ✓
Reboot ✓
Terminate. ✓ ✓ ✓ ✓
Uninstall. ✓ ✓ ✓ ✓
Warm Boot ✓
OS Upgrade ✓
Workspace ONEIntelligent Hub
Upgrade.
✓
Create a Files-Actions ComponentYou can install, configure, and upgrade devices by assigning files/actions to a product. The files/actionscomponent also contains ways to manage the file system of a device.
Create Files/Actions to install and configure files and upgrades onto your devices using productprovisioning.
Note Windows Rugged and Windows Desktop: Windows Unified Agent is a 32-bit application, sowhen trying to run scripts in a 64-bit machine, proper redirections must be used to get access to the 64-bitfolder or the registry hive.
Procedure
1 Navigate to Devices > Provisioning > Components > Files/Actions and select Add Files/Actions.
2 Select the device Platform for which you want to make the files/actions.
3 Complete the General text boxes.
Settings Descriptions
Name Enter a name for the files/actions. The name cannot be longer than 255 characters.
Description Enter a short description for the files/actions.
Version The UEM console pre-populates this setting.
Product Provisioning
VMware, Inc. 65

Settings Descriptions
Platform Read-only setting displays the selected platform.
Managed By Select the organization group that can edit the files/actions.
4 Select the Files tab.
5 Select Add Files.
The Add Files window displays.
6 Select Choose Files to browse for a file or multiple files to upload.
There is a 2 GB limit on uploads.
Note Windows Rugged devices can use the files/actions option to install XML onto a device. Formore information, see Create an XML Provisioning File, Android, Win7, WinRugg.
Android and Windows Rugged devices can use the File-Action function to upgrade the OS of thedevice remotely. For more information, see Create an OS Upgrade File-Action, Android and Createan OS Upgrade File-Action, WinRugg.
7 Select Save to upload the files.
Once the files upload, the file grouping screen opens. File groups allow you to assign differentdownload paths and settings to different groups of files you have uploaded to a single file/action.
8 Select uploaded files and select Add to move the files into a new file group.
9 Define the Download Path the device uses to store the file group in a specific device folder.
If the download path entered does not exist, the folder structure is created as part of the installation.
Note Windows Rugged devices can Store OS Update Files on Relay Server to ensure that filesused to update the OS remain available on the relay server.
10 Select Save.
You can repeat the previous steps for as many files as you want.
11 Select the Manifest tab.
Actions are not required if you have at least one file uploaded.
12 Add actions to the Install Manifest or the Uninstall Manifest if needed.
The uninstall manifest only runs when the Uninstall action is added to the product. If nothing is addedto the Uninstall Manifest, uninstalling the file/action results in no effect.
Select the platform for which you are making a File-Action.
Option Description
Android Files-Actions Manifest Options for Android
macOS Files-Actions Manifest Options for macOS
Product Provisioning
VMware, Inc. 66

Option Description
QNX Files-Actions Manifest Options for QNX
Windows 7 Files-Actions Manifest Options for Windows 7
Windows Desktop Files-Actions Manifest Options for Windows Desktop
Windows Rugged Files-Actions Manifest Options for WinRugg
Files-Actions Manifest Options for AndroidYou must select all the desired Android options for your Files-Actions product component.
Procedure
1 Add the Manifest Actions for your Android File-Action.
Settings Descriptions
Workspace ONE Intelligent HubUpgrade
Install the new Workspace ONE Intelligent Hub to the device. Before using this file/action, see Upload the Workspace ONE Intelligent Hub APF File, Upgrade File-Action for more information.
Apply Custom Settings Apply custom, OEM-specific device settings based on the selected XML file. Youmust upload the custom XML or ZIP file as part of the file/action.
Supported Devices:
n Android Motorola Solutions devices with the Android Hub v7.1+
n Upload the ZIP file created by MSI.
n Android Zebra devices with the Android Hub v7.2+ and Zebra's MX ServiceApp installed on the device.
n Create your XML configuration file using Zebra Stage Now.
n Upload the XML configuration file and select it from the drop-down menu.
n After pushing the product containing an Apply Custom Setting file/action,the status information reports in the Job Log. If an error occurs, the failedresponse XML is reported in the Job Log. For more information, seeProduct Job Statuses.
Copy Files Copy files from one location to another on the device.
Create Folder Create a new folder on the device.
Delete Files Delete folders from the device.
Install Unmanaged Application Install an unmanaged .APK file. Workspace ONE UEM does not add the app to themanaged app list. Enterprise wipes or unenrollment do not remove the app fromthe device. You must use the Uninstall Unmanaged Application file/action. Consideradding Uninstall Unmanaged Application to the uninstall manifest of any productincluding the Install Unmanaged Application file/action.
Move Files Move files from one location to another on the device.
OS Upgrade Install a new OS upgrade and the relevant Workspace ONE Intelligent Hub. Formore information on this option, see Create an OS Upgrade File-Action, Android.
Reboot Restart the device.
Remove Folder Remove a folder from the device.
Rename File Rename a file on the device.
Product Provisioning
VMware, Inc. 67

Settings Descriptions
Rename Folder Rename a folder located in the device.
Run Intent Run command lines and arguments on the device. See RunIntent Action, File-Action Android for more information.
Uninstall Unmanaged Application Uninstall an unmanaged application. Enter the package ID of the app.
2 When finished adding actions to the Manifest, select Save.
What to do next
Path Variables – For all file management-related actions listed above (copy files, create folder, deletefiles, move files, remove folder, rename file, and rename folder), you have the option of inserting a pathvariable for both source and target, as applicable. The use of these variables in your Files/Actions pathmeans you do not need to account for the randomly generated OEM-specific path definitions in thecreation of your Files/Actions.
$internal$ – Use this variable at the beginning of your path to indicate your source/target path to be readfrom/written to the internal storage space. Supports read and write actions. For example: /$internal$/agreement/license.txt addresses the file license.txt in the agreement folder on the device'sinternal storage space.
Note $internal$ does not work with all Files/Actions.
$external$ – Use this variable at the beginning of your path to indicate your source path to be from theexternal memory card storage, which the device must feature. External storage supports read-onlyaccess so any usage must involve a memory card that has been properly formatted and furnished withthe correct files in the correct locations. For example: /$external$/sdcard/license.txt reads the filelicense.txt from the sdcard folder found on the device's external memory card storage.
Files-Actions Manifest Options for macOSYou must select all the desired macOS options for your Files-Actions product component.
Product Provisioning
VMware, Inc. 68

Procedure
1 Add the Manifest Actions for your macOS File-Action.
Settings Descriptions
Execute Script Runs the selected script on the device. This command supports .sh and .scpt files.
You must enter the script file path and name. Select Execute as Root to run thescript as the Root user. If you do not enable this option, the script runs as the usercurrently logged in.
Install Install files on the device. This is accomplished using command lines. Supports thefollowing file types.
macOSDMG, PKG, or APP (zipped)
If the DMG file contains an APP file, Workspace ONE UEM moves the APP file tothe /Applications folder. If the DMG contains a PKG or MPKG file, extract the filefrom the DMG and push the PKG or MPKG directly.
Workspace ONE UEM supports installing and managing .app files as internalapplications which provide additional control for removing apps upon unenrollment.
Run Use the manifest to run an application. This is accomplished using command lines.The Run command must use the syntax of "\[full file path]". For example, \programfiles\program.exe.
You must select the context of the command. Select whether the command runs atthe system level, the user level, or the admin account level.
For Windows Rugged devices, Workspace ONE UEM supports 3 file types, EXE,AWS, and LNK. The EXE is the app itself while AWS is the AirWatch supportedscripting language. LNK files support an inferred execution based on the fileextension. For example, if a DOC file is run, the device would use whatever app isassociated with DOC files.
Note With macOS devices, you can run any root command that you normally usewithin Terminal. The Workspace ONE Intelligent Hub automatically appends sudobefore running any command.
Uninstall Uninstall a program or application on the device. You must enter the applicationname.
Note The Uninstall Manifest is for deleting files when a product is removed. If youremove a product from a device, any files installed remain on the device untiluninstalled using an Uninstall Manifest.
2 When finished adding actions to the Manifest, select Save.
Files-Actions Manifest Options for QNXYou must select all the desired QNX options for your Files-Actions product component.
Product Provisioning
VMware, Inc. 69
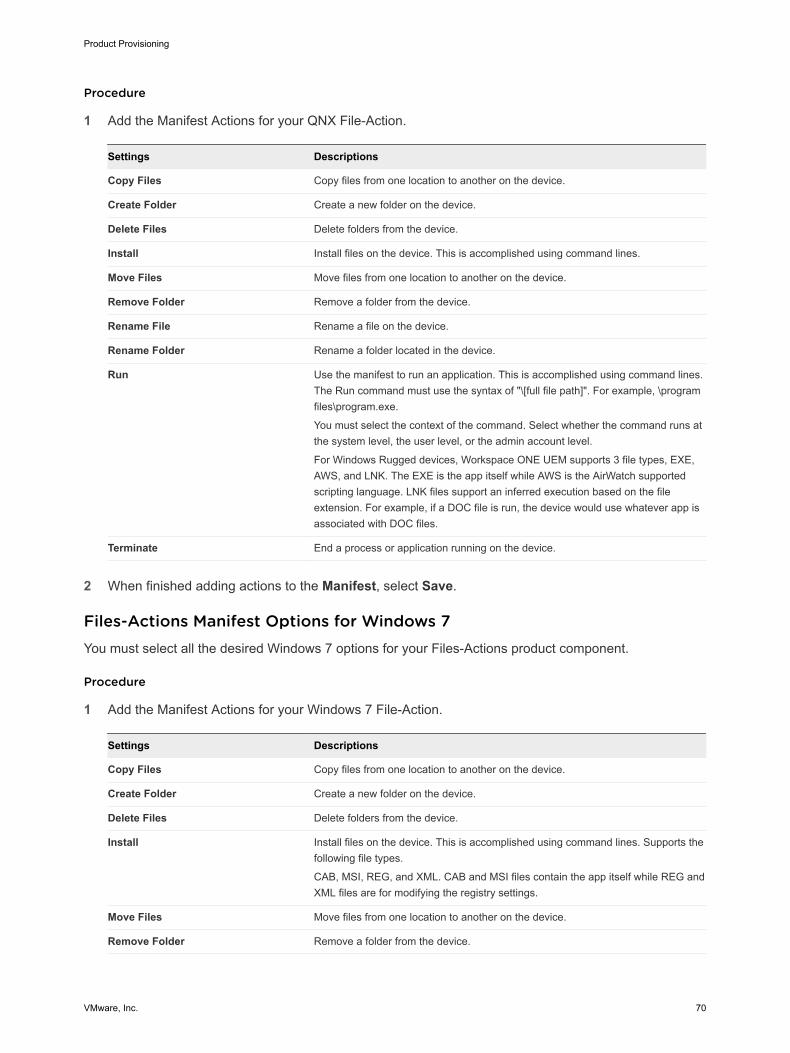
Procedure
1 Add the Manifest Actions for your QNX File-Action.
Settings Descriptions
Copy Files Copy files from one location to another on the device.
Create Folder Create a new folder on the device.
Delete Files Delete folders from the device.
Install Install files on the device. This is accomplished using command lines.
Move Files Move files from one location to another on the device.
Remove Folder Remove a folder from the device.
Rename File Rename a file on the device.
Rename Folder Rename a folder located in the device.
Run Use the manifest to run an application. This is accomplished using command lines.The Run command must use the syntax of "\[full file path]". For example, \programfiles\program.exe.
You must select the context of the command. Select whether the command runs atthe system level, the user level, or the admin account level.
For Windows Rugged devices, Workspace ONE UEM supports 3 file types, EXE,AWS, and LNK. The EXE is the app itself while AWS is the AirWatch supportedscripting language. LNK files support an inferred execution based on the fileextension. For example, if a DOC file is run, the device would use whatever app isassociated with DOC files.
Terminate End a process or application running on the device.
2 When finished adding actions to the Manifest, select Save.
Files-Actions Manifest Options for Windows 7You must select all the desired Windows 7 options for your Files-Actions product component.
Procedure
1 Add the Manifest Actions for your Windows 7 File-Action.
Settings Descriptions
Copy Files Copy files from one location to another on the device.
Create Folder Create a new folder on the device.
Delete Files Delete folders from the device.
Install Install files on the device. This is accomplished using command lines. Supports thefollowing file types.
CAB, MSI, REG, and XML. CAB and MSI files contain the app itself while REG andXML files are for modifying the registry settings.
Move Files Move files from one location to another on the device.
Remove Folder Remove a folder from the device.
Product Provisioning
VMware, Inc. 70

Settings Descriptions
Rename File Rename a file on the device.
Rename Folder Rename a folder located in the device.
Run Use the manifest to run an application. This is accomplished using command lines.The Run command must use the syntax of "\[full file path]". For example, \programfiles\program.exe.
You must select the context of the command. Select whether the command runs atthe system level, the user level, or the admin account level.
Terminate End a process or application running on the device.
Uninstall Uninstall a program or application on the device. You must enter the applicationname.
The application name must match the name that appears in the Uninstall menu inthe Control Panel.
Note The Uninstall Manifest is for deleting files when a product is removed. If youremove a product from a device, any files installed remain on the device untiluninstalled using an Uninstall Manifest.
2 When finished adding actions to the Manifest, select Save.
Files-Actions Manifest Options for Windows DesktopYou must select all the desired Windows Desktop options for your Files-Actions product component.
Procedure
1 Add the Manifest Actions for your Windows Desktop File-Action.
Settings Descriptions
Copy Files Copy files from one location to another on the device.
Create Folder Create a new folder on the device.
Delete Files Delete folders from the device.
Install Install files on the device. This is accomplished using command lines. Supports thefollowing file types.
CAB, MSI, REG, and XML. CAB and MSI files contain the app itself while REG andXML files are for modifying the registry settings.
REG files require batch files and PowerShell commands.
Move Files Move files from one location to another on the device.
Remove Folder Remove a folder from the device.
Rename File Rename a file on the device.
Rename Folder Rename a folder located in the device.
Run Use the manifest to run an application. This is accomplished using command lines.The Run command must use the syntax of "\[full file path]". For example, \programfiles\program.exe.
You must select the context of the command. Select whether the command runs atthe system level, the user level, or the admin account level.
Product Provisioning
VMware, Inc. 71

Settings Descriptions
Terminate End a process or application running on the device.
Uninstall Uninstall a program or application on the device. You must enter the applicationname.
The application name must match the name that appears in the Uninstall menu inthe Control Panel.
Note The Uninstall Manifest is for deleting files when a product is removed. If youremove a product from a device, any files installed remain on the device untiluninstalled using an Uninstall Manifest.
2 When finished adding actions to the Manifest, select Save.
Files-Actions Manifest Options for WinRuggYou must select all the desired Windows Rugged options for your Files-Actions product component.
Procedure
1 Add the Manifest Actions for your Windows Rugged File-Action.
Settings Descriptions
Workspace ONE Intelligent HubUpgrade
Install the new Workspace ONE Intelligent Hub to the device. Before using this file/action, see Upload the Workspace ONE Intelligent Hub APF File, Upgrade File-Action for more information.
Copy Files Copy files from one location to another on the device.
Create Folder Create a new folder on the device.
Files Delete folders from the device.
Install Install files on the device. This is accomplished using command lines. Supports thefollowing file types.
CAB, REG, and XML. CAB files contain the app itself while REG and XML files arefor modifying the registry settings.
Consider using the Workspace ONE UEM CAB Creator to create CAB files thatcombine multiple files into one CAB file.
Move Files Move files from one location to another on the device.
Remove Folder Remove a folder from the device.
Rename File Rename a file on the device.
Rename Folder Rename a folder located in the device.
Product Provisioning
VMware, Inc. 72

Settings Descriptions
Run Use the manifest to run an application. This is accomplished using command lines.The Run command must use the syntax of "\[full file path]". For example, \programfiles\program.exe.
You must select the context of the command. Select whether the command runs atthe system level, the user level, or the admin account level.
For Windows Rugged devices, Workspace ONE UEM supports 3 file types, EXE,AWS, and LNK. The EXE is the app itself while AWS is the AirWatch supportedscripting language. LNK files support an inferred execution based on the fileextension. For example, if a DOC file is run, the device would use whatever app isassociated with DOC files.
Note With macOS devices, you can run any root command that you normally usewithin Terminal. The Workspace ONE Intelligent Hub automatically appends sudobefore running any command.
Terminate End a process or application running on the device.
Uninstall Uninstall a program or application on the device. You must enter the applicationname.
WD W7 The application name must match the name that appears in the Uninstallmenu in the Control Panel.
Note The Uninstall Manifest is for deleting files when a product is removed. If youremove a product from a device, any files installed remain on the device untiluninstalled using an Uninstall Manifest.
Warm Boot Restart the device.
2 For each manifest action, select a Critical option. If the critical 'success' or 'error' options areselected, then the action is skipped if the condition is not met.
Option Condition
Continue on Error Execute this manifest action only if the previous action fails.
Continue Execute this manifest action regardless of the outcome of the previous action.
Continue on Success Execute this manifest action only if the previous action succeeds. If the previousaction is skipped, then this manifest action is also skipped.
3 When finished adding actions to the Manifest, select Save.
Editing Files-ActionsYou can edit existing Files-Actions to keep products and devices up-to-date.
When you edit any existing files/actions, the version number increases. After saving the edits, WorkspaceONE UEM runs a check against all active products to find any that contain the newly edited files/actions.
If any active products contain the files/actions, a warning prompt displays listing all active productsaffected by the edited files/actions. You can then choose to Activate or Deactivate a product using thefiles/actions.
Product Provisioning
VMware, Inc. 73

Delete Files-ActionsWorkspace ONE UEM checks any attempt to delete files-actions against the list of active products. Todelete files-actions, it must be detached from all products.
Procedure
1 Select the Files/Actions listed in the Warning prompt.
2 Select Edit.
3 Remove the files-actions from the product.
4 Select Save.
5 Repeat for all products containing the files-actions.
6 Once the files-actions detaches from all products, you can delete the files-actions.
If the files-actions is part of an active product, a warning prompt displays listing any product that uses thefiles/actions.
Import Motorola Packages in Files-Actions, Android and WinRuggYou can import MSP (Motorola Services Platform) packages, which can be unpacked into proper files/actions for use in products.
Procedure
1 Navigate to Devices > Provisioning > Components > Files/Actions and select Add.
2 Select the Platform you want to create a staging configuration for.
3 Select Import Package.
4 Select Upload to add an APF file.
Once the file is uploaded, the required text boxes are auto-completed.
5 Select Save.
Create an XML Provisioning File, Android, Win7, WinRuggXML provisioning allows you to download a custom-designed XML file to a device in a provisioningproduct. After the file is downloaded, it runs an install command to extract the settings from the XML fileand install them on the device.
Procedure
1 Navigate to Devices > Provisioning > Components > Files/Actions and select Add Files/Actions.
2 Select your platform.
3 Enter the required settings on the General tab, then select the Files tab and upload the desired XMLfile and enter the destination path on the device.
4 Select the Manifest tab and Add an Install Action for the XML file.
Product Provisioning
VMware, Inc. 74
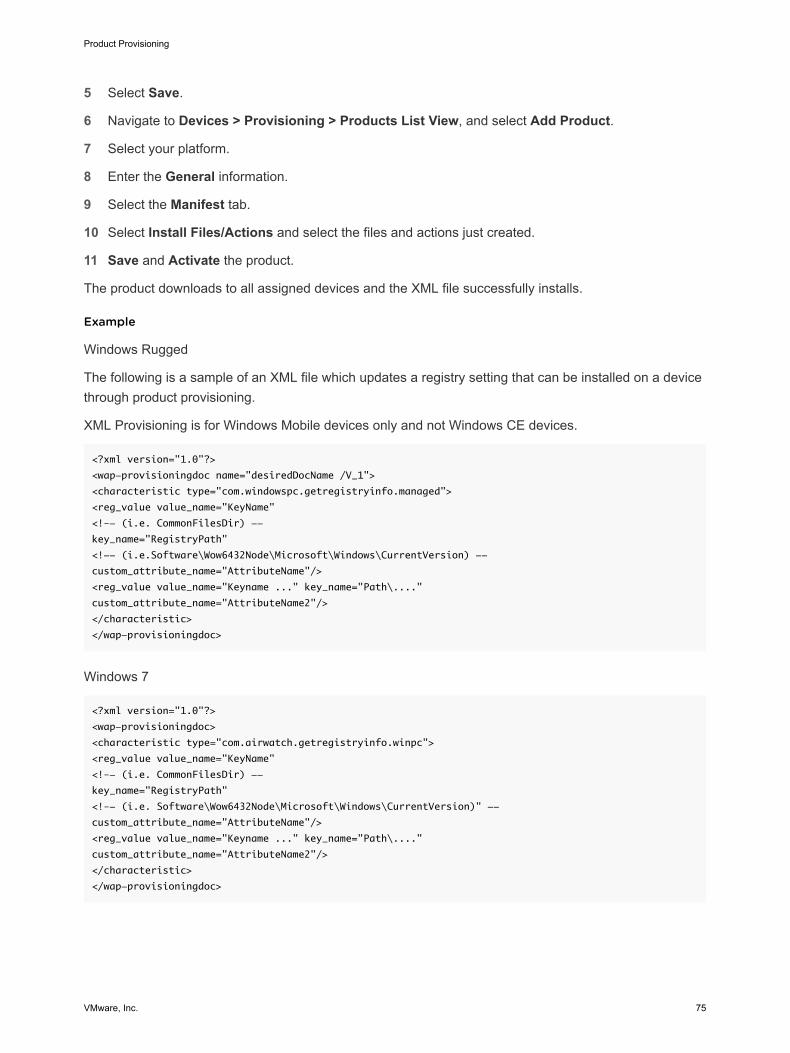
5 Select Save.
6 Navigate to Devices > Provisioning > Products List View, and select Add Product.
7 Select your platform.
8 Enter the General information.
9 Select the Manifest tab.
10 Select Install Files/Actions and select the files and actions just created.
11 Save and Activate the product.
The product downloads to all assigned devices and the XML file successfully installs.
Example
Windows Rugged
The following is a sample of an XML file which updates a registry setting that can be installed on a devicethrough product provisioning.
XML Provisioning is for Windows Mobile devices only and not Windows CE devices.
<?xml version="1.0"?>
<wap-provisioningdoc name="desiredDocName /V_1">
<characteristic type="com.windowspc.getregistryinfo.managed">
<reg_value value_name="KeyName"
<!–- (i.e. CommonFilesDir) --
key_name="RegistryPath"
<!-- (i.e.Software\Wow6432Node\Microsoft\Windows\CurrentVersion) --
custom_attribute_name="AttributeName"/>
<reg_value value_name="Keyname ..." key_name="Path\...."
custom_attribute_name="AttributeName2"/>
</characteristic>
</wap-provisioningdoc>
Windows 7
<?xml version="1.0"?>
<wap-provisioningdoc>
<characteristic type="com.airwatch.getregistryinfo.winpc">
<reg_value value_name="KeyName"
<!–- (i.e. CommonFilesDir) --
key_name="RegistryPath"
<!–- (i.e. Software\Wow6432Node\Microsoft\Windows\CurrentVersion)" --
custom_attribute_name="AttributeName"/>
<reg_value value_name="Keyname ..." key_name="Path\...."
custom_attribute_name="AttributeName2"/>
</characteristic>
</wap-provisioningdoc>
Product Provisioning
VMware, Inc. 75

Android
<?xml version="1.0"?>
<attributes>
<attribute name="attribute 1" value="value 1"/>
<attribute name="attribute 2" value="value 2"/>
<attribute name="attribute 3" value="value 3"/>
</attributes>
Workspace ONE Intelligent Hub Upgrading a File-ActionWhen you upgrade your devices, you can seed the Workspace ONE Intelligent Hub in the WorkspaceONE UEM console for use in products. The file-action Workspace ONE Intelligent Hub Upgrade thengrabs the list of seeded APF files when creating a manifest action for products.
Use this option to enroll devices with older Hub versions installed. You can enroll the devices thenupgrade the device to the new Hub version you want to use.
When using this upgrade option, be alert for failed upgrades. A failed upgrade can cause the product topush repeatedly as the console recognizes the older Hub version. This can cause additional strain on thenetwork and much greater battery consumption on the device. If the upgrade fails, deactivate the productand look over the configuration to ensure that the settings are correct.
Note The Hub Packages screen is only accessible in Customer type organization groups.
Upload the Workspace ONE Intelligent Hub APF File, Upgrade File-ActionThe Hub Package can be uploaded only in specific organization group types, for example, in organizationgroups of type ‘Customer’. Upload the Workspace ONE Intelligent Hub Package at the highestorganization group level. You can find the file specific to your OEM located in Workspace ONE UEMResources.
Procedure
1 Navigate to Devices > Provisioning > Components > Hub Packages and select Add WorkspaceONE Intelligent Hub. Make sure that you are using the top-level organization group.
2 Select the platform for which you are adding the Workspace ONE Intelligent Hub package.
The Add Workspace ONE Intelligent Hub screen displays.
3 Select the Upload button next to the Application File setting.
4 Select Choose File to browse for the APF file of the Workspace ONE Intelligent Hub version youwant to upload.
5 Select the APF file and select Open to select the file.
6 Select Save to close the upload dialog.
With the uploading of the APF file, the settings are automatically populated with data.
Product Provisioning
VMware, Inc. 76

7 Make any desired edits to File Name, Package Name, and Version for the Workspace ONEIntelligent Hub.
8 Select Save to upload the APF file to the UEM console.
RunIntent Action, File-Action AndroidThe runIntent action starts an Android intent that facilitates late runtime binding between the code indifferent applications. Use these intents to accomplish actions on your Android devices.
The most significant use of runIntent is the launching of activities, where it can be thought of as the gluebetween activities. It is a passive data structure holding an abstract description of an action to beperformed. The runIntent action supports both explicit and implicit intents.
Depending on the arguments used, the Workspace ONE Intelligent Hub uses either of the following tostart the specified intent.
n android.content.Context.startActivity(Intent intent)
n android.content.Context.sendBroadcast(Intent intent) to run the specified intent.
RunIntent Syntax
The argument syntax changes depending on whether explicit or implicit mode is specified.
mode=explicit, broadcast=[true|false] , action=< action>, package=<package>, class=<class> [,
data=<data>][, extraString=<stringname>=<string value>[,...]][, extraInt=<int name>=<int value>[,…]]
mode=implicit, broadcast=[true|false] , action=<action> [,category=<category>][, uri=<uri>] [,
data=<data>] [, extraString=<string name>=<string value>[,...]][, extraInt=<int name>=<int value>[,…]]
Table 4-13. Arguments
Argument Explanation
mode=[explicit|implicit] Specifies whether the intent is explicit or implicit.
broadcast=[true|false] Specifies whether the intent to be launched using startActivity() or sendBroadcast().
action=<action> Specifies the Android action string for the intent. An example of an Android action string isandroid.intent.action.MAIN.
package=<package > Specifies the Android package name of the java class to be explicitly run. Android package namesare generally of the format com.mycompany.myapplication.
class=<class> Specifies the java class in the specified package that is to be explicitly launched.
uri=<uri> Specifies the URI that is to be passed with the implicitly launched intent.
category =<category> Specifies the Android category string that is to be passed with the implicitly launched intent. Anexample of an Android category string is android.intent.category.DEFAULT
data=<data> Specifies the value of the Android data parameter that is to be passed with the explicitly or implicitlylaunched intent.
Product Provisioning
VMware, Inc. 77

extraString=<stringname>=<string value>
Specifies the name of an extra string parameter that is to be passed with the explicitly or implicitlylaunched intent. string value specifies the value of the extra string. The extraString argument can beused multiple times to specify additional extra string name/values.
extraInt=<int name>=<intvalue>
Specifies the name of an extra int parameter that is to be passed with the explicitly or implicitlylaunched intent. int value specifies the value of the extra int. The extraInt argument can be usedmultiple times to specify additional extra int name/values.
The following table indicates which arguments are required, optional, or not applicable for the explicit andimplicit modes.
mode Explicit Implicit
broadcast required required
action required required
package required n/a
class required n/a
uri n/a optional
category n/a optional
data optional optional
extraString optional optional
extraInt optional optional
Example RunIntent
mode=explicit,broadcast=false,action=android.intent.action.MAIN,package=com.examples.myappl,class=com.
examples.myappl.MainActivity
APK File Installation
You can use a runIntent action on an APK file on the device's local storage which instals an application onthe device.
RunIntent Syntax for APK File Installation
mode=implicit,broadcast=false,action=com.airwatch.android.provisioning.INSTALL_APKS_FROM_FOLDER,packag
e=com.airwatch.androidagent,extraString=path=/storage/emulated/Download
n You must customize the path in the highlighted portion to account for your specific file and folderstructure.
n You can specify an individual APK file in this path on the runIntent which installs an app on thedevice.
n You can also specify a folder in the path of the runIntent, which runs all APK files found in that folder.
n Apps installed on a device using APK files via a runIntent are unmanaged.
n You can also use a path variable in the runIntent to represent the device's internal or external storage.
Product Provisioning
VMware, Inc. 78
Path Variable Usage in RunIntent for APK Installation
$internal$ – Use this variable at the beginning of your path to indicate your source/target path to be readfrom/written to the internal storage space. Supports read and write actions. For example: /$internal$/agreement/license.txt addresses the file license.txt in the agreement folder on the device'sinternal storage space.
Note $internal$ does not work with all Files/Actions.
$external$ – Use this variable at the beginning of your path to indicate your source path to be from theexternal memory card storage, which the device must feature. External storage supports read-onlyaccess so any usage must involve a memory card that has been properly formatted and furnished withthe correct files in the correct locations. For example: /$external$/sdcard/license.txt reads the filelicense.txt from the sdcard folder found on the device's external memory card storage.
Upgrade the OS, File-Action for AndroidYou can upgrade the OS of your Android devices remotely using product provisioning. This processallows you to keep your entire device fleet up-to-date without needing to have the devices shipped backto you.
After an Android device receives an Android OS Upgrade file/action, the device processes the commandin the following order.
Prerequisites
n Support includes Zebra devices using the Zebra MX Service and any OEM supporting the PlatformOEM Service v3.0 or later. For more information about the Platform OEM Service, see the VMwareWorkspace ONE UEM Android Platform Guide topics titled Android OEM Services and PlatformOEM Service Overview.
n Note Before updating your Motorola device to a new Zebra OS, you must have the Workspace ONEIntelligent Hub for Android v5.1.4+ installed and the 1.9 MX service.
Procedure
1 The device receives the product which you can verify on the device by navigating to Hub > Products.
2 Download all the files including the OS update zip which you can verify in the Product logs found onthe device in Hub > Products > Product Name.
3 Once the downloads complete on a Zebra device, the Workspace ONE Intelligent Hub backs up itsdata and any installed managed applications to the device enterprise folder which is persistent.
4 The Hub then reboots the device into recovery mode to install the update.
5 Device then applies the OS update.
6 Once complete, the device reboots.
After reboot, the Workspace ONE Intelligent Hub validates that the OS update is successful beforereporting that the job completed successfully.
Product Provisioning
VMware, Inc. 79

What to do next
If the OS update fails, you can investigate the reasons why by using the Workspace ONE UEM console tonavigate to Devices > Provisioning > Product Dashboard. Select the failed product in Recent ProductStatus that contains the OS upgrade. In the View Devices screen, select the magnifying glass icon toview history, then select the magnifying glass icon again to view the Job Log.
Create an OS Upgrade File-Action, AndroidUpgrade Android devices remotely with the OS Upgrade File-Action. Add the file-action to a product toupdate your devices without a need for a manual OS update.
Prerequisites
Procedure
1 Navigate to Devices > Provisioning > Components > Files/Actions and select the Add Files/Actions button.
2 Select the Android platform.
3 Complete the General text boxes.
a Enter a Name.
b Enter a Description.
c View the pre-populated Version number of the file-action.
d View and confirm the Platform for the file-action.
e Enter who the files-actions are Managed By.
4 Select the Files tab.
5 Select the Add Files button and upload the extracted OS update files.
For Zebra devices, upload the following files and specify the path as either /data/tmp/ to store the fileon the data partition, or as a known internal path to store it on the internal storage. For other devices,specify a known internal storage path on the device, such as /sdcard/.
n OS Update ZIP file – This file can be a major or minor OS upgrade file. The file can also be anenterprise reset package.
n [optional] Workspace ONE Intelligent Hub update package (APF) – This optional file can bespecified to update the Workspace ONE Intelligent Hub before initiating the actual OS update.Workspace ONE UEM can provide this APK.
6 Select the Manifest tab and select Add Action under the Install Manifest.
7 Add OS Upgrade command to the manifest and select the corresponding OS upgrade file that wasuploaded earlier.
Your Manifest tab looks similar to the following.
Product Provisioning
VMware, Inc. 80

8 Select Save.
What to do next
After creating an OS Upgrade file/action, create a product to push the upgrade to your devices. SeeCreate a Product for more information.
Note Before installing an OS Update, the device checks the battery level. If the level is below athreshold, the product fails. This failure displays in the log.
Upgrade the OS, File-Action for WinRuggUsing the Windows OS Upgrade file/action, upgrade your Motorola and Zebra Windows Rugged devicesremotely. By creating a product containing the OS Upgrade file/action, you can upgrade all your deviceswithout having them shipped back to you.
Prerequisites
For Windows Rugged devices, all OS upgrade files are restricted access files and require a valid useraccount with Motorola to log in with a valid device serial number. The OS upgrade files are specific toboth device model and OS version. The Workspace ONE ™ UEM OS upgrade process uses the APFfiles and requires the administrator to first install the MSP Package Builder utility.
This utility is required to extract the contents of the APF file into individual components that are thenpushed to the device and used to upgrade the OS.
Important The Windows Rugged OS Upgrade method requires the Workspace ONE Intelligent Hubv5.3+ for Windows Rugged devices.
To use the Windows Rugged OS Upgrade, you must have the following:
n The MSP Package Builder utility installed on your computer.
Product Provisioning
VMware, Inc. 81
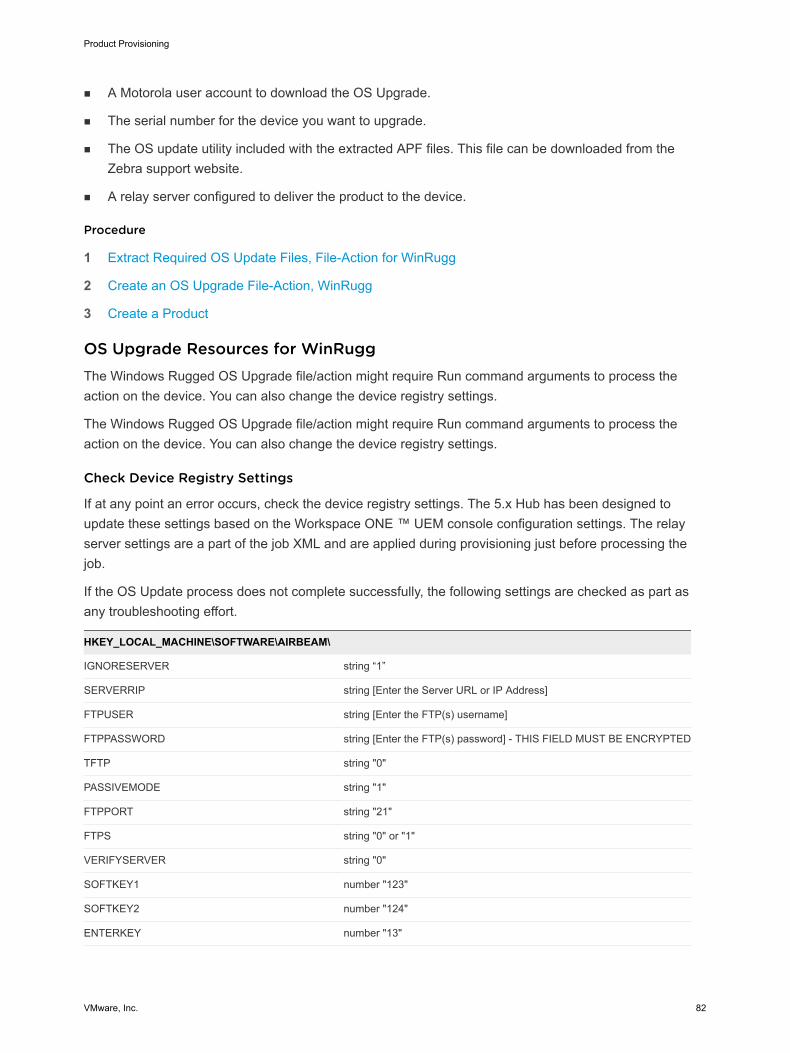
n A Motorola user account to download the OS Upgrade.
n The serial number for the device you want to upgrade.
n The OS update utility included with the extracted APF files. This file can be downloaded from theZebra support website.
n A relay server configured to deliver the product to the device.
Procedure
1 Extract Required OS Update Files, File-Action for WinRugg
2 Create an OS Upgrade File-Action, WinRugg
3 Create a Product
OS Upgrade Resources for WinRuggThe Windows Rugged OS Upgrade file/action might require Run command arguments to process theaction on the device. You can also change the device registry settings.
The Windows Rugged OS Upgrade file/action might require Run command arguments to process theaction on the device. You can also change the device registry settings.
Check Device Registry Settings
If at any point an error occurs, check the device registry settings. The 5.x Hub has been designed toupdate these settings based on the Workspace ONE ™ UEM console configuration settings. The relayserver settings are a part of the job XML and are applied during provisioning just before processing thejob.
If the OS Update process does not complete successfully, the following settings are checked as part asany troubleshooting effort.
HKEY_LOCAL_MACHINE\SOFTWARE\AIRBEAM\
IGNORESERVER string “1”
SERVERRIP string [Enter the Server URL or IP Address]
FTPUSER string [Enter the FTP(s) username]
FTPPASSWORD string [Enter the FTP(s) password] - THIS FIELD MUST BE ENCRYPTED
TFTP string "0"
PASSIVEMODE string "1"
FTPPORT string "21"
FTPS string "0" or "1"
VERIFYSERVER string "0"
SOFTKEY1 number "123"
SOFTKEY2 number "124"
ENTERKEY number "13"
Product Provisioning
VMware, Inc. 82

Run Command Argument Information
-d option describes the Workspace ONE UEM relay server folder path containing files required to updatethe device. It uses the following format (with forward slashes and double quotes): "[path of your relayserver]/PFILES/[file action name]_version/"
-y option describes the maximum number of retry attempts while the –z option describes the retry delay.
-q is the folder on the device that is used to download the files from the FTP server when updatingWindows Mobile. This location is typically “\Temp” or “\Storage Card”. In CE updates, the files aredownloaded one at a time into memory so the parameter is not used in that case.
-p is the OSUpdate project name. The project name can be whatever the user wants it to be but is usuallysomething to indicate what the update package contains. This name should be the same as the MotorolaAPF file. The project (APF) should be named in such a way as to be able to identify the target device, OStype, and so forth.
For the Workspace ONE UEM process, this name will be the same as whatever you call the dummy APDfile (which can be an empty text file).
n If your command line contained –p”WT41N0”, you need to have a WT41N0.apd file put down to thedevice prior to doing the update. This is only needed for CE devices.
n For Windows Mobile devices –p”MC9190WM65” is required by the command line parsing, but ineffect will not be used.
Extract Required OS Update Files, File-Action for WinRuggBefore you can create an OS Upgrade file/action, you must extract the required files from the APF files.These files are extracted using the MSP Package Builder Utility.
Procedure
1 Start the MSP Package Builder Utility.
2 Navigate to File > Open Project and select the appropriate APF file and open it in MSP PackageBuilder.
3 Navigate to Tools > Convert Project to open the Convert to Project dialog box.
4 Complete the following text boxes.
n Name – Enter the name for the OS Upgrade project.
n Extract FilesTo – Enter the location the files should be saved to or select the Browse button toselect the location.
5 Select OK to close the Convert to Project dialog box.
6 Select Command from the left window pane.
7 Select Install and copy the install command from the bottom right window pane.
Consider copy-pasting this install command to a file (Notepad, Word, and so on) so you can access itlater while creating the File/Action for the OS Upgrade.
Product Provisioning
VMware, Inc. 83

Create an OS Upgrade File-Action, WinRuggOnce you extract the OS upgrade files from the APF file, create an OS Upgrade file-action. If you mustupdate the device registry, create a separate files-actions for the Registry Edit file and list that Files-Actionfirst in the product manifest.
Procedure
1 Navigate to Devices > Provisioning > Components > Files/Actions and select the Add Files/Actions button.
2 Select the Windows Rugged platform.
3 Complete the General text boxes.
a Enter a Name.
b Enter a Description.
c View the pre-populated Version number of the file-action.
d View and confirm the Platform for the file-action.
e Enter who the files-actions are Managed By.
4 Select the Files tab and select Add Files.
5 Select Choose Files and upload the extracted OS update files.
6 Specify the Download Path\[directory]\[full file name]
7 Enable Store OS Update Files on Relay Server to ensure that OS Update files remain on the RelayServer until needed by the OSUpdate utility.
Product Provisioning
VMware, Inc. 84

8 Select Save to add the file and return to the Files tab.
9 Select Add Files to add additional files.
10 Upload the OS Update Utility EXE and the "package.TXT" manifest file.
Windows Mobile devices always use a file named "osupdMagneto.exe." For Windows CE devices,the filename varies with the device.
Windows CE devices also require a package .APD. The contents of this file are not important and canbe a simple text format file containing something benign. It can even be empty.
11 Specify separate Download Paths for both the OS Update Utility and the package .TXT manifest file.
The Download Path for the OS Update utility and the package.TXT manifest file must be: "\Windows\".
The Windows CE .APD file must be placed in: "\Application\AirBeam\PKG."
Important Do not select Relay Server Only. These files need to be delivered directly to the device.
12 (Optional) Create a files/actions to download and install the REG file to the device.
This step is only necessary if the registry settings are not already correctly updated on the device.
Download the REG file to the '\Temp' directory specifying the full filename. On the manifest tab, addan Install action type and specify the directory location and the filename of the REG file to be run onthe device.
13 Once all the files have been uploaded, select the Manifest tab and select Add Action to add InstallActions.
14 Select the Run action in the Action Types text box.
15 Copy the Install Command from the MSP Package Builder utility and paste it into the Command Lineand Arguments to Run.
You must edit the syntax of the Install Command to match Workspace ONE ™ UEM run syntax:
n Windows Mobile
n You must use double quotes around "\windows\osupdMagento" and add the .exe to the endof osupdMagento.
n -d"myserverpath" must be updated in the following format: "[path of your relay server]/PFILES/[file action name]_version/". So if the directory on the relay server that you are usingfor OS Update is /Motorola/OSUpdateFiles, the name of the OS Update file/action is"OSUpdate" and the "OSUpdate" file/action is on version 5, then the -d argument might looklike: -d"/Motorola/OSUpdateFiles/PFILES/OSUpdate_5/".
• The full run command syntax with all the arguments looks similar to this:
\windows\osupdMagneto.exe" -p"MC9190WM65" -o -y5 -z10 -q"\temp\" -d"/Motorola/
OSUpdateFiles/PFILES/OSUpdate_5/
Product Provisioning
VMware, Inc. 85
n Windows CE
n You must use double quotes around "\windows\ [OS Update Utility filename]" and addthe .exe to the end of the filename.
n -d"myserverpath" must be updated in the following format: "[path of your relay server]/PFILES/[file action name]_version/". So if the directory on the relay server that you are usingfor OS Update is /Motorola/OSUpdateFiles, the name of the OS Update file/action is"OSUpdate" and the "OSUpdate" file/action is on version 5, then the -d argument might looklike: -d"/Motorola/OSUpdateFiles/PFILES/OSUpdate_5/".
• The full run command syntax with all the arguments looks similar to this:
\windows\[OS Update filename].exe" -p"WT41N0" -o -y5 -z10 -d"/Motorola/OSUpdateFiles/
PFILES/OSUpdate_5/
16 Select Save.
17 Add the OS Upgrade file/action to a product and assign the product to all applicable devices.
Once the device receives the product, the OS Update process initiates. A notification screen displayswhen the upgrade is complete.
Product SetsOccasionally there are conflicting products provisioned to devices due to similar grouping in smart groupsand custom attributes. Product sets allow you to group conflicting products and rank the products basedon business needs.
Product Sets BasicsProduct sets contain multiple products that you want to keep mutually exclusive. Product sets are usefulfor situations where the products contained inside the product set consist of content that should onlyapply to specific devices within the parameters set by the rules engine using custom attributes.
The products in the product set follow a hierarchy based on ranking according to business needs. From agiven product set, a device receives only one product that applies to the device. This product is thehighest ranked product where the device meets the smart group and custom attribute rules criteria. Oncea device receives a product from a product set, the device will not receive any other products from the setunless the rank of a subsequent product is elevated or a new product is created in the set with a higherrank.
Important A product must exist as either a standalone product or as part of a product set. The productset ensures the integrity of mutual exclusivity of products for a given device.
Create a Product SetCreate a product set to control the delivery of multiple products so a device receives only the specificproduct that applies to the device based on your business rules.
Product Provisioning
VMware, Inc. 86

Procedure
1 Navigate to Devices > Provisioning > Product Sets and select the Add Product Set button.
2 Select the platform for which you want to create the product set.
3 Complete the General text boxes.
Settings Descriptions
Name Enter a name for the product sets. The name cannot be longer than 255characters.
Description Enter a short description for the product sets.
Managed By Select the organization group that can edit the product sets.
4 Select the Products tab.
5 Select Add to add products to the product set.
6 Create a product including manifest items, conditions, and deployment settings.
See Create a Product for more information on creating a product. Ensure that you use the rulesengine to create custom attribute-based rules for each product so the policy engine can properlyassign the products.
7 Use the Up and Down arrows to adjust product ranking based on business needs.
8 Set products to Active if needed.
9 Select Save to create the product set.
Add a Product to a Product SetYou can add a product to an existing product set. This action requires following specific rules due to thecomplicated relationship between products and business rules.
A new product in a product set is added with the lowest ranking in the set by default. If the new productshould be a higher rank, you must edit the ranking. See Change the Product Ranking in a Product Set formore information on what happens when product ranks are adjusted.
Procedure
1 Navigate to Devices > Provisioning > Product Sets.
2 Find the product set you want to add a product to and select the Edit icon ( ).
3 Select the Products tab.
4 Select Add Product.
5 Manually adjust the product rank as needed according to your business needs.
6 Select Save to add the product to the product set.
Product Provisioning
VMware, Inc. 87

Any modifications made during the edit of a product set do not take effect until you save the product set.Once saved, the product set enters the policy engine for evaluation.
Remove a Product from a Product SetRemove a product from an existing product set. This action requires following specific rules due to thecomplicated relation between products and business rules.
Removing a product from a product set raises the rank of all products previously ranked below theremoved product by one. If multiple products are removed, the remaining products are adjusted by onerank for each product removed. See Change the Product Ranking in a Product Set for more informationon what happens when product ranks are adjusted.
Any modifications made during the edit of a product set do not take effect until you save the product set.
Procedure
1 Navigate to Devices > Provisioning > Product Sets.
2 Find the product set you want to add a product to and select the Edit icon ( ).
3 Select the Products tab.
4 Select the check box for each product you want to remove from the product set.
5 Select the Delete button to remove the products.
6 Manually adjust the product rank as needed according to your business needs.
7 Select Save to add the product to the product set.
Once saved, the product set enters the policy engine for evaluation.
Activate and Deactivate Products in a Product SetWhen you select to activate or deactivate a product that is part of a product set, a series of reactions takeplace.
Procedure
1 Navigate to Devices > Provisioning > Product Sets and select the pencil icon ( ) to the left of theProduct Set name in the listing.
The Edit Product Set screen displays.
2 Select the Products tab.
The full list of products in the product set displays including the green and red traffic light toggles.Products with a green light are active, products with a red light are inactive.
3 Select the traffic light toggle to switch between activated (green) and deactivated (red) products.
n Deactivating a product in a product set sends a removal command to all devices with that product,and the next highest ranked product is installed.
Product Provisioning
VMware, Inc. 88
n Activating a product in a product set might trigger other products to be removed on devices, and thenewly activated product to be installed.
Viewing Product Sets in Device DetailsProduct Sets display on individual device detail pages to show the status of the products' deployments tothe device. The products listed that are part of a product set display the product set they pertain to andthe deployment status of the products.
The Products tab displays all the products in a product set that is assigned to a device. The status of theproducts in relation to the device is displayed as well. Not all the displayed products from a product setare applicable for the device viewed.
To see the product sets in the Device Details, navigate to Devices > List View and select the device youwant to view. Then select the More option and select Products.
The following text boxes display relevant product set information:
n Product Set – Displays the product set that contains the product. Select the product set to view theproduct set details.
n Status – Displays the status of the product. For products in a product set, the appropriate productdeployed to the device is labeled as Compliant. The other products contained in the product set thatare eligible for deployment but are not deployed to the device are labeled as Outranked. Any productthat is not eligible for deployment to the device is labeled as Not Applicable.
Change the Product Ranking in a Product SetProduct set ranking controls which product of a product set is sent to a device. Since the ranking is thekey feature of product sets, changes in ranking cause a series of reactions in the product set.
Listed below are examples of rank changes and what happens to the product, product set, and devicesas a result.
Product Provisioning
VMware, Inc. 89

Table 4-14. Rank Changes
Reason for Edit Effect of Edit
Adding a newproduct.
The new product is set at the lowest rank. You must manually change the rank of the new product as needed.
Changing rank ofexisting products
Increasing the rank (selecting Up arrow) of a product decreases the rank of all subsequent products by one.
Decreasing the rank (selecting Down arrow) of a product increases the rank of previously lower-rankedproducts.
After you complete the rank changes and save the product, the product set enters the policy engine forevaluation. The engine assesses the custom attribute for each device against the new device rankings.
If you reorder the Products priority within a Product Set, then the Products are reassigned based on the newpriority order. As a result, the Workspace ONE UEM console sends removal commands for all devices affectedby the reorder and assign Products based on the new order.
After editing product ranking, only the products affected by the new ranking receive removal and installcommands. Products outside the change in ranking are not affected.
Removing aProduct
Removing a product increases the rank of all products previously ranked below the deleted product by one. Ifmultiple products were removed, the ranking increases by one for each product removed.
All products that preceded the deleted product's rank remain unchanged.
Any products that had the removed product installed receives a new product based on the new rankings.
Procedure
1 Navigate to Devices > Provisioning > Product Sets.
2 Find the product set you want to add a product to and select the Edit icon ( ).
3 Select the Products tab.
4 Manually adjust the product rank as needed according to your business needs.
5 Select Save to apply the rank changes.
Custom AttributesCustom attributes enable you to extract specific values from a managed device and return it to theWorkspace ONE UEM powered by AirWatch. You can also assign the attribute value for device lookupvalues.
Note Custom attributes (and the rules generator) are only configurable and useable at Customer-levelorganization groups.
Product Provisioning
VMware, Inc. 90
Custom Attributes DatabaseCustom attributes are stored either as XML files on the device or in the custom attribute database on theWorkspace ONE UEM console server. When using the database, custom attributes are sent as samplesto Workspace ONE UEM periodically for asset tracking of key/value pairs. If a record in the devicedatabase is configured with 'Create Attribute' = TRUE, then the Workspace ONE Intelligent Hubautomatically retrieves the Name and Value sent with the custom attributes sample. The key/value pairdisplays in the Device Details page for the device in the Custom Attributes tab.
Note Custom Attribute values cannot return the following special characters: / \ " * : ; < > ? |. If a scriptreturns a value which contains these characters, the value is not reported on the console. Trim thesecharacters from the script's output.
Create Custom AttributesCreate a custom attribute and values to push to devices. These attributes and values control how productrules work. Custom Attributes also function as lookup values for certain devices.
Procedure
1 Navigate to Devices > Provisioning > Custom Attributes > List View.
2 Select Add and then select Add Attribute.
3 Under the Settings tab, enter an Attribute Name.
4 Enter the optional Description of what the attribute identifies.
5 Enter the name of the Application that gathers the attribute.
6 Select Collect Value for Rule Generator to make the values of the attribute available in the drop-down menu of the rule generator.
7 Select Use in Rule Generator if you want to use the attribute in the rule generator.
8 Select Persist to prevent the removal of the custom attribute from the Workspace ONE UEM consoleunless an Admin or an API call explicitly removes it.
Otherwise, the attribute is removed as normal. If you delete a custom attribute reported from a deviceto the UEM console, a persisted custom attribute remains in the UEM console. Custom attributepersistence is only available to Android and Windows Rugged devices.
9 Select Use as Lookup Value to use the custom attribute as a lookup value anywhere in the UEMconsole.
You can use custom attributes as part of a device friendly name to simplify device naming.
10 Select the Values tab.
11 Select Add Value to add values to the custom attribute and then select Save.
Product Provisioning
VMware, Inc. 91

Create a Custom Attributes Profile, macOSWrite a command or script and report it as a custom attribute using the Workspace ONE Intelligent Hubfor macOS v.2.3 and higher. Choose when to execute the command or script on hourly intervals or duringan event.
Custom Attributes can also be used in Assignment Rules for Products.
Procedure
1 Navigate to Devices > Profiles & Resources > Profiles and select Add then Add Profile. SelectApple macOS, and then select Device Profile, since this profile is only applicable to the entiredevice.
2 Scroll down the menu bar on the left and select Custom Attributes followed by Configure.
3 Enter the Attribute Name.
4 Enter the Script/Command to run. Expand the text box as needed.
5 Choose an Execution Interval to allow for scheduling to report either in hours or as an event occurs.
6 Use the + and - buttons at the bottom of the payload to create multiple scripts.
7 Select Save & Publish when you are finished to push the profile to devices.
Note Custom Attribute values cannot return the following special characters: / \ " * : ; < > ? |. If ascript returns a value which contains these characters, the value is not reported on the console. Trimthese characters from the script's output.
Custom Attributes ImportingThe custom attribute batch import feature allows you to load custom attributes and corresponding valuesinto the system in bulk. In the templates provided, each column corresponds to one custom attribute andeach row corresponds to their different parameters.
With the templates, you can import custom attributes in different ways and with different information.
Caution The syntax of the first column of each template must be replicated exactly. Failure to use theproper syntax can cause database issues and result in loss of data.
Template Typesn Custom Attributes Template – Allows you to define a custom attribute and its settings.
n Custom Attribute Values Template – Allows you to define the values of predefined custom attributes.
Product Provisioning
VMware, Inc. 92

n Device Custom Attribute Values – Allows you to define the values of predefined custom attributes forindividual devices based on the cross reference (Xref) value. The Xref values determine the individualdevices receiving the value for each custom attribute.
a DeviceID (Workspace ONE UEM assigned DeviceID when the device enrolls)
b Serial Number
c UDID
d MAC Address
e IMEI Number
Save the file as a .csv before you import it.
Assign Organization Groups Using Custom AttributesConfigure rules that control how devices are assigned to organization groups following enrollment. Youcan only create one custom attribute assignment rule for each organization group you run.
Procedure
1 Ensure that you are currently in a customer type organization group.
2 Navigate to Groups & Settings > All Settings > Devices & Users > General > Advanced.
3 Set Device Assignment Rules to Enabled.
4 Set the Type to Organization Group by Custom Attribute.
5 Select Save.
6 Navigate to Devices > Provisioning > Custom Attributes > List View > Add > Add Attribute andcreate a custom attribute if you have not already done so.
See Create Custom Attributes for more information.
7 Navigate to Devices > Provisioning > Custom Attributes > Custom Attributes AssignmentRules > Add Rule.
8 Select the Organization Group to which the rule assigns devices.
Product Provisioning
VMware, Inc. 93

9 Select Add Rule to configure the logic of the rule.
Setting Description
Attribute/Application
This custom attribute determines device assignment.
Operator This operator compares the Attribute to the Value to determine if the device qualifies for the product.
When using more than one Operator in a rule, you must include a Logical Operator between each Operator.
Note There is a limitation on the less than (<) and greater than (>) operators. This limitation includes "less thanor equal to" and "greater than or equal to" variants. These operators are mathematical in nature, which meansthey are effective at comparing numbers including integers. They cannot be used to compare non-numeric textstrings. And while it is common for software versions to be represented with numbers indicating a gradedversioning system (for example, 6.14.2), such representations are not numbers because they have more thanone decimal point. These representations are actually text strings. Therefore, any assignment rule thatcompares software version numbers with multiple decimal points using greater than or less than operators (andtheir variants) can result in an error message.
Value All values from all applicable devices are listed here for the Attribute selected for the rule.
Add LogicalOperator
Select to display a drop-down menu of logical operators such as AND, OR, NOT, and parentheses. Allows formore complex rules.
10 Select Save after configuring the logic of the rule.
When a device enrolls with an assigned attribute, the rule assigns the device to the configuredorganization group.
Custom Attributes, AndroidUse XML provisioning to collect custom attributes based on device details for your Android device.Custom attributes enable you to use advanced product provisioning functionality.
Procedure
1 Navigate to Devices > Provisioning > Components > Files/Actions > Add and select Android asyour platform.
2 Create an XML provisioning file.
See #unique_95. The manifest must include an action to download the XML file to the Zebra devicelocation /enterprise/usr/attributes.
For non-Zebra Android devices, the XML file location is /sdcard/Android/data/com.airwatch.androidagent/files/attributes/.
Upon receiving the XML file, the Workspace ONE Intelligent Hub for Android creates a custom attributesoutput file.
During the next check-in with AirWatch, the Workspace ONE Intelligent Hub sends the output file to theWorkspace ONE UEM console.
Product Provisioning
VMware, Inc. 94
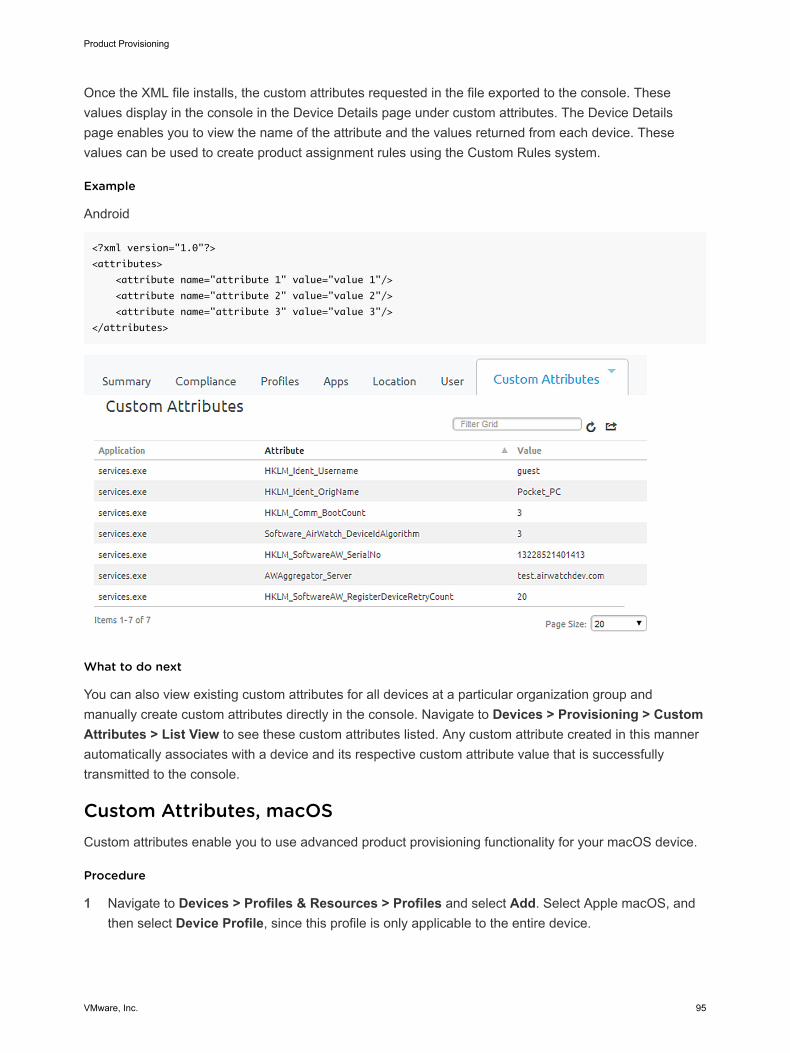
Once the XML file installs, the custom attributes requested in the file exported to the console. Thesevalues display in the console in the Device Details page under custom attributes. The Device Detailspage enables you to view the name of the attribute and the values returned from each device. Thesevalues can be used to create product assignment rules using the Custom Rules system.
Example
Android
<?xml version="1.0"?>
<attributes>
<attribute name="attribute 1" value="value 1"/>
<attribute name="attribute 2" value="value 2"/>
<attribute name="attribute 3" value="value 3"/>
</attributes>
What to do next
You can also view existing custom attributes for all devices at a particular organization group andmanually create custom attributes directly in the console. Navigate to Devices > Provisioning > CustomAttributes > List View to see these custom attributes listed. Any custom attribute created in this mannerautomatically associates with a device and its respective custom attribute value that is successfullytransmitted to the console.
Custom Attributes, macOSCustom attributes enable you to use advanced product provisioning functionality for your macOS device.
Procedure
1 Navigate to Devices > Profiles & Resources > Profiles and select Add. Select Apple macOS, andthen select Device Profile, since this profile is only applicable to the entire device.
Product Provisioning
VMware, Inc. 95

2 Create a Custom Attributes profile.
For more information, see Create a Custom Attributes Profile, macOS.
The script included in the profile runs on the device to gather the values for each attribute.
Example: Key-Value Pair ExamplesThe following is an example of commands you can use for creating, removing, or modifying key-valuepairs. Use these commands to dynamically change the values for a custom attribute on the device.
Add a Key-Value Pair
/usr/libexec/PlistBuddy -c "Add :ASSET_ID string '1'" "/Library/Application Support/AirWatch/Data/
CustomAttributes /CustomAttributes.plist"
Delete a Key-Value Pair
/usr/libexec/PlistBuddy -c "Delete :ASSET_TAG" "/Library/Application Support/AirWatch/Data/
CustomAttributes/ CustomAttributes.plist"
Modify a Key-Value Pair
/usr/libexec/PlistBuddy -c "Set :ASSET_ID '2'" "/Library/Application Support/AirWatch/Data/
CustomAttributes/ CustomAttributes.plist"
What to do next
You can view existing custom attributes for all devices at a particular organization group as well asmanually create custom attributes directly in the console. Navigate to Devices > Provisioning > CustomAttributes > List View to see the custom attributes listed. Any custom attribute created in this mannerautomatically associates with a device and its respective custom attribute value that is successfullytransmitted to the console.
Custom Attributes, Win7Use XML provisioning to collect custom attributes based on device details. Custom attributes enable youto use advanced product provisioning functionality for your Windows 7 device.
Procedure
1 Navigate to Devices > Provisioning > Components > Files/Actions > Add and select Windows 7as your platform.
2 Create an XML product.
For more information, see Create an XML Provisioning File, Android, Win7, WinRugg. The manifestmust include an action to download the XML file to {installation path}\AirWatch\AgentUI\Cache\Profiles.
Upon receiving the XML file, the Workspace ONE Intelligent Hub for Windows 7 creates a customattributes output file. During the next check-in with Workspace ONE ™ UEM, the Workspace ONEIntelligent Hub sends the output file to the UEM console.
Product Provisioning
VMware, Inc. 96

Once the XML file installs, the custom attributes requested in the file exported to the UEM console. Thesevalues display in the console in the Device Details page under Custom Attributes. The Device Detailspage enables you to view the name of the attribute and the values returned from each device. Thesevalues can be used to create product assignment rules using the Custom Rules system.
Upon enrollment, the Workspace ONE Intelligent Hub for PC automatically generates the Device Modeland Serial Number attributes.
Example: Syncing Registry SettingsTo synchronize the registry settings on a Windows 7 device with the console, which is likely the mostcommon use of custom attributes for Windows 7 devices, you need to create a custom XML file.
Below is an example of the format of an XML file that can pull information from the registry on a device:
<xml version="1.0">
<wap-provisioningdoc name="desiredDocName /V_1">
<characteristic type="com.windowspc.getregistryinfo.managed">
<reg_value value_name="KeyName(i.e. CommonFilesDir)"
key_name="RegistryPath(i.e.Software\Wow6432Node\Microsoft\Windows\
CurrentVersion)"custom_attribute_name="AttributeName"/>
<reg_value value_name="Keyname ..." key_name="Path\...."
custom_attribute_name="AttributeName2"/>
</characteristic>
</wap-provisioningdoc>
It must be in the previous format for the XML file to get correctly parsed and the registry settings to beoutputted to a key value pair that can be exported back to the UEM console.
In this example, the registry key path is “HKEY_LOCAL_MACHINE\Ident” for two of the values and withinthat key path it is reading the values of “Username” and “OrigName”. The ‘custom_attribute_name’parameter is simply the name of the custom attribute that displays in the console and corresponds to thevalue read from the device.
Product Provisioning
VMware, Inc. 97

What to do next
You can also view existing custom attributes for all devices at a particular organization group as well asmanually create custom attributes directly in the console. Navigate to Devices > Provisioning > CustomAttributes > List View to see these custom attributes listed. Any custom attribute created in this mannerautomatically associates with a device and its respective custom attribute value that is successfullytransmitted to the console.
Custom Attributes, WinDeskUse XML provisioning to collect custom attributes based on device details. Custom attributes enable youto use advanced product provisioning functionality for your Windows Desktop device.
Procedure
1 Navigate to Devices > Provisioning > Components > Files/Actions > Add and select Windows >Windows Desktop as your platform.
2 Complete the steps to create an XML product as mentioned in Create an XML Provisioning File.Upload the XML file and specify the download path as {installation path}\AirWatch\AgentUI\Cache\Profiles.
Upon receiving the XML file, the Workspace ONE Intelligent Hub creates a custom attributes output file.During the next check-in with Workspace ONE ™ UEM, the Workspace ONE Intelligent Hub sends theoutput file to the UEM console.
Once the XML file installs, the custom attributes requested in the file are reported to the UEM console.These values display in the console in the Device Details page under custom attributes. This page allowsyou to view the name of the attribute and the values returned from each device. These values can beused to create product assignment rules using the Custom Rules system.
Note Note: Custom Attributes support the HKLM registry hive only.
Product Provisioning
VMware, Inc. 98

Example: Fetching Registry SettingsA common use of custom attributes for Windows devices is to fetch registry settings with the UEMconsole. To do this, you must create a custom XML file and deploy it using a custom settings policytargeted to the AirWatch Unified Agent. Here is an example of the format of an XML file that can pullinformation from the registry on a device.
Windows 10 Example
<xml version="1.0">
<wap-provisioningdoc name="System Info /V_1">
<characteristic type="com.windowspc.getregistryinfo.managed">
<reg_value custom_attribute_name="Hostname"
key_name="SYSTEM\CurrentControlSet\Control\ComputerName\ActiveComputerName"
value_name="ComputerName"/>
</characteristic>
</wap-provisioningdoc>
The custom payload must be in the above format. When the correct syntax is used, the XML is parsedand the registry settings are outputted to a key value pair that are exported back to the Workspace ONEUEM console.
In the above example, the registry key name or path is “Computer\HKEY_LOCAL_MACHINE\SYSTEM\CurrentControlSet\Control\ComputerName\ActiveComputerName” and the value_name is“ComputerName”. The data corresponding to this value name is retrieved and stored in the console withthe label specified under the ‘custom_attribute_name’ parameter which is “Hostname” in the examples.
The final output of this configuration stores the computer name of the device in the Workspace ONEdatabase with a key Hostname and a data value retrieved from the device. For example, Hostname ->JSMITH-PC01. This data can be viewed in the Custom Attributes tab on the Device Details view.
What to do next
You can also view existing custom attributes for all devices at a particular organization group andmanually create custom attributes directly in the console. Navigate to Devices > Provisioning > CustomAttributes > List View to see these custom attributes listed. Any custom attribute created in this mannerautomatically associates with a device and its respective custom attribute value that is successfullytransmitted to the console.
Custom Attributes, WinRuggUse XML provisioning to collect custom attributes based on device details for your Windows Ruggeddevice. Custom attributes enable you to use advanced product provisioning functionality.
Procedure
1 Navigate to Devices > Provisioning > Components > Files/Actions, then select the Add Files/Actions button, and then select Windows Rugged as your platform.
Product Provisioning
VMware, Inc. 99

2 Create an XML product.
For more information, see Create an XML Provisioning File, Android, Win7, WinRugg. The manifestincludes an action to download the XML file to \Program Files\Airwatch\Cache\Profiles.
Upon receiving the XML file, the Workspace ONE Intelligent Hub for Windows Rugged creates a customattributes output file. During the next check-in with Workspace ONE UEM, the Workspace ONE IntelligentHub sends the output file to the Workspace ONE UEM console.
Once the XML file installs, the custom attributes requested in the file are reported to the UEM console.These values display in the UEM console on the Device Details page under custom attributes. TheDevice Details page enables you to view the name of the attribute and the values returned from eachdevice. These values can be used to create product assignment rules using the Custom Rules system.
Example
Syncing Registry Settings
To synchronize the registry settings on a Windows Rugged device with the console, which is likely themost common use of custom attributes for Windows Rugged devices, you must create a custom XML file.Below is an example of the format of an XML file that can pull information from the registry on a device:
<?xml version="1.0"?>-<wap-provisioningdoc allowRemoval="True" name="GetTypicalRegValues/V_1"
id="5a63204f-848c-42d5-9c14-4ca070743920">
-<characteristic uuid="f49a9cb5-48e9-47cd-84cc-ef122dcb5d50"
type="com.airwatch.getregistryinfo.winmo">
<reg_value value_name="Username"
key_name="HKEY_LOCAL_MACHINE\Ident"
custom_attribute_name="HKLM_Ident_Username"/>
<reg_value value_name="OrigName"
key_name="HKEY_LOCAL_MACHINE\Ident"
custom_attribute_name="HKLM_Ident_OrigName"/>
<reg_value value_name="BootCount"
key_name="HKEY_LOCAL_MACHINE\Comm"
custom_attribute_name="HKLM_Comm_BootCount"/>
<reg_value value_name="DeviceIdAlgorithm"
key_name="HKEY_LOCAL_MACHINE\Software\AirWatch"
Product Provisioning
VMware, Inc. 100

custom_attribute_name="Software_AirWatch_DeviceIdAlgorithm"/>
</characteristic></wap-provisioningdoc>
It must be in the previous format for the XML file to get correctly parsed and the registry settings to beoutputted to a key value pair that can be exported back to the UEM console. In this example, the registrykey path is “HKEY_LOCAL_MACHINE\Ident” for two of the values and within that key path it is readingthe values of “user name” and “OrigName”. The ‘custom_attribute_name’ parameter is simply the name ofthe custom attribute that displays in the console and corresponds to the value read from the device.
Using Third-Party Applications to Create Custom Attributes
If you want to create custom attributes using a third-party application, you need that application to exportan XML file with a key value pair to the Program Files\AirWatch\Cache\CustomAttributes directory onthe device. Once an XML file with a key value pair is present in this directory, it is parsed by theWorkspace ONE Intelligent Hub and included in the next interrogator sample. The XML key/value pairmust be in the following format.
<?xml version="1.0"?>-<attributes>
<attribute name="HKLM_Ident_Username" value="guest"/>
<attribute name="HKLM_Ident_OrigName" value="Pocket_PC"/>
<attribute name="HKLM_Comm_BootCount" value="1"/>
<attribute name="Software_AirWatch_DeviceIdAlgorithm" value="3"/>
<attribute name="HKLM_SoftwareAW_SerialNo" value="13233521403231"/>
</attributes>
‘Attribute name’ is the name of the attribute in the console while ‘value’ is the corresponding value that isassociated with that attribute.
What to do next
You can also view existing custom attributes for all devices at a particular organization group andmanually create custom attributes directly in the UEM console. Navigate to Devices > Provisioning >Custom Attributes > List View to see these custom attributes listed. Any custom attribute created in thismanner automatically associates with a device and its respective custom attribute value that issuccessfully transmitted to the UEM console.
Product Provisioning
VMware, Inc. 101

Product Management 5Manage products using the product provisioning management functionality built into Workspace ONEUEM powered by AirWatch. Product management uses the Products Dashboard, Products List View, andDevice Details View to manage how devices use products.
Rugged devices have different device actions and options than consumer devices. Some actions, such asRemote Management, require additional configuration before using with devices. Products must bedeactivated before most device actions work. You must also disable any components before using deviceactions.
XML ProvisioningFor Android, Win7, and WinRugg Only, XML provisioning allows you to download a custom-designedXML file to a device in a provisioning product. After the file is downloaded, it runs an install command toextract the settings from the XML file and install them on the device. For more information, see Create anXML Provisioning File, Android, Win7, WinRugg.
This chapter includes the following topics:
n Products Dashboard
n Products List View
n View Information About Products in Device Details
n Product Job Statuses
Products DashboardView and manage products from the Products Dashboard. Navigate to Devices > Provisioning >Products Dashboard.
The dashboard provides an easy method of viewing the status of your products and the devices theyprovision. The charts of information allow you to examine specific products or devices so you can remaininformed about your device fleet.
VMware, Inc. 102

Recent Product StatusThis chart displays the 10 most recently created products and the status for each product. You can selectany section of the bar graph to view the devices to which that product status applies.
n Compliant – The product installed on the device and the inventory data of the product reported by thedevice matches the requirements of the product.
n For Windows Rugged Only: The product also passes a file hash validation, ensuring theproduct on the device is the exact same product provisioned by the console or API call.
n In Progress – The product has been sent to the device and is pending a compliance check based oninventory.
n n For Windows Rugged Only: The compliance check also factors in file hash data to be receivedfrom the device.
n Must Push – The product deployment type is set to elective. The admin on the console side mustinitiate product installation.
n Dependent – The product depends on another product installation before installing onto devices.
n Failed – The product reached maximum attempts to install on the device and is no longer attemptingto install.
Filters
You can filter the Recent Product Status chart to refer to specific device platforms that support product
provisioning. To filter your results, select the Menu icon ( ) in the top right corner. Select the platformsyou want to filter by.
Product ComplianceThe Product Compliance chart shows the total percentage of each compliance status. The numberdisplayed in each status is the total number of product statuses reported from each device.
Filters
You can filter the Product Compliance chart to display specific device platforms that support productprovisioning and the total percentage of each compliance status for a specific products.
Product Provisioning
VMware, Inc. 103

To filter your results, select the Menu icon ( ) in the top right corner. Select either the platform or theproduct by which you want to filter.
Top Job ComplianceThis chart displays a ratio of total job count to the number of devices to which the product is provisioned.This ratio gives you information on what products are having issues running.
For example, if the number shown is a 3, then you know that an average of 3 jobs per device happens forthis product. If you select the bar for each product, the View Devices screen displays with all devicescurrently assigned the product. You can then determine which jobs are failing and the reason for thosefailures.
Filters
You can filter the Total Job Compliance chart to refer to specific device platforms that support product
provisioning. To filter your results, select the menu icon ( ) in the top right corner. Select the platformsyou want to filter by.
Product BreakdownThis section shows you the breakdown of your products. The first chart shows the breakdown of productsby platform. Selecting a platform displays the Products List View filtered by that product. Thisarrangement allows you to see the products available for each platform quickly.
The second chart displays the percentage of your products that are active vs. inactive and a total numberof products. Selecting a chart displays the Products List View page filtered by the status of the product.
Product Provisioning
VMware, Inc. 104

Products List ViewThe Product List view allows you to view, edit, copy, reprocess, and delete products and view the devicesa product is provisioning.
Navigate to Devices > Provisioning > Product List View. This is the Products List View. Listed here areall the available products for the current organization group. The products can be sorted using thecolumns.
n Platform sorts by the device platform.
n Managed By sorts by the organization group the product is assigned to.
n A/D sorts by if the product uses activation/deactivation dates or manual.
n Compliant, In Progress, Failed, and Total Assigned sort by the status of the product on devices.
Select a product by name to view the details and settings of the product. The View Product screendisplays the general settings, manifest items, conditions, deployment settings, and product dependenciesfor the product. You can also select the number links in the Compliant, In Progress, Failed, HasDependency, Must Push, Offline, and Total columns, allowing you to see device details as they pertainto these product provisioning statuses.
Select the edit radio button to the left of each product name and you have access to the following actions.
n You can Deactivate a product, making it no longer accessible. Deactivating the product also clears allpending provisioning commands.
n Select the Edit button to edit a product. You can only edit products after they are deactivated. Editdisplays the Product Wizard allowing you to change any part of a product.
n Select the View Devices button to view all devices to which the product provisions. A quick summaryof information on each device allows you to see which devices are at specific statuses. Select adevice Friendly Name to open the Device Details Page for that device.
More Actionsn You can view the Activation Log for the selected product, which displays detailed information about
the product including date of activation and the name of the admin who initiated the activation.
Product Provisioning
VMware, Inc. 105

n You can make a Copy of a product. If one of your products has detailed and intricate parameters, youcan save time programming them from the beginning by making a copy of an existing product. Youcould then, for example, change the application in the manifest of the copy, thus making an entirelynew product that shares the same detailed parameters.
n You can attempt to fix non-compliant products and push the product to the device again by selectingthe Reprocess button.
n The Force Reprocess action resends Products to all assigned devices regardless of compliancestatus. The devices fully download and install every component of the Product manifest, even if itexists on the device already. You can perform this action on multiple products simultaneously.
n Select the Relay Server Status button to see the status of the relay server associated with theproduct. Only active products have the Relay Server Status button. You can also view history fromthe View Devices page to see the past and future products pushed to the device based on Productsync.
n The Inherited Products option displays all inherited products a child organization group receivesfrom the parent organization groups. As products are provisioned based on smart groups and notorganization groups, your devices can receive products from a parent organization group.
View Information About Products in Device DetailsYou can use the Device Details View to see the products, files/actions, apps, and profiles pushed to adevice.
ProductsTo view the products on a device, navigate to Devices > List View > Select a device > More >Products. This displays the products available on a specific device.
Any product that fails to push to devices can be reprocessed by selecting the Reprocess button next tothe failed product.
Product SetsProduct Sets display on individual device detail pages to show the status of the products' deployments tothe device. The products listed that are part of a product set display the product set they pertain to andthe deployment status of the products.
The following text boxes display relevant product set information.
n Product Set – Displays the product set that contains the product. Select the product set to view theproduct set details.
n Status – Displays the status of the product. For products in a product set, the appropriate productdeployed to the device is labeled as Compliant. The other products contained in the product set thatare eligible for deployment but are not deployed to the device are labeled as Outranked. Any productthat is not eligible for deployment to the device is labeled as Not Applicable.
Product Provisioning
VMware, Inc. 106

Files/ActionsNavigate to Devices > List View > Select a device > More > Files/Actions to access the files/actionson the device.
ApplicationsFor Android devices only, navigate to Devices > Details View > Apps to access the Applications on thedevice.
ProfilesFor Windows Rugged devices, Windows Desktop devices, QNX devices, and Android devices only,navigate to Devices > Details View > Additional Options > Profiles to access the Profiles on thedevice.
Product Job StatusesProduct provisioning works by handling each item in a product as a different job. As a product is pushedto a device, the Workspace ONE UEM console updates the status of each job to display any errors orissues that are in process.
Product Job LogsYou can view more detail about product jobs by viewing the job logs.
Navigate to Devices > List View and select the friendly name of a device that has been provisioned witha product. Next, select the More tab, select Products, then select the magnifying glass icon to the right ofthe Last Job Status column. This action displays the Jobs screen which provides access to the contentsof the Job logs.
The Job logs provide a detailed history of events that have elapsed for the device in question as itpertains to the assigned product. This history includes timestamps, progress, error messages, and pause/resume history.
Each job follows a workflow and the statuses reflect the position in the process.
Job Status Description
*Queued The job is created but not yet started.
Delivered Job initially delivered to device database.
Paused Job was previously started but a failure occurred. Jobs resume before other jobs are processed.
Download Pending The download remains in a pending state until download conditions are met.
Downloaded The job downloaded to the device.
Install pending The install is pending until install conditions are met.
Installed The job installed on the device.
Deferred Job download conditions not yet met.
Product Provisioning
VMware, Inc. 107

Job Status Description
Waiting Job is processing on the device but the status of the job is not confirmed.
Completed / Failed Job processing complete. Complete means that the process was a success. Failed means that the processfailed.
Canceled Job canceled while deferred or waiting.
Orphaned Job being process by device uncompleted when jobs reprocessed. Job will automatically restart when able.
Deleted The job was canceled by the user on the device.
Note * If one or more relay servers are part of your product provisioning environment, you may seeextended periods in which "Queued" is the official job status. While each relay server added to theprocessing chain serves to greatly enhance the performance of a busy provisioning environment, theyalso tend to delay the reporting of a conclusive product status.
You can use the following methods to troubleshoot and investigate a job status where relay servers areinvolved.n Check Relay Server Advanced Info - Navigate to Devices > Provisioning > Relay Servers > List
View and select the radio button to the left of the relay server name. Select the More Actions buttonthat appears and lastly, select Advanced Info. This displays the Relay Server AdvancedInformation screen, where you can verify a product's Queued Count. Device commands forproducts are not sent to devices until any recently-created product stops being reported in this field.Once you see a zero value in this field, then device commands can be sent.
n Check Relay Server Status. - Navigate to Devices > Provisioning > Product List View and selectthe radio button to the left of the product you want to research. Select the More Actions button andlastly, select Relay Server Status. You can check the specific status of the relay server by hoveringyour pointer over the displayed Relay Server icon.
Job Log Detail LevelYou can set the amount of detail captured in the Job Log for Android and Windows Rugged devices onlyby navigating to Groups & Settings > All Settings > Devices & Users > Android or Windows >Windows Rugged then continue on to Hub Settings then scroll down to the Product Provisioningsection and select the Job Log Level you prefer.
You can also Target a Device Log Level for Troubleshooting Purposes, Android and WinRugg.
Configure the Collection of Job Logs for Specific DevicesYou can target individual devices for job log collection.
Procedure
1 Navigate to Groups & Settings > All Settings > Admin > Diagnostics > Logging.
2 Select the Enabled slider for each component and Scheduled Services for which you want to collectdata.
Product Provisioning
VMware, Inc. 108

3 Scroll down to the Targeted Logging section, Enable the Targeted Logging slider, and complete thesettings.
Setting Description
Organization Group(s) Select the organization group(s) where the device(s) reside(s).
Device ID(s) Enter the device ID(s) for which you want to enable targeted logging. Use commasto separate multiple device IDs.
File Storage Impersonation Enabled Enable if you are using a file storage server to store these targeted logs and enterthe appropriate authentication credentials.
File Path Enter the path and filename of the LOG file where you would like the data saved.
File Storage Impersonation UserName
This option appears only when File Storage Impersonation Enabled is checked.
Enter the username of the storage server where you targeted logs are saved.
File Storage Impersonation Password This option appears only when File Storage Impersonation Enabled is checked.
Enter the corresponding password of the username of the storage server whereyou targeted logs are saved.
Test Connection (button) Select this button to test the connection. It tests various possible scenarios whichthe logging process uses and makes sure it is working as expected.
4 Save to apply Targeted Logging.
What to do next
For Android and Windows Rugged only, you can target an individual device for troubleshooting purposes.See Target a Device Log Level for Troubleshooting Purposes, Android and WinRugg.
Define How Much Data to Collect, Product Job LogYou can define the length of time job log data is collected. Define this timescale by taking the followingsteps.
Procedure
1 Navigate to Groups & Settings > All Settings > Admin > Data Purging.
2 Locate the purge module named DevicePolicyJobPurge and select the pencil icon ( ) to open theData Purging screen.
3 Complete the Purge older than (days) setting with the length of time in days that you want to keepjob log data.
4 Select Save.
Job logs older than the selected number of days are purged from the Workspace ONE UEM console.
Target a Device Log Level for Troubleshooting Purposes, Androidand WinRuggYou can target an individual device and temporarily change its logging level for troubleshooting purposes.
Product Provisioning
VMware, Inc. 109

Procedure
1 Navigate to Devices > List View, locate the device you want to troubleshoot and select the devicefriendly name to display the Device Details.
2 Click the More tab and select Targeted Logging.
3 Select Create New Log and select the length of time you want the log to capture data.
4 Select Start to begin the logging.
Product Provisioning
VMware, Inc. 110

Device Management, ProductProvisioning 6You can manage devices you have provisioned products onto using the tools and features that come withWorkspace ONE UEM powered by AirWatch, such as Device Details, Enterprise Reset, AdvancedRemote Management, and much more.
The features presented in the topics that follow are specific to devices associated with productprovisioning, including Windows Rugged, QNX, and others. For information about device management orthe Workspace ONE UEM Console in general, see VMware Workspace ONE Managing Devices andVMware Workspace ONE Console Basics, each available on docs.vmware.com.
This chapter includes the following topics:
n Device Details Page, QNX
n Device Details Page, WinRugg
n Device Details Page, WinDesk
n Device Details Page, Win7
n Configure Settings, QNX
n Enterprise Reset a Rugged Device, Android and WinRugg
n Enable AirWatch Cloud Messaging, Android Rugged
n Advanced Remote Management
n Platform OEM Service, Android Provisioning
n Batch (BAT) File Guidelines, Win7 and WinDesk
Device Details Page, QNXThe Device Details page displays detailed device information for QNX devices and lets you quicklyaccess user and device management actions.
You can access the Device Details page by selecting a device's Friendly Name from the Device Searchpage. You can also use one of the available Dashboards or any of the available search tools with theWorkspace ONE ™ UEM console.
From the Device Details page, you can access specific device information broken into different menutabs. Each menu tab contains related device information depending on your Workspace ONE UEMdeployment.
VMware, Inc. 111

Performing Remote ActionsThe More drop-down on the Device Details page enables you to perform remote actions over-the-air tothe selected device.
The actions listed below vary depending on factors such as device platform, UEM console settings, andenrollment status.
n Add Tag – Assign a customizable tag to a device, which can be used to identify a special device inyour fleet.
n Change Organization Group – Change the device's home organization group to another pre-existing OG. Includes an option to select a static or dynamic OG.
n Delete Device – Delete and unenroll a device from the console. Sends the enterprise wipe commandto the device that gets wiped on the next check-in and marks the device as Delete In Progress onthe console. If the wipe protection is turned off on the device, the issued command immediatelyperforms an enterprise wipe and removes the device representation in the console.
n Edit Device – Edit device information such as Friendly Name, Asset Number, Device Ownership,Device Group and Device Category.
n Enterprise Wipe – Enterprise Wipe a device to unenroll and remove all managed enterpriseresources including applications and profiles. This action cannot be undone and re-enrollment will berequired for Workspace ONE UEM to manage this device again. Includes options to prevent future re-enrollment and a Note Description field for you to add any noteworthy details about the action.
n Enterprise Wipe is not supported for cloud domain-joined devices.
n Remote Management – Take control of a supported device remotely using this action, whichlaunches a console application that enables you to perform support and troubleshoot on the device.Android devices require Remote Control Service to be installed on the device.
n Send Message – Send a message to the user of the selected device. Choose between Email, PushNotification (through AirWatch Cloud Messaging), and SMS.
Device Details Page, WinRuggUse the Device Details page to track detailed Windows Rugged device information and quickly accessuser and device management actions. You can access Device Details by selecting a device FriendlyName from the Device List View, using one of the Dashboards, or with any of the search tools.
From the Device Details page, you can access specific device information broken into different menutabs. Each menu tab contains related device information depending on your Workspace ONE UEMdeployment.
Remote ActionsThe More drop-down on the Device Details page enables you to perform remote actions over the air tothe selected device.
Product Provisioning
VMware, Inc. 112

The actions vary depending on factors such as the device platform, UEM console settings, andenrollment status:
n Add Tag – Assign a customizable tag to a device, which can be used to identify a special device inyour fleet.
n App Remote View – Take a series of screenshots of an installed application and send them to theRemote View screen in the UEM console. You may choose the number of screenshots and the lengthof the gap, in seconds, between the screenshots.
Android and iOS devices require VMware Content Locker to be installed on the device to executeApp Remote View.
n Apps (Query) – Send an MDM query command to the device to return a list of installed apps.
n Certificates (Query) – Send an MDM query command to the device to return a list of installedcertificates.
n Change Organization Group – Change the device's home organization group to another pre-existing OG. Includes an option to select a static or dynamic OG.
n Clear Passcode (Device) – Clear the device passcode. To be used in situations where the user hasforgotten their device's passcode.
n Delete Device – Delete and unenroll a device from the console. Sends the enterprise wipe commandto the device that gets wiped on the next check-in and marks the device as Delete In Progress onthe console. If the wipe protection is turned off on the device, the issued command immediatelyperforms an enterprise wipe and removes the device representation in the console.
n Device Information (Query) – Send an MDM query command to the device to return basicinformation on the device such as friendly name, platform, model, organization group, operatingsystem version and ownership status.
n Device Wipe – Send an MDM command to wipe a device clear of all data and operating system. Thisputs the device in a state where recovery partition will be needed to reinstall the OS. This actioncannot be undone.
n iOS Device Wipe Considerations
• For iOS 11 and below devices, the device wipe command would also wipe the Apple SIMdata associated with the devices.
• For iOS 11+ devices, you have the option to preserve the Apple SIM data plan (if existed onthe devices). To do this, select the Preserve Data Plan checkbox on the Device Wipe pagebefore sending the device wipe command.
• For iOS 11.3+ devices, you have an additional option to enable or disable to skip theProximity Setup screen while sending down the device wipe command. When the option isenabled, the Proximity Setup screen will be skipped in the Setup Assistant and thuspreventing the device user from seeing the Proximity Setup option.
n For Windows Desktop Devices, you can choose the type of device wipe.
• Wipe - This option wipes the device of all content.
Product Provisioning
VMware, Inc. 113

• Wipe Protected - This option is similar a normal device wipe, but this option cannot becircumvented by the user. The Wipe Protected command keeps trying to reset the deviceuntil it is successful. In some device configurations, this command can leave the deviceunable to boot.
• Wipe and Persist Provisioning Data - This option wipes the device but specifies thatprovisioning data should be backed up to a persistent location. After the wipe executes, theprovisioning data is restored and applied to the device. The provisioning folder is saved. Youcan find the folder by navigating on the device to %ProgramData%\Microsoft\Provisioning .
n Edit Device – Edit device information such as Friendly Name, Asset Number, Device Ownership,Device Group and Device Category.
n Enterprise Reset – Enterprise Reset a device to factory settings, keeping only the Workspace ONEUEM enrollment.
Product Provisioning
VMware, Inc. 114
n Windows Desktop Only: Enterprise Reset restores a device to a Ready to Work state when a deviceis corrupted or has malfunctioning applications. It re-installs the Windows OS while preserving userdata, user accounts and managed applications. The device will re-sync auto-deployed enterprisesettings, policies, and apps after reset while remaining managed by Workspace ONE.
n Enterprise Wipe – Enterprise Wipe a device to unenroll and remove all managed enterpriseresources including applications and profiles. This action cannot be undone and re-enrollment will berequired for Workspace ONE UEM to manage this device again. Includes options to prevent future re-enrollment and a Note Description field for you to add any noteworthy details about the action.
n Enterprise Wipe is not supported for cloud domain-joined devices.
n File Manager – Launch a File Manager within the UEM console that enables you to remotely view adevice's content, add folders, conduct searches and upload files.
n Provision Now – Provision products to a device. Provisioning is the ability to create an orderedinstallation of files, actions, profiles and applications into a single product that can be pushed todevices.
n Query All – Send a query command to the device to return a list of installed apps (includingWorkspace ONE Intelligent Hub, where applicable), books, certificates, device information, profilesand security measures.
n Registry Manager – Launch a Registry Manager within the UEM console that enables you toremotely view a device's OS registry, add keys, conduct searches and add properties.
n Remote Control – Take control of a supported device remotely using this action, which launches aconsole application that enables you to perform support and troubleshooting on the device. Androiddevices require Remote Control Service to be installed on the device.
n Remote Management – Take control of a supported device remotely using this action, whichlaunches a console application that enables you to perform support and troubleshoot on the device.Android devices require Remote Control Service to be installed on the device.
n Request Device Check-In – Request that the selected device check itself in to the UEM console.This action updates the Last Seen column status.
n Restart Workspace ONE Intelligent Hub – Restart the Workspace ONE Intelligent Hub. To be usedduring troubleshooting for when the enrollment process or submodule installation process isinterrupted.
n Send Message – Send a message to the user of the selected device. Choose between Email, PushNotification (through AirWatch Cloud Messaging), and SMS.
n Start/Stop AWCM – Start/Stop the Cloud Messaging service for the selected device. VMwareAirWatch Cloud Messaging (AWCM) streamlines the delivery of messages and commands from theAdmin Console by eliminating the need for end users to access the public Internet or utilize consumeraccounts, such as Google IDs.
n Task Manager – Launch a Task Manager within the UEM console that enables you to remotely viewa device's currently-running tasks, including task Name, Process ID and applicable Actions you maytake.
Product Provisioning
VMware, Inc. 115
n View Manifest – View the device's Package Manifest in XML format from the UEM console. Themanifest on Windows Rugged devices lists metadata for widgets and apps.
n Warm Boot – Initiate a restart of the operating system without performing a power-on self-test(POST).
n Workspace ONE Intelligent Hub Query – Send a query command to theWorkspace ONE IntelligentHub on the device to ensure it has been installed and is functioning normally.
Device Details Page, WinDeskUse the Device Details page to track detailed device information for Windows Desktop devices andquickly access user and device management actions.
You can access Device Details by selecting a device Friendly Name from the Device List View, using oneof the Dashboards, or with any of the search tools.
From the Device Details page, you can access specific device information broken into different menutabs. Each menu tab contains related device information depending on your Workspace ONE UEMdeployment.
Remote ActionsThe More Actions drop-down on the Device Details page enables you to perform remote actions overthe air to the selected device.
The actions vary depending on factors such as the device platform, Workspace ONE UEM consolesettings, and enrollment status:
n Add Tag – Assign a customizable tag to a device, which can be used to identify a special device inyour fleet.
n Apps (Query) – Send an MDM query command to the device to return a list of installed apps.
The Apps (Query) action requires an active enrolled user login.
n Certificates (Query) – Send an MDM query command to the device to return a list of installedcertificates.
The Certificates (Query) requires an active enrolled user login.
n Change Organization Group – Change the device's home organization group to another pre-existing OG. Includes an option to select a static or dynamic OG.
n Request Device Log – Request the debug log on the selected device, after which you may view thelog by selecting the More tab and choosing Attachments > Documents. You cannot view the logwithin the Workspace ONE UEM consoleThe log is delivered as a ZIP file that can be used totroubleshoot and provide support.
When you request a log you can choose to receive the logs from the System or the Hub. Systemprovides system-level logs. Hub provides logs from the multiple agents running on the device.
Product Provisioning
VMware, Inc. 116

Android Only: you can retrieve detailed logs from corporate-owned Android devices and view themin the console to quickly resolve issues on the device.
n Delete Device – Delete and unenroll a device from the console. Sends the enterprise wipe commandto the device that gets wiped on the next check-in and marks the device as Delete In Progress onthe console. If the wipe protection is turned off on the device, the issued command immediatelyperforms an enterprise wipe and removes the device representation in the console.
n Device Information (Query) – Send an MDM query command to the device to return basicinformation on the device such as friendly name, platform, model, organization group, operatingsystem version and ownership status.
n Device Wipe – Send an MDM command to wipe a device clear of all data and operating system. Thisputs the device in a state where recovery partition will be needed to reinstall the OS. This actioncannot be undone.
n iOS Device Wipe Considerations
• For iOS 11 and below devices, the device wipe command would also wipe the Apple SIMdata associated with the devices.
• For iOS 11+ devices, you have the option to preserve the Apple SIM data plan (if existed onthe devices). To do this, select the Preserve Data Plan checkbox on the Device Wipe pagebefore sending the device wipe command.
• For iOS 11.3+ devices, you have an additional option to enable or disable to skip theProximity Setup screen while sending down the device wipe command. When the option isenabled, the Proximity Setup screen will be skipped in the Setup Assistant and thuspreventing the device user from seeing the Proximity Setup option.
n For Windows Desktop Devices, you can choose the type of device wipe.
• Wipe - This option wipes the device of all content.
• Wipe Protected - This option is similar a normal device wipe, but this option cannot becircumvented by the user. The Wipe Protected command keeps trying to reset the deviceuntil it is successful. In some device configurations, this command can leave the deviceunable to boot.
Product Provisioning
VMware, Inc. 117

• Wipe and Persist Provisioning Data - This option wipes the device but specifies thatprovisioning data should be backed up to a persistent location. After the wipe executes, theprovisioning data is restored and applied to the device. The provisioning folder is saved. Youcan find the folder by navigating on the device to %ProgramData%\Microsoft\Provisioning .
n Edit Device – Edit device information such as Friendly Name, Asset Number, Device Ownership,Device Group and Device Category.
n Enterprise Wipe – Enterprise Wipe a device to unenroll and remove all managed enterpriseresources including applications and profiles. This action cannot be undone and re-enrollment will berequired for Workspace ONE UEM to manage this device again. Includes options to prevent future re-enrollment and a Note Description field for you to add any noteworthy details about the action.
n Enterprise Wipe is not supported for cloud domain-joined devices.
n Enterprise Reset – Enterprise Reset a device to factory settings, keeping only the Workspace ONEUEM enrollment.
n Windows Desktop Only: Enterprise Reset restores a device to a Ready to Work state when a deviceis corrupted or has malfunctioning applications. It re-installs the Windows OS while preserving userdata, user accounts and managed applications. The device will re-sync auto-deployed enterprisesettings, policies, and apps after reset while remaining managed by Workspace ONE.
n Lock Device – Send an MDM command to lock a selected device, rendering it unusable until it isunlocked.
Important When locking a device, an enrolled user must be signed into the device for the command toprocess. The lock command locks the device and any user signed in must reauthenticate with Windows.If an enrolled user is signed-in to the device, a lock device command locks the device. If an enrolled useris not signed in, the lock device command is not processed.
n Query All – Send a query command to the device to return a list of installed apps (includingWorkspace ONE Intelligent Hub, where applicable), books, certificates, device information, profilesand security measures.
n Reboot Device – Reboot a device remotely, reproducing the effect of powering it off and on again.
n Remote Management – Take control of a supported device remotely using this action, whichlaunches a console application that enables you to perform support and troubleshoot on the device.Android devices require Remote Control Service to be installed on the device.
n Security (Query) – Send an MDM query command to the device to return the list of active securitymeasures (device manager, encryption, passcode, certificates, etc.).
n Send Message – Send a message to the user of the selected device. Choose between Email, PushNotification (through AirWatch Cloud Messaging), and SMS.
Product Provisioning
VMware, Inc. 118

Device Details Page, Win7Use the Device Details page to track detailed device information for Windows 7 devices and quicklyaccess user and device management actions.
You can access Device Details by selecting a device Friendly Name from the Device List View, using oneof the Dashboards, or with any of the search tools.
From the Device Details page, you can access specific device information broken into different menutabs. Each menu tab contains related device information depending on your Workspace ONE UEMdeployment.
Remote ActionsThe More drop-down on the Device Details page enables you to perform remote actions over the air tothe selected device.
Product Provisioning
VMware, Inc. 119

The actions vary depending on factors such as the device platform, Workspace ONE UEM consolesettings, and enrollment status:
n Add Tag – Assign a customizable tag to a device, which can be used to identify a special device inyour fleet.
n Change Organization Group – Change the device's home organization group to another pre-existing OG. Includes an option to select a static or dynamic OG.
n Delete Device – Delete and unenroll a device from the console. Sends the enterprise wipe commandto the device that gets wiped on the next check-in and marks the device as Delete In Progress onthe console. If the wipe protection is turned off on the device, the issued command immediatelyperforms an enterprise wipe and removes the device representation in the console.
n Edit Device – Edit device information such as Friendly Name, Asset Number, Device Ownership,Device Group and Device Category.
n Enterprise Wipe – Enterprise Wipe a device to unenroll and remove all managed enterpriseresources including applications and profiles. This action cannot be undone and re-enrollment will berequired for Workspace ONE UEM to manage this device again. Includes options to prevent future re-enrollment and a Note Description field for you to add any noteworthy details about the action.
n Enterprise Wipe is not supported for cloud domain-joined devices.
n Lock Device – Send an MDM command to lock a selected device, rendering it unusable until it isunlocked.
n Query All – Send a query command to the device to return a list of installed apps (includingWorkspace ONE Intelligent Hub, where applicable), books, certificates, device information, profilesand security measures.
n Remote Management – Take control of a supported device remotely using this action, whichlaunches a console application that enables you to perform support and troubleshoot on the device.Android devices require Remote Control Service to be installed on the device.
n Send Message – Send a message to the user of the selected device. Choose between Email, PushNotification (through AirWatch Cloud Messaging), and SMS.
Configure Settings, QNXThe Workspace ONE Intelligent Hub for QNX devices is pre-configured with Workspace ONE ™ UEM.Change these settings when you need the Workspace ONE Intelligent Hub to meet certain businessneeds.
Product Provisioning
VMware, Inc. 120

Procedure
u Navigate to Groups & Settings > All Settings > Devices & Users > QNX > Hub Settings to editthe Workspace ONE Intelligent Hub Settings.
Setting Description
Device ID Algorithm Set the unique device identification algorithm used on the device.
Heartbeat Interval (min) Set the time (in minutes) the Workspace ONE Intelligent Hub waits before checking-in with theWorkspace ONE UEM console.
Data Sample Interval (min) Set the time (in minutes) the Workspace ONE Intelligent Hub waits to collect data from thedevice.
Data Transmit Time Interval(min)
Set the time (in minutes) the Workspace ONE Intelligent Hub waits to send data to the UEMconsole.
What to do next
For information about initiating a remote management session for troubleshooting purposes, seeAdvanced Remote Management.
The Workspace ONE Intelligent Hub for QNX devices supports Job notifications for products provisionedto the device. Notifications for jobs that successfully reach completion display on the device side throughthe Workspace ONE Intelligent Hub for QNX devices.
AWTrigger Commands, QNXAWTrigger allows third-party applications to interact with the Workspace ONE Intelligent Hub for QNX.
The applications interact in two ways. The first interaction is the ability to enable/disable the process ofproducts using the fast track. This setting allows you to evaluate products regardless of any conditionsenabled for the product. For example, you can install all products available for a device immediatelyinstead of waiting for conditions or dependencies.
The second interaction ability allows you to evaluate all device readiness and detached conditionsimmediately. This interaction circumvents the normal check-in interval for the Workspace ONE IntelligentHub and will check all conditions at that moment as opposed to waiting for the normal interval.
This appendix lists the commands available for use while using the Workspace ONE ™ UEM InstallationDirectory Command-Line entries.
AWTrigger –installnow trueThis command processes all the jobs that have already reached the device (and also all the jobs thatreach the device after this command has been successfully run) to be processed with immediate effect bydisabling all conditions.
AWTrigger –installnow falseThis command will disable the installnow functionality. All the jobs that reach the device after thiscommand has been run, will be processed normally (by evaluating conditions).
Product Provisioning
VMware, Inc. 121
AWTrigger –condition trueThis command causes all the deferred jobs on the device to be reevaluated again with immediate effect tosee if the condition specified (in each job) has been met or not. Useful in the case of file conditions.
For example, suppose that a job has been pushed onto the device which has a file condition associatedwith it and the file condition specifies to check for the presence of a test file. If the test file is missing onthe device, AWApplicationManager creates a flag file. Hub defers this job by 5 minutes. After 5 minutes,the AWApplicationManager will again check for the presence of the test file). If the application creates atest file after 2 minutes (of deferring the job) and if the technician does not want to wait for another 3minutes for the job to be processed, he can run this command and the job will be immediately evaluated.This command causes ALL the deferred jobs to be evaluated with immediate effect.
AWTrigger –hThis prints the usage of the utility into the respective log file.
AWTrigger -migrateca trueThis migrates your XML custom attribute files to the new custom attribute database.
In order for the new text boxes to be present in a custom attribute XML file created from a profile, theUEM console version must be at least 8.1, and the Workspace ONE Intelligent Hub version must be atleast 5.4.66.98.
For clean migration of custom attribute data from XML files to the database, Workspace ONE UEMrecommends repushing any profiles that are already installed on any devices so that the new text boxesare present.
Migrate from XML to CA Database, AWTriggersYou can migrate information in XML format to the custom attribute database by taking the following steps.
Procedure
1 Repush existing profiles to update XML files with data for all profile text boxes.
2 Update configuration file "~/airwatch/General-Config.cfg" to use DB_BASED_CA.
[CustomAttributes] Type = DB_BASED_CA
3 Run command for custom attribute migration utility.
~/airwatch/AWTrigger -migrateca true
4 Check Status.
~/airwatch/AWStatusFinder -migrateca
Migrating from AirWatch 8 XML to CA Database, AWTriggersWorkspace ONE UEM recommends re-pushing the custom attribute profile from the UEM console afterupgrading to AirWatch v8.1.
Product Provisioning
VMware, Inc. 122

If you choose to migrate to a CA Database without pushing the updated profile, the following decisionsare made by the migration process.
n Importing Application values.
n If an Application value does exist for a custom attribute record in an XML file, then the existingvalue is used as the value for application when the record is inserted into the database.
n If an Application value does not exist for an attribute record in an XML file, then the File Name isused as the Application value when the record is inserted into the database.
n Importing Attribute Name values.
n The name of the custom attribute record in the XML element is imported as the name of thecustom attribute database record.
n Importing value.
n The value of the custom attribute record in the XML element is imported as the value of thecustom attribute database record.
n Importing is_dynamic values.
n If an is_dyanmic value does exist for a custom attribute record in an XML file, then the existingvalues are imported as the is_dynamic value for the database record.
n If an is_dyanmic value does not exist for a custom attribute record in an XML file, then theis_dynamic value is set to "True" for the database record.
n Importing Permission values:
n If a Permission value does exist for a custom attribute record in an XML file, then the existingvalue is imported as the Permission value for the database record.
n If a Permission value does not exist for a custom attribute record in an XML file, then thePermission value is set to "read/write" for the database record.
n Importing sync.
n If a Sync value does exist for a custom attribute record in an XML file, then the existing value isimported as the Sync value for the database record.
n If a Sync value does not exist for a custom attribute record in an XML file, then the Sync value isset to "True" for the database record.
Enterprise Reset a Rugged Device, Android and WinRuggEnterprise Reset enables you to reset a device similar to an enterprise wipe, but with one importantdifference. Profiles and files/actions set to persist on a device are not removed and automatically reinstallon a device following the first reboot after an enterprise reset.
Product Provisioning
VMware, Inc. 123

Enterprise Reset is only available for Windows Rugged Devices and Android legacy Motorola, Zebra, andHoneywell devices.
Note Enterprise Reset cannot run on devices with low battery levels. If you attempt an Enterprise Reseton a device with low battery level, a warning displays alerting to you about potential issues with theEnterprise Reset. On Android devices, the Enterprise Reset command is held until the device reachessufficient battery level. Once the device is charged, the Reset occurs automatically.
Procedure
1 Navigate to Devices > List View and select a device you want to Enterprise Reset.
2 On the Device Details View, select the More Actions button.
3 Select Enterprise Reset, located under Management section.
4 Enter your Security Pin in the Restrict Action prompt to perform the Enterprise Reset.
Enable AirWatch Cloud Messaging, Android RuggedAirWatch Cloud Messaging (AWCM) provides an internal communication solution for the entireWorkspace ONE UEM solution as a comprehensive replacement for Google Cloud Messaging (GCM).
AWCM provides real-time device management status and command pushes for:
n Devices that cannot be configured with a Google Account.
n Devices restricted to internal network communication.
n Devices without public Internet access.
Enable AWCMEnable AWCM by navigating to Devices > Device Settings > Android > Hub Settings > AirWatchCloud Messaging.
Select Enabled on Use AWCM Instead of C2DM to enable AWCM. Selecting this option locks thedeployment type to Always Running so that the system and device have a constant and ongoing line ofcommunication. You may also choose to leave the Use AWCM Instead of C2DM check box uncheckedand decide to make the deployment type Always Running or Manual, with an associated timeout value.
Advanced Remote ManagementAdvanced Remote Management (ARM) allows you to connect remotely to end-user devices so you canhelp with troubleshooting and maintenance. ARM requires your computer and the end-user device toconnect to the Advanced Remote Management Server to facilitate communication between theWorkspace ONE UEM console and the end-user device.
For more information, see VMware Workspace ONE Advanced Remote Management Documentationon docs.vmware.com.
Product Provisioning
VMware, Inc. 124

Platform OEM Service, Android ProvisioningThe Platform OEM (POEM) Service is an additional app that allows the Workspace ONE UEM console toprovide extended management capabilities to Android legacy devices only.
After you enroll, the Workspace ONE UEM console automatically detects if the device can takeadvantage of additional device capabilities, and deploys an Original Equipment Manufacturer (OEM)specific service application to your Android. The OEM Service app is a plug-in app that is only installedand used in combination with Workspace ONE Intelligent Hub enrollment.
It allows for additional MDM capabilities that only pertain to a specific OEM device. All of these APKs areavailable through AirWatch Resources by request. There are a few service apps that we publish to theGoogle Play Store (see list below).
Here is a sample of supported features and available OEMs for the Platform OEM Service.
POEM Service Featuresn Silent App installation, uninstallation, and updates
n Silent Device Administrator Activation on launch
n Date/Time configuration (date format, time format, time zone, server time, SNTP, HTTP URL, or Auto)
n Toggle Bluetooth on/off with the Disable Bluetooth restriction
n Disable installation from unknown sources on 5.0 Lollipop and above
n Device Reboot
POEM Service Versionsn Bluebird
n Kube
n Getac
n Honeywell
n HP
n Intermec
n Lenovo
n Mediawave
n Panasonic
n Sonim
n Zebra CC5000
POEM Service Version Available on the Google Play Storen Samsung
Product Provisioning
VMware, Inc. 125

n Sony
n LG
n Huawei
n Zebra
n Honeywell
Batch (BAT) File Guidelines, Win7 and WinDeskWhile writing and running batch (BAT) files when working with rugged devices, you should follow somebest practices.
Accounting for PathWindows Unified Agent is a 32-bit application, so when trying to run scripts in a 64-bit machine, properredirections must be used to get access to the 64-bit folder or the registry hive.
There are two %windir%\System32 on a Windows x64 system.
n %windir%\System32 directory is for 64-bit applications. This directory contains a 64-bit cmd.exe.
n %windir%\SysWOW64 directory is for 32-bit applications. This directory contains a 32-bit cmd.exe.
Since Workspace ONE Intelligent Hub is a 32-bit application, it can access %windir%\System32 forrunning 64-bit applications by using %windir%\Sysnative in path.
Admin must use %windir%\Sysnative in script to access any 64-bit applications.
For example,
%windir%\Sysnative\manage-bde -on c: -skiphardwaretest
n manage-bde is a 64-bit application and it can be accessed only by providing proper path %windir%\Sysnative.
n Certutil is part of both folders (32-bit and 64-bit), so no need to give %windir%\Sysnative in the script.
Writing Scripts for RegistrySince Windows Unified Agent is a 32-bit application, it always creates a record or performs any action onWOW6432 Node.
On 64-bit Windows, HKLM\Software\Wow6432Node contains values used by 32-bit applications runningon the 64-bit system.
32-bit applications do not create records in HKLM\Software directly.
To write explicitly to a 64-bit hive, add the /reg:64 modifier to the end of your REG ADD command inscripts to create a record in the HKLM\Software registry path.
For example, REG ADD HKLM\Software\MyApp /reg:64
Product Provisioning
VMware, Inc. 126

General Instructionsn Running scripts in admin context when Standard User is logged in performs actions for Admin User.
For example,
Running a script in User context installs a certificate for a standard user in the Current user store.
Running a script in Admin context installs a certificate for an Admin in the Current user store.
n Path should be quoted while passing arguments to batch files.
For example,
"C:\Passing_Argument.bat" Hello World
n The BAT file extension must always be included in the file path. Omitting this extension causes thescript not to run. This causes a file not found error.
n It is always recommended to have file action as run while deploying batch files.
Product Provisioning
VMware, Inc. 127

Lookup Values 7A lookup value is a variable that represents a particular data element of a device, user, or admin accountin Workspace ONE UEM powered by AirWatch. Lookup values can be invaluable in completing a processor a form.
In several different text boxes in the Workspace ONE UEM console, you can add lookup values in placeof manually entered or static values. In most cases, lookup values function as a stand-in for a piece ofinformation you do not know or do not have access to.
For example, the Add Device screen is used to add a device to your fleet. One of the text boxes on thisscreen that can be completed with lookup values is the Expected Friendly Name.
The friendly name represents the device on many different screens in the UEM console including theDevice List View and the Details View. And while you can enter a static friendly name manually, you caninstead use lookup values to standardize the friendly name and make it a valuable identifier.
A common friendly name format can be constructed with the following lookup values.
{EnrollmentUser} {DeviceModel} {DeviceOperatingSystem} {DeviceSerialNumberLastFour}
If you enter the above in the Expected Friendly Name text box, it produces a friendly name that lookslike this on the Device List View.
jsmith iPad iOS GHKD
This friendly name instantly provides you with at least three useful pieces of information. And with the lastfour digits of the device serial number at the end, it is virtually guaranteed to be unique.
Data OverheadWhen used, lookup values do not add to the device's memory with an extra load. Lookup values are aconstruct of the UEM console itself, not something that is transferred to the device.
Static Strings Versus Lookup ValuesLookup values cannot be applied once a static string has been entered in a text box.
For example, assume that you have 100 devices to enroll. You add the first 50 devices using a manuallyentered static string for Expected Friendly Name. For the next 50 devices, you opt to use a lookup valuefor Expected Friendly Name instead. Those 100 devices, half with static friendly names and the otherhalf with lookup values, can coexist perfectly well. There is no issue with mixing and matching staticstrings and lookup values.
VMware, Inc. 128
However, you cannot return to the first 50 devices and replace the static string friendly name with alookup value.
Custom Lookup ValuesYou can use the Custom Attributes feature to make your own lookup values. You can then use thesecustom lookup values in the same manner as ordinary lookup values. For details, see Create CustomAttributes.
Lookup Values ListingTo reference a full listing of lookup values including the locations in Workspace ONE UEM from whichthey are accessed, see https://support.workspaceone.com/articles/115001663908.
Product Provisioning
VMware, Inc. 129