Product Information Guide Permaglass
24
1 Product Information Guide Permaglass
Transcript of Product Information Guide Permaglass

1
Product Information Guide
Permaglass

2
Table of Contents
Table of Contents ............................................................................................... 2
Introduction ........................................................................................................ 3
Window descriptions.......................................................................................... 4
Operation instructions ....................................................................................... 5
Maintenance and Care ...................................................................................... 7
Condensation .................................................................................................... 10
Installation ........................................................................................................ 11
General Installation Notes ........................................................................... 12
Fiberglass windows: ..................................................................................... 14
Service Procedure ............................................................................................ 20
Basic Terminology............................................................................................ 21
Warranty Card ................................................................................................. 24

3
Introduction Thank you for choosing Norwood as your window and door supplier. Our
commitment to both quality and service has made us one of the industry leaders
in the production of wood windows and doors.
For generations the skilled craftsmen at Norwood have been building high
quality wood windows and doors to withstand the harsh realities of rugged
North American winters. Today, the tradition continues with the complete line
of low-maintenance and high-performance products from Norwood.
This manual will help you Install, Maintain and Care for your new Norwood
Windows and Doors for many years of operation and beauty.

4
Window descriptions
Casement Window Awning Window
Single/Double Hung Glider Window

5
Operation instructions Casement and Awning windows:
To open, unlock the window by lifting the lock handle on the cam-lock. In the case of
awnings lift the locks on both sides. Turn the handle on the roto-gear clock-wise to open the
sash.
For windows casements 24” or less turn the roto-gear counter clock-wise to open.
To close, turn the handle on the roto-gear counter clock-wise until the sash closes snug
against the frame. Be careful not to over tighten the roto-gear as it may strip the hardware.
To lock the window, pull the lock handle on the cam-lock downward.
To remove the screen, pull up on the pull tabs on the screen, tilt the screen toward you from
the bottom and gently pull the screen out of it’s’ track. To install the screen reverse the
process.
Double Hung windows:
To open, disengage the lock or locks on top of the bottom sash. Gently lift the bottom sash
using the top rail of the bottom sash. To open the top sash gently pull down on the top rail of
the top sash.
To close, gently push the bottom sash down against bottom of window frame and push top
sash up against top of the frame. To lock, engage the locks on top of the bottom sash.
To remove the screen, open the bottom sash up half way and the top sash down half
way. Lift the screen latches up until the top side of the latch is at a 90o angle to the side
of the screen (repeat for all 4 screen latches). Using the screen pull located at the
bottom of the screen, gently lift the screen up and out of its track. To install, reverse
the process.
To tilt or remove the sash, lift the bottom sash up about 5” then pull the two tilt-in-keepers
(one on each side of the top rail of the sash) toward the center. Gently pull the sash inward to
tilt. Do not tilt the sash past a 45o angle unless you want to remove it. To remove the sash tilt
the sash down to a 90o angle (this will lock the sash shoes in place) and slowly lift one corner
up and away from the sash shoe, then pull the opposite corner out of its sash shoe. To
remove top sash lower half way down and follow the same steps used to removing the
bottom sash. To reinstall the sash, reverse the process starting with the top sash.
NOTE: Be very careful because sash can be very heavy.
6
Single Hung windows:
To open, disengage the lock or locks on top of the bottom sash. Gently lift the bottom sash using the top rail of the bottom sash.
To close, gently push the bottom sash down against bottom of window frame. To lock,
engage the locks on top of the bottom sash.
To remove the screen, open the bottom sash completely. Lift the screen latches up until
the top side of the latch is at a 90o angle to the side of the screen (repeat for all 4 screen
latches). Using the screen pull located at the bottom of the screen, gently lift the screen up and out of its track. To install reverse the process.
To tilt or remove the sash, lift the bottom sash up about 5” then pull the two Tilt-in-
Keepers (one on each side of the top rail of the sash) toward the center. Gently pull the
sash inward to tilt. Do not tilt the sash past a 45o angle unless you want to remove it. To
remove the sash tilt the sash down to a 90o angle (this will lock the sash shoes in place)
and slowly lift one corner up and away from the sash shoe, then pull the opposite corner
out of its sash shoe. To reinstall the sash, reverse the process.
NOTE: Be very careful because sash can be very heavy.
Glider windows:
To open disengage the lock or locks located on the center meet rail. Slide the sash in the opposite direction to open.
To close slide the sash until it is snug against the frame and re-engage the locks.
To remove the screen open the window lift the screen latches up until the top side of the
latch is at a 90o angle to the side of the screen). Using the screen pull located at the
bottom of the screen, gently lift the screen up and out of its track. To install, reverse the
process.

7
Maintenance and Care
This section of the manual will help you care for and maintain your Norwood Windows for
many trouble free years.
Before Installation:
Store windows and doors on a level surface in a dry, well-ventilated area.
Keep the windows and doors of the floor about 4 inches and cover them on the top
and bottom. This will protect them from water, dirt and abuse it will also allow air
circulation around the windows and doors.
Do not store windows and doors in direct sunlight. Windows and doors made from
woods such as Cherry and Mahogany will discolor if exposed to direct sunlight in an
unfinished state.
Store windows and doors in a temperature controlled building where temperature and
humidity can be controlled. Recommended humidity levels should be between 35 to
55% and 10 to 25 Deg Celsius.
Windows and doors, should always be handled with clean hands or while wearing
gloves.
DO NOT drag windows and doors they should always be lifted and carried when
being moved.
After Installation:
Glass:
The glass surfaces can be cleaned using a mild soap or vinegar based solution. The exterior
of the glass should be cleaned at lease twice a year (more in some cases depending on the
environmental conditions) and the interior cleaned as often as needed.
Caution: Avoid getting the cleaning solution on wood parts or the hardware as this may
cause staining on the wood and remove the grease from the operating parts of the
hardware.
Hardware:
Because of the wide range of environments that our products are installed, some cleaning and
lubrication is required. The hardware and tracks of your windows should be checked at least
once a year for a build-up of dirt and grime.

8
Cleaning:
Wipe the tracks and hardware using a mild soap solution.
Caution: Avoid using Vinegar, Citrus, Industrial and Abrasive cleaners on the
hardware because they can remove the corrosion resistant coatings from the hardware.
Lubrication:
After the hardware has been cleaned and dried, it must be lubricated. It is recommended that
lithium grease be used because of its waterproofness. Apply a light coating of grease to the
track, pivot points, and gears on the hardware.
Note: Avoid using petroleum based lubricants such as oil or petroleum jelly as it will
stay wet and attract more dirt.
Warning: Avoid getting any grease on the wood parts because it may cause staining and
damage to the surface.

9
Norcoat Flexacron Paint and Stain Finish
The Norcoat Flexacron coating is a premium quality, high performance finish and requires
minimal maintenance.
Light accumulation of dirt can be removed using a garden hose equipped with a soft bristle
brush. Heavier accumulations can be removed using a mild soap solution. For wet paint, tar
and caulking use kerosene or mineral spirits. DO NOT use stronger solvents or abrasive type
cleaners because they will damage the paint surface.
Mildew thrives on warmth and moisture that is most common near water such as the Great
Lakes, the coast and other large bodies of water. If you live in an area of high humidity you
should inspect your windows regularly for the presence of mildew and clean as needed,
however, because mildew is so adaptable it can flourish in almost any climate.
Cracks resulting from joint movement should be caulked with high quality caulking materials
such as Dow-734 silicone.
Minor nicks and scratches may be touched up with a matching Pittsburgh Paint 78-Line Sun-
Proof semi-gloss acrylic latex paint.

10
Condensation What is condensation?
Condensation happens when there is too much moisture in the air at a certain temperature. When the
warmer moist air comes in contact with a cooler surface it reaches its dew point causing “sweat” or
condensation on the cooler surface.
There are several interior surfaces where condensation can appear in your home; cold water pipes,
toilet tanks, door hinges, and windows. These surfaces usually have a cooler surface temperature
than the air around them and therefore when the warmer moist air comes in contact with them
condensation (sweating) occurs.
A good example of condensation is the sweat on the bathroom mirror after a shower. Because the
mirror has a cooler surface temperature than other surfaces in the bathroom the moisture in the air
from the shower collects and forms condensation on the surface of the mirror. If the exhaust fan is
running during the shower the amount of condensation on the mirror is significantly reduced.
The table below shows recommended relative humilities for different outside temperatures. The table
shows that as the outside temperature drops so should the relative humidity within the home to
minimize condensation.
Outside air temperature in
degrees C
Relative Humidity with inside air
temperature of 20 degrees C
-30 or below not over 15%
-30 to -24 not over 20%
-18 to -12 not over 25%
-12 to -6 not over 30%
-6 to 0 not over 40%
Sources of humidity in the home:
Humidity is released in the home through normal daily activities such as:
Cooking
Washing machines, dryers and dishwashers
Showering
Watering house plants etc.
Ways to help control humidity:
Run exhaust fans while cooking, bathing or cleaning.
Have all fans vented to the outside.
Vent attic and crawl spaces.
Open a door or window for a short time to allow moisture to escape.
Open blinds and drapes during the day and during the night raise the blinds at least 5” to
allow for air flow against the glass

11
Installation
Before you begin please read and understand these installation instructions. The following
installation instructions are recommended by Norwood and failure to follow them may void
the warranty.
The following installation instructions are the minimum required by Norwood. If local
building codes exceed these installation instructions then the local building codes must
be followed.
Because of newer construction methods and the increasing need for energy efficiency in our
homes, this installation method seals the window to the exterior weather barrier. A sill pan is
used to capture any water that may collect under the window and redirects it to the outside
preventing it from entering the wall cavity.
These installation instructions are to be used in the installation of flat windows only. For any
other window type such as bays and bows consult your local Norwood dealer.
Materials and Tools required for Installation.
Materials:
#10 x 2” corrosion resistant pan head screws.
Cedar shims or spacers
Galvanized drip cap
High quality exterior grade silicone sealant.
Low expansion insulating foam or batt insulation. Do Not use high expansion
foams.
6” wide self adhesive flashing.
Building wrap
Thin, rigid and bendable sheet metal for sill pan or pre-manufactured sill pan such as
Sure Sill TM .
Tools:
Hammer
Level
Tape Measure
Square
Metal cutting shears
Utility knife

12
General Installation Notes Step 1:
Check to ensure that the window is the size, color, configuration and grill pattern as ordered.
Examine the windows and doors for any shipping damage such as scuffed paint, broken glass,
broken hardware or torn screens.
If there are any discrepancies, DO NOT INSTALL THE UNIT. Please contact your local Norwood
dealer for further instructions.
Unpack the window:
Remove all cardboard wrapping and shipping blocks.
Remove all strapping.
Remove any dirt and dust from all trims with a clean cloth; this is to ensure that the silicone
and flashing will stick.
Step 2:
Check the rough opening (RO).
Make sure that the opening is level, square and plumb.
Measure the opening, the opening should be ½” larger than the window in both height and
width. For larger windows measure in several places to ensure that the studs or header is not
bowed.
Note: If a pre-manufactured sill pan is being used, the height of the sill pan must be added to
the height of the R.O. Any problems found with the opening should be corrected before you
continue.
Step 3:
Cutting the weather resistant barrier:
Start by cutting along the top of the weather
barrier (tight to the header) from one side to
the other.
At the bottom of the opening cut an inverted
“Y” in the weather barrier. Start at each
bottom corner and cut at a 45O angle toward
the center. From the
Center where the 2 angle cuts meet cut
straight up to the header.
Fold the two sides and bottom of the
weather barrier over the rough opening and
fasten using staples to the interior of the opening. DO NOT FASTEN THE TOP.
At the top of the opening cut two 6” 45O angle cuts in the weather barrier. Make the cuts up
and away from the opening.
Temporarily staple the top flap of weather barrier up and away from the opening,
exposing the wall sheathing.

13
Step 4:
Installing the sill pan:
How to make the sill pan:
The sill pan is made from thin, rigid and bendable, corrosion resistant sheet metal.
Measure the width of rough opening and cut the sheet metal 1” longer.
Measure the thickness of the wall and cut the sheet metal 3” wider.
Measure the thickness of the wall and add ½”. Make a line on the length of the
sheet metal equal to that measurement. From that line cut in ½” from each end.
On the wider side of the sheet metal bend the side and two ends (where you made
the ½” cuts) up until they are at 90O angle. Fold the corners toward the outside of
the bend.
Fold the narrower side of the sheet metal in the opposite direction at a
90O angle.
Place sill pan in the opening for a “dry fit”.
If sill is not level place shims under the sill pan (not the window) to level it.
Remove the sill pan and put two 3/8” beads of silicone on the sill.
Put 3/8” bead of silicone on the inside of the downward lip of the sill pan.
Place sill pan back into opening and press into silicone to ensure a good fit.
Fasten sill pan to framing using screws 16” on center.
Cover the heads of the screws with silicone.
Note: If a pre-manufactured sill pan is being used, install it in accordance to
manufacturer’s instructions.

14
Fiberglass windows:
This is at least a two person step, one person outside holding the window and one
person inside to fasten the window to the framing.
- For operating windows ensure the window is closed and locked.
- Put a continuous 1/2” bead of silicone around the sides and top of the window behind
nailing fin. DO NOT silicone the bottom.
- Place window in the opening.
- Center window in the opening.
- Level and Plumb the window using shims.
- Place shims 1” from top and bottom and every 16” around the window.
- For Double and Single hung windows shims must be placed at the meet rail.
- Where multiple windows are joined, place shims under joins.
Secure the window using one of the methods below:
Nailing Fin
- Secure window through the nailing fin using screws or nails.
- Check any operating window for proper operation. If window is not operating properly,
adjustments may be required to the shims (may be over shimmed).
- Silicone between window frame and exterior finish using exterior grade silicone.

15
Installation Strap Remove marked screw from side of window and secure installation strap to window jamb.
Do not over tighten screw.
Secure window to rough stud opening using #8 x 2 ½” screws.
Check any operating window for proper operation. If window is not operating properly,
adjustments may be required to the shims (may be over shimmed).
Silicone between window frame and exterior finish using exterior grade silicone.
Through Jamb
- Secure window with screws through predrilled holes in window jamb.
- Check any operating window for proper operation. If window is not operating properly,
adjustments may be required to the shims (may be over shimmed).
- Silicone between window frame and exterior finish using exterior grade silicone.
16
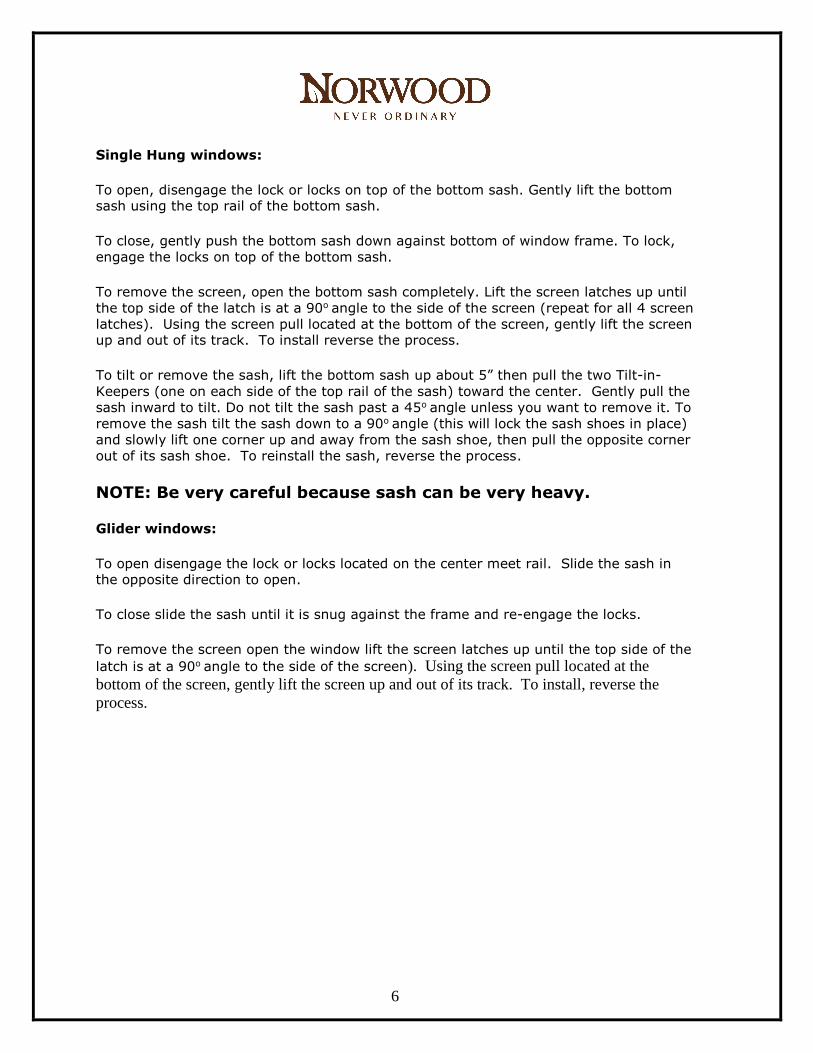
Step 6:
Installing drip cap:
Cut galvanized drip cap ¼” longer than width of window.
Apply ¼” bead of silicone to top of the exterior trim of the window and the wall.
Center drip cap over window on top of exterior trim and nail in place. Place nails in
the exterior wall sheathing not through the top of exterior trim. Put silicone on the
heads of the nails.
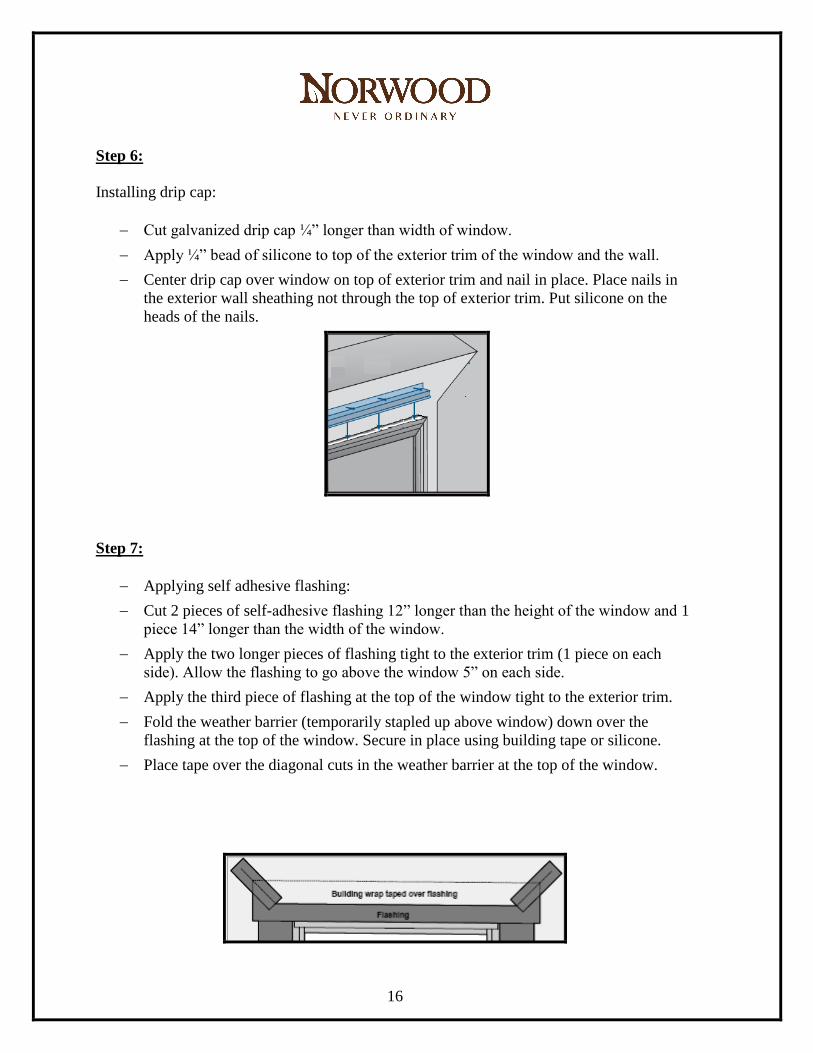
Step 7:
Applying self adhesive flashing:
Cut 2 pieces of self-adhesive flashing 12” longer than the height of the window and 1
piece 14” longer than the width of the window.
Apply the two longer pieces of flashing tight to the exterior trim (1 piece on each
side). Allow the flashing to go above the window 5” on each side.
Apply the third piece of flashing at the top of the window tight to the exterior trim.
Fold the weather barrier (temporarily stapled up above window) down over the
flashing at the top of the window. Secure in place using building tape or silicone.
Place tape over the diagonal cuts in the weather barrier at the top of the window.

17
Step 8:
Finishing the installation:
You could use either fiberglass insulation or low/minimal expansion foam to insulate
the window.
Note: DO NOT pack fiberglass insulation too tight. FOLLOW ALL manufacturer’s
installation instruction on any expanding foam used.
After the exterior finish is complete silicone the sides and top of the window.

18
Fiberglass Window Warranty
This document sets out the various warranties which Norwood gives to the original purchaser of products
manufactured by Norwood. This warranty is non transferable and is valid to the original owner of the building
where the product is installed.
Norwood will provide to the original owner a fifteen (15) year warranty that Fiberglass components will not
degrade, bow or twist and two (2) against defect in workmanship that renders the product unserviceable. This
warranty is limited to the replacement of the defective component only.
This warranty does not cover:
Product which has been physically damaged during installation or delivery.
Insulated Glass
Norwood, as manufacturer, warrants all insulated glass from seal failure or fogging between the glass panes, for
a ten (10) year period from the date of manufacture.
Norwood warrants that all glass units be free from stress cracks for a period of two (2) years from the date of
manufacture.
Should there be a failure of the air seal within the limited warranty period, Norwood shall, at their discretion:
Either replace the defective insulated glass, or a sash glazed with insulated glass, at no charge within a
period of two (2) years from date of purchase.
Years three (3) to ten (10) from date of purchase, Norwood shall, at its own discretion, provide a
replacement piece of insulated glass, or a sash glazed with insulated glass, delivered to the original point of
purchase. The customer will be responsible for installation and replacement of the glass
Norwood will not be responsible for repainting, refinishing, or similar activities involved in the
installation and replacement of glass at any time.
This warranty does not cover:
Cracked or broken glass or damage to product resulting from accident, abusive handling or misuse,
shattering due to heat build-up or any cause beyond the control of Norwood such as fire, flood and any act
of nature.
Minor glass imperfections that do not affect normal vision or product performance. Normal manufacturing
defects considered as acceptable by the Canadian industry standard are imperfections such as scratches that
are invisible to the naked eye more that one meter from the glass.
Hardware, Weather-stripping and Sealants, Etc.
Norwood provides a limited warranty against defects or error in workmanship for a five (5) year period from
the date of manufacture.
These products are generally manufactured by others and provided to us as finished items to incorporate into
our products. Within that time period Norwood will provide replacement materials at no charge. The customer
will be responsible for installation of these materials.
Norwood will not, however, be responsible for the installation or any refinishing work associated with
replacement of these parts.
This warranty does not cover:
Any hardware or weatherstripping that has been painted or coated with any substance that could interfere
with the operation of the part.
Normal wear or tear and natural weathering on surfaces.
Damage to surfaces caused by chemicals used for such activities as brick washing.
Abuse by on site construction.

19
Norwood factory applied paints:
Nor coat coatings, as supplied by Norwood are guaranteed not to crack, peel or blister for a period of fifteen
(15) years from date of application when used under normal atmospheric conditions.
Norwood’s liability under this warranty will be limited to all cost related to refinishing or replacing the
defective part. Norwood will, in all instances, have the option of determining which of the above shall be
utilized to fulfill this obligation as well as what materials will be used in the event of refinishing
Claims under this warranty must be made to Norwood, in writing, within thirty (30) days of discovering a
defective unit.
This warranty does not cover:
Product which has been physically damaged during installation or delivery.
Damage to the finish system induced by excessive movement of the substrate.
Damaged areas that have been improperly touched-up or touched-up by materials that were not approved
by Norwood.
Product that has been exposed to chemicals or other corrosive substance or corrosive environments.
This warranty is limited to defects in workmanship and materials and does not cover damage or defects
caused by or arising from:
1. Damage occurring in transit (by a carrier other than Norwood) after the item leaves the Norwood
plant, or on-site damage occurring during construction through vandalism, or from any other cause
beyond Norwood’s control.
2. Improper handling or installation by the builder or customer, or the failure of the builder or the
customer to follow Norwood’s instructions.
3. Installation of the window in its opening in a manner that is not exactly plumb, square and true and
adequately shimmed as described in the installation instructions supplied with each product.
4. The unit is being subjected to stresses resulting from localized application of heat which causes
excessive temperature differential over the glass surface or edges, or if strain is applied to the unit by
movement of the building, or if provisions have not been made in accordance with sound practice for
adequate expansion or contraction of framing members.
5. Claims involving the improper installation and/or finishing where such work was not originally
performed by Norwood.
6. Labor to install any replacement warranted parts is covered for 2 years at Norwood’s discretion.
7. Any sized units having dimensions greater than those listed in Norwood’s catalog.
8. Discoloration or weathering of hardware finishes.
9. Air or water infiltration or damage on site mulled product.
Dealers should note that the Norwood will invoice replacement parts at regular price, and in turn issue full
credit when defective parts has been returned for inspection for warranty approval.
In consideration of the above express warranties extended by Norwood, all other warranties or
conditions, either expressed or implied whether arising by statute or otherwise, including warranties of
merchantability and fitness for a particular purpose is excluded.
In no event shall Norwood be liable for indirect or consequential damages such as the cost of repairing or
replacing property damage as a result of product failure.

20
Service Procedure
Norwood Windows is committed to its product long after it leaves the factory. If you
require service on your product please follow the procedure listed below.
1. Read your warranty before you make a warranty claim.
2. Contact the dealer where you purchased your product.
Your dealer is the best source for your service assistance. They have the experience and ability to solve many of your service issues.
In the event that the dealer is unable to solve the problem:
3. An After Sales Service Report should be filled out by the dealer, and sent to
Norwood Windows. This report should include the dealers name and address, the
Customers name and address, date purchased, original order and line numbers, the
nature of the compliant and digital photos (where possible).
After all the relevant information is received, Norwood’s service coordinator will evaluate
the claim and inform the dealer of any corrective action that will be taken.
Note: Prior written approval will be required before service work is performed
by outside contractors or dealers and inside technicians with transferable cost
to Norwood. Norwood reserves the right to charge a fee for on-site inspections
if required.

21
Basic Terminology
Argon: An inert, colorless, and harmless gas used instead of air in sealed spaces between panes of glass in
insulating glass units to increase insulation. Argon is less conductive to heat than air.
Awning Window: A type of operable window with a top-hinged sash that swings outward at
the bottom.
Balance: Is a mechanical device, normally spring loaded, used in hung windows to counterbalance the weight
of the sash during opening and closing.
Bay window: A composite of three windows, usually made up of a large center unit and two
flanking units that return at 30- or 45-degree angles to the wall. A bay projects from the wall
of the structure
Bow window: A composite of four or more window units in a radial or “bow” formation, offering a gently
curved contour. Bow windows also project outward from the walls of the structure.
Brickmold: A type of external casing, which frames windows and doors.
Casement: A type of window with a side-hinged sash that opens or swings like a door.
Caulking: Sealants used to seal fixed and movable construction joints and prevent infiltration.
Double-Hung Window: A window unit that has two operable sashes which move vertically in the frame. Two
vertically sliding sash which by-pass each other in a single frame. Sashes typically fit within vinyl balances and
tilt out and remove for safe, easy cleaning.
Dual pane: Two panes of glass with a single airspace, held together by an edge spacer.
Fixed Unit: A stationary window or door that does not open.
Frame: The enclosure in which window sash or door panels are mounted. Outside members of a window unit
which enclose the sashes. Composed of side jambs, head jamb and sill.
Glazing: Glass in a window or door; the act or process of fitting glass or panels into the sash or frame of the
window
Head: The main horizontal member forming the top of the window or door frame.
Hopper: A window unit in which the top of the sash swings inward.
Jamb: The main vertical members forming the sides of a window or door frame. Side jambs are the vertical
pieces of a window frame. The head jamb is the horizontal piece across the top. The vertical member of a
window frame.
Patio Doors: Sliding glass doors, often used for access to a deck or terrace.

22
Picture Window: A large stationary (non-ventilating) window which is designed for a maximum view without
obstruction.
Rail: The top and bottom horizontal members of the framework of a window sash or door panel, a horizontal
sash member.
Sash: The inner frame which holds glass in operable and fixed window units
Single-Hung: A double-hung type of window in which the top sash is fixed or inoperable.
Slider: A type of window with one fixed sash, and one that slides sideways --good where outside clearance is
limited.
Weather Stripping: Thin sections of material used to prevent air leakage around operable windows and doors.

23

24
Warranty Card
Please complete and mail this Warranty Card within 90 days after receiving your windows
and doors to register your Norwood Warranty.
Owners Name:_______________________
Owners Address:_______________________________________________
City:_______________________ State:____________________Zip:______________
Purchase Date:___________________________Dealer:__________________ Warranty Department
Norwood Windows
249 Parker Rd.
Scoudouc, NB
E4P 3P8