
Product features and decoration may vary from the … Hood Latch 2 5 12 Volt Battery 1 6 Battery...
31
Owner’s Manual with Assembly Instructions Please read this manual and save it with your original sales receipt. For Model 74020 Tools needed for assembly: Phillips Screwdriver, Hammer, and Safety Scissors (not included). Use only with a Power Wheels ® 12 Volt Lead-acid Rechargeable Battery and a Power Wheels ® 12 Volt Charger with Type “12V” Connector (included). Product features and decoration may vary from the picture above. Jeep Wrangler ®
Transcript of Product features and decoration may vary from the … Hood Latch 2 5 12 Volt Battery 1 6 Battery...

Owner’s Manual with Assembly InstructionsPlease read this manual and save it with your original sales receipt.
For Model 74020
Tools needed for assembly: Phillips Screwdriver, Hammer, and Safety Scissors (not included).Use only with a Power Wheels® 12 Volt Lead-acid Rechargeable Battery and
a Power Wheels® 12 Volt Charger with Type “12V” Connector (included).
Product features and decoration may vary from the picture above.
Jeep Wrangler®

2
Table of Contents
Important Information
A Important Information . . . . . . . . . . . . . . . . . . . . . . . . . . . . . . . . . . . . . . . . . . . . . . . . . . . . . . . . . . . . . . . . . . . . .2B Warnings . . . . . . . . . . . . . . . . . . . . . . . . . . . . . . . . . . . . . . . . . . . . . . . . . . . . . . . . . . . . . . . . . . . . . . . . . . . . . .3C Parts . . . . . . . . . . . . . . . . . . . . . . . . . . . . . . . . . . . . . . . . . . . . . . . . . . . . . . . . . . . . . . . . . . . . . . . . . . . . . . . . .4D Parts Diagram . . . . . . . . . . . . . . . . . . . . . . . . . . . . . . . . . . . . . . . . . . . . . . . . . . . . . . . . . . . . . . . . . . . . . . . . . . .6E Battery Charging . . . . . . . . . . . . . . . . . . . . . . . . . . . . . . . . . . . . . . . . . . . . . . . . . . . . . . . . . . . . . . . . . . . . . . . . .8F Assembly . . . . . . . . . . . . . . . . . . . . . . . . . . . . . . . . . . . . . . . . . . . . . . . . . . . . . . . . . . . . . . . . . . . . . . . . . . . . .10G Label Decoration . . . . . . . . . . . . . . . . . . . . . . . . . . . . . . . . . . . . . . . . . . . . . . . . . . . . . . . . . . . . . . . . . . . . . . . .17H Battery Installation . . . . . . . . . . . . . . . . . . . . . . . . . . . . . . . . . . . . . . . . . . . . . . . . . . . . . . . . . . . . . . . . . . . . . .18I Battery Care and Disposal . . . . . . . . . . . . . . . . . . . . . . . . . . . . . . . . . . . . . . . . . . . . . . . . . . . . . . . . . . . . . . . .19J Rules for Safe Driving . . . . . . . . . . . . . . . . . . . . . . . . . . . . . . . . . . . . . . . . . . . . . . . . . . . . . . . . . . . . . . . . . . . .20K How to Operate Your Vehicle . . . . . . . . . . . . . . . . . . . . . . . . . . . . . . . . . . . . . . . . . . . . . . . . . . . . . . . . . . . . . . .21L Caring for Your Vehicle . . . . . . . . . . . . . . . . . . . . . . . . . . . . . . . . . . . . . . . . . . . . . . . . . . . . . . . . . . . . . . . . . . .22M Problems and Solutions Guide . . . . . . . . . . . . . . . . . . . . . . . . . . . . . . . . . . . . . . . . . . . . . . . . . . . . . . . . . . . . .23N Limited Warranty . . . . . . . . . . . . . . . . . . . . . . . . . . . . . . . . . . . . . . . . . . . . . . . . . . . . . . . . . . . . . . . . . . . . . . . .27O Authorized Service Centers . . . . . . . . . . . . . . . . . . . . . . . . . . . . . . . . . . . . . . . . . . . . . . . . . . . . . . . . . . . . . . . .27
• Your new vehicle requires adult assembly. Please setaside at least 45 minutes for assembly.
• You must charge your battery for 18 - 30 hours before you use your vehicle for the first time. Werecommend that you start charging your battery beforebeginning assembly. Please see Battery Chargingbeginning on page 8 for detailed instructions.
• Read this manual carefully for important safetyinformation and operating instructions before using your vehicle.
• This vehicle is designed for use on grass, asphalt orother hard surfaces, on hills or flat terrain, by children 3 years of age and older.
• This vehicle has adjustable play seat belts. Pleasenote that the adjustable seat belts are designed to be a play feature only and do not function as protectivesafety restraints.
• To prevent damaging the motors and gears, do not towanything behind the vehicle or overload it. Do not exceedthe maximum weight capacity of 130 lb. (60 kg).
• For safety reasons, your vehicle has been pre-set so that it will only operate at low speed. You must removethe high speed lock-out screw to allow operation ofthe vehicle at high speed. Please see page 22 fordetailed instructions.
A• If you have any questions about your Power Wheels®
vehicle, please call our toll-free service lines at 1-800-348-0751 from 8 AM to 5 PM (EST) Mondaythrough Friday. Trained customer service representativesare available to take your call in English or French.Habla Español? Si usted tiene alguna pregunta ó necesita asistencia llame gratis 1-800-348-0755 para losEstados Unidos. Tenemos representantes que hablanespañol para atender su llamada.
• For your convenience, Power Wheels® maintains anAuthorized Service Center Network with more than 400 authorized service centers nationwide. Our authorized service centers will repair or replace partsunder warranty at no extra charge, and can perform non-warranty repairs for a minimal charge. Please seethe Authorized Service Center list beginning on page 27to find the authorized service center nearest you, or call 1-800-348-0751.
• Please complete and return the enclosed RegistrationCard today, or call 1-800-348-0751 to register your vehicle by phone.

3
WARNING• Children can be harmed by small parts, sharp edges and sharp points in the vehicle’s
unassembled state, or by electrical items. Care should be taken in unpacking and assemblyof the vehicle. Children should not handle parts, including the battery, or help in assembly ofthe vehicle.
• Keep small parts and plastic bags out of children’s reach. Dispose of plastic bags properly.• Adult supervision is required. Children do not have the judgement necessary to avoid many
accidents. Be sure that children operating this vehicle can do so safely and that they aresupervised at all times.
• Never use near steps, driveways, steep inclines, roadways, alleys, swimming pool areas orother bodies of water.
• Always wear shoes or sneakers when operating this vehicle.• Never allow more than two riders; one driver and one passenger.• The riders should sit on the seat when the vehicle is in operation.• Hot motors. Handle carefully.• Never alter this vehicle or its electrical system in any way. Alterations could cause a fire
resulting in injury and could also ruin the electrical system.• Use of the wrong type battery or charger could cause a fire or explosion, resulting in
serious injury.• Use of Power Wheels® components in products other than Power Wheels® vehicles could
cause overheating, fire or explosion.
• The battery must be handled by adults only. The battery is heavy and contains sulfuric acid(electrolyte). Dropping the battery could result in serious injury.
• Read the cautions on the back panel of the battery.
• Never allow children to charge the battery. Battery charging must be done by adults only.A child could be injured by the electricity involved in charging the battery.
• Examine the battery, charger and their connectors for excessive wear or damage each timeyou charge the battery. If damage or excessive wear is detected, do not use the vehicle untilyou have replaced the worn or damaged part as it could possibly cause a fire resulting in injury.
WarningsB
CAUTION• This package contains small parts. Adult assembly is required.• Use the charger in dry locations only.

PartsC
4
• If you experience a problem with this product, or are missing a part, please call us at 1-800-348-0751, rather thanreturn this product to the store.
• Please identify all parts before assembly and save all packaging material until assembly is complete to ensure that noparts are discarded.
• Metal parts have been coated with a lubricant to protect them during shipment. Wipe all metal parts with a paper towelto remove any excess lubricant.
Steering Wheel Cap
Microphone
Gas Cap
Short Seat Belt Strap - 2
Small Parts Bag
Taillight Housing SetTaillight Lens Set
12 Volt Charger
Long Seat Belt Strap
Lens Guard - 2Headlight Lens - 2Battery Retainer
12-VOLTCHARGER
12 Volt Battery
Pb
Light Cover – 2
KCTM Light Rack, Rear
KCTM Light Rack, Front
Windshield Bracket - 2Windshield
Hinge Pin - 2

5
Parts
Knob Plate
Hood Latch – 2 Dashboard Knob – 2
Key Assembly
#8 x 1" Screw – 11
#10 x 1" Screw – 2
#6 x 11/2" Screw – 4
Sport Bar
Not Shown: Label Sheet, Literature Bag
Steering Column
.354 Cap Nut – 3* All Screws Shown Actual Size
Vehicle Body
DashHood
Seat
*For your convenience, an extra .354 cap nut has been included.
Steering Wheel
#8 x 11/4" Screw – 10
Sport Bar Support - 2
Sport Bar Bracket Set
11/2" x 1/4" Machine Screw - 2
#10 x 1/2" Screw – 2
Windshield (Front Half)
Windshield (Back Half)

6
Parts DiagramD
1
2
3
4
6
5
10
18
17 19
33
3131
30
25
27
26
34
14
13
13
12
89
16
11
33
24
7
23
22
36
32
32
35
10
10
3
37
28
29
15
15
20
21
37
10
38
7
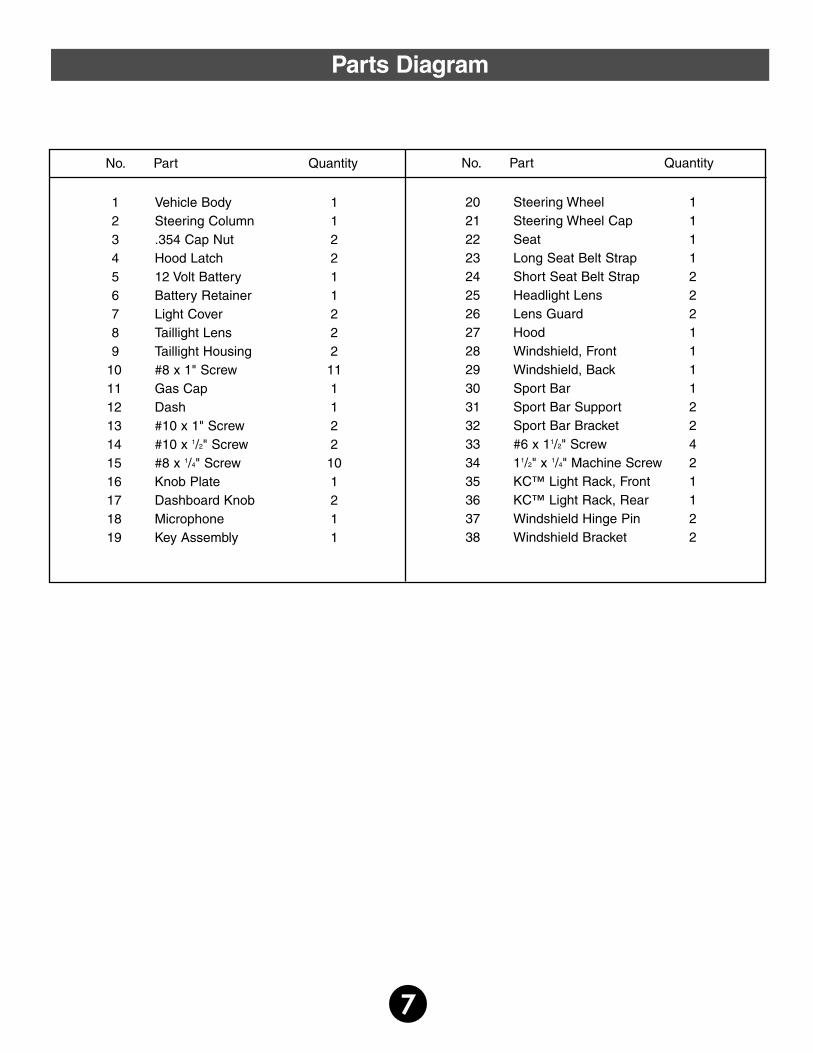
1 Vehicle Body 12 Steering Column 13 .354 Cap Nut 24 Hood Latch 25 12 Volt Battery 16 Battery Retainer 17 Light Cover 28 Taillight Lens 29 Taillight Housing 2
10 #8 x 1" Screw 1111 Gas Cap 112 Dash 113 #10 x 1" Screw 214 #10 x 1/2" Screw 215 #8 x 1/4" Screw 1016 Knob Plate 117 Dashboard Knob 218 Microphone 119 Key Assembly 1
20 Steering Wheel 121 Steering Wheel Cap 122 Seat 123 Long Seat Belt Strap 124 Short Seat Belt Strap 225 Headlight Lens 226 Lens Guard 227 Hood 128 Windshield, Front 129 Windshield, Back 130 Sport Bar 131 Sport Bar Support 232 Sport Bar Bracket 233 #6 x 11/2" Screw 434 11/2" x 1/4" Machine Screw 235 KC™ Light Rack, Front 136 KC™ Light Rack, Rear 137 Windshield Hinge Pin 238 Windshield Bracket 2
Parts Diagram
No. Part QuantityNo. Part Quantity

CAUTIONUse the charger in dry locations only.
Battery ChargingEWARNING
• The battery must be handled by adultsonly. The battery is heavy and containssulfuric acid (electrolyte). Dropping thebattery could result in serious injury.
• Never allow children to charge the battery.Battery charging must be done by adultsonly. A child could be injured by theelectricity involved in charging the battery.
• Use of the wrong type battery or chargercould cause a fire or explosion, resultingin serious injury.
• Use of Power Wheels® components inproducts other than Power Wheels®
vehicles could cause overheating, fire or explosion.
• Read the cautions on the back panel ofthe battery.
• Examine the battery, charger and theirconnectors for excessive wear or damageeach time you charge the battery. Ifdamage or excessive wear is detected, donot use the charger or the vehicle until you have replaced the worn ordamaged part.
• Never alter this vehicle or its electricalsystem in any way. Alterations couldcause a fire resulting in injury and couldalso ruin the electrical system.
8
About Thermal FusesYour Power Wheels® 12 volt battery is equipped with abuilt-in thermal fuse. The thermal fuse is a self-resettingsafety device which automatically “trips” and shuts downoperation of the vehicle if the vehicle is overloaded or thedriving conditions too severe. Once a fuse has “tripped”, itwill automatically reset itself after approximately 25seconds and allow the vehicle to resume normaloperations. To avoid repeated automatic shutdowns, donot overload the vehicle by exceeding the 130 lb.maximum weight capacity or by towing anything behindthe vehicle. Avoid severe driving conditions, such asdriving up very steep slopes or running into fixed objects,which can cause the wheels to stop spinning while poweris still being supplied to the motors. Make sure your childstops the vehicle before switching speeds or direction.
If a thermal fuse in a battery continually trips undernormal driving conditions, please contact your local Power Wheels® Authorized Service Center. For thelocation of the Authorized Service Center nearest to you,see page 27.

Battery Charging
Pb
• Plug the charger connector into the battery .• Plug the charger into a standard 120 volt wall outlet .Note: If power flow to the wall outlet is controlled by aswitch, make sure the switch is “ON”.• Before first-time use, charge the battery for at least 18
hours. Never charge the battery longer than 30 hours.• Recharge the battery for at least 14 hours after each
use of your vehicle. Do not charge the battery longer than 30 hours.
• Once the battery is charged, pull firmly on the chargerconnector to disconnect it from the battery. Unplug thecharger from the wall outlet. The battery is now ready tobe installed in your vehicle. Please see the BatteryInstallation section on page 18 for detailed instructions oninstalling your battery. If your battery is already installed inyour vehicle, simply re-connect the motor harnessconnector to the battery and lower and fasten the hood.
11 211 1
Battery
ChargerConnector
9
Important Notes• Your new battery must be charged for at least 18 hours
before you use it in your vehicle for the first time.• You do not need to remove the battery from your
vehicle to recharge it.• The battery must be upright while charging.• The charger is not a toy.• Do not short circuit the battery.• We recommend that you start charging your battery
before beginning assembly of your new vehicle.• Before charging the battery, examine the battery case for
cracks and other damage which may cause sulfuric acid(electrolyte) to leak during the charging process. Ifdamage is detected, do not charge the battery or use itin your vehicle. Battery acid is very corrosive and cancause severe damage to surfaces it contacts.
• Do not charge the battery on a surface which could bedamaged by the acid contained inside the battery. Takeprecautions to protect the surface on which you chargeyour battery.
• Use only a Power Wheels® 12 volt charger with type“12V” connector (120 VAC 60 Hz 28W with an output of12 VDC 1200mA) to charge your Power Wheels®
rechargeable 12 volt battery.
11 1
11 2
HI LO KC
COOLHEAT
Dash View
30
13
3
6
12
4
11
5
25
16
244
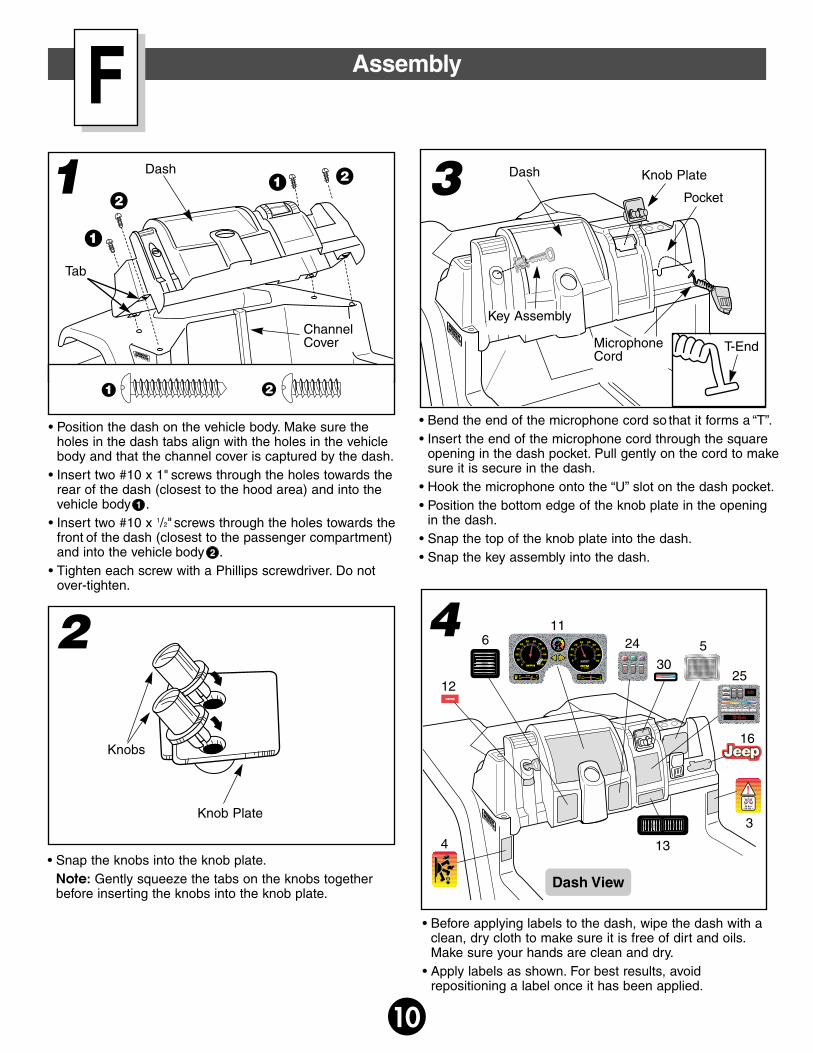
• Before applying labels to the dash, wipe the dash with aclean, dry cloth to make sure it is free of dirt and oils.Make sure your hands are clean and dry.
• Apply labels as shown. For best results, avoidrepositioning a label once it has been applied.
• Position the dash on the vehicle body. Make sure theholes in the dash tabs align with the holes in the vehiclebody and that the channel cover is captured by the dash.
• Insert two #10 x 1" screws through the holes towards therear of the dash (closest to the hood area) and into thevehicle body .
• Insert two #10 x 1/2" screws through the holes towards thefront of the dash (closest to the passenger compartment)and into the vehicle body .
• Tighten each screw with a Phillips screwdriver. Do notover-tighten.
11 2
11 1
AssemblyF1
2
3
10
• Snap the knobs into the knob plate.Note: Gently squeeze the tabs on the knobs togetherbefore inserting the knobs into the knob plate.
Knob Plate
Knobs
Dash Knob Plate
Key Assembly
MicrophoneCord
• Bend the end of the microphone cord so that it forms a “T”.• Insert the end of the microphone cord through the square
opening in the dash pocket. Pull gently on the cord to makesure it is secure in the dash.
• Hook the microphone onto the “U” slot on the dash pocket.• Position the bottom edge of the knob plate in the opening
in the dash.• Snap the top of the knob plate into the dash.• Snap the key assembly into the dash.
T-End
21
1 2
1
2
Dash
ChannelCover
Tab

Assembly
6
7
11
• Insert the end of the steering column through the hole inthe steering rod.
• Fit a cap nut onto the end of the steering column.• While supporting the steering column, tap the cap nut
with a hammer to secure it on the steering column.Helpful Hint! You may want the help of another person to support the steering column while you tap the cap nutwith the hammer.
Steering Rod
Cap Nut
End of Steering Column
Bottom View
• Turn the vehicle body upright.• Position the steering wheel so that the spokes form a
“Y” as shown. The tab on the steering wheel stemshould face up.
• Fit the steering wheel onto the steering column.• Fit a cap nut onto the end of the steering column.• Tap the cap nut with a hammer to secure it on the
steering column.Helpful Hint! You may want the help of another person to support the steering column while you tap the cap nut with the hammer.
Steering Wheel
Cap Nut
Steering Column
“UP”
Tab5
SteeringColumn
Hole
Bottom View
• Wipe the steering column with a paper towel to removeany excess lubricant.
• Turn the vehicle body on its side.• Insert the straight end of the steering column up through
the hole in the vehicle body wall and out through thehole in the dash.
8 Steering Wheel
• Fit the steering wheel cap into the center of the steeringwheel with the screw holes aligned.
• Insert two #8 x 1" screws as shown.• Tighten the screws with a Phillips screwdriver. Do not
over-tighten.
SteeringWheelCap

Assembly
12
• Fit the lens tabs on the back of a lens assembly into theheadlight slots in the grille.
• Press firmly to snap the lens assembly into the grille.• Repeat this procedure to snap the other lens assembly
into the grille.
Grille
Tabs
Slots
10
• Fit the wide notch in the side of a headlight lens underthe wide tab on a lens guard.
• Press firmly on the inside of the headlight lens to snap itinto the lens guard.
• Repeat this procedure to assemble the other headlightlens to the remaining lens guard.
Lens
Wide NotchWide Tab
Lens Guard
9
• Insert a hood latch into one of the holes in the vehiclebody, near the hood area.
• Twist the base of the hood latch 1/4 turn to secure it inthe vehicle body.
• Repeat this procedure on the other side of the hoodarea to attach the other hood latch to the vehicle body.
Hood Latch
Hole
11
HoodLatch
Hole
Hood
Tabs
• Position the hood over the front of the vehicle body as shown.
• Insert the tabs on the hood into the slots in the vehicle body.
• Close the hood.
Slot Slot
12

Assembly
13
14
15
16
• Fit the screw pegs on the windshield brackets into theholes in the top surface of the dash. Press firmly to fitthe lip on each windshield bracket into the slot in the topof the dash.
• Insert two #8 x 1" screws into each windshield bracket.• Tighten the screws with a Phillips screwdriver. Do not
over-tighten.
WindshieldBrackets
#8 x 1" Screws #8 x 1" Screws13
Lip ofBracket
Slot
• Align the slots in the front half of the windshield framewith the tabs on the windshield brackets.
• Fit the front half of the windshield frame onto thewindshield brackets as shown.
Windshield Frame -Front Half
Slots
Tabs
Hinge Pin
WindshieldBracket
WindshieldFrame -Front Half
• Rotate the front half of the windshield frame down so itlays flat on the vehicle body.
• Working from the center of the vehicle, insert a hinge pinthrough the holes in the windshield frame and the holesin a windshield bracket, as shown.
• Repeat this procedure to secure the front half of thewindshield frame to the other windshield bracket.
Slots
SlotsWindshield Frame -Front Half
Windshield Frame -Back Half
• Fit the back half of the windshield frame onto the fronthalf of the windshield frame. Make sure the slots at thebottom of the two windshield frame halves are aligned.
• Insert ten #8 x 11/4" screws into the back half of thewindshield frame.
• Tighten the screws with a Phillips screwdriver. Do notover-tighten.
Helpful Hint! Squeeze the two windshield halves togetherwhile tightening the screws.• Lift the assembled windshield to the raised position.

Assembly
14
19
• With the seat at an angle, insert the tabs on the frontedge of the seat into the slots in the foot-well wall .
• Push down firmly on the edge of the seat above eachtab to snap the tabs into the slots .
• Rotate the back of the seat down to snap the seatback tabs into the slots in the vehicle body. Push downfirmly on the seat back.
11 311 2
11 1
Seat
Tabs
Seat Back Tabs
Slot
1
2
11 3 PUSHHERE
20 #8 x 1" Screw
• Insert a #8 x 1" screw into the rear of seat as shown.• Tighten the screw with a Phillips screwdriver. Do not
over-tighten.
18
• Insert each fastener end of the long seat belt strapthrough a slot in the center of the seat. Make sure thefasteners face the outer edge of the seat.
• Pull each side of the long seat belt strap evenly throughthe slots. Make sure to pull each T-loop through a slot.
• Turn the seat upright.
T-Loop
Fastener End
Long Seat Belt Strap
17
• Turn the seat upside down.• Insert the fastener end of a short seat belt strap through
the slot near the outer edge of the seat. Make sure theside of the seat belt with the fastener faces the outeredge of the seat.
• Pull the short seat belt strap completely through the slot until the last T-loop at the opposite end of the beltcatches against the slot. You will pull one T-loop throughthe slot.
• Repeat this procedure to assemble the other short seatbelt strap.
Short SeatBelt Strap
Fastener End
Seat
Slot
End T-Loops
Slot
T-Loop (Pull through slot)

Sport Bar
KCTM Light Rack -Front Half
• Position the sport bar with the ends on a flat surface,as shown.
• Fit and hold the front and back halves of the KCTM lightrack against the sport bar. Make sure the two KCTM lightrack halves are aligned, and that the screw holes in theKCTM light rack are aligned with the screw holes in thesport bar.
• Snap the tabs on the front half of the KCTM light rack intothe slots below the light housings on the rear half of theKCTM light rack.
• Insert two #6 x11/2" screws through the holes in the backof the KCTM light rack, through the sport bar, and into thefront half of the KCTM light rack.
• Tighten the screws with a Phillips screwdriver. Do notover-tighten.
KCTM Light Rack - Back Half
Tabs
23
Assembly
• Align the four tabs on the inside of a light cover with the four slots in one of the light housings on theKCTM light rack. (Make sure the light covers arepositioned with the wide spaced tabs at the top.)
• Push firmly on the light cover to snap it to the housing.•Repeat this procedure on the other side of the KCTM light rack to assemble the other light.
Light Covers
Housing
Slots24
21
• Using safety scissors, remove the sport bar bracketsfrom the plastic connector. Dispose of the plastic connector.
• Position the sport bar upright.• Position a sport bar bracket above one of the sport bar
side legs, as shown.• Insert the tab on the inside of a sport bar bracket into the
hole in the sport bar side leg.• Fit the ring on a sport bar support against the end of the
sport bar bracket.• Fold the sport bar bracket over the sport bar to close it
around the sport bar and sport bar support.
Sport Bar
Sport Bar Bracket
Sport Bar Support
Tab
Hole
Side Leg
Ring
22
• Insert a #6 x 11/2" screw into the sport bar bracket as shown.
• Tighten the screw with a Phillips screwdriver. Do not over-tighten.
• Repeat steps 20 and 21 to attach the other sport bar support to the other sport bar side leg.
Sport Bar Bracket
Sport Bar
Sport Bar Support
15

Assembly
16
28
27 TaillightHousing
TaillightLens
• Using safety scissors, remove the taillight lenses and thetaillight housings from the plastic connectors. Dispose ofthe plastic connectors.
• Face the rear of the vehicle.• Fit a taillight lens inside a taillight housing.• Position the taillight housing with lens against the vehicle
body with the screw holes aligned, as shown.• Insert two #8 x 1" screws through the taillight lens and
housing and into the vehicle body as shown.• Tighten the screws with a Phillips screwdriver. Do not
over-tighten.• Repeat this procedure to attach the other taillight.
• Position the gas cap so that its tether points down.• Snap the gas cap into the hole under the right taillight.
Gas Cap
Tether
26
25
• Fit the sport bar and sport bar support legs into the holesin the vehicle body.
• Push down firmly on a sport bar side leg while pulling up on the side fender to fit the sport bar into the vehicle body.
• Repeat this procedure on the other side of the vehicle body.
• Insert a 11/2" x 1/4" machine screw into the hole closest tothe front of the vehicle in the underside of the rear wheelwell, through the vehicle body and into the end of thesport bar.
• Tighten the screw with a Phillips screwdriver. Do not over-tighten.
• Repeat this procedure on the other side of the vehicle body.
Sport Bar
SideFender
PULL HERE
PUSH HERE
Sport Bar
RearWheelWell

Label Decoration
17
G
Jeep and the Jeep grille design are registered trademarks ofDaimlerChrysler Corporation and are used under license.©DaimlerChrysler Corporation.
®
®
®
Proper label application will help to keep the labelslooking their best! When applying labels, keep thefollowing guidelines in mind:• Wash your hands before applying the labels.• Before applying the labels, wipe the surface of the
vehicle with a clean, dry cloth to remove any dust or oils.• Place the labels exactly as shown in the illustrations.• For best results, avoid repositioning a label once it has
been applied to the vehicle.• After applying a label, rub the label firmly with a
clean, dry cloth to make sure the label is adheredto your vehicle. Start at the center of a label, andsmooth towards the outer edges to remove air bubbles.
One-time assembly is now complete.
IMPORTANT NOTES:• Please carefully read the owner’s information in this
manual and teach your child about proper vehicle opera-tion and rules for safe driving before allowing operationof this vehicle.
• For safety reasons, your vehicle has been pre-set so thatit will only operate at low speed (21/2 mph, maximum).Make sure that your child can safely operate this vehicle at low speed before adjusting the vehicle to run at highspeed (5 mph, maximum).Todisconnect high speed lock-out,please see page 22.
Left Side View
Right Side View
Back View
26
19
23
8
10
29
261827
2
28
28
20157
21
21
22
14
22
22
9
2221
21
1
15
17

Battery InstallationH
18
Pb
Important Note: Use only a Power Wheels® 12 volt battery.Use of any other battery will damage your vehicle. Makesure that you charge the battery for at least 18 hours usingthe enclosed Power Wheels® 12 volt charger beforeoperating your vehicle for the first time. Charge the batteryfor at least 14 hours after each use of the vehicle. Nevercharge the battery longer than 30 hours. Failure to followthese instructions may damage your battery and will voidyour warranty. It is easier to install the battery beforeassembling the hood to your vehicle. If you have alreadyassembled the hood to your vehicle, you may want toremove it to install the battery.
1
2
3
• Lift the hood to access the battery compartment.
• Place the Power Wheels® battery upright in the battery compartment.
• Insert the looped end of battery retainer ( ) into the slotin the vehicle body near the dash.
• Squeeze the battery retainer arms ( ) and fit them intothe slots in the vehicle body.
BatteryCompartment
Hood
MotorHarness Connector
Front of Vehicle
Pb
Battery Retainer
Slot
Slot
Arm
Looped End
1
2
1
2
• Plug the motor harness connector into the battery.
Pb
Motor HarnessConnector
Battery4
Battery

Battery Care and Disposal
Battery Care and Disposal
I
If a battery leak develops, avoid contact with the leakingacid and place the damaged battery in a plastic bag. See information below for proper disposal.If acid comes in contact with skin or eyes, flush with coolwater for at least 15 minutes and call a physician.If acid is internally ingested, give water, milk of magnesiaor egg whites immediately. Never give emetics or inducevomiting. Call a physician.• Charge a new battery for at least 18 hours before first
use. Never charge the battery longer than 30 hours.Overcharging or undercharging the battery may shortenbattery life and decrease vehicle running time.
• After the first charge, recharge the battery for at least 14 hours after each use. Never charge the battery longerthan 30 hours. Charge the battery after each use,regardless of how long the vehicle was used.
• The battery must be upright while charging.• Do not allow the battery to run down completely
before charging.• Charge the battery before storing the vehicle.• Charge the battery at least once per month, even if the
vehicle has not been used.• Leaving the battery in a discharged condition will
ruin it.• Do not store the battery in temperatures above 75° F or
below -10° F.• Prevent the battery from moving freely inside the battery
compartment. Always use the battery retainer to securethe battery in the battery compartment.
• Examine the battery, charger and its connector forexcessive wear or damage each time you charge thebattery. If damage is detected, do not use the charger or the battery until you have replaced the worn ordamaged part.
• Your Power Wheels® battery is a sealed lead-acid battery. It must be recycled or disposed of in anenvironmentally sound manner.
• Do not dispose of a lead-acid battery in your regular,household trash. The incineration, landfilling or mixing ofsealed lead-acid batteries with household trash is prohibited by law in most areas.
• Return the battery to a federal or state approved lead-acid battery recycler, such as a Power Wheels®
authorized service center, or a local seller of automotivebatteries. Contact your local waste management officialsfor other information regarding the environmentally soundcollection, recycling and disposal of lead-acid batteries.
Care
Disposal
Battery Installation
19
• Lower the hood.• Lift the hood latches and fit the latch pegs onto the hood
to close it.
Hood Latch
Hood
Hood Latch
5

20
Rules for Safe DrivingJ
5. Do not operate this vehicle with more than two riders;one driver and one passenger seated in the seatingarea. A child who is not sitting on the seat or who isstanding on the vehicle could fall off, cause a tip-over orblock the driver’s view. A child could be seriously injured.
6. Always wear shoes or sneakers when operating this vehicle.
7. Never put anything near any moving parts. Rotatingparts such as motors, gear boxes and wheels can snagfingers, hair, etc., causing serious injury. Do not allowoperation of the vehicle when it is on its side or in anupside-down position.
8. Do not operate the vehicle near flammable vapors(gasoline, paint thinner, acetone, liquid wax, etc.).The vehicle’s electrical switches, like most electricalswitches, emit an internal spark when first turned on or turned off. The presence of flammable liquids orvapors could cause an explosion or a fire. Keep all flammable products in tightly sealed containers andaway from the vehicle.
9. Do not allow a child to operate the vehicle without proper adult supervision. To prevent unsupervised use ofthe vehicle, disconnect the motor harness from thebattery when the vehicle is not in use.To disconnect the motor harness connector andbattery:• Raise the hood to access the battery.• Unplug the motor harness connector from the battery.• Lower the hood and fasten the hood latches.
Teach Safety Rules to ChildrenWhile children can quickly develop the skill necessary todrive this vehicle, it is important to remember that theirjudgement skills are still very immature. Unsupervised driving by children can lead to serious injury. Before children use this vehicle, an adult should carefully evaluatethe driving area as well as the children’s skill level andability to drive this vehicle safely. Children are not alwaysable to recognize or anticipate hazards, even when theyhave been taught about them. There is no acceptablesubstitute for adult supervision.
Teach appropriate safety rules to your child before allowingoperation of this vehicle. These rules should also bereviewed with neighborhood children or other playmateswho want to drive this vehicle.
1. Do not allow any child to drive the vehicle in the street ornear moving (motorized) vehicles.
2. Do not allow any child to drive near bodies of water(such as pools or creeks), obstructions (such as furniture, low tree limbs or play equipment), or drop-offs(such as stairs or decks).
3. Do not allow any child to drive the vehicle in the dark.A child could encounter unexpected obstacles and havean accident. Operate the vehicle only in the daytime or ina well-lit area.
4. Teach your child to avoid driving on steep inclines orslopes. Restrict your child’s driving to areas that are fairlylevel with gentle inclines or slopes of no more than 10°.
• While driving down a steep slope, the vehicle may gain unsafe speed, even if the foot pedal is released to stop.
• While driving across a steep slope, the vehicle may tiltand tip over. The wheels could lose traction, causing the vehicle to slip.
• While driving up a steep incline, the motor may stop and the vehicle could roll backwards at an unsafe speed.
WARNING• Adult supervision is required. Children do
not have the judgement necessary to avoidmany accidents. Be sure that childrenoperating this vehicle can do so safely andthat they are supervised at all times.
• Never use near steps, driveways, steepinclines, roadways, alleys, swimming poolareas or other bodies of water.
• Always wear shoes or sneakers whenoperating this vehicle.
• Never allow more than two riders; one driverand one passenger.
• The riders should sit on the seat when thevehicle is in operation.
10°
Incline should never be more than 10°

21
How to Operate Your VehicleK
• Make sure the shifter is in the low speed ( ) position .• Press down on the foot pedal . The vehicle goes forward
at a maximum of 21/2 mph .• Help your child practice steering to learn how far and how
quickly to turn the steering wheel when driving forward in low speed.
11 311 211 1
• Your vehicle has a patented electronic braking systemthat automatically stops the vehicle when your child’s footis lifted from the pedal.
• Make sure your child is comfortable with steering thevehicle and automatically knows how to stop.
Beginner Use - Low Speed Drive
To Stop
Please Note: To avoid damaging the motors and gears, stop the vehicle before shifting from forward toreverse ( ).• Once your child is completely comfortable with operating
the vehicle in the forward mode, introduce reverse ( ).To Back Up• Make sure the shifter is in the reverse ( ) position .11 1
To Back Up
11 311 1 11 2
11 311 1 11 2
As assembled, your vehicle is ready to roll in low speed (21/2 mph, maximum). It has been pre-set so it will onlyoperate in low speed. After your child has mastered thebasic skills of driving and understands the rules for safedriving, it’s time to remove the high speed lock-out screw toallow the vehicle to operate in low or high speed.See the instructions on page 22 to remove the highspeed lock-out screw.
• Press down on the foot pedal .The vehicle will go inreverse at a maximum of 21/2 mph . The vehicle isdesigned to operate in low speed only in reverse.
• Help your child practice steering to learn how far and howquickly to turn the steering wheel when driving in reverse.
11 311 2

22
To Drive
Caring For Your VehicleL
Advanced Use - High Speed Drive• Check all screws, retainers and protective coverings
regularly and tighten as required. Check plastic parts on aregular basis for cracks or broken pieces.
• During snowy or rainy weather, the vehicle should bestored inside or under a protective cover. Remember tocharge the battery at least once per month while yourvehicle is not in regular use.
• Avoid operating the vehicle in wet or snowy conditions and do not spray the vehicle with a hose. Do not wash thevehicle with soap and water. Water or moisture in themotors or electrical switches can cause them to corrodeand could cause switch or motor failure.
• Avoid operating the vehicle on sand, loose dirt or gravel.Sand, loose dirt or gravel in the motors or electricalswitches can cause them to jam and could cause switchor motor failure.
• The vehicle can be wiped down with a soft, dry cloth. Fora shiny finish, you can wipe plastic parts with a non-waxfurniture polish applied to a soft-cloth. Do not useautomotive wax. Do not use soap and water or spray thevehicle with a hose.
• To ensure that your vehicle stays in good operating order,we recommend that you periodically have your vehiclechecked by a Power Wheels® authorized service center.See page 27 for the list of authorized service centers orcall 1-800-348-0751 for the location of the authorized service center nearest you.
Disconnecting the High Speed Lock-Out
How to Operate Your Vehicle
11 311 1 11 2
Please Note: To avoid damaging the motors and gears,stop the vehicle before shifting between low and high speed.• Make sure the shifter is in the high speed( )position .• Press down on the foot pedal . The vehicle goes
forward at a maximum of 5 mph .• Help your child practice steering to learn how far and how
quickly to turn the steering wheel when driving forward inhigh speed.
• Make sure your child is comfortable with steering the vehicle and automatically knows how to stop.
• Stopping in high speed is the same as stopping in lowspeed. The vehicle automatically stops when your child’s foot is lifted from the pedal.
11 311 2 11 1
Shifter
Lock-Out Screw
• Before you disconnect the high speed lock-out, makesure your child knows how to steer, how to start andstop the vehicle and knows the rules for safe driving.When the high speed lock-out is disconnected, thevehicle can be driven forward in low speed (21/2 mph,maximum) or high speed (5 mph, maximum).
• Make sure the shifter is in the reverse ( ) position.• Loosen the screw in the shifter box using a Phillips
screwdriver.• Remove the screw.• Insert the lock-out screw into the hole in the shifter
handle to keep it for future use. It can be re-inserted intothe shifter box to lock-out high speed.
StoragePosition
Lock-OutPosition

23
Problems and Solutions Guide
IMPORTANT! If you experience a problem with your vehicle, first check the Problems and SolutionsGuide below. If you still experience a problem, please contact Power Wheels® Consumer Affairs, toll-free at 1-800-348-0751 between 8 AM and 5 PM (EST) Monday through Friday. Or, contact your localPower Wheels® authorized service center. For the location nearest you, please refer to the AuthorizedService Center list beginning on page 27.
M
Problem Possible Cause Solution
Vehicle does not run Undercharged battery Charge the battery. A new battery should have been charged for at least 18 hours before using the vehicle forthe first time. After first-time use, recharge the battery for atleast 14 hours after each use. Never charge the battery longer than 30 hours.
Check all connectors. Make sure the charger connector isplugged into the battery, and that the charger is pluggedinto the wall.
Make sure power flow to the wall outlet is “ON”.
Charger is not working There is no sure way to tell if your charger is working unless you have a volt meter. If you suspect there is a problem withyour charger, contact your local Power Wheels® authorized service center. They can test your charger for you.
Tripped thermal fuse Each Power Wheels® 12 volt battery has a built-in thermalfuse. A thermal fuse may “trip” and shut down operation ofthe vehicle if the vehicle is overloaded or the drivingconditions too severe. The fuse will automatically reset itselfafter approximately 25 seconds, allowing the vehicle toresume normal operation. To avoid repeated automaticshutdowns, do not overload the vehicle by exceeding the130 lb. maximum weight capacity or by towing anythingbehind the vehicle. Avoid severe driving up very steep hillsor running into fixed objects, which can cause the wheels tostop spinning while power is still being supplied to themotors. If a thermal fuse continually trips, contact your localPower Wheels® authorized service center.
Loose wire or loose connectors Check all wires and connectors. Make sure the motorharness connector is plugged into the battery, and thatthere are no loose wires around the motors.
Dead battery If your battery is old or if you have not followed BatteryCare instructions, your battery may be dead. If you areunsure whether or not the battery is dead, you can have it tested at your local Power Wheels® authorized service center.
Electrical switch damage The electrical switches can become corroded due toexposure to water or moisture, or can jam due to loose dirt,sand or gravel. Contact your local Power Wheels®
authorized service center for diagnosis and repair.
Motor damage Contact your local Power Wheels® authorized service centerfor diagnosis and repair.

24
Problems and Solutions Guide
Vehicle was running but Loose wire or loose connectors Check all wires and connectors. Make sure the motorsuddenly stopped harness connector is plugged into the battery, and that
there are no loose wires around the motors.
Tripped thermal fuse Each Power Wheels® 12 volt battery has a built-in thermalfuse. A thermal fuse may “trip” and shut down operation ofthe vehicle if the vehicle is overloaded or the drivingconditions too severe. The fuse will automatically reset itselfafter approximately 25 seconds, allowing the vehicle toresume normal operation. To avoid repeated automaticshutdowns, do not overload the vehicle by exceeding the130 lb. maximum weight capacity or by towing anythingbehind the vehicle. Avoid severe driving up very steep hillsor running into fixed objects, which can cause the wheels tostop spinning while power is still being supplied to themotors. If a thermal fuse continually trips, contact your localPower Wheels® authorized service center.
Short run time (Less than Undercharged battery Charge the battery. A new battery should have been1 - 3 hours per charge) charged for at least 18 hours before using the vehicle for
the first time. After first-time use, recharge the battery forat least 14 hours after each use. Never charge thebattery longer than 30 hours.
Check all wires and connectors. Make sure the chargerconnector is plugged into the battery, and that the chargeris plugged into the wall.
Make sure power flow to the wall outlet is “ON”.
Overcharged battery Do not charge the battery longer than 30 hours. If you suspect that your battery is damaged as a result of overcharging, contact your local Power Wheels® authorized service center. They can test your battery for you.
Battery is old and will not Even with proper care, a rechargeable battery does notaccept full charge last forever. Average battery life is 1 to 3 years depending
on vehicle use and use conditions. Replace the battery witha new Power Wheels® 12 volt rechargeable battery. For bestperformance, do not use substitute parts.
Tripped thermal fuse Each Power Wheels® 12 volt battery has a built-in thermalfuse. A thermal fuse may “trip” and shut down operation ofthe vehicle if the vehicle is overloaded or the drivingconditions too severe. The fuse will automatically reset itselfafter approximately 25 seconds, allowing the vehicle toresume normal operation. To avoid repeated automaticshutdowns, do not overload the vehicle by exceeding the130 lb. maximum weight capacity or by towing anythingbehind the vehicle. Avoid severe driving up very steep hillsor running into fixed objects, which can cause the wheels tostop spinning while power is still being supplied to themotors. If a thermal fuse continually trips, contact your localPower Wheels® authorized service center.
Problem Possible Cause Solution

25
Problems and Solutions Guide
Problem Possible Cause Solution
Vehicle runs sluggishly Undercharged battery Charge the battery. A new battery should have beencharged for at least 18 hours before using the vehicle forthe first time. After first-time use, recharge the battery for atleast 14 hours after each use. Never charge the batterylonger than 30 hours.
Check all connectors. Make sure the charger connector isplugged into the battery, and that the charger is pluggedinto the wall.
Make sure power flow to the wall outlet is “ON”.
Battery needs charging After approximately 3 hours of constant use, the batteryneeds charging.
Battery is old and will not accept Even with proper care, a rechargeable battery does not lastfull charge forever. Average battery life is 1 to 3 years depending on
the vehicle use and use conditions. Replace the battery witha new Power Wheels® 12 volt rechargable battery. For bestperformance, do not use substitute parts.
Vehicle is overloaded Make sure you do not overload the vehicle by allowing more than 2 riders at one time, by exceeding the 130 lb.maximum weight capacity, or by towing objects behind the vehicle.
Driving conditions are too stressful Use only on gentle inclines or slopes of 10˚ or less.
Vehicle runs in low speed, but High speed lock-out not disconnected The vehicle was pre-set to run only in low speed. does not run in high speed To allow the vehicle to run in low and high speed, you
must disconnect the High Speed Lock-Out. Follow the (Please Note: The vehicle is instructions on page 22 to remove the High designed to operate in low Speed Lock-Out screw.speed only in reverse ( ).)
When the foot pedal is pressed Operation of vehicle in low speed It is possible that only one rear wheel may spin when bothonly one rear wheel spins rear wheels are raised off the ground and the vehicle is in
low speed. This does not necessarily indicate a problem. Check for proper operation of the drive system by raising the rear wheels off the ground and pressing the foot pedal. If only one rear wheel spins, carefully press your hand on the spinning wheel to slow it down. The other rear wheel should begin to spin. If the other rear wheel does not begin to spin, there may be a problem with the vehicle. Contact your local Power Wheels® authorized service center for diagnosis and repair.
Sometimes the vehicle doesn’t Loose wire or connector Check all wires around the motors and all connectors torun, but other times it does make sure they are tight.
Motor or electrical switch damage Contact your local Power Wheels® authorized servicecenter for diagnosis and repair.

If, after reviewing the Problems and Solutions Guide, the vehicle still fails to operate, please contact your nearest authorized service center (see page 27) or contact Power Wheels® Consumer Affairs toll-free at 1-800-348-0751.Helpful Hint! For faster service when calling Consumer Affairs, completely charge the battery before calling and have thefollowing available by the phone:• vehicle,• vehicle model number (see sticker in battery compartment),• vehicle production run number (see sticker in battery compartment).
Problems and Solutions Guide
26
Problem Possible Cause Solution
When the foot pedal is pressed, Loose wire or connector Check all wires around the motors and all connectorsthe vehicle won’t run without to make sure they are tight.a push
“Dead Spot” on motor Contact your local Power Wheels® authorized servicecenter for diagnosis and repair.
Loud clacking or grinding Broken gears Contact your local Power Wheels® authorized servicenoise from a motor-gearbox center for diagnosis and repair.
Charger gets warm during use It is normal for some chargers to get No action required. warm during use and is not reasonfor concern. If your charger does not get warm during
use, it does not mean that it is not working properly.
Battery makes a sizzling or It is normal for some batteries to No action required.gurgling noise when charging make noise and swell slightly while
charging and is not reason for If your battery does not make noise or swell slightlyconcern. during charging, it does not mean that it is
not accepting the charge.

Bumper-to-Bumper* Limited WarrantyN
Authorized Service CentersO
*One year limited warranty from the date ofpurchase on the Power Wheels® vehicle.
Six month limited warranty on the 12 volt battery.
For the original purchaser, this one year limited warrantycovers the Power Wheels® ride-on vehicle (purchased fromPower Wheels®) against defects in materials andworkmanship. The six month limited warranty applies onlyto the 12 volt battery included by Power Wheels® with theoriginal purchase of the vehicle.This warranty covers normal use and does not cover thePower Wheels® vehicle or battery if damaged byunreasonable use, neglect, accident, abuse, misuse,improper service or other causes not arising out of defectsin materials or workmanship. Evidence of any attempt atconsumer repair will void this warranty. This warranty does
not cover, and is intended to exclude, any liability on thepart of Power Wheels®, whether under this warranty orimplied by law or any indirect or consequential damages forbreach of warranty. Some states do not allow the exclusionor limitation so this limitation may not apply to you.Should you need service or assistance with your vehicleduring the warranty period, do not return the vehicle tothe store. Power Wheels® has provided a nationwidenetwork of authorized service centers. Please refer to thelist in this manual. Power Wheels® is continually expandingour Authorized Service Center Network. If there is not anauthorized service center in your area, please callConsumer Affairs for information, 1-800-348-0751.This warranty gives you specific legal rights, and you mayalso have other rights which may vary from state to state.Please save your original sales receipt.
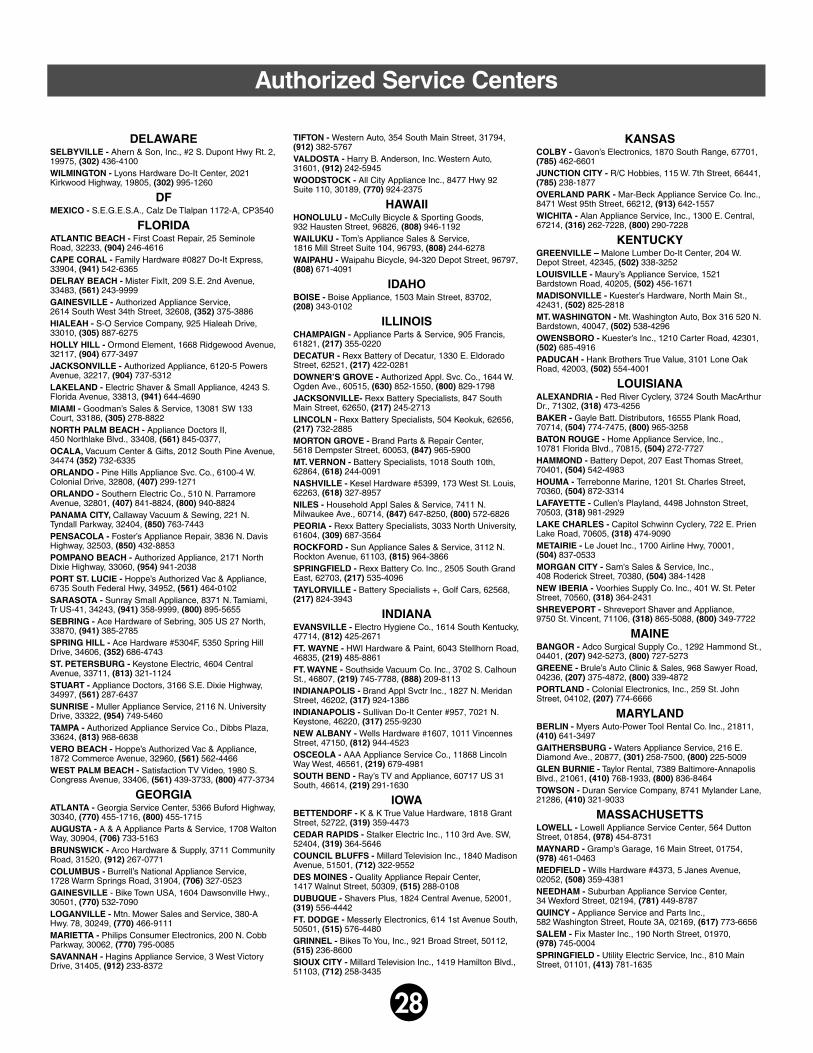
We are continually expanding our Authorized Service Center Network. Please check this listingfor the Authorized Service Center nearest you. If there is not one in your area, please call Power Wheels® Consumer Affairs at 1-800-348-0751.
ALABAMABIRMINGHAM - Frigid Appliance Center, 1861Centerpoint Rd., 35215, (205) 853-3952BIRMINGHAM - Frigid Appliance Center, 701 GraymontAve. North, 35203, (205) 323-5831DECATUR - Peddler II, 1308 Fairway Drive SE, 35601,(205) 350-1044DOTHAN - Bill’s Appliance Service, 208 Bic Rd., 36303,(334) 792-7746DOUGLAS - Brown Hardware #4916, Highway 75,35964, (256) 593-6086HOMEWOOD - Frigid Appliance Center, 154 West ValleyAve. 35209, (205) 942-3959MONTGOMERY - Acme Service Co., 2603 HighlandAve., 36107, (334) 264-2456TROY - Specialty Batteries, 1317 South Brundidge St.,36081, (334) 670-6800, Toll Free: (800)-477-8230
ALASKAANCHORAGE - Ken’s Electronics Service, 360 E.International, 99518, (907) 562-3443
ARIZONAGLENDALE - Elliott Electric Appliance, 6242 N. 43rdAve., 85301, (602) 937-2613SCOTTSDALE - Elliott Electric Appliance, 7515 E.McDowell Road, 85257, (602) 946-7487TUCSON - Arizona Small Appliance Service, 5033 E. 5thStreet, 85711, (520) 325-3988
ARKANSASFT. SMITH - Bromley Appliance Service, 614 North 10thStreet, 72901, (501) 782-9646JONESBORO - Jonesboro Sewing & Vac, 1420 SouthCaraway Road, 72401, (870) 931-9600, (800) 530-7656LITTLE ROCK - C & W Tool Repair, 1400 South Main St.,72202, (501) 374-1911ROGERS - Kressels Vacuum & Repair, 115 North 5th St.,72756, (501) 636-7894 STUTTGART - Davis Lumber Company, 301 EastMichigan, 72160, (870) 673-3601
CALIFORNIAANDERSON - Hardware Express #0572, Do It Best,96007, (530) 365-3783BAKERSFIELD - Southwest TV, 6300 White Lane, SuiteB, 93309, (805) 397-4940CONCORD - Ca. Electric Service Inc., 1170-G BurnettAve., 94520, (925) 827-1011COVINA - Ca. Electric Service Inc., 612 Shoppers Ln.,91723, (626) 915-4935FORT JONES - Ft. Jones Frontier Hardware, 11911 MainStreet, 96032, (916) 468-2266FRESNO - Valley Small Appliance, 4005 E. Ashlan Ave.,93726, (209) 224-5530FULLERTON - Ca. Electric Service Inc., 1208 E. AshAvenue, 92831, (714) 870-0900LOS ALAMITOS - Ca. Electric Service Inc., 11284 Los Alamitos Blvd., 90720, (562) 430-2668MERCED - Moosehead Electronics, 920 W. 18th Street,95340, (209) 723-4712MISSION VIEJO - Ca. Electric Service Inc., 23725 ViaFabricante, 92691, (714) 586-9440OAKLAND - Ca. Electric Service Inc., 2301 Broadway,94612, (510) 834-1050OXNARD - Tiny’s / The Clean-up Store, 1237 SaviersRoad, 93033, (805) 487-9401PASADENA - Ca. Electric Service Inc., 2594 E.Colorado Blvd., 91107, (626) 792-3194SACRAMENTO - Ca. Electric Service Inc., 1717 BellStreet, 95825, (916) 648-1604SALINAS - SRS Hobbies, 1038A North Davis Road,93907, (831) 424-4044, (800) 414-4547SAN DIEGO - Ca. Electric Service Inc., 3440 El CajonBlvd., 92104, (619) 283-6488 SAN FRANCISCO - Ca. Electric Service Inc., 3934Geary Blvd., 94118, (415) 386-4500
SAN JOSE - Ca. Electric Service Inc., 481 SouthBascom Ave., 95128, (408) 295-1722SANTA ROSA - Hardisty’s Inc., 710 Farmers Lane,95405, (707) 545-0535SKY FOREST - Sky Forest Electrical, 26870 Highway 18,92385, (909) 337-0811STOCKTON - California Electronics, 929 North YosemiteStreet, 95203, (209) 466-5432TEMECULA - Ca. Electric Service Inc., 41715 EnterpriseCircle, 92590, (909) 695-5445 VAN NUYS - Ca. Electric Service Inc., 14753 OxnardBlvd., 91411, (818) 997-8855WEST LOS ANGELES - Ca. Electric Service Inc., 2314S. Westwood Blvd., 90064, (310) 475-2532YUCAIPA - Aire-Rite Heating & A/C, 34724 YucaipaBlvd., 92399, (909) 797-2788
COLORADOCOLORADO SPRINGS - Nelson Appliance Repair, Inc.,1220 E. Fillmore, 80907, (719) 635-1928, (800) 291-8010DENVER - Appliance Service, 4262 Lowell Blvd., 80211,(303) 458-1109ENGLEWOOD - Appliance Service, 3932 S. Broadway,80110, (303) 781-1227, (800) 553-1864GRAND JUNCTION - V & L Appliance Service, 591 25Road Suite A6, 81506, (970) 243-3360PUEBLO - Direct Maytag Home Appliance Co., 1407Santa Fe Drive, 81006, (719) 543-0777
CONNECTICUTHAMDEN - New Haven Appliance, 1627 Dixwell Ave.,06514, (203) 288-6229HARTFORD - Hartford Element & Appliance, 1500Albany Avenue, 06112, (860) 246-7424, (800) 787-7977SHELTON - Jeff’s Appliance, Inc., 500 A Howe Avenue,06484, (203) 924-8997STAMFORD - Appliance Service of Stamford, 15 CedarHeights Road, 06905, (203) 322-7656WATERBURY - P.J. Appliance Repair, 935 South MainStreet, 06706, (203) 757-1014
27
Authorized Service Centers
28
DELAWARESELBYVILLE - Ahern & Son, Inc., #2 S. Dupont Hwy Rt. 2,19975, (302) 436-4100WILMINGTON - Lyons Hardware Do-It Center, 2021Kirkwood Highway, 19805, (302) 995-1260
DFMEXICO - S.E.G.E.S.A., Calz De Tlalpan 1172-A, CP3540
FLORIDAATLANTIC BEACH - First Coast Repair, 25 SeminoleRoad, 32233, (904) 246-4616CAPE CORAL - Family Hardware #0827 Do-It Express,33904, (941) 542-6365DELRAY BEACH - Mister FixIt, 209 S.E. 2nd Avenue,33483, (561) 243-9999 GAINESVILLE - Authorized Appliance Service,2614 South West 34th Street, 32608, (352) 375-3886HIALEAH - S-O Service Company, 925 Hialeah Drive,33010, (305) 887-6275HOLLY HILL - Ormond Element, 1668 Ridgewood Avenue,32117, (904) 677-3497JACKSONVILLE - Authorized Appliance, 6120-5 PowersAvenue, 32217, (904) 737-5312LAKELAND - Electric Shaver & Small Appliance, 4243 S.Florida Avenue, 33813, (941) 644-4690MIAMI - Goodman’s Sales & Service, 13081 SW 133Court, 33186, (305) 278-8822NORTH PALM BEACH - Appliance Doctors II,450 Northlake Blvd., 33408, (561) 845-0377, OCALA, Vacuum Center & Gifts, 2012 South Pine Avenue,34474 (352) 732-6335ORLANDO - Pine Hills Appliance Svc. Co., 6100-4 W.Colonial Drive, 32808, (407) 299-1271ORLANDO - Southern Electric Co., 510 N. ParramoreAvenue, 32801, (407) 841-8824, (800) 940-8824PANAMA CITY, Callaway Vacuum & Sewing, 221 N.Tyndall Parkway, 32404, (850) 763-7443PENSACOLA - Foster’s Appliance Repair, 3836 N. DavisHighway, 32503, (850) 432-8853POMPANO BEACH - Authorized Appliance, 2171 NorthDixie Highway, 33060, (954) 941-2038PORT ST. LUCIE - Hoppe’s Authorized Vac & Appliance,6735 South Federal Hwy, 34952, (561) 464-0102SARASOTA - Sunray Small Appliance, 8371 N. Tamiami,Tr US-41, 34243, (941) 358-9999, (800) 895-5655SEBRING - Ace Hardware of Sebring, 305 US 27 North,33870, (941) 385-2785SPRING HILL - Ace Hardware #5304F, 5350 Spring HillDrive, 34606, (352) 686-4743ST. PETERSBURG - Keystone Electric, 4604 CentralAvenue, 33711, (813) 321-1124STUART - Appliance Doctors, 3166 S.E. Dixie Highway,34997, (561) 287-6437SUNRISE - Muller Appliance Service, 2116 N. UniversityDrive, 33322, (954) 749-5460TAMPA - Authorized Appliance Service Co., Dibbs Plaza,33624, (813) 968-6638VERO BEACH - Hoppe’s Authorized Vac & Appliance,1872 Commerce Avenue, 32960, (561) 562-4466WEST PALM BEACH - Satisfaction TV Video, 1980 S.Congress Avenue, 33406, (561) 439-3733, (800) 477-3734
GEORGIAATLANTA - Georgia Service Center, 5366 Buford Highway,30340, (770) 455-1716, (800) 455-1715AUGUSTA - A & A Appliance Parts & Service, 1708 WaltonWay, 30904, (706) 733-5163BRUNSWICK - Arco Hardware & Supply, 3711 CommunityRoad, 31520, (912) 267-0771COLUMBUS - Burrell’s National Appliance Service,1728 Warm Springs Road, 31904, (706) 327-0523GAINESVILLE - Bike Town USA, 1604 Dawsonville Hwy.,30501, (770) 532-7090LOGANVILLE - Mtn. Mower Sales and Service, 380-AHwy. 78, 30249, (770) 466-9111MARIETTA - Philips Consumer Electronics, 200 N. CobbParkway, 30062, (770) 795-0085SAVANNAH - Hagins Appliance Service, 3 West VictoryDrive, 31405, (912) 233-8372
TIFTON - Western Auto, 354 South Main Street, 31794,(912) 382-5767VALDOSTA - Harry B. Anderson, Inc. Western Auto,31601, (912) 242-5945WOODSTOCK - All City Appliance Inc., 8477 Hwy 92Suite 110, 30189, (770) 924-2375
HAWAIIHONOLULU - McCully Bicycle & Sporting Goods,932 Hausten Street, 96826, (808) 946-1192WAILUKU - Tom’s Appliance Sales & Service,1816 Mill Street Suite 104, 96793, (808) 244-6278WAIPAHU - Waipahu Bicycle, 94-320 Depot Street, 96797,(808) 671-4091
IDAHOBOISE - Boise Appliance, 1503 Main Street, 83702,(208) 343-0102
ILLINOISCHAMPAIGN - Appliance Parts & Service, 905 Francis,61821, (217) 355-0220DECATUR - Rexx Battery of Decatur, 1330 E. EldoradoStreet, 62521, (217) 422-0281DOWNER’S GROVE - Authorized Appl. Svc. Co., 1644 W.Ogden Ave., 60515, (630) 852-1550, (800) 829-1798JACKSONVILLE- Rexx Battery Specialists, 847 SouthMain Street, 62650, (217) 245-2713LINCOLN - Rexx Battery Specialists, 504 Keokuk, 62656,(217) 732-2885MORTON GROVE - Brand Parts & Repair Center,5618 Dempster Street, 60053, (847) 965-5900MT. VERNON - Battery Specialists, 1018 South 10th,62864, (618) 244-0091NASHVILLE - Kesel Hardware #5399, 173 West St. Louis,62263, (618) 327-8957NILES - Household Appl Sales & Service, 7411 N.Milwaukee Ave., 60714, (847) 647-8250, (800) 572-6826 PEORIA - Rexx Battery Specialists, 3033 North University,61604, (309) 687-3564ROCKFORD - Sun Appliance Sales & Service, 3112 N.Rockton Avenue, 61103, (815) 964-3866SPRINGFIELD - Rexx Battery Co. Inc., 2505 South GrandEast, 62703, (217) 535-4096TAYLORVILLE - Battery Specialists +, Golf Cars, 62568,(217) 824-3943
INDIANAEVANSVILLE - Electro Hygiene Co., 1614 South Kentucky,47714, (812) 425-2671FT. WAYNE - HWI Hardware & Paint, 6043 Stellhorn Road,46835, (219) 485-8861FT. WAYNE - Southside Vacuum Co. Inc., 3702 S. CalhounSt., 46807, (219) 745-7788, (888) 209-8113INDIANAPOLIS - Brand Appl Svctr Inc., 1827 N. MeridanStreet, 46202, (317) 924-1386INDIANAPOLIS - Sullivan Do-It Center #957, 7021 N.Keystone, 46220, (317) 255-9230NEW ALBANY - Wells Hardware #1607, 1011 VincennesStreet, 47150, (812) 944-4523OSCEOLA - AAA Appliance Service Co., 11868 LincolnWay West, 46561, (219) 679-4981SOUTH BEND - Ray’s TV and Appliance, 60717 US 31South, 46614, (219) 291-1630
IOWABETTENDORF - K & K True Value Hardware, 1818 GrantStreet, 52722, (319) 359-4473CEDAR RAPIDS - Stalker Electric Inc., 110 3rd Ave. SW,52404, (319) 364-5646COUNCIL BLUFFS - Millard Television Inc., 1840 MadisonAvenue, 51501, (712) 322-9552DES MOINES - Quality Appliance Repair Center,1417 Walnut Street, 50309, (515) 288-0108DUBUQUE - Shavers Plus, 1824 Central Avenue, 52001,(319) 556-4442FT. DODGE - Messerly Electronics, 614 1st Avenue South,50501, (515) 576-4480GRINNEL - Bikes To You, Inc., 921 Broad Street, 50112,(515) 236-8600SIOUX CITY - Millard Television Inc., 1419 Hamilton Blvd.,51103, (712) 258-3435
KANSASCOLBY - Gavon’s Electronics, 1870 South Range, 67701,(785) 462-6601JUNCTION CITY - R/C Hobbies, 115 W. 7th Street, 66441,(785) 238-1877OVERLAND PARK - Mar-Beck Appliance Service Co. Inc.,8471 West 95th Street, 66212, (913) 642-1557WICHITA - Alan Appliance Service, Inc., 1300 E. Central,67214, (316) 262-7228, (800) 290-7228
KENTUCKYGREENVILLE – Malone Lumber Do-It Center, 204 W.Depot Street, 42345, (502) 338-3252LOUISVILLE - Maury’s Appliance Service, 1521Bardstown Road, 40205, (502) 456-1671MADISONVILLE - Kuester’s Hardware, North Main St.,42431, (502) 825-2818MT. WASHINGTON - Mt. Washington Auto, Box 316 520 N.Bardstown, 40047, (502) 538-4296OWENSBORO - Kuester’s Inc., 1210 Carter Road, 42301,(502) 685-4916PADUCAH - Hank Brothers True Value, 3101 Lone OakRoad, 42003, (502) 554-4001
LOUISIANAALEXANDRIA - Red River Cyclery, 3724 South MacArthurDr., 71302, (318) 473-4256BAKER - Gayle Batt. Distributors, 16555 Plank Road,70714, (504) 774-7475, (800) 965-3258BATON ROUGE - Home Appliance Service, Inc.,10781 Florida Blvd., 70815, (504) 272-7727HAMMOND - Battery Depot, 207 East Thomas Street,70401, (504) 542-4983HOUMA - Terrebonne Marine, 1201 St. Charles Street,70360, (504) 872-3314LAFAYETTE - Cullen’s Playland, 4498 Johnston Street,70503, (318) 981-2929LAKE CHARLES - Capitol Schwinn Cyclery, 722 E. PrienLake Road, 70605, (318) 474-9090METAIRIE - Le Jouet Inc., 1700 Airline Hwy, 70001,(504) 837-0533MORGAN CITY - Sam's Sales & Service, Inc.,408 Roderick Street, 70380, (504) 384-1428NEW IBERIA - Voorhies Supply Co. Inc., 401 W. St. PeterStreet, 70560, (318) 364-2431SHREVEPORT - Shreveport Shaver and Appliance,9750 St. Vincent, 71106, (318) 865-5088, (800) 349-7722
MAINEBANGOR - Adco Surgical Supply Co., 1292 Hammond St.,04401, (207) 942-5273, (800) 727-5273GREENE - Brule’s Auto Clinic & Sales, 968 Sawyer Road,04236, (207) 375-4872, (800) 339-4872PORTLAND - Colonial Electronics, Inc., 259 St. JohnStreet, 04102, (207) 774-6666
MARYLANDBERLIN - Myers Auto-Power Tool Rental Co. Inc., 21811,(410) 641-3497GAITHERSBURG - Waters Appliance Service, 216 E.Diamond Ave., 20877, (301) 258-7500, (800) 225-5009GLEN BURNIE - Taylor Rental, 7389 Baltimore-AnnapolisBlvd., 21061, (410) 768-1933, (800) 836-8464TOWSON - Duran Service Company, 8741 Mylander Lane,21286, (410) 321-9033
MASSACHUSETTSLOWELL - Lowell Appliance Service Center, 564 DuttonStreet, 01854, (978) 454-8731MAYNARD - Gramp’s Garage, 16 Main Street, 01754,(978) 461-0463MEDFIELD - Wills Hardware #4373, 5 Janes Avenue,02052, (508) 359-4381NEEDHAM - Suburban Appliance Service Center,34 Wexford Street, 02194, (781) 449-8787QUINCY - Appliance Service and Parts Inc.,582 Washington Street, Route 3A, 02169, (617) 773-6656SALEM - Fix Master Inc., 190 North Street, 01970,(978) 745-0004SPRINGFIELD - Utility Electric Service, Inc., 810 MainStreet, 01101, (413) 781-1635

Authorized Service Centers
29
MICHIGANALMONT - Almont Do It Center #421, 4545 Van Dyke,48003, (810) 798-8922BAY CITY - Bay Vac & Pedal, 805 Columbus Ave.,48708, (517) 892-7516BRIGHTON - Complete Battery Source, 8023 W. GrandRiver, 48116, (810) 220-1050DAVISON - Gill-Roy’s Hardware, 8405 East Davison,48423, (810) 653-2288DEARBORN - McNichols Electric Service, 1836 GrindleyPark, 48124, (313) 563-7550DETROIT - McNichols Electric Service, 13725 W.McNichols, 48235, (313) 342-6070, (800) 562-4226GAYLORD - Alpine Electronics Services, 604 West Main,49735, (517) 732-5004, (800) 244-6633GRAND RAPIDS - Superior Appliance Company,1050 Scribner Avenue, NW, 49504, (616) 459-3271JACKSON - Hammond Hardware #277, 1800 FrancisSt., 49204, (517) 782-0704KALAMAZOO - Consumer Repair, 3938 Westnedge,49008, (616) 344-1200LANSING - Rapid Appliance Service, Inc., 1454 E.Michigan Avenue, 48912, (517) 485-1320MARLETTE - Thumb Appl & Tool Repair, 3441 MainStreet, 48453, (517) 635-7848MIDLAND - Knopics Do-It Center, 3128 Jefferson Ave.,48640, (517) 832-2774NEW BUFFALO - Lawn Ranger “One Stop Shop” 19425US Hwy 12, 49117, (616) 469-0667PRUDENVILLE - Ford’s Do-It Center, 841 W. HoughtonLake Drive, 48651, (517) 366-7622ROYAL OAK - McNichols Electric Service, 4115 West 13Mile Road, 48072, (248) 288-5135SWARTZ CREEK - Gill-Roy’s Hardware, 9061 MillerRoad, 48473, (810) 635-2020TRAVERSE CITY - De Weese Hardware Inc., 1029Carver Street, 49686, (616) 947-7670
MINNESOTABLAINE - Barness #1, 8701 Central Ave. NE, 55434,(612) 780-77229BRAINERD - Git A’Round, 4299 Hwy. 371 North, 56401,(218) 828-8088DULUTH - All Brand Mr. Fixit, 16 West First Street,55802, (218) 722-1499ROCHESTER - Roberts Electronics, 611 6th Ave. NW,55901, (507) 282-2140ST. LOUIS PARK - Barness #3, 4631 Excelsior Blvd.,55416, (612) 926-0521ST. PAUL - Barness #2, 1573 University Avenue, 55104, (651) 646-3109
MISSISSIPPIHATTIESBURG - Champion Cycle & Fitness, 2625Lincoln Road, 39402, (601) 264-8233IUKA - W. H. Fairless Hardware Co. Inc., 117 FultonStreet, 38852, (601) 423-2233, (800) 797-9457MERIDIAN - Broadmoor Home Center, 2420 Old NorthHills Street, 39305, (601) 483-7373RIDGELAND - Propeller Service, 291 Hwy. 51, 39157,(601) 856-3191STARKVILLE - East Mississippi Lumber, 300 RussellStreet, 39759, (601) 323-3554TUPELO - Polaris Outdoor World, 1644C Eason Blvd.,38801, (601) 680-4733
MISSOURIGLADSTONE - Mar-Beck Appliance Serv. Co. Inc.,6559 N. Oak Traffic Way, 64118, (816) 436-9191INDEPENDENCE - Mar-Beck Appliance Service Co. Inc., 4476 South Noland Road, 64055, (816) 478-1889KANSAS CITY - Mar-Beck Appliance Service Co. Inc.,303 W. 79th Street, 64114, (816) 523-6931POPLAR BLUFF - Mills Iron & Supply, 1919 S.Westwood Blvd., 63901, (573) 785-2628SPRINGFIELD - Mar-Beck Appliance Service Co. Inc.,2704 S. Glenstone Avenue, 65804, (417) 882-3070ST. LOUIS - Authorized Appliance, Inc., 2355 HamptonAvenue, 63139, (314) 647-4250
MONTANABILLINGS - Radio Equipment Company, 1205 MonadRd., 59101, (406) 256-9778, (800) 711-4024
NEBRASKAGRAND ISLAND - Mundt’s Small Appliance & Vacuum,1822 W. Northfront Street, 68803, (308) 382-5084LINCOLN - CB Small Appliance, 432 South 11th Street,68508, (402) 475-2546LINCOLN - Sperry TV, 3201 Pioneer Blvd./Suite 33,68503, (402) 327-8111LINCOLN - Sperry TV, 2013 Highway 2, 68502,(402) 464-9181NORTH PLATTE - Sperry TV, Westfield Shopping Center,69010, (308) 532-5200OMAHA - Myers Electric Co., Inc., 1458 South 16thStreet, 68108, (402) 342-7710
NEVADALAS VEGAS - Burney’s Commercial Service,4480 Aldebaran Avenue, 89103, (702) 736-0006MINDEN - Valley Do-It Center, 1587 Highway 395,89423, (702) 782-5111
NEW HAMPSHIREMARLBOROUGH, Electronics Aid Inc., 32 RoxburyRoad, 03455, (603) 876-4161
NEW JERSEYHAWTHORNE - Ter Kuile, Inc., 206 Diamond BridgeAvenue, 07506, (973) 423-1142HIGHLAND PARK - Dash Electronics, 10 North SecondAve., 08904, (732) 247-2495 HOWELL - South Jersey TV Service, 4321 Route 9North, 07731, (732) 363-5550, (800) 244-3094MAPLEWOOD - Kiss Electrical Contractors Inc.,36 Newark Way, 07040, (973) 275-9400OCEAN - South Jersey TV Service, 1719 Route 35,07712, (732) 531-3565SICKLERVILLE - Sicklerville Hardware, 540Williamstown Road, 08081, (609) 728-3800TOMS RIVER - South Jersey TV Service, 1171 FischerRoad, 08753, (732) 506-9400TRENTON - Tattersall Inc. #5459, 309 N. Willow Street,08618, (609) 393-4293
NEW MEXICOALBUQUERQUE - Appliance Service Center, 5505Silver Avenue, SE, 87108, (505) 265-7774CLOVIS - Burns Hardware Do-It Center, 1511 N. Prince,88101, (505) 769-2528
NEW YORKALBANY - Lake Electronic Service, 1650 CentralAvenue, 12205, (518) 869-8424, (800) 585-3777BAYSHORE, L.I. - Turnpike Appliance of Suffolk,1253 Sunrise Highway, 11706, (516) 665-8311BINGHAMTON - Hardware Fare Do-It Center,1139 Front Street, 13905, (607) 722-9202BRONX - Home Appl. Vacuum World, 5902 RiverdaleAvenueCor W 259th St., 10471, (718) 884-4600COMMACK - Turnpike Appliance Service, 6181 JerichoTurnpike, 11725, (516) 499-3355EAST AURORA - Sem-Fab of Western New York,455 Olean Road, 14052, (716) 652-5228EAST ROCHESTER - ABC Electronics Service Corp.,350 West Commercial St., 14445, (716) 248-3504ELMIRA - Capabilities Inc., 1149 Sullivan Street, 14901,(607) 734-2006HAMBURG - K-Technologies, Inc., 5424 Abel Road,14075, (716) 649-5460HUDSON - Sweeps Vacuum & Repair Center, 705Warren Street, 12534, (518) 828-5457MONTICELLO - Wayne’s Small Engine & Equip. Repair,79 St. John Street, 12701, (914) 796-1851 POUGHKEEPSIE - S & S Appliance Sales & Service, 390 Violet Avenue, 12601, (914) 452-6122RICHMOND HILL - Lockdoctor Locksmiths In, 104-37Atlantic Ave., 11418, (718) 441-6242ROCHESTER - Benfante Appliance Service,1286 Mt. Hope Avenue, 14620, (716) 473-8765
SEA CLIFF - Shabra Electronics, 400 Glen Cove Avenue,11579, (516) 671-2218STATEN ISLAND - Springstead Lumber, 4255 AmboyRoad, 10308, (718) 984-0300SYRACUSE - County Wide Appliance, 1001 N. StateStreet, 13208, (315) 479-5253, (800) 333-3243TUCKAHOE - Authorized Appliance of Westchester, 26 Columbus Ave., 10707, (914) 961-8011UTICA - Oneida Bicycle & Sports, 2107 Whitesboro St.,13502, (315) 724-6084WARWICK - Wadeson Home Center 4397, 60 ForesterAvenue, 10990, (914) 987-2255, (800) 982-2215 WEST HEMPSTEAD - Turnpike Appl. Svc., 86Hempstead Turnpike, 11552, (516) 486-5700, (800) 628-3911WILLIAMSVILLE - Hector’s Hardware, 876 Maple Road,14221, (716) 688-4488YORKVILLE - Yorkville Battery, Inc., 126 WhitesboroStreet, 13495, (315) 736-2307
NORTH CAROLINAASHEVILLE - Skyland Hardware #6423, 3179 SweetenCreek Road, 28803, (828) 684-0308CHARLOTTE - Auth. Appl. Service Center, 1020Tuckaseegee Rd., 28208, (704) 377-4501, (800) 532-6127CLINTON - Danny’s Service Center, 119 Vance Street,28328, (910) 592-3200ELIZABETH CITY - Coastal Office Equipment, 501 EastChurch Street, 27909, (252) 335-2927JACKSONVILLE - Discount Sales & Service, 468-BWestern Blvd., 28546, (910) 455-6700NORTH WILKESBORO - Appalachian Serv Center,609 Elkin Hwy 268 East, 28659, (336) 667-5103RALEIGH - Authorized Appliance Service Center, 800 North Person Street, 27604, (919) 834-3476STATESVILLE - First Flight Bicycles, 216 S. Center St.,28677, (704) 878-9683WILMINGTON - American Tool & Tractor, 102 EastwoodRoad, 28403, (910) 392-5784WINSTON-SALEM - Authorized Appliance ServiceCenter, 904 South Marshall Street, 27117, (336) 725-5396
NORTH DAKOTAFARGO - General Parts & Supply Co., 10 S. 18th Street,58103, (701) 235-4161, (800) 279-9987
OHIOAKRON - Advanced Appliance Service Company, 1604 Home Avenue, 44310, (330) 630-0058AMHERST - Battery Power, 1911 Cooper Foster ParkRoad, 44001 (440) 960-2940BROOKLYN HEIGHTS - Philips Consumer 729, 950Keynote Circle, 44131, (216) 741-3334, (800) 331-7037CANTON - Appliance Parts Co., 1267 Dueber Ave. S.W.,44706, (330) 453-8077CINCINNATI - H & S Service, 458 Old State Route 74,45244, (513) 528-0808 DAYTON - Layer Electric, 603 South Ludlow, 45402,(937) 224-9608LIMA - Crouse Lumber Do-It Center, 333 E. MarketStreet, 45801, (419) 229-9070, (800) 826-9663MENTOR - Lake Erie Lawn & Garden, 7833 Munson Rd.,44060, (440) 257-9000NEW BOSTON - True Value Toy Town, 4207 GalliaStreet, 45662, (740) 456-5704NEW CARLISLE - Ballweg Hardware Inc., 3300 SouthDayton-Lakeview, 45344, (937) 849-1306, (800) 786-1308PARMA - Majors Appliance, 5785 Ridge Road, 44129,(440) 884-7200STRYKER - Short’s Hardware #3545, 115 N. DepotStreet, Po Box 60, 43557, (419) 682-4231TOLEDO - Broadway Sales, 1621 Broadway, 43609,(419) 241-9731, (800) 436-5415WELLINGTON - TraveLite Inc. 100 Industrial Avenue,44090, (440) 647-3670YOUNGSTOWN - O’Connor’s, 3224 Market Street,44507, (330) 782-4705

Authorized Service Centers
30
OKLAHOMAMC ALESTER - Quality Upholstery, 803 E. Gene StipeBlvd., 74501, (918) 423-4747OKLAHOMA CITY - Brand Appliance Repair, Co., 538 N. Pennsylvania Avenue, 73107, (405) 235-0583OKLAHOMA CITY - Appliance Services By CK, 101 EastMadison, 73105, (405) 5258862OKLAHOMA CITY - Oklahoma Service Center, 1940North May Avenue, 73107, (405) 946-9841 TULSA - H.L. Moss, Inc., 1714 E. 15th Street, 74104, (918) 744-1305, (800) 248-5948
OREGONEUGENE -Oldfield’s, 1465 W 7th, 97402, (541) 485-6000PORTLAND - Appliance Repair Central, 3203 N. E.Sandy Blvd., 97232, (503) 234-7339, (800) 588-7339SEASIDE - Distinctive Carpet Care, 407 South Holladay,97138, (503) 738-3007
PENNSYLVANIAALTOONA - Frye’s Sweep/Sew Center Inc., 1400 ValleyView Blvd., 16602, (814) 943-5001, (800) 640-1308BUTLER - Battery Warehouse, 469 Cunningham Street,16001, (724) 287-3191COLLINGDALE - Kenney Electric, 920 Mac DadeBoulevard, 19023, (610) 534-7373ERIE - Parke T. Morrow, Inc., 627 W 26th Street, 16508,(814) 455-7566HARRISBURG - C.A. Juillard Inc., 2301 North SeventhStreet, 17110, (717) 233-3488, (800) 633-3488JOHNSTOWN - Cambria True Value Hardware, West HillsSquare, 15905, (814) 255-4752KINGSTON - Vac-Way Appliance & Service, 595 MarketStreet, 18704, (717) 288-4508LANCASTER - Colonial Electronics, 241 West RosevilleRd. Suite 2, 17601, (717) 560-2222MC DONALD - Small Engine World, 130 E. O‘HaraStreet, 15057, (724) 926-3330MOSCOW - Vac-Way Appliance & Service Co., 101 VanBrunt Street, 18444, (717) 842-4668ORANGEVILLE - Hess Do-It Center & Market, Route487, Box 4 M, 17859, (717) 683-5162PHILADELPHIA - Appliance Care & Service Co.,6407 Rising Sun Ave., 19111, (215) 725-3112PITTSBURGH - Ferry Electric Service Co., 140 ClairtonBlvd., 15236, (412) 653-6004PITTSBURGH - Ferry Electric Service Co., 7498McKnight Road, 15237, (412) 364-3403READING - Electric Repair Co., 502-504 North 9thStreet, 19604, (610) 376-5444, (800) 422-8171 SCRANTON - Vac-Way Appliance and Service Co.,601 Cedar Avenue, 18505, (717) 343-1121SHAMOKIN DAM - Willard Battery Outlet, 138 S. OldTrail, 17876, (717) 743-5383TROY - Hoover Hardware #3958, 9 Canton Street,16947, (717) 297-3445, (800) 251-2156WILKES-BARRE - Walter Hardware Do-It Center, 57 N. Welles Street, 18702, (717) 823-1406YORK - Parcel Plus, 2549 E. Market Street, 17402,(717) 757-1875
PUERTO RICOHATILLO - Tropical Parts Service, Carr 130km 8.5 B0.Pajui 00659, (809) 898-6474MAYAGUEZ - Cardona Appliance Service, 8 San VicenteSreet, 00680, (809) 832-8366MAYAGUEZ - AAA Melendez Rental & Repair, Calle Post#319 Sur, 00680, (787) 832-5225PONCE - Ferreteria Vivian, 775 Calle Caoba, 00731,(787) 840-0677PUERTO NUEVO - Buckeye Service, 1013 Jesus T.Pinero Avenue, 00920, (787) 782-6175
RHODE ISLAND
SOUTH CAROLINAAIKEN - Dunagan's Sewing & Vac, 1536 Whiskey Road,29803, (803) 649-6777CHARLESTON HEIGHTS - Dorchester Electric Service,3575 Dorchester Avenue, 29405, (843) 747-5221COLUMBIA - Authorized Appliance Service Center,1811 Taylor Street, 29202, (803) 254-8414
DARLINGTON - Hobbies and More, 1570 South MainStreet, 29532, (843) 393-0355EASLEY - Trails End Bicycles, 110 Pendleton Street,29640, (864) 306-1684FORT MILL - Service Engines Inc., 3356 SC Hwy 5129715, (803) 548-1778, (800) 845-1191GREENWOOD - Bikes & Boards & Mopeds, 203AMontague Avenue, 29646, (864) 229-2453SENECA - Seneca Micronics #110 East North First St.,29678, (864) 882-6580SPARTANBURG - Boiling Springs Hardware, 3124Boiling Springs Rd, 29303, (864) 578-1852
SOUTH DAKOTAWINNER - Nelwon Electronics Inc., 422 West 2nd Street,57580, (605) 842-1611
TENNESSEEDANDRIDGE - Save More Sales, Highway 25-70Bldg. 259, 37725, (423) 397-1255 CHATTANOOGA - Light Electric Company, 739 East11th Street, 37403, (423) 267-9224KNOXVILLE - Appliance & Electric Service, 5309-AKingston Pike, 37919, (423) 588-5395, (800) 585-5395KNOXVILLE - Authorized Appliance Service Center, 1206 North Central Street, 37917, (423) 524-3376MEMPHIS - Camp Electric, 647 Madison Avenue, 38103,(901) 527-7543, (800) 238-7345NASHVILLE - Webb’s Appliance Service Center, 1519Church Street, 37203, (615) 329-4079, (800) 899-4079
TEXASABILENE - Mike's Bikes, 3317 South 1st Street, 79602,(915) 672-1853AMARILLO - Reid’s Appliance Service, Inc., 906Georgia, 79102, (806) 373-8812AUSTIN - Harrell Supply and Service, Inc., 5435 BurnetRoad, 78756, (512) 451-6464, (800) 332-7250AUSTIN - Harrell Supply and Service, Inc., 1409 WestOltorf, 78704, (512) 442-5966CORPUS CHRISTI - Brand Appliance & Microwave,2751 South Staples, 78404, (512) 854-1851DALLAS - All Type Sales and Service, 2835 Irving Blvd.,75207, (214) 638-1170, (800) 717-1170DALLAS - Pearsol Appliance Co., 3127 Main Street,75226, (214) 939-0930, (800) 527-7385FT. WORTH - Ft. Worth Shaver and Appliance, 1012 West 7th Street, 76102, (817) 335-9970HOUSTON - Brand Appliance Service Center,1970 FM 1960 W, 77090, (281) 537-7795HOUSTON - Brand Appliance Service Center,5727 Richmond Avenue, 77057, (713) 782-8910KILLEEN - Master Tech Repairs, 501 W. Elms Rd.Suite #10, 76542, (254) 618-5480LAREDO - Rubio Electric Co., 1719 San Bernardo,78040, (956) 722-3908LONGVIEW - Foster’s, 3315 Gilmer Road, 75604, (903) 759-3939LUBBOCK - Minter’s, 4409 50th Street, 79414, (806) 799-3170LUFKIN - STS Audio and Video, 1505 South First Street,75901, (409) 639-4529MC ALLEN - All-In-One Repair Shop, 2313 Lark Avenue,78504, (956) 682-8858MIDLAND - Midland Tool Specialty, 918 South Main,79701, (915) 682-4647, (800) 499-0755PASADENA - Larry’s TV Service Inc., 3520 FairmontParkway, 77504, (281) 998-0122, (800) 244-0281ROMA - True Value Hardware, 1004 E. Highway 83, 78584, (956) 849-1322SAN ANTONIO - Brand Appliance Sales & Service, 6435 San Pedro Avenue, 78216, (210) 344-8577SEYMOUR - Western Auto #5341, 211 N. Main Street,76380, (940) 888-3980TEMPLE - Master Tech Repairs, 2819 West AvenueNorth, 76504, (254) 773-8991VICTORIA - Tom’s Video Service, 211 East Anaqua,77901, (512) 576-0664, (800) 433-0664WICHITA FALLS - Burke’s Appliance Service, 2410 10thStreet, 76309, (817) 723-6211
UTAHOREM - The Mending Shed, 1735 South State Street,84058, (801) 225-8012, (800) 339-9297SALT LAKE CITY - Appliance Service Center, Inc.,1475 South Main, 84115, (801) 467-6361
VERMONTRUTLAND - Appliance Service Center Ltd., 152Woodstock Avenue, 05701, (802) 773-8917RUTLAND - Foley’s Equipment Care Center, 7 PineStreet, 05702, (802) 773-8917
VIRGINIAHARRISONBURG - J.L. Maintenance & Repair, 1420Virginia Avenue, 22802, (540) 434-4040, (800) 2960-9844LUISA - Lakeside Electrice Contractors, 4344 Davis HwySte 2, 23093, (540) 967-3000 NORFOLK - Commonwealth Electric Shaver, 6614Virginia Beach Blvd., 23502, (757) 461-4475RICHMOND - Wells, Inc., 3502 Jefferson Davis Hwy.,23234, (804) 233-6726ROANOKE - Commonwealth Electric Shaver, 5524Williamson Road NW, 24012, (540) 366-6038SOUTH BOSTON - South Boston True Value, 307 BroadStreet, 24592, (804) 572-6666VIENNA - Appliance Fix-It, 8455 Tyco Road, 22182, (703) 893-1234WINCHESTER - Battery Mart of Winchester, 1 BatteryDr., 22601, (540) 665-0065
WASHINGTONBELLEVUE - Action Small Appliance, 1500 145th PlaceSE, 98007, (425) 643-9806, (888) 643-9806FEDERAL WAY - Martha Lake Electronics, 2118 South314th Street, 98003, (253) 946-9033LYNNWOOD - Martha Lake Electronics, 16521 13th Ave.W., 98037, (425) 743-4178RENTON - Martha Lake Electronics, 212 South West43rd, 98055, (425) 251-5417SEATTLE - Action Small Appliance, 2125-2nd Ave.,98121, (206) 448-2020SPOKANE - AALWACO Appliance Service, E. 3403Euclid Avenue, 99217, (509) 487-1089TACOMA - Martha Lake Electronics, 2913 South 38thStreet, 98409, (253) 475-0668WENATCHEE - Motor Mart, 150 Marr, 98801,(509) 663-4237, (800) 696-9422
WEST VIRGINIABECKLEY - Jerry’s Detectors, Vacuum & Appl.,411 Second Street, 25801, (304) 253-3521CHARLESTON - Sneed’s Vacuum & Sewing Center,2614 7th Avenue, 25312, (304) 744-3670, (800) 245-8048HARRISVILLE - Western Auto Assoc. Store, 1107 E.Main St., 26362, (304) 643-2226HUNTINGTON - Mike’s Appliance and Service, 212 20thStreet, 25703, (304) 522-0737MARTINSBURG - Battery Mart, 1161-3 WinchesterAvenue, 25401, (304) 267-7033, (800) 464-7918WHEELING - Fast Service Center, 1058 Main Street,26003, (304) 232-5561 (800) 874-4090
WISCONSINGREEN BAY - Kastle Carts, 3990 Evergreen Ave.,54313, (920) 465-6121 LACROSSE - Paul’s Shaver Service, 1224 CaledoniaStreet, 54603, (608) 782-6291MARINETTE - Delta Do-It Center, W 1536 Highway 41,54143, (715) 732-1768MILWAUKEE - Brand Appliance Repair, Inc., 3707 North92nd Street, 53222, (414) 461-0440
MILWAUKEE - Brand Appliance Repair, Inc., 6000 W.Oklahoma Ave., 53219, (414) 541-4340MONONA - Kiefers Shaver and Appliance, 4511 MononaDrive, 53716, (608) 221-3322
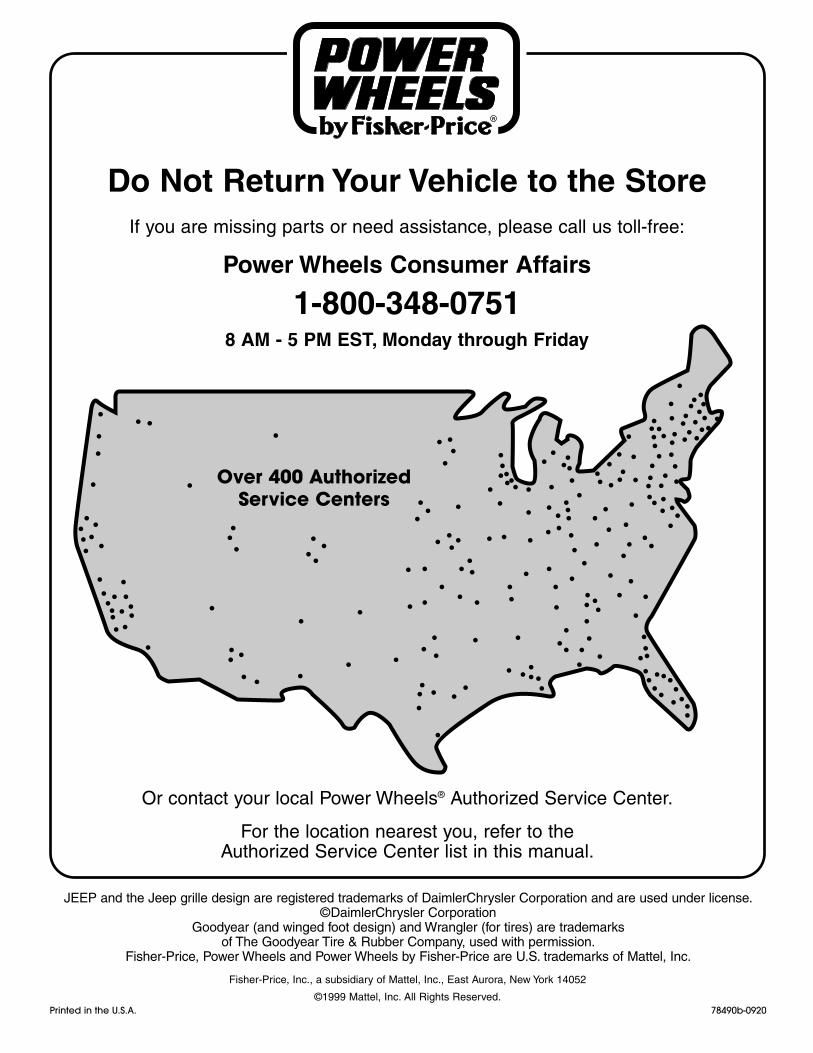
Printed in the U.S.A. 78490b-0920
Fisher-Price, Inc., a subsidiary of Mattel, Inc., East Aurora, New York 14052
©1999 Mattel, Inc. All Rights Reserved.
Do Not Return Your Vehicle to the StoreIf you are missing parts or need assistance, please call us toll-free:
Power Wheels Consumer Affairs
1-800-348-07518 AM - 5 PM EST, Monday through Friday
Over 400 AuthorizedService Centers
Or contact your local Power Wheels® Authorized Service Center.
For the location nearest you, refer to the Authorized Service Center list in this manual.
JEEP and the Jeep grille design are registered trademarks of DaimlerChrysler Corporation and are used under license.©DaimlerChrysler Corporation
Goodyear (and winged foot design) and Wrangler (for tires) are trademarks of The Goodyear Tire & Rubber Company, used with permission.
Fisher-Price, Power Wheels and Power Wheels by Fisher-Price are U.S. trademarks of Mattel, Inc.


