Producing a Dynamic Presentation - Prince George's …academic.pgcc.edu/psc/DPP_guide.pdf ·...
24
Producing a Dynamic Presentation Using Microsoft ® PowerPoint ® 2002 A Guide for Science & Mathematics Students Scott A. Sinex Robert S. Osinski Department of Physical Sciences Prince George’s Community College Largo, MD 20774-2199 Fall 2002 version
Transcript of Producing a Dynamic Presentation - Prince George's …academic.pgcc.edu/psc/DPP_guide.pdf ·...

Producing a Dynamic Presentation
Using Microsoft®
PowerPoint® 2002
A Guide for Science & Mathematics Students
Scott A. Sinex Robert S. Osinski
Department of Physical Sciences
Prince George’s Community College Largo, MD 20774-2199
Fall 2002 version

ii
This Guide was produced as part of a presentation “Dynamic PowerPoint: A Visualization Tool for Engaging Learners” produced by Dr. Sinex. In order to “experience” some of the capabilities of the animation tools in PowerPoint 2002, please go to: http://academic.pg.cc.md.us/~ssinex/DPP/DynPP.ppt. Other “Guides” available to our Science and Mathematics students are:
8 Using Excel for Handling, Graphing, and Analyzing Scientific Data
8 Data Handling and Analysis on the TI-82 and TI-83/83 Plus Graphing
Calculators Printed copies may be obtained in the Department Office (CH-100). Alternatively, you may access them online at http://academic.pg.cc.md.us/psc -- select Resources for Students.

iii
Table of Contents Introduction……………………………………………………………………………………………………………………. 1 A Touch of Philosophy…………………………………………………………………………………………………… 2 Getting Started……………………………………………………………………………………………………………… 2 Adding Dynamic Aspects………………………………………………………………………………………………. 6 Pictures and movies……………………………………………………………………. 8 Custom Animation……………………………………………………………………… 10 Hyperlinks…………………………………………………………………………………… 14 Cartooning…………………………………………………………………………………… 15 Molecular Structures…………………………………………………………………………………………………… 16 Citation of Internet Sources……………………………………………………………………..……………… 17 Printing Slides and Handouts………………………………………………………………………… …………. 18 Appendix - Short Cut Keystrokes…………………………….……………………………………… …….. 19

iv

1
Introduction According to the Oxford English Dictionary, “dynamic” references an active, potent, energetic, and forceful presentation.8 The judicious use of animation tools allows addition of vitalizing motion attributes to slide elements and focuses attention on content -- without distraction and overloading a slide with too much detail. Microsoft’s Office Suite - Office XP Professional, includes enhanced versions of Word, Excel, Access, and PowerPoint.< Content developed in any of Office’s components and other applications, e.g., Stella® and Inspiration,® (modeling software) may be copied, pasted, and in some cases . . . edited within a PowerPoint slide. Hyperlinks to animations at web sites and on disk drives may be activated, thus illustrating a concept. Computers in the College’s Open Computer Labs have these applications and broadband (fast) access to The Internet. Therefore, a myriad of tools and materials with which to generate a professional, content-rich presentation are readily available. After a primer on producing a basic text-dominated presentation, we focus on introducing PowerPoint 2002’s animation tools. Then we present more specific guidance for adding molecular structures from MDL Information Systems, Inc.’s Chime plug-in . . . most important to our biology and chemistry students. We address the issue of attribution, i.e., using and citing “other people’s work” and finally, offer advice on printing your slides for “handouts” to participants.
·
8 From the Oxford English Dictionary - Online version - http://dictionary.oed.com < Please note that animation capabilities in earlier versions of PowerPoint are more limited and that ALL screen shots referenced in this Guide are from PowerPoint 2002.

2
A Touch of Philosophy Implicit in assembling content for your presentation is developing your ability to integrate and differentiate science concepts that demonstrate fundamental mastery of selected scientific principles. If a good image is worth a thousand words, i.e., provides a “shortcut” to a lengthy written description/illustration of a concept, then adding explanatory animation to an image may provide the “mental glue” leading to more complete understanding. Some of the complexity and underlying “mystery” of science and mathematical concepts may be revealed through simple animation. Inherent in the real world, matter and energy in physical, chemical, geological, and biological systems? interact dynamically . . . controlled by sets of processes and forces which “resist” complete understanding. Your own ability to facilitate cognition by grappling with the concepts, discovering “order,” based upon logic/reasoning and authoring a presentation on a selected topic will enhance cognition beyond the “static” portrayal in your text.
I Getting Started If you are new to PowerPoint and design concepts, you may wish to first look at the materials on the next page and the key strokes given in the Appendix, otherwise -- let’s begin! ? A system may be defined as a set of objects or things that work together through a regular set of relations, thus facilitating prediction. I Image source: www.langara.bc.ca/images/ thinker-big.gif

3
Here are two examples of PowerPoint slides and some presentation tips.
4
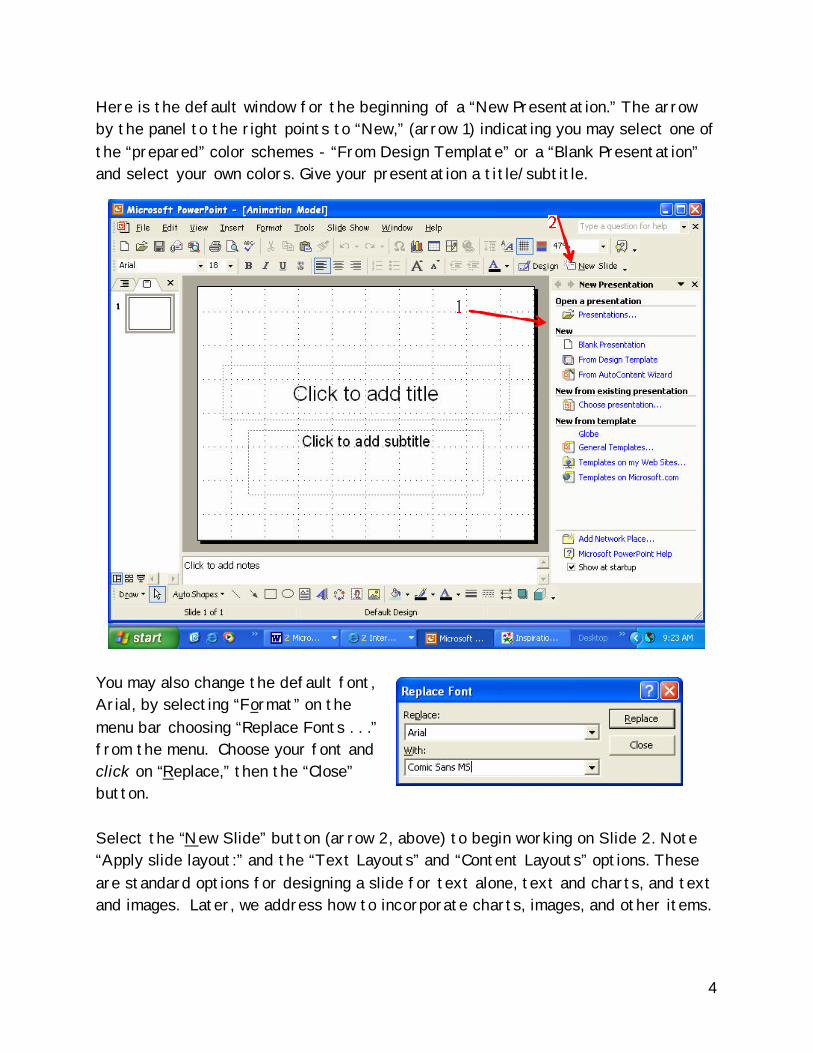
Here is the default window for the beginning of a “New Presentation.” The arrow by the panel to the right points to “New,” (arrow 1) indicating you may select one of the “prepared” color schemes - “From Design Template” or a “Blank Presentation” and select your own colors. Give your presentation a title/subtitle.
You may also change the default font, Arial, by selecting “Format” on the menu bar choosing “Replace Fonts . . .” from the menu. Choose your font and click on “Replace,” then the “Close” button. Select the “New Slide” button (arrow 2, above) to begin working on Slide 2. Note “Apply slide layout:” and the “Text Layouts” and “Content Layouts” options. These are standard options for designing a slide for text alone, text and charts, and text and images. Later, we address how to incorporate charts, images, and other items.

5
Within a slide right-click in an area outside a text box -- note a contextual menu (see arrow). Please explore these options in designing your slides.
Note the drawing tools and “AutoShapes” along the bottom of the screen in the oval. You may use these tools as in Microsoft Word . . . to add greater variety to slides. You may place Excel charts (graphs) into PowerPoint. From Excel, select (highlight) a chart/worksheet, right-click, select “copy,” open your PowerPoint slide right-click, and “paste.” The chart is now “linked” to Excel and may be edited in PowerPoint. For better viewing you may need to resize your chart (click on the corner and drag) and edit font sizes -- for projection, a font size of 24 or above, may be necessary. Avoid using large tables, especially of data -- most viewers will not “process” detail!

6
To view slides in the presentation mode, go to “Slide Show” on the menu bar and select “View Show.” This will allow you to preview your presentation from the beginning. Alternatively, you may view the current slide in a Show Mode by selecting the screen icon in the lower left corner of the window. See the “S - Labeled” arrow on the screen capture below.
Please check how your presentation looks when projected by an LCD projector. Colors change and what looks great on your computer screen may be “horrible” when projected. Adding Dynamic Aspects Here is where the real power of PowerPoint 2002 comes into “play” -- the addition of elements of motion will change a static presentation to one that is dynamic. For slides with images, it is best to begin with a blank slide as images may be positioned and resized more easily. Text may be added and positioned within a “Text Box.”
Sli

7
Choose the “Insert,” “Text Box” option from the menu bar or the icon labeled below (labeled arrow). Here are the menu and tool bars from PowerPoint 2002.
Select “New Slide” from the toolbar and then a blank slide from “Content Layouts” in the side panel. By right-clicking an open area on a slide, an option -- “Grid and Guides . . . .” may be displayed and used to help layout objects. Objects may be resized by clicking an image and dragging a corner, thus maintaining proportions. Resizing an image using a side border will “distort” the image. Also enlarging an image too much may lessen the quality (resolution/clarity) of image. Adding dynamic elements to your presentation will “engage” your audience and provide explanatory visualization to your topic. Also you should “do your part” to –
Help “Stamp Out” PowerPoint Induced Sleep!!!!!
Blank Slide
Text Box
Grid & Guides

8
To emplace pictures, e.g., GIF’s or JPG’s, PNG’s (common graphic files), and movies, go to “Insert” on the menu bar, then select the appropriate category, such as “Picture,” “From File . . . “ and complete your slide. See the screen shot below. Animated GIF’s, which are common on web pages and available on many websites, are active (play) in PowerPoint.
All images become part of the PowerPoint file,> therefore, be aware of file sizes before using images. It is best to convert/save any BMP images to JPG file format to limit file size. For a movie, select Movies and Sounds and then “Movie from File.” If you find an appropriate movie file, remember to save the file in a folder with your presentation. Movie files are not stored as part of the PowerPoint presentation. Common file formats for movies are: AVI, MPG, QT, and MOV. AVI are video files that may be played by Windows Media Player. For other movie formats, e.g.,
> PowerPoint files are saved with the “ppt” file extension.

9
QuickTime, the appropriate player must be installed on the computer used for your presentation. A movie can be set to play automatically when the slide comes up or after you select and activate by clicking. To view the animation or movie, you need to be in “Slide Show.” Sounds, e.g., WAV files, are treated in the same fashion as movies, except you start with “Sounds from Files.” If you select “Sound from Clip Organizer . . .” you will find files (in a variety of formats- WAV, WMA, etc.) from which to select a tune (see side panel in screen shot below). The timing is done as a “Custom Animation . . .” (see next section). A small speaker ion appears on your slide when a sound is used. This movable icon is visible in your Slide Show. “Click” to play sound.
As with movies, sound files need to be placed in your presentation folder, as they are not incorporated into the PowerPoint file.

10
To add animation, click and highlight the text or object, then right-click to get the menu shown below, and select Custom Animation . . .”
Now you can exhibit your “creativity” by determining how objects “move.” It is much more than flying text or “wordimation.” If you do your own drawing in PowerPoint and want to animate it, you may want to select all the parts of a drawing and then group it using the Group function on the Draw menu at the bottom of the screen. This makes it a single object. You may also “cause” text to move into a slide as a label. You can even shoot arrows at the target!
11
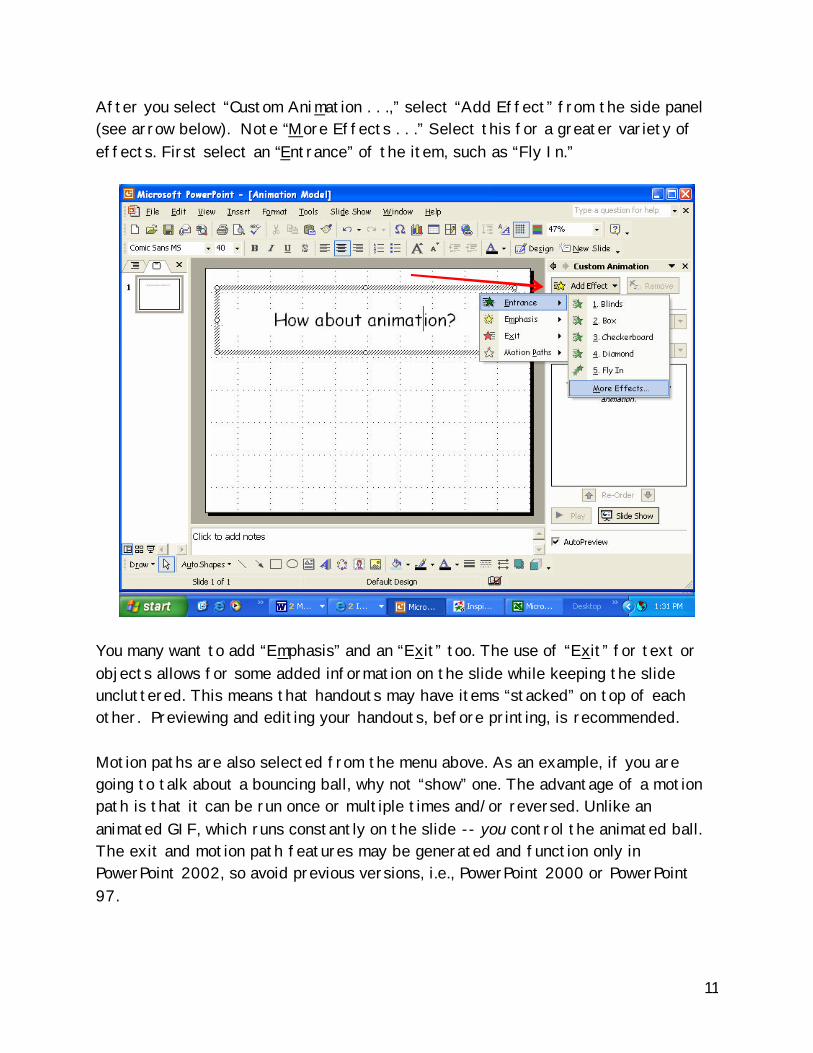
After you select “Custom Animation . . .,” select “Add Effect” from the side panel (see arrow below). Note “More Effects . . .” Select this for a greater variety of effects. First select an “Entrance” of the item, such as “Fly In.”
You many want to add “Emphasis” and an “Exit” too. The use of “Exit” for text or objects allows for some added information on the slide while keeping the slide uncluttered. This means that handouts may have items “stacked” on top of each other. Previewing and editing your handouts, before printing, is recommended. Motion paths are also selected from the menu above. As an example, if you are going to talk about a bouncing ball, why not “show” one. The advantage of a motion path is that it can be run once or multiple times and/or reversed. Unlike an animated GIF, which runs constantly on the slide -- you control the animated ball. The exit and motion path features may be generated and function only in PowerPoint 2002, so avoid previous versions, i.e., PowerPoint 2000 or PowerPoint 97.

12
As part of an animation, you may want to change the speed and/or how many times it repeats. This is done on the menu that is pulled down for the animation as “1” below at the arrow.
The timing selection will appear as shown to the right. How the animation starts, any delay on entrance, how fast it appears, and if repeated, may be selected from the pull down menus. You may have to “play” with the selections to get the timing down to where you think it works.

13
Here is a slide with a number of animation steps including entrance and exiting. The animation is set up so that when you click, a label to a body part comes with an arrow. Clicking for the next label causes the previous label to exit. This prevents the slide from becoming cluttered. The custom animation panel on the right shows the element sequence. Elements may be re-ordered (see arrow) and grouped by clicking on the appropriate up/down arrow.
WORDS OF CAUTION
If you are going to routinely add animations, especially with a single slide, SAVE your work after each addition. It has been our experience that “screen freezes/crashes” occur all too often.

14
To add a hyperlink to a slide: 8 First, select (highlight) the text/image to be “linked.” 8 Add a hyperlink by clicking the Globe Symbol (with chain links) on the tool
bar, select Insert, then Hyperlink, or use the Ctrl + K shortcut keys.
The menu box below will appear. Now add the URL in the address box.
For an Internet link select or type the complete Uniform Resource Locator (URL), e.g., http://academic.pg.cc.md.us/psc. Copying and pasting a URL from a browser window usually insures a correct address, but just in case, always click your link to make sure it actually accesses the correct web site. The hyperlink is only active in the slide show. You may also link to a file that will open an application on your computer, such as a STELLA model, or an Inspiration mental map. This will open a window “over” your Slide Show. Closing thi s window allows you to continue the “show” where you left off.
Address Box

15
Cartooning is an option in PowerPoint. This is a series of frames or slides where a small change is done on each successive slide. PowerPoint will play the series as a flipbook and simulate motion. The best way to do this is to start from one slide with all the background and other objects on it, duplicate the slide, by selecting Insert, “Duplicate slice,” and modify it. You might need four-to-five slides to show what you want to illustrate. Go to your first slide and then under Slide Show on the menu bar select “Slide Transition” and the menu as shown to the right will appear on the side panel. Set the advance slide to “Automatically after” and zero will appear in the box. If this is too fast, place 0.5 or 1 second in the box. Unselect the “On mouse click.” Click on the “Apply to All Slides” button. If this is just a file to keep flipping through, then go to Slide Show and select “Set Up Show.” Under Show options select Loop continuously until ‘Esc’. Under “Advance slides” select “Using timings, if present.”
Press the Esc key on your computer to stop the loop. You can link this cartoon as one PowerPoint file into another presentation file, then when you press “Esc” you go back to your presentation.
16
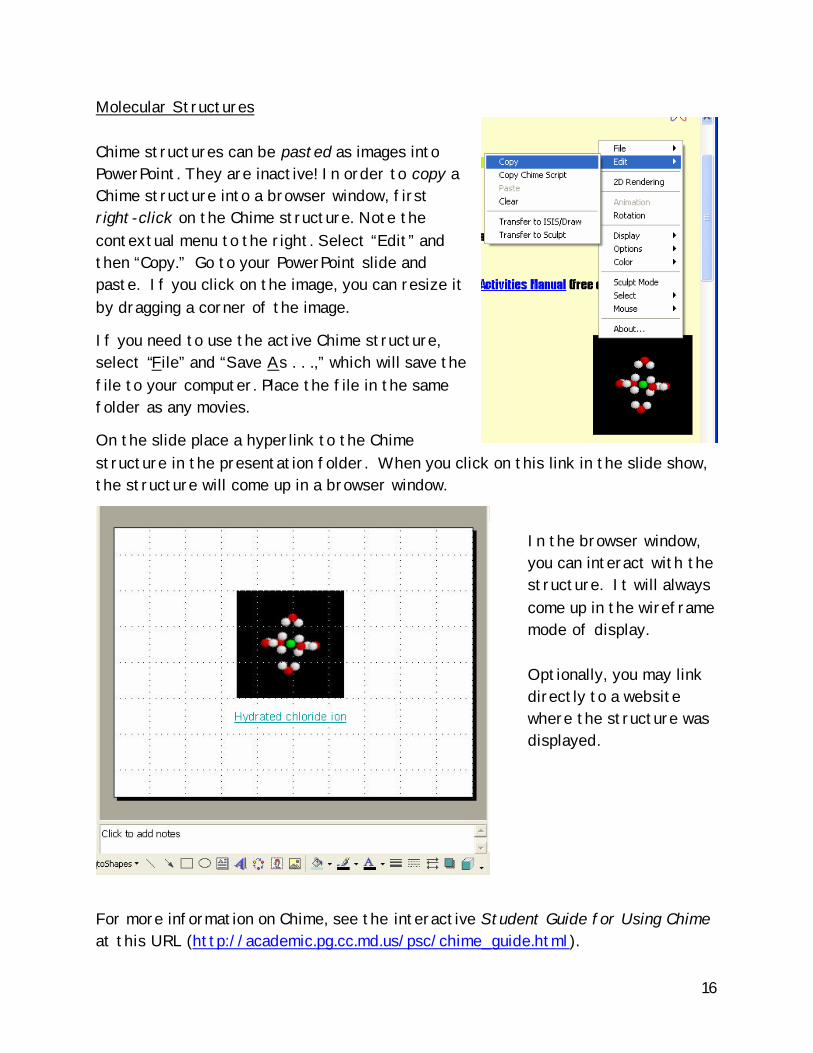
Molecular Structures Chime structures can be pasted as images into PowerPoint. They are inactive! In order to copy a Chime structure into a browser window, first right-click on the Chime structure. Note the contextual menu to the right. Select “Edit” and then “Copy.” Go to your PowerPoint slide and paste. If you click on the image, you can resize it by dragging a corner of the image.
If you need to use the active Chime structure, select “File” and “Save As . . .,” which will save the file to your computer. Place the file in the same folder as any movies.
On the slide place a hyperlink to the Chime structure in the presentation folder. When you click on this link in the slide show, the structure will come up in a browser window.
In the browser window, you can interact with the structure. It will always come up in the wireframe mode of display. Optionally, you may link directly to a website where the structure was displayed.
For more information on Chime, see the interactive Student Guide for Using Chime at this URL (http://academic.pg.cc.md.us/psc/chime_guide.html).

17
Citation of Internet Sources Always give proper credit to your source of information. If the text, which should be rewritten and not copied or paraphrased, is from a specific source, cite a complete URL for a web page on the lower corner of the slide. For an animated GIF, movies, or other images, cite a complete URL for a web page and place the link below the image. In both cases the links should be “clickable,” i.e., should direct a user to the source. Copyrighted images from The Internet should not be used. Many sources of free clipart and animated GIF’s are available, e.g., try http://www.google.com and select the tab for “Images,” type in a “desired” image name adding “animated,” and see what “appears.” Below is an image “BLT. . .” from a web page. Right-clicking the image opens a contextual menu. Select “Save Picture As,” name the image (file) and save to your own disk.
18
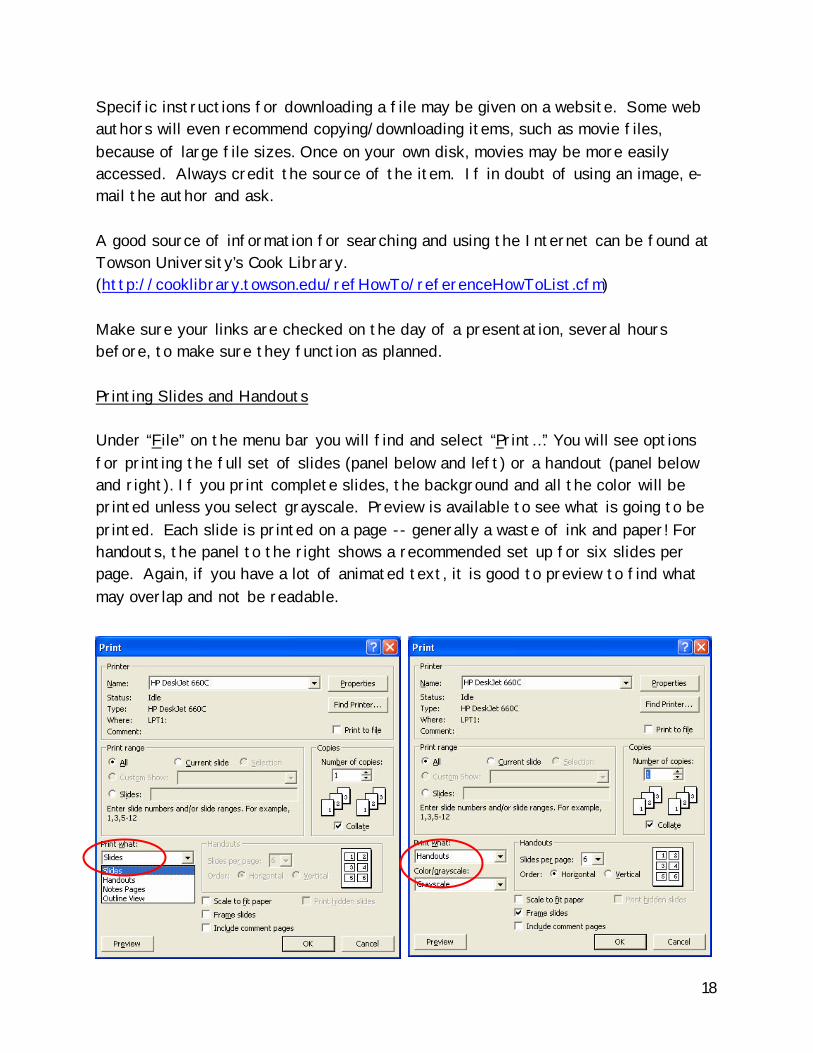
Specific instructions for downloading a file may be given on a website. Some web authors will even recommend copying/downloading items, such as movie files, because of large file sizes. Once on your own disk, movies may be more easily accessed. Always credit the source of the item. If in doubt of using an image, e-mail the author and ask. A good source of information for searching and using the Internet can be found at Towson University’s Cook Library. (http://cooklibrary.towson.edu/refHowTo/referenceHowToList.cfm) Make sure your links are checked on the day of a presentation, several hours before, to make sure they function as planned. Printing Slides and Handouts Under “File” on the menu bar you will find and select “Print…” You will see options for printing the full set of slides (panel below and left) or a handout (panel below and right). If you print complete slides, the background and all the color will be printed unless you select grayscale. Preview is available to see what is going to be printed. Each slide is printed on a page -- generally a waste of ink and paper! For handouts, the panel to the right shows a recommended set up for six slides per page. Again, if you have a lot of animated text, it is good to preview to find what may overlap and not be readable.

19
Appendix
PowerPoint Shortcut Keys Shortcut Action
Ctrl + A Select All Ctrl + B Bold Ctrl + C Copy Ctrl + D Duplicate Ctrl + E Center Text Ctrl + F Find Ctrl + G Show Guides Ctrl + H Replace Text Ctrl + I Italicize Text Ctrl + J Justify Text Ctrl + K Insert Hyperlink Ctrl + L Left Align Text Ctrl + M New slide Ctrl + N New Presentation Ctrl + O Open Ctrl + P Print Ctrl + Q Close PowerPoint Ctrl + R Right Align Text Ctrl + S Save Ctrl + T Format Fonts Ctrl + U Underline Text Ctrl + V Paste Ctrl + W Close Document Ctrl + X Cut Ctrl + Y Redo Last Action Ctrl + Z Undo Last Action Alt + Shift + Left Arrow Promote a paragraph Alt + Shift + Right Arrow Demote a paragraph Crtl + Backspace Delete a word Ctrl + + Apply superscript formatting Ctrl + = Apply subscript formatting F4 or Ctrl + Y Repeat your last action F5 Start a slide show F6 Switch to the next pane (clockwise) Shift + F3 Capitalize Shift + F6 Switch to the previous pane
(counterclockwise)

20
PowerPoint Slide Show Shortcut Keys Shortcut Action
S or = Stop or Restart an Automatic Slide Show
<number> + Enter Go to Slide <number>
B or . (period) Display a Black Screen, or Return to Slide Show
W or , (comma) Display a White Screen, or Return to Slide Show
Ctrl + H Hide the Pointer
Ctrl + A Redisplay the Hidden Pointer/Change Pointer
Hold both Mouse Buttons 2 Secs Return to the First Slide