PROCEDURE FOR ON-LINE REGISTRATION OF PURCHASE ORDER AND...
12
PROCEDURE FOR ON-LINE REGISTRATION OF PURCHASE ORDER AND CALL FOR INSPECTION The Inspection Billing System has now been modified. It is a web based application and works on variety of Windows Opearting system like Win-XP, Win-7 or above. Users working on Windows-7 of above operating system can use Internet Explorer / Mozila/ Chrome for using the application. Users working on Windows-XP platform should preferably use Google Chrome for using the application. Launch the browser & enter URL : “sap.ritesinsp.com”. To Register a Purchase Order / Call For inspection, Click on the option “PO Registration/Call For Registration”. Disclaimer : The data presented in various screens in this manual is for Demo & Training Purpose Only.
Transcript of PROCEDURE FOR ON-LINE REGISTRATION OF PURCHASE ORDER AND...

PROCEDURE FOR ON-LINE REGISTRATION OF
PURCHASE ORDER AND CALL FOR INSPECTION
The Inspection Billing System has now been modified. It is a web based application and works on
variety of Windows Opearting system like Win-XP, Win-7 or above.
Users working on Windows-7 of above operating system can use Internet Explorer / Mozila/
Chrome for using the application.
Users working on Windows-XP platform should preferably use Google Chrome for using the
application.
Launch the browser & enter URL : “sap.ritesinsp.com”.
To Register a Purchase Order / Call For inspection, Click on the option
“PO Registration/Call For Registration”.
Disclaimer : The data presented in various screens in this manual is for Demo & Training
Purpose Only.

A vendor Login Screen will be displayed.
Click on
[Yes] button
Enter your existing Vendor-Id and Password and click on [Login] button. (Note : New users should contact Northern Region Inspection for Vendor-Id and Password)

Click on appropriate choice
For Registrating New PO click on [PO Registration] option.
To register a Call against existing Case No. Click on [Call For Registration]
Note : The user must have RITES case Number for registering a Call For Inspection.

Procedure For Registration of New Po for getting RITES Case No.
Click on [PO Registration] option in previous screen.
Click on [NEW PURCHASE ORDER] button for registering new Purchase Order To Modify existing PO that was
registered on-line follow instructions as mentioned here.
Click on [Search PO] button without any data to search all PO registered
On-Line
Click on [NEW PURCHASE ORDER] button for registering new Purchase Order

The System will display the following screen :
Enter the relevant data in the above fields.
Select “Northern Region”
Click on [Save] button aftering the data

The System will display the message “Data Saved”. In case of any error an Error Message will be displayed. E-mail the error to RITES
or contact RITES administrator for resolution.
Once the data is saved, the system will generate a unique reference number. The user must also upload a copy of Purchase Order in PDF format. Only one file is allowed to be
uploaded. One file can contain any number of pages. To enter the line items of purchase order (i.e. item details) click on [PO Details] button.
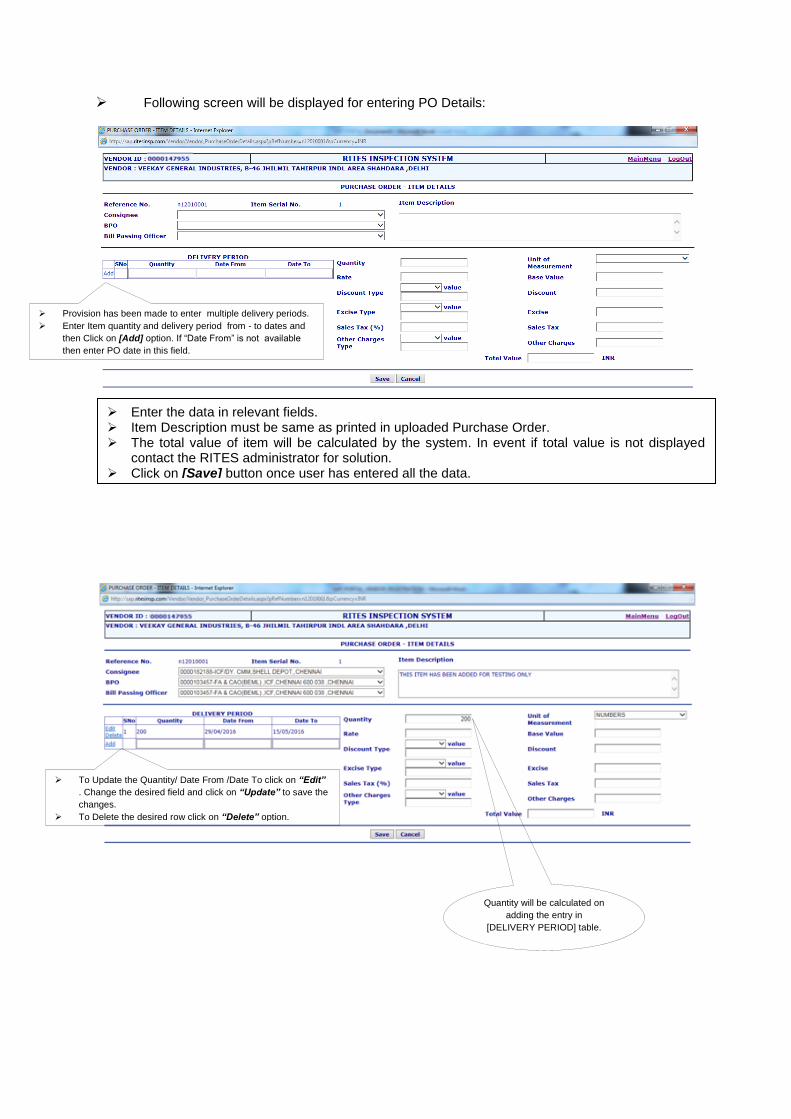
Following screen will be displayed for entering PO Details:
Provision has been made to enter multiple delivery periods.
Enter Item quantity and delivery period from - to dates and
then Click on [Add] option. If “Date From” is not available
then enter PO date in this field.
Enter the data in relevant fields. Item Description must be same as printed in uploaded Purchase Order. The total value of item will be calculated by the system. In event if total value is not displayed
contact the RITES administrator for solution. Click on [Save] button once user has entered all the data.
To Update the Quantity/ Date From /Date To click on “Edit”
. Change the desired field and click on “Update” to save the
changes.
To Delete the desired row click on “Delete” option.
Quantity will be calculated on
adding the entry in
[DELIVERY PERIOD] table.

When the user has finished entering the PO details , Click on MainMenu and then Click on
[Search PO] button.
When user saves the data the existing record will be displayed as above. To Modify existing Item details click on Item Serial No. The details will be displayed on the above
screen. Make the necessary changes and press [Save] button.
The system will display the list of all Purchase Orders registered on-line. Click on “Transfer PO To Inspection Office”. The system will display appropriate message.
This is an important step. Without it the PO details will remain in transit and “RITES Case Number” will not be generated.
User can Modify existing PO details by Clicking on [Modify] label in front of the desired record. After allotment of RITES Case Number user cannot modify PO Details.
Important
Step

Procedure For Registration of New Call For Inspection
Login using Vendor-Id and Password
Following screen will be displayed.
Click on [Call For Inspection] option
Following Screen will be displayed.
To Register New Call - Enter Case Number and Click on [New Call] button.
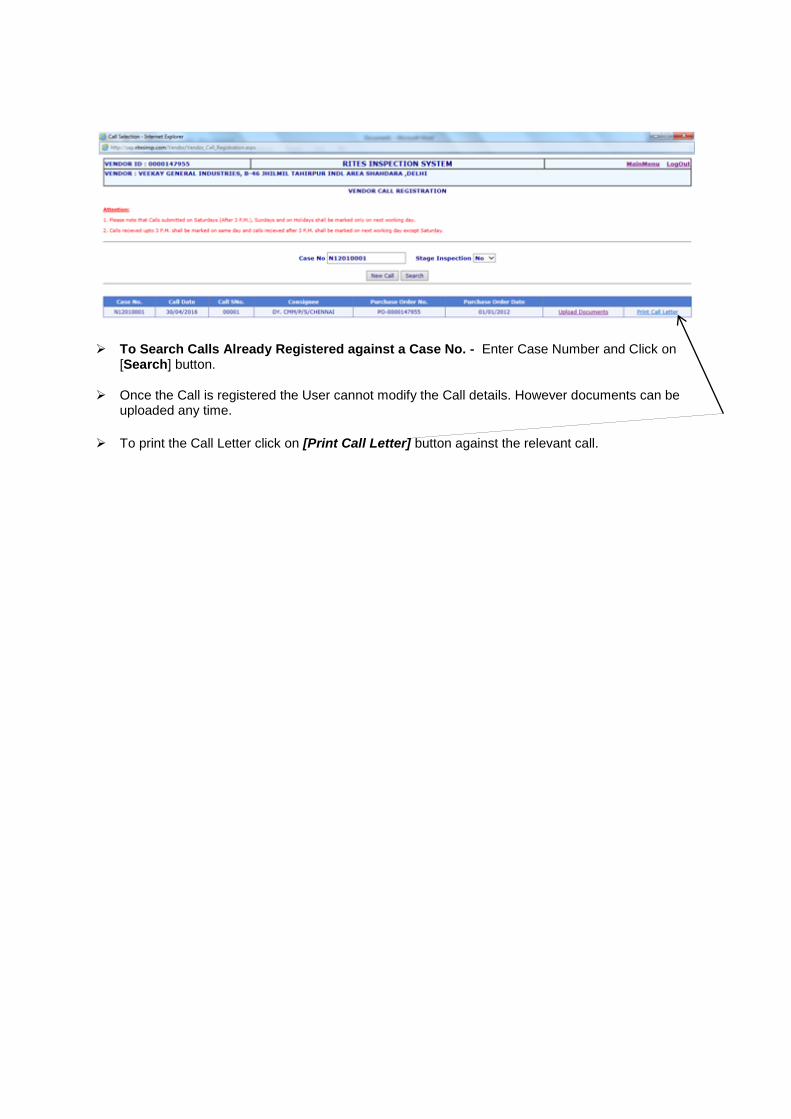
To Search Calls Already Registered against a Case No. - Enter Case Number and Click on [Search] button.

When User Clicks on [New Call] button in previous screen, The following screen is displayed:
Items marked in red are displayed by the system and are non editable.
For other fields user need to enter the relevant information as asked for.
In case of multiple Delivery Period system displays seperate lines. System will accept the user input for Offered Quantity against valid delivery period only and this is a mandatory data.
For other fields like Test Qty, Approval Date and Lot Size enter the data where ever available and applicable (these are non-mandatory fields).
After User has entered the data ckeck the declaration and press the button [I Agree Kindly Register The Call] to save the data and register the call.
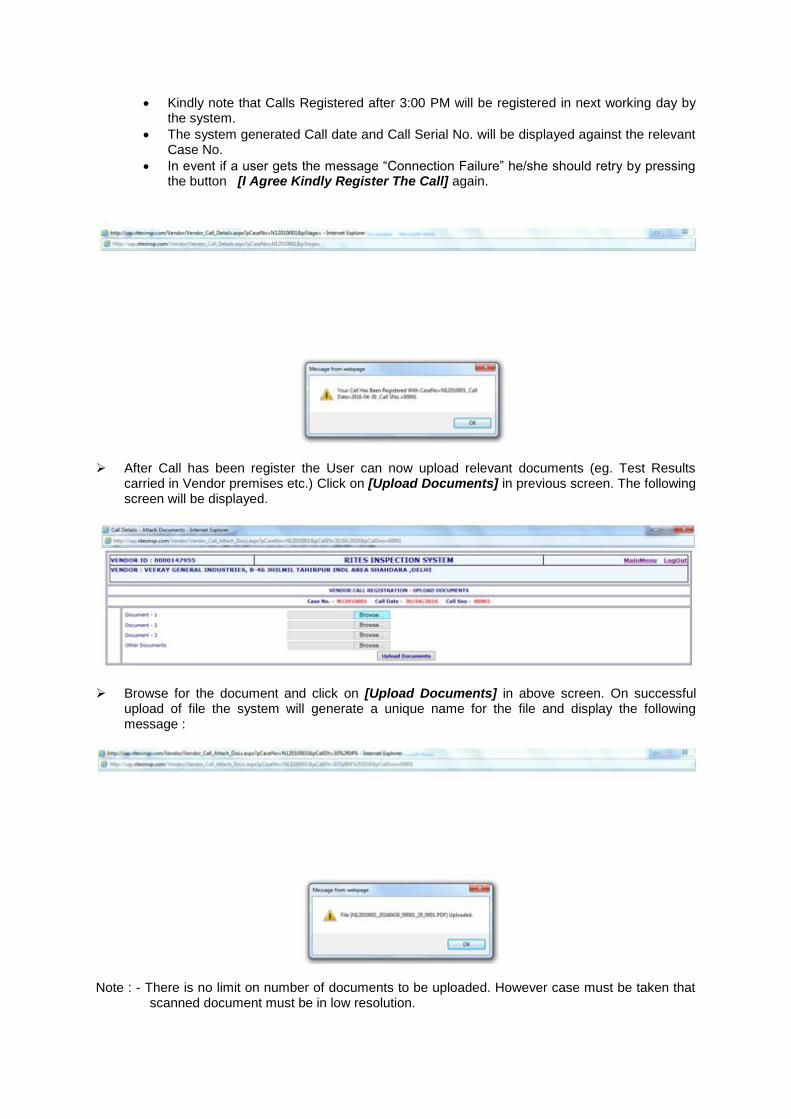
Kindly note that Calls Registered after 3:00 PM will be registered in next working day by the system.
The system generated Call date and Call Serial No. will be displayed against the relevant Case No.
In event if a user gets the message “Connection Failure” he/she should retry by pressing the button [I Agree Kindly Register The Call] again.
After Call has been register the User can now upload relevant documents (eg. Test Results carried in Vendor premises etc.) Click on [Upload Documents] in previous screen. The following screen will be displayed.
Browse for the document and click on [Upload Documents] in above screen. On successful upload of file the system will generate a unique name for the file and display the following message :
Note : - There is no limit on number of documents to be uploaded. However case must be taken that scanned document must be in low resolution.
To Search Calls Already Registered against a Case No. - Enter Case Number and Click on [Search] button.
Once the Call is registered the User cannot modify the Call details. However documents can be uploaded any time.
To print the Call Letter click on [Print Call Letter] button against the relevant call.