Pro96Com - RadioReference.comPro96Com is designed to decode the 9600 bps APCO-P25 control channel...
44
Pro96Com Pro-96/APCO-P25 9600 bps Control channel monitoring utility Version 1.9.4 Copyright © 2007-2010, Michael Vander Veer All Rights Reserved
Transcript of Pro96Com - RadioReference.comPro96Com is designed to decode the 9600 bps APCO-P25 control channel...

Pro96Com
Pro-96/APCO-P25 9600 bps Control channel monitoring utility
Version 1.9.4 Copyright © 2007-2010, Michael Vander Veer All Rights Reserved

Table of Contents:
Introduction:........................................................................................................1
Acknowledgments: .............................................................................................1
Getting Started:...................................................................................................2
System Requirements: ......................................................................................2
Using the Pro-96 or Pro-2096 as a decode radio: .............................................3
Using the GRECOM PSR-500, PSR-600, PSR-500C, PSR-600C, PRO-106 or PRO-197 as a decode radio:.............................................................................4
Screen Layouts: ..................................................................................................5
Common Areas:...............................................................................................6
Screen Tabs: .................................................................................................6
Tower Information Area: ................................................................................7
Decode Information: ......................................................................................7
System Activity Screen: .................................................................................8
Site Activity: ...................................................................................................8
TalkGroup Hold:.............................................................................................8
Monitor Priority Threshold:.............................................................................8
Column Description:.......................................................................................9
Affiliation Information Screen: .....................................................................10
Site Affiliations Area:....................................................................................10
Affiliation Log Area:......................................................................................10
Site Information Screen:...............................................................................11
Site Information:...........................................................................................11
Adjacent Tower Information: ........................................................................11
Frequency Identifier Tables: ........................................................................11
Patches Screen: ............................................................................................12
Patch List: ....................................................................................................12
Patch Log:....................................................................................................12
Table of Contents:
Other Events Screen:....................................................................................13
Channel Grant Trace Screen: .......................................................................14
Unknown Packets Screen: ...........................................................................15
Packet Dump Screen: ...................................................................................16
Configuration Screen:...................................................................................17
Decode Configuration Tab: ..........................................................................17 Communications: ........................................................................................17 Decoding Scanner Type: ............................................................................17 Latency: ......................................................................................................17
Scanner Control Tab:...................................................................................18 Radio Profile: ..............................................................................................18 Control Port:................................................................................................18 Port Speed:.................................................................................................18 Private Call Priority: ....................................................................................18 Quiet Frequency: ........................................................................................18
Data Options:...............................................................................................19 Auto Save of Data:......................................................................................19 Add Date to all log file names: ....................................................................19 Require Confirmations for Clear and Stop Monitoring Buttons: ..................19 Enable Data Backup every x days: .............................................................19
Screen Settings Tab: ...................................................................................20 Global Tab: .................................................................................................20 Global Font Selection:.................................................................................20 Odd/Even Display Screens: ........................................................................20 Screen and Column Sizes: .........................................................................20 System and Site Information Options:.........................................................20
Activity Screen tab: ......................................................................................21 Font Selection:............................................................................................21 Colors: ........................................................................................................21 Screen Options: ..........................................................................................21
Affiliation Screen tab: ...................................................................................22 Make this screen Visible: ............................................................................22 Font Selection:............................................................................................22 Logging: ......................................................................................................22 Color Settings: ............................................................................................22
Tower Information Screen Settings:.............................................................23 Make this screen Visible: ............................................................................23 Font Selection:............................................................................................23
Patches Screen Settings:.............................................................................23 Make this screen Visible: ............................................................................23

Table of Contents:
Font Selection:............................................................................................23 Logging: ......................................................................................................23
Other Events Screen Settings:.....................................................................24 Make this screen Visible: ............................................................................24 Font Selection:............................................................................................24 Logging: ......................................................................................................24
Grant Log Screen Settings:..........................................................................25 Make this screen Visible: ............................................................................25 Font Selection:............................................................................................25 Logging: ......................................................................................................25
Unknown Packet Screen Settings:...............................................................25 Make this screen Visible: ............................................................................25 Font Selection:............................................................................................25 Logging: ......................................................................................................25
Packet Dump Screen Settings: ....................................................................26 Make this screen Visible: ............................................................................26 Font Selection:............................................................................................26 Logging: ......................................................................................................26
RR Web Service/Proxy Settings: .................................................................27 Enable the Radio Reference Web Service Option: .....................................27 Proxy Settings:............................................................................................27
System Edit Screen:......................................................................................28
TalkGroup Edit Screen: ................................................................................28
Radio ID Edit Screen:....................................................................................29
Saving your data:..............................................................................................30
The Basics: ....................................................................................................30
Files and formats: .........................................................................................31
Configuring tables for UHF/VHF Systems in the Pro-96: ..............................33
Example 1 (UHF):............................................................................................35
Example 2 (VHF):............................................................................................35
Pro96Com Scanner Profile Information ..........................................................36
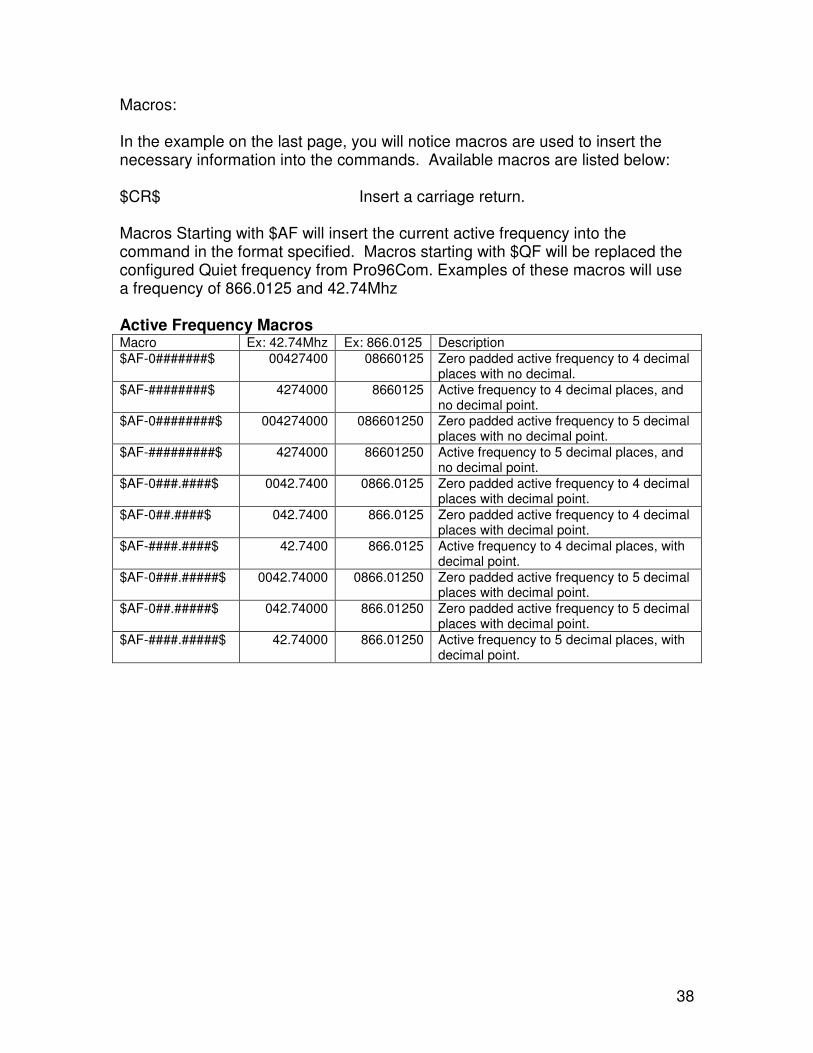
Macros: ...........................................................................................................38
Active Frequency Macros .........................................................................38

Table of Contents:
Quiet Frequency Macros ...........................................................................39
Spacing Macros .........................................................................................39

1
Introduction: Pro96Com is designed to decode the 9600 bps APCO-P25 control channel information using the following decode radios:
• RadioShack PRO-96 • RadioShack PRO-2096 • GRECOM PSR-500 • GRECOM PSR-600 • GRECOM PSR-500C • GRECOM PSR-600C • RadioShack PRO-106
• RadioShack PRO-197
• Uniden BCD396XT
• Uniden BCD996XT
• Anritsu S412D Monitor
Data from the control channel is presented on various tabs on the screen. Pro96Com is also capable of controlling virtually any computer controlled scanner. While the program can control many radios, only radios that are capable of receiving digital transmissions will be supported by the author.
Acknowledgments: I would like to thank the KQA414 group, Jim Sokol, and José E. Torres for their assistance on testing the various versions of this software while in early development. I would also like to thank Rick Parrish for developing the Pro96Dmp program and answering my questions (and there were a lot of them early on). Last but not least, I would like to thank GRE for adding the control channel data dump feature into the Pro-96, Pro-2096, PSR-500, and the PSR-600 scanners. Note: Brand names mentioned in this document are trademarks of their respective companies.
2
Getting Started:
System Requirements: To monitor a 9600 bps APCO-P25 control channel with Pro96Com, you must have the following items:
• A supported decode scanner model.
• Programming cable for the scanner (The PSR-500 and PSR-600 require the USB cable from Radio Shack or GRE)
• Computer with at least one serial port (two serial ports if you intend to control a Uniden scanner) or a computer with a USB port and an appropriate adapter cable to connect to the scanner.
• Computer with the Windows 2000 or later operating system.
3
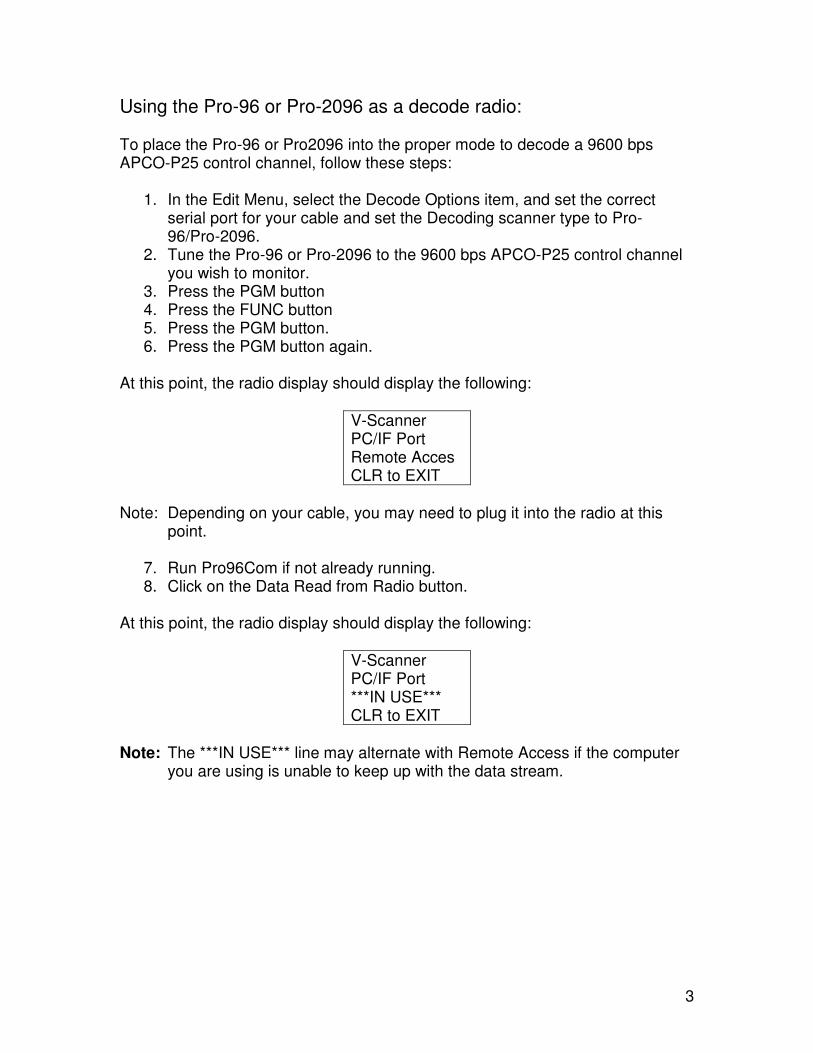
Using the Pro-96 or Pro-2096 as a decode radio: To place the Pro-96 or Pro2096 into the proper mode to decode a 9600 bps APCO-P25 control channel, follow these steps:
1. In the Edit Menu, select the Decode Options item, and set the correct serial port for your cable and set the Decoding scanner type to Pro-96/Pro-2096.
2. Tune the Pro-96 or Pro-2096 to the 9600 bps APCO-P25 control channel you wish to monitor.
3. Press the PGM button 4. Press the FUNC button 5. Press the PGM button. 6. Press the PGM button again.
At this point, the radio display should display the following:
V-Scanner PC/IF Port Remote Acces CLR to EXIT
Note: Depending on your cable, you may need to plug it into the radio at this
point.
7. Run Pro96Com if not already running. 8. Click on the Data Read from Radio button.
At this point, the radio display should display the following:
V-Scanner PC/IF Port ***IN USE*** CLR to EXIT
Note: The ***IN USE*** line may alternate with Remote Access if the computer
you are using is unable to keep up with the data stream.

4
Using the GRECOM PSR-500, PSR-600, PSR-500C, PSR-600C, PRO-106 or PRO-197 as a decode radio:
1. In the Edit Menu, select the Decode Options item, and set the correct serial port for your USB cable and set the Decoding scanner type to PSR-500/PSR-600.
2. Connect the USB serial cable to your computer and your scanner. 3. Tune to an active control channel in a TSYS object using the Analyze
feature of the scanner. 4. Click on the Read Data from Radio button.
Note: If you are using CPU firmware prior to version 1.2, you will need to manually set the CC Dump option in the FUNC-GLOB menu to on. Firmware version 1.2 and later have an option to turn this function on via software, and do not require this to be turned on in the scanner.

5
Screen Layouts: When you start Pro96Com, you will see a screen that looks something like this:
This is the main screen of the program. The following pages will go into detail about each screen that is available.
6
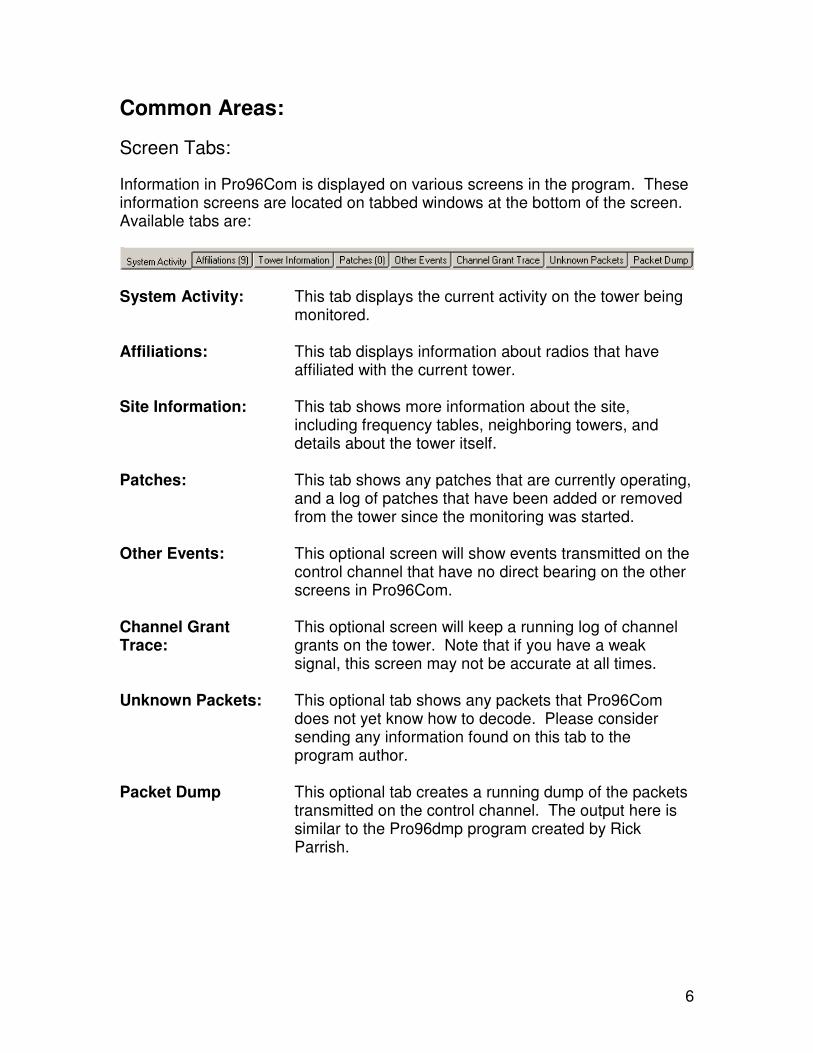
Common Areas:
Screen Tabs: Information in Pro96Com is displayed on various screens in the program. These information screens are located on tabbed windows at the bottom of the screen. Available tabs are:
System Activity: This tab displays the current activity on the tower being
monitored.
Affiliations: This tab displays information about radios that have affiliated with the current tower.
Site Information: This tab shows more information about the site, including frequency tables, neighboring towers, and details about the tower itself.
Patches: This tab shows any patches that are currently operating, and a log of patches that have been added or removed from the tower since the monitoring was started.
Other Events: This optional screen will show events transmitted on the control channel that have no direct bearing on the other screens in Pro96Com.
Channel Grant Trace:
This optional screen will keep a running log of channel grants on the tower. Note that if you have a weak signal, this screen may not be accurate at all times.
Unknown Packets: This optional tab shows any packets that Pro96Com does not yet know how to decode. Please consider sending any information found on this tab to the program author.
Packet Dump This optional tab creates a running dump of the packets transmitted on the control channel. The output here is similar to the Pro96dmp program created by Rick Parrish.

7
Tower Information Area: Once you have begun decoding a control channel, the system Information area will display the System ID, Site number (both decimal and hex format as shown on the Pro-96 display), the WACN ID, and the description of the system and the site if they are available. Depending on the settings in the screen configuration area, the system information section will either look similar to what’s shown to the right, or the abbreviated version shown below.
Decode Information:
While monitoring a control channel using the Pro-96 or Pro-2096, Pro96Com is constantly querying the radio for data. If new data is available, that information is placed in line in a buffer to be processed. The indicators shown below the system information are intended to give you a reference to how well the control channel is being decoded. In the example shown, Pro96Com requested 53 packets from the radio and received 25 valid data packets to those requests. The machine is easily keeping up with the incoming data since the available buffer space is running at 100%. When using a PSR-500 or PSR-600 as the decode radio, the number of packets will always be compared to the theoretical limit of 40 packets per second, and will indicate how many packets were received in the last second.
8
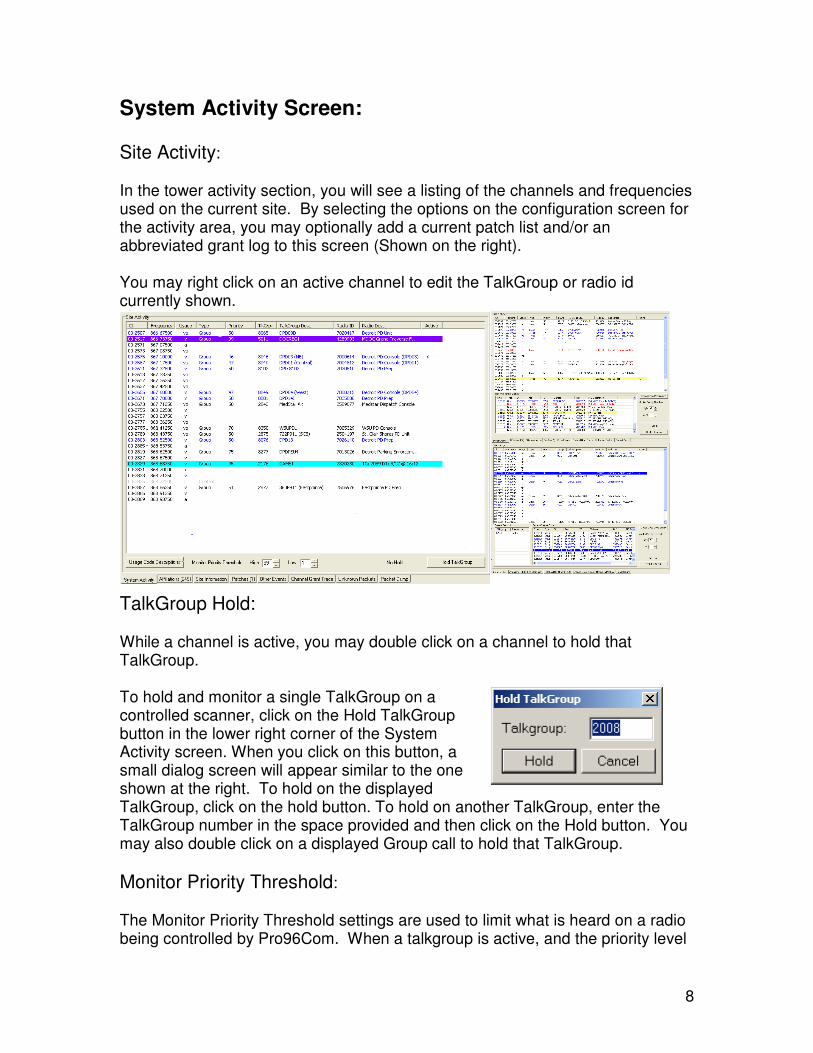
System Activity Screen: Site Activity: In the tower activity section, you will see a listing of the channels and frequencies used on the current site. By selecting the options on the configuration screen for the activity area, you may optionally add a current patch list and/or an abbreviated grant log to this screen (Shown on the right). You may right click on an active channel to edit the TalkGroup or radio id currently shown.
TalkGroup Hold: While a channel is active, you may double click on a channel to hold that TalkGroup. To hold and monitor a single TalkGroup on a controlled scanner, click on the Hold TalkGroup button in the lower right corner of the System Activity screen. When you click on this button, a small dialog screen will appear similar to the one shown at the right. To hold on the displayed TalkGroup, click on the hold button. To hold on another TalkGroup, enter the TalkGroup number in the space provided and then click on the Hold button. You may also double click on a displayed Group call to hold that TalkGroup.
Monitor Priority Threshold: The Monitor Priority Threshold settings are used to limit what is heard on a radio being controlled by Pro96Com. When a talkgroup is active, and the priority level
9
of that talkgroup is at or between the values set, the monitor radio will be tuned to the frequency for that talkgroup. If the priority level of the talkgroup falls outside this range, the talkgroup will be ignored.
Column Description: Ch: This is the channel number being used by the system. The channel
number is broken into two parts. The first part (before the dash (-) is the table ID. APCO-P25 systems may have up to 16 tables in use on the system labeled 0 through 15. The second part of the channel number is the channel within the specified table. More information on channel numbers can be found in the Site Information screen section.
Frequency The calculated actual frequency of the channel based on the information provided on the control channel. This frequency is calculated from the base frequency, spacing, and channel number provided in the frequency table.
Usage This field shows how this frequency has been used by the system. See the section on usage flags following this section for more details.
Type This lists how the channel is currently being used. If the channel is idle, this column will be blank. Possible entries in this field include Group (Standard Group Call), Private (Private call, AKA I-CALL), Phone (Telephone Interconnect). When a call is detected to be Encrypted, a (Enc) indicator will be added to this column.
Priority When a channel is active, this column will list the priority value given to the TalkGroup. These priorities may be set using the TalkGroup editor. A lower number in this field is the higher priority talkgroup. A talkgroup with a priority of 1 will almost always be the selected talkgroup.
TalkGroup When a channel is active, this field will show the TalkGroup number that is active on this channel. If the channel is active with a private call, this will be the Radio ID of the person that initiated the private call.
TalkGroup Description
This is the description of the TalkGroup as entered by you. To edit the TalkGroup descriptions, you may right click on the entry while active on this screen, or select the System option on the menu and then choose the Edit TalkGroup option.
Radio ID This is the radio ID of the current transmitting unit. This ID can be missed if you have a weak signal on the control channel as it is normally only transmitted once per transmission.
Radio Description
This is the user entered description of this radio. The first time Pro96Com sees a radio, it will add a default description that includes the TalkGroup number and date/time it was first seen.
Active This column shows what TalkGroup you are currently monitoring if you are using the option to control a Uniden scanner.

10
Affiliation Information Screen: Before a radio may transmit on a trunked system, it must first notify the controller what tower and TalkGroup it needs. This process is known as affiliating with the tower. This screen lists all radios that have affiliated with the current tower since the program was started. The accuracy of this screen will improve as the program runs.
Site Affiliations Area: On the left side, all radios that have affiliated with the site since the program was run are listed. To change the description of either the TalkGroup or the Radio, right click on the line you wish to change and select the ID you want to change. Then click the refresh button to reload the complete list with the new tags.
Affiliation Log Area: The right side of the screen is a chronological listing of the affiliation activity on the tower since the program was started. You may optionally exclude denied affiliations from this log in the Configuration editor found under the Edit Menu. You may save the information in the affiliation log to a standard CSV format file. This file will be stored in the folder for this radio system. (See Saving your information later in this document for more information about the system folder) The AutoScroll checkbox will allow you to always keep the most recent affiliation activity on the screen at all times. Uncheck this box if you wish to browse the log. The Auto Save checkbox will automatically save new information to a log file every minute. This is the same as pressing the Save button manually every minute. This checkbox is not preserved across restarts.

11
Site Information Screen:
This optional screen shows the information being transmitted on the control channel about adjacent towers, and frequency tables.
Site Information:
In the upper left corner, information about the current tower that is being transmitted by the control channel is displayed.
Adjacent Tower Information:
On the lower left side of the screen, any sites that are being advertised as being close to this site are listed. P25 systems
advertise this information so that radios that are moving away from this site’s coverage area can quickly check for a better signal on one of these sites. Adjacent sites are also known as Neighbor sites.
Frequency Identifier Tables:
On the right side of the screen, any frequency identifier tables that are being broadcast from the tower are listed. ID 0 will almost always be as shown. These tables are used to calculate the correct frequency for the channel numbers that are transmitted on the control channel.
Frequencies are derived from this information by multiplying the spacing by the channel number and adding that result to the base frequency. Information about calculating the values needed to make the Pro-96 properly track VHF and UHF Systems can be found near the end of this documentation.

12
Patches Screen: This optional screen will list any active patches. There is also a patch log that will show any patch activity that has occurred on this tower since the program was started.
Patch List:
The left side of the screen shows any active patches on the system. Patches will be shown in a format similar to that shown on the left. 2009 (MSP D2East) � 2007 (MSP D2North) This means that TalkGroup 2009 is patched to TalkGroup 2007. All transmissions on either 2007 or 2009 will appear on the system as 2007.
Patch Log: The right side of the screen will be a running log of patch activity on this tower. As patches are added or removed from the tower, an entry will be placed in this window to that effect. This information may be saved to a standard CSV format file in the system folder. This file will be named Patches###.CSV where the ### is replaced by the tower number in a decimal format. If this file exists, the new data will be appended to the existing file.

13
Other Events Screen: This optional screen shows informational messages from the control channel. Most people will probably not have a need for this information.
This screen includes the raw information from the control channel (Packet Data) and a description of what that data means. Since the majority of the entries on this screen tend to be unit registrations (Radios “logging on” to the radio system but not affiliating with a TalkGroup yet), there is an option to filter these packet types from this log. The items on this screen may also be saved to a file in the system directory. This information will be stored in the file named Events###.CSV where the ### is replaced with the tower number in decimal format. If the file exists, new data will be appended to that file. Checking the Auto Save option will save new information displayed on the screen to the file every minute. This is the same as pressing the Save button manually every minute.

14
Channel Grant Trace Screen: This is an optional screen that may be enabled in the configuration screen under the Edit menu. When a user presses the push-to-talk button on the radio, a signal is sent to the system controller with a request for an available repeater on the system. If a repeater is available, the controller will assign it to this radio and send a channel grant message for all radios that are using that TalkGroup. This message is called a channel grant message.
This screen lists the date and time, what type of channel grant, the channel number, Frequency, TalkGroup, TalkGroup description, Radio ID and Radio description. This information is dependant on a good signal level to be accurate. The channel grant message is generally only transmitted once and can be easily missed on a weak signal. This information on this screen can be saved to CSV file in the system folder. The file will be named GrantLog-###.csv. As usual, the ### will be replaced with the tower number in decimal format. If the file already exists, new information will be appended to the existing file. As with the other screens, checking the Auto Save option will save new data on this screen to the log file every minute.

15
Unknown Packets Screen: This is an optional screen that may be enabled in the configuration screen under the Edit menu. This screen is primarily intended to help learn any packet formats that Pro96Com doesn’t currently know how to handle. If you enable this option and see packets listed in this screen, please save them to a file and forward them to the software author for analysis.
This optional screen will list all unknown types of packets that may be transmitted over the control channel. You may save this information to a standard TXT format file in the system folder. This file will be named UnknownPackets-###.txt where the ### is replaced by the tower number of the current tower. The Auto Save option will save new data on this screen to the log file every minute. Note: It is not unusual for this screen to remain blank. If you do see information on this screen, please send the information to the program author for analysis.

16
Packet Dump Screen: This is an optional screen that may be enabled in the configuration screen under the Edit menu. This screen will show the interpretation of each packet as it is decoded by Pro96Com. The output of this screen is similar in format to the pro96dmp program written by Rick Parrish. This screen is intended primarily as a debugging tool. It is not recommended that you leave this option turned on as it will use a lot of CPU and memory. Some people testing this feature have also reported crashing issues, presumed to be due to memory issues.
Note: This screen will store up to 10,000 lines of data, after which the first lines of data will be deleted. This has the effect of appearing to auto scroll even if the auto scroll checkbox is not checked. You may save this information to a standard TXT format file in the system folder. This file will be named Dump-###.txt where the ### is replaced by the tower number of the current tower. The Auto Save option will save new data on this screen to the log file every minute.

17
Configuration Screen: This screen may be accessed by selecting the Configuration option in the Edit Menu. Configuration options are available on the tabs shown. Please note that this area has been extensively redesigned in this version.
Decode Configuration Tab: This screen has all of the general configuration options for radio being used to decode the control channel data.
Communications: In the Communications area, you may select the serial port number that will be connected to your Pro-96 scanner. This option may not be changed while the program is reading data from the Pro-96.
Decoding Scanner Type: This setting determines how Pro96Com will look for the control channel data. How this information is obtained from the scanner is very different depending on the scanner model being used.
Latency: The Latency setting controls the amount of time between requests to the Pro-(20)96. Setting this option too high will degrade the decode rate dramatically. Setting this option to 0 will remove all delays between requests. Using a setting of 0 on a single processor machine will cause heavy use of the CPU and may slow down other applications on the computer considerably. Note: The Latency setting has no effect when using the PSR-500/PSR-600 as decode radios.

18
Scanner Control Tab: This tab allows you to enable control of a second scanner. Since 9600 bps APCO-P25 systems are 100% digital, only a receiver capable of decoding a P25 CAI audio stream should be used. Control of a second scanner requires a computer with at least two serial ports. One serial port will be connected to the Pro-96 to read the control channel data, the second serial port will be connected to the second scanner to be used to monitor the voice transmissions. Radio Profile: Starting with version 1.40, Pro96Com uses “Scanner Profiles” to control a second scanner. Profiles for the Uniden BC250D/BC785D, BC296D/BC769D, and the BCD396T/BCD996T scanners are included with the program. Control Port: This port is used to control the monitor radio. This port may not be set to the same port as the one being used to collect data from the decode scanner. Setting this port to the same port as the decode scanner will automatically disable the control option. Port Speed: The controlled scanners may use a variety of port speeds. Set this speed to be the same as the controlled scanner supports. Private Call Priority: If you wish to monitor private calls, set the priority level you wish to use on these conversations. To disable private calls, set the priority level to 0. Quiet Frequency: The quiet frequency should be set to a frequency that is not used in your area. The monitor radio will be set to this frequency whenever there is no activity on the system being monitored, or when all active channels are set to a priority of Ignore.

19
Data Options: This tab is used to control the handling of the data collected by Pro96Com. Auto Save of Data: This option will save the data being collected at intervals you select between 1 minute and 60 minutes. These auto saves will only occur while Pro96Com is actively monitoring a tower. Add Date to all log file names: This checkbox will add the date to the beginning of the file name for all log files. This allows you to have a separate log file for each day if you wish. The date will be added as YYYYMMDD- Require Confirmations for Clear and Stop Monitoring Buttons: This option will enable a confirmation box whenever a Clear button or the stop decoding button is pressed. Enable Data Backup every x days: This option will enable an automatic check and backup of your system### folders stored by Pro96Com. If this option is enabled, every time Pro96Com is started, it will check to see when the last backup was done. If more than the number of days specified have passed, a backup will be performed in the background (a backup in progress indication will be shown next to the Read Radio button). By default this option will create a folder in the current System### folder named “Backup” and copy the files there. Alternatively, you may specify a specific folder where backups should be stored. When using this option, the entire contents of each System### folder will be copied to this location.

20
Screen Settings Tab: This tab contains all of the settings for the various screens displayed by Pro96Com. Global Tab: This tab includes all of the settings that are used on all of the screens. Global Font Selection: If the Use Global Font option is checked, the font, size and bold settings on this screen will be used for all program screens. Odd/Even Display Screens: These options allow you to select the colors to use on screens that use an alternating color pattern. Screen and Column Sizes: Checking this option will have Pro96Com save all window sizes and positions in the INI file. These settings will then be reloaded on the next startup. This option will also save column sizes within each screen. System and Site Information Options: The “Show abbreviated system information at the bottom of the screen” option controls the display of the system and site information on the main window. If this option is checked, the system information on the right side of the screen will be hidden, and some system and site information will be shown at the bottom of the screen.

21
Activity Screen tab: This tab contains all settings relating to the activity screen. Font Selection: If the Use Global Font option is off on the Global tab, this section of the screen allows you to choose the font, size and bold options for this screen. Colors: This section allows you to set the default display color for talkgroups that have not had colors assigned specifically to them. You may also select the color of the current control channel line on the activity screen. Screen Options: There are two options in this section that control the optional extra items that may be added to the activity screen. The “Include Patch List on Activity Screen” option will display a small list on the lower left corner of the activity screen that lists all active patches on the system. The “Include Abbreviated Grant Log on activity screen” option will duplicate the grant log screen information in a smaller list at the bottom of the activity screen. You may select the number of lines retained on this list by selecting the number in the space provided.

22
Affiliation Screen tab: Make this screen Visible: This checkbox will hide or make visible the affiliation information. Even with this screen hidden, the information is still collected as needed. Font Selection: If the Use Global Font option on the Global screen is unchecked, this area will allow you to set the font, size, and bold options for this screen only. Logging: These options control logging of the information collected on this screen. The Turn on Auto Logging at Startup will turn on the automatic logging of affiliations when the program starts. The Include Denied Affiliations option controls the display of failed affiliations. Color Settings: This option allows you to choose between the alternating color scheme or the assigned talkgroup colors on the affiliation list.

23
Tower Information Screen Settings: Make this screen Visible: This checkbox will hide or make visible the tower information screen. Even with this screen hidden, the information is still collected as needed. Font Selection: If the Use Global Font option on the Global screen is unchecked, this area will allow you to set the font, size, and bold options for this screen only.
Patches Screen Settings: Make this screen Visible: This checkbox will hide or make visible the tower information screen. Even with this screen hidden, the information is still collected as needed. Font Selection: If the Use Global Font option on the Global screen is unchecked, this area will allow you to set the font, size, and bold options for this screen only. Logging: The Turn on Auto Logging at Startup will turn on the automatic logging of patch information when the program starts.

24
Other Events Screen Settings: Make this screen Visible: This checkbox will hide or make visible the Other Events screen. Even with this screen hidden, the information is still collected as needed. Font Selection: If the Use Global Font option on the Global screen is unchecked, this area will allow you to set the font, size, and bold options for this screen only. Logging: The Turn on Auto Logging at Startup will turn on the automatic logging of patch information when the program starts.

25
Grant Log Screen Settings: Make this screen Visible: This checkbox will hide or make visible the tower information screen. Even with this screen hidden, the information is still collected as needed. Font Selection: If the Use Global Font option on the Global screen is unchecked, this area will allow you to set the font, size, and bold options for this screen only. Logging: The Turn on Auto Logging at Startup will turn on the automatic logging of patch information when the program starts.
Unknown Packet Screen Settings: Make this screen Visible: This checkbox will hide or make visible the Unknown Packets screen. Even with this screen hidden, the information is still collected as needed. Font Selection: If the Use Global Font option on the Global screen is unchecked, this area will allow you to set the font, size, and bold options for this screen only. Logging: The Turn on Auto Logging at Startup will turn on the automatic logging of patch information when the program starts.

26
Packet Dump Screen Settings: Make this screen Visible: This checkbox will hide or make visible the Unknown Packets screen. Even with this screen hidden, the information is still collected as needed. Font Selection: If the Use Global Font option on the Global screen is unchecked, this area will allow you to set the font, size, and bold options for this screen only. Logging: The Turn on Auto Logging at Startup will turn on the automatic logging of patch information when the program starts.

27
RR Web Service/Proxy Settings: This tab is used to control the handling of the data collected by Pro96Com. Enable the Radio Reference Web Service Option: This option enables the entry of your RadioReference.com User Name and Password. If you have a premium subscription to the radioreference.com web site, Pro96Com will allow you to download the current information for the system you are monitoring. Proxy Settings: If your internet connection requires the use of a proxy server, you can specify this information here.
28
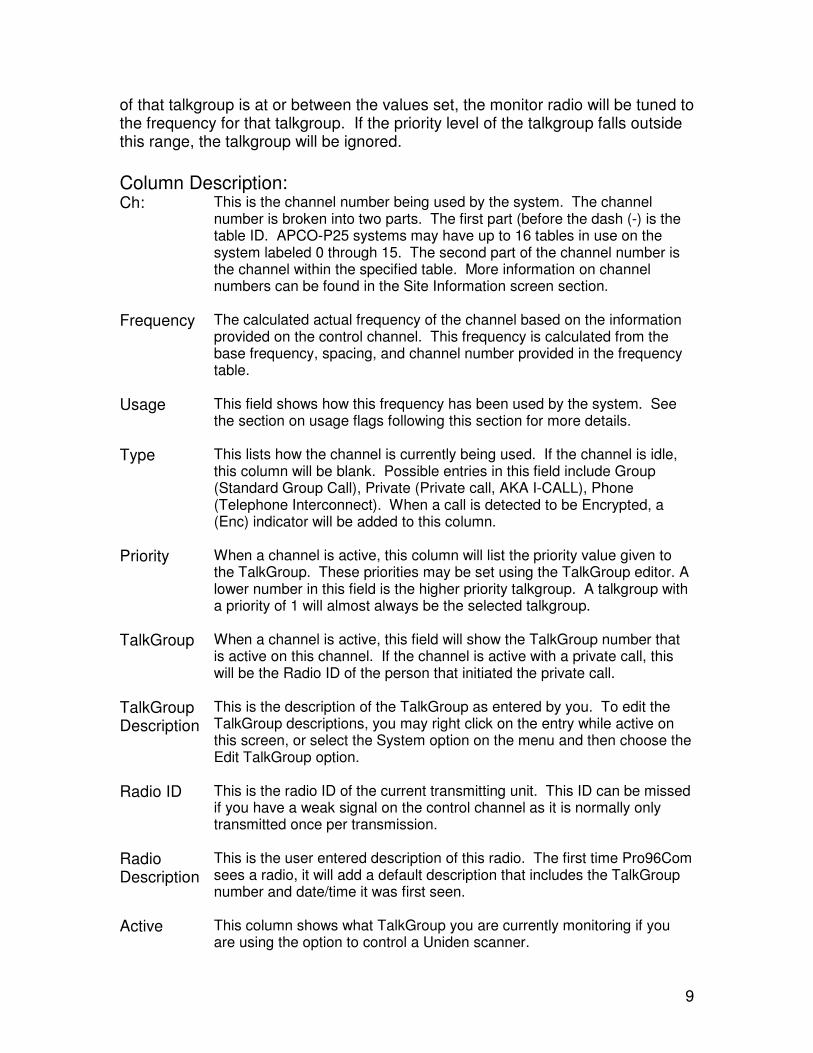
System Edit Screen: This screen allows you to edit the basic information about the current system and tower being modified. This screen may be accessed from the System menu.
TalkGroup Edit Screen: This screen allows you to edit the text label and priority setting for a TalkGroup. This screen may be accessed from the System menu.
To edit a TalkGroup, enter the TalkGroup number in the TalkGroup field and then move to the TalkGroup Name field. If a tag and priority are already associated with this TalkGroup number, the fields will be filled in with that information. You may also edit a TalkGroup by right clicking on an active entry on the system activity screen and selecting the edit TalkGroup option from that menu. This option is also available on the Affiliation screen. You may set the TalkGroup priority to any level between 0 and 99. Setting the priority to 0 will ignore the talkgroup when controlling a second scanner. You may set specific colors for this talkgroup by clicking on the Text Color or BG Color buttons. To return the color to the defaults set in the global tab, click on the Default button.

29
Radio ID Edit Screen: This screen is similar to the TalkGroup edit screen.
This screen may be accessed using the same methods as those listed for the TalkGroup edit screen.

30
Saving your data:
The Basics: Pro96Com can save the data that is collected from a site for future reference. All information about a particular system is stored in the radio system folder. The system folder will be located in the folder where Pro96Com is located, and will be named System### where the ### is replaced by the hexadecimal system ID. As an example, we’ll use the Michigan Public Safety Communications System (MPSCS). The system ID for this system is 796. All files related to this system once saved may be found in the System796 folder located in the Pro96Com folder. To save your data, you must use the Save System Information option in the file menu. If you switch towers, you must save the information you have collected before starting the data collection on the new tower or all new information collected will be lost.

31
Files and formats: Pro96Com uses various files to store the information about the system. All files relating to a particular system will be stored in the system folder. File Name Description
System.ini This file contains the basic information about the system including the system name, and the names of the individual towers that are a part of the system.
Radios.txt This file contains a list of all of the radio ids that have been seen by Pro96Com. Information is stored in the file one radio per line. See the file for specifics on the format.
TalkGroups.txt This file contains a list of all TalkGroup that have been seen by Pro96Com. All information about these TalkGroups is stored in this file including the text tag and monitor priority. See the file for more information about the format of this file.
Tower####.txt These files will be created for each tower that has been monitored by Pro96Com. The #### in the file name will be replaced by the tower number of the specific tower in a decimal format. This file stores the frequency information for this tower, as well as the frequency tables and neighbor site information.
Affiliations-###.csv These files will be created by pressing the save button on the Affiliation Log screen. The ### in the file name will be replaced by the tower number in decimal format. If this file already exists when the save button is pressed, any new information will be appended to the end of the file.
GrantLog-###.csv These files will be created by pressing the save button on the Grant Trace Log screen. The ### in the file name will be replaced by the tower number in decimal format. If this file already exists when the save button is pressed, any new information will be appended to the end of the file.
UnknownPackets-###.txt These files will be created by pressing the save button on the Unknown Packets screen. The ### in the file name will be replaced by the tower number in decimal format. If this file already exists when the save button is pressed, any new information will be appended to the end of the file.

32
EventLog-###.csv These files will be created by pressing the save button on the Other Events screen. The ### in the file name will be replaced by the tower number in decimal format. If this file already exists when the save button is pressed, any new information will be appended to the end of the file.
Dump-###.txt These files will be created by pressing the save button on the Packet Dump screen. The ### in the file name will be replaced by the tower number in decimal format. If this file already exists when the save button is pressed, any new information will be appended to the end of the file.

33
Configuring tables for UHF/VHF Systems in the Pro-96: If you are monitoring APCO P25 systems that use the standard 800Mhz identifiers (Base of 851.00625Mhz, Spacing 0.00625) then there is no need to program in tables into the radio. If you are monitoring a system that uses different identifiers, you will need to use the custom table or multi-table option in the radio to properly track the system. APCO P-25 systems can have up to 16 identifier tables. Each identifier contains the information needed by the radios on the system to calculate transmit and receive frequencies needed to communicate on the system. Identifiers are made up of a base frequency, channel spacing, transmit offset, and channel bandwidth. A typical identifier table for 800Mhz APCO P25 systems would look like the following: ID Base Spacing TX Offset BandWidth
0 851.00625 0.00625 -45.00000 0.00625 On a Federal UHF system, a typical identifier table might look something like this: ID Base Spacing TX Offset BandWidth
0 851.00625 0.00625 -45.00000 0.00625 2 406.00000 0.01250 10.00000 0.01250
On a VHF System, you may see something like this: ID Base Spacing TX Offset BandWidth
0 851.00625 0.00625 -45.00000 0.00625 1 762.00000 0.00625 30.00000 0.00625 2 136.00000 0.01250 -5.00000 0.01250 3 136.00000 0.01250 -5.10000 0.01250 4 136.00000 0.01250 -5.20000 0.01250 5 136.00000 0.01250 -3.00000 0.01250 6 136.00000 0.01250 -4.50000 0.01250 7 136.00000 0.01250 3.25000 0.01250 8 136.00000 0.01250 3.00000 0.01250 9 136.00000 0.01250 4.50000 0.01250
These identifiers give you the information needed to make the Pro-96 properly track and monitor these systems. The Pro-96 has only 6 available table slots where the radio systems could use up to 16 identifiers. The key is to have Pro96Com monitor the specific towers you wish to listen to, and make a note of which identifiers are in use on those particular towers. You would then calculate the values needed for the tables.

34
For each identifier in use on the tower to be monitored, you can calculate the values needed by using the following formulas: Base: Use the base frequency listed in the identifier. CH Lo: Identifier number * 4096 CH Hi: CH Lo + 4095 Offset: Same as CH Lo Step: Spacing value shown in the Identifier The table below lists all of the calculated channel numbers needed for the Pro-96 tables for each identifier.
Identifier CH Lo Ch Hi Offset 0 0 4095 0 1 4096 8191 4096 2 8192 12287 8192 3 12288 16383 12288 4 16384 20479 16384 5 20480 24575 20480 6 24576 28671 24576 7 28672 32767 28672 8 32768 36863 32678 9 36864 40959 36864
10 40960 45055 40960 11 45056 49151 45056 12 49152 53247 49152 13 53248 57343 53248 14 57344 61439 57344 15 61440 65535 61440
35
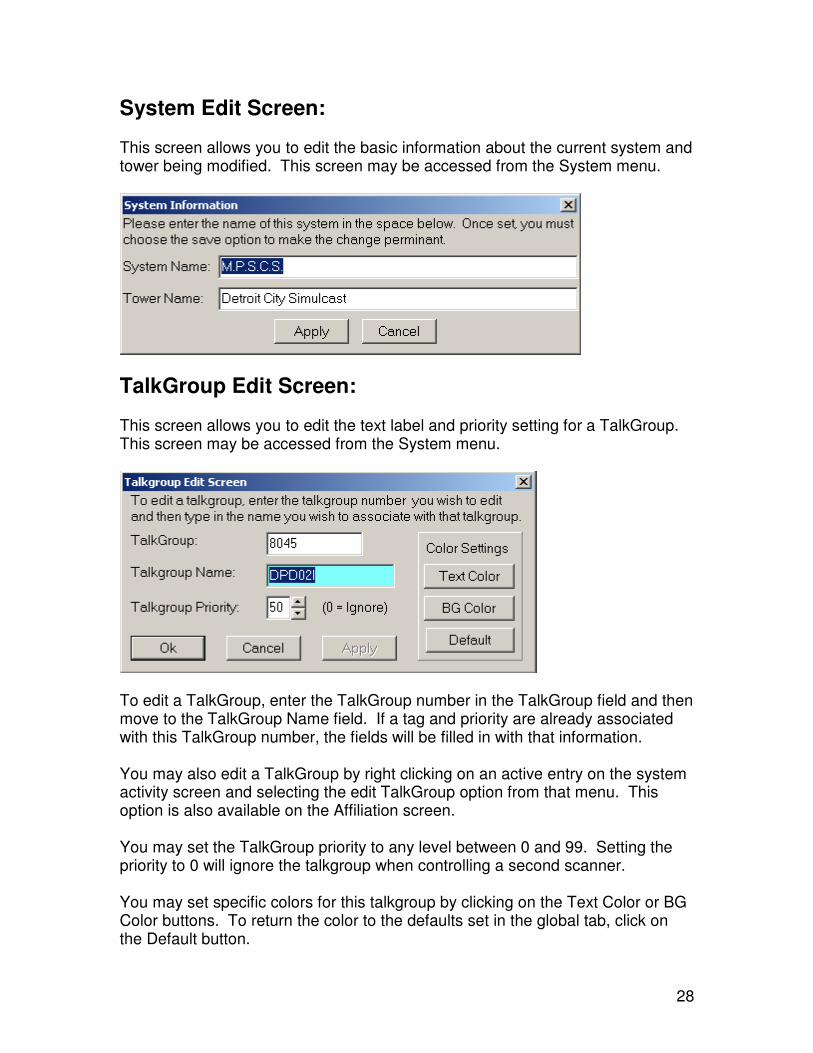
Example 1 (UHF): ID Base Spacing TX Offset BandWidth
2 406.00000 0.01250 10.00000 0.01250 Base: 406.00000 CH Lo: Identifier * 4096
2 * 4096 8192
CH Hi: CH Lo + 4095 8192 + 4095 12287 Offset: 8192 (Same as CH Lo) Step: 12.5Khz Example 2 (VHF): ID Base Spacing TX Offset BandWidth
3 136.00000 0.01250 -5.10000 0.01250 4 136.00000 0.01250 -5.20000 0.01250
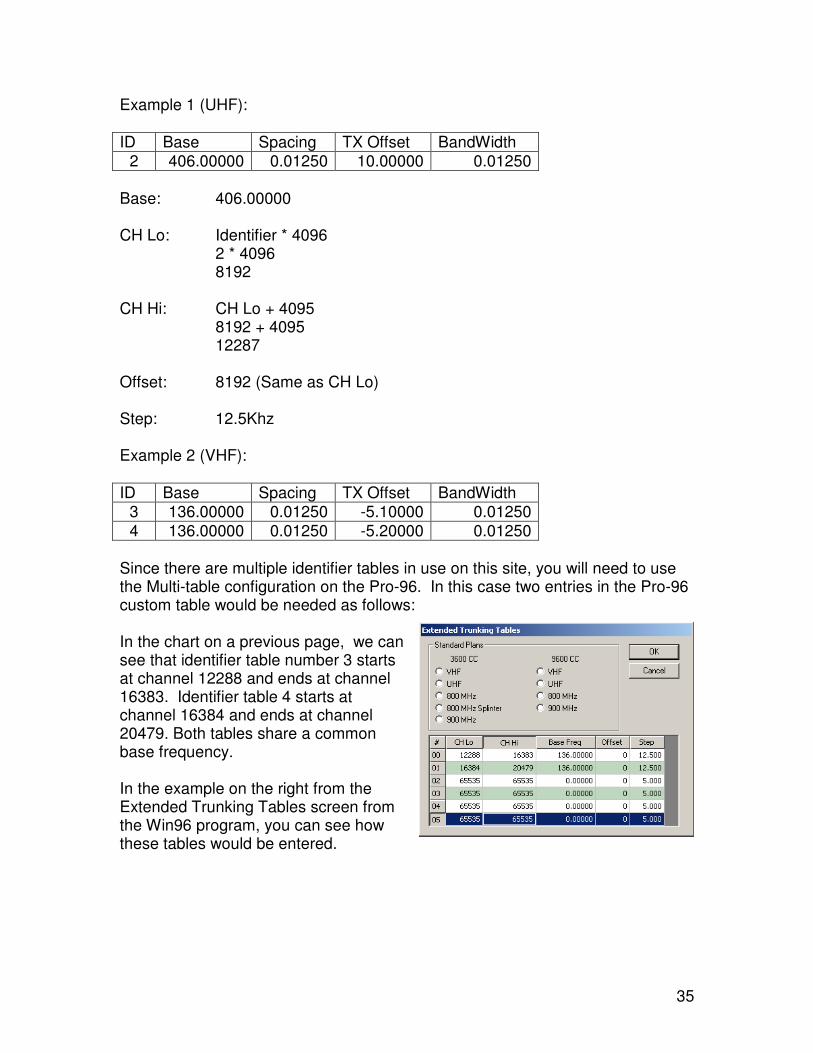
Since there are multiple identifier tables in use on this site, you will need to use the Multi-table configuration on the Pro-96. In this case two entries in the Pro-96 custom table would be needed as follows: In the chart on a previous page, we can see that identifier table number 3 starts at channel 12288 and ends at channel 16383. Identifier table 4 starts at channel 16384 and ends at channel 20479. Both tables share a common base frequency. In the example on the right from the Extended Trunking Tables screen from the Win96 program, you can see how these tables would be entered.

36
Pro96Com Scanner Profile Information Pro96Com version 1.40 and above includes the ability to use scanner control profiles. These profiles contain a subset of commands needed to control any scanner that is capable of computer control. A profile for a scanner is done through the use of a file with a .scanner extension (i.e. BC250D.Scanner, BC296D.Scanner, Etc.) The format of the scanner profile is a standard INI style file. The file contains two sections: [Scanner] This section contains basic information about the scanner, and the
port settings needed to communicate with this scanner. [Commands] This section contains the command templates for some basic
functions of the scanner. Detailed information about these sections may be found on the following pages. The [Scanner] section has the following keys: Description This is a basic description of the scanner. While not
currently used by Pro96Com, this key is planned to be used in future versions to make selection of the various profiles easier for the user.
PortBits This key is for the number of data bits to be used for
communicating with the scanner. Typical settings for this key would be 7 or 8.
PortParity This key is for the parity setting for the communications port.
Typical settings for this key would be N, E, or O where N=No Parity, E=Even Parity, and O=Odd Parity
PortStop This key contains the number of stop bits for the
communications port. The typical setting for this key would be 1 in almost all cases.
Typical Settings: [Scanner] Description=Uniden BC250D Scanner PortBits=8 PortParity=N PortStop=1

37
The [Commands] section has the following keys. If a command is not entered into the profile, nothing will be sent to the scanner when that command would normally be triggered. Init This command is sent to the scanner when monitoring of a
system is started. Scan This command will be used to place the radio in scan mode. Manual This command is used to place the scanner in Manual mode. Quiet This command is used to set the scanner to the defined
quiet frequency when there are no talkgroups to be monitored.
Active This command is used to set the scanner to the frequency of
the active talkgroup. This command is the default command to be sent when a frequency becomes active for all bandwidths unless a specific bandwidth is overridden. If you are not using spacing specific commands, you do not have to define any of the other Active commands that follow:
Active5 This command will be used when the bandwidth advertised
by the system is 5Khz. Active625 This command will be used when the bandwidth advertised
by the system is 6.25Khz. Active10 Same as above, but for 10Khz bandwidth. Active125 Same as above, but for 12.5Khz bandwidth. Active25 25Khz Active50 50Khz Active100 100Khz Example: [Commands] Scan=KEY01$CR$ Manual=MA001$CR$ Quiet=RF$AF-0#######$$CR$ Active=RF$AF-0#######$ $SP-KHZ$K$CR$ Active6.25=RF$ AF-0#######$ 12.5K$CR$
38
Macros: In the example on the last page, you will notice macros are used to insert the necessary information into the commands. Available macros are listed below: $CR$ Insert a carriage return. Macros Starting with $AF will insert the current active frequency into the command in the format specified. Macros starting with $QF will be replaced the configured Quiet frequency from Pro96Com. Examples of these macros will use a frequency of 866.0125 and 42.74Mhz Active Frequency Macros Macro Ex: 42.74Mhz Ex: 866.0125 Description $AF-0#######$ 00427400 08660125 Zero padded active frequency to 4 decimal
places with no decimal. $AF-########$ 4274000 8660125 Active frequency to 4 decimal places, and
no decimal point. $AF-0########$ 004274000 086601250 Zero padded active frequency to 5 decimal
places with no decimal point. $AF-#########$ 4274000 86601250 Active frequency to 5 decimal places, and
no decimal point. $AF-0###.####$ 0042.7400 0866.0125 Zero padded active frequency to 4 decimal
places with decimal point. $AF-0##.####$ 042.7400 866.0125 Zero padded active frequency to 4 decimal
places with decimal point. $AF-####.####$ 42.7400 866.0125 Active frequency to 4 decimal places, with
decimal point. $AF-0###.#####$ 0042.74000 0866.01250 Zero padded active frequency to 5 decimal
places with decimal point. $AF-0##.#####$ 042.74000 866.01250 Zero padded active frequency to 5 decimal
places with decimal point. $AF-####.#####$ 42.74000 866.01250 Active frequency to 5 decimal places, with
decimal point.

39
Quiet Frequency Macros Macro Ex: 42.74Mhz Ex: 866.0125 Description $QF-0#######$ 00427400 08660125 Zero padded active frequency to 4 decimal
places with no decimal. $QF-########$ 4274000 8660125 Active frequency to 4 decimal places, and
no decimal point. $QF-0########$ 004274000 086601250 Zero padded active frequency to 5 decimal
places with no decimal point. $QF-#########$ 4274000 86601250 Active frequency to 5 decimal places, and
no decimal point. $QF-0###.####$ 0042.7400 0866.0125 Zero padded active frequency to 4 decimal
places with decimal point. $QF-0##.####$ 042.7400 866.0125 Zero padded active frequency to 4 decimal
places with decimal point. $QF-####.####$ 42.7400 866.0125 Active frequency to 4 decimal places, with
decimal point. $QF-0###.#####$ 0042.74000 0866.01250 Zero padded active frequency to 5 decimal
places with decimal point. $QF-0##.#####$ 042.74000 866.01250 Zero padded active frequency to 5 decimal
places with decimal point. $QF-####.#####$ 42.74000 866.01250 Active frequency to 5 decimal places, with
decimal point.
Spacing Macros Macro Ex: 6.25Khz Ex: 12.5Khz Description $SP-MHZ$ 0.00625 0.0125 Spacing in Mhz, decimal places as needed. $SP-MHZ4$ 0.0062 0.0125 Spacing in Mhz to 4 decimal places. $SP-MHZ5$ 0.00625 0.01250 Spacing in Mhz to 5 decimal places $SP-KHZ 6.25 12.5 Spacing in Khz, decimal places as needed. $SP-KHZ2 6.25 12.50 Spacing in Khz, 2 decimal places $SP-KHZ3 6.250 12.500 Spacing in Khz, 3 decimal places $SP-KHZ4 6.2500 12.5000 Spacing in Khz, 4 decimal places $SP-KHZ5 6.25000 12.50000 Spacing in Khz, 5 decimal places $SP-KHZ*10$ 62.5 125 Spacing in Khz multiplied by 10, decimal
places as needed. $SP-KHZ*100$ 625 1250 Spacing in Khz multipled by 100, decimal
places as needed