Pro-Watch Software Suite - Honeywell Integrated Security€¦ · Caution: Cautions provide...
70
Document 7-901073V1 Pro-Watch Software Suite Installation Guide © 2012 Honeywell Release 4.0 Pro-Watch ™ Software Suite Release 4.0 Installation Guide
Transcript of Pro-Watch Software Suite - Honeywell Integrated Security€¦ · Caution: Cautions provide...

Document 7-901073V1 Pro-Watch Software Suite Installation Guide © 2012 Honeywell Release 4.0
Pro-Watch™ Software SuiteRelease 4.0
Installation Guide

Copyright© 2012 Honeywell. All rights reserved.
Pro-Watch name and logo are registered trademarks of Honeywell. All other product and brand names are the service marks, trademarks, registered trademarks, or registered service marks of their respective owners. Printed in the United States of America. Honeywell reserves the right to change any information in this document at any time without prior notice.
Microsoft and Windows are registered trademarks of Microsoft Corporation. Windows Server is a trademark of Microsoft Corporation.
Ordering Information
Please contact your local Honeywell Access Systems representative or visit us on the web at http://www.honeywellintegrated.com/ for information about ordering.
Feedback
Honeywell Access Systems appreciates your comments about this manual. Please visit us on the web at http://www.honeywellintegrated.com/ to post your comments.
Pro-Watch Software Suite Installation Guide, Release 4.0 Document 7-901073V1

ii www.honeywell.com

CONTENTS
Chapter 1 Preface
1.1 Purpose of this Document....................................................................................... 21.2 Audience.................................................................................................................... 21.3 Pro-Watch Documentation Set .............................................................................. 21.4 Use of Symbols ........................................................................................................ 21.5 Compliance ............................................................................................................... 3
Chapter 2 Pro-Watch 4.0 Installation
2.1 Overview ................................................................................................................... 22.2 Runtime Requirements............................................................................................ 22.3 Supported Operating Systems................................................................................ 22.4 Installation Types..................................................................................................... 3
2.4.1 Pro-Watch Software Suite ................................................................... 32.4.2 Pro-Watch Web Component................................................................ 4
2.5 Installing Pro-Watch - Preliminary Steps............................................................. 42.5.1 Installation Options ............................................................................. 7
2.5.1.1 Option1........................................................................................ 72.5.1.2 Option 2....................................................................................... 9
2.6 Complete Installation ............................................................................................ 102.7 Server-Only Installation........................................................................................ 152.8 Client (Complete) Installation.............................................................................. 172.9 Terminal Client Installation.................................................................................. 212.10 Database Only Installation ................................................................................. 222.11 Custom Installation.............................................................................................. 242.12 Installing Pro-Watch - Final Steps .................................................................... 262.13 Installing Pro-Watch Web Components........................................................... 32
2.13.1 HTTP Error 500.21 Internal Server Error ....................................... 392.13.2 Configuring HTTPS in Pro-Watch Web Client Login page ........... 40
2.14 Upgrade Installation Process.............................................................................. 442.15 Pro-Watch 4.00.0 product upgrade with SoftKey License............................ 482.16 Pro-Watch Web Component Deployment Scenarios ..................................... 50
2.16.1 Single Machine Deployment ........................................................... 502.16.1.1 Scenario ................................................................................... 50
2.16.2 Distributed Machines Deployment.................................................. 502.16.2.1 Scenario 1 ................................................................................ 502.16.2.2 Scenario 2 ................................................................................ 512.16.2.3 Scenario 3 ................................................................................ 51
Pro-Watch Software Suite Installation Guide, Release 4.0, Document 7-901073V1 iii

2.16.2.4 Scenario 4 ................................................................................ 522.17 Repair and Modify the Pro-Watch Web Component ..................................... 532.18 Appendix............................................................................................................... 58
2.18.1 Installing .Net Framework 4.0......................................................... 58
iv www.honeywell.com
Preface 1
In this preface...
Purpose of this Document 2
Audience 2
Pro-Watch Documentation Set 2
Use of Symbols 2
Pro-Watch Software Suite Installation Guide, Release 4.0, Document 7-901073V1 1

PrefacePurpose of this Document
1.1 Purpose of this Document The Pro-Watch Software Suite Installation Guide provides the procedures and information necessary to install Release 4.0 of the Pro-Watch access control system and Pro-Watch Web Component.
These procedures require Microsoft Windows Server 2008 or Server 2008 R2 for the Pro-Watch Server/Web Server. Microsoft Windows 7 or Vista for the Pro-Watch Web Client.
1.2 Audience This guide is written for the Pro-Watch system administrator who installs the Pro-Watch software on local machines.
1.3 Pro-Watch Documentation SetThe Pro-Watch Software Suite documentation set includes the following manuals:
• Pro-Watch Software Suite Guide (7-901071-K) in Portable Data File (PDF) format and as an Hypertext Markup Language (HTML) online help file accessed from the software.
• Pro-Watch Software Suite Quick Reference Guide in PDF format.
• Pro-Watch Software Suite Installation Guide (7-901073-D) in PDF format.
• Pro-Watch Software Suite Release Notes, Release 4.0.
1.4 Use of SymbolsThe following symbols appear in this guide:
Danger: Dangers provide information that you must follow to avoid the risk of physical injury.
Warning: Shock warnings provide information that you must follow to avoid physical injury by electrical shock.
Caution: Cautions provide information that you must follow to avoid damage to the hardware or software components of the system.
Note: Notes provide important information about a procedure or topic.
Tip: Tips provide information that maximizes the implementation of a feature.
2 www.honeywell.com

PrefaceCompliance
1.5 ComplianceTo obtain applicable EU compliance Declaration of Conformities for this product, please refer to our website, http://www.security.honeywell.com/hsce/international/index.html.
For any additional information regarding the compliance of this product to any EU-specific requirements, please contact:
Honeywell Security & Communications
Honeywell Security - Quality Assurance Dept., Newhouse Industrial Estate
Motherwell
Lanarkshire ML1 5SB
Scotland
United Kingdom
Tel: +44(0) 1698 738200
Email: [email protected]
Pro-Watch Software Suite Installation Guide, Release 4.0, Document 7-901073V1 3

PrefaceCompliance
4 www.honeywell.com

Pro-Watch 4.0 Installation 2
In this guide...
Overview 2
Runtime Requirements 2
Supported Operating Systems 2
Installation Types 3
Installing Pro-Watch - Preliminary Steps 4
Complete Installation 10
Server-Only Installation 14
Client (Complete) Installation 17
Terminal Client Installation 21
Database Only Installation 22
Custom Installation 24
Installing Pro-Watch - Final Steps 26
Installing Pro-Watch Web Components 32
Upgrade Installation Process 44
Pro-Watch 4.00.0 product upgrade with SoftKey License 48
Pro-Watch Web Component Deployment Scenarios 50
Repair and Modify the Pro-Watch Web Component 53
Appendix 58
Pro-Watch Software Suite Installation Guide, Release 4.0, Document 7-901073V1 1
Pro-Watch 4.0 InstallationOverview
2.1 OverviewThis guide documents the installation of the Pro-Watch 4.0 software and Pro-Watch Web Component. Note that after you install this software, you will also need to complete the Pro-Watch licensing procedure documented in the Pro-Watch 4.0 Software Keys Guide, 800-01823V1.
2.2 Runtime RequirementsPro-Watch (PW) Software Suite 4.0 requires:
• MDAC 2.8 SP1
• Microsoft .Net Framework 3.5 SP1 (32-bit required)
• Microsoft Windows Installer 4.5
• Microsoft Windows PowerShell 1.0
Pro-Watch Software Suite 4.0 also requires Microsoft SQL Server 2005 or 2008. If neither is installed, the Pro-Watch installation program will install Microsoft SQL Server 2008 Express for you. Note, however, that both the MS SQL x32 and x64 installation executables must be in the same folder as the Pro-Watch installation executable.
Caution: Ensure that these required components are present on the local system; if they are not, you must install them before continuing with the rest of the Pro-Watch installation.
Note: The setup file and installation instructions in this guide are valid only for Pro-Watch Version 4.0 or greater. Pro-Watch Software Suite Release 3.81 must be already installed if you are upgrading to Release 4.0.
Pro-Watch (PW) Web Component 4.0 requires:
• Microsoft .Net Framework 4.0: Refer “Installing .Net Framework 4.0“ on page 58 for the installation procedure.
• IIS 7.5: By default the Pro-Watch 4.0 Software Suite enables the IIS 7.5, if it is not enabled by the supported operating system.
• IE 8: A user can download IE 8 from the web and install.
Caution: Ensure that these required components are present on the local system; if they are not, the user cannot install and access the Pro-Watch Web component.
2.3 Supported Operating Systems Requirements of OS are:
For Pro-Watch Server/Web Server:
• Windows 2008 Server or Server 2008 R2.
For Pro-Watch Web Client:
• Windows 7 or Vista
2 www.honeywell.com

Pro-Watch 4.0 InstallationInstallation Types
Note: Pro-Watch 4.0 currently does not support Windows NT 4.0, Windows 2000 Server, Windows 2003 Server, or Windows XP.
2.4 Installation TypesThe Pro-Watch Software Suite allows you to install the following:
1. Pro-Watch Software Suite
2. Pro-Watch Web Component
Note: The above installations are dependent on the feature check box selected in Installation Wizard.
2.4.1 Pro-Watch Software SuiteBelow are the configuration options for installing a new instance of Pro-Watch Software Suite as described in the section “Installing Pro-Watch - Preliminary Steps“ on page 4.
• Complete Pro-Watch Installation – Installs all of the Pro-Watch components. Provides full server and client functionality.
• Server-Only Pro-Watch Installation – Installs only the Pro-Watch Server and configures the database.
Note: Configuring the Pro-Watch database involves either installing a new database or upgrading a pre-existing database to function with this version of Pro-Watch.
• Pro-Watch Client (Complete) – Installs only the Pro-Watch client applications.
• Pro-Watch Terminal Client – Installs only the Pro-Watch client terminal application.
• Pro-Watch Database Only – Configures the Pro-Watch database.
Note: Configuring the Pro-Watch database involves either installing a new database or upgrading a pre-existing database to function with this version of Pro-Watch.
• Custom Pro-Watch Installation – Allows the installation of Pro-Watch components custom selected from a list.
Note: The Custom Pro-Watch Installation option should only be used by advanced users who understand what components of Pro-Watch are compatible with one another.
In addition to all the above types, there is also a process to upgrade an existing version of Pro-Watch. This is described separately in the section “Upgrade Installation Process“ on page 44.
Pro-Watch Software Suite Installation Guide, Release 4.0, Document 7-901073V1 3
Pro-Watch 4.0 InstallationInstalling Pro-Watch - Preliminary Steps
2.4.2 Pro-Watch Web ComponentInstalls only the Pro-Watch Web Component as described in the section “Installing Pro-Watch Web Components“ on page 32.
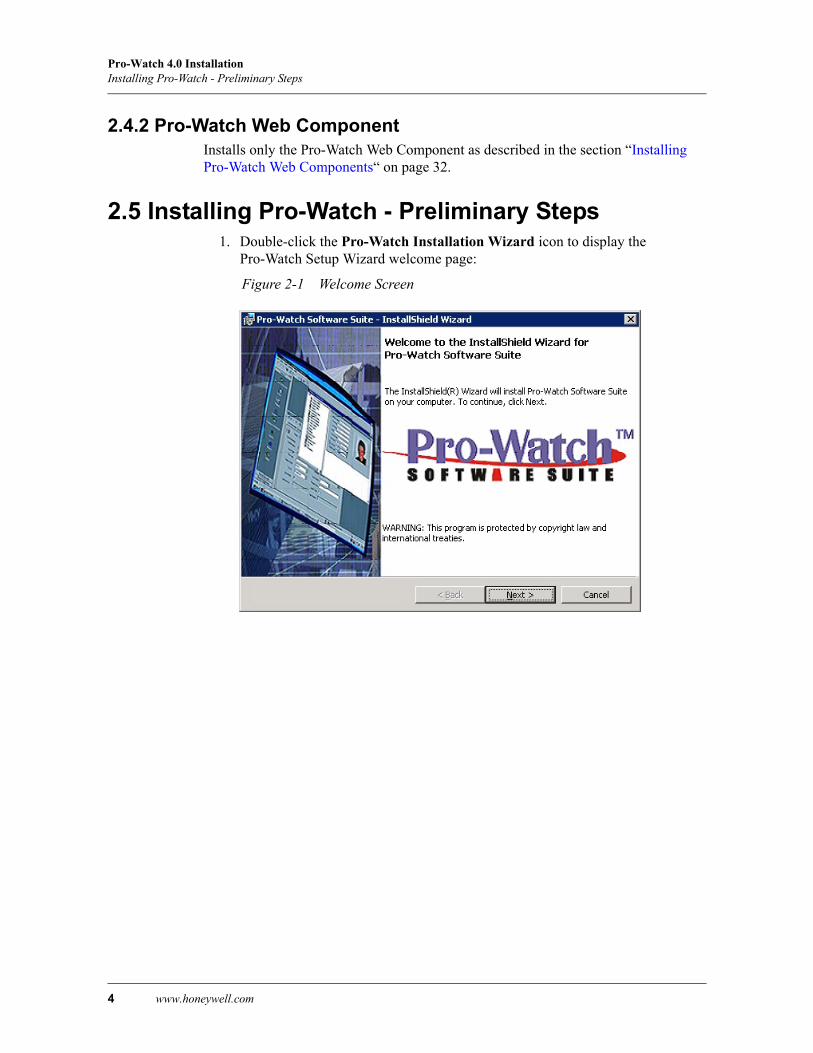
2.5 Installing Pro-Watch - Preliminary Steps 1. Double-click the Pro-Watch Installation Wizard icon to display the
Pro-Watch Setup Wizard welcome page:
Figure 2-1 Welcome Screen
4 www.honeywell.com

Pro-Watch 4.0 InstallationInstalling Pro-Watch - Preliminary Steps
2. Click Next to display the Pro-Watch License Agreement screen:
Figure 2-2 License Agreement
Pro-Watch Software Suite Installation Guide, Release 4.0, Document 7-901073V1 5

Pro-Watch 4.0 InstallationInstalling Pro-Watch - Preliminary Steps
3. Click the radio button to confirm agreement with the licensing terms and click Next to display the feature installation screen:
Figure 2-3 Featured Installation
Explanation of Features
Select the appropriate check box for the available feature installation choices described in the table below:
Feature Installation Options
Description
To install only Pro-Watch Software Suite
If you want to install only Pro-Watch Software Suite and does not see a need for Pro-Watch Web Client access then:
Install the Pro-Watch Software Suite based on your configuration selections as described in “Select an Option Button“ on page 8 and
Refer sections 2.6 Complete Installation to 2.11 Custom Installation.
6 www.honeywell.com
Pro-Watch 4.0 InstallationInstalling Pro-Watch - Preliminary Steps
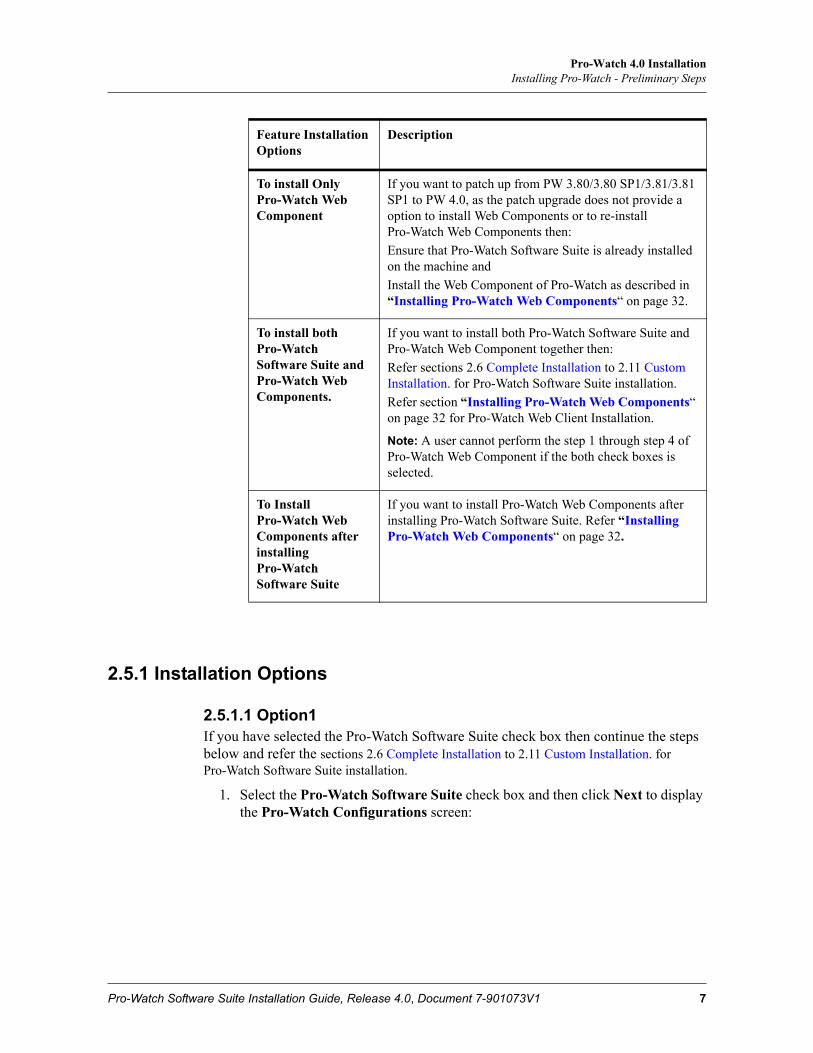
2.5.1 Installation Options
2.5.1.1 Option1If you have selected the Pro-Watch Software Suite check box then continue the steps below and refer the sections 2.6 Complete Installation to 2.11 Custom Installation. for Pro-Watch Software Suite installation.
1. Select the Pro-Watch Software Suite check box and then click Next to display the Pro-Watch Configurations screen:
To install Only Pro-Watch Web Component
If you want to patch up from PW 3.80/3.80 SP1/3.81/3.81 SP1 to PW 4.0, as the patch upgrade does not provide a option to install Web Components or to re-install Pro-Watch Web Components then:
Ensure that Pro-Watch Software Suite is already installed on the machine and
Install the Web Component of Pro-Watch as described in “Installing Pro-Watch Web Components“ on page 32.
To install both Pro-Watch Software Suite and Pro-Watch Web Components.
If you want to install both Pro-Watch Software Suite and Pro-Watch Web Component together then:
Refer sections 2.6 Complete Installation to 2.11 Custom Installation. for Pro-Watch Software Suite installation.
Refer section “Installing Pro-Watch Web Components“ on page 32 for Pro-Watch Web Client Installation.
Note: A user cannot perform the step 1 through step 4 of Pro-Watch Web Component if the both check boxes is selected.
To Install Pro-Watch Web Components after installing Pro-Watch Software Suite
If you want to install Pro-Watch Web Components after installing Pro-Watch Software Suite. Refer “Installing Pro-Watch Web Components“ on page 32.
Feature Installation Options
Description
Pro-Watch Software Suite Installation Guide, Release 4.0, Document 7-901073V1 7

Pro-Watch 4.0 InstallationInstalling Pro-Watch - Preliminary Steps
Figure 2-4 Configuration Options
Select an Option Button
2. Select the appropriate option button to select one the available installation configuration choices described in the table below:
Installation Option Description
“Complete Installation“ on page 10
Installs all of the Pro-Watch components and provides full server and client functionality. We recommend that you administer Pro-Watch from the same local machine.
“Server-Only Installation“ on page 15
Installs only the Pro-Watch Server and configures the Pro-Watch database.
“Client (Complete) Installation“ on page 17
Installs only the Pro-Watch client applications, the most common installation type when the server components are not needed.
“Terminal Client Installation“ on page 21
Installs only the Pro-Watch terminal client application. This configuration allows a user to use a local camera while using Pro-Watch through Remote Desktop or Microsoft Terminal Server Client.
8 www.honeywell.com

Pro-Watch 4.0 InstallationInstalling Pro-Watch - Preliminary Steps
3. After you select the desired configuration option, in the Select SQL Version field select the version that matches your version and click Next to display the first screen for the installation process you have chosen.
Note: To install Pro-Watch to a folder other than the default, click Browse and select an appropriate folder.
2.5.1.2 Option 2
If you have selected Pro-Watch Web Component check box then perform the steps as described in “Installing Pro-Watch Web Components“ on page 32.
“Database Only Installation“ on page 22
Configures the Pro-Watch database. This option allows you to install or upgrade a Pro-Watch database without actually installing Pro-Watch.
“Custom Installation“ on page 24
Allows the installation of individual Pro-Watch components (advanced users only).
Installation Option Description
Pro-Watch Software Suite Installation Guide, Release 4.0, Document 7-901073V1 9

Pro-Watch 4.0 InstallationComplete Installation
2.6 Complete Installation 1. Complete the “Installing Pro-Watch - Preliminary Steps“ on page 4.
2. Select the Complete Pro-Watch Installation option button as explained in the section “Select an Option Button“ on page 8.
Figure 2-5 Complete Installation Selection
3. Select from the drop-down list the SQL version running on your machine.Note: If you do not have a version of SQL installed, the following message appears and SQL Express 2008 will be installed automatically. Click OK.
4. To change the installation path, click Browse to find and redefine the path.
Note: If you want to upgrade the existing Pro-Watch database, select the Upgrade Database check box.
5. Click Next to display the Configure Pro-Watch Server screen.
10 www.honeywell.com

Pro-Watch 4.0 InstallationComplete Installation
Figure 2-6 Configure Pro-Watch Server screen
6. Select the Logon Type from the drop-down list.
7. Enter your user name.
8. Select the Domain Name from the drop-down list.
Pro-Watch Software Suite Installation Guide, Release 4.0, Document 7-901073V1 11
Pro-Watch 4.0 InstallationComplete Installation
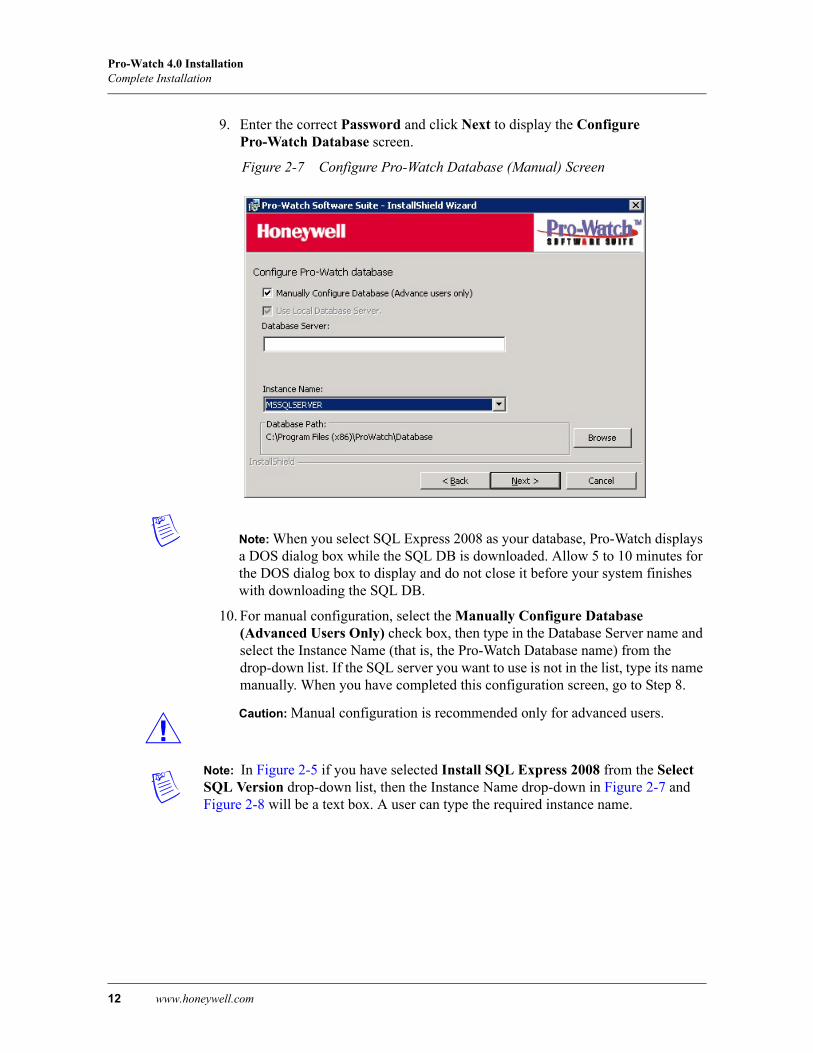
9. Enter the correct Password and click Next to display the Configure Pro-Watch Database screen.
Figure 2-7 Configure Pro-Watch Database (Manual) Screen
Note: When you select SQL Express 2008 as your database, Pro-Watch displays a DOS dialog box while the SQL DB is downloaded. Allow 5 to 10 minutes for the DOS dialog box to display and do not close it before your system finishes with downloading the SQL DB.
10. For manual configuration, select the Manually Configure Database (Advanced Users Only) check box, then type in the Database Server name and select the Instance Name (that is, the Pro-Watch Database name) from the drop-down list. If the SQL server you want to use is not in the list, type its name manually. When you have completed this configuration screen, go to Step 8.
Caution: Manual configuration is recommended only for advanced users.
Note: In Figure 2-5 if you have selected Install SQL Express 2008 from the Select SQL Version drop-down list, then the Instance Name drop-down in Figure 2-7 and Figure 2-8 will be a text box. A user can type the required instance name.
12 www.honeywell.com
Pro-Watch 4.0 InstallationComplete Installation
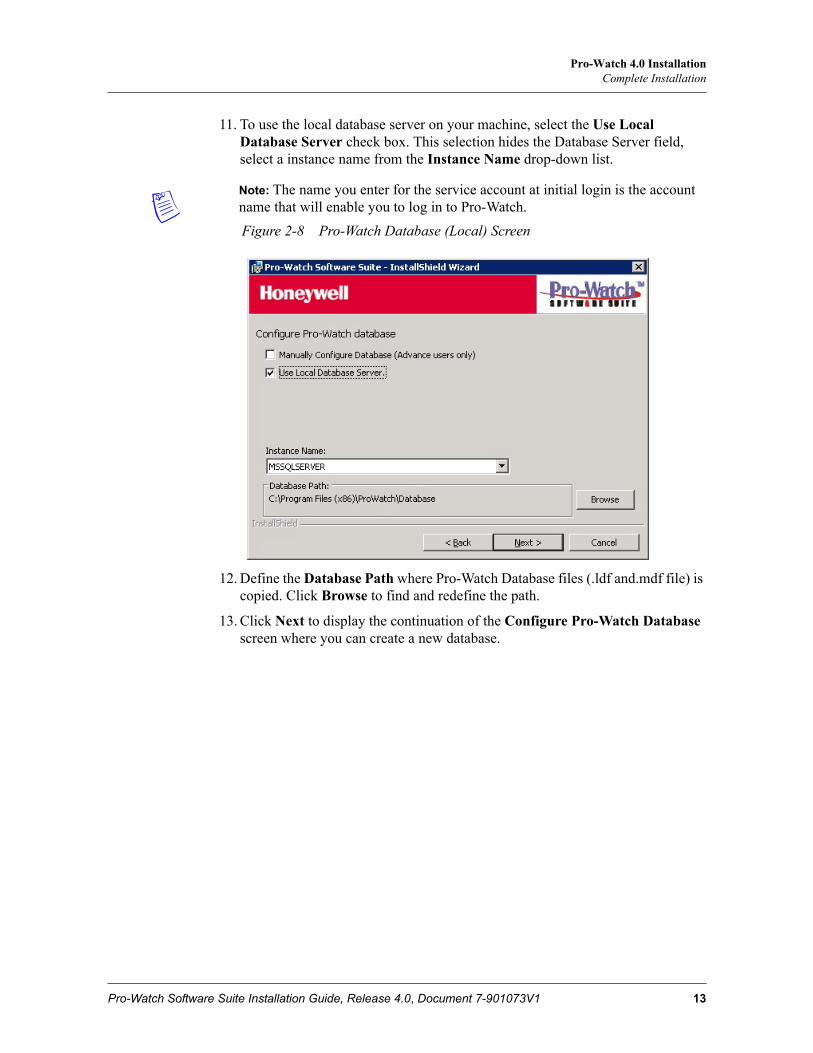
11. To use the local database server on your machine, select the Use Local Database Server check box. This selection hides the Database Server field, select a instance name from the Instance Name drop-down list.
Note: The name you enter for the service account at initial login is the account name that will enable you to log in to Pro-Watch.
Figure 2-8 Pro-Watch Database (Local) Screen
12. Define the Database Path where Pro-Watch Database files (.ldf and.mdf file) is copied. Click Browse to find and redefine the path.
13. Click Next to display the continuation of the Configure Pro-Watch Database screen where you can create a new database.
Pro-Watch Software Suite Installation Guide, Release 4.0, Document 7-901073V1 13
Pro-Watch 4.0 InstallationComplete Installation
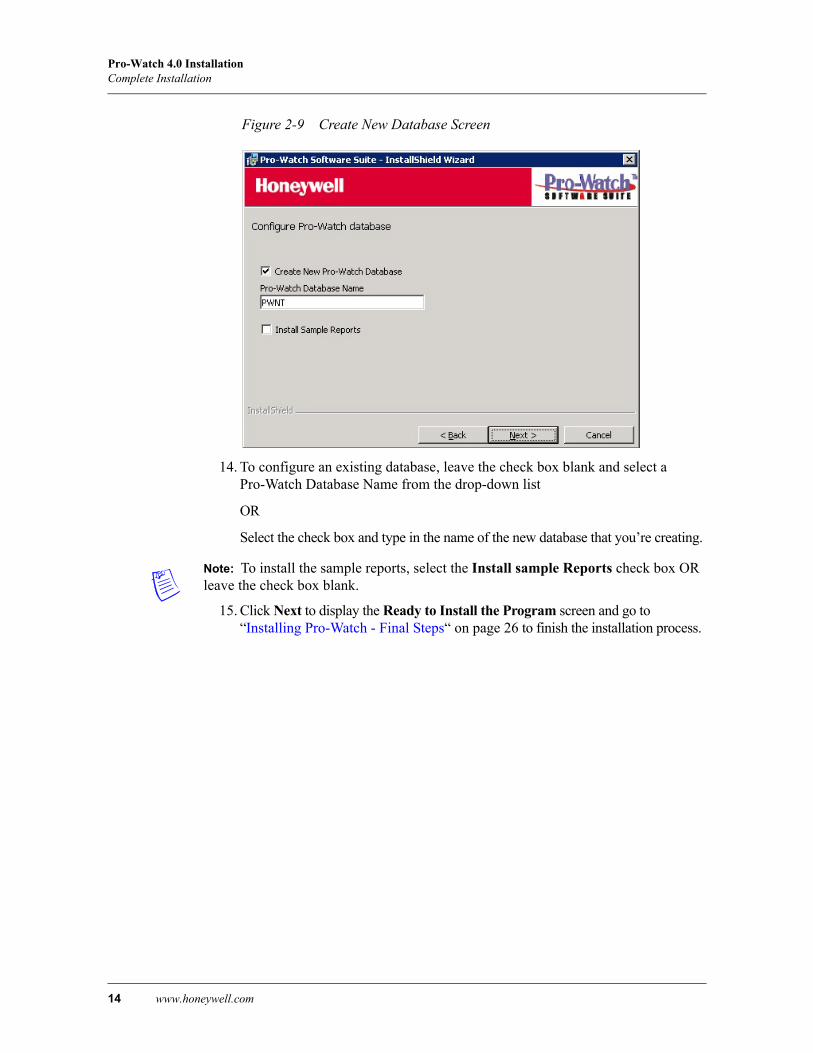
Figure 2-9 Create New Database Screen
14. To configure an existing database, leave the check box blank and select a Pro-Watch Database Name from the drop-down list
OR
Select the check box and type in the name of the new database that you’re creating.
Note: To install the sample reports, select the Install sample Reports check box OR leave the check box blank.
15. Click Next to display the Ready to Install the Program screen and go to “Installing Pro-Watch - Final Steps“ on page 26 to finish the installation process.
14 www.honeywell.com
Pro-Watch 4.0 InstallationServer-Only Installation
2.7 Server-Only InstallationThe server-only installations do not include any client components.
1. Complete the “Installing Pro-Watch - Preliminary Steps“ on page 4.
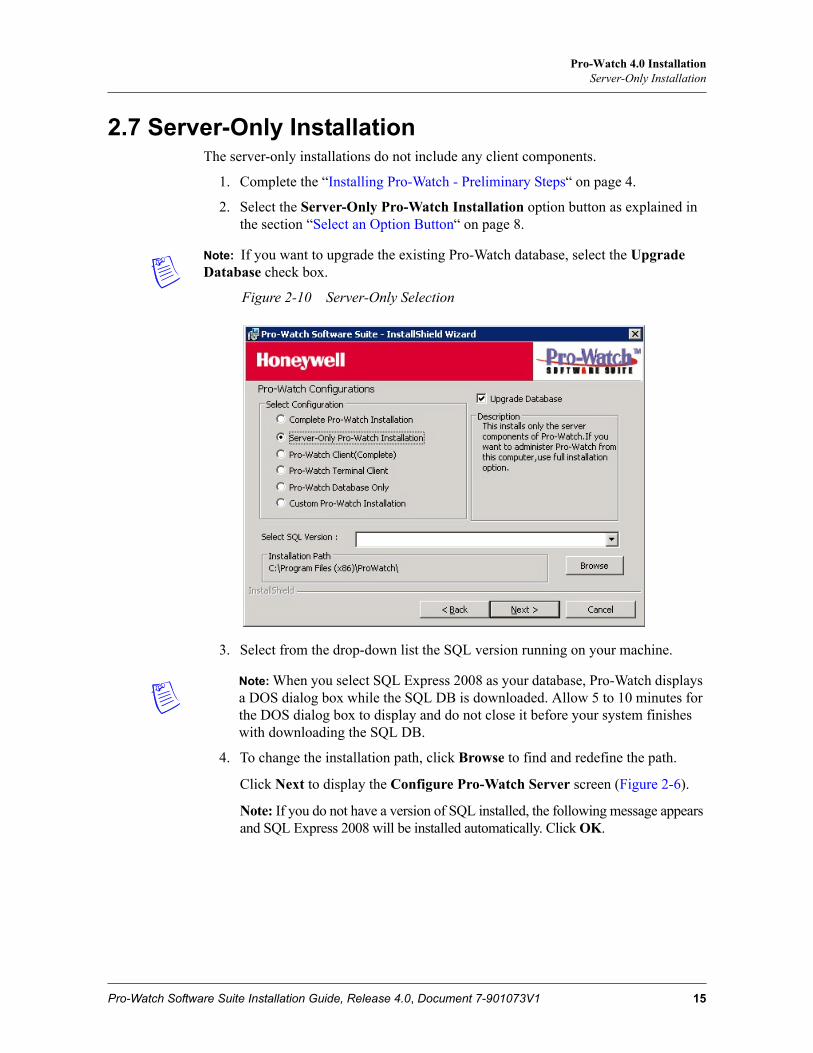
2. Select the Server-Only Pro-Watch Installation option button as explained in the section “Select an Option Button“ on page 8.
Note: If you want to upgrade the existing Pro-Watch database, select the Upgrade Database check box.
Figure 2-10 Server-Only Selection
3. Select from the drop-down list the SQL version running on your machine.
Note: When you select SQL Express 2008 as your database, Pro-Watch displays a DOS dialog box while the SQL DB is downloaded. Allow 5 to 10 minutes for the DOS dialog box to display and do not close it before your system finishes with downloading the SQL DB.
4. To change the installation path, click Browse to find and redefine the path.
Click Next to display the Configure Pro-Watch Server screen (Figure 2-6).
Note: If you do not have a version of SQL installed, the following message appears and SQL Express 2008 will be installed automatically. Click OK.
Pro-Watch Software Suite Installation Guide, Release 4.0, Document 7-901073V1 15

Pro-Watch 4.0 InstallationServer-Only Installation
5. Enter the requested information and click Next to display the Configure Pro-Watch Database screen (Figure 2-7).
6. For manual configuration, select the Manually Configure Database (Advanced Users Only) check box (see Figure 2-7). Select a Database Server from the drop-down list and enter the Pro-Watch Database Name. If the SQL server you want to use is not in the list, type its name manually.
Caution: Manual configuration is recommended only for the advanced users.
7. To use the local database server on your machine, select the Use Local Database Server check box. This selection disables the Database Server field, so you must either type in a new database name or select a local database from the Instance Name drop-down list. (See Figure 2-8.)
8. Click Next to display the continuation of the Configure Pro-Watch Database screen (Figure 2-9).
9. To configure an existing database, leave the check box blank and select a Pro-Watch Database Name from the drop-down list
OR
Select the check box and type in the name of the new database you’re creating.
10. Click Next to display the Ready to Install the Program screen and go to “Installing Pro-Watch - Final Steps“ on page 26 to finish the installation process.
16 www.honeywell.com
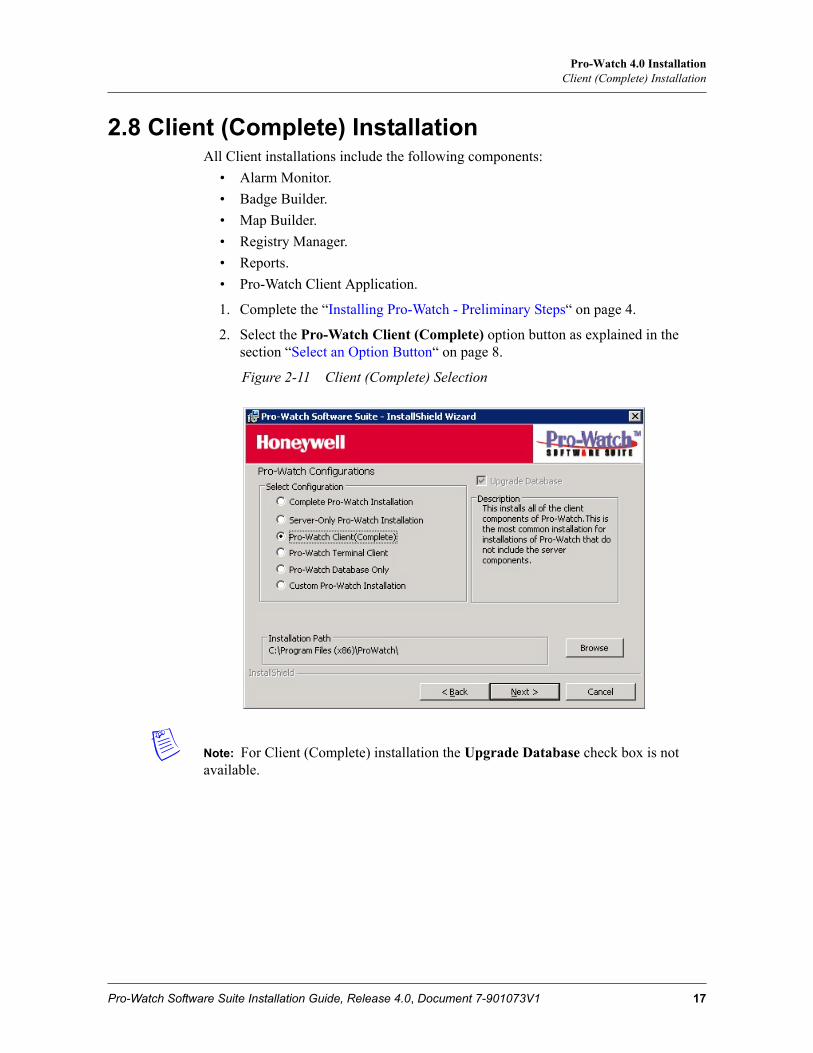
Pro-Watch 4.0 InstallationClient (Complete) Installation
2.8 Client (Complete) InstallationAll Client installations include the following components:
• Alarm Monitor.
• Badge Builder.
• Map Builder.
• Registry Manager.
• Reports.
• Pro-Watch Client Application.
1. Complete the “Installing Pro-Watch - Preliminary Steps“ on page 4.
2. Select the Pro-Watch Client (Complete) option button as explained in the section “Select an Option Button“ on page 8.
Figure 2-11 Client (Complete) Selection
Note: For Client (Complete) installation the Upgrade Database check box is not available.
Pro-Watch Software Suite Installation Guide, Release 4.0, Document 7-901073V1 17
Pro-Watch 4.0 InstallationClient (Complete) Installation
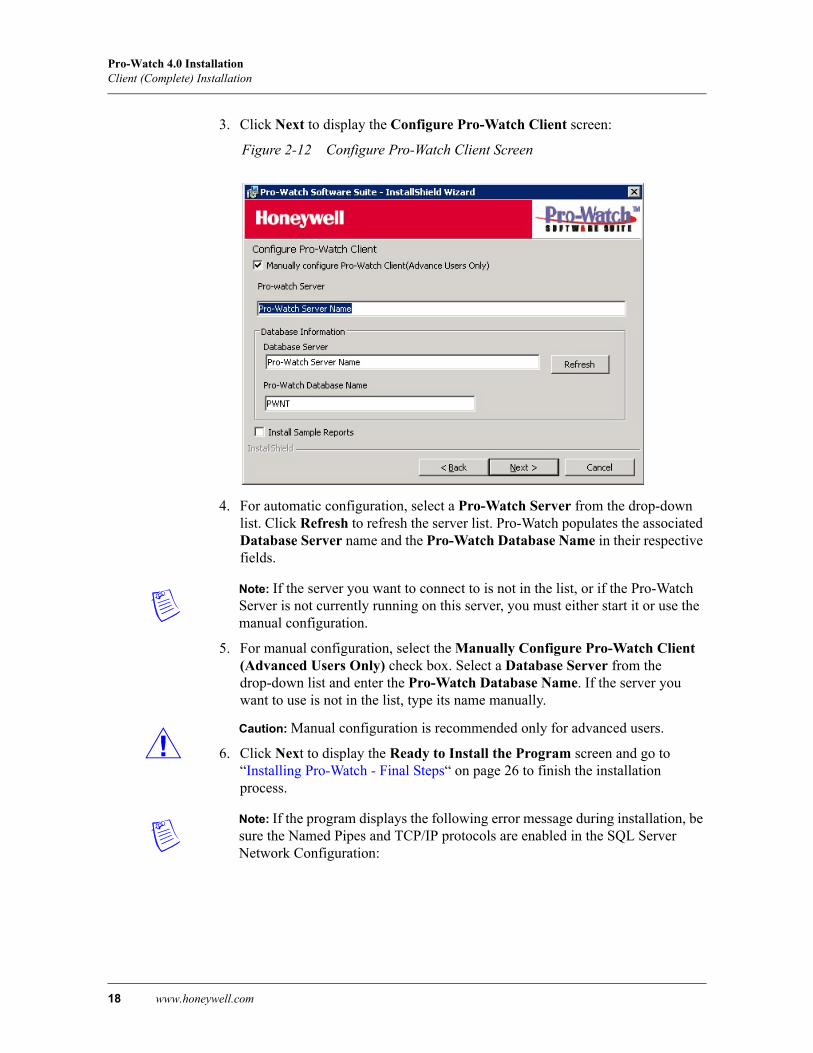
3. Click Next to display the Configure Pro-Watch Client screen:
Figure 2-12 Configure Pro-Watch Client Screen
4. For automatic configuration, select a Pro-Watch Server from the drop-down list. Click Refresh to refresh the server list. Pro-Watch populates the associated Database Server name and the Pro-Watch Database Name in their respective fields.
Note: If the server you want to connect to is not in the list, or if the Pro-Watch Server is not currently running on this server, you must either start it or use the manual configuration.
5. For manual configuration, select the Manually Configure Pro-Watch Client (Advanced Users Only) check box. Select a Database Server from the drop-down list and enter the Pro-Watch Database Name. If the server you want to use is not in the list, type its name manually.
Caution: Manual configuration is recommended only for advanced users.
6. Click Next to display the Ready to Install the Program screen and go to “Installing Pro-Watch - Final Steps“ on page 26 to finish the installation process.
Note: If the program displays the following error message during installation, be sure the Named Pipes and TCP/IP protocols are enabled in the SQL Server Network Configuration:
18 www.honeywell.com

Pro-Watch 4.0 InstallationClient (Complete) Installation
7. Run the SQL Server Configuration Manager.
8. Select SQL Server Network Configuration > Protocols for SQLEXPRESS to display the protocols.
Pro-Watch Software Suite Installation Guide, Release 4.0, Document 7-901073V1 19

Pro-Watch 4.0 InstallationClient (Complete) Installation
9. Click the Named Pipes and TCP/IP protocols to display their properties, and use the drop-down list to set the Enabled property to Yes.
10. Stop, and then restart, the MS SQL service to activate your changes.
20 www.honeywell.com
Pro-Watch 4.0 InstallationTerminal Client Installation
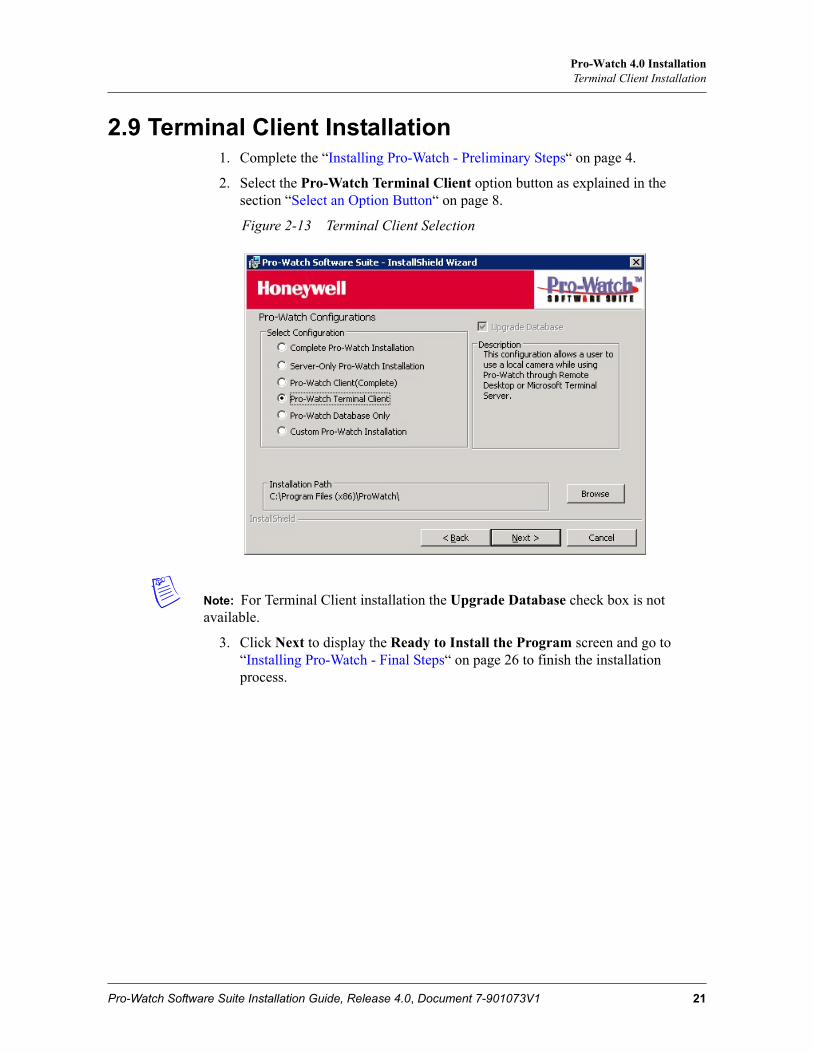
2.9 Terminal Client Installation 1. Complete the “Installing Pro-Watch - Preliminary Steps“ on page 4.
2. Select the Pro-Watch Terminal Client option button as explained in the section “Select an Option Button“ on page 8.
Figure 2-13 Terminal Client Selection
Note: For Terminal Client installation the Upgrade Database check box is not available.
3. Click Next to display the Ready to Install the Program screen and go to “Installing Pro-Watch - Final Steps“ on page 26 to finish the installation process.
Pro-Watch Software Suite Installation Guide, Release 4.0, Document 7-901073V1 21
Pro-Watch 4.0 InstallationDatabase Only Installation
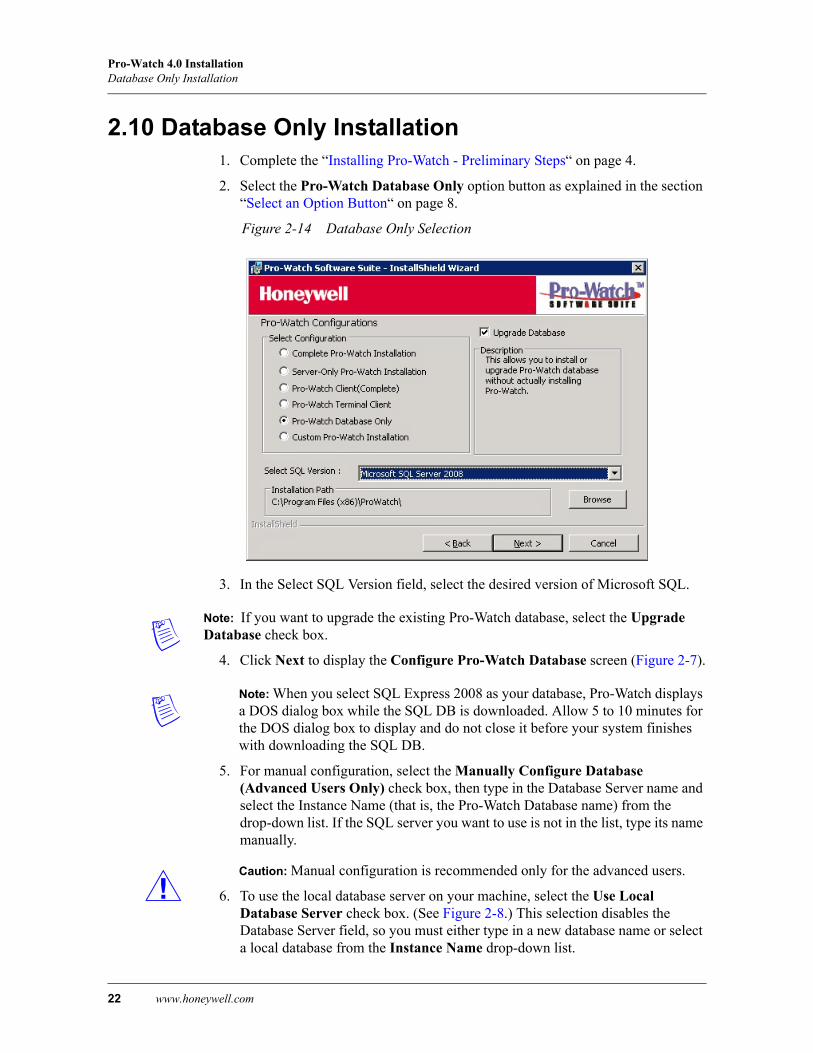
2.10 Database Only Installation 1. Complete the “Installing Pro-Watch - Preliminary Steps“ on page 4.
2. Select the Pro-Watch Database Only option button as explained in the section “Select an Option Button“ on page 8.
Figure 2-14 Database Only Selection
3. In the Select SQL Version field, select the desired version of Microsoft SQL.
Note: If you want to upgrade the existing Pro-Watch database, select the Upgrade Database check box.
4. Click Next to display the Configure Pro-Watch Database screen (Figure 2-7).
Note: When you select SQL Express 2008 as your database, Pro-Watch displays a DOS dialog box while the SQL DB is downloaded. Allow 5 to 10 minutes for the DOS dialog box to display and do not close it before your system finishes with downloading the SQL DB.
5. For manual configuration, select the Manually Configure Database (Advanced Users Only) check box, then type in the Database Server name and select the Instance Name (that is, the Pro-Watch Database name) from the drop-down list. If the SQL server you want to use is not in the list, type its name manually.
Caution: Manual configuration is recommended only for the advanced users.
6. To use the local database server on your machine, select the Use Local Database Server check box. (See Figure 2-8.) This selection disables the Database Server field, so you must either type in a new database name or select a local database from the Instance Name drop-down list.
22 www.honeywell.com

Pro-Watch 4.0 InstallationDatabase Only Installation
7. Click Next to display the continuation of the Configure Pro-Watch Database screen (Figure 2-9).
8. To configure an existing database, leave the check box blank and select a Pro-Watch Database Name from the drop-down list
OR
To configure a new database, select the check box and type in the name of the new database. To install the new Pro-Watch database to a folder on the SQL server other than the default one, click Browse and select a new path.
9. Click Next to display the Ready to Install the Program screen. and go to “Installing Pro-Watch - Final Steps“ on page 26 to finish the installation process.
Pro-Watch Software Suite Installation Guide, Release 4.0, Document 7-901073V1 23

Pro-Watch 4.0 InstallationCustom Installation
2.11 Custom InstallationDuring both the server and client installations, both the client and server components can be customized. The custom setup option enables you to install only a selected subset of the client and server components.
1. Complete the “Installing Pro-Watch - Preliminary Steps“ on page 4.
2. Select the Custom Pro-Watch Installation option button explained in the section “Select an Option Button“ on page 8.
Figure 2-15 Custom Installation Selection
3. Select from the drop-down list the SQL version running on your machine.
Note: When you select SQL Express 2008 as your database, Pro-Watch displays a DOS dialog box while the SQL DB is downloaded. Allow 5 to 10 minutes for the DOS dialog box to display and do not close it before your system finishes with downloading the SQL DB.
4. To change the installation path, click Browse to find and redefine the path.
Note: If you want to upgrade the existing Pro-Watch database, select the Upgrade Database check box.
24 www.honeywell.com

Pro-Watch 4.0 InstallationCustom Installation
5. Click Next to display the Pro-Watch Custom Installation Options screen.
Figure 2-16 Custom Installation Options
6. In this step you choose which components to install. To modify how a component is installed, click on the icon for that component to view the choices:
Figure 2-17 Feature Installation Options
7. Review the components and select the ones you want to install, and click Next.
8. The order of the remaining screens depends on your choices of components to install. If you want to install a server (that is, you did not X it out), perform the steps listed in “Complete Installation“ on page 10. If you do not want to install a server, mark it as unavailable to be installed and click Next to display the Configure Pro-Watch Client screen (Figure 2-12). Perform the steps in “Client (Complete) Installation“ on page 17 for the rest of the procedure.
9. Go to “Installing Pro-Watch - Final Steps“ on page 26.
Pro-Watch Software Suite Installation Guide, Release 4.0, Document 7-901073V1 25
Pro-Watch 4.0 InstallationInstalling Pro-Watch - Final Steps
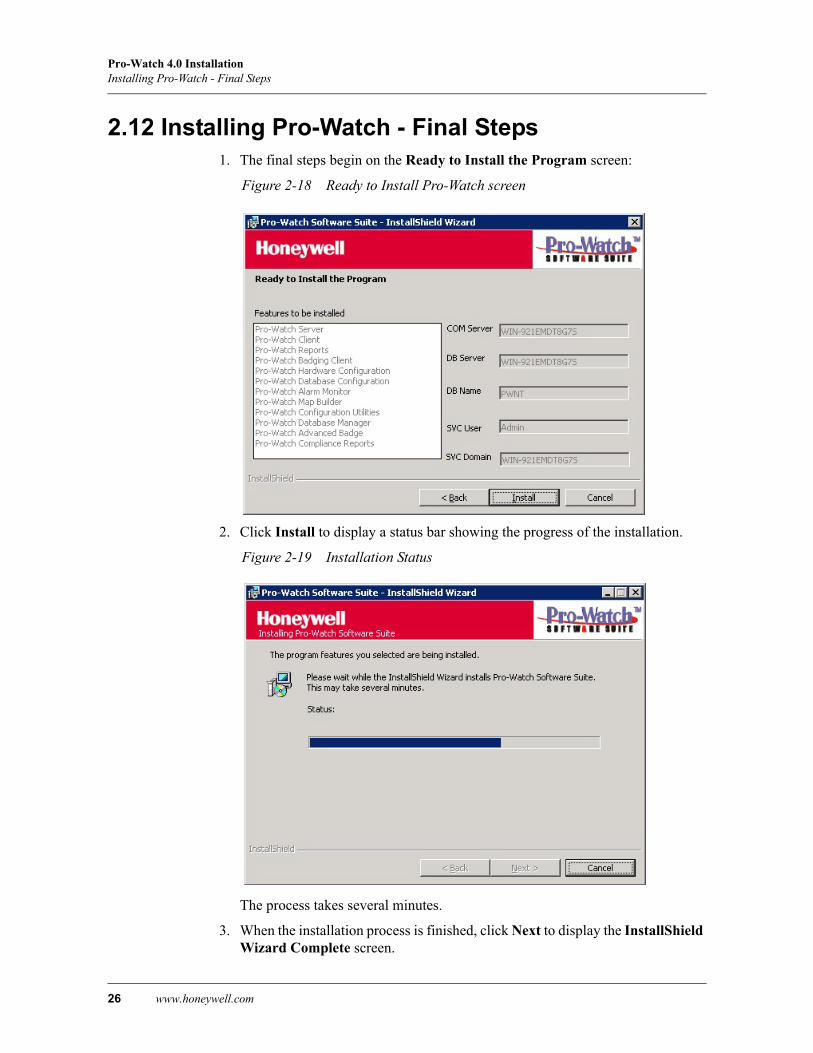
2.12 Installing Pro-Watch - Final Steps 1. The final steps begin on the Ready to Install the Program screen:
Figure 2-18 Ready to Install Pro-Watch screen
2. Click Install to display a status bar showing the progress of the installation.
Figure 2-19 Installation Status
The process takes several minutes.
3. When the installation process is finished, click Next to display the InstallShield Wizard Complete screen.
26 www.honeywell.com

Pro-Watch 4.0 InstallationInstalling Pro-Watch - Final Steps
Figure 2-20 Installation Completion Screen
4. Click Finish. A small pop-up informs you that you have to reboot the PC for the installation to take effect.
Figure 2-21 Reboot Prompt
5. Click YES to restart your computer.
6. If you are running either the MS Windows 2008 or Vista operating system, set the Pro-Watch Server service type to Automatic (Delayed Start):
a. From the system Control Panel, select Services to display the list of services installed on the system.
b. From the list of services, right-click Pro-Watch Server and select Properties.
Pro-Watch Software Suite Installation Guide, Release 4.0, Document 7-901073V1 27
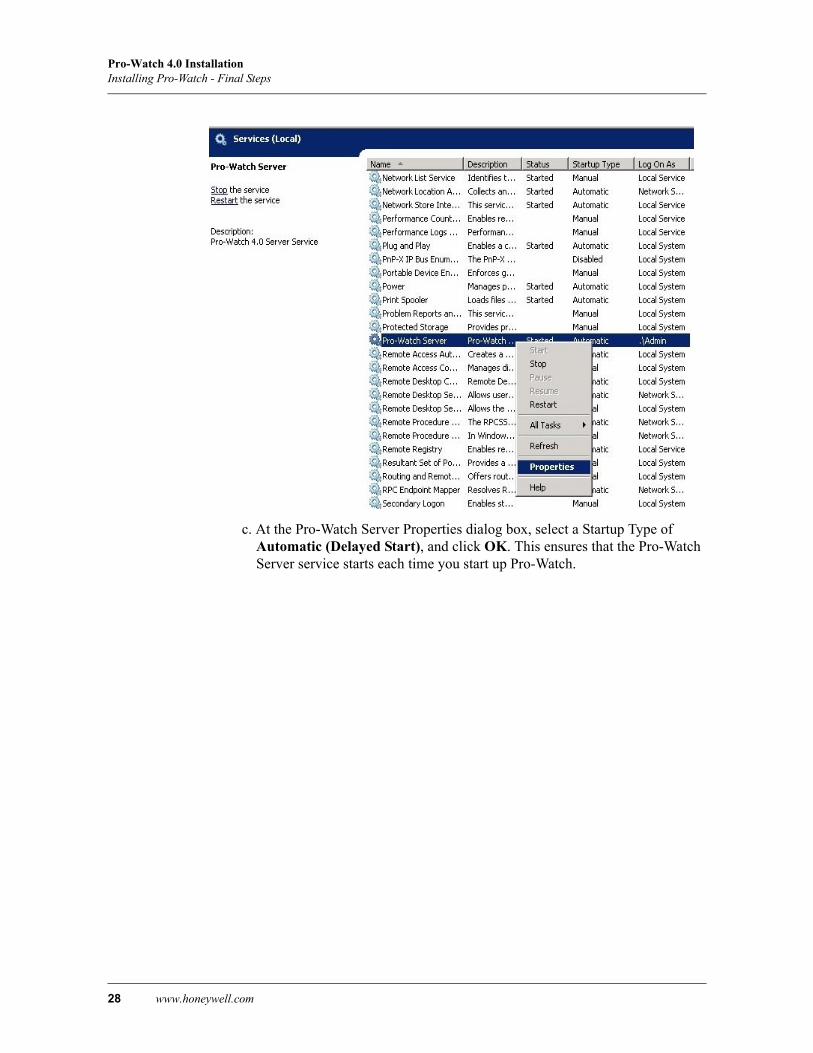
Pro-Watch 4.0 InstallationInstalling Pro-Watch - Final Steps
c. At the Pro-Watch Server Properties dialog box, select a Startup Type of Automatic (Delayed Start), and click OK. This ensures that the Pro-Watch Server service starts each time you start up Pro-Watch.
28 www.honeywell.com
Pro-Watch 4.0 InstallationInstalling Pro-Watch - Final Steps
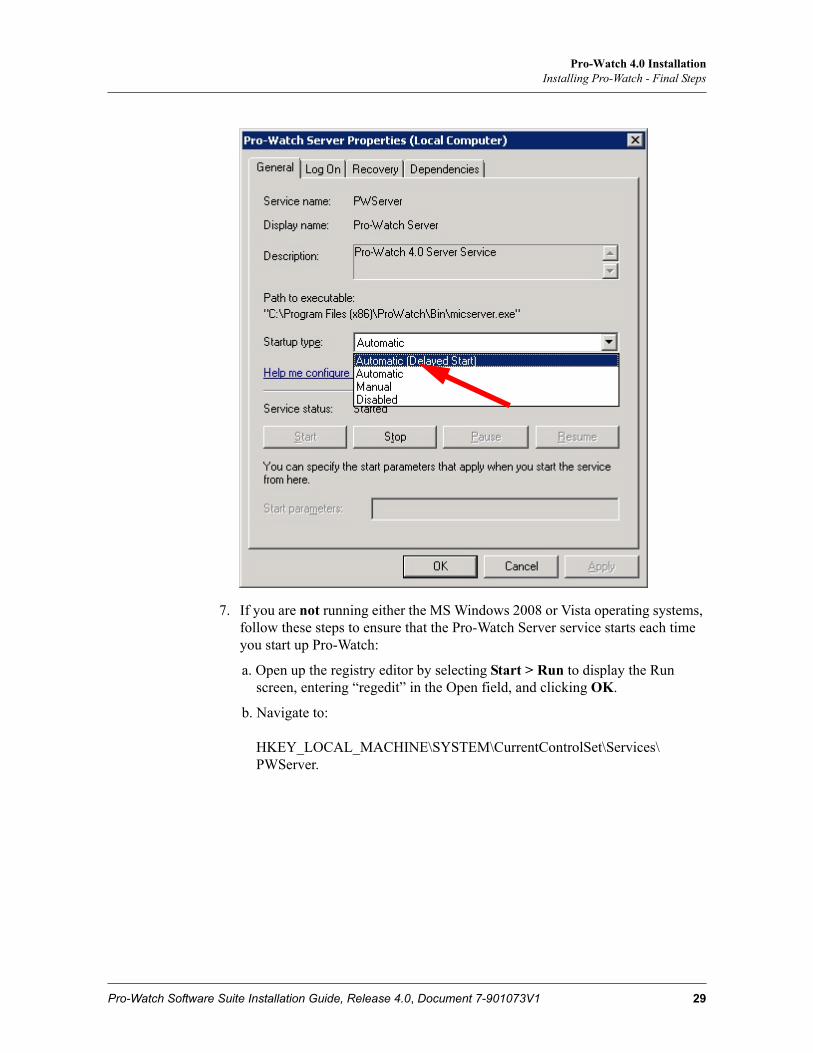
7. If you are not running either the MS Windows 2008 or Vista operating systems, follow these steps to ensure that the Pro-Watch Server service starts each time you start up Pro-Watch:
a. Open up the registry editor by selecting Start > Run to display the Run screen, entering “regedit” in the Open field, and clicking OK.
b. Navigate to:
HKEY_LOCAL_MACHINE\SYSTEM\CurrentControlSet\Services\PWServer.
Pro-Watch Software Suite Installation Guide, Release 4.0, Document 7-901073V1 29

Pro-Watch 4.0 InstallationInstalling Pro-Watch - Final Steps
c. Right-click anywhere on the Registry Editor screen and select New > Multi-String Value.
d. In the new value field that appears, enter the value name “DependOnService.”
e. With the DependOnService value highlighted, right-click and select Modify.
30 www.honeywell.com
Pro-Watch 4.0 InstallationInstalling Pro-Watch - Final Steps
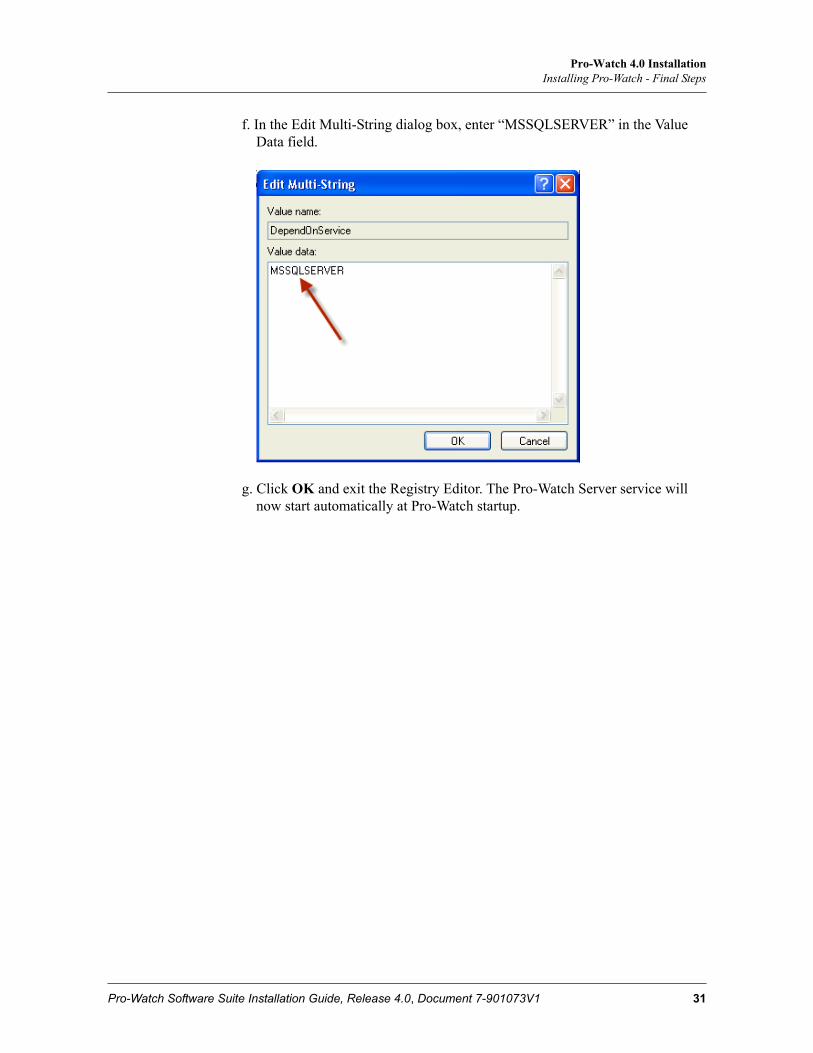
f. In the Edit Multi-String dialog box, enter “MSSQLSERVER” in the Value Data field.
g. Click OK and exit the Registry Editor. The Pro-Watch Server service will now start automatically at Pro-Watch startup.
Pro-Watch Software Suite Installation Guide, Release 4.0, Document 7-901073V1 31
Pro-Watch 4.0 InstallationInstalling Pro-Watch Web Components
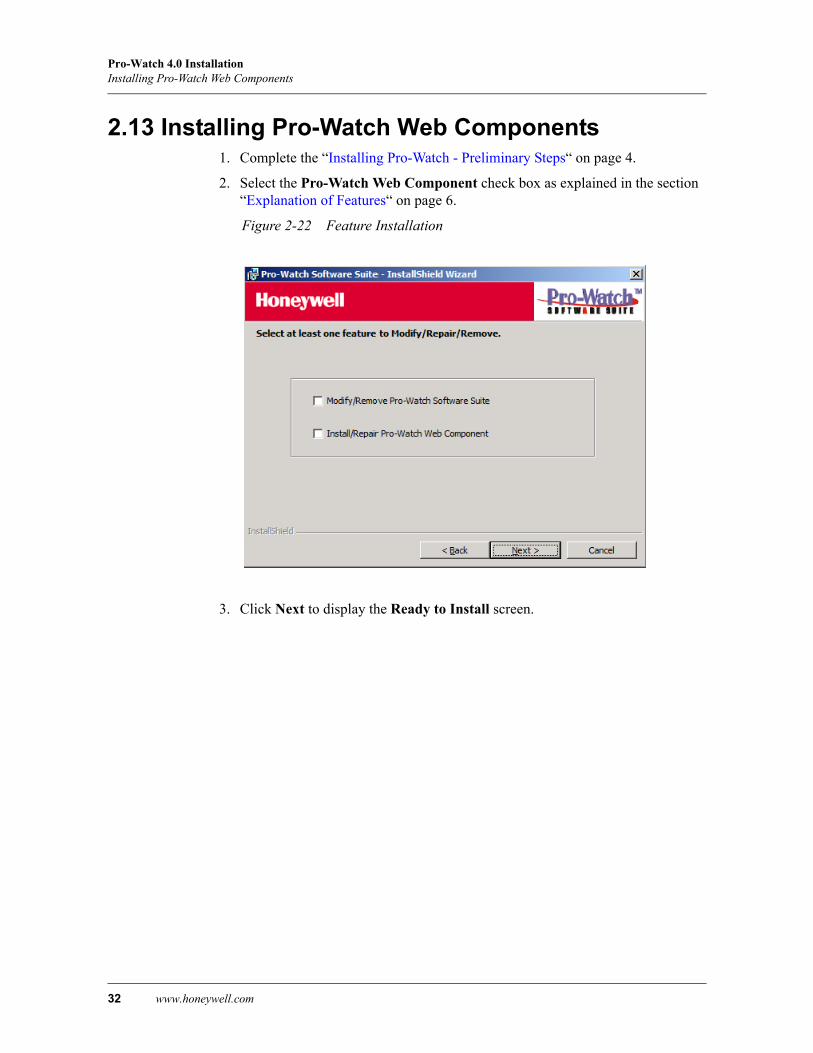
2.13 Installing Pro-Watch Web Components 1. Complete the “Installing Pro-Watch - Preliminary Steps“ on page 4.
2. Select the Pro-Watch Web Component check box as explained in the section “Explanation of Features“ on page 6.
Figure 2-22 Feature Installation
3. Click Next to display the Ready to Install screen.
32 www.honeywell.com

Pro-Watch 4.0 InstallationInstalling Pro-Watch Web Components
Figure 2-23 Ready to Install
4. Click Install to display a status bar showing the progress of the installation.
Figure 2-24 Installation Progress
The process takes several minutes.
Note: While the installshield displays the progress, a message box appears as shown below.
Pro-Watch Software Suite Installation Guide, Release 4.0, Document 7-901073V1 33
Pro-Watch 4.0 InstallationInstalling Pro-Watch Web Components
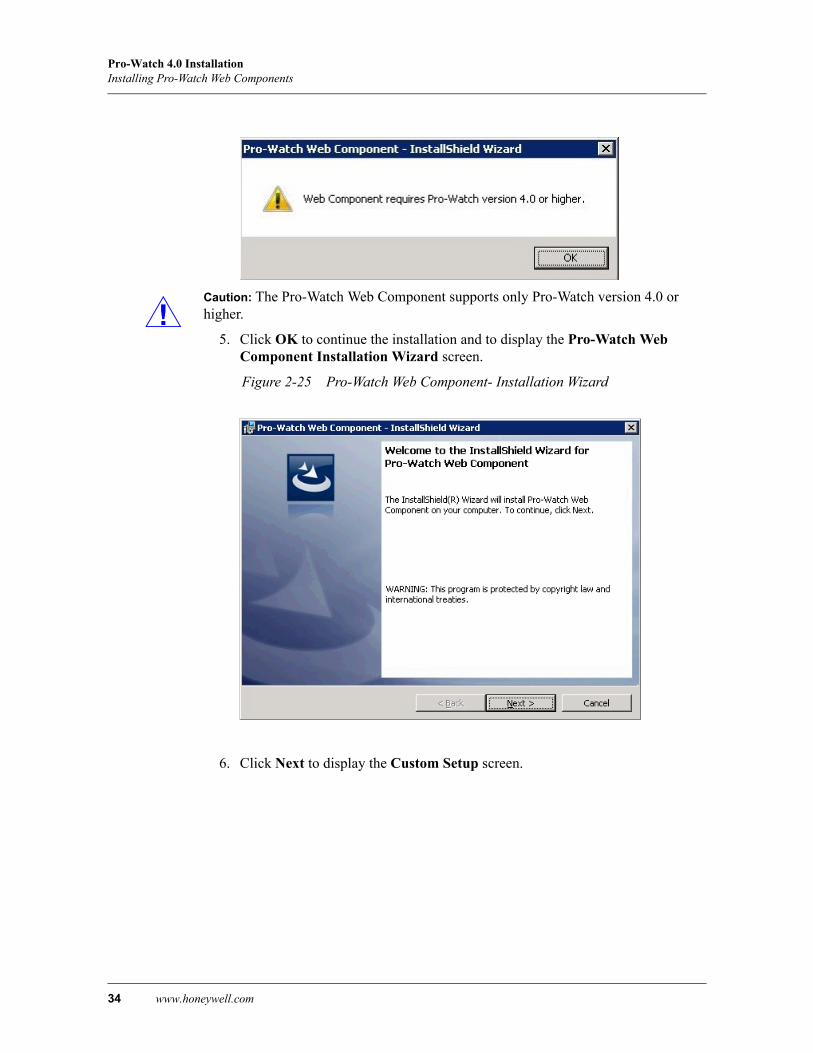
Caution: The Pro-Watch Web Component supports only Pro-Watch version 4.0 or higher.
5. Click OK to continue the installation and to display the Pro-Watch Web Component Installation Wizard screen.
Figure 2-25 Pro-Watch Web Component- Installation Wizard
6. Click Next to display the Custom Setup screen.
34 www.honeywell.com
Pro-Watch 4.0 InstallationInstalling Pro-Watch Web Components
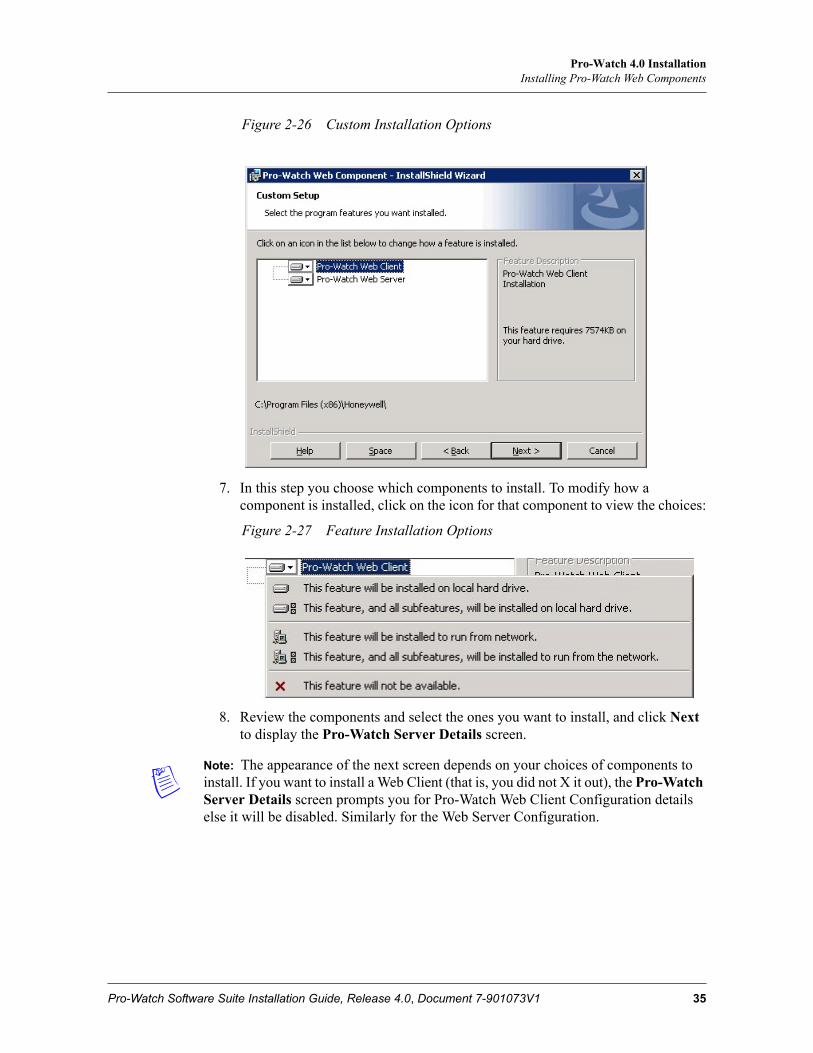
Figure 2-26 Custom Installation Options
7. In this step you choose which components to install. To modify how a component is installed, click on the icon for that component to view the choices:
Figure 2-27 Feature Installation Options
8. Review the components and select the ones you want to install, and click Next to display the Pro-Watch Server Details screen.
Note: The appearance of the next screen depends on your choices of components to install. If you want to install a Web Client (that is, you did not X it out), the Pro-Watch Server Details screen prompts you for Pro-Watch Web Client Configuration details else it will be disabled. Similarly for the Web Server Configuration.
Pro-Watch Software Suite Installation Guide, Release 4.0, Document 7-901073V1 35

Pro-Watch 4.0 InstallationInstalling Pro-Watch Web Components
Figure 2-28 Pro-Watch Server Details screen
The Pro-Watch Database Server and Database Name is updated by default.
9. Type in the Pro-Watch Server Name where the server is located for the Web Server Configuration.
10. Type in the Pro-Watch Web Server Name where the web server is located for the Web Client Configuration and click Next to display the Application Pool Identity screen.
36 www.honeywell.com

Pro-Watch 4.0 InstallationInstalling Pro-Watch Web Components
Figure 2-29 Application pool Identity
Note: By default the Domain Name is automatically populated with the logged in user domain.
11. Type in the User Name and Password and click Next to display the Destination Folder screen.
Figure 2-30 Destination Folder Screen
12. To change the installation path, click Change to find and redefine the path. Click Next to display the Ready to Install screen.
Pro-Watch Software Suite Installation Guide, Release 4.0, Document 7-901073V1 37

Pro-Watch 4.0 InstallationInstalling Pro-Watch Web Components
Figure 2-31 Ready to Install
13. Click Install to display a status bar showing the progress of the installation.
Figure 2-32 Installation Progress
The process takes several minutes.
14. When the installation process is finished, click Next to display the InstallShield Wizard Complete screen.
38 www.honeywell.com

Pro-Watch 4.0 InstallationInstalling Pro-Watch Web Components
Figure 2-33 Installation Completion Screen
15. Click Finish to complete the installation.
2.13.1 HTTP Error 500.21 Internal Server ErrorAfter installing the Pro-Watch 4.0 Web Component, sometimes the ASP.NET will not register correctly with IIS. When a user tries to access the website, the following error message is displayed:
"HTTP Error 500.21 Internal Server Error: Handler 'PageHandlerFactory-Integrated' has a bad module 'ManagedPipelineHandler' in its module list".
Reason for the error: ASP.NET may not be registered properly with IIS. User must register ASP.NET with IIS to enable the handlers required to run .NET pages.
To register ASP.NET with IIS, perform the following steps:
1. Open Command Prompt under an Administrator account.
2. Navigate to "C:\Windows\Microsoft.NET\Framework\v4.0.30319".
3. Run the command "aspnet_regiis.exe -i".
Warning: Running the command "aspnet_regiis.exe -i" will upgrade the .NET Framework Versions of "Classic .NET Application Pool" and "DefaultAppPool" from 2.0 to 4.0. If the server is hosting IIS web services other than Pro-Watch, this upgrade may cause those applications to break in .NET Framework Versions.
To resolve this:Manually change the versions of the two application pools to what they were before the upgrade. If Pro-Watch is the only web service hosted on the machine, then this step is not required.
Pro-Watch Software Suite Installation Guide, Release 4.0, Document 7-901073V1 39
Pro-Watch 4.0 InstallationInstalling Pro-Watch Web Components
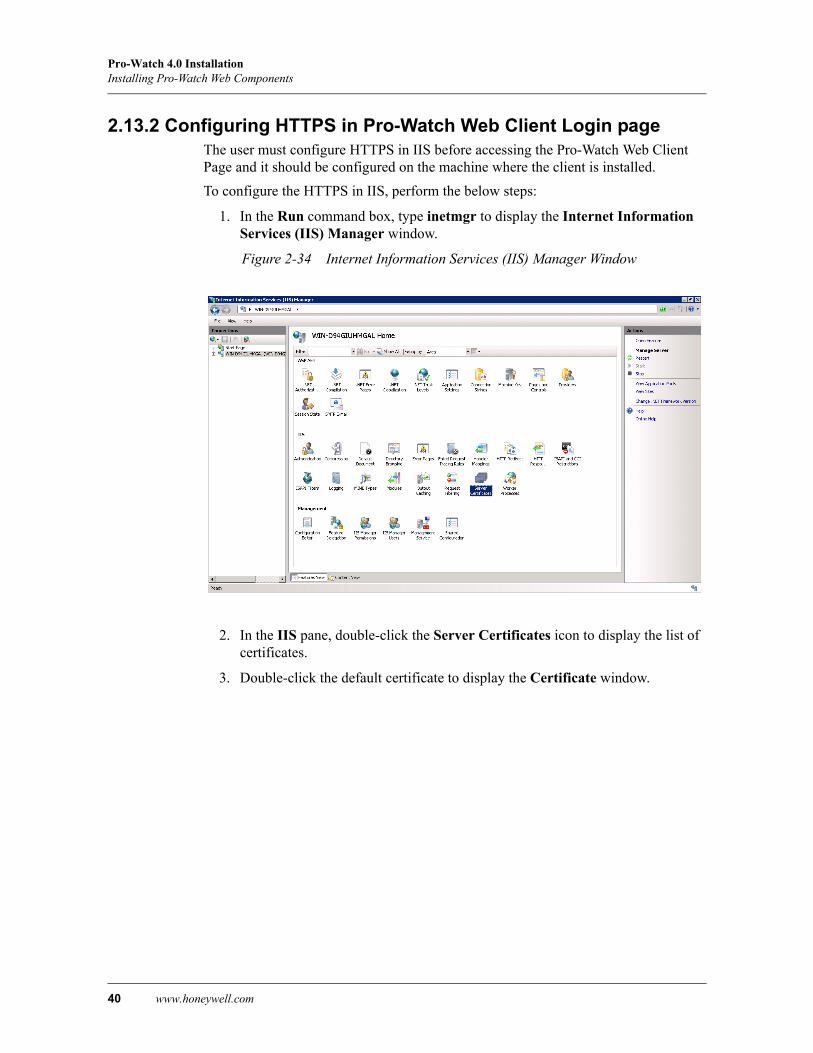
2.13.2 Configuring HTTPS in Pro-Watch Web Client Login pageThe user must configure HTTPS in IIS before accessing the Pro-Watch Web Client Page and it should be configured on the machine where the client is installed.
To configure the HTTPS in IIS, perform the below steps:
1. In the Run command box, type inetmgr to display the Internet Information Services (IIS) Manager window.
Figure 2-34 Internet Information Services (IIS) Manager Window
2. In the IIS pane, double-click the Server Certificates icon to display the list of certificates.
3. Double-click the default certificate to display the Certificate window.
40 www.honeywell.com

Pro-Watch 4.0 InstallationInstalling Pro-Watch Web Components
Figure 2-35 Certificate Window
Note: Ensure that the default certificate is available or it can be a valid certificate from a standard vendor. The certificate should not be a self signed certificate.
4. In the Connections pane, navigate to Sites > DefaultWebSites.
5. Right-click on the DefaultWebSites node and then select Edit Bindings to display the Site Bindings dialog box
Pro-Watch Software Suite Installation Guide, Release 4.0, Document 7-901073V1 41
Pro-Watch 4.0 InstallationInstalling Pro-Watch Web Components
Figure 2-36 Site Bindings Dialog Box
6. In the Site Bindings dialog box, click the Add button to display the Add Site Binding dialog box.
Figure 2-37 Add Site Binding
7. Select https from the Type drop-down list.
Note: When you select https from the type drop-down list, the SSLCertificate drop-down list is displayed and the Host name box is disabled.
42 www.honeywell.com

Pro-Watch 4.0 InstallationInstalling Pro-Watch Web Components
8. Select All Unassigned from the IP address drop-down list.
9. Type the required port number.
10. Select the default certificate from the SSL certificate drop-down list and then click OK.
11. In the Connections pane, navigate to Sites > DefaultWebSite > ProWatchWeb Client > Login.aspx to display the Login.aspx Home screen.
Pro-Watch Software Suite Installation Guide, Release 4.0, Document 7-901073V1 43

Pro-Watch 4.0 InstallationInstalling Pro-Watch Web Components
Figure 2-38 Login.aspx Home Screen
12. In the Login.aspx Home screen double-click the SLL Settings icon to display the SSL Settings screen.
13. In the SSL Settings screen, select the Required SSL check box.
14. In the Client Certificates, select the Accept option and then click Apply in the right most pane.
Figure 2-39 SSL Settings Screen
44 www.honeywell.com

Pro-Watch 4.0 InstallationUpgrade Installation Process
A message “The changes have been successfully saved” is displayed.
15. Restart the IIS.
2.14 Upgrade Installation ProcessPro-Watch Software Suite Release 4.0 must be already installed before you begin this procedure.
1. Before you begin to install the patch:
• Close out any Pro-Watch software that may be running.
• Be sure the ProWatchBridgeService service is not running.
2. Copy the patch executable onto your machine.
3. Double-click on the executable to display the Pro-Watch Setup Wizard Welcome screen.
Figure 2-40 Welcome Screen
Pro-Watch Software Suite Installation Guide, Release 4.0, Document 7-901073V1 45

Pro-Watch 4.0 InstallationUpgrade Installation Process
4. Click Next to display the Start Installation screen.
Figure 2-41 Start Patch Installation Screen
If you are installing Pro-Watch Server, select the Apply Update to Database check box (if you are installing Pro-Watch Client, the check box is greyed out).
5. Click Next to display the Installing screen.
Figure 2-42 Installing Patch Screen
The status bars display the progress of the installation.
46 www.honeywell.com

Pro-Watch 4.0 InstallationUpgrade Installation Process
6. When the installation is complete, the software automatically displays the message that the installation is successful.
Figure 2-43 Successful Installation Message
7. Click Finish. A small pop-up informs you that you have to reboot the PC for the patch to take effect.
Figure 2-44 Reboot Prompt
8. Click OK to restart your computer.
9. Manually start the Pro-Watch service. To do this, go to the Windows Control Panel, select Administrative Tools, and select Services.
Pro-Watch Software Suite Installation Guide, Release 4.0, Document 7-901073V1 47

Pro-Watch 4.0 InstallationUpgrade Installation Process
10. At the Pro-Watch Server Properties dialog box, click the Start button to start the Pro-Watch Server service. Click OK to exit.
48 www.honeywell.com

Pro-Watch 4.0 InstallationPro-Watch 4.00.0 product upgrade with SoftKey License
2.15 Pro-Watch 4.00.0 product upgrade with SoftKey License
This section describes upgrading the Pro-Watch 4.00.0 product with respect to SoftKey Licensing
To begin the procedure a user is required to register the Pro-Watch 4.00.0 with the SoftKey License Server as shown in the below screen.
Figure 2-45 SoftKey License Server Screen
After registering the Pro-Watch 4.00.0, perform the below steps:
Note: The user will get the new Voucher ID for the Pro-Watch version 4.00.0 along with the product setup.
1. Install the Pro-Watch 4.00.0 in the machine.
2. Generate the Host ID (*.hid) file from the newly installed Pro-Watch version 4.00.0.
3. E-mail the Voucher ID and Host ID (mentioned in Step2) to [email protected] to get the license certificate file within 3 minutes.
Tip: The license server require e-mail submissions to be provided in a specific format to facilitate automated processing. If a request complies with submission requirements, the license server will reply with a result license file as an attachment.
Pro-Watch Software Suite Installation Guide, Release 4.0, Document 7-901073V1 49

Pro-Watch 4.0 InstallationPro-Watch 4.00.0 product upgrade with SoftKey License
Please use the below format to submit your e-mail to the license server:
• New Vouchers:To: [email protected]: VOUCHID:VoucherID-should-be-entered-hereAttachment: Host ID (*.hid) file
• Upgrade or Supersede Vouchers:To: [email protected]: VOUCHID:VoucherID-should-be-entered-hereAttachment: Host ID (*.hid) file
• Transfer license requests for existing voucher:To: [email protected]: VOUCHID:VoucherID-should-be-entered-hereAttachment: Host ID file and Termination file (*.term)
Note: If upgrade licenses are active on the machine, then separate transfer request is to be sent for each active license.
4. Install the license and work with the application.
50 www.honeywell.com

Pro-Watch 4.0 InstallationPro-Watch Web Component Deployment Scenarios
2.16 Pro-Watch Web Component Deployment Scenarios
This section describes various deployment scenarios of Pro-Watch Web Component. Pro-Watch supports the following types of deployments:
1. Single Machine Deployment
2. Distributed Machines Deployment
2.16.1 Single Machine Deployment
2.16.1.1 Scenario
In a single machine deployment scenario the following components are installed on the same machine:
• Pro-Watch Server: To install only Pro-Watch Server perform the steps given in Server-Only Installation, page 15.
• Pro-Watch Client: To install only Pro-Watch Client perform the steps given in Client (Complete) Installation, page 17.
• Pro-Watch Database: To install only Pro-Watch Database perform the steps given in Database Only Installation, page 22.
• Pro-Watch Web Server: To install only Pro-Watch Web Server perform the steps given in Installing Pro-Watch Web Components, page 32.
• Pro-Watch Web Client: To install only Pro-Watch Web Client perform the steps given in Installing Pro-Watch Web Components, page 32.
2.16.2 Distributed Machines Deployment Distributed Machines deployment is possible in the following ways:
2.16.2.1 Scenario 1
The following components can be installed in Machine 1:
• Pro-Watch Server: To install only Pro-Watch Server perform the steps given in Server-Only Installation, page 15.
• Pro-Watch Client: To install only Pro-Watch Client perform the steps given in Client (Complete) Installation, page 17.
• Pro-Watch Database: To install only Pro-Watch Database perform the steps given in Database Only Installation, page 22.
In Machine 2 the following components can be installed:
• Pro-Watch Web Server: To install only Pro-Watch Web Server perform the steps given in Installing Pro-Watch Web Components, page 32.
• Pro-Watch Web Client: To install only Pro-Watch Web Client perform the steps given in Installing Pro-Watch Web Components, page 32.
Pro-Watch Software Suite Installation Guide, Release 4.0, Document 7-901073V1 51
Pro-Watch 4.0 InstallationPro-Watch Web Component Deployment Scenarios
Note: Machine 1 and 2 should be interconnected through LAN.
2.16.2.2 Scenario 2
In this scenario the following components can be installed in Machine 1:
• Pro-Watch Server: To install only Pro-Watch Server perform the steps given in Server-Only Installation, page 15.
• Pro-Watch Database: To install only Pro-Watch Database perform the steps given in Database Only Installation, page 22.
In Machine 2 the following component is installed:
• Pro-Watch Web Server: To install only Pro-Watch Web Server perform the steps given in Installing Pro-Watch Web Components, page 32.
In Machine 3 the following component is installed:
• Pro-Watch Client: To install only Pro-Watch Client perform the steps given in Client (Complete) Installation, page 17.
Note: Machine 1, 2 and 3 should be interconnected through LAN.
In Machine 4 the following component is installed.
• Pro-Watch Web Client: To install only Pro-Watch Web Client perform the steps given in Installing Pro-Watch Web Components, page 32.
Note: Machine 4 will communicate over network with Machine 1, 2 and 3.
2.16.2.3 Scenario 3
This kind of scenario is generally deployed. In this scenario the following components are installed in Machine 1:
• Pro-Watch Server: To install only Pro-Watch Server perform the steps given in Server-Only Installation, page 15.
• Pro-Watch Web Server: To install only Pro-Watch Web Server perform the steps given in Installing Pro-Watch Web Components, page 32.
• Pro-Watch Web Client: To install only Pro-Watch Web Client perform the steps given in Installing Pro-Watch Web Components, page 32.
In Machine 2 the following component is installed:
• Pro-Watch Client: To install only Pro-Watch Client perform the steps given in Client (Complete) Installation, page 17.
Note: Both the machines 1 and 2 are interconnected through LAN.
52 www.honeywell.com

Pro-Watch 4.0 InstallationPro-Watch Web Component Deployment Scenarios
2.16.2.4 Scenario 4
In scenario 4 all the components are installed in individual machines as explained below:
Machine 1:
• Pro-Watch Server: To install only Pro-Watch Server perform the steps given in Server-Only Installation, page 15.
Machine 2:
• Pro-Watch Web Server: To install only Pro-Watch Web Server perform the steps given in Installing Pro-Watch Web Components, page 32.
Machine 3:
• Pro-Watch Client: To install only Pro-Watch Client perform the steps given in Client (Complete) Installation, page 17.
Machine 4:
• Pro-Watch Web Client: To install only Pro-Watch Web Client perform the steps given in Installing Pro-Watch Web Components, page 32.
Note: All the above machines should be interconnected through LAN.
Pro-Watch Software Suite Installation Guide, Release 4.0, Document 7-901073V1 53

Pro-Watch 4.0 InstallationRepair and Modify the Pro-Watch Web Component
2.17 Repair and Modify the Pro-Watch Web Component
To repair and modify the Pro-Watch Web Component installation, perform the following steps:
1. Double-click the Pro-Watch installation wizard icon to display the Pro-Watch Installation welcome wizard screen.
Figure 2-46 Pro-Watch Installation welcome wizard
2. Click Next to display the Feature Modify/Repair/Remove screen.
54 www.honeywell.com

Pro-Watch 4.0 InstallationRepair and Modify the Pro-Watch Web Component
Figure 2-47 Feature Modify/Repair/Remove screen
3. Select the Install/Repair Pro-Watch Web Component check box and click Next. A message box pops-up as shown below.
Note: Once the Pro-Watch Software Suite and PW Web Component is installed, now you can only Repair/Remove the Web Component.
4. Click OK to display Ready to install screen.
Pro-Watch Software Suite Installation Guide, Release 4.0, Document 7-901073V1 55

Pro-Watch 4.0 InstallationRepair and Modify the Pro-Watch Web Component
Figure 2-48 Ready to install screen
5. Click Install to display Figure 2-24 Installation Progress screen. The Process takes several minutes and displays the welcome installation wizard to repair/ Remove the Web Component.
Figure 2-49 Welcome Installation Wizard
6. Click Next to display the Program Maintenance screen where you can Repair or Remove the Web Component.
56 www.honeywell.com

Pro-Watch 4.0 InstallationRepair and Modify the Pro-Watch Web Component
Figure 2-50 Program Maintenance screen
7. Click the Repair radio button and then click Next to display Ready to Repair Program screen.
Figure 2-51 Ready to Repair Program screen
Pro-Watch Software Suite Installation Guide, Release 4.0, Document 7-901073V1 57

Pro-Watch 4.0 InstallationRepair and Modify the Pro-Watch Web Component
8. Click Install to display a status bar showing the progress of the installation as shown in Figure 2-24 Installation Progress screen.When the installation process is finished, click Finish in the InstallShield Wizard Complete screen.
Figure 2-52 InstallShield Wizard Complete screen
A small pop-up prompts you to reboot the PC for the installation to take effect.
Figure 2-53 Reboot Prompt
9. Click YES to restart your computer.
58 www.honeywell.com
Pro-Watch 4.0 InstallationAppendix
2.18 AppendixThis section explains about installing pre-requisites for Pro-Watch Web Client.
To install the Pro-Watch 4.0 Web component a user is required to install the following three components:
• Net 4.0
• IIS 7.5: By default the Pro-Watch 4.0 Software Suite enables the IIS 7.5 if it is not enabled by the supported operating system.
• IE 8: A user can download IE 8 from the web and install.
Without installing the above components, the user cannot install and use the Pro-Watch Web component.
2.18.1 Installing .Net Framework 4.0To install the .Net Framework 4.0, perform the following steps:
1. Double-click the dotNet 4.0 setup.exe icon to display the NET Framework 4 Setup welcome wizard screen.
Figure 2-54 .NET Framework 4 Setup Welcome Wizard
2. Select the I have read and accept the license terms check box and then click Install to display Installation Progress screen.
Pro-Watch Software Suite Installation Guide, Release 4.0, Document 7-901073V1 59

Pro-Watch 4.0 InstallationAppendix
Figure 2-55 Installation Progress screen
The installation screen displays a status bar showing the progress of the installation. The process takes several minutes, when the installation process is finished it displays the Installation Complete screen
Figure 2-56 Installation Complete screen
3. Click Finish to complete the installation.
60 www.honeywell.com

Specifications subject to change without notice.
© Honeywell. All rights reserved.
Document 7-901073V1.
Honeywell
135 West Forest Hill Avenue
Oak Creek, WI 53154
(414) 766-1700 Ph
(414) 766-1798 Fax
www.honeywellintegrated.com
Honeywell – Europe
Boeblingerstrasse 17
71101 Schonaich
Germany