NEURO-MUSCULAR Junction and SKELETAL muscular contraction DR.RAHUL

Doc # 160088_02Released 22/10/18
PRO SeriesResidential Overhead Garage Door Opener

CSI-1 Instruction Manual2
Table of ContentsInstallation InstructionsInstallation Safety Warnings 4
Pre-Installation Requirements 6
Kit Contents 7
Mount Wall & Door Bracket 8
Attach Opener to Track 8
Install Steel Track 9
Programming Instructions 10
Programming OPEN and CLOSE Limits 10
Programming Hand Transmitters 11
Deleting Stored Hand Transmitters 11
Obstruction Force Adjustment 11
Automatic Closing 12
Programming 13
Photo Beam connection 13
Photo Electric Safety Beams 13
Other Terminals 14
OPEN / STOP / CLOSE Terminals 14
Introduction and Application 14

3CSI-1 Instruction Manual
Table of ContentsHome Owner InstructionsHome Owner Safety Warnings 16
Opener Safety and Security 18
Your Door CAN NOT be used by the opener when: 18
Your Door CAN be used when: 18
To Disengage the Opener: 18
To Re-Engage the Opener: 18
Test the Manual Door operation: 18
Maintenance 19
Door Maintenance 19
Safety Testing 19
Light bulb replacing 19
Troubleshooting 20
Warranty 22

CSI-1 Instruction Manual4
WARNING! • The door may operate unexpectedly, therefore do not allow anything to stay in the path of the door.
• When operating the manual release while the door is open, the door may fall rapidly due to weak or broken springs, or due to being improperly balanced.
• The drive must not be used with a door incorporating a wicket door, unless the drive cannot be operated with the wicket door open.
• The drive is intended to be installed at least 2.5m above the floor.
• Do not disengage the opener to manual operation with children/persons or any objects including motor vehicles within the doorway.
• If the door is closing and is unable to re-open when obstructed, discontinue use. Do not use a door with faulty obstruction sensing.
ELECTROCUTION! • Place opener in protected area so that it does not get wet.
• Do not spray with water.• Disconnect the power cord from mains power before
making any repairs or removing covers. Only experienced service personnel should remove covers from the opener.
• If the power supply cord is damaged, it must be replaced by an suitably qualified person.
• Connect the opener to a properly earthed general purpose 240V mains power outlet installed by a qualified electrical contractor.
This automatic garage door opener is designed and tested to offer safe service provided it is installed and operated in strict accordance with the following safety warnings. Failure to comply with the following instructions may result in death, serious personal injury or property damage.
Installation Safety Warnings

5CSI-1 Instruction Manual
Installation Safety Warnings CAUTION:Emergency Access • If garage has no pedestrian entrance door, an
emergency access device should be installed. This accessory allows manual operation of the garage door from outside in case of power failure.
Muscular strain • Practice correct lifting techniques (carton weighs approx 9kgs)
• Practice correct lifiting techniques when required to lift the door as per installation instructions.
Fall from ladder • Ensure ladder is the correct type for job.• Ensure ladder is on flat firm ground that will take the
weight without the legs sinking.• Ensure user has 3 points of contact while on ladder.
Crush injury from unsecured door
• Place a 2 metre exclusion zone around area under the door while it is unsecured.
• Follow the installation instructionsGarage Door • Examine the door installation, in particular, springs and
mountings for signs of wear, damage and imbalance.• The garage door must be well balanced. Sticking or
binding doors must be repaired by a qualified garage door installer prior to installation of the opener.
• Remove or disengage all garage door locks and mechanisms prior to installation of the opener.
Entanglement • Never plug in and operate opener prior to installation.• Keep hands and loose clothing clear of door and
guides at all times.Entrapment under operating door
• DO NOT operate the opener unless the garage door is in full view and free from objects such as cars and children/people. Make sure that the door has finished moving before entering or leaving the garage
• In order for the opener to sense an object obstructing the door way, some force must be exerted on the object. As a result the object, door and/or person may suffer minor damage or injury.
• Ensure the garage door is in good working order by undertaking regular servicing.
• Install the optional wall transmitter in a location where the garage door is visible, but out of the reach of children at a height of at least 1.5m.
• Photo Electric beams must be installed if the closing force at the bottom edge of the door exceeds 400N (40kg)
CSI-1 Instruction Manual6
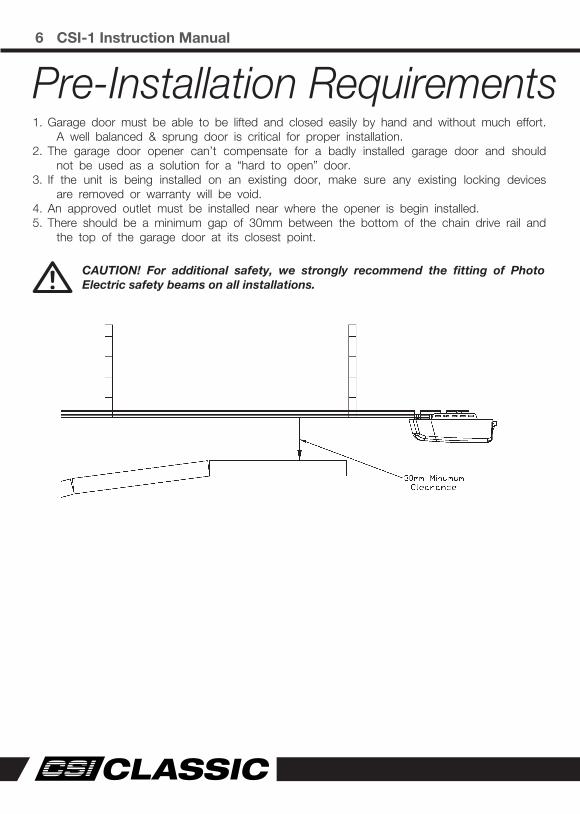
Pre-Installation Requirements1. Garage door must be able to be lifted and closed easily by hand and without much effort.
A well balanced & sprung door is critical for proper installation.2. The garage door opener can’t compensate for a badly installed garage door and should
not be used as a solution for a “hard to open” door.3. If the unit is being installed on an existing door, make sure any existing locking devices
are removed or warranty will be void.4. An approved outlet must be installed near where the opener is begin installed.5. There should be a minimum gap of 30mm between the bottom of the chain drive rail and
the top of the garage door at its closest point.
CAUTION! For additional safety, we strongly recommend the fitting of Photo Electric safety beams on all installations.

7CSI-1 Instruction Manual
Pre-Installation Requirements Kit Contents
1. 1 x CSI-1 drive unit2. 1 x Wall mount transmitter3. 2 x Transmitters and batteries4. 1 x Bent arm door attachment5. 1 x Straight arm door attachment6. 1 x Wall bracket TS017. 1 x Door bracket8. 2 x Pin Snap 1.8x329. 2 x Hex Head screw M8x1610. 1 x Pin 0880
11. 1 x Clevis Pin 082512. 2 x Hex Serration flange nut M813. 1 x Motor Shaft14. 2 x U hanging Brackets15. 1 x Click Bracket16. 6 x Hex Serration flange Nut M617. 2 x Mounting Brackets18. 2 x Hex screw M6 x 1419. 1 x Track
1
23
4
56
7
8
9
1011
13
12
17
14
1516
1819

CSI-1 Instruction Manual8
Mount Wall & Door Bracket1. Wall Bracket - Close the garage door and measure
the garage door width at the top and mark the centre. Locate and mount the wall bracket 2cm-15cm above the door on the inside wall.
(Depend on the actual installation space).
2. Door Bracket – Fix the door bracket to a structural part of the door as close to the top edge as possible.
Attach Opener to Track
1. Attach the opener head to the steel track. Assembly the 2 “U” Hanging brackets with 6mm nuts supplied.
2. Attach the click bracket to the opener and track.
9CSI-1 Instruction Manual
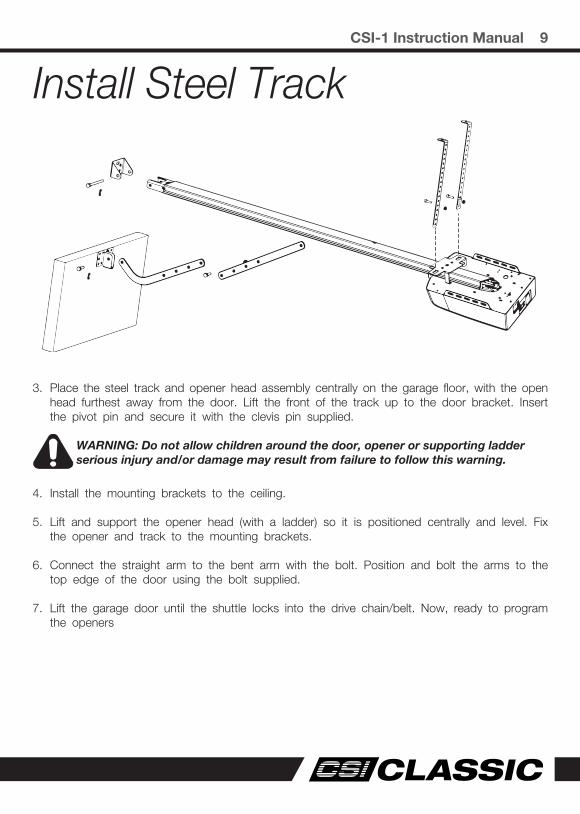
3. Place the steel track and opener head assembly centrally on the garage floor, with the open head furthest away from the door. Lift the front of the track up to the door bracket. Insert the pivot pin and secure it with the clevis pin supplied.
WARNING: Do not allow children around the door, opener or supporting ladder serious injury and/or damage may result from failure to follow this warning.
4. Install the mounting brackets to the ceiling.
5. Lift and support the opener head (with a ladder) so it is positioned centrally and level. Fix the opener and track to the mounting brackets.
6. Connect the straight arm to the bent arm with the bolt. Position and bolt the arms to the top edge of the door using the bolt supplied.
7. Lift the garage door until the shuttle locks into the drive chain/belt. Now, ready to program the openers
Mount Wall & Door Bracket
Attach Opener to Track
Install Steel Track

CSI-1 Instruction Manual10
Programming InstructionsProgramming OPEN and CLOSE Limits1. Press and hold SET Button until 1 appears
on the display then release the button. The door opener is now in Programming Mode.
2. Press and hold the UP until the door reaches the desired open position.
NOTE: Fine adjustments can be made by toggling UP & DOWN buttons
3. Now press the SET button to confirm the postiion. The display will now indicate the number 2.
4. Next press and hold the DOWN button until the door reached the desired close position. For fine adjustments toggle UP & DOWN buttons.
5. Now press and hold the DOWN button until the door reaches the desired close position. For fine adjustments toggle UP & DOWN buttons.
6. Now press the SET button to confirm the close position.
WARNING: The door will now cycle open and close to set the travel limits and force sensitivity adjustments. The door is now set for normal operation.

11CSI-1 Instruction Manual
Programming InstructionsProgramming Hand TransmittersNOTE: Hand transmitters that are supplied with the door opener are pre-programmed.1. Press the CODE button. A dot will be
indicated in the corner of the display.
2. Now press the button on the hand transmitter you want to use, pause for 2 seconds, then press the same button on the hand transmitter again for 2 seconds.
The dot on the display will flash to confirm the code, then turn off. Repeat the process for additional remotes that need to be stored.
Deleting Stored Hand Transmitters1. Press and hold CODE button until a C is
indicated on the display. All stored remotes will be deleted.
Obstruction Force Adjustment
CAUTION: The obstruction force adjustment is set automatically during programming. Normally no adjustment is necessary.
1. Press and hold the SET button until 3 appears on the display the release the button.
The unit is now in force adjustment mode.
2. Press the UP button to increase the force setting or the DOWN button to decrease the force setting.
The minimum force is 1 and it can be adjusted upward.
3. Press SET to confirm your setting.NOTE: The force is set on 3 as standard in factory.
Increase force
Decrease force

CSI-1 Instruction Manual12
Automatic Closing1. Press and hold UP button until a horizontal
bar is indicated on the display. Now press UP button once to set the auto close time (in minutes).
2. Press UP button to increase the time, or DOWN button to decrease the time.
The maximum time is 135 seconds. To disable Auto Close, set tume to zero (0).
3. Press SET button to confirm the set.
WARNING! It is compulsory to have Safety Beams installed when using Auto-Close mode.
Increase A/C time
Decrease A/C time
Auto Close enabled
Auto Close disabled
Programming Instructions

13CSI-1 Instruction Manual
ProgrammingNOTE: Make sure the photo beam has been correctly installed and use Normally Closed contacts to the accessory terminals of the opener1. Press and hold the DOWN button until 11
appears on the display. To enable the photo beam option press UP again, the display will indicate a H (enabled) or press DOWN button to disable (display 11) the option.
2. Press SET to confirm the set.
Photo Beam connection
1. Flash (Caution Light) should be less than 25W.
2. PB (External Push Button) should be “No”.
Photo Electric Safety Beams
Photo Beam disabled
Photo Beam enabled
Programming Instructions

CSI-1 Instruction Manual14
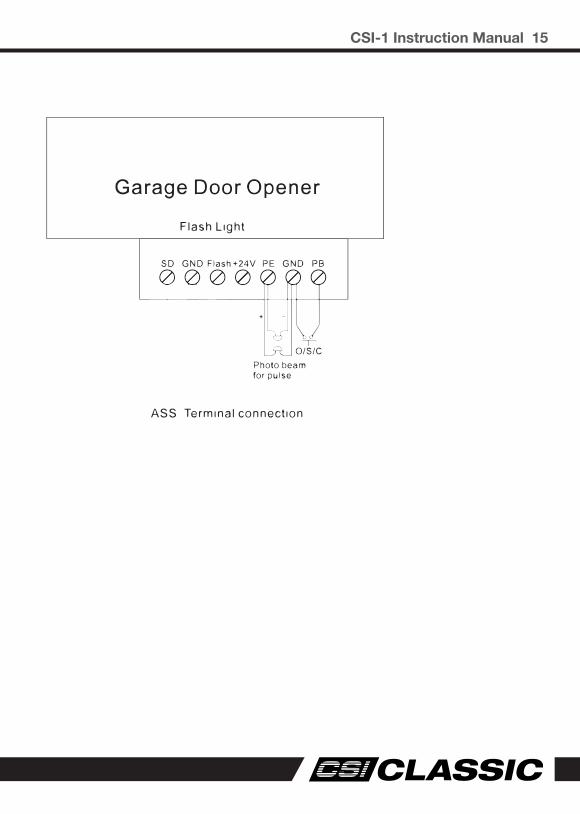
Other TerminalsOPEN / STOP / CLOSE TerminalsThe O/S/C facility can be used for an external push button switch to operate the opener. The switch must have voltage free normally open contacts.
Introduction and Application1. The O/S/C interfaces available. Add a new O/S/C button to open or close the door.
2. Flash Light function. There are corresponding interfaces for this
function and provide 24V-35V flash light voltage. Connect the flash light with DC 24V-28V, currents<100mA. When use AC 220V power flash lights, please match an adapter, and wiring as required.
15CSI-1 Instruction Manual

CSI-1 Instruction Manual16
Home Owner Safety Warnings
WARNING! • When operating the manual release while the door is open, the door may fall rapidly due to weak or broken springs, or due to being improperly balanced.
• DO NOT disengage the opener to manual operation with children/persons or any objects including motor vehicles within the doorway.
• If the door is closing and does not re-open when obstructed, discontinue use. DO NOT use a door with faulty obstruction sensing.
ELECTROCUTION! • Place opener in protected area so that it does not get wet.
• DO NOT spray with water.• DO NOT open the protective covers.• DO NOT operate opener if cable is damaged.
DO NOT DO IT YOURSELF
• Keep the garage door balanced. Sticking or binding doors must be repaired. Garage doors, door springs, brackets and their hardware are under extreme tension and can cause serious personal injury. DO NOT attempt any garage door adjustment. DO NOT use if repair or adjustment is needed. Call for a professional garage door service.
This automatic garage door opener is designed and tested to offer safe service provided it is installed and operated in strict accordance with the following safety warnings. Failure to comply with the following instructions may result in death, serious personal injury or property damage.
DIY

17CSI-1 Instruction Manual
Home Owner Safety Warnings
CAUTION:Emergency access
Entrapment under operating door
• If your garage has no pedestrian entrance door, an emergency access device should be installed. This accessory allows manual operation of the garage door from outside in case of power failure.
• Watch the moving door and keep people away until the door is completely opened or closed. DO NOT operate door when persons are near the door.
• DO NOT allow children to play with door controls or transmitters.
• Regularly conduct Open and Close cycle testing.• Ensure the garage door is in good working order by
undertaking regular servicing.• Wall transmitters should be installed in a location where
the garage door is visible, but out of the reach of children at a height of at least 1.5m.
• Install Safety Beams (recommended).Fall from Ladder • Ensure ladder is the correct type for the job.
• Ensure ladder is on flat ground.• Ensure user has 3 points of contact while on ladder.
Entanglement in or laceration from moving door
• Keep hands and loose clothing clear of door and guides at all times.
• Keep hands clear of moving door as sharp edges can cause cuts or lacerations.

CSI-1 Instruction Manual18
Opener Safety and Security
CAUTION: When the opener is manually disengaged, the door is no longer locked. To lock the door manually, re-engage the opener after the door is closed.
WARNING! When operating the manual release (while the door is open) the door may fall rapidly due to weak or broken springs, or due to being improperly balanced.
Do not disengage the opener to manual operation with children/persons or any objects including motor vehicles within the doorway.
CAUTION: Do not use the string handle as a mechanism to open the door. Failure to comply may cause serious injury.
Your Door CAN NOT be used by the opener when:1. There is a locking device installed.2. There is a power failure.
Your Door CAN be used when:3. There is an emergency, by disengaging the
opener.4. There is a power failure, by disengaging the
opener.
To Disengage the Opener:It is recommended to do so with the door in the closed position. Pull the manual release cord towards the door, until you hear a click. Move the door manually.
To Re-Engage the Opener:Check the door has not been locked by a locking device. To re-engage the door simply run the opener in automatic mode or move door by hand until the trolley engages in the chain shuttle.
Test the Manual Door operation:Periodically disengage the opener and manually operate the door. The door must be smooth to operate by hand. The force required on the bottom rail should not exceed 20kg.

19CSI-1 Instruction Manual
Opener Safety and Security MaintenanceDoor MaintenanceA poorly maintained door could cause fatal / serious injuries or damage to property.
1. Frequent examine the door, particularly the cables, springs and mountings for signs of wear, damage or imbalance. DO NOT USE if repair or adjustment is needed since a fault in the installation or an incorrectly balanced door may cause injury.
2. Fasteners: Check all screws, nuts and bolts to ensure they are secure.
3. Spring Tension: It is natural for springs to lose tension. Should the door become hard to operate or completely inoperative, contact a door professional.
4. Guide Tracks: Clean the internal sections of the guide tracks every 3 - 6 months with a cloth dampened with mineral turps or methylated spirits.
Safety TestingIt is recommended that you run the following testing procedures MONTHLY to ensure the garage door is fit for use.
1. Open the door. 2. Place a piece of timber approximately 40mm
highon the floor directly under the door.3. Press the button to close the door.4. The door should strike the objext and re-
open.5. Remove the timber.
Put the door into manual by pulling down on the manual release string to disengage the motor and contact 02 9722 5670 for support.
WARNING! Failure to maintain your garage door may void the warranty on your garage door opener.
DO NOT DO IT YOURSELF:
Door adjustments should only be carried out by experienced persons, as this function can be dangerous if not performed under strict safety procedures.
DIY
WARNING! If the door is closing and is unable to re-open when obstructed, discontinue use. Do not use a door with faulty obstruction sensing.
Light bulb replacingTo replace the light bulb in the opener follow below:
ELECTROCUTION! Make sure the power supply has been cut off before replacing the light bulb. And ensure the voltage of the new light bulb is in accordance with the local voltage and the power is within 25 Watt.
1. Demount the screws on the lamp cover.2. Take the lamp cover away the trwist off
the old L.E.D light anti-clockwise. 3. Fix the new L.E.D light and lamp cover.

CSI-1 Instruction Manual20
TroubleshootingFault appearance Possible cause Solution
The opener does not work Power Supply Check whether the opener is connected to power.
LED lights do not work The LED is broken Replace the LED
Poisiton missing System error Re-set the limit traveling
While learning, the digital display
Travel less than 30cm or more than 9m Re-set the limit traveling
Digital display
Opener does not work or stop working
Insufficient voltage Check the power supply
Digital display or Unbalanced spring Rebalance the spring
Opener is not working
Digital display
Opener failed to learn the UP and DOWN limit setting.
Follow the Programming Instructions on how to set the open and close limits.
Door moves up only. Door will not close.
Digital display
Safety Beam is obstructed Check there is not obstruction in the safety beams path.
The remote control cannot be used or the operation distance is short
Flat battery
Antenna is loose or not well extended
Replace the battery
Extend the antenna on the opener
Digital display Stored remote code is full Delete all stored codes and only code remotes needed.

21CSI-1 Instruction Manual
TroubleshootingFault appearance Possible cause Solution
The opener does not work Power Supply Check whether the opener is connected to power.
LED lights do not work The LED is broken Replace the LED
Poisiton missing System error Re-set the limit traveling
While learning, the digital display
Travel less than 30cm or more than 9m Re-set the limit traveling
Digital display
Opener does not work or stop working
Insufficient voltage Check the power supply
Digital display or Unbalanced spring Rebalance the spring
Opener is not working
Digital display
Opener failed to learn the UP and DOWN limit setting.
Follow the Programming Instructions on how to set the open and close limits.
Door moves up only. Door will not close.
Digital display
Safety Beam is obstructed Check there is not obstruction in the safety beams path.
The remote control cannot be used or the operation distance is short
Flat battery
Antenna is loose or not well extended
Replace the battery
Extend the antenna on the opener
Digital display Stored remote code is full Delete all stored codes and only code remotes needed.

CSI-1 Instruction Manual22
This Warranty is given by CSI Doors a division of B&D Australia Pty Ltd (ABN 25 010 473 971), 1956 Dandenong Rd, Clayton 3168, ph 02 9722 5670, email [email protected].
PLEASE NOTE:• This Warranty is in addition to any statutory, non-excludable guarantees or warranty rights and remedies under the law. See section 5 below.
• This warranty applies to the original purchaser only and may not be transferred.• This Warranty is to be read in conjunction with the owner’s copy of the installation instruction manual.• In this warranty, ‘CSI Representative’ means an entity authorized by CSI to service CSI products.
It is a condition of the below warranties that the manual operating (opening and closing) force of the door by hand does not exceed 20kg.
MODEL WARRANTY DOOR (MAX)
SECTIONAL
CSI Classic Pro Series
3 yrs 120kg
EXTRAS
TRACK ASSEMBLY(includes all parts)
1 year
TRANSMITTERS & ACCESSORIES
1 year
1. MAKING A CLAIM(a) The product parts in the above table should operate
in accordance with the product manual for the time period shown, provided you comply with the manufacturer’s instructions concerning installation, operation, maintenance and testing. Failure to do so may void all or part of this warranty.
(b) If, during the relevant warranty period, a product part in the table above appears to contain a defect, call the retailer from whom you purchased the product, or CSI Classic on 02 9722 5670, and they will instruct you what to do next.
(c) You are responsible for the cost of making a claim under this Warranty. Additional access expenses where the Product is not readily accessible must be borne by you.
(d) If CSI Classic or CSI Classic’s Representative confirms the product is defective and covered by this Warranty, CSI Classic will repair or replace it (at CSI Classic’s sole option) at no cost to you. Goods presented for repair may be replaced or repaired by refurbished goods or parts of the same type.
2. WARRANTY CONDITIONSIt is a condition of this warranty that:(a) you provide a copy of the receipt of original purchase
of the product, and the serial number of the Product which can be found on the label adhered to the Product.
(b) the Product has been serviced by CSI Classic or a CSI Classic Representative, within 12 months of installation (to allow for the door to settle) and at regular intervals not exceeding 2 years and on each of these services, the garage door or gate to which the Product is attached has also been serviced by the door manuafacturer or its authorised service agent.
3. WARRANTY EXCLUSIONSThis warranty excludes defecrts or improper operation resulting from:(a) excessive wear and tear that may cause the product
to fail;(b) accidental, deliberate or negligent damage or damage
cause by insects, dirt, plants or other objects;(c) blown fuses, electrical surges, power surges or power
spikes or faulty or unsuitable electrical wiring of structures to which the product is affixed;
(d) theft, fire, flood, rain, water, lightning, storms or any other acts of God;
(e) salt or other corrosion due to environmental conditions,
(f) any installation, configuration or use of the product contrary to the instructions supplied with the product;
(g) maximum continuous operating time exceeding 1 minute in10 minutes;
(h) the manual operating (opening and closing) force of the door by hand exceeding 20kg;
(i) door weight exceeding amounts listed in table above, for relevant Product;
(j) the door used with the product not being in safe working order and condition;
(k) any modification to the product or acts of any person in respect of the product which are not authorized by CSI Classic and which impact Product performance;
(l) installation of a residential garage door opener in a commercial or industrial premises or in a dwelling other than a single-family dwelling; or
(m) radio or electrical interference or lack of availability of signal.
NOTE: CONSUMABLES (eg Batteries in remote control transmitters and light bulbs and fuses) are not covered by this warranty
Warranty

23CSI-1 Instruction Manual
4. OTHER CONDITIONS(a) This Warranty is not transferable.(b) The warranty period stated in the table will not be
extended for Products or parts repaired or replaced during the relevant warranty period.
(c) Where the Product is sold by any person other than CSI Classic, except for the warranty set out above, such person has no authority from CSI Classic to give any warranty or guarantee on CSI Classic’s behalf in addition to the warranty set out above.
5. STATUTORY GUARANTEES OR WARRANTIES IN AUSTRALIA
If you are a consumer under the Australian Consumer Law, our goods come with guarantees that cannot be excluded under the Australian Consumer Law. You are entitled to a replacement or refund for a major failure and for compensation for any other reasonably foreseeable loss or damage. You are also entitled to have the goods repaired or replaced if the goods fail to be of acceptable quality and the failure does not amount to a major failure.This warranty certificate and other statements contained in this document or other CSI Classic documents given to you do not exclude, restrict or modify the application of all or any of the provisions of the Australian Consumer Law.
To the extent permitted by the Act or other laws, CSI Classic:(a) limits its liability for breach of a statuatory guarantee to the
payment of the cost of replacing the Product or acquiring an equivalent Product; and
(b) expressly excludes any liability for consequential loss and incidental or indirect damages (including but not limited to damages for loss of business profits, income, business, goodwill or reputation, or business interruption) due to a defect of the Product.