Prius Maintenance: Air-Conditioner Filter -...
10
Prius Maintenance Air-Conditioner Filter Disclaimer: All the information stated in this document was provided by Prius owners. None were affiliated with Toyota Motor Corporation, except as customers. This document is not sanctioned by Toyota Motor Corporation or any of its affiliates. The ideas, suggestions, and opinions offered in this document have not been endorsed by the manufacturer of those specific components or Toyota Motor Corporation. Any harm or damage that may result from the application of or the following of any ideas, suggestions, or opinions contained in this document is the sole responsibility of the individual that applied or followed said ideas, suggestions or opinions. The authors of this document hereby declare that they cannot and will not be held liable, in any fashion, for the content or the use of this document. Prius Maintenance: Air-Conditioner Filter 1 of 1 Last Updated: 6/26/2005
Transcript of Prius Maintenance: Air-Conditioner Filter -...

Prius Maintenance
Air-Conditioner Filter
Disclaimer: All the information stated in this document was provided by Prius owners. None were affiliated with Toyota Motor Corporation, except as customers. This document is not sanctioned by Toyota Motor Corporation or any of its affiliates. The ideas, suggestions, and opinions offered in this document have not been endorsed by the manufacturer of those specific components or Toyota Motor Corporation. Any harm or damage that may result from the application of or the following of any ideas, suggestions, or opinions contained in this document is the sole responsibility of the individual that applied or followed said ideas, suggestions or opinions. The authors of this document hereby declare that they cannot and will not be held liable, in any fashion, for the content or the use of this document.
Prius Maintenance: Air-Conditioner Filter 1 of 1 Last Updated: 6/26/2005
AT YOUR OWN RISK - No liability is accepted for anything mentioned within this document; all actions are at your own risk. You are responsible for any damage caused by improper action or forcing of components when removing or connecting. Proceed with care.
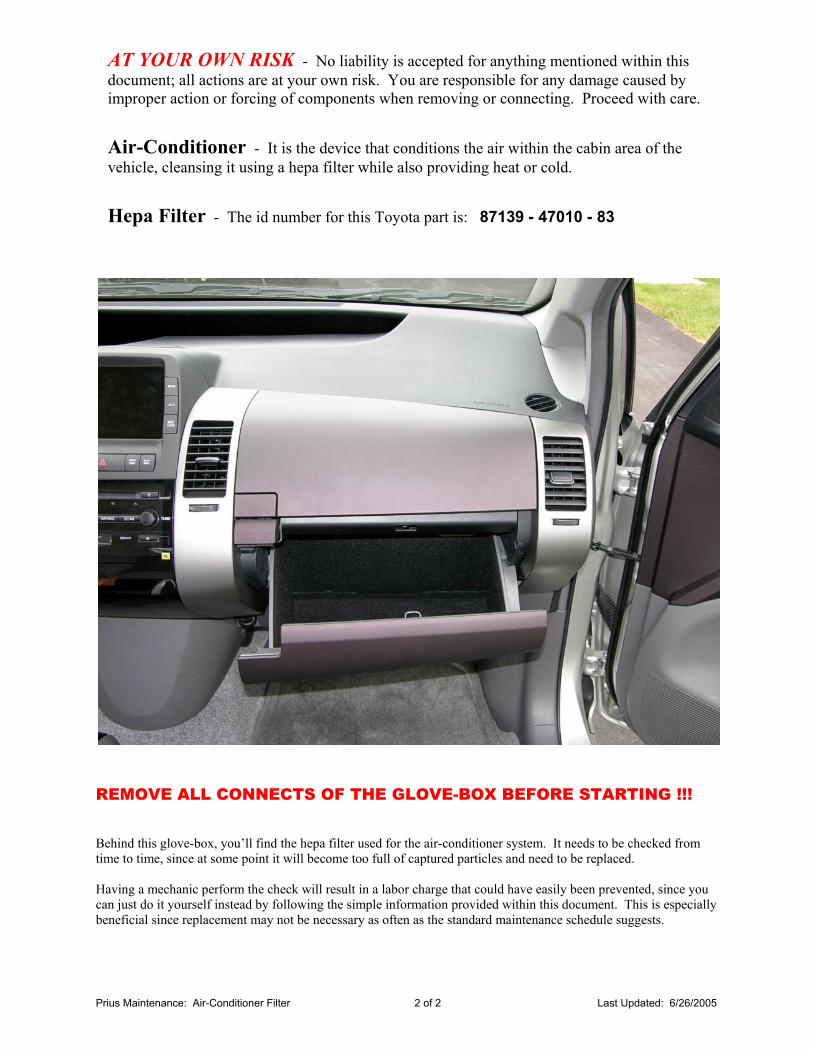
Air-Conditioner - It is the device that conditions the air within the cabin area of the vehicle, cleansing it using a hepa filter while also providing heat or cold.
Hepa Filter - The id number for this Toyota part is: 87139 - 47010 - 83
REMOVE ALL CONNECTS OF THE GLOVE-BOX BEFORE STARTING !!! Behind this glove-box, you’ll find the hepa filter used for the air-conditioner system. It needs to be checked from time to time, since at some point it will become too full of captured particles and need to be replaced. Having a mechanic perform the check will result in a labor charge that could have easily been prevented, since you can just do it yourself instead by following the simple information provided within this document. This is especially beneficial since replacement may not be necessary as often as the standard maintenance schedule suggests.
Prius Maintenance: Air-Conditioner Filter 2 of 2 Last Updated: 6/26/2005

Above is the right side of the glove-box. Begin the process to reveal the hepa filter behind it by simply pulling inward with your hand. No tool is required. The flexible plastic will bend allowing the catch to be bypassed. Below is the left side of the glove-box. Pull on it the same way you did on the right side.
Prius Maintenance: Air-Conditioner Filter 3 of 3 Last Updated: 6/26/2005

Back on the right side, notice how there is an attached arm preventing the glove-box from dropping to the floor. This is a plastic shock-absorber that dampens (makes softer) movement when opening & closing the glove-box. Also, notice how the catch that you bypassed is now visible. Later when putting the glove-box back into place, you will simply push hard to make the flexible plastic bend allowing that catch to slip behind the stop.
Prius Maintenance: Air-Conditioner Filter 4 of 4 Last Updated: 6/26/2005

Prius Maintenance: Air-Conditioner Filter 5 of 5 Last Updated: 6/26/2005
Above is an extreme close-up of the dampener and the arm in which it attaches. Below is the entire dampener, when removed entirely from the internal assembly.

Prius Maintenance: Air-Conditioner Filter 6 of 6 Last Updated: 6/26/2005
Once you disconnect the dampener, hold onto the glove-box! Otherwise, it will fall to the floor. Slowly & Carefully lower it to the floor by hand instead. Having reached this point, the hepa filter for the air-conditioner system is now accessible.

Above is the plastic box in which the hepa filter and air-conditioner fan is located. To remove the hepa filter, all you have to do is pull on the two tabs at the top of the white area, on the left & right side. An inch tall horizontal cartridge will easily slide out. Below is what that plastic box looks like with the cartridge removed.
Prius Maintenance: Air-Conditioner Filter 7 of 7 Last Updated: 6/26/2005

Above is what the cartridge looks like removed from the car. Below is a photo of the hepa filter partially removed from the plastic cartridge. This can be take out entirely and shaken to dislodge the captured particles. If necessary, it should be replaced. Just push it into place; there are grips all along the inner-edge at the base to hold it.
Prius Maintenance: Air-Conditioner Filter 8 of 8 Last Updated: 6/26/2005
Prius Maintenance: Air-Conditioner Filter 9 of 9 Last Updated: 6/26/2005
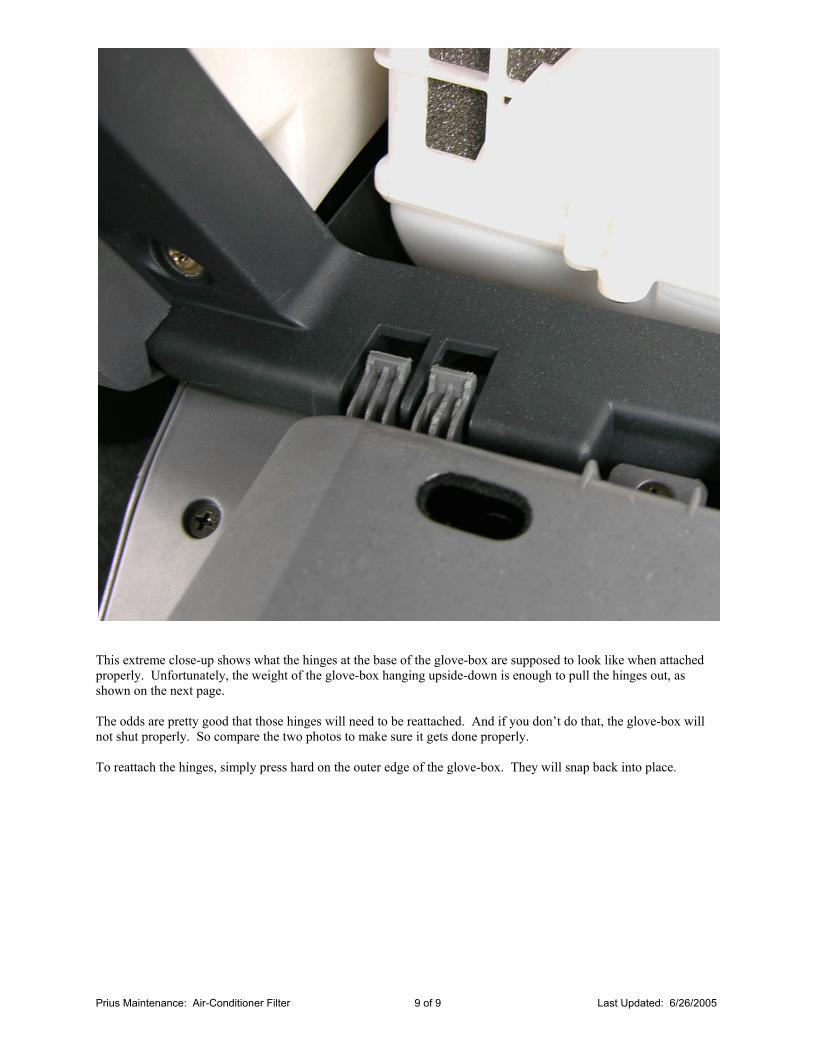
This extreme close-up shows what the hinges at the base of the glove-box are supposed to look like when attached properly. Unfortunately, the weight of the glove-box hanging upside-down is enough to pull the hinges out, as shown on the next page. The odds are pretty good that those hinges will need to be reattached. And if you don’t do that, the glove-box will not shut properly. So compare the two photos to make sure it gets done properly. To reattach the hinges, simply press hard on the outer edge of the glove-box. They will snap back into place.

Prius Maintenance: Air-Conditioner Filter 10 of 10 Last Updated: 6/26/2005
Once you have properly refitted the glove-box, reverse the process you performed earlier. Connect the dampener to the glove-box, by pushing the eye into the gripping arm. Then push on the outside of the glove-box to make the flexible plastic bend allowing that catch on each side to slip behind the stops. At that point, you are done!