PrismPOS Quick Menu Users Guide - Nebraska …nebook.com/wpassets23/uploads/2017/07/PrismPOS... ·...
26
1 of 26 Quick Menu Mode Users Guide IT Special Projects May 2017 PrismPOS v1.8.9+
Transcript of PrismPOS Quick Menu Users Guide - Nebraska …nebook.com/wpassets23/uploads/2017/07/PrismPOS... ·...

1 of 26
Quick Menu Mode Users Guide
IT Special Projects
May 2017
PrismPOS v1.8.9+

2 PrismPOS Quick Menu PrismPOS Quick Menu Users Guide
© 2017 Nebraska Book Company, Inc. All rights reserved.
This document contains proprietary information of Nebraska Book Company, Inc. Any reproduction of this
information in whole or in part without prior written authorization is prohibited. Use of this material for
purposes other than in connection with PrismCore® violates the License Agreement. PrismCore® is a
registered trademark of Nebraska Book Company, Inc. iPhone® and iOS® are registered trademarks of
Apple, Inc. EasyLink® is a registered trademark of EasyLink Services Corp. Pubnet® is a registered
trademark of RR Bowker, LLC. Microsoft, SQL Server, and Windows are registered trademarks of Microsoft
Corporation. PrismCore® utilizes Microsoft SQL Server database.
Every attempt has been made to make this material complete, accurate, and up-to-date. Users are
cautioned, however, that Nebraska Book Company, Inc. reserves the right to make changes to the software
and its related documentation without notice and shall not be responsible for any damages (including
inconsequential) caused by reliance on the material presented, including, but not limited to, typographic,
arithmetic, or listing errors.
If you have any comments or suggestions regarding this document, please send e-mail to
Published 05/25/2017 by:
IT Special Projects
A division of Nebraska Book Company, Inc.
4700 South 19th Street
Lincoln, Nebraska 68512
(402) 421-7300
Printed in U.S.A.

PrismPOS Quick Menu 3 PrismPOS Quick Menu Users Guide
Contents
PrismPOS Quick Menu ............................................................................................................ 4
Quick Menu Terms and Navigation ........................................................................................ 5
Configure Quick Menus ........................................................................................................... 7
Add a New Quick Menu Profile ........................................................................................... 7
Configure a New Quick Menu Pages/Columns ................................................................. 8
Creating Quick SKUs Page/Column ............................................................................... 8
Creating Non Merchandise Page/Column ................................................................... 12
Create Pages/Columns Setup in PrismCore ................................................................ 13
Create Made to Order Page/Column ............................................................................ 14
Attach a Quick Menu Profile to a POS Register ............................................................... 18
PRISMPOS Register ............................................................................................................... 20
Using the Quick Menu to Sell Quick SKUs, Non-Merchandise and Made to Order items
............................................................................................................................................ 21
Made to Order other Buttons ........................................................................................ 26

4 PrismPOS Quick Menu PrismPOS Quick Menu Users Guide
PrismPOS Quick Menu
Quick Menu allows you to add items on a PrismPOS register that make for faster, more
efficient transaction, particularly with deli-type transactions. Configuration of Quick
Menu takes place in Admin Tool and accessed by selecting the Quick Menu/Special
Items button the home screen at the register(s).
There are several types of items that may be added under the in the Quick Menu. Some
originate from PrismCore and others created in Quick Menu.
Quick Menu mode allows you to add items to a PrismPOS cash register not needed on
registers anywhere else.
This document looks at all types of items that may be setup within the Quick Menu.
They include:
Pay In and Pay Out
Gift Cards
DCC Sales
Quick SKUs
Non-Merchandise
Made to Order Items
Note: Throughout this document you will see inconsistencies due to changing the
names of Nebraska Book Company’s software products. It will take sometime to
complete all changes within the software itself. Thank you for your patience.

Quick Menu Terms and Navigation 5 PrismPOS Quick Menu Users Guide
Quick Menu Terms and Navigation
In Edit Profile there are 6 areas:
Profile Name:
After transaction return to:
Menu type:
Search Items page
Organize page
Edit page
Field Definition
Profile Name: Name to identify the profile.
After transaction return to:
Special Items: Return to/start at the Special Items screen. 360 Home: Return to/start PrismPOS home screen.
Menu type:
Classic Special Items: Quick Menu access button called Special Items. Will display as Figure 1. Quick Menu: Quick Menu access button called Quick Menu. Will display as Figure 2.
Figure 1: Menu Type Special Items
Figure 2: Menu Type Quick Menu

6 Quick Menu Terms and Navigation PrismPOS Quick Menu Users Guide
Field Definition
Search Items:
Search items: Search for existing items from PrismCore Item/Inventory Maintenance and/or Non Merchandise. Drag items to pages in Organize frame.
Organize:
Drag to reorder or nest items: Clicking Add Page button below the frame adds pages. Add items to pages using Search items and drag/drop. Clicking Add Container button below the frame, with a page highlighted, adds container folder(s) under pages. Resulting buttons viewable at the register. Repeatable containers: Set up containers to use multiple times. Drag them to the appropriate place in the Drag to reorder or nest frame. Import WinPRISM pages: Checking boxes pulls setups from PrismCore resulting in that box displaying in the Drag to reorder or nest items and creating a page.
Edit: Edit: Display varies based on selection in Organize page.
Search Items Organize Edit
Configure Quick Menus 7 PrismPOS Quick Menu Users Guide
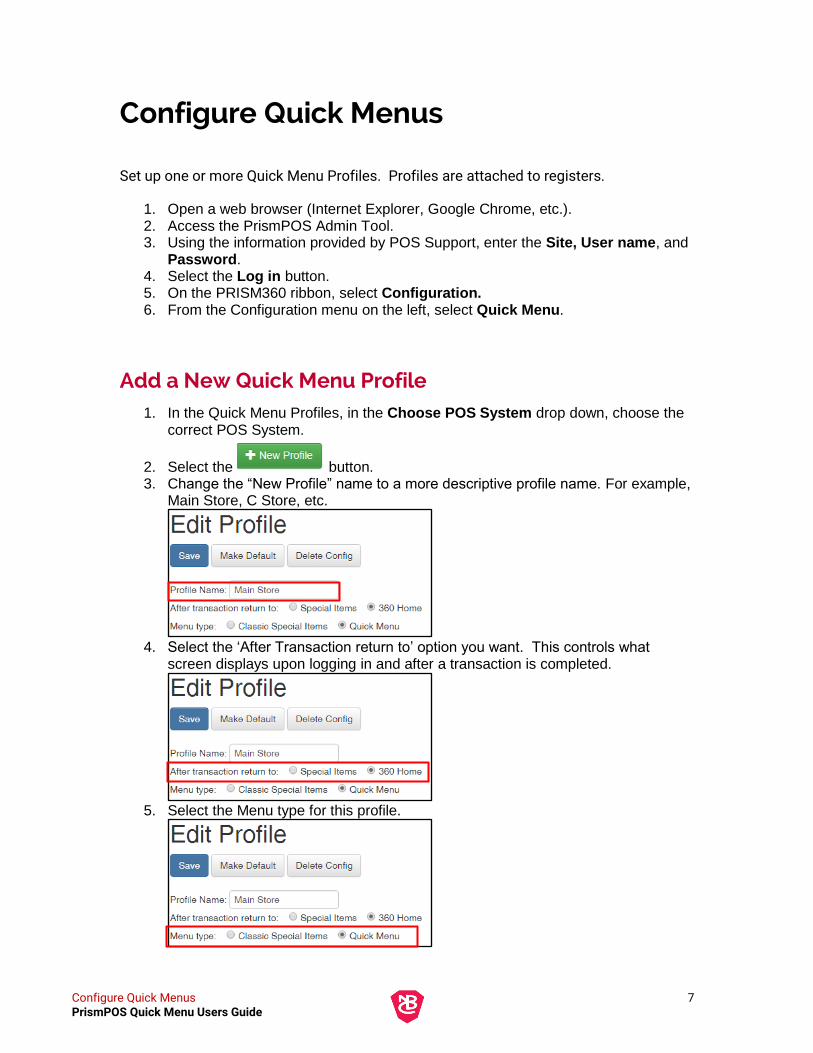
Configure Quick Menus
Set up one or more Quick Menu Profiles. Profiles are attached to registers.
1. Open a web browser (Internet Explorer, Google Chrome, etc.). 2. Access the PrismPOS Admin Tool. 3. Using the information provided by POS Support, enter the Site, User name, and
Password. 4. Select the Log in button. 5. On the PRISM360 ribbon, select Configuration. 6. From the Configuration menu on the left, select Quick Menu.
Add a New Quick Menu Profile 1. In the Quick Menu Profiles, in the Choose POS System drop down, choose the
correct POS System.
2. Select the button. 3. Change the “New Profile” name to a more descriptive profile name. For example,
Main Store, C Store, etc.
4. Select the ‘After Transaction return to’ option you want. This controls what
screen displays upon logging in and after a transaction is completed.
5. Select the Menu type for this profile.

8 Configure Quick Menus PrismPOS Quick Menu Users Guide
6. When completed, select the Save button.
7. Use Search Items, Organize, and Edit to add pages to your Quick Menu.
Configure a New Quick Menu Pages/Columns This section covers four types of Quick Menu pages that may be created.
Creating Quick SKUs Page/Column Quick SKUs are existing PrismCore items that do not have a barcode attached to scan or
for some other reason you find the quick menu to be a better option for selling those
items.
1. Select the Default Column.
Note: If the Default Column has already been used, click on New page, below the
frame, to add additional pages/columns.
2. In Edit the Page Label displays.

Configure Quick Menus 9 PrismPOS Quick Menu Users Guide
3. Rename the page/column.
4. Select Save.
5. To add additional pages or containers within pages, select Add page or Add
container button below the frame.
Note: Containers are further sub-folders/categories of items.

10 Configure Quick Menus PrismPOS Quick Menu Users Guide
Adding Items from PrismCore to Pages/Containers Any number of items or containers with items, depending on the quick menu you are
building, may be added. All items must exist in PrismCore in either Item Maintenance or
Non Merchandise.
1. Enter the name (description, author, title) or SKU, of the item to add to your Quick
SKUs page/column, in Search Items.
2. Locate the item.
3. Select, drag, and drop it in the Quick SKUs folder.
4. Edit displays information about the item:
5. Input changes, if any, and Save.
Item Notes:
Button label: You can re-name the button for this item. SKU: PrismCore SKU for this item. Color: PrismCore color for this item, if applicable.

Configure Quick Menus 11 PrismPOS Quick Menu Users Guide
Size: PrismCore size, if applicable. Color (with color buttons): Color you want the button of this item to be on
the PRISMPOS register screen. Made to Order: If a ‘Made to Order’ item choose this option. Send to KDS: If you want to send this information to a KDS (Kitchen
Display System), choose this option.
6. Continue adding items to the Quick SKUs page.
Note: You may organize your Quick SKUs by creating containers under the
page/column and dragging items in those folders. See example below.
7. Add a container by highlighting the page/column.
8. Select the Add container button.
9. Highlight the Container folder.
10. Rename the new container in Edit.
11. Select Save.
12. Add items to the new container.

12 Configure Quick Menus PrismPOS Quick Menu Users Guide
Creating Non Merchandise Page/Column Non Merchandise includes items or services that are not part of your inventory tracked
in ICS. Non Merchandise set up starts in PrismCore Admin -> POS tab -> Parameters ->
Non Merchandise.
Once Non Merchandise is set up in PrismCore Admin you may add them to a page in
Quick Menu. Follow steps 1-10, Creating Quick SKUs Page/Column, naming the page
Non Merchandise.
Adding Non Merchandise Items from PrismCore to Pages/Containers Non Merchandise items are added to the Non Merchandise page using the same
method as regular items. You are limited to searching by the name of the Non
Merchandise item. Create additional containers to organize your non-merchandise
items, if you wish. See Adding Items from PrismCore to Pages/Containers.
1. Enter the Non Merchandise item in Search Items.
2. Select, drag, and drop the item in the Non Merchandise folder.
3. Use Edit if you needed and Save.
4. Continue finding and dragging Non Merchandise items to the page.
Configure Quick Menus 13 PrismPOS Quick Menu Users Guide
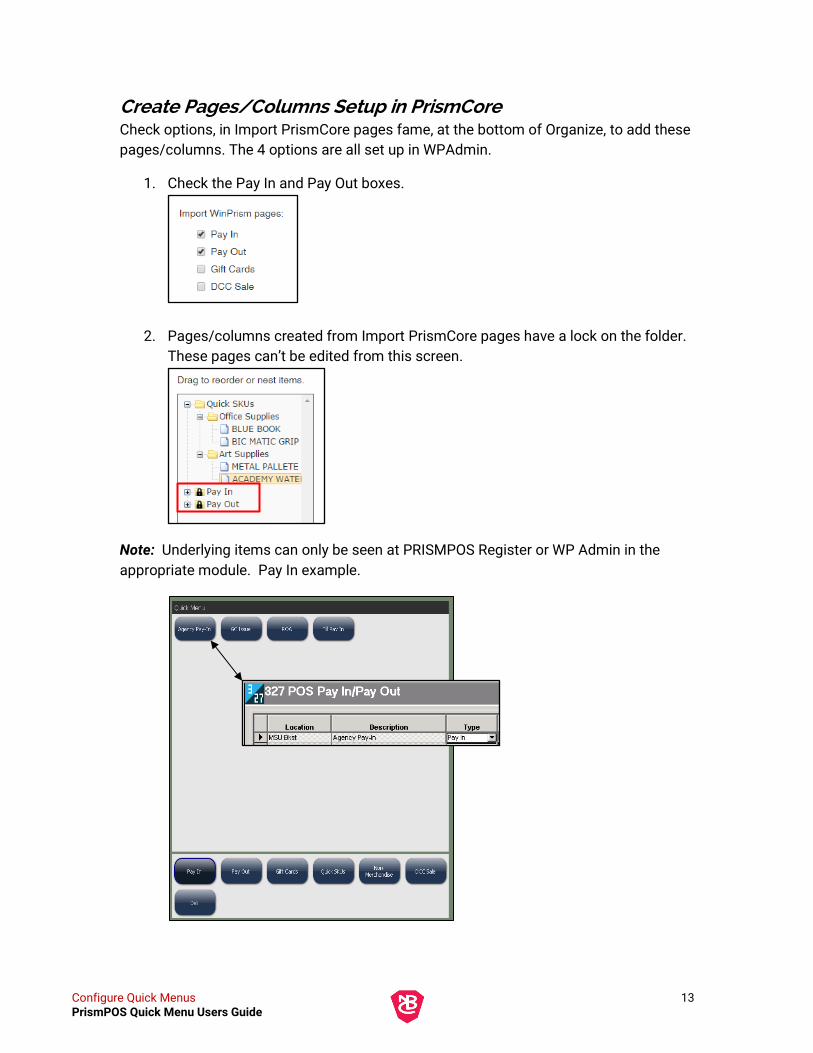
Create Pages/Columns Setup in PrismCore Check options, in Import PrismCore pages fame, at the bottom of Organize, to add these
pages/columns. The 4 options are all set up in WPAdmin.
1. Check the Pay In and Pay Out boxes.
2. Pages/columns created from Import PrismCore pages have a lock on the folder.
These pages can’t be edited from this screen.
Note: Underlying items can only be seen at PRISMPOS Register or WP Admin in the
appropriate module. Pay In example.

14 Configure Quick Menus PrismPOS Quick Menu Users Guide
Create Made to Order Page/Column If there are items you sell that have a variety of options associated, for example, deli
items, Made to Order allows input of multiple parameter options for the items.
Follow steps 1-10, Creating Quick SKUs Page/Column, to set up a page/column for Deli
or Kitchen items. Our example page is called Sandwiches with a container called Deli
Sandwiches with two sandwiches.
To Create a Made to Order Item: 1. Create the page, search for and select, drag, and drop the item into the page or
container.
2. Highlight the item and in Edit check Configure Made to Order box
3. Made to Order Configuration dialog displays.
Determine what options are available for this item. In this example, the first
option we want to offer is type of bread.

Configure Quick Menus 15 PrismPOS Quick Menu Users Guide
4. Select Create New Group, the Add Group dialog displays.
Name: Choose a name for the group.
Required: Is this option required? For example, ‘Bread’ might be
required, but ‘Additional Toppings’ might be optional.
Allow multiple selections: Does this option will allow for more than one
choice. For example, you may only be able to choose one ‘Bread’ type,
but you may allow multiple ‘Cheese’ types.
5. Once you have your options set, select Add Group. The group now appears.
ADDING OPTIONS TO GROUPS 1. Once you have the group added, select Add Item.
2. Notice there are two options at the top of the screen.

16 Configure Quick Menus PrismPOS Quick Menu Users Guide
WinPRISM: This allows you to choose an option that exists as a
PrismCore SKU or a PrismCore non-merch item. For example, if you
track the inventory of your cheese slices by SKU, you would want to add
those SKUs to this order, to track the inventory. Conversely, if you
wanted to have an item hit your reports, but not track by SKU, add a non-
merchandise item.
360: This allows you to input an option that is NOT tracked within
PrismCore. For example, if you want to offer toasted bread, but don’t
want to track that in inventory, add as a 360 only item.
3. Start with assuming we do not track bread type by SKU. We want to add a 360
only item. Select 360.
4. Enter the Name you want to use. In this case “White Bread”.
5. Click Add Item.
6. Continue adding items to this option type until you have added all of your
choices.
7. When finished, add more option types by selecting Create New Group, or you
select Save and Close if you are finished.

Configure Quick Menus 17 PrismPOS Quick Menu Users Guide
8. Add another group, called “Additional Toppings”.
9. This group includes a PrismCore item. Select PrismCore from the top and enter
the name of the item to add in the Search by name or SKU field.
10. Select the correct item it will appear on the right hand side of the screen. You can
only change the Button Text of this item, since it is a PrismCore SKU.
11. When finished, select Add Item.
12. Continue adding items until this option contains all the available choices.
13. Continue adding groups and items until you have added all the options for this
Made to Order Item.

18 Configure Quick Menus PrismPOS Quick Menu Users Guide
Attach a Quick Menu Profile to a POS Register After creating a Quick Menu Profile, attach it to the POS Register(s).
1. From the Configuration menu on the left, select POS.
2. From the POS dropdown, select the appropriate POS system.
3. From the Register tab’s dropdown list, select the appropriate register.
4. To the right of the Register selection are three options; New | Edit | Delete. Select
Edit.
5. From the Edit Register dialog displays, half way down on the left is Quick Menu
Profile.

Configure Quick Menus 19 PrismPOS Quick Menu Users Guide
6. From the drop down list select the Profile for this register then select Save
Changes.

20 PrismPOS Register PrismPOS Quick Menu Users Guide
PrismPOS Register
Two settings control how the Quick Menu displays and works for the profile attached to
the register:
After transaction return to:
Special Items: Choose this to return to or start at the Special Items screen.
360 Home: Choose this to return PrismPOS home screen.
Menu Type:
Classic Special Items: The button to access the Quick Menu is Special Items
and when selected items/pages will as below in Fig. 1.
Quick Menu: The button to access the Quick Menu is Quick Menu and when
selected, pages will display as below in Fig. 2.
Figure 1
Figure 2

PrismPOS Register 21 PrismPOS Quick Menu Users Guide
In this example, Quick Menu Profile set to 360 Home and Quick Menu.
Using the Quick Menu to Sell Quick SKUs, Non-Merchandise and Made to Order items
1. To use the Quick Menu, select the Quick Menu Button (remember depending on
your settings it may be called Special Items). Regardless of name it is always
displayed in the lower middle portion of the display.

22 PrismPOS Register PrismPOS Quick Menu Users Guide
2. The Quick Menu displays in the Detail Frame.
3. The pages created in the profile display in the same order as listed in the profile.
Note: Access Quick Menu, Edit Profile page and drag and drop the pages
accordingly to re-arrange them.
4. The choices are listed across the top for the left most page. In this example
Containers under the Quick SKUs page.
Note: We know they are Containers because the green color. Although green
may be set as a color for an item, the shade is different. You may want to name
your Containers distinctively to indicate it is a Container and not an item.
5. To add an item to the transaction, select the appropriate page and then item as
necessary.

PrismPOS Register 23 PrismPOS Quick Menu Users Guide
6. Example of adding a Quick SKU, a Non-Merchandise item, and a Made to Order
item to a transaction.
a. Selecting the Office Supplies Container and then the Blue Book.
b. The item now displays on the left in the Notepad Frame.

24 PrismPOS Register PrismPOS Quick Menu Users Guide
c. Select the Non Merchandise page; the non merchandise items display
and we add Parking Fees to the transaction.
d. Adding a Made to Order item. Select Sandwiches and Deli Sandwiches
display. Select Deli Sandwiches to display Turkey Sandwich.

PrismPOS Register 25 PrismPOS Quick Menu Users Guide
e. Select Turkey Sandwich and the Made to Order options will display.
f. Select the buttons for the appropriate choices. If changes are needed, you
can simply unselect the original choice, and select another choice.
g. On the left, the receipt on screen will show your options as you choose
them:

26 PrismPOS Register PrismPOS Quick Menu Users Guide
h. Select the Done button in the lower right hand corner of the details frame
once all options are selected.
i. Continue with your sale, total and tender normally.
Sample receipt:
Note: Made to Order items, options selected, also print on the receipt.
Made to Order other Buttons There are several other buttons at the bottom of the Made to Order page, explained
below.
Button Description
Note Add a note to the item.
Override Price Enter a different price than the default price.
Discount Add a Discount to the item.
Taxes Change the tax code of the item.
Refund Refund the item.