PRISMAdirect Configuration Administration guide
244
Administration guide PRISMAdirect Configuration
Transcript of PRISMAdirect Configuration Administration guide

Administration guide
PRISMAdirectConfiguration

Copyright and TrademarksCopyright
Copyright 2018 Océ.
Illustrations and specifications do not necessarily apply to products and services offered in eachlocal market. No part of this publication may be reproduced, copied, adapted or transmitted,transcribed, stored in a retrieval system, or translated into any language or computer language inany form or by any means, electronic, mechanical, optical, chemical, manual, or otherwise,without the prior written permission of Océ.
OCÉ MAKES NO WARRANTY OF ANY KIND WITH REGARD TO THE CONTENTS OF THISPUBLICATION, EITHER EXPRESS OR IMPLIED, EXCEPT AS PROVIDED HEREIN, INCLUDINGWITHOUT LIMITATION, THEREOF, WARRANTIES AS TO MARKETABILITY, MERCHANTABILITY,FITNESS FOR A PARTICULAR PURPOSE OF USE OR NON-INFRINGEMENT. OCÉ SHALL NOT BELIABLE FOR ANY DIRECT, INCIDENTAL, OR CONSEQUENTIAL DAMAGES OF ANY NATURE, ORLOSSES OR EXPENSES RESULTING FROM THE USE OF THE CONTENTS OF THIS PUBLICATION.
Océ reserves the right to revise this publication and to make changes from time to time in thecontent hereof without obligation to notify any person of such revision or changes.
Language
Translation of the original instructions that are in British English.
Trademarks
Océ, Océ ColorWave, Océ DPConvert, Océ PlotWave, Océ PRISMA, Océ PRISMAproduction, OcéVarioPrint are registered trademarks of Océ-Technologies B.V. Océ is a Canon company.
Adobe, Acrobat, PostScript, and the Adobe logos are either registered trademarks or trademarksof Adobe Systems Incorporated in the United States and/or other countries.
Microsoft, Word, Excel, Office 365, Outlook, PowerPoint are trademarks or registered trademarksof Microsoft Corp. incorporated in the United States and/or other countries.
All other trademarks are the property of their respective owners.
Edition 2018-12
Software version 1.4.1 US
Contents
Chapter 1Start using the application................................................................................................ 7
Software version.............................................................................................................................................. 8[Login]............................................................................................................................................................... 9Manage your profile.......................................................................................................................................10Add, edit or delete.......................................................................................................................................... 11
Chapter 2Procedures.........................................................................................................................13
Introduction.....................................................................................................................................................14Configure the payment workflow................................................................................................................. 15Configure the file hosting services, for example, Dropbox........................................................................ 20Configure linking to a file or folder............................................................................................................... 25Setup the uniFLOW interface........................................................................................................................ 27Configure the shipping workflow..................................................................................................................29Configure the tax services workflow............................................................................................................ 33Configure the self-registration workflow......................................................................................................38Configure the languages................................................................................................................................39Configure the preflight workflow.................................................................................................................. 41Configure the email workflow....................................................................................................................... 43Use custom fonts in the emails of PRISMAdirect........................................................................................46Configure the VDP workflow......................................................................................................................... 48Use LDAP attributes in a VDP document, e.g., for business cards............................................................ 49Configure the budget management workflow.............................................................................................50Configure the prices for media, printing, and finishing.............................................................................. 53Configure the price estimation workflow..................................................................................................... 54Configure the quotation workflow................................................................................................................ 57Configure the workflow for automation templates..................................................................................... 60Analyze log files and view which services log information........................................................................62
Chapter 3System...............................................................................................................................65
Connectivity.................................................................................................................................................... 66Manage the LDAP servers....................................................................................................................... 66
Authentication types......................................................................................................................... 70Authentication & retrieve user data.................................................................................................74
Configure the email settings................................................................................................................... 75Configure the file hosting services......................................................................................................... 76Configure linking to a file or folder.........................................................................................................77Integrate Office 365 and Microsoft Outlook with PRISMAdirect..........................................................78Select the payment providers for PRISMAdirect...................................................................................84Shipping....................................................................................................................................................85
Select the shipping providers for PRISMAdirect............................................................................ 85Define any custom box sizes............................................................................................................ 86Configure the default shipping label................................................................................................87
Select the tax services for PRISMAdirect...............................................................................................88Type the default origin address.............................................................................................................. 89Setup the uniFLOW interface.................................................................................................................. 90Configure for automatic license update and allow remote assistance............................................... 91
Contents
3PRISMAdirect 1.4.1

Web submission............................................................................................................................................. 94Configure the general settings................................................................................................................94Define the desk submission users.......................................................................................................... 95Create friendly URLs................................................................................................................................ 96Configure the payment providers per web server................................................................................ 97Configure the shipping providers per web server................................................................................ 98Configure the tax services per web server............................................................................................ 99Configure remote web servers............................................................................................................. 100Configure access to web shops per web server..................................................................................101
Services settings...........................................................................................................................................102Advanced infrastructure settings..........................................................................................................102Control the services of PRISMAdirect.................................................................................................. 103JDD service.............................................................................................................................................104
Manage the JDD service settings...................................................................................................104Manage the failed jobs....................................................................................................................105
Automatic process settings...................................................................................................................106Configure the clean-up settings............................................................................................................108JDF service............................................................................................................................................. 109
Manage the general settings for the JDF service......................................................................... 109Create a JDF endpoint.....................................................................................................................110
Print Prepare Manager service settings............................................................................................... 112Print Licence Monitoring service settings............................................................................................113Import service.........................................................................................................................................114
Pause the import service.................................................................................................................114Create an import folder...................................................................................................................115
Export service.........................................................................................................................................118Pause the export service.................................................................................................................118Create an export folder for orders..................................................................................................119Create an export folder for jobs..................................................................................................... 121
Security......................................................................................................................................................... 122Select the authentication type and enable a secure connection........................................................122Create self-signed certificates............................................................................................................... 123
Backup and restore.......................................................................................................................................125Accounting and reporting............................................................................................................................126
Configure the accounting workflow..................................................................................................... 126Configure the invoice settings.............................................................................................................. 128Email the accounting reports................................................................................................................ 129Configure the reports folder..................................................................................................................132
Select the active languages for PRISMAdirect...........................................................................................133Manage the corrupted orders, jobs, and products.................................................................................... 134Configure the system of measurement used for media........................................................................... 135Define the path for the temporary folder................................................................................................... 136Define the license server settings............................................................................................................... 137
Chapter 4Web shop.........................................................................................................................141
Introduction...................................................................................................................................................142Configure the general settings.................................................................................................................... 143Configure the access control per web shop...............................................................................................145Layout............................................................................................................................................................146
Configure the layout.............................................................................................................................. 146Configure the order history settings.................................................................................................... 147Web shop view.......................................................................................................................................148
Configure the custom columns for orders and jobs.....................................................................148Create a filter....................................................................................................................................149
Configure the submission settings.......................................................................................................150Pricing............................................................................................................................................................151
Manage cost centers per web shop......................................................................................................151Configure the default maximum price of an order per web shop..................................................... 153
Contents
4PRISMAdirect 1.4.1

Configure custom prices per web shop............................................................................................... 154Configure the default price estimation settings per web shop.......................................................... 155Configure the default quotation settings per web shop..................................................................... 156Enable payment per web shop............................................................................................................. 157Enable shipping per web shop............................................................................................................. 158Enable tax services per web shop........................................................................................................ 159Set the currency..................................................................................................................................... 160
Enable and configure the preflight rules per web shop............................................................................161Select the active languages for the web shop........................................................................................... 162Contact information..................................................................................................................................... 163
Type the origin address per web shop.................................................................................................163Type the contact information settings................................................................................................. 164
Chapter 5User management.......................................................................................................... 165
Users..............................................................................................................................................................166Manage the users...................................................................................................................................166Edit the profile settings..........................................................................................................................168Activate self-registered users................................................................................................................169Import users from an LDAP server or uniFLOW server...................................................................... 170Assign a cost centre to a user............................................................................................................... 171Configure the maximum price of an order for the users per web shop............................................172
User groups.................................................................................................................................................. 173Add or edit a user group....................................................................................................................... 173Import user groups from an LDAP server or uniFLOW server...........................................................177Assign a cost center to a user group....................................................................................................178Configure the maximum price of an order for the user groups per web shop................................ 179
Manage the user roles................................................................................................................................. 180
Chapter 6Order processing.............................................................................................................181
General settings............................................................................................................................................182Configure the general settings..............................................................................................................182Configure the general VDP settings..................................................................................................... 184
Manage the filters.........................................................................................................................................185Manage the automation templates.............................................................................................................187Enable and configure the preflight rules for the [Order processing] console.........................................188Workflow configuration............................................................................................................................... 189
Manage operators and order managers.............................................................................................. 189Manage the categories.......................................................................................................................... 190Configure the actions at an order state change.................................................................................. 191Configure the other settings................................................................................................................. 192Configure the reminders....................................................................................................................... 193Configure the email templates..............................................................................................................194
Ticket mappings........................................................................................................................................... 195Use job ticket settings in printer driver................................................................................................ 195Use job tickets settings in document................................................................................................... 196
Configure the printed ticket......................................................................................................................... 197
Chapter 7Printer settings................................................................................................................199
Manage the printers for the application..................................................................................................... 200Discover a new printer...........................................................................................................................200Add a printer manually..........................................................................................................................203Manage the general settings.................................................................................................................204Manage the printer configuration.........................................................................................................206Manage the connection settings...........................................................................................................207
Add or edit a printer cluster.........................................................................................................................209
Contents
5PRISMAdirect 1.4.1

Application settings......................................................................................................................................210Add a color strip.....................................................................................................................................210Add an imposition template..................................................................................................................211
Chapter 8Price and formula editor.................................................................................................213
Select a formula manager........................................................................................................................... 214Use the prices and formulas from the Excel sheet............................................................................. 214
Worksheet "CostSheet"................................................................................................................... 215Worksheet "Utilities"........................................................................................................................217The toolbar buttons.........................................................................................................................219Working with the formulas............................................................................................................. 223
Pricing............................................................................................................................................................228Configure the system-wide prices........................................................................................................ 228
Formulas....................................................................................................................................................... 229Create the formulas............................................................................................................................... 229
Variables of type "Choice"...............................................................................................................230Test the formulas................................................................................................................................... 233
Apply a discount...........................................................................................................................................234Create a constant..........................................................................................................................................235Configure the currency settings.................................................................................................................. 236Backup and restore.......................................................................................................................................237
Index.................................................................................................................................239
Contents
6PRISMAdirect 1.4.1

Chapter 1 Start using the application

Software versionThis documentation describes the functionality of PRISMAdirect v1.4.1.
Software version
8 Chapter 1 - Start using the applicationPRISMAdirect 1.4.1

[Login]Depending on the application configuration, it may be necessary to identify yourself. You have toenter your user name and password.1. Enter your user name.2. Enter your password.3. Select [Remember my user name and password.] to log on next time, without entering your
user name and password.You have to accept cookies from this application to support this option.
4. Click [Log in].For easy access, you are advised to add this page to your personal bookmarks.
[Login]
Chapter 1 - Start using the application 9PRISMAdirect 1.4.1

Manage your profileWhen you log on for the first time, the [Edit profile] dialog will appear. You must define yourprofile settings before you can continue. The email address is mandatory.
The profile data of users can be stored on an LDAP server. For these users, the profile settings areautomatically filled in with profile data from the LDAP server. These users cannot change theirprofile settings.1. Click the pencil icon to edit your profile settings. The icon appears when you hover the mouse
pointer over your username in the top-right corner of the workspace.2. Change your profile.3. Click [Save].
Manage your profile
10 Chapter 1 - Start using the applicationPRISMAdirect 1.4.1

Add, edit or deleteAction icons become available when you hover the mouse pointer over the concerning item.
Action Description
New Click the plus icon to add an item, e.g. a user or cost center. Theicon appears when you hover the mouse pointer over the item.
Edit Click the pencil icon to edit an item, e.g. a user or cost center. Theicon appears when you hover the mouse pointer over the item.
Delete Click the delete icon to delete an item, e.g. a user or cost center.The icon appears when you hover the mouse pointer over theitem.
Add, edit or delete
Chapter 1 - Start using the application 11PRISMAdirect 1.4.1

Add, edit or delete
12 Chapter 1 - Start using the applicationPRISMAdirect 1.4.1

Chapter 2 Procedures
IntroductionThis chapter contains complete procedures for configuring PRISMAdirect. Each proceduredescribes the configuration of a workflow that must be configured in two or more dialogs. Forexample, you have to configure the payment workflow in several dialogs.
The other chapters in this document describe the configuration of each separate dialog ofPRISMAdirect.
Introduction
14 Chapter 2 - ProceduresPRISMAdirect 1.4.1

Configure the payment workflow
Introduction
The payment providers offer a payment service for your customers. When you select one or morepayment providers, each customer can pay for their orders directly.
This topic describes the complete configuration of the payment workflow.
You have to configure the payment settings in the [Configuration] workflow:1. Check that the JDD service user has Internet access
The JDD service user is the user that runs the "Print Job Data Dispatcher" service. The usermust have Internet access.
2. Select the payment providers for PRISMAdirectYou can select which payment providers are available for PRISMAdirect.Configure the authentication to the SQL server instance. PRISMAdirect creates a paymentreport per payment provider on the SQL server when the authentication is correct.The payment report is stored in the accounting database on the SQL server. You do not haveto enable the accounting functionality to create and access the payment report. Theaccounting functionality and the payment report can be enabled independently.
3. Configure the payment providers per web serverYou have to configure the payment providers for each web server once the payment serviceis enabled for PRISMAdirect.
4. Enable payment per web shopYou have to enable the payment service for each web shop where you want to offer thepayment service.
5. Optionally, you can customize the payment settings per user groupYou can customize the payment settings for each user group. The custom settings overrulethe web shop settings for the concerning user group. The custom settings are used in all webshops for the corresponding user group.
Check that the JDD service user has Internet access
The JDD service user is the user that runs the "Print Job Data Dispatcher" service. It isrecommended that you change the user only when:1. The user has a local system account. And2. You want to use the file hosting services and/or the payment providers. The user must have
Internet access.
A number of services will be restarted when the user is changed. Orders that are being submittedby customers will become corrupt. The following services will be restarted:• The Message Queuing service• The Print Job Data Dispatcher service
1. Click [System] - [Services settings] - [Advanced infrastructure].2. The read-only text box displays the current JDD service user. Click [Test connection] to test if
the user has Internet access.You can change the user:1. Click the [Change] button.2. Select the domain and user name. For example, you can select the user that runs the
services of PRISMAdirect. The user must have Internet access if you want to use the filehosting services and/or the payment providers.Type the password. Letters in passwords must be typed using the correct case.
Configure the payment workflow
Chapter 2 - Procedures 15PRISMAdirect 1.4.1

3. Click button [OK] and click [Test connection] to test if the user has Internet access.
4. Click [OK].3. Click [Save].
Select the payment providers for PRISMAdirect
1. Click [System] - [Connectivity] - [Payment providers].2. Enable option [Use payment providers] to enable payment for PRISMAdirect.3. Select which payment providers will be available for PRISMAdirect.
4. Configure the credentials for the SQL server. The application creates a payment report perpayment provider and stores them on the SQL server.
Configure the payment workflow
16 Chapter 2 - ProceduresPRISMAdirect 1.4.1

The same SQL server is used for the accounting workflow, see [System] - [Accounting andreporting] - [Accounting] - [Accounting workflow]. When you change the settings for the SQLserver in that dialog, the settings will also change in this dialog and vice versa.1. Define the [Computer name \ instance name:].
With this option, you define where the payment reports are stored. For example:SQL_server_name\SQL_server_instance_name.
2. You have to define how the [Order processing] connects to the SQL server. Theauthentication type depends on the location of the SQL server:
Location of the SQL server Description
Local SQL server SQL authentication (recommended)Type the account credentials of an existing login account for theSQL server.
Remote SQL server insidethe domain
Windows authentication (recommended)The Windows user credentials are used for the authentication. Theuser is not prompted for a user name and password.
SQL server outside the do-main
SQL authentication (mandatory)Type the account credentials as defined by the customer for theSQL server.
3. Type the password of user sa. You have defined the password for user sa when youinstalled PRISMAdirect.Accounting information can be collected when the user has system administration rightson the accounting database.
4. [Test connection]Click this button to test the connection to the SQL server.
5. Click [Save].
Configure the payment providers per web server
You have to configure the [Payment providers] for each web server.1. Click [System] - [Web submission] - <web server> - [Payment providers].2. Option [Use payment providers]
• EnabledYou can enable one or more payment providers for the concerning web server. Forexample: PayPal.
• DisabledFor example, your company uses a local area network. You can disable the paymentproviders in this dialog since your Web server has no Internet access. The customer doesnot receive an "unable to connect" message from the payment provider.
3. Configure each payment provider.Click on the bar of the payment provider that you want to configure. For example: PayPal. Thebar expands and you can fill in the required settings. Each payment provider delivers therequired settings to you when you create a merchant account.
Configure the payment workflow
Chapter 2 - Procedures 17PRISMAdirect 1.4.1

4. Click [Save].
Enable payment per web shop
1. Click [Web shop] - <web shop> - [Pricing] - [Payment].2. Enable the [Enable payment] option. Customers have to pay their orders before they can
submit their orders via the web shop. The payment providers as defined for the web serverare available for the customers.You can customise this setting for one or more user groups. See procedure Optionally, youcan customize the payment settings per user group.
3. Click [Save].
Optionally, you can customize the payment settings per user group
1. Click [User management] - [User groups] - [User group settings].2. Click on the bar of the user group that you want to customize. The user group expands.3. Scroll to section [Enable payment].4. A customer can be part of a user group. The settings of the user group overwrite the payment
settings of each web shop.• Web shop
The user group uses the value of setting [Enable payment] as defined for the web shop.• Custom = Yes
Payment is enabled for each web shop for the concerning user group. A requirement is thatthe payment providers are configured, see procedure Configure the payment providers perweb server.
• Custom = NoPayment is disabled for each web shop for the concerning user group.
Configure the payment workflow
18 Chapter 2 - ProceduresPRISMAdirect 1.4.1

5. Click [Save].
Configure the payment workflow
Chapter 2 - Procedures 19PRISMAdirect 1.4.1

Configure the file hosting services, for example,Dropbox
Important information concerning Dropbox
If you use Dropbox as a file hosting service, you have to:1. Upgrade to PRISMAdirect 1.3.3, or higher. PRISMAdirect 1.3.3, or higher, uses Dropbox API
v2.2. Send the return URLs to the support channel of PRISMAdirect. The support channel must
include the URLs to the Dropbox App management page for successful access authentication.The URLs are the DNS names / Friendly URLs used to access each web shop and the orderprocessing console.
Reason:
Dropbox ends the support for the Dropbox API v1 on September 28th, 2017. From September28th, 2017 onwards, Dropbox will only support Dropbox API v2. This API version implementsOAuth2 authentication, which requires significant changes related to the way the accessauthentication works.
Introduction
The file hosting services provide an Internet hosting service specifically designed to host userfiles. When you enable file hosting services, the users can add files from the hosting service—the"cloud"—to their job. Both the print room operator and the customers can use the file hostingservices, for example, Dropbox.
This topic describes how you can enable and configure Dropbox. After configuration,PRISMAdirect is allowed to access the Dropbox accounts on behalf of the customers. Eachavailable file hosting service must be configured in a similar manner.
You have to configure the file hosting settings in the [Configuration] workspace:1. Check that the JDD service user has Internet access
The JDD service user is the user that runs the "Print Job Data Dispatcher" service. The usermust have Internet access.
2. Enable and configure the file hosting services3. Optionally, you can customize the file hosting services per user group
You can customize the file hosting services for each user group. The custom settings overrulethe web shop settings for the concerning user group. The custom settings are used in all webshops for the corresponding user group.
You have to configure the products in the [Product and order editor] workspace:1. Enable option [File hosting service] for one or more products
Check that the JDD service user has Internet access
The JDD service user is the user that runs the "Print Job Data Dispatcher" service. It isrecommended that you change the user only when:1. The user has a local system account. And2. You want to use the file hosting services and/or the payment providers. The user must have
Internet access.
A number of services will be restarted when the user is changed. Orders that are being submittedby customers will become corrupt. The following services will be restarted:• The Message Queuing service• The Print Job Data Dispatcher service
Configure the file hosting services, for example, Dropbox
20 Chapter 2 - ProceduresPRISMAdirect 1.4.1

1. Click [System] - [Services settings] - [Advanced infrastructure].2. The read-only text box displays the current JDD service user. Click [Test connection] to test if
the user has Internet access.You can change the user:1. Click the [Change] button.2. Select the domain and user name. For example, you can select the user that runs the
services of PRISMAdirect. The user must have Internet access if you want to use the filehosting services and/or the payment providers.Type the password. Letters in passwords must be typed using the correct case.
3. Click button [OK] and click [Test connection] to test if the user has Internet access.
4. Click [OK].3. Click [Save].
Enable and configure the file hosting services
1. Click [System] - [Connectivity] - [File hosting services].2. Enable option [Use file hosting services] in section [Global settings].3. Select which file hosting services will be available for PRISMAdirect. For example, Dropbox.
Configure the file hosting services, for example, Dropbox
Chapter 2 - Procedures 21PRISMAdirect 1.4.1

4. Enable option [Use file hosting services] in section [Order processing and web serversettings].In other words, enable the selected file hosting services for both the print room operator andthe customers.
NOTEDropbox can be disabled for PRISMAdirect. However, you can configure Dropboxwhen it is enabled for [Order processing and web server settings]. Then, you canenable Dropbox for one or more user groups. See procedure Optionally, configurethe file hosting services per user group below. You can do this for each availablefile hosting service.
5. Section [Cache settings]You can store the data of the file hosting services within a cache. If requested data iscontained in the cache, the request can be served by simply reading the cache. This iscomparatively faster than fetching data from its original storage location in the cloud.Define both the cache size and the cache folder.
NOTEThe JDD service user must have the permission "Full Control" over the cachefolder.
6. Configure each file hosting service.Click on the bar of the file hosting service that you want to configure. The bar expands andyou can fill in the required settings. Each file hosting service delivers the required settings toyou when you create an account. For example, for Dropbox you have to define the:1. [Consumer Key]2. [Consumer Secret]
7. Configure other available file hosting services in a similar manner.8. Click [Save].
Now, PRISMAdirect is allowed to access the Dropbox accounts on behalf of the customers.
Configure the file hosting services, for example, Dropbox
22 Chapter 2 - ProceduresPRISMAdirect 1.4.1

Enable option [File hosting service] for one or more products
Enable option [File hosting service] for each product for which you want to allow, for example,Dropbox as file source.1. Open the [Product and order editor] and click [Products].2. Select a product for which you want to allow Dropbox as file source.3. Click the pane [Detailed product settings].4. Enable option [File source] - [File hosting service] in section [Files]. Section [Files] is available
in the view [Web shop].5. Click [Update].6. Repeat this procedure for all products for which you want to allow Dropbox as file source.7. Click the [Publish] icon in the tab of workspace [Product and order editor] or [Web shop
editor].Publishing the changes to the PRISMAdirect server could take some time. The status barindicates the progress.
Result
Option "File hosting ..." is now available for your customers and operators:
Optionally, you can customize the file hosting settings per user group
1. Click [User management] - [User groups] - [User group settings].2. Click on the bar of the user group that you want to customize. The user group expands.3. Scroll to section [File hosting service].4. A customer or operator can be part of a user group. The settings of the user group overwrite
the settings for PRISMAdirect.• Global settings
The user group uses the settings of the file hosting services as defined for PRISMAdirect.• Custom = Yes
File hosting services are enabled for each web shop for the concerning user group. Arequirement is that the file hosting services are configured, see procedure Enable andconfigure the file hosting services.
• Custom = No
Configure the file hosting services, for example, Dropbox
Chapter 2 - Procedures 23PRISMAdirect 1.4.1
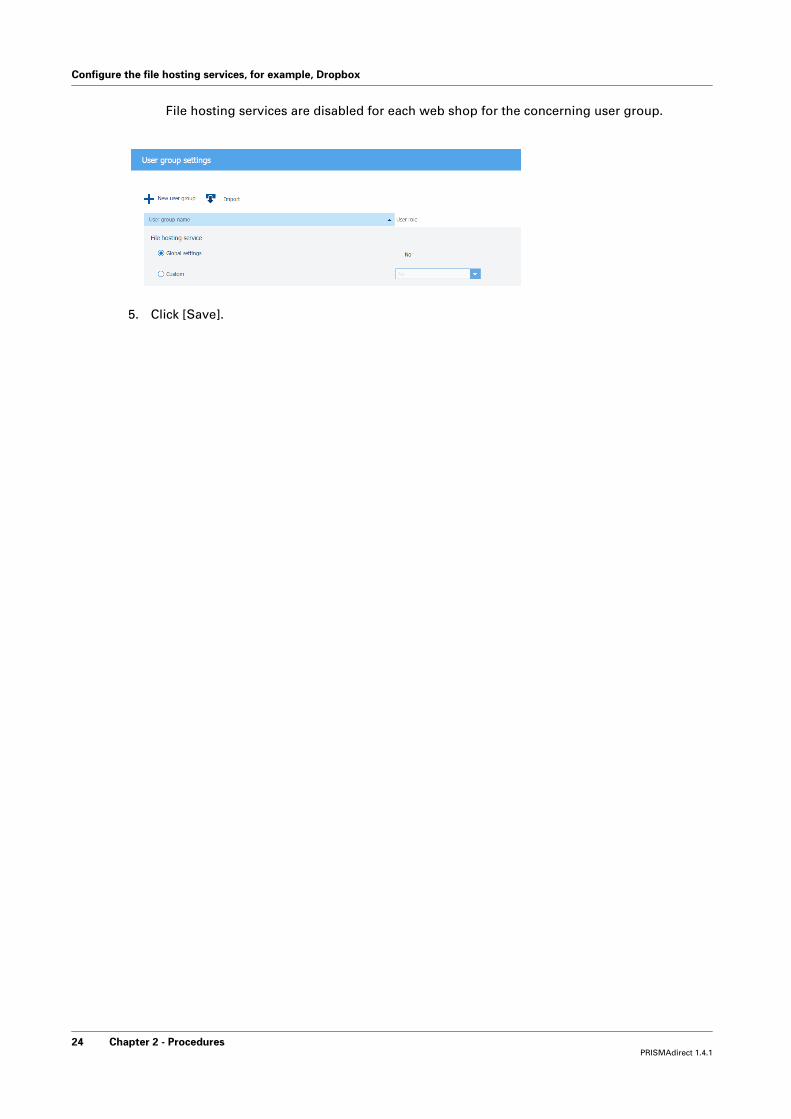
File hosting services are disabled for each web shop for the concerning user group.
5. Click [Save].
Configure the file hosting services, for example, Dropbox
24 Chapter 2 - ProceduresPRISMAdirect 1.4.1

Configure linking to a file or folderPRISMAdirect can act as a file hosting service. You can configure a folder containing files andsubfolders. The folder must exist on the file system of the server of PRISMAdirect. Or you can usea folder on a network share that is accessible to the server.
When the customer creates an order, the customer can browse to the folder and select one file.
You have to configure the folder containing linkable files in the [Configuration] workspace:1. Configure linking to a file or folder
You have to configure the products in the [Product and order editor] workspace:1. Enable option [Link] for one or more products
Configure linking to a file or folder
1. Click [System] - [Connectivity] - [Folder for linkable files].2. [Configure the folder containing linkable files]
Click on the bar of [Folder for linkable files]. The bar expands and you can type the path to thefolder containing linkable files.The folder can contain files and subfolders. The folder must exist on the file system of theserver of PRISMAdirect. Or you can use a folder on a network share that is accessible to theserver. Note that the path to the folder is only validated when you define it on the server. Youcan check if the typed folder path is correct in log file "JobDataDispatcher.log", see Analyzelog files and view which services log information on page 62.The customer can select a file only from the defined folder or its subfolders. The customercannot access the rest of the file system.
3. Click [Save].
Enable option [Link] for one or more products
Enable option [Link] for each product for which you want to offer a link to a file or folder.1. Open the [Product and order editor] and click [Products].2. Select a product for which you want to allow linking to a file or folder.3. Click the pane [Detailed product settings].4. Enable option [Link] in section [Files]. Section [Files] is available in the view [Web shop].5. Click [Browse]. Click the plus icon to select a file or folder. The icon appears when you hover
the mouse pointer over the item. The folder has been configured in the [Configuration]workspace.When you assign a link to a folder, the customer must select one file from the folder beforesubmitting the order. When you assign a link to a file, the file is added to the orderautomatically when the customer submits the order.
6. Click [OK] and click [Save].7. Repeat this procedure for all products for which you want to offer a link to a file or folder.8. Click the [Publish] icon in the tab of workspace [Product and order editor] or [Web shop
editor].Publishing the changes to the PRISMAdirect server could take some time. The status barindicates the progress.
Configure linking to a file or folder
Chapter 2 - Procedures 25PRISMAdirect 1.4.1

Configure linking to a file or folder
26 Chapter 2 - ProceduresPRISMAdirect 1.4.1

Setup the uniFLOW interfaceYou can setup an interface between the PRISMAdirect server and the uniFLOW server. TheuniFLOW server then manages:• User management• Authentication
The users and user groups managed on the uniFLOW server must receive an appropriate[Role] for PRISMAdirect. The role determines the login rights of each user and user group inPRISMAdirect. You can manage the users and user groups in workspace [User management].
• Budget managementThe price approval workflow and the cost centers are managed by the uniFLOW server.
• AccountingThe accounting information is stored on the PRISMAdirect server. The uniFLOW server canrequest the accounting information using the Read Leonardo Accounting Info task.
This topic describes the complete configuration of the uniFLOW interface. You have to configurethe uniFLOW interface in the [Configuration] workspace:• Setup the uniFLOW interface
You have to pair a unique URL of the PRISMAdirect server with the service URL of theuniFLOW server.
• Enable the interface between the web server and the uniFLOW serverAll web shops accessible via the web servers connected to the uniFLOW server will use theworkflow as defined by uniFLOW. You can also disconnect a web server from the uniFLOWserver. The web shops accessible via the disconnected web server will use the workflow asdefined by PRISMAdirect.
• Configure access to web shops per web serverAll web shops accessible via the web servers connected to the uniFLOW server will use theworkflow as defined by uniFLOW. However, you can explicitly configure which web shops canbe accessed from which web servers. The web shops that are not accessible via the web serverwill use the workflow as defined by PRISMAdirect.
Setup the uniFLOW interface
1. Click [System] - [Connectivity] - [uniFLOW interface].2. [Enable uniFLOW interface]
Enable the uniFLOW interface for the PRISMAdirect server and the local web server.3. [PRISMAdirect interface settings]
You can accept the default endpoint and port. If required, you can type a custom endpointand/or port. The port must be unique. Test the connection to check that the URL is correct andunique.• [Use secure connections (HTTPS)]
The URL of the PRISMAdirect server changes from HTTP into HTTPS.• [Do not validate the uniFLOW certificate]
The secure connection requires a certificate. The certificate is stored on the uniFLOWserver. You can choose to not validate the uniFLOW certificate, for example when theuniFLOW server contains a self-signed certificate.
4. [uniFLOW interface settings]Type the service URL. This URL is defined on the uniFLOW server. Test the connection tocheck that the URL is correct and unique.
5. Click [Pair].The application creates the interface between the PRISMAdirect server and the uniFLOWserver. When you change any of the settings in this dialog, you need to create the interfaceagain.Click [Unpair] to disconnect the interface manually.
Setup the uniFLOW interface
Chapter 2 - Procedures 27PRISMAdirect 1.4.1

6. Click [Save].
Enable the interface between the web server and the uniFLOW server
Setting [Enable uniFLOW interface] becomes available for the remote web servers when you havepaired the PRISMAdirect server with the uniFLOW server.
For the remote web servers, do:1. Click [System] - [Web submission] - [Remote web servers].2. Click [Configure] to open a dedicated configuration dialog for the concerning web server. You
can find the link [Configure] directly behind the displayed registration time.3. Open the dialog [General settings].4. [Enable uniFLOW interface]
Enable the interface between the web server and the uniFLOW server. All web shopsaccessible via the web servers connected to the uniFLOW server will use the workflow asdefined by uniFLOW. You can also disconnect a web server from the uniFLOW server. Theweb shops accessible via the disconnected web server will use the workflow as defined byPRISMAdirect.
5. Click [Save].
Configure access to web shops per web server
1. Click [System] - [Web submission] - <web server> - [Web shop access from web servers].2. Enable or disable access to the web shops from each available web server.
All web shops accessible via the web servers connected to the uniFLOW server will use theworkflow as defined by uniFLOW. However, you can explicitly configure which web shops canbe accessed from which web servers. The web shops that are not accessible via the webserver will use the workflow as defined by PRISMAdirect.
3. Click [Save].
Set the trace level for the uniFLOW interface
• [Debug]The [Debug] trace level provides the most detailed log information. The [Debug] trace level canimpact the performance of the application.
• [Error]The errors are logged.
• [Info]The errors and information messages are logged
Setup the uniFLOW interface
28 Chapter 2 - ProceduresPRISMAdirect 1.4.1

Configure the shipping workflow
Introduction
You can offer a shipping service to your customers. When you select one or more shippingproviders, each customer can request shipment of an order via the web shop.
This topic describes the complete configuration of the shipping workflow.
You have to configure the shipping settings in the [Configuration] workspace:1. Create shipping formulas
You have to create the shipping formulas based on agreements with each shipping provider.2. Select the shipping providers for PRISMAdirect
You can select which shipping providers are available for PRISMAdirect.The selected shipping providers will be available in the [Order processing] workspace. Thecustomer can only select whether or not to ship an order. The operator can select whichshipping provider will ship the order.
3. Configure the shipping providers per web serverPRISMAdirect can run multiple web servers. You have to configure the shipping providers foreach web server once shipping is enabled for PRISMAdirect.
4. Enable shipping per web shopA web server can run multiple web shops. You have to configure shipping for each web shoponce shipping is enabled for the concerning web server.All shipping providers that are enabled and configured on the web server are available for theweb shop. You cannot select or deselect shipping providers on web shop level. You can onlyenable or disable the shipping service.
5. Configure the default shipping labelThe default label will be used when the shipping provider does not offer a shipping label.
6. Type the default origin addressYou can use the default origin address when you have only one web shop. When you havemultiple web shops, you have to type an origin address for each separate web shop.You ship your packages from the origin address.
7. Type the origin address per web shopWhen you have multiple web shops, you have to type an origin address for each separateweb shop.You ship your packages from the origin address.
8. Define any custom box sizesEach shipping provider offers a range of default box sizes. You can define one or morecustom box sizes for each shipping provider.
NOTEWhen you select an additional shipping provider for PRISMAdirect, that provider isalso added to each existing custom box. Now, you have to configure each existingcustom box for the new provider.
9. Optionally, you can customize the shipping settings per user groupYou can customize the shipping settings for each user group. The custom settings overrulethe web shop settings for the concerning user group. The custom settings are used in all webshops for the corresponding user group.
Create shipping formulas
1. Click [Price and formula editor] - [Formulas] - [Shipping formulas for orders].2. Create the shipping formulas based on agreements with each shipping provider. See chapter
[Price and formula editor] for a description of how you can create formulas.
Configure the shipping workflow
Chapter 2 - Procedures 29PRISMAdirect 1.4.1

Select the shipping providers for PRISMAdirect
1. Click [System] - [Connectivity] - [Shipping] - [General settings].2. Enable the [Use shipping providers] option.3. Select which shipping providers will be available for PRISMAdirect. For example, FedEx.4. You can type a message to the customer for each provider.
Click a language to type a message in that language. The available languages are displayedjust above the text field. The available languages are equal to the active languages forPRISMAdirect. See: [System] - [Active languages for system].Most providers offer a link that customers can click to track their package. If a provider doesnot offer such a link, then you can type the web site of the shipment provider in the message.For example: Go to shipmentprovider.com to track your order.
5. Click [Save].Shipment is now enabled for PRISMAdirect. However, PRISMAdirect can run multiple webservers. Now, you have to enable or disable shipping per web server, see procedureConfigure the shipping providers per web server below.
Configure the shipping providers per web server
1. Click [System] - [Web submission] - <web server> - [Shipping providers].2. Option [Use shipping providers]
• EnabledYou have enabled shipment for the concerning web server. The web server can run one ormore web shops. In this dialog, you have to configure the shipping providers first. Then,you have to enable or disable shipping per web shop, see procedure Enable shipping perweb shop below.
• DisabledYou have disabled shipment for the concerning web server. The web server can run one ormore web shops. Customers of these web shops cannot request shipment of their orders.
3. Configure each shipping provider.Click on the bar of the shipping provider that you want to configure. The bar expands and youcan fill in the required settings. For example, you can define the setting User key, et ceterawhen you use the FedEx API. Each shipping provider delivers the required settings to youwhen you create an account.
4. Click [Save].
Enable shipping per web shop
1. Click [Web shop] - <web shop> - [Pricing] - [Shipping].2. Enable the [Enable shipping] option.
Customers of this web shop can now request shipment of their orders.3. Click [Add].
You can configure one or more delivery times and assign shipping formulas to each deliverytime.1. Configure the maximum time to deliver an order. The shorter the delivery time, the higher
the postage.You can type a value in the text field. Or you can click the arrow buttons to increase ordecrease the value.
2. Assign a shipping formula to the delivery time. Select a formula from the drop-down list.3. Do this for each delivery time.
4. Click [Save].The customer can choose one of the configured delivery times in the web shop.
Configure the shipping workflow
30 Chapter 2 - ProceduresPRISMAdirect 1.4.1
Configure the default shipping label
1. Click [System] - [Connectivity] - [Shipping] - [Default label].2. You can use variables from the list of [Order items] and/or the [Origin address] to create the
shipment label. This allows you to use dynamic information in the label. Drag and drop thevariable into the label at the desired position. A variable is indicated by '%' symbols. You canalso type fixed text in the label.
3. Define the font settings for the label.4. Select the size of the media on which the default label will be printed.5. Enable option [Print logo in label] when you want to add a logo to the label.
• Click button [Browse] to select an image.The allowed image file types are: .bmp, .jpg, .gif, .png.Click [Clear] to remove a selected image.
• Select the position for the logo from the drop-down list.• [Scale logo to page size]
You can scale the logo to the page size. Enable option [Keep ratio] if you want to use thesame relation between width and height for the logo as for the page size. You have todefine the width [%] for the image.
6. Click button [Preview] to preview the shipment label.7. Click [Save].
Type the default origin address
1. Click [System] - [Connectivity] - [Origin address].2. Type the origin address for your web shop. You can use the default origin address when you
have only one web shop. When you have multiple web shops, you have to type an originaddress for each separate web shop.The address will not be validated in this dialog. The address will be validated when:• The operator requests a shipment in the [Order processing] workspace. The selected
shipment provider returns an error message if any of the values are incorrect.• The operator or customer creates an order while tax services workflow is enabled. The tax
service returns an error message if any of the values are incorrect.3. Click [Save].
Type the origin address per web shop
1. Click [Web shop] - <web shop> - [Contact information] - [Origin address].2. [Use default origin address]
• EnabledThe web shop uses the default origin address. See: [System] - [Connectivity] - [Originaddress].
• DisabledType the origin address for your web shop. When you have multiple web shops, you haveto type an origin address for each separate web shop.The address will not be validated in this dialog. The address will be validated when:• The operator requests a shipment in the [Order processing] workspace. The selected
shipment provider returns an error message if any of the values are incorrect.• The operator or customer creates an order while tax services workflow is enabled. The
tax service returns an error message if any of the values are incorrect.3. Click [Save].
Define any custom box sizes
1. Click [System] - [Connectivity] - [Shipping] - [Custom box sizes].
Configure the shipping workflow
Chapter 2 - Procedures 31PRISMAdirect 1.4.1

2. You can create one or more custom box sizes for each shipping provider. Do this for eachshipping provider enabled for PRISMAdirect.
3. Click [Save].
Optionally, you can customize the shipping settings per user group
1. Click [User management] - [User groups] - [User group settings].2. Click on the bar of the user group that you want to customize. The user group expands.3. Scroll to section [Enable shipping].4. A customer can be part of a user group. The settings of the user group overwrite the shipping
settings of each web shop.• Web shop
The user group uses the value of setting [Enable shipping] as defined for the web shop.• Custom = Yes
Shipping is enabled for each web shop for the concerning user group. A requirement isthat the shipping providers are configured, see procedure Configure the shipping providersper web server.
• Custom = NoShipping is disabled for each web shop for the concerning user group.
5. Click [Save].
Configure the shipping workflow
32 Chapter 2 - ProceduresPRISMAdirect 1.4.1

Configure the tax services workflow
Introduction
The tax service calculates the sales taxes for the orders.
This topic describes the complete configuration of the tax services workflow.
You have to configure the tax settings in the [Configuration] workspace:1. Select the tax services for PRISMAdirect
You can select which tax calculation services are available for PRISMAdirect.2. Configure the tax services per web server
PRISMAdirect can run multiple web servers. You have to configure the tax services for eachweb server once tax calculation is enabled for PRISMAdirect.
3. Enable tax services per web shopA web server can run multiple web shops. You can select one tax service per web shop oncetax calculation is enabled for the concerning web server.
4. Configure the price estimation settings per web shopThe price estimation formula is used when the customer submits an order. The quotationformula can only be used by the operator after the order has been received.The prices for the orders and jobs must be calculated first before the sales tax can becalculated.
5. Type the default origin addressSome states in the USA apply sales tax to products based on the origin address, rather thanthe destination address.You can use the default origin address when you have only one web shop. When you havemultiple web shops, you have to type an origin address for each separate web shop.You ship your packages from the origin address.
6. Type the origin address per web shopSome states in the USA apply sales tax to products based on the origin address, rather thanthe destination address.When you have multiple web shops, you have to type an origin address for each separateweb shop.You ship your packages from the origin address.
Select the tax services for PRISMAdirect
1. Click [System] - [Connectivity] - [Tax services].2. Enable the [Use tax calculation services] option.3. Select which tax services will be available for PRISMAdirect. For example, FixedTax.4. You can add additional tax codes for Avalara in section [Custom tax codes].
Each Avalara tax code has tax rules associated with it that define the taxability for that code instates and local jurisdictions in the USA. See the website of Avalara for the available taxcodes.
Configure the tax services workflow
Chapter 2 - Procedures 33PRISMAdirect 1.4.1

5. Click [Save].Tax calculation services are now enabled for PRISMAdirect. However, PRISMAdirect can runmultiple web servers. Now, you have to enable or disable tax services per web server, seeprocedure Configure the tax services per web server below.
Configure the tax services per web server
1. Click [System] - [Web submission] - <web server> - [Tax services].2. Option [Use tax calculation services]
• EnabledYou have enabled tax calculation services for the concerning web server. The web servercan run one or more web shops. In this dialog, you have to configure the tax services first.Then, you have to enable or disable tax services per web shop, see procedure Enable taxservices per web shop below.
• DisabledYou can disable the tax services in this dialog when your Web server has no Internetaccess. For example, your company uses a local area network. The user does not receivean "unable to connect" message.
3. Configure each tax service.Click on the bar of the tax service that you want to configure. The bar expands and you can fillin the required settings. For example, you can define the setting Account number, et ceterawhen you use the Avalara API. Avalara delivers these settings to you when you create amerchant account.
Configure the tax services workflow
34 Chapter 2 - ProceduresPRISMAdirect 1.4.1

4. Click [Save].
Enable tax services per web shop
1. Click [Web shop] - <web shop> - [Pricing] - [Tax services].2. Enable the [Enable tax calculation services] option.3. Select a tax service from the drop-down list.
Options become available depending on the selected tax calculation service. For example:• Shipping tax code
Each Avalara tax code has tax rules associated with it that define the taxability for that codein states and local jurisdictions in the USA. See the website of Avalara for the available taxcodes.
• [Finalize the tax when the order is finalized]PRISMAdirect commits the sales tax to Avalara when the order is finalized. If you disablethis option, you have to finalize the tax in Avalara manually.
• Show the prices including the taxPrices are always shown without taxes when you have selected Avalara.
Configure the tax services workflow
Chapter 2 - Procedures 35PRISMAdirect 1.4.1

4. Click [Save].The tax service calculates the sales taxes for the orders submitted through this web shop.
Configure the price estimation settings per web shop
1. Click [Web shop] - <web shop> - [Pricing] - [Price estimation].2. Enable price estimation. Select either [Yes] or [Always].
The prices for the orders and jobs must be calculated first before the sales tax can becalculated.
3. Drag and drop the formula that you want to use to the active formulas. Do this for both thejobs and the orders.
4. Click [Save].
Type the default origin address
1. Click [System] - [Connectivity] - [Origin address].2. Type the origin address for your web shop. You can use the default origin address when you
have only one web shop. When you have multiple web shops, you have to type an originaddress for each separate web shop.The address will not be validated in this dialog. The address will be validated when:• The operator requests a shipment in the [Order processing] workspace. The selected
shipment provider returns an error message if any of the values are incorrect.• The operator or customer creates an order while tax services workflow is enabled. The tax
service returns an error message if any of the values are incorrect.
Configure the tax services workflow
36 Chapter 2 - ProceduresPRISMAdirect 1.4.1

3. Click [Save].
Type the origin address per web shop
1. Click [Web shop] - <web shop> - [Contact information] - [Origin address].2. [Use default origin address]
• EnabledThe web shop uses the default origin address. See: [System] - [Connectivity] - [Originaddress].
• DisabledType the origin address for your web shop. When you have multiple web shops, you haveto type an origin address for each separate web shop.The address will not be validated in this dialog. The address will be validated when:• The operator requests a shipment in the [Order processing] workspace. The selected
shipment provider returns an error message if any of the values are incorrect.• The operator or customer creates an order while tax services workflow is enabled. The
tax service returns an error message if any of the values are incorrect.
3. Click [Save].
Configure the tax services workflow
Chapter 2 - Procedures 37PRISMAdirect 1.4.1
Configure the self-registration workflow
Introduction
You can allow self-registration for each web shop. Customers can then create an account to theweb shop. Without an account, customers have to fill in their name and address details for everyorder.
This topic describes the complete configuration of the self-registration workflow.
You have to configure the self-registration settings in the [Configuration] workspace:1. Allow self-registration per web shop
• Configure if users are allowed to create an account for a web shop via self-registration.• Configure if each account is activated automatically or manually.
2. Activate self-registered users manuallyYou can activate or deactivate any self-registered user accounts.
Allow self-registration per web shop
1. Click [Web shop] - <web shop> - [General settings].2. [Allow self-registration]
Customers can create their own accounts when you enable this option. The link [Create anaccount] appears in the login screen of the web shop.
3. [Use CAPTCHA]Customers have to type the displayed alphanumerical characters while creating an account.
4. [The system administrator must activate all new self-registered user accounts]• Enabled
Type the email address for the system administrator.The system administrator receives an email when a user has created a new account viaself-registration. The system administrator must activate each account manually.
• DisabledAll new user accounts are activated automatically.Once an account is activated, you can manage the concerning user in workspace [Usermanagement]. You can add the user to a user group, assign a cost center, etc.
5. [Add self-registered users to user group]• Enabled
Select a user group. The new user is automatically added to the selected user group.• Disabled
You can manage the concerning user in workspace [User management]. You can add theuser to a user group, assign a cost center, etc.
6. Click [Save].
Activate self-registered users manually
1. Click [User management] - [Users] - [Self-registered users].2. Select which new accounts you want to activate.3. Click [Save].
The application sends an email to each user whose account is activated.Once an account is activated, you can manage the concerning user in workspace [Usermanagement]. You can add the user to a user group, assign a cost center, etc.
Configure the self-registration workflow
38 Chapter 2 - ProceduresPRISMAdirect 1.4.1

Configure the languages
Introduction
You can activate multiple languages for PRISMAdirect. A language link becomes available in thecomponents of PRISMAdirect. When you, an operator, or a customer select an availablelanguage, the user interface will be shown in the selected language.
This topic describes how you can activate languages for PRISMAdirect and the web shops.
You have to configure the languages in the [Configuration] workspace:1. Select the active languages for PRISMAdirect
A language link becomes available in the components of PRISMAdirect, e.g. the [Orderprocessing] console. You or an operator can change the display language via the languagelink.
2. Allow customers to change the language per web shop3. Select the active languages per web shop
Configure which of the languages for PRISMAdirect are available per web shop.4. Select the language for the logon page per web shop5. Optionally, you can customize the permission to change the language per user group
You can customize the permission to change the language of web shops for each user group.The custom settings overrule the web shop settings for the concerning user group. Thecustom settings are used in all web shops for the corresponding user group.
Select the active languages for PRISMAdirect
1. Click [System] - [Active languages for system].2. Enable all languages that you want to offer to your users.
By default, the installation language is enabled.3. Click [Save].
Allow customers to change the language per web shop
1. Click [Web shop] - <web shop> - [General settings].2. [Allow the customer to change the language]
Enable this option to allow a customer to change the language of the web shop.If this option is disabled, the web shop is displayed in the installation language and thecustomer is not able to change the language.
3. Click [Save].
Select the active languages per web shop
1. Click [Web shop] - <web shop> - [Active languages].2. Select the default language for the web shop from the drop-down list.3. Enable all languages that you want to offer to your customers.4. Click [Save].
Select the language for the logon page per web shop
1. Click [Web shop] - <web shop> - [Layout] - [Layout].2. Select the language for the logon page of the web shop from the drop-down list.3. Select the theme for the web shop from the drop-down list.4. Type the login instructions in the selected language.5. Click [Save].
Configure the languages
Chapter 2 - Procedures 39PRISMAdirect 1.4.1

Optionally, you can customize the permission to change the language per user group
1. Click [User management] - [User groups] - [User group settings].2. Click on the bar of the user group that you want to customize. The user group expands.3. Scroll to section [Allow the customer to change the language].4. A customer can be part of a user group. The settings of the user group overwrite the shipping
settings of each web shop.• Web shop
The user group uses the value of setting [Allow the customer to change the language] asdefined for the web shop.
• Custom = YesCustomers that are part of the concerning user group are allowed to change the languageof each web shop. A requirement is that more than one language is active, see procedureSelect the active languages per web shop.
• Custom = NoCustomers that are part of the concerning user group are not allowed to change thelanguage of each web shop.
5. Click [Save].
Configure the languages
40 Chapter 2 - ProceduresPRISMAdirect 1.4.1

Configure the preflight workflow
Introduction
A preflight operation is a quality check of your document.
The preflight operation checks if any rules are violated in the PDF file(s). The set of rules is fixed.Some of the rules can be configured. If enabled, the automatic preflight operation is appliedwhen a customer submits an order. The automatic preflight operation allows you to fix theviolations according to the configured rules or cancel the operation with that document. Apreflight report and an annotated file are generated. The preflight report shows a summary of theproblems that have been found. The annotated file shows the complete document with thelocation of any found problems and fixes. The manual preflight operation automatically fixes theviolations according to the configured rules. Some problems are detected by the preflightoperation, but cannot be fixed automatically. It is recommended that you fix these problemsmanually before you print the job.
This topic describes the complete configuration of the preflight workflow.
You have to configure the preflight settings in the [Configuration] workspace:1. Enable and configure the preflight rules for the [Order processing] console
Option preflight is now available in the [Order processing] console. The operator canmanually preflight the PDF files.
2. Enable and configure the preflight rules per web shopOption preflight is now available in the web shop. The operator can manually preflight thePDF files.You can configure the preflight settings for each web shop. These settings will alsobe used when you create an order for this web shop in the [Order processing].
3. Configure the number of preflight processesYou can configure the number of preflight processes that can run in parallel.
4. Email the preflight report to your customerYou can attach the preflight report to emails to your customer.
5. Optionally, you can customize the preflight settings per user groupYou can customize automatic preflight for each user group. The custom settings overrule theweb shop settings for the concerning user group. The custom settings are used in all webshops for the corresponding user group.
Enable and configure the preflight rules for the [Order processing] console
1. Click [Order processing] - [Preflight].2. Enable the rules that you want to use in column [Enabled].3. Click on the bar of the rule that you want to configure. If the bar expands, you can configure
the rule. If the bar does not expand, you can only enable or disable the rule.You can configure some rules to detect and fix a violation. Other rules can only be configuredto detect a violation. These violations can only be solved in the corresponding PDF file by thecustomer or the operator.
4. Define the [Severity] of each rule.• [Warning]
A violation of the rule is detected. You can ignore the warning.• [Error]
A violation of the rule is detected. The violation of the rule must be fixed.5. You can define a timeout.
When the timeout value is exceeded, the preflight operation is canceled.6. Click [Save].
Configure the preflight workflow
Chapter 2 - Procedures 41PRISMAdirect 1.4.1
Enable and configure the preflight rules per web shop
1. Click [Web shop] - <web shop> - [Preflight].2. Enable the rules that you want to use in column [Enabled].3. Click on the bar of the rule that you want to configure. If the bar expands, you can configure
the rule. If the bar does not expand, you can only enable or disable the rule.You can configure some rules to detect and fix a violation. Other rules can only be configuredto detect a violation. These violations can only be solved in the corresponding PDF file by thecustomer or the operator.
4. Define the [Severity] of each rule.• [Warning]
A violation of the rule is detected. You can ignore the warning.• [Error]
A violation of the rule is detected. The violation of the rule must be fixed.5. You can define a timeout.
When the timeout value is exceeded, the preflight operation is canceled.6. [Enable automatic preflight]
When you enable this option, the application preflights each PDF file that the customer addsto an order in the web shop. When the customer adds a non-PDF file, then the file must beconverted to PDF first before the preflight operation can start.
7. Click [Save].
Configure the number of preflight processes
1. Click [System] - [Services settings] - [Automatic process].2. Set the number of preflight processes.
It is recommended that you define the same number of preflight processes as you have webshops for which option [Enable automatic preflight] is enabled.The number of processes can impact the performance of the application.
3. Click [Save].
Email the preflight report to your customer
1. Click [Order processing] - [Workflow configuration] - [Email templates].2. Select an email template.3. Enable the [Attach the preflight report] option.
Most, but not all, email templates offer option [Attach the preflight report].
Optionally, you can customize the preflight settings per user group
1. Click [User management] - [User groups] - [User group settings].2. Click on the bar of the user group that you want to customize. The user group expands.3. Scroll to section [Enable automatic preflight].4. A customer or operator can be part of a user group. The settings of the user group overwrite
the settings for PRISMAdirect.• Web shop
The user group uses the value of setting [Enable automatic preflight] as defined for theweb shop.
• Custom = YesAutomatic preflight is enabled for each web shop for the concerning user group. You haveto configure the preflight rules, see procedure Enable and configure the preflight rules perweb shop.
• Custom = NoAutomatic preflight is disabled for each web shop for the concerning user group.
5. Click [Save].
Configure the preflight workflow
42 Chapter 2 - ProceduresPRISMAdirect 1.4.1

Configure the email workflow
Introduction
This topic describes the complete configuration of the email workflow.
You have to configure the email settings in the [Configuration] workspace:1. Configure the SMTP server of the print room and the email settings2. Create default email messages
You can create default email messages for the customers, approvers, etc. The emails can besent at various stages while processing an order. Emails can also be sent at certain stages ofa workflow, for example, budget control.
3. Allow the operator to attach additional files to email messages4. Allow the operator to edit the email messages before sending them
You also have to configure if email messages are sent to the customers, approvers, etc.
Configure the SMTP server of the print room and the email settings
1. Click [System] - [Connectivity] - [Email settings].2. Type the email address of the print room.
When you type a different email address for a web shop, then this email address isoverwritten. See: [Web shop] - <web shop> - [Contact information] - [Contact information].
3. Type the name that will be used in the 'From' field of the email message. For example: 'Printroom'.
4. Type any Cc addresses. You can enter multiple email addresses, separated with a semicolon(;).
5. The operator can add or remove email addresses from the 'Cc' field when you enable option[Allow the operator to add Cc addresses].
6. Configure the SMTP server.1. Type the address and the port number of your email server. The default port number for
SMTP is 25.Ask your IT department for details.
2. Click button [Test connection] to test the connection to the email server.
Configure the SMTP authentication.1. [Enable SSL]
Select this option if you want to create a secure SMTP connection. You have to update theport number. The default port number for an SMTP connection secured by SSL is 587.Ask your IT department for details.
2. You can allow self-signed certificates for the secure connection.SMTP server can treat self-signed certificates the same as a certificate issued by anuntrusted CA. Depending on their policy, they may drop the connection or decide totransmit emails anyways.
3. Configure the authentication of the sender.The value for this option depends on how the client has configured the SMTP server.
Setting Description
[Anonymous] Select this value if no authentication is required for your SMTPserver.
[Custom authentication] Some SMTP servers require that the sender is authenticated. Typea valid PRISMAdirect user and its password.You can use the [Test connection] button to check the entered cre-dentials.
Configure the email workflow
Chapter 2 - Procedures 43PRISMAdirect 1.4.1

7. It is recommended that you send a test email to check your configuration of the SMTP server.8. Click [Save].
Create default email messages
1. Click [Order processing] - [Workflow configuration] - [Email templates].2. Select the email template that you want to configure.3. Click a language to configure the email message in that language. The available languages
are displayed just above the subject field. The available languages are equal to the activelanguages for PRISMAdirect. See: [System] - [Active languages for system].
4. Create the email message.• Type the text. Use the icons to use different font types, font color, text alignment, etc.• You can add images, for example, your company logo.• You can use the order items and product items as variables. Drag and drop the variable
into the message at the desired position. A variable is enclosed by '%' symbols. You canalso type fixed text in the label.You can use the product items only for jobs. Drag and drop the layout item [Jobinformation (per job)] into the email message to create a job specific text box.
• You can include a hyperlink to the order in your email. Drag and drop [Hyperlink to order]into the message. When the customer clicks the hyperlink, a web page opens that containsthe concerning order.
Click [Revert to default] to use the default email message again. Your changes will bediscarded.
5. You can configure which files are automatically attached to the email message.• Select option [Attach the document] to attach the final PDF document to the email
message.• Select the [Attach the tickets] option to attach the job ticket to the email message.• Select the [Attach the preflight report] option to attach the preflight report to the email
message.
The operator can attach additional files to an email message when the [Allow operator toattach files when sending email] option is enabled. See procedure Configure the emailworkflow on page 43.
6. Click [Preview email] to check your email message.7. Click [Save].8. Repeat these steps for all email templates.
Allow the operator to attach additional files to email messages
1. Click [Order processing] - [Workflow configuration] - [General settings] - [Other settings].2. [Allow operator to attach files when sending email]
You can define the email templates in section [Email templates]. In that section, you candefine which files will be attached to the emails by default. When you enable this option, theoperator is allowed to attach additional files to the email messages to the customer.
3. Click [Save].
Allow the operator to edit the email messages before sending them
1. Click [Order processing] - [Workflow configuration] - [General settings].2. Select one of the order state changes that trigger sending an email, for example, Order
accepted.The emails can be sent at various stages while processing an order. Emails can also be sent atcertain stages of a workflow, for example, Price approval of the budget managementworkflow.
Configure the email workflow
44 Chapter 2 - ProceduresPRISMAdirect 1.4.1
3. Enable option [Send email] when you want to send an email when the order changes into theconcerning state. You can select several options for sending an email:• [Always]
The email message for the concerning order state change is always send to the customer.• [When requested by customer]
The email message for the concerning order state change is only sent to the customerwhen the customer has requested this.
• [Send an email to the customer]The email message for the concerning order state change is always send to the customer.
• [Send an email to the operators]The email message for the concerning order state change is always send to the operator.
4. [Allow to edit the email message before sending]Default email messages have been created for the order state changes that trigger sending anemail. When you enable this option:• At a particular order state change, the concerning default email message opens.• The operator can change the email message.• The operator has to manually send the email message.
When you disable this option, any default email message is sent automatically.Most, but not all, triggers contain option [Allow to edit the email message before sending].
5. Click [Save].
Configure the email workflow
Chapter 2 - Procedures 45PRISMAdirect 1.4.1

Use custom fonts in the emails of PRISMAdirectIn the following procedure, the custom font "Viner Hand ITC Regular" is made available toPRISMAdirect:1. Install the custom font on all required computers
Install the custom font on:• The PRISMAdirect server
The PRISMAdirect server runs the order processing sessions.• The computers of the customers that receive the emails
The customers receive emails that use a default font when the custom font is not installedon their computers.
You can verify that the custom font is installed on the required computers. For eachcomputer, do:1. Open the Search dialog of Windows and type "View installed fonts".2. Click "View installed fonts" for an overview of the fonts installed on the concerning
computer.
2. Make the custom font available to PRISMAdirect1. Browse to: <drive>:\Program Files (x86)\Oce\PRISMAdirect\WebFolder
\Scripts\redactor2. Open the file fontfamily.js in an editor, for example, Notepad++.3. Look for the part in the JavaScript file that lists the fonts:
var fonts = [ 'Arial', 'Helvetica', 'Georgia', 'Times New Roman','Monospace' ];The code var fonts = [ 'Arial', ...]; is an array of font names. Each font can beselected by its name in PRISMAdirect.
4. For each custom font, do:Add the name of the custom font to the list of font name. You can add the name whereveryou want: at the beginning, in the middle or at the end. In this example, the font name isadded at the beginning of the array:var fonts = [ 'Viner Hand ITC, sans-serif', 'Arial', 'Helvetica','Georgia', 'Times New Roman', 'Monospace' ];• The font name must be enclosed by single quotation marks. In this example 'Viner
Hand ITC, sans-serif'.
Use custom fonts in the emails of PRISMAdirect
46 Chapter 2 - ProceduresPRISMAdirect 1.4.1

• The array of font names is comma separated.
5. Save the file fontfamily.js.3. Clear the cache of the browser
For Google Chrome, you can hold down the "CTRL" button and then press F5.4. The custom font is now available and can be used in PRISMAdirect
You can apply the font to the email message:
Use custom fonts in the emails of PRISMAdirect
Chapter 2 - Procedures 47PRISMAdirect 1.4.1

Configure the VDP workflow
Introduction
The VDP functionality is available in the PRISMA Core. The PRISMA Core is installed on theserver. Therefore, all actions and validations concerning the VDP functionality are executed onthe server. Jobs can be created in the web shop and the Order processing console. Theseapplications must have access to the server when they are installed on separate computers. TheOrder processing console and the web server connect to the PRISMAdirect server via the port forthe Print Prepare Manager service.
This topic describes the complete configuration of the VDP workflow.
You have to configure the VDP workflow in the [Configuration] workspace:1. Configure the port for the [Print Prepare Manager service]
The Order processing console and the web server connect to the PRISMAdirect server via theport for the Print Prepare Manager service. These applications must have access to thePRISMAdirect server to use the VDP functionality.
2. Configure the preview settings for a variable data document
Configure the port for the [Print Prepare Manager service]
1. Click [System] - [Services settings] - [Print Prepare Manager service].2. Define the port for the Print Prepare Manager service. The default port number is 54000.
Check that the port is available on the order processing console and the web server.3. Click [Save].
Configure the preview settings for a variable data document
1. Click [Order processing] - [General settings] - [VDP settings].2. Define the maximum number of pages of a variable data document shown in the [Preview] or
[Proof PDF]. The maximum value for this option is 2000 pages.A high number of pages can decrease the performance of the application.
3. Click [Save].4. Click [System] - [Services settings] - [JDD service] - [General settings].5. Define the timeout for the VDP preview generation. The application does not display the VDP
preview when the generation of the preview is not completed within the defined timeout.Do not configure this setting yourself. Change this setting only after consulting the help desk.
6. Click [Save].
Configure the VDP workflow
48 Chapter 2 - ProceduresPRISMAdirect 1.4.1

Use LDAP attributes in a VDP document, e.g., forbusiness cards
Introduction
In PRISMAdirect, you can use the values of LDAP attributes in a VDP document. Firstly, you haveto map the LDAP attributes to profile settings and/or job ticket items. Then you can use the profilesettings and/or job ticket items in a VDP document. Now, the values of the LDAP attributes areused as variable data in the VDP document. The mapped LDAP attributes are especially useful forcreating business cards.
When to do
This topic is valid when you use PRISMAdirect in combination with PRISMAprepare or the VDPEditor.
Map the LDAP attributes
1. Go to the [Configuration] workspace of PRISMAdirect.2. Click [System] - [Connectivity] - [LDAP server] - [LDAP servers].3. Select an LDAP server and click [Edit].4. Map the LDAP attributes to profile settings and/or job ticket items.5. Click [Save].
Procedure
1. Open PRISMAprepare or the VDP Editor.Create a new VDP document:1. Open a PDF file.2. Add one or more text frames to the PDF file. Inside the text frames, you can type the field
names that you want to use. The field names must use the exact spelling of the profilesettings and/or the job ticket items as defined in PRISMAdirect. You have to enclose each fieldname with the "<" and ">" signs, for example, <TelephoneNumber>.Alternatively, you can create an Excel sheet where you use the profile settings and/or jobticket items as column headers. Add the Excel sheet as data source. Click [Insert field]. Now,you can select the profile settings and/or job ticket items from a drop-down list.
3. Save the created VDP document.2. Open the [Product and order editor]
Create a new VDP product in the [Product and order editor]:1. Click [New product] and select the product type, e.g., [Business cards].2. Click the pane [Detailed product settings].3. Add the new VDP document in section [File].4. Select the [Manual input] option.5. Configure the new product as required and click [Save].
3. Open the [Web shop editor]Add the new VDP product to the product catalogue of the web shop.
4. [Web Submission]1. The customer creates an order using the new VDP product. All manual input fields are shown
to the customer. Where possible, the input fields use the values of the mapped LDAPattributes. Any additional fields remain empty. The customer can manually type a value forthe empty fields, e.g., the mobile phone number.
Use LDAP attributes in a VDP document, e.g., for business cards
Chapter 2 - Procedures 49PRISMAdirect 1.4.1

Configure the budget management workflow
Introduction
You can manage the budgets for users and user groups. You have to create one or more costcenters for each web shop. You have to assign a budget to each cost center. Then, you can assignone or more users and user groups to each cost center. For the assigned users the prices of theirorders are deducted from the budget. You can set a maximum price for an order for each user oruser group. An approver has to accept or reject the order when the price exceeds the maximumprice. Accept or reject only applies to the price of an entire order. An approver cannot accept orreject the prices of the separate jobs in an order.
NOTEWhen the payment workflow is enabled, then the budget management workflow is disabled.
This topic describes the complete configuration of the budget management workflow.
You have to configure the cost centers in the [Configuration] workspace:1. Create one or more cost centers per web shop2. Assign cost centers to users and user groups per web shop
You have to configure the price approval settings in the [Configuration] workspace:1. Configure the default maximum price of an order per web shop2. Configure the maximum price of an order for the users and user groups per web shop
You can configure the maximum price of an order for the users and user groups per webshop. These custom settings overwrite the default maximum price of an order per web shop.
Alternatively, you can setup an interface between the PRISMAdirect server and the uniFLOWserver. The uniFLOW server then manages the cost centers and the price approval workflow.
Budget: available, reserved, and spent
You can change the available budget and you can reset the spent budget. The reserved budget isa step in the approval workflow and can therefore not be reset or changed.• Available budget:
The total budget available for the users of the web site.• Spent budget:
The amount spent so far by all users of the concerning cost center. You can reset the spentbudget per cost centre manually.
• Reserved budget:A user has submitted an order costing $10,-. The approver must accept or reject the price ofthe order. While waiting for accept or rejection, the $10,- is added to the reserved budget.• When the order is accepted, the $10,- moves to the spent budget.• When the order is rejected, the $10,- moves to the available budget.
Create one or more cost centers per web shop
1. Click [Web shop] - <web shop> - [Pricing] - [Cost centers].2. Click [New cost center] to create the top level cost center.
Click the plus icon to add a cost center.3. Type a name and description for the cost center.
You can use the characters: 'a - z', 'A - Z', '0 - 9', '_' . Spaces are allowed for the name.4. Define the email address of the approver for this cost center. Use a semicolon to separate
multiple email addresses.The approver receives an email when the spent budget exceeds the specified threshold.
5. Define the available budget for the cost center.
Configure the budget management workflow
50 Chapter 2 - ProceduresPRISMAdirect 1.4.1

6. [Send warning at threshold [%]:]Define a percentage of the available budget. The approver receives an email when the spentbudget exceeds the specified threshold. The approver can increase or decrease the availablebudget, or reset the spent budget.You can edit the email message, see [Order processing] - [Workflow configuration] - [Emailtemplates].
7. [Use cost center one level down:]For example, you can create a top level cost center which contains the total budget. Then youcreate a cost center per department. The cost center for each department uses part of the totalbudget. When you enable this option for the top level cost center, then users can only selectone of the departmental cost centers.
8. Select the default cost center.When multiple cost centers are assigned to a web shop, you can select the default cost centerfor that web shop. Customers can select any of the cost centers of the web shop.
9. Click [Save].
Assign cost centers to users and user groups per web shop
1. To assign users, click [User management] - [Users] - [Cost centers] - <web shop>.To assign user groups, click [User management] - [User groups] - [Cost centers] - <webshop>.
2. Select a user.The available cost centres for the user appear.
3. Click the checkbox to assign a cost center to the user.You can assign multiple cost centres to the user. The cost centers are added to the [Assignedcost centers].• Click the view icon to view the configuration of the cost center. The icon appears when you
hover the mouse pointer over a cost center.4. Deselect the cost centers that you want to remove for the user in section [Available cost
centers].Or you can click the delete icon in section [Assigned cost centers]. The icon appears when youhover the mouse pointer over a cost center.
5. Click [Save].
Configure the default maximum price of an order per web shop
1. Click [Web shop] - <web shop> - [Pricing] - [Price approval workflow].2. Click [New level].3. Define the maximum price of an order for the current level. You can type a value in the
spinbox.4. Define the email address of the approver for the current level. Use a semicolon to separate
multiple email addresses.The approver receives an email when the order price exceeds the maximum price for thecurrent level. The approver of the current level must approve or reject the order. If the priceexceeds the maximum price of the next level, an approver of that level must also approve orreject the order.
NOTEThe approver for level 1 can forward the approval form to the approver for level 2.
5. Click button [New level] to define a maximum price for the new level. The maximum price ofthe new level must be higher than the maximum price of the previous level.
6. [Allow an approver to accept on behalf of higher level approvers]When you enable this option, each approver can always accept or reject an order, regardlessof the price.
Configure the budget management workflow
Chapter 2 - Procedures 51PRISMAdirect 1.4.1

7. Click [Save].
Configure the maximum price of an order for the users and user groups per web shop
You can configure the maximum price of an order for the users and user groups per web shop.These custom settings overwrite the default maximum price of an order per web shop.1. To customize the maximum price of an order for:
• Users: click [User management] - [Users] - [Price approval workflow] - <web shop>.• User groups: click [User management] - [User groups] - [Price approval workflow] - <web
shop>.2. Select a user or user group.3. Click [New level].4. Define the maximum price of an order for the current level. You can type a value in the
spinbox.5. Define the email address of the approver for the current level. Use a semicolon to separate
multiple email addresses.The approver receives an email when the order price exceeds the maximum price for thecurrent level. The approver of the current level must approve or reject the order. If the priceexceeds the maximum price of the next level, an approver of that level must also approve orreject the order.
NOTEThe approver for level 1 can forward the approval form to the approver for level 2.
6. Click button [New level] to define a maximum price for the new level. The maximum price ofthe new level must be higher than the maximum price of the previous level.
7. [Allow an approver to accept on behalf of higher level approvers]When you enable this option, each approver can always accept or reject an order, regardlessof the price.
8. Click [Save].
Configure the budget management workflow
52 Chapter 2 - ProceduresPRISMAdirect 1.4.1

Configure the prices for media, printing, and finishing
Introduction
You have to configure the prices in the [Configuration] workflow:1. Configure the default prices for PRISMAdirect
You have to configure the default prices for media, printing and finishing options. You canconfigure the prices for choice items that you want to use in formulas. You have to configurethe prices for stationery products. When you have configured the prices, you can createformulas for jobs and for orders.
2. Optionally, configure custom prices per web shopWhen the default prices are configured for PRISMAdirect, you can optionally configurecustom prices for each web shop. The prices for a web shop overrule the default prices forPRISMAdirect.
All items for media, printing and finishing are defined in and retrieved from the [Product andorder editor]. This is also true for the choice items.
Configure the default prices for PRISMAdirect
1. Click [Price and formula editor] - [Pricing].2. Configure all pages in paragraph [Pricing] starting with page [Prices for media].3. Define values for all options in the dialog. You can type a value in the text field. Or you can
click the arrow buttons to increase or decrease the value.4. Click [Save].
Optionally, configure custom prices per web shop
1. Check that the default prices are configured.Click [Price and formula editor] - [Pricing].
2. Click [Web shop] - <web shop> - [Pricing] - [Pricing].3. Configure if the default prices must be increased or decreased for the selected web shop.
Define percentages for all options in the dialog. You can type a percentage in the text field. Oryou can click the arrow buttons to increase or decrease the percentage. Define if thepercentage must be added or subtracted for each option.
4. Click [Save].
Configure the prices for media, printing, and finishing
Chapter 2 - Procedures 53PRISMAdirect 1.4.1

Configure the price estimation workflow
Introduction
You can configure the price estimation settings for each web shop. When the price estimationworkflow is enabled, the customer is always presented with an estimation of the job cost.
This topic describes the complete configuration of the price estimation workflow.
You have to configure the products in the [Product and order editor] workspace:1. Select a price estimation formula per product
Go to the [Product and order editor] workspace and select a product. You can select one priceestimation formula per product. The product settings overrule the user group and the webshop settings.
You have to configure the price estimation settings in the [Configuration] workspace:1. Configure the default price estimation settings per web shop2. Optionally, you can customize the price estimation settings per user group
The custom settings overrule the web shop settings for the user group. The custom settingsare used in all web shops for the corresponding user group.
The application uses the following price settings and formulas to estimate a price:1. If a formula is assigned to the product, then this formula is used.2. Otherwise, the formula and price settings assigned to the user group are used.3. If no formulas are assigned to the product or user group, then the formulas and price settings
assigned to the web shop are used.
Select a price estimation formula per product
1. Open the [Product and order editor] and click [Products].2. Select a product for which you want to use a price estimation formula.3. Click the pane [Detailed product settings].4. Select a quotation formula in section [Price settings] in the view [Web shop].
You can select [[Default price settings]]. In this case, the jobs created with this product willuse the settings and formulas as defined in the web shop.
5. Click [Update].6. Repeat this procedure for all products for which you want to use a price estimation formula.7. Click the [Publish] icon in the tab of workspace [Product and order editor] or [Web shop
editor].Publishing the changes to the PRISMAdirect server could take some time. The status barindicates the progress.
Configure the default price estimation settings per web shop
1. Click [Web shop] - <web shop> - [Pricing] - [Price estimation].2. You can define the default price estimation settings for the selected web shop.
Configure the price estimation workflow
54 Chapter 2 - ProceduresPRISMAdirect 1.4.1
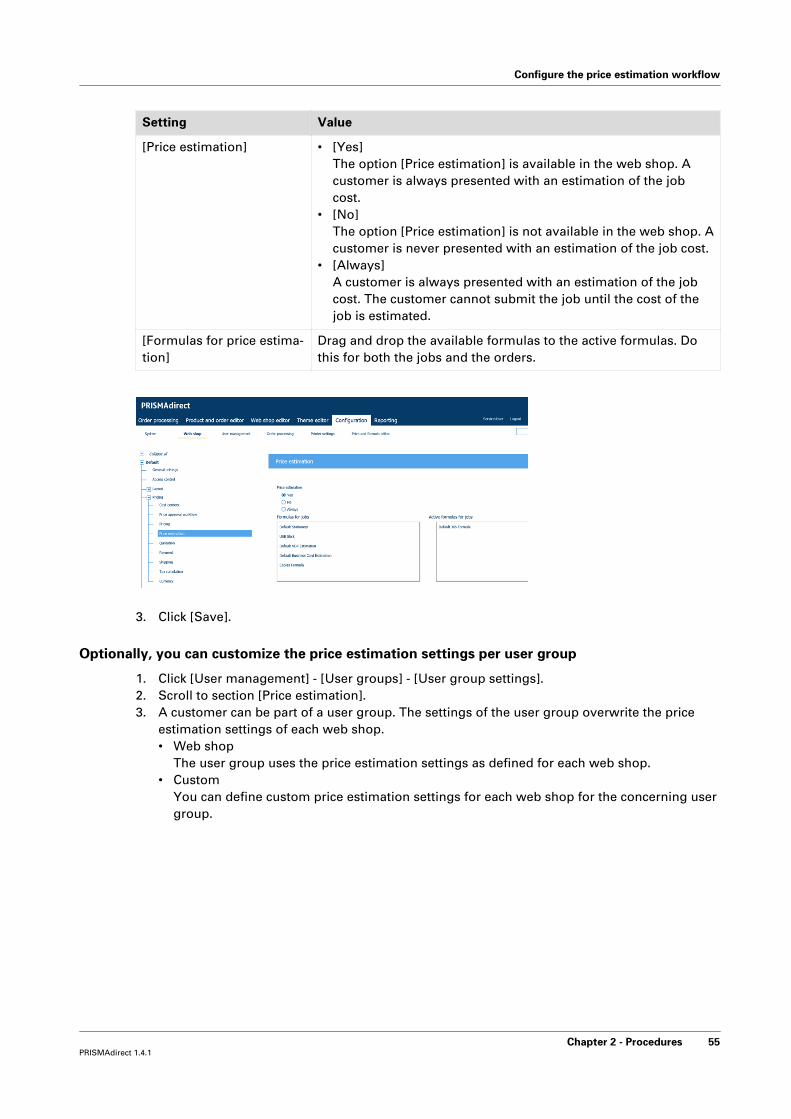
Setting Value
[Price estimation] • [Yes]The option [Price estimation] is available in the web shop. Acustomer is always presented with an estimation of the jobcost.
• [No]The option [Price estimation] is not available in the web shop. Acustomer is never presented with an estimation of the job cost.
• [Always]A customer is always presented with an estimation of the jobcost. The customer cannot submit the job until the cost of thejob is estimated.
[Formulas for price estima-tion]
Drag and drop the available formulas to the active formulas. Dothis for both the jobs and the orders.
3. Click [Save].
Optionally, you can customize the price estimation settings per user group
1. Click [User management] - [User groups] - [User group settings].2. Scroll to section [Price estimation].3. A customer can be part of a user group. The settings of the user group overwrite the price
estimation settings of each web shop.• Web shop
The user group uses the price estimation settings as defined for each web shop.• Custom
You can define custom price estimation settings for each web shop for the concerning usergroup.
Configure the price estimation workflow
Chapter 2 - Procedures 55PRISMAdirect 1.4.1

Setting Value
[Enabled] • [Yes]The option [Price estimation] is available in the web shop. Acustomer is always presented with an estimation of the jobcost.
• [No]The option [Price estimation] is not available in the web shop. Acustomer is never presented with an estimation of the job cost.
• [Always]A customer is always presented with an estimation of the jobcost. The customer cannot submit the job until the cost of thejob is estimated.
[Select formulas] Drag and drop the available formulas to the active formulas. Dothis for both the jobs and the orders.
NOTEIn the [Product and order editor], the system administrator can select a priceestimation formula for each product. The formulas in the product overrule theformulas assigned to the user group in this dialog.
4. Click [Save].
Configure the price estimation workflow
56 Chapter 2 - ProceduresPRISMAdirect 1.4.1

Configure the quotation workflow
Introduction
You can configure the quotation settings for each web shop. When the quotation workflow isenabled, the operator calculates and sends the quotation to the customer. A license is required touse the quotation functionality.
This topic describes the complete configuration of the quotation workflow.
You have to configure the products in the [Product and order editor] workspace:1. Select a quotation formula per product
Go to the [Product and order editor] workspace and select a product. You can select onequotation formula per product. The product settings overrule the user group and the webshop settings.
You have to configure the quotation settings in the [Configuration] workspace:1. Configure the quotation settings per web shop2. Optionally, you can customize the quotation settings per user group
The custom settings overrule the web shop settings for the user group. The custom settingsare used in all web shops for the corresponding user group.
The application uses the following price settings and formulas to calculate a quotation:1. If a formula is assigned to the product, then this formula is used.2. Otherwise, the formula and price settings assigned to the user group are used.3. If no formulas are assigned to the product or user group, then the formulas and price settings
assigned to the web shop are used.
Select a quotation formula per product
1. Open the [Product and order editor] and click [Products].2. Select a product for which you want to use a quotation formula.3. Click the pane [Detailed product settings].4. Select a quotation formula in section [Price settings] in the view [Print room].
You can select [[Default price settings]]. In this case, the jobs created with this product willuse the settings and formulas as defined in the web shop.
5. Click [Update].6. Repeat this procedure for all products for which you want to use a quotation formula.7. Click the [Publish] icon in the tab of workspace [Product and order editor] or [Web shop
editor].Publishing the changes to the PRISMAdirect server could take some time. The status barindicates the progress.
Configure the quotation settings per web shop
1. Click [Web shop] - <web shop> - [Pricing] - [Quotation].2. You can define the default quotation settings for the selected web shop.
Configure the quotation workflow
Chapter 2 - Procedures 57PRISMAdirect 1.4.1

Setting Value
[Quotation] • [Yes]Option [Quotation] is available in the web shop. A customer canrequest a quotation.
• [No]Option [Quotation] is not available in the web shop. A customercannot request a quotation.
• [Always]A customer is always presented with a quotation. The customercannot disable the request to calculate a quotation.
[Price can be accepted onbehalf of the customer]
Enable this option to allow the operator to accept the quotation onbehalf of the customer.Disable this option to force the customer to accept or reject thequotation.
[An order can be printedonly after the price is calcu-lated]
Enable this option to force the operator to always calculate thequotation. The quotation must be calculated for a correct budgetcontrol.
[Formula for job:] You have to select a formula to calculate the quotations of thejobs.
[Formula for order:] You have to select a formula to calculate the quotations of the or-ders.
3. Click [Save].
Optionally, you can customize the quotation settings per user group
1. Click [User management] - [User groups] - [User group settings].2. Scroll to section [Quotation].3. A customer can be part of a user group. The settings of the user group overwrite the
quotation settings of each web shop.• Web shop
The user group uses the quotation settings as defined for each web shop.• Custom
You can define custom quotation settings for each web shop for the concerning usergroup.
Setting Value
[Enabled] • [Yes]Option [Quotation] is available in the web shop. A customer canrequest a quotation.
• [No]Option [Quotation] is not available in the web shop. A customercannot request a quotation.
• [Always]A customer is always presented with a quotation. The customercannot disable the request to calculate a quotation.
[Price can be accepted onbehalf of the customer]
Enable this option to allow the operator to accept the quotation onbehalf of the customer.Disable this option to force the customer to accept or reject thequotation. 4
Configure the quotation workflow
58 Chapter 2 - ProceduresPRISMAdirect 1.4.1

Setting Value
[An order can be printedonly after the price is calcu-lated]
Enable this option to force the operator to always calculate thequotation. The quotation must be calculated for a correct budgetcontrol.
[Formula for job:] You have to select a formula to calculate the quotations of thejobs.
[Formula for order:] You have to select a formula to calculate the quotations of the or-ders.
NOTEIn the [Product and order editor], the system administrator can select a quotationformula for each product. The formulas in the product overrule the formulasassigned to the user group in this dialog.
4. Click [Save].
Configure the quotation workflow
Chapter 2 - Procedures 59PRISMAdirect 1.4.1

Configure the workflow for automation templates
Introduction
For repetitive jobs it is possible to select one or more templates with pre-defined settings. Theywill prepare a job using PRISMAprepare in the background. These templates are calledautomation templates. They can be applied manually or automatically. The benefits of theautomation templates are:• Saving time and minimizing errors as the layout is standardized and preparation is done in the
background.• Consistent layout in a multiple operator environment.
This topic describes the complete configuration of the workflow for automation templates.1. You have to prepare the PRISMAdirect server:
1. Install PRISMAprepare on the PRISMAdirect serverYou can create and maintain the automation templates in PRISMAprepare.
2. Install the PRISMAdirect Web Bootstrap on the PRISMAdirect serverThe PRISMAdirect Web Bootstrap synchronizes the automation templates inPRISMAprepare with PRISMAdirect.
Now, you can start using the automation templates in PRISMAdirect.2. You have to allow the use of automation templates in the [Configuration] workspace:
1. Allow using automation templates in PRISMAdirectFirstly, you have to allow using automation templates in PRISMAdirect. Then, theautomation templates become available in the [Order processing] console and in the[Product and order editor] workspace.• [Order processing] console
The operator can apply automation templates manually to jobs.• [Product and order editor] workspace
You can assign one or more templates to a product. Each job is created using aproduct. The automation templates assigned to the product will be appliedautomatically when the job arrives on the server.
2. Configure the port for the [Print Prepare Manager service]The automation templates functionality is available in the PRISMA Core. The PRISMACore is installed on the server. Therefore, applying the automation templates is executedon the server. The Order processing console connects to the PRISMAdirect server via theport for the Print Prepare Manager service.
3. Manage the automation templatesYou can manage the automation templates available for PRISMAdirect.
3. You have to configure the products in the [Product and order editor] workspace:1. Assign automation templates to one or more products
You can assign one or more templates to a product. Each job is created using a product.The automation templates assigned to the product will be applied automatically when thejob arrives on the server.
Install PRISMAprepare on the PRISMAdirect server
1. Install PRISMAprepare on the serverYou need a license to run PRISMAprepare.
2. Create and maintain the automation templates in PRISMAprepare.
Install the PRISMAdirect Web Bootstrap on the PRISMAdirect server
1. Click [System] - [Downloads].2. Download and install the PRISMAdirect Web Bootstrap.
Configure the workflow for automation templates
60 Chapter 2 - ProceduresPRISMAdirect 1.4.1

The PRISMAdirect Web Bootstrap synchronizes the automation templates in PRISMApreparewith PRISMAdirect.
Manage the automation templates
Click [Order processing] - [Manage automation templates] to manage the automation templatesfor PRISMAdirect.
Allow using automation templates in PRISMAdirect
1. Click [Order processing] - [Workflow configuration] - [General settings] - [Other settings].2. Enable the [Automation templates] option.
You have allowed using automation templates in PRISMAdirect. Now, the automationtemplates become available in the [Order processing] console and in the [Product and ordereditor] workspace.
Configure the port for the [Print Prepare Manager service]
1. Click [System] - [Services settings] - [Print Prepare Manager service].2. Define the port for the Print Prepare Manager service. The default port number is 54000.
Check that the port is available on the PRISMAdirect server.3. Click [Save].
Assign automation templates to one or more products
You can assign one or more automation templates to a product. Each job is created using aproduct. The automation templates assigned to the product will be applied automatically whenthe job arrives on the server.1. Open the [Product and order editor] and click [Products].2. Select a product for which you want to use automation templates.3. Click the pane [Detailed product settings].4. Select the [Print room] view and expand section [Automation templates].5. Drag and drop available automation templates to the active automation templates. You can
activate more than one automation template per product. Drag each automation template upor down to put them in the correct order.• The application of a template can fail. For example, the automation template can only be
applied to the job partially. In this case, an error is reported in the [Order processing]console on job level in section [Automation templates]. However, no errors are reported tothe print room operator when you enable option [Ignore errors].
6. Click [Update].7. Repeat this procedure for all products for which you want to use automation templates.8. Click the [Publish] icon in the tab of workspace [Product and order editor] or [Web shop
editor].Publishing the changes to the PRISMAdirect server could take some time. The status barindicates the progress.
Configure the workflow for automation templates
Chapter 2 - Procedures 61PRISMAdirect 1.4.1

Analyze log files and view which services loginformation
Each service logs information in a dedicated log file. You can use the log files to troubleshoot theconfiguration of PRISMAdirect.
Collect and analyze the log files
Use the "PRISMAdirect software support" tool to collect and analyze logging information. Do:1. Start the "PRISMAdirect software support" tool to collect the log files:
Click: "Start - Search - Apps - Software Support".2. Analyze the log files.
Select tab "Logs" to start analyzing the log files.
Log files and services
The following services are deployed on the PRISMAdirect server and/or web servers:• Print Automatic Processing Service
This service performs page counting, page preview generation, merge, and native fileconversion. It writes to log file "ProcessingService.log".
• Print Job Data DispatcherThis service uploads files during job submission and dispatches actions on jobs in the systemto the Print Automatic Processing Service. It writes to log file "JobDataDispatcher.log".
• Print Monitoring ServiceThis service handles notifications on changes (Orders/Files/Order status) from the JDFFramework and it caches data for the web client. It writes to the log files"MonitoringService.log", the "MonitoringWCF.log" and "LicenseState.log".
• Print Import ServiceThis service imports orders from a local or remote file system, via hot folders. It writes to logfile "ImportService.log".
• Print Export ServiceThis service exports orders into archive files, into the configured export folder. It writes to logfile "ExportService.log".
• JDF FrameworkThis service handles user management and order storage on disk. It writes to log file "FW-OceJdfFramework-Trace.log".
• Print JDF ServiceThis service imports orders from JDF/JMF endpoints. It writes to log file "JdfService.log".
• Print Prepare Manager ServiceThis service performs the actions that involve PRISMA Core. For example, apply automationtemplates, VDP document and data source validation, etc. It writes to log file"PrepareManagerService.log".
• Print CleanUp ServiceThis service removes files that are no longer needed. It writes to log file "CleanUpService.log".
• Print Cost Manager ServiceThis service computes cost estimation, quotation and handles budget approval and operationson cost centers. It writes to the log files "CostManagerService.log" and "CostManagerWCF.log".
• Print License Monitoring ServiceThis service checks the license. It writes to log file "LicenseMonitoringService.log".
• Print Machine ManagerThis service handles the IIS configuration. It writes to log file "MachineManagerService.log".
• Print ORS Service
Analyze log files and view which services log information
62 Chapter 2 - ProceduresPRISMAdirect 1.4.1

This service handles the connection to Océ Remote Service. It writes to log file"ORSService.log".
• Print Synchronization ServiceThis service runs only on the remote component "Web server". It handles the synchronizationof settings between the server and the remote web server. It writes to log file"SynchronizationService.log".
• Print Uniflow Interface ServiceThis service handles the connection to uniFLOW. It writes to log file"UniflowInteropService.log".
• Print CSVLog ServiceThis service is always disabled.
The following service is deployed on client PCs:• Print Bootstrap Service
This service synchronizes the automation templates in PRISMAprepare with PRISMAdirect. Itwrites to the log files "Bootstrap.log" for the web bootstrap executable and"BootstrapService.log" for the Print Bootstrap Service.
The following service is deployed on all computers where PRISMA Core is installed:• PRISMAprepare ORS service
This service handles the connection between PRISMAprepare and Océ Remote Service.
The following table shows which services run on each component of PRISMAdirect:
Server Web server Client PC
• Print Automatic ProcessingService
• Print Job Data Dispatcher• Print Monitoring Service• Print CleanUp Service• Print Cost Manager Service• Print License Monitoring
Service• Print Machine Manager• Print ORS Service• Print Import Service• Print Export Service• JDF Framework• Print JDF Service• Print Prepare Manager
Service• Print Uniflow Interface Serv-
ice• Print CSVLog Service (disa-
bled)• PRISMAprepare ORS serv-
ice
• Print Automatic ProcessingService
• Print Job Data Dispatcher• Print Monitoring Service• Print CleanUp Service• Print Cost Manager Service• Print License Monitoring
Service• Print Machine Manager• Print ORS Service• Print Synchronization Serv-
ice (on remote web serveronly)
• Print Bootstrap Service• PRISMAprepare ORS serv-
ice
Analyze log files and view which services log information
Chapter 2 - Procedures 63PRISMAdirect 1.4.1

Analyze log files and view which services log information
64 Chapter 2 - ProceduresPRISMAdirect 1.4.1

Chapter 3 System

Connectivity
Manage the LDAP serversThe connection status of each LDAP server is displayed in column [Status].• Green dot:
The connection to the LDAP server is established.• Orange dot:
The connection to the LDAP server is not checked or the connection is being checked.After a reboot of the system, the dots are orange. Click [Test connection] to update the state ofeach LDAP server.
• Red dot:The connection to the LDAP server cannot be established. Check the settings of the LDAPserver.
Additional actions Description
Test the connection Click [Test connection] to test the connection to the selected LDAPserver. The connection status of each LDAP server is displayed incolumn [Status]. The following checks are done:• Connect + bind to the LDAP server;• Read of RootDSE;• Probe for a user entry to enumerate user attributes;• Probe for a group entry to enumerate group attributes.
Refresh the LDAP informa-tion
Click [Refresh] to refresh the generic info about the LDAP, usersand groups part of that LDAP.PRISMAdirect stores some information about each LDAP locally.The information regards generic info about the LDAP, users andgroups part of that LDAP. In order for it to be in sync with the realinformation, a service synchronizes this information automaticallyonce a day, at midnight. If you want to synchronize this informa-tion manually, you have to use the [Refresh] functionality whichstarts an update of the information stored for all the LDAP servers.
Add an LDAP server
You can use LDAP servers for authentication and to retrieve user data. An LDAP server can beused for Windows authentication of users.1. Click [System] - [Connectivity] - [LDAP server] - [LDAP servers].2. Click [Add] or click on the bar of the LDAP server that you want to configure. The bar expands
and you can fill in the required settings.
Setting Description
[Domain name for LDAPserver:]
You can define a custom name for the LDAP server. The customname must be unique. 4
Connectivity
66 Chapter 3 - SystemPRISMAdirect 1.4.1

Setting Description
[Credentials policy: ] The JDF Framework service uses these credentials to connect tothe LDAP server.• [Use the credentials of the currently logged on user]
These are the credentials that are stored in the global settingsof the LDAP server. These credentials are used for each connec-ted LDAP server. These credentials are not defined in the appli-cation by the user. This value can always be used for each LDAPserver.
• [Use the credentials which are stored on the LDAP server]You must supply a user name and password to retrieve infor-mation from the LDAP server. Define the [LDAP server username:] and [LDAP user password:].
• [Use the credentials of the Windows user who runs the JDFFramework service]You can select this credential policy only for Secure-based au-thentication types. This credential policy supports IntegratedWindows Authentication (IWA) only.These credentials are defined by the user during the installationof the application. The Windows user can be DocWorker, a localuser, or a selected domain user. You can identify the Windowsuser who runs the JDF Framework in the Services dialogue ofMicrosoft Windows:• .\JdfFramework: local user• .\DocWorker: DocWorker
[Server address:] Type the address of the LDAP server. If you define only the ad-dress of the LDAP server, the users are searched through the en-tire LDAP server. You can also define the server address and thesearch root. When you define the server address and the searchroot, the search for users starts at the defined root on the server.For example:LDAP://sro.company.net:389/DC=sro,DC=company,DC=net,where:• sro.company.net
The address of the domain controller.• 389
The port which is used to connect to the LDAP server.The default port number for a non-secure connection is 389.The default port number for a secure connection is 636.
• DC=sro,DC=company,DC=netThe path to search for users in the active directory tree on theLDAP server.
[Server type:] Select a server type. The server types which start with “Native…”are preferred.The other server types are available for backwards compatibility. 4
Manage the LDAP servers
Chapter 3 - System 67PRISMAdirect 1.4.1

Setting Description
[Use secure connection(SSL)]
Select this option if you want to create a secure connection to theLDAP server.You must update the port number in option [Server address:]when you want to use a secure connection. The default port num-ber for a non-secure connection is 389. The default port numberfor a secure connection is 636.To be able to select this option, the LDAP server has to supportthis.
[User filter:] A default user filter is created automatically when the LDAP serveris used for authentication or to retrieve user data. Only users thatpass the filter can be imported from the LDAP server.You can edit the filter. The minimum filter is the LDAP attribute foruser name, for example: (sAMAccountName=%u). The user filtermust contain "%u" as placeholder for the user name. The mini-mum filter will always work, but it is not time efficient.The filter must be updated when the [LDAP attribute for username:] is changed.
[LDAP attribute for username:]
You can define the LDAP attribute that contains the user name.The default LDAP attribute is used for the user name if this field isleft empty. The default LDAP attribute depends on the server type.
[User group filter:] A default user group filter is created automatically when the LDAPserver is used for authentication or to retrieve user data. Only usergroups that pass the filter can be imported from the LDAP server.You can edit the filter. The minimum filter is the LDAP attribute forgroup name, for example: (cn=%g). The user group filter mustcontain "%g" as placeholder for the user group name. The mini-mum filter will always work, but it is not time efficient.The filter must be updated when the [LDAP attribute for groupname:] is changed.
[LDAP attribute for groupname:]
You can define the LDAP attribute that contains the group name.The default LDAP attribute is used for the group name if this fieldis left empty. The default LDAP attribute depends on the servertype.
[Authentication used toconnect to LDAP server:]
You can define the type of authentication which the applicationuses to connect to the LDAP server. See Authentication types onpage 70
[Authentication used toconnect user to the LDAPserver:]
You can define the type of authentication which the applicationuses to authenticate a user on the LDAP server. See Authentica-tion types on page 70 4
Manage the LDAP servers
68 Chapter 3 - SystemPRISMAdirect 1.4.1

Setting Description
Allow automatic creationof users:
Every user who logs on to the application with a user name andpassword known by the LDAP server is created automatically. The[User type] of an automatically created user becomes:• [Windows user] if the user is authenticated via Windows au-
thentication.• [LDAP user] if the user is authenticated via custom authentica-
tion.
An automatically created user belongs to the group of [Custom-ers]. The users in the [Customers] group can access the webshops.
[Separator for multi-valuedattributes:]
The LDAP attributes can contain multiple values. Therefore, youhave to define a separator to read each separate value correctly.In the [Product and order editor] workspace, you can create lookupitems to read information from an LDAP server. Both the lookupitem and the LDAP server must use the same separator. Else, thelookup item cannot return multiple values of an LDAP attributecorrectly.
3. Click [Save].
Edit profile mappings
For each LDAP server, you can map information available in the LDAP server to the [Profilesettings] of the customers. The precondition is that the LDAP server is used to retrieve user data.The [Profile settings] of the customers then automatically receive the data from the LDAP server.• If the LDAP attribute contains a value, the associated profile attribute is filled in. The customer
cannot change the profile attribute.• If the LDAP attribute does not contain a value, the associated profile attribute is left empty. The
customer must define the value of the profile attribute.• If you deselect a profile attribute, the user can change the value of the profile attribute.
1. Click [System] - [Connectivity] - [LDAP server] - [LDAP servers].2. Select an LDAP server and scroll to section [Edit profile mappings].3. Type an LDAP attribute for each enabled profile attribute.
The LDAP attributes may not be present in all the LDAP servers or might not contain relevantinformation.
4. Click [Save].5. Check that the LDAP server is used to retrieve user data.
When the LDAP server is used to retrieve user data, the profile attributes receive the value ofthe mapped LDAP attribute.1. Click [System] - [Connectivity] - [LDAP server] - [Authentication & user data].2. If required, drag and drop the LDAP server into field [Servers used to retrieve user data:].
6. Click [Save].
Map LDAP attributes to order items
You can map LDAP attributes to order items. When the LDAP server is used to retrieve user data,the order items receive the value of the mapped LDAP attribute.1. Click [Add].2. Select an order item from the drop-down list.3. Type the LDAP attribute that contains the information that you want to use for the order item.4. Do this for all order items that you want to map to LDAP attributes.
Manage the LDAP servers
Chapter 3 - System 69PRISMAdirect 1.4.1

5. Click [Save].
Authentication typesYou can define the type of authentication which the application uses to connect to the LDAPserver. And you can define the type of authentication which the application uses to authenticate auser on the LDAP server. Authentication types can be combined with an optimization, e.g.NoneAndServerBind. This authentication type can be combined with the ServerBind optimization.• The authentication types are described in the table "Authentication types".• The optimizations for the authentication types are described in the table "Authentication
optimizations".
NOTEIn LDAP "authentication" is called "bind".
Authentication types
Authentication type Description
None None means a simple bind to the server using plain text creden-tials. A simple bind is the only binding mechanism defined in theLDAP specification itself. None has a high compatibility acrossLDAP server vendors.WARNING: this authentication is NOT SECURE because plain textcredentials are used.Possible usage: All server types, but this authentication type is notrecommended.
NoneAndServerBind This is the None authentication type combined with the Server-Bind optimisation.WARNING: this authentication is NOT SECURE because plain textcredentials are used.Possible usage: ActiveDirectory, but this authentication type is notrecommended.
NoneAndFastServerBind This is the None authentication type combined with ServerBindand FastBind optimizations.WARNING: this authentication is NOT SECURE because plain textcredentials are used.Possible usage: ActiveDirectory, but this authentication type is notrecommended.
Anonymous Anonymous means that no authentication is done. Most LDAPservers do not allow anonymous access by default, or give a veryrestrictive access to the server.Possible usage: All server types, but this authentication type is notrecommended.
AnonymousAndServerBind This is the Anonymous authentication type combined with theServerBind optimisation.Possible usage: ActiveDirectory, but this authentication type is notrecommended. 4
Authentication types
70 Chapter 3 - SystemPRISMAdirect 1.4.1

Authentication type Description
AnonymousAndFastSer-verBind
This is the Anonymous authentication type combined with Server-Bind and FastBind optimizations.Possible usage: ActiveDirectory, but this authentication type is notrecommended.
Secure Secure is the Windows authentication method, which relies on theWindows Security Support Provider Interface (SSPI). The SSPIusually selects the Windows Negotiate protocol with Kerberos orNTLM authentication. Secure supports both explicit credentialsand Integrated Windows Authentication (IWA).WARNING: ActiveDirectoryFastDelegationSecureBinding is prefer-red for better security over Secure.Possible usage: ActiveDirectory, NativeADS, NativeLDAP with aWindows-based LDAP Server.
FastSecureBinding This is the Secure authentication type combined with the FastBindoptimisation.WARNING: ActiveDirectoryFastDelegationSecureBinding is prefer-red for better security over FastSecureBinding.Possible usage: ActiveDirectory, NativeADS.
SecureSocketLayer SecureSocketLayer means that a TLS/SSL communication channelis used to encrypt all the network traffic. The encryption includesthe bind and exchange of credentials. This is the recommendedsetting for most LDAP servers, when security must be guaranteedwithout using the Windows authentication and security mecha-nisms. However, the setup is complex because SecureSocketLayerrequires that the server has a valid server certificate installed. Andthe client must trust the Certificate Authority (CA) which issuedthe server certificate.The analysis of SecureSocketLayer problems can be complex:• For ADSI-based connectors:
Any SecureSocketLayer-related problems are reported in theWindows System Event log. If the server certificate is invalid,the SecureSocketLayer connection will fail.
• For non-ADSI-based connectors:Any SecureSocketLayer-related problems are reported in thedialogue that appears after you click button [Test connection]. Ifthe server certificate is invalid, a warning is reported but the Se-cureSocketLayer connection will succeed.
Possible usage: SunDirectoryServer, NativeLDAP, NativeADS.This authentication type is recommended.
FastSecureSocketLayer This is the SecureSocketLayer authentication type combined withthe FastBind optimisation for ADSI-based connectors, or FastCon-currentBinding optimisation for non-ADSI connectors.Possible usage: SunDirectoryServer, NativeLDAP, NativeADS.This authentication type is recommended.
ActiveDirectoryFastSecure-Binding
This is the Secure authentication type combined with the Sealing,Signing and FastBind optimization. The users are authenticatedagainst ActiveDirectory servers.Possible usage: ActiveDirectory, NativeADS. 4
Authentication types
Chapter 3 - System 71PRISMAdirect 1.4.1

Authentication type Description
ActiveDirectoryFastDelega-tionSecureBinding
This is the Secure authentication type combined with the Sealing,Signing, Delegation, and FastBind optimization. The users are au-thenticated against ActiveDirectory servers.Possible usage: ActiveDirectory, NativeADS.This authentication type is recommended for ActiveDirectory.
Basic Basic means a simple bind to the server using plain text creden-tials. This authentication type is very similar to None.WARNING: this authentication is NOT SECURE because plain textcredentials are used.Possible usage: All server types, but this authentication type is notrecommended.
BasicWithFastConcurrent-Binding
This is the Basic authentication type combined with the FastCon-currentBinding optimisation.WARNING: this authentication is NOT SECURE because plain textcredentials are used.Possible usage: All server types, but this authentication type is notrecommended.
BasicWithFastConcurrent-BindingAndSSL
This is the Basic authentication type combined with the FastCon-currentBinding optimization and a SecureSocketLayer communi-cation channel.Possible usage: NativeLDAP.This authentication type is recommended.
Negotiate This is the Windows Negotiate authentication, which means thesame as Secure authentication. Negotiate results in Kerberos orNTML authentication.Possible usage: ADAM and NativeLDAP connectors against a Win-dows-based LDAP server.
Kerberos The Kerberos authentication is almost the same as Secure authen-tication. Kerberos results in Kerberos authentication.WARNING: Negotiate is preferred over Kerberos.Possible usage: ADAM and NativeLDAP connectors against a Win-dows-based LDAP server.
NTML The NTML authentication is almost the same as Secure authenti-cation. NTML results in NTML authentication.WARNING: Negotiate is preferred over NTML.Possible usage: ADAM and NativeLDAP connectors against a Win-dows-based LDAP server.
Digest This is the Windows Digest Access authentication.Possible usage: ADAM and NativeLDAP connectors against a Win-dows-based LDAP server.
Authentication optimizations
• The authentication types are described in the table "Authentication types".• The optimizations for the authentication types are described in the table "Authentication
optimizations".
Authentication types
72 Chapter 3 - SystemPRISMAdirect 1.4.1

Authentication optimiza‐tions
Description
ServerBind With optimization ServerBind, only the server which is specified inthe connection URL is addressed.It is usually safe to use ServerBind for most LDAP servers and forActiveDirectory when the specific domain controller is addressed.Failover servers for ActiveDirectory are not addressed.
FastBind With FastBind optimization, the objectClass attribute on the serveris not used. This increases the performance.Optimization FastBind is only valid for ADSI-based connectors,such as ActiveDirectory or NativeADS.
FastConcurrentBinding With optimization FastConcurrentBinding no security token is cre-ated. This increases the performance when only user authentica-tion is needed.Optimization FastConcurrentBinding is only valid for non-ADSIbased connectors, such as ADAM, NativeLDAP, SunDirectoryServ-er.
SecureSocketLayer With option SecureSocketLayer, a TLS/SSL communication chan-nel is created to encrypt all network traffic.
Sealing Optimization Sealing activates additional encryption capabilities ofSSPI.
Signing Optimization Signing activates additional data integrity checkingcapabilities of SSPI.
Delegation Optimization Delegation activates the ability of using the Windowssecurity context across domains.
Authentication types
Chapter 3 - System 73PRISMAdirect 1.4.1

Authentication & retrieve user dataThe [Authentication & user data] dialog displays the LDAP servers which are available to theapplication. The application searches for LDAP servers in the local network and domain duringthe start up of the application. The LDAP servers can be added to two different lists:• [Servers used for authentication:]
The first LDAP server in the list is used for the authentication of a user. If the user cannot beauthenticated by the first server, then the second server is used, etc.User data can be collected from each server in this list.
• [Servers used to retrieve user data:]The servers in this list are only used to retrieve user data that is available on an LDAP server.The retrieved user data is filled in automatically in the mapped profile attributes and themapped job ticket items.
Select the LDAP server
1. Click [System] - [Connectivity] - [LDAP server] - [Authentication & user data].2. You can drag and drop the available LDAP servers into field [Servers used for authentication:]
or field [Servers used to retrieve user data:].3. You can drag and drop the servers to set the correct order of the LDAP servers.4. Click [Save].
Authentication & retrieve user data
74 Chapter 3 - SystemPRISMAdirect 1.4.1

Configure the email settingsConfigure the SMTP server of the print room and the email settings
The settings in this dialog are part of the procedure to configure the email workflow. For thecomplete procedure, see Configure the email workflow on page 43.
Configure the SMTP server of the print room and the email settings
1. Click [System] - [Connectivity] - [Email settings].2. Type the email address of the print room.
When you type a different email address for a web shop, then this email address isoverwritten. See: [Web shop] - <web shop> - [Contact information] - [Contact information].
3. Type the name that will be used in the 'From' field of the email message. For example: 'Printroom'.
4. Type any Cc addresses. You can enter multiple email addresses, separated with a semicolon(;).
5. The operator can add or remove email addresses from the 'Cc' field when you enable option[Allow the operator to add Cc addresses].
6. Configure the SMTP server.1. Type the address and the port number of your email server. The default port number for
SMTP is 25.Ask your IT department for details.
2. Click button [Test connection] to test the connection to the email server.
Configure the SMTP authentication.1. [Enable SSL]
Select this option if you want to create a secure SMTP connection. You have to update theport number. The default port number for an SMTP connection secured by SSL is 587.Ask your IT department for details.
2. You can allow self-signed certificates for the secure connection.SMTP server can treat self-signed certificates the same as a certificate issued by anuntrusted CA. Depending on their policy, they may drop the connection or decide totransmit emails anyways.
3. Configure the authentication of the sender.The value for this option depends on how the client has configured the SMTP server.
Setting Description
[Anonymous] Select this value if no authentication is required for your SMTPserver.
[Custom authentication] Some SMTP servers require that the sender is authenticated. Typea valid PRISMAdirect user and its password.You can use the [Test connection] button to check the entered cre-dentials.
7. It is recommended that you send a test email to check your configuration of the SMTP server.8. Click [Save].
Configure the email settings
Chapter 3 - System 75PRISMAdirect 1.4.1

Configure the file hosting servicesThe settings in this dialog are part of the procedure to configure the file hosting services, forexample, Dropbox. For the complete procedure, see Configure the file hosting services, forexample, Dropbox on page 20.
Configure the file hosting services
76 Chapter 3 - SystemPRISMAdirect 1.4.1

Configure linking to a file or folderThe settings in this dialog are part of the procedure to configure linking to a file or folder. For thecomplete procedure, see Configure linking to a file or folder on page 25.
Configure linking to a file or folder
Chapter 3 - System 77PRISMAdirect 1.4.1
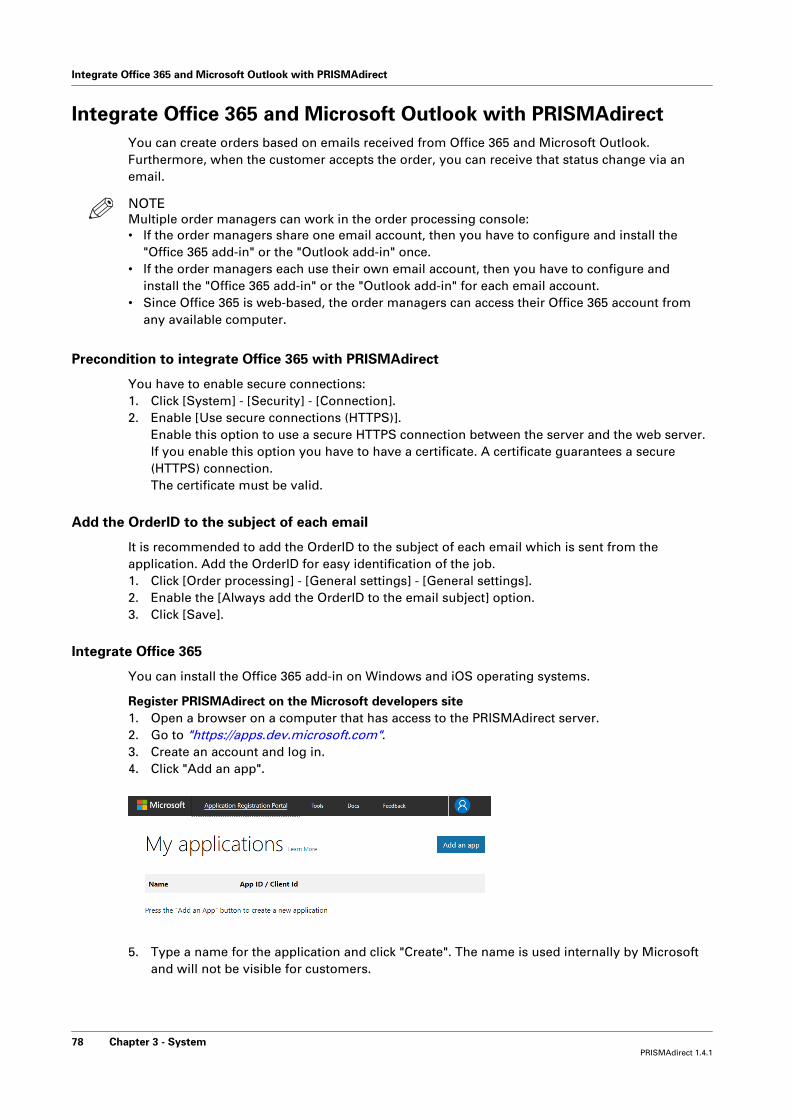
Integrate Office 365 and Microsoft Outlook with PRISMAdirectYou can create orders based on emails received from Office 365 and Microsoft Outlook.Furthermore, when the customer accepts the order, you can receive that status change via anemail.
NOTEMultiple order managers can work in the order processing console:• If the order managers share one email account, then you have to configure and install the
"Office 365 add-in" or the "Outlook add-in" once.• If the order managers each use their own email account, then you have to configure and
install the "Office 365 add-in" or the "Outlook add-in" for each email account.• Since Office 365 is web-based, the order managers can access their Office 365 account from
any available computer.
Precondition to integrate Office 365 with PRISMAdirect
You have to enable secure connections:1. Click [System] - [Security] - [Connection].2. Enable [Use secure connections (HTTPS)].
Enable this option to use a secure HTTPS connection between the server and the web server.If you enable this option you have to have a certificate. A certificate guarantees a secure(HTTPS) connection.The certificate must be valid.
Add the OrderID to the subject of each email
It is recommended to add the OrderID to the subject of each email which is sent from theapplication. Add the OrderID for easy identification of the job.1. Click [Order processing] - [General settings] - [General settings].2. Enable the [Always add the OrderID to the email subject] option.3. Click [Save].
Integrate Office 365
You can install the Office 365 add-in on Windows and iOS operating systems.
Register PRISMAdirect on the Microsoft developers site1. Open a browser on a computer that has access to the PRISMAdirect server.2. Go to "https://apps.dev.microsoft.com".3. Create an account and log in.4. Click "Add an app".
5. Type a name for the application and click "Create". The name is used internally by Microsoftand will not be visible for customers.
Integrate Office 365 and Microsoft Outlook with PRISMAdirect
78 Chapter 3 - SystemPRISMAdirect 1.4.1

6. Scroll to section "Microsoft Graph Permissions" and click "Add" for option "DelegatedPermissions".
7. Enable “Mail.Read” and click OK.
8. Scroll to section "Platforms" and click "Add Platform".
Integrate Office 365 and Microsoft Outlook with PRISMAdirect
Chapter 3 - System 79PRISMAdirect 1.4.1
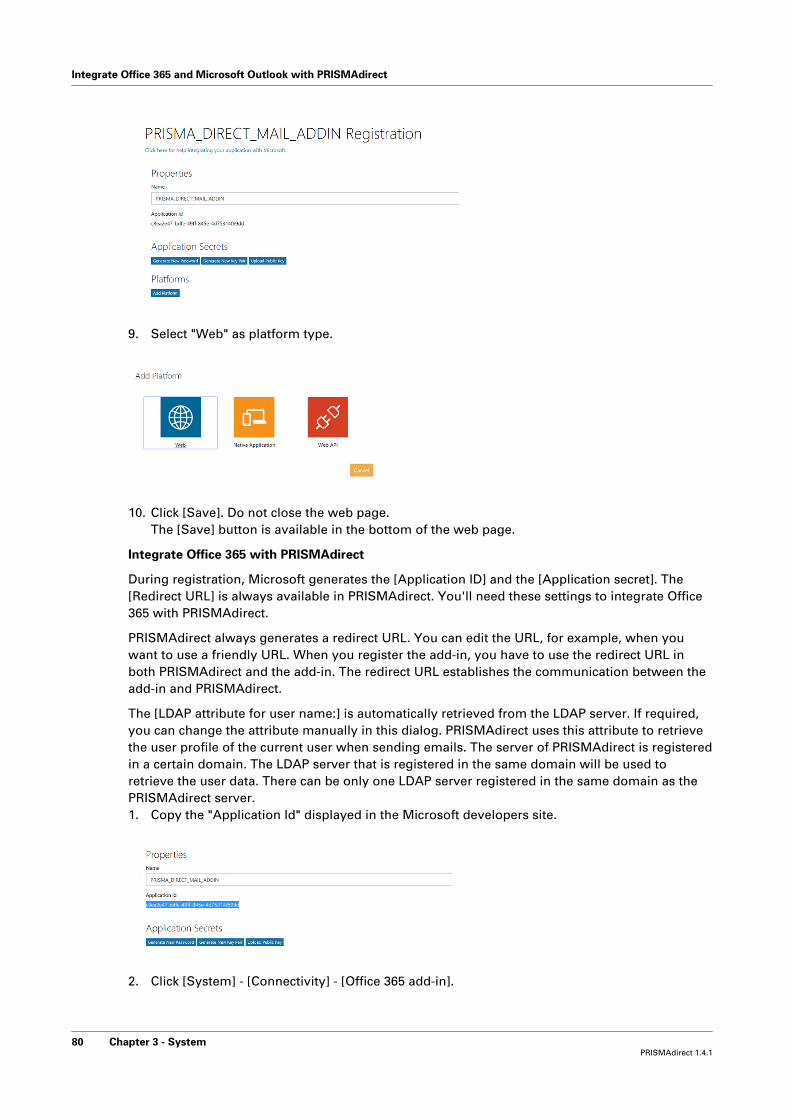
9. Select "Web" as platform type.
10. Click [Save]. Do not close the web page.The [Save] button is available in the bottom of the web page.
Integrate Office 365 with PRISMAdirect
During registration, Microsoft generates the [Application ID] and the [Application secret]. The[Redirect URL] is always available in PRISMAdirect. You'll need these settings to integrate Office365 with PRISMAdirect.
PRISMAdirect always generates a redirect URL. You can edit the URL, for example, when youwant to use a friendly URL. When you register the add-in, you have to use the redirect URL inboth PRISMAdirect and the add-in. The redirect URL establishes the communication between theadd-in and PRISMAdirect.
The [LDAP attribute for user name:] is automatically retrieved from the LDAP server. If required,you can change the attribute manually in this dialog. PRISMAdirect uses this attribute to retrievethe user profile of the current user when sending emails. The server of PRISMAdirect is registeredin a certain domain. The LDAP server that is registered in the same domain will be used toretrieve the user data. There can be only one LDAP server registered in the same domain as thePRISMAdirect server.1. Copy the "Application Id" displayed in the Microsoft developers site.
2. Click [System] - [Connectivity] - [Office 365 add-in].
Integrate Office 365 and Microsoft Outlook with PRISMAdirect
80 Chapter 3 - SystemPRISMAdirect 1.4.1

3. Paste the "Application Id" into option [Application ID] in the [Office 365 add-in] dialog ofPRISMAdirect.
4. Click [Save].5. Copy the [Redirect URL] displayed in the [Office 365 add-in] dialog.
PRISMAdirect automatically fills in the [Redirect URL] and the [LDAP attribute for user name:].6. Go to the Microsoft developers site.7. Scroll to section "Platforms" and paste the [Redirect URL] into option "Redirect URLs".
8. Click [Save]. Do not close the web page.The [Save] button is available in the bottom of the web page.
9. Scroll to section "Application Secrets" and click "Generate New Password".
10. Copy the password. It is recommended that you store the password in a file. Click OK.11. Click [System] - [Connectivity] - [Office 365 add-in].12. Paste the password into option [Application secret] in the [Office 365 add-in] dialog of
PRISMAdirect.
Integrate Office 365 and Microsoft Outlook with PRISMAdirect
Chapter 3 - System 81PRISMAdirect 1.4.1

13. Click [Save].
Install the add-in
You can install the add-in in every Office 365 environment that has access to the PRISMAdirectserver.1. Click [System] - [Downloads].2. Download the "PRISMAdirect Office 365 AddIn". Select option "Save File" if a dialog opens to
ask you what to do with the file. The default download location for the file is the "Downloads"folder.PRISMAdirect will not notify you when the download is completed.
3. Open a browser on a computer that has access to the PRISMAdirect server.4. Go to "outlook.office365.com".5. Log in with an account that is valid for the Office 365 environment.6. Click the cogwheel icon to open the settings.7. Select "Manage add-ins".
8. Select "My add-ins".9. Select "+ Add a custom add-in", then select "Add from file..." in section "Custom add-ins".
Integrate Office 365 and Microsoft Outlook with PRISMAdirect
82 Chapter 3 - SystemPRISMAdirect 1.4.1

10. Browse to the folder that contains the downloaded "PRISMAdirect Office 365 AddIn.xml" file.By default, that is the "Downloads" folder.
11. Select the file and click "Open".12. Click "Install".
13. When installation is completed, the custom add-in "PRISMAdirect" is added to Office 365.To create an order from an email, click the small icon of the PRISMAdirect add-in. In the right-hand side, a dialog expands and you can click "Create order from email".
Integrate Microsoft Outlook
You can install the Microsoft Outlook add-in only on Windows operating systems.1. Open workspace [Configuration] and go to [Downloads].2. Download the "PRISMAdirect Outlook AddIn".
Wait until the "OutlookAddInInstallerZip.exe" has been downloaded.3. Run the executable on each computer that connects to the order processing workspace. The
Outlook Addin allows the order manager and operator can create orders from emails.
Integrate Office 365 and Microsoft Outlook with PRISMAdirect
Chapter 3 - System 83PRISMAdirect 1.4.1

Select the payment providers for PRISMAdirectThe settings in this dialog are part of the procedure to configure the payment workflow. For thecomplete procedure, see Configure the payment workflow on page 15.
Select the payment providers for PRISMAdirect
84 Chapter 3 - SystemPRISMAdirect 1.4.1

Shipping
Select the shipping providers for PRISMAdirectThe settings in this dialog are part of the procedure to configure the shipping workflow. For thecomplete procedure, see Configure the shipping workflow on page 29.
Shipping
Chapter 3 - System 85PRISMAdirect 1.4.1

Define any custom box sizesEach shipping provider offers a range of default box sizes. You can define one or more custombox sizes for each shipping provider.
NOTEWhen you select an additional shipping provider for PRISMAdirect, that provider is also added toeach existing custom box. Now, you have to configure each existing custom box for the newprovider.
The settings in this dialog are part of the procedure to configure the shipping workflow. For thecomplete procedure, see Configure the shipping workflow on page 29.
Define any custom box sizes
1. Click [System] - [Connectivity] - [Shipping] - [Custom box sizes].2. You can create one or more custom box sizes for each shipping provider. Do this for each
shipping provider enabled for PRISMAdirect.3. Click [Save].
Define any custom box sizes
86 Chapter 3 - SystemPRISMAdirect 1.4.1

Configure the default shipping labelYou can offer a shipping service to your customers. When you select one or more shippingproviders, each customer can request shipment of an order via the web shop.
PRISMAdirect delivers the origin address, the delivery address, etc. to the shipping providerwhen the operator clicks [Dispatch] in the [Order processing] workspace. The shipping providerreturns a shipping label containing the addresses, barcode, etc. The operator can print theshipping label and paste it to the package.
The default label will be used when the shipping provider does not offer a shipping label. Thelabel only contains the information that you configure in this dialog.
The settings in this dialog are part of the procedure to configure the email workflow. For thecomplete procedure, see Configure the shipping workflow on page 29.
Configure the default shipping label
1. Click [System] - [Connectivity] - [Shipping] - [Default label].2. You can use variables from the list of [Order items] and/or the [Origin address] to create the
shipment label. This allows you to use dynamic information in the label. Drag and drop thevariable into the label at the desired position. A variable is indicated by '%' symbols. You canalso type fixed text in the label.
3. Define the font settings for the label.4. Select the size of the media on which the default label will be printed.5. Enable option [Print logo in label] when you want to add a logo to the label.
• Click button [Browse] to select an image.The allowed image file types are: .bmp, .jpg, .gif, .png.Click [Clear] to remove a selected image.
• Select the position for the logo from the drop-down list.• [Scale logo to page size]
You can scale the logo to the page size. Enable option [Keep ratio] if you want to use thesame relation between width and height for the logo as for the page size. You have todefine the width [%] for the image.
6. Click button [Preview] to preview the shipment label.7. Click [Save].
Configure the default shipping label
Chapter 3 - System 87PRISMAdirect 1.4.1

Select the tax services for PRISMAdirectThe settings in this dialog are part of the procedure to configure the tax services workflow. Forthe complete procedure, see Configure the tax services workflow on page 33.
Select the tax services for PRISMAdirect
88 Chapter 3 - SystemPRISMAdirect 1.4.1

Type the default origin addressYou ship your packages from the origin address. You can use the default origin address whenyou have only one web shop. When you have multiple web shops, you have to type an originaddress for each separate web shop. See: [Web shop] - <web shop> - [Contact information] -[Origin address].
The origin address is part of the following procedures:• Configuration of the shipping workflow. For the complete procedure, see Configure the
shipping workflow on page 29.• Configuration of the tax services workflow. For the complete procedure, see Configure the tax
services workflow on page 33.
Type the default origin address
1. Click [System] - [Connectivity] - [Origin address].2. Type the origin address for your web shop. You can use the default origin address when you
have only one web shop. When you have multiple web shops, you have to type an originaddress for each separate web shop.The address will not be validated in this dialog. The address will be validated when:• The operator requests a shipment in the [Order processing] workspace. The selected
shipment provider returns an error message if any of the values are incorrect.• The operator or customer creates an order while tax services workflow is enabled. The tax
service returns an error message if any of the values are incorrect.
For example, the zip code is incorrect or the shipment provider is not active in the specifiedcountry.
3. Click [Save].
Type the default origin address
Chapter 3 - System 89PRISMAdirect 1.4.1

Setup the uniFLOW interfaceThe settings in this dialog are part of the procedure to set up the uniFLOW interface and toconfigure the uniFLOW workflow. For the complete procedure, see Setup the uniFLOW interfaceon page 27.
Setup the uniFLOW interface
90 Chapter 3 - SystemPRISMAdirect 1.4.1

Configure for automatic license update and allow remoteassistance
Remote assistance
Remote assistance enables our organization to connect and support our customers remotely.Implementation is based on TeamViewer. The customer has to allow a remote desktopconnection for the help desk employee.
Automatic license update
Updated licenses can be automatically downloaded and installed on the product. An updatedlicense is downloaded and installed automatically when:• The customer extends the maintenance period.• The customer has bought optional features.• The customer has bought support for additional users.
Customers with a valid maintenance contract are entitled to software maintenance releases. Theinstaller verifies whether a customer is allowed to install an update of the product.
A newly downloaded license is:• Announced to the customer.• Automatically installed on the local Floating License Server.
For a remote Floating License Server:• Specify the license folder on the remote computer. Share the license folder to install the new
license file automatically.• The customer can copy the license file manually from the specified license path to the
remote Floating License Server. Then, the customer can install the new license file manually.
The customer can verify the expiration date of the license and the maintenance period in theAbout box.
Configure for automatic license update
1. Click [System] - [Connectivity] - [Remote Service] - [General settings].2. Enable the [Enabled] option.
There is no connection to the remote service back office when this option is disabled.3. [Service organization ID:] and [Verification code:].
The ID and verification code identify your service organization. These settings are used to findyour PRISMAdirect installation on the remote service website in the service organization.The serial number is automatically retrieved from the license when the license server isconfigured correctly. To configure the license server, do:1. Open the [Configuration] workspace.2. Click [System] and select [License].
4. Define the proxy server settings.You have to define the proxy server settings when you need special permissions forTeamViewer in your network.• [Automatically detect settings]
NOTEDo not use this option when you want to allow remote assistance. Firstly,configure the settings of the proxy server manually using option [Enable proxyserver]. Then do procedure "Allow remote assistance".
NOTEOnly use this option for automatic license update and automatic download ofsoftware updates.
Configure for automatic license update and allow remote assistance
Chapter 3 - System 91PRISMAdirect 1.4.1

The application detects the settings of your proxy server automatically. The proxy serversettings as configured in your browser are used.
• [Use proxy server]Add the settings of the proxy server manually.• [Proxy URL:]
The hostname and port. For example: proxy.example.com:8080[Proxy server authentication]Use this option if the proxy server requires authentication.1. [Proxy domain:]
The domain where the proxy server resides.2. [Proxy user name:] and [Proxy password:]
The logon credentials for the proxy server.5. Specify the license path:
• Local Floating License ServerType the license path. No further action required.You have to refresh the web page when the license is installed.
• Remote Floating License Server• Define a shared folder with the required rights:
1. Create and share the license folder on your remote Floating License Server. The[Remote service credentials:] user must have to following rights to the shared folder:Modify, Read, Write.
2. [Remote service credentials:]The read-only text box displays the current remote service user. This user runs thePrint ORS Service which offers the remote assistance functionality. Click [Testconnection] to test if the defined user has Internet access.You can change the user:1. Click the [Change] button.2. Select the domain and user name. Type the password. Letters in passwords must
be typed using the correct case. The user must have Internet access.3. Click the [OK] button.
The remote service user is changed.4. Click [Test connection] to test if the defined user has Internet access.
• If you don't want to create a shared folder, you can copy the license file manually.1. The license file cannot be updated automatically because you have not created a
shared folder. Therefore, an error message appears informing you that the licensecannot be updated on the license server.
2. Click [System] - [Connectivity] - [Remote Service] - [General settings].3. Scroll to the bottom of the dialog to section [Failed to update license on:].
This section appears when a license cannot be updated automatically.4. Click the save icon to save the license file on your computer.5. Copy the license file from your computer to the license folder on the remote Floating
License Server.6. Click [Save].7. Verify whether the [Remote Service] connection has been established. A status icon is
available in the top of the dialog:• Green light
The connection to the remote service back office is established.• Orange light
The connection to the remote service back office has failed.
When the service Print ORS Service is not running, the application cannot connect to [RemoteService].1. Click [System] - [Services settings] - [Services].
Configure for automatic license update and allow remote assistance
92 Chapter 3 - SystemPRISMAdirect 1.4.1

2. Start the service Print ORS Service.
Allow remote assistance
Preconditions for remote assistance:• Do procedure "Configure for automatic license update".• The [Proxy server settings] are configured.
1. Click [System] - [Connectivity] - [Remote Service] - [Remote assistance].2. Enable the [Allow remote assistance] option.
Remote assistance by our organization is based on TeamViewer. The help desk employee canrequest to allow a remote desktop connection for remote assistance.
3. Click [Save].
Configure for automatic license update and allow remote assistance
Chapter 3 - System 93PRISMAdirect 1.4.1

Web submissionYou can configure the local web server and any remote web servers in these dialogs.
Configure the general settingsThe setting [Enable uniFLOW interface] is part of the procedure to set up the uniFLOW interface.For the complete procedure, see Setup the uniFLOW interface on page 27.
1. Click [System] - [Web submission] - <web server> - [General settings].2. [Put the web site into maintenance mode]
Enable this option to put the web server into maintenance. Customers cannot access the webshop anymore.Type the corresponding server name or IP address. When your server is part of a network,you have to use the UNC path to the server. For example: \\<servername.domain.topdomain>\.
3. [Allow the customer to print the order ticket and job ticket]You can allow the customer to print the tickets of the job and order.
4. Type the address of the web server.1. The fixed IP address
It is recommended to use the fixed IP address of the web server.2. The Fully Qualified Domain Name (FQDN), for example, myserver.mydomain.net.
Use the FQDN if the web server does not have a fixed IP address. For example, the DHCPserver assigns a dynamic IP address to the web server.
5. [Enable uniFLOW interface]Enable the interface between the web server and the uniFLOW server. All web shops hostedby the web servers connected to the uniFLOW server will use the workflow as defined byuniFLOW. You can also disconnect a web server from the uniFLOW server. All web shopshosted by the disconnected web server will use the workflow as defined by PRISMAdirect.Setting [Enable uniFLOW interface] becomes available when you have paired thePRISMAdirect server with the uniFLOW server.
6. Click [Save].
Web submission
94 Chapter 3 - SystemPRISMAdirect 1.4.1

Define the desk submission usersYou can add or remove Desk Submission users. A Desk Submission user can create jobs onbehalf of customers of the web shops.
1. Click [System] - [Web submission] - <web server> - [Desk submission users].2. Select [Local users] or an LDAP server.
The local users, or the users on the LDAP servers, become available in the [Users] drop-downlist.
3. Select a user.4. Click the [Add] button.
The user has Desk Submission rights.
Define the desk submission users
Chapter 3 - System 95PRISMAdirect 1.4.1

Create friendly URLsYou can create a user-friendly URL for each web shop to improve the usability and accessibility ofyour web shops for your customers.
This dialog contains the default web shop and each web shop that is created in the [Web shopeditor].
1. Click [System] - [Web submission] - <web server> - [Desk submission users].2. Select a web shop.3. Type a user-friendly URL for the web shop.4. Click [Save].
Create friendly URLs
96 Chapter 3 - SystemPRISMAdirect 1.4.1

Configure the payment providers per web serverThe settings in this dialog are part of the procedure to configure the payment workflow. For thecomplete procedure, see Configure the payment workflow on page 15.
Configure the payment providers per web server
Chapter 3 - System 97PRISMAdirect 1.4.1

Configure the shipping providers per web serverThe settings in this dialog are part of the procedure to configure the shipping workflow. For thecomplete procedure, see Configure the shipping workflow on page 29.
Configure the shipping providers per web server
98 Chapter 3 - SystemPRISMAdirect 1.4.1

Configure the tax services per web serverThe settings in this dialog are part of the procedure to configure the tax services workflow. Forthe complete procedure, see Configure the tax services workflow on page 33.
Configure the tax services per web server
Chapter 3 - System 99PRISMAdirect 1.4.1
Configure remote web servers1. Click [System] - [Web submission] - [Remote web servers].2. For each remote web server, do:
1. Type a name for the web server.2. Type the address of the web server.
1. The fixed IP addressIt is recommended to use the fixed IP address of the web server.
2. The Fully Qualified Domain Name (FQDN), for example, myserver.mydomain.net.Use the FQDN if the web server does not have a fixed IP address. For example, theDHCP server assigns a dynamic IP address to the web server.
3. Click [Configure] to open a dedicated configuration dialog for the concerning web server.You can find the link [Configure] directly behind the displayed registration time.You have to configure each separate web server.
3. Click [Save].
Configure remote web servers
100 Chapter 3 - SystemPRISMAdirect 1.4.1

Configure access to web shops per web serverBy default, all web shops are hosted by all web servers for load balancing. However, you canexplicitly configure which web shops can be accessed from which web servers.1. Click [System] - [Web submission] - <web server> - [Web shop access from web servers].2. Enable or disable access to the web shops from each available web server.3. Click [Save].
Configure access to web shops per web server
Chapter 3 - System 101PRISMAdirect 1.4.1

Services settings
Advanced infrastructure settings
Logon credentials for installed components
Consider a distributed system. The components of the system must authenticate themselves tothe server. You can define the logon credentials for the components in this dialog. Use thesecredentials when you install the components.1. Click [System] - [Services settings] - [Advanced infrastructure].2. [Logon credentials for installed components]
• Define a username and password.This user must belong to the [Services] group. The application restarts when you changethe username or password.
Change the password of the ServicesUser account
1. Click [System] - [Services settings] - [Advanced infrastructure].2. Click [Change password].3. Type a new password. Use the following rules to define a strong password:
• The password must have at least 8 characters.• The password must use both upper case and lower case characters.• The password must contain at least one number.• The password must contain at least one symbol.• The password must be different from the user name.
Confirm the password.4. You have to restart the server and all web servers of PRISMAdirect for the system to work
properly.
Check that the JDD service user has Internet access
The JDD service user is part of the following procedures:• Configuration of the payment workflow. For the complete procedure, see Configure the
payment workflow on page 15.• Configuration of the file hosting services. For the complete procedure, see Configure the file
hosting services, for example, Dropbox on page 20.
Services settings
102 Chapter 3 - SystemPRISMAdirect 1.4.1
Control the services of PRISMAdirectWhen you experience problems with the application, you have to check that all services ofPRISMAdirect are running.1. Click [System] - [Services settings] - [Services].2. Start any service that is not running.
All services of PRISMAdirect depend on the JDF Framework service. Therefore, you can onlyrestart this service.
NOTEAll orders that are being submitted will become corrupt when you restart the PrintJob Data Dispatcher service or the JDF Framework service.
Control the services of PRISMAdirect
Chapter 3 - System 103PRISMAdirect 1.4.1

JDD service
Manage the JDD service settingsThe Job Data Dispatcher (JDD) service is used by the web shops to submit orders to the server.
The setting [VDP preview generation timeout [s]:] is part of the procedure to configure the VDPworkflow. For the complete procedure, see Configure the VDP workflow on page 48.1. Click [System] - [Services settings] - [JDD service] - [General settings].2. Select a template to configure the JDD service. Each template defines custom values which
depend on the expected size and number of jobs submitted from the web shops.3. Do not configure the remaining settings in this dialog yourself. Change these settings only
after consulting the help desk when you have performance issues.4. Click [Save].
Trace level
Set the trace level for the JDD service:• [Debug]
The [Debug] trace level provides the most detailed log information. The [Debug] trace level canimpact the performance of the application.
• [Error]The errors are logged.
• [Info]The errors and information messages are logged
JDD service
104 Chapter 3 - SystemPRISMAdirect 1.4.1
Manage the failed jobsA failed job is a job which is not successfully received on the server. You can handle only onefailed job at a time. The failed jobs are displayed in a list. You have to resubmit each failed job.1. Click [System] - [Services settings] - [JDD service] - [Failed jobs].2. Select a failed job.
You can select only one job at a time.3. Click [Resubmit]
The job is submitted.• If the server receives the job, the job is removed from the list.• If the server does not receive the job, the job must be deleted manually.
Additional actions Description
[Delete] The failed job is deleted from the server.
[Refresh] Click the [Refresh] button to update the list of failed jobs.The list of failed jobs is not updated automatically.
Manage the failed jobs
Chapter 3 - System 105PRISMAdirect 1.4.1

Automatic process settingsConversion to PDF
PRISMAdirect can automatically convert non-PDF files into PDF files when you integrate NeeviaDocument Converter Pro into PRISMAdirect. You have to purchase and install Neevia DocumentConverter Pro, then you have to configure PRISMAdirect. You can install Neevia on:• The PRISMAdirect server
Neevia converts any non-PDF files in orders created by the operator. When the web server runson the server, then Neevia also converts any non-PDF files in orders submitted by thecustomers.
• Each remote web server where you want to use automatic conversionNeevia converts any non-PDF files in orders submitted by the customers.
Merge PDF files
The automatic merge service merges two or more PDF files into one PDF file. For example, two ormore PDF files are automatically merged when you view a job with multiple PDF files.
Preflight operation
A preflight operation is a quality check of your document.
The setting [Preflight processes:] is part of the procedure to configure the preflight workflow. Forthe complete procedure, see Configure the preflight workflow on page 41.
Configure the automatic processes
1. Click [System] - [Services settings] - [Automatic process].2. [Enable automatic conversion].
PRISMAdirect can automatically convert non-PDF files into PDF files when you integrateNeevia Document Converter Pro into PRISMAdirect.1. Select HotfolderConverter from the drop-down list. The HotfolderConverter represents
Neevia Document Converter Pro.2. Define the hot folders for Neevia Document Converter Pro.
Enable option [Detect folders of the conversion application] to use the default hot foldersof Neevia. Or you can type the paths of the hot folders in the text fields.• [Input folder:]: The converter receives the files for conversion via this input folder.• [Output folder:]: The converter places the converted files in this output folder.• [Error folder:]: The converter places the files that cannot be converted automatically in
this error folder.3. Select a merge application from the drop-down list.
The automatic merge service merges two or more PDF files into one PDF file. For example,two or more PDF files are automatically merged when you view a job with multiple PDF files.Select a merge application from the drop-down list:• PDFNetMerge
PDFNetMerge is the default merge application. It is always available to you.Disadvantage of PDFNetMerge: any bookmarks are lost after merging.
• AcrobatMerge
NOTEAcrobat Professional must be installed on the [Web server] when you want touse AcrobatMerge.
4. Set the number of preflight processes.It is recommended that you define the same number of preflight processes as you have webshops for which option [Enable automatic preflight] is enabled.The number of processes can impact the performance of the application.
Automatic process settings
106 Chapter 3 - SystemPRISMAdirect 1.4.1

5. Click [Save].
Trace level
Set the trace level for the automatic process settings:• [Debug]
The [Debug] trace level provides the most detailed log information. The [Debug] trace level canimpact the performance of the application.
• [Error]The errors are logged.
• [Info]The errors and information messages are logged
Automatic process settings
Chapter 3 - System 107PRISMAdirect 1.4.1

Configure the clean-up settingsThe application creates temporary files. The temporary files left behind by the applicationaccumulate over time and can take up a lot of disk space. These temporary files can be cleaned-up by the Print Cleanup Service.1. Click [System] - [Services settings] - [Clean-up].2. Define the [Number of hours between two clean-up operations:].
If the “Number of hours between two clean-up operation” is 0, then the clean-up servicecleans up one more time and only then it’s deactivated.
3. Define if you want to delete finalised orders automatically.• Enable [Delete finalized orders automatically after [days]:] option
The application deletes any finalised orders automatically after the defined number ofdays.
• Disable option [Delete finalized orders automatically after [days]:]The operator has to delete finalized orders manually.
4. Click [Save].
Trace level
Set the trace level for the clean-up settings:• [Debug]
The [Debug] trace level provides the most detailed log information. The [Debug] trace level canimpact the performance of the application.
• [Error]The errors are logged.
• [Info]The errors and information messages are logged
Configure the clean-up settings
108 Chapter 3 - SystemPRISMAdirect 1.4.1

JDF service
Manage the general settings for the JDF serviceThe Job Definition Format (JDF) is a technical standard being developed by the CIP4 organization.The purpose of the standard is to facilitate interaction between different systems in a printing orprint-related workflow. PRISMAdirect offers an interface based on the JDF standard which allowscommunication with external JDF-enabled software components.
The CIP4 JDF specification is a very extensive standard covering all areas in the life cycle of aprint job, from preflight to image rendering to finishing and packaging. Océ has developed aproprietary standard for the JDF ticket which is a subset of the CIP4 description.
PRISMAdirect defines a proprietary job ticket with a set of ticket settings that can be configuredand extended by the user. The user must be able to submit a job to PRISMAdirect via JMFmessages by providing a JDF ticket and the required data files. A mapping file is used toconstruct a valid PRISMAdirect ticket with the values taken from the JDF ticket.1. Click [System] - [Services settings] - [JDF service] - [General settings].2. [Use secure connections (HTTPS)]
Enable this option if you want to use only a secure HTTPS connection to submit orders viaJDF.
3. Use the [Pause JDF service] check box to pause or restart the JDF service.You receive a notification when the JDF service is restarted.
4. Click [Save].
Trace level
Set the trace level for the JDF service:• [Debug]
The [Debug] trace level provides the most detailed log information. The [Debug] trace level canimpact the performance of the application.
• [Error]The errors are logged.
• [Info]The errors and information messages are logged
JDF service
Chapter 3 - System 109PRISMAdirect 1.4.1

Create a JDF endpointIn this dialogue you can setup the JDF endpoints. You can use a JDF endpoint to transfer jobs toa web shop of PRISMAdirect. Status information of the order is sent back from PRISMAdirect. Theconnection status of each JDF endpoint is displayed in column [Status].
Status
Green dot The connection to the JDF endpoint is established.
Orange dot The connection to the JDF endpoint is not checked or the connec-tion is being checked.After a reboot of the system, the dots are orange. Click [Test con-nection] to update the state of each JDF endpoint.
Red dot The connection to the JDF endpoint cannot be established. Checkthe settings of the JDF endpoint.
1. Click [System] - [Services settings] - [JDF service] - [JDF endpoints].2. Click [Add JDF endpoint].
Select a [JDF endpoint] and click [Edit] to edit an existing [JDF endpoint].3. Define the [JDF endpoint] data.
1. Type a name for the JDF endpoint.2. The URL used to access this [JDF endpoint] is automatically generated and cannot be
changed.4. [Additional configuration for DSF]
Enable this option when you want to use Digital StoreFront.1. You can type a value in the spinbox for the DSF port.
The DSF URL is generated automatically and cannot be changed.5. [Web shop]
Select for which web shop you want to create the JDF endpoint.6. [Choose a default product]
The JDF endpoint uses the selected product to create jobs. The selected product is only usedwhen the JDF ticket does not specify a product.
7. [Allowed file types]• To accept all document types, type: *• You can type the supported types of digital documents (for example PDF, DOC, PS, ...). Use
a comma to separate the custom document types.
You can customise this setting for one or more user groups. See: [User management] - [Usergroups] - [User group settings]. The custom settings overrule the web shop settings for theuser group. The custom settings are used in all web shops for the corresponding user group.
8. [Timeout for orders containing multiple jobs [min.]:]You have to set the timeout for orders containing multiple jobs. All jobs have to be importedbefore the timeout expires. If the timeout expires, the order including any imported jobs ismarked as [Failed].
9. Select the desired [Authentication] method and define the required data.
Setting Description
[Windows authentication] The Windows user is actually the user that runs the “Print JDFService”. You can lookup the user of “Print JDF Service” in theServices dialog of Microsoft Windows.This user must be an LDAP user and the LDAP server must exist inPRISMAdirect for the authentication of the endpoint to be success-ful.The user is not prompted for a user name and password. 4
Create a JDF endpoint
110 Chapter 3 - SystemPRISMAdirect 1.4.1

Setting Description
[Custom authentication] Type a valid PRISMAdirect user and its password.You can use the [Test connection] button to check the entered cre-dentials.
10. [Use custom mapping files]Enable this option to use your own mapping file. The [Mapping files] are used every time the[JDF endpoint] is used. Do not move, delete or rename these files.
Setting Description
[Default mapping file forjob status][Default mapping file forJDF ticket]
You can download the default mapping files and use these files tocreate a custom mapping. See the two links in the top-right of thedialog.
[Upload] Browse to the mapping files that you want to use.
[JDF ticket:] This file is used to map JDF to PRISMAdirect ticket items. A map-ping file is used to construct a valid PRISMAdirect ticket with thevalues taken from the JDF ticket.
[Job status:] This file is used to map the job status in PRISMAdirect to JDF.
11. [Disable automatic price estimation and quotation]When this option is disabled, the prices are automatically calculated directly after the importof an order.Otherwise, the customer must click [Calculate now] to estimate the price of the order. Theoperator must click [Calculate now] to calculate the quotation.
12. [Collect logging for analytical purposes]Use the logging to analyze the JMF messages and the JDF ticket.
13. Click [Save].You receive a notification that the JDF service is restarted.
Location of the default mapping files1. Click [System] - [Services settings] - [JDF service] - [JDF endpoints].2. Click the following links to download the mapping files:
• [Default mapping file for job status]This file is used to map the job status in PRISMAdirect to JDF.
• [Default mapping file for JDF ticket]This file is used to map JDF to PRISMAdirect ticket items. A mapping file is used toconstruct a valid PRISMAdirect ticket with the values taken from the JDF ticket.
NOTEThe mapping files are used every time the [JDF endpoint] is used.
Location of the default mapping files
Chapter 3 - System 111PRISMAdirect 1.4.1
Print Prepare Manager service settingsThe VDP functionality is available in the PRISMA Core. The PRISMA Core is installed on theserver. Therefore, all actions and validations concerning the VDP functionality are executed onthe server. Jobs can be created in the web shop and the Order processing console. The webshops are hosted by web servers. The web servers must have access to the server when they areinstalled on separate computers. The web servers connect to the PRISMAdirect server via the portfor the Print Prepare Manager service.
The setting Port of the Print Prepare Manager service is part of the following procedures:• Configuration of the VDP workflow. For the complete procedure, see Configure the VDP
workflow on page 48.• Configuration of the workflow for automation templates. For the complete procedure, see
Configure the workflow for automation templates on page 60.
Configure the port for the [Print Prepare Manager service]
1. Click [System] - [Services settings] - [Print Prepare Manager service].2. Define the port for the Print Prepare Manager service. The default port number is 54000.
Check that the port is available for the web servers.3. Click [Save].
Trace level
Set the trace level for the Print Prepare Manager service:• [Debug]
The [Debug] trace level provides the most detailed log information. The [Debug] trace level canimpact the performance of the application.
• [Error]The errors are logged.
• [Info]The errors and information messages are logged
Print Prepare Manager service settings
112 Chapter 3 - SystemPRISMAdirect 1.4.1

Print Licence Monitoring service settingsThe Print Licence Monitoring service checks regularly if a new or updated license is available inthe [Floating Licence Server].1. Click [System] - [Services settings] - [Print Licence Monitoring service].2. Define the port for the Print Licence Monitoring service. The server and the [Floating Licence
Server] must have access to the port.3. Click [Save].
Trace level
Set the trace level for the Print Licence Monitoring service:• [Debug]
The [Debug] trace level provides the most detailed log information. The [Debug] trace level canimpact the performance of the application.
• [Error]The errors are logged.
• [Info]The errors and information messages are logged
Print Licence Monitoring service settings
Chapter 3 - System 113PRISMAdirect 1.4.1

Import service
Pause the import serviceYou can pause the automatic import of jobs from the configured import folders.
Disable option [Pause import service] to start the automatic import service again.1. Click [System] - [Services settings] - [Import service] - [General settings].2. Enable the [Pause import service] option.
The import service is paused. Jobs are not imported anymore.3. Click [Save].
Trace level
You can define the trace level for the import service.• [Debug]
The [Debug] trace level provides the most detailed log information. The [Debug] trace level canimpact the performance of the application.
• [Error]The errors are logged.
• [Info]The errors and information messages are logged
Import service
114 Chapter 3 - SystemPRISMAdirect 1.4.1

Create an import folderThe operator can manually import orders into the [Order processing]. It is also possible toautomatically import orders into the [Order processing] via import folders.1. Click [System] - [Services settings] - [Import service] - [Import folders].2. Click [New import folder].3. Define the [Import folder path].
Type the path including the import folder name. The folder must exist on the server ofPRISMAdirect, or it must be a folder on a network share that is accessible to the user runningthe PRISMAdirect services.
4. Select the [Import order type:].This setting defines the type of import folder and therefore the type of orders that can beimported.
Setting Description
[Normal order] This type of import folder accepts all orders of PRISMAdirect.Normal orders will be imported using the product with which theywere created. If this product does not exist anymore, they will beimported using the current Default Generic Product.
[Legacy job] The orders will be imported using the current Default GenericProduct.
[JDF ticket job] This type of import folder creates orders containing one job.Drop a JDF ticket containing a link to a file in the import folder.PRISMAdirect uses the JDF ticket and the file to create an ordercontaining one job.• Mapping file for the JDF ticket
A mapping file is used to construct a valid PRISMAdirect ticketwith the values taken from the JDF ticket. The import folderuses a default mapping file. The mapping file describes whichticket items are allowed in the JDF ticket.
NOTEThe "TRM PRISMAdirect" contains detailed informa-tion concerning the mapping files.
• Custom mapping file for the JDF ticketClick [Upload] to use a custom mapping file for this import fold-er. 4
Create an import folder
Chapter 3 - System 115PRISMAdirect 1.4.1

Setting Description
[JDF tickets for order withmultiple jobs]
This type of import folder creates orders containing multiple jobs.Firstly, drop a JDF ticket of the order in the import folder. The tick-et for the order specifies the names of the JDF tickets per job. Thenames of the JDF tickets must be comma-separated. The JDF tick-et of the order must be submitted first. Then, the JDF tickets foreach job must be submitted. PRISMAdirect starts a timer when itreceives the JDF ticket of the order. The communication status ofthe order will be "Incoming". By default, the timeout is 60 minutes.All JDF tickets of the jobs must be received within that time frame.When the JDF tickets of the jobs appear within the timeout, thecommunication status of the order becomes "New". When the JDFtickets of the jobs do not appear within the timeout, the communi-cation status of the order becomes "Failed".• Mapping file for the JDF ticket
A mapping file is used to construct a valid PRISMAdirect ticketwith the values taken from the JDF ticket. The import folderuses a default mapping file. The mapping file describes whichticket items are allowed in the JDF ticket.
NOTEThe "TRM PRISMAdirect" contains detailed informa-tion concerning the mapping files.
• Custom mapping file for the JDF ticketClick [Upload] to use a custom mapping file for this import fold-er.
[PDF only job with defaultorder ticket]
This type of import folder accepts only PDF files.• [Order ticket]
Define a custom order ticket for this particular import folder.
[Always accept orders andjobs]
This type of import folder accepts only PDF files.• [Order ticket]
Define a custom order ticket for this particular import folder.
The imported orders receive the state [Accepted].
[Scanned job] This type of import folder accepts only scanned files.The operator must create a job which contains a [Paper original].The scanned file must contain the job number. Then the scannedfile is automatically attached to the job.The default job ticket is used for these jobs.
5. Select the web shopThe orders are imported for the selected web shop.
6. [Allowed file types]• To accept all document types, type: *• You can type the supported types of digital documents (for example PDF, DOC, PS, ...). Use
a comma to separate the custom document types.
You can customise this setting for one or more user groups. See: [User management] - [Usergroups] - [User group settings]. The custom settings overrule the web shop settings for theuser group. The custom settings are used in all web shops for the corresponding user group.
7. [Choose a default product]Click the drop-down list to select a product.• Import folders using a JDF ticket:
Create an import folder
116 Chapter 3 - SystemPRISMAdirect 1.4.1

The JDF ticket can define a product that must be used to create the order. If the ticket doesnot define a product, then the selected default product will be used to create the new order.
• Import folders not using a JDF ticket:The orders will be created using the selected product.
8. [Timeout for orders containing multiple jobs [min.]:]You have to set the timeout for orders containing multiple jobs. All jobs have to be importedbefore the timeout expires. If the timeout expires, the order including any imported jobs ismarked as [Failed].
9. [Allow importing an order multiple times]The order number will increase each time you import the same order.
10. [Preserve orders and jobs states]For jobs that were created with PRISMAaccess, the job state cannot be preserved and thestate of the job will always be [New]• When this option is enabled for legacy jobs:
If the job state of the legacy job was [Ready], the job state of the imported job is set to[Ready].Else, the job state of the imported job is set to [New]
• When this option is enabled for normal jobs:The job state of the imported job is equal to the job state of the exported job. All theallowed job operations and restrictions imposed by the job state apply on the imported job.
• When this option is disabled for normal jobs:The job state of the imported job is set to [New]
11. [Disable automatic price estimation and quotation]When this option is disabled, the prices are automatically calculated directly after the importof an order.Otherwise, the customer must click [Calculate now] to estimate the price of the order. Theoperator must click [Calculate now] to calculate the quotation.
12. Click [Save].The import folder is configured and added to the list of import folders.
Create an import folder
Chapter 3 - System 117PRISMAdirect 1.4.1

Export service
Pause the export serviceYou can pause the automatic export of jobs from the configured export folders.
Disable the [Pause export service] option to start the automatic export service again.1. Click [System] - [Services settings] - [Export service] - [General settings].2. Enable the [Pause export service] option.
The export service is paused. Jobs are not exported anymore.3. Click [Save].
Trace level
You can define the trace level for the export service.• [Debug]
The [Debug] trace level provides the most detailed log information. The [Debug] trace level canimpact the performance of the application.
• [Error]The errors are logged.
• [Info]The errors and information messages are logged
Export service
118 Chapter 3 - SystemPRISMAdirect 1.4.1

Create an export folder for ordersThe operator can manually export orders from the [Order processing]. It is also possible toautomatically export orders from the [Order processing] via export folders. You must create anexport query. If the query is valid for an order, then that order is exported. By default, all availablefiles of an order are exported.1. Click [System] - [Services settings] - [Export service] - [Export folders for orders].2. Click the [New export folder] button.3. Define the [Export folder path].
Type the path including the export folder name. The folder must exist on the server ofPRISMAdirect, or it must be a folder on a network share that is accessible to the user runningthe PRISMAdirect services.
4. Define the export query.If the query is valid for an order, then that order is exported. The export query is an SQLquery which is uses order items. You have to define a query per export folder. Define a queryon page 119
5. Enable or disable option [Export original files and job ticket only].By default, all available files of an order are exported. However, when you enable this option,only the original files and the job ticket for each file are exported. The following files are notexported:• The JDF ticket• The conversion file, if available• The redistill file, if available• The merged document, if available
6. Enable or disable option [Delete order after export].When you enable this option, all exported orders are removed from the [Order processing].
7. Click [Save].The export folder is configured and added to the list of export folders.
Define a query
Procedure
1. Drag and drop the order items and operators in the query field.To create an SQL query, you can use:• The available order items• The available operators• The additional operators: ', ", +, -, /, %
The following rules apply:• Numbers are integers. A decimal separator is not allowed.• String values are enclosed in quotation marks.• Dates are enclosed in quotation marks. A date must be a valid date according to the regional
settings of the computer.• Enumeration values are enclosed in quotation marks.• Boolean values are enclosed in quotation marks.
Examples:
Type Valid value Invalid value
Number 53 34.5
String 'Hello' Hello
Dates '1/1/10' 1/1/10 4
Create an export folder for orders
Chapter 3 - System 119PRISMAdirect 1.4.1

Type Valid value Invalid value
Enumeration 'Enum_value' Enum_value
Boolean 'True' True
2. Example of a valid SQL query:[Date] >= '1/1/10'
Define a query
120 Chapter 3 - SystemPRISMAdirect 1.4.1

Create an export folder for jobsThe operator can manually export one or more jobs of an order from the [Order processing]. It isalso possible to automatically export jobs from the [Order processing] via export folders. Youmust create an export query. If the query is valid for a job, then that job is exported.1. Click [System] - [Services settings] - [Export service] - [Export folders for jobs].2. Click the [New export folder] button.3. Define the [Export folder path].
You can create a dynamic path using job items and fixed text. You can drag and drop the jobitems into the “Export folder path”. The backslashes are added automatically. For example,C:\[IntakeOperator]\[JobNumber]• For each job ticket item in the path, a folder or subfolder is created during export.
This archive solution is job based, therefore you can use only the job items. This option is notavailable for the export of orders.You can create export folders on the server of PRISMAdirect, or on a network share that isaccessible to the user running the PRISMAdirect services.
4. Define the export query.If the query is valid for a job, then that job is exported. The export query is an SQL querywhich is uses job items. You have to define a query per export folder. Define a query onpage 119By default, the complete job is exported as a ZIP file. The ZIP file contains:• The files of the job• The job ticket• The conversion file, if available• The redistill file, if available• The merged document, if available
5. Enable or disable option [Export current PDF file only].When you enable this option, only the merged document of the job is exported as PDF file.The ZIP file described in the previous step is not exported.
6. [Export current PDF and file containing all ticket items]Enable this option to export the following files:• The merged document of the job is exported as PDF file.• An XML file containing all job items and order items. Note that each job always contains all
job items even if these are not visible in the ticket. All job items are available in this XMLfile. The file also contains the job name.
7. Click [Save].The export folder is configured and added to the list of export folders.
Create an export folder for jobs
Chapter 3 - System 121PRISMAdirect 1.4.1

Security
Select the authentication type and enable a secure connectionPRISMAdirect offers single sign on. Therefore, [Windows authentication] is integrated with ActiveDirectory.1. Click [System] - [Security] - [General settings].2. Select the authentication type.
The installed services and the [Configuration] always use [Custom authentication].3. Click [Save].
Orders can be sent from web shops to the Order processing console. You can configure if youwant to use a secure connection between the server and the web server.1. Click [System] - [Security] - [General settings].2. [Use secure connections (HTTPS)]
Enable this option to use a secure HTTPS connection between the server and the web server.If you enable this option you have to have a certificate. A certificate guarantees a secure(HTTPS) connection.
3. Click [Save].
Security
122 Chapter 3 - SystemPRISMAdirect 1.4.1
Create self-signed certificatesPRISMAdirect can create a secure connection via HTTPS to the browsers of the customers. To useHTTPS, you need to create a self-signed certificate on PRISMAdirect. Or you can buy a certificatefrom a Certification Authority. When a customer visits a web shop, the certificate is deployed tothe browser of the customer. PRISMAdirect creates a secure connection via HTTPS in thefollowing cases:• The customer supplies credentials for custom / self-registration authentication.• Communication with the web server.• Communication between a web server and the central server.• JDF service• Printer proxy• PRISMAdirect Outlook AddIn• PRISMAdirect Web Bootstrap
NOTEIt is recommended that you buy SSL certificates from a Certificate Authority when yourcustomers use Chrome as browser. The reason is that Chrome will not setup a secureconnection for self-signed certificates.
Additional information
The Secure Socket Layer (SSL) protocol was created to ensure secure transactions between Webservers and Web browsers.
Data sent via an SSL connection is protected by encryption, a mechanism that preventseavesdropping and tampering with any transmitted data. SSL provides that private data sent to aWeb site, such as passwords, are kept confidential. Web server 'Certificates' are required toinitialize an SSL session.
End users know that they have an SSL session with a website when their browser displays thelittle gold padlock and the address bar starts with 'https' rather than 'http'.
When connecting to the web shop over SSL, the user's Web browser decides whether or not totrust the web shop's SSL Certificate based on which Certification Authority has issued the actualSSL Certificate. To determine this, the browser looks at its list of trusted issuing authorities -represented by a collection of Trusted Root CA Certificates added into the browser by thebrowser vendor (such as Microsoft or Netscape).
Most SSL certificates are issued by CAs who own and use their own Trusted Root CA Certificates.These Trusted Root CA Certificates have already been added to all popular browsers, and arealready trusted. These SSL certificates are known as 'single root' SSL certificates.
Create a self-signed certificate
1. Click [System] - [Security] - [Certificates].2. Click the [Add] button.3. Define all [Certificate items].4. Define the [Number of years that the certificate is valid:] option.5. Click the [OK] button.
The created Certificate will be added to the 'Installed Certificates' list.Self-signed certificates are automatically imported on the web server.
Create self-signed certificates
Chapter 3 - System 123PRISMAdirect 1.4.1

Additional actions Description
Remove certificate You can only remove self-signed Certificates here.1. Click the delete icon to delete a certificate. The icon appears
when you hover the mouse pointer over the certificate.A dialog will appear that asks you to confirm.
2. Click 'OK' to remove the selected Certificate.
Create self-signed certificates
124 Chapter 3 - SystemPRISMAdirect 1.4.1

Backup and restoreIt is recommended that you create a backup after each installation and patch installation.
Backup and restore of the configurations and the order data
• The databases and configuration files will be backed up and restored in their entirety.• The backup files contain computer dependant settings. You can only restore a backup file
when:• The computer name is the same.• The installation paths are the same.• The application version is the same as the application version that created the backup file.
• You can use the export file on any computer.• After each restore, all services will be restarted and the PRISMAdirect website will be restarted.
Therefore, users will have to log in again.
Export and import of the settings
You can import and export the configuration of PRISMAdirect. Then, you can use the exportedsettings to configure another installation of PRISMAdirect. You can use the export file on anycomputer.
When you export the settings, all settings will be exported. When you import the settings, youcan select all settings or a subset of the exported settings.
In addition, PRISMAdirect offers a number of preproduced configuration files. You can use thesefiles for fast configuration of PRISMAdirect as well.
Backup
1. Click [System] - [Backup and restore].2. You can backup the [Configurations] and the [Order data]. Click [Backup].
By default, the backup files are stored in the "Downloads" folder in your user profile folder onyour computer.
3. You can export the [Settings] of the application. Click [Export].By default, the export file is stored in the "Downloads" folder in your user profile folder onyour computer.
Restore
1. Click [System] - [Backup and restore].2. You can restore the [Configurations] and the [Order data].
1. Click [Restore].2. Browse to the folder where the backup files are located.3. Click [Open].
3. You can import the [Settings] of the application.1. Click [Import].2. Browse to the folder where the export file is located.3. Click [Open].4. Select which settings you want to import.
Backup and restore
Chapter 3 - System 125PRISMAdirect 1.4.1

Accounting and reporting
Configure the accounting workflowYou can collect accounting information. The accounting information is saved in an SQL database.The accounting workflow uses the following order items and ticket items:
Order items:• FinalCost• UserId• Account• FinalizedTime
Ticket items:• FinalCost• FinalizedDate
These ticket items are available in several views in the [Product and order editor]. The systemadministrator can edit the captions of these items in the [Product and order editor].
The operator must be able to assign values to the ticket items which are used for accounting.Define in the [Product and order editor] that these ticket items can be edited by the operator.
The ticket is allowed to contain other ticket items.
The accounting information cannot be collected if the ticket definition contains an item with aname longer than 128 characters.
Enable accounting
1. Click [System] - [Accounting and reporting] - [Accounting] - [Accounting workflow].2. Enable the [Enable accounting] option.3. Configure the credentials for the SQL server.
The same SQL server is used for the payment workflow, see [System] - [Connectivity] -[Payment providers]. When you change the settings for the SQL server in that dialog, thesettings will also change in this dialog and vice versa.1. Define the [Computer name \ instance name:].
With this option, you define where the accounting database is stored. For example:SQL_server_name\SQL_server_instance_name.
2. You have to define how the [Order processing] connects to the accounting database. Theauthentication type depends on the location of the SQL server:
Location of the SQL server Description
Local SQL server SQL authentication (recommended)Type the account credentials of an existing login account for theSQL server.
Remote SQL server insidethe domain
Windows authentication (recommended)The Windows user credentials are used for the authentication. Theuser is not prompted for a user name and password.
SQL server outside the do-main
SQL authentication (mandatory)Type the account credentials as defined by the customer for theSQL server.
3. Type the password of user sa. You have defined the password for user sa when youinstalled PRISMAdirect.
Accounting and reporting
126 Chapter 3 - SystemPRISMAdirect 1.4.1

Accounting information can be collected when the user has system administration rightson the accounting database.
4. [Test connection]Click this button to test the connection to the SQL server.
4. Click [Save].
Clear the database
When PRISMAdirect is installed for a new customer, it is used in a testing environment first.During this period the database is filled with dummy information. You can clear all data from thedatabase when PRISMAdirect is ready to switch to production. All records will be deleted and youstart with a clean database again.
You have to be logged in as servicesuser to clear the database. You cannot use the user nameand password directly above the button to login as servicesuser. You have to log out, thenlogin as servicesuser again.
An error is reported when clearing the database fails. In this case, there are two possibilities:• The database still contains its information.• The database is no longer available to you.
If an error is reported, use the "Software Support" tool to export the logging. Analyze thefollowing log file: WebDashBoardLog.log.
Configure the accounting workflow
Chapter 3 - System 127PRISMAdirect 1.4.1

Configure the invoice settingsIn this dialog, you can define the company information for the invoice. The [Order processing]uses the collected accounting information to generate the invoice.
1. Click [System] - [Accounting and reporting] - [Accounting] - [Invoice].2. Click button [Browse] to select an image.
The allowed image file types are: .bmp, .jpg, .gif, .png.3. Type the company name.4. Type the company address.5. Click [Save].
Configure the invoice settings
128 Chapter 3 - SystemPRISMAdirect 1.4.1

Email the accounting reportsThis topic describes the complete configuration to email the accounting reports.
You have to configure the settings to email the accounting reports in the [Configuration]workflow:1. Enable accounting
You have to enable accounting to:• Collect accounting information.• Enable dialog [Email accounting reports automatically]. This dialog is hidden when
accounting is disabled.2. Configure the settings to email the accounting reports automatically
Configure the default email settings and create a scheduled task.3. Select which reports you want to attach to the email
Select and configure the reports. You can configure custom email settings.
You can manage the accounting reports in workspace [Reporting].
Enable accounting
1. Click [System] - [Accounting and reporting] - [Accounting] - [Accounting workflow].2. Enable the [Enable accounting] option.3. Configure the credentials for the SQL server.
The same SQL server is used for the payment workflow, see [System] - [Connectivity] -[Payment providers]. When you change the settings for the SQL server in that dialog, thesettings will also change in this dialog and vice versa.1. Define the [Computer name \ instance name:].
With this option, you define where the accounting database is stored. For example:SQL_server_name\SQL_server_instance_name.
2. You have to define how the [Order processing] connects to the accounting database. Theauthentication type depends on the location of the SQL server:
Location of the SQL server Description
Local SQL server SQL authentication (recommended)Type the account credentials of an existing login account for theSQL server.
Remote SQL server insidethe domain
Windows authentication (recommended)The Windows user credentials are used for the authentication. Theuser is not prompted for a user name and password.
SQL server outside the do-main
SQL authentication (mandatory)Type the account credentials as defined by the customer for theSQL server.
3. Type the password of user sa. You have defined the password for user sa when youinstalled PRISMAdirect.Accounting information can be collected when the user has system administration rightson the accounting database.
4. [Test connection]Click this button to test the connection to the SQL server.
4. Click [Save].
Email the accounting reports
Chapter 3 - System 129PRISMAdirect 1.4.1

Configure the settings to email the accounting reports automatically
The dialog [Email accounting reports automatically] becomes available when you have enabledaccounting. See the above procedure.1. Click [System] - [Accounting and reporting] - [Reporting] - [Email accounting reports
automatically].2. Configure the default email settings.
1. Enable the [Email accounting reports automatically] option.2. Define the default email address. This is the email address of the recipient of the reports.
When you add more than one email address, you must use a semicolon to separate theaddresses.
3. [File format for report:]The reports are converted into the selected format. The converted reports are attached tothe email.
4. [Reporting period [months]:]The accounting reports for the defined reporting period are emailed.
3. Create a scheduled task.• Click [New trigger].• Define when you want the task to start.
You can define that the task is executed once, or you can set a recurrence pattern. Definethe start date and enable or disable the task.
• Type the username and password for the user. This user runs the task.The [AutomaticReportsEmailSender] task is created in the task scheduler. The task isexecuted with the provided credentials.The task generates the selected reports before emailing the reports. The reports generatedvia the scheduled task are saved on the server in the "Asset" folder. You can select thereports in dialog [Accounting reports].
• Click [Save].
Select which reports you want to attach to the email
1. Click [System] - [Accounting and reporting] - [Reporting] - [Accounting reports].2. Enable option [Email the report] for each report you want to attach to the email. You can
select one or more reports.The report filenames (*.rpt) are displayed in this dialog. However, the report titles aredisplayed in workspace [Reporting]. It is recommended that the filename and the title of areport are similar when you create a new report.
3. Click the report to configure the report settings.1. Define the email address.
• [Default]Send the report to the recipient defined in dialog [Email accounting reportsautomatically]
• [Custom]Define a custom email address for the recipient. The custom email address overrulesthe default email address for this report.
When you add more than one email address, you must use a semicolon to separate theaddresses.
2. [Attach the report]The report is attached as a file to the email.
3. [Add hyperlink to report to the email]A link is added to the email. Click the link to open the report on the server.
4. [Overwrite existing report]You can keep all versions of this report, or you can overwrite any existing reports on theserver.
Email the accounting reports
130 Chapter 3 - SystemPRISMAdirect 1.4.1

5. [Delete existing report automatically]Enable this option to automatically delete the report on the server when a new report isgenerated. You can type a value in the spinbox for the number of days.
4. Click [Save].
Email the accounting reports
Chapter 3 - System 131PRISMAdirect 1.4.1
Configure the reports folderYou can manage the accounting reports in workspace [Reporting]. In this dialog, you canconfigure the location to store the reports that are generated in workspace [Reporting].
The task [AutomaticReportsEmailSender] generates the selected reports before emailing thereports. You can create the task in dialog [Email accounting reports automatically]. You can selectthe reports in dialog [Accounting reports]. The reports generated via the scheduled task are savedon the server in the "Asset" folder.
1. Click [System] - [Accounting and reporting] - [Reporting] - [Reports folder].2. Type the path to the reports folder.3. Click [Save] to create the reports folder on the server.
Configure the reports folder
132 Chapter 3 - SystemPRISMAdirect 1.4.1

Select the active languages for PRISMAdirectThe settings in this dialog are part of the procedure to configure the languages for PRISMAdirectand the web shops. For the complete procedure, see Configure the languages on page 39.1. Click [System] - [Active languages for system].2. Enable all languages that you want to offer to your users.
By default, the installation language is enabled.3. Click [Save].
Select the active languages for PRISMAdirect
Chapter 3 - System 133PRISMAdirect 1.4.1
Manage the corrupted orders, jobs, and products
Manage the corrupted orders and jobs
A corrupted order or job is stuck in a certain state, for example, editing, redistilling, printing, etc.1. Click [System] - [Corrupted items].
• [Corrupted orders]• [Corrupted jobs]
2. Select a job from the list of corrupted orders or jobs.
Additional actions Description
Recover corrupted ordersand jobs
1. Click [Unlock].The job returns to the previous valid state. Now, you can con-tinue to process the job.
[Save] 1. Click [Save].2. Browse to a location. Click the [Save] button.
The corrupted job and the job ticket are saved.
The saved job and job ticket can be sent to the help desk to ana-lyze why the job became corrupted.
[Delete] 1. Click [Delete].The corrupted job is deleted from the server.
[Refresh] 1. Click button [Refresh] to update the list of corrupted jobs.The list of corrupted jobs is not updated automatically.
Manage the corrupted products
A corrupted product appears in the list when a user cannot use the product to create a job. Theuser cannot select the product because it contains an invalid or inaccessible link.
The column [Failed attempts to use product] shows how often users tried to create a job usingthe corrupted product.1. Click [System] - [Corrupted items] - [Corrupted products].2. Click the pencil icon. The icon appears when you hover the mouse pointer over a corrupted
product.The pane [Detailed product settings] of the corrupted product opens in the [Product and ordereditor] workspace.
3. Type a correct link or fix the access to the folder.When the link is fixed, the product is automatically removed from the list of corruptedproducts.
Manage the corrupted orders, jobs, and products
134 Chapter 3 - SystemPRISMAdirect 1.4.1
Configure the system of measurement used for mediaThe installation language determines which system of measurement is used for the application.However, you can use a different system of measurement for the media.1. Click [System] - [System of measurement for media:].2. Select which system of measurement you want to use for the media.3. Click [Save].
Result
The properties of new and existing media are displayed in the units of the selected system ofmedia. For example, the media weight will be displayed in [lb bond] or [lb index] instead of g/m2
when you select [Imperial].
The media caption does not change when you change the system of measurement. If required,you can manually change the captions of existing media in the [Product and order editor]workspace. For example, you can change a media caption like "A4,80 g/m2,Plain,White" into"A4,21 lb bond,Plain,White". To do so, go to the [Product and order editor] workspace and select[Product items]. Select item "Media" to change the media captions, if required.
Configure the system of measurement used for media
Chapter 3 - System 135PRISMAdirect 1.4.1

Define the path for the temporary folderYou have to define the temporary folder path. This folder is used to create the temporary backupfile.
1. Click [System] - [Temporary folder].2. You can type or copy/paste the folder path in the text field.3. Click [Save].
Define the path for the temporary folder
136 Chapter 3 - SystemPRISMAdirect 1.4.1

Define the license server settingsThe licenses are based on a MAC address of the computer where the Floating License Server(FLS) is installed. A MAC address is the unique identifier of a network adapter. A computer mayhave multiple network adapters, both physical and virtual (Ethernet, Wi-Fi, VPN, VMplayer, …).The FLS manages the licenses. The licensed application (PRISMAprepare and/or PRISMAdirect)must connect to the FLS. Therefore, you have to specify:1. The name of the FLS. The server name can be a network name or an IP address. You have to
specify the server name in the licensed application.2. The port of the FLS. You have to specify the license server port in both the licensed
application and the [License Server Administration].3. Click [Test connection] to test the server name and license server port for correctness.
Terminology
FLS: the computer where the Floating License Server is installed.
Licensed application: PRISMAprepare and/or PRISMAdirect.
Check the IP address or name of the FLS
The FLS name can be a network name or an IP address. To check the name of the FLS, do:1. Open the [Configuration] workspace.2. Click [System] and select [License].
• Local Floating License ServerThe FLS and the licensed application are installed on the same computer. Use the followingFLS name:1. 127.0.0.1
This is the IP address of the local host.
Do not use: "localhost", the Fully Qualified Domain Name (FQDN) or a short DNS name.
• Remote Floating License ServerThe FLS and the licensed application are installed on different computers. Use the followingFLS name:1. The fixed IP address
It is recommended to use the fixed IP address of the FLS.• Troubleshooting
If the connection is lost while you use a fixed IP address for the FLS:Check whether the IP address of the FLS has changed. Update the IP address in thelicensed application. The following screenshot uses 134.188.137.170 as IP address. Youhave to use the actual IP address of your FLS.
Define the license server settings
Chapter 3 - System 137PRISMAdirect 1.4.1

2. The Fully Qualified Domain Name (FQDN), for example, myserver.mydomain.net.Use the FQDN if the FLS does not have a fixed IP address. For example, the DHCP serverassigns a dynamic IP address to the FLS.• Troubleshooting
If the licensed application using an FQDN cannot connect to the FLS:The DNS server must know the FLS else the FLS cannot receive the dynamicallygenerated IP address from the DHCP server. This DNS server must also be known by thelicensed application.Ping the FQDN to check if it is already resolved by the DNS server.
Do not use: a short DNS name, for example, myserver. When using a short DNS name, thelicensed application must try all known domain names to find or fail to find the FLS.
Check the port numbers
The FLS uses TCP/IP ports to communicate with the licensed application. You have to check if thesame license server port is used in both the [License Server Administration] and the licensedapplication.
To check the license server port for the FLS in the licensed application, do:1. Open the [Configuration] workspace.2. Click [System] and select [License].3. The "Port" number must be equal to the "License server port number" in the [License Server
Administration].
Check the TCP/IP ports used by the FLS:1. Open the [License Server Administration].2. Select [License server settings] and click [Edit] .3. Click [Edit ports].
Define the license server settings
138 Chapter 3 - SystemPRISMAdirect 1.4.1

1. The license server portThe licensed application uses this port number to initiate communications with the FLS. Thelmgrd.exe process listens on the license server port.Range: [27000 - 27009] or [ANY].If the port number is [ANY], the FLS uses the first available port in the range [27000 - 27009]to listen for the licensed application. The licensed application tries to connect to the FLSstarting with port 27000. If the FLS does not respond, the licensed application tries the nextport. When all ports in the range [27000 - 27009] are blocked or in use by other applications,the licensed application cannot connect to FLS.
2. The vendor portWhen the licensed application connects to the license server port, it receives the vendor portnumber from the FLS. Then, the licensed application opens the vendor port. Theocelmgrd.exe process listens on the vendor port.Range: [49152 - 65535] or [ANY].If the port number is [ANY], the first available port in the range [49152 - 65535] is used by theFLS and the licensed application.
Troubleshooting
Using value [ANY] allows for dynamic assignment of a port number. Using a dynamic port allowsthe licensed application to adapt itself to changing configurations. However, creating aconnection dynamically also costs time in retries, hang-ups, and timeouts. Furthermore, a firewallcan allow only fixed ports and block dynamic ports. Use a fixed port for:• The license server port, for example, 27000. Configure this port in both the [License Server
Administration] and the licensed application.• The vendor port, for example, 50000. Configure this port in the [License Server
Administration].
When you want to use a fixed port, you must be sure that the selected port can be used:1. Check that:
• The FLS can open the license server port for listening.• The licensed application can open the vendor port.
If a port cannot be opened, an error appears in the log file lmgrdFile.log. Location of thelog file: C:\Program Files (x86)\Oce\Floating License Server\lmgrdFile.log
2. Check that the licensed application can connect to the FLS. For example:• The firewall can block access to the fixed port. You have to configure the firewall.• Other applications use all ports in the range [27000 - 27009]. You have to free one port in
the range [27000 - 27009].
Define the license server settings
Chapter 3 - System 139PRISMAdirect 1.4.1

Define the license server settings
140 Chapter 3 - SystemPRISMAdirect 1.4.1

Chapter 4 Web shop

IntroductionThe [Web shop] component contains all available web shops. The name of the default web shopis [Default]. This web shop is always available. Each web shop that is created in the [Web shopeditor] is added with its own name to [Web shop]. You have to configure each web shopseparately.
Introduction
142 Chapter 4 - Web shopPRISMAdirect 1.4.1

Configure the general settings1. Click [Web shop] - <web shop> - [General settings].2. [Enable anonymous access]
When you enable anonymous access to a web shop, you allow anonymous customers tobrowse the web shop. Anonymous customers cannot order from the web shop.Customers have to log in to the web shop to order products.
3. [Remember the user name and password]The option [Remember the user name and password] becomes available in the logon screenfor the customer. When the customer enables this option, the customer can log on next timewithout entering username and password.The customer must enable cookies in the browser to support this option.
4. Click [Save].
Allow self-registration per web shop
This section is part of the procedure to configure the self-registration workflow. For the completeprocedure, see Configure the self-registration workflow on page 38.• Configure if users are allowed to create an account for a web shop via self-registration.• Configure if each account is activated automatically or manually.
1. Click [Web shop] - <web shop> - [General settings].2. [Allow self-registration]
Customers can create their own accounts when you enable this option. The link [Create anaccount] appears in the login screen of the web shop.
3. [Use CAPTCHA]Customers have to type the displayed alphanumerical characters while creating an account.
4. [The system administrator must activate all new self-registered user accounts]• Enabled
Type the email address for the system administrator.The system administrator receives an email when a user has created a new account viaself-registration. The system administrator must activate each account manually.
• DisabledAll new user accounts are activated automatically.Once an account is activated, you can manage the concerning user in workspace [Usermanagement]. You can add the user to a user group, assign a cost center, etc.
5. [Add self-registered users to user group]• Enabled
Select a user group. The new user is automatically added to the selected user group.• Disabled
You can manage the concerning user in workspace [User management]. You can add theuser to a user group, assign a cost center, etc.
6. Click [Save].
Configure the permissions for customers
Option [Allow the customer to change the language] is part of the procedure to configure thelanguages for PRISMAdirect and the web shops. For the complete procedure, see Configure thelanguages on page 39.1. Click [Web shop] - <web shop> - [General settings].2. [Allow users to change their password]
Enable this option to allow customers to change their password.You can customise this setting for one or more user groups. See: [User management] - [Usergroups] - [User group settings]. The custom settings overrule the web shop settings for theuser group. The custom settings are used in all web shops for the corresponding user group.
Configure the general settings
Chapter 4 - Web shop 143PRISMAdirect 1.4.1

3. [Allow the customer to change the language]Enable this option to allow a customer to change the language of the web shop. If this optionis disabled, the web shop is displayed in the installation language and the customer is notable to change the language.
4. Click [Save].
Configure the general settings
144 Chapter 4 - Web shopPRISMAdirect 1.4.1

Configure the access control per web shop1. Click [Web shop] - <web shop> - [Access control].2. Configure the access of users per web shop.
• EveryoneAll users have access to the web shop.
• CustomOnly the users in the allowed user groups have access to the web shop. Drag and drop oneor more user groups into section [Allowed user groups].
• No accessYou can select this option to make the web shop inaccessible. For example, while you arebuilding or maintaining the web shop.
3. Click [Save].
Configure the access control per web shop
Chapter 4 - Web shop 145PRISMAdirect 1.4.1

Layout
Configure the layoutYou have to configure the layout of each web shop. You can select the language of the logonpage, the theme, etc.
Configure the layout settings
The setting [Login instructions:] is part of the procedure to configure the languages forPRISMAdirect and the web shops. For the complete procedure, see Configure the languages onpage 39.1. Click [Web shop] - <web shop> - [Layout] - [Layout].2. Select the language for the logon page of the web shop from the drop-down list.3. Select the theme for the web shop from the drop-down list.
You can create and edit the themes in workspace [Theme editor].4. Select the layout of the products:
• ListThe products are displayed as a horizontal list in the web shop.
• Thumbnail• The products are displayed both next to each other and below each other.
5. Type the login instructions in the selected language.6. [Enable 'Download' page]
You can publish documents for the customer in the web shop.1. Create folder "DownloadPage" in the temporary folder on the server. For the location of
the temporary folder, see Define the path for the temporary folder on page 136.For example: C:\Windows\Temp\PRISMAdirect\DownloadPage
2. Copy the files that you want to publish in the web shop in this folder.3. Enable the [Enable 'Download' page] option.
The [Downloads] link becomes available in the web shop.
The files are available for the customer when the customer clicks [Information] - [Downloads].7. Click [Save].
Layout
146 Chapter 4 - Web shopPRISMAdirect 1.4.1

Configure the order history settingsWhen you enable the order history, a list becomes available for the customer in the web shop.This list contains the canceled and finalized orders.1. Click [Web shop] - <web shop> - [Layout] - [Order history settings].2. Enable [Show order history].3. Click [Save].
Configure the order history settings
Chapter 4 - Web shop 147PRISMAdirect 1.4.1

Web shop view
Configure the custom columns for orders and jobsYou can configure which order information is displayed for each order and job in the web shop.You can make the most important information of the orders available to the customers in oneview.
For example, you can enable item [Number of jobs inside] to display how many jobs an ordercontains. For each order, the number of jobs is displayed as: {0} jobs inside.
You can customise this setting for one or more user groups. See: [User management] - [Usergroups] - [User group settings]. The custom settings overrule the web shop settings for the usergroup. The custom settings are used in all web shops for the corresponding user group.
Configure the custom columns
1. Click [Web shop] - <web shop> - [Layout] - [Web shop view].2. Select:
• [Custom columns for job] to configure the displayed information for jobs in the web shop.• [Custom columns for order] to configure the displayed information for orders in the web
shop.3. You can drag and drop available items to the active items.
It is recommended that you enable not more than 12 items.4. Drag each active item to set the order of the items.
The item in the top becomes the leftmost displayed item. The item at the bottom becomes therightmost displayed item.
5. Click [Save].
Web shop view
148 Chapter 4 - Web shopPRISMAdirect 1.4.1

Create a filterYou can create filters to determine which orders are visible for a user. You can create andconfigure the filters in the following locations in workspace [Configuration]:1. [Web shop]
The filter determines which orders are visible for a customer.2. [Order processing]
The filters determine which orders and jobs are visible for order managers and operators inthe [Order processing] workspace. See Manage the filters on page 185.
This topic describes how you can create and configure one or more filters for the web shop.
Create a filter
1. Use one or more items for the filter.1. Click [Web shop] - <web shop> - [Layout] - [Web shop view] - [Filter].2. Select an item in the list. The following items are available for the filter:
• All order items and job items, including the custom items, available in the [Product andorder editor] workspace.
• All items used for internal administration, for example, [Communication state],[Accepted by], [Assigned to], etc.
Additional actions Description
Sort the items Click the column header 'Name' to apply ascending sorting or de-scending sorting.Click the column header '*' to sort on items that are used in the fil-ter.
3. Enable the [Use in filter] option.An item is marked with a funnel icon when the item is added to the filter.
4. Configure the values for the item.2. Define which logical operator must be used when the filter contains two or more items.
• By default, the 'AND' operator is used when you add more than one item to the filter. Jobsand orders become visible when all filter criteria are met.
• When you enable option [Allow the OR operator in the filter], the 'OR' operator is usedwhen you add more than one item to the filter. Jobs and orders become visible when atleast one filter criteria is met.
3. [All jobs of the order must meet the filter criteria]An order and its jobs are only displayed when the filter criteria are met for all jobs.For example, the filter contains the following criterion for the jobs: [Communication state] =[Printed]. Now, the order is only shown in the [Order view] when all of its jobs have beenprinted.
4. Click [Save].
Create a filter
Chapter 4 - Web shop 149PRISMAdirect 1.4.1

Configure the submission settingsThe settings in this dialog are related to file submission.
1. Click [Web shop] - <web shop> - [Layout] - [Submission].• [Allowed file types]
• To accept all document types, type: *• You can type the supported types of digital documents (for example PDF, DOC, PS, ...).
Use a comma to separate the custom document types.
You can customise this setting for one or more user groups. See: [User management] -[User groups] - [User group settings]. The custom settings overrule the web shop settingsfor the user group. The custom settings are used in all web shops for the correspondinguser group.
• [Maximum number of jobs per order:]You can configure a maximum number of jobs per order for the customers of the webshop. The number of jobs is not limited in the [Order processing] workspace.
• [Overview of warnings]It is recommended that the user solves any warning(s) before the user submits the order.When you enable this option, the button [Check for warnings] becomes available for thecustomer. The user can click the button to check the order for warnings. The operationchecks for any conflicts between the PDF file and the values of the visual ticket items. Forexample, you assigned a media type to the PDF file, but another media type is assigned tothe visual ticket item [Media]. This results in a warning. See the help file of the [Productand order editor] for more information concerning visual ticket items.
• [Copyright administration]Enable this option to make the customer responsible that submitted files are not copyrightprotected. A submitted document may have copyrights and this cannot be automaticallychecked by the software. The customer explicitly needs to sign off for copyrights to free theprint room of copyrights infringements before the jobs can be sent to the print room. Thecustomer can only submit a job when option [Copyright administration] is enabled.You can customise this setting for one or more user groups. See: [User management] -[User groups] - [User group settings]. The custom settings overrule the web shop settingsfor the user group. The custom settings are used in all web shops for the correspondinguser group.
• [Copyright administration message:]A default message is displayed to the customer or operator when:1. The [Copyright administration] option is enabled in this dialogue.2. The customer or operator tries to submit an order, but he or she has not enabled the
[Copyright administration] option in the order ticket.
Click a language to type a default message to the customer or operator in that language.The available languages are displayed just above the text field.
2. Click [Save].
Configure the submission settings
150 Chapter 4 - Web shopPRISMAdirect 1.4.1

Pricing
Manage cost centers per web shopYou can manage the budgets for users and user groups. You have to create one or more costcenters for each web shop. You have to assign a budget to each cost center. Then, you can assignone or more users and user groups to each cost center. For the assigned users the prices of theirorders are deducted from the budget. You can set a maximum price for an order for each user oruser group. An approver has to accept or reject the order when the price exceeds the maximumprice. Accept or reject only applies to the price of an entire order. An approver cannot accept orreject the prices of the separate jobs in an order.
NOTEWhen the payment workflow is enabled, then the budget management workflow is disabled.
Alternatively, you can setup an interface between the PRISMAdirect server and the uniFLOWserver. The uniFLOW server then manages the cost centers and the price approval workflow. SeeSetup the uniFLOW interface on page 27
The settings in this dialog are part of the procedure to configure the budget managementworkflow. For the complete procedure, see Configure the budget management workflow onpage 50.
Budget: available, reserved, and spent
You can change the available budget and you can reset the spent budget. The reserved budget isa step in the approval workflow and can therefore not be reset or changed.• Available budget:
The total budget available for the users of the web site.• Spent budget:
The amount spent so far by all users of the concerning cost center. You can reset the spentbudget per cost centre manually.
• Reserved budget:A user has submitted an order costing $10,-. The approver must accept or reject the price ofthe order. While waiting for accept or rejection, the $10,- is added to the reserved budget.• When the order is accepted, the $10,- moves to the spent budget.• When the order is rejected, the $10,- moves to the available budget.
Create one or more cost centers per web shop
1. Click [Web shop] - <web shop> - [Pricing] - [Cost centers].2. Click [New cost center] to create the top level cost center.
Click the plus icon to add a cost center.3. Type a name and description for the cost center.
You can use the characters: 'a - z', 'A - Z', '0 - 9', '_' . Spaces are allowed for the name.4. Define the email address of the approver for this cost center. Use a semicolon to separate
multiple email addresses.The approver receives an email when the spent budget exceeds the specified threshold.
5. Define the available budget for the cost center.6. [Send warning at threshold [%]:]
Define a percentage of the available budget. The approver receives an email when the spentbudget exceeds the specified threshold. The approver can increase or decrease the availablebudget, or reset the spent budget.You can edit the email message, see [Order processing] - [Workflow configuration] - [Emailtemplates].
Pricing
Chapter 4 - Web shop 151PRISMAdirect 1.4.1

7. [Use cost center one level down:]For example, you can create a top level cost center which contains the total budget. Then youcreate a cost center per department. The cost center for each department uses part of the totalbudget. When you enable this option for the top level cost center, then users can only selectone of the departmental cost centers.
8. Select the default cost center.When multiple cost centers are assigned to a web shop, you can select the default cost centerfor that web shop. Customers can select any of the cost centers of the web shop.
9. Click [Save].
Manage the cost centers per web shop
Additional actions Description
Reset the spent budget 1. Click the pencil icon. The icon appears when you hover themouse pointer over a cost center.
2. Click [Reset spent budget].The spent budget of the cost center is reset to zero.
Edit a cost center Click the pencil icon. The icon appears when you hover the mousepointer over a cost center.
Delete a cost center Click the delete icon. The icon appears when you hover the mousepointer over a cost center.
Import cost centers Click the import icon. The icon appears when you hover themouse pointer over a cost center.The imported cost centers are added to the existing cost centers.You cannot save the imported cost centers, when you have impor-ted an existing cost center.
Export cost centers Click the export icon. The icon appears when you hover the mousepointer over a cost center.You can click the export icon of:• Top level cost center: all cost centers are exported.• Any other cost center: the selected cost center and the cost cen-
ters it contains are exported.
By default, the XML file is stored in the "Downloads" folder on theserver of PRISMAdirect.
Manage cost centers per web shop
152 Chapter 4 - Web shopPRISMAdirect 1.4.1

Configure the default maximum price of an order per web shopYou can manage the budgets for users and user groups. You have to create one or more costcenters for each web shop. You have to assign a budget to each cost center. Then, you can assignone or more users and user groups to each cost center. For the assigned users the prices of theirorders are deducted from the budget. You can set a maximum price for an order for each user oruser group. An approver has to accept or reject the order when the price exceeds the maximumprice. Accept or reject only applies to the price of an entire order. An approver cannot accept orreject the prices of the separate jobs in an order.
NOTEWhen the payment workflow is enabled, then the budget management workflow is disabled.
Alternatively, you can setup an interface between the PRISMAdirect server and the uniFLOWserver. The uniFLOW server then manages the cost centers and the price approval workflow. SeeSetup the uniFLOW interface on page 27
The settings in this dialog are part of the procedure to configure the budget managementworkflow. For the complete procedure, see Configure the budget management workflow onpage 50.
Configure the default maximum price of an order per web shop
1. Click [Web shop] - <web shop> - [Pricing] - [Price approval workflow].2. Click [New level].3. Define the maximum price of an order for the current level. You can type a value in the
spinbox.4. Define the email address of the approver for the current level. Use a semicolon to separate
multiple email addresses.The approver receives an email when the order price exceeds the maximum price for thecurrent level. The approver of the current level must approve or reject the order. If the priceexceeds the maximum price of the next level, an approver of that level must also approve orreject the order.
NOTEThe approver for level 1 can forward the approval form to the approver for level 2.
5. Click button [New level] to define a maximum price for the new level. The maximum price ofthe new level must be higher than the maximum price of the previous level.
6. [Allow an approver to accept on behalf of higher level approvers]When you enable this option, each approver can always accept or reject an order, regardlessof the price.
7. Click [Save].
Configure the default maximum price of an order per web shop
Chapter 4 - Web shop 153PRISMAdirect 1.4.1

Configure custom prices per web shopAll items for media, printing and finishing are defined in and retrieved from the [Product andorder editor]. This is also true for the choice items.
This topic describes how you can configure custom prices for each web shop.
Optionally, configure custom prices per web shop
1. Check that the default prices are configured.Click [Price and formula editor] - [Pricing].
2. Click [Web shop] - <web shop> - [Pricing] - [Pricing].3. Configure if the default prices must be increased or decreased for the selected web shop.
Define percentages for all options in the dialog. You can type a percentage in the text field. Oryou can click the arrow buttons to increase or decrease the percentage. Define if thepercentage must be added or subtracted for each option.
4. Click [Save].
Configure custom prices per web shop
154 Chapter 4 - Web shopPRISMAdirect 1.4.1

Configure the default price estimation settings per web shopThe settings in this dialog are part of the following procedures:• Configuration of the price estimation workflow. For the complete procedure, see Configure the
price estimation workflow on page 54.• Configuration of the tax services workflow. For the complete procedure, see Configure the tax
services workflow on page 33.
The jobs created with a product will use the following price settings and formulas:1. If a formula is assigned to the product, then this formula is used.2. Otherwise, the formula and price settings assigned to the user group are used.3. If no formulas are assigned to the product or user group, then the formulas and price settings
assigned to the web shop are used.
Configure the default price estimation settings per web shop
1. Click [Web shop] - <web shop> - [Pricing] - [Price estimation].2. You can define the default price estimation settings for the selected web shop.
Setting Value
[Price estimation] • [Yes]The option [Price estimation] is available in the web shop. Acustomer is always presented with an estimation of the jobcost.
• [No]The option [Price estimation] is not available in the web shop. Acustomer is never presented with an estimation of the job cost.
• [Always]A customer is always presented with an estimation of the jobcost. The customer cannot submit the job until the cost of thejob is estimated.
[Formulas for price estima-tion]
Drag and drop the available formulas to the active formulas. Dothis for both the jobs and the orders.
3. Click [Save].
Configure the default price estimation settings per web shop
Chapter 4 - Web shop 155PRISMAdirect 1.4.1
Configure the default quotation settings per web shopIn this dialog, you can define the default quotation settings for the web shop. The operatorcalculates and sends the quotation to the customer. A license is required to use the quotationfunctionality.
The setting [Price estimation] is part of the price estimation workflow. For the completeprocedure, see Configure the price estimation workflow on page 54.
The jobs created with a product will use the following price settings and formulas:1. If a formula is assigned to the product, then this formula is used.2. Otherwise, the formula and price settings assigned to the user group are used.3. If no formulas are assigned to the product or user group, then the formulas and price settings
assigned to the web shop are used.
Configure the quotation settings per web shop
1. Click [Web shop] - <web shop> - [Pricing] - [Quotation].2. You can define the default quotation settings for the selected web shop.
Setting Value
[Quotation] • [Yes]Option [Quotation] is available in the web shop. A customer canrequest a quotation.
• [No]Option [Quotation] is not available in the web shop. A customercannot request a quotation.
• [Always]A customer is always presented with a quotation. The customercannot disable the request to calculate a quotation.
[Price can be accepted onbehalf of the customer]
Enable this option to allow the operator to accept the quotation onbehalf of the customer.Disable this option to force the customer to accept or reject thequotation.
[An order can be printedonly after the price is calcu-lated]
Enable this option to force the operator to always calculate thequotation. The quotation must be calculated for a correct budgetcontrol.
[Formula for job:] You have to select a formula to calculate the quotations of thejobs.
[Formula for order:] You have to select a formula to calculate the quotations of the or-ders.
3. Click [Save].
Configure the default quotation settings per web shop
156 Chapter 4 - Web shopPRISMAdirect 1.4.1

Enable payment per web shopThe settings in this dialog are part of the procedure to configure the payment workflow. For thecomplete procedure, see Configure the payment workflow on page 15.
Enable payment per web shop
Chapter 4 - Web shop 157PRISMAdirect 1.4.1

Enable shipping per web shopThe settings in this dialog are part of the procedure to configure the shipping workflow. For thecomplete procedure, see Configure the shipping workflow on page 29.
Enable shipping per web shop
158 Chapter 4 - Web shopPRISMAdirect 1.4.1

Enable tax services per web shopThe settings in this dialog are part of the procedure to configure the tax services workflow. Forthe complete procedure, see Configure the tax services workflow on page 33.
Enable tax services per web shop
Chapter 4 - Web shop 159PRISMAdirect 1.4.1

Set the currencyYou can set a different currency for each web shop.1. Click [Web shop] - <web shop> - [Pricing] - [Currency].2. [Use default currency]
• EnabledCheck that the default currency is set.Click [Price and formula editor] - [Currency].
• DisabledSet a custom currency for the web shop.
3. Select a currency from the drop-down list.Amounts are displayed with the selected currency code from the drop-down list or you candefine a custom currency sign.• [Currency sign]
Enable the checkbox and type the currency symbol. You can type text or use an ALT code,for example, ALT 0128 for the euro symbol.
4. Click [Save].
Set the currency
160 Chapter 4 - Web shopPRISMAdirect 1.4.1

Enable and configure the preflight rules per web shopA preflight operation is a quality check of your document.
The preflight operation checks if any rules are violated in the PDF file(s). The set of rules is fixed.Some of the rules can be configured. If enabled, the automatic preflight operation is appliedwhen a customer submits an order. The automatic preflight operation allows you to fix theviolations according to the configured rules or cancel the operation with that document. Apreflight report and an annotated file are generated. The preflight report shows a summary of theproblems that have been found. The annotated file shows the complete document with thelocation of any found problems and fixes. The manual preflight operation automatically fixes theviolations according to the configured rules. Some problems are detected by the preflightoperation, but cannot be fixed automatically. It is recommended that you fix these problemsmanually before you print the job.
Enable and configure the preflight rules per web shop
1. Click [Web shop] - <web shop> - [Preflight].2. Enable the rules that you want to use in column [Enabled].3. Click on the bar of the rule that you want to configure. If the bar expands, you can configure
the rule. If the bar does not expand, you can only enable or disable the rule.You can configure some rules to detect and fix a violation. Other rules can only be configuredto detect a violation. These violations can only be solved in the corresponding PDF file by thecustomer or the operator.
4. Define the [Severity] of each rule.• [Warning]
A violation of the rule is detected. You can ignore the warning.• [Error]
A violation of the rule is detected. The violation of the rule must be fixed.5. You can define a timeout.
When the timeout value is exceeded, the preflight operation is canceled.6. [Enable automatic preflight]
When you enable this option, the application preflights each PDF file that the customer addsto an order in the web shop. When the customer adds a non-PDF file, then the file must beconverted to PDF first before the preflight operation can start.
7. Click [Save].
Enable and configure the preflight rules per web shop
Chapter 4 - Web shop 161PRISMAdirect 1.4.1
Select the active languages for the web shopThe settings in this dialog are part of the procedure to configure the languages for PRISMAdirectand the web shops. For the complete procedure, see Configure the languages on page 39.1. Click [Web shop] - <web shop> - [Active languages].2. Select the default language for the web shop from the drop-down list.3. Enable all languages that you want to offer to your customers.4. Click [Save].
Select the active languages for the web shop
162 Chapter 4 - Web shopPRISMAdirect 1.4.1
Contact information
Type the origin address per web shopYou ship your packages from the origin address. When you have multiple web shops, you haveto type an origin address for each separate web shop.
The origin address is part of the following procedures:• Configuration of the shipping workflow. For the complete procedure, see Configure the
shipping workflow on page 29.• Configuration of the tax services workflow. For the complete procedure, see Configure the tax
services workflow on page 33.
Type the origin address per web shop
1. Click [Web shop] - <web shop> - [Contact information] - [Origin address].2. [Use default origin address]
• EnabledThe web shop uses the default origin address. See: [System] - [Connectivity] - [Originaddress].
• DisabledType the origin address for your web shop. When you have multiple web shops, you haveto type an origin address for each separate web shop.The address will not be validated in this dialog. The address will be validated when:• The operator requests a shipment in the [Order processing] workspace. The selected
shipment provider returns an error message if any of the values are incorrect.• The operator or customer creates an order while tax services workflow is enabled. The
tax service returns an error message if any of the values are incorrect.
For example, the zip code is incorrect or the shipment provider is not active in the specifiedcountry.
3. Click [Save].
Contact information
Chapter 4 - Web shop 163PRISMAdirect 1.4.1

Type the contact information settingsThe contact information used in the [About] link in the web shop. Customers can contact theperson with questions, etc.1. Click [Web shop] - <web shop> - [Contact information] - [Contact information].2. Configure:
Setting Description
[Name] The name of the contact person
[Telephone number] The telephone number of the contact person.
[Location] The location where the contact person can be found.
[Email address] The email address of the contact person.
3. Click [Save].
Type the contact information settings
164 Chapter 4 - Web shopPRISMAdirect 1.4.1

Chapter 5 User management

Users
Manage the usersDialog [User settings] displays all available users. The application automatically fills in the valuesin column [User type]. These values depend on the creation of the users. Every user who logs onto the application with an LDAP username and password is created automatically. The [User type]becomes:• [Windows user] for an automatically created user that is authenticated via Windows
authentication.• [LDAP user] for an automatically created user that is authenticated via custom authentication.• [Web user] for users created in this dialog.• [Web user] for self-registered users with an active account. See Activate self-registered users
on page 169.
1. Click [User management] - [Users] - [User settings].2. Click the plus icon to add a user.
Click the pencil icon to edit the user.3. Define the user name. The user name must be unique. The following characters are not
allowed in a username: @";:<>|?/\*[],=+The [User name] cannot be changed when you edit the user.
4. Define the [Role] of the user.• [Services]
The users in the [Services] group have the highest rights. These users can access:• [Order processing]. Both the [Order view] and the [Job view].• [Product and order editor]• [Web shop editor]• [Theme editor]• [Configuration]• [Reporting]• Web shops
• [Order managers]The users in the [Order managers] group can access:• [Order processing]. Both the [Order view] and the [Job view].• [Product and order editor]
• [Operators]The users in the [Operators] group can access the [Job view] of the [Order processing].
• [Customers]The users in the [Customers] group can access the web shops.
5. Define the [Password] for this user. You can also change the existing password of a user. Thepassword must be different from the user name. Use the following rules to define a strongpassword:• The password must have at least 8 characters.• The password must use both upper case and lower case characters.• The password must contain at least one number.• The password must be different from the user name.
Confirm the password.Click [Reset password] to change the existing password of a user.
6. You can add a user to one or more user groups. However, you cannot add users to usergroups that are managed by an LDAP server. User groups managed by an LDAP server aregrayed out.
Users
166 Chapter 5 - User managementPRISMAdirect 1.4.1

When a user is added to multiple user groups:• You have to select a default user group for the user. The budget of the default user group is
used for this user.• You have assigned a role to each user group. Each role has associated rights. The rights for
the user groups are merged for the user.7. [Allow only the use of filters created by the system administrator]
• EnabledThe order manager and operator cannot create any filters. They can only use the filterscreated by the system administrator.
• DisabledThe order manager and operator can create filters in the [Order processing] workspace.
This option is not available for users with role: [Customers].8. Click [Save].
Manage the users
Chapter 5 - User management 167PRISMAdirect 1.4.1

Edit the profile settingsYou can map the [Profile settings] of the customer to job ticket items. When the customersubmits a job, the job ticket items automatically receive the data from the [Profile settings]. Theavailable profile attributes are fixed and cannot be changed.• If the profile attribute contains a value, the associated job ticket item is filled in automatically.
The customer cannot change the job ticket item.• If the profile attribute does not contain a value, the associated job ticket item is left empty. The
customer must define the value of the job ticket item.• If you deselect a profile attribute, the customer must define the value of the job ticket item.
[User profile]
1. Click [User management] - [Users] - [User profile].2. Enable the profile settings that you want to use. The profile settings are available in the left-
hand side of the dialog.3. Assign each profile attribute to a job ticket item.
Click the drop-down list and select a job ticket item. The ticket item receives the value of theprofile attribute when the customer creates a job.
4. Click [Save].
Edit the profile settings
168 Chapter 5 - User managementPRISMAdirect 1.4.1
Activate self-registered usersYou can activate or deactivate any self-registered user accounts.
The settings in this dialog are part of the procedure to configure the self-registration workflow.For the complete procedure, see Configure the self-registration workflow on page 38.
Activate self-registered users manually
1. Click [User management] - [Users] - [Self-registered users].2. Select which new accounts you want to activate.3. Click [Save].
The application sends an email to each user whose account is activated.Once an account is activated, you can manage the concerning user in workspace [Usermanagement]. You can add the user to a user group, assign a cost center, etc.
Activate self-registered users
Chapter 5 - User management 169PRISMAdirect 1.4.1

Import users from an LDAP server or uniFLOW serverYou can import users from an LDAP server or uniFLOW server. You cannot add a [User role] to animported user. When you add the user to a user group, the user receives the role of the usergroup. You also can only change the default group of an imported user amongst the groups itbelongs to in the LDAP server. Also, you cannot change its password.
1. Click [User management] - [Users] - [Import from LDAP server].2. Click on a server to view the available users.
To view the available user groups, go to [User management] - [User groups] - [Import fromLDAP server].
3. Select which users you want to import.4. Click [Save] to import the users.5. You can configure a number of settings for the imported users.
Click [User management] - [Users] - [User settings].
Import users from an LDAP server or uniFLOW server
170 Chapter 5 - User managementPRISMAdirect 1.4.1
Assign a cost centre to a userYou can manage the budgets for users and user groups. You have to create one or more costcenters for each web shop. You have to assign a budget to each cost center. Then, you can assignone or more users and user groups to each cost center. For the assigned users the prices of theirorders are deducted from the budget. You can set a maximum price for an order for each user oruser group. An approver has to accept or reject the order when the price exceeds the maximumprice. Accept or reject only applies to the price of an entire order. An approver cannot accept orreject the prices of the separate jobs in an order.
NOTEWhen the payment workflow is enabled, then the budget management workflow is disabled.
Alternatively, you can setup an interface between the PRISMAdirect server and the uniFLOWserver. The uniFLOW server then manages the cost centers and the price approval workflow. SeeSetup the uniFLOW interface on page 27
The settings in this dialog are part of the procedure to configure the budget managementworkflow. For the complete procedure, see Configure the budget management workflow onpage 50.
Assign a cost centre to a user
1. Click [User management] - [Users] - [Cost centers] - <web shop>.2. Select a user.
The available cost centres for the user appear.3. Click the checkbox to assign a cost center to the user.
You can assign multiple cost centres to the user. The cost centers are added to the [Assignedcost centers].• Click the view icon to view the configuration of the cost center. The icon appears when you
hover the mouse pointer over a cost center.4. Deselect the cost centers that you want to remove for the user in section [Available cost
centers].Or you can click the delete icon in section [Assigned cost centers]. The icon appears when youhover the mouse pointer over a cost center.
5. Click [Save].
Assign a cost centre to a user
Chapter 5 - User management 171PRISMAdirect 1.4.1
Configure the maximum price of an order for the users per webshop
You have to create one or more cost centers for each web shop. Then, you can configure themaximum price of an order for the users and user groups per web shop. These custom settingsoverwrite the default maximum price of an order per web shop.
The settings in this dialog are part of the procedure to configure the budget managementworkflow. For the complete procedure, see Configure the budget management workflow onpage 50.
Configure the maximum price of an order for the users per web shop
1. Click [User management] - [Users] - [Price approval workflow] - <web shop>.2. Select a user.3. Click [New level].4. Define the maximum price of an order for the current level. You can type a value in the
spinbox.5. Define the email address of the approver for the current level. Use a semicolon to separate
multiple email addresses.The approver receives an email when the order price exceeds the maximum price for thecurrent level. The approver of the current level must approve or reject the order. If the priceexceeds the maximum price of the next level, an approver of that level must also approve orreject the order.
NOTEThe approver for level 1 can forward the approval form to the approver for level 2.
6. Click button [New level] to define a maximum price for the new level. The maximum price ofthe new level must be higher than the maximum price of the previous level.
7. [Allow an approver to accept on behalf of higher level approvers]When you enable this option, each approver can always accept or reject an order, regardlessof the price.
8. Click [Save].
Configure the maximum price of an order for the users per web shop
172 Chapter 5 - User managementPRISMAdirect 1.4.1

User groups
Add or edit a user groupYou have to configure each web shop separately in workspace [Web shop]. In this dialog, you cancustomize a number of web shops settings for each user group. The custom settings overrule theweb shop settings for this user group. The custom settings are used in all web shops for this usergroup.
1. Click [User management] - [User groups] - [User group settings].2. Click the plus icon to add a user group. A new user group is created.
Click the pencil icon to edit the user group.3. Define the user group name. The name must be unique.
The following characters are not allowed in a user group name: @";:<>|?/\*[],=+The [User group name] cannot be changed when you edit the user group.
4. Define the [Role] of the users in the group.• [Services]
The users in the [Services] group have the highest rights. These users can access:• [Order processing]. Both the [Order view] and the [Job view].• [Product and order editor]• [Web shop editor]• [Theme editor]• [Configuration]• [Reporting]• Web shops
• [Order managers]The users in the [Order managers] group can access:• [Order processing]. Both the [Order view] and the [Job view].• [Product and order editor]
• [Operators]The users in the [Operators] group can access the [Job view] of the [Order processing].
• [Customers]The users in the [Customers] group can access the web shops.
5. You can customize a number of web shops settings for each user group.• [Allowed file types]
• Web shopUse the settings for [Allowed file types] as defined in dialog [Submission] in [Web shop].
• CustomUse custom settings for [Allowed file types] for this user group. The custom settingsoverrule the web shop settings for this user group. The custom settings are used in allweb shops for this user group.
• [Price estimation]• Web shop
The user group uses the price estimation settings as defined for each web shop.• Custom
You can define custom price estimation settings for each web shop for the concerninguser group.
User groups
Chapter 5 - User management 173PRISMAdirect 1.4.1

Setting Value
[Enabled] • [Yes]The option [Price estimation] is available in the web shop. Acustomer is always presented with an estimation of the jobcost.
• [No]The option [Price estimation] is not available in the web shop. Acustomer is never presented with an estimation of the job cost.
• [Always]A customer is always presented with an estimation of the jobcost. The customer cannot submit the job until the cost of thejob is estimated.
[Select formulas] Drag and drop the available formulas to the active formulas. Dothis for both the jobs and the orders.
The setting [Price estimation] is part of the price estimation workflow. For the completeprocedure, see Configure the price estimation workflow on page 54.
NOTEIn the [Product and order editor], the system administrator can select a priceestimation formula for each product. The formulas in the product overrule theformulas assigned to the user group in this dialog.
• [Quotation]• Web shop
The user group uses the quotation settings as defined for each web shop.• Custom
You can define custom quotation settings for each web shop for the concerning usergroup.
Setting Value
[Enabled] • [Yes]Option [Quotation] is available in the web shop. A customer canrequest a quotation.
• [No]Option [Quotation] is not available in the web shop. A customercannot request a quotation.
• [Always]A customer is always presented with a quotation. The customercannot disable the request to calculate a quotation.
[Price can be accepted onbehalf of the customer]
Enable this option to allow the operator to accept the quotation onbehalf of the customer.Disable this option to force the customer to accept or reject thequotation.
[An order can be printedonly after the price is calcu-lated]
Enable this option to force the operator to always calculate thequotation. The quotation must be calculated for a correct budgetcontrol.
[Formula for job:] You have to select a formula to calculate the quotations of thejobs. 4
Add or edit a user group
174 Chapter 5 - User managementPRISMAdirect 1.4.1

Setting Value
[Formula for order:] You have to select a formula to calculate the quotations of the or-ders.
The setting [Quotation] is part of the price estimation workflow. For the completeprocedure, see Configure the quotation workflow on page 57.
NOTEIn the [Product and order editor], the system administrator can select a quotationformula for each product. The formulas in the product overrule the formulasassigned to the user group in this dialog.
• [Copyright administration]• Web shop
Use the settings for [Copyright administration] as defined in dialog [Submission] in [Webshop].
• CustomUse custom settings for [Copyright administration] for this user group. The customsettings overrule the web shop settings for this user group. The custom settings areused in all web shops for this user group.
• [Allow the customer to change the language]• Web shop
The user group uses the value of setting [Allow the customer to change the language] asdefined for the web shop.
• Custom = YesCustomers that are part of the concerning user group are allowed to change thelanguage of each web shop. More than one language must be active, see procedureConfigure the languages on page 39.
• Custom = NoCustomers that are part of the concerning user group are not allowed to change thelanguage of each web shop.
• [Custom columns]• Web shop
Use the settings for [Custom columns] as defined in dialog [Custom columns] for jobsand orders in [Web shop].
• CustomUse custom settings for [Custom columns] for this user group. The custom settingsoverrule the web shop settings for this user group. The custom settings are used in allweb shops for this user group.
• [Enable 'Download' page]• Web shop
Use the settings for [Enable 'Download' page] as defined in dialog [Layout] in [Webshop].
• CustomUse custom settings for [Enable 'Download' page] for this user group. The customsettings overrule the web shop settings for this user group. The custom settings areused in all web shops for this user group.
• [File hosting service]• Global settings
The user group uses the settings of the file hosting services as defined for PRISMAdirect.• Custom = Yes
Add or edit a user group
Chapter 5 - User management 175PRISMAdirect 1.4.1

File hosting services are enabled for each web shop for the concerning user group. Thefile hosting services must be configured, see procedure Configure the file hostingservices, for example, Dropbox on page 20.
• Custom = NoFile hosting services are disabled for each web shop for the concerning user group.
• [Enable payment]• Web shop
The user group uses the value of setting [Enable payment] as defined for the web shop.• Custom = Yes
Payment is enabled for each web shop for the concerning user group. The paymentproviders must be configured, see procedure Configure the payment workflow onpage 15.
• Custom = NoPayment is disabled for each web shop for the concerning user group.
• [Enable shipping]• Web shop
The user group uses the value of setting [Enable shipping] as defined for the web shop.• Custom = Yes
Shipping is enabled for each web shop for the concerning user group. The shippingproviders must be configured, see procedure Configure the shipping workflow onpage 29.
• Custom = NoShipping is disabled for each web shop for the concerning user group.
• [Enable automatic preflight]• Web shop
The user group uses the value of setting [Enable automatic preflight] as defined for theweb shop.
• Custom = YesAutomatic preflight is enabled for each web shop for the concerning user group. Youhave to configure the preflight rules, see procedure Configure the preflight workflow onpage 41.
• Custom = NoAutomatic preflight is disabled for each web shop for the concerning user group.
6. Click [Save].
Add or edit a user group
176 Chapter 5 - User managementPRISMAdirect 1.4.1

Import user groups from an LDAP server or uniFLOW serverYou can import user groups from an LDAP server or uniFLOW server. By default, the users in theuser group receive the role [Customers]. After import of the user group, you can:• Change the role of the users in the user group• Customize a number of web shops settings for the user group
1. Click [User management] - [User groups] - [Import from LDAP server].2. Click on a server to view the available user groups.
To view the available users, go to [User management] - [Users] - [Import from LDAP server].3. Select which user groups you want to import.4. Click [Save] to import the user groups.5. You can configure a number of settings for the imported user groups. For example, to change
the role of the users in the user group.Click [User management] - [User groups] - [User group settings].
Import user groups from an LDAP server or uniFLOW server
Chapter 5 - User management 177PRISMAdirect 1.4.1

Assign a cost center to a user groupYou can manage the budgets for users and user groups. You have to create one or more costcenters for each web shop. You have to assign a budget to each cost center. Then, you can assignone or more users and user groups to each cost center. For the assigned users the prices of theirorders are deducted from the budget. You can set a maximum price for an order for each user oruser group. An approver has to accept or reject the order when the price exceeds the maximumprice. Accept or reject only applies to the price of an entire order. An approver cannot accept orreject the prices of the separate jobs in an order.
NOTEWhen the payment workflow is enabled, then the budget management workflow is disabled.
Alternatively, you can setup an interface between the PRISMAdirect server and the uniFLOWserver. The uniFLOW server then manages the cost centers and the price approval workflow. SeeSetup the uniFLOW interface on page 27
The settings in this dialog are part of the procedure to configure the budget managementworkflow. For the complete procedure, see Configure the budget management workflow onpage 50.
Assign a cost center to a user group
1. Click [User management] - [User groups] - [Cost centers] - <web shop>.2. Select a user.
The available cost centres for the user appear.3. Click the checkbox to assign a cost center to the user.
You can assign multiple cost centres to the user. The cost centers are added to the [Assignedcost centers].• Click the view icon to view the configuration of the cost center. The icon appears when you
hover the mouse pointer over a cost center.4. Deselect the cost centers that you want to remove for the user in section [Available cost
centers].Or you can click the delete icon in section [Assigned cost centers]. The icon appears when youhover the mouse pointer over a cost center.
5. Click [Save].
Assign a cost center to a user group
178 Chapter 5 - User managementPRISMAdirect 1.4.1

Configure the maximum price of an order for the user groups perweb shop
You have to create one or more cost centers for each web shop. Then, you can configure themaximum price of an order for the users and user groups per web shop. These custom settingsoverwrite the default maximum price of an order per web shop.
The settings in this dialog are part of the procedure to configure the budget managementworkflow. For the complete procedure, see Configure the budget management workflow onpage 50.
Configure the maximum price of an order for the user groups per web shop
1. Click [User management] - [User groups] - [Price approval workflow] - <web shop>.2. Select a user group.3. Click [New level].4. Define the maximum price of an order for the current level. You can type a value in the
spinbox.5. Define the email address of the approver for the current level. Use a semicolon to separate
multiple email addresses.The approver receives an email when the order price exceeds the maximum price for thecurrent level. The approver of the current level must approve or reject the order. If the priceexceeds the maximum price of the next level, an approver of that level must also approve orreject the order.
NOTEThe approver for level 1 can forward the approval form to the approver for level 2.
6. Click button [New level] to define a maximum price for the new level. The maximum price ofthe new level must be higher than the maximum price of the previous level.
7. [Allow an approver to accept on behalf of higher level approvers]When you enable this option, each approver can always accept or reject an order, regardlessof the price.
8. Click [Save].
Configure the maximum price of an order for the user groups per web shop
Chapter 5 - User management 179PRISMAdirect 1.4.1

Manage the user rolesThe user roles determine the login rights of each user and user group in PRISMAdirect. You cancreate and manage the custom user roles. You can assign the custom user role to a user or usergroup. When you delete this role, the role [Customers] is automatically assigned to the user oruser group.
You cannot edit or delete the default user roles:• [Services]• [Order managers]• [Operators]• [Customers]
1. Click [User management] - [User roles].2. Click [New role].
You can also click the copy icon to copy an existing role. The icon appears when you hoverthe mouse pointer over the existing role.
3. Type the name for the user role.By default, all rights are enable for the new role.
4. Enable or disable access to workspaces and dialogs for the role.You have to disable [Order view] first, before you can disable [Job view].
5. You can assign the user role to a user or user group. See Manage the users on page 166 andAdd or edit a user group on page 173
Manage the user roles
180 Chapter 5 - User managementPRISMAdirect 1.4.1

Chapter 6 Order processing

General settings
Configure the general settingsConfigure the general settings for the operator and the order manager of the [Order processing]workspace.1. Click [Order processing] - [General settings] - [General settings].2. You can configure the following settings:
• [Allow the operator to change the files of jobs]Enable this option to allow the operator to change the files of submitted jobs.When this option is enabled, the operator can:• A product can contain a fixed document. The operator can remove the fixed document
and can add other files to the job.• A product can contain a fixed VDP document. The operator can remove the fixed VDP
document and can add other files to the job.• Add or remove files from the jobs.• Edit a non-PDF file.
The customers must be confident that the files are printed exactly as these were submitted.When you enable this option, there is no guarantee that the submitted files will remainunchanged before the job is printed.
• [Allow the order manager to change the orders]Enable this option to allow the order manager to change the submitted orders. The ordermanager can add or remove jobs from the orders.The order manager should change an order only after a request from the customer.
• [Always add the OrderID to the email subject]It is recommended to add the OrderID to the subject of each email which is sent from theapplication. Add the OrderID for easy identification of the job.This setting is part of the following procedure: Integrate Office 365 and Microsoft Outlookwith PRISMAdirect on page 78.
• [Overview of warnings]It is recommended that the operator solves any warning(s) before the operator submits theorder. When you enable this option, the operator can open the overview of warnings in the[Order processing].The order is checked for warnings before the order is submitted.
• [Allow the order manager to assign jobs from imported orders to operators]Imported orders can contain multiple jobs. Enable this option to allow the order managerto assign the jobs to different operators.
• [Get notifications when a new order is received]The operator and the order manager get notifications when a new order is received. Thenotifications are• A ringing sound, and• The browser tab displays the number of new orders.
• [Current job number]This option contains the job number of the last job. You can define any job number with amaximum value of 999999999.The next submitted or imported job receives job number: [Current job number] + 1.
• [Current order number:]This option contains the number of the last order. You can define any number with amaximum value of 999999999.
General settings
182 Chapter 6 - Order processingPRISMAdirect 1.4.1

The next submitted or imported order receives order number: [Current order number:] + 1.3. Click [Save].
Trace level
Set the trace level for the [Order processing] workspace:• [Debug]
The [Debug] trace level provides the most detailed log information.The [Debug] trace level can impact the performance of the application.
• [Error]The errors are logged.
• [Info]The errors and information messages are logged
Configure the general settings
Chapter 6 - Order processing 183PRISMAdirect 1.4.1

Configure the general VDP settingsThe setting in this dialog is part of the procedure to configure the VDP workflow. For thecomplete procedure, see Configure the VDP workflow on page 48.
Configure the preview settings for a variable data document
1. Click [Order processing] - [General settings] - [VDP settings].2. Define the maximum number of pages of a variable data document shown in the [Preview] or
[Proof PDF]. The maximum value for this option is 2000 pages.A high number of pages can decrease the performance of the application.
3. Click [Save].
Configure the general VDP settings
184 Chapter 6 - Order processingPRISMAdirect 1.4.1

Manage the filtersYou can create filters to determine which orders are visible for a user. A filter shows the jobs andorders that match the required filter criteria. The filter hides all other jobs and orders.
You can create and configure the filters in the following locations in workspace [Configuration]:1. [Web shop]
The filter determines which orders are visible for a customer. See Create a filter on page 149.2. [Order processing]
The filters determine which orders and jobs are visible for order managers and operators inthe [Order processing] workspace.
This topic describes how you can create and configure one or more filters for the [Orderprocessing] workspace.
Additional actions Description
Edit a filter Click the pencil icon. The icon appears when you hover the mousepointer over a filter.
Delete a filter Click the delete icon. The icon appears when you hover the mousepointer over a filter.
Create a filter
1. Click [Order processing] - [Manage filters]. Then select:• [Filters for orders]
Create a filter for the [Order view] of the [Configuration] workspace.• [Filters for jobs]
Create a filter for the [Job view] of the [Configuration] workspace.2. Click the plus icon to add a filter.3. Assign the filter.
• Assign a filter for orders to an order manager. You can manage the order managers in[Order processing] - [Workflow configuration] - [General settings] - [Assign orders to].
• Assign a filter for jobs to an operator. You can manage the operators in [Order processing]- [Workflow configuration] - [General settings] - [Assign jobs to].
4. Type a name and description for the filter. The name must be unique.5. Use one or more items for the filter.
1. Select an item in the list. The following items are available for the filter:• All order items and job items, including the custom items, available in the [Product and
order editor] workspace.• All items used for internal administration, for example, [Communication state],
[Accepted by], [Assigned to], etc.
Additional actions Description
Sort the items Click the column header 'Name' to apply ascending sorting or de-scending sorting.Click the column header '*' to sort on items that are used in the fil-ter.
2. Enable the [Use in filter] option.An item is marked with a funnel icon when the item is added to the filter.
3. Configure the values for the item.6. Define which logical operator must be used when the filter contains two or more items.
Manage the filters
Chapter 6 - Order processing 185PRISMAdirect 1.4.1

• By default, the 'AND' operator is used when you add more than one item to the filter. Jobsand orders become visible when all filter criteria are met.
• When you enable option [Allow the OR operator in the filter], the 'OR' operator is usedwhen you add more than one item to the filter. Jobs and orders become visible when atleast one filter criteria is met.
7. [All jobs of the order must meet the filter criteria]An order and its jobs are only displayed when the filter criteria are met for all jobs.For example, the filter contains the following criterion for the jobs: [Communication state] =[Printed]. Now, the order is only shown in the [Order view] when all of its jobs have beenprinted.
8. Click [Save].
Manage the filters
186 Chapter 6 - Order processingPRISMAdirect 1.4.1

Manage the automation templatesIn PRISMAprepare, you can create automation templates and export them to file. Then, you canimport the automation templates from the file to PRISMAdirect.
The settings in this dialog are part of the procedure to configure the workflow for automationtemplates. For the complete procedure, see Configure the workflow for automation templates onpage 60.
Import automation templates
Additional actions Description
Delete an automation tem-plate
Click the delete icon. The icon appears when you hover the mousepointer over an automation template.
1. Click [Order processing] - [Manage automation templates].2. You can import automation templates to PRISMAdirect.
• [Import templates]Select one or more automation templates and click [Open]. The file type of an automationtemplate is *.MRSCRIPT.
• [Import archive]Browse to the ZIP file that contains the automation templates and click [Open].
3. Select how you want to import the automation templates.• [Merge with the existing templates]
Any automation template that does not yet exist in PRISMAdirect is added toPRISMAdirect.
• [Replace the existing templates]The application deletes the automation templates available in PRISMAdirect. Then, the newtemplates are imported.
4. Click [OK].
Manage the automation templates
Chapter 6 - Order processing 187PRISMAdirect 1.4.1

Enable and configure the preflight rules for the [Orderprocessing] console
A preflight operation is a quality check of your document.
The preflight operation checks if any rules are violated in the PDF file(s). The set of rules is fixed.Some of the rules can be configured. If enabled, the automatic preflight operation is appliedwhen a customer submits an order. The automatic preflight operation allows you to fix theviolations according to the configured rules or cancel the operation with that document. Apreflight report and an annotated file are generated. The preflight report shows a summary of theproblems that have been found. The annotated file shows the complete document with thelocation of any found problems and fixes. The manual preflight operation automatically fixes theviolations according to the configured rules. Some problems are detected by the preflightoperation, but cannot be fixed automatically. It is recommended that you fix these problemsmanually before you print the job.
Enable and configure the preflight rules for the [Order processing] console
The settings in this dialog are part of the procedure to configure the preflight workflow. For thecomplete procedure, see Configure the preflight workflow on page 41.1. Click [Order processing] - [Preflight].2. Enable the rules that you want to use in column [Enabled].3. Click on the bar of the rule that you want to configure. If the bar expands, you can configure
the rule. If the bar does not expand, you can only enable or disable the rule.You can configure some rules to detect and fix a violation. Other rules can only be configuredto detect a violation. These violations can only be solved in the corresponding PDF file by thecustomer or the operator.
4. Define the [Severity] of each rule.• [Warning]
A violation of the rule is detected. You can ignore the warning.• [Error]
A violation of the rule is detected. The violation of the rule must be fixed.5. You can define a timeout.
When the timeout value is exceeded, the preflight operation is canceled.6. Click [Save].
Enable and configure the preflight rules for the [Order processing] console
188 Chapter 6 - Order processingPRISMAdirect 1.4.1

Workflow configuration
Manage operators and order managersYou can create and manage operators and order managers.• You can assign orders to order managers in the [Order view] of the [Configuration] workspace.• You can assign jobs to operators in the [Job view] of the [Configuration] workspace.
In this way, you can divide the workload between several people.
Additional actions Description
Edit an operator or ordermanager
Click the pencil icon. The icon appears when you hover the mousepointer over an operator or order manager.
Delete an operator or ordermanager
Click the delete icon. The icon appears when you hover the mousepointer over an operator or order manager.You cannot delete an operator or order manager when a job or or-der is assigned to this user. In this dialog, you cannot delete a userwhen the user was created in [User management] - [Users] - [Usersettings].
Create an operator or order manager
1. To manage the order managers, click: [Order processing] - [Workflow configuration] -[General settings] - [Assign orders to].To manage the operators, click: [Order processing] - [Workflow configuration] - [Generalsettings] - [Assign jobs to].
2. Click the plus icon to create an operator or order manager.3. Type a name. You can use the characters: 'a - z', 'A - Z', '0 - 9', '_' . Spaces are allowed.4. Click [Save].
Workflow configuration
Chapter 6 - Order processing 189PRISMAdirect 1.4.1

Manage the categoriesYou can assign jobs to predefined categories and to custom categories in workspace [Orderprocessing].
The predefined categories are:• [New jobs]• [Ready jobs]• [Finalized jobs]
You cannot edit or delete the predefined categories.
You can define your own custom categories. You cannot delete a custom category when jobs areassigned to this category.
1. Click [Order processing] - [Workflow configuration] - [General settings] - [Categories].2. Click the plus icon to add a category.
Click the pencil icon to edit the category.3. Edit the name of the category.
You can use the characters: 'a - z', 'A - Z', '0 - 9', '_' . Spaces are allowed.4. Click [Save].
Manage the categories
190 Chapter 6 - Order processingPRISMAdirect 1.4.1
Configure the actions at an order state changeYou can configure which actions must be performed by the application when the state of an orderchanges. This procedure describes all actions that are possible at an order state change. Not allactions are available for all state changes.
The settings in this dialog are part of the procedure to configure the email workflow. For thecomplete procedure, see Configure the email workflow on page 43.
1. Click [Order processing] - [Workflow configuration] - [General settings].2. Select any of the order states.
• Print job ticket when...Enable this option when you want to print the ticket when the order changes into theconcerning state.
• Enable option [Send email] when you want to send an email when the order changes intothe concerning state. You can select several options for sending an email:• [Always]
The email message for the concerning order state change is always send to thecustomer.
• [When requested by customer]The email message for the concerning order state change is only sent to the customerwhen the customer has requested this.
• [Send an email to the customer]The email message for the concerning order state change is always send to thecustomer.
• [Send an email to the operators]The email message for the concerning order state change is always send to the operator.
• [Allow to edit the email message before sending]Default email messages have been created for the order state changes that trigger sendingan email. When you enable this option:• At a particular order state change, the concerning default email message opens.• The operator can change the email message.• The operator has to manually send the email message.
When you disable this option, any default email message is sent automatically.Most, but not all, triggers contain option [Allow to edit the email message before sending].
• [Send email to Cc addresses]Enable option [Send email to Cc addresses] to add a carbon copy address to the email sent.You can define multiple email addresses. Use a semicolon to separate the email addresses.
• [Move to category]Define to which category you want to move the order when the order state changes intothe concerning state.
• [Assign jobs to]Define to which operator you want to assign the jobs of the order when the order statechanges into the concerning state.
• [Assign orders to]Define to which order manager you want to assign the order when the order state changesinto the concerning state.
3. Click [Save].
Configure the actions at an order state change
Chapter 6 - Order processing 191PRISMAdirect 1.4.1
Configure the other settingsThis dialog contains settings that are part of two separate procedures:• [Allow operator to attach files when sending email]
This setting is part of the procedure to configure the email workflow. For the completeprocedure, see Configure the email workflow on page 43.
• [Automation templates]This setting is part of the procedure to configure the workflow for automation templates. Forthe complete procedure, see Configure the workflow for automation templates on page 60.
1. Click [Order processing] - [Workflow configuration] - [General settings] - [Other settings].2. Define the print settings for the ticket.
A ticket is inserted as a banner page before the job.3. [Allow operator to attach files when sending email]
You can define the email templates in section [Email templates]. In that section, you candefine which files will be attached to the emails by default. When you enable this option, theoperator is allowed to attach additional files to the email messages to the customer.
4. [Automation templates]Enable this option to allow using automation templates in PRISMAdirect. Now, theautomation templates become available in the [Order processing] console and in the [Productand order editor] workspace.
5. Click [Save].
Configure the other settings
192 Chapter 6 - Order processingPRISMAdirect 1.4.1

Configure the remindersYou can configure reminders about jobs that are nearly due. You can have up to 5 reminders withdifferent colors. The [Job number] column receives the selected color of the concerningreminder. For workspace [Order processing]:• It is recommended that you add the columns [Creation date] and [Delivery date] as order
information to the list of orders.• Add the same columns as job information to the list of jobs.
In this way, the operator can see the creation date of the job and the requested delivery date inone view.
1. Click [Order processing] - [Workflow configuration] - [User management] - [Reminders].2. Select [Set a reminder] if you want to be reminded about jobs that are nearly due.3. Click [New reminder].4. You can select how far ahead of the due date the reminder of the job is displayed:
• [Days]The number of days before the due date.
• [Hours]The number of hours before the due date.
• [Minutes]The number of minutes before the due date.
5. You can select the colour for the job to signal the concerning reminder.6. Click [Save].
Configure the reminders
Chapter 6 - Order processing 193PRISMAdirect 1.4.1

Configure the email templatesYou can create default email messages for the customers, approvers, etc. The emails can be sentat various stages while processing an order. Emails can also be sent at certain stages of aworkflow, for example, budget control.
This dialog contains settings that are part of two separate procedures:• The settings in this dialog are part of the procedure to configure the email workflow. For the
complete procedure, see Configure the email workflow on page 43.• [Attach the preflight report]
This setting is part of the procedure to configure the preflight workflow. For the completeprocedure, see Configure the preflight workflow on page 41.
Create default email messages
1. Click [Order processing] - [Workflow configuration] - [Email templates].2. Select the email template that you want to configure.3. Click a language to configure the email message in that language. The available languages
are displayed just above the subject field. The available languages are equal to the activelanguages for PRISMAdirect. See: [System] - [Active languages for system].
4. Create the email message.• Type the text. Use the icons to use different font types, font color, text alignment, etc.• You can add images, for example, your company logo.• You can use the order items and product items as variables. Drag and drop the variable
into the message at the desired position. A variable is enclosed by '%' symbols. You canalso type fixed text in the label.You can use the product items only for jobs. Drag and drop the layout item [Jobinformation (per job)] into the email message to create a job specific text box.
• You can include a hyperlink to the order in your email. Drag and drop [Hyperlink to order]into the message. When the customer clicks the hyperlink, a web page opens that containsthe concerning order.
Click [Revert to default] to use the default email message again. Your changes will bediscarded.
5. You can configure which files are automatically attached to the email message.• Select option [Attach the document] to attach the final PDF document to the email
message.• Select the [Attach the tickets] option to attach the job ticket to the email message.• Select the [Attach the preflight report] option to attach the preflight report to the email
message.
The operator can attach additional files to an email message when the [Allow operator toattach files when sending email] option is enabled. See procedure Configure the emailworkflow on page 43.
6. Click [Preview email] to check your email message.7. Click [Save].8. Repeat these steps for all email templates.
Configure the email templates
194 Chapter 6 - Order processingPRISMAdirect 1.4.1

Ticket mappings
Use job ticket settings in printer driverYou can use the values in the job ticket directly in the corresponding settings in the printer driver.All available printers that support the [UPP mappings] will be available in the section [UPPmappings]. The Unified Print Path (UPP) printers use the same technology as PRISMAprepare toprint page programmed documents.
You can use job ticket items of type: [Choice], [Yes/No], [Text] and [Number].
You can use the values of the job ticket in:• [All printers]
The values of the job ticket are used in all printer drivers.• To specific printers
The values of the job ticket are used in a specific printer driver. The job ticket settings for aspecific printer driver overwrite the use of these settings for all printers.You can use the values of the job ticket differently in different printer drivers.
Example
You can map a job ticket item to multiple printer settings in the printer driver. For example, youselect value 'Internal report' for job ticket item 'Document type'. Then, you map 'Internal report'to the printer settings 'Duplex = On' and 'Staple = Off'. When a user specifies the 'Document' typeas 'Internal report', the document will be printed duplex and without a staple.
Map the job ticket items
1. Click [Order processing] - [Ticket mappings] - [UPP mappings].2. Select if you want to use the job ticket settings in:
• [All printers]• A specific printer
3. Select a [Job ticket item].The possible values for this [Job ticket item] and the [Printer parameters] are displayed. Atleast one printer that supports [UPP mappings] must be installed to see items in the [Printerparameters].
4. Select one of the values and select the corresponding printer parameter.5. Repeat above steps for each job ticket item that you want to use in the printer driver.6. Click [Save].
Ticket mappings
Chapter 6 - Order processing 195PRISMAdirect 1.4.1

Use job tickets settings in documentYou can use the values of the job ticket items in document attributes. The document attributesare used when you page program the document.
You can use job ticket items of type: [Choice], [Yes/No], [Text] and [Number].
NOTEYou can use the job ticket settings only if the document is not already page programmed.
Map the job ticket items
1. Click [Order processing] - [Ticket mappings] - [Job ticket items in document].2. Select a [Job ticket item].
The possible values for this [Job ticket item] and the [Document attributes] are displayed.3. Select one of the values and select the corresponding document attribute.
You can map one job ticket item per document attribute.4. Repeat above steps for each job ticket item that you want to use in the document attributes.5. Click [Save].
Use job tickets settings in document
196 Chapter 6 - Order processingPRISMAdirect 1.4.1

Configure the printed ticket1. Click [Order processing] - [Print options for ticket].2. Define the font settings for the ticket. You can use different font types, font sizes, etc for each
group of items.• [Ticket title settings]
Define how the title of the job ticket must be printed.• [Group item settings]
Define how the group items of the job ticket must be printed.• [Item settings]
Define how the job ticket items must be printed.3. Select on which media the ticket must be printed.
• Media: select the type of media to print the ticket on.• Media size: select the size of the ticket.
4. Enable the [Print logo in ticket] option to print the logo in the job ticket.1. Click button [Browse] to select an image.
The allowed image file types are: .bmp, .jpg, .gif, .png.Click [Clear] to remove a selected image.
2. Select the position for the logo from the drop-down list.3. [Scale logo to page size]
You can scale the logo to the page size. Enable the [Keep ratio] option to use the samerelation between width and height for the logo as for the page size. You have to define thewidth [%] for the image.
5. Click [Save].
Configure the printed ticket
Chapter 6 - Order processing 197PRISMAdirect 1.4.1

Configure the printed ticket
198 Chapter 6 - Order processingPRISMAdirect 1.4.1

Chapter 7 Printer settings

Manage the printers for the application
Discover a new printerYou can use the printer discovery tool to easily add printers to PRISMAdirect. The newly addedprinter is not automatically available in PRISMAdirect. You have to close and open PRISMAdirectto load the printer in the application.
With this printer discover tool, you can detect printers on your network and get the configurationof the printers by standard SNMP protocol. The SNMP protocol must be enabled on the printers.When SNMP is not enabled, you can still add printers manually.
Click the [Discover] button to launch the [Printer discovery tool].
[Printer discovery method]
You can discover printers on the network either by broadcast, by scanning a range of IPaddresses or by defining a subnet mask. By default, the range of IP addresses and the subnetmask are retrieved from the local IP address and the local Windows subnet mask.
Discovery method Description
[Broadcast to local net-work]
Use this discovery method when printers are connected to the lo-cal network.SNMP enabled printers that recognise this type of broadcast willrespond.
NOTENot all SNMP enabled printers respond to the broadcast.
[Scan range] Use this discovery method when printers are connected to anoth-er subnet of the network than the local network.
NOTEWhen you have multiple network cards in your systemyou should use the scan range discovery method.
Scan a range of IP addresses for SNMP enabled printers from thelowest to the highest IP address.
[Scan subnet] Use this discovery method when you network is divided into subnetworks.Scan the defined subnet for SNMP enabled printers. The systemuses the subnet mask to determine the scan range. You canchange the subnet mask.
Click [Search] to start the discovery of printers.
Or you can define the additional settings for [Advanced...] first.
[Advanced discovery]
Click the[Advanced...] button to define SNMP parameters. These parameters are used during thescan process. Some of them are also used to configure the discovered printers.
Manage the printers for the application
200 Chapter 7 - Printer settingsPRISMAdirect 1.4.1

Scan process properties
Setting Explanation
[Retries:] Define how many times the tool tries to contact a printer.
[Timeout (ms):] Define the response timeout of a printer in ms.
You can select which SNMP version is supported by the printer:• SNMP V1• SNMP V3
You can define the following settings when you select SNMP V1:
Settings SNMP V1
Setting Description
[Read community:] The read community name is used to identify the group of devicesthat support printer monitoring.Default value 'public'.
You can define the following settings when you select SNMP V3:
Settings SNMP V3
Setting Description
[Security user name:] Define a user name for the authentication service.
[Context:] 'Context' refers to the collection of management information ac-cessible by the SNMP entity. This setting is optional.
[Authentication protocol:] Select the authentication protocol that is used by the printer.• None• MD5• SHA
[Authentication password:] The 'Authentication password' is the password required for theauthentication service.
[Confirm password:] Confirm the authentication password.
[Privacy protocol:] Select the encryption algorithm that is used by the printer.• None• DES• AES
[Privacy password:] The 'Privacy password' is the password required for the privacy(encryption) service. This setting is optional.
[Confirm password:] Confirm the privacy password.
Search result window
Once the discovery starts, using the selected scan method and its parameters, progression statusinformation shows the current number of scanned IP addresses and the current number ofprinters found. The result of the scan process is updated progressively and displays the followinginformation:
Column header Explanation
[IP address] The printer IP address. 4
Discover a new printer
Chapter 7 - Printer settings 201PRISMAdirect 1.4.1

Column header Explanation
[Printer name] The Windows printer name if the printer is already defined in thelocal Windows system, otherwise the model name is used as theprinter name.
[Printer model] The printer model.
[Status] The printer configuration status. The following status can beshown:• [New]
The printer is not yet available on the local system.• [Not configured]
The printer is available on the local system but the printer is notyet configured for PRISMAdirect.
• [Configured]The printer is available on the local system and the printer isconfigured for PRISMAdirect.
• [Not responding]The printer is available on the local system and the printer canbe configured for PRISMAdirect. However, the printer is not re-sponding.
• [Invalid configuration]The printer is available on the local system. However, the print-er is configured for another printer model or another version ofthe print server.
• [Invalid printer]The printer is defined on the local system with the same printeraddress. However, the printer does not match the discoveredprinter model or its version.
The following actions are available depending on the configuration status of the printer:• [Add]
The configuration status of the printer is [New]. Click [Add] to add the printer to the localsystem and/or configure the printer for PRISMAdirect. If the driver is required but not yetinstalled, the action button also launches the printer driver installation wizard before addingthe printer to the local system.For printers for which no driver is needed, the action button opens a dialog that allows you toadd the printer to PRISMAdirect. No printer is added to the local system. The finishers areautomatically retrieved from the printer.
• [Edit]The configuration status of the printer is [Configured]. Click [Edit] to edit the configuration ofthe printer.
• [Configure]The configuration status of the printer is [Not configured] or [Invalid configuration]. Click[Configure] to configure the printer for PRISMAdirect. The available finishers are automaticallyretrieved from the printer.
• [Remove]The configuration status of the printer is [Not responding] or [Invalid printer]. Click [Remove] toremove the printer from the local system and from the PRISMAdirect configuration.
Add a printer manually
Click the [Add additional printer] button to add a printer manually. For example, SNMP is notenabled on a printer. Therefore, the printer discovery tool cannot find the printer.
Discover a new printer
202 Chapter 7 - Printer settingsPRISMAdirect 1.4.1

Add a printer manuallyYou can add a printer manually. For example, SNMP is not enabled on a printer. Therefore, theprinter discovery tool cannot find the printer.1. Click [Printer settings] and click the plus icon next to [Printers].2. Select the printer model and controller version of your printer.3. You can change the printer name.4. Enter the IP address of the printer.5. Click OK.
Add a printer manually
Chapter 7 - Printer settings 203PRISMAdirect 1.4.1

Manage the general settingsThe general settings define the properties and the availability of each printer. Click [Printersettings] - [Printers] and select an available printer.
Printer image
You can change the printer image:1. Click the printer image.2. Select a printer image from the pre-defined list of images or upload your own image.
Images of type GIF, JPG, and PNG are supported.3. Click OK.
Preferences
• [Available for printing]Enable this option to make the printer available in the application.
• [Enable the driver settings button in the print dialog]The printer driver can offer options that are not available in the [Print] dialogue. For example,the printer driver of a color printer can offer color settings which are not supported byPRISMAdirect.Enable this option to add the driver settings button to the [Print] dialogue. You can find thisbutton next to the printer driver in the [Print] dialog.If the [Print] dialogue offers all driver settings, then the driver settings button is not added tothe [Print] dialogue.
NOTEThe printer output can be ruined if the printer driver dialogue contains settings thatconflict with page program settings. Options like [Same-up], [Booklet], pageprogramming in the driver and 'Number of copies' are potentially dangerous.Rasterize and finishing settings are usually save.
• [Enable accounting]When this option is enabled, the tab [Accounting] becomes available in the [Print] dialogue.
• [Maximum number of sheets per job for variable data documents]A print job for variable data documents can be very large. You can set a maximum number ofsheets per job to limit the size of a print job. Now, the application will cut the large print jobinto a number of smaller print jobs. Every smaller print job will not contain more than thespecified maximum number of sheets.The minimum value for this setting is 400 sheets.For example, a print job contains 4000 variable data documents. Each variable data documentcontains 10 pages that are printed on 5 sheets. You set a maximum of 400 sheets. Theapplication now sends 50 smaller print jobs to the printer instead of one large print job.
PDL Settings
• [Far East fonts:]Select this option if you want to include Far East fonts.
• [PostScript level:]Select the PostScript level of the printer. Available options are [Level 2] or [Level 3].
• [Emit fonts:]• Select option [All fonts] to add all used fonts to the print file. This will lead to a larger print
file.
Manage the general settings
204 Chapter 7 - Printer settingsPRISMAdirect 1.4.1

• Select option [Embedded fonts] to add only the embedded fonts to the print file. For fontsthat are not embedded, the printer will check if the font is installed on the printer. If not, thefont will be replaced by a font that is installed on the printer.
[Web sites for the printer:]
You can add one or more URLs to the text field. The URLs become available in the context menuof the printer in the [Order processing].
Right-click a printer in the [Order processing] to open the context menu of the printer. You canselect the website(s) in the context menu.
NOTEThis option is available in PRISMAdirect only.
Manage the general settings
Chapter 7 - Printer settings 205PRISMAdirect 1.4.1

Manage the printer configuration
Introduction
The print queues of the printer are listed in section [Destination]. The print queues are printerdependent. In addition to the default print queues, DocBoxes and virtual printers can be definedon the print server. DocBoxes can be defined on the PRISMAsync Print Server. Virtual printerscan be defined on the Fiery Print Server. DocBoxes and virtual printers are print queues thatapply specific settings to print jobs that are sent to them. For example, specific color options areapplied to each job that is sent to the queue. You have to import these queues from the printserver before you can make them available to the operator.
You can enable one or more print queues for the operator. The operator can find the print queuesin the [Print] dialog.
Finishers that are possibly available to the printer are listed in section [Finishers]. You have toselect which finishers are actually available to the printer. The selected finishers and their outputlocations become available to the operator in the [Print] dialog.
Manage the print queues
1. Click [Printer settings] - [Printers] and select an available printer. Click [Printer configuration].2. Select the print queues that you want to enable for the operator. When you enable more than
one queue, you have to select a default queue from the drop-down list.• Click [Import DocBoxes] or [Import virtual printers] to import specific print queues from the
print server. You can enable one or more of these specific print queues for the operator.
Manage the finishers for the printer
1. Click [Printer settings] - [Printers] and select an available printer. Click [Printer configuration].2. Click [Get printer configuration] to retrieve the latest configuration of the printer. This button
is only available for printers that support this option.3. Select which finishers are actually available to the printer.
• When you select more than one finisher, you have to select a default finisher from thedrop-down list.
• You can select the default output location for unused cyclic media from the drop-down list.Any unused cyclic media, such as tab media, is deposited in this output location.
4. Click [Save].
Manage the printer configuration
206 Chapter 7 - Printer settingsPRISMAdirect 1.4.1

Manage the connection settingsDefine the [Printer connection] settings when you want to:• Import or export the media catalog via a network to or from the printer.• Support DocBoxes. Check the specifications of your printer to determine if the printer supports
DocBoxes.• Support printer monitoring via SNMP.
1. Click [Printer settings] and select an available printer. Click and [Edit] select the [Connection]tab.
2. Define the [Printer connection] settings:
Setting Description
[Printer URL:] The URL of the printer. For example: http://10.29.167.169.You can edit [Printer URL:] only if the printer connection type is"JMF" or when the printer is not installed in the Windows spooler.The setting is disabled when the address is retrieved from theWindows spooler.
[Print to file] Select this option to send the print data to a file. You can enablethis option to diagnose a print problem.
[Connection type:] Select if you want to print using a protocol or the Windows spool-er. This parameter can be modified only when more than one con-nection type is supported for the selected printer.• Windows spooler• LPD• JMF
[Connection timeout (ms):] Define the connection timeout in ms. The printer must respond toeach request before the timeout expires. When the timeout doesexpire, the request to the printer is canceled.
3. Enable option [Printer monitoring] to monitor printers via SNMP.For example, you can monitor the toner level, printer status, etc.
Setting Explanation
Retry timer Define the frequency to monitor the printer in seconds. The range is: 5 - 900seconds.
You can select which SNMP version is supported by the printer:• SNMP V1• SNMP V3
SNMP V3 introduces a user-based security model for authentication and privacy services.
You can define the following settings when you select SNMP V1:
Settings SNMP V1
Setting Description
[Read communi-ty:]
The read community name is used to identify the group of devices that sup-port printer monitoring.Default value 'public'.
You can define the following settings when you select SNMP V3:
Manage the connection settings
Chapter 7 - Printer settings 207PRISMAdirect 1.4.1

Settings SNMP V3
Setting Description
[Security username:]
Define a user name for the authentication service.
[Context:] 'Context' refers to the collection of management information accessible bythe SNMP entity. This setting is optional.
[Authenticationprotocol:]
Select the authentication protocol that is used by the printer.• None• MD5• SHA
[Authenticationpassword:]
The 'Authentication password' is the password required for the authentica-tion service.
[Confirm pass-word:]
Confirm the authentication password.
[Privacy proto-col:]
Select the encryption algorithm that is used by the printer.• None• DES• AES
[Privacy pass-word:]
The 'Privacy password' is the password required for the privacy (encryption)service. This setting is optional.
[Confirm pass-word:]
Confirm the privacy password.
4. Click [OK].
Manage the connection settings
208 Chapter 7 - Printer settingsPRISMAdirect 1.4.1

Add or edit a printer clusterYou can group printers into printer clusters. You can use the printer cluster for load balancing.Load balancing is based on print speed. The goal is to split the workload in such a way that allprinters within the cluster are ready at the same time with their part of the job. For example, thecluster contains two printers. Printer A is twice as fast as printer B. When you send 60 copies of ajob to the printer cluster, then printer A prints 40 copies and printer B prints 20 copies.
Load balancing is also applied to variable data documents. Variable data documents are splitbased on records. One record is equal to one applied row of the data source. When the userprovides manual input, the manual input is considered to be one row of a data source.1. Click [Printer settings].2. Click the plus icon to create a printer cluster. Or select an existing cluster to edit the cluster.3. Define a name. The name must be unique.
You can use the characters: 'a - z', 'A - Z', '0 - 9', '_' . Spaces are allowed.4. Type a description for the printer cluster.5. You can drag and drop available printers to the active printers.
• You can define the print speed of each printer that you add to the cluster. The applicationuses the print speed to calculate the workload per printer when you enable load balancing.The print speed is often based on optimal paper formats and no finishing. When you usenon-optimal paper formats and/or finishing, the print speed decreases. You can decreasethe print speed to ensure a better calculation of the workload per printer.
Drag and drop active printers to the available printers to remove printers from the cluster.6. Click [Save].
Add or edit a printer cluster
Chapter 7 - Printer settings 209PRISMAdirect 1.4.1

Application settings
Add a color stripColor strips are used in PRISMAdirect as color proofing strips on the printed output.1. Click [Printer settings] - [Application settings] - [Color strips].2. Click the plus icon.3. Browse to the color strip that you want to add. You can select one or more color strips.
The supported file types are: *.eps, *.pdf, *.tif and *.tiff.4. Click [Open].
The added color strip is enabled by default. You can disable the color strip by deselecting thecheckbox.
Application settings
210 Chapter 7 - Printer settingsPRISMAdirect 1.4.1

Add an imposition templateThe application offers a number of imposition layout types. You can add and delete user-definedimposition layouts. You can disable any imposition layout. When a document uses a disabledimposition layout, the layout is still applied when that document is printed.
See the help file of the [Order processing] for a complete description of the default impositiontypes.
1. Click [Printer settings] - [Application settings] - [Imposition templates].2. Click the plus icon.3. Browse to the layout file(s) that you want to add. You can select one or more layout files.4. Click [Open].
The added imposition layout is enabled by default. You can disable the imposition layout bydeselecting the checkbox.
Add an imposition template
Chapter 7 - Printer settings 211PRISMAdirect 1.4.1

Add an imposition template
212 Chapter 7 - Printer settingsPRISMAdirect 1.4.1

Chapter 8 Price and formula editor

Select a formula managerYou can configure the prices and build the formulas for the price workflows with the [Price andformula editor].
When you have upgraded from PRISMAaccess to PRISMAdirect, you can choose to keep usingthe formula manager of PRISMAaccess.
1. Click [Price and formula editor] - [General settings].2. [Use the prices and formulas from the Excel sheet]
• Enable this setting to use the formula manager, i.e. the Excel sheet, of PRISMAaccess.• Disable this setting to configure the prices and build the formulas for the price workflows
with the [Price and formula editor].3. Click [Save].
Use the prices and formulas from the Excel sheet
Where is it
When you have upgraded from PRISMAaccess to PRISMAdirect, you can choose to keep usingthe formula manager of PRISMAaccess. The formula manager uses the default functionality ofMicrosoft Excel. The formula manager allows you to change the cost calculation rules of thesystem. You can configure the default formulas. You can also create new formulas.1. Click [Price and formula editor] - [General settings].2. [Use the prices and formulas from the Excel sheet]
Enable this setting to use the formula manager, i.e. the Excel sheet, of PRISMAaccess.
The worksheets
By default, a number of formulas are available. You can define custom formulas in the columnsnext to the default formulas up to and including column Z. Each column can contain one formula.Each column contains all information for one formula:• The name and the calculated result of the formula.
The result of the formula is shown in row 3.• The calculation for the formula.
The formula can use one of the default calculations, or a custom calculation.• The calculation collects its values from the concerning column in the result table.• The result table collects the values for all job ticket items from the concerning column in the
job ticket table.• The job ticket table receives its values from the current job ticket definition.
NOTEIt is recommended that you do not remove the default formulas.
Select a formula manager
214 Chapter 8 - Price and formula editorPRISMAdirect 1.4.1

Worksheet "CostSheet"
The layout of the formula manager in worksheet "CostSheet"
6A 6B 6C 6D6
7
5
4
2
31
Frame Description
1 The toolbar of the formula manager.
2 Select the language for the formulas in cell C2. Use one of the abbreviations from ta-ble [Captions] in worksheet "Utilities".The translated names for the formulas in the "CostSheet" worksheet are taken fromthe [Captions] table in the "Utilities" worksheet. The translated names of the formulasare shown in row 2 below the original formula name that is shown in row 1.• The formula names in row 1 are displayed in the [PRISMAaccess Administration].• The formula names in row 2 are displayed in the web shop.
3 The formulasBy default, a number of formulas are available. You can define custom formulas in thecolumns next to the default formulas up to and including column Z. Each column cancontain one formula. The formula can use one of the default calculations, or a customcalculation. The result of the formula is shown in row 3.
4 The calculationsDefault calculations are available. You can also create a custom calculation. For eachformula, you must select one calculation. The calculation collects its values from theconcerning column in the result table.
5 The result tableThe result table collects the values for all job ticket items from the concerning columnin the job ticket table.For example, a document can contain several types of media. The total cost for alltypes of media is calculated in the job ticket table. The total cost is added to the con-cerning cell in row [Media] in the result table. The calculation collects its values fromthe concerning column in the result table.
6 The job ticket table 4
Worksheet "CostSheet"
Chapter 8 - Price and formula editor 215PRISMAdirect 1.4.1

Frame Description
6A [Job ticket items]The list of [Job ticket items] is taken from the current job ticket definition. You can usethese ticket items in your formulas.Column [Job ticket items] is column A of the worksheet "CostSheet".
6B [Item values]The possible values of each job ticket item. For example, the job ticket item [Punch-ing] can have the values [(none)], [2 holes], [4 holes], [23 holes] or [Other].Column [Item values] is column B of the worksheet "CostSheet".
6C [Amount:]The amount - or the value - which is defined by the customer for each job ticket item.For example, the customer selected value [23 holes] for job ticket item [Punching].The column [Amount:] receives its values directly from the job ticket items of the sub-mitted job tickets.Column [Amount:] is column C of the worksheet "CostSheet".
6D The pricing columnsEach column can contain one formula. Each formula has a dedicated pricing column.Define the price for each [Item value] of each job ticket item in the pricing columns.The value in column [Amount:] is multiplied with the price in the pricing column. Theresult is the total price for the concerning [Item value] of a job ticket item.
7 The default worksheets.
Worksheet "CostSheet"
216 Chapter 8 - Price and formula editorPRISMAdirect 1.4.1

Worksheet "Utilities"
The layout of the formula manager in worksheet "Utilities"
5
4
2
3
1
Frame Description
1 The [Captions] tableThe translated names for the formulas in the "CostSheet" worksheet are taken fromthe [Captions] table in the "Utilities" worksheet.The [Captions] can be modified for each language and the changes will show up inthe web shop.
NOTEThe [Captions] table is defined as a Named Range. The name of the NamedRange is [CostCaptions]. Use the VLOOKUP function to use the values in theNamed Range in a formula. Named Ranges and the VLOOKUP function aredescribed in the Microsoft Excel help file.
2 The [Copies table]The reduction of the price for a certain amount of copies is taken from the [Copies ta-ble] in worksheet "Utilities".The first column (column B) represents the number of copies and the rest representthe actual values (reductions) for the different situations.
NOTEThe [Copies table] is defined as a Named Range. The name of the NamedRange is [CopiesTable]. Use the VLOOKUP function to use the values in theNamed Range in a formula. Named Ranges and the VLOOKUP function aredescribed in the Microsoft Excel help file.
3 The [Color] tableColor pages are more expensive than black & white pages.Create an absolute cell reference to use the values from this table. For example: Utilit-ies!$D$35. 4
Worksheet "Utilities"
Chapter 8 - Price and formula editor 217PRISMAdirect 1.4.1

Frame Description
4 The delivery time tableSame day delivery of the job is more expensive than a delivery after one or moredays.Create an absolute cell reference to use the values from this table. For example: Utilit-ies!$D$37.
5 The default worksheets.
Worksheet "Utilities"
218 Chapter 8 - Price and formula editorPRISMAdirect 1.4.1

The toolbar buttons
[Add items]
Introduction
If you want to add [Job ticket items] to the CostSheet and automatically use the propercalculation settings. Use this procedure.
NOTEIf the required [Job ticket items] are not available close the Formula manager. Open the [JobTicket Editor] to create the required [Job ticket items].
Procedure
1. Click [Add items].The [Add items] dialog will open. The dialog contains all [Job ticket items] that are not availablein the job ticket table.
2. Select the [Job ticket items] you want to add to the CostSheet.You can select the items one by one via the check boxes or Select all / deselect all. You can alsotype part of the name in the search box in order to ease your search for a specific item.
3. Click OK to add the items to the CostSheet.The selected items are added at the bottom of the job ticket table.
4. For each new [Job ticket item] and [Item value]:1. Define the multiplier for the [Job ticket item] and its [Item values] in the first pricing column.2. Select all cells of the new [Job ticket item] in the first pricing column, including the cell in row
[Total:]. Copy the selected cells to all other pricing columns.3. Add the new [Job ticket item] to the result table.
Copy one of the available rows. Type the name of the [Job ticket item] in the cell of column Ain the result table.
4. Create a cell reference from the result table to the cell in row [Total:] in the job ticket table.Create the cell reference in the same column as the first pricing column.• Create a relative reference to collect the value of the cell in row [Total:] in the job ticket
table. For example: =D79. A relative reference is usually used for [Item type:] [Number]• Create an absolute reference to collect a value from column [Amount:]. For example: =$C
$84. An absolute reference is usually used for [Item type:] [Yes/No], [Date] or [Text].5. Select the cell with the cell reference in the result table. Copy the selected cell to all other
columns in the result table.6. You can use the cells from the result table in the calculations.
[Refresh]
Introduction
The job ticket definition can be changed in the [Job Ticket Editor]. Click the [Refresh] button toupdate the [Item values] of the [Job ticket items] in the job ticket table.
Click the [Add items] button to add new [Job ticket items] to the job ticket table.
Procedure
1. Click the [Refresh] button.The [Item values] of the [Job ticket items] in the job ticket table are updated.
The toolbar buttons
Chapter 8 - Price and formula editor 219PRISMAdirect 1.4.1

A row is added to the job ticket table for each new [Item value]. A row is removed from the jobticket table for each deleted [Item value]. The names are updated for any renamed [Item values].
2. For each new [Item value]:Define the multiplier in all pricing columns. The cell for each new [Item value] is automaticallyadded to the formula for the total cost of the [Job ticket item].
[Used items on top]
Introduction
If you want to sort [Job ticket items] from the CostSheet without disturbing the proper calculationsettings. Use this procedure.
Procedure
1. Click the [Used items on top].The usage of an item is calculated with the following formula: number of values in the item *number of appearances in the formulas.The list of [Job ticket items] will be sorted from top to bottom in a descending order relative tothe usage of each item.
Example
If you have 2 [Job ticket items] that appear in 2 formulas then the one with more values willappear in the list above the second item.
[Remove all unused items]
Introduction
If you want to remove unused [Job ticket items] from the CostSheet without disturbing the propercalculation settings. Use this procedure.
Unused [Job ticket items] are the [Job ticket items] that are not used in any formulas.
Procedure
1. Click [Remove all unused items].The unused items are removed from the job ticket table.
2. For each removed [Job ticket item]:1. Remove the [Job ticket item] from the result table.
[Remove items]
Introduction
If you want to remove [Job ticket items] from the CostSheet without disturbing the propercalculation settings. Use this procedure.
Procedure
1. Click [Remove items].The [Remove items] dialog will open. The dialog contains all [Job ticket items] that are availablein the job ticket table.
[Used items on top]
220 Chapter 8 - Price and formula editorPRISMAdirect 1.4.1

2. Select the [Job ticket items] you want to remove from the CostSheet. You can select the [Jobticket items] one by one via the check boxes or select all / deselect all.
3. Click OK to remove the [Job ticket items] from the CostSheet.The [Job ticket items] are removed from the job ticket table.
4. For each removed [Job ticket item]:1. Remove the cells of the result table from the calculations that used the [Job ticket item].2. Remove the [Job ticket item] from the result table.
[Remove unused regions]
Introduction
The job ticket definition can be changed in the [Job Ticket Editor]. If you want to remove [Jobticket items] that are no longer in the definition you can use this procedure.
Procedure
1. Click [Remove unused regions].All [Job ticket items] that are not in the definition will be removed from theCostSheet .
2. For each removed [Job ticket item]:1. Remove the cells of the result table from the calculations that used the [Job ticket item].2. Remove the [Job ticket item] from the result table.
[Use system language]
Introduction
You can automatically translate the following parts of the formula manager into the installationlanguage of Microsoft Excel:• The [Job ticket items] and default headers in the job ticket table.• The buttons of the formula manager.
The installation language of Microsoft Excel must be one of the 18 languages that are supportedby PRISMAaccess. See the first column of table [Captions] in worksheet "Utilities" for theabbreviations of the supported languages.
NOTEThe installation language of Microsoft Excel is only used for the formula manager.
Procedure
1. Click [Use system language].The following parts of the formula manager are automatically translated into the installationlanguage of Microsoft Excel:• The [Job ticket items] and default headers in the job ticket table.• The buttons of the formula manager.
[Use default style]
Introduction
The factory default can be applied to the job ticket table in worksheet CostSheet. All customchanges to the job ticket table are lost.
[Remove unused regions]
Chapter 8 - Price and formula editor 221PRISMAdirect 1.4.1

Procedure
1. Click [Use default style].The factory default is applied to the job ticket table in worksheet CostSheet. All custom changesto the job ticket table are lost.• The names of the [Job ticket items] and the default headers are restored.• The color of the cells and the color of the text are set to the factory default.
[Use default style]
222 Chapter 8 - Price and formula editorPRISMAdirect 1.4.1

Working with the formulas
Check the [Job ticket items]
Introduction
The required [Job ticket items] must be available before you can create or configure a formula.
Procedure
1. Check that all required [Job ticket items] are available in the job ticket table. If the required [Jobticket items] are not available see : Add items on page 219
2. Check that all required values of the [Job ticket items] are available in column [Item values].Column [Item values] is column B of the worksheet "CostSheet". If the required values are notavailable, do sub-step a:1. Close the Formula manager. Open the [Job Ticket Editor] to create the required [Item values].
Create a formula
Introduction
By default, a number of formulas are available. You can define custom formulas in the columnsnext to the default formulas up to and including column Z. Each column can contain one formula.Each column contains all information for one formula:• The name and the calculated result of the formula.
The result of the formula is shown in row 3.• The calculation for the formula.
The formula can use one of the default calculations, or a custom calculation.• The calculation collects its values from the concerning column in the result table.• The result table collects the values for all job ticket items from the concerning column in the
job ticket table.• The job ticket table receives its values from the current job ticket definition.
NOTEIt is recommended that you do not remove the default formulas.
Before you begin
The required [Job ticket items] for the new formula must be available.
When to do
In this procedure a complete new formula is created in column Z of the worksheet "CostSheet".The new formula is based on two [Job ticket items]: [Copies] and [Cover]. In this example, thedata of the formula in column E is used as starting point for the formula in column Z.
Working with the formulas
Chapter 8 - Price and formula editor 223PRISMAdirect 1.4.1

Procedure
1. Fill column Z with data from an existing formula. In this example, the data of the formula incolumn E is used as starting point for the formula in column Z.1. Click the column label "E" to select all cells of column E.2. To copy the selected cells, click "Edit - Copy", or press CTRL+C.3. Click the column label "Z".4. Click "Edit - Paste", or press CTRL+V.
The formulas and formatting of column E are copied into column Z. The cell references areautomatically adjusted.
2. Define the name of the new formula in cell Z1. In this example: "Job cost".The formula names in row 1 are displayed in the [PRISMAaccess Administration].
3. Define the name of the new formula in cell Z2. In this example: "Job cost".The formula names in row 2 are displayed in the web shop.
4. Define the price for the [Item values] of the [Job ticket items] in column Z.Optionally, you can define a custom name for the new pricing column. In this example: "Jobcost".
Create a formula
224 Chapter 8 - Price and formula editorPRISMAdirect 1.4.1

5. Check the formulas for [Copies] and [Cover] in the job ticket table. The formulas must use thevalues from column [Amount:] and the values from the new pricing column "Job cost". The[Amount:] column receives its values directly from the submitted job tickets. The value in column[Amount:] is multiplied with the price in the pricing column. The total price of a job ticket item isthe sum of the prices of its [Item values].1. Collect the price of [Copies] in cell Z78: =$C77*Z77.2. Collect the prices for all [Item values] of [Cover] in cell Z141: =$C137*Z137+$C138*Z138+
$C139*Z139+$C140*Z140.
6. Collect the prices for all [Item values] in the result table.The result table collects the values for all job ticket items from the concerning column in the jobticket table.1. Collect the price of [Copies] in cell Z13: =Z78.2. Collect the price of [Cover] in cell Z26: =Z141.
7. In this example, create a new calculation in cell Z7 of row 7: ONLY B&W. Add up the prices for[Copies] and [Cover].It is recommended to use the IF function for each new calculation: =IF ( logical_test, value_if_true,value_if_false ). If the logical_test is true, the job cost is calculated. Else, the calculation returns adefault value. In this example: 9999.99.
NOTEYou can use the functions of most categories in Microsoft Office Excel to create acalculation. You cannot use the functions of category "Database".
1. Add up the prices of [Copies] and [Cover] in cell Z7: =IF((Z13+Z26)>0,SUM(Z13, Z26),9999.99).2. If required, you can reduce the total price when the customer orders a certain amount of
[Copies]: =IF((Z13+Z26)>0,SUM(Z13, Z26)*VLOOKUP(Z13,CopiesTable,2,TRUE),9999.99).The reduction of the price for a certain amount of [Copies] is taken from the [Copies table] inthe "Utilities" worksheet.
NOTEThe formula syntax and usage of the VLOOKUP function is described in theMicrosoft Excel help file.
Create a formula
Chapter 8 - Price and formula editor 225PRISMAdirect 1.4.1

8. Collect the result for the formula in cell Z3: =Z7.The value in Z3 is returned to the customer.
After you finish
You must test each new formula for correctness.
Test a formula
Introduction
You can create and configure new formulas in the Formula manager. You must test each newformula for correctness.
When to do
A new formula is created in column Z. The new formula is based on two [Job ticket items]:[Copies] and [Cover]. In this procedure, the new formula is tested for correctness.
Procedure
1. Check that the new pricing column uses the values from column [Amount:].1. Click cell Z78.2. Click "Trace Precedents" from the Excel menu.
The usage of the "Trace Precedents" function is described in the Microsoft Excel help file.3. Check that the value from column [Amount:] is used for [Copies].
1. Click cell Z141.2. Click "Trace Precedents" from the Excel menu.3. Check that the values from column [Amount:] are used for [Cover].
Test a formula
226 Chapter 8 - Price and formula editorPRISMAdirect 1.4.1
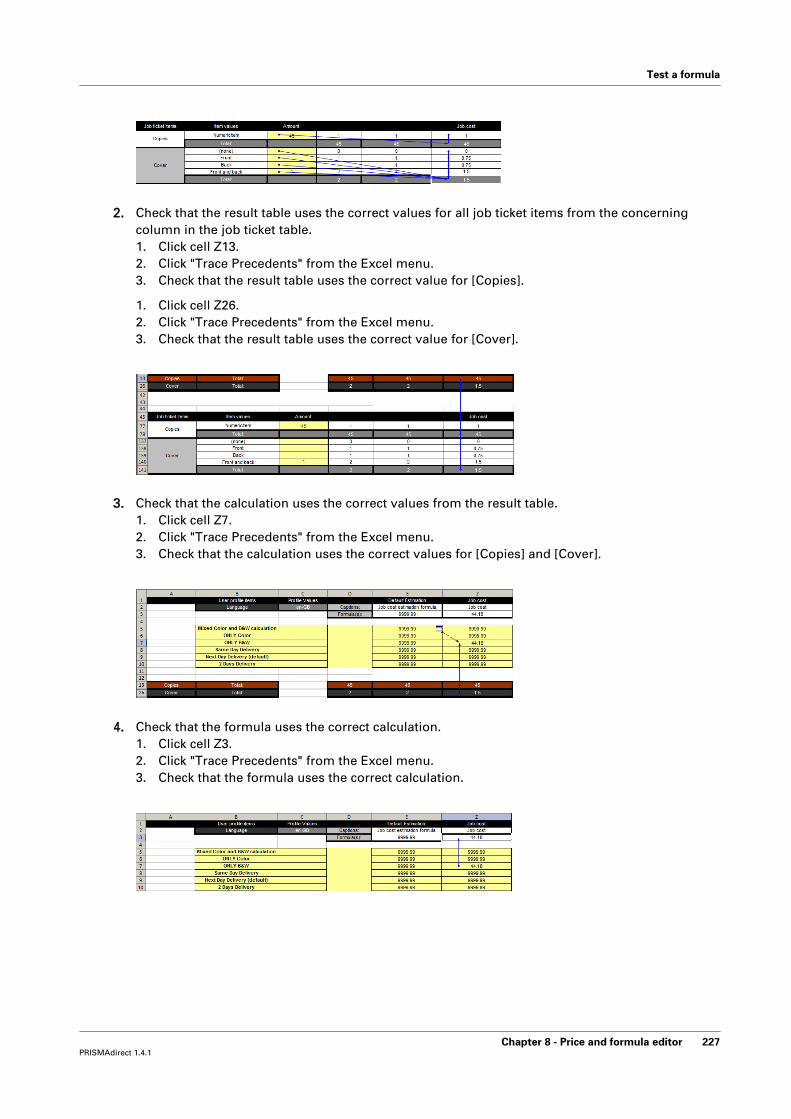
2. Check that the result table uses the correct values for all job ticket items from the concerningcolumn in the job ticket table.1. Click cell Z13.2. Click "Trace Precedents" from the Excel menu.3. Check that the result table uses the correct value for [Copies].
1. Click cell Z26.2. Click "Trace Precedents" from the Excel menu.3. Check that the result table uses the correct value for [Cover].
3. Check that the calculation uses the correct values from the result table.1. Click cell Z7.2. Click "Trace Precedents" from the Excel menu.3. Check that the calculation uses the correct values for [Copies] and [Cover].
4. Check that the formula uses the correct calculation.1. Click cell Z3.2. Click "Trace Precedents" from the Excel menu.3. Check that the formula uses the correct calculation.
Test a formula
Chapter 8 - Price and formula editor 227PRISMAdirect 1.4.1

Pricing
Configure the system-wide pricesAll items for media, printing and finishing are defined in and retrieved from the [Product andorder editor]. This is also true for the choice items.
This topic describes how you can configure the system-wide prices.
The settings in the Prices for ... dialogs are part of the procedure to configure the email workflow.For the complete procedure, see Configure the prices for media, printing, and finishing onpage 53.
Configure the prices for media, printing and finishing items
1. Click [Price and formula editor] - [Pricing].2. Configure all pages in paragraph [Pricing] starting with page [Prices for media].3. Define values for all options in the dialog. You can type a value in the text field. Or you can
click the arrow buttons to increase or decrease the value.4. Click [Save].5. Do the same for:
• [Prices for printing]• [Prices for finishing]
Configure the prices for choice items
1. Click [Price and formula editor] - [Pricing].2. Click [Prices for choice items for jobs].3. Click the drop-down list and select the choice item that you want to configure.4. Click [Add].
All options of the choice item are added to the dialog. You can add and configure more choiceitems to the dialog.
5. Define values for all options in the dialog. You can type a value in the text field. Or you canclick the arrow buttons to increase or decrease the value.
6. Click [Save].7. Do the same for:
• [Prices for choice items for orders]
Configure the prices for stationery products
1. Click [Price and formula editor] - [Pricing].2. Click [Prices for stationery products].3. Define values for all stationery products in the dialog. You can type a value in the text field. Or
you can click the arrow buttons to increase or decrease the value.4. Click [Save].
Pricing
228 Chapter 8 - Price and formula editorPRISMAdirect 1.4.1

Formulas
Create the formulasFormulas for jobs and orders
You have to configure the prices for media, printing and finishing options. You can configure theprices for choice items that you want to use in formulas. When you have configured the prices,you can create formulas for jobs and for orders. You can create one or more constants. You canuse the constants in the formulas. You can configure discounts for everyone or for specific usergroups. You can use the discounts in combination with the formulas.• [Formulas for jobs]
You create a formula by adding formula parts. By default, the first formula part for jobs isInitialCost.• InitialCost = ((prices for media * number of pages) + (prices for media * number of covers) +
(prices for printing * number of pages) + prices for finishing) * number of copiesThe number of covers depends on the value of CoverPlace: 0 for none, 1 for front or back, 2for front and back.
A formula for jobs is applied to jobs. Each job contains one type of media.• [Formulas for orders]
By default, TotalCost is available for formulas for orders. TotalCost can be used as a formulapart. It is available in the list of [Variables] that you can use for an expression. Just dragTotalCost in field [Expression] and click [Save].• TotalCost = the total of the prices of all jobs of the order.
A formula for orders is applied to orders. Each order can contain multiple jobs. Each job canuse a different type of media than any other job in the order.
Formulas for shipping
The shipping formulas calculate the postage & packing. The shorter the delivery time, the higherthe postage. You have to create the shipping formulas based on agreements with each shippingprovider. Note that the actual postage is calculated when the operator clicks [Dispatch] in the[Order processing] workspace.• [Shipping formulas for orders]
Create a formula for each delivery time that you offer to the customers. The customer canselect a delivery time in the web shop. The calculated postage & packing is displayed to thecustomer. The calculated price is a contract between the customer and the web shop. You cancreate one or more shipping formulas for each web shop.
1. Click [Price and formula editor] - [Formulas] and select:• [Formulas for jobs], or• [Formulas for orders], or• [Shipping formulas for orders]
2. Click [Add].3. Define a name. The name must be unique.
You can use the characters: 'a - z', 'A - Z', '0 - 9', '_' . Spaces are allowed.4. Click a language to type the caption in that language. The available languages are displayed
just above the text field.5. Click [New part of formula].
By default, the first formula part for jobs is InitialCost.1. Select the type of the formula part.
• [Addition]The result of this formula part is added to the result of the previous formula part.
• [Subtraction]
Formulas
Chapter 8 - Price and formula editor 229PRISMAdirect 1.4.1

The result of this formula part is subtracted from the result of the previous formulapart.
• [Exit]The result of this formula part will halt the execution of the formula. The calculatedresult until the exit statement is returned for the formula.
2. Define a name. The name must be unique.You can use the characters: 'a - z', 'A - Z', '0 - 9', '_' . Spaces are allowed.
3. Define the result of the formula part in field [Value].You can only use variables that return a numerical value. Drag the variables in the field[Value]. For more information concerning the variable types, see Variables of type"Choice" on page 230.
4. Select how you want to use the value of the formula part in option [Use expression as:].• [Value]
The result of this formula part is added to or subtracted from the result of the previousformula part as a value.
• [Percentage]The result of this formula part is added to or subtracted from the result of the previousformula part as a percentage.
5. Create the condition for the expression in field [Condition:]. You can use all variables andoperators in the condition. The value of this formula part is used when the condition ismet. The value of this formula part is always used when you do not create a condition.For more information concerning the variable types, see Variables of type "Choice" onpage 230.
6. You can repeat step 5 to add additional formula parts to the formula.7. You can drag each formula part to the correct position in [Parts of formula]. The formula parts
are executed in the given order starting with the first formula part.8. Click [Save].
The formula becomes available for the user groups, web shops and the products.9. Do the same for:
• [Formulas for jobs], or• [Formulas for orders], or• [Shipping formulas for orders]
Variables of type "Choice"A number of variable types are available when you create a formula part. You can use a variableof type [Choice] as follows:• Field [Value]
The variable contains the option of a choice item that is valid for the job. For example:Suppose that the choice item DocumentMediaColor contains 10 color options for media colour.For the formula, the variable DocumentMediaColor only contains the color that is actually usedfor the media in this job.
• Field [Condition:]You can use variables of type [Choice] in field [Condition:]. In this field, you can use all optionsof the choice item to create the condition:1. Drag the variable into the field.2. Drag or type the operator into the field.3. Type the quotation marks ("") in the field.
The list of options for the concerning choice item appears. For example:Suppose that the choice item DocumentMediaColor contains 10 color options for mediacolour. For the condition, you can use all 10 options of the choice item.
4. Select an option from the list to create the condition.
Variables of type "Choice"
230 Chapter 8 - Price and formula editorPRISMAdirect 1.4.1
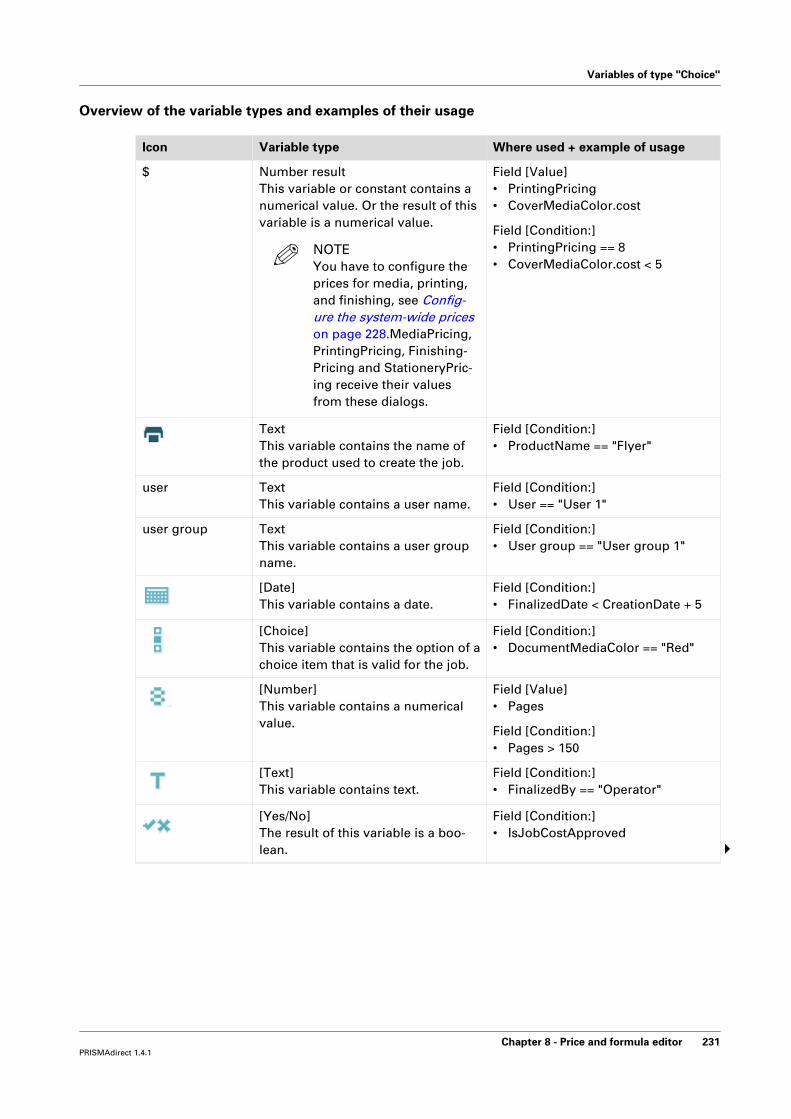
Overview of the variable types and examples of their usage
Icon Variable type Where used + example of usage
$ Number resultThis variable or constant contains anumerical value. Or the result of thisvariable is a numerical value.
NOTEYou have to configure theprices for media, printing,and finishing, see Config-ure the system-wide priceson page 228.MediaPricing,PrintingPricing, Finishing-Pricing and StationeryPric-ing receive their valuesfrom these dialogs.
Field [Value]• PrintingPricing• CoverMediaColor.cost
Field [Condition:]• PrintingPricing == 8• CoverMediaColor.cost < 5
TextThis variable contains the name ofthe product used to create the job.
Field [Condition:]• ProductName == "Flyer"
user TextThis variable contains a user name.
Field [Condition:]• User == "User 1"
user group TextThis variable contains a user groupname.
Field [Condition:]• User group == "User group 1"
[Date]This variable contains a date.
Field [Condition:]• FinalizedDate < CreationDate + 5
[Choice]This variable contains the option of achoice item that is valid for the job.
Field [Condition:]• DocumentMediaColor == "Red"
[Number]This variable contains a numericalvalue.
Field [Value]• Pages
Field [Condition:]• Pages > 150
[Text]This variable contains text.
Field [Condition:]• FinalizedBy == "Operator"
[Yes/No]The result of this variable is a boo-lean.
Field [Condition:]• IsJobCostApproved
4
Variables of type "Choice"
Chapter 8 - Price and formula editor 231PRISMAdirect 1.4.1

Icon Variable type Where used + example of usage
PrintInColor[Choice]This variable contains the option of achoice item that is valid for the job.For example:
Field [Condition:]For an example, see variable type[Choice]
NewCoverMedia[Choice]This variable contains the option of achoice item that is valid for the job.For example:
CoverPlace[Choice]This variable contains the option of achoice item that is valid for the job.For example:
Plexity[Choice]This variable contains the option of achoice item that is valid for the job.For example:
Folding[Choice]This variable contains the option of achoice item that is valid for the job.For example:
OrientationAndBindingEdge[Choice]This variable contains the option of achoice item that is valid for the job.For example:
Media[Choice]This variable contains the option of achoice item that is valid for the job.For example:
Punching[Choice]This variable contains the option of achoice item that is valid for the job.For example:
BindingMethod[Choice]This variable contains the option of achoice item that is valid for the job.For example:
Variables of type "Choice"
232 Chapter 8 - Price and formula editorPRISMAdirect 1.4.1

Test the formulasYou can test the formulas that you have created. You just have to upload an order to test aformula.
Before you begin
There are two ways to test each formula:1. You create specific orders for each formula. You use these orders in this dialogue. The system
applies a formula based on the data inside the order. You can see which formula was appliedin the detailed test result.
2. You can also assign the formula that you want to test directly to a product or to a web shop.You have to create specific orders to test the formula. See Configure the default priceestimation settings per web shop on page 155 and Configure the default quotation settingsper web shop on page 156
Test the formula
1. Click [Price and formula editor] - [Formulas] - [Test formula].2. Click [Use exported order].3. Browse to the zip file that contains one order.
You can create a zip file containing one order in the [Order processing]. Select one order inthe [Order processing] and click [Export orders].
4. The formula is tested. The detailed test result of the formula is displayed.
Test the formulas
Chapter 8 - Price and formula editor 233PRISMAdirect 1.4.1

Apply a discountYou can apply a discount to products and/ or user groups. When you apply multiple discounts toa product or a user group, the order of the discounts is important. The first discount in the list willbe applied to the concerning product or user group. Any other discounts in this list for thatproduct or user group will not be applied.
To change the currency for the discounts, click [Product and order editor] - [Currency].
1. Click [Price and formula editor] - [Discounts].2. Click [Add].
• Define the amount for the discount. You can type a value in the text field. You can use thedecimal separator "." in the value. Or you can click the arrow buttons to increase ordecrease the value.• Value
The discount is a value subtracted from the formula result.• Percentage
The discount is a percentage subtracted from the formula result.
• Select for which users the discount applies.• [Everyone]
The discount is available for everyone who uses the selected product.• [User group]
Click Browse to select one or more user groups. The discount is available for the users inthe specified user groups.
• [Product name]You can apply the discount to one or more products.
• [Web shop name]You can apply the discount for the products to one or more web shops.
• [Show discounts to customers]Enable this option to show the discounts for the selected products and web shops. Eachselected product displays the value or the percentage of the discount in a red field.
3. Click [Save].
Apply a discount
234 Chapter 8 - Price and formula editorPRISMAdirect 1.4.1
Create a constantYou can create one or more constants. You can use the constants in the formulas.
1. Click [Price and formula editor] - [Constants].2. Click [Add].3. Define a name. The name must be unique.
You can use the characters: 'a - z', 'A - Z', '0 - 9', '_' . Spaces are allowed.4. Define a value for the constant. You can type a value in the text field. Or you can click the
arrow buttons to increase or decrease the value.5. Click [Save].
The constant is added to the list of variables for the formulas. You can use the constant in theformulas.
Create a constant
Chapter 8 - Price and formula editor 235PRISMAdirect 1.4.1

Configure the currency settings1. Click [Price and formula editor] - [Currency].2. Select a currency from the drop-down list.
Amounts are displayed with the selected currency code from the drop-down list or you candefine a custom currency sign.• [Currency sign]
Enable the checkbox and type the currency symbol. You can type text or use an ALT code,for example, ALT 0128 for the euro symbol.
3. Define the location of the currency sign:• [Before the amount]• [After the amount]
4. Configure the allowed number of decimals for the job cost.5. Click [Save].
Configure the currency settings
236 Chapter 8 - Price and formula editorPRISMAdirect 1.4.1

Backup and restoreYou can import and export the settings of the [Price and formula editor]. The backup file containsall formulas, prices, discounts, etc. Then, you can use the exported settings to configure anotherinstallation of PRISMAdirect. You can use the export file on any computer.
When you export the settings, all settings will be exported. When you import the settings, allsettings will be imported.
Backup
1. Click [Price and formula editor] - [Backup and restore].2. Click [Export].
The exported file is stored in the [Downloads] folder.
Restore
1. Click [Price and formula editor] - [Backup and restore].2. Click [Import].3. Browse to the folder where the backup file is located.4. Click [Open].
All settings of the [Price and formula editor] are being restored.
Backup and restore
Chapter 8 - Price and formula editor 237PRISMAdirect 1.4.1

Backup and restore
238 Chapter 8 - Price and formula editorPRISMAdirect 1.4.1

Index
A
About link.............................................................. 164Access per web shop........................................... 145Accounting............................................................ 126Accounting database............................................126Accounting reports
Email............................................................... 129Add additional printer.......................................... 202Add items.............................................................. 219Add printer............................................................ 203Advanced discovery............................................. 200Alarm..................................................................... 193Allowed file types................................. 110, 116, 150Anonymous access.............................................. 143Assign to............................................................... 189Automatic conversion.......................................... 106Automatic merge..................................................106Automation templates........................................... 60
Manage........................................................... 187Available budget.............................................50, 151
B
Backup................................................................... 125Prices and formulas....................................... 237
Box sizes..................................................................86Budget management..............................................50
Cost center for user........................................171Cost center for user group............................ 178Default cost center................................... 50, 151Default price approval settings..................... 153Price approval for user groups..................... 179Price approval for users.................................172
Button: Add items.................................................219Button: Refresh..................................................... 219Button: Remove all unused items....................... 220Button: Remove items..........................................220Button: Remove unused regions.........................221Button: Use default style......................................221Button: Use system language............................. 221Button: Used items on top...................................220
C
Category................................................................ 190Certificate.............................................................. 123
Clean-up settings..................................................108Clear the database................................................127Cluster................................................................... 209Color strip..............................................................210Connection to the server......................................122Constant................................................................ 235Contact information............................................. 164Copyright administration.....................................150Corrupted jobs...................................................... 134Corrupted orders.................................................. 134Corrupted products.............................................. 134Cost center
Assign to user.................................................171Assign to user group..................................... 178Create and manage..................................50, 151
CostSheet.............................................................. 215Currency
Default.............................................................236System............................................................ 236Web shop........................................................160
Current job number..............................................182Current order number.......................................... 182Custom columns for jobs.....................................148Custom columns for orders.................................148
D
Discount................................................................ 234DocBox.................................................................. 206Dropbox...................................................................20
E
Email settings......................................................... 75Email templates.................................................... 194Email workflow....................................................... 43Excel sheet
PRISMAaccess................................................214Export folder for jobs........................................... 121Export folder for orders....................................... 119Export service
Pause...............................................................118Restart.............................................................118
F
Failed jobs............................................................. 105
Index
239PRISMAdirect 1.4.1

File hosting services...............................................20File types............................................... 110, 116, 150Filter
Order processing............................................185Web shop........................................................149
Finalized orders.................................................... 108Finisher..................................................................206Font settings......................................................... 197Formula manager
PRISMAaccess................................................214Formulas
Jobs.................................................................229Orders............................................................. 229Shipping..........................................................229
H
Hosting web shops...............................................101
I
Import folder......................................................... 115Import service
Pause...............................................................114Restart.............................................................114
Import user groupsLDAP server....................................................177uniFLOW server..............................................177
Import usersLDAP server....................................................170uniFLOW server..............................................170
Imposition layout..................................................211
J
JDD service settings.............................................104JDD service user...............................................15, 21JDF endpoints.......................................................110JDF mapping file.................................................. 111JDF service
Pause...............................................................109
L
LanguageAllow customers to change the web shoplanguage................................................... 39, 143Login web shop........................................39, 146PRISMAdirect languages.........................39, 133Web shop languages............................... 39, 162
LDAP attributesMap to order items.......................................... 69Map to profile attributes..................................69
LDAP serverAdd....................................................................66
Authentication..................................................74Retrieve user data............................................ 74
License server....................................................... 137Link to file................................................................25Link to folder........................................................... 25Linkable files........................................................... 25Load balancing..................................................... 209Login rights........................................................... 167Logo in ticket.........................................................197
M
Maintenance mode.................................................94Mapping file.......................................................... 111
N
Neevia....................................................................106
O
Order history list...................................................147Order state change............................................... 191OrderID............................................................ 78, 182Origin address
Default...............................................................89Web shop........................................................163
Overview of warnings.......................................... 182
P
Passwords for customers.................................... 143Payment
System-wide.....................................................16Payment per web shop.......................................... 18Payment providers................................................. 17Payment report....................................................... 16Payment workflow..................................................15PayPal...................................................................... 17Preflight processes......................................... 42, 106Preflight rules
Order processing console............................. 188Web shop........................................................161
Preflight workflow.................................................. 41Preview variable data document...................48, 184Price and formula editor...................................... 214Price approval
Default settings.............................................. 153User groups....................................................179Users............................................................... 172
Price estimation settings - default.......................155Prices for choice items for jobs........................... 228Prices for choice items for orders....................... 228Prices for finishing
System............................................................ 228
Index
240PRISMAdirect 1.4.1

Web shop........................................................154Prices for media
System............................................................ 228Web shop........................................................154
Prices for printingSystem............................................................ 228Web shop........................................................154
Prices for stationery products............................. 228Print License Monitoring service.........................113Print Prepare Manager service................ 48, 61, 112Print queue............................................................206Printer cluster........................................................209Printer connection................................................ 207Printer discovery method.................................... 200Printer discovery tool........................................... 200Printer general settings........................................204Printer monitoring................................................ 207Problem in PRISMAdirect.................................... 103Procedure: Automation templates........................ 60Procedure: Budget management.......................... 50Procedure: Default price estimation settings....... 54Procedure: Default quotation settings.................. 57Procedure: Email workflow....................................43Procedure: File hosting services........................... 20Procedure: Languages........................................... 39Procedure: Payment workflow.............................. 15Procedure: Preflight workflow...............................41Procedure: Prices for media, printing, andfinishing...................................................................53Procedure: Self-registration workflow..................38Procedure: Shipping workflow..............................29Procedure: Tax services workflow........................ 33Procedure: VDP workflow...................................... 48Product
Discount..........................................................234Profile...................................................................... 10Profile mapping...................................................... 69Profile settings...................................................... 168
Map to job ticket items.................................. 168
Q
Quotation settings - default................................. 156
R
Refresh.................................................................. 219Remember user credentials.................................143Reminder...............................................................193Remote web server.............................................. 100Remove all unused items.................................... 220Remove certificate................................................124Remove items....................................................... 220Remove unused regions...................................... 221
Reports folder....................................................... 132Reserved budget.............................................50, 151Restore.................................................................. 125
Prices and formulas....................................... 237
S
Search result window.......................................... 201Secure connections
JDF service..................................................... 109Select a printer image.......................................... 204Self-registered users............................................ 169Self-registration
Activate accounts automatically............. 38, 143Activate accounts manually.................... 38, 169Allow......................................................... 38, 143
Self-registration workflow..................................... 38self-signed certificates......................................... 123Shipping label.........................................................87Shipping providers
PRISMAdirect................................................... 30Web server........................................................30Web shop..........................................................30
Shipping workflow................................................. 29SMTP server............................................................75Spent budget.................................................. 50, 151Submission settings.............................................150System of measurement for media.................... 135
T
Tax servicesPRISMAdirect................................................... 33Web server........................................................34Web shop..........................................................35
Tax services workflow............................................33Testing formulas...................................................233Ticket mappings
Document....................................................... 196Printer driver...................................................195
Trace levelAutomatic process settings...........................107Clean-up settings........................................... 108Export service.................................................118Import service.................................................114JDD service.....................................................104JDF service..................................................... 109Order processing workspace........................ 183Print License Monitoring service.................. 113Print Prepare Manager service......................112uniFLOW interface........................................... 28
Troubleshoot.........................................................103
Index
241PRISMAdirect 1.4.1

U
uniFLOW interface............................................27, 94Unused cyclic media............................................ 206Use default style................................................... 221Use system language...........................................221Used items on top................................................ 220User group
Customize web shop settings....................... 173User roles.............................................................. 180Utilities.................................................................. 217
V
Variable typeChoice............................................................. 230
Variable types....................................................... 230VDP settings....................................................48, 184VDP workflow......................................................... 48Virtual printer........................................................206
W
Warnings............................................................... 150Web server
Web shop........................................................101Workflow............................................................... 191Worksheet CostSheet...........................................215Worksheet Utilities............................................... 217
Index
242PRISMAdirect 1.4.1


Canon Inc.www.canon.com
Canon U.S.A., Inc.www.usa.canon.com
Canon Canada Inc.www.canon.ca
Canon Europe Ltdwww.canon-europe.com
Canon Latin America Inc.www.cla.canon.com
Canon Australia PTY. Ltdwww.canon.com.au
Canon China Co., Ltdwww.canon.com.cn
Canon Singapore PTE. Ltdwww.canon.com.sg
Canon Hongkong Co., Ltdwww.canon.com.hk
© Océ 2018