Printing with Letter Stories - Institute for Excellence in...
28
Printing with Letter Stories Blackline Masters Sample These are Sample Pages for preview only! Copyrighted Materials!
Transcript of Printing with Letter Stories - Institute for Excellence in...

Printing with Letter StoriesBlackline MastersSample
These are Sample Pages for preview only! Copyrighted Materials!

First Edition, June 2014Institute for Excellence in Writing, L.L.C.
Incorporating the methods of !e Blended Sound-Sight Program of Learning
by Anna Ingham, C.M.
Sample
These are Sample Pages for preview only! Copyrighted Materials!

Also by Jill Pike: Phonetic Zoo Teacher’s Notes Primary Arts of Language: Reading Program Primary Arts of Language: Writing Program Student Writing Intensive Handouts (Levels A, B, and C) SWI Continuation Course Handouts (Levels A, B, and C) A Syllabus for Introduction to Literary Analysis
Printing with Letter Stories First Edition, June 2014 Copyright © 2014 Jill Pike ISBN 978-1-62341-145-9
Our duplicating/copying policy for these Blackline Masters:
All rights reserved.
No part of this publication may be reproduced, stored in a retrieval system, or transmitted in any form or by any means, electronic, mechanical, photocopying, recording, or otherwise, without the prior written permission of the author, except as provided by U.S.A. copyright law and the specific policy below:
Home use: The purchaser may reproduce these Blackline Masters for use within his or her immediate family. Each family must purchase their own Blackline Masters.
Classroom use: The purchaser may reproduce these Blackline Masters for use within his or her own class. Each teacher is required to purchase his or her own Blackline Masters.
Library use: These Blackline Masters may be checked out of a lending library provided patrons agree not to make copies.
Additional copies of these Blackline Masters may be purchased from IEW® at IEW.com/PLS-BL or IEWSchools.com/PLS-BL
Institute for Excellence in Writing 8799 N. 387 Rd. Locust Grove, OK 74352 800.856.5815 [email protected] or [email protected] IEW.com or IEWSchools.com Printed in the United States of America
IEW is a registered trademark of the Institute for Excellence in Writing, L.L.C.
Sample
These are Sample Pages for preview only! Copyrighted Materials!

TEACHER MATERIALSIntroduction 5
Scope and Sequence 11
The Letter Stories (Alphabetical) 16
Lesson Plans with Teacher’s Notes 21
STUDENT MATERIALSStudent Handouts 69
Additional Practice Pages 163
Reproducible Paper with Guidelines 213
Matching Game Cards 221
Letter Tiles 237
Contents
Sample
These are Sample Pages for preview only! Copyrighted Materials!

Printing with Letter Stories 5
IntroductionFoundational to all composition is the ability to print e!ortlessly. Students need to be able to hear a word, decipher its sounds, turn those sounds into symbols, and do it all automatically. If your students already know their letters, use these lessons to reinforce their ability and to ensure the correct formation of each letter using a mature pen grip.
To use these lessons, read through the introduction and pay close attention to the teacher’s notes in each lesson. Each student will need a copy of the Student Handouts as well as the Additional Practice Pages if you choose to use them. Decide if you want to provide a set of matching cards per student or use a set per group of students. "e Matching Game cards can be printed on card stock or regular paper. "ey are a fun game, but do not need to be indestructible.
Letter Stories "e printing lessons blend the learning of the letters and their sounds with how to write them. Instead of presenting the letters alphabetically, they are presented by starting stroke so that your students can learn a few strokes that will work for many letters.
Each letter is presented along with a letter story to help your students remember the sound and shape of each letter—the focus will be on the sound a letter makes instead of its name. "is is indicated by placing the letter inside downstrokes. For example, the letter c is introduced as the happy letter; it is happy because it is a cookie that someone took a bite out of: |c|, |c|, cookie. (Say the hard sound of c, not the name of the letter.) On the other hand, the letter o is the sad letter. “Ah,” says the o, “nobody took a bite out of me.” "us, these stories reinforce both the sounds and the shape of each letter.
Be expressive as you introduce each letter, and embellish the stories as much as you wish because it will help your students remember. If students are asked to write a |g| and cannot remember the shape, simply remind them, “"at is the draggy leg letter.” Over time, they will remember without the stories to aid them.
"e letter stories apply only to the lowercase letters; there are no stories for the capital letters. Once the lowercase letters have all been introduced, the capital letters will be introduced as the way the lowercase letters look when they are dressed up at the beginning of a sentence or a proper noun. Some look the same; others change their out$t a bit. See page 16 for an alphabetical summary of the letter stories.
Sample
These are Sample Pages for preview only! Copyrighted Materials!
6 Institute for Excellence in Writing
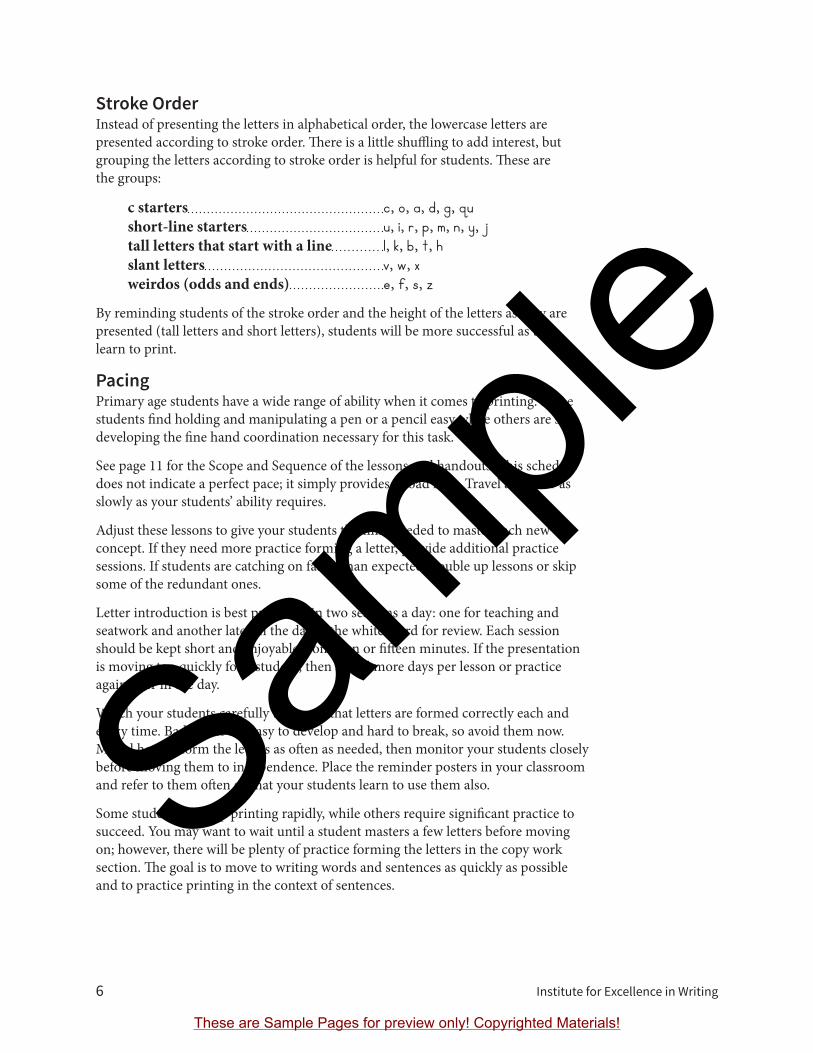
Stroke OrderInstead of presenting the letters in alphabetical order, the lowercase letters are presented according to stroke order. "ere is a little shu%ing to add interest, but grouping the letters according to stroke order is helpful for students. "ese are the groups:
c starters c, o, a, d, g, qu short-line starters u, i, r, p, m, n, y, j tall letters that start with a line l, k, b, t, h slant letters v, w, x weirdos (odds and ends) e, f, s, z
By reminding students of the stroke order and the height of the letters as they are presented (tall letters and short letters), students will be more successful as they learn to print.
PacingPrimary age students have a wide range of ability when it comes to printing. Some students $nd holding and manipulating a pen or a pencil easy while others are still developing the $ne hand coordination necessary for this task.
See page 11 for the Scope and Sequence of the lessons and handouts. "is schedule does not indicate a perfect pace; it simply provides a road map. Travel as fast or as slowly as your students’ ability requires.
Adjust these lessons to give your students the time needed to master each new concept. If they need more practice forming a letter, provide additional practice sessions. If students are catching on faster than expected, double up lessons or skip some of the redundant ones.
Letter introduction is best presented in two sessions a day: one for teaching and seatwork and another later in the day at the whiteboard for review. Each session should be kept short and enjoyable—only ten or $&een minutes. If the presentation is moving too quickly for a student, then spend more days per lesson or practice again later in the day.
Watch your students carefully to ensure that letters are formed correctly each and every time. Bad habits are easy to develop and hard to break, so avoid them now. Model how to form the letters as o&en as needed, then monitor your students closely before moving them to independence. Place the reminder posters in your classroom and refer to them o&en so that your students learn to use them also.
Some students pick up printing rapidly, while others require signi$cant practice to succeed. You may want to wait until a student masters a few letters before moving on; however, there will be plenty of practice forming the letters in the copy work section. "e goal is to move to writing words and sentences as quickly as possible and to practice printing in the context of sentences.
Sample
These are Sample Pages for preview only! Copyrighted Materials!
Printing with Letter Stories 7
Practice on a Chalk or Whiteboard FirstOccupational therapists o&en recommend having students work on a slanted or vertical surface because it improves their concentration, increases their muscle strength and coordination, and aids in managing direction (e.g., up is truly up). "erefore, when introducing a new letter for printing, have your students practice using their whole arm in the air and then on a chalk or whiteboard. Using vertical boards or drawing easels can aid in the development of $ne motor control and upper extremity stability, both of which are critical to good penmanship.
An alternative to a large whiteboard on the wall is a small, lap-sized whiteboard which can be purchased in the o'ce/school section of almost any department store. Inexpensive whiteboards of any size can be cut from “white hardboard wall panels,” available at most building supply stores.
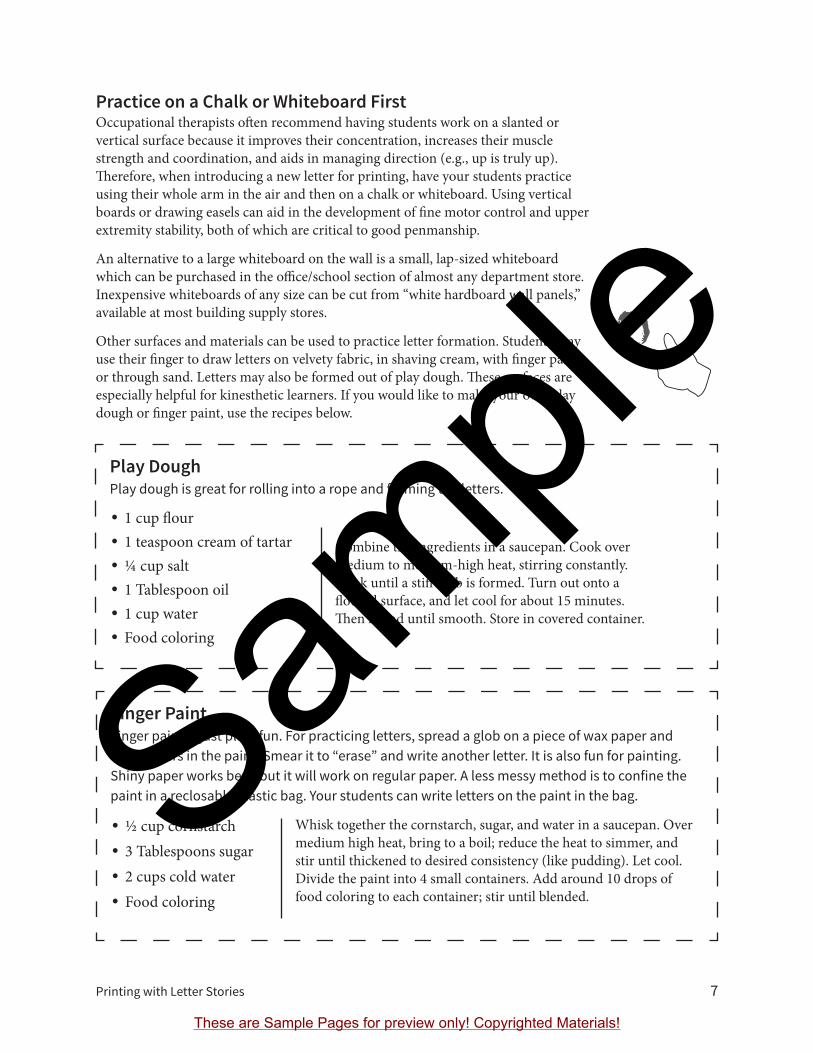
Other surfaces and materials can be used to practice letter formation. Students may use their $nger to draw letters on velvety fabric, in shaving cream, with $nger paint, or through sand. Letters may also be formed out of play dough. "ese surfaces are especially helpful for kinesthetic learners. If you would like to make your own play dough or $nger paint, use the recipes below.
Finger PaintFinger paint is just plain fun. For practicing letters, spread a glob on a piece of wax paper and write letters in the paint. Smear it to “erase” and write another letter. It is also fun for painting. Shiny paper works best, but it will work on regular paper. A less messy method is to confine the paint in a reclosable plastic bag. Your students can write letters on the paint in the bag.
• ½ cup cornstarch • 3 Tablespoons sugar • 2 cups cold water • Food coloring
Play DoughPlay dough is great for rolling into a rope and forming the letters.
• 1 cup )our • 1 teaspoon cream of tartar • ¼ cup salt • 1 Tablespoon oil • 1 cup water • Food coloring
Whisk together the cornstarch, sugar, and water in a saucepan. Over medium high heat, bring to a boil; reduce the heat to simmer, and stir until thickened to desired consistency (like pudding). Let cool. Divide the paint into 4 small containers. Add around 10 drops of food coloring to each container; stir until blended.
Combine the ingredients in a saucepan. Cook over medium to medium-high heat, stirring constantly. Cook until a sti! blob is formed. Turn out onto a )oured surface, and let cool for about 15 minutes. "en knead until smooth. Store in covered container.
Sample
These are Sample Pages for preview only! Copyrighted Materials!

8 Institute for Excellence in Writing
Letter BlocksWhen initially working on paper, letter blocks will be used instead of guidelines. Students can practice printing one letter in each square. "is permits students to focus on the letter itself without having to worry about lines. Le& to right progression can be emphasized when using the letter blocks—le& to right, top to bottom. For additional practice, make extra copies of the printing pages or simply divide regular paper into blocks.
Do not introduce guidelines until your student has mastered the lowercase letters using letter blocks.
GuidelinesOnce students can correctly print all their lowercase letters, then guidelines can be introduced as the capital letters are taught. To help students understand where each letter sits, or lives, we have superimposed a house on the guidelines:
Most letters are short and live on the “main )oor.” "ey must touch the )oor and their head bumps the dotted line. Some letters are so tall that their heads poke up into the “attic” and they bump their head on the roof. Others have parts that drop down into the “basement.” Using these reminders will help students form their letters correctly.
Again, it is helpful for students to practice their letters on guidelines drawn on a whiteboard before moving onto paper. Using a permanent marker to add the guidelines to a board cut from white hardboard can make a great practice board. Hang it on the wall or place it on an easel for easy access.
When moving to paper, use a size that is comfortable for your students. "e guidelines used in these lessons are narrower than typical primary paper. "is size is large enough to permit students to use larger hand motions when printing yet narrow enough to allow students to draw the letters without moving their hand too much. It also permits more words per line.
Students bene$t from using guidelines all through their elementary years. For your convenience, the student materials include blank pages with guidelines that you can reproduce for student use for years to come.
Pen or Pencil?Traditionally, primary grade students have been required to write in pencil exclusively. You may defy tradition. Pencils are convenient because they permit erasure, but that is not necessarily a bene$t. Much time is wasted erasing and rewriting. Why not just cross it out and try again? Most writing is in the rough dra& form where cross outs and rearranging arrows are embraced. Also, pencils can be frustrating. "ey do not create a dark contrast to paper unless students press
Sample letter block worksheet
a
Sample
These are Sample Pages for preview only! Copyrighted Materials!

Printing with Letter Stories 9
hard—something they should avoid. Pencils also require constant sharpening to write correctly, which wastes time. Pens, gel pens, and $ne-tipped markers create strong contrast with little pressure. "ey are also fun to use and o!er variety in color and texture.
"us, reserve pencils for $nal dra&s where erasing is not only permissible but necessary since primary students o&en make mistakes. For practice, use pens or markers.
Print or Cursive?"ere is a debate going on about whether students should begin their handwriting with printing or cursive. Although a few children with dysgraphia might do better with cursive because it allows their writing to )ow instead of start and stop, teaching printing may be better for developing a student’s ability to identify the individual letters and how they work phonetically.
Printing With Letter Stories teaches students to form their letters in one stroke instead of using the old “ball and stick” method; thus, they will easily transition to cursive when ready.
"ese lessons give you the freedom to adapt the printing style to whatever method you prefer; there is no perfect way to teach printing. Adjust these lessons to meet the needs of your students. If you like using loops and curls, include them. "e important thing is to ensure a proper pen grip, to start each letter at the top using a single stroke (usually), and to develop neat, e'cient handwriting.
DysgraphiaIf your student complains about working on handwriting, the problem might not be laziness; it is likely some form of dysgraphia, which is a very broad term describing di'culty with getting the written word down on paper. If a student complains about handwriting being too di'cult, or if you see a delay in their ability to print, there are some things you can do to help. If you feel your student needs professional help, consult an occupational therapist.
In mild cases, the problem is o&en a delay in $ne motor control. A very simple thing you can do to help them develop their strength and complete their printing practice is to tape the page to the wall and have them do their work vertically.
Strengthening shoulders, arms, and $ngers will also help. Five to ten minutes of crawling around on the )oor (palms of hands and knees) is an excellent precursor to handwriting. A crawling race down the hall and up the stairs should be both fun and bene$cial. Wheelbarrow walking is also helpful. (Child walks with his hands while someone holds his feet.)
To strengthen hand muscles, students can mold play dough and squeeze clothespins. Hiding coins in play dough and letting children extract them is a fun way to strengthen hands. Using tweezers to manipulate objects and cutting along pre-drawn lines will also help.
Fine motor skills can also be improved by playing with Lego® blocks, stringing small beads, and moving small objects from the palm to the $ngers of their hand (without the help of the other hand).
For more information regarding pens versus pencils, see Andrew Pudewa’s article, “Convert to Pens” at IEW.com/article-list.
Sample
These are Sample Pages for preview only! Copyrighted Materials!

10 Institute for Excellence in Writing
Some students will bene$t from “crossing the midline.” Using a coin bank or some other container with a slit in the lid, place coins to the right of the student. Have him pick it up with his le& hand and place it in the container. Repeat using the opposite side.
Specialized paper is also bene$cial. "ree-colored lined paper (with the top line sky-blue, red dashed in the middle, and green )oor) can better segment the “)oors” of the “house.” "is kind of paper is available almost anywhere. "ere is also raised-line paper that will add a tactile cue. You can $nd raised-line paper at assistivewritingsolutions.com
Le!-HandersHandwriting is a challenge for “le&ies.” "ey must push the pen across the paper instead of pulling the instrument as it was designed to be used, which causes the pen to dig into the paper. "us, gel pens or felt tip markers are great for le&-handers because they reduce friction. "is is also why le&-handed students o&en develop odd pencil grips. Since it is truly harder for them to force the pen across the page, they o&en do not have the $nger strength to do so. "us, monitoring a le&-handed student’s pen grip is critical. See Lesson 1 for complete instructions for teaching a student how to hold their writing instrument.
In addition to increased friction, le&-handed students also $nd that their hand drags across the fresh ink, smudging the writing and staining the hand. A simple $x is to turn the paper to the right. In this orientation the hand slides under the text reducing smudges.
Providing model letters and sentences above the guidelines instead of to the le& also aids le&-handed students so that the model is not covered by their le& hand.
Finally, if your le&-handed students are writing in a spiral notebook, they will do better if they write on the “back” side of the paper (with the spiral to the right) rather than the “front” side. If using a three-ring binder, they should take the paper out, place it on the le& side of the rings for writing, and return it to the binder when $nished. "is way a le&-handed student will not be burdened with trying to work over the bindings of standard right-handed notebooks.
With all these challenges, be patient while teaching a le&-handed student to print. "ey might end up forming their letters a little di!erently than their right-handed friends. "at is $ne! "e goal is a neat and readable script, not perfection.
Scope and Sequence"e scope and sequence for the lessons begins on the next page. It is followed by the alphabetical description of all the letter stories. "e lesson plans will guide you through the presentation of all the letters (lowercase and capitals) along with teaching students how to write on guidelines.
Once all the capital letters have been introduced, the lessons end and copy work may begin using the Additional Practice Pages. Feel free to use other model sentences from your students’ other studies for printing practice. Continue to monitor pen grip and how students are forming their letters. Practice does not make perfect; practice makes permanent. Be sure the practice is moving them toward good handwriting.
Sample
These are Sample Pages for preview only! Copyrighted Materials!
Printing with Letter Stories 11
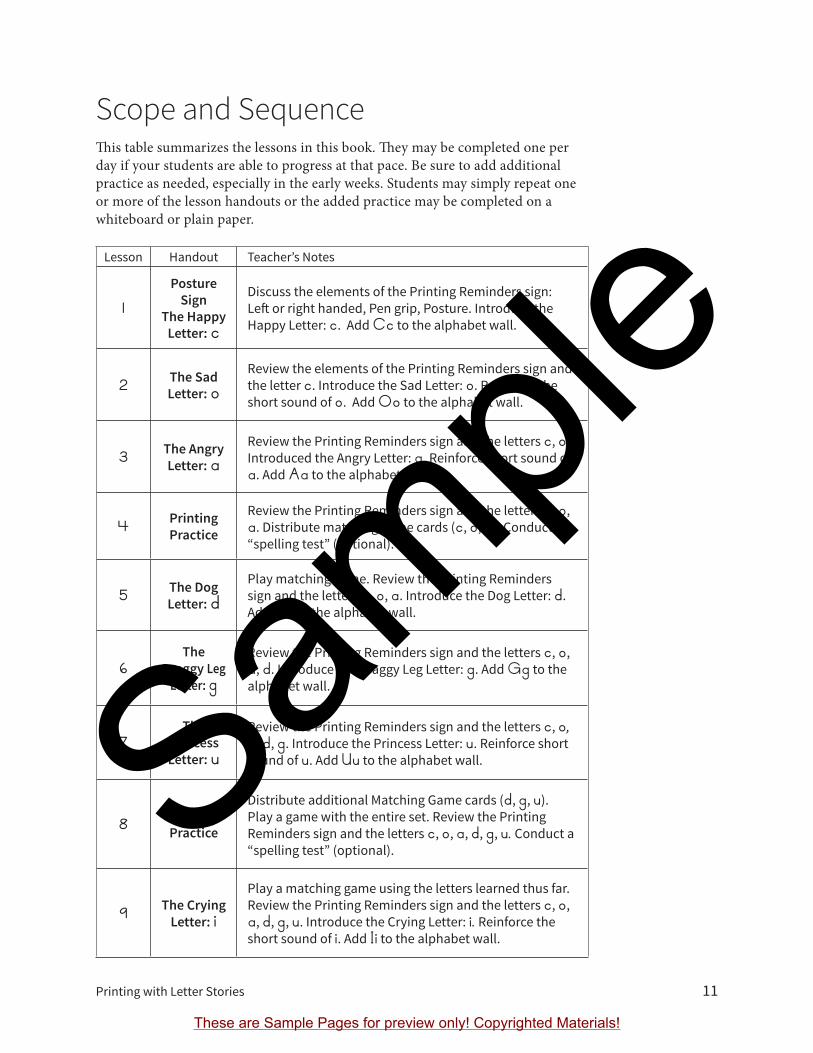
Scope and Sequence "is table summarizes the lessons in this book. "ey may be completed one per day if your students are able to progress at that pace. Be sure to add additional practice as needed, especially in the early weeks. Students may simply repeat one or more of the lesson handouts or the added practice may be completed on a whiteboard or plain paper.
Lesson Handout Teacher’s Notes
1Posture
Sign The Happy
Letter: c
Discuss the elements of the Printing Reminders sign: Le" or right handed, Pen grip, Posture. Introduce the Happy Letter: c. Add Cc to the alphabet wall.
2 The Sad Letter: o
Review the elements of the Printing Reminders sign and the letter c. Introduce the Sad Letter: o. Reinforce the short sound of o. Add Oo to the alphabet wall.
3 The Angry Letter: a
Review the Printing Reminders sign and the letters c, o. Introduced the Angry Letter: a. Reinforce short sound of a. Add Aa to the alphabet wall.
4 Printing Practice
Review the Printing Reminders sign and the letters c, o, a. Distribute matching game cards (c, o, a). Conduct a “spelling test” (optional).
5 The Dog Letter: d
Play matching game. Review the Printing Reminders sign and the letters c, o, a. Introduce the Dog Letter: d. Add Dd to the alphabet wall.
6The
Draggy Leg Letter: g
Review the Printing Reminders sign and the letters c, o, a, d. Introduce the Draggy Leg Letter: g. Add Gg to the alphabet wall.
7The
Princess Letter: u
Review the Printing Reminders sign and the letters c, o, a, d, g. Introduce the Princess Letter: u. Reinforce short sound of u. Add Uu to the alphabet wall.
8 Printing Practice
Distribute additional Matching Game cards (d, g, u). Play a game with the entire set. Review the Printing Reminders sign and the letters c, o, a, d, g, u. Conduct a “spelling test” (optional).
9 The Crying Letter: i
Play a matching game using the letters learned thus far. Review the Printing Reminders sign and the letters c, o, a, d, g, u. Introduce the Crying Letter: i. Reinforce the short sound of i. Add Ii to the alphabet wall.
Sample
These are Sample Pages for preview only! Copyrighted Materials!

12 Institute for Excellence in Writing
Lesson Handout Teacher’s Notes
10The
Licking Letter: l
Review the Printing Reminders sign and all the letters learned thus far. Introduce the Licking Letter: l. Add Ll to the alphabet wall.
11The
Kicking Letter: k
Review the Printing Reminders sign and all the letters learned thus far. Introduce the Kicking Letter: k. Reinforce short sound of u. Add Kk to the alphabet wall.
12 Printing Practice
Distribute additional Matching Game cards (i, l, k). Play a game with the entire set. Review the Printing Reminders sign and use the alphabet wall to review all the letters learned so far. Sort the letters on the wall into “mastered” and “need review.” Conduct a “spelling test” using the review sheet, or have students practice letters using their Matching Game cards.
13The
Bouncing Letter: b
Play a matching game using the letters learned thus far. Review the Printing Reminders sign and all the letters learned thus far. Introduce the Bouncing Letter: b. Add Bb to the alphabet wall.
14The
Roaring Letter: r
Play a matching game using the letters learned thus far. Review the Printing Reminders sign and all the letters learned thus far. Introduce the Roaring Letter: r.Add Rr to the alphabet wall.
15 The Teeth Letter: e
Review the Printing Reminders sign and the letters learned thus far. Introduce the Teeth Letter: e. Reinforce the short sound of e. Introduce the concept of vowels and identify the long sounds of all vowels. Create a vowel ladder. Add Ee to the alphabet wall.
16 Printing Practice
Distribute Matching Game cards (b, r, e). Play a game with the entire set. Sort the cards into vowels/consonants. Review long and short sounds of vowels. Explore CVC words using letter tiles. Review the Printing Reminders sign and use your letter wall or poster to review all the letters learned so far. Conduct a “spelling test” using the review sheet, or have students practice letters using their Matching Game cards.
17The
Popping Letter: p
Play a matching game using the letters learned thus far. Continue to explore the vowels and their sounds.Review the Printing Reminders sign and the letters learned thus far. Introduce the Popping Letter: p.Add Pp to the alphabet wall.
Introduction: Scope and Sequence
Sample
These are Sample Pages for preview only! Copyrighted Materials!
Printing with Letter Stories 13
Lesson Handout Teacher’s Notes
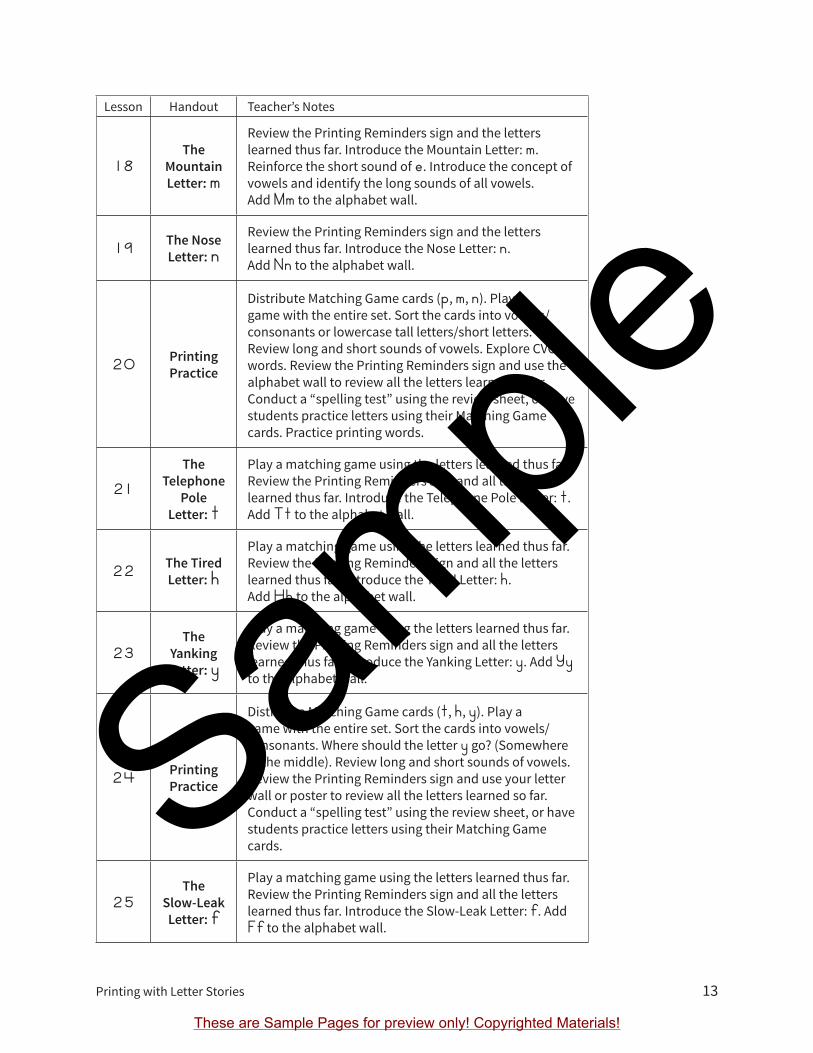
18The
Mountain Letter: m
Review the Printing Reminders sign and the letters learned thus far. Introduce the Mountain Letter: m.Reinforce the short sound of e. Introduce the concept of vowels and identify the long sounds of all vowels.Add Mm to the alphabet wall.
19 The Nose Letter: n
Review the Printing Reminders sign and the letters learned thus far. Introduce the Nose Letter: n.Add Nn to the alphabet wall.
20 Printing Practice
Distribute Matching Game cards (p, m, n). Play a game with the entire set. Sort the cards into vowels/consonants or lowercase tall letters/short letters. Review long and short sounds of vowels. Explore CVC words. Review the Printing Reminders sign and use the alphabet wall to review all the letters learned so far. Conduct a “spelling test” using the review sheet, or have students practice letters using their Matching Game cards. Practice printing words.
21The
Telephone Pole
Letter: t
Play a matching game using the letters learned thus far. Review the Printing Reminders sign and all the letters learned thus far. Introduce the Telephone Pole Letter: t. Add Tt to the alphabet wall.
22 The Tired Letter: h
Play a matching game using the letters learned thus far. Review the Printing Reminders sign and all the letters learned thus far. Introduce the Tired Letter: h. Add Hh to the alphabet wall.
23The
Yanking Letter: y
Play a matching game using the letters learned thus far. Review the Printing Reminders sign and all the letters learned thus far. Introduce the Yanking Letter: y. Add Yy to the alphabet wall.
24 Printing Practice
Distribute Matching Game cards (t, h, y). Play a game with the entire set. Sort the cards into vowels/consonants. Where should the letter y go? (Somewhere in the middle). Review long and short sounds of vowels. Review the Printing Reminders sign and use your letter wall or poster to review all the letters learned so far. Conduct a “spelling test” using the review sheet, or have students practice letters using their Matching Game cards.
25The
Slow-Leak Letter: f
Play a matching game using the letters learned thus far. Review the Printing Reminders sign and all the letters learned thus far. Introduce the Slow-Leak Letter: f. Add Ff to the alphabet wall.
Sample
These are Sample Pages for preview only! Copyrighted Materials!

14 Institute for Excellence in Writing
Lesson Handout Teacher’s Notes
26The
Hissing Letter: s
Play a matching game using the letters learned thus far. Review the Printing Reminders sign and all the letters learned thus far. Introduce the Hissing Letter: s.Add Ss to the alphabet wall.
27 The Queen Letter: qu
Play a matching game using the letters learned thus far. Review the Printing Reminders sign and all the letters learned thus far. Introduce the Queen Letter: qu.Add Qu/qu to the alphabet wall.
28 Printing Practice
Distribute Matching Game cards (f, s, qu). Play a game with the entire set. Sort the cards into vowels/consonants. Review long and short sounds of vowels. Review the Printing Reminders sign and use your letter wall or poster to review all the letters learned so far. Conduct a “spelling test” using the review sheet, or have students practice letters using their Matching Game cards.
29 The Vase Letter: v
Play a matching game using the letters learned thus far. Review the Printing Reminders sign and all the letters learned thus far. Introduce the Vase Letter: v.Add Vv to the alphabet wall.
30 The Water Letter: w
Play a matching game using the letters learned thus far. Review the Printing Reminders sign and all the letters learned thus far. Introduce the Water Letter: w.Add Ww to the alphabet wall.
31X Marks the Spot Letter: x
Play a matching game using the letters learned thus far. Review the Printing Reminders sign and all the letters learned thus far. Introduce the X Marks the Spot Letter: x. Add Xx to the alphabet wall.
32 Printing Practice
Distribute Matching Game cards (v, w, x). Play a game with the entire set. Sort the cards into vowels/consonants. Review long and short sounds of vowels. Review the Printing Reminders sign and use the alphabet wall to review all the letters learned so far. Conduct a “spelling test” using the review sheet, or have students practice letters using their Matching Game cards.
33The
Jumping Letter: j
Play a matching game using the letters learned thus far. Review the Printing Reminders sign and all the letters learned thus far. Introduce the Jumping Letter: j. Add Jj to the alphabet wall.
Introduction: Scope and Sequence
Sample
These are Sample Pages for preview only! Copyrighted Materials!

Printing with Letter Stories 15
Lesson Handout Teacher’s Notes
34 The Zigzag Letter: z
Play a matching game using the letters learned thus far. Review the Printing Reminders sign and all the letters learned thus far. Introduce the Zigzag Letter: z.Add Zz to the alphabet wall. Distribute remaining Matching Game cards.
35 Printing practice
Introduce guidelines. Practice single letters on guidelines.
36 Printing practice
Review guidelines. Practice words on lines. Focus on spacing.
37 Printing practice
Introduce capital letters. Start with the twins: Cc, Oo, Ss.
38 Printing practice More twins: Uu, Vv, Ww
39 Printing practice More twins: Pp, Yy
40 Printing practice More twins: Xx, Zz
41 Printing practice
Introduce more capital letters. Continue with letters that look somewhat like their lowercase letter: Bb, Hh, Ii, Jj, Kk
42 Printing practice
More capitals that are a little like the lowercase letter: Ff, Ll, Mm, Qu/qu, Tt
43 Printing practice
Capital letters that are very di#erent than the lowercase letter: Aa, Dd, Ee.
44 Printing practice
More capitals that are very di#erent than the lowercase letter: Gg, Nn, Rr.
45 Printing practice
Use this last lesson page to identify any letters that your student needs to practice.Sam
ple
These are Sample Pages for preview only! Copyrighted Materials!

Printing with Letter Stories 19
Practice Letters with Guidelines
Sample
These are Sample Pages for preview only! Copyrighted Materials!

Printing with Letter Stories 23
Le! or Right?"e $rst di'culty students might have is telling their le& hand from their right hand. A teacher can overcome this di'culty by replacing the terms le& and right with concrete objects in the room. Instead of telling a student to move his pen “to the le&,” the teacher might say “toward the windows.” Determine which hand each student uses to write. If a student uses either hand, observe their ability and suggest that they choose one or the other to use consistently.
Next, discuss how to tilt their paper. Right-handed students should tilt their paper slightly to the le& so they can see what they are printing. Le&-handed students should tilt their paper slightly to the right so they can see what they are printing.
"e poster illustrated in the margin is located in the student handouts. Display it each time your students are practicing handwriting.
Pen GripEnsure that your students are holding their writing instrument properly. Instruct students to pick up the pen between the pads of their thumb and index $nger and then tip the pen back to rest on the hand. "e pen rests on the middle $nger while the rest of the $ngers should be gently curled under the hand. An acceptable alternative to this is to hold the pen between the pads of the thumb and index/middle $nger. In either case, the thumb and index $nger should form a circular shape if the pen is held correctly. Monitor this position carefully to avoid the development of bad habits such as the thumb wrapped around the index $nger. O&en students will complain that they do not like the correct position, but it is crucial for the development of a mature and e'cient grasp.
If you $nd that you must constantly remind a student how to hold a pen, you might want to purchase a pencil grip. "ere are two basic varieties. "e Stetro pencil grip is small and $rm. It slips over any standard pen or pencil and has symbols and grooves for the $ngers to ensure a correct grasp. For right-handed students, the arrow should point to the tip of the pen; for le&-handed students the arrow should point away from the tip. "e thumb goes on the star, and the rest of the $ngers will naturally fall into place. "e Pencil Grip is larger and squishy. "e smaller end goes toward the tip of the pen, and the thumb is placed on the L or R depending on handedness.
Remember—practice makes permanent. If a student develops bad habits early, they will likely stay with him for life. Also, consider that some children are usually not ready to begin formal handwriting until they are $ve or six years old. If your students are younger than six, consider using fat pens, pencils, crayons, or markers for writing. Hold o! on using guidelines until they are older. Encourage very young children to hold their writing instrument in their $ngertips instead of their $sts.
TEACHER NOTES
Lesson 1
These aids (and more) can be found at headsupnow.com under “handwriting.”
More le!-handed tips can be found in the introduction on page 10.
Le! or Right ? ✓ Right-handed tilt to the le!
✓ Le!-handed tilt to the right
Pen Grip ✓ not too tight ✓ use fingertips ✓ write so!ly
Sit Up Straight!
Printing Reminders
Lesson continued on next page
Sample
These are Sample Pages for preview only! Copyrighted Materials!
24 Institute for Excellence in Writing
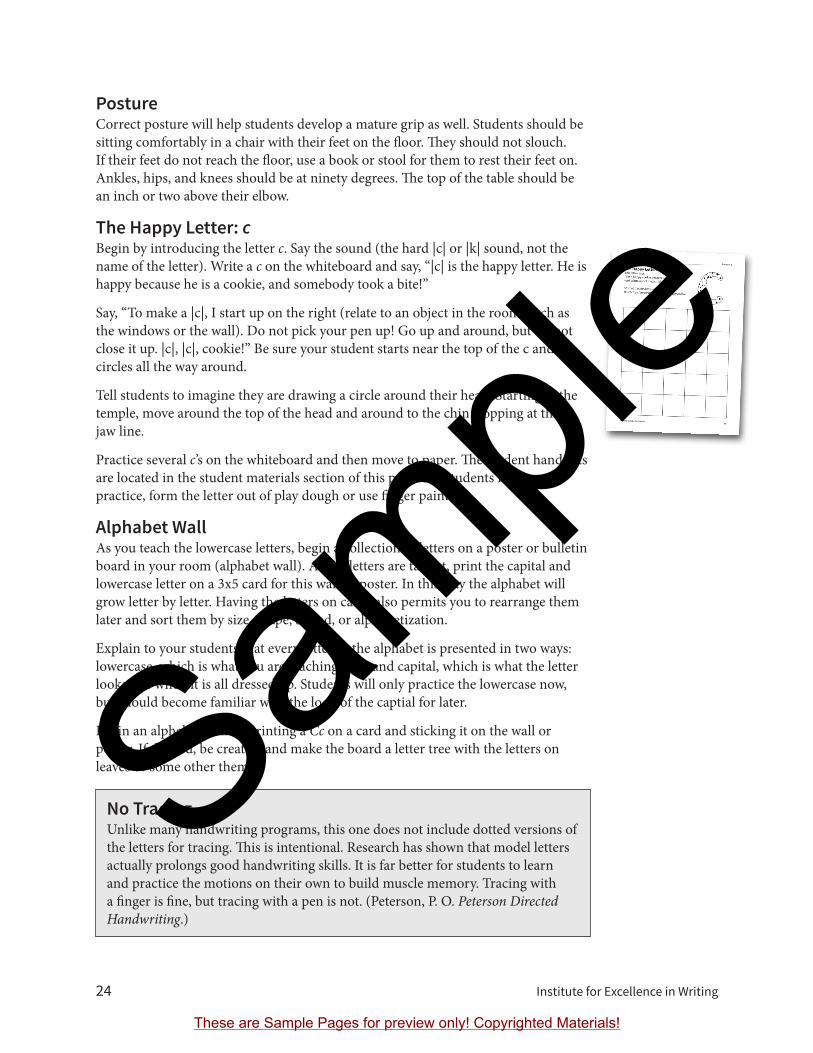
PostureCorrect posture will help students develop a mature grip as well. Students should be sitting comfortably in a chair with their feet on the )oor. "ey should not slouch. If their feet do not reach the )oor, use a book or stool for them to rest their feet on. Ankles, hips, and knees should be at ninety degrees. "e top of the table should be an inch or two above their elbow.
The Happy Letter: cBegin by introducing the letter c. Say the sound (the hard |c| or |k| sound, not the name of the letter). Write a c on the whiteboard and say, “|c| is the happy letter. He is happy because he is a cookie, and somebody took a bite!”
Say, “To make a |c|, I start up on the right (relate to an object in the room, such as the windows or the wall). Do not pick your pen up! Go up and around, but do not close it up. |c|, |c|, cookie!” Be sure your student starts near the top of the c and circles all the way around.
Tell students to imagine they are drawing a circle around their head. Starting at the temple, move around the top of the head and around to the chin stopping at the jaw line.
Practice several c’s on the whiteboard and then move to paper. "e student handouts are located in the student materials section of this packet. If students need more practice, form the letter out of play dough or use $nger paint.
Alphabet WallAs you teach the lowercase letters, begin a collection of letters on a poster or bulletin board in your room (alphabet wall). As the letters are taught, print the capital and lowercase letter on a 3x5 card for this wall or poster. In this way the alphabet will grow letter by letter. Having the letters on cards also permits you to rearrange them later and sort them by size, shape, sound, or alphabetization.
Explain to your students that every letter in the alphabet is presented in two ways: lowercase, which is what you are teaching now, and capital, which is what the letter looks like when it is all dressed up. Students will only practice the lowercase now, but should become familiar with the look of the captial for later.
Begin an alphabet wall by printing a Cc on a card and sticking it on the wall or poster. If desired, be creative and make the board a letter tree with the letters on leaves or some other theme.
No TracingUnlike many handwriting programs, this one does not include dotted versions of the letters for tracing. "is is intentional. Research has shown that model letters actually prolongs good handwriting skills. It is far better for students to learn and practice the motions on their own to build muscle memory. Tracing with a $nger is $ne, but tracing with a pen is not. (Peterson, P. O. Peterson Directed Handwriting.)
Sample
These are Sample Pages for preview only! Copyrighted Materials!
Printing with Letter Stories 31
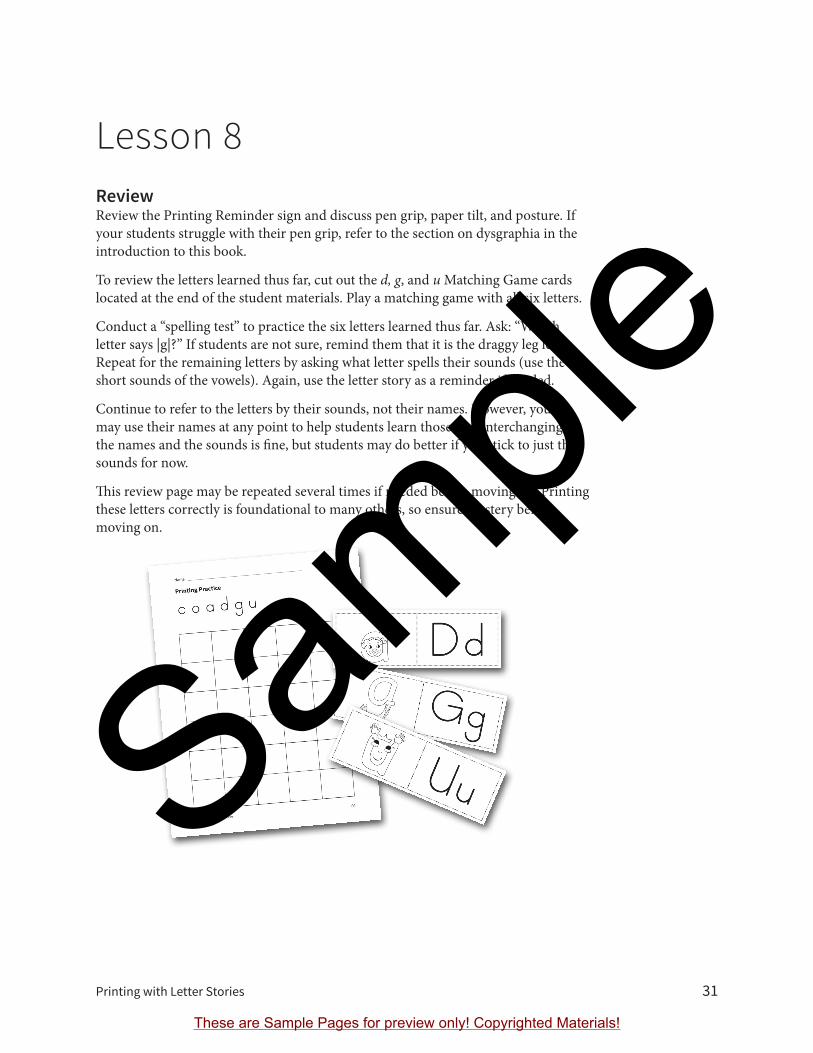
Review Review the Printing Reminder sign and discuss pen grip, paper tilt, and posture. If your students struggle with their pen grip, refer to the section on dysgraphia in the introduction to this book.
To review the letters learned thus far, cut out the d, g, and u Matching Game cards located at the end of the student materials. Play a matching game with all six letters.
Conduct a “spelling test” to practice the six letters learned thus far. Ask: “Which letter says |g|?” If students are not sure, remind them that it is the draggy leg letter. Repeat for the remaining letters by asking what letter spells their sounds (use the short sounds of the vowels). Again, use the letter story as a reminder if needed.
Continue to refer to the letters by their sounds, not their names. However, you may use their names at any point to help students learn those too. Interchanging the names and the sounds is $ne, but students may do better if you stick to just the sounds for now.
"is review page may be repeated several times if needed before moving on. Printing these letters correctly is foundational to many others, so ensure mastery before moving on.
Lesson 8
Sample
These are Sample Pages for preview only! Copyrighted Materials!
48 Institute for Excellence in Writing
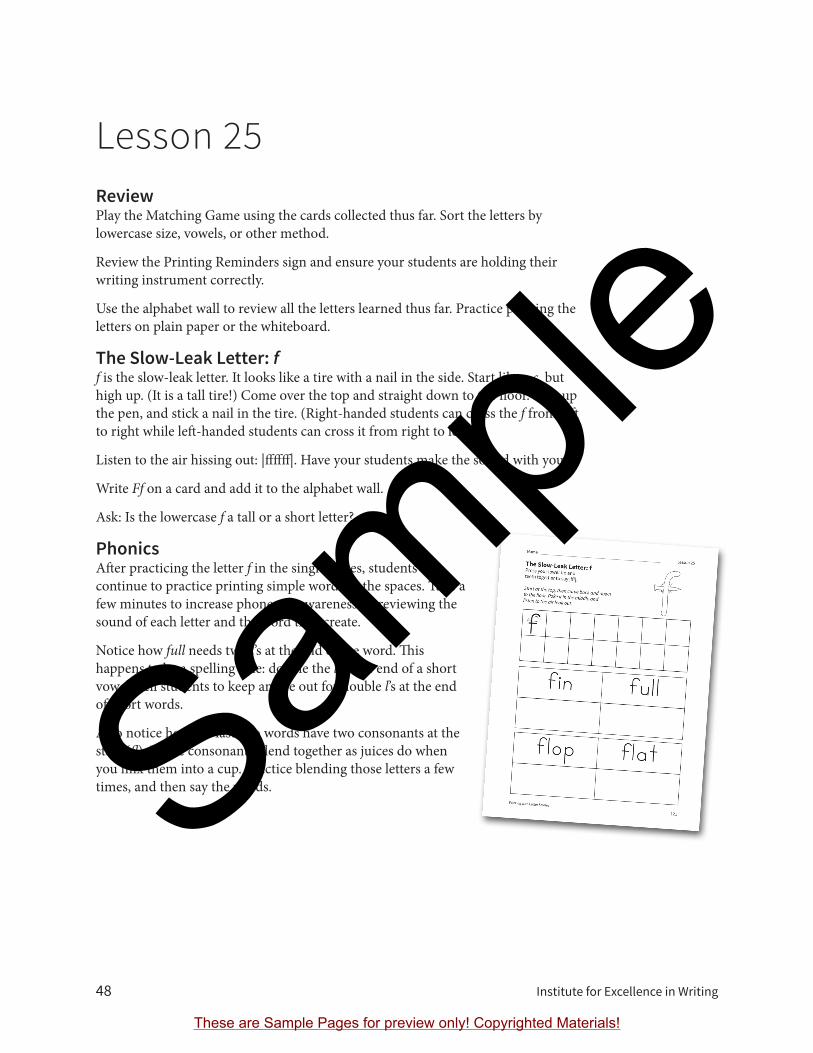
Review Play the Matching Game using the cards collected thus far. Sort the letters by lowercase size, vowels, or other method.
Review the Printing Reminders sign and ensure your students are holding their writing instrument correctly.
Use the alphabet wall to review all the letters learned thus far. Practice printing the letters on plain paper or the whiteboard.
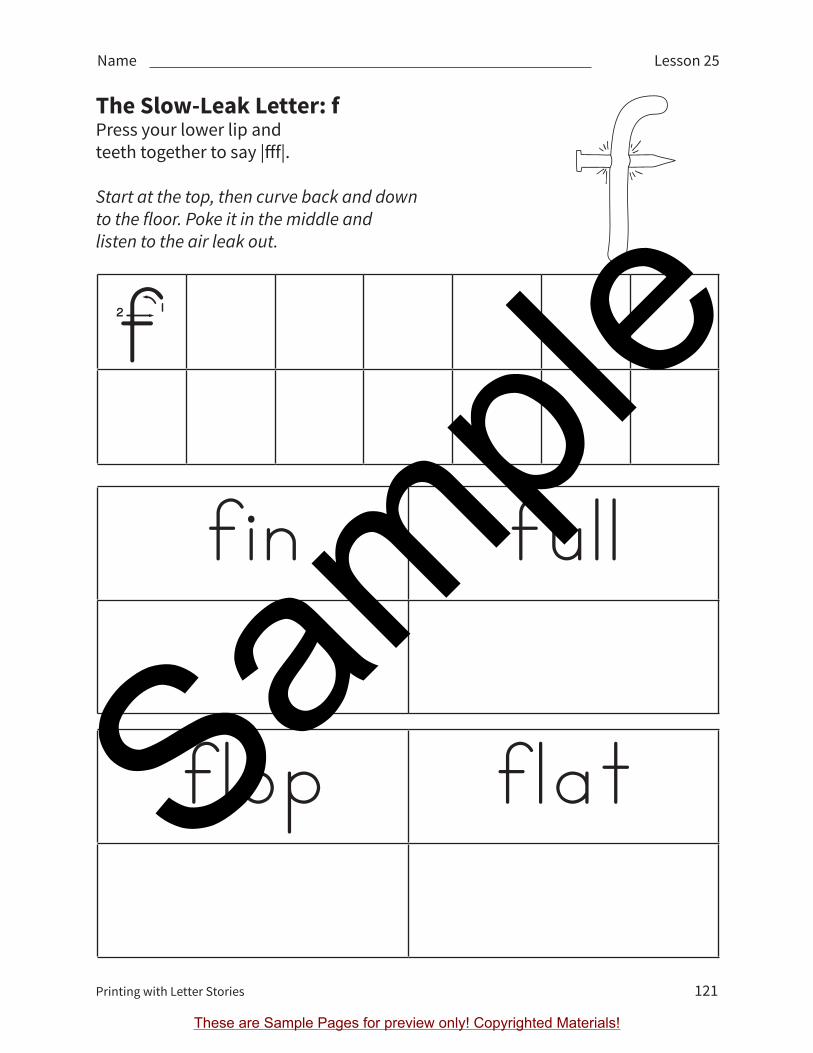
The Slow-Leak Letter: f f is the slow-leak letter. It looks like a tire with a nail in the side. Start like a c, but high up. (It is a tall tire!) Come over the top and straight down to the !oor. Pick up the pen, and stick a nail in the tire. (Right-handed students can cross the f from le" to right while le"-handed students can cross it from right to le".)
Listen to the air hissing out: |###|. Have your students make the sound with you.
Write Ff on a card and add it to the alphabet wall.
Ask: Is the lowercase f a tall or a short letter?
Phonics A"er practicing the letter f in the single boxes, students can continue to practice printing simple words in the spaces. Take a few minutes to increase phonemic awareness by reviewing the sound of each letter and the word they create.
Notice how full needs two l’s at the end of the word. $is happens to be a spelling rule: double the l at the end of a short vowel. Tell students to keep an eye out for double l’s at the end of short words.
Also notice how the last two words have two consonants at the start (!). $ose consonants blend together as juices do when you mix them into a cup. Practice blending those letters a few times, and then say the words.
Lesson 25
Sample
These are Sample Pages for preview only! Copyrighted Materials!
58 Institute for Excellence in Writing
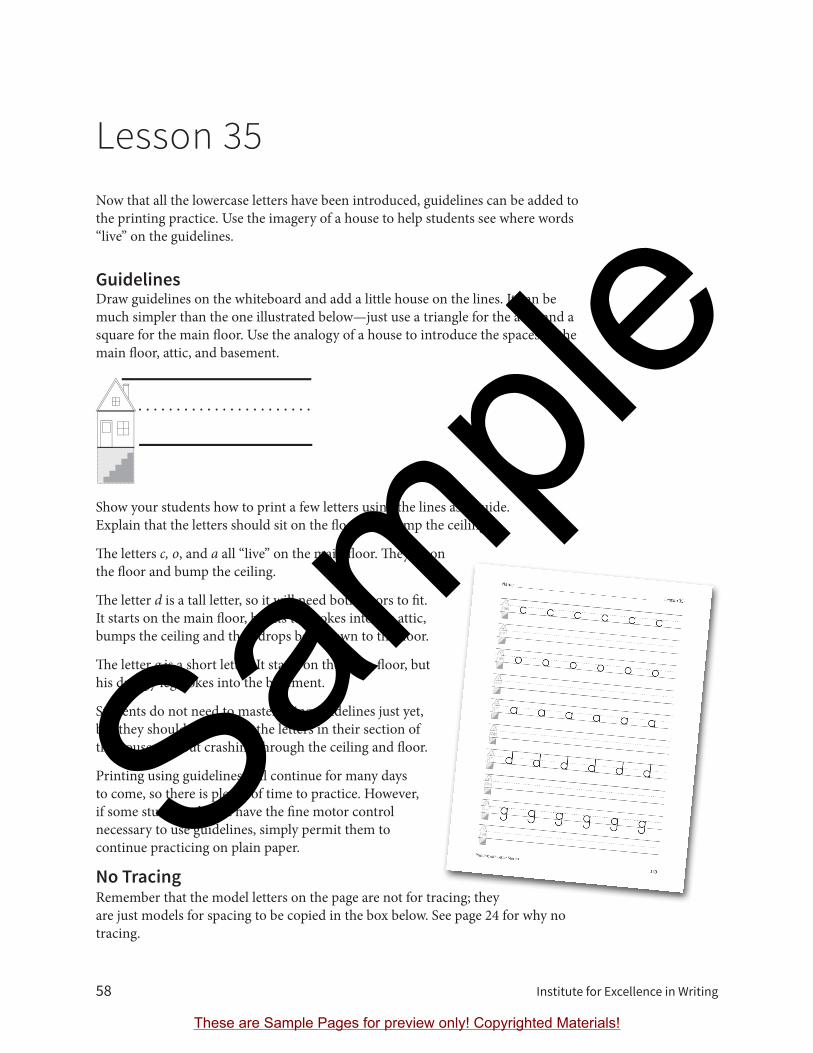
Now that all the lowercase letters have been introduced, guidelines can be added to the printing practice. Use the imagery of a house to help students see where words “live” on the guidelines. Guidelines Draw guidelines on the whiteboard and add a little house on the lines. It can be much simpler than the one illustrated below—just use a triangle for the attic and a square for the main )oor. Use the analogy of a house to introduce the spaces as the main )oor, attic, and basement.
Show your students how to print a few letters using the lines as a guide. Explain that the letters should sit on the )oor and bump the ceiling.
"e letters c, o, and a all “live” on the main )oor. "ey sit on the )oor and bump the ceiling.
"e letter d is a tall letter, so it will need both )oors to $t. It starts on the main )oor, but its tail pokes into the attic, bumps the ceiling and then drops back down to the )oor.
"e letter g is a short letter. It starts on the main )oor, but his draggy leg pokes into the basement.
Students do not need to master using guidelines just yet, but they should try to keep the letters in their section of the house without crashing through the ceiling and )oor.
Printing using guidelines will continue for many days to come, so there is plenty of time to practice. However, if some students do not have the $ne motor control necessary to use guidelines, simply permit them to continue practicing on plain paper.
No TracingRemember that the model letters on the page are not for tracing; they are just models for spacing to be copied in the box below. See page 24 for why no tracing.
Lesson 35
Sample
These are Sample Pages for preview only! Copyrighted Materials!

Printing with Letter Stories 65
Lesson 42Today students will practice more letters that look somewhat like their lowercase counterparts. Find them on the alphabet wall before modeling how to print them.
Ff!e capital of the leaky-tire letter is a strong tractor tire that is more square than curvy. Start at the top and draw the straight line. !en pick up the pen and draw the top of the tire and poke a pin into that.
Ll Give the licking letter a chin.
Mm!e capital mountain letter has sharp peaks. Start at the top and draw the "rst cli#. Pick up the pen and start at the top again and go skiing. Down the mountain, up to the next peak, and then straight down o# the cli#. Ouch!
Qu qu
!e queen stands up holding a scepter. Princess u sits at her side. Start at the top and draw a capital O and put a straight line from the queen to the $oor.
Tt!is telephone pole has the bar at the top instead of in the middle. It really keeps the wires well away from little children!Sam
ple
These are Sample Pages for preview only! Copyrighted Materials!

Printing with Letter Stories 73
The Happy Letter: c This letter says, “I’m a happy cookie because somebody took a bite out of me; |c|, |c|, cookie!”
Start at the top and curve around. Don’t close him up because he is a happy cookie.
c
Name Lesson 1
Sample
These are Sample Pages for preview only! Copyrighted Materials!
Printing with Letter Stories 121
f
The Slow-Leak Letter: fPress your lower lip and teeth together to say |#f|.
Start at the top, then curve back and down to the floor. Poke it in the middle and listen to the air leak out.
Name Lesson 25
fin
flop flat
full
Sample
These are Sample Pages for preview only! Copyrighted Materials!

Printing with Letter Stories 141
Name Lesson 35
c c c c c c
o o o o o o
a a a a a a
d d d d d d
g g g g g g Sample
These are Sample Pages for preview only! Copyrighted Materials!

Printing with Letter Stories 181
Copy the sentence. Draw a picture to match.
Name
Sample
These are Sample Pages for preview only! Copyrighted Materials!

Printing with Letter Stories 223
Sample
These are Sample Pages for preview only! Copyrighted Materials!
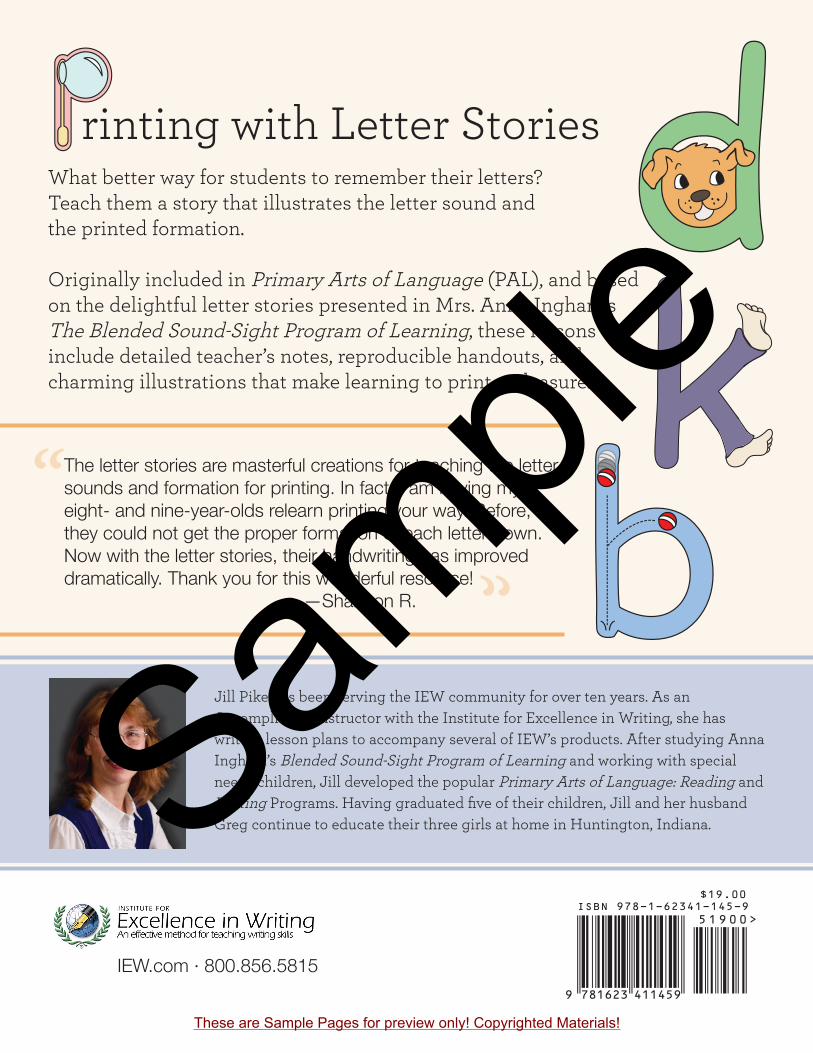
What better way for students to remember their letters? Teach them a story that illustrates the letter sound and the printed formation.
Originally included in Primary Arts of Language (PAL), and based on the delightful letter stories presented in Mrs. Anna Ingham’s The Blended Sound-Sight Program of Learning, these lessons include detailed teacher’s notes, reproducible handouts, and charming illustrations that make learning to print a pleasure.
Jill Pike has been serving the IEW community for over ten years. As an Accomplished Instructor with the Institute for Excellence in Writing, she has written lesson plans to accompany several of IEW’s products. After studying Anna Ingham’s Blended Sound-Sight Program of Learning and working with special needs children, Jill developed the popular Primary Arts of Language: Reading and Writing Programs. Having graduated fi ve of their children, Jill and her husband Greg continue to educate their three girls at home in Huntington, Indiana.
rinting with Letter Stories
;OL�SL[[LY�Z[VYPLZ�HYL�THZ[LYM\S�JYLH[PVUZ�MVY�[LHJOPUN�[OL�SL[[LY�ZV\UKZ�HUK�MVYTH[PVU�MVY�WYPU[PUN��0U�MHJ[��0�HT�OH]PUN�T`�LPNO[��HUK�UPUL�`LHY�VSKZ�YLSLHYU�WYPU[PUN�`V\Y�^H �̀�)LMVYL��[OL`�JV\SK�UV[�NL[�[OL�WYVWLY�MVYTH[PVU�VM�LHJO�SL[[LY�KV^U��5V^�^P[O�[OL�SL[[LY�Z[VYPLZ��[OLPY�OHUK^YP[PUN�OHZ�PTWYV]LK�KYHTH[PJHSS �̀�;OHUR�`V\�MVY�[OPZ�^VUKLYM\S�YLZV\YJL�� � � � � ·:OHUUVU�9�
0,>�JVT��������������
Sample
These are Sample Pages for preview only! Copyrighted Materials!