
PRINTING & SHARING IMAGES IN LIGHTROOM - Amazon S3 · PRINTING & SHARING IMAGES IN LIGHTROOM // ©...
27
PRINTING & SHARING IMAGES IN LIGHTROOM // © PHOTZY.COM 1 PRINTING & SHARING IMAGES IN LIGHTROOM Quick Guide Written by Kent DuFault Photzy
Transcript of PRINTING & SHARING IMAGES IN LIGHTROOM - Amazon S3 · PRINTING & SHARING IMAGES IN LIGHTROOM // ©...
PRINTING & SHARING IMAGES IN LIGHTROOM // © PHOTZY.COM 1
PRINTING & SHARING IMAGES IN LIGHTROOMQuick Guide
Written by Kent DuFault
Photzy
PRINTING & SHARING IMAGES IN LIGHTROOM // © PHOTZY.COM 2
Photzy recently received this email from one of our followers:
“I recently purchased your Fundamental Editing guide and spent much time reading and taking notes.
When I began to use it this past weekend, I ran into a stumbling block. It shows /refers to the ppi/dpi at the bottom center of the frame which is a good thing to monitor for resolution in creating print-worthy photos. I am working in Lightroom and do not see that ppi/dpi reference and cannot figure out what my resolution is.
I did work on some photos (minimal cropping) and when I went to upload to a site to print, I received a warning that they were of low resolution.
I am new to this and would appreciate any insight you can provide. Also, I’m trying to figure out what is the best process in sharing decent resolution photos – export or print or direct email? When I use the print module it will not allow me to eliminate a white border around the photo.”
I am going to do my best to answer these questions here in this Quick Guide.
Recommended Reading: If you do not have a copy of the Fundamental Editing premium guide yet, you may check it out here.
What You Will Learn in this Guide
·· The differences between ppi and dpi
·· How to identify the pixel count of an image file in Lightroom
·· How to determine how many pixels are needed for given size photographic prints
·· Some ideas on how to safely share your photographs online
·· How to make a borderless print on your home printer using Lightroom
·· How to properly size an image for a photographic print using Lightroom
·· How to export an image in Lightroom in preparation for sending it to a photo lab
Identifying the file size – ppi/dpi – is easy. Let’s tackle that one first.
PRINTING & SHARING IMAGES IN LIGHTROOM // © PHOTZY.COM 3
DPI AND PPI
What is ppi/dpi?
These two terms are often (and mistakenly) used interchangeably. PPI stands for pixels per inch in a digital image file. DPI stands for dots per inch when a printer is printing an image.
It’s unfortunate, but the printing aspect of digital photography is one of the most convoluted (and difficult to grasp) aspects of our medium.
For the most part, you need to be concerned about pixels per inch (ppi) and not worry about dots per inch (dpi).
Recommended Reading: For those that want to know more, this is a good explanation of ppi versus dpi over at Image Science.
PRINTING & SHARING IMAGES IN LIGHTROOM // © PHOTZY.COM 4
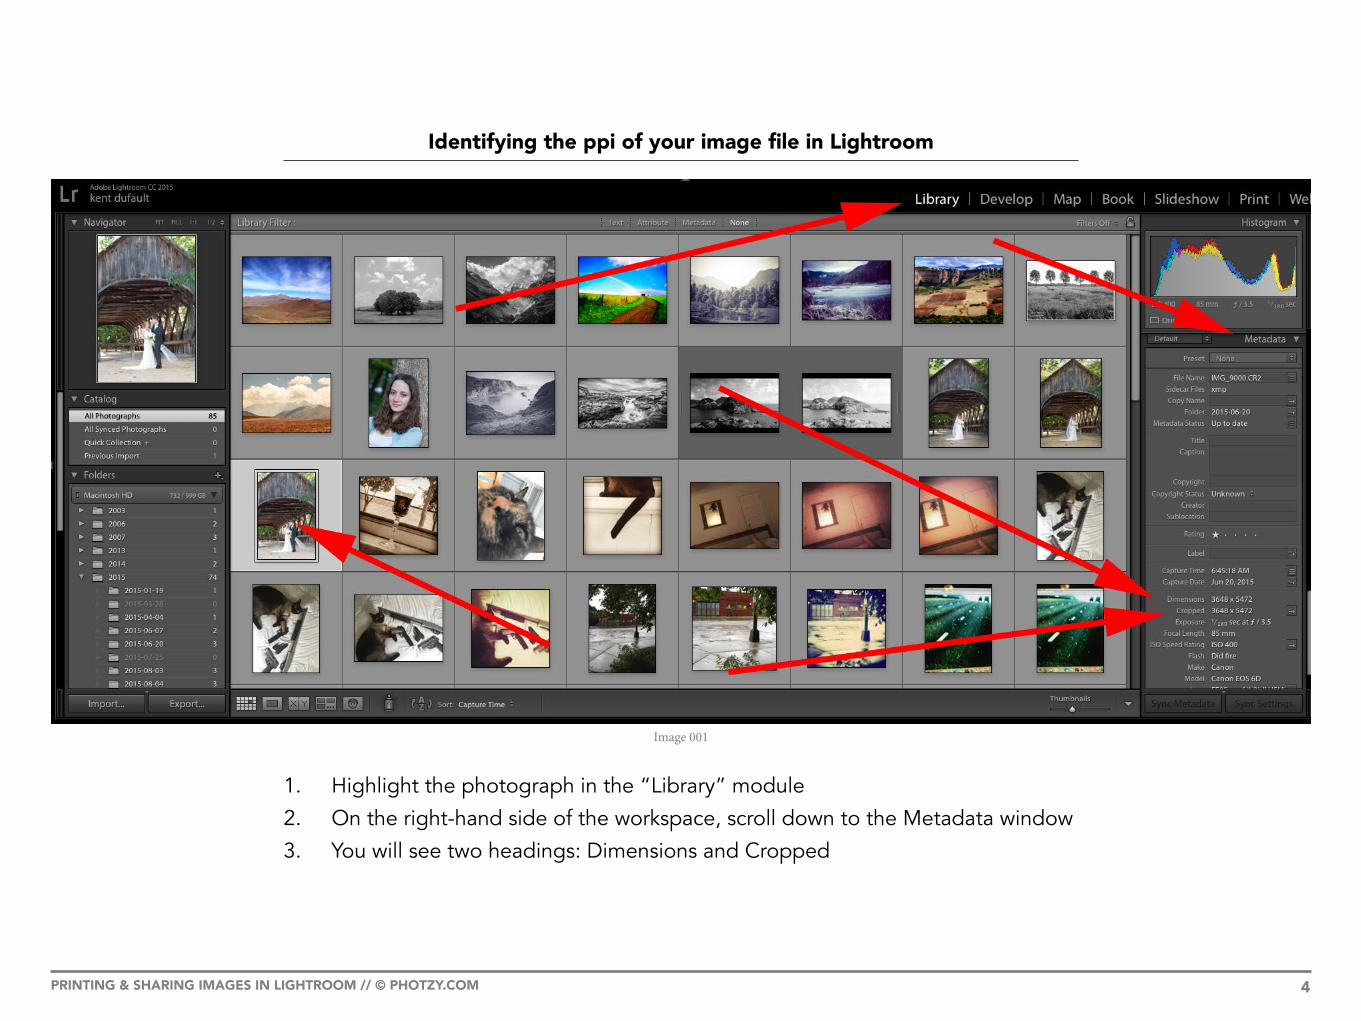
Identifying the ppi of your image file in Lightroom
Image 001
1. Highlight the photograph in the “Library” module
2. On the right-hand side of the workspace, scroll down to the Metadata window
3. You will see two headings: Dimensions and Cropped
PRINTING & SHARING IMAGES IN LIGHTROOM // © PHOTZY.COM 5
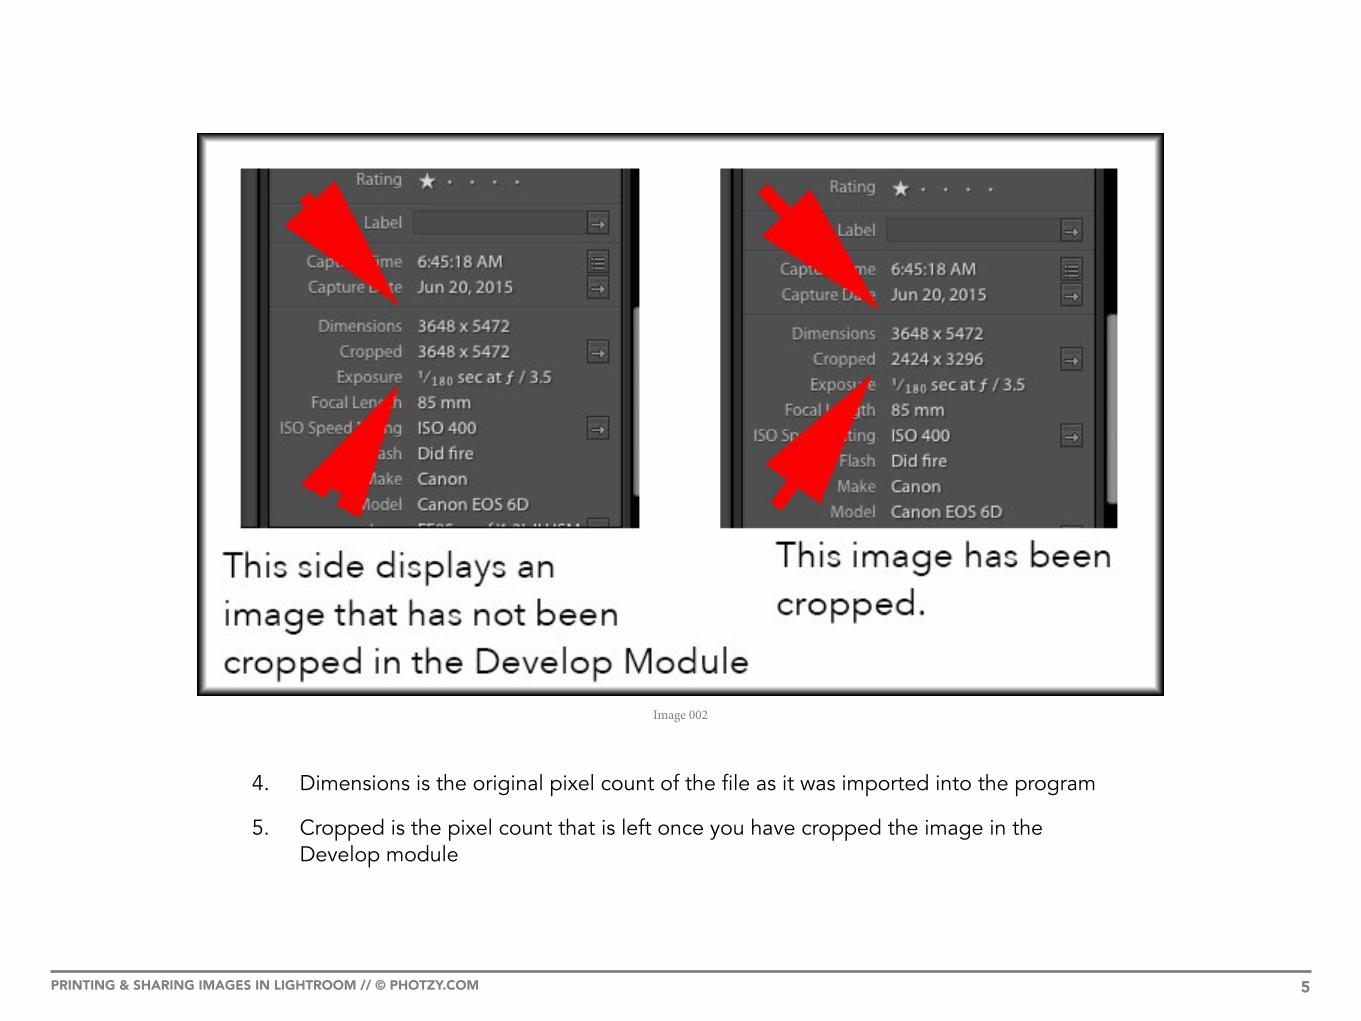
Image 002
4. Dimensions is the original pixel count of the file as it was imported into the program
5. Cropped is the pixel count that is left once you have cropped the image in the Develop module
PRINTING & SHARING IMAGES IN LIGHTROOM // © PHOTZY.COM 6
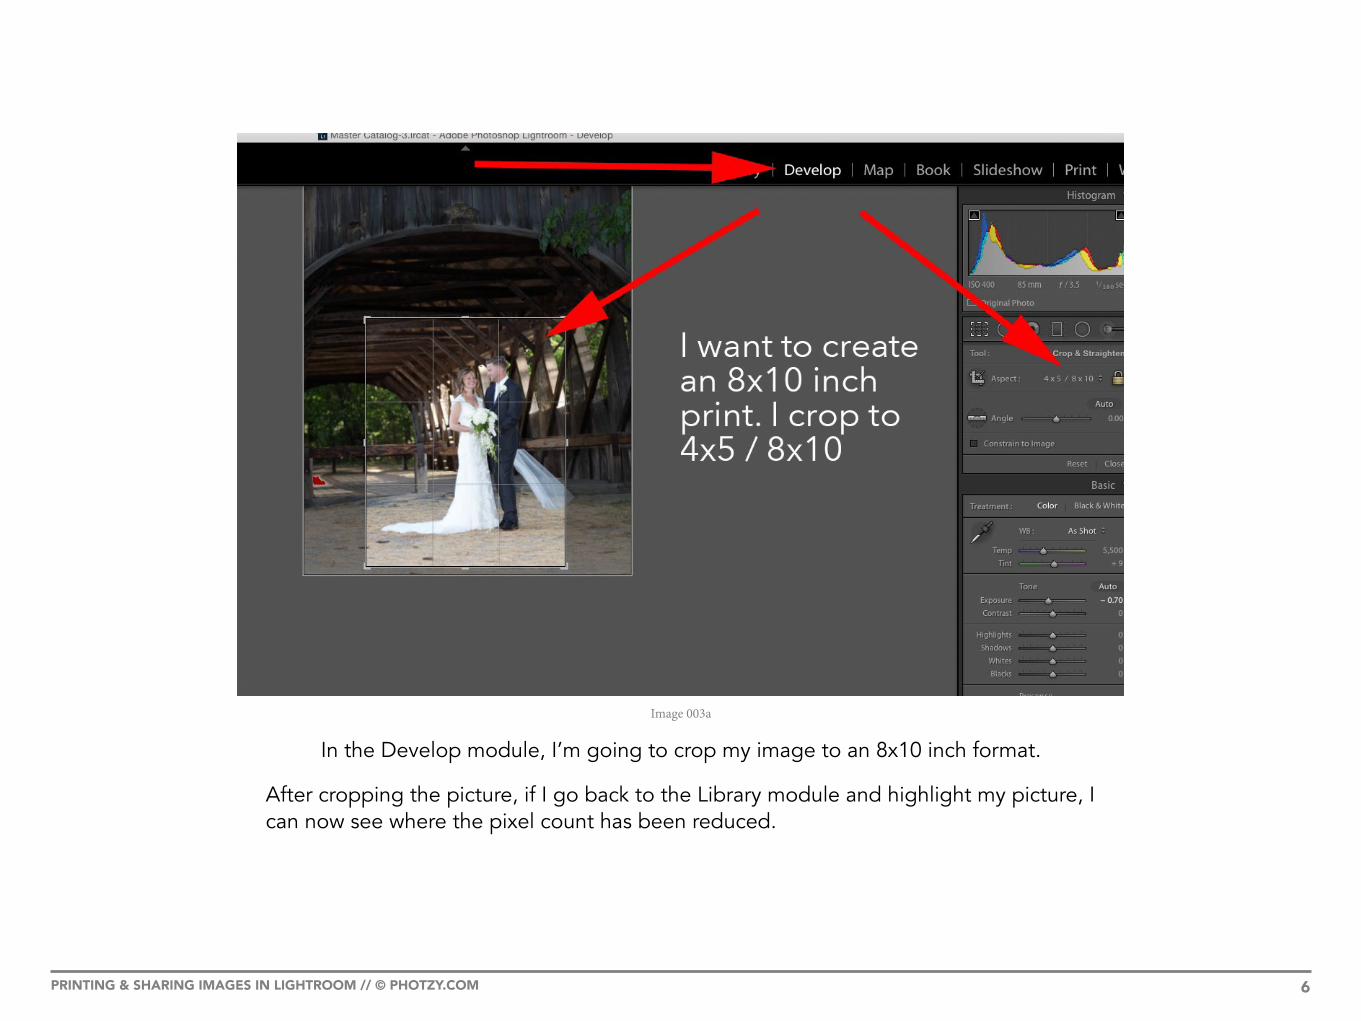
Image 003a
In the Develop module, I’m going to crop my image to an 8x10 inch format.
After cropping the picture, if I go back to the Library module and highlight my picture, I can now see where the pixel count has been reduced.

PRINTING & SHARING IMAGES IN LIGHTROOM // © PHOTZY.COM 7
Image 003b
If you were attempting to send this picture file to a photo lab, then this is where you would check the pixel count. You would need to take the following steps:
1. Check the pixel count2. Determine your print size3. Check your pixel count with your photo lab’s
recommended resolution4. If you are well within the limits for your chosen
photo size, your image file is appropriately sized
(more on that in a minute), and your file is of decent quality, then proceed to order the print
5. If you are at the lowest recommended resolution (or lower), then make the determination if the print is possible by using the file quality and the end use for the photograph as a guide. In most cases, you are probably better off going to a smaller print size rather than trying to make do with an under-sized file.
PRINTING & SHARING IMAGES IN LIGHTROOM // © PHOTZY.COM 8
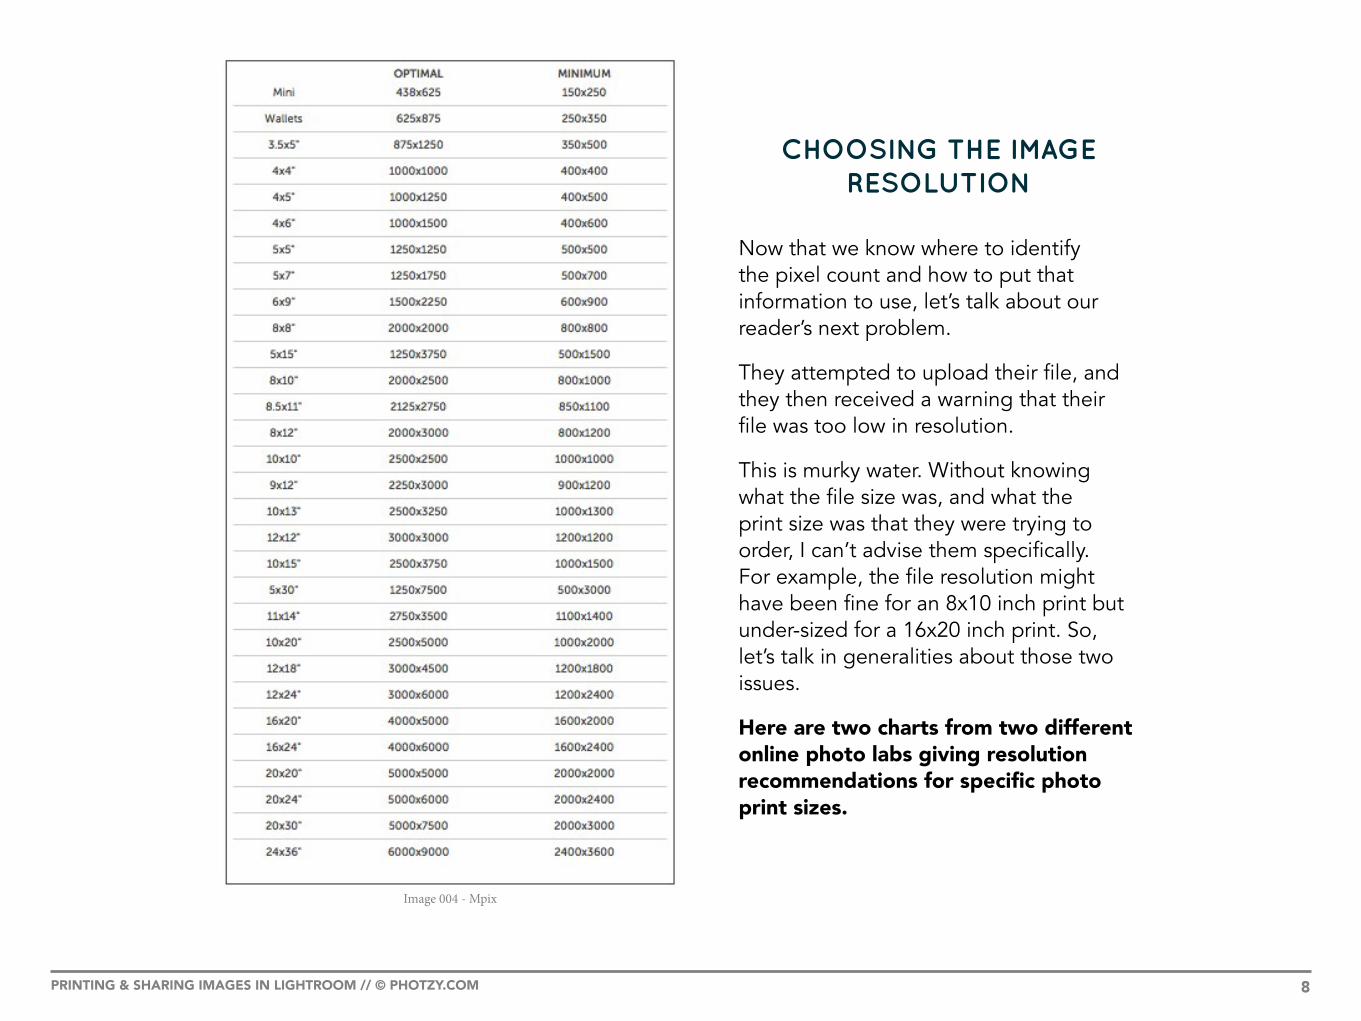
CHOOSING THE IMAGE RESOLUTION
Now that we know where to identify the pixel count and how to put that information to use, let’s talk about our reader’s next problem.
They attempted to upload their file, and they then received a warning that their file was too low in resolution.
This is murky water. Without knowing what the file size was, and what the print size was that they were trying to order, I can’t advise them specifically. For example, the file resolution might have been fine for an 8x10 inch print but under-sized for a 16x20 inch print. So, let’s talk in generalities about those two issues.
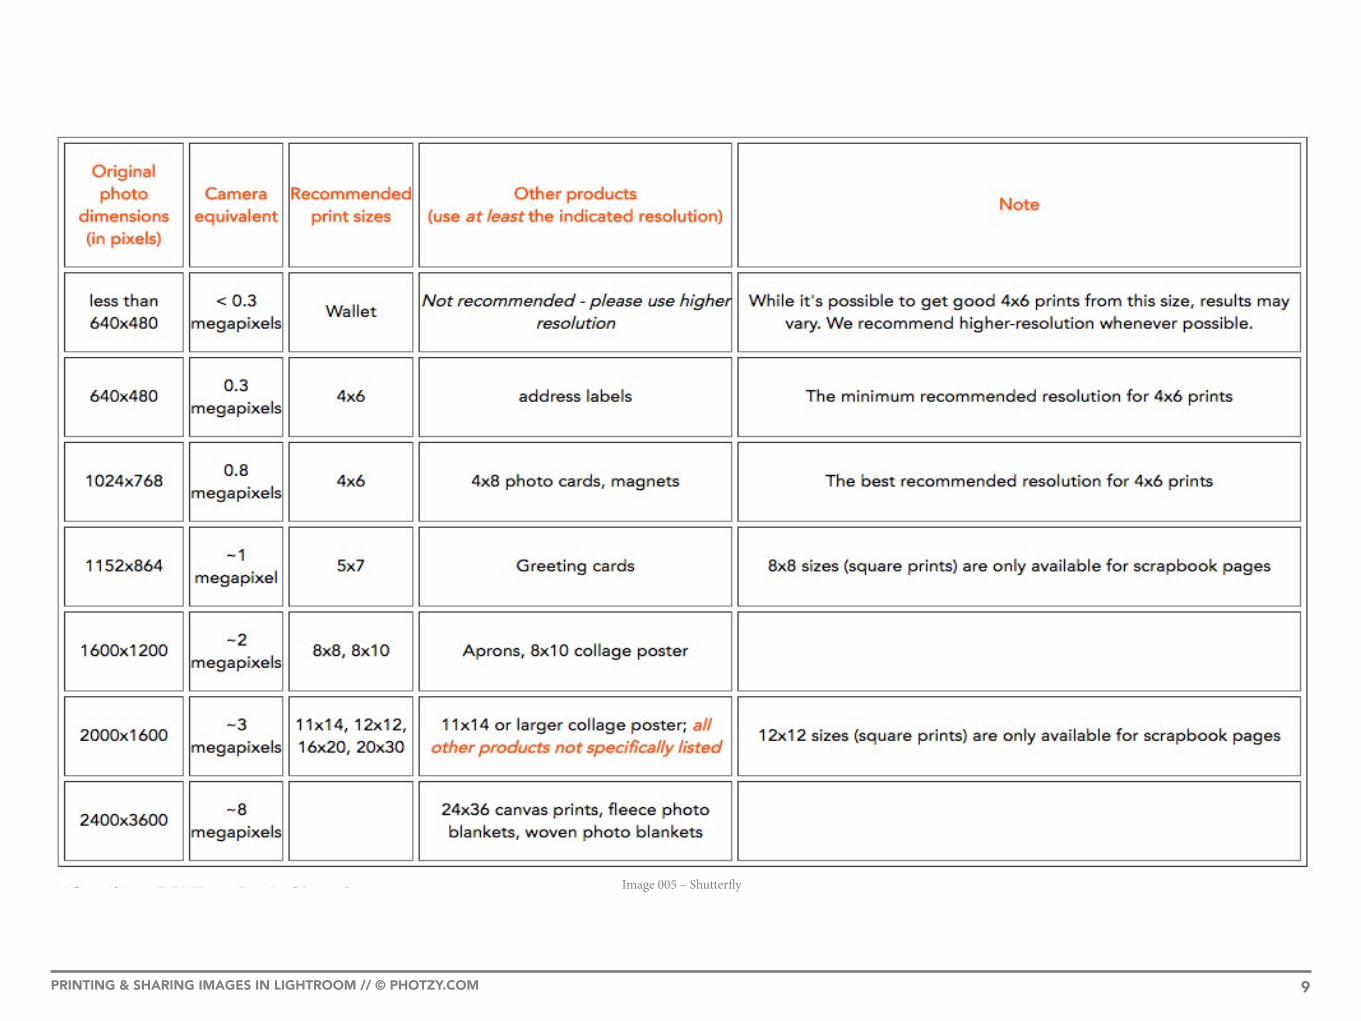
Here are two charts from two different online photo labs giving resolution recommendations for specific photo print sizes.
Image 004 - Mpix
PRINTING & SHARING IMAGES IN LIGHTROOM // © PHOTZY.COM 9
Image 005 – Shutterfly

PRINTING & SHARING IMAGES IN LIGHTROOM // © PHOTZY.COM 10
The first thing that you will notice is that the numbers, and the breakdown of those numbers between the two charts, varies widely.
This is the other murky aspect of getting prints made at a photo lab. The results will vary widely based on the photo lab’s own equipment.
Key Lesson: It’s a good idea to research different photo labs. Pick one that you’re comfortable with and then stick with them. Over time, you will become used to how they produce your work, and you’ll get better results.
When our reader got the “Low Resolution” warning, the software was simply stating a fact that the pixel count was low for the image size.
However, there is a secondary issue when it comes to resolution and print size.
That issue is the quality of the original photo file.
You can get a gorgeous 16x20 inch photographic print from a file resolution of 1600x2000 if your original is sharp, well exposed, and has minimal noise. On the other hand, you can get a lousy 16x20 inch print from a 4000x5000 pixel file if it was poorly shot.
A number of years ago, I worked for a digital portrait studio – this was when digital photography was just taking off. We were using Canon 10D cameras. They were 6 megapixels. We routinely sold 24x30 inch wall portraits that were produced with these cameras, and they looked great. Remember, the quality of your shot makes a big difference!
PRINTING & SHARING IMAGES IN LIGHTROOM // © PHOTZY.COM 11
SHARING IMAGES
Next, our reader asked about sharing their photographs. What is the best route?
This particular question is one that I will have the least specific answer for. There are just too many options!
Here are my particular choices on sharing:
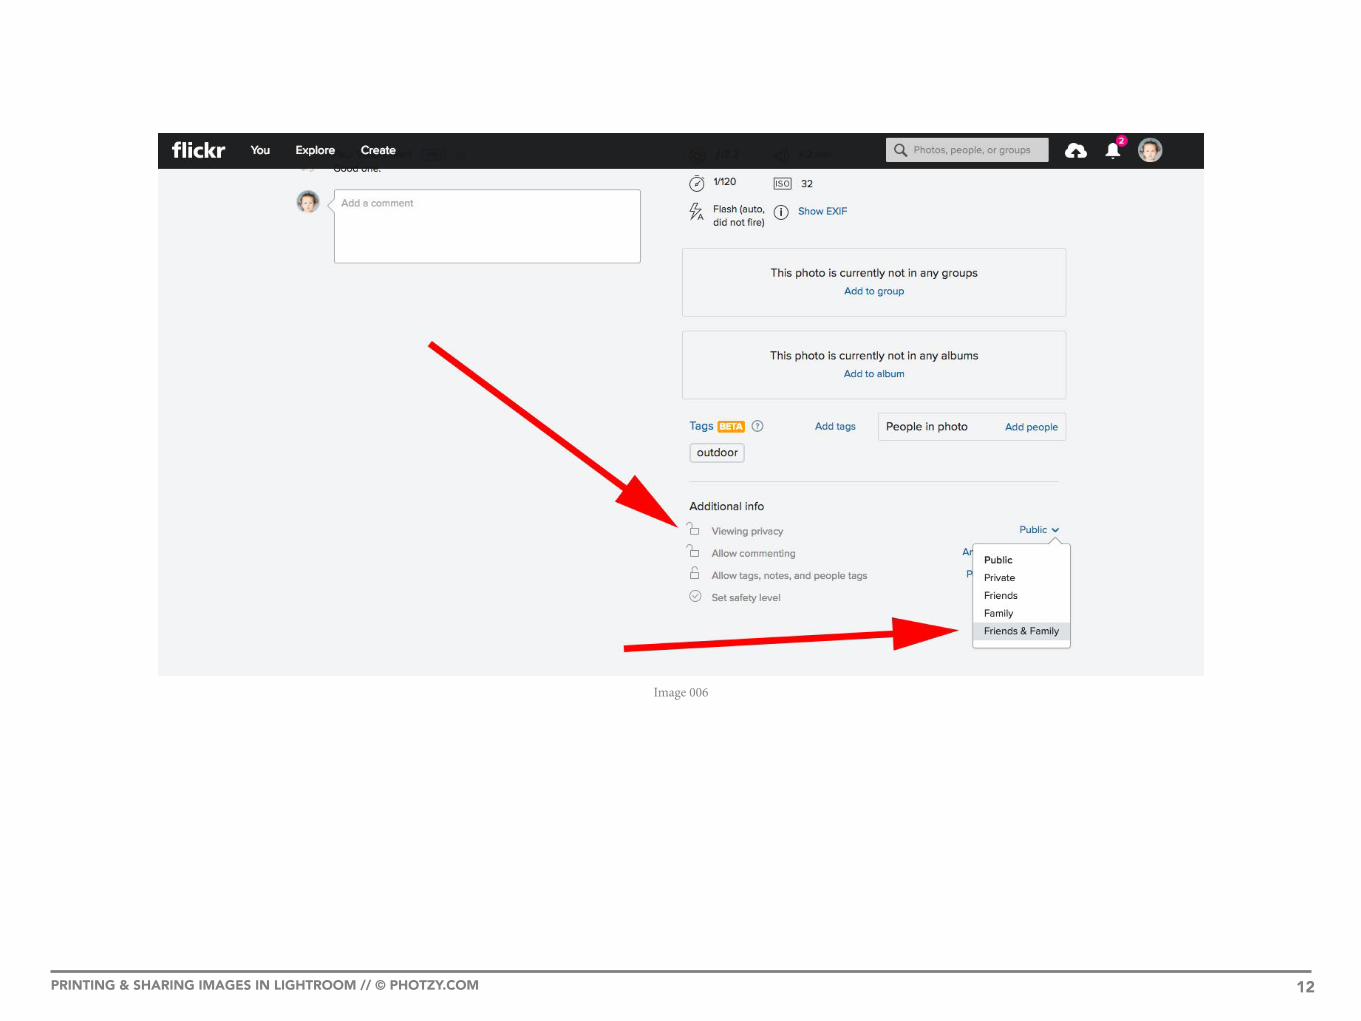
I use Flickr and set the Privacy setting to “Family & Friends” (see page 12). They can then see the images and download them if they wish, but the general public can’t.
I can also adjust the settings based on who I wish to see them, and possibly give access to them.
I also post family photographs on Facebook. I keep the privacy setting to family only. I know many people don’t like the Facebook policy on photographs, which essentially says they own anything that you upload. However, I’m of the thinking, “Hey, Facebook, if you want a picture of me with my feet up and drinking a beer, have at it!”
For my professional work, which needs to be transferred between myself and a client without any possibility of someone else seeing them, downloading them, or using them in any manner, I use Dropbox.
PRINTING & SHARING IMAGES IN LIGHTROOM // © PHOTZY.COM 13
PRINTING WITHOUT A WHITE BORDER
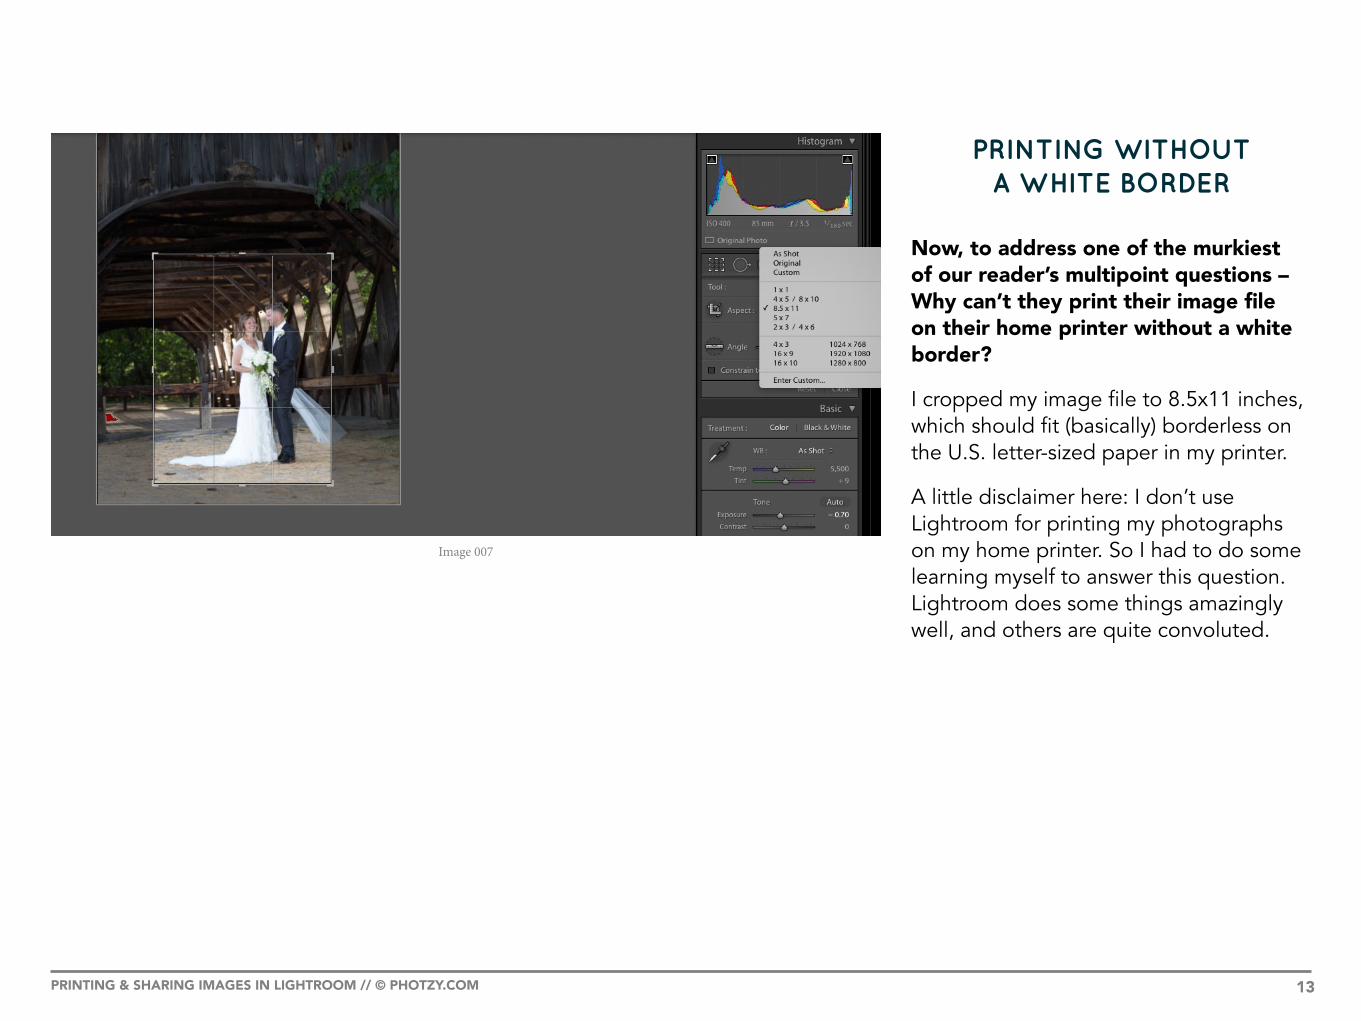
Now, to address one of the murkiest of our reader’s multipoint questions – Why can’t they print their image file on their home printer without a white border?
I cropped my image file to 8.5x11 inches, which should fit (basically) borderless on the U.S. letter-sized paper in my printer.
A little disclaimer here: I don’t use Lightroom for printing my photographs on my home printer. So I had to do some learning myself to answer this question. Lightroom does some things amazingly well, and others are quite convoluted.
Image 007
PRINTING & SHARING IMAGES IN LIGHTROOM // © PHOTZY.COM 14
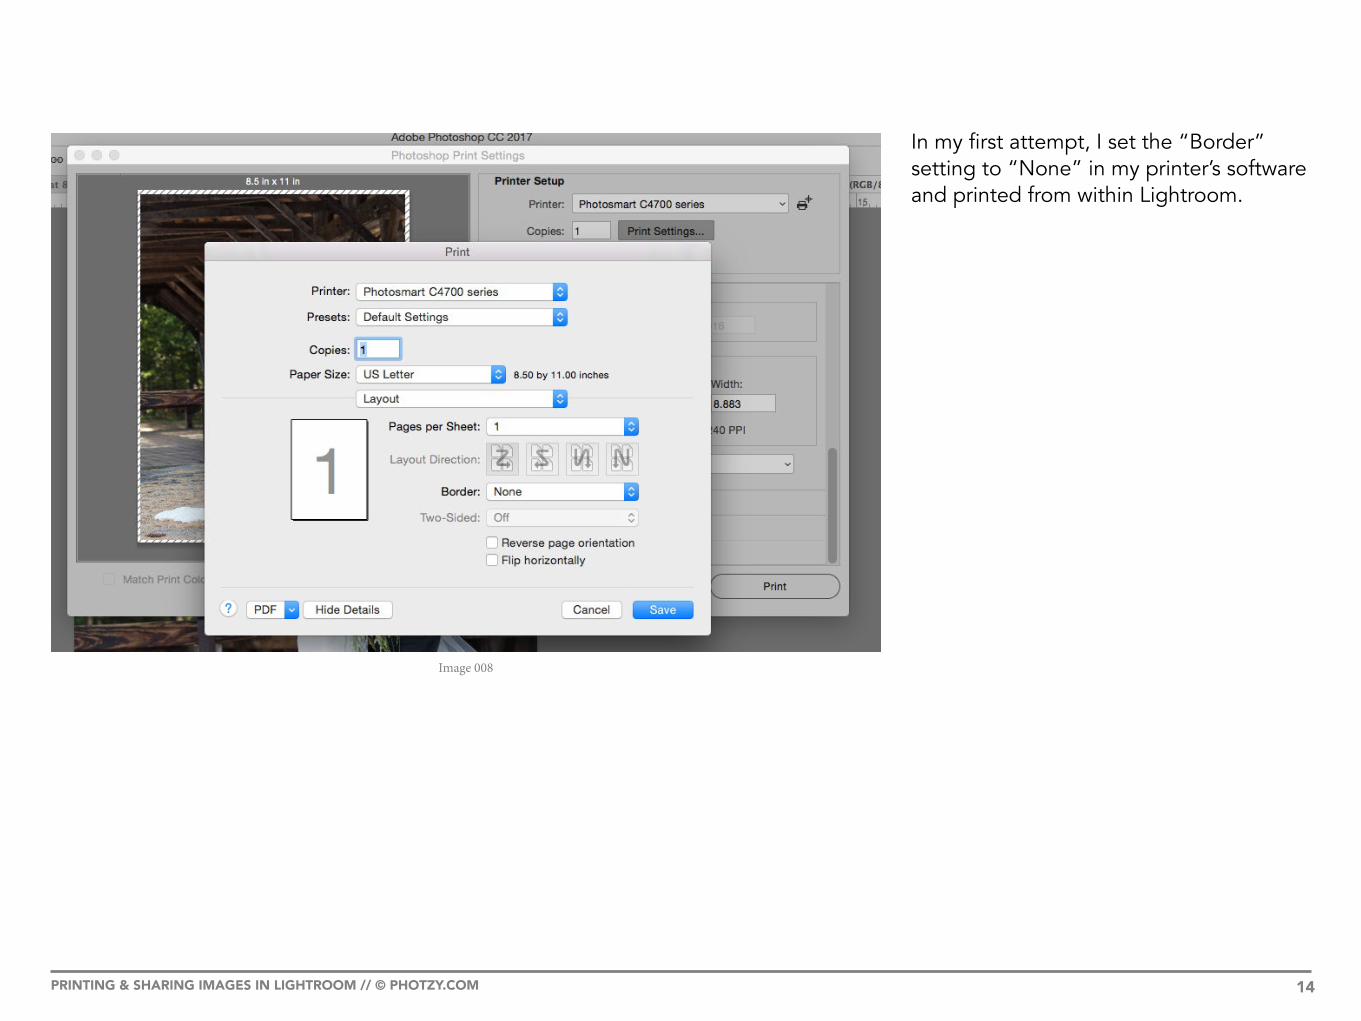
In my first attempt, I set the “Border” setting to “None” in my printer’s software and printed from within Lightroom.
Image 008
PRINTING & SHARING IMAGES IN LIGHTROOM // © PHOTZY.COM 15
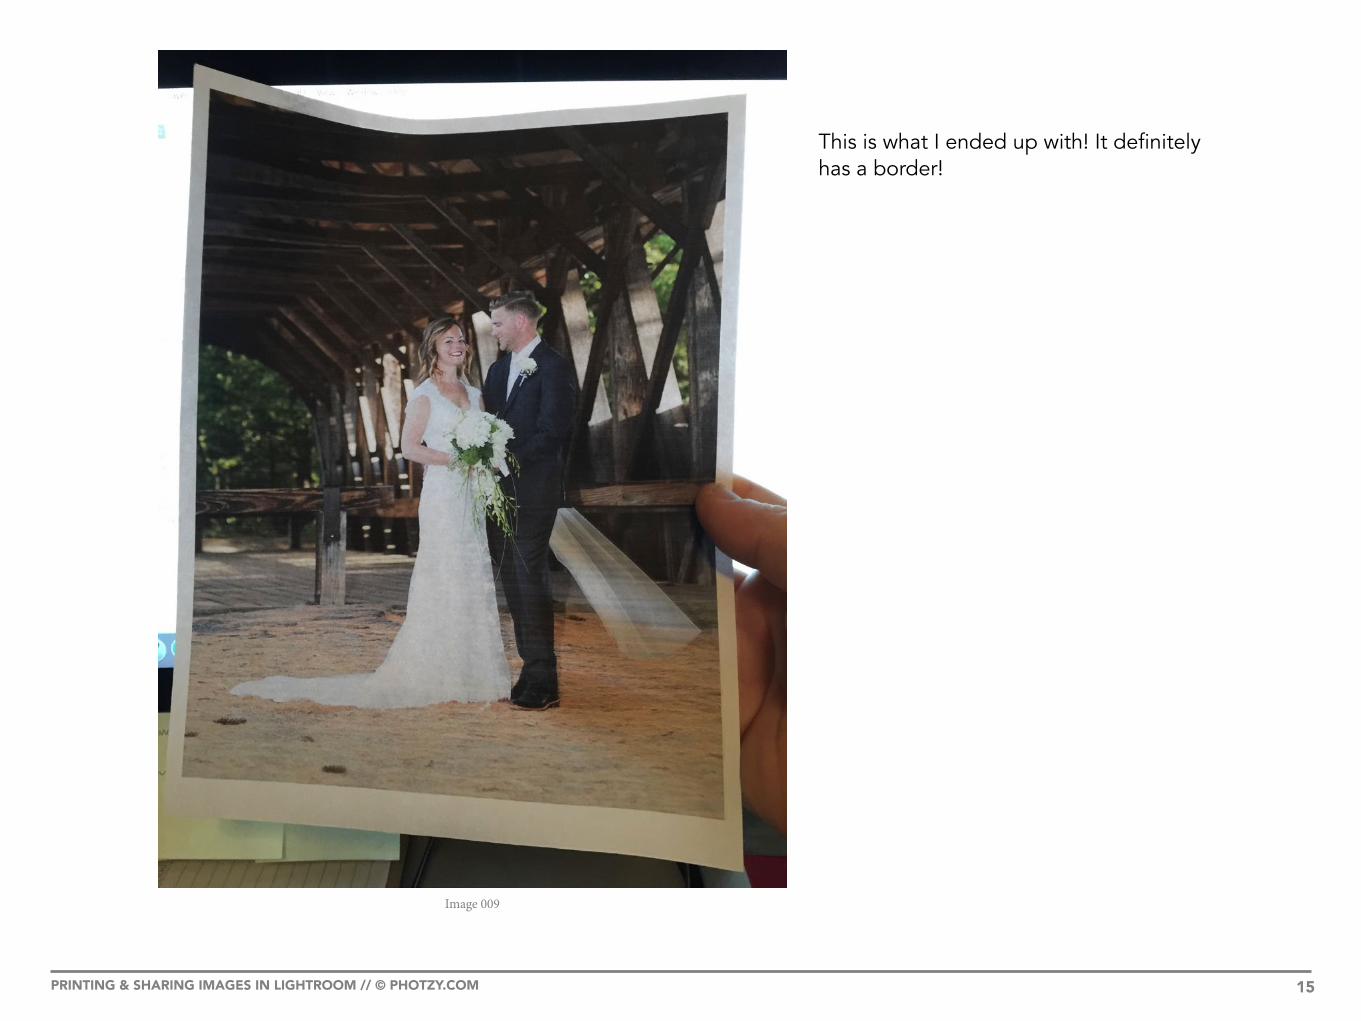
This is what I ended up with! It definitely has a border!
Image 009
PRINTING & SHARING IMAGES IN LIGHTROOM // © PHOTZY.COM 16
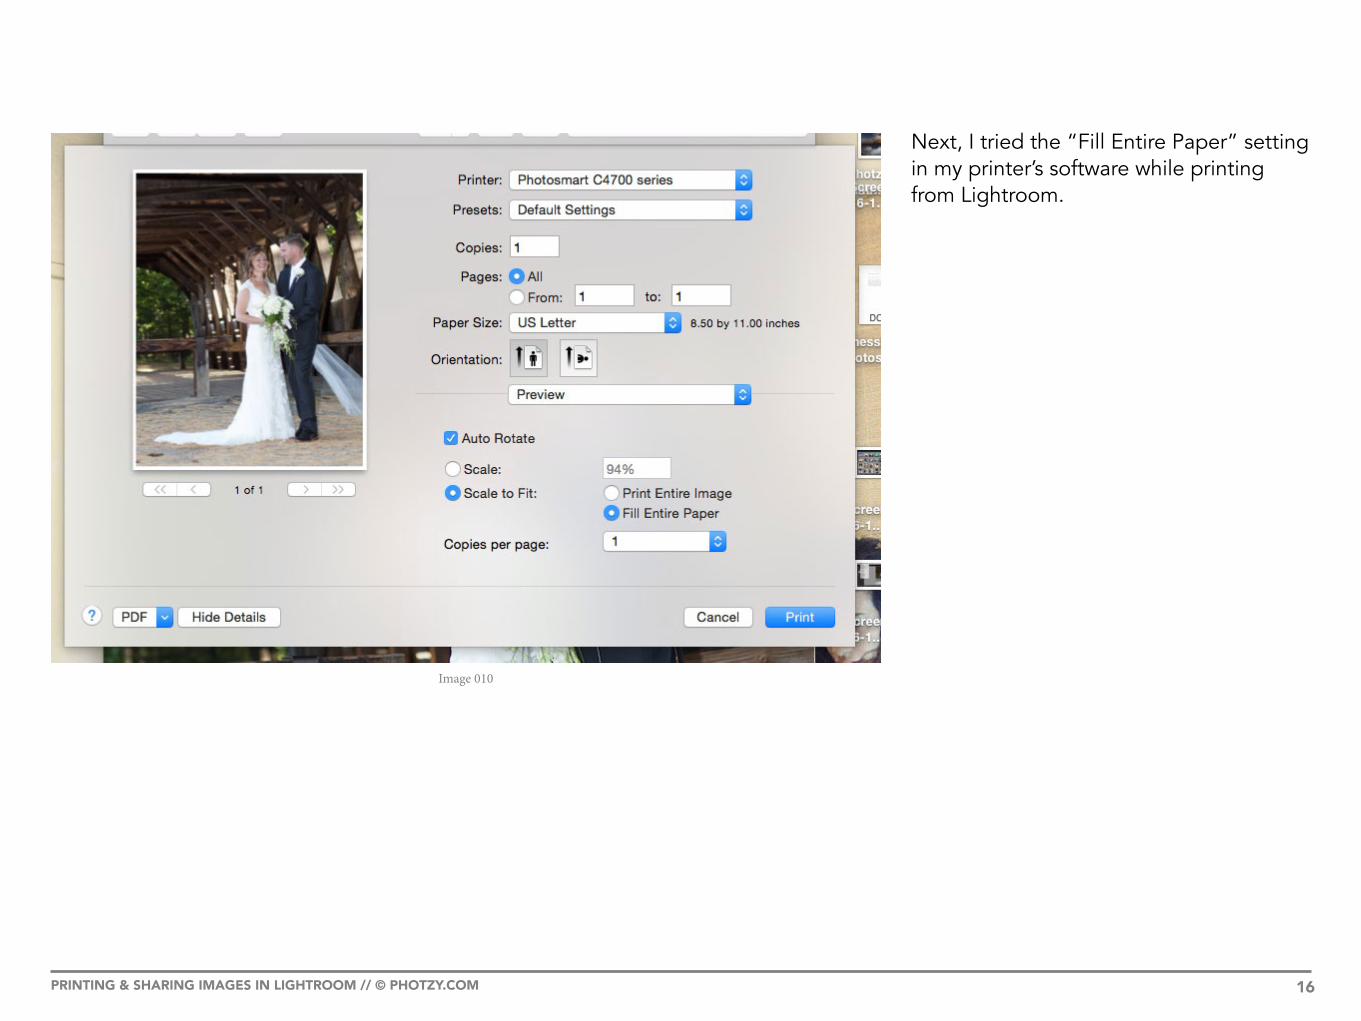
Next, I tried the “Fill Entire Paper” setting in my printer’s software while printing from Lightroom.
Image 010
PRINTING & SHARING IMAGES IN LIGHTROOM // © PHOTZY.COM 17
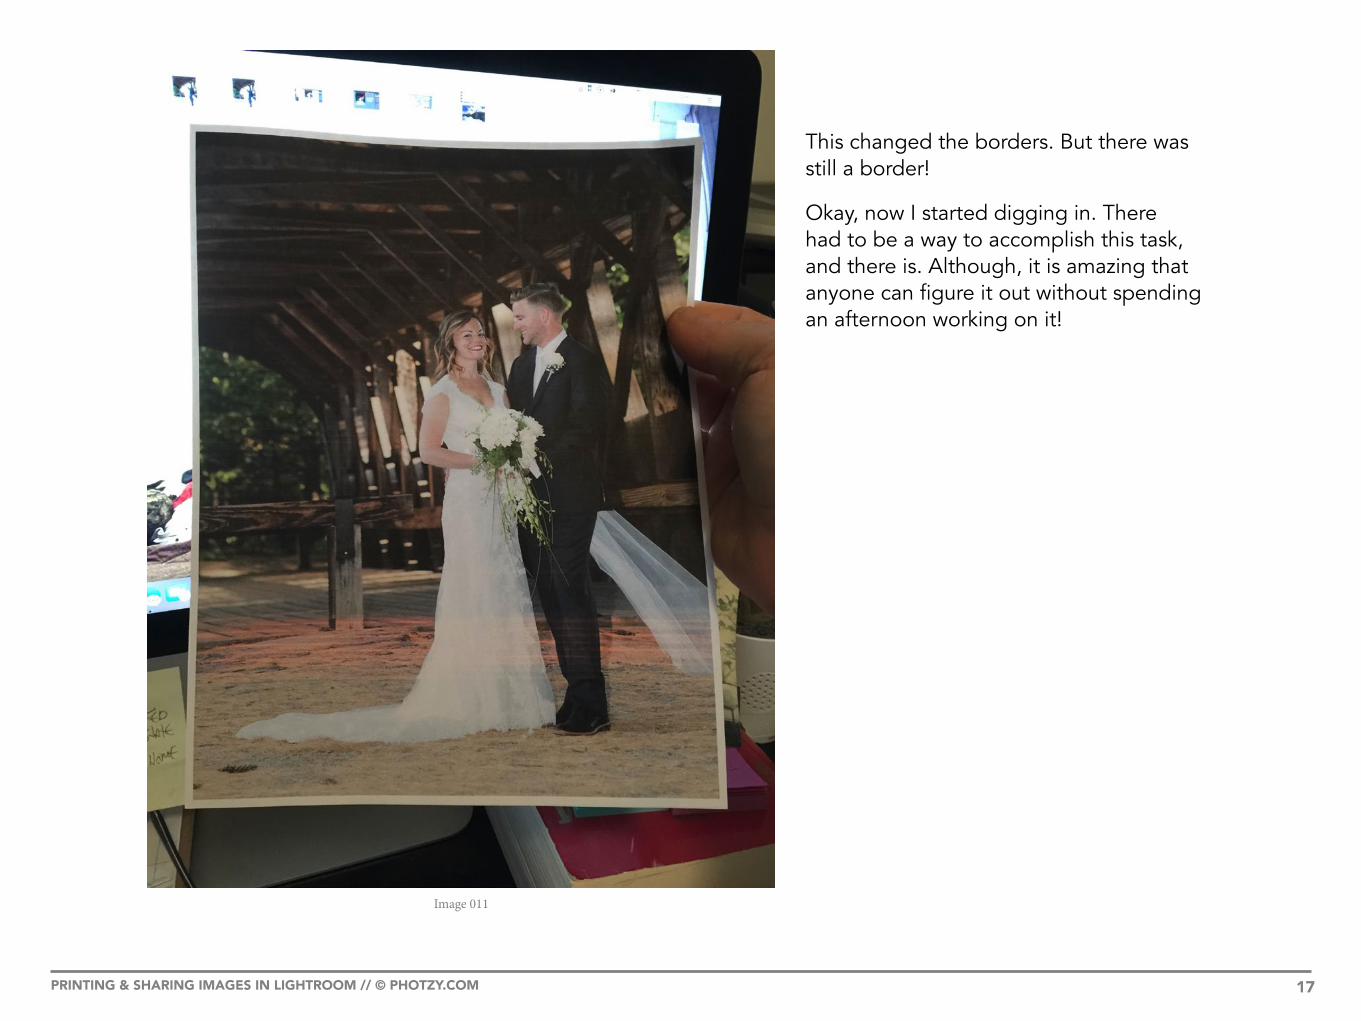
This changed the borders. But there was still a border!
Okay, now I started digging in. There had to be a way to accomplish this task, and there is. Although, it is amazing that anyone can figure it out without spending an afternoon working on it!
Image 011
PRINTING & SHARING IMAGES IN LIGHTROOM // © PHOTZY.COM 18
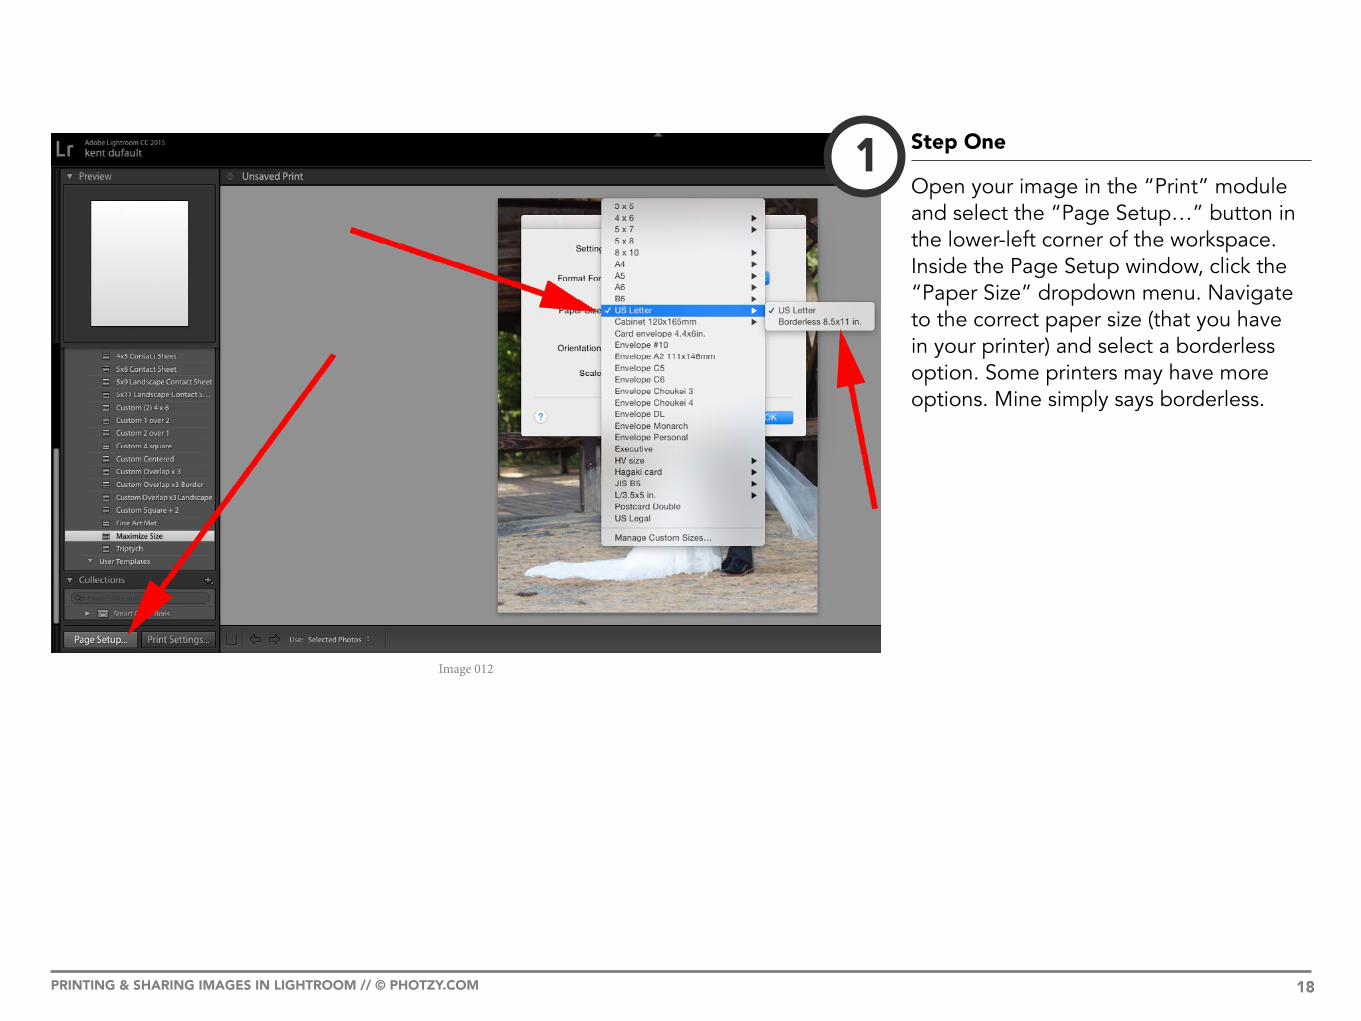
Step One
Open your image in the “Print” module and select the “Page Setup…” button in the lower-left corner of the workspace. Inside the Page Setup window, click the “Paper Size” dropdown menu. Navigate to the correct paper size (that you have in your printer) and select a borderless option. Some printers may have more options. Mine simply says borderless.
1
Image 012

PRINTING & SHARING IMAGES IN LIGHTROOM // © PHOTZY.COM 19
Step Two
In the “Layout” window on the right-hand side of the workspace, make sure the “Margins” sliders are all set to “0” (they do not default to 0, so you must set them to this setting!).
Image 013
2
PRINTING & SHARING IMAGES IN LIGHTROOM // © PHOTZY.COM 20
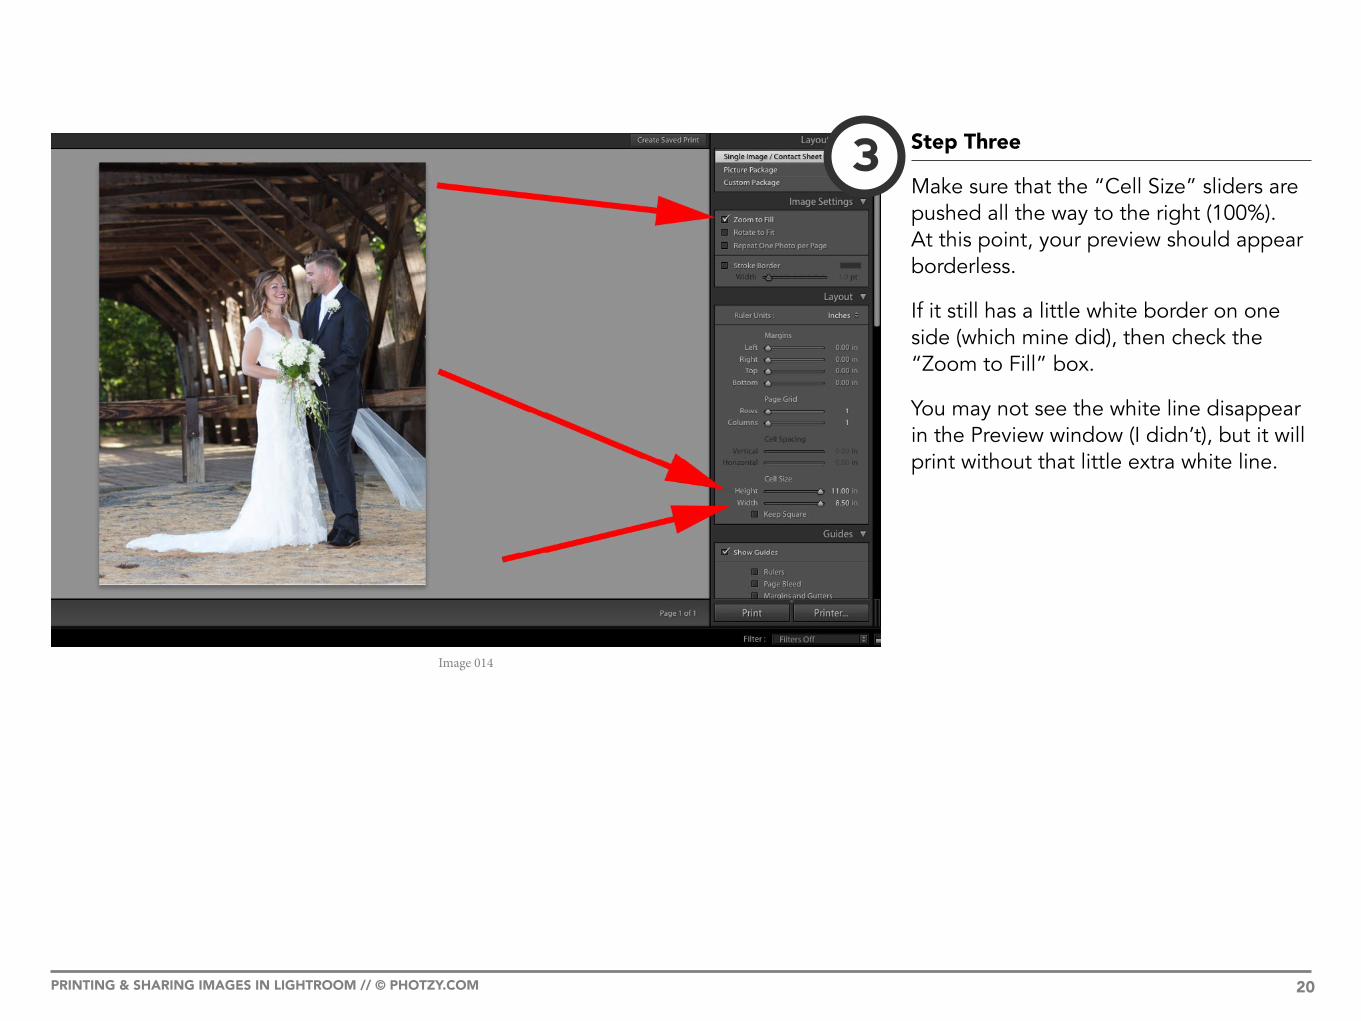
Step Three
Make sure that the “Cell Size” sliders are pushed all the way to the right (100%). At this point, your preview should appear borderless.
If it still has a little white border on one side (which mine did), then check the “Zoom to Fill” box.
You may not see the white line disappear in the Preview window (I didn’t), but it will print without that little extra white line.
Image 014
3
PRINTING & SHARING IMAGES IN LIGHTROOM // © PHOTZY.COM 21
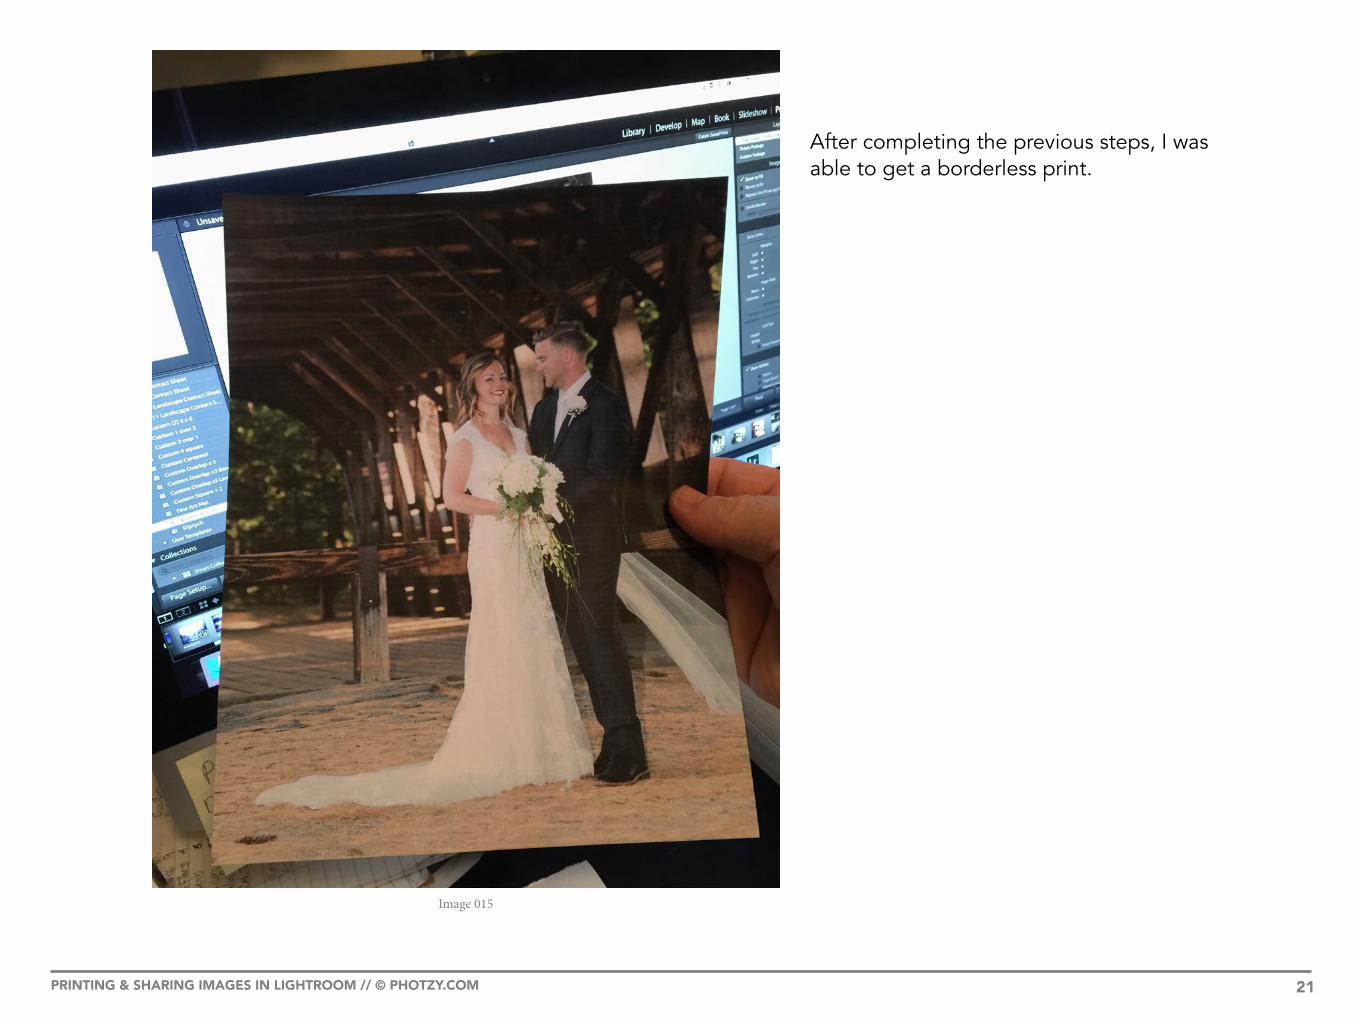
After completing the previous steps, I was able to get a borderless print.
Image 015
PRINTING & SHARING IMAGES IN LIGHTROOM // © PHOTZY.COM 22
PHOTO LAB PRINTING TIPS
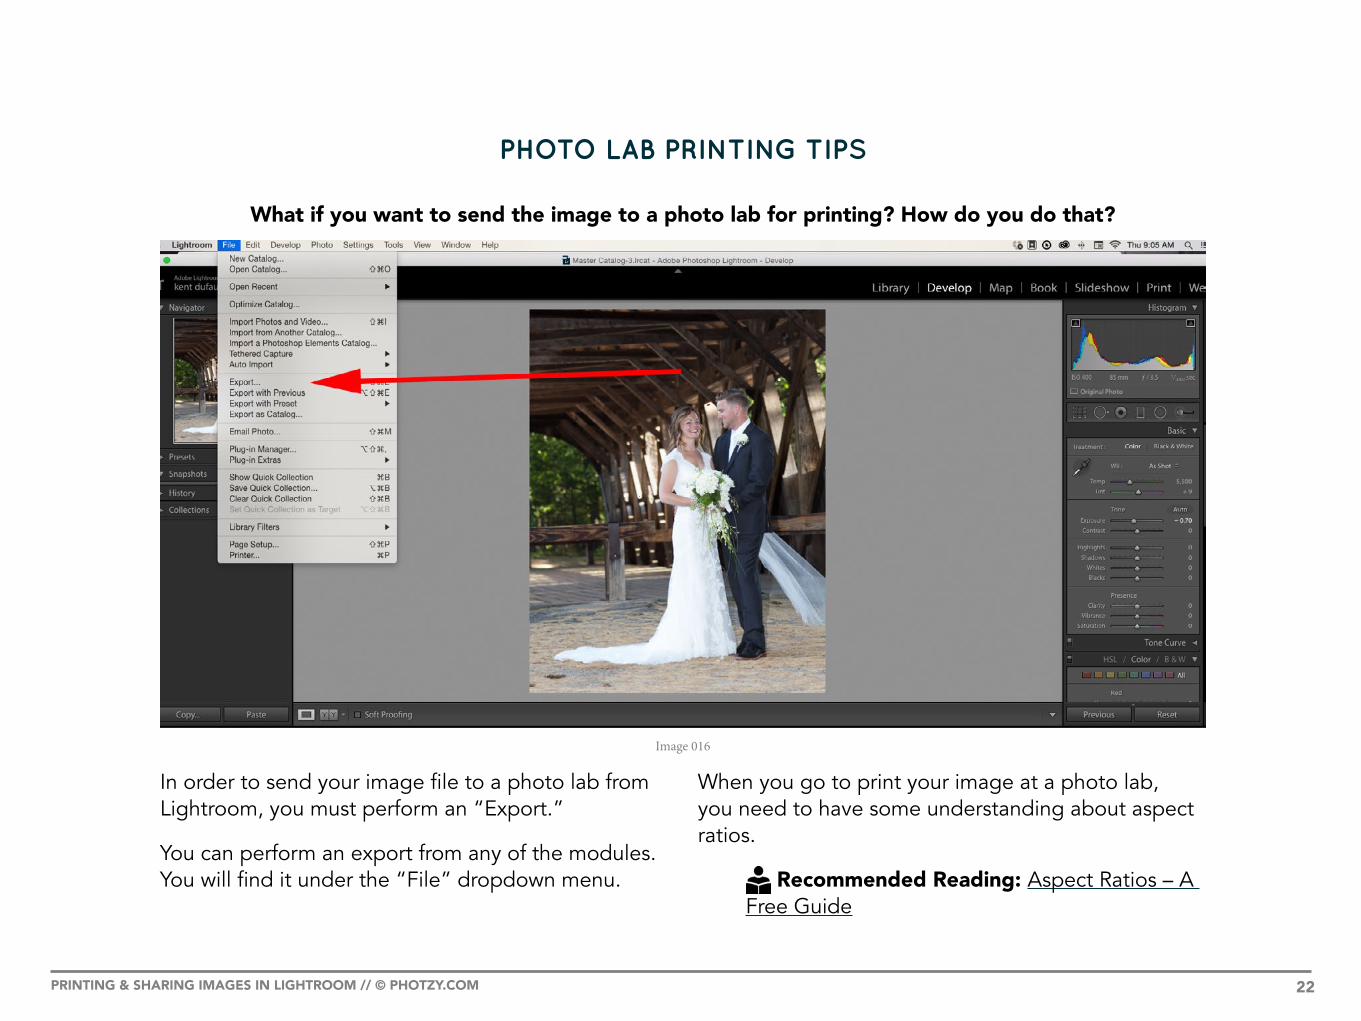
What if you want to send the image to a photo lab for printing? How do you do that?
Image 016
In order to send your image file to a photo lab from Lightroom, you must perform an “Export.”
You can perform an export from any of the modules. You will find it under the “File” dropdown menu.
When you go to print your image at a photo lab, you need to have some understanding about aspect ratios.
Recommended Reading: Aspect Ratios – A Free Guide
PRINTING & SHARING IMAGES IN LIGHTROOM // © PHOTZY.COM 23
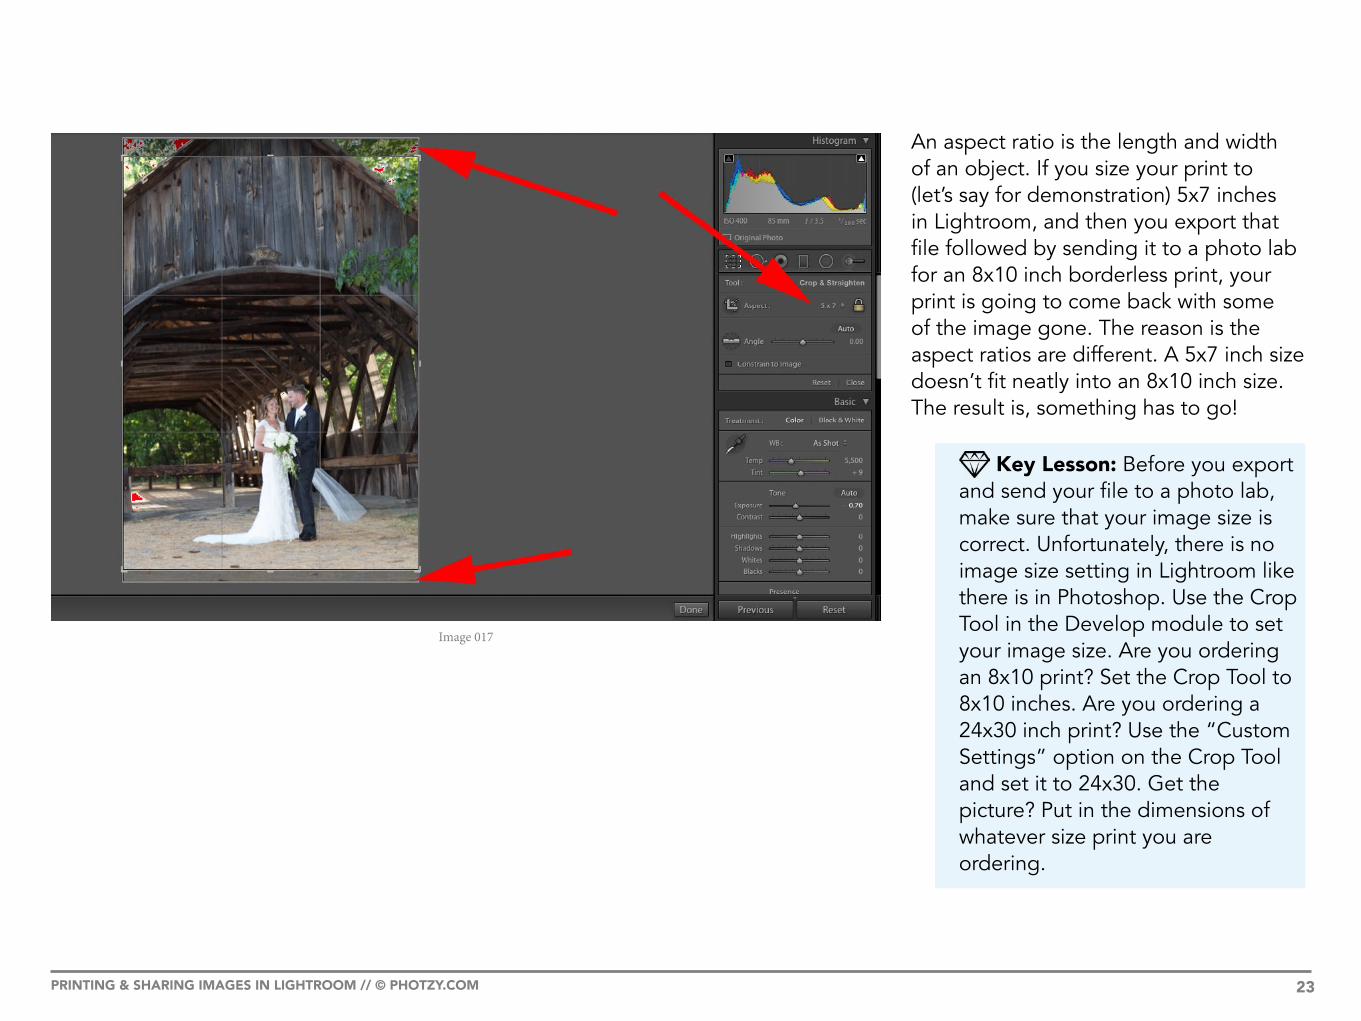
An aspect ratio is the length and width of an object. If you size your print to (let’s say for demonstration) 5x7 inches in Lightroom, and then you export that file followed by sending it to a photo lab for an 8x10 inch borderless print, your print is going to come back with some of the image gone. The reason is the aspect ratios are different. A 5x7 inch size doesn’t fit neatly into an 8x10 inch size. The result is, something has to go!
Key Lesson: Before you export and send your file to a photo lab, make sure that your image size is correct. Unfortunately, there is no image size setting in Lightroom like there is in Photoshop. Use the Crop Tool in the Develop module to set your image size. Are you ordering an 8x10 print? Set the Crop Tool to 8x10 inches. Are you ordering a 24x30 inch print? Use the “Custom Settings” option on the Crop Tool and set it to 24x30. Get the picture? Put in the dimensions of whatever size print you are ordering.
Image 017
PRINTING & SHARING IMAGES IN LIGHTROOM // © PHOTZY.COM 24
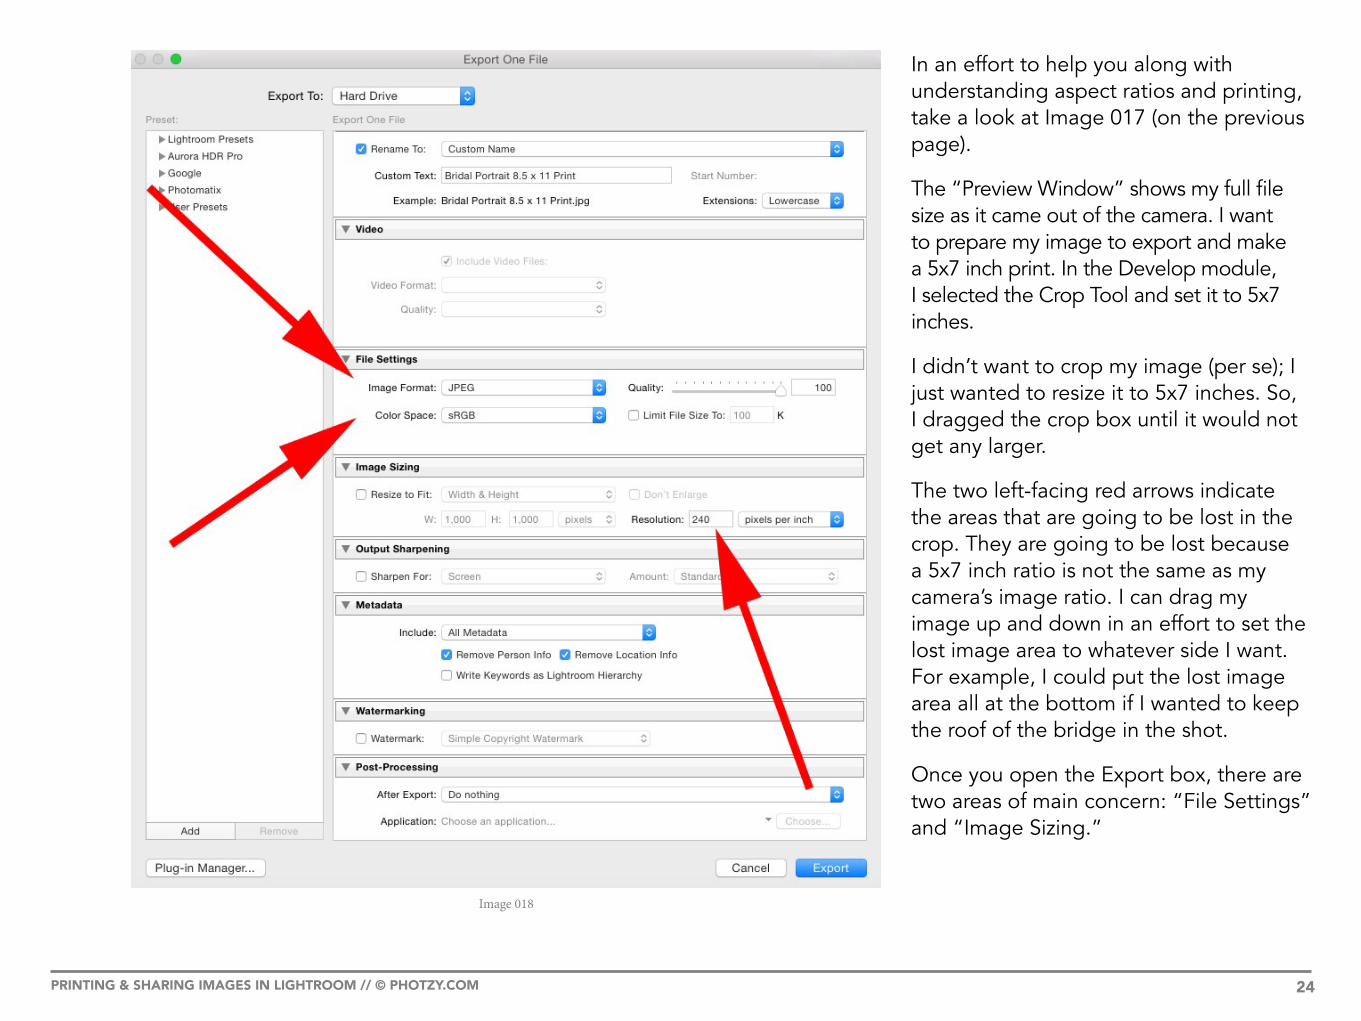
In an effort to help you along with understanding aspect ratios and printing, take a look at Image 017 (on the previous page).
The “Preview Window” shows my full file size as it came out of the camera. I want to prepare my image to export and make a 5x7 inch print. In the Develop module, I selected the Crop Tool and set it to 5x7 inches.
I didn’t want to crop my image (per se); I just wanted to resize it to 5x7 inches. So, I dragged the crop box until it would not get any larger.
The two left-facing red arrows indicate the areas that are going to be lost in the crop. They are going to be lost because a 5x7 inch ratio is not the same as my camera’s image ratio. I can drag my image up and down in an effort to set the lost image area to whatever side I want. For example, I could put the lost image area all at the bottom if I wanted to keep the roof of the bridge in the shot.
Once you open the Export box, there are two areas of main concern: “File Settings” and “Image Sizing.”
Image 018
PRINTING & SHARING IMAGES IN LIGHTROOM // © PHOTZY.COM 25
File Settings
Make sure the “Image Format” is set to “JPEG” – all photo labs currently use .jpeg or .tif image files. The .jpeg is just easier to work with. Make sure the “Quality” slider is set all the way to “100.” Make sure the “Color Space” is set to “sRGB.” Some photographers might try and tell you to use one of the other settings, but don’t listen to them. Currently, ALL photo labs use the sRGB color space.
Image Sizing
The only setting you should concern yourself with is the resolution. Leave it at 240 ppi. Some photo labs may have some verbiage on their website saying the files should be set at 300 ppi. Ignore that. The equipment that the photo labs use automatically adjusts the file ppi to their requirements. If your image file is under-sized, you may be tempted at this point to up the resolution. Don’t do it. Small adjustments can sometimes squeeze by unnoticed, but most of the time there will be a noticeable loss of image quality if you try and raise the resolution artificially.
Important Note: One final word on ordering prints from photo labs: do not sharpen your images or apply very light sharpening. The equipment that a photo lab uses applies sharpening to the file. If you sharpen it (a lot), and then they sharpen it, you will likely get an awful looking print that is filled with artifacts.
Recommended Reading: If you would like to learn the fundamentals of editing photos in Lightroom, Photoshop, or Elements, grab a copy of the Fundamental Editing premium guide.
PRINTING & SHARING IMAGES IN LIGHTROOM // © PHOTZY.COM 26
Self Check Quiz
1. What is the difference between dpi and ppi?
2. In which module can you find the ppi of an image using Lightroom?
3. True or False: When you crop an image, the ppi stays the same. It’s the dpi that changes.
4. True or False: It’s impossible to create a print larger than 8x10 inches from a 6-megapixel camera.
5. When ordering a print from a photo lab, there are two concerns: image resolution and image ___________.
6. If you upload your image files to Flickr and you wish to limit who can see them, what setting would you change?
7. True or False: In order to print a borderless print from your home printer, you must use the printer settings and NOT the Lightroom settings.
8. What is an aspect ratio?
9. If I try to print an 8x10 inch print from an image file that is sized to 5x7 inches, what is going to happen?
10. True or False: If I send my image file to a professional photo lab, I can use any color space setting that I want to.
IF YOU’D LIKE TO CONTINUE LEARNING AND IMPROVING
YOUR PHOTOGRAPHY PLEASE VISIT PHOTZY.COM
About the Author
Kent DuFault is a professional photographer and author.
LinkedIn: http://www.linkedin.com/in/kentdufault/Flickr: https://www.flickr.com/people/35449761@N04/Clippings: https://www.clippings.me/kentdufaultGurushots: https://gurushots.com/kentdufault500px: https://500px.com/kentdufault