Printing for Fun and Profit under AIX 5L - IBM · PDF fileibm.com/redbooks Printing for Fun...
598
ibm.com/redbooks Printing for Fun and Profit under AIX 5L John Tesch Kristin Moore KyeongWon Jeong Introduction of System V print subsystem Effective print management with many advanced topics Solving print problems with hints and tips
-
Upload
truongdien -
Category
Documents
-
view
227 -
download
2
Transcript of Printing for Fun and Profit under AIX 5L - IBM · PDF fileibm.com/redbooks Printing for Fun...

ibm.com/redbooks
Printing for Fun and Profit under AIX 5L
John TeschKristin Moore
KyeongWon Jeong
Introduction of System V print subsystem
Effective print management with many advanced topics
Solving print problems with hints and tips


Printing for Fun and Profit under AIX 5L
March 2001
SG24-6018-00
International Technical Support Organization

© Copyright International Business Machines Corporation 2001. All rights reserved.Note to U.S Government Users – Documentation related to restricted rights – Use, duplication or disclosure is subject to restrictions set forth in GSA ADP Schedule Contract with IBM Corp.
First Edition (March 2001)
This edition applies to IBM RS/6000 systems for use with the AIX 5L Operating System Version 5.0 and is based on information available in November, 2000.
Comments may be addressed to:IBM Corporation, International Technical Support OrganizationDept. JN9B Building 003 Internal Zip 283411400 Burnet RoadAustin, Texas 78758-3493
When you send information to IBM, you grant IBM a non-exclusive right to use or distribute the information in any way it believes appropriate without incurring any obligation to you.
Before using this information and the product it supports, be sure to read the general information in Appendix G, “Special notices” on page 525.
Take Note!
Contents
Figures . . . . . . . . . . . . . . . . . . . . . . . . . . . . . . . . . . . . . . . . . . . . . . . . . . . xv
Tables. . . . . . . . . . . . . . . . . . . . . . . . . . . . . . . . . . . . . . . . . . . . . . . . . . . .xix
Preface . . . . . . . . . . . . . . . . . . . . . . . . . . . . . . . . . . . . . . . . . . . . . . . . . . .xxiThe team that wrote this redbook. . . . . . . . . . . . . . . . . . . . . . . . . . . . . . . . . . . xxiComments welcome. . . . . . . . . . . . . . . . . . . . . . . . . . . . . . . . . . . . . . . . . . . . xxii
Part 1. Introduction . . . . . . . . . . . . . . . . . . . . . . . . . . . . . . . . . . . . . . . . . . . . . . . . . . . . . 1
Chapter 1. Overview of AIX 5L print subsystems . . . . . . . . . . . . . . . . . . 31.1 What is new in AIX 5L printing? . . . . . . . . . . . . . . . . . . . . . . . . . . . . . . 3
1.1.1 Who can administer printing? . . . . . . . . . . . . . . . . . . . . . . . . . . . . 31.1.2 System V print subsystem . . . . . . . . . . . . . . . . . . . . . . . . . . . . . . 41.1.3 Changes to the PowerPC print subsystem . . . . . . . . . . . . . . . . . . 4
1.2 Packaging . . . . . . . . . . . . . . . . . . . . . . . . . . . . . . . . . . . . . . . . . . . . . . 71.2.1 System V print subsystem filesets . . . . . . . . . . . . . . . . . . . . . . . . 71.2.2 PowerPC print subsystem filesets. . . . . . . . . . . . . . . . . . . . . . . . . 7
1.3 Web-based System Manager versus SMIT printer management. . . . . . 71.4 Multiple approaches to printing. . . . . . . . . . . . . . . . . . . . . . . . . . . . . . . 8
1.4.1 Printing by directly addressing the printer device driver . . . . . . . . 81.4.2 Printing directly to a network printer with a socket program . . . . . 91.4.3 Printing by utilizing the System V print subsystem . . . . . . . . . . . . 91.4.4 Printing by utilizing the PowerPC print subsystem . . . . . . . . . . . . 91.4.5 Printing by utilizing an advanced print management system . . . . . 9
1.5 Comparing System V, PowerPC, and Infoprint Manager printing . . . . 101.6 Design considerations . . . . . . . . . . . . . . . . . . . . . . . . . . . . . . . . . . . . 131.7 Choosing the correct print subsystem. . . . . . . . . . . . . . . . . . . . . . . . . 16
1.7.1 System V print subsystem comparison . . . . . . . . . . . . . . . . . . . . 161.7.2 PowerPC print subsystem comparison . . . . . . . . . . . . . . . . . . . . 181.7.3 Infoprint Manager comparison . . . . . . . . . . . . . . . . . . . . . . . . . . 201.7.4 Comparison by feature . . . . . . . . . . . . . . . . . . . . . . . . . . . . . . . . 231.7.5 Comparison by data type . . . . . . . . . . . . . . . . . . . . . . . . . . . . . . 25
1.8 Switching between the two AIX 5L print subsystems . . . . . . . . . . . . . 251.8.1 Three ways to switch between print subsystems. . . . . . . . . . . . . 261.8.2 Actions when switching from PowerPC to System V printing. . . . 281.8.3 Actions when switching from System V to PowerPC printing. . . . 281.8.4 FAQ about switching print subsystems . . . . . . . . . . . . . . . . . . . . 29
1.9 To spool or not to spool . . . . . . . . . . . . . . . . . . . . . . . . . . . . . . . . . . . 301.9.1 When will a print job be spooled? . . . . . . . . . . . . . . . . . . . . . . . . 301.9.2 Where will the file be spooled? . . . . . . . . . . . . . . . . . . . . . . . . . . 30
© Copyright IBM Corp. 2001 iii

1.9.3 How much spool space will you need? . . . . . . . . . . . . . . . . . . . . 311.9.4 Adding a separate file system for spooling? . . . . . . . . . . . . . . . . 31
1.10 Printer devices and device drivers . . . . . . . . . . . . . . . . . . . . . . . . . . 341.10.1 Adding a printer device . . . . . . . . . . . . . . . . . . . . . . . . . . . . . . . 341.10.2 Listing printer devices. . . . . . . . . . . . . . . . . . . . . . . . . . . . . . . . 341.10.3 Printer device attributes . . . . . . . . . . . . . . . . . . . . . . . . . . . . . . 351.10.4 Printer device character formatting . . . . . . . . . . . . . . . . . . . . . . 36
1.11 Print subsystem performance aspects . . . . . . . . . . . . . . . . . . . . . . . 361.11.1 Performance based on the number of defined printers . . . . . . . 371.11.2 Performance based on the number of active print jobs . . . . . . . 371.11.3 Performance based on the number of queued print jobs . . . . . . 381.11.4 Performance based on the number of users . . . . . . . . . . . . . . . 381.11.5 Performance based on program efficiency . . . . . . . . . . . . . . . . 381.11.6 Performance based on size and type of jobs printed. . . . . . . . . 381.11.7 Performance based on the amount of available memory. . . . . . 401.11.8 Performance based on spool disk configuration . . . . . . . . . . . . 401.11.9 Performance for spooled jobs versus queued jobs . . . . . . . . . . 401.11.10 Performance aspects of remote printing . . . . . . . . . . . . . . . . . 411.11.11 Performance based on user behavior . . . . . . . . . . . . . . . . . . . 411.11.12 Performance of the administrative tools . . . . . . . . . . . . . . . . . 41
Part 2. System V print subsystem . . . . . . . . . . . . . . . . . . . . . . . . . . . . . . . . . . . . . . . . . 43
Chapter 2. System V print subsystem basics . . . . . . . . . . . . . . . . . . . . 452.1 Overview . . . . . . . . . . . . . . . . . . . . . . . . . . . . . . . . . . . . . . . . . . . . . . 45
2.1.1 Overview of the print service and print request processing . . . . . 462.1.2 Administrative interfaces . . . . . . . . . . . . . . . . . . . . . . . . . . . . . . 492.1.3 Planning . . . . . . . . . . . . . . . . . . . . . . . . . . . . . . . . . . . . . . . . . . . 51
2.2 Managing the print service . . . . . . . . . . . . . . . . . . . . . . . . . . . . . . . . . 552.2.1 Displaying the current status of the print service. . . . . . . . . . . . . 562.2.2 Stopping the print service . . . . . . . . . . . . . . . . . . . . . . . . . . . . . . 562.2.3 Starting the print service. . . . . . . . . . . . . . . . . . . . . . . . . . . . . . . 56
2.3 Printer management . . . . . . . . . . . . . . . . . . . . . . . . . . . . . . . . . . . . . . 562.3.1 Adding a locally-attached printer. . . . . . . . . . . . . . . . . . . . . . . . . 572.3.2 Modifying an existing printer . . . . . . . . . . . . . . . . . . . . . . . . . . . . 782.3.3 Deleting a printer or class . . . . . . . . . . . . . . . . . . . . . . . . . . . . . . 83
2.4 Setting up defaults . . . . . . . . . . . . . . . . . . . . . . . . . . . . . . . . . . . . . . . 842.4.1 Setting the default destination . . . . . . . . . . . . . . . . . . . . . . . . . . 852.4.2 Setting the default for print spooling . . . . . . . . . . . . . . . . . . . . . . 872.4.3 Setting default printing priorities and limits . . . . . . . . . . . . . . . . . 87
2.5 Printing files . . . . . . . . . . . . . . . . . . . . . . . . . . . . . . . . . . . . . . . . . . . . 882.5.1 Submitting a print request. . . . . . . . . . . . . . . . . . . . . . . . . . . . . . 882.5.2 Modifying a print request . . . . . . . . . . . . . . . . . . . . . . . . . . . . . . 95
iv Printing for Fun and Profit under AIX 5L

2.5.3 Checking status . . . . . . . . . . . . . . . . . . . . . . . . . . . . . . . . . . . . . 952.5.4 Cancelling a print request . . . . . . . . . . . . . . . . . . . . . . . . . . . . . . 972.5.5 Prioritizing a print request . . . . . . . . . . . . . . . . . . . . . . . . . . . . . . 982.5.6 Holding and releasing a print request . . . . . . . . . . . . . . . . . . . . . 992.5.7 Moving a print request to another queue. . . . . . . . . . . . . . . . . . 1002.5.8 Scheduling a print request . . . . . . . . . . . . . . . . . . . . . . . . . . . . 100
2.6 BSD commands . . . . . . . . . . . . . . . . . . . . . . . . . . . . . . . . . . . . . . . . 100
Chapter 3. System V network printing . . . . . . . . . . . . . . . . . . . . . . . . 1033.1 Printing to print servers or remote printers using LPD . . . . . . . . . . . 103
3.1.1 Overview . . . . . . . . . . . . . . . . . . . . . . . . . . . . . . . . . . . . . . . . . 1033.1.2 Planning . . . . . . . . . . . . . . . . . . . . . . . . . . . . . . . . . . . . . . . . . . 1043.1.3 Adding a remotely-attached printer . . . . . . . . . . . . . . . . . . . . . . 105
3.2 Adding a JetDirect-attached printer . . . . . . . . . . . . . . . . . . . . . . . . . 1153.2.1 Overview . . . . . . . . . . . . . . . . . . . . . . . . . . . . . . . . . . . . . . . . . 1153.2.2 Planning . . . . . . . . . . . . . . . . . . . . . . . . . . . . . . . . . . . . . . . . . . 1153.2.3 Adding a JetDirect-attached printer . . . . . . . . . . . . . . . . . . . . . 116
3.3 Configuring the System V print subsystem as a print server . . . . . . . 1283.3.1 Tasks at the server . . . . . . . . . . . . . . . . . . . . . . . . . . . . . . . . . . 1283.3.2 Tasks at the client . . . . . . . . . . . . . . . . . . . . . . . . . . . . . . . . . . 132
Chapter 4. System V advanced printing . . . . . . . . . . . . . . . . . . . . . . . 1354.1 Overview . . . . . . . . . . . . . . . . . . . . . . . . . . . . . . . . . . . . . . . . . . . . . 135
4.1.1 Understanding the different types in System V printing . . . . . . . 1354.1.2 Overview of customizations covered. . . . . . . . . . . . . . . . . . . . . 137
4.2 Printer interface programs . . . . . . . . . . . . . . . . . . . . . . . . . . . . . . . . 1384.2.1 How do the interface scripts work? . . . . . . . . . . . . . . . . . . . . . . 1394.2.2 Creating and modifying a custom interface script . . . . . . . . . . . 1434.2.3 Assigning a custom interface script to a printer. . . . . . . . . . . . . 1444.2.4 Example: HP JetDirect interface programs . . . . . . . . . . . . . . . . 1444.2.5 Example: Modifying the SCO IBM Network Printer 12 script . . . 1474.2.6 Example: Modifying the SCO Lexmark interface script . . . . . . . 1504.2.7 Example: Custom interface to pipe data to an output program . 1504.2.8 Adding special tab support . . . . . . . . . . . . . . . . . . . . . . . . . . . . 151
4.3 Using the terminfo database. . . . . . . . . . . . . . . . . . . . . . . . . . . . . . . 1514.3.1 Terminfo attributes used by the ‘standard’ ASCII interface . . . . 1524.3.2 How to find if a printer is supported in terminfo . . . . . . . . . . . . . 1534.3.3 Understanding terminfo printer entries. . . . . . . . . . . . . . . . . . . . 1534.3.4 Viewing terminfo attributes . . . . . . . . . . . . . . . . . . . . . . . . . . . . 1544.3.5 Adding a new printer to terminfo . . . . . . . . . . . . . . . . . . . . . . . . 154
4.4 Using printer form support . . . . . . . . . . . . . . . . . . . . . . . . . . . . . . . . 1564.4.1 Adding or modifying a form . . . . . . . . . . . . . . . . . . . . . . . . . . . . 1564.4.2 Removing a form . . . . . . . . . . . . . . . . . . . . . . . . . . . . . . . . . . . 158
v

4.4.3 Displaying a form description . . . . . . . . . . . . . . . . . . . . . . . . . . 1584.4.4 Maintaining access lists for forms . . . . . . . . . . . . . . . . . . . . . . . 1594.4.5 Alerting the operator to mount a form . . . . . . . . . . . . . . . . . . . . 1594.4.6 Mounting a form . . . . . . . . . . . . . . . . . . . . . . . . . . . . . . . . . . . . 1604.4.7 Unmounting a form . . . . . . . . . . . . . . . . . . . . . . . . . . . . . . . . . . 1604.4.8 Printing using a form. . . . . . . . . . . . . . . . . . . . . . . . . . . . . . . . . 160
4.5 Customizing printer attributes . . . . . . . . . . . . . . . . . . . . . . . . . . . . . . 1614.5.1 Specifying character sets . . . . . . . . . . . . . . . . . . . . . . . . . . . . . 1614.5.2 Specifying font cartridges to use with a printer . . . . . . . . . . . . . 1634.5.3 Setting printer port characteristics . . . . . . . . . . . . . . . . . . . . . . 164
4.6 System V print filters . . . . . . . . . . . . . . . . . . . . . . . . . . . . . . . . . . . . 1644.6.1 Using print filters for file conversion . . . . . . . . . . . . . . . . . . . . . 1654.6.2 Using print filters for special print modes . . . . . . . . . . . . . . . . . 1674.6.3 Using print filters for printer fault handling . . . . . . . . . . . . . . . . 1674.6.4 What makes a program a good filter . . . . . . . . . . . . . . . . . . . . . 1674.6.5 Defining print filters . . . . . . . . . . . . . . . . . . . . . . . . . . . . . . . . . 1694.6.6 Adding and changing filters . . . . . . . . . . . . . . . . . . . . . . . . . . . 1734.6.7 Removing filters . . . . . . . . . . . . . . . . . . . . . . . . . . . . . . . . . . . . 1734.6.8 Examining filters . . . . . . . . . . . . . . . . . . . . . . . . . . . . . . . . . . . . 174
4.7 I18N - Internationalization filters . . . . . . . . . . . . . . . . . . . . . . . . . . . . 1744.8 ASCII text printers . . . . . . . . . . . . . . . . . . . . . . . . . . . . . . . . . . . . . . 1754.9 PCL printers . . . . . . . . . . . . . . . . . . . . . . . . . . . . . . . . . . . . . . . . . . . 175
4.9.1 Using the pcl filter to add carriage returns . . . . . . . . . . . . . . . . 1754.9.2 Using the pr filter to add titles to each page . . . . . . . . . . . . . . . 175
4.10 PostScript printers . . . . . . . . . . . . . . . . . . . . . . . . . . . . . . . . . . . . . 1764.10.1 Using PostScript printers . . . . . . . . . . . . . . . . . . . . . . . . . . . . 1774.10.2 Support for non-PostScript print request . . . . . . . . . . . . . . . . . 1784.10.3 PostScript capabilities provided by filters . . . . . . . . . . . . . . . . 1794.10.4 Installing, registering, and maintaining PostScript printer . . . . 1804.10.5 Installing and maintaining PostScript filters. . . . . . . . . . . . . . . 1814.10.6 Installing and maintaining PostScript fonts . . . . . . . . . . . . . . . 182
4.11 Printing ASCII text to a PostScript printer . . . . . . . . . . . . . . . . . . . . 1864.12 Restricting users access and priorities for printers . . . . . . . . . . . . . 1864.13 Customizing header pages . . . . . . . . . . . . . . . . . . . . . . . . . . . . . . . 187
4.13.1 Example: PCL header with large user name . . . . . . . . . . . . . . 1874.13.2 Example: Custom PostScript header page . . . . . . . . . . . . . . . 189
4.14 Setting up a printer with multiple names . . . . . . . . . . . . . . . . . . . . . 191
Part 3. PowerPC print subsystem . . . . . . . . . . . . . . . . . . . . . . . . . . . . . . . . . . . . . . . . 195
Chapter 5. PowerPC print subsystem basics . . . . . . . . . . . . . . . . . . . 1975.1 Overview . . . . . . . . . . . . . . . . . . . . . . . . . . . . . . . . . . . . . . . . . . . . . 197
5.1.1 Printing via the PowerPC print subsystem . . . . . . . . . . . . . . . . 197
vi Printing for Fun and Profit under AIX 5L

5.1.2 The piobe backend . . . . . . . . . . . . . . . . . . . . . . . . . . . . . . . . . . 2005.1.3 The rembak backend . . . . . . . . . . . . . . . . . . . . . . . . . . . . . . . . 2015.1.4 The piojetd backend . . . . . . . . . . . . . . . . . . . . . . . . . . . . . . . . . 2025.1.5 Print spooling subsystem . . . . . . . . . . . . . . . . . . . . . . . . . . . . . 202
5.2 The default queue . . . . . . . . . . . . . . . . . . . . . . . . . . . . . . . . . . . . . . 2045.2.1 System default queue . . . . . . . . . . . . . . . . . . . . . . . . . . . . . . . . 2055.2.2 Individual’s default queues . . . . . . . . . . . . . . . . . . . . . . . . . . . . 205
5.3 Queue management . . . . . . . . . . . . . . . . . . . . . . . . . . . . . . . . . . . . . 2065.3.1 Physically adding the printer . . . . . . . . . . . . . . . . . . . . . . . . . . . 2075.3.2 Adding a locally attached printer queue . . . . . . . . . . . . . . . . . . 2075.3.3 Displaying a queue configuration information . . . . . . . . . . . . . . 2235.3.4 Deleting a queue . . . . . . . . . . . . . . . . . . . . . . . . . . . . . . . . . . . 2285.3.5 Enabling and disabling a queue . . . . . . . . . . . . . . . . . . . . . . . . 2315.3.6 Cancelling print jobs . . . . . . . . . . . . . . . . . . . . . . . . . . . . . . . . . 233
5.4 Setting up printer device defaults . . . . . . . . . . . . . . . . . . . . . . . . . . . 2335.4.1 Displaying the printer device setting . . . . . . . . . . . . . . . . . . . . . 2345.4.2 Changing the printer device setting . . . . . . . . . . . . . . . . . . . . . 237
5.5 Start and stopping the printer services . . . . . . . . . . . . . . . . . . . . . . . 2385.5.1 The qdaemon . . . . . . . . . . . . . . . . . . . . . . . . . . . . . . . . . . . . . . 2395.5.2 The lpd daemon . . . . . . . . . . . . . . . . . . . . . . . . . . . . . . . . . . . . 242
5.6 Printing files in the PowerPC print subsystem . . . . . . . . . . . . . . . . . 2435.6.1 Submitting a printing job . . . . . . . . . . . . . . . . . . . . . . . . . . . . . . 2445.6.2 Checking status . . . . . . . . . . . . . . . . . . . . . . . . . . . . . . . . . . . . 2475.6.3 Cancelling a printing job . . . . . . . . . . . . . . . . . . . . . . . . . . . . . . 2525.6.4 Prioritizing a printing job . . . . . . . . . . . . . . . . . . . . . . . . . . . . . . 2565.6.5 Holding and releasing a print job . . . . . . . . . . . . . . . . . . . . . . . 2605.6.6 Moving a printing job to another queue . . . . . . . . . . . . . . . . . . . 262
5.7 Printer pooling . . . . . . . . . . . . . . . . . . . . . . . . . . . . . . . . . . . . . . . . . 266
Chapter 6. PowerPC network printing . . . . . . . . . . . . . . . . . . . . . . . . . 2676.1 Overview . . . . . . . . . . . . . . . . . . . . . . . . . . . . . . . . . . . . . . . . . . . . . 267
6.1.1 Outbound network printing overview . . . . . . . . . . . . . . . . . . . . . 2676.1.2 Inbound network printing overview . . . . . . . . . . . . . . . . . . . . . . 269
6.2 The LPD protocol . . . . . . . . . . . . . . . . . . . . . . . . . . . . . . . . . . . . . . . 2696.2.1 Printing from AIX 5L to a remote host-attached printer . . . . . . . 2726.2.2 AIX 5L as a LPD print server (inbound). . . . . . . . . . . . . . . . . . . 283
6.3 Printing to HP JetDirect-attached printers . . . . . . . . . . . . . . . . . . . . . 2946.3.1 Planning . . . . . . . . . . . . . . . . . . . . . . . . . . . . . . . . . . . . . . . . . . 2956.3.2 Adding a JetDirect-attached printer . . . . . . . . . . . . . . . . . . . . . 2966.3.3 Sample /etc/qconfig stanza. . . . . . . . . . . . . . . . . . . . . . . . . . . . 303
6.4 Adding an IBM Network Printer . . . . . . . . . . . . . . . . . . . . . . . . . . . . 3036.4.1 Planning . . . . . . . . . . . . . . . . . . . . . . . . . . . . . . . . . . . . . . . . . . 3036.4.2 Adding an IBM Network Printer. . . . . . . . . . . . . . . . . . . . . . . . . 304
vii

6.4.3 Sample /etc/qconfig stanza. . . . . . . . . . . . . . . . . . . . . . . . . . . . 3116.5 Miscellaneous network printers and print servers . . . . . . . . . . . . . . . 312
6.5.1 IBM Network Station attached printers . . . . . . . . . . . . . . . . . . . 3126.5.2 Printing via an IBM Xstation . . . . . . . . . . . . . . . . . . . . . . . . . . . 3126.5.3 Windows printing . . . . . . . . . . . . . . . . . . . . . . . . . . . . . . . . . . . 3166.5.4 Print and terminal servers. . . . . . . . . . . . . . . . . . . . . . . . . . . . . 318
Chapter 7. PowerPC advanced printing . . . . . . . . . . . . . . . . . . . . . . . 3217.1 Printer backend programs . . . . . . . . . . . . . . . . . . . . . . . . . . . . . . . . 321
7.1.1 The default piobe backend . . . . . . . . . . . . . . . . . . . . . . . . . . . . 3227.1.2 Creating a printer backend program . . . . . . . . . . . . . . . . . . . . . 3237.1.3 Example: Shell script backend to check flags . . . . . . . . . . . . . . 3237.1.4 Example: Backend script to strip print flags . . . . . . . . . . . . . . . 3257.1.5 Example: Backend script to intercept print flags . . . . . . . . . . . . 3257.1.6 Example: Simple C backends . . . . . . . . . . . . . . . . . . . . . . . . . . 327
7.2 Customizing printer attributes . . . . . . . . . . . . . . . . . . . . . . . . . . . . . . 3277.2.1 Setting attribute defaults with SMIT . . . . . . . . . . . . . . . . . . . . . 3277.2.2 Setting attribute defaults with lsvirprt . . . . . . . . . . . . . . . . . . . . 3287.2.3 Using command line options to customize a single print job . . . 330
7.3 Customizing virtual printers . . . . . . . . . . . . . . . . . . . . . . . . . . . . . . . 3307.3.1 How to find if a printer is supported . . . . . . . . . . . . . . . . . . . . . 3307.3.2 Understanding the colon file syntax . . . . . . . . . . . . . . . . . . . . . 3317.3.3 Listing virtual printer attributes . . . . . . . . . . . . . . . . . . . . . . . . . 3327.3.4 Key virtual printer attributes . . . . . . . . . . . . . . . . . . . . . . . . . . . 3347.3.5 Adding a new printer type to the predefined database . . . . . . . 3357.3.6 Creating a new predefined printer with minor changes . . . . . . . 3367.3.7 Adding more font sizes to an HP LaserJet virtual printer. . . . . . 3377.3.8 Adding a printer with ledger size paper. . . . . . . . . . . . . . . . . . . 3397.3.9 Adding special tab support . . . . . . . . . . . . . . . . . . . . . . . . . . . . 343
7.4 Adding form support to PowerPC printing . . . . . . . . . . . . . . . . . . . . . 3447.4.1 What needs to be added for supporting forms?. . . . . . . . . . . . . 3447.4.2 Adding a form . . . . . . . . . . . . . . . . . . . . . . . . . . . . . . . . . . . . . . 3457.4.3 Modifying a form. . . . . . . . . . . . . . . . . . . . . . . . . . . . . . . . . . . . 3457.4.4 Removing a form . . . . . . . . . . . . . . . . . . . . . . . . . . . . . . . . . . . 3467.4.5 Displaying a form description . . . . . . . . . . . . . . . . . . . . . . . . . . 3467.4.6 Access lists for forms . . . . . . . . . . . . . . . . . . . . . . . . . . . . . . . . 3467.4.7 Alerting the operator to mount a form . . . . . . . . . . . . . . . . . . . . 3467.4.8 Mounting and unmounting a form . . . . . . . . . . . . . . . . . . . . . . . 3467.4.9 Printing using a form. . . . . . . . . . . . . . . . . . . . . . . . . . . . . . . . . 347
7.5 PowerPC print filters . . . . . . . . . . . . . . . . . . . . . . . . . . . . . . . . . . . . 3477.5.1 Default filters . . . . . . . . . . . . . . . . . . . . . . . . . . . . . . . . . . . . . . 3477.5.2 What makes a good filter program . . . . . . . . . . . . . . . . . . . . . . 3487.5.3 Defining user print filters. . . . . . . . . . . . . . . . . . . . . . . . . . . . . . 348
viii Printing for Fun and Profit under AIX 5L

7.5.4 Using a print filter to remove or add carriage returns . . . . . . . . 3497.5.5 Using print filters for banner headers . . . . . . . . . . . . . . . . . . . . 3507.5.6 Using print filters for file conversion . . . . . . . . . . . . . . . . . . . . . 3517.5.7 Using filters for electronic form download . . . . . . . . . . . . . . . . . 352
7.6 PostScript printers . . . . . . . . . . . . . . . . . . . . . . . . . . . . . . . . . . . . . . 3527.6.1 PostScript printer initialization . . . . . . . . . . . . . . . . . . . . . . . . . 3527.6.2 Printing simple ASCII text to PostScript printers . . . . . . . . . . . . 352
7.7 Downloadable font support . . . . . . . . . . . . . . . . . . . . . . . . . . . . . . . . 3547.7.1 Using the mF attribute to download fonts . . . . . . . . . . . . . . . . . 3547.7.2 Using a filter to add the font on demand . . . . . . . . . . . . . . . . . . 355
7.8 Restricting users on a printer . . . . . . . . . . . . . . . . . . . . . . . . . . . . . . 3567.9 Custom header pages . . . . . . . . . . . . . . . . . . . . . . . . . . . . . . . . . . . 357
7.9.1 Introduction to header pages . . . . . . . . . . . . . . . . . . . . . . . . . . 3577.9.2 What determines if the header page is printed? . . . . . . . . . . . . 3577.9.3 Header page templates . . . . . . . . . . . . . . . . . . . . . . . . . . . . . . 3587.9.4 Steps to create a custom header page . . . . . . . . . . . . . . . . . . . 3597.9.5 Example: PCL header page with large user name . . . . . . . . . . 3607.9.6 Example: PostScript header page with large user name . . . . . . 361
7.10 Printing via an ASCII Terminal Attached Printer . . . . . . . . . . . . . . . 3647.10.1 Configuring an ASCII terminal attached printer . . . . . . . . . . . . 3657.10.2 Hardware setup . . . . . . . . . . . . . . . . . . . . . . . . . . . . . . . . . . . 3657.10.3 Configuring the auxiliary port in your terminal . . . . . . . . . . . . . 3657.10.4 Adding the printer to your system . . . . . . . . . . . . . . . . . . . . . . 3657.10.5 Testing your printer. . . . . . . . . . . . . . . . . . . . . . . . . . . . . . . . . 366
Part 4. Problem solving and tools . . . . . . . . . . . . . . . . . . . . . . . . . . . . . . . . . . . . . . . . 371
Chapter 8. Troubleshooting . . . . . . . . . . . . . . . . . . . . . . . . . . . . . . . . . 3738.1 Common troubleshooting checklist . . . . . . . . . . . . . . . . . . . . . . . . . . 374
8.1.1 Checklist for local printing problems . . . . . . . . . . . . . . . . . . . . . 3748.1.2 Checklist for remote printing problems . . . . . . . . . . . . . . . . . . . 3758.1.3 Check the obvious . . . . . . . . . . . . . . . . . . . . . . . . . . . . . . . . . . 3768.1.4 Nothing prints on local printers . . . . . . . . . . . . . . . . . . . . . . . . . 3768.1.5 The output is garbled or incomplete . . . . . . . . . . . . . . . . . . . . . 3838.1.6 The output spacing is bad. . . . . . . . . . . . . . . . . . . . . . . . . . . . . 3878.1.7 The output prints with the wrong font . . . . . . . . . . . . . . . . . . . . 3878.1.8 The print job requests the wrong paper size . . . . . . . . . . . . . . . 3898.1.9 Network print jobs fail to print . . . . . . . . . . . . . . . . . . . . . . . . . . 390
8.2 Common troubleshooting techniques . . . . . . . . . . . . . . . . . . . . . . . . 3948.2.1 Using lptest to generate print files . . . . . . . . . . . . . . . . . . . . . . 3948.2.2 Use enscript to generate PostScript . . . . . . . . . . . . . . . . . . . . . 3948.2.3 Use splp to look at printer devices . . . . . . . . . . . . . . . . . . . . . . 3958.2.4 Printing to a file . . . . . . . . . . . . . . . . . . . . . . . . . . . . . . . . . . . . 395
ix

8.2.5 Printing directly to the device special file . . . . . . . . . . . . . . . . . 3958.2.6 Printing directly to network printers . . . . . . . . . . . . . . . . . . . . . . 3968.2.7 Using iptrace to trace network printing . . . . . . . . . . . . . . . . . . . 3978.2.8 Capturing files . . . . . . . . . . . . . . . . . . . . . . . . . . . . . . . . . . . . . 3988.2.9 Capture the flag . . . . . . . . . . . . . . . . . . . . . . . . . . . . . . . . . . . . 3998.2.10 Using the script shell to capture user input . . . . . . . . . . . . . . . 4028.2.11 Using fuser to find processes . . . . . . . . . . . . . . . . . . . . . . . . . 4038.2.12 Using the echo statement in shell scripts . . . . . . . . . . . . . . . . 4038.2.13 Special considerations for some RS/232 adapters . . . . . . . . . 403
8.3 Troubleshooting for System V printing . . . . . . . . . . . . . . . . . . . . . . . 4048.3.1 File permission problems . . . . . . . . . . . . . . . . . . . . . . . . . . . . . 4048.3.2 Is the print service active? . . . . . . . . . . . . . . . . . . . . . . . . . . . . 4048.3.3 Does the printer have the right attributes? . . . . . . . . . . . . . . . . 4058.3.4 Logs and status files. . . . . . . . . . . . . . . . . . . . . . . . . . . . . . . . . 4058.3.5 Is the LANG variable set right? . . . . . . . . . . . . . . . . . . . . . . . . . 4088.3.6 Cancelled remote jobs still queued . . . . . . . . . . . . . . . . . . . . . . 4098.3.7 Printing to a file . . . . . . . . . . . . . . . . . . . . . . . . . . . . . . . . . . . . 4098.3.8 Cleaning up and starting over . . . . . . . . . . . . . . . . . . . . . . . . . . 4108.3.9 Stopping unwanted header pages . . . . . . . . . . . . . . . . . . . . . . 4118.3.10 Troubleshooting System V interface scripts . . . . . . . . . . . . . . 4128.3.11 Check timeouts in the Systems file for remote queues . . . . . . 4148.3.12 Is /etc/lp/Systems file entry correct? . . . . . . . . . . . . . . . . . . . . 4148.3.13 Example: solving a remote printing problem . . . . . . . . . . . . . . 4158.3.14 Troubleshooting HP JetDirect printing. . . . . . . . . . . . . . . . . . . 418
8.4 Troubleshooting for PowerPC printing . . . . . . . . . . . . . . . . . . . . . . . 4198.4.1 File permission problems . . . . . . . . . . . . . . . . . . . . . . . . . . . . . 4198.4.2 Is the print service active? . . . . . . . . . . . . . . . . . . . . . . . . . . . . 4208.4.3 Does the printer have the right attributes? . . . . . . . . . . . . . . . . 4218.4.4 Logs and status files. . . . . . . . . . . . . . . . . . . . . . . . . . . . . . . . . 4228.4.5 Printing to a file with PowerPC printing . . . . . . . . . . . . . . . . . . . 4258.4.6 Cleaning up and starting over . . . . . . . . . . . . . . . . . . . . . . . . . . 4268.4.7 Checking the flags to enq . . . . . . . . . . . . . . . . . . . . . . . . . . . . . 4288.4.8 Stopping unwanted header pages . . . . . . . . . . . . . . . . . . . . . . 428
8.5 Common errors and solutions. . . . . . . . . . . . . . . . . . . . . . . . . . . . . . 4308.5.1 Problem adding a second local printer on the same device. . . . 4308.5.2 Cannot change attributes because device is busy . . . . . . . . . . 4318.5.3 Remote job disappears after queue enabled. . . . . . . . . . . . . . . 4318.5.4 Bad mandatory environment variable . . . . . . . . . . . . . . . . . . . . 4318.5.5 LOG: is read only . . . . . . . . . . . . . . . . . . . . . . . . . . . . . . . . . . . 4328.5.6 No formfeed after banner page . . . . . . . . . . . . . . . . . . . . . . . . . 433
Chapter 9. Printing tips and utilities . . . . . . . . . . . . . . . . . . . . . . . . . . 4359.1 Obtaining AIX-ready utilities . . . . . . . . . . . . . . . . . . . . . . . . . . . . . . . 435
x Printing for Fun and Profit under AIX 5L
9.1.1 The AIX toolbox for Linux Applications packages . . . . . . . . . . . 4359.1.2 The CD-ROM from UNIX Power Tools . . . . . . . . . . . . . . . . . . . 4359.1.3 Bull download sites. . . . . . . . . . . . . . . . . . . . . . . . . . . . . . . . . . 4369.1.4 UCLA SEAS public domain software for AIX. . . . . . . . . . . . . . . 436
9.2 PostScript utilities. . . . . . . . . . . . . . . . . . . . . . . . . . . . . . . . . . . . . . . 4379.2.1 Using enscript to convert text to PostScript. . . . . . . . . . . . . . . . 4389.2.2 Using psutils for custom PostScript printing . . . . . . . . . . . . . . . 4389.2.3 Using System V filters for PostScript printing . . . . . . . . . . . . . . 4399.2.4 Ghostscript for PostScript viewing and file conversion . . . . . . . 4409.2.5 PostScript font utilities . . . . . . . . . . . . . . . . . . . . . . . . . . . . . . . 4419.2.6 Using xpreview to view PostScript . . . . . . . . . . . . . . . . . . . . . . 4429.2.7 Using psroff for man pages. . . . . . . . . . . . . . . . . . . . . . . . . . . . 4429.2.8 PostScript to ASCII. . . . . . . . . . . . . . . . . . . . . . . . . . . . . . . . . . 442
9.3 Utilities for capturing and printing X Windows . . . . . . . . . . . . . . . . . . 4429.3.1 Using xpr and xwd to print X windows. . . . . . . . . . . . . . . . . . . . 4439.3.2 Using xv to capture and print X windows . . . . . . . . . . . . . . . . . 4439.3.3 Using xgrabsc. . . . . . . . . . . . . . . . . . . . . . . . . . . . . . . . . . . . . . 444
9.4 Using the pr filter to format text . . . . . . . . . . . . . . . . . . . . . . . . . . . . 4449.4.1 Using pr as a printer filter . . . . . . . . . . . . . . . . . . . . . . . . . . . . . 4459.4.2 Printing 2-up with pr . . . . . . . . . . . . . . . . . . . . . . . . . . . . . . . . . 4459.4.3 Adding line numbers with pr . . . . . . . . . . . . . . . . . . . . . . . . . . . 4469.4.4 Adding a title to the pages . . . . . . . . . . . . . . . . . . . . . . . . . . . . 4469.4.5 Indenting lines with pr. . . . . . . . . . . . . . . . . . . . . . . . . . . . . . . . 446
9.5 Standard filters in AIX . . . . . . . . . . . . . . . . . . . . . . . . . . . . . . . . . . . 4469.5.1 The sed filter . . . . . . . . . . . . . . . . . . . . . . . . . . . . . . . . . . . . . . 4469.5.2 The awk filter . . . . . . . . . . . . . . . . . . . . . . . . . . . . . . . . . . . . . . 4479.5.3 The perl filter . . . . . . . . . . . . . . . . . . . . . . . . . . . . . . . . . . . . . . 4479.5.4 The tr filter . . . . . . . . . . . . . . . . . . . . . . . . . . . . . . . . . . . . . . . . 4479.5.5 The expand filter. . . . . . . . . . . . . . . . . . . . . . . . . . . . . . . . . . . . 448
9.6 Socket programs for network printing . . . . . . . . . . . . . . . . . . . . . . . . 4489.6.1 Using socket program filters with System V . . . . . . . . . . . . . . . 4489.6.2 Using socket filter programs in PowerPC printing . . . . . . . . . . . 4489.6.3 Known print socket filter programs . . . . . . . . . . . . . . . . . . . . . . 4499.6.4 Example: printing with netcat from System V . . . . . . . . . . . . . . 450
9.7 Utilities to print from Microsoft Windows to AIX . . . . . . . . . . . . . . . . 4519.7.1 IBM LPR Remote Printing Client to print to AIX from Windows . 4519.7.2 Using Samba and FastConnect to print from Windows . . . . . . . 4529.7.3 Using PC/NFS to print from Windows . . . . . . . . . . . . . . . . . . . . 452
9.8 LAIX software tools for AIX printing . . . . . . . . . . . . . . . . . . . . . . . . . 452
Chapter 10. Overview of Infoprint Manager for AIX . . . . . . . . . . . . . . 45510.1 Features and benefits. . . . . . . . . . . . . . . . . . . . . . . . . . . . . . . . . . . 455
10.1.1 Centralized management of distributed environment . . . . . . . 455
xi

10.1.2 Intelligent printing . . . . . . . . . . . . . . . . . . . . . . . . . . . . . . . . . . 45610.2 Target markets . . . . . . . . . . . . . . . . . . . . . . . . . . . . . . . . . . . . . . . . 457
10.2.1 Distributed environment . . . . . . . . . . . . . . . . . . . . . . . . . . . . . 45710.2.2 ERP printing . . . . . . . . . . . . . . . . . . . . . . . . . . . . . . . . . . . . . . 45710.2.3 Cross-system printing . . . . . . . . . . . . . . . . . . . . . . . . . . . . . . . 45810.2.4 Other environments . . . . . . . . . . . . . . . . . . . . . . . . . . . . . . . . 45910.2.5 Infoprint Manager and AIX 5L . . . . . . . . . . . . . . . . . . . . . . . . . 459
10.3 Selected views of the graphical administrative interface . . . . . . . . . 46010.4 Additional information . . . . . . . . . . . . . . . . . . . . . . . . . . . . . . . . . . . 466
Appendix A. Print tasks and commands . . . . . . . . . . . . . . . . . . . . . . . . 467A.1 Commands listed alphabetically . . . . . . . . . . . . . . . . . . . . . . . . . . . . . . . 467A.2 System V print subsystem tasks and commands . . . . . . . . . . . . . . . . . . 471
A.2.1 Administrative tasks and commands . . . . . . . . . . . . . . . . . . . . . . . 471A.2.2 Informational tasks and commands . . . . . . . . . . . . . . . . . . . . . . . . 474A.2.3 Printing tasks and commands. . . . . . . . . . . . . . . . . . . . . . . . . . . . . 474
A.3 PowerPC print subsystem tasks and commands . . . . . . . . . . . . . . . . . . 475
Appendix B. RS/6000 serial printer cabling . . . . . . . . . . . . . . . . . . . . . . 479B.1 Interposers and null modems . . . . . . . . . . . . . . . . . . . . . . . . . . . . . . . . . 479B.2 Supported RS/232 signals . . . . . . . . . . . . . . . . . . . . . . . . . . . . . . . . . . . 480B.3 Adapters and cables . . . . . . . . . . . . . . . . . . . . . . . . . . . . . . . . . . . . . . . . 482
B.3.1 Native serial ports . . . . . . . . . . . . . . . . . . . . . . . . . . . . . . . . . . . . . . 482B.3.2 IBM 8-port adapters . . . . . . . . . . . . . . . . . . . . . . . . . . . . . . . . . . . . 482B.3.3 IBM 16-port adapters . . . . . . . . . . . . . . . . . . . . . . . . . . . . . . . . . . . 483B.3.4 IBM 128-port adapters . . . . . . . . . . . . . . . . . . . . . . . . . . . . . . . . . . 483B.3.5 Cable descriptions . . . . . . . . . . . . . . . . . . . . . . . . . . . . . . . . . . . . . 483
Appendix C. Virtual printer colon files and System V terminfo . . . . . 485C.1 Attribute file syntax comparison . . . . . . . . . . . . . . . . . . . . . . . . . . . . . . . 485
C.1.1 Attribute file names and locations. . . . . . . . . . . . . . . . . . . . . . . . . . 485C.1.2 Attribute file formats . . . . . . . . . . . . . . . . . . . . . . . . . . . . . . . . . . . . 486C.1.3 Attribute naming conventions . . . . . . . . . . . . . . . . . . . . . . . . . . . . . 489C.1.4 Attribute value formats . . . . . . . . . . . . . . . . . . . . . . . . . . . . . . . . . . 490
C.2 Terminfo stack language introduction . . . . . . . . . . . . . . . . . . . . . . . . . . . 496C.2.1 Example: If-then-else . . . . . . . . . . . . . . . . . . . . . . . . . . . . . . . . . . . 497C.2.2 Other stack language constructs . . . . . . . . . . . . . . . . . . . . . . . . . . 497
Appendix D. Tracing remote printing . . . . . . . . . . . . . . . . . . . . . . . . . . . 499D.1 Reading the System V lpNet log. . . . . . . . . . . . . . . . . . . . . . . . . . . . . . . 499
D.1.1 Log from successful outbound print job . . . . . . . . . . . . . . . . . . . . . 499D.1.2 Log from outbound lpstat . . . . . . . . . . . . . . . . . . . . . . . . . . . . . . . . 499D.1.3 Example: lpNet from inbound status request . . . . . . . . . . . . . . . . . 500D.1.4 Example: lpNet log from host with name not in /etc/lp/Systems. . . 500
xii Printing for Fun and Profit under AIX 5L

D.1.5 Example: Inbound print request . . . . . . . . . . . . . . . . . . . . . . . . . . . 500D.1.6 Example: Wrong host name . . . . . . . . . . . . . . . . . . . . . . . . . . . . . . 501D.1.7 Example: Wrong inbound queue name . . . . . . . . . . . . . . . . . . . . . 501D.1.8 Example: Connection time-out to server . . . . . . . . . . . . . . . . . . . . 501
D.2 Using rembak logging . . . . . . . . . . . . . . . . . . . . . . . . . . . . . . . . . . . . . . . 502D.2.1 Example: Successful remote print log . . . . . . . . . . . . . . . . . . . . . . 502D.2.2 Example: Error when remote queue does not exist . . . . . . . . . . . . 504
D.3 Using lpd logging with the PowerPC print subsystem . . . . . . . . . . . . . . 505D.4 Using iptrace to log remote printing . . . . . . . . . . . . . . . . . . . . . . . . . . . . 506
D.4.1 The syntax of a packet . . . . . . . . . . . . . . . . . . . . . . . . . . . . . . . . . . 507D.4.2 The main steps of a successful print trace . . . . . . . . . . . . . . . . . . . 508D.4.3 Client does not have permission to print on server . . . . . . . . . . . . 510D.4.4 LPD server not running on the remote host . . . . . . . . . . . . . . . . . . 510D.4.5 Missing queue on the server . . . . . . . . . . . . . . . . . . . . . . . . . . . . . 510
Appendix E. Data streams . . . . . . . . . . . . . . . . . . . . . . . . . . . . . . . . . . . . 511E.1 What is a data stream? . . . . . . . . . . . . . . . . . . . . . . . . . . . . . . . . . . . . . . 511E.2 Most popular data streams description . . . . . . . . . . . . . . . . . . . . . . . . . . 512
E.2.1 Hewlett-Packard Printer Control Language (HP PCL) . . . . . . . . . . 512E.2.2 Proprinter data stream . . . . . . . . . . . . . . . . . . . . . . . . . . . . . . . . . . 513E.2.3 PostScript data stream . . . . . . . . . . . . . . . . . . . . . . . . . . . . . . . . . . 513
E.3 Data streams supported by the AIX print subsystems . . . . . . . . . . . . . . 514E.4 Data streams supported by Infoprint Manager for AIX . . . . . . . . . . . . . . 515
E.4.1 Input data streams . . . . . . . . . . . . . . . . . . . . . . . . . . . . . . . . . . . . . 515E.4.2 Output data streams . . . . . . . . . . . . . . . . . . . . . . . . . . . . . . . . . . . . 517
Appendix F. System V supported printer types . . . . . . . . . . . . . . . . . . 519
Appendix G. Special notices . . . . . . . . . . . . . . . . . . . . . . . . . . . . . . . . . . 525
Appendix H. Related publications . . . . . . . . . . . . . . . . . . . . . . . . . . . . . . 529H.1 IBM Redbooks . . . . . . . . . . . . . . . . . . . . . . . . . . . . . . . . . . . . . . . . . . . . 529H.2 IBM Redbooks collections . . . . . . . . . . . . . . . . . . . . . . . . . . . . . . . . . . . 529H.3 Other resources . . . . . . . . . . . . . . . . . . . . . . . . . . . . . . . . . . . . . . . . . . . 529H.4 Referenced Web sites . . . . . . . . . . . . . . . . . . . . . . . . . . . . . . . . . . . . . . 530
How to get IBM Redbooks . . . . . . . . . . . . . . . . . . . . . . . . . . . . . . . . . . 533IBM Redbooks fax order form . . . . . . . . . . . . . . . . . . . . . . . . . . . . . . . . . . . . 534
Abbreviations and acronyms . . . . . . . . . . . . . . . . . . . . . . . . . . . . . . . . 535
Index . . . . . . . . . . . . . . . . . . . . . . . . . . . . . . . . . . . . . . . . . . . . . . . . . . . 537
IBM Redbooks review . . . . . . . . . . . . . . . . . . . . . . . . . . . . . . . . . . . . . . 569
xiii

xiv Printing for Fun and Profit under AIX 5L

Figures
1. Overview of print request processing. . . . . . . . . . . . . . . . . . . . . . . . . . . . . 462. Initial panel in Web-based System Manager . . . . . . . . . . . . . . . . . . . . . . . 583. Manually configuring a device . . . . . . . . . . . . . . . . . . . . . . . . . . . . . . . . . . 594. New device settings panel . . . . . . . . . . . . . . . . . . . . . . . . . . . . . . . . . . . . . 605. Showing added device. . . . . . . . . . . . . . . . . . . . . . . . . . . . . . . . . . . . . . . . 606. Display for Directory Disabled Printers (System V) . . . . . . . . . . . . . . . . . . 667. Adding a locally-attached printer (step 1 of 4) . . . . . . . . . . . . . . . . . . . . . . 678. Adding a locally-attached printer (step 2 of 4) . . . . . . . . . . . . . . . . . . . . . . 689. Adding a locally-attached printer (step 3 of 4) . . . . . . . . . . . . . . . . . . . . . . 6910. Adding a locally-attached printer (step 4 of 4) . . . . . . . . . . . . . . . . . . . . . . 7211. Success! . . . . . . . . . . . . . . . . . . . . . . . . . . . . . . . . . . . . . . . . . . . . . . . . . . 7312. Deleting printers and/or classes. . . . . . . . . . . . . . . . . . . . . . . . . . . . . . . . . 8413. Set the default destination . . . . . . . . . . . . . . . . . . . . . . . . . . . . . . . . . . . . . 8614. Adding an LPD printer (step 1 of 4) . . . . . . . . . . . . . . . . . . . . . . . . . . . . . 10715. Adding an LPD printer (step 2 of 4) . . . . . . . . . . . . . . . . . . . . . . . . . . . . . 10716. Adding an LPD printer (step 3 of 4) . . . . . . . . . . . . . . . . . . . . . . . . . . . . . 10817. Adding an LPD printer (step 4 of 4) . . . . . . . . . . . . . . . . . . . . . . . . . . . . . 10918. Adding a JetDirect-attached printer (step 1 of 4) . . . . . . . . . . . . . . . . . . . 11719. Adding a JetDirect-attached printer (step 2 of 4) . . . . . . . . . . . . . . . . . . . 11820. Adding a JetDirect-attached printer (step 4 of 4) . . . . . . . . . . . . . . . . . . . 11921. Multiple virtual printers . . . . . . . . . . . . . . . . . . . . . . . . . . . . . . . . . . . . . . . 19222. The first panel of Web-based System Manager. . . . . . . . . . . . . . . . . . . . 20823. Printer menus. . . . . . . . . . . . . . . . . . . . . . . . . . . . . . . . . . . . . . . . . . . . . . 20824. Entering the queue name. . . . . . . . . . . . . . . . . . . . . . . . . . . . . . . . . . . . . 20925. Selecting the type of the destination . . . . . . . . . . . . . . . . . . . . . . . . . . . . 20926. Selecting the existing printer . . . . . . . . . . . . . . . . . . . . . . . . . . . . . . . . . . 21027. Selecting the brand name of the printer. . . . . . . . . . . . . . . . . . . . . . . . . . 21028. Selecting a model of the printer . . . . . . . . . . . . . . . . . . . . . . . . . . . . . . . . 21129. Selecting a installation media . . . . . . . . . . . . . . . . . . . . . . . . . . . . . . . . . 21130. Selecting a type of port . . . . . . . . . . . . . . . . . . . . . . . . . . . . . . . . . . . . . . 21231. Selecting a available port. . . . . . . . . . . . . . . . . . . . . . . . . . . . . . . . . . . . . 21232. Selecting a type of the queue . . . . . . . . . . . . . . . . . . . . . . . . . . . . . . . . . 21233. The final confirmation. . . . . . . . . . . . . . . . . . . . . . . . . . . . . . . . . . . . . . . . 21334. A success notice . . . . . . . . . . . . . . . . . . . . . . . . . . . . . . . . . . . . . . . . . . . 21335. Checking the first created queue . . . . . . . . . . . . . . . . . . . . . . . . . . . . . . . 21336. Selecting a type of destination for the second queue . . . . . . . . . . . . . . . 21437. Selecting the existing printer for the second queue . . . . . . . . . . . . . . . . . 21538. A confirmation notice for the second queue. . . . . . . . . . . . . . . . . . . . . . . 21539. Checking two queues. . . . . . . . . . . . . . . . . . . . . . . . . . . . . . . . . . . . . . . . 21640. All printer queues information . . . . . . . . . . . . . . . . . . . . . . . . . . . . . . . . . 224
© Copyright IBM Corp. 2001 xv
41. Local queue menus . . . . . . . . . . . . . . . . . . . . . . . . . . . . . . . . . . . . . . . . . 22442. Local queue properties panel. . . . . . . . . . . . . . . . . . . . . . . . . . . . . . . . . . 22543. Properties panel for printer processor . . . . . . . . . . . . . . . . . . . . . . . . . . . 22544. Checking the status in overview and tasks . . . . . . . . . . . . . . . . . . . . . . . 22645. Printer queue cancel confirmation . . . . . . . . . . . . . . . . . . . . . . . . . . . . . . 22946. Stopping queues . . . . . . . . . . . . . . . . . . . . . . . . . . . . . . . . . . . . . . . . . . . 23147. Properties panel for local parallel printer lp0 . . . . . . . . . . . . . . . . . . . . . . 23448. The qdaemon subsystem. . . . . . . . . . . . . . . . . . . . . . . . . . . . . . . . . . . . . 23949. Checking the print jobs in the queue . . . . . . . . . . . . . . . . . . . . . . . . . . . . 24850. Cancel one print job . . . . . . . . . . . . . . . . . . . . . . . . . . . . . . . . . . . . . . . . . 25351. Cancel all print jobs in one queue . . . . . . . . . . . . . . . . . . . . . . . . . . . . . . 25352. Cancel all print jobs in all queues . . . . . . . . . . . . . . . . . . . . . . . . . . . . . . 25453. Before changing print job priority . . . . . . . . . . . . . . . . . . . . . . . . . . . . . . . 25754. Changing print job priority . . . . . . . . . . . . . . . . . . . . . . . . . . . . . . . . . . . . 25755. After changing print job priority . . . . . . . . . . . . . . . . . . . . . . . . . . . . . . . . 25856. Holding a print job . . . . . . . . . . . . . . . . . . . . . . . . . . . . . . . . . . . . . . . . . . 26057. Moving a print job to another queue . . . . . . . . . . . . . . . . . . . . . . . . . . . . 26358. After moving a print job . . . . . . . . . . . . . . . . . . . . . . . . . . . . . . . . . . . . . . 26359. The basic flow of remote printing using LPR/LPD . . . . . . . . . . . . . . . . . . 27160. Overview and tasks panel for printers . . . . . . . . . . . . . . . . . . . . . . . . . . . 27661. Name of printer to add . . . . . . . . . . . . . . . . . . . . . . . . . . . . . . . . . . . . . . . 27762. Type of attachment . . . . . . . . . . . . . . . . . . . . . . . . . . . . . . . . . . . . . . . . . 27763. Remote server information. . . . . . . . . . . . . . . . . . . . . . . . . . . . . . . . . . . . 27864. Printer added successfully . . . . . . . . . . . . . . . . . . . . . . . . . . . . . . . . . . . . 27965. Overview panel reflecting new printer . . . . . . . . . . . . . . . . . . . . . . . . . . . 27966. Remote client list . . . . . . . . . . . . . . . . . . . . . . . . . . . . . . . . . . . . . . . . . . . 28567. Remote computer access list. . . . . . . . . . . . . . . . . . . . . . . . . . . . . . . . . . 28668. Removing access for a remote system . . . . . . . . . . . . . . . . . . . . . . . . . . 28769. Status of the lpd subsystem. . . . . . . . . . . . . . . . . . . . . . . . . . . . . . . . . . . 28870. Starting or stopping the lpd subsystem . . . . . . . . . . . . . . . . . . . . . . . . . . 28871. Remote print subsystem enabled . . . . . . . . . . . . . . . . . . . . . . . . . . . . . . 28972. Overview and tasks for printers . . . . . . . . . . . . . . . . . . . . . . . . . . . . . . . . 29673. Name of new JetDirect-attached printer . . . . . . . . . . . . . . . . . . . . . . . . . 29774. JetDirect attachment type . . . . . . . . . . . . . . . . . . . . . . . . . . . . . . . . . . . . 29775. JetDirect-attached printer manufacturer . . . . . . . . . . . . . . . . . . . . . . . . . 29876. JetDirect-attached printer model . . . . . . . . . . . . . . . . . . . . . . . . . . . . . . . 29877. JetDirect-attached printer data stream. . . . . . . . . . . . . . . . . . . . . . . . . . . 29978. JetDirect-attached - BOOTP/TFTP selection. . . . . . . . . . . . . . . . . . . . . . 29979. JetDirect-attached hostname . . . . . . . . . . . . . . . . . . . . . . . . . . . . . . . . . . 30080. JetDirect-attached verification panel . . . . . . . . . . . . . . . . . . . . . . . . . . . . 30081. Overview and tasks for printers . . . . . . . . . . . . . . . . . . . . . . . . . . . . . . . . 30482. Queue name for IBM Network Printer . . . . . . . . . . . . . . . . . . . . . . . . . . . 30583. IBM Network Printer attachment type . . . . . . . . . . . . . . . . . . . . . . . . . . . 306
xvi Printing for Fun and Profit under AIX 5L

84. IBM Network Printer manufacturer. . . . . . . . . . . . . . . . . . . . . . . . . . . . . . 30685. IBM Network Printer model . . . . . . . . . . . . . . . . . . . . . . . . . . . . . . . . . . . 30786. IBM Network Printer data stream. . . . . . . . . . . . . . . . . . . . . . . . . . . . . . . 30787. IBM Network Printer - BOOTP/TFTP selection . . . . . . . . . . . . . . . . . . . . 30888. IBM Network Printer hostname . . . . . . . . . . . . . . . . . . . . . . . . . . . . . . . . 30889. IBM Network Printer verification. . . . . . . . . . . . . . . . . . . . . . . . . . . . . . . . 30990. Infoprint Manager Advanced Administration GUI’s main panel . . . . . . . . 46191. Infoprint Manager printer status display. . . . . . . . . . . . . . . . . . . . . . . . . . 46292. Infoprint Manager SNMP printer status . . . . . . . . . . . . . . . . . . . . . . . . . . 46393. Infoprint Manager administrative actions for printers . . . . . . . . . . . . . . . . 46494. Infoprint Manager administrative actions for jobs . . . . . . . . . . . . . . . . . . 46495. Job status details . . . . . . . . . . . . . . . . . . . . . . . . . . . . . . . . . . . . . . . . . . . 46596. Infoprint Manager retained job status display . . . . . . . . . . . . . . . . . . . . . 466
xvii

xviii Printing for Fun and Profit under AIX 5L

Tables
1. Comparison of print subsystem functions . . . . . . . . . . . . . . . . . . . . . . . . . 102. Printing systems comparison by print feature . . . . . . . . . . . . . . . . . . . . . . 233. Printing systems comparison by data types supported . . . . . . . . . . . . . . . 254. Times for printing different sizes of files. . . . . . . . . . . . . . . . . . . . . . . . . . . 395. Time comparison when printing to two queues at the same time . . . . . . . 406. Comparison of administrative interfaces . . . . . . . . . . . . . . . . . . . . . . . . . . 497. Information required according to different printer attachments . . . . . . . . 538. Cross-reference of configuration information. . . . . . . . . . . . . . . . . . . . . . . 549. Characteristics of a form . . . . . . . . . . . . . . . . . . . . . . . . . . . . . . . . . . . . . 15610. Examples: Print filter programs . . . . . . . . . . . . . . . . . . . . . . . . . . . . . . . . 16811. Template keywords . . . . . . . . . . . . . . . . . . . . . . . . . . . . . . . . . . . . . . . . . 17012. Filter arguments used by lpfilter. . . . . . . . . . . . . . . . . . . . . . . . . . . . . . . . 17213. Filters to convert content types to PostScript. . . . . . . . . . . . . . . . . . . . . . 17814. Attributes of queue status . . . . . . . . . . . . . . . . . . . . . . . . . . . . . . . . . . . . 25115. Print queue status . . . . . . . . . . . . . . . . . . . . . . . . . . . . . . . . . . . . . . . . . . 25216. PowerPC outbound network printer programs. . . . . . . . . . . . . . . . . . . . . 26817. Print and terminal server protocols . . . . . . . . . . . . . . . . . . . . . . . . . . . . . 31818. Commonly used qprt flags . . . . . . . . . . . . . . . . . . . . . . . . . . . . . . . . . . . . 33019. Key virtual printer attributes . . . . . . . . . . . . . . . . . . . . . . . . . . . . . . . . . . . 33420. Paper size virtual printer attributes . . . . . . . . . . . . . . . . . . . . . . . . . . . . . 34021. Percent codes used in virtual printer header pages. . . . . . . . . . . . . . . . . 35822. Percent codes used for labels in header pages. . . . . . . . . . . . . . . . . . . . 35923. Printing utilities in UNIX Power Tools . . . . . . . . . . . . . . . . . . . . . . . . . . . 43524. Printing utilities available from Group Bull download site . . . . . . . . . . . . 43625. Printer utilities available from UCLA SEAS . . . . . . . . . . . . . . . . . . . . . . . 43726. PostScript utilities in the psutils package . . . . . . . . . . . . . . . . . . . . . . . . . 43827. Print socket filter programs . . . . . . . . . . . . . . . . . . . . . . . . . . . . . . . . . . . 44928. Printer utilities available from LAIX software . . . . . . . . . . . . . . . . . . . . . . 45229. AIX 5L print commands and print subsystem where valid . . . . . . . . . . . . 46830. Administrative tasks and associated commands (System V) . . . . . . . . . 47131. Informational commands in the System V print subsystem . . . . . . . . . . . 47432. User commands in the System V print subsystem . . . . . . . . . . . . . . . . . 47533. Tasks and associated commands in PowerPC print subsystem . . . . . . . 47534. Interposer crossover connections . . . . . . . . . . . . . . . . . . . . . . . . . . . . . . 48035. Serial printer signal definitions in AIX . . . . . . . . . . . . . . . . . . . . . . . . . . . 48036. AIX printer cables. . . . . . . . . . . . . . . . . . . . . . . . . . . . . . . . . . . . . . . . . . . 48337. Terminfo boolean attributes . . . . . . . . . . . . . . . . . . . . . . . . . . . . . . . . . . . 49138. Terminfo numeric attributes . . . . . . . . . . . . . . . . . . . . . . . . . . . . . . . . . . . 49139. Terminfo constant string attributes. . . . . . . . . . . . . . . . . . . . . . . . . . . . . . 49240. Terminfo attributes that require a parameter . . . . . . . . . . . . . . . . . . . . . . 493
© Copyright IBM Corp. 2001 xix

41. Virtual printer boolean attributes . . . . . . . . . . . . . . . . . . . . . . . . . . . . . . . 49442. Virtual printer numeric attributes . . . . . . . . . . . . . . . . . . . . . . . . . . . . . . . 49443. Virtual printer attributes with a string constant . . . . . . . . . . . . . . . . . . . . . 49544. Virtual printer attributes calculated by stack language. . . . . . . . . . . . . . . 49645. Commonly used colon file escape sequences. . . . . . . . . . . . . . . . . . . . . 49846. Supported printer types - System V print subsystem in AIX 5L V5.0. . . . 519
xx Printing for Fun and Profit under AIX 5L
Preface
The introduction of AIX 5L demonstrates IBM’s commitment to the open model of computing. The addition of the System V Release 4 print subsystem in this release of AIX is just one of the many ways that IBM demonstrates this commitment. Many new functions have been introduced in this latest release of AIX. System V Release 4 is often referred to as SVR4, and will be denoted as System V in this document.
In AIX 5L, IBM includes both the traditional AIX print subsystem, which we will call the PowerPC print subsystem, as well as the System V print subsystem, which has been a printing standard for many years in the UNIX environment. For more complex printing environments, IBM also offers a print management product called Infoprint Manager. The system administrator must decide which print subsystem fits his or her environment the best. One of the aims of this book is to help you make that decision.
This redbook provides information on the two print subsystems available with AIX 5L Version 5.0. New in Version 5.0 is the initial implementation of the System V print subsystem, and this redbook will compare and contrast it with the legacy AIX or PowerPC print subsystem, as well as with the Infoprint Manager for AIX licensed program product.
Topics that will be covered for both the System V and PowerPC print subsystems include:
• Basic configuration and administration tasks
• Advanced topics
• Troubleshooting
The team that wrote this redbook
This redbook was produced by a team of specialists from around the world working at the International Technical Support Organization, Austin Center.
KyeongWon Jeong is a Senior Software Engineer at the International Technical Support Organization, Austin Center. He writes extensively on AIX and education materials. Before joining the ITSO, he worked in IBM Global Learning Services of IBM Korea as a Senior Education Specialist and was a class manager of all AIX classes for the customers and interns. He has many years of teaching and development experience.
© Copyright IBM Corp. 2001 xxi

John Tesch is a Senior IT Consultant in the United States ~ Advanced Technical Support group. He has 19 years of experience in workstation computing in IBM. He holds a degree in Chemistry from Texas Lutheran College, and a Ph.D. in Analytical Chemistry from the University of Colorado. His areas of AIX expertise include printing, sendmail, serial communications, X windows, and IBM Network Stations. He has authored Internet Tips on AIX Printing and presented a multitude of classes and presentations on printing and other AIX topics at numerous IBM conferences.
Kristin Moore is a Consulting IT Specialist in the IBM Printing Systems Division’s Technical Sales Support organization in the United States. She has 15 years of experience in the field of printing and Advanced Function Presentation (AFP), and has worked at IBM since 1984. Her areas of expertise include the Infoprint Manager products on the AIX and Windows platforms, as well as AFP software products on the MVS, OS/390 and OS/2 platforms. She collaborated on Printing for Fun and Profit on AIX under AIX V4, GG24-3570, and was the editor and principal author of two editions of Print Services Facility/6000: Installation Experiences. Kristin has also co-developed and taught internal classes on Infoprint Manager and Print Services Facility (PSF) for AIX.
Thanks to the following people for their invaluable contributions to this project:
International Technical Support Organization, Austin CenterWade Wallace
IBM AustinMarvin Toungate, Carrie Mitsuyoshi, Kenneth Banning, Mark Brown
Comments welcome
Your comments are important to us!
We want our Redbooks to be as helpful as possible. Please send us your comments about this or other Redbooks in one of the following ways:
• Fax the evaluation form found in “IBM Redbooks review” on page 569 to the fax number shown on the form.
• Use the online evaluation form found at ibm.com/redbooks
• Send your comments in an Internet note to [email protected]
xxii Printing for Fun and Profit under AIX 5L

Part 1. Introduction
© Copyright IBM Corp. 2001 1

2 Printing for Fun and Profit under AIX 5L

Chapter 1. Overview of AIX 5L print subsystems
For a system administrator, printers are a significant responsibility, yet they are taken for granted by users and management alike. To effectively manage the printing environment, a systems administrator must understand the following topics:
• The manner in which the chosen subsystem functions
• How to install printers
• How to configure printers and the print spooling subsystem
• How to print files and manage the progress of print requests from submission to printout
• Options for printing to network print servers and printers
• How to print from different clients
• The different types of data streams that printers support
• How to handle printing to printers with special forms
• How to solve printing related problems
This chapter reviews these topics for the System V and PowerPC print subsystems, with some information on Infoprint Manager. It also addresses some more advanced printing topics, such as special UNIX utilities to assist in printing selected pages of a file, printing files in an n-up style, and printing ASCII files to PostScript printers.
1.1 What is new in AIX 5L printing?
The print subsystem has made significant changes in going from AIX 4.3.3 to AIX 5L Version 5.0.
1.1.1 Who can administer printing?A new user named lp with group name lp has been added to support System V printing. PowerPC print administrators must be assigned to the printq group, while System V print administrators need to be assigned to the lp AIX group. Users who are members of the printq administrative group can add print devices to the operating system, which can be used by either print subsystem.
© Copyright IBM Corp. 2001 3

1.1.2 System V print subsystemThe most obvious change to AIX 5L printing is the addition of the System V print subsystem. This new feature of AIX allows administrators that are new to AIX, but who have UNIX experience, to manage printing in a manner that they are already familiar with. It also adds the ability to easily handle preprinted forms to AIX printing.
1.1.3 Changes to the PowerPC print subsystemThe following sections describe the changes that have been made to the traditional AIX or PowerPC print subsystem in going from AIX 4.1 to AIX 5L.
1.1.3.1 Changes from AIX 4.3.3 to AIX 5LTo support the existence of two print subsystems at the same time, some of the AIX files and directories were changed.
Below is a list of the files, directories, user and administrative commands, and internal programs that will be created in order to support System V printing, along with the owner, group, and permissions of each, including any symbolic links.
• bos.rte changes for PowerPC print subsystem
File Mode Owner Group Pathname========== ===== ===== ================================================drwxr-xr-x bin bin /usr/aix/bin (AIX)-rwxr-xr-x bin bin /usr/aix/bin/cancel (AIX)-rwxr-xr-x bin bin /usr/aix/bin/lp (AIX)-rwxr-xr-x bin bin /usr/aix/bin/lpq (AIX)-rwxr-xr-x bin bin /usr/aix/bin/lpr (AIX)-rwxr-xr-x bin bin /usr/aix/bin/lprm (AIX)-rwxr-xr-x bin bin /usr/aix/bin/lpstat (AIX)-r-sr-x--- root system /usr/sbin/switch.prt (AIX)-rwx------ root system /usr/sbin/switch.prt.subsystem (AIX)
• bos.rte.printer changes during post install
File Mode Owner Group Pathname========== ===== ===== ================================================lrwxrwxrwx root system /usr/bin/cancel -> /usr/aix/bin/cancel(AIX)lrwxrwxrwx root system /usr/bin/lp -> /usr/aix/bin/lp (AIX)lrwxrwxrwx root system /usr/ucb/lpq -> /usr/aix/bin/lpq (AIX)lrwxrwxrwx root system /usr/ucb/lpr -> /usr/aix/bin/lpr (AIX)lrwxrwxrwx root system /usr/ucb/lprm -> /usr/aix/bin/lprm (AIX)lrwxrwxrwx root system /usr/bin/lpstat -> /usr/aix/bin/lpstat(AIX)-rwxrwx--- root system /usr/aix/_AIX_print_subsystem (AIX)
• [Created on the fly when switching to System V]
-rwxrwx--- root lp /usr/sysv/_SYS5_print_subsystem (System V)
4 Printing for Fun and Profit under AIX 5L
• printers.rte changes
File Mode Owner Group Pathname========== ===== ===== ================================================-r-xr-x--- root printq /usr/aix/bin/disable (AIX)-r-xr-x--- root printq /usr/aix/bin/enable (AIX)lrwxrwxrwx root system /usr/bin/disable -> /usr/aix/bin/disable (AIX)lrwxrwxrwx root system /usr/bin/enable -> /usr/aix/bin/enable(AIX)
1.1.3.2 Changes from AIX 4.2 to AIX 4.3.3Changes from AIX 4.2 to AIX 4.3.3 include enhancements to remote printing, support for a number of new printers, and enhancements to print job administration.
Remote printing made more robustOne of the major changes introduced in going from AIX 4.2 to AIX 4.3.3 was to increase the robustness of the remote printing system. This was done by adding the ability for both rembak and lpd to have new flags that enable them to build log files. Use the following commands to start error logging:
# stopsrc -s lpd# startsrc -s lpd -a “-D /tmp/lpddebug”
For rembak, add a -D logfile flag for rembak as shown here:
backend = /usr/lib/lpd/rembak -D /tmp/remback.log
AIX Version 4.3.0 added the capability for an AIX server to queue more than 1000 jobs to a single queue from a remote client. This is an extension to the RFC 1179 specification for remote printing.
The extended curses capability was enhanced to support printer attributes. For details, see the AIX 4.3.3 /usr/lpp/bos/README.SPEC1170.
Support for new printers addedNew printer support added in AIX 4.3.0 included Lexmark 2380 Model 3, Lexmark 2381 Model 3, Lexmark 2390 Model 3, Lexmark 2391 Model 3, and Lexmark Forms Printer Model 4227.
New printer support added in AIX 4.3.1 included HP LaserJet 4000 and IBM InfoPrint 20.
New printer support added in AIX 4.3.2 included IBM InfoPrint 32, Lexmark Optra Color 40, Lexmark Optra Color 45, Lexmark Optra Color 1200, Lexmark Optra K 1220, HP LaserJet 8000, and HP LaserJet 8500 Color.
New printer support added in AIX 4.3.3 include HP 2500C Color Printer, HP LaserJet D640, HP LaserJet 8100, HP Color LaserJet 4500, IBM InfoPrint 40,
Chapter 1. Overview of AIX 5L print subsystems 5

Lexmark Optra T printer family, Lexmark Optra Se, Lexmark Optra W810, Lexmark Optra M410, and Lexmark Optra E310.
Print job administration support added at AIX 4.3.2The print queue administration commands have been enhanced to support print queues with more than 1000 jobs. Previous editions of AIX would allow more than 1000 jobs in a print queue, but cancelling or altering a job when the queue size grew to more than 1000 jobs became difficult. This was because print job numbers would repeat, and specifying a specific job number did not guarantee that the job selected would be unique or the one desired.
The formatting of the output of the qchk command, when used with the -w flag, has been changed to show the six-figure print job number. The lpstat command has been changed to also accept the -W flag to show information in wide format. The use of the -W flag results in output where the lines are over 106 characters in length and can be confusing to read on 80 column screens. The default format for both commands remains unchanged.
The enq, cancel, qprt, qcan, and lprm commands have been altered to accept six-figure job numbers.
The enhancement applies only to jobs submitted to local print queues. Jobs submitted to remote queues still have three digit print job numbers because of the restrictions in the lpd standard.
The time taken to list or remove jobs on the queue is proportional to the number of jobs queued. It is suggested that for performance reasons that you maintain a queue size of less than 1000 jobs unless absolutely necessary.
1.1.3.3 Changes from AIX 4.1 to AIX 4.2Changes introduced from AIX 4.1 to AIX 4.2 include the increase in job queue size and the addition of a number of printers.
The ability to queue more than 1000 active jobs to a single local queue was added, but management for these jobs did not allow unique access in AIX 4.2.
New printers added at AIX 4.2 include the IBM 3130 Advanced Function Printer, IBM 4247 Printer, IBM 6400 series printers, HP LaserJet 5Si and 5Si MX, Lexmark Optra Plus, Lexmark Optra C, Lexmark Optra E, Lexmark Optra N, Lexmark ExecJet IIc, Lexmark ValueWriter 600, Lexmark 4039 Plus, and the Lexmark 4079 Color JetPrinter Plus.
6 Printing for Fun and Profit under AIX 5L

1.2 Packaging
The basic functions for both printer subsystems are installed by default when AIX is installed, but additional features and printers can be installed manually after this initial installation. All printer software for both System V and PowerPC print subsystems is contained on the AIX installation media.
1.2.1 System V print subsystem filesetsThe System V print subsystem consists of 6 filesets. The names of the filesets are bos.svprint.rte, bos.svprint.fonts, bos.svprint.hpnp, bos.svprint.ps, bos.terminfo.svprint.data, and bos.msg.en_US.svprint.
1.2.2 PowerPC print subsystem filesetsBy default, the base PowerPC print subsystem is installed and enabled, but only a couple of printers are available. The first time you add a PowerPC printer that is not in the basic install list, you will be prompted to install additional printer software from the AIX installation media. The name identifying the PowerPC print filesets begin with “printer.”. To list all the PowerPC print filesets that have been installed, type the following command:
# lslpp -l printer.* > /tmp/installed.filesets
1.3 Web-based System Manager versus SMIT printer management
Web-based System Manager is the primary tool for managing AIX 5L. While you can use SMIT to manage PowerPC printing, Web-based System Manager is the only GUI tool for managing System V printing. The only SMIT command for System V printing is the option to change back to the PowerPC print subsystem. Web-based System Manager for the System V print subsystem has minimal function in AIX 5L Version 5.0, but the function will be enhanced in subsequent releases.
Web-based System Manager always uses the context of the current print subsystem. The tasks to be performed by the Web-based System Manager application include:
• Add new printers or classes of printers (parallel, serial, remote, and network).
• Set the default printer.
• Remove printers or classes of printers.
• Switch between the PowerPC and System V print subsystems.
Chapter 1. Overview of AIX 5L print subsystems 7

The status information to be displayed for System V will include the following:
• Show the default printer.
• Display the requests on the default printer.
• Display the printers defined on the system.
• Display the stopped printers on the system.
• Show the printers that currently have problems.
When the PowerPC print subsystem is enabled, all SMIT menus continue to work as they do in AIX 4.3.3, but when the System V print subsystem is enabled, attempts to access some of the panels will result in an error stating that the PowerPC print subsystem is not active, while other panels are no longer visible.
1.4 Multiple approaches to printing
Under AIX 5L, there are several methods of attaching printers and directing print output to them. They include:
• Printing by directly addressing the printer device driver
• Printing directly to a network printer with a socket program
• Printing by utilizing the System V print subsystem
• Printing by utilizing the PowerPC print subsystem
• Printing by utilizing an advanced print management system
1.4.1 Printing by directly addressing the printer device driverIn this environment, the printer must be directly attached to one of the AIX serial or parallel ports. The application or user directs the file to be printed to a special device file in the /dev directory (usually /dev/lp##, where ## is the device number starting with lp0) that represents the device driver. The device driver then takes the file and sends it to the printer.
There are advantages and disadvantages to printing directly to the device driver. The major disadvantage is that you bypass the spool facility; therefore, you lose your ability to serialize print requests to a printer via the print spooling subsystem. This is because the application owns the printer device for the period that it is printing, and all other applications or users will get an error if they try to print. The major advantage is security, in that the printer can be set up so only that application or user can print to a particular printer.
8 Printing for Fun and Profit under AIX 5L

Examples of situations where you may want to set up direct printing to a device driver include printer problem determination, printing checks, logging messages, and printing from applications that only print to files.
An example of a command to print to printer device lp02 is shown here:
# cat /etc/motd > /dev/lp02
1.4.2 Printing directly to a network printer with a socket programThis is similar to printing to a device driver, except that instead of redirecting the output to a file, it is piped to a program that makes a direct socket connection with a printer. Examples of programs that can send data to a printer are the piohpnpf program for sending to HP JetDirect printers, pioibmnpf for IBM Network Printers, and non-IBM programs such as csportd, rprint, or dtsout, which are used to send data to some terminal servers.
1.4.3 Printing by utilizing the System V print subsystemIn this environment, information that a user or application wishes to be printed is sent to the System V print spooler using the standard System V print command lp. Jobs are serialized using the System V print spooler. The spooling subsystem will itself communicate with the local printer device drivers or the network printing applications.
1.4.4 Printing by utilizing the PowerPC print subsystemIn this environment, information that a user or application wishes to be printed is sent to the qdaemon print spooler using any of the PowerPC print commands (for example, enq, qprt, dtprint, lp, or lpr). Jobs are serialized by the qdaemon, which calls backend programs that may format and filter the data, add computer setup information, and then send the data to the device driver or network printer program.
1.4.5 Printing by utilizing an advanced print management systemIn this environment, printing is managed by a system like IBM Infoprint Manager. This gives users more control over jobs by ensuring that the print request is routed to a printer that is appropriate for the data being printed and is located where the user can get to the output easily. In general, this adds some cost to the solution, but also greatly enhances security and the control over the print output.
For an overview of Infoprint Manager for AIX and its capabilities, see Section 10.1, “Features and benefits” on page 455.
Chapter 1. Overview of AIX 5L print subsystems 9
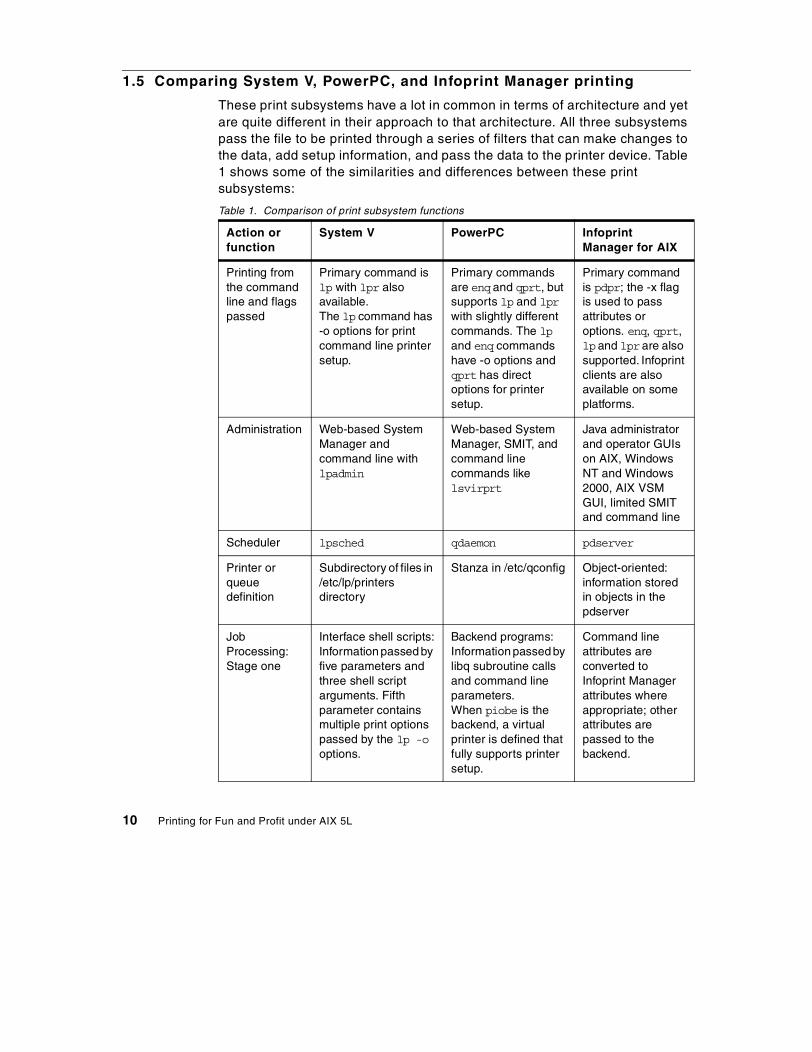
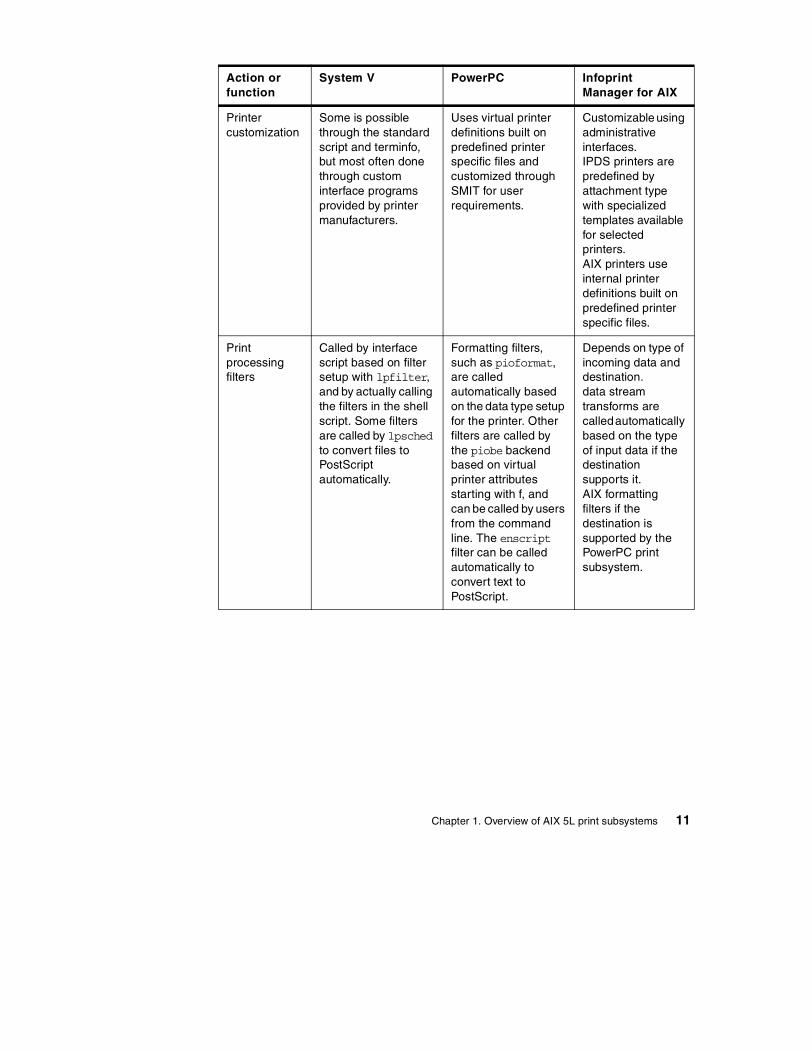
1.5 Comparing System V, PowerPC, and Infoprint Manager printing
These print subsystems have a lot in common in terms of architecture and yet are quite different in their approach to that architecture. All three subsystems pass the file to be printed through a series of filters that can make changes to the data, add setup information, and pass the data to the printer device. Table 1 shows some of the similarities and differences between these print subsystems:
Table 1. Comparison of print subsystem functions
Action or function
System V PowerPC Infoprint Manager for AIX
Printing from the command line and flags passed
Primary command is lp with lpr also available.The lp command has -o options for print command line printer setup.
Primary commands are enq and qprt, but supports lp and lpr with slightly different commands. The lp and enq commands have -o options and qprt has direct options for printer setup.
Primary command is pdpr; the -x flag is used to pass attributes or options. enq, qprt, lp and lpr are also supported. Infoprint clients are also available on some platforms.
Administration Web-based System Manager and command line with lpadmin
Web-based System Manager, SMIT, and command line commands like lsvirprt
Java administrator and operator GUIs on AIX, Windows NT and Windows 2000, AIX VSM GUI, limited SMIT and command line
Scheduler lpsched qdaemon pdserver
Printer or queue definition
Subdirectory of files in /etc/lp/printers directory
Stanza in /etc/qconfig Object-oriented: information stored in objects in the pdserver
Job Processing: Stage one
Interface shell scripts:Information passed by five parameters and three shell script arguments. Fifth parameter contains multiple print options passed by the lp -o options.
Backend programs: Information passed by libq subroutine calls and command line parameters.When piobe is the backend, a virtual printer is defined that fully supports printer setup.
Command line attributes are converted to Infoprint Manager attributes where appropriate; other attributes are passed to the backend.
10 Printing for Fun and Profit under AIX 5L
Printer customization
Some is possible through the standard script and terminfo, but most often done through custom interface programs provided by printer manufacturers.
Uses virtual printer definitions built on predefined printer specific files and customized through SMIT for user requirements.
Customizable using administrative interfaces.IPDS printers are predefined by attachment type with specialized templates available for selected printers. AIX printers use internal printer definitions built on predefined printer specific files.
Print processing filters
Called by interface script based on filter setup with lpfilter, and by actually calling the filters in the shell script. Some filters are called by lpsched to convert files to PostScript automatically.
Formatting filters, such as pioformat, are called automatically based on the data type setup for the printer. Other filters are called by the piobe backend based on virtual printer attributes starting with f, and can be called by users from the command line. The enscript filter can be called automatically to convert text to PostScript.
Depends on type of incoming data and destination.data stream transforms are called automatically based on the type of input data if the destination supports it.AIX formatting filters if the destination is supported by the PowerPC print subsystem.
Action or function
System V PowerPC Infoprint Manager for AIX
Chapter 1. Overview of AIX 5L print subsystems 11

Output filters The shell script passes the setup and commands to output filters such as lp.cat and postio, which can talk directly with printers and handle errors.
The piobe backend passes data through pioout, which writes directly to the device. Errors are handled by communications through the qdaemon.
Secondary processes are provided to communicate with TCP/IP-attached printers using sockets, channel-attached printers, and PowerPC print filters. Errors are handled by communications through pdserver. Notification profiles can be set up on a job, device, and server level to handle delivery of error and informational messages.
Action or function
System V PowerPC Infoprint Manager for AIX
12 Printing for Fun and Profit under AIX 5L

1.6 Design considerations
The design of your printing environment will depend on a number of issues. This section describes some of the things that should be considered when setting up a print server, and how each of these items helps determine the overall design of your printing solution. Some key considerations are:
• The number of users, print jobs, and printers
As the number of users increases, the load on printers and the print server increase. This usually results in more print jobs and more printers and a more complex management task for the administrator. When a printer runs out of paper or toner, or becomes jammed, the print queue may go down. Some of the things that you must consider are:
- Who can fix the problem and reenable the queue?
- How are messages sent to users and administrators?
- What is the impact to other users?
- Can the process of making printers available be automated?
LPD/LPR remote printing
Controlled by lpsched, which starts lpNet daemon to send and receive remote jobs. lpNet queues local jobs by communicating directly with lpsched.
Remote lpr jobs are sent by the qdaemon backend rembak, and received by the lpd daemon which is controlled independently. Lpd queues local jobs by calling enq.
For incoming jobs, depends if Infoprint client is used (sockets) or if normal lpr/lpd printing. For the latter, if the destination is not an AIX printer, enq passes the print request to pdserver. In multi-server Infoprint environments, remote jobs are transferred between servers using sockets and RPCs; you can also create a destination which invokes rembak.
Action or function
System V PowerPC Infoprint Manager for AIX
Chapter 1. Overview of AIX 5L print subsystems 13

• The experience of the system administrator
The choice of print subsystem will often be based on the background of the system administrator. If the administrator has extensive experience in AIX, then they will often lean toward the PowerPC print subsystem because of the SMIT configuration tools. On the other hand, if the administrator has more experience on a UNIX system, such as SCO or Solaris, then they will likely lean toward using the System V print subsystem. In the case when the administrator comes from an IBM mainframe background, Infoprint Manager may be required to give them the level of comfort and control that they are used to.
• Security considerations
Security of printers can be a very important issue for some companies. This is especially important when printing financial documents, such as checks, when printing on expensive printed forms, or when printing sensitive information, such as performance appraisals. In these cases, the ability to limit printing to a select number of users is an important consideration. The System V print subsystem and Infoprint Manager both have some built-in capabilities for restricting users to certain printers. System V uses the printer to allow and deny attributes, in order to control user access to local printers and from users on remote clients. Infoprint Manager can be implemented with or without DCE, depending on the level of security required. In the PowerPC print subsystem, customization of the backend must be done to restrict user access.
• The use of printed or electronic forms
When an application prints to a preprinted form that must first be loaded into a printer, it is important that other users do not print to the printer while these expensive forms are loaded. This is only a problem when multiple forms or forms and plain paper are used in the same printer. The System V print subsystem has a built-in capability to allow or deny users access to selecting a form and form properties when printing. Infoprint Manager can also provide this function by allowing the administrator to specify which forms a printer supports, and by restricting access to a printer to specific users. Infoprint Manager checks to see if any printers support a user-requested preprinted form before accepting a job, and will not actually schedule a job to a printer until the operator signals that the requested form is actually mounted and available. Infoprint Manager also supports use of electronic forms. PowerPC printing does not have this capability, and customization to add this capability means creating multiple queues and managing which queues are enabled while a form is loaded.
14 Printing for Fun and Profit under AIX 5L

• The location of printers relative to the server and attachment method
The distance of the printers from the server, and the number of printers at a particular location, will determine how the printers can be attached.
- Parallel attached:
One printer that is in the same room as the server can be attached using the parallel port. Other parallel printers must be attached using either serial to parallel converters or through network interface boxes.
- Serial attached:
Printers at the same site can be attached using either serial communications methods, such as RS/232 or RS/422. By using the 128-port adapter combined with DSU/CSU modems and remote RANs, users at up to four remote locations per adapter can be supported as local devices. Also included in serial attached printers are printers attached to the back of a serial attached ASCII terminal. The attachment of serial printers seems to cause administrators the largest amount of problems of all attachment types associated with matching properties and getting wiring pinouts correctly.
- Network attached:
Printers attached over the network can be directly connected to the network using internal cards and network interfaces, or through support devices, such as network print servers, thin clients, or terminal servers. Network attached printers can be attached over LANs and WANs and therefore can be located anywhere on the network, including different cities or countries. One advantage of network attached printers that is often overlooked is the ability to use standard network trace tools for debugging printing problems. Network printing often offers the most reliable wiring and the most flexible solution for placement of printers and servers.
• The location of printers relative to users
Users naturally prefer printers that are in close proximity to their desks. This means that the printer may be remote to the system administrator or the technician managing the print queues. It may be necessary to give some of these remote users access to commands for managing printers and queues.
In addition, users may only want to view the status and availability of printers that are close to them. One of the features that you want to look for in this environment is one where the print subsystem supports directory services for providing the appropriate information to different users. Infoprint Manager allow association of users with different printers.
Chapter 1. Overview of AIX 5L print subsystems 15
With the PowerPC printer subsystem, this will mean writing separate scripts for different users.
• Print job load balancing
System V print subsystem offers the concept of classes of printers, where a user can submit a job to a class of printers, and the subsystem will use this for simple load balancing. The PowerPC print subsystem has the concept of load balancing by allowing the administrator to build queues with multiple queue devices. When the user prints to the queue, the job will be printed on the first available queue device assigned to that queue. Infoprint Manager supports printer pooling and automatic workload balancing, including the ability to specify print deadlines and “print-after” times, to group jobs into batches, and to schedule jobs based on size.
1.7 Choosing the correct print subsystem
When considering which subsystem to use in your environment, it is important to understand some of the advantages of each of the available print subsystems.
1.7.1 System V print subsystem comparisonThe System V Release 4 print subsystem, which is often referred to as SVR4, has been used on a number of UNIX operating systems for a long time, and was introduced into AIX as part of the Monterey project based on SCO’s Unixware 7 print subsystem.
System V remote printing was left out of the AIX implementation because this method of printing to remote machines is outdated and existed mainly for backward compatibility. However, BSD remote printing is implemented; this is the standard in UNIX and provides the print capability that UNIX users have come to expect.
1.7.1.1 Advantages of the System V print subsystem • Compatibility with other UNIX print solutions
This is one of the main reasons that IBM has moved to the System V print subsystem. System administrators from HP/UX, Sun Solaris, SCO and other UNIX variants will find the directory structure, commands and command flags more familiar.
• Availability of printer interface models
Printer manufacturers write a single interface shell script for different UNIX systems that contains minor ‘definition’ modifications for individual UNIX
16 Printing for Fun and Profit under AIX 5L

variations. With the support of System V printing in AIX, it will be easier for these manufacturers to add support for AIX printing.
• Support for loading forms in printers
The ability to use System V based printer forms is available from the command line in AIX 5L Version 5.0, and will be enabled from the Web-based System Manager in a future release.
• Inclusion of standard PostScript filters
The System V print code includes print filters for converting a number of file formats to PostScript with the inclusion of some formatting and page selection.
1.7.1.2 Disadvantages of the System V print subsystem • IBM Network Printer support
Currently IBM Network Printers are only supported as BSD remote printers in System V printing. However, by downloading and using the interface models created for SCO, full support should be achieved. A description of how to provide this support by modification of the SCO interface programs is provided in Section 4.2.5, “Example: Modifying the SCO IBM Network Printer 12 script” on page 147.
• Lexmark Network Printer support
Lexmark Network Printers are only supported as BSD remote printers in System V printing in AIX 5L. Lexmark also includes SCO interface models for System V printing on their Web site, and it is likely that they will add AIX 5L support in the future. See Section 4.2.6, “Example: Modifying the SCO Lexmark interface script” on page 150 for more details.
• Printer accounting is not tied into AIX sar in the same manner as the PowerPC print subsystem.
• You must first add a print device and then add a printer in the current release of Web-based System Manager. This is not as well integrated on AIX as it is in the PowerPC print subsystem.
• The System V print subsystem is less sophisticated on AIX than is the PowerPC print subsystem at the time of writing this document.
• Modifying a System V terminfo attribute or other printer attribute customization has fewer supported tools than changing a PowerPC virtual printer attribute.
• The output from status commands like lpstat have fewer formatting options, and are generally harder to read than PowerPC status when a large number of printers are involved.
Chapter 1. Overview of AIX 5L print subsystems 17

• Native support for terminal and Xstation attached printers is not available.
• National language support is not yet as fully integrated as it is in PowerPC based printing.
1.7.2 PowerPC print subsystem comparisonWhen the PowerPC print subsystem was created, it was designed to combine the features of System V and BSD printing, along with some unique features found only in AIX.
1.7.2.1 Advantages of the PowerPC print subsystem • Easy transition to AIX from either BSD or System V.
By offering many of the print commands, such as lp, lpr, lpstat, enable, disable, and cancel, the transition for users from other UNIX operating systems to PowerPC printing is quite easy.
• Powerful and versatile print drivers.
The print drivers used to drive specific printers were designed in such a way that most printing options available on the printer could be requested by a user by specifying flags on the AIX-specific qprt command, and the defaults for the printer were easily changed by the system administrator using the AIX SMIT system administration tool.
• Limits fields and option validation.
Limits fields give the user and administrator a valid range of choices for each option and would prohibit a user from using an invalid value when printing or an administrator from setting up an invalid parameter while setting the printer defaults.
• Virtual printer customization is supported through menus and GUI interfaces.
SMIT, Web-based System Manager, and the command line tool lsvirprt all allow an administrator to customize individual printers through menu selection and other simple methods that do not require the knowledge of shell script programming, as would be required in System V printer customization.
• Powerful spooling subsystem with customizable backends.
The print spooler in the PowerPC subsystem can call custom programs and pass information through a standard published API, which allows the qdaemon to pass important information about the queue and the job to the backend program. This allows the subsystem to serialize other types of
18 Printing for Fun and Profit under AIX 5L

jobs in addition to printing, and it makes the PowerPC print subsystem totally customizable and extensible.
• Print devices and queues can be added in a single action from SMIT.
• Administrators can dial in and use text-based SMIT menus more effectively than Web-based System Manager (which is the only non-command line interface for System V printers).
• Print filters are easy to setup.
Several print filters, such as pr and asa, are installed by default. Other filters are easy to install to a virtual printer, and can then be designated by the user when printing. This capability can be used for file conversion as well as downloading fonts and electronic forms
• Better documentation available.
The AIX V4 Printer Guide, SC23-2783, provides more information on writing new virtual printers and backends than is available for System V on any UNIX platform.
• Built-in support for Xstation and terminal attached printers.
Backends are supplied for printing to Xstations and terminal attached printers. With terminal-attached printers, the data stream is intermixed with the terminal and keyboard I/O in order to give more efficient printing while users are using the terminals.
• PowerPC printing is fully National Language Support (NLS) enabled.
The virtual printer subsystem has NLS translation tables to support conversion of characters on the screen to the appropriate character that is supported by the printer code page, and automatic code page switching when characters on the screen are found to print from a secondary code set on the printer.
1.7.2.2 Disadvantages of the PowerPC print subsystemSome of the features that give PowerPC printing an advantage over other UNIX print methods (such as System V) also create some of the disadvantages.
• Complexity
Because the print drivers in PowerPC printing are very powerful, they are also inherently complex. This makes it very difficult for the average user to understand and make changes to a print driver or to create a driver for a new printer.
Chapter 1. Overview of AIX 5L print subsystems 19

• Portability and availability of printer drivers
Since the PowerPC virtual printers are unique to AIX, an interface program filter written by an individual or printer manufacturer for another operating system can not be used in the PowerPC print subsystem on AIX. The virtual printer colon file must be completely re-written. This delays the introduction of new printer drivers for AIX. Only the IBM Printing System Division and Lexmark write drivers for their own printers, and IBM AIX development has traditionally only provided the most popular HP printers.
• No support for preprinted forms
There are no commands to indicate when a form is loaded into a printer or to specify a form when printing.
• Different flags for BSD and System V print commands
Many flags for BSD and System V print commands are different in the PowerPC print subsystem than they are in the standard print subsystems on other UNIX systems.
• Long term direction
The long term direction of printing in AIX is to maintain compatibility with other UNIX systems, and the proprietary nature of the PowerPC print subsystem means that it is a likely candidate to be phased out over time, although it will be supported for many years.
1.7.3 Infoprint Manager comparisonInfoprint Manager for AIX is the follow-up product to Print Services Facility (PSF) for AIX (also known as PSF/6000), Printing Systems Manager (PSM), and Print On Demand software, and it incorporates features of each while providing additional function. See Chapter 10, “Overview of Infoprint Manager for AIX” on page 455 for an overview of Infoprint Manager.
1.7.3.1 Advantages of Infoprint Manager for AIX • Support for a wide range of printers and other destinations
- Standard printing to all printers supported by the AIX 5L PowerPC print subsystem
- Advanced function printing to printers that support the Intelligent Printer Datastream (IPDS), PCL (PCL 4, 5, and 5C), and PPDS
This includes monochrome printers with speeds as fast as 1002 impressions per minute (including color and MICR post-processing support) and full-color printers up to 138 impressions per minute.
- Support for e-mail and fax as output destinations
20 Printing for Fun and Profit under AIX 5L
• Interoperability with many UNIX and non-UNIX platforms using standard networking protocols
• Strong printing and printer management
- Ability to integrate with Tivoli Output Manager
- Integration with SNMP and Network Printer Manager (NPM) for improved error detection and status information
- Flexible event notification
Infoprint Manager provides notification that you can tailor depending on the needs of users, operators, and administrators. For example, users can receive information about their own jobs, operators can receive information on Infoprint objects requiring attention, and administrators can receive information on configuration changes.
• Scalability
Infoprint Manager for AIX can be installed on a single RS/6000, or it can be installed on multiple servers with shared information and resources. This allows you to manage printing through LANs and WANs with a single view of all printers and resources.
Infoprint Manager for AIX servers can interoperate not only with each other, but with Infoprint Manager for Windows NT and Windows 2000 servers as well, again using shared information.
• Option validation and intelligent job routing
- Print requests are initially validated to ensure that a printer actually exists which can support the job requirements. Jobs are not actually scheduled to the destination until all resources are ready at the printer.
- If the destination supports it, Infoprint Manager automatically detects the data type of incoming jobs and invokes a data stream transform to convert the incoming data type to the language of the target printer.
• Flexible job scheduling and workload management options
- Users can request jobs be printed before or after a certain time, or can group jobs into batches to be printed together.
- Administrators can restrict jobs to specific printers based on size.
- Infoprint Manager can retain printed jobs for specified period of time, either as configured by the administrator or as requested by the users. When the retention period expires, the jobs will automatically be deleted.
Chapter 1. Overview of AIX 5L print subsystems 21

• Forms management capability
- Jobs requiring a specific form will not print until the operator indicates that form is mounted; if the form is already mounted, the job will be scheduled automatically if all other resources are available.
- Infoprint Manager also supports electronic forms.
• Security
- Standard security based on user or group IDs and access control lists (ACLs) for both operations and objects (servers, queues, destinations)
- Additional security available with DCE integration
• Optional integrated digital scanning and library option
• Automated migration for existing PSF for AIX and PSM customers
1.7.3.2 Disadvantages of Infoprint Manager for AIX • Complexity
Infoprint Manager is a very flexible and powerful product, but with that power comes complexity. Although it is possible to install Infoprint Manager and use defaults initially, to take full advantage of its capability will take time and experience.
In order to maximize your chances for success, IBM recommends that you contract with IBM Printing’s professional services organization to plan for, install, and initially configure your Infoprint Manager for AIX system.
Infoprint Manager is not necessarily an appropriate solution for every customer or environment.
• Cost
Infoprint Manager is a licensed program product with priced features, whereas the PowerPC and System V print subsystems are included in AIX 5L.
The pricing in Infoprint Manager Version 3.2 is more modular than in earlier versions, so you only pay for the features you really need. (Infoprint Manager is competitively priced with other products in the marketplace.)
Professional services for installation or customization will cost extra.
• Limited support in AIX 5L
- Infoprint Manager will require a Program Temporary Fix (PTF) in order to install and work with AIX 5L. That PTF is not yet available; check with the IBM Support Center for the current status.
22 Printing for Fun and Profit under AIX 5L

- Infoprint Manager will require that the PowerPC print subsystem in AIX 5L be the active subsystem. There is no support yet for the System V print subsystem.
1.7.4 Comparison by featureTable 2 compares the two base print subsystems and Infoprint Manager for AIX by features:
Table 2. Printing systems comparison by print feature
Feature System V print subsystem
PowerPC print subsystem
Infoprint Manager for AIX
Robustness + at Version 5.0 +++ +++
Text printing +++ +++ +++ with external formatting capabilities.
PostScript printing +++ +++ +++
Greater than 1000 jobs to queue
N/A ++ +++
LPR/LPD printing ++ lpNet is used for both inbound and outbound lpr/lpd printing. All jobs are logged, but the output is less usable for solving problems.
+++ rembak is used as the lpr, and the lpd daemon as the lpd. Both offer better logging capabilities.
+++
JetDirect printing ++ +++ +++
Status formatting + ++ +++ (GUI)
Mounted forms support
+++ Using lpforms -- +++
LDAP security Planned for the future.
-- - (DCE support available).
Filters +++ Automated through lpfilters or by calling directly from interface scripts.
+++ User specified when printing, add filters through SMIT menus.
+++ Automatic data stream “sniffing.”
Chapter 1. Overview of AIX 5L print subsystems 23

Available printers supported
+ Standard, but dependent on printer manufacturers.
+ Many available, but not standard and few are available from printer manufacturers.
++
Download fonts ++ PostScript download, and mounted font cartridge support.
++ Support for any font download available through virtual printers.
+++ for AFP printers, including outline and raster, single and double-byte.++ for AIX printers; same as PowerPC print subsystem.
Multiple copies +++ Custom interface can use printer capability.
++ May send the print job multiple times to printer.
+++
Program support - Not documented, but possibly can be done.
+++ Can serialize most AIX programs.
+ Can execute AIX programs through BSD device support system.
Command line control
++ Customizable by interface and filter.
+++ Extensive with qprt.
+++ Extensive with pdpr.
Terminal attached printers
- Not currently supported.
+++ Virtual printer support.
--
Xstation attached printers
- Not supported. ++ Backend supplied.
+
Problem determination logs
+ Easy to set up. +++ More information and logging capabilities.
+++
Feature System V print subsystem
PowerPC print subsystem
Infoprint Manager for AIX
24 Printing for Fun and Profit under AIX 5L

1.7.5 Comparison by data typeTable 3 compares the two base print subsystems and Infoprint Manager by the type of information that needs to be printed:
Table 3. Printing systems comparison by data types supported
1.8 Switching between the two AIX 5L print subsystems
The default print subsystem in AIX 5L Version 5.0 is the current PowerPC print subsystem; the System V print subsystem is an alternate method of
Output System V print subsystem
PowerPC print subsystem
Infoprint Manager for AIX
Simple text +++ +++ +++ External formatting supported.
PostScript +++ +++ +++ PDF also supported.
Other data formats -- -- PCL, SAP R/3, TIFF, GIF, JPEG, DBCS, EUC, ditroff, EBCDIC & ASCII line data, AFP.
From PC programs +++ +++ +++ Windows clients provided.
To forms in printers +++ - (manual setup only)
+++
Checks, employee evaluations, and so on
When LDAP available, extra security will be provided.
Security only available through custom backend.
+++ (non-DCE uses IDs and ACLs; DCE uses authentication and authorization).
Envelopes No special support, but is supported by some manufacturers’ interface scripts.
Command line paper selection for envelopes as well as menu customization of envelope sizes.
- For AIX printers, same as PowerPC printing.- For AFP printers, default resources provided.
Electronic forms ++ Could setup as font.
++ Can add with filter.
+++
Chapter 1. Overview of AIX 5L print subsystems 25

printing. At install time, the PowerPC print subsystem is always set as the active one, and System V is always inactive. They can not both be set to the active state at the same time using the normal procedures. However, there is nothing to prevent an administrator from overriding this manually for some print operations.
If you have problems with switching print subsystems, check to see if there are jobs still queued, or processes that are hung. When switching from the System V print subsystem, check for queued jobs with the command:
# lpstat -o
If there are jobs still queued, use the cancel command to cancel them. Also, if the attempt to switch simply hangs, look for processes that may be hung or orphaned by using the ps command. One culprit to watch out for is lpNet.
# ps -ef | grep lpNet
If there are lpNet processes that are owned by PID 1, then use kill -9 to remove these processes.
1.8.1 Three ways to switch between print subsystemsThere are three ways to switch between print subsystems: 1) from Web-based System Manager, 2) using SMIT, and 3) using the command line.
Option 1: Using Web-based System ManagerThe main Web-based System Manager “Directory Disabled Printers (System V)” panel in either print subsystem has an option to change to the other print subsystem under the “TASKS” menu. You will get one of these menu options:
Switch to PowerPC print subsystemSwitch to System V print subsystem
To change print subsystems, simply click on this selection.
When choosing the option to switch print subsystems, you will get a warning that the current subsystem printers will no longer be available.
Option 2: Using SMITThe option to Change / Show Current Print Subsystem has been added to the top level Print Spooling menu in SMIT, as shown in the following panel:
26 Printing for Fun and Profit under AIX 5L

By Choosing Change / Show Current Print Subsystem, the next panel will display the line to select the print subsystem, as shown here:
Change / Show Current Print Subsystem [AIX]
The current subsystem will show up in the box on the right, and the field will toggle between two choices AIX and System V. Executing the panel will run the command /usr/aix/bin/switch.prt, which will in turn run the script /usr/aix/bin/switch.prt.subsystem, which will take the value displayed as input. Running the command with the current system as input will result in an error. Running the command with the alternate subsystem will switch the system from the current one to the alternate one. The more queues that are defined in the subsystem that you are exiting, the longer the command to switch will take.
Option 3: Using the command lineThe switch.prt command can be used to switch between printer subsystems, or to display the currently active printer subsystem. The syntax of the command is:
switch.prt [-s print_subsystem] [-d]
The valid values for print_subsystem are AIX and SystemV. Running the command with the -d flag will display the current print subsystem.
Print Spooling
Move cursor to desired item and press Enter.
[AIX Print Mode Only]Start a Print JobManage Print JobsList All Print QueuesManage Print QueuesAdd a Print QueueAdd an Additional Printer to an Existing Print QueueChange / Show Print Queue CharacteristicsChange / Show Printer Connection CharacteristicsRemove a Print QueueManage Print ServerProgramming Tools
[AIX and System V Print Mode] Change / Show Current Print Subsystem
F1=Help F2=Refresh F3=Cancel F8=ImageF9=Shell F10=Exit Enter=Do
Chapter 1. Overview of AIX 5L print subsystems 27

Examples:
# switch.prt -s SystemV# switch.prt -s AIX
For security reasons, this command is a front-end to the script /usr/aix/bin/switch.prt.subsystem which will do the real work. This command is also called by the Web-based System Manager and SMIT interfaces.
1.8.2 Actions when switching from PowerPC to System V printingThe switch.prt.subsystem command uses the following logic in switching from PowerPC to System V printing:
1. Makes sure that you are not trying to switch to the current subsystem.
2. Checks to see if all print jobs are terminated. If there are any active jobs, the following error message will be printed:
All print jobs must be terminated
3. Stops qdaemon, writesrv, and lpd daemons and modifies /etc/inittab, so they do not start automatically if the system is rebooted.
4. Disables the SMIT menus as much as possible.
5. Switches the Web-based System Manager plug-ins.
6. Changes the lock files from PowerPC to System V.
7. Removes AIX links and add System V links for the duplicate commands between them. This includes the following files: /usr/bin/cancel, /usr/bin/enable, /usr/bin/disable, /usr/bin/lp, /usr/bin/lpstat, /usr/ucb/lpq, /usr/ucb/lpr, and /usr/ucb/lprm. This includes changing the tcbck database.
8. Launch /usr/lib/lp/lpsched to start the System V print subsystem.
1.8.3 Actions when switching from System V to PowerPC printingThe switch.prt.subsystem command uses the following logic in switching from System V to PowerPC printing:
1. Makes sure that you are not trying to switch to the current subsystem.
2. Checks to see if all print jobs are terminated. If there are any active jobs, the following error message will be printed:
All print jobs must be terminated
3. Stops lpsched with /usr/sbin/lpshut.
4. Enables the SMIT menu items.
28 Printing for Fun and Profit under AIX 5L

5. Changes the lock files from System V to PowerPC.
6. Removes System V links and add PowerPC links for the duplicate commands between them. This includes the following files: /usr/bin/cancel, /usr/bin/enable, /usr/bin/disable, /usr/bin/lp, /usr/bin/lpstat, /usr/ucb/lpq, /usr/ucb/lpr, and /usr/ucb/lprm. This includes changing the tcbck database.
7. Modifies /etc/inittab to change programs started on reboot and start the qdaemon, writesrv, and lpd daemons.
1.8.4 FAQ about switching print subsystemsQ: What happens if there are queues or printers defined when I switch to a different print subsystem?
A: The queues and printers will remain defined, but will be inactive while the other print subsystem is active. If the print subsystem is switched back, the queues and printers will become available again.
Q: What happens if there are active jobs when I try to switch print subsystems?
A: The switch.prt command will return an error message, and there will not be a switch of subsystems.
Q: What happens if there are disabled queues or printers with waiting print jobs?
A: The queues or printers will remain disabled, and will not be available while the other print subsystem is available. When the original print subsystem is reactivated, the printers will once again show a status of disabled or DOWN. Jobs that were originally queued to the printer, will print as soon as the queue or printer is enabled.
Q: What happens if a user submits a job with enq or qprt when the System V print subsystem is active?
A: You will receive the following error message:
Cannot awaken qdaemon (request accepted anyway)
However, enq still builds a job description file in /var/spool/lpd/qdir. When the PowerPC print subsystem is reenabled, the jobs will be queued and print to the PowerPC defined printer.
Chapter 1. Overview of AIX 5L print subsystems 29

1.9 To spool or not to spool
The term spooling is defined in this context to mean making a copy of a print file before sending the file to the printer. When a print job is spooled, it is first copied to the spool directory for the print subsystem, and then the copy of the file is printed. This means that if you make a change to the file after it is queued, but before it is sent through the print subsystem, this will have no effect on what is printed. On the other hand, if you do not spool the print file, then the current contents of the file at the time it reaches the head of the queue will be sent to the printer.
1.9.1 When will a print job be spooled?The following list gives the circumstances when a print job will be spooled:
• When the lpr command is used with no flags, the job will be spooled.
# lpr -P laser4 /home/guest/readme.txt
• When the print job is piped to the print command:
# cat /etc/qconfig | lp -d ljet5
• When the lp, enq, or qprt uses the -c flag:
# lp -c -d myprt /etc/motd# enq -c -P floor3 /tmp/docuprt.ps# qprt -c -P simple /usr/lpp/bos/README.txt
• When the job is received from a remote system.
• When enabled as default System V print subsystem:
# lpadmin -O copy
The lpadmin -O copy flag sets the option in the /etc/default/lp file that says:
copy-files: copy
The default in System V is not to spool.
1.9.2 Where will the file be spooled?There are three places that you can expect files to be spooled. These are:
• For files received by lpd, files are spooled in /var/spool/lpd.
• In the PowerPC print subsystem, files are spooled in /var/spool/qdaemon.
• In the System V print subsystem, files are spooled in /var/spool/lp/tmp under separate directories for each server. For the local printing, the spooling will go to /var/spool/lp/tmp/host-name, where host-name is the name returned by the hostname command. For remote printing, the files are
30 Printing for Fun and Profit under AIX 5L

stored in /var/spool/lp/tmp/remote-host-id, where remote-host-id may be the remote host IP address, hostname, or fully qualified host name depending on how the remote queue is defined. The /var/spool/lp/tmp directory is actually a link to /spool/tmp. An example for host lpsrv1, the local files are stored in /var/spool/lp/tmp/lpsrv1. The files begin with the job number and end with a -0 for the print job description file and with -1 for the actual data file.
1.9.3 How much spool space will you need?You will need enough space to hold all of the files that may be queued at one time. To find out how much space is currently available in /var, use the df command. The df -k flag will give the output in kilobytes, as shown here:
# df -kFilesystem 1024-blocks Free %Used Iused %Iused Mounted on/dev/hd4 20480 8576 59% 1126 11% //dev/hd2 524288 4928 100% 21681 17% /usr/dev/hd9var 8192 2804 66% 374 19% /var/dev/hd3 20480 19048 7% 77 2% /tmp/dev/hd1 4096 3920 5% 22 3% /home/proc - - - - - /proc/dev/hd10opt 4096 3332 19% 32 4% /opt/dev/lv00 12288 3608 71% 48 2% /share
This shows that there are 2804 kilobytes of space left in /var. This is much less than you would normally need on a print server.
The simple way to expand space is to increase the size of /var. The disadvantage of this is that the /var file system is hard to reduce in size if you accidently make it too large. Also accounting files in /var/adm can fill up /var. To increase the size of /var, either use the fastpath smitty chjfs, or use the command line option:
# chfs -a size=’+30000’ /var
The value is in 512 byte blocks, so this will increase the size by about 15 MB. The df -k command confirms this with a new size of 18668 kilobytes. This may be adequate only for a small server with simple text files.
1.9.4 Adding a separate file system for spooling?The advantage of adding a separate file system for spooling is that it is relatively easy to increase of decrease the file system size based on spooling requirements. Create a new file system starting with the SMIT fastpath smitty jfs and choose Add a Journaled File system and follow the directions to add a standard journaled file system. This will give you the following SMIT panel
Chapter 1. Overview of AIX 5L print subsystems 31

that you can fill out the SIZE, MOUNT POINT, and set Mount AUTOMATICALLY at system restart to yes:
Next, follow the smitty storage menu to mount the file system.
Next, check the size with df -k command, as shown above. Increase the file system to the size you want with the following command:
# chfs -a size=’+30000’ /spool
and change the ownership of /spool to lp:lp for System V or root:printq for PowerPC:
# chown lp:lp /spool# chown root:printq /spool
The next step is to build the links. For the PowerPC print subsystem, use the following commands to create a spool directory for PowerPC printing:
Add a Standard Journaled File System
Type or select values in entry fields.Press Enter AFTER making all desired changes.
[Entry Fields] Volume group name rootvg* SIZE of file system (in 512-byte blocks) [20]
* MOUNT POINT [/spool] Mount AUTOMATICALLY at system restart? yes PERMISSIONS read/write Mount OPTIONS [] Start Disk Accounting? no Fragment Size (bytes) 4096 Number of bytes per inode 4096 Allocation Group Size (MBytes) 8
F1=Help F2=Refresh F3=Cancel F4=ListF5=Reset F6=Command F7=Edit F8=ImageF9=Shell F10=Exit Enter=Do
32 Printing for Fun and Profit under AIX 5L

If you disable the printer and spool a job to the printer and look at /spool/qdaemon, you will see the file that has been queued. In the output below, the spooled file is tcOsOEa.
# lptest 5 5 | enq -P testq# ls -l /spool/qdaemontotal 16drwxrwxr-x 2 bin printq 512 Oct 20 14:24 qdaemon-rw-r----- 1 root printq 30 Oct 20 14:36 tcOsOEa
For System V print subsystem, a similar thing could be done with /var/spool/lp/tmp. First stop the scheduler with:
# lpshut
It is important that you move the tmp subdirectories. This should happen automatically with:
# cd /var/spool/lp# mv tmp /spool
Link the directories, as shown here:
# ln -fs /spool/tmp tmp
Use ls to make sure all the files have been moved:
# ls -l /spooltotal 24drwxrwx--- 2 root system 512 Oct 20 13:55 lost+founddrwxr-sr-x 3 bin printq 512 Oct 20 14:36 qdaemon-rw-r--r-- 1 root sys 0 Oct 20 14:09 testdrwx--x--x 6 lp lp 512 Oct 11 18:44 tmp
# cd /var/spool# mv qdaemon /spool# chown bin:printq /spool/qdaemon# ln -fs /spool/qdaemon qdaemon# ls -ltotal 10drwxr-xr-x 4 bin cron 512 Sep 22 04:21 crondrwxrwxr-x 7 lp lp 512 Oct 11 15:35 lpdrwxrwxr-x 5 bin printq 512 Oct 11 18:19 lpddrwxrwxr-x 2 bin mail 512 Oct 06 15:55 maildrwxrwx--- 2 root system 512 Sep 20 16:39 mqueuelrwxrwxrwx 1 root system 14 Oct 20 14:25 qdaemon -> /spool/qdaemondrwxr-xr-x 2 root system 512 Oct 06 15:55 rwhodrwxrwsrwx 2 bin staff 512 Oct 06 15:55 secretmaildrwxr-xr-x 10 uucp uucp 512 Oct 12 09:55 uucpdrwxrwxrwx 2 uucp uucp 512 Oct 12 09:55 uucppublicdrwxrwxr-x 2 root system 512 Sep 20 16:39 writesrv
Chapter 1. Overview of AIX 5L print subsystems 33

# ls /spool/tmp.net rs1230a.itsc.austin.ibm.com9.19.129.12 rs9220b
At this point, you may have to restart the scheduler with:
/usr/lib/lpd/lpsched
1.10 Printer devices and device drivers
Local printing to serial and parallel attached printers for both the System V and PowerPC print subsystems is done through standard AIX device drivers. Before using either print subsystem, you should be aware of how these device drivers work and some of the commands that you can use to look at the devices.
1.10.1 Adding a printer devicePrint devices can be added from the command line, from SMIT, and from Web-based System Manager. The device created in all three methods will be the same, and can be used by either of the base print subsystems. The printer type that you add when creating a device determines the buffer size and some timing parameters for the serial or parallel device driver that is ultimately used. It is not important that the device printer type and the print subsystem printer type match exactly, only that they are similar in type. If you are adding a laser printer, then you should choose any laser printer that is similar in speed to the actual print model you will be using.
1.10.2 Listing printer devicesWhen a print device is added, the device is represented by a special character device file in /dev with a name starting with lp, and a number of the printer that is given in sequential order as the devices are added. A list of all the printers currently on a system can be listed with lsdev, as shown here:
$ lsdev -Cc printerlp0 Available 00-00-0P-00 Lexmark Optra laser printerlp1 Available 00-00-S2-00 IBM Network Printer 12lp2 Available 00-00-S1-00 Hewlett-Packard Color LaserJet 4500
This not only gives you the models of all printers that have been added, but also tells you if they are available, and the adapter and port number where they have been installed.
To list all the available printer types, use:
# lsdev -Pc printer
34 Printing for Fun and Profit under AIX 5L
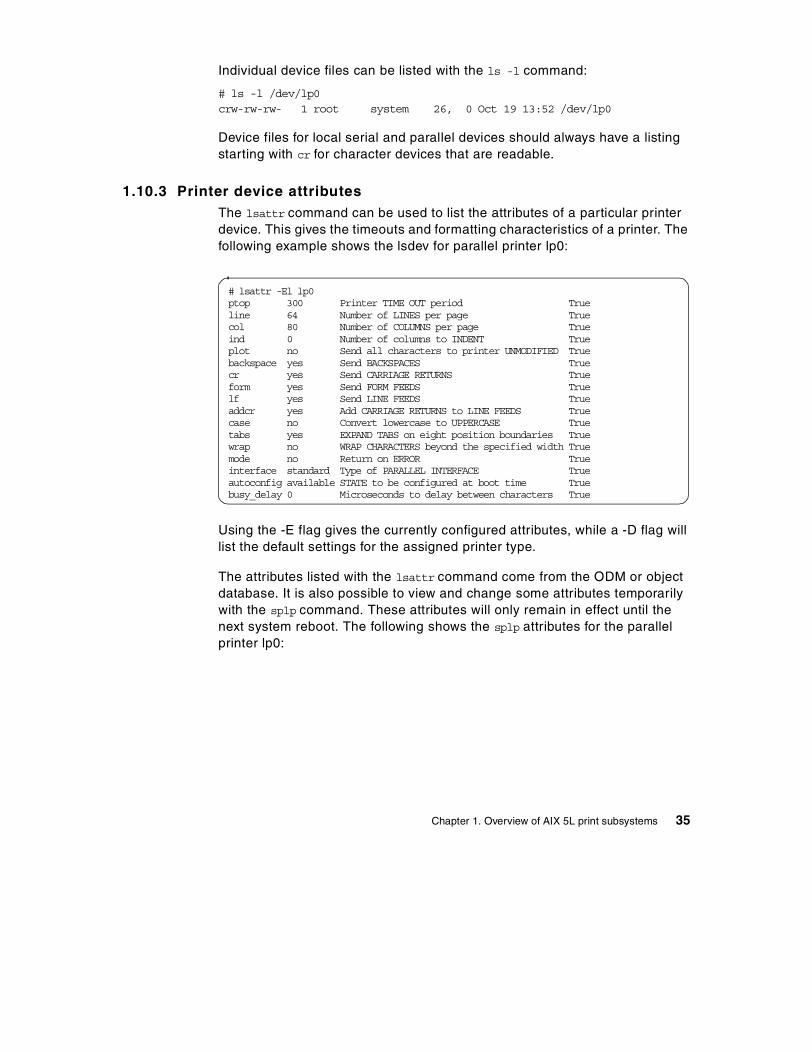
Individual device files can be listed with the ls -l command:
# ls -l /dev/lp0crw-rw-rw- 1 root system 26, 0 Oct 19 13:52 /dev/lp0
Device files for local serial and parallel devices should always have a listing starting with cr for character devices that are readable.
1.10.3 Printer device attributesThe lsattr command can be used to list the attributes of a particular printer device. This gives the timeouts and formatting characteristics of a printer. The following example shows the lsdev for parallel printer lp0:
Using the -E flag gives the currently configured attributes, while a -D flag will list the default settings for the assigned printer type.
The attributes listed with the lsattr command come from the ODM or object database. It is also possible to view and change some attributes temporarily with the splp command. These attributes will only remain in effect until the next system reboot. The following shows the splp attributes for the parallel printer lp0:
# lsattr -El lp0ptop 300 Printer TIME OUT period Trueline 64 Number of LINES per page Truecol 80 Number of COLUMNS per page Trueind 0 Number of columns to INDENT Trueplot no Send all characters to printer UNMODIFIED Truebackspace yes Send BACKSPACES Truecr yes Send CARRIAGE RETURNS Trueform yes Send FORM FEEDS Truelf yes Send LINE FEEDS Trueaddcr yes Add CARRIAGE RETURNS to LINE FEEDS Truecase no Convert lowercase to UPPERCASE Truetabs yes EXPAND TABS on eight position boundaries Truewrap no WRAP CHARACTERS beyond the specified width Truemode no Return on ERROR Trueinterface standard Type of PARALLEL INTERFACE Trueautoconfig available STATE to be configured at boot time Truebusy_delay 0 Microseconds to delay between characters True
Chapter 1. Overview of AIX 5L print subsystems 35

1.10.4 Printer device character formattingThe ability to write directly to a printer device file was introduced in Section 1.4.1, “Printing by directly addressing the printer device driver” on page 8, and in fact, this is how both the System V and PowerPC print subsystems send their jobs to local printers. To send the file /etc/motd to printer lp5, simply redirect the output of the cat command, as shown here:
$ cat /etc/motd > /dev/lp5
One capability of the printer device driver that you should be aware of is its ability to do minor print formatting of the print file as it is being sent to the printer. From the splp output, you might be able to guess that some of these capabilities are adding carriage returns to line feeds and restricting the page width and length. These types of actions are usually only helpful for simple ASCII text files, and in fact can cause problems with formatted printer files by placing undesired control characters in the middle of the print file. When using the print subsystems, the device driver is placed in passthrough mode so this formatting does not occur. If you are printing directly to the device from an application, and find the file is not printing properly, you may want to try pass-through mode by using the splp command as follows:
# splp -p + lp0
1.11 Print subsystem performance aspects
The performance of the printing for any print subsystem will be dependent on a large number of variables including:
• The number of print jobs active at once
• The number of printers or queues defined
• The number of jobs queued to a printer at any one time
# splp lp0
device = /dev/lp0 (+ yes ! no)CURRENT FORMATTING PARAMETERS (ignored by qprt, lpr, and lp commands)Note: -p + causes the other formatting parameters to be ignored.-p ! pass-through? -c + send carriage returns?-l 64 page length (lines) -n + send line feeds?-w 80 page width (columns) -r + carriage rtn after line feed?-i 0 indentation (columns) -t ! suppress tab expansion?-W ! wrap long lines? -b + send backspaces?-C ! convert to upper case? -f + send form feeds?CURRENT ERROR PROCESSING PARAMETERS-T 300 timeout value (seconds) -e ! return on error?
36 Printing for Fun and Profit under AIX 5L

• The number of users on the system
• The backend program or interface script efficiency and amount of processing required
• The size and type of files printed
• The amount of memory available
• The way that the disks are configured
• Whether jobs are spooled or queued
• How often people use status commands
• The administrative tools used to configure the printer
1.11.1 Performance based on the number of defined printersThe number of defined printers or queues affects performance of printer management, printer status reports, and printing files. Each time that a printer is defined, the length of the queue definition increases. This not only includes the list of printer directories and files in System V /etc/lp/printers directory or the number of stanzas in /etc/qconfig in PowerPC printing, but also the amount of memory allocated for the scheduler to manage the queues. When you make changes to printer definitions, the administrative tools must build larger lists, and it takes longer to bring up the definition panels. This is especially true when using Web-based System Manager.
The list generated by status commands like lpstat become increasingly long and take longer to display in a meaningful way. This is especially true when there are remote queues in the PowerPC print subsystem where unavailable queues will timeout before going to the next queue status listing.
When printing, the scheduler must check to first see if the printer exists and then, in some cases, if the print commands are valid for the specified printer or queue. This requires a search through the list of available printers until the requested printer is found, and then a check of the configuration for that printer.
1.11.2 Performance based on the number of active print jobsWhen the scheduler (either lpsched or qdaemon) process a print job, the scheduler will fork processes to handle the job. This increases the number of processes running on the system, the amount of memory required to handle the processes, the amount of disk space required for temporary files, and the amount of context switching that will occur.
Chapter 1. Overview of AIX 5L print subsystems 37
1.11.3 Performance based on the number of queued print jobsWhen a large number of jobs are queued, each job has a process id assigned, and the scheduler must search through the list of jobs to find the one with the highest priority or the one that meets the requirements to be run next. For example, when several thousand jobs are queued to a single PowerPC queue, it can take several seconds to cancel a print job and the time that it takes to queue a new job is proportional to the number of jobs already in the queue. This means that system resources are being wasted, and the print subsystem becomes less efficient.
1.11.4 Performance based on the number of usersThe number of users can have a significant impact on printing if the allow and deny functions are turned on for System V printers and forms.
1.11.5 Performance based on program efficiencyThe efficiency of the scheduler, the interface or backend programs, and the filters that finally deliver the file to the printer all have an impact on the print subsystem efficiency. In general, compiled programs will be more efficient than shell scripts and thus use less resources. The actions performed by the filters will also determine the amount of CPU that is utilized. Each time that one filter pipes output to the next filter, additional memory and disk resources are consumed. A program that converts the file from one printer language to another will also consume more resource than one which simply adds a small amount of information to the front of the file and then passes the file through untouched.
1.11.6 Performance based on size and type of jobs printedFiles that are larger will require more memory and disk resources as they are piped from filter to filter. When a text job is processed, the length and width parameters, as well as some others, may require that the processing filter formatter will have to examine the file character by character. When printing a PostScript of formatted PCL file, the filter can pass the file directly without extensive formatting. In the PowerPC print subsystem, National Language Support requires that a translation filter be called when printing text files. Both System V and PowerPC print subsystems have filters for converting text files to PostScript. These will put a load on the server that normally would be handled inside the printer.
Testing the difference between 8 KB and 80 KB filesThe following tests were done on an RS/6000 model 260 with two CPUs with the following steps:
38 Printing for Fun and Profit under AIX 5L

1. Create a queue that prints to a file in the /dev directory.
2. Create two test files using the lptest command shown here:
# lptest 80 100 > /tmp/80x100.txt# lptest 80 1000 > /tmp/80x1000.txt
3. Create a script that prints each job 100 times.
4. Use the timex command to run the script for each fileset.
# timex ./runjobs /tmp/80x100.txt
5. Use a stopwatch to time the total time until the last job clears the queue. Use the lpstat -o | wc -l command to determine how many jobs are still queued.
The results for each file are shown in Table 4.
Table 4. Times for printing different sizes of files
The time to queue the print job was the time returned by the timex command. The time to print is the time until the queue shows all jobs have been processed. The jobs were being printed as they were queued, so the times might be different if the jobs were allowed to queue first while the queue was disabled, and then the queue enabled once all jobs were queued, but the performance aspects would not really change.
The vmstat command showed a dip in the idle CPU time to about 80 percent idle for only about one second in every six seconds for the System V print subsystem, indicating that there are some bottlenecks that may not affect print jobs to multiple printers.
When the shell script that printed the jobs was changed to send 50 jobs to each queue, the results show some efficiency from multitasking. The results are shown in Table 5 on page 40:
File size System V print subsystem PowerPC print subsystem
Time to queue Time to print Time to queue Time to queue
8 KB (local) 80 seconds 10:45 minutes < 8 seconds 10 seconds
80 KB (local) 80 seconds 10:35 minutes < 8 seconds 25 seconds
8 KB (remote) 80 seconds 9:20 minutes < 7 seconds 61 seconds
Chapter 1. Overview of AIX 5L print subsystems 39

Table 5. Time comparison when printing to two queues at the same time
This table shows that with the System V print subsystem, printing jobs through multiple queues increases the efficiency of the subsystem. The two printer scenario prints to one local and one remote queue, while the one printer scenario shows the results for either the local or the remote printer. The three printer test was run with three local printers.
1.11.7 Performance based on the amount of available memoryWhen sufficient memory is available, temporary files or spooled files may still be in memory when it is time for a filter to process them. This will reduce the number of disk reads that are required to process the job. The memory effect also helps the performance of the scheduler so that it does not have to continuously read the printer configurations. The amount of memory required is dependent on the size of jobs printed, the number of jobs printed as once, the number of queues or printers defined, and the number of jobs queued. The vmstat and svmon performance tools can be used to help determine the amount of memory being used.
1.11.8 Performance based on spool disk configurationWhen jobs are spooled, often they will be written to the disk, but only read from memory. This type of disk activity often performs better if the spool space is striped across multiple physical disks. This rule applies to both remote as well as locally originating jobs. Use the iostat command to determine if you have some physical disks that show high utilization rates.
1.11.9 Performance for spooled jobs versus queued jobsWhen jobs are spooled, this adds a disk write, often a disk read, and the removal of the spool file. Spooling jobs should be avoided when possible, especially on busy servers. For small jobs (8 KB) spooled on the System V subsystem to a single printer, we did not see any measurable differences between queued and spooled.
File Size System V print subsystem PowerPC print subsystem
Time to queue Time to print TIme to queue Time to print
1 printer 80 seconds 10:30 to 10:45 < 8 seconds 10-60 seconds
2 printers 77 seconds 5:05 minutes 8.5 seconds 33 seconds
3 printers 79 seconds 3:30 minutes 12.5 seconds 13 seconds
40 Printing for Fun and Profit under AIX 5L

1.11.10 Performance aspects of remote printingNetworking adds additional system requirements to printing. All incoming remote jobs are spooled, which adds a disk requirement that allows the remote jobs that are waiting printing at any one time to be stored. Because AIX is multitasking, the lpd daemon or the lpNet daemon can spawn multiple instances to handle multiple incoming jobs at the same time, which increases the number of processes in the system.
Status jobs for lpr/lpd printing require a network connect and request from the client to the server. On busy networks or servers, this can cause a delay in the return from the status command and utilization of system resources.
Microsoft Windows NT and 2000 lpr clients can generate a considerable amount of extra traffic if they are configured with the wrong queue name. Instead of the Windows printer going into a disabled state, the lpr continues to send request after request, wasting client, network, and server resources. AIX remote printing will soon recognize the error, return an error to the user printing the job, and disable the printer or queue so that the continuous requests do not continue.
1.11.11 Performance based on user behaviorOne of the common printing problems is that when users do not find a print job, they will do excessive status requests, and often submit the job multiple times. Often the jobs are later found on a different printer than the user thought they were printing to. The excessive printing can increase the load on the system.
1.11.12 Performance of the administrative toolsThe system resources required by an administrative tool vary greatly depending on the tool. Web-based System Manager uses the greatest amount of system resources and usually requires more time between steps than the other tools, but in return offers the administrator a more intuitive environment to manage the print server. The GUI based version of SMIT is next in system resource requirements, followed by text based SMIT and, finally, command line execution of administration commands. Usually, this does not have significant impact on the print server or the jobs being printed, and the only impact is to the system print administrators.
Chapter 1. Overview of AIX 5L print subsystems 41

42 Printing for Fun and Profit under AIX 5L

Part 2. System V print subsystem
© Copyright IBM Corp. 2001 43

44 Printing for Fun and Profit under AIX 5L

Chapter 2. System V print subsystem basics
In this chapter, we will introduce the basics of the System V print subsystem as it exists in the initial release of AIX 5L Version 5.0, including:
• Overview
• Starting and stopping the print service
• Administering printers
- Adding local printers - Modifying printers - Deleting printers
• Setting system defaults, including:
- Destination - Print spooling - Printing priorities and limits
• Instructions for printing a file
We will also discuss the different interfaces that are available, including Web-based System Manager, SMIT, and the command line. Since not all functions can be performed with all interfaces, we will describe which interfaces can be used for which tasks.
Subsequent chapters include information on configuring remote and JetDirect-attached printers, as well as advanced topics, such as forms, filters, and interfaces.
2.1 Overview
The System V print subsystem being introduced in AIX 5L is based on work done in the Project Monterey initiative and the SCO Unixware 7 implementation of System V Release 4 printing.
Although use of the System V print subsystem is optional in the Version 5.0 release, the PowerPC print subsystem (the traditional AIX print subsystem) is the most robust and preferred print subsystem for AIX.
For administrators and users accustomed to System V Release 4 printing, the terminology will be familiar. However, for those used to working with earlier versions of AIX, there are some changes in terminology that we will point out as we describe how System V printing works.
© Copyright IBM Corp. 2001 45

2.1.1 Overview of the print service and print request processingThe System V print service is a collection of utilities that help you, as system or print administrator, to configure, monitor, and control the printers on your system. The print service:
• Receives files users want to print • Filters the files (if needed, so they can print properly) • Schedules the work of one or more printers • Starts programs that interface with the printer(s) • Keeps track of the status of jobs • Alerts you to printer problems • Keeps track of mounting forms and filters • Issues error messages when problems arise
Figure 1. Overview of print request processing
Figure 1 gives an overview of the processing of a print request.
1. When a user sends a file to be printed, the print service (which is sometimes referred to as the spooling daemon or lpsched) will check the printer’s configuration file (a) and the information from files in the terminfo
46 Printing for Fun and Profit under AIX 5L

directory (b) to validate that the requested printer is accepting jobs and is capable of printing the type of job with the parameters specified by the user.
a. The configuration file, /etc/lp/printers/printername/configuration, is created when you add a printer and modified when you customize a printer. This file contains information about the printer, including the content types or data formats the printer accepts, the printer type from the terminfo database, the device name and the source of the interface script (if local or JetDirect-attached), the remote hostname and queue (if remote), and banner page requirements.
b. The terminfo database contains data according to printer type. A printer type entry includes information about the printer’s capabilities and is used to validate print requests and print configurations.
For example, when a user submits a job to a local printer specifying a particular page length, if the terminfo database does not show that printer is capable of setting that page length, the print service will reject the request. On the other hand, if terminfo does show it capable, then the interface program in Step 3 on page 48 will use the information from terminfo to initialize the local printer.
Note that the configuration files and terminfo database entries are only checked for jobs submitted to local or JetDirect-attached printers.
2. If the printer is capable of printing the job, the print service assigns the print job a unique name known as the request ID1 and adds this request to the print queue. Each printer has its own queue, which consists of all print jobs to be sent to the same printer. You can hold jobs in the queue, move jobs up in a queue, or transfer jobs to another print queue.
1 The request ID consists of the name of the printer on which the file is to be printed and a unique number identifying thefile. You use this request ID to find out the status of the print job or to cancel the print job.
If the terminfo database does not include a printer type entry that can be used for your printer, you can add a new entry that describes the capabilities of the printer. For additional information on terminfo, see Section 4.3, “Using the terminfo database” on page 151.
Customization hint
Chapter 2. System V print subsystem basics 47

The System V print subsystem allows you to group or pool printers that you have defined into classes. A user can then submit a print request to a class (rather than to a specific printer); the print service will assign the request to the first available printer in the class that is capable of printing the job.
3. The interface program is a shell script that is responsible for managing the printer: it initializes the printer port (if necessary) and the printer hardware (with information from the terminfo database), prints the banner page, and invokes a filter to send copies of the user's files to the printer.
The original interface shell scripts are located in the /usr/lib/lp/model directory. When you add a printer, an exact copy of the interface shell script that your printer uses is made in the /etc/lp/interfaces directory by the name of your printer.
For example, if you add a local printer named “myprint” that uses the PS interface, the file /usr/lib/lp/model/PS is copied without modification to /etc/lp/interfaces/myprint. (JetDirect-attached printers use some additional files in /usr/lib/hpnp which are modified while adding the printer.)
4. Print filters can convert or transform a file into another format, for example, adding carriage returns to line feeds or mapping one set of escape sequences into another, and can provide a special setup by interpreting print modes requested by a user.
Filters are extremely useful in UNIX printing because, unlike PC-based printing with its APIs, UNIX applications must supply their own printer specific output, unless they write to a standard format and rely on print filters to convert to the specific printer format.
The default filter provided with the print service, /usr/lib/lp/bin/lp.cat, provides simple fault detection but no file conversion. It reads the file to be printed on its standard input and writes it to the device to be printed on.
There are two types of user-supplied filters: slow and fast.
a. Slow filters are usually used to provide formatting or file conversion and are run separately by the spooling daemon to avoid tying up a printer. An example of a slow filter is /usr/lib/lp/bin/slow.filter.
If you have a particularly complicated printer or if you want to use features not provided by the print service, you can customize the interface program. Interface programs are also sometimes available from the printer manufacturer. For additional information on interface programs, see Section 4.2, “Printer interface programs” on page 138.
Customization hint
48 Printing for Fun and Profit under AIX 5L

b. Fast filters are run so their output goes directly to the printer; thus, they can exert control over the printer and receive status back. An example of a fast filter is /usr/lib/lp/bin/lp.cat.
5. The print service is responsible for keeping track of the status of the printers and slow filters; when a printer finishes printing a job, the print service has it start printing another job if one is queued. Once the job is scheduled to the printer, the print service adds an entry for the print request to the request log (/var/lp/logs/requests).
2.1.2 Administrative interfacesThere are three interfaces that can be used with the System V print subsystem: Web-based System Manager, SMIT, and the command line. However, you cannot perform all tasks using each of the interfaces.
Unlike the AIX V4 and AIX 5L for PowerPC print subsystems, when the System V print subsystem is active, you can not use the System Management Interface Tool (SMIT) to configure printing (with a few exceptions). The primary interfaces you will use for configuring the System V print subsystem are Web-based System Manager or the command line.
Table 6 shows which interface(s) can be used in AIX 5L V5.0 for selected tasks when the System V print subsystem is active
Table 6. Comparison of administrative interfaces
Web-based SM SMIT Command line
Display current print subsystem X X X
Switch between print subsystem X X X
Add/remove device X X X
It is possible to add custom filters or filters from printer manufacturers to your system to provide a link between the applications used on your system and the printers so that the applications do not have to produce device-dependent output. For additional information on creating and using filters in the System V print subsystem, see Section 4.6, “System V print filters” on page 164.
Customization hint
Chapter 2. System V print subsystem basics 49

In AIX 5L V5.0, Web-based System Manager provides a Summary and Overview plug-in with only limited task support; in this release, most of the tasks can only be accomplished through the command line. Web-based System Manager will be enhanced in future releases to provide full access to System V printing capabilities.
Add new System V destination
X (only basic configuration) X
Display printer configuration X
Change printer configuration X
Delete destination X X
Set and list default destination X X
View number of requests on default printer
X X
View number of defined printers X X
View number of stopped printers X
Start/stop the print service X
Display status of the print service X
Submit print jobs X
Manage print jobs X
Web-based SM SMIT Command line
50 Printing for Fun and Profit under AIX 5L

2.1.3 PlanningBefore you configure a System V printer, it is helpful to consider and collect the various pieces of information you will need:
• What name will you give the printer?
Printer names may be no longer than the maximum length filename allowed for the file system type you are using, and may consist of all printable characters except the space, slash, backslash, colon, semicolon, comma, asterisk, question mark, and tilde. The dash can be used in any position except the first position in a printer name.
• What specific printer type will you be adding (for example, HP LaserJet 4M or IBM Infoprint 12)?
- Identify the terminfo entry you will use when adding your printer.
You can check for printer types in the /usr/lib/terminfo/svprint.ti file or look in the /usr/lpp/sysmgt.websm/inst_root/var/websm/data/model.stz file. The following shows a stanza from the model.stz file, which is described in more detail in Section 4.1.1, “Understanding the different types in System V printing” on page 135:
hp-laserjet-5Si-mopier:name="HP LaserJet 5Si Mopier (PCL)"terminfo=hplaserjetinterface=standardcontents=pcl
It is not important that you find an exact match for your printer model, only that you choose a printer type for a similar kind of printer. Here is a rule of thumb:
• If you are defining a PCL printer, use a value of hplaserjet, and make sure to set the content type to pcl.
There are several commands that are valid in both the System V and PowerPC print subsystems. However, depending on which print subsystem is active, they may require different flags and may behave differently. When you check the man pages for commands, make sure that you read the correct section for the print subsystem in which you are working. For example, when reading the man page for lp, make sure you use the section entitled “System V Print Subsystem lp on an PowerPC and IA-64 platforms.”
Note
Chapter 2. System V print subsystem basics 51

• If you are defining a PostScript printer, you should use one of the following printer types:
- PS, PSR, or PS-r for serial-attached printers - PS-b or PS-br for parallel-attached printers
The PS printer types serve two functions. First, they cause the print service to activate the correct fast filter to communicate with the printer. Second, the PS interface creates a PostScript banner page for PS printers. The banner page is printed last if the printer type is PS-r or PS-br, and the pages of the document are printed in reverse order.
• For other printers, choose a similar printer type.
For more information, see Appendix F, “System V supported printer types” on page 519.
- Does the manufacturer of your printer provide a printer-specific interface script (sometimes called a model script) for the AIX 5L System V print subsystem or perhaps SCO Unixware 7 that can be modified as necessary? Or will you need to use one of the IBM-supplied interface scripts (that is, “standard”, “PS”, hpnp.model, or hpnpIS.model)?
• How will the printer be attached (for example, parallel or JetDirect)?
The System V print subsystem supports local printing (parallel or serial - RS232 or RS422), remote printing using BSD’s lpd protocol (RFC 1179), and printing to devices that support Hewlett-Packard’s JetDirect appliances.
- If you are attaching the printer locally (parallel or serial), does AIX have a specific device for your printer? You can list the supported device types using one of the following methods:
• # lsdev -P -c printer -F "type subclass description" | sort -u
• # smitty pdp -> List All Supported Printers/Plotters
If it does not, does your printer manufacturer supply one? Failing that, use a device that is most like the printer you will be defining.
- If you will be using a serial attachment, you will need printer-specific information in order to create the device, such as baud rate, parity, bits per character, stop bit, flow control, and so forth.
• Will your new printer be part of a class? If so, which one? If you are creating a new class at the same time you create the printer, what will the class name be? (The class name uses the same naming convention as does the printer name.)
52 Printing for Fun and Profit under AIX 5L

• What data streams will you be sending to your printer (for example, ASCII, PCL, or PostScript)? In System V terminology, this is called content type. For which one(s) will you be configuring your printer?
• When there is a problem (an alert) with the printer, whom do you wish to be notified and how? When the problem is resolved, how do you want printing to resume?
• Will banner pages (header pages) be mandatory, or will you allow users to suppress printing of the banner page?
• Are there any special forms, and how will you control access to them?
• What is your access policy for this printer? Can everyone print to it, or do you want to restrict access?
The information you will need varies by the type of printer attachment, as shown in Table 7.
Table 7. Information required according to different printer attachments
Locally-attached Remote LPD JetDirect-attached
Name of printer X X X
Class of printer(optional) X X X
Description of printer (optional) X X X
Device name (/dev/lp*) X
Remote hostname or IP address
X X
Remote printer name X
Action upon printer alert X X
Recovery after alert X X
Print processing model (interface program)
X X
Printer type X X X
Chapter 2. System V print subsystem basics 53

You will use these pieces of information as you configure your printer using either Web-based System Manager or the lpadmin command, as shown in Table 8.
Table 8. Cross-reference of configuration information
Content type(s) supported X X X
User access authorization X X X
Special forms authorization
X(defaults to deny
access to all users on all systems)
X(defaults to deny
access to all users on all systems)
X(defaults to allow
access to all users on all systems)
Default printing options (length, width, cpi, lpi)
X X
Permit suppression of banner pages
XN/A
(No banners sent from local host)
X
Web-based System Manager
lpadmin command
Corresponding lpadmin flag
Name of printer X (required) X (required) -p
Class of printer X (optional) X (optional) -c
Description of printer
X (optional) X (optional) -D
For local, device name
X (required) X (required) -v
For remote, server name and remote printer name
X (required) X (required) -s
Action upon printer alert
X (required) X (optional with defaults)
-A [-W]
Recovery after alert X (required) X (optional with defaults)
-F
Locally-attached Remote LPD JetDirect-attached
54 Printing for Fun and Profit under AIX 5L

There are a few less commonly used flags relating to print wheels or font cartridges that are discussed in Section 4.5, “Customizing printer attributes” on page 161.
2.2 Managing the print service
When running the System V print subsystem, the print service is started automatically at system boot. Here is the entry from the /etc/inittab file:
We will discuss how to:
• Display the current status of the print service
• Stop the print service
• Start the print service
Print processing model (interface program)
X (required) X (required) -m | -i | -e(three options, mutually exclusive)
Printer type X (required) X (optional, but strongly recommended)
-T
Content type(s) supported
X (required; single value)Note: GUI calls this “print interface”
X (optional with default; multiple values allowed)
-I
User access authorization
X (optional with default)
-u
Special forms authorization
X (optional with default)
-f
Default printing options (length, width, cpi, lpi)
X (optional) -o
Permit suppression of banner pages
-X (optional with default)
-o nobanner
Web-based System Manager
lpadmin command
Corresponding lpadmin flag
lpsched:2:wait:/usr/lib/lp/lpsched > /dev/console
Chapter 2. System V print subsystem basics 55
Only the root or lp users or members of the lp group can manage the print service.
2.2.1 Displaying the current status of the print serviceYou can check the current status of the print service (or scheduler) from the AIX command prompt using the lpstat command with the -r flag, that is lpstat -r. If the print service is up, the command will return scheduler is running; if the print service is down, it will return scheduler is not running.
The Web-based System Manager interface does not currently display the status of the print service.
2.2.2 Stopping the print serviceThe lpshut command shuts down the print service:
# lpshutUX:lpshut: INFO: Print services stopped.
All printers that are printing at the time the lpshut command is invoked stop printing. When the print service is started again, requests that were printing at the time a printer was shut down are reprinted from the beginning. You may wish to use the reject command on each printer to prevent the queuing of any new jobs and allow currently printing jobs to finish before issuing the lpshut command.
2.2.3 Starting the print serviceThe lpsched command starts the print service. You must use the full path name, /usr/lib/lp/lpsched, or add the path to your environment:
# /usr/lib/lp/lpschedUX:lpsched: INFO: Print services started.
If the print service fails to run, check the lpsched log file, which contains all failed attempts to load print requests, printer descriptions, forms, filters, classes, alerts, and systems. The log files are located in /var/lp/logs (linked to from /etc/lp/logs).
2.3 Printer management
In this section, we will describe the tasks involved in administering locally-attached printers, including:
• Adding a printer
56 Printing for Fun and Profit under AIX 5L
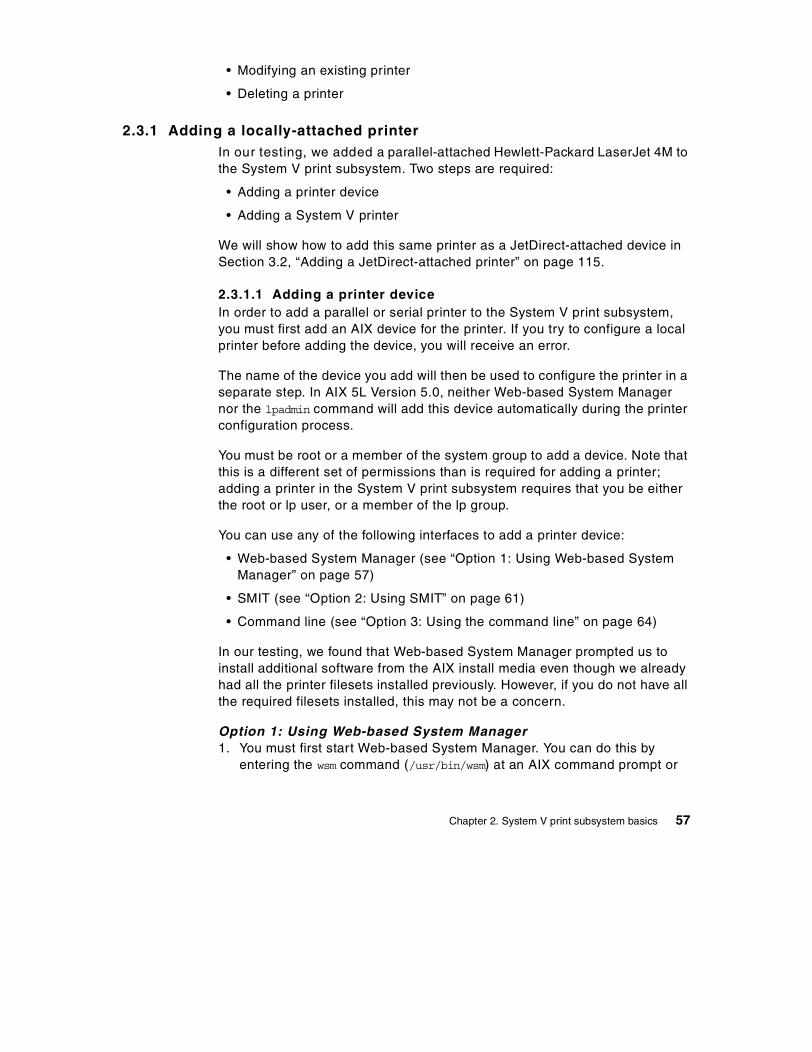
• Modifying an existing printer
• Deleting a printer
2.3.1 Adding a locally-attached printerIn our testing, we added a parallel-attached Hewlett-Packard LaserJet 4M to the System V print subsystem. Two steps are required:
• Adding a printer device
• Adding a System V printer
We will show how to add this same printer as a JetDirect-attached device in Section 3.2, “Adding a JetDirect-attached printer” on page 115.
2.3.1.1 Adding a printer deviceIn order to add a parallel or serial printer to the System V print subsystem, you must first add an AIX device for the printer. If you try to configure a local printer before adding the device, you will receive an error.
The name of the device you add will then be used to configure the printer in a separate step. In AIX 5L Version 5.0, neither Web-based System Manager nor the lpadmin command will add this device automatically during the printer configuration process.
You must be root or a member of the system group to add a device. Note that this is a different set of permissions than is required for adding a printer; adding a printer in the System V print subsystem requires that you be either the root or lp user, or a member of the lp group.
You can use any of the following interfaces to add a printer device:
• Web-based System Manager (see “Option 1: Using Web-based System Manager” on page 57)
• SMIT (see “Option 2: Using SMIT” on page 61)
• Command line (see “Option 3: Using the command line” on page 64)
In our testing, we found that Web-based System Manager prompted us to install additional software from the AIX install media even though we already had all the printer filesets installed previously. However, if you do not have all the required filesets installed, this may not be a concern.
Option 1: Using Web-based System Manager1. You must first start Web-based System Manager. You can do this by
entering the wsm command (/usr/bin/wsm) at an AIX command prompt or
Chapter 2. System V print subsystem basics 57

through the CDE Application Manager, System_Admin folder by selecting Management Console. The panel shown in Figure 2 will appear:
Figure 2. Initial panel in Web-based System Manager
2. Select the Devices object with your mouse and double-click. A panel will open displaying different device objects.
3. Select and double-click the Printers object.
4. From the Device task-bar pull-down, select New -> Manually Configure, as shown in Figure 3 on page 59. (You cannot use Automatically Configure for printer devices since they are not software-detectable.)
58 Printing for Fun and Profit under AIX 5L

Figure 3. Manually configuring a device
5. Choose from the pop-up list of device types that can be added:
- Parallel Printer
- RS232 Printer
- RS422 Printer
- TTY
We selected Parallel Printer and clicked on the Install... button.
6. At this point, Web-based System Manager may pop up a panel requiring you to provide the AIX install media so that it can install additional print software. Select the appropriate software source and specify whether you want all or selected printer filesets installed. (Note that Web-based System Manager may require you to perform this step, even if you have previously installed all the printer filesets.)
7. When the first Devices - New Device panel appears, as shown in Figure 4 on page 60, select the value from the list that most closely matches your printer device. In this case, we selected type hplj4 and clicked Next.
8. From the pop-up panel that asks you to Select a parent to which the device will be connected..., we selected ppa0, the only value and pressed Next.
9. On the next and final panel, we took the defaults and clicked Finish.
Chapter 2. System V print subsystem basics 59
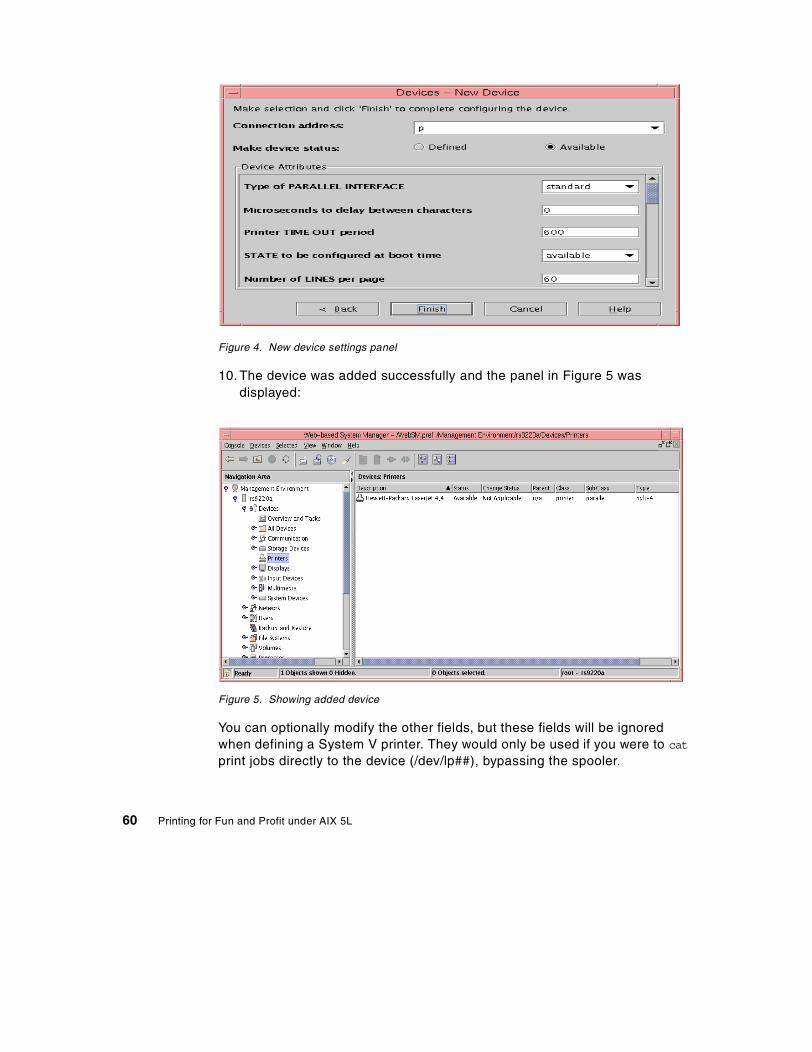
Figure 4. New device settings panel
10. The device was added successfully and the panel in Figure 5 was displayed:
Figure 5. Showing added device
You can optionally modify the other fields, but these fields will be ignored when defining a System V printer. They would only be used if you were to cat print jobs directly to the device (/dev/lp##), bypassing the spooler.
60 Printing for Fun and Profit under AIX 5L
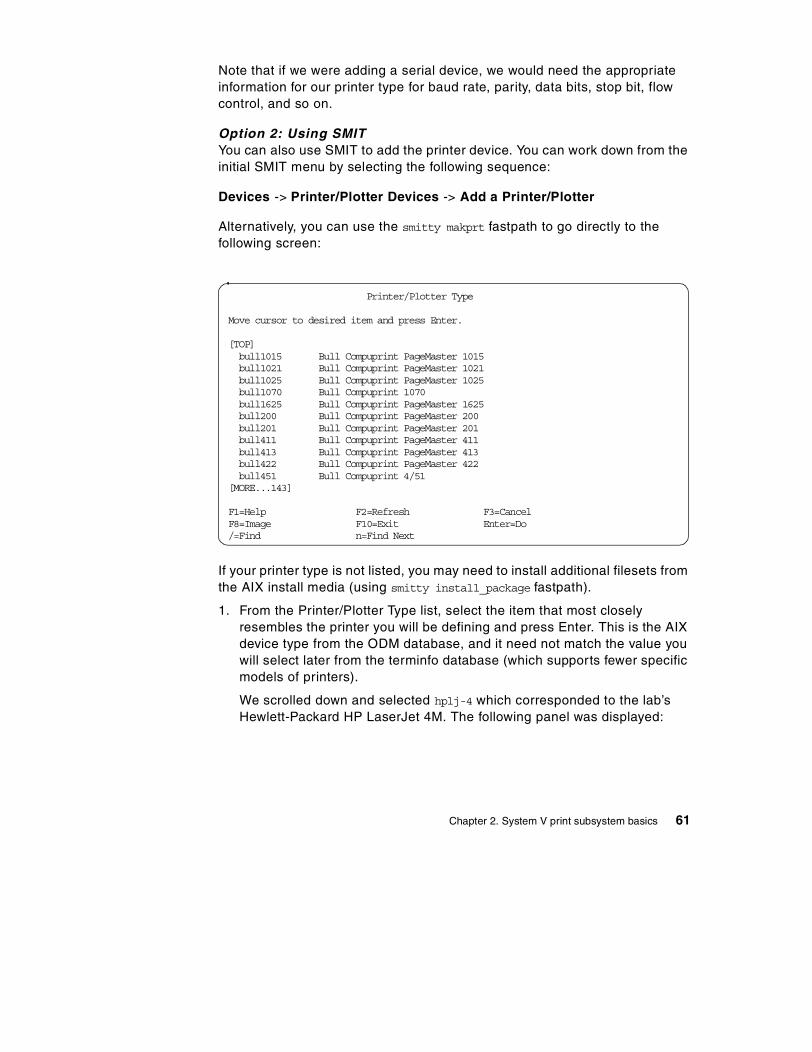
Note that if we were adding a serial device, we would need the appropriate information for our printer type for baud rate, parity, data bits, stop bit, flow control, and so on.
Option 2: Using SMITYou can also use SMIT to add the printer device. You can work down from the initial SMIT menu by selecting the following sequence:
Devices -> Printer/Plotter Devices -> Add a Printer/Plotter
Alternatively, you can use the smitty makprt fastpath to go directly to the following screen:
If your printer type is not listed, you may need to install additional filesets from the AIX install media (using smitty install_package fastpath).
1. From the Printer/Plotter Type list, select the item that most closely resembles the printer you will be defining and press Enter. This is the AIX device type from the ODM database, and it need not match the value you will select later from the terminfo database (which supports fewer specific models of printers).
We scrolled down and selected hplj-4 which corresponded to the lab’s Hewlett-Packard HP LaserJet 4M. The following panel was displayed:
Printer/Plotter Type Move cursor to desired item and press Enter. [TOP] bull1015 Bull Compuprint PageMaster 1015 bull1021 Bull Compuprint PageMaster 1021 bull1025 Bull Compuprint PageMaster 1025 bull1070 Bull Compuprint 1070 bull1625 Bull Compuprint PageMaster 1625 bull200 Bull Compuprint PageMaster 200 bull201 Bull Compuprint PageMaster 201 bull411 Bull Compuprint PageMaster 411 bull413 Bull Compuprint PageMaster 413 bull422 Bull Compuprint PageMaster 422 bull451 Bull Compuprint 4/51 [MORE...143] F1=Help F2=Refresh F3=Cancel F8=Image F10=Exit Enter=Do /=Find n=Find Next
Chapter 2. System V print subsystem basics 61

2. Select the appropriate interface from the pop-up list and press Enter. In this example, we selected parallel.
3. We selected the ppa0 entry and pressed Enter.
Printer/Plotter Interface Move cursor to desired item and press Enter. parallel rs232 rs422 F1=Help F2=Refresh F3=Cancel F8=Image F10=Exit Enter=Do /=Find n=Find Next
Parent Adapter Move cursor to desired item and press Enter. ppa0 Available 01-D0 Standard I/O Parallel Port Adapter F1=Help F2=Refresh F3=Cancel F8=Image F10=Exit Enter=Do /=Find n=Find Next
62 Printing for Fun and Profit under AIX 5L

4. The only required field on this panel is PORT number; you can use the F4 key to display the possible values. In this case, the only possible value is p.
You can optionally modify the other fields, but these fields will be ignored when defining a System V printer. They would only be used if you were to cat print jobs directly to the device (/dev/lp##), bypassing the spooler.
Once we made our selections, we pressed Enter. The printer device was added.
Note that if we were adding a serial device, we would need the appropriate information for our printer type for baud rate, parity, data bits, stop bit, flow control, and so on.
Add a Printer/Plotter Type or select values in entry fields. Press Enter AFTER making all desired changes. [TOP] [Entry Fields] Printer/Plotter type hplj-4 Printer/Plotter interface parallel Description Hewlett-Packard LaserJ> Parent adapter ppa0 * PORT number [p] + Type of PARALLEL INTERFACE [standard] + Microseconds to delay between characters [0] +# Printer TIME OUT period [600] +# STATUS of device at BOOT time available + Ignore the following attributes when using the Print Queue: Number of LINES per page [60] +#Number of COLUMNS per page [80] +#
Number of COLUMNS to indent [0] +# Send all characters to printer UNMODIFIED no + Send BACKSPACES yes + WRAP CHARACTERS beyond the specified width no + Send FORM FEEDS yes + Send CARRIAGE RETURNS yes + Send LINE FEEDS yes + Add CARRIAGE RETURNS to LINE FEEDS yes + Convert lowercase to uppercase no + Expand TABS on eight position boundaries yes + Return on ERROR no + [BOTTOM] F1=Help F2=Refresh F3=Cancel F4=List F5=Reset F6=Command F7=Edit F8=Image F9=Shell F10=Exit Enter=Do
Chapter 2. System V print subsystem basics 63

Option 3: Using the command lineAs a third option, you can use the following command from an AIX command prompt to add a Hewlett-Packard LaserJet 4 on the parallel port.
# mkdev -c printer -t ‘hplj-4’ -s ‘parallel’ -p ‘ppa0’ -w ‘p’
Refer to the man pages for the mkdev command for additional information on the flags.
Note that the value for the -t flag must match a value in the Predefined Devices object class. To display possible values, enter:
# lsdev -P -c printer -F “type subclass description” | sort -u
You may wish to search for a specific device type, and you can do so by piping the output of the lsdev command to grep. For example:
# lsdev -P -c printer -F “type subclass description” | grep -i hp | pg
If your printer type is not listed, you may need to install additional filesets from the AIX install media (using smitty install_package fastpath).
To list all printer devices that are defined on your system and their status (Available or Defined), use this command:
# lsdev -Cc printer
Testing your deviceBefore proceeding, it is a good idea to verify that your device type works. You can print a file directly through the device driver using the following command:
# lptest 10 10 > /dev/lp0
where /dev/lp0 is the name of your device. If you are unable to print directly to the physical printer in this manner, you must fix this problem before proceeding.
2.3.1.2 Verifying the active print subsystemBefore proceeding, confirm that the System V print service is the enabled print subsystem. You can use Web-based System Manager, SMIT or the command line.
• Web-based System Manager provides a visual indicator. As you can see in Figure 6 on page 66, if the System V print subsystem is active, you can see in the navigation areas as well as in the Overview and Tasks panel that the System V print subsystem is named explicitly.
• The root user can use the SMIT fastpath, smitty chprtsubsystem, to display the current print subsystem.
64 Printing for Fun and Profit under AIX 5L

• The root user can issue the switch.prt -d command from the command prompt to display the active print subsystem.
• Alternatively, any user can deduce which print subsystem is active by issuing the lpstat -o command. If a list of jobs is returned, or if you are returned to the cursor, the System V print subsystem is active; if you see output similar to the following, the PowerPC print subsystem is active.
2.3.1.3 Adding a local printerIn order to add a System V printer, you must be either the root or lp user, or you must be a member of the lp group. You can use either of the following interfaces:
• Web-based System Manager (see “Option 1: Using Web-based System Manager” on page 65)
• Command line (see “Option 2: Using the lpadmin command” on page 73)
We found it helpful to equate the fields in Web-based System Manager with the various flags for the lpadmin command, and we will include that information as we describe the Web-based System Manager process. Additional information on the flags will be included in Section 2.3.2, “Modifying an existing printer” on page 78.
Option 1: Using Web-based System ManagerIn Web-based System Manager, select the Printers (System V) plug-in from the left frame of the console (Figure 2 on page 58). AIX 5L V5.0 currently only supports Directory Disabled printers, so open that container. This will display the panel in Figure 6 on page 66.
Queue Dev Status Job Files User PP % Blks Cp Rnk ------- ----- --------- --- ------------------ ---------- ---- -- ----- --- --- test lp0 READY
Chapter 2. System V print subsystem basics 65

Figure 6. Display for Directory Disabled Printers (System V)
To add a new printer, you can either select the New printer task in the Overview panel, the Printers pull-down from the task bar, or the New Printer... toolbar icon. Any of these selections will start the New Printer wizard, which includes these steps:
1. Step 1 of 4: Specify New Printer and Attachment Method
a. Select a name for your System V printer. See Figure 7 on page 67 for more details.
Printer names may be no longer than the maximum length filename allowed for the file system type you are using, and may consist of all printable characters except the space, slash, backslash, colon, semicolon, comma, asterisk, question mark, and tilde. The dash can be used in any position except the first position in a printer name.
This is equivalent to the -p flag on the lpadmin command.
In Web-based System Manager wizards, required fields are denoted by bold text.
Note
66 Printing for Fun and Profit under AIX 5L

Figure 7. Adding a locally-attached printer (step 1 of 4)
b. You can optionally specify a print class for printer pooling. If you have previously specified a print class, that class will appear in the pull-down list. If no classes exist, the list will be empty. You can type in a new class name here.
Class names may be no longer than the maximum length filename allowed for the file system type you are using, and may consist of all printable characters except the space, slash, backslash, colon, semicolon, comma, asterisk, question mark, and tilde. The dash can be used in any position except the first position in a printer name.
This is equivalent to the -c flag on the lpadmin command.
c. You can optionally provide a description of the printer. This description will be displayed when a user asks for the status of the printer using either lpstat -p [printer] -D or lpstat -p [printer] -l.
This is equivalent to the -D flag on the lpadmin command.
d. Select an attachment method:
• Local connection to this system (parallel or serial) • Remote connection to local printer on another system (that is, to a
remote LPD server or an LPD-capable printer) • Remote connection to a network printer (only JetDirect-attachment
is supported)
In this chapter, we are defining a parallel-attached HP LaserJet 4M, so we selected the first option, Local connection to this system.
Chapter 2. System V print subsystem basics 67

After selecting the appropriate options, we clicked on Next. The panel shown in Figure 8 was displayed.
Figure 8. Adding a locally-attached printer (step 2 of 4)
2. Step 2 of 4: Specify Local Attachment Options
The local device name is a required field. The pull-down list will contain the names of all the print devices that have been previously configured (for example, lp0). If this field is blank on your screen, you have forgotten to define the device, as described in Section 2.3.1.1, “Adding a printer device” on page 57.
This is equivalent to the -v flag on the lpadmin command.
Note that multiple printers may point to the same device file.
We selected lp0 and clicked Next.The panel in Figure 9 on page 69 was displayed.
3. Step 3 of 4: Specify Printer Options
In this step, you provide the information for the kind of alerts you want to receive and the method of recovery in case of a printer problem, the model or interface script that will be used, the printer type (from terminfo), and the content types that the printer can accept. A content type of simple gives a passthrough mode and does not add carriage returns to line feeds.
68 Printing for Fun and Profit under AIX 5L

Figure 9. Adding a locally-attached printer (step 3 of 4)
a. What action is to happen on a printer alert? This setting defines an alert to inform the administrator or other designated user when a printer fault is detected, and periodically thereafter, until the printer fault is cleared. (The administrator is the privileged user who originally created the printer or who last issued the command to change the printer alert value.) If an alert is not defined for a particular printer, no messages are sent when a printer fault occurs.
Your choices are:
• Nothing • E-mail once to the administrator • Message to the administrator’s console • Run a user-provided script
Note: In our tests with early code, if we chose Nothing then we received an error following Step 4. Our workaround was to select E-mail, knowing that we could always adjust it later through the lpadmin command. This will be fixed in a future release.
The print service’s fault detection and error recovery are only as good as the interface program and fast filter that the printer uses can provide.
This is equivalent to the -A flag on the lpadmin command.
Chapter 2. System V print subsystem basics 69

There are additional useful options available on the lpadmin command, including the ability to send e-mail or message alerts to a specified user:
# lpadmin -p hp-par2 -A ‘mail johnboy’
Using Web-based System Manager panels, e-mail or message alerts can only be directed to the person who defined the printer, that is, the person who started wsm.
Another advantage to the lpadmin command is that you can specify that you want to receive repeated alerts at a given interval (in minutes). When you use Web-based System Manager, an alert is only issued once.
Finally, you can use the lpadmin command to define alerts for all printers with a single command.
b. How do you want to continue on restart? Your options are:
• Top of page (default) • Beginning • Wait
This setting specifies how (or if) printing should proceed for any print request that is stopped because of a printer fault.
In Web-based System Manager, the default value for this setting is Top of page, which means to start printing the request again from the top of the page where printing stopped. If a capable filter is not being used, you will be notified in an alert if recovery can not proceed as you want.
The other two options are to resume printing automatically from the beginning of the job (Beginning) or to disable printing on the destination until the administrator or a user enables printing again (Wait).
If Wait is used, then during the wait the administrator or the user who originally submitted the stopped print request can issue a change request to resume printing on a different destination. You must use the command line to do this; see the -i option of the lp command.
This is equivalent to the -F flag of the lpadmin command.
c. What is the print processing model?
• Standard (default) • PostScript
This setting specifies the model interface program provided by the print service for the printer. There are two possible values, Standard
70 Printing for Fun and Profit under AIX 5L

(generic printer interface) and PostScript (interface for PostScript printers only); Standard is the default.
This is equivalent to the -m flag on the lpadmin command.
d. What is the printer type? This is the list of supported printers as defined in the terminfo database. Refer to the information in Section 2.1.3, “Planning” on page 51 for information on how to determine the appropriate value to select here.
For our test Hewlett-Packard LaserJet 4M, we selected one of the hplaserjet entries in the list.
For additional information on the terminfo database, see Section 4.3, “Using the terminfo database” on page 151.
This is equivalent to the -T flag on the lpadmin command.
e. What is the printer interface? This is really asking what content types you want your printer to accept. The choices in the pull-down list are:
• Simple (default) • PostScript • PCL
The content type is used by the print service to determine if the printer can handle the print job or to determine if there are filters registered to convert the file to a format that can be printed. The user can specify that a file is a particular content type by using the lp -T flag.
The default type is simple, which consists of printable ASCII characters and selected control characters (backspace, tab, line feed or new line, form feed, and carriage return). The simple content type is a passthrough mode interface, and will not add carriage returns to line feeds. With standard UNIX text files, this can cause a stair-step effect, because these files only have line feeds to separate lines. This mode is good for printing files that have been formatted by an application in either UNIX or Windows.
When adding a laser printer, it is important to specify a content type of either PostScript or PCL. If you do not specify PCL for a PCL printer, the printer output will be in a stair-step format or may not show at all. When using the PCL content type, you must also make sure that you register the pcl filter from the command line as follows:
# lpfilter -f pcl -F /etc/lp/fd/pcl.fd
If you plan to print ASCII text files to a PostScript printer, you will also need to register the PostScript filters, as described in the advanced printing section on printer filters. See Section 4.10.4, “Installing,
Chapter 2. System V print subsystem basics 71

registering, and maintaining PostScript printer” on page 180 for more details.
Although you can only choose one value through Web-based System Manager panel, you can specify additional values through the lpadmin -I command. See Section 2.3.2, “Modifying an existing printer” on page 78 or the man page for the lpadmin command for additional information.
Other values may be specified through the lpadmin command. Except for simple, each content-type name is freely determined by the administrator. For additional information, see Section 4.1.1.3, “Content type” on page 136.
This is equivalent to the -I flag on the lpadmin command.
4. Step 4 of 4: Verify Settings and Add New Printer
The panel shown in Figure 10 is a read-only panel for verification purposes. You have the chance to go back and change any settings before you select Finish, which commits the underlying lpadmin command that you have built over the previous panels through your selections.
Figure 10. Adding a locally-attached printer (step 4 of 4)
5. If successful, you receive the message shown in Figure 11 on page 73.
72 Printing for Fun and Profit under AIX 5L

Figure 11. Success!
On the Web-based System Manager Overview panel, you should now see in the Status area that you have a printer defined. You can also use the lpstat command with the -p flag to display the printer status.
Option 2: Using the lpadmin commandWhen you add a new printer using the command line, you must complete three separate tasks:
1. Create the printer with the lpadmin command.
2. Allow the printer to accept (or queue) jobs with the accept command.
3. Allow the printer to print jobs with the enable command.
Note that, in contrast, creating a printer with Web-based System Manager takes care of all of these steps for you. However, you can not specify all of the possible options through Web-based System Manager panels in AIX 5L V5.0.
In this section, we describe how to create a very basic printer, taking all of the defaults. You can later customize your printer further through the use of additional options. Although we are documenting them in separate sections, you can also use these option flags at the time you create your printer. See Section 2.3.2, “Modifying an existing printer” on page 78.
To customize or make any modifications to an existing printer in AIX 5L V5.0, you can not use Web-based System Manager; you must use the lpadmin command from the AIX command prompt. Additional information can be found in Section 2.3.2, “Modifying an existing printer” on page 78.
Note
Chapter 2. System V print subsystem basics 73

Creating a basic printer using defaultsThe syntax of the lpadmin command to add a new locally-attached printer is as follows:
# lpadmin -p printer -v device -T printer-type -I pcl [options]
• The -p flag is used to configure a new printer or to change the configuration of an existing printer.
Printer (and class) names may be no longer than the maximum length filename allowed for the file system type you are using, and may consist of all printable characters except the space, slash, backslash, colon, semicolon, comma, asterisk, question mark, and tilde. The dash can be used in any position except the first position in a printer name.
• The -v flag specifies the AIX printer device name, such as /dev/lp0.
• The -T flag indicates the printer type from the terminfo table.
Although the -T flag is optional, you should specify it when adding a printer because this is the connection to the information in the terminfo database. If this flag is not used, the default printer type is unknown; no information will be extracted from the terminfo database, so each user request will be printed without first initializing the printer.
Refer to the information in Section 2.1.3, “Planning” on page 51 for information on how to determine the appropriate value to select for the -T flag.
• The -I flag indicates the content type.
It is important to add PCL printers with type pcl so that the pcl filter will add carriage returns to line feeds. You will also need to register the pcl filter with the command:
# lpfilter -f pcl -F /etc/lp/fd/pcl.fd
When using printer type PS, use a content type of PS and ensure that the PS filter is registered. (See Section 4.10.5, “Installing and maintaining PostScript filters” on page 181 for more details.)
To create a very basic configuration for our parallel-attached HP LaserJet 4M PCL printer, we issued the lpadmin command with the -p, -v, -I pcl and -T flags:
74 Printing for Fun and Profit under AIX 5L

The message that was received in response to this lpadmin command was to alert us that the printer had been added, and all users would be able to access this device and printer. You can use the -u flag of the lpadmin command to allow or deny access to the printer by user. See Section 3.3.1.2, “Granting access to printers” on page 130 for more information. To restrict access to the device, follow the instructions in the message.
Here are additional considerations:
• When defining a PostScript printer, you must explicitly specify several flags so that the correct printer type (-T), interface script (-m), and content type (-I) are specified; the defaults for these flags will not work for PostScript printers.
A sample command to add a parallel-attached PostScript printer would be:
# lpadmin -p prtps -v /dev/lp0 -T PS-b -m PS -I PS
We will explain the -m and -I flags in greater detail in Section 2.3.2, “Modifying an existing printer” on page 78. For information on the values for the -T flag, see Section 2.1.3, “Planning” on page 51.
• When defining a PCL printer, you must explicitly specify the printer type (-T hplaserjet) and the content type (-I pcl) for the correct alignment of the banner page and for the pcl filter to add carriage returns to line feeds. You must also register the pcl filter.
A sample command to add a parallel-attached PCL printer would be:
# lpadmin -p prtpcl -v /dev/lp0 -T hplaserjet -I pcl
If we were adding a serial-attached printer for which we had defined the /dev/lp1 device, we would have issued essentially the same command:
# lpadmin -p hp-ser1 -v /dev/lp1 -T hplaserjet -I pcl
We mention this about serial-attached printers because administrators who are familiar with other UNIX systems may be accustomed to specifying the -o stty flag with the serial device options. In AIX 5L, those options are defined in the serial device itself (see Section 2.3.1.1, “Adding a printer device” on page 57 for more information).
# lpadmin -p hp-par2 -I pcl -v /dev/lp0 -T hplaserjetUX:lpadmin: WARNING: "/dev/lp0" is accessible by others. TO FIX: If other users can access it you may get unwanted output. If this is not what you want change the owner to "lp" and change the mode to 0600. Processing continues.
Chapter 2. System V print subsystem basics 75
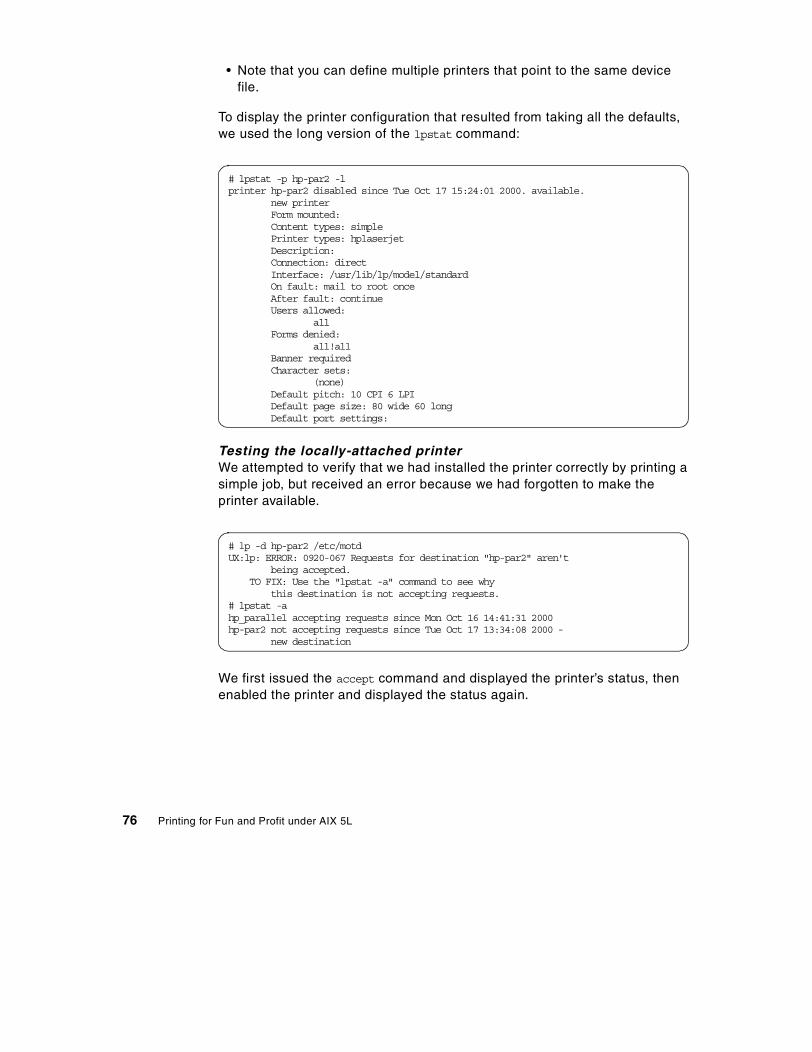
• Note that you can define multiple printers that point to the same device file.
To display the printer configuration that resulted from taking all the defaults, we used the long version of the lpstat command:
Testing the locally-attached printerWe attempted to verify that we had installed the printer correctly by printing a simple job, but received an error because we had forgotten to make the printer available.
We first issued the accept command and displayed the printer’s status, then enabled the printer and displayed the status again.
# lpstat -p hp-par2 -l printer hp-par2 disabled since Tue Oct 17 15:24:01 2000. available. new printer Form mounted: Content types: simple Printer types: hplaserjet Description: Connection: direct Interface: /usr/lib/lp/model/standard On fault: mail to root once After fault: continue Users allowed: all Forms denied: all!all Banner required Character sets: (none) Default pitch: 10 CPI 6 LPI Default page size: 80 wide 60 long Default port settings:
# lp -d hp-par2 /etc/motd UX:lp: ERROR: 0920-067 Requests for destination "hp-par2" aren't being accepted. TO FIX: Use the "lpstat -a" command to see why this destination is not accepting requests.# lpstat -a hp_parallel accepting requests since Mon Oct 16 14:41:31 2000 hp-par2 not accepting requests since Tue Oct 17 13:34:08 2000 - new destination
76 Printing for Fun and Profit under AIX 5L

Notice that we used two different instances of the lpstat command with different flags to get information on accept/reject status (lpstat -a) and on enable/disable status (lpstat -p). We could have also used the lpstat -t command to get both statuses in a single command. (Refer to the man pages for the lpstat command for additional information.)
When we resubmitted the job, we received the following error:
The value of $LANG on our test system was en_US. If we added the -L C flag on the lp command to change the locale to C, the job printed successfully with a header page that displayed our system hostname and userid, the date and time at which the job printed, and the job number or request-ID, for example, hp-par2-753. We could have also changed the $LANG environment variable to C.
2.3.1.4 Files created as result of adding the printerAfter we added the hp-par2 printer, the following files were added:
• /etc/lp/interfaces/hp-par2: This is an exact copy of the /usr/lib/lp/model/standard shell script and is a result of specifying lpadmin -i standard.
• In /etc/lp/printers/hp-par2, the following files:
- alert.sh: This is a shell script that issues the command we specified with the lpadmin -A command.
# accept hp-par2 UX:accept: INFO: destination "hp-par2" now accepting requests# lpstat -a hp_parallel accepting requests since Mon Oct 16 14:41:31 2000 hp-par2 accepting requests since Tue Oct 17 14:14:01 2000# lpstat -p hp-par2 printer hp-par2 disabled since Tue Oct 17 14:19:34 2000. available.
new destination# enable hp-par2 UX:enable: INFO: printer "hp-par2" now enabled# lpstat -p hp-par2 printer hp-par2 is idle. enabled since Tue Oct 17 14:19:58 2000. available.
UX:lp: ERROR: 0920-056 The following options can’t be handled:-L locale (or default locale)
TO FIX: The printer(s) that otherwise qualifyfor printing your request can’t handleone or more of these options. Tryanother printer, or change the options.
Chapter 2. System V print subsystem basics 77

- alert.vars: This is a file with two lines. Although we do not have information on the exact layout of this file, the second line corresponds to the value we specified on the -W flag on the lpadmin command.
- configuration: This file contained the following information:
- forms.deny: This currently contains an entry, all!all, which is the default. See Section 4.4.4, “Maintaining access lists for forms” on page 159 for more information.
- users.allow: This file contains the list of users allowed to print to this printer, currently all, which is the default. See Section 3.3.1.2, “Granting access to printers” on page 130 for more information.
2.3.2 Modifying an existing printerTo modify an existing printer in AIX 5L Version 5.0, you must use the command line; there is no way in the current release to use Web-based System Manager to do this.
You use the lpadmin command with the various option flags. These options can appear on the command line in any order. We will not cover all of the possible options for the lpadmin command here, but rather will concentrate on the ones useful when first configuring a printer. You should refer to the man pages for complete information.
• -A AlertType [-W minutes]
The -A flag defines an alert to inform the administrator when a printer fault is first detected, and periodically thereafter, until the printer fault is cleared.
If an alert is not defined for a particular printer, a single mail message is sent to the administrator by default (equivalent to -A mail -W once).
Banner: on:Always Content types: simple Device: /dev/lp0 Interface: /usr/lib/lp/model/standard Printer type: hplaserjet Modules: default Form feed: on
After you change the attributes of a printer, you need to disable and enable the printer so the changes are recognized.
Note
78 Printing for Fun and Profit under AIX 5L

The other possible values are to write a message to the administrator’s terminal (write), to not send any messages (none), or to run a named shell script or command every time the alert needs to be sent.
The administrator is the privileged user who originally created the printer or who last issued the command to change the printer alert value. You can specify that the alerts go to someone besides the administrator by specifying another userid. Example:
# lpadmin -p hp-par2 -A ‘mail johnboy’ -W 5
If you do not specify the -W flag, you will receive the alert only once. You can request to receive ongoing alerts by specifying the -W minutes flag, where the value of minutes is a positive integer. For example:
# lpadmin -p hp-par2 -A write -W 5
If you wish to stop the alerts from being issued before the fault is resolved, you use the following command:
# lpadmin -p printername -A quiet
Note: Use quiet only to terminate an active alert; do not specify quiet as the alert type for a new printer.
Note: The print service can detect printer faults only through an adequate fast filter and only when the standard interface program or a suitable customized interface program is used. Furthermore, the level of recovery after a fault (see the -F flag) depends on the capabilities of the filter your printer is using.
• -c class
The class option allows you to assign a printer to a group or pool of printers. If you submit a print job to a class instead of to a specific printer, then the first available printer in the class will accept and print your job.
You do not need to predefine the class; if it does not exist when this command is issued, it will be created automatically. Class names may be no longer than the maximum length filename allowed for the file system type you are using, and may consist of all printable characters except the space, slash, backslash, colon, semicolon, comma, asterisk, question mark, and tilde. The dash can be used in any position except the first position in a printer name.
To list existing classes, use the lpstat command with the -c flag: lpstat -c all. This command will also list the printers that belong to each class.
To remove a printer from a class, use lpadmin -p printer -r class. If the printer is the last member of the class, then the class is deleted. For example:
Chapter 2. System V print subsystem basics 79
# lpadmin -p hp-par2 -c newclass
When setting a default destination (see Section 2.4.1, “Setting the default destination” on page 85), the administrator can specify either a class or a specific printer.
• -D description
This description will be displayed when a user asks for a full description of the printer using either lpstat -p [printer] -D or lpstat -p [printer] -l. For example:
# lpadmin -p hp-par2 -D “redbook test printer”
• -F FaultRecoveryMethod
The -F flag specifies how or if printing should proceed for any print request that is stopped because of a printer fault. The default value for this flag is beginning, which means to start printing the request again from the beginning of the job.
The other two options are to disable printing on the destination until the administrator or a user enables printing again (wait) or to continue printing on the top of the page where printing stopped (continue); the latter requires a filter to wait for the fault to clear before automatically continuing.
If wait is used, then during the wait the administrator or user who submitted the stopped print request can issue a change request to resume printing on a different destination. See the -i option of the lp command. For example:
# lpadmin -p hp-par2 -F wait
• -I Content-Type-List
The -I flag indicates the content type(s) that the destination can print. If the list includes more than one name, the names must be separated by commas or blank spaces; if they are separated by blank spaces, the entire list must be enclosed in double quotes.
This information is used by the print service to determine if the printer can handle a print request or to determine if there are filters registered to convert the file to a format that can be printed. The user can specify that a file is a particular content type by using the lp command with the -T flag.
The default type is simple, which consists of printable ASCII characters and selected control characters (backspace, tab, line feed or new line, form feed, and carriage return). The simple content type acts as a passthrough mode type, and no control characters will be added.
If you do not want the print service to consider simple a valid type for the printer, specify either an explicit value (such as the printer type from the -T
80 Printing for Fun and Profit under AIX 5L
flag) or an empty list. If you do want simple included along with other types, you must explicitly include simple in the list. For example:
# lpadmin -p hp-par2 -I “pcl PS simple myname”
Other values may be specified. Except for simple, pcl and PS, each content type name is freely determined by the administrator. As discussed earlier for PCL printers, it is important to use the content type of pcl and register the pcl filter with lpfilter. When the content type of PS is used, ASCII text files can be automatically converted to PostScript by registering the download, postio, and postprint filters as shown here:
# lpfilter -f download -F /etc/lp/fd/download.fd# lpfilter -f postio -F /etc/lp/fd/postio.fd# lpfilter -f postprint -F /etc/lp/fd/postprint.fd
For more information on using filters, see Section 4.6, “System V print filters” on page 164.
• -m model
The -m flag specifies the interface program (also known as a model program or model script) provided with the print service for the printer. AIX 5L Version 5.0 supplies two possible values, standard (generic printer interface) and PS (interface for PostScript printers only); standard is the default.
The -m flag cannot be used with either the -e or -i flags; they are mutually exclusive. The -e and -i flags will not be discussed in this chapter. For additional information on interface programs, see Section 4.2, “Printer interface programs” on page 138. For example:
# lpadmin -p hp-par2 -m standard
• -o options
Certain defaults (font pitch, line spacing, page size and port settings) are automatically configured for you based on the values in the terminfo database when you specify a printer type in Web-based System Manager or with the lpadmin -T command. These defaults will be passed to an interface program if the values are not supplied by a form (see Section 4.4, “Using printer form support” on page 156) or are not explicitly specified by the user at job submission.
You can display the current values of size and spacing using the lpstat -p printer -l command.
To change those values, you use the lpadmin command with the -o flag and various keywords. Four -o options that can have defaults defined are:
Chapter 2. System V print subsystem basics 81

- -o length=number - -o width=number - -o cpi=number - -o lpi=number
The number refers to a non-negative number used to indicate a unit of size. The type of unit is shown by a trailing letter attached to the number:
- Centimeters, marked with a trailing c - Inches, marked with a trailing i - Numbers that show sizes in units appropriate to use, without a trailing
letter, that is, lines, characters, lines per inch, or characters per inch
The first four default option values must agree with the capabilities of the type of physical printer, as defined in the terminfo database for the printer type. If they do not, the command is rejected.
You can reset any of the -o flags to the default values (which vary for different types of printers), by typing them without assigned values, as follows:
- -o length= - -o width= - -o cpi= - -o lpi=
Note: These values should be able to be modified using the -o flag on the lpadmin command. However, our testing indicated some problems in the early versions of the AIX 5L V5.0 code; these problems have been reported to development and will be fixed in a future release.
• -T printer-type
The -T flag indicates the printer type from the terminfo table.
As we stated earlier, although the -T flag is optional, you should specify it when adding a printer because this is the connection to the information in the terminfo database. If this flag is not used, the default printer type is unknown; no information will be extracted from the terminfo database, so each user request will be printed without first initializing the printer.
Refer to the information in Section 2.1.3, “Planning” on page 51 for information on how to determine the appropriate value to select for the -T flag.
Printer status following customizationHere is the output of the lpstat -p hp-par2 -l command after issuing all the commands in the previous examples. Compare it to the output of the same command we issued in “Option 2: Using the lpadmin command” on page 73.
82 Printing for Fun and Profit under AIX 5L
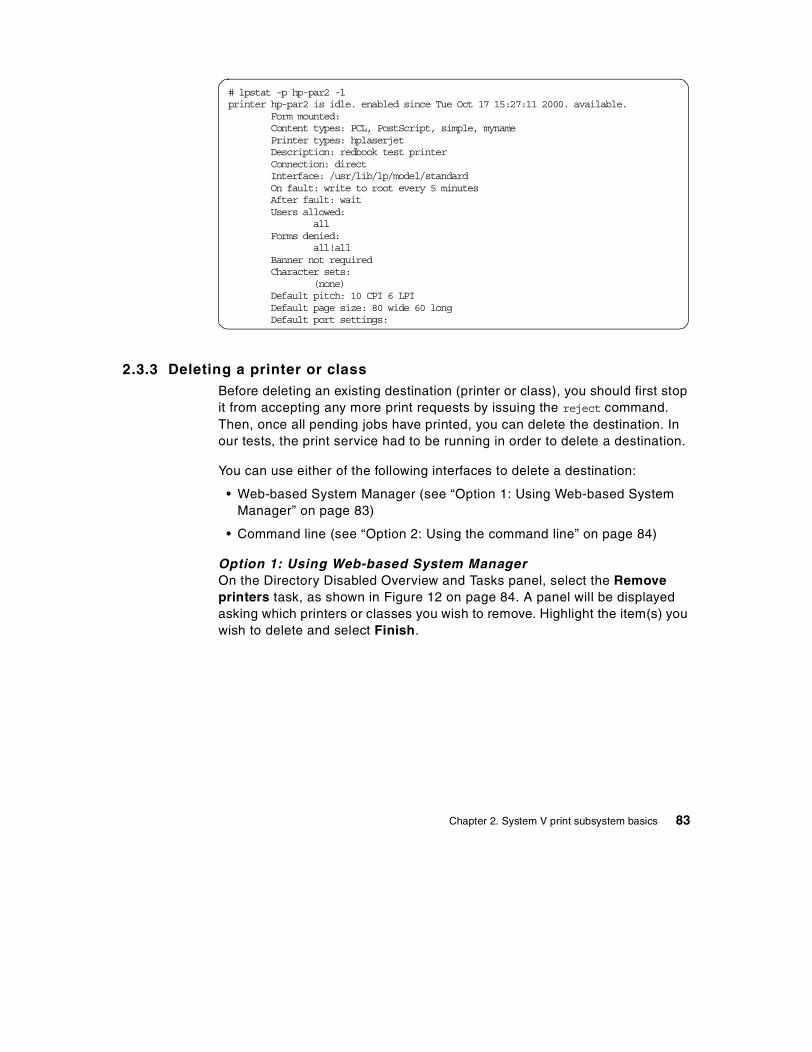
2.3.3 Deleting a printer or classBefore deleting an existing destination (printer or class), you should first stop it from accepting any more print requests by issuing the reject command. Then, once all pending jobs have printed, you can delete the destination. In our tests, the print service had to be running in order to delete a destination.
You can use either of the following interfaces to delete a destination:
• Web-based System Manager (see “Option 1: Using Web-based System Manager” on page 83)
• Command line (see “Option 2: Using the command line” on page 84)
Option 1: Using Web-based System ManagerOn the Directory Disabled Overview and Tasks panel, select the Remove printers task, as shown in Figure 12 on page 84. A panel will be displayed asking which printers or classes you wish to remove. Highlight the item(s) you wish to delete and select Finish.
# lpstat -p hp-par2 -l printer hp-par2 is idle. enabled since Tue Oct 17 15:27:11 2000. available. Form mounted: Content types: PCL, PostScript, simple, myname Printer types: hplaserjet Description: redbook test printer Connection: direct Interface: /usr/lib/lp/model/standard On fault: write to root every 5 minutes After fault: wait Users allowed: all Forms denied: all!all Banner not required Character sets: (none) Default pitch: 10 CPI 6 LPI Default page size: 80 wide 60 long Default port settings:
Chapter 2. System V print subsystem basics 83

Figure 12. Deleting printers and/or classes
You can select multiple sequential items in the list by pressing the left mouse button and dragging the cursor to highlight them or by holding down the Shift key while using the mouse to highlight the range of items to delete. If you want to delete multiple items in the list that are not sequentially listed, you can hold down the Ctrl key and use the mouse button to highlight specific printers or classes to delete.
Option 2: Using the command lineThe lpadmin command with the -x dest flag removes the specified destination (printer or class) from the print service. The syntax is:
# lpadmin -x dest
• If dest is a printer and is the only member of a class, then the class is also deleted.
• If dest is a non-empty class, you can delete the class without deleting the printers that were members of this class.
• If dest is all, all printers and classes are removed. Be very careful with this command!
2.4 Setting up defaults
The administrator should consider the system-wide defaults that he or she can configure. These include:
84 Printing for Fun and Profit under AIX 5L

• Destination
• Spooling behavior
• Printer attributes
2.4.1 Setting the default destinationThe System V print administrator can define a printer or class to be used as the default destination in the case where a user does not specify a destination on the print command and has not set either the LPDEST or the PRINTER environment variable. There is no system default destination unless the administrator explicitly sets one.
Without a default destination, a user must specify a destination (dest) in each print request, or the print service will issue an error. By default, dest is taken from the environment variable LPDEST. If LPDEST is not set2, then dest is taken from the environment variable PRINTER. If PRINTER is not set, a default destination (if one exists) for the system is used. If no system default is set and the -T flag on the lp command is used, dest will be selected on the basis of content-type specified with the -T flag (for example, lp -d any -T simple).
You can use either of the following interfaces to set the default system destination:
• Web-based System Manager (see “Option 1: Using Web-based System Manager” on page 85)
• Command line (see “Option 2: Using the command line” on page 86)
Option 1: Using Web-based System ManagerYou can use Web-based System Manager to set or to change the system-wide default destination, but you can not use it to unset the default destination; that is, you can not use Web-based System Manager to return to a state where there is no system-wide default destination.
You can start the Set default printer task either from the Directory Disabled Overview and Tasks panel or from the Web-based System Manager pull-down (select Printers -> Set Default Printer...), as shown in Figure 13 on page 86.
2 If you use the export command to set an environment variable and later need to set it to a null value, use the unsetcommand.
Chapter 2. System V print subsystem basics 85

Figure 13. Set the default destination
You can select a single item from this list. Press Finish when you have made your selection.
Option 2: Using the command lineYou use the lpadmin command with the -d flag to specify a system-wide default destination. That destination can be either a printer or a class of printers. For example:
# lpadmin -d hp-par2
To unset the system default printer, you can enter a null value (lpadmin -d) or the keyword none (lpadmin -d none).
2.4.1.1 Displaying the current default destinationYou can use either of the following interfaces to display the current default system destination:
• Web-based System Manager (see “Option 1: Using Web-based System Manager” on page 86)
• Command line (see “Option 2: Using the command line” on page 87)
Option 1: Using Web-based System ManagerThe default destination is displayed on the “Overview and Tasks” panel of Web-based System Manager, as shown in Figure 6 on page 66.
86 Printing for Fun and Profit under AIX 5L

Option 2: Using the command lineTo display the name of the current default destination (if any), use the lpstat command with the -d flag:
# lpstat -d
2.4.2 Setting the default for print spoolingAs discussed in Section 1.9, “To spool or not to spool” on page 30, the print service administrator can control whether or not the print service queues a copy of the user’s file(s) or the original file itself when a print job is submitted.
You use the lpadmin command with the -O copy-option flag, where the value for copy-option can be either copy or nocopy. The default behavior is that of nocopy.
• If -O copy is specified, the system always copies the user’s source files to the spool area (/var/spool/lp/tmp) when a print job is submitted.
• If -O nocopy is specified, the files are copied only if the user specifies the -c flag of the lp command when submitting the job.
This value is stored in the /etc/default/lp file and is checked every time a job is submitted. Note that until you issue the lpadmin -O command, the /etc/default directory is not created. For example:
# lpadmin -O nocopy
2.4.3 Setting default printing priorities and limitsThe print administrator can use the lpusers command to set default priority levels system-wide and by specific user, and can also set limits to the priority level that can be requested by users. Both the priority-level and the priority-limit use a range of 0 to 39, with 0 being the highest priority.
• To list the current priority-level and priority-limits:
# lpusers -l
• You can set a system-wide priority-level that will be used if a user does not specify a priority level with a print request (lp -q).
# lpusers -d priority-level
The initial default priority-level is 20.
• You can set a default priority-limit that users can request when submitting a print request.
# lpusers -q priority-limit [login-ID-list]
Chapter 2. System V print subsystem basics 87

Users that have been given a limit can not submit a print request with a higher priority level than the one assigned, nor can they change a request already submitted to have a higher priority.
You can set priority limits for a specific user on the local system, all users on the local system, a specific user on a remote system, all users on a remote system, or a specific user on all systems.
To remove a priority limit for a login-ID-list, use the -u flag on the lpusers command. See the man page for the lpusers command for additional details.
2.5 Printing files
This section will discuss how to print a job and how to manage a print request once it has been submitted.
2.5.1 Submitting a print requestWhen the System V print subsystem is active, the only interface you can use to submit print requests is the command line. lp is the preferred print command in System V, though you may also use the lpr command (see “The lpr command” on page 94).
The lp commandBecause you must use the command line to submit print requests to the System V print subsystem (that is, there is no SMIT interface for submitting jobs), we have chosen to include details on the lp command here. We have not included all flags or options, just the most common ones.
If you check the man pages for either lp or lpr, make sure that you read the correct section for the print subsystem in which you are working. For example, when reading the man page for lp, use the section that is entitled “System V Print Subsystem lp on an PowerPC and IA-64 platforms.”
The basic syntax of the lp command is:
$ lp -d dest [print-options] file-name(s)
To print in the System V print subsystem, you must use either the lp or lpr command. You cannot use the enq or qprt commands, because those commands will continue to send jobs to the PowerPC print subsystem’s queues even when it is not the active print subsystem.
Note
88 Printing for Fun and Profit under AIX 5L
The lp command is used to send a print request either to a particular destination (printer or class) or, using -d any, to any printer capable of meeting all requirements of the print request.
Printers that are not accepting requests will not be considered when the destination is any. (Use the lpstat -a command to see which printers are accepting requests.) However, if a request is destined for a class of printers, and the class itself is accepting requests, then all printers in the class will be considered, regardless of their acceptance status.
If filenames are not specified on the command line, standard input is assumed. The standard input may be specified along with named files on the command line by listing the filenames and specifying for the standard input. The files will be printed in the order in which they appear on the command line.
The print service associates a unique request-ID with each request and displays it on the standard output. This request-ID can be used later when canceling or changing a request, or when determining its status. See the man pages for the cancel command for details about canceling a request, and for lpstat for information about checking the status of a print request.
Flags must always precede filenames, but may be specified in any order.
Flags
-c Make copies of the files to be printed immediately when lp is invoked. Normally files will not be copied, but will be linked whenever possible; the exception to this is if the administrator has configured the system to make copies of (spool) all print requests.
If the -c flag is not specified, the user should be careful not to remove any of the files before the request has been printed in its entirety. It should also be noted that if the -c flag is not specified, any changes made to the named files after the request is made but before it is printed will be reflected in the printed output.
-d dest Choose dest as the printer or class of printers that is to do the printing. If dest is a printer, then the request will be printed only on that specific printer. If dest is a class of printers, then the request will be printed on the first available printer that is a member of the class. If dest is any, then the request will be
Chapter 2. System V print subsystem basics 89
printed on any printer that can handle it. If no system default is set and -T is used, dest will be selected on the basis of content-type specified with the -T flag. See the description of -T.
For a discussion of default destinations, see Section 2.4.1, “Setting the default destination” on page 85.
-f form-name [-d any] Print the request on the form form-name. The print service ensures that the form is mounted on the printer. If form-name is requested with a printer destination that cannot support the form, the request is rejected. If form-name has not been defined for the system, or if the user is not allowed to use the form, the request is rejected.
When the -d any flag is given, the request is printed on any printer that has the requested form mounted and can handle all other needs of the print request.
-H special-handling Print the request according to the value of special-handling. Acceptable values for special-handling are defined below:
hold Do not print the request until notified. If printing has already begun, stop it. Other print requests will go ahead of a held request until it is resumed.
resume Resume a held request. If it had been printing when held, it will be the next request printed, unless subsequently bumped by an immediate request. The -i flag (followed by a request-ID) must be used whenever this argument is specified.
immediate Print the request next. If more than one request is assigned immediate, the most recent request will be printed first. If another request is currently printing, it must be put on hold to allow this immediate request to print. (Available only to print service administrators)
-L locale-name Specify locale-name as the locale to use with this print request. By default, locale-name is set to the
90 Printing for Fun and Profit under AIX 5L

value of LC_CTYPE. If LC_CTYPE is not set, locale-name defaults to the C locale.
-m Send mail after the files have been printed. By default, mail is not sent upon normal completion of the print request.
-n number Print number copies of the output. The default is one copy.
-o options Specify printer-dependent options. Several such options may be collected by specifying the -o flag more than once (that is, -o option1 -o option2), or by specifying a list of options with one -o flag enclosed in double quotes and separated by spaces (that is, -o "option1 option2").
nobanner Do not print a banner page with this request. The administrator can disallow this option at any time.
nofilebreak Do not insert a form feed between the files given, if submitting more than one file. This option is not supported by printers configured to use the PS (PostScript) interface.
length=number Print this request with pages number long. A number is an optionally scaled decimal number that gives a size in lines, characters, inches, or centimeters, as appropriate. The scale is indicated by appending the letter i for inches, or the letter c for centimeters. For length or width settings, an unscaled number indicates lines or characters; for line pitch or character pitch settings, an unscaled number indicates lines per inch or characters per inch (the same as a number scaled with i).
For example, length=66 indicates a page length of 66 lines,
Chapter 2. System V print subsystem basics 91

length=11i indicates a page length of 11 inches, and length=27.94c indicates a page length of 27.94 centimeters. This option may not be used with the -f option and is not supported by the PS (PostScript) interface.
width=number Print this request with pages number wide. (See the explanation of numbers in the discussion of length above.) This option may not be used with the -f option and is not supported by the PS (PostScript).
lpi=number Print this request with the line pitch set to number. (See the explanation of numbers in the discussion of length above.) This option may not be used with the -f flag and is not supported by the PS (PostScript).
cpi=pica | elite | compressed
Print this request with the character pitch set to pica (representing 10 characters per inch), elite (representing 12 characters per inch), or compressed (representing as many characters per inch as a printer can handle).
There is not a standard number of characters per inch for all printers; see the terminfo database for the default character pitch for your printer. This option may not be used with the -f flag and is not supported by the PS (PostScript) interface.
-P page-list Print the pages specified in page-list. This flag can be used only if there is a filter available to handle it; otherwise, the print request will be rejected. The
92 Printing for Fun and Profit under AIX 5L

page-list may consist of ranges of numbers, single page numbers, or a combination of both. The pages will be printed in ascending order.
-q priority-level Assign this request priority-level in the printing queue. The values of priority-level range from 0 (highest priority) to 39 (lowest priority). If a priority is not specified, the default for the print service is used, as assigned by the system administrator. A priority limit may be assigned to individual users by the system administrator. (See the lpusers command for additional information.)
-R Remove file(s) after submitting the print request. Use this flag with caution.
-r See -T content-type [-r] flag.
-t title Print title on the banner page of the output. The default is no title. Enclose title in quotes if it contains blanks.
-T content-type [-r] Print the request on a printer that can support the specified content-type. If no printer accepts this type directly, a filter will be used to convert the content into an acceptable type. If the -r flag is specified, a filter will not be used. If -r is specified but no printer accepts the content-type directly, the request is rejected. If the content-type is not acceptable to any printer, either directly or with a filter, the request is rejected. The default content-type is simple.
-w Write a message on the user's terminal after the files have been printed. If the user is not logged in, or if the printer resides on a remote system, then mail will be sent instead. Be aware that messages may be sent to a panel other than the one in which the command was originally entered.
-y mode-list Print this request according to the printing modes listed in mode-list. The allowed values for mode-list are locally defined. This option may be used only if there is a filter available to handle it; otherwise, the print request will be rejected. In most cases, the following options are defined for PostScript print filters:
Chapter 2. System V print subsystem basics 93

-y landscape Change the orientation of a physical page from portrait to landscape.
-y x=number, y=numberChange the default position of a logical page on a physical page by moving the origin.
-y group=number Group multiple logical pages on a single physical page.
-y magnify=number Change the logical size of each page in a document.
-o length=number Select the number of lines in each page of the document.
-P number Select, by page numbers, a subset of a document to be printed.
-n number Print multiple copies of a document.
There are some other flags that can be specified on the lp command. Refer to the man page, the AIX 5L Commands Reference, the AIX 5L Guide to Printers and Printing, and Chapter 4, “System V advanced printing” on page 135 for additional information.
The lpr commandWe will not go into a great amount of detail here on the lpr command because lp is the preferred command. However, we did want to show the format of the command. Refer to the System V section of the man page or AIX 5L Commands Reference for lpr for additional information.
The syntax of the lpr command is as follows:
/usr/bin/lpr [-P printer] [-# copies] [-C class] [-J job] [-T title] [-i [indent] [-w cols] [-r] [-m] [-h] [-s] [-filter_option] [file...]
Note that with lpr, command line options can not be combined into a single argument as with some other commands. For example, the command lpr -fs is not equivalent to lpr -f -s.
94 Printing for Fun and Profit under AIX 5L

Also, the meaning of the -C class flag is different for lpr than for lp. In lpr, the class value is printed on the banner page; it does not mean that a job is submitted to a System V destination that is a class.
2.5.2 Modifying a print requestYou can use a slightly different form of the lp command to change the options for a request submitted previously. A user can change only his or her own jobs.
Syntax:
$ lp -i request-ID print-options
The print request identified by the request-ID is changed according to the print-options specified with this command. The print-options available are the same as those with the first form of the lp command. If the request has finished printing, the change is rejected. If the request is already printing, it will be stopped and restarted from the beginning (unless the -P flag has been given).
2.5.3 Checking statusThe lpstat command displays current status or general configuration information on different objects that have been defined in the print subsystem.
The basic syntax of the command is:
$ lpstat [flags] [object-list]
You specify a particular flag to list the status of different kinds of objects. For example, to check the status of the print service itself, use:
$ lpstat -r
If you have defined more than one kind of an object, you can display the status of all the objects of that kind, or you can limit the display to specific objects. For example, if you have defined more than one print class, you can display the status of all the objects:
$ lpstat -c all
or you can limit your display to a single object:
$ lpstat -c Room_3C3
Chapter 2. System V print subsystem basics 95

or even a list of objects:
$ lpstat -c "Room_3C3 remote"
For some objects, you can get a basic or an expanded status by using the -l flag. For example, to display the short status of queued jobs:
$ lpstat -o
would return the following:
In contrast, you could request a long status display by adding the -l flag:
You can display information on overall system status (-r, -s, -t) printer classes (-c), printers (-p, -a, -d), jobs (-o, -R, -u), forms (-f) and print wheels or character sets (-S).
For complete syntax, refer to the man pages for the System V version of the lpstat command or to AIX 5L Commands Reference. See also Table 31 on page 474 for a task-oriented list of status commands.
Note: The System V print subsystem also supports the BSD UNIX check print queue command (lpq). See the man page or AIX 5L Commands Reference for the exact syntax.
any-267 dumbuser 880 Wed Nov 8 12:34:09 2000 newprt-268 dumbuser 880 Wed Nov 8 12:35:33 2000 Home-269 dumbuser 880 Wed Nov 8 12:35:59 2000 Home-270 dumbuser 880 Wed Nov 8 12:37:29 2000 np12-271 dumbuser 880 Wed Nov 8 12:38:07 2000 reallylongprintername-272 dumbuser 880 Wed Nov 8 12:48:08 2000
$ lpstat -o -lany-267 dumbuser 880 Wed Nov 8 12:34:09 2000 assigned hp1 newprt-268 dumbuser 880 Wed Nov 8 12:35:33 2000 queued for newprt Home-269 dumbuser 880 Wed Nov 8 12:35:59 2000 queued for Home Home-270 dumbuser 880 Wed Nov 8 12:37:29 2000 queued for Home np12-271 dumbuser 880 Wed Nov 8 12:38:07 2000 queued for np12 reallylongprintername-272 dumbuser 880 Wed Nov 8 12:48:08 2000 queued for reallylongprintername
96 Printing for Fun and Profit under AIX 5L

2.5.4 Cancelling a print requestThe cancel command cancels print requests submitted with the lp command.
A user can cancel a print request using its request-ID, which you can discover by using the lpstat command with the -o flag. Once you know the request-ID, you use the cancel command:
$ cancel [request-ID-list] [printers]
Alternatively, the user can specify one or more printers, on which only the currently printing request will be cancelled if it is the user's job.
A second form of the cancel command cancels all print requests for users specified in login-ID-list.
$ cancel -u login-ID-list [printers]
This command cancels all print requests (including those jobs currently being printed) associated with the login ID of the user making the request, either on all printers (by default) or on the printer specified.
• A user without special privileges can cancel only requests that are associated with his or her own login ID.
• Administrative users with the appropriate privileges can cancel jobs submitted by any user.
Double quotes must be used around login-ID-list if the list contains blanks. The argument login-ID-list may include any or all of the following constructs:
login-ID A user on the local system
system-name!login-ID A user on system system-name
system-name!all All users on system system-name
all!login-ID A user on all systems
all All users on the local system
all!all All users on all systems
A remote job can be canceled only if it originated on the client system; that is, a server system can cancel jobs that came from a client, and a client system can cancel jobs it sent to a server.
The cancellation of a request that is currently printing frees the printer to print the next request.
Chapter 2. System V print subsystem basics 97

2.5.5 Prioritizing a print requestWhen the System V print subsystem is active, by default each print request is assigned a priority of 20, where the range of priorities can be between 0 and 39 (with 0 as the highest). A user can request a specific priority at job submission time by specifying the -q flag on the lp command. For example:
$ lp -d Home -q 39 /etc/motd
Reprioritizing by priority-level and rankYou can use the -R flag on the lpstat command to show the current order or rank in which requests will be printed, though you will not see the actual priority number. For example, we submitted one print request without specifying any priority, then two more requests, one with priority of 39 and one with priority of 5. We would expect to see the job with priority 5 print first, followed by the job with default priority 20, then finally the job with priority 39. Here are our results, as expected:
Or to show the rank of all jobs assigned to printer Home:
You can see that the job we submitted with a priority of 5 is the first in Home’s queue to be printed.
If desired, the administrator can assign a system-wide priority limit and/or a priority limit for individual users using the lpusers command. A user can not submit a print request with a priority higher than that limit.
$ lp -d Home /etc/motdrequest id is Home-269 (1 file)$ lpstat -o Home-269 -R 1 Home-269 dumbuser 880 Wed Nov 8 12:35:59 2000 $ lp -d Home -q 39 /etc/motd request id is Home-280 (1 file) $ lp -d Home -q 5 /etc/hosts request id is Home-281 (1 file) $ lpstat -o "Home-269 Home-280 Home-281" -R 2 Home-269 dumbuser 880 Wed Nov 8 12:35:59 2000 6 Home-280 dumbuser 880 Wed Nov 8 19:25:13 2000 1 Home-281 dumbuser 1419 Wed Nov 8 19:25:26 2000
$ lpstat -R | grep Home 1 Home-281 dumbuser 1419 Wed Nov 8 19:25:26 2000 2 Home-269 dumbuser 880 Wed Nov 8 12:35:59 2000 3 Home-270 dumbuser 880 Wed Nov 8 12:37:29 2000 4 Home-275 dumbuser 880 Wed Nov 8 12:53:05 2000 5 Home-276 dumbuser 880 Wed Nov 8 12:54:16 2000 6 Home-280 dumbuser 880 Wed Nov 8 19:25:13 2000
98 Printing for Fun and Profit under AIX 5L

Print requests that are queued and not yet printing can be assigned a new priority. This overrides any existing priorities and will reposition the request in the queue to put it ahead of lower priority requests or behind any others at the same or higher priority. For example:
$ lp -i request-ID -q NewPriorityLevel
Users can change the priority of only their own jobs, and the print administrator can reprioritize any job.
Promoting a request to the head of the queueThere will be times when you need to promote a pending print request so that it prints immediately after the currently printing job.
Rather than changing that job’s priority, you can use the following command to move a print request to the head of the queue:
# lp -i request-ID -H immediate
You must be a privileged user (root or lp, or a member of the lp group) in order to issue this command. Other users cannot use the -H immediate option.
If it must start printing immediately, but another request is currently printing, you can hold the other request, as described in Section 2.5.6, “Holding and releasing a print request” on page 99.
2.5.6 Holding and releasing a print requestA print request that has not yet finished printing can be put into held status. If a job is currently printing, you can stop it and later resume printing it.
A user can put his or her own request on hold and then release it, but can not release a print request that an administrator has put on hold.
To hold a print request:
$ lp -i request-ID -H hold
To release or resume a held print request:
$ lp -i request-ID -H resume
By default, a released job will start printing again from the beginning, but you can specify that printing restart at a specific page by adding the -P flag to the lp command when you resume it.
Chapter 2. System V print subsystem basics 99
2.5.7 Moving a print request to another queueThere may be occasions when you need to move a print request from one printer to another. To do this, you use the lpmove command.
You can move one or more specific print requests to a different destination using this syntax:
$ lpmove request-ID-list dest
You can move all currently queued print requests from one destination to another using this form of the command:
$ lpmove dest1 dest2
This latter form of the lpmove command causes the print service to reject any new requests for dest1.
Notes:
• When moving requests, lpmove does not verify that the new destination is accepting requests. You should verify the accept status of the new target using lpstat -a dest.
• The lpmove command does not move requests that have options (such as content type and form required) that can not be handled by the new destination.
2.5.8 Scheduling a print requestYou can use the AIX cron facilities to schedule a print request. Use the smit at fastpath or smit -> Performance & Resource Scheduling -> Schedule Jobs to access the SMIT menus to schedule, list and remove jobs.
2.6 BSD commands
The print commands we have discussed in this chapter are primarily the System V commands. AIX 5L also includes several BSD commands that can be used with the System V print subsystem. They include:
lpc The lpc command controls the operation of the printer or of multiple printers. The lpc command can be used to start or stop a printer, disable or enable a printer's spooling queue, rearrange the order of jobs in a queue, or display the status of each printer, along with its spooling queue and printer daemon. With no parameters, the lpc command runs interactively, prompting with lpc>.
100 Printing for Fun and Profit under AIX 5L

lpq The lpq command displays the contents of a printer queue. It reports the status of jobs specified by job#, or all jobs owned by the user specified by username. lpq reports on all jobs in the default printer queue when invoked with no arguments.
lpr The lpr command submits a print request to the scheduler with options specified on flags. (See “The lpr command” on page 94.)
lprm The lprm command removes a job or jobs from a printer's spooling queue. Without any arguments, lprm deletes the job that is currently active, provided that the user who invoked lprm owns that job. When a privileged user specifies a username, lprm removes all jobs belonging to that user.
For additional information, refer to the AIX 5L Commands Reference, or the man pages for each command.
Chapter 2. System V print subsystem basics 101

102 Printing for Fun and Profit under AIX 5L

Chapter 3. System V network printing
In this chapter, we will cover print environments that involve networking or communications. This will include both the configuration and administration of remote printers (or “outbound” printing) as well as print serving (or “inbound” printing).
• On the “outbound” side, the implementation of remote printing follows the BSD model rather than the traditional System V model because the BSD implementation (lpd) remote printing is now generally considered the remote printing standard in UNIX. This means that as long as your target system or printer supports LPD, as defined in Request for Comments (RFC) 1179, you can configure the System V print subsystem in AIX 5L to print to it. For example:
- LPD printing; by this, we mean printing to remote servers or printers that support the LPD protocol. See Section 3.1, “Printing to print servers or remote printers using LPD” on page 103 for more details.
- JetDirect-attached printers, which System V somewhat misleadingly refers to as “network attached”. See Section 3.2, “Adding a JetDirect-attached printer” on page 115.
Historically, System V printing has also supported dialing to a printer using the dial-up printer option. However, because the need for dialing to a printer is outdated and very seldom used by customers, the dial-up printer option (-U of the lpadmin command) is not supported in AIX 5L.
• We will also discuss using the System V print subsystem as a print server, that is, receiving print requests from remote clients or “inbound”. See Section 3.3, “Configuring the System V print subsystem as a print server” on page 128 for more information.
3.1 Printing to print servers or remote printers using LPD
This section applies to printers that are directly IP-addressable and which support LPD, as well as to printers that are attached to and managed by remote print servers. If you need to define a JetDirect-attached printer, see Section 3.2, “Adding a JetDirect-attached printer” on page 115.
3.1.1 OverviewBecause the remote server or printer is running LPD, the process is designed so that no formatting or filtering takes place on the local server; any formatting is taken care of at the destination.
© Copyright IBM Corp. 2001 103
Whenever the print service is started, lpsched starts the lpNet daemon. When you submit a job to a remote LPD destination, the lp command contacts lpsched, which connects to lpNet. lpNet forks a child process and passes the data to that process which sends it to the remote LPD without any local processing.
To enable printing to remote LPD servers or printers, there must be an entry for each remote target created in the /etc/lp/Systems file.
• If you are using Web-based System Manager, the host entry (with default values) will be made for you automatically using the information you provide in the instructions on page 117.
• If you are creating your printer from the command line, you must first register the remote system with the System V print service. See “Step 1: Adding the remote system name to the local print service” on page 110 for details.
3.1.2 PlanningBecause the printing process for remote LPD destinations is different than for locally-attached or JetDirect-attached printers, the information required to configure a remotely-attached LPD printer is also different.
You can not specify any alert or restart information, since the print service does not own this kind of printer. Nor can you specify a print processing model, since there is no interface script that is executed locally for printers attached in this manner.
When you configure a remotely-attached printer, in addition to the standard information (such as printer name, optional class and description), you specify the following information:
• Remote hostname or IP address
• Name of the printer or queue on the remote system
- For a remote server, this would be the name of the print queue on that system.
- For a network-attached LPD printer, this would be the name of the print queue within the printer. For example, the IBM Infoprint 12 has two internal queue names: TEXT for ASCII or simple text, and PASS for formatted PCL or PostScript data. You should refer to your printer’s documentation to find this printer-specific information.
104 Printing for Fun and Profit under AIX 5L
• Printer type (from terminfo)
Although this is a required entry in Web-based System Manager (optional on the command line), the information in terminfo is not used for remote printers, even for validation. In our tests, we obtained the same print results whether we specified a printer type or used a value of ‘unknown’.
• Content type(s) supported
Likewise, although Web-based System Manager requires that you enter a value, it will not be checked.
3.1.3 Adding a remotely-attached printerYou can use either of the following interfaces to add a remotely-attached System V printer:
• Web-based System Manager (see “Option 1: Using Web-based System Manager” on page 105)
• Command line (see “Option 2: Using the lpadmin command” on page 110)
See Table 8 on page 54 for the Web-based System Manager fields and lpadmin flags that you use to enter this information.
Option 1: Using Web-based System ManagerThe Web-based System Manager panels are very similar to those used to add a locally-attached printer.
First, you start Web-based System Manager (as described in “Option 1: Using Web-based System Manager” on page 57) and open the Overview and Tasks panel for Directory Disabled printers (see Figure 6 on page 66). To add a printer, you can either select the New printer task in the Overview panel, the Printers pull-down from the task bar, or the New Printer... toolbar icon. Any of these selections will start the New Printer wizard, which includes these steps:
1. Step 1 of 4: Specify New Printer and Attachment Method (see Figure 14 on page 107)
a. Select a name for your System V printer.
Printer names may be no longer than the maximum length filename allowed for the file system type you are using, and may consist of all printable characters except the space, slash, backslash, colon, semicolon, comma, asterisk, question mark, and tilde. The dash can be used in any position except the first position in a printer name.
This is equivalent to the -p flag on the lpadmin command.
Chapter 3. System V network printing 105

b. You can optionally specify a print class for printer pooling. If you have previously specified a print class, that class will appear in the pull-down list. If no classes exist, the list will be empty. You can type in a new class name here.
Class names may be no longer than the maximum length filename allowed for the file system type you are using, and may consist of all printable characters except the space, slash, backslash, colon, semicolon, comma, asterisk, question mark, and tilde. The dash can be used in any position except the first position in a printer name.
This is equivalent to the -c flag on the lpadmin command.
c. You can optionally provide a description of the printer. This description will be displayed when a user asks for the status of the printer using either lpstat -p [printer] -D or lpstat -p [printer] -l.
This is equivalent to the -D flag on the lpadmin command.
d. Select an attachment method:
• Local connection to this system (parallel or serial) • Remote connection to local printer on another system (that is, to a
remote LPD server or an LPD-capable printer) • Remote connection to a network printer (only JetDirect-attachment
supported)
For LPD servers or devices, you must use the attachment method of “Remote connection to local printer on another system.” (The third option of “Remote connection to a network printer” is only to be used for JetDirect-attached printers.)
In our testing, we were configuring an IBM Network Printer 12 that was attached to the lab’s Token-Ring network.
106 Printing for Fun and Profit under AIX 5L
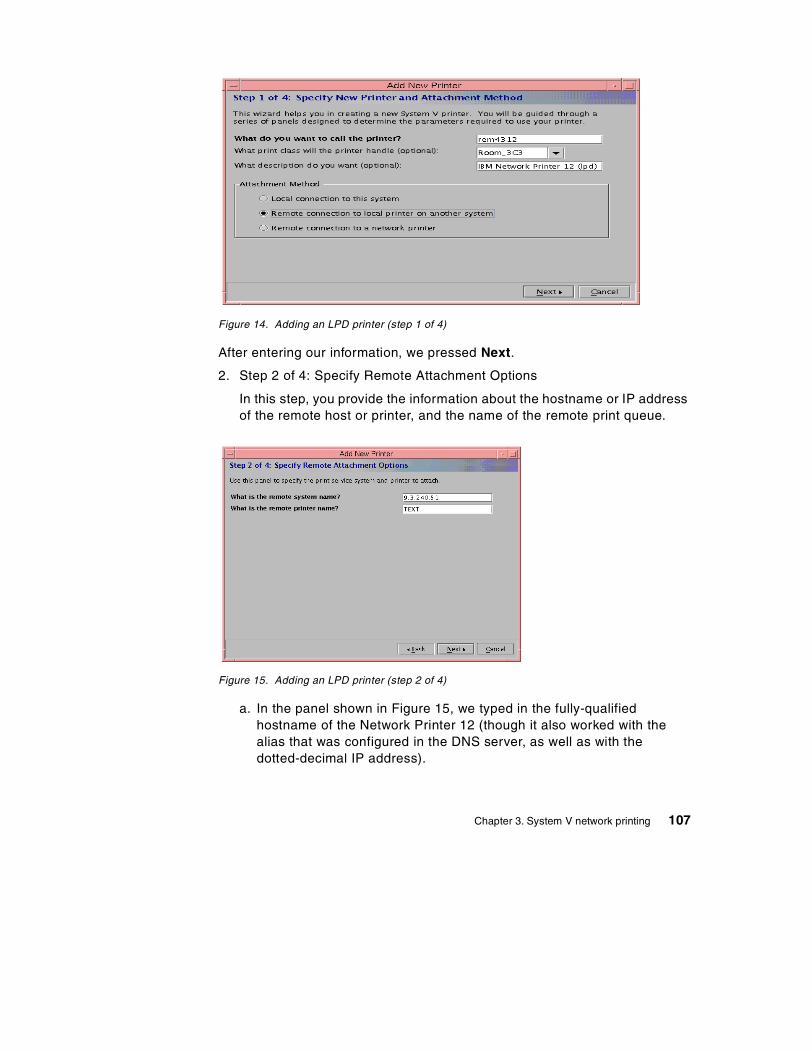
Figure 14. Adding an LPD printer (step 1 of 4)
After entering our information, we pressed Next.
2. Step 2 of 4: Specify Remote Attachment Options
In this step, you provide the information about the hostname or IP address of the remote host or printer, and the name of the remote print queue.
Figure 15. Adding an LPD printer (step 2 of 4)
a. In the panel shown in Figure 15, we typed in the fully-qualified hostname of the Network Printer 12 (though it also worked with the alias that was configured in the DNS server, as well as with the dotted-decimal IP address).
Chapter 3. System V network printing 107

b. We entered the name of one of the Network Printer 12’s internal queues; because we were configuring for ASCII files, we used the value of TEXT that we found in the printer’s documentation, and clicked Next.
These values would be specified on the -s flag on the lpadmin command.
3. Step 3 of 4: Specify Printer Options
In the panel shown in Figure 16, you must enter values for printer type and for print interface (which in this case really means the content type you intend the printer to process).
Figure 16. Adding an LPD printer (step 3 of 4)
a. What is the printer type? At first, we were confused about what to enter here because there is no entry in the terminfo database for IBM Network Printers. Then we recalled that the terminfo entry (though a required entry in Web-based System Manager) is really not used for remote LPD printing, so we could have picked any value, including unknown. (See Section 3.1.2, “Planning” on page 104 for more details.)
This is equivalent to the -T flag on the lpadmin command.
b. What is the printer interface? This question is really asking what content type you want your printer to accept. However, the value for content type is not used for remote LPD printing, so we let this default to Simple and pressed Next.
This is equivalent to the -I flag on the lpadmin command.
108 Printing for Fun and Profit under AIX 5L

4. Step 4 of 4: Verify Settings and Add New Printer
We confirmed that these were the entries we intended and pressed Finish.See Figure 17 for details.
Figure 17. Adding an LPD printer (step 4 of 4)
The printer was created successfully.
Files that were addedWe found it interesting to examine the files that were created after we added our new printer.
• Because this was our first LPD device, the /etc/lp/Systems file was created with the following entry:
9.3.240.51:x:-:bsd:-:n:10:-:-:
If this had not been our first remote printer, that file would have previously existed, and the new remote host information would have been appended to it.
• In the /etc/lp/printers/ directory:
- comment: This file consisted of one line with the text from the description we entered in Step 1.
- configuration: This file contained the following information:
Banner: on:Always Content types: simple Printer type: hplaserjetRemote: 9.3.240.51!TEXT Range: 3,8 Form feed: on
Chapter 3. System V network printing 109
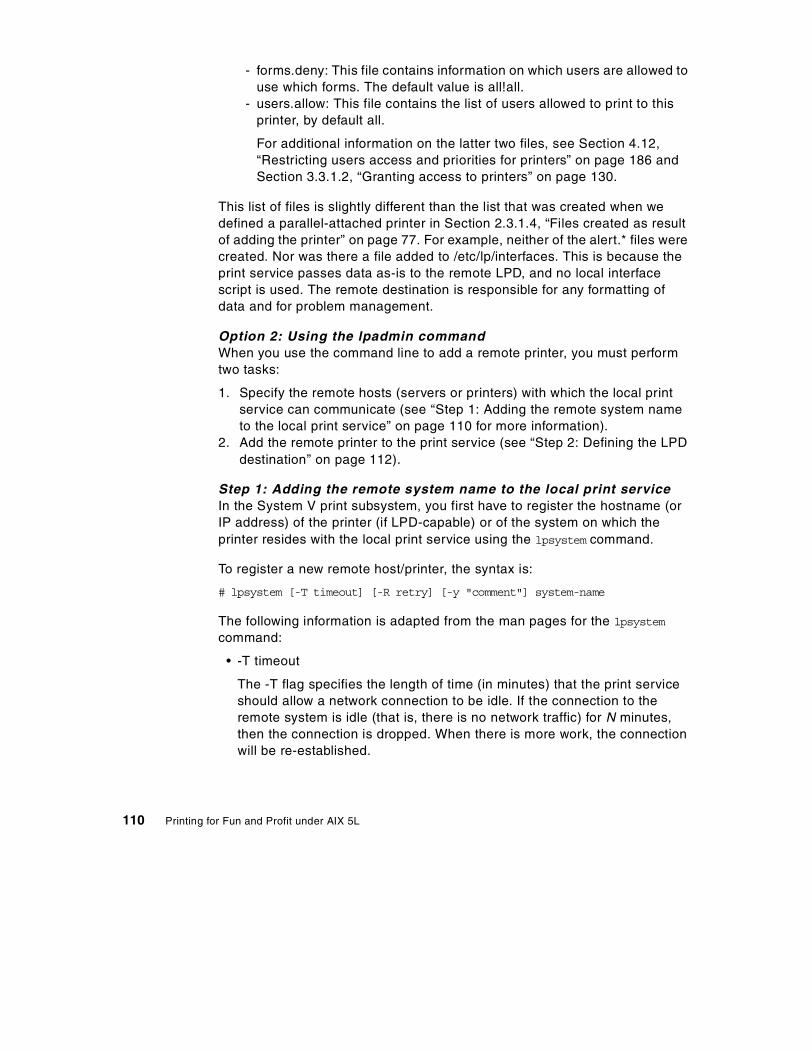
- forms.deny: This file contains information on which users are allowed to use which forms. The default value is all!all.
- users.allow: This file contains the list of users allowed to print to this printer, by default all.
For additional information on the latter two files, see Section 4.12, “Restricting users access and priorities for printers” on page 186 and Section 3.3.1.2, “Granting access to printers” on page 130.
This list of files is slightly different than the list that was created when we defined a parallel-attached printer in Section 2.3.1.4, “Files created as result of adding the printer” on page 77. For example, neither of the alert.* files were created. Nor was there a file added to /etc/lp/interfaces. This is because the print service passes data as-is to the remote LPD, and no local interface script is used. The remote destination is responsible for any formatting of data and for problem management.
Option 2: Using the lpadmin commandWhen you use the command line to add a remote printer, you must perform two tasks:
1. Specify the remote hosts (servers or printers) with which the local print service can communicate (see “Step 1: Adding the remote system name to the local print service” on page 110 for more information).
2. Add the remote printer to the print service (see “Step 2: Defining the LPD destination” on page 112).
Step 1: Adding the remote system name to the local print serviceIn the System V print subsystem, you first have to register the hostname (or IP address) of the printer (if LPD-capable) or of the system on which the printer resides with the local print service using the lpsystem command.
To register a new remote host/printer, the syntax is:
# lpsystem [-T timeout] [-R retry] [-y "comment"] system-name
The following information is adapted from the man pages for the lpsystem command:
• -T timeout
The -T flag specifies the length of time (in minutes) that the print service should allow a network connection to be idle. If the connection to the remote system is idle (that is, there is no network traffic) for N minutes, then the connection is dropped. When there is more work, the connection will be re-established.
110 Printing for Fun and Profit under AIX 5L
Valid values are n, 0, and N, where N is an integer greater than 0. The value n means “never time out''; 0 means “as soon as the connection is idle, drop it.'' The default is n.
Note: In the initial release of AIX 5L Version 5.0, there is a known problem with the default timeout value of n (never-time-out) that is used when remote systems are registered with the print service. The symptom is that jobs sent to a remote printer will stay in the local queue and not be transmitted. This problem has been fixed at the time of editing this redbook. But in the interim, you can specify a non-zero integer to set the timeout value on the lpsystem -T flag as a workaround; the unit is minutes. For example:
# lpsystem -T 60 remote-hostname
• -R retry
The -R parameter specifies the length of time (in minutes) to wait before trying to re-establish a connection to the remote system when the connection was dropped abnormally (that is, a network error).
Legal values are n, 0, and N, where N is an integer greater than 0 and it means “wait N minutes before trying to reconnect.” The value n means “do not retry dropped connections until there is more work;” 0 means “try to reconnect immediately. The default is 10 minutes.
• -y “comment”
The -y flag allows you to enter a description for the system entry. This description is visible when lpsystem -l is used.
• system-name
system-name is the name of the remote system to which you want to be able to send jobs. To allow connection to any BSD system, use the asterisk (*) as the system-name.
The result of the lpsystem command and its flags are defined in /etc/lp/Systems. You can edit this file with a text editor (such as vi), but editing is not recommended. By using lpsystem, you can ensure that the print service is notified of any changes to the Systems file.
ExampleWe wanted to permit printing to the IBM Network Printer 12 on the Token-Ring network in the lab. Its hostname was rs1290a.itsc.austin.ibm.com. We issued two lpsystem commands as root, one to add the name of the IBM Network Printer 12 (with the workaround for the timeout value) and the other to display the resulting information:
Chapter 3. System V network printing 111
You will note that the value for the Type attribute is bsd. Although other implementations of System V printing support other protocols (such as Novell or System V), the only protocol type supported in AIX 5L is bsd, which is the RFC 1179 LPR/LPD protocol.
Once this was accomplished, we could define our remote printer.
Step 2: Defining the LPD destinationYou use the lpadmin command to define a remote printer. The invocation is similar to that used when defining a locally-attached printer, but instead of using the -v flag, you use the -s option. For example:
# lpadmin -p local-name -s server-name[!server-printer-name]
This option makes a server-attached or LPD-capable printer accessible to users on your system. The server-name is the name of the system on which the printer is located or is the hostname of the printer itself. (You can also use IP addresses instead of hostnames.)
The server-printer-name is the name defined on the remote server system for that printer or queue.
Example for a remote printerIn our planning for this printer, we had determined the following:
• We wanted to be able to send it PostScript print jobs.
• We decided to name the queue on our system remps.
• We knew that the internal queue on the IBM Network Printer 12 for formatted PCL or PostScript data is hardcoded in the printer to a value of PASS.
# lpsystem -T 90 -y "IBM4312 TR" rs1290a.itsc.austin.ibm.com UX:lpsystem: INFO: "rs1290a.itsc.austin.ibm.com" has been added.# lpsystem -l System: rs1290a.itsc.austin.ibm.com Type: bsd Connection timeout: 90 minutes Retry failed connections: after 10 minutes Comment: IBM4312 TR
Remember, the remote hostname or IP address must already be listed in the systems table by using the lpsystem command, as we did in “Step 1: Adding the remote system name to the local print service” on page 110.
Note
112 Printing for Fun and Profit under AIX 5L

• We determined that the printer’s IP address and its hostname.
• We decided not to make it a member of a class or pool.
• Although we knew that the terminfo entry is not used for LPD destinations, we set this value to PS, so that someone looking at the detailed printer information with the lpstat command would recognize that this printer is intended for PostScript printing.
• Likewise, even though we also knew that the value for content-type is not used for LPD destinations, we set the value to postscript, so that a long status display would provide a true description of the purpose of this printer.
We issued the following command:
# lpadmin -p remps -s rs1290a.itsc.austin.ibm.com!PASS -T PS -I postscript
We then used different variations of the lpstat command to display the status of our new printer:
We had to issue the accept and enable commands to make the printer ready to print:
• # accept remps (so remps could begin to queue print requests)
• # enable remps (so remps could begin to print any waiting requests)
# lpstat -t scheduler is running system for remps: rs1290a.itsc.austin.ibm.com (as printer PASS) remps not accepting requests since Wed Oct 25 13:19:29 2000 - new destination printer remps disabled since Wed Oct 25 13:19:29 2000. available. new printer# lpstat -p remps -lprinter remps disabled since Wed Oct 25 13:19:29 2000. available. new printer Content types: postscript Printer types: PS Description: Users allowed: all Forms denied: all!all Banner required Character sets: (none) Default pitch: Default page size: 80 wide 66 long
Chapter 3. System V network printing 113
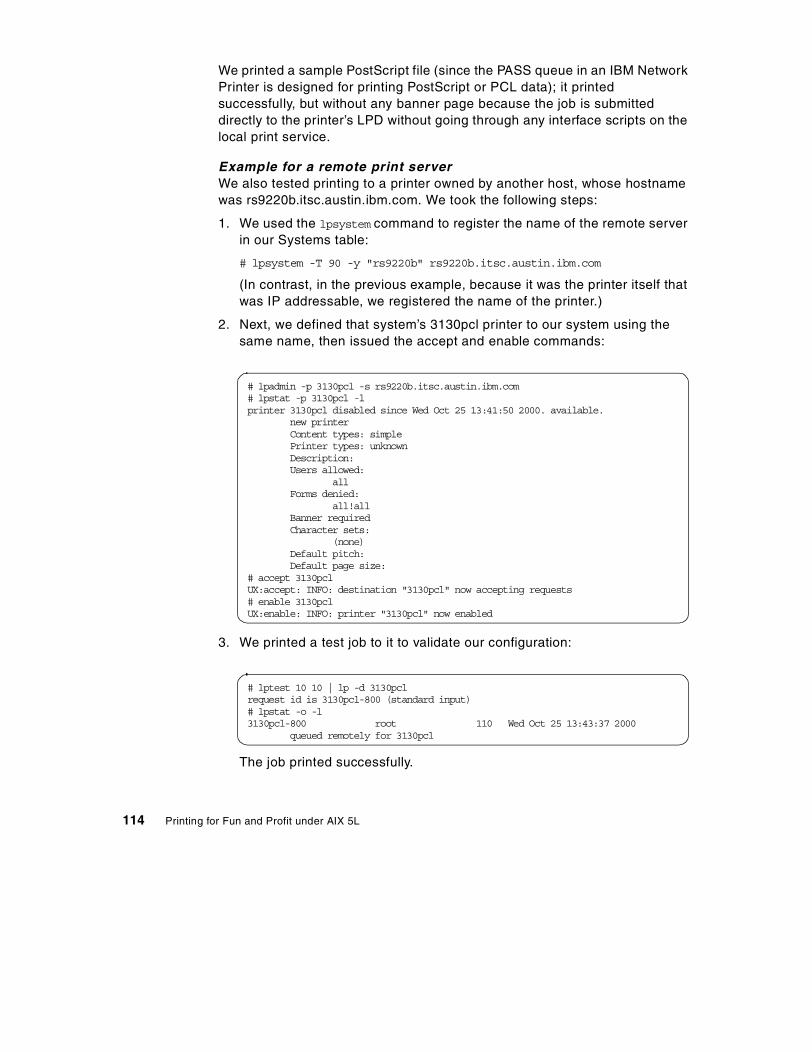
We printed a sample PostScript file (since the PASS queue in an IBM Network Printer is designed for printing PostScript or PCL data); it printed successfully, but without any banner page because the job is submitted directly to the printer’s LPD without going through any interface scripts on the local print service.
Example for a remote print serverWe also tested printing to a printer owned by another host, whose hostname was rs9220b.itsc.austin.ibm.com. We took the following steps:
1. We used the lpsystem command to register the name of the remote server in our Systems table:
# lpsystem -T 90 -y "rs9220b" rs9220b.itsc.austin.ibm.com
(In contrast, in the previous example, because it was the printer itself that was IP addressable, we registered the name of the printer.)
2. Next, we defined that system’s 3130pcl printer to our system using the same name, then issued the accept and enable commands:
3. We printed a test job to it to validate our configuration:
The job printed successfully.
# lpadmin -p 3130pcl -s rs9220b.itsc.austin.ibm.com # lpstat -p 3130pcl -l printer 3130pcl disabled since Wed Oct 25 13:41:50 2000. available. new printer Content types: simple Printer types: unknown Description: Users allowed: all Forms denied: all!all Banner required Character sets: (none) Default pitch: Default page size: # accept 3130pcl UX:accept: INFO: destination "3130pcl" now accepting requests # enable 3130pcl UX:enable: INFO: printer "3130pcl" now enabled
# lptest 10 10 | lp -d 3130pcl request id is 3130pcl-800 (standard input) # lpstat -o -l 3130pcl-800 root 110 Wed Oct 25 13:43:37 2000 queued remotely for 3130pcl
114 Printing for Fun and Profit under AIX 5L

3.2 Adding a JetDirect-attached printer
This section applies only to printers that attach to the network using a Hewlett-Packard JetDirect interface. If you have printers that attach to the network using other interfaces or that are attached to a remote server, you can not use the instructions in this section; see Section 3.1, “Printing to print servers or remote printers using LPD” on page 103.
3.2.1 OverviewThe printing process for JetDirect-attached printers differs from the processes for the other two attachment types we have described in this book, and the configuration procedure is different as well. JetDirect printing is similar to local printing in several ways (local filtering, alerts, print options, no entry in the Systems file), but quite different in others.
When you submit a print job to a JetDirect-attached printer, the lp command contacts lpsched, which calls a first JetDirect-specific interface program. That first interface program in turn calls the standard interface script and pipes the resulting output to the hpnpf program, which communicates with the JetDirect-attached printer.
The configuration process:
1. Creates a JetDirect-specific script by copying the /usr/lib/hpnp/hpnp.model file into /etc/lp/interfaces/printername, then modifying that copy to pipe its output to the standard interface script.
2. Copies the standard interface as /etc/lp/interfaces/model.orig/printername, not as /etc/lp/interfaces/printername as it does for a locally-attached printer. (In contrast, no interface script is used at all when you configure remote LPD printers or servers.)
3.2.2 PlanningWhen you configure a JetDirect-attached printer, in addition to the standard information (printer name, optional class and description), you specify the following information:
• Remote hostname or IP address for the printer
• Action upon printer alert
• Recovery after alert
• Print processing model (interface program)
• Printer type (from terminfo)
Chapter 3. System V network printing 115
• Content type(s) supported
See Table 8 on page 54 for the Web-based Manager fields and lpadmin flags that you use to enter this information.
Note that unlike remote LPD destinations, you do not add an entry to the /etc/lp/Systems file for JetDirect-attached printers. (See Section 3.1.1, “Overview” on page 103 for more information.)
3.2.3 Adding a JetDirect-attached printerYou can use one of the following interfaces to add a JetDirect-attached System V printer:
• Web-based System Manager (see “Option 1: Using Web-based System Manager” on page 116 for more information)
• A simple menu-driven utility called hpnpcfg, which may be familiar to experienced UNIX print administrators (see “Option 2: Using the hpnpcfg utility” on page 121 for more information)
• A few commands from the command line (see “Option 3: Using the command line” on page 127 for more information)
Option 1: Using Web-based System ManagerFirst, you start Web-based System Manager (as described in “Option 1: Using Web-based System Manager” on page 57) and open the Overview and Tasks panel for Directory Disabled printers (Figure 6 on page 66). To add a printer, you can either select the New printer task in the Overview panel, the Printers pull-down from the task bar, or the New Printer... toolbar icon. Any of these selections will start the New Printer wizard, which includes these steps:
116 Printing for Fun and Profit under AIX 5L
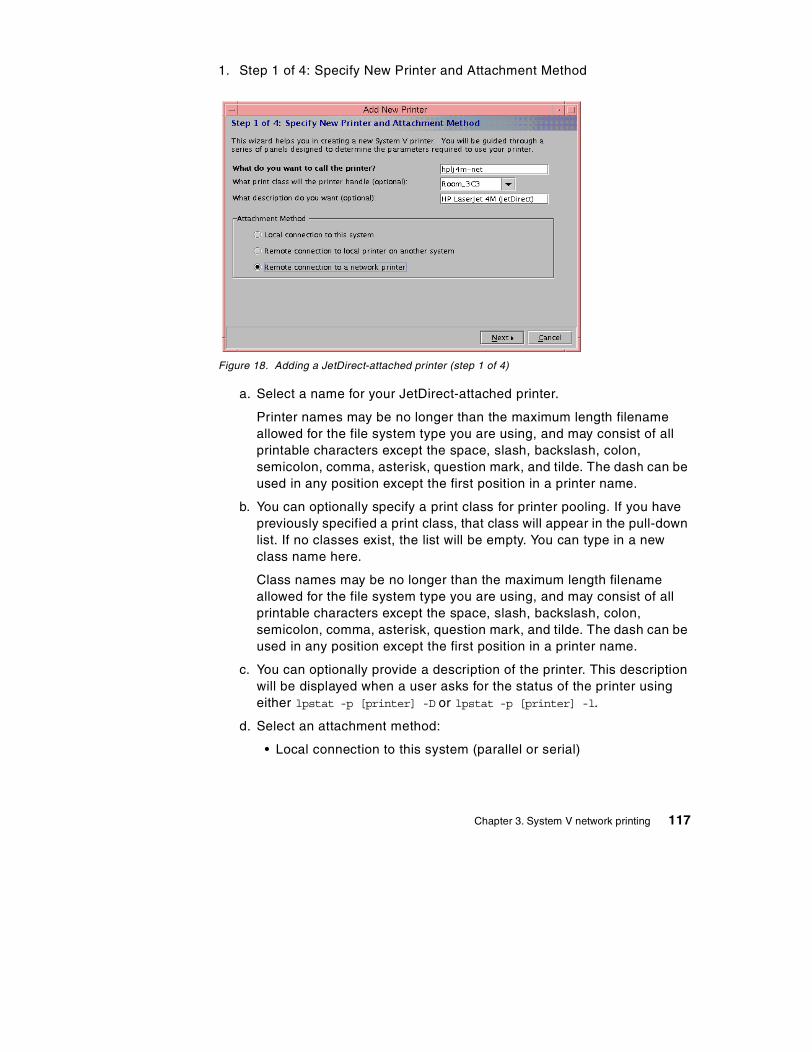
1. Step 1 of 4: Specify New Printer and Attachment Method
Figure 18. Adding a JetDirect-attached printer (step 1 of 4)
a. Select a name for your JetDirect-attached printer.
Printer names may be no longer than the maximum length filename allowed for the file system type you are using, and may consist of all printable characters except the space, slash, backslash, colon, semicolon, comma, asterisk, question mark, and tilde. The dash can be used in any position except the first position in a printer name.
b. You can optionally specify a print class for printer pooling. If you have previously specified a print class, that class will appear in the pull-down list. If no classes exist, the list will be empty. You can type in a new class name here.
Class names may be no longer than the maximum length filename allowed for the file system type you are using, and may consist of all printable characters except the space, slash, backslash, colon, semicolon, comma, asterisk, question mark, and tilde. The dash can be used in any position except the first position in a printer name.
c. You can optionally provide a description of the printer. This description will be displayed when a user asks for the status of the printer using either lpstat -p [printer] -D or lpstat -p [printer] -l.
d. Select an attachment method:
• Local connection to this system (parallel or serial)
Chapter 3. System V network printing 117
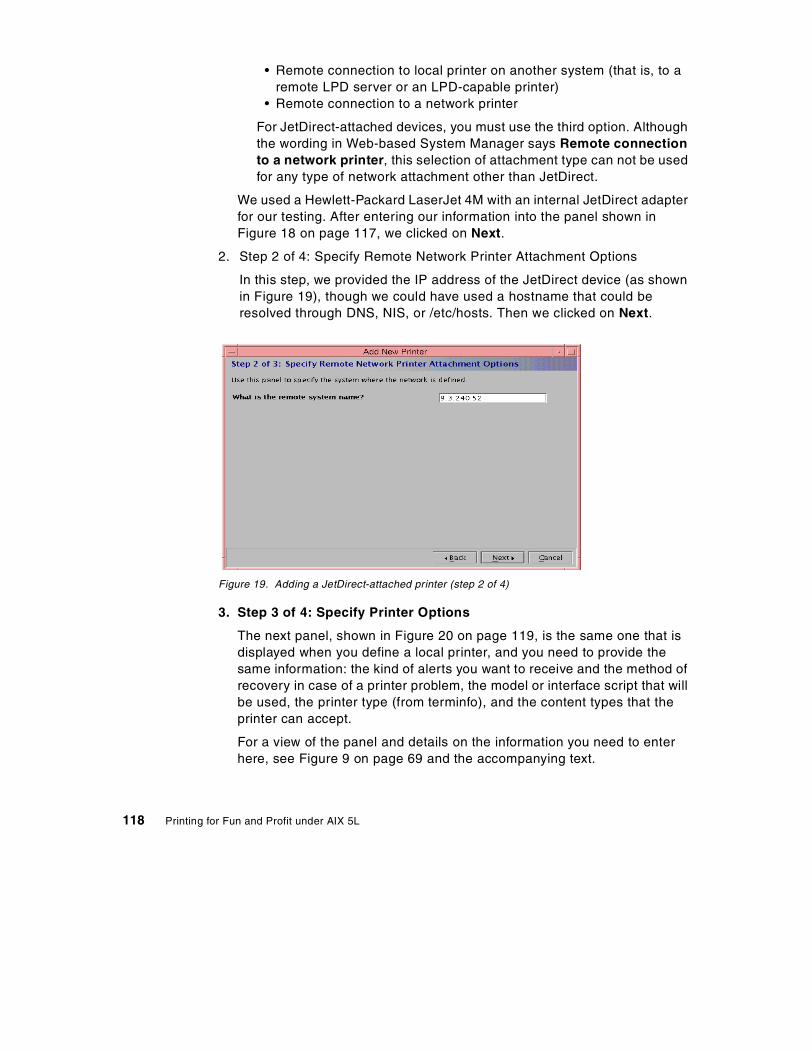
• Remote connection to local printer on another system (that is, to a remote LPD server or an LPD-capable printer)
• Remote connection to a network printer
For JetDirect-attached devices, you must use the third option. Although the wording in Web-based System Manager says Remote connection to a network printer, this selection of attachment type can not be used for any type of network attachment other than JetDirect.
We used a Hewlett-Packard LaserJet 4M with an internal JetDirect adapter for our testing. After entering our information into the panel shown in Figure 18 on page 117, we clicked on Next.
2. Step 2 of 4: Specify Remote Network Printer Attachment Options
In this step, we provided the IP address of the JetDirect device (as shown in Figure 19), though we could have used a hostname that could be resolved through DNS, NIS, or /etc/hosts. Then we clicked on Next.
Figure 19. Adding a JetDirect-attached printer (step 2 of 4)
3. Step 3 of 4: Specify Printer Options
The next panel, shown in Figure 20 on page 119, is the same one that is displayed when you define a local printer, and you need to provide the same information: the kind of alerts you want to receive and the method of recovery in case of a printer problem, the model or interface script that will be used, the printer type (from terminfo), and the content types that the printer can accept.
For a view of the panel and details on the information you need to enter here, see Figure 9 on page 69 and the accompanying text.
118 Printing for Fun and Profit under AIX 5L

We selected e-mail notification for alerts, restarts from top of page (when possible), the standard processing model, the hplaserjet printer type, and content type (which Web-based System Manager calls print interface on this panel) of pcl. The printer type and content type are important, because if they are not set right, you will get the print job on the same page as the banner page and stair-step output. As with local printer, when you use the content type of pcl, you will also need to register the pcl filter using the command:
# lpfilter -f pcl -F /etc/lp/fd/pcl.fd
With the pcl filter registered, the scheduler will call the pcl filter to add carriage returns to line feeds. After entering the information, we clicked Next.
4. Step 4 of 4: Verify Settings and Add New Printer
Figure 20. Adding a JetDirect-attached printer (step 4 of 4)
We verified the settings, clicked Finish, and the printer was added successfully.
We used the lpstat command to list the printer configuration:
Chapter 3. System V network printing 119

Note: In the early release code that we tested, Web-based System Manager caused the interface script for JetDirect-attached printers to be created with incorrect permissions. Before testing the printer, change the permissions for the interface script to executable owned by user lp and group lp. For example, if the printer name is jet02, use these commands:
# chmod +x /etc/lp/interfaces/jet02# chown lp:lp /etc/lp/interfaces/jet02
We attempted to verify the configuration by printing an ASCII file:
# lp -d hplj4m-net /etc/motd
This printed correctly as long as the printer type was set to hplaserjet, the content type was set to pcl, and the pcl filter was registered.
Files that were addedAfter defining the network-attached printer we called hplj4m-net, the following files were created:
• In the /etc/lp/printers/hplj4m.net directory:
- alert.sh - alert.vars - comment - configuration - forms.deny - users.allow
# lpstat -p hplj4m-net -l printer hplj4m-net is idle. enabled since Mon Oct 23 19:01:41 2000. available. Form mounted: Content types: pcl Printer types: hplaserjet Description: Ethernet-attached HP-LJ 4M (JetDirect NIC) Connection: direct Interface: /usr/lib/lp/model/standard On fault: mail to root once After fault: continue Users allowed: all Forms denied: all!all Banner required Character sets: (none) Default pitch: 10 CPI 6 LPI Default page size: 80 wide 60 long Default port settings:
120 Printing for Fun and Profit under AIX 5L

These files are like those created for a locally-attached printer (see Section 2.3.1.4, “Files created as result of adding the printer” on page 77 for details), with the interesting point that the device that is used with a JetDirect printer is /dev/null.
• /etc/lp/interfaces/hplj4m.net - This is a copy of the /usr/lib/hpnp/hpnp.model file with modifications made for the address of the remote servers and is the file that was copied with the incorrect permissions (as mentioned earlier). This script invokes the original model or interface script from the subdirectory model.orig and pipes its output to /usr/lib/hpnp/hpnpf.
• /etc/lp/interfaces/model.orig/hplj4m-net - This is the copy of the standard interface file copied from the /usr/lib/lp/model directory.
In contrast to defining a remote printer (Section 3.1, “Printing to print servers or remote printers using LPD” on page 103), adding a network-attached printer did not cause any entries to be made to the /etc/lp/Systems file.
Option 2: Using the hpnpcfg utilityAIX 5L includes an installation script, /usr/lib/hpnp/hpnpcfg, that can be used to configure JetDirect-attached printers.
To start the hpnpcfg utility, we issued the following command as root:
# /usr/lib/hpnp/hpnpcfg
This displayed the following menus, where we entered a question mark (?) in order to view the online help for this utility:
In the early release code that we tested, the hpnpcfg script shuts down the scheduler and restarts it with some environment variables set to values that cause any JetDIrect queues to no longer work. Before running the script, edit the file /usr/lib/hpnp/cfg/option6, and comment out these lines:
# echo /usr/sbin/lpshut | tee -a -- $LOG# /usr/sbin/lpshut# if [ $? -eq 0 ]# then# STARTLP=1# fi
If you do not make these changes to the script, make sure to recycle the scheduler by running lpshut and lpsched after running the script.
Note
Chapter 3. System V network printing 121

In our test environment, the HP LaserJet 4M had an internal JetDirect token-ring adapter that was directly IP addressable and did not require the use of BOOTP. Therefore, we bypassed options 1-3 and selected the fourth option to verify network printer connectivity:
HP NETWORK PRINTER CONFIGURATION TASKS MAIN MENU 1) Verify installation of software 2) Configure a printer with BOOTP/TFTP 3) Verify BOOTP/TFTP configuration 4) Verify network printer connectivity 5) Verify network printer operation 6) Add printer to spooler 7) Remove printer BOOTP/TFTP configuration 8) Remove printer from spooler ?) Help q) Quit Please enter selection: ? To configure a new network peripheral, use options 2 through 6 in sequence. Option 2 creates a BOOTP entry and an optional file of configuration parameters to be retrieved by the network peripheral with TFTP. Options 3, 4, and 5 verify the local BOOTP/TFTP operation and verify that the network peripheral is operating correctly as a network node. Option 5 sends a file to the network peripheral without using the spooling system. Option 6 configures the local spooler to use the network peripheral. After completing option 6, you are finished with peripheral and spooler configuration and can send printjobs through the spooling system. Option 7 removes the BOOTP entry and configuration file created by option 2. Option 8 removes the spooler configuration created in option 6. Press the return key to continue ...
122 Printing for Fun and Profit under AIX 5L

We could communicate with the printer’s address, so we selected the fifth option to send a test file directly to the printer to verify printer operation:
Please enter selection: 4 Enter the network peripheral name or IP address: 9.3.240.52 ========================================================= Testing network connectivity to 9.3.240.52 .... ping 9.3.240.52 PING 9.3.240.52: (9.3.240.52): 56 data bytes 64 bytes from 9.3.240.52: icmp_seq=0 ttl=60 time=4 ms 64 bytes from 9.3.240.52: icmp_seq=1 ttl=60 time=3 ms 64 bytes from 9.3.240.52: icmp_seq=2 ttl=60 time=3 ms C ----9.3.240.52 PING Statistics---- 3 packets transmitted, 3 packets received, 0% packet loss round-trip min/avg/max = 3/3/4 ms 9.3.240.52 passed the network connectivity test ========================================================= The printer network connectivity test is complete. Press the return key to continue ...
Please enter selection: 5 Enter the network peripheral name or IP address: 9.3.240.52
The following types of test files can be sent to the printer:
1) text file 2) PostScript file Which type of file should be sent? (1/2 default=1) =============================================================== Checking that rs9220a is on the printer's access list ... /usr/lib/hpnp/cfg/canaccess 9.3.240.52 Usage: canaccess [-c community] [-p port] [-v] peripheral The access list test was inconclusive ... continuing Sending a test file to 9.3.240.52 ... /usr/lib/hpnp/hpnpf -n -v -R -x 9.3.240.52 /usr/lib/hpnp/testfiles/text Connecting to 9.3.240.52 ... connected Sending file /usr/lib/hpnp/testfiles/text
The file was successfully sent to 9.3.240.52. =============================================================== The network printer operation test is complete.
Chapter 3. System V network printing 123

We do not recommend sending the test PostScript file because it is prefixed with non-PostScript commands, which in our test environment caused the printer to print out the PostScript source.
We next selected the sixth option to add the printer to the spooler:
The online help states that the name is limited to 14 alphanumeric characters plus the underscore, and indeed this program enforces those rules; when you use this hpnpcfg tool to add a JetDirect-attached printer, you will not be allowed to enter a name that does not meet these criteria. (In contrast, when you use Web-based System Manager or lpadmin to add local or remote printers, you need only follow the general file naming rules of the operating system when naming printers or classes.)
Continuing with the hpnpcfg script, it next asked us for the host name or IP address of the JetDirect-attached printer. The name you specify here must be known either through DNS, NIS, or by an entry in the /etc/hosts file; if not, you will receive an error message.
Next, the script asked for printer type and the content type.
Please enter selection: 6 Enter the lp spooler destination name: ? Enter the name to be used as the destination in an "lp" command. The name should match the peripheral's network name, but it does not have to. For example, the lp destination name can be "p1" and the name known on the network (and stored in /etc/hosts) can be "koala". The name is limited to 14 characters and must consist entirely of the characters A-Z, a-z, 0-9, and _ (underscore). Enter "q" to return to the main menu Enter the lp spooler destination name: jet4m
Enter the network peripheral name (default=jet4m): ? The lp spooler destination name can be different from the network peripheral name. The lp spooler destination name is the name used with the -d option of the "lp" command. The network peripheral name is the name entered in /etc/hosts, NIS (Network Information Service), or DNS (Domain Name System.) Enter "q" to return to the main menu Enter the network peripheral name (default=jet4m): rs1290b
124 Printing for Fun and Profit under AIX 5L
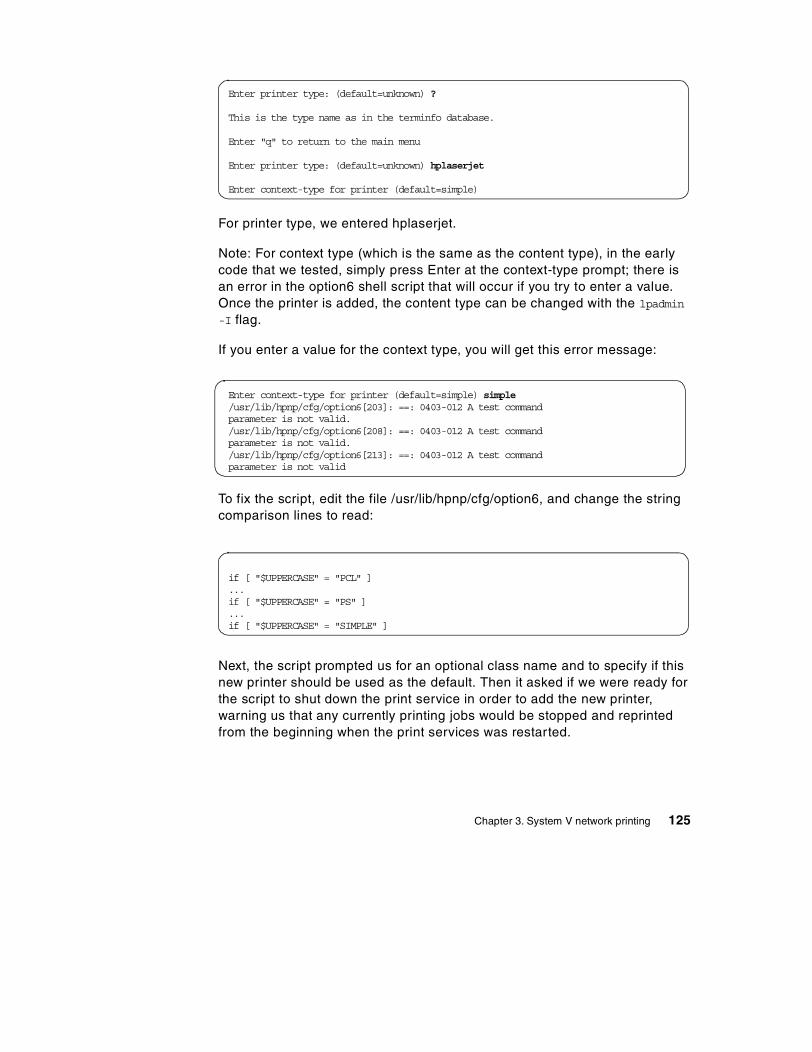
For printer type, we entered hplaserjet.
Note: For context type (which is the same as the content type), in the early code that we tested, simply press Enter at the context-type prompt; there is an error in the option6 shell script that will occur if you try to enter a value. Once the printer is added, the content type can be changed with the lpadmin -I flag.
If you enter a value for the context type, you will get this error message:
To fix the script, edit the file /usr/lib/hpnp/cfg/option6, and change the string comparison lines to read:
Next, the script prompted us for an optional class name and to specify if this new printer should be used as the default. Then it asked if we were ready for the script to shut down the print service in order to add the new printer, warning us that any currently printing jobs would be stopped and reprinted from the beginning when the print services was restarted.
Enter printer type: (default=unknown) ? This is the type name as in the terminfo database. Enter "q" to return to the main menu Enter printer type: (default=unknown) hplaserjet Enter context-type for printer (default=simple)
Enter context-type for printer (default=simple) simple /usr/lib/hpnp/cfg/option6[203]: ==: 0403-012 A test command parameter is not valid./usr/lib/hpnp/cfg/option6[208]: ==: 0403-012 A test command parameter is not valid./usr/lib/hpnp/cfg/option6[213]: ==: 0403-012 A test command parameter is not valid
if [ "$UPPERCASE" = "PCL" ]...if [ "$UPPERCASE" = "PS" ]...if [ "$UPPERCASE" = "SIMPLE" ]
Chapter 3. System V network printing 125

We replied yes (y), and the hpnpcfg script performed the following actions and wrote these messages to the console and the /tmp/hpnpcfg.log file:
We displayed the current configuration of the printer:
Enter the spooler class for the peripheral to join (optional): Room_3C3 Will this be the default printer? (y/n/q default=n) n Ready to shut down the spooling system, configure the new destination, and start the spooling system again. When the spooling system is shut down all printing will stop. Any print requests that are currently printing will be reprinted in their entirety when the spooling system is restarted. OK to continue? (y/n/q default=y) y
======== Fri Nov 17 15:18:09 CST 2000 BEGIN HPNPCFG ON aix4prt
======== Fri Nov 17 15:18:30 CST 2000 BEGIN HPNPCFG ON aix4prt======== BEGIN MENU CHOICE 6
Adding jet06 to spooler
/usr/sbin/lpadmin -p jet06 -v /dev/null -f allow:all -u allow:all -I simple -T hplaserjetmv /usr/spool/lp/admins/lp/interfaces/jet06
/usr/spool/lp/admins/lp/interfaces/model.orig/jet06sed -e s/ PERIPH=/PERIPH=9.3.240.53/ /usr/lib/hpnp/hpnp.model >
/usr/spool/lp/admins/lp/interfaces/jet06scheduler was not restarted/usr/sbin/accept jet06/usr/bin/enable jet06
126 Printing for Fun and Profit under AIX 5L

Now change the content type of the printer with lpadmin:
# lpadmin -p jet06 -I pcl
One major difference in this configuration, when compared to the other configurations we had tested, was the value for forms. On all previous printer definitions where we took the default, the value for a new printer was Forms denied: all!all, which means that no special forms could be mounted on this printer (unless overridden by an administrator). However, using hpnpcfg, the value for the printer defined with this utility was Forms allowed: all. This may not be the desired behavior, particularly in an environment where the special forms could be preprinted payroll checks, that is, negotiable documents! Another problem that occurs is that the adding a printer with this script will fail if forms are defined.
We tested from the command line by printing the /etc/motd file, and it printed fine with a banner in front.
Option 3: Using the command lineThe most failsafe method to add JetDirect-attached printers is to use the command line option. The commands needed can be obtained from the log of hpnpcfg and are shown here (for adding a printer named jet5 to printer with the hostname debsprt).
# lpstat -p jet4m -l printer jet4m is idle. enabled since Wed Oct 25 15:13:01 2000. available. Form mounted: Content types: simple Printer types: hplaserjet Description: Connection: direct Interface: /usr/lib/lp/model/standard On fault: mail to root once After fault: continue Users allowed: all Forms allowed: all Banner required Character sets: (none) Default pitch: 10 CPI 6 LPI Default page size: 80 wide 60 long Default port settings:
Chapter 3. System V network printing 127
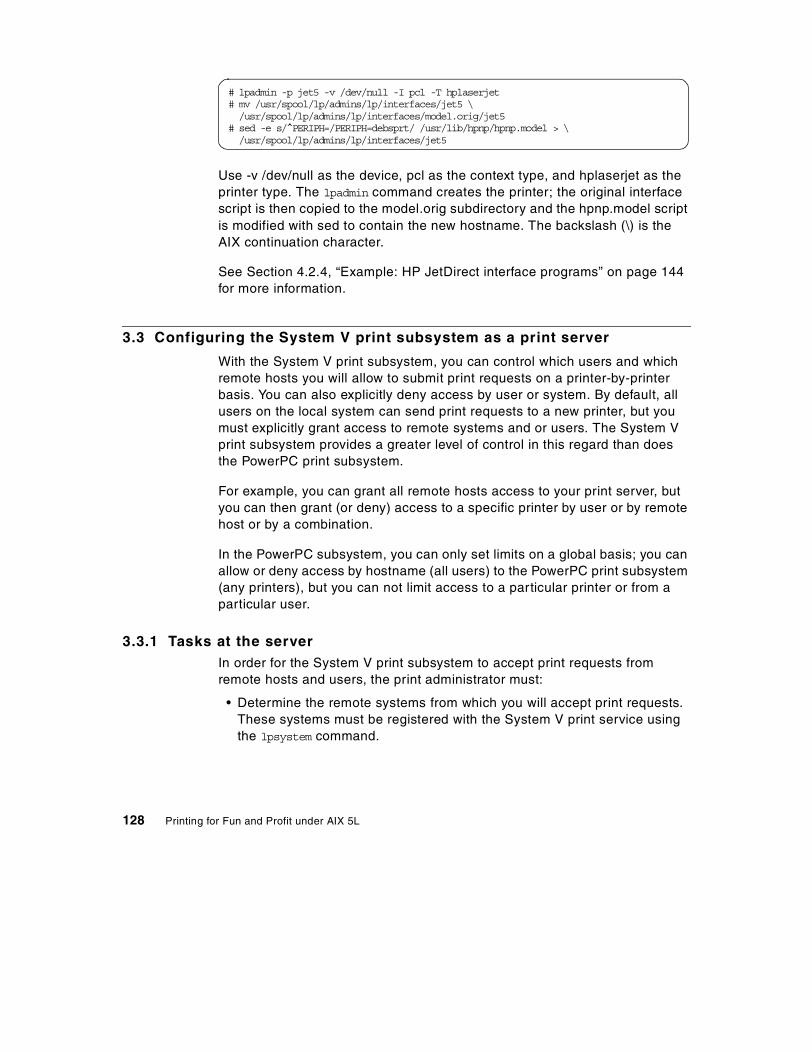
Use -v /dev/null as the device, pcl as the context type, and hplaserjet as the printer type. The lpadmin command creates the printer; the original interface script is then copied to the model.orig subdirectory and the hpnp.model script is modified with sed to contain the new hostname. The backslash (\) is the AIX continuation character.
See Section 4.2.4, “Example: HP JetDirect interface programs” on page 144 for more information.
3.3 Configuring the System V print subsystem as a print server
With the System V print subsystem, you can control which users and which remote hosts you will allow to submit print requests on a printer-by-printer basis. You can also explicitly deny access by user or system. By default, all users on the local system can send print requests to a new printer, but you must explicitly grant access to remote systems and or users. The System V print subsystem provides a greater level of control in this regard than does the PowerPC print subsystem.
For example, you can grant all remote hosts access to your print server, but you can then grant (or deny) access to a specific printer by user or by remote host or by a combination.
In the PowerPC subsystem, you can only set limits on a global basis; you can allow or deny access by hostname (all users) to the PowerPC print subsystem (any printers), but you can not limit access to a particular printer or from a particular user.
3.3.1 Tasks at the serverIn order for the System V print subsystem to accept print requests from remote hosts and users, the print administrator must:
• Determine the remote systems from which you will accept print requests. These systems must be registered with the System V print service using the lpsystem command.
# lpadmin -p jet5 -v /dev/null -I pcl -T hplaserjet# mv /usr/spool/lp/admins/lp/interfaces/jet5 \/usr/spool/lp/admins/lp/interfaces/model.orig/jet5
# sed -e s/^PERIPH=/PERIPH=debsprt/ /usr/lib/hpnp/hpnp.model > \/usr/spool/lp/admins/lp/interfaces/jet5
128 Printing for Fun and Profit under AIX 5L

• Explicitly grant access to each printer to remote users and remote hosts using the lpadmin command with the -u flag:
- Decide if you will accept print requests from all remote hosts or just specific ones.
- Decide if you will accept print requests from all users or just specific ones.
• If granting universal access, decide if you want to restrict that by denying print requests on a host and/or user basis.
You do not have to take any explicit action to start a daemon to receive remote print jobs.
3.3.1.1 Registering remote systemsThe first step in setting up the System V print subsystem as a print server is to register those remote host systems that will be allowed to submit print requests to your printers.
• If you wish to allow connections from any system, you can do so using the asterisk as wildcard on the lpsystem command:
# lpsystem -T 10 -R 10 -y “Allow all BSD connections” “*”
This adds the following entry to the /etc/lp/Systems file:
The presence of this entry allows a print server to accept connections from systems that are not explicitly configured as known systems. This does not necessarily mean that all users from any system can send print requests to any of your printers; you can control that on an individual printer, user and remote host basis.
• If you do not want to separately control access to each printer on your system, but you want the /etc/lp/Systems file to specify which remote systems have access to your printers, you need to remove the wildcard entry from the file and add entries for the remote systems. To do this, perform the following:
- To remove the wildcard entry for BSD systems, use the following command:
# lpsystem -r “*”
- To add the entry for a specific remote system, use the following command:
*:x:-:bsd:-:10:10:-:0:Allow all BSD connections
Chapter 3. System V network printing 129
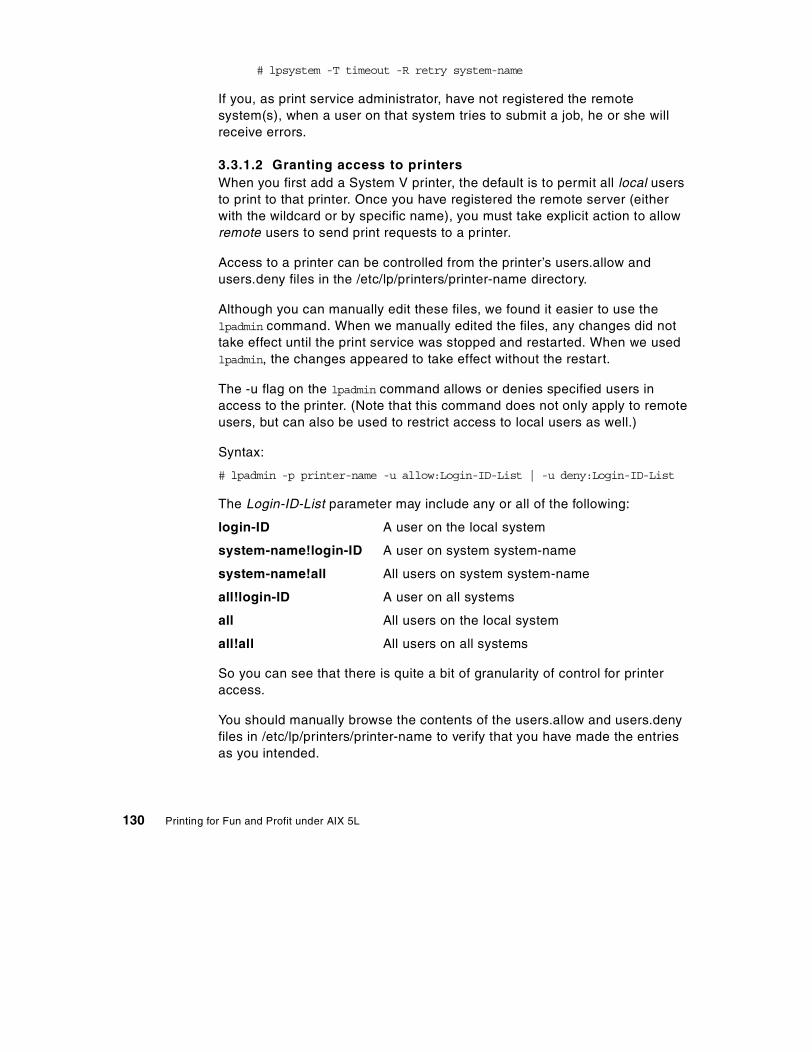
# lpsystem -T timeout -R retry system-name
If you, as print service administrator, have not registered the remote system(s), when a user on that system tries to submit a job, he or she will receive errors.
3.3.1.2 Granting access to printersWhen you first add a System V printer, the default is to permit all local users to print to that printer. Once you have registered the remote server (either with the wildcard or by specific name), you must take explicit action to allow remote users to send print requests to a printer.
Access to a printer can be controlled from the printer’s users.allow and users.deny files in the /etc/lp/printers/printer-name directory.
Although you can manually edit these files, we found it easier to use the lpadmin command. When we manually edited the files, any changes did not take effect until the print service was stopped and restarted. When we used lpadmin, the changes appeared to take effect without the restart.
The -u flag on the lpadmin command allows or denies specified users in access to the printer. (Note that this command does not only apply to remote users, but can also be used to restrict access to local users as well.)
Syntax:
# lpadmin -p printer-name -u allow:Login-ID-List | -u deny:Login-ID-List
The Login-ID-List parameter may include any or all of the following:
login-ID A user on the local system
system-name!login-ID A user on system system-name
system-name!all All users on system system-name
all!login-ID A user on all systems
all All users on the local system
all!all All users on all systems
So you can see that there is quite a bit of granularity of control for printer access.
You should manually browse the contents of the users.allow and users.deny files in /etc/lp/printers/printer-name to verify that you have made the entries as you intended.
130 Printing for Fun and Profit under AIX 5L

3.3.1.3 Scenarios for user accessThere is more than one way to accomplish the same objective. You need to decide which works best for your environment.
Scenario 1:You want to configure your system so that it will accept print requests from any remote host. You have decided that only user doug on remote system deneb should be able to print to the printer myprint on local system redbird.
You could use the lpsystem command with the wildcard to allow all remote hosts (including deneb) to submit print requests to the print service on redbird. Then you grant access to myprint only for remote user doug using the lpadmin command with the -u allow flag:
Note that all local users and doug on deneb can print to myprint.
Scenario 2: You have decided that all users on the remote host paris can print to myprint on redbird, but no other users on any remote hosts. Use the command:
# lpadmin -p myprint -u allow:paris!all
This assumes that the /etc/lp/Systems file contains a wildcard entry for all BSD hosts and/or that it contains a specific entry for paris.
Scenario 3:Perhaps you have used the wildcard to enable all remote systems to submit print requests to your server, but you decide that there is one user badguy on remote system vader that you do not want to be able to print to myprint. Use the command:
Note that the users.deny file was created with this new entry.
# lpsystem -T 10 -R 10 -y “Allow all BSD connections” “*”# lpadmin -p myprint -u allow:deneb!doug# cat /etc/lp/printers/myprint/users.allowall deneb!doug
# lpadmin -p kwmpar -u deny:vader!badguy # cat /etc/lp/printers/myprint/users.deny vader!badguy # cat /etc/lp/printers/myprint/users.allow all deneb!doug
Chapter 3. System V network printing 131
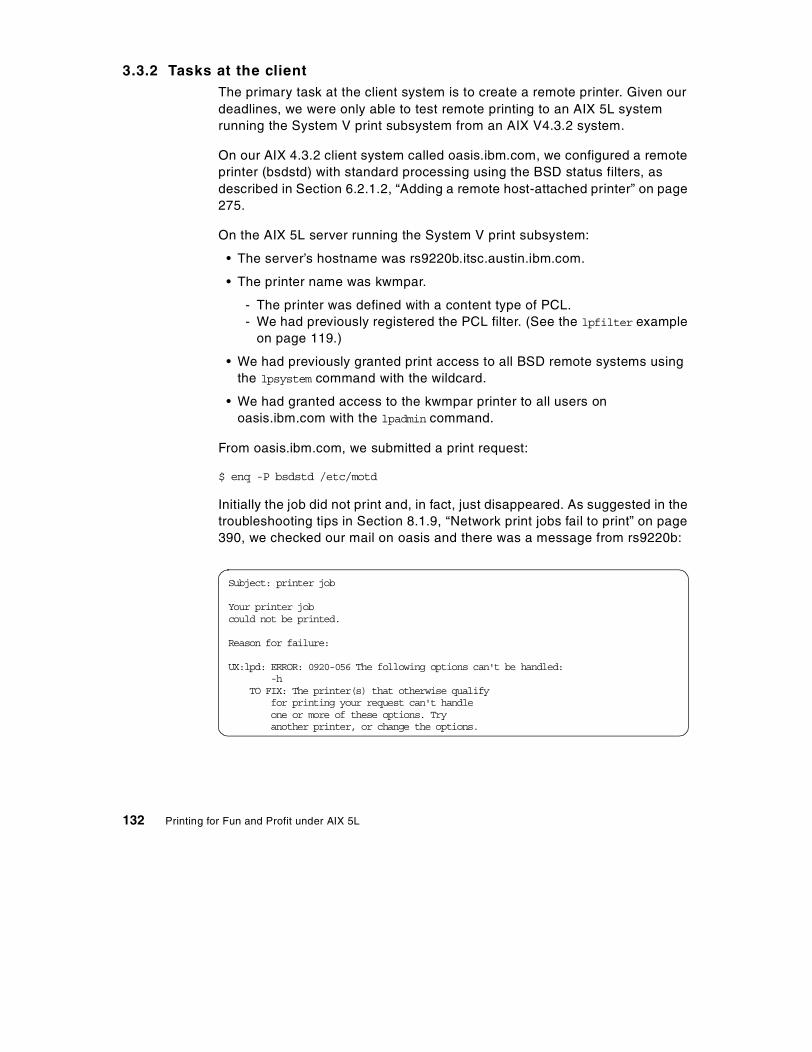
3.3.2 Tasks at the clientThe primary task at the client system is to create a remote printer. Given our deadlines, we were only able to test remote printing to an AIX 5L system running the System V print subsystem from an AIX V4.3.2 system.
On our AIX 4.3.2 client system called oasis.ibm.com, we configured a remote printer (bsdstd) with standard processing using the BSD status filters, as described in Section 6.2.1.2, “Adding a remote host-attached printer” on page 275.
On the AIX 5L server running the System V print subsystem:
• The server’s hostname was rs9220b.itsc.austin.ibm.com.
• The printer name was kwmpar.
- The printer was defined with a content type of PCL. - We had previously registered the PCL filter. (See the lpfilter example
on page 119.)
• We had previously granted print access to all BSD remote systems using the lpsystem command with the wildcard.
• We had granted access to the kwmpar printer to all users on oasis.ibm.com with the lpadmin command.
From oasis.ibm.com, we submitted a print request:
$ enq -P bsdstd /etc/motd
Initially the job did not print and, in fact, just disappeared. As suggested in the troubleshooting tips in Section 8.1.9, “Network print jobs fail to print” on page 390, we checked our mail on oasis and there was a message from rs9220b:
Subject: printer job Your printer job could not be printed. Reason for failure: UX:lpd: ERROR: 0920-056 The following options can't be handled: -h TO FIX: The printer(s) that otherwise qualify for printing your request can't handle one or more of these options. Try another printer, or change the options.
132 Printing for Fun and Profit under AIX 5L

The -h flag is a flag for the lpr command that says to suppress the banner page. However, the kwmpar printer on rs9220b was configured with the default setting of banners required. We logged into rs9220b as the print administrator and modified kwmpar so that banners were no longer required (lpadmin -p kwmpar -o nobanner), resubmitted the print request from oasis, and the job printed.
Chapter 3. System V network printing 133

134 Printing for Fun and Profit under AIX 5L

Chapter 4. System V advanced printing
In previous chapters, you have learned how to add and remove printers, print to printers, and make minor changes. This chapter contains more advanced topics, such as how interface scripts work, how to use the terminfo database, techniques for using forms, security considerations, and some specific hints and tips to make System V printing more efficient.
4.1 Overview
Although the introductory and networking chapters will help you setup printers and print to them, the ability to fully customize printers so that they will deliver the desired output on paper from the right paper tray with the right font requires a more thorough understanding of how the print subsystem works and what you as the administrator can do to customize the printer attributes to meet your user’s needs.
4.1.1 Understanding the different types in System V printingIn System V printing, many different things are referred to as types. When starting with the System V print subsystem, this is one of the more confusing aspects. Most of these are described in Chapter 2, “System V print subsystem basics” on page 45, and the following section is meant to only be a quick reference. When you create a new printer with Web-based System Manager, the supported printer list from /usr/lpp/sysmgt.websm/inst_root/var/websm/data/model.stz is used to determine the printer type, the interface type, and the content type. The following shows a sample stanza from this file:
hp-laserjet-ps-4L:name="HP LaserJet 4L/4ML (Postscript)"terminfo=PS-binterface=PScontents=PS
This stanza shows a Printer device type of HP LaserJet 4L/4ML (Postscript), a printer type of PS-b, a content type of PS, and an interface model type of PS. The following sections help clarify the meaning and use of each of these print subsystem types.
4.1.1.1 Printer device typeThis is the printer model added when you add a printer device. The printer model is used to customize the serial or parallel device driver to make the devices more specific to a particular printer. In traditional AIX printing, there
© Copyright IBM Corp. 2001 135
was a one to one correspondence between the printer device types and the virtual printer types. This is not necessary, because a group of similar printers really use the same device attributes, such as the buffer size and any special timing requirements. There is really only a need for differences when going from slow dot matrix printers and plotters to faster dot matrix printers and then on to laser printers. So if you pick any printer that has similar speed to the one you are using, you will have a working and supported solution from an operating system device driver standpoint.
4.1.1.2 Printer typeThe printer type associates a printer with an entry in the terminfo database that is used to extract setup and formatting commands. Since most of the command sequences defined in terminfo definitions are common to a family of printers, such as PostScript, PCL, Proprinter, Epson and Printronix, there are really very few printer types needed. Multiple printer definitions can use the same printer type. The printer type is defined by the lpadmin -T flag. The printer type must be used if the following are to work: -o cpi, -o lpi, -o width, and -o length flags of the lpadmin and lp commands, and the -S and -f flags of the lpadmin command. The exception to this are scripts that are printer specific and generate the command sequences inside the interface script instead of accessing them from terminfo. The printer type is designed to be used by the lp.set filter to generate printer setup sequences for horizontal spacing (cpi), vertical spacing (lpi), page width, page length, and character set. If the print type is not set right, it is possible that even simple control characters such as a formfeed will not be used right. One example of this is that if the content type for a PCL printer is set to unknown, there may not be a formfeed after the banner page.
4.1.1.3 Content typeThe content type is defined by the lpadmin -I flag and determines which types of print files can be sent to the printer. The content type list can contain a list of files that the printer can handle. This is appropriate for laser printers that can handle both PostScript and PCL. The type simple is recognized as the default content type. A simple type of file is a data stream containing only printable ASCII characters and does no formatting. This is basically a passthrough content type. The content type is used by lpsched to determine if the printer can handle the print job or to determine if there are filters registered to convert the file to a format that can be printed. The user can specify that a file is a particular content type by using the lp -I flag.
When using a PCL printer, the content type should be set to pcl and the pcl print filter should be registered. This will allow the pcl print filter to add carriage returns and line feeds. If you do not do this, it is likely that the output
136 Printing for Fun and Profit under AIX 5L

will appear in stair-steps, or may not appear at all. To add these functions to an existing printer, use the lpfilter and lpadmin commands to register the pcl filter and change the content type to pcl.
# lpfilter -f pcl -F /etc/lp/fd/pcl.fd# lpadmin -p printer-name -I pcl
After making these changes, normal text files will be properly formatted when sending them to the printer.
The PS content type is reserved for PostScript printers. When the content type is PS, the postprint, postio, and download filters combine to allow users to send text files to the printer. The postprint filter will convert the file from text to PostScript. For this to work properly, you must first register the filters and set the interface type to PS. Use lpfilter and lpadmin to make these changes, as shown here:
# lpfilter -f postio -F /etc/lp/fd/postio.fd# lpfilter -f download -F /etc/lp/fd/download.fd# lpfilter -f postprint -F /etc/lp/fd/postprint.fd# lpadmin -p printer-name -I PS
See Section 4.10, “PostScript printers” on page 176 for more details.
4.1.1.4 Interface model typeThough not technically a type for System V printing, there are multiple models of interfaces supplied as the starting point for processing the print job and sending the processed file to the printer.
4.1.2 Overview of customizations coveredIn the System V print subsystem, you can customize printers by performing one of the following actions:
• Using a custom interface script
• Adding a new printer to the terminfo database
• Adding form support to a printer definition
• Setting the printer attributes
• Specifying specific character sets
• Specifying a printer font cartridge
• Setting up PostScript print filters
• Printing text files to PostScript printers
• Restricting user access to printers
Chapter 4. System V advanced printing 137
4.2 Printer interface programs
A printer interface program is a shell script called by lpsched for local print requests. Often referred to as print drivers, which they are not, these scripts control what happens to your print job before it goes to the printer. By default, printers will use either the standard interface programs for most ASCII text or the PS interface program for PostScript. The printer interface programs are built from model scripts located in /usr/lib/lp/model. Also, the /etc/lp/model directory is linked to the /usr/lib/lp/model directory. When a printer is created, a copy of the interface script is copied to the /var/spool/lp/admins/lp/interfaces directory. In AIX, this is actually a link to /etc/lp/interfaces. You will find that each local printer listed by lpstat will have a script located in this directory, and the names will be the same as the name of the printer.
To make changes permanent, so they will be added to new printers, make the changes to the model scripts. To make the changes specific to a particular printer, make the changes in the interfaces subdirectory. The original model of the interface script will be in a different directory. Check the printer configuration file in /etc/lp/printers/printer-name/configuration file which will always point to the model of the interface file that is being used.
Printer manufacturers package printer support for System V printers by providing custom interface scripts, and even though these scripts currently do not include AIX customization, it is believed that the manufacturers will soon support AIX as IBM moves to this standard print subsystem.
A printer interface program should:
• Initialize the printer port, if necessary. The standard interface program uses the stty command to initialize the printer port.
• Initialize the printer hardware for cpi, lpi, page length, page width, printer font, paper tray, simplex or duplex and similar parameters based on print flags.
• Print a banner page, if requested.
• Print the number of copies specified by the print request.
If you are using HP JetDirect printers, the script will be in /etc/lp/interfaces, but this script will call the script that will actually be used, which is in the /etc/lp/interfaces/model.orig subdirectory.
Note
138 Printing for Fun and Profit under AIX 5L

• Return an error code.
The System V print service, not a printer interface program, is responsible for opening the printer port. The printer port is given to the printer interface program as standard output, and the printer is identified as the controlling terminal for the printer interface program, so that a hang-up of the port will cause a SIGHUP signal to be sent to the printer interface program to interrupt or cancel a print job.
4.2.1 How do the interface scripts work?The starting or standard model interfaces are stored in /usr/lib/lp/model and include:
• standard
• PS
• B2.job
Also included for JetDirect printing are two additional model interface scripts that are located in /usr/lib/lp/hpnp and are named:
• hpnp.model
• hpnpIS.model
These are shell scripts, and if you understand shell programming methods, you can read the source and understand what they do and do not do. Except for the JetDirect scripts, these are only called for local print jobs.
The interface script receives information from lpsched about the user and the print job through two methods:
• Environmental variables
• Command line parameters.
The next section describes the three standard environment variables and the five standard command line parameters that are passed in addition to the file names.
4.2.1.1 Environment variables and argumentsThe scheduler passes a user environment that can be obtained with the set or env commands, and will always set the TERM environment variable to use for obtaining information from the terminfo database. The FILTER will only be passed if the scheduler has determined that file conversion needs to be done.
Chapter 4. System V advanced printing 139
Environment variablesThe following environment variables are set by the scheduler and passed as environment variables:
TERM The TERM variable is used to access the cpi, lpi, length, width, character set and other information from the terminfo database.
FILTER The FILTER variable can be set by the scheduler to tell the script to run a different formatting filter instead of lp.set. The filter type is set when the scheduler finds that the requested content type does not match the requested printers content type, and there are filters registered to convert the content type from the input content type to the output content type. For example, to add carriage returns for a pcl printer, the pcl filter will be set.
CHARSET The CHARSET variable can contain the character set to use.
Command line parametersWhen writing or modifying an interface script, you should be able to handle the five standard parameters that are passed as $1 through $5. The fifth parameter, the options_list, can actually contain multiple flags that can either be the standard lp flags or custom flags defined for your particular interface and supplied by the lp -o options. After the options_list is the list of files to be printed.
The following variables are received in the script as command line variables:
printer The printer name is set by the zeroth parameter (for example, the basename of the shell script) and works because the interface script file name is the same name as the printer name.
request_id The request_id is the first parameter passed and is the job name consisting of the queue name, a dash, and the job number.
user_name The user_name is the second parameter passed. This is the system name and userid of the person who submitted the print job. This information is printed on the title page.
title The title is the third parameter passed and is null unless it is included as a command line argument. When it is available, it is printed on the banner.
copies The number of copies is the fourth parameter passed.
options_list The fifth parameter is the options list, which is parsed by the interface. The options are always included without the -o flag.
140 Printing for Fun and Profit under AIX 5L

This can be the standard options such as -o nobanner, or user defined options such as -o landscape. One of the options always included is the file list or flist= option, which includes the filename, a colon, and a number. If the input is standard list, then only the colon and number are included.
file_names The rest of the parameters include the actual filenames to print. Jobs that are queued will list the full path of the original file name, while spooled jobs will contain the path to the file in the spool directory.
The following sections give an overview of the operations performed by each of the default interface scripts.
4.2.1.2 The standard scriptThe interface script model named standard is a fairly simple script that allows the printer to be initialized by setting simple printer attributes, such as character, line pitch and page orientation. It does this by adding control sequences appropriate for the printer based on the terminfo attributes. It also adds a banner page and handles printer errors gracefully by disabling the printer and mailing an error message the user who printed the file.
This simple script does not provide capabilities such as tray selection, page orientation, or simplex/duplex selection. For sophisticated printer setup, an interface script should be obtained from the manufacturer. Because the terminfo database is used for printer attributes, a single script can handle a large number of printers.
When the interface that you choose is based on the standard script, this script is copied to /etc/lp/interfaces/printer-name. For debugging or customization for a particular printer, you may want to add debug echo statements or customization commands. Add them to the working script in this new directory. The basic steps performed by this standard script are shown here in the order in which they occur:
1. Set traps for script termination.
2. Set some globally used variables and functions.
3. Check the arguments passed by lpadmin to make sure there are at least five arguments.
4. Convert the arguments into variable names.
5. Parse the option_list parameters; this sets variables to pass to the filters later, including things like cpi, lpi, length, and width options.
6. Check for the TERM, CHARSET, and FILTER environment variables.
Chapter 4. System V advanced printing 141
7. If FILTER is null, then set FILTER to lp.cat to output to the device.
8. Initializes the printer device with stty.
9. Initializes the printer with commands from the terminfo database. The attributes used here can be init or iprog, is1, is2, is3, if, tabs, and so on.
10. Initializes the printer for cpi, lpi, width, and length, but not the character set by calling lp.set. This will set the values used by the banner page.
11. Prints the banner page.
12. Initializes the printer for cpi, lpi, width, length, and the character set by calling lp.set. This will set the values used by the print job.
13. Outputs to the printer through the FILTER (usually lp.cat) and then to lp.tell to handle any error processing.
14. Sends a carriage return and a form feed.
15. Exits with a return code (zero if successful).
Printer initializationPrinter initialization in the standard script is done through two processes, as shown in steps 9, 10, and 12 above. The initialization in step 9 is done through the use of the tput (terminfo output) command. If the init terminfo attribute exists for the printer, then it is used for all the initialization in this step. If it does not exist, then the commands are determined by the terminfo attributes iprog, is1, is2, it, ht, and is3.
Note: In the early version of the code that we tested, the command tput init was redirected to /dev/null and never initialized the printer, but this will be fixed in future releases. If it is not, change the line:
if ${TPUT} init 2>/dev/null > /dev/null
to
if ${TPUT} init 2>/dev/null
Print job formattingThe standard interface program supplied in this version of AIX 5L does not do any formatting. This is done by filters that will be called when the printer content is set to pcl or wrapped. When this is done, the pcl filter is called by the standard interface to add carriage returns to line feeds and the like. The pr filter can also be used to do formatting. The actual filter that is used will be determined by the difference between the content type of the print job and the printer. The filter is passed by lpsched to the interface program through the FILTER environment variable. To register the pcl filter, use the following command:
142 Printing for Fun and Profit under AIX 5L

# lpfilter -f pcl -F /etc/lp/fd/pcl.fd
The pcl filter will be used when the input type is simple, and the printer type is pcl. This will add carriage returns to lines just ending in line feeds when using the standard script. See Section 4.9, “PCL printers” on page 175 for more details.
4.2.1.3 The PS scriptThe PS (PostScript) interface program works very similar to the standard interface. It uses the download, postio, and postio_b filters instead of lp.set, lp.cat, and lp.tell for the banner pages, and lp.set is not used at all. The terminfo database is not used by this filter for initialization. The PS-r, PS-br, and PSR TERM types only affect the position of the banner page, determining if it is printed before or after the main print job. The banner page is created in text mode and passed through postprint to create the postscript.
4.2.2 Creating and modifying a custom interface scriptIt is possible to create your own custom interface script to include the printer characteristics for a printer with or without using the terminfo database. The easiest way to create your own interface program is to make a copy of the standard interface program and then make modifications to the new script. This can be done in three steps:
1. Change to the model directory:
# cd /usr/lib/lp/model
2. Make a copy of the standard interface program:
# cp standard custom-name
For laser printers, make a copy of the /usr/hpnp/hpnpIS.model script and customize it:
# cp /usr/hpnp/hpnpIS.model custom-name
3. Edit the custom-name program. This is a shell script and is fairly well documented.
The types of things you may want to modify include:
• Any port setup commands
• The printer setup commands and escape sequences
• The default print filter program
• Add or delete arguments for the print commands
• Handle any errors
Chapter 4. System V advanced printing 143

• Call special filters
If you use the hpnpIS.model, you will get complete printer setup (for example, tray selection, page orientation selection, simplex/duplex selection and other printer attributes) for HP laserjet printers. This script should also work for PCL and PostScript laser printers from other manufacturers. You will have to make one additional change to the script so that it will not pipe the output to the remote socket program.
Change the line:
CHANGEME
to
CHANGMETOTHIS
4.2.3 Assigning a custom interface script to a printerSet up the custom printer interface program for a specific printer with the lpadmin command with the -i flag. The syntax is:
# lpadmin -p printer-name -i custom-name
where printer-name and custom-name apply to the name of the printer you plan to use and the full path name of the customer printer interface program. For example, to set a custom interface program named smalltype to a printer named laser1 use:
# lpadmin -p laser1 -i /usr/lib/lp/model/smalltype
or
# lpadmin -p laser2 -i /usr/hpnpIS.model -T unknown -v /dev/lp12
4.2.4 Example: HP JetDirect interface programsThe models for the HP JetDirect printers are located in the /usr/lib/hpnp directory. The default script to be used is named hpnp.model, as described in Chapter 3, “System V network printing” on page 103. This script will be used when you add a JetDirect attached printer with either Web-based system manager or with the config script /usr/lib/hpnp/hpnpcfg. When creating a JetDirect printer, the standard interface script is used to create the printer and is copied to /etc/lp/interfaces/printer-name by lpadmin. The hp specific script, then copies the script to the /etc/lp/interfaces/printer-name/model.orig/printer-name. The hpnp.model script is copied to /etc/lp/interfaces/printer-name and modified to pipe its output to the copy of the standard script now in model.orig, while setting the
144 Printing for Fun and Profit under AIX 5L

output of that script to be piped to the hpnpf filter, which sends the output to the network attached printer. When added this way, the formatting is supposed to be done by the script in model.orig. To add formatting to PCL printers, the pcl content type must be set and the pcl filter must be registered, as described in Section 4.9, “PCL printers” on page 175.
Installing the custom scriptTo solve this problem, you can use the extra model script (that is supplied) called hpnpIS.model. This script contains the printer escape codes for HP PCL and PostScript printers built into the file instead of using the values from terminfo. The steps for changing to the new interface script are:
1. Change to the hpnp directory:
# cd /usr/lib/hpnp
2. Back up the original script:
# cp hpnp.model hpnp.model.bak
3. Copy the new script to hpnp.model:
# cp hpnpIS.model hpnp.model
Creating the customized printer for network printingAt this point, the printer can be installed by using Web-based System Manager and choosing an HP JetDirect network printer, or by running the hpnpinstall script, followed by the hpnpcfg script.
The sequence of events for creating printer hpdj14 would go like this if issued from the command line:
1. Shut down the scheduler (optional):
# lpshut
2. Add the printer with lpadmin:
# lpadmin -p hpdj14 -v /dev/null -I simple -T unknown
3. Change to the interfaces directory:
# cd /etc/lp/interfaces
4. Move the hpdj14 file to model.orig:
# mv hpdj14 model.orig/hpdj14
5. Set the IP address of the network printer while copying the file:
# sed -e s/^PERIPH=/PERIPH=9.3.240.52/ /usr/lib/hpnp/hpnp.model hpdj14
6. Start the scheduler (optional; it is necessary if lpshut is run), accept jobs and enable the printer:
Chapter 4. System V advanced printing 145

# /usr/lib/lp/lpsched # accept hpdj14# enable hpdj14
Creating the customized hpnpIS interface for local printingBy default, the script hpnpIS.model is designed to work with JetDirect attached printers, but because the script provides such good printer initialization for laser printers, the same script can be modified to use for local printers. The procedure above could be used, but a simpler procedure is shown here (This procedure assumes you have already created /dev/lp2.):
1. Add the printer with lpadmin:
# lpadmin -p hplj14 -v /dev/lp2 -I simple -T unknown \-i /usr/lib/hpnp/hpnpIS.model
2. Change to the interfaces directory:
# cd /etc/lp/interfaces
3. Edit the file hplj14 that was just created in step 2.
Add the LPCAT definition near the top of the page, as shown here:
LOGFILE="/tmp/$PERIPH.$$"NETWORK="$HPNPF -x $PERIPH"LPCAT="/usr/lib/lp/bin/lp.cat"printer=$PERIPH
4. Comment out the pipe to the $NETWORK and replace this line with a $LPCAT command, as shown below:
#) | $NETWORK >> $LOGFILE 2>&1) | $LPCAT 2>/tmp/hplj14.log
5. Set the printer accept jobs and enable the printer:
# accept hpdj14# enable hpdj14
The output for this queue will go to /dev/lp2.
Default page sizeThe default paper size for this script is set to A4. For the US, you will probably want to change this to letter. The paper size is set with an escape sequence specified in the part of the code that looks like this:
146 Printing for Fun and Profit under AIX 5L
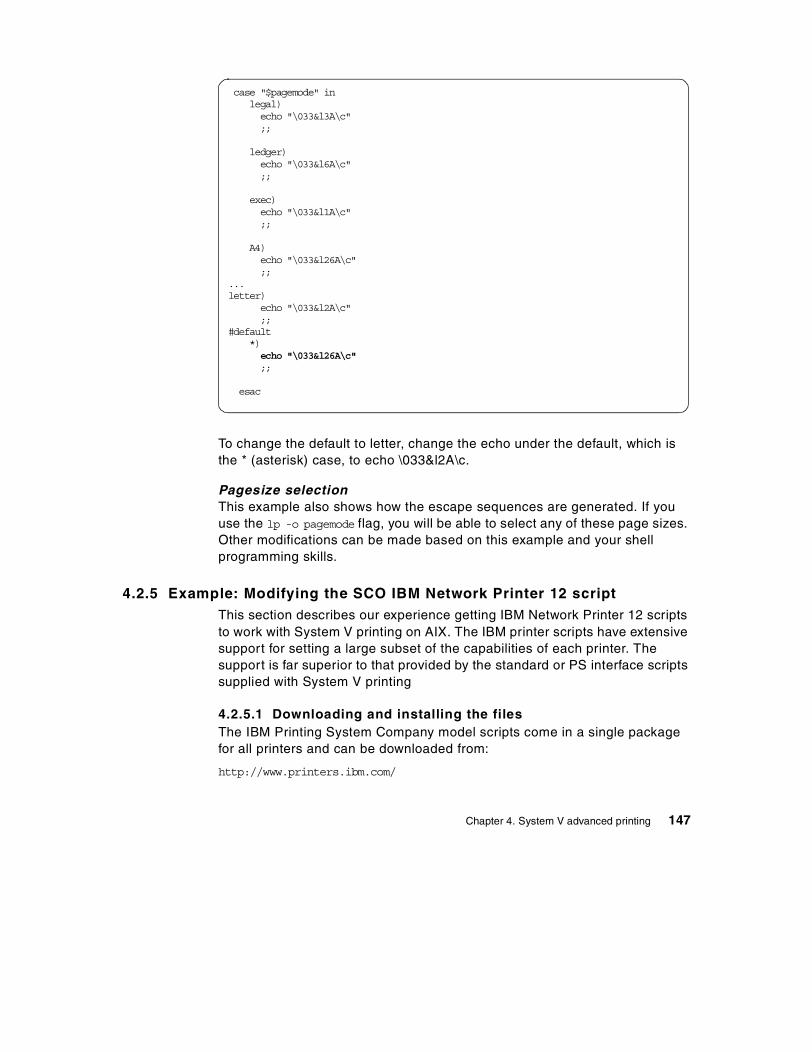
To change the default to letter, change the echo under the default, which is the * (asterisk) case, to echo \033&l2A\c.
Pagesize selectionThis example also shows how the escape sequences are generated. If you use the lp -o pagemode flag, you will be able to select any of these page sizes. Other modifications can be made based on this example and your shell programming skills.
4.2.5 Example: Modifying the SCO IBM Network Printer 12 scriptThis section describes our experience getting IBM Network Printer 12 scripts to work with System V printing on AIX. The IBM printer scripts have extensive support for setting a large subset of the capabilities of each printer. The support is far superior to that provided by the standard or PS interface scripts supplied with System V printing
4.2.5.1 Downloading and installing the filesThe IBM Printing System Company model scripts come in a single package for all printers and can be downloaded from:
http://www.printers.ibm.com/
case "$pagemode" in legal) echo "\033&l3A\c" ;;
ledger) echo "\033&l6A\c" ;;
exec) echo "\033&l1A\c" ;;
A4) echo "\033&l26A\c" ;;...letter) echo "\033&l2A\c" ;;#default *) echo "\033&l26A\c" ;;
esac
Chapter 4. System V advanced printing 147

Select drivers and then download the SCO drivers. This will download a file named scoaa_ml.tar. Copy this file to a SCO system /home/ibm directory, untar the file, and unpack with the pkgadd command using the -s flag to place this in the /home/ibmnp subdirectory:
# tar -xvf scoaa_ml.tar# pkgadd -s /home/ibmnp -d /home/ibm/IBMnp
This will creates a subdirectory /home/ibmnp/opt with a number of other subdirectories. Change to the /home/ibmnp/opt directory and use the tar command to put the files in a format that can be unpacked on the AIX 5L system:
# cd /home/ibmnp/opt# tar -cvf /home/ibm/ibmstuff.tar
On the AIX system, make sure there is an /opt file system that contains at least 5 MB of space, and FTP the file from the SCO system into this directory and unpack with:
# tar -xvf ibmstuff.tar
This will create a /opt/ibmnp directory with four subdirectories:
• admin
• bin
• man
• models.
The man pages for each printer model provide a complete list of -o flags that can be used with the lp command when printing.
Some of the simple -o options include:
• Page orientation: portrait, landscape or rotate
• Tray selection: main, tray1 or tray2
• Paper size selection: letter, ledger, A4, A5, and so on
• Type size: 10, 12, 15, 17
• Type style: bold, italic, medium
• Resolution: dpi
148 Printing for Fun and Profit under AIX 5L

4.2.5.2 Making minor modifications to the files for startersThe scripts are not set up to log the errors properly on AIX, so we added a quick stanza in the portion of the script that defines the log files, as shown below:
This change now directed the script errors to /var/lp/logs/lpsched. When we ran the script, it logged the following error:
./ibmnp12[851]: syntax error at line 851 : `{' unmatched
We added a curly bracket (}) at the end of the file and the error disappeared.
4.2.5.3 Creating a printer that used the scriptBecause we wanted to check the output, we created a printer that printed to a file in the /dev directory using the following commands:
# touch /dev/lpx; chmod 777 /dev/lpx; chown lp:lp /dev/lpx# lpadmin -i /opt/ibmnp/models/ibmnp12 -T unknown -I simple -p np12a -v /dev/lpx
This created the interface /etc/lp/interfaces/np12a. Then we tested the printer with these commands:
# lp -o landscape -d np12a -L C /etc/motdrequest id is np12a-233 (1 file)# ls -l /dev/lpx-rw-rw-rw- 1 lp lp 1769 Nov 1 18:56 /dev/lpx
case "$OS" in SCO_SV | solaris | SOLARIS | SunOS) if [ -w "/var/spool/lp/logs/lpsched" ] then log="/var/spool/lp/logs/lpsched" else log=/dev/null fi ;;# JWT:IBM - Added AIX lpsched log 11/1/2000 AIX) if [ -w "/var/lp/logs/lpsched" ] then log="/var/lp/logs/lpsched" else log=/dev/null fi ;; HP-UX)
Chapter 4. System V advanced printing 149

We printed the /dev/lpx to a network attached printer and the landscape mode worked, but there were some PJL errors that may have come because we first printed to a file, and then separately printed the file to a network printer.
4.2.6 Example: Modifying the SCO Lexmark interface scriptThe Lexmark interface script for SCO can be downloaded from the Lexmark FTP download site starting from http://www.lexmark.com. The file that can be downloaded is in SCO pkgadd format, and so you will need a SCO system to unpack the files. The file will download as drivers-unixware7_pkg.Z. Once this is downloaded to the SCO system, uncompress the file and use the SCO pkgadd command with -s to install to a directory:
# uncompress drivers-unixware7_pkg# pkgadd -s /home/lexmark -d /home/lexmark/drivers-unixware7_pkg.
We chose to install only the printer software. This created a subdirectory with the code in /home/lexmark/MVprint. The model script is in the reloc subdirectory tree ./reloc/$INSTDIR/markvision/bin. Most of the files in this subdirectory are SCO executable files, but the shell script is called marknet_model. This script uses two of the executables for SCO, which are formatter and transport (directly). The script also indirectly calls executables like cat_serial.
To have any chance of this working, you have to first install the AIX version of the software, which uses AIX colon files, but also contains the transport code cat_npa and cat_lexbe executables, as well as an interesting program called sniff.
Because Lexmark is good at supporting a lot of servers, it is probably best to wait until the code is available for AIX 5L before using this backend.
4.2.7 Example: Custom interface to pipe data to an output programProbably the easiest method to use to pipe data to a laser printer is to start with the /usr/lib/hpnpIS.model script and make changes to set the NETWORK environment variable equal to that required for the program you use. The steps to set this up and send data to a network socket filter name netprt could be done as follows:
1. Add the printer with lpadmin:
# lpadmin -p hplj14 -v /dev/null -I simple -T unknown \-i /usr/lib/hpnp/hpnpIS.model
2. Change to the interfaces directory:
# cd /etc/lp/interfaces
150 Printing for Fun and Profit under AIX 5L
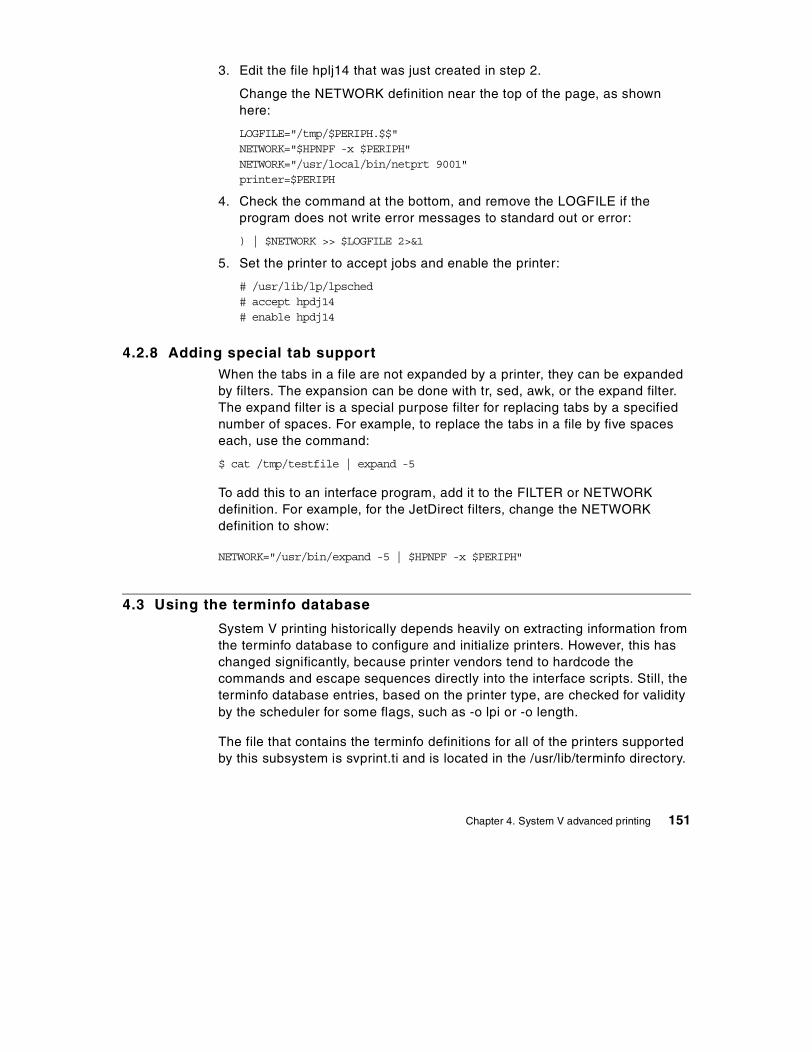
3. Edit the file hplj14 that was just created in step 2.
Change the NETWORK definition near the top of the page, as shown here:
LOGFILE="/tmp/$PERIPH.$$"NETWORK="$HPNPF -x $PERIPH"NETWORK="/usr/local/bin/netprt 9001"printer=$PERIPH
4. Check the command at the bottom, and remove the LOGFILE if the program does not write error messages to standard out or error:
) | $NETWORK >> $LOGFILE 2>&1
5. Set the printer to accept jobs and enable the printer:
# /usr/lib/lp/lpsched# accept hpdj14# enable hpdj14
4.2.8 Adding special tab supportWhen the tabs in a file are not expanded by a printer, they can be expanded by filters. The expansion can be done with tr, sed, awk, or the expand filter. The expand filter is a special purpose filter for replacing tabs by a specified number of spaces. For example, to replace the tabs in a file by five spaces each, use the command:
$ cat /tmp/testfile | expand -5
To add this to an interface program, add it to the FILTER or NETWORK definition. For example, for the JetDirect filters, change the NETWORK definition to show:
NETWORK="/usr/bin/expand -5 | $HPNPF -x $PERIPH"
4.3 Using the terminfo database
System V printing historically depends heavily on extracting information from the terminfo database to configure and initialize printers. However, this has changed significantly, because printer vendors tend to hardcode the commands and escape sequences directly into the interface scripts. Still, the terminfo database entries, based on the printer type, are checked for validity by the scheduler for some flags, such as -o lpi or -o length.
The file that contains the terminfo definitions for all of the printers supported by this subsystem is svprint.ti and is located in the /usr/lib/terminfo directory.
Chapter 4. System V advanced printing 151

The file is terminfo compiled (tic) and stored in the respective terminfo directories at install time.
The System V interface program standard uses the terminfo database to initialize each printer and establish a page width, character pitch, line pitch, and character set. The command sequences, which are often escape sequences, are stored as TERM attributes in the terminfo database.
Each printer is identified in the terminfo database with a short name. The name required by the terminfo database is identical to the name used to set the printer type you specify with the -T flag when creating a printer with the lpadmin command. For example, the entries for different types of PostScript printers are in /usr/share/lib/terminfo/P. The default PostScript entries provided with the AIX 5L system are PS (for PostScript) and PSR (for PostScript Reverse).
Be sure that you do not confuse printer type with content type. The printer type is the generic name for a printer and is the reference name for accessing the information in the terminfo database. The content type tells the System V print subsystem what types of files can be printed directly on each printer. Most printers can print at least two types of files: The file formatted specifically for that printer and the simple ASCII text file that is the default content type for all printers.
If you cannot find a terminfo entry for your printer, you still may be able to find a simple printer emulation similar to your printer use the printer without any special characters. In this case, the printer will print with the System V print service without the automatic selection of page size, pitch, and character sets. In cases where you use printer manufacturer interface programs, the printer type may be set to unknown, and all parameters will be set by the interface.
If there is no terminfo entry for your type of printer and you want to keep the printer set in the correct modes, you can either customize the interface program used with the printer or add an entry to the terminfo database. These can be added in separate files, and installed as described to create a new printer terminfo entry.
4.3.1 Terminfo attributes used by the ‘standard’ ASCII interfaceThe PostScript PS interface does not use terminfo attributes at all, but both lpsched and the standard ASCII interface use a few of the attributes to generate setup strings.
152 Printing for Fun and Profit under AIX 5L

The /usr/lib/lp/model/standard script uses terminfo attributes for setup. If the init attribute is defined, then the commands in this attribute are sent to the printer. If init is not defined, then the iprog attribute is used to run a program, and the terminfo is1, is2, and is3 attributes are used for printer initialization.
4.3.2 How to find if a printer is supported in terminfoSupport for printers that are supported by default in AIX 5L are shipped in the file /usr/share/lib/terminfo/svprint.ti. Each printer that is supported will have a definition line beginning in column 1 that gives the different printer aliases or TERM values that are used to access the printer attributes. These type aliases are separated by vertical bars, and after the final vertical bar is a definition of the printer. The line ends in a comma. A sample printer name, alias and description line is shown here:
hplaserjet|hplaser|HP Laserjet I,
When defining this printer, you could use either hplaserjet or hplaser as the printer type. To see all printer types that start with h, you can do a directory listing of the /usr/share/lib/terminfo/h directory. This directory will also contain any terminal definitions that begin in h. The following listing shows the h directory at installation time:
# ls /usr/share/lib/terminfo/hh19-pb hft-mhft-oldhplaser+basichppaintjet-hihft hft-m-old hp2621-pb hplaser+high hppaintjetThft-c hft-name hp7550 hplaserjet hppaintjetT-hihft-c-old hft-nam-old hplaser hppaintjet
4.3.3 Understanding terminfo printer entries.Terminfo files are made up of stanzas of information for each printer. These stanzas or paragraphs consist of a name line followed by attribute lines. Each entry is separated from the next by a comma. Only the name entry and comments start in column one. All other lines start with a tab. The name of the printer specified in the terminfo file is referenced from by the printer type in Web-based System Manager or with lpadmin.
If a printer is based on another, then only the modified attributes are listed, followed by a use=original_printer_name entry, where original_printer_name is the name of the terminfo entry that you want to take advantage of.
4.3.3.1 Terminfo attribute typesThe three types of terminfo attributes are boolean, numeric and string. Boolean attributes are true if they are defined or else they are false. Numeric
Chapter 4. System V advanced printing 153

attributes have the format attribute#value. String attributes have the format attribute=string.
Examples of boolean, numeric and string attributes:
cpix,cols#80,cpi=%?%p1%{10}%=%t\E&k0S%e%p1%{17}%=%t\E&k2S%;
4.3.3.2 Terminfo character sequenceFor non-printing control characters, terminfo uses character pairs to denote the control character. Some of the most common definitions are \E for the escape character and the use of the carat (^) to denote Ctrl modified codes, such as ^M for carriage return and ^L for form feed.
4.3.3.3 Terminfo stack language introductionThe terminfo stack language is the same one used in the AIX virtual printer files. It is called a stack language because values are placed on a stack, operated on, and then output to the data stream, which goes to initialize the printer. It is a powerful language, with operations such as if-then-else, which are used to implement command flag options. The attributes act as subroutines, and the calling program can pass parameters, such as a number for a font size, which can be used to produce an output sequence that sets the defaults on a print stream.
A more detailed list of terminfo attributes used in printing is shown in the tables in Table 38 on page 491, Table 39 on page 492, and Table 40 on page 493.
4.3.4 Viewing terminfo attributesIf you want to see the values that are output for a particular printer type, you can use the tput command with the -T flag to specify the TERM value for the printer followed by the attribute name (in this case lpi) and any parameters (in this case, 6):
# tput -T hplaserjet lpi 6 | od -a0000000 esc & 1 6 D0000005
4.3.5 Adding a new printer to terminfoThe easiest way to create a net terminfo entry is to start with an existing entry, make changes, and then recompile the entry to create the new entry.
154 Printing for Fun and Profit under AIX 5L

To convert the compiled terminfo definitions to text editable files you can use the infocmp command. For example, to retrieve the hplaserjet definitions, use:
# infocmp hplaserjet > widelaser.ti
This will give a file named widelaser.ti that looks like:
This file can be edited with a UNIX text editor, such as vi or dtterm. Change the name of the printer and make changes to the attributes that are different from those of the original printer. For example, if you want to call the printer widelaser and the printer had the properties of 80 columns and 66 lines, you would only need to change the first two lines of the file and add a comment so that the beginning of the file looks like this:
widelaser|Laser Printer with 132 columns and 66 lines, bitwin#1, bitype#2, cols#132, lines#66, npins#8, orc#12, orhi#120, orl#8, orvi#48, spinh#300,
The final step to create the new printer definition is to use the terminfo compile command (tic) to add the widelaser entry to the terminfo database. The file will automatically be created in /usr/share/lib/terminfo/w/widelaser. The sample tic command is:
# tic widelaser
The new printer type will now be available using the lpadmin -T flag to modify an existing printer or to create a new one with the widelaser type. To change
# infocomp hplaserjet
# Reconstructed via infocmp from file: /usr/share/lib/terminfo/h/hplaserjethplaserjet|hplaser|HP Laserjet I, bitwin#1, bitype#2, cols#80, lines#60, npins#8, orc#12, orhi#120, orl#8, orvi#48, spinh#300, spinv#300, chr=%?%p1%{0}%>%p1%{127}%<%t\E&k%p1%dH%;, cpi=%?%p1%{10}%=%t\E&k0S%e%p1%{17}%=%t\E&k2S%;, cr=\r, cud=\E&a+%p1%dR, cud1=\n, cuf=\E&a+%p1%dC, cuf1=\s, cvr=%?%p1%{0}%>%p1%{127}%<%t\E&l%p1%dC%;, defbi=%?%p5%{0}%>%p5%{5}%<%&%t\E&a%p1%p5%*%{12}%*%{5}%/%dH\E&a%p2%p5%*%{12}%*%{5}%/%dV\E*t%{300}%p5%/%dR\E*r1A%;, endbi=\E*rB, ff=\f, hpa=\E&a%p1%dC, is2=\EE\E&k0G, lpi=%?%p1%{1}%=%t\E&l1D%e%p1%{2}%=%t\E&l2D%e%p1%{3}%=%t\E&l3D%e%p1%{4}%=%t\E&l4D%e%p1%{6}%=%t\E&l6D%e%p1%{8}%=%t\E&l8D%e%p1%{12}%=%t\E&l12D%e%p1%{16}%=%t\E&l16D%e%p1%{24}%=%t\E&l24D%e%p1%{48}%=%t\E&l48D%;, mgc=\E9, porder=1\,2\,3\,4\,5\,6\,7\,8;0, ritm=\E(s0S, rmul=\E&d@, sbim=\E*b%p1%dW, sitm=\E(s1S, slines=\E&l%p1%dP, smgbp=\E&l%p1%{1}%+%dF, smglp=\E&a%p1%dL, smgrp=\E&a%p1%dM, smgtp=\E&l%p1%{1}%+%dE, smul=\E&dD, u9=\E&l%p1P, vpa=\E&a%p1%dR,
Chapter 4. System V advanced printing 155

the printer type of the printer named f3laser to widelaser, use the following command:
# lpadmin -p f3laser -T widelaser
If you specify multiple printer types in a comma separated list, the attributes from the different terminfo entries will be combined.
4.4 Using printer form support
A form is a preprinted sheet of paper with text and graphics that can be loaded into a local printer for use in place of plain paper. Common examples of forms include company letterhead, invoices, blank checks, vouchers, receipts, and labels.
Typically, a batch of forms will be loaded into a printer, either as a tray of single sheets or as a box of fan-fold paper. The System V Print Subsystem helps you manage the use of pre-printed forms, but it does not provide any help in positioning text on the form. This is responsibility of the application generating the output. The print service keeps track of which print requests require special forms and which forms are currently mounted in the printer. It can alert the operator when a request comes to print to a form that is not currently installed in the printer. In this case, the operator would notify the print manager that it was unloading the current form and loading a new one.
4.4.1 Adding or modifying a formThe lpforms command is used to administer the use of preprinted forms. The -f formname -F pathname option is used to add a new form, form-name, to the LP print service, or to change the attributes of an existing form. The form description is taken from pathname if the -F option is given, or from the standard input if the - (minus) option is used. One of these two options must be used to define or change a form. The parameter pathname is the pathname of a file that contains all or any subset of the information about the form, as shown in Table 9:
Table 9. Characteristics of a form
Characteristic Default Description
Page length 66 lines The length of each page of the form. This can be expressed in lines, inches, or centimeters.
Page width 80 columns The width of the form, expressed in characters, inches, or centimeters.
156 Printing for Fun and Profit under AIX 5L

When you have gathered the information that applies to your form, enter it in a file using the following format:
Page length: scaled-numberPage width: scaled-numberNumber of pages: integerLine pitch: scaled-numberCharacter pitch: scaled-numberCharacter set choice: character-set-name[,mandatory]Ribbon color: ribbon-colorComment:comment
Number of pages 1 Number of pages in a multi-page form.
Line pitch 6 lines/inch Line separation distance in either lines per inch or lines per centimeter.
Character pitch 10 char/inch Character separation distance in either characters per inch or characters per centimeter.
Character set choice
any The character set, print wheel, or font cartridge that should be used when this form is used.
Ribbon color any Used for printers where the ribbon needs to be changed to have a special color.
Comment Any remark that might help users understand what the form is, when it should be used, and so on.
Alignment pattern none A sample file that the print service can use to fill one blank form to test for alignment. An optional parameter of content type may also be specified for the alignment pattern.
Alert command none This allows the operator or administrator to be alerted when a specified number of requests are waiting for a form to be mounted. The message can be either mail or a message to your terminal.
Users allowedUsers denied
No restrictions A list of users who are specifically denied or allowed use of the form. If the allow list is not empty, the deny list is ignored. If the allow list is empty, the deny list is used.
Characteristic Default Description
Chapter 4. System V advanced printing 157

Alignment pattern: [content-type]
The form name should have a maximum of 14 characters. You only need to change parameters that are different from the defaults. The following shows a sample form:
Page Width: 80Page Length: 66Line Pitch: 6Character Pitch: 10Character Set Choice: any
When you are done with the form, use the lpforms command to define the form to the print subsystem. If your filename is paycheck, then define the form with the command:
# lpforms -f paycheck -F /home/lpadmin/paycheck
This creates a form file named paycheck stored in /etc/lp/forms/paycheck. To change the form, simply edit the file, and reenter the command. To set the form to a specific printer, add the -p printer-name flag to lpforms, as shown here:
# lpforms -p checkprt -f allow:form-list
You can also add set a printer to not allow the use of a form with:
# lpforms -p checkprt -f deny:form-list
4.4.2 Removing a formThere is no limited to the number of forms that you can define, but try to keep the number of forms that are defined to a minimum. This will allow users to more easily choose the appropriate form
To remove a form, enter the following command:
# lpforms -f form-name -x
4.4.3 Displaying a form descriptionThere are two commands to use to display the information about a form. The lp administrator (lp) and superuser (root) only can use the lpforms command, which will contain information about the alignment pattern. The syntax of this command is:
# lpforms -f form-name -l
All others users can use the lpstat command with the syntax:
158 Printing for Fun and Profit under AIX 5L

# lpstat -f form-name -l
The output of the lpstat command will tell the user if they have access to use the form. The format of the output is:
# lpstat -f paycheck -lform paycheck is available to you
Page length: 66Page width: 92Number of pages: 1Line pitch: 6Character pitch: 10Character set choice: anyRibbon color: any
4.4.4 Maintaining access lists for formsYou can specifically allow or deny users access to specific forms by defining them in the form definition or by using the following commands:
# lpforms -f form-name -u allow:user-list# lpforms -f form-name -u deny:user-list
The user-list is a list of AIX users separated by a comma or space. If you use spaces to separate the list, enclose the entire list (including the allow: or deny:) in quotes. Using allow:all allows everybody; using deny:all denies everybody.
4.4.5 Alerting the operator to mount a formThe following commands can be used by the print administrator with userid lp or a member of the lp group to enable the alert function to be performed when a form is requested by a user or application sending a print job to a form that is not currently mounted in a printer:
# lpforms -f form-name -A mail -Q integer -W minutes# lpforms -f form-name -A write -Q integer -W minutes# lpforms -f form-name -A ‘command’ -Q integer -W minutes# lpforms -f form-name -A none
The first command directs the print service to mail a message to the administrator. The second command directs the service to write a message to the login terminal from which the lpforms command was issued. The third command directs the service to run the specified command. In each of these cases, the alert is sent after the number of print request have occurred that are specified in the -Q option. The requests are repeated at the interval specified in the -W option. The fourth command means do not send an alert when the form needs mounting.
Chapter 4. System V advanced printing 159

Once you start receiving repeated alerts, you can stop the alerts with the following command:
# lpforms -f form-name -A quite
If the form-name is all any of the commands, the alert applies to all forms.
4.4.6 Mounting a formBefore the System V print subsystem can start printing forms to the pre-printed form, you must physically place the forms in the printer and notify the print service that you have mounted them. Print requests that require a particular form will be held in the queue until the form is mounted. You may also want to print an alignment job prior to releasing the jobs that have been queued to the printer using that form.
The proper procedure involves these steps:
1. Disable the printer, using the disable command.
2. Physically mount the form in the printer.
3. Tell the print subsystem that the form checkstock has been mounted on printer matrix4 with the command:
# lpadmin -p matrix4 -M -f checkstock -a -o filebreak
4. Align the form if necessary
5. Re-enable the printer using the enable command.
If you are mounting a form with an alignment pattern defined for it, you will be asked to press the Enter key before each copy of the alignment pattern is printed. After the pattern prints, you can adjust the form if necessary and press the Enter key again. When you are done with the alignment, press Ctrl-C. You can drop the -a and -o filebreak options if you do not want to bother with the alignment pattern. If the alignment file contains a formfeed, you can leave out the -o filebreak command. This command tells the print manager to add the formfeed character from the terminfo database.
4.4.7 Unmounting a formIf you want to unmount a form or print wheel, use the following command:
# lpadmin -p printer-name -M -f none
4.4.8 Printing using a formA user can specify that a particular form be used by adding the -f form-name to the lp command, as shown here:
160 Printing for Fun and Profit under AIX 5L

$ lp -f form-name -d printer file-name
To print to the first available printer with the form invoice, use the following command:
$ lp -f invoice -d any
The print job will be queued, but not printed until the form is mounted by the print administrator.
4.5 Customizing printer attributes
Most printer attributes are set on creation or changed with the lpadmin command, as described in Chapter 2, “System V print subsystem basics” on page 45. As explained there, they can also be listed with the lpstat command syntax:
# lpstat -p printer-name -l
The types of things that you can change are the printer type, content type, pitch, page size, banner usage, character sets, and port settings.
In addition, the command sequences that are sent to the printer are stored in the terminfo database. These are matched to the printer type, and can be listed with:
# infocmp printer-type
Changing these parameters was described in the terminfo database customization section earlier in Section 4.3, “Using the terminfo database” on page 151.
The remainder of this section describes how you can specify the character set, font cartridge, and the printer port characteristics.
4.5.1 Specifying character setsFor printers that allow selectable character sets, determine the names of the character sets and then map each set to a name or number in the terminfo database.
To determine the names of the character sets listed for printer type ibmgraphics in the terminfo database, enter the following command:
# tput -T ibmgraphics csnm 0
Chapter 4. System V advanced printing 161
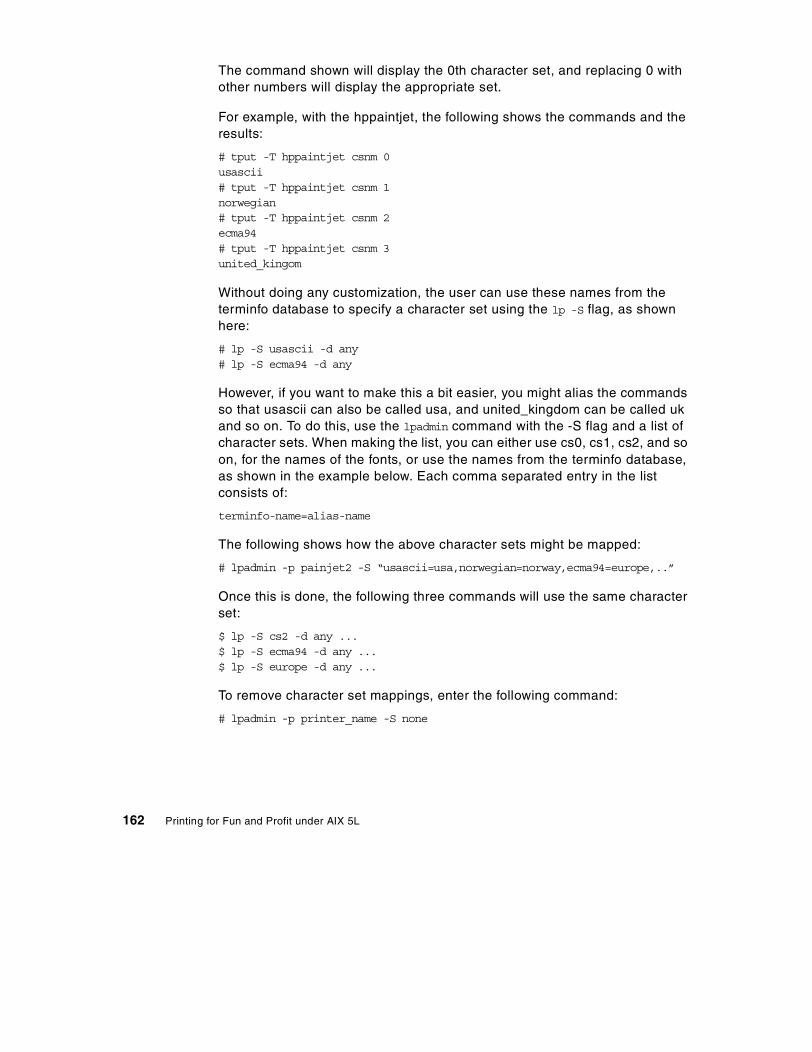
The command shown will display the 0th character set, and replacing 0 with other numbers will display the appropriate set.
For example, with the hppaintjet, the following shows the commands and the results:
# tput -T hppaintjet csnm 0usascii# tput -T hppaintjet csnm 1norwegian# tput -T hppaintjet csnm 2ecma94# tput -T hppaintjet csnm 3united_kingom
Without doing any customization, the user can use these names from the terminfo database to specify a character set using the lp -S flag, as shown here:
# lp -S usascii -d any# lp -S ecma94 -d any
However, if you want to make this a bit easier, you might alias the commands so that usascii can also be called usa, and united_kingdom can be called uk and so on. To do this, use the lpadmin command with the -S flag and a list of character sets. When making the list, you can either use cs0, cs1, cs2, and so on, for the names of the fonts, or use the names from the terminfo database, as shown in the example below. Each comma separated entry in the list consists of:
terminfo-name=alias-name
The following shows how the above character sets might be mapped:
# lpadmin -p painjet2 -S “usascii=usa,norwegian=norway,ecma94=europe,..”
Once this is done, the following three commands will use the same character set:
$ lp -S cs2 -d any ...$ lp -S ecma94 -d any ...$ lp -S europe -d any ...
To remove character set mappings, enter the following command:
# lpadmin -p printer_name -S none
162 Printing for Fun and Profit under AIX 5L

4.5.2 Specifying font cartridges to use with a printerThe lpadmin command specifies both character sets and font cartridges with the lpadmin -S flag. For cartridges, the list is simply a list of the names of the mountable font cartridges on the printer. This function is less used with new printers, but may be required to support some printers, such as the IBM 4019 laser printer.
To specify a list of available font cartridges for the printer, use the following command:
# lpadmin -p printer_name -S font_cartridge_list
font_cartridge_list is a list of font cartridge names, separated by commas or spaces. If spaces are used, then the entire list must be in quotes, but not the -S.
To remove all the font cartridges, enter the following command:
# lpadmin -p printer_name -S none
Font cartridges are mounted to the printer server similar to the way that printer forms are mounted.
To install or change a font cartridge:
1. Disable the printe.r
2. Remove the current font cartridge from the printer.
3. Install the new font cartridge on the printer.
4. Mount the new font cartridge by entering.
# lpadmin -p printer_name -M -S font_cartridge_name
5. Reenable the printer.
The following print command would now choose that printer:
# lp -d any -S font_cartridge_name
To arrange for alerts, use the command:
# lpadmin -S font_cartridge_name -A alert_method -Q number -W minutes
For example, to direct print service to write alerts to your terminal every two minutes whenever the printer queue contains three or more requests for the Helvetica cartridge and it is not already mounted, enter the following command:
lpadmin -S helvetica -A write -Q 3 -W 2
Chapter 4. System V advanced printing 163

4.5.3 Setting printer port characteristicsPrinter port characteristics for serial attached printers are set with the stty command. These characteristics include things like the baud rate, number of data bits, flow control, stop bits, and delays after certain characters. To add or change printer port characteristics of a printer, use the -o ‘stty-option-list’ option of the lpadmin command. For example, to set the baud rate to 19200, use the following command:
# lpadmin -p michele1 -o “stty=’19200 ’”
These values are used by the interface program to set up the port.
4.6 System V print filters
A filter is a program that takes input from standard in and outputs to standard out. This is important, as it allows the output from one filter to become the input of another filter or to the printer interface program that sends the data to the printer.
Print filters are necessary in UNIX printing, because unlike PC based printing, where the printer device drivers support a standard API and any application can output to any printer type installed on the system, UNIX applications must supply their own printer specific output. This leads to the problem that a UNIX (AIX) application must keep current with the latest printers from all manufacturers, or they must write to a standard print format, and let print filters supplied by the manufacturer convert to the specific printer format.
Three functions distinguishes a print filter:
• Converting a user file from one data format into a data stream that will print properly on a given printer.
• Handling the special print modes that users may request with the lp -y option to the lp command. Examples of these print modes are two-sided (duplex) printing, landscape-mode printing, and draft output.
• Detecting printer faults and informing the print service about the fault so that the print service can send an alert to the submitter or print administrator.
Not every filter can perform all three tasks. Because filters can be piped together, individual filters can be linked together to provide separate functions.
164 Printing for Fun and Profit under AIX 5L
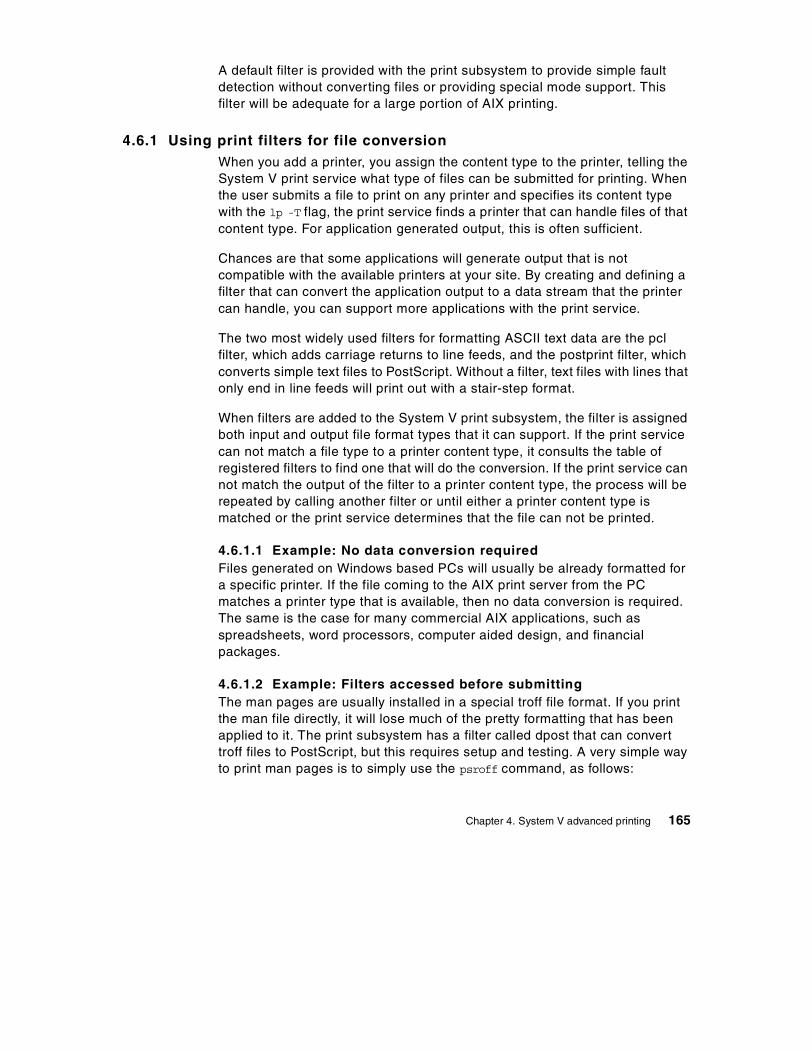
A default filter is provided with the print subsystem to provide simple fault detection without converting files or providing special mode support. This filter will be adequate for a large portion of AIX printing.
4.6.1 Using print filters for file conversionWhen you add a printer, you assign the content type to the printer, telling the System V print service what type of files can be submitted for printing. When the user submits a file to print on any printer and specifies its content type with the lp -T flag, the print service finds a printer that can handle files of that content type. For application generated output, this is often sufficient.
Chances are that some applications will generate output that is not compatible with the available printers at your site. By creating and defining a filter that can convert the application output to a data stream that the printer can handle, you can support more applications with the print service.
The two most widely used filters for formatting ASCII text data are the pcl filter, which adds carriage returns to line feeds, and the postprint filter, which converts simple text files to PostScript. Without a filter, text files with lines that only end in line feeds will print out with a stair-step format.
When filters are added to the System V print subsystem, the filter is assigned both input and output file format types that it can support. If the print service can not match a file type to a printer content type, it consults the table of registered filters to find one that will do the conversion. If the print service can not match the output of the filter to a printer content type, the process will be repeated by calling another filter or until either a printer content type is matched or the print service determines that the file can not be printed.
4.6.1.1 Example: No data conversion requiredFiles generated on Windows based PCs will usually be already formatted for a specific printer. If the file coming to the AIX print server from the PC matches a printer type that is available, then no data conversion is required. The same is the case for many commercial AIX applications, such as spreadsheets, word processors, computer aided design, and financial packages.
4.6.1.2 Example: Filters accessed before submittingThe man pages are usually installed in a special troff file format. If you print the man file directly, it will lose much of the pretty formatting that has been applied to it. The print subsystem has a filter called dpost that can convert troff files to PostScript, but this requires setup and testing. A very simple way to print man pages is to simply use the psroff command, as follows:
Chapter 4. System V advanced printing 165

$ psroff -man /usr/local/man/man1/gunzip.1 -dprinter$ psroff -man /usr/local/man/man1/gunzip.1 | lp -TPS -dany
Another filter than can easily be used before submitting the job is the pr formatter. The pr filter can be used to add special formatting to ASCII text files, such as adding a title, rotating the output, and providing 2-UP printing. For example, to print the /usr/lpp/bos/README file in 2-UP, use the following command:
$ pr -l 60 -w 172 -2 /usr/lpp/bos/README | lp -ylandscape -dprinter
The pr formatter can also be used as a filter in the System V print subsystem.
4.6.1.3 Example: Converting troff into PostScriptThe troff format is a traditional UNIX format used for typesetting devices. In the past, this was a traditional format for application manuals. Today, manuals are more likely to be produced as PostScript of PDF files, but it is still important to be able to print troff formatted manuals if you receive them.
A number of filters included in the System V print subsystem convert different types of files into PostScript. These filters are located in /usr/lib/lp/postscript. The filter to convert troff to PostScript is called dpost.
4.6.1.4 Example: Converting PDF to PostScriptAlthough there are no filters supplied with AIX 5L that convert PDF to postscript, there are still a couple of options for printing these files. The first is to use the Acrobat program to convert the output to PostScript. The second is to use a public domain filter, such as pdf2ps or PDFprint, and install this as a System V print filter.
4.6.1.5 Example: Printing from Netscape to a PCL printer.The UNIX version of Netscape is designed to only print to a PostScript printer. There are two choices when printing to a non-PostScript printer from Netscape. One is to create a simple PostScript to ASCII filter that will print only the text portion of the pages. The second is to use the GhostScript filter to create formatted PCL. The reports on this second method is that it works with somewhat limited success.
4.6.1.6 Example: Using filters to send output to remote serversWhen using a socket program to send output from a System V defined printer to a remote printer, the socket program will often be implemented as a filter that can be called by simply replacing the FILTER shell variable in the interface program by the desired FILTER socket program.
166 Printing for Fun and Profit under AIX 5L

4.6.2 Using print filters for special print modesEach filter that you add to the print system can be registered to handle the following functions:
• Special modes • Printer type • Character pitch • Line pitch • Page length • Page width • Pages to print • Character set • Form name • Number of copies
The print service provides a default handling for all of these properties except special modes. However, it may be more efficient to have a filter handle some of these and override the default handling. A printer that supports multiple copies might use a filter that sends a command to the printer to print multiple copies, rather than sending the print job to the printer multiple times, as the default handler would do.
4.6.3 Using print filters for printer fault handlingJust as converting a file and handling special printing modes are printer specific, so is the process of detecting printer faults, such as out of paper, paper jam, or out of toner. The print service attempts to detect faults in general, and for most printers does so properly. For local printing, the filter must interact with the printer serial or parallel device driver to retrieve information.
If you set the printer configuration so that printing should automatically resume after a fault is cleared, the interface program will keep the filter active so that it can pick right up where it left off. For this reason, the filter must understand both the data stream going to the printer, so that it can determine page separation, as well as understand the error messages coming back from the printer, in order to determine the last successfully printed page.
In some cases, filters for printer fault handling will be supplied by the printer manufacturer. It is highly unlikely that you will write your own filters for this purpose.
4.6.4 What makes a program a good filterHere are a few guidelines for choosing an appropriate filter:
Chapter 4. System V advanced printing 167
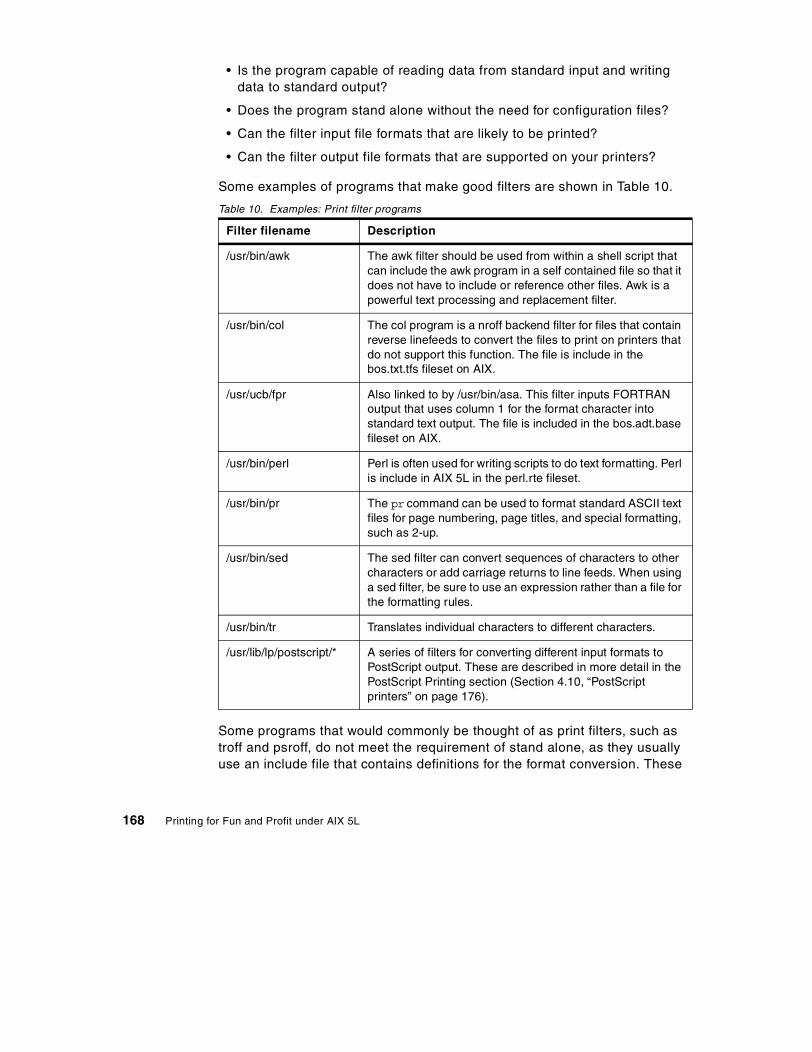
• Is the program capable of reading data from standard input and writing data to standard output?
• Does the program stand alone without the need for configuration files?
• Can the filter input file formats that are likely to be printed?
• Can the filter output file formats that are supported on your printers?
Some examples of programs that make good filters are shown in Table 10.
Table 10. Examples: Print filter programs
Some programs that would commonly be thought of as print filters, such as troff and psroff, do not meet the requirement of stand alone, as they usually use an include file that contains definitions for the format conversion. These
Filter filename Description
/usr/bin/awk The awk filter should be used from within a shell script that can include the awk program in a self contained file so that it does not have to include or reference other files. Awk is a powerful text processing and replacement filter.
/usr/bin/col The col program is a nroff backend filter for files that contain reverse linefeeds to convert the files to print on printers that do not support this function. The file is include in the bos.txt.tfs fileset on AIX.
/usr/ucb/fpr Also linked to by /usr/bin/asa. This filter inputs FORTRAN output that uses column 1 for the format character into standard text output. The file is included in the bos.adt.base fileset on AIX.
/usr/bin/perl Perl is often used for writing scripts to do text formatting. Perl is include in AIX 5L in the perl.rte fileset.
/usr/bin/pr The pr command can be used to format standard ASCII text files for page numbering, page titles, and special formatting, such as 2-up.
/usr/bin/sed The sed filter can convert sequences of characters to other characters or add carriage returns to line feeds. When using a sed filter, be sure to use an expression rather than a file for the formatting rules.
/usr/bin/tr Translates individual characters to different characters.
/usr/lib/lp/postscript/* A series of filters for converting different input formats to PostScript output. These are described in more detail in the PostScript Printing section (Section 4.10, “PostScript printers” on page 176).
168 Printing for Fun and Profit under AIX 5L

filters may work for local systems if the file permissions are set up properly, but it is unlikely that they would be appropriate for remote printers.
4.6.5 Defining print filtersPrint filters used by lpsched are managed using the lpfilter command similar to the manner which lpforms manages forms. There are a set of filter definitions for the standard System V print subsystem located in /etc/lp/fd. These definitions can be used to add or register these filters to the print subsystem.
When you add a filter (sometimes called registering a filter), you can define the characteristics that describe the filter from a print service perspective. The properties that can be defined for a filter using lpfilter include:
Filter nameThe command line name of the filter
Input types This is the list of file types (for example, content types) that the filter can process. The file type name can be up to 14 characters. The default type is simple. Most filters can take only one type of input, but the print service does not restrict a filter to this. If several filters can use the same file types, then be consistent when giving the input file type a name.
Output types This is a list of the file types (for example, content types) that the filter can produce as output. For a given instance, a filter will produce only a single output type, but the filter may accept an option that can vary the output on demand. The names of output types are also restricted to 14 letters, digits, and dashes.The output type names should either match the content types for your defined printers or the input type for additional filters.
Printers A filter should be able to work with all printers that accept the output type specified, but there are cases where you might want to restrict the output of the filter to a specific printer or to avoid using a slow filter to a particular printer that uses expect a fast turnaround on jobs. In this case, include all the desired printers in the list.
Filter Type The System V print service recognizes two types of filters: fast and slow. Fast filters are labeled fast either because the incur little system overhead, or because they have direct access to the printer when they run for detecting printer faults or doing other special control. A print filter that uses the PRINTER keyword as a filter option must be installed as a fast filter. All other filters should be labeled slow.
Chapter 4. System V advanced printing 169

Options Options allow printing modes and options to be converted from the lp options to the filter options based on a template describing the transformation. The types of options that a filter might support are page length, a list of pages to print, the number of copies, and the page orientation. There are 13 sources of information, including the MODE option, which can contain multiple attributes.
The filter template, which is describe in the next subsection, defines a pattern and a replacement pattern for modifying lp flags into filter flags.
To define a filter, create a text file with one parameter on each line, as shown in Section 4.6.5.2, “Filter description files” on page 171.
4.6.5.1 Filter templatesA template is a statement in the Options: section of a filter definition that defines how the flags from the lp command will be mapped to the command line flags of the filter. A filter may include one or more templates. Multiple templates may be entered on a single line and separated by commas, or they may be entered on separate lines, preceded by the Options: prefix.
The format of a template line for a single definition is shown here:
Options: keyword pattern = replacement
The interpretation of this by the print system is that when an input flag to lp matches the pattern, then it is replaced by the replacement pattern and passed to the filter as a command line argument.
The available template keywords are shown in Table 11.
Table 11. Template keywords
Keyword Possible patterns Example
INPUT Available input content-type Options: INPUT X = -Xb
OUTPUT Available output content-type Options: OUTPUT simple = -a, OUTPUT PS = -p
TERM Available printer-type Options: TERM * = \-T *
CPI integer Options: CPI * = \-pitch *
LPI integer Options: LPI * = -vmi*
LENGTH integer Options: LENGTH * = -l*
170 Printing for Fun and Profit under AIX 5L

Example OUTPUT template:
Options: OUTPUT postscript=-P
This says that if the OUTPUT type for the printer is postscript that the -P flag is passed to the filter.
Example LENGTH template:
Options: LENGTH * = -l*
In this case, the -o length flag will match the wild card *, and the length will be passed as a -l flag to the filter. For example, if the filter name is /usr/local/bin/myfilt and the following was the lp command:
$ lp -d laser1 -o length=72
this would be passed to the filter as:
$ /usr/local/bin/myfilt -l 72
Example MODES template:
The following template converts the lp -y land option to the filter -landscape option:
Options: MODES land = -landscape
4.6.5.2 Filter description filesPrint filter description files contain lines with the lpfilter arguments listed in Table 12 on page 172.
WIDTH integer Options: WIDTH * = -w*
PAGES page-list (1,7,12) Options: PAGES * = -pages *
CHARSET character-set Options: CHARSET ibm850 = -c pc427
FORM Available form name Options: FORM * = -form *
COPIES integer Options: COPIES * = -n *
MODES modes Options: MODES land = -r
Keyword Possible patterns Example
Chapter 4. System V advanced printing 171

Table 12. Filter arguments used by lpfilter
The description file should contain a line for each item that you want to set to a value other than the default.
4.6.5.3 Predefined filter templatesThe System V print subsystem comes with a group of predefined filter templates located in /etc/lp/fd. Many of these deal with PostScript printers.
Example: dpost filterThe filter program /usr/lib/lp/postscript/dpost takes one input type, troff, and produces one output type called postscript, which works with any printer of type PS (for PostScript). In defining the printer, you want to give your users two page orientation options of port and land for portrait and landscape, but the filter uses command line flags of -op and -ol to designate these options. Users will have to use the -y port or -y land to designate these options, because neither is native to the lp command. For this reason, they will be included as MODES options. The filter definition file will look like this:
Input types: troffOutput types: postscriptPrinter types: PSFilter type: slowCommand: /usr/lib/lp/postscript/dpostOptions: LENGTH * = -l *Options: MODES port = -op, MODES land = -ol
The user submitting a file of type troff for printing landscape on a PostScript printer of type PS with a page length of 45 lines would enter the following command:
$ lp -T troff -o length=60 -y land -d any
Item: Default Example
Command (no default) Command: /usr/bin/col
Input types: any Input types: simple
Output types: any Output types: PS
Printer types: any Printer types: hplaser
Printers: any Printers: laser1, laser4
Filter type: slow Filter type: fast
Options: (no default) Options: MODES landscape = -l
172 Printing for Fun and Profit under AIX 5L

The filter would be invoked by the print service to convert the file with the following options:
/usr/lib/lp/postscript/dpost -l60 -ol
The output from the following command will show the attributes of any installed filter by the name of filter-name.
# lpfilter -f filter-name -l
4.6.6 Adding and changing filtersTo add the filter to the system once you have created the definition file, use the following command:
# lpfilter -f filter-name -F filename
where filter-name is the desired name of the filter with a maximum of 14 alphanumeric characters and underscores and filename is the full path name of the definition file that you created following the instructions in the previous step.
To make changes to a filter, simply modify the printer definition file or create one with only the differences and rerun the same lpfilter command.
To restore a filter to the default filter values, simply use the command:
# lpfilter -f filter-name -i
Make sure to replace filter-name with the name of the desired filter.
Defined filters are stored in the file /etc/lp/filter.table. An entry looks like this:
:PS,PS-b:any:simple:postprint:PS:slow:/usr/lib/lp/postscript/postprint:
The /etc/lp/filter.table file has read permissions for all users, so could be used to check for available filters.
4.6.7 Removing filtersAlthough there is no limit to the number of filters that you can define, it is recommended that you remove filters that are no longer in use to avoid extra processing by the print service when it is searching for an appropriate filter.
To remove a filter, execute the following command (replacing the filter-name with the name of the filter you want to remove):
# lpfilter -f filter-name -x
Chapter 4. System V advanced printing 173

4.6.8 Examining filtersAny printer that has been added to the print service can be examined by running the lpfilter command with the -l flag. The output of this command is in the proper format to input as a filter definition file when adding a new filter and can be used as a template.
To display the definition of the filter, enter the command:
# lpfilter -f filter-name -l
To write the definition to a file for future reference, or to use as a sample for creating a new filter file, redirect the output to a file, as shown here:
# /usr/sbin/lpfilter -f filter-name -l > filename
4.7 I18N - Internationalization filters
i18n is short for internationalization (i, plus 18 other characters, plus n). There are two filters that are part of the System V print subsystem that deal with i18n:
• /usr/lib/lp/bin/I18n_print for text
• /usr/lib/lp/bin/I18n_pp for PostScript
The filter templates for these are in /etc/lp/fd and are i18n_print and i18n_pp respectively. The i18n_pp filter does internationalization and then calls postprint to convert an ASCII text file to PostScript.
These filters will normally be transparent to users. They use the terminfo database and local passed to them for adding control characters and providing national language support for error messages. The i18N_print program takes two parameters:
• -T TERM provides the terminfo entry to obtain the control characters.
• -X locale provides the locale entry for error messages and internationalized formatting.
The i18N_pp program takes parameters to set the orientation of the page, the number of copies, magnification of the page, and the locale. These values are used when calling postprint to convert from ASCII to PostScript.
174 Printing for Fun and Profit under AIX 5L
4.8 ASCII text printers
When printing to an ASCII text printer, such as a PCL printer or most dot matrix printers, the output may appear in a stair-step format, or may be missing altogether. The cause of this is UNIX text files, which end lines only in line feeds. Many printers require the addition of a carriage return to print properly. This can be handled in two ways. The first is to send sequences to the printer so the printer can add the carriage returns. The second method is to use a print filter, such the pcl filter or the pr filter, to add the carriage returns. Both of these filters are fully supported by the System V print subsystem. The pcl filter is described in Section 4.9, “PCL printers” on page 175.
4.9 PCL printers
The default content type for printing is simple, but PCL printers should be setup with a content type of pcl. This will allow the pcl filter to be called automatically to add carriage returns to line feeds for simple files. When printing a formatted PCL file that already has all the formatting characters added, you will want to print with the lp -T pcl flag.
4.9.1 Using the pcl filter to add carriage returnsThe /usr/lib/lp/bin/pcl filter can be used to convert files of simple or wrapped type to pcl by adding carriage returns and the like. When this filter is used, the printer content type will be set to pcl. If the default content type simple is used, lpsched will set the FILTER environment variable to use the pcl filter. Before you can use the pcl filter, you must register it with the scheduler by using the following command:
# lpfilter -f pcl -F /etc/lp/fd/pcl.fd
If you do not do this, you will get this error message:
UX:lp: ERROR: 0920-054 There is no filter to convert the file content. TO FIX: Use the lpstat -p -l command to find a printer that can handle the file type directly, or consult with your system administrator.
4.9.2 Using the pr filter to add titles to each pageThe pr filter definition file is /etc/lp/fd/prtitle.fd. This file shows that the input type is simple, the output type is wrapped, and the program is /usr/bin/pr. This
Chapter 4. System V advanced printing 175

means that to use the filter, the printer must be defined with content type of wrapped by using the lpadmin -I flag, as shown here:
# lpadmin -p textprt -v /dev/lp12 -I wrapped -T lpr
The printer type of lpr makes sure the formfeed and carriage return characters are set for lpsched.
Next the pr filter must be registered. This is done using lpfilter and the filter definition file prtitle.fd. There is a bug with the early release code lpfilter command where Options are not properly parsed. Before using the prtitle.fd, make a backup copy and comment out the options lines as shown here:
# cd /etc/lp/fd# cp prtitle.fd pr.fd# vi pr.fd
Comment out the following lines in the pr.fd file by adding a # character at the beginning of the lines:
# Options: MODES prtitle\=\(.*\) = -h \1# Options: MODES locale\=\(.*\) = -
Now register the new pr filter with:
# lpfilter -f pr -F /etc/lp/fd/pr.fd
List the pr filter definition:
# lpfilter -f pr -lInput types: simpleOutput types: wrappedPrinter types: anyPrinters: anyFilter type: slowCommand: /usr/bin/pr
When we tested this by creating a file to a queue, we saw that the filter added a date time stamp, a page number, extra line feeds to fill the page, and a form feed, but no carriage returns. This means that you still have to set the printer to add the carriage returns or combine this with the pcl filter described in the next section.
4.10 PostScript printers
PostScript is a general purpose programming language, like C or Pascal. In addition to providing the usual features of a language, however, PostScript
176 Printing for Fun and Profit under AIX 5L

allows a programmer to specify the appearance of both text and graphics on a page.
A PostScript printer is equipped with a computer that runs an interpreter for processing PostScript language files. When a PostScript printer receives a file, it runs that file through the interpreter and then prints it. Unless special provisions have been made by the manufacturer, files submitted to a PostScript printer must be written in the PostScript language.
PostScript provides excellent facilities for managing text and graphics and combining them. Also, most major applications that support printed output support PostScript. In the age of the Internet, this is especially true with browser output and Adobe PDF files, both easily printed in PostScript.
PostScript graphics operators facilitate the construction of geometric figures which can then be positioned and scaled with any orientation. The text capabilities allow the user to specify a number of different fonts that can be placed on a page in any position, size, or orientation. Because text is treated as graphics, text and graphics are readily combined. Moreover, the language is resolution and device-independent, so that draft copies can be proofed on a low-resolution device and the final version printed in higher resolution on a different device.
One of the disadvantages of PostScript printers is that unless they also support a text-based print stream, they can not directly print text and other file formats. The files will simply be flushed by the printer and may or may not give an error to let the user know what has happened to the file. The print service provides optional filters to convert many types of files to PostScript so that users may take advantage of PostScript and continue to use their standard applications, such as troff.
Another advantage of PostScript printers is that they support retail type 1 fonts that can be installed for use with applications running on the desktop. These fonts may be downloaded to PostScript printers if the application generates PostScript output that uses them. The lp command handles this automatically using the download filter.
4.10.1 Using PostScript printersWhen the PostScript printers and filters have been installed, the print service manages PostScript files like any others. If /tmp/kraker.ps is a file containing a PostScript document and psprinter has been defined to the print service as a PostScript printer, the following command:
$ lp -d psprinter -T PS /tmp/kraker.ps
Chapter 4. System V advanced printing 177

will schedule the print request and manage the transmission of the request to the PostScript printer.
4.10.2 Support for non-PostScript print requestBecause PostScript is a language and PostScript printers are expecting print requests written in that language, some applications may produce standard print requests that may not be intelligible to PostScript printers. Examples of print requests that may not be interpreted by some PostScript printers and filters that are available with AIX System V printing are shown in Table 13.
Table 13. Filters to convert content types to PostScript
Filters are provided with the print service to translate print requests with some of these formats to the PostScript language. For example, to convert a file containing ASCII text to PostScript code, the postprint filter takes that text and writes a program around it, specifying printing parameters such as fonts and the layout of the text on a page.
Once the PostScript filters are installed and registered, they will be invoked automatically by the print service when a user specifies a content type for a print request with the lp -T option. For example, if a user enters the following command:
$ lp -d psprinter -T simple report2
the simple ASCII text file report2 will be converted to PostScript automatically, as long as the destination printer (psprinter) has been defined to the system as a PostScript printer.
Content Type Filter Type of Print Request
simple postprint Print an ASCII (‘simple’) text file to a PostScript printer.
daisy postdaisy Print files for a Diablo 630 (‘daisy-wheel’) printer.
dmd postdmd Print a bit-mapped display from a terminal.
tek4014 posttek Print files formatted for a Tektronix 4014 device.
troff dpost Print output from the troff command.
plot postplot Print plot-formatted files.
gif, jpg, bmp NA Standard graphics files (undefined to System V).
pdf NA Adobe Acrobat PDF files (undefined to System V).
html NA Web files (undefined to System V).
178 Printing for Fun and Profit under AIX 5L

Another option for printing ASCII text files on AIX is to use the enscript command to format the data. This command supports a large range of fonts. See the enscript man page and the description in Chapter 9, “Printing tips and utilities” on page 435 for more details.
4.10.3 PostScript capabilities provided by filtersThe filters (postprint, dpost, postdaisy, postdmd, posttek, and postplot) shown in Table 13 on page 178 also take advantage of PostScript capabilities to provide additional printing flexibility. Most of these features may be accessed through the mode option (invoked by the -y option) to the lp command. These filters allow you to use several unusual options for your print jobs. The following list describes these options and shows the option to include on the lp command line for each one.
-y reverse Reverse the order in which pages are printed.
-y landscape Change the orientation of a physical page from portrait to landscape.
-y x=number,y=number Change the default position of a logical page on a physical page by moving the origin.
-y group=number Group multiple logical pages on a single physical page.
-y magnify=number Change the logical size of each page in a document.
-o length=number Select the number of lines in each page of the document.
-P num_list Select, by page numbers, a subset of a document to be printed, where num_list is page numbers or page ranges separated by commas (for example, 1,4,6-8,14- prints pages 1, 4, 6, 7, 8, and 14 through the end).
-n number Print multiple copies of a document.
Chapter 4. System V advanced printing 179

4.10.3.1 Example: Printing only pages 6-9 of a text documentLet us assume that you have a file called report2 that has a content type simple (meaning that the content of this file is in ASCII text format). You want to print six pages of this file (pages four through nine) with two logical pages on each physical page. Because one of the printers on your system (psprinter) is a PostScript printer, you can do this by entering the following command:
$ lp -d psprinter -T simple -P 4-9 -y group=2 myfile
The filter that groups these logical pages will try to position the pages on the physical page to maximize space utilization. Thus, when you specify group=2, the pages will be printed side by side (2-up), so that the physical page will be landscape orientation. Landscape mode, which controls the orientation of the logical page rather than the physical page, would cause the logical pages to be positioned one on top of the other when combined with the group=2 option.
4.10.4 Installing, registering, and maintaining PostScript printerPostScript printers, like other printers, are registered with the lpadmin command or Web-based System Manager, as described in Chapter 2, “System V print subsystem basics” on page 45. They must use the PS interface program, requested by specifying -m PS on the lpadmin command line or Web-based System Manager panel.
If these filters are to be used with an application that creates PostScript output, make sure that the format of the application conforms to the format of the PostScript file structuring comments. In particular, the beginning of each PostScript page must be marked by the comment:
%%Page: label ordinal
where ordinal is a positive integer that specifies the position of the page in the sequence of pages in the document, and label is an arbitrary page label.
Note
180 Printing for Fun and Profit under AIX 5L

4.10.5 Installing and maintaining PostScript filtersThe PostScript filters provided with the print subsystem cover many of the common print conversion situations. However in AIX 5L, these filters are not registered with the print service automatically. For example, if you try to print an ASCII plain text file to a printer created with the following command:
# lpadmin -p ps1 -T PS-b -I PS -m PS -v /dev/lpx
and the file is printed with the following command:
$ lp -d ps1 -T simple /etc/motd
then you will get this error unless you have installed the postprint filter:
UX:lp: ERROR: 0920-054 There is no filter to convert the file content. TO FIX: Use the lpstat -p -l command to find a printer that can handle the file type directly, or consult with your system administrator.
There are default description files for each of the postscript filters in /etc/lp/fd. By examining the fd files, you can see the input and output type that each filter uses. For example when you use the postprint filter to print an ASCII file, it outputs a type of postscript, which is the input of the download filter, which has an output of postdown, which is the input type for postio, which outputs to type PS used by printers. You should be able to register the filters with the following script:
The printer type and content type of a PostScript printer must be consistent with the printer type used in PostScript filters. Therefore, install your PostScript printers with a printer type of PS, PS-b, PS-r, PSR, or PS-br, and a content type of PS.
Note
Chapter 4. System V advanced printing 181

Note: The problem that we found when testing this was that the options parameters in these .fd files were not working properly, and we had to make copies of the .fd files and then remove the options from the files before the lpfilter command would work without errors. This will be fixed in future releases.
4.10.5.1 Special purpose PostScript filtersThe System V print subsystem installs five special purpose filters that are used in PostScript.
postio The postio filter is mandatory for PostScript printing to work. Combined with lp.cat, this filter communicates directly with the printer.
lp.cat The lp.cat filter is the default filter for all printers. It is required for support of PostScript printers. It is used with postio to communicate directly with the printer
download The download filter is used to download PostScript fonts to the printer.
postreverse The postreverse filter can be used to reverse the output of PostScript files or to select specific pages to print.
postmd The postmd filter is used to convert PostScript color to gray scale.
4.10.6 Installing and maintaining PostScript fontsOne of the advantages of PostScript is its ability to manage fonts. Fonts are stored in outline form in the Type 1 format, either on the printer or on a computer that communicates with a printer. Fonts can also be embedded in
#!/usr/bin/sh#Register the PostScript filters with lpfiltercd /etc/lp/fdlpfilter -f download -F download.fdlpfilter -f dpost -F dpost.fdlpfilter -f postdaisy -F postdaisy.fdlpfilter -f postdmd -F postdmd.fdlpfilter -f postio -F postio.fdlpfilter -f postior -F postior.fdlpfilter -f postmd -F postmd.fdlpfilter -f postplot -F postplot.fdlpfilter -f postprint -F postprint.fdlpfilter -f postreverse -F postreverse.fdlpfilter -f posttek -F posttek.fdcd -
182 Printing for Fun and Profit under AIX 5L

the PostScript file itself. When a document is printed, the PostScript interpreter generates each character as needed (in the appropriate size) from the outline description of it. If a font required for a document is not stored on the printer being used, it must be transmitted to that printer before the document can be printed. This transmission process is called downloading fonts. Special type 1 fonts are available from a number of font foundries.
Fonts are stored and accessed in several ways:
• Fonts may be stored permanently on a printer. These printer-resident fonts may be installed in ROM on the printer by the manufacturer. If the printer has a disk, fonts may be installed on that disk by you (that is, by the Print Service administrator). Older PostScript printers were shipped with 35 standard fonts, although less expensive models have only 13. The IBM Network Printer 12 with 65 fonts is more characteristic of today’s PostScript printers.
• A font may be permanently downloaded by being transmitted to a printer that supports flash memory. This method is useful when there is continual use of a font by the majority of print requests serviced by that printer.
• Fonts may be prepended to a print request by the user and be transmitted as part of the user print request. When the document has been printed, the space allocated to the font is freed for other print requests. The font is stored in the user's directory. This method is preferable for fonts with limited usage.
• Fonts may be stored on a system shared by many users. These fonts may be described as host-resident. This system may be a server for the printer or may be a system connected to the printer by a network. Each user may request fonts in the document to be printed. This method is useful when there are a large number of available fonts or when there is not continual use of these fonts by all print requests. If the fonts will be used only on printers attached to a server, store them on the server. If the fonts are to be used by users on one system who may send jobs to multiple printers on a network, store them on the users' system.
The print service allows you to manage fonts in any of these ways. It provides a special download filter to manage fonts using the last method in the list.
4.10.6.1 Obtaining a list of printer-resident fontsAll PostScript printers today come with fonts resident in the printer ROM. Some older printers have a disk, cartridges, or cards that contained fonts. Today, some printers have fonts on hard disk or memory modules. For PostScript printers attached via a serial port, a list of these fonts can be generated using the postio command and a PostScript program, romfonts.ps.
Chapter 4. System V advanced printing 183

A more common way of obtaining the font list is to use the printer menus to print out the PS fonts. For example, on the IBM Network Printer 12, choose Menu -> Test Menu -> Print PS Fonts and press Enter. This shows the 65 fonts installed in this printer. The method for using postio is given in AIX Version 5, Guide to Printers and Printing.
4.10.6.2 Adding printer-resident fonts to a printer’s font listWhen a PostScript printer is added to the print service, the list of printer-resident fonts is not added automatically. You should add a font list file if you plan to ever download fonts to prevent downloading of fonts that are already resident on the printer. The font list consists of an ASCII file with the name of each font on a separate line. This file can be created by a text editor, such as vi. The font list should be contained in the following file:
/etc/lp/printers/printer-name/residentfonts
where printer-name is the name of the printer.
4.10.6.3 Installing and maintaining host-resident fontsSome fonts can be resident on the host and transmitted to the printer as needed for particular print requests. As the administrator, it is your job to make PostScript fonts available to all the users on a system. To do so, you must know how and where to install these fonts. Because fonts are requested by name and stored in files, the print service keeps a map file that shows the correspondence between the names of fonts and the names of the files containing those fonts. Both of these must be updated when fonts are installed on the host. The full path for the map file is as follows:
/usr/share/lib/hostfontdir/map
This file is not created for you. You will have to create the file by hand.
Type 1 fonts are available on the Internet, from font foundries, and from the AIX X11 type 1 fonts stored in /usr/lib/X11/fonts/Type1 directory. The X11 fonts will be used for this setup example.
To install host-resident fonts, follow these steps:
1. If the /usr/share/lib/hostfontdir does not exist, create it:
# mkdir /usr/share/lib/hostfontdir
2. Change to the /usr/share/lib/hostfontdir:
# cd /usr/share/lib/hostfontdir
3. Copy the font files from /usr/lib/X11/fonts/Type1 directory:
# cp /usr/lib/X11/fonts/Type1/*.pfa
184 Printing for Fun and Profit under AIX 5L

4. Get the filename from the font files:
# grep FontName *.pfacour_s.pfa:/FontName /CourierSymbols defcour_sb.pfa:/FontName /CourierSymbols-Bold defhelv_s.pfa:/FontName /HelveticaSymbols defhelv_sb.pfa:/FontName /HelveticaSymbols-Bold deftnr_s.pfa:/FontName /TimesNewRomanSymbols deftnr_sb.pfa:/FontName /TimesNewRomanSymbols-Bold def
5. Add the font names and full pathnames of the files to the map file. Any comments in this file begin with a percent sign (%). A sample map file is shown here:
% Map file from the X11 Type 1 fontsCourierSymbols /usr/share/lib/hostfontdir/cour_s.pfaCourierSymbols-Bold /usr/share/lib/hostfontdir/cour_sb.pfaHelveticaSymbols /usr/share/lib/hostfontdir/helv_s.pfaHelveticaSymbols-Bold /usr/share/lib/hostfontdir/helv_sb.pfaTimesNewRomanSymbols /usr/share/lib/hostfontdir/tnr_s.pfaTimesNewRomanSymbols-Bold /usr/share/lib/hostfontdir/tnr_sb.pfa
If you are only able to download fonts with a .pfb suffix, there are public domain utilities, such as pfb2pfa, that are available on the Internet (such as http://bibliofile.mc.duke.edu/gww/fonts/postscript-utilities/index.html) to convert pfb fonts to pfa type fonts.
4.10.6.4 Downloading Host-Resident fontsThe PostScript language clearly defines the ability to prepend fonts to a PostScript document to be printed. The download filter takes advantage of this capability to send fonts to both local and remote printers.
The download filter does five things:
1. It searches the PostScript document to determine which fonts have been requested. These requests are documented with the following PostScript structuring comments:
%%DocumentFonts: font1 font2 . . .
in the header comments.
2. It searches the list of fonts resident on that printer (in /etc/lp/printers/printer-name/residentfonts) to see if the requested font must be downloaded.
3. If the font is not resident on the printer, it searches the host-resident font directory to see if the requested font is available. The only candidates for downloading are fonts listed in the map table that point download to
Chapter 4. System V advanced printing 185

readable files. A Type 1 font is downloaded once, at most, for a single document, even if it occurs multiple times in the %%DocumentFonts: comment or PostScript file. The downloading of fonts occurs only for the duration of the PostScript job; however, permanent downloading of fonts to the printer's RAM can be done with special PostScript programming techniques using the exitserver operator.
Requests for unlisted fonts or inaccessible files are ignored; all requests are ignored if the map table can not be read.
4. If the font is available, the filter takes the file for that font and prefixes it to the file to be printed.
5. The filter sends the font definition file and the PostScript source file (the file to be printed) to the PostScript printer.
4.11 Printing ASCII text to a PostScript printer
If you send an ASCII simple text file to a printer that supports only PostScript, the printer will flush the print job and may or may not print an error page. There are at least two ways to print simple text files to a PostScript printer.
The first method is to install the postscript filters, including postprint, download and postio. With this method, the print service uses these filters to convert from input type simple to output type PS for the PostScript file. When this is done, you can print a simple text file to the PostScript queue with the following command:
$ lp -d ps2 -T simple /etc/motd
The second method is to use the enscript application that is a part of the bos.txt.ts fileset in AIX. To use this command, you can either pipe the file to the command, or use the filename as the final argument, as shown here:
$ enscript -d ps2 /etc/motd
For more details on making fancier output with enscript, see Section 9.2, “PostScript utilities” on page 437.
4.12 Restricting users access and priorities for printers
The lpadmin -u allow: and -u deny: flags can be used to restrict certain users from printing on a specific printer. In addition to this, the lpforms command and the lpadmin -f allow command also have allow and deny flags which can restrict user access to printers while forms are mounted.
186 Printing for Fun and Profit under AIX 5L

For each printer the LP print service keeps two lists of users:
• An allow-list of people allowed to use the printer
• A deny-list of people denied access to the printer
With the lpadmin -u allow flag, the users listed are added to the allow-list and removed from the deny-list.
With the lpadmin -u deny flag, the users listed are added to the deny-list and removed from the allow-list.
If the allow-list is not empty, only the users in the list may use the printer, regardless of the contents of the deny-list. If the allow-list is empty, but the deny-list is not, the users in the deny-list may not use the printer. All users can be denied access to the printer by specifying -u deny:all. All users may use the printer by specifying -u allow:all.
The lpusers command is used to set limits to the queue priority level that can be assigned to jobs submitted by users of the LP print service.
4.13 Customizing header pages
The header pages for both PostScript and text pages are created in the interface scripts associated with the queue. The standard interface creates a simple text header page, while the PS interface starts by pre-pending the file /usr/lib/lp/postscript/banner.ps.
One of the things that you may want to add to the banner page is paper tray selection as this is not handled by the standard scripts. Find the printer commands to do this in your printer programming technical reference.
The steps to create a custom header page are to create a new interface script, as describer earlier in the chapter, or to simply edit the file in the interfaces directory associated with your printer. Make changes to this file to create the desired header page.
4.13.1 Example: PCL header with large user nameThe banner portion of the PCL is contained in a small part of the standard interface script. In this example you can create a printer using that model, and then change to the printer interfaces directory /etc/lp/interfaces. The script that you will change is in this directory and has the same name as the printer you created. Search the file for the line:
## Print the banner page
Chapter 4. System V advanced printing 187

The code for generating the regular banner is shown here:
You can change the format of this to output any information that you might want (to inform users of changes) or you make changes to emphasize information. When you add text, the output must be directed to standard out. In this example, you will add the PCL codes to change the font to a larger font for the user name. You can see that for printers that support a WIDE_CS that some of this may already happen. When adding codes to change the font, you also must add the font to return the printer to the font that was there before you sent the job. One thing you might add at the end is a printer reset command, which for PCL is escape E. The escape character can be added to an echo statement with “\033”. So escape E would be:
echo “\033E”
Before starting to modify the header page for a PCL printer, there are some simple things that you should know about the PCL data stream. The following list should give you enough information to get started:
• PCL is simply ASCII Text with special escape sequences to give the printer commands.
• Use simple PCL commands from the printers technical reference.
• [ESC] can be created with echo “\033”.
regular_banner () { echo "${CR}\c" echo "${PAD}${PAD}${PAD}${PAD}${PAD}\c" echo "#####${WIDE_CS} User: ${user_name}${NORM_CS}${NL}\c" if [ -n "$ALIAS_USERNAME" ] then echo "${PAD}\c" echo "#####${WIDE_CS} Alias: ${ALIAS_USERNAME}${NORM_CS}${N L}\c" fi if [ -n "${title}" ] then echo "${PAD}\c" echo "#####${WIDE_CS} Title: ${title}${NORM_CS}${NL}\c" fi echo "${PAD}\c" echo "#####${WIDE_CS} Printed: LC_TIME=C date '+%a %H:%M %h %d, %Y'` ${NORM_CS}${NL}\c" echo "${PAD}\c" echo "#####${WIDE_CS} Job number: ${request_id}${NORM_CS}${NL}\c" echo "${PAD}${PAD}${PAD}${PAD}${PAD}\c" if [ -n "${FF}" ] thenecho "${CR}${FF}\c" fi}
188 Printing for Fun and Profit under AIX 5L

• You can concatenate PCL commands that start with the same sequence letters by using small letters until the final letter:
[ESC](s4148t1p16V = [ESC](s4148T + [ESC](s1P + [ESC](s16V [ESC](s#T - Sets the Typestyle (FONT). [ESC](s3T - Courier - fixed font,
uses [ESC](s5H for pitch[ESC](s4148T - Univers - proportional font,
uses [ESC](s35V for point size [ESC](s#P sets fixed (#=0) or proportional(#=1) [ESC](s#H gives pitch for fixed fonts
Larger number gives smaller characters[ESC](s#V gives Point size for proportional fonts
Larger number gives larger characters
To change the size of the name on the header page, add the two echo statements around the statement that echoes the name, as shown here:
echo "\033(s4148t1p16V"echo "#####${WIDE_CS} User: ${user_name}${NORM_CS}${NL}\c"echo "\033(s3t0p10H"
The resulting header page will look like this:
Of course, you can apply any touches you want, included imbedded graphics. Another way to add the custom header is to create a custom header template file to setup any fonts and graphics and cat the file before printing the information.
4.13.2 Example: Custom PostScript header pageThe PostScript header page is created by the standard interface program by passing the text to postprint to create the PostScript, and by the PS interface
####################
#### User: rs9330b!sallymae######## Printed: Wed 09:53 Nov 01, 2000######## Job number: hp1-574################
Chapter 4. System V advanced printing 189
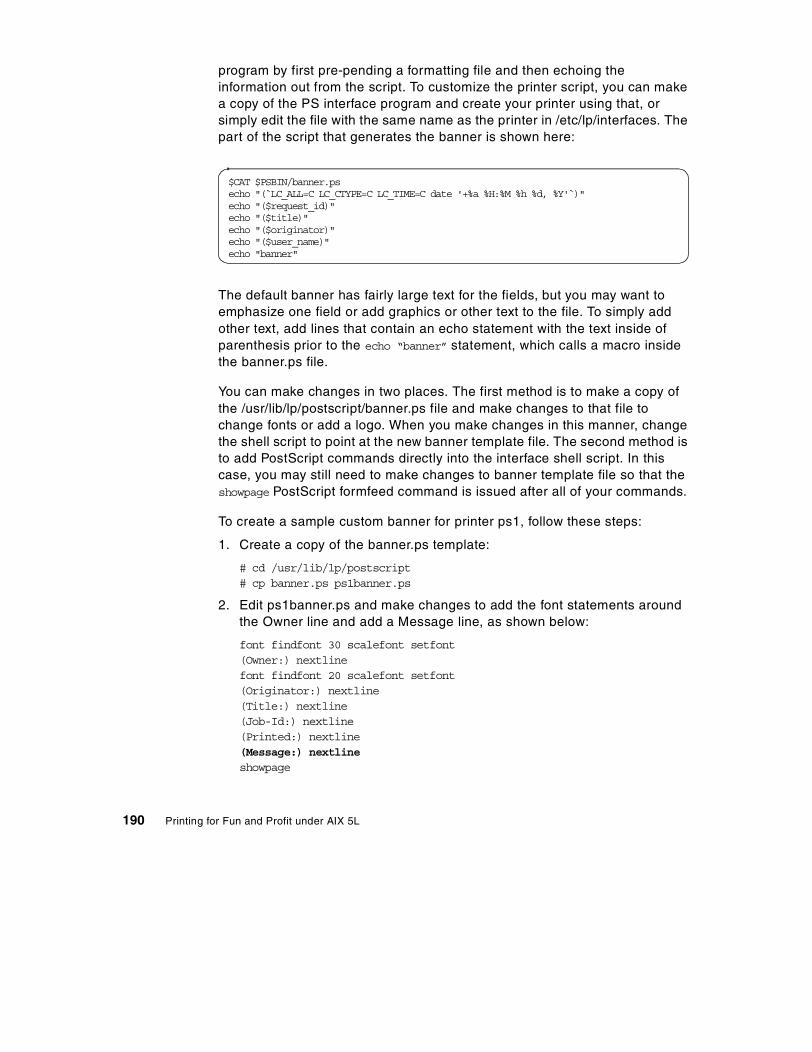
program by first pre-pending a formatting file and then echoing the information out from the script. To customize the printer script, you can make a copy of the PS interface program and create your printer using that, or simply edit the file with the same name as the printer in /etc/lp/interfaces. The part of the script that generates the banner is shown here:
The default banner has fairly large text for the fields, but you may want to emphasize one field or add graphics or other text to the file. To simply add other text, add lines that contain an echo statement with the text inside of parenthesis prior to the echo “banner” statement, which calls a macro inside the banner.ps file.
You can make changes in two places. The first method is to make a copy of the /usr/lib/lp/postscript/banner.ps file and make changes to that file to change fonts or add a logo. When you make changes in this manner, change the shell script to point at the new banner template file. The second method is to add PostScript commands directly into the interface shell script. In this case, you may still need to make changes to banner template file so that the showpage PostScript formfeed command is issued after all of your commands.
To create a sample custom banner for printer ps1, follow these steps:
1. Create a copy of the banner.ps template:
# cd /usr/lib/lp/postscript# cp banner.ps ps1banner.ps
2. Edit ps1banner.ps and make changes to add the font statements around the Owner line and add a Message line, as shown below:
font findfont 30 scalefont setfont(Owner:) nextlinefont findfont 20 scalefont setfont(Originator:) nextline(Title:) nextline(Job-Id:) nextline(Printed:) nextline(Message:) nextlineshowpage
$CAT $PSBIN/banner.psecho "( LC_ALL=C LC_CTYPE=C LC_TIME=C date '+%a %H:%M %h %d, %Y' )"echo "($request_id)"echo "($title)"echo "($originator)"echo "($user_name)"echo "banner"
190 Printing for Fun and Profit under AIX 5L

3. Change to the interfaces directory:
# cd /etc/lp/interfaces
4. Edit the ps1 file and change the CAT statement and add a message statement. Notice the statements in this file are in reverse order of those in the template.
$CAT $PSBIN/ps1banner.psecho "(`LC_ALL=C LC_CTYPE=C LC_TIME=C date '+%a %H:%M %h %d, %Y'`)"echo "($request_id)"echo "($title)"echo "($originator)"echo "($user_name)"echo "(Printer will be offline Friday)"echo "banner"
5. Test print the banner page
The banner page printed with these changes will look like this:
4.14 Setting up a printer with multiple names
The print service allows you to set up a single printer with multiple names to perform multiple functions. For example, if your printer supports both portrait and landscape modes, you can set up a different name for each function and then send jobs to each printer name. These multiple printers are called virtual printers, not to be confused with the PowerPC print subsystem virtual printers.
Owner: rs9220b!heidiOriginator: rs9220b!heidiTitle: Pigs flyPrinted: Wed 10:56 Nov 01, 2000Message: Printer will be offline Friday
Chapter 4. System V advanced printing 191

Figure 21. Multiple virtual printers
The print spooler system differentiates printers by name only, not by the device to which the printer is connected. To specify different names for the same device and to prevent multiple print jobs from appearing simultaneously, you must set up both the real printer and additional virtual printers. The real printer performs the actual printing and the virtual printers pass print jobs to the real printer.
For example, to set up two virtual printers, port and land, that use the capabilities of an Hewlett-Packard LaserJet, use this procedure:
1. Set up the real printer. Specify the Name as real and set the Model to HPLaserJet.
2. Set up the port and land virtual printers. Set the Model to network. Specify the same Device to which real is connected.
3. Create the file /usr/spool/lp/remote and add the following lines:
port: lp -dreal -oportraitland: lp -dreal -olandscape
This specifies that when printing to printer land, the print system sends the print job to printer real using the -olandscape option (to print in landscape mode) and when printing to printer port, the print system sends the print job to printer real using the -oportrait option (to print in portrait mode).
Note: The options listed after -dreal depend on the printer model. Check the interface script in /usr/spool/lp/admins/lp/interface for your printer to determine the printer- or class-dependent -o options.
To print a file in landscape mode, enter the following command:
192 Printing for Fun and Profit under AIX 5L

$ lp -dland filename
This procedure translates the -dland option to lp to the necessary options for the printer (in this example, -dreal -ol).
Another way to accomplish this is to create a simple shell script to perform the type of printing. For example:
# Land - shell script to print in landscape mode# syntax: land <file> <file>#lp -d real -ol $@
The reasons for choosing one method over the other depend on how your applications access the print system. Many applications allow you to specify only the name of the printer, so virtual printers are the only solution. Other applications might allow complete control over the commands that submit the print job. In this case, you might use the shell script above.
Chapter 4. System V advanced printing 193

194 Printing for Fun and Profit under AIX 5L

Part 3. PowerPC print subsystem
© Copyright IBM Corp. 2001 195

196 Printing for Fun and Profit under AIX 5L

Chapter 5. PowerPC print subsystem basics
To manage printers in an AIX 5L environment, it is important to understand the way in which AIX 5L implements printing facilities. This section reviews the manner in which printing is implemented in AIX 5L, so that you may better understand the function of the print spooling subsystem. AIX 5L implements printing in a manner similar to many other UNIX variants, but with some key differences. After reviewing this chapter, you should understand the general printing approach employed in AIX 5L and be able to contrast it with other printing systems you are familiar with.
5.1 Overview
Under AIX 5L, there are two basic methods that can be employed to drive or use printers that you might attach to a RISC System/6000. They are:
1. Printing by directly addressing the printer device driver
This method of printing bypasses the print subsystem and goes directly to the printer device driver via the special character file in the /dev directory. It is common to both print subsystems and is covered in Chapter 1, “Overview of AIX 5L print subsystems” on page 3.
2. Printing by utilizing the print spooling subsystem
In this environment, information that a user or application wishes to be printed is sent to the spooling subsystem. The spooling subsystem will itself drive the printers and share them among the various applications and users who wish ejected at page ends, that a page eject is the last command sent, and that control characters, such as line feeds and carriage returns, are correctly interpreted. The device driver also controls the printer communications port through attributes such as line speed, parity and stop bits for that printer port. The print subsystem places the device driver in transparent mode so that the only formatting of the data will be done via the virtual printer.
5.1.1 Printing via the PowerPC print subsystemThe most common method of printing in AIX is to use the print spooling subsystem. The PowerPC print subsystem that is available in AIX 5L is the traditional AIX print subsystem. It is a substantially enhanced print spooling subsystem over other UNIX print subsystems, but also is unique, and therefore requires knowledge that is not available to the non-AIX system administrator. This subsystem provides the flexibility required in the modern printing environment where printers often have multiple personalities, that
© Copyright IBM Corp. 2001 197

allow them to emulate a range of other printer devices. There are really two views of the print spooling subsystem that are important to understand:
• The logical view of how printers, virtual printers and queues relate.
• The manner in which files are processed by the print spooling subsystem.
First, we will discuss the logical view of printers and queues.
5.1.1.1 Printers, virtual printers, and print queuesA prerequisite to a discussion on the print spooling subsystem is a discussion to define terms that are used. From a logical viewpoint there are three major components of the print spooling subsystem. These are printers, print queues, and virtual printers.
• Printers are the actual devices on which output is printed. In AIX 5L, printers are a pairing of the real printer and the printer device driver. The printer device driver is represented by a special file in the /dev directory beginning with the letters lp, for example, /dev/lp24.
• Print queues are the destinations that print requests are directed to and the queues on which print jobs wait for an appropriate printer to become available. Queues can be served by one or more printers by using multiple queue devices. A queue is represented by a pair of stanza in the /etc/qconfig file:
- the queue stanza
- the queue device stanza.
• A virtual printer is a single logical view of the components that make up a printer from a user’s perspective. A virtual printer describes the combination of a printer device, a data stream that a printer supports, and the specific configuration of the queue and queue device that serve the virtual printer. A virtual printer is represented by a file in the /var/spool/lpd/pio/@local/ddi directory.
Virtual printers are important because modern printers can support multiple data streams. For example, the Lexmark IBM 4029 can support ASCII, PostScript, and HP-PCL data streams. Users may wish to utilize all of these options on the same physical device. So, virtual printers provide a method for mapping multiple data streams to the single printer device. For example, the ASCII data stream mode of printing for a specific Lexmark IBM 4029 LaserPrinter is one virtual printer. The PostScript printing mode for the same Lexmark IBM 4029 LaserPrinter may be a second virtual printer definition associated with that same physical Lexmark IBM 4029 LaserPrinter device.
198 Printing for Fun and Profit under AIX 5L

5.1.1.2 How virtual printers are defined by AIX 5LThe information about virtual printers is kept in a database. After having configured a virtual printer, you will find a file named something like ibm4039.ascii:lp0.ascii:lp0 in the /var/spool/lpd/pio/@local/custom directory. Each virtual printer configured generates a unique file in this directory. This file contains all the printer control information that is appropriate for the ascii:lp0 virtual printer. This information can be modified via the chvirprt command or listed via the lsvirprt command. The name of the virtual printer will also match the name of the queue and queue device specified in the qconfig file. For example, if you create the asc:lp0 virtual printer using mkpq, you will create a print queue called asc and a printer queue device called lp0 in the qconfig file. If you list available printers via qchk -A, this printer will be listed as Queue asc and Dev lp0. The information in the custom directory is only used for changing and listing the virtual printer attributes. The backend programs like piobe actually use a digested binary database of information stored in the ../@local/ddi subdirectory.
5.1.1.3 How print files are processedThe second view of the print spooling subsystem that is important to the systems administrator is how print requests are processed by the programs that make up the print spooling subsystem.
1. The user submits the print job with qprt, lp, lpr, enq, or dtprint.
2. These print commands transfer the print job to enq.
3. enq checks the queue using /etc/qconfig.bin.
4. enq creates the job description file in /var/spool/lpd/qdir.
5. enq signals the qdaemon.
6. The qdaemon maintains a serial order of the job and executes the backend program.
7. If the backend program is piobe, the virtual printer is used. If the backend program is rembak, the output is sent to a remote print server.
8. Local print jobs are processed by the backend and sent to the device driver.
9. The device driver sends the file to the physical printer.
10. If the backend program is rembak, the lpd connection is made with the remote server and the file is sent and processed there.
11. If the backend program is piorlfb, then a combination of steps 7 and 10 is performed. The job is sent through the virtual printer and then on to the remote server.
Chapter 5. PowerPC print subsystem basics 199

As you can see from this list, you present the print request to the print spooling subsystem via one of the printing commands, such as qprt, lp, lpr, or enq. Depending on the command chosen, there are many options available to control printing, for example, options such as the print queue to be used, the print job’s priority, and some output control commands are some of the options that can be selected. The commands to request printing of a file are discussed in Section 5.6, “Printing files in the PowerPC print subsystem” on page 243.
All the commands that request the printing of a file invoke the AIX 5L enq command to actually place the print request into the appropriate queue. When the enq command receives a print request, it reviews information about queues and printers, which it has read from the qconfig configuration file, and then places the job request on the appropriate queue. This is done by updating files in the /usr/lpd/stat and the /usr/lpd/qdir directories.
Once a job has been placed onto a print queue, the qdaemon process is responsible for the jobs and passes them to the appropriate printer via the correct backend program. These backend programs are identified in the qconfig file via the backend=entry in the queue device stanza for the destination queue. Normally the queue device specifies that the piobe command, the rembak command, the piorlfb command, the pioibmnp or the piojetd command be used to process the enqueued print request. The backend command can, though, be a command or shell script that you have written to serve a specific purpose. The piobe command controls printing through the virtual printer subsystem and the output usually goes to local printer devices on the system that the print spooling subsystem is running in. The rembak command will take a print job and transmit it to a specified remote system for printing. The piorlfb and piojetd backends actually pass the output through the piobe backend so the virtual printer processing can occur prior to the job being sent to the next command. With piorlfb, the output from piobe is then sent to the remote printer with rembak. With piojetd, the output is piped from rembak to the piohpnpf filter, which sends the data over the network to the JetDirect printer.
5.1.2 The piobe backendThe piobe process then takes the print file passed to it through a pipeline of appropriate filters based on the individual virtual printer definitions. These filters first add printer initialization commands, as specified in the virtual printer attributes, then format (for ASCII) or pass the data through unaltered (for PostScript or passthrough) and send it on to the printer, and finally send printer reset sequences. Formatting the data usually involves adding carriage returns to line feeds, adding line feeds and carriage returns to truncate the
200 Printing for Fun and Profit under AIX 5L

the page width, adding formfeeds to truncate the page based on the page length, substituting spaces for tabs, and similar actions.
The piobe process uses the device driver in this transparent mode so that the printer data stream generated by piobe is not modified as it passes through the device driver to the actual printer device.
This means that the only way to specifically configure the behavior of a printer when using the print spooling subsystem is to modify the virtual printer database. By using the qprt flags, you can specify for the virtual printer to not send the initialization control sequences, to passthrough the print job untouched, and to not send the printer reset control sequences.
5.1.3 The rembak backendIn many modern installations, users of one system may wish to share a printing resource installed on another system. AIX 5L supports this via remote or networking printing facilities. These remote printing facilities are built upon the TCP/IP communications protocols. So, to utilize remote printing facilities your systems must be connected via the TCP/IP protocol and support the required TCP/IP applications.
The rembak program is the backend program used by the print spooling subsystem when printing to a remote host or printer that supports the lpd (line printer daemon) protocol which communicates on TCP/IP socket 515. One example is printing between AIX systems where rembak on the client system sends a request to lpd on the server system, which is then passed to enq on the server to enter its local queueing system. Other hosts that support the lpd protocol include most UNIX systems, TCP/IP for OS/2, VM and MVS, Windows NT, the flexip program for Novell Netware, some internal printer cards such as HP JetDirect, LexMark Marknet, and IBM Network Printer cards, network print servers, and some network terminal servers, such as Lantronics. Large files sent to PCs or network print servers may need to use the -T minutes flag on rembak to avoid timeouts.
The rembak command sends a job to be queued on a server attached somewhere else in the network via TCP/IP protocols. The rembak command works as the client that expects to find a process called lpd daemon; this works as the server that receives print requests for being processed by the local qdaemon. The qdaemon passes the request to the piobe backend of the local system, which continues with the normal local processing.
Chapter 5. PowerPC print subsystem basics 201

5.1.4 The piojetd backendThe piojetd is a shell script that calls the piobe backend program and then pipes the virtual printer output to a network filter called piohpnpf, which sends the output to the JetDirect printer or print server usually using TCP/IP port 9100. More discussion of this print method is described in Chapter 6, “PowerPC network printing” on page 267.
5.1.5 Print spooling subsystemAs you have seen from our previous discussion, there are a number of components that make up the print spooling subsystem. To configure the print spooling subsystem to meet specific requirements that you may have, there are several key files and utilities. This section discusses how to use those files and utilities to modify the print spooling subsystem as required. The following topics will be discussed:
• Configuring and managing print queues
• Configuring and managing print queue devices
• Configuring and managing printer devices
• Configuring and managing virtual printers
5.1.5.1 Print queues and queue devicesPrint queues and print queue devices are defined in the file /etc/qconfig.
The qconfig fileThe qconfig file is used by the print spooling subsystem to control configuration of the print queues themselves and the backend print queue devices that will process the enqueued jobs. The qconfig file contains stanzas that describe the characteristics of the printer spool queues and the backend devices that they invoke. Some examples of these stanzas are explained below. There is one important aspect of the qconfig file that should be understood: this is the manner in which the configuration information is accessed by the enq command or the qdaemon.
The /etc/qconfig file is in ASCII format, but the commands that compose the print spooling subsystem actually use the /etc/qconfig.bin binary version. The /etc/qconfig ASCII file is digested by the /usr/lpd/digest program to create a binary version called /etc/qconfig.bin. It is this digested binary version of the qconfig file that contains the configuration parameters that are used by enq or the qdaemon. For simplicity, we will refer to both versions of the qconfig file simply as the qconfig file.
202 Printing for Fun and Profit under AIX 5L

The qconfig file is a flat ASCII attribute file in a stanza format. Stanzas in this file describe either queues or queue devices. Every queue stanza requires that one or more queue device stanzas immediately follow it in the file.
The local queue format is shown below:
The queue named emmadee is a local queue with a single queue device lp12. For the local queue, most of the information is contained in the queue device stanza which starts with the line lp12:. The file = /dev/lp12 is used to set the standard out for the backend program. In this case, this is set to a device file and will print to a local attached printer. The queue device name and the file parameter often are the same, but this does not have to be true. The banner pages are controlled by the header and trailer lines. The backend program is usually the last line in the queue device stanza. In this example, backend = /usr/lib/lpd/piobe indicates that this queue will use the virtual printer subsystem.
A local queue can be defined with multiple print devices. This allows pooling of the jobs sent to the queue. The qdaemon first checks the availability of the first queue device and prints to it if it is available. If it is not available, then the next queue device is tried and so on until an available queue device is found for that queue. The following shows an example of a queue with multiple queue devices:
emmadee: device = lp12lp12: file = /dev/lp12 header = always trailer = never access = both backend = /usr/lib/lpd/piobe
lydia: device = lp1,lp2lp1: file = /dev/lp1 header = never trailer = never access = both backend = /usr/lib/lpd/piobelp2: file = /dev/lp2 header = never trailer = never access = both backend = /usr/lib/lpd/piobe
Chapter 5. PowerPC print subsystem basics 203
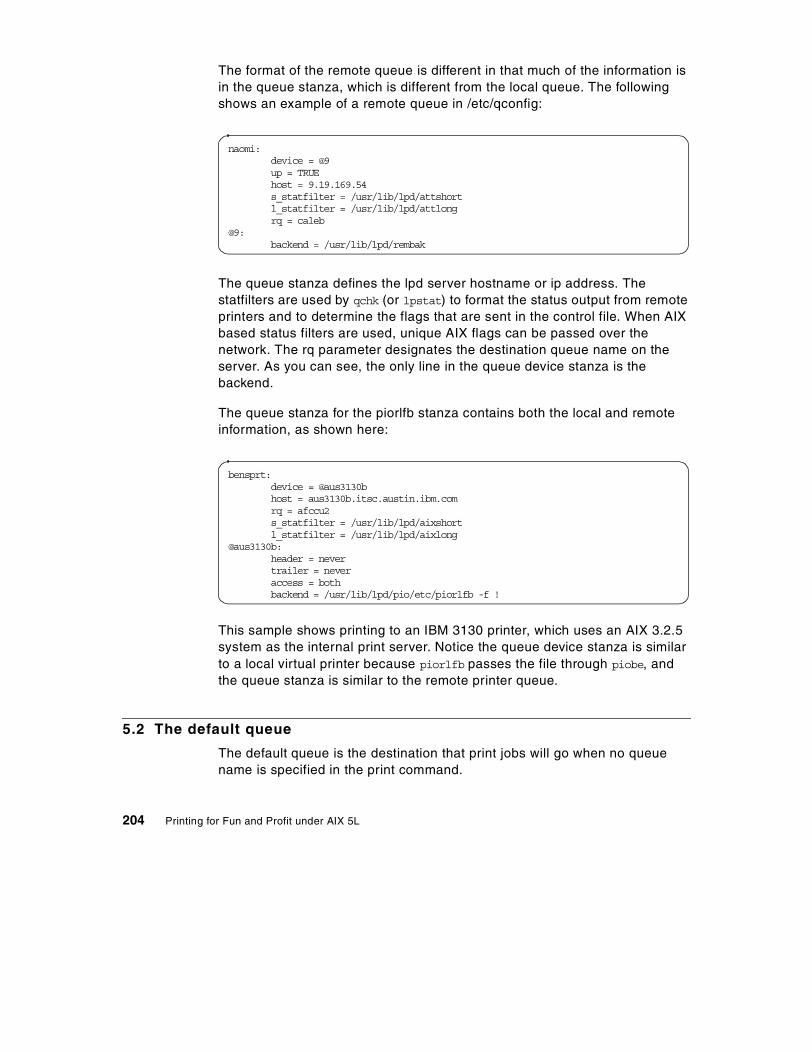
The format of the remote queue is different in that much of the information is in the queue stanza, which is different from the local queue. The following shows an example of a remote queue in /etc/qconfig:
The queue stanza defines the lpd server hostname or ip address. The statfilters are used by qchk (or lpstat) to format the status output from remote printers and to determine the flags that are sent in the control file. When AIX based status filters are used, unique AIX flags can be passed over the network. The rq parameter designates the destination queue name on the server. As you can see, the only line in the queue device stanza is the backend.
The queue stanza for the piorlfb stanza contains both the local and remote information, as shown here:
This sample shows printing to an IBM 3130 printer, which uses an AIX 3.2.5 system as the internal print server. Notice the queue device stanza is similar to a local virtual printer because piorlfb passes the file through piobe, and the queue stanza is similar to the remote printer queue.
5.2 The default queue
The default queue is the destination that print jobs will go when no queue name is specified in the print command.
naomi: device = @9 up = TRUE host = 9.19.169.54 s_statfilter = /usr/lib/lpd/attshort l_statfilter = /usr/lib/lpd/attlong rq = caleb@9: backend = /usr/lib/lpd/rembak
bensprt: device = @aus3130b host = aus3130b.itsc.austin.ibm.com rq = afccu2 s_statfilter = /usr/lib/lpd/aixshort l_statfilter = /usr/lib/lpd/aixlong@aus3130b: header = never trailer = never access = both backend = /usr/lib/lpd/pio/etc/piorlfb -f !
204 Printing for Fun and Profit under AIX 5L

5.2.1 System default queueThe first queue stanza to appear in the /etc/qconfig file sets the system default queue. This can be changed system wide using Web-based System Manager, SMIT, or the command line.
For Web-based System Manager. one of the main tasks for directory disabled printers is Set default printer. Select the desired printer from the list and click Finish.
For SMIT, follow these steps:
1. Run # smitty spooler.
2. Choose Manage Print Queues.
3. Choose Set the Systems’s Default Print Queue.
4. Use the F4 key to show a list of queues and select the desired queue.
5. Press Enter.
From the command line, use the following command:
# /usr/lib/lpd/pio/etc/piochdfq -q ‘benslaser’
Any of these actions will actually move the queue to the front of /etc/qconfig.
5.2.2 Individual’s default queuesIndividuals can set up environment variables to specify destinations in their environment. If the LPDEST environment variable is set, the enq command uses the queue name specified by the LPDEST variable. If set, this value is always used, even if the PRINTER variable is also set. If the PRINTER variable is set and no LPDEST variable is set, the enq command uses the queue name specified by the PRINTER environment variable. Any destination command-line options override both the LPDEST and the PRINTER environment variables. If neither the LPDEST nor the PRINTER variable is set, the enq command uses the system default queue name. The system default queue name is the name of the first queue defined in the /etc/qconfig file. For example, to set these variables to laser3 for the Bourne and Korn shells, enter the following commands:
# export PRINTER=laser3# export LPDEST=laser3
To set these variables for the csh shell, enter the following commands:
# setenv PRINTER=laser3# setenv LPDEST=laser3
Chapter 5. PowerPC print subsystem basics 205

Note that when one of these variables are set, a command like cancel -x### (a common method of canceling jobs) will not find the job unless it is in the queue specified by the environment variable.
5.2.2.1 Administrative privilege and the print spooling subsystemThe print spooling subsystem uses AIX 5L security. AIX 5L uses a system of administrative privilege to control access to many administrative areas, such as the print spooling subsystem. The administrative privilege approach allows a systems administrator to delegate some authority to administer a portion of the AIX 5L environment without having to give a user the sweeping powers of the root user or system group. To configure the print spooling subsystem and perform many administrative tasks, a user must either be the root user, a member of the system group or a member of the printq administrative group. Users who are members of the printq administrative group can manipulate the print spooling subsystem but do not have access to other administrative privileges (such as managing mail), unless those privileges are also given to them.
5.3 Queue management
There are many reasons that you may want to modify the print queues and queue devices in the qconfig file. You may wish to provide specific users or applications with specific queues; you may want special queues that are available only at certain times; you may want to track printer use of some users but not others. Given that you require modification of the print queue or queue device stanzas in the qconfig file, there are two major ways in which these files can be manipulated:
• The first is to edit the qconfig file directly, using the editor of your choice. Although the advanced user can use this method, errors in editing and format can cause the print subsystem to be inoperable and the qdaemon may not start.
• The second is to use the facilities provided via AIX 5L, such as Web-based System Manager, SMIT, and the command line to configure print queues and queue devices. This is the recommended approach. The following sections discuss the facilities provided by AIX 5L to manipulate the qconfig file.
This section will describe how to perform the following print queue configuration and management tasks via the facilities provided by AIX 5L:
• Adding a print queue
• Displaying print queue configuration information
206 Printing for Fun and Profit under AIX 5L
• Modifying a print queue configuration
• Stopping and starting a print queue
• Removing a print queue
5.3.1 Physically adding the printerFollow the next steps to install the physical printer:
1. Review all relevant installation planning information, such as the printer’s own manuals and this entire chapter, to ensure that you have the required components and information to install the printer in question.
2. Review your system’s configuration and select the serial or parallel port which you plan to connect the printer.
3. Ensure that the communications port you plan to use is not already in use by other devices, such as printers, terminals or modems. If the port is already in use, either move the device attached to the port or modify the configuration of that device. For example, for a tty device, set the Enable LOGIN field to disable. For a printer, set STATE to be configured at boot time field to defined. This ensures that there is no conflict in demand for use of the port.
4. Connect the printer to the communications port (serial or parallel) you have selected to connect the printer. You must ensure that you have used the appropriate cabling. The RISC System/6000 General Information and Planning Kit provides information on planning the installation of devices such as printers.
5. Using the documentation provided with the printer, configure it appropriately. If using a serial interface, take note of the settings that you have made for items such as baud rate, stop bits, data bits, and flow control settings. You will need these to configure the AIX printer device driver correctly. For example, for an IBM Proprinter, you may set baud rate to 9600 bps, parity to none, bits per character to 8, stop bits to 1, and xon/xoff to be used for flow control.
5.3.2 Adding a locally attached printer queueOne of the advantages of PowerPC printing is that you can add the local print device, queue, and virtual printer in one step. Log on as a user with appropriate privileges, such as root or a member of the printq admin group. You have a choice for the interface. Follow the steps of one of these options (based on your preference) to add a print queue.
Chapter 5. PowerPC print subsystem basics 207

Option 1: Using Web-based System ManagerFollow the steps to add a local queue. In this example, we have added the first queue by step 14 and added the second queue by step 15 to step 18.
1. In the command prompt, enter the following command:
# wsm
The panel shown in Figure 22 will be displayed.
Figure 22. The first panel of Web-based System Manager
2. Double click Printers icon on the right frame and then double click All Printer Queues in the panel shown in Figure 23. Then select Printers -> New -> New Queue and Printer Wizard dialog in the menu.
Figure 23. Printer menus
3. Enter the queue name for the new printer queue and click the Next button, as shown in Figure 24 on page 209.
208 Printing for Fun and Profit under AIX 5L

Figure 24. Entering the queue name
4. The panel shown in Figure 25 is used to decide the destination type of the printer. In this example, select Local and click the Next button.
Figure 25. Selecting the type of the destination
5. The existing local printers information will be displayed, as shown in Figure 26 on page 210. In this example, there is no information, since this is the first time to add new printer. Select Add New Printer.
Chapter 5. PowerPC print subsystem basics 209

Figure 26. Selecting the existing printer
6. You need to select one of the printer brand names in the panel shown in Figure 27. If you can not find your brand name, select Other. In this example, we need to select IBM, since we will install IBM printer. Click Next.
Figure 27. Selecting the brand name of the printer
7. The next step is to select the printer model. In this example, shown in Figure 28 on page 211, we need to select the IBM 4312 model. Click Next. If the device for this printer has been installed already, you will get the panel shown in Figure 30 on page 212; skip to Step 9. Otherwise, continue on to the next step.
210 Printing for Fun and Profit under AIX 5L

Figure 28. Selecting a model of the printer
8. The next step is to select installation media. You can install printer devices using floppy disks, tapes, CD-ROM, or by specifying any directories which contain this image. Normally, this software will be on the AIX 5L installation media. In this example, select CD-ROM drive and click Next, as shown in Figure 29. The printer devices will actually be installed at this time.
Figure 29. Selecting a installation media
9. You can choose type of port to connect to the printer. In this example, select Parallel and click Next, as shown in Figure 30 on page 212.
Chapter 5. PowerPC print subsystem basics 211

Figure 30. Selecting a type of port
10. Select ppa0 for the available port and location and click Next, as shown in Figure 31.
Figure 31. Selecting a available port
11. You need to choose the type of queue you want; in this example, we want IBM 4312 printer support PCL queue and PostScript queue. Select PCL 5E Emulation and click Next, as shown in Figure 32.
Figure 32. Selecting a type of the queue
12. Verify all information in the panel shown in Figure 33 on page 213. If everything is correct, click Next.
212 Printing for Fun and Profit under AIX 5L
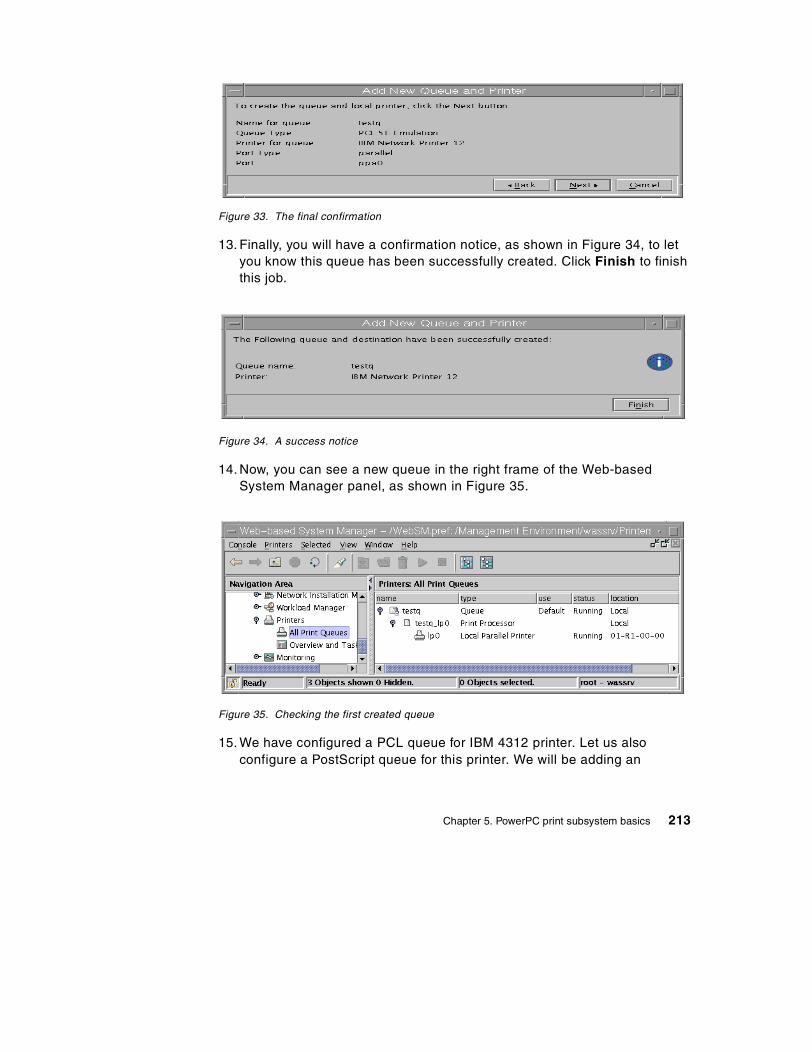
Figure 33. The final confirmation
13. Finally, you will have a confirmation notice, as shown in Figure 34, to let you know this queue has been successfully created. Click Finish to finish this job.
Figure 34. A success notice
14. Now, you can see a new queue in the right frame of the Web-based System Manager panel, as shown in Figure 35.
Figure 35. Checking the first created queue
15. We have configured a PCL queue for IBM 4312 printer. Let us also configure a PostScript queue for this printer. We will be adding an
Chapter 5. PowerPC print subsystem basics 213

additional queue to an existing printer. You can do this by several different ways.
The easiest method is to add a queue to a file in the /dev directory and simply specify the file name of the device created in the previous section. In this example, we have used Printer Advanced Dialog. In panel shown in Figure 35 on page 213, select Printers->New->New Queue and Printer Advanced dialog. The panel shown in Figure 36 will be displayed. Type a name for the new queue and select Local printer. Click Next.
Figure 36. Selecting a type of destination for the second queue
16. In the panel shown in Figure 37 on page 215, select IBM Network Printer 12 and click Next instead of choosing Add New Printer, because the printer device has been installed already in this case.
214 Printing for Fun and Profit under AIX 5L

Figure 37. Selecting the existing printer for the second queue
17. Click Finish to finish to create PostScript queue, as shown in Figure 38.
Figure 38. A confirmation notice for the second queue
18. Now, you can see two queues in the Web-based System Manager panel shown in Figure 39 on page 216.
Chapter 5. PowerPC print subsystem basics 215
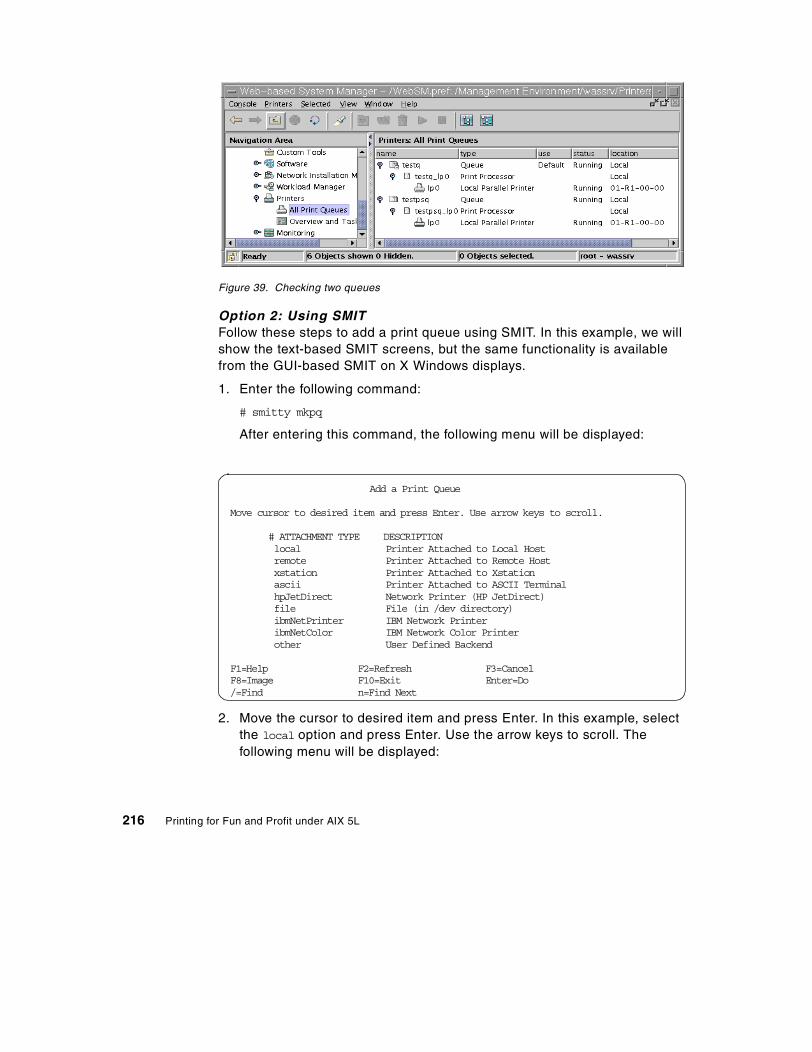
Figure 39. Checking two queues
Option 2: Using SMITFollow these steps to add a print queue using SMIT. In this example, we will show the text-based SMIT screens, but the same functionality is available from the GUI-based SMIT on X Windows displays.
1. Enter the following command:
# smitty mkpq
After entering this command, the following menu will be displayed:
2. Move the cursor to desired item and press Enter. In this example, select the local option and press Enter. Use the arrow keys to scroll. The following menu will be displayed:
Add a Print Queue
Move cursor to desired item and press Enter. Use arrow keys to scroll.
# ATTACHMENT TYPE DESCRIPTION local Printer Attached to Local Host remote Printer Attached to Remote Host xstation Printer Attached to Xstation ascii Printer Attached to ASCII Terminal hpJetDirect Network Printer (HP JetDirect) file File (in /dev directory) ibmNetPrinter IBM Network Printer ibmNetColor IBM Network Color Printer other User Defined Backend
F1=Help F2=Refresh F3=Cancel F8=Image F10=Exit Enter=Do /=Find n=Find Next
216 Printing for Fun and Profit under AIX 5L

3. From this menu, select the option that matches your printer brand. If your printer brand is not listed, select Other. In this example, we have selected IBM, because we are installing an IBM 4019 printer. After pressing Enter, the following screen will be displayed:
4. If your printer model is not listed, select Other, which is at the bottom of the list. To get there, use the down arrow or page down key. If you select a printer model that has its device driver installed (available) on your system, skip to step 12. Otherwise, the following screen will be displayed:
Printer Type Move cursor to desired item and press Enter. Bull Canon Dataproducts Hewlett-Packard IBM Lexmark OKI Printronix QMS Texas Instruments Other (Select this if your printer type is not listed above) F1=Help F2=Refresh F3=Cancel F8=Image F10=Exit Enter=Do /=Find n=Find Next
Printer Type Move cursor to desired item and press Enter. [TOP] ibm-pages IBM PAGES(558x) Printers ibm2380 IBM 2380 Personal Printer II ibm2380-2 IBM 2380 Plus printer (Model 2) ibm2381 IBM 2381 Personal Printer II ibm2381-2 IBM 2381 Plus printer (Model 2) ibm2390 IBM 2390 Personal Printer II ibm2390-2 IBM 2390 Plus printer (Model 2) ibm2391 IBM 2391 Personal Printer II ibm2391-2 IBM 2391 Plus printer (Model 2) ibm3112 IBM 3112 Page Printer [MORE...59] F1=Help F2=Refresh F3=Cancel F8=Image F10=Exit Enter=Do /=Find n=Find Next
Chapter 5. PowerPC print subsystem basics 217

5. You might be thinking, why do you have to install your printer device driver; should it not already be installed in your system? In order to reduce the operating system size, you have to choose what will be installed. When you first install AIX, it does not come with all the device drivers AIX supports. If you are going to install different printers, check if these printers device drivers are already installed and if they are not installed, install them. Otherwise, you will probably have to install a new device driver every time you install a new printer. To see if the your printer device driver is installed, type the following command at the prompt line:
# smitty pdp
Select List All Supported Printer/Plotters. If your printer model is not listed, you will have to install its device driver.
6. In the previous screen, press Enter to install your printer device driver. The Install Additional Printer/Plotter Software screen will be displayed. In our example, we use the AIX 5L install software from the CD-ROM drive, so we have selected /dev/cd0 for input device. After pressing Enter, the following screen will be displayed:
Printer Support Not Installed
Type or select a value for the entry field.Press Enter AFTER making all desired changes.
[Entry Fields] Software to support the printer you selected is not installed. Press Enter to install printer support software packages.
F1=Help F2=Refresh F3=Cancel F4=ListF5=Reset F6=Command F7=Edit F8=ImageF9=Shell F10=Exit Enter=Do
218 Printing for Fun and Profit under AIX 5L

7. Press F4 to see a list of available installation devices in your system. The following screen will be displayed. Select all the printer device drivers you intend to install using F7 and the arrow keys and press Enter. In this example, we have chosen IBM Network Printer 12 for IBM 4312 printer.
8. Press Enter to install the printer device drivers you have selected. You will see the following screen. Press Enter again to start installation.
Install Additional Printer/Plotter Software
Type or select values in entry fields.Press Enter AFTER making all desired changes.
[Entry Fields]* INPUT device / directory for software /dev/cd0* SOFTWARE to install [printers] + PREVIEW only? (install operation will NOT occur) no + Include corresponding LANGUAGE filesets? yes +
F1=Help F2=Refresh F3=Cancel F4=ListF5=Reset F6=Command F7=Edit F8=ImageF9=Shell F10=Exit Enter=Do
Install Additional Printer/Plotter Software
Ty+--------------------------------------------------------------------------+Pr| SOFTWARE to install | | | | Move cursor to desired item and press F7. Use arrow keys to scroll. |* | ONE OR MORE items can be selected. |* | Press Enter AFTER making all selections. | | | | [MORE...148] | | + 5.0.0.0 IBM 7372 Color Plotter | | + 5.0.0.0 IBM InfoPrint 20 | | + 5.0.0.0 IBM InfoPrint 32 | | + 5.0.0.0 IBM InfoPrint 40 | | + 5.0.0.0 IBM InfoPrint32 Hindi UTF-8 Datastream | | + 5.0.0.0 IBM Network Color Printer | | + 5.0.0.0 IBM Network Color Printer Attachment | | > + 5.0.0.0 IBM Network Printer 12 | | [MORE...40] | | | | F1=Help F2=Refresh F3=Cancel |F1| F7=Select F8=Image F10=Exit |F5| Enter=Do /=Find n=Find Next |F9+--------------------------------------------------------------------------+
Chapter 5. PowerPC print subsystem basics 219

9. If you are successful, the following screen will be displayed:
10. Now that you have your printer device software installed, press F10 and you will get back to the prompt sign. You have to do step 1 (by entering the smitty mkpq command) to step 3 again.
11. Select which type of connection you are using to connect your printer to your system. In our example, we have connected our printer using the parallel port.
Install Additional Printer/Plotter Software
Type or select values in entry fields.Press Enter AFTER making all desired changes.
[Entry Fields]* INPUT device / directory for software /dev/cd0* SOFTWARE to install [+ 5.0.0.0 IBM Network> + PREVIEW only? (install operation will NOT occur) no + Include corresponding LANGUAGE filesets? yes +
F1=Help F2=Refresh F3=Cancel F4=ListF5=Reset F6=Command F7=Edit F8=ImageF9=Shell F10=Exit Enter=Do
COMMAND STATUS
Command: OK stdout: yes stderr: no
Before command completion, additional instructions may appear below.
[MORE...50]Finished processing all filesets. (Total time: 7 secs).
+-----------------------------------------------------------------------------+ Summaries:+-----------------------------------------------------------------------------+
Installation Summary--------------------Name Level Part Event Result-------------------------------------------------------------------------------printers.ibm4312.rte 5.0.0.0 USR APPLY SUCCESS
[BOTTOM]
F1=Help F2=Refresh F3=Cancel F6=CommandF8=Image F9=Shell F10=Exit /=Findn=Find Next
220 Printing for Fun and Profit under AIX 5L
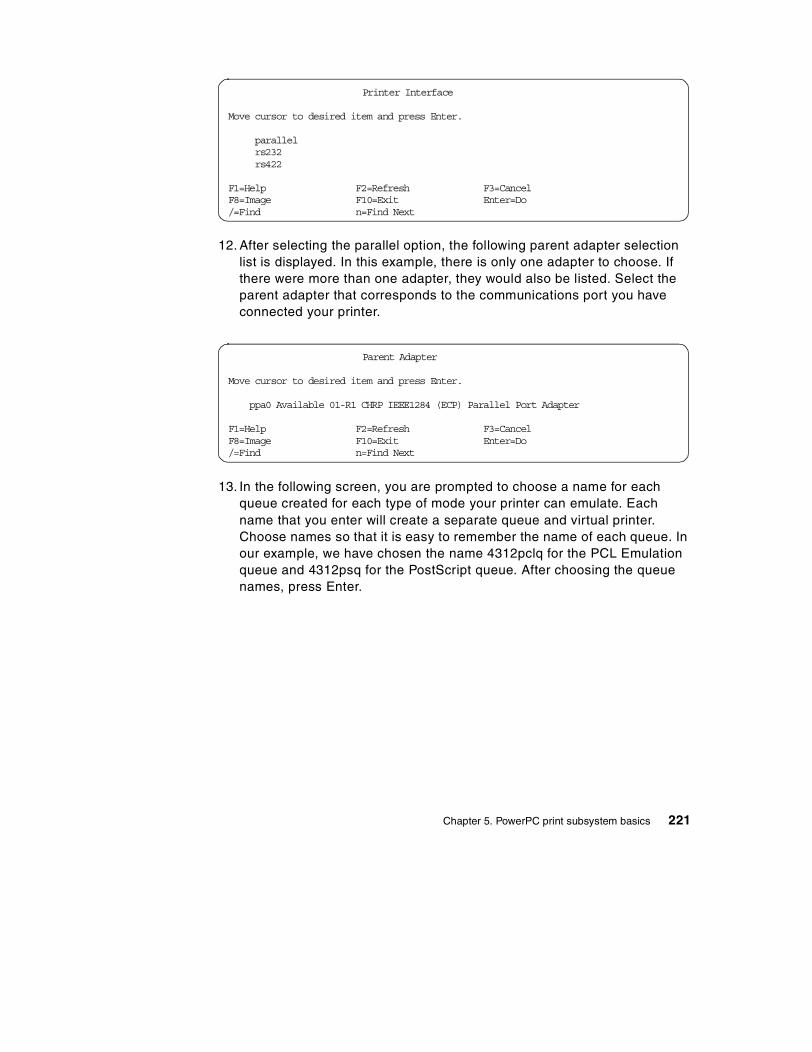
12. After selecting the parallel option, the following parent adapter selection list is displayed. In this example, there is only one adapter to choose. If there were more than one adapter, they would also be listed. Select the parent adapter that corresponds to the communications port you have connected your printer.
13. In the following screen, you are prompted to choose a name for each queue created for each type of mode your printer can emulate. Each name that you enter will create a separate queue and virtual printer. Choose names so that it is easy to remember the name of each queue. In our example, we have chosen the name 4312pclq for the PCL Emulation queue and 4312psq for the PostScript queue. After choosing the queue names, press Enter.
Printer Interface Move cursor to desired item and press Enter. parallel rs232 rs422 F1=Help F2=Refresh F3=Cancel F8=Image F10=Exit Enter=Do /=Find n=Find Next
Parent Adapter Move cursor to desired item and press Enter. ppa0 Available 01-R1 CHRP IEEE1284 (ECP) Parallel Port Adapter F1=Help F2=Refresh F3=Cancel F8=Image F10=Exit Enter=Do /=Find n=Find Next
Chapter 5. PowerPC print subsystem basics 221

14. If you see a screen like the following, you have successfully configured a printer into the print spooling subsystem.
Option 3: Using the command lineYou can also add a print queue through the command line, but using Web-based System Manager or SMIT to add a print queue avoids dealing with a queue, a queue device, and a virtual printer. If you are going to add a virtual printer queue, then the steps to add the printer become quite complicated, and, unless you are going to create shell scripts to add your queues, should be avoided. The steps shown below show how you might add
Add a Print Queue
Type or select values in entry fields.Press Enter AFTER making all desired changes.
[Entry Fields] Description IBM Network Printer 12
Names of NEW print queues to add PCL 5E Emulation [4312pclq] PostScript [4312psq]
Printer connection characteristics* PORT number [p] + Type of PARALLEL INTERFACE [standard] + Printer TIME OUT period (seconds) [600] +# STATE to be configured at boot time available +
F1=Help F2=Refresh F3=Cancel F4=ListF5=Reset F6=Command F7=Edit F8=ImageF9=Shell F10=Exit Enter=Do
COMMAND STATUS
Command: OK stdout: yes stderr: no
Before command completion, additional instructions may appear below.
Added printer 'lp0'.
Added print queue '4312pclq'.Added print queue '4312psq'.
F1=Help F2=Refresh F3=Cancel F6=CommandF8=Image F9=Shell F10=Exit /=Findn=Find Next
222 Printing for Fun and Profit under AIX 5L

a remote queue which does not use a virtual printer. This procedure could also be used to add a queue with a custom backend.
1. Add a queue using the mkque command. For example, the following command will configure a remote queue. It configures just the queue and not the queue device.
# mkque -qlp -a “host=creecher” -a “rq=lp13”
- The -q flag specifies the name of the queue to be added (lp).
- The -a flag specifies a line to be added to the queue stanza in the qconfig file (host=creecher and rq=lp13). These flags must be entered last when entering the mkque command on the command line.
2. Add a queue device associated with the queue you have added, using the mkquedev command. For the queue we have added in the previous example, the following command will add a device named lpdev that has /usr/lib/lpd/rembak as its backend:
# mkquedev -qlp -dlpdev -a “backend=usr/lib/lpd/rembak”
- The -q flag specifies the name of the queue (this name must already exist) to which the queue device is added. The mkquedev command automatically adds the device=attribute to the specified queue stanza.
- The -a flag specifies the attribute to be added to the device stanza in the /etc/qconfig file (backend=usr/lib/lpd/rembak).
5.3.3 Displaying a queue configuration informationOnce printers have been established, you may wish to review their configuration. This section will describe how this can be accomplished using different interfaces.
Option 1: Using Web-based System ManagerBy selecting All Print Queues, you can see all information about queues in the Web-based System Manager panel. In the example shown in Figure 40 on page 224, you notice there are two queues in this system and the name of the default queue is testq.
Chapter 5. PowerPC print subsystem basics 223

Figure 40. All printer queues information
When you click a right mouse button in the right frame of previous panel, you will see the menus shown in Figure 41.
Figure 41. Local queue menus
You can see the details about each queues by selecting Properties in this menu. You will see the panel shown in Figure 42 on page 225.
224 Printing for Fun and Profit under AIX 5L

Figure 42. Local queue properties panel
Actually, you can see this kind of properties information not only for queues, but also for print processors and local parallel printer. For instance, the panel in Figure 43 appears when you select Properties menu on the printer processor object.
Figure 43. Properties panel for printer processor
Also, by clicking Overview and Tasks, you can look at the overall status of the queues. In the example shown in Figure 44 on page 226, you notice that two queues are configured.
Chapter 5. PowerPC print subsystem basics 225
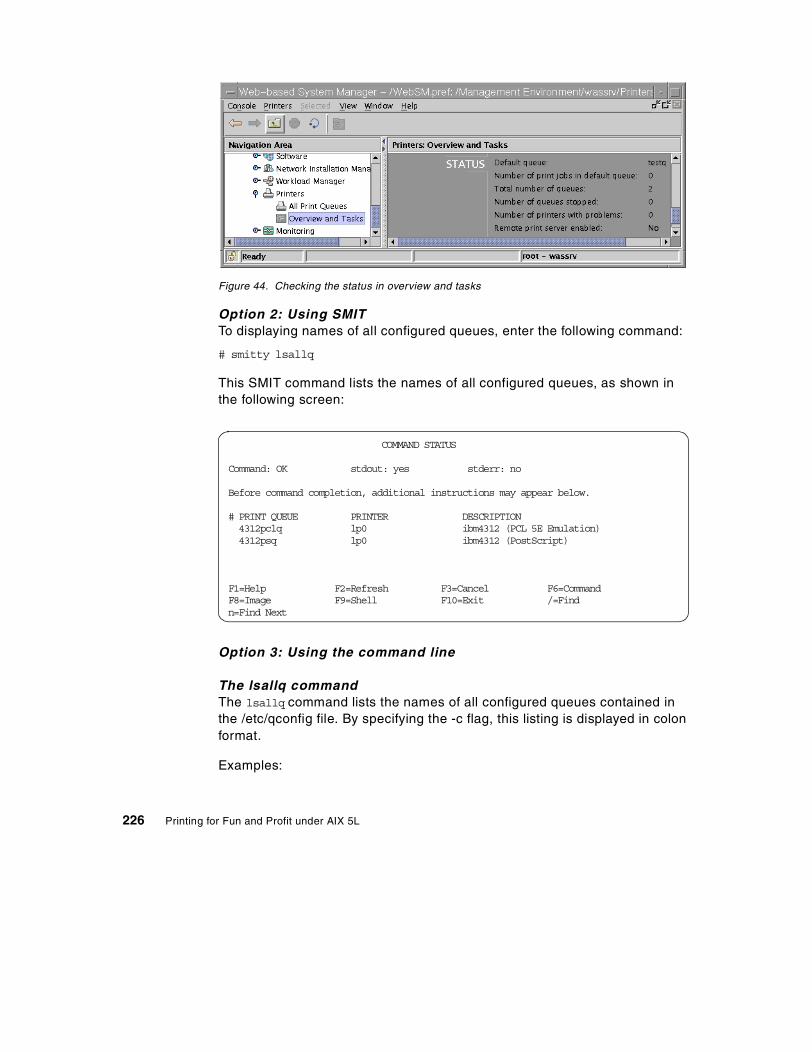
Figure 44. Checking the status in overview and tasks
Option 2: Using SMITTo displaying names of all configured queues, enter the following command:
# smitty lsallq
This SMIT command lists the names of all configured queues, as shown in the following screen:
Option 3: Using the command line
The lsallq commandThe lsallq command lists the names of all configured queues contained in the /etc/qconfig file. By specifying the -c flag, this listing is displayed in colon format.
Examples:
COMMAND STATUS
Command: OK stdout: yes stderr: no
Before command completion, additional instructions may appear below.
# PRINT QUEUE PRINTER DESCRIPTION 4312pclq lp0 ibm4312 (PCL 5E Emulation) 4312psq lp0 ibm4312 (PostScript)
F1=Help F2=Refresh F3=Cancel F6=CommandF8=Image F9=Shell F10=Exit /=Findn=Find Next
226 Printing for Fun and Profit under AIX 5L

• To list all of the queue names in the /etc/qconfig file, enter the following command:
# lsallq4312pclq4312psq
• To list all configured queues in colon format, enter the following command:
# lsallq -c4312pclq4312pclq: lp04312psq4312psq: lp0
The first line shows just the queue. In the second line of each queue, the name before the colon is the queue name and the one after the colon is the queue device name.
The lsque CommandThe lsque command lists details of the queue and queue device configurations that are stored in the /etc/qconfig file.
Examples:
• The -q flag specifies the name of the queue stanza. To display a queue stanza (lp), enter the following command:
# lsque -q 4312pclq4312pclq:device =lp0
• When the -c flag is used, the data is displayed in colon format. To display queue stanza lp in colon format, enter the following command:
# lsque -c -q 4312pclq#name:device:discipline:up:acctfile:host:s_statfilter:l_statfilter:rq4312pclq:lp0:fcfs:TRUE:FALSE::::
This method of displaying queue data is useful because the colons may be used as field separators when using the output from this command in a shell script.
The lsquedev commandThe lsquedev command displays the name of the queue stanza and associated attributes.
Examples:
Chapter 5. PowerPC print subsystem basics 227

• To display the lp0 device stanza on the 4019ascii queue, enter the following command:
# lsquedev -q4019ascii -dlp0lp0:file =/dev/lp0header =nevertrailer =neveraccess =bothbackend =/usr/lib/lpd/piobe
- The -d flag specifies the name of the device stanza that is displayed (lp0).
- The -q flag specifies the name of the queue containing the device stanza that is displayed (4019ascii).
• To display the lp0 device stanza on the 4019ascii queue in colon format, enter the following command:
# lsquedev -c -q 4019ascii -d lp0#name:file:access:feed:header:trailer:backend:alignlp0:/dev/lp0:both:never:never:never:/usr/lib/lpd/piobe:FALSE
When the -c flag is used, the data is displayed in colon format. This format is useful if you wish to use the output of this command in shell scripts of SMIT discover strings.
• To list the names of all the configured queue devices within the 4019ascii queue in the /etc/qconfig file, enter the following command:
# lsallqdev -q 4019asciilp0
The -q flag specifies the queue name (4019ascii).
• To list the names of all of the configured queue device within the 4019ascii queue in the /etc/qconfig file in colon format, enter the following command:
# lsallqdev -q 4019ascii -c4019ascii:lp0
The -c flag causes colon format output for use by SMIT.
5.3.4 Deleting a queueYou may need to remove a print queue from time to time. To delete a queue or queue device, you must have root authority. You can do this by using one of the interfaces (Web-based System Manager, SMIT, or the command line).
Using Web-based System Manager or SMIT is a lot easier than using the command line, because you only deal with the print queue itself. If the print
228 Printing for Fun and Profit under AIX 5L
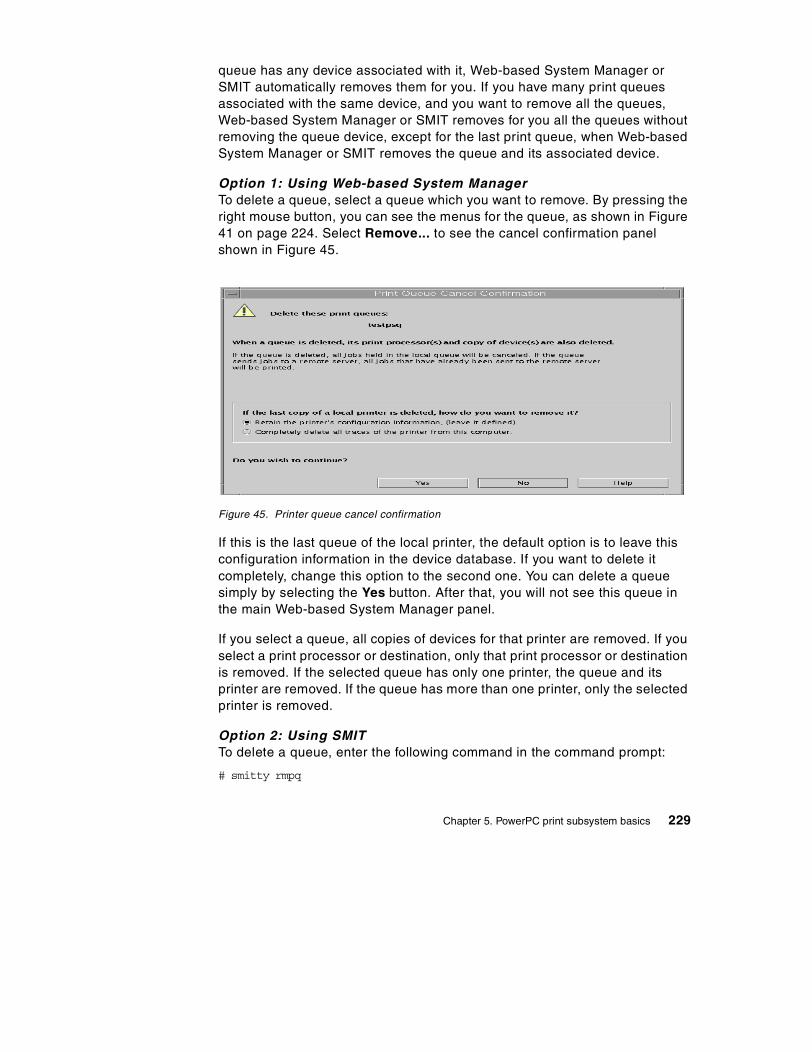
queue has any device associated with it, Web-based System Manager or SMIT automatically removes them for you. If you have many print queues associated with the same device, and you want to remove all the queues, Web-based System Manager or SMIT removes for you all the queues without removing the queue device, except for the last print queue, when Web-based System Manager or SMIT removes the queue and its associated device.
Option 1: Using Web-based System ManagerTo delete a queue, select a queue which you want to remove. By pressing the right mouse button, you can see the menus for the queue, as shown in Figure 41 on page 224. Select Remove... to see the cancel confirmation panel shown in Figure 45.
Figure 45. Printer queue cancel confirmation
If this is the last queue of the local printer, the default option is to leave this configuration information in the device database. If you want to delete it completely, change this option to the second one. You can delete a queue simply by selecting the Yes button. After that, you will not see this queue in the main Web-based System Manager panel.
If you select a queue, all copies of devices for that printer are removed. If you select a print processor or destination, only that print processor or destination is removed. If the selected queue has only one printer, the queue and its printer are removed. If the queue has more than one printer, only the selected printer is removed.
Option 2: Using SMITTo delete a queue, enter the following command in the command prompt:
# smitty rmpq
Chapter 5. PowerPC print subsystem basics 229
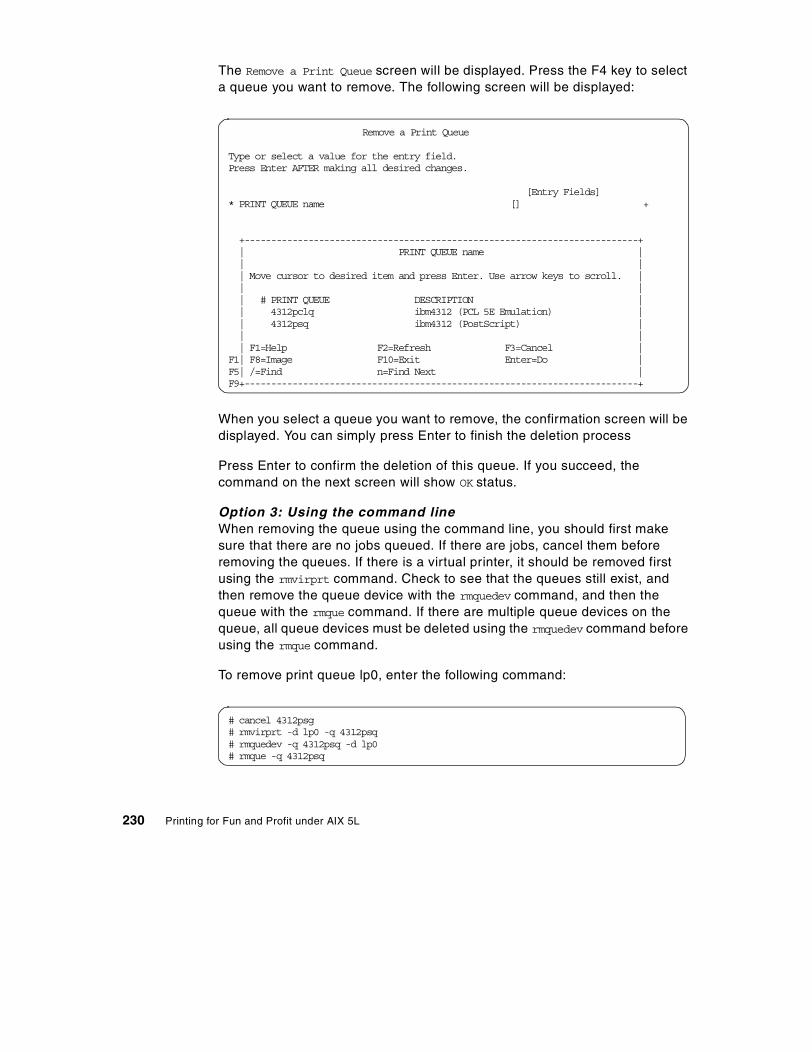
The Remove a Print Queue screen will be displayed. Press the F4 key to select a queue you want to remove. The following screen will be displayed:
When you select a queue you want to remove, the confirmation screen will be displayed. You can simply press Enter to finish the deletion process
Press Enter to confirm the deletion of this queue. If you succeed, the command on the next screen will show OK status.
Option 3: Using the command lineWhen removing the queue using the command line, you should first make sure that there are no jobs queued. If there are jobs, cancel them before removing the queues. If there is a virtual printer, it should be removed first using the rmvirprt command. Check to see that the queues still exist, and then remove the queue device with the rmquedev command, and then the queue with the rmque command. If there are multiple queue devices on the queue, all queue devices must be deleted using the rmquedev command before using the rmque command.
To remove print queue lp0, enter the following command:
Remove a Print Queue
Type or select a value for the entry field.Press Enter AFTER making all desired changes.
[Entry Fields]* PRINT QUEUE name [] +
+--------------------------------------------------------------------------+ | PRINT QUEUE name | | | | Move cursor to desired item and press Enter. Use arrow keys to scroll. | | | | # PRINT QUEUE DESCRIPTION | | 4312pclq ibm4312 (PCL 5E Emulation) | | 4312psq ibm4312 (PostScript) | | | | F1=Help F2=Refresh F3=Cancel |F1| F8=Image F10=Exit Enter=Do |F5| /=Find n=Find Next |F9+--------------------------------------------------------------------------+
# cancel 4312psg# rmvirprt -d lp0 -q 4312psq# rmquedev -q 4312psq -d lp0# rmque -q 4312psq
230 Printing for Fun and Profit under AIX 5L
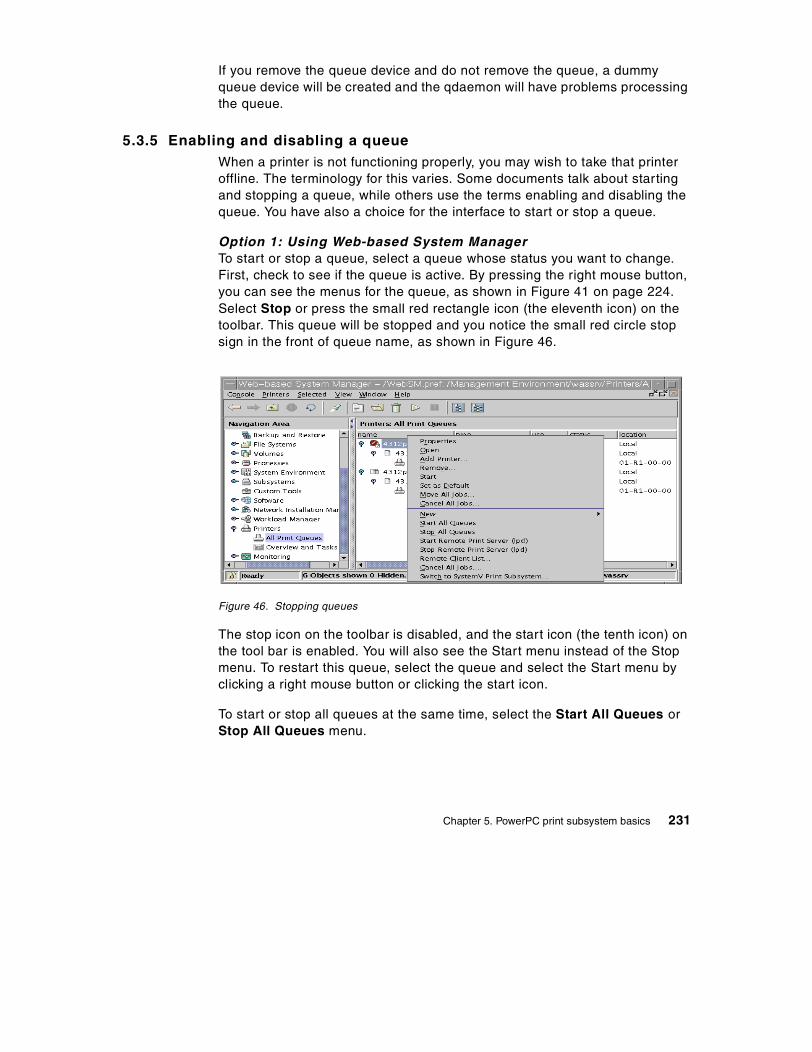
If you remove the queue device and do not remove the queue, a dummy queue device will be created and the qdaemon will have problems processing the queue.
5.3.5 Enabling and disabling a queueWhen a printer is not functioning properly, you may wish to take that printer offline. The terminology for this varies. Some documents talk about starting and stopping a queue, while others use the terms enabling and disabling the queue. You have also a choice for the interface to start or stop a queue.
Option 1: Using Web-based System ManagerTo start or stop a queue, select a queue whose status you want to change. First, check to see if the queue is active. By pressing the right mouse button, you can see the menus for the queue, as shown in Figure 41 on page 224. Select Stop or press the small red rectangle icon (the eleventh icon) on the toolbar. This queue will be stopped and you notice the small red circle stop sign in the front of queue name, as shown in Figure 46.
Figure 46. Stopping queues
The stop icon on the toolbar is disabled, and the start icon (the tenth icon) on the tool bar is enabled. You will also see the Start menu instead of the Stop menu. To restart this queue, select the queue and select the Start menu by clicking a right mouse button or clicking the start icon.
To start or stop all queues at the same time, select the Start All Queues or Stop All Queues menu.
Chapter 5. PowerPC print subsystem basics 231

Option 2: Using SMITTo disable a queue, enter the following command:
# smitty qstop
Press the F4 key to select a queue to stop. The following screen will be displayed:
By selecting a queue, this queue will be stopped. To start a queue, enter the following command:
# smitty qstart
You will see the similar screen and can start again by selecting a queue.
Option 3: Using the command lineThe qadm command brings printers, queues, and the spooling system up or down (makes printers available or unavailable) and cancels jobs. The qadm command can only affect local print jobs. You must also have root user authority, or belong to either the system group or printq group, to run this command.
Examples:
• To bring down 4312pclq queue, enter one of the following commands:
# qadm -D 4312pclq# disable 4312pclq
Stop a Print Queue
Type or select a value for the entry field.Press Enter AFTER making all desired changes.
[Entry Fields]* PRINT QUEUE name [] +
+--------------------------------------------------------------------------+ | PRINT QUEUE name | | | | Move cursor to desired item and press Enter. Use arrow keys to scroll. | | | | # PRINT QUEUE DESCRIPTION | | 4312pclq ibm4312 (PCL 5E Emulation) | | 4312psq ibm4312 (PostScript) | | | | F1=Help F2=Refresh F3=Cancel |F1| F8=Image F10=Exit Enter=Do |F5| /=Find n=Find Next |F9+--------------------------------------------------------------------------+
232 Printing for Fun and Profit under AIX 5L

When you check queue status by using the qchk or lpstat command, the status of this queue will be DOWN.
• To bring up 4312pclq queue, enter one of the following commands:
# qadm -U 4312pclq# enable 4312pclq
When you check queue status by using qchk or lpstat command, the status of this queue will be READY.
The other options of the qadm command are -G and -K. The G option gracefully brings down the queuing system. This flag temporarily interrupts the daemon process after all currently running jobs on all queues are finished. Use of this flag is the only way to bring the system down without causing such problems as jobs hanging up in the queue. The K option brings down the printer you name, ending all current jobs immediately. Jobs remain in the queue and run again when the printer is brought back up.
5.3.6 Cancelling print jobsTo cancel all of your jobs on printer lp0 (or all jobs on printer lp0, if you have root user authority), enter one of the following commands:
# qadm -X 4312pclq# cancel 4312pclq# qcan -X 4312pclq
The -X flag cancels the printing of the user’s jobs on the specified queue (4312pclq). If you have root user privileges, all jobs on that queue are deleted.
You can also cancel individual jobs by using job id. Use the following commands:
# qcan -x 435# cancel 435
5.4 Setting up printer device defaults
The printer device attributes can be changed using one of the standard administrative interfaces. This information is common for both the PowerPC print subsystem and the System V print subsystem. This section describes changing things like the serial baud rate or the parallel busy timeout settings.
Chapter 5. PowerPC print subsystem basics 233

5.4.1 Displaying the printer device settingYou have a choice for the interface to display settings.
Option 1: Using Web-based System Manager.To display the settings, select the lp0 (local parallel printer) object and click the right mouse button, as shown in Figure 40 on page 224. You will see similar menus in Figure 42 on page 225. Select Properties menu. The panel in Figure 47 will be displayed.
Figure 47. Properties panel for local parallel printer lp0
You may review or modify these properties.
Option 2: Using SMITTo display or change printer device settings via a SMIT dialogue, enter the following command:
# smitty chgprt
This SMIT command allows you to display or modify properties of a printer device. In the first screen, you will be presented with a list of printers to be displayed or modified.
234 Printing for Fun and Profit under AIX 5L

Select a printer and press Enter. In this example, we have selected lp0. The following screen will be displayed. Now, you may review or modify the settings using the standard facilities of SMIT.
Option 3: Using the command line
Displaying printer device settings with the splp commandTo display the current printer settings for the /dev/lp0 printer (the default), enter the splp command:
Printer/Plotter Move cursor to desired item and press Enter. lp0 Available 01-R1-00-00 IBM Network Printer 12 F1=Help F2=Refresh F3=Cancel F8=Image F10=Exit Enter=Do /=Find n=Find Next
Change / Show Characteristics of a Printer/Plotter
Type or select values in entry fields.Press Enter AFTER making all desired changes.
[TOP] [Entry Fields] Printer/Plotter lp0 Printer/Plotter type ibm4312 Printer/Plotter interface parallel Description IBM Network Printer 12 Status Available Location 01-R1-00-00 Parent adapter ppa0* PORT number [p] + Type of PARALLEL INTERFACE [standard] + Microseconds to delay between characters [0] +# Printer TIME OUT period [600] +# STATUS of device at BOOT time available +
[MORE...16]
F1=Help F2=Refresh F3=Cancel F4=ListF5=Reset F6=Command F7=Edit F8=ImageF9=Shell F10=Exit Enter=Do
Chapter 5. PowerPC print subsystem basics 235

Displaying printer device settings with the lsattr commandThe lsattr command displays information about the attributes of a given device or kind of device. The lsattr command is a general AIX command for displaying information about devices. We will only review this command relative to printers.
Examples:
• To list the current attribute values for the lp0 device, enter the following command:
• To list the default attribute values for the lp0 device, enter the following command:
# splp
device = /dev/lp0 (+ yes ! no)CURRENT FORMATTING PARAMETERS (ignored by qprt, lpr, and lp commands)Note: -p + causes the other formatting parameters to be ignored.-p ! pass-through? -c + send carriage returns?-l 60 page length (lines) -n + send line feeds?-w 80 page width (columns) -r + carriage rtn after line feed?-i 0 indentation (columns) -t ! suppress tab expansion?-W ! wrap long lines? -b + send backspaces?-C ! convert to upper case? -f + send form feeds?CURRENT ERROR PROCESSING PARAMETERS-T 600 timeout value (seconds) -e ! return on error?
# lsattr -l lp0 -Eptop 600 Printer TIME OUT period Trueline 60 Number of LINES per page Truecol 80 Number of COLUMNS per page Trueind 0 Number of columns to INDENT Trueplot no Send all characters to printer UNMODIFIED Truebackspace yes Send BACKSPACES Truecr yes Send CARRIAGE RETURNS Trueform yes Send FORM FEEDS Truelf yes Send LINE FEEDS Trueaddcr yes Add CARRIAGE RETURNS to LINE FEEDS Truecase no Convert lowercase to UPPERCASE Truetabs yes EXPAND TABS on eight position boundaries Truewrap no WRAP CHARACTERS beyond the specified width Truemode no Return on ERROR Trueinterface standard Type of PARALLEL INTERFACE Trueautoconfig available STATE to be configured at boot time Truebusy_delay 0 Microseconds to delay between characters True
236 Printing for Fun and Profit under AIX 5L

• To list the default attribute values for a IBM 4312 parallel printer, enter the following command:
• To list the possible values of the ptop attribute for a IBM 4312 parallel printer, enter the following command:
# lsattr -c printer -s parallel -t ibm4312 -a ptop -R1...1000 (+1)
5.4.2 Changing the printer device settingTo change printer device settings, you can use the Web-based System Manager, SMIT, or the command line. Printer device settings may be permanently modified by using the Web-based System Manager or SMIT. But
# lsattr -l lp0 -Dptop 600 Printer TIME OUT period Trueline 60 Number of LINES per page Truecol 80 Number of COLUMNS per page Trueind 0 Number of columns to INDENT Trueplot no Send all characters to printer UNMODIFIED Truebackspace yes Send BACKSPACES Truecr yes Send CARRIAGE RETURNS Trueform yes Send FORM FEEDS Truelf yes Send LINE FEEDS Trueaddcr yes Add CARRIAGE RETURNS to LINE FEEDS Truecase no Convert lowercase to UPPERCASE Truetabs yes EXPAND TABS on eight position boundaries Truewrap no WRAP CHARACTERS beyond the specified width Truemode no Return on ERROR Trueinterface standard Type of PARALLEL INTERFACE Trueautoconfig available STATE to be configured at boot time Truebusy_delay 0 Microseconds to delay between characters True
# lsattr -c printer -s parallel -t ibm4312 -Dptop 600 Printer TIME OUT period Trueline 60 Number of LINES per page Truecol 80 Number of COLUMNS per page Trueind 0 Number of columns to INDENT Trueplot no Send all characters to printer UNMODIFIED Truebackspace yes Send BACKSPACES Truecr yes Send CARRIAGE RETURNS Trueform yes Send FORM FEEDS Truelf yes Send LINE FEEDS Trueaddcr yes Add CARRIAGE RETURNS to LINE FEEDS Truecase no Convert lowercase to UPPERCASE Truetabs yes EXPAND TABS on eight position boundaries Truewrap no WRAP CHARACTERS beyond the specified width Truemode no Return on ERROR Trueinterface standard Type of PARALLEL INTERFACE Trueautoconfig available STATE to be configured at boot time Truebusy_delay 0 Microseconds to delay between characters True
Chapter 5. PowerPC print subsystem basics 237
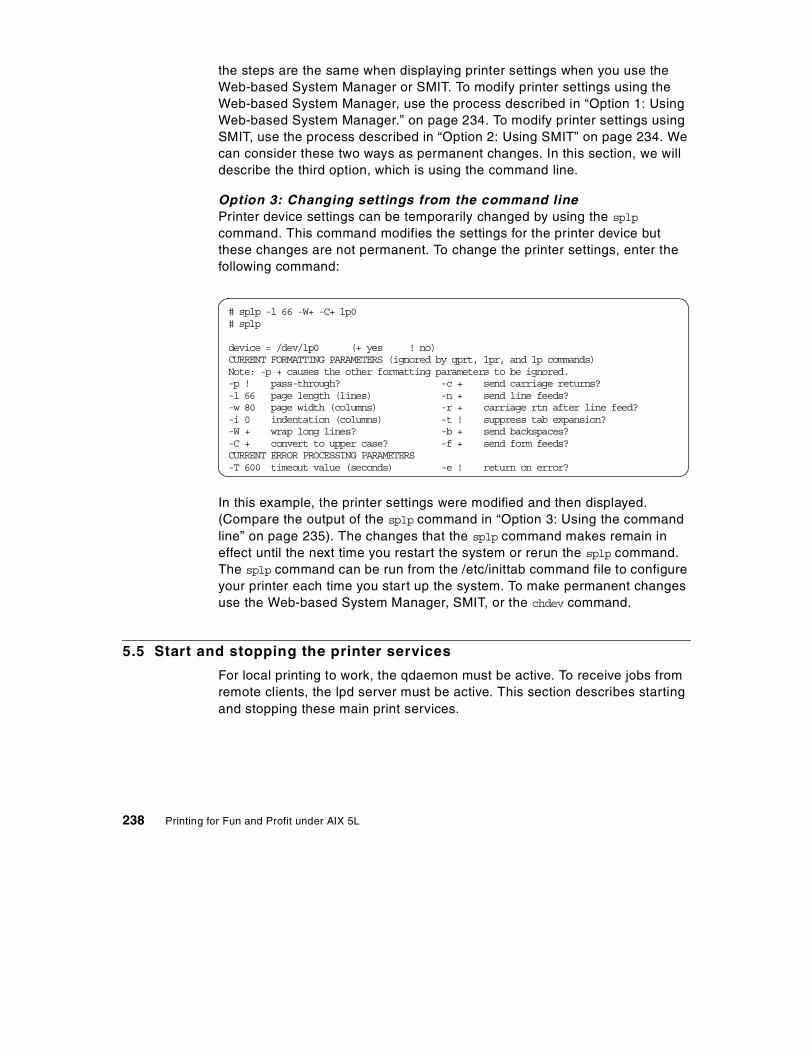
the steps are the same when displaying printer settings when you use the Web-based System Manager or SMIT. To modify printer settings using the Web-based System Manager, use the process described in “Option 1: Using Web-based System Manager.” on page 234. To modify printer settings using SMIT, use the process described in “Option 2: Using SMIT” on page 234. We can consider these two ways as permanent changes. In this section, we will describe the third option, which is using the command line.
Option 3: Changing settings from the command linePrinter device settings can be temporarily changed by using the splp command. This command modifies the settings for the printer device but these changes are not permanent. To change the printer settings, enter the following command:
In this example, the printer settings were modified and then displayed. (Compare the output of the splp command in “Option 3: Using the command line” on page 235). The changes that the splp command makes remain in effect until the next time you restart the system or rerun the splp command. The splp command can be run from the /etc/inittab command file to configure your printer each time you start up the system. To make permanent changes use the Web-based System Manager, SMIT, or the chdev command.
5.5 Start and stopping the printer services
For local printing to work, the qdaemon must be active. To receive jobs from remote clients, the lpd server must be active. This section describes starting and stopping these main print services.
# splp -l 66 -W+ -C+ lp0# splp
device = /dev/lp0 (+ yes ! no)CURRENT FORMATTING PARAMETERS (ignored by qprt, lpr, and lp commands)Note: -p + causes the other formatting parameters to be ignored.-p ! pass-through? -c + send carriage returns?-l 66 page length (lines) -n + send line feeds?-w 80 page width (columns) -r + carriage rtn after line feed?-i 0 indentation (columns) -t ! suppress tab expansion?-W + wrap long lines? -b + send backspaces?-C + convert to upper case? -f + send form feeds?CURRENT ERROR PROCESSING PARAMETERS-T 600 timeout value (seconds) -e ! return on error?
238 Printing for Fun and Profit under AIX 5L

5.5.1 The qdaemonThe qdaemon is the main printer daemon and must be running for both local and remote printing when using the PowerPC print subsystem.
Option 1: Using Web-based System ManagerTo select the qdaemon, click Subsystems->All subsystems in the left frame of the Web-based System Manager panel, as shown in Figure 48. Click the tree icon in the first column of spooler in the right frame of the panel to expand detail objects. You will see Stop... menus by clicking a right mouse button if the qdaemon is active. Or you can use the small red rectangle stop icon (the eight icon) in the tool bar (after highlighting the qdaemon object) to stop the qdaemon. If the qdaemon is inactive, you will see the Start... menu. Or you can use the start icon (the seventh icon) in the tool bar (after highlighting the qdaemon object) to start the qdaemon.
Figure 48. The qdaemon subsystem
5.5.1.1 Option 2: Using SMITTo start, stop, or display any subsystems, enter the following command:
# smitty subsys
The following screen will be displayed:
Chapter 5. PowerPC print subsystem basics 239

In this screen, you can see several menus to start, stop, or query a susbsystem. To start qdaemon, select the Start a Subsystem menu.
In the following screen, press the F4 key to find the qdaemon subsystem:
Subsystems
Move cursor to desired item and press Enter.
List All Subsystems Query a Subsystem Start a Subsystem Stop Subsystem Refresh a Subsystem Trace Subsystem
F1=Help F2=Refresh F3=Cancel F8=ImageF9=Shell F10=Exit Enter=Do
Start a Subsystem
Type or select a value for the entry field.Press Enter AFTER making all desired changes.
[Entry Fields]* Subsystem Name +
F1=Help F2=Refresh F3=Cancel F4=ListF5=Reset F6=Command F7=Edit F8=ImageF9=Shell F10=Exit Enter=Do
240 Printing for Fun and Profit under AIX 5L

You can see the qdaemon on the top of the list. Select qdaemon and then press Enter to start the qdaemon in the next screen. You can use similar steps to stop or query any subsystems.
Option 3: Using the command lineYou can use startsrc, stopsrc, and lssrc commands to start, stop, and query any subsystems (respectively). You can consider this as a temporary change. As a prerequisite, the system resource controller process (srcmstr) should be running in your system. Usually, you can find this entry in the /etc/inittab file. In this example, we used the lssrc command to verify that the status of qdaemon is active. Next, we used the stopsrc command to inactive the qdaemon. And then we started the qdaemon by using startsrc command again.
Start a Subsystem
Ty+--------------------------------------------------------------------------+Pr| Subsystem Name | | | | Move cursor to desired item and press Enter. |* | |+ | [TOP] | | qdaemon | | writesrv | | lpd | | clvmd | | inetd | | gated | | named | | routed | | rwhod | | iptrace | | [MORE...31] | | | | F1=Help F2=Refresh F3=Cancel |F1| F8=Image F10=Exit Enter=Do |F5| /=Find n=Find Next |F9+--------------------------------------------------------------------------+
Chapter 5. PowerPC print subsystem basics 241

5.5.2 The lpd daemonThe lpd daemon acts as the print server to receive network print jobs from clients. It can be thought of as the remote printing service.
Option 1: Using Web-based System ManagerYou can start the lpd daemon by selecting the Start Remote Print Server (lpd) menu and you can stop the lpd daemon by selecting the Stop Remote Print Server (lpd) menu in, as shown in Figure 23 on page 208 or in Figure 41 on page 224.
Option 2: Using SMITTo show the status or start or stop the lpd daemon, enter the following command:
# smitty server
The following screen will be displayed. By selecting the appropriate one of the last three menus, you can start or stop the lpd daemon or display the status of the lpd daemon.
# lssrc -s qdaemonSubsystem Group PID Status qdaemon spooler 9292 active# stopsrc -s qdaemon0513-044 The qdaemon Subsystem was requested to stop.# lssrc -s qdaemonSubsystem Group PID Status qdaemon spooler inoperative# startsrc -s qdaemon0513-059 The qdaemon Subsystem has been started. Subsystem PID is 5488.# lssrc -s qdaemonSubsystem Group PID Status qdaemon spooler 5488 active
242 Printing for Fun and Profit under AIX 5L

Option 3: Using the command lineBy using the startsrc or stopsrc commands, you can temporary change the status of the lpd daemon, as you can see in the following screen:
5.6 Printing files in the PowerPC print subsystem
Now that we have a printer configured, we will probably want to use it. This section reviews the several ways available to request a job be printed and then manage the progress of that job through the print spooling subsystem. It is important that a systems administrator develops a good understanding of these commands, as users will often seek assistance on how to meet their more complex printing requirements or to get that special rush job printed.
This section includes the following topics:
• Sending print requests to a print queue
• Listing print requests within a print queue
• Canceling jobs in a print queue
Manage Print Server
Move cursor to desired item and press Enter.
List all Remote Clients with Print Access Add Print Access for a Remote Client Remove Print Access for a Remote Client Start the Print Server Subsystem (lpd daemon) Stop the Print Server Subsystem Show Status of the Print Server Subsystem
F1=Help F2=Refresh F3=Cancel F8=ImageF9=Shell F10=Exit Enter=Do
# lssrc -s lpdSubsystem Group PID Status lpd spooler inoperative# startsrc -s lpd0513-059 The lpd Subsystem has been started. Subsystem PID is 9298.# lssrc -s lpdSubsystem Group PID Status lpd spooler 9298 active# stopsrc -s lpd0513-044 The lpd Subsystem was requested to stop.# lssrc -s lpdSubsystem Group PID Status lpd spooler inoperative
Chapter 5. PowerPC print subsystem basics 243
• Prioritizing jobs in a print queue
• Holding and releasing jobs
• Moving jobs between queues
If you are already familiar with System V commands such as lp, cancel, lpstat, and so on, or BSD commands such as lpr, lpq, or lprm, you can continue to use these commands for printing and managing print queues, although the flag syntax may be slightly different.
Appendix A, “Print tasks and commands” on page 467 summarizes and reviews which BSD and System V printing commands are supported by AIX. This section focuses on the AIX facilities that are provided to address these requirements. These commands offer the greatest available function for making print requests and managing the print queues.
5.6.1 Submitting a printing jobThe first step in the process of printing is to place a print job or request into the print spooling subsystem. AIX features a number of commands and facilities to perform this task. There is one prerequisite to initiating a print request, though: before you can print a file, you must have read access to it.
Option 1: Using Web-based System ManagerWeb-based System Manager will not normally be used for printing files.
Option 2: Using SMITSMIT also would only be used when the user wants to set specific settings and does not know the qprt command.
To start a printing job, enter the following command:
# smitty qprt
To print the desired file, fill in, with the print queue name, where you want to print your file or press the F4 key to see a list of available queues. Press Enter after selecting the queue. If no printer is specified, the default is used. In our example, the following screen is displayed after pressing the F4 key:
244 Printing for Fun and Profit under AIX 5L

Select to which queue you will send your print request. In our example, we have chosen the 4312pclq queue. The following screen is displayed:
Select a print file type that you want to start. In the following screen, you can specify the details for your job to start, including:
Start a Print Job
Type or select a value for the entry field.Press Enter AFTER making all desired changes.
[Entry Fields] PRINT QUEUE name [] +
+--------------------------------------------------------------------------+ | PRINT QUEUE name | | | | Move cursor to desired item and press Enter. Use arrow keys to scroll. | | | | # PRINT QUEUE[:PRINTER] DESCRIPTION | | 4312pclq ibm4312 (PCL 5E Emulation) | | 4312psq ibm4312 (PostScript) | | | | F1=Help F2=Refresh F3=Cancel |F1| F8=Image F10=Exit Enter=Do |F5| /=Find n=Find Next |F9+--------------------------------------------------------------------------+
Start a Print Job
Type or select a value for the entry field.Press Enter AFTER making all desired changes.
[Entry Fields] PRINT QUEUE name [4312pclq] +
+--------------------------------------------------------------------------+ | Print File Type | | | | Move cursor to desired item and press Enter. | | | | a ASCII | | c PCL | | n troff (ditroff) intermediate output | | p pass-through | | s PostScript | | | | F1=Help F2=Refresh F3=Cancel |F1| F8=Image F10=Exit Enter=Do |F5| /=Find n=Find Next |F9+--------------------------------------------------------------------------+
Chapter 5. PowerPC print subsystem basics 245

• Text print options
• Job processing options
• Text formatting options
• Paper/page options
• Header/trailer page options
• Messages/diagnostics
Fill in the Name of FILE to print field with the name of the file you want to print, make all necessary modifications, and press Enter to print your file.
Option 3: Using the command line to printThe qprt command creates and queues a print job. The qprt command was designed to work with the virtual printer subsystem, and there are qprt print flags for most print customization. The qprt command is described in more detail in AIX 5L Commands References.
The qprt command has a large variety of parameters that can be used. Some of the most useful are shown here as examples:
• Use qprt -p to select the printer pitch. Normally values of 10 and 12 will be accepted, but sometimes also a value of 17:
$ qprt -p12 -P queue-name /tmp/testfile
Start a Print Job
Type or select values in entry fields.Press Enter AFTER making all desired changes.
[TOP] [Entry Fields] Print queue name 4312pclq* Name of FILE to print [/samples]
-------------- Text Print Options ------------- PITCH (characters per inch) [10] +# TYPE STYLE (name) courier + Print QUALITY 600
----------- Job Processing Options ------------ Number of COPIES [1] +# Place job in 'HELD' state when queued? no + PAGE NUMBER where printing should begin [1] +# COPY FILE and print from copy? no +[MORE...36]
F1=Help F2=Refresh F3=Cancel F4=ListF5=Reset F6=Command F7=Edit F8=ImageF9=Shell F10=Exit Enter=Do
246 Printing for Fun and Profit under AIX 5L

• Use the qprt -z+ flag to print landscape, as shown here.
$ qprt -z+ -P lazyboy /tmp/testfile
• Use the qprt -Y+ flag to print duplex, as shown here:
$ qprt -Y+ -P duplo /tmp/testfile
• To indent the page on the left margin, use the qprt -i command.
$ qprt -i 5 -P harry /tmp/testfile
• To print formatted files in passthrough mode, use the qprt -dp flag. Note in this example that we can still specify landscape orientation:
$ qprt -dp -z+ -P zaphod /tmp/testfile
• To print text files to a PostScript queue, use the qprt -da flag. This can be combined with the -p flag to designate the character size the virtual printer uses enscript to convert the text to postscript:
$ qprt -da -p 14 -P ps /tmp/testfile
Note that the flags can be combined. To print landscape, 17 characters per inch with a lineprinter font, try:
$ qprt -z+ -p17 -slineprinter -P funjet /tmp/testfile
In addition to qprt, the enq, lp and lpr commands can be used from the command line. Printing from CDE is done through a command called dtprint. When using lp or enq, the qprt flags can be set with -o options. For example, to set the pitch to 12 with lp and enq, use:
$ lp -o -p12 -d pcl /tmp/testfile$ enq -o -p17 -P pcl /tmp/testfile
The lpr command does not use the -o flag, and so can not be used for most virtual printer settings. By default, lpr spools all files and overrides the queue header page setting to always generate a header, unless you use the -h flag to turn off headers, as shown here:
$ lpr -h -P pcl /tmp/bens.doc
5.6.2 Checking statusOnce a print job has been submitted to the queueing system you may wish to see the status of the job on the print spooling subsystem. You can do this through Web-based System Manager, SMIT, or the command line. This section describes how to use these interfaces to list queue information. In all ways, you can review the contents of one or more print queues to check the current status of the queues and the jobs you have submitted. They also show the status of printers and queues.
Chapter 5. PowerPC print subsystem basics 247

Option 1: Using Web-based System ManagerYou can check the status of the queues in the status column of the right frame in Web-based System Manager panel, as you can see in Figure 40 on page 224.
To check the printing jobs related to the queues, double click a queue you want or select the Open menu, as shown in Figure 41 on page 224. The panel in Figure 49 will be displayed:
Figure 49. Checking the print jobs in the queue
Option 2: Using SMITTo only check the status of the queues, enter the following command:
# smitty qstatus
The following screen will be displayed:
Show Status of Print Queues
Type or select values in entry fields.Press Enter AFTER making all desired changes.
[Entry Fields] Include status of print queues remote servers? [yes] +
F1=Help F2=Refresh F3=Cancel F4=ListF5=Reset F6=Command F7=Edit F8=ImageF9=Shell F10=Exit Enter=Do
248 Printing for Fun and Profit under AIX 5L
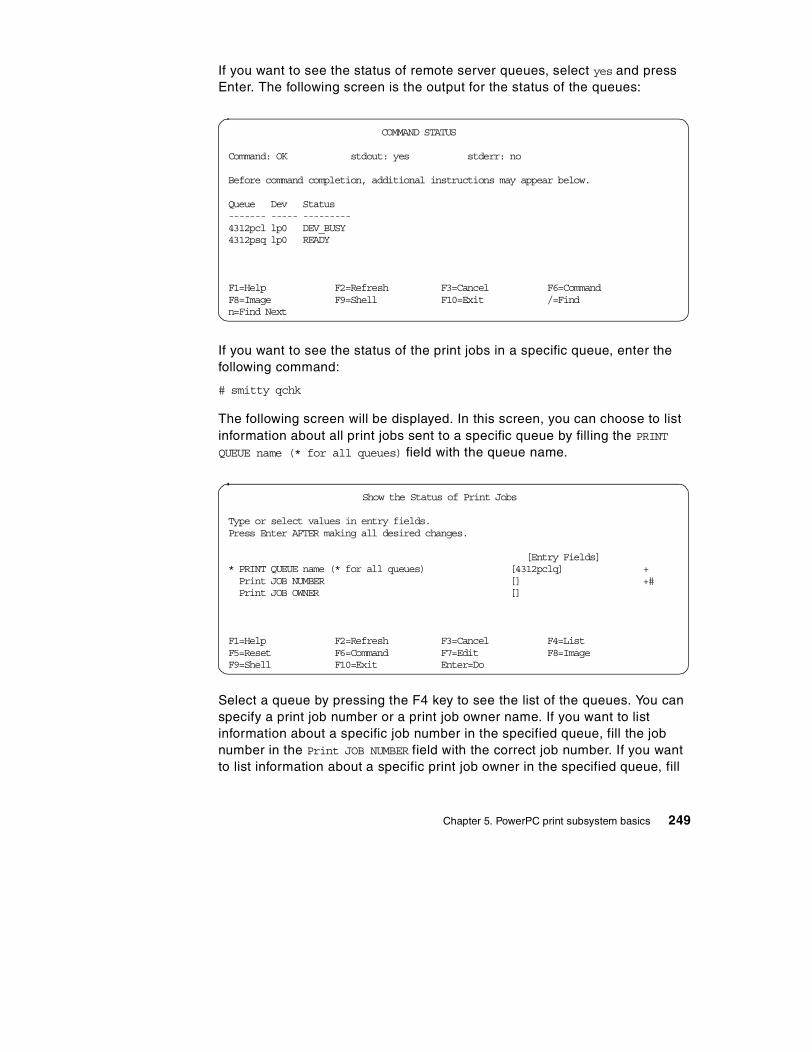
If you want to see the status of remote server queues, select yes and press Enter. The following screen is the output for the status of the queues:
If you want to see the status of the print jobs in a specific queue, enter the following command:
# smitty qchk
The following screen will be displayed. In this screen, you can choose to list information about all print jobs sent to a specific queue by filling the PRINT QUEUE name (* for all queues) field with the queue name.
Select a queue by pressing the F4 key to see the list of the queues. You can specify a print job number or a print job owner name. If you want to list information about a specific job number in the specified queue, fill the job number in the Print JOB NUMBER field with the correct job number. If you want to list information about a specific print job owner in the specified queue, fill
COMMAND STATUS
Command: OK stdout: yes stderr: no
Before command completion, additional instructions may appear below.
Queue Dev Status------- ----- ---------4312pcl lp0 DEV_BUSY4312psq lp0 READY
F1=Help F2=Refresh F3=Cancel F6=CommandF8=Image F9=Shell F10=Exit /=Findn=Find Next
Show the Status of Print Jobs
Type or select values in entry fields.Press Enter AFTER making all desired changes.
[Entry Fields]* PRINT QUEUE name (* for all queues) [4312pclq] + Print JOB NUMBER [] +# Print JOB OWNER []
F1=Help F2=Refresh F3=Cancel F4=ListF5=Reset F6=Command F7=Edit F8=ImageF9=Shell F10=Exit Enter=Do
Chapter 5. PowerPC print subsystem basics 249

the Print JOB OWNER field with the print job owner’s userid. To list information about all print requests on all queues, fill the PRINT QUEUE name (* for all queues) field with * and leave other fields blank.
Press Enter to see the results. In this example, the following screen shows the status of the queue and jobs in the 4312pclq queue:
Option 3: Using the command lineThe qchk command displays the current status information regarding specified print jobs, print queues, or users. Use the appropriate flag followed by the requested name or number to indicate specific status information. This command report on the status of the queues is shown in the following screen:
COMMAND STATUS
Command: OK stdout: yes stderr: no
Before command completion, additional instructions may appear below.
Queue Dev Status Job Files User PP % Blks Cp Rnk------- ----- --------- --- ------------------ ---------- ---- -- ----- --- ---4312pcl lp0 DEV_WAIT QUEUED 7 /etc/motd root 1 1 1 QUEUED 8 /etc/qconfig root 2 1 2 QUEUED 9 /.profile root 1 1 3 QUEUED 10 /.kshrc root 1 1 4
F1=Help F2=Refresh F3=Cancel F6=CommandF8=Image F9=Shell F10=Exit /=Findn=Find Next
# qchk helpusage: qchk [-ALqW] [-PQueueName] [-#JobNumber] [-uUserName] [-wDelaySeconds] Shows the status of a queue and lists all queue devices.# qchk -AQueue Dev Status Job Files User PP % Blks Cp Rnk------- ----- --------- --- ------------------ ---------- ---- -- ----- --- ---4312pcl lp0 RUNNING 7 /bigfile1 root 9 1 1 QUEUED 8 /etc/qconfig root 2 1 2 QUEUED 9 /.profile root 1 1 3 QUEUED 10 /.kshrc root 1 1 44312psq lp0 RUNNING 11 /bigfile2 root 9 1 1 QUEUED 12 /etc/environment root 2 1 2# qchk -P 4312psqQueue Dev Status Job Files User PP % Blks Cp Rnk------- ----- --------- --- ------------------ ---------- ---- -- ----- --- ---4312psq lp0 RUNNING 11 /bigfile2 root 9 1 1 QUEUED 12 /etc/environment root 2 1 2
250 Printing for Fun and Profit under AIX 5L

The qchk command with no flags specifies the default print queue. Flags used in this example are explained as follows:
• The -A flag specifies all queues.
• The -L flag specifies long form mode.
• The -w delay flag specifies that print status will be displayed, until all print jobs are done. The status will be displayed by updating the screen every five seconds (delay seconds).
To display the status for queue 4312psq, we have used the -P flag, which specifies the queue (4312psq). To display the status for job number 12, enter the following command:
# qchk -#12
Table 14 illustrates the key attributes reported via the queue status commands and what they refer to.
Table 14. Attributes of queue status
As you can see in the previous screen, the qchk command that queries the print queue status shows the current state of printers and queues that are
Attribute Description
Queue The queue name used in the qconfig file.
Dev The queue device name used in the qconfig file.
Status The current status of the job.
Job The job number of this print job, which is used by many of the print spooling subsystem control commands, such as qcan.
Files The name of the files being printed.
User The user ID of the user that owns the job.
PP Pages in the requested print job.
% Percentage of the job completed so far.
Blks The number of blocks the print job has been broken into.
Cp The number of copies of the requested print job that will be printed.
Rnk The job’s rank in the print queue; the job ranked 1 should be printing.
Chapter 5. PowerPC print subsystem basics 251
defined in the /etc/qconfig file. Table 15 describes entries which may be displayed in the Status column.
Table 15. Print queue status
The enq -A and lpstat commands can also be used. To display the queue status for a queue every five seconds, use the following command:
$ enq -P wsmq -A -w 2
To get the status of only local queues, so you do not have to wait for the remote queues to timeout on unavailable or slow servers, use the following command:
$ enq -P remque -isA
To display the queue with long queue names, use the following command:
$ lpstat -vnet17a -W
5.6.3 Cancelling a printing jobIt is sometimes necessary to remove jobs from the print queue. You may find this to be the case when an extremely large file has been sent to the queue in error, and the printer resource would be tied up unnecessarily. It is possible to continuously change the priority on the specific job, but a more effective way
Status Description
READY Indicates that the printer is up and ready to accept jobs.
DEV_WAIT Indicates that either the printer is not online, out of paper, has a paper jam, or any similar problem which will prevent the job from printing. Normally, the problem that causes this state has also caused a message to be sent to the job owner or the operator.
RUNNING Indicates that a job is either enrolled to be printed, or is printing.
HELD Indicates that the job is held and will not be put on the queue until it is released using the qhld or enq commands.
DOWN Indicates that the printer is not online; it probably has been taken offline by the operator for maintenance.
UNKNOWN Indicates that the status command cannot determine the status of the printer. This state is often an indicator of problems with printers or the print spooling subsystem.
OPR_WAIT Indicates that the job is suspended, waiting on an operator response to a message.
252 Printing for Fun and Profit under AIX 5L

to address this problem is to remove the job from the queue. This may be accomplished using the cancel, lprm or qcan commands.
Option 1: Using Web-based System ManagerSelect a print job which you want to cancel and then press Cancel Job button, as shown in Figure 49 on page 248. The panel in Figure 50 is the final confirmation panel. If you want to continue, press OK to delete.
Figure 50. Cancel one print job
You can delete all print jobs in one queue if you have permission. Select the Cancel All Jobs... menu by clicking the right mouse button, as you can see in Figure 41 on page 224. The panel in Figure 51 is the final confirmation panel. If you want to continue, press OK to delete.
Figure 51. Cancel all print jobs in one queue
You can delete all print jobs in all queues if you have permission. Select the Cancel All Jobs... menu, as shown in Figure 23 on page 208. The panel in Figure 52 on page 254 is the final confirmation panel. If you want to continue, press OK to delete.
Chapter 5. PowerPC print subsystem basics 253

Figure 52. Cancel all print jobs in all queues
Option 2: Using SMITTo use SMIT to cancel print jobs, enter the following command:
# smitty qcan
The following screen will be displayed:
Press the F4 key to see all the print jobs, as shown in the following screen. Select a print job that you want to delete. Press Enter to delete this print job, as shown in the next screen.
Cancel a Print Job
Type or select values in entry fields.Press Enter AFTER making all desired changes.
[Entry Fields] PRINT QUEUE containing job [] + (required for remote jobs)* Print JOB NUMBER [] +#
F1=Help F2=Refresh F3=Cancel F4=ListF5=Reset F6=Command F7=Edit F8=ImageF9=Shell F10=Exit Enter=Do
254 Printing for Fun and Profit under AIX 5L

Option 3: Using the command lineThe qcan or cancel commands can cancel either a particular job number or all jobs in a print queue. In this example:
• The status of the queues was displayed.
• Job number 12 was canceled and then the cancellation was verified.
• All jobs for the print queue 4312psq were cancelled and then the cancellation was verified.
Notice that only the jobs for the print queue 4312pclq remain.
In the previous qcan command,
• The -P printer flag specifies which printer jobs should be cancelled.
• The -X flag cancels all jobs for the specified queue. If you have root user authority, all jobs on that queue are deleted. If you do not have root user authority, only those jobs submitted by you will be canceled. This flag is only valid for local print jobs.
Cancel a Print Job
Type or select values in entry fields.Press Enter AFTER making all desired changes.
[Entry Fields] PRINT QUEUE containing job [] + +--------------------------------------------------------------------------+* | Print JOB NUMBER |+# | | | Move cursor to desired item and press Enter. | | | | # Queue Job Files User | | # ------- --- ------------------ ---------- | | 4312pcl 7 /etc/motd root | | 4312pcl 8 /etc/qconfig root | | 4312pcl 9 /.profile root | | 4312psq 11 /etc/hosts root | | 4312psq 12 /etc/environment root | | | | F1=Help F2=Refresh F3=Cancel |F1| F8=Image F10=Exit Enter=Do |F5| /=Find n=Find Next |F9+--------------------------------------------------------------------------+
Chapter 5. PowerPC print subsystem basics 255
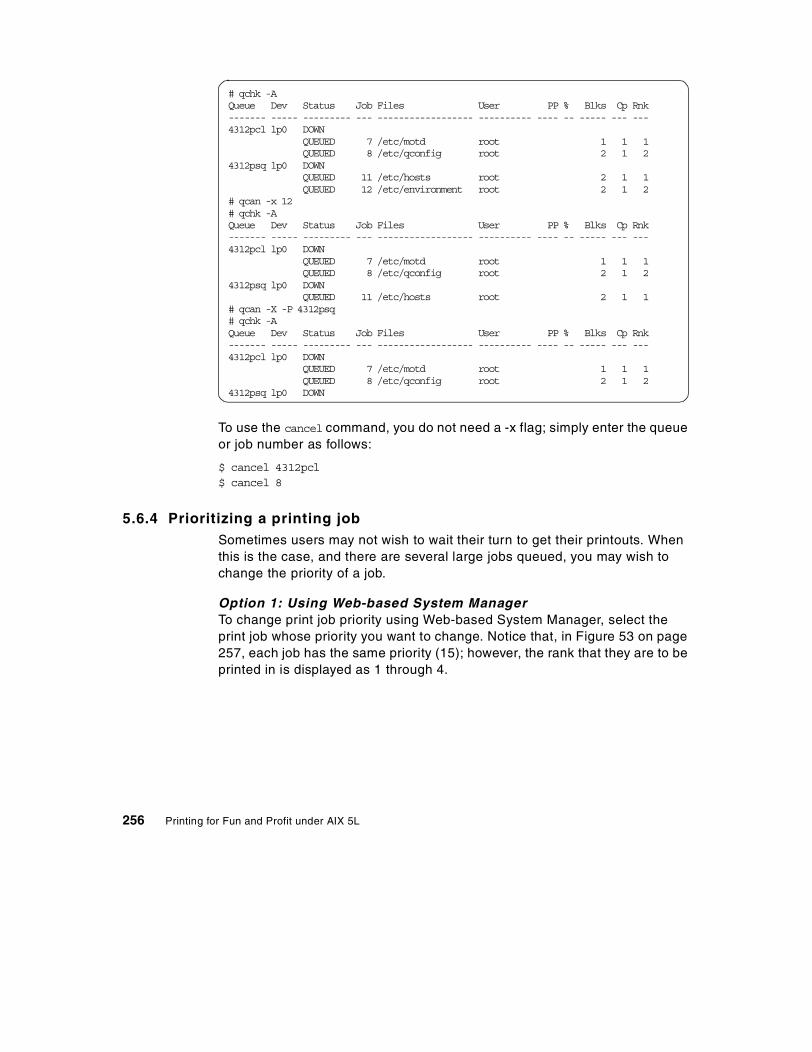
To use the cancel command, you do not need a -x flag; simply enter the queue or job number as follows:
$ cancel 4312pcl$ cancel 8
5.6.4 Prioritizing a printing jobSometimes users may not wish to wait their turn to get their printouts. When this is the case, and there are several large jobs queued, you may wish to change the priority of a job.
Option 1: Using Web-based System ManagerTo change print job priority using Web-based System Manager, select the print job whose priority you want to change. Notice that, in Figure 53 on page 257, each job has the same priority (15); however, the rank that they are to be printed in is displayed as 1 through 4.
# qchk -AQueue Dev Status Job Files User PP % Blks Cp Rnk------- ----- --------- --- ------------------ ---------- ---- -- ----- --- ---4312pcl lp0 DOWN QUEUED 7 /etc/motd root 1 1 1 QUEUED 8 /etc/qconfig root 2 1 24312psq lp0 DOWN QUEUED 11 /etc/hosts root 2 1 1 QUEUED 12 /etc/environment root 2 1 2# qcan -x 12# qchk -AQueue Dev Status Job Files User PP % Blks Cp Rnk------- ----- --------- --- ------------------ ---------- ---- -- ----- --- ---4312pcl lp0 DOWN QUEUED 7 /etc/motd root 1 1 1 QUEUED 8 /etc/qconfig root 2 1 24312psq lp0 DOWN QUEUED 11 /etc/hosts root 2 1 1# qcan -X -P 4312psq# qchk -AQueue Dev Status Job Files User PP % Blks Cp Rnk------- ----- --------- --- ------------------ ---------- ---- -- ----- --- ---4312pcl lp0 DOWN QUEUED 7 /etc/motd root 1 1 1 QUEUED 8 /etc/qconfig root 2 1 24312psq lp0 DOWN
256 Printing for Fun and Profit under AIX 5L
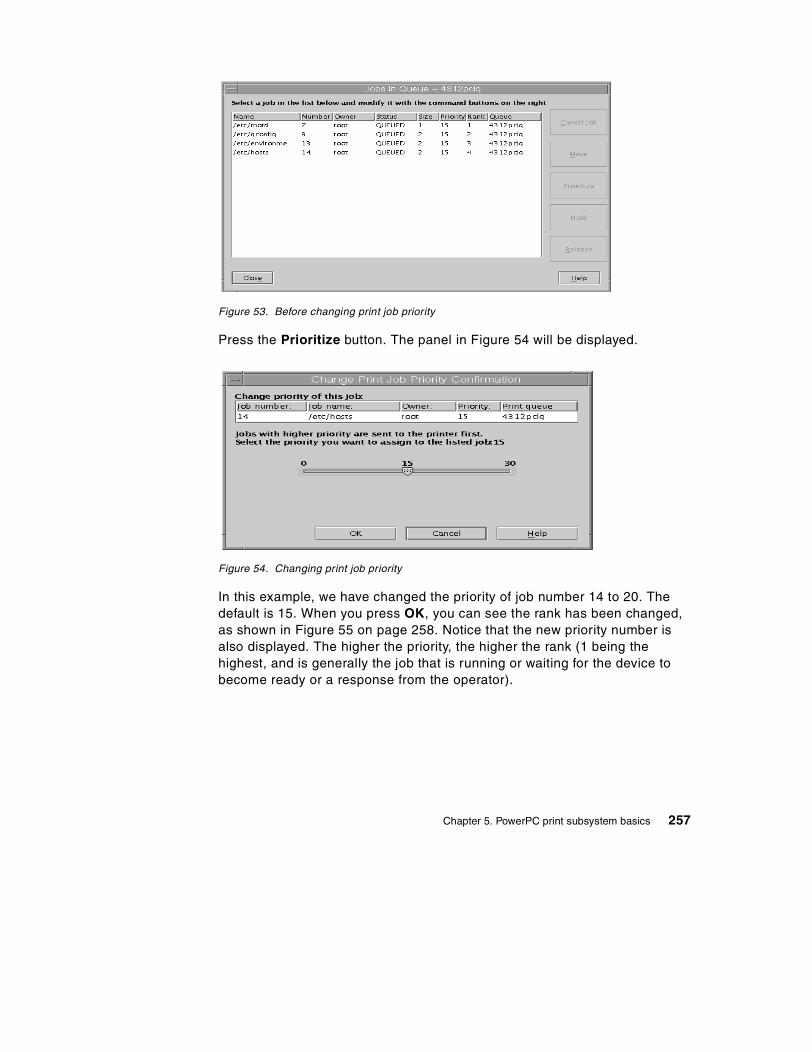
Figure 53. Before changing print job priority
Press the Prioritize button. The panel in Figure 54 will be displayed.
Figure 54. Changing print job priority
In this example, we have changed the priority of job number 14 to 20. The default is 15. When you press OK, you can see the rank has been changed, as shown in Figure 55 on page 258. Notice that the new priority number is also displayed. The higher the priority, the higher the rank (1 being the highest, and is generally the job that is running or waiting for the device to become ready or a response from the operator).
Chapter 5. PowerPC print subsystem basics 257

Figure 55. After changing print job priority
Option 2: Using SMITTo use SMIT to change job priority, enter the following command:
# smitty qpri
Press the F4 key to see all print jobs. The following screen will be displayed:
Prioritize a Print Job
Type or select values in entry fields.Press Enter AFTER making all desired changes.
[Entry Fields]* Print JOB NUMBER [] +#* Priority LEVEL. [] # +--------------------------------------------------------------------------+ | Print JOB NUMBER | | | | Move cursor to desired item and press Enter. | | | | # Queue Job Files User | | # ------- --- ------------------ ---------- | | 4312pcl 7 /etc/motd root | | 4312pcl 8 /etc/qconfig root | | 4312pcl 13 /etc/environment root | | 4312pcl 14 /etc/hosts root | | | | F1=Help F2=Refresh F3=Cancel |F1| F8=Image F10=Exit Enter=Do |F5| /=Find n=Find Next |F9+--------------------------------------------------------------------------+
258 Printing for Fun and Profit under AIX 5L

Select one print job whose priority you want to change. In the following screen, type the priority level that you want to change. Press Enter to run it.
Option 3: Using the command lineThe qpri command prioritizes a job in a print queue by specifying the job number and giving it a priority number. The qpri command works only on local print jobs. Remote print jobs are not supported. After a job has been sent to a remote host, that host can change the job’s priority, but the sender can not. You must have root user authority, or belong to either the system group or printq group to run this command.
Prioritize a Print Job
Type or select values in entry fields.Press Enter AFTER making all desired changes.
[Entry Fields]* Print JOB NUMBER [14] +#* Priority LEVEL. [18] # Enter a number between 0 and 20. A root user, or a user in the printq group, may enter a number between 0 and 30. (Larger numbers indicate higher priorities.)
F1=Help F2=Refresh F3=Cancel F4=ListF5=Reset F6=Command F7=Edit F8=ImageF9=Shell F10=Exit Enter=Do
# qchk -AQueue Dev Status Job Files User PP % Blks Cp Rnk------- ----- --------- --- ------------------ ---------- ---- -- ----- --- ---4312pcl lp0 DEV_WAIT QUEUED 7 /etc/motd root 1 1 1 QUEUED 8 /etc/qconfig root 2 1 2 QUEUED 13 /etc/environment root 2 1 3 QUEUED 14 /etc/hosts root 2 1 44312psq lp0 DEV_WAIT# qpri -#14 -a 20# qchk -AQueue Dev Status Job Files User PP % Blks Cp Rnk------- ----- --------- --- ------------------ ---------- ---- -- ----- --- ---4312pcl lp0 DEV_WAIT QUEUED 14 /etc/hosts root 2 1 1 QUEUED 7 /etc/motd root 1 1 2 QUEUED 8 /etc/qconfig root 2 1 3 QUEUED 13 /etc/environment root 2 1 44312psq lp0 DEV_WAIT
Chapter 5. PowerPC print subsystem basics 259

In this previous example, we changed the priority of job number 14 and then verified that the priority and the rank had been changed.
In the previous qpri command:
• The -#flag specifies the Job Number (14) whose priority should be changed.
• The -a flag specifies the Priority Number to be assigned (20).
5.6.5 Holding and releasing a print jobSometimes it is necessary to hold a print job rather than canceling it or keep changing its priority.
Option 1: Using Web-based System ManagerSelect a print job that you want to hold and select the Hold menu, shown in Figure 53 on page 257. In this example, we have held job number 14, as shown in Figure 56.
Figure 56. Holding a print job
When you want to release this job, select the Release menu.
Option 2: Using SMITTo use SMIT to hold or release a print job, enter the following command:
# smitty qhld
The following screen will be displayed:
260 Printing for Fun and Profit under AIX 5L

Select hold or release by pressing the F4 key. Type or select a print job number or print queue number or print job owner’s name. If you select a print queue name, all print jobs in this queue will be held or released. Press Enter to run it.
Option 3: Using the command lineThe qhld command holds and releases a spooled print job that is not being printed. The qhld command works on local queues only (remote queues are not supported). You must have root authority, be a member of the printq group or be the print job owner to use this command. You can hold/release a spooled job through SMIT or the command line.
Hold / Release Print Jobs
Type or select values in entry fields.Press Enter AFTER making all desired changes.
[Entry Fields] Hold or Release jobs [hold] +
Print JOB NUMBER [14] +# - OR -
PRINT QUEUE name [] + - OR -
Print JOB OWNER [] +
F1=Help F2=Refresh F3=Cancel F4=ListF5=Reset F6=Command F7=Edit F8=ImageF9=Shell F10=Exit Enter=Do
Chapter 5. PowerPC print subsystem basics 261
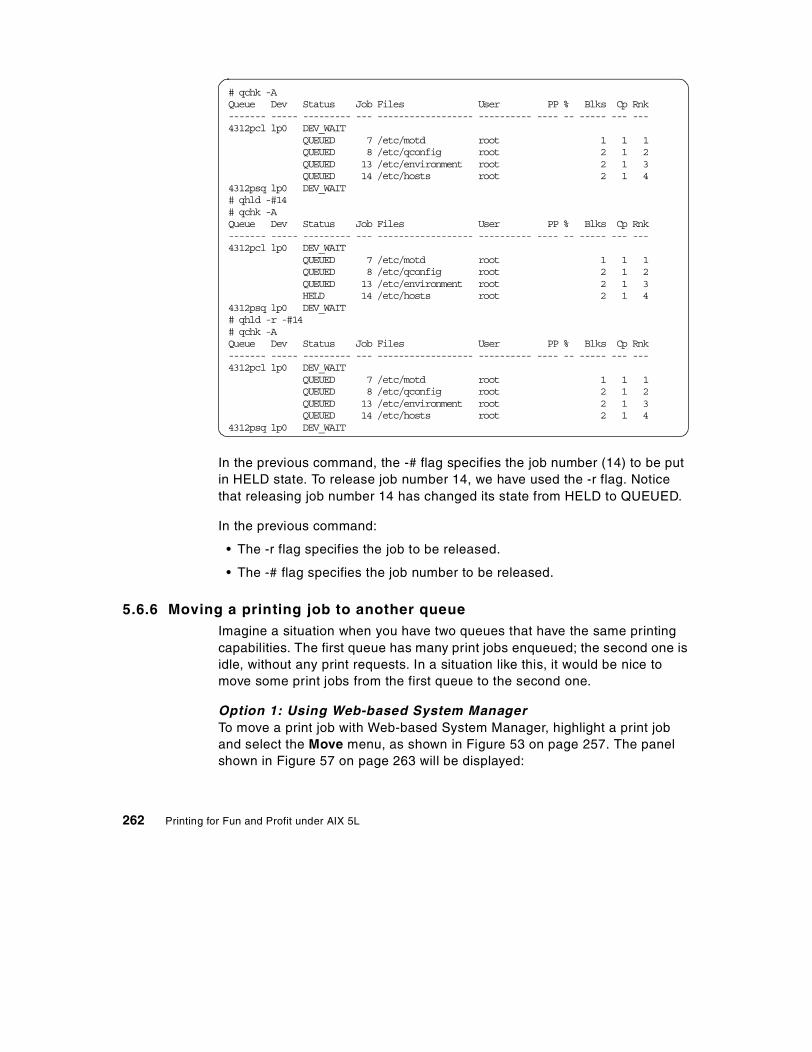
In the previous command, the -# flag specifies the job number (14) to be put in HELD state. To release job number 14, we have used the -r flag. Notice that releasing job number 14 has changed its state from HELD to QUEUED.
In the previous command:
• The -r flag specifies the job to be released.
• The -# flag specifies the job number to be released.
5.6.6 Moving a printing job to another queueImagine a situation when you have two queues that have the same printing capabilities. The first queue has many print jobs enqueued; the second one is idle, without any print requests. In a situation like this, it would be nice to move some print jobs from the first queue to the second one.
Option 1: Using Web-based System ManagerTo move a print job with Web-based System Manager, highlight a print job and select the Move menu, as shown in Figure 53 on page 257. The panel shown in Figure 57 on page 263 will be displayed:
# qchk -AQueue Dev Status Job Files User PP % Blks Cp Rnk------- ----- --------- --- ------------------ ---------- ---- -- ----- --- ---4312pcl lp0 DEV_WAIT QUEUED 7 /etc/motd root 1 1 1 QUEUED 8 /etc/qconfig root 2 1 2 QUEUED 13 /etc/environment root 2 1 3 QUEUED 14 /etc/hosts root 2 1 44312psq lp0 DEV_WAIT# qhld -#14# qchk -AQueue Dev Status Job Files User PP % Blks Cp Rnk------- ----- --------- --- ------------------ ---------- ---- -- ----- --- ---4312pcl lp0 DEV_WAIT QUEUED 7 /etc/motd root 1 1 1 QUEUED 8 /etc/qconfig root 2 1 2 QUEUED 13 /etc/environment root 2 1 3 HELD 14 /etc/hosts root 2 1 44312psq lp0 DEV_WAIT# qhld -r -#14# qchk -AQueue Dev Status Job Files User PP % Blks Cp Rnk------- ----- --------- --- ------------------ ---------- ---- -- ----- --- ---4312pcl lp0 DEV_WAIT QUEUED 7 /etc/motd root 1 1 1 QUEUED 8 /etc/qconfig root 2 1 2 QUEUED 13 /etc/environment root 2 1 3 QUEUED 14 /etc/hosts root 2 1 44312psq lp0 DEV_WAIT
262 Printing for Fun and Profit under AIX 5L

Figure 57. Moving a print job to another queue
Select the print queue that is your destination. Press OK. When you check both print queues, you will see the panels shown in Figure 58:
Figure 58. After moving a print job
Option 2: Using SMITTo use SMIT to move a print job, enter the following command:
# smitty qmov
In the next screen, press the F4 key to see the list for the destination queue. The following screen will be displayed:
Chapter 5. PowerPC print subsystem basics 263
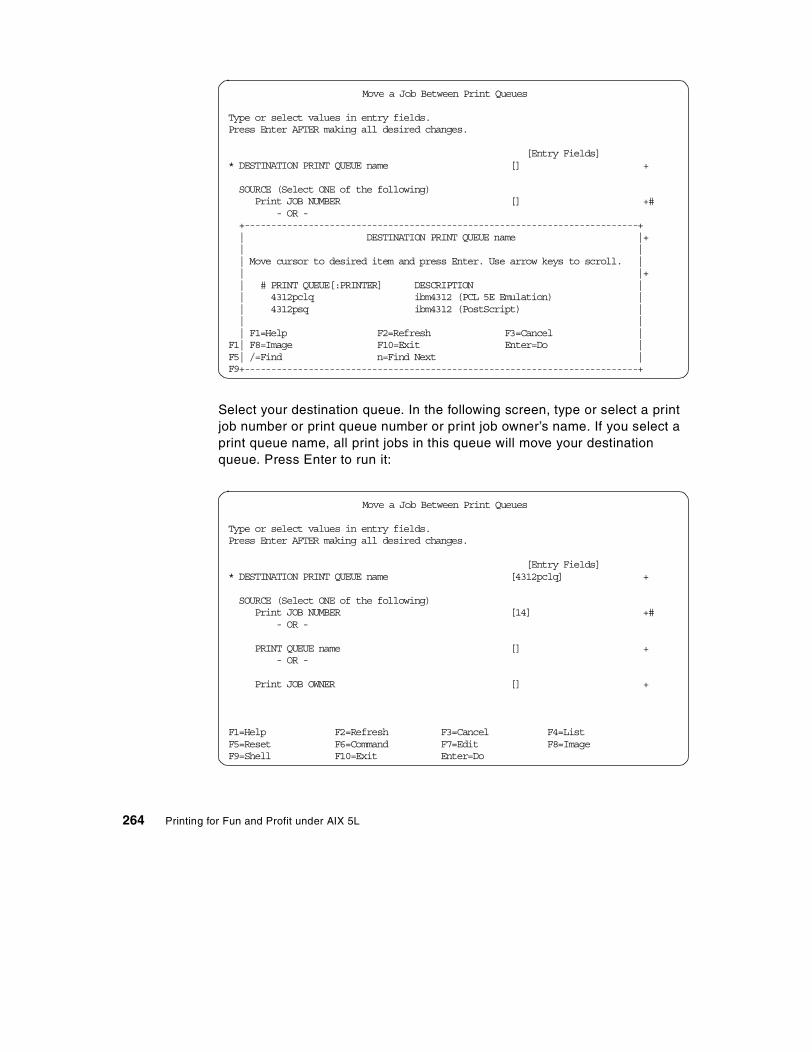
Select your destination queue. In the following screen, type or select a print job number or print queue number or print job owner’s name. If you select a print queue name, all print jobs in this queue will move your destination queue. Press Enter to run it:
Move a Job Between Print Queues
Type or select values in entry fields.Press Enter AFTER making all desired changes.
[Entry Fields]* DESTINATION PRINT QUEUE name [] +
SOURCE (Select ONE of the following) Print JOB NUMBER [] +# - OR - +--------------------------------------------------------------------------+ | DESTINATION PRINT QUEUE name |+ | | | Move cursor to desired item and press Enter. Use arrow keys to scroll. | | |+ | # PRINT QUEUE[:PRINTER] DESCRIPTION | | 4312pclq ibm4312 (PCL 5E Emulation) | | 4312psq ibm4312 (PostScript) | | | | F1=Help F2=Refresh F3=Cancel |F1| F8=Image F10=Exit Enter=Do |F5| /=Find n=Find Next |F9+--------------------------------------------------------------------------+
Move a Job Between Print Queues
Type or select values in entry fields.Press Enter AFTER making all desired changes.
[Entry Fields]* DESTINATION PRINT QUEUE name [4312pclq] +
SOURCE (Select ONE of the following) Print JOB NUMBER [14] +# - OR -
PRINT QUEUE name [] + - OR -
Print JOB OWNER [] +
F1=Help F2=Refresh F3=Cancel F4=ListF5=Reset F6=Command F7=Edit F8=ImageF9=Shell F10=Exit Enter=Do
264 Printing for Fun and Profit under AIX 5L
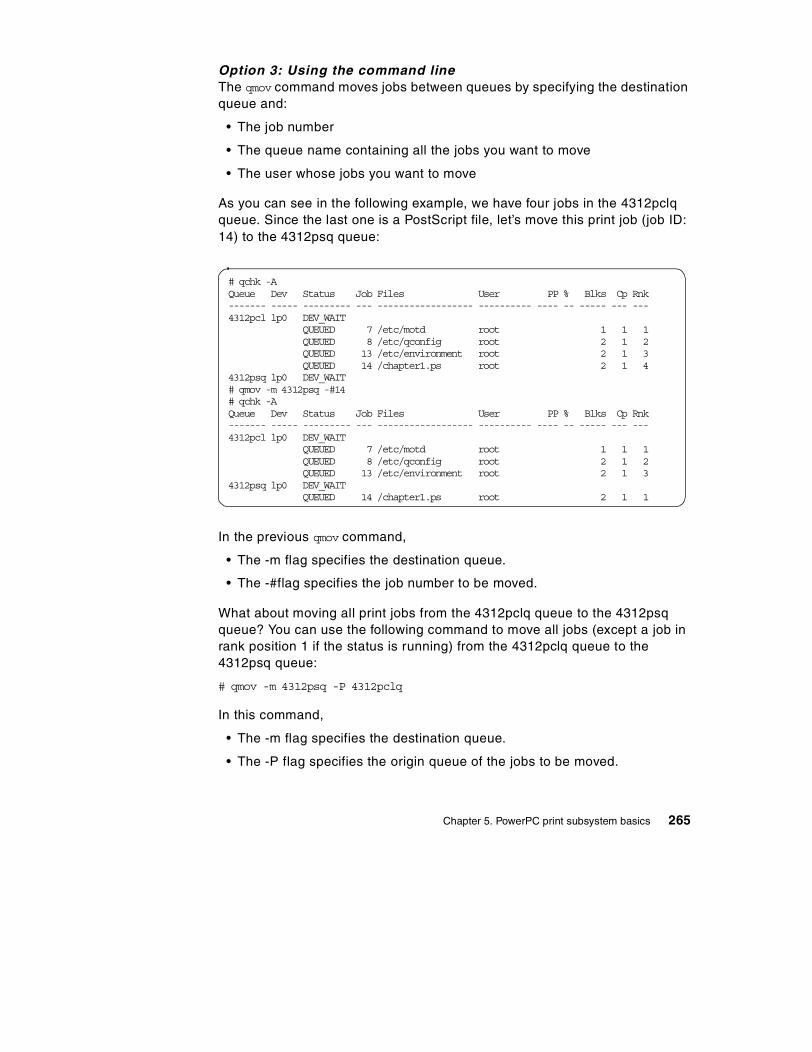
Option 3: Using the command lineThe qmov command moves jobs between queues by specifying the destination queue and:
• The job number
• The queue name containing all the jobs you want to move
• The user whose jobs you want to move
As you can see in the following example, we have four jobs in the 4312pclq queue. Since the last one is a PostScript file, let’s move this print job (job ID: 14) to the 4312psq queue:
In the previous qmov command,
• The -m flag specifies the destination queue.
• The -#flag specifies the job number to be moved.
What about moving all print jobs from the 4312pclq queue to the 4312psq queue? You can use the following command to move all jobs (except a job in rank position 1 if the status is running) from the 4312pclq queue to the 4312psq queue:
# qmov -m 4312psq -P 4312pclq
In this command,
• The -m flag specifies the destination queue.
• The -P flag specifies the origin queue of the jobs to be moved.
# qchk -AQueue Dev Status Job Files User PP % Blks Cp Rnk------- ----- --------- --- ------------------ ---------- ---- -- ----- --- ---4312pcl lp0 DEV_WAIT QUEUED 7 /etc/motd root 1 1 1 QUEUED 8 /etc/qconfig root 2 1 2 QUEUED 13 /etc/environment root 2 1 3 QUEUED 14 /chapter1.ps root 2 1 44312psq lp0 DEV_WAIT# qmov -m 4312psq -#14# qchk -AQueue Dev Status Job Files User PP % Blks Cp Rnk------- ----- --------- --- ------------------ ---------- ---- -- ----- --- ---4312pcl lp0 DEV_WAIT QUEUED 7 /etc/motd root 1 1 1 QUEUED 8 /etc/qconfig root 2 1 2 QUEUED 13 /etc/environment root 2 1 34312psq lp0 DEV_WAIT QUEUED 14 /chapter1.ps root 2 1 1
Chapter 5. PowerPC print subsystem basics 265
5.7 Printer pooling
Print queues can be serviced by more than one printer through printer pooling. This means that a user can submit the job to a queue, and the print service will select the first available printer assigned to that queue. Multiple printers are assigned to a single queue through the use of multiple queue devices for the same queue.
The first virtual printer is created in the normal way, as described in Section 5.3.2, “Adding a locally attached printer queue” on page 207. To add additional queue devices, use the SMIT option Add an Additional Printer to an Existing Print Queue from the smitty spooler fastpath and follow the normal steps for adding a local printer. The last screen will allow you to enter the Name an of existing PRINT QUEUE. Add the queue name that you added in the first step.
When printer pooling is in affect, all jobs will print to the printer defined in the first queue device listed in /etc/qconfig, unless that printer is busy. If that printer is busy, then the job will be printed to the printer defined in the next queue device, assuming it is not busy. This is similar to printer classes in System V printing.
266 Printing for Fun and Profit under AIX 5L

Chapter 6. PowerPC network printing
The topic of network printing encompasses both the configuration and administration of remote printers (or outbound printing) as well as the AIX system as print server (or inbound printing). In this chapter, we will discuss various print configurations that involve both these aspects of network printing as follows:
• Overview of network printing
• The LPD protocol
- Adding a remote host-attached printer
- AIX 5L as LPD server (inbound)
• JetDirect-attached printers
• IBM Network Printers
• Other types of network printing
- Network Station-attached printers
- Xstation-attached printers
- PC printing
- Print and terminal servers
6.1 Overview
Network or remote printing can use a number of different protocols, including Netware, AppleTalk, Banyan Vines, DECnet, TCP/IP socket applications, the Common Internet File System/Server Message Block (CIFS/SMB) protocol (used by Microsoft Windows, Samba, and IBM Fast Connect), the Internet Printing Protocol (IPP), and the most common in the TCP/IP environment: the Line Printer Daemon Protocol (LPD).
6.1.1 Outbound network printing overviewAIX PowerPC printing provides full support for the following types of network printing:
• LPR/LPD printing, defined by RFC 1179, that is used to print to and from remote UNIX servers, network printers, Network Stations, and many terminal and print servers (See Section 6.2, “The LPD protocol” on page 269, Section 6.5.1, “IBM Network Station attached printers” on page 312, and Section 6.5.4, “Print and terminal servers” on page 318 fore more information.)
© Copyright IBM Corp. 2001 267

• Hewlett-Packard JetDirect printing, used to print to HP network printers that support JetDirect protocol, to HP JetDirect EX external printer server boxes, and by a few other print server manufacturers who support the JetDirect protocol (see Section 6.3, “Printing to HP JetDirect-attached printers” on page 294 for more information.)
• IBM Network Printer printing using the pioibmnpm printer backend with the pioibmnpf filter to send the data to the printer (see Section 6.4, “Adding an IBM Network Printer” on page 303 for more information.)
• Xstation printing used to print to IBM Xstations using the piolpx printer backend and sent by the /usr/lpp/x_st_mgr/bin/catlpx filter (see Section 6.5.2, “Printing via an IBM Xstation” on page 312 for more information.)
• Lexmark network printer support, available for downloading from Lexmark using a proprietary MarkNet protocol
To support the different outbound network protocols, AIX supplies a separate print backend for each protocol. Table 16 lists the protocols that are supported, and the backend program and network filter used for each. The term network filter describes a program that can accept a data file as standard input and transfer that file to a remote print host.
Table 16. PowerPC outbound network printer programs
For example, if communicating with a remote server using standard processing, AIX uses the rembak program to send the print output to that system for printing.
In this chapter, we will focus on the protocols supported by the PowerPC print subsystem.
Network printing protocol Backend program Network filter
Remote server - standard processing
rembak rembak
Remote server - local filtering piorlfb rembak
JetDirect-attached piojetd piohpnpf
IBM Network Printer pioibmnpm pioibmnpf
IBM Network Color Printer piocolor pioibmnpf
Xstation piolpx catlpx
Lexmark - MarkNet-attached lpabe catlexbe
Lexmark - Markvision lexbe catlexbe
268 Printing for Fun and Profit under AIX 5L

6.1.2 Inbound network printing overviewThe AIX PowerPC print subsystem can act as an inbound server for jobs sent with the LPD protocol using the lpd daemon. Print jobs can be received from other UNIX hosts, and from PCs and mainframes that support an lpr transfer program.
When AIX is acting as the print server, it uses the LPD protocol. The lpd daemon monitors port 515 for incoming print requests. Each request is assigned to the appropriate local queue. The file to be printed is placed in the /var/spool/lpd directory, and the Job Description File (JDF) is placed in the /var/spool/lpd/qdir directory. The print request is then managed by the qdaemon and the appropriate backend (usually piobe) on the remote server.
By default, any TCP system can place a request on any host for printing services. Therefore, as a security feature, the lpd daemon accepts print requests only from remote hosts that are listed in its local /etc/hosts.lpd or /etc/hosts.equiv files.
For information on configuring AIX 5L for inbound printing using LPD, see Section 6.2.2, “AIX 5L as a LPD print server (inbound)” on page 283.
It is also possible to receive print jobs from PCs using SMB protocol and PC/NFS protocol. Each of these require separate programs (such as Samba, IBM Fast Connect, or PC/NFS) and will not be discussed in this chapter. For some utilities, see Chapter 9, “Printing tips and utilities” on page 435.
With SNA support installed, AIX can also accept jobs from IBM S/390 mainframes. This topic also will not be expanded upon in this document.
6.2 The LPD protocol
Printing using the LPD protocol is defined in Request for Comments (RFC) 1179 and can be viewed at http://www.ietf.org/rfc/rfc1179.txt. Although never officially adopted as a standard, RFC 1179 is used by most computer, terminal server, print server, and printer manufacturers for network printing.
When the host name is defined in the /etc/hosts.equiv file, the user has more access rights than just those associated with printing. Commands such as rlogin and rsh also use the hosts.equiv file for access control. You need to be aware of the security implications of using the hosts.equiv file.
Note
Chapter 6. PowerPC network printing 269

However, individual manufacturers may adapt or extend the existing standard to provide additional functions.
The basic flow of remote printing using LPR/LPD is as follows:
1. Client sends a print request to server specifying a queue name.
2. Server acknowledges that the queue exists.
3. Client sends a packet that contains the temporary file name, and the number of bytes in the file.
4. Server acknowledges that it has room to accept the job.
5. Client sends the data file to be printed.1
6. Client sends a packet that contains the control file name and the number of bytes in the control file.
7. Server acknowledges that it is ready to accept the control file.
8. Client sends the control file.
9. Server acknowledges that it has received the file.
10. Client or Server sends a FIN packet to end transmission.
AIX 5L and lpr/lpd printingIn AIX, lpr/lpd printing is supported by an lpr program named rembak and an lpd daemon, both of which fully support the protocol defined in RFC 1179. Figure 59 on page 271 gives a pictorial overview of lpr/lpd printing in AIX 5L.
1 Start ing in AIX V4.3, AIX and other IBM client lpr products introduced the abil ity to send the control f ile
f irst. This allows some servers to start printing the fi le before the entire f ile is received. This is based
on an extension to the RFC 1179 protocol.
270 Printing for Fun and Profit under AIX 5L
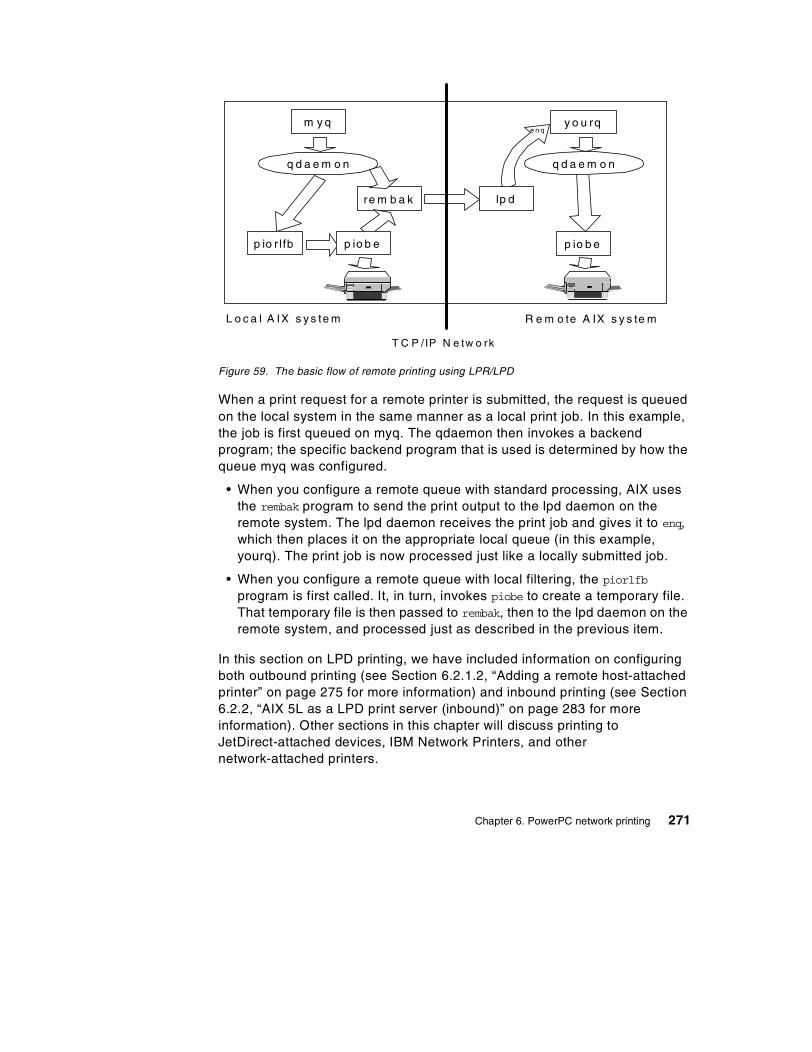
Figure 59. The basic flow of remote printing using LPR/LPD
When a print request for a remote printer is submitted, the request is queued on the local system in the same manner as a local print job. In this example, the job is first queued on myq. The qdaemon then invokes a backend program; the specific backend program that is used is determined by how the queue myq was configured.
• When you configure a remote queue with standard processing, AIX uses the rembak program to send the print output to the lpd daemon on the remote system. The lpd daemon receives the print job and gives it to enq, which then places it on the appropriate local queue (in this example, yourq). The print job is now processed just like a locally submitted job.
• When you configure a remote queue with local filtering, the piorlfb program is first called. It, in turn, invokes piobe to create a temporary file. That temporary file is then passed to rembak, then to the lpd daemon on the remote system, and processed just as described in the previous item.
In this section on LPD printing, we have included information on configuring both outbound printing (see Section 6.2.1.2, “Adding a remote host-attached printer” on page 275 for more information) and inbound printing (see Section 6.2.2, “AIX 5L as a LPD print server (inbound)” on page 283 for more information). Other sections in this chapter will discuss printing to JetDirect-attached devices, IBM Network Printers, and other network-attached printers.
m y q
re m b a k
p io r lfb
y o u rq
p io b e
q d a e m o n
p io b e
q d a e m o n
lp d
e n q
T C P /IP N e tw o rk
L o c a l A IX s y s te m R e m o te A IX s y s te m
Chapter 6. PowerPC network printing 271

6.2.1 Printing from AIX 5L to a remote host-attached printerIn this section, we describe how to configure a printer that is attached to a remote server. That is, we will configure AIX for outbound printing using the LPD protocol.
6.2.1.1 PlanningBefore you add a remote printer, you should determine the values you plan to use for the following:
• Standard processing or local filtering
Starting in Version 4, AIX allows both local and remote formatting. Remote formatting (standard processing) is similar to AIX 3.2.5; local formatting (or filtering) allows a virtual printer to be set up on the local system to send the print data to the remote system with local headers and printer setup information attached. For additional information, see “Standard processing or local filtering” on page 273.
Note that Web-based System Manager does not prompt you to choose a value for this parameter; the remote printers it creates will use standard processing. If you want to use other than standard processing, you must use SMIT or the command line to define your remote printer.
• Name of printer on your system
Beginning in AIX Version 4.3.2, printer names can have a maximum of 20 characters including a-z, A-Z, 0-9, underscore (_), minus (-), plus (+) or the “at” sign (@). Note that you must specify the -W flag on either the lpstat, lpq, qchk, or enq commands in order to see the wide display with the long printer name; the default display will only show the first seven characters in a printer name.
• Hostname or dotted decimal IP address of the remote server
This must be a valid hostname defined by either a domain nameserver or in the /etc/hosts file.
• Name of the existing print queue on the remote server
• Type of print spooler on the remote server
This parameter often receives little attention, but it can cause problems if not set appropriately. See “Type of print spooler on the remote server” on page 274 for additional information.
• Backend timeout value (optional):
If the connection to the remote server is slow, the connection that rembak makes with the remote server may time out, causing the queue to go to a DOWN state. This occurs most often as a result of one of two scenarios:
272 Printing for Fun and Profit under AIX 5L
- When printing to a network print device with a small buffer that is receiving jobs from multiple hosts
- When connecting to a server over a slow network, such as a Wide Area Network (WAN)
In these cases, set a timeout value of five minutes or more.
• Control file or data file first?
The value you need to set here will depend on what the remote spooling subsystem expects. The default, as originally defined in RFC 1179, is to send the data file first, then the control file, but you can configure an AIX remote queue to send the control file before the data file. This capability was added to allow print servers that support this function to start printing the file before the entire file is received. If you send the control file first and a failure occurs, rembak tries to send the data file(s) first as an alternative. If this attempt fails, the queue is taken down.
We will now discuss two of these items in greater detail.
Standard processing or local filteringWhen adding remote queues at AIX 4 and above, you are given the option of three types of remote printing:
• Standard Processing
• Standard with NFS access to server print queue attributes
• Local filtering before sending to print server
The first option, Standard Processing, uses the rembak backend, and is the default for remote printing prior to AIX V4. No formatting takes place on the local client; all formatting occurs at the remote host.
The second option is rarely used. It consists of mounting the virtual printer colon files from the server on the AIX print client, and setting up a virtual printer using these files. There are two prerequisites for using this option:
• The Network File System (NFS) program must be installed and running.
• The remote server must be running AIX Version 4 and have exported the directory /var/spool/lpd/pio/@local. (See “Starting the lpd subsystem” on page 291 for information on how to configure this using SMIT.)
The third option uses a local virtual printer on the AIX client before sending data to the remote queue using the rembak program. The print backend for this configuration is a shell script called /usr/lib/lpd/pio/etc/piorlfb. This option
Chapter 6. PowerPC network printing 273

should be used when you need to format the data locally before sending it to the remote server. You should consider the following implications:
• When creating a remote queue with local formatting, you must create a virtual printer. When using smitty mkpq fastpath, this will happen automatically.
• The /tmp directory must be large enough to contain all the files being spooled at a time.
• The rembak command cannot send data from stdin, so you must have an intermediate temporary file. This means that rembak cannot act as a filter in a virtual printer, so that backends like piorlfb must create a formatted temporary file and pass this file to rembak to send to the remote lpd server.
Type of print spooler on the remote serverAs mentioned in the introduction to this section, this parameter is generally not well understood and often incorrectly specified, leading to incorrect or even lost output between systems. This parameter is often referred to as the status filter, but that only partially describes its function. In fact, the value you set here will affect not only the status filtering, but also the print command flags that will be sent to the remote system.
A status filter does not actually filter the data itself, but rather filters the status received back from the remote lpd server by AIX and formats that data for local display, such as when the lpstat command is issued. There are both short and long format status filters; the status command you issue determines which version of the status filter will be used. For example, lpstat -t requests a long status; lpstat with no flags requests a short status.
Print command flags are parameters that you include on your print command (such as qprt) to specify formatting preferences. For example, you may want to specify a particular page length or paper drawer for use on the remote printer. Depending on the type of print spooler you specify, these commands may or may not be sent to the remote server.
Web-based System Manager does not prompt you to choose one of these values when you use it to add a remote printer. It will create a remote printer that uses Standard Processing (rembak). If you want to use either of the other types, you must use SMIT or the command line to create your remote printer.
Note
274 Printing for Fun and Profit under AIX 5L
When you set the value for the type of print spooler on the remote server, you can select one value from the following four options:
• AIX V3 or V4 should obviously be used when the remote server is using the legacy AIX print subsystem, now known in AIX 5L as the PowerPC print subsystem.
• BSD would most commonly be used with printers attached to certain remote Sun systems or to terminal and print servers.
• System V would be used if the remote server is running AIX 5L with the System V print subsystem or is running HP-UX, for example. This is sometimes referred to as the ATT filter.
• AIX V2 (RT PC) is rarely seen anymore, but is included for backward compatibility with earlier releases of AIX.
If you are unsure of the type of LPD protocol the remote server follows, the BSD filters will give better status output than the System V filters in most circumstances.
Unfortunately, most people simply leave the filter at AIX for all queues. While this will usually have no effect on printer servers, except to have the status page formatting look a little odd, the results when using another UNIX print server or even an NT server may not be quite as harmless. This is especially true when you are trying to send formatting flags to the other side. Some flags that are not sent with BSD or System V (ATT) filters include:
• qprt -l for page length • qprt -p for setting pitch • qprt -z for setting landscape • qprt -u for selecting paper drawer • qprt -Y for duplex operation
6.2.1.2 Adding a remote host-attached printerYou can use the following interfaces to add a remote printer:
• Web-based System Manager (see “Option 1: Using Web-based System Manager” on page 276)
• SMIT (see “Option 2: Using SMIT” on page 280)
• Command line (see “Option 3: Using the command line” on page 281)
Chapter 6. PowerPC network printing 275

Option 1: Using Web-based System Manager1. Start the Web-based System Manager either from the CDE Application
Manager -> System_Admin -> Management Console, or from the command line using wsm. From the main Management Environment panel, open the Printers container, then the Overview and Tasks object. A panel similar to Figure 60 should appear.
Figure 60. Overview and tasks panel for printers
2. From this panel, there are two different ways you can add a printer:
- From the task bar, you can select Printers -> New -> New Queue and Printer Wizard dialog....
- From the Overview and Tasks, select the New queue and printer task.
When printing to a remote server, the administrator of that remote server must have performed several tasks to enable remote printing. For information on configuring an AIX system as a print server, see Section 6.2.2.2, “Managing the LPD print server” on page 284.
Note
276 Printing for Fun and Profit under AIX 5L

When you select either of the two options above, you will see the panel shown in Figure 61.
Figure 61. Name of printer to add
3. In this example, we defined an IBM 3130 printer attached to a remote host named rs9220b; we named our printer aix3130 and clicked Next. The panel in Figure 62 was displayed:
Figure 62. Type of attachment
4. We selected remote, since the printer is attached to a remote RS/6000, and clicked Next. The panel in Figure 63 on page 278 is shown. Click Finish.
Chapter 6. PowerPC network printing 277
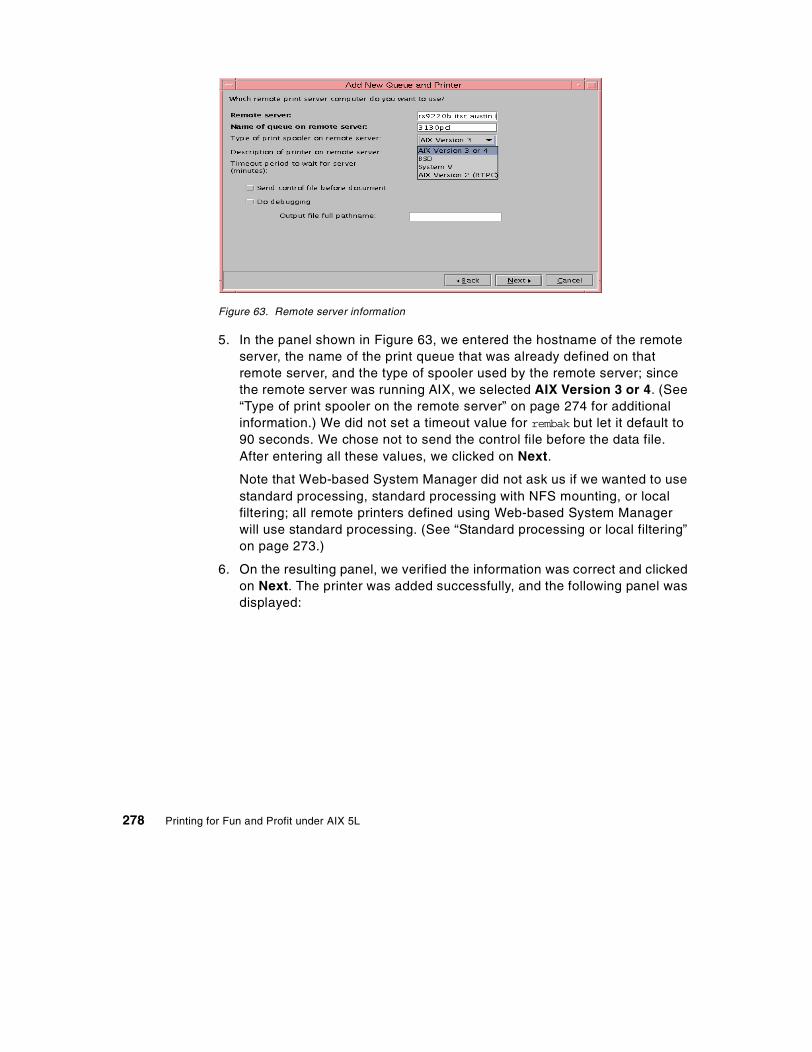
Figure 63. Remote server information
5. In the panel shown in Figure 63, we entered the hostname of the remote server, the name of the print queue that was already defined on that remote server, and the type of spooler used by the remote server; since the remote server was running AIX, we selected AIX Version 3 or 4. (See “Type of print spooler on the remote server” on page 274 for additional information.) We did not set a timeout value for rembak but let it default to 90 seconds. We chose not to send the control file before the data file. After entering all these values, we clicked on Next.
Note that Web-based System Manager did not ask us if we wanted to use standard processing, standard processing with NFS mounting, or local filtering; all remote printers defined using Web-based System Manager will use standard processing. (See “Standard processing or local filtering” on page 273.)
6. On the resulting panel, we verified the information was correct and clicked on Next. The printer was added successfully, and the following panel was displayed:
278 Printing for Fun and Profit under AIX 5L
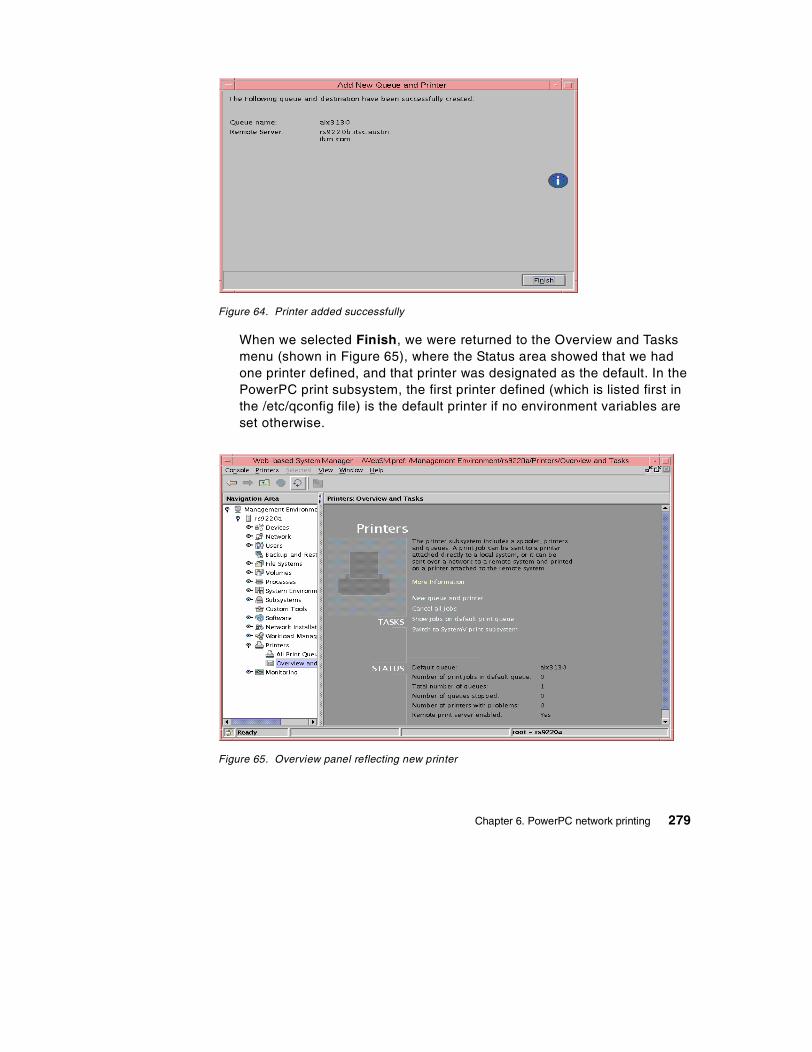
Figure 64. Printer added successfully
When we selected Finish, we were returned to the Overview and Tasks menu (shown in Figure 65), where the Status area showed that we had one printer defined, and that printer was designated as the default. In the PowerPC print subsystem, the first printer defined (which is listed first in the /etc/qconfig file) is the default printer if no environment variables are set otherwise.
Figure 65. Overview panel reflecting new printer
Chapter 6. PowerPC network printing 279

Option 2: Using SMITYou can also define remote printers using SMIT.
1. You can use the smitty mkpq fastpath, or work through the SMIT menus:
# smitty -> Print Spooling -> Add a Print Queue
2. For our example, we were defining an IBM 3130 attached to a remote RS/6000, so we selected remote and pressed Enter.
3. We selected Standard processing. See “Standard processing or local filtering” on page 273 for additional information. The following panel was displayed:
Add a Print Queue Move cursor to desired item and press Enter. Use arrow keys to scroll. # ATTACHMENT TYPE DESCRIPTION local Printer Attached to Local Host remote Printer Attached to Remote Host xstation Printer Attached to Xstation ascii Printer Attached to ASCII Terminal hpJetDirect Network Printer (HP JetDirect) file File (in /dev directory) ibmNetPrinter IBM Network Printer ibmNetColor IBM Network Color Printer other User Defined Backend F1=Help F2=Refresh F3=Cancel F8=Image F10=Exit Enter=Do /=Find n=Find Next
Type of Remote Printing Move cursor to desired item and press Enter. Standard processing Standard with NFS access to server print queue attributes Local filtering before sending to print server F1=Help F2=Refresh F3=Cancel F8=Image F10=Exit Enter=Do /=Find n=Find Next
280 Printing for Fun and Profit under AIX 5L
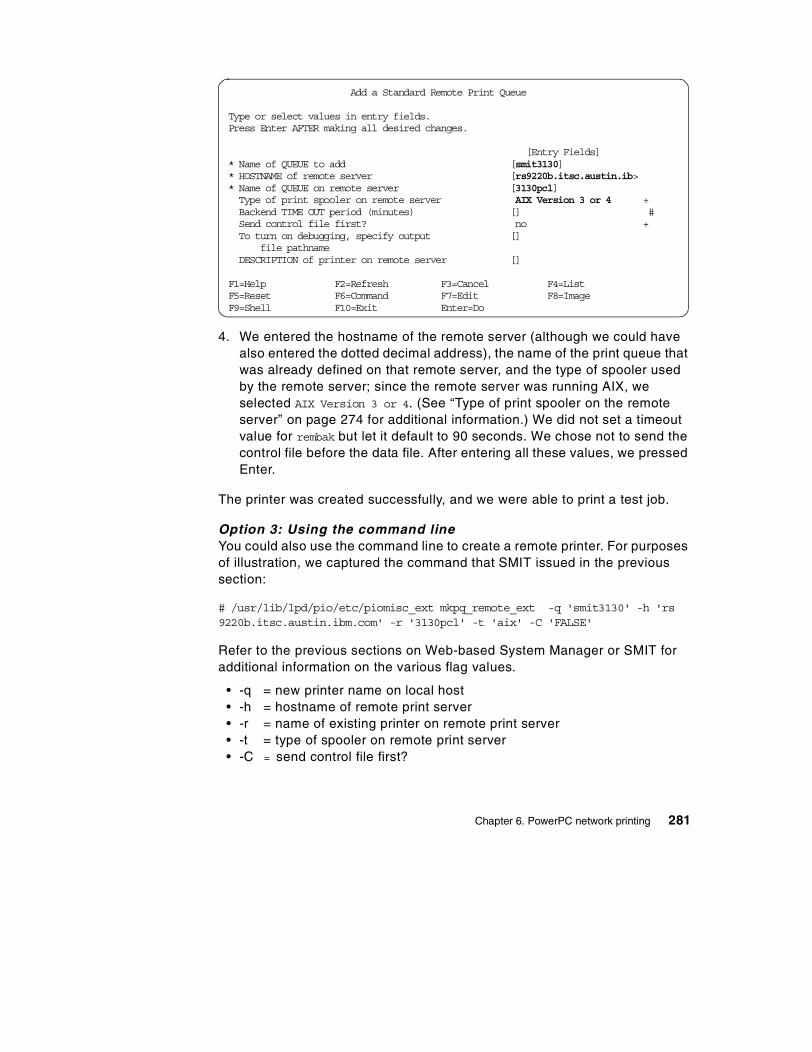
4. We entered the hostname of the remote server (although we could have also entered the dotted decimal address), the name of the print queue that was already defined on that remote server, and the type of spooler used by the remote server; since the remote server was running AIX, we selected AIX Version 3 or 4. (See “Type of print spooler on the remote server” on page 274 for additional information.) We did not set a timeout value for rembak but let it default to 90 seconds. We chose not to send the control file before the data file. After entering all these values, we pressed Enter.
The printer was created successfully, and we were able to print a test job.
Option 3: Using the command lineYou could also use the command line to create a remote printer. For purposes of illustration, we captured the command that SMIT issued in the previous section:
# /usr/lib/lpd/pio/etc/piomisc_ext mkpq_remote_ext -q 'smit3130' -h 'rs 9220b.itsc.austin.ibm.com' -r '3130pcl' -t 'aix' -C 'FALSE'
Refer to the previous sections on Web-based System Manager or SMIT for additional information on the various flag values.
• -q = new printer name on local host • -h = hostname of remote print server • -r = name of existing printer on remote print server • -t = type of spooler on remote print server • -C = send control file first?
Add a Standard Remote Print Queue Type or select values in entry fields. Press Enter AFTER making all desired changes. [Entry Fields] * Name of QUEUE to add [smit3130] * HOSTNAME of remote server [rs9220b.itsc.austin.ib> * Name of QUEUE on remote server [3130pcl] Type of print spooler on remote server AIX Version 3 or 4 + Backend TIME OUT period (minutes) [] # Send control file first? no + To turn on debugging, specify output [] file pathname DESCRIPTION of printer on remote server [] F1=Help F2=Refresh F3=Cancel F4=List F5=Reset F6=Command F7=Edit F8=Image F9=Shell F10=Exit Enter=Do
Chapter 6. PowerPC network printing 281

6.2.1.3 Sample /etc/qconfig entry for remote printingThe following screen shows a sample /etc/qconfig stanza that was created when we define a remote printer (standard processing) attached to another RS/6000 using the PowerPC print subsystem:
6.2.1.4 Remote lpd printer statusThe use of remote printers presents a change in the way print jobs are processed. As a result, this changes the way some print-related commands and facilities work. The primary change is that once a job has been transmitted to the remote host, it is no longer managed by the print spooling subsystem on your local system. As you can imagine, commands like qchk that query the status of print queues and printers must behave in a different way.
To facilitate these changes, the rembak program can do more than just send the print request to the remote printer. It can also send a request to a remote server. That request can be a print job, a status request, a job cancel request, or even a request to stop the remote queuing system.
When you have configured your remote printing environment and issue the enq -A command (or qchk -A or lpstat, things now work differently. First, enq will query the status of local print queues and printers by analyzing the qconfig file and print spooling subsystem status files. The command will also use rembak to request queue status information from the remote print server(s).
In the following example, we have defined a print queue on our system called smit3130. This queue points to a queue called 3130pcl on a remote server, rs9220b. When we request status on our smit3130 printer, the response from enq -A will now look like:
smit3130: device = @rs9220b up = TRUE host = rs9220b.itsc.austin.ibm.com s_statfilter = /usr/lib/lpd/aixshort l_statfilter = /usr/lib/lpd/aixlong rq = 3130pcl @rs9220b: backend = /usr/lib/lpd/rembak
282 Printing for Fun and Profit under AIX 5L

You will note that there are two entries for the smit3130 queue. The first is the status of the local queue, and the second is the status of the queue (3130pcl) over on the remote system.
Note: Under normal circumstances, the rembak command is called by the qdaemon command. It is not intended to be entered on the command line by a user. If executed from the command line, it may bring the remote queue down, so its use in this manner should be avoided.
6.2.2 AIX 5L as a LPD print server (inbound)In the previous section, we discussed the AIX 5L system from the perspective of a client or requester of remote print services. In this section, we consider the reverse: AIX as print server.
6.2.2.1 LPD print server management overviewThe AIX 5L PowerPC print subsystem implements the LPD server as an independent lpd daemon that is controlled by the system resource controller (SRC). This means that you may manage the lpd daemon using Web-based System Manager, SMIT, or the command line SRC commands lssrc, startsrc, and stopsrc.
The lpd daemon is installed as a default part of AIX server installation, but is not enabled by default. The lpd daemon performs the following tasks when enabled:
• Listens on port 515 for print requests from remote clients.
• Checks that the remote host has access to print on the server.
• Checks for the existence of the requested print queue.
• Checks for space for the print job.
• Copies the print job to /var/spool/lpd.
• Builds command line flags based on the flags in the control file.
# enq -A -W Queue Dev Status Job Files User PP % Blks Cp Rnk ---------------------------------------------------------------------------------------smit3130 @rs9220b READY smit3130 3130pcl READY aix4312 ibm@rs1290a READY aixjpcl hp@rs1290b READY aix3130 @rs9220b READY parpcl lp0 DOWN
QUEUED 1001 /etc/motd root@redbi 2 1 1
Chapter 6. PowerPC network printing 283

• Queues the job on the local system by calling enq with a flag requesting that the print file be removed after printing.
• Logs the request if debugging is turned on.
The basic assumption when running the LPD server is that there are queues defined on the AIX host that is running the lpd daemon. These may be local print queues with the printer attached to the server, or they can be remote or network attached printers, where the print server is acting to serialize the print jobs sent to that printer. In any case, the LPD server must have enough disk space to hold all the jobs that may be spooled at one time.
The /etc/locks/lpd file contains the process ID of the currently running instance of the lpd daemon. If the current machine becomes inoperable (the error message displayed is lpd: lock file or duplicate daemon), you may need to remove the ID for the lpd daemon when the system starts again.
6.2.2.2 Managing the LPD print serverAs print administrator for an AIX 5L print server, the common tasks you will perform include:
• Managing (adding or removing) print access for a remote client
The most common method of granting access for clients on remote print systems is to add an entry in the /etc/hosts.lpd file, and the methods that we describe here will update that file.
As mentioned in Section 6.1.2, “Inbound network printing overview” on page 269, it is also possible to grant broader access (more than just printing) to users on remote system by adding an entry to the /etc/hosts.equiv file, but you should be aware of the security implications.
You will notice that you can only grant or deny access based on remote computer name, not by individual user. This is different than the granularity provided by System V remote printing, as described in Section 3.3, “Configuring the System V print subsystem as a print server” on page 128.
• Managing the lpd subsystem, including:
- Displaying status of the lpd subsystem - Starting the lpd subsystem - Stopping the lpd subsystem
You can use any of the following interfaces to accomplish these administrative tasks:
284 Printing for Fun and Profit under AIX 5L
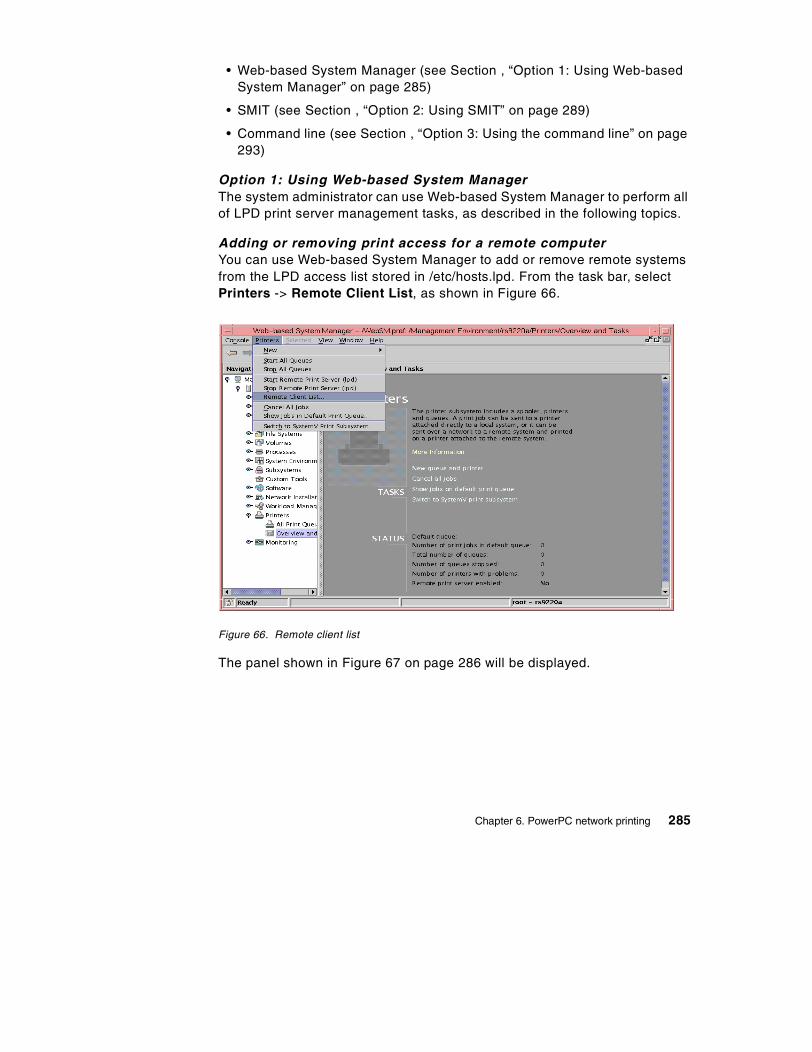
• Web-based System Manager (see Section , “Option 1: Using Web-based System Manager” on page 285)
• SMIT (see Section , “Option 2: Using SMIT” on page 289)
• Command line (see Section , “Option 3: Using the command line” on page 293)
Option 1: Using Web-based System ManagerThe system administrator can use Web-based System Manager to perform all of LPD print server management tasks, as described in the following topics.
Adding or removing print access for a remote computerYou can use Web-based System Manager to add or remove remote systems from the LPD access list stored in /etc/hosts.lpd. From the task bar, select Printers -> Remote Client List, as shown in Figure 66.
Figure 66. Remote client list
The panel shown in Figure 67 on page 286 will be displayed.
Chapter 6. PowerPC network printing 285

Figure 67. Remote computer access list
From this panel, you can add or remove access to your printers to users on any remote system, or you can limit access to users on specific remote systems.
• To add a new remote computer name, place the cursor in the second field (labeled Computer name:) and type that system’s fully qualified host name or dotted decimal IP address. Then click Add, then click Apply or OK in order for your change to be processed.
• To remove access for a remote system, highlight that system’s name in the first field (labeled Computer access list:) and click on the Remove button to the right of that box, as shown in Figure 68 on page 287.
286 Printing for Fun and Profit under AIX 5L

Figure 68. Removing access for a remote system
Click Add, then click Apply or OK in order for your change to be processed.
Display status of the lpd subsystemThe status of the lpd subsystem is displayed on Web-based System Manager’s Printers: Overview and Tasks panel as the last item in the Status list Remote print server enabled:, as shown in Figure 69 on page 288.
Chapter 6. PowerPC network printing 287

Figure 69. Status of the lpd subsystem
Starting or stopping the lpd subsystemFrom the task bar, select Printers, then depending on your requirement, click either on Start Remote Print Server (lpd) or Stop Remote Print Server (lpd), as seen in Figure 70.
Figure 70. Starting or stopping the lpd subsystem
288 Printing for Fun and Profit under AIX 5L
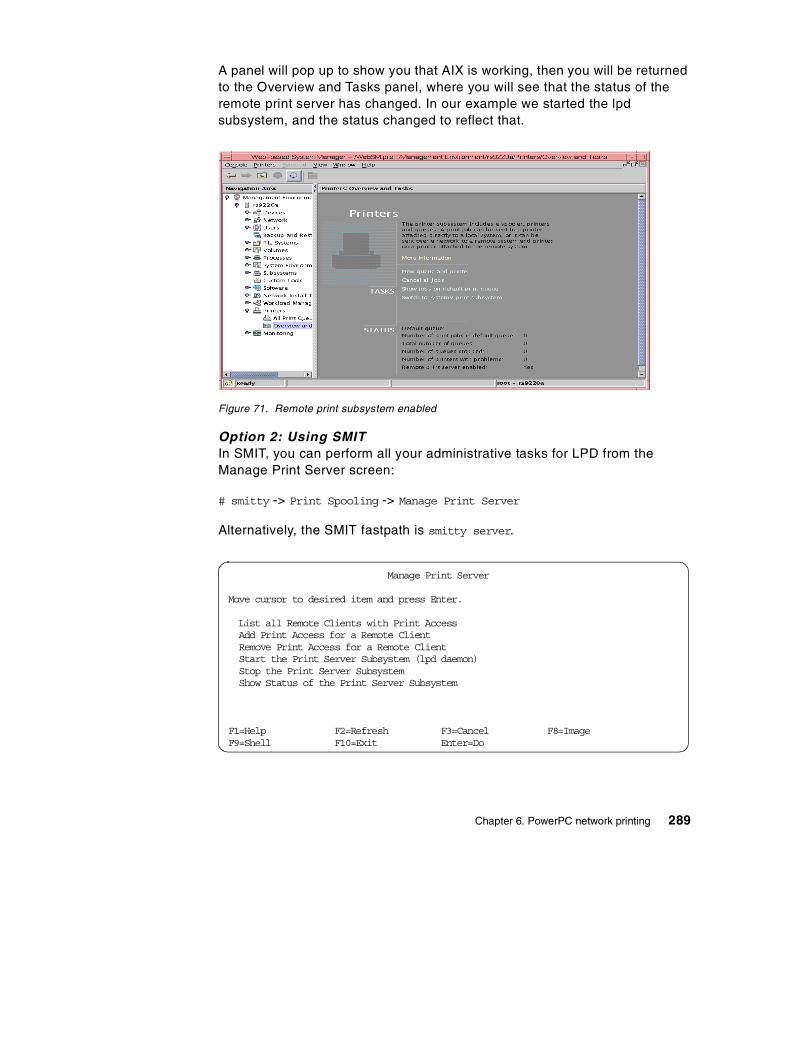
A panel will pop up to show you that AIX is working, then you will be returned to the Overview and Tasks panel, where you will see that the status of the remote print server has changed. In our example we started the lpd subsystem, and the status changed to reflect that.
Figure 71. Remote print subsystem enabled
Option 2: Using SMITIn SMIT, you can perform all your administrative tasks for LPD from the Manage Print Server screen:
# smitty -> Print Spooling -> Manage Print Server
Alternatively, the SMIT fastpath is smitty server.
Manage Print Server Move cursor to desired item and press Enter. List all Remote Clients with Print Access Add Print Access for a Remote Client Remove Print Access for a Remote Client Start the Print Server Subsystem (lpd daemon) Stop the Print Server Subsystem Show Status of the Print Server Subsystem
F1=Help F2=Refresh F3=Cancel F8=Image F9=Shell F10=Exit Enter=Do
Chapter 6. PowerPC network printing 289

These SMIT panels are fairly self-explanatory, and you can access online help with the F1 key. We will merely note the SMIT fastpaths and show an example of each screen.
Adding print access for a remote clientThe SMIT fastpath is smitty mkhostslpd.
Note that you can enter either the remote system’s hostname or its dotted decimal IP address.
Removing print access for a remote clientThe SMIT fastpath is smitty rmhostslpd..
Displaying status of the lpd subsystemThere is no SMIT fastpath to execute this command directly. From the panel that is displayed in response to the smitty server fastpath, select the entry to Show Status of the Print Server Subsystem and press Enter. The following panel that shows the status will be displayed:
Add Print Access for a Remote Client Type or select values in entry fields. Press Enter AFTER making all desired changes. [Entry Fields] * Name of REMOTE CLIENT [rs1230svr.itsc.austin.> (Hostname or dotted decimal address)
F1=Help F2=Refresh F3=Cancel F4=List F5=Reset F6=Command F7=Edit F8=Image F9=Shell F10=Exit Enter=Do
Remove Print Access for a Remote Client Type or select values in entry fields. Press Enter AFTER making all desired changes. [Entry Fields] * Name of REMOTE CLIENT [rs9220b.itsc.austin.ib> +
F1=Help F2=Refresh F3=Cancel F4=List F5=Reset F6=Command F7=Edit F8=Image F9=Shell F10=Exit Enter=Do
290 Printing for Fun and Profit under AIX 5L

Starting the lpd subsystemThe SMIT fastpath to get to this screen is smitty mkitab_lpd. There are three fields you can modify.
• You have the option to start LPD immediately, the next time the system is rebooted, or both.
Choosing system restart adds an entry to the /etc/inittab file so that the lpd daemon will automatically start after a system restart. Choosing now
COMMAND STATUS Command: OK stdout: yes stderr: no Before command completion, additional instructions may appear below. Subsystem Group PID Status lpd spooler 16630 active F1=Help F2=Refresh F3=Cancel F6=Command F8=Image F9=Shell F10=Exit /=Find n=Find Next
Start the Print Server Subsystem Type or select values in entry fields. Press Enter AFTER making all desired changes. [Entry Fields] Start subsystem now, on system restart, or both [now] + TRACE lpd daemon activity to syslog? [no] + EXPORT directory containing print attributes? [no] + Note: Exporting this print server's directory containing its print attributes will allow print clients to mount the directory. The clients can use this server's print attributes to display and validate print job attributes when starting print jobs destined for this print server. Note that the Network File System (NFS) program product must be installed and running. F1=Help F2=Refresh F3=Cancel F4=List F5=Reset F6=Command F7=Edit F8=Image F9=Shell F10=Exit Enter=Do
Chapter 6. PowerPC network printing 291

causes the daemon to be started immediately, but no entry is made in the /etc/inittab file.
• You also have an option to turn tracing on, but you should only do this when you need to perform problem determination. You should turn tracing off when the problem has been resolved so that you eliminate the overhead that tracing can introduce.
• You have the option to export the print attribute directory. As described in “Standard processing or local filtering” on page 273, one of the options when creating a remote printer is to choose standard processing with NFS access to server print queue attributes. In most cases, you will let this default to no.
The command that SMIT executes when using the default values is:
/usr/sbin/piomisc_base server_start_when 'both' 'no' 'no'.
If you succeed, you will see the following screen:
Stopping the lpd subsystemThe SMIT fastpath is smit rmitab_lpd. You can choose to stop it immediately, the next time the system is restarted, or both. Choosing system restart removes the lpd daemon entry in the /etc/inittab file. After a system restart, the lpd daemon will no longer be available. Choosing now halts the daemon immediately (if there is an entry in /etc/inittab for the lpd daemon, it will be restarted automatically after a system restart).
COMMAND STATUS Command: OK stdout: yes stderr: no Before command completion, additional instructions may appear below. 0513-059 The lpd Subsystem has been started. Subsystem PID is 20174.
F1=Help F2=Refresh F3=Cancel F6=Command F8=Image F9=Shell F10=Exit /=Find n=Find Next
292 Printing for Fun and Profit under AIX 5L

If you select now and press Enter, the message you receive when SMIT returns is:
If you then display the status, the lpd subsystem will have a status of inoperative.
Option 3: Using the command lineYou can also perform all the administrative tasks for the lpd subsystem from the command line.
Adding or removing print access for a remote clientYou can use the ruser command with the -a flag to add print access for a remote system. This will add an entry to the /etc/hosts.lpd file:
# ruser -a -p 'rs1230svr.itsc.austin.ibm.com'
You can also use the ruser command with the -d flag to remove access for a remote system and delete the corresponding entry from the /etc/hosts.lpd file. Or you can vi /etc/hosts.lpd to add or remove a line with the entry:
Stop the Print Server Subsystem Type or select values in entry fields. Press Enter AFTER making all desired changes. [Entry Fields] Stop subsystem now, on system restart, or both [now] +
F1=Help F2=Refresh F3=Cancel F4=List F5=Reset F6=Command F7=Edit F8=Image F9=Shell F10=Exit Enter=Do
0513-044 The lpd Subsystem was requested to stop.
# Examples: # # host allows access to all users on host # -host denies access to all users on host # +@group allows access to all users on hosts in group # -@group denies access to all users on hosts in group rs9220b.itsc.austin.ibm.com rs1230svr.itsc.austin.ibm.com
Chapter 6. PowerPC network printing 293

The change will take effect immediately; you do not have to refresh the subsystem.
Managing the lpd subsystemBecause the AIX 5L PowerPC print subsystem implements the LPD server as an independent lpd daemon that is controlled by the system resource controller (SRC), you can manage the LPD daemon using the command line SRC commands lssrc, startsrc, and stopsrc.
• Displaying status of the lpd subsystem:
# lssrc -s lpd
• Starting the lpd subsystem:
# startsrc -s lpd
• Stopping the lpd subsystem:
# stopsrc -s lpd
You can also use the SRC commands with the -g flag to manage the spooler group, which includes qdaemon and the writesrv daemon, in addition to lpd.
• Displaying status of the spooler group:
# lssrc -g spooler
• Starting the spooler group:
# startsrc -g spooler
• Stopping the spooler group:
# stopsrc -g spooler
6.3 Printing to HP JetDirect-attached printers
JetDirect cards or external boxes from Hewlett-Packard allow you to attach printers to a network instead of to a server. The printers do not necessarily have to be manufactured by Hewlett-Packard to attach to a JetDirect device.
Depending on the type of device, JetDirect devices will get their IP address either from non-volatile storage on the device or over the network using the BOOTP protocol. AIX supports both configurations.
Beginning in V4.2.1, AIX supports the JetDirect EX Plus3 Multi-Port Print Server, as well as the single port devices, by specifying the port number when setting up the queue. The default TCP/IP port number for JetDirect printing is port 9100. JetDirect EX boxes use port 9101 and 9102 for the extra ports.
294 Printing for Fun and Profit under AIX 5L

The JetDirect filter program has also been used by some customers on non-JetDirect print servers that require a socket connection. The only change to the configuration in these cases is the selection of an appropriate port number to match the server. The JetDirect socket program does not have a timeout, so that once a print job has started, it will stay connected until the print job is done, without any dependence on the time it takes the server to accept the job, as long as there are no network timeouts.
6.3.1 PlanningFor our testing, we used an HP LaserJet 4M with an internal JetDirect device to attach the printer to our Token-Ring network.
You will need the following information when adding a JetDirect-attached printer:
• Name of the new print queue(s)
Beginning in AIX Version 4.3.2, printer names can have a maximum of 20 characters including a-z, A-Z, 0-9, underscore (_), minus (-), plus (+) or the “at” sign (@). Note that you must specify the -W flag on either the lpstat, lpq, qchk, or enq commands in order to see the wide display with the long printer name; the default display will only show the first seven characters in a printer name.
If your printer supports multiple data streams (see Appendix E, “Data streams” on page 511 for more information), you will need a name for each data stream type you want to define. For example, our HP LaserJet 4M supports PCL, PostScript, HP-GL/2, PCL (Hangeul as code) and PCL (Hangeul as image) (the latter two are Korean-specific). So to support all these data streams, you would need five different print queue names. We configured only the PCL and PostScript queues during our testing; we left the other names blank.
• Hostname of the JetDirect device
This must be a valid hostname defined by either a domain nameserver or in the /etc/hosts file.
• Port number on the JetDirect device.
The default port number is 9100. If you are using the JetDirect EX Plus3 Multi-Port Print Server, use 9100 for parallel port 1, 9101 for parallel port 2, and 9102 for parallel port 3.
If you want to use another port number, specify the default port 9100 to make the queue, then edit the backend= statement for that queue in the /etc/qconfig file.
Chapter 6. PowerPC network printing 295

6.3.2 Adding a JetDirect-attached printerYou can use the following interfaces to add a JetDirect-attached printer:
• Web-based System Manager (see “Option 1: Using Web-based System Manager” on page 296)
• SMIT (see “Option 2: Using SMIT” on page 300).
• Command line (see “Option 3: Using the command line” on page 302).
Many printers support multiple data streams, and in AIX you usually define one queue per data stream. Note that SMIT will allow you to define all queues for a single printer in a single pass; Web-based System Manager only supports adding a single queue at a time.
Option 1: Using Web-based System Manager1. Start the Web-based System Manager either from the CDE Application
Manager -> System_Admin -> Management Console or from the command line using wsm. From the main Management Environment panel, open the Printers container, then the Overview and Tasks object.
Figure 72. Overview and tasks for printers
2. From the panel shown in Figure 72, there are two ways you can add a printer:
- From the task bar, you can select Printers -> New -> New Queue and Printer Wizard dialog....
296 Printing for Fun and Profit under AIX 5L

- From the Overview and Tasks, select the New queue and printer task.
When you select either of the two options above, you will see the panel shown in Figure 73.
Figure 73. Name of new JetDirect-attached printer
3. In Figure 73, we defined an HP LaserJet 4M printer with the internal JetDirect card with a name of aixjetd and clicked Next. The following panel was displayed:
Figure 74. JetDirect attachment type
From the list of possible printer attachments in Figure 74, we selected hpJetDirect - Network Printer (HP JetDirect).
Chapter 6. PowerPC network printing 297
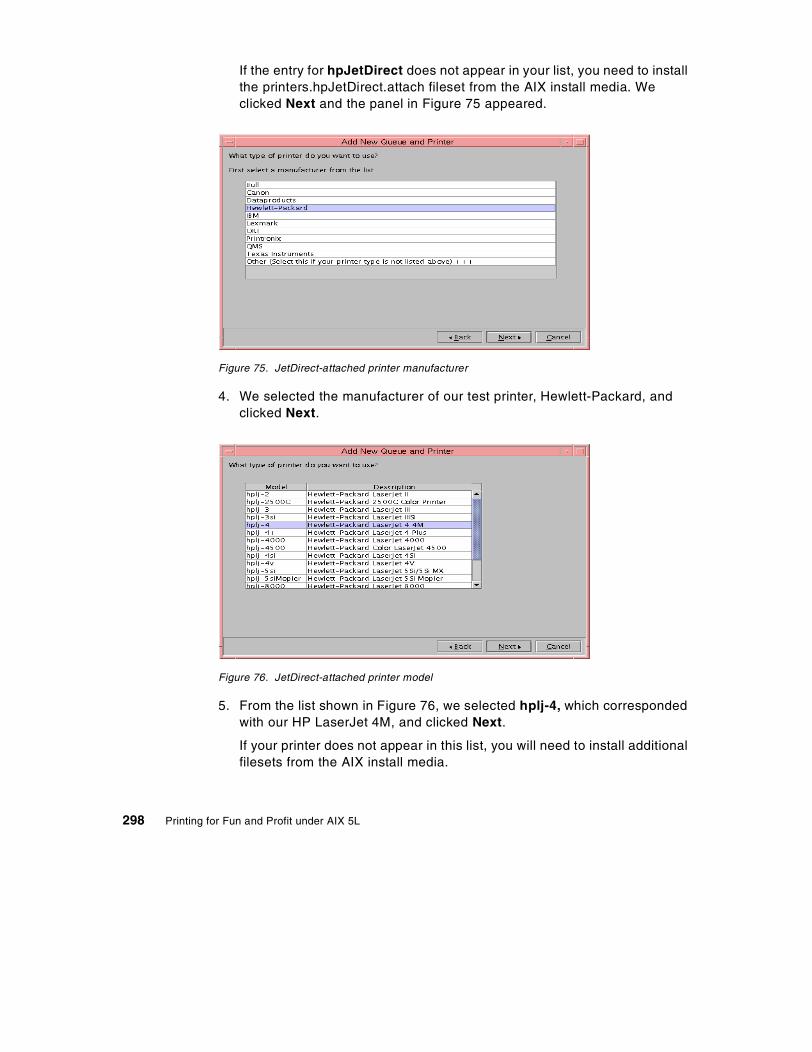
If the entry for hpJetDirect does not appear in your list, you need to install the printers.hpJetDirect.attach fileset from the AIX install media. We clicked Next and the panel in Figure 75 appeared.
Figure 75. JetDirect-attached printer manufacturer
4. We selected the manufacturer of our test printer, Hewlett-Packard, and clicked Next.
Figure 76. JetDirect-attached printer model
5. From the list shown in Figure 76, we selected hplj-4, which corresponded with our HP LaserJet 4M, and clicked Next.
If your printer does not appear in this list, you will need to install additional filesets from the AIX install media.
298 Printing for Fun and Profit under AIX 5L
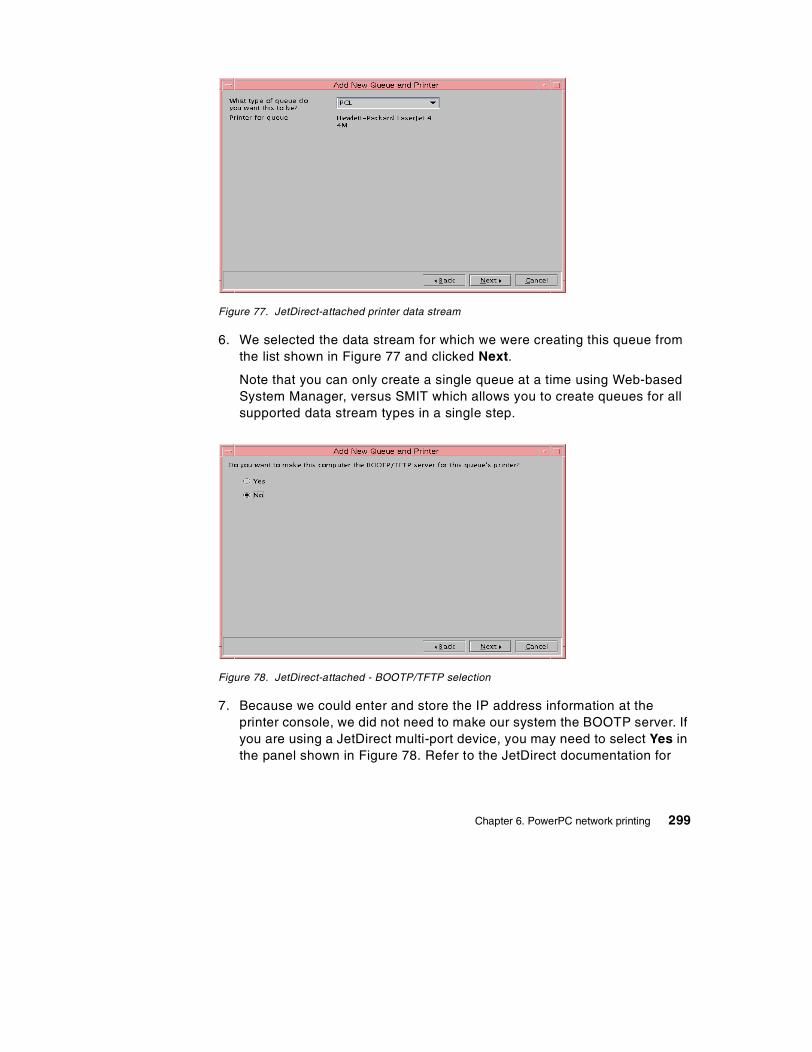
Figure 77. JetDirect-attached printer data stream
6. We selected the data stream for which we were creating this queue from the list shown in Figure 77 and clicked Next.
Note that you can only create a single queue at a time using Web-based System Manager, versus SMIT which allows you to create queues for all supported data stream types in a single step.
Figure 78. JetDirect-attached - BOOTP/TFTP selection
7. Because we could enter and store the IP address information at the printer console, we did not need to make our system the BOOTP server. If you are using a JetDirect multi-port device, you may need to select Yes in the panel shown in Figure 78. Refer to the JetDirect documentation for
Chapter 6. PowerPC network printing 299
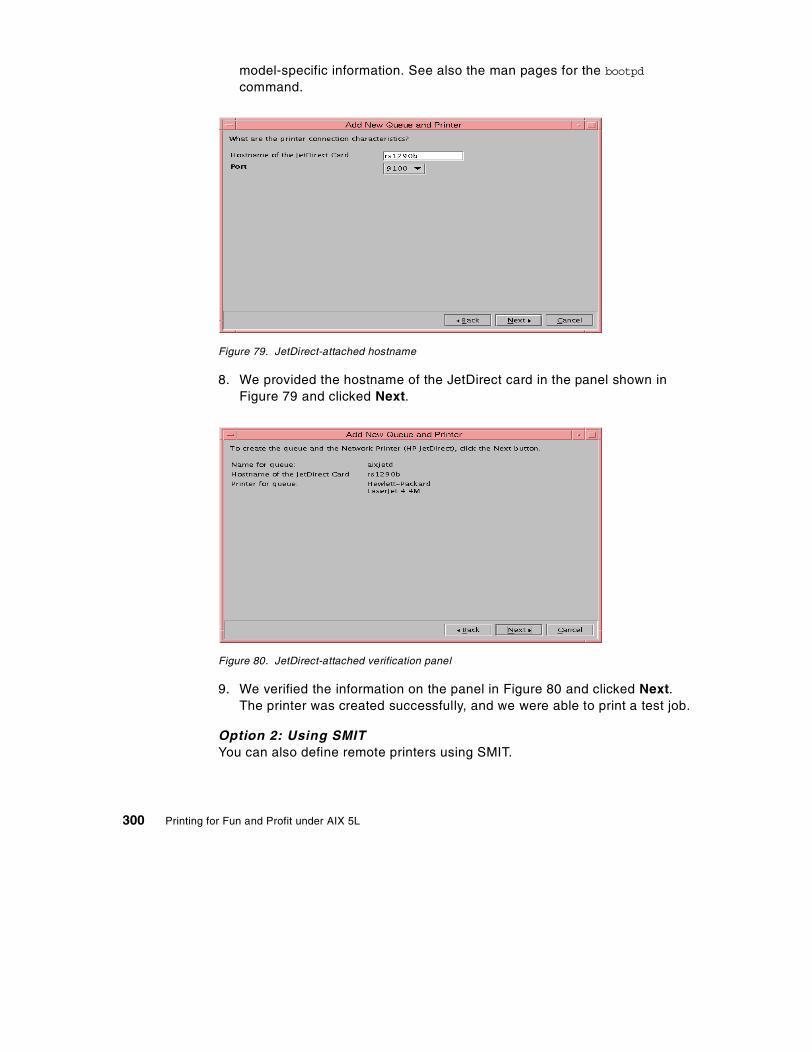
model-specific information. See also the man pages for the bootpd command.
Figure 79. JetDirect-attached hostname
8. We provided the hostname of the JetDirect card in the panel shown in Figure 79 and clicked Next.
Figure 80. JetDirect-attached verification panel
9. We verified the information on the panel in Figure 80 and clicked Next. The printer was created successfully, and we were able to print a test job.
Option 2: Using SMITYou can also define remote printers using SMIT.
300 Printing for Fun and Profit under AIX 5L

1. You can use the smitty mkpq fastpath, or work through the SMIT menus:
# smitty -> Print Spooling -> Add a Print Queue
2. From the list of possible printer attachments, we selected hpJetDirect - Network Printer (HP JetDirect). If the entry for hpJetDirect does not appear in your list, you need to install the printers.hpJetDirect.attach fileset from the AIX install media.
We pressed Enter. On the next two panels, we specified the printer manufacturer (Hewlett-Packard) and the model (hplj-4). Then the following panel was displayed:
3. Because we could enter and store the IP address information at the printer console, we did not need to make our system the BOOTP server. If you are using a JetDirect multi-port device, you may need to select Yes
Print Spooling Move cursor to desired item and press Enter. AIX Print Mode Only: +--------------------------------------------------------------------------+ ¦ Add a Print Queue ¦ ¦ ¦ ¦ Move cursor to desired item and press Enter. Use arrow keys to scroll. ¦ ¦ ¦ ¦ # ATTACHMENT TYPE DESCRIPTION ¦ ¦ local Printer Attached to Local Host ¦ ¦ remote Printer Attached to Remote Host ¦ ¦ xstation Printer Attached to Xstation ¦ ¦ ascii Printer Attached to ASCII Terminal ¦ ¦ hpJetDirect Network Printer (HP JetDirect) ¦ ¦ file File (in /dev directory) ¦ ¦ ibmNetPrinter IBM Network Printer ¦ ¦ ibmNetColor IBM Network Color Printer ¦ ¦ other User Defined Backend ¦ ¦ ¦ ¦ F1=Help F2=Refresh F3=Cancel ¦ ¦ F8=Image F10=Exit Enter=Do ¦ F1¦ /=Find n=Find Next ¦ F9+--------------------------------------------------------------------------+
BOOTP/TFTP Server Move cursor to desired item and press Enter. 1 Make this system a BOOTP/TFTP server 2 Do NOT make this system a BOOTP/TFTP server F1=Help F2=Refresh F3=Cancel F8=Image F10=Exit Enter=Do /=Find n=Find Next
Chapter 6. PowerPC network printing 301

here. Refer to the JetDirect documentation for model-specific information. See also the man pages for the bootpd command. We selected option 2 and pressed Enter.
The following panel was displayed:
4. Unlike Web-based System Manager, the SMIT method allows you to define multiple print queues for the different print data streams from a single screen. We entered the information as described in Section 6.3.1, “Planning” on page 295 and pressed Enter.
Option 3: Using the command lineYou could also use the command line to create a remote printer. For purposes of illustration, we captured the command that SMIT issued in the previous section:
# /usr/lib/lpd/pio/etc/piomkjetd mkpq_jetdirect -p 'hplj-4' -D pcl -q 's30pcl' -D ps -q 's30ps' -h 'rs1290b.itsc.austin.ibm.com' -x '9100'
Refer to the previous sections on Web-based System Manager or SMIT for additional information on the various flag values.
• -p = printer type (This must exist in the ODM database.) • -D = data type • -q = name of new print queue • -h = hostname of JetDirect device • -x = port number on JetDirect device
Add a Print Queue Type or select values in entry fields. Press Enter AFTER making all desired changes. [Entry Fields] Description Hewlett-Packard LaserJ> Names of NEW print queues to add PCL [s30pcl] PostScript [s30ps] HP-GL/2 [] PCL(Hangeul printing as code) [] PCL(Hangeul Character printing as image) [] Printer connection characteristics * HOSTNAME of the JetDirect Card [rs1290b.itsc.austin.ib> * PORT [9100] +# F1=Help F2=Refresh F3=Cancel F4=List F5=Reset F6=Command F7=Edit F8=Image F9=Shell F10=Exit Enter=Do
302 Printing for Fun and Profit under AIX 5L

6.3.3 Sample /etc/qconfig stanzaHere is the stanza for the JetDirect queue we just added:
6.4 Adding an IBM Network Printer
Just as JetDirect-attached devices have their own installation process, protocol and backend program, so do the IBM Network and Infoprint printers. (Note that the IBM Network Color Printer (4303) has its own process and backend.)
6.4.1 PlanningFor our testing, we used an IBM Network Printer 12 (4312) with a Token-Ring Network Interface Card (NIC).
You will need the following information when adding an IBM Network printer:
• Name(s) of the new print queue(s) to add
Beginning in AIX Version 4.3.2, printer names can have a maximum of 20 characters, including a-z, A-Z, 0-9, underscore (_), minus (-), plus (+) or the “at” sign (@). Note that you must specify the -W flag on either the lpstat, lpq, qchk or the enq commands in order to see the wide display with the long printer name; the default display will only show the first seven characters in a printer name.
If your printer supports multiple data streams (see Appendix E, “Data streams” on page 511 for more information), you will need a name for each data stream type you want to define. For example, our IBM Network Printer 12 supports PCL 5E and PostScript, so to support both data streams, you would need two different print queue names.
s30pcl: device = hp@rs1290b hp@rs1290b: file = /var/spool/lpd/pio/@local/dev/hp@rs1290b#hpJetDirect#9100 header = never trailer = never access = both backend = /usr/lib/lpd/pio/etc/piojetd rs1290b 9100
Chapter 6. PowerPC network printing 303

• Hostname of the network printer card
This must be a valid hostname defined by either a domain nameserver or in the /etc/hosts file.
6.4.2 Adding an IBM Network PrinterYou can use the following interfaces to add an IBM Network Printer:
• Web-based System Manager (see “Option 1: Using Web-based System Manager” on page 304)
• SMIT (see “Option 2: Using SMIT” on page 309)
• Command line (see “Option 3: Using the command line” on page 311)
Many printers support multiple data streams, and in AIX you usually define one queue per data stream. Note that SMIT will allow you to define all queues for a single printer in a single pass; Web-based System Manager only supports adding a single queue at a time.
Option 1: Using Web-based System Manager1. Start the Web-based System Manager either from the CDE Application
Manager -> System_Admin -> Management Console or from the command line using wsm. From the main Management Environment panel, open the Printers container, then the Overview and Tasks object.
Figure 81. Overview and tasks for printers
304 Printing for Fun and Profit under AIX 5L

2. From the panel shown in Figure 81 on page 304, there are two ways you can add a printer:
- From the task bar, you can select Printers -> New -> New Queue and Printer Wizard dialog....
- From the Overview and Tasks, select the New queue and printer task.
When you select either of the two options, you will see the panel shown in Figure 82:
Figure 82. Queue name for IBM Network Printer
3. In this example, we defined an IBM Network Printer 12 with a queue name of aix4312 and clicked Next. The panel in Figure 83 on page 306 was displayed.
Chapter 6. PowerPC network printing 305

Figure 83. IBM Network Printer attachment type
4. From the list of possible printer attachments, we selected ibmNetPrinter - IBM Network Printer. If the entry for ibmNetPrinter does not appear in your list, you need to install the printers.ibmNetPrinter.attach fileset from the AIX install media.
If you are installing an IBM Network Color Printer (4303), you should select the entry for ibmNetColor - IBM Network Color Printer. If that entry does not appear in your list, install the printers.ibmNetColor.attach fileset.
Figure 84. IBM Network Printer manufacturer
5. We selected the manufacturer, IBM, and clicked Next, as shown in Figure 84.
306 Printing for Fun and Profit under AIX 5L
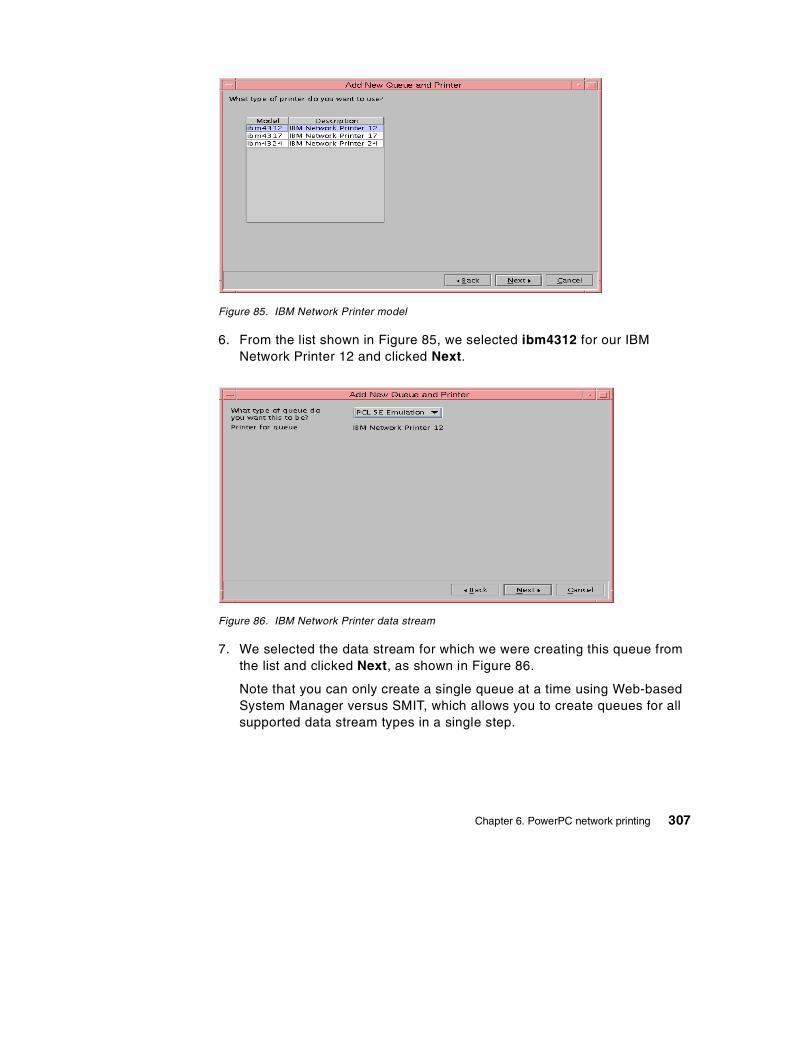
Figure 85. IBM Network Printer model
6. From the list shown in Figure 85, we selected ibm4312 for our IBM Network Printer 12 and clicked Next.
Figure 86. IBM Network Printer data stream
7. We selected the data stream for which we were creating this queue from the list and clicked Next, as shown in Figure 86.
Note that you can only create a single queue at a time using Web-based System Manager versus SMIT, which allows you to create queues for all supported data stream types in a single step.
Chapter 6. PowerPC network printing 307

Figure 87. IBM Network Printer - BOOTP/TFTP selection
8. For IBM Network Printers, you should always select No when asked if you want to make this computer a BOOTP server, as shown in Figure 87.
Figure 88. IBM Network Printer hostname
9. We provided the hostname of the IBM Network Printer and clicked Next, as shown in Figure 88.
308 Printing for Fun and Profit under AIX 5L
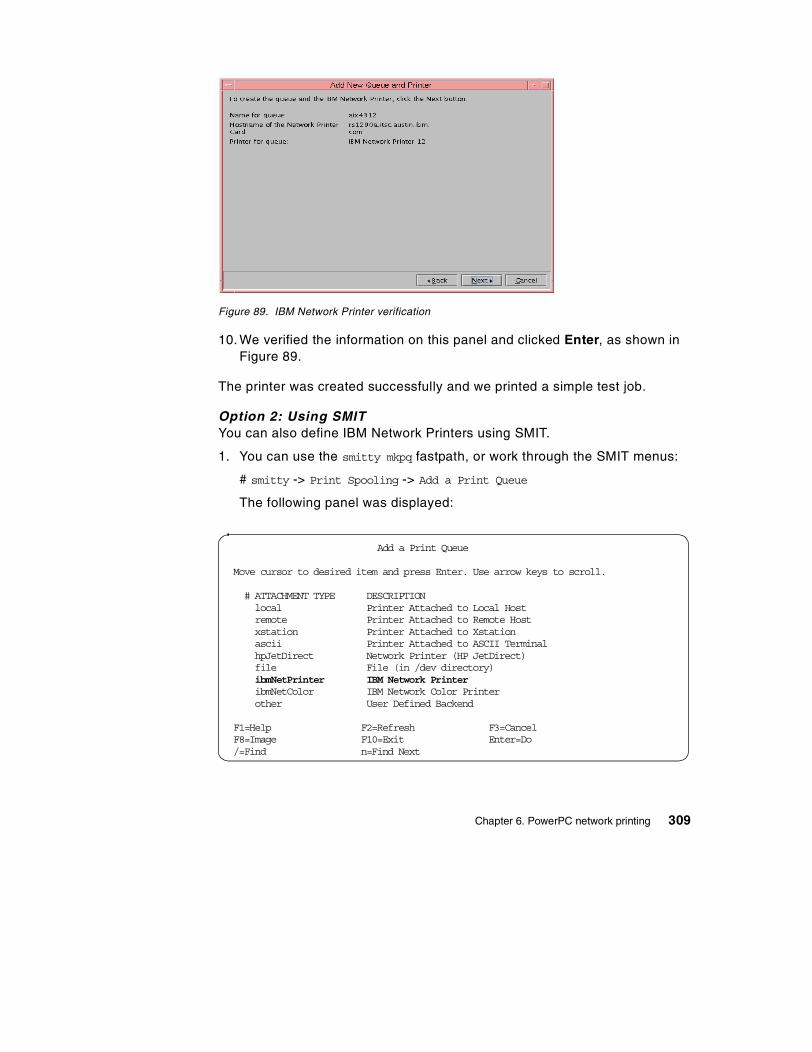
Figure 89. IBM Network Printer verification
10. We verified the information on this panel and clicked Enter, as shown in Figure 89.
The printer was created successfully and we printed a simple test job.
Option 2: Using SMITYou can also define IBM Network Printers using SMIT.
1. You can use the smitty mkpq fastpath, or work through the SMIT menus:
# smitty -> Print Spooling -> Add a Print Queue
The following panel was displayed:
Add a Print Queue Move cursor to desired item and press Enter. Use arrow keys to scroll. # ATTACHMENT TYPE DESCRIPTION local Printer Attached to Local Host remote Printer Attached to Remote Host xstation Printer Attached to Xstation ascii Printer Attached to ASCII Terminal hpJetDirect Network Printer (HP JetDirect) file File (in /dev directory) ibmNetPrinter IBM Network Printer ibmNetColor IBM Network Color Printer other User Defined Backend F1=Help F2=Refresh F3=Cancel F8=Image F10=Exit Enter=Do /=Find n=Find Next
Chapter 6. PowerPC network printing 309

2. From the list of possible printer attachments, we selected ibmNetPrinter - IBM Network Printer. If the entry for ibmNetPrinter does not appear in your list, you need to install the printers.ibmNetPrinter.attach fileset from the AIX install media.
If you are installing an IBM Network Color Printer (4303), you should select the entry for ibmNetColor - IBM Network Color Printer. If that entry does not appear in your list, install the printers.ibmNetColor.attach fileset.
In the next two panels, we first specified the manufacturer (IBM) and then the specific printer model (ibm4312). The following panel was displayed:
3. When adding IBM Network Printers, you do not need to make your system a BOOTP server because the printer stores its own address in its non-volatile memory. We selected the second option and pressed Enter.
4. Unlike Web-based System Manager, SMIT allows you to define multiple print queues for the different data streams from a single screen. We
BOOTP/TFTP Server Move cursor to desired item and press Enter. 1 Make this system a BOOTP/TFTP server 2 Do NOT make this system a BOOTP/TFTP server F1=Help F2=Refresh F3=Cancel F8=Image F10=Exit Enter=Do /=Find n=Find Next
Add a Print Queue Type or select values in entry fields. Press Enter AFTER making all desired changes. [Entry Fields] Description IBM Network Printer 12 Names of NEW print queues to add PCL 5E Emulation [s12pcl] PostScript [s12ps] Printer connection characteristics * HOSTNAME of the Network Printer Card [rs1290a.ibm.com]
F1=Help F2=Refresh F3=Cancel F4=List F5=Reset F6=Command F7=Edit F8=Image F9=Shell F10=Exit Enter=Do
310 Printing for Fun and Profit under AIX 5L
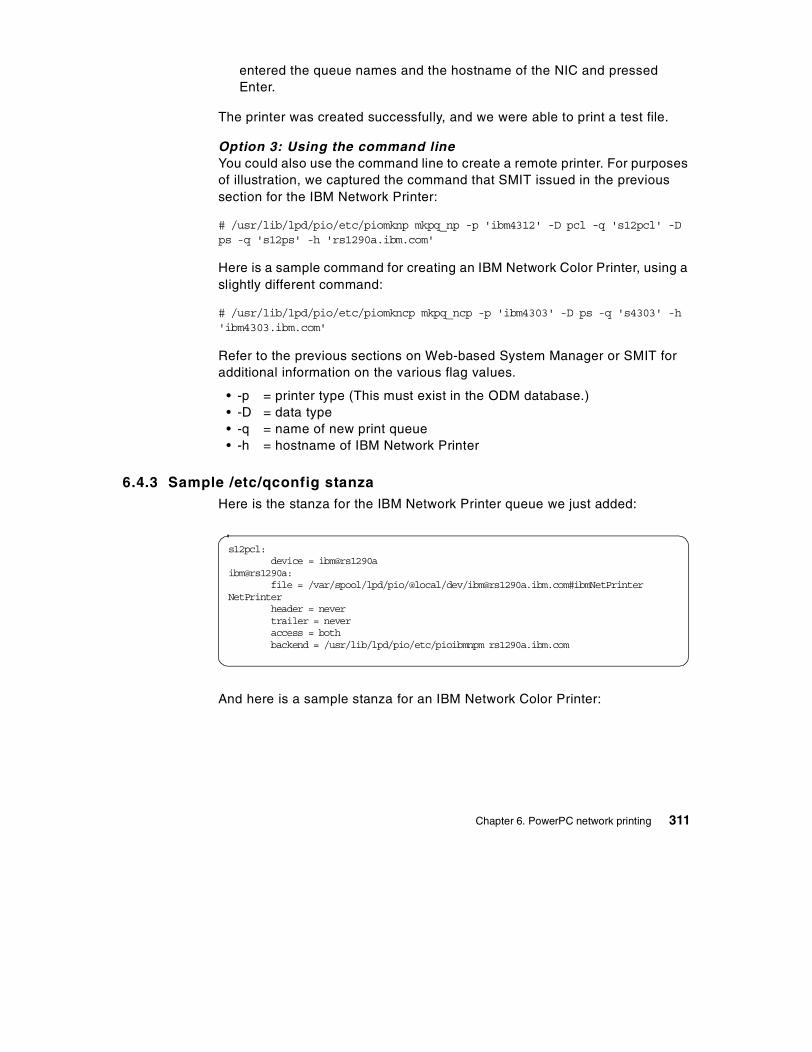
entered the queue names and the hostname of the NIC and pressed Enter.
The printer was created successfully, and we were able to print a test file.
Option 3: Using the command lineYou could also use the command line to create a remote printer. For purposes of illustration, we captured the command that SMIT issued in the previous section for the IBM Network Printer:
# /usr/lib/lpd/pio/etc/piomknp mkpq_np -p 'ibm4312' -D pcl -q 's12pcl' -D ps -q 's12ps' -h 'rs1290a.ibm.com'
Here is a sample command for creating an IBM Network Color Printer, using a slightly different command:
# /usr/lib/lpd/pio/etc/piomkncp mkpq_ncp -p 'ibm4303' -D ps -q 's4303' -h 'ibm4303.ibm.com'
Refer to the previous sections on Web-based System Manager or SMIT for additional information on the various flag values.
• -p = printer type (This must exist in the ODM database.) • -D = data type • -q = name of new print queue • -h = hostname of IBM Network Printer
6.4.3 Sample /etc/qconfig stanzaHere is the stanza for the IBM Network Printer queue we just added:
And here is a sample stanza for an IBM Network Color Printer:
s12pcl: device = ibm@rs1290a ibm@rs1290a: file = /var/spool/lpd/pio/@local/dev/[email protected]#ibmNetPrinterNetPrinter header = never trailer = never access = both backend = /usr/lib/lpd/pio/etc/pioibmnpm rs1290a.ibm.com
Chapter 6. PowerPC network printing 311

There are some notable differences for the IBM Network Color Printer, the most significant of which is a different backend program.
6.5 Miscellaneous network printers and print servers
In addition to the standard print support described earlier in this chapter, AIX 5L can print to a number of other network-attached devices and print servers, as described in the following topics.
6.5.1 IBM Network Station attached printersPrinters attached to IBM Network Stations receive their jobs through the LPD protocol and can be connected from the PowerPC print subsystem as remote printers. In most cases, it is recommended that local filtering be used when creating queues to the IBM Network Station. It is also recommended that all jobs be queued through a single AIX queue, since the Network Station does not have any disk space to spool print jobs. To set up a Network Station queue, use the remote queue names PARALLEL and SERIAL to distinguish the port where the printer is attached to the Network Station.
6.5.2 Printing via an IBM XstationPrinters can be attached to either the serial or parallel ports of an IBM Xstation. In order to print to an IBM Xstation, the Xstation Manager software must first be installed. The IBM Xstation Manager V1.2 software contains the catlpx program, which acts as the backend program in the print spooling subsystem that drives the IBM Xstation connected printer. The catlpx program connects the printer to the network port, sends the processed print file to the IBM Xstation, and closes the connection when the print job has finished.
s4303: host = ibm4303.ibm.com rq = ibmncp_direct s_statfilter = /usr/lib/lpd/bsdshort l_statfilter = /usr/lib/lpd/bsdlong device = ibm@ibm4303 ibm@ibm4303: file = /var/spool/lpd/pio/@local/dev/[email protected]#ibmNetColor header = never trailer = never access = both backend = /usr/lib/lpd/pio/etc/piocolor
312 Printing for Fun and Profit under AIX 5L

6.5.2.1 Adding an IBM Xstation-attached printerThe example below outlines how a printer connected to an IBM Xstation can be configured. This assumes that IBM Xstation Manager V1.2 has been installed and the IBM Xstation that will have a connected printer is known appropriately to the system.
Here we document our experiences configuring an IBM Xstation-attached printer:
1. We entered smitty mkpq fast path. The following screen was displayed:
2. We selected the xstation option and pressed Enter.
3. On the following two panels we entered the name of the printer manufacturer (IBM) and the printer model (ibm4039). The following screen was then displayed:
Add a Print Queue Move cursor to desired item and press Enter. Use arrow keys to scroll. # ATTACHMENT TYPE DESCRIPTION local Printer Attached to Local Host remote Printer Attached to Remote Host xstation Printer Attached to Xstation ascii Printer Attached to ASCII Terminal hpJetDirect Network Printer (HP JetDirect) file File (in /dev directory) ibmNetPrinter IBM Network Printer ibmNetColor IBM Network Color Printer other User Defined Backend F1=Help F2=Refresh F3=Cancel F8=Image F10=Exit Enter=Do /=Find n=Find Next
Xstation NAME Type or select a value for the entry field. Press Enter AFTER making all desired changes. [Entry Fields] * Xstation NAME [tx24.itsc.austin.ibm.c> +
F1=Help F2=Refresh F3=Cancel F4=List F5=Reset F6=Command F7=Edit F8=Image F9=Shell F10=Exit Enter=Do
Chapter 6. PowerPC network printing 313

4. We pressed F4 to see a list of available Xstations attached to our system and selected the name of the IBM Xstation to which we would be attaching the 4039. The Xstation name is the IP name for the Xstation.
In our example we have connected our printer to a Xstation named tx24.itsc.austin.ibm.com. We were using a nameserver for name resolution. (If you are not using a nameserver, you should have the Xstation name and its IP address in the /etc/hosts file, and you should use this name for the Xstation NAME field.)
5. The following screen was displayed after selecting tx24.itsc.austin.ibm.com and pressing Enter:
6. In our example, tx24.itsc.austin.ibm.com is an Xstation model 120. After making this selection, the following screen was displayed:
7. Since we were attaching the 4039 to the parallel interface, we selected parallel on this panel and pressed Enter. The following screen was displayed:
Xstation Type Move cursor to desired item and press Enter. Xstation 120 Xstation 130 Xstation 140 Xstation 150 Xstation 160 F1=Help F2=Refresh F3=Cancel F8=Image F10=Exit Enter=Do /=Find n=Find Next
Printer Type Move cursor to desired item and press Enter. p Parallel s Serial Port F1=Help F2=Refresh F3=Cancel F8=Image F10=Exit Enter=Do /=Find n=Find Next
314 Printing for Fun and Profit under AIX 5L
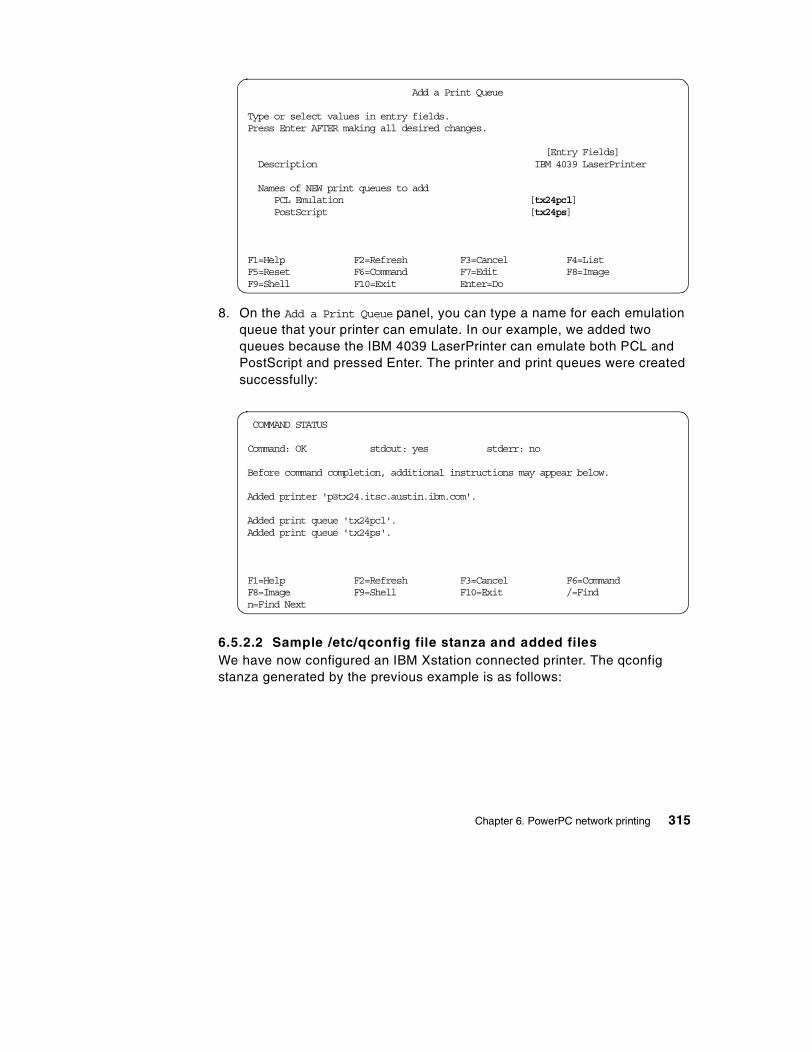
8. On the Add a Print Queue panel, you can type a name for each emulation queue that your printer can emulate. In our example, we added two queues because the IBM 4039 LaserPrinter can emulate both PCL and PostScript and pressed Enter. The printer and print queues were created successfully:
6.5.2.2 Sample /etc/qconfig file stanza and added filesWe have now configured an IBM Xstation connected printer. The qconfig stanza generated by the previous example is as follows:
Add a Print Queue Type or select values in entry fields. Press Enter AFTER making all desired changes. [Entry Fields] Description IBM 4039 LaserPrinter Names of NEW print queues to add
PCL Emulation [tx24pcl] PostScript [tx24ps]
F1=Help F2=Refresh F3=Cancel F4=List F5=Reset F6=Command F7=Edit F8=Image F9=Shell F10=Exit Enter=Do
COMMAND STATUS Command: OK stdout: yes stderr: no Before command completion, additional instructions may appear below. Added printer '[email protected]'. Added print queue 'tx24pcl'. Added print queue 'tx24ps'.
F1=Help F2=Refresh F3=Cancel F6=Command F8=Image F9=Shell F10=Exit /=Find n=Find Next
Chapter 6. PowerPC network printing 315

This process created the following virtual printer colon files in the /var/spool/lpd/pio/@local/custom directory:
• tx24pcl:p@tx24
• tx24ps:p@tx24
The digested files are in the /var/spool/lpd/pio/@local/ddi directory:
• [email protected]:p@tx24
• [email protected]:p@tx24
6.5.3 Windows printingIn most configurations, the AIX system will act as the print server to receive print jobs from Windows-based systems. When receiving jobs from a Windows PC, the easiest protocol to use is the LPD protocol, but the SMB print protocol can also be used when Samba or IBM Fast Connect are installed on the AIX server. Printing in this environment is described in two redbooks:
• Samba Installation, Configuration, and Sizing Guide (SG24-6004)
• AIX and Windows NT: Solutions for Interoperability (SG24-5102)
The PC/NFS product also supports printing from the PC environment, but discussion of this product is beyond the scope of this publication.
Based on our personal experience, our choice for printing from Windows (3.1, 95, or 98) is to use the lpr client for Windows from IBM. This tool is free and it works well in the AIX environment.
tx24pcl: device = p@tx24 p@tx24: file = /var/spool/lpd/pio/@local/dev/[email protected]#xstation header = never trailer = never access = both backend = /usr/lib/lpd/pio/etc/piolpx [email protected] tx24ps: device = p@tx24 p@tx24: file = /var/spool/lpd/pio/@local/dev/[email protected]#xstation header = never trailer = never access = both backend = /usr/lib/lpd/pio/etc/piolpx [email protected]
316 Printing for Fun and Profit under AIX 5L

SoftwareYou may download a free lpr client for Windows 95/98 from the IBM Web site (ftp://ftp.software.ibm.com/printers/products/netprt/lpr/). The file to download is instlpr.exe.
To install the software, click on the instlpr icon from Windows Explorer. This will completely install the software. At the end of the installation, be sure to read the instructions for installing a print queue. The only changes to these for AIX are:
• Enter the AIX print queue in the box labeled Printer/Queue name.
• For all pre-AIX Version 4.3 systems, select Send data file before control file.
You can add up to 20 different remote printers with this technique.
Setting up the AIX server to accept Windows jobsThe requirements on the AIX side for printing from the Windows lpr are:
• A working print queue should exist on the AIX server.
• The lpd daemon must be running.
• The Windows hostname should be in /etc/hosts or resolvable through DNS or NIS.
• The Windows hostname or IP address should be in /etc/hosts.lpd.
Adding a Windows 95 queue to print to AIXTo add a queue to print to the Windows 95/98 system using the IBM LPR Remote Printing Client, follow these steps:
1. From the Start button, select Settings then Printers.
2. Click the Add Printer icon.
3. From the first page of the Wizard, click Next to continue.
4. Select Local printer and click Next.
5. Select the printer manufacturer and printer model and click Next.
6. Select the appropriate driver to use.
7. Select LPT1: for the printer port or IBM LPR Remote Printer if you have already created a remote printer you want to use.
8. Enter a printer name of your choice and click Next to continue.
9. Click the No button for test print and click Finish.
10. Right-click the icon on the Printer folder and select Properties.
Chapter 6. PowerPC network printing 317

11. Click the Details menu tab and then the Add Port push button.
12. Click the Other button and select IBM LPR Remote Printing Client and click OK.
13. Enter the hostname or IP address of the AIX system.
14. Enter the print queue name on the AIX server.
15. Set the Send banner page control flag to determine if you want the AIX banner page.
16. Do not click the Send data file before control file.
17. Do not click the Send plain text control flag.
18. Click OK.
19. Click OK to add the printer queue.
Note: For a graphical description of these directions on the Windows 95 system, click Start -> Programs -> IBM LPR Remote Printing Client -> Adding an IBM LPR Remote Printer.
6.5.4 Print and terminal serversA variety of print and terminal servers support printing from AIX. Many of the newer print servers support the LPD protocol. Servers that do not support LPD usually have a socket protocol and a documented procedure for printing from AIX. Table 17 references some of the terminal and print server manufacturers and the associated protocol or backend:
Table 17. Print and terminal server protocols
Print Server Protocol and/or program
AXIS LPD, FTP, & PROS proprietary protocol
Chase Research: IOLAN server LPD protocol
IBM 7318 Terminal Servers cnsconnect as local printers
Digital Products NETPrint and JETXPrint LPD protocol
Intel NetportExpress 10/100 and PRO LPD or JetDirect protocol
Pacific Data Products DirectNet LPD protocol
XCD Print Server JetDirect protocol
Microplex Print Servers LPD, rshd, and direct socket protocols
Emulex NETque and NETjet LPD or rprint socket program
318 Printing for Fun and Profit under AIX 5L

Synoptics terminal server csportd socket program
Xylogics Annex Terminal Server aprint socket program
Lantronix Print/Terminal Servers LPD protocol
Central Data Terminal Server Look like local device with their drivers
Print Server Protocol and/or program
Chapter 6. PowerPC network printing 319

320 Printing for Fun and Profit under AIX 5L

Chapter 7. PowerPC advanced printing
In previous chapters, you have learned how to add and remove printers, print to printers, and make minor changes. This chapter discusses more advanced customization using the PowerPC print subsystem.
The topics discussed in this chapter include:
• Using a custom backend
• Adding a new printer to the predef database
• Adding form support to a printer definition - unsupported
• Setting the printer attributes
• Specifying specific character sets
• Specifying a printer font cartridge
• Setting up PostScript print filters
• Printing text files to PostScript printers
• Restricting user access to printers - unsupported
7.1 Printer backend programs
When a print job is processed, a printer backend program is executed by a qdaemon to process the print job and send it to the printer. The backend that used most often is the piobe backend, which enables AIX virtual printers to do their formatting, but AIX 5L comes with several other standard printer backends for PowerPC programming. Two of these, piojetd and pioibmnpm, are shell script wrappers that call pass the print job through piobe as a filter before sending the job to network attached printers.
Although the virtual printer backends are very powerful, it may be necessary to create a custom backend program for a number of reasons, such as:
• Supporting flags that are not supported by piobe
• Serializing non-printing jobs
• Adding functions such as archiving and limiting users
• Supporting System V print filters
A printer backend program used for printing should:
• Initialize the printer port if necessary. For local printers, this is done by the pioout filter.
© Copyright IBM Corp. 2001 321
• Generate printer setup sequences for printer fonts, paper tray, simplex or duplex, page orientation, and similar parameters based both on defaults and print command line flags.
• Print a banner page if requested.
• Print the requested number of copies.
• Handle and report errors sending jobs to the printer.
7.1.1 The default piobe backendThe default and virtual printer backend, piobe, handles all types of printer jobs based on the settings in virtual printer files called colon files. The functions that piobe is responsible for includes calling filters to do the following:
• Validate command line flags.
• Initialize the printer based on defaults and flags.
• Provide support for user defined filters.
• Format ASCII data.
• National language support by translating from the input codepage to the output printer symbol set (ASCII only).
• Reset the printer to a predefined condition.
• Call the program to send the header and trailer pages.
• Send a form feed at the end of job.
• Transfer the data to the printer device.
• Handle errors and reports them through the qdaemon.
Although virtual printers are often called device drivers, piobe does not:
• Generate any printer language commands, such as PostScript or PCL, other than the initialization and reset sequences.
• Test for correctness of the format of data.
• Automatically recognize the type of data, except for very simple sniffing of the first couple of characters to look for PostScript (if set up properly).
• Act as a print API for applications.
Customization of the piobe backend is done through customizing the virtual printer, which is discussed in Section 7.3, “Customizing virtual printers” on page 330.
322 Printing for Fun and Profit under AIX 5L

7.1.2 Creating a printer backend programPrinter backend programs can be written as C applications or as simple shell scripts. When written in C, there are library routines that can be called to communicate with the qdaemon. These routines are discussed in detail in the “Printer Backend Overview for Programming” chapter in AIX V4 Printer Guide, SC23-2783. This is available on the Web at:
http://www.rs6000.ibm.com/doc_link/en_US/a_doc_lib/aixbman/printrgd/prt_backend_overview.htm
As an introduction, the following text is included from that reference:
“The printer backend is invoked once for every file or group of files to be printed, with the name of each file passed to the backend as a parameter. The backend opens the file, reads it, and sends it to the device. The recommended method for a backend to operate is to write to its standard output, with the qdaemon process opening the device onto the correct file descriptor. This requires setting the file field in the qconfig file.
The name of the file to be printed can be a direct or relative path name. The user ID and group ID of the backend are those of the user submitting the job.
When a backend is invoked, it has access to the user's environment. To access the user's environment, the backend may invoke the getenv subroutine. For example, to access the user's directory, getenv (PWD) returns a pointer to the directory name. The backend can use this to read from or write to this directory
If the backend writes to its standard output, the qdaemon opens the device in root-user mode. If the backend needs to open the device itself, it must have the correct permissions to open the device. Since the backend runs under the permissions of the user sending the print job, you may need to change the protections on the device or install the backend set-user-ID or set-group-ID.”
In addition to this reference, there are several tips on writing both shell scripts and backends available on the Web at:
http://service.boulder.ibm.com/rs6k/techdocs/index.v4.html#print
7.1.3 Example: Shell script backend to check flagsA simple example shell script that can be useful for both learning how to use a custom backend and for finding out what flags have been passed to the backend can be written and implemented with very little work.
Chapter 7. PowerPC advanced printing 323
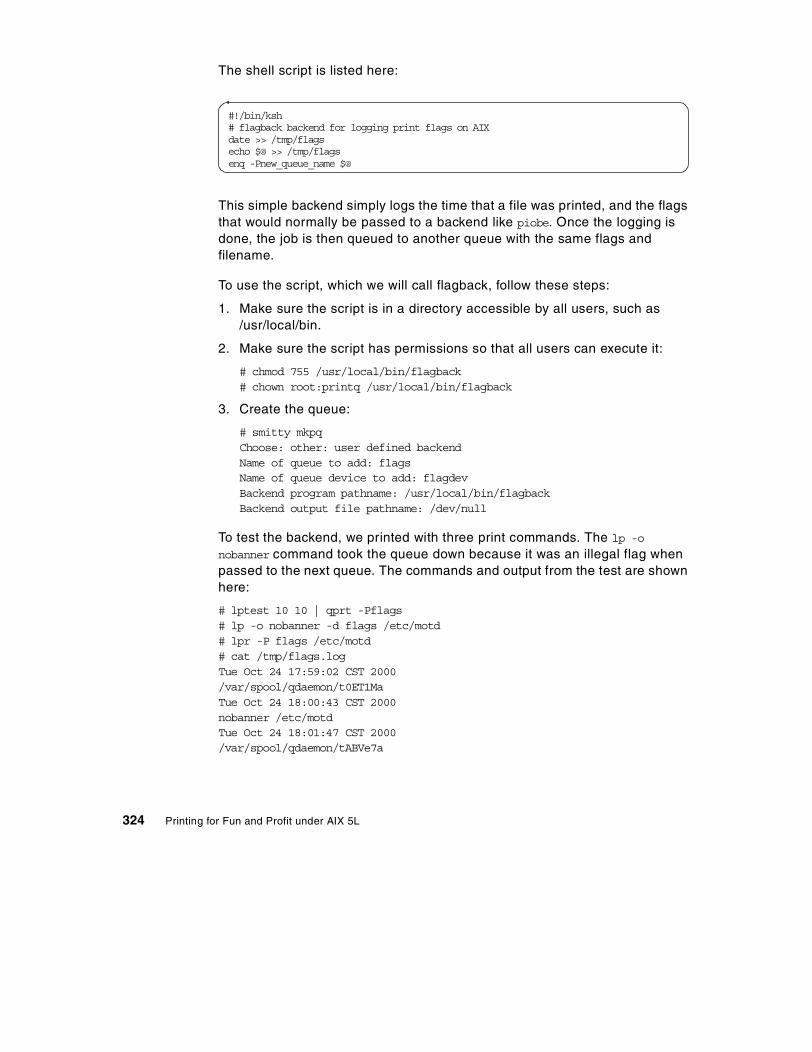
The shell script is listed here:
This simple backend simply logs the time that a file was printed, and the flags that would normally be passed to a backend like piobe. Once the logging is done, the job is then queued to another queue with the same flags and filename.
To use the script, which we will call flagback, follow these steps:
1. Make sure the script is in a directory accessible by all users, such as /usr/local/bin.
2. Make sure the script has permissions so that all users can execute it:
# chmod 755 /usr/local/bin/flagback# chown root:printq /usr/local/bin/flagback
3. Create the queue:
# smitty mkpqChoose: other: user defined backendName of queue to add: flagsName of queue device to add: flagdevBackend program pathname: /usr/local/bin/flagbackBackend output file pathname: /dev/null
To test the backend, we printed with three print commands. The lp -o nobanner command took the queue down because it was an illegal flag when passed to the next queue. The commands and output from the test are shown here:
# lptest 10 10 | qprt -Pflags# lp -o nobanner -d flags /etc/motd# lpr -P flags /etc/motd# cat /tmp/flags.logTue Oct 24 17:59:02 CST 2000/var/spool/qdaemon/t0ET1MaTue Oct 24 18:00:43 CST 2000nobanner /etc/motdTue Oct 24 18:01:47 CST 2000/var/spool/qdaemon/tABVe7a
#!/bin/ksh# flagback backend for logging print flags on AIXdate >> /tmp/flagsecho $@ >> /tmp/flagsenq -Pnew_queue_name $@
324 Printing for Fun and Profit under AIX 5L

The lpr command does not show the original file name because it spools the output to the queue by default.
7.1.4 Example: Backend script to strip print flagsSometimes you want to ignore all flags coming in and build your own print command with the flags that you want to use. In this case, you can simply extract the file names from the options passed and build the new command. This example will only work with one file at a time, because we are basing it on the attribute that gives only the last parameter passed to the backend, namely the \$$# ksh construct. Note this seems to work best in an eval statement, as shown below (The sleep gives a little time for the copy to complete):
7.1.5 Example: Backend script to intercept print flagsWhen trying to use some of the flags passed, the getopts command can be very useful. See a Korn shell programming book for more details, but this command basically uses a number of flag possibilities to determine which flags to look for. If the character is followed by a colon, then it is expected to have a parameter following the flag. Other advantages of this command are that the parameters can follow the flag directly, with a space, or with a tab. Once inside the getopts loop, you can handle each flag as you wish, by simply ignoring some, while changing others to valid commands. The first script below is a good test script to run from the command line. It expects a parameter for all the flags, except the -c flag.
#!/bin/ksh# I always like to add some logging in when I write these thingsdate >> /tmp/flagseval "qprt -dp -c -z+ -p14 -v8 -Ppcl04 \$$#"sleep 5
Chapter 7. PowerPC advanced printing 325

To turn this into a backend, remove the print statements and replace them with actions that are appropriate, like building a flag string. Then extract the file names and add a print statement. This illustrates how to capture the flags, but uses only the -X flags.
#/bin/ksh#while getopts :J:X:b:cf: argumentsdo case $arguments in X) print "You entered a -X option of $OPTARG";; :) print "Your forgot the -X argument";; J) print "You entered a -J option of $OPTARG";; b) print "You entered a -b option of $OPTARG";; c) print "You entered a -c option";; f) print "You entered a -f option of $OPTARG";; \?) print "You entered $OPTARG";; esacdone ((current_position = OPTIND -1)) shift $current_positionecho "Left at $1"echo "Number of arguments left is $#"
#/bin/ksh# This testpr.sh script is designed to print overlays# when initiated by HCON, but should also work for other# types of printing.#while getopts :J:L:X:Z:b:ci:j:l:p:s:t:u:v:w:x:y:z: argumentsdo case $arguments in## $OPTARG X) Xflags="-X $OPTARG" ;; J) Jflags="-J $OPTARG" ;; L) Lflags="-L $OPTARG" ;; Z) Zflags="-Z $OPTARG" ;; b) bflags="-b $OPTARG" ;;## add other flags here y) yflags="-y $OPTARG" ;; z) zflags="-z $OPTARG" ;; \?) ;; esacdone ((current_position = OPTIND -1)) shift $current_positiondate >> /tmp/flags.outecho "Number of files to print $#" >> /tmp/flags.outecho "Filenames were: $*" >> /tmp/flags.outqprt -Ppcl -Z! -p14 -f2 -dp -z+ -v8 $Xflags $*
326 Printing for Fun and Profit under AIX 5L

7.1.6 Example: Simple C backendsAlthough shell scripts are simple to use, and provide some quick debugging capability, they lack the ability to get information from the qdaemon, such as the username, title, queue name, job number and header page information. All this type of information is easily obtained using the libq routines. This is described in the “Printer Backend Overview for Programming” chapter in AIX V4 Printer Guide, SC23-2783, and will not be repeated here. A simple C backend example is available at:
http://service.boulder.ibm.com/rs6k/techdocs/91763041913324.html
7.2 Customizing printer attributes
Common printer setup functions, like input tray selection, beginning font, and page orientation, can be customized to set the default setting for a particular virtual printer by using SMIT or the lsvirprt command.
7.2.1 Setting attribute defaults with SMITMost common printer attributes can easily be changed using SMIT starting with the smitty chpq fastpath.
The SMIT characteristics to change/show screen gives four options:
1. Printer setup
2. Default print job attributes
3. Accounting file
4. Queuing disciple
The first two of these options can be used for changing virtual printer attributes and thus setting the defaults for the virtual printer.
Options in printer Setup usually allow you to set:
• AUTOMATIC detection of print file TYPE
• Default paper sizes for all the trays
• Paper trays for header and trailer pages (useful for colored paper)
• Extra flags for header and trailer pages
Options for default print job attributes let you set most attributes that can also be used as command line flags. When possible, the SMIT screen lets you use a pop-up menu to select from allowable choices. Other times the help text assists you on determining the valid information to enter.
Chapter 7. PowerPC advanced printing 327
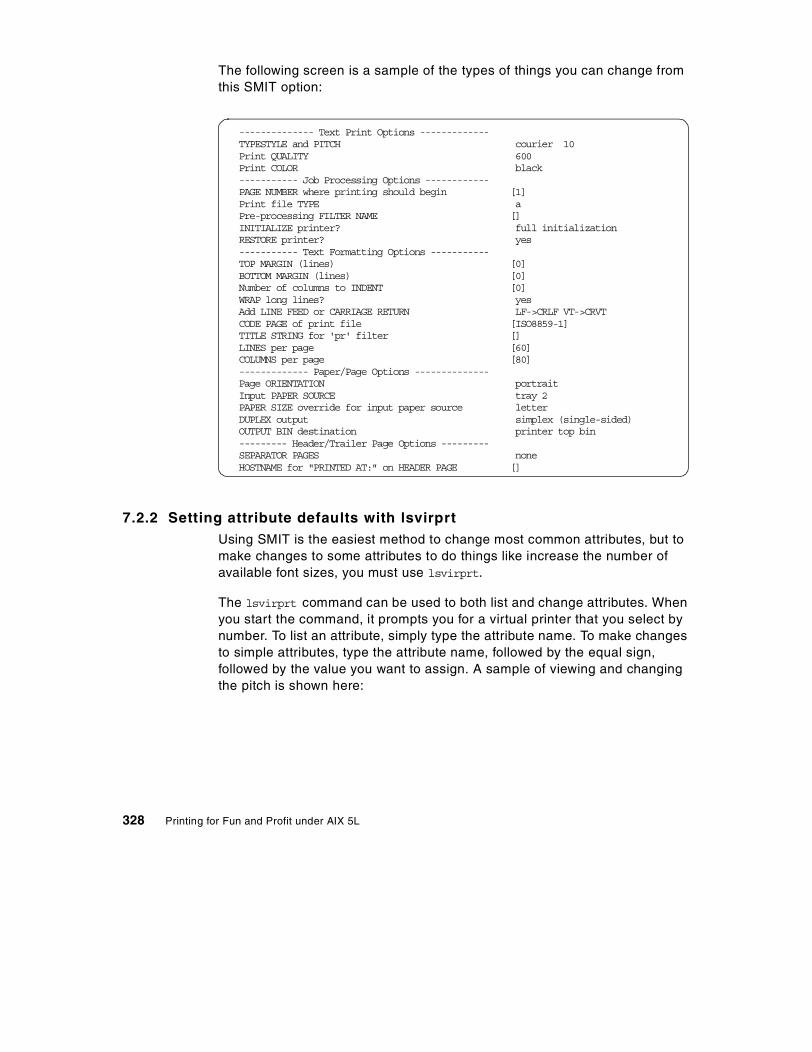
The following screen is a sample of the types of things you can change from this SMIT option:
7.2.2 Setting attribute defaults with lsvirprtUsing SMIT is the easiest method to change most common attributes, but to make changes to some attributes to do things like increase the number of available font sizes, you must use lsvirprt.
The lsvirprt command can be used to both list and change attributes. When you start the command, it prompts you for a virtual printer that you select by number. To list an attribute, simply type the attribute name. To make changes to simple attributes, type the attribute name, followed by the equal sign, followed by the value you want to assign. A sample of viewing and changing the pitch is shown here:
-------------- Text Print Options ------------- TYPESTYLE and PITCH courier 10 Print QUALITY 600 Print COLOR black ----------- Job Processing Options ------------ PAGE NUMBER where printing should begin [1] Print file TYPE a Pre-processing FILTER NAME [] INITIALIZE printer? full initialization RESTORE printer? yes ----------- Text Formatting Options ----------- TOP MARGIN (lines) [0] BOTTOM MARGIN (lines) [0] Number of columns to INDENT [0] WRAP long lines? yes Add LINE FEED or CARRIAGE RETURN LF->CRLF VT->CRVT CODE PAGE of print file [ISO8859-1] TITLE STRING for 'pr' filter [] LINES per page [60] COLUMNS per page [80] ------------- Paper/Page Options -------------- Page ORIENTATION portrait Input PAPER SOURCE tray 2 PAPER SIZE override for input paper source letterDUPLEX output simplex (single-sided)
OUTPUT BIN destination printer top bin --------- Header/Trailer Page Options --------- SEPARATOR PAGES none HOSTNAME for "PRINTED AT:" on HEADER PAGE []
328 Printing for Fun and Profit under AIX 5L
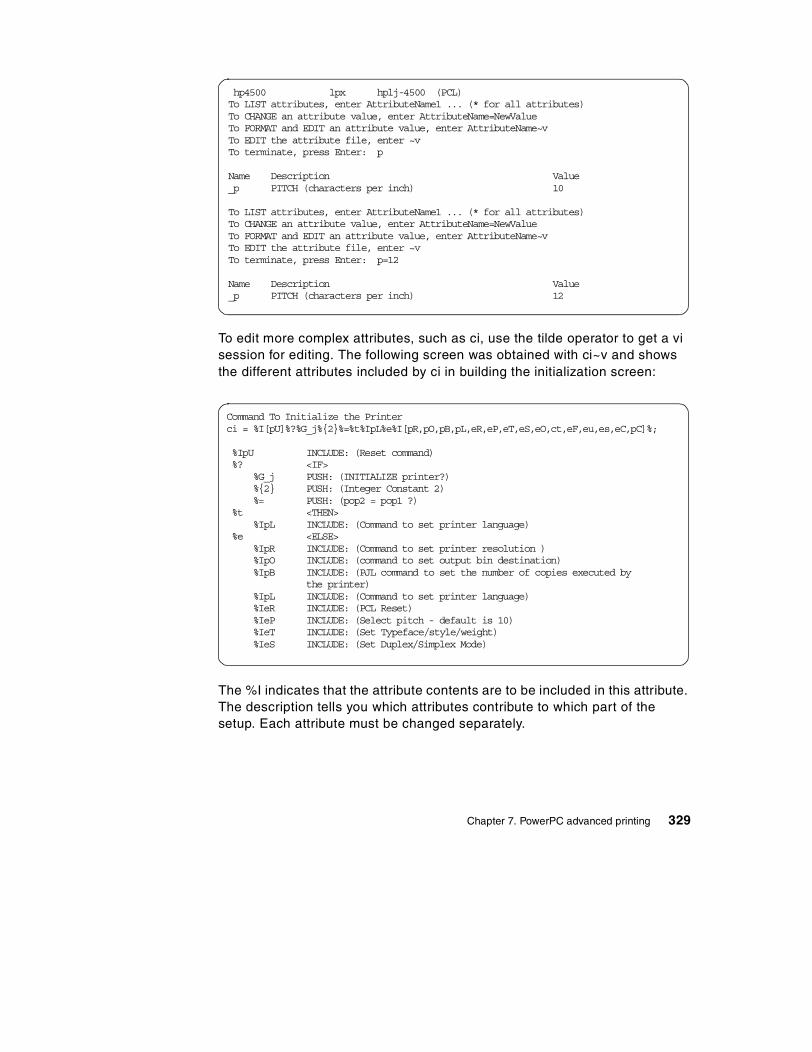
To edit more complex attributes, such as ci, use the tilde operator to get a vi session for editing. The following screen was obtained with ci~v and shows the different attributes included by ci in building the initialization screen:
The %I indicates that the attribute contents are to be included in this attribute. The description tells you which attributes contribute to which part of the setup. Each attribute must be changed separately.
hp4500 lpx hplj-4500 (PCL)To LIST attributes, enter AttributeName1 ... (* for all attributes)To CHANGE an attribute value, enter AttributeName=NewValueTo FORMAT and EDIT an attribute value, enter AttributeName~vTo EDIT the attribute file, enter ~vTo terminate, press Enter: p
Name Description Value_p PITCH (characters per inch) 10
To LIST attributes, enter AttributeName1 ... (* for all attributes)To CHANGE an attribute value, enter AttributeName=NewValueTo FORMAT and EDIT an attribute value, enter AttributeName~vTo EDIT the attribute file, enter ~vTo terminate, press Enter: p=12
Name Description Value_p PITCH (characters per inch) 12
Command To Initialize the Printerci = %I[pU]%?%G_j%{2}%=%t%IpL%e%I[pR,pO,pB,pL,eR,eP,eT,eS,eO,ct,eF,eu,es,eC,pC]%;
%IpU INCLUDE: (Reset command) %? <IF> %G_j PUSH: (INITIALIZE printer?) %{2} PUSH: (Integer Constant 2) %= PUSH: (pop2 = pop1 ?) %t <THEN> %IpL INCLUDE: (Command to set printer language) %e <ELSE> %IpR INCLUDE: (Command to set printer resolution ) %IpO INCLUDE: (command to set output bin destination) %IpB INCLUDE: (PJL command to set the number of copies executed by the printer) %IpL INCLUDE: (Command to set printer language) %IeR INCLUDE: (PCL Reset) %IeP INCLUDE: (Select pitch - default is 10) %IeT INCLUDE: (Set Typeface/style/weight) %IeS INCLUDE: (Set Duplex/Simplex Mode)
Chapter 7. PowerPC advanced printing 329
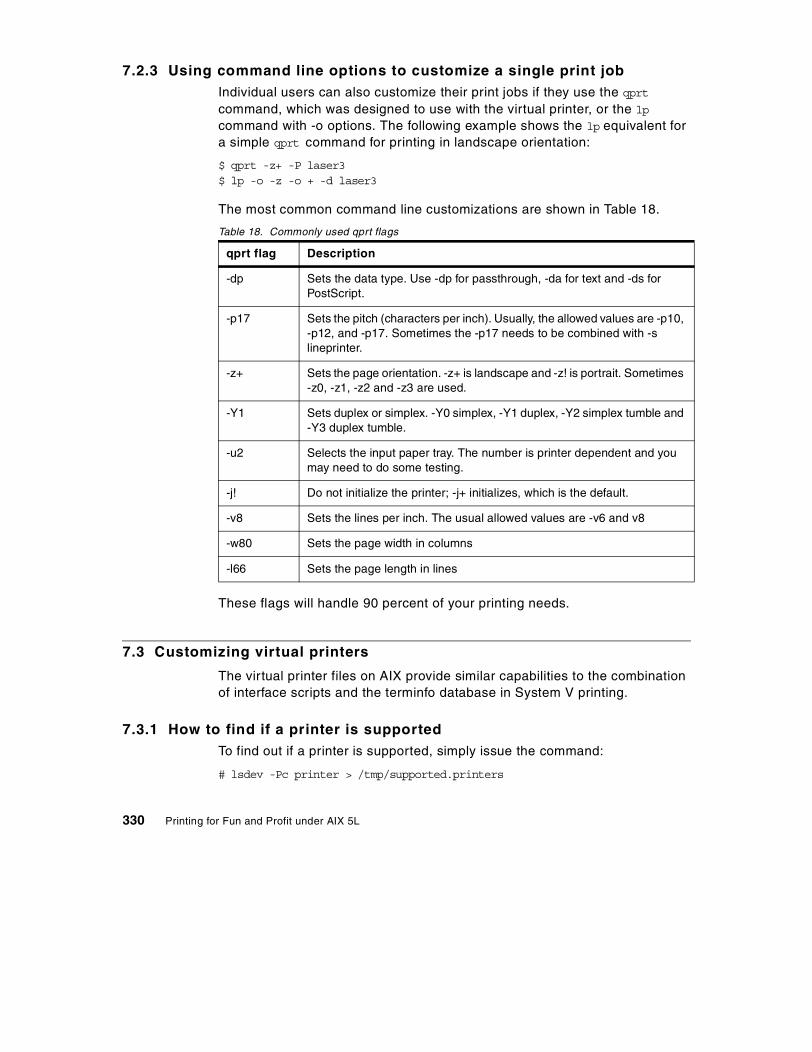
7.2.3 Using command line options to customize a single print jobIndividual users can also customize their print jobs if they use the qprt command, which was designed to use with the virtual printer, or the lp command with -o options. The following example shows the lp equivalent for a simple qprt command for printing in landscape orientation:
$ qprt -z+ -P laser3$ lp -o -z -o + -d laser3
The most common command line customizations are shown in Table 18.
Table 18. Commonly used qprt flags
These flags will handle 90 percent of your printing needs.
7.3 Customizing virtual printers
The virtual printer files on AIX provide similar capabilities to the combination of interface scripts and the terminfo database in System V printing.
7.3.1 How to find if a printer is supportedTo find out if a printer is supported, simply issue the command:
# lsdev -Pc printer > /tmp/supported.printers
qprt flag Description
-dp Sets the data type. Use -dp for passthrough, -da for text and -ds for PostScript.
-p17 Sets the pitch (characters per inch). Usually, the allowed values are -p10, -p12, and -p17. Sometimes the -p17 needs to be combined with -s lineprinter.
-z+ Sets the page orientation. -z+ is landscape and -z! is portrait. Sometimes -z0, -z1, -z2 and -z3 are used.
-Y1 Sets duplex or simplex. -Y0 simplex, -Y1 duplex, -Y2 simplex tumble and -Y3 duplex tumble.
-u2 Selects the input paper tray. The number is printer dependent and you may need to do some testing.
-j! Do not initialize the printer; -j+ initializes, which is the default.
-v8 Sets the lines per inch. The usual allowed values are -v6 and v8
-w80 Sets the page width in columns
-l66 Sets the page length in lines
330 Printing for Fun and Profit under AIX 5L

Most printers will not be installed by default, but can be installed from the AIX 5L install media from the printers.
7.3.2 Understanding the colon file syntaxThe colon file syntax is completely defined in the “Printer Colon File Conventions” chapter of AIX 4.3 Guide to Printers and Printing, SC23-4130, which is available on the Web at:
http://www.rs6000.ibm.com/doc_link/en_US/a_doc_lib/aixbman/printrgd/prt_colon_file_conv.htm#A354P93d
Each line in the colon file consists of five fields, each separated by colons (hence the name colon file). The five fields are:
1. Message catalog ID
Identifies the message catalog where the attribute description is stored. The message catalog ID can take any of three forms:
- Null string: The string value for the mD attribute is assumed to be the file name of the message catalog (for example, mydescriptors.cat).
- One character: An abbreviation for pioattrx.cat, where x is the one-character catalog ID. This form of the catalog ID is normally used only by the operating system.
- Catalog file name: The file name of the message catalog (for example, mydescriptors.cat).
2. Message number
Identifies the message index in the catalog that contains the description of this attribute. Leading zeros are ignored.
3. Attribute name
Specifies two characters, except for group header attributes, which are five characters.
4. Limits field
Specifies limits for the attributes that are used in validating administrator entries when setting the virtual printer defaults as well as user entries when printing with the qprt flags.
5. Attribute value string
The value assigned to the virtual printer attribute, which can be from 0 to 1000 characters.
The following is a sample entry for the width attribute:
Chapter 7. PowerPC advanced printing 331
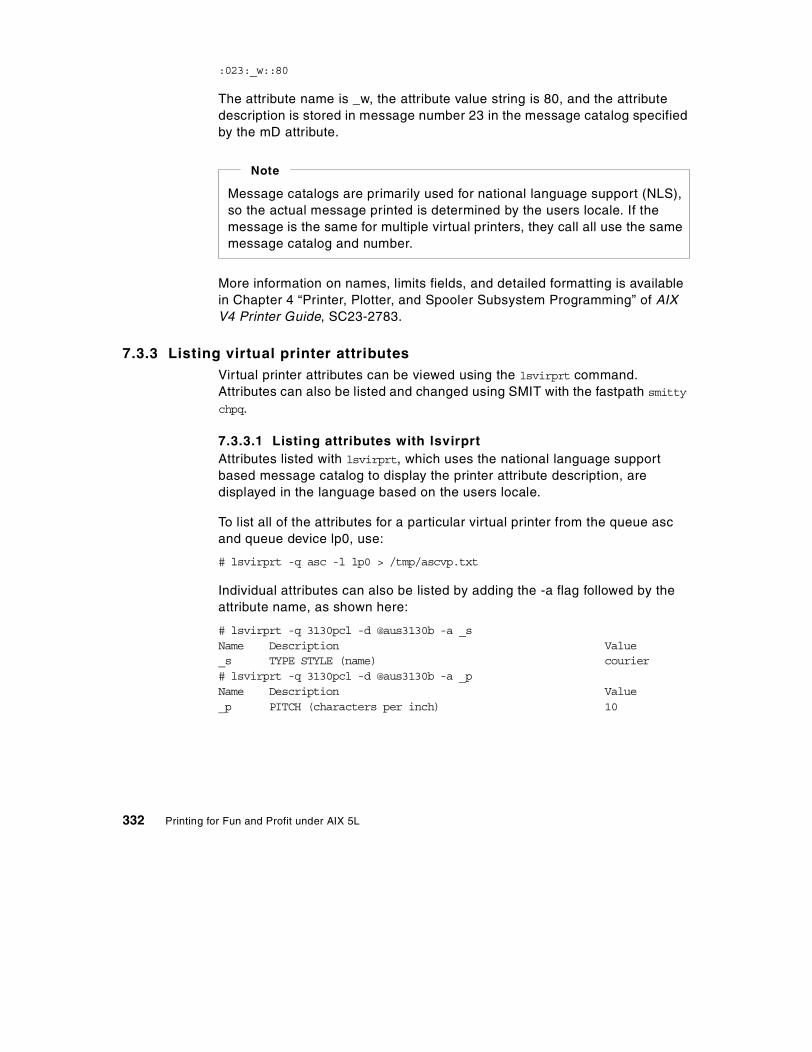
:023:_w::80
The attribute name is _w, the attribute value string is 80, and the attribute description is stored in message number 23 in the message catalog specified by the mD attribute.
More information on names, limits fields, and detailed formatting is available in Chapter 4 “Printer, Plotter, and Spooler Subsystem Programming” of AIX V4 Printer Guide, SC23-2783.
7.3.3 Listing virtual printer attributesVirtual printer attributes can be viewed using the lsvirprt command. Attributes can also be listed and changed using SMIT with the fastpath smitty chpq.
7.3.3.1 Listing attributes with lsvirprtAttributes listed with lsvirprt, which uses the national language support based message catalog to display the printer attribute description, are displayed in the language based on the users locale.
To list all of the attributes for a particular virtual printer from the queue asc and queue device lp0, use:
# lsvirprt -q asc -l lp0 > /tmp/ascvp.txt
Individual attributes can also be listed by adding the -a flag followed by the attribute name, as shown here:
# lsvirprt -q 3130pcl -d @aus3130b -a _sName Description Value_s TYPE STYLE (name) courier# lsvirprt -q 3130pcl -d @aus3130b -a _pName Description Value_p PITCH (characters per inch) 10
Message catalogs are primarily used for national language support (NLS), so the actual message printed is determined by the users locale. If the message is the same for multiple virtual printers, they call all use the same message catalog and number.
Note
332 Printing for Fun and Profit under AIX 5L

7.3.3.2 Listing and changing attributes with SMITTo list or change virtual printer default attributes for a printer, use the SMIT fastpath smitty chpq, choose the virtual printer name, and select the category of attributes. To list or change attributes, follow these steps:
1. Start SMIT with fastpath:
# smitty chpq
2. Enter the PRINT QUEUE name.
3. Select the type of attributes to change from four choices (option 2 is most often chosen):
a. Printer Setup
b. Default Print Job Attributes
c. Accounting File
d. Queuing Discipline
4. Scroll down to see all the attributes.
5. Press the F4 key to see the valid entries that have been defined by the limits field. Select the desired value and press Enter to make changes:
. Change / Show Default Print Job Attributes
Type or select values in entry fields.Press Enter AFTER making all desired changes.
[TOP] [Entry Fields] Print queue name 3130pcl Printer name @aus3130b
-------------- Text Print Options ------------- TYPESTYLE and PITCH courier 10 +
----------- Job Processing Options ------------ PAGE NUMBER where printing should begin [1] +# Print file TYPE a + Pre-processing FILTER NAME [] + INITIALIZE printer? full initialization + RESTORE printer? yes +
----------- Text Formatting Options -----------[MORE...24]
F1=Help F2=Refresh F3=Cancel F4=ListF5=Reset F6=Command F7=Edit F8=ImageF9=Shell F10=Exit Enter=Do
Chapter 7. PowerPC advanced printing 333
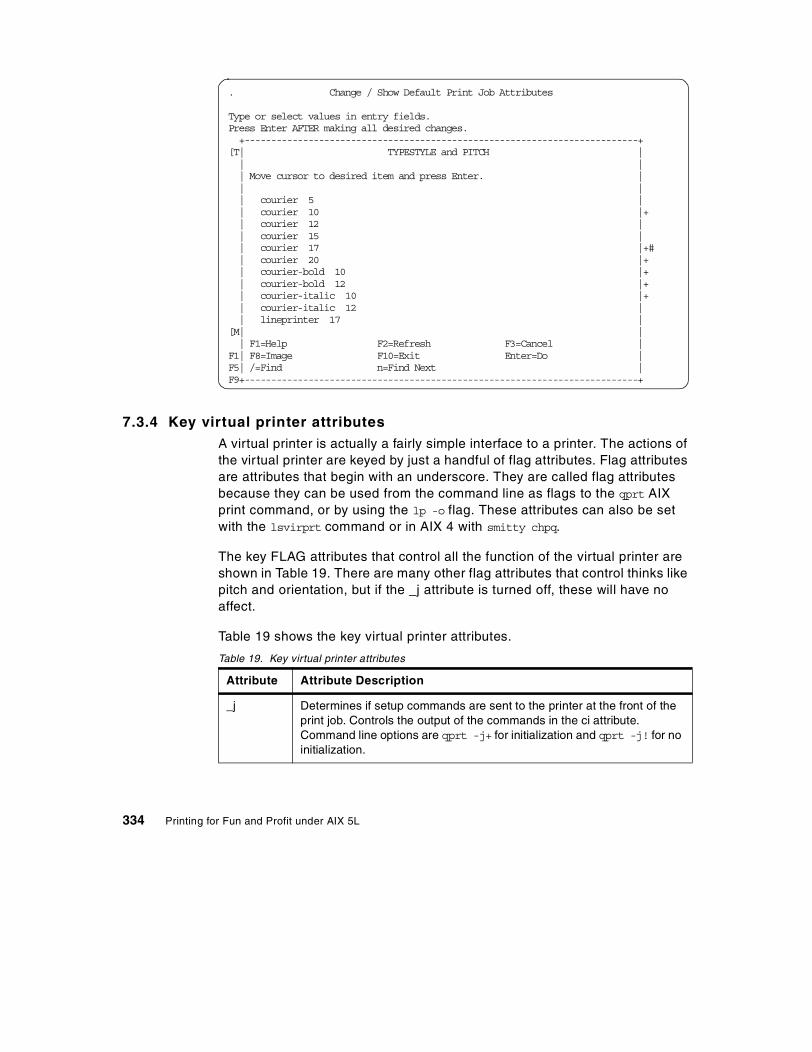
7.3.4 Key virtual printer attributesA virtual printer is actually a fairly simple interface to a printer. The actions of the virtual printer are keyed by just a handful of flag attributes. Flag attributes are attributes that begin with an underscore. They are called flag attributes because they can be used from the command line as flags to the qprt AIX print command, or by using the lp -o flag. These attributes can also be set with the lsvirprt command or in AIX 4 with smitty chpq.
The key FLAG attributes that control all the function of the virtual printer are shown in Table 19. There are many other flag attributes that control thinks like pitch and orientation, but if the _j attribute is turned off, these will have no affect.
Table 19 shows the key virtual printer attributes.
Table 19. Key virtual printer attributes
Attribute Attribute Description
_j Determines if setup commands are sent to the printer at the front of the print job. Controls the output of the commands in the ci attribute. Command line options are qprt -j+ for initialization and qprt -j! for no initialization.
. Change / Show Default Print Job Attributes
Type or select values in entry fields.Press Enter AFTER making all desired changes. +--------------------------------------------------------------------------+[T| TYPESTYLE and PITCH | | | | Move cursor to desired item and press Enter. | | | | courier 5 | | courier 10 |+ | courier 12 | | courier 15 | | courier 17 |+# | courier 20 |+ | courier-bold 10 |+ | courier-bold 12 |+ | courier-italic 10 |+ | courier-italic 12 | | lineprinter 17 |[M| | | F1=Help F2=Refresh F3=Cancel |F1| F8=Image F10=Exit Enter=Do |F5| /=Find n=Find Next |F9+--------------------------------------------------------------------------+
334 Printing for Fun and Profit under AIX 5L

7.3.5 Adding a new printer type to the predefined databaseThe easiest way to add a new printer type is to find an existing virtual printer that is close to the one you are going to create, creating a queue with that virtual printer, making the modifications to that virtual printer, and then using the piopredef command to create the new predef file. Once that is done, only minor changes are needed with vi to set the new printer name.
_f Determines the filter, if any should be run, to preprocess the print file before sending to the formatter. Takes a one character argument like _f=1. This filter program would be specified in qprt -f1 flag. The actual program is designated by the fc attribute for filter c, by f1 for user filter 1.
_d Determines type of data formatting, if any should take place. Takes a one character argument, such as _d=a. The formatter to use would then be in attribute ia. The qprt options are usually qprt -da for ASCII, -dp for passthrough, and -ds for PostScript.
_X Determines codepage of Input data. Determines if box characters, symbols, Euro character, and so on, will be printed. The default is ISO8859-1. For box character support, use qprt -X IBM850.
_J Determines if printer is reset to specified settings at the end of the job. Controls the output of the commands in the cr attribute. Command line options are qprt -J+ for reset and -J! for no reset.
sh Non-flag determines header page programs and templates. Controlled by header = value in /etc/qconfig or the -Ban enq or qprt flag. (-h turns off for lpr). This attribute contains the full path name of the program that generates header pages. Setting the attribute to NULL removes any chance of headers.
_Z Determines if form feed sent at end of job. The command line options are qprt -Z+ to send the form feed, and -Z! to not add another form feed, if one already exists at the end of the file.
ci The ci attribute contains the commands used to initialize the printer when _j=+. This attribute generally includes other attributes which are used for individual setup functions, such as eR for PCL reset, eP for pitch, eu for input tray, and es for page size. Each of these attributes contains stack code to generate the command sequence to be sent to the printer. This is similar to the use of terminfo file attributes with System V interface programs.
Attribute Attribute Description
Chapter 7. PowerPC advanced printing 335

7.3.6 Creating a new predefined printer with minor changesIn this example, the new printer that we are going to add is simply going to be a printer that has different default settings for the page orientation and fonts. The steps for this example are:
1. Create a dummy print file in /dev:
# touch /dev/lpx# chown root:printq /dev/lpx# chmod 755 > /dev/lpx
2. Create a virtual printer using the smitty mkpq fastpath.
3. Choose the File in the /dev/directory.
4. For the example, choose the Lexmark and lexOptraE.
5. Select the lpx file for the device name:
Name of existing file in the /dev directory? lpx
6. Enter a queue name, such as newlex:
Name of NEW print queues to addenhanced PCL (R) 5 emulation newlex
7. Press Enter to add the printer, and F10 to exit SMIT
8. Modify the virtual printer starting with smitty chpq.
9. Enter newlex for the printer name and press Enter.
10. Select two Default Print Job Attributes.
11. Change Pitch characters per inch to 17.
12. Change Page ORIENTATION to landscape.
13. Press Enter to save the changes and F10 to exit SMIT.
14. Create a new predef file with piopredef.
# piopredef -q newlex -d lpx -s pcl -t lexOptraEl
15. Change to the predef directory:
# cd /usr/lib/lpd/pio/predef
16. Edit the file lexOptraEl.pcl that was created with piopredef.
17. Change the mL attribute to read:
:331:mL:Lexmark Optra E landscape laser printer
18. Add a new printer and you will find the new printer in the list.
336 Printing for Fun and Profit under AIX 5L

When you print, you will find that it prints in landscape with a pitch of 17.
7.3.7 Adding more font sizes to an HP LaserJet virtual printerBy default, all HP laserjet virtual printers have only the font sizes courier 10, 12, and 17, courier bold 10 and 12, courier italic 10 and 12, and lineprinter 17 available. The printers will actually support a larger range of values, but these give convenient page widths and lengths. In this example, the courier 15 font will be added to the virtual printer. For this virtual printer, the font sizes and styles are controlled by the mU attribute.
The following procedure can be used to add a courier 15 font to the available options for the HP Laserjet 4500 printer:
1. Add a virtual printer named hp4500 using the HP Laserjet 4500 printer. (Procedures for adding a virtual printer are described in Chapter 5, “PowerPC print subsystem basics” on page 197.)
2. Use lsvirprt to make modifications:
# lsvirprt
3. Enter the number in front of the hp4500 virtual printer.
4. Enter mU~v to use a vi type editor to edit the mU attribute. This will display a screen that shows the stack language for this attribute:
+--------------------------------------------------------------------------+ | Printer Type | | | | Move cursor to desired item and press Enter. | | | | [MORE...12] | | lexOptraC1200 Lexmark Optra Color 1200 printer | | lexOptraC40 Lexmark Optra Color 40 printer | | lexOptraC45 Lexmark Optra Color 45 printer | | lexOptraE Lexmark Optra E laser printer | | lexOptraE310 Lexmark Optra E310 Laser Printer | | lexOptraEl Lexmark Optra E landscape laser printer | | lexOptraEp Lexmark Optra Ep laser printer | | lexOptraK12 Lexmark Optra K 1220 laser printer | | lexOptraM410 Lexmark Optra M410 Laser Printer | | lexOptraN Lexmark Optra N laser printer | | [MORE...5] | | | | F1=Help F2=Refresh F3=Cancel | | F8=Image F10=Exit Enter=Do | | /=Find n=Find Next | +--------------------------------------------------------------------------+
Chapter 7. PowerPC advanced printing 337
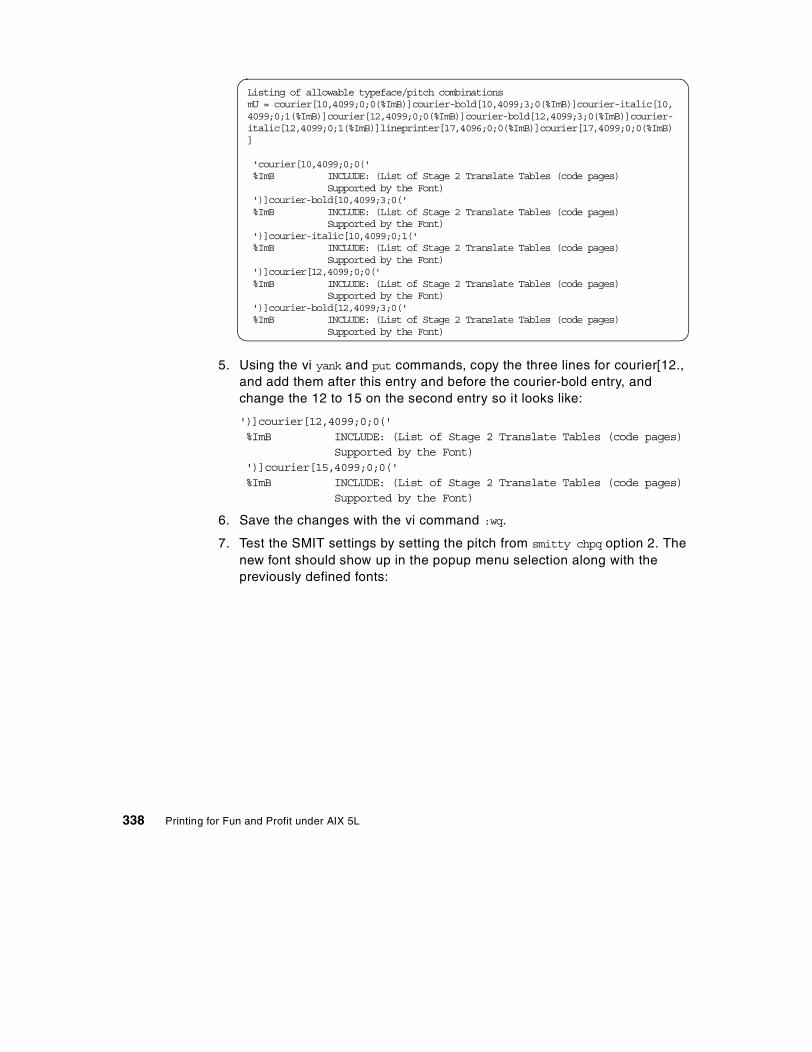
5. Using the vi yank and put commands, copy the three lines for courier[12., and add them after this entry and before the courier-bold entry, and change the 12 to 15 on the second entry so it looks like:
')]courier[12,4099;0;0(' %ImB INCLUDE: (List of Stage 2 Translate Tables (code pages) Supported by the Font) ')]courier[15,4099;0;0(' %ImB INCLUDE: (List of Stage 2 Translate Tables (code pages) Supported by the Font)
6. Save the changes with the vi command :wq.
7. Test the SMIT settings by setting the pitch from smitty chpq option 2. The new font should show up in the popup menu selection along with the previously defined fonts:
Listing of allowable typeface/pitch combinationsmU = courier[10,4099;0;0(%ImB)]courier-bold[10,4099;3;0(%ImB)]courier-italic[10,4099;0;1(%ImB)]courier[12,4099;0;0(%ImB)]courier-bold[12,4099;3;0(%ImB)]courier-italic[12,4099;0;1(%ImB)]lineprinter[17,4096;0;0(%ImB)]courier[17,4099;0;0(%ImB)]
'courier[10,4099;0;0(' %ImB INCLUDE: (List of Stage 2 Translate Tables (code pages) Supported by the Font) ')]courier-bold[10,4099;3;0(' %ImB INCLUDE: (List of Stage 2 Translate Tables (code pages) Supported by the Font) ')]courier-italic[10,4099;0;1(' %ImB INCLUDE: (List of Stage 2 Translate Tables (code pages) Supported by the Font) ')]courier[12,4099;0;0(' %ImB INCLUDE: (List of Stage 2 Translate Tables (code pages) Supported by the Font) ')]courier-bold[12,4099;3;0(' %ImB INCLUDE: (List of Stage 2 Translate Tables (code pages) Supported by the Font)
338 Printing for Fun and Profit under AIX 5L

8. Test by printing with the qprt -p 15 flag.
# lptest 60 10 | qprt -p 15 -P hp4500
You could make this the default setting for the printer by using the piopredef command, as shown in the previous example.
The other option for using multiple font sizes is to use the LexMark Optra virtual printers as an example for making modification. These virtual printers allow a much wider range of font sizes and styles.
7.3.8 Adding a printer with ledger size paperMany times the only change to one virtual printer to support a new printer type is the ability to specify a new paper type, such as ledger. Making changes to support a new paper type require an in depth knowledge of the virtual printer syntax, which attributes are used, and the exact size in pels of each page size. For this reason, we would recommend that you start with a printer such as the HP Laserjet 8100, and make changes to other attributes, such as the input and output trays. To find which printers support ledger paper, change to directory /usr/lib/lpd/pio/predef, and use the grep command for ledger.
7.3.8.1 Complex solution to ledger paper sizeTo make a general purpose virtual printer which can print to ledger pager and other sizes, you will have to change many attributes. Table 20 on page 340
. +--------------------------------------------------------------------------+ | TYPESTYLE and PITCH | | | | Move cursor to desired item and press Enter. | | |+ | courier 10 |+ | courier 12 |+ | courier 15 | | courier 17 | | courier-bold 10 |+#| courier-bold 12 |+
| courier-italic 10 |+ | courier-italic 12 |+ | lineprinter 17 |+[M| | | F1=Help F2=Refresh F3=Cancel |F1| F8=Image F10=Exit Enter=Do |F5| /=Find n=Find Next |F9+--------------------------------------------------------------------------+
Chapter 7. PowerPC advanced printing 339

shows the attributes that are used in properly formatting the correct paper size.
Table 20. Paper size virtual printer attributes
To make these changes to the hplj-4v.pcl file, follow these steps:
1. Change to the predef directory:
# cd /usr/lib/lpd/pio/predef
2. Back up the original file:
# mkdir /usr/local/predef# cp hplj-4v.pcl /usr/local/predef
3. Edit the hplj-4v.pcl file and replace the attribute lines with those shown here:
:837:s3:S[120]I[1810522]En%IWE:8:835:s4:S[108]I[1810522]En%IWE:8:836:s5:S[117]I[1810522]En%IWE:8:763:WE::R[10,DL=8,9]:762:WP::R[letter,legal,ledger,A3,A4,B4,B5=1,2,3,4,5,6,7]:1:461:wJ::%G_Q%Pq%?%GWu%{5}%=%t%?%Gs5%{8}%=%t%{1157}%e%{1087}%;%e%?%gq%{1}%=%t%{2400}%e%gq%{2}%=%t%{2400}%e%gq%{3}%=%t%{3150}%e%gq%{4}%=%t%{2338}%e%gq%{5}%=%t%{3365}%e%gq%{6}%=%t%{2893}%e%{2008}%;%;%d
Attribute Description
es Generates the paper size command sent to the printer by ci (command to initialize printer).
WE Ring list used by SMIT limits field for table of envelope sizes allowed.
WP Ring List used by SMIT limits field for table of paper sizes allowed.
wJ Paper size dimensions (pels) used by text formatter to determine number of characters for page width in portrait orientation.
wK Paper size dimensions (pels) used by text formatter to determine number of characters for page length in portrait orientation.
wM Paper size dimensions (pels) used by text formatter to determine number of characters for page width in landscape orientation.
wR Paper size dimensions (pels) used by text formatter to determine number of characters for page length in landscape orientation.
s3,s4, s5 Default paper size values for the envelope trays.
s1, s2, s7 Default paper size for the standard trays.
340 Printing for Fun and Profit under AIX 5L

:462:wK::%G_Q%Pq%?%GWu%{5}%=%t%?%Gs5%{8}%=%t%{2562}%e%{2300}%;%e%?%gq%{1}%=%t%{3000}%e%gq%{2}%=%t%{3900}%e%gq%{3}%=%t%{4800}%e%gq%{4}%=%t%{3207}%e%gq%{5}%=%t%{4660}%e%gq%{6}%=%t%{3999}%e%{2735}%;%;%d:463:wM::%G_Q%Pq%?%GWu%{5}%=%t%?%Gs5%{8}%=%t%{2730}%e%{2480}%;%e%?%gq%{1}%=%t%{3180}%e%gq%{2}%=%t%{4080}%e%gq%{3}%=%t%{4980}%e%gq%{4}%=%t%{3389}%e%gq%{5}%=%t%{4842}%e%gq%{6}%=%t%{4181}%e%{2917}%;%;%d:464:wR::%G_Q%Pq%?%GWu%{5}%=%t%?%Gs5%{8}%=%t%{1007}%e%{937}%;%e%?%gq%{1}%=%t%{2250}%e%gq%{2}%=%t%{2250}%e%gq%{3}%=%t%{3000}%e%gq%{4}%=%t%{2180}%e%gq%{5}%=%t%{3270}%e%gq%{6}%=%t%{2735}%e%{1850}%;%;%d:482:es::\33&l%G_Q%Pq%?%G_u%{5}%=%t%?%gq%{9}%=%t90%e81%;%e%?%gq%{1}%=%t2%e%gq%{2}%=%t3%e%gq%{3}%=%t16%e%gq%{4}%=%t26%e%gq%{5}%=%t27%e%gq%{6}%=%t46%e%gq%{7}%=%t45%e2%;%;A
Once this is done, the ledger option will show in the SMIT attributes, and can be used from the qprt -Q 3 option.
7.3.8.2 Simple solution to ledger paper sizeThe above solution gives total flexibility to the virtual printer. However, the PowerPC print subsystem will let you create multiple queues for the same printer. So if you are willing to live with a simple ledger-only virtual print queue and select ledger paper by printing to that queue, then you could modify the hplj-v.pcl queue in a simpler manner.
In this solution, you must first agree on some standard options and hardcode the virtual printer to use them. You will place the virtual printer in passthrough mode, so the formatter does not have to determine the line length, and therefore we will use a command to tell the printer to add carriage returns to line feeds.
First, agree on the following settings:
• 17 cpi
• Courier
• 8 lpi
• Optional Paper Tray
• Page size of 11 x 17
• Simplex
• Portrait
An entry in the colon file must be on a single line, even though they are shown wrapped in the above example text.
Note
Chapter 7. PowerPC advanced printing 341

To customize this virtual printer, follow these steps:
1. Use smitty mkpq to make a new queue for this printer based on the Hewlett-Packard LaserJet 4.
2. Create a PCL queue and name it ledger (Note that the name you use is optional).
3. Type lsvirprt to modify the virtual printer.
4. Choose ledger (or the name you named this queue).
5. The screen will show:
ledger jwt hplj-4 (PCL)
To LIST attributes, enter AttributeName1 ... (* for all attributes) To CHANGE an attribute value, enter AttributeName=NewValue To FORMAT and EDIT an attribute value, enter AttributeName~v To EDIT the attribute file, enter ~v To terminate, press Enter:
6. Set the line termination mode to have the LaserJet add carriage returns:
- Type ct=\33&k2G .
- This is the PCL printer command to tell the printer to add CR to LF.
7. Set the page size to ledger:
- Type es=\33&l6A.
- This is the PCL command for ledger paper size.
8. Set the paper tray to the new tray. Here you may have to play around because HP has changed these a number of times for different printer models. Here are some options for the HP Laserjet 4V:
- Type et=\33&l5H: Optional 500/2000 Sheet, Lower Cassette
- Type et=\33&l1H: Tray 2
- Type et=\33&l4H: Multipurpose Tray - Tray 3
- Type et=\33&l8H: Tray 1
9. Turn off formatting in AIX so it does not add line feeds and carriage returns, or form feeds to shorten the job.
- Type d=p: Puts virtual printer in passthrough mode.
10. Set the pitch to 17.
- Type p=17.
342 Printing for Fun and Profit under AIX 5L

11. Set the spacing to 8 lines per inch.
- Type: v=8.
12. Press Enter to exit lsvirprt and save settings.
Once this is done, you can test the virtual printer, and if it works, use the piopredef command to create a custom ledger predef file.
7.3.9 Adding special tab supportBy default, the ASCII based virtual printer formatting program replaces each tab with eight spaces. The actual tab replacement algorithm is controlled by the wh attribute. To make changes to the wh attribute, use the lsvirprt command and type wh~v:
lsvirprt choose the appropriate queue. When prompted by: To LIST attributes, enter AttributeName1 ... To CHANGE an attribute value, enter AttributeName=NewValue To FORMAT and EDIT an attribute value, enter AttributeName~v To EDIT the attribute file, enter ~v To terminate, press Enter: wh~v
This gives a vi editor session to modify the wh attribute, as shown here:
The constant 9 is the variable for the first tab column, the constant 8 is the distance between tabs. The constant 28 is the number of tabs that get sent.
Current Horizontal Tab Settings (terminated by null) wh = %{9}%Px%{28}%Py%?%gy%t%wy%gx%c%gx%{8}%+%Px%;%;\0
%{9} PUSH: (Integer Constant 9) %Px POP -> Internal Variable x %{28} PUSH: (Integer Constant 28) %Py POP -> Internal Variable y %? <IF> %gy PUSH: (Internal Variable y) %t <THE> %wy <WHILE> Loop (Counter is in Internal Variable %c) %gx PUSH: (Internal Variable x) %c POP -> Low-Order Byte -> OUTPUT %gx PUSH: (Internal Variable x) %{8} PUSH: (Integer Constant 8) %+ PUSH: (pop2 + pop1) %Px POP -> Internal Variable x %; <END> %; <END> '\0'
Chapter 7. PowerPC advanced printing 343

To have the first tab at column 50 with tabs 10 apart, change this to:
Another method for changing tabs is to use the expand filter as one of the user filters. This solution solves the problem when using a postscript queue for ASCII text. To to add a user filter that calls the expand utility before passing the file to enscript use these steps:
# chvirprt -q ps -d lp0 -a "f2=/usr/bin/expand -3"# chvirprt -q ps -d lp0 -a "f=2"# chvirprt -q ps -d lp0 -a "d=a"
ASCII files printed to this queue will have each tab replaced by three spaces.
7.4 Adding form support to PowerPC printing
The support for forms that are loaded in a printer are not supported by standard PowerPC queues and virtual printers. This section describes how they can be implemented with custom scripts using the native capabilities of the print subsystem. It also will help you understand that if you need this capability that you probably want to move to the System V print subsystem.
7.4.1 What needs to be added for supporting forms?The commands that need to be added to provide this support are ones that emulate the lpforms and lpadmin commands that the register forms, and mount and unmount them. One method of doing this is to use multiple PowerPC queues for each printer, with special names associated for each form. Scripts for mounting a form would disable all names associated with other forms, and mount the queue associated with a particular form. Users would print with an alias script that would actually build the queue name
%{50} PUSH: (Integer Constant 9) <--- 1st column %Px POP -> Internal Variable x %{28} PUSH: (Integer Constant 28) %Py POP -> Internal Variable y %? <IF> %gy PUSH: (Internal Variable y) %t <THEN> %wy <WHILE> Loop (Counter is in Internal Variable %c) %gx PUSH: (Internal Variable x) %c POP -> Low-Order Byte -> OUTPUT <---- Gets send to the formatter. %gx PUSH: (Internal Variable x) %{10} PUSH: (Integer Constant 8) <---- between columns %+ PUSH: (pop2 + pop1) %Px POP -> Internal Variable x <---- Build the next column %; <END> %; <END> '\0'
344 Printing for Fun and Profit under AIX 5L

based on the user specified printer and form names. The alias script would also check against a user database to see if the user is authorized to print to the form. There would also need to be an alias of the lpstat command for returning the printer information in a user friendly manner based on the form. Scripts are needed to create the queues when a form is added so that printer administration will be similar to System V.
7.4.2 Adding a formForms could be added as separate queue devices, or they could be added as separate queues in the PowerPC print subsystem with names that reflect the queue name.
For example, the queue name for the printer without a form will be tst, with the form check the queue name will be tst-check, with the form order, the queue name will be tst-order. The tst queue will be made as a normal virtual printer with smitty mkpq. If this is a local queue to /dev/lp03, then the other virtual printers will be made as type file instead of local to point to the same printer. Once the queues are added, disable the tst-check and tst-order queues. A normal enq will show the three queues like this:
$ enq -isWA | grep tsttst lpx READYtst-check lpx DOWNtst-order lpx DOWN
The -i and -s flags for enq give me only the local jobs on the queue, and the -W flag give me the entire long name of the queue. This will be useful in creating the commands to list the forms and the custom lp command to check that the form exists when printing.
The lpforms command can be used to build the form just like in System V printing. The custom command will need to be able to read the file interpret it. For example, the form paycheck description would be stored in /etc/lp/forms/paycheck/describe.
7.4.3 Modifying a formThe general modification of the form would be to set the pitch, page orientation and the like. The administrator can do this with the normal smitty chpq or lsvirprt commands, or use lpforms to change the form definitions.
Chapter 7. PowerPC advanced printing 345

7.4.4 Removing a formRemoving the form would require that the queue be removed, and that the form definition file also be removed. This could be done using lpforms -f form-name -x.
7.4.5 Displaying a form descriptionThe administrator can lists the forms with lpforms the same as System V, but the user would need a custom version of lpstat to give the same output.
7.4.6 Access lists for formsYou can specify allow or deny users access to forms using the lpforms command. This example allows only users matt, heidi, and michele to print to the form.
# lpforms -f paycheck -u allow:matt,heidi,michele
This information is stored in /etc/lp/forms/paycheck/allow.
7.4.7 Alerting the operator to mount a formThe alert could be done through the custom lp command, which could either send a screen message to the administrators console, or e-mail to the administrator. The message to the screen could be repeated by a loop in a shell script. The administrators console tty or pty number could be stored in a file.
7.4.8 Mounting and unmounting a formThe procedure to unmount the current form and mount the next one would be as follows:
1. Disable the queue associated with the current form, using the disable form. This could be done with a custom command.
2. Wait until the queue is down, and physically mount the form in the printer.
3. Use a custom align form script to print an alignment job.
4. Re-enable the form using the enable command for the queue that is associated with the form.
For example, you have the printer tst with forms check and order as described earlier. If no forms are currently mounted, then the tst queue will be active. If you want to mount the check form, this would be the procedure:
# disable tst# lpstat -vtst
346 Printing for Fun and Profit under AIX 5L

Physically mount the form and then use:
# align check# enable tst-check
The align check would have to put the jobs that are queued on hold, and enable the queue and print a single job at a time, and when done, take the jobs off hold.
7.4.9 Printing using a formThe main lp command link will have to be changed to point to a custom version of lp that does most of the work. This lp shell script is executed before the job is queued, and thus can intercept the -f form-name, and -d queue or -d any flag, and turn them into commands that will print to the correct queue for that printer name.
7.5 PowerPC print filters
Print filters can be used by the virtual printer to make changes to a file before it is sent to the printer. Most filters are designed for transforming the input file by adding and stripping characters, or by doing some kind of transformation on the file. Filters can also be used for downloading fonts and page overlays used as electronic forms. One of the advantages of the virtual printer is that several filters can be installed, and they can be selected individually by users with the qprt -f flag. This section describes the default filters as well as procedures for adding your own custom filter.
7.5.1 Default filtersMost virtual printers have some filters defined by default. For PCL printers, the default filters are:
/usr/bin/pr The pr filter is referenced by qprt -fp, and can be used to do much of the same type of text file formatting that the virtual printer does, such as wrapping lines and limiting page size. The pr filter can also be used to add page titles, page numbers, and can even be used to generate 2-up output.
/usr/ucb/fpr The fpr filter, also known as the asa filter, is referenced by the qprt -ff flag. It is used to handle files formatted with FORTRAN column one formatting commands.
/usr/bin/hplj The hplj filter is referenced as qprt -fn. This filter is used to convert ditroff files to PCL format.
Chapter 7. PowerPC advanced printing 347
passthrough The qprt -fl flag causes the text formatter to be bypassed. It is not really a filter at all, but acts much like the qprt -dp flag for passing files like those created by PC Windows based applications to a printer without creating problems that might otherwise occur.
PostScript virtual printers also use the pr and fpr filters. Additional default filters for PostScript virtual printers include:
/usr/bin/psc The psc filter is referenced by the qprt -fn flag. This filter is used to convert ditroff files to PostScript format.
/usr/bin/psplot The psplot filter is referenced by the qprt -fg flag. This filter is used to convert special Sun graphics files to PostScript.
/usr/bin/enscript Although not exactly called as a filter, text files printed to a PostScript queue can be converted to PostScript using enscript if printed with the qprt -da flag, or if automatic detection is turned on via SMIT.
It is also possible to use the System V print filters with the PowerPC print subsystem.
7.5.2 What makes a good filter programHere are some guidelines for choosing an appropriate filter:
• Is the program capable of reading data from standard input and writing data to standard output?
• Does the program stand alone without the need for configuration files?
• Can the filter input file formats that are likely to be printed?
• Can the filter output file formats that are supported on your printers?
• Is the program accessible to all users who will print with it?
7.5.3 Defining user print filtersA use print filter can be added through SMIT starting from the smitty spooler fastpath and using the Programming Tools menu option.
To add a user defined filter, follow these steps:
1. Start SMIT with spooler fastpath:
# smitty spooler
2. Choose Programming Tools.
348 Printing for Fun and Profit under AIX 5L

3. Choose Change / Show Preprocessing Filters.
4. Choose the virtual printer name.
5. Enter the complete pathname of the filter in User defined filter 1-5.
6. Press Enter to save the changes and F10 to exit SMIT.
The filters can be set as default by setting the _f virtual printer attribute using lsvirprt, or through SMIT Change /Show Default Print Attributes under the field Pre-processing filter name by selecting one of the standard filters or the user defined filter.
7.5.4 Using a print filter to remove or add carriage returnsFiles that need to be printed passthrough because they contain graphics or other special formatting often end up printing with a stair-step pattern because there are no carriage returns added. This can be solved by adding code to tell the printer to add carriage returns or by a simple sed filter. Simply add the following filter to User defined filter 1.
/usr/bin/sed -e “s/$/\015/g”
This filter adds a carriage return (\015 is an octal representation of a carriage return) at the beginning of each new line ($ means new line). Now print the file with the qprt -f1 flag, as shown here:
$ lptest 5 5 | qprt -f1 -dp -Ptext
To test the filter from the command line, use:
$ lptest 5 5 | /usr/bin/sed -e “s/$/\ctrl-Vctrl-M/g” | od -a
You need to use Ctrl-V and Ctrl-M, because of the differences in the way ksh and the virtual parse the commands.
The sed filter can be also used to do simply substitution filtering, such as removing carriage returns that are causing double spacing. In this case, change User defined filter 2 to:
/usr/bin/sed -e “s/\015//g”
Printing a file with extra carriage returns will now strip the carriage returns so when the virtual printer adds new ones, there will not be two in a row. To print using this filter, use the following command:
$ qprt -f2 -Ptext /tmp/withcr.file
The tr filter is also good for this type of character translation:
Chapter 7. PowerPC advanced printing 349

7.5.5 Using print filters for banner headersThe header page in AIX printing is generated by the virtual printer, which calls a program called pioburst. The program name of the header program, and the attributes passed to the program are defined in the virtual printer attribute sh. By modifying this attribute we can call our own header program, or we can change the template used by the pioburst program.
With PostScript and PCL printers, it is probably easiest to change the header templates. These templates are in /usr/lib/lpd/pio/burst, and have the name H.ascii for the ASCII text and PCL queues and H.ps for Postscript queues. By adding format commands for the printer to these templates you can change the size and information provided on these pages, and even include graphics such as a company logo. A method based on this is described in Section 7.9.5, “Example: PCL header page with large user name” on page 360 and Section 7.9.6, “Example: PostScript header page with large user name” on page 361.
Dot matrix printers usually do not have the capability to print with jumbo fonts, but there is a UNIX program that comes with AIX that can generate large characters from normal print characters. This program is called banner. The output from banner looks like:
# # #### ###### ##### # # ## # # ###### # # # # # # ## # # # ## ## # # # #### ##### # # # # # # # # ## # ##### # # # # ##### # # # ###### # # # # # # # # # # # ## # # # # # #### #### ###### # # ####### # # # # # ######
To see the output for your ID type:
$ banner $USER
This filter can be written either with a C program, a ksh script, or even a perl or other script. The key is that the program outputs to standard out (stdio), and after printing the banner page, must read the data file from standard in, and pass it on through to the printer.
The example used here will use the simple shell script shown here:
350 Printing for Fun and Profit under AIX 5L

To set up the filter, follow these steps:
1. Place the program or script in /usr/bin/bigbanner.
2. Make sure the program is executable by all. Make the owner root and the group printq.
# chmod 755 /usr/bin/bigbanner# chown root:printq /usr/bin/bigbanner
3. Modify the virtual printer with lsvirprt or smitty spooler:
- Using lsvirprt:
lsvirprtSelect the queuef=1f1=/usr/bin/bigbanner
- Using SMIT fastpath smitty spooler:
smitty spoolerChoose: Programming ToolsChoose: Change / Show Pre-processing FiltersSelect the queueUser defined filter 1 [/usr/bin/bigbanner]smitty spoolerChoose: Change / Show Print Queue CharacteristicsSelect the queueChoose: 2 Default Print Job Attributesfor Pre-processing FILTER NAME: Select: 1 User defined filter 1
Now turn off the normal header pages and you are set to print with banner header pages.
7.5.6 Using print filters for file conversionThe standard fpr and hplj filters convert from one file input format to another. It is also possible to add your own filters for doing this.
#!/bin/ksh# Shell script to call banner program for AIX Virtual Printer# Call the banner program with the user name/usr/bin/banner $USER# Send a form feed.printf "\f"# Pass the file through untouched.cat
Chapter 7. PowerPC advanced printing 351

7.5.7 Using filters for electronic form downloadA filter can be used for downloading an electronic form for PCL-based printers. The form consists of PCL macro commands that can be used to print the form on every page, or print the form when selected.
7.6 PostScript printers
PostScript printers are supported as a standard type of virtual printer in AIX. The following sections describe some of the unique capabilities of the AIX PostScript virtual printers.
7.6.1 PostScript printer initializationThe PostScript virtual printer adds only a small amount of initialization for the printer, such as input and output tray selection, simple or duplex, and resolution. The PostScript formatter does not modify the PostScript file in any way.
A typical PostScript file’s trip through the virtual printer includes:
• Addition of a PostScript header page
• Processing by any user specified print filters
• Initializing the printer by:
- Putting the printer in PostScript mode using a PJL (Printer Job Language) command.
- Setting the printer resolution using a PJL command.
- Setting the plex mode to either simplex or duplex with a statusdict command.
- Setting the paper input tray with the statusdict command.
It is usually assumed that a PostScript file will provide the rest of the formatting, including setting fonts, page orientation, and paper size. These features are usually a function of the application generating the file.
7.6.2 Printing simple ASCII text to PostScript printersPostScript printer support also includes the ability to convert simple ASCII text files to PostScript using enscript. In this mode, a number of the command line flags and SMIT selections are available for choosing options such as font, page title, lines per page, and gaudy mode.
352 Printing for Fun and Profit under AIX 5L
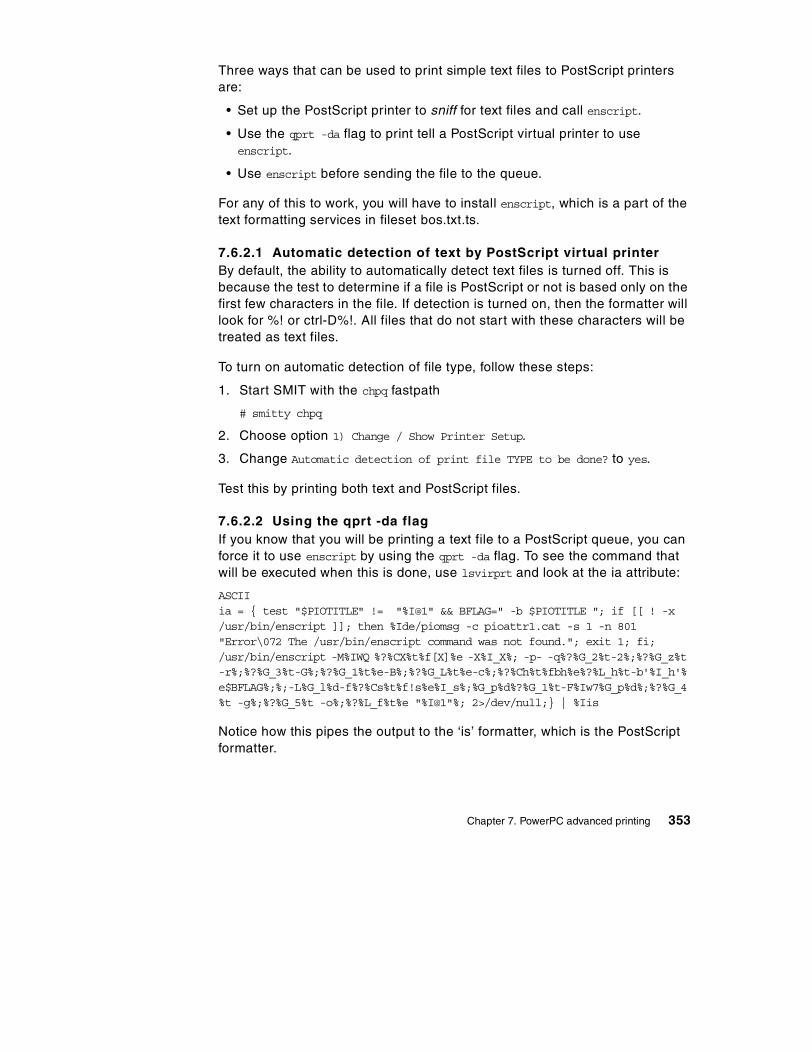
Three ways that can be used to print simple text files to PostScript printers are:
• Set up the PostScript printer to sniff for text files and call enscript.
• Use the qprt -da flag to print tell a PostScript virtual printer to use enscript.
• Use enscript before sending the file to the queue.
For any of this to work, you will have to install enscript, which is a part of the text formatting services in fileset bos.txt.ts.
7.6.2.1 Automatic detection of text by PostScript virtual printerBy default, the ability to automatically detect text files is turned off. This is because the test to determine if a file is PostScript or not is based only on the first few characters in the file. If detection is turned on, then the formatter will look for %! or ctrl-D%!. All files that do not start with these characters will be treated as text files.
To turn on automatic detection of file type, follow these steps:
1. Start SMIT with the chpq fastpath
# smitty chpq
2. Choose option 1) Change / Show Printer Setup.
3. Change Automatic detection of print file TYPE to be done? to yes.
Test this by printing both text and PostScript files.
7.6.2.2 Using the qprt -da flagIf you know that you will be printing a text file to a PostScript queue, you can force it to use enscript by using the qprt -da flag. To see the command that will be executed when this is done, use lsvirprt and look at the ia attribute:
ASCIIia = { test "$PIOTITLE" != "%I@1" && BFLAG=" -b $PIOTITLE "; if [[ ! -x /usr/bin/enscript ]]; then %Ide/piomsg -c pioattr1.cat -s 1 -n 801 "Error\072 The /usr/bin/enscript command was not found."; exit 1; fi; /usr/bin/enscript -M%IWQ %?%CX%t%f[X]%e -X%I_X%; -p- -q%?%G_2%t-2%;%?%G_z%t -r%;%?%G_3%t-G%;%?%G_1%t%e-B%;%?%G_L%t%e-c%;%?%Ch%t%fbh%e%?%L_h%t-b'%I_h'%e$BFLAG%;%;-L%G_l%d-f%?%Cs%t%f!s%e%I_s%;%G_p%d%?%G_1%t-F%Iw7%G_p%d%;%?%G_4%t -g%;%?%G_5%t -o%;%?%L_f%t%e "%I@1"%; 2>/dev/null;} | %Iis
Notice how this pipes the output to the ‘is’ formatter, which is the PostScript formatter.
Chapter 7. PowerPC advanced printing 353

When using the -da flag, you can also use other flags, such as the -p for font size, -l for page length, and -s for font style.
7.6.2.3 Using enscript from the command lineThe enscript filter can also be used from the command line for more control, using all the options specified in the man page. Because this command can be used by both the PowerPC print subsystem and the System V print subsystem, it is discussed in more detail in the Chapter 9, “Printing tips and utilities” on page 435.
7.7 Downloadable font support
Some virtual printers support the download of fonts, while others do not. For PostScript printers, a filter can be used to prepend a download font to the PostScript print job. It is also possible to download PCL fonts to the flash memory of some printers.
7.7.1 Using the mF attribute to download fontsThe mF attribute can be used for the full path name of a font to be downloaded. The font must contain the commands to properly install itself once it is sent to the printer. This can be used with type 1 PostScript fonts.
Adobe Type 1 Fonts come in three versions:
• Macintosh ATM/Laserwriter Fonts
• DOS Binary PFB fonts
• UNIX ASCII PFA downloadable fonts
Of these, only the ASCII or PFA files will easily download from AIX to a PostScript Laser Printer. Most files are distributed in the Mac or PFB formats, so it is often necessary to convert these to the PFA format using a utility like pfb2pfa.
If the mF attribute is set to the full path name of the font, it will be downloaded with each job that is sent to the queue. With this method, simply create a separate PostScript virtual printer for each font you want to use. There is only one font file per virtual printer, but multiple fonts can be contained in a single file. The pfa file is a standard ASCII PostScript file and you can edit it with vi or your favorite editor. You can also concatenate files with cat file1 >> file2.
The procedure to add the files to the virtual printer is:
354 Printing for Fun and Profit under AIX 5L

1. Place the font in the /usr/lib/lpd/pio/fonts directory.
2. Use lsvirprt to modify the virtual printer.
3. Select the printer to be used.
4. Set mF=/usr/lib/lpd/pio/fonts/fontname.pfa where fontname is the name of font file to use.
5. Press Enter to exit lsvirprt and save changes.
The font must be identified in the file you are printing. Examples:
• /English-Russian-Architect findfont 14 scalefont setfont
• /Times-Roman findfont 15 scalefont setfont
Print to the virtual printer and font will be added.
7.7.2 Using a filter to add the font on demandThe earlier method adds the font to all files sent through the virtual printer. By using a simple filter, the font can be added at will using the qprt -f1 flag.
The filter is a simple program that when called, reads the font file and sends it to stdout; it then adds the program being printed to stdout. The administrator can add a separate font to attribute f1, f2, f3, and so on, in the virtual printer by specifying the font name as a part of the attribute. For example:
f1=/usr/local/bin/addfont font1.pfb
The user then selects this font to print with:
$ qprt -f1 -Pps filename.ps
The addfont filter source is in this screen:
Chapter 7. PowerPC advanced printing 355
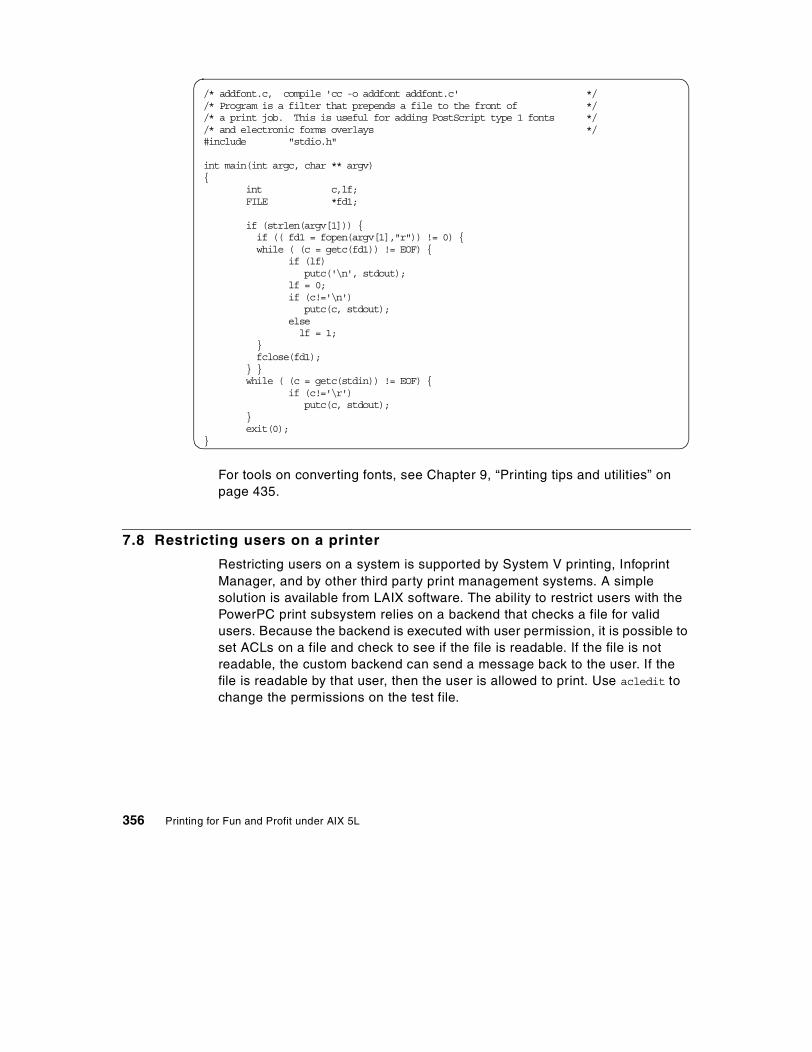
For tools on converting fonts, see Chapter 9, “Printing tips and utilities” on page 435.
7.8 Restricting users on a printer
Restricting users on a system is supported by System V printing, Infoprint Manager, and by other third party print management systems. A simple solution is available from LAIX software. The ability to restrict users with the PowerPC print subsystem relies on a backend that checks a file for valid users. Because the backend is executed with user permission, it is possible to set ACLs on a file and check to see if the file is readable. If the file is not readable, the custom backend can send a message back to the user. If the file is readable by that user, then the user is allowed to print. Use acledit to change the permissions on the test file.
/* addfont.c, compile 'cc -o addfont addfont.c' *//* Program is a filter that prepends a file to the front of *//* a print job. This is useful for adding PostScript type 1 fonts *//* and electronic forms overlays */#include "stdio.h"
int main(int argc, char ** argv){ int c,lf; FILE *fd1;
if (strlen(argv[1])) { if (( fd1 = fopen(argv[1],"r")) != 0) { while ( (c = getc(fd1)) != EOF) { if (lf) putc('\n', stdout); lf = 0; if (c!='\n') putc(c, stdout); else lf = 1; } fclose(fd1); } } while ( (c = getc(stdin)) != EOF) { if (c!='\r') putc(c, stdout); } exit(0);}
356 Printing for Fun and Profit under AIX 5L

7.9 Custom header pages
This section describes how you can use the standard AIX banner program to create header pages with larger names for some fields by making minor modifications to the header page template. Using the same technique, you can also add graphics and other information to header pages.
7.9.1 Introduction to header pagesHeader jobs (also known as burst) are created as a separate print job by the virtual printer backend piobe. This can mean a separation of header page and job output in some remote printing. Both the header program and a header template are defined in the sh virtual printer attribute. By changing the header template, you can create any kind of header page that you want. Some key facts about header pages include:
• The default program for generating headers is /usr/lib/lpd/pio/etc/pioburst.
• The default template for the ASCII data stream is /usr/lib/lpd/pio/burst/H.ascii.
• After generating the header page, the output is sent through the device independent filter /usr/lib/lpd/pio/etc/pioformat.
• The output from pioformat is piped to a data stream dependent filter in the /usr/lib/lpd/pio/fmtr directory.
Information supplied here is analogous for trailer pages, with the exception that the st virtual printer is used for trailer pages.
7.9.2 What determines if the header page is printed?Header pages are determined by the virtual printer, so if you are printing remote without local formatting, you will not get a local header page. The virtual printer determines whether to print a header page based on three things:
1. An entry inside the queue device in /etc/qconfig:
header = never, always, group never: No headers unless called from command line always: Header ever file unless off from command line. group: One header per print command.
2. Command line arguments:
enq -Bnn qprt -Bnn
Chapter 7. PowerPC advanced printing 357

lpr always uses a header unless no headers is specified with the -h flag.
3. The sh attribute in the virtual printer.
- This attribute contains the program that writes the header pages: pioburst.
- Set sh= to nothing and you will never get header pages.
7.9.3 Header page templatesHeader pages are printed by printing a template that contains percent signs (%), which are substituted with key variables by the pioburst program when the header page prints. The template files are stored in /usr/lib/lpd/pio/burst. Header templates start with H, while trailer templates start with T. The extension of the template name is an indication of the type of data stream that it supports.
Template percent codes, shown in the left column of Table 21, are substituted by the value derived from the description in the right column.
Table 21. Percent codes used in virtual printer header pages
For national language support, the titles for each of the standard fields is also represented by a percent code that is replaced by the appropriate title for the locale of the user submitting the print job. The label codes are shown in Table 22 on page 359:
Percent code Description of substitution field
%A Replaced by the formatting flags used by piobe, including command line flags. This is useful for debugging formatting problems.
%D Delivery user specified as the to user by enq or qprt.
%H Host name and queue device where the job is printed.
%P Time the job was printed.
%Q Time the job was queued.
%S User who submitted the job.
%T Title of the job, or the file name that was printed.
358 Printing for Fun and Profit under AIX 5L

Table 22. Percent codes used for labels in header pages
7.9.4 Steps to create a custom header pageFollow these steps to create a custom header page that you can modify to your own liking:
1. Go to directory where the templates are kept:
# cd /usr/lib/lpd/pio/predef
2. Copy current template to new name:
# cp H.ascii H.custom1
3. Make modification to the new header:
# vi H.custom1 Add text or move lines around, and save.
4. Modify the virtual printer to point to the new file:
# lsvirprt Select the virtual printer. Type: sh~v, sh tilda v gives vi session Move as in vi to H.asci, change to H.custom1 :wq to save and exit. Press the [enter] key to exit lsvirprt
5. Print, making sure you have headers set:
# qprt -Ban /etc/motd
Percent code Description of title field
%a FLAG VALUES:
%d DELIVER TO:
%e END OF OUTPUT FOR:
%h PRINTED AT:
%p TIME PRINTED:
%q TIME QUEUED:
%s SUBMITTED BY:
%t TITLE:
Chapter 7. PowerPC advanced printing 359

7.9.5 Example: PCL header page with large user nameBefore starting to modify the header page for a PCL printer, there are some simple things that you should know about the PCL data stream. The following list should give you enough information to get started:
• PCL is simply ASCII Text with special escape sequences to give the printer commands.
• Use simple PCL commands from the printers technical reference.
• [ESC] can be created in vi with the sequence Ctrl-v Esc, and looks like ^[.
• You can concatenate PCL commands that start with the same sequence letters by using small letters until the final letter. For example:
[ESC](s4148t1p16V = [ESC](s4148T + [ESC](s1P + [ESC](s16V [ESC](s#T - Sets the Typestyle (FONT). [ESC](s3T - Courier - fixed font,
uses [ESC](s5H for pitch[ESC](s4148T - Universe - proportional font,
uses [ESC](s35V for point size [ESC](s#P sets fixed (#=0) or proportional(#=1) [ESC](s#H gives pitch for fixed fonts
Larger number gives smaller characters[ESC](s#V gives Point size for proportional fonts
Larger number gives larger characters
You could also create the header with a Windows print driver, such as HP LaserJet III, and print to a file. This would allow you to have graphics on the custom header page and would create the PCL automatically.
The source code for a simple custom header page is shown here:
360 Printing for Fun and Profit under AIX 5L

The output from this header page would look something like:
7.9.6 Example: PostScript header page with large user nameTo modify the PostScript header page H.ps, follow the same steps as above, but copy H.ps to the custom header page of your choice.
*********** This is a Custom Header Page ***********************************
%t %T
%q %Q
%p %P
%h %H (s4148t1p16V %s %S (s3t0p10H
%l %L
*********************************************************************
%a %A *********************************************************************
*********** This is a Custom Header Page ***********************************
TITLE: H.pcl
TIME QUEUED: Mon Mar 04 09:48:40 1996TIME PRINTED: Mon Mar 04 09:48:41 1996
PRINTED AT: lp4039 (4039 @ tesch
SUBMITTED BY: zaphod
DELIVER TO: ======> zaphod <======
******************************************************************************
FLAG VALUES:a=0, b=0, d=1, f=l, g=1, i=0, j=+, l=60, q=300, t=0, u=2, v=6, w=80,x=2, z=!, A=1, B=an, C=!, H=, J=+, K=, L=+, N=1, O=3, P=pcl4039:lp4039, Q=1,W=, X=IBM-850, Y=0, Z=+******************************************************************************
Chapter 7. PowerPC advanced printing 361

The following is a list of PostScript commands that should allow you to change the font:
• Fonts are defined by command like. For example:
/Courier findfont 12 scalefont setfont Courier is the font, Could Replace with Helvetica for Block letters. 12 is the size, Replace with larger
• Comment lines start with percent sign in PostScript, and you must add a second percent sign so the formatter does not try to interpret them.
• showpage is PostScript formfeed.
• show is PostScript show text.
• Text to print is placed inside of parenthesis proceeding show.
The first part of the H.ps file contains PostScript commands to set up the page and to define macros, such as the crlf macro shown in the source below. The portion of the modified H.pscust file shown below only shows the parts of the file that actually print the header page:
362 Printing for Fun and Profit under AIX 5L

The header page generated by this uses the Palatino-BoldItalic font at size 30 for the name of the queue and the user who printed. The header page will look similar to this:
(********************************************************************) show crlf(********************************************************************) show crlfcrlfcrlf(%t %T ) wrap_linescrlf(%p %P ) wrap_linesrlf(%q %Q ) wrap_linescrlfcrlf(%h ) wrap_linescrlfcrlf/Palatino-BoldItalic findfont 30 scalefont setfont(PS4039 @ tesch ) wrap_linescrlfcrlfcrlf/Courier findfont 12 scalefont setfont(%s ) wrap_linescrlfcrlfcrlf/Palatino-BoldItalic findfont 30 scalefont setfont(%S ) wrap_linescrlf/Courier findfont 12 scalefont setfont(%d =====> %D <===== ) wrap_linescrlf(********************************************************************) show crlf(********************************************************************) show crlfcrlf
Chapter 7. PowerPC advanced printing 363

Just as with PCL pages, custom pages could be created with a PC presentation graphics program, and saved as PostScript. You would then have to edit that program to add double percent signs so that the formatter and PostScript did not misinterpret them.
7.10 Printing via an ASCII Terminal Attached Printer
It is possible to connect a printer to the auxiliary port of an ASCII terminal, such as an IBM 3151. You may then want to print to that printer in the same manner as you print to any other shared printer and still work on the terminal at the same time as something is being printed.
*##################################################################**##################################################################*
****************************************************************************************************************************************
TITLE: H4039.ps
TIME PRINTED: Mon Mar 04 10:14:37 1996
TIME QUEUED: Mon Mar 04 10:14:37 1996
PRINTED AT:
PS4039 @ tesch
SUBMITTED BY:
redrover@doghouse
DELIVER TO: =====> redrover@doghouse <======
****************************************************************************************************************************************
FLAG VALUES:a=0, d=s, f=l, j=+, q=300, u=1, A=1, B=an, C=!, H=, J=+, N=1,P=ps4039:duplx, X=IBM-850, Y=0, Z=!
********************************************************************
364 Printing for Fun and Profit under AIX 5L

In AIX V3.1, there was no formal support for printing to an ASCII terminal attached printer. Beginning in AIX V4, this has been made as easy as adding a printer attached to the host.
7.10.1 Configuring an ASCII terminal attached printerMost of the asynchronous ASCII terminals used in UNIX systems have an auxiliary port which can be used to connect a printer. In this section, we will show how to set up an IBM 2380-2 printer attached to an IBM 3151 model 310 ASCII terminal. If you are using a terminal other than the IBM 3151, which will support a printer attached to it, you will have to find out how to set up your terminal and its auxiliary port. We are also assuming that this terminal is attached to your system and is working.
7.10.2 Hardware setupBefore adding the printer to your AIX system, perform the following steps:
1. Connect your serial printer to the auxiliary port of your terminal using a RS232 cable. For the IBM 3151 terminal, just a pin-thru cable is required.
2. Make note of the following settings for your printer:
- Line speed (baud rate in bps) - Word Length (bits per char) - Parity (odd, even, no, space, mark) - Stop bits (1,2)
7.10.3 Configuring the auxiliary port in your terminalOn the IBM 3151 terminal, perform the following steps:
1. Turn on your IBM 3151 terminal.
2. Simultaneously press the Ctrl and the Setup keys. The SETUP menu is displayed.
3. Using the Send key, select the KEYBOARD/PRINTER option. Fill in the PRINTER options with the printer settings you have noted.
4. Using the Send key, select the FUNCTION option. Select the Save option and press the Space key to save your configuration.
7.10.4 Adding the printer to your systemNow that you have physically attached the printer to your working terminal and configured its auxiliary port with the printer settings, perform the next steps to add your printer to the print spooling subsystem:
Chapter 7. PowerPC advanced printing 365

1. Log on as root or a member of the printq admin group.
2. Enter smitty mkpq fast path. From this screen choose the option:
ascii Printer Attached to ASCII Terminal
3. From the next screen, select the printer manufacturer.
4. From the next screen, select the Printer Type.
5. Select the tty for the terminal that has your printer attached. In our example, we have our printer attached to tty0.
6. Fill the Name of new PRINT QUEUE to add field with the name of the print queue for the terminal attached printer. In our example, we have used the name 2380ascii for this print queue.
7.10.5 Testing your printerTo see if your printer is working, first issue the lpstat command to list all the available print queues in your system. In our example, the printer is available through the 2380ascii print queue, as you can seen here:
# lpstat -v2380asciiQueue Dev Status Job Files User PP % Blks Cp ------- ----- --------- --- ------------------ ---------- ---- -- ----- ---2380asc lp0 READY
To test if the printer is working properly, use a command of your preference to send a file to the newly created print queue. In our example, we have issued the following command:
# lp -d2380ascii /etc/qconfig
This command sends the/etc/qconfig file to be printed in our IBM 2380-2 printer through the 2380ascii print queue.
If you take a look at the qconfig file, you will see the following stanzas for the terminal-attached printer:
2380ascii:device = tty0tty0:file = /dev/tty0header = nevertrailer = neveraccess = bothbackend = /usr/lib/lpd/piobe
366 Printing for Fun and Profit under AIX 5L
As you can see in the file = /dev/tty0 stanza, the output device for the terminal attached printer is the device driver for the terminal. What happens if you want to print directly to the device driver instead of printing through the spooling subsystem? We will show an example.
Log on to the terminal that has the printer attached (in our example, tty0) so that you can send data to be displayed in this terminal. Type the following command on any other terminal (not on tty0):
# banner Printing to terminal > /dev/tty0
You will see a screen like the following on tty0 terminal:
##### ##### # # # ##### # # # #### # # # # # ## # # # ## # # # # # # # # # # # # # # # # # ##### ##### # # # # # # # # # # ### # # # # # ## # # # ## # # # # # # # # # # # # ####
##### #### # # # # # # # # # # # # # ####
##### ###### ##### # # # # # ## # # # # # ## ## # ## # # # # # ##### # # # ## # # # # # # # # # # ##### # # # # # # ###### # # # # # # # # # ## # # # # ###### # # # # # # # # # ######
Even though the device driver defined in the qconfig file for the printer attached to the terminal is /dev/tty0, if you print directly to /dev/tty0, the output is sent to the terminal, not to the printer.
If you want to print directly to the printer, you need to send some control characters to the terminal prior to sending data to the printer. These control characters tell the terminal to work in passthrough mode, that is, data sent to the terminal in this mode should be sent to the auxiliary port and not to the screen. To exit from the passthrough mode, control characters need to be sent to the terminal.
The control characters we are using in the next example are valid only for the IBM 3151 terminal models 110/310/410. If you are using another terminal
Chapter 7. PowerPC advanced printing 367
type, you should find which characters makes your terminal work in a passthrough mode.
For example:
Type the following command on the other terminal (not on tty0):
# echo ^P^R > /dev/tty0
This tells the tty0 terminal to work in passthrough mode. These control characters can be obtained by holding the Ctrl key and typing vpvr. This should be read as Ctrl-P + Ctrl-R. You do not need to hold the Shift key to get a capital p or capital r.
Now type the following command on the other terminal (not on tty0):
# banner printing to printer > /dev/tty0
You should get the following output on your printer:
##### ##### # # # ##### # # # #### # # # # # ## # # # ## # # # # # # # # # # # # # # # # # ##### ##### # # # # # # # # # # ### # # # # # ## # # # ## # # # # # # # # # # # # ####
##### #### # # # # # # # # # # # # # ####
##### ##### # # # ##### ###### ##### # # # # # ## # # # # # # # # # # # # # # ##### # # ##### ##### # # # # # # ##### # # # # # ## # # # # # # # # # # # ###### # #
Now, anything that you send to tty0 is going to be sent to your printer. To tell the terminal to stop working in passthrough mode, type the following command:
#echo ^P^T > /dev/tty0
368 Printing for Fun and Profit under AIX 5L

The control characters used in the previous command should be read as Ctrl-P + Ctrl-T. These characters can be obtained by holding the Ctrl key and typing vpvt.
Based on the previous example, you can understand how the piobe backend sends data to be printed on a terminal attached printer.
You should be aware that printing on a printer attached to an ASCII terminal is not as fast as printing to a printer attached directly to the host. All data that is sent to the terminal and to the printer attached to this terminal uses the same connection to the host. Loss of performance is expected.
Chapter 7. PowerPC advanced printing 369

370 Printing for Fun and Profit under AIX 5L

Part 4. Problem solving and tools
© Copyright IBM Corp. 2001 371

372 Printing for Fun and Profit under AIX 5L

Chapter 8. Troubleshooting
The goal of this chapter is to provide you the administrator with some tools and tips that will help turn the art of troubleshooting into a science. Problems with printing may be as minor as minor cosmetic blemishes on the output to as major as checks that have failed to print. Where you look for problems depends on such factors as the type of printer, the type of file to be printed, and the way in which the printer is connected to the server.
This chapter is divided into three sections:
• Common troubleshooting techniques
• Troubleshooting specific to System V printing
• Troubleshooting specific to PowerPC printing
The procedure of problem determination can be reduced to a few steps:
1. Isolate the problem
- Determine the system and subsystem where the problem exists.
- Determine if the problem is hardware or software.
- Determine if the problem is local or remote.
- Is data getting to the printer?
2. Identify the cause of the problem
- Is the printer plugged in with the proper pinouts?
- Is the data formatted properly by the right formatter and filter?
- Are the right flags being used?
- Is the printer properly configured?
3. Improve the situation
- Try a different printer, adapter, or cable.
- Use a more appropriate virtual printer or printer type.
- Use different print flags.
4. Test the solution
- Test with other print files.
- Have other users test for problems.
- Make sure you did not create a new problem.
© Copyright IBM Corp. 2001 373

The rest of the chapter lists some of the most common printing problems, and provides information to help you isolate the problem, identify the problem, improve the situation, and test the solution.
8.1 Common troubleshooting checklist
This section is organized in terms of the problems that typically occur when trying to print documents. In each case, the areas common to both print subsystem will be explored.
8.1.1 Checklist for local printing problemsThe following list is a high level overview of things that you might check if jobs are not printing on local printers. More details are given in the rest of the chapter:
• Is the printer ok?
- Is the printer turned on?
- Does the printer have a message on the display or blinking lights?
- Can it print a test page?
- Can you print from other systems?
- Are cables tight, the correct type, and the correct length?
- Is the cable good? Test it on another system.
• Is the device setup properly?
- Redirect output directly to the device file.
- Is the baud rate, handshaking and port number right for serial?
- Try a different port on the computer.
• Is the printer or virtual printer setup properly?
- Does the printer match the defined types and data streams in the printer/queue setup?
- Does the printer point to the right device?
- Is the user allowed to print to the printer or form? (System V)
- Are the print flags valid for the virtual printer or interface script?
- Is the printer accepting jobs and enabled? Use lpstat with the right flags.
- Is the printer name spelled right on the print command line?
374 Printing for Fun and Profit under AIX 5L

- Do you get command line, mail, or logged messages?
• Is the qdaemon (PowerPC) or lpsched (System V) running? To check, use:
- System V: lpstat -r
- PowerPC: lssrc -s qdaemon
8.1.2 Checklist for remote printing problemsThe following list is a high level overview of things that you might check if jobs are not printing on remote printers. More details are given in the rest of the chapter:
• Is lpd or lpNet running on the server? To check, use:
- System V: lpstat -r
- PowerPC: lssrc -s lpd
• Does the client have the right hostname and remote queue specified?
• Do both the client and host names exist in a DNS or common /etc/hosts files?
• Does the client have permission to print to the server?
- System V: Check the servers and clients Systems file.
- PowerPC: Check the servers /etc/hosts.lpd file for the system name.
- Does the name in this file match the DNS entry? Test IP address, fully qualified and short names.
• Does the user on the client have permission to print to the printer?
• System V: Check the printers users.allow file or use lpstat -p printer -l for the correct permissions. Use all!all for all remote users.
• PowerPC: Use rembak and lpd debug log features.
• System V: Check the /etc/lp/logs/lpNet log.
• Use iptrace to check a job as it goes over the network.
• Disable server queue
- Make sure job is queued on server while the queue is disabled.
- Check JDF or request log for command line flags.
• If a job queues when the queue is disabled, but does not print when the queue is enabled:
- Make copy of file and use local procedures.
- Use flags in the JDF or request log to print.
Chapter 8. Troubleshooting 375
8.1.3 Check the obviousCheck the obvious:
• Make sure the printer is turned on and is online.
• Make sure the cable is attached to the printer and the computer.
• Make sure the LAN cables are plugged into both the printer server (computer) and the printer. Check that you can ping the printer from the AIX server.
8.1.4 Nothing prints on local printersOne of the most frustrating things is to print a job, go to the printer, and find that the output is missing. Where can you go from there?
8.1.4.1 My job is missing, but others are printingThe problem may have nothing to do with the printer. Someone else may have accidently picked up the printout. This tends to happen more often when banners are not being used, or when the banner is the same color as the output.
Multiple queues with one disabled or downIt is possible that the queue is backed up with a large number of jobs, or a single very large job? Sometimes a large job will cause a queue to go down, or disable. When you set up multiple queues or virtual printers to print to the same printer, it may be possible that one of these queues is disabled while other queues are still printing.
Are you printing text to a PostScript printer?While some printers are able to sniff the type of print data stream and automatically select the right internal mechanism for printing, very often when a printer is told that a job is PostScript, it will print nothing if it is sent a plain ASCII text file or a PostScript job that is improperly formatted. Check the printer to see if the files that are printing are valid PostScript jobs.
How large is the failing job?If the job that is not printing is much larger than the jobs that are printing, there could be several reasons for the job failing to print. Some of these reasons are:
• The job is being spooled, and there is not enough spool space. See Section 8.1.4.4, “Is there enough space in the spool file system?” on page 382.
• The job is being sent to a network print server that does not have a large enough buffer. If you are using a network print server device, such as the
376 Printing for Fun and Profit under AIX 5L

Axis, HP JetDirectEX, or Intel NetPort box, the internal buffer space of the box may limit the size of the file you can print. Check to see if the job can print if the printer is attached to a local parallel or serial port. If you determine the job is too large, try to print the job in sections.
• The printer memory is not large enough to handle the print job. If the AIX file system is large enough and you can print small jobs, the problem may be in the printer. See if you can break the job into smaller pieces. Try to establish the limits of the printer by testing with files of different sizes. It may be possible to add more memory to the printer.
Is the job accessible to the print service?AFS/DFS print files that are accessible to the user sometimes may not be accessible to the print service. If you are trying to print files that are mounted from a remote system and they will not print even though similar files print on your local system, try moving the file to /tmp and printing it from there. If this works, you will either have to use this as a workaround or change the permissions on how the files are exported from the server.
Did you send the job to the right printer or queue?Often times, printer names can be confusing and close to one another. Make sure you are printing to the right queue and that the printer destination is at the location where you are trying to pick up the output.
8.1.4.2 Nothing prints, but the lights on the printer flash or changeWith this symptom, you know that at least something is getting to the printer, but for some reason the printer is rejecting the jobs.
Does the printer support the data stream of the print file?As described in the previous section, one of the most common causes for this problem is printing plain ASCII text files to a PostScript queue. Many users have the misconception that laser printers can automatically print any kind of file that is sent to it. If you have a PostScript only queue, but need to print ASCII text files, see Section 4.11, “Printing ASCII text to a PostScript printer” on page 186 or Section 9.2.1, “Using enscript to convert text to PostScript” on page 438.
Is the print job too large for the printer?This case was reviewed in Section 8.1.4.1, “My job is missing, but others are printing” on page 376; however, it is possible that the job is in front of the queue and blocking all jobs. If you have the queue set to automatically retry, you could see the spooler try over and over to try to send the job to the printer without success.
Chapter 8. Troubleshooting 377
Is there bad wiring to the printer?Some cases of bad wiring will still allow a signal to go to the printer. Some of these cases are cables that are too long, or that are missing some of the signal pins necessary for full communications. See “Is the printer properly connected to the computer?” on page 379.
Are the port settings right?Printers that are connected through serial cables can cause problems that are hard to detect when the serial port settings of the computer adapter and the printer serial port are not fully matched. Typical settings include the baud rate, the number of data bits, the parity, and the number of stop bits. Often when the baud rate is wrong, you will get garbage like upside down question marks printed, but sometimes nothing will print.
Some printers, such as Printronix and IBM 6400 series printers, have a setting on the printer to determine the meaning of some of the serial lines. On these printers:
• Make sure that RTS is always TRUE.
• Make sure that DTR is controlled by BUFFER FULL.
8.1.4.3 Nothing is reaching the printerThere are situations where there is no evidence that the print job has reached the printer. For locally attached printers, this may be hard to determine, because some printers give no indication when a print job arrives that they can not handle. In these situations, you will have to review Section 8.1.4.2, “Nothing prints, but the lights on the printer flash or change” on page 377.
For network printers, you should always use a network tracing technique, as described in Section 8.2.7, “Using iptrace to trace network printing” on page 397.
Some of the common problems associated with jobs never reaching the printer are discussed in the rest of this section.
Is the job still in the queue?If lpstat shows that the job is still in the print queue, there are usually two situations.
1. The job is next in line, but the queue is down, disabled, running, or in a wait state.
If the queue or printer is down or disabled, this indicates that the print system had problems sending the job to the printer.
378 Printing for Fun and Profit under AIX 5L
Common causes of this problem are:
- Bad cable connection.
- Bad permissions on files or directories.
- Mismatch on network protocols.
- Files that are too large to print.
- Printer is turned off, or off line.
- The right size of paper was not requested.
The steps that you should take to diagnose this symptom are:
- See if you can cat or copy the file directly to the device or network printer. This will isolate the problem to either the print device or to the print spooler. If you find the problem is with the device or the network connection, then you will not have to perform the rest of the diagnostic steps listed here, but can go directly to improving the situation by fixing the cabling, device or actual problems with the printer.
- See if root can print the file. This will test for some file permission problems but not all. If only root can print, then you will need to check for file permission problems. Use tcbck, but be careful to not use the automatic fix flag, as this can introduce more problems than it fixes.
- Check to make sure that the remote printer server is using the same port numbers. A common mistake is to setup a network printer using the JetDirect protocol when it expects the LPR/LPD remote protocol. Another problem may be using the wrong port number for a terminal server that accepts print jobs. One trick for printers that support the JetDirect protocol is to telnet to port 9100 and type data to see if it will print when you exit by pressing the designated escape character (usually Ctrl-]).
- Check the file size and file system sizes using df and ls -l.
2. The job is not first in the queue.
It is possible that someone else’s job is causing the problem. In this case, make sure you are using the same procedure, but testing with the job that is causing the problem.
Is the printer properly connected to the computer?First, make sure the printer and the computer are connected by a cable. This can be a real problem when going through a patch panel or switching box.
Make sure that same type of interface is used on the computer and the printer. A mistake that some people make is to assume that since both the
Chapter 8. Troubleshooting 379

printer and the computer adapter breakout box (such as a 128-port RAN) both have RJ-45 connectors that they can simply attach a cable between the two and make a connection. Unfortunately, the RJ-45 on the printer is usually an ethernet connection, while that on the RAN is a serial connection, and the two can not communicate. Some people make a similar mistake in connecting serial and parallel cables.
What type of cable is being used? Because many buildings are wired with CAT 5 networking cable, people make the assumption that this can be used with no special consideration for attaching serial printers. The RS/232 standard says that you should use standard shielded twisted pair cable for serial communications; CAT 5 cable does not meet this requirement. If you insist on using CAT 5 cable, make sure the proper pairs of wires are paired together to avoid crosstalk. This especially means pairing a ground signal with the data signal.
Getting the pinouts right can be a very frustrating exercise. For example, the IBM 64-port adapter, 128-port adapter, and 7318 terminal server all use RJ-45 connectors, but each of them uses different RS/232 pinouts. Make sure that you are using the right pinouts from the device reference guides.
Some printers use the SSD line (pin 11 on a db25 connector in DTE mode) to do hardware flow control. This line must be pinned to DCD on the RS/6000 adapter port.
Some printers (for instance, Epson FX1050, HP Laserjet 4M, HP LaserJet 4plus, and HP DeskJet) treat the RTS signal as a flow control signal. This signal is normally connected to the RS/6000 or pSeries CTS line. AIX requires that the CTS signal be a sign that the printer is turned on and functional. If this signal goes false while printing, the PowerPC queue will go DOWN. For these printers, special cables are needed to wrap the RTS signal to CTS on the computer end of the cable.
The length and quality of the cable can have a large effect on the ability to print. If the printer and adapter both support RS/232D, then quality print cables can allow the printer to be up to 200 feet from the computer. If either only supports RS/232C, then the distance should be limited to 50 feet. For parallel printing, the standard recommends 6-feet cables. Be aware that cables are sold in lengths that can exceed the standard.
Are the port settings right?Serial port settings, such as baud rate, data bits, stop bits, and flow control method, can be set at both the printer and the computer device setup. Make sure that you check that these setting match on both ends.
380 Printing for Fun and Profit under AIX 5L

Does the printer device exist?If for some reason the printer device is removed, sometimes a regular file can get created in the /dev directory. When this happens, the print jobs can fill up the file rather than being directed to a printer. To see if this might be the case, use the ls -l /dev/lp* command to make sure that each file permission starts with the c for character special device. To identify the special device file that is associated with a traditional print queue in AIX, use the lsque to find the queue device name and the lsquedev to find the associated special file. Then use the ls -l command on that file, as shown here:
If the file listing does not start with crw, then you make sure that the device is properly created. This may require removing the file and reading the device.
For the printer in System V printing, use the lpstat command with the -t flag:
$ lpstat -t | grep ps1device for ps1: /dev/lp0$ ls -l /dev/lp0crw-rw-rw- 1 root system 24, 0 Oct 19 09:56 /dev/lp0
The following shows the output from an incorrect entry of a normal (non-device driver) file:
-rw-rw-rw 1 lp lp 53455 Oct 19 09:57 /dev/lp1
Is the printer attached to the correct device?From the last section, you should be able to find the device attached to a queue or printer. It is important to make sure that the device is on the adapter that you expect and at the right port. To find the device location, use the lsdev command, as shown here:
# lsdev -Cc printerlp0 Available 01-D0-00-00 Lexmark Optra laser printerlp1 Available 00-00-0P-00 HP LaserJet 4m
$ lsque -q ascasc: device = lp0$ lsquedev -q asc -d lp0lp0: file = /dev/lp0 header = never trailer = never access = both backend = /usr/lib/lpd/piobe$ ls -l /dev/lp0crw-rw-rw- 1 root system 24, 0 Oct 19 09:56 /dev/lp0
Chapter 8. Troubleshooting 381

In this case, the lp0 location number starts with 01. This indicates that the device is one of the bus 01 of the computer. The lp1 printer device indicates that it is attached to the main parallel port. The location code varies between models, but can always be used to find the location of the adapter and port on that adapter. Make sure the printer is on the right port.
In some cases, you may find that the output that you printed went to someone’s terminal screen or to a different printer. This can be a problem after restoring a mksysb tape for a system with 128-port adapters when the RANs have been added in different order. The problem is caused by the order in which the new devices are added in walk the bus order on restoring the mksysb tape. In this case, the safest thing may be to remove and to read devices.
Can you print directly to the print device?One way to isolate the problem between the print service and the device cable hardware side is to copy or cat the file directly to the device file. If the printer is an ASCII text or PCL printer, then redirect the lptest command to the printer as follows:
# splp -p+ lp0# lptest 10 10 > /dev/lp0
If the printer is a PostScript, then use the cat command with a small PostScript file that you know works. Our suggestion is that you use one of the header files, such as H.ps:
# cat /usr/lib/lpd/pio/burst/H.ps > /dev/lp0
If this prints, this indicates the problem is with the print service. If the command hangs and then returns the error message when you press Ctrl-C:
ksh: /dev/lp0: 0403-005 can’t create the specified file
then this usually indicates that either the printer is not turned on or that there is a cable problem. With serial printers, this usually indicates that there is no signal coming from the printer to the computer CTS signal pin.
8.1.4.4 Is there enough space in the spool file system?To find the space in the file system in KB and the size of the file, see how much space is left in the /var, /tmp, and /etc file systems. If the space in /var is smaller than the file you are trying to print, increase the file system size using smitty chjfs fast path. Commands to check the size of the file systems and file are:
# df -k# ls -l full-path-name-to-file
382 Printing for Fun and Profit under AIX 5L

Make sure to look at the space that is left in the file system and not the percentage left.
The file space issue is most important in two cases:
1. When you are spooling files.
Spooling files makes a copy of the file before it is sent to the printer. For PowerPC-based printing, files are spooled to /var/spool/lpq/qdaemon, while in System V, they are spooled to /var/spool/lp/tmp. If you expect a lot of large files, then we recommend that you create a separate file system and link the spool directory. This gives you the advantage of being able to reduce the size of the file system much easier than reducing the size of /var. For more information when files are spooled, see Section 1.9, “To spool or not to spool” on page 30.
2. When the server is receiving files from a remote client.
Files received by the lpd daemon in PowerPC printing are received in /var/spool/lpd and stored there until they print. If you receive too many files, or if the files are too large, you can run out of space in this directory as well. This is harder to link, since the PowerPC print subsystem permanent files are stored in subdirectories with this as the parent directory.
8.1.4.5 Nothing prints, but you get an error messageThe error messages that you get back from the print command that you use will usually be different for the two print subsystems and will be covered in the separate sections later in this chapter.
8.1.5 The output is garbled or incompleteThis section is designed to help you fix problems once there is ink on the paper. This may range from legible text with minor flows in formatting to just a few garbled characters on the page.
8.1.5.1 Are the port settings correct?If all you see are few upside down question marks and other characters that do not look much like real text, this may indicate a bad baud rate setting if you are on a serial connection. Make sure that the baud rate set on the printer and the one set on the computer match. If you are going through a modem or a multiplexer, then you may also have to match the baud with these devices.
8.1.5.2 Are the tabs set correctly?You will see this problem most often in printing text documents with tables. Confirm this is the problem by creating a couple lines of text in a file with
Chapter 8. Troubleshooting 383
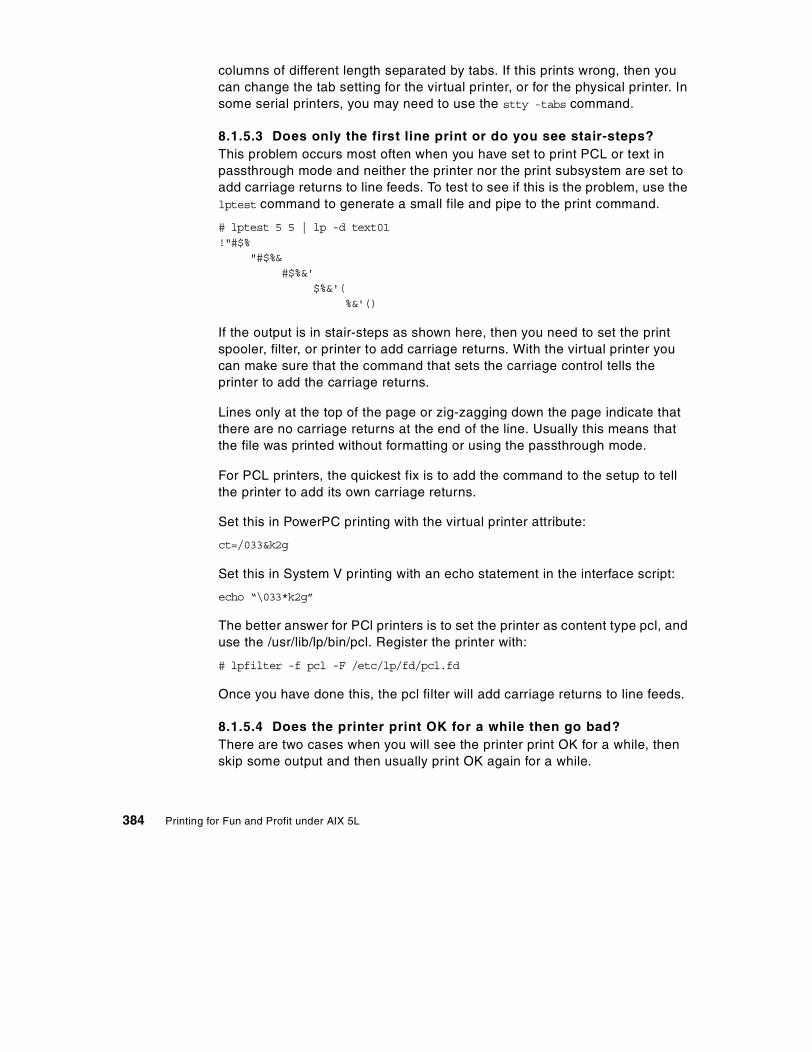
columns of different length separated by tabs. If this prints wrong, then you can change the tab setting for the virtual printer, or for the physical printer. In some serial printers, you may need to use the stty -tabs command.
8.1.5.3 Does only the first line print or do you see stair-steps?This problem occurs most often when you have set to print PCL or text in passthrough mode and neither the printer nor the print subsystem are set to add carriage returns to line feeds. To test to see if this is the problem, use the lptest command to generate a small file and pipe to the print command.
# lptest 5 5 | lp -d text01!"#$% "#$%& #$%&' $%&'( %&'()
If the output is in stair-steps as shown here, then you need to set the print spooler, filter, or printer to add carriage returns. With the virtual printer you can make sure that the command that sets the carriage control tells the printer to add the carriage returns.
Lines only at the top of the page or zig-zagging down the page indicate that there are no carriage returns at the end of the line. Usually this means that the file was printed without formatting or using the passthrough mode.
For PCL printers, the quickest fix is to add the command to the setup to tell the printer to add its own carriage returns.
Set this in PowerPC printing with the virtual printer attribute:
ct=/033&k2g
Set this in System V printing with an echo statement in the interface script:
echo “\033*k2g”
The better answer for PCl printers is to set the printer as content type pcl, and use the /usr/lib/lp/bin/pcl. Register the printer with:
# lpfilter -f pcl -F /etc/lp/fd/pcl.fd
Once you have done this, the pcl filter will add carriage returns to line feeds.
8.1.5.4 Does the printer print OK for a while then go bad?There are two cases when you will see the printer print OK for a while, then skip some output and then usually print OK again for a while.
384 Printing for Fun and Profit under AIX 5L

The first case is when the flow control (serial handshake) is not set up properly between the computer and the printer. This is only a problem with RS/232 attached printers, since RS/422, parallel, and network printing all have flow control built-in to the protocol or hardware.
For RS/232 attached printers, we recommend that you use hardware flow control whenever possible. With hardware flow control, when the print buffer on the printer reaches a high water mark, the printer signal on a line such as DTR drops. When this happens, if this signal line is attached to the AIX DCD signal, the AIX computer will stop sending data until the line is asserted once again. Because this is handled in hardware, the printing stops immediately. As soon as the printer empties the buffer to a low water mark by printing the information from the buffer, the DTR signal is asserted and AIX starts sending data once again. The important consideration in hardware flow control is to recognize which signal line is used by the printer to indicate buffer flow and make sure that line is attached to the DCD signal line on the AIX side. In the rare instance when you set up a printer as a TTY device, then RTS-CTS flow control should be used.
When the computer to printer is setup with software flow control (also called XON/XOFF flow control), the printer signals that the buffer has reached its low water mark by sending an XOFF character on the printer TxD line, which is received on the computer RxD line. The computer may wait continue to send data a character at a time until it receives a number of XOFF characters before stopping the data flow. Once the printer buffer is emptied to the low water mark, the printer sent an XON signal to tell the computer to resume sending data. This procedure has an built-in delay, and with slow printers can cause buffer overflow and lost data. You may be able to change the print output buffer size on the device driver or set parameters to reduce the delay in responding to the XOFF, but we recommend that you change to hardware flow control if you possibly can. To change the number of XOFF characters that the driver looks for, change the RECEIVE trigger level in smitty devices for the printer from 3 to 1.
The second case is when the timing delay is bad for parallel printers, or the device driver buffer size is too large for the printer. For slow parallel printers and plotters, there is a smit parameter called Microseconds to delay between characters that can help avoid this type of problem. To change the transmit buffer size for a serial printer, use smitty devices and change the printer TRANSMIT buffer count.
Chapter 8. Troubleshooting 385
8.1.5.5 Are there problems printing graphics?If you are trying to print graphics files directly, then you need to find a filter that will convert the graphics to either PCL or PostScript, or use a program like a browser or xv to view the graphics file and print from there. This is usually a good solution for printing to PostScript printers.
If the graphics are in a PostScript document, then the problem probably lies in an incompatibility between the application that created the data and the printer, or you have passed the PostScript file through an ASCII text filter that has split the file based on width or added extra characters.
If the file is a formatted PCL file, the most common problem is that when the file is printed though an ASCII text queue, the line width is truncated by the text filter. It is important to print these files in a passthrough mode and tell the printer to add carriage returns to line feeds.
8.1.5.6 Is the printer type correct?Printing with the wrong printer type for the data stream can cause several different but equally undesirable results. Many people believe that all laser printers are PostScript printers. This is not the case. PostScript is often an add-on option for a laser or other printer.
Does PostScript print out like a program listing?If the output on the printer looks the same as the file if you view it with the pg or more commands, then most likely problems are that either the printer does not support PostScript, or you have sent the PostScript file to an ASCII printer or queue, which has sent commands to the printer to tell the printer to print text. You can fix the first case by using a PostScript printer, or in some cases, using a filter like GhostScript to convert the PostScript to PCL or other format. In the second case, you can fix it by creating a PostScript queue for PostScript print jobs.
Do you have unexpected symbols in the output?In this case, much of the output prints fine, but there are control characters either at the beginning or throughout the text. Control characters for one printer may print as symbols on another. A good example would be printing a file created for an Epson injet printer on an HP injet printer. This is especially true if the file were created in a Windows application where sometimes the characters are printed as graphics. In files created on AIX, if you use the wrong virtual printer for PowerPC printing, or the wrong printer type in System V printing, then the control characters set to initialize the printer could also exhibit this behavior.
386 Printing for Fun and Profit under AIX 5L

8.1.6 The output spacing is badThe output contains the expected text and may be readable, but the text appears in an unexpected format, such as:
• Double spaced
• No left margin
• Lines only at the top of page, or zig-zagging down page
• Incorrect printer type
8.1.6.1 Double spacedIf your output is double spaced, this usually indicates that you have printed a file that already contains carriage returns at the end to a virtual printer or System V printer that adds carriage returns to line feeds. The solutions to this problem are to print in passthrough mode, or to use a filter to strip the existing carriage returns before submitting the job to the print processing.
8.1.6.2 No left marginIf you print a file that starts with tabs at the beginning of some lines, but these lines are printing at the left margin, then the tabs are not being correctly converted to spaces or not handled properly by the printer. This problem is unlikely to occur on PowerPC-based printing, because the default is to map tabs to eight spaces. In System V, if the printer’s tab settings are not correct, they should set every eight spaces. You can have the System V print service not send tabs by using the -tabs stty option as follows:
# lpadmin -p printer-name -o stty=-tabs
8.1.7 The output prints with the wrong fontThe size and type of font is dependent on several issues:
• Is the file PostScript or formatted PCL?
• What is the default font for the printer?
• What fonts are installed on the printer?
• Does the interface program or printer backend set the font?
• What is the LANG variable set to?
8.1.7.1 Is the file PostScript or formatted PCL?With PostScript or formatted PCL files, the fonts are often specified inside the document. It may be that the font requested is not available on the printer. Potential solutions are to change the font in the document, downloading the
Chapter 8. Troubleshooting 387

font to flash memory on a semi-permanent basis, or downloading the font with the print job.
For PostScript fonts, the font is specified in a statement like this:
/Times-BoldItalic findfont
Since PostScript files contain only ASCII text, you can edit and change this with an editor to a font that is available on your printer.
8.1.7.2 What is the default font for the printer?If the interface program or printer backend do not set the font, then the default font for the printer will be used. The method to check the default font will be different for different printers. See the printer technical reference manual for more details. Another option is to add a command to set the font to the interface script or backend program. When using System V printers, this can be done with echo statements in the interface script similar to:
echo “\033(s3T”echo “\033(s15H
For the PowerPC print subsystem, when using virtual printers, the font setting is a part of the virtual printer setup. Normally, there will be a limited selection of the available fonts. For PCL printers, the available fonts are usually defined by the mU, eP, or eT attribute of the virtual printer. It is always possible to add a font command at the end of the printer initialization attribute ci.
8.1.7.3 What fonts are installed on the printer?In most printer setup or test sequences, there is a method to print the available fonts. In today’s printers, there is usually a large selection of over 60 fonts available, and these should meet most needs. When a required font is not available in the printer, use one of the font download methods described in the advanced chapter for the appropriate print subsystem.
8.1.7.4 Does the interface program or printer backend set the font?In UNIX print subsystems, the character sets, styles, and fonts can be set once at the beginning by the interface program or printer backend.
In System V, the fonts are set by the interface script. For the standard interface script, the CHARSET environment variable is used to determine the required character set. If CHARSET is enabled, then it is passed to the lp.set filter as the fifth parameter. The lp.set then checks to see if the character set exists in the printer terminfo database and if it does, it will output the command string from the database to initialize the printer. This will only work with TERM types where the character set is defined. When using
388 Printing for Fun and Profit under AIX 5L

manufacturer scripts or interfaces build on the /usr/lib/hpnp/hpnpIS.model, the character set is chosen by echoing a command sequence. For example, in the hpnpIS.model script, the following line selects the character set:
echo “\033)0B\c”
The command used to set the pitch to 12 cpi is:
echo “\033(s12H\033)s12H\c”
To make changes to character sets not supported by the script, you will have to add changes to the interface script. In this case, the user chooses the pitch with the lp -o pitch=condensed or similar command.
In PowerPC virtual printers, the printer is initialized by the ci attribute sequences. These are set from SMIT, Web-based System Manager, or with lsvirprt. Users can select the print style and pitch with qprt -s style -p pitch. To support font sizes or styles not supported by the virtual printer requires special customization. For PCL printers, this is usually done with the mU attribute.
8.1.7.5 What is the LANG variable set to?For the PowerPC print subsystem using virtual printers, the installation LANG variable will set the input translation table for the particular virtual printer. This will show up in the _X attribute:
# lsvirprt -q asc -d lp0 -a X
Name Description Value_X CODE PAGE of print file ISO8859-1
The default codepage for the US is ISO8859-1. One of the problems that people experience is that files with box characters do not print the boxes correctly when this codepage is used. To print a simple ASCII text file that contains line drawing characters, specify the IBM850 codepage by changing the X attribute, or by using the following command:
$ qprt -XIBM850 -Ptext /tmp/testfile
8.1.8 The print job requests the wrong paper sizeFor PCL or other ASCII printers, make sure the default paper size is set right in the virtual printer or interface script. Next, make sure the command for the paper size is not embedded in the file. For PostScript files, the paper size is often defined inside the print file itself, and there is little you can do in the virtual printer or interface script to change it. You should go back to the application that creates the file.
Chapter 8. Troubleshooting 389

8.1.9 Network print jobs fail to printWhen printing to network print servers and network printers, the goal of troubleshooting is to isolate the problem to the print client or server and then to do local problem determination.
8.1.9.1 Print Jobs still queued on local queueSince the job is still queued on the local (client) queue, you can assume that the job was rejected by the remote (server) system, or that the system could not be reached.
Can the client reach the server?Before looking for printing specific problems, you should make sure that you have a good network connection between the client and the server. You should be able to ping the server from the client both by address and by name.
If you can not ping by both address and name, then printing is not going to work. If you can not ping even by address, then fix the networking problem or make sure both the client and server are turned on and that you can ping the client from the server.
Are there any name resolution problems?Because the rembak client and the lpd server may do a gethostbyname call, it is important that both the client and the server can recognize each other not only by address but also by name. If you are using DNS, then use the nslookup command to check the name lookup both by address and by name.
If you are not using a Domain Name Server (DNS), then use the host command instead of nslookup.
If you fail to get the same results from the address and the name, or if you do not get a name at all, then either add the names to the DNS or to the /etc/hosts file.
Is the lpd daemon turned on the server?If the server is an AIX system running the PowerPC print subsystem, then you can check to see if lpd is running by using the following command:
# lssrc -s lpd
If it is not enabled, then turn it on with:
# startsrc -s lpd
or from the SMIT menu for managing a remote printer subsystem.
390 Printing for Fun and Profit under AIX 5L

If the server is an AIX system running the System V print subsystem, then first check to see that the scheduler is running with the lpstat command:
# lpstat -r
If this is running, then use ps as follows:
# ps -ef | grep lpNet
On other servers, make sure that the lpd server is accepting jobs.
Does the client have permission to print to the server?For PowerPC servers, this means that the /etc/hosts.lpd file on the server contains an entry for the client, or has the + symbol to allow all clients. Check the server manuals for setting client permissions for other print servers. For System V printers, the allow=all only allows local users. To allow all remote users, set the allow value to all!all.
Does the network protocol match?If the server is a network printer, then make sure that it supports LPD printing, or that you are using the appropriate type of printing on AIX to support the protocol to talk to that printer.
Collect error messages and logsLook for error messages that may indicate a problem. In the PowerPC print subsystem, you can turn on logging with remote computing to help solve these problems.
Do a network trace to see if there are any identifying error messages in the output. For more about the network trace, see Section 8.2.7, “Using iptrace to trace network printing” on page 397.
Check to see if the user received e-mail or a messageThe text of the mail will often give the information required to diagnose the problem.
Is the control file sent in the right order?In AIX 4.3, the PowerPC print subsystem introduced the capability to send the LPD control file before the print job. This capability is not supported by all servers, but can help with the print speed with some of them. When setting up a remote printer, make sure that this value is set properly.
Is there enough space on the server?Some jobs are rejected by the server because there is not enough room to store the file. In this case, the file may be so large that a trace is nearly
Chapter 8. Troubleshooting 391
impossible. This problem is probably most easily identified if only large print jobs do not get moved to the remote server system.
Are the permissions for LPD correct on the server?We have seen cases where the permissions for the lpd daemon or spool directory have been changed by mistake and the daemon was unable to save files. Check both the userid that is running lpd, and the file permissions on the daemon and the /var/spool/lpd directory.
Does iptrace show error messages?Sometimes the server will send back a text error message that can be seen in the iptrace file that will help to identify the cause of the problem. See Appendix D, “Tracing remote printing” on page 499 for more information.
Does iptrace show negative acknowledgementsAfter each request by the client, the server should return a single byte with a zero value. This can be seen in the iptrace output. If this value is non-zero, then the client is sending an error message back (sometimes called a negative acknowledgement or NACK) to the server. The PowerPC print subsystem will assume this means the client is not ready, and will change the queue status to DOWN. The System V print subsystem will retry after a specified timeout period for a specified number of tries based on the values in the Systems file
8.1.9.2 Is the timeout value set for System V remote printing?When using remote printing with the System V print subsystem, make sure that you have set a timeout value for the system you are printing to with the lpsystem command to set the timeout to two minutes:
# lpsystem -T 2 -p printer-name
8.1.9.3 Print jobs backing up on remote queueIf the print job backs up on the remote queue, then the connection between the client and the server was successful. In this case, you have a local printing problem on the server system.
8.1.9.4 Print jobs disappearMaybe the most frustrating problem is when the job seems to just disappear. This can be caused by flags that are accepted by the remote system lpd but are incompatible with the printer or virtual printer on the server, or it can be a file that is incompatible with the printer on the server.
392 Printing for Fun and Profit under AIX 5L

Disable the queue on the remote systemBy disabling the queue on the remote system, you can find out several things. First you can make sure that the print job has actually been queued on the server. If it has not, then you can use iptrace to make sure that if it ever left the client. If it was transferred, but is no longer queued, then the lpd daemon may have some problems passing the job to the print subsystem. If the trace shows the job never left the client, then you have isolated the problem to the client.
If the file is queued on the server, then you can check to see if the flags passed to the server are valid, and if the file will print to the queue when submitted locally.
Are the flags right?This is a good time to play capture the flag, as described in the individual print subsystem sections. There are two places to get the flags. The first is from the control file in the iptrace. The second is from request description file. In PowerPC printing, this file is the job description file in /var/spool/lpd/qdir. In System V printing, the flag can be found in the request file in /var/spool/lp/tmp/printer-name/printid-0. More detail is provided in the messages and logs section of each print subsystem.
Some print servers can support extra flags, such as the -o flag, and others cannot. PowerPC remote printing uses a number of non-standard flags that may be either ignored, refused, or used improperly by other print servers. It is important to set the server type to BSD or ATT if you are not going to use an AIX PowerPC based remote server. For printing from PowerPC to System V, use the ATT value.
Does the file print right locally on the server?The name of the copy of the file on the AIX server can also be found in the same request description files as talked about in the previous section. Copy this file to /tmp/testfile. Now enable the queue on the server. The print job should disappear again, or you have discovered a timing problem. Now print a copy of the file you saved to /tmp/testfile without any flags. If this prints OK, then you know the file prints OK and you can try the file with the flags you found in the previous step. Often, you will need to use the -o flag with enq or lp to use the captured flags. If the file does not print, then you have a local printing problem with that file, and you can use the local print troubleshooting steps elsewhere in this chapter.
Chapter 8. Troubleshooting 393

8.2 Common troubleshooting techniques
This section describes some of the common print troubleshooting techniques that you can use on AIX. While the previous sections of this chapter are problem oriented, this section is tool oriented.
8.2.1 Using lptest to generate print filesThe lptest command is an excellent tool for generating a known output that can be printed. It generates a test pattern to standard output and can be used by piping the output to a print command, or redirecting it to a device. The syntax of the command is:
$ lptest columns lines
For example to generate a file 20 lines wide by 5 lines long, use the following command:
$ lptest 20 5!"#$%&'()*+,-./01234"#$%&'()*+,-./012345#$%&'()*+,-./0123456$%&'()*+,-./01234567%&'()*+,-./012345678
This command is useful for making sure a printer has the right print width and page length, because you can generate exactly the number of rows and columns that should fit on a page. In other cases, you can generate a small number of short rows to see if there is any stair-step effect on the printer.
To test printing, use pipe for the output to the print command:
$ lptest 10 5 | lp -d laser1
To output directly to the print device, use the following command:
$ lptest 15 5 > /dev/lp17
8.2.2 Use enscript to generate PostScriptThe enscript command must be installed from the bos.txt.ts fileset. This command generates PostScript files from ASCII text files. You can combine it with the output from lptest with enscript for testing PostScript printers. Use the -d flag to specify the print queue.
$ lptest 10 10 | enscript -d ps1
The enscript command can be used to provide additional capabilities, such as page titles, special fonts, and 2-up printing.
394 Printing for Fun and Profit under AIX 5L

8.2.3 Use splp to look at printer devicesThe splp command gives you the characteristics of the printer device. For a serial printer, it also gives the port characteristics, such as baud rate. If you are having problems with files catted directly to the port, try setting the device driver to passthrough with:
# splp -p+ lp0
Example of splp output from a parallel printer:
# splp lp0
device = /dev/lp0 (+ yes ! no)CURRENT FORMATTING PARAMETERS (ignored by qprt, lpr, and lp commands)Note: -p + causes the other formatting parameters to be ignored.-p ! pass-through? -c + send carriage returns?-l 64 page length (lines) -n + send line feeds?-w 80 page width (columns) -r + carriage rtn after line feed?-i 0 indentation (columns) -t ! suppress tab expansion?-W ! wrap long lines? -b + send backspaces?-C ! convert to upper case? -f + send form feeds?CURRENT ERROR PROCESSING PARAMETERS-T 300 timeout value (seconds) -e ! return on error?
8.2.4 Printing to a filePrinting to a file is one of the most useful techniques for testing how the print interface programs, backends, and filters change a print file. Because this is done differently, it will be discussed separately with each print subsystem. Refer to Section 8.3.7, “Printing to a file” on page 409 for printing to a file with the System V print subsystem and Section 8.4.5, “Printing to a file with PowerPC printing” on page 425 for printing to a file with the PowerPC print subsystem.
8.2.5 Printing directly to the device special fileIf the queue is continuously going to a down or disabled state, the problem may be in the cabling or the device driver. To print a file directly to the device, you can use the cat command and simply redirect the output to the device as shown here:
# cat /etc/hosts > /dev/lp32
If this hangs, then the printer connection may be bad, including missing signals. If you press Ctrl-C, and the screen message that returns refers to Can’t create device, this is an indication that the serial connection is not
Chapter 8. Troubleshooting 395

receiving a signal on the computer CTS line. Try wrapping back RTS to CTS with a jumper to see if this solves the problem. If it does, then fix the wiring.
If you get a message back that the device is busy, use the fuser command to find the process that has the printer open, as follows:
# fuser /dev/lp12
When printing formatted files to the device, you may need to use splp to place the driver in passthrough mode, as described above.
Some applications open the file /dev/lp## directly and print to the file. This should work OK, but will probably put a lock on the file, so the print scheduler will not be able to use the print device.
8.2.6 Printing directly to network printers
8.2.6.1 Printing directly to an LPD attached printerYou can use rembak to print directly to the LPD on another system, but only if you are root user or a member of the printq group. Save the file that you want to print, and use the -S flag to designate the server IP address and the -P flag to specify the printer name on the server. The rembak command can not act like a filter as it will not accept standard input. For example, to print to host net27 with a queue name of ASCII, only root can use the following command:
# /usr/lib/lpd/rembak -S net27 -P ASCII /tmp/testfile
8.2.6.2 Printing directly to an HP JetDirect attached printerAIX contains two commands to print to HP JetDirect printers. For the PowerPC print subsystem, /usr/lib/lpd/pio/etc/piohpnpf will be used to send jobs to the printer. For the System V print subsystem, /usr/lib/hpnp/hpnpf will be used to send the jobs. The only flag needed for testing is the -x flag, which designates the hostname or IP address of the printer or JetDirect box port 0. This will send data to port 9100. The following shows sample commands for each print subsystem:
# lptest 10 10 | /usr/lib/lpd/pio/etc/piohpnpf -x laser42.biguys.myco.com# lptest 20 10 | /usr/lib/hpnp/hpnpf -x laser42.bigguys.myco.com
8.2.6.3 Telnet to JetDirect printersFor true HP JetDirect printers or print servers, you can telnet to port 9100 (or the appropriate port). You do not have to login, but can type text directly. Once you are done, type the escape control sequence given (usually Ctrl-[) and the printer will print. For example:
# telnet 150.1.1.4 9100# Trying...
396 Printing for Fun and Profit under AIX 5L

Connected to 150.1.1.4Escape character is ‘^]’Testing to see if this printsLine two^] - Press the ctrl-] keytelnet> quitConnection closed
This should print the following:
Testing to see if this printsLine two
8.2.7 Using iptrace to trace network printingThe two most used network tracing tools on AIX are iptrace and tcpdump. While tcpdump is useful for determining the protocols and amount of data going over the network, iptrace is the most useful for printing because you can see both the handshaking as well as the actual data as it passes between the client and the server. It is also the only tool that can be used to capture the LPR control file being sent to the server.
To run iptrace for printing, you should first know which TCP/IP port that the transfer will use. When using standard remote printing, the well known printer port 515 will always be used. For using the HP JetDirect protocol, the port number will be 9100, except for JetDirect EX boxes with multiple ports, which will use ports 9101 and 9102. For terminal servers, you will usually find the port number during the setup. The format of the iptrace command that you should use for tracing printing is:
# iptrace -p port-number -a -b -s client-name -d server-name file-name.trc
Try to print with as small a job as you can and still observe the problem (to reduce the size of the file). Once the test job has been transferred, check to see that the file has increased in size over the 11 byte beginning size. If it has not grown in size, then you probably have multiple interface adapters and may need to use the -i flag to specify a particular adapter. Assuming that the file has grown in size, find the process id of the iptrace, and then use ipformat to format the output. The following shows a sample capture of standard remote printing between host prtsrv and netprt01:
# iptrace -p 515 -a -b -s prtsrv -d netprt01 /tmp/test.trcprint from the users application# ps -ef | grep iptrace root 12908 6970 0 14:41:51 - 0:11 lptrace# kill 12908# ipreport -n /tmp/test.trc > /tmp/test.rpt
Chapter 8. Troubleshooting 397

# pg /tmp/test.rpt
Appendix D, “Tracing remote printing” on page 499 contains instructions for analyzing the output.
8.2.8 Capturing filesFiles can be captured in many places along the path between the job submitter and the printer. This is necessary to find where errors may be occurring.
8.2.8.1 Capturing the file before it goes through the queueIt is often important to know if the problem is with the file, the print settings, or with the virtual printer. The user may not actually know what the file looks like. This is especially true if the job is created by an application that sends the job to the printer. These steps show how to capture the input file when using the PowerPC print subsystem:
1. Disable the queue:
# disable testq
2. Submit the job to the queue. Usually this would be from an application. For example, you would use the following print command in Netscape:
# lpr -P testq
Check to make sure the job is queued:
# lpstat -vtestqQueue Dev Status Job Files User PP % Blks Cp Rnk------- ----- --------- --- ------------------ ---------- ---- -- ----testq lpx DOWN QUEUED 66 STDIN.76636 root 1 1 1
3. Find the filename of the spooled file from the job description file:
# ls /var/spool/lpd/qdirn0root:local$#@!iXybn0root:testq$#@[email protected]:kristin$#@!iGUb
4. Tail the qdir file to get the spool file name:
# tail /var/spool/lpd/qdir/n0r00t:test*-Ptestq
STDIN.76636rootrs9220b
398 Printing for Fun and Profit under AIX 5L

0/var/spool/qdaemon/t0lkRMa 2
5. Copy the file to /tmp/testfile. The last line of the file contains the filename:
# cp /var/spool/qdaemon/t0lkRMa /tmp/testfile
Examine the file and print it with different flags. If printing remotely, you may want to compare it to the file once it reaches the server.
8.2.8.2 Capturing a file after it goes through the queueTo capture the file after it goes through the queue, print to a file, as described in Section 8.3.7, “Printing to a file” on page 409 and Section 8.4.5, “Printing to a file with PowerPC printing” on page 425.
8.2.8.3 Capturing a file as it goes over the networkThe iptrace command can be used to capture the file and the flags as the file moves across the network from the client to the server. This can help determine if the entire file is being sent to the server, and what flags were sent. See Section 8.2.7, “Using iptrace to trace network printing” on page 397 for more information.
8.2.8.4 Capturing a file on the remote systemIf the remote system or server is running AIX, then you simple disable the queue on the remote system, and capture it as described in Section 8.2.8.1, “Capturing the file before it goes through the queue” on page 398. If it is a different type of server, you will have to use tools from that server, or simply use the iptrace as it goes to the server.
8.2.9 Capture the flagOften a flag that is not compatible with the system can cause a file to simply disappear. This happens when printing from applications, mainframe print methods in VMS and OS/400, or from PC based lpr clients. To capture the flags, disable the queue and print the file or from the application. Then look at the job control file.
8.2.9.1 System V flagsIn System V printing, the flags can be found in the request file in /var/spool/lp/tmp/hostname/printid-0.
Chapter 8. Troubleshooting 399
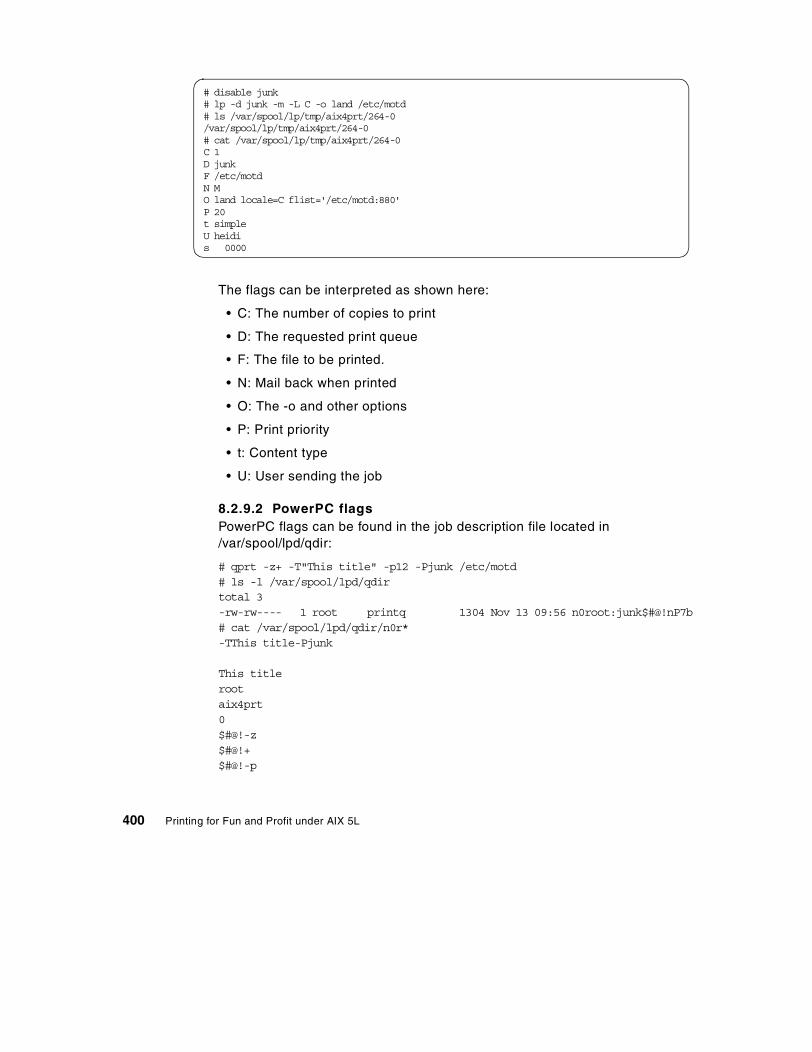
The flags can be interpreted as shown here:
• C: The number of copies to print
• D: The requested print queue
• F: The file to be printed.
• N: Mail back when printed
• O: The -o and other options
• P: Print priority
• t: Content type
• U: User sending the job
8.2.9.2 PowerPC flagsPowerPC flags can be found in the job description file located in /var/spool/lpd/qdir:
# qprt -z+ -T"This title" -p12 -Pjunk /etc/motd# ls -l /var/spool/lpd/qdirtotal 3-rw-rw---- 1 root printq 1304 Nov 13 09:56 n0root:junk$#@!nP7b# cat /var/spool/lpd/qdir/n0r*-TThis title-Pjunk
This titlerootaix4prt0$#@!-z$#@!+$#@!-p
# disable junk# lp -d junk -m -L C -o land /etc/motd# ls /var/spool/lp/tmp/aix4prt/264-0/var/spool/lp/tmp/aix4prt/264-0# cat /var/spool/lp/tmp/aix4prt/264-0C 1D junkF /etc/motdN MO land locale=C flist='/etc/motd:880'P 20t simpleU heidis 0000
400 Printing for Fun and Profit under AIX 5L
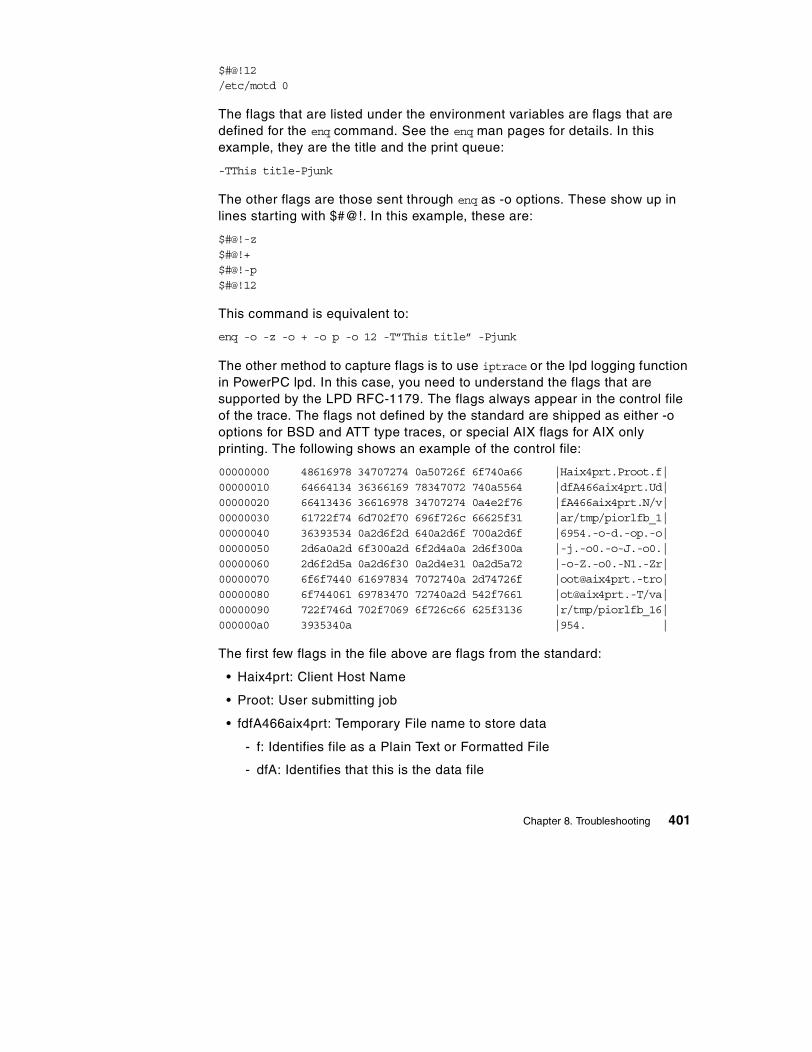
$#@!12/etc/motd 0
The flags that are listed under the environment variables are flags that are defined for the enq command. See the enq man pages for details. In this example, they are the title and the print queue:
-TThis title-Pjunk
The other flags are those sent through enq as -o options. These show up in lines starting with $#@!. In this example, these are:
$#@!-z$#@!+$#@!-p$#@!12
This command is equivalent to:
enq -o -z -o + -o p -o 12 -T”This title” -Pjunk
The other method to capture flags is to use iptrace or the lpd logging function in PowerPC lpd. In this case, you need to understand the flags that are supported by the LPD RFC-1179. The flags always appear in the control file of the trace. The flags not defined by the standard are shipped as either -o options for BSD and ATT type traces, or special AIX flags for AIX only printing. The following shows an example of the control file:
00000000 48616978 34707274 0a50726f 6f740a66 |Haix4prt.Proot.f|00000010 64664134 36366169 78347072 740a5564 |dfA466aix4prt.Ud|00000020 66413436 36616978 34707274 0a4e2f76 |fA466aix4prt.N/v|00000030 61722f74 6d702f70 696f726c 66625f31 |ar/tmp/piorlfb_1|00000040 36393534 0a2d6f2d 640a2d6f 700a2d6f |6954.-o-d.-op.-o|00000050 2d6a0a2d 6f300a2d 6f2d4a0a 2d6f300a |-j.-o0.-o-J.-o0.|00000060 2d6f2d5a 0a2d6f30 0a2d4e31 0a2d5a72 |-o-Z.-o0.-N1.-Zr|00000070 6f6f7440 61697834 7072740a 2d74726f |[email protected]|00000080 6f744061 69783470 72740a2d 542f7661 |[email protected]/va|00000090 722f746d 702f7069 6f726c66 625f3136 |r/tmp/piorlfb_16|000000a0 3935340a |954. |
The first few flags in the file above are flags from the standard:
• Haix4prt: Client Host Name
• Proot: User submitting job
• fdfA466aix4prt: Temporary File name to store data
- f: Identifies file as a Plain Text or Formatted File
- dfA: Identifies that this is the data file
Chapter 8. Troubleshooting 401

- 466: Job number on the client
- aix4prt: Client host name
• UdfA466aix4pr: Unlink this File when done (says this is temporary file)
The other flags in the control file are divided between other flags, for example, flags that start with a -o, and enq flags. The enq flags are the flags found within man enq. Many of the -o or other flags are actually virtual printer or qprt flags when used between two AIX systems, but are transferred as other flags, because LPD on the server passes the flags to enq to start the print process on the AIX server.
The following shows how the flags are logged when lpd logging is turned on, as described in Section 8.4.4.5, “Remote printing logs” on page 423:
lpd[56734] doit: cfn=[cfA929tesch.972600121].lpd[56734] doit: get a line [Htesch].lpd[56734] doit: get a line [Proot].lpd[56734] doit: get a line [fdfA929tesch].lpd[56734] doit: get a line [UdfA929tesch].lpd[56734] doit: get a line [NSTDIN.6404].
8.2.10 Using the script shell to capture user inputWhen using any command from the command line that gives more output than a single screen will hold, use the script command to capture your keystrokes and the program output. This can be quite useful if you are running a printer install script such as /usr/lib/hpnp/hpnpcfg. To use script, follow these instructions:
1. Start the script shell and designate a log file:
# script /tmp/hpnpcfg.log
2. Run the command that you want to diagnose:
# /usr/lib/hpnp/hpnpcfg
3. After the program exits, exit the script by typing exit:
# exitScript command is complete on Mon Oct 23 19:17:23 CST 2000
4. Print out the log or page it to the screen:
# lp -d net12 /tmp/hpnpcfg.log
402 Printing for Fun and Profit under AIX 5L

8.2.11 Using fuser to find processesThe fuser command gives a list of the process IDs associated with a file. Since device drivers in UNIX are represented by files, it is possible to find the process that is currently printing to a device by using fuser, as shown here:
# fuser /dev/lp0/dev/lp0: 12808 45590 # ps -ef | grep 12808 root 12808 7756 0 13:46:36 - 0:00 /usr/lib/lpd/piobe /etc/motd root 45590 12808 0 13:46:36 - 0:00 /usr/lib/lpd/pio/etc/pioout
This can be useful when trying to free a hung printer queue.
8.2.12 Using the echo statement in shell scriptsMuch of System V printing is done through shell scripts, and simple shell scripts can be written for PowerPC printing to diagnose things such as bad flags being passed. Because the standard out of the shell script is often directed to the printer or to an unknown locations, when using the echo statement, direct it to a known file. For System V, an example is given in Section 8.3.10, “Troubleshooting System V interface scripts” on page 412.
8.2.13 Special considerations for some RS/232 adapters
8.2.13.1 16-port adapter considerationsThe 16-port adapter uses a breakout box that has 25-pin connectors. The pinouts for these connectors satisfy the requirements for printing because Txd, Rxd, DCD and DTR are all present. In cases where users try to use CTS flow control, there will be problems, because the CTS signal is not brought out to the breakout box. The CTS signal tells AIX that the printer is turned on. The CTS signal is wrapped back, and AIX may not be able to tell if the printer has been turned off. This is especially true when using software flow control.
8.2.13.2 128-port adapter considerationsThe 128-port adapter breakout boxes are called Remote Asynchronous Nodes (RANs). The connectors are RS/45 connectors similar to those used in networking.
One of the problems with using the 128-port adapter is that the RJ/45 connectors use a unique pinout for the RS/232 signal lines that is different from the 64-port adapter and the 7318 network terminal server that IBM used to sell. It is important that you check the pinouts carefully when adding devices on 128-port adapters.
Chapter 8. Troubleshooting 403

The second problem with 128-port adapters is that the DCD signal is on the outside pin of the 10-bin RJ/45 connector. This is the signal that the AIX device driver uses for hardware flow control. Since 10-bin RJ/45 connectors are hard to find at times people use 8-bin connectors, which does not contain the DCD pin. Through software control, the DSR signal (pin 2) can be made to act like DCD and the hardware flow control will still work. For this to work, you must set Use Alternate RJ 45 pinouts to Yes in SMIT.
8.2.13.3 Attaching printers with 4 wiresWhen buildings are pre-wired with cables containing only 4 wires, there are often problems attaching serial printers. First of all, unless you do special wiring to insure that the DTR signal from the printer attaches to the DCD signal on the AIX system, there will be no hardware flow control. Second, the CTS signal on the AIX side will need to have a wrap cable from the AIX RTS signal or the port will not be able to open and you will get the Can’t create error message when catting to the file. In the case, the queue would always go down.
The second option that some people use is to add the printer as a TTY device with clocal turned on. In this case, you will use software flow control. The only problem that we have seen with this is that the queue does not know when the printer has been taken off line, and jobs can be lost because XOFF may not be sent or seen.
8.3 Troubleshooting for System V printing
This section lists the troubleshooting techniques that only apply to System V printing on AIX.
8.3.1 File permission problemsSome of the key permissions you will want to check are:
• Are the permissions for lpsched and lpNet set to ---s--x--- owned by root:lp?
• Are the default filters in /usr/lib/lp/bin set to executable?
• Is the interface program executable?
• Are the device file attributes allowing users to print?
8.3.2 Is the print service active?To see if the scheduler is running, use the lpstat command with -r:
# lpstat -r
404 Printing for Fun and Profit under AIX 5L

scheduler is running
For printing to remote servers, check that lpNet is also started:
# ps -ef | grep lpNet
If the scheduler is not running, try to restart it with:
# /usr/lib/lp/lpsched
You do not have to separately start lpNet, as lpsched starts it automatically.
Before making major changes, disable the scheduler with lpshut.
If the daemons are not active, double check the permissions on files, and make sure that you check any changes you made since it was last active.
8.3.3 Does the printer have the right attributes?It is important the printer setup have the right attributes both for the local printer device as well as for the printer spooler attributes.
8.3.3.1 Printer deviceCheck the communications attributes of the serial or parallel device driver to make sure they match those of the printer.
8.3.3.2 System V defined printer attributesSystem V attributes that must match the printer include:
• Printer type
• Printer interface
• Content type
Other printer attributes that you need to pay attention to are the permissions for the printer and for forms set with the allow and deny flags in lpadmin. The default allow for a printer is all, but that is only good for local users. See the lpadmin man pages for the syntax for allowing remote user permissions. The setting for all users on all systems is all!all.
8.3.4 Logs and status filesThere are a number of places to check for logs.
Chapter 8. Troubleshooting 405

8.3.4.1 Check the mailCheck your mail to see if you have received any mail messages from the lp user. These will give you a place to start looking for the problem. An example error message is shown here:
In this case, the problem was with an unsupported LANG variable and the message was not much help, but in other instances, this message can be very helpful.
8.3.4.2 Check the logs in /var/lp/logsThere are three files in this directory:
• requests
• lpsched
• lpNet
From lp Tue Oct 24 09:33:01 2000Received: (from lp@localhost) by rs9220b.itsc.austin.ibm.com (AIX5.0/8.9.3/8.9.3) id JAA61332 for root@rs9220b; Tue, 24 Oct 2000 09:33:01 -0600Date: Tue, 24 Oct 2000 09:33:01 -0600From: lpMessage-Id: <[email protected]>To: [email protected]: 173Status: RO
Subject: Status of lp request hp1-357
Your request hp1-357 destined for hp1 encountered an error while printing on printer hp1.Printing stopped with an exit code of 1.
406 Printing for Fun and Profit under AIX 5L

The requests file gets updated every time someone attempts to print. It contains the default flags, and other information, as shown in this sample log entry:
This shows the ownership of the user who printed, the date the job was printed, the job id, the priority, and the content type. This also shows the location of the file being printed. This does not tell you as much about what is wrong as it does tell you how the print job was submitted. For example, this lp command used the -r flag when it was submitted.
The lpsched log tells you when lpsched was started and stopped, and any errors that have occurred in forking child processes or in executing interface scripts:
= hp1-357, uid 0, gid 0, lid 0, size 110, Tue Oct 24 09:32:59 2000z hp1C 1D hp1F /var/spool/lp/tmp/rs9220b/357-1O locale=en_US flist=':110'P 20t simpleU rootrs 0x0100
Thu Oct 12 18:55:36 2000: UX:lpsched: INFO: Print services stopped.Thu Oct 12 18:55:44 2000: UX:lpsched: INFO: Print services started.Thu Oct 12 23:12:30 2000: UX:lpsched: ERROR: 0920-281 Received unexpected signal 33; terminating.Fri Oct 13 08:39:32 2000: UX:lpsched: INFO: Print services started.Fri Oct 13 11:08:28 2000: UX:lpsched: ERROR: 0920-271 Failed to fork child process (Resource temporarily unavailable).Thu Oct 12 18:55:36 2000: UX:lpsched: INFO: The network process has terminated.
Chapter 8. Troubleshooting 407

The lpNet log shows you when network programs such as lpNet are forked, and when connections are made with remote systems. This log shows the events when we tried to cancel a job that was not printing on a remote system:
8.3.4.3 Checking the pstatus fileThe /var/spool/lp/system/pstatus file contains a status stanza for each of the printers. This file often has a line with the last failure, as shown here:
==========net12enabled accepting972671048 971311069NAK'd by remote lpd: waiting auto retrynew destination
8.3.5 Is the LANG variable set right?If you try to print from a locale that has not been fully installed on your system, you may get errors such as the one shown below:
# lptest 10 10 | lp -d hp1UX:lp: ERROR: 0920-054 There is no filter to convert the file content. TO FIX: Use the lpstat -p -l command to find a printer that can handle the file type directly, or consult with your system administrator.
However, if you simply add the -L C flag, the file prints with no errors:
# lptest 10 10 | lp -L C -d hp1request id is hp1-362 (standard input)
10/24/00 10:37 c 12972 rs1230a.myco.com lpd retrying connection to rs1230a.myco.com10/24/00 10:45 c 58614 rs1230a.myco.com ERROR: class=Fatal, type=Unix, trace=(contimeout/setjmp), Interrupted system call10/24/00 10:45 c 58614 rs1230a.myco.com Abnormal process termination.10/24/00 10:47 p 61398 <none> Got a hit.10/24/00 10:47 p 61398 <none> Got a hit. lpExec10/24/00 10:47 p 61398 <none> Started child for rs1230a.myco.com, pid = 5099010/24/00 10:47 p 61398 <none> Into Polling loop.10/24/00 10:47 c 50990 rs1230a.myco.com lpd starting (active)
408 Printing for Fun and Profit under AIX 5L

8.3.6 Cancelled remote jobs still queuedWhen a remote printer is set up, and for some reason it stops printing when you cancel a job, the job is still visible to lpstat but shows a canceled status, as shown here:
# lpstat -o allnet12-359 root 110 Tue Oct 24 10:16:50 2000 canceled
In this case, you will probably have to shut down the scheduler and restart, although it may be possible to kill the lpNet command that is hanging that port.
8.3.7 Printing to a fileBy printing to a file, you can see exactly what the virtual printer has added to the file that is being printed. With the lpadmin command, you can specify an output file with the -v option. The following procedure explains how you could use this to diagnose a problem:
1. Create a file in the /dev directory. The file must have permissions for the user doing the testing to use; therefore, you can set the permissions accordingly.
# touch /dev/lpx# chmod 600 /dev/lpx# chown lp:lp /dev/lpx
2. Create a printer to a file using the printer type, interface type, and content type that you want to diagnose:
# lpadmin -m standard -T hplaserjet -I simple -p fileq -v /dev/lpx
This may give an error if the lpx permission are set to 777 or something else, but that is not a problem. For PostScript queues, you will need to specify type PS-b, because this uses lp.cat, while PS uses postio, which will not print to a file, but only to a printer:
# lpadmin -m PS -T PS-b -I PS -p fileps -v /dev/lpx
3. Give the commands to have the printer accept jobs and enable the printer.
# accept fileqUX:accept: INFO: destination "fileq" now accepting requests# enable fileqUX:enable: INFO: printer "fileq" now enabled
4. Print to the fileq printer with a test job and make sure there is data in the file:
# lptest 5 5 | lp -d fileq -L Crequest id is fileq-594 (standard input)
Chapter 8. Troubleshooting 409

# ls -l /dev/lpx-rw-rw-rw- 1 lp lp 222 Nov 01 12:34 /dev/lpx# cat /dev/lpx
When looking at the file, it may be useful to use vi and the od command to look at escape sequences.
8.3.8 Cleaning up and starting overThere should not be a necessity to clear out all the queues and start over, but you might have a need for this if you clone a system.
8.3.8.1 Resetting the print subsystem job numberThe job number for the local jobs is stored in /spool/tmp/host-name/.SEQF and contains four fields separated by colons, as shown here:
1:999:1:598
The first two numbers are the limits of the job numbers. The next number shows where this job sequence started, and the last number (598) is the number of the next print request. To change the sequence number, just change this last value, and recycle the print subsystem with lpshut and lpsched.
8.3.8.2 Cleaning out old print filesIf you are just having problems, you may want to start out by cleaning out the job request files. First, check to see the job names and cancel them, as shown here:
# lpstat -o# cancel fileps-124
If you are not able to cancel the files, then remove the individual files from the /spool/tmp/host-name directory and the /var/spool/lp/requests/host-name directory.
8.3.8.3 Cleaning out old printersTry first to use lpadmin to remove the queues using the -x flag
# lpadmin -x fileps
Check to see if the file was not removed, and if it was not, then remove the directory files and the interface program:
# lpstat -p fileps -l# rm -R /etc/lp/printers/fileps# rm /etc/lp/interfacers/fileps
410 Printing for Fun and Profit under AIX 5L

8.3.8.4 Remove the temporary filesThe temporary message files sometimes build up in the /var/spool/lp/tmp and /var/spool/lp/temp directories and subsequent subdirectories. Use ls -lR /var/spool/lp/tmp to look for files that might be left over.
8.3.8.5 Remove the old log filesThe log files are stored in /var/lp/logs. We would make a backup copy of the logs and then copy /dev/null on top of each of the files to zero them or simply redirect nothing, as shown here:
# > /var/lp/logs/lpNet# > /var/lp/logs/lpsched# > /var/lp/logs/requests
8.3.9 Stopping unwanted header pagesIn System V printing, the banners are controlled by the interface script, the printer setup, and the command line flags.
8.3.9.1 Configuration banner selectionWhen creating the printer, specify no banners. If you are creating or modifying a printer with lpadmin, use the -o nobanner flag to specify that you do not want banners.
The configuration file in /etc/lp/printers/printer-name/configuration may show:
Banner: on:Always
The Always forces a banner page no matter what the user sends on the lp command line. After you run lpadmin -o nobanner, this line will change to:
Banner: on
This does not turn off banners, but allows the user to select to not have banners by using the -o nobanner flag with the lp command.
8.3.9.2 Command line banner selectionIf the administrator has enabled banner select for users with -o nobanner as described in the previous section, then the user can avoid banners with the lp -o nobanner flag, as shown here:
$ lp -o nobanner -d finetext
By default, the lpr command will always send a command line flag to have a header page. To avoid this, you can use lpr -h for no header.
Chapter 8. Troubleshooting 411

8.3.9.3 Interface file banner selectionFor local printers, find the interface in /var/spool/lp/admins/lp/interfaces that has the same name of the printers. The script should have a line that starts with nobanner=”no”. To easily find this in vi, use the find command with a carat (beginning of line) as follows:
/^nobannernobanner=”no”
Change this to
nobanner=”yes”
8.3.10 Troubleshooting System V interface scriptsMany of the System V interface programs are scripts. This makes it easy for you to use the echo command to investigate problems, and even to determine the order of events for local programs, or to determine where formatting errors might be occurring.
Each local printer has an interface program in /etc/lp/interfaces based on one of the model scripts. For example, if your printer is named hp1, the interface will be /etc/lp/interfaces/hp1. To see if the hp1 script is called, edit the script, and after the line that starts with the word trap, enter these two lines:
date >> /tmp/hp1.logecho "entered hp1" >> /tmp/hp1.log
Set the permission on /tmp/hp1.log, so all users can write:
# chmod 755 /tmp/hp1.log
Now print to the hp1 queue, and check the log:
Fri Oct 27 13:33:40 CST 2000entered hp1
This shows that the script is invoked. Now you can try to use this to find problems that you have. For example, if you issue the following lp command, you may want to know if the problem is from the lp command or from the interface script:
# lp -o cpi=17 -d hp1 /etc/motdUX:lp: ERROR: 0920-056 The following options can't be handled: -o cpi= TO FIX: The printer(s) that otherwise qualify for printing your request can't handle one or more of these options. Try another printer, or change the options.
412 Printing for Fun and Profit under AIX 5L

Checking the log, you will find that the entry was not logged, so the problem occurs prior to reaching the interface script, and therefore it is likely that terminfo was not checked.
You can also use this method to verify the command line arguments that have been passed to the script or to check the environment variables that have been set and passed by lpsched. Adding the lines in bold to the script can help show information that was passed:
## Check arguments###########
echo "Arguments are $*" >> /tmp/hp1.logparse () { echo "`expr \"$1\" : \"^[^=]*=\(.*\)\"`" echo "`expr \"$1\" : \"^[^=]*=\(.*\)\"`" >> /tmp/hp1.log
and
printer=`basename $0`request_id=$1user_name=$2title=$3copies=$4option_list=$5echo “printer: $printer” >> /tmp/hp1.logecho “request_id: $request_id” >> /tmp/hp1.logecho “user_name: $user_name” >> /tmp/hp1.logecho “title: $title” >> /tmp/hp1.logecho "Number of copies: $copies" >> /tmp/hp1.logecho “#options: $option_list” >> /tmp/hp1.log
shift 5files="$*" echo “Filenames: $files” >> /tmp/hp1.log
The following echo statements help to diagnose problems with the parameters sent to lp.set and can be placed in the internal_lpset subroutine:
internal_lpset () {echo "Inside internal_lpset" >> /tmp/hp1.logecho "LPSET parms are $1:$2:$3:$4:$5" >> /tmp/hp1.logecho "LPSET parms are cpi:lpi:width:length:character set" >> /tmp/hp1.log
Test the environment variables somewhere in the script with:
env >> /tmp/hp1.env
Chapter 8. Troubleshooting 413
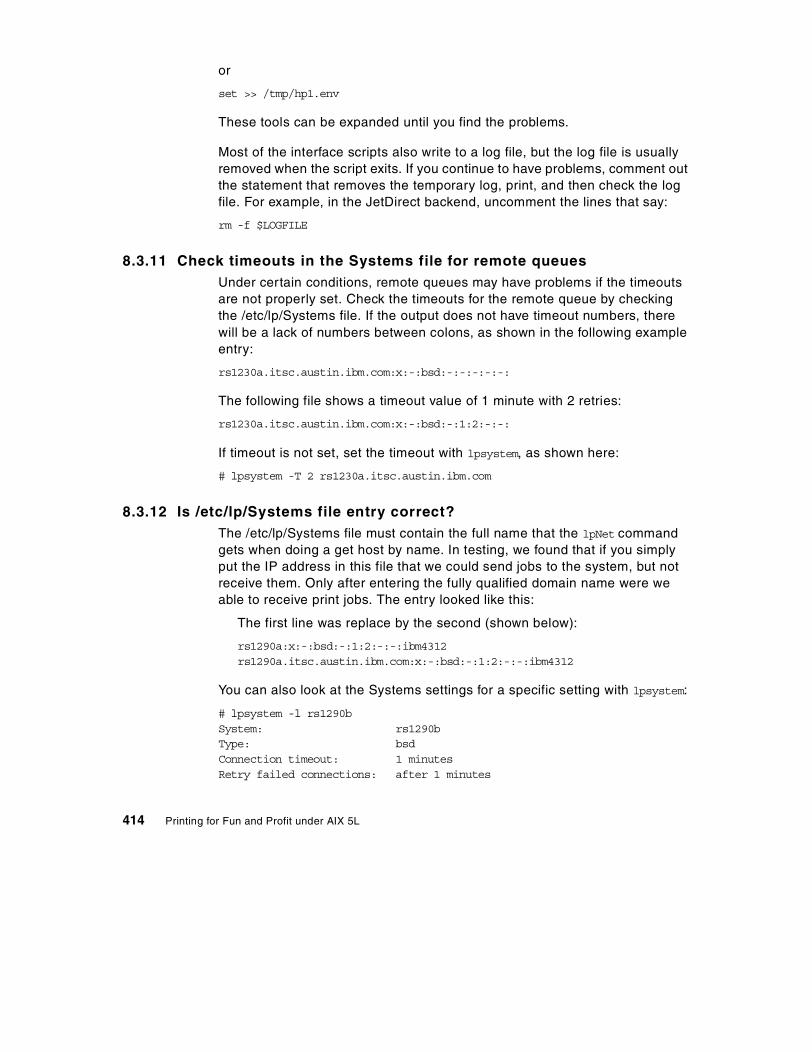
or
set >> /tmp/hp1.env
These tools can be expanded until you find the problems.
Most of the interface scripts also write to a log file, but the log file is usually removed when the script exits. If you continue to have problems, comment out the statement that removes the temporary log, print, and then check the log file. For example, in the JetDirect backend, uncomment the lines that say:
rm -f $LOGFILE
8.3.11 Check timeouts in the Systems file for remote queuesUnder certain conditions, remote queues may have problems if the timeouts are not properly set. Check the timeouts for the remote queue by checking the /etc/lp/Systems file. If the output does not have timeout numbers, there will be a lack of numbers between colons, as shown in the following example entry:
rs1230a.itsc.austin.ibm.com:x:-:bsd:-:-:-:-:-:
The following file shows a timeout value of 1 minute with 2 retries:
rs1230a.itsc.austin.ibm.com:x:-:bsd:-:1:2:-:-:
If timeout is not set, set the timeout with lpsystem, as shown here:
# lpsystem -T 2 rs1230a.itsc.austin.ibm.com
8.3.12 Is /etc/lp/Systems file entry correct?The /etc/lp/Systems file must contain the full name that the lpNet command gets when doing a get host by name. In testing, we found that if you simply put the IP address in this file that we could send jobs to the system, but not receive them. Only after entering the fully qualified domain name were we able to receive print jobs. The entry looked like this:
The first line was replace by the second (shown below):
rs1290a:x:-:bsd:-:1:2:-:-:ibm4312rs1290a.itsc.austin.ibm.com:x:-:bsd:-:1:2:-:-:ibm4312
You can also look at the Systems settings for a specific setting with lpsystem:
# lpsystem -l rs1290bSystem: rs1290bType: bsdConnection timeout: 1 minutesRetry failed connections: after 1 minutes
414 Printing for Fun and Profit under AIX 5L

Comment: jetdir
8.3.13 Example: solving a remote printing problemThis section shows a troubleshooting example for both an outgoing and an incoming LPD print job.
8.3.13.1 Example: Missing outgoing network print jobsSymptoms: Jobs to the remote printer are queued, but continue in a running state. When you try to cancel them, they stay in the lpstat output, but show as canceled. Running the lpstat -o net12 command for printer net12, there was a several second delay, and then no output printed.
After stopping the scheduler and restarting, we cleared the /etc/lp/logs/lpNet flag, and re-ran the lpstat -o net12 command. We got the following output to the lpNet log:
10/27/00 11:12 p 7888 <none> Got a hit.10/27/00 11:12 p 7888 <none> Got a hit. lpExec10/27/00 11:12 p 7888 <none> Started child for rs1230a.itsc.austin.ibm.com, pid = 1932210/27/00 11:12 p 7888 <none> Into Polling loop.10/27/00 11:12 c 19322 rs1230a.itsc.austin.ibm.com lpd starting (active)
When we check the process table for process 19322, this shows:
# ps -ef | grep 19322root 19322 7888 0 11:12:19 - 0:00 lpNet
This is a child process forked by the parent lpNet, as shown by this ps:
# ps -ef | grep lpNet root 7888 45298 0 10:59:18 - 0:00 lpNet root 19322 7888 0 11:12:19 - 0:00 lpNet
The lpNet parent is owned by process 4529,8 which is the scheduler:
# ps -ef | grep 45298 root 7888 45298 0 10:59:18 - 0:00 lpNet
root 45298 1 0 10:59:18 - 0:00 /usr/lib/lp/lpsched
We checked the /etc/lp/Systems file to see if the server was entered:
$ cat /etc/lp/Systems9.19.129.12:x:-:bsd:-:3:10:-:-:rs1230a.itsc.austin.ibm.com:x:-:bsd:-:1:2:-:-:
We checked the configuration file to see if the server name matched:
$ cat /etc/lp/printers/net12/conf*
Chapter 8. Troubleshooting 415
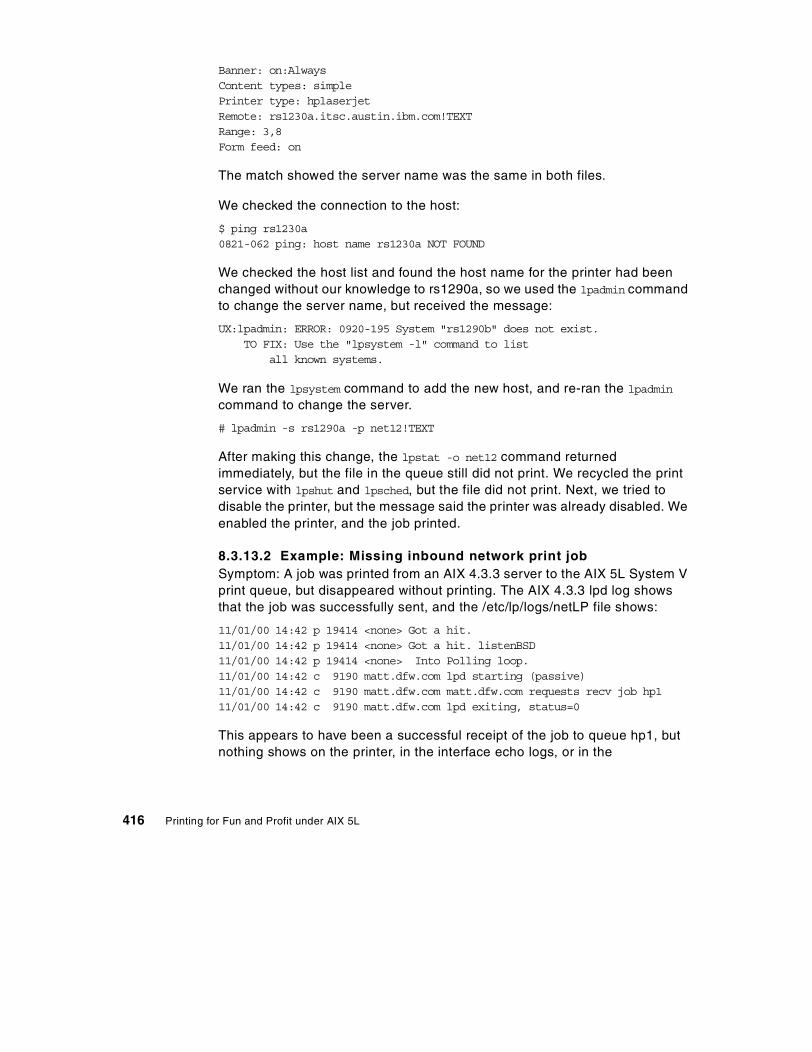
Banner: on:AlwaysContent types: simplePrinter type: hplaserjetRemote: rs1230a.itsc.austin.ibm.com!TEXTRange: 3,8Form feed: on
The match showed the server name was the same in both files.
We checked the connection to the host:
$ ping rs1230a0821-062 ping: host name rs1230a NOT FOUND
We checked the host list and found the host name for the printer had been changed without our knowledge to rs1290a, so we used the lpadmin command to change the server name, but received the message:
UX:lpadmin: ERROR: 0920-195 System "rs1290b" does not exist. TO FIX: Use the "lpsystem -l" command to list all known systems.
We ran the lpsystem command to add the new host, and re-ran the lpadmin command to change the server.
# lpadmin -s rs1290a -p net12!TEXT
After making this change, the lpstat -o net12 command returned immediately, but the file in the queue still did not print. We recycled the print service with lpshut and lpsched, but the file did not print. Next, we tried to disable the printer, but the message said the printer was already disabled. We enabled the printer, and the job printed.
8.3.13.2 Example: Missing inbound network print jobSymptom: A job was printed from an AIX 4.3.3 server to the AIX 5L System V print queue, but disappeared without printing. The AIX 4.3.3 lpd log shows that the job was successfully sent, and the /etc/lp/logs/netLP file shows:
11/01/00 14:42 p 19414 <none> Got a hit.11/01/00 14:42 p 19414 <none> Got a hit. listenBSD11/01/00 14:42 p 19414 <none> Into Polling loop.11/01/00 14:42 c 9190 matt.dfw.com lpd starting (passive)11/01/00 14:42 c 9190 matt.dfw.com matt.dfw.com requests recv job hp111/01/00 14:42 c 9190 matt.dfw.com lpd exiting, status=0
This appears to have been a successful receipt of the job to queue hp1, but nothing shows on the printer, in the interface echo logs, or in the
416 Printing for Fun and Profit under AIX 5L

/var/lp/logs/lpsched or /var/lp/logs/requests files. The lpstat -o command shows that no jobs are queued.
We disabled the queue, and repeated the test print from the remote client, but again nothing was queued. Suspecting a problem with locale, since we often have to use the lp -L C flag to print, we tried starting lpsched with the locale set to C instead of en_US, as follows:
# lpshut# export LANG=C# /usr/lib/lp/lpsched
This did not resolve or change the problem in any way.
We checked the /var/spool/lp/system/pstatus file and it read:
==========hp1disabled accepting973111581 972921654unknown reasonTesting the printer
The test user on the client received this mail message:
Subject: printer job
Your printer jobcould not be printed.
Reason for failure:
UX:lpd: ERROR: 0920-053 You are not allowed to use the destination "hp1". TO FIX: Use the lpstat -p command to list all known printers; you can use those marked "available".
The lpstat -p command showed the queue hp1 was available:
# lpstat -p | grep hp1printer hp1 disabled since Wed Nov 1 14:46:21 2000. available.
We checked the allow file for the printer:
# cat /etc/lp/printers/hp1/users.allowall
Chapter 8. Troubleshooting 417
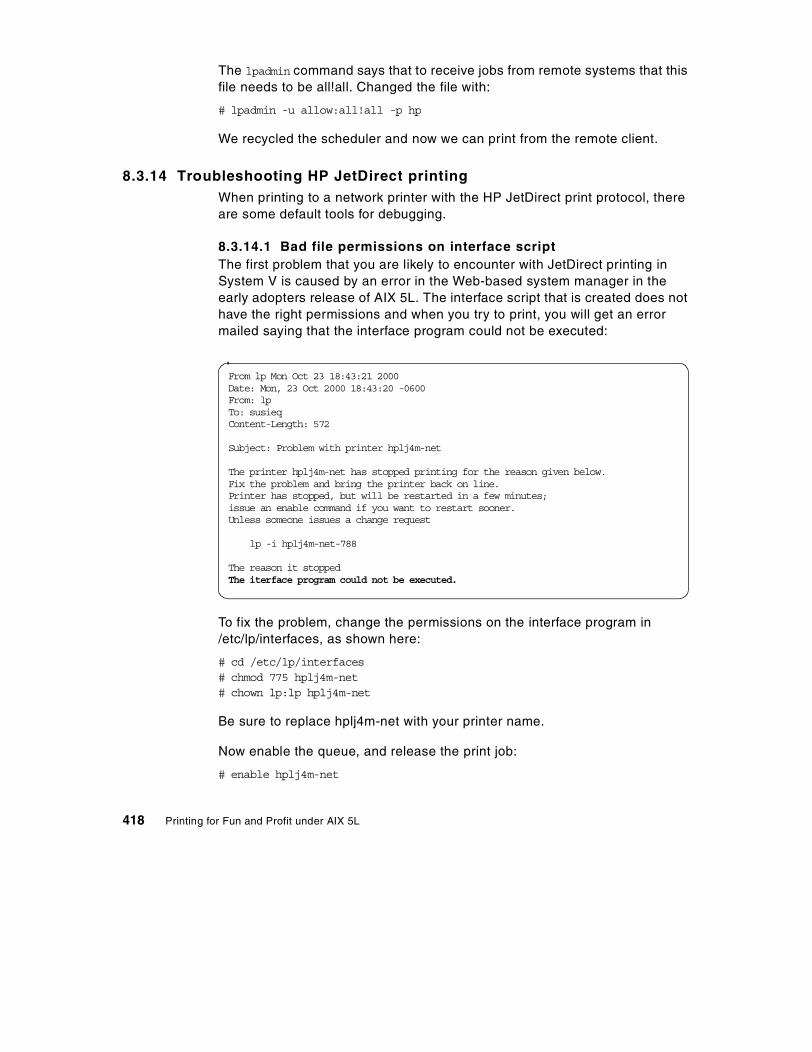
The lpadmin command says that to receive jobs from remote systems that this file needs to be all!all. Changed the file with:
# lpadmin -u allow:all!all -p hp
We recycled the scheduler and now we can print from the remote client.
8.3.14 Troubleshooting HP JetDirect printingWhen printing to a network printer with the HP JetDirect print protocol, there are some default tools for debugging.
8.3.14.1 Bad file permissions on interface scriptThe first problem that you are likely to encounter with JetDirect printing in System V is caused by an error in the Web-based system manager in the early adopters release of AIX 5L. The interface script that is created does not have the right permissions and when you try to print, you will get an error mailed saying that the interface program could not be executed:
To fix the problem, change the permissions on the interface program in /etc/lp/interfaces, as shown here:
# cd /etc/lp/interfaces# chmod 775 hplj4m-net # chown lp:lp hplj4m-net
Be sure to replace hplj4m-net with your printer name.
Now enable the queue, and release the print job:
# enable hplj4m-net
From lp Mon Oct 23 18:43:21 2000Date: Mon, 23 Oct 2000 18:43:20 -0600From: lpTo: susieqContent-Length: 572
Subject: Problem with printer hplj4m-net
The printer hplj4m-net has stopped printing for the reason given below.Fix the problem and bring the printer back on line.Printer has stopped, but will be restarted in a few minutes;issue an enable command if you want to restart sooner.Unless someone issues a change request
lp -i hplj4m-net-788
The reason it stopped The iterface program could not be executed.
418 Printing for Fun and Profit under AIX 5L

# lp -i hplj4m-net-788
8.3.14.2 Check for /tmp/hpnpf.* log filesCheck for /tmp/hpnpf.* log files by issuing the following command:
The Do not have access is an indication that the printer may be offline. The JetDirect protocol does not use the lpsystem information in any way. At this point, check to see if the printer is available using ping. Then telnet to port 9100. If you get the following error, then check the printer:
# telnet 9.3.240.52 9100Trying...telnet: connect: A remote host refused an attempted connect operation.
8.3.14.3 Stair-step output on PCL printersThe default printer that you create with type simple will give stair-step output. The key to getting this to work right on PCL printers is to set the content type for the printer to pcl and registering the pcl filter. To register the pcl filter, use the following command:
# lpfilter -f pcl -F /etc/lp/fd/pcl.fd
8.4 Troubleshooting for PowerPC printing
The following section includes troubleshooting tips that only apply to the PowerPC print subsystem.
8.4.1 File permission problemsThe only time you are likely to have problems with file permissions is when an overaggressive system administrator has made changes manually, or
# ls -l /tmp/hpnpf.*-rw-r--r-- 1 lp lp 280 Nov 15 16:40 /tmp/hpnpf.41480 # cat /tmp/hpnpf.41480wsm1-331 /etc/lp/interfaces/model.orig/wsm1 | /usr/lib/hpnp/hpnpf -x rs1290bwsm1-331 Do not have accesswsm1-331 Do not have accesswsm1-331 Do not have accesswsm1-331 Do not have accesswsm1-331 Do not have accesswsm1-331 5 errors logged for wsm1-331; errors no longer logged
Chapter 8. Troubleshooting 419

someone has run tcbck with flags set to automatically fix problems. Symptoms of the problem are:
• Only root can print
• Can not print from some directories
Use tcbck to find out what files appear to have the wrong permissions, and change them manually. A checklist of common print permission errors is given in AIX V4 Printer Guide, SC23-2783.
8.4.2 Is the print service active?To determine if the qdaemon and lpd are active, you can use the lssrc command, as shown here:
# lssrc -s qdaemon# lssrc -s lpd
8.4.2.1 Starting the print servicesTo restart either daemon, use the startsrc command:
# startsrc -s qdaemon# startsrc -s lpd
Be sure to check again to make sure that the daemons have stayed active.
8.4.2.2 The qdaemon will not stay activeA frequent problem that occurs when administrators hand edit the /etc/qconfig file is that the qdaemon finds syntax errors in the file and will not remain active. If this is the case, make a backup copy of /etc/qconfig, and then start removing queues from the end one at a time. Try to restart the qdaemon after removing each queue. A queue consists of two paragraphs or stanzas of information. The queue stanza points to the queue device stanza. Make sure that there is a queue device for each queue stanza. Make sure that all lines begin with a tab, except for the lines defining the queue or queue device names; these must start in column zero.
Extraneous files in qdirAnother problem that can cause errors and problems with the qdaemon are extraneous files in the /var/spool/lpd/qdir directory. If there are any files in this directory other than job description files for active queues, these files should be removed.
The dummy queue deviceWhen queue devices are removed while jobs are queued, sometimes you will end up with a queue with a dummy queue device. To fix this, remove the
420 Printing for Fun and Profit under AIX 5L

queue stanza from /etc/qconfig, and remove any virtual printer files, status files, and job description files associated with that queue.
8.4.3 Does the printer have the right attributes?Setting up a printer with the wrong attributes can cause problems with flow control and formatting. It is important that you match the printer to one similar in capabilities in AIX. Both the attributes of the printer device and the virtual printer are important.
8.4.3.1 Printer deviceWhen adding a printer that is locally attached using either RS/232 or parallel interfaces, there are a number of attributes that need to be set.
RS/232 attached printersFor RS/232 attached printers, the baud rate, number of data bits, parity setting, and number of stop bits must all match those set on the printers. In addition, the size of the buffer can be important, because with some slow printers the data may be sent faster than the printer can accept the data and so fast that it can not set the flow control. The other RS/232 setting that must match is the flow control. Although hardware flow control is recommended, either hardware or software flow control can be used. The important thing is that it must be set the same on both the printer and the computer device settings.
Parallel attached printersAbout the only setting that can really affect the outcome of parallel attached printers is the delay in which the printers respond to the hardware handshake lines. For slow printers and plotters, the value for Delay between characters can be increased in the printer devices section.
8.4.3.2 Virtual printersWhile device attributes can determine whether something can print, the virtual printer attributes will have a large effect on the output that actually appears on the printed page. Because a virtual printer does printer initialization with print commands that are unique to the data stream supported by the printer, it is important that you select a virtual printer that uses the same data streams that your printer expects. For example, if you set up a Epson Injet printer, which uses an Epson control sequence, using an HP Injet printer virtual printer, which uses a PCL control sequence, the output will be unintelligible.
Other things that must match are the page width and length, especially when printing text files.
Chapter 8. Troubleshooting 421

8.4.4 Logs and status filesWhen you are having printing-related problems, there are messages and log files that can help resolve the problem. This section describes a number of the places you might look for diagnostic information.
8.4.4.1 Command line error messagesWhen you print, the first opportunity for error comes from using illegal command flags or values for those flags. An example of using the wrong flag is shown here:
# cd /tmp# cat cmderr.txt# lp -p69 -P3130pcl /etc/motdlp: illegal option -- pusage: lp [-cmsw] [-dDestination] [-nNumber] [-oOption] [-tTitle] [-] File ... Prints a file in a format suitable for sending to a line printer.
8.4.4.2 Mail messagesOften times, either the qdaemon or the piobe backend will mail messages to the user submitting the job and the root user describing problems that occur.
8.4.4.3 Messages to the consoleOften, the message that a queue has gone down or other errors will be printed to the users login terminal.
8.4.4.4 Virtual printer error message filesWhen errors occur with parameters for flags within the virtual printer, an error file is created in /var/spool/lpd/pio/@local. The files begin with msg and then contain a number, a period, and the queue name and device name.
For example, this command with an illegal pitch:
# qprt -p15 -P3130pcl /etc/motd
produced this error message in msg1.3130pcl:@aus3130b:
-----------------------------------------------------------Thu Oct 26 13:23:07 2000 (root)-----------------------------------------------------------
=====> MESSAGE FROM PRINT JOB 1062 (/etc/motd) <=====0782-598 The value 1 specified in the validate op V in thelimits field for _p attribute indicates failure
422 Printing for Fun and Profit under AIX 5L
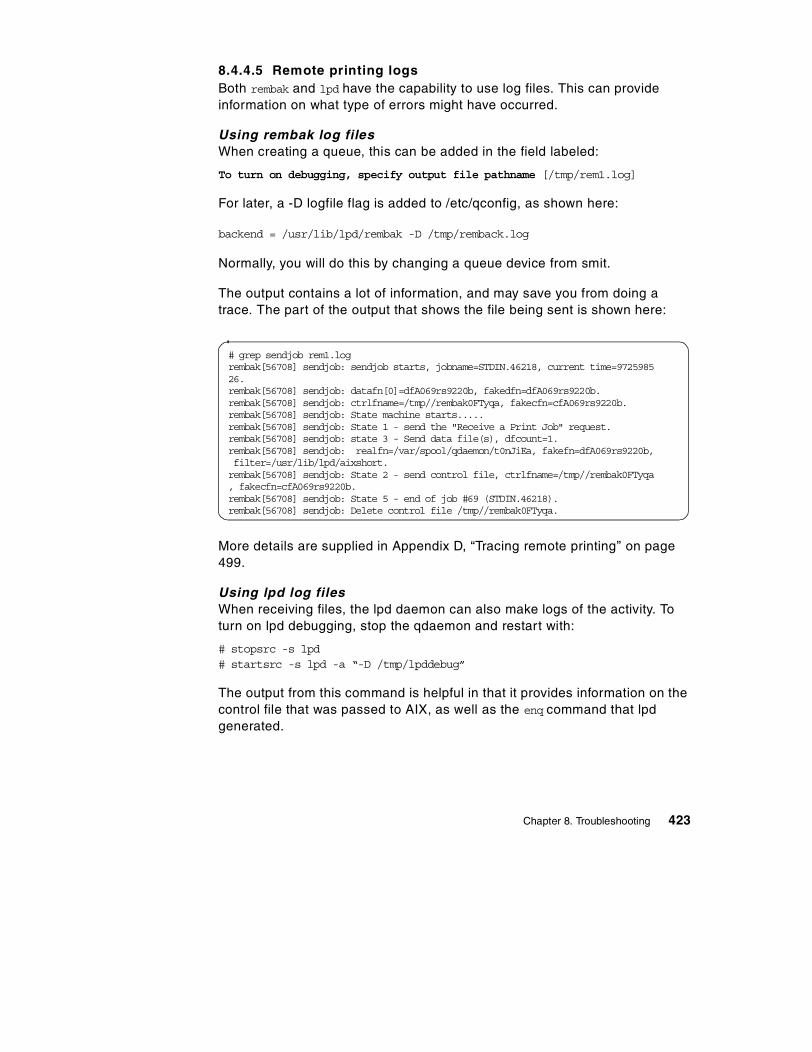
8.4.4.5 Remote printing logsBoth rembak and lpd have the capability to use log files. This can provide information on what type of errors might have occurred.
Using rembak log filesWhen creating a queue, this can be added in the field labeled:
To turn on debugging, specify output file pathname [/tmp/rem1.log]
For later, a -D logfile flag is added to /etc/qconfig, as shown here:
backend = /usr/lib/lpd/rembak -D /tmp/remback.log
Normally, you will do this by changing a queue device from smit.
The output contains a lot of information, and may save you from doing a trace. The part of the output that shows the file being sent is shown here:
More details are supplied in Appendix D, “Tracing remote printing” on page 499.
Using lpd log filesWhen receiving files, the lpd daemon can also make logs of the activity. To turn on lpd debugging, stop the qdaemon and restart with:
# stopsrc -s lpd # startsrc -s lpd -a “-D /tmp/lpddebug”
The output from this command is helpful in that it provides information on the control file that was passed to AIX, as well as the enq command that lpd generated.
# grep sendjob rem1.logrembak[56708] sendjob: sendjob starts, jobname=STDIN.46218, current time=972598526.rembak[56708] sendjob: datafn[0]=dfA069rs9220b, fakedfn=dfA069rs9220b.rembak[56708] sendjob: ctrlfname=/tmp//rembak0FTyqa, fakecfn=cfA069rs9220b.rembak[56708] sendjob: State machine starts.....rembak[56708] sendjob: State 1 - send the "Receive a Print Job" request.rembak[56708] sendjob: state 3 - Send data file(s), dfcount=1.rembak[56708] sendjob: realfn=/var/spool/qdaemon/t0nJiEa, fakefn=dfA069rs9220b, filter=/usr/lib/lpd/aixshort.rembak[56708] sendjob: State 2 - send control file, ctrlfname=/tmp//rembak0FTyqa, fakecfn=cfA069rs9220b.rembak[56708] sendjob: State 5 - end of job #69 (STDIN.46218).rembak[56708] sendjob: Delete control file /tmp//rembak0FTyqa.
Chapter 8. Troubleshooting 423

The following shows some of the output from a sample run:
A more complete description is provided in Appendix D, “Tracing remote printing” on page 499.
8.4.4.6 Job description filesThe job description file (JDF) can help find information about the file that is being printed, the users’ environment, and the flags that are being passed. In most cases, the information at the end of the file is most useful. For example, the following JDF file shows the enq flags, the other flags, and the file being printed:
Line descriptions for the file above are:
• The line with -Ttesting-Ptestq shows which of the standard enq flags were passed from qprt to enq.
• The middle lines show the title was testing, printed by root on system rs9220b.
• The lines beginning with $#@! are formatting flags from qprt, or lp -o that are treated as other flags by enq. They are usually virtual printer formatting flags and useful for diagnosing problems where illegal flags are being sent
lpd[56734] doit: cfn=[cfA929tesch.972600121].lpd[56734] doit: get a line [Htesch].lpd[56734] doit: get a line [Proot].lpd[56734] doit: get a line [fdfA929tesch].lpd[56734] doit: get a line [UdfA929tesch].lpd[56734] doit: get a line [NSTDIN.6404].lpd[56734] doit: exec enq cmd=[/usr/bin/enq -P3130pcl -r -troot@tesch [email protected] -N1 -TSTDIN.6404 /var/spool/lpd/dfA929tesch.972600121 ].
-Ttesting-Ptestq
testingrootrs9220b0$#@!-d$#@!p$#@!-p$#@!17$#@!-z$#@!+$#@!-f$#@!1/var/spool/qdaemon/t6FLT7a 2
424 Printing for Fun and Profit under AIX 5L

a a job simply disappears. Test these flags individually with the enq -o flag. A common problem is the -fl flag; if this is set, make sure the virtual printer has an fl attribute set to %ip.
• The final line in the file is the name of the file being printed. Because this is in /var/spool/qdaemon, the file has been spooled locally. For local jobs that are not spooled, the original file name will show on this line. For jobs received from remote clients, the files will be in /var/spool/lpd.
8.4.4.7 Status filesStatus files are used by lpstat and qchk to list the status of the file. The files are in /var/spool/lpd/stat, and begin with s.; however, the files are in binary format and cannot be directly accessed. The PID file in this directory does give the process ID of the qdaemon, and the files that begin with p. contain process IDs for processes forked by the qdaemon, for example, before a device timed out on lp0 because the printer was turned off. The file p.textq.lp0 contained the value 12808. To see what processes are associated with this queue, use the ps command, as shown here:
# cat plocal.txt# ps -ef | grep 12808 root 12808 7756 0 13:46:36 - 0:00 /usr/lib/lpd/piobe /etc/motd root 45590 12808 0 13:46:36 - 0:00 /usr/lib/lpd/pio/etc/pioout -A0 -B880 -C14688 -F\14\15 root 46824 14270 1 13:50:52 pts/1 0:00 grep 12808
This shows that the pioout command was called by piobe. The pioout command is the filter that writes to the local device port.
8.4.5 Printing to a file with PowerPC printingBy printing to a file, you can see exactly what the virtual printer has added to the file that is being printed. In AIX 5L, you have the capability to add printers to a file in the /dev directory. The following procedure explains how you could use this to diagnose a problem:
1. Create a file in the /dev directory. The file must have permissions for the user doing the testing to use; therefore, you can set the permissions accordingly.
# touch /dev/lpx# chmod 666 /dev/lpx
2. Create a queue printing to a file using the printer type you want to diagnose:
# smitty mkpqChoose: file File in the /dev directory
Chapter 8. Troubleshooting 425
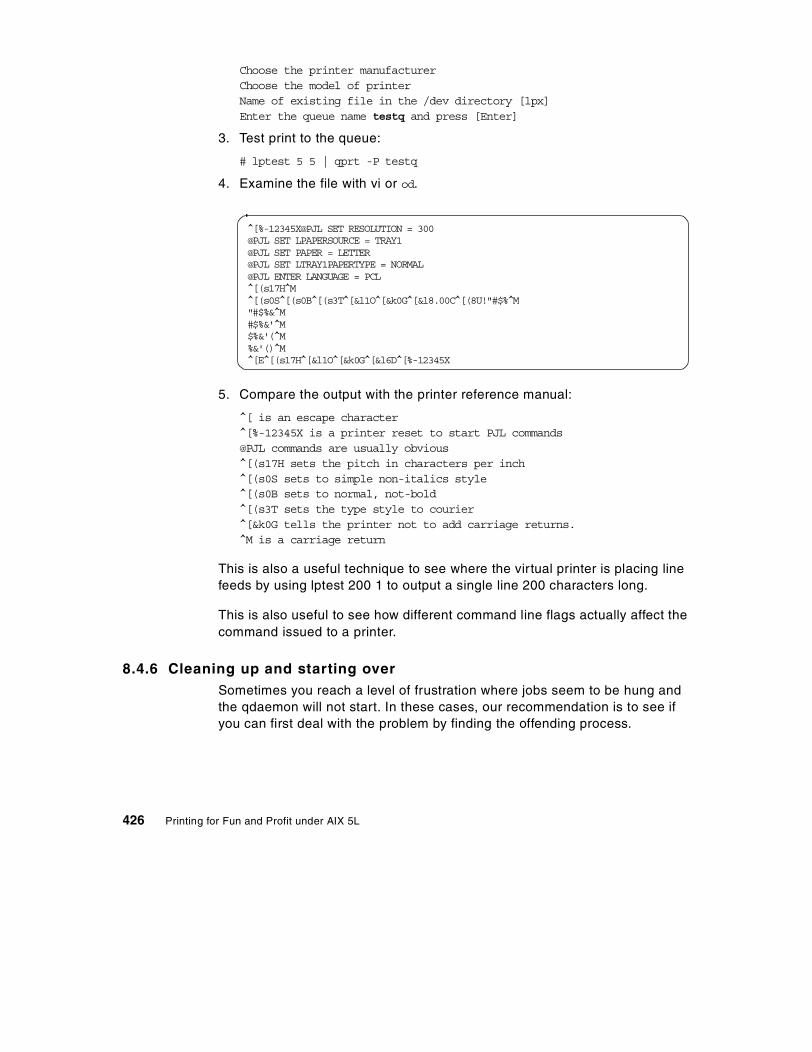
Choose the printer manufacturerChoose the model of printerName of existing file in the /dev directory [lpx]Enter the queue name testq and press [Enter]
3. Test print to the queue:
# lptest 5 5 | qprt -P testq
4. Examine the file with vi or od.
5. Compare the output with the printer reference manual:
^[ is an escape character^[%-12345X is a printer reset to start PJL commands@PJL commands are usually obvious^[(s17H sets the pitch in characters per inch^[(s0S sets to simple non-italics style^[(s0B sets to normal, not-bold^[(s3T sets the type style to courier^[&k0G tells the printer not to add carriage returns.^M is a carriage return
This is also a useful technique to see where the virtual printer is placing line feeds by using lptest 200 1 to output a single line 200 characters long.
This is also useful to see how different command line flags actually affect the command issued to a printer.
8.4.6 Cleaning up and starting overSometimes you reach a level of frustration where jobs seem to be hung and the qdaemon will not start. In these cases, our recommendation is to see if you can first deal with the problem by finding the offending process.
[%-12345X@PJL SET RESOLUTION = 300@PJL SET LPAPERSOURCE = TRAY1@PJL SET PAPER = LETTER@PJL SET LTRAY1PAPERTYPE = NORMAL@PJL ENTER LANGUAGE = PCL[(s17H M[(s0S [(s0B [(s3T [&l1O [&k0G [&l8.00C [(8U!"#$% M"#$%&^M#$%&'^M$%&'(^M%&'()^M[E [(s17H [&l1O [&k0G^[&l6D^[%-12345X
426 Printing for Fun and Profit under AIX 5L

8.4.6.1 First try to find the cause of the hangThe process IDs of the processes that have been forked by the qdaemon are stored in files that begin with the letter p in the /var/spool/lpd/stat directory. Start by stopping the qdaemon and checking for existing status process files in this directory. If they still exist, then cat the files and use kill -9 to stop the processes. In many cases, this will fix the problem. After this, use the fuser command to see if there are any processes still active on the device that appears hung. For example, if you have jobs that seem to be hung on lp17, then check for processes with:
# fuser /dev/lp17
If any process is active on this port, this command will give the process ID.
Check to see if any other processes that start with qd or pio are still active:
# ps -ef | grep qd# ps -ef | grep pio# kill -9 PIDnumbers
Another thing that can cause the qdaemon to fail is the presence of extraneous files in /var/spool/lpd/qdir. Make sure that the files in this directory have the format of job description files (JDF). A non JDF file will cause lpstat to give an error about a bad queue.
At this point, you may want to cancel jobs that created the problem and restart the qdaemon.
8.4.6.2 Last resort: Clean out the queueing systemWhen all else fails and you can not resolve problems with print jobs that are hung, you can totally clean out the queuing system. This procedure deletes all print jobs and they must be resubmitted. You must be root to perform this task. The steps to follow are:
1. Stop the qdaemon and associated processes:
# stopsrc -s qdaemon
2. Kill all processes associated with the qdaemon. These are normally processes that start with qd, such as qdfork, or pio, such as pioformat or pioout.
# ps -ef | grep qd# ps -ef | grep pio# kill -9 PIDnumbers
If processes cannot be killed with kill -9, you may need to reboot.
Chapter 8. Troubleshooting 427

3. Clean out the queue status files. This will reset the job numbers unless you preserver /var/spool/lpd/stat/numfile.
# rm /var/spool/lp/stat/*
4. Remove any spooled jobs:
# rm /var/spool/lpd/qdir/*# rm /var/spool/lpd/qdaemon/*# rm /var/spool/lpd/df*
5. Restart the qdaemon:
# startsrc -s qdaemon
8.4.7 Checking the flags to enqIn PowerPC printing, all the commands, qprt, lp, lpr, lpd, dtprint, and so on, all send their output through enq. One way to test this is to mount the echo command over the enq command, as shown here:
# mount /bin/echo /bin/enq
Now print from the commands and see how this is seen by enq:
$ qprt -p17 -Ttitle -v8 -Pasc /etc/motd-o -p -o 17 -T title -o -v -o 8 -P asc /etc/motd# lp -m -djunk -o land /etc/motd-C -n -P junk -o land -j -- /etc/motd# lpr -P junk /etc/motd-P junk -c -Bgn /etc/motd
Note that when you do this, no one will be able to print until you unmount using the following command:
# unmount /bin/enq
8.4.8 Stopping unwanted header pagesBanner pages for PowerPC printing can be controlled by command line flags to the print commands, configuration of the queue, or customization of the virtual printer file
8.4.8.1 Configuration banner selectionBanners are supported by the virtual printer for PowerPC printing. When you create or modify a virtual printer, you can specify if you want header pages, trailer pages, separator pages, any combination or no banner pages.
428 Printing for Fun and Profit under AIX 5L

To change banner page, use the smitty chpq fastpath, select the printer, and then select Change / Show Default Print Job Attributes. Scroll down to the field Separator Pages and press the F4 key. Select None for no banner pages.
This will show up in the queue device stanza for the printer in /etc/qconfig as header and trailer, as shown in this example for the queue asc with queue device lp0:
# lsquedev -q asc -d lp0lp0:
file = /dev/lp0header = nevertrailer = neveraccess = bothbackend = /usr/lib/lpd/piobe
8.4.8.2 Command line banner selectionUsers can override the banner selection from the configuration file. To turn off banners from the command line with enq or qprt, use the -Bnn flag, as shown here:
$ enq -Bnn -P lj24 /tmp/testfile$ qprt -Bnn -P lj24 /tmp/testfile
The lpr command issues a header page by default. To turn off the header page, use the -h flag:
$ lpr -h -P lj24 /tmp/testfile
8.4.8.3 Virtual printer banner selectionAt times applications issue the lpr command, or you as the administrator have no control of users who want to use the lpr command without flags. You can disable all banner pagers from the virtual printer by removing the banner page generation program from the sh virtual printer attribute. Use the lsvirprt command to modify the virtual printer for this type of operation.
1. Start lsvirprt:
# lsvirprt
2. Select the desired printer.
Chapter 8. Troubleshooting 429

3. Set sh to nothing, as shown here:
8.5 Common errors and solutions
This section includes examples of errors seen in both the System V print subsystem and the PowerPC print subsystem.
8.5.1 Problem adding a second local printer on the same deviceOnce you have added a printer to a device line lp0, if you try to add another virtual printer using the smitty mkpq fastpath, you will get an error message in SMIT that looks like this:
Command: failed stdout: yes stderr: noBefore command completion, additional instructions may appear below.Method error (/usr/lib/methods/cfgpp): 0514-031 A device is already configured at the specified location.
This problem can be solved by adding a printer to a file in the dev directory, and specifying the file name as lp0 (or whatever device file name you were trying to use).
4050n lpx hplj-4050 (PCL)To LIST attributes, enter AttributeName1 ... (* for all attributes)To CHANGE an attribute value, enter AttributeName=NewValueTo FORMAT and EDIT an attribute value, enter AttributeName~vTo EDIT the attribute file, enter ~vTo terminate, press Enter: sh
Name Description Valuesh Pipeline for Header Page %Ide/pioburst %F[H ] %Idb/H.ascii | % Ide/pioformat -@ % Idd/%Imm -!%Idf/pi ofpcl -J+ -L! %IsH -u%IuH
To LIST attributes, enter AttributeName1 ... (* for all attributes)To CHANGE an attribute value, enter AttributeName=NewValueTo FORMAT and EDIT an attribute value, enter AttributeName~vTo EDIT the attribute file, enter ~vTo terminate, press Enter: sh=
Name Description Valuesh Pipeline for Header Page
430 Printing for Fun and Profit under AIX 5L
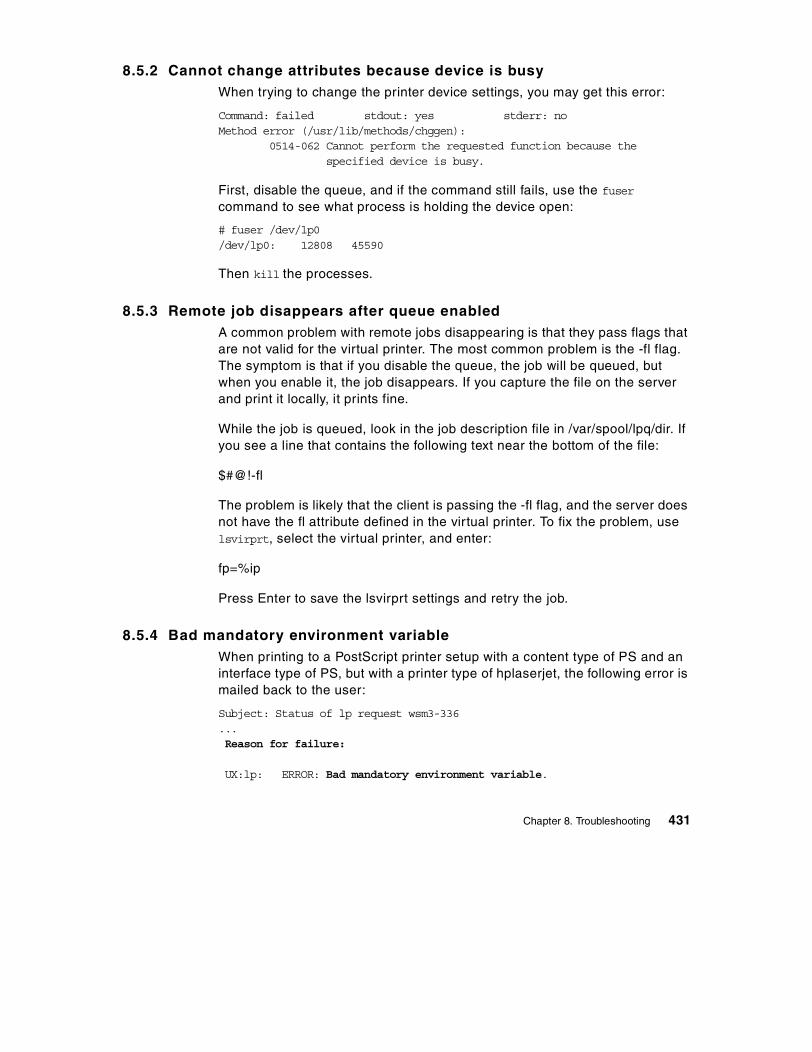
8.5.2 Cannot change attributes because device is busyWhen trying to change the printer device settings, you may get this error:
Command: failed stdout: yes stderr: noMethod error (/usr/lib/methods/chggen): 0514-062 Cannot perform the requested function because the specified device is busy.
First, disable the queue, and if the command still fails, use the fuser command to see what process is holding the device open:
# fuser /dev/lp0/dev/lp0: 12808 45590
Then kill the processes.
8.5.3 Remote job disappears after queue enabledA common problem with remote jobs disappearing is that they pass flags that are not valid for the virtual printer. The most common problem is the -fl flag. The symptom is that if you disable the queue, the job will be queued, but when you enable it, the job disappears. If you capture the file on the server and print it locally, it prints fine.
While the job is queued, look in the job description file in /var/spool/lpq/dir. If you see a line that contains the following text near the bottom of the file:
$#@!-fl
The problem is likely that the client is passing the -fl flag, and the server does not have the fl attribute defined in the virtual printer. To fix the problem, use lsvirprt, select the virtual printer, and enter:
fp=%ip
Press Enter to save the lsvirprt settings and retry the job.
8.5.4 Bad mandatory environment variableWhen printing to a PostScript printer setup with a content type of PS and an interface type of PS, but with a printer type of hplaserjet, the following error is mailed back to the user:
Subject: Status of lp request wsm3-336... Reason for failure:
UX:lp: ERROR: Bad mandatory environment variable.
Chapter 8. Troubleshooting 431
TO FIX: Consult your system administrator.
Checking the interface program for the printer shows that this error is generated when the TERM type is not one of the PostScript TERM types of PS, PS-b, PS-r, PS-br, or PSR. To fix the problem, use lpadmin to change the printer type to PS-b:
# lpadmin -p wsm3 -T PS-b
After making this change, you should be able to print.
8.5.5 LOG: is read onlyWhen adding JetDirect printers with the /usr/lib/hpnp/hpnpcfg script using the standard hpnp.model, the following error is mailed back to users who try to print to the queue:
Printing stopped with an exit code of 1.
Reason for failure:/etc/lp/interfaces/wsm2[44]: LOG: is read only
On examining the scrip /etc/lp/interfaces/wsm2, line 44 contained the following script statement:
LOG=/tmp/$PERIPH.$$
Further examination indicates that the problem is not with file permissions, but with environment variable permissions. If the line is changed to:
LOG1=/tmp/$PERIPH.$$
the problem will even cause JetDirect printers that were working before to no longer work. The reason is that the hpnpcfg script sets the LOG environment variable prior to restarting lpsched. When lpsched executes the interface program, the variable is set in read only mode. The solution to the problem is to stop the scheduler, make sure the LOG is unset in the root environment and then restart the scheduler:
# lpshut# unset LOG# /usr/lib/lp/lpsched
Although the hpnpcfg script is undocumented and unsupported, a more permanent solution to the problem is to modify the hpnpcfg script; but hpnpcfg calls /usr/lib/hpnp/cfg/option6 to create the printer, and this is where the scheduler is stopped. lpadmin is called to add the printer, and lpsched is called to stop the printer. If you comment out the lines so the scheduler is not
432 Printing for Fun and Profit under AIX 5L

stopped and restarted, then the printers will work without manual intervention. The following shows the lines commented out in the option6 shell script:
STARTLP=0#echo /usr/sbin/lpshut | tee -a -- $LOG#/usr/sbin/lpshut#if [ $? -eq 0 ]#then# STARTLP=1#fi
8.5.6 No formfeed after banner pageWhen you add a printer with the hpnpcfg script, if you do not specify the type as pcl, you may not see any pages beyond the header. This is because the simple type is a passthrough type of printing with no modification to the file. This can be fixed by changing the content type to pcl and making sure the pcl filter has been installed as follows:
# lpadmin -p printer-name -I pcl# lpfilter -f pcl -F /etc/lp/fd/pcl.fd
Once you make this change, the text files will print fine, but there will be no formfeed after the header page. To add a formfeed, simply change the printer type to hplaserjet, as shown here:
# lpadmin -p printer-name -T hplaserjet
If this is not a PCL printer, choose an appropriate terminfo type for the option.
Chapter 8. Troubleshooting 433

434 Printing for Fun and Profit under AIX 5L

Chapter 9. Printing tips and utilities
This chapter contains a number of topics that cover printing and shown how to extend the capabilities of both the System V or PowerPC environment. They are included in this separate chapter because they are not really a part of either of the print subsystems. Utilities included in this chapter include both filters and formatting programs that ship as a part of AIX, and utilities that are available in the public domain.
9.1 Obtaining AIX-ready utilities
Not all public domain utilities are available pre-compiled, but many are. There are two Internet sites that are dedicated to utilities that are precompiled and tested on AIX. These are the Group Bull public domain site (http://www.rge.com/pub/systems/aix/bull/)and the UCLA SEAS public domain software site (http://aixpdslib.seas.ucla.edu/aixpdslib.html). In addition to these sites, the AIX Toolbox for Linux Applications packages contain software that is not generally available in the standard AIX 5L offering.
9.1.1 The AIX toolbox for Linux Applications packagesThe AIX toolbox for Linux Applications packages, which can be found at http://www-1.ibm.com/servers/aix/products/aixos/linux/download.html, contain a number of useful utilities that may be helpful with printing that are compiled to work well with AIX 5L.
9.1.2 The CD-ROM from UNIX Power ToolsThe CD-ROM that is included with UNIX Power Tools, by Jerry Peek et al, contains a large number of utilities. Some of the utilities that are applicable to printing are included in Table 23.
Table 23. Printing utilities in UNIX Power Tools
Utilities Description
pstext Utility for converting txt files to PostScript.
psutils Collection of five programs: psbook, psselect, pstops, psnup, and epsffit. Also included are scripts that fix several different types of PostScript files.
watchq A daemon that monitors the queues for several printers and sends messages to users when errors occur.
© Copyright IBM Corp. 2001 435

9.1.3 Bull download sitesGroup Bull operates an internet site where AIX printing utilities can be downloaded for free. The software is packaged in standard installp format, and can be installed with the standard Web-based System Manager and SMIT management tools. The URL for Group Bull public domain software is:
http://www.rge.com/pub/systems/aix/bull/
Although the code is divided into AIX 4.1.5 and earlier and AIX 4.3.2 and later, in general, the code created for any of these versions should work on AIX 5L.
Table 24 contains a list of the printing utilities available from the Group Bull site.
Table 24. Printing utilities available from Group Bull download site
9.1.4 UCLA SEAS public domain software for AIXThe University of California at Los Angeles has maintained a software download repository for AIX software for many years. The software is usually available in either a source based package or as an executable. Most of this software is packaged in the tar format and is easily installed on AIX by simply unpacking. The URL for the UCLA SEAS public domain library is:
Utility Description
gnu.ghostview-3.5.8 Utility for previewing and printing PostScript files.
gnu.ghostscript-5.10 Utility with filters for converting PostScript to other formats.
gnuplot-3.5.0.0 Plotting utility to create plots that can be printed.
ImageMagick-5.2.4.0 Image manipulation tool. Use to image files to formats that can be printed or imbedded in documents.
pstoedit-2.41.0.0 PostScript transformation tools. Require gnu.ghostscript to install.
psutils-1.17.0.0 Utilities to manipulate postscript for printing selected parts, in different order, or multiple PostScript pages on a single printer page.
SAMBA-2.0.7.0 File and printer server utility to print from Windows based clients using SMB protocol.
xpdf-0.9.0.0 Utility for displaying and printing Adobe .pdf files.
xps-3.14.0.0 Utility to display PostScript files on Xservers.
freetype The free TrueType font engine.
436 Printing for Fun and Profit under AIX 5L

http://aixpdslib.seas.ucla.edu/aixpdslib.html
A list of software utilities available for AIX printing available from UCLA are shown in Table 25.
Table 25. Printer utilities available from UCLA SEAS
9.2 PostScript utilities
PostScript is a page definition language and there are a large number of utilities available to display and modify the PostScript file before it is sent to the printer. This section contains information on some of the more widely used utilities.
Utility Description
a2ps ASCII to PostScript converter.
gif2png Convert gif files to png format.
gimp GNU image manipulation program.
ghostscript GNU Ghostscript interpreter/previewer (needs gs-fonts).
ghostview GNU PostScript documents viewer.
gs GNU Ghostscript filter for converting PostScript.
gs-fonts Ghostscript fonts.
groff GNU groff document formatting system.
Mesa Mesa 3-D graphics library.
plotutils Plotting utilities.
samba File and print serving which implements the SMB protocol for printing from Windows.
textutils GNU text file processing utilities.
tgif Drawing tool and conversion.
transfig Plotting tool.
xdvi Program for previewing .dvi files .
xgrabsc An X-Windows image grabber.
xv Image (GIF,JPEG,TIFF,PBM,PGM,PPM,PS, and so on) displayer and printer. Use to grab X-Windows.
xwpick Pick images from an X11-screen and store in files.
Chapter 9. Printing tips and utilities 437
9.2.1 Using enscript to convert text to PostScriptThe text to PostScript conversion program that has been available as a part of AIX for the longest time is called enscript. The enscript filter is used in virtual printers to convert text files to print on PostScript printers. Some of the capabilities of enscript include:
• Ability to select the font used for the generated PostScript
• Ability to display the file in n-up format
• Ability to display the text with a title and fancy formatting
9.2.1.1 Printing binder titles and selecting fontsTo print titles for the side of a binder, we often use the large fonts that can be generated very easily with enscript as shown here:
$ echo “Notebook binder label” | enscript -fCourier32 -d ps
A list of the available fonts for enscript is contained in /usr/lib/ps/fontmap in the lefthand column. This command may give you a better font for a label, but would look bad printing an ASCII text file.
$ echo “AIX printing tips” | enscript -fHelvetica-Bold34 -Pps
9.2.1.2 Printing 2-up and landscapeThe following command will print the /etc/qconfig file rotated to landscape with two pages on the physical page:
$ enscript -2r -dps /etc/qconfig
9.2.1.3 Printing with page title and timestampAlthough enscript includes the filename and date by default, the -G flag adds a gaudy mode that prints the title and timestamp in a fancier format.
$ enscript -2Gr -ttitle -dps /etc/qconfig
9.2.2 Using psutils for custom PostScript printingThe public domain package psutils includes the utilities in Table 26.
Table 26. PostScript utilities in the psutils package
Utilities Description
ps2pdf Convert text files to PDF format.
438 Printing for Fun and Profit under AIX 5L

Many applications give the ability to create 2-up output. Sometimes you have a PostScript file that is already created and you want to print that 2-up. The psnup utility was designed just for this purpose. This utility is not shipped with AIX, but is available from a number of UNIX shareware sites, such as http://bibliofile.mc.duke.edu/gww/fonts/postscript-utilities/index.html, as well in the CD-ROM that is included with UNIX Power Tools, by Jerry Peek et al. The command syntax may vary based on the application generating the output. The following is an example command:
$ psnup -w280 -2 filename | pqrt -Pps (Shareware)
9.2.3 Using System V filters for PostScript printingThe System V print filters described in Chapter 4, “System V advanced printing” on page 135 can also be used from the command line. The postprint routine is useful for conversion from text to PostScript. These print routines also have capabilities similar to the postutil package in that they can print files n-up and select pages from PostScript files.
psbook Rearranges pages from a PostScript document into signatures for printing books. The -s option selects the number of sides which will be folded and bound together. The number given should be a multiple of four. Psbook normally prints the page numbers of the pages rearranged.
psmerge Merges PostScript documents into a single document. It only works in specific cases where the files were created using the same application, with the same device setup and resources loaded.
psnup Puts multiple logical pages onto each physical sheet of paper.
psresize Rescales and centers a document on a different size of paper. The input must follow the Adobe Document Structuring Conventions.
psselect Allows extraction of selected pages from a PostScript document to create a new document.
pstops Rearranges pages from a PostScript document, creating a new PostScript file. Pstops can be used to perform a large number of arbitrary re-arrangements of documents, including arranging for printing 2-up, 4-up, booklets, reversing, selecting front or back sides of documents, and scaling.
Utilities Description
Chapter 9. Printing tips and utilities 439

9.2.4 Ghostscript for PostScript viewing and file conversionGhostscript is the name of a set of software that provides:
• An interpreter for PostScript language and the Adobe Portable Document Format (PDF)
• A set of C procedures (the Ghostscript library) that implement the graphics and filtering (data compression/decompression/conversion) capabilities that appear as primitive operations in the PostScript language in a PDF.
Ghostscript is a copyrighted work (Aladdin Enterprises owns the copyright); and is not shareware or in the public domain; however, it is distributed with a license called the Aladdin Free Public License that allows free use, copying, and distribution by end users, but does not allow commercial distribution. The current version is available from:
ftp://ftp.cs.wide.edu/ghost/alladin/gsNNN/ghostscript*NNNN*
where NNN is the version number without embedded dots. For a copy on CD, see:
http://www.cs.wisc.edu/~ghost/index.html
Some of the utilities with Ghostscript include:
• pdf2ps: Converts PDF files to Level 2 PostScript.
• ps2ascii: Converts PostScript to simple ASCII text.
• ps2epsi: Converts PostScript to 9-pin Epson format.
Ghostscript can be used to convert PostScript to formats supported by different types of printers. Output types are determined by drivers. There were six generic drivers contained in the source module when we downloaded it:
• cdj500: HP DeskJet 500C and 540C
• cdj550: HP DeskJet 550C, 560C, 660C, and 660Cse
• pjxl300: HP PaintJet XL300 and DeskJet 1200C
• pjtest: HP PaintJet
• pjxltest: HP PaintJet XL
• declj250: DECLJ2500
There are a number of shell scripts, including ones for setting up BSD UNIX printing with /etc/printcap.
To display a PostScript file with Ghostscript, use the following command:
440 Printing for Fun and Profit under AIX 5L

$ /usr/local/bin/gs /pathname/file.ps
To create a PCL version of the PostScript file, use the following command:
$ gs -dNOPAUSE -dBATCH -dSAFER -sDEVICE=ljet3 \-sOutputFile=/tmp/acrob.pcl infile.ps
Since Ghostscript is a filter and can accept input from standard input and write to standard output, it can be implemented as a filter.
For PowerPC, set the f1 attribute to:
/usr/local/bin/gs -q -dNOPAUSE -dBATCH -dSAFER -dDEVICE=ljet3 -sOutputFile= -
To use the filter, either set f=1, or use the qprt -f1 flag.
For System V printing, add the same line in the pipeline of the FILTER parameter in the interface file for the queue.
9.2.5 PostScript font utilitiesWe found three major sources of both free and commercial fonts and information about fonts on the Internet:
http://www.adobe.com/http://www.bitstream.com/http://www.monotype.com/
PostScript fonts can be downloaded from the Internet in different formats. Often times, these need converted to PFA type fonts. Two tools that we have seen that convert files to PFA are:
• t1utils: A collection of simple type-1 font manipulation programs.
• pfb2pfa: A conversion program from binary pfb fonts to ascii mode pfa fonts.
T1utils is a collection of simple type-1 font manipulation programs. Together, they allow you to convert between PFA (ASCII) and PFB (binary) formats, disassemble PFA or PFB files into human-readable form and reassemble them into PFA or PFB format. Additionally, you can extract font resources from a Macintosh font file (ATM/Laserwriter).
There are currently five programs:
t1ascii Converts PFB files to PFA format.
t1binary Converts PFA files to PFB format.
Chapter 9. Printing tips and utilities 441

t1disasm Disassembles a type-1 font (PFA or PFB format) into a raw, human-readable text form for subsequent hand editing, tweaking, hint fixing, and so on.
t1asm Assembles type-1 font into PFA or PFB format from raw, human-readable text form.
unpost Extracts POST resources from a Macintosh type-1 file (ATM/Laserwriter) into PFA or PFB format for use outside the Macintosh environment. The Macintosh file should be stored in MacBinary format or as a raw resource fork. Note that unpost does not have to run on a Macintosh, but makes Macintosh type-1 fonts available to UNIX machines and PCs.
The programs are written in ANSI C. The version we downloaded compiled and ran without errors on AIX. The program that is usually needed is t1ascii. This utility will convert the fonts to PFA, which can be downloaded as described in each of the advanced printing chapters of this book.
9.2.6 Using xpreview to view PostScriptThe xpreview command comes as a standard part of the X11 installation on AIX and can be used to preview PostScript files. It is less sophisticated than Ghostview, but can still be useful for simple PostScript files.
9.2.7 Using psroff for man pagesThe psroff utility is a tool that can be used to print the man pages from many of the public domain software packages to a PostScript printer with proper formatting. For example, to print the man page for psmerge, use the following command:
# psroff -man -d ps /usr/local/man/man1/psmerge.1
9.2.8 PostScript to ASCIIAlthough it is fairly simply to convert from text to PostScript, going the other direction is less straightforward. For simple text, the process can be accomplished with the public domain utility ps2ascii, but this will not handle graphics. The GhostScript utility is probably the most promising tool in this area.
9.3 Utilities for capturing and printing X Windows
The following is are commonly used utilities for capturing and printing X windows on AIX and other UNIX systems.
442 Printing for Fun and Profit under AIX 5L
9.3.1 Using xpr and xwd to print X windowsThe combination of xwd to capture an X window and xpr to convert the output to a format that can be printed, such as PCL or PostScript, is a useful combination for doing screen captures from the X windows systems. We find that this works best for PostScript printers, but we have also used it with PCL laser printers. To use this utility for PostScript printers, follow these simple steps:
1. Create the script /usr/local/bin/winprt with the following contents:
#!/bin/kshxwd -xy | xpr -device ps | lp -d ps
2. Make sure the file is executable by all:
# chmod +x /usr/local/bin/winprt
3. Run the command from a text panel:
$ winprt
4. Use Alt-Tab to bring the desired panel to the top, align the + cursor on top of the panel using the mouse, and click the left mouse button.
5. After a short delay, the file will print to the ps printer.
To print the entire screen, you can use the -root flag for xwd:
xwd -xy | xpr -device ps | lp -d ps
To print to a PCL based laser printer, use the following command:
$ xwd -frame | xpr -device ljet | lp -d pcl
or
$ xwd -frame | xpr -device ljet | lp -d pc
9.3.2 Using xv to capture and print X windowsThe xv utility, available as public domain software, is one of the most useful tools for capturing X windows and converting between different file formats. Most of the pictures in this book were captured with xv. xv can save the output as most standard graphics formats, as well as in PostScript. One of the advantages of xv is that you can mark any triangle on the screen and capture it. To use xv, simply install and type xv from any command line. This will bring up a standard panel with the author’s (John Bradley) name. Right click on the panel and the xv controls panel will appear. To capture a portion of the screen, click the grab button. This will bring up another panel which lets you click a box to Hide XV windows, and to put a Delay so that you can autograb
Chapter 9. Printing tips and utilities 443

a panel. For most cases, simply click the Grab button and proceed. To capture a complete panel, move the cursor over the panel and click the left mouse button. To capture a rectangle on the screen, push the left mouse button down, form the triangle and release. The original panel will now become a panel containing the captured image. From this point, either click the Save button to save the image in the desired format, or the Print button to print the image.
9.3.3 Using xgrabscThe xgrabsc utility available as public domain software, captures X windows. It has less formatting capabilities than xv, but is easier to automate (similar to the xwd/xpr combination) while adding the ability to capture a selected rectangle in a manner similar to xv. The xgrabsc writes PostScript output to standard output and can be used to pipe the output directly to a printer, as follows:
$ xgrabsc | lp -d ps
9.4 Using the pr filter to format text
The pr filter is a powerful text formatting utility shipped with AIX. It does text formatting similar to that performed by the ASCII formatter of the PowerPC virtual printer subsystem. Some of the formatting functions that can be done by pr include:
• Truncate text lines based on the page width.
• Inserting carriage returns based on the page length.
• Adding page titles and page numbers to the file.
• Rotating and printing in n-up format.
• Provide double spaced output for reviewing documents.
• Expand tabs into spaces.
• Add formfeeds or spaces to fill a page.
• Merge files in a side by side format.
• Add line numbers.
• Indent lines.
444 Printing for Fun and Profit under AIX 5L

9.4.1 Using pr as a printer filterThe pr command can be used from the command line or as a filter for either print subsystem. When used from the command line, pr can accept data as standard in, or by specifying a file name, as shown here:
$ cat /etc/motd | pr -h “Add your title” | lp -d textq$ pr -d -h “double spaced motd” /etc/motd | lp -d textq
9.4.1.1 Using the pr filter with System V printersTo specify the pr filter for a System V printer when using the standard interface program, edit the printer interface program in /etc/lp/interfaces and change the line that is commented out below to the second line, adding any flags to pr that are desired:
# FILTER="${LPCAT} ${LPCAT_ARG}" # allow infinite delays FILTER=" pr | ${LPCAT} ${LPCAT_ARG}"
A more elegant solution would be to add a -o option to set the FILTER variable if the file was printed with lp -o pr. To do this, add the lines directory under the simple=”yes” example, as shown here:
# simple )# simple="yes"# ;; pr ) FILTER=" pr | ${LPCAT} ${LPCAT_ARG}" ;;
You can add the flags to the pr command to get different effects.
9.4.1.2 Using the pr filter with PowerPC queuesThe pr command is built-in to the virtual printer fp attribute. To use the pr filter, simply use:
$ qprt -fp -P queue-name file-name
or
$ lp -o -fp -d printer-name file-name
9.4.2 Printing 2-up with prThe following is a sample command that will generate 2-up text output for a PCL laser printer queue. The -l 60 specifies the length per page, the -w 172 specifies the width, the -2 tells pr to format the file 2-up. The qprt -z+ flag is used to make the printer print landscape. We use the passthrough flag because pr will add carriage returns to the line feeds already.
Chapter 9. Printing tips and utilities 445

$ pr -l 60 -w 172 -2 filename | qprt -z+ -dp -p17splp
With System V, you would need to add commands to the interface program to place the printer in landscape mode.
9.4.3 Adding line numbers with prTo add line numbers to a file, add the -n flag to pr:
$ pr -n file-name | lp -d queue-name
9.4.4 Adding a title to the pagesBy default, pr puts the file name at the top of each page along with a date/time stamp. To replace the file name with a title, use the header flag and place the title in quotes, as shown here:
$ pr -h “This is my title” | lp -d asc
9.4.5 Indenting lines with prWhen printing files to put in a binder, it is useful to indent the lines so that they are not in the area where the holes are located. This can be done with the pr -o Offset flag, as shown here:
$ pr -o 5 | lp -d asc
9.5 Standard filters in AIX
This section includes the following standard filters in AIX system:
• sed
• awk
• perl
• tr
• expand
9.5.1 The sed filterThe sed program is a useful filter because you can use it for simple substitution of characters or strings. When using sed, you can build substitutions strings on files or on the command line. Functions that sed might play as a print filter is to strip out unwanted characters or to substitute one character for another. Some of the things that you might want to do with sed include:
446 Printing for Fun and Profit under AIX 5L

• Remove unwanted carriage returns: (^M is formed by ctrl-V ctrl-M):
# cat file | sed -e “s/\^M//g”
• Substitute 8 spaces for each tab: (Use the tab character for tab)
# cat file | sed -e “s/tab/ /g”
• Remove backspace characters:
# cat file | sed -e “s/^H//g”
To use a file of commands, use the -f flag:
# sed -f /usr/local/filt.cr file | lp -d txt
9.5.2 The awk filterThe awk filter can be used for more complicated processing of text where you might want to search for a value in a line, and then replace a different parameter in the line. The awk filter has a complete formatting language with search, if-then-else, and print statements, to handle text. An awk filter could be used to change font sizes inside an already formatted document. Often, awk will be used inside of a shell script, and possibly even in interface scripts.
9.5.3 The perl filterPerl adds an even more sophisticated level of text search and manipulation of files before or as they are being printed. Perl scripts can be used to format data from an iptrace report into a more meaningful set of data.
9.5.4 The tr filterThe tr filter is a simple single character translation program. It is useful when substituting a single character, such as a carriage return with a null. To translate braces into brackets, enter the following command:
$ tr ‘{}’ ‘\[]‘ < textfile | lp -d text
To delete all null characters from a file, use the following command:
$ tr -d ‘\0’ < textfile | lp -d text
To replace every nonprinting character, other than valid control characters, with a ? (question mark), enter the following command:
$ tr -c ‘[:print:][:cntrl”]’ ‘[?*]’ < textfile | lp -d text
There is also a BSD version of the command named trbsd.
Chapter 9. Printing tips and utilities 447

9.5.5 The expand filterThe expand filter can be used to expand or replace tab characters with a specified number of spaces. To replace tabs with 8 spaces, use the following command:
$ cat /tmp/testfile | expand -8 | lp -d text
9.6 Socket programs for network printing
Printing to printers attached to both print and terminal servers is often done by using TCP/IP socket filter programs to send the data from AIX to the server. This section describes some of these filters and how they might be used to send print jobs from AIX to the remote printers.
9.6.1 Using socket program filters with System VThe JetDirect interface example program /usr/lib/hpnp/hpnpIS.model is a good example of a System V program that calls a socket filter. The filter is defined in the line:
HPNPF="/usr/lib/hpnp/hpnpf"NETWORK="$HPNPF -x $PERIPH"
and used later in the script with the line:
) | $NETWORK >> $LOGFILE 2>&1
To use a different filter, simply change these lines to identify the filter and the required parameters to designate the printer or terminal server hostname and port number.
9.6.2 Using socket filter programs in PowerPC printingFrom the PowerPC print subsystem perspective the backends are located in /usr/lib/lpd/pio/etc. Two of these backends that provide examples of using socket filters are:
• piojetd
• pioibmnp.
The pertinent lines in these files are shown here:
/usr/lib/lpd/piobe "$@" | /usr/lib/lpd/pio/etc/piohpnpf -x $hostname -p $port/usr/lib/lpd/piobe $* | /usr/lib/lpd/pio/etc/pioibmnpf $ipaddr 2501
448 Printing for Fun and Profit under AIX 5L

Make a JetDirect queue, then copy the backend piojetdir to piosocket1, and replace the piohpnpf or pioibmnpf socket filters with the filters for your print server, and change the backend program name in the queue device for the new queue. This can be done through SMIT or by editing /etc/qconfig. Be careful when editing /etc/qconfig, because formatting errors can cause the qdaemon to not work at all.
9.6.3 Known print socket filter programsTable 27 lists some of the more well known socket print filter programs. This list is incomplete, as many people have written programs for this function.
Table 27. Print socket filter programs
All of these programs take standard input and pipe it to a network socket connection and therefore can be used as output filters for both print subsystems.
Filter Description
piohpnpf HP socket program that can be used with HP JetDirect enabled printers and print servers. The default port is 9100, but other ports can be specified.
pioibmnpf IBM socket program that can be used with IBM Network Printers.
aprint This socket program was distributed by Xylogics for the Annex terminal server. The company was acquired by Bay Networks which has been acquired by Nortel Networks, and the current availability of the program is unknown, although it should be available under an Annex terminal server support contract.
netcat A general purpose printer socket filter by Jeff Liebermann is available at http://gate.cruzio.com/~jeffl/sco/lp/. A number of interface programs and scripts are also provided.
TCPrint A general purpose printer socket filter from LAIX available with support from http://home.flash.net/~laixsoft/
lexlink Software for LexMark printers that use special protocols are available.
csportd This socket filter was written to support Xyplex Access terminal servers and can be set up either as a filter or as a named pipe special device and used with local printers. Xyplex servers can also be updated to support LPD protocol.
rlp This socket filter is available from 3Comm for their terminal servers.
rprint This socket filter is from Emulex for NETque and NETjet print servers.
ncdprint This socket filter is used to print to printers attached to NCD thin clients.
Chapter 9. Printing tips and utilities 449
9.6.4 Example: printing with netcat from System VThis example is based on information by Jeff Liebermann available at http://gate.cruzio.com/~jeffl/sco/lp/. This location includes a socket program called netcat and a number of interface scripts for printing to network printers.
There are a number of network print filters available both from the public domain, and from terminal and print server manufacturers. A number of these are listed in Table 27 on page 449. These filters have the ability to accept the file as standard input, and transfer the file to a specified port on a remote terminal or print server using a TCP/IP socket protocol.
It is possible to use the standard interface script in conjunction with any of these filters, using the following example with minor modifications:
1. Change to the model directory:
# cd /usr/lib/lp/model
2. Make a copy of the standard interface program:
# cp standard netiface
3. Edit the netiface interface:
# vi netiface
4. Add the following lines:
NETHOST=NETPORT=FILTER=”sed ‘s/$/^M/’ | /usr/local/bin/netprint -H $NETHOST -P $NETPORT
at the top of the file after the trap and at any point before the line
...... if [ -z FILTER ] ......
5. If a banner page is required another modification to this file is necessary because the standard interface outputs the banner page separately from the actual print file. Simply add the command to pipe to eval FILTER at the lines where the banner is printed, as shown here:
if [ "no" = "${nobanner}" -a "${TERM}" != "PSR" ]then eval "${banner} ${banner_filter}" | eval $FILTERfi
This sets up the print model to pipe its output to the program netprint and to add carriage returns at the beginning of each line. The next procedure is to add a printer using the netiface script:
450 Printing for Fun and Profit under AIX 5L
1. Add a printer with lpadmin by assigning the netiface interface script with the -m flag, using device file /dev/nul:
# lpadmin -pnetpr1 -v/dev/null -mnetiface -Thplaserjet
2. Change to the directory containing the interface program for this printer:
# cd /etc/lp/interfaces
3. Edit the script to customize for the particular printer address and port:
# vi netiface
4. Make the changes to the IP address and port number:
NETHOST=”129.24.256.12”NETPORT=”9001”
5. Give the commands for the printer to accept jobs and then enable the printer:
# accept netpr1# enable netpr1
6. To print a simple ASCII file, use the following command:
$ lp -dnetpr1 /usr/local/file/readme.txt
This should print the file and mail errors to the user.
9.7 Utilities to print from Microsoft Windows to AIX
There are at least three ways to print from Windows clients to AIX servers. Different administrators will choose different solutions based on their requirements, network setup, and expertise. The following sections describe some experiences with each of these solutions.
9.7.1 IBM LPR Remote Printing Client to print to AIX from WindowsThe IBM LPR Remote Printing Client allows users on Windows 95/98 systems to add local printers that actually print to an AIX server using the LPR/LPD protocol. The software is free and can be downloaded from:
ftp://ftp.software.ibm.com/printers/products/netprt/lpr/
The install instructions are simple and easy to follow, and once installed, the program can used to set up printers to multiple remote hosts and queues. In our experience, this is a much more efficient solution to printing from Windows to AIX than using Samba, Fast Connect or PCNFS. The AIX server uses the lpNet program in System V printing or the lpd daemon in PowerPC to
Chapter 9. Printing tips and utilities 451
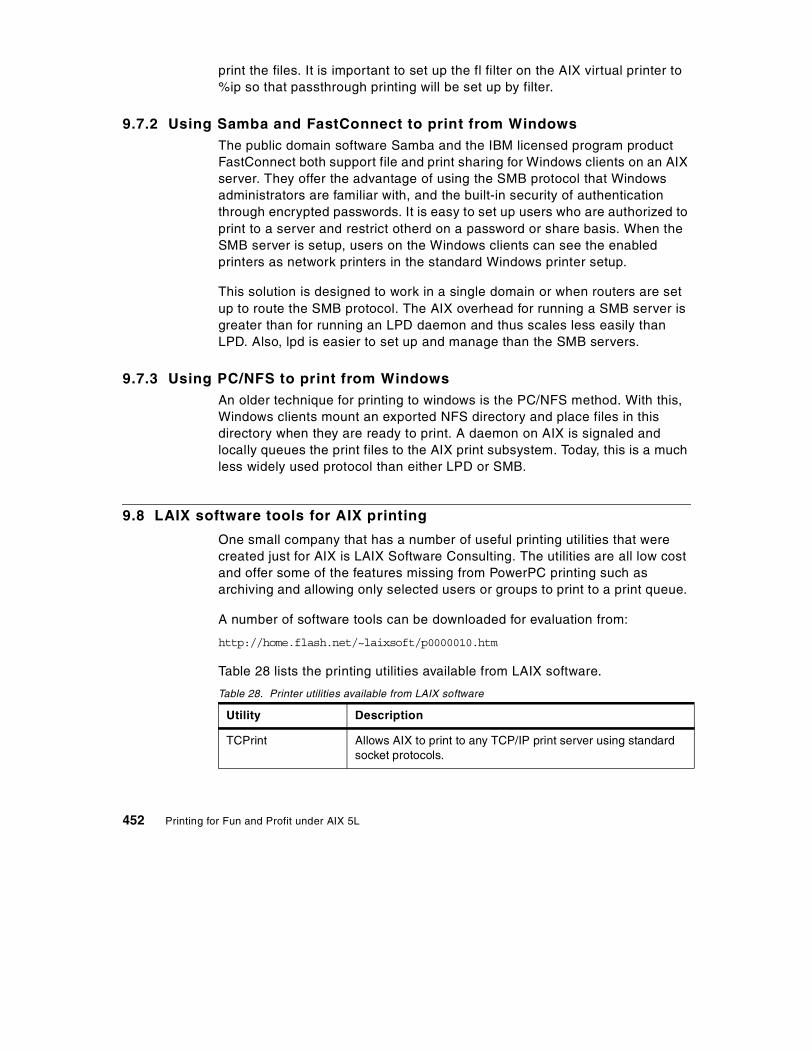
print the files. It is important to set up the fl filter on the AIX virtual printer to %ip so that passthrough printing will be set up by filter.
9.7.2 Using Samba and FastConnect to print from WindowsThe public domain software Samba and the IBM licensed program product FastConnect both support file and print sharing for Windows clients on an AIX server. They offer the advantage of using the SMB protocol that Windows administrators are familiar with, and the built-in security of authentication through encrypted passwords. It is easy to set up users who are authorized to print to a server and restrict otherd on a password or share basis. When the SMB server is setup, users on the Windows clients can see the enabled printers as network printers in the standard Windows printer setup.
This solution is designed to work in a single domain or when routers are set up to route the SMB protocol. The AIX overhead for running a SMB server is greater than for running an LPD daemon and thus scales less easily than LPD. Also, lpd is easier to set up and manage than the SMB servers.
9.7.3 Using PC/NFS to print from WindowsAn older technique for printing to windows is the PC/NFS method. With this, Windows clients mount an exported NFS directory and place files in this directory when they are ready to print. A daemon on AIX is signaled and locally queues the print files to the AIX print subsystem. Today, this is a much less widely used protocol than either LPD or SMB.
9.8 LAIX software tools for AIX printing
One small company that has a number of useful printing utilities that were created just for AIX is LAIX Software Consulting. The utilities are all low cost and offer some of the features missing from PowerPC printing such as archiving and allowing only selected users or groups to print to a print queue.
A number of software tools can be downloaded for evaluation from:
http://home.flash.net/~laixsoft/p0000010.htm
Table 28 lists the printing utilities available from LAIX software.
Table 28. Printer utilities available from LAIX software
Utility Description
TCPrint Allows AIX to print to any TCP/IP print server using standard socket protocols.
452 Printing for Fun and Profit under AIX 5L

Qman Complete AIX print queue management. Shows status all print queues, warns of conditions which could lead to printing problems.
Netty Lets devices on TCP/IP terminal servers be treated as local tty devices.
DIALprinter Allows AIX to print to remote sites that only have a printer attached to a modem.
Archive for AIX Allows storing copies of print jobs to files.
Dispatch Allows an AIX print queue to round-robin distribute print jobs to a configurable pool of printers.
Restrictq Allows administrator to restrict who can print to certain queues on a per user or per group basis. Print job archiving functions of Archive have been incorporated into Restrictq.
Utility Description
Chapter 9. Printing tips and utilities 453

454 Printing for Fun and Profit under AIX 5L

Chapter 10. Overview of Infoprint Manager for AIX
Infoprint Manager for AIX is an IBM licensed program product (5765-E42) that provides enhanced printing and print management capabilities. It is based on the Palladium technology and open industry standards, such as ISO DPA 10175-1 and IEEE POSIX P1387, that were developed in the MIT Athena project.
Infoprint Manager is the result of the combined evolution of the Print Services Facility (PSF) for AIX (formerly PSF/6000) and Printing Systems Manager (PSM) products, and is part of a family of software and hardware products (both IBM and non-IBM) that use the published, non-proprietary Advanced Function Presentation (AFP) architecture.
Although Infoprint Manager for AIX runs on the AIX platform, it fits into the heterogeneous environments that are common today because of its use of the standard TCP/IP print and communications protocols. It is also highly interoperable with IBM legacy print environments, allowing you to locate your jobs and your printers where it makes the most sense for your environment.
10.1 Features and benefits
AIX users who are looking for print and printer management capabilities beyond those included in the AIX 5L operating system may wish to consider the following partial list of advantages that Infoprint Manager can provide.
10.1.1 Centralized management of distributed environmentInfoprint Manager’s graphical user interfaces (GUI) enables centralized management of printers and jobs. You can:
• View, set, or change the characteristics of printers and jobs in your enterprise
• Monitor the status of printers and jobs, with automatic problem notification
• View, set, or change defaults for both printers and jobs
• Start, stop, interrupt, resume, delete, and move jobs
• Start, stop, space, or shutdown printers
Infoprint Manager for AIX can be integrated with Tivoli Output Manager.
© Copyright IBM Corp. 2001 455

10.1.2 Intelligent printingHave you ever tried to print a PostScript job, only to find pages and pages of PostScript source in the printer instead of the formatted output you really wanted?
Have you ever accidentally submitted a large job to a really slow printer?
Or have you had to submit the same job to multiple printers, just so you could get your output, and ended up with duplicate copies and wasted paper?
Infoprint Manager can help prevent these occurrences and more with advanced job validation and scheduling capabilities. These include:
• Intelligent routing of jobs based on their characteristics, including:
- Required print characteristics (duplex, print resolution, and more)
- Required paper type or size
- Required printer location, name or model
- Data stream
- Job size
- Grouped jobs
• Flexible job scheduling options, including:
- Print deadlines
- Order of submission
- Priority
- Size
- A “print-after” time
- A time by which the job must print or be automatically discarded
• Workload management that allows you to:
- Pool printers to maximize utilization and throughput
- Reroute jobs in the event a printer is unavailable
- Minimize loss of jobs by:
• Holding jobs that fail instead of discarding them • Optionally retaining printed jobs for some period of time • Automatically disabling printers with problems • Retrying jobs automatically in the event of network failures
- Transform data and print concurrently
456 Printing for Fun and Profit under AIX 5L
- Interrupt jobs to let a more critical job print, then resume the first job at the interruption point
- Forms management
10.2 Target markets
Customers in the following environments may wish to consider Infoprint Manager for AIX.
10.2.1 Distributed environmentInfoprint Manager can provide centralized output management for a wide range of printers and users, and it is frequently used by help desks to resolve print questions. Some of the advantages include:
• Centralized configuration, monitoring and management of a network of printers, both local and remote
• Automatic printer problem detection and notification to operators, administrators and help desk personnel
• Automatic printer workload balancing
• Job tracking from end-to-end (integrating SNMP and IBM’s Network Printer Manager utility)
• Job distribution to printers, fax machines, e-mail, and other destinations
• Accounting information
A Java-based GUI that runs on AIX, Windows NT, and Windows 2000 is available in versions for operators and administrators.
10.2.2 ERP printingAs mainframe customers migrate legacy applications to ERP products in the distributed environment, they recognize the need for print capabilities similar to those provided by OS/390 and JES. Infoprint Manager has been installed at a number of these customers to extend the print capabilities of common ERP applications, including SAP R/3, PeopleSoft, Oracle, Baan, and JD Edwards.
One of the popular benefits that Infoprint Manager can provide is access to high-speed duplex printers - as fast as 1002 impressions per minute at 600 dpi resolution. This is of particular interest to customers with high volume output requirements.
Chapter 10. Overview of Infoprint Manager for AIX 457

Another appealing feature is the ability to use electronic forms to replace expensive pre-printed forms, especially now that color can be applied.
We will mention two ERP products in particular:
• SAP R/3:
- Infoprint Manager for AIX enables the printing of barcode output on PCL printers without the need for a barcode SIMM in each printer.
- Both ABAP and SAPscript (OTF) output is supported using SAPGOF, PCL or PostScript device types.
- Infoprint Manager for AIX V3.1 or later is SAP-certified to the BC-XOM Output Management System interface in SAP R/3 release 4.0a or later with callback notification.
- The SAP R/3 application server(s) need not be running on AIX in order to utilize Infoprint Manager for AIX printers and capabilities.
• PeopleSoft:
- The primary output data streams of PeopleSoft include PCL, PostScript and ASCII, all of which Infoprint Manager can process.
- PeopleSoft customers have replaced the banks of slower PCL printers that they have traditionally used with higher speed printers driven by Infoprint Manager for AIX, lowering the total cost of printing and improving reliability and throughput.
10.2.3 Cross-system printingOne of the strengths of Infoprint Manager is its ability to function in a heterogeneous environment.
• Users on a wide range of platforms can submit jobs to Infoprint Manager for printing on a variety of printer types and speeds, using either Infoprint Manager clients or standard LPR/LPD print commands.
• Infoprint Manager for AIX provides support for a wide range of input data streams (see Appendix E.4, “Data streams supported by Infoprint Manager for AIX” on page 515), including Adobe-certified PostScript 3 and PDF 1.3, as well as PCL5, ASCII, SAP ABAP, and SAPscript (OTF), and several image formats.
• It supports a variety of output devices, including those that support PCL (PCL4, 5, 5C), PostScript, and IBM Intelligent Printer Data Stream (IPDS), as well as all devices supported by the underlying AIX PowerPC print subsystem. Fax and e-mail are also supported as output destinations.
458 Printing for Fun and Profit under AIX 5L

• The Infoprint Manager products on the AIX and on the Windows NT and Windows 2000 platforms can be installed in a multi-server environment where all printers on all interoperating servers can be viewed and managed from a single Java GUI interface.
• Infoprint Manager supports printing data from OS/390 (MVS) with IP PrintWay, Download for OS/390, PSF Direct, or LPR, and from VM, VSE, and OS/400 using PSF Direct or LPR. Infoprint Manager can also automatically route jobs up to OS/390 for printing on devices managed by PSF for OS/390.
10.2.4 Other environmentsOther industries where Infoprint Manager is being used include:
• Financial institutions for high-volume printing of statements with pre-printed forms management capability and magnetic ink character recognition (MICR) support.
• Banks with regional branches who benefit from multiple print server interoperability to minimize network traffic, yet still have centralized management.
• Commercial print-on-demand environments for cost-effective color or monochrome printing of short-run documents.
• Universities who use the optional digital library (including scan support) to store materials for reprint, as needed.
• One-on-one marketing companies who want to produce targeted mailings with variable data content.
• Legal and judicial customers who use Web-based digital reprographics to capture (scan), submit and transfer documents electronically.
10.2.5 Infoprint Manager and AIX 5LIn order for Infoprint Manager to work on AIX 5L, you will need to activate the legacy AIX PowerPC print subsystem. Infoprint Manager will not initially be supported with the System V print subsystem in AIX 5L.
Infoprint Manager for AIX Version 3.2 will require a Program Temporary Fix (PTF) to install under AIX 5L. As of publication, this PTF is not yet available. Check with the IBM Support Center for the current status.
Chapter 10. Overview of Infoprint Manager for AIX 459

10.3 Selected views of the graphical administrative interface
The administrator can choose one of several methods to administer Infoprint Manager:
• The AIX Visual Systems Management (VSM) interface.
• The Infoprint Manager Administration GUI, a Java application that is available on the AIX, Windows NT, and Windows 2000 platforms and which comes in three different views, depending on the customer’s requirements.
• Command line.
Selected actions are available through the Infoprint Manager SMIT administrator’s interface.
Although we were not able to include an entire chapter on Infoprint Manager (since the PTF to enable it to install on AIX 5L Version 5.0 was not yet available when this document was written), we wanted to include several screen shots of the Administration GUI so that you could get a preview of the primary administrative interface. The views that were captured came from the advanced version of the Administration GUI running on an AIX V4.3.2 system.
460 Printing for Fun and Profit under AIX 5L

Figure 90. Infoprint Manager Advanced Administration GUI’s main panel
The main panel of the advanced Administration GUI shows all queues defined on the Infoprint Manager server named redbird. Although all queues are displayed by default, you can filter the view to display selected queues; this can be useful if you have assigned an operator or help desk specialist to monitor a specific queue or queues.
In the left well, the object that you highlight will determine what wells open on the right side of the panel. In Figure 90, we have highlighted the queue, and on the right side, wells are displayed for the printers (called actual destinations in Infoprint Manager), for the logical destinations (objects that can be associated with actual destinations and for which defaults can be set), and for the jobs assigned to that queue. On the left side of the panel, the bottom well would show any jobs that had been retained, their status, and how soon they would be deleted.
In each well, you can customize the columns or attributes of the objects to be displayed. For example, by default, only the printer name, status and the mounted media or form are displayed for a printer. You can see in Figure 90 that we have customized the view to add the column for which media the printer actually supports. Many other attributes are available for display. Likewise, you can customize the display for the objects in the other wells.
Chapter 10. Overview of Infoprint Manager for AIX 461

Alternatively, you can open up separate panels to display all printers, all logical destinations, jobs by queue, and retained jobs, as well as a panel for error messages. You can then arrange your selected panels to suit your needs.
When looking at the main panel in Figure 90 on page 461, you can see that each of the three printers has a different status. The printer that has a status of disabled is graphically represented by a black printer, and the printer that has a status of “ready with warning” is graphically represented by a yellow printer. To find out more about why printer 21ipds has a warning, we checked its status. We double-clicked on the printer, but we could have also checked status by selecting an icon from the toolbar, selecting the Printers pull-down from the task-bar, or right-clicking on the printer object, then selecting Check Status.... (You can also customize which actions are available from the toolbar and the pull-down menu.)
When we checked the status, the panel in Figure 91 was displayed:
Figure 91. Infoprint Manager printer status display
The status panel in Figure 91 tells us that the printer is idle and enabled, but it is running low on paper. It is important to note that the information provided in the status panel is only as good as the printer can provide to Infoprint Manager. This particular printer, an Infoprint 21, is IPDS-capable and supports SNMP, so we get quite a detailed status.
Since the Infoprint 21 does support SNMP, Infoprint Manager can provide more information through the integrated Network Printer Manager (NPM) utility by clicking on the More information... button. The panel in Figure 92 on page 463 is then displayed.
462 Printing for Fun and Profit under AIX 5L

Figure 92. Infoprint Manager SNMP printer status
This panel will display a graphic representation of the printer and of the console. The information will be updated as the printer is polled using SNMP. Active alarms list the current critical alarms from the most recent polling of the printer. If applicable, an icon in front of the alarm shows the training level required to fix the alarm condition (none, key operator, call for service, or user).
The task bar pull-down in Figure 93 on page 464 shows the actions that an administrator can perform on a printer object. These include creating, copying, moving, deleting, setting defaults, checking status, enabling, disabling, forwardspacing and backspacing (on selected printers), pausing or shutting down a printer, resuming a paused printer, changing the mounted form, rerouting jobs, and accessing the properties notebook with all the attributes for that printer.
You will also notice in Figure 93 on page 464 that the toolbar shows more icons than in Figure 90 on page 461; this is because we used Options -> Customize... from the task bar to change the information and actions displayed.
Chapter 10. Overview of Infoprint Manager for AIX 463

Figure 93. Infoprint Manager administrative actions for printers
Figure 94 shows a problem job that cannot currently be printed, as well the various actions an administrator can perform on jobs.
Figure 94. Infoprint Manager administrative actions for jobs
464 Printing for Fun and Profit under AIX 5L

The icon for the problem job is colored red. If we check the job status, the following panel is displayed:
Figure 95. Job status details
Figure 95 shows that the job has been placed in held status because a required resource is not ready. In this case, the user requested A4 paper when submitting the job. Since the printer supports A4 paper, as you can see in Figure 90 on page 461, the job was accepted, but it can not be printed because A4 paper is not currently loaded in the printer. You can either change the paper at the printer, or you can change the paper (media) that the job requires; then the job will be printed.
Other job actions include holding and releasing jobs, changing the number of copies or the retention period for a job, promoting, moving, deleting with optional retention or searching for jobs, and accessing the properties notebook for a job.
Finally, we have included a screen capture in Figure 96 on page 466 showing a retained job and its status:
Chapter 10. Overview of Infoprint Manager for AIX 465

Figure 96. Infoprint Manager retained job status display
You will note that the job is currently in held status and will be deleted when its retention period expires in 2 days, 23 hours.
10.4 Additional information
For additional information, refer to the Infoprint Manager Web site at:
http://www.printers.ibm.com/R5PSC.NSF/Web/ipmgraixhome.
466 Printing for Fun and Profit under AIX 5L

Appendix A. Print tasks and commands
This appendix summarizes many of the tasks and associated commands used with the two print subsystems that are available in AIX 5L Version 5.0.
First, we have listed the most common commands in both print subsystems in Table 29 on page 468, with a notation of which commands can be used with which print subsystem.
In Appendix A.2, “System V print subsystem tasks and commands” on page 471, we address general tasks in the System V print subsystem, separated into sections for:
• Administrators (Table 30 on page 471)
• Commands of use to both administrators and users (Table 31 on page 474)
• End user commands (Table 32 on page 475)
Finally, in Table 33 on page 475 in Appendix A.3, “PowerPC print subsystem tasks and commands” on page 475, we have listed the tasks for the PowerPC print subsystem and grouped them according to the familiar SMIT hierarchy.
A.1 Commands listed alphabetically
This section lists the most common print commands in alphabetic order. For complete syntax information, you should refer to the AIX documentation.
However, note that there are several commands that are valid in both the System V and PowerPC print subsystems. Depending on which print subsystem is active, a particular command may require different flags and provide different results. When you check the man pages for commands, make sure that you read the correct section for the print subsystem in which you are working.
For example, assume the System V print subsystem is active. When you read the man page for lpstat, make sure you use the section entitled “System V Print Subsystem lp on an PowerPC and IA-64 platforms.” You would find that for System V, the lpstat command with the -c flag will report the names of all print classes and their members. In contrast, lpstat -c in the PowerPC print subsystem will provide status and job information for all the print queues.
Although we do not discuss them explicitly, AIX 5L includes several familiar commands from the BSD printing environment, including lpc, lpq, lprm and
© Copyright IBM Corp. 2001 467

lpr. All but one of them (lpc) can be used with either the System V or PowerPC print subsystem, but the flags and results may differ.
Table 29. AIX 5L print commands and print subsystem where valid
CommandValid in
PowerPC print
subsystem?
Valid in System V
print subsystem?
Description
accept X Allow queuing of print requests for the named destination(s).
cancel X X Cancel a print job.
chque X Change queue attributes in /etc/qconfig.
chquedev X Change queue device attributes in /etc/qconfig.
chvirprt X Change the virtual printer definition in custom colon files.
disable X X Disable a printer.
enable X X Enable a printer.
enq X Many functions, including:- Submit, hold, release
prioritize and cancel a print job.
- Bring printers up or down.- Display status.- Change queue and qdaemon
status.
lp X X Submit a print job.
lpadmin X Administer System V printing.
lpc X Administer System V print service (BSD).
lpfilter X Administer filters used with the print service.
lpforms X Administer forms used with the print service.
lpmove X Move a job to another printer.
468 Printing for Fun and Profit under AIX 5L

lpq X X Display the queue of printer jobs.
lpr X X Submit a print job.
lprm X X Remove jobs from printer queue.
lpsched X Start the print service.
lpshut X Stop the print service.
lpstat X X Display status information.
lpsystem X Register remote systems with the print service.
lptest X X Generate the line printer ripple pattern.
lpusers X Set printing queue priorities.
lsallq X List the name of all configured queues.
lsallqdev X List the name of all queue device names for a given queue.
lsque X Display the queue stanza information for a given queue.
lsquedev X Display the queue device stanza information for the given queue and device.
lssrc X List the status of subsystems and processes managed by the Systems Resource Controller.
lsvirprt X List the attributes of a virtual printer.
mkque X Add a printer queue.
mkquedev X Add a printer queue device.
mkvirprt X Add a virtual printer.
CommandValid in
PowerPC print
subsystem?
Valid in System V
print subsystem?
Description
Appendix A. Print tasks and commands 469

pac X Prepare printer accounting information.
pr X X Write a file to standard output.
qadm X Perform administrative functions for the PowerPC print subsystem.
qcan X Cancel a print job.
qchk X Check print job status.
qhld X Hold/release print job.
qmov X Move a job to another queue.
qpri X Prioritize a print job.
qprt X Submit a print job.
reject X Disallow queuing of jobs for the named destination(s).
rmque X Remove a printer queue.
rmquedev X Remove a printer queue device.
rmvirprt X Remove a virtual printer.
ruser X Directly manipulate entries in system databases that control foreign host access to programs.
splp X X Display or change printer driver (/dev/lp##) settings.
startsrc X Start processes and groups managed by the SRC such as the spooler group or the qdaemon or lpd processes.
stopsrc X Stop processes and groups managed by the SRC.
switch.prt X X Switch print subsystem.
CommandValid in
PowerPC print
subsystem?
Valid in System V
print subsystem?
Description
470 Printing for Fun and Profit under AIX 5L

A.2 System V print subsystem tasks and commands
This section will include common tasks for a System V print subsystem and their associated commands. We have separated the information into tables containing tasks and their associated commands:
• Administrative tasks which require special authorities
• Status or informational requests of use to both administrators and users
• Print request commands accessible to users
A.2.1 Administrative tasks and commands
By default, only the root user or a member of the lp group can issue the commands listed in Table 30. You should refer to the man pages or official AIX 5L documentation for additional information.
Table 30. Administrative tasks and associated commands (System V)
Administrator Tasks Commands
Print service management
Show current print subsystem. switch.prt -d
Switch print subsystem. switch.prt -s [aix | systemv]
Start the print service. /usr/lib/lp/lpsched
Stop the print service. lpshut
Set/change system default destination.
lpadmin -d [dest-name]
Register remote system(s) with print service.
lpsystem [options] system-name
Unregister remote system(s) with print service.
lpsystem -r system-name
Printer and print device management
Add a printer device (/dev/lp##). mkdev -c printer -t type -s subclass -p parentname -w connection-location
Move a printer/plotter device to another port.
chdev -l name -p parentname -w connection-location
Change/show characteristics of a printer/plotter device.
chdev -l Name -w Connection-location -a Attribute='value'
Remove a printer/plotter device. rmdev -l Name [-d]
Appendix A. Print tasks and commands 471

Configure a defined printer/plotter device (makes a defined device available for use).
mkdev -l Name
Install additional printer/plotter software.
/usr/lib/instl/sm_inst installp_cmd -a -c -g -Q -X -d '/dev/cd0' -f 'printers' '-G'
Change/show printer driver settings. splp [lpn]
Add or change a local printer. lpadmin - p printer-name -v device [options]
Add or change a remote printer. lpadmin -p printer-name -s server-name[!server-printer-name] [options]
Delete a destination (printer or class). lpadmin -x dest-name
Allow queuing of print requests for named destination (printer or class).
accept dest-name
Disallow queuing of print requests for named destination (printer or class).
reject [-r reason] dest-name
Activate printer(s) for printing. enable printer-name(s)
Deactivate printer(s) for printing. disable [options] printer-name(s)
User priorities
Set system-wide default printing priority.
lpusers -d priority-level
List default printing priority level and user priority assignments.
lpusers -l
Set default priority limit that users in the login-ID-list can request when submitting a print request.
lpusers -q priority-limit -u login-ID-list
Set default priority limit for all users not explicitly given a limit.
lpusers -q priority-limit
Remove any explicit priority limit for the specified user(s).
lpusers -u login-ID-list
Forms
Add/change a form. lpforms -f form-name options
Administrator Tasks Commands
472 Printing for Fun and Profit under AIX 5L

List attributes of a form. lpforms -f form-name -l
Allow/deny access to a form. lpforms -f form-name -u options
Set form to alert when queued jobs request it.
lpforms -f form-name -A alert-type [-Q minutes] [-W requests]
Delete a form. lpforms -f form-name -x
Mount a form. lpadmin -p printer-name -M -f form-name -a [-o filebreak]
Filters
Add/change a filter. lpfilter -f filter-name options
List attributes of a filter. lpfilter -f filter-name -l
Reset an original filter to its original settings.
lpfilter -f filter-name -i
Delete a filter. lpfilter -f filter-name -x
Job management
Report a number showing the rank order of jobs in the print queue for each printer.
lpstat -R
Cancel print requests submitted by any user.
cancel [request-ID-list] [printer-name-list]cancel -u “login-ID-list” [printer-name-list]
Move a print request to another destination.
lpmove request-ID dest-name
Move all print requests from one destination to another and cause the first destination to reject additional print requests.
lpmove dest-name-1 dest-name-2
Print the request next. lp -i request-ID -H immediate
Administrator Tasks Commands
Appendix A. Print tasks and commands 473
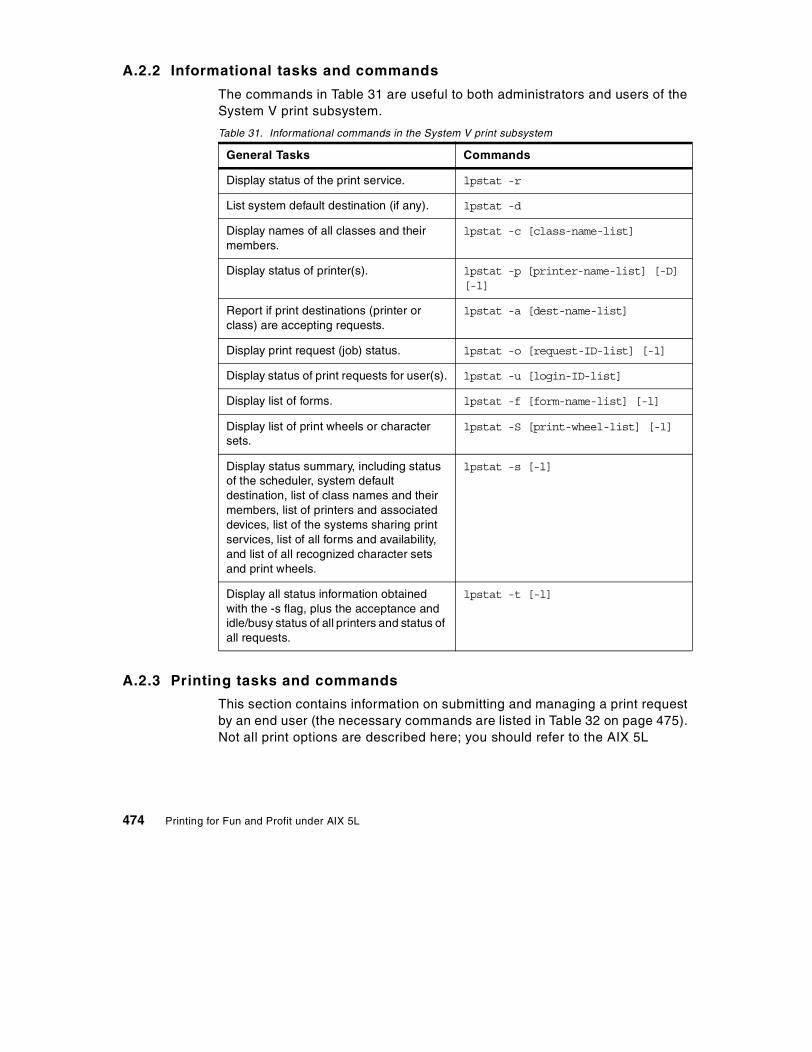
A.2.2 Informational tasks and commands
The commands in Table 31 are useful to both administrators and users of the System V print subsystem.
Table 31. Informational commands in the System V print subsystem
A.2.3 Printing tasks and commands
This section contains information on submitting and managing a print request by an end user (the necessary commands are listed in Table 32 on page 475). Not all print options are described here; you should refer to the AIX 5L
General Tasks Commands
Display status of the print service. lpstat -r
List system default destination (if any). lpstat -d
Display names of all classes and their members.
lpstat -c [class-name-list]
Display status of printer(s). lpstat -p [printer-name-list] [-D] [-l]
Report if print destinations (printer or class) are accepting requests.
lpstat -a [dest-name-list]
Display print request (job) status. lpstat -o [request-ID-list] [-l]
Display status of print requests for user(s). lpstat -u [login-ID-list]
Display list of forms. lpstat -f [form-name-list] [-l]
Display list of print wheels or character sets.
lpstat -S [print-wheel-list] [-l]
Display status summary, including status of the scheduler, system default destination, list of class names and their members, list of printers and associated devices, list of the systems sharing print services, list of all forms and availability, and list of all recognized character sets and print wheels.
lpstat -s [-l]
Display all status information obtained with the -s flag, plus the acceptance and idle/busy status of all printers and status of all requests.
lpstat -t [-l]
474 Printing for Fun and Profit under AIX 5L
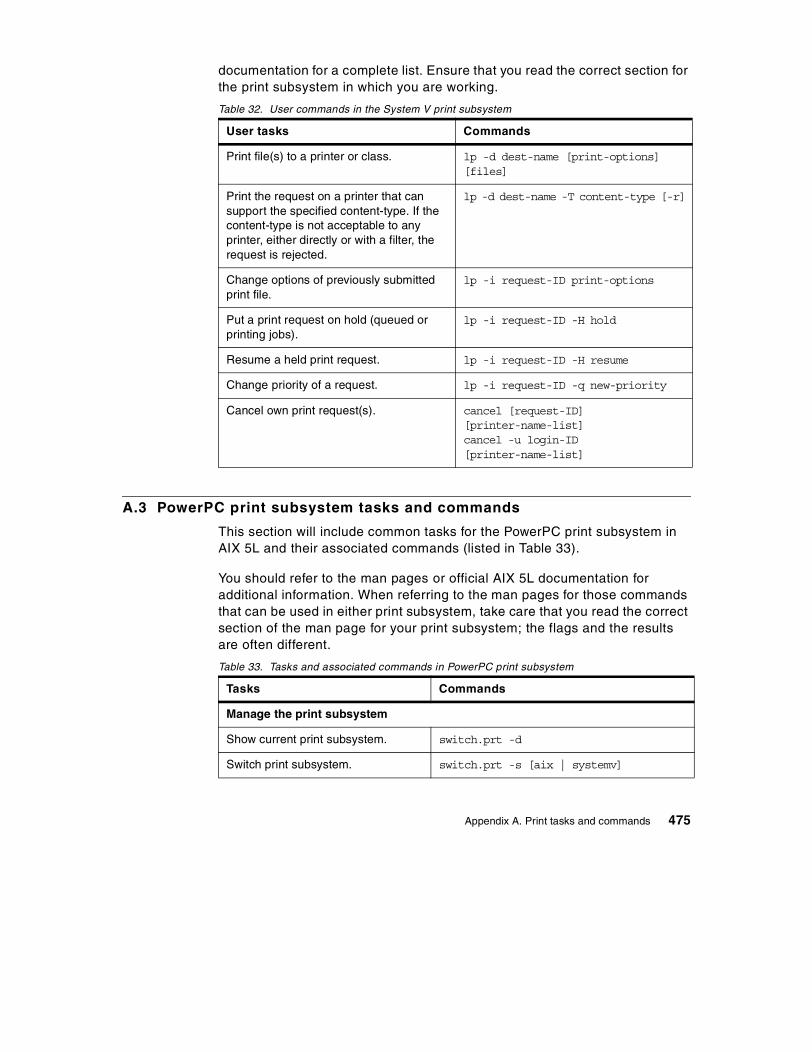
documentation for a complete list. Ensure that you read the correct section for the print subsystem in which you are working.
Table 32. User commands in the System V print subsystem
A.3 PowerPC print subsystem tasks and commands
This section will include common tasks for the PowerPC print subsystem in AIX 5L and their associated commands (listed in Table 33).
You should refer to the man pages or official AIX 5L documentation for additional information. When referring to the man pages for those commands that can be used in either print subsystem, take care that you read the correct section of the man page for your print subsystem; the flags and the results are often different.
Table 33. Tasks and associated commands in PowerPC print subsystem
User tasks Commands
Print file(s) to a printer or class. lp -d dest-name [print-options] [files]
Print the request on a printer that can support the specified content-type. If the content-type is not acceptable to any printer, either directly or with a filter, the request is rejected.
lp -d dest-name -T content-type [-r]
Change options of previously submitted print file.
lp -i request-ID print-options
Put a print request on hold (queued or printing jobs).
lp -i request-ID -H hold
Resume a held print request. lp -i request-ID -H resume
Change priority of a request. lp -i request-ID -q new-priority
Cancel own print request(s). cancel [request-ID] [printer-name-list]cancel -u login-ID [printer-name-list]
Tasks Commands
Manage the print subsystem
Show current print subsystem. switch.prt -d
Switch print subsystem. switch.prt -s [aix | systemv]
Appendix A. Print tasks and commands 475

Manage spooler group. [lssrc | startsrc | stopsrc] -g spooler
Manage qdaemon. [lssrc | startsrc | stopsrc] -s qdaemon
Manage local print devices
List all defined printers and plotters. lsdev -C -c printer | sort -u
List all supported printers and plotters.
lsdev -P -c printer -F "type subclass description" | sort -u
Add a printer/plotter device. mkdev -c printer -t type -s subclass -p parentname -w connection-location
Move a printer/plotter device to another port.
chdev -l name -p parentname -w connection-location
Change/show characteristics of a printer/plotter device.
chdev -l Name -w Connection-location -a Attribute='value'
Remove a printer/plotter device. rmdev -l Name [-d]
Configure a defined printer/plotter device (makes a defined device available for use).
mkdev -l Name
Install additional printer/plotter software.
/usr/lib/instl/sm_inst installp_cmd -a -c -g -Q -X -d '/dev/cd0' -f 'printers' '-G'
Change/show printer driver settings. splp [lpn]
Manage print queues
Add a print queue. mkque [-D] -q Name [-a 'Attribute = Value'...]
Change/show print queue characteristics.
chque -q Name [-a 'Attribute=Value'...]
chvirprt -d QueueDeviceName -q PrintQueueName -a Attribute=Value...
Remove a print queue (after removing all queue devices).
rmquedevrmque -q Namermvirprt
List all print queues. lsallq
Show status of print queues (by queue, by job, by user).
enq, qchk, lpq, lpstat
Tasks Commands
476 Printing for Fun and Profit under AIX 5L
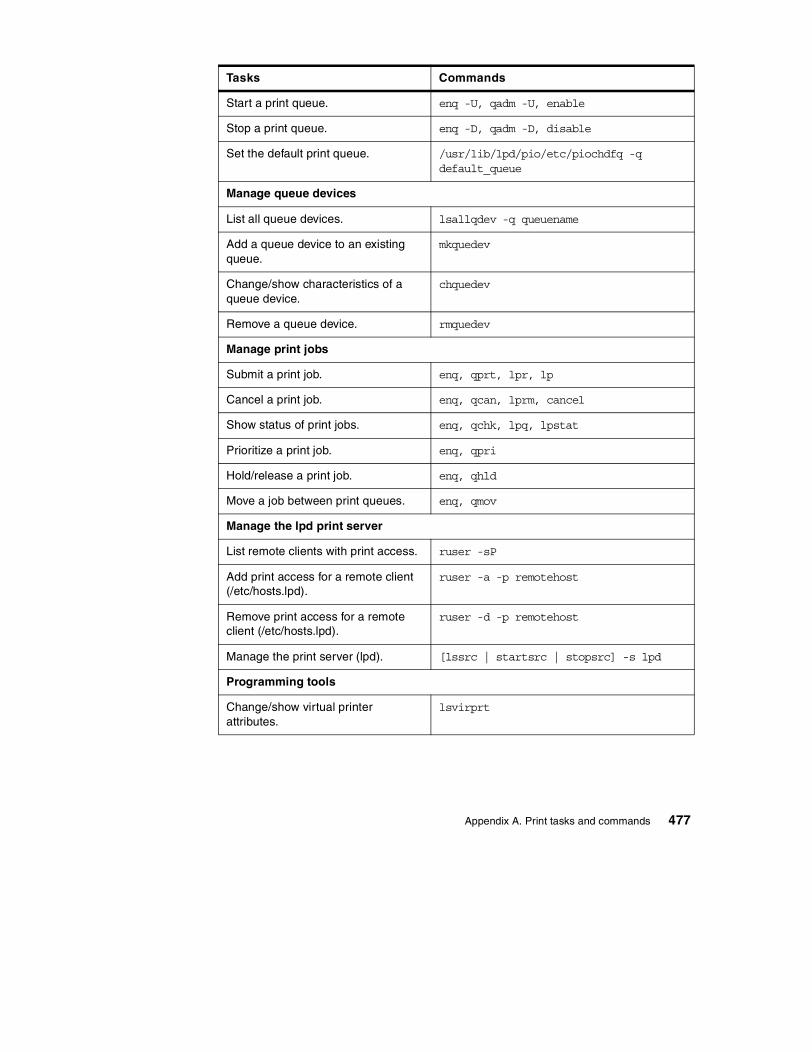
Start a print queue. enq -U, qadm -U, enable
Stop a print queue. enq -D, qadm -D, disable
Set the default print queue. /usr/lib/lpd/pio/etc/piochdfq -q default_queue
Manage queue devices
List all queue devices. lsallqdev -q queuename
Add a queue device to an existing queue.
mkquedev
Change/show characteristics of a queue device.
chquedev
Remove a queue device. rmquedev
Manage print jobs
Submit a print job. enq, qprt, lpr, lp
Cancel a print job. enq, qcan, lprm, cancel
Show status of print jobs. enq, qchk, lpq, lpstat
Prioritize a print job. enq, qpri
Hold/release a print job. enq, qhld
Move a job between print queues. enq, qmov
Manage the lpd print server
List remote clients with print access. ruser -sP
Add print access for a remote client (/etc/hosts.lpd).
ruser -a -p remotehost
Remove print access for a remote client (/etc/hosts.lpd).
ruser -d -p remotehost
Manage the print server (lpd). [lssrc | startsrc | stopsrc] -s lpd
Programming tools
Change/show virtual printer attributes.
lsvirprt
Tasks Commands
Appendix A. Print tasks and commands 477

478 Printing for Fun and Profit under AIX 5L

Appendix B. RS/6000 serial printer cabling
To print to serial printers from an RS/6000 or eServer pSeries system, it is important that you understand the cable considerations of the AIX device driver. The AIX serial device drivers for printer and tty devices work slightly different, and it is recommended that you use the printer device driver when possible. However at times, it may be easier (but possibly less reliable) to use a tty device for 4-wire printing. The goal of this appendix is to help you better understand the serial cable requirements for printing.
Sample pinouts for a number of RS/6000 serial adapters are given in Appendix D of Printing for Fun and Profit Under AIX V4, GG24-3570 and have not been duplicated here. This document is available on the Web at http://www.redbooks.ibm.com. Complete pinout information is available on the Web at http://www.rs6000.ibm.com/resource/hardware_docs/.
B.1 Interposers and null modems
Serial communications are based on two types of devices:
• Data terminal equipment (DTE), which usually includes computers and printers
• Data communications equipment (DCE), which usually includes modems and multiplexers
Therefore, signals for computers and printers are usually defined using the DTE standard, and both want to talk on the same wire. For this reason, some method of crossing the lines is required. You might think of this as the crossroads that are necessary in a highway in going from a country where people drive on the right side of the road going into a country where people drive on the left side of the road. In other words, the transmit wire from one device must be crossed over to connect to the receive line of the other device. This is normally done through a null modem or interposer.
Because there are many different types of null modems that cross different signal lines, it is important that you use an appropriate type of null modem. The null modem available from IBM for this purpose is called an interposer
© Copyright IBM Corp. 2001 479

and is called cable E with a feature code of 2937. It has two DB-25 connectors, and has the mapping of signals shown in Table 34.
Table 34. Interposer crossover connections
B.2 Supported RS/232 signals
The way that AIX interprets signals for printers may be a little different than other computer systems or printers use. Therefore, it is important that you fully understand the signals and how they are used. The AIX signal definitions are shown in Table 35.
Table 35. Serial printer signal definitions in AIX
System Signal System 25 pinFemale pinouts
Device 25 pinMale pinouts
Device Signal
Ground Shield 1 Ground
TD - transmit data 2 3 RD
RD - receive data 3 2 TD
RTS - ready to send 4 5 CTS
CTS - clear to send 5 4 RTS
DSR - data set ready 6 20 DTR
Signal Ground 7 7 Sig. Gnd
CD - carrier detect 8 20 DTR
DTR - data terminal ready 20 6 DSR
DTR 20 8 CD
Signal Description
Ground The ground should be connected to the shield on one end of the cable, and to pin 1 on the other end. If you connect both ends to pin 1, you can sometimes experience ground loop problems and noise in the data.
TD The transmit data signal, also abbreviated as TxD, is the data sent by the computer. This is the line where the print job will actually go to the printer and must be attached to the printers receive data signal line.
RD The receive data signal, also abbreviated as RxD, is the responses from the printer, such as the XON/XOFF signal. This signal must be attached to the printers transmit data signal.
480 Printing for Fun and Profit under AIX 5L

The mandatory lines are the data lines and a signal ground, but only if you wrap back a signal to CTS on the computer line. The next most important
RTS The ready to send data line will be asserted when the port is opened from AIX. This is designed to let the printer know that the computer is ready to send data. In the case that the printer does not have an RTS signal that is asserted when the printer is turned on, this signal can be wrapped back on the computer end to CTS.
CTS The clear to send signal is used by AIX to determine if the printer is turned on or off. If this signal is not asserted by the printer, AIX will not print, and the queues will go to a disabled state. This signal is normally connected to the printer RTS signal; in cases where the printer uses a different signal line to tell the computer it is powered on, that other signal should be connected to CTS on the AIX side. If no signal is asserted, or if the RTS signal from the printer is used for handshaking, then the RTS signal from the computer should be wrapped back to the CTS signal line at the computer end of the cable.
DSR The data set ready signal is an input signal and is not used by AIX printing except in one case; in the 128-port cables that have fewer than 10-pins, the DSR signal can be treated as the DCD signal by using the alternate RJ-45 pinouts (altpin) setting for the device.
CD The carrier detect signal, also called DCD, is the key signal for AIX hardware handshaking that is usually called DTR handshake. For hardware handshaking or flow control, this signal must be connected to the signal from the printer that drops when the printer buffer reaches a high water mark. In most cases, this is the printer DTR signal, but occasionally this can be a signal on pin 21 or the RTS signal.
Sig. Gnd. The signal ground from the computer should always be connected to the signal ground on the printer to maintain the signal balance.
DTR The data terminal ready is an output signal that just like the RTS signal will be asserted when the port is opened. This is used to signal that AIX is ready to print.
Signal Description
The two signals that cause the most problems in AIX printing are the CTS signal and the CD signal. If the printer signal does not assert the AIX CTS signal, the queue will go DOWN, and any attempt to print directly to the device will fail with a Can’t create error. The AIX CD signal is used for DTR flow control. If this signal is missing, hardware flow control will not work.
Note
Appendix B. RS/6000 serial printer cabling 481
move is getting the computer flow control line (usually DTR) to the computer DCD line. The next important thing to remember is to make sure you have good shielding on the cable; cable crosstalk can be one of the most frustrating symptoms to diagnose. Using CAT 5 cable can cause this type of crosstalk and poor flow control.
B.3 Adapters and cables
This section describes the various serial ports and adapters on the RS/6000 computers and the cables available from IBM to attach printers for that adapter or port. The assumptions in this section are that the printer will have a 25-pin connector with the standard signals required by AIX. If the printer has a 9-pin connector, or if it does not support the RTS signal as a sign that it is turned on, or does not support DTR as a flow control signal, then custom cables will need to be made.
B.3.1 Native serial ports
All native serial ports on AIX computers have full support for all the required signals.
Older RS/232 models used a 10-pin connector that were connected to a printer through cable B and cable D.
Newer models will have either a 25-pin connector or a 9-pin AT style connector. For 25-pin connectors, use a combination of a straight through cable D combined with an interposer cable E. For 9-pin style, use a 9-pin to 25-pin conversion cable, such as the AS cable, with the interposer.
Some models have 25-pin connectors that use an AS cable to fan out to two 25-pin connectors for two ports from 1 connector at the back of the computer. This can then be connected with a straight through cable D combined with an interposer cable E.
B.3.2 IBM 8-port adapters
The IBM 8-port adapters support the full complement of signals with a 25-pin connector and can be connected using a straight through cable D combined with an interposer cable E. The 8-port adapters also support EIA-422 connected printers.
482 Printing for Fun and Profit under AIX 5L
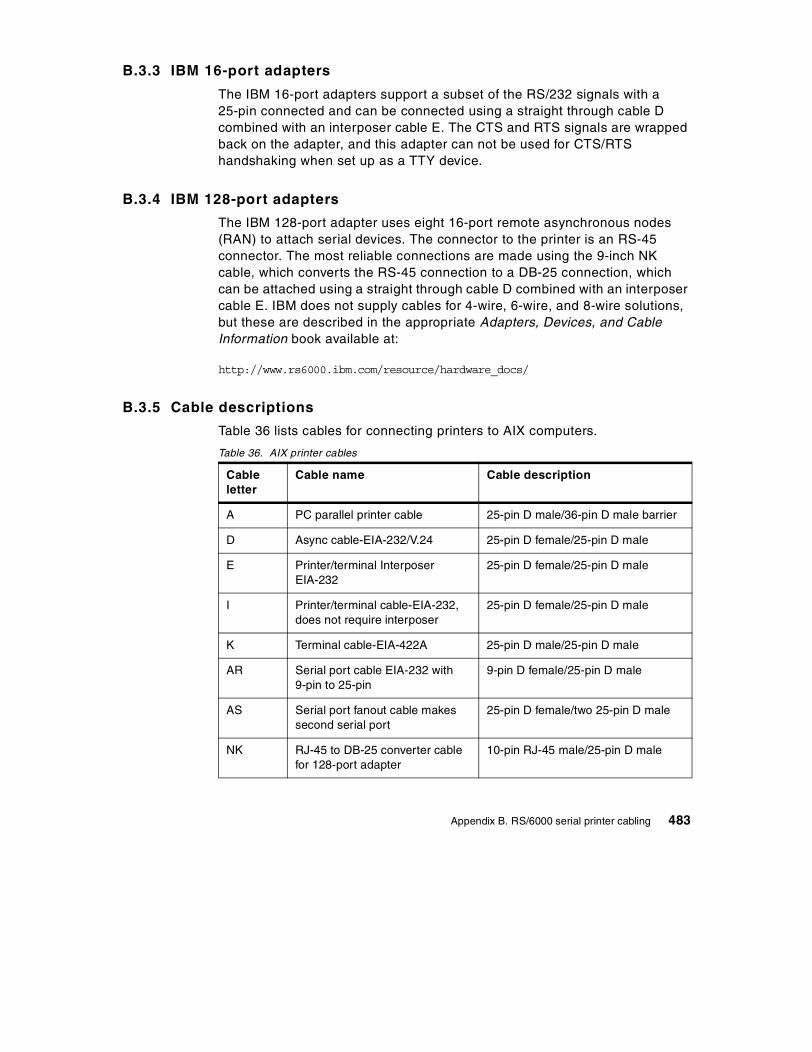
B.3.3 IBM 16-port adapters
The IBM 16-port adapters support a subset of the RS/232 signals with a 25-pin connected and can be connected using a straight through cable D combined with an interposer cable E. The CTS and RTS signals are wrapped back on the adapter, and this adapter can not be used for CTS/RTS handshaking when set up as a TTY device.
B.3.4 IBM 128-port adapters
The IBM 128-port adapter uses eight 16-port remote asynchronous nodes (RAN) to attach serial devices. The connector to the printer is an RS-45 connector. The most reliable connections are made using the 9-inch NK cable, which converts the RS-45 connection to a DB-25 connection, which can be attached using a straight through cable D combined with an interposer cable E. IBM does not supply cables for 4-wire, 6-wire, and 8-wire solutions, but these are described in the appropriate Adapters, Devices, and Cable Information book available at:
http://www.rs6000.ibm.com/resource/hardware_docs/
B.3.5 Cable descriptions
Table 36 lists cables for connecting printers to AIX computers.
Table 36. AIX printer cables
Cable letter
Cable name Cable description
A PC parallel printer cable 25-pin D male/36-pin D male barrier
D Async cable-EIA-232/V.24 25-pin D female/25-pin D male
E Printer/terminal Interposer EIA-232
25-pin D female/25-pin D male
I Printer/terminal cable-EIA-232, does not require interposer
25-pin D female/25-pin D male
K Terminal cable-EIA-422A 25-pin D male/25-pin D male
AR Serial port cable EIA-232 with 9-pin to 25-pin
9-pin D female/25-pin D male
AS Serial port fanout cable makes second serial port
25-pin D female/two 25-pin D male
NK RJ-45 to DB-25 converter cable for 128-port adapter
10-pin RJ-45 male/25-pin D male
Appendix B. RS/6000 serial printer cabling 483

NL Customer-supplied cable for connecting a 128-port Remote Async Node 16-Port EIA-232 to a printer or terminal device
4-, 6-, 8-, 10-pin RJ-45 male/25-pin D male
NP RJ-45 to DB-25 Converter Cable for 128-port adapter
8-pin RJ-45 male/25-pin D male
Cable letter
Cable name Cable description
484 Printing for Fun and Profit under AIX 5L
Appendix C. Virtual printer colon files and System V terminfo
The virtual printer colon file sequence is discussed in depth in Chapter 4, “Printer, Plotter, and Spooler Subsystem Programming” of AIX Version 4.3 Guide to Printers and Printing, SC23-4130. The terminfo definitions and language are described in termcap and terminfo, by John Strange et al. This appendix is only a short overview contrasting and comparing the two methods of storing printer configuration information. It is our desire to provide information so that if the administrator knows one or the other of the print subsystems, they will be able to gain an appreciation for the way the other subsystem works. The details of each subsystem are described more fully in the references listed.
C.1 Attribute file syntax comparison
This section compares and contrasts the files and attribute naming conventions for the two print subsystems.
C.1.1 Attribute file names and locations
This section describes the differences in where the attribute definitions files originate and where they are stored for use by the print subsystem.
C.1.1.1 PowerPC attribute definition filesSystem V print subsystem definitions are used for a printer based on the printer type set by Web-based System Manager or lpadmin -T. The source code for all supported printers is stored in a common file (/var/share/lib/terminfo/svprint.ti), but other printers can be added with their own source code. The source code is compiled using tic (terminfo compile) into individual binary files for each printer type or alias for that type. The binary files are stored in single letter named subdirectories, under the terminfo subdirectory. The binary file name is the same name as the printer type name and is stored in the subdirectory name based on the first character of the printer type name. For example, the printer type hplaser will be stored in ../terminfo/h/hplaser. The same binary terminfo file can be used for all printers with the same printer type.
C.1.1.2 PowerPC attribute definition filesPowerPC print subsystem definitions are used for virtual printers based on the printer type assigned by Web-based System Manager or SMIT. A custom file is built for each virtual printer from the appropriate default file for that printer type in /var/spool/lpd/pio/predef. When a new virtual printer is added,
© Copyright IBM Corp. 2001 485

a virtual printer definition file is built based on the predef file for the printer type, and some master definition files that are common to similar type printers. The new virtual printer definition is stored in /var/spool/lpd/pio/@local/custom. This file contains source code that can be read and changed with lsvirprt or SMIT. The piodigest command then converts this text colon file to a binary definition file used by the print formatter. The binary file is stored in /var/spool/lpd/pio/@local/ddi. The device name is based on the queue name and the device name. In contrast to the System V definition files, the PowerPC definition files are unique to the individual virtual printer queue definition. Each queue has its own source file in the custom subdirectory and its own binary file in the ddi subdirectory.
C.1.2 Attribute file formats
The format of the attribute files is totally different between the two print subsystems, but the information contained is similar in a number of ways.
C.1.2.1 System V terminfo file formatTerminfo file entries for each printer type start with a printer name in column 1, followed by a list of aliases, and a description, all on the first line of the printer definition. All other lines of a terminfo entry start with a tab. All entries in a terminfo file are separated by commas. One terminfo entry can reference another entry using the use= attribute definition. To view the terminfo entry for any defined printer type, use the infocmp -T printer-type command, as shown here:
486 Printing for Fun and Profit under AIX 5L

C.1.2.2 PowerPC virtual printer colon file formatThere is a separate virtual printer definition file for each defined virtual printer queue, and each attribute is stored in a separate line with five fields:
1. Message catalog ID
Identifies the message catalog where the attribute description is stored. The message catalog ID can take any of three forms:
- Null string: The string value for the mD attribute is assumed to be the file name of the message catalog (for example, mydescriptors.cat).
- One character: An abbreviation for pioattrx.cat, where x is the one-character catalog ID. This form of the catalog ID is normally used only by the operating system.
- Catalog file name: The file name of the message catalog (for example, mydescriptors.cat).
2. Message number
Identifies the message index in the catalog that contains the description of this attribute. Leading zeros are ignored.
3. Attribute name
Specifies two characters, except for group header attributes, which are five characters.
#infocmp -T hplaserjet# Reconstructed via infocmp from file: /usr/share/lib/terminfo/h/hplaserjethplaserjet|hplaser|HP Laserjet I, bitwin#1, bitype#2, cols#80, lines#60, npins#8, orc#12, orhi#120, orl#8, orvi#48, spinh#300, spinv#300, chr=%?%p1%{0}%>%p1%{127}%<%t\E&k%p1%dH%;, cpi=%?%p1%{10}%=%t\E&k0S%e%p1%{17}%=%t\E&k2S%;, cr=\r, cud=\E&a+%p1%dR, cud1=\n, cuf=\E&a+%p1%dC, cuf1=\s, cvr=%?%p1%{0}%>%p1%{127}%<%t\E&l%p1%dC%;, defbi=%?%p5%{0}%>%p5%{5}%<%&%t\E&a%p1%p5%*%{12}%*%{5}%/%dH\E&a%p2%p5%*%{12}%*%{5}%/%dV\E*t%{300}%p5%/%dR\E*r1A%;, endbi=\E*rB, ff=\f, hpa=\E&a%p1%dC, is2=\EE\E&k0G, lpi=%?%p1%{1}%=%t\E&l1D%e%p1%{2}%=%t\E&l2D%e%p1%{3}%=%t\E&l3D%e%p1%{4}%=%t\E&l4D%e%p1%{6}%=%t\E&l6D%e%p1%{8}%=%t\E&l8D%e%p1%{12}%=%t\E&l12D%e%p1%{16}%=%t\E&l16D%e%p1%{24}%=%t\E&l24D%e%p1%{48}%=%t\E&l48D%;, mgc=\E9, porder=1\,2\,3\,4\,5\,6\,7\,8;0, ritm=\E(s0S, rmul=\E&d@, sbim=\E*b%p1%dW, sitm=\E(s1S, slines=\E&l%p1%dP, smgbp=\E&l%p1%{1}%+%dF, smglp=\E&a%p1%dL, smgrp=\E&a%p1%dM, smgtp=\E&l%p1%{1}%+%dE, smul=\E&dD, u9=\E&l%p1P, vpa=\E&a%p1%dR,
Appendix C. Virtual printer colon files and System V terminfo 487

4. Limits field
Specifies limits for the attributes that are used in validating administrator entries when setting the virtual printer defaults as well as user entries when printing with the qprt flags.
5. Attribute value string
The value assigned to the virtual printer attribute, which can be from 0 to 1000 characters.
To view the attributes in the colon file format, change to the directory /var/spool/lpd/pio/@local/custom and use vi, more, or pg to view the file. The following shows an extract of a typical file:
To list the attribute file in a more readable format using the national language supported message catalogs, use the lsvirprt command with the -q flag to specify the queue name and the -d flag to specify the queue device name. The format of this output is:
:063:_a:DnEnR[0,1]:0:635:_b:S[D010]I[1810508]E#G[0..%?%G_l%{0}%=%t%e%G_l%G_t%-%{1}%-%d%;]:0:658:_d:S[C925]I[1810509]EnL[%IW2]F1:a:659:_f:S[C930]I[1810535]EtL[%IW3]F1V[% W7]Dy::623:_g:S[C250]I[1810511]E#G[1..]:1:717:_h:S[D040]I[1810512]::637:_i:S[D015]I[1810513]E#G[0..%G_w%{1}%-%d]:0:616:_j:S[C940]I[1810536]EnR[pioattr1.cat,1,785;no initialization,full initialization,send PCL language switch command only=0,1,2]:1:678:_l:S[D045]I[1810514]E#F1L[print "%{6}%Pv%IW4\\t@ 6 %`W8\\n%{8}%Pv%IW4\\t@ 8 %`W8"]V[%?%G_l%{0}%<%t1%e0%;]:%IwY:700:_p:DnE#V[% W1]:10:712:_q:S[B045]I[1810554]EnR[=300,600]:300:701:_s:DnEnV[% W1]:courier:634:_t:S[D005]I[1810515]E#G[0..%?%G_l%{0}%=%t%e%G_l%G_b%-%{1}%-%d%;]:0
_Q PAPER SIZE override for input paper source %IwQ_W Number of copies executed by the printer 1_X CODE PAGE of print file ISO8859-1_Y DUPLEX output 0_Z Send FORM FEED after each file? +_a 0: Normal Print; 1: Return Flag Values & 0 Pipeline, But Don't Print_b BOTTOM MARGIN (lines) 0_d Print file TYPE a_f Pre-processing FILTER NAME_g PAGE NUMBER where printing should begin 1_h TITLE STRING for 'pr' filter_i Number of columns to INDENT 0_j INITIALIZE printer? 1
488 Printing for Fun and Profit under AIX 5L

The colon file syntax is completely defined in Chapter 4, “Printer Colon File Conventions” of AIX 4.3 Guide to Printers and Printing, SC23-4130, which is available on the Web at:
http://www.rs6000.ibm.com/doc_link/en_US/a_doc_lib/aixbman/printrgd/prt_co
lon_file_conv.htm#A354P93d
C.1.3 Attribute naming conventions
The names of terminfo and virtual attributes each have a standard for defining them, but are totally different names.
C.1.3.1 Terminfo printer attribute naming conventionTerminfo attribute names are usually in the range from three to eight characters long, and are usually either a short name like bold or an acronym such as cpi (for characters per inch). Attributes that turn on functionality like underline usually start with sm for set mode, while those that turn off the function usually start with rm for reset mode. The attribute names are standards and are used for all System V printer attributes.
C.1.3.2 Virtual printer attribute naming conventionVirtual printer attribute names do not have as much consistency as the terminfo attributes. There are cases where the same attribute can have different meanings with different printer types. However, there are suggested standards, as described here:
Attribute names should follow the following conventions:
• Each attribute name must be unique for the particular printer.
• Attribute names can contain the characters a through z, A through Z, 0 through 9, and _ (underscore). The name cannot begin with a numeral.
• All attribute names must be two characters long (except group header attribute names, which can be five characters long).
• Attribute names for group headers begin with _ _ (two underscores) and must not be longer than five characters. A group header attribute (formerly called a comment attribute) marks the beginning of a group of related attributes. For example, the group header attribute _ _FLG marks the beginning of a group of attributes that define the default values for command line flags. The grouping of attributes is for readability purposes and does not affect how the attributes are processed.
• An attribute name beginning with _ (an underscore), except for group headers, can be overridden by a command line flag of the same name as the second character of the attribute name. For example, -w 132, specified
Appendix C. Virtual printer colon files and System V terminfo 489

with the qprt command, overrides with a value of 132 the value specified for the _w attribute in the colon file.
Suggested Attribute NamesSuggested attribute names are names that are assumed by many formatter filters:
• First character is _: Attributes that can be overridden by command flags.
• First character is s: System administrator value.
• First character is d: Directory path.
• First character is m: Miscellaneous value (constant).
• First character is w: Work value (changes while formatting).
• First character is c: Command aggregate.
• First character is a: ASCII control code.
• First character is e: Printer escape sequence.
• First character is t and second character is 0-9: Path name to translation tables.
• First character is i: Programs to format the data based on _d.
• First character is f: Filter programs.
Full path names of zero or more. Stage 2 translation tables used by formatter. Multiple values must be separated by commas.
More information on the names, limits fields, and detailed formatting are available in Chapter 4 “Printer, Plotter, and Spooler Subsystem Programming” of AIX V4 Printer Guide, SC23-2783.
C.1.4 Attribute value formats
There are three types of attributes that can be assigned for either System V or PowerPC printing. These are:
• boolean
• numeric
• string
490 Printing for Fun and Profit under AIX 5L

C.1.4.1 System V boolean attributesTerminfo boolean attributes are considered false unless they are defined within the printer definition and then they are considered true. Boolean attributes used by System V printing are shown in Table 37.
Table 37. Terminfo boolean attributes
C.1.4.2 System V numeric attributesTerminfo numeric attributes are defined by separating the attribute name and value by the ‘#’ symbol. See Table 38 for details.
Table 38. Terminfo numeric attributes
C.1.4.3 System V string attributesTerminfo string attributes come in two types: those that contain a constant string, and those that calculate an output string based on input parameters.
Attribute Description
cpix When true, changing the pitch of the printer automatically changes the printer resolution.
daisy When true, changing a character set requires printer intervention.
lpix When true, changing the line spacing of the printer automatically changes the printer resolution.
Attribute Description Example
bufsz Number of bytes buffered before printing bufsz#5000
cols Columns per line (line width) cols#80
cps Characters per second (average rate) cps#300
it Number of spaces between tabs it#8
lines Number of lines per page lines#60
npins Number of pins in the print head npins#8
orc Horizontal resolution in units per line orc#1
orhi Horizontal resolution in units per inch orhi#8
orl Vertical resolution in units per line orl#30
orvi Vertical resolution in units per inch orvi#144
spinh Spacing of dots horizontally in dots per inch spinh#300
spinv Spacing of dots vertically in dots per inch spinv#300
Appendix C. Virtual printer colon files and System V terminfo 491

The first table shows string attributes that output a constant string value. In specifying strings, the ^ symbol designates that the next character is modified by ctrl, \s is a space, \t is a tab, and \E is an escape character.
To see the value of any of these strings for a particular printer type, use the following command:
Syntax: tput -T printer-type attribute-name | od -ax# tput -T hplaserjet lpi 6 | od -a0000000 esc & 1 6 D
Table 39 shows constant string attributes.
Table 39. Terminfo constant string attributes
Attribute Definition Example
cr Carriage Return cr=^M
cud1 Move down 1 line (line feed) cud1=^J
cuf1 Move forward 1 column (space) cuf1=\s
endbi End bidirectional print endbi=\E*rB
ff Form feed character ff=^L
ht Horizontal tab character ht=^I
init Printer initialization string init=\EE
is1 Printer initialization strings one is1=^X
is2 Printer initialization string two is2=^R\EA\014\E2\Ef
is3 Printer initialization string three is3=EX\001\120D
mgc Clear all margins (top, bottom, and sides)
mgc=\E9
smul Set underline mode smul=\E-1
rmul End underline rmul=\E&d@
swidm=\ Enable double wide characters swidm=\EW1
rwidm Stop double wide characters rwidm=\EW0
smgl Set left margin at current location smgl=\E9
smgt Set top margin at current location smgt=\E+
smgb Set bottom margin at current location smgb=\E-
492 Printing for Fun and Profit under AIX 5L

You can view attributes that take parameters by using the tput command, as shown here:
$ tput -T printer-type attribute parameter
Table 40 shows some attributes that take parameters.
Table 40. Terminfo attributes that require a parameter
sitm Enable italics printing sitm=\E(s1S
smso Set strike over mode sms0=\EE
rmso End strike over mode rmso=\EF
bold Set bold characters bold=\EG
smacs Set alternate character set mode smacs=\E6
rmacs End alternate character set mode rmacs=\E7
Attribute Description Example
cpi Characters per inch cpi=%?%p1%{10}%=%t^R%e%p1%{16}%=%p1%{17}%=%O%t^O%;
cvr Change vertical resolution
cvr=%?%p1%{0}%>%p1%{256}%<%&%t\EA%p1%c\E2%;
lpi Lines per inch lpi=%?%p1%{6}%=%t\E&l6D%{120}%PL%e%p1%{8}%=%t\E&l8D%{90}%PL%e%p1%{9}%=%t\E&l9D%{80}%PL%
scs Select character set scs=%?%p1%{0}%=%p1%{1}%=%O%t\E7%e%p1%{2}%=%t\E6%
slines Set page length slines=\Ev%p1%02d.
smglp Set left margin smglp=\EL%p1%03d
smgrp Set right margin smgrp=\E/%{1}%p1%+%03d
smgtp Set top margin smgtp=\E[%p1%dr
smgbp Set bottom margin smgbp=\E[;%p1%dr
Attribute Definition Example
Appendix C. Virtual printer colon files and System V terminfo 493

C.1.4.4 PowerPC boolean attributesBoolean virtual printer attributes are designated true by a + sign or a value of 1, and false by a ! or value of 0. Some of the more significant binary attributes are listed in Table 41.
Table 41. Virtual printer boolean attributes
C.1.4.5 PowerPC numeric attributesNumeric attributes are specified by setting the virtual printer attribute value to a number. Some of the most significant examples of numeric attributes are shown in Table 42.
Table 42. Virtual printer numeric attributes
Attribute Description
_E Double spacing.
_J Restore printer settings at end of job.
_L Wrap long lines based on the _l value.
_Z Send FORM FEED after each file.
_j Initialize printer at start of job.
_z Set landscape mode. This may also be set to 0, 1, 2, and 3.
sD Automatic detection of print file type to be done.
Attribute Description
_Y Type of duplex. 0=simplex, 1=duplex, 2=simplex tumble, 3=duplex tumble.
_b Bottom margin in lines.
_i Number of columns to INDENT.
_l Lines per page.
_p PITCH (characters per inch).
_q Print QUALITY.
_t Top margin in lines.
_u Input PAPER SOURCE.
_v Lines per inch. The allowed values are usually only 6 and 8.
_w Page width in columns.
_x Add LINE FEED or CARRIAGE RETURN.
494 Printing for Fun and Profit under AIX 5L

C.1.4.6 PowerPC string attributesString attributes can come in individual characters, string constants, and strings that require parameters to calculate.
Strings with constant valueSome virtual printer values require a single character and usually map that character to some longer string or action. For example, the _d attribute takes the character a to represent ASCII text, which then uses the ia attribute to determine which formatter to use. Other attributes take a simple string value. Table 43 lists some of the more commonly used attributes that require a string constant:
Table 43. Virtual printer attributes with a string constant
Attribute Description
_d Print file TYPE: a=ASCII, p=passthrough, s=PostScript, c=PCl.
_s Type style, such as courier, checked by the mU attribute.
mA Printer Data Stream Description, like PCL or PostScript.
mD Name of message catalog.
mN Printer model number.
mL Printer description.
pL Command to select the printer language.
pU Printer reset command: Example \33%%-12345X.
C1-Cn Command string to set different character sets.
af Form feed character.
ac Line feed character.
zM Printer manufacturer used by SMIT.
zP Parent file from which attributes are inherited.
Appendix C. Virtual printer colon files and System V terminfo 495
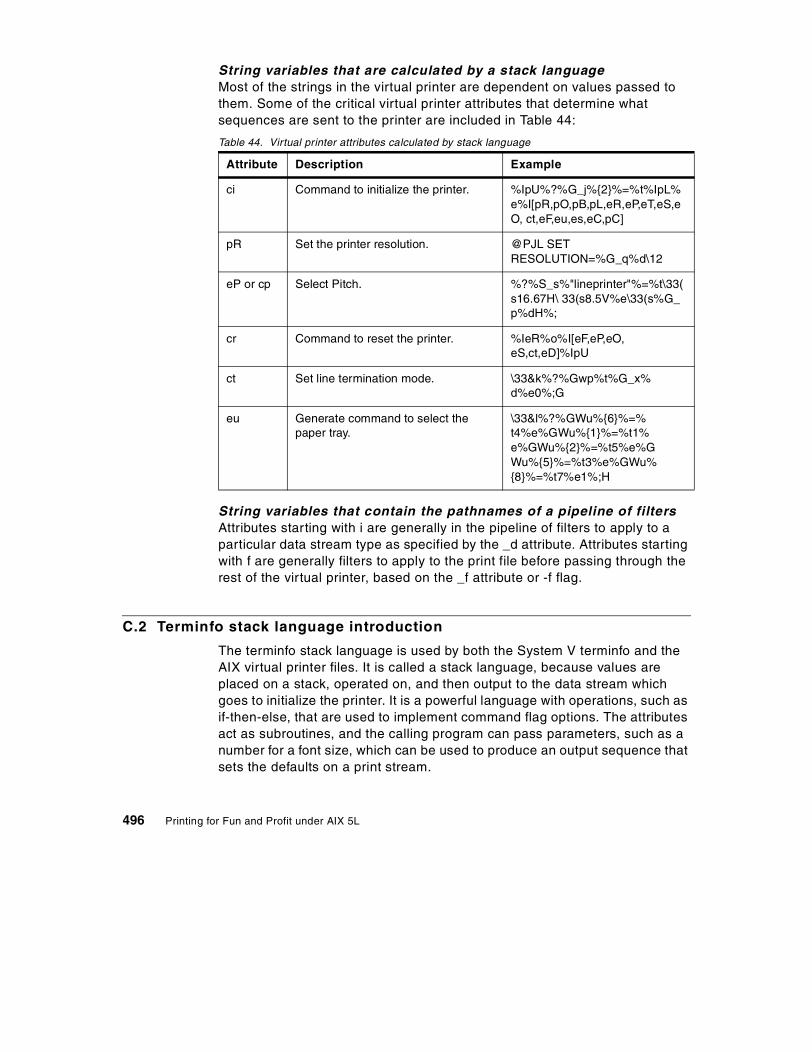
String variables that are calculated by a stack languageMost of the strings in the virtual printer are dependent on values passed to them. Some of the critical virtual printer attributes that determine what sequences are sent to the printer are included in Table 44:
Table 44. Virtual printer attributes calculated by stack language
String variables that contain the pathnames of a pipeline of filtersAttributes starting with i are generally in the pipeline of filters to apply to a particular data stream type as specified by the _d attribute. Attributes starting with f are generally filters to apply to the print file before passing through the rest of the virtual printer, based on the _f attribute or -f flag.
C.2 Terminfo stack language introduction
The terminfo stack language is used by both the System V terminfo and the AIX virtual printer files. It is called a stack language, because values are placed on a stack, operated on, and then output to the data stream which goes to initialize the printer. It is a powerful language with operations, such as if-then-else, that are used to implement command flag options. The attributes act as subroutines, and the calling program can pass parameters, such as a number for a font size, which can be used to produce an output sequence that sets the defaults on a print stream.
Attribute Description Example
ci Command to initialize the printer. %IpU%?%G_j%{2}%=%t%IpL%e%I[pR,pO,pB,pL,eR,eP,eT,eS,eO, ct,eF,eu,es,eC,pC]
pR Set the printer resolution. @PJL SET RESOLUTION=%G_q%d\12
eP or cp Select Pitch. %?%S_s%"lineprinter"%=%t\33(s16.67H\ 33(s8.5V%e\33(s%G_ p%dH%;
cr Command to reset the printer. %IeR%o%I[eF,eP,eO, eS,ct,eD]%IpU
ct Set line termination mode. \33&k%?%Gwp%t%G_x% d%e0%;G
eu Generate command to select the paper tray.
\33&l%?%GWu%{6}%=% t4%e%GWu%{1}%=%t1% e%GWu%{2}%=%t5%e%G Wu%{5}%=%t3%e%GWu% {8}%=%t7%e1%;H
496 Printing for Fun and Profit under AIX 5L

C.2.1 Example: If-then-else
An example of the if-then-else construct is shown here:
lpi=%?%p1%{6}%=%t\E&l6D%{120}%PL%e%p1%{8}%=%t\E&l8D%{90}%PL%e%p1%{9}%=%t\E&l9D%{80}%PL%;
The sequence %? .. %t .. %e %; is a if-then-else-end construction, %p1 is a parameter, %{6} is a constant, \E is an escape character, and %Pc says to pop the value off the stack and set it to c where c must be in the range a to z or A to Z. The following pseudo-code illustrates how this lines per inch attribute is parsed:
%? if %p1 parameter 1 %{6} constant 6 %= equal (if parameter 1 = a value of 6) %t then \E&l6D output the escape sequence %{120} push the constant 120 on the stack %PL set the variable L to 120 %e else %p1 parameter 1 %{8} constant 8 %= equal (if parameter 1 = a value of 8)
%t then \E&l8D output the escape sequence %{90} push the constant 90 on the stack %PL set the variable L to 120
%e ... %; endif
This sequence says that if the program passes a parameter value of 6 lines per inch that the value sent to the printer will be escape ampersand 16D, and if the parameter is 8 that the sequence will be escape ampersand 18D.
C.2.2 Other stack language constructs
A detailed list of the stack language for the virtual printer is given in Chapter 4. “Printer, Plotter, and Spooler Subsystem Programming”, in AIX Version 4.3 Guide to Printers and Printing, SC23-4130. Table 45 lists some of the more commonly used colon file escape sequences:
Appendix C. Virtual printer colon files and System V terminfo 497

Table 45. Commonly used colon file escape sequences
Esc. Seq. Description
%% Generates the % (percent sign) character.
%d Used as a formatting character to output integers as strings similar to the %d used in C programming.
%c Used as a formatting indicator to output integers as a single character while discarding the lower order byte.
%Ixx Include the string from attribute xx. This can be used recursively, as attribute xx can include another attribute.
%I[...] Includes multiple attributes included in a comma separated list.
%”xyz” Pushes a pointer to the str9ing xyz on the stack.
%‘”String” Passes the string as a command.
%Gxx Gets the integer attribute value of attribute xx.
%Pf Pops an integer from the stack to variable f.
%Zg Zeroes the variable g.
%gf Gets (pushes) the value of the variable f.
%+ %- %* %/ %m
Pushes the result of an operation onto the stack.
%= %> %! Pushes a value of 1 if true, or 0 if false, onto the stack.
498 Printing for Fun and Profit under AIX 5L
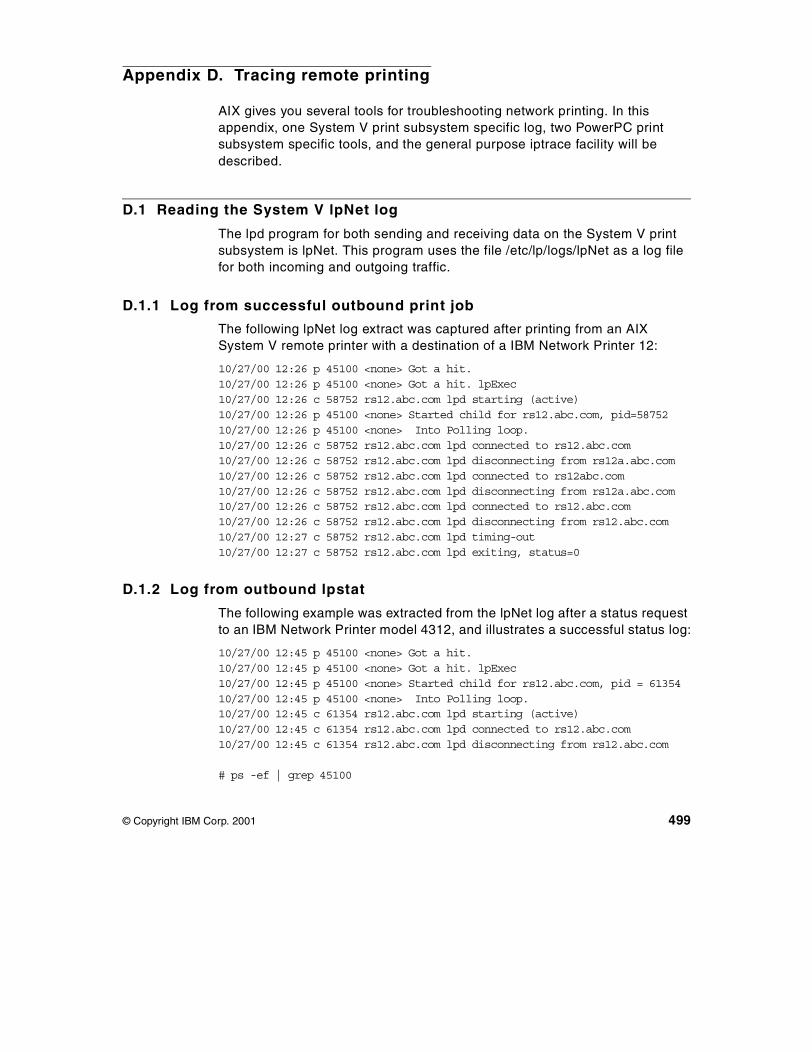
Appendix D. Tracing remote printing
AIX gives you several tools for troubleshooting network printing. In this appendix, one System V print subsystem specific log, two PowerPC print subsystem specific tools, and the general purpose iptrace facility will be described.
D.1 Reading the System V lpNet log
The lpd program for both sending and receiving data on the System V print subsystem is lpNet. This program uses the file /etc/lp/logs/lpNet as a log file for both incoming and outgoing traffic.
D.1.1 Log from successful outbound print job
The following lpNet log extract was captured after printing from an AIX System V remote printer with a destination of a IBM Network Printer 12:
10/27/00 12:26 p 45100 <none> Got a hit.10/27/00 12:26 p 45100 <none> Got a hit. lpExec10/27/00 12:26 c 58752 rs12.abc.com lpd starting (active)10/27/00 12:26 p 45100 <none> Started child for rs12.abc.com, pid=5875210/27/00 12:26 p 45100 <none> Into Polling loop.10/27/00 12:26 c 58752 rs12.abc.com lpd connected to rs12.abc.com10/27/00 12:26 c 58752 rs12.abc.com lpd disconnecting from rs12a.abc.com10/27/00 12:26 c 58752 rs12.abc.com lpd connected to rs12abc.com10/27/00 12:26 c 58752 rs12.abc.com lpd disconnecting from rs12a.abc.com10/27/00 12:26 c 58752 rs12.abc.com lpd connected to rs12.abc.com10/27/00 12:26 c 58752 rs12.abc.com lpd disconnecting from rs12.abc.com10/27/00 12:27 c 58752 rs12.abc.com lpd timing-out10/27/00 12:27 c 58752 rs12.abc.com lpd exiting, status=0
D.1.2 Log from outbound lpstat
The following example was extracted from the lpNet log after a status request to an IBM Network Printer model 4312, and illustrates a successful status log:
10/27/00 12:45 p 45100 <none> Got a hit.10/27/00 12:45 p 45100 <none> Got a hit. lpExec10/27/00 12:45 p 45100 <none> Started child for rs12.abc.com, pid = 6135410/27/00 12:45 p 45100 <none> Into Polling loop.10/27/00 12:45 c 61354 rs12.abc.com lpd starting (active)10/27/00 12:45 c 61354 rs12.abc.com lpd connected to rs12.abc.com10/27/00 12:45 c 61354 rs12.abc.com lpd disconnecting from rs12.abc.com
# ps -ef | grep 45100
© Copyright IBM Corp. 2001 499

root 45100 7932 0 12:18:07 - 0:00 lpNet
Process ID 61354 belonged to the lpNet child process, while 45100 belonged to the parent lpNet, whose parent is lpsched.
D.1.3 Example: lpNet from inbound status request
The following entry was extracted from the lpNet log after receiving a status request from an AIX 4.3.3 client to the AIX 5L server:
10/27/00 13:06 p 45108 <none> Got a hit.10/27/00 13:06 p 45108 <none> Got a hit. listenBSD10/27/00 13:06 p 45108 <none> Into Polling loop.10/27/00 13:06 p 45108 <none> Got a hit. listenBSD10/27/00 13:06 p 45108 <none> Into Polling loop.10/27/00 13:06 c 7686 client1.xyz.com lpd starting (passive)10/27/00 13:06 c 7686 client1.xyz.com clien1.xyz.com requests disp10/27/00 13:06 p 45108 <none> Got a hit. listenBSD10/27/00 13:06 p 45108 <none> Into Polling loop.10/27/00 13:06 c 7686 client1.xyz.com lpd starting (passive)10/27/00 13:06 c 7686 client1.xyz.com client1.xyz.com requests displayq short net12 layq short net12
D.1.4 Example: lpNet log from host with name not in /etc/lp/Systems
The following entry was extracted from the lpNet log after a failed attempt to print the remote printer. After some diagnosis, we found that the queue was setup with a hostname that did not exist.
10/27/00 12:54 p 45100 <none> Got a hit.10/27/00 12:54 p 45100 <none> Got a hit. listenBSD10/27/00 12:54 p 45100 <none> Into Polling loop.
D.1.5 Example: Inbound print request
The following entry was extracted from the lpNet log after a job was received from an AIX 4.3.3 client by the AIX 5L System V print server. Both this log and the AIX rembak log indicated a successful transfer of the print job.
10/30/00 08:30 p 45108 <none> Got a hit.10/30/00 08:30 p 45108 <none> Got a hit. listenBSD10/30/00 08:30 c 56488 client1.xyz.com lpd starting (passive)10/30/00 08:30 c 56488 client1.xyz.com client1.xyz.com requests recvjob hp110/30/00 08:30 p 45108 <none> Into Polling loop.10/30/00 08:30 c 56488 client1.com lpd exiting, status=0
500 Printing for Fun and Profit under AIX 5L

D.1.6 Example: Wrong host name
When running the lpstat command to a host that does not exist, we get the following output to the log indicating the error:
10/27/00 11:12 p 7888 <none> Got a hit.10/27/00 11:12 p 7888 <none> Got a hit. lpExec10/27/00 11:12 p 7888 <none> Started child for rsa.abc.com, pid = 1932210/27/00 11:12 p 7888 <none> Into Polling loop.10/27/00 11:12 c 19322 rsa.abc.com lpd starting (active)
When we check the process table for process 19322, this shows:
# ps -ef | grep 19322root 19322 7888 0 11:12:19 - 0:00 lpNet
This is a child process forked by the parent lpNet, as shown by this ps:
# ps -ef | grep lpNet root 7888 45298 0 10:59:18 - 0:00 lpNet root 19322 7888 0 11:12:19 - 0:00 lpNet
The lpNet parent is owned by process 45298, which is the scheduler:
# ps -ef | grep 45298 root 7888 45298 0 10:59:18 - 0:00 lpNet
root 45298 1 0 10:59:18 - 0:00 /usr/lib/lp/lpsched
D.1.7 Example: Wrong inbound queue name
The following shows some of the error lines when data was received for a queue that did not exist:
10/30/00 08:54 p 45108 <none> Got a hit.10/30/00 08:54 p 45108 <none> Got a hit. listenBSD10/30/00 08:54 c 56510 tes.dfw.com lpd starting (passive)10/30/00 08:54 c 56510 tes.dfw.com tes.dfw.com requests recvjob hp10010/30/00 08:54 c 56510 tes.dfw.ibm.com unknown printer: hp10010/30/00 08:54 p 45108 <none> Into Polling loop.10/30/00 08:54 c 56510 tes.dfw.com lpd exiting, status=0
D.1.8 Example: Connection time-out to server
The following shows an error when there was a connection time-out when sending data to a server:
10/27/00 14:45 c 58764 9.19.129.12 lpd disconnecting from 9.19.129.1210/27/00 14:47 c 58764 9.19.129.12 ERROR: class=Fatal, type=Unix, trace=(contimeout/setjmp), Interrupted system call10/27/00 14:47 c 58764 9.19.129.12 Abnormal process termination.
Appendix D. Tracing remote printing 501
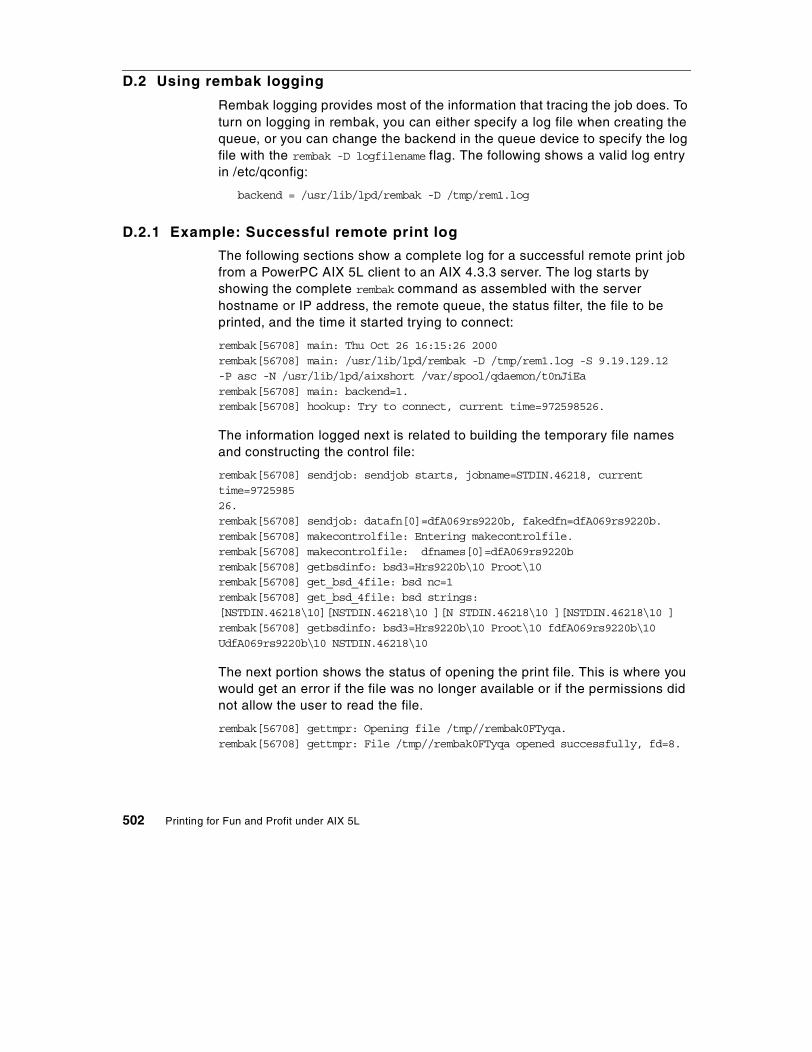
D.2 Using rembak logging
Rembak logging provides most of the information that tracing the job does. To turn on logging in rembak, you can either specify a log file when creating the queue, or you can change the backend in the queue device to specify the log file with the rembak -D logfilename flag. The following shows a valid log entry in /etc/qconfig:
backend = /usr/lib/lpd/rembak -D /tmp/rem1.log
D.2.1 Example: Successful remote print log
The following sections show a complete log for a successful remote print job from a PowerPC AIX 5L client to an AIX 4.3.3 server. The log starts by showing the complete rembak command as assembled with the server hostname or IP address, the remote queue, the status filter, the file to be printed, and the time it started trying to connect:
rembak[56708] main: Thu Oct 26 16:15:26 2000rembak[56708] main: /usr/lib/lpd/rembak -D /tmp/rem1.log -S 9.19.129.12 -P asc -N /usr/lib/lpd/aixshort /var/spool/qdaemon/t0nJiEarembak[56708] main: backend=1.rembak[56708] hookup: Try to connect, current time=972598526.
The information logged next is related to building the temporary file names and constructing the control file:
rembak[56708] sendjob: sendjob starts, jobname=STDIN.46218, current time=972598526.rembak[56708] sendjob: datafn[0]=dfA069rs9220b, fakedfn=dfA069rs9220b.rembak[56708] makecontrolfile: Entering makecontrolfile.rembak[56708] makecontrolfile: dfnames[0]=dfA069rs9220brembak[56708] getbsdinfo: bsd3=Hrs9220b\10 Proot\10rembak[56708] get_bsd_4file: bsd nc=1rembak[56708] get_bsd_4file: bsd strings: [NSTDIN.46218\10][NSTDIN.46218\10 ][N STDIN.46218\10 ][NSTDIN.46218\10 ]rembak[56708] getbsdinfo: bsd3=Hrs9220b\10 Proot\10 fdfA069rs9220b\10 UdfA069rs9220b\10 NSTDIN.46218\10
The next portion shows the status of opening the print file. This is where you would get an error if the file was no longer available or if the permissions did not allow the user to read the file.
rembak[56708] gettmpr: Opening file /tmp//rembak0FTyqa.rembak[56708] gettmpr: File /tmp//rembak0FTyqa opened successfully, fd=8.
502 Printing for Fun and Profit under AIX 5L

When we created the queue, we specified that the control file be sent first. In this section, rembak actually starts the TCP/IP connection with the server, then requests to send a data file to queue asc. The server sends back an ACKnowledgment of hex 0x0, which is a ‘yes, you can print to this queue’ answer.
rembak[56708] sendjob: ctrlfname=/tmp//rembak0FTyqa,fakecfn=cfA069rs9220b.rembak[56708] sendjob: State machine starts.....rembak[56708] sendjob: State 1 - send the "Receive a Print Job" request.rembak[56708] sendreq: sendreq - sending lpd request [\2 asc\10 ]. rembak[56708] gotack: Reading ACK status.....current time=972598526, timeout_ack=90.rembak[56708] gotack: ACK status=0x0.
The next object that rembak sends is information about the job it is going to send, including the fake file name, and the size (110 bytes in this example). Again, the status returned is hex zero, indicating the server can accept a job of the specified size.
rembak[56708] sendjob: state 3 - Send data file(s), dfcount=1.rembak[56708] sendjob: realfn=/var/spool/qdaemon/t0nJiEa, fakefn=dfA069rs9220b, filter=/usr/lib/lpd/aixshort.rembak[56708] sendreq: sendreq - sending lpd request [\3 110 dfA069rs9220b\10 ].rembak[56708] gotack: Reading ACK status.....current time=972598526, timeout_ack=90.rembak[56708] gotack: ACK status=0x0.
The next section shows rembak actually sends the data file and getting the acknowledgement of hex zero again, saying the server accepted the job:
rembak[56708] senddatafile: Opening file /var/spool/qdaemon/t0nJiEa.rembak[56708] senddatafile: File /var/spool/qdaemon/t0nJiEa opened successfully, fd=9.rembak[56708] send_file_rembak: Reading 110 bytes from file, fd=9.rembak[56708] send_file_rembak: Writing 110 bytes to socket 7.rembak[56708] send_file_rembak: File sent.rembak[56708] ack: Send ACK.rembak[56708] send_file_rembak: waiting for ACK.rembak[56708] gotack: Reading ACK status.....current time=972598526, timeout_ack=90.rembak[56708] gotack: ACK status=0x0.
The next section requests that the control file be sent:
rembak[56708] sendjob: State 2 - send control file, ctrlfname=/tmp//rembak0FTyqa:, fakecfn=cfA069rs9220b.
Appendix D. Tracing remote printing 503

rembak[56708] sendreq: sendreq - sending lpd request [\2 106 cfA069rs9220b\10 ].rembak[56708] gotack: Reading ACK status.....current time=972598527, timeout_ack=90.rembak[56708] gotack: ACK status=0x0.
The next section shows the control file being sent:
rembak[56708] sendcontrolfile: Opening file /tmp//rembak0FTyqa.rembak[56708] sendcontrolfile: File /tmp//rembak0FTyqa opened successfully, fd=9.rembak[56708] send_file_rembak: Reading 106 bytes from file, fd=9.rembak[56708] send_file_rembak: Writing 106 bytes to socket 7.rembak[56708] send_file_rembak: File sent.rembak[56708] ack: Send ACK.rembak[56708] send_file_rembak: waiting for ACK.rembak[56708] gotack: Reading ACK status.....current time=972598527, timeout_ack=90.rembak[56708] gotack: ACK status=0x0.
The final section shows the end of job cleanup.
rembak[56708] sendjob: State 5 - end of job #69 (STDIN.46218).rembak[56708] sendjob: Delete control file /tmp//rembak0FTyqa.
D.2.2 Example: Error when remote queue does not exist
In this example, the job was sent to badq, which did not exist on the server. The portion of the log with the error is shown below:
rembak[48762] sendjob: State 1 - send the "Receive a Print Job" request.rembak[48762] sendreq: sendreq - sending lpd request [\2 badq\10 ].:rembak[48762] gotack: Reading ACK status.....current time=972657276, rembak[48762] gotack: ACK status=0x30.rembak[48762] gotack: Unknown NACK status code.rembak[48762] short_sendreq: (WARNING) Failed receiving acknowledgement.rembak[48762] cleanupcf: need to cleanup ctlfname /tmp//rembakVoLDEarembak[48762] sendjob: (FATAL ERROR) Failed receiving acknowledgement.
This does not really tell us what the problem is, simply that we got a NACK (negative acknowledgement) when we tried to print to badq. In this case, the iptrace gives us a more definitive answer, as shown:
00000000 30373831 2d323038 20756e6b 6e6f776e |0781-208 unknown|00000010 20707269 6e746572 20626164 712e | printer badq. |
504 Printing for Fun and Profit under AIX 5L

D.3 Using lpd logging with the PowerPC print subsystem
The lpd log file provides information that is almost impossible to get without doing a network trace, as described in the iptrace section below. To turn on lpd logging, stop the lpd daemon, and then restart with the -D attribute, as shown here:
# stopsrc -s lpd # startsrc -s lpd -a “-D /tmp/lpddebug”
The example trace file shown here shows the steps that the lpd daemon takes in receiving a print job and passing it to enq on the server:
When lpd receives a request, it checks to make sure the queue (3130pcl in this case) exists, and if it does, responds with an ACK to the client:
lpd[46248] doreq: lpd command=[\2 3130pcl].lpd[46248] readjob: send ACK.
The data file information is received:
lpd[46248] readjob: send ACK.lpd[46248] readjob: lpd command=[\3 110 dfA929tesch].lpd[46248] readjob: CmdType 3 - receive data file.
The server is check to make sure there is space to receive the file, and an ACK sent if everything is OK:
lpd[46248] chk_request: Entering chk_request, rq_str=[110 dfA929tesch].lpd[46248] chk_request: rc=2, filename=dfA929tesch, *psize=110.lpd[46248] chk_request: Opening file dfA929tesch.972600121.lpd[46248] chk_request: Clearing file dfA929tesch.972600121, *psize=110.lpd[46248] chk_request: send ACK.
The server receives the data file:
lpd[46248] readfile: Entering readfile, file=dfA929tesch.972600121, size=110.lpd[46248] readfile: Opening file dfA929tesch.972600121.lpd[46248] readfile: File dfA929tesch.972600121 opened successfully, fd=4.lpd[46248] readfile: Reading 110 bytes from socket, fd=1.lpd[46248] readfile: Writing 110 bytes to file, fd=4.lpd[46248] noresponse: Read ACK status byte, current time=972600122.lpd[46248] noresponse: ACK status byte=0x0.lpd[46248] readfile: send ACK.
The control file information is received:
lpd[46248] readjob: lpd command=[\2 51 cfA929tesch].
Appendix D. Tracing remote printing 505

lpd[46248] readjob: CmdType 2 - receive control file.
The control file information is validated:
lpd[46248] chk_request: Entering chk_request, rq_str=[51 cfA929tesch].lpd[46248] chk_request: rc=2, filename=cfA929tesch, *psize=51.lpd[46248] chk_request: Opening file cfA929tesch.972600121.lpd[46248] chk_request: Clearing file cfA929tesch.972600121, *psize=51.lpd[46248] chk_request: send ACK.
The control file is received:
lpd[46248] chk_request: Entering chk_request, rq_str=[51 cfA929tesch].lpd[46248] chk_request: rc=2, filename=cfA929tesch, *psize=51.lpd[46248] chk_request: Opening file cfA929tesch.972600121.lpd[46248] chk_request: Clearing file cfA929tesch.972600121, *psize=51.lpd[46248] chk_request: send ACK.
The control file is parsed to build command line flags:
lpd[56734] doit: cfn=[cfA929tesch.972600121].lpd[56734] doit: get a line [Htesch].lpd[56734] doit: get a line [Proot].lpd[56734] doit: get a line [fdfA929tesch].lpd[56734] doit: get a line [UdfA929tesch].lpd[56734] doit: get a line [NSTDIN.6404].
The enq command is built and issued:
lpd[56734] doit: exec enq cmd=[/usr/bin/enq -P3130pcl -r -troot@tesch [email protected] -N1 -TSTDIN.6404 /var/spool/lpd/dfA929tesch.972600121 ].
This shows you what commands are issued to the AIX print queue, which may tell you why the job did not print.
D.4 Using iptrace to log remote printing
Using iptrace can show us the complete story on remote printing. It shows the IP and TCP protocol handshaking and acknowledgement, window size and other details purely related to networking. It also shows us the complete LPD protocol, requests, lpd acknowledgements, the control file contents, and the entire data file. A Web resource for understanding trace formats in more detail is given at:
http://service.boulder.ibm.com/rs6k/techdocs/9175597789870.html
506 Printing for Fun and Profit under AIX 5L
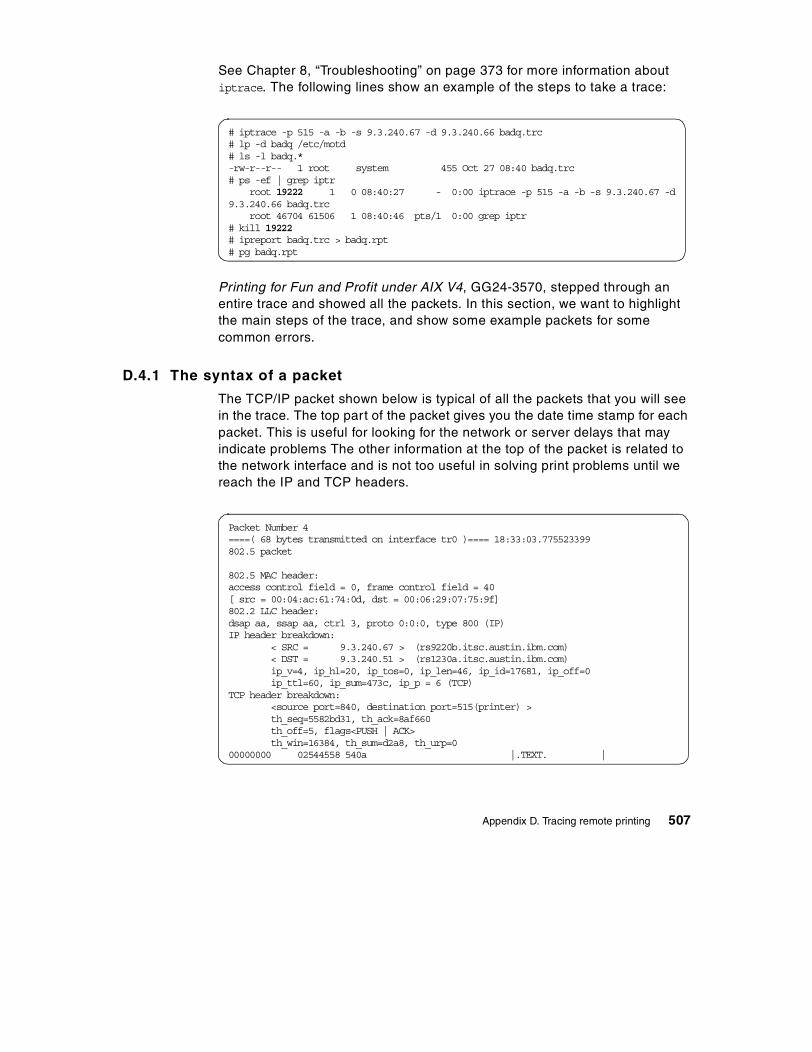
See Chapter 8, “Troubleshooting” on page 373 for more information about iptrace. The following lines show an example of the steps to take a trace:
Printing for Fun and Profit under AIX V4, GG24-3570, stepped through an entire trace and showed all the packets. In this section, we want to highlight the main steps of the trace, and show some example packets for some common errors.
D.4.1 The syntax of a packet
The TCP/IP packet shown below is typical of all the packets that you will see in the trace. The top part of the packet gives you the date time stamp for each packet. This is useful for looking for the network or server delays that may indicate problems The other information at the top of the packet is related to the network interface and is not too useful in solving print problems until we reach the IP and TCP headers.
# iptrace -p 515 -a -b -s 9.3.240.67 -d 9.3.240.66 badq.trc# lp -d badq /etc/motd# ls -l badq.*-rw-r--r-- 1 root system 455 Oct 27 08:40 badq.trc# ps -ef | grep iptr root 19222 1 0 08:40:27 - 0:00 iptrace -p 515 -a -b -s 9.3.240.67 -d 9.3.240.66 badq.trc root 46704 61506 1 08:40:46 pts/1 0:00 grep iptr# kill 19222# ipreport badq.trc > badq.rpt # pg badq.rpt
Packet Number 4====( 68 bytes transmitted on interface tr0 )==== 18:33:03.775523399802.5 packet
802.5 MAC header:access control field = 0, frame control field = 40[ src = 00:04:ac:61:74:0d, dst = 00:06:29:07:75:9f]802.2 LLC header:dsap aa, ssap aa, ctrl 3, proto 0:0:0, type 800 (IP)IP header breakdown: < SRC = 9.3.240.67 > (rs9220b.itsc.austin.ibm.com) < DST = 9.3.240.51 > (rs1230a.itsc.austin.ibm.com) ip_v=4, ip_hl=20, ip_tos=0, ip_len=46, ip_id=17681, ip_off=0 ip_ttl=60, ip_sum=473c, ip_p = 6 (TCP)TCP header breakdown: <source port=840, destination port=515(printer) > th_seq=5582bd31, th_ack=8af660 th_off=5, flags<PUSH | ACK> th_win=16384, th_sum=d2a8, th_urp=000000000 02544558 540a |.TEXT. |
Appendix D. Tracing remote printing 507

The IP header shows you who sent the packet and who it was sent to. This is important in making sure you are tracing the packet to the right server. The ip_len field also gives us the packet length.
The TCP header shows us the port number. Because AIX can multitasking, you may have multiple jobs going to the same remote server at the same time. By checking the port number, you can be sure you are tracing a unique job. The port 515 is always the port for the printer server running the lpd daemon. The th_seq and th_ack fields help you look for duplicate packets, and helps you put the packets back in order. The th_win field is used to tell the remote host how large of packets that the local host can receive. If this value is set to zero, this is a way of telling the other host that this host is not ready to receive data at this time. This is the way that network handshaking should be done, but the rules are not always followed by simple print servers. The flags field tells us the function of the TCP packet. Packets with SYN, ACK, RST, and FIN are only network protocol. Packets with PUSH are the only ones that actually involve the LPR/LPD communications. The RST packet normally indicates an error, but some servers simply use it at the end of a transfer instead of FIN. If the System V print subsystem server does not have the proper entry in the System file, the connection will be ended with RST.
The data portion of the transfer contains three columns of data. The first column shows the number of data bytes in the packet prior to this line. The second column contains the data in hexadecimal format, and the third column contains the data in ASCII text format. In the example above, the first column is all zeroes because it is the first data line in the packet. The second column starts with a 02 hex, which in this case is a command to request permission to print, and the third field is the text which in this packet contains the name of the remote queue.
D.4.2 The main steps of a successful print trace
Each successful LPD print job follows these steps as it passes over the network (TCP/IP ACKs are shown in the trace, but not recorded here.):
1. TCP/IP handshake with three packets with these flag values:
- SYN from client
- SYN | ACK from the server
- ACK from the client
2. Request to print from client (flags=PUSH) that starts with a HEX value of 02, and contains the name of the remote queue (in this case TEXT).
508 Printing for Fun and Profit under AIX 5L

00000000 02544558 540a |.TEXT. |
3. The acknowledgment from the LPD (515) server. If successful, this will be a hex zero, as shown in this packet.
00000000 00 |. |
4. The data file information packet, which gives the size (880) of the file, and the temporary file name (dfA016rs922). This packet is from the client to the 515 port.
00000000 03383830 20646641 30313672 73393232 |.880 dfA016rs922|00000010 30620a |0b. |
5. The acknowledgement from the LPD (515) server. If successful, this will be a hex zero.
6. The data file will go next. This may be in a single packet, or in multiple packets with occasional ACKs from the server. Because you get both the hex and the text view of the data, you can see control characters and any commands added if local formatting is done. Here is a couple lines from a data file not starting at the beginning:
000000f0 2a202057 656c636f 6d652074 6f204149 |* Welcome to AI|00000100 58205665 7273696f 6e20352e 30212020 |X Version 5.0! |
7. The acknowledgment from the LPD (515) server. If successful, this will be a hex zero.
8. The control file information packet giving the size and temporary name of the control file:
00000000 02373720 63664130 31367273 39323230 |.77 cfA016rs9220|00000010 620a |b. |
9. The acknowledgment from the LPD (515) server
10. The control file, which contains all the flags. This includes AIX specific flags, flags specified with the -o flag, and the standard LPD flags that will simply be sent as the first letter of the attribute, such as Hrs9220b to designate the host, Jmotd to designate the job name, Proot and Lroot are the from and to users, fdfA... says this is formatted, UdfA... says to remove the temporary file when done, and N/etc/motd is the name of the file being printed:
00000000 48727339 32323062 0a50726f 6f740a4a |Hrs9220b.Proot.J|00000010 6d6f7464 0a437273 39323230 620a4c72 |motd.Crs9220b.Lr|00000020 6f6f740a 66646641 30313672 73393232 |oot.fdfA016rs922|00000030 30620a55 64664130 31367273 39323230 |0b.UdfA016rs9220|00000040 620a4e2f 6574632f 6d6f7464 0a |b.N/etc/motd. |
11. A PUSH packet with hex zero from the client to indicate the file is done.
Appendix D. Tracing remote printing 509

12. The acknowledgment from the LPD (515) server.
13. The end handshaking with FINs by both hosts, or sometimes a RST by one of the hosts.
The rest of the section shows some common errors that can be detected using iptrace.
D.4.3 Client does not have permission to print on server
When the client has not been authorized by placing the name in the /etc/hosts.lpd file or other methods depending on the server, the following message may be seen:
00000000 30373831 2d323032 20796f75 7220686f |0781-202 your ho|00000010 73742064 6f657320 6e6f7420 68617665 |st does not have|00000020 206c696e 65207072 696e7465 72206163 | line printer ac|00000030 63657373 2e |cess. |
D.4.4 LPD server not running on the remote host
When the LPD is not running, you may see several requests to print that are simply responded to by the server with an RST.
D.4.5 Missing queue on the server
When the remote host lpd server is active, but the server does not have the requested queue, the message will be similar to this:
00000000 30373831 2d323038 20756e6b 6e6f776e |0781-208 unknown|00000010 20707269 6e746572 20626164 712e | printer badq. |
510 Printing for Fun and Profit under AIX 5L

Appendix E. Data streams
This appendix explains the following:
• What is a data stream?
• Most common data stream descriptions.
• data streams supported by the AIX print subsystems.
• data streams supported by Infoprint Manager for AIX.
E.1 What is a data stream?
A data stream is a well-defined set of commands which allow the computer to tell the printer what and where to print. There are different implementations of data streams for different hardware platforms.
Print data streams have evolved over time from very basic and inflexible to the powerful and sometimes complex systems available today.
Formerly, applications on PCs or UNIX workstations could output simple text to be formatted with device drivers, but graphics and typographic capability were extremely limited with the original dot matrix printers. Each printer required specific, device-dependent control characters. Even a simple ASCII file sent to two different kinds of printers would often appear different because of different fonts and print qualities.
Mainframe impact printers required the application developer to format the data within the application; paper tapes were used to transmit carriage controls. Graphic capability was essentially non-existent, because the printers generally used fully-formed character bands, and printing was done line by line; there was no capability to place individual dots on a page.
Hewlett-Packard’s introduction of PCL and the original LaserJet in 1984 and Adobe’s introduction of the PostScript language in 1985, along with printers incorporating a PostScript interpreter, radically changed the workstation printing environment. PostScript was particularly popular because of its sophisticated graphics and desktop publishing capability through the use of outline fonts and vector graphics.
Today, many manufacturers build printers that incorporate interpreters according to the PCL and PostScript standards.
Likewise, IBM’s introduction of the Advanced Function Presentation (AFP) architecture along with the Print Services Facility (PSF) software and the
© Copyright IBM Corp. 2001 511

3800 laser printer in the mid-1980s brought all-points-addressability along with reliable, high-speed printing to the mainframe printing environment.
From its original introduction on the MVS platform, AFP software is now available on all IBM operating systems (OS/390, VM, VSE, OS/400, AIX, and OS/2) as well as on Windows NT and Windows 2000, with strong cross-platform compatibility. Many of the AFP software and hardware products available from IBM and other vendors support not only IBM’s Intelligent Printer Data Stream (IPDS), but PCL and PostScript as well.
E.2 Most popular data streams description
This section describes the most common data streams supported by AIX and by Infoprint Manager for AIX.
E.2.1 Hewlett-Packard Printer Control Language (HP PCL)
PCL, first introduced in 1984, was designed to be expandable, enabling future versions to add additional commands and capabilities. Each successive version becomes a functional superset of the previous version. PCL has become one of the most common data streams in the industry.
According to the Hewlett-Packard Web site (http://www.hp.com), PCL commands are compact escape sequence codes that are embedded in the print job data stream. HP PCL formatters and fonts are designed to translate application output into high-quality, device-specific, raster print images.
The first version of PCL provided daisywheel printers with the ability to interpret commands, select specific characters to print, and later added spacing and sizing to characters. But it was with the introduction of the LaserJet printer and PCL 3 in 1984 that PCL really became one of the leading industry standard printer description languages.
PCL 3 Offered full-page formatting and vector graphics.
PCL 4 Added a greater selection of typefaces and downloadable macros.
PCL 4e Provided support for compressed, bitmapped fonts and raster images.
PCL 5 Introduced many advanced capabilities, including scalable fonts, support for HP-GL/2 plotter commands, and the PJL language for data stream switching.
PCL 5e Provided support for 600 dpi resolution.
512 Printing for Fun and Profit under AIX 5L

PCL 5c Provided color printing support.
PCL 6 Rewritten as an object-oriented control language; provides faster printing for complex graphics, improved network performance, and better document fidelity through font synthesis technology.
E.2.2 Proprinter data stream
The Proprinter data stream was used on the Epson ESC/P** printer, which was a Personal Printer with the IBM logo. The evolution of this data stream made it an incorporated feature of Personal Printer Data Stream (PPDS) Level 1 and 2.
This data stream contains all Proprinter, QuietWriter, QuickWriter, and LaserPrinter 4019 and 4029 commands.
Level 1 The basic level of PPDS, providing the basic services needed by any printer.
Level 2 Incorporated enhancements in the font selection, print quality selection and paper handling. This level is represented by the Quietwriter and Quickwriter family of products.
Level 3 Provided enhancements to the previous PPDS levels for page type printers, such as the IBM Laser Printer 4019, including the ability to place text and images at any position on the page (Cursor Positioning), to work with forms, overlays and repetitive command sequences (Save and Manage Macros), to fill drawings with different patterns (Rule and Fill), and to change the orientation of the paper
Level 4 Added new features to the IBM LaserPrinter 4029 and to the previous PPDS levels, including compression and decompression of raster image, scalable fonts, and enhanced orientations (set print angle)
The PPDS data stream is no longer being enhanced.
E.2.3 PostScript data stream
The PostScript language, introduced by Adobe in 1985, is an interpretive programming language with powerful graphics capabilities. A PostScript job is printed by sending the job to a PostScript interpreter, which converts the high-level PostScript language description into low-level raster data format. Usually, the interpreter is resident in printer microcode, but some software
Appendix E. Data streams 513

programs (such as Infoprint Manager for AIX) contain an external interpreter for rasterizing PostScript.
Level 1 Described the basic Adobe PostScript set of functions:
• Stack oriented data stream
• Scalable Adobe Type 1 and Type 3 outline fonts
• Smooth, hardware independent gray scaling
• Multiple orientations on the physical page
Level 2 Enhanced the base Level 1 by adding the following features:
• Forms: a set of operations that constitute a form, which may be cached
• Color: more methods of specifying color, for example, index color and color separations
• Composite fonts: unlimited character sets
PostScript 3 Adds the following enhancements:
• Enhanced graphics capabilities, including smooth blends, 4096 gray levels, masked images, and high-fidelity color
• Digital prepress support, including direct PDF printing on high-end systems, in-RIP trapping, and color handling enhancements
• Miscellaneous improvements, including enhanced page rendering, driver enhancements, extended font set, and advanced print driver software
Adobe’s Portable Data Format (PDF) is closely related to PostScript. Refer to the Adobe Web site for additional information (http://www.adobe.com).
E.3 Data streams supported by the AIX print subsystems
The most common input data streams printed in an AIX environment are ASCII and PostScript, and the most common output types are PostScript and PCL printers. The level of support for a data stream will depend on which print subsystem you choose to run (PowerPC or System V) in AIX 5L, and the level of support that print subsystem provides.
Both print subsystems can process simple ASCII text, PostScript and PCL input data and send it to PostScript and PCL printers. Both subsystems have the capability to invoke filters or other programs to do some data formatting
514 Printing for Fun and Profit under AIX 5L

(like enscript to convert ASCII to PostScript), but in most cases, the application must provide the data already formatted.
The legacy AIX PowerPC print subsystem with virtual printers and their attributes currently provides greater flexibility, as described in Section 1.7.2.1, “Advantages of the PowerPC print subsystem” on page 18.
E.4 Data streams supported by Infoprint Manager for AIX
Infoprint Manager for AIX supports a variety of input data streams that can either be passed through to printers as-is or can be transformed for sending to destinations that do not necessarily natively support the original input data type.
When passing data streams through Infoprint Manager without any transforms, Infoprint Manager supports all of the input data streams and output devices that the AIX PowerPC print subsystem supports.
In addition, a widely used function of Infoprint Manager for AIX is to transform print job (input) data streams into printer or other destination (output) data streams for supported Infoprint Manager for AIX printers. This section describes these data streams:
• Input data streams
• Output data streams
E.4.1 Input data streams
Infoprint Manager for AIX supports transformation of these input data streams:
PostScript 3 Adobe’s PostScript data stream (using an Adobe certified transform).
PDF 1.3 Adobe’s Portable Document Format.
PCL 5 and 5e Hewlett-Packard’s Printer Control Language.
ASCII Common data format for UNIX and PC system, with or without Proprinter escape sequences.
SAP R/3 ABAP list format and SAPscript formatter output (OTF) used in the SAP R/3 program.
TIFF Tagged Image File Format, a raster graphics data format, generally produced by scanners or fax machines.
Appendix E. Data streams 515

GIF(sm) Graphics Interchange Format(sm), a raster graphics format owned by CompuServe Incorporated; generally used for line-art images, such as icons and logos.
JPEG JPEG, which stands for Joint Photographic Experts Group; an image format frequently used for photographic images.
DBCS ASCII Double Byte Character Set ASCII text for Japanese and Traditional Chinese. (Simplified Chinese can be processed as well using a different method.)
EUC Extended UNIX Code files without escape sequences in Japanese, Traditional Chinese, and Korean.
ditroff A device independent data stream created by the UNIX troff formatter
S/370 line data Also known as 1403 line data (EBCDIC), this data stream originated in the MVS mainframe environment and is characterized by lines of data separated by a carriage return at the end of each line. It may be prefixed with ANSI or machine carriage controls and may also contain Table Reference Characters (TRCs).
AFPDS The Advanced Function Presentation Data Stream includes text and inline resources, such as form definitions and page definitions used by Infoprint Manager for AIX to construct the data stream that then points to the overlays, page segments, and fonts. This published, non-proprietary architecture includes a data format that can be created on a variety of operating systems, such as OS/390 (MVS), VM, VSE, OS/400, OS/2, or Windows, and can be interchanged among the platforms.
Mixed mode A combination of AFP records and line data (either ASCII or 1403 line data).
MO:DCA-P Mixed Object:Document Content Architecture for Presentation Data stream, which is subset of the AFP Data Stream. The AFP Data Stream also includes the following objects:
IOCA Image Object Content Architecture is a collection of constructs used to interchange and present images.
GOCA Graphic Object Content Architecture provides a collection of graphics values and control
516 Printing for Fun and Profit under AIX 5L

structures used to interchange and present graphics data.
BCOCA Bar Code Object Content Architecture is a collection of constructs used to interchange and present bar codes.
E.4.2 Output data streams
In addition to supporting AIX printers with their native data streams (that is, no transforms), Infoprint Manager for AIX can send transformed data (see Section E.4.1, “Input data streams” on page 515) to non-impact printers that support the following types of output data streams:
IPDS IBM’s non-proprietary Intelligent Printer Data Stream is an all-points-addressable data stream that allows users to position text, images, and graphics at any defined point on a printed page.
PPDS Personal Printer Data Stream.
PCL Printer Control Language Levels 4, 5 and 5C (color).
Infoprint Manager for AIX can also send transformed data to fax machines or to e-mail destinations.
Appendix E. Data streams 517

518 Printing for Fun and Profit under AIX 5L

Appendix F. System V supported printer types
The information in Table 46 comes from the model.stz file in the /usr/lpp/sysmgt.websm/inst_root/var/websm/data/ directory, and provides additional guidance on selecting a printer type. If your printer is not listed, choose the printer type that most closely resembles the capabilities of your printer. It is not important that it match, only that it is a similar type of printer.
For example, you can probably use a printer type of hplaserjet when defining a Lexmark Optra.
Table 46. Supported printer types - System V print subsystem in AIX 5L V5.0
Name Terminfo type Interface script Content type
Canon Bubble Jet 10ex bj-10ex standard
Canon Bubble Jet 130e bj-130e standard
Canon Bubble Jet 200 bj-200 standard
Canon Bubble Jet 300 bj-300 standard
Canon Bubble Jet 330 bj-330 standard
Epson FX 850 fx-850 standard
Epson FX 1050 fx-1050 standard
Epson DFX 5000 dfx-5000 standard
Epson DFX 8000 dfx-8000 standard
Epson LQ 570 lq-570 standard
Epson LQ 870 lq-870 standard
Epson LQ 1170 lq-1170 standard
Epson EPL 7500 epl-7500 standard
HP LaserJet (PCL) hplaserjet standard pcl
HP LaserJet (PostScript) PS-b PS PS
HP LaserJet II (PCL) hplaserjet standard pcl
HP LaserJet II (PostScript)
PS-b PS PS
HP LaserJet III (PCL) hplaserjet standard pcl
© Copyright IBM Corp. 2001 519

HP LaserJet III (PostScript)
PS-b PS PS
HP LaserJet IIIsi (PCL) hplaserjet standard pcl
HP LaserJet IIIsi (PostScript)
PS-b PS PS
HP LaserJet 4 (PCL) hplaserjet standard pcl
HP LaserJet 4 (PostScript)
PS-b PS PS
HP LaserJet 4L/4ML (PCL)
hplaserjet standard pcl
HP LaserJet 4L/4ML (PostScript)
PS-b PS PS
HP LaserJet 4P/4MP (PCL)
hplaserjet standard pcl
HP LaserJet 4P/4MP (PostScript)
PS-b PS PS
HP LaserJet 4M (PCL) hplaserjet standard pcl
HP LaserJet 4M (PostScript)
PS-b PS PS
HP LaserJet 4Si/4Si MX (PCL)
hplaserjet standard pcl
HP LaserJet 4Si/4Si MX (PostScript)
PS-b PS PS
HP LaserJet 4 Plus/4M Plus (PCL)
hplaserjet standard pcl
HP LaserJet 4 Plus/4M Plus (PostScript)
PS-b PS PS
HP LaserJet 4V/4MV (PCL)
hplaserjet standard pcl
HP LaserJet 4V/4MV (PostScript)
PS-b PS PS
HP LaserJet 5 (PCL) hplaserjet standard pcl
Name Terminfo type Interface script Content type
520 Printing for Fun and Profit under AIX 5L

HP LaserJet 5 (PostScript)
PS-b PS PS
HP LaserJet 5L/5ML (PCL)
hplaserjet standard pcl
HP LaserJet 5L/5ML (PostScript)
PS-b PS PS
HP LaserJet 5P/5MP (PCL)
hplaserjet standard pcl
HP LaserJet 5P/5MP (PostScript)
PS-b PS PS
HP LaserJet 5Si/5Si MX (PCL)
hplaserjet standard pcl
HP LaserJet 5Si/5Si MX (PostScript)
PS-b PS PS
HP LaserJet 5Si Mopier (PCL)
hplaserjet standard pcl
HP LaserJet 5si Mopier (PostScript)
PS-b PS PS
HP LaserJet 6P (PCL) hplaserjet standard pcl
HP LaserJet 6P (PostScript)
PS-b PS PS
HP LaserJet 6L (PCL) hplaserjet standard pcl
HP LaserJet 6L (PostScript)
PS-b PS PS
HP DeskJet 500 deskjet standard
HP DeskJet 1200C/1200CPS
deskjet standard
HP DeskJet 1600C/1600CM
deskjet standard
HP PaintJet paintjet standard
IBM ProPrinter proprinter standard
Oki 320 oki-320 standard
Name Terminfo type Interface script Content type
Appendix F. System V supported printer types 521

Oki 390 oki-390 standard
Oki OL 400 oki-ol400 standard
Oki OL 800 oki-ol800 standard
Panasonic KX-P1180 kx-p1180 standard
Panasonic KX-P1695 kx-p1695 standard
Panasonic KX-P1124 kx-p1124 standard
Panasonic KX-P1624 kx-p1624 standard
PostScript (Serial) PS PS PS
PostScript (Parallel) PS-b PS PS
PostScript (Serial with page reversal)
PS-r PS PS
PostScript (Parallel with page reversal)
PS-br PS PS
Unisys AP1337 - Epson emulation
AP1337-e standard simple
Unisys AP1337 - IBM emulation
AP1337-i standard simple
Unisys AP1339 - Epson emulation
AP1339-e standard simple
Unisys AP1339 - IBM emulation
AP1339-i standard simple
Unisys AP1357 - Epson emulation
AP1357-e standard simple
Unisys AP1357 - IBM emulation
AP1357-i standard simple
Unisys AP1359 - Epson emulation
AP1359-e standard simple
Unisys AP1359 - IBM emulation
AP1359-i standard simple
Unisys AP1371 - Epson emulation
AP1371-e standard simple
Name Terminfo type Interface script Content type
522 Printing for Fun and Profit under AIX 5L

Unisys AP1371 - IBM emulation
AP1371-i standard simple
Unisys AP9205 - IBM emulation
AP9205-i standard simple
Unisys AP9205 - HP LaserJet emulation
AP9205-lj standard simple
Unisys AP9205 - HP LaserJet Plotter emulation
AP9205-ljplt standard simple
Unisys AP9210 - IBM emulation
AP9210-i standard simple
Unisys AP9210 - HP LaserJet emulation
AP9210-lj standard simple
Unisys AP9210 - HP LaserJet Plotter emulation
AP9210-ljplt standard simple
Unisys AP9215 - Epson emulation
AP9215-e standard simple
Unisys AP9215 - Diablo emulation
AP9215-d standard simple
Unisys AP9215 - IBM emulation
AP9215-i standard simple
Unisys AP9215 - HP LaserJet emulation
AP9215-lj standard simple
Unisys AP9310 - HP LaserJet emulation
AP9310-lj standard simple
Unisys AP9312 - HP LaserJet emulation
AP9312-lj standard simple
Unisys AP9316 - HP LaserJet emulation
AP9316-lj standard simple
Unisys AP9415 - HP LaserJet emulation
AP9415-lj standard simple
Other unknown standard simple
DOS printer unknown standard simple, PS
Name Terminfo type Interface script Content type
Appendix F. System V supported printer types 523

524 Printing for Fun and Profit under AIX 5L

Appendix G. Special notices
This publication is intended to help the AIX system administrators to manage print subsystem effectively. The information in this publication is not intended as the specification of any programming interfaces that are provided by AIX 5L print subsystem or the AIX 5L operating system. See the PUBLICATIONS section of the IBM Programming Announcement for AIX operating system for more information about what publications are considered to be product documentation.
References in this publication to IBM products, programs or services do not imply that IBM intends to make these available in all countries in which IBM operates. Any reference to an IBM product, program, or service is not intended to state or imply that only IBM's product, program, or service may be used. Any functionally equivalent program that does not infringe any of IBM's intellectual property rights may be used instead of the IBM product, program or service.
Information in this book was developed in conjunction with use of the equipment specified, and is limited in application to those specific hardware and software products and levels.
IBM may have patents or pending patent applications covering subject matter in this document. The furnishing of this document does not give you any license to these patents. You can send license inquiries, in writing, to the IBM Director of Licensing, IBM Corporation, North Castle Drive, Armonk, NY 10504-1785.
Licensees of this program who wish to have information about it for the purpose of enabling: (i) the exchange of information between independently created programs and other programs (including this one) and (ii) the mutual use of the information which has been exchanged, should contact IBM Corporation, Dept. 600A, Mail Drop 1329, Somers, NY 10589 USA.
Such information may be available, subject to appropriate terms and conditions, including in some cases, payment of a fee.
The information contained in this document has not been submitted to any formal IBM test and is distributed AS IS. The use of this information or the implementation of any of these techniques is a customer responsibility and depends on the customer's ability to evaluate and integrate them into the customer's operational environment. While each item may have been reviewed by IBM for accuracy in a specific situation, there is no guarantee that the same or similar results will be obtained elsewhere. Customers
© Copyright IBM Corp. 2001 525

attempting to adapt these techniques to their own environments do so at their own risk.
Any pointers in this publication to external Web sites are provided for convenience only and do not in any manner serve as an endorsement of these Web sites.
The following terms are trademarks of the International Business Machines Corporation in the United States and/or other countries:
The following terms are trademarks of other companies:
Adobe and Adobe Acrobat are either registered trademarks or trademarks of Adobe Systems Incorporated in the United States and/or other countries.
Ghostscript is a registered trademark of Aladdin Enterprises in the U.S. and other countries.
Netscape is a registered trademark of Netscape Communications Corporation in the U.S. and other countries.
Tivoli, Manage. Anything. Anywhere.,The Power To Manage., Anything. Anywhere.,TME, NetView, Cross-Site, Tivoli Ready, Tivoli Certified, Planet Tivoli, and Tivoli Enterprise are trademarks or registered trademarks of Tivoli Systems Inc., an IBM company, in the United States, other countries, or both. In Denmark, Tivoli is a trademark licensed from Kjøbenhavns Sommer - Tivoli A/S.
C-bus is a trademark of Corollary, Inc. in the United States and/or other countries.
Java and all Java-based trademarks and logos are trademarks or registered trademarks of Sun Microsystems, Inc. in the United States and/or other countries.
IBM �Advanced File PrintingAIXwindows®DFSIPDSOS/2® POWERparallel®RISC System/6000®S/390®VM/ESA®
RedbooksAFS®AS/400®Infoprint® MVSOS/390®PowerPC®RS/6000® Sequent®Xstation Manager®
Redbooks Logo AIX®DB2®Intelligent Printer Data StreamNetfinity® OS/400®Print Services FacilityS/370SP
526 Printing for Fun and Profit under AIX 5L

Microsoft, Windows, Windows NT, and the Windows logo are trademarks of Microsoft Corporation in the United States and/or other countries.
PC Direct is a trademark of Ziff Communications Company in the United States and/or other countries and is used by IBM Corporation under license.
ActionMedia, LANDesk, MMX, Pentium and ProShare are trademarks of Intel Corporation in the United States and/or other countries.
UNIX is a registered trademark in the United States and other countries licensed exclusively through The Open Group.
SET, SET Secure Electronic Transaction, and the SET Logo are trademarks owned by SET Secure Electronic Transaction LLC.
Other company, product, and service names may be trademarks or service marks of others.
Appendix G. Special notices 527

528 Printing for Fun and Profit under AIX 5L

Appendix H. Related publications
The publications listed in this section are considered particularly suitable for a more detailed discussion of the topics covered in this redbook.
H.1 IBM Redbooks
For information on ordering these publications see Appendix , “How to get IBM Redbooks” on page 533.
• AIX and Windows NT: Solutions for Interoperability, SG24-5102
• Printing for Fun and Profit Under AIX V4, GG24-3570
• Samba Installation, Configuration, and Sizing Guide, SG24-6004
H.2 IBM Redbooks collections
Redbooks are also available on the following CD-ROMs. Click the CD-ROMs button at ibm.com/redbooks for information about all the CD-ROMs offered, updates and formats.
H.3 Other resources
These publications are also relevant as further information sources:
• AIX V4.3 Guide to Printers and Printing, SC23-4130
• AIX V4 Printer Guide, SC23-2783
• John Strange and Tim O’Reilly, termcap and terminfo, 3rd Edition, O’Reilly & Associates, 1988, ISBN 0-93717-522-6
• Jerry Peek, Tim O’Reilly, and Mike Loukides, UNIX Power Tools, 2nd Edition, O’Reilly & Associates, 1997, ISBN 1-56592-260-3
CD-ROM Title Collection Kit Number
IBM System/390 Redbooks Collection SK2T-2177IBM Networking Redbooks Collection SK2T-6022IBM Transaction Processing and Data Management Redbooks Collection SK2T-8038IBM Lotus Redbooks Collection SK2T-8039Tivoli Redbooks Collection SK2T-8044IBM AS/400 Redbooks Collection SK2T-2849IBM Netfinity Hardware and Software Redbooks Collection SK2T-8046IBM RS/6000 Redbooks Collection SK2T-8043IBM Application Development Redbooks Collection SK2T-8037IBM Enterprise Storage and Systems Management Solutions SK3T-3694
© Copyright IBM Corp. 2001 529

Some of the publications referenced in this book are no longer available in hardcopy but can be found at the following Web site until May 2001:
http://www.rs6000.ibm.com/idd500/nav/Books/nav.htm
After May 2001, they can be found at:
http://www.rs6000.ibm.com/resource/aix_resource/Pubs
The publications are:
• AIX 5L Commands Reference
• AIX 5L Guide to Printers and Printing
H.4 Referenced Web sites
These Web sites are also relevant as further information sources:
• http://service.boulder.ibm.com/rs6k/techdocs/index.v4.html#print
AIX Version 4 Printing Tips
• http://www.rge.com/pub/systems/aix/bull/
Group Bull site with AIX public domain software
• http://aixpdslib.seas.ucla.edu/aixpdslib.html
UCLA site with AIX public domain software
• http://www.cs.wisc.edu/~ghost/index.html
Ghostscript home page
• ftp://ftp.cs.wide.edu/ghost/alladin/
Ghostscript FTP site
• http://gate.cruzio.com/~jeffl/sco/lp/
Home site for netcat filter
• http://home.flash.net/~laixsoft/
AIX printing tools from LAIX
• http://www.adobe.com/
Adobe type 1 PostScript fonts
• http://www.bitstream.com/
Bitstream PostScript fonts
• http://www.monotype.com
Monotype PostScript fonts
• http://www.printers.ibm.com
IBM Printing Systems Division home page
530 Printing for Fun and Profit under AIX 5L

• http://www.printers.ibm.com/R5PSC.NSF/Web/support+overview
Support (includes drivers, utilities, and other information)
• http://www.printers.ibm.com/R5PSC.NSF/Web/ipmgrfamilyhome
Infoprint Manager family software home page
• http://www-1.ibm.com/servers/aix/products/aixos/linux/download.html
Download site for the AIX Toolbox for Linux Applications packages
• http://bibliofile.mc.duke.edu/gww/fonts/postscript-utilities/index.html
Download site for postscript utilities.
• http://www.lexmark.com
Lexmark home site
• http://www.ietf.org/rfc/rfc1179.txt
Site for Line Printer Daemon Protocol.
• ftp://ftp.software.ibm.com/printers/products/netprt/lpr
Download site for instpr.exe.
• http://www.rs6000.ibm.com/doc_link/en_US/a_doc_lib/aixbman/printrgd/prt_
backend_overview.htm
IBM site page for Printer Backend Overview for Programming.
• http://service.boulder.ibm.com/rs6k/techdocs/91763041913324.html
IBM site page for Basic AIX Printer Backend Program Example.
• http://www.rs6000.ibm.com/doc_link/en_US/a_doc_lib/aixbman/printrgd/prt_
colon_file_conv.htm#A354P93d
IBM site page for Printer Colon File Conventions.
• www.redbooks.ibm.com
IBM Redbooks home page.
• http://www.rs6000.ibm.com/resource/hardware_docs/
RS/6000 System and Options Libraries home page.
• http://service.boulder.ibm.com/rs6k/techdocs/9175597789870.html
IBM site page for Tracing Remote Printing.
• www.hp.com
Hewlett-Packard home page.
Appendix H. Related publications 531

532 Printing for Fun and Profit under AIX 5L

How to get IBM Redbooks
This section explains how both customers and IBM employees can find out about IBM Redbooks, redpieces, and CD-ROMs. A form for ordering books and CD-ROMs by fax or e-mail is also provided.
• Redbooks Web Site ibm.com/redbooks
Search for, view, download, or order hardcopy/CD-ROM Redbooks from the Redbooks Web site. Also read redpieces and download additional materials (code samples or diskette/CD-ROM images) from this Redbooks site.
Redpieces are Redbooks in progress; not all Redbooks become redpieces and sometimes just a few chapters will be published this way. The intent is to get the information out much quicker than the formal publishing process allows.
• E-mail Orders
Send orders by e-mail including information from the IBM Redbooks fax order form to:
• Telephone Orders
• Fax Orders
This information was current at the time of publication, but is continually subject to change. The latest information may be found at the Redbooks Web site.
In United States or CanadaOutside North America
e-mail [email protected] information is in the “How to Order” section at this site:http://www.elink.ibmlink.ibm.com/pbl/pbl
United States (toll free)Canada (toll free)Outside North America
1-800-879-27551-800-IBM-4YOUCountry coordinator phone number is in the “How to Order” section at this site:http://www.elink.ibmlink.ibm.com/pbl/pbl
United States (toll free)CanadaOutside North America
1-800-445-92691-403-267-4455Fax phone number is in the “How to Order” section at this site:http://www.elink.ibmlink.ibm.com/pbl/pbl
IBM employees may register for information on workshops, residencies, and Redbooks by accessing the IBM Intranet Web site at http://w3.itso.ibm.com/ and clicking the ITSO Mailing List button. Look in the Materials repository for workshops, presentations, papers, and Web pages developed and written by the ITSO technical professionals; click the Additional Materials button. Employees may access MyNews at http://w3.ibm.com/ for redbook, residency, and workshop announcements.
IBM Intranet for Employees
© Copyright IBM Corp. 2001 533

IBM Redbooks fax order form
Please send me the following:
We accept American Express, Diners, Eurocard, Master Card, and Visa. Payment by credit card notavailable in all countries. Signature mandatory for credit card payment.
Title Order Number Quantity
First name Last name
Company
Address
City Postal code
Telephone number Telefax number VAT number
Invoice to customer number
Country
Credit card number
Credit card expiration date SignatureCard issued to
534 Printing for Fun and Profit under AIX 5L

Abbreviations and acronyms
ACL Access Control List
AFP Advanced Function Presentation
AFPDS Advanced Function Presentation Data Stream
AIX Advanced Interactive eXecutive
BOCA Bar Code Object Content Architecture
CDE Common Desktop Environment
CPI Characters Per Inch
CTS Clear To Send
CVR Change Vertical Resolution
DBCS Double Byte Character Set
DCE Distributed Computing Environments
DCE Data Communications Equipment
DFS Distributed File System
DNS Domain Name System
DPI Dots Per Inch
DSR Data Set Ready
DTE Data Terminal Equipment
DTR Data Terminal Ready
ERP Enterprise Resource Planning
EUC Extended UNIX Code
GIF Graphics Interchange Format
GOCA Graphic Object Content Architecture
© Copyright IBM Corp. 2001
GUI Graphic User Interface
IBM International Business Machines Corporation
IOCA Image Object Content Architecture
IP Internet Protocol
IPDS Intelligent Printer Data Stream
ITSO International Technical Support Organization
JDF Job Description File
JPEG Joint Photographic Experts Group
LAN Local Area Network
LDAP Lightweight Directory Access Protocol
LPD Line Printer Daemon Protocol
LPI Lines Per Inch
NFS Network File System
NIC Network Interface Card
NLS National Language Support
NPM Network Printer Manager
ODM Object Database Manager
PCL Printer Control Language
PDF Portable Document Format
PJL Printer Job Language
PPDS Personal Printer Data Stream
PSF Print Services Facility
535

PSM Printing Systems Manager
PTF Program Temporary Fix
RAN Remote Asynchronous Node
RFC Request For Comments
RTS Ready To Send
SCS Select Character Set
SMIT System Management International Tool
SNA Systems Network Architecture
SNMP Simple Network Management Protocol
SRC System Resource Controller
TCP Transmission Control Protocol
TIFF Tagged Image File Format
TRC Table Reference Character
VSM Visual System Management
URL Universal Resource Locator
WAN Wide Area Network
WSM Web-based System Manager
536 Printing for Fun and Profit under AIX 5L
Index
Symbols$#@! 424%I 329%IpL 329/dev/lp## 8, 34, 60, 63, 68, 74, 470, 471/dev/null 121, 128/etc/config 311/etc/hosts 272, 295, 304, 317/etc/hosts.equiv 269, 284/etc/hosts.lpd 269, 284, 285, 293, 317, 477/etc/inittab 55, 291, 292/etc/locks/lpd 284/etc/lp/printers 10/etc/lp/Systems 104, 109, 111, 116, 121, 129, 131/etc/qconfig 10, 279, 282, 295, 303, 315/tmp 274/tmp/hpnpcfg.log 126/usr/bin/wsm 57/usr/lib/hpnp/cfg/option6 121, 125/usr/lib/lp/lpsched (System V) 56/var/lp/logs 56/var/spool/lpd 269, 283/var/spool/lpd/pio/@local 273, 316/var/spool/lpd/qdir 269
Numerics10-pin connector 482128-port adapter 380, 403, 4831403 line data 51616-port adapter 403, 48325-pin connector 4822-up 180, 347, 438, 439, 4453Comm 4494-wire 404, 48364-port adapter 3806-wire 4837318 network terminal server 380, 4038-port adapter 4828-wire 4839-pin connector 482
Aa2ps 437A3 340A4 146, 340
© Copyright IBM Corp. 2001
abnormal process termination 501accept 409, 451, 468accept command (System V) 73, 76, 113, 114, 146accepting 417access list (PowerPC)
remote client 128, 284, 285, 290, 293access list (System V)
forms 53, 54, 55, 110, 159lpadmin command 130printer 53remote access 128, 129, 130, 132user 53, 54, 55, 186users 110
Access terminal servers 449accounting
Infoprint Manager 457System V print subsystem 17
ACK 503, 505, 507Send ACK 503
acknowledgment 506, 509ACL 25acledit 356action
printer alert (System V) 69, 110, 115adding
filter 173new printer to terminfo 154new virtual printer predef 335
adding a form 156adding a JetDirect-attached printer
command line (PowerPC) 302command line (System V) 127files created (System V) 120hpnpcfg program (System V) 121overview (System V) 115planning (PowerPC) 295planning (System V) 115SMIT (PowerPC) 300Web-based System Manager (PowerPC) 296Web-based System Manager (System V) 116
adding a local printercommand line (System V) 73files created (System V) 77PowerPC print subsystem 207System V print subsystem 57Web-based System Manager (System V) 65
adding a Network Station attached printer (Power-
537

PC) 312adding a printer device
command line 64SMIT 61Web-based System Manager 57
adding a remote printercommand line (PowerPC) 281files created (System V) 109lpadmin command (System V) 110planning (PowerPC) 272SMIT (PowerPC) 280status filter (PowerPC) 132Web-based System Manager (PowerPC) 276Web-based System Manager (System V) 105
adding an IBM Network Printercommand line (PowerPC) 311planning 303SMIT (PowerPC) 309Web-based System Manager (PowerPC) 304
adding an Xstation attached printer (PowerPC) 312Adobe Acrobat PDF files 177, 178Adobe Document Structuring Conventions 439Adobe Portable Document Format 440Adobe Type 1 fonts 354Advanced Function Presentation (AFP) 455, 511, 516AFP
(see Advanced Function Presentation) 516AIX 5L printing
new features 3Aladdin Free Public License 440alert
font cartridge 163forms 157
alert (System V)action 69, 110, 115, 118interval 70printer 53, 54, 68, 69, 110, 115recovery 53, 54, 68, 110, 115, 118
alert type (System V)custom command 79e-mail 119mail 78none 79quiet 79terminal message 79
alignmentforms 157
all!all 78, 130
allow 418form users 157forms 159
allow-list 187Alternate RJ 45 pinouts 404altpin 481Annex terminal server 449aprint 449Archive for AIX 453archiving 321asa 19, 168asa filter 347ASCII 25
Infoprint Manager 515ASCII terminal 365, 369ASCII text 508
converting to PostScript 81ASCII text files
convert to PostScript 394ASCII text printers 175ASCII text to PostScript 174, 178, 186, 352ATT filter
PowerPC print subsystem 275attachment method 66, 67, 107, 117attribute defaults
lsvirprt 328attribute definitions files 485attribute names 489attributes
customizing 327System V print subsystem 405, 421
automatic detection 348text versus PostScript 353
automatic detection of print file type 21, 327, 494auxiliary port 365awk filter 151, 168, 447
BBaan
Infoprint Manager 457backend
piobe 321, 369pioibmnpm 321piojetd 321rembak 502restricting users 356
backend programs 321creating 323
538 Printing for Fun and Profit under AIX 5L
definition in qconfig 200example 323, 325example C program 327overview 321piobe 200piojetd 200piorlfb 200PowerPC print subsystem 10, 268rembak 200, 201shell script 323
backendssocket filters 448virtual printer 321
banner 367banner pages 136, 141, 143, 322, 450
command line selection 429custom PCL 187mandatory (System V) 53, 54missing formfeed 433remote (LPD) printing (System V) 114stopping unwanted 411suppress (System V) 53, 54, 55, 91, 133unwanted in PowerPC printing 428
banner program 350, 357banner usage 161banner.ps 190baud rate 61, 63, 164, 207, 365, 380, 421Bay Networks 449bits per char 365BM Network Printers 449bmp 178bold type 148booklets 439BOOTP 122, 294, 299, 301, 308, 310bootpd command 300, 302box characters 335BSD
commands 100protocol 112status filter 132
burst 357
Ccable 479cable B 482cable D 482, 483cable E 482Cable length 380
cancel command 6, 18, 89, 97, 233, 468cancelling a print request
PowerPC print subsystem 252System V print subsystem 97
capturingfile after the queue 399file on remote system 399file over the network 399files before printing 398printing flags 399
capturing X windows 442xgrabsc 444xv 443
carriage returns 36, 48, 68, 71, 74, 75, 119, 165, 328, 342, 349, 444
adding 384adding by filter 142missing 384removing unwanted 447
carrier detect 480, 481cat 9CAT 5 cable 380, 482catlexbe 268catlpx 268CD 480, 481CDE Application Manager 58CDROM 435change attributes
lsvirprt 328changing
filters 173changing a print request
System V print subsystem 95character pitch
terminfo 152character set selection 493character sets 136, 161
selecting 161characters per inch 247, 330, 493CHARSET 171
environment variable 388used by interface script 140
chdev 238chk_request 505, 506chmod command 120chown command 120chpq 327chque command 468chquedev command 468
539

chvirprt command 344, 468ci attribute 329class
naming convention (System V) 52, 67, 79, 106, 117printer (System V) 67, 79, 106, 125System V print subsystem 16, 48
clean upSystem V print subsystem 410
cleanupcf 504clear to send 480client
lpNet 500no permission 510rembak 502
codepage 322, 335col 168colon file syntax 489colon files 322, 485color printing
Infoprint Manager 459cols 154, 491columns per page 328command line
adding a local printer (System V) 73adding a printer device 64canceling print jobs 255deleting a printer (System V) 84deleting a queue 230disabling a queue 232displaying printer device settings 235enscript 354holding and releasing print jobs 261moving print jobs 265parameters used by interface scripts 140print job customization 330printing a file 246queue status 250setting the default destination (System V) 86setting the default printer 205starting and stopping the lpd daemon 243starting and stopping the qdaemon 241
command line flags 322commands common to both print subsystems 51configuration file 415
System V print subsystem 47connection timeout 501console messages
PowerPC print subsystem 422
content type 135, 136, 142, 161, 519filter 169filter output 169filters used for 165pcl 136, 175, 433PS 137simple 136, 178, 433troff 178unknown 136using filters 165wrapped 176
content type (System V)changing 127definition 53for JetDirect-attached printer 116for remote printer 105lpadmin -I flag 74, 80PCL 71, 75, 81, 120PostScript 71, 75PS 81, 181simple 68, 71, 81specifying for a printer 54, 55, 68, 71, 108, 118, 124specifying multiple types 72specifying when printing 93
context typeSystem V print subsystem 128
contimeout 501control file 505, 506, 509
parsing 506PowerPC print subsystem 273, 278, 283remote printing 401
conversionbinary pfb fonts to ASCII pfa fonts 441PostScript to PCL 441
conversion cable 482convert
ASCII text to PostScript 137PFB files to PFA format 441simple text files to PostScript 165
COPIES 171copies 179, 322
interface script parameter 140courier 189, 337, 338CourierSymbols 185CPI 170cpi 136, 154, 493cpix 154cps 491
540 Printing for Fun and Profit under AIX 5L

cr 492crosstalk 482csportd 9, 449ct 384ctrlfname 503CTS 480, 481custom
backend 323banner 190interface script with socket filter 451PostScript header page 189PostScript printing 438virtual printer 486
custom backend 356custom filter 347custom header page 359
source code 360custom header pages 357custom interface
using pipe 150custom interface script 143
IBM Network Printers 148installing 145
custom subdirectory 488customization
command line 330printer attributes 327System V print subsystem 137
Ddaemon
lpd 201PowerPC print subsystem 420System V print subsystem 46, 405
daisy-wheel 178data bits 61, 63, 164, 207, 380, 421Data communications equipment 479data compression 440data conversion 165data file
PowerPC print subsystem 273, 278data set ready 480data stream 53, 154
HP-GL/2 512overview 511PCL 511, 512PCL 3 512PCL 4 512, 517
PCL 4e 512PCL 5 512, 517PCL 5C 517PCL 5c 513PCL 5e 512PCL 6 513PDF 514PostScript 511, 513PPDS 513Proprinter 513supported by AIX 514supported by Infoprint Manager for AIX 515
data terminal equipment 479data terminal ready 480data type 25, 53, 330DB-25 connector 480DBCS 25
(see double byte character set ASCII) 516DCD signal 380, 385, 404, 481DCE 14, 22, 25, 479ddi 486ddi subdirectory 486default
destination (System V) 80, 85, 125filters 347font 388pitch (System V) 81print job attributes 327printer attributes 327printer type (System V) 82printer type of unknown (System V) 74queue 204Setting System V print subsystem defaults 84virtual printer attributes 333
default destinationcommand line (System V) 86displaying (System V) 86Web-based System Manager (System V) 85
default limitssetting (System V) 87
default prioritiessetting (System V) 87
default queuesystem 205
definition filefilter 176
Delay between characters 421deleting a class
command line (System V) 84
541

System V print subsystem 83deleting a printer
command line (System V) 84System V print subsystem 83Web-based System Manager (System V) 83
deleting a queue 228SMIT 229Web-based System Manager 229
denyform users 157
deny-list 187DeskJet 1200C 440destination
default (System V) 85destination port 507device
special device files 395device driver 8, 34, 36, 479
advantages 8disadvantages 8parallel 135transparent mode 201type 135
device type 135Diablo 630 178diagnosis 500DIALprinter 453dial-up printing (System V) 103disable 18, 232, 346, 468disable command
System V print subsystem 77disabling a queue
PowerPC print subsystem 231disk space 391Dispatc 453display printer description (System V)
lpstat command 117displaying
form contents 158displaying long printer names
PowerPC print subsystem 272displaying LPD subsystem status
command line (PowerPC) 294PowerPC print subsystem 284, 290SMIT (PowerPC) 293Web-based System Manager (PowerPC) 287
displaying print statusPowerPC print subsystem 274
displaying status of the spooler group
command line (PowerPC) 294ditroff 25, 348ditroff data stream 516DNS 390doit
cfn 506exec enq cmd 506get a line 506
doreq 505Double Byte Character Set (DBCS) ASCII
Infoprint Manager 516double spaced 444DOWN 481download 143
Bull public domain software site 436electronic form 352fonts 354IBM lpr client for Windows 451
download filter 81, 137, 177, 182, 185downloading fonts 183dpi 148dpost 166, 178dpost filter 165, 172, 179DSR 480, 481DTE 380, 479dtprint 9DTR 480, 481dtsout 9dtterm 155dummy queue device 420duplex 141, 144, 164, 322, 328, 329, 330, 352
selecting when printing 247dvi files 437
EEBCDIC 25, 516echo 403EIA-422 482electronic form 352e-mail
error message 391Infoprint Manager 20, 457, 458, 517
Emulex 449enable 18, 73, 113, 146, 233, 347, 409, 451, 468enable command (System V) 114enable status (System V) 77enabling a queue
PowerPC print subsystem 231
542 Printing for Fun and Profit under AIX 5L

endjob 503enq 6, 9, 10, 13, 247, 282, 284, 428, 468
Ban flag 335-Bnn flag 357flags 401, 428issued from lpd 506System V print subsystem 88
enscript 11, 179, 352, 394, 438landscape 438large fontsw 438
enscript filter 348enscript program 515envelope size 340environment variables
bad mandatory error 431FILTER 142LANG 77LPDEST 85PRINTER 85used by interface scripts 139
epsffit 435Epson FX1050 380ERP
Infoprint Manager 457error
0514-031 4300514-062 4310781-208 5100782-598 4220920-053 4170920-054 175, 1810920-056 1320920-195 416Bad mandatory environment variable. 431can’t create file 481can’t create file or device 382class=Fatal, trace=(contimeout) 501common to both print subsystems 430connection timeout 501Do not have access 419LOG is read only 432logs 391messages 391remote print shown by iptrace 507wrong remote queue name 501
error handling 12error messages
PowerPC print subsystem 422escape codes 48, 145
et_bsd_4file 502EUC 25
(see Extended UNIX Code) 516example
2-up landscape with pr 445backend program 323backend programs 325bad queue name for remote printing 510bad remote queue 504C backend program 327log bad queue name 501log from wrong host name 501lpNet log error 500netcat socket filter 450PCL header page with large user name 360socket programs 448successful inbound remote print log 500successful remote print log 502
exit code1 432
expand filter 151, 344, 448expand tabs 151Extended UNIX Code (EUC)
Infoprint Manager 516
Ffailed
receiving acknowledgement 504failed remote print log 500failure
LOG is read only 432failure log
System V print subsystem 408Fast Connect 269, 316, 451fast filter 169fax
Infoprint Manager 20, 457, 458, 515, 517file conversion 165file conversion filters 351file format 165file permission problems
PowerPC print subsystem 419System V print subsystem 404
file system size 382file type 328file_names
interface script parameter 141filter
543

adding fonts 355asa 347awk 168, 447col 168comparing 23custom (System V) 49defining 169definition table 173deleting 173dpost 165enscript 348expand 344, 448fast 49, 69fault handling 167file conversion 165, 351FORTRAN 168, 347fpr 347, 351guidelines 167hplj 347input types 169internationalization 174listing 174output 12output types 169overview 11, 48pcl 142postdaisy 179postdmd 179postplot 179postprint 179posttek 179pr 175program guidelines 348psc 348psplot 348psroff 166registering 71, 169registering (System V) 120sed 168, 446setting tabs 344slow 48, 49System V print subsystem 164table 178tasks 164templates 170tr 168, 447virtual printer attribute 335
filter definition file 176FILTER environment variable 140, 142, 166, 450
filter options 170filter templates 170
predefined 172filter type 169filter.table 173FIN 508, 510findfont 355fl attribute 431flags
capturing 399, 400enq 428-fl flag 431lpadmin options 78PowerPC print subsystem 400
flexip 201flow control 61, 63, 164, 207, 380, 421
DTR or hardware 385RTS-CTS 385XON-XOFF 385
font cartridges 163font foundry 183font list 184font size 337, 339fontmap 438fonts 322, 327, 387
adding type 1 fonts 184default 388download comparison 24download on demand 355downloading PostScript 441installed on printer 388large 438PostScript 182PostScript type 1 177printer resident 183type 1 183virtual printer download support 354
FORM 171form download 352form feed (System V) 91form support 156format 200
FORTRAN 347formatting 335, 342
adding carriage returns 142standard interface 142using pr filter 168
formfeed 201, 322, 433, 444terminfo 160
544 Printing for Fun and Profit under AIX 5L

formsaccess list 159alert 157alignment 157, 160electronic 14, 19, 22, 25Infoprint Manager 14, 22, 23, 25, 457, 458, 459listing contents 158modifying 158mounting 159mounting a form 160PowerPC print subsystem 14, 19, 20, 23, 25, 344preprinted 14, 20, 156printing to 160removing 158System V print subsystem 4, 14, 17, 23, 25, 53, 127unmounting 160
forms.allow 127forms.deny 78FORTRAN filter 347FORTRAN format filter 168fpr 168fpr filter 347freetype 436ftp
440fuser 396, 403, 427
GGarbled output 383gaudy mode 352, 438getbsdinfo 502getenv 323gethostbyname 390getopts 325gettmpr 502Ghostscript 437, 440Ghostscript filter 166ghostview 437GIF 25, 178, 437
(see Graphics Interchange Format) 516gif2png 437gimp 437GNU Ghostscript 437gnu.ghostscript 436gnu.ghostview 436gnuplot 436
gotack 503ACK status=0x30 504
graphics 349printing problems 386
Graphics Interchange Format (GIF)Infoprint Manager 516
groff 437Group Bull 435group pages 179gs 437gs-fonts 437
Hhandshake 481
TCP/IP 508handshaking 506hang
PowerPC print subsystem 427header page 53, 322
%A code 358%D code 358%H code 358%P code 358%Q code 358%S code 358%T code 358creating custom 359custom 187, 357custom PCL 187custom PostScript 189formatting flags 358host name 358job title 358large user names 187missing formfeed after header 433paper tray selection 327PostScript custom 361powerPC print subsystem introduction 357stopping unwanted 411template 335unwanted in PowerPC printing 428user name 358virtual printer program 335
header programcustom 357
Helvetica-Bold 438Hewlett-Packard 512hexadecimal format 508
545

holding a print job 260System V print subsystem 99Web-based System Manager 260
host name error 501hostname 502host-resident fonts 184HP DeskJet 380HP DeskJet 500C 440HP LaserJet 337HP LaserJet 4500 337HP LaserJet 4M 74, 380HP LaserJet 4plus 380HP LaserJet 8100 339HP PaintJet XL300 440HP-GL/2 512hpJetDirect 297, 301hplaser TERM type 153hplaserjet 75, 120, 128, 153, 155, 433
TERM type 153hplj filter 347, 351hpnp 48hpnp.model 115, 121, 128, 432hpnpcfg 121, 145, 432, 433
known problem 121online help 121
hpnpf 115, 121hpnpinstall 145hpnpIS.model 52, 143, 144HP-UX
type of status filter 275ht 142
II18N 174I18n_pp 174I18n_print 174IBM 3130 204IBM 3151 365IBM 4019 printer 217IBM Fast Connect 269, 316IBM LPR Remote Printing Client 451IBM LPR Remote Printing Client for Windows 316, 317IBM Network Printer 17, 201, 268
adding a printer (PowerPC) 304piocolor backend 312pioibmnpf filter 268pioibmnpm backend 268, 311
PowerPC print subsystem 268sample /etc/qconfig stanza 311
IBM Network Printer 12 183, 214, 499custom interface program 147
IBM Printing System Companydownload site 147
IBM Proprinter 207IBM850 335ibmgraphics 161ibmNetColor 306, 310ibmNetPrinter 306, 310imesNewRomanSymbols 185inbound 500inbound print request 500indenting lines 446infocmp 155, 161, 486Infoprint Manager
1403 line data 516accounting 457administration 460advantages 20, 455AIX 5L support 459, 460ASCII 515automatic detection of print file type 21Baan 457client code 458color printing 20, 459command line 10command line interface 460commercial printing 459comparison 20comparison to System V and PowerPC print subsystems 10cross-system printing 458DBCS ASCII 516digital reprographics 459disadvantages 22ditroff 516e-mail 20, 457, 458, 517ERP printing 457error handing 12EUC 516fax 20, 457, 458, 515, 517forms management 14, 22, 23, 25, 457, 459GIF 516GUI 10, 455, 457, 459, 460, 461high-speed printers 20in distributed environment 457interoperability 21
546 Printing for Fun and Profit under AIX 5L

JD Edwards 457job actions 465job retention 21job scheduling 21, 456job validation 21, 456JPEG 516LPR 458, 459MICR printing 20, 459MVS 459Network Printer Manager (NPM) 21, 462notification 21notification profile 12object-oriented 10Oracle 457OS/390 459OS/400 459overview 455PCL 515PDF 515PeopleSoft 457, 458PostScript 515PowerPC print subsystem 23, 458, 459printer actions 463printer pooling 456printers supported 457printing 9professional services 22Program Temporary Fix (PTF) 22retained job 465S/370 line data 516SAP R/3 457, 458, 515scalability 21scan 22, 459security 14, 22, 25SMIT 10, 460SNMP 21, 462, 463supported input data streams 25, 458, 515supported output data streams 458, 517supported printers 20System V print subsystem 23, 459templates 11TIFF 515Tivoli Output Manager 21, 455variable data 459VM 459VSE 459VSM interface 10, 460Web site 466workload balancing 16, 21, 456, 457
init 492initialization 322
printer 142initialization strings 492initialize printer 330, 335
terminfo 151INPUT 170install
Additional Printer/Plotter Software 219printer software 218
installp 436instlpr 317Intelligent Printer Data Stream (IPDS) 512, 517interface program
fault handling 167functions performed by 138ps 143tab support 151using socket filters 448
interface program (System V) 47, 48, 55, 79, 81, 115
JetDirect specific 115interface script 519
command line parameters 140custom 48, 145environment variables 140filters called by 23IBM Network Printers 147Lexmark 150standard script 141troubleshooting 412
interface script (System V)hpnp.model 52hpnpIS.model 52JetDirect known problem 120manufacturer-supplied 52PostScript 71, 75PS script 52remote (LPD) printer 110specifying for a printer 53, 68, 118standard script 52, 70, 121
interface script parametercopies 140file_names 141options_list 140printer 140request_id 140title 140user_name 140
547

interface shell scriptSystem V print subsystem 10
interface type 135internationalization 174interposer 479, 482iostat 40IP address 451, 502IP header 507IPDS
(see Intelligent Printer Data Stream) 517iprog 142iprog terminfo attribute 153iptrace 397, 510
bad remote queue name 504error messages 392logging remote printing 506tracing network printing 397
Is the print service active? 420is1 142, 153, 492is2 142, 153, 492is3 142, 492ISO8859-1 335, 389it 142italic type 148
JJD Edwards
Infoprint Manager 457JDF 269, 424JetDirect 23, 52, 200, 201, 268, 294, 432, 448, 449
adding a printer (PowerPC) 294adding a printer (System V) 115EX boxes 397filter program (PowerPC) 295hpnpf.* log files 419interface program 144log files 414PowerPC print subsystem 268sample /etc/qconfig stanza (PowerPC) 303socket program (PowerPC) 295System V print subsystem 103telnet for testing 396
JetDirect EX Plus3 Multi-Port Print Server 294, 295, 299, 301JetDirect printing
bad file permissions 418Job Description File (JDF) 269, 424
job disappearsremote troubleshooting 431
job number 77System V print subsystem 410
job prioritySMIT 258Web-based System Manager 256
job retentionInfoprint Manager 21
Joint Photographic Experts Group (JPEG)Infoprint Manager 516
JPEG 25, 437(see Joint Photographic Experts Group) 516
jpg 178
LLAIX 449LAIX software tools 452landscape 148, 150, 164, 172, 179, 192, 330, 336, 337, 340, 438
qconfig 438selecting when printing 247
LANG 77, 389, 408large user name 361LDAP 25LDAP security 23ledger 340ledger size paper 339legal 340LENGTH 170letter 340lexbe 268lexlink 449Lexmark 198, 268, 449
interface program download site 150interface script 150
LexMark Marknet 201Lexmark Network Printer 17LexMark Optra 339Lexmark Optra E 336limit 98limits field 340, 488line data 25line feeds 36, 48, 68, 71, 74, 75, 119line pitch
forms 157line spacing 81line width 491
548 Printing for Fun and Profit under AIX 5L

lineprinter 337lines 491lines per inch 330, 343, 493lines per page 179, 328, 352, 491local filtering
Network Station attached printers 312PowerPC print subsystem 273
locale 174, 332log files
JetDirect System V 419removing 411
log remote printing 506LOGFILE environment variable 146logs
hpnpcfg (System V) 126lpNet 408lpsched 407lpsched (System V) 56PowerPC print subsystem 422pstatus file 408remote lpd 505remote PowerPC printing 423requests 49System V print subsystem 405, 406
long queue names 252lp 10lp command 9, 10, 18, 88, 104, 115, 247, 468
-c flag 89content type 178-d flag 88, 89-f flag 90-H flag 90, 99-i flag 70, 80, 90, 95, 99-L flag 90-m flag 91-n flag 91-o flag 91-P flag 92, 95-q flag 93, 98-R flag 93-r flag 93selecting forms 161specifying a character set 162syntax 88System V print subsystem 88-T flag 80, 93, 165, 172, 175, 178-t flag 93-w flag 93-y flag 93, 164, 180
lp.cat 12, 48, 143, 182lp.cat filter 182lp.set 143lp.set filter 136lp.tell 143lpabe 268lpadmin 10, 137, 409, 432, 433, 451, 468
adding a character set 162adding a font cartridge 163adding a printer with a custom script 149custom interface script 144-f flag 186-I flag 136, 176-i flag 144-m flag 180setting new printer type 156setting port charaacteristics 164setting TERM type 153-T flag 136, 485-u flag 187unmounting a form 160
lpadmin command (System V)adding a local printer 54, 73, 74adding a remote printer (LPD) 112copy-option 87option flags 73, 78, 105, 116
lpadmin flags-A 54, 69, 70, 77, 78-c 54, 67, 79, 106-D 54, 67, 80, 106-d 86-e 55, 81-F 54, 70, 79, 80-f 55-I 55, 72, 74, 75, 80, 108, 125, 127-i 55, 77, 81-m 55, 71, 75, 81-O 87-o 55, 81, 82-p 54, 66, 74, 105-s 54, 108, 112-T 55, 71, 74, 75, 80, 81, 82, 108-u 55, 129, 130, 131-U (not supported) 103-v 54, 68, 74, 128-W 54, 78-x 84
lpc command 467, 468System V print subsystem 100
549

LPCATenvironment variable 146
LPD 509/etc/inittab 292/etc/inittab (PowerPC) 291access list (PowerPC) 285, 290, 293daemon 317daemon (PowerPC) 269, 270, 283displaying subsystem status (PowerPC) 284, 287, 290, 293, 294managing the print server (PowerPC) 284, 289managing the subsystem (command line) 293, 294managing the subsystem (SMIT) 291managing the subsystem (Web-based System Manager) 288PowerPC print subsystem 267protocol 267, 269, 270, 312, 316starting the subsystem (PowerPC) 284, 294stopping the subsystem (PowerPC) 284, 294System V print subsystem 103troubleshooting (PowerPC) 284, 292
lpd 5, 13, 201, 420acknowledgements 506-D debug flag 505daemon 390, 451log files 423logging 402, 505starting and stopping 242
LPD protocol 449, 506LPDEST 85, 205lpfilter 11, 23, 137, 419, 433
adding a filter 173bug 176deleting filter 173listing 174listing filter definitions 174registering filters 169registering PostScript filters 137registering the filter 173setting defaults 173
lpfilter command 119, 132, 468lpfilter command (System V)
adding a pcl filter 71, 74, 81adding a PostScript filter 74, 81
lpforms 23, 156, 158, 468creating a form 158displaying form 158maintain form access list 159
modifying a form 158mounting a form 159registering filters 169removing a form 158setting form alert 160
LPI 170lpi 136, 493lpix 491lpmove command 100, 468lpNet 13, 104, 391, 501
daemon 104log 408
lpNet log 499lpq command 467, 469
System V print subsystem 101lpr 9, 10, 18, 247, 325
-h flag 358System V print subsystem 88
lpr command 468, 469-C flag 95-h flag 133syntax 94System V print subsystem 101
lprm command 6, 467, 469System V print subsystem 101
lpsched 10, 11, 13, 104, 115, 121, 142, 405, 432, 469
log 407parent of lpNet 104, 500pcl filter 175using filters 169
lpsched (System V)/etc/inittab entry 55log 56print service 46purpose 56
lpset 413lpshut 121, 432, 433, 469lpshut command (System V) 56lpstat 6, 17, 18, 233, 346, 366, 404
listing forms 159listing printer attributes 161log from remote status 501remote print log 499
lpstat command 89, 469-a flag 100-a flag (System V) 77, 89-c flag (System V) 95display printer configuration (System V) 76
550 Printing for Fun and Profit under AIX 5L

display printer description (System V) 106, 117displaying accept/reject status (System V) 77displaying enable/disable status (System V) 77displaying job order 98displaying printer description (System V) 67displaying status of print service (System V) 56-l flag (System V) 96-o flag (System V) 96-p flag (System V) 77PowerPC print subsystem 274-R flag 98-r flag (System V) 56, 95syntax 95System V print subsystem 95-t flag (PowerPC) 274-t flag (System V) 77, 113
lpsystem command 392, 414, 469-l flag 111, 112-R flag 111, 130-r flag 129syntax 110-T flag 110, 111, 130wildcard 129, 131, 132-y flag 111
lptest 64, 339, 382, 394, 426, 469lpusers command 98, 187, 469lpusers command (System V) 87, 93lsallq 227lsallq command 226, 469lsallqdev command 469lsattr 35, 236, 237lsdev command 52, 64lslpp 7lsque 227, 381, 469lsquedev 227, 381, 469lssrc command 241, 283, 294, 390, 420, 469
-g flag 294-s flag 294
lsvirprt 10, 18, 327, 337, 469, 486, 488customizing virtual printer attributes 328defining filters 351listing attributes 332virtual printer customization 343
MMAC header 507mail messages
PowerPC print subsystem 422
System V print subsystem 406makecontrolfile 502man pages 165
printing 442managing the LPD subsystem
command line (PowerPC) 293PowerPC print subsystem 288, 294SMIT (PowerPC) 291Web-based System Manager (PowerPC) 285
margin 328selecting when printing 247
MarkNet 268Markvision 150, 268message catalog 487message number 487MICR printing
Infoprint Manager 459Microseconds to delay between characters 63Microsoft Windows 451missing inbound network print job 416missing print job 175mkdev 64mkque command 223, 469mkquedev command 223, 469mkvirprt command 469model
directory (System V) 48System V print subsystem 55, 81, 118
model directory 143model interface
hpnp.model 139hpnpIS.model 139PostScript 71standard 70, 139
model scripthpnpIS 143
model type 137model.orig 115, 121, 128model.stz 51, 135, 519modem 479MODES 171
template 171modify a printer
System V print subsystem 78modifying a form 158modifying a print request
System V print subsystem 95Monterey 45mount a form 159, 346
551

move a print jobcommand line 265SMIT 263Web-based System Manager 262
moving a print job 262System V print subsystem 100
multiplexer 479MVS 201, 516
NNACK 392, 504name resolution 390national language support 18, 19, 332, 358native serial ports 482NCD thin clients 449ncdprint 449negative acknowledgement 504netcat 449NETHOST 450NETjet 449NETPORT 450netprt 150NETque 449Netscape 166Netty 453NETWORK
environment variable 150network attached printers 321
PowerPC print subsystem 267System V print subsystem 103
NETWORK environment variable 146network filter
PowerPC print subsystem 268network print server 201Network Printer Manager (NPM) 21, 457network printers
printing directly to 396network printing
control file 401missing jobs 390, 415negative acknowledgements 392socket programs 448timeout 392troubleshooting 416
network printing protocols 268network protocol 391, 508network socket filter 150Network Station attached printers (PowerPC) 267,
312network terminal server 201network-attached printer 15NFS 273, 292NK cable 483NL cable 484noresponse 505Nortel Networks, 449Novell Netware 201nput tray 335nroff 168NSTDIN 502null modem 479numfile 428n-up 444
OObject Database Manager (ODM) 61od 154, 426ODM 35ODM database 302, 311option flags 78, 91option6 432Options
filter definition 176MODES locale 176MODES prtitle 176
options_listinterface script parameters 140
OracleInfoprint Manager 457
orientation 141, 179OS/2 201, 516OS/390 516OS/400 516outbound print job 499OUTPUT 170output bin 329output filters 12overview
System V print subsystem 46, 135
Ppac command 470packet
iptrace 507length 508
padmin
552 Printing for Fun and Profit under AIX 5L

mounting a form 160page length 136, 330, 444
forms 156page numbering 168page numbers 179, 347, 444page order 179page orientation 141, 144, 322, 327
landscape or portrait 352portrait, landscape or rotate 148
page size 81, 91, 146, 161, 335ledger 342letter 147
page title 168, 347, 352, 438, 444, 446page width 136, 330, 444
forms 156terminfo 152
page-range (System V) 92PAGES 171Palatino-BoldItalic font 363paper size 146, 328, 352, 389
default for standard trays 340escape sequence 146ledger 339
paper size selectionletter, ledger, A4, A5 148
paper tray 322, 327, 328, 330, 352parallel attached printers 421parallel port 8parallel printer 15, 59, 75parallel printer cable 483parity 61, 63, 365, 421parse
control file 506passthrough 68, 71, 136, 200, 330, 348, 349, 368, 452passthrough mode 342
selecting when printing 247PBM 437PC/NFS 269, 316, 452PCL 25, 144, 322, 336, 347
content type 71Infoprint Manager 515, 517printing formatted files 387stair-step output 419
PCL 3 512PCL 4 512PCL 4e 512PCL 5 512PCL 5c 513
PCL 5e 512PCL 6 513PCL commands 188, 360PCL data stream 360pcl filter 142, 165, 175, 384, 419, 433
registering 175PCL filter (System V) 71, 81PCL header page 187, 360PCL printer 71, 74, 75, 81, 136, 166, 342, 350, 384PCL reset 329, 335PCNFS 451PDF 25, 166, 177, 178, 440, 514PDF files to Level 2 PostScript 440pdf2ps 166, 440PDFprint 166pdpr 10, 24pdserver 10, 12, 13pels 340PeopleSoft
Infoprint Manager 457, 458performance
administrative interface 37, 41amount of processing required 37, 38available memory 37, 40disk configuration 37, 40effect of filters 38effect of user behavior 41frequency of status requests 37, 41graphical SMIT 41number of active print jobs 36, 37number of printers or queues 36, 37number of processes 37number of queued print jobs 36, 38number of users 37, 38remote printing 41size and type of files 37, 38spooling or queuing 37, 40text-based SMIT 41variables 36Web-based System Manager 41
perl 168perl filter 447permissions 392Personal Printer Data Stream (PPDS) 513, 517PFA 354, 441pfa type fonts 185PFB 354, 441pfb fonts 185pfb2pfa 185, 354, 441
553

pinout 479piobe 10, 11, 12, 321, 357, 425piobe backend 269, 322, 369pioburst 350piocolor 268, 312piodigest 486pioformat 11, 427piohpnpf 9, 200, 268, 448, 449pioibmnp 448pioibmnpf 9, 268, 448, 449pioibmnpm 268, 311, 321piojetd 200, 268, 321, 448piolpx 268pioout 12, 425pioout filter. 321piopredef 335, 336piorlfb 200, 268, 274pipe data to output program 150pitch 81, 161, 329, 330, 335, 337, 342
forms 157selecting when printing 246setting with lsvirprt 328terminfo 152
PJL 352, 426pkgadd 150polling loop 500pool of printers 79pooling 266pooling printers
Infoprint Manager 16, 456System V print subsystem 16
port 515 269, 283port 9100 294, 295, 396port 9101 294, 295port 9102 294, 295port number 63, 451port setting 161port settings 81, 383port=515 507Portable Data Format (PDF) 514
Infoprint Manager 515portrait 148, 172, 192, 328, 330, 340postdaisy 178postdmd 178postio 12, 182postio filter 137, 182postio filter (System V) 81postio_b 143postmd filter 182
postplot 178postprint 143, 174, 178, 439postprint filter 137, 165, 178, 179, 181postprint filter (System V) 81postreverse filter 182PostScript 144, 186, 200, 322, 330, 348
adding a printer (System V) 75automatic detection 353converting PCL to 166converting PDF to 166creating from PDF 166creating from text 165creating from troff 166custom header page 189data stream 513file conversion 440filters 17, 168font utilities 441fonts 182header 350header page 352Infoprint Manager 515interface program 143page selection 439print filters (System V) 93printer type (System V) 52printing ASCII text 394source prints 386terminfo entries 152type 1 fonts 177view with xpreview 442viewing 440virtual printer 352virtual printer overview 352X windows 443
PostScript fonts 354PostScript printers 137, 176, 352PostScript to 9-pin Epson format 440PostScript to ASCII 442PostScript to PCL 441PostScript to simple ASCII text 440PostScript utilities 437posttek 178postutil 439PowerPC print subsystem
add a print queue 476add a printer device 476add a queue device 477add print access for remote client 477
554 Printing for Fun and Profit under AIX 5L

adding a JetDirect attached printer 296adding a local queue 207adding a Network Station attached printer 312adding an IBM Network Printer 304adding an Xstation attached printer 312advanced topics 321advantages 18as print server 269, 283, 316attribute syntax 485attribute testing 421automatic filter type detection 354backend program 9, 10, 268, 321cancel a print job 477capturing print flags 400change a queue device 477change a virtual printer 477change characteristics of a printer device 476change print queue characteristics 476change printer driver settings 476changes from V4.1 to V4.2 6changes from V4.2.0 to V4.3.3 5changes from V4.3.3 to V5.0 4cleaning up 426colon file format 487command line 10command line errors 422comparison 18comparison to System V print subsystem and In-foprint Manager 10compatibility 18configure a defined printer device 476control file 270, 273, 278data file 270, 273, 278deleting a queue 228disadvantages 19display job status 477display status of print queues 476displaying long printer names 272displaying LPD subsystem status 284, 287, 290enabling and disabling a queue 231enhancements 4, 5, 6error messages 422file permission problems 419filesets 7filters 347forms 14, 19, 20, 23, 25, 344hold a print job 477inbound printing 269, 283
Infoprint Manager 458install additional printer software 476ledger paper size 341list all print queues 476list all queue devices 477list defined printers 476list remote clients with print access 477list supported printers 476local filtering 268, 272, 273local formatting 272log files 422mail messages 422manage qdaemon 476manage spooler group 476manage the LPD print server 284, 477managing LPD access (command line) 293managing LPD access (SMIT) 290managing LPD access (Web-based System Manager) 285managing print server (SMIT) 289managing the LPD subsystem (command line) 293managing the LPD subsystem (SMIT) 291managing the LPD subsystem (Web-based Sys-tem Manager) 288move a print job 477move a printer device 476multiple printers 191network filter 268Network Station attached printers 312number of jobs 5outbound printing 267, 272print administrators 3print command flags 274, 330print server attached printers 318printers supported 5, 6printing 9printing files 243prioritize a print job 477qdaemon 9release a print job 477remote client 502remote logging 5remote print log 505remote printing logs 423remove a print queue 476remove a printer device 476remove a queue device 476, 477remove print access for remote client 477
555

restricting users 356security 14, 25set the default print queue 477show a queue device 477show a virtual printer 477show characteristics of a printer device 476show current print subsystem 475show print queue characteristics 476show printer driver settings 476SMIT 7, 8, 10socket filters 448spooling 30standard processing 268, 272, 273standard with NFS access 273start a print queue 477starting LPD subsystem 284starting printer services 238status files 422, 425status filter 274stop a print queue 477stopping print services 238stopping the LPD subsystem 284submit a print job 477switch print subsystem 475switching to System V print subsystem 7terminal server attached printers 318troubleshooting 419type of print spooler 272, 274, 278unwanted header pages 428Web-based System Manager 7, 10workload balancing 16
PPDS(see Personal Printer Data Stream) 513, 517
pr 19, 168, 4702-up 445adding line numbers 446
pr filter 142, 175, 347, 444pr formatter 166predef 486predef directory 340predefined database 335preprinted forms 156print class (System V) 67print command flags
PowerPC print subsystem 274print file
finding in job description file 425finding in request log 407
print filter
add carriage returns 349SMIT 348
print filters (System V) 48print log
remote rembak 502print modes 164print server 449
design considerations 13PowerPC print subsystem 267, 269, 318print subsystem selection 16System V print subsystem 103, 128tasks (System V) 128
print service 187is scheduler active 404starting and stopping 238
print service (System V)displaying status 56managing 55overview 46starting 56stopping 56
Print Services Facility (PSF) 511print spooling
setting the default (System V) 87print subsystem
comparison 16printcap 440PRINTER 85, 205printer
attributes 405backend program 321class (System V) 52, 79content type 165device testing 395fault handling 167fault recovery method (System V) 80faults 164form support 156form support (System V) 81initialization 142, 328installed fonts 388interface program 16, 138location 15multiple names 191pooling 266pooling (System V) 67reset 335resolution 329testing 366
556 Printing for Fun and Profit under AIX 5L

virtual printer initialization 335printer alert (System V) 69printer attributes
customizing 161, 327customizing with SMIT 327
printer descriptionSystem V print subsystem 80
printer device 34, 36changing settings 237defaults 233displaying settings 234list attributes 35PowerPC print subsystem 421System V print subsystem 52, 53, 54, 59, 68, 405
printer faultalert (System V) 69detection 79
printer initialization 329terminfo attributes 153
printer interface 138System V print subsystem 108
Printer Job Language (PJL) 352, 512printer manufacturer interface programs 152printer name
command line variable 140printer pitch 246printer port
setting characteristics 164printer resolution 352printer setup 144printer status (System V) 76printer type 135, 136, 161, 386, 485
choosing (System V) 51, 105, 108, 519creating new 155default (System V) 74definition (System V) 71hplaserjet 75, 120PostScript (System V) 52PS 181specifying (System V) 68, 74, 75, 108, 128System V print subsystem 51, 53, 55, 135terminfo 47, 51, 105, 108, 115, 118, 124, 152, 519unknown 152virtual printer 335
printer type versus content type 152printer-resident fonts 183printers
ASCII text 175IBM Network Printer (PowerPC) 268, 303JetDirect attached (PowerPC) 268, 296Lexmark (PowerPC) 268naming convention (PowerPC) 272, 295, 303naming convention (System V) 66, 105, 117, 124network attached (PowerPC) 267Network Station attached (PowerPC) 267, 312parallel 52, 59print server attached (PowerPC) 267, 318remote 448serial 52, 479supported by Infoprint Manager 457terminal attached (PowerPC) 267, 318Xstation attached (PowerPC) 268, 312
printers.hpJetDirect.attach 298, 301printers.ibmNetColor.attach 306, 310printers.ibmNetPrinter.attach 306, 310printing
ASCII to PostScript 186BSD commands 467commands 467directly to device 395directly to device problems 382directly to file 409directly to network printers 396graphics 386jobs disappear 392man pages 165, 442output spacing is bad 387PostScript 25PostScript prints out like a program listing 386tasks 467testing flags 393text 25tips 435to a file 395unexpected double spaced 387unexpected symbols 386using a form 160wrong font 387wrong paper size 389X windows 443
printing files 244PowerPC print subsystem 243System V print subsystem 88
printing modes 93Printing Systems Manager (PSM) 20, 22, 455
557
printing to a filePowerPC print subsystem 425System V print subsystem 409
printq admin group 366priorities
user 186prioritizing a print request
System V print subsystem 98prioritizing a printing job 256priority level 187priority-level
System V print subsystem 87, 93, 98priority-limit
System V print subsystem 87, 93, 98process ID 425process termination 501programming 321promoting a print job
System V print subsystem 99Proprinter data stream 513protocol 506
network 508prtitle.fd 175, 176PS 52, 75, 172, 181, 409, 432
model interface 139TERM type 152
ps2ascii 440ps2epsi 440ps2pdf 438PS-b 52, 75, 181, 409, 432psbook 435, 439PS-br 52, 143, 181, 432psc filter 348PSF for AIX 20, 22, 455PSF/6000 20, 455PSinterface program overview 143psmerge 439psnup 435, 439psplot filter 348PSR 52, 143, 181, 432
TERM type 152PS-r 52, 181, 432psresize 439psroff 165, 442psselect 435, 439pstatus 417
System V print subsystem 408pstext 435pstoedit 436
pstops 435, 439psutils 435, 436ptich
setting 328ptop attribute 237public domain 435public domain software
UCLA 436public domain software site 435PUSH 507, 508PUSH packet 509
Qqadm 232, 233, 470qcan 6, 233, 255, 470qchk 6, 470qconfig 200, 202
default queue 205qdaemon 10, 13, 200, 201, 269, 321, 323, 420, 427, 449
starting and stopping 239won’t stay active 420
qdfork 427qdir 200, 393
errors from extra files 420qhld 261, 470Qman 453qmov 265, 470qpr
-J flag 335qpri command 470qprt 6, 9, 10, 18, 24, 246, 428, 470
-Ban flag 335, 359-Bnn flag 357-d flag 330, 335-da flag 353-dp flag 348-f flag 347-f1 flag 335flags 201-fp flag 445-j flag 330-l flag 330-p flag 339-p17 flag 330-Q flag 341System V print subsystem 88-u2 flag 330
558 Printing for Fun and Profit under AIX 5L

-v flag 330-w flag 330-X flag 335-Y0 flag 330-Z flag 335-z flag for landscape 330
queuedevice stanza 204local stanza format 203queue stanza 204
queue name 488queue status 233
command line 250DOWN 380SMIT 248Web-based System Manager 248
RRAN 15, 483RD 480readfile 505readjob
lpd command 505send ACK 505
ready to send 480realfn 503receive trigger level 385recovery
printer alert (System V) 115refused an attempted connect 419register the pcl filter 142registering the remote system
known problem (System V) 111lpsystem command 112, 114, 129, 132removing an entry (System V) 129System V print subsystem 104, 110, 129timeout (System V) 111
reject command 470reject command (System V) 56, 77releasing a print job 260
System V print subsystem 99rembak 5, 13, 200, 268, 270, 273, 274, 282, 283
-D flag for logging 502log 500, 502log files 423overview 201
remote asynchronous node 483remote connection to a network printer (System V)
118remote print log 502, 506remote printers 448remote printing
access list (PowerPC) 285, 290, 293attachment type (PowerPC) 277, 297control file 401control file (PowerPC) 270, 273, 278, 283daemon (System V) 129data file (PowerPC) 270, 273, 278disk space (PowerPC) 284displaying status of LPD subsystem 284displaying status of LPD subsystem (command line) 294displaying status of LPD subsystem (SMIT) 290displaying status of LPD subsystem (Web-based System Manager) 287flow (PowerPC) 270local filtering (PowerPC) 272, 273lock file 284logs 284managing the LPD server (PowerPC) 284, 289managing the LPD subsystem (PowerPC) 288, 291, 293, 294overview (PowerPC) 267overview (System V) 103planning (System V) 104PowerPC print subsystem 267sample /etc/qconfig stanza (PowerPC) 282standard processing (PowerPC) 272, 273standard with NFS access (PowerPC) 273starting the LPD subsystem (PowerPC) 284status (PowerPC) 282status filter (PowerPC) 274stopping the LPD subsystem (PowerPC) 284System V print subsystem 103timeout 392tracing 499troubleshooting 414, 415troubleshooting (PowerPC) 292type of print spooler (PowerPC) 272, 274, 278
remote queue 392, 502remove
filter 173forms 158old printers 410
removing a queuePowerPC print subsystem 228
replace character 447
559

request ID 47, 77, 89, 409request log 49request_id
interface script parameter 140requests file 417reset 322resetting job numbers
System V print subsystem 410resolution 352restart
beginning 70top of page 70wait 70
restrict users 186restricting users 356
PowerPC print subsystem 356Restrictq 453resuming a job
System V print subsystem 90resuming a print request
System V print subsystem 99retry
setting remote retry value 414reverse order 179RFC 1179 52, 103, 112, 267, 269, 270, 273ring list 340RJ/45 connector 404RJ-45 481RJ-45 connector 380RJ-45 to DB-25 converter cable 483rlogin 269rlp 449rmque 230, 470rmquedev 230, 470rmvirprt 230, 470rprint 9, 449RS/232 421, 483RS/232 adapters 403RS/232 attached printers
PowerPC print subsystem 421RS/232 signals 480RS-45 connector 483rsh 269RST 508, 510RTS 404, 480, 481ruser command 293, 470RxD 480
SS/370 line data
Infoprint Manager 516Samba 269, 316, 436, 437, 451SAP R/3 25
ABAP 458Infoprint Manager 457, 458, 515SAPscript 458
sar 17scalefont 355scheduler 404scheduling a print request 100SCO drivers
interface script for IBM printers 148SCO Unixware 7 45, 52scoaa_ml.tar 148script language
perl 168scs 493security
considerations 14Infoprint Manager 14, 22, 25LDAP 25PowerPC print subsystem 14, 25System V print subsystem 14, 25
sed command 128, 168sed filter 151, 349, 446select character set 493send_file_rembak 503, 504sendcontrolfile 504senddatafile 503sendjob 502, 504sendreq 503serial port 8serial printer 15
128-port adapter 15pinouts 15RS/232 15RS/422 15
serial printers 404, 479serial-attached 75server
LPD 510lpNet 500
server name 416setfont 355setting fonts 352shell script
filter 350
560 Printing for Fun and Profit under AIX 5L

shielding 482short_sendreq 504showpage 362SIGHUP 139signal ground 481simple content type 71, 81, 108, 169simplex 141, 144, 322, 328, 329, 330slow filter 169SMB protocol 269, 316, 452SMIT 7, 327
Add a Print Queue screen 216adding a printer device 61canceling print jobs 254defining filters 351displaying printer device settings 234Infoprint Manager 10listing virtual printer attributes 333mkpq 366move a print job 263pitch 338print filters 348printer support installation 218Printer Type screen 217printing files 244queue status 248removing a queue 229setting the default printer 205starting and stopping the lpd daemon 242starting and stopping the qdaemon 239virtual printer customization 327
SNA 269sniffing data type 353SNMP 21, 457, 462, 463socket 503socket 515 201socket filter 150, 448
csportd 449ncdprint 449netcat 449rlp 449rprint 449TCPrint 452
socket filter programs 449socket program 9, 144, 166, 448source port 507special device file 381splp 35, 235, 238, 382, 395, 470spooler group
displaying status (PowerPC) 294
members (PowerPC) 294starting (PowerPC) 294stopping (PowerPC) 294
spooling 18, 30, 325, 383setting the default (System V) 87
SRC 294srcmstr 241SSD line 380stack language
terminfo 154stair-step 71, 119, 165, 175stair-step output 384, 419standard
model interface 139standard interface
terminfo use 152standard interface script 141
JetDirect-attached printer 115standard model 77standard processing
PowerPC print subsystem 273standard script
steps performed by 141starting a queue 231starting the LPD subsystem
command line (PowerPC) 294PowerPC subsystem 284
starting the printer services 238starting the qdaemon 420starting the spooler group
command line (PowerPC) 294startsrc 5, 241, 390, 428, 505startsrc command 283, 294, 470
-g flag 294-s flag 294
status 247accept/reject (System V) 77displaying printer 76enable/disable (System V) 77
status filesPowerPC print subsystem 422, 425System V print subsystem 405
status filter 502PowerPC print subsystem 274
stepssuccessful iptrace 508
stop bits 61, 63, 164, 207, 365, 421stopping a queue 231stopping the LPD subsystem
561

command line (PowerPC) 294PowerPC subsystem 284
stopping the printer services 238stopping the spooler group
command line (PowerPC) 294stopsrc 5, 241, 427, 505stopsrc command 283, 294, 470
-g flag 294-s flag 294
stty 75, 164submitting a printing job 244successful remote print log 502Sun
type of status filter 275Sun graphics files 348supported printers 485supported terminfo printers 153svirprt 429svmon 40svprint.ti 51, 485switch.prt 27, 65, 470switching between print subsystems 25symbol set 322SYN 508syntax
comparison 485iptrace packet 507TCP/IP packet 507virtual printer colon file 489
System file 508system resource controller (SRC) 283, 294System V Print Subsystem
form support 156mounting forms 160TERM type 152
System V print subsystem 4accounting 17activate printer 472add a filter 473add a form 472add a local printer 472add a printer device 471add a remote printer 472adding a JetDirect-attached printer 115adding a local printer 57, 65adding a printer device 57administrative tasks 471advanced topics 135advantages 16
alert 53, 118allow access to a form 473allow queuing of print requests 472as print server 103, 128attachment method 67BSD commands 100cancel a print request 473, 475change a filter 473change a form 472change a local printer 472change a remote printer 472change characteristics of a printer device 471change default destination 471change options of submitted request 475change printer driver settings 472change priority of a print request 475changing a print request 95class 16, 48, 125class naming convention 52, 67clean up 410command line 10comparison of administrative interfaces 49comparison to PowerPC print subsystem and In-foprint Manager 10comparison, general 16compatibility 16configure a defined printer device 472content type 118, 124, 125, 519context type 125, 128converting files to PostScript 166customizing a printer 73deactivate printer 472default printer 125delete a class 472delete a filter 473delete a form 473delete a printer 472deleting a class 83deleting a printer 83deny access to a form 473disable printer 472disadvantages 17disallow queuing of print requests 472display accept status 474display all status information 474display class information 474display job rank order 473display list of forms 474display print request status 474
562 Printing for Fun and Profit under AIX 5L

display printer status 474display status of print service 56, 474display status summary 474display user’s print request status 474enable printer 472error recovery 69fault detection 69file permission problems 404filesets 7filters 164, 165flags 399forms 4, 14, 17, 23, 25, 53, 127hold a print request 475holding a job 99holding a print job 90inbound print log 500Infoprint Manager 459install additional printer software 472interface script 118, 519interface shell script 10JetDirect 103
troubleshooting 418job priority 99list character sets 474list default destination 474list default printing priority 472list filter attributes 473list form attributes 473list print wheels 474list user priorities 472local device name 68logs 405, 406LPD 103mail messages 406missing inbound network jobs 416model 55, 118modifying a print request 95modifying a printer 73mount a form 473move a print request 473move a printer device 471move all print requests 473moving a job 100overview 46PostScript filters 81pr filter 166, 445predefined filters 172print administrator 3print commands 471
print job next 473print service 46printer description 67, 80printer device 59, 68printer fault recovery 80printer interface 108printer name 51printer naming convention 66printer options 68printer type 118, 124, 519printing 9printing directly to a file 409printing files 88prioritizing a print request 98priority-level 87, 93priority-limit 87, 93, 98promoting a job 99pstatus 408register a remote system 471registering a remote system 104, 128, 129registering filters 71, 74, 119, 169release a job 99remote access 128, 129remote connection to a network printer 106remote connection to local printer on another system 106remote print troubleshooting 415remote printing 103remote printing log 499remote timeout 392remove a printer device 471remove user priority limit 472reset filter to defaults 473resume a held print request 475resume a job 90, 99security 14, 25set default destination 471set default print priority 472set default priority limit for all users 472set default user priority limit 472set form alert 473show characteristics of a printer device 471show current print subsystem 471show printer driver settings 472SMIT 8, 49socket filters 166, 448specify a content type when printing 475spooler 9spooling 30
563
stair-step output 419start the print service 56, 471status requests 471stop the print service 56, 471submit print request 475supported printers 519switch print subsystem 471switching to PowerPC print subsystem 7temporary files 411terminfo 118, 151, 519terminfo attributes 485terminfo file format 486troubleshooting 404troubleshooting interface scripts 412type definitions 135unregister a remote system 471Web-based System Manager 7, 10, 49workload balancing 16
System V print subsystem server RST 508Systems file 414, 415
Tt1ascii 441t1asm 442t1binary 441t1disasm 442t1utils 441tab support 151
virtual printer 343tabs 344, 444Tagged Image File Format (TIFF)
Infoprint Manager 515TCP header 507TCP/IP connection 503TCP/IP handshake 508TCP/IP socket filter programs 448tcpdump 397TCPrint 449, 452TD 480tek4014 178Tektronix 4014 178telnet
JetDirect 396template
filter 170header page 358
template keywords 170temporary files
System V print subsystem 411TERM 170, 174, 432
ibmgraphics 161PS-r, PS-br, PSR 143supported types 153used by interface script 140
termcap 485terminal
auxiliary port 365terminal attached printer 365terminal server 15, 449
PowerPC print subsystem 267, 318terminal-attached printer 18, 19, 24, 366terminfo 11, 136, 141, 143, 413, 433, 485
compile with tic 155database 47, 51, 71, 74file format 486length attribute 151listing printer with infocmp 155lpi attribute 151printer attribute naming convention 489printer entries 153printer type 51, 68, 74, 82, 105, 108, 115, 118, 519sample entry 153stack language introduction 154use= attributes 153viewing attributes 154
terminfo attribute 142boolean 153modifying 17numeric 153printer initialization 153standard interface 153string 153
terminfo compile 152, 485terminfo database
escape sequences 151overview 151page width 152PS and PSR TERM types 152standard interface program 152
testinglocal device 64locally-attached printers 76
textautomatic detection 353external formatting 25
text files to a PostScript queue 247
564 Printing for Fun and Profit under AIX 5L
text formatting utility 444text to PostScript 438, 439tgif 437th_win 507tic 155, 485
terminfo compile 152TIFF 25, 437
(see Tagged Image File Format) 515timeout
ack 504parallel attached printer 63remote printing 392System V print subsystem remote printing 414
timeout to server 501timestamp 438tips 435title 446
command line parameter 140Tivoli Output Management 21Top of page 70tput 142, 154, 161, 492tr 168tr filter 151, 349, 447tracing network printing 397tracing remote printing 499transfig 437transmit buffer count 385tray selection 141, 144, 148, 327, 352trbsd 447troff 165, 172, 178troff formatter 516troubleshooting 373
capturing files 398Checklist for local printing 374Checklist for remote printing 375common techniques 394flags 393hpnpcfg log 126Is lpd running? 390JetDirect attached printers 396job still in the queue 378large file is the failing 376LPD subsystem (PowerPC) 292lpsched log (System V) 56mail message 391missing jobs 376missing remote System V jobs 415name resolution 390network printing 390
PowerPC print subsystem 419remote jobs disappear 431remote printing 132, 415remote printing (PowerPC) 284request log 49stair-step output in System V 419System V print subsystem 404System V print subsystem JetDirect 418test output generation with lptest 394tips common to both print subsystems 374virtual printers 421
TrueType font 436tumble 330two-sided printing 164TxD 480type 1 fonts 177, 183, 354, 441type size 148type style 148typeface 329Typestyle 189
UUCLA 435UCLA SEAS public domain software 436Univers font 189unknown
default printer type (System V) 74, 108unknown printer 501unknown printer type 152unmounting a form 160, 346unpost 442URL
Group Bull 436UCLA SEAS 436
user access 186user list
forms 159user_name
command line parameter 140users
form allow and deny 157users.allow 78, 130users.deny 130, 131utilities 435UX
lp 412
565

Vvalidity testing 488verifying the active print subsystem 64vi 155, 335Virtual printer
banner selection 429virtual printer
_d attribute 335_f attribute 335_J attribute 335_L attribute 494_p attribute 342_v attribute 343_X attribute 335_Z attribute 335automatic file type detection 353backend 322banner header 350ci attribute 335colon file format 487colon file sequence 485ct attribute 342customization 11, 18, 327, 337default attribute files 485es attribute 340, 342filters 347header page attribute 357key attributes 334limits 488listing attributes 332mD attribute 487message catalog 487mF attribute 354mL attribute 336mU attribute 337predefined printers 335ring list 340sD attribute 494sh attribute 335, 350, 358, 359wh attribute 343
virtual printer attributefl 431fp 431sh 429
virtual printer backends 321virtual printers
troubleshooting 421VM 201, 516vmstat 40
VSE 516
WWeb resource
iptrace formats 506Web-based System Manager 7, 54
adding a JetDirect attached printer (PowerPC) 296adding a JetDirect-attached printer (System V) 116adding a local PowerPC queue 208adding a local printer (System V) 65adding a local printer device 57adding a remote printer (PowerPC) 276adding a remote printer (System V) 105adding an IBM Network Printer (PowerPC) 304canceling print jobs 253checking queue status 248deleting a printer (System V) 83deleting a queue 229disabling a queue 231displaying printer device settings 234holding a print job 260job priority 256managing LPD access (PowerPC) 285moving print jobs 262performance 41printer type 485printing files 244required fields 66setting TERM type 153setting the default destination (System V) 85setting the default printer 205starting 57, 105, 116, 276, 296, 304starting and stopping the lpd daemon 242starting the qdaemon 239tasks 7
WIDTH 171window size 506Windows 316, 451, 516
choosing a printer content type for 71IBM LPR Remote Printing Client 316, 317printing to AIX 316
Windows 95/98 451Windows files 165Windows NT 201, 316wire
serial pinouts 404
566 Printing for Fun and Profit under AIX 5L

word processor 165workload balancing
Infoprint Manager 16, 456, 457PowerPC print subsystem 16System V print subsystem 16
wrapped content type 175writesrv daemon 294wsm command 57, 276, 296, 304
XX Windows 437
capturing 442image grabber 437
xgrabsc 437, 444XON/XOFF 480xpdf 436xpr 443xpreview 442xps 436Xstation 268Xstation attached printers (PowerPC)
added files 315adding a printer 312catlpx filter 268, 312piolpx backend 268sample /etc/qconfig stanza 315
Xstation-attached printer 18, 19, 24xv 437, 443xwd 443xwpick 437Xylogics 449Xyplex Access terminal server 449
Zzig-zag output 384
567

568 Printing for Fun and Profit under AIX 5L

© Copyright IBM Corp. 2001 569
IBM Redbooks review
Your feedback is valued by the Redbook authors. In particular we are interested in situations where a Redbook "made the difference" in a task or problem you encountered. Using one of the following methods, please review the Redbook, addressing value, subject matter, structure, depth and quality as appropriate.
• Use the online Contact us review redbook form found at ibm.com/redbooks • Fax this form to: USA International Access Code + 1 914 432 8264 • Send your comments in an Internet note to [email protected]
Document NumberRedbook Title
SG24-6018-00Printing for Fun and Profit under AIX 5L
Review
What other subjects would you like to see IBM Redbooks address?
Please rate your overall satisfaction:
O Very Good O Good O Average O Poor
Please identify yourself as belonging to one of the following groups:
O Customer O Business Partner O Solution DeveloperO IBM, Lotus or Tivoli EmployeeO None of the above
Your email address:The data you provide here may be used to provide you with information from IBM or our business partners about our products, services or activities.
O Please do not use the information collected here for future marketing or promotional contacts or other communications beyond the scope of this transaction.
Questions about IBM’s privacy policy?
The following link explains how we protect your personal information.ibm.com/privacy/yourprivacy/


Printing for Fun and Profit under AIX 5L


®
SG24-6018-00 ISBN 0738418641
INTERNATIONAL TECHNICALSUPPORTORGANIZATION
BUILDING TECHNICALINFORMATION BASED ONPRACTICAL EXPERIENCE
IBM Redbooks are developed by the IBM International Technical Support Organization. Experts from IBM, Customers and Partners from around the world create timely technical information based on realistic scenarios. Specific recommendations are provided to help you implement IT solutions more effectively in your environment.
For more information:ibm.com/redbooks
Printing for Fun and Profit under AIX 5L
Introduction of System V print subsystem
Effective print management with many advanced topics
Solving print problems with hints and tips
The introduction of AIX 5L demonstrates IBM’s commitment to the open model of computing. The addition of the System V Release 4 print subsystem in this release of AIX is just one of the many ways that IBM demonstrates this commitment. Many new functions have been introduced in this latest release of AIX.
In AIX 5L, IBM includes both the traditional AIX print subsystem, which we will call the PowerPC print subsystem, as well as the System V print subsystem, which has been a printing standard for many years in the UNIX environment. For more complex printing environments, IBM also offers a print management product called Infoprint Manager. The system administrator must decide which print subsystem fits his or her environment the best. One of the aims of this book is to help you make that decision.
This redbook provides information on the two print subsystems available with AIX 5L Version 5.0. New in Version 5.0 is the initial implementation of the System V print subsystem, and this redbook will compare and contrast it with the legacy PowerPC print subsystem, as well as with the Infoprint Manager for AIX licensed program product.