Preserving Historic Ceramic Tile Floors - National Park Service
16
40 PRESERVATION BRIEFS Preserving Historic Ceramic Tile Floors Anne E. Grimmer and Kimberly A. Konrad U.S. Department of the Interior National Park Service Cultural Resources Heritage Preservation Services Figure 1. Minton encaustic tile floor, 3rd floor, Patent Office Building (now the National Portrait Gallery), Washington, D.C. Originally cons tru cted between 1836-40 under the supervision of Robert Mills, the upper floors of this portion of the building were restored and redecorated in 1877 in the "Modern Renaissance style" by Cluss & Shulze, Architects, after a disastrous fire. Photo: Ja ck E. Boucher, HABS Collection. With a tradition that dates to ancient civilizations, ceramic* tile flooring can be found in a variety of settings in diverse cultures and structures, including residential buildings ranging from large apartment buildings to small private houses, institutional buildings such as government offices and schools, and religious buildings such as cathedrals and mosques. Historically, its widespread use may be attributed to the fact that a readily available natural material-clay- could be converted by a relatively simple manufacturing process-baking or firing-into a very durable, long-lasting and attractive floor tile that is easy to maintain. Ceramic floor tiles exhibit a versatility of colored glazes and decoration, and they range from the plainest terra cotta tiles to highly decorated individual ceramic tiles and elaborately patterned tile floors. Their modularity, as standardized units, make them easy to fit into different sized spaces which also explains much of the popularity of ceramic floor tiles throughout history (Fig. 1). This Brief begins with an overview of ceramic tiles as a traditional flooring material. It includes an explanation of the various kinds of historic floor tiles used in the United States and how they were made. General guidance is given on preservation treatments, focusing on maintenance, and, when necessary, selective replacement of damaged floor tiles. The Brief is intended to provide owners and managers of historic properties with an understanding of the significance and historical background of ceramic floor tiles, and a basic awareness of maintenance techniques and various deterioration problems to which tile floors are especially prone . In the case of significant historic ceramic tile floors, a professional conservator of ceramics should be consulted to advise in matters of repair, restoration or conservation. Historically, ceramic tiles were used on walls as wainscotting, on fireplace hearths and fireplace surrounds, and even on furniture, as well as for flooring. However, because floor tiles are subject to greater damage and deterioration, they are the primary emphasis of this Brief. Highlights include: a short history of ceramic floor tiles; a description of ceramic tile types; a summary of traditional installation methods; maintenance techniques; and guidance on repair and replacement. 1
Transcript of Preserving Historic Ceramic Tile Floors - National Park Service

40 PRESERVATION BRIEFS
Preserving Historic Ceramic Tile Floors
Anne E. Grimmer and Kimberly A. Konrad
U.S. Department of the Interior National Park Service Cultural Resources
Heritage Preservation Services
Figure 1. Minton encaustic tile floor, 3rd floor, Patent Office Building (now the National Portrait Gallery), Washington, D.C. Originally constructed between 1836-40 under the supervision of Robert Mills, the upper floors of this portion of the building were restored and redecorated in 1877 in the "Modern Renaissance style" by Cluss & Shulze, Architects, after a disastrous fire. Photo: Jack E. Boucher, HABS Collection.
With a tradition that dates to ancient civilizations, ceramic* tile flooring can be found in a variety of settings in diverse cultures and structures, including residential buildings ranging from large apartment buildings to small private houses, institutional buildings such as government offices and schools, and religious buildings such as cathedrals and mosques. Historically, its widespread use may be attributed to the fact that a readily available natural material-claycould be converted by a relatively simple manufacturing process-baking or firing-into a very durable, long-lasting and attractive floor tile that is easy to maintain. Ceramic floor tiles exhibit a versatility of colored glazes and decoration, and they range from the plainest terra cotta tiles to highly decorated individual ceramic tiles and elaborately patterned tile floors. Their modularity, as standardized units, make them easy to fit into different sized spaces which also explains much of the popularity of ceramic floor tiles throughout history (Fig. 1).
This Brief begins with an overview of ceramic tiles as a traditional flooring material. It includes an explanation of the various kinds of historic floor tiles used in the United States and how they were made. General guidance is given on preservation treatments, focusing on maintenance, and, when necessary, selective replacement of damaged floor tiles. The Brief is intended to provide owners and managers of historic properties with an understanding of the significance and historical background of ceramic floor tiles, and a basic awareness of maintenance techniques and various deterioration problems to which tile floors are especially prone. In the case of significant historic ceramic tile floors, a professional conservator of ceramics should be consulted to advise in matters of repair, restoration or conservation. Historically, ceramic tiles were used on walls as wainscotting, on fireplace hearths and fireplace surrounds, and even on furniture, as well as for flooring. However, because floor tiles are subject to greater damage and deterioration, they are the primary emphasis of this Brief. Highlights include: a short history of ceramic floor tiles; a description of ceramic tile types; a summary of traditional installation methods; maintenance techniques; and guidance on repair and replacement.
1

2
The Tile-Making Process Clay is an earthen material, moldable or plastic when wet, non-plastic when dry, and permanently hard when baked or fired. It is widely distributed geographically, and often found mixed with sand in soils of a loam type-a mixture of clay, silt and sand. Relatively pure clay is not usually a surface deposit, although, in some cases, it may be exposed by erosion. Clay types vary throughout the world, and even within a region. Each type of clay possesses a unique combination of special properties such as plasticity, hardness and lightness, as well as color and texture, which makes some clays better suited for one kind of ceramic than another. The correct clay mixture needed for a particular purpose can be created by blending clays and adding other materials, but using the wrong type of clay can result in expensive production problems such as crazing (the formation of tiny cracks in a tile glaze) or warping of the tile itself. Traditionally, chalky clays have been preferred for many kinds of ceramic tiles, in part because they produce, when fired, a white body which is desirable for decorating. Other materials can be added, including grog (or ground-up fired clay) that helps aerate the clay and prevents warping, speeds firing and reduces shrinking, or calcined flint, to harden it.
There are several methods used for making ceramic tiles: extrusion; compaction or dust-pressing; cutting from a sheet of clay; or molded in a wooden or metal frame. Quarry tiles are extruded, but most ceramic floor tiles, including traditional encaustic, geometric and ceramic "mosaic" tiles are made from refined and blended ceramic powders using the compaction method, known as dust-pressing. Encaustic tiles, which were made by dust-pressing, are unique in that their designs are literally "inlaid"into the tile body, rather than surface-applied. Once formed, tiles are dried slowly and evenly to avoid warpage, then fired in a special kiln that controls high, even heat at temperatures up to 1200·C (or approximately 2500·F) for 30-40 hours. Higher temperatures produce denser tiles with harder glazes. Most ceramic tiles require only one firing to achieve low porosity and become vitrified or glasslike, but some, especially highly decorated tiles, are fired more than once. Non-vitreous and semi-vitreous tiles are fired at lower temperatures and are much more porous.
Historical Background Historically, the use of ceramic floor tiles goes back to the fourth millennium B.C. in the Near and Far East. The Romans introduced tile-making in Western Europe as they occupied territories. However, that art was eventually forgotten in Europe for centuries until the 12th century when Cistercian monks developed a method of making encaustic floor tiles with inlaid patterns for cathedral and church floors. But, this skill was again lost in the 16th century following the Reformation. Except for finely decorated wall tiles made in Turkey and the Middle East, and Delft tiles made in Holland in the 17th century, ceramic floor tiles were not made again in Europe until almost the mid-19th century.
The modern tile industry was advanced by Herbert Minton in 1843 when he revived the lost art of encaustic tilemaking in England. The industry was further revolutionized in the 1840s by the" dust-pressing" method which consisted of compressing nearly dry clay between
two metal dies. Dust-pressing replaced tile-making by hand with wet clay, and facilitated mechanization of the tile-making industry. Throughout the rest of the 19th century, dust-pressing enabled faster and cheaper production of better quality floor tiles in a greater range of colors and designs. In the 1850s encaustic tiles were selected for such important structures as the new Palace at Westminster in London, and Queen Victoria's Royal Residence on the Isle of Wight. By the latter part of the 19th century, despite the fact that encaustic tiles were still quite expensive, they had become a common flooring material in many kinds of buildings.
Development of the Tile Industry in America. Although plain, undecorated ceramic tiles were traditionally a common flooring material in many parts of the Americas, especially in Latin and South America, ceramic floor and roof tiles were probably not made in the North American Colonies until the late-16th or early-17th century. It was, however, in the Victorian era that ceramic tile flooring first became so prevalent in the United States. The production of decorative tiles in America began about 1870 and flourished until about 1930.
Like so many architectural fashions of the day, the popularity of ceramic tile floors in America was greatly influenced by the noted architect and critic, Andrew Jackson Downing. In his book The Architecture of Country Houses, published in 1850, Downing recommended encaustic floor tiles for residential use because of their practicality, especially in vestibules and entrance halls.
The 1876 Philadelphia Centennial Exposition, with its European and even a few American exhibits of decorative floor tile, was a major factor in popularizing ceramic tile floors in the U.S. Initially, most ceramic tiles-other than purely utilitarian floor tiles-were imported from England, and their relatively high cost meant that only wealthy Americans could afford them. However, when English tile companies realized the potential for profitable export, they soon established agents in major U.S. cities to handle their
........... "'~:" ~ ~ . ~ .. '" ~ .;
Figure 2. In the 19th century, Minton tiles were sold from this catalogue to American clients-including the Architect of the Capitol-by Miller & Coates, 279 Pearl Street, New York. Photo: David W. Look, AlA.

.ey TO
SfCTO<
American business (Fig. 2). The English near monopoly actually stimulated the growth of the U.S. tile industry in the 1870s resulting in sharply decreased English imports by 1890.
The location of potteries and ceramic tile factories is dependent upon the ready availability of suitable ball clay (clay that balled or held together), kaolin (a white clay used as a filler or extender), and feldspar (a crystalline mineral), and an accessible market. Since the cost of shipping the manufactured products tended to restrict profitable sales to limited areas, this usually determined whether a factory would succeed. Although the United States Pottery in Bennington, Vermont, is known to have made encaustic tiles as early as 1853, the Pittsburgh Encaustic Tile Company (later the Star Encaustic Tiling Company), was the first successful American tile company, and is generally considered the first to manufacture ceramic tile in the U.S. on a commercial basis beginning in 1876.
At least 25 ceramic tile companies were founded in the United States between 1876 and 1894. In the East, several notable tile firms that were established in this period flourished in the Boston area, such as the Chelsea Keramic Art Works, the Low Art Tile Works, and the Grueby Faience Company. Other East Coast companies organized in the late-19th and early-20th century included the International Tile & Trim Company, in Brooklyn, New York; the Trent Tile Company, Providential Tile Company, Mueller Mosaic Tile Company, and the Maywood Tile Company, all in New Jersey; and the Moravian Pottery and Tile Works in Doylestown, Pennsylvania (Fig. 3).
Many factories were also established in the Midwest-in Indiana, Michigan, and, especially, in Ohio. In the last quarter of the 19th century, the town of Zanesville, Ohio, was the largest center for pottery and tile-making in the world. Some of the factories in Zanesville included: Ohio Encaustic Tile Company; Mosaic Tile Company; Zanesville
SECTION A-A
---'-[
: i
Figure 3. (a) The Moravian Pottery and Tile Works, a National Historic Landmark in Doylestown, PA, was designed in the Spanish Mission style and constructed by Henry Chapman Mercer over a period of years from 1911-1917. Tiles were manufactured primarily by hand in keeping with Mercer's Arts and Crafts ideals. (b) Mercer's tiles, seen here in the library, were used throughout his house, Fonthill. (c-e) One of Mercer's most important commissions was the floor of the Pennsylvania State Capitol in Harrisburg. if) The factory closed in 1930 after Mercer's death, but resumed tile-making in 1974. New tiles are dated and made in the traditional way. (a) Drawing: Leslie S. Claytor, Benita C. Welch, Isabel C. Yang, HAER Collection; (b) Photo: Jack E. Boucher, HABS Collection; (c-e) Photos: Courtesy, Mercer Museum, The Bucks County Historical Society; (j) Photo: Anne Grimmer.
3

4
Figure 4. The tiled Presidential Seal in the courtyard of the Pension Building (now the National Building Museum), Washington, D.C. , was installed in honor of President William McKinley's second inauguration in 1901. The"heavy Damask design," resembling fabric, that was used to decorate the tiles, indicates they were probably manufactured by The Mosaic Tile Company, Zanesville, Ohio, which first introduced this design. Photo: Kimberly A. Konrad.
Figure 5. Geometric tiles made by the American Encaustic Tiling Company, also in Zanesville, were installed in the corridors of the Pension Building in 1888, several years after the building's completion. Photo: Kimberly A. Konrad.
Figure 6. The Los Angeles Union Passenger Terminal features ceramic tile floors in the Art Deco-style. Photo: HABS Collection.
Majolica Company; and J.B. Owens Pottery, later to become the Empire Floor and Wall Tile Company (Fig. 4). The American Encaustic Tiling Company, established in 1876, was one of the first, and most successful manufacturers in Zanesville (Fig. 5). In the early 1930s it was the largest tile company in the world, producing large quantities of floor tile, plain and ornamental wall tile, and art tile until it closed about 1935, as a result of the Depression. The United States Encaustic Tile Company, Indianapolis, Indiana; Rookwood Pottery, Cincinnati, Ohio; Cambridge Art Tile Works, Covington, Kentucky; and Pewabic Pottery, Detroit, Michigan, were some of the other well-known potteries in the Midwest.
Around the turn of the century, the industry began to expand as tilemakers moved West and established potteries there. Joseph Kirkham started the ceramic tile industry on the West Coast in 1900 when he set up the Pacific Art Tile Company in Tropico, California, after his company in Ohio was destroyed by fire . In 1904 the company became the Western Art Tile Company, surviving for five years until it went out of business in 1909. During the early-20th century, other companies were founded in Southern California, in and around Los Angeles (Fig. 6). Batchelder & Brown, in particular, of Pasadena (later BatchelderWilson in Los Angeles), was well-known for its Arts and Crafts-style tiles in the teens and 1920s. By the early 1940s California had become one of the leading producers of tile, especially faience, in the U.S. (Fig. 7) .
Ceramic engineers, potters and artists not only moved frequently from one pottery to another, but often struck out on their own and established new factories when dissatisfied with a former employer. Also, it was not uncommon for one company to reuse a defunct factory or purchase another pottery business, change the name and increase the product line. As a result, many of the companies in existence today are descendants of the early pioneering firms.
Changes in the Tile Industry. The majority of ceramic floor tile made in the U.S. before 1890 was encaustic, but various factories gradually began to develop and produce other kinds of tiles. The Trent Tile Company, among others, started to manufacture both white and colored ceramic mosaic tiles by the mid-1890s (Fig. 8). White vitreous wall tile became available, as well as more decorative tiles with colored glazes, such as the variegated faience glazes intended to give a more hand-crafted appearance that were originated by the Grueby Faience and Tile Company in 1894, and soon adopted by other potteries (Fig. 9).
In the 19th and early-20th century, many ceramic tile firms had their own engraving departments, while some used commercial designs supplied by professional printers. Well-known designers were often commissioned to work on specific product lines for a particular firm. These designers worked for one firm after another which resulted in similar designs being produced by different companies. (Historic ceramic floor tiles were usually identified by a manufacturer's or designer's mark on the back, if they were marked at all.) By the latter part of the 19th century readymixed glazes and colors were also available. This was a great advantage for potters who, prior to this, had to mix their own colors and glazes.
During the 20th century, the floor tile industry continued to evolve as much as it had in the previous century. Modern

Figure 7. "Scott/IS Castle" in Death Valley, California, was built over a lO-year period, beginning in 1922. Many of the rooms, the salon (a), as wel~ as t~e kitchen. (b), have tile floors. Some are composed of both local, Califorma-made tiles, and Spanish tiles. Photos: Jack E. Boucher, HABS Collection.
Figure 8. The Trent Tile Company advertised its "Ceramic Mosaic Floor" tiles in the 1906 edition of "Sweet's" Indexed Catalogue of Building Construction. Photo: Sharon C. Park, AlA.
Figure 9 .. Beginning in the late-19th century, a decorative frieze with a relief.deslgn, such as thIs clas~lcal egg and dart motif, was often added to hIghlight plam ceramIc wall tile. Photo: Kimberly A. Konrad.
methods of production employed sophisticated machinery, new materials and decorating techniques. In the years following World War II, there were many advances in the industry. Commercially manufactured dust-pressed tiles, which had previously required more than 70 hours just in the kiln, could be made in less than two hours from the raw material stage to finished tiles, boxed and ready to ship. Dried, unglazed tiles were sprayed with colored glaze evenly and automatically as conveyors carried the tiles into the tunnel kilns, and the extrusion process ensured that the tiles were cut to a uniform thickness and size. The changes and developments in the production of floor tile brought forth a wide range of shapes and sizes, along with new colors, glazes and decorating techniques.
After the turn of the century, fewer encaustic floor tiles were used, particularly in residential architecture. The introduction of ceramic mosaic floor tiles was a factor in their decline (Fig. 10). The development of rubber interlocking floor tiles in 1894, along with other, more resilient, flooring materials, was instrumental in the decreased popularity not only of encaustic tiles, but also other ceramic tile flooring. These new materials were not only cheaper, they were not as fragile; they were also lighter and thinner, and easier to install.
Ceramic mosaic tiles remained in common use through the 1930s in part because an innovative development had made laying such small tiles easier. The tiles were pre-mounted in decorative patterns on 12" x 12" sheets of paper, and sold ready to lay in cement. This greatly simplified the tile setter's work, and no doubt was a significant factor in the increased popularity of ceramic mosaic tiles. Sophisticated mosaic floor designs became common in entrance foyers of public and private buildings (Fig. 11). Small, white, unglazed tiles in round, square, octagonal or hexagonal shapes were promoted for their sanitary qualities, particularly for bathroom floors, while larger, rectangular, white, glazed tiles were used for bathroom walls or wainscotting. Colored tiles were also popular, especially
for bathrooms, and even kitchens (Fig. 12). Quarry tile, which was larger and thicker than other ceramic floor tile of this period, was often used in public buildings, as well as for entrance halls, small studies, libraries, dining rooms and even living rooms in private homes. But, by the 1930s, the fashion for art tile had diminished to the point where floor tiles were, for the most part, generally regarded as primarily utilitarian, as opposed to important decorative elements.
Ceramic Floor Tile Types The thickness of historic ceramic floor tiles varied considerably according to their intended use and when they were made. Floor tiles were thicker and harder than wall or ceiling tiles. Stove tiles, meant to retain the heat of the stove, were sometimes as much as several inches thick. Medieval floor tiles were usually one inch thick; encaustic tiles of the Victorian era tended to be slightly thinner. Modern, 20th-century tiles, with the exception of some art pottery tiles, are the thinnest, as a result of modern
Figure 10. Ceramic mosaic tile floors were practical for structures like this Bath House, Hot Springs, Arkansas (1914-1915). Photo: Jack E. Boucher, HABS Collection.
5

6
manufacturing methods. The backs of most, but not all, ceramic floor tiles are covered with raised (or sometimes recessed) ridges, circles or squares which help to increase the bonding capability of the tile.
Unglazed and Glazed Tiles
Ceramic floor tiles can generally be divided into two types: unglazed and glazed. Unglazed tiles include: quarry tiles; encaustic and geometric tiles; and ceramic mosaic tiles, which can be either glazed or unglazed. Most other ceramic floor tiles are glazed.
Unglazed Tiles
Quarry tiles are the most basic type of historic ceramic floor tile (Fig. 13). Originally made from quarried stone, they are machine-made using the extrusion process. Quarry tiles are unglazed, semi-vitreous or vitreous, and essentially are square or rectangular slabs of clay baked in a kiln. The colors of quarry tiles are natural earthen shades of gray, red and brown determined by the clay and, to some extent, the temperature and duration of firing. Quarry tiles, which range from 1/4" to 1 / 2" in thickness, are available in square and rectangular shapes in sizes that include 3", 4-1/4", 6" (one of the most common sizes), 9" and 12" squares; 6" x 12", 6" x 9", 4-1/4" x 9", 3" x 6", and 3" x 9" rectangles; and 4" x 8" hexagon shapes. (Pavers or paver tiles are a simpler, and tend to be somewhat cruder, version of quarry tiles. Like quarry tiles, they are usually unglazed, but slightly thicker. Machine-made pavers are either semi-vitreous or vitreous, and generally formed by dust-pressing, although sometimes are extruded. Hand-made pavers which are common in Mexico and southern Europe are non-vitreous.)
Encaustic tiles are a type of traditional unglazed-yet decorative-floor tile, manufactured by the dust-pressed method. Whereas most ceramic tiles are surface-decorated or decorated with impressed or embossed designs created by a mold, encaustic tiles are unique in that their decorative designs are not on the surface, but are inlaid patterns created as part of the manufacturing process. First, a thin, approximately 1/4" layer of fine, almost powder-dry, clay was pressed into a mold with a relief design at the bottom which formed a depreSSion in the face of the tile. A second, thicker layer of coarser clay was laid over the first layer, then covered with another layer of fine clay. This "sandwich" helped prevent warping and ensured that the body of the tile was strong and had a fine, smooth surface. The layers of clay "dust" were compacted by presses, after which the mold was inverted and the die removed, thus producing a tile with an indented or intaglio pattern on top. After the tile dried, colored slip (liquid white clay colored with dyes), was poured to fill in the intaglio pattern. Each color had to dry before another color of slip was added. The recessed area was overfilled to allow for shrinkage, and after drying for several days, and before firing, the excess slip was scraped off the surface by a rotating cutter that created a flat, although not completely smooth, face. Problems might arise during the firing. Due to the dissimilar rates of contraction of the different clays, the inlaid clay could shrink too much and fall out of the tile recesses; or, the tile could be stained by the different pigments used for the design if impure or unstable (Fig. 14).
By the 1840s, encaustic tiles were made entirely with almostdry clay using the dust-pressed method. This served to
Figure 11. Ceramic mosaic tiles were used decoratively on the entrance floor of this early-20th century school building. Photo: Kimberly A. Konrad.
eliminate the possibility of staining the body of the tile with other colors and permitted the use of more colors on a single tile. Thus, an encaustic tile can sometimes be dated according to the complexity and the number of colors in its pattern. Red tiles with white figurative patterns were generally the earliest, followed by brown and buff colored tiles. In the 1860s, blue tiles with yellow or buff patterns were popular, succeeded by more subtle color schemes featuring a "chocolate" red with a soft grey. By 1860, up to six colors were used in a single tile to form a pattern. Toward the end of the century, white encaustic tiles with a black or gold design were common, as well as tiles with complicated color patterns of white, black, gold, pink, green and blue. Encaustic tiles were decorated with traditional as well as original designs. Some, particularly intricate, designs were painted on the surface of the tile with opaque colored glazes, instead of being inlaid (Fig. 15). Most major tile manufacturers sold many of the same pre-formed encaustic floor tile patterns through catalogues. Encaustic tiles were produced in a variety of sizes, mostly square or octagonal in shape, and almost any design could be custommade for a special purpose or to fit a particular space. Historic, 19th-century encaustic tiles were generally slightly less than 1" thick, about 15/16." Cheaper tiles of lesser quality were also made of clay or cement. These designs
Figure 12. These colorful (yellow, black and white), and boldly patterned Art Deco-style ceramic tiles were made in France. Ernest Hemingway's wife, Pauline, brought them back to the U.S. in the 19305 and had them installed in a bathroom in their house in Key West, Florida. Photo: Susan Escherich.

Figure 13. Quarry tiles were used in the corridors on many of the upper floors of the U.S. Department of the Interior Building (1935-1936). They were laid in a pattern identical to the more expensive marble floor tiles that were used in the public spaces. Photo: Brooks Photographers, HABS Collection.
resembled those commonly found on encaustic tiles but applied as a transfer printed pattern, or using a multi-color lithographic or silkscreen process. These are still manufactured and popular in many parts of the world (Fig. 16).
Smaller, single-colored versions of encaustic tiles that, when assembled together form a geometric pattern, are called geometric tiles in England. However, in the United States they are generally not differentiated from encaustic tiles. Based on the geometric ~egments of a six-inch square, they were typically rectangular, square, triangular or hexagonal in shape, and about the same thickness as patterned encaustic tiles (Fig. 17). Geometric tiles were especially well suited for decorative borders, and a wide variety of floor designs could be created with their many shapes, sizes and colors-either alone or combined with patterned encaustic tiles. The cost of producing geometric tiles was much less than of encaustic tiles because each tile involved only one type of clay and one color. By the end of the 19th century, over 60 different shapes and sizes of geometric tiles were available in up to ten colors, including buff, beige or tan, salmon, light grey, dark grey, red, chocolate, blue, white and black.
Ceramic mosaic tiles are essentially smaller versions of geometric tiles (usually no larger than 2-1/4", and no thicker than 1 / 4") ranging in size from 1 / 2" to 2 3 / 16", in square, rectangular or oblong, hexagonal, pentagonal and
trapezoidal shapes. Both vitreous and semi-vitreous mosaic tiles were available, unglazed in solid or variegated colors with a matte finish, or glazed in unlimited colors. Single, one-piece tiles were also fabricated to give the appearance of multiple mosaic pieces. This was achieved with a mold, which gave the appearance of recessed mortar joints separating individual "mosaics" (Fig. 18).
Glazed Tiles
With the exception of quarry tiles, encaustic tiles, and some mosaic tiles, most ceramic floor tiles are decorated with a glaze. While unglazed tiles derive their color solely from the clay, or from oxides, dyes or pigments added to the clay, the color of glazed tiles is provided by the glaze, either shiny or matte. Some potteries specialized in certain kinds of glazes and were famous for them. The earliest and most common method of clay tile decoration made use of tin-glazes which were essentially transparent lead glazes. Tiles were either dipped into the glaze or the glaze was brushed on the tile surface. Glazes were generally made with white lead, flint, or china clays ground up and mixed with finely ground metallic oxides that provided the color. Colored glazes were commonly known as "enamels". Colors included blue derived from cobalt, green from copper, purple from manganese, yellow from antimony and lead, and reds and browns from iron. An opaque glaze was created by adding tin oxide.
Laying Ceramic Tile Floors 19th Century Techniques. Aside from the use of improved tools and modern materials, installation methods have changed little since the mid-19th century. M. Digby Wyatt, an architect for one of the major 19th century encaustic tile manufacturers in Britain, Maw & Co., described this procedure for laying encaustic and geometric tiles in 1857:
First, either an even layer of bricks, a 2-1/2" bed of concrete of quicklime and gravel, or a mixture of Portland cement and clean sharp sand was laid to prepare a solid foundation for the tiles. If the tiles were to be laid over an existing wooden floor, the floor boards had to be pulled up, sawn into short lengths and fitted between the joists. Concrete filled in the spaces and made the base flush with the upper face of the joists, and created a level surface finished within 1" of the finished floor line. A layer of
Figure 14. Making encaustic tiles. When finished, a reproduction encaustic tile resembles a historic tile, but the reproduction process is quite different from the traditional method. Designs for reproduction tiles are recreated by a computer from drawings of the original tile. (a) The computer image of the design is transferred to, and machine-cut into, a Plaster of Paris mold. Plastic, buff-colored clay is pressed into the mold to form the main body of the tile, and left to dry for 24 hours. (b) Colored slip, or liquid clay, is poured into the indented portions of the tile to create the pattern. (Each color of slip must dry before another color can be poured.) (c) After drying, and before firing, excess slip is scraped off, leaving the surface of the tile smooth, but the slip-filled areas still slightly recessed. (d) A side view of the 19th-century tile at the top of the photograph clearly shows the 3-layer clay "sandwich," as well as the 2 colors of slip that form the inlaid design. The new tile, be/ow, is slightly thinner and is made from only 1 layer of clay. Photos: (a-b) H&R Johnson Tiles Ltd.; (c-d) Wayne Firth, Office of the Architect of the Capitol.
7

8
Figure 15. The detailed features of the portrait on this round tile in the U.S. Capitol were painted on the surface of the tile rather than inlaid. Photo: David W. Look, AlA.
cement mortar was then laid on top. This allowed the tiles to fit in the same amount of space as the floorboards they replaced.*
Before laying the tiles, skirting boards or shoe moldings were to be removed, and replaced after the tiles were laid. This eliminated having to cut the outer tiles to fit exactly, and resulted in a neater appearance.
Next, the floor design was marked off with mason's string or chalk lines which divided the space into equal quadrants. The first section to be laid out was defined by two parallel strips of wood, or guide pieces, about 4" wide. A level thickness of cement was spread between these strips. The tiles, thoroughly soaked in water, were laid in the cement and leveled with a straight-edge. The foundation had to be kept wet while the tiles were being laid. Small strips of wood temporarily placed at right angles to the guide pieces helped keep elaborate patterns straight.
When the bed was hard, the joints were filled with pure cement mortar-sometimes colored with lamp black, red ochre or other natural pigments-mixed to the consistency of cream. Excess mortar was wiped off the tiles with a piece of flannel or sponge.
*The traditional practice of sawing the original floor boards and fitting them between the joists, still used today to maintain a low finished floor profile, has resulted in numerous cracked tiles and other failures. Instead, a better approach is to leave the existing floor boards, if they are in good shape, and install a cementitious backer board (CBU) available in thicknesses ranging from 114" to 5/8" as the setting bed for the tiles.
~ • ~ ~. • • .~ ~ • • ~ • • ~ ~ ~ • ~ ~. • • .~ ~ • ~
Figure 17. Shown here are typical geometric tile patterns popular in the late-19th century, as illustrated in Decorative Tile Designs in Full Color. Selected and arranged by Carol Belanger Grafton. NY; Dover Publications, Inc. , 1992, pp. 73, 83.
Figure 16. Historic cement floor tiles in a house at 103 Calle San Jose, Old San Juan , Puerto Rico, feature a design intended to resemble wood parquet. (Note the mismatched repair.) Photo: Jack E. Boucher, HABS Collection.
A newly-laid tile floor could not be walked on for 4-6 days until the cement hardened properly. Occasional washing would remove the saline scum that often appeared on the surface right after the tiles were laid.
20th Century Techniques. Almost 50 years later, in 1904, the Tile Manufacturers of the United States of America published Suggestions for Setting Tile with the intent of bringing tile-laying up to a uniform standard. This guidance was very similar to that given by Wyatt. But, there were some differences, such as using hollow clay tile as a foundation material and heavy tar paper when laying tile over a wooden floor to protect the floor boards from the moisture of the mortar mix. Emphasis was placed on using the best quality cement, sand, and purest water to obtain a durable tile floor. Soaking the tiles before setting was no longer necessary, but using stiffer mortar was suggested to prevent it from rising up between the tiles.
Tile-laying methods changed somewhat more later in the 20th century, mostly due to the availability of new materials and techniques. By the 1920s small ceramic mosaic tiles were manufactured as 12" square sheets held together by a face-mounted paper "skin." This made it possible to lay the 12" square of tiles as a unit rather than each of the small tiles individually. Mounting the tiles directly in the cement resulted in a very strong bond. But the face-mounted paper obscured the tiles from view making it difficult for the tilesetter to see if the tiles were being laid straight. The fact that the paper was not removed until after the tiles were firmly set in the cement bond coat further complicated
Figure 18. One-piece tiles were made with a mold that created the appearance of mortar joints and individual mosaics, as illustrated in Decorative Tile Designs in Full Color. Selected and arranged by Carol Belanger Grafton. NY; Dover Publications, Inc., 1992, p. 87.

Figure 19. Regular maintenance treatments for the historic quarry tile floors in the U.S. Department of the Interior, shown here in a side corridor, include: stripping and waxing once a year; weekly spraying and buffing with a commercial "floor finish revitalizerlcleaner" that is slip resistant; and dust mopping or damp mopping 4 times a week. Photo: Brooks Photographers, HABS Collection.
realignment of crooked tiles. This paper "skin" was eventually replaced with a fabric mesh backing. This permitted the tiles to be aligned as soon as the moisture from the bond coat loosened the mesh from the back of the tile; it also allowed a single tile to be cut away from the mesh and repositioned immediately. Although the fabric mesh made tile setting faster, sometimes it also resulted in a weaker bond by reducing the contact area between the backs of the tiles and the bond coat.
Following World War II, different methods of preparing a foundation for a ceramic tile floor were developed to be more compatible with new materials, such as reinforced concrete, expanded wire mesh, polyethylene and waterproof plywood. New adhesives and grouts also facilitated tile installation, and an increased variety of epoxy and cement mortars allowed for different setting bed thicknesses. But today, after half a century of practical application, some of these "new" materials, such as plywood, particle board, oriented strand boards and other wood panels, are no longer recommended for use with ceramic tile.
Mortar beds are lighter, more flexible, and much thinner than they were previously, having shrunk from several inches to as thin as 3/32". A greater variety of materials are used for setting ceramic floor tiles, including bonding agents and waterproof membranes. Basic installation methods have not changed significantly, but they vary according to the type of sub floor on which the tile is to be laid. While the same concerns for level underlayment and strong adhesion exist, advancement has occurred mostly in the increased speed and ease of laying the tiles.
Historic Ceramic Floor Tile: Preservation and Maintenance
Before undertaking any work more complicated than regular maintenance or a very simple repair on a significant historic ceramic tile floor, or on any historic tile floor where
serious damage has occurred, it is recommended that a professional conservator of ceramics, an historical architect, an architectural historian, or a chemist with particular knowledge and experience in this field be consulted. This will ensure that all future work, whether it be regularlyscheduled maintenance or more technical and specialized repair and restoration, is done in accordance with the Secretary of the Interior's Standards for the Treatment of Historic Properties.
Cleaning Methods. Ceramic tiles are essentially a practical, low-maintenance flooring material. Yet, even glazed tiles are somewhat porous, and can get dirty and stained, especially in heavy traffic areas or where oil, fat, and grass stains are likely to occur. Although heavily soiled areas may be difficult or impossible to clean completely, in most instances, cleaning ceramic tile floors is relatively easy. Cleaning should always begin with the gentlest means possible, which may be as simple as warm water. Regular maintenance should include sweeping, or preferably dry or damp mopping or vacuuming to reduce grit. Tiles can usually be cleaned with a non-soap-based household floor cleaner, such as one of the commercial products intended for cleaning ceramic tile floors available on the market.
All cleaning and stain-removal products should always be tested on a small, inconspicuous area before using. Abrasive cleaners (including powdered cleansers and even "mildly" abrasive creams) and mechanical equipment can damage and wear away the protective surface, as well as the decorative design on the tiles, and should not be used on ceramic tile floors. Generally, acid-based cleaning solutions should also not be used on ceramic tile floors because they can damage the complex silicates in a glaze. However, there are some acid-based cleaners specially formulated for cleaning and removing coatings from ceramic tile floors that may be acceptable, but even these must be used with caution. Sometimes an acid-based cleaner may, in fact, be needed to remove discoloration or staining caused by lime or cement mortar. But, it should be tested first, used with caution, and applied only to a thoroughly wetted tile floor from which excess water has been removed. Pre-wetting a ceramic tile floor before cleaning is a good policy to observe with all cleaners. The water saturates the porous tile and prevents chemicals or other cleaning agents from penetrating into the tile body. Floor tiles should be always rinsed thoroughly after cleaning.
Figure 20. The surfaces of these late-19th century encaustic tiles have become worn and much of the pattern has been lost after more than 100 years of use. Photo: Anne Grimmer.
Figure 21. These cracked geometric tiles may have been damaged by the repeated passage of heavy equipment over the floor. Photo: Anne Grimmer.
9

10
Plastic pot-scrubbers may be effective in loosening and removing superficial dirt without abrading the glazed or vitrified surface of the tiles. Stubborn asphalt or oil stains, scuff marks, or soiling can sometimes be removed with ammonia or one of the household spray products intended for cleaning kitchen or bathroom tiles. If necessary, a solvent may be applied carefully to pre-wetted tiles, but it should not be left on the surface for an extended amount of time as it may cause discoloration. If possible, a stain should always be identified first in order to select the material best-suited to remove it.
Organic growth, such as mold or mildew, can be eliminated with a dilute solution of household bleach and a neutral household detergent, or a dilute (5-10%) solution of trisodium phosphate (TSP). After applying either of these solutions, it may be necessary to scrub the floor with a natural bristle or nylon brush, and then rinse with clear water. Even a dilute bleach solution should not be left on a ceramic tile floor for more than a few minutes, since the alkali in the bleach can lead to the formation of a white efflorescent deposit. Efflorescence (a whitish haze of water-soluble salts) may stain and streak the tile, or may even cause minor spalling around the joints.
Regular maintenance of a ceramic tile floor should always begin with vacuuming to remove loose dirt and grit. Then, a mild cleaning solution may be applied and left on the floor for 10-15 minutes, without letting it dry on the tiles. Heavily soiled areas may be scrubbed with a natural bristle or nylon brush to loosen dirt from the tile surface. Finally, the floor should be thoroughly rinsed with clean, clear water, preferably twice, and dried with terry cloth towels, if necessary. Any proprietary cleaning product should always be used in accordance with the manufacturer's directions (Fig. 19).
Protective Coatings. In most instances, traditional ceramic tile floors probably would not have been treated or given a protective coating other than wax. In the 19th century, some encaustic tile floors were treated with linseed oil, but this is not a practice recommended today because linseed oil tends to attract dirt and discolors as it ages. Most historic ceramic tile floors simply acquired a natural "polish" or sheen through use. Because the surface of ceramic tiles is already protected with a fired skin or a glaze, an additional protective coating should generally not be needed.
Opinions differ concerning the use of protective coatings, penetrating sealers, or waxes on ceramic tile floors, and, especially, on historic ceramic tile floors. If properly applied and regularly cleaned, a coating can sometimes be an effective maintenance treatment, but only on interior floors. However, if not adequately or properly maintained, rather than facilitating maintenance of ceramic tile floors in high traffic areas, such coatings may tend to emphasize traffic patterns as they wear away or become scratched. Some coatings may also peel in spots, or cause tile to appear hazy or cloudy if the coating is not applied in accordance with the manufacturer's specifications, or if the tiles are not perfectly clean when the coating is applied. Furthermore, applying such a coating may actually increase maintenance costs, since a coating requires periodic removal and renewal. The frequent removal of a coating can also damage a ceramic tile floor if it is carried out with harsh chemicals or abrasive mechanical equipment. If any coating
Figure 22. Original section drawing of the 2nd and 3rd floors of the House of Representatives Wing of the U.S. Capitol shows how Montgomery C. Meigs ensured the durability of the encaustic tile floors that were laid in the 1850s. He specified that the 3/4" tiles be laid on top of1l2 to 3/4 " mud (or mortar), which, in turn, was to be laid over a coal tar membrane on top of 3" of brick over an air space of 4-6 ". Photo: Wayne Firth, Office of the Architect of the Capitol.
is considered, a traditional coating, such as floor wax, may be the most suitable. Wax is easy to remove when it becomes worn, and does not impart a high, potentially inappropriate, gloss to the surface.
On the other hand, a penetrating sealer, or impregnator, may be worth considering to protect patterned encaustic tiles, or painted or printed tiles featuring a design that might be worn off, particularly in public buildings with a high volume of foot traffic. For example, some manufacturers of new, reproduction encaustic tiles recommend applying a penetrating sealer to the replacement tiles, as well as to the historic tiles. Impregnators do not change the color of the tile surface and, unlike some penetrating sealers, are completely invisible after they have been applied. They can reduce the porosity or water absorption of the tile surface, and provide some protection for the tile (and the grout) against staining. This may be particularly useful on lightcolored floors. Whether to apply an impregnator to an historic ceramic tile floor, and what type or product to use, are decisions that should generally made in consultation with a conservator or ceramic tile specialist. It may also be necessary to comply with certain safety standards and friction requirements of the ADA (Americans with Disabilities Act). The ADA Guidelines recommend "a static coefficient of friction" of 0.6 for level surfaces and 0.8 for ramps. This may require the application of a non-slip sealer or wax to historic ceramic tile floors in some public buildings.

Despite the non-traditional shiny finish they may impart to a floor surface, two-part, acrylic-based coating systems are commonly used today on historic ceramic tile floors in many public buildings, primarily because they facilitate easy maintenance. If it is decided that a sealer is to be used, a product with a matte or dull finish may be preferable, or more appropriate, for a historic ceramic tile floor than one with a high-gloss.
In some cases, temporary protection may be the best approach until a better solution is found. Non-permanent protection for an historic ceramic tile floor may be as simple as using floor mats at doors or in heavy traffic areas.
Historic Ceramic Floor Tile: Damage and Deterioration Problems Loss of Tile Surface and Pattern. Ceramic tiles are among the most durable of historic flooring materials, but natural wear and a certain amount of deterioration or damage is inevitable. Some tiles, such as dense, close-textured quarry tiles and ceramic mosaic tiles, resist abrasion and stain absorption very well. But many others, especially patterned encaustic and geometric tiles, are extremely susceptible to abrasion. Heavy traffic can also result in uneven wear, or even cupping, in certain areas of tile floors that get more use than others, such as doorway entrances. The particular clay mix, or the dye or pigment used to color the clay, can also affect the hardness and durability of individual tiles or an entire ceramic tile floor (Fig. 20).
Tile Glaze Failure. Occasionally some glazes can become pitted or powdery as they age. Lead glazes used in the 19th century, which were fired at low temperatures, deteriorated relatively quickly. Glazes have different physical properties from the fired clay tile body itself, and as a result may sometimes crack or craze. Unless the crazing visibly extends into the porous clay of the tile body beneath, this is not generally a serious material failure; however, dirt entering these cracks cannot be removed, and will discolor the tile. If the crazing penetrates through the glaze, it may increase the water absorption of the tile.
Tile Breakage. Ceramic floor tiles are very susceptible to damage and breakage caused when something heavy is dropped. Repeated passage of heavy objects, or carts, over a floor can also crack and break ceramic tiles, as well as heavy vibration from outside traffic (Fig. 21).
Moisture Damage to Tile. Ceramic tile floors have been traditionally viewed as highly waterproof systems that do not require protection from moisture. In reality, however, this is not true. Water-related problems are one of the most common causes for the deterioration and failure of historic tile floors, particularly in bathrooms and other rooms where there is a lot of moisture. Water that is allowed to sit in areas around shower stalls and bathtubs can eventually damage grout and mortar, and loosen tiles. Some of the more porous kinds of tiles that are not as hard-fired may actually begin to powder or spall if subjected to constant moisture.
Loose, Cracked, Broken or Unbonded Tile due to Mortar Failure. The durability of ceramic tile floors depends to a great extent on a sound mortar bed and sound mortar joints. The wrong mortar type or mortar that is inadequately mixed can also spell trouble for a ceramic tile floor. Failure
of a tile floor system laid over a subfloor is often the result of weakened or deteriorated grout or mortar which allows the tiles to become loose. Mortar may also be weakened or loosened by cleaning solutions that are too strong.
Proper tile-laying technique includes the use of a material that will allow for some movement of the tiles. Traditionally, a layer of asphalt (replaced by a layer of plastic or building paper in more modern construction) was inserted to separate the base and the bedding underneath (Fig. 22). This prevents bonding between the base and the bed, and allows for some "relative" movement. It is intended to prevent the ceramic tile floor from arching or ridging, a condition in which single or entire rows of tiles can pop up to relieve tension and separate completely from the bed. When this happens, the condition will probably require taking up and relaying many or all of the tiles.
Tile Damage or Loss caused by Systems Update. The installation of new plumbing, electrical and HV AC systems, or the attachment of new fixtures and furnishings, may be one of the most common sources of damage to an historic ceramic tile floor. Earlier remodeling projects to remove old pipes or to replace "out-dated" bathroom fixtures may have resulted in the loss of floor tiles (Fig. 23). Different shapes and sizes of new fixtures, equipment or pipes may have exposed previously untiled areas that have been inappropriately patched with cement. Careless workers and insensitive installations can also result in damage, breakage or removal of historic floor tiles. All of these conditions will require matching replacement tile.
Historic Ceramic Floor Tile: Repair and Replacement The Secretary of the Interior's Standards for the Treatment of Historic Properties emphasize the retention and preservation of historic building material. Preservation and repair treatments are always preferable to replacement.
Mortar Joint Repair. Deteriorated mortar joints and loose mortar or grout can generally be repaired. First, the entire floor should be checked for loose tiles that need to be regrouted. Damaged mortar should be carefully removed by hand and the joints wetted or a bonding agent applied in preparation for regrouting. When making mortar repairs, it is important to use grout that matches the old in color and consistency as closely as possible.
Figure 23. These non-matching tiles are inappropriate replacements for original tiles that were damaged during bathroom remodeling. Photo: Anne Grimmer.
11

12
(a-b) Above: By the mid-1970s, many of the patterns in the encaustic tile floors had become faint, and some had completely worn off in the most heavily trafficked areas. (c) Below left: Damaged areas of the floor had been patched with salvaged pieces of tile that fit, but did not match. Photos: Wayne Firth, Office of the Architect of the Capitol.
Figure 24. U.S. Capitol Restoration Project. Restoration of the historic ceramic tile flooring at the U.S. Capitol is one of the most extensive ongoing undertakings of this kind in the U.S. When the Office of the Architect of the Capitol contacted H&R Johnson-Richards, the man ufacturer of Millton Hollins tiles, regarding restoration of the tile floors in preparation for the American Bicentennial, the company was unaware of the extent of original Minton encaustic and geometric floor tiles in the U.S. Capitol building. Montgomery C. Meigs, Supervising Engineer, and Architect of the Capitol Extension, Thomas U. Walter, specified Minton encaustic tiles for the floors in the two wings that were added to the Capitol. The tiles were ordered from the factory in England through Miller & Coates, a Minton supplier in New York City, and installed in the 1850s.
When the project was initiated, the intent was to replace only those tiles that were severely damaged or worn. Removing and replacing selected sections of the tile floor in their entirety was determined to be a better approach because of the difficulty of removing one tile without damaging adjacent tiles in good condition, in addition to the difficulty of matching new and old tiles which are slightly different in color, pattern and thickness. This means that sometimes tiles in good condition may have to be removed, but they are salvaged and stored for future reuse.
Before ordering the reproduction tiles, each section of the Capitol floor was drawn and photo-documented. The condition of all the tiles was evaluated based on a ratillg of one to four (excellent, good, damaged, or, in need of replacement), and color-coded accordingly. Every tile that needed to be replaced was individually numbered and photographed with dimensional, color and grey scales.
H 8< R
JOHNSON
=.:.:-_"=:"' ... ..:.==.. .. :.0:.:.:.:::-_ .~ • .:::.o:::." .. __ . ... __
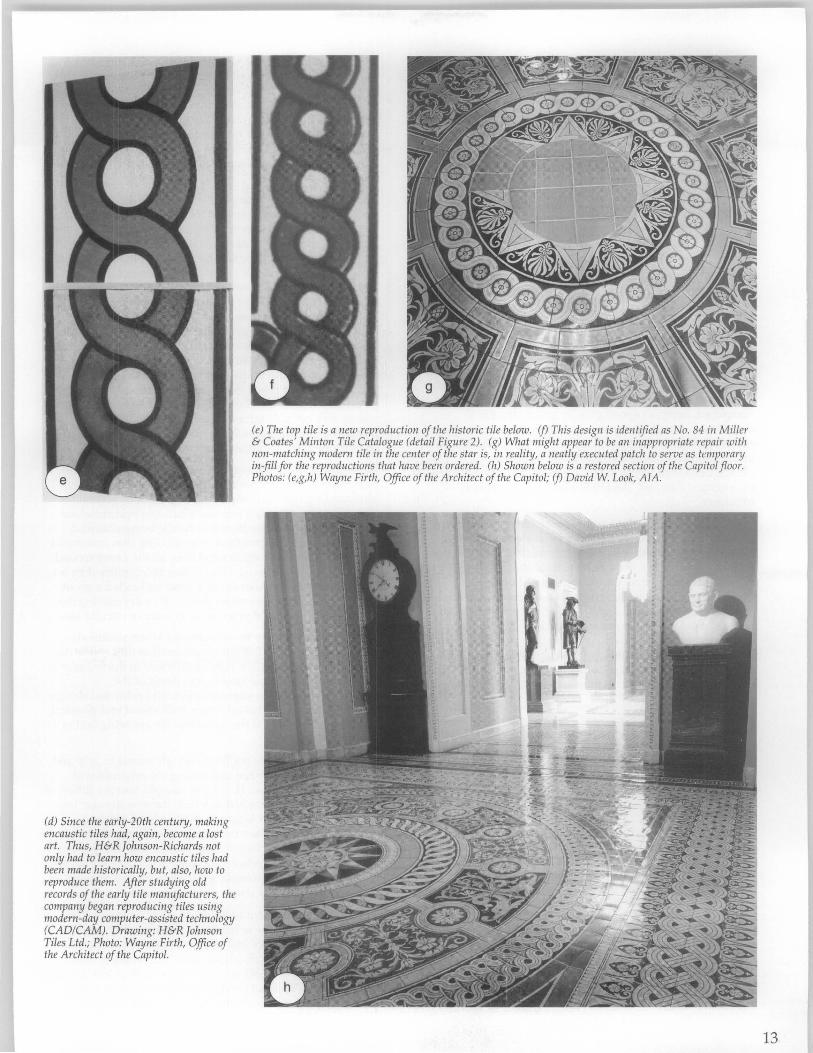
(d) Since the early-20th century, making encaustic tiles had, again, become a lost art. Thus, H&R Johnson-Richards not only had to learn how encaustic tiles had been made historically, but, also, how to reproduce them. After studying old records of the early tile manufacturers, the company began reproducing tiles using modern-day computer-assisted technology (CAD/CAM). Drawing: H&R Johnson Tiles Ltd.; Photo: Wayne Firth, Office of the Architect of the Capitol.
(e) The top tile is a new reproduction of the historic tile below. (j) This design is identified as No. 84 in Miller & Coates' Minton Tile Catalogue (detail Figure 2). (g) What might appear to be an inappropriate repair with non-matching modern tile in the center of the star is, in reality, a neatly executed patch to serve as temporary in-fill for the reproductions that have been ordered. (h) Shown below is a restored section of the Capitol floor. Photos: (e,g,h) Wayne Firth, Office of the Architect of the Capitol; (j) David W. Look, AlA.
13

14
Figure 25. This comparison of an original, historic encaustic tile (top) with a reproduction encaustic tile (bottom) reveals an obvious difference in thickness, but only a slight difference in the design. Photo: Wayne Firth, Office of the Architect of the Capitol.
Tile Repair. Trying to remove one tile can endanger surrounding tiles. Thus, it may be better to preserve and retain an original historic tile that is only slightly damaged, rather than replace it. Sometimes cracks may be repaired, or a corner or piece of tile that has broken off may be reattached, using an epoxy glue, or grout. If a tile is chipped or a small corner or edge is missing, a carefully executed patch of epoxy-mixed with colored enamel, or mortar tinted to blend with the tile, may be less conspicuous than trying to replace every tile that has even the slightest damage. And, it is a better preservation treatment.
In limited instances, glaze failure or surface powdering of ceramic floor tiles may sometimes be treated successfully by a conservator with a specially formulated, solvent-based, mineral densifying agent (such as silicic acid), followed by a siloxane sub-surface repellent, applied 24 hours later. Under the right circumstances, such a treatment can harden and bind the surface, and lower the absorbency of the tile, and still maintain the vapor transmission. But this is a highly complex undertaking and should only be attempted by a conservator after appropriate testing. Not only are these chemicals highly toxic and dangerous to handle, but if used improperly, they can cause greater damage to the tile!
Tile Replacement. When an individual tile or a larger portion of an historic ceramic tile floor is missing or so severely damaged that it cannot be repaired, or if it has become a safety hazard, then it should be replaced. When a ceramic tile floor has deteriorated as a result of long term wear and abrasion, or from settlement or vibration damage to the setting bed, there are a number of factors that need to be considered before choosing a preservation treatment. If damage to tiles is the result of more than normal wear and tear, the source of the problem needs to be identified, and the problem corrected before replacing the damaged tiles.
Successful replacement not only depends on the availability of matching tiles, but on the condition of the substrate on which the tiles are laid. Before installing the replacement tiles, any problems, such as settlement or vibration, will have to be addressed, and the height of the new setting bed may have to be adjusted for the thickness of the new tiles.
Selective Replacement of Individual Tiles. This cautious approach, typically an attempt to replace only the most seriously damaged tiles, is often taken or considered when
only a small number of tiles are involved. Unless old, matching tiles can be found and reused, replacement often requires specially fabricated reproduction tiles. In some instances, individual historic tiles that are damaged may be replaced with matching tiles salvaged from other, less prominent areas of the floor or from other buildings. This is most feasible if the tiles to be replaced are either plain, and easy to match, or decorated with a common historic floor tile pattern.
In order to replace damaged tiles, it can be helpful to identify the manufacturer and the approximate date of the tiles, if possible. However, many mass-produced tiles are not marked and give little or no information as to their origin, although stylistic similarities with other marked tiles may sometimes provide a clue as to the manufacturer. Some decorating firms seldom signed their work, while many firms made bisque tiles (plain, unglazed, once-fired tiles) for other companies, as well as their own use. Identifying marks will generally be found on the back of the tile. A mark impressed or molded into the back of the tile may give the name or initials of the company which made the tile or the bisque; sometimes a printed or painted mark indicates if it was decorated by a different company, or artist. Historic building records and construction documents may provide information about the tile company or supplier. Catalogues of the period may also be useful in identifying the tile manufacturer of unmarked tiles.
Replacing a single damaged tile is based on the ability to remove only the deteriorated tile without harming surrounding tiles. Attempts to remove one or several damaged tiles often fail because a hammer and chisel are used. The shock of the blows to the tile being removed travels through the grout into surrounding tiles and cracks them. To avoid damaging good tiles, all the grout around the tile must be removed. This is best accomplished by an experienced tile installer using a hand tool called a grout saw or, for grout joints wider than 3/8", a dry-cutting diamond blade, mounted in an angle grinder or circular saw.
Other difficulties may be encountered when selectively replacing damaged tiles with reproduction tiles. New tiles, especially encaustic tiles, may be different in thickness and, sometimes, despite the attention to detail of the reproduction process, slightly different in color and design from historic tiles. This can cause both visual and physical problems, especially if the replacements are being laid in a piecemeal fashion.
If the setting bed does not have enough mortar to grip and hold the tile, one new tile laid among the originals will eventually come loose. If the new and old tiles are different thicknesses, the setting bed in which the new tiles are laid must be at a different height to create a level finished surface. In addition, the two levels of setting beds may be of different composition; one may be harder, stronger and less flexible than the other. This may also lead to problems, since the setting bed foundation should act and respond as a unit to the load and stresses placed upon it.
Sectional Replacement of Tiles. In some instances, the best approach may be to remove a complete section of damaged original tiles and replace that section of floor in its entirety with new reproduction tiles. Advantages of this method include the ability to lay a level setting bed, as well as achieving a finished product that is uniform in color and pattern match. Although this approach may involve

replacing more original tiles with reproduction tiles than may be absolutely necessary, original tiles that remain in good condition can be saved to be reused in other sections where only a few tiles are damaged. This technique is generally most appropriate either when the section being replaced is the most damaged portion of the floor, or is in a relatively inconspicuous location and the tiles that are removed will supply enough salvaged pieces to permit inkind repair of a more visually prominent area (Fig. 24).
When laying a section of reproduction tiles, it may be a good idea to use contemporary materials and installation methods such as expansion joints or flexible expansion material. One of the major causes of ceramic floor tile installation failure and cracked, broken or disbonded tiles is the lack of expansion joints. Expansion joints were sometimes used in laying historic ceramic tile floors, and these are frequently the ones that have survived in the best condition. Many preservation contractors hesitate to use conventional expansion joint filler materials because of their limited range of colors. However, there are new flexible sealants in a wide range of colors that are available in either sanded or unsanded textures to match the surrounding grout joints. As a result, the expansion joints are almost invisible. A bonding agent may also be considered-if recommended by the tile manufacturerand any drawings provided by the manufacturer should be used to guide the installation.
Each preservation technique has advantages and disadvantages that the historic property owner or manger should take into consideration before deciding which one is best suited to the particular flooring problem. For example, slight differences in the shape, size, color and the pattern between the old and the new tiles are frequently encountered. If replacing an entire section, the slightest difference in size and dimension between the original tiles and the reproduction tiles, even if it is as small as 1/8" or 1 / 16", can mean that the new section of tile will not fit inside an existing border (Fig. 25). Even though drawings and photos are provided to the manufacturer, there may be some variation in the design and pattern size on the new tiles. Thus, they may not align perfectly with the original tiles, and as a result the section of the floor that has been replaced may be quite conspicuous.
Summary Historic ceramic tiles are a common flooring material in many different kinds of small, as well as large, private and public, structures throughout the United States. Whether plain, or decoratively patterned, traditional ceramic floor tiles are important in defining the character of historic buildings. Although ceramic floor tiles are a practical material, they are also fragile, and can be easily damaged by improper installation techniques, insensitive remodeling, harsh cleaning methods, and even regular daily use. Preserving them requires careful day-to-day maintenance. This should begin with using gentle, nonabrasive methods and materials to clean them, and, in some instances, using an appropriate coating or impregnator to protect them.
Some historic ceramic tile floors, due to their manufacturer, their unique design, or their location in a certain room or within a particular building, may have greater significance than those that are purely utilitarian. Such floors should be
accorded special care, and a ceramics conservator or preservation specialist should always be consulted to prepare responsible maintenance plans and to provide guidance concerning repair treatments and replacement techniques for them.
Unless an historic ceramic tile floor is extensively damaged with many missing and broken tiles and, therefore, potentially hazardous, it may be preferable to leave it alone. An unevenly worn floor surface, worn colors or patterns on the tiles, or slight cracks, chips, or scratches in the tiles themselves does not necessarily mean that the tiles should be replaced. Such relatively minor imperfections seldom detract from the character of an historic ceramic tile floor. They may, in fact, impart character, and be less noticeable or obtrusive than replacement of a single tile or a larger section with new tiles that do not match the originals exactly. Each situation should be evaluated on its own basis before selecting the preservation approach best suited to the project.
Selected Reading Austwick, Jill. The Decorated Tile: An Illustrated History of English Tilemaking and Design. New York: Scribners, 1980.
Barnard, Julian. Victorian Ceramic Tiles. Greenwich, CT: New York Graphic Society Ltd., 1972.
Bruhn, Thomas P. American Decorative Tiles, 1870-1930. Storrs, CT: William Benton Museum of Art, 1979.
Byrne, Michael. Setting Tile. Newtown, CT: The Taunton Press, 1995.
Decorative Tile Designs in Full Color. Selected and arranged by Carol Belanger Grafton. New York: Dover Publications, Inc., 1992.
Fidler, John. "Protective Custody: John Fidler examines the options on caring for brick, tile or stone floors." Traditional Homes. (August 1989), pp.112-115.
Furnival, William James. Leadless Decorative Tiles, Faience & Mosaic. Stone, Staffordshire: W.J. Furnival, 1904.
Lavenberg, George N. Ceramic Tile Manual. Los Angeles: Building News, 1986.
Massey, James C, and Shirley Maxwell. "Decorative Tile: Art for the Victorian and Arts and Crafts Home." Old-House Journal. Vol. XIX, No. 2 (Marchi April 1991), pp. 54-58.
Massey, James C, and Shirley Maxwell. "The Ceramic Circus." OldHouse Journal. Vol. XXIII, No.2 (Marchi April 1995), pp. 46-51.
Riley, Noel. Tile Art: A History of Decorative Ceramic Tiles. London: The Apple Press, 1987.
Rosenstiel, Helene Von, and Gail Caskey Winkler. Floor Coverings for Historic Buildings: A Guide to Selecting Reproductions. Washington, D.C: The Preservation Press, 1988.
Taylor, Joseph A. "Ceramic Tiles in Commerce." BR Building Renovation. (Fall 1994), pp. 45-48.
The Secretary of the Interior's Standards for the Treatment of Historic Properties with Guidelines for Preserving, Rehabilitating, Restoring and Reconstructing Historic Buildings. Kay D. Weeks and Anne E. Grimmer. Washington, D.C: U.S. Department of the Interior, National Park Service, Cultural Resource Stewardship and Partnerships, Heritage Preservation Services, 1995.
Tunick, Susan. American Decorative Tiles. Sponsored by Assopiastrelle (Association of Italian Ceramic Tile and Refractories Manufacturers), and coordinated by D. Grosser and Associates, Ltd., New York (1991).
Vandenburgh, Jayne M., mo. "Restoring the Ohio State Senate Building: An American Tile Classic Returns." Tile Design and Installation. Vol. 8, No.1 Ganuary 1995), pp.32-35.
Wyatt, M. Digby. Specimens of Geometric Mosaic Manufactured by Maw & Co. of Benthall, near Broseley. London: M. Digby Wyatt, 1857.
15

16
Some Sources for Replacement Tiles There are a number of companies that offer standard lines of reproduction tiles, while others focus on custom work. Some new lines of reproduction tile attempt to be exact replicas of original tiles from the late-19th and early-20th century, while others are modern interpretations or adaptations of traditional designs, and may not be appropriate as replacement tiles in a preservation or restoration project. For additional sources see: "Traditional Building's Ceramic Tile SourceList," Traditional Building, Vol. 9, No.4 (July / August 1996), pp.92-93.
Designs in Tile P.O. Box 358 Mt. Shasta, CA 96067 Custom-made reproduction art tile.
Fulper Tile P.O. Box 373 Yardley, PA 19067 Reopened factory reproduces historic tiles using original Arts and Craftsperiod glazes.
H&R Johnson Tiles Ltd. Head Office: Highgate Tile Works
Tunstall, Stoke-on-Trent England ST6 4JX
U.s. Office: Johnson USA Inc. P.O. Box 2335 Farmingdale, NJ 07727
Stock and custom reproductions of Minton Hollins encaustic and geometric tiles.
L'Esperance Tile Works 237 Sheridan Avenue Albany, NY 12210 Custom-made encaustic, geometric, mosaic and other traditional ceramic tiles.
Moravian Pottery and Tile Works Swamp Road Doylestown, P A 18901 Reproduction tiles based on Henry Chapman Mercer's original designs.
Motawi Tileworks 33 North Staebler Road, Suite 2 Ann Arbor, MI 48103 Reproduction tiles in Arts and Crafts, Art Nouveau and other styles.
Native Tile and Ceramics 4230 Glencoe Avenue Marina Del Rey, CA 90292 Reproduction decorative tiles in Southern California tradition of Craftsman, Mission, Art Deco and other styles.
Acknowledgements Anne E. Grimmer is Senior Architectural Historian, Technical Preservation Services Branch, Heritage Preservation Services Program, National Park Service, Washington, D.C. Kimberly A. Konrad is a Preservation Planner, Boston Landmarks Commission, The Environment Department, City of Boston, MA. The authors wish to thank the following individuals for providing technical review and other assistance in the development of this publication: Marc Tartaro, AlA, and William Allen, Office of the Architect of the Capitol, Washington, DC; Mary Catherine Bluder, Bucks County Historical Society, Doylestown, PA; Michael F. Byrne, Ceramic Tile Education Foundation, Clemson, SC; Milford Wayne Donaldson, FAIA, Los Angeles, CA; Gray LaFortune, CTC, Ceramic Tile Institute of America, Inc., Culver City, CA; Joseph Taylor, Tile Heritage Foundation, Healdsburg. CA; Susan Tunick, Friends of Terra Cotta, Inc., New York, NY; Anne Weber, Ford Forewell Mills and Gatsch, Architects, Princeton, NJ; Glenn Wharton, Wharton & Griswold Associates, Inc., Santa Barbara, CA; Charles E. Fisher, Sharon C. Park, AIA, and, especially, Kay D. Weeks, National Park Service, Washington, DC.
This publication has been prepared pursuant to the National Historic Preservation Act of 1966, as amended, which directs the Secretary of the Interior to develop and make available information concerning historic properties. Comments about this publication should be directed to de Teel Patterson Tiller, Acting Manager, Heritage Preservation Services Program, National Park Service, P. O. Box 37127, Washington, D.C. 20013-7127. This publication is not copyrighted and can be reproduced without penalty. Normal procedures for credit to the authors and the National Park Service are appreciated.
ISSN: 0885-7016
Original Style Stovax Ltd. Falcon Road, Sowton Industrial Estate Exeter, Devon England EX2 7LF Reproduction ceramic tiles from 1750-1902.
Pewabic Pottery, Inc. 10125 East Jefferson Avenue Detroit, MI 48214 Reopened factory reproduces original tile designs and glazes.
Terra Designs Tileworks 241 East Blackwell Street Dover, NJ 07801 Mosaic tessarae experts, and reproduction of historic ceramic tiles.
Tile Guild 2840 East 11 th Street Los Angeles, CA 90023 Reproduction of traditional Spanish, Portuguese, Dutch, Italian and English tiles.
Tile Restoration Center, Inc. 3511 Interlake N. Seattle, WA 98103 Reproduction of Arts and Crafts-period tiles.
Helpful Organizations The American Institute for Conservation of Historic and Artistic Works (AIC) 1717 K Street, N.W., Suite 301 Washington, DC 20006
Ceramic Tile Institute of America, Inc. 12061 Jefferson Boulevard Culver City, CA 90030-6212
Friends of Terra Cotta, Inc. 771 West End Avenue, 10E New York, NY 10025
Tile Council of America P.O. Box 1787 Clemson, SC 29633
Tile Heritage Foundation P. O. Box 1850 Healdsburg, CA 95448
·Ceramic: Any product manufactured from a nonmetallic mineral (such as clay), by firing at high temperatures.
Cover Logo: "Ceramic Mosaic and Vitreous Floor Tile." American Encaustic Tiling Company, Ltd., Zanesville, Ohio. "Sweet's" Indexed Catalogue of Building Construction. NY, NY: The Architectural Record Co., 1906. Photo: Sharon C. Park, AlA.
October 1996