presents 5 favorite sock patterns - Interweave...Interweave Knits presents 5 favorite sock patterns...
17
presents 5 FAVORITE SOCK PATTERNS F A V O R I T E P A T T E R N S • F A V O R I T E P A T T E R N S • 5
Transcript of presents 5 favorite sock patterns - Interweave...Interweave Knits presents 5 favorite sock patterns...
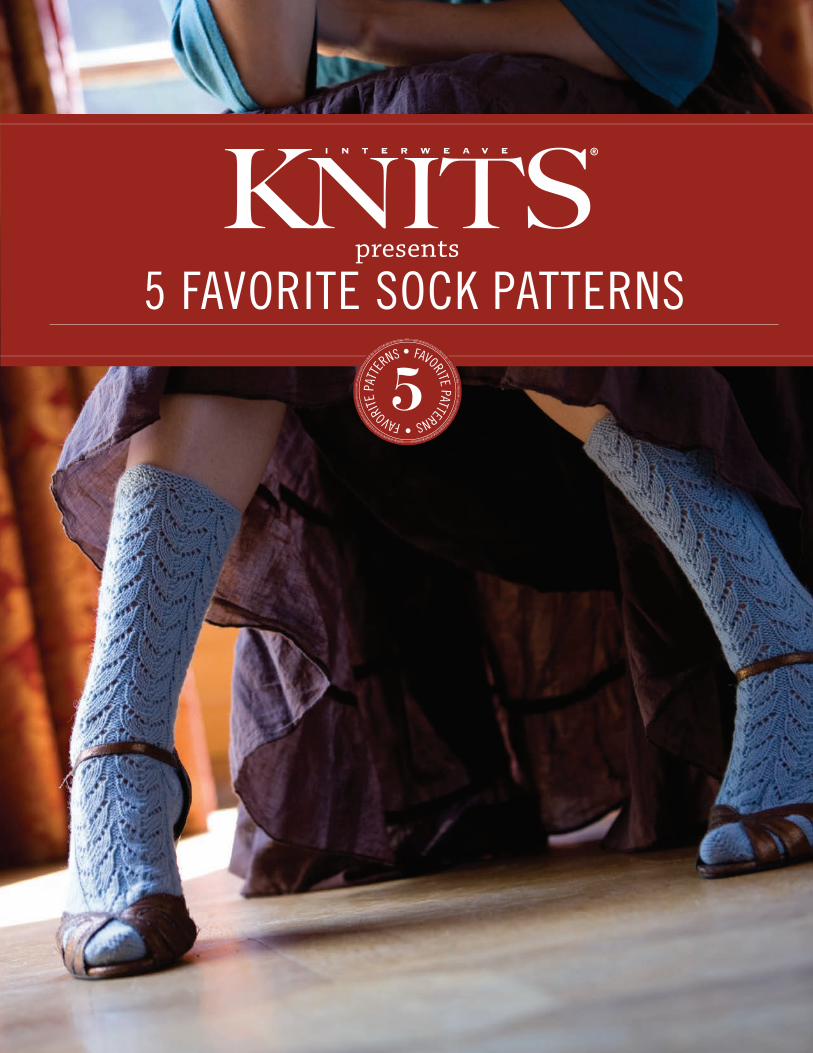
presents
5 favorite sock patternsfavorite patterns • favori
te p
atte
rns •
5
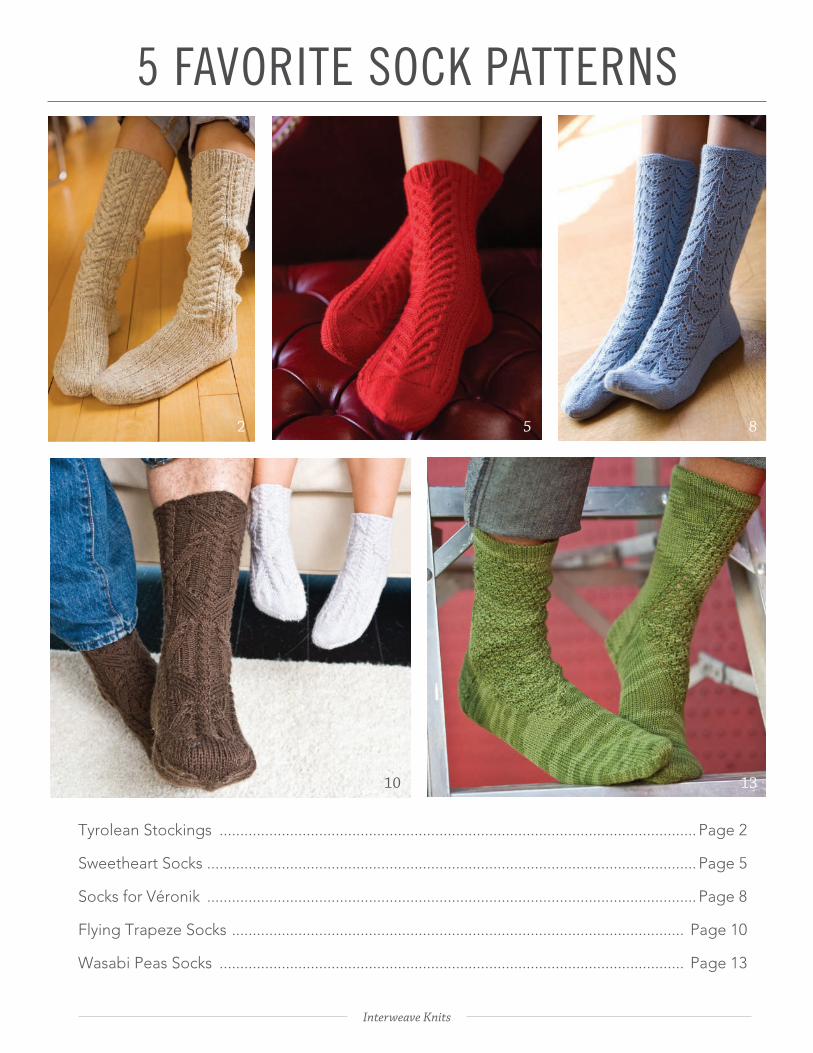
Tyrolean Stockings ................................................................................................................... Page 2
Sweetheart Socks ...................................................................................................................... Page 5
Socks for Véronik ...................................................................................................................... Page 8
Flying Trapeze Socks ............................................................................................................. Page 10
Wasabi Peas Socks ................................................................................................................ Page 13
2 85
10 13
5 favorite sock patterns
Interweave Knits
Interweave Knits presents 5 favorite sock patterns©F+W Media, Inc. | All rights reserved | F+W Media grants permission for any or all pages in this issue to be copied for personal use | knittingdaily.com
1
5 favorite sock patterns
E D I T O R I A LEDITORIAL DIREcTOR Karin Strom
EDITOR, eBOOks Amy PalmerEDITOR, knitting daily Kathleen CubleyEDITOR, interweave knits Lisa Shroyer
MAnAgIng EDITOR Allison MackinAssIsTAnT EDITOR Amanda Williams
sEnIOR PROjEcT EDITOR Joni Coniglio
PROjEcT cOORDInATOR Kathy MalloTEchnIcAL EDITORs
Lori Gayle, Dee Neer, Nancy Shroyer
c R E AT I v E s E Rv I c E sDEsIgnER Kit Kinseth
PRODucTIOn DIREcTOR Trish FaubionPRODucTIOn cOORDInATOR Dean Howes
PhOTOgRAPhy As noted
P u B L I s h I n ggROuP PuBLIshER Jamie Bogner
MARkETIng MAnAgER Annie Hartman BakkenWEB MAnAgER Jason Hardgrave
Projects and information are for inspiration and personal use only. We’ve made every effort to
ensure the accuracy of the contents of this publication. However, human errors do occur. If you have questions regarding a pattern in
this issue, please visit us online at interweave.com/contact-us/customer-service.
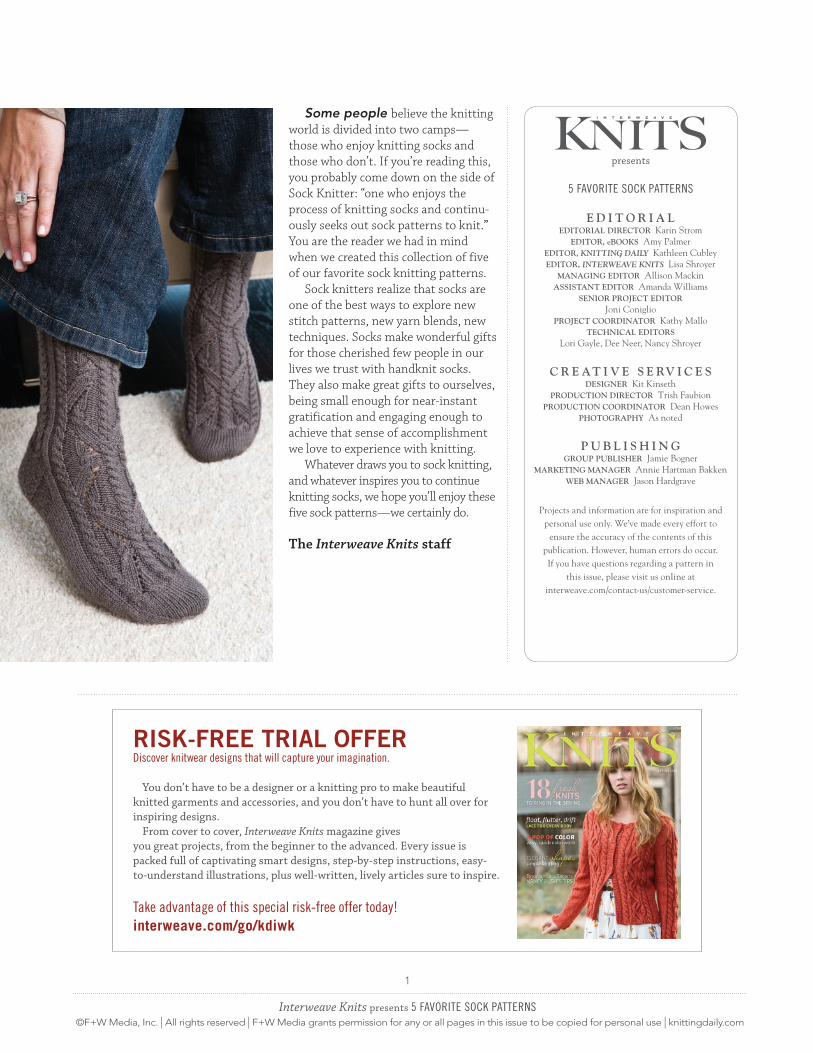
Some people believe the knitting world is divided into two camps—those who enjoy knitting socks and those who don’t. If you’re reading this, you probably come down on the side of Sock Knitter: “one who enjoys the process of knitting socks and continu-ously seeks out sock patterns to knit.” You are the reader we had in mind when we created this collection of five of our favorite sock knitting patterns.
Sock knitters realize that socks are one of the best ways to explore new stitch patterns, new yarn blends, new techniques. Socks make wonderful gifts for those cherished few people in our lives we trust with handknit socks. They also make great gifts to ourselves, being small enough for near-instant gratification and engaging enough to achieve that sense of accomplishment we love to experience with knitting.
Whatever draws you to sock knitting, and whatever inspires you to continue knitting socks, we hope you’ll enjoy these five sock patterns—we certainly do.
The Interweave Knits staff
RISK-FREE TRIAL OFFERDiscover knitwear designs that will capture your imagination.
You don’t have to be a designer or a knitting pro to make beautiful knitted garments and accessories, and you don’t have to hunt all over for inspiring designs.
From cover to cover, Interweave Knits magazine gives you great projects, from the beginner to the advanced. Every issue is packed full of captivating smart designs, step-by-step instructions, easy-to-understand illustrations, plus well-written, lively articles sure to inspire.
take advantage of this special risk-free offer today!interweave.com/go/kdiwk
Interweave Knits presents 5 favorite sock patterns©F+W Media, Inc. | All rights reserved | F+W Media grants permission for any or all pages in this issue to be copied for personal use | knittingdaily.com
2
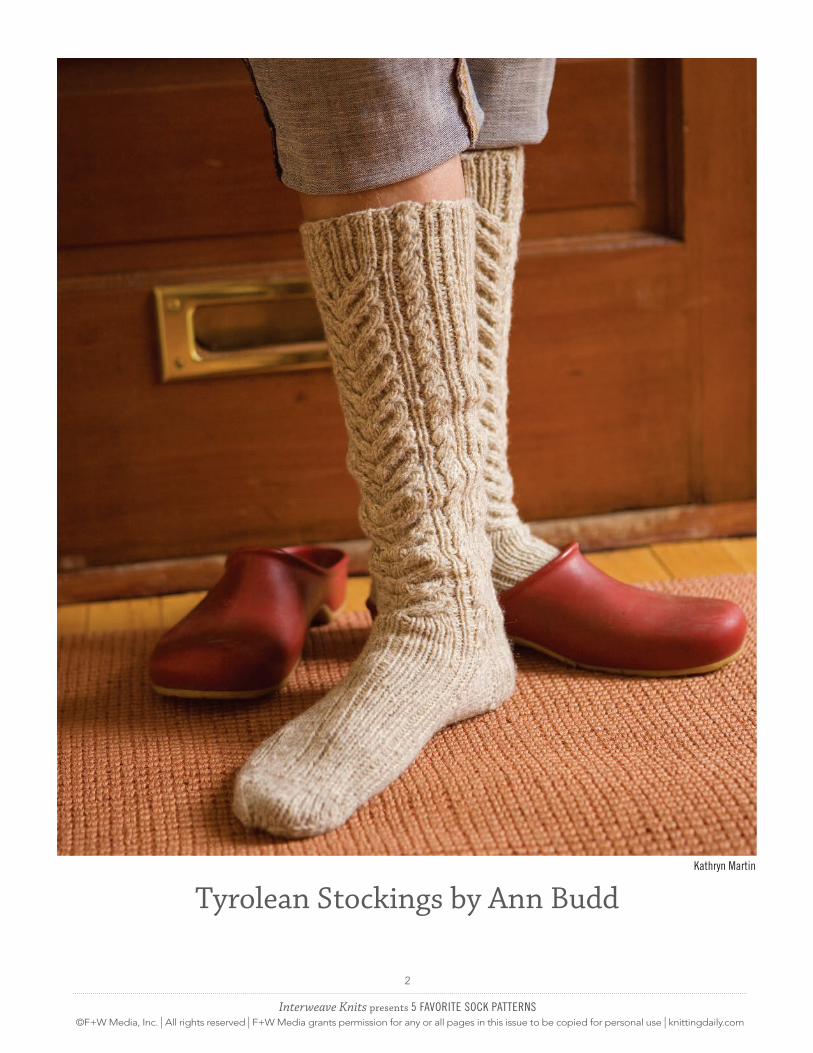
Tyrolean Stockings by Ann Buddkathryn Martin
Interweave Knits presents 5 favorite sock patterns©F+W Media, Inc. | All rights reserved | F+W Media grants permission for any or all pages in this issue to be copied for personal use | knittingdaily.com
3
tyrolean stockings
A n n B u d d
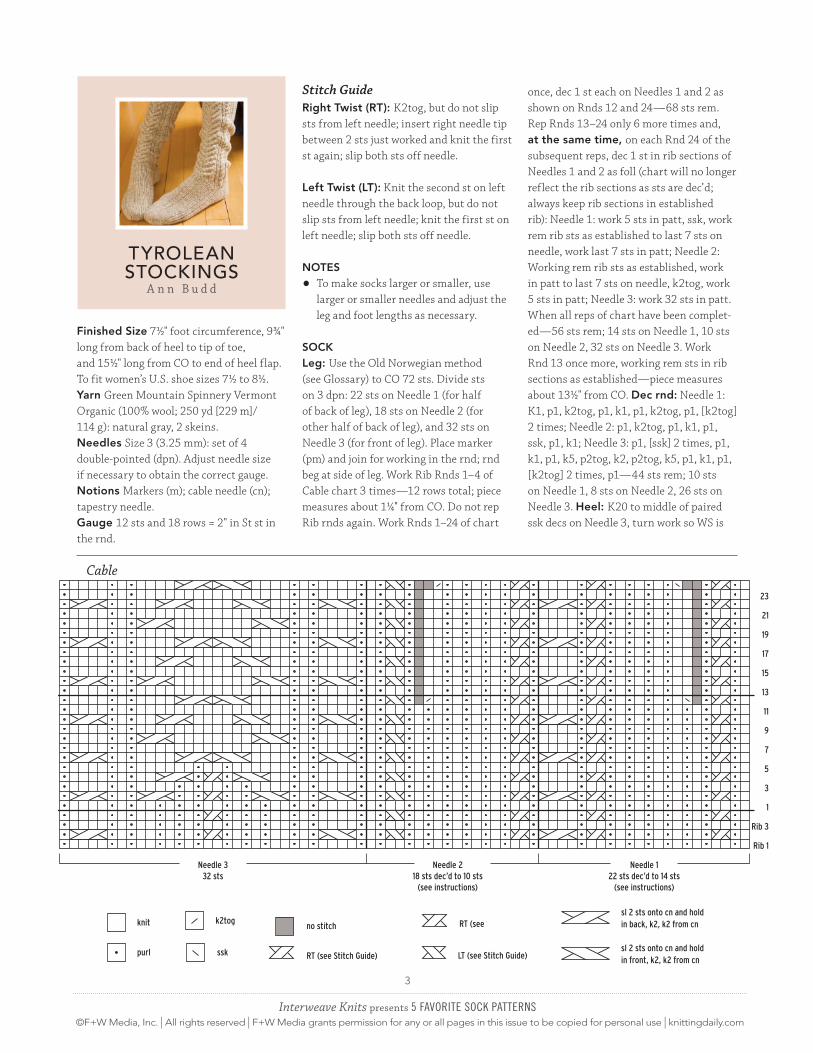
Finished Size 7½" foot circumference, 9¾" long from back of heel to tip of toe, and 15½" long from CO to end of heel flap. To fit women’s U.S. shoe sizes 7½ to 8½. Yarn Green Mountain Spinnery Vermont Organic (100% wool; 250 yd [229 m]/ 114 g): natural gray, 2 skeins.Needles Size 3 (3.25 mm): set of 4 double-pointed (dpn). Adjust needle size if necessary to obtain the correct gauge.Notions Markers (m); cable needle (cn); tapestry needle.Gauge 12 sts and 18 rows = 2" in St st in the rnd.
Stitch GuideRight Twist (RT): K2tog, but do not slip sts from left needle; insert right needle tip between 2 sts just worked and knit the first st again; slip both sts off needle.
Left Twist (LT): Knit the second st on left needle through the back loop, but do not slip sts from left needle; knit the first st on left needle; slip both sts off needle.
NoTeS
• To make socks larger or smaller, use larger or smaller needles and adjust the leg and foot lengths as necessary.
SockLeg: Use the Old Norwegian method (see Glossary) to CO 72 sts. Divide sts on 3 dpn: 22 sts on Needle 1 (for half of back of leg), 18 sts on Needle 2 (for other half of back of leg), and 32 sts on Needle 3 (for front of leg). Place marker (pm) and join for working in the rnd; rnd beg at side of leg. Work Rib Rnds 1–4 of Cable chart 3 times—12 rows total; piece measures about 1¼" from CO. Do not rep Rib rnds again. Work Rnds 1–24 of chart
once, dec 1 st each on Needles 1 and 2 as shown on Rnds 12 and 24—68 sts rem. Rep Rnds 13–24 only 6 more times and, at the same time, on each Rnd 24 of the subsequent reps, dec 1 st in rib sections of Needles 1 and 2 as foll (chart will no longer reflect the rib sections as sts are dec’d; always keep rib sections in established rib): Needle 1: work 5 sts in patt, ssk, work rem rib sts as established to last 7 sts on needle, work last 7 sts in patt; Needle 2: Working rem rib sts as established, work in patt to last 7 sts on needle, k2tog, work 5 sts in patt; Needle 3: work 32 sts in patt. When all reps of chart have been complet-ed—56 sts rem; 14 sts on Needle 1, 10 sts on Needle 2, 32 sts on Needle 3. Work Rnd 13 once more, working rem sts in rib sections as established—piece measures about 13½" from CO. Dec rnd: Needle 1: K1, p1, k2tog, p1, k1, p1, k2tog, p1, [k2tog] 2 times; Needle 2: p1, k2tog, p1, k1, p1, ssk, p1, k1; Needle 3: p1, [ssk] 2 times, p1, k1, p1, k5, p2tog, k2, p2tog, k5, p1, k1, p1, [k2tog] 2 times, p1—44 sts rem; 10 sts on Needle 1, 8 sts on Needle 2, 26 sts on Needle 3. Heel: K20 to middle of paired ssk decs on Needle 3, turn work so WS is
23
21
19
17
15
13
11
9
7
5
3
1
Rib 3
Rib 1
Needle 332 sts
Needle 218 sts dec’d to 10 sts
(see instructions)
Needle 122 sts dec’d to 14 sts
(see instructions)
Cable
knit
purl
k2tog
ssk
no stitch
RT (see Stitch Guide)
LT (see Stitch Guide)
sl 2 sts onto cn and holdin back, k2, k2 from cn
sl 2 sts onto cn and holdin front, k2, k2 from cn
knit
purl
k2tog
ssk
no stitch
RT (see Stitch Guide)
LT (see Stitch Guide)
sl 2 sts onto cn and holdin back, k2, k2 from cn
sl 2 sts onto cn and holdin front, k2, k2 from cn
knit
purl
k2tog
ssk
no stitch
RT (see Stitch Guide)
LT (see Stitch Guide)
sl 2 sts onto cn and holdin back, k2, k2 from cn
sl 2 sts onto cn and holdin front, k2, k2 from cn
knit
purl
k2tog
ssk
no stitch
RT (see Stitch Guide)
LT (see Stitch Guide)
sl 2 sts onto cn and holdin back, k2, k2 from cn
sl 2 sts onto cn and holdin front, k2, k2 from cn
knit
purl
k2tog
ssk
no stitch
RT (see Stitch Guide)
LT (see Stitch Guide)
sl 2 sts onto cn and holdin back, k2, k2 from cn
sl 2 sts onto cn and holdin front, k2, k2 from cn
knit
purl
k2tog
ssk
no stitch
RT (see Stitch Guide)
LT (see Stitch Guide)
sl 2 sts onto cn and holdin back, k2, k2 from cn
sl 2 sts onto cn and holdin front, k2, k2 from cn
knit
purl
k2tog
ssk
no stitch
RT (see Stitch Guide)
LT (see Stitch Guide)
sl 2 sts onto cn and holdin back, k2, k2 from cn
sl 2 sts onto cn and holdin front, k2, k2 from cn
Interweave Knits presents 5 favorite sock patterns©F+W Media, Inc. | All rights reserved | F+W Media grants permission for any or all pages in this issue to be copied for personal use | knittingdaily.com
4
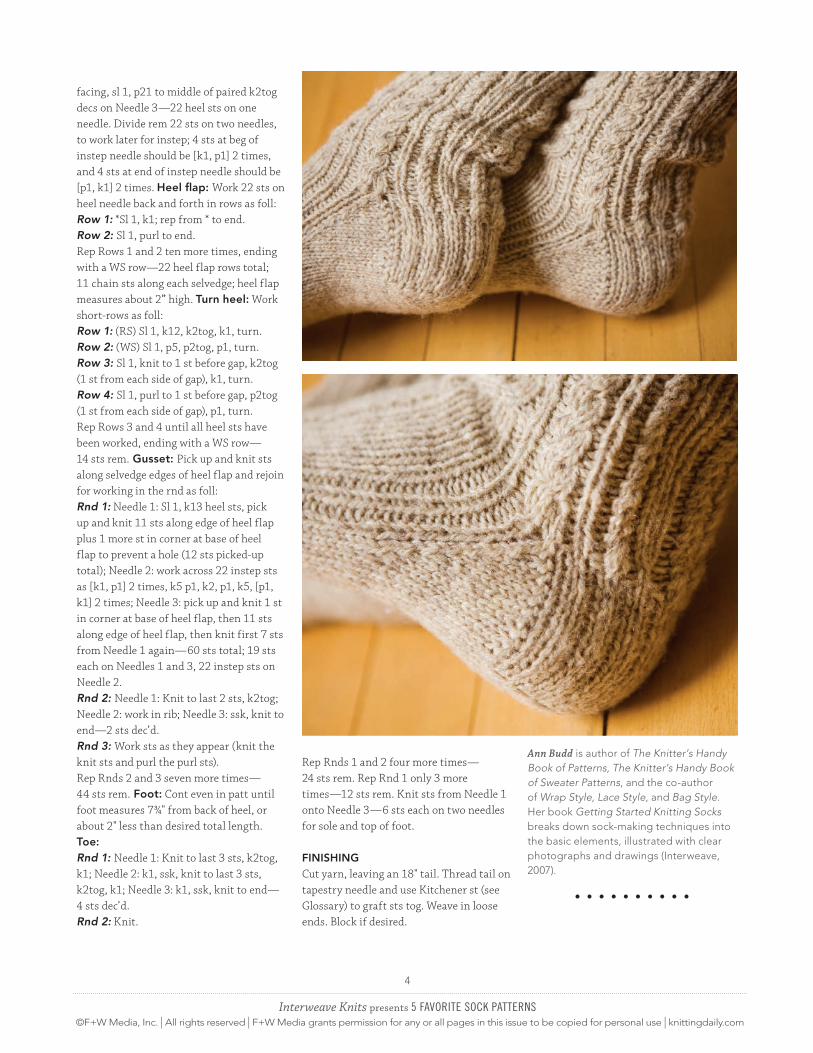
facing, sl 1, p21 to middle of paired k2tog decs on Needle 3—22 heel sts on one needle. Divide rem 22 sts on two needles, to work later for instep; 4 sts at beg of instep needle should be [k1, p1] 2 times, and 4 sts at end of instep needle should be [p1, k1] 2 times. Heel flap: Work 22 sts on heel needle back and forth in rows as foll:Row 1: *Sl 1, k1; rep from * to end.Row 2: Sl 1, purl to end.Rep Rows 1 and 2 ten more times, ending with a WS row—22 heel flap rows total; 11 chain sts along each selvedge; heel flap measures about 2” high. Turn heel: Work short-rows as foll:Row 1: (RS) Sl 1, k12, k2tog, k1, turn.Row 2: (WS) Sl 1, p5, p2tog, p1, turn.Row 3: Sl 1, knit to 1 st before gap, k2tog (1 st from each side of gap), k1, turn.Row 4: Sl 1, purl to 1 st before gap, p2tog (1 st from each side of gap), p1, turn.Rep Rows 3 and 4 until all heel sts have been worked, ending with a WS row—14 sts rem. Gusset: Pick up and knit sts along selvedge edges of heel flap and rejoin for working in the rnd as foll: Rnd 1: Needle 1: Sl 1, k13 heel sts, pick up and knit 11 sts along edge of heel flap plus 1 more st in corner at base of heel flap to prevent a hole (12 sts picked-up total); Needle 2: work across 22 instep sts as [k1, p1] 2 times, k5 p1, k2, p1, k5, [p1, k1] 2 times; Needle 3: pick up and knit 1 st in corner at base of heel flap, then 11 sts along edge of heel flap, then knit first 7 sts from Needle 1 again—60 sts total; 19 sts each on Needles 1 and 3, 22 instep sts on Needle 2. Rnd 2: Needle 1: Knit to last 2 sts, k2tog; Needle 2: work in rib; Needle 3: ssk, knit to end—2 sts dec’d.Rnd 3: Work sts as they appear (knit the knit sts and purl the purl sts).Rep Rnds 2 and 3 seven more times—44 sts rem. Foot: Cont even in patt until foot measures 7¾" from back of heel, or about 2" less than desired total length. Toe:Rnd 1: Needle 1: Knit to last 3 sts, k2tog, k1; Needle 2: k1, ssk, knit to last 3 sts, k2tog, k1; Needle 3: k1, ssk, knit to end—4 sts dec’d.Rnd 2: Knit.
Rep Rnds 1 and 2 four more times—24 sts rem. Rep Rnd 1 only 3 more times—12 sts rem. Knit sts from Needle 1 onto Needle 3—6 sts each on two needles for sole and top of foot.
FiNiSHiNGCut yarn, leaving an 18" tail. Thread tail on tapestry needle and use Kitchener st (see Glossary) to graft sts tog. Weave in loose ends. Block if desired.
Ann Budd is author of The Knitter’s Handy Book of Patterns, The Knitter’s Handy Book of Sweater Patterns, and the co-author of Wrap Style, Lace Style, and Bag Style. Her book Getting Started Knitting Socks breaks down sock-making techniques into the basic elements, illustrated with clear photographs and drawings (Interweave, 2007).
Interweave Knits presents 5 favorite sock patterns©F+W Media, Inc. | All rights reserved | F+W Media grants permission for any or all pages in this issue to be copied for personal use | knittingdaily.com
5
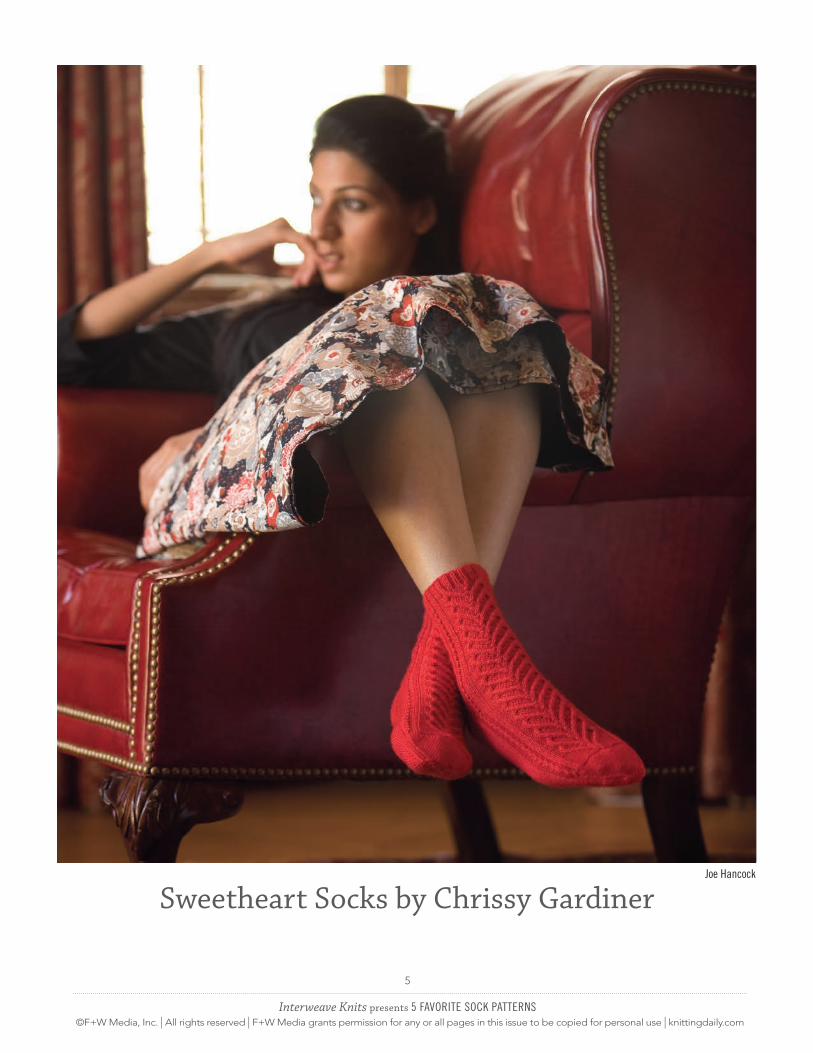
Sweetheart Socks by Chrissy GardinerJoe Hancock
Interweave Knits presents 5 favorite sock patterns©F+W Media, Inc. | All rights reserved | F+W Media grants permission for any or all pages in this issue to be copied for personal use | knittingdaily.com
6
sweetheartsocks
C h r i s s y G a r d i n e r
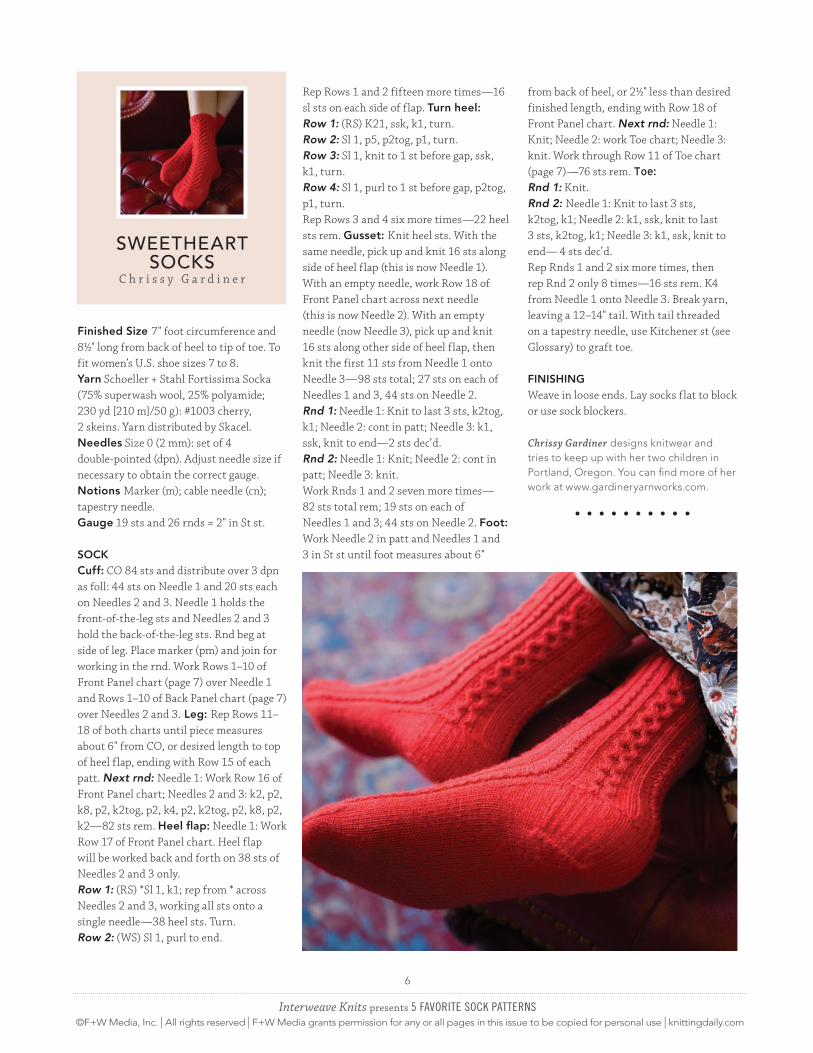
Finished Size 7" foot circumference and 8½" long from back of heel to tip of toe. To fit women’s U.S. shoe sizes 7 to 8.Yarn Schoeller + Stahl Fortissima Socka (75% superwash wool, 25% polyamide; 230 yd [210 m]/50 g): #1003 cherry, 2 skeins. Yarn distributed by Skacel. Needles Size 0 (2 mm): set of 4 double-pointed (dpn). Adjust needle size if necessary to obtain the correct gauge.Notions Marker (m); cable needle (cn); tapestry needle.Gauge 19 sts and 26 rnds = 2" in St st.
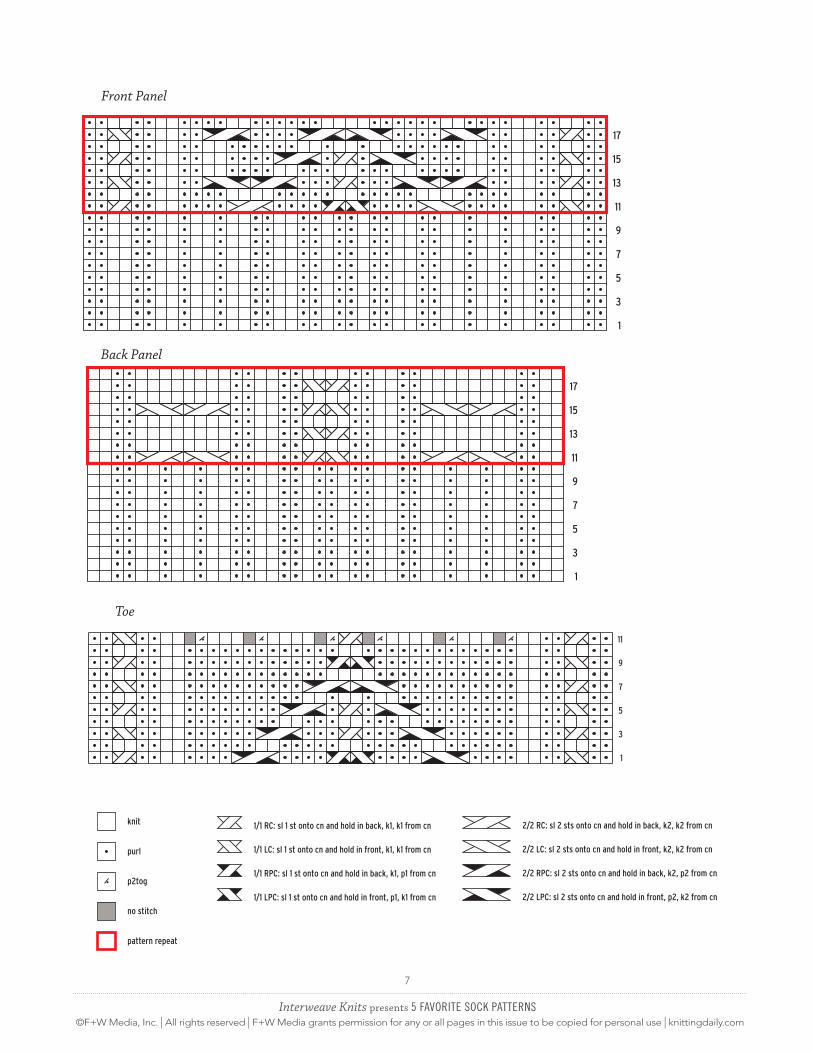
Sockcuff: CO 84 sts and distribute over 3 dpn as foll: 44 sts on Needle 1 and 20 sts each on Needles 2 and 3. Needle 1 holds the front-of-the-leg sts and Needles 2 and 3 hold the back-of-the-leg sts. Rnd beg at side of leg. Place marker (pm) and join for working in the rnd. Work Rows 1–10 of Front Panel chart (page 7) over Needle 1 and Rows 1–10 of Back Panel chart (page 7) over Needles 2 and 3. Leg: Rep Rows 11–18 of both charts until piece measures about 6" from CO, or desired length to top of heel flap, ending with Row 15 of each patt. Next rnd: Needle 1: Work Row 16 of Front Panel chart; Needles 2 and 3: k2, p2, k8, p2, k2tog, p2, k4, p2, k2tog, p2, k8, p2, k2—82 sts rem. Heel flap: Needle 1: Work Row 17 of Front Panel chart. Heel flap will be worked back and forth on 38 sts of Needles 2 and 3 only. Row 1: (RS) *Sl 1, k1; rep from * across Needles 2 and 3, working all sts onto a single needle—38 heel sts. Turn.Row 2: (WS) Sl 1, purl to end.
Rep Rows 1 and 2 fifteen more times—16 sl sts on each side of flap. Turn heel: Row 1: (RS) K21, ssk, k1, turn.Row 2: Sl 1, p5, p2tog, p1, turn.Row 3: Sl 1, knit to 1 st before gap, ssk, k1, turn.Row 4: Sl 1, purl to 1 st before gap, p2tog, p1, turn.Rep Rows 3 and 4 six more times—22 heel sts rem. Gusset: Knit heel sts. With the same needle, pick up and knit 16 sts along side of heel flap (this is now Needle 1). With an empty needle, work Row 18 of Front Panel chart across next needle (this is now Needle 2). With an empty needle (now Needle 3), pick up and knit 16 sts along other side of heel flap, then knit the first 11 sts from Needle 1 onto Needle 3—98 sts total; 27 sts on each of Needles 1 and 3, 44 sts on Needle 2. Rnd 1: Needle 1: Knit to last 3 sts, k2tog, k1; Needle 2: cont in patt; Needle 3: k1, ssk, knit to end—2 sts dec’d.Rnd 2: Needle 1: Knit; Needle 2: cont in patt; Needle 3: knit.Work Rnds 1 and 2 seven more times—82 sts total rem; 19 sts on each of Needles 1 and 3; 44 sts on Needle 2. Foot: Work Needle 2 in patt and Needles 1 and 3 in St st until foot measures about 6"
from back of heel, or 2½" less than desired finished length, ending with Row 18 of Front Panel chart. Next rnd: Needle 1: Knit; Needle 2: work Toe chart; Needle 3: knit. Work through Row 11 of Toe chart (page 7)—76 sts rem. Toe:
Rnd 1: Knit.Rnd 2: Needle 1: Knit to last 3 sts, k2tog, k1; Needle 2: k1, ssk, knit to last 3 sts, k2tog, k1; Needle 3: k1, ssk, knit to end— 4 sts dec’d.Rep Rnds 1 and 2 six more times, then rep Rnd 2 only 8 times—16 sts rem. K4 from Needle 1 onto Needle 3. Break yarn, leaving a 12–14" tail. With tail threaded on a tapestry needle, use Kitchener st (see Glossary) to graft toe.
FiNiSHiNGWeave in loose ends. Lay socks flat to block or use sock blockers.
Chrissy Gardiner designs knitwear and tries to keep up with her two children in Portland, Oregon. You can find more of her work at www.gardineryarnworks.com.
Interweave Knits presents 5 favorite sock patterns©F+W Media, Inc. | All rights reserved | F+W Media grants permission for any or all pages in this issue to be copied for personal use | knittingdaily.com
7
Front Panel
17
15
13
11
9
7
5
3
1
Back Panel
17
15
13
11
9
7
5
3
1
11
9
7
5
3
1
Toe
knit
purl
p2tog
no stitch
pattern repeat
1/1 RC: sl 1 st onto cn and hold in back, k1, k1 from cn
1/1 LC: sl 1 st onto cn and hold in front, k1, k1 from cn
1/1 RPC: sl 1 st onto cn and hold in back, k1, p1 from cn
1/1 LPC: sl 1 st onto cn and hold in front, p1, k1 from cn
2/2 RC: sl 2 sts onto cn and hold in back, k2, k2 from cn
2/2 LC: sl 2 sts onto cn and hold in front, k2, k2 from cn
2/2 RPC: sl 2 sts onto cn and hold in back, k2, p2 from cn
2/2 LPC: sl 2 sts onto cn and hold in front, p2, k2 from cn
Interweave Knits presents 5 favorite sock patterns©F+W Media, Inc. | All rights reserved | F+W Media grants permission for any or all pages in this issue to be copied for personal use | knittingdaily.com
8
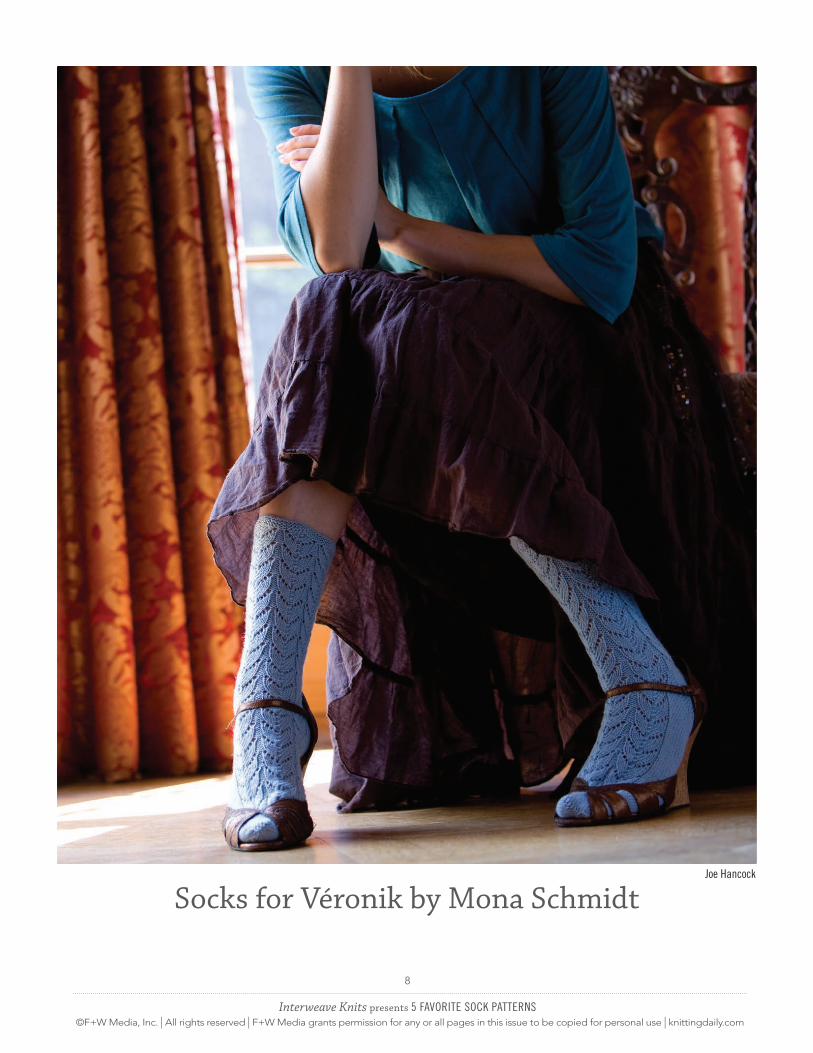
Socks for Véronik by Mona SchmidtJoe Hancock
Interweave Knits presents 5 favorite sock patterns©F+W Media, Inc. | All rights reserved | F+W Media grants permission for any or all pages in this issue to be copied for personal use | knittingdaily.com
9
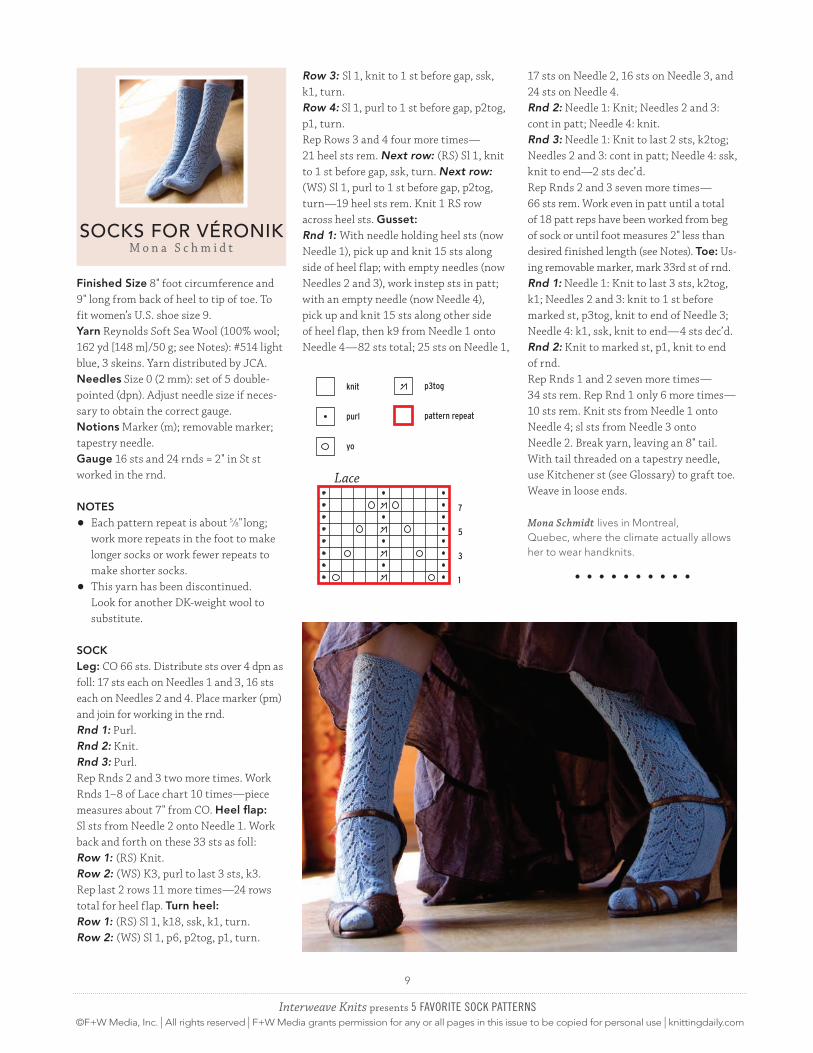
socks for VÉronik M o n a S c h m i d t
Finished Size 8" foot circumference and 9" long from back of heel to tip of toe. To fit women’s U.S. shoe size 9.Yarn Reynolds Soft Sea Wool (100% wool; 162 yd [148 m]/50 g; see Notes): #514 light blue, 3 skeins. Yarn distributed by JCA.Needles Size 0 (2 mm): set of 5 double-pointed (dpn). Adjust needle size if neces-sary to obtain the correct gauge.Notions Marker (m); removable marker; tapestry needle.Gauge 16 sts and 24 rnds = 2" in St st worked in the rnd.
NoTeS
• Each pattern repeat is about 5 ⁄8" long; work more repeats in the foot to make longer socks or work fewer repeats to make shorter socks.
• This yarn has been discontinued. Look for another DK-weight wool to substitute.
SockLeg: CO 66 sts. Distribute sts over 4 dpn as foll: 17 sts each on Needles 1 and 3, 16 sts each on Needles 2 and 4. Place marker (pm) and join for working in the rnd.Rnd 1: Purl.Rnd 2: Knit.Rnd 3: Purl.Rep Rnds 2 and 3 two more times. Work Rnds 1–8 of Lace chart 10 times—piece measures about 7" from CO. Heel flap: Sl sts from Needle 2 onto Needle 1. Work back and forth on these 33 sts as foll: Row 1: (RS) Knit.Row 2: (WS) K3, purl to last 3 sts, k3.Rep last 2 rows 11 more times—24 rows total for heel flap. Turn heel: Row 1: (RS) Sl 1, k18, ssk, k1, turn.Row 2: (WS) Sl 1, p6, p2tog, p1, turn.
Row 3: Sl 1, knit to 1 st before gap, ssk, k1, turn.Row 4: Sl 1, purl to 1 st before gap, p2tog, p1, turn.Rep Rows 3 and 4 four more times—21 heel sts rem. Next row: (RS) Sl 1, knit to 1 st before gap, ssk, turn. Next row: (WS) Sl 1, purl to 1 st before gap, p2tog, turn—19 heel sts rem. Knit 1 RS row across heel sts. Gusset: Rnd 1: With needle holding heel sts (now Needle 1), pick up and knit 15 sts along side of heel flap; with empty needles (now Needles 2 and 3), work instep sts in patt; with an empty needle (now Needle 4), pick up and knit 15 sts along other side of heel flap, then k9 from Needle 1 onto Needle 4—82 sts total; 25 sts on Needle 1,
17 sts on Needle 2, 16 sts on Needle 3, and 24 sts on Needle 4.Rnd 2: Needle 1: Knit; Needles 2 and 3: cont in patt; Needle 4: knit.Rnd 3: Needle 1: Knit to last 2 sts, k2tog; Needles 2 and 3: cont in patt; Needle 4: ssk, knit to end—2 sts dec’d.Rep Rnds 2 and 3 seven more times—66 sts rem. Work even in patt until a total of 18 patt reps have been worked from beg of sock or until foot measures 2" less than desired finished length (see Notes). Toe: Us-ing removable marker, mark 33rd st of rnd.Rnd 1: Needle 1: Knit to last 3 sts, k2tog, k1; Needles 2 and 3: knit to 1 st before marked st, p3tog, knit to end of Needle 3; Needle 4: k1, ssk, knit to end—4 sts dec’d.Rnd 2: Knit to marked st, p1, knit to end of rnd.Rep Rnds 1 and 2 seven more times—34 sts rem. Rep Rnd 1 only 6 more times—10 sts rem. Knit sts from Needle 1 onto Needle 4; sl sts from Needle 3 onto Needle 2. Break yarn, leaving an 8" tail. With tail threaded on a tapestry needle, use Kitchener st (see Glossary) to graft toe. Weave in loose ends.
Mona Schmidt lives in Montreal, Quebec, where the climate actually allows her to wear handknits.
knit
purl
yo
p3tog
pattern repeat
knit
purl
yo
p3tog
pattern repeat
7
5
3
1
Lace
Interweave Knits presents 5 favorite sock patterns©F+W Media, Inc. | All rights reserved | F+W Media grants permission for any or all pages in this issue to be copied for personal use | knittingdaily.com
10
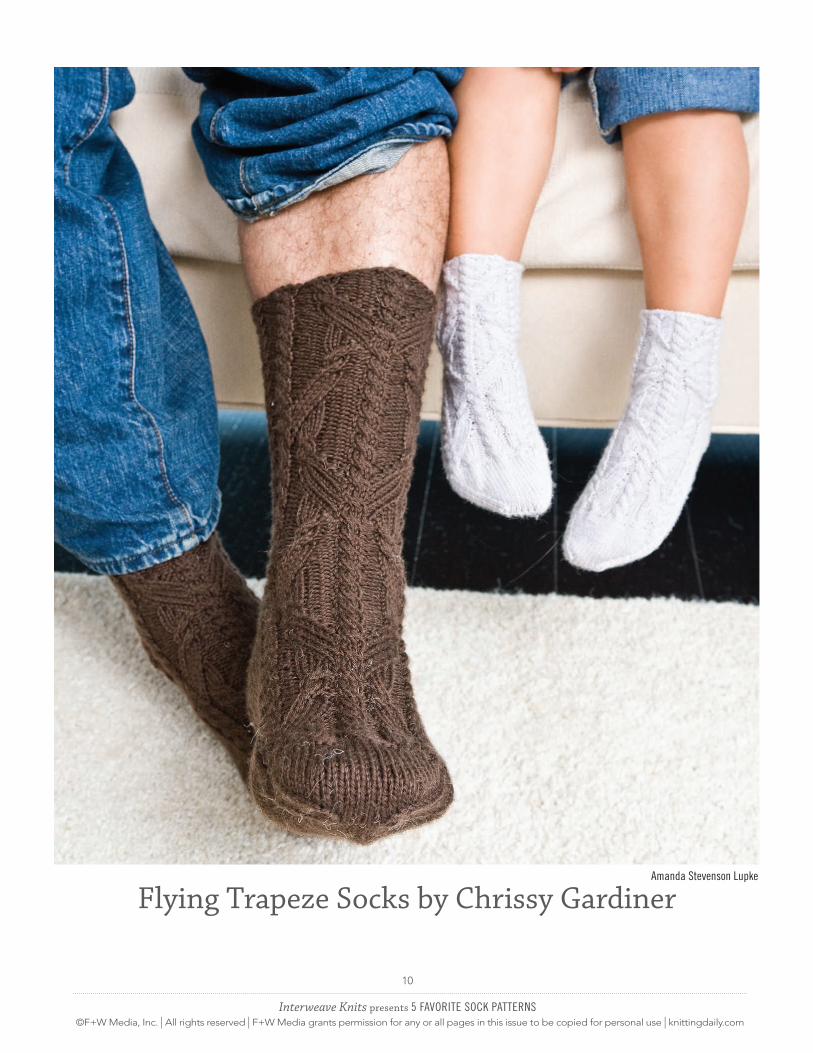
Flying Trapeze Socks by Chrissy Gardineramanda stevenson Lupke
Interweave Knits presents 5 favorite sock patterns©F+W Media, Inc. | All rights reserved | F+W Media grants permission for any or all pages in this issue to be copied for personal use | knittingdaily.com
11
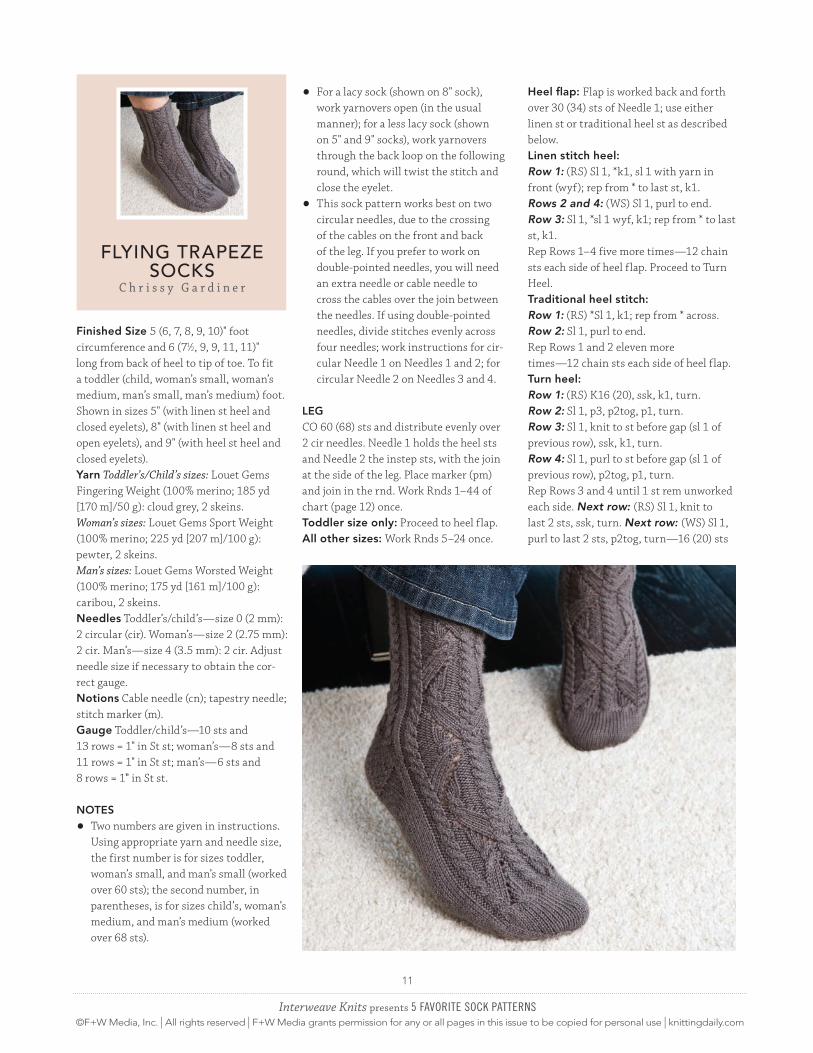
flying trapeze
socksC h r i s s y G a r d i n e r
Finished Size 5 (6, 7, 8, 9, 10)" foot circumference and 6 (71⁄2, 9, 9, 11, 11)" long from back of heel to tip of toe. To fit a toddler (child, woman’s small, woman’s medium, man’s small, man’s medium) foot. Shown in sizes 5" (with linen st heel and closed eyelets), 8" (with linen st heel and open eyelets), and 9" (with heel st heel and closed eyelets).Yarn Toddler’s/Child’s sizes: Louet Gems Fingering Weight (100% merino; 185 yd [170 m]/50 g): cloud grey, 2 skeins.Woman’s sizes: Louet Gems Sport Weight (100% merino; 225 yd [207 m]/100 g): pewter, 2 skeins.Man’s sizes: Louet Gems Worsted Weight (100% merino; 175 yd [161 m]/100 g): caribou, 2 skeins.Needles Toddler’s/child’s—size 0 (2 mm): 2 circular (cir). Woman’s—size 2 (2.75 mm): 2 cir. Man’s—size 4 (3.5 mm): 2 cir. Adjust needle size if necessary to obtain the cor-rect gauge.Notions Cable needle (cn); tapestry needle; stitch marker (m).Gauge Toddler/child’s—10 sts and 13 rows = 1" in St st; woman’s—8 sts and 11 rows = 1" in St st; man’s—6 sts and 8 rows = 1" in St st.
NoTeS
• Two numbers are given in instructions. Using appropriate yarn and needle size, the first number is for sizes toddler, woman’s small, and man’s small (worked over 60 sts); the second number, in parentheses, is for sizes child’s, woman’s medium, and man’s medium (worked over 68 sts).
• For a lacy sock (shown on 8" sock), work yarnovers open (in the usual manner); for a less lacy sock (shown on 5" and 9" socks), work yarnovers through the back loop on the following round, which will twist the stitch and close the eyelet.
• This sock pattern works best on two circular needles, due to the crossing of the cables on the front and back of the leg. If you prefer to work on double-pointed needles, you will need an extra needle or cable needle to cross the cables over the join between the needles. If using double-pointed needles, divide stitches evenly across four needles; work instructions for cir-cular Needle 1 on Needles 1 and 2; for circular Needle 2 on Needles 3 and 4.
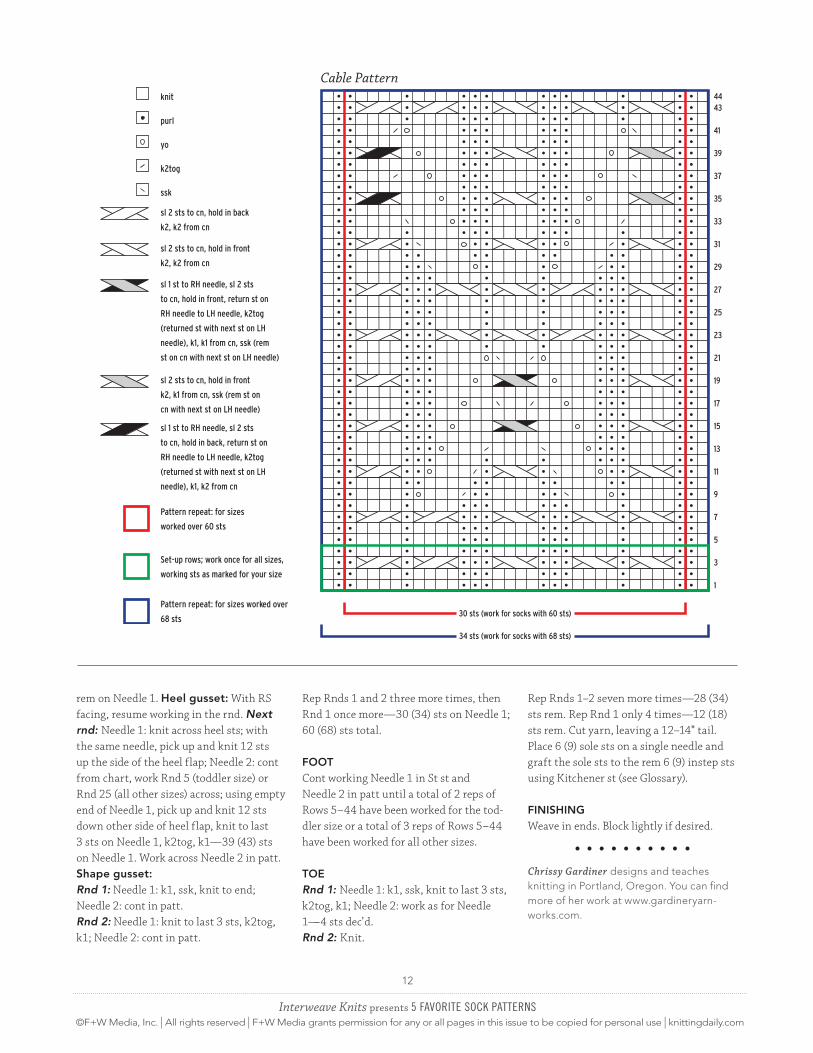
LeGCO 60 (68) sts and distribute evenly over 2 cir needles. Needle 1 holds the heel sts and Needle 2 the instep sts, with the join at the side of the leg. Place marker (pm) and join in the rnd. Work Rnds 1–44 of chart (page 12) once. Toddler size only: Proceed to heel flap.All other sizes: Work Rnds 5–24 once.
Heel flap: Flap is worked back and forth over 30 (34) sts of Needle 1; use either linen st or traditional heel st as described below. Linen stitch heel:Row 1: (RS) Sl 1, *k1, sl 1 with yarn in front (wyf); rep from * to last st, k1.Rows 2 and 4: (WS) Sl 1, purl to end.Row 3: Sl 1, *sl 1 wyf, k1; rep from * to last st, k1.Rep Rows 1–4 five more times—12 chain sts each side of heel flap. Proceed to Turn Heel.Traditional heel stitch:Row 1: (RS) *Sl 1, k1; rep from * across.Row 2: Sl 1, purl to end.Rep Rows 1 and 2 eleven more times—12 chain sts each side of heel flap.Turn heel:Row 1: (RS) K16 (20), ssk, k1, turn.Row 2: Sl 1, p3, p2tog, p1, turn.Row 3: Sl 1, knit to st before gap (sl 1 of previous row), ssk, k1, turn.Row 4: Sl 1, purl to st before gap (sl 1 of previous row), p2tog, p1, turn.Rep Rows 3 and 4 until 1 st rem unworked each side. Next row: (RS) Sl 1, knit to last 2 sts, ssk, turn. Next row: (WS) Sl 1, purl to last 2 sts, p2tog, turn—16 (20) sts
Interweave Knits presents 5 favorite sock patterns©F+W Media, Inc. | All rights reserved | F+W Media grants permission for any or all pages in this issue to be copied for personal use | knittingdaily.com
12
rem on Needle 1. Heel gusset: With RS facing, resume working in the rnd. Next rnd: Needle 1: knit across heel sts; with the same needle, pick up and knit 12 sts up the side of the heel flap; Needle 2: cont from chart, work Rnd 5 (toddler size) or Rnd 25 (all other sizes) across; using empty end of Needle 1, pick up and knit 12 sts down other side of heel flap, knit to last 3 sts on Needle 1, k2tog, k1—39 (43) sts on Needle 1. Work across Needle 2 in patt. Shape gusset:Rnd 1: Needle 1: k1, ssk, knit to end; Needle 2: cont in patt.Rnd 2: Needle 1: knit to last 3 sts, k2tog, k1; Needle 2: cont in patt.
Rep Rnds 1–2 seven more times—28 (34) sts rem. Rep Rnd 1 only 4 times—12 (18) sts rem. Cut yarn, leaving a 12–14" tail. Place 6 (9) sole sts on a single needle and graft the sole sts to the rem 6 (9) instep sts using Kitchener st (see Glossary).
FiNiSHiNGWeave in ends. Block lightly if desired.
Chrissy Gardiner designs and teaches knitting in Portland, Oregon. You can find more of her work at www.gardineryarn-works.com.
yo
k2tog
ssk
sl 2 sts to cn, hold in back
k2, k2 from cn
sl 2 sts to cn, hold in front
k2, k2 from cn
knit
purl
Pattern repeat: for sizes
worked over 60 sts
sl 2 sts to cn, hold in front
k2, k1 from cn, ssk (rem st on
cn with next st on LH needle)
sl 1 st to RH needle, sl 2 sts
to cn, hold in front, return st on
RH needle to LH needle, k2tog
(returned st with next st on LH
needle), k1, k1 from cn, ssk (rem
st on cn with next st on LH needle)
sl 1 st to RH needle, sl 2 sts
to cn, hold in back, return st on
RH needle to LH needle, k2tog
(returned st with next st on LH
needle), k1, k2 from cn
Set-up rows; work once for all sizes,
working sts as marked for your size
Pattern repeat: for sizes worked over
68 sts
25
23
21
19
17
15
13
11
9
7
5
3
1
43
41
39
37
35
31
29
27
33
44
30 sts (work for socks with 60 sts)
34 sts (work for socks with 68 sts)
Cable Pattern
Rep Rnds 1 and 2 three more times, then Rnd 1 once more—30 (34) sts on Needle 1; 60 (68) sts total.
FooTCont working Needle 1 in St st and Needle 2 in patt until a total of 2 reps of Rows 5–44 have been worked for the tod-dler size or a total of 3 reps of Rows 5–44 have been worked for all other sizes.
ToeRnd 1: Needle 1: k1, ssk, knit to last 3 sts, k2tog, k1; Needle 2: work as for Needle 1—4 sts dec’d.Rnd 2: Knit.
Interweave Knits presents 5 favorite sock patterns©F+W Media, Inc. | All rights reserved | F+W Media grants permission for any or all pages in this issue to be copied for personal use | knittingdaily.com
13
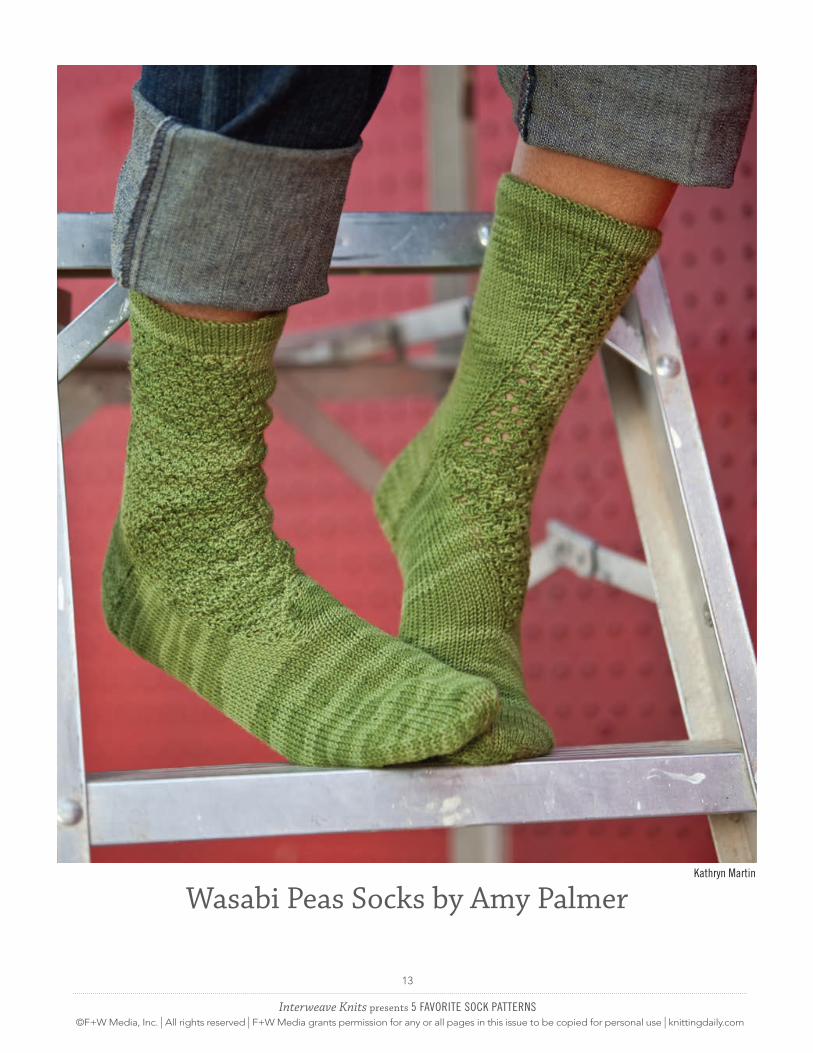
Wasabi Peas Socks by Amy Palmerkathryn Martin
Interweave Knits presents 5 favorite sock patterns©F+W Media, Inc. | All rights reserved | F+W Media grants permission for any or all pages in this issue to be copied for personal use | knittingdaily.com
14
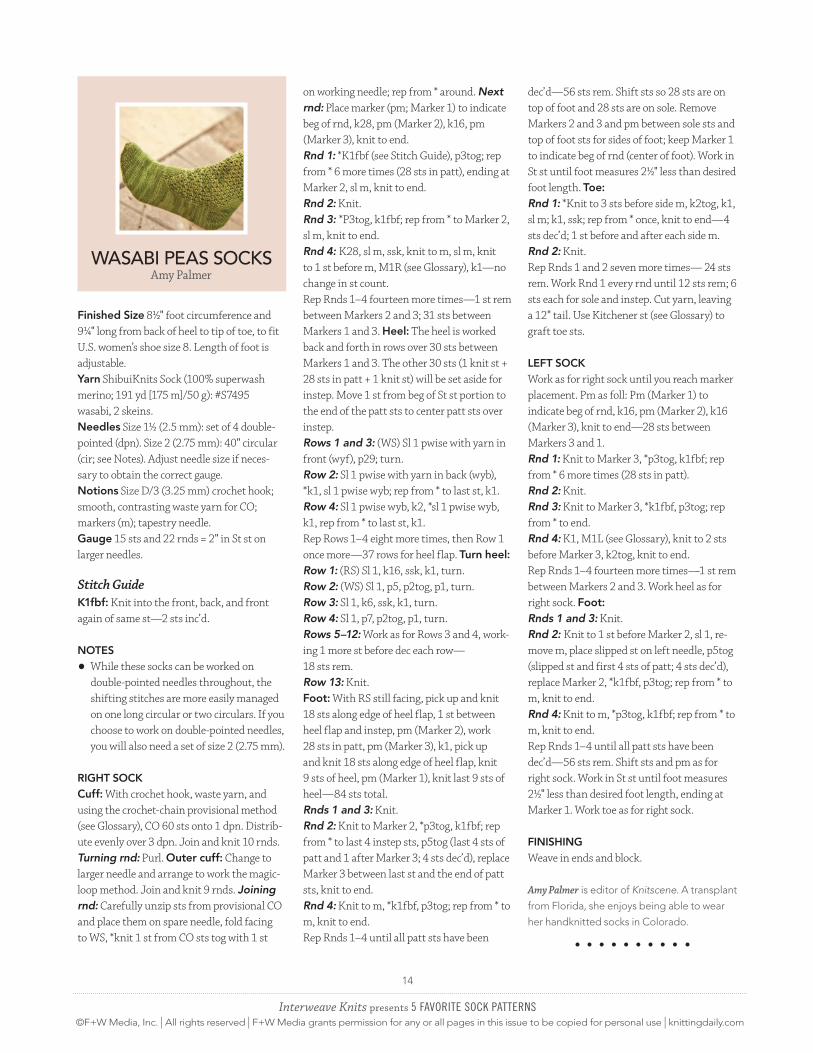
wasabi peas socks Amy Palmer
Finished Size 8½" foot circumference and 9¼" long from back of heel to tip of toe, to fit U.S. women’s shoe size 8. Length of foot is adjustable. Yarn ShibuiKnits Sock (100% superwash merino; 191 yd [175 m]/50 g): #S7495 wasabi, 2 skeins. Needles Size 1½ (2.5 mm): set of 4 double-pointed (dpn). Size 2 (2.75 mm): 40" circular (cir; see Notes). Adjust needle size if neces-sary to obtain the correct gauge. Notions Size D/3 (3.25 mm) crochet hook; smooth, contrasting waste yarn for CO; markers (m); tapestry needle. Gauge 15 sts and 22 rnds = 2" in St st on larger needles.
Stitch Guidek1fbf: Knit into the front, back, and front again of same st—2 sts inc’d.
NoTeS
• While these socks can be worked on double-pointed needles throughout, the shifting stitches are more easily managed on one long circular or two circulars. If you choose to work on double-pointed needles, you will also need a set of size 2 (2.75 mm).
RiGHT Sockcuff: With crochet hook, waste yarn, and using the crochet-chain provisional method (see Glossary), CO 60 sts onto 1 dpn. Distrib-ute evenly over 3 dpn. Join and knit 10 rnds. Turning rnd: Purl. outer cuff: Change to larger needle and arrange to work the magic-loop method. Join and knit 9 rnds. Joining rnd: Carefully unzip sts from provisional CO and place them on spare needle, fold facing to WS, *knit 1 st from CO sts tog with 1 st
on working needle; rep from * around. Next rnd: Place marker (pm; Marker 1) to indicate beg of rnd, k28, pm (Marker 2), k16, pm (Marker 3), knit to end. Rnd 1: *K1fbf (see Stitch Guide), p3tog; rep from * 6 more times (28 sts in patt), ending at Marker 2, sl m, knit to end.Rnd 2: Knit.Rnd 3: *P3tog, k1fbf; rep from * to Marker 2, sl m, knit to end. Rnd 4: K28, sl m, ssk, knit to m, sl m, knit to 1 st before m, M1R (see Glossary), k1—no change in st count.Rep Rnds 1–4 fourteen more times—1 st rem between Markers 2 and 3; 31 sts between Markers 1 and 3. Heel: The heel is worked back and forth in rows over 30 sts between Markers 1 and 3. The other 30 sts (1 knit st + 28 sts in patt + 1 knit st) will be set aside for instep. Move 1 st from beg of St st portion to the end of the patt sts to center patt sts over instep.Rows 1 and 3: (WS) Sl 1 pwise with yarn in front (wyf), p29; turn.Row 2: Sl 1 pwise with yarn in back (wyb), *k1, sl 1 pwise wyb; rep from * to last st, k1.Row 4: Sl 1 pwise wyb, k2, *sl 1 pwise wyb, k1, rep from * to last st, k1. Rep Rows 1–4 eight more times, then Row 1 once more—37 rows for heel flap. Turn heel:Row 1: (RS) Sl 1, k16, ssk, k1, turn.Row 2: (WS) Sl 1, p5, p2tog, p1, turn.Row 3: Sl 1, k6, ssk, k1, turn.Row 4: Sl 1, p7, p2tog, p1, turn.Rows 5–12: Work as for Rows 3 and 4, work-ing 1 more st before dec each row—18 sts rem.Row 13: Knit. Foot: With RS still facing, pick up and knit 18 sts along edge of heel flap, 1 st between heel flap and instep, pm (Marker 2), work 28 sts in patt, pm (Marker 3), k1, pick up and knit 18 sts along edge of heel flap, knit 9 sts of heel, pm (Marker 1), knit last 9 sts of heel—84 sts total. Rnds 1 and 3: Knit.Rnd 2: Knit to Marker 2, *p3tog, k1fbf; rep from * to last 4 instep sts, p5tog (last 4 sts of patt and 1 after Marker 3; 4 sts dec’d), replace Marker 3 between last st and the end of patt sts, knit to end.Rnd 4: Knit to m, *k1fbf, p3tog; rep from * to m, knit to end. Rep Rnds 1–4 until all patt sts have been
dec’d—56 sts rem. Shift sts so 28 sts are on top of foot and 28 sts are on sole. Remove Markers 2 and 3 and pm between sole sts and top of foot sts for sides of foot; keep Marker 1 to indicate beg of rnd (center of foot). Work in St st until foot measures 2½" less than desired foot length. Toe:Rnd 1: *Knit to 3 sts before side m, k2tog, k1, sl m; k1, ssk; rep from * once, knit to end—4 sts dec’d; 1 st before and after each side m. Rnd 2: Knit. Rep Rnds 1 and 2 seven more times— 24 sts rem. Work Rnd 1 every rnd until 12 sts rem; 6 sts each for sole and instep. Cut yarn, leaving a 12" tail. Use Kitchener st (see Glossary) to graft toe sts.
LeFT Sock Work as for right sock until you reach marker placement. Pm as foll: Pm (Marker 1) to indicate beg of rnd, k16, pm (Marker 2), k16 (Marker 3), knit to end—28 sts between Markers 3 and 1. Rnd 1: Knit to Marker 3, *p3tog, k1fbf; rep from * 6 more times (28 sts in patt). Rnd 2: Knit.Rnd 3: Knit to Marker 3, *k1fbf, p3tog; rep from * to end. Rnd 4: K1, M1L (see Glossary), knit to 2 sts before Marker 3, k2tog, knit to end. Rep Rnds 1–4 fourteen more times—1 st rem between Markers 2 and 3. Work heel as for right sock. Foot:Rnds 1 and 3: Knit.Rnd 2: Knit to 1 st before Marker 2, sl 1, re-move m, place slipped st on left needle, p5tog (slipped st and first 4 sts of patt; 4 sts dec’d), replace Marker 2, *k1fbf, p3tog; rep from * to m, knit to end.Rnd 4: Knit to m, *p3tog, k1fbf; rep from * to m, knit to end. Rep Rnds 1–4 until all patt sts have been dec’d—56 sts rem. Shift sts and pm as for right sock. Work in St st until foot measures 2½" less than desired foot length, ending at Marker 1. Work toe as for right sock.
FiNiSHiNGWeave in ends and block.
Amy Palmer is editor of Knitscene. A transplant
from Florida, she enjoys being able to wear
her handknitted socks in Colorado.
Interweave Knits presents 5 favorite sock patterns©F+W Media, Inc. | All rights reserved | F+W Media grants permission for any or all pages in this issue to be copied for personal use | knittingdaily.com
15
With waste yarn and crochet hook, make a loose chain of about four stitches more than you need to cast on. With needle, working yarn, and beginning two stitches from end of chain, pick up and knit one stitch through the back loop of each crochet chain (Figure 1) for desired number of stitches. Work the piece as desired, and when you’re ready to work in the opposite direction, pull out the crochet chain to expose live stitches (Figure 2).
Figure 1 Figure 2
CroChet Chain (Provisional) Cast-on
beg beginning; begin; begins bet between BO bind off CC contrasting color cm centimeter(s) cn cable needle CO cast on cont continue(s); continuing dec(s) decrease(s); decreasing dpn double-pointed needle(s) foll following; follows g gram(s) inc increase(s); increasing k knit k1f&b knit into front and back of same st k2tog knit two stitches together kwise knitwise LC left cross m(s) marker(s) MC main color mm millimeter(s) M1 (P) make one (purl) M1R (L) make one right (left) p purl p1f&b purl into front and back of same st p2tog purl two stitches together patt(s) pattern(s) pm place marker psso pass slipped stitch over p2sso pass two slipped stitches
over pwise purlwise RC right cross rem remain(s); remaining rep repeat; repeating rev St st reverse stockinette stitch rib ribbing rnd(s) round(s) RS right side rev sc reverse single crochet sc single crochet sk skip sl slip sl st slip stitch (sl 1 st pwise unless oth-
erwise indicated) ssk slip 1 kwise, slip 1 kwise,
k2 sl sts tog tbl (decrease) ssp slip 1 kwise, slip 1 kwise, p2 sl sts
tog tbl (decrease) st(s) stitch(es) St st stockinette stitch tbl through back loop tog together WS wrong side wyb with yarn in back wyf with yarn in front yo yarn over * repeat starting point
(i.e., repeat from *) * * repeat all instructions
between asterisks ( ) alternate measurements
and/or instructions [ ] instructions that are to be worked as
a group a specified number of times
learn it • abbreviations
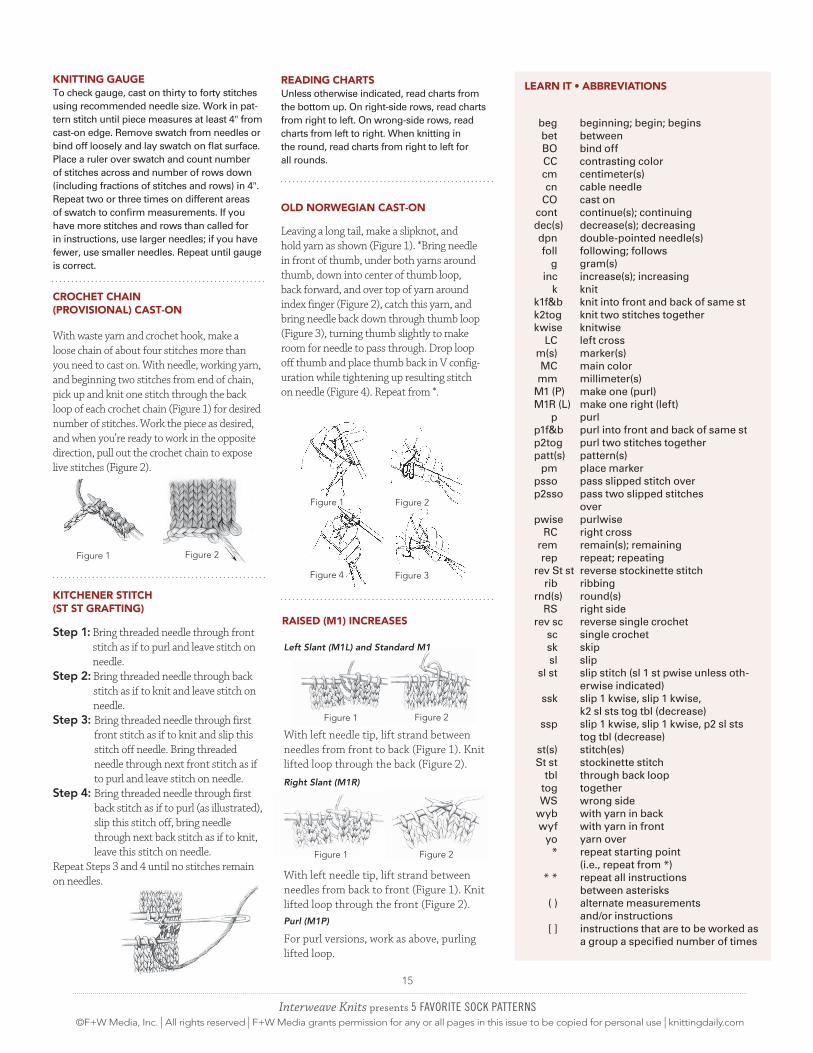
Leaving a long tail, make a slipknot, and hold yarn as shown (Figure 1). *Bring needle in front of thumb, under both yarns around thumb, down into center of thumb loop, back forward, and over top of yarn around index finger (Figure 2), catch this yarn, and bring needle back down through thumb loop (Figure 3), turning thumb slightly to make room for needle to pass through. Drop loop off thumb and place thumb back in V config-uration while tightening up resulting stitch on needle (Figure 4). Repeat from *.
old norwegian Cast-on
Figure 3Figure 4
Figure 2Figure 1
Step 1: Bring threaded needle through front stitch as if to purl and leave stitch on needle.
Step 2: Bring threaded needle through back stitch as if to knit and leave stitch on needle.
Step 3: Bring threaded needle through first front stitch as if to knit and slip this stitch off needle. Bring threaded needle through next front stitch as if to purl and leave stitch on needle.
Step 4: Bring threaded needle through first back stitch as if to purl (as illustrated), slip this stitch off, bring needle through next back stitch as if to knit, leave this stitch on needle.
Repeat Steps 3 and 4 until no stitches remain on needles.
KitChener stitCh (st st grafting)
raised (M1) inCreases
With left needle tip, lift strand between needles from back to front (Figure 1). Knit lifted loop through the front (Figure 2).
With left needle tip, lift strand between needles from front to back (Figure 1). Knit lifted loop through the back (Figure 2).
Figure 2
Right Slant (M1R)
For purl versions, work as above, purling lifted loop.
Figure 1
Figure 2Figure 1
Purl (M1P)
Left Slant (M1L) and Standard M1
Knitting gaugeTo check gauge, cast on thirty to forty stitches using recommended needle size. Work in pat-tern stitch until piece measures at least 4" from cast-on edge. Remove swatch from needles or bind off loosely and lay swatch on flat surface. Place a ruler over swatch and count number of stitches across and number of rows down (including fractions of stitches and rows) in 4". Repeat two or three times on different areas of swatch to confirm measurements. If you have more stitches and rows than called for in instructions, use larger needles; if you have fewer, use smaller needles. Repeat until gauge is correct.
reading ChartsUnless otherwise indicated, read charts from the bottom up. On right-side rows, read charts from right to left. On wrong-side rows, read charts from left to right. When knitting in the round, read charts from right to left for all rounds.