presents 44GUIDES FREE - Sew News · Sew Easy Pillows FREE SEWING 4 GUIDES 1 Home-Dec...
18
presents 1 2 3 4 1 Home-Dec Trims by Trenia Bell 2 Pillow Talk by Pam Archer 3 Repurposed Runner by Rebecca Brent Kemp 4 Rethinking Wool by Linda Lee Sew Easy Pillows FREE SEWING GUIDES 4 4
Transcript of presents 44GUIDES FREE - Sew News · Sew Easy Pillows FREE SEWING 4 GUIDES 1 Home-Dec...
presents
11 22 33 4411 Home-Dec Trims
by Trenia Bell
22 Pillow Talkby Pam Archer
33 Repurposed Runnerby Rebecca Brent Kemp
44 Rethinking Woolby Linda Lee
Sew Easy Pillows
FREESEWING GUIDES44
Sew Easy Pillows
FREESEWING GUIDES44
11 Home-Dec Trims ..............................................PAGE 1
22 Pillow Talk..................................................PAGE 6
33 Repurposed Runner.................................PAGE 10
44 Rethinking Wool.........................................PAGE 12
TABLE OF CONTENTS
Learn how to quickly and easily update your home décor bycreating unique designer pillows in these four how-to sewingguides. Follow the must-have tips for embellishing home-decprojects in “Home-Dec Trim,” and then make three eye-catchingpillows using your new skills. In “Pillow Talk,” discover how toupdate a ready-made pillow by creating a stylish wrap. “Repur-posed Runner” shows you a clever way to recycle a table run-ner into a pair of new pillows. Find out how to use wool tostitch stunning throw pillows in “Rethinking Wool.” Add thesesimple pillow projects to your sewing to-do list to add fun andflair to your home décor!
Happy sewing!
Beth BradleyAssociate Editor, Sew News
1 sewnews
how to Basics
Trim Types
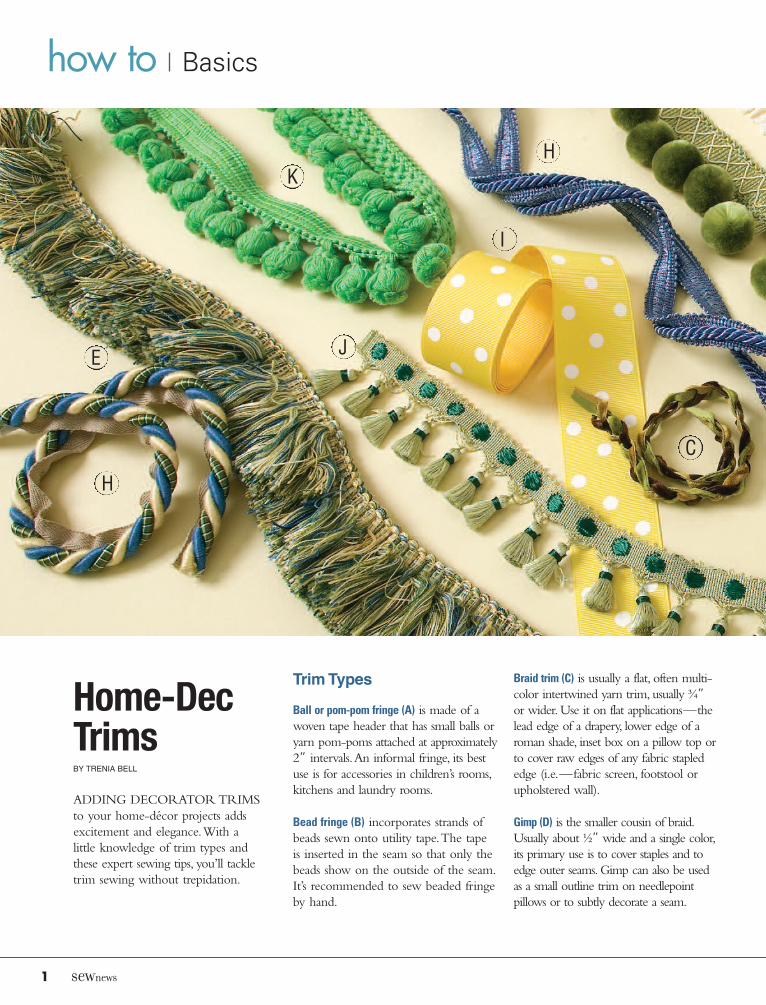
Ball or pom-pom fringe (A) is made of awoven tape header that has small balls oryarn pom-poms attached at approximately2” intervals.An informal fringe, its bestuse is for accessories in children’s rooms,kitchens and laundry rooms.
Bead fringe (B) incorporates strands ofbeads sewn onto utility tape.The tapeis inserted in the seam so that only thebeads show on the outside of the seam.It’s recommended to sew beaded fringeby hand.
Braid trim (C) is usually a flat, often multi-color intertwined yarn trim, usually ¾”or wider.Use it on flat applications—thelead edge of a drapery, lower edge of aroman shade, inset box on a pillow top orto cover raw edges of any fabric staplededge (i.e.—fabric screen, footstool orupholstered wall).
Gimp (D) is the smaller cousin of braid.Usually about ½” wide and a single color,its primary use is to cover staples and toedge outer seams.Gimp can also be usedas a small outline trim on needlepointpillows or to subtly decorate a seam.
Home-DecTrimsBY TRENIA BELL
ADDING DECORATORTRIMSto your home-décor projects addsexcitement and elegance.With alittle knowledge of trim types andthese expert sewing tips, you’ll tackletrim sewing without trepidation.
H
C
I
K
JE
H
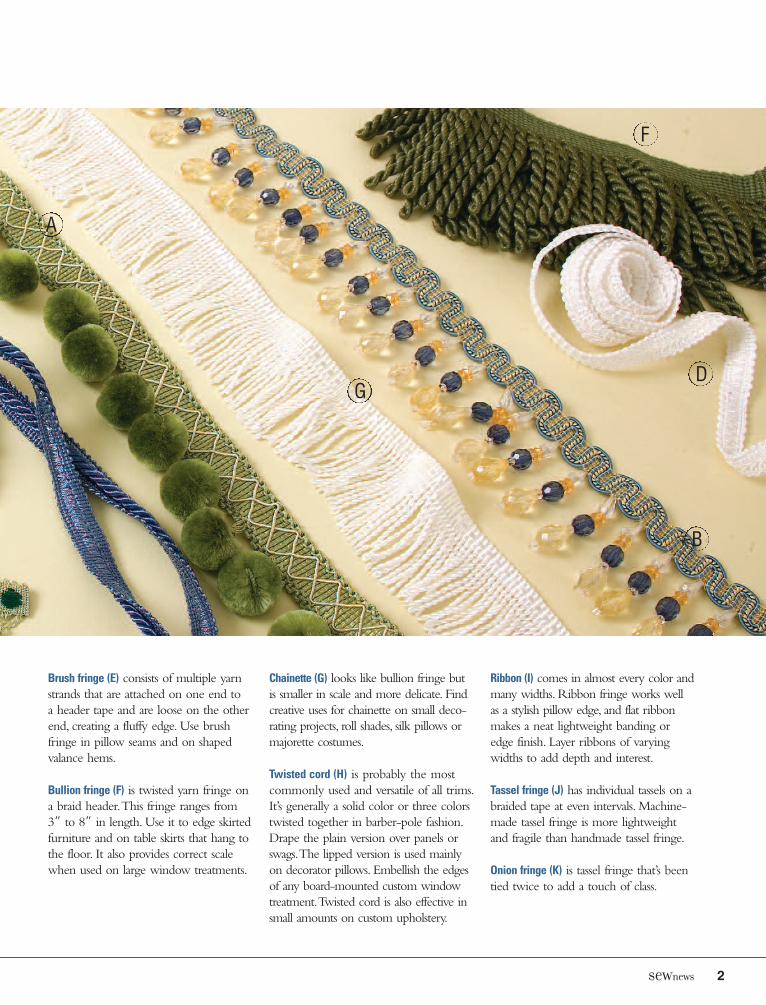
Brush fringe (E) consists of multiple yarnstrands that are attached on one end toa header tape and are loose on the otherend, creating a fluffy edge. Use brushfringe in pillow seams and on shapedvalance hems.
Bullion fringe (F) is twisted yarn fringe ona braid header.This fringe ranges from3” to 8” in length. Use it to edge skirtedfurniture and on table skirts that hang tothe floor. It also provides correct scalewhen used on large window treatments.
Chainette (G) looks like bullion fringe butis smaller in scale and more delicate. Findcreative uses for chainette on small deco-rating projects, roll shades, silk pillows ormajorette costumes.
Twisted cord (H) is probably the mostcommonly used and versatile of all trims.It’s generally a solid color or three colorstwisted together in barber-pole fashion.Drape the plain version over panels orswags.The lipped version is used mainlyon decorator pillows. Embellish the edgesof any board-mounted custom windowtreatment.Twisted cord is also effective insmall amounts on custom upholstery.
Ribbon (I) comes in almost every color andmany widths.Ribbon fringe works wellas a stylish pillow edge, and flat ribbonmakes a neat lightweight banding oredge finish. Layer ribbons of varyingwidths to add depth and interest.
Tassel fringe (J) has individual tassels on abraided tape at even intervals. Machine-made tassel fringe is more lightweightand fragile than handmade tassel fringe.
Onion fringe (K) is tassel fringe that’s beentied twice to add a touch of class.
sewnews 2
D
F
B
G
A
3 sewnews
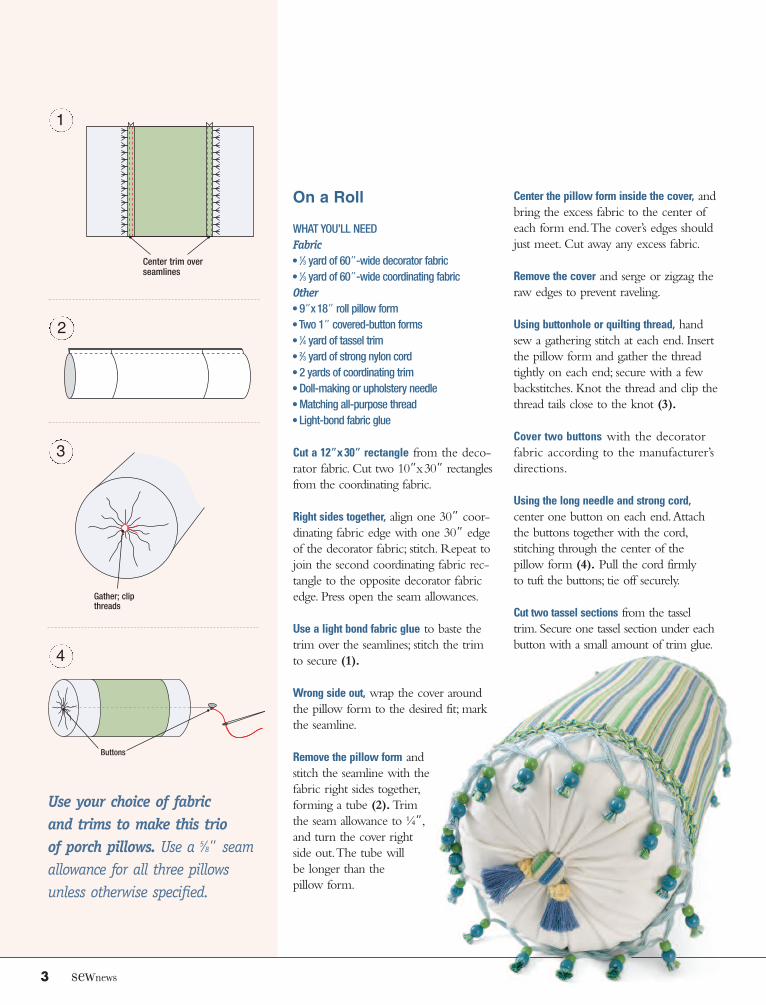
Use your choice of fabricand trims to make this trioof porch pillows. Use a 5⁄8” seamallowance for all three pillowsunless otherwise specified.
On a Roll
WHAT YOU’LL NEEDFabric7 1⁄3 yard of 60”-wide decorator fabric7 1⁄3 yard of 60”-wide coordinating fabricOther7 9”x18” roll pillow form7Two 1” covered-button forms7 1⁄4 yard of tassel trim7 2⁄3 yard of strong nylon cord7 2 yards of coordinating trim7Doll-making or upholstery needle7Matching all-purpose thread7 Light-bond fabric glue
Cut a 12”x30” rectangle from the deco-rator fabric. Cut two 10”x30” rectanglesfrom the coordinating fabric.
Right sides together, align one 30” coor-dinating fabric edge with one 30” edgeof the decorator fabric; stitch. Repeat tojoin the second coordinating fabric rec-tangle to the opposite decorator fabricedge. Press open the seam allowances.
Use a light bond fabric glue to baste thetrim over the seamlines; stitch the trimto secure (1).
Wrong side out, wrap the cover aroundthe pillow form to the desired fit; markthe seamline.
Remove the pillow form andstitch the seamline with thefabric right sides together,forming a tube (2).Trimthe seam allowance to ¼”,and turn the cover rightside out.The tube willbe longer than thepillow form.
Center the pillow form inside the cover, andbring the excess fabric to the center ofeach form end.The cover’s edges shouldjust meet. Cut away any excess fabric.
Remove the cover and serge or zigzag theraw edges to prevent raveling.
Using buttonhole or quilting thread, handsew a gathering stitch at each end. Insertthe pillow form and gather the threadtightly on each end; secure with a fewbackstitches. Knot the thread and clip thethread tails close to the knot (3).
Cover two buttons with the decoratorfabric according to the manufacturer’sdirections.
Using the long needle and strong cord,center one button on each end.Attachthe buttons together with the cord,stitching through the center of thepillow form (4). Pull the cord firmlyto tuft the buttons; tie off securely.
Cut two tassel sections from the tasseltrim. Secure one tassel section under eachbutton with a small amount of trim glue.
Center trim overseamlines
Buttons
Gather; clipthreads
1
2
3
4
sewnews 4
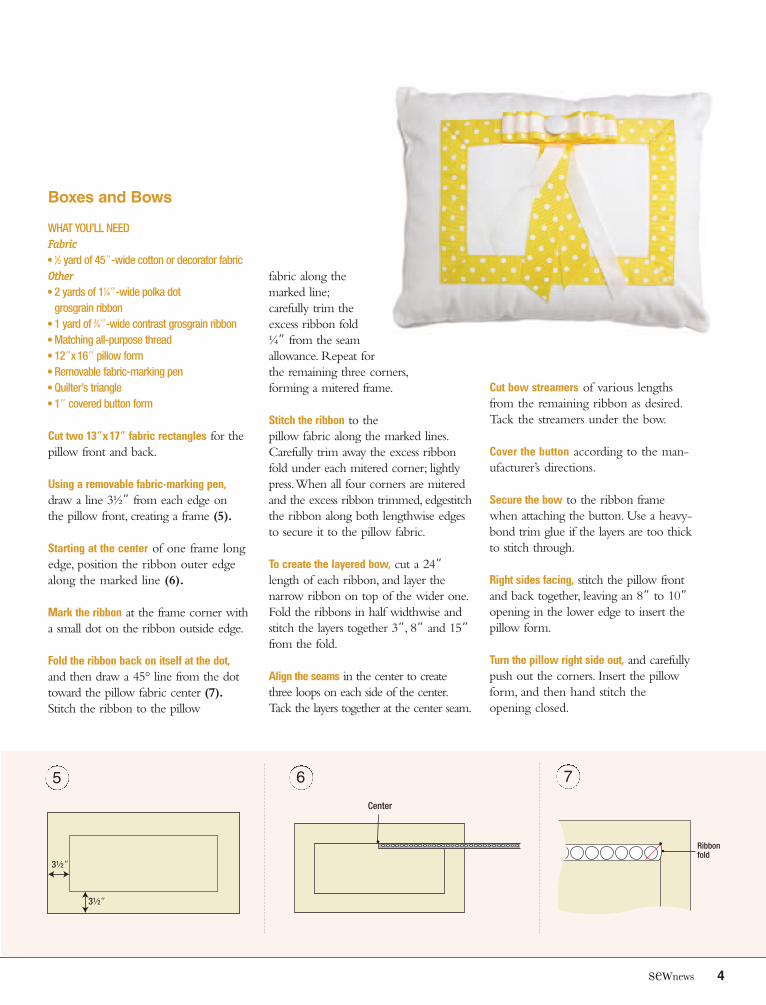
Boxes and Bows
WHATYOU’LL NEEDFabric7 1⁄2 yard of 45”-wide cotton or decorator fabricOther7 2 yards of 11⁄4”-wide polka dotgrosgrain ribbon
7 1 yard of 3⁄4”-wide contrast grosgrain ribbon7Matching all-purpose thread7 12”x16” pillow form7 Removable fabric-marking pen7Quilter’s triangle7 1” covered button form
Cut two 13”x17” fabric rectangles for thepillow front and back.
Using a removable fabric-marking pen,draw a line 3½” from each edge onthe pillow front, creating a frame (5).
Starting at the center of one frame longedge, position the ribbon outer edgealong the marked line (6).
Mark the ribbon at the frame corner witha small dot on the ribbon outside edge.
Fold the ribbon back on itself at the dot,and then draw a 45° line from the dottoward the pillow fabric center (7).Stitch the ribbon to the pillow
fabric along themarked line;carefully trim theexcess ribbon fold¼” from the seamallowance. Repeat forthe remaining three corners,forming a mitered frame.
Stitch the ribbon to thepillow fabric along the marked lines.Carefully trim away the excess ribbonfold under each mitered corner; lightlypress.When all four corners are miteredand the excess ribbon trimmed, edgestitchthe ribbon along both lengthwise edgesto secure it to the pillow fabric.
To create the layered bow, cut a 24”length of each ribbon, and layer thenarrow ribbon on top of the wider one.Fold the ribbons in half widthwise andstitch the layers together 3”, 8” and 15”from the fold.
Align the seams in the center to createthree loops on each side of the center.Tack the layers together at the center seam.
Cut bow streamers of various lengthsfrom the remaining ribbon as desired.Tack the streamers under the bow.
Cover the button according to the man-ufacturer’s directions.
Secure the bow to the ribbon framewhen attaching the button. Use a heavy-bond trim glue if the layers are too thickto stitch through.
Right sides facing, stitch the pillow frontand back together, leaving an 8” to 10”opening in the lower edge to insert thepillow form.
Turn the pillow right side out, and carefullypush out the corners. Insert the pillowform, and then hand stitch theopening closed.
5 6 7
31⁄2”
31⁄2”
Center
Ribbonfold
5 sewnews
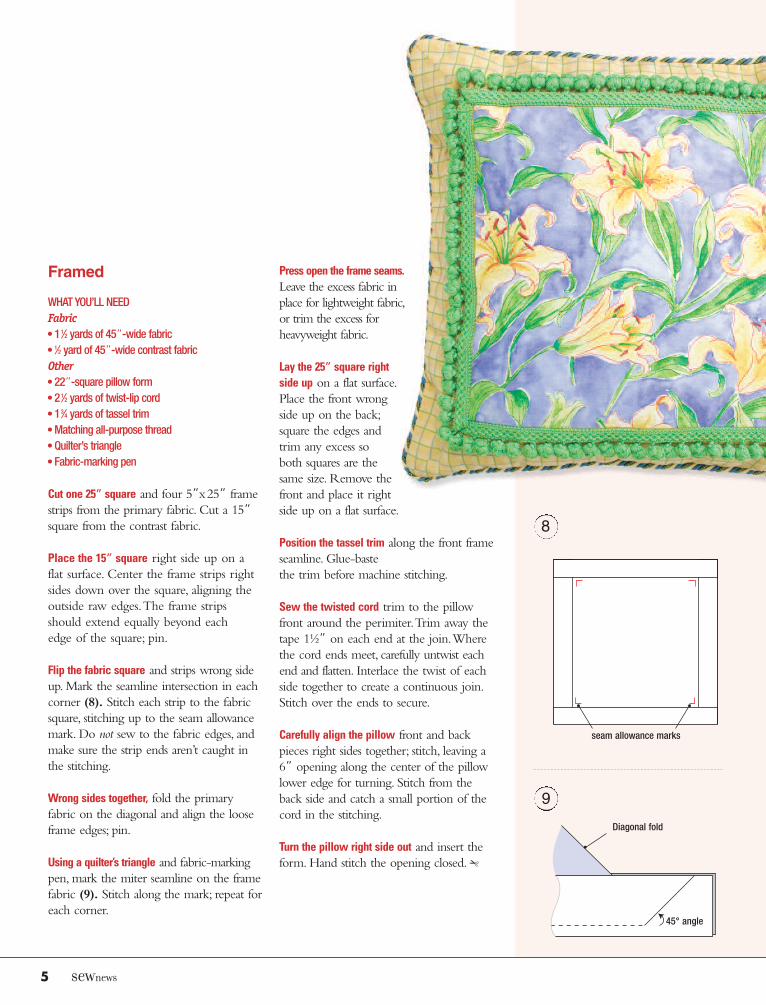
Framed
WHATYOU’LL NEEDFabric7 11⁄2 yards of 45”-wide fabric7 1⁄2 yard of 45”-wide contrast fabricOther7 22”-square pillow form7 21⁄2 yards of twist-lip cord7 13⁄4 yards of tassel trim7Matching all-purpose thread7Quilter’s triangle7 Fabric-marking pen
Cut one 25” square and four 5”x25” framestrips from the primary fabric. Cut a 15”square from the contrast fabric.
Place the 15” square right side up on aflat surface. Center the frame strips rightsides down over the square, aligning theoutside raw edges.The frame stripsshould extend equally beyond eachedge of the square; pin.
Flip the fabric square and strips wrong sideup.Mark the seamline intersection in eachcorner (8). Stitch each strip to the fabricsquare, stitching up to the seam allowancemark. Do not sew to the fabric edges, andmake sure the strip ends aren’t caught inthe stitching.
Wrong sides together, fold the primaryfabric on the diagonal and align the looseframe edges; pin.
Using a quilter’s triangle and fabric-markingpen, mark the miter seamline on the framefabric (9). Stitch along the mark; repeat foreach corner.
Press open the frame seams.Leave the excess fabric inplace for lightweight fabric,or trim the excess forheavyweight fabric.
Lay the 25” square rightside up on a flat surface.Place the front wrongside up on the back;square the edges andtrim any excess soboth squares are thesame size. Remove thefront and place it rightside up on a flat surface.
Position the tassel trim along the front frameseamline. Glue-bastethe trim before machine stitching.
Sew the twisted cord trim to the pillowfront around the perimiter.Trim away thetape 1½” on each end at the join.Wherethe cord ends meet, carefully untwist eachend and flatten. Interlace the twist of eachside together to create a continuous join.Stitch over the ends to secure.
Carefully align the pillow front and backpieces right sides together; stitch, leaving a6” opening along the center of the pillowlower edge for turning. Stitch from theback side and catch a small portion of thecord in the stitching.
Turn the pillow right side out and insert theform. Hand stitch the opening closed. Z
seam allowance marks
Diagonal fold
45° angle
8
9
6 sewnews
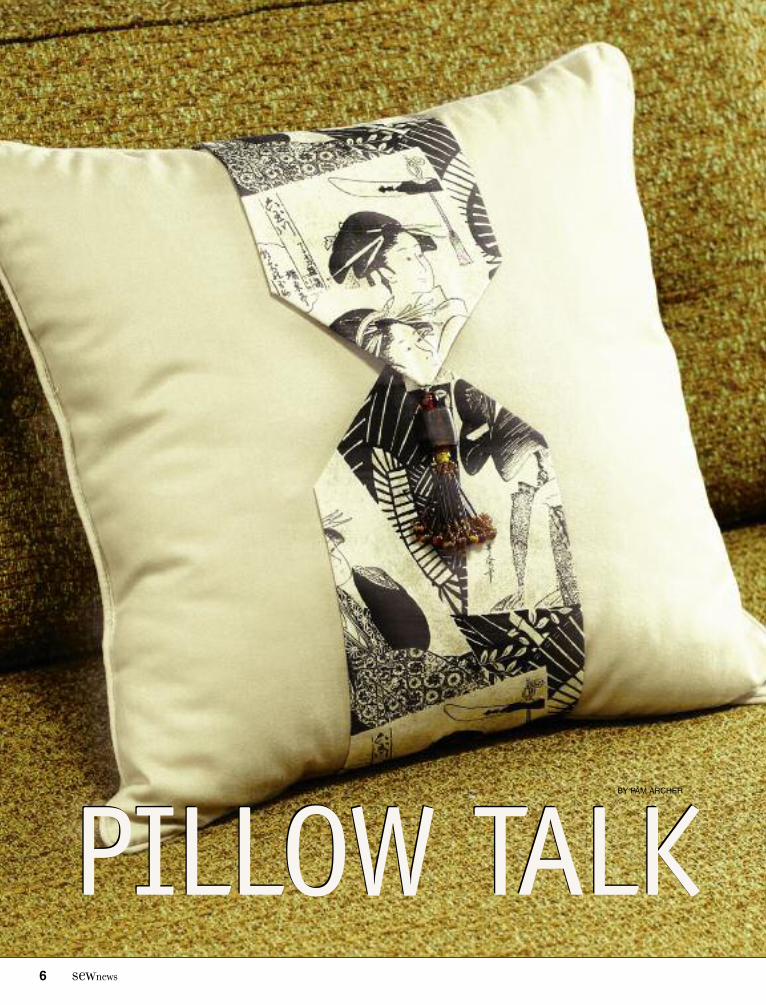
PILLOW TALKPILLOW TALKBY PAM ARCHER
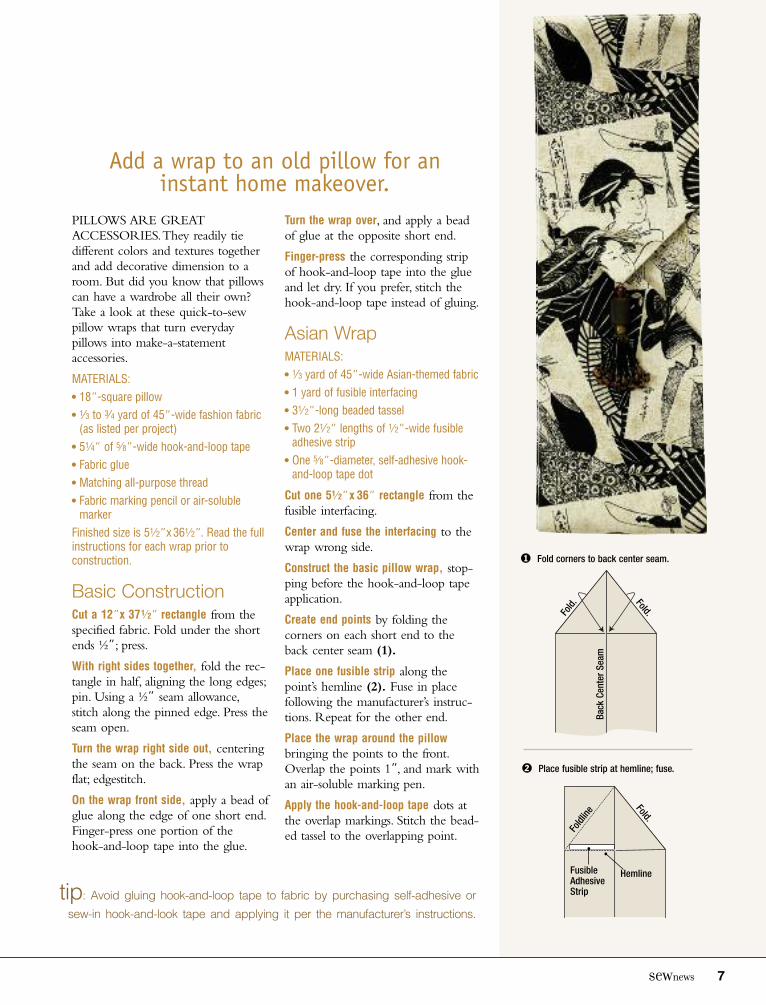
PILLOWS ARE GREATACCESSORIES.They readily tiedifferent colors and textures togetherand add decorative dimension to aroom. But did you know that pillowscan have a wardrobe all their own?Take a look at these quick-to-sewpillow wraps that turn everydaypillows into make-a-statementaccessories.
MATERIALS:7 18”-square pillow7 1⁄3 to 3⁄4 yard of 45”-wide fashion fabric(as listed per project)
7 51⁄4” of 5⁄8”-wide hook-and-loop tape7 Fabric glue7 Matching all-purpose thread7 Fabric marking pencil or air-solublemarker
Finished size is 51⁄2”x361⁄2”. Read the fullinstructions for each wrap prior toconstruction.
Basic ConstructionCut a 12”x 371⁄2” rectangle from thespecified fabric. Fold under the shortends ½”; press.
With right sides together, fold the rec-tangle in half, aligning the long edges;pin. Using a ½” seam allowance,stitch along the pinned edge. Press theseam open.
Turn the wrap right side out, centeringthe seam on the back. Press the wrapflat; edgestitch.
On the wrap front side, apply a bead ofglue along the edge of one short end.Finger-press one portion of thehook-and-loop tape into the glue.
Turn the wrap over, and apply a beadof glue at the opposite short end.
Finger-press the corresponding stripof hook-and-loop tape into the glueand let dry. If you prefer, stitch thehook-and-loop tape instead of gluing.
Asian WrapMATERIALS:7 1⁄3 yard of 45”-wide Asian-themed fabric7 1 yard of fusible interfacing7 31⁄2”-long beaded tassel7 Two 21⁄2” lengths of 1⁄2”-wide fusibleadhesive strip
7 One 5⁄8”-diameter, self-adhesive hook-and-loop tape dot
Cut one 51⁄2”x 36” rectangle from thefusible interfacing.
Center and fuse the interfacing to thewrap wrong side.
Construct the basic pillow wrap, stop-ping before the hook-and-loop tapeapplication.
Create end points by folding thecorners on each short end to theback center seam (1).
Place one fusible strip along thepoint’s hemline (2). Fuse in placefollowing the manufacturer’s instruc-tions. Repeat for the other end.
Place the wrap around the pillowbringing the points to the front.Overlap the points 1”, and mark withan air-soluble marking pen.
Apply the hook-and-loop tape dots atthe overlap markings. Stitch the bead-ed tassel to the overlapping point.
sewnews 7
tip: Avoid gluing hook-and-loop tape to fabric by purchasing self-adhesive or
sew-in hook-and-look tape and applying it per the manufacturer’s instructions.
Add a wrap to an old pillow for aninstant home makeover.
1 Fold corners to back center seam.
2 Place fusible strip at hemline; fuse.
Back
Center
Seam
Fold.
Foldline
Fold.Fold.
FusibleAdhesiveStrip
Hemline
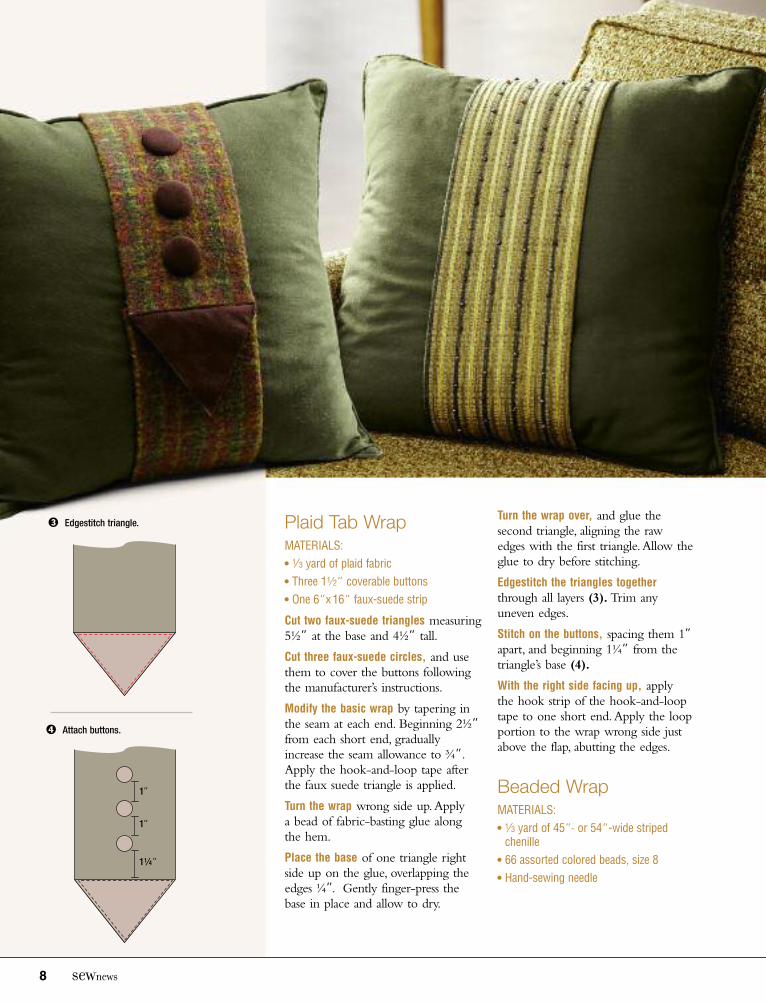
Plaid Tab WrapMATERIALS:7 1⁄3 yard of plaid fabric7 Three 11⁄2” coverable buttons7 One 6”x16” faux-suede strip
Cut two faux-suede triangles measuring5½” at the base and 4½” tall.
Cut three faux-suede circles, and usethem to cover the buttons followingthe manufacturer’s instructions.
Modify the basic wrap by tapering inthe seam at each end. Beginning 2½”from each short end, graduallyincrease the seam allowance to ¾”.Apply the hook-and-loop tape afterthe faux suede triangle is applied.
Turn the wrap wrong side up.Applya bead of fabric-basting glue alongthe hem.
Place the base of one triangle rightside up on the glue, overlapping theedges ¼”. Gently finger-press thebase in place and allow to dry.
Turn the wrap over, and glue thesecond triangle, aligning the rawedges with the first triangle.Allow theglue to dry before stitching.
Edgestitch the triangles togetherthrough all layers (3).Trim anyuneven edges.
Stitch on the buttons, spacing them 1”apart, and beginning 1¼” from thetriangle’s base (4).
With the right side facing up, applythe hook strip of the hook-and-looptape to one short end.Apply the loopportion to the wrap wrong side justabove the flap, abutting the edges.
Beaded WrapMATERIALS:7 1⁄3 yard of 45”- or 54”-wide stripedchenille
7 66 assorted colored beads, size 87 Hand-sewing needle
8 sewnews
3 Edgestitch triangle.
4 Attach buttons.
1”
1”
11⁄4”
sewnews 9
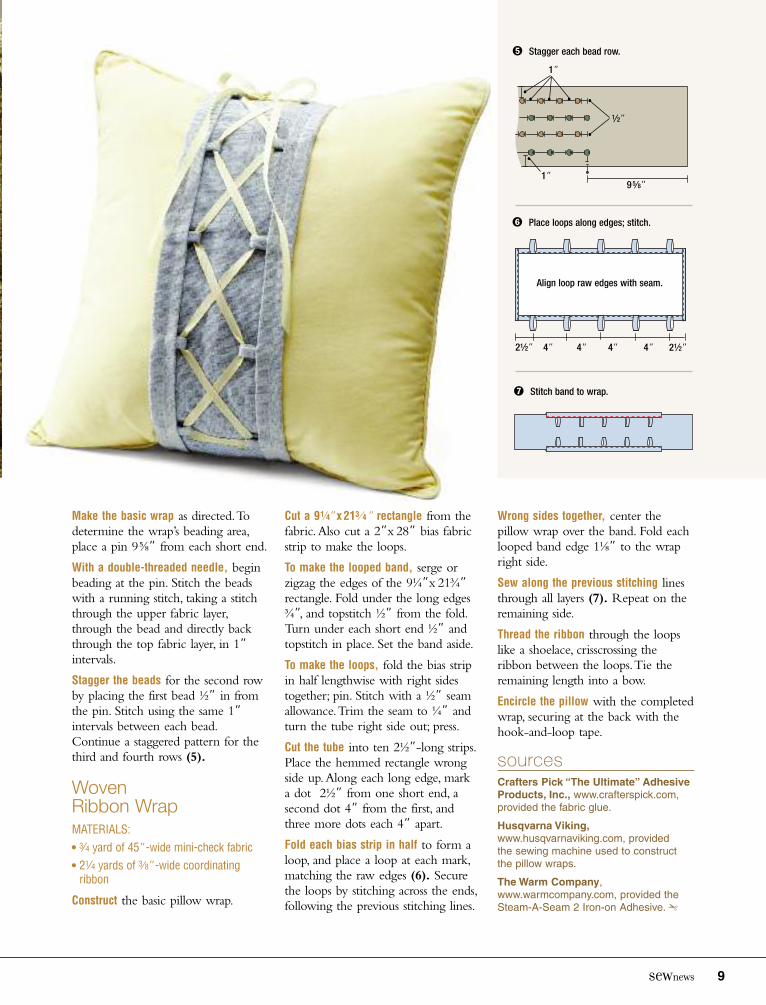
Make the basic wrap as directed.Todetermine the wrap’s beading area,place a pin 9⅝” from each short end.
With a double-threaded needle, beginbeading at the pin. Stitch the beadswith a running stitch, taking a stitchthrough the upper fabric layer,through the bead and directly backthrough the top fabric layer, in 1”intervals.
Stagger the beads for the second rowby placing the first bead ½” in fromthe pin. Stitch using the same 1”intervals between each bead.Continue a staggered pattern for thethird and fourth rows (5).
WovenRibbon WrapMATERIALS:7 3⁄4 yard of 45”-wide mini-check fabric7 21⁄4 yards of 3⁄8”-wide coordinatingribbon
Construct the basic pillow wrap.
Cut a 91⁄4”x 213⁄ 4” rectangle from thefabric.Also cut a 2”x 28” bias fabricstrip to make the loops.
To make the looped band, serge orzigzag the edges of the 9¼”x 21¾”rectangle. Fold under the long edges¾”, and topstitch ½” from the fold.Turn under each short end ½” andtopstitch in place. Set the band aside.
To make the loops, fold the bias stripin half lengthwise with right sidestogether; pin. Stitch with a ½” seamallowance.Trim the seam to ¼” andturn the tube right side out; press.
Cut the tube into ten 2½”-long strips.Place the hemmed rectangle wrongside up.Along each long edge, marka dot 2½” from one short end, asecond dot 4” from the first, andthree more dots each 4” apart.
Fold each bias strip in half to form aloop, and place a loop at each mark,matching the raw edges (6). Securethe loops by stitching across the ends,following the previous stitching lines.
Wrong sides together, center thepillow wrap over the band. Fold eachlooped band edge 1⅛” to the wrapright side.
Sew along the previous stitching linesthrough all layers (7). Repeat on theremaining side.
Thread the ribbon through the loopslike a shoelace, crisscrossing theribbon between the loops.Tie theremaining length into a bow.
Encircle the pillow with the completedwrap, securing at the back with thehook-and-loop tape.
sourcesCrafters Pick “The Ultimate” AdhesiveProducts, Inc., www.crafterspick.com,provided the fabric glue.
Husqvarna Viking,www.husqvarnaviking.com, providedthe sewing machine used to constructthe pillow wraps.
The Warm Company,www.warmcompany.com, provided theSteam-A-Seam 2 Iron-on Adhesive. Z
5 Stagger each bead row.
1”
1”95⁄8”
1⁄2”
6 Place loops along edges; stitch.
7 Stitch band to wrap.
Align loop raw edges with seam.
4” 4” 4” 4” 21⁄2”21⁄2”
sewnews 10
projectquick & easy
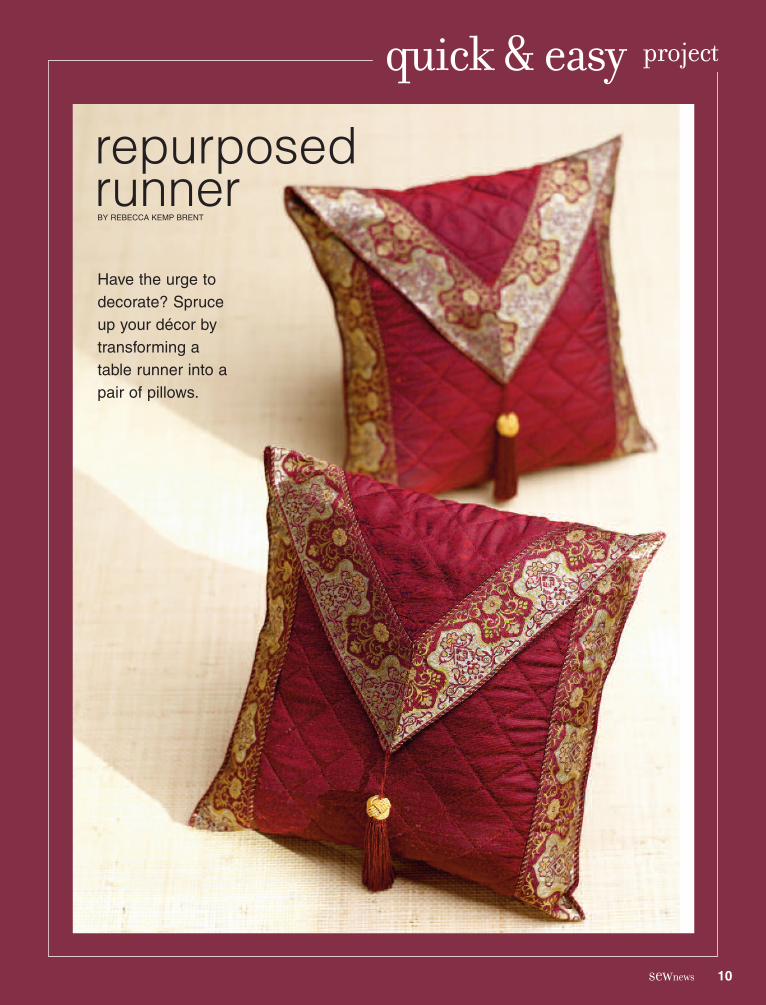
Have the urge todecorate? Spruceup your décor bytransforming atable runner into apair of pillows.
repurposedrunnerBY REBECCA KEMP BRENT
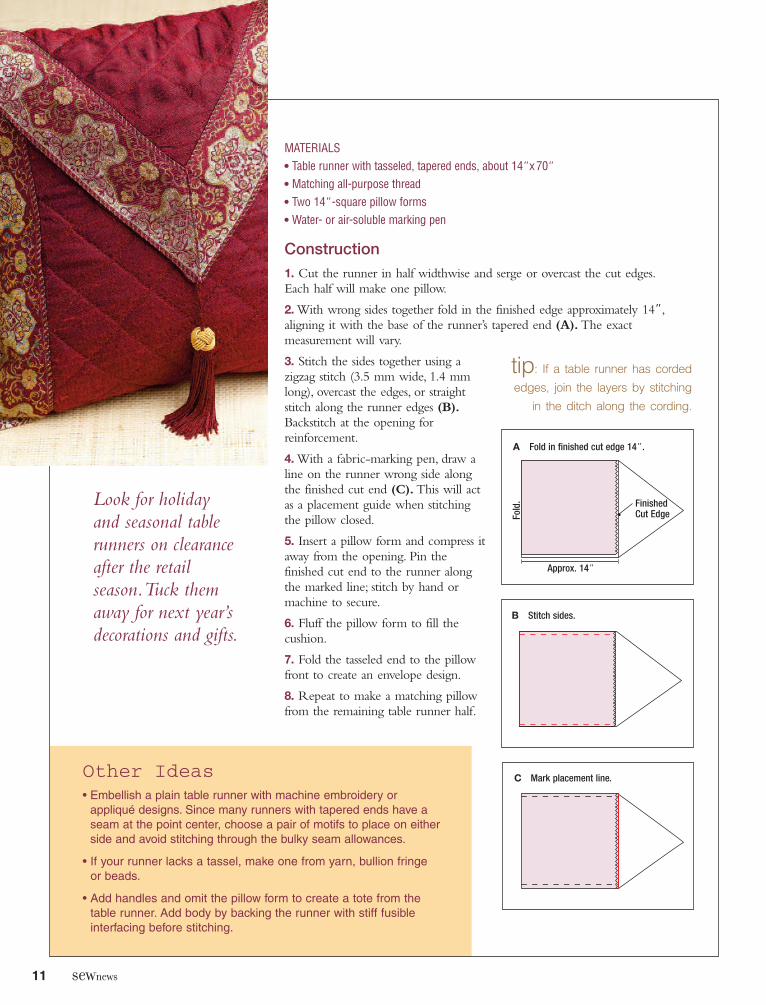
MATERIALS7 Table runner with tasseled, tapered ends, about 14”x70”7 Matching all-purpose thread7 Two 14”-square pillow forms7 Water- or air-soluble marking pen
Construction1. Cut the runner in half widthwise and serge or overcast the cut edges.Each half will make one pillow.
2. With wrong sides together fold in the finished edge approximately 14”,aligning it with the base of the runner’s tapered end (A).The exactmeasurement will vary.
3. Stitch the sides together using azigzag stitch (3.5 mm wide, 1.4 mmlong), overcast the edges, or straightstitch along the runner edges (B).Backstitch at the opening forreinforcement.
4. With a fabric-marking pen, draw aline on the runner wrong side alongthe finished cut end (C).This will actas a placement guide when stitchingthe pillow closed.
5. Insert a pillow form and compress itaway from the opening. Pin thefinished cut end to the runner alongthe marked line; stitch by hand ormachine to secure.
6. Fluff the pillow form to fill thecushion.
7. Fold the tasseled end to the pillowfront to create an envelope design.
8. Repeat to make a matching pillowfrom the remaining table runner half.
11 sewnews
Look for holidayand seasonal tablerunners on clearanceafter the retailseason.Tuck themaway for next year’sdecorations and gifts.
Other Ideas• Embellish a plain table runner with machine embroidery orappliqué designs. Since many runners with tapered ends have aseam at the point center, choose a pair of motifs to place on eitherside and avoid stitching through the bulky seam allowances.
• If your runner lacks a tassel, make one from yarn, bullion fringeor beads.
• Add handles and omit the pillow form to create a tote from thetable runner. Add body by backing the runner with stiff fusibleinterfacing before stitching.
tip: If a table runner has corded
edges, join the layers by stitching
in the ditch along the cording.
B Stitch sides.
C Mark placement line.
A Fold in finished cut edge 14”.
FinishedCut EdgeFo
ld.
Approx. 14”
12 sewnews
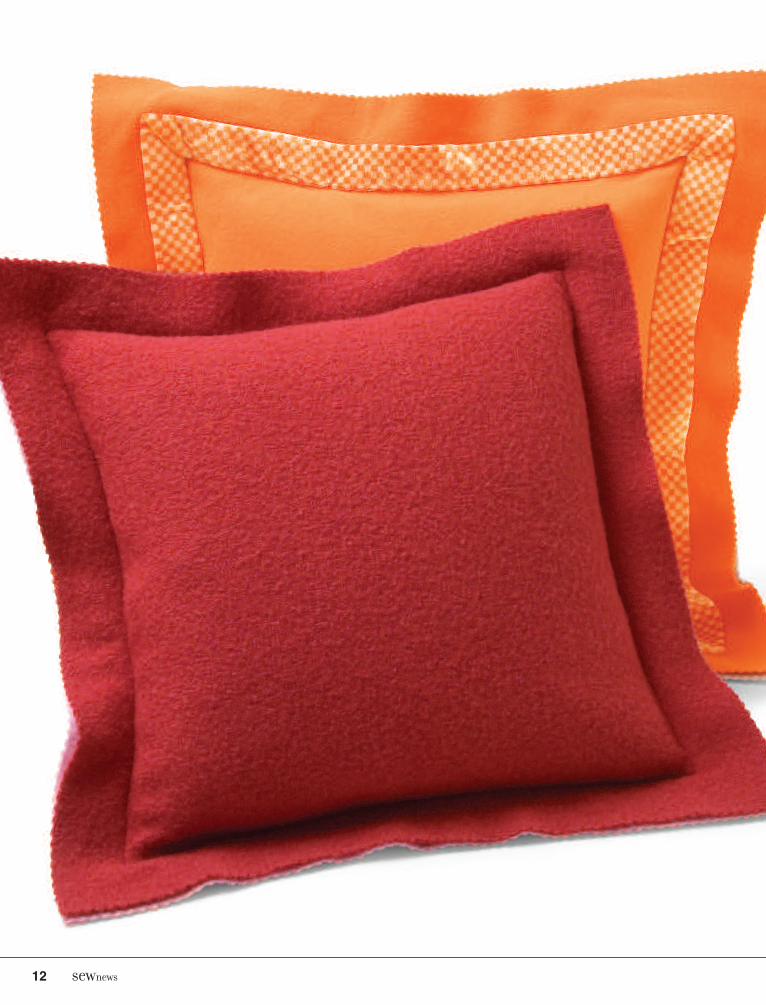
WHEN LOOKING FOR PILLOWFABRIC, most people head to thedecorator department of the fabricstore, but scouring your stash ofgarment fabrics instead can be justthe ticket. Remnants from coats,sweaters, blazers and other winter-wear offer up all kinds of newpossibilities for pillow making.Simple details, minimal embellish-
ments, and best of all, the ability touse raw edges, highlight the naturalbeauty of wool and make it agenuine candidate for any season.
FabricsLook for wool fabric that doesn’travel much, such as double-facedwool, which usually has a differentcolor on each side.Another goodchoice is a heavyweight coating, suchas melton or soft cashmere blends.Or look for fabric that shrinks and nolonger ravels when repeatedly washedand dried.This includes single-knitwool jerseys and sweater knits(including old sweaters that no longerfit or are out of style).
To felt wool fabrics, wash them in thehottest water without detergent, andagitate on the longest cycle.After thefirst laundering, dry in a hot dryer.Check the amount of felting andshrinking. If you want a denser lookor more texture, continue washingand agitating until the fabric is felted
how you want it.This can take asmany as five or six washings.
WARM & WOOLYPillowsMATERIALS(Makes one pillow)7 2⁄3 yard each of two colors of fabric(after felting)
7 1⁄8 yard of felted wool jersey or 2 yardsof 11⁄2”-wide ribbon
7 Rotary cutter with pinking blade orpinking shears
7 1⁄8”-wide double-sided tape or narrowstrips of fusible web
7 16”-square pillow form7 Matching thread7 Chalk marker
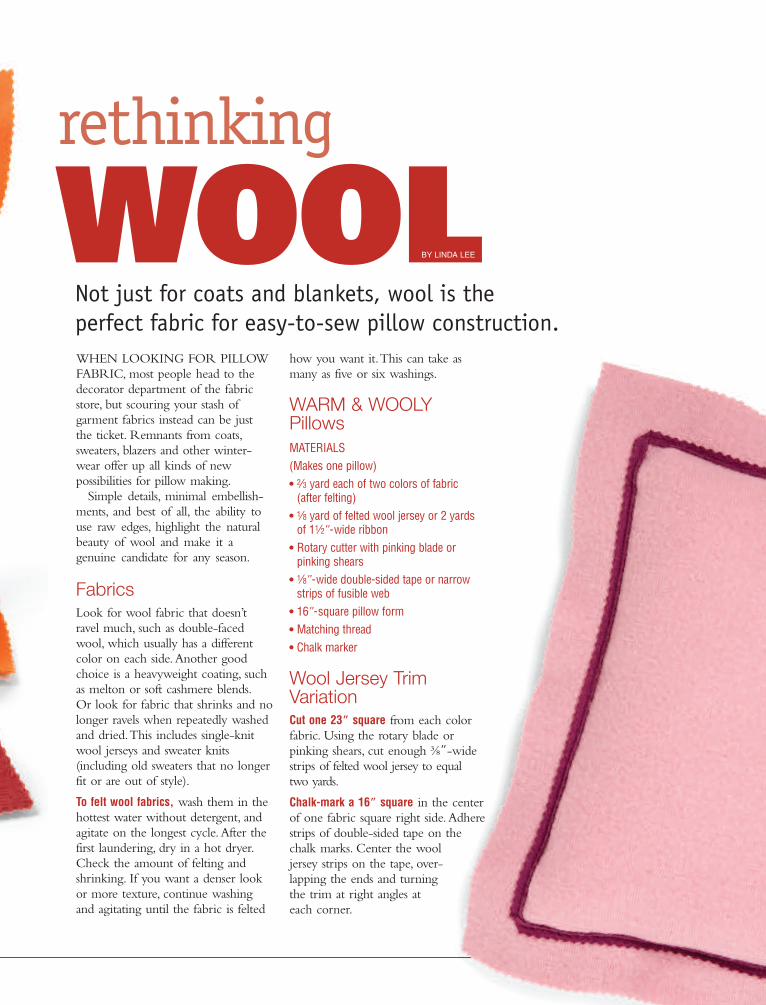
Wool Jersey TrimVariationCut one 23” square from each colorfabric. Using the rotary blade orpinking shears, cut enough ⅜”-widestrips of felted wool jersey to equaltwo yards.
Chalk-mark a 16” square in the centerof one fabric square right side.Adherestrips of double-sided tape on thechalk marks. Center the wooljersey strips on the tape, over-lapping the ends and turningthe trim at right angles ateach corner.
sewnews 5 D E C E M B E R 2 0 0 6 67
Not just for coats and blankets, wool is theperfect fabric for easy-to-sew pillow construction.
rethinking
WOOLBY LINDA LEE
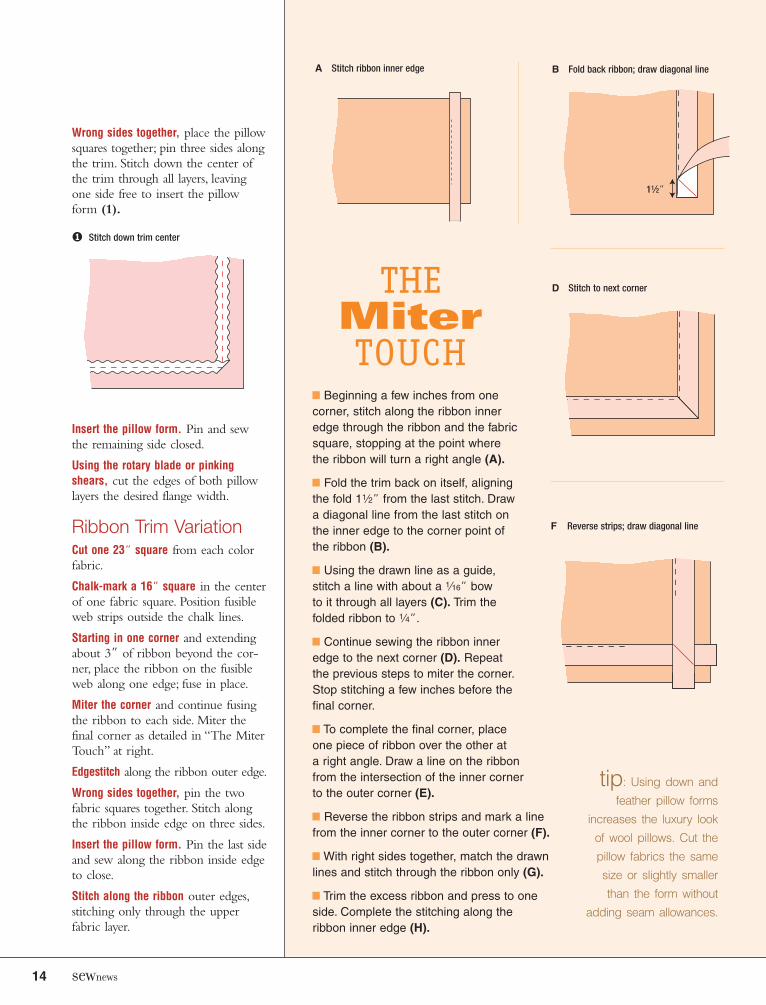
Wrong sides together, place the pillowsquares together; pin three sides alongthe trim. Stitch down the center ofthe trim through all layers, leavingone side free to insert the pillowform (1).
Insert the pillow form. Pin and sewthe remaining side closed.
Using the rotary blade or pinkingshears, cut the edges of both pillowlayers the desired flange width.
Ribbon Trim VariationCut one 23” square from each colorfabric.
Chalk-mark a 16” square in the centerof one fabric square. Position fusibleweb strips outside the chalk lines.
Starting in one corner and extendingabout 3” of ribbon beyond the cor-ner, place the ribbon on the fusibleweb along one edge; fuse in place.
Miter the corner and continue fusingthe ribbon to each side. Miter thefinal corner as detailed in “The MiterTouch” at right.
Edgestitch along the ribbon outer edge.
Wrong sides together, pin the twofabric squares together. Stitch alongthe ribbon inside edge on three sides.
Insert the pillow form. Pin the last sideand sew along the ribbon inside edgeto close.
Stitch along the ribbon outer edges,stitching only through the upperfabric layer.
p Beginning a few inches from onecorner, stitch along the ribbon inneredge through the ribbon and the fabricsquare, stopping at the point wherethe ribbon will turn a right angle (A).
p Fold the trim back on itself, aligningthe fold 11⁄2” from the last stitch. Drawa diagonal line from the last stitch onthe inner edge to the corner point ofthe ribbon (B).
p Using the drawn line as a guide,stitch a line with about a 1⁄16” bowto it through all layers (C). Trim thefolded ribbon to 1⁄4”.
p Continue sewing the ribbon inneredge to the next corner (D). Repeatthe previous steps to miter the corner.Stop stitching a few inches before thefinal corner.
p To complete the final corner, placeone piece of ribbon over the other ata right angle. Draw a line on the ribbonfrom the intersection of the inner cornerto the outer corner (E).
p Reverse the ribbon strips and mark a linefrom the inner corner to the outer corner (F).
p With right sides together, match the drawnlines and stitch through the ribbon only (G).
p Trim the excess ribbon and press to oneside. Complete the stitching along theribbon inner edge (H).
14 sewnews
1 Stitch down trim center
A Stitch ribbon inner edge B Fold back ribbon; draw diagonal line
11⁄2”
THEMiterTOUCH
D Stitch to next corner
F Reverse strips; draw diagonal line
tip: Using down and
feather pillow forms
increases the luxury look
of wool pillows. Cut the
pillow fabrics the same
size or slightly smaller
than the form without
adding seam allowances.
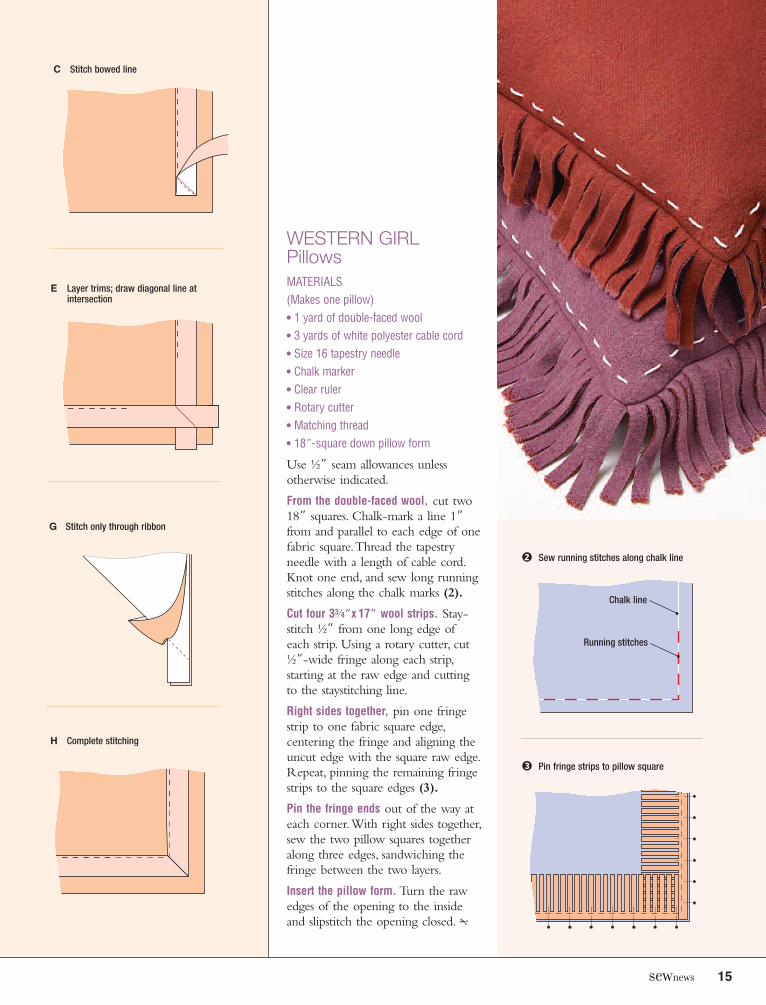
WESTERN GIRLPillowsMATERIALS(Makes one pillow)7 1 yard of double-faced wool7 3 yards of white polyester cable cord7 Size 16 tapestry needle7 Chalk marker7 Clear ruler7 Rotary cutter7 Matching thread7 18”-square down pillow form
Use ½” seam allowances unlessotherwise indicated.
From the double-faced wool, cut two18” squares. Chalk-mark a line 1”from and parallel to each edge of onefabric square.Thread the tapestryneedle with a length of cable cord.Knot one end, and sew long runningstitches along the chalk marks (2).
Cut four 33⁄4”x 17” wool strips. Stay-stitch ½” from one long edge ofeach strip. Using a rotary cutter, cut½”-wide fringe along each strip,starting at the raw edge and cuttingto the staystitching line.
Right sides together, pin one fringestrip to one fabric square edge,centering the fringe and aligning theuncut edge with the square raw edge.Repeat, pinning the remaining fringestrips to the square edges (3).
Pin the fringe ends out of the way ateach corner.With right sides together,sew the two pillow squares togetheralong three edges, sandwiching thefringe between the two layers.
Insert the pillow form. Turn the rawedges of the opening to the insideand slipstitch the opening closed. Z
sewnews 15
2 Sew running stitches along chalk line
3 Pin fringe strips to pillow square
Chalk line
Running stitches
C Stitch bowed line
E Layer trims; draw diagonal line atintersection
G Stitch only through ribbon
H Complete stitching

Get inspired and start creating incredible new designs with a subscription to
• Stitch amazing gifts for your family and friends
• Create a fl attering fashion-savvy outfi t
• Transform your home with colorful pillows, curtains, duvets and more
• Save time with the latest tips from the pros
• Save money with discounts on exclusive designer patterns
Whether you’re an eager beginner or a seasoned
expert, you’ll fi nd every issue of Sew News a
perfect mix of pure inspiration, practical tips and
techniques, and stimulating projects for adding
your own personal touch to every piece you
create – from fashion and accessories to gifts
and home décor.
sewnews.com
SWEET VALENTINE DECORATIONS—FREE patterns included! (P. 50)
10 PLUS-SIZE FIT TIPS + PATTERN REVIEW
Fit & FashionTips, Tricks & Techniques25
Create Your
Signature Style with
DesignerDetails8 zipper rosettes
8 lace overlays
8 needle-felted
flourishes
TOP TRENDS for Spring
Your fit questions answered
Basic draping principles
Basic draping principles
Choosing the right pattern size
Ease explainedEase explained
Fashion sketching 101
Simple pattern Simple pattern manipulation
++
&
Enter our FIRST-EVER
Style StarCONTEST WIN
BIG! (P. 38)
February/March 2011
DISPLAY UNTIL 3/14/11
$5.99 US / $6.99 CAN
sew NEWS
SEWP-110500-Cover.indd cn1
12/15/10 2:44:25 PM12/15/10 2:44:25 PM
Reach our Subscriber Services Center:www.sewnews.com/subscriberservices
800-289-6397 (U.S.) / 386-597-4387 (Int’l) • [email protected]
Sew News Subscriber Services • P.O. Box 433054 • Palm Coast, FL • 32143
Subscribe to Sew News magazine, the trusted sewing source
It’s quick and easy! Visit www.SewNews.com/Subscribe
Discover how to:
sewnews.com
LENTTTIIINNNNE DECORATIONS—FREE patterns included! (P. 50)
g 101ation
manipulamaaninipippululaatatitioon
&
Enter our
FIRST-EVER
Style StarCONTESTStyle SStyle S
&&W&&W&& IIIIIIIIIINNIINNINININNNNNNNNNNNNNNNNNNNNNNNNNNIINNNNNNNNNNIIIIIININININNNNNNN&B&&B&BB&&BIG!GIIGIGIGIGIGGIGGGGGGGGGGGGGGIGGGGGIGGGGGGGGGIGIGG!G!G!IGIGIIGGGGGGGGGGGGGGGGGGGGGGGGGGGGGIG!!!!!!IGIGIIGGGGGGGGGGGGIGGGGG!!!!! (P. 388883838883333888)))))))
DISPLAY UNTIL 3/14/11
$5.99 US / $6.99 CAN
April/May 2011
RUFFLE TECHNIQUES STRAIGHT FROM THE RUNWAY (P. 60)
6 GREAT MOTHER’S DAY GIFT IDEAS
Make aSSppllaasshhwith REVERSIBLE RAINWEAR
Figure- FlatteringPatterns
to Inspire Your Spring STYLE
++Quick Fixes for MACHINETENSION TROUBLES
EXPERT TIPSfor KNIT SEWING SUCCESS Create for a Cause:14 Charitiesto sew for
step-by-step tutorial inside!
How to Fit the PERPERFFEECCTT PPAANNTTSS ORGANIZEOffice Supplies in under an hour!
Create interlocking scallops
along a skirt placket. (P. 40)
1010
15
SEWP-110500-Cover-CN1.indd 1
2/3/11 11:15:25 AM2/3/11 11:15:25 AM
www.sewnews.com/subscribe