Presentation #32050 Presentation #32050 Implementing Oracle9i Data Guard For Higher Availability By...
61
Presentation #32050 Presentation #32050 Implementing Oracle9i Data Guard For Higher Availability By Daniel T. Liu First American Real Estate Solutions Date: Thursday, November 14, 2002 @ 2:30 PM - 3:30 PM Room: Marriott Salon 2
-
Upload
winfred-cain -
Category
Documents
-
view
215 -
download
0
Transcript of Presentation #32050 Presentation #32050 Implementing Oracle9i Data Guard For Higher Availability By...

Presentation #32050Presentation #32050Implementing Oracle9i Data
Guard For Higher Availability
By Daniel T. LiuFirst American Real Estate Solutions
Date: Thursday, November 14, 2002 @ 2:30 PM - 3:30 PM
Room: Marriott Salon 2

OracleWorld 2002, Paper #32050, Daniel T. Liu, FARES
2
Agenda
• Introduction• General Concepts
and Architecture• Process Architecture• Data Protection Mode• Data Guard
Implementation

OracleWorld 2002, Paper #32050, Daniel T. Liu, FARES
3
Agenda
• Role Management• Data Guard
Implementation Tips• Summary• Q & A

OracleWorld 2002, Paper #32050, Daniel T. Liu, FARES
4
Introduction• Challenges for Database Higher Availability
– Database Size– Database Backup Time– Database Recovery Time– 24 x 7 Uptime
• High Availability Options– Oracle Advanced Replication– Oracle Real Application Clusters (RAC)– Oracle Data Guard (Standby Database)– EMC Time Finder– Quest SharePlex

OracleWorld 2002, Paper #32050, Daniel T. Liu, FARES
5
Introduction
• History of Standby Database– Oracle7.3: First Release of Standby
Database– Oracle8i: Automatic shipping and
application of redo logs– Oracle9i Release 1: Protection mode– Oracle9i Release 2: Logical standby
database

OracleWorld 2002, Paper #32050, Daniel T. Liu, FARES
6
General Concepts and Architecture
• Data Guard Components
• Data Guard Roles
• Data Guard Interfaces

OracleWorld 2002, Paper #32050, Daniel T. Liu, FARES
7
Data Guard Components• Primary Database
• Standby Database– Physical Standby Database– Logical Standby Database (9iR2 only)
• Log Transport Services
• Network Configuration
• Log Apply Services
• Data Guard Broker

OracleWorld 2002, Paper #32050, Daniel T. Liu, FARES
8
PrimaryDatabase
LogTransportServices
LogApply
ServicesO
racle Net
DataGuardBroker
DataGuardBroker
CLI GUI
StandbyDatabase
OnlineRedoLogs
LocalArchived
Logs
RemoteArchived
Logs

OracleWorld 2002, Paper #32050, Daniel T. Liu, FARES
9
Data Guard Roles
A database can operate in one of the two mutually exclusive roles:
• Failover– One of the standby databases takes the
primary database role
• Switchover– In Oracle9i, primary and standby
database can continue to alternate roles

OracleWorld 2002, Paper #32050, Daniel T. Liu, FARES
10
Data Guard Interface
• SQL*Plus and SQL StatementsSQL> alter database commit to switchover to physical standby;
• Data Guard Broker GUI– Data Guard Manager
• Data Guard Broker Command-Line Interface$ dgmgrlDGMGRL for Solaris: Version 9.2.0.1.0 - Production.
(c) Copyright 2002 Oracle Corporation. All rights reserved.
Welcome to DGMGRL, type "help" for information.DGMGRL>

OracleWorld 2002, Paper #32050, Daniel T. Liu, FARES
11
Process Architecture
• Physical/Logical Standby Processes– LGWR (Log Writer) process– ARCH (Archiver) process– LNS (LGWR Network Server) process– RFS (Remote File Server) process– MRP (Managed Recovery) process

OracleWorld 2002, Paper #32050, Daniel T. Liu, FARES
12
Process Architecture
• Physical/Logical Standby Processes– FAL (Fetch Archive Log) Client process– FAL (Fetch Archive Log) Server process– LSP (Logical Standby) process– PX (Parallel Execution) process– DMON (Data Guard Broker Monitor) process

OracleWorld 2002, Paper #32050, Daniel T. Liu, FARES
13
Physical Standby Processes Architecture
PrimaryDatabase
Oracle N
et
LGWR LNS
FALServer
ARCH
FALClient/MRPARCH
DMON DMON
RFS
SYNC
ASYNC
Physicalstandby
Database
OnlineRedoLogs
LocalArchived
Logs
RemoteArchived
Logs
StandbyRedoLogs

OracleWorld 2002, Paper #32050, Daniel T. Liu, FARES
14
Logical Standby Processes Architecture
PrimaryDatabase
Oracle N
et
LGWR LNS
ARCH
LSP0
DMON DMON
RFS
SYNC
ASYNC
LogicalStandbyDatabase
PX
PX
PX
PX
MiningGroup
ApplyingGroup
OnlineRedoLogs
LocalArchived
Logs
RemoteArchived
Logs

OracleWorld 2002, Paper #32050, Daniel T. Liu, FARES
15
Data Protection Mode• Oracle9i Release 1 has four data protection modes
Mode Log Writing Process
Network Trans Mode
Disk Write Option
Redo Log Reception Option
Failure Resolution Option
Guaranteed LGWR SYNC AFFIRM Standby redo logs
Protect
Instant LGWR SYNC AFFIRM Standby redo logs
Unprotect
Rapid LGWR ASYNC NOAFFIRM Standby redo logs
Unprotect
Delayed ARCH ASYNC NOAFFIRM Archived redo logs
Unprotect

OracleWorld 2002, Paper #32050, Daniel T. Liu, FARES
16
Data Protection Mode• Oracle9i Release 2 has three data protection modes
Mode Log Writing Process
Network Trans Mode
Disk Write Option
Redo Log Reception Option
Supported on
Maximum Protection
LGWR SYNC AFFIRM Standby redo logs are required
Physical standby databases
Maximum Availability
LGWR SYNC AFFIRM Standby redo logs
Physical and logical standby databases
Maximum Performance
LGWR or ARCH
SYNC or ASYNC
NOAFFIRM Standby redo logs
Physical and logical standby databases

OracleWorld 2002, Paper #32050, Daniel T. Liu, FARES
17
Data Guard Implementation
• The following shows how to set up Data Guard in this given environment:
1.The production database name is prod.2.One primary database instance called prod_01
on host server_01; one physical standby database instance called prod_02 on host server_02.
3.Listener listener_prod_01 is on host server_01, and pointed by TNS entry prod_01.

OracleWorld 2002, Paper #32050, Daniel T. Liu, FARES
18
Data Guard Implementation
4.Listener listener_prod_02 is on host server_02, and pointed by TNS entry prod_02.
5.The purpose of TNS entry prod_01 and prod_02 are used for LGWR/ARCH process to ship redo logs to the standby site, and for FAL process to fetch redo logs from the primary site.
6.Since Data Guard broker is not used here, we set dg_broker_start to false.

OracleWorld 2002, Paper #32050, Daniel T. Liu, FARES
19
Data Guard Implementation
7.The protection mode is set to best performance. Therefore, only local archive destination (log_archive_dest_1) is set to mandatory; the standby archive destination (log_archive_dest_2) is set to optional for LGWR process, with network transmission method of asynchronous and disk write option of no affirm.
8.The standby site is not using standby online redo logs. Therefore, the redo log reception option is archived logs.

OracleWorld 2002, Paper #32050, Daniel T. Liu, FARES
20
Data Guard Configuration
Primary Site:
Database Name: prodPrimary Server: server_01Primary Instance Name: prod_01Primary Listener: listener_prod_01
Standby Site:
Database Name: prodStandby Server: server_02Standby Instance name: prod_02Standby Listener: listener_prod_02
/var/opt/oracle/oratab entry:
prod_01:/u01/app/oracle/product/9.2.0:N
/var/opt/oracle/oratab entry:
prod_02:/u01/app/oracle/product/9.2.0:N

OracleWorld 2002, Paper #32050, Daniel T. Liu, FARES
21
Data Guard Configuration
Primary init.ora file: db_name = prod #drs_start = false # for 9.0.1 dg_broker_start = false # for 9.2.0 #fal_server = “prod_02” #fal_client = “prod_01” log_archive_dest_1 = ’location=/u02/arch/prod/ mandatory’ log_archive_format = prod_%s.arc log_archive_start= true standby_archive_dest = ’/u02/arch/prod’ log_archive_dest_2 = ’service=prod_02 optional repoen=60 lgwr async noaffirm’ log_archive_dest_state_2 = enable
Standby init.ora file: db_name = prod #drs_start = false # for 9.0.1 dg_broker_start = false # for 9.2.0 fal_server = “prod_01” fal_client = “prod_02” log_archive_dest_1 = ’location=/u02/arch/prod/ mandatory’ log_archive_format = prod_%s.arc log_archive_start= true standby_archive_dest = ’/u02/arch/prod’ #log_archive_dest_2 = ’service=prod_01 optional repoen=60 lgwr async noaffirm’ #log_archive_dest_state_2 = enable

OracleWorld 2002, Paper #32050, Daniel T. Liu, FARES
22
Data Guard Configuration
Primary listener.ora file:
Listener_prod_01 (address_list = (address = (protocol = tcp) (host = server_01) (port = 1522) ) )sid_list_listener_prod_01 (sid_list = (sid_desc =
(oracle_home=/u01/app/oracle/product/9.2) (sid_name = prod_01) ) )
Standby listener.ora file:
Listener_prod_02 (address_list = (address = (protocol = tcp) (host = server_02) (port = 1522) ) )sid_list_listener_prod_02 (sid_list = (sid_desc =
(oracle_home=/u01/app/oracle/product/9.2) (sid_name = prod_02) ) )

OracleWorld 2002, Paper #32050, Daniel T. Liu, FARES
23
Data Guard Configuration
Primary tnsnames.ora file:
Prod = (description = (address = (protocol = tcp) (host = server_01) (port = 1522) (connect_data = (sid = prod_01)))Prod_01 = (description = (address = (protocol = tcp) (host = server_01) (port = 1522) (connect_data = (sid = prod_01)))Prod_02 = (description = (address = (protocol = tcp) (host = server_02) (port = 1522) (connect_data = (sid = prod_02)))

OracleWorld 2002, Paper #32050, Daniel T. Liu, FARES
24
Steps to Set up a Data Guard Environment
• Step 1: The preparation
• Step 2: Backup the primary database datafiles
• Step 3: Create the physical standby database control file
• Step 4: Transfer the datafiles and control file to the standby site

OracleWorld 2002, Paper #32050, Daniel T. Liu, FARES
25
Steps to Set up a Data Guard Environment
• Step 5: Start the listeners on both primary and standby site
• Step 6: Start the standby database
• Step 7: Place the standby database in managed recovery mode
• Step 8: Monitor the Log Transport Services and Log Apply Services

OracleWorld 2002, Paper #32050, Daniel T. Liu, FARES
26
Step 1: The Preparation
• Plan the Data Guard environment.– Understand the business requirements and demands– Decide the number of standby databases
(logical/physical)– Decide file system layout for standby (if feasible,
prefer identical layout of primary database)– Ensure primary database is in ARCHIVELOG mode– Choose the proper redo log size and groups– Choose the proper protection mode

OracleWorld 2002, Paper #32050, Daniel T. Liu, FARES
27
Step 1: The Preparation
• Setup the init.ora file for both primary and standby databases.
• Setup the listener.ora file for both primary and standby databases.
• Setup tnsnames.ora file for both primary and standby sites.

OracleWorld 2002, Paper #32050, Daniel T. Liu, FARES
28
Step 2: Backup The Primary Database File
• Shut down the primary database.• Backup the primary database datafiles.$ cp /u02/oradata/prod/* /u03/backup/prod/
• Startup the primary database with the modified p-file.

OracleWorld 2002, Paper #32050, Daniel T. Liu, FARES
29
Step 3: Create The Physical Standby Database Control File
• Ensure the primary database is in ARCHIVELOG mode and automatic archiving is enabled.
• Issue the following command to create the standby control file:SQL> alter database create standby controlfile as ‘/u01/app/oracle/admin/prod/ctl/stbycf.ctl’;

OracleWorld 2002, Paper #32050, Daniel T. Liu, FARES
30
Step 4: Transfer The Datafiles and Control File to The Standby Site
• Transfer the datafiles.$ rcp /u03/backup/prod/* server_02:/u02/oradata/prod
• Transfer the standby control file$ rcp /u01/app/oracle/admin/prod/ctl/stbycf.ctl server_02:/u01/app/oracle/admin/prod/ctl/control01.ctl

OracleWorld 2002, Paper #32050, Daniel T. Liu, FARES
31
Step 5: Start The Listeners on Both Primary and Standby Site
• Start the primary database listener.$ lsnrctl start listener_prod_01
• Start the standby database listener.$ lsnrctl start listener_prod_02

OracleWorld 2002, Paper #32050, Daniel T. Liu, FARES
32
Step 6: Start The Standby Database
• Set the correct Oracle environment.
• Connect as sysdba.SQL> connect /as sysdba;
• Bring the database in nomount mode first.SQL> startup nomount;
• Mount the standby database.SQL> alter database mount standby database;

OracleWorld 2002, Paper #32050, Daniel T. Liu, FARES
33
Step 7: Place the Standby Database in Managed Recovery Mode
• Issue the following command to bring the standby database in managed recover mode.
SQL> alter database recover managed standby database disconnect from session;

OracleWorld 2002, Paper #32050, Daniel T. Liu, FARES
34
Step 8: Monitor the Log Transport Services and Log Apply Services
• Issue a few log switches on the primary database.SQL> alter system switch logfile;
• Confirm the log files received on the standby archive destination.
• Check the standby alert log file to see if the new logs have applied to the standby database.Media Recovery Log /u02/arch/prod/prod_1482.arc
• Monitor the managed recovery.SQL> select process, status, thread#, sequence#, block#, blocks from v$managed_standby;

OracleWorld 2002, Paper #32050, Daniel T. Liu, FARES
35
Failover
• Failover is only performed as a result of an unplanned outage of the primary database.
• During a failover, the standby database (prod_02) becomes the new primary database. It is possible to have data loss.
• The old primary (prod_01) has to be discarded.
• Need to re-create a new standby database.

OracleWorld 2002, Paper #32050, Daniel T. Liu, FARES
36
Forced Failover
• In 9.0.1, since you do not have Standby Redo Log files, you issue the following command on the standby site to activate the new primary database:SQL> alter database activate standby database;

OracleWorld 2002, Paper #32050, Daniel T. Liu, FARES
37
Graceful Failover
• In 9.2.0, you can gracefully Failover even without standby redo log files. Issue the following command on the standby site to Failover to a new primary database.SQL> alter database recover managed standby database skip standby logfiles;
• This will apply all available redo and make the standby available to become a Primary. Complete the operation by switching the standby over to the primary role with the following command:SQL> alter database commit to switchover to primary;

OracleWorld 2002, Paper #32050, Daniel T. Liu, FARES
38
Switchover
• A switchover operation is a planned operation.
• All the archive logs required bringing the standby to the primary’s point in time need to be available.
• The old standby database (prod_02) becomes the new primary, and the old primary (prod_01) becomes the new standby database.

OracleWorld 2002, Paper #32050, Daniel T. Liu, FARES
39
Switchover Step
• Step 1: Switchover preparation for formal primary database
• Step 2: Shutdown the primary database and bring up as the new standby database
• Step 3: Switchover preparation for the former standby database
• Step 4: Shutdown the standby database and bring up as the new primary database

OracleWorld 2002, Paper #32050, Daniel T. Liu, FARES
40
Switchover Step
• Step 5: Add Temp Tablespace
• Step 6: Put the new standby database in managed recovery mode
• Step 7: Change TNS Entry for the New Primary Database

OracleWorld 2002, Paper #32050, Daniel T. Liu, FARES
41
Step 1: Switchover preparation for formal primary database
• End all activities on the primary and standby database• Check primary database switchover statusSQL> select database_role, switchover_status from v$database;DATABASE_ROLE SWITCHOVER_STATUS -------------- ----------------PRIMARY TO STANDBY
• Initiate the switchover operation on the primary databaseSQL> alter database commit to switchover to physical standby;

OracleWorld 2002, Paper #32050, Daniel T. Liu, FARES
42
Step 2: Shutdown the primary database and bring up as the new standby database
• Shutdown the primary database normallySQL> shutdown normal;
• Modify the former primary database’s initialization file– fal_server = “prod_02”– fal_client = “prod_01”– Remove parameters log_archive_dest_2 and
log_archive_dest_state_2. Or, just defer it if you like
• Bring the former primary database in mount modeSQL> startup nomount;SQL> alter database mount standby database;

OracleWorld 2002, Paper #32050, Daniel T. Liu, FARES
43
Step 3: Switchover preparation for the former standby database
• Check standby database switchover statusSQL> select database_role, switchover_status from v$database;DATABASE_ROLE SWITCHOVER_STATUS--------------------------------PHYSICAL STANDBY TO PRIMARY
• Initiate the switchover operation on the standby databaseSQL> alter database commit to switchover to physical primary;

OracleWorld 2002, Paper #32050, Daniel T. Liu, FARES
44
Step 4: Shutdown the standby database and bring up as the new primary database• Shutdown the standby database
SQL> shutdown normal;• Modify the former standby database’s initialization
file– fal_server = “prod_01”– fal_client = “prod_02”– Add parameters log_archive_dest_2 and
log_archive_dest_state_2
• Bring up the former standby database as the new primary databaseSQL> startup;

OracleWorld 2002, Paper #32050, Daniel T. Liu, FARES
45
Step 5: Add Temp Tablespace
• Issue the following command to add TEMP tablespace
SQL> ALTER TABLESPACE TEMP
ADD TEMPFILE
'/u02/oradata/prod/temp01.dbf'
SIZE 3072M reuse
AUTOEXTEND OFF;

OracleWorld 2002, Paper #32050, Daniel T. Liu, FARES
46
Step 6: Put the new standby database in managed recovery mode
• Issue the following command on the new standby database.
SQL> alter database recover managed standby database disconnect;

OracleWorld 2002, Paper #32050, Daniel T. Liu, FARES
47
Step 7: Change TNS Entry for the New Primary Database
• Change the TNS entry on all application hosts to point to the new primaryProd =
(description = (address = (protocol = tcp) (host = server_02) (port = 1522) (connect_data = (sid = prod_02)) )

OracleWorld 2002, Paper #32050, Daniel T. Liu, FARES
48
Implementation Tips
• Tip #1: Primary Online Redo Logs
• Tip #2: Standby Online Redo Logs vs. Standby Archived Redo logs
• Tip #3: Enforce Logging
• Tip #4: RMAN Backup
• Tip #5: Disable Log Transport Services When Standby Database is down

OracleWorld 2002, Paper #32050, Daniel T. Liu, FARES
49
Implementation Tips
• Tip #6: Standby Database Upgrade
• Tip #7: Data Guard Broker
• Tip #8: Using ‘Delay’ Option to Protect Logical/Physical Corruptions
• Tip #9: Always Monitor Log Apply Services and Check alert.log File for Errors

OracleWorld 2002, Paper #32050, Daniel T. Liu, FARES
50
Tip #1: Primary Online Redo Logs
• The number of redo groups– Fewest groups possible– Guarantee a recycled group is always available
• The size of redo logs– Determined by the amount of transaction– Small (50 MB): less standby database lag time– Medain (200 MB)– Large (1 GB): less log switches
• The best way to determine if the current configuration is satisfactory is to examine the contents of the log writer process’s trace file and the database’s alert log.
OracleWorld 2002, Paper #32050, Daniel T. Liu, FARES
51
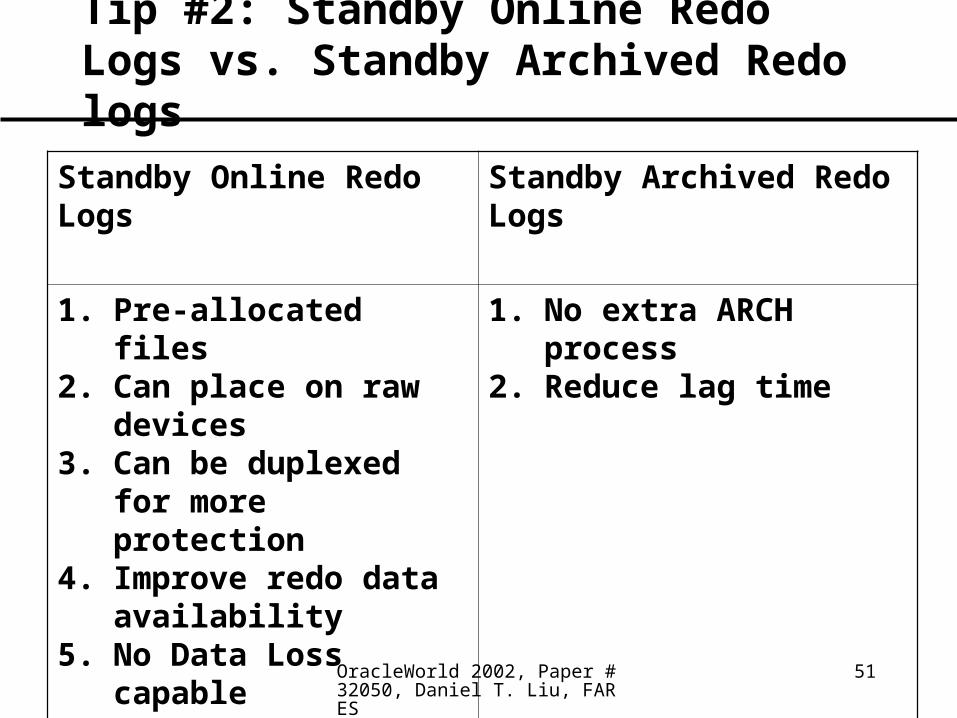
Tip #2: Standby Online Redo Logs vs. Standby Archived Redo logs
Standby Online Redo Logs Standby Archived Redo Logs
1. Pre-allocated files2. Can place on raw devices3. Can be duplexed for
more protection4. Improve redo data
availability5. No Data Loss capable
1. No extra ARCH process2. Reduce lag time

OracleWorld 2002, Paper #32050, Daniel T. Liu, FARES
52
Tip #3: Enforce Logging
• A new feature in Oracle9i Release 2• Force redo log to be generated for individual
database objects set to NOLOGGING. This is required for a no data loss strategy.
• Here is the SQL command to set FORCE LOGGING:SQL> select force_logging from v$database;
FORCE_LOGGING
--------------
NO
SQL> alter database force logging;

OracleWorld 2002, Paper #32050, Daniel T. Liu, FARES
53
Tip #4: RMAN Backup
• A failover operation reset logs for the new primary. If you use RMAN to backup your database, you need to create a new incarnation of the target database. Otherwise, your RMAN backup will fail.
RMAN> reset database;

OracleWorld 2002, Paper #32050, Daniel T. Liu, FARES
54
Tip #5: Disable Log Transport Services When Standby Database is down
• When a standby database or host is down for maintenance, it is advisable to temporarily disable the log transport services for that site
• It may temporarily freeze the primary database during heavy transactions
• Issue this command on the primary database before bring down the standby database:SQL> alter system set log_archive_dest_state_2 = defer;
• When the standby database is up again, issue:SQL> alter system set log_archive_dest_state_2 = enable;

OracleWorld 2002, Paper #32050, Daniel T. Liu, FARES
55
Tip #6: Standby Database Upgrade
• Steps to upgrade standby database to newer database version:– Step 1: Shutdown both primary and standby
databases– Step 2: Install Oracle9i software on both primary
and standby hosts– Step 3: Upgrade the primary database– Step 4: Rebuild standby database from the
upgraded primary

OracleWorld 2002, Paper #32050, Daniel T. Liu, FARES
56
Tip #7: Data Guard Broker
• Oracle9i R1 broker configuration supported only one primary site and one physical standby site. The first release of broker is not so user friendly with limited features.
• Oracle9i R2 broker has made great improvements. The new configuration now support up to nine standby sites (including logical standby database). Both Data Guard Manager and CLI support switchover and failover operations.

OracleWorld 2002, Paper #32050, Daniel T. Liu, FARES
57
Tip #8: Using ‘Delay’ Option to Protect Logical/Physical Corruptions
• You may utilize the delay option (if you have multiple standby sites) to prevent physical/logical corruption of your primary. For instance, your standby #1 may not have ‘Delay’ on to be your disaster recovery standby database. However, you may opt to implement a delay of minutes or hours on your standby #2 to allow recover from a possible physical or logical corruption on your primary database.SQL> alter database recover managed standby database delay 5 disconnect;

OracleWorld 2002, Paper #32050, Daniel T. Liu, FARES
58
Tip #9: Always Monitor Log Apply Services and Check alert.log File for Errors• Always Check alert.log and trace file on
both primary and standby databases.
• See the following web site for standby monitoring scripts to check alert.log:
http://www.dbazine.com/liu2.html

OracleWorld 2002, Paper #32050, Daniel T. Liu, FARES
59
Summary
• High Availability Options
• Data Guard Concept and Architecture
• Data Protection Mode
• Data Guard Implementation Steps
• Role Management
• Implementation Tips

OracleWorld 2002, Paper #32050, Daniel T. Liu, FARES
60
ReferencesOracle9i, Data Guard Concepts and Administration. Release 1 (9.0.1);Oracle9i, Data Guard Concepts and Administration. Release 2 (9.2);Oracle9i, Data Guard Broker. Release 2 (9.2);Oracle Metalink Support;Top DBA Shell Scripts for Monitoring Database, Daniel T. Liu; DBAZine;
I would also like to acknowledge the assistance of Bob Polak of the Allants Groups, Larry Barry, Ann Collins, Archana Sharma and Husam Tomeh of FARES, and Larry Carpenter, Joseph Meeks of Oracle Corporation.

OracleWorld 2002, Paper #32050, Daniel T. Liu, FARES
61
Thanks For Coming !!
Daniel Liu Contact Information
Phone: (714) 701-3346
Email: [email protected]
Email: [email protected]
Company Web Site:
http://www.firstam.com