Preqin App Install/Config Guidedocs.preqin.com/support/Preqin_Sync_Installation.pdfPreqin App...
15
Preqin App Install/Config Guide sync
Transcript of Preqin App Install/Config Guidedocs.preqin.com/support/Preqin_Sync_Installation.pdfPreqin App...
PreqinApp Install/Config Guide
sync

► 2Preqin App Install/Config Guide
sync © 2012 Preqin Ltd. / www.preqin.com
INSTALLATION
1. Navigate to Salesforce's AppExchange website and search for the "Preqin Sync" app.
2. Click the “Get It Now” button on the Preqin Sync listing.
3. Select the "Login to the AppExchange" button.
4. Enter the credentials of a Salesforce System Administrator User when prompted.
► 3Preqin App Install/Config Guide
sync © 2012 Preqin Ltd. / www.preqin.com
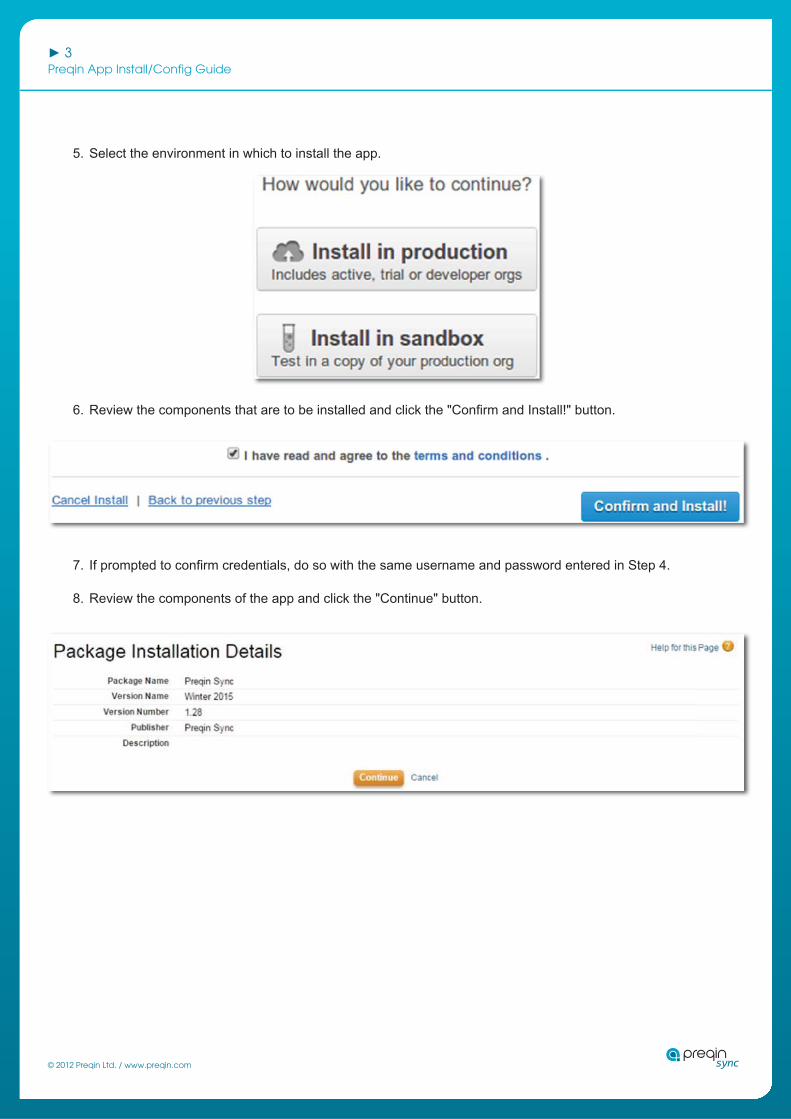
5. Select the environment in which to install the app.
6. Review the components that are to be installed and click the "Confi rm and Install!" button.
7. If prompted to confi rm credentials, do so with the same username and password entered in Step 4.
8. Review the components of the app and click the "Continue" button.
► 4Preqin App Install/Config Guide
sync © 2012 Preqin Ltd. / www.preqin.com
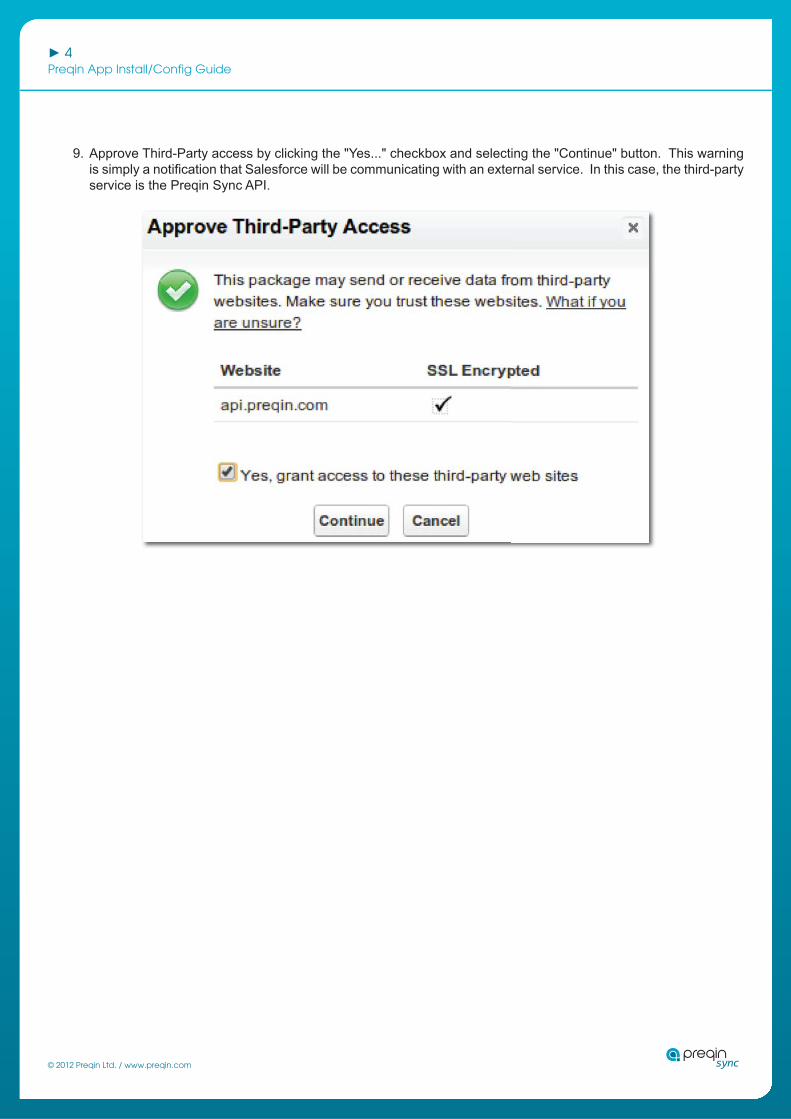
9. Approve Third-Party access by clicking the "Yes..." checkbox and selecting the "Continue" button. This warning is simply a notifi cation that Salesforce will be communicating with an external service. In this case, the third-party service is the Preqin Sync API.
► 5Preqin App Install/Config Guide
sync © 2012 Preqin Ltd. / www.preqin.com
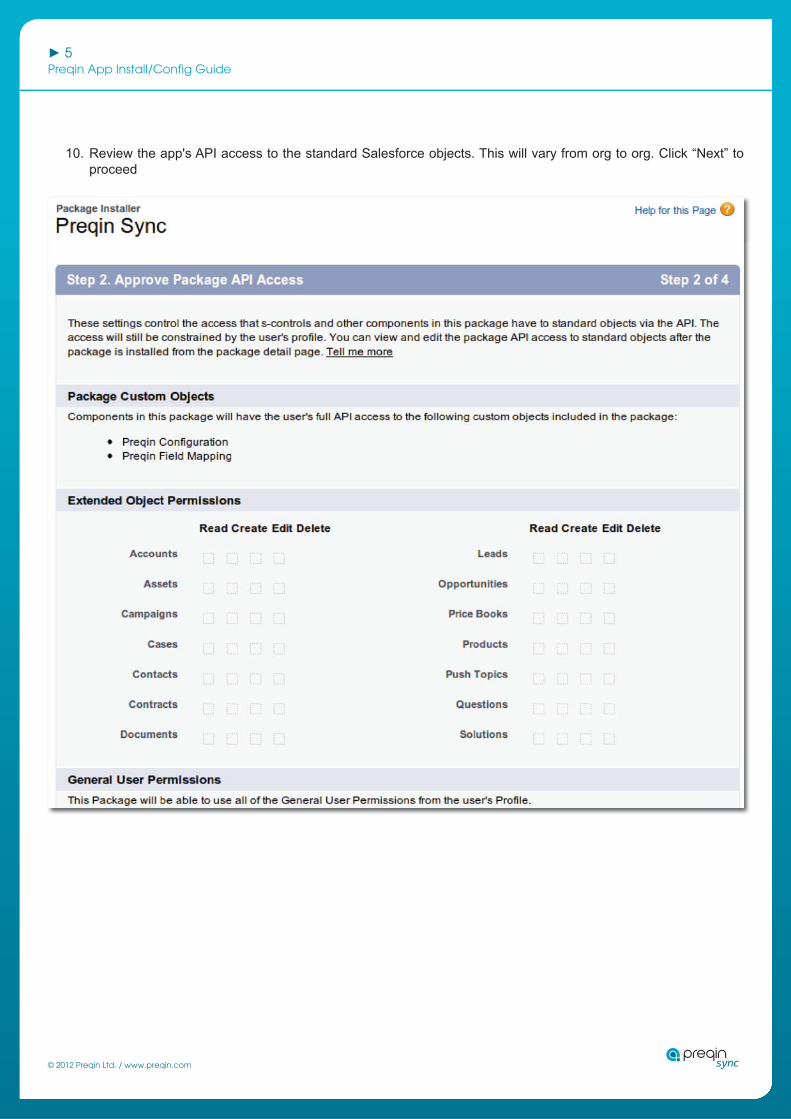
10. Review the app's API access to the standard Salesforce objects. This will vary from org to org. Click “Next” to proceed
► 6Preqin App Install/Config Guide
sync © 2012 Preqin Ltd. / www.preqin.com
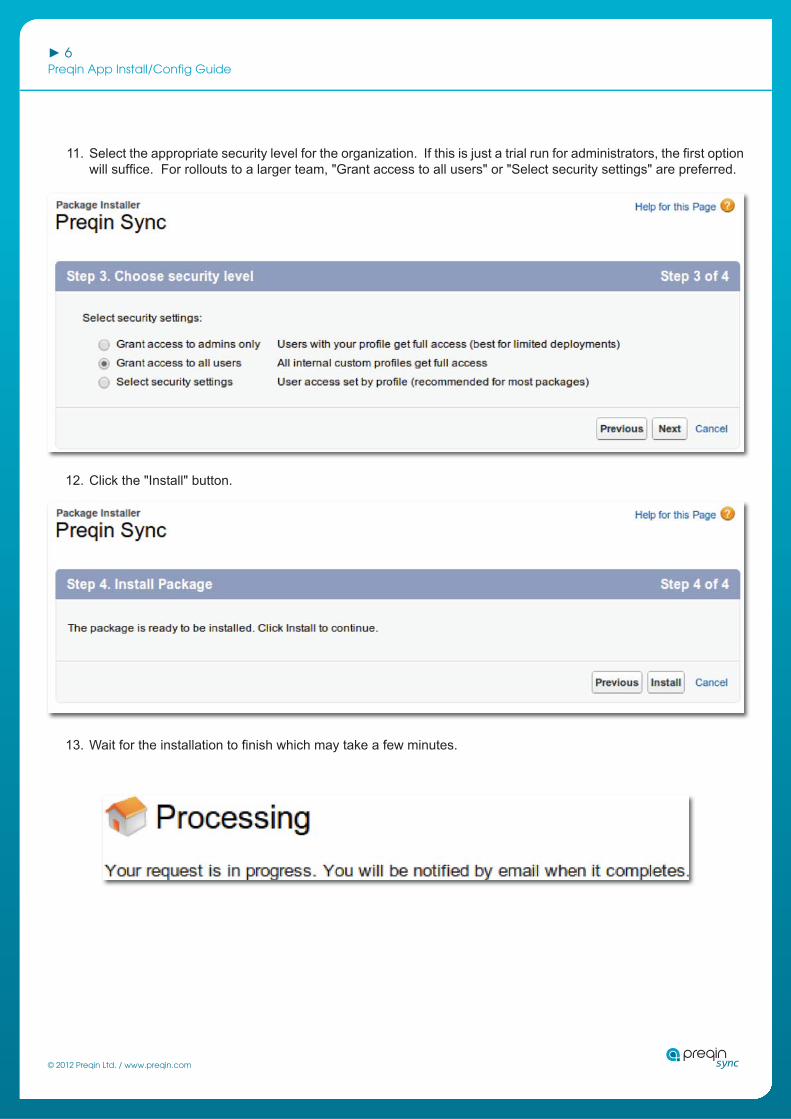
11. Select the appropriate security level for the organization. If this is just a trial run for administrators, the fi rst option will suffi ce. For rollouts to a larger team, "Grant access to all users" or "Select security settings" are preferred.
12. Click the "Install" button.
13. Wait for the installation to fi nish which may take a few minutes.
► 7Preqin App Install/Config Guide
sync © 2012 Preqin Ltd. / www.preqin.com
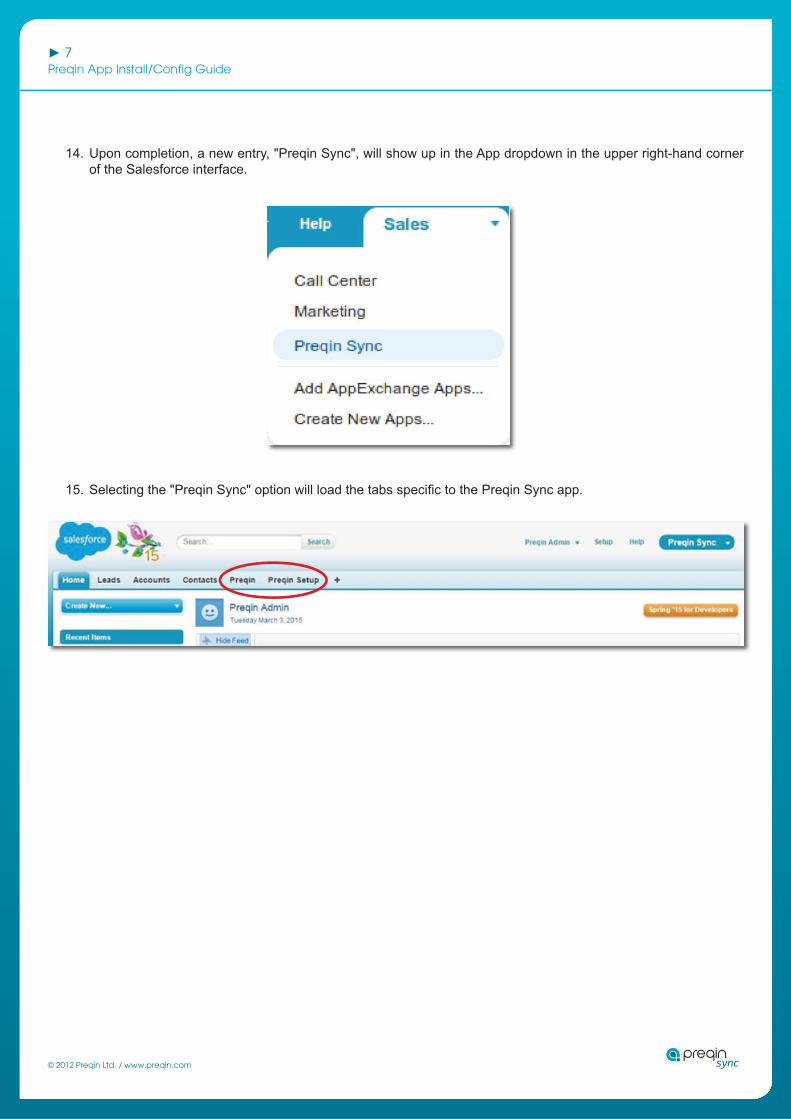
14. Upon completion, a new entry, "Preqin Sync", will show up in the App dropdown in the upper right-hand corner of the Salesforce interface.
15. Selecting the "Preqin Sync" option will load the tabs specifi c to the Preqin Sync app.
► 8Preqin App Install/Config Guide
sync © 2012 Preqin Ltd. / www.preqin.com
CONFIGURATION
Create “Add Preqin Contact” Button
1. Navigate to Setup -> [App Setup] Customize -> Accounts -> Buttons, Links, and Actions2. Click "New Button or Link".3. Set the Label as "Add Preqin Contact" and confi rm that the Name fi lls in “Add_Preqin_Contact”.4. Set the Display Type as "Detail Page Button".5. Set the Behavior as "Execute JavaScript" and confi rm that Content Source changes to “OnClick JavaScript”6. In the large text area, enter the following script. Please be aware that when copying and pasting from a PDF fi le,
unintended line breaks or other formatting may be introduced which can confl ict with the code.
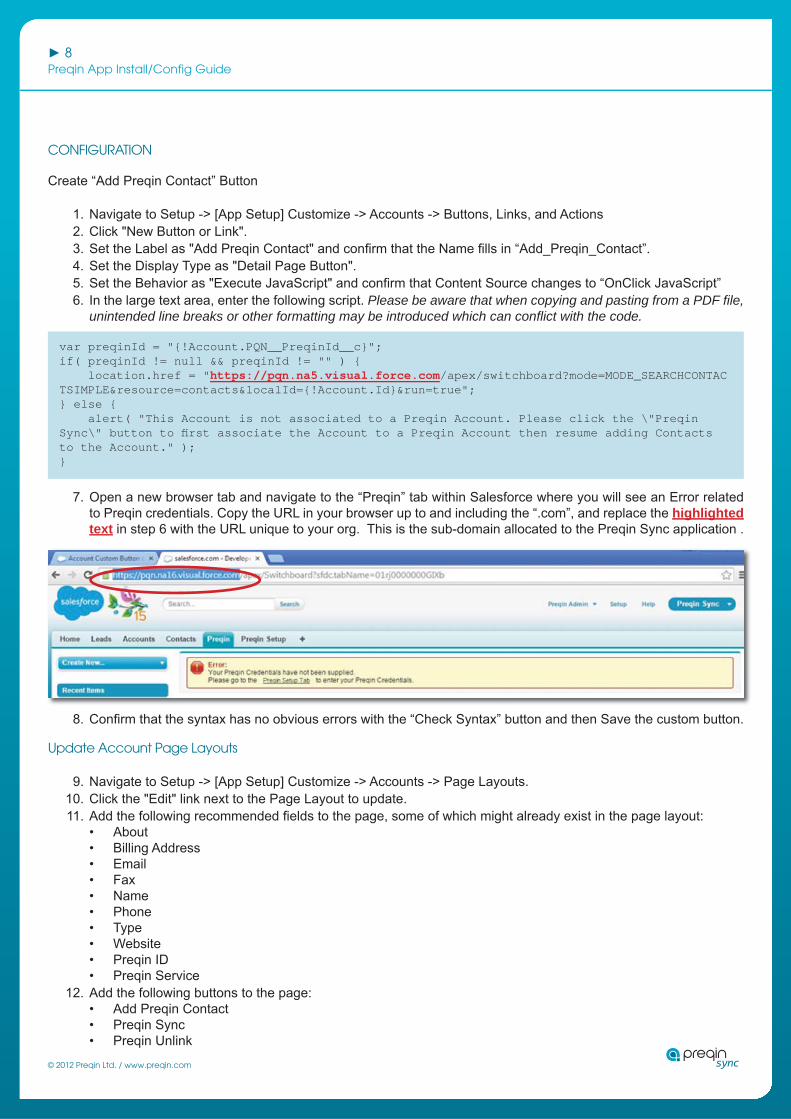
7. Open a new browser tab and navigate to the “Preqin” tab within Salesforce where you will see an Error related to Preqin credentials. Copy the URL in your browser up to and including the “.com”, and replace the highlighted text in step 6 with the URL unique to your org. This is the sub-domain allocated to the Preqin Sync application .
8. Confi rm that the syntax has no obvious errors with the “Check Syntax” button and then Save the custom button.
Update Account Page Layouts
9. Navigate to Setup -> [App Setup] Customize -> Accounts -> Page Layouts.10. Click the "Edit" link next to the Page Layout to update.11. Add the following recommended fi elds to the page, some of which might already exist in the page layout:
• About• Billing Address• Email• Fax• Name• Phone• Type• Website• Preqin ID• Preqin Service
12. Add the following buttons to the page:• Add Preqin Contact• Preqin Sync• Preqin Unlink
var preqinId = "{!Account.PQN__PreqinId__c}";if( preqinId != null && preqinId != "" ) { location.href = "https://pqn.na5.visual.force.com/apex/switchboard?mode=MODE_SEARCHCONTACTSIMPLE&resource=contacts&localId={!Account.Id}&run=true";} else { alert( "This Account is not associated to a Preqin Account. Please click the \"Preqin Sync\" button to fi rst associate the Account to a Preqin Account then resume adding Contacts to the Account." );}
► 9Preqin App Install/Config Guide
sync © 2012 Preqin Ltd. / www.preqin.com
13. Add the transient frame to the page layout:i. Create a new section by dragging the “Section” option from layout editor into an appropriate location on the
page. ii. Select the “Visualforce Pages” option in the layout editor and drag the “Account Transient” element into the
new section created in Step i.iii. Click the wrench icon on the “Account Transient” element in the page layout and adjust the settings to the
following recommendations:• Width: 100%• Height: 500• Show Scrollbars: True
14. Save the Page Layout.15. Repeat for any other applicable Page Layouts.
Update Contact Page Layouts
16. Navigate to Setup -> [App Setup] Customize -> Contacts -> Page Layouts.17. Click the "Edit" link next to the Page Layout to update.18. Add the following recommended fi elds to the page, some of which might already exist in the page layout:
• Email• Fax• Name• Phone• Title
19. Add the following buttons to the page:• Preqin Sync• Preqin Unlink
20. Save the Page Layout.21. Repeat for any other applicable Page Layouts.
► 10Preqin App Install/Config Guide
sync © 2012 Preqin Ltd. / www.preqin.com
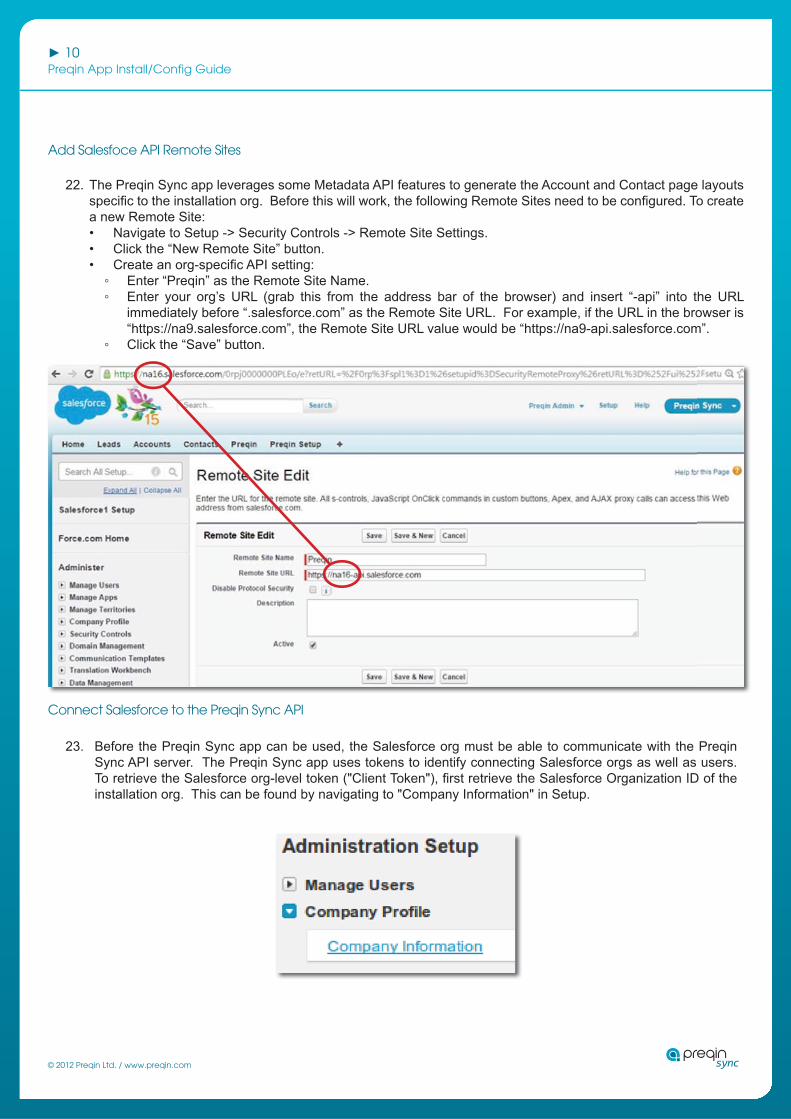
Add Salesfoce API Remote Sites
22. The Preqin Sync app leverages some Metadata API features to generate the Account and Contact page layouts specifi c to the installation org. Before this will work, the following Remote Sites need to be confi gured. To create a new Remote Site:• Navigate to Setup -> Security Controls -> Remote Site Settings.• Click the “New Remote Site” button.• Create an org-specifi c API setting:
◦ Enter “Preqin” as the Remote Site Name. ◦ Enter your org’s URL (grab this from the address bar of the browser) and insert “-api” into the URL
immediately before “.salesforce.com” as the Remote Site URL. For example, if the URL in the browser is “https://na9.salesforce.com”, the Remote Site URL value would be “https://na9-api.salesforce.com”.
◦ Click the “Save” button.
Connect Salesforce to the Preqin Sync API
23. Before the Preqin Sync app can be used, the Salesforce org must be able to communicate with the Preqin Sync API server. The Preqin Sync app uses tokens to identify connecting Salesforce orgs as well as users. To retrieve the Salesforce org-level token ("Client Token"), fi rst retrieve the Salesforce Organization ID of the installation org. This can be found by navigating to "Company Information" in Setup.
► 11Preqin App Install/Config Guide
sync © 2012 Preqin Ltd. / www.preqin.com
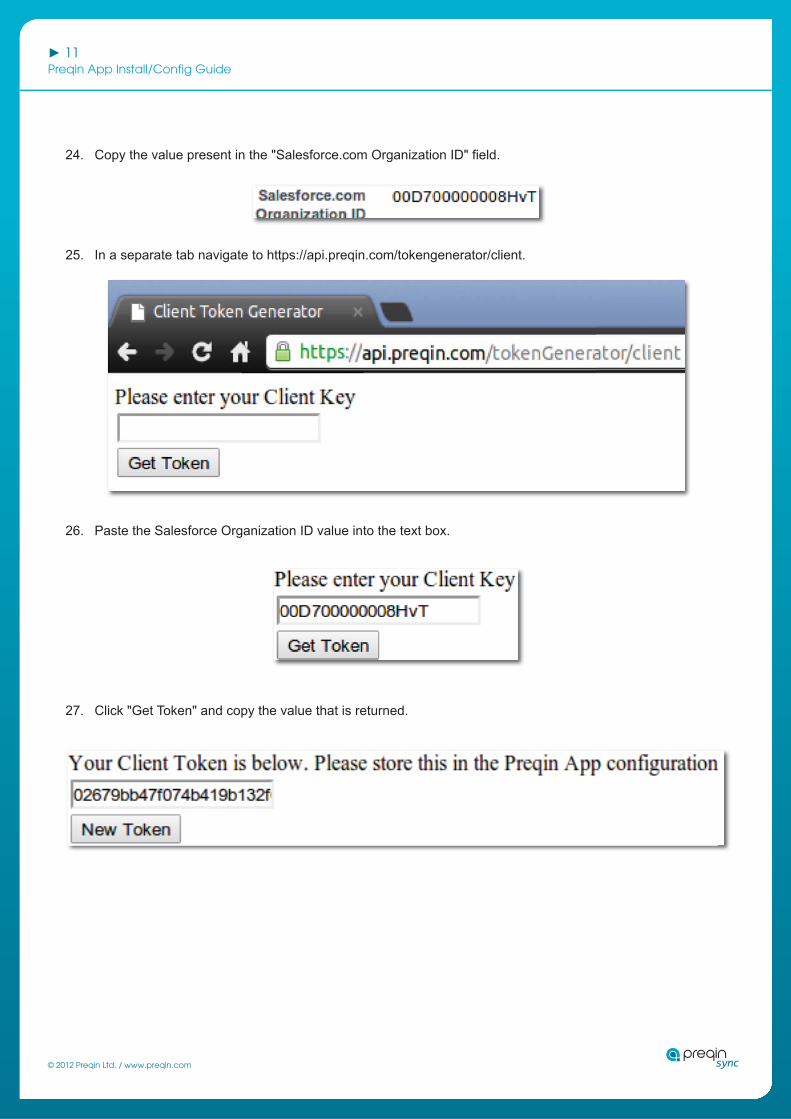
24. Copy the value present in the "Salesforce.com Organization ID" fi eld.
25. In a separate tab navigate to https://api.preqin.com/tokengenerator/client.
26. Paste the Salesforce Organization ID value into the text box.
27. Click "Get Token" and copy the value that is returned.

► 12Preqin App Install/Config Guide
sync © 2012 Preqin Ltd. / www.preqin.com
28. In Salesforce, navigate to Custom Settings in Setup.
29. Click the “Manage” link next to the “Preqin Confi guration” Custom Setting. This will hold the Client Token value that allows encrypted communication between Salesforce and the Preqin Sync API.
30. Click the "New" button to create a new Preqin Confi guration record.
► 13Preqin App Install/Config Guide
sync © 2012 Preqin Ltd. / www.preqin.com
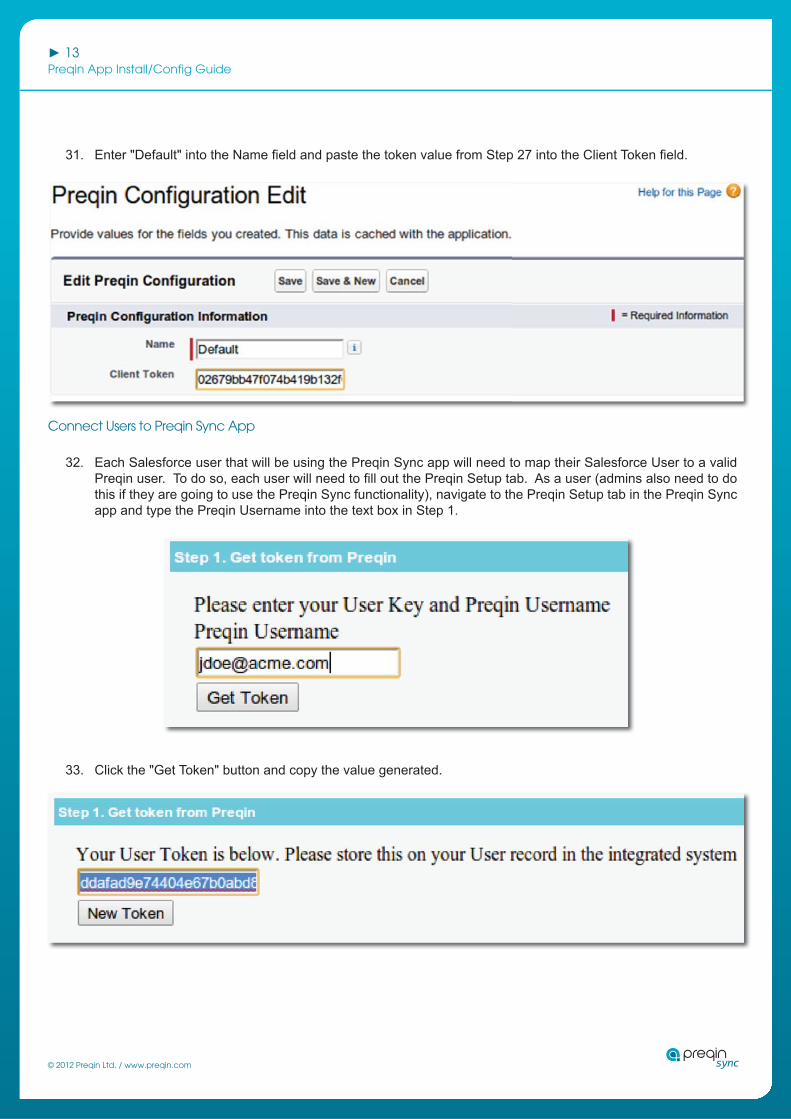
31. Enter "Default" into the Name fi eld and paste the token value from Step 27 into the Client Token fi eld.
Connect Users to Preqin Sync App
32. Each Salesforce user that will be using the Preqin Sync app will need to map their Salesforce User to a valid Preqin user. To do so, each user will need to fi ll out the Preqin Setup tab. As a user (admins also need to do this if they are going to use the Preqin Sync functionality), navigate to the Preqin Setup tab in the Preqin Sync app and type the Preqin Username into the text box in Step 1.
33. Click the "Get Token" button and copy the value generated.
► 14Preqin App Install/Config Guide
sync © 2012 Preqin Ltd. / www.preqin.com
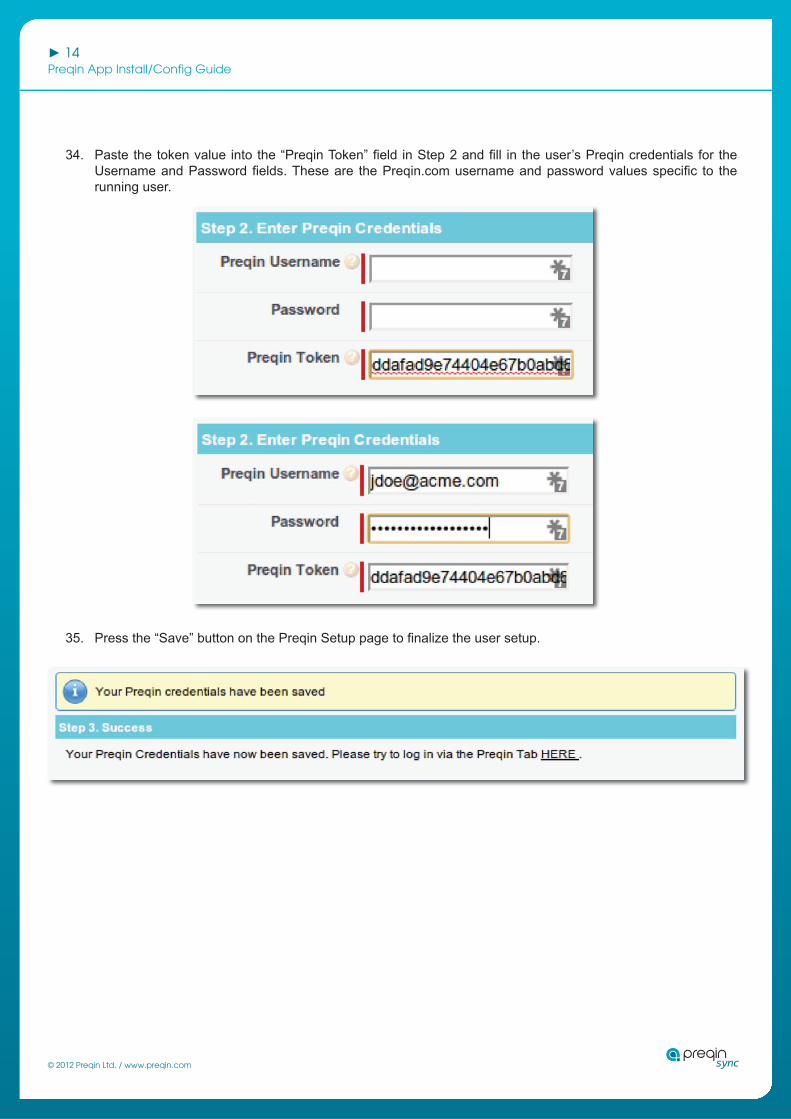
34. Paste the token value into the “Preqin Token” fi eld in Step 2 and fi ll in the user’s Preqin credentials for the Username and Password fi elds. These are the Preqin.com username and password values specifi c to the running user.
35. Press the “Save” button on the Preqin Setup page to fi nalize the user setup.
► 15Preqin App Install/Config Guide
sync © 2012 Preqin Ltd. / www.preqin.com
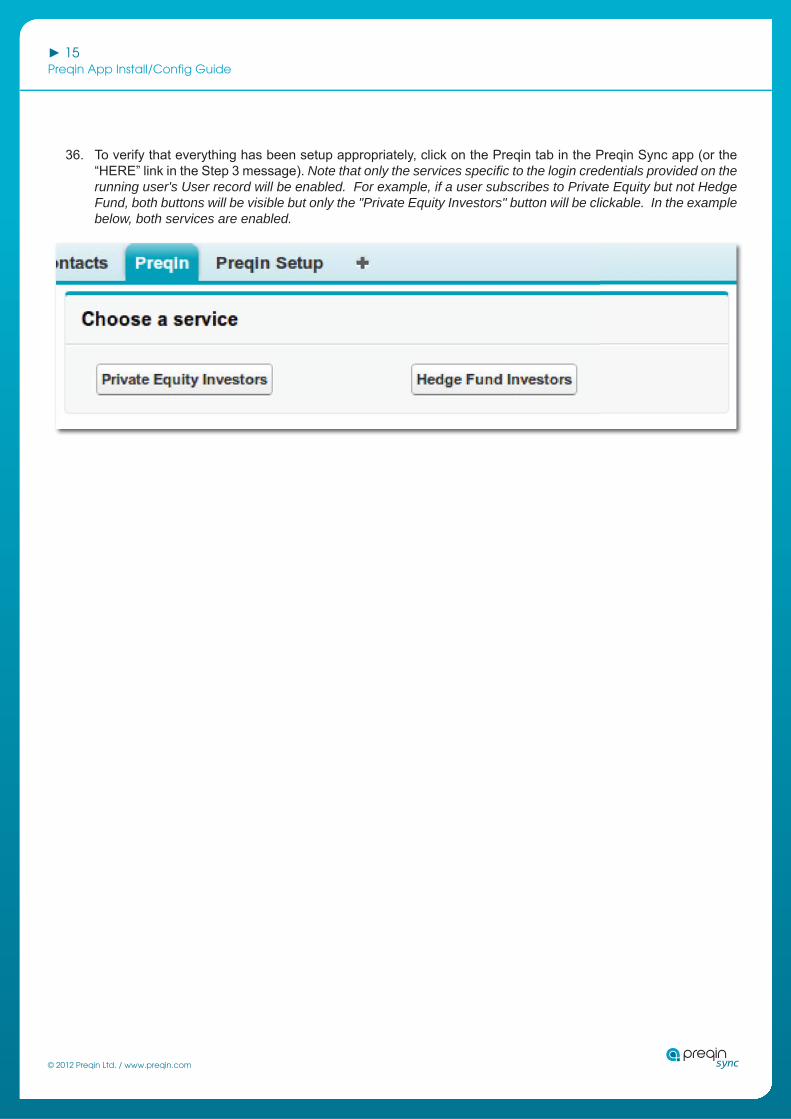
36. To verify that everything has been setup appropriately, click on the Preqin tab in the Preqin Sync app (or the “HERE” link in the Step 3 message). Note that only the services specifi c to the login credentials provided on the running user's User record will be enabled. For example, if a user subscribes to Private Equity but not Hedge Fund, both buttons will be visible but only the "Private Equity Investors" button will be clickable. In the example below, both services are enabled.