Practical Microbiology for Secondary...
48
Practical Microbiology for Secondary Schools A resource for Key Stages 3, 4 & post-16 and the equivalent Scottish qualifications Society for General Microbiology (SGM) Microbiology in Schools Advisory Committee (MiSAC)
Transcript of Practical Microbiology for Secondary...

Practical Microbiology for Secondary Schools
A resource for Key Stages 3, 4 & post-16and the equivalent Scottish qualifications
Society for General Microbiology (SGM)Microbiology in Schools Advisory Committee (MiSAC)
Cover 2008 Version.qxd 5/12/08 11:16 Page 3

About this resource
Microbiology is a popular option for practical work in schools. Micro-organisms are ideal for use in the school laboratory as they are relatively easy to maintain, and they can be used todemonstrate a wide range of biological processes and applications, as well as directly reflectingthe microbiology content of national curricula.
The text provides a series of safe, tried and tested practical investigations suitable for Key Stages3 and 4/GCSE science and equivalent Scottish qualifications. Many of the experiments also meetthe needs of the AS/A2 specifications and can be adapted for project work. It is based on an earlier, out-of-print publication Practical Microbiology & Biotechnology for Schools (Macdonald,1987) but has been significantly modified to match current practice and recent curriculumchanges. The book incorporates new material, including some open-ended investigations.
Credits & Acknowledgements
This resource has been funded by the Society for General Microbiology.
It has been compiled by a working party of the Microbiology in Schools Advisory Committee(MiSAC) comprising: Peter Fry, John Grainger, Janet Hurst, John Tranter and Paul Wymer, withinvaluable input from Dariel Burdass of SGM.
The team would like to thank other members of MiSAC for their help and advice. They are also grateful for the errors pointed out and suggestions for improvement made by HelenNankervis and Marilyn Whitworth of Nottingham University who trialled the investigations in the laboratory.
Editors: John Grainger & Janet HurstDesign and Production Editor: Ian AthertonIllustrations: Lesley Hoyles & Sally NobleFront cover illustration: TEK Image / Science Photo Library
ISBN 0 95368 382 6
Copyright
Practical Microbiology for Secondary Schools is copyright. The Society for General Microbiologyasserts its moral right to be identified as copyright holder under Section 77 of the Designs,Patents and Copyright Act (UK) 1988.
Educational use: Electronic or paper copies of the resource or individual pages from it may be made for classroom and bona fide educational uses, provided that the copies are distributedfree of charge or at the cost of reproduction and that the SGM is credited and identified as copyright holder.
Published by the Society for General Microbiology, Marlborough House, Basingstoke Road,Spencers Wood, Reading RG7 1AG, UK
© 2008 Society for General Microbiology; revised 2008
Cover 2008 Version.qxd 5/12/08 11:16 Page 4

Contents
About this resource Inside front cover
Using this resource 2
Good microbiological laboratory practice 2
Practical techniques and tips 3
InvestigationsLife forms and processes
Finding and growing microbes 4
Estimating the number of bacteria in water 6
Breakdown of starch by microbes 8
Breakdown of protein by microbes 10
Alcohol production using immobilised yeast cells 12
A microbe which moves towards light 14
Microbes in the environmentMicrobes and cellulose 16
Microbes and water pollution 18
Nitrogen-fixing bacteria 20
Isolating microbes from root nodules 22
Effects of chemical elements on microbial growth 24
Microbes and foodBreakdown of pectin by microbes 26
Microbes and breadmaking 28
Preserving food 30
Microbes and yoghurt making 32
Microbes and food spoilage 34
Microbes and milk quality 36
Health and hygieneEffects of antiseptics on microbes 38
Microbes and personal hygiene 40
Open-ended investigationsInvestigating microbes and cellulose 42
Investigating the effects of antimicrobials 43
Further resourcesBooks and websites 44
Safety 44
Practical techniques 44
Sources of cultures, equipment and consumables 44
Sources of advice 44
Society for General Microbiology Inside back cover
Microbiology in Schools Advisory Committee Inside back cover
Book 2008 Version.qxd 5/12/08 11:05 Page 1

Using this resource Good microbiological laboratorypractice
Just like any other practical activity in school science, all microbiology investi-gations require the user to adopt good microbiological laboratory practice(GMLP). The techniques and activities included in this book, and the micro-organisms suggested, present minimum risk given good practice. Here is a briefoverview to help those involved in preparing for, or using, the various activi-ties to carry them out safely. Further detailed information is available in theresources listed on p. 44.
Risk assessmentSchool microbiology will generally be safe, but before any practical activity is undertaken, risks must be assessed. Each individual (be they students, technicians or teachers) embarking on a practical activity is responsible for hisor her own health and safety and also for that of others affected by the work.Risk assessment will involve comparing the steps involved in an intendedactivity with procedures suggested in model risk assessments.* This will identify the safety precautions that need to be taken in the context of the levelof work and, possibly, the need to amend the procedure so that risks to healthand safety from any hazard(s) are minimised. Local rules must also be complied with. Of greatest importance in risk assessment is a consideration ofthe skills and behaviour of the students about to tackle a practical activity; a procedure that is safe for one group of individuals may need to be modifiedwith a different class. Also important is ensuring that a procedure is safe forpupils, but also does not endanger the health and safety of technicians orteachers during preparation or disposal. In deciding on the appropriate precautions to adopt, it is prudent that all cultures are treated as potentiallypathogenic (for example, because of possible contamination). Emergency procedures, such as dealing with spills, should also be considered.
No one should perform a microbiological procedure without receiving appropriate training from, or supervision by, a competent person. Informationon suppliers of training is available on p. 44.
Microbiology safetyThere are five areas for consideration when embarking on practical microbiology investigations, which make planning ahead essential.� Preparation and sterilisation of equipment and culture media.� Storage and maintenance of stocks of microbial cultures for future invest-
igations and preparation of an inoculum for the current investigation.� Inoculation of the media with the prepared culture.� Incubation of cultures and sampling during growth, if required.� Sterilisation and safe disposal of all cultures and decontamination of
equipment.
Good organisational skills and a disciplined approach ensure that every activity is performed both safely and successfully.
Personal protectionFood or drink should not be stored or consumed in a laboratory or prep roomthat is used for microbiology. No one should lick labels, apply cosmetics, chewgum, suck pens or pencils or smoke in a laboratory or prep room. Facilitiesshould be provided within the laboratory or prep room for hands to be washedwith soap and warm water after handling microbial cultures and wheneverleaving the laboratory. Paper towels, or some other hygienic method, shouldbe used for drying hands. If contamination of the hands is suspected, then they should be washed immediately with soap. Cuts or abrasions should beprotected by the use of waterproof dressings or disposable gloves. Safety glasses may be worn according to local requirements. Appropriate protectiveclothing may be required.
Photocopiable double-page spreads are providedfor each investigation. The right-hand page of each spread is the student worksheet, illustratedwith simple line drawings, whilst the left-handpage provides notes for teachers and technicians to assist with preparation and risk assessment, including a list of materials required and suggestions for student questions. Both pages provide planning support. It should be noted thatmany investigations require up to a week formicrobial growth to occur before usable results areavailable.
The worksheets are arranged in four main themeswhich relate to areas of the National Curriculumfor Science for England and Wales and the Scottishspecifications, supporting, in particular, the KeyStage 3 Schemes of Work. Investigations can beselected to fit individual teaching programmes;they are not intended to be used in sequence. Each activity is stand-alone and offers students the opportunity to develop the investigative skillsrequired for National Curriculum Key Stages 3 and 4. To help students experience the wholeprocess of investigating selected problems fromstart to finish, two suggestions for open-ended explorations using micro-organisms are providedon pp. 42 and 43.
Whenever working with micro-organisms there arepractical procedures to ensure safe transfer andavoid contamination which are common to mostactivities. An outline of these appears on p. 3,together with some other useful tips relevant tomany of the investigations.
Basic Practical Microbiology: A Manual, publishedby the SGM, is recommended. Cross references tospecific techniques in this work are listed on thestudent worksheets where appropriate.
2 © 2008 SGM Practical Microbiology for Secondary Schools
*Model risk assessments that can be consulted includeMicrobiology: an HMI Guide for Schools and Further Education(HMSO 1990, now out of print), Topics in Safety (ASE 1988, 2001),CLEAPSS Laboratory Handbook chapter 15.2, 15.12 (CLEAPSS2001), Safety in Science Education (DfEE; HMSO 1996) andBiology/Biotechnology Safety in Microbiology: A Code of Practicefor Scottish Schools and Colleges (SSERC Ltd, 2002).
Book 2008 Version.qxd 5/12/08 11:05 Page 2
Practical techniques and tips
Aseptic techniqueSterile equipment and media should be used in the transfer and culture of micro-organisms. Aseptic technique should be observedwhenever micro-organisms are transferred from one container to another. This involves working in an area in which draughts arecontrolled, for example close to a lit Bunsen burner so that there is an updraught of air away from the bench, thereby minimisingthe risk of contaminating open cultures.
Flaming loops and bottlesOnly sterile instruments should be used to transfer cultures of micro-organisms. With pipettes or syringes, these will have been pre-sterilised but, for most transfers, an inoculation loop will be used which is sterilised by heating along its length until it glowsred. This is done both before and after each transfer. When the loop is loaded, beware of ‘splutter’ when the culture is rapidly heated. This is minimised if the loop is heated first near the handle and slowly drawn through the flame so that the tip of the loopis prewarmed before it reaches the flame. Formation of microbial aerosols is avoided by the careful use of loops and pipettes.
The necks of open bottles or tubes should also be flamed, both before and after transfers, by passing them briefly through a hotBunsen burner flame. The aim is not to sterilise the glass (which may break if heating is prolonged), but to create a convection current of air away from the open mouth of the vessel, so helping to minimise the risk of contaminants entering.
Pipettes and syringesA variety of pipettes is available for the aseptic transfer of cultures, suspensions of natural materials and sterile solutions. Usually itis adequate to control the volume to be transferred in terms of the number of drops delivered, e.g. for routine inoculation using aPasteur (dropping) pipette to provide a culture. For measured volumes, e.g. when making dilutions, some form of calibrated pipetteis required. Suitable types include a dropping pipette with volumes marked on the barrel and one that delivers drops of a known volume. The long calibrated pipettes that are used in chemistry are also suitable. Pipetting by mouth is forbidden. A teat shouldalways be used. Relatively inexpensive calibrated pipette fillers (e.g. Bibbettes) are also available from suppliers. Syringes and micro-pipettes holding the appropriate volume provide a useful alternative.
A non-absorbent cotton wool plug about 1 cm long is placed in the wide end of the pipette before sterilisation. This prevents airborne microbes from contaminating the fluid being transferred and prevents the operator and environment from contaminationby a culture. However, the cotton wool plug must remain dry because a wet plug does not act as a barrier to the passage of microbes.Glass pipettes should be sterilised in either an autoclave or hot air oven.
Handling and labelling agar platesAfter inoculating an agar plate, it is customary to tape the lid to the base to prevent accidental opening. It is best to use clear adhesive tape since masking or biohazard warning tape may obscure the observation of cultures that grow. Only two or four smallpieces of tape are required; covering the top and bottom of an agar plate with a ‘cross’ of tape merely wastes tape and may interferewith the viewing of the plate’s contents. Before incubation is complete, an agar plate must never be sealed completely by tapingaround the circumference; this will create anaerobic conditions which may prevent the normal growth of microbes or isolate anaerobes which may be pathogenic. If there is reason to suspect that an incubated plate may contain unknown species (which may be pathogenic), for example when sampling from the environment, it is sensible to seal plates completely just before they arereturned to students for observations.
Agar plates are normally inverted after inoculation to avoid any moisture forming on the lid during incubation and dripping downonto the agar. Since plates will normally be inspected with the agar base uppermost and the microbial growth observed through theagar in the base, it is also necessary to label the base, rather than the lid. Labelling should be small to prevent obscuring the view ofmicrobes that develop. Using small adhesive labels may be more convenient than writing on the dish.
Incubation and storageFor the purposes of the investigations in this book, virtually all cultures can be incubated at room temperature. At the lower temperatures now recommended, an incubator may not therefore be needed but, if used, it should be set at around 20–25 °C and certainly no higher than 30 °C to avoid the inadvertent growth of pathogens. An exception to this rule is in the fermentation of milk to make yoghurt. If an incubator is not used, plates should be incubated (and subsequently stored) where they cannot be tampered with, for example in a cupboard rather than left on a shelf in a laboratory. It is not recommended that incubated plates arestored in a refrigerator for more than a few days; long-term storage will cause, or increase, problems of condensation.
Disposal and disinfectionContaminated materials and equipment should preferably be heat-sterilised by autoclaving if incineration is not possible or appropriate. This may be time-consuming but it is considerably safer than the use of a disinfectant which may also not ensure complete sterilisation. A disinfectant will be needed for items such as pipettes and syringes that cannot be resterilised after use byflaming, for swabbing benches and for dealing with accidental spills. Time is needed if disinfection is to be achieved and this maytake up to 30 minutes with some types, for example sodium chlorate(1) (hypochlorite) or domestic bleach. Not all disinfectants arestable when used (for example bleach is degraded by organic matter). Virkon and sodium chlorate(1) are likely to be of most use.
Practical Microbiology for Secondary Schools © 2008 SGM 3
Book 2008 Version.qxd 5/12/08 11:05 Page 3

Finding and growing microbes
Life forms and processes
Microbes are found everywhere. A litre of pond water can contain millions of microbes. A similar number can be present in a gram ofsoil. Many microbes and their spores can be carried by winds, watersand animals across and between continents.
Recommendations1. To limit the number of agar plates required, each group should use
either nutrient or malt agar plates. Nutrient agar supports thegrowth of a wide range of bacteria and fungi from soil and air. Maltextract agar supports better growth of fungi because the low pHand nutrient content reduce competition from bacteria.
2. The plates exposed to the air should be left in a variety of placesboth inside and outdoors. Do not place the dishes in toilets. Ensurethat other students/teachers are aware of why the plates are thereor the experiment may be disrupted.
3. The students should be told that one agar plate is being keptunopened in the classroom/laboratory as a control.
4. The plates should be kept at room temperature or incubated at20–25 °C for 2–3 days. After incubation the plates should be tapedaround the circumference so that the lids cannot be removed.
NotesExposure of the agar plates in a variety of places should, after incubation, produce growth of bacteria and fungi. The number ofcolonies may be a reflection of the disturbance of the air by convection currents or people. Microbes in disturbed air may not be detected as they are held in suspension. Soil and water will probably yield more microbial colonies than air.
Learning objectivesTo show:� that microbes are everywhere� the variety of microbes� that the microbial population varies from
place to place
Age rangeYear 7 and above
DurationSession 1 40 minutesSession 2 20 minutesIncubation period: min. 48 h between sessions
Materials (each group)� 3 nutrient agar plates
or 3 malt extract agar plates
� bottle containing 1 g soil suspended in 100 cm3 tap water
� bottle containing 10 cm3 pond water� 2 sterile glass or plastic spreaders� 2 sterile dropping pipettes� beaker of disinfectant� Bunsen burner� adhesive tape� marker pen
4 © 2008 SGM Practical Microbiology for Secondary Schools
QuestionsSession 11. Where do you think microbes may be found?2. Is a single microbial cell visible to the naked eye?3. What conditions do you think would encourage the growth of microbes?4. What different kinds of microbes exist?5. Do you expect any difference between the malt agar plates and the nutrient agar plates? If so, why?6. What is the purpose of the ‘control’ plate?
Session 27. Describe the appearance of each of your plates. Do they all look the same?8. Which plate shows most microbial growth? Can you suggest any reasons for this?9. Do your plates look the same as those from other groups, using a different kind of growth medium?
If not, suggest a reason why.10.Write down any ideas you have about how microbes might be important in the places you have investigated.
Teacher’s Guide
Book 2008 Version.qxd 5/12/08 11:05 Page 4


Recommendations1. The microbial population of natural waters varies widely from place
to place and time to time. It is essential to try this experimentbefore the lesson, to check that the dilution suggested produces thedesired result, i.e. a countable number of colonies.
2. Care should be taken with the temperature of the nutrient agar atpouring. Below 45 °C the agar will start to set and be lumpy; athigher than 55 °C some of the microbes may be killed.
3. When students are mixing the agar and culture in the Petri dish,they should be instructed to swirl the contents gently in a figure ofeight to ensure even distribution of the sample.
4. As an alternative to river or pond water, an overnight nutrientbroth culture of Bacillus subtilis or Micrococcus luteus can be used to illustrate the colony counting technique. In this case it is essential to use more dilute samples (1/100, 1/1000) or the growthmight be too heavy to count colonies.
Materials (each group)� pond or river water in a beaker� 2 Universal bottles each containing
ca 15 cm3 molten nutrient agar held at 45–50 °C
� 2 Petri dishes� bottle containing sterile distilled water� sterile clean test tube with cap� 2 × 10 cm3 sterile syringes or calibrated
pipettes and fillers� Bunsen burner� beaker of disinfectant� marker pen� adhesive tape
6 © 2008 SGM Practical Microbiology for Secondary Schools
QuestionsSession 11. What was the point of diluting the original water sample?2. By next lesson, any bacteria in the water will give rise to ‘colonies’ visible in and on the agar.
What will these colonies consist of?3. What is the difference between a ‘viable’ cell count and ‘total’ cell count?4. What other kinds of microbes might be present in the water sample?5. How would you expect your dishes to look next lesson?
Session 26. Describe the appearance of your Petri dish and count the number of colonies. Explain your results.7. Calculate the number of bacteria per litre of your original water sample.8. How accurate do you think this estimate of numbers is? Explain your answer.9. If your results are not what you expected, suggest some reasons why not.10.Do you think the colonies that you can see came from microbes in your original water sample?
If not, where else might they have come from? How could you check this?11. What steps are taken to ensure that no harmful microbes are found in mains water?
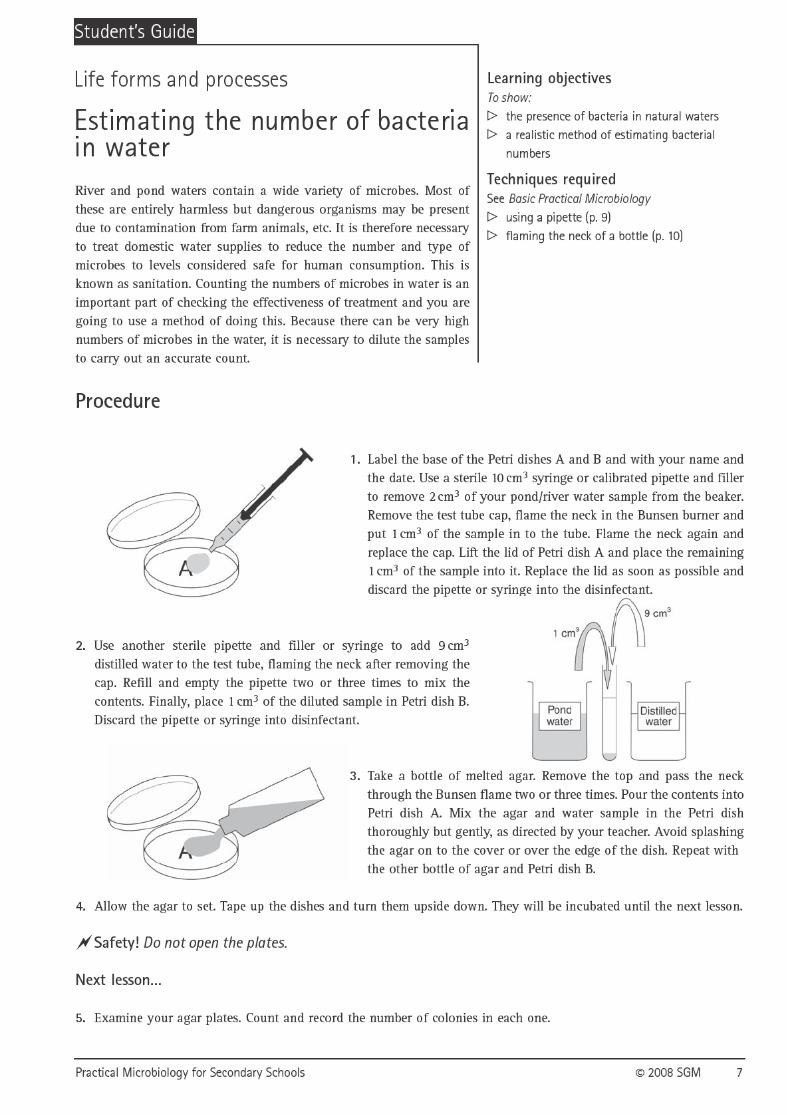
Estimating the number of bacteriain water
Life forms and processes
Most methods of estimating numbers of viable bacteria involve theinoculation of a solid medium with the sample (or diluted sample).After incubation the number of cells in the inoculum can be estimatedfrom the number of colonies which develop on or in the medium. It isusually assumed that each colony has arisen from a single cell; thenumber of cells that actually grow into colonies depends at least partlyon the type of medium used and on the conditions of incubation.
Learning objectivesTo show:� the presence of bacteria in natural waters � a realistic method of estimating bacterial
numbers
Age rangeYear 7 and above
DurationSession 1 40 minutesSession 2 30 minutesIncubation period: min. 48 h between sessions
Teacher’s Guide
Book 2008 Version.qxd 5/12/08 11:05 Page 6

Recommendations1. The cultures of Bacillus subtilis and Escherichia coli should be
inoculated into nutrient broth at least 48 hours before the lesson.B. subtilis (catalogue no. B53) from Sciento produces amylase.
2. The paper discs can either be purchased (Whatman Antibiotic Assaydiscs) or punched from filter or chromatography paper with a corkborer (ca 6 mm diameter) or a hole punch.
3. After the first lesson and incubation at room temperature for a fewdays, the agar plates should be inverted and filter papers soaked in40 % methanal (formaldehyde)* solution placed in the lids. Theseshould be left overnight to kill the microbes and then removed,after which the students can irrigate the plates with iodine solution.
* Safety! Methanal is toxic and corrosive. Avoid breathing in thevapour. Use eye protection, gloves and a fume cupboard.
NotesSome strains of B. subtilis produce amylases whereas E. coli doesnot. Other microbes suitable for school use, such as the fungusAspergillus oryzea, also show marked amylase activity. Thisrequires starch malt agar, which is made by adding 100 cm3 4 %starch suspension to each 100 cm3 malt agar (made with light malt).If using A. oryzea, a culture grown in malt extract broth for 7 daysis required.
Materials (each group)Session 1� test tubes/bottles containing 2 cm3 each of:
Bacillus subtilis nutrient broth cultureEscherichia coli nutrient broth culture
� starch nutrient agar plate(Heat 4 g soluble starch in 100 cm3 distilled water to form a suspension. Allow to cool and mix with 100 cm3 molten nutrient agar before sterilisation.)
� 0.1 % amylase solution� 4 paper discs (see recommendations)� forceps� sterile distilled water� Bunsen burner� beaker of disinfectant� marker pen� adhesive tape
Session 2� iodine solution and dropper� graph paper and ruler
8 © 2008 SGM Practical Microbiology for Secondary Schools
QuestionsSession 11. What reaction is catalysed by amylase enzymes?2. Why do microbes produce amylase enzymes?3. What is the purpose of the control disc soaked in distilled water?
Session 24. Describe the appearance of your agar plate after it has been flooded with iodine.5. Do all microbes produce amylases?6. What physical factors might affect the amylase activity?7. Suggest some reasons why microbes are used as a source of industrial amylases.8. Suggest some uses of amylase enzymes in industry and the home.
Breakdown of starch by microbes
Life forms and processes
Amylase enzymes are widespread in many organisms including micro-organisms. Microbial amylases are secreted by cells and degrade starchmolecules that are too large to pass through the cell wall. The amylasesproduced by microbes are often used in industry, particularly in starchprocessing, where the products of starch degradation (sugars, syrups)are used in the manufacture of foods and beverages.
Learning objectivesTo show:� that some microbes produce amylase� a simple assay technique for amylase activity� an aspect of the industrial importance of
microbes
Age rangeYear 9 and above
DurationSession 1 40 minutesSession 2 30 minutesIncubation period: min. 48 h between sessions
Teacher’s Guide
Book 2008 Version.qxd 5/12/08 11:05 Page 8


Recommendations1. The cultures of Bacillus subtilis and Saccharomyces cerevisiae
should be inoculated at least 48 hours before the lesson.2. Plates must be treated carefully after inoculation to prevent the
spreading of the drops of culture. They should not be inverted untilthe drops have dried.
3. When the milk agar is made, it is assumed that the microbial population of the milk will not affect the outcome of the invest-igation. A control plate could be used to cover this possibility,although the uninoculated area of the plate really suffices.This aspect could form the basis for a question exploring students’understanding of the difference between pasteurised and sterilisedmilk.
Notes1. The milk agar is opaque due to the milk protein casein. After
inoculation and incubation, clear areas around microbial coloniesindicate protease activity.
2. An alternative procedure using paper discs can be used in thisexperiment (see page 8).
Materials (each group)� bottles containing ca 2 cm3 each of:
Bacillus subtilis nutrient broth culture Saccharomyces cerevisiae malt extract broth culture
� 2 milk agar* plates� 2 sterile dropping pipettes� Bunsen burner� beaker of disinfectant� marker pen� adhesive tape
*Milk agar. Make up and sterilise nutrient agar. Allow to cool to 45–50 °C and add pasteurised milk (10 % by volume) aseptically and mix carefully. The milk should be freshly bought and pasteurised. Skimmed, semi-skimmed or full cream milk can be used.
10 © 2008 SGM Practical Microbiology for Secondary Schools
QuestionsSession 11. What do proteins consist of?2. Why are proteins important in our bodies?3. How are proteins broken down in our bodies?4. What is causing the cloudiness of the agar in your Petri dishes?5. If the microbes you are using break down proteins, what do you expect your agar plates to look like next lesson?
Session 26. Describe the appearance of your agar plates.7. Is there any evidence of protease production by the microbes?8. If so, how is this beneficial to the microbes?9. Suggest some uses of protease enzymes in industry.10.How are these enzymes produced on a large scale?11. What factors might affect the activity of the enzymes?12.Suggest a procedure for investigating the effects of one of these factors.
Breakdown of protein by microbes
Life forms and processes
Protease enzymes are produced by several bacteria and fungi. Theycatalyse the hydrolysis of proteins to amino acids. Industrial appli-cations of proteases include detergent manufacture, brewing and baking, meat tenderisation and leather preparation. Microbes, including fungi of the genus Aspergillus, are used to produce proteases on a commercial scale.
Learning objectivesTo show:� that microbes produce proteases� the chemical nature of proteins� the use of proteases in industry
Age rangeYear 9 and above
DurationSession 1 40 minutesSession 2 30 minutesIncubation period: min. 48 h between sessions
Teacher’s Guide
Book 2008 Version.qxd 5/12/08 11:05 Page 10


Recommendations1. The yeast cultures should be inoculated in broth at least 48 hours
before the lesson and incubated at 20–25 °C or room temperature.2. To obtain distinct beads of immobilised cells, the syringe should
be held 5 cm above the calcium chloride solution in the beaker. The latter should be swirled gently as the contents of the syringeare released drop by drop. If the syringe contents are released tooquickly, separate beads will not be obtained. Although not difficult,the procedure should be demonstrated before students attempt it.
3. A few drops of Universal indicator may be added to the apple juiceso that pH changes may be observed.
Notes1. Cloudiness in the limewater should be apparent during the first
week but after two weeks a crust will form and the solution willbecome clear.
2. Beads will rise during the incubation period because of carbondioxide evolution by the entrapped yeast.
3. The investigation could be extended by exploring the continued re-use of the beads in either batch or continuous culture.
Materials (each group)� ca 10 cm3 Saccharomyces cerevisiae culture
in malt extract broth in a small beaker� 200 cm3 apple juice� 250 cm3 2 % calcium chloride solution in
500 cm3 beaker� 10 cm3 3 % sodium alginate solution made
up in deionised water � distilled water in a small beaker and in a
wash bottle� 100 cm3 limewater� 2 × 250 cm3 conical flasks with bungs and
connecting tubes� 2 × 100 cm3 conical flasks� 250 cm3 beaker� 100 cm3 measuring cylinder� 10 cm3 syringe� beaker of disinfectant� filter paper and filter funnel� marker pen
12 © 2008 SGM Practical Microbiology for Secondary Schools
QuestionsSession 11. Describe what you see when the drops of yeast suspension/alginate are added to calcium chloride solution.2. How do you explain this observation?3. Describe what has happened to the yeast cells.4. What is the purpose of the limewater in this investigation?5. How will you know whether or not fermentation of sugar to alcohol has occurred in either flask?6. Do you expect any difference in alcohol production between the two flasks? If so, explain why.
Session 27. Has the limewater gone cloudy in either case?8. Describe the smell of the contents of either flask. Is this evidence enough to confirm alcohol production?9. The immobilised cells are trapped in a jelly-like substance. How do they manage to ferment the apple juice?10.How could you tell whether the immobilised cells are as good as the free yeast cells in fermenting the juice?11. Which other factors may affect the rate of alcohol production? Outline some experiments to test your ideas.12.What are the advantages of using immobilised cells in industrial processes?
Alcohol production using immobilised yeast cells
Life forms and processes
In many industrial biotransformations, immobilised enzymes or cellsare used. This is often advantageous for the production of high purityproducts free of residual protein. It also enables expensive enzymes tobe recovered and used again. Immobilised yeast cells are not typicallyused in commercial alcohol production, but they are used here todemonstrate the technique.
Learning objectivesTo show:� the role of yeast in alcohol production� the production of carbon dioxide by yeast
cells� the relative performance of free yeast cells
and immobilised yeast cells
Age rangeYear 7 and above
DurationSession 1 40 minutesSession 2 20 minutesIncubation period: min. 7 days between sessions
Teacher’s Guide
Book 2008 Version.qxd 5/12/08 11:05 Page 12


Recommendations1. Considerable forward planning is required for this investigation
because a relatively large volume of actively growing Euglenaculture is needed. Cultures obtained from Sciento are usually denseand active. If necessary, grow up the Euglena in Biobred AlgaeMedium (also from Sciento), following the instructions provided.
2. Filters: sets of gelatin sheets of different colours can be purchasedfrom school science suppliers (Philip Harris, Cinemoid colour filtersheets).
3. It is very important to ensure that no light enters the tube except via the ‘windows’. The tubes should be left in natural light, but not directsunlight (a north facing window ledge is ideal), for at least 2 days.If in a test tube rack, make sure that no windows are obscured by it.
4. The tubes should be removed gently from the cardboard sleeves,otherwise cells will become detached from the sides.
5. To aid microscopic examination, a drop of 10 % methyl cellulose canbe added to the drop of Euglena culture on the slide. This will slowdown movement and help detailed observation. Focus on the cultureusing the low power lens first.
Materials (each group)� bottle containing 10 cm3 Euglena culture
(available from Sciento and other suppliers)� 20 cm3 Biobred Algae Medium (available
from Sciento)� large boiling tube� dropping pipette� coloured filters (see recommendations)� black paper� sticky tape� non-absorbent cotton wool� aluminium foil� scissors� slide and cover slip� microscope� Bunsen burner� marker pen� beaker of disinfectant
14 © 2008 SGM Practical Microbiology for Secondary Schools
QuestionsSession 11. What enables Euglena to move?2. Why is Euglena not a typical protozoan?3. What is the name of the process by which Euglena makes its own food?4. What is needed (besides light) for this process to occur?5. What are the products of the process?6. Which windows do you think Euglena will be most attracted to?
Session 27. Do your results confirm the prediction you made last lesson? If not, suggest some reasons why.8. Which colours does Euglena absorb most?9. How reliable do you consider your results to be?10.Suggest further investigations which could be carried out to test your conclusions.
NotesThe greatest accumulation of cells will occur at the colourless window. More cells will be concentrated at the red and bluewindows than the green and yellow ones. The experiment is worthwhile even if microscopic examination is excluded.
A microbe which moves towardslight
Life forms and processes
Euglena, a single-celled organism, possesses chloroplasts and can photosynthesise like a plant. If cultured in the dark it tends to lose itschloroplasts. It moves by means of a flagellum. The organism containsa light-sensitive eyespot (or stigma) consisting of several pigment-containing lipid droplets.
Learning objectivesTo show:� some characteristics of Euglena� the wavelengths of light that are useful in
photosynthesis� the importance of photosynthetic microbes in
the carbon cycle
Age rangeYear 9 and above
DurationSession 1 60 minutesSession 2 20 minutesIncubation period: min. 48 h between sessions
Teacher’s Guide
Book 2008 Version.qxd 5/12/08 11:05 Page 14


Notes1. The types of paper indicated are only suggestions. Different types
of paper have different physical and chemical properties that willmake them more or less susceptible to cellulose degradation.Cardboard, for example, contains a lot of lignin which protects thecellulose from degradation, because of its branching structure. Inkon heavily printed paper is known to have a protective role againstcellulose degradation because it forms a physical barrier to theenzyme.
2. An open-ended investigation to explore a cellulolytic activity isprovided on p. 42.
Materials (each group)� 6 test tubes with caps/cotton wool plugs� 60 cm3 sterile nutrient broth� 5 g soil� 250 cm3 conical flask� sterile 5 cm3 graduated pipette and filler� marker pen� 1 × 2 cm2 strips of different types of paper:
filter paper (× 2)unprinted newspaperheavily printed newspaperglossy magazine coverthin cardboard
� beaker of disinfectant
16 © 2008 SGM Practical Microbiology for Secondary Schools
QuestionsSession 11. What is the main component of paper?2. What is produced when this substance is broken down?3. What kind of animals have cellulase enzymes in their gut?4. What is the main industrial source of cellulase enzymes?5. How are microbes important in the carbon cycle?6. Do you expect to see any differences between your tubes next lesson? Explain your answer.
Session 27. Which tubes show evidence of cellulase activity? Try to explain any differences.8. What happens to domestic waste paper?9. What are landfill sites? What are some of the major problems that they present?10.What is compost? How are microbes important in its production?11. Why is it important that microbes degrade cellulose?
Microbes and cellulose
Microbes in the environment
Cellulose, a polymer of glucose, is used as a carbon source by a number of fungi and bacteria found in soil and compost heaps, etc.,and by certain bacteria in the rumen (the grass-digesting part of thegut) in cows and other ruminants. These microbes produce cellulaseenzymes that can degrade certain types of cellulose outside the cellinto products which include glucose.
Learning objectivesTo show:� the role of microbes in decomposing
organic waste� the role of microbes in the carbon cycle� the role of microbes in the production of
industrial enzymes
Age rangeYear 7 and above
DurationSession 1 30 minutesSession 2 20 minutesIncubation period: up to 3 wks between sessions
Teacher’s Guide
Book 2008 Version.qxd 5/12/08 11:05 Page 16


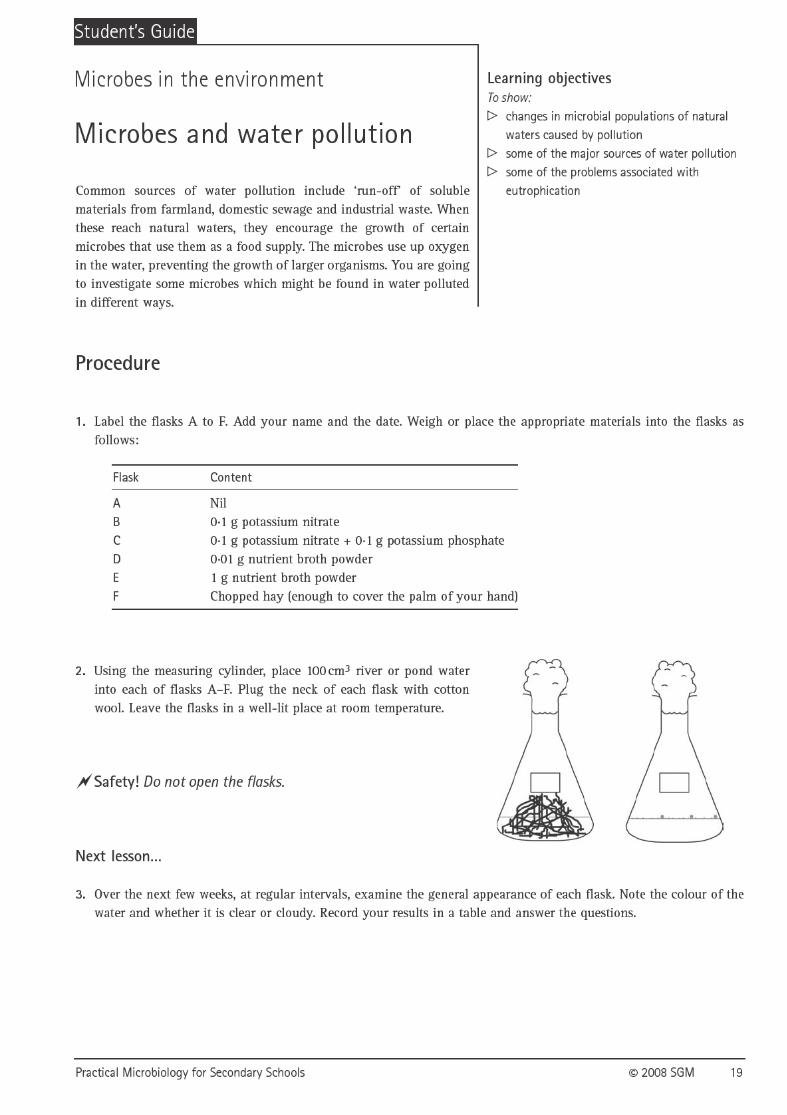
Recommendations1. Pond or river water samples should preferably be collected on the
day of the lesson or the day before, ensuring that they come from aplace where there is no risk from farm or sewage effluent.
2. Depending on facilities, it may be necessary to provide students withpre-weighed ingredients (especially 0.01 g nutrient broth powder).
3. If the number of conical flasks or storage space is limited, the experiment can be run as a demonstration.
4. Illumination by direct light (e.g. on a window sill) is adequate, but continuous artificial illumination, especially in winter, is moreeffective.
5. A shallow layer of water and use of cotton wool rather than rubberbungs helps aeration of the flask contents.
Materials (each group)� 600 cm3 pond or river water� hay (chopped)� 1.5 g nutrient broth powder� 1 g potassium nitrate� 1 g potassium phosphate� 6 × 250 cm3 conical flasks� 100 cm3 measuring cylinder� non-absorbent cotton wool� access to a balance� marker pen
18 © 2008 SGM Practical Microbiology for Secondary Schools
QuestionsSession 11. Why is it important for the flasks to be kept in the light?2. How do you ensure that the air supply to the flasks is the same as that in the natural environment?3. When you examine the flasks over the next few weeks, what would you expect the water in each of them to look
like? Explain your answer.4. What are the major sources of water pollution?5. What is eutrophication?6. Explain the sequence of events that might connect the death of fish in a river with the use of fertiliser on the land.
Session 27. Suggest possible reasons for differences between your own results and those of other groups.8. How are the conditions in the experiment different from those in nature?9. What conclusions, if any, can be drawn from your results? Describe further investigations that you could carry
out to test your conclusions.
Notes1. This is a long-term investigation which can be run for 4 weeks or more. Considerable fluctuations in the populations
of different microbes are evident from week to week. This results in visible changes in colour and opacity.2. Flasks B–D are likely to yield algae. Flask E will show cloudiness and a surface skin caused by the rapid growth of
bacteria. Duplicates of these could be kept in the dark for comparison with those in the light.3. Hay (flask F) provides microbes not naturally present in the water. Straw is less effective. Different substances can
be added to the flasks to simulate industrial pollution, e.g. dehydrated potato or milk as examples from the foodindustry. These will also add different microbes.
Microbes and water pollution
Microbes in the environment
Dissolving various minerals and other nutrients in pond or river watercan simulate the effects of common sources of pollution. Differentcombinations and concentrations promote the growth of certainmicrobes selectively, leading to noticeable changes in the colour andopacity of the water.
Learning objectivesTo show:� changes in microbial populations of natural
waters caused by pollution� some of the major sources of water pollution� some of the problems associated with
eutrophication
Age rangeYear 10 and above
DurationSession 1 40 minutesSubsequent sessions 10–15 minutesIncubation period: over 3–4 wks
Teacher’s Guide
Book 2008 Version.qxd 5/12/08 11:05 Page 18

*Nitrogen-free mineral salts agarFor 500 cm3, first dissolve 0.05 g FeCl3.6H2O in 500 cm3 distilledwater. Add 2 g K2HPO4, 0.25 g MgSO4.7H2O and 10 g glucose.Dissolve and check pH, adjust to 8.3 if necessary using 0.1 M NaOH.Pour into a bottle containing 1 g CaCO3 and 7.5 g agar. Autoclaveat 121 °C for 20 minutes. When pouring into plates, mix to dispersethe CaCO3 first.Nitrogen-free mineral salts agar can also be purchased from PhilipHarris. Agar powder can be added to this at the rate of 2 g per100cm3 before sterilisation.
RecommendationsThe plates containing soil should be kept at room temperature orincubated at 20–25 °C for 2–3 days.
Materials (each group)� nutrient agar plate� nitrogen-free mineral salts agar plate
(for recipe, see left)*� soil� forceps or spatula� marker pen� adhesive tape
20 © 2008 SGM Practical Microbiology for Secondary Schools
QuestionsSession 11. What is the difference between the two growth media?2. What sources of nitrogen are available to microbes in the soil?3. What sources of nitrogen are available to microbes in the two dishes?4. Do you expect to see any difference between your dishes next lesson? Explain your answer.5. Why is nitrogen essential for living organisms?
Session 26. Are there any similarities or differences between the plates? If so, do these confirm your predictions?7. How can you identify any colonies of Azotobacter on either of the plates?8. If you can, does this confirm that these bacteria are able to ‘fix’ nitrogen from the atmosphere?9. Where else do nitrogen-fixing bacteria occur?10.What would happen to the nitrogen cycle if nitrogen-fixing bacteria did not exist?
Nitrogen-fixing bacteria
Microbes in the environment
The reduction of nitrogen to ammonia by nitrogen-fixing organisms is catalysed by a nitrogenous enzyme complex. As nitrogenase activityis very sensitive to the presence of oxygen, in aerobic bacteria inacti-vation by oxygen is prevented in several ways. Azotobacter, for exam-ple, has the highest respiratory rate of any organism, leading to rapidremoval of oxygen by respiration. It also produces a protective slimelayer which facilitates its identification in this investigation. Azoto-bacter is able to fix nitrogen when free-living in the soil (compareRhizobium, pp. 22–23).
Learning objectivesTo show:� that free-living nitrogen-fixing bacteria occur
in the soil� one role of microbes in the nitrogen cycle� how bacteria may be isolated from soil
Age rangeYear 9 and above
DurationSession 1 20 minutesSubsequent sessions 20 minutesIncubation period: min. 48 h between sessions
Teacher’s Guide
Book 2008 Version.qxd 5/12/08 11:05 Page 20


*Mannitol yeast extract agar (MYEA)Suspend 10 g agar in 1 l water. Heat to dissolve. Add 0.5 g K2HPO4,0.2 g MgSO4.7H2O, 0.2 g NaCl, 0.2 g CaCl2.6H2O, 10 g mannitol and0.4 g yeast extract. Dispense and sterilise by autoclaving.
Recommendations1. Advance planning is necessary to obtain suitable plant material.
Clover (obtain seeds from school science suppliers or plants from afield or lawn) is recommended as the nodules are relatively soft.
2. Potato dextrose agar supplemented with 0.25 g yeast extract perlitre may be used instead of mannitol yeast extract agar.
3. The plates should be incubated preferably at 20–25 °C for 2–3 daysor at room temperature.
4. If the nodules are cleaned well in the alcohol, a population of pre-dominantly Rhizobium should result. Students should be informedthat they are using sterile apparatus so that any bacteria that dogrow on their plates are likely to have come from the root nodules.
5. 1% bleach solution can be used instead of alcohol to clean the nodules.
6. The colonies of Rhizobium are off-white with a sticky appearance.Colonies of other colours are NOT Rhizobium; they may be eitherintracellular contaminants from the nodule or soil microbes thathave survived the washing and alcohol treatment.
Materials (each group)� plant with root nodules e.g. clover, peas� mannitol yeast extract agar plate
(for recipe, see left)*� sterile distilled water in beaker (covered)� 70 % (v/v) industrial denatured alcohol
in a small beaker or glass Petri dish covered in foil (CAUTION: flammable, keep covered away from lit Bunsen burner)
� 5 sterile Petri dishes� Bunsen burner� dropping pipettes: 1 sterile, 1 non-sterile� sterile glass rod� scalpel� metal forceps (can be pre-sterilized by
autoclaving)� wire loop� beaker of disinfectant� marker pen� adhesive tape
22 © 2008 SGM Practical Microbiology for Secondary Schools
QuestionsSession 11. What is the alcohol treatment for?2. What kinds of plants have root nodules? What are they?3. How do root nodules help the plant?4. Does the plant help the microbes?5. What name is given to this type of relationship?6. What do you expect to see growing on your agar plate next lesson?
Session 27. Is there just one type of microbe growing, or more than one?8. Where do you think most of the microbes growing on the dish have come from?9. Where might any other microbes have come from?10.Are the microbes fixing nitrogen while they are growing on the agar plate?11. Explain the importance of nitrogen-fixing microbes in the nitrogen cycle.
Isolating microbes from root nodules
Microbes in the environment
The roots of leguminous plants have small swellings (nodules) containing bacteria of the genus Rhizobium. This is a symbiotic relationship, with the plant providing nutrients and protection whilethe Rhizobium supplies the plant with ‘fixed’ nitrogen from the atmosphere. Plant growth is therefore enhanced even in nitrogen-poorsoils. A nitrogen-containing medium is used here because Rhizobiumis able to fix nitrogen only when inside the nodule.
Learning objectivesTo show:� the role of microbes in the nitrogen cycle� how microbes can be grown from root
nodules� an example of symbiosis
Age rangeYear 11 and above
DurationSession 1 30 minutesSession 2 20 minutesIncubation period: min. 48 h between sessions
Teacher’s Guide
Book 2008 Version.qxd 5/12/08 11:05 Page 22


Recommendations1. This investigation requires a large number of conical flasks per
group.2. A large quantity of an actively growing culture of Scenedesmus
(available from Sciento) is required. Add the stock liquid culture to, e.g. 100 cm3 complete Sach’s medium in a 500 cm3 flask. Addmore growth medium at intervals until the required quantity isachieved. Scenedesmus should be kept in bright light (not directsunlight). If daylight is inadequate (e.g. in winter) a bank of two orthree ‘warm light’ fluorescent tubes can be used. The cultures forthe investigation should be bright green in colour. Bulking upinevitably depends on the condition of the original culture and thetime of year.
EutrophicationIn water enriched with inorganic ions beneficial to plant growth,algae may undergo a population explosion (an ‘algal bloom’), particularly in the summer. Degradation of their dead remainseventually leads to the production of hydrogen sulphide and this,in addition to the deoxygenation of the water by saprophytic bacteria, causes the death of other organisms such as fish.
Materials (each group)� bottle containing 20 cm3 culture of
Scenedesmus in complete Sach’s medium (Mineral Deficiency Sach’s Water Culture Set is available from Philip Harris. Make up stock solutions as required.)
� 5 × 250 cm3 labelled conical flasks with non-absorbent cotton wool plugs containing:A 100 cm3 complete mediumB 100 cm3 medium without KC 100 cm3 medium without PD 100 cm3 medium without NE 100 cm3 distilled water
� 5 cm3 sterile syringe/calibrated pipette and filler
� sterile dropping pipette� beaker of disinfectant� slides and coverslips� mounted needle� microscope� marker pen� Bunsen burner
24 © 2008 SGM Practical Microbiology for Secondary Schools
QuestionsSession 11. What elements are needed to make proteins?2. Why are fertilisers used by farmers?3. What elements are included in the fertilisers?4. What do you expect the appearance of your flasks to have in 2–3 weeks’ time?
Session 25. In which flask has most growth taken place and in which flask has least growth taken place?6. Which element(s) are most important for growth of the algae?7. What do you think would happen if the flasks were kept in the dark?8. When fertiliser runs off from farm land into waterways, what effect do you think this may have on: (a) microscopic
plants; (b) larger water plants; (c) animals; (d) bacteria?
Effects of chemical elements onmicrobial growth
Microbes in the environment
In this investigation, the green alga Scenedesmus provides an alterna-tive to traditional water culture experiments with higher plants todemonstrate the effects of mineral deficiency on growth. Scenedesmusis one of the commonest bloom-forming freshwater algae and it cantherefore provide a useful introduction to the effects of eutrophicationin natural waters.
Learning objectivesTo show:� the relative importance of selected chemical
elements on plant growth� the uses of different elements by plants� the process of eutrophication
Age rangeYear 9 and above
DurationSession 1 40 minutesSession 2 30 minutesIncubation period: 2–3 wks between sessions
Teacher’s Guide
Book 2008 Version.qxd 5/12/08 11:05 Page 24


Recommendations1. An actively growing culture of Erwinia carotovora is required. This
should be grown up in nutrient broth incubated at 20–25 °C for atleast 48 hours before the lesson.
2. The potato slices must be cut thinly so that they do not touch thelid of the Petri dish.
3. Carrots can be used as an alternative to potato, or as a comparison.Fruits could also be tested.
Notes1. The effects of ‘soft rot’ should be visible in the inoculated potato
slices after about 3 days. 2. Pectinases degrade pectin ultimately to simple sugars. Pectin
molecules are too large to enter microbial cells and are degradedoutside the cell by pectinases secreted by the micro-organism.
Materials (each group)� bottle containing ca 2 cm3 culture of Erwinia
carotovora� 2 Petri dishes each containing a slice of
potato� distilled water� beaker of disinfectant� Bunsen burner� 2 sterile dropping pipettes� marker pen� adhesive tape
26 © 2008 SGM Practical Microbiology for Secondary Schools
QuestionsSession 11. Where is pectin found in plants? 2. What effect would the breakdown of pectin have on plant cells?3. What source of pectinase are you using in this investigation?4. Do you expect to see any difference in the potato slices next lesson?
Session 25. Describe the appearance of each vegetable slice. Explain any differences. Do your results support your predictions?6. Do you think pectinase made by microbes is stored in the microbial cells or released outside them? Explain your
answer.7. How might pectinase be of use to a company that produces apple juice?
Breakdown of pectin by microbes
Microbes and food
The ability of some microbes to degrade complex polymers into ferment-able substances is fundamental to the carbon cycle. Pectin is a polymerin plant cell walls where it acts as a kind of glue, holding the wallstogether. Microbial breakdown of pectin leads to soft-rot in fruit andvegetables. Pectinase, the enzyme responsible, is produced commerciallyusing micro-organisms such as Aspergillus niger and Bacillus subtilis foruse in wine and fruit juice production. Some pectin passes into the juiceduring fruit pressing, reducing juice yields and increasing viscosity. Thiscan be overcome by adding pectinases to fruit pulp prior to pressing.
Learning objectivesTo show:� that microbes produce pectinase� that microbes are important in decomposition
and nutrient recycling� how pectinase is useful in the fruit juice
industry
Age rangeYear 9 and above
DurationSession 1 40 minutesSession 2 30 minutesIncubation period: 72 h between sessions
Teacher’s Guide
Book 2008 Version.qxd 5/12/08 11:05 Page 26


Recommendations1. *The yeast suspension should be prepared in a beaker before the
lesson. Add a 15 g sachet of dried bakers yeast and a teaspoon ofsugar to each 150 cm3 water.
2. The use of a paste as opposed to a proper dough ensures usefulresults in a limited period of time. It is important that the paste does not touch the sides of the measuring cylinder when beingtransferred from the beaker.
3. Wide-necked funnels, e.g. powder funnels, should be used if available.
4. Each group should be allocated to a waterbath at a particular temperature. Glass measuring cylinders are preferable to plasticones which may float.
5. After 35–45 minutes, the protein (gluten) skin of the paste willbreak and carbon dioxide will escape. Readings need only be takenup to this point.
NotesIn addition to illustrating the effects of temperature on yeast(enzyme) activity, the experiment can be extended to investigatethe effects of substrate concentration, quantity of yeast and pH.
Materials (each group)� 30 cm3 yeast suspension (see left)*� 1 g sugar� 25 g plain or wholemeal flour� 250 cm3 beaker� funnel� 50 cm3 measuring cylinder� 250 cm3 measuring cylinder� spatula� stopclock� access to a balance� 3 waterbaths: 20 °C, 30 °C, 37 °C� graph paper� marker pen
28 © 2008 SGM Practical Microbiology for Secondary Schools
Questions1. What makes the dough paste rise?2. Did it start to rise immediately? If not, after how long?3. Why was sugar added to the mixture?4. Describe the effect of temperature on the rate of rising.5. Do you think the paste would have risen quickly or slowly or not at all at the following temperatures: 0 °C, 10 °C,
40 °C, 60 °C? Explain your answers.6. What is yeast?7. What do yeast cells produce that enables them to use the sugar?8. How could you prove that the activity of the yeast cells was responsible for making the dough rise?
Microbes and breadmaking
Microbes and food
Bread and related bakery products are normally produced from wheatflour, water or milk, salt, fat, sugar and the yeast Saccharomyces cerevisiae. When the ingredients are mixed and the sugars fermented,the dough rises due to the formation of carbon dioxide. The alcoholproduced by the fermentation is lost during baking. The fermentationachieves three primary objectives: leavening (carbon dioxide production), flavour development and texture changes in the dough.
Learning objectivesTo show:� the importance of yeast in breadmaking� the effect of temperature on yeast activity� the relationship between yeast activity
and enzyme activity
Age rangeYear 7 and above
Duration50 minutes
Teacher’s Guide
Book 2008 Version.qxd 5/12/08 11:05 Page 28


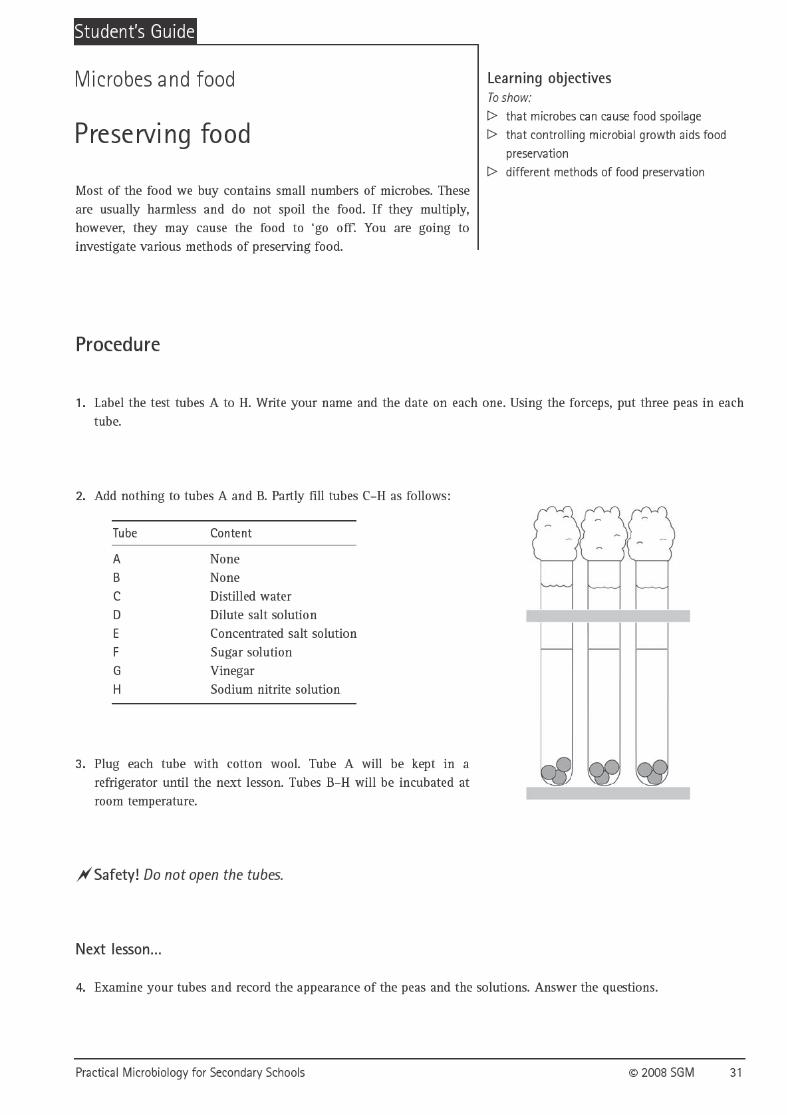
RecommendationsTube A should be kept in a refrigerator. Tubes B–H should be incubated at room temperature or at 20–25 °C and for at least 48hours.
Notes1. The turbidity produced in the tubes is caused by microbes (mainly
bacteria) already present on the peas, growing on the nutrients ofthe vegetable. Very dense turbidity indicates around 109 microbesper cm3 and turbidity just visible to the naked eye about 106
per cm3.2. When considering the preservatives used, it is interesting to
compare the peas with bacon. The latter contains 3–6 % NaCl and small quantities (parts per million) of nitrite. Nitrite content is limited by law because of possible health dangers, but its antimicrobial action is enhanced in the presence of NaCl, in heat-treated foods and at acid pH values of 5–6. As an extension activity, students could experiment with combinations of preservatives in the tubes.
Materials (each group)� 24 frozen peas� stock flasks containing:
dilute (1 %, w/v) sodium chloride solutionconcentrated (20 %, w/v) sodium chloridesolutionsodium nitrite (5 %, w/v) solutionsucrose (20 %, w/v) solutionclear white vinegar
� 8 test tubes� forceps� non-absorbent cotton wool� marker pen
30 © 2008 SGM Practical Microbiology for Secondary Schools
QuestionsSession 11. Why is food in shops marked with a ‘use-by’ date?2. What causes food to go off?3. How does vinegar act as a preservative?4. What other methods of preservation are being used in this investigation? How do they work?5. Some foods are preserved by vacuum-packing. How does this affect the growth of microbes?6. How are packet soup and instant potato preserved?7. How was meat preserved before refrigerators were invented?8. What methods are used to preserve fish?9. How do you keep food fresh at home?10.How do you expect the liquid and/or peas in each tube to appear next lesson? Explain your answers.
Session 211. Describe the appearance of the peas and liquid in each tube. Why has the liquid sometimes gone cloudy?12.Do your results confirm your predictions? If not, suggest reasons for any differences.13.From your results, describe the effect of temperature on the growth of microbes.
Preserving food
Microbes and food
The various methods of food preservation aim to prevent or delaymicrobial and other forms of spoilage, and to guard against food poisoning. Such methods therefore help the product to retain its nutritional value, extend its shelf-life and keep it safe for consumption.Preservation techniques include refrigeration, packaging, acidity,chemicals such as nitrite or metabisulphate and heat treatment.
Learning objectivesTo show:� that microbes can cause food spoilage� that controlling microbial growth aids food
preservation� different methods of food preservation
Age rangeYear 7 and above
DurationSession 1 30 minutesSession 2 20 minutesIncubation period: 48 h between sessions
Teacher’s Guide
Book 2008 Version.qxd 5/12/08 11:05 Page 30

Recommendations1. Add 0.5 % (w/v) glucose to nutrient agar before dispensing in
bottles and sterilising. The glucose provides a fermentable substratefor the lactic acid bacteria.
2. Live yoghurt must be used (i.e. not pasteurised and containing nopreservatives) or the investigation will not work. The product labeloften includes the names of the bacteria in the yoghurt.
3. *Resazurin tablets are available from school science suppliers.Dissolve 1 tablet in 50 cm3 distilled water to give a 0.005 % (w/v)solution. Resazurin is a blue redox indicator dye which changescolour in response to microbial growth. It is pink when oxidisedand colourless when reduced. The test gives an indication of themicrobial activity of the sample.
4. The beakers of yoghurt need to be removed from the waterbath/incubator after 24 hours and refrigerated.
NotesThis investigation should be carried out in a laboratory. If studentswish to make yoghurt which they can taste, then this should bedone in a food technology room using a method suitable forkitchen conditions. One is available from the SGM on request (orsee www.microbiologyonline.org.uk).
Materials (each group)� live yoghurt in a 50 cm3 beaker � 250 cm3 UHT milk in a beaker� resazurin dye (see left)*� Universal indicator� 2 glucose nutrient agar plates� distilled water in a wash bottle� 3 test tubes labelled A, B, C, with bungs� 2 × 50 cm3 beakers labelled HY and UY� 1 × 10 cm3 syringe� 1 × 1 cm3 syringe� 1 teaspoon� 2 pipettes and fillers� wire loop� waterbaths/incubators: 37 °C, 43 °C� stopclock� Bunsen burner, tripod and gauze� adhesive tape� clingfilm� marker pen� eye protection
32 © 2008 SGM Practical Microbiology for Secondary Schools
QuestionsSession 11. What is UHT milk? How does it differ from pasteurised milk?2. Resazurin becomes decolourised by microbial activity. What changes do you expect to see in tubes A, B and C?3. Describe the effect of heat on the microbes in the yoghurt.4. What differences do you expect to see in the contents of beakers HY and UY next lesson?5. What differences do you expect to see between the agar plates next lesson?
Session 26. Describe the appearance of the agar plates and the milk in the beakers. Were your predictions correct?7. What difference, if any, is there in pH between the contents of the beakers?8. Does this investigation prove that microbes are responsible for yoghurt production?9. If not, suggest how it could be modified so that it did.10.What is the name of the sugar present in milk? What happens to it during yoghurt making?11. Why is it important to ensure that milk used for yoghurt making is free from antibiotics?
Microbes and yoghurt making
Microbes and food
Yoghurt is usually made from pasteurised low-fat milk that is high inmilk solids. The milk is inoculated with a mixed culture of lactic acidbacteria (Lactobacillus bulgaricus and Streptococcus thermophilus) andincubated at 35–45 °C for several hours; the pH falls to ca 4.3, coagu-lating the milk proteins. The bacteria act co-operatively: L. bulgaricusbreaks down proteins to amino acids and peptides, which stimulate thegrowth of S. thermophilus; formic acid produced by S. thermophilusin turn stimulates growth of the lactobacilli which convert lactose inthe milk to lactic acid, producing the characteristic flavour.
Learning objectivesTo show:� the importance of microbes in yoghurt
making� that the process involves the production of
acid� the effect of heat on microbes
Age rangeYear 7 and above
DurationSession 1 40 minutesSession 2 20 minutesIncubation period: min. 48 h between sessions
Teacher’s Guide
Book 2008 Version.qxd 5/12/08 11:05 Page 32

Recommendations1. Ideally the apparatus should be sterile for best results; it should
certainly be very clean.2. The peas are in tubes to avoid contamination by the students.3. The agar plates should be poured prior to the investigation to
ensure that their surfaces are dry. After inoculation, they should not be disturbed until the drops have dried.
4. The plates should be incubated at 20–25 °C or at room temperaturefor 2–3 days and refrigerated until examined.
5. A Pasteur pipette can be calibrated by drawing into it a known volume, e.g. 1 cm3 water, and counting the number of drops formedwhen this volume is discharged. Alternatively, plastic disposablePasteur pipettes are available from school science suppliers. The drop size from these is ca 0.02 cm3.
Notes1. It is safe to use uncooked vegetables because of the types of
microbe present, unlike raw meat which may contain pathogensand must not be used.
2. This is known as the Miles and Misra technique for estimatingviable cell counts. Drops that contain large numbers of viable cells give rise to circular areas of confluent growth. Any drop containing less than about 15 viable cells will produce a small,countable number of colonies.
Materials (each group)� test tube A containing 3 freshly defrosted
peas� test tube B containing 3 peas defrosted and
left at room temperature for 24 hours� 2 nutrient agar plates� 2 clean glass rods� 2 × sterile 1 cm3 syringes/pipettes and fillers� 2 × sterile 10 cm3 syringes/pipettes and fillers� 150 cm3 sterile distilled water� adhesive tape� marker pen� 10 test tubes� 2 calibrated dropping pipettes� beaker of disinfectant
34 © 2008 SGM Practical Microbiology for Secondary Schools
QuestionsSession 11. Describe some types of food spoilage.2. Which peas do you expect to have most microbes on them?3. What is the purpose of making the two dilution series?4. Why are the samples used in the order suggested?5. What do you expect your agar plates to look like next lesson?
Session 26. Why do some of the six spots on each plate show more growth than others?7. Do all the colonies look the same? If not, what does this suggest?8. If one microbe gives rise to each colony, work out how many microbes were in each of the original pea suspensions.9. Has storage for 24 hours after defrosting made any difference to the numbers of microbes?10.Why is it unwise to refreeze frozen food that has thawed and been kept at room temperature?11. Suggest the main sources of error in this investigation. How would you improve it to obtain reliable estimates of
microbial numbers?
Microbes and food spoilage
Microbes and food
Almost any kind of food is a good medium for microbial growth. Theprocess of ‘going off’ occurs when microbes grow on or in the food,altering its consistency, taste and smell. The processes used to preservefoods (see p. 30) are those that delay or prevent microbial growth. Thisinvestigation demonstrates the rate of bacterial growth in food, usinga routine method of estimating microbial numbers.
Learning objectivesTo show:� the rapid increase in microbial numbers
during storage of defrosted food� the role of microbes in food spoilage� the dangers of re-freezing thawed food
Age rangeYear 9 and above
DurationSession 1 40 minutesSession 2 30 minutesIncubation period: min. 48 h between sessions
Teacher’s Guide
Book 2008 Version.qxd 5/12/08 11:05 Page 34

Recommendations1. The milk should be kept at room temperature for 24 or 48 hours as
required.2. Marking the tubes at 10 cm3 levels precludes the need for several
pipettes.3. *Resazurin tablets are available from school science suppliers.
Dissolve one table in 50 cm3 distilled water to give a 0.005% (w/v)solution. Resazurin is a blue redox indicator dye which changescolour in response to microbial growth. It is pink when oxidisedand colourless when reduced. The test gives an indication of themicrobial activity of the sample.
NotesDuring incubation of the milk samples, the metabolic activity of themicrobes present causes the resazurin to change colour. The extentand range of colour change are a reflection of microbial activity in the sample. The colour code given on the worksheet is a simpli-fication of that formerly used in the dairy industry for grading thekeeping quality of milk. This is a simple investigation that givesvisual evidence of the differences between samples within the duration of one lesson.
Materials (each group)� 6 × 10 cm3 labelled milk samples:
A fresh pasteurisedB 24 h pasteurisedC 48 h pasteurisedD fresh UHTE 24 h UHTF 48 h UHT
� 20 cm3 resazurin dye solution (see left)*� 6 test tubes marked at 10 cm3, with bungs� pipette and filler/syringe� waterbath at 37 °C� stopclock� marker pen
36 © 2008 SGM Practical Microbiology for Secondary Schools
Questions1. What causes milk to go sour?2. Does UHT milk go sour when kept? If not, why not?3. What parameter could you use to assess the quality of milk?4. How reliable do you think the resazurin test is? List the advantages and disadvantages of the test.5. What is causing the dye to change colour?6. Why are the tubes incubated at 37 °C?7. Explain your results. What difference do they indicate between UHT and pasteurised milk?8. How could you improve the reliability of your results?9. What further investigations could you carry out to test the conclusions in your answer to question 7?
Microbes and milk quality
Microbes and food
Milk contains water, protein, sugar, fat, vitamins and minerals. It is an excellent medium for growth of many bacteria. Pasteurisation killspathogens which can be carried in milk, such as Salmonella and Mycobacterium bovis, as well as much of the natural milk flora. It alsoinactivates certain bacterial enzymes (e.g. lipases) which would otherwisecause spoilage. Milk is held at a minimum temperature of 72 °C for atleast 15 seconds. Some harmless bacteria survive the process, multiplyingas the milk ages and causing it to sour. UHT milk is heated to well aboveboiling point for about 4 seconds, killing virtually all bacteria and spores.
Learning objectivesTo show:� the presence of microbes in milk� that microbial numbers increase in milk
during storage� the different effects of pasteurisation and
ultra-high heat treatment on microbes in milk
Age rangeYear 7 and above
Duration50 minutes
Teacher’s Guide
Book 2008 Version.qxd 5/12/08 11:05 Page 36

Procedure
1. Label your test tubes A–F, together with your name. Use a syringe or calibrated pipette and filler to place 2 cm3
resazurin dye in the bottom of each tube.
2. The key to the milk samples is as follows:
A fresh pasteurisedB 24h pasteurisedC 48h pasteurisedD fresh UHTE 24h UHTF 48h UHT
Add milk sample A to tube A up to the 10 cm3 mark. Replace the bung and turn the tube upside down three times.Repeat for the other five milk samples and tubes.
3. Record the colour of the contents of each tube, using the best matchfrom the list opposite.
Place the tubes in the waterbath and start the stopclock. Record thecolours every 5 minutes for 30 minutes in a table as shown below.Answer the questions.
�Safety! Do not open the tubes.
Time Sample(minutes) A B C D E F051015202530
Practical Microbiology for Secondary Schools © 2008 SGM 37
Colour of sample Quality of milkBlue (no change) ExcellentLilac GoodDeep pink/mauve FairPink PoorWhite Bad
Milk is a good source of food for microbes as well as for ourselves.Pasteurisation is a heating process which kills the harmful microbesthat sometimes are found in raw milk. Some microbes survive thisprocess and can cause the milk to ‘go off’. Ultra-high temperature(UHT) milk is heated to a much higher temperature, killing virtually allbacteria. The number of microbes in milk is a measure of its quality.This can be estimated by finding the rate of change of colour ofresazurin dye.
Learning objectivesTo show:� the presence of microbes in milk� that microbial numbers increase in milk
during storage� the different effects of pasteurisation and
ultra-high heat treatment on microbes in milk
Microbes and milk quality
Microbes and food
Student’s Guide
Book 2008 Version.qxd 5/12/08 11:05 Page 37

Recommendations1. The culture of Bacillus subtilis should be inoculated in nutrient
broth and incubated at 25 °C at least 48 hours before the lesson.2. Any proprietory antiseptic can be used.3. The plates should be incubated preferably at 20–25 °C for 2–3 days,
but can be kept at room temperature.4. Filter paper discs (Whatman Antibiotic Assay discs) are available
from school science suppliers or they can be cut from Whatman No.1 filter paper with a cork borer (ca 6 mm diameter) or a hole punch.
5. When students are mixing the agar and the culture in the Petri dish,they should be instructed to swirl the contents gently a few timesclockwise, anti-clockwise, forwards and sideways.
Notes1. Other suitable bacteria include e.g. Micrococcus luteus, Escherichia
coli and Bacillus subtilis.2. Inhibition of growth is shown by a clear area around the disc.
Growth appears either as many small colonies visible to the nakedeye or, if a large volume of cells was added, a confluent area of turbidity.
3. The same approach can be used to investigate the effects of otherantimicrobial compounds – see p. 43.
Materials (each group)� Bacillus subtilis culture in nutrient broth� Universal bottle containing ca 20 cm3 molten
nutrient agar held at ca 45–50 °C� 70 % (v/v) industrial denatured alcohol in a
small beaker or glass Petri dish covered in foil (CAUTION: flammable)
� Petri dish� sterile dropping pipette� ca 10 cm3 antiseptic, e.g. TCP, Dettol,
in Universal bottle labelled A� 2 Universal bottles labelled B and C� distilled water in a beaker� beaker of disinfectant� 10 cm3 syringe or pipette and filler� metal forceps (can be pre-sterilised by
autoclaving)� 4 sterile paper discs� Bunsen burner� adhesive tape� marker pen� graph paper
38 © 2008 SGM Practical Microbiology for Secondary Schools
QuestionsSession 11. What are antiseptics?2. What is the difference between antiseptics and antibiotics?3. What might affect the growth of microbes between now and the next lesson?4. What is the concentration of antiseptic in bottles B and C?5. Why are the discs added in the order suggested?6. What do you expect the appearance of your agar plates to be next lesson?
Session 27. Do your results support the predictions you made last lesson?8. Describe the range of results obtained by the class for each dilution. Suggest possible reasons for any differences
between the groups.9. Do the class results all indicate the same overall pattern? If so, what conclusions can you draw from them?10.What further experiments could you do to confirm these conclusions?
Effects of antiseptics on microbes
Health and hygiene
Antiseptics are used in the disinfection of living tissue. They may beused prophylactically (i.e. to prevent infection) or therapeutically (i.e. to treat infection). Any given antiseptic is usually more effectiveagainst some microbes than others and its activity may be greatlyaffected by factors such as dilution, temperature, pH or the presence of organic matter or detergent.
Learning objectivesTo show:� the effects of antiseptics on microbial
growth� the effects of dilution of antiseptics on
microbial growth
Age rangeYear 9 and above
DurationSession 1 50 minutesSession 2 20 minutesIncubation period: min. 48 h between sessions
Teacher’s Guide
Book 2008 Version.qxd 5/12/08 11:05 Page 38


Recommendations1. To prepare lawn cultures of S. cerevisiae inoculate malt extract agar
plates with a few drops of the culture in malt extract broth. Spreadthe liquid evenly over the surface of the agar using a sterile glassrod spreader and incubate for 48 hours at 20–25 °C.
2. Even though all plates will be sterilised, it is important that students wash their hands thoroughly as directed to reduce the riskof inadvertently culturing organisms already present on the skinsurface. Sterile gloves could also be worn.
3. All toilet paper should be placed in the autoclave bag immediatelyafter use.
4. A combination of the traditional, smooth-style toilet paper and softpaper should be provided for comparison. Different thicknesses ofpaper could also be tested with different groups.
Materials (each group)� 3 lawn cultures of Saccharomyces cerevisiae
on malt extract agar*� 3 malt extract agar plates� different brands of toilet paper� different types of soap� autoclave bag� adhesive tape� marker pen
*Malt extract agar. Dissolve 15 g malt extract and 18 g bacteriological agar in 1 l distilled water. Dispense into bottles and sterilise by autoclaving. Malt extract agar is also available from school science suppliers.
40 © 2008 SGM Practical Microbiology for Secondary Schools
QuestionsSession 11. What kinds of microbes occur in the human intestine?2. Why is it important to wash your hands (a) before meals, (b) after using the lavatory?3. What is an infectious disease?4. What are the main defence mechanisms of the body against microbial infection?5. What do you expect the appearance of dishes A, B and C to be next lesson?
Session 26. Does the appearance of your dishes match your predictions?7. Are the class results consistent? If not, suggest reasons for any differences.8. Do the class results show any evidence of differences in effectiveness of (a) toilet papers, (b) soaps?9. What do the results suggest about personal hygiene procedures?10.Suggest as many methods as you can to prevent the spread of infectious disease.
Microbes and personal hygiene
Health and hygiene
This investigation uses the harmless yeast Saccharomyces cerevisiae tosimulate the contamination of hands with faecal microbes and theeffectiveness of handwashing in removing them. Different brands and thicknesses of toilet paper and different types of soap may be evaluated.
Learning objectivesTo show:� the permeability of toilet paper to microbes� the importance of handwashing after visiting
the lavatory� how pathogens can be transmitted
Age rangeYear 7 and above
DurationSession 1 40 minutesSession 2 30 minutesIncubation period: min. 48 h between sessions
Teacher’s Guide
Book 2008 Version.qxd 5/12/08 11:05 Page 40


Background� Cellulose is a fibrous substance that helps to provide plants with a
rigid structure. It is the most important plant polymer, making upsome 40–50 % of the mature plant cell wall. It is also the mostabundant carbohydrate. The molecules are very large and long andcontain carbon, hydrogen and oxygen. Cellulose is a very stablesubstance at ordinary temperatures, and the types of microbe thatcan decompose and thus recycle it are extremely important in sustaining the turnover of organic matter for the rest of the livingworld. It often occurs in a complex mixture with lignin (anotherplant polymer) called lignocellulose, in wood, forest and agri-cultural wastes, and in waste paper.
� Cellulose is not soluble in water, so microbes cannot absorb it intotheir cells. Instead, once close to it, they secrete cellulase enzymeswhich partly digest the cellulose. It is broken down into solublesugar molecules which the microbes can absorb and use. Higherorganisms do not make cellulases, which means that herbivorescannot digest cellulose themselves. Instead they depend on cellu-lolytic bacteria in their intestinal tracts to do the job for them.
� On land the major decomposers of cellulose are fungi, aided by afew aerobic and anaerobic bacteria. In marine habitats bacteria are primarily responsible for breaking down cellulose, but in freshwater aquatic fungi carry out this function in well aerated zones,with bacteria playing an increasingly important role as the amountof oxygen diminishes. Cellulolytic bacteria include species ofCellulomonas, Pseudomonas and Ruminococcus. Cellulolytic fungiinclude Chaetomium, Fusarium, Myrothecium and Trichoderma.
Designing your investigationIn designing your investigation you should consider the experimental and investigative skillsto be assessed. These are:� planning� implementing� analysing evidence and drawing conclusions� evaluating evidence and procedures(See your coursework guide for further details).
Points to consider when planning your investigation:� Any hazards involved in doing the
experiment and how the risks of the procedure can be minimised. (see Basic Practical Microbiology: A Manual)
� Whether you can make a prediction that you can test (e.g. cellulolytic activity will increase with temperature).
� What variables need to be taken into account (e.g. the source of the soil samples, the mixing of the soil suspension).
� How many tests you need for reliability (e.g. how many replicates of each treatment).
42 © 2008 SGM Practical Microbiology for Secondary Schools
ExamplesHere are some ideas that could be explored:
� The effect of temperature on the activity of cellulolytic microbes or cellulases (from school science suppliers)� The cellulolytic activity of microbes from different soils� The effect on cellulolytic activity of adding different nutrients to the soil samples� Whether fungi or bacteria are more important in terms of cellulolytic activity, in particular types of soil
Writing UpYour report should include the following sections, in this order: Introduction/plan; Hypothesis; Prediction; Materialsand Methods (including a risk assessment); Results; Discussion; Evaluation/Conclusion.
�Safety!Your plan MUST be checked by your teacher before starting your investigation.
Research briefUsing this information and other facts you have researched, plan an investigation into someaspect of the production of cellulase enzymes bymicrobes, or the effects of the enzymes. A basicprocedure for testing the cellulolytic activity ofmicrobes is described on p. 17. You may wish touse a different test according to the type ofinvestigation you are planning.
Investigating microbes and cellulose
Open-ended investigation
Book 2008 Version.qxd 5/12/08 11:05 Page 42

Practical Microbiology for Secondary Schools © 2008 SGM 43
Background� Antimicrobial substances include disinfectants, antiseptics and
antibiotics. Disinfection is a procedure that destroys or inactivatesmicrobes. It usually involves the treatment of non-living objectssuch as surfaces or liquids with chemicals (disinfectants) e.g. chlorine, phenols and hypochlorites. Antisepsis is the disinfectionof living tissues with chemicals (antiseptics) e.g. hydrogen peroxide, iodine and diluted alcohol. Antibiotics are chemicals that, even at very low concentrations, inhibit or kill certainmicrobes. Penicillins are a well-known group of antibiotics.
� Disinfectants and antiseptics that kill bacteria are said to be bactericidal. Others merely halt the growth of bacteria and if inactivated, e.g. by dilution, bacterial growth may be resumed.These are said to be bacteriostatic. A bactericidal disinfectant orantiseptic may become bacteriostatic when diluted.
� Antibiotics are produced by microbes as a natural defence againstother microbes. Some are still produced commercially using micro-organisms, although a large number are manufactured chemically.Some antibiotics are active against a narrow range of species whilstothers affect a broad spectrum of organisms. The ability to makeantimicrobial substances is not limited to microbes; most animalshave antibacterial substances in their bodily secretions, such aslysosyme in sweat and tears. Plant materials such as garlic (Alliumsativum), tea tree oil (Melaleuca alternifolia) and oil of cloves(Syzyium aromaticum) also have antimicrobial properties.
Designing your investigationIn designing your investigation you should consider the experimental and investigative skillsto be assessed. These are:� planning� implementing� analysing evidence and drawing conclusions� evaluating evidence and procedures(See your coursework guide for further details).
Points to consider when planning your investigation:� Any hazards involved in doing the
experiment and how the risks of the procedure can be minimised. (see Basic Practical Microbiology: A Manual)
� Whether you can make a prediction that you can test (e.g. higher concentrations of antimicrobial substance will be more effective).
� What variables need to be taken into account (e.g. incubation temperature, pH).
� How many tests you need for reliability (e.g. how many replicates of each treatment).
ExamplesHere are some ideas that could be explored:
� The antimicrobial effects of different plant extracts� The effect of concentration on the inhibitory effects of different antimicrobial agents� Antimicrobial effects of different toothpastes, mouthwashes or deodorants� Effects of antimicrobials on different microbes
Writing UpYour report should include the following sections, in this order: Introduction/plan; Hypothesis; Prediction; Materialsand Methods (including a risk assessment); Results; Discussion; Evaluation/Conclusion.
�Safety!Your plan MUST be checked by your teacher before starting your investigation.
Investigating the effects of antimicrobials
Open-ended investigation Research briefUsing this information and other facts you have researched, plan an investigation into someaspect of antimicrobial substances. The basic procedure for testing the effects of antimicrobialsis described on p. 39. You may wish to modify this according to the type of investigation you areplanning. For example, antibiotic production bysoil bacteria can be investigated by inoculating a nutrient agar plate with some soil, incubating it and looking for zones of inhibition.
Book 2008 Version.qxd 5/12/08 11:05 Page 43
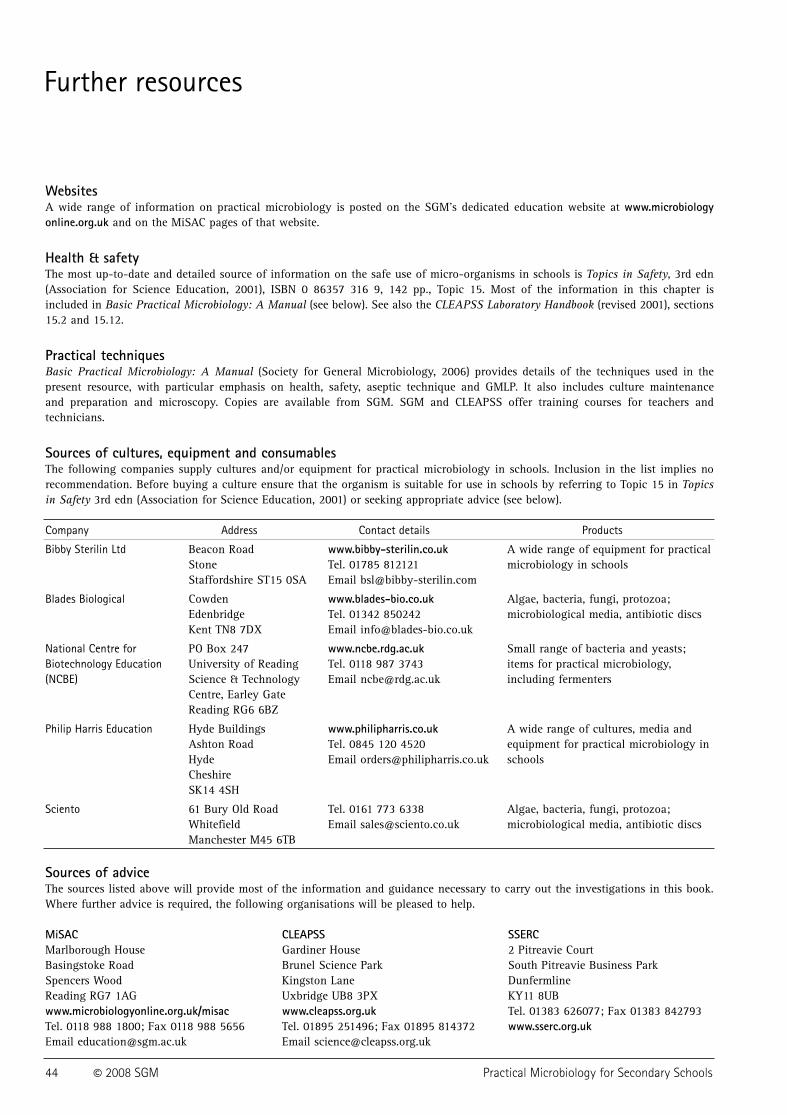
Further resources
WebsitesA wide range of information on practical microbiology is posted on the SGM’s dedicated education website at www.microbiologyonline.org.uk and on the MiSAC pages of that website.
Health & safetyThe most up-to-date and detailed source of information on the safe use of micro-organisms in schools is Topics in Safety, 3rd edn(Association for Science Education, 2001), ISBN 0 86357 316 9, 142 pp., Topic 15. Most of the information in this chapter is included in Basic Practical Microbiology: A Manual (see below). See also the CLEAPSS Laboratory Handbook (revised 2001), sections15.2 and 15.12.
Practical techniquesBasic Practical Microbiology: A Manual (Society for General Microbiology, 2006) provides details of the techniques used in the present resource, with particular emphasis on health, safety, aseptic technique and GMLP. It also includes culture maintenance and preparation and microscopy. Copies are available from SGM. SGM and CLEAPSS offer training courses for teachers and technicians.
Sources of cultures, equipment and consumablesThe following companies supply cultures and/or equipment for practical microbiology in schools. Inclusion in the list implies no recommendation. Before buying a culture ensure that the organism is suitable for use in schools by referring to Topic 15 in Topicsin Safety 3rd edn (Association for Science Education, 2001) or seeking appropriate advice (see below).
Company Address Contact details Products
Bibby Sterilin Ltd Beacon Road www.bibby-sterilin.co.uk A wide range of equipment for practicalStone Tel. 01785 812121 microbiology in schoolsStaffordshire ST15 0SA Email [email protected]
Blades Biological Cowden www.blades-bio.co.uk Algae, bacteria, fungi, protozoa;Edenbridge Tel. 01342 850242 microbiological media, antibiotic discsKent TN8 7DX Email [email protected]
National Centre for PO Box 247 www.ncbe.rdg.ac.uk Small range of bacteria and yeasts;Biotechnology Education University of Reading Tel. 0118 987 3743 items for practical microbiology, (NCBE) Science & Technology Email [email protected] including fermenters
Centre, Earley GateReading RG6 6BZ
Philip Harris Education Hyde Buildings www.philipharris.co.uk A wide range of cultures, media and Ashton Road Tel. 0845 120 4520 equipment for practical microbiology inHyde Email [email protected] schoolsCheshireSK14 4SH
Sciento 61 Bury Old Road Tel. 0161 773 6338 Algae, bacteria, fungi, protozoa;Whitefield Email [email protected] microbiological media, antibiotic discsManchester M45 6TB
Sources of adviceThe sources listed above will provide most of the information and guidance necessary to carry out the investigations in this book.Where further advice is required, the following organisations will be pleased to help.
MiSAC CLEAPSS SSERCMarlborough House Gardiner House 2 Pitreavie CourtBasingstoke Road Brunel Science Park South Pitreavie Business ParkSpencers Wood Kingston Lane DunfermlineReading RG7 1AG Uxbridge UB8 3PX KY11 8UBwww.microbiologyonline.org.uk/misac www.cleapss.org.uk Tel. 01383 626077; Fax 01383 842793Tel. 0118 988 1800; Fax 0118 988 5656 Tel. 01895 251496; Fax 01895 814372 www.sserc.org.ukEmail [email protected] Email [email protected]
44 © 2008 SGM Practical Microbiology for Secondary Schools
Book 2008 Version.qxd 5/12/08 11:05 Page 44

Society for General Microbiology (SGM)
SGM is a professional body for scientists who work in all areas of microbiology. An important functionof the Society is the promotion of the public understanding of microbiology. SGM produces and distributes a wide range of resources to support microbiology teaching in schools and colleges across all Key Stages and post-16. It also runs training courses in practical microbiology for teachers and technicians and occasional workshops. The Society also offers an information service to teachers and participates in schools competitions and other activities.
School Membership of SGM offers many benefits including:� Microbiology Today, the award-winning magazine� Discounts on SGM INSET courses� Priority mailings of SGM teaching resources
Contact:SGM, Marlborough House, Basingstoke Road, Spencers Wood, Reading RG7 1AGTel. 0118 988 1800Fax 0188 988 5656Email [email protected] www.microbiologyonline.org.uk
Microbiology in Schools Advisory Committee (MiSAC)
MiSAC exists to promote the teaching of microbiology in schools. Founded in 1969, it consists of representatives of a wide range of educational and scientific bodies who work to help teachers recognise the potential of micro-organisms as educational resources in a variety of ways. MiSAC is arecognised source of authoritative advice on the safe use of micro-organisms, develops practical protocols, produces a regular bulletin MiSAC Matters, Briefings and Activities sheets, responds toGovernment reports and maintains contact with examining bodies and school science suppliers. Theannual MiSAC competition for schools is a major activity supported by sponsorship from professionalorganisations and industry. Core activities depend on the voluntary work of its members and financialsupport from the organisations they represent. MiSAC has charitable status.
Contact:MiSAC, Marlborough House, Basingstoke Road, Spencers Wood, Reading RG7 1AGTel. 0118 988 1800Fax 0188 988 5656Email [email protected] www.microbiologyonline.org.uk
Cover 2008 Version.qxd 5/12/08 11:16 Page 5

Micro-organisms are everywhere and affect many aspects of our lives. Thisresource offers practical activities which enable the student to explore the exciting world of microbes, set within the context of course specifications and teaching the investigative skills required by the National Curriculum. Each of the investigations is safe and straightforward but also rewarding for the student. Double-page spreads, comprising a teacher guide and student worksheet, clearly set out the requirements for each activity and the procedure to be followed. The text is accompanied by helpful line drawings.
The resource has been compiled by members of the Microbiology in SchoolsAdvisory Committee (MiSAC) who are all experts of longstanding in microbiologyteaching.
© 2008 Society forGeneral Microbiology
ISBN 0 95368 382 6
Cover 2008 Version.qxd 5/12/08 11:16 Page 2