Practical CakePHP Projects - Karoon Gas · He is the author of Beginning CakePHP: From Novice to...
389
Transcript of Practical CakePHP Projects - Karoon Gas · He is the author of Beginning CakePHP: From Novice to...
Practical CakePHP Projects
Kai Chan and John Omokore with Richard K. Miller
Practical CakePHP Projects
Copyright © 2009 by Kai Chan and John Omokore with Richard K. Miller
All rights reserved. No part of this work may be reproduced or transmitted in any form or by any means, electronic or mechanical, including photocopying, recording, or by any information storage or retrieval system, without the prior written permission of the copyright owner and the publisher.
ISBN-13 (pbk): 978-1-4302-1578-3
ISBN-13 (electronic): 978-1-4302-1579-0
Printed and bound in the United States of America 9 8 7 6 5 4 3 2 1
Trademarked names may appear in this book. Rather than use a trademark symbol with every occurrence of a trademarked name, we use the names only in an editorial fashion and to the benefit of the trademark owner, with no intention of infringement of the trademark.
Java™ and all Java-based marks are trademarks or registered trademarks of Sun Microsystems, Inc., in the US and other countries. Apress, Inc., is not affiliated with Sun Microsystems, Inc., and this book was writ-ten without endorsement from Sun Microsystems, Inc.
Lead Editor: Steve AnglinTechnical Reviewer: David GoldingEditorial Board: Clay Andres, Steve Anglin, Mark Beckner, Ewan Buckingham, Tony Campbell, Gary
Cornell, Jonathan Gennick, Michelle Lowman, Matthew Moodie, Jeffrey Pepper, Frank Pohlmann, Ben Renow-Clarke, Dominic Shakeshaft, Matt Wade, Tom Welsh
Project Manager: Richard Dal PortoCopy Editor: Marilyn SmithAssociate Production Director: Kari Brooks-CoponyProduction Editor: Candace EnglishCompositor: Patrick CunninghamProofreader: Martha WhittIndexer: Brenda MillerArtist: April MilneCover Designer: Kurt KramesManufacturing Director: Tom Debolski
Distributed to the book trade worldwide by Springer-Verlag New York, Inc., 233 Spring Street, 6th Floor, New York, NY 10013. Phone 1-800-SPRINGER, fax 201-348-4505, e-mail , or visit .
For information on translations, please contact Apress directly at 2855 Telegraph Avenue, Suite 600, Berkeley, CA 94705. Phone 510-549-5930, fax 510-549-5939, e-mail , or visit
.
Apress and friends of ED books may be purchased in bulk for academic, corporate, or promotional use. eBook versions and licenses are also available for most titles. For more information, reference our Special Bulk Sales–eBook Licensing web page at .
The information in this book is distributed on an “as is” basis, without warranty. Although every precau-tion has been taken in the preparation of this work, neither the author(s) nor Apress shall have any liability to any person or entity with respect to any loss or damage caused or alleged to be caused directly or indi-rectly by the information contained in this work.
The source code for this book is available to readers at .

For Rita—Kai Chan
For Comfort—John Omokore
For Marian —Richard K. Miller

v
Contents at a Glance
About the Authors . . . . . . . . . . . . . . . . . . . . . . . . . . . . . . . . . . . . . . . . . . . . . . . . . . . . . . . . . . . . . . . . xiii
About the Technical Reviewer . . . . . . . . . . . . . . . . . . . . . . . . . . . . . . . . . . . . . . . . . . . . . . . . . . . . . . xiv
Acknowledgments . . . . . . . . . . . . . . . . . . . . . . . . . . . . . . . . . . . . . . . . . . . . . . . . . . . . . . . . . . . . . . . . xv
Introduction . . . . . . . . . . . . . . . . . . . . . . . . . . . . . . . . . . . . . . . . . . . . . . . . . . . . . . . . . . . . . . . . . . . . xvii
CHAPTER 1 Cake Fundamentals . . . . . . . . . . . . . . . . . . . . . . . . . . . . . . . . . . . . . . . . . . . . . 1
CHAPTER 2 Blogging . . . . . . . . . . . . . . . . . . . . . . . . . . . . . . . . . . . . . . . . . . . . . . . . . . . . . . . 29
CHAPTER 3 E-Commerce . . . . . . . . . . . . . . . . . . . . . . . . . . . . . . . . . . . . . . . . . . . . . . . . . . . 47
CHAPTER 4 A Message Forum Web Service . . . . . . . . . . . . . . . . . . . . . . . . . . . . . . . . . 85
CHAPTER 5 Google Maps and the Traveling Salesman . . . . . . . . . . . . . . . . . . . . . . 131
CHAPTER 6 Mashing Twitter with the Google Translator . . . . . . . . . . . . . . . . . . . . 173
CHAPTER 7 Unit Testing and Web Testing . . . . . . . . . . . . . . . . . . . . . . . . . . . . . . . . . . 213
CHAPTER 8 A Cake Control Panel . . . . . . . . . . . . . . . . . . . . . . . . . . . . . . . . . . . . . . . . . . 237
CHAPTER 9 Translating Stories . . . . . . . . . . . . . . . . . . . . . . . . . . . . . . . . . . . . . . . . . . . . 271
CHAPTER 10 Adding Automagic Fields . . . . . . . . . . . . . . . . . . . . . . . . . . . . . . . . . . . . . . 307
CHAPTER 11 Cake Tags . . . . . . . . . . . . . . . . . . . . . . . . . . . . . . . . . . . . . . . . . . . . . . . . . . . . 317
CHAPTER 12 Dynamic Data Fields . . . . . . . . . . . . . . . . . . . . . . . . . . . . . . . . . . . . . . . . . . 329
CHAPTER 13 Captcha . . . . . . . . . . . . . . . . . . . . . . . . . . . . . . . . . . . . . . . . . . . . . . . . . . . . . . 359
INDEX . . . . . . . . . . . . . . . . . . . . . . . . . . . . . . . . . . . . . . . . . . . . . . . . . . . . . . . . . . . . . . . . . . . . . . . 371
vii
Contents
About the Authors . . . . . . . . . . . . . . . . . . . . . . . . . . . . . . . . . . . . . . . . . . . . . . . . . . . . . . . . . . . . . . . . xiii
About the Technical Reviewer . . . . . . . . . . . . . . . . . . . . . . . . . . . . . . . . . . . . . . . . . . . . . . . . . . . . . . xiv
Acknowledgments . . . . . . . . . . . . . . . . . . . . . . . . . . . . . . . . . . . . . . . . . . . . . . . . . . . . . . . . . . . . . . . . xv
Introduction . . . . . . . . . . . . . . . . . . . . . . . . . . . . . . . . . . . . . . . . . . . . . . . . . . . . . . . . . . . . . . . . . . . . xvii
CHAPTER 1 Cake Fundamentals . . . . . . . . . . . . . . . . . . . . . . . . . . . . . . . . . . . . . . . . . . 1
Cake Features . . . . . . . . . . . . . . . . . . . . . . . . . . . . . . . . . . . . . . . . . . . . . . . . . . . 1
The Ingredients of Cake . . . . . . . . . . . . . . . . . . . . . . . . . . . . . . . . . . . . . . . . . . . 2
The Model-View- Controller Design Pattern . . . . . . . . . . . . . . . . . . . . . . 2
Rapid Application Development . . . . . . . . . . . . . . . . . . . . . . . . . . . . . . . . 2
PHP 4+ . . . . . . . . . . . . . . . . . . . . . . . . . . . . . . . . . . . . . . . . . . . . . . . . . . . . . 3
Object-Oriented Programming . . . . . . . . . . . . . . . . . . . . . . . . . . . . . . . . . 3
Dissecting Cake . . . . . . . . . . . . . . . . . . . . . . . . . . . . . . . . . . . . . . . . . . . . . . . . . . 5
Cake’s Directory Structure . . . . . . . . . . . . . . . . . . . . . . . . . . . . . . . . . . . . 5
The Cake Naming Conventions . . . . . . . . . . . . . . . . . . . . . . . . . . . . . . . . 6
Models . . . . . . . . . . . . . . . . . . . . . . . . . . . . . . . . . . . . . . . . . . . . . . . . . . . . . . . . . . 8
Model Creation . . . . . . . . . . . . . . . . . . . . . . . . . . . . . . . . . . . . . . . . . . . . . . 8
Data Validation . . . . . . . . . . . . . . . . . . . . . . . . . . . . . . . . . . . . . . . . . . . . . 13
Views . . . . . . . . . . . . . . . . . . . . . . . . . . . . . . . . . . . . . . . . . . . . . . . . . . . . . . . . . . 15
Controllers . . . . . . . . . . . . . . . . . . . . . . . . . . . . . . . . . . . . . . . . . . . . . . . . . . . . . . 18
Cake Components . . . . . . . . . . . . . . . . . . . . . . . . . . . . . . . . . . . . . . . . . . . . . . . 19
Helpers . . . . . . . . . . . . . . . . . . . . . . . . . . . . . . . . . . . . . . . . . . . . . . . . . . . . . . . . 21
Plugins . . . . . . . . . . . . . . . . . . . . . . . . . . . . . . . . . . . . . . . . . . . . . . . . . . . . . . . . . 22
Vendors . . . . . . . . . . . . . . . . . . . . . . . . . . . . . . . . . . . . . . . . . . . . . . . . . . . . . . . . 25
Summary . . . . . . . . . . . . . . . . . . . . . . . . . . . . . . . . . . . . . . . . . . . . . . . . . . . . . . 27
CHAPTER 2 Blogging . . . . . . . . . . . . . . . . . . . . . . . . . . . . . . . . . . . . . . . . . . . . . . . . . . . . . 29
Creating the Database . . . . . . . . . . . . . . . . . . . . . . . . . . . . . . . . . . . . . . . . . . . 29
Reviewing the Application Structure . . . . . . . . . . . . . . . . . . . . . . . . . . . . . . . 31
Creating the Post Model . . . . . . . . . . . . . . . . . . . . . . . . . . . . . . . . . . . . . . . . . . 31
CONTENTSviii
Creating the Posts Controller . . . . . . . . . . . . . . . . . . . . . . . . . . . . . . . . . . . . . . 32
Listing the Posts . . . . . . . . . . . . . . . . . . . . . . . . . . . . . . . . . . . . . . . . . . . . 32
Adding a Post . . . . . . . . . . . . . . . . . . . . . . . . . . . . . . . . . . . . . . . . . . . . . . 35
Updating a Post . . . . . . . . . . . . . . . . . . . . . . . . . . . . . . . . . . . . . . . . . . . . 38
Unpublishing a Post . . . . . . . . . . . . . . . . . . . . . . . . . . . . . . . . . . . . . . . . . 40
Publishing a Post . . . . . . . . . . . . . . . . . . . . . . . . . . . . . . . . . . . . . . . . . . . 41
Deleting a Post . . . . . . . . . . . . . . . . . . . . . . . . . . . . . . . . . . . . . . . . . . . . . 42
Creating an RSS Feed . . . . . . . . . . . . . . . . . . . . . . . . . . . . . . . . . . . . . . . 43
Summary . . . . . . . . . . . . . . . . . . . . . . . . . . . . . . . . . . . . . . . . . . . . . . . . . . . . . . . 46
CHAPTER 3 E-Commerce . . . . . . . . . . . . . . . . . . . . . . . . . . . . . . . . . . . . . . . . . . . . . . . . . 47
The Online Shop Layout . . . . . . . . . . . . . . . . . . . . . . . . . . . . . . . . . . . . . . . . . . 47
Two Site Layouts . . . . . . . . . . . . . . . . . . . . . . . . . . . . . . . . . . . . . . . . . . . 48
Layout of the Main Content . . . . . . . . . . . . . . . . . . . . . . . . . . . . . . . . . . 48
The User Journey . . . . . . . . . . . . . . . . . . . . . . . . . . . . . . . . . . . . . . . . . . . . . . . . 49
Setting Up the Shop Database . . . . . . . . . . . . . . . . . . . . . . . . . . . . . . . . . . . . . 50
Interacting with the Online Shop Database . . . . . . . . . . . . . . . . . . . . . . . . . . 52
The Category Model . . . . . . . . . . . . . . . . . . . . . . . . . . . . . . . . . . . . . . . . . 53
The Categories Controller . . . . . . . . . . . . . . . . . . . . . . . . . . . . . . . . . . . . 56
The Product Model . . . . . . . . . . . . . . . . . . . . . . . . . . . . . . . . . . . . . . . . . . 59
The Products Controller . . . . . . . . . . . . . . . . . . . . . . . . . . . . . . . . . . . . . 59
The Cart Model . . . . . . . . . . . . . . . . . . . . . . . . . . . . . . . . . . . . . . . . . . . . . 63
Handling User Requests . . . . . . . . . . . . . . . . . . . . . . . . . . . . . . . . . . . . . . . . . . 67
The AppController Class . . . . . . . . . . . . . . . . . . . . . . . . . . . . . . . . . . . . . 67
The Home Page . . . . . . . . . . . . . . . . . . . . . . . . . . . . . . . . . . . . . . . . . . . . 69
The Carts Controller . . . . . . . . . . . . . . . . . . . . . . . . . . . . . . . . . . . . . . . . . 69
The Order Model. . . . . . . . . . . . . . . . . . . . . . . . . . . . . . . . . . . . . . . . . . . . 75
The Google Checkout Button . . . . . . . . . . . . . . . . . . . . . . . . . . . . . . . . . 79
The PayPal Submit Button . . . . . . . . . . . . . . . . . . . . . . . . . . . . . . . . . . . 82
Summary . . . . . . . . . . . . . . . . . . . . . . . . . . . . . . . . . . . . . . . . . . . . . . . . . . . . . . . 83
CHAPTER 4 A Message Forum Web Service . . . . . . . . . . . . . . . . . . . . . . . . . . . . 85
Our Take on Web Services . . . . . . . . . . . . . . . . . . . . . . . . . . . . . . . . . . . . . . . . 85
Web Service Elements. . . . . . . . . . . . . . . . . . . . . . . . . . . . . . . . . . . . . . . 85
REST and HTTP . . . . . . . . . . . . . . . . . . . . . . . . . . . . . . . . . . . . . . . . . . . . . 87
Result Return Formats. . . . . . . . . . . . . . . . . . . . . . . . . . . . . . . . . . . . . . . 88
Application Requirements . . . . . . . . . . . . . . . . . . . . . . . . . . . . . . . . . . . . . . . . 88
Threads and Posts . . . . . . . . . . . . . . . . . . . . . . . . . . . . . . . . . . . . . . . . . . 89
Web Service Requests. . . . . . . . . . . . . . . . . . . . . . . . . . . . . . . . . . . . . . . 90
Layout . . . . . . . . . . . . . . . . . . . . . . . . . . . . . . . . . . . . . . . . . . . . . . . . . . . . 91
CONTENTS ix
Application Structure . . . . . . . . . . . . . . . . . . . . . . . . . . . . . . . . . . . . . . . . . . . . . 91
JSON Web Services . . . . . . . . . . . . . . . . . . . . . . . . . . . . . . . . . . . . . . . . . . . . . . 92
Our Application Controller . . . . . . . . . . . . . . . . . . . . . . . . . . . . . . . . . . . . . . . . 94
Fetch a Message . . . . . . . . . . . . . . . . . . . . . . . . . . . . . . . . . . . . . . . . . . . 97
Fetch Several Messages . . . . . . . . . . . . . . . . . . . . . . . . . . . . . . . . . . . . 100
Fetch the Threads . . . . . . . . . . . . . . . . . . . . . . . . . . . . . . . . . . . . . . . . . 105
Post Messages . . . . . . . . . . . . . . . . . . . . . . . . . . . . . . . . . . . . . . . . . . . . 110
Process a Message . . . . . . . . . . . . . . . . . . . . . . . . . . . . . . . . . . . . . . . . 116
Process a Search Request . . . . . . . . . . . . . . . . . . . . . . . . . . . . . . . . . . 120
Writing the API Documentation . . . . . . . . . . . . . . . . . . . . . . . . . . . . . . . . . . . 125
Summary . . . . . . . . . . . . . . . . . . . . . . . . . . . . . . . . . . . . . . . . . . . . . . . . . . . . . . 129
CHAPTER 5 Google Maps and the Traveling Salesman . . . . . . . . . . . . . . . 131
Hello Map! . . . . . . . . . . . . . . . . . . . . . . . . . . . . . . . . . . . . . . . . . . . . . . . . . . . . . 131
Google Maps Explained . . . . . . . . . . . . . . . . . . . . . . . . . . . . . . . . . . . . . . . . . 133
Geocoding . . . . . . . . . . . . . . . . . . . . . . . . . . . . . . . . . . . . . . . . . . . . . . . . 133
Google Map Events . . . . . . . . . . . . . . . . . . . . . . . . . . . . . . . . . . . . . . . . 134
Map Interface Elements . . . . . . . . . . . . . . . . . . . . . . . . . . . . . . . . . . . . 134
Overlays . . . . . . . . . . . . . . . . . . . . . . . . . . . . . . . . . . . . . . . . . . . . . . . . . . 134
Driving Directions . . . . . . . . . . . . . . . . . . . . . . . . . . . . . . . . . . . . . . . . . . 135
Application Requirements . . . . . . . . . . . . . . . . . . . . . . . . . . . . . . . . . . . . . . . 136
Application Structure . . . . . . . . . . . . . . . . . . . . . . . . . . . . . . . . . . . . . . . . . . . . 138
Cake Models . . . . . . . . . . . . . . . . . . . . . . . . . . . . . . . . . . . . . . . . . . . . . . . . . . . 140
The Interface . . . . . . . . . . . . . . . . . . . . . . . . . . . . . . . . . . . . . . . . . . . . . . . . . . 141
The Global Layout . . . . . . . . . . . . . . . . . . . . . . . . . . . . . . . . . . . . . . . . . 141
Home Page . . . . . . . . . . . . . . . . . . . . . . . . . . . . . . . . . . . . . . . . . . . . . . . 143
Travel Mappr Manager . . . . . . . . . . . . . . . . . . . . . . . . . . . . . . . . . . . . . . . . . . 146
Finding Locations . . . . . . . . . . . . . . . . . . . . . . . . . . . . . . . . . . . . . . . . . . 148
The Traveling Salesman Algorithm . . . . . . . . . . . . . . . . . . . . . . . . . . . 150
Plotting the Journey . . . . . . . . . . . . . . . . . . . . . . . . . . . . . . . . . . . . . . . . 156
Journey Data . . . . . . . . . . . . . . . . . . . . . . . . . . . . . . . . . . . . . . . . . . . . . . . . . . 160
Saving a Journey . . . . . . . . . . . . . . . . . . . . . . . . . . . . . . . . . . . . . . . . . . 160
Saving Tags . . . . . . . . . . . . . . . . . . . . . . . . . . . . . . . . . . . . . . . . . . . . . . . 167
Retrieving and Editing a Journey . . . . . . . . . . . . . . . . . . . . . . . . . . . . . 168
Viewing a Journey . . . . . . . . . . . . . . . . . . . . . . . . . . . . . . . . . . . . . . . . . 169
Summary . . . . . . . . . . . . . . . . . . . . . . . . . . . . . . . . . . . . . . . . . . . . . . . . . . . . . . 172
CONTENTSx
CHAPTER 6 Mashing Twitter with the Google Translator . . . . . . . . . . . . . 173
The Twitter API . . . . . . . . . . . . . . . . . . . . . . . . . . . . . . . . . . . . . . . . . . . . . . . . . 173
The Google Ajax Language API . . . . . . . . . . . . . . . . . . . . . . . . . . . . . . . . . . . 175
Application Requirements . . . . . . . . . . . . . . . . . . . . . . . . . . . . . . . . . . . . . . . 176
Application Structure . . . . . . . . . . . . . . . . . . . . . . . . . . . . . . . . . . . . . . . . . . . . 178
Cake Models . . . . . . . . . . . . . . . . . . . . . . . . . . . . . . . . . . . . . . . . . . . . . . . . . . . 181
Internationalization and Localization . . . . . . . . . . . . . . . . . . . . . . . . . . . . . . 184
Web Services . . . . . . . . . . . . . . . . . . . . . . . . . . . . . . . . . . . . . . . . . . . . . . . . . . 186
Caching . . . . . . . . . . . . . . . . . . . . . . . . . . . . . . . . . . . . . . . . . . . . . . . . . . . . . . . 188
Caching Views . . . . . . . . . . . . . . . . . . . . . . . . . . . . . . . . . . . . . . . . . . . . 189
Caching Models . . . . . . . . . . . . . . . . . . . . . . . . . . . . . . . . . . . . . . . . . . . 189
Caching Twitter and Google Translations . . . . . . . . . . . . . . . . . . . . . 189
Caching and the Application Layout . . . . . . . . . . . . . . . . . . . . . . . . . . 190
Changing Languages . . . . . . . . . . . . . . . . . . . . . . . . . . . . . . . . . . . . . . . 190
Changing Locales . . . . . . . . . . . . . . . . . . . . . . . . . . . . . . . . . . . . . . . . . . 191
The Controllers . . . . . . . . . . . . . . . . . . . . . . . . . . . . . . . . . . . . . . . . . . . . . . . . . 192
The Twittertwister Controller . . . . . . . . . . . . . . . . . . . . . . . . . . . . . . . . 192
The TwitterRequest Controller . . . . . . . . . . . . . . . . . . . . . . . . . . . . . . . 194
The TwitterStatus Controller . . . . . . . . . . . . . . . . . . . . . . . . . . . . . . . . 196
The AppController . . . . . . . . . . . . . . . . . . . . . . . . . . . . . . . . . . . . . . . . . 209
Summary . . . . . . . . . . . . . . . . . . . . . . . . . . . . . . . . . . . . . . . . . . . . . . . . . . . . . . 211
CHAPTER 7 Unit Testing and Web Testing . . . . . . . . . . . . . . . . . . . . . . . . . . . . . 213
Getting Programming Done . . . . . . . . . . . . . . . . . . . . . . . . . . . . . . . . . . . . . . 213
Our Case Study: An App Like In/Out . . . . . . . . . . . . . . . . . . . . . . . . . . . . . . . 214
Creating the Application . . . . . . . . . . . . . . . . . . . . . . . . . . . . . . . . . . . . 214
Adding Username Validation . . . . . . . . . . . . . . . . . . . . . . . . . . . . . . . . 219
Using Cake’s Unit Testing Framework . . . . . . . . . . . . . . . . . . . . . . . . . . . . . 221
Installing SimpleTest . . . . . . . . . . . . . . . . . . . . . . . . . . . . . . . . . . . . . . . 222
Creating Your Own Unit Tests . . . . . . . . . . . . . . . . . . . . . . . . . . . . . . . 224
Using Assert Methods . . . . . . . . . . . . . . . . . . . . . . . . . . . . . . . . . . . . . . 231
Testing the Entire MVC System . . . . . . . . . . . . . . . . . . . . . . . . . . . . . . 232
Web Testing . . . . . . . . . . . . . . . . . . . . . . . . . . . . . . . . . . . . . . . . . . . . . . . . . . . 232
Creating Web Tests . . . . . . . . . . . . . . . . . . . . . . . . . . . . . . . . . . . . . . . . 232
Web Testing Any Application . . . . . . . . . . . . . . . . . . . . . . . . . . . . . . . . 234
Test-Driven Development . . . . . . . . . . . . . . . . . . . . . . . . . . . . . . . . . . . . . . . . 235
Summary . . . . . . . . . . . . . . . . . . . . . . . . . . . . . . . . . . . . . . . . . . . . . . . . . . . . . . 235
CONTENTS xi
CHAPTER 8 A Cake Control Panel . . . . . . . . . . . . . . . . . . . . . . . . . . . . . . . . . . . . . . 237
Application Requirements . . . . . . . . . . . . . . . . . . . . . . . . . . . . . . . . . . . . . . . 237
The Authentication and ACL Components . . . . . . . . . . . . . . . . . . . . . . . . . . 238
The Authentication Component . . . . . . . . . . . . . . . . . . . . . . . . . . . . . . 238
The Access Control List Component . . . . . . . . . . . . . . . . . . . . . . . . . . 238
Component Setup . . . . . . . . . . . . . . . . . . . . . . . . . . . . . . . . . . . . . . . . . 241
Control Panel Application Controllers . . . . . . . . . . . . . . . . . . . . . . . . . . . . . . 242
The Control Panel Controller . . . . . . . . . . . . . . . . . . . . . . . . . . . . . . . . 242
The Actions Controller . . . . . . . . . . . . . . . . . . . . . . . . . . . . . . . . . . . . . . 244
The Groups Controller . . . . . . . . . . . . . . . . . . . . . . . . . . . . . . . . . . . . . . 251
The Users Controller . . . . . . . . . . . . . . . . . . . . . . . . . . . . . . . . . . . . . . . 259
Testing the Control Panel . . . . . . . . . . . . . . . . . . . . . . . . . . . . . . . . . . . . . . . . 266
Summary . . . . . . . . . . . . . . . . . . . . . . . . . . . . . . . . . . . . . . . . . . . . . . . . . . . . . . 270
CHAPTER 9 Translating Stories . . . . . . . . . . . . . . . . . . . . . . . . . . . . . . . . . . . . . . . . . 271
Application Structure . . . . . . . . . . . . . . . . . . . . . . . . . . . . . . . . . . . . . . . . . . . . 271
The Translate Behavior . . . . . . . . . . . . . . . . . . . . . . . . . . . . . . . . . . . . . . . . . . 272
Stories . . . . . . . . . . . . . . . . . . . . . . . . . . . . . . . . . . . . . . . . . . . . . . . . . . . . . . . . 273
Baking Cake . . . . . . . . . . . . . . . . . . . . . . . . . . . . . . . . . . . . . . . . . . . . . . 273
Adding Stories . . . . . . . . . . . . . . . . . . . . . . . . . . . . . . . . . . . . . . . . . . . . 277
Administering Stories . . . . . . . . . . . . . . . . . . . . . . . . . . . . . . . . . . . . . . 279
Translating Stories . . . . . . . . . . . . . . . . . . . . . . . . . . . . . . . . . . . . . . . . . 279
Viewing Stories . . . . . . . . . . . . . . . . . . . . . . . . . . . . . . . . . . . . . . . . . . . . 282
Deleting Stories . . . . . . . . . . . . . . . . . . . . . . . . . . . . . . . . . . . . . . . . . . . 284
Listing Stories . . . . . . . . . . . . . . . . . . . . . . . . . . . . . . . . . . . . . . . . . . . . . 284
Translation Pagination . . . . . . . . . . . . . . . . . . . . . . . . . . . . . . . . . . . . . . . . . . 288
Locale and Language Selection . . . . . . . . . . . . . . . . . . . . . . . . . . . . . . . . . . 292
Setting Locale by Browser . . . . . . . . . . . . . . . . . . . . . . . . . . . . . . . . . . 292
Setting Locale by Language Code . . . . . . . . . . . . . . . . . . . . . . . . . . . . 293
Setting Locale by Hand . . . . . . . . . . . . . . . . . . . . . . . . . . . . . . . . . . . . . 293
User Authentication . . . . . . . . . . . . . . . . . . . . . . . . . . . . . . . . . . . . . . . . . . . . . 293
Logging In . . . . . . . . . . . . . . . . . . . . . . . . . . . . . . . . . . . . . . . . . . . . . . . . 294
Logging Out . . . . . . . . . . . . . . . . . . . . . . . . . . . . . . . . . . . . . . . . . . . . . . . 296
Baked Code . . . . . . . . . . . . . . . . . . . . . . . . . . . . . . . . . . . . . . . . . . . . . . . . . . . . 297
Summary . . . . . . . . . . . . . . . . . . . . . . . . . . . . . . . . . . . . . . . . . . . . . . . . . . . . . . 306
CONTENTSxii
CHAPTER 10 Adding Automagic Fields . . . . . . . . . . . . . . . . . . . . . . . . . . . . . . . . . . 307
Cake’s Built- in Magic Fields . . . . . . . . . . . . . . . . . . . . . . . . . . . . . . . . . . . . . 307Writing a Custom Behavior . . . . . . . . . . . . . . . . . . . . . . . . . . . . . . . . . . . . . . . 308Building Custom Magic Fields . . . . . . . . . . . . . . . . . . . . . . . . . . . . . . . . . . . . 309
Access Data Field . . . . . . . . . . . . . . . . . . . . . . . . . . . . . . . . . . . . . . . . . . 310Record Order Data Field . . . . . . . . . . . . . . . . . . . . . . . . . . . . . . . . . . . . 311Locking Data Field . . . . . . . . . . . . . . . . . . . . . . . . . . . . . . . . . . . . . . . . . 313
Summary . . . . . . . . . . . . . . . . . . . . . . . . . . . . . . . . . . . . . . . . . . . . . . . . . . . . . . 315
CHAPTER 11 Cake Tags . . . . . . . . . . . . . . . . . . . . . . . . . . . . . . . . . . . . . . . . . . . . . . . . . . 317
Content and Data Separation . . . . . . . . . . . . . . . . . . . . . . . . . . . . . . . . . . . . . 317View Template . . . . . . . . . . . . . . . . . . . . . . . . . . . . . . . . . . . . . . . . . . . . . . . . . 319Cake View Class Extension . . . . . . . . . . . . . . . . . . . . . . . . . . . . . . . . . . . . . . 321Cake Plugins . . . . . . . . . . . . . . . . . . . . . . . . . . . . . . . . . . . . . . . . . . . . . . . . . . . 323Yahoo! Maps . . . . . . . . . . . . . . . . . . . . . . . . . . . . . . . . . . . . . . . . . . . . . . . . . . . 325Summary . . . . . . . . . . . . . . . . . . . . . . . . . . . . . . . . . . . . . . . . . . . . . . . . . . . . . . 328
CHAPTER 12 Dynamic Data Fields . . . . . . . . . . . . . . . . . . . . . . . . . . . . . . . . . . . . . . . 329
Traditional Product Searching . . . . . . . . . . . . . . . . . . . . . . . . . . . . . . . . . . . . 329The Dynamic Data Approach . . . . . . . . . . . . . . . . . . . . . . . . . . . . . . . . . . . . . 330
Considerations for Using the Dynamic Data Approach . . . . . . . . . . 331The Product Database Design . . . . . . . . . . . . . . . . . . . . . . . . . . . . . . . 332Baking for This Application . . . . . . . . . . . . . . . . . . . . . . . . . . . . . . . . . . 337
Building the Product Search Feature . . . . . . . . . . . . . . . . . . . . . . . . . . . . . . 338Creating the Product Search Form . . . . . . . . . . . . . . . . . . . . . . . . . . . 338Processing the Search . . . . . . . . . . . . . . . . . . . . . . . . . . . . . . . . . . . . . 347
Adding a Product . . . . . . . . . . . . . . . . . . . . . . . . . . . . . . . . . . . . . . . . . . . . . . . 353Creating Table Entries . . . . . . . . . . . . . . . . . . . . . . . . . . . . . . . . . . . . . . 353Entering Product Data . . . . . . . . . . . . . . . . . . . . . . . . . . . . . . . . . . . . . . 354
Summary . . . . . . . . . . . . . . . . . . . . . . . . . . . . . . . . . . . . . . . . . . . . . . . . . . . . . . 358
CHAPTER 13 Captcha . . . . . . . . . . . . . . . . . . . . . . . . . . . . . . . . . . . . . . . . . . . . . . . . . . . . . 359
Captcha Implementations. . . . . . . . . . . . . . . . . . . . . . . . . . . . . . . . . . . . . . . . 359Captcha Types . . . . . . . . . . . . . . . . . . . . . . . . . . . . . . . . . . . . . . . . . . . . 360ASCII Art Captcha . . . . . . . . . . . . . . . . . . . . . . . . . . . . . . . . . . . . . . . . . . 361
A Captcha Component . . . . . . . . . . . . . . . . . . . . . . . . . . . . . . . . . . . . . . . . . . 362The ASCII Art Component Class . . . . . . . . . . . . . . . . . . . . . . . . . . . . . . 362The Captcha Controller . . . . . . . . . . . . . . . . . . . . . . . . . . . . . . . . . . . . . 365
Summary . . . . . . . . . . . . . . . . . . . . . . . . . . . . . . . . . . . . . . . . . . . . . . . . . . . . . . 369
INDEX . . . . . . . . . . . . . . . . . . . . . . . . . . . . . . . . . . . . . . . . . . . . . . . . . . . . . . . . . . . . . . . . . . . . . . 371

xiii
About the Authors
KAI CHAN started his computing career in the late 1980s. His current interests include programming methodology, the Semantic Web, data visualization, and enterprise systems. Kai holds a Computer Science bachelor’s degree and a master’s degree in Computer Graphics. He is a cofounder of the Azzian MVC CMS framework. Together with John Omokore and others, he runs a software and training company in London, specializing in various large-scale projects, from SAP to e-commerce web sites. When he has a spare moment, he likes tennis, squash, and long-distance running.
JOHN OMOKORE is a developer, technical consultant, writer, and trainer. John has programming experience in many technologies, including Linux, PHP, MySQL, and Ajax. He has worked on market research data analysis, database development, and related systems. He received his bachelor’s degree in Mathematics and is pursuing a postgraduate degree in software engineering at Oxford University in England. John provides consulting and web development services to corporate organizations around the world. He’s a cofounder of AlternativeBrains and the Azzian MVC CMS framework and sits on the board of many companies. John lives outside London with his wife, two children, and some animals. His
career interests include open source scripting languages, OOP programming, and the use of SAP in large-scale industries (chiefly oil and gas). When not scripting, he enjoys playing chess and squash, visiting the gym, and a bit of socializing.
RICHARD K. MILLER graduated from Brigham Young University with a degree in Business Management but has been interested in technology since he began computer programming at age 10. His experience includes web programming, Internet marketing, and new media strategies. He is the developer of several MediaWiki extensions and WordPress plugins, including the widely used What Would Seth Godin Do plugin.
xiv
About the Technical Reviewer
DAVID GOLDING began developing web sites in 1999 and first started using CakePHP on a bet he couldn’t complete a web application in five minutes. He is the author of Beginning CakePHP: From Novice to Professional (Apress, 2008) and has taught CakePHP even while it was still in early stages of development. David has a degree in European Studies from Brigham Young University and continues work in religious studies and history as a graduate student at Claremont Graduate University. He lives with his wife, Camille, and his son, Kenny, in Southern California.
xv
Acknowledgments
When we first decided to write this book, we really didn’t think it would be that difficult a task. After all, we’ve been coding and writing documentation for years and years. Now having written the book, we can honestly say it has been one of the hardest projects we’ve done since we wrote our first-ever Hello World program. As such, with tears streaming from our eyes, we would wholeheartedly like to thank all the people involved. It all sounds like a cliché, but it’s all true. Thank you to the team at Apress, the Cake Software Foundation, col-leagues, friends, families, and neighbors. In no particular order, we would like to thank them individually. They are Steve Anglin, Richard Dal Porto, Matt Wade, Marilyn Smith, Joohn Choe, David Golding, Nancy Wright, Richard K. Miller, Rita Woo, Terry Wells, Dan Jackson, Candace English, and God.
Kai Chan and John Omokore
Thank you to Kai Chan and John Omokore for allowing me to take part in this book. I’ve enjoyed working with them and the entire Apress team. Thanks to David Golding for getting me involved. I’m thankful for good parents, family, friends, and colleagues, and to God.
Richard K. Miller
xvii
Introduction
First off, thank you for picking up this book. Whether you are standing in a bookshop or reading this at home, we assume you probably have a strong interest in developing web sites. In the past few years, the number of web site frameworks has increased dramatically. This is especially true for PHP-based frameworks. Many people have chosen to adopt CakePHP (Cake, for short) for various reasons, such as these:
want team members who can quickly pick up a new piece of technology.
Cake forum. And there are always some good discussions happening on the Cake IRC. (To see for yourself, simply download mIRC from , connect to the server , and join the channel.)
When you are developing a site using Cake, you often find yourself trawling through tutorials online to see how things are done. We’ve done that ourselves many times. However, despite the power of the Internet, we still like to look through books. And we think you will find this book a great help in your Cake development endeavors, in addition to all of the material available online.
Most of the applications in this book have been written as a result of some real-world development we have done in the past. We focus on projects that we think are relevant to the future of web development.
Let’s take mashups, for example. We should all take an interest in this ever-expanding area of web development. We can honestly say that any successful online web site in the future will need to easily communicate with other applications. Application designers will need to bear this in mind. Matters such as search engine optimization need to be built into the appli-cation itself. Cake allows us to think in terms of the high-level architecture instead of the nuts and bolts of a web application.
Who Should Read This BookPractical CakePHP is a book mainly for developers. To get the most from it, you should be comfortable with a number of web technologies and programming concepts. These include PHP, SQL, HTML, JavaScript, object-oriented programming, and design patterns, as well as the general principles of web development. If you are at the forefront of web development, then this book is for you!
INTRODUCTIONxviii
If our book sounds a little too advanced for you, we recommend that you do some pre-liminary reading. We suggest the following books:
Beginning PHP and MySQL: From Novice to Professional, Third Edition, by W. Jason Gilmore (Apress, 2008)
Beginning CakePHP: From Novice to Professional by David Golding (Apress, 2008)
How This Book Is OrganizedEach chapter in this book has been chosen so it will cover the core features in Cake, plus some of the minor features as well. The following is a rough breakdown of what each chapter includes.
the CakePHP framework, this is the place to start.
beginners who want to know what a Cake application looks like. If there are two chap-ters in the book that need to be read in sequence, they are Chapters 1 and 2.
common application. We walk through implementing an online shop using the Cake framework.
API. We guide you through creating a clean API, so any third party can access your application using standard protocols.
Maps API is used with Cake. One of the main features of this chapter’s application relates to the classic traveling salesman problem: a salesman needs to visit a number of cities only once and return to where he started.
of web services in modern web application development. In true Web 2.0 and Cake fashion, this chapter’s application mashes the Google Ajax Language API with the Twitter API to provide automatic translation of Twitter messages.
professionals. Cake 1.2 devotes a large section to testing, and this chapter shows you how to take advantage of Cake’s integrated unit testing features.
features. We develop a web-based front end that allows administrators to manage user security.
INTRODUCTION xix
internationalization and localization features. We develop an application in which news stories are available in other languages, with an administration area where translators can translate stories from a base language to another language.
magic fields like , , and . We create three new automagic fields.
XML tags are used as a wrapper to coding logic. Using Cake, we develop our own HTML-based tags to display two Yahoo maps.
product-filtering technique. We take a dynamic data approach to product searches.
chapter’s project, the Captcha test is housed in a Cake component so it can be used by other applications.
How to Contact the AuthorsThe authors can be contacted as follows:
.
.
.
C H A P T E R 1
Cake Fundamentals
Using a framework of some sort has now become the order of the day for building large- scale web applications. Organizations have found that using an in- house framework for web projects enhances code reuse, scalability, quick project turnarounds, and security.
New and evolving frameworks provide rapid application development tools to promote the adoption of particular programming languages. Many frameworks derived from PHP have been popular with programmers in the open source community. CakePHP—Cake for short—is currently one of the fastest-growing rapid application development frameworks. When you are developing large web applications or creating components that you will reuse in many appli-cations, you’ll find Cake to be a great help.
In this chapter, we’ll highlight some of the concepts, technologies, and tools that Cake relies on, including the PHP scripting language, the Model-View- Controller design pattern, and object- oriented programming techniques. We will also outline the default folder struc-tures and naming conventions and introduce some Cake best practices. And, of course, we’ll demonstrate how to write some Cake code.
This chapter will serve as a quick reference that will provide you with a solid foundation on which to build your knowledge of the framework throughout the rest of the book.
Cake FeaturesWhy should you use Cake when there are so many other frameworks in town? There is a num-ber of good reasons for the popularity of Cake PHP. It has a short learning curve in comparison to other frameworks, because Cake is easy to use and understand. Also, because there are so many PHP programmers, Cake has a large community. New users can find many projects to refer to and use.
Here are some features of Cake that make web application development with it easy and fast:
other database platforms.
1
CHAPTER 1 CAKE FUNDAMENTALS2
security, sessions, and request handling.
and many others.
Note For a complete and up-to- date list of Cake features; see the official web site at . You can also find many discussions regarding how Cake compares with other frameworks,
such as Ruby on Rails, symfony, Zend Framework, and CodeIgniter. For a comparison of Cake with the aforementioned frameworks, check
.
The Ingredients of CakeIn this section, we’ll delve into the core concepts and technologies employed by Cake, starting with the MVC design pattern.
The Model-View- Controller Design PatternCake supports the MVC design pattern, which aims to modularize an application into three parts:
model represents the data for the application.
view represents the presentation.
controller ties the model and view together and deals with user input.
Familiarity with the MVC pattern is a plus, but this book does not assume you have any prior knowledge of MVC. This chapter covers how Cake employs the MVC concept.
Rapid Application DevelopmentAlong with MVC, Cake took on the philosophy of
taken to design software systems by using many prebuilt skeleton structures. This provides developers with many advantages, including easier maintenance, code reuse, more efficient
based on client feedback, decreasing the dangers of feature creep.Additionally, you can find a lot of off-the- shelf open source code, which you can easily
plug into your Cake applications. A great place to start is .
CHAPTER 1 CAKE FUNDAMENTALS 3
PHP 4+PHP 4+ refers to PHP version 4 and above. PHP has become one of the most important server- side scripting languages on the Web. It is currently a predominant language for the development of web applications. It provides web developers the functionalities to quickly create dynamic web applications. PHP has come a long way since PHP 3 was first introduced more than a decade ago.
The adoption of the Cake framework assumes knowledge of PHP 4. The official PHP manual, at , provides a complete reference on PHP.
Note A common problem faced in life with a new adventure is where to go for the right information in order to avoid the mistakes of predecessors. If you are just starting out with PHP, you can refer to the many online PHP forums and repositories, such as the popular PEAR library and the ever- growing
web site.
Object-Oriented ProgrammingObject-oriented which the parts of a program are organized as a collection of objects, each of which represents an instance of a class, and whose classes are all members of a hierarchy of classes united via
object , while a object , and they both inherit from the class.
The Cake framework supports the three key principles of object- oriented development: encapsulation, inheritance, and polymorphism.
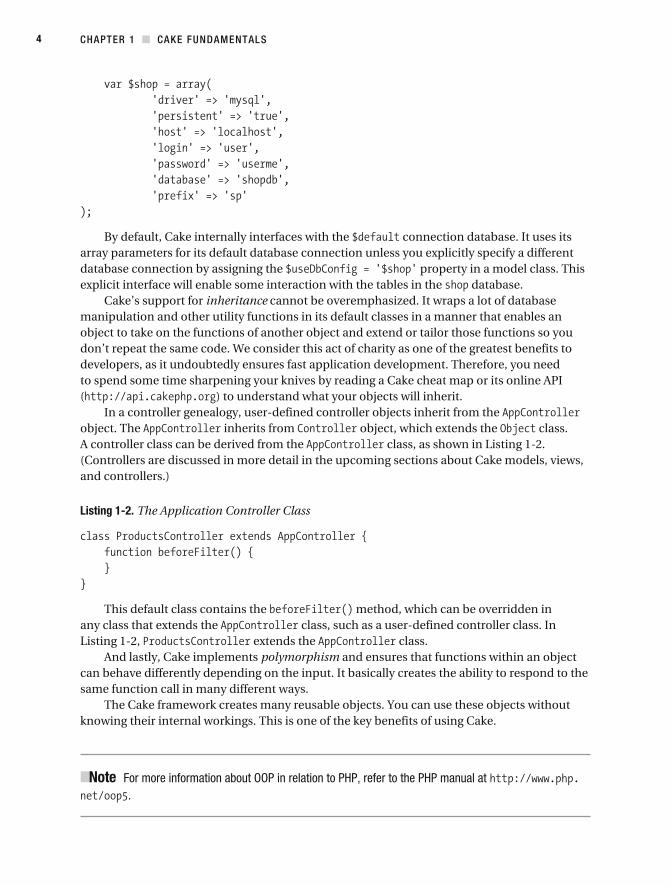
For the simple magic called encapsulation, Cake’s implementation of one object is protected, or hidden away, from another object to eliminate interference. However, there must be some interaction with other objects in the application, or the object is useless. As in most OOP applications, an object in the Cake framework provides an interface to another object to enable this interaction. called , which encapsulates and database connection arrays.
Listing 1-1. The Cake Database Configuration Class
CHAPTER 1 CAKE FUNDAMENTALS4
By default, Cake internally interfaces with the connection database. It uses its
database connection by assigning the property in a model class. This database.
Cake’s support for inheritance cannot be overemphasized. It wraps a lot of database manipulation and other utility functions in its default classes in a manner that enables an
don’t repeat the same code. We consider this act of charity as one of the greatest benefits to developers, as it undoubtedly ensures fast application development. Therefore, you need to spend some time sharpening your knives by reading a Cake cheat map or its online API
In a controller genealogy, user- defined controller objects inherit from the object. The inherits from class. A controller class can be derived from the class, as shown in
Listing 1-2. The Application Controller Class
This default class contains the method, which can be overridden in class, such as a user- defined controller class. In
class. And lastly, Cake implements polymorphism and ensures that functions within an object
can behave differently depending on the input. It basically creates the ability to respond to the same function call in many different ways.
knowing their internal workings. This is one of the key benefits of using Cake.
Note For more information about OOP in relation to PHP, refer to the PHP manual at .
CHAPTER 1 CAKE FUNDAMENTALS 5
Dissecting CakeBefore you start baking a Cake application, you will need to download the Cake framework from scripting language, so you need to have PHP up and running first. If you will be using informa-
the
Cake’s Directory StructureWhen you unpack Cake, you will find the following main folder structures:
: Contains files and folders for your application. The folder is your development folder, where your application- specific folders and files reside.
: Contains core Cake libraries. The folder contains the core libraries for
doing.
: Contains Cake document files such as the read me, copyright, and change log
: Contains third- party code. The folder can contain third- party
-sible for you to have many different applications sharing a single Cake installation. With this
Table 1-1. The Cake Default Folder Structure
Directory Description
The parent folder for your application
Contains configuration files for global structures such database connections, security, and access control
Contains your user- defined component files
Allows you to deploy Cake with as the
Contains locale files that deal with internationalization
Contains the model files
Contains the plugin files
Contains the test folders and files
Contains third- party libraries
Continued
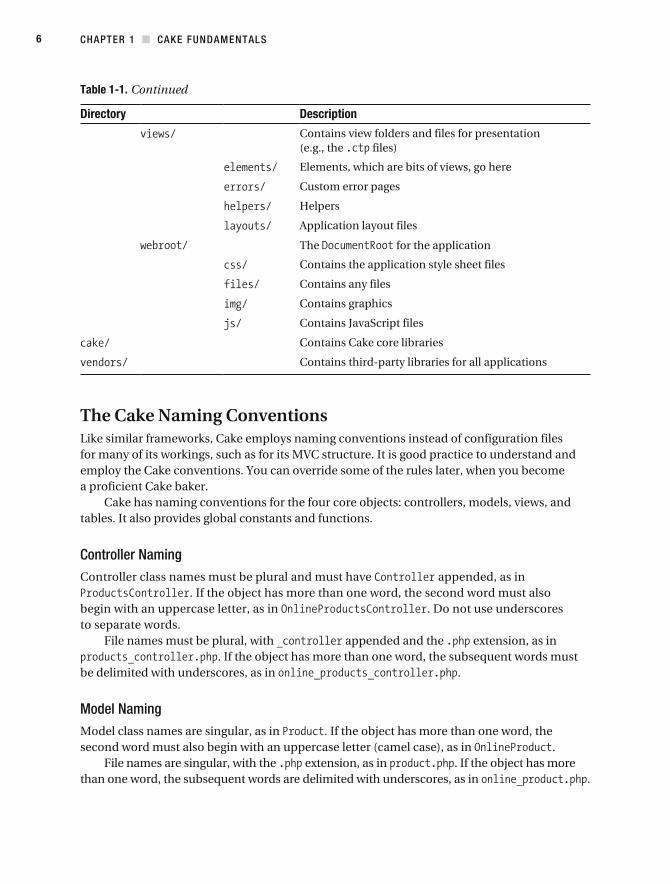
CHAPTER 1 CAKE FUNDAMENTALS6
Table 1-1. Continued
Directory Description
Contains view folders and files for presentation
Elements, which are bits of views, go here
Custom error pages
Helpers
Application layout files
The for the application
Contains the application style sheet files
Contains any files
Contains graphics
Contains Cake core libraries
Contains third- party libraries for all applications
The Cake Naming Conventionsframeworks, Cake employs naming conventions instead of configuration files
for many of its workings, such as for its MVC structure. It is good practice to understand and
a proficient Cake baker.Cake has naming conventions for the four core objects: controllers, models, views, and
tables. It also provides global constants and functions.
Controller NamingController class names must be plural and must have appended, as in
. If the object has more than one word, the second word must also begin with an uppercase letter, as in to separate words.
File names must be plural, with appended and the . If the object has more than one word, the subsequent words must
be delimited with underscores, as in .
Model NamingModel class names are singular, as in . If the object has more than one word, the
.File names are singular, with the . If the object has more
than one word, the subsequent words are delimited with underscores, as in .
CHAPTER 1 CAKE FUNDAMENTALS 7
View NamingView file a method , the path is .
Table Namingnames should be plural, with words delimited with underscores, as in
property to your
where is the name of a table in a database.
Global ConstantsThe global constants are categorized into three major parts:
Core defines: For defines the Cake application session value.
Web root configurable paths: For defines the web root folder
Paths: For
page as an array from the folder:
Global FunctionsThe global function code snippet performs a simple search and replace operation to add style to .
The controller should contain most of the business logic, like this:
Cake, the business logic is often separated into components or vendors, as discussed later in this chapter.
CHAPTER 1 CAKE FUNDAMENTALS8
Note It is advisable to familiarize yourself with the global constants and functions to avoid reinventing the wheel. To see a complete list of Cake’s various classes and functions, visit .
ModelsThe model is the first of the MVC concepts. Communicating with data stores such as tables,
web application, especially when it involves a large number of users. The actions of manipu-lating data stored in a data store are best done within a model. The model should be involved
placed in the model.
Model CreationModels are declared using the keyword , followed by the name you wish to give to the
-ods specific to the implementation of that model as determined by the business requirement.
A user- defined model class should follow the Cake naming convention and predefined class. The class
model class in class properties and methods.
Listing 1-3. A Sample Model Class
Though the Cake’s properties and methods. We will bring some of these useful properties and methods into the limelight throughout this book.
The class is originally defined in the directory. To create your own, place it in . This allows methods to be shared among the models. The class, which . Model default methods such as the method are defined in the class stored in
class until you become
CHAPTER 1 CAKE FUNDAMENTALS 9
Note Refer to the cheat sheet in at before writing a query method in your class definition. Alternatively, check the Cake API at . This effort will save you from rewriting existing functionalities and enhance rapid application development. For example, Cake provides a query to retrieve some or all information from a database table.
records from one or more database tables.
tables.
records.
First, we will create a table named shown in
Listing 1-4. The Table Schema for departments
create some records, by using the default this method comes at the price of ensuring that the format of the data to be passed to it as
sample data structure in
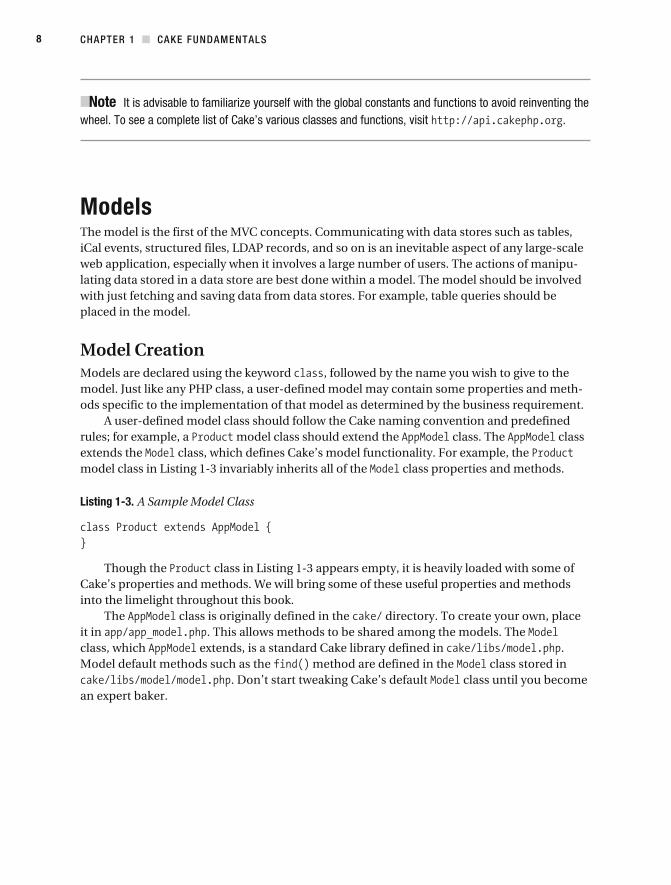
CHAPTER 1 CAKE FUNDAMENTALS10
Listing 1-5. Cake’s Expected $this- >data Format
database table. This structure, stored in a PHP variable such as or ta, will save its values to matching fields in the database table. To commit the data in this structure into this table, the method is at your service, but the format of argument is crucial to the success of the operation.
model class to use this preformatted data and commit the two additional records into the
table. The model class is shown in
Listing 1-6. The Department Model Class
CHAPTER 1 CAKE FUNDAMENTALS 11
properties, starting with the property assigned the value . This property is property specifies
the name of the table required for data access or manipulation in the model. Although it isn’t
model name is , Cake will use the table for the model by default. It is
naming convention is not followed. The model function call should be done in a controller class. We’ll discuss
the controller in more detail later in this chapter. In our imaginary controller class, to invoke the
This method accepts as a parameter the preformatted array information called , as statement, if the passed to Cake’s model func-
tion is committed to the database table, a Boolean value is returned; if not,
model function.form created using the object in a view, Cake automati-
cally structures the form fields data submitted to a controller in a format that is similar to that
-ingful, most data- access operations are filtered using some criteria. We’re going to add a method to the
Listing 1-7. Retrieving Records Using $region=‘US’ Criteria with the find() Method
method that accepts as its parameter. This method employs the service of the Cake’s method to retrieve some department information based on
CHAPTER 1 CAKE FUNDAMENTALS12
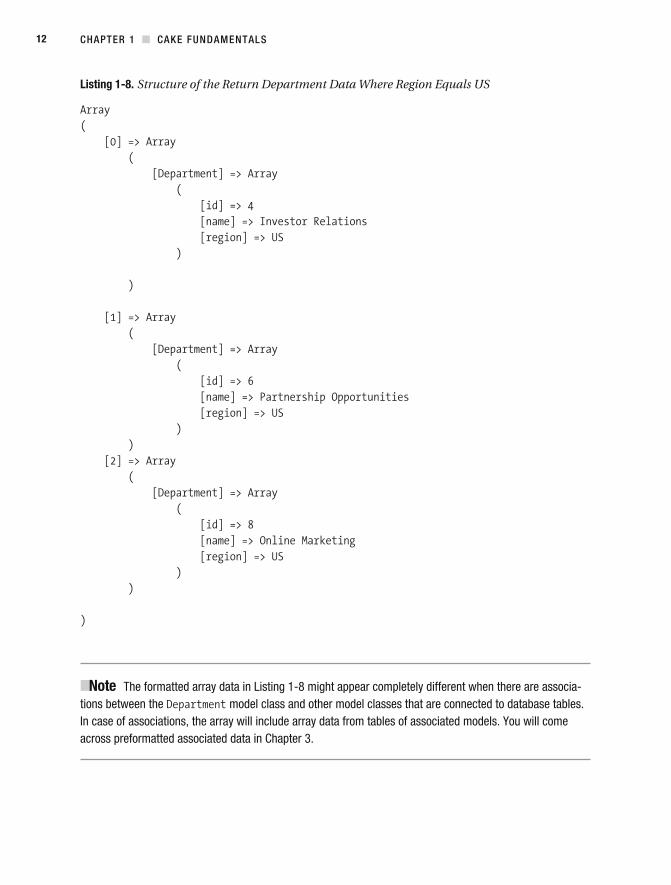
Listing 1-8. Structure of the Return Department Data Where Region Equals US
Note The formatted array data in Listing 1-8 might appear completely different when there are associa-tions between the model class and other model classes that are connected to database tables. In case of associations, the array will include array data from tables of associated models. You will come across preformatted associated data in Chapter 3.
CHAPTER 1 CAKE FUNDAMENTALS 13
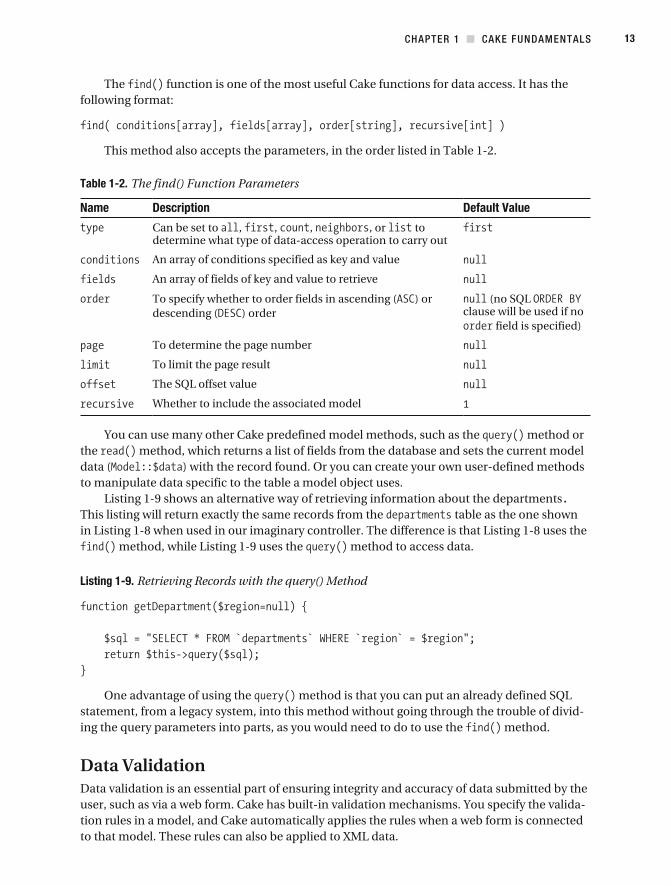
The function is one of the most useful Cake functions for data access. It has the following format:
Table 1-2. The find() Function Parameters
Name Description Default Value
Can be set to , , , , or to determine what type of data- access operation to carry out
An array of conditions specified as key and value
An array of fields of key and value to retrieve
clause will be used if no
To determine the page number
To limit the page result
Whether to include the associated model
method or the method, which returns a list of fields from the database and sets the current model
to manipulate data specific to the table a model object uses.
table as the one shown
method to access data.
Listing 1-9. Retrieving Records with the query() Method
One advantage of using the statement, from a legacy system, into this method without going through the trouble of divid-ing the query parameters into parts, as you would need to do to use the method.
Data Validationis an essential part of ensuring integrity and accuracy of data submitted by the
-tion rules in a model, and Cake automatically applies the rules when a web form is connected
CHAPTER 1 CAKE FUNDAMENTALS14
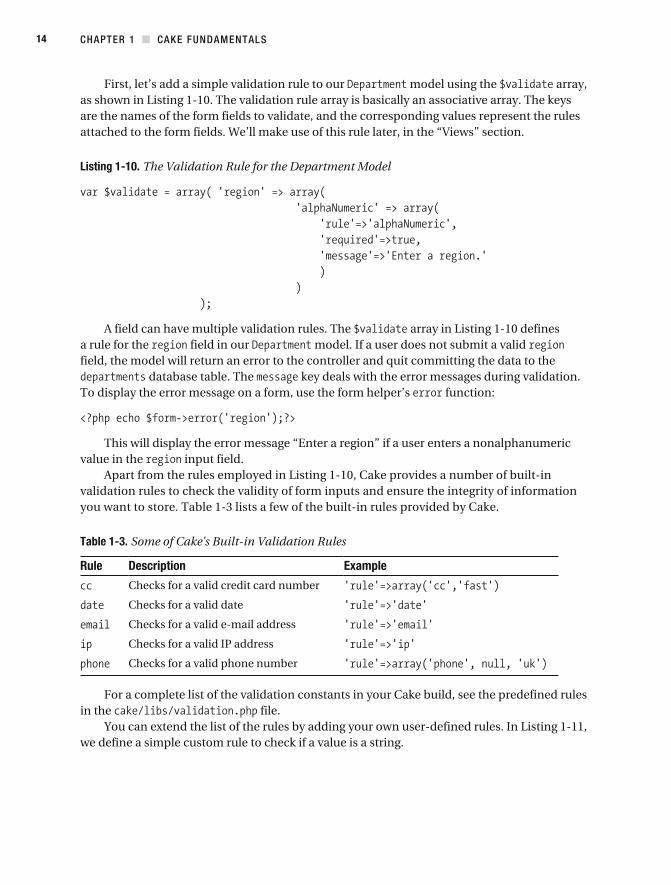
First, let’s add a simple validation rule to our model using the array,
are the names of the form fields to validate, and the corresponding values represent the rules attached to the form fields. We’ll make use of this rule later, in the “Views” section.
Listing 1-10. The Validation Rule for the Department Model
A field can have multiple validation rules. The a rule for the field in our model. If a user does not submit a valid field, the model will return an error to the controller and quit committing the data to the
database table. The key deals with the error messages during validation. To display the error message on a form, use the form helper’s function:
This will display the error message “Enter a region” if a user enters a nonalphanumeric value in the input field.
validation rules to check the validity of form inputs and ensure the integrity of information
Table 1-3. Some of Cake’s Built- in Validation Rules
Rule Description Example
Checks for a valid credit card number
Checks for a valid date
Checks for a valid e-mail address
Checks for a valid IP address
Checks for a valid phone number
For a complete list of the validation constants in your Cake build, see the predefined rules in the file.
we define a simple custom rule to check if a value is a string.
CHAPTER 1 CAKE FUNDAMENTALS 15
Listing 1-11. A Custom Rule Called String
Before you apply a custom rule, such as the file, and then simply add the rule to your model array:
This will ensure that the field is a valid string. In upcoming chapters, you will come across more validation rules.
The model object is robust and provides a lot of functionality for database manipulation. However, part of the data retrieved by a model is required for web surfers’ consumption. When
look at in the following section.
ViewsNow that form to ask users to enter depart-ment information. The task of building a web form is done in a view.
the users. However, views can be anything, especially if Cake is used to output other formats component and
view for the method in the is stored as .
method in a controller.
Note Views should be involved only with displaying output. For example, this is where you will see HTML tags and XML tags. Business logic, such as , should not be in the view. However, the following is OK in a view:
database table. We are going to use another utility provided by Cake to build forms: the object. add view.
CHAPTER 1 CAKE FUNDAMENTALS16
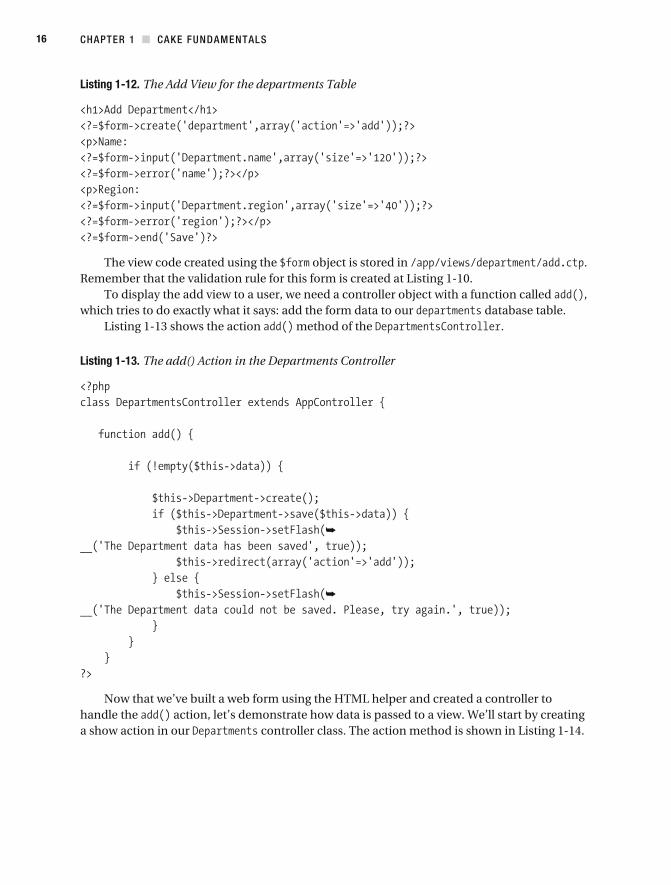
Listing 1-12. The Add View for the departments Table
The view code created using the object is stored in .
To display the add view to a user, we need a controller object with a function called , database table.
shows the action method of the .
Listing 1-13. The add() Action in the Departments Controller
Now that we’ve built a web form using the handle the action, let’s demonstrate how data is passed to a view. We’ll start by creating a show action in our controller class. The action method is shown in
CHAPTER 1 CAKE FUNDAMENTALS 17
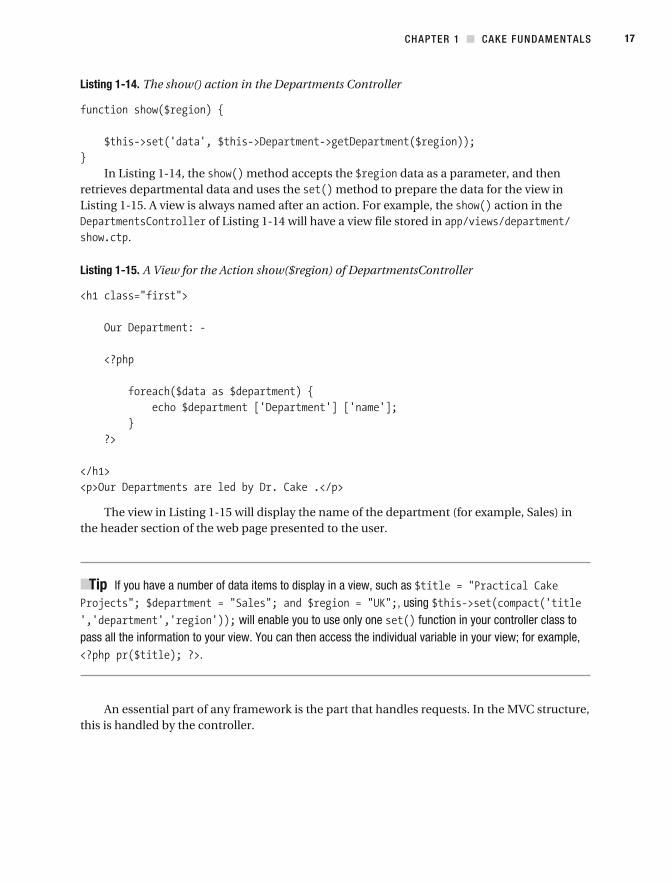
Listing 1-14. The show() action in the Departments Controller
method accepts the data as a parameter, and then retrieves departmental data and uses the method to prepare the data for the view in
action in the
.
Listing 1-15. A View for the Action show($region) of DepartmentsController
the header section of the web page presented to the user.
Tip If you have a number of data items to display in a view, such as , using
will enable you to use only one function in your controller class to pass all the information to your view. You can then access the individual variable in your view; for example,
.
An essential part of any framework is the part that handles requests. In the MVC structure, this is handled by the controller.
CHAPTER 1 CAKE FUNDAMENTALS18
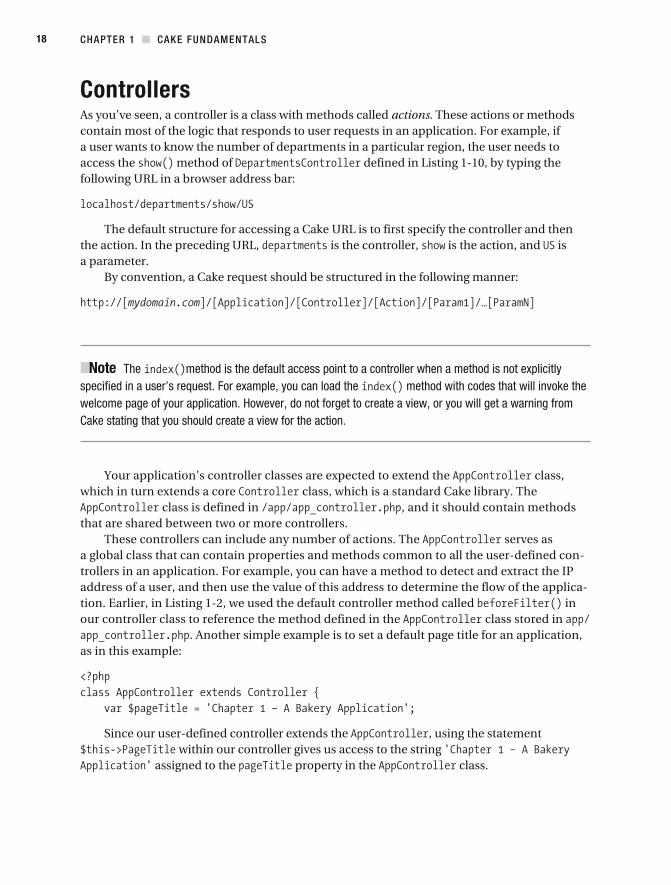
ControllersAs you’ve seen, a controller is a class with methods called actions. These actions or methods
a user wants to know the number of departments in a particular region, the user needs to access the method of
is the controller, is the action, and is a parameter.
By convention, a Cake request should be structured in the following manner:
Note The method is the default access point to a controller when a method is not explicitly specified in a user’s request. For example, you can load the method with codes that will invoke the welcome page of your application. However, do not forget to create a view, or you will get a warning from Cake stating that you should create a view for the action.
class, class, which is a standard Cake library. The
class is defined in , and it should contain methods that are shared between two or more controllers.
These controllers can include any number of actions. The serves as a global class that can contain properties and methods common to all the user- defined con-
address of a user, and then use the value of this address to determine the flow of the applica- in
our controller class to reference the method defined in the class stored in default page title for an application,
, using the statement within our controller gives us access to the string
assigned to the property in the class.
CHAPTER 1 CAKE FUNDAMENTALS 19
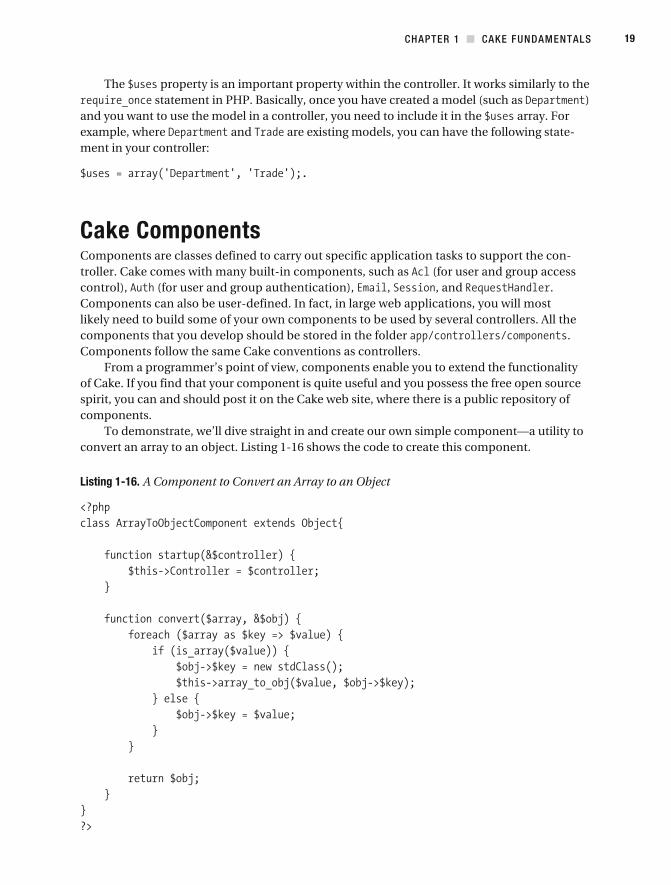
The property is an important property within the controller. It works similarly to the
and you want to use the model in a controller, you need to include it in the array. For and -
ment in your controller:
Cake ComponentsComponents are classes defined to carry out specific application tasks to support the con-troller. Cake comes with many built- in components, such as
, , and . Components can also be user- defined. In fact, in large web applications, you will most likely need to build some of your own components to be used by several controllers. All the components that you develop should be stored in the folder . Components follow the same Cake conventions as controllers.
of Cake. If you find that your component is quite useful and you possess the free open source spirit, you can and should post it on the Cake web site, where there is a public repository of components.
To demonstrate, we’ll dive straight in and create our own simple component—a utility to convert an array to an object.
Listing 1-16. A Component to Convert an Array to an Object

CHAPTER 1 CAKE FUNDAMENTALS20
The stored in :
, is used to instantiate the controller object. This enables all other functions within the component to access information contained in the parent controller. It’s basically a callback method used to bring the controller object into the component.
, is our user- defined function. It does the work of -
ponent whenever you want to convert an array to an object.
such as a database table name, into components.controllers or other components. To use a component—
whether it is a built- in one or one you have created—you need to first declare the component within the array in a user- defined controller, another component, or in the
statement:
component and our component in the class.
Listing 1-17. Using Components in DepartmentsController
database table from an array to an object. First, we use the array to reference the model. We then use the array to reference the component, which is a built- in Cake component, and the component, which is our user- defined
function that contains a declaration of an array vari-able called . We retrieve the department data using the default function, store the result in the array, and then pass the array to the method of the component. Finally, we use the Cake global function to print the resulting object.
CHAPTER 1 CAKE FUNDAMENTALS 21
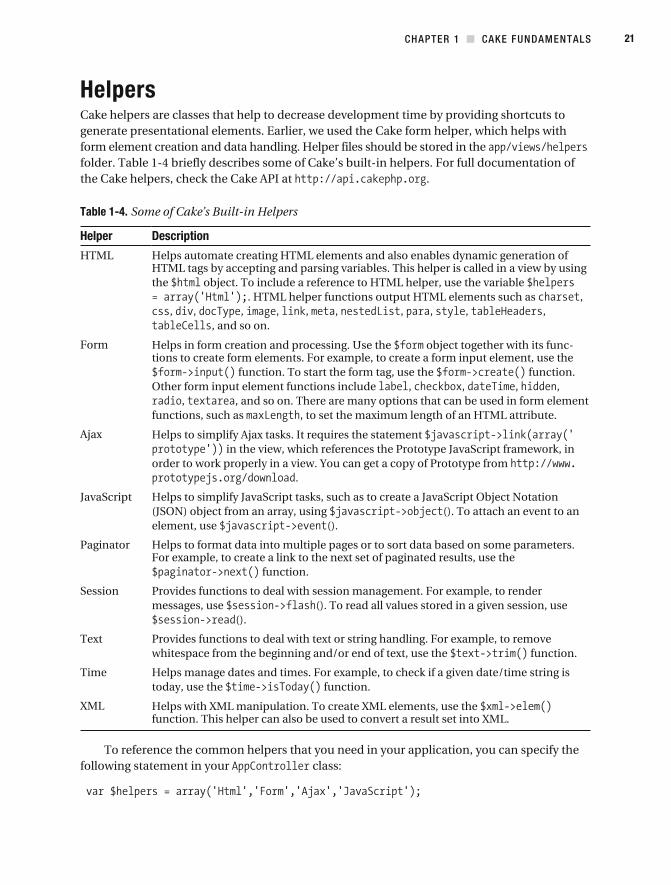
HelpersCake helpers are classes that help to decrease development time by providing shortcuts to generate presentational elements. Earlier, we used the Cake form helper, which helps with form element creation and data handling. Helper files should be stored in the
documentation of the Cake helpers, check the Cake API at .
Table 1-4. Some of Cake’s Built- in Helpers
Helper Description
Helps
the ,
, , , , , , , , , , , and so on.
Form Helps object together with its func-
function. To start the form tag, use the function. Other form input element functions include , , , ,
, , and so on. There are many options that can be used in form element functions, such as
Helps
.
Helps
element, use
Paginator Helps to format data into multiple pages or to sort data based on some parameters.
function.
Provides messages, use
Provides function.
Time Helps today, use the function.
Helps
To reference the common helpers that you need in your application, you can specify the following statement in your class:
CHAPTER 1 CAKE FUNDAMENTALS22
This will ensure that the function in a layout works properly.
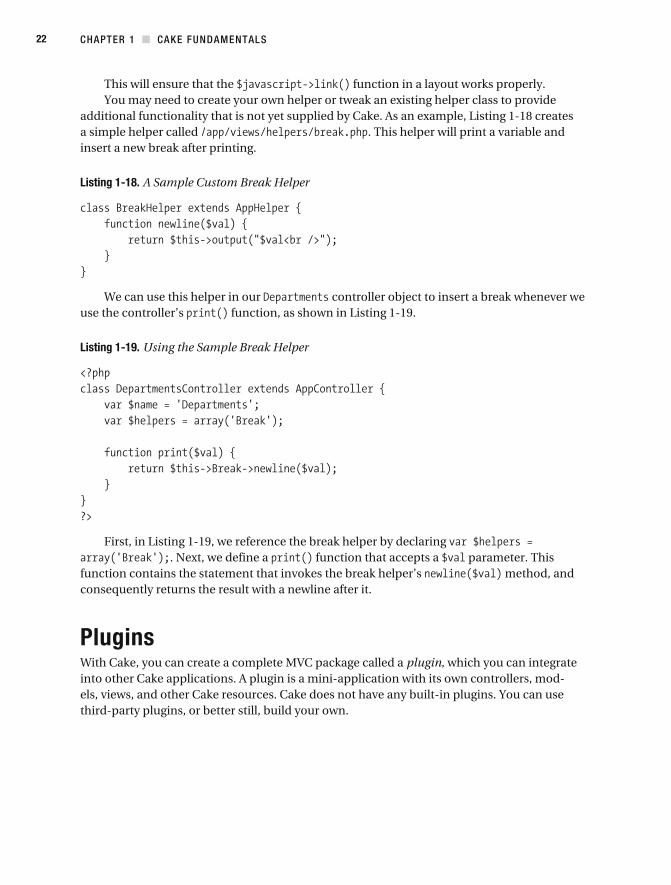
a simple helper called / . This helper will print a variable and insert a new break after printing.
Listing 1-18. A Sample Custom Break Helper
We can use this helper in our controller object to insert a break whenever we use the controller’s
Listing 1-19. Using the Sample Break Helper
function that accepts a parameter. This function contains the statement that invokes the break helper’s method, and consequently returns the result with a newline after it.
PluginsWith Cake, you can create a complete MVC package called a plugin, which you can integrate into other Cake applications. A plugin is a mini- application with its own controllers, mod-
third- party plugins, or better still, build your own.

CHAPTER 1 CAKE FUNDAMENTALS 23
Here, we will create a basic feedback plugin that will provide mailing facility. It will have the following directory structure:
where
contains plugin controllers.
contains plugin models.
contains plugin views.
is the plugin’s , named after the plugin.
is the plugin’s , named after the plugin.
Note You must create both an and an for a plugin to work properly. If you forget to define the class and the , Cake will throw a “Missing Controller” error.
The feedback plugin’s is stored in , and its corresponding class is stored in
as shown in
Listing 1-20. Feedback App Classes for the Feedback Plugin
CHAPTER 1 CAKE FUNDAMENTALS24
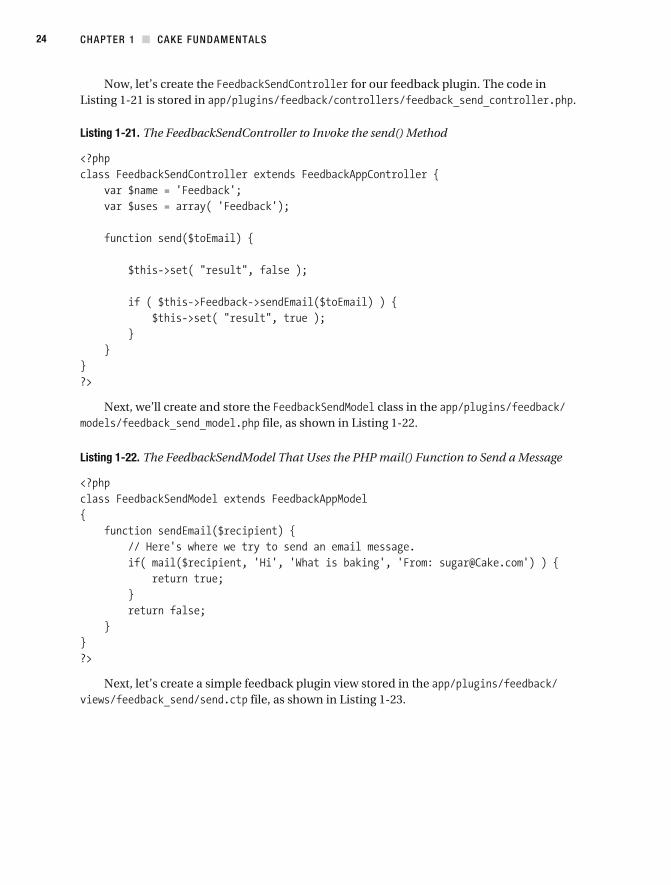
Now, let’s create the for our feedback plugin. The code in .
Listing 1-21. The FeedbackSendController to Invoke the send() Method
class in the
Listing 1-22. The FeedbackSendModel That Uses the PHP mail() Function to Send a Message
CHAPTER 1 CAKE FUNDAMENTALS 25
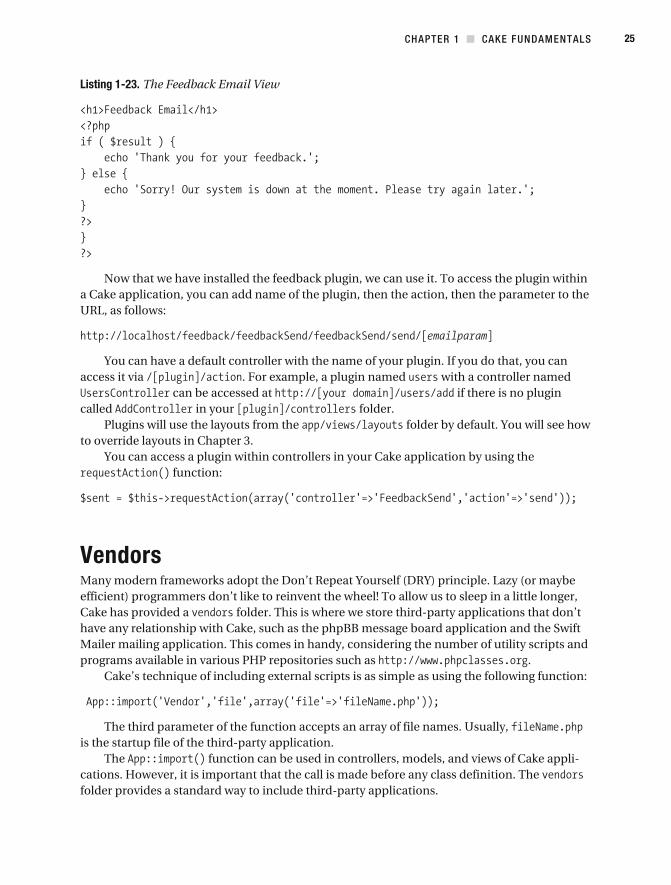
Listing 1-23. The Feedback Email View
Now that we have installed the feedback plugin, we can use it. To access the plugin within a Cake application, you can add name of the plugin, then the action, then the parameter to the
access it via with a controller named can be accessed at if there is no plugin
called in your folder.Plugins will use the layouts from the
to override layouts in Chapter 3.
function:
VendorsMany modern frameworks adopt the
Cake has provided a folder. This is where we store third- party applications that don’t
Mailer mailing application. This comes in handy, considering the number of utility scripts and programs available in various PHP repositories such as .
scripts is as simple as using the following function:
is the startup file of the third- party application.
The function can be used in controllers, models, and views of Cake appli-cations. However, it is important that the call is made before any class definition. The folder provides a standard way to include third- party applications.
CHAPTER 1 CAKE FUNDAMENTALS26
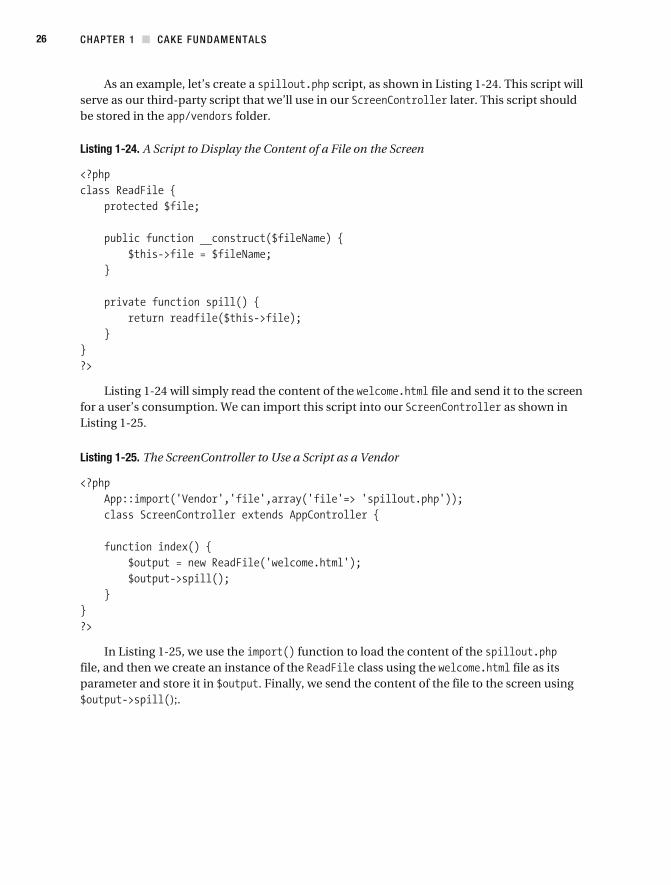
serve as our third- party script that we’ll use in our later. This script should be stored in the folder.
Listing 1-24. A Script to Display the Content of a File on the Screen
file and send it to the screen for a user’s consumption. We can import this script into our as shown in
Listing 1-25. The ScreenController to Use a Script as a Vendor
function to load the content of the file, and then we create an instance of the class using the file as its parameter and store it in . Finally, we send the content of the file to the screen using
CHAPTER 1 CAKE FUNDAMENTALS 27
Summary
the Cake MVC structure works, with business logic stored in controllers and components, data access in models, and presentational markup in the view. Additionally, we showed how Cake reduces development time with helpers, plugins, and vendors.
After reading this chapter, you should have an overview of how Cake structures a web -
one interested in PHP programming and with a need to write rapid web applications. But do note, sometimes it may be better to write basic methods like “Hello World” in a simple PHP script, rather than using Cake, so that you don’t end up killing an ant with a sledge hammer.
In the following chapters, we’ll present full- fledged Cake applications, beginning with a simple blogging application.

C H A P T E R 2
Blogging
The Web has revolutionized the way we communicate with friends and strangers. We now freely exchange media content, such as textual information, graphics, audio, and video. One of the ways to exchange such information is known as blogging. Blogging uses HTML forms for tasks such as submitting posts, uploading content, and so on.
In the 1990s, blogging started like a kiddie joke, with individuals posting their personal stuff online. Since then, there has been an explosion of blogging web sites. Nowadays, movie stars, politicians, and corporate organizations such as Microsoft host their own blogging sites to communicate their ideas.
This chapter describes how to build your own blogging application. But why would you bother to develop such an application when you can use one of the many free or low- cost solutions, such as Blogger, Movable Type, Textpattern, WordPress, TypePad, or LiveJournal (to name a few)?
The ready- made blogger solutions have common interface design features. Developing your own blogging application allows you to customize the site, giving it a unique look, exclud-ing unnecessary features, and adding features that are not supplied with the prebuilt sites.
In this chapter, we’ll build our own blog application, which will enable us to list, add, edit, delete, publish, and unpublish posts. We will use Cake’s form helper to automate some tasks, such as to generate form elements, validate user- submitted data, and repopulate invalid form elements with submitted data. We will insert the post data into an XML file to provide RSS service to those with an RSS reader (or aggregator).
To create this blog application, you need a web server that supports PHP and a database server to store some information. If you are new to the concepts and the workings of Cake, read Chapter 1 before continuing with this chapter.
Creating the DatabaseBuilding web sites that allow user interactivity sometimes requires working with persistent data, which can be stored in relational databases or local file systems. This requirement applies to building our blog application, as we need to manage the post records. As mentioned in the previous chapter, we’ll use the MySQL database server for the examples in this book. We’ll use Cake’s objects and their methods that allow us to store and retrieve data from a data-base. For information about how to configure Cake’s database connection parameters and connect to a database, see Chapter 1.
29
CHAPTER 2 BLOGGING30
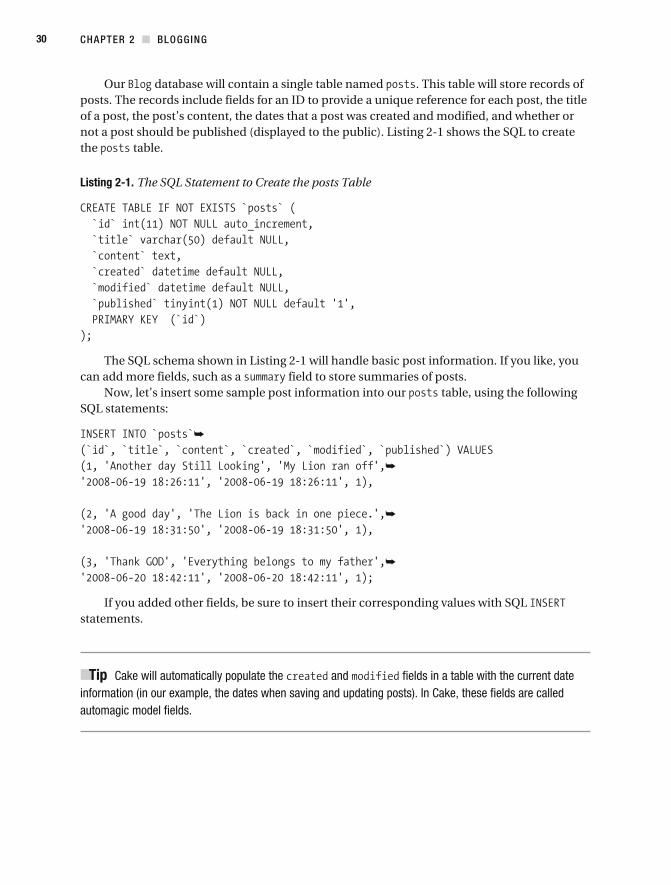
Our database will contain a single table named . This table will store records of posts. The records include fields for an ID to provide a unique reference for each post, the title of a post, the post’s content, the dates that a post was created and modified, and whether or not a post should be published (displayed to the public). Listing 2-1 shows the SQL to create the table.
Listing 2-1. The SQL Statement to Create the posts Table
The SQL schema shown in Listing 2-1 will handle basic post information. If you like, you can add more fields, such as a field to store summaries of posts.
Now, let’s insert some sample post information into our table, using the following SQL statements:
If you added other fields, be sure to insert their corresponding values with SQL statements.
Tip Cake will automatically populate the and fields in a table with the current date information (in our example, the dates when saving and updating posts). In Cake, these fields are called automagic model fields.
CHAPTER 2 BLOGGING 31
Reviewing the Application StructureBefore we start to build the blog application, let’s take a brief look at the folder structure and files that will form part of the application. Table 2-1 assumes that other default Cake folders and files also exist in the same environment.
Table 2-1. The Blog Application Structure
Directory Description
The parent folder for the blog application
Amended file to include our blog database parameters
file, which contains all the actions, such as add post
file to deal with our blog application data
, , , and files
We’ll create these files and explain their contents in upcoming sections. For details on Cake’s complete file system structure, refer to Chapter 1.
Creating the Post ModelThe object manages the post data. By using Cake’s naming convention, we’ll be able to take advantage of the functionality inherently provided by Cake. We’ll use that functionality to interact with the database table, and access and manipulate the post records. The model class, shown in Listing 2-2, is stored in .
Listing 2-2. The Post Object That Handles the Post Data (app/models/post.php)
CHAPTER 2 BLOGGING32
The model class consists of the property, used to handle PHP 4 backward- compatibility, and the array property, which contains the validation rules.
In the array, each element’s key corresponds to the name of the input element to be validated (for example, ), and its value defines the rules to apply against the input before the post data is saved to the table—when the post form is submitted. Listing 2-2 shows the validation rules. We check that the and the fields of the form are not empty when the form is submitted. We also check whether the values submitted are alpha-numeric. If not, the corresponding error messages set in the validation array against the
keys will be displayed.The object, which we will create next, will use the model object to
access information from the table, ensure the integrity of the submitted post informa-tion, and then commit the post into the database table.
Creating the Posts ControllerNow that the model class is created, we need a object to manage all the post actions. These actions include listing all the posts and providing the user interfaces for adding and editing post data. The controller calls the model object created in Listing 2-2 to handle the post data as required.
The class will contain the methods listed in Table 2-2.
Table 2-2. The PostsController Class Actions
Method Description
Lists all the posts from the table and handles the RSS feed for posts
Invokes the add post page and saves validated posts to the table
Invokes the edit post page
Disables a published post
Enables a disabled post so it’s published
Removes a post record from the table
Listing the PostsThe class, shown in Listing 2-3, extends the class. This file is stored in .
CHAPTER 2 BLOGGING 33
Listing 2-3. The PostsController to Define Post Actions (app/controllers/posts_controller.php)
First, we add the method, which displays the list of posts. By default, this method is called if no other action is called explicitly during a URL request. Along with showing all the published posts, the index page contains links that will enable users to perform operations such as edit, publish, unpublish, and delete a post record.
In Listing 2-3, the method contains two simple statements. The first uses the model object with its default method to pull all the posts from the database table and then store the results in an array called . The second prepares and sets the records so that the file, shown in Listing 2-4, can display the list of all the posts from the variable.
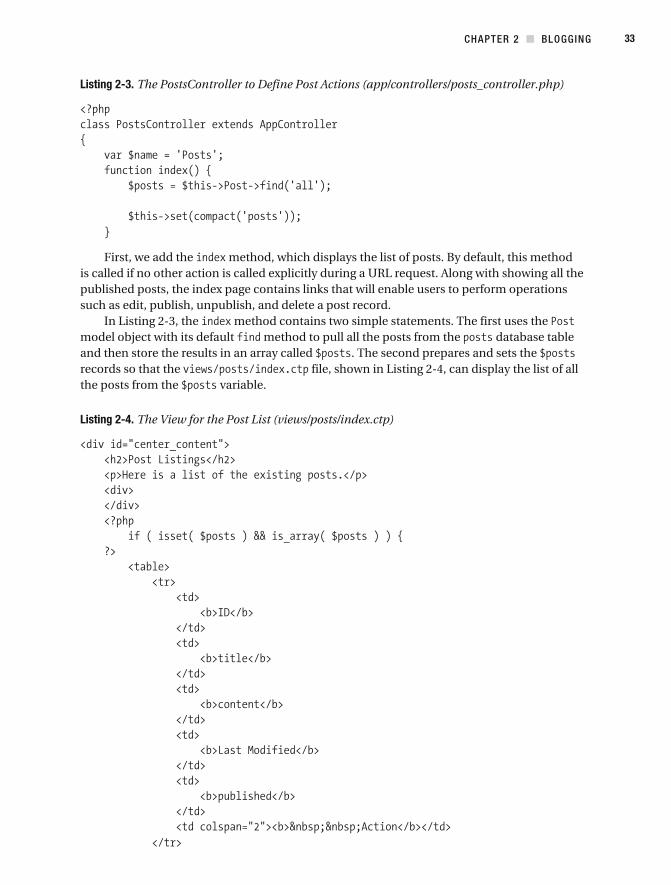
Listing 2-4. The View for the Post List (views/posts/index.ctp)
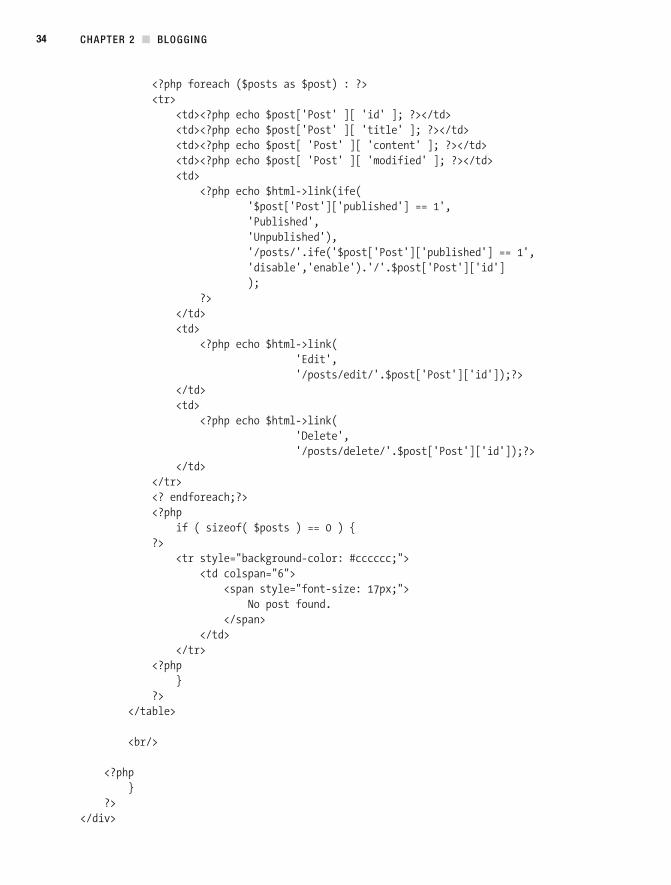
CHAPTER 2 BLOGGING34
CHAPTER 2 BLOGGING 35
The file in Listing 2-4 starts with the headings of the web page that displays the posts list. We then insert a section of PHP code immediately after these headings. If the
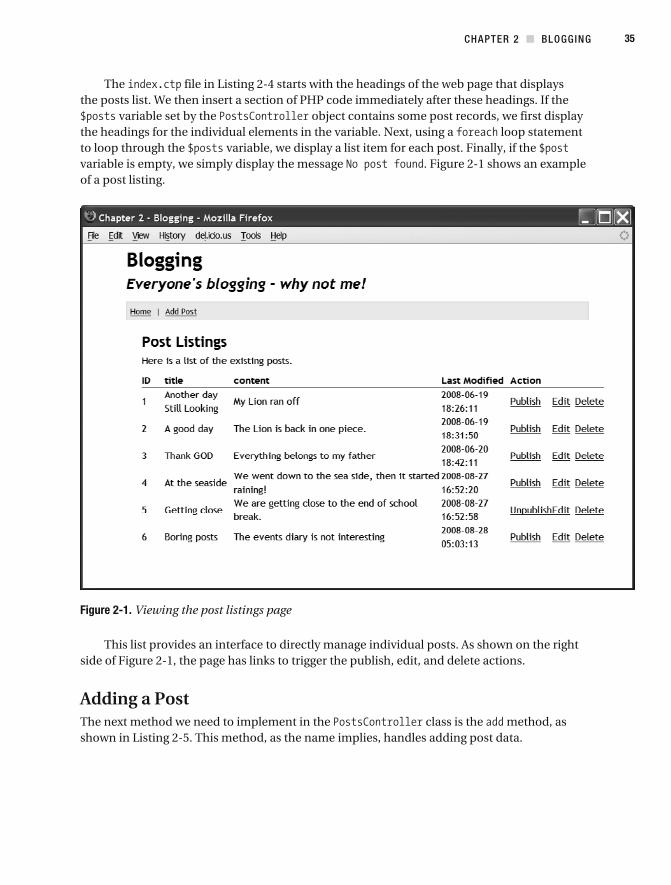
variable set by the object contains some post records, we first display the headings for the individual elements in the variable. Next, using a loop statement to loop through the variable, we display a list item for each post. Finally, if the variable is empty, we simply display the message . Figure 2-1 shows an example of a post listing.
Figure 2-1. Viewing the post listings page
This list provides an interface to directly manage individual posts. As shown on the right side of Figure 2-1, the page has links to trigger the publish, edit, and delete actions.
Adding a PostThe next method we need to implement in the class is the method, as shown in Listing 2-5. This method, as the name implies, handles adding post data.
CHAPTER 2 BLOGGING36
Listing 2-5. The add Method for Adding Post Data
In the method, the first two statements set the heading and slogan for the add view page. This is necessary because we are going to use a single element view to display the forms to add and edit posts. Elements in Cake enable you to reuse views.
Next, we check if the add post form has been submitted. If the form has not been sub-mitted, the add view is displayed. If the submitted data ta) is not empty, using the method of the model object, the application will attempt to create a new post record. The method automatically uses the validation rules defined in Listing 2-2 to check the integrity of the submitted post. If the post does not pass the validation rules, the error message is set, using the method of the object. Otherwise, the post is saved to the database table, and the success message is set for display in the view.
Next, we’ll create the add view and store the codes in file. The con-tent of the file is simply the following code snippet:
The method accepts the name of a file stored in the folder ( in this case), without the file extension (without ). It simply transfers the content of into the file. The resulting source code for the add view is shown in Listing 2-6.
CHAPTER 2 BLOGGING 37
Listing 2-6. The Add View That Provides an Interface to Add a Post (app/views/posts/add.ctp)
In Listing 2-6, we start by displaying the heading of the interface for adding a post. We then insert a PHP opening code tag to house the creation of the form using Cake’s form helper functionality. First, the method defines the start tag for our form. Its string argument represents the action that will be invoked, such as the URL to which the form data will be submitted. Note that if the method attribute is not specified, the method is the default request method.
Next, we start to add the required form input elements using the method, which deals with the error handling of the form. Its argument, , is a string that rep-resents the name of the input element, where is the model name, followed by a dot (.), and holds the value of the post’s title.
Next is the method to generate the text input element called , whose first argument is in the same argument format as the error input element. The second argu-ment of the text input element is an associative array of HTML text input element attributes.
Following that is the code that generates the input element called using an argument format similar to the input element discussed previously.
Finally, after we’ve added the form elements, we can add the form closing tag using the form helper method (). It also accepts an associative array of HTML submit input element attributes.
Figure 2-2 shows an example of an add post form when a user tries to submit a blank form. The error messages are displayed.
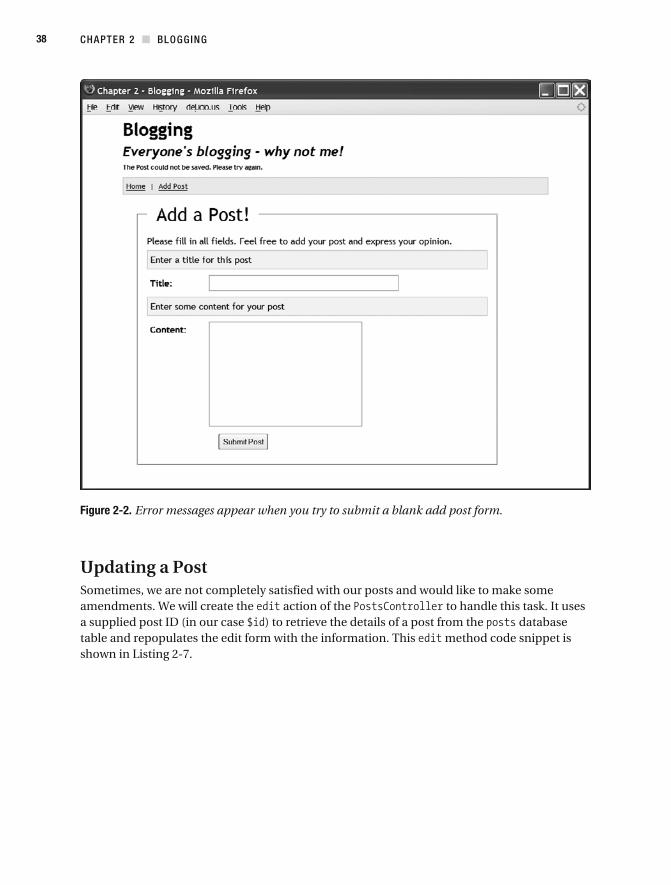
CHAPTER 2 BLOGGING38
Figure 2-2. Error messages appear when you try to submit a blank add post form.
Updating a PostSometimes, we are not completely satisfied with our posts and would like to make some amendments. We will create the action of the to handle this task. It uses a supplied post ID (in our case ) to retrieve the details of a post from the database table and repopulates the edit form with the information. This method code snippet is shown in Listing 2-7.
CHAPTER 2 BLOGGING 39
Listing 2-7. The edit Action That Handles a Post Edit Request
In Listing 2-7, we first set the heading and slogan for the edit view page. The next step we take is to check whether and (form data) are empty. If so, an error message is stored in our object, and the request is redirected to the blog home page. If the sub-mitted form data is not empty, Cake will try to commit the edited post information to the database table and then flash appropriate messages upon success or failure. Finally, if only the submitted data is empty, a post’s information is pulled with the model method using the supplied as the criterion.
Next, we’ll create the edit view and store the codes in the file. The content of this file is exactly the same as that of the file:
Here, we’ve reused the element file again to produce the source code for the edit post view, taking advantage of the elements resource of Cake. In principle, the views for adding and editing posts are the same, except for their page headings.
Figure 2-3 shows an example of the edit view for post ID 1.
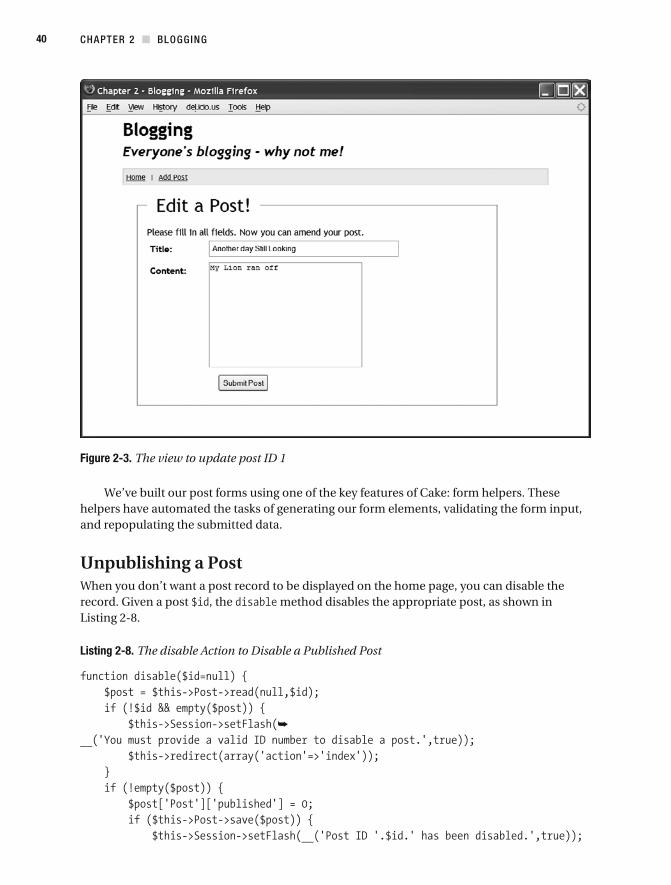
CHAPTER 2 BLOGGING40
Figure 2-3. The view to update post ID 1
We’ve built our post forms using one of the key features of Cake: form helpers. These helpers have automated the tasks of generating our form elements, validating the form input, and repopulating the submitted data.
Unpublishing a PostWhen you don’t want a post record to be displayed on the home page, you can disable the record. Given a post , the method disables the appropriate post, as shown in Listing 2-8.
Listing 2-8. The disable Action to Disable a Published Post
CHAPTER 2 BLOGGING 41
In Listing 2-8, using the request , a post record is retrieved from the database table and stored in the array variable. If the value is null or the variable is empty, we use the object to set the appropriate message and redirect to the blog home page. If there is a valid and the is not empty, we set the post published element to and update the database table. Finally, the object sets the appropriate message, and then we redirect to the blog home page.
Publishing a PostThe method does the opposite of the method. It uses the supplied post ID ( ) to determine which post record to enable, as shown in Listing 2-9.
Listing 2-9. The enable Action to Enable (Publish) a Disabled Post
In Listing 2-9, the method contains the same code sections as that of the method in Listing 2-8. The difference is in the method, the statement
is set to .
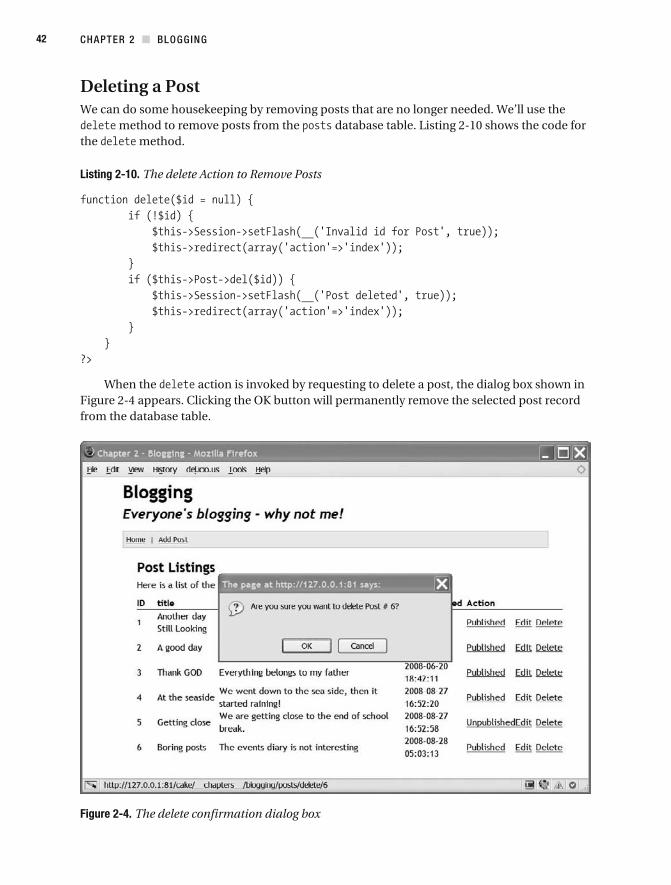
CHAPTER 2 BLOGGING42
Deleting a PostWe can do some housekeeping by removing posts that are no longer needed. We’ll use the
method to remove posts from the database table. Listing 2-10 shows the code for the method.
Listing 2-10. The delete Action to Remove Posts
When the action is invoked by requesting to delete a post, the dialog box shown in Figure 2-4 appears. Clicking the OK button will permanently remove the selected post record from the database table.
Figure 2-4. The delete confirmation dialog box

CHAPTER 2 BLOGGING 43
Creating an RSS FeedSince we’ve decided to share our posts with the rest of the world, we can reduce the stress on our blog database by creating an RSS feed—a static XML file that will be updated whenever the posts change.
RSS is an abbreviation for Really Simple Syndication. It is an XML web content syndica-tion format that can be read by using news reader software (or through some online sites and scripts). For the blog application, using an RSS feed means that people can get updated infor-mation about your blog without needing to visit your blogging web site. Scripts such as robots can fetch your RSS feed so that your users can be kept informed of changes to your posts.
Essentially, what we’ll create is an XML file of the information stored in the database table. Remember that our code will be writing to a static file stored somewhere on your web site, so it is important to ensure read- write privileges for the document.
You can generate an RSS feed in several ways, such as with the Document Object Model (DOM), XMLWriter, SimpleXML, and so on. However, Cake provides a helper to handle RSS feeds, so you don’t need to worry about how to micromanage them. The RSS helper creates standards- compliant RSS feeds. You invoke its functionality with
.For the RSS feed for our blog application, we first need to include the following in our
file:
This informs the router to parse out file extensions from the URL. For example, would yield a file extension of . It is used by com-
ponents to automatically switch to alternative layouts and templates in order to load the with content.
Caution Don’t forget to add to your file and also ensure that you add to your ’s variable. Things will not go well if the two instructions are not added. However, if you already have , just add the string argument. accepts many arguments.
Now we need to perform the following tasks:
RSS feed.
The first task requires that we tweak the method in the class by adding extra lines of code to it. In this case, we will add the channel array data and then fetch the ten most recent post records for public consumption. The content of our new method is shown in Listing 2-11.
CHAPTER 2 BLOGGING44
Listing 2-11. The New index Method of the PostsController Modified for RSS
In Listing 2-11, the channel and posts information are set for the views and layouts, which we’ll create next.
The layout file, , will contain the following code snippet:
Since Cake allows views to pass variables to the layout, we’ve set the variable in the layout, instead of following the normal convention of setting variables in a controller.
Next, we will create the RSS view in . This file will contain a function called , which accepts the (for example, post data) as an argu-ment, and as its name implies, returns a transformed array version of the post data. Listing 2-12 shows the content of the RSS view file.
Listing 2-12. The Content of the RSS View (app/views/posts/rss/index.ctp)
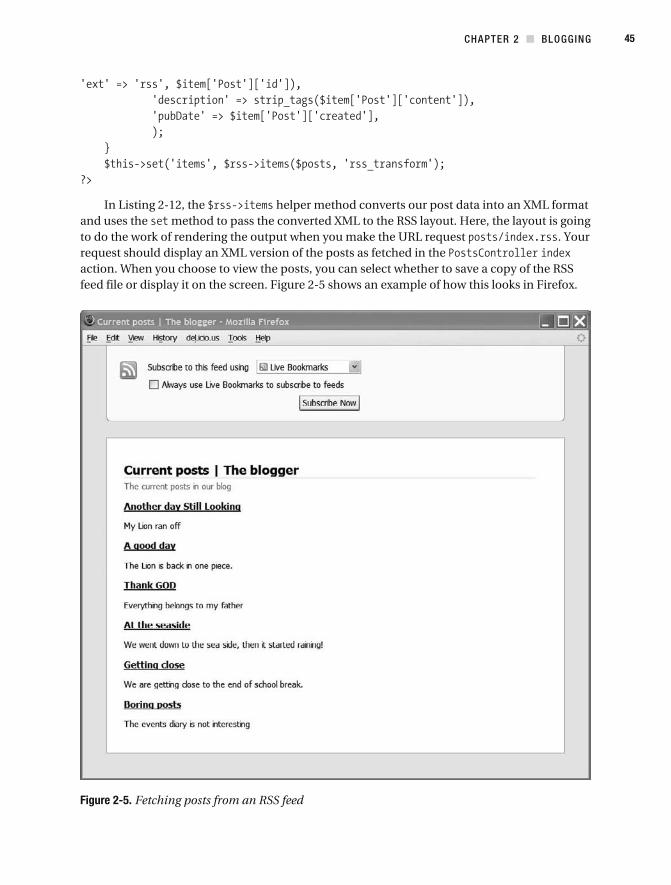
CHAPTER 2 BLOGGING 45
In Listing 2-12, the helper method converts our post data into an XML format and uses the method to pass the converted XML to the RSS layout. Here, the layout is going to do the work of rendering the output when you make the URL request . Your request should display an XML version of the posts as fetched in the action. When you choose to view the posts, you can select whether to save a copy of the RSS feed file or display it on the screen. Figure 2-5 shows an example of how this looks in Firefox.
Figure 2-5. Fetching posts from an RSS feed
CHAPTER 2 BLOGGING46
SummaryThis chapter described how to build a blogging application using Cake. We first created a database table and populated it with some sample posts. We took advantage of Cake’s components by creating our posts controller and model classes to perform the necessary tasks: list, add, edit, delete, save, enable, disable, and access data. The corresponding action views were created using the object methods. Finally, we created an RSS feed, with the help of the RSS helper, to present some of our posts to the public.
The modularity of the blogging application allows it to be extended by adding more actions to the controller class. For example, you could add an action to upload images.
C H A P T E R 3
E-Commerce
The buzzword e- commerce, short for electronic commerce, simply refers to the processing and recording of online transactions. To boast a competitive edge and increase profit, busi-nesses and individuals that peddle services or products must not just have a web presence but also endeavor to sell their merchandise online. There are numerous e- commerce applica-tions based on the PHP scripting language, such as the free, open source osCommerce and Magento. Here, we’re going to implement an online shop using the Cake framework.
First, we’ll design a skeletal look and feel for our shop, and then we’ll create our shop database in MySQL. Next, we’ll populate the database with some category and product infor-mation. We’ll then use Cake features to allow users to select categories and products, add selected products to their shopping cart, click to check out, and, finally, make payments using the popular Google Checkout or PayPal payment system.
This chapter assumes that you’re familiar with PHP, MySQL, and Cake. It also assumes that you have set up a development environment that supports these technologies.
The Online Shop LayoutA typical online shop layout is divided into five sections (elements). We’ll follow that design and use the Cake view elements listed in Table 3-1. We’ll use Cake’s features to help us develop these elements of our shop application before stitching them together into the standard layout.
Table 3-1. View Elements of Online Shop Layout
Division Name Description
[Header] Contains header information, such as the logo and banner
[Left Column] Displays an expandable category level, sublevel, and product lists
[Center Column] The main content area of the web site; what it contains depends on the visitor action, so it might show a product description, best- selling products, and so on
[Right Column] Contains the mini- basket or other elements
[Footer] Displays summary information about a shop, such as the copyright, contact information, shortcut links, and so on
47
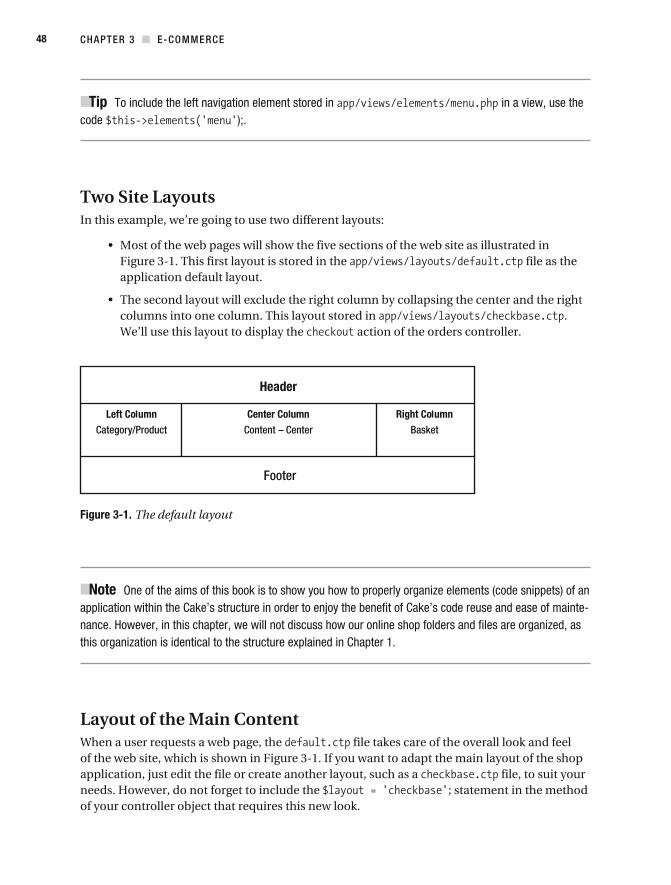
CHAPTER 3 E-COMMERCE48
Tip To include the left navigation element stored in in a view, use the code );.
Two Site LayoutsIn this example, we’re going to use two different layouts:
Figure 3-1. This first layout is stored in the file as the application default layout.
columns into one column. This layout stored in . We’ll use this layout to display the action of the orders controller.
Figure 3-1. The default layout
Note One of the aims of this book is to show you how to properly organize elements (code snippets) of an application within the Cake’s structure in order to enjoy the benefit of Cake’s code reuse and ease of mainte-nance. However, in this chapter, we will not discuss how our online shop folders and files are organized, as this organization is identical to the structure explained in Chapter 1.
Layout of the Main ContentWhen a user requests a web page, the file takes care of the overall look and feel of the web site, which is shown in Figure 3-1. If you want to adapt the main layout of the shop application, just edit the file or create another layout, such as a file, to suit your needs. However, do not forget to include the ; statement in the method of your controller object that requires this new look.
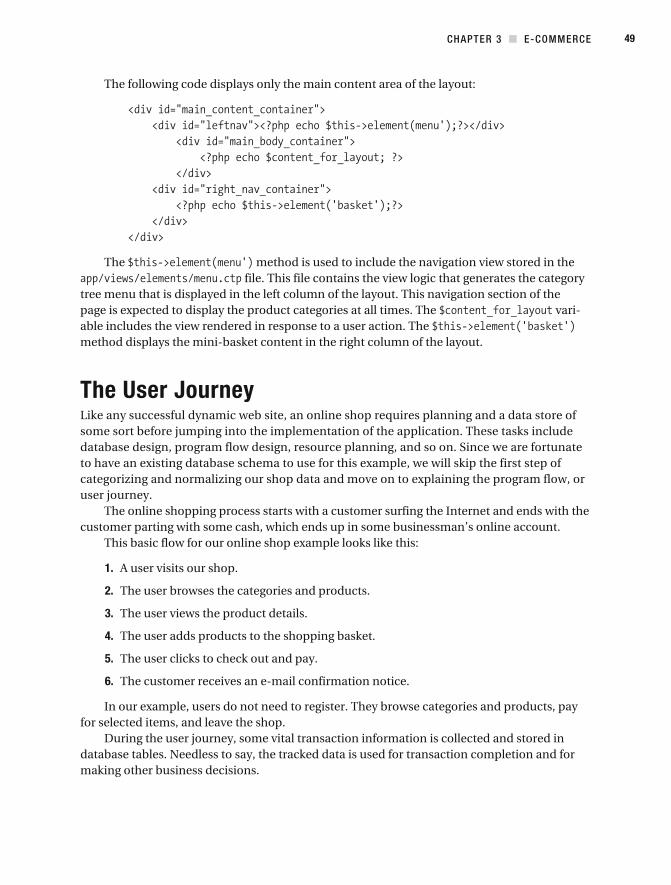
CHAPTER 3 E-COMMERCE 49
The following code displays only the main content area of the layout:
The method is used to include the navigation view stored in the file. This file contains the view logic that generates the category
tree menu that is displayed in the left column of the layout. This navigation section of the page is expected to display the product categories at all times. The vari-able includes the view rendered in response to a user action. The method displays the mini- basket content in the right column of the layout.
The User JourneyLike any successful dynamic web site, an online shop requires planning and a data store of some sort before jumping into the implementation of the application. These tasks include database design, program flow design, resource planning, and so on. Since we are fortunate to have an existing database schema to use for this example, we will skip the first step of categorizing and normalizing our shop data and move on to explaining the program flow, or user journey.
The online shopping process starts with a customer surfing the Internet and ends with the customer parting with some cash, which ends up in some businessman’s online account.
This basic flow for our online shop example looks like this:
1. A user visits our shop.
2. The user browses the categories and products.
3. The user views the product details.
4. The user adds products to the shopping basket.
5. The user clicks to check out and pay.
6. The customer receives an e-mail confirmation notice.
In our example, users do not need to register. They browse categories and products, pay for selected items, and leave the shop.
During the user journey, some vital transaction information is collected and stored in database tables. Needless to say, the tracked data is used for transaction completion and for making other business decisions.
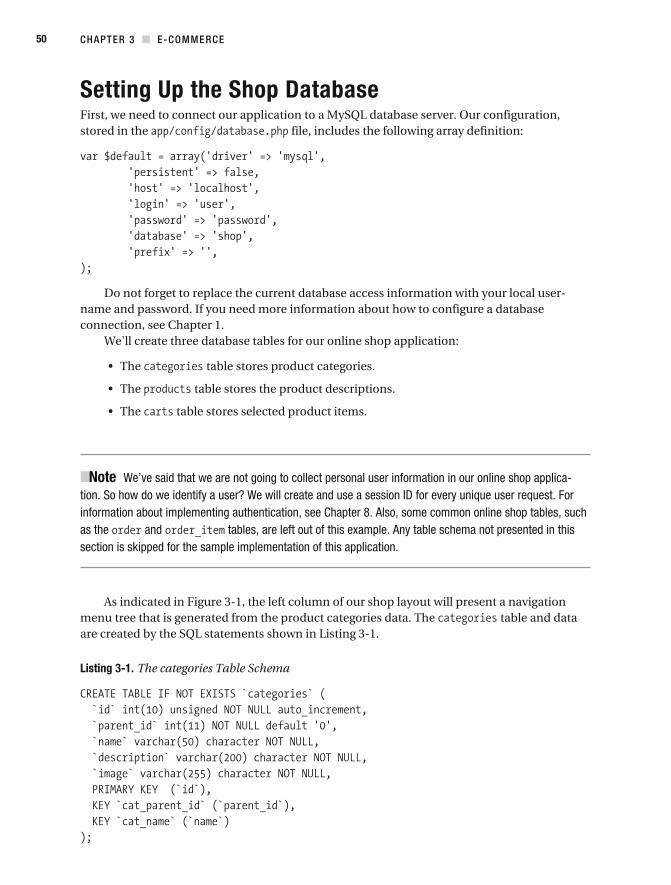
CHAPTER 3 E-COMMERCE50
Setting Up the Shop DatabaseFirst, we need to connect our application to a MySQL database server. Our configuration, stored in the file, includes the following array definition:
Do not forget to replace the current database access information with your local user-name and password. If you need more information about how to configure a database connection, see Chapter 1.
We'll create three database tables for our online shop application:
table stores product categories.
table stores the product descriptions.
table stores selected product items.
Note We’ve said that we are not going to collect personal user information in our online shop applica-tion. So how do we identify a user? We will create and use a session ID for every unique user request. For information about implementing authentication, see Chapter 8. Also, some common online shop tables, such as the and tables, are left out of this example. Any table schema not presented in this section is skipped for the sample implementation of this application.
As indicated in Figure 3-1, the left column of our shop layout will present a navigation menu tree that is generated from the product categories data. The table and data are created by the SQL statements shown in Listing 3-1.
Listing 3-1. The categories Table Schema
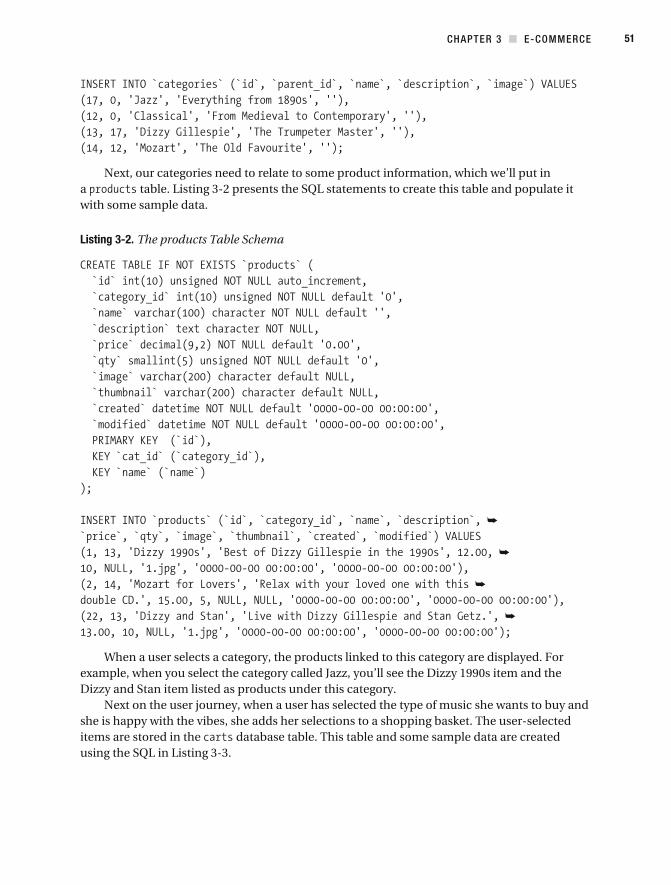
CHAPTER 3 E-COMMERCE 51
Next, our categories need to relate to some product information, which we’ll put in a table. Listing 3-2 presents the SQL statements to create this table and populate it with some sample data.
Listing 3-2. The products Table Schema
When a user selects a category, the products linked to this category are displayed. For example, when you select the category called Jazz, you’ll see the Dizzy 1990s item and the Dizzy and Stan item listed as products under this category.
Next on the user journey, when a user has selected the type of music she wants to buy and she is happy with the vibes, she adds her selections to a shopping basket. The user- selected items are stored in the database table. This table and some sample data are created using the SQL in Listing 3-3.
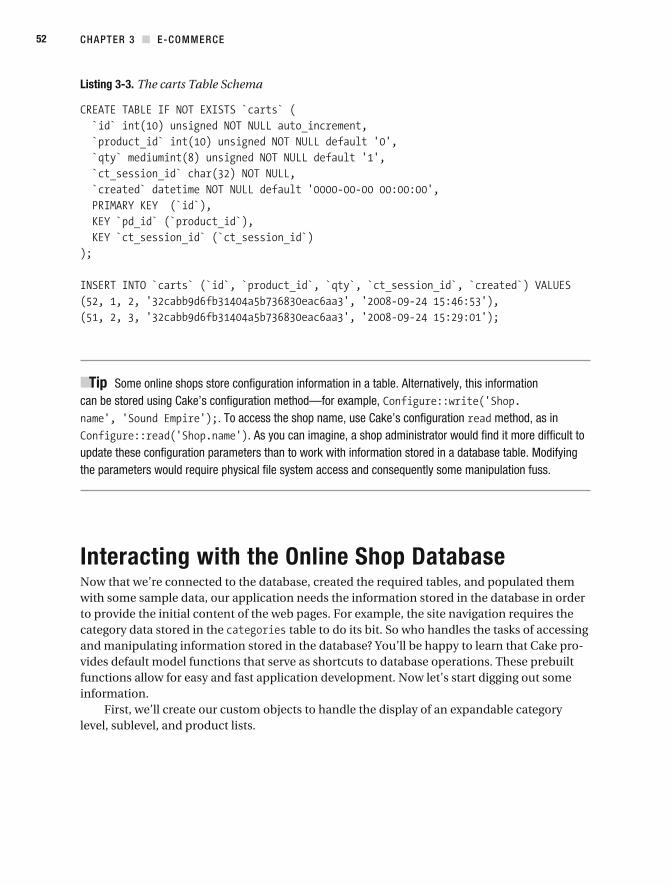
CHAPTER 3 E-COMMERCE52
Listing 3-3. The carts Table Schema
Tip Some online shops store configuration information in a table. Alternatively, this information can be stored using Cake’s configuration method—for example,
. To access the shop name, use Cake’s configuration method, as in . As you can imagine, a shop administrator would find it more difficult to
update these configuration parameters than to work with information stored in a database table. Modifying the parameters would require physical file system access and consequently some manipulation fuss.
Interacting with the Online Shop DatabaseNow that we’re connected to the database, created the required tables, and populated them with some sample data, our application needs the information stored in the database in order to provide the initial content of the web pages. For example, the site navigation requires the category data stored in the table to do its bit. So who handles the tasks of accessing and manipulating information stored in the database? You’ll be happy to learn that Cake pro-vides default model functions that serve as shortcuts to database operations. These prebuilt functions allow for easy and fast application development. Now let’s start digging out some information.
First, we’ll create our custom objects to handle the display of an expandable category level, sublevel, and product lists.
CHAPTER 3 E-COMMERCE 53
The Category ModelLet’s create the model class to interact with the table data created in Listing 3-1. The beginning of this model is shown in Listing 3-4.
Listing 3-4. The Beginning of the Category Model (app/models/category.php)
In this model, we have two important properties:
property will serve as a reference to this model object within the controllers of this application when needed.
simply defines the relationship between the table and the table. In this case, we define that a
record can relate to many records. In our application, the category is associated with the products and (see Listings 3-1 and 3-2). This property is required to ensure an association between the and
model objects.
Now that the model class is attached to our table data and it has established a relationship with the table data, we can create some custom methods in the model class to interact with the and tables. These custom methods will internally use Cake’s default properties and methods, such as the method for data-base create, read, update, and delete (CRUD) operations.
The model class will contain three methods to provide information in the final format needed to generate the products category navigation: , , and .
The first method, , returns the entire category list. This method is shown in Listing 3-5.
Listing 3-5. The Category Model’s getCategories() Method
The method in Listing 3-5 is employed whenever we require the list of all the product categories from the table, in ascending order of the category IDs. We’ve provided some parameters, and , so that it’s possible to use this function in more than one way elsewhere in the application.
Next in this model class is the method, which returns the currently selected category and its children categories. This method is shown in Listing 3-6.
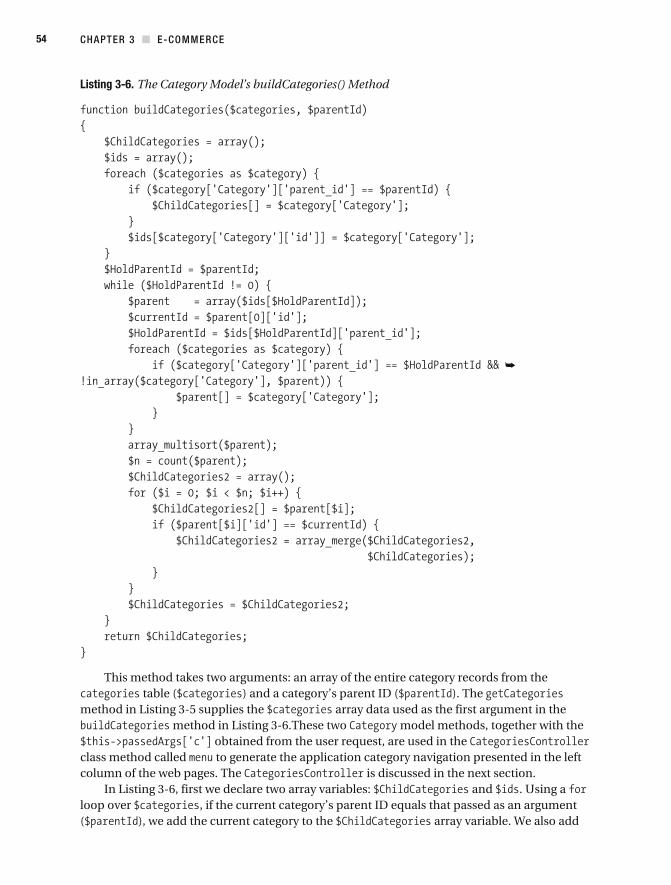
CHAPTER 3 E-COMMERCE54
Listing 3-6. The Category Model’s buildCategories() Method
This method takes two arguments: an array of the entire category records from the table ( ) and a category’s parent ID ( ). The
method in Listing 3-5 supplies the array data used as the first argument in the method in Listing 3-6.These two model methods, together with the
obtained from the user request, are used in the class method called to generate the application category navigation presented in the left column of the web pages. The is discussed in the next section.
In Listing 3-6, first we declare two array variables: and . Using a loop over , if the current category’s parent ID equals that passed as an argument ( ), we add the current category to the array variable. We also add

CHAPTER 3 E-COMMERCE 55
the current category to the array, making sure that the array key is the category ID of the current category. This is followed by a loop to create a parent category and append children categories appropriately. Finally, the function formats and returns the current cat-egory list, which includes only the currently selected category and its children. This function is made so it can also handle deep category levels (more than two levels).
Next, we create the method, as shown in Listing 3-7. This method returns a list of the entire category IDs that belong to the children of a specified category.
Listing 3-7. The Category Model’s getChildCategories() Method
The arguments supplied to the method contain the following infor-mation, in the order presented here:
: All the category lists stored in the table.
: A category ID that requires its children category IDs.
: Whether it should include all levels deep of children categories in the oper-ation. Its default value is the Boolean .
Next in this method we use an statement to check for a valid category list, if the method is not supplied with a valid category argument. This means that if
there is no category information from the table stored in the array, we use the method to generate the entire category list and assign the result to the
variable.Next, we count the number of elements in the array and assign the result to
the variable. We then declare an array variable called , which will contain a list of the children category IDs.
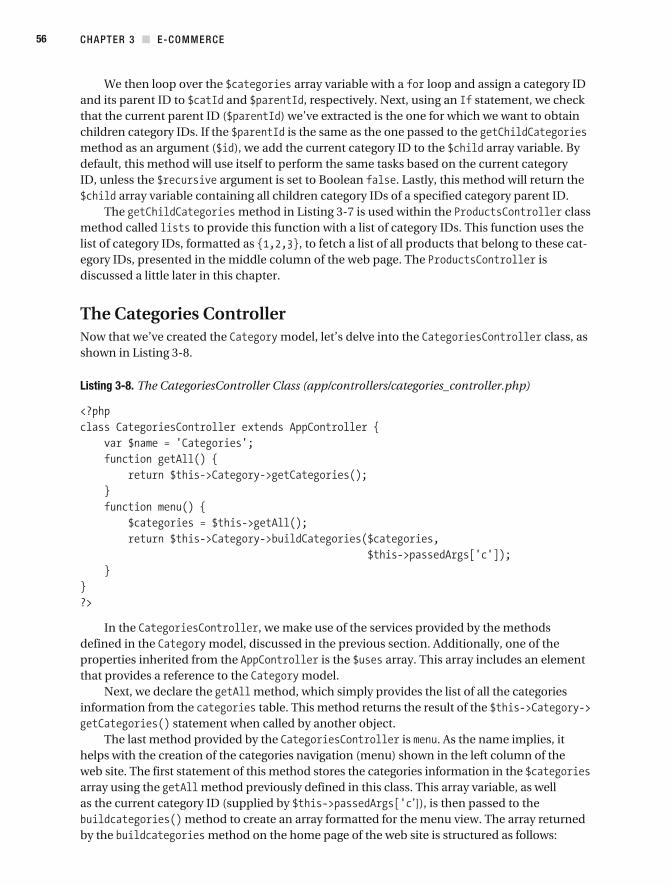
CHAPTER 3 E-COMMERCE56
We then loop over the array variable with a loop and assign a category ID and its parent ID to and , respectively. Next, using an statement, we check that the current parent ID ( ) we’ve extracted is the one for which we want to obtain children category IDs. If the is the same as the one passed to the method as an argument ( ), we add the current category ID to the array variable. By default, this method will use itself to perform the same tasks based on the current category ID, unless the argument is set to Boolean . Lastly, this method will return the
array variable containing all children category IDs of a specified category parent ID.The method in Listing 3-7 is used within the class
method called to provide this function with a list of category IDs. This function uses the list of category IDs, formatted as , to fetch a list of all products that belong to these cat-egory IDs, presented in the middle column of the web page. The is discussed a little later in this chapter.
The Categories ControllerNow that we’ve created the model, let’s delve into the class, as shown in Listing 3-8.
Listing 3-8. The CategoriesController Class (app/controllers/categories_controller.php)
In the , we make use of the services provided by the methods defined in the model, discussed in the previous section. Additionally, one of the properties inherited from the is the array. This array includes an element that provides a reference to the model.
Next, we declare the method, which simply provides the list of all the categories information from the table. This method returns the result of the
statement when called by another object.The last method provided by the is . As the name implies, it
helps with the creation of the categories navigation (menu) shown in the left column of the web site. The first statement of this method stores the categories information in the array using the method previously defined in this class. This array variable, as well as the current category ID (supplied by ’]), is then passed to the
method to create an array formatted for the menu view. The array returned by the method on the home page of the web site is structured as follows:
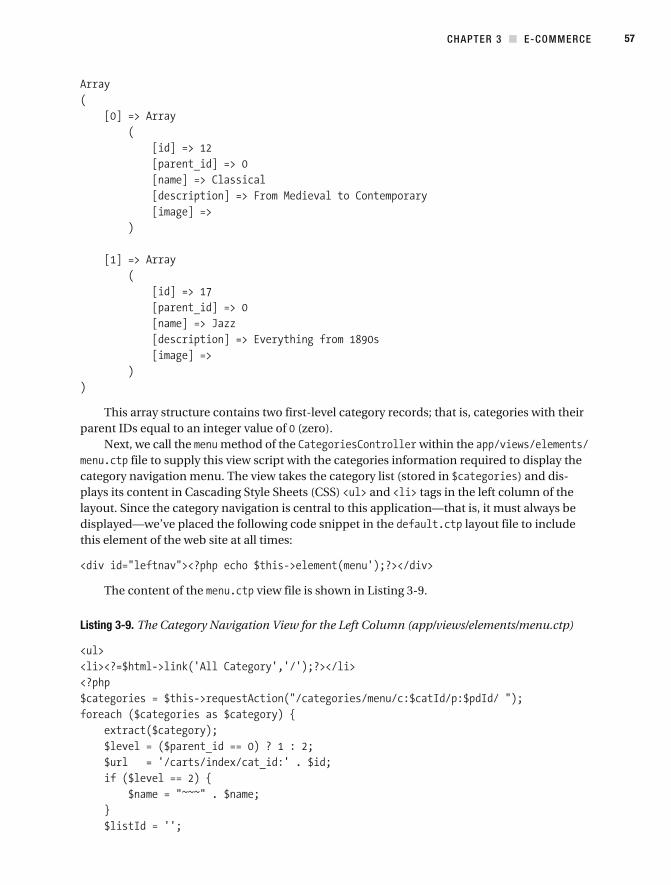
CHAPTER 3 E-COMMERCE 57
This array structure contains two first- level category records; that is, categories with their parent IDs equal to an integer value of (zero).
Next, we call the method of the within the file to supply this view script with the categories information required to display the
category navigation menu. The view takes the category list (stored in ) and dis-plays its content in Cascading Style Sheets (CSS) and tags in the left column of the layout. Since the category navigation is central to this application—that is, it must always be displayed—we’ve placed the following code snippet in the layout file to include this element of the web site at all times:
The content of the view file is shown in Listing 3-9.
Listing 3-9. The Category Navigation View for the Left Column (app/views/elements/menu.ctp)
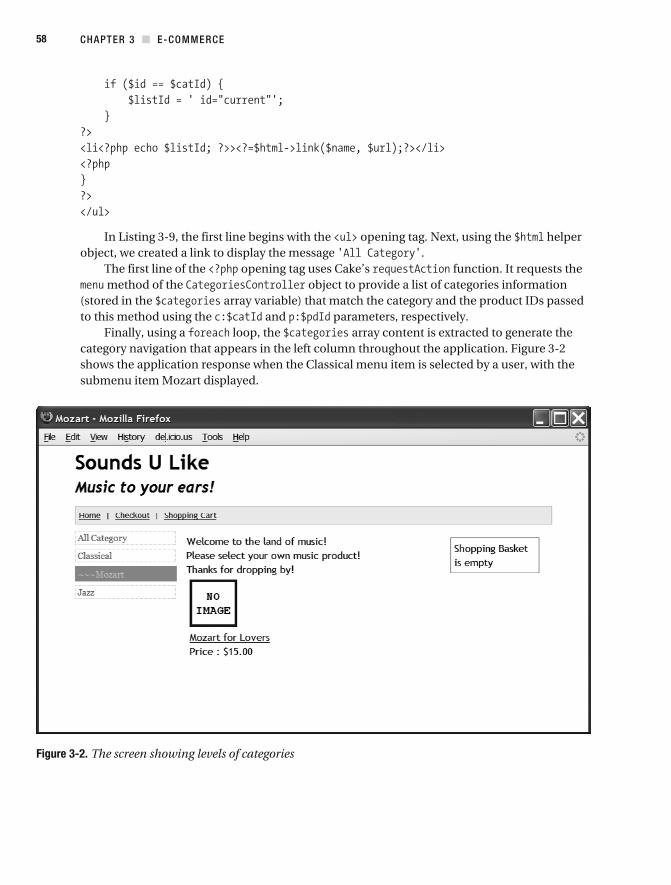
CHAPTER 3 E-COMMERCE58
In Listing 3-9, the first line begins with the opening tag. Next, using the helper object, we created a link to display the message .
The first line of the opening tag uses Cake’s function. It requests the method of the object to provide a list of categories information
(stored in the array variable) that match the category and the product IDs passed to this method using the and parameters, respectively.
Finally, using a loop, the array content is extracted to generate the category navigation that appears in the left column throughout the application. Figure 3-2 shows the application response when the Classical menu item is selected by a user, with the submenu item Mozart displayed.
Figure 3-2. The screen showing levels of categories
CHAPTER 3 E-COMMERCE 59
The Product ModelOur next task is to implement the model class, which as the name suggests, provides product information from the table. We will begin with the class properties, as shown in Listing 3-10.
Listing 3-10. The Beginning of the Product Model (app/models/product.php)
In the property, the array variable tells the application that a product record belongs to a category. (The property works as described in the earlier discussion of the model.)
Next is the method, shown in Listing 3-11. This method provides all the product records based on one or more category IDs in the ascending order of product category ID.
Listing 3-11. The Product Model’s lists() Method
The Products ControllerNow that we’ve created the model class, we need an object to provide some data and services to other objects in our shop application. The class, shown in Listing 3-12, defines the and methods to provide these services when called by other objects or scripts within the application.
Listing 3-12. The ProductsController Class (app/controllers/products_controller.php)
CHAPTER 3 E-COMMERCE60
The method in Listing 3-12 returns a list of products based on one or more category IDs. The first statement in this method retrieves all the categories information and stores the result in the array. This array is then used as the first argument of the
method of the model to provide a filtered set of category information, stored in the array variable. The second argument, ], of this method determines the family of category information that is required.
Next is the method, which accepts the newly created array as the first argument, the current category ID (stored in ’]), and a Boolean . We talked about this method earlier in the discussion of the model class ( Listing 3-7). Here, this method returns the list of all children category IDs that belong to the category ID supplied as second argument of the method. Next, using the PHP function, the current category ID and that of the children are merged together and stored in the array variable.
Finally, the variable is passed to the method of the model, which returns a list of all products that belong to the category IDs available in the variable. The method of the is called or triggered when a user clicks a category. This method is called in the view file, which is shown in Listing 3-13.
Listing 3-13. The Product List View for the Center Column (app/views/elements/products.ctp)
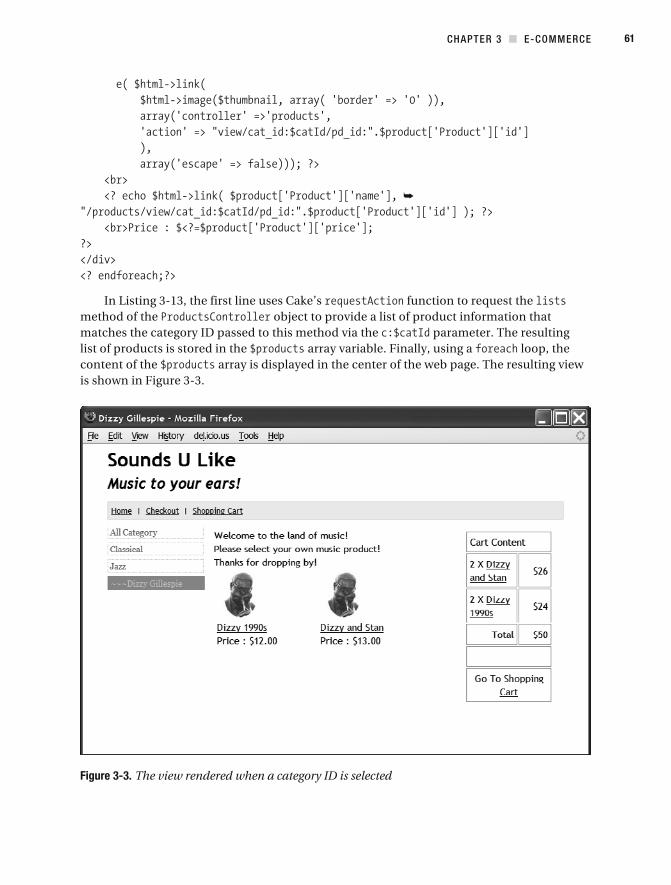
CHAPTER 3 E-COMMERCE 61
In Listing 3-13, the first line uses Cake’s function to request the method of the object to provide a list of product information that matches the category ID passed to this method via the parameter. The resulting list of products is stored in the array variable. Finally, using a loop, the content of the array is displayed in the center of the web page. The resulting view is shown in Figure 3-3.
Figure 3-3. The view rendered when a category ID is selected
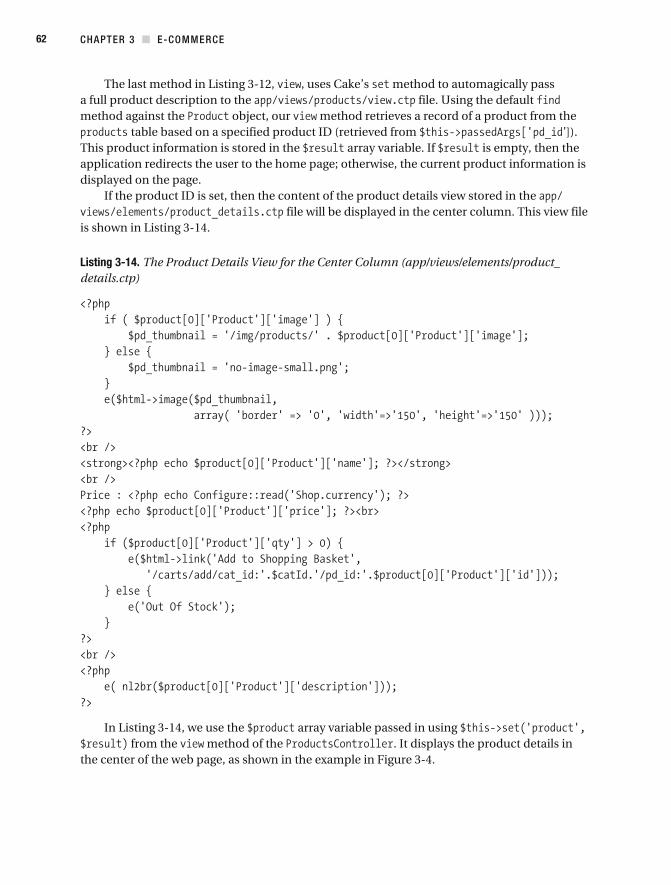
CHAPTER 3 E-COMMERCE62
The last method in Listing 3-12, , uses Cake’s method to automagically pass a full product description to the file. Using the default method against the object, our method retrieves a record of a product from the
table based on a specified product ID (retrieved from ’]). This product information is stored in the array variable. If is empty, then the application redirects the user to the home page; otherwise, the current product information is displayed on the page.
If the product ID is set, then the content of the product details view stored in the file will be displayed in the center column. This view file
is shown in Listing 3-14.
Listing 3-14. The Product Details View for the Center Column (app/views/elements/product_details.ctp)
In Listing 3-14, we use the array variable passed in using from the method of the . It displays the product details in
the center of the web page, as shown in the example in Figure 3-4.
CHAPTER 3 E-COMMERCE 63
The and other controllers employ the services of the and models. Reference to these models is available in the class, as dis-
cussed a little later in the chapter.
Figure 3-4. The index view rendered when a product is selected
The Cart ModelNext, we’ll implement the model class. Along with supplying the content of the shopping cart to the application, the model provides functionalities to manipulate the cart, as well as the checkout section of the application. We will begin with the class properties, shown in Listing 3-15.
Listing 3-15. The Beginning of the Cart Model (app/models/cart.php)
The class starts with the class definition, as usual, and then establishes its relation-ship with the model object using . This simply states that a cart can contain one or more products.
CHAPTER 3 E-COMMERCE64
We’ll create the following methods in the model:
The method supplies all the information stored in the table. This method is shown in Listing 3-16.
Listing 3-16. The Cart Model’s getCart() Method
The method takes two arguments: (product ID) and (session ID). These are used in Cake’s method to filter the provided table records. The product ID is extracted from a user’s URL request. The session ID is obtained from Cake’s object. These variables are extracted in the method of the object, as you will see later in this chapter.
Next is the method, which checks whether there is at least one record in the table. This method is shown in Listing 3-17.
Listing 3-17. The Cart Model’s isCartEmpty() Method
The method accepts (session ID) as its argument and uses the method to check whether the session ID exists in the table. If this session ID exists in the table, is returned; otherwise, is returned, and the message “Shopping Basket is empty” is displayed. The status of the basket section, on the right side of the web site, depends on the value returned by this method.
CHAPTER 3 E-COMMERCE 65
Next, we need the function to add a product to the table, , as shown in Listing 3-18.
Listing 3-18. The Cart Model’s addCart() Method
The method takes a product ID and the session ID as its arguments. Here, we use Cake’s model method to add the product ID, quantity, and session ID. We do not need to fill in the cart table’s field (see Listing 3-3), as this is one of Cake’s magic fields and will be filled in automatically by the model when the method is called.
Now we need a function to update the quantity of a product in the table. This is the , as shown in Listing 3-19.
Listing 3-19. The Cart Model’s updateCart() Method
This is triggered when a user clicks the Add to Shopping Basket link on the product description page. If the displayed product ID and session ID match that of the argument, the record quantity is incremented by one.
Next, we include a function to remove old cart records, . Sometimes customers add products to the shopping basket, but don’t bother to either complete the transaction or empty the basket. The method shown in Listing 3-20 will handle cleaning up abandoned carts' records.
Listing 3-20. The Cart Model’s cleanUp() Method
The method deletes records that were added to the basket three days ago from the table.
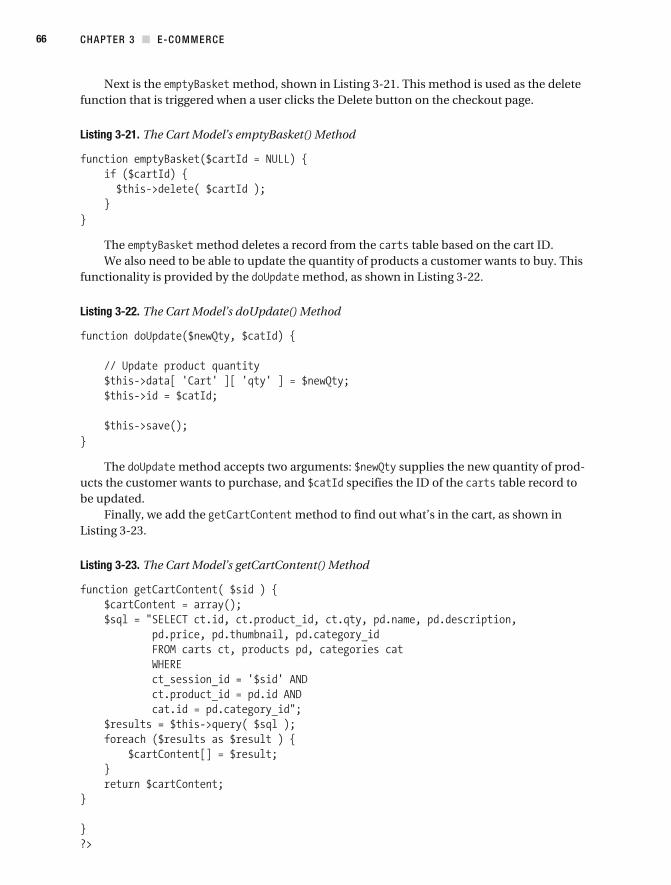
CHAPTER 3 E-COMMERCE66
Next is the method, shown in Listing 3-21. This method is used as the delete function that is triggered when a user clicks the Delete button on the checkout page.
Listing 3-21. The Cart Model’s emptyBasket() Method
The method deletes a record from the table based on the cart ID. We also need to be able to update the quantity of products a customer wants to buy. This
functionality is provided by the method, as shown in Listing 3-22.
Listing 3-22. The Cart Model’s doUpdate() Method
The method accepts two arguments: supplies the new quantity of prod-ucts the customer wants to purchase, and specifies the ID of the table record to be updated.
Finally, we add the method to find out what’s in the cart, as shown in Listing 3-23.
Listing 3-23. The Cart Model’s getCartContent() Method
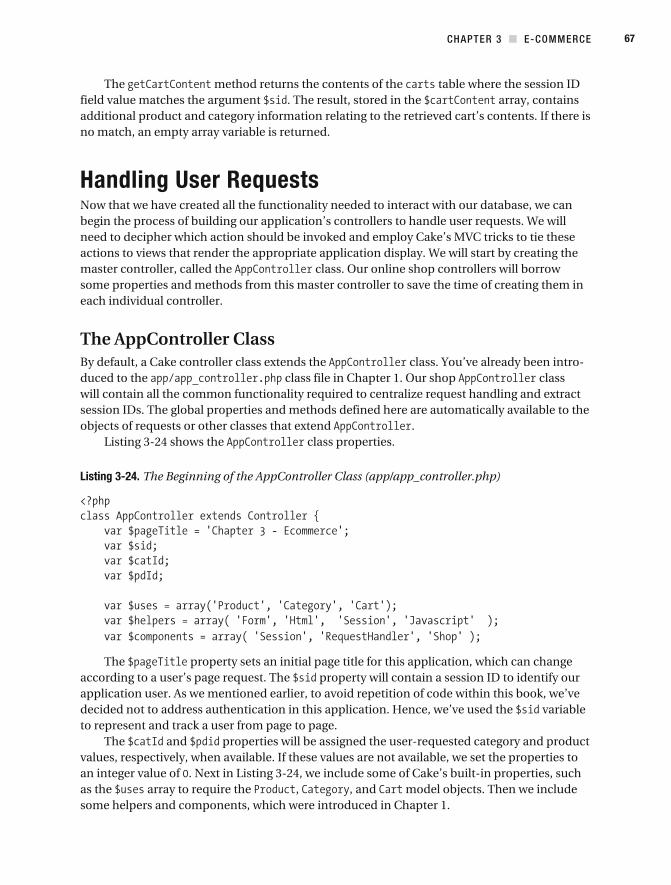
CHAPTER 3 E-COMMERCE 67
The method returns the contents of the table where the session ID field value matches the argument . The result, stored in the array, contains additional product and category information relating to the retrieved cart’s contents. If there is no match, an empty array variable is returned.
Handling User RequestsNow that we have created all the functionality needed to interact with our database, we can begin the process of building our application’s controllers to handle user requests. We will need to decipher which action should be invoked and employ Cake’s MVC tricks to tie these actions to views that render the appropriate application display. We will start by creating the master controller, called the class. Our online shop controllers will borrow some properties and methods from this master controller to save the time of creating them in each individual controller.
The AppController ClassBy default, a Cake controller class extends the class. You’ve already been intro-duced to the class file in Chapter 1. Our shop class will contain all the common functionality required to centralize request handling and extract session IDs. The global properties and methods defined here are automatically available to the objects of requests or other classes that extend .
Listing 3-24 shows the class properties.
Listing 3-24. The Beginning of the AppController Class (app/app_controller.php)
The property sets an initial page title for this application, which can change according to a user’s page request. The property will contain a session ID to identify our application user. As we mentioned earlier, to avoid repetition of code within this book, we’ve decided not to address authentication in this application. Hence, we’ve used the variable to represent and track a user from page to page.
The and properties will be assigned the user- requested category and product values, respectively, when available. If these values are not available, we set the properties to an integer value of . Next in Listing 3-24, we include some of Cake’s built- in properties, such as the array to require the , , and model objects. Then we include some helpers and components, which were introduced in Chapter 1.
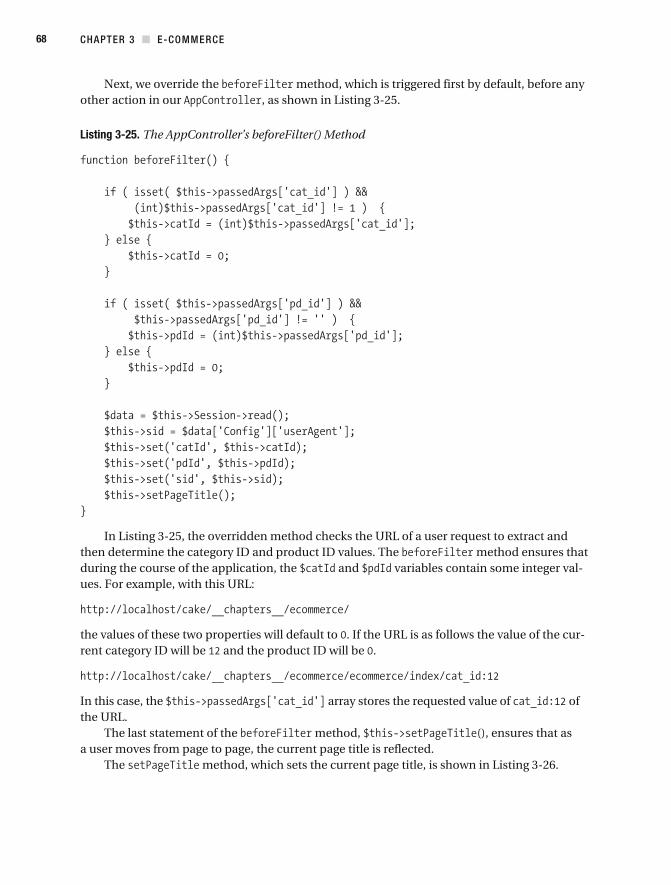
CHAPTER 3 E-COMMERCE68
Next, we override the method, which is triggered first by default, before any other action in our , as shown in Listing 3-25.
Listing 3-25. The AppController’s beforeFilter() Method
In Listing 3-25, the overridden method checks the URL of a user request to extract and then determine the category ID and product ID values. The method ensures that during the course of the application, the and variables contain some integer val-ues. For example, with this URL:
the values of these two properties will default to . If the URL is as follows the value of the cur-rent category ID will be and the product ID will be .
In this case, the array stores the requested value of of the URL.
The last statement of the method, (), ensures that as a user moves from page to page, the current page title is reflected.
The method, which sets the current page title, is shown in Listing 3-26.
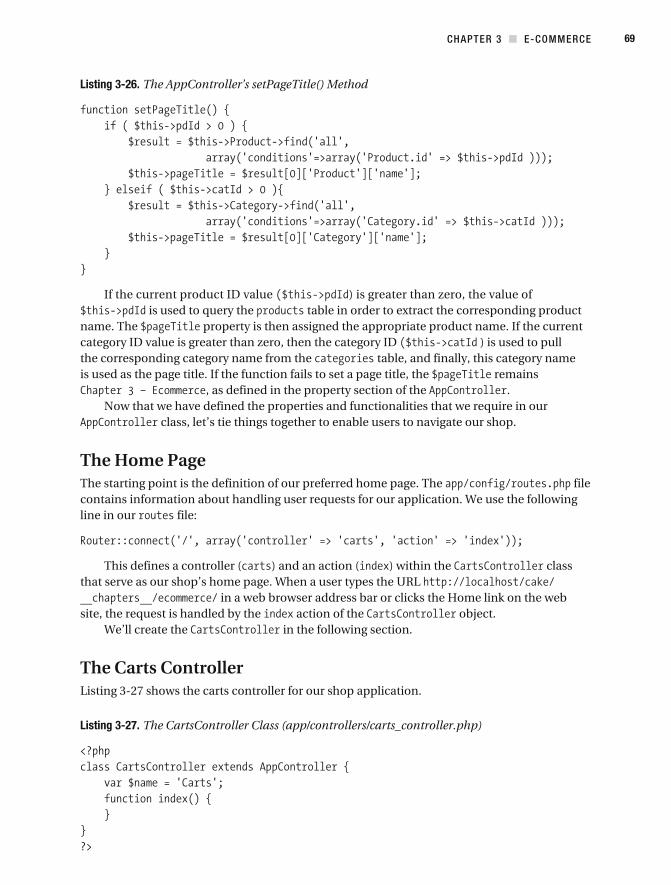
CHAPTER 3 E-COMMERCE 69
Listing 3-26. The AppController’s setPageTitle() Method
If the current product ID value ) is greater than zero, the value of is used to query the table in order to extract the corresponding product
name. The property is then assigned the appropriate product name. If the current category ID value is greater than zero, then the category ID ) is used to pull the corresponding category name from the table, and finally, this category name is used as the page title. If the function fails to set a page title, the remains
, as defined in the property section of the .Now that we have defined the properties and functionalities that we require in our
class, let’s tie things together to enable users to navigate our shop.
The Home PageThe starting point is the definition of our preferred home page. The file contains information about handling user requests for our application. We use the following line in our file:
This defines a controller ( ) and an action ( ) within the class that serve as our shop’s home page. When a user types the URL
in a web browser address bar or clicks the Home link on the web site, the request is handled by the action of the object.
We’ll create the in the following section.
The Carts Controller Listing 3-27 shows the carts controller for our shop application.
Listing 3-27. The CartsController Class (app/controllers/carts_controller.php)
CHAPTER 3 E-COMMERCE70
The class begins by extending the class. It then sets its property to to ensure backward compatibility with PHP 4.
By default, the action is mapped to the view file. Remember that the layout of our shop contains a middle section, or center column. Our
view handles what is rendered in this area of the web site layout. The content of this view file is shown is shown in Listing 3-28.
Listing 3-28. The View for the Center Column Content (app/views/carts/index.ctp)
In Listing 3-28, we first render our welcome message using the function, which is a Cake convenience method for PHP’s statement. You can change this message to suit your needs. Next, we use the current values of the product ID ( ) and category ID ( ), as defined in the method of the class ( Listing 3-25), to logically control the view that is finally displayed to web surfers.
When a user visits our shop for the first time, the values of the product ID and category ID will be set to zero, as defined in the method of the , since the user has not yet selected a category or a product from the home page. For this scenario, the view logic will render the content stored at . We will also have this scenario when a user clicks the Home link of the web site. The content of this view is shown in Listing 3-29.
Listing 3-29. The Category List View for the Center Column (app/views/elements/categories.ctp)
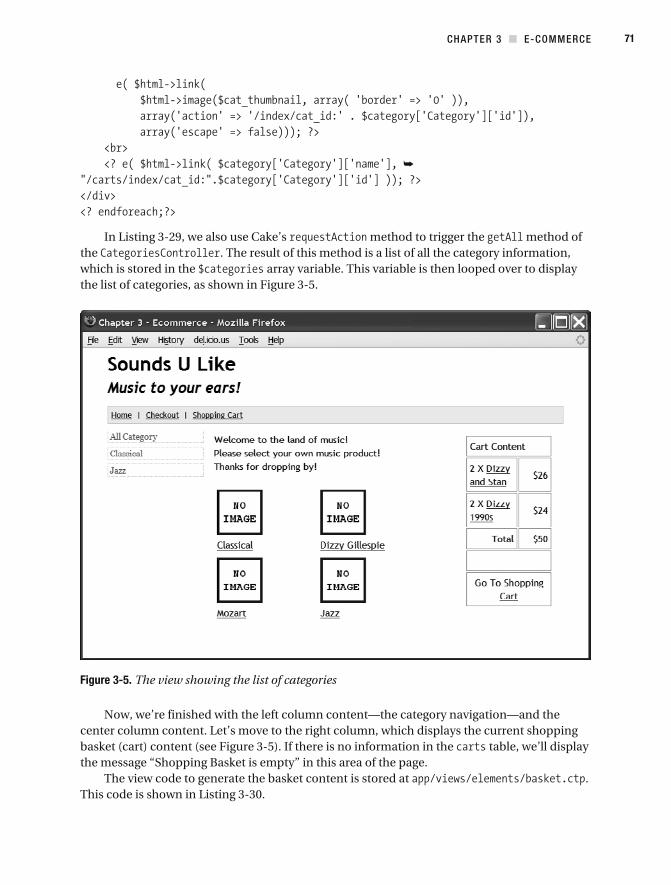
CHAPTER 3 E-COMMERCE 71
In Listing 3-29, we also use Cake’s method to trigger the method of the . The result of this method is a list of all the category information, which is stored in the array variable. This variable is then looped over to display the list of categories, as shown in Figure 3-5.
Figure 3-5. The view showing the list of categories
Now, we’re finished with the left column content—the category navigation—and the center column content. Let’s move to the right column, which displays the current shopping basket (cart) content (see Figure 3-5). If there is no information in the table, we’ll display the message “Shopping Basket is empty” in this area of the page.
The view code to generate the basket content is stored at . This code is shown in Listing 3-30.
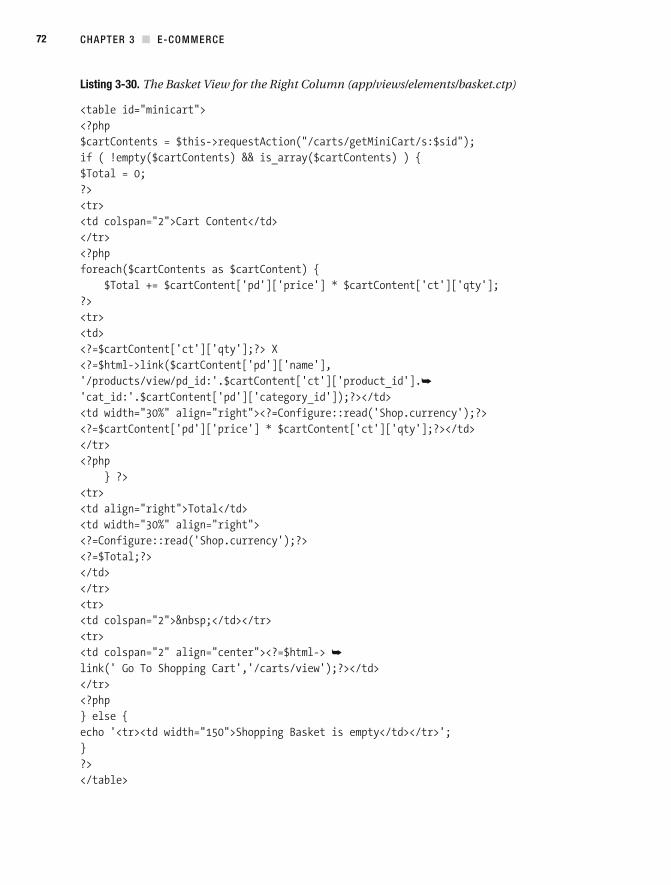
CHAPTER 3 E-COMMERCE72
Listing 3-30. The Basket View for the Right Column (app/views/elements/basket.ctp)
CHAPTER 3 E-COMMERCE 73
Before we delve into the code in Listing 3-30, let’s add the product titled Mozart for Lovers to our basket by clicking the Add to Shopping Basket link on the product description page. Adding a product to the basket triggers the ’s method, shown in Listing 3-31.
Listing 3-31. The CartsController’s add() Method
In Listing 3-31, the first statement uses Cake’s model method, which accepts a product ID Id) to retrieve a product’s information from the table. This product information is stored in the array variable. If is empty, the application redirects to the home page.
Next, the script checks if the product quantity is less than or equal to zero. If so, the appli-cation uses the Cake object’s method to hold the message
in the object, and then redirects to the home page. Then the application calls the method of the model object in order to check
the existence of this product in the shopping basket. The result of this method is stored in the array variable. If the product does not exist in the shopping basket against the
current session ID, the method of the model object is called to insert a new product into the table. If the product does exist in the shopping basket, the method is called to increment the quantity of the product in the table by one.
Next, the script seizes the opportunity to do some housecleaning by calling the method to remove records that are few days old from the table. Finally, the application redirects the user to the current product’s description page.
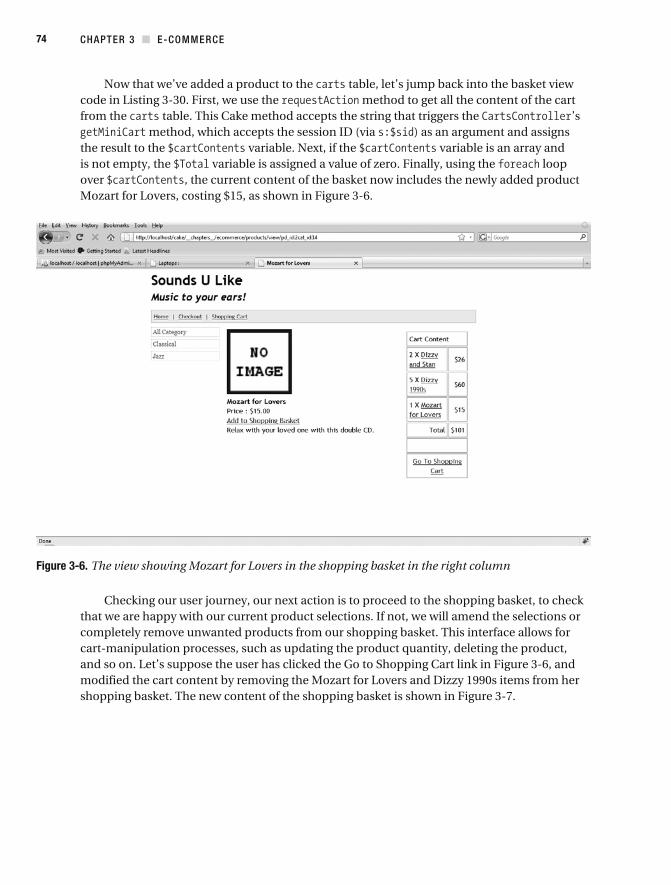
CHAPTER 3 E-COMMERCE74
Now that we’ve added a product to the table, let’s jump back into the basket view code in Listing 3-30. First, we use the method to get all the content of the cart from the table. This Cake method accepts the string that triggers the ’s
method, which accepts the session ID (via ) as an argument and assigns the result to the variable. Next, if the variable is an array and is not empty, the variable is assigned a value of zero. Finally, using the loop over , the current content of the basket now includes the newly added product Mozart for Lovers, costing $15, as shown in Figure 3-6.
Figure 3-6. The view showing Mozart for Lovers in the shopping basket in the right column
Checking our user journey, our next action is to proceed to the shopping basket, to check that we are happy with our current product selections. If not, we will amend the selections or completely remove unwanted products from our shopping basket. This interface allows for cart- manipulation processes, such as updating the product quantity, deleting the product, and so on. Let’s suppose the user has clicked the Go to Shopping Cart link in Figure 3-6, and modified the cart content by removing the Mozart for Lovers and Dizzy 1990s items from her shopping basket. The new content of the shopping basket is shown in Figure 3-7.
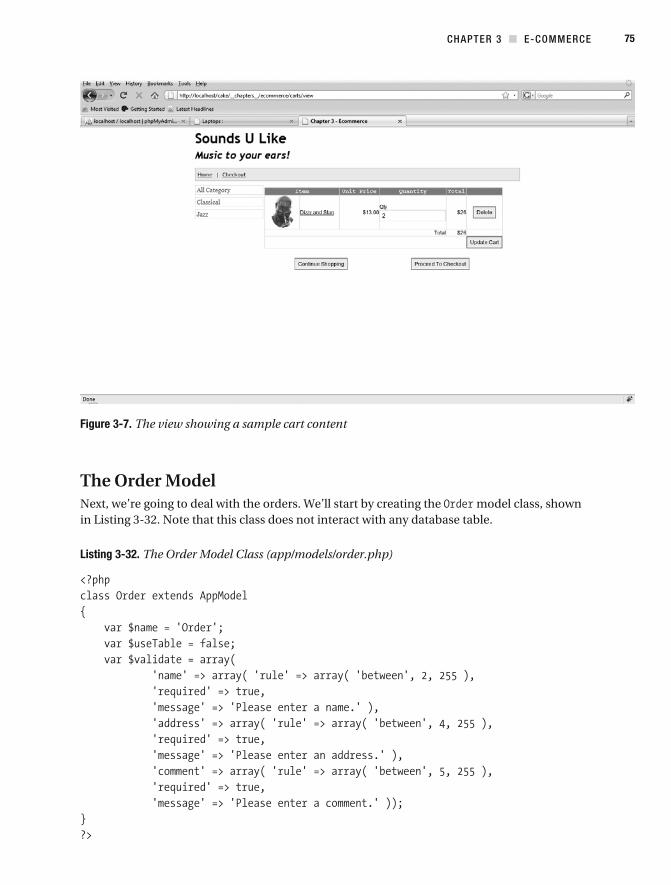
CHAPTER 3 E-COMMERCE 75
Figure 3-7. The view showing a sample cart content
The Order ModelNext, we’re going to deal with the orders. We’ll start by creating the model class, shown in Listing 3-32. Note that this class does not interact with any database table.
Listing 3-32. The Order Model Class (app/models/order.php)
CHAPTER 3 E-COMMERCE76
In Listing 3-32, we define the array to ensure input data integrity for the , , and form elements.
Next, we’re going to click the Proceed to Checkout button. Our action will trigger the method of the object, which is defined in Listing 3-33.
Listing 3-33. The OrdersController Class (app/controllers/orders_contoller.php)
As usual, the class references the model object using the statement. Next, we define the method, which first extracts the cur-
rent cart’s content IDs from array, and then stores the result in the array. The array is passed to the view file, shown
in Listing 3-34, for display. The last statement of this method changes the default layout to .
Listing 3-34. The Checkout View (app/views/orders/checkout.ctp)
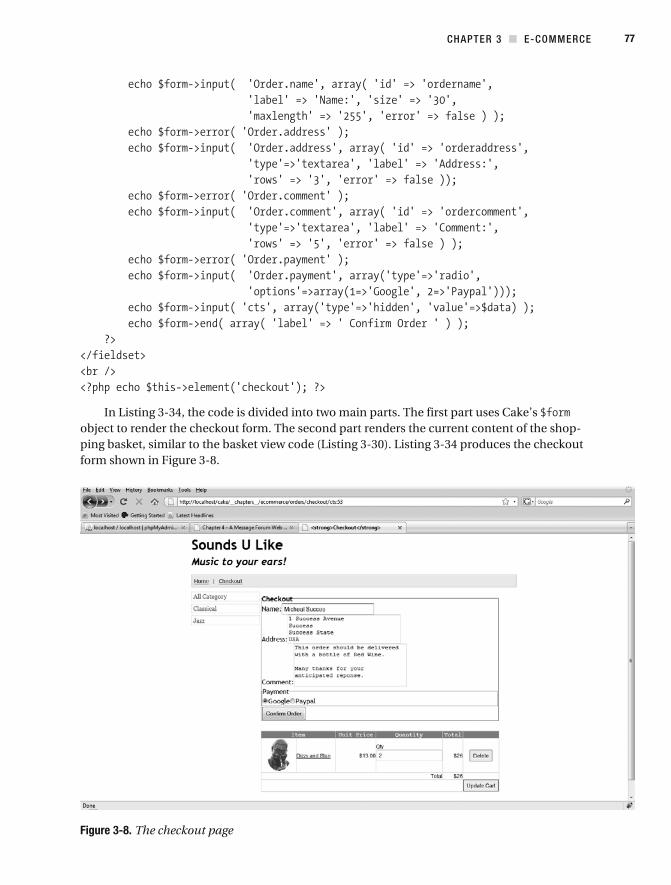
CHAPTER 3 E-COMMERCE 77
In Listing 3-34, the code is divided into two main parts. The first part uses Cake’s object to render the checkout form. The second part renders the current content of the shop-ping basket, similar to the basket view code ( Listing 3-30). Listing 3-34 produces the checkout form shown in Figure 3-8.
Figure 3-8. The checkout page
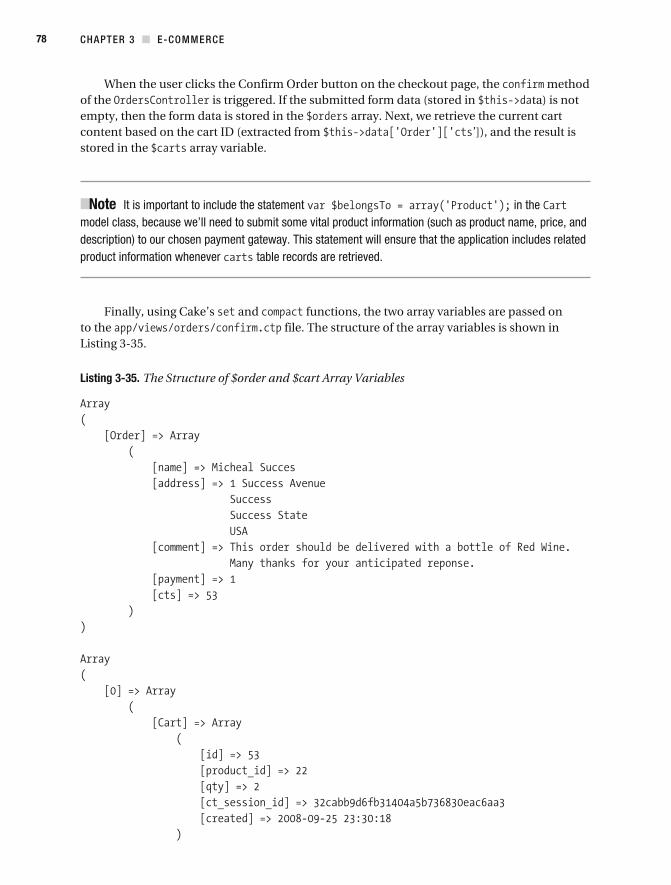
CHAPTER 3 E-COMMERCE78
When the user clicks the Confirm Order button on the checkout page, the method of the is triggered. If the submitted form data (stored in ta) is not empty, then the form data is stored in the array. Next, we retrieve the current cart content based on the cart ID (extracted from ’]), and the result is stored in the array variable.
Note It is important to include the statement in the model class, because we’ll need to submit some vital product information (such as product name, price, and description) to our chosen payment gateway. This statement will ensure that the application includes related product information whenever table records are retrieved.
Finally, using Cake’s and functions, the two array variables are passed on to the file. The structure of the array variables is shown in Listing 3-35.
Listing 3-35. The Structure of $order and $cart Array Variables
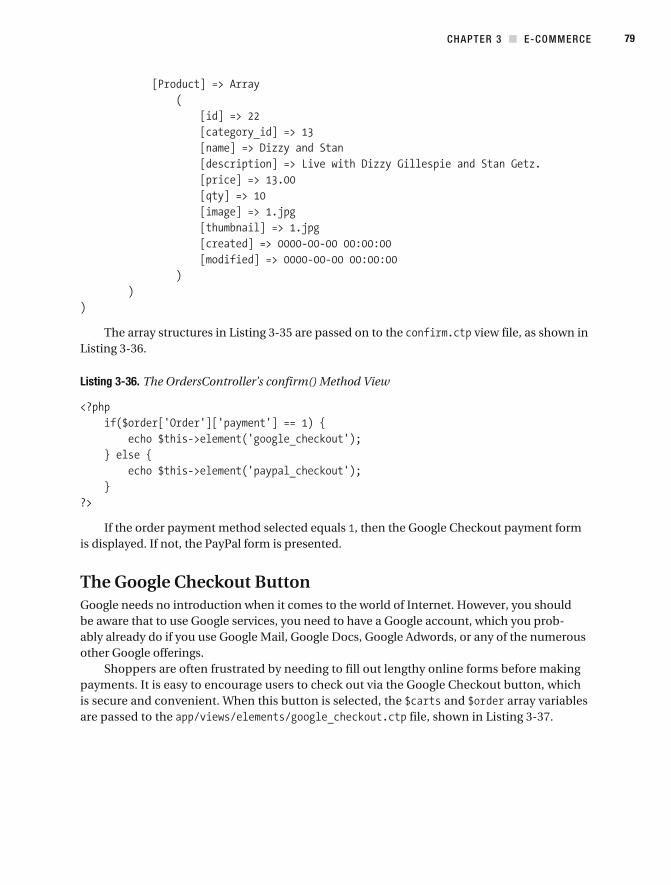
CHAPTER 3 E-COMMERCE 79
The array structures in Listing 3-35 are passed on to the view file, as shown in Listing 3-36.
Listing 3-36. The OrdersController’s confirm() Method View
If the order payment method selected equals , then the Google Checkout payment form is displayed. If not, the PayPal form is presented.
The Google Checkout ButtonGoogle needs no introduction when it comes to the world of Internet. However, you should be aware that to use Google services, you need to have a Google account, which you prob-ably already do if you use Google Mail, Google Docs, Google Adwords, or any of the numerous other Google offerings.
Shoppers are often frustrated by needing to fill out lengthy online forms before making payments. It is easy to encourage users to check out via the Google Checkout button, which is secure and convenient. When this button is selected, the and array variables are passed to the file, shown in Listing 3-37.
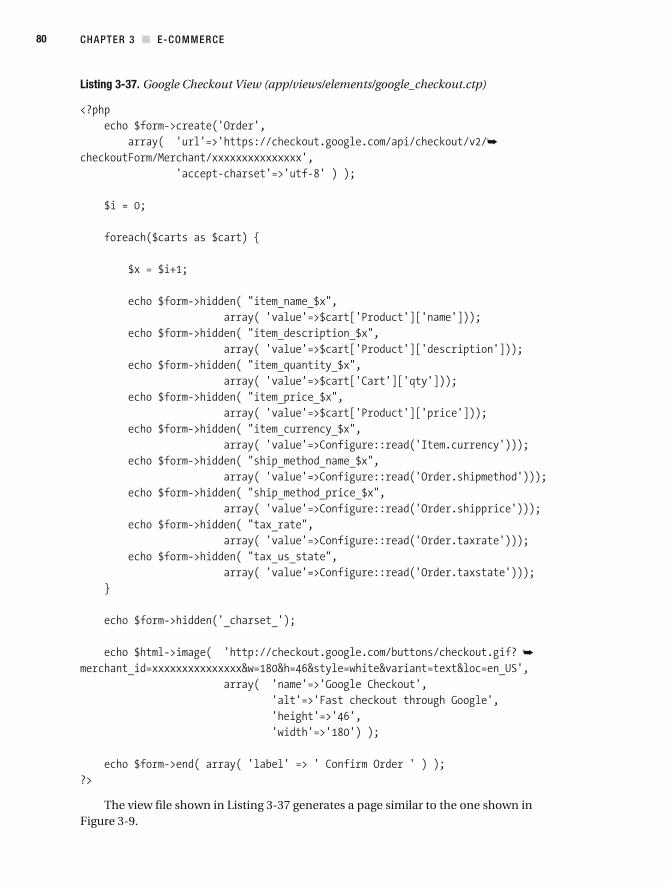
CHAPTER 3 E-COMMERCE80
Listing 3-37. Google Checkout View (app/views/elements/google_checkout.ctp)
The view file shown in Listing 3-37 generates a page similar to the one shown in Figure 3-9.
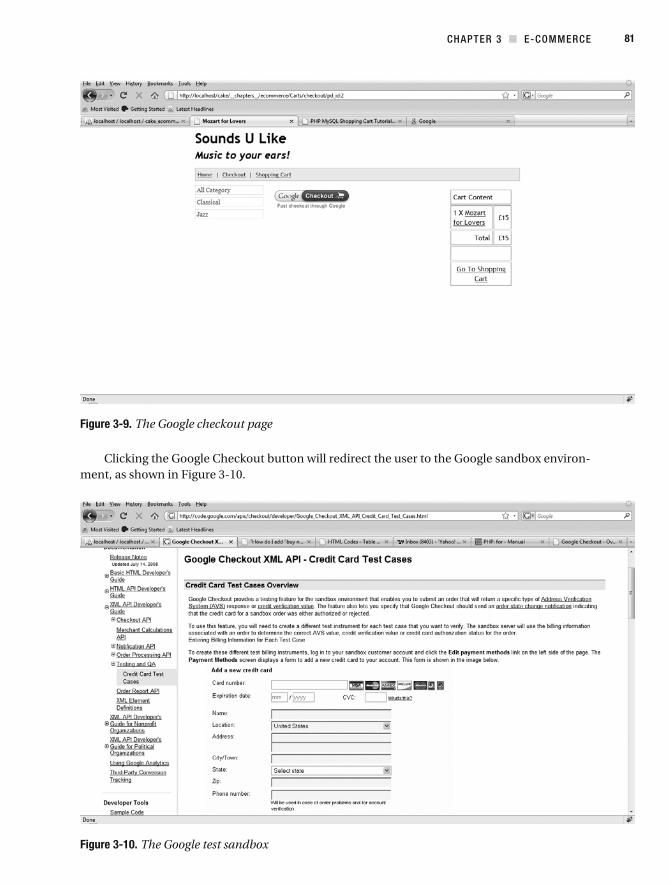
CHAPTER 3 E-COMMERCE 81
Figure 3-9. The Google checkout page
Clicking the Google Checkout button will redirect the user to the Google sandbox environ-ment, as shown in Figure 3-10.
Figure 3-10. The Google test sandbox
CHAPTER 3 E-COMMERCE82
For more information about processing online sales using Google’s payment system, Google Checkout buttons, and the Google sandbox, visit the following sites:
.
The PayPal Submit ButtonPayPal can be regarded as the father of online payment gateways. It’s ubiquitous when it comes to online payment choices. Here, we are going to create the payment form, in the
file, as shown in Listing 3-38. You can use the Buy-it- Now button form generator on PayPal to create a similar payment form.
Listing 3-38. The PayPal View (app/views/elements/paypal_checkout.ctp)
The PayPal view is passed the and the array variables. For further information about the numerous services provided by PayPal, visit
.
CHAPTER 3 E-COMMERCE 83
SummaryIn this chapter, we went through the process of building an online shop. For this demonstra-tion, we’ve kept its features to a minimum. However, users can navigate the product category menu, add products to a shopping basket, review the basket contents, and proceed to the checkout form.
We started this chapter by looking at a typical shop layout, the shop user journey, and the creation of the database and tables needed for the shop application. We then proceeded to build all the model classes that interact with the database tables, such as those for categories, products, carts, and so on.
To handle user requests, we built the class with properties and methods that provide functionality common to other controller classes. This helps us to avoid “rein-venting the wheel” and to extend other controller classes, such as the category controller of the application. We then built the other controller classes to handle the application requests.
Finally, we created checkout forms to handle payment transactions. We used a Google sandbox as our payment test environment and also created a PayPal form as an alternative payment option.
Building a comprehensive e- commerce web site obviously involves more than what we covered in this chapter. For example, you would want to add an administration area to the web site to facilitate management.
C H A P T E R 4
A Message Forum Web Service
In this chapter, we’ll build a Cake- based forum. While there are a lot of popular open source forums such as phpBB, we like the idea of rolling our own. It’s a fantastic learning process, and we get to deal with a lot of new subjects that don’t come up in our day jobs.
So that our forum will stand out from the crowd, we need a unique selling point. That will be a web service API for our forum. Web services are quite a common feature in many modern web applications, but not that common in many of the forums.
Our Take on Web ServicesThe term web services can have many meanings. For example, simply entering the URL
into your browser can be called a web service request, since you’re using HTTP . The World Wide Web Consortium (W3C) has an official definition for web services ( ):
Web services provide a standard means of interoperating between different software
applications, running on a variety of platforms and/or frameworks.
This meaning is quite general, indicating that web services are a way for computers to talk to each other, which may or may not include the Web.
Before we get to creating our forum, let’s clear up what we mean by web services.
Web Service ElementsThere are many elements relating to web services. We start with a short explanation of each element to provide a foundation for our particular angle on web services.
85
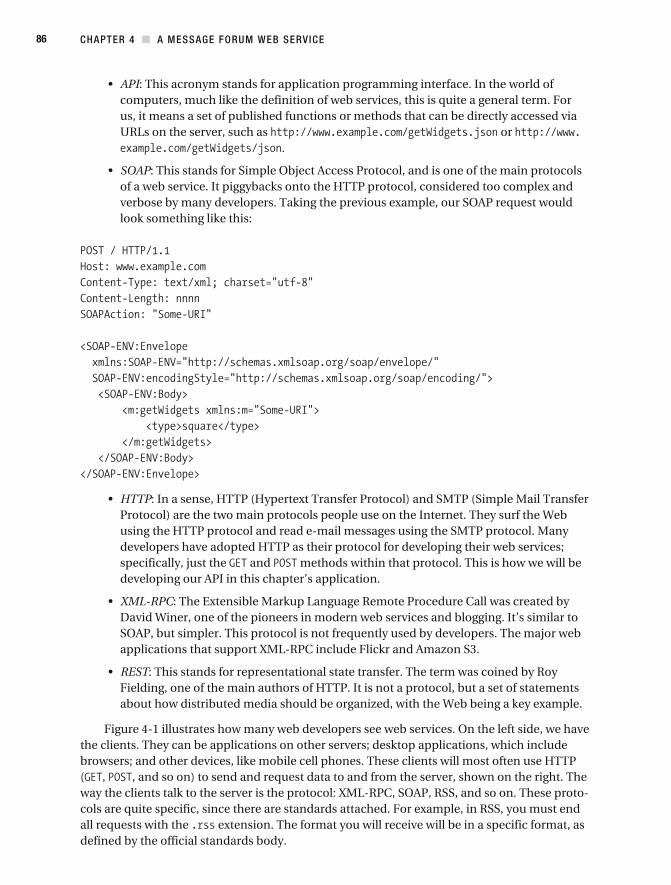
CHAPTER 4 A MESSAGE FORUM WEB SERVICE 86
API: This acronym stands for application programming interface. In the world of computers, much like the definition of web services, this is quite a general term. For us, it means a set of published functions or methods that can be directly accessed via URLs on the server, such as or
.
SOAP: This stands for Simple Object Access Protocol, and is one of the main protocols of a web service. It piggybacks onto the HTTP protocol, considered too complex and verbose by many developers. Taking the previous example, our SOAP request would look something like this:
HTTP: In a sense, HTTP (Hypertext Transfer Protocol) and SMTP (Simple Mail Transfer Protocol) are the two main protocols people use on the Internet. They surf the Web using the HTTP protocol and read e-mail messages using the SMTP protocol. Many developers have adopted HTTP as their protocol for developing their web services; specifically, just the and methods within that protocol. This is how we will be developing our API in this chapter’s application.
XML-RPC: The Extensible Markup Language Remote Procedure Call was created by David Winer, one of the pioneers in modern web services and blogging. It’s similar to SOAP, but simpler. This protocol is not frequently used by developers. The major web applications that support XML- RPC include Flickr and Amazon S3.
REST: This stands for representational state transfer. The term was coined by Roy Fielding, one of the main authors of HTTP. It is not a protocol, but a set of statements about how distributed media should be organized, with the Web being a key example.
Figure 4-1 illustrates how many web developers see web services. On the left side, we have the clients. They can be applications on other servers; desktop applications, which include browsers; and other devices, like mobile cell phones. These clients will most often use HTTP ( , , and so on) to send and request data to and from the server, shown on the right. The way the clients talk to the server is the protocol: XML- RPC, SOAP, RSS, and so on. These proto-cols are quite specific, since there are standards attached. For example, in RSS, you must end all requests with the extension. The format you will receive will be in a specific format, as defined by the official standards body.
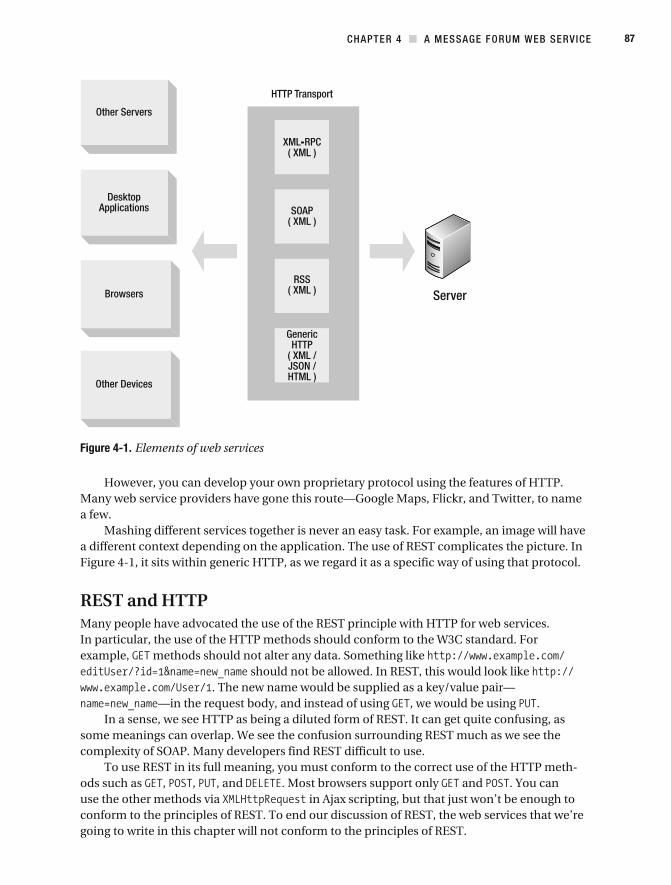
CHAPTER 4 A MESSAGE FORUM WEB SERVICE 87
Figure 4-1. Elements of web services
However, you can develop your own proprietary protocol using the features of HTTP. Many web service providers have gone this route—Google Maps, Flickr, and Twitter, to name a few.
Mashing different services together is never an easy task. For example, an image will have a different context depending on the application. The use of REST complicates the picture. In Figure 4-1, it sits within generic HTTP, as we regard it as a specific way of using that protocol.
REST and HTTPMany people have advocated the use of the REST principle with HTTP for web services. In particular, the use of the HTTP methods should conform to the W3C standard. For example, methods should not alter any data. Something like
should not be allowed. In REST, this would look like . The new name would be supplied as a key/value pair—
—in the request body, and instead of using , we would be using .In a sense, we see HTTP as being a diluted form of REST. It can get quite confusing, as
some meanings can overlap. We see the confusion surrounding REST much as we see the complexity of SOAP. Many developers find REST difficult to use.
To use REST in its full meaning, you must conform to the correct use of the HTTP meth-ods such as , , , and . Most browsers support only and . You can use the other methods via in Ajax scripting, but that just won’t be enough to conform to the principles of REST. To end our discussion of REST, the web services that we’re going to write in this chapter will not conform to the principles of REST.

CHAPTER 4 A MESSAGE FORUM WEB SERVICE 88
Note The four most important HTTP requests are , , , and . requests a resource, such as an HTML file. (Requesting the resource must not cause a side effect, such as deleting a record).
sends data to the resource to be processed. It creates a new resource, updates the resource, or both. We’ll consider the operation to be the same as the . Elliotte Rusty Harold gives a good explanation at
. Finally, just deletes a resource, such as a user account.
We’ve always liked the principle of KISS, which means we prefer to Keep It Short and Simple. Logical standards like SOAP sometimes are just too logical. As such, like many web APIs, we’re just opting for plain old HTTP and as the two modes that developers can use to access the innards of our forum. Referring to our diagram in Figure 4-1, we’re using the generic HTTP method.
Result Return FormatsWhen we make a web service request, the result can be returned in many formats depending on the client request, including HTML, JSON, XML, and RSS.
You can even specify the result to be returned as a comma- separated list or as a JavaScript- ready document output. For our application, we’ll use JSON. Developers can easily use our web services via Ajax or on the server using or .
Application RequirementsOne of the main focal points of our forum application is the API. Therefore, we’ll start by thinking about the methods that we will be exposing to the public. The API requests will come from other applications, not individuals using the application via an interface, so we must consider that in our planning.
In our forum application, we want to include some common features that are found in all forums:
Since our own interface is basically also a client, we need to look at our own front end as if it were a third- party client application that is calling the processing scripts from a distant server. We know there are several ways to make a URL request. The following are the ones we are interested in:
or ; they may also want it returned in a particular format
or
or ; that is, the ( ) within the browser makes the HTTP call
CHAPTER 4 A MESSAGE FORUM WEB SERVICE 89
Some of our actions may support only and/or . This is similar to many of the other web APIs.
We must have a standard way to respond to requests. For example, in HTTP, the response code 200 is OK, and the response code 404 is resource or page not found. Furthermore, some requests return data, while others carry out particular actions like saving data. We must be able to return data in a consistent manner given different requests.
Threads and PostsFor our forum, we need to decide how discussions should be organized. We simply define a discussion (commonly called a thread) as the messages and the subsequent messages (replies) to those messages. Let’s look at some of the ways in which messages could be organized.
Organized by DateUsing this method, each message is organized by date order, regardless of to which message it is replying. Users can then see the most up-to- date messages as they come in.
Organizing by date is problematic because we won’t know which message a message is replying to. We can overcome this by including the message, but do we include the whole mes-sage or just part of it? Perhaps we could allow the users to select the parts they are replying to?
Listing 4-1 shows a code snippet that allows a user to quote part of a message so other users can refer to it.
Listing 4-1. JavaScript Code to Get Selected Text
CHAPTER 4 A MESSAGE FORUM WEB SERVICE 90
You might want to use the code in Listing 4-1 if you decide to extend the forum appli-cation. It simply retrieves the text a user has selected with the mouse. On line 9, we check whether the user has selected any text on Firefox/Gecko- based browsers. If so, we place the text in to the variable. Line 12 checks for text selection in Internet Explorer/Trident- based browsers.
Organized by First PostUsing the by-first- post organization, we show only new messages, essentially the first mes-sages, as they come in. We won’t show the replies. If users want to read the replies, they need to drill down; that is, make another request to a different Cake action.
If a user replies to an old message, it won’t be displayed. It will remain relative to that old message. Users will know of that reply only when they drill down to it.
An obvious problem is that active discussions will be followed only by those who par-ticipated in it at the early stages, when the discussions were at the top of the page. When new messages arrive, the old messages get pushed down. This is not desirable, since we want many people contributing to a discussion as long as possible. After all, if people are just asking ques-tions on the forum, very few people would bother to read the forum.
Organized by RepliesYou can also organize the threads by the number of replies, so the thread that has the greatest number of replies is shown first. If no one has contributed to the thread for a while, it will still stay at the top.
The problem with this organization is that current and active threads are not given prior-ity. So we end up putting too much emphasis on a topic that may no longer be of interest to most people.
Organized by Last PostAnother organization possibility is a slightly different take on the by-first- post organization. Using this method, we order a discussion by its last post, but we show the first post.
This approach has a number of advantages. If a new message comes in, it floats to the top. However, if a reply to an old message is posted, the first post of that discussion floats to the top. In this way, we encourage people to participate in ongoing discussions. If the discussion has been exhausted, it simply floats back down the page.
Organizing the posts by the last post seems to be the most sensible method. In fact, most forums organize discussions this way, and so will our application.
Web Service RequestsOur application will support the following five API requests:
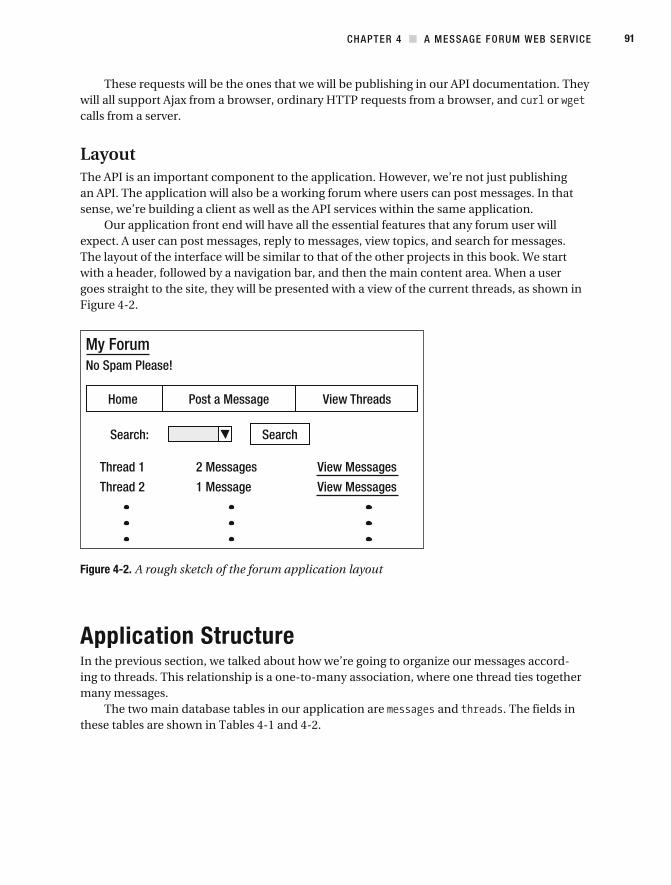
CHAPTER 4 A MESSAGE FORUM WEB SERVICE 91
These requests will be the ones that we will be publishing in our API documentation. They will all support Ajax from a browser, ordinary HTTP requests from a browser, and or calls from a server.
LayoutThe API is an important component to the application. However, we’re not just publishing an API. The application will also be a working forum where users can post messages. In that sense, we’re building a client as well as the API services within the same application.
Our application front end will have all the essential features that any forum user will expect. A user can post messages, reply to messages, view topics, and search for messages. The layout of the interface will be similar to that of the other projects in this book. We start with a header, followed by a navigation bar, and then the main content area. When a user goes straight to the site, they will be presented with a view of the current threads, as shown in Figure 4-2.
Figure 4-2. A rough sketch of the forum application layout
Application StructureIn the previous section, we talked about how we’re going to organize our messages accord-ing to threads. This relationship is a one-to- many association, where one thread ties together many messages.
The two main database tables in our application are and . The fields in these tables are shown in Tables 4- 1 and 4- 2.
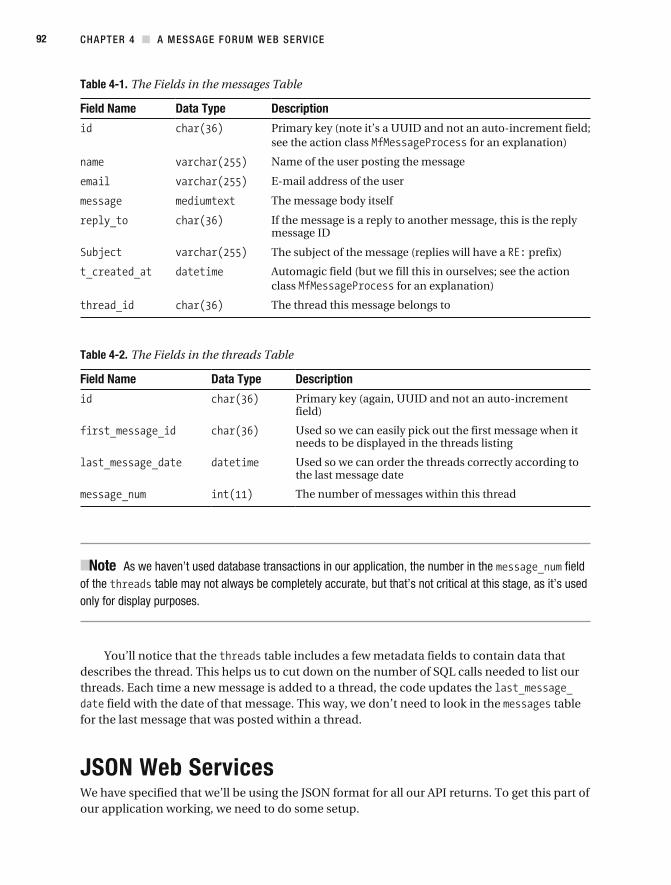
CHAPTER 4 A MESSAGE FORUM WEB SERVICE 92
Table 4-1. The Fields in the messages Table
Field Name Data Type Description
Primary key (note it’s a UUID and not an auto- increment field; see the action class for an explanation)
Name of the user posting the message
E-mail address of the user
The message body itself
If the message is a reply to another message, this is the reply message ID
The subject of the message (replies will have a prefix)
Automagic field (but we fill this in ourselves; see the action class for an explanation)
The thread this message belongs to
Table 4-2. The Fields in the threads Table
Field Name Data Type Description
Primary key (again, UUID and not an auto- increment field)
Used so we can easily pick out the first message when it needs to be displayed in the threads listing
Used so we can order the threads correctly according to the last message date
The number of messages within this thread
Note As we haven’t used database transactions in our application, the number in the field of the table may not always be completely accurate, but that’s not critical at this stage, as it’s used only for display purposes.
You’ll notice that the table includes a few metadata fields to contain data that describes the thread. This helps us to cut down on the number of SQL calls needed to list our threads. Each time a new message is added to a thread, the code updates the
field with the date of that message. This way, we don’t need to look in the table for the last message that was posted within a thread.
JSON Web ServicesWe have specified that we’ll be using the JSON format for all our API returns. To get this part of our application working, we need to do some setup.
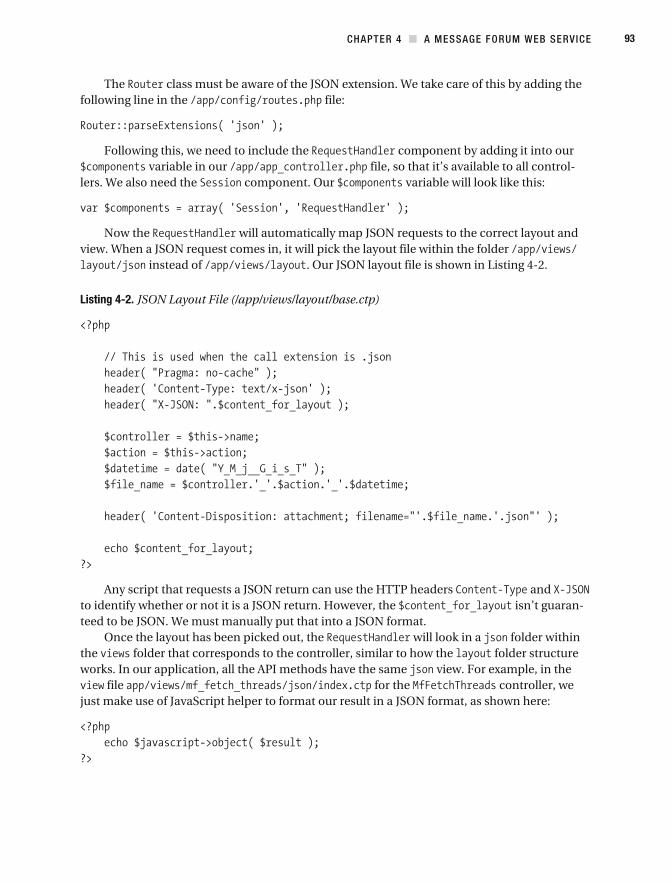
CHAPTER 4 A MESSAGE FORUM WEB SERVICE 93
The class must be aware of the JSON extension. We take care of this by adding the following line in the file:
Following this, we need to include the component by adding it into our variable in our file, so that it’s available to all control-
lers. We also need the component. Our variable will look like this:
Now the will automatically map JSON requests to the correct layout and view. When a JSON request comes in, it will pick the layout file within the folder
instead of . Our JSON layout file is shown in Listing 4-2.
Listing 4-2. JSON Layout File (/app/views/layout/base.ctp)
Any script that requests a JSON return can use the HTTP headers and to identify whether or not it is a JSON return. However, the isn’t guaran-teed to be JSON. We must manually put that into a JSON format.
Once the layout has been picked out, the will look in a folder within the folder that corresponds to the controller, similar to how the folder structure works. In our application, all the API methods have the same view. For example, in the
file for the controller, we just make use of JavaScript helper to format our result in a JSON format, as shown here:
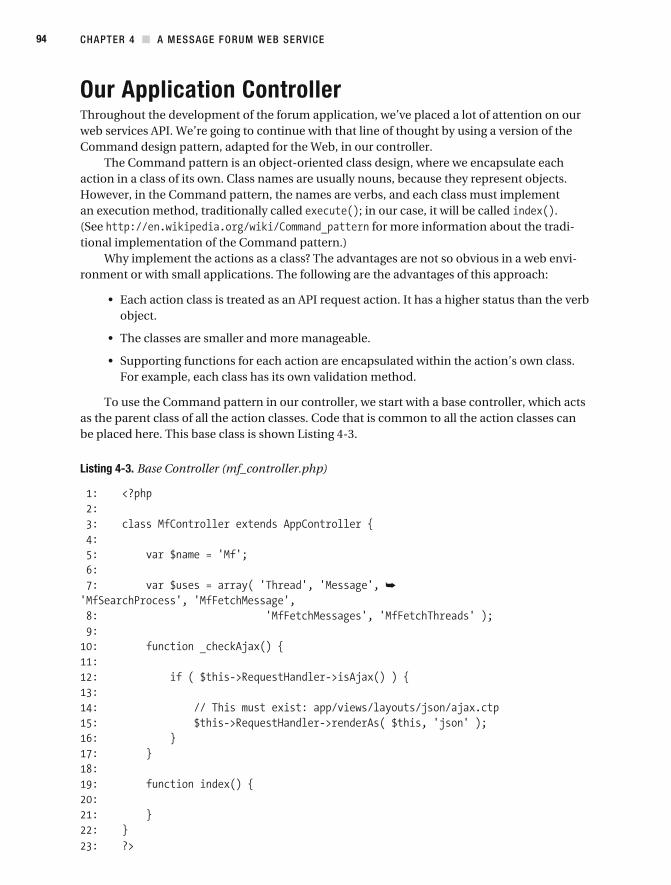
CHAPTER 4 A MESSAGE FORUM WEB SERVICE 94
Our Application ControllerThroughout the development of the forum application, we’ve placed a lot of attention on our web services API. We’re going to continue with that line of thought by using a version of the Command design pattern, adapted for the Web, in our controller.
The Command pattern is an object- oriented class design, where we encapsulate each action in a class of its own. Class names are usually nouns, because they represent objects. However, in the Command pattern, the names are verbs, and each class must implement an execution method, traditionally called ; in our case, it will be called . (See for more information about the tradi-tional implementation of the Command pattern.)
Why implement the actions as a class? The advantages are not so obvious in a web envi-ronment or with small applications. The following are the advantages of this approach:
object.
For example, each class has its own validation method.
To use the Command pattern in our controller, we start with a base controller, which acts as the parent class of all the action classes. Code that is common to all the action classes can be placed here. This base class is shown Listing 4-3.
Listing 4-3. Base Controller (mf_controller.php)
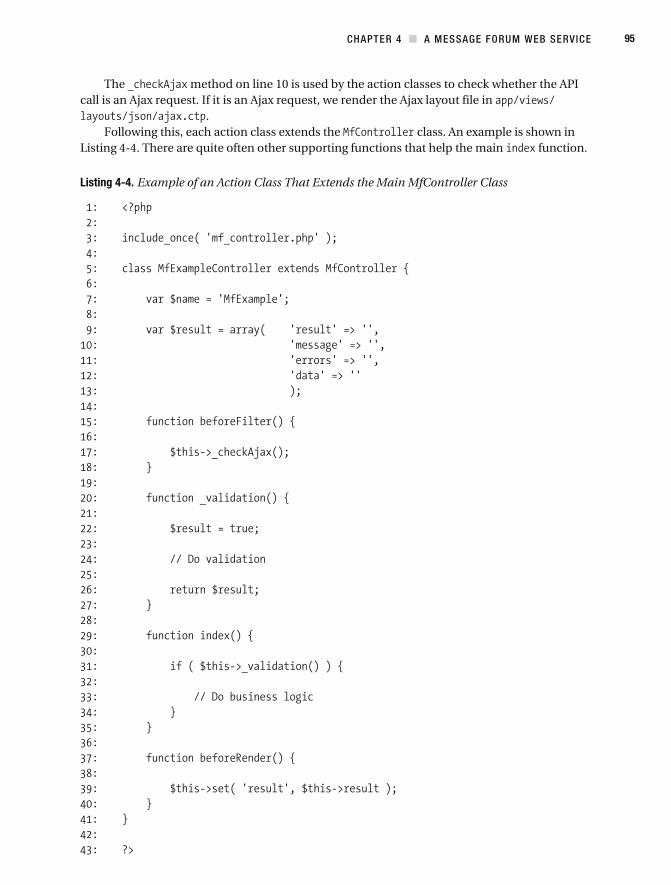
CHAPTER 4 A MESSAGE FORUM WEB SERVICE 95
The method on line 10 is used by the action classes to check whether the API call is an Ajax request. If it is an Ajax request, we render the Ajax layout file in
.Following this, each action class extends the class. An example is shown in
Listing 4-4. There are quite often other supporting functions that help the main function.
Listing 4-4. Example of an Action Class That Extends the Main MfController Class
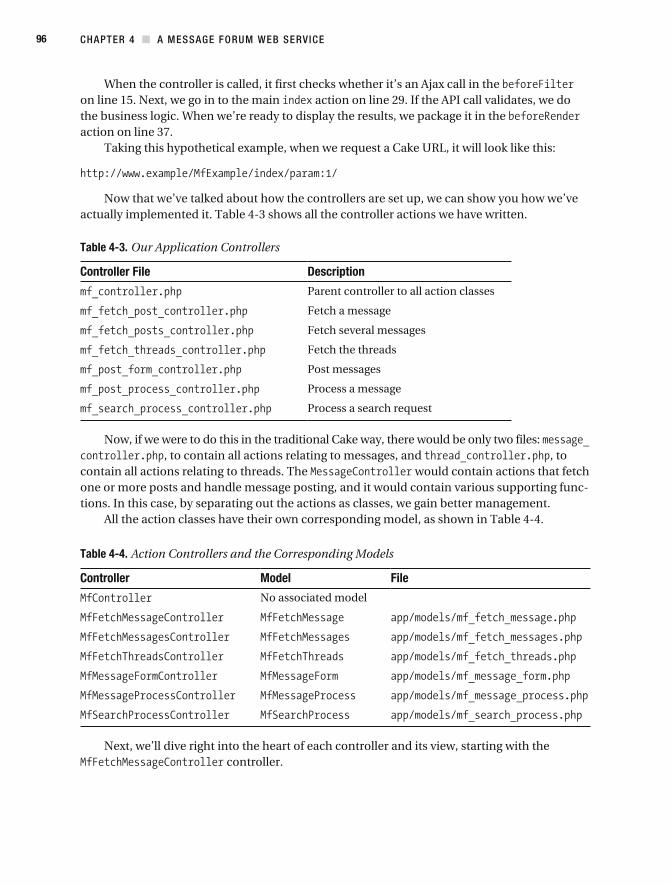
CHAPTER 4 A MESSAGE FORUM WEB SERVICE 96
When the controller is called, it first checks whether it’s an Ajax call in the on line 15. Next, we go in to the main action on line 29. If the API call validates, we do the business logic. When we’re ready to display the results, we package it in the action on line 37.
Taking this hypothetical example, when we request a Cake URL, it will look like this:
Now that we’ve talked about how the controllers are set up, we can show you how we’ve actually implemented it. Table 4-3 shows all the controller actions we have written.
Table 4-3. Our Application Controllers
Controller File Description
Parent controller to all action classes
Fetch a message
Fetch several messages
Fetch the threads
Post messages
Process a message
Process a search request
Now, if we were to do this in the traditional Cake way, there would be only two files: , to contain all actions relating to messages, and , to
contain all actions relating to threads. The would contain actions that fetch one or more posts and handle message posting, and it would contain various supporting func-tions. In this case, by separating out the actions as classes, we gain better management.
All the action classes have their own corresponding model, as shown in Table 4-4.
Table 4-4. Action Controllers and the Corresponding Models
Controller Model File
No associated model
Next, we’ll dive right into the heart of each controller and its view, starting with the controller.
CHAPTER 4 A MESSAGE FORUM WEB SERVICE 97
Fetch a MessageThe is used to find a particular message using its . The method executes a simple SQL statement to the database and fetches the single mes-sage record. The code is shown in Listing 4-5.
Listing 4-5. Fetch One Message Controller (mf_fetch_message_controller.php)
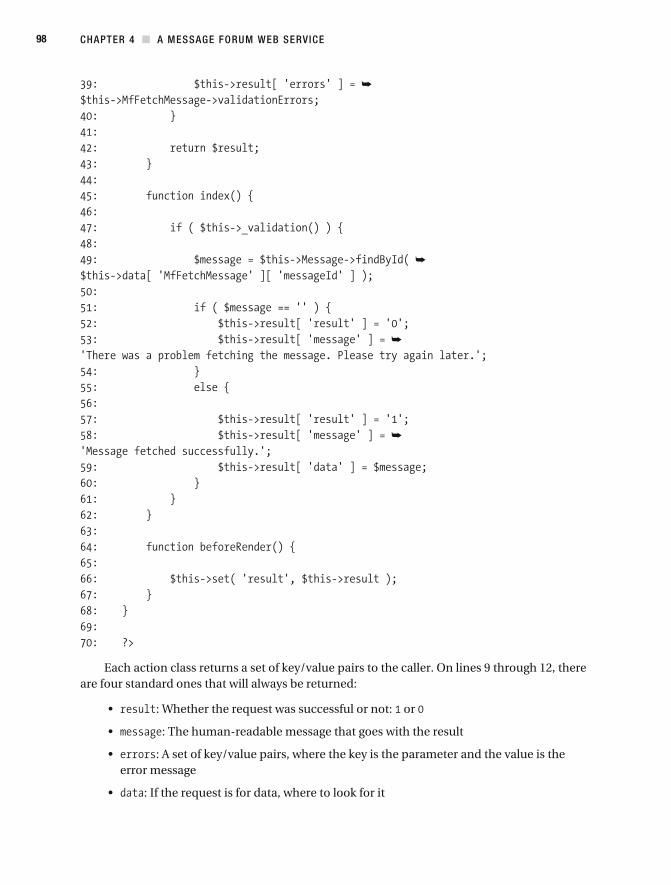
CHAPTER 4 A MESSAGE FORUM WEB SERVICE 98
Each action class returns a set of key/value pairs to the caller. On lines 9 through 12, there are four standard ones that will always be returned:
: Whether the request was successful or not: or
: The human- readable message that goes with the result
: A set of key/value pairs, where the key is the parameter and the value is the error message
: If the request is for data, where to look for it
CHAPTER 4 A MESSAGE FORUM WEB SERVICE 99
Most of the action classes have three methods: , , and . The method checks whether it’s an Ajax call. The parent method looks like this:
We have manually mapped Ajax calls to JSON returns. If it is an Ajax call, the layout is used. We would like to return data to callers in a standard
way, of course. However, this is not always possible, Ajax and server- side calls can handle for-matted data like JSON, but then HTML messes up the format.
The main method is where all the action happens. We have created a method. Any parameter coming into the action class must be validated, and we make use of Cake’s validation as much as we can. To do this, we create a model specifically for our action class called , as shown in Listing 4-6.
Listing 4-6. MfFetchMessageController Model (app/models/mf_fetch_message.php)
Once the validation has passed, we go ahead and carry out the business logic within . When that’s done, the method is called. This method sets the variable for the views. Of course, we could have just as easily set the result in , but following the idea of the Command pattern, we’re keeping code decoupled and standardized.
Our view for the is quite simple. It takes and formats it in HTML, ready to be displayed. It’s worth highlighting that the JSON output
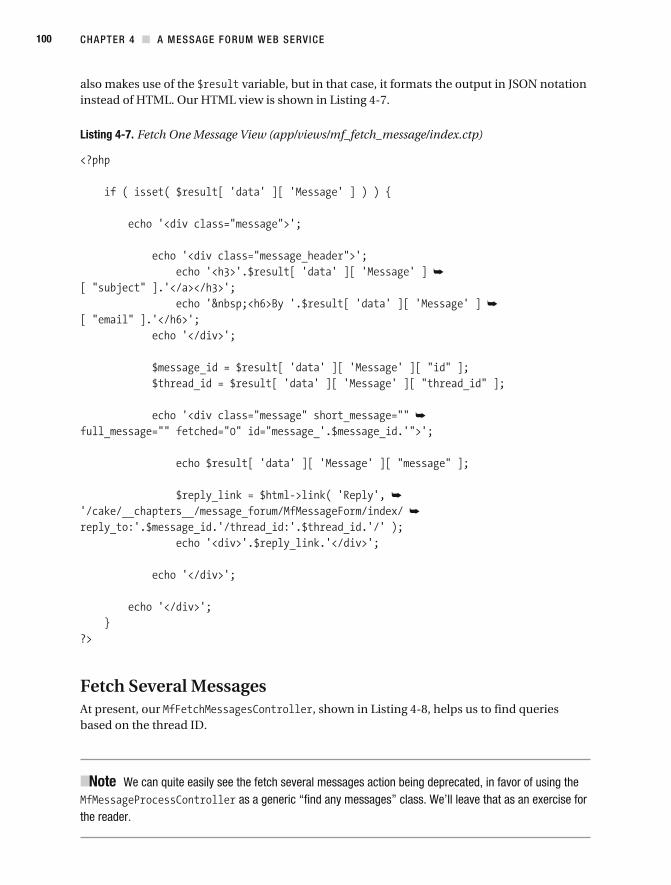
CHAPTER 4 A MESSAGE FORUM WEB SERVICE 100
also makes use of the variable, but in that case, it formats the output in JSON notation instead of HTML. Our HTML view is shown in Listing 4-7.
Listing 4-7. Fetch One Message View (app/views/mf_fetch_message/index.ctp)
Fetch Several MessagesAt present, our , shown in Listing 4-8, helps us to find queries based on the thread ID.
Note We can quite easily see the fetch several messages action being deprecated, in favor of using the as a generic “find any messages” class. We’ll leave that as an exercise for
the reader.
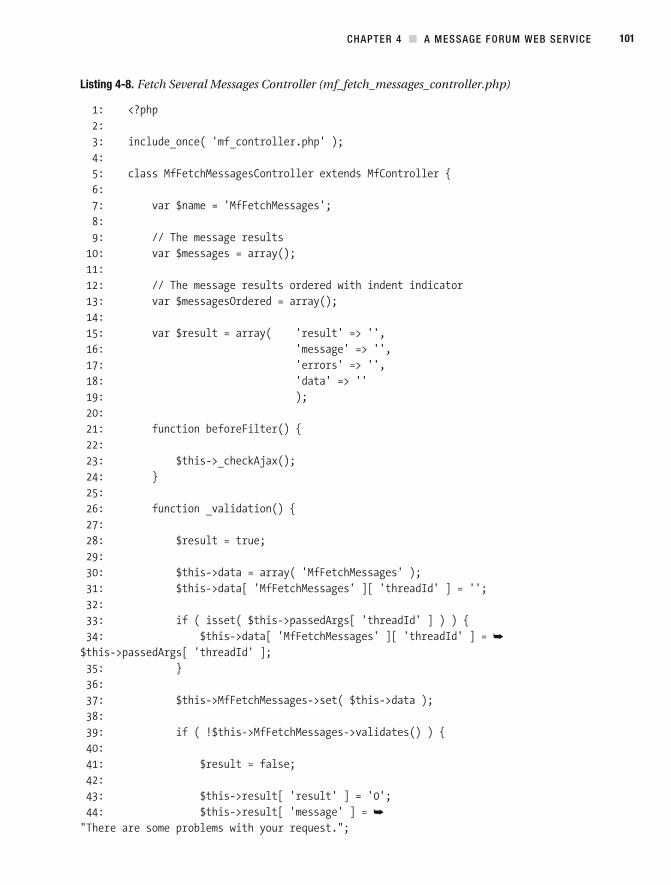
CHAPTER 4 A MESSAGE FORUM WEB SERVICE 101
Listing 4-8. Fetch Several Messages Controller (mf_fetch_messages_controller.php)
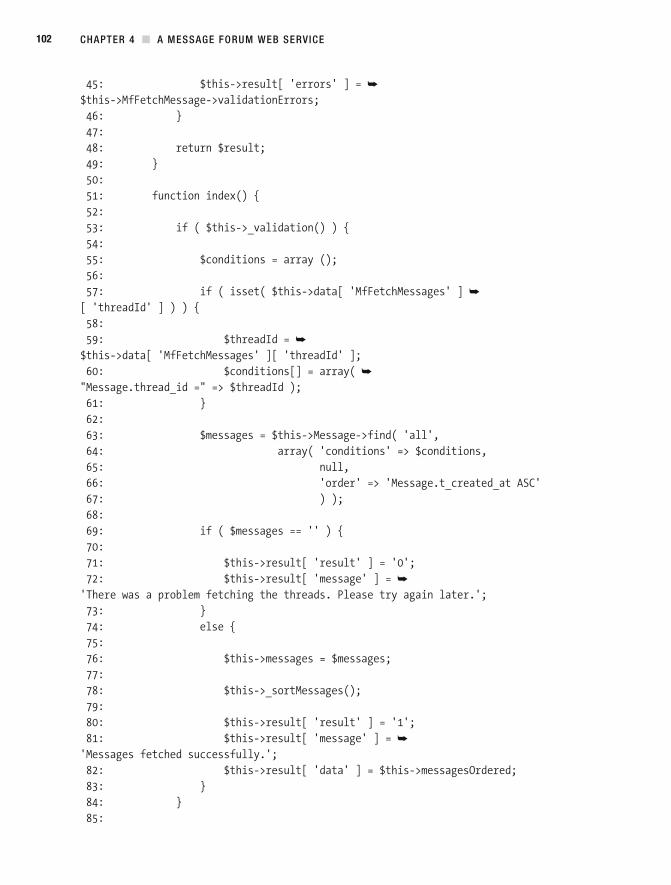
CHAPTER 4 A MESSAGE FORUM WEB SERVICE 102
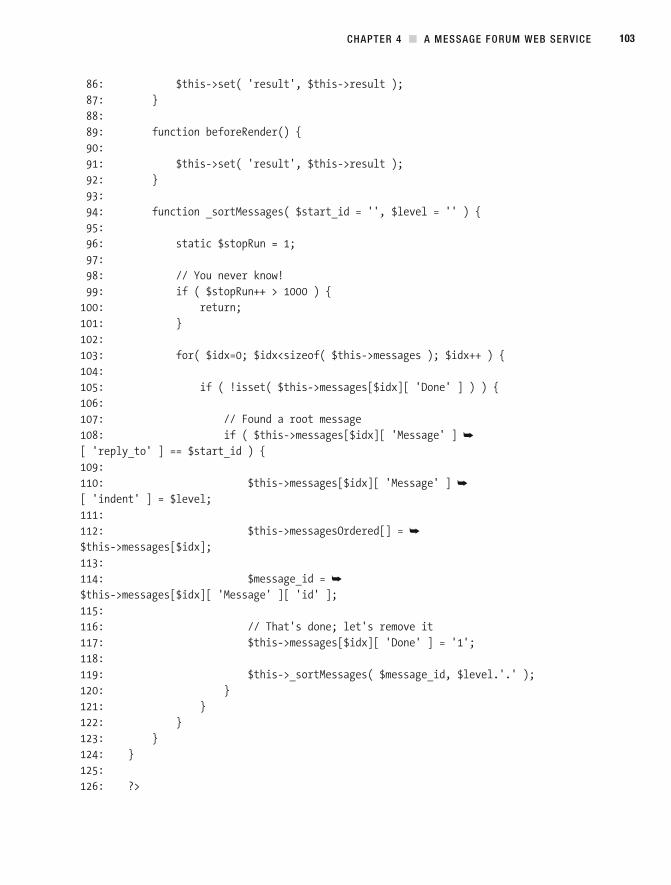
CHAPTER 4 A MESSAGE FORUM WEB SERVICE 103
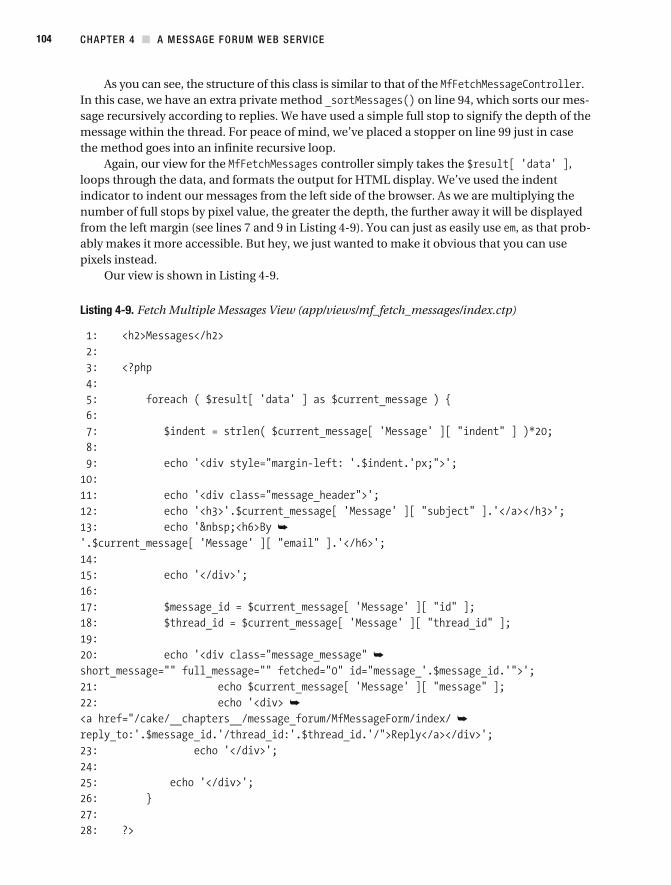
CHAPTER 4 A MESSAGE FORUM WEB SERVICE 104
As you can see, the structure of this class is similar to that of the . In this case, we have an extra private method on line 94, which sorts our mes-sage recursively according to replies. We have used a simple full stop to signify the depth of the message within the thread. For peace of mind, we’ve placed a stopper on line 99 just in case the method goes into an infinite recursive loop.
Again, our view for the controller simply takes the , loops through the data, and formats the output for HTML display. We’ve used the indent indicator to indent our messages from the left side of the browser. As we are multiplying the number of full stops by pixel value, the greater the depth, the further away it will be displayed from the left margin (see lines 7 and 9 in Listing 4-9). You can just as easily use , as that prob-ably makes it more accessible. But hey, we just wanted to make it obvious that you can use pixels instead.
Our view is shown in Listing 4-9.
Listing 4-9. Fetch Multiple Messages View (app/views/mf_fetch_messages/index.ctp)
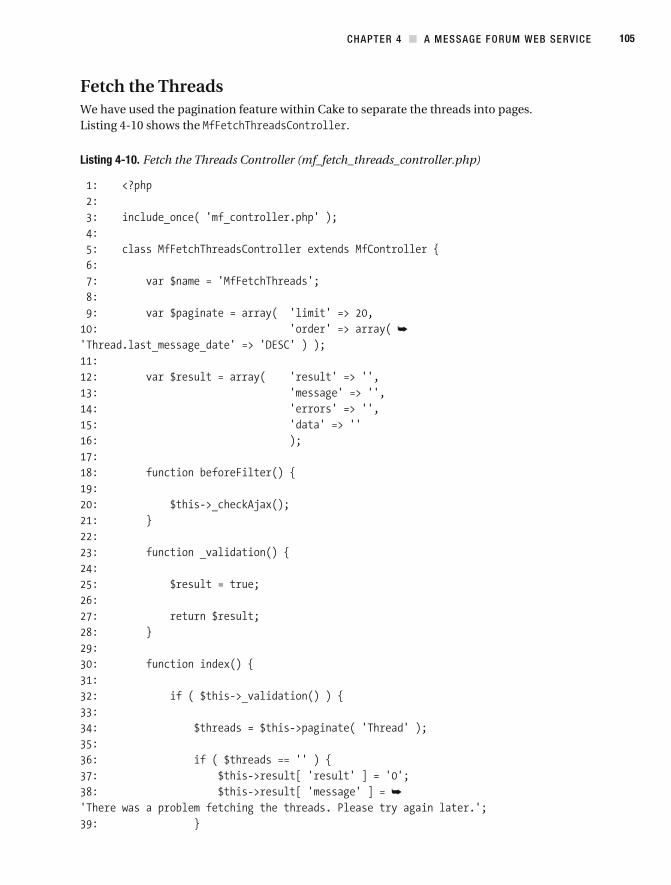
CHAPTER 4 A MESSAGE FORUM WEB SERVICE 105
Fetch the ThreadsWe have used the pagination feature within Cake to separate the threads into pages. Listing 4-10 shows the .
Listing 4-10. Fetch the Threads Controller (mf_fetch_threads_controller.php)
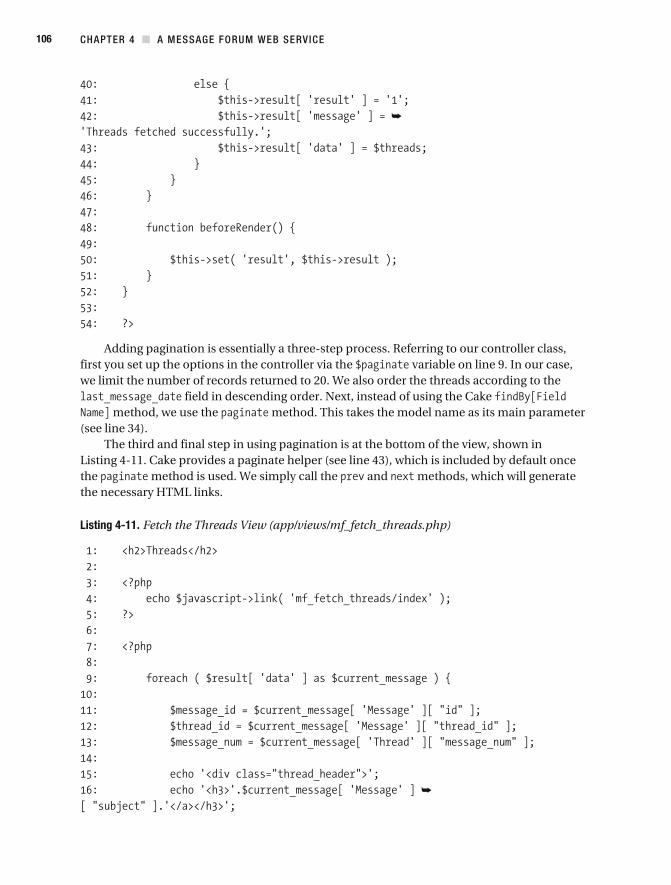
CHAPTER 4 A MESSAGE FORUM WEB SERVICE 106
Adding pagination is essentially a three- step process. Referring to our controller class, first you set up the options in the controller via the variable on line 9. In our case, we limit the number of records returned to 20. We also order the threads according to the
field in descending order. Next, instead of using the Cake method, we use the method. This takes the model name as its main parameter
(see line 34). The third and final step in using pagination is at the bottom of the view, shown in
Listing 4-11. Cake provides a paginate helper (see line 43), which is included by default once the method is used. We simply call the and methods, which will generate the necessary HTML links.
Listing 4-11. Fetch the Threads View (app/views/mf_fetch_threads.php)
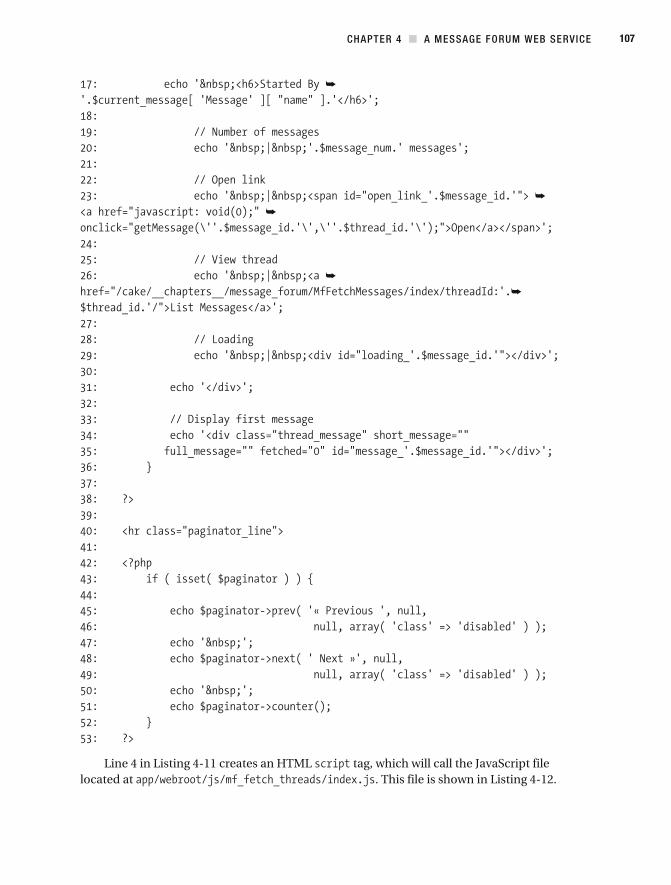
CHAPTER 4 A MESSAGE FORUM WEB SERVICE 107
Line 4 in Listing 4-11 creates an HTML tag, which will call the JavaScript file located at . This file is shown in Listing 4-12.
CHAPTER 4 A MESSAGE FORUM WEB SERVICE 108
Listing 4-12. JavaScript File Used to Support the Fetching of Threads (app/webroot/js/mf_fetch_threads/index.js)
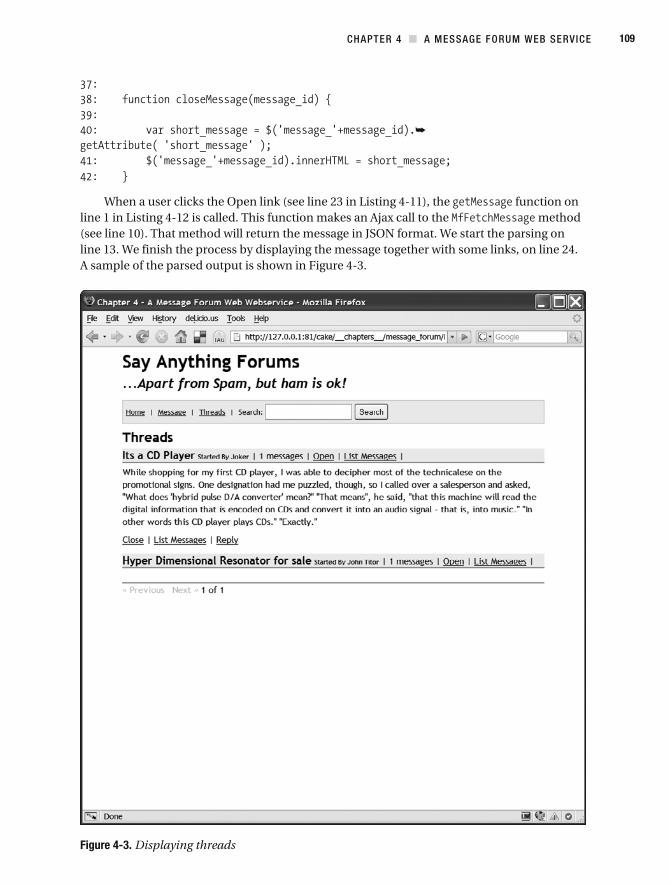
CHAPTER 4 A MESSAGE FORUM WEB SERVICE 109
When a user clicks the Open link (see line 23 in Listing 4-11), the function on line 1 in Listing 4-12 is called. This function makes an Ajax call to the method (see line 10). That method will return the message in JSON format. We start the parsing on line 13. We finish the process by displaying the message together with some links, on line 24. A sample of the parsed output is shown in Figure 4-3.
Figure 4-3. Displaying threads
CHAPTER 4 A MESSAGE FORUM WEB SERVICE 110
Post MessagesOur message posting form, shown in Listing 4-13, posts messages using Ajax by default. How-ever, if the user has JavaScript turned off, it will degrade to standard HTML posting. Because it's not part of our API method calls, its structure doesn’t mirror the API action classes. How-ever, in the future we may include this as an API method call where users can use our form instead of writing their own. They can conveniently include the form in the sidebar of their web site—in a blog, for example.
Listing 4-13. Post a Message Controller (mf_message_form_controller.php)
The view for the form is pretty sparse, as shown here:
CHAPTER 4 A MESSAGE FORUM WEB SERVICE 111
As you can see, the view for the message form is separated off into an element, as shown in Listing 4-14.
Listing 4-14. Message Posting Form as an Element (/app/views/elements/message_form.ctp)
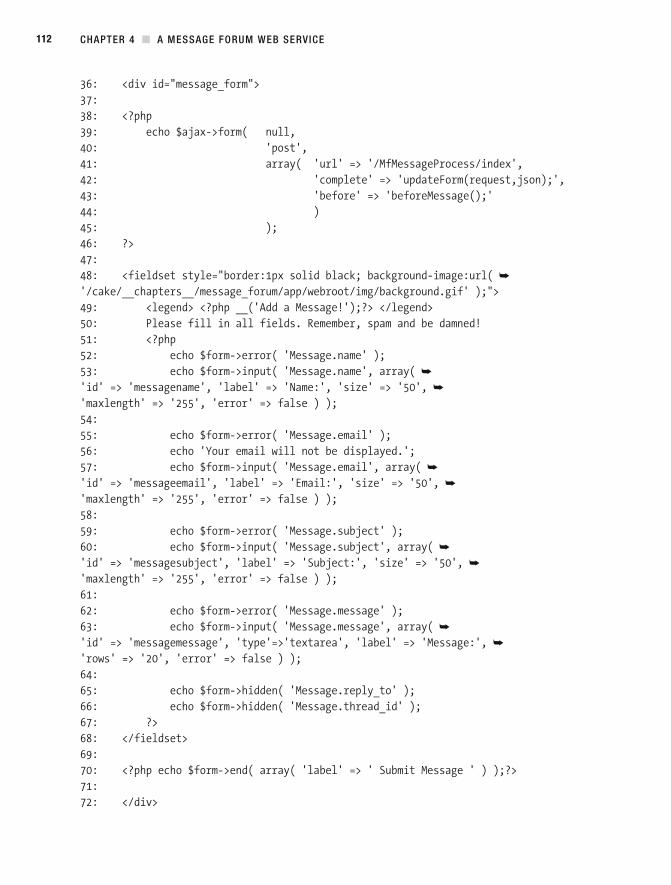
CHAPTER 4 A MESSAGE FORUM WEB SERVICE 112
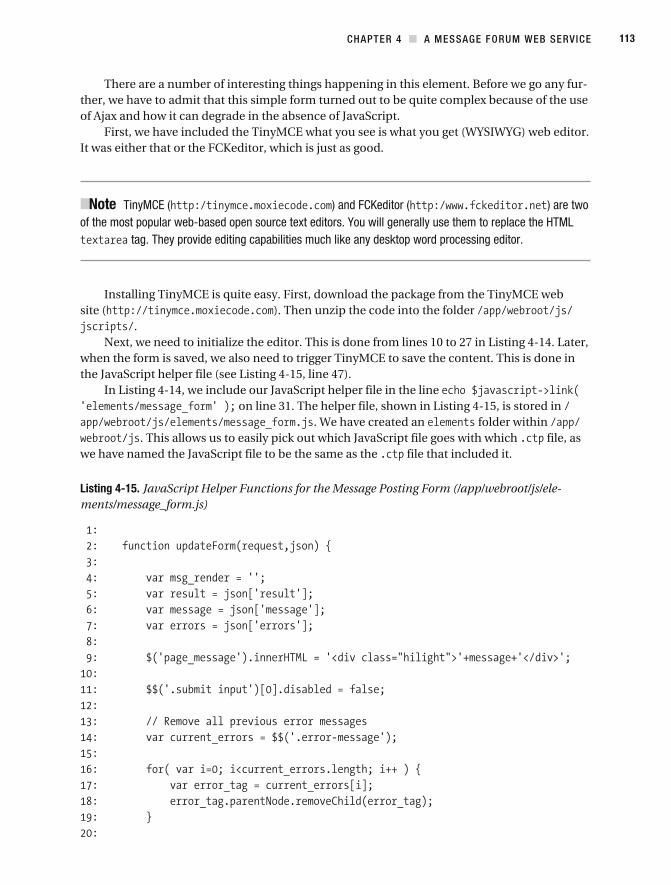
CHAPTER 4 A MESSAGE FORUM WEB SERVICE 113
There are a number of interesting things happening in this element. Before we go any fur-ther, we have to admit that this simple form turned out to be quite complex because of the use of Ajax and how it can degrade in the absence of JavaScript.
First, we have included the TinyMCE what you see is what you get (WYSIWYG) web editor. It was either that or the FCKeditor, which is just as good.
Note TinyMCE ( ) and FCKeditor ( ) are two of the most popular web- based open source text editors. You will generally use them to replace the HTML
tag. They provide editing capabilities much like any desktop word processing editor.
Installing TinyMCE is quite easy. First, download the package from the TinyMCE web site ( ). Then unzip the code into the folder
. Next, we need to initialize the editor. This is done from lines 10 to 27 in Listing 4-14. Later,
when the form is saved, we also need to trigger TinyMCE to save the content. This is done in the JavaScript helper file (see Listing 4-15, line 47).
In Listing 4-14, we include our JavaScript helper file in the line on line 31. The helper file, shown in Listing 4-15, is stored in
. We have created an folder within . This allows us to easily pick out which JavaScript file goes with which file, as
we have named the JavaScript file to be the same as the file that included it.
Listing 4-15. JavaScript Helper Functions for the Message Posting Form (/app/webroot/js/ele-ments/message_form.js)
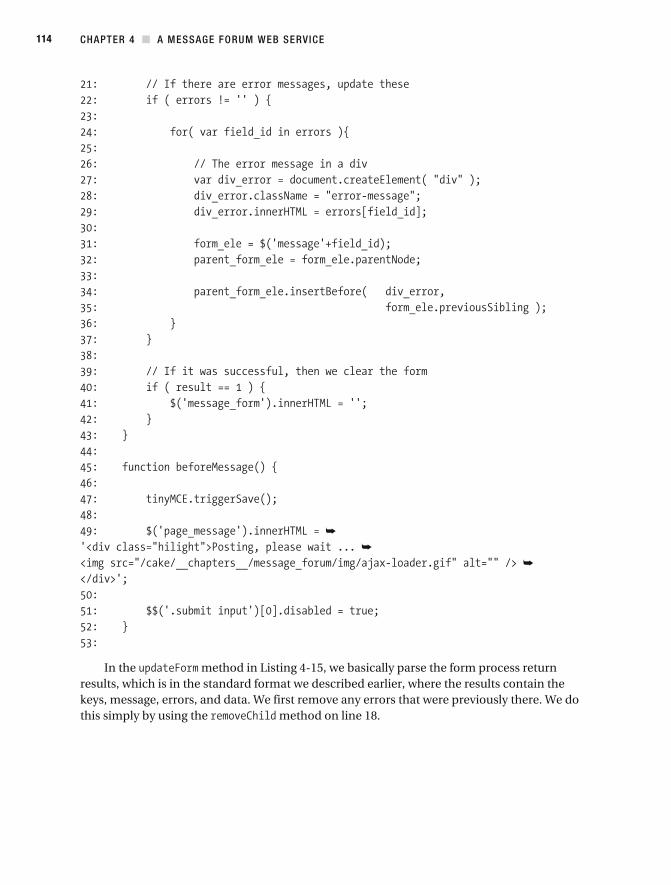
CHAPTER 4 A MESSAGE FORUM WEB SERVICE 114
In the method in Listing 4-15, we basically parse the form process return results, which is in the standard format we described earlier, where the results contain the keys, message, errors, and data. We first remove any errors that were previously there. We do this simply by using the method on line 18.
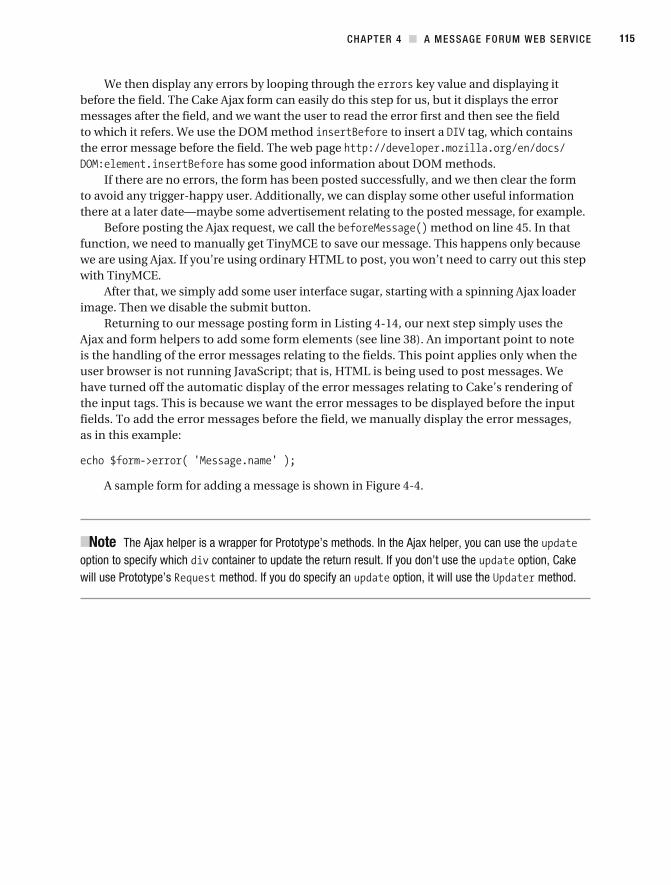
CHAPTER 4 A MESSAGE FORUM WEB SERVICE 115
We then display any errors by looping through the key value and displaying it before the field. The Cake Ajax form can easily do this step for us, but it displays the error messages after the field, and we want the user to read the error first and then see the field to which it refers. We use the DOM method to insert a tag, which contains the error message before the field. The web page
has some good information about DOM methods.If there are no errors, the form has been posted successfully, and we then clear the form
to avoid any trigger- happy user. Additionally, we can display some other useful information there at a later date—maybe some advertisement relating to the posted message, for example.
Before posting the Ajax request, we call the method on line 45. In that function, we need to manually get TinyMCE to save our message. This happens only because we are using Ajax. If you’re using ordinary HTML to post, you won’t need to carry out this step with TinyMCE.
After that, we simply add some user interface sugar, starting with a spinning Ajax loader image. Then we disable the submit button.
Returning to our message posting form in Listing 4-14, our next step simply uses the Ajax and form helpers to add some form elements (see line 38). An important point to note is the handling of the error messages relating to the fields. This point applies only when the user browser is not running JavaScript; that is, HTML is being used to post messages. We have turned off the automatic display of the error messages relating to Cake’s rendering of the input tags. This is because we want the error messages to be displayed before the input fields. To add the error messages before the field, we manually display the error messages, as in this example:
A sample form for adding a message is shown in Figure 4-4.
Note The Ajax helper is a wrapper for Prototype’s methods. In the Ajax helper, you can use the option to specify which container to update the return result. If you don’t use the option, Cake will use Prototype’s method. If you do specify an option, it will use the method.
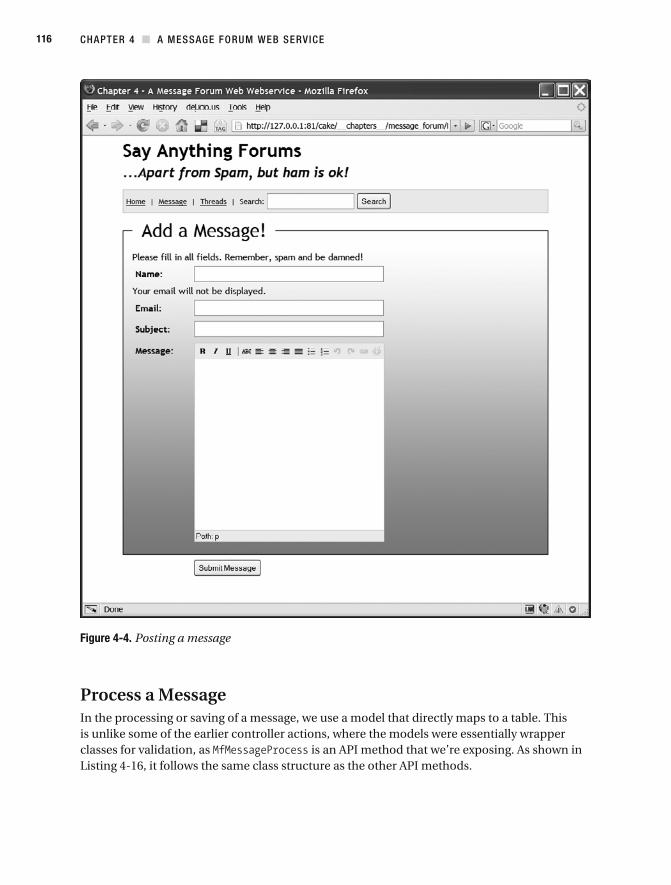
CHAPTER 4 A MESSAGE FORUM WEB SERVICE 116
Figure 4-4. Posting a message
Process a MessageIn the processing or saving of a message, we use a model that directly maps to a table. This is unlike some of the earlier controller actions, where the models were essentially wrapper classes for validation, as is an API method that we’re exposing. As shown in Listing 4-16, it follows the same class structure as the other API methods.
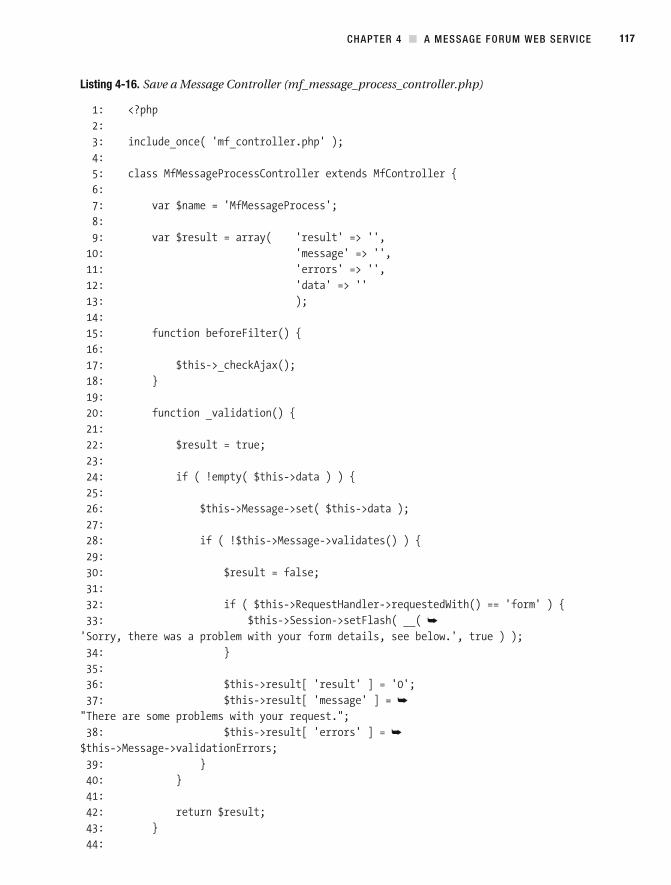
CHAPTER 4 A MESSAGE FORUM WEB SERVICE 117
Listing 4-16. Save a Message Controller (mf_message_process_controller.php)
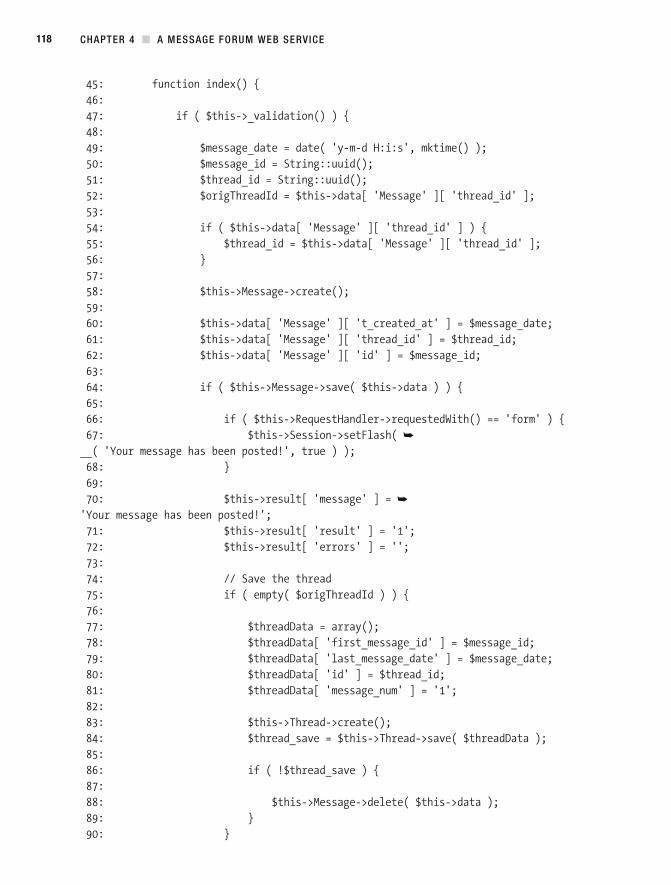
CHAPTER 4 A MESSAGE FORUM WEB SERVICE 118
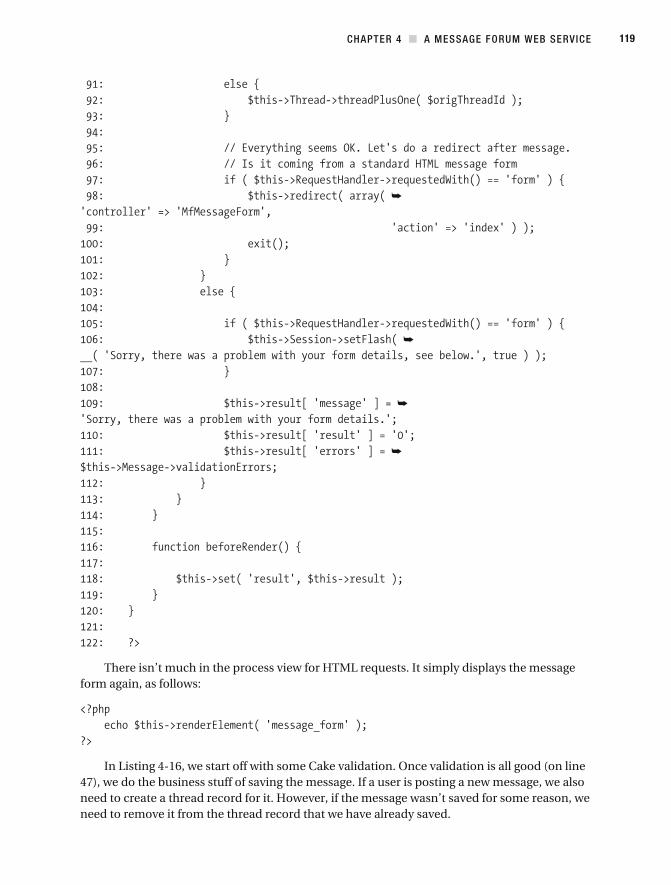
CHAPTER 4 A MESSAGE FORUM WEB SERVICE 119
There isn’t much in the process view for HTML requests. It simply displays the message form again, as follows:
In Listing 4-16, we start off with some Cake validation. Once validation is all good (on line 47), we do the business stuff of saving the message. If a user is posting a new message, we also need to create a thread record for it. However, if the message wasn’t saved for some reason, we need to remove it from the thread record that we have already saved.
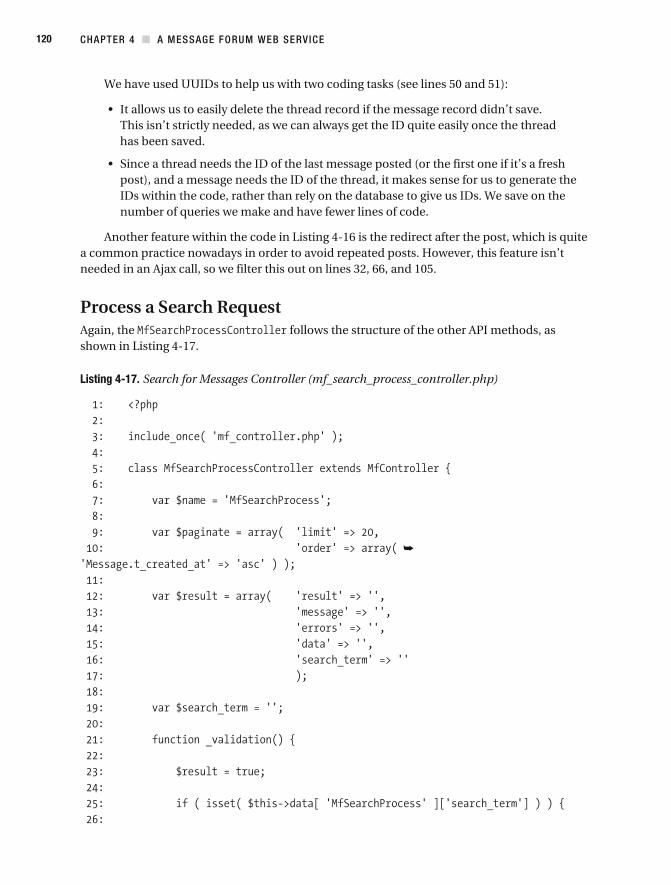
CHAPTER 4 A MESSAGE FORUM WEB SERVICE 120
We have used UUIDs to help us with two coding tasks (see lines 50 and 51):
This isn’t strictly needed, as we can always get the ID quite easily once the thread has been saved.
post), and a message needs the ID of the thread, it makes sense for us to generate the IDs within the code, rather than rely on the database to give us IDs. We save on the number of queries we make and have fewer lines of code.
Another feature within the code in Listing 4-16 is the redirect after the post, which is quite a common practice nowadays in order to avoid repeated posts. However, this feature isn’t needed in an Ajax call, so we filter this out on lines 32, 66, and 105.
Process a Search RequestAgain, the follows the structure of the other API methods, as shown in Listing 4-17.
Listing 4-17. Search for Messages Controller (mf_search_process_controller.php)
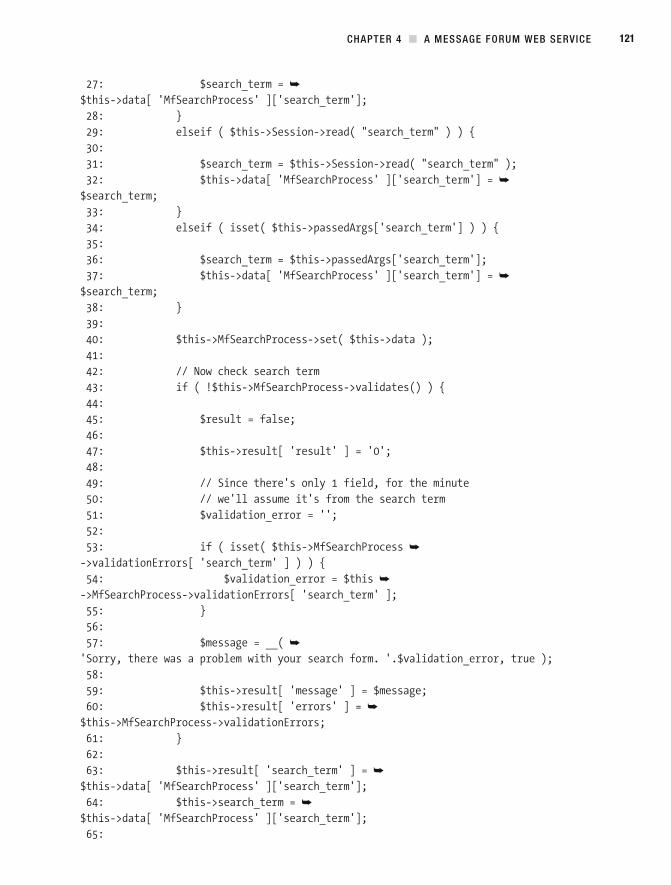
CHAPTER 4 A MESSAGE FORUM WEB SERVICE 121
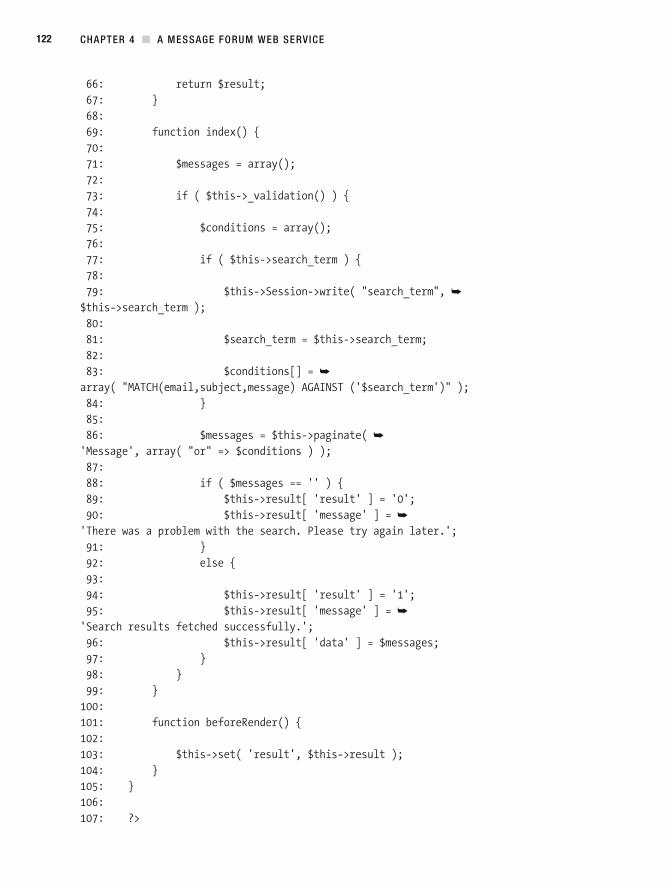
CHAPTER 4 A MESSAGE FORUM WEB SERVICE 122
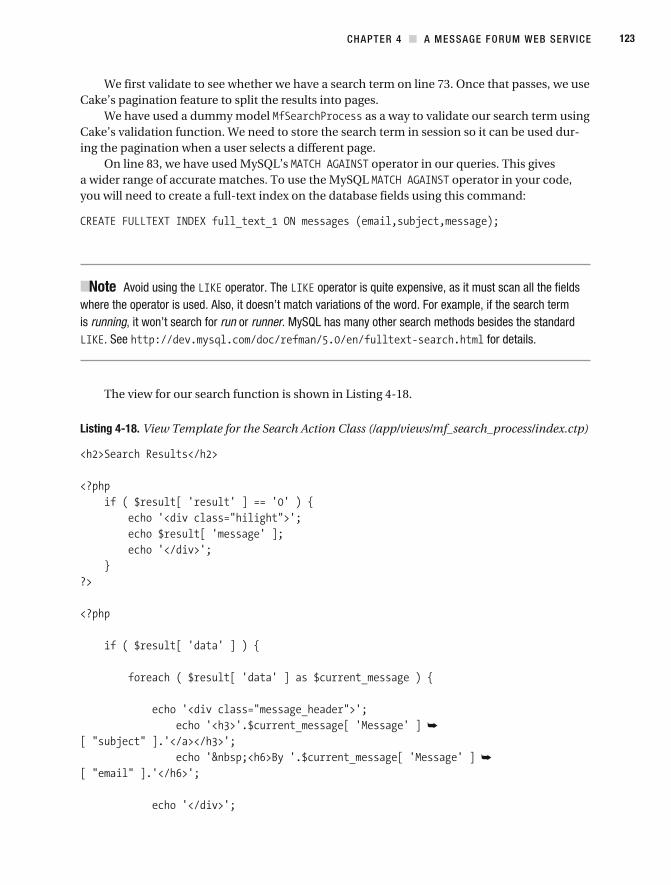
CHAPTER 4 A MESSAGE FORUM WEB SERVICE 123
We first validate to see whether we have a search term on line 73. Once that passes, we use Cake’s pagination feature to split the results into pages.
We have used a dummy model as a way to validate our search term using Cake’s validation function. We need to store the search term in session so it can be used dur-ing the pagination when a user selects a different page.
On line 83, we have used MySQL’s operator in our queries. This gives a wider range of accurate matches. To use the MySQL operator in your code, you will need to create a full- text index on the database fields using this command:
Note Avoid using the operator. The operator is quite expensive, as it must scan all the fields where the operator is used. Also, it doesn’t match variations of the word. For example, if the search term is running, it won’t search for run or runner. MySQL has many other search methods besides the standard
. See for details.
The view for our search function is shown in Listing 4-18.
Listing 4-18. View Template for the Search Action Class (/app/views/mf_search_process/index.ctp)
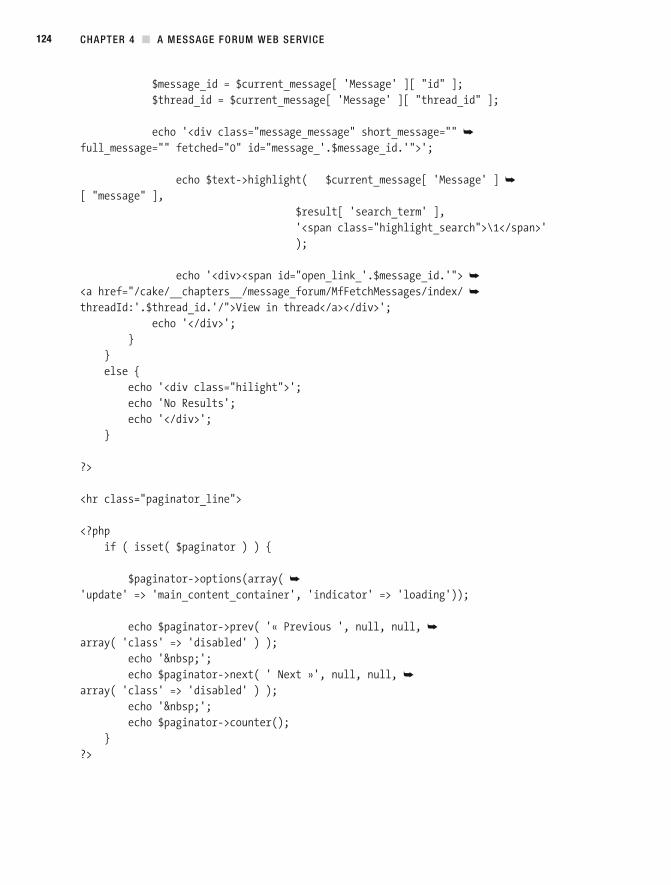
CHAPTER 4 A MESSAGE FORUM WEB SERVICE 124
CHAPTER 4 A MESSAGE FORUM WEB SERVICE 125
The view loops through the message results and formats the output. In the pagination helper methods at the bottom, we have used Ajax for the and links. In Cake, we sim-ply add the following line to Ajaxify the links:
Tip We have used the text helper to highlight our search term. But don’t forget there are also some other basic functions in the Cake API that may help you out in other situations. For example, in parts of this application, we have used the helper function instead of using or even the Cake shorthand function . See for details.
Writing the API DocumentationFor many developers, writing documentation is never a pleasant experience. But for this chap-ter, you could say it’s the end point. Without the documentation, there’s no reason for writing the API. Why bother to structure our actions around the Command pattern? It would have been easier to just write each action within one or two controllers.
The following shows the documentation for the Web Forum API as it would appear on our forum web site.
Welcome to our message forum API. We provide five different methods for you to use. All our method returns use the JSON format. Each request will return four or more keys. The standard four keys returned on every request are as follows:
: If 1 is returned, this means the request was processed successfully. If 0 is returned, then see and key.
: A human- friendly return message. This will complement the key.
: This will contain error messages relating to the result. It will be given in key/value pairs, where the is the name of the parameter and contains the error message.
: If the request returns data, it will be held in this key.
You must end all URL requests in . An example request would look like this:
CHAPTER 4 A MESSAGE FORUM WEB SERVICE 126
And the return response may look like this:
The API documentation follows.
MfFetchMessageGet one forum message.
Arguments (Required)—The message ID
HTTP Method
Syntax
ReturnStandard return keys
MfFetchMessagesNote the extra letter . Get more than one message from the forum. At present, we filter only by the thread ID.
Arguments (Required)—The thread ID
CHAPTER 4 A MESSAGE FORUM WEB SERVICE 127
HTTP Method
Syntax
ReturnStandard return keys
MfFetchThreadsGet the forum threads. This returns a set of paginated messages. The messages are sorted according to the date of the last message that was posted within a thread. Each page has 20 messages. At present, this amount is fixed.
Arguments (Optional)—The page number starting from 1. Numeric.
HTTP Method
Syntax
ReturnStandard return keys
MfMessageProcessPost a message onto the forum.
Arguments
(Optional)—Sender’s name. Maximum 255 characters.
(Required)—Sender’s e-mail address. Maximum 255 characters.
(Required) —Message subject. Maximum 255 characters.
(Optional) —Message body. Maximum 16,777,215 characters.
CHAPTER 4 A MESSAGE FORUM WEB SERVICE 128
HTTP Method
Syntax
ReturnStandard return keys
MfSearchProcessSearch for messages. The results are paginated with 20 messages per page.
Arguments
(Required)—Search term. Maximum 255 characters.
(Optional)—Page number. Numeric.
HTTP Method
Syntax
ReturnStandard return keys, plus extra key, which contains the search term
CHAPTER 4 A MESSAGE FORUM WEB SERVICE 129
SummaryIn this application, we’ve covered several Cake topics, including the use of Ajax, JSON web service returns, Cake pagination, the use of validation in a model with no associated table, and how to include the TinyMCE browser editor. The highlight of the chapter, however, was the building of a web service API.
The application still has a number of features we should add before it can be used in a commercial environment. Here are some suggestions that you can use to further develop the forum application:
or at least keep it down to a minimum. In the final chapter in this book, we implement a Captcha authentication test. You can easily integrate this into the forum application. However, this puts the responsibility on every user. If you don’t like interrupting the usability of the site, you can employ a filter, like a Bayesian text filter, instead. There are several PHP versions of this filter floating about. For other techniques, see
.
users who have posted questions.
-ever, this might be a barrier to the use of the forum, since it’s one more hurdle for users to jump over. Fewer users posting messages means fewer people will find anything interesting on the forum.
action classes like and our API action classes like more or less live within the same domain. They share
the same folders and same parent controllers. It’s as if they were part of the API, but, of course, they are not. You should separate them out, either into separate controllers or separate folders.
C H A P T E R 5
Google Maps and the Traveling Salesman
Some friends of ours are about to go on a big European vacation. They talked about how they’ve used Google Maps to help them find the location of hotels, restaurants, and local attractions. They wanted to keep friends and families updated of their progress, but didn’t want to use e-mail. Furthermore, they weren’t sure in which order to visit the places. Being far more enthusiastic than they were, we said we would write an application for them that they can use to enter their destinations, make comments, and plan their journey.
In our application, we’re going to be covering many topics. Since we’re going to be using Google Maps, client- side JavaScript will be employed. We also want to store the locations and the comments they make. Naturally, we’ll be creating some Cake models to represent these data entities. We will also be building a straightforward controller to hold the functions that will manage the locations and comments.
One of the main features of the application relates to a classic computing puzzle called the “traveling salesman problem” (or in our case, the traveling tourist problem). Namely, a salesman needs to visit a number of cities only once, but return back to the same place as where he started. Devise an algorithm to find the shortest route for the whole trip. This part of the application will be done client side using a simple algorithm, but the calculated route will be stored on the database.
Now, to get started, we’ll first talk about Google Maps.
Hello Map!Google Maps is pretty easy to use, so we can dive straight in with the Google Map equivalent of the Hello World program, as shown in Listing 5-1.
Listing 5-1. A Simple Google Maps Example
131
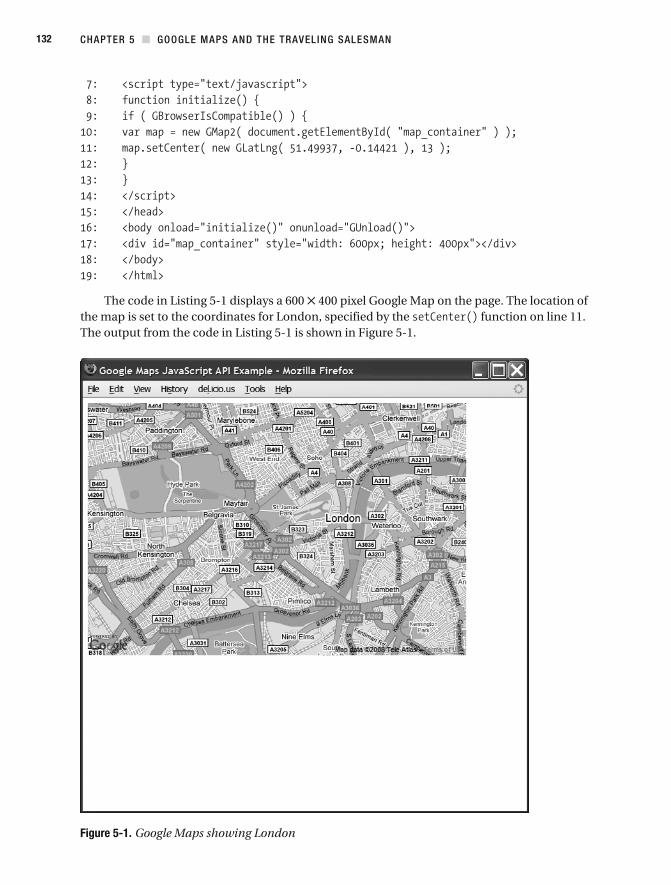
CHAPTER 5 GOOGLE MAPS AND THE TRAVELING SALESMAN 132
The code in Listing 5-1 displays a 600 400 pixel Google Map on the page. The location of the map is set to the coordinates for London, specified by the function on line 11. The output from the code in Listing 5-1 is shown in Figure 5-1.
Figure 5-1. Google Maps showing London
CHAPTER 5 GOOGLE MAPS AND THE TRAVELING SALESMAN 133
To get started, we need to include the JavaScript Google Maps API file. This is done using the tag on line 6. Within the tag, you must provide your own Google Maps API key. You can get a key (which is free) at .
Tip If you are developing on a local machine, you can still get a key. For example, you can use or , depending on which local URL you are using.
Once the page has been loaded via the event on line 16, the function is called.
The method, as defined on line 8, first checks whether we have a compatible browser. If we do, we then go ahead and create an object that will represent a map on the web page. This is done using the class. Additionally, we also need to provide an area where it can display the map; in our case, it’s a tag with an ID called on line 17.
We’re not quite finished yet though. In order for a map to be displayed, we need to tell the map object to display a location, and this is done using the function on line 11, which sets the location and displays the map at the same time. And that’s it! Wasn’t that easy?
When the browser is closed or when a different page is brought up, the event calls . This Google Map function closes down unwanted connections and is used to avoid memory leaks.
Google Maps ExplainedGoogle Maps is almost exclusively a client- side JavaScript API. Although you can make some server- side calls, that is not encouraged. After all, Google collects better statistics if the calls are made from the browser rather than from the server.
Note To effectively use Google Maps, you need to have some basic knowledge of JavaScript, particularly the object- oriented areas of the language. Two sites to get you started are
and .
Before we start, let’s go over the main features of the API that are relevant to our application.
GeocodingGeocoding is the process of converting textual locations such as street addresses or place names into geographic coordinates. This is important for a number of reasons. We can locate exact positions on a map, enabling us to place markers accurately. It eliminates confusion where two or more places have the same name.
The Google Maps API includes a class that provides us with a geocoding service. This is the class.
CHAPTER 5 GOOGLE MAPS AND THE TRAVELING SALESMAN 134
Google Map EventsWithin browsers, JavaScript can be programmed to execute code depending on certain events. In traditional terminology, this is called event- driven programming. These events come in many forms: they can be mouse- based, keyboard- based, or even based on other events, such as when a page is completely loaded.
Event-based programming is particularly important in an Ajax environment. Since calls are mostly asynchronous, things don’t happen in a nice serial fashion.
Note Before the use of Ajax, just about every activity on a browser was synchronous. Users had to wait for feedback whenever they generated an event, such as by clicking a link or submitting a form. Essentially, you could make only one call to the server at any one time. With the use of in Ajax, we can now make many calls to the server within a single web page, which makes them all asynchronous. Events can happen independently of each other.
Google Maps defines its own specialized events, which are handled by the API itself. These are separate from the DOM events within a browser, which are more generic. For example, a event can be attached to any instance of a map, so when a user clicks a map, a call is made to a function, which opens a window with information regarding the location that the user has clicked and additionally stores the coordinates of the location with a call to the server using Ajax. Map events are handled by the object. We will register events using the
static method.
Map Interface ElementsIn the Google Maps API, you can add interface control elements, which allow you to interact with the map. Examples include buttons that you can use to move the map around, instead of using the mouse, and a sliding control bar to zoom in and out of the map. In Google Maps terminology, these are known as controls. All the control elements subclass the class. You can define your own control by subclassing this class. For example, you can create a but-ton that makes an Ajax call to your database server, fetching any journey near that location.
OverlaysObjects that move with the map are called overlays. These can be pushpins marking the loca-tion of a point or graphical lines that show route directions. The API provides several built- in overlay classes, which are listed in Table 5-1.
Markers are interactive in that they can be dragged across the map and placed in a new location. Each marker has an icon attached to it. You can define your own icon or use the default one.
A large number of markers can slow down the display of the map. As a result, the API has a marker manager class called .
CHAPTER 5 GOOGLE MAPS AND THE TRAVELING SALESMAN 135
Table 5-1. Map Overlay Objects
Overlay Description
This class is used to mark a point on the map.
This class is used to lay down lines on the map. There is also a class, where the lines form a closed area.
With this class, as well as drawing lines on the map, you can add images on top of them.
With this class, the map itself is an overlay. You can modify the map itself with your own version of the map. However, you probably won’t be using this very often. The pop- up bubble speech window is a special overlay; only one can exist in any one map instance.
Driving DirectionsOne useful feature in the Google Maps API is the ability to map out a travel route via several locations. These routes are then marked in blue on the map. This is done via the class. A very useful feature is the ability of the class to take locations either as textual names or latitude/longitude coordinate points. As an example, Listing 5-2 shows plotting a route from New York to Anchorage. Figure 5-2 shows the route map itself.
Listing 5-2. Using the Google Maps GDirections Class to Find a Route
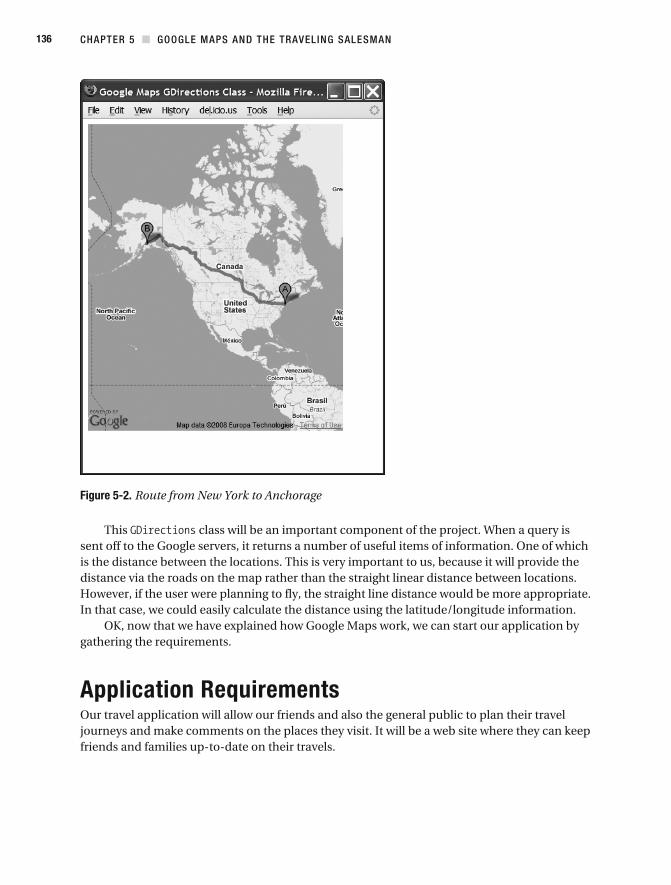
CHAPTER 5 GOOGLE MAPS AND THE TRAVELING SALESMAN 136
Figure 5-2. Route from New York to Anchorage
This class will be an important component of the project. When a query is sent off to the Google servers, it returns a number of useful items of information. One of which is the distance between the locations. This is very important to us, because it will provide the distance via the roads on the map rather than the straight linear distance between locations. However, if the user were planning to fly, the straight line distance would be more appropriate. In that case, we could easily calculate the distance using the latitude/longitude information.
OK, now that we have explained how Google Maps work, we can start our application by gathering the requirements.
Application RequirementsOur travel application will allow our friends and also the general public to plan their travel journeys and make comments on the places they visit. It will be a web site where they can keep friends and families up-to- date on their travels.
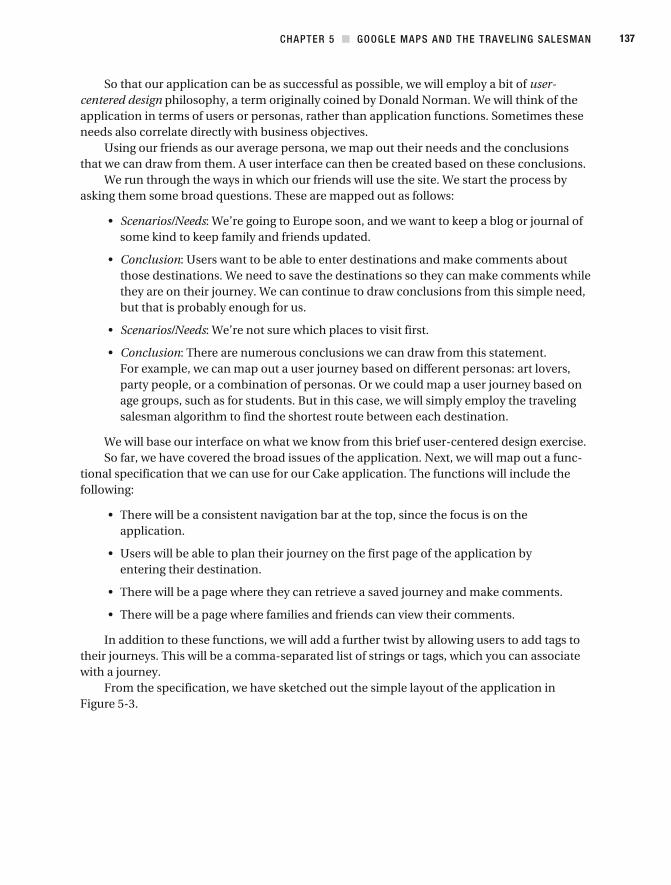
CHAPTER 5 GOOGLE MAPS AND THE TRAVELING SALESMAN 137
So that our application can be as successful as possible, we will employ a bit of user- centered design philosophy, a term originally coined by Donald Norman. We will think of the application in terms of users or personas, rather than application functions. Sometimes these needs also correlate directly with business objectives.
Using our friends as our average persona, we map out their needs and the conclusions that we can draw from them. A user interface can then be created based on these conclusions.
We run through the ways in which our friends will use the site. We start the process by asking them some broad questions. These are mapped out as follows:
Scenarios/Needs: We’re going to Europe soon, and we want to keep a blog or journal of some kind to keep family and friends updated.
Conclusion: Users want to be able to enter destinations and make comments about those destinations. We need to save the destinations so they can make comments while they are on their journey. We can continue to draw conclusions from this simple need, but that is probably enough for us.
Scenarios/Needs: We’re not sure which places to visit first.
Conclusion: There are numerous conclusions we can draw from this statement. For example, we can map out a user journey based on different personas: art lovers, party people, or a combination of personas. Or we could map a user journey based on age groups, such as for students. But in this case, we will simply employ the traveling salesman algorithm to find the shortest route between each destination.
We will base our interface on what we know from this brief user- centered design exercise.So far, we have covered the broad issues of the application. Next, we will map out a func-
tional specification that we can use for our Cake application. The functions will include the following:
application.
entering their destination.
In addition to these functions, we will add a further twist by allowing users to add tags to their journeys. This will be a comma- separated list of strings or tags, which you can associate with a journey.
From the specification, we have sketched out the simple layout of the application in Figure 5-3.
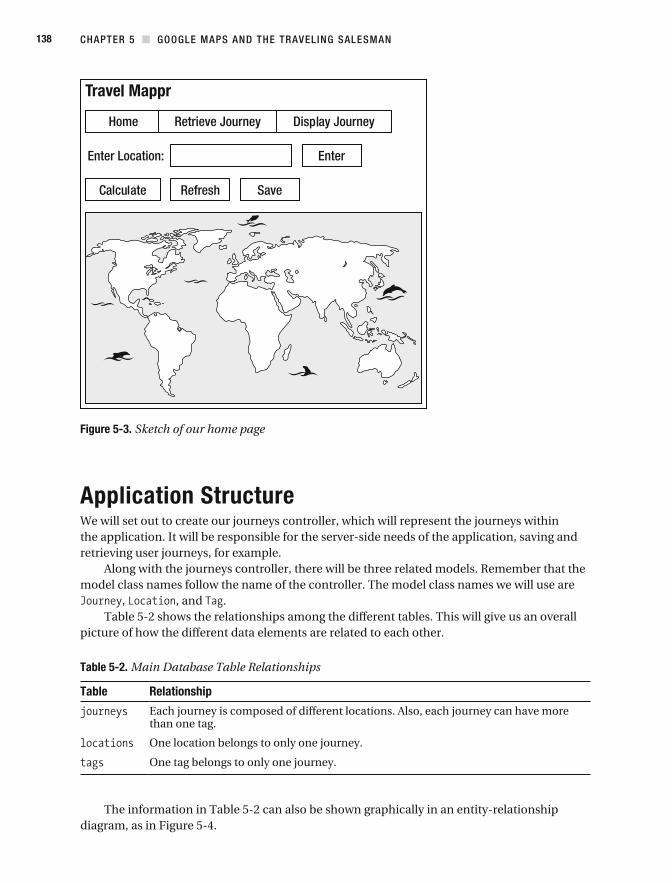
CHAPTER 5 GOOGLE MAPS AND THE TRAVELING SALESMAN 138
Figure 5-3. Sketch of our home page
Application StructureWe will set out to create our journeys controller, which will represent the journeys within the application. It will be responsible for the server- side needs of the application, saving and retrieving user journeys, for example.
Along with the journeys controller, there will be three related models. Remember that the model class names follow the name of the controller. The model class names we will use are
, , and . Table 5-2 shows the relationships among the different tables. This will give us an overall
picture of how the different data elements are related to each other.
Table 5-2. Main Database Table Relationships
Table Relationship
Each journey is composed of different locations. Also, each journey can have more than one tag.
One location belongs to only one journey.
One tag belongs to only one journey.
The information in Table 5-2 can also be shown graphically in an entity- relationship diagram, as in Figure 5-4.
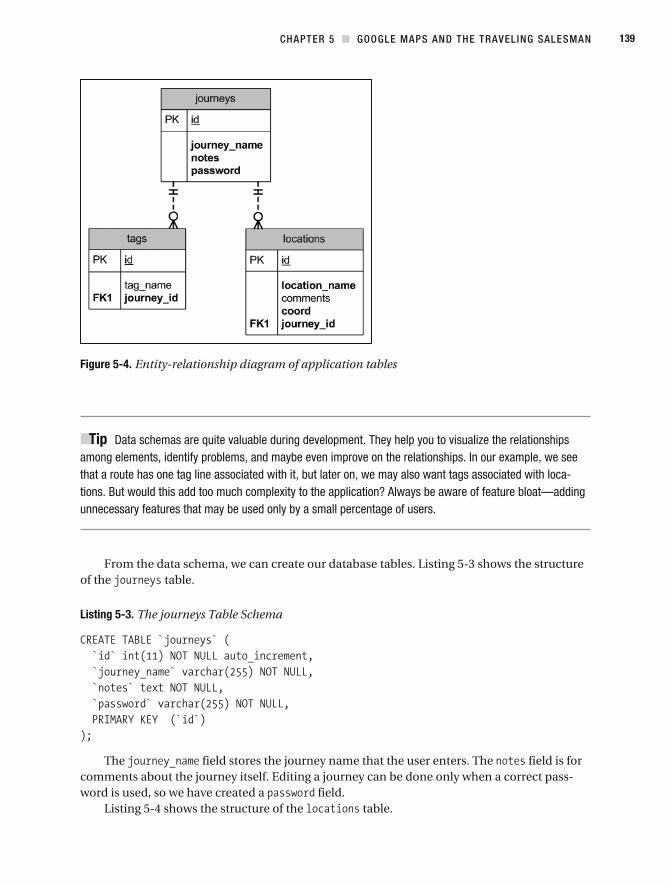
CHAPTER 5 GOOGLE MAPS AND THE TRAVELING SALESMAN 139
Figure 5-4. Entity- relationship diagram of application tables
Tip Data schemas are quite valuable during development. They help you to visualize the relationships among elements, identify problems, and maybe even improve on the relationships. In our example, we see that a route has one tag line associated with it, but later on, we may also want tags associated with loca-tions. But would this add too much complexity to the application? Always be aware of feature bloat—adding unnecessary features that may be used only by a small percentage of users.
From the data schema, we can create our database tables. Listing 5-3 shows the structure of the table.
Listing 5-3. The journeys Table Schema
The field stores the journey name that the user enters. The field is for comments about the journey itself. Editing a journey can be done only when a correct pass-word is used, so we have created a field.
Listing 5-4 shows the structure of the table.
CHAPTER 5 GOOGLE MAPS AND THE TRAVELING SALESMAN 140
Listing 5-4. The locations Table Schema
The name of the location that the user enters is held in . The field stores the comments for a particular location. The field is longitude and latitude infor-mation taken from geocoding the location name. Finally, is the foreign key to the
table. Listing 5-5 shows the table structure.
Listing 5-5. The tags Table Schema
The table is pretty simple. The field holds a particular tag name for a journey. The field is the foreign key to the table.
Cake ModelsFrom the schema in Listings 5- 3, 5- 4, and 5- 5, we created the Cake models, as shown in Listings 5- 6, 5- 7, and 5- 8.
Listing 5-6. The Journey Model (/app/models/journey.php)
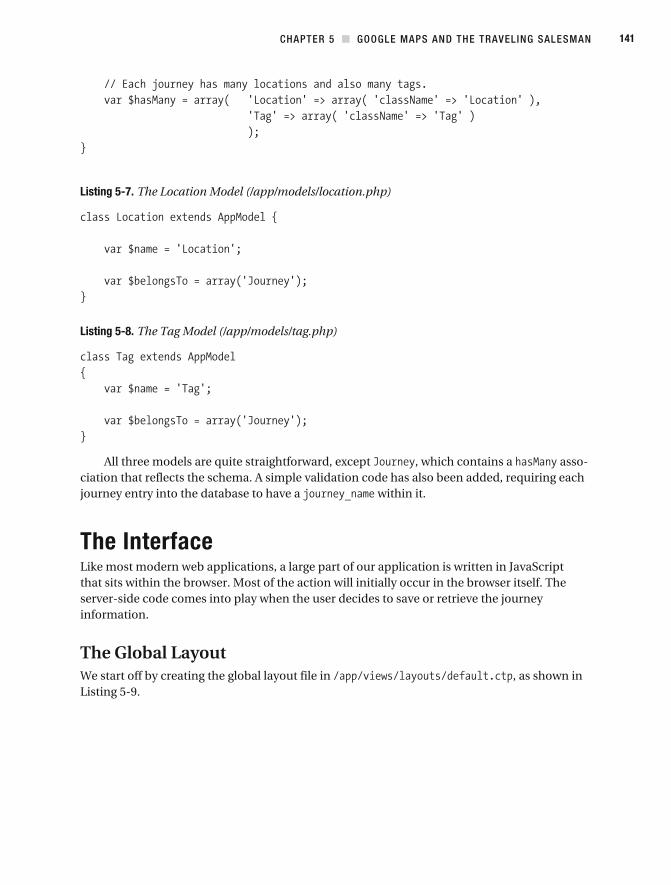
CHAPTER 5 GOOGLE MAPS AND THE TRAVELING SALESMAN 141
Listing 5-7. The Location Model (/app/models/location.php)
Listing 5-8. The Tag Model (/app/models/tag.php)
All three models are quite straightforward, except , which contains a asso-ciation that reflects the schema. A simple validation code has also been added, requiring each journey entry into the database to have a within it.
The InterfaceLike most modern web applications, a large part of our application is written in JavaScript that sits within the browser. Most of the action will initially occur in the browser itself. The server- side code comes into play when the user decides to save or retrieve the journey information.
The Global LayoutWe start off by creating the global layout file in , as shown in Listing 5-9.
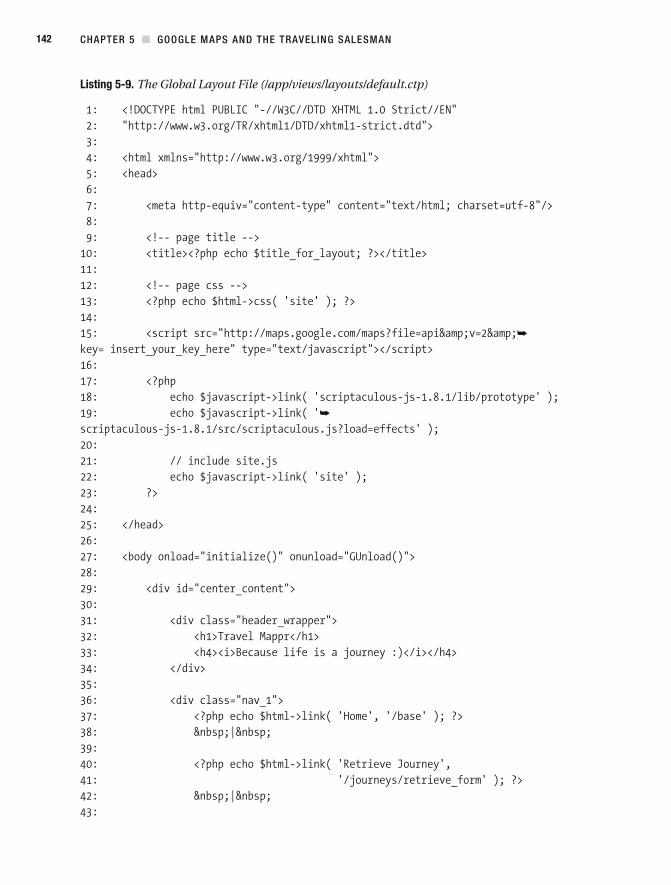
CHAPTER 5 GOOGLE MAPS AND THE TRAVELING SALESMAN 142
Listing 5-9. The Global Layout File (/app/views/layouts/default.ctp)
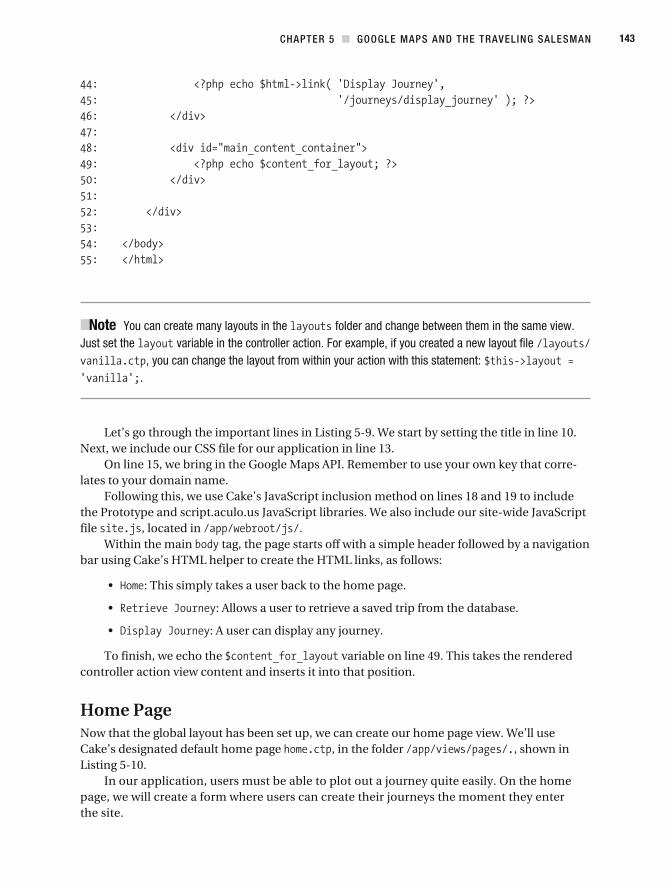
CHAPTER 5 GOOGLE MAPS AND THE TRAVELING SALESMAN 143
Note You can create many layouts in the folder and change between them in the same view. Just set the variable in the controller action. For example, if you created a new layout file
, you can change the layout from within your action with this statement: .
Let’s go through the important lines in Listing 5-9. We start by setting the title in line 10. Next, we include our CSS file for our application in line 13.
On line 15, we bring in the Google Maps API. Remember to use your own key that corre-lates to your domain name.
Following this, we use Cake’s JavaScript inclusion method on lines 18 and 19 to include the Prototype and script.aculo.us JavaScript libraries. We also include our site- wide JavaScript file , located in .
Within the main tag, the page starts off with a simple header followed by a navigation bar using Cake’s HTML helper to create the HTML links, as follows:
: This simply takes a user back to the home page.
: Allows a user to retrieve a saved trip from the database.
: A user can display any journey.
To finish, we echo the variable on line 49. This takes the rendered controller action view content and inserts it into that position.
Home PageNow that the global layout has been set up, we can create our home page view. We’ll use Cake’s designated default home page , in the folder , shown in Listing 5-10.
In our application, users must be able to plot out a journey quite easily. On the home page, we will create a form where users can create their journeys the moment they enter the site.
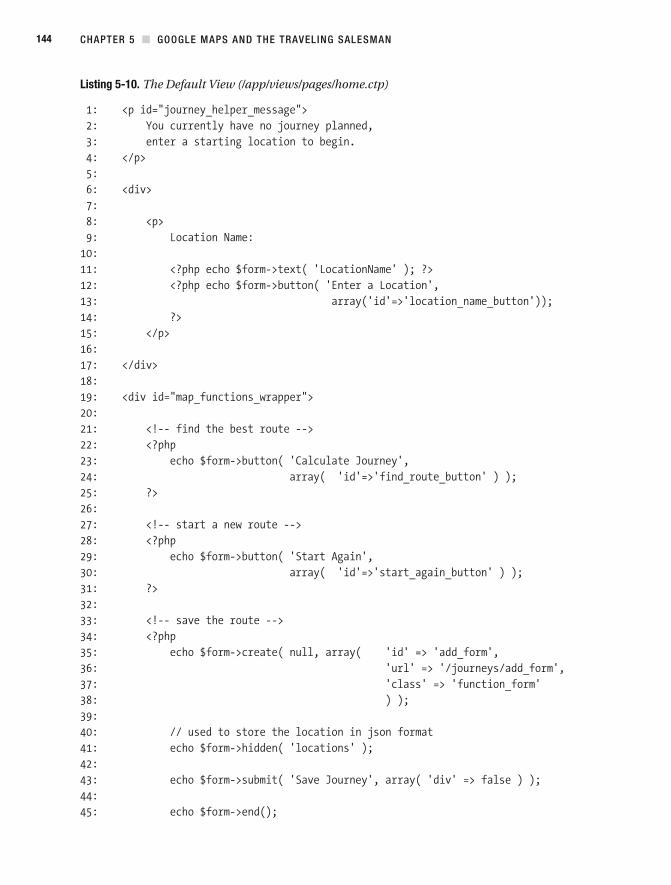
CHAPTER 5 GOOGLE MAPS AND THE TRAVELING SALESMAN 144
Listing 5-10. The Default View (/app/views/pages/home.ctp)
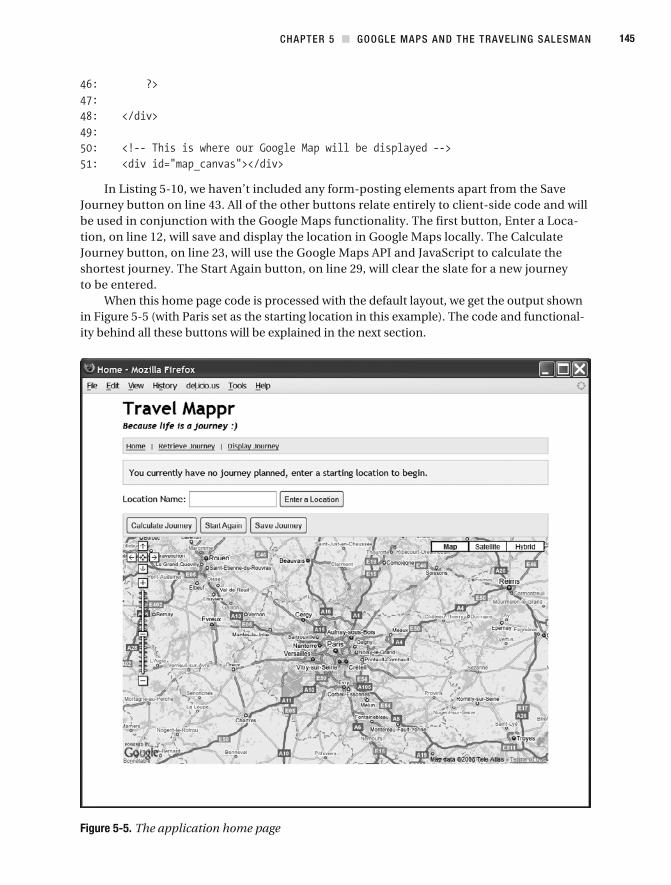
CHAPTER 5 GOOGLE MAPS AND THE TRAVELING SALESMAN 145
In Listing 5-10, we haven’t included any form- posting elements apart from the Save Journey button on line 43. All of the other buttons relate entirely to client- side code and will be used in conjunction with the Google Maps functionality. The first button, Enter a Loca-tion, on line 12, will save and display the location in Google Maps locally. The Calculate Journey button, on line 23, will use the Google Maps API and JavaScript to calculate the shortest journey. The Start Again button, on line 29, will clear the slate for a new journey to be entered.
When this home page code is processed with the default layout, we get the output shown in Figure 5-5 (with Paris set as the starting location in this example). The code and functional-ity behind all these buttons will be explained in the next section.
Figure 5-5. The application home page
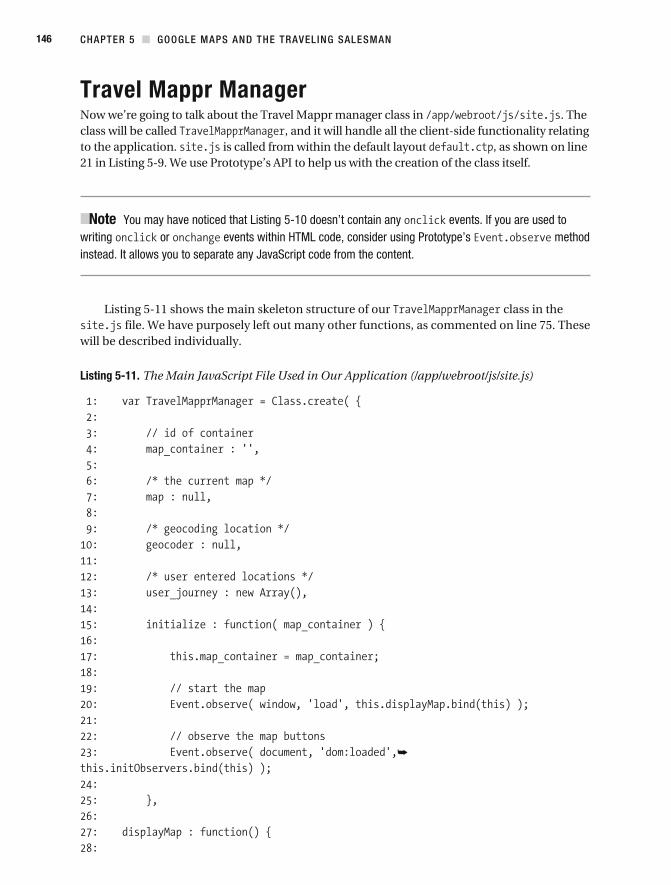
CHAPTER 5 GOOGLE MAPS AND THE TRAVELING SALESMAN 146
Travel Mappr ManagerNow we’re going to talk about the Travel Mappr manager class in . The class will be called , and it will handle all the client- side functionality relating to the application. is called from within the default layout , as shown on line 21 in Listing 5-9. We use Prototype’s API to help us with the creation of the class itself.
Note You may have noticed that Listing 5-10 doesn’t contain any events. If you are used to writing or events within HTML code, consider using Prototype’s method instead. It allows you to separate any JavaScript code from the content.
Listing 5-11 shows the main skeleton structure of our class in the file. We have purposely left out many other functions, as commented on line 75. These
will be described individually.
Listing 5-11. The Main JavaScript File Used in Our Application (/app/webroot/js/site.js)
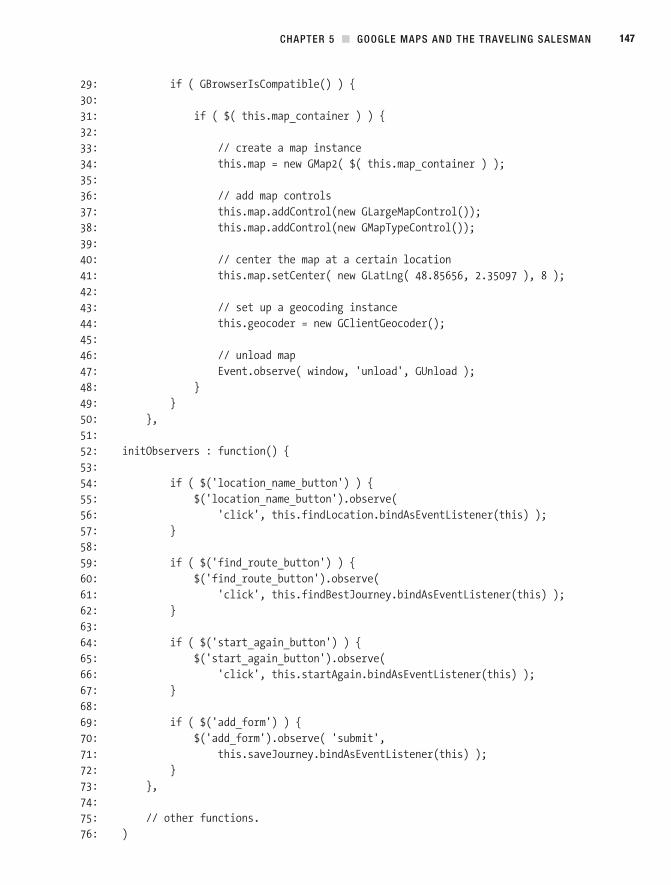
CHAPTER 5 GOOGLE MAPS AND THE TRAVELING SALESMAN 147
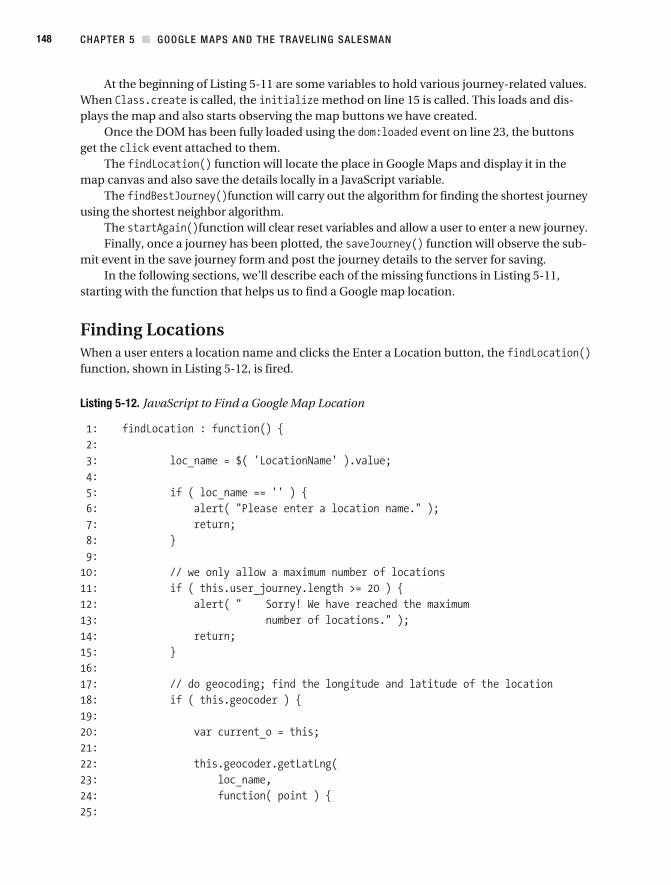
CHAPTER 5 GOOGLE MAPS AND THE TRAVELING SALESMAN 148
At the beginning of Listing 5-11 are some variables to hold various journey- related values. When is called, the method on line 15 is called. This loads and dis-plays the map and also starts observing the map buttons we have created.
Once the DOM has been fully loaded using the event on line 23, the buttons get the event attached to them.
The function will locate the place in Google Maps and display it in the map canvas and also save the details locally in a JavaScript variable.
The function will carry out the algorithm for finding the shortest journey using the shortest neighbor algorithm.
The function will clear reset variables and allow a user to enter a new journey.Finally, once a journey has been plotted, the function will observe the sub-
mit event in the save journey form and post the journey details to the server for saving.In the following sections, we’ll describe each of the missing functions in Listing 5-11,
starting with the function that helps us to find a Google map location.
Finding LocationsWhen a user enters a location name and clicks the Enter a Location button, the function, shown in Listing 5-12, is fired.
Listing 5-12. JavaScript to Find a Google Map Location
CHAPTER 5 GOOGLE MAPS AND THE TRAVELING SALESMAN 149
This function starts with a couple of error- handling lines. Then we make the geocoding API call on line 22. If the Google API call finds the location, we store it using our function on line 44. We simply hold the location name and coor-dinate in an array and push it into a global array. Finally, we set the map to show the location and add a pushpin marker, starting from line 35.
Figure 5-6 shows an example of what a user should see after entering a location.In the next section, we’ll look at the algorithm for our traveling salesman/tourist problem.
It’s the shortest distance between locations. Even so, it’s pretty long, so you may want to jump to the next section and come back to the algorithm later.
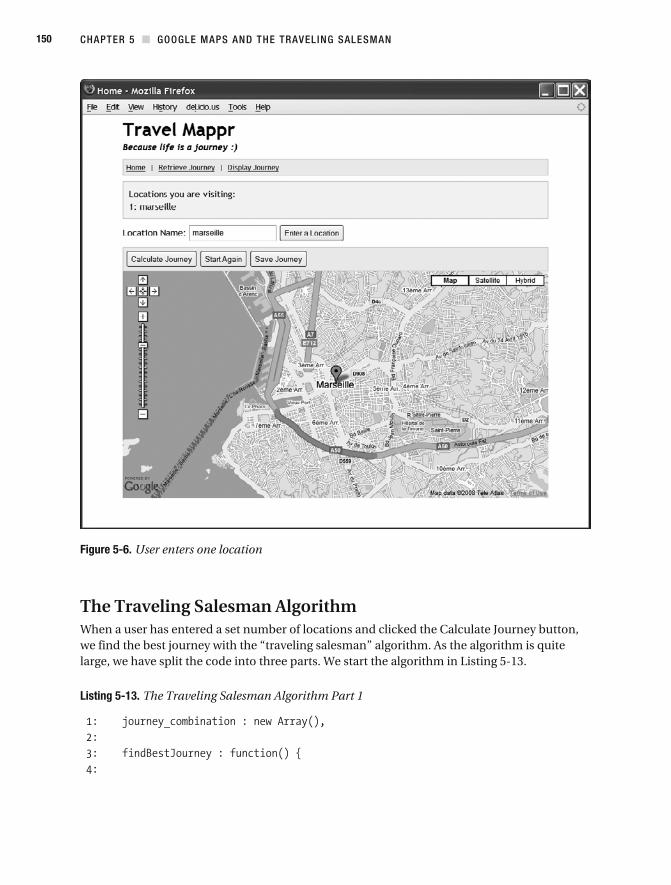
CHAPTER 5 GOOGLE MAPS AND THE TRAVELING SALESMAN 150
Figure 5-6. User enters one location
The Traveling Salesman AlgorithmWhen a user has entered a set number of locations and clicked the Calculate Journey button, we find the best journey with the “traveling salesman” algorithm. As the algorithm is quite large, we have split the code into three parts. We start the algorithm in Listing 5-13.
Listing 5-13. The Traveling Salesman Algorithm Part 1

CHAPTER 5 GOOGLE MAPS AND THE TRAVELING SALESMAN 151
The variable at the top of Listing 5-13 holds all the journey combinations that the user has entered. The function starts on line 3 with a couple of lines of error checking. Next, we work out all the combinations between the locations on line 17 to line 35. After that, we call on line 37, which in turn makes the Google geocoding requests to fetch the distance for each pair of locations in . Once that is done, we can start calculating the shortest distances between locations.
We continue from the previous listing with Listing 5-14.
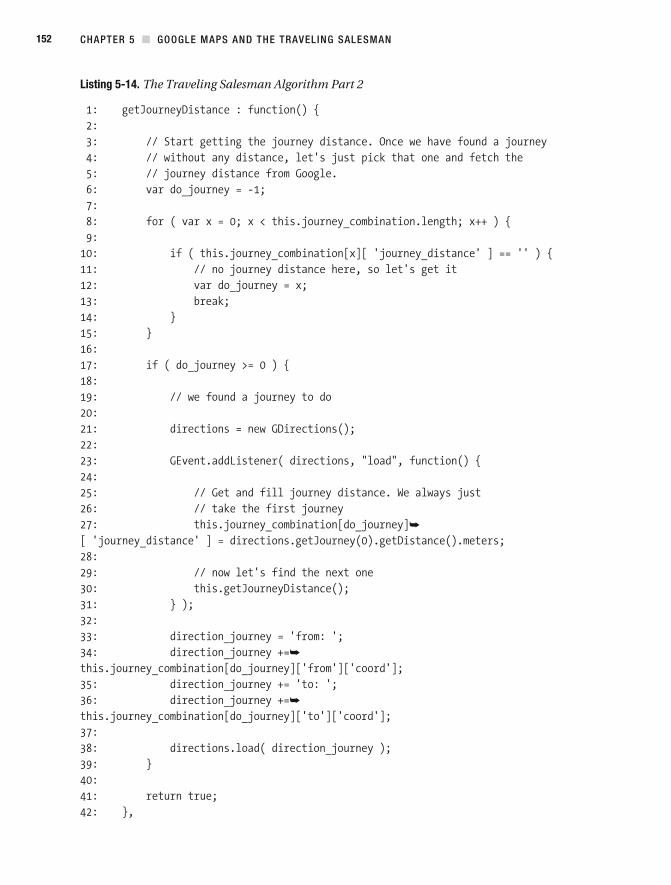
CHAPTER 5 GOOGLE MAPS AND THE TRAVELING SALESMAN 152
Listing 5-14. The Traveling Salesman Algorithm Part 2
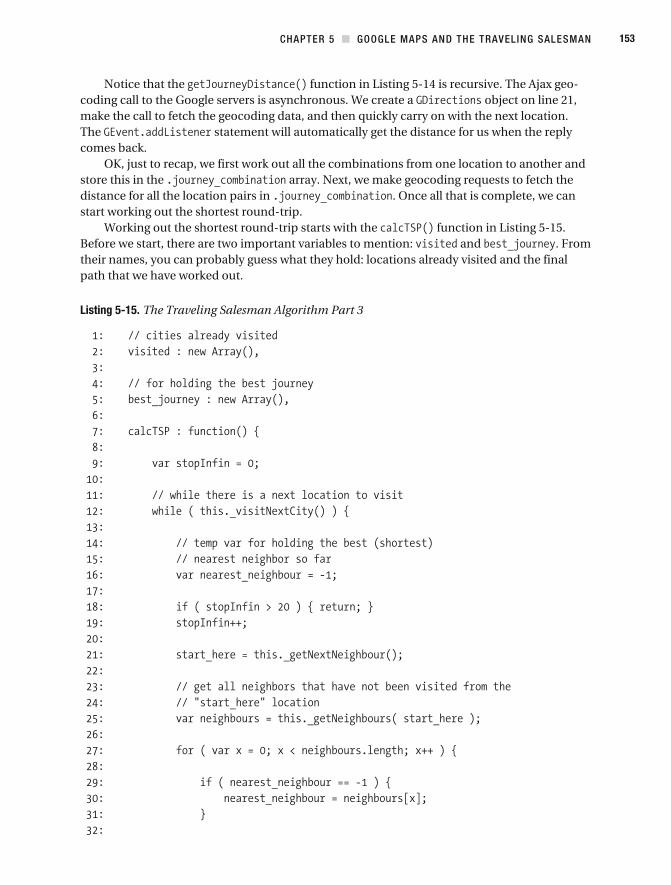
CHAPTER 5 GOOGLE MAPS AND THE TRAVELING SALESMAN 153
Notice that the function in Listing 5-14 is recursive. The Ajax geo-coding call to the Google servers is asynchronous. We create a object on line 21, make the call to fetch the geocoding data, and then quickly carry on with the next location. The statement will automatically get the distance for us when the reply comes back.
OK, just to recap, we first work out all the combinations from one location to another and store this in the array. Next, we make geocoding requests to fetch the distance for all the location pairs in . Once all that is complete, we can start working out the shortest round- trip.
Working out the shortest round- trip starts with the function in Listing 5-15. Before we start, there are two important variables to mention: and . From their names, you can probably guess what they hold: locations already visited and the final path that we have worked out.
Listing 5-15. The Traveling Salesman Algorithm Part 3
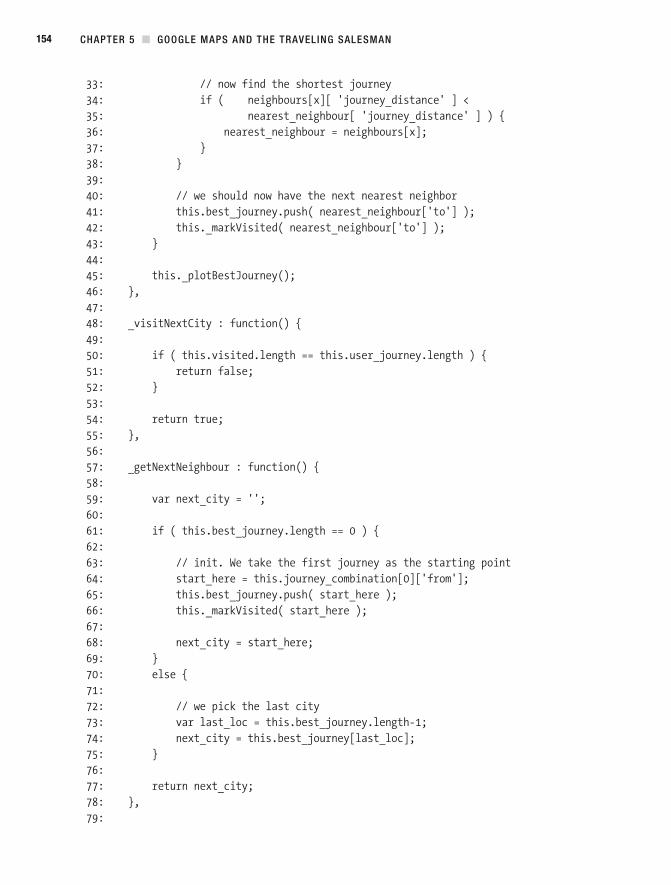
CHAPTER 5 GOOGLE MAPS AND THE TRAVELING SALESMAN 154
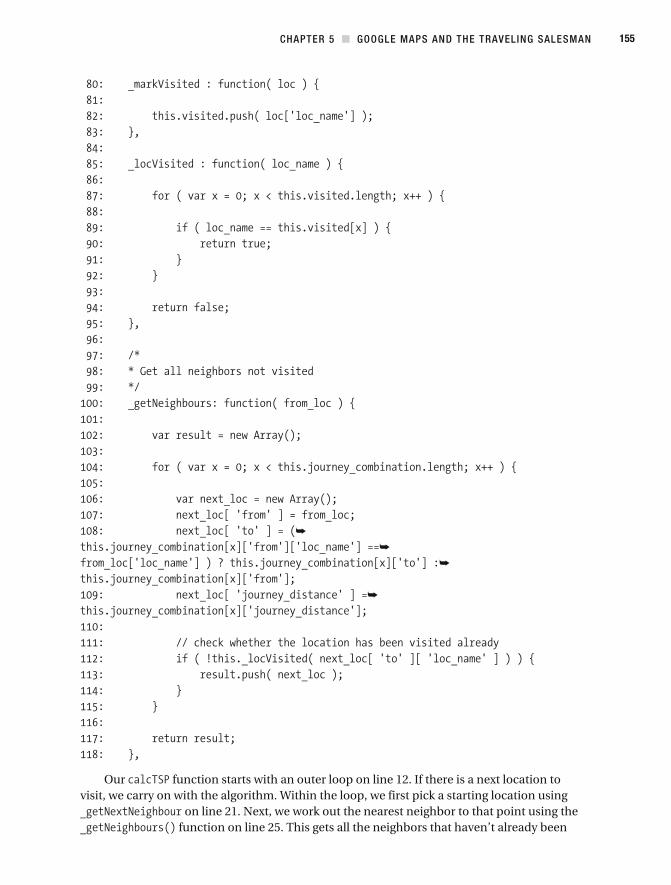
CHAPTER 5 GOOGLE MAPS AND THE TRAVELING SALESMAN 155
Our function starts with an outer loop on line 12. If there is a next location to visit, we carry on with the algorithm. Within the loop, we first pick a starting location using
on line 21. Next, we work out the nearest neighbor to that point using the function on line 25. This gets all the neighbors that haven’t already been
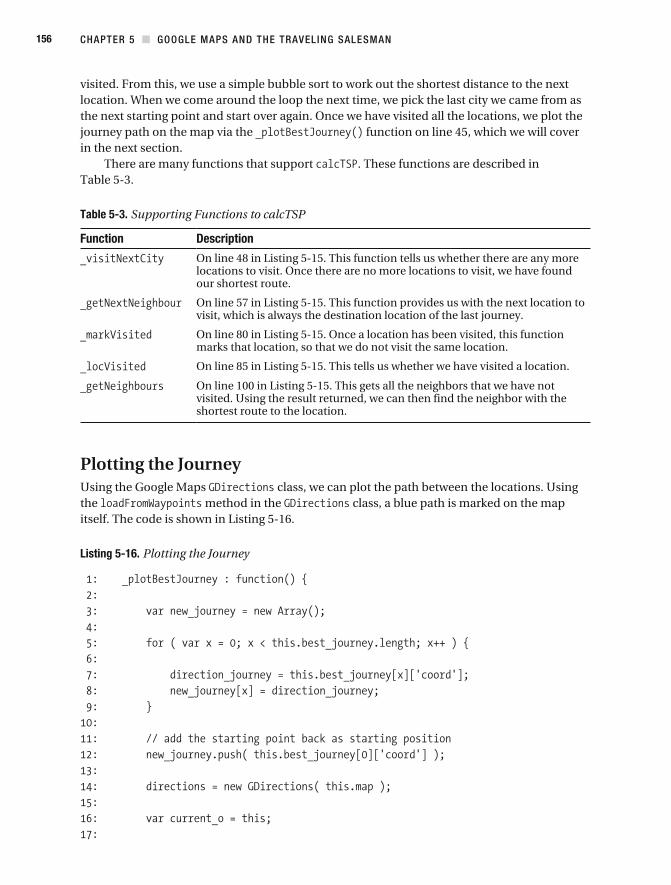
CHAPTER 5 GOOGLE MAPS AND THE TRAVELING SALESMAN 156
visited. From this, we use a simple bubble sort to work out the shortest distance to the next location. When we come around the loop the next time, we pick the last city we came from as the next starting point and start over again. Once we have visited all the locations, we plot the journey path on the map via the function on line 45, which we will cover in the next section.
There are many functions that support . These functions are described in Table 5-3.
Table 5-3. Supporting Functions to calcTSP
Function Description
On line 48 in Listing 5-15. This function tells us whether there are any more locations to visit. Once there are no more locations to visit, we have found our shortest route.
On line 57 in Listing 5-15. This function provides us with the next location to visit, which is always the destination location of the last journey.
On line 80 in Listing 5-15. Once a location has been visited, this function marks that location, so that we do not visit the same location.
On line 85 in Listing 5-15. This tells us whether we have visited a location.
On line 100 in Listing 5-15. This gets all the neighbors that we have not visited. Using the result returned, we can then find the neighbor with the shortest route to the location.
Plotting the JourneyUsing the Google Maps class, we can plot the path between the locations. Using the method in the class, a blue path is marked on the map itself. The code is shown in Listing 5-16.
Listing 5-16. Plotting the Journey
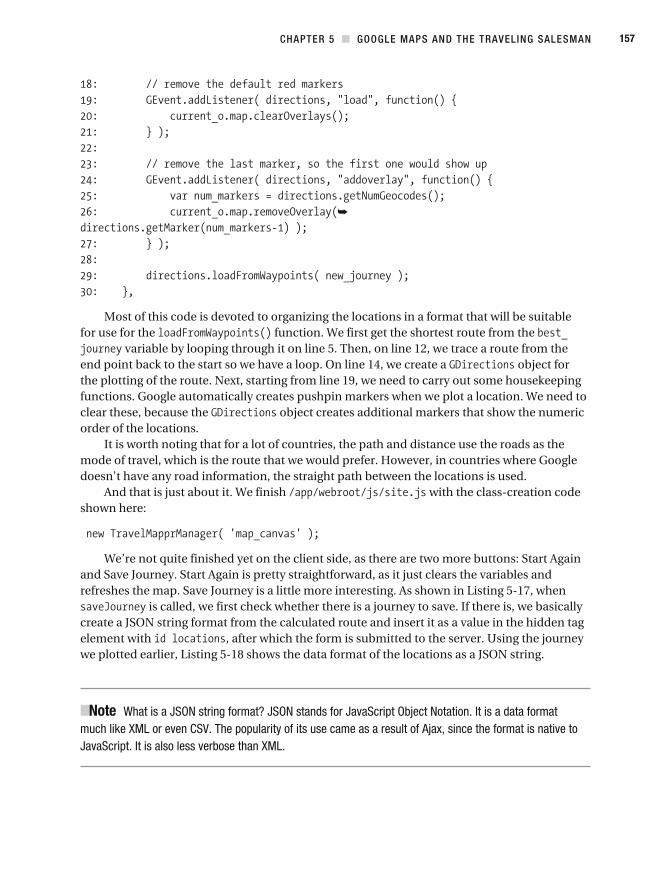
CHAPTER 5 GOOGLE MAPS AND THE TRAVELING SALESMAN 157
Most of this code is devoted to organizing the locations in a format that will be suitable for use for the function. We first get the shortest route from the
variable by looping through it on line 5. Then, on line 12, we trace a route from the end point back to the start so we have a loop. On line 14, we create a object for the plotting of the route. Next, starting from line 19, we need to carry out some housekeeping functions. Google automatically creates pushpin markers when we plot a location. We need to clear these, because the object creates additional markers that show the numeric order of the locations.
It is worth noting that for a lot of countries, the path and distance use the roads as the mode of travel, which is the route that we would prefer. However, in countries where Google doesn't have any road information, the straight path between the locations is used.
And that is just about it. We finish with the class- creation code shown here:
We’re not quite finished yet on the client side, as there are two more buttons: Start Again and Save Journey. Start Again is pretty straightforward, as it just clears the variables and refreshes the map. Save Journey is a little more interesting. As shown in Listing 5-17, when
is called, we first check whether there is a journey to save. If there is, we basically create a JSON string format from the calculated route and insert it as a value in the hidden tag element with , after which the form is submitted to the server. Using the journey we plotted earlier, Listing 5-18 shows the data format of the locations as a JSON string.
Note What is a JSON string format? JSON stands for JavaScript Object Notation. It is a data format much like XML or even CSV. The popularity of its use came as a result of Ajax, since the format is native to JavaScript. It is also less verbose than XML.
CHAPTER 5 GOOGLE MAPS AND THE TRAVELING SALESMAN 158
Listing 5-17. The saveJourney Function
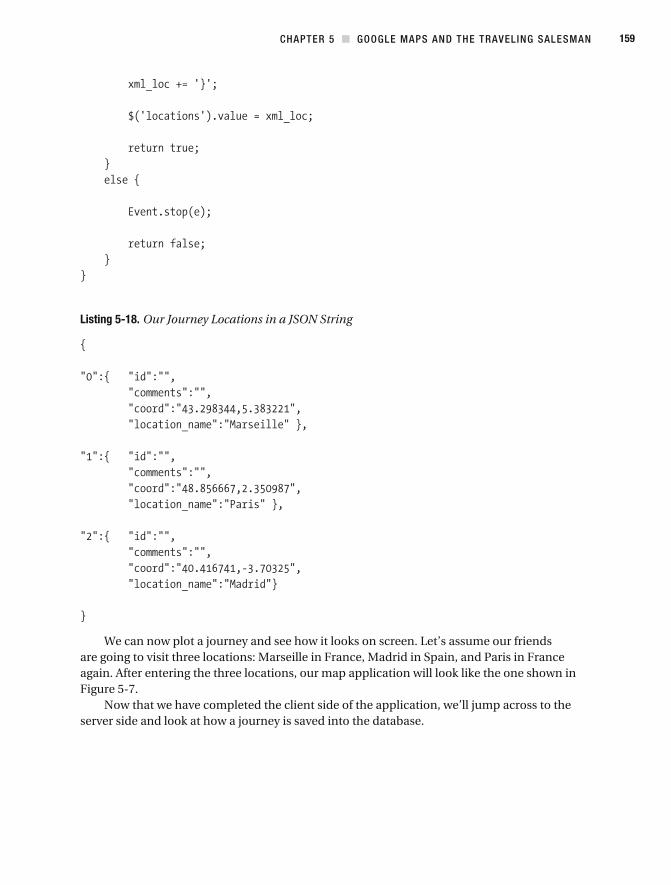
CHAPTER 5 GOOGLE MAPS AND THE TRAVELING SALESMAN 159
Listing 5-18. Our Journey Locations in a JSON String
We can now plot a journey and see how it looks on screen. Let’s assume our friends are going to visit three locations: Marseille in France, Madrid in Spain, and Paris in France again. After entering the three locations, our map application will look like the one shown in Figure 5-7.
Now that we have completed the client side of the application, we’ll jump across to the server side and look at how a journey is saved into the database.
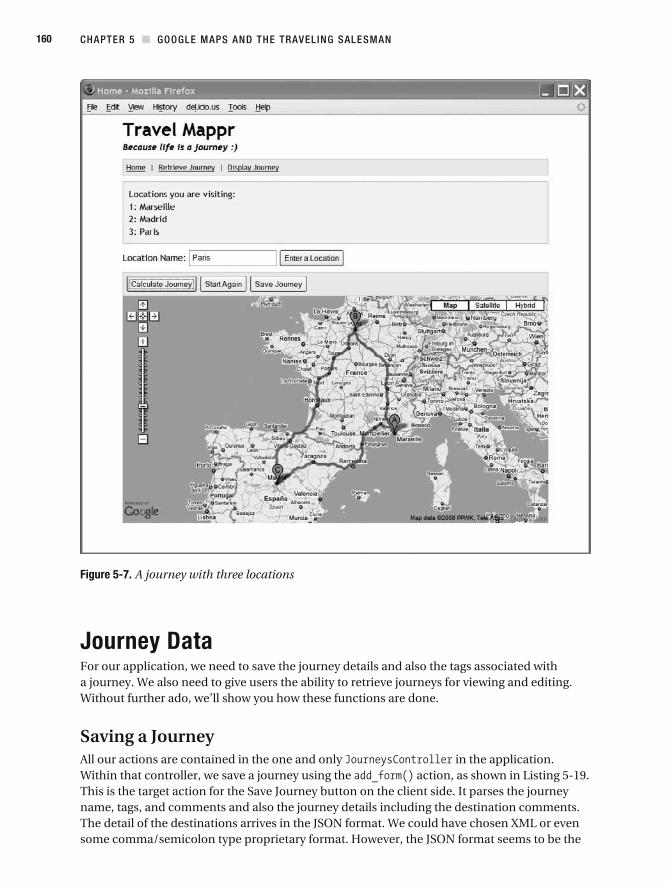
CHAPTER 5 GOOGLE MAPS AND THE TRAVELING SALESMAN 160
Figure 5-7. A journey with three locations
Journey DataFor our application, we need to save the journey details and also the tags associated with a journey. We also need to give users the ability to retrieve journeys for viewing and editing. Without further ado, we’ll show you how these functions are done.
Saving a JourneyAll our actions are contained in the one and only in the application. Within that controller, we save a journey using the action, as shown in Listing 5-19. This is the target action for the Save Journey button on the client side. It parses the journey name, tags, and comments and also the journey details including the destination comments. The detail of the destinations arrives in the JSON format. We could have chosen XML or even some comma/semicolon type proprietary format. However, the JSON format seems to be the
CHAPTER 5 GOOGLE MAPS AND THE TRAVELING SALESMAN 161
de facto format nowadays for web client/server data exchange. We set two variables to be used by the view: and .
Listing 5-19. Saving Journeys
Now let’s look at the view that goes with the action. The is used to decide whether we are saving a new journey or editing an existing one. The same form is used to add or edit a journey. The view for action is shown in Listing 5-20. It is stored in
. The output of the view is shown in Figure 5-8.
Note We have noticed that as applications get more complex, they often branch out into separate add or edit action/view pairs. Be careful, as the code in the controller and view can get out of hand. Use components in the controller and view helpers or elements in the view where you can spot common code. In fact, we were pretty close to having two views, as we weren’t sure whether to have the password field when editing a journey.
Listing 5-20. The View for the add_form Action
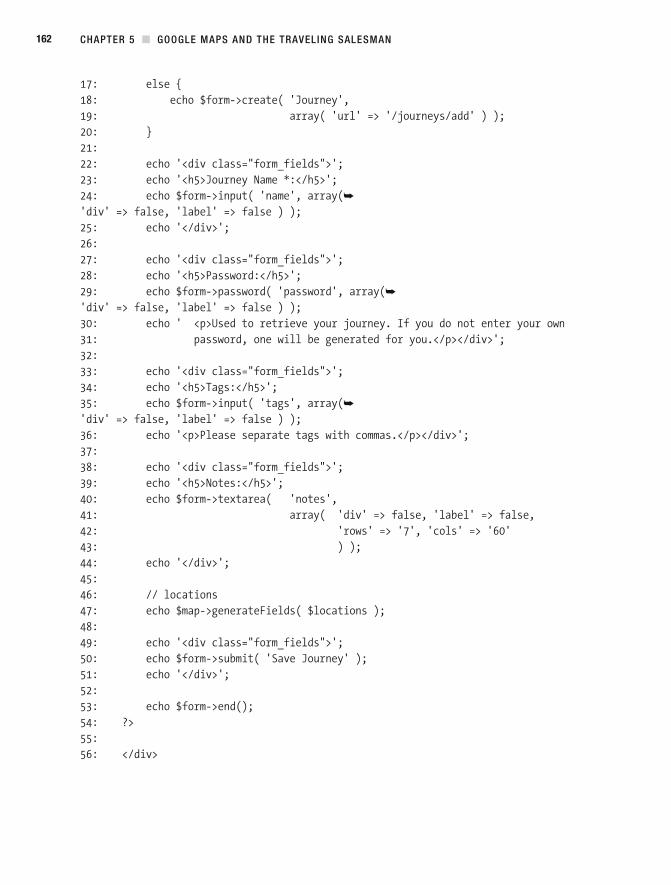
CHAPTER 5 GOOGLE MAPS AND THE TRAVELING SALESMAN 162
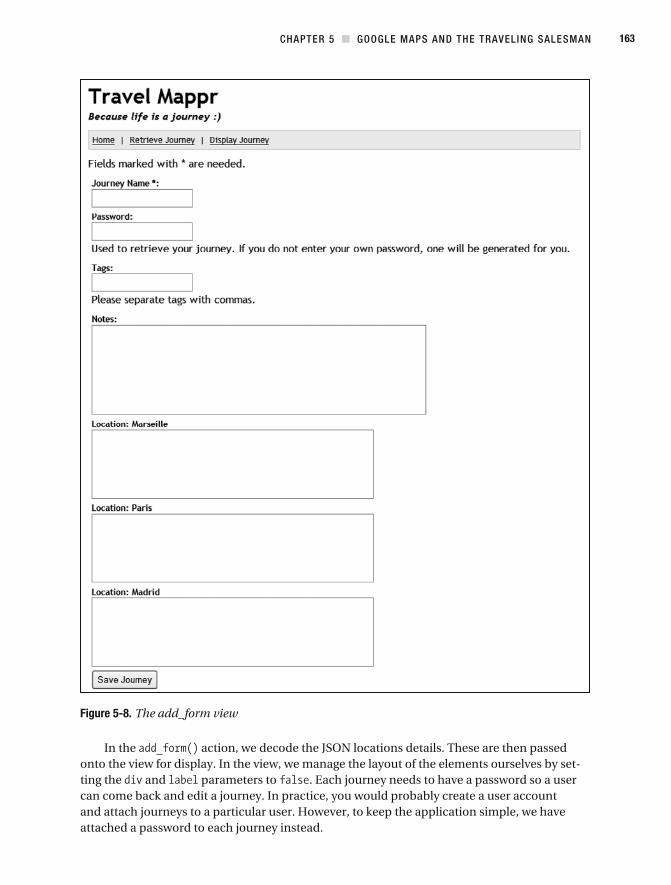
CHAPTER 5 GOOGLE MAPS AND THE TRAVELING SALESMAN 163
Figure 5-8. The add_form view
In the action, we decode the JSON locations details. These are then passed onto the view for display. In the view, we manage the layout of the elements ourselves by set-ting the and parameters to . Each journey needs to have a password so a user can come back and edit a journey. In practice, you would probably create a user account and attach journeys to a particular user. However, to keep the application simple, we have attached a password to each journey instead.
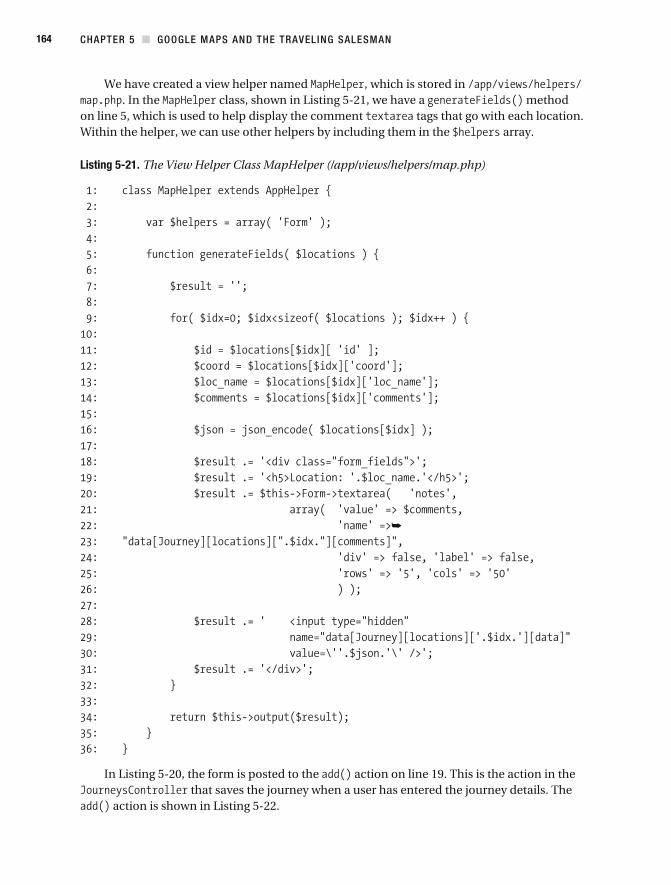
CHAPTER 5 GOOGLE MAPS AND THE TRAVELING SALESMAN 164
We have created a view helper named , which is stored in . In the class, shown in Listing 5-21, we have a method
on line 5, which is used to help display the comment tags that go with each location. Within the helper, we can use other helpers by including them in the array.
Listing 5-21. The View Helper Class MapHelper (/app/views/helpers/map.php)
In Listing 5-20, the form is posted to the action on line 19. This is the action in the that saves the journey when a user has entered the journey details. The
action is shown in Listing 5-22.
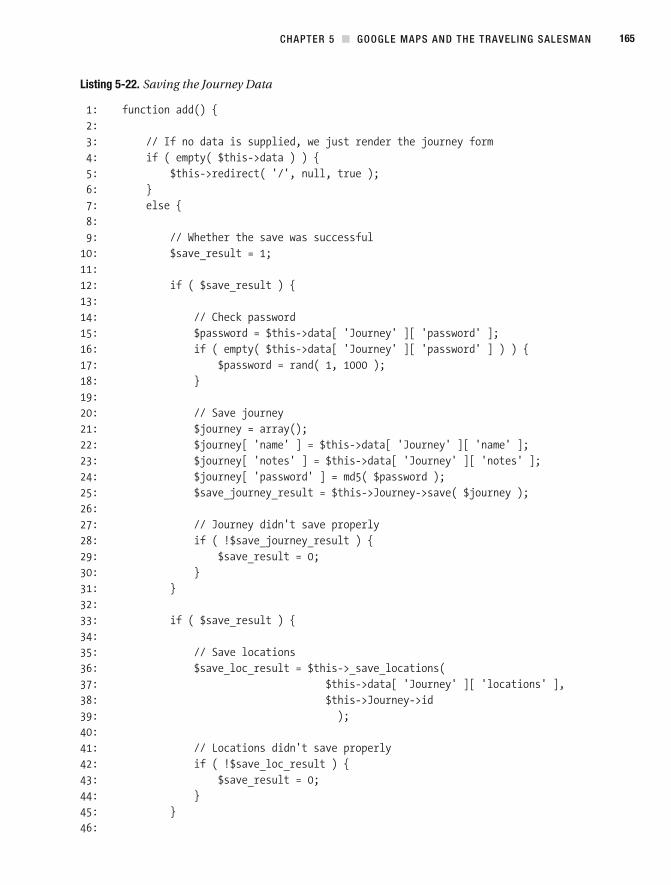
CHAPTER 5 GOOGLE MAPS AND THE TRAVELING SALESMAN 165
Listing 5-22. Saving the Journey Data
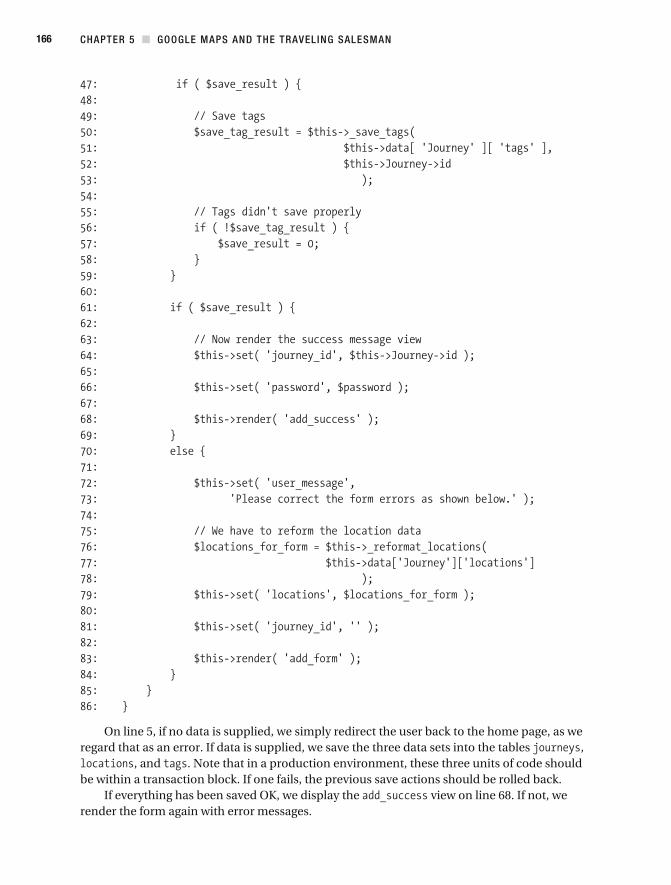
CHAPTER 5 GOOGLE MAPS AND THE TRAVELING SALESMAN 166
On line 5, if no data is supplied, we simply redirect the user back to the home page, as we regard that as an error. If data is supplied, we save the three data sets into the tables ,
, and . Note that in a production environment, these three units of code should be within a transaction block. If one fails, the previous save actions should be rolled back.
If everything has been saved OK, we display the view on line 68. If not, we render the form again with error messages.
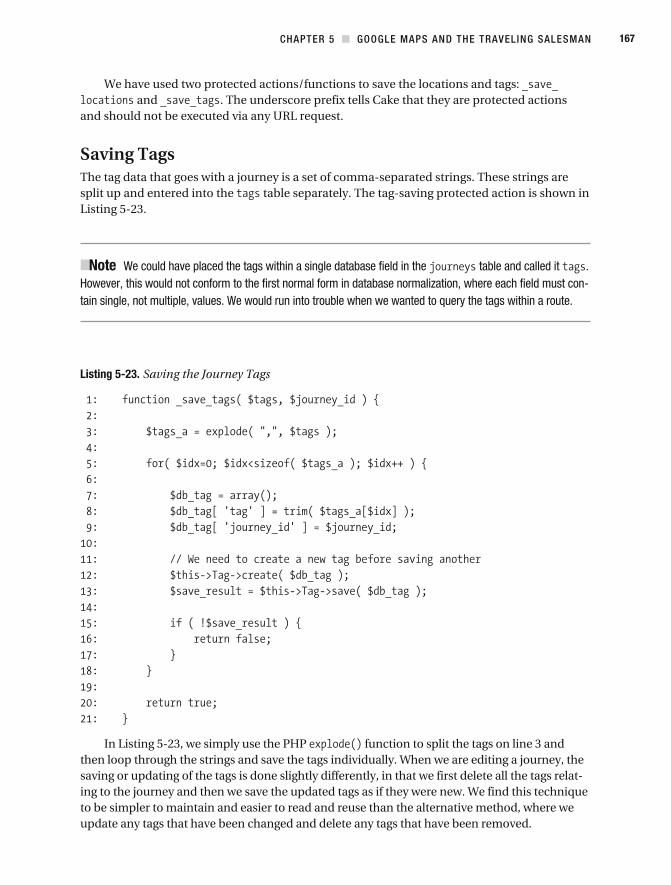
CHAPTER 5 GOOGLE MAPS AND THE TRAVELING SALESMAN 167
We have used two protected actions/functions to save the locations and tags: and . The underscore prefix tells Cake that they are protected actions
and should not be executed via any URL request.
Saving TagsThe tag data that goes with a journey is a set of comma- separated strings. These strings are split up and entered into the table separately. The tag- saving protected action is shown in Listing 5-23.
Note We could have placed the tags within a single database field in the table and called it . However, this would not conform to the first normal form in database normalization, where each field must con-tain single, not multiple, values. We would run into trouble when we wanted to query the tags within a route.
Listing 5-23. Saving the Journey Tags
In Listing 5-23, we simply use the PHP function to split the tags on line 3 and then loop through the strings and save the tags individually. When we are editing a journey, the saving or updating of the tags is done slightly differently, in that we first delete all the tags relat-ing to the journey and then we save the updated tags as if they were new. We find this technique to be simpler to maintain and easier to read and reuse than the alternative method, where we update any tags that have been changed and delete any tags that have been removed.
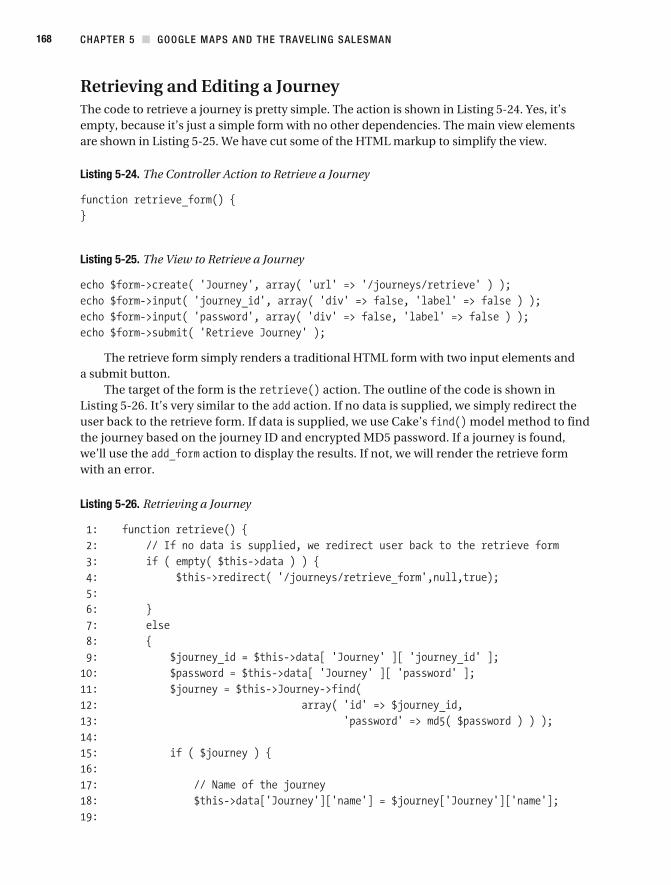
CHAPTER 5 GOOGLE MAPS AND THE TRAVELING SALESMAN 168
Retrieving and Editing a JourneyThe code to retrieve a journey is pretty simple. The action is shown in Listing 5-24. Yes, it’s empty, because it’s just a simple form with no other dependencies. The main view elements are shown in Listing 5-25. We have cut some of the HTML markup to simplify the view.
Listing 5-24. The Controller Action to Retrieve a Journey
Listing 5-25. The View to Retrieve a Journey
The retrieve form simply renders a traditional HTML form with two input elements and a submit button.
The target of the form is the action. The outline of the code is shown in Listing 5-26. It’s very similar to the action. If no data is supplied, we simply redirect the user back to the retrieve form. If data is supplied, we use Cake’s model method to find the journey based on the journey ID and encrypted MD5 password. If a journey is found, we’ll use the action to display the results. If not, we will render the retrieve form with an error.
Listing 5-26. Retrieving a Journey
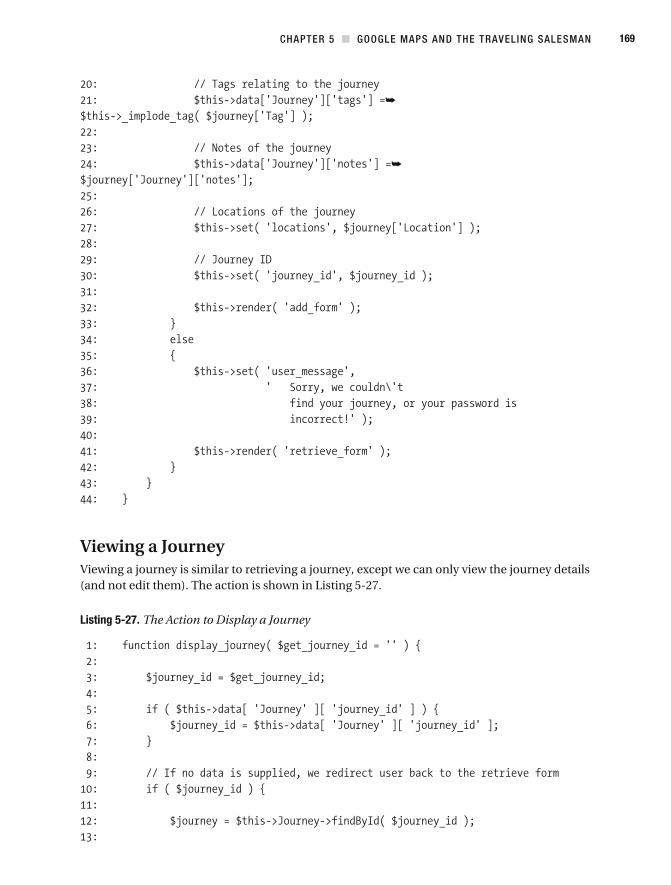
CHAPTER 5 GOOGLE MAPS AND THE TRAVELING SALESMAN 169
Viewing a JourneyViewing a journey is similar to retrieving a journey, except we can only view the journey details (and not edit them). The action is shown in Listing 5-27.
Listing 5-27. The Action to Display a Journey
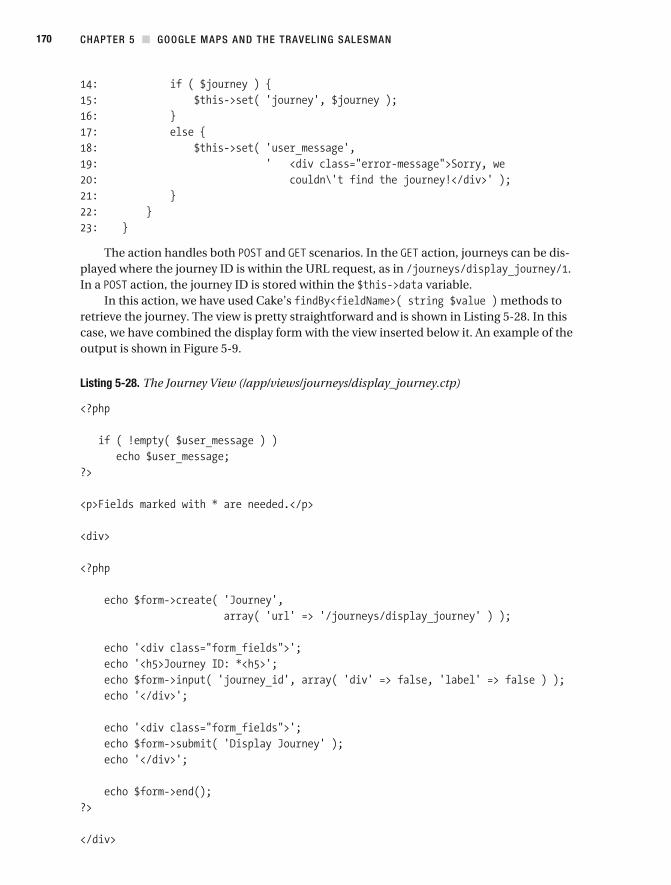
CHAPTER 5 GOOGLE MAPS AND THE TRAVELING SALESMAN 170
The action handles both and scenarios. In the action, journeys can be dis-played where the journey ID is within the URL request, as in . In a action, the journey ID is stored within the variable.
In this action, we have used Cake’s methods to retrieve the journey. The view is pretty straightforward and is shown in Listing 5-28. In this case, we have combined the display form with the view inserted below it. An example of the output is shown in Figure 5-9.
Listing 5-28. The Journey View (/app/views/journeys/display_journey.ctp)
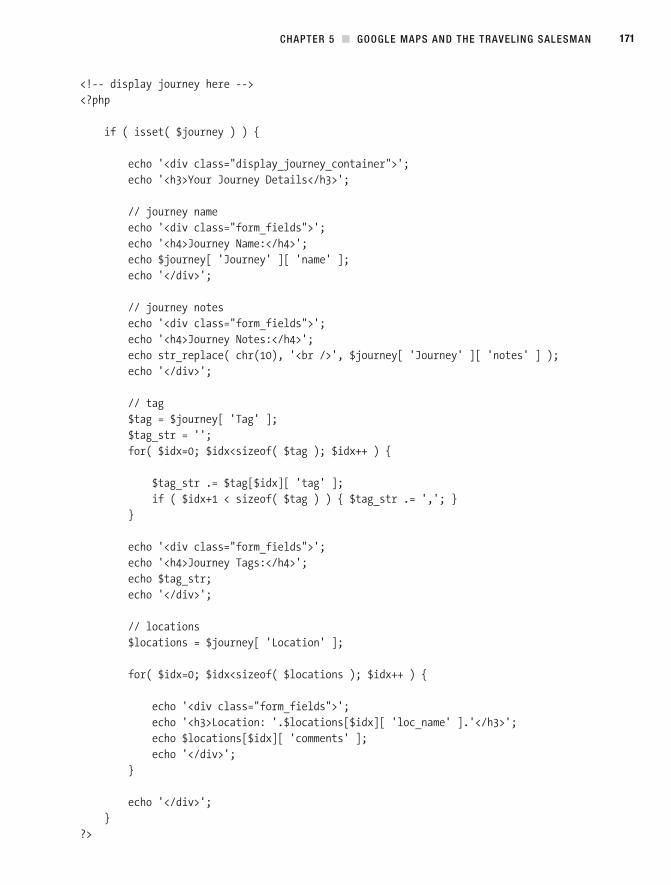
CHAPTER 5 GOOGLE MAPS AND THE TRAVELING SALESMAN 171
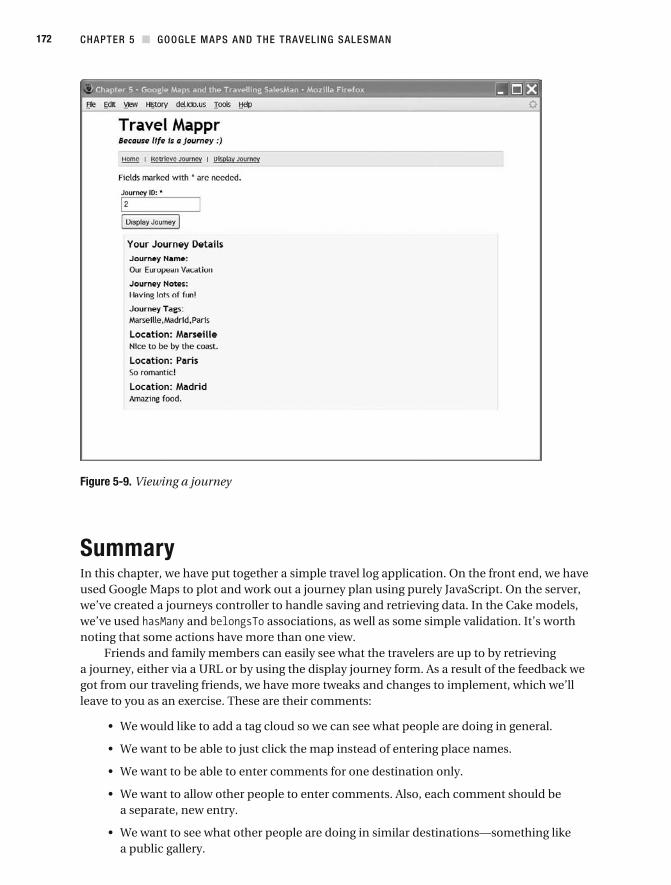
CHAPTER 5 GOOGLE MAPS AND THE TRAVELING SALESMAN 172
Figure 5-9. Viewing a journey
SummaryIn this chapter, we have put together a simple travel log application. On the front end, we have used Google Maps to plot and work out a journey plan using purely JavaScript. On the server, we’ve created a journeys controller to handle saving and retrieving data. In the Cake models, we’ve used and associations, as well as some simple validation. It’s worth noting that some actions have more than one view.
Friends and family members can easily see what the travelers are up to by retrieving a journey, either via a URL or by using the display journey form. As a result of the feedback we got from our traveling friends, we have more tweaks and changes to implement, which we’ll leave to you as an exercise. These are their comments:
a separate, new entry.
a public gallery.
C H A P T E R 6
Mashing Twitter with the Google Translator
For our fast- paced modern lifestyle, Twitter has filled a gap that fits between text messaging and blogging. You have a spare minute and want to let your pals know what you are doing or thinking, Twitter fits that need nicely. Twitter is a social networking and micro- blogging web application. You can post short messages to tell your friends and everyone else what you’re up to right now. These short messages are referred to as statuses, updates, or tweets.
We can see Twitter being quite an addiction: Twitterdiction! In fact, we often view the Twitter public timeline, which is a listing of what people around the world are doing at that moment. However, quite a number of messages are in a foreign language. If a message has a cute picture, we cut and paste it into the Google Translate web site (
) to see what it says. Wouldn’t it be nice if we could do this translation automati-cally? Here’s a stroke of luck: Google now has a language translation web service within the Google Ajax Language API. And in true Web 2.0 and Cake fashion, we can easily mash them together and bake some Cake!
In this chapter, we’re going to cover quite a number of Cake topics. Twitter comes with an API that we can call from the server. The Google Ajax Language API can be called from the browser via Ajax or the server, but in this chapter, we’ll be using only the server- side method.
So, let’s get to creating our application, which we’ll call Twitter Twister.
The Twitter APIThe Twitter API comes with many methods. These methods are submitted via the principles of representational state transfer (REST). In most cases, this will be HTTP or —what most people have been using since their early days of web development. Twitter will also return the appropriate HTTP status code.
There are a few more items to be aware of when using the API:
requests to 70 requests per 60 minutes. Essentially, if you make one request per minute, you’ll be OK.
UTF- 8. As such, we must develop our application with this in mind.
173
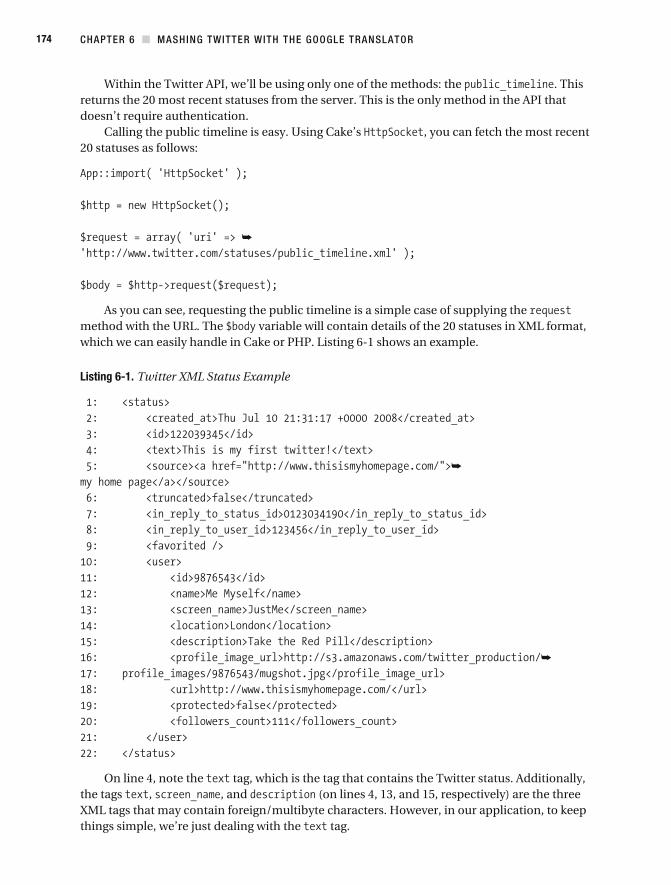
CHAPTER 6 MASHING TWITTER WITH THE GOOGLE TRANSLATOR 174
Within the Twitter API, we’ll be using only one of the methods: the . This returns the 20 most recent statuses from the server. This is the only method in the API that doesn’t require authentication.
Calling the public timeline is easy. Using Cake’s , you can fetch the most recent 20 statuses as follows:
As you can see, requesting the public timeline is a simple case of supplying the method with the URL. The variable will contain details of the 20 statuses in XML format, which we can easily handle in Cake or PHP. Listing 6-1 shows an example.
Listing 6-1. Twitter XML Status Example
On line 4, note the tag, which is the tag that contains the Twitter status. Additionally, the tags , , and (on lines 4, 13, and 15, respectively) are the three XML tags that may contain foreign/multibyte characters. However, in our application, to keep things simple, we’re just dealing with the tag.

CHAPTER 6 MASHING TWITTER WITH THE GOOGLE TRANSLATOR 175
Tip Some of the normal string manipulation functions do not always work on multibyte characters. For example, may return different length sizes depending on whether the string is single or multibyte. Cake has a useful class called , which contains some string- manipulation functions specifically written for multibyte characters, similar to PHP’s module.
Now that we have covered the basics of the Twitter API, we can show you how the Google Ajax Language API works.
The Google Ajax Language APIThe Google Ajax Language API is part of the Google Ajax API set of products. We’ll call it the Google Translator for short, as that’s its main feature.
The API allows you to translate or detect language text. The API commands can be called via Ajax, through other non- JavaScript environments like Flash, or on the server. For further details on using the Ajax calls, visit the Google Language API web site at (
).
Caution It must be said that the quality of the Google Ajax Language API translation can be quite poor. However, the service will serve our purposes, since we just want to get an idea of what’s in the Twitter statuses.
To use the commands on the server side, again, we can employ Cake’s class. For example, to translate “hello world,” we use the code in Listing 6-2.
Listing 6-2. Translating “Hello World”
CHAPTER 6 MASHING TWITTER WITH THE GOOGLE TRANSLATOR 176
In Listing 6-2, we use the command and pass three parameters to it:
, for version of the API
, for the text we want to translate
, for the source language English ( ) and target language Japanese ( ), separated by an entity- encoded vertical bar symbol:
All the API commands respond in the JSON format, which we can easily decode using the PHP command .
Google’s API documentation advises developers to make sure an HTTP referer header is always in place when making requests. This is shown in line 8 of Listing 6-2. Additionally, an API key should be sent. You can obtain a key from either of the following signup pages:
)
)
One useful feature is the language detection. If you do not know the original language that you want to translate, you can omit the source language in the parameter. So, for example, we could simply write . Now how cool is that!
Note At the time of writing, the Google Ajax Language API is still quite new, and there don’t appear to be any request limits. However, we can all be quite certain this will change at some point in the future.
Application RequirementsEven though we are essentially developing this application for fun, we still need to establish some requirements and consider usability.
The broad requirement is to give users the ability to view the current public timeline in any language by using the Google Translator to translate the status text. This simple statement gives us a starting point for scoping the application.
Scoping an application can be a lengthy task, involving many aspects, such as content, func-tion, layout, wireframes, and site maps—just to mention a few. Since our application is quite small and should be fun, we will concentrate on the following simple functional requirements:
-nitely need to cache results. We will take advantage of Cake’s cache helper to assist us.
we still need to cache results and save on bandwidth and the time it takes for the trans-lation round- trip.
for Cake to provide data in different formats, we will add an RSS web feed service as well. We will use Cake’s RSS helper.
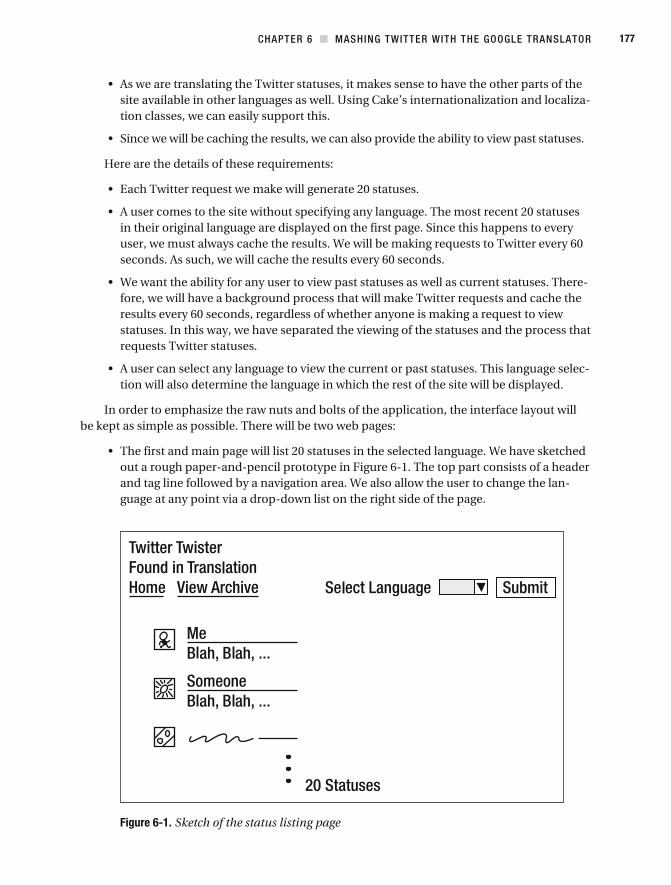
CHAPTER 6 MASHING TWITTER WITH THE GOOGLE TRANSLATOR 177
site available in other languages as well. Using Cake’s internationalization and localiza-tion classes, we can easily support this.
Here are the details of these requirements:
in their original language are displayed on the first page. Since this happens to every user, we must always cache the results. We will be making requests to Twitter every 60 seconds. As such, we will cache the results every 60 seconds.
-fore, we will have a background process that will make Twitter requests and cache the results every 60 seconds, regardless of whether anyone is making a request to view statuses. In this way, we have separated the viewing of the statuses and the process that requests Twitter statuses.
-tion will also determine the language in which the rest of the site will be displayed.
In order to emphasize the raw nuts and bolts of the application, the interface layout will be kept as simple as possible. There will be two web pages:
out a rough paper-and- pencil prototype in Figure 6-1. The top part consists of a header and tag line followed by a navigation area. We also allow the user to change the lan-guage at any point via a drop- down list on the right side of the page.
Figure 6-1. Sketch of the status listing page
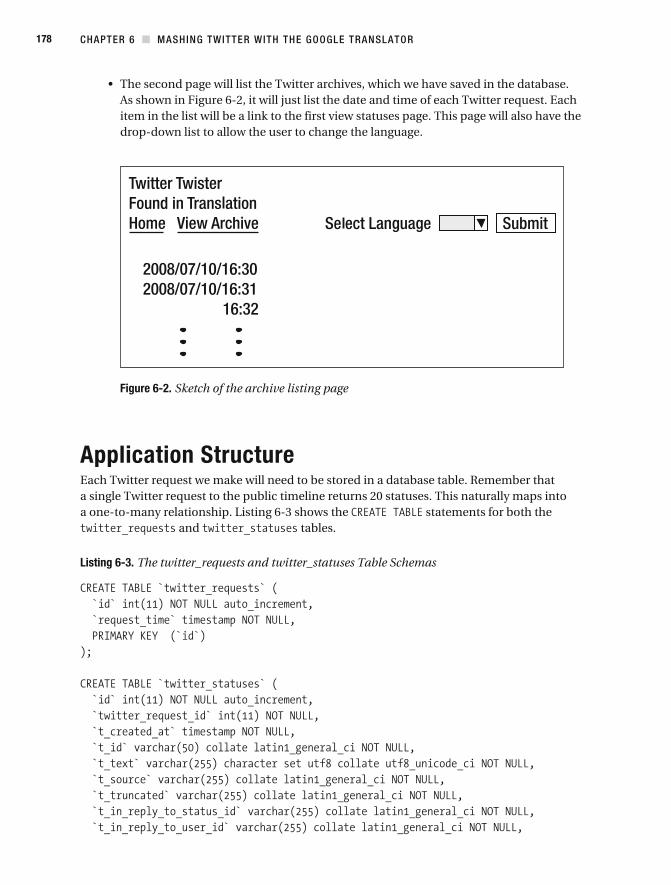
CHAPTER 6 MASHING TWITTER WITH THE GOOGLE TRANSLATOR 178
As shown in Figure 6-2, it will just list the date and time of each Twitter request. Each item in the list will be a link to the first view statuses page. This page will also have the drop- down list to allow the user to change the language.
Figure 6-2. Sketch of the archive listing page
Application StructureEach Twitter request we make will need to be stored in a database table. Remember that a single Twitter request to the public timeline returns 20 statuses. This naturally maps into a one-to- many relationship. Listing 6-3 shows the statements for both the
and tables.
Listing 6-3. The twitter_requests and twitter_statuses Table Schemas
CHAPTER 6 MASHING TWITTER WITH THE GOOGLE TRANSLATOR 179
In the table, the field simply holds the time of the request. The table will mainly hold all the data that has been returned by the Twitter request. Most fields are stored in the collation. However, the ,
, and fields are stored in , since they will con-tain foreign characters. Notice that we’re not using , as we may want to add search functionality to the fields later on; users expect searches to be case insensitive— .
The structure of how the translation will work is slightly trickier. When a Twitter request is made, the statuses returned will contain different languages. Do we also want to automatically translate them into all the other available languages? Pondering this point, we come up with a half yes and half no answer. Yes, we do want to translate them into other languages, but no, not immediately after fetching them from Twitter. This job should be spread over a period of time instead.
When a user does want to view the statuses in another language, whether they are current or past statuses, we will translate them on the fly and then cache the results. Thus, the first user who chooses to view a Twitter request in a specific language will need to endure the time delay that it takes to translate the 20 statuses. If we were running this application for real, we wouldn’t want this to happen, as users would start to talk about how slow the site is to use.
When a status does get translated, the results are stored in the table, shown in Listing 6-4. This gives us a one-to- many relationship between
and , with one status having many different translations.
Listing 6-4. The twitter_translations Table Schema
CHAPTER 6 MASHING TWITTER WITH THE GOOGLE TRANSLATOR 180
The and fields will contain the language code to translate from and to, respectively. The field is, in a sense, redundant. When we are retrieving a translation of a status, we don’t really need to know the language it was in, as we have a foreign key link to the table, but we may need it in the future. The field will contain the actual translation, so it needs to be in .
Since localization will be involved somewhere, we see it as an advantage to have a lan-guage table that will help us bind different language areas together. Listing 6-5 shows the schema for this table, named .
Listing 6-5. The languages Table Schema
The table is essentially a lookup table for language codes. The field is for the name of the language, such as Japanese. The field is the three- letter ISO 639- 3 language code used by Cake. The field is for the two- letter language code used by Google.
Note After much digging, we’re still not sure why Google’s language code has mostly two letters. We think it’s a combination of codes, like the two- letter ISO 639- 1 language code combined with locale names.
Figure 6-3 shows the relationships between the tables. The field in the table is linked to the and fields in the table. So we have a translation from one language to another language based on the
entry. In the table, each request gives us many statuses, which are recorded in the table, and each status has many different translations, which are recorded in the table.
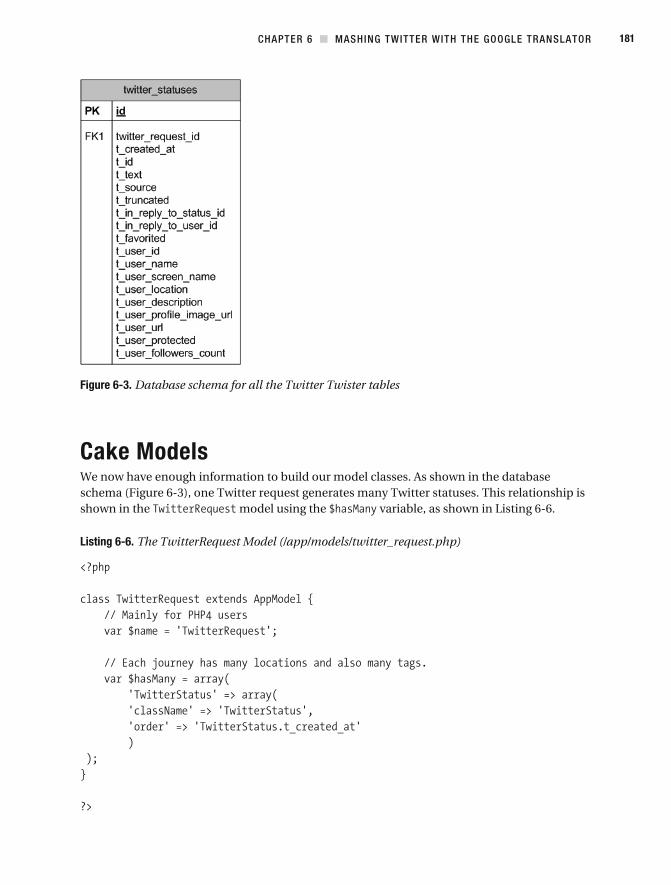
CHAPTER 6 MASHING TWITTER WITH THE GOOGLE TRANSLATOR 181
Figure 6-3. Database schema for all the Twitter Twister tables
Cake ModelsWe now have enough information to build our model classes. As shown in the database schema ( Figure 6-3), one Twitter request generates many Twitter statuses. This relationship is shown in the model using the variable, as shown in Listing 6-6.
Listing 6-6. The TwitterRequest Model (/app/models/twitter_request.php)
CHAPTER 6 MASHING TWITTER WITH THE GOOGLE TRANSLATOR 182
The table sits between the table and the table. One record has many translations in the
table. To complete the has- many relationship between the and models, we need to add the relationship to the Cake
model, shown in Listing 6-7.
Listing 6-7. The TwitterStatus Model (/app/models/twitter_status.php)
The model, shown in Listing 6-8, is quite simple, in that one single translation belongs to one Twitter status.
Listing 6-8. The TwitterTranslation Model (/app/models/twitter_translation.php)
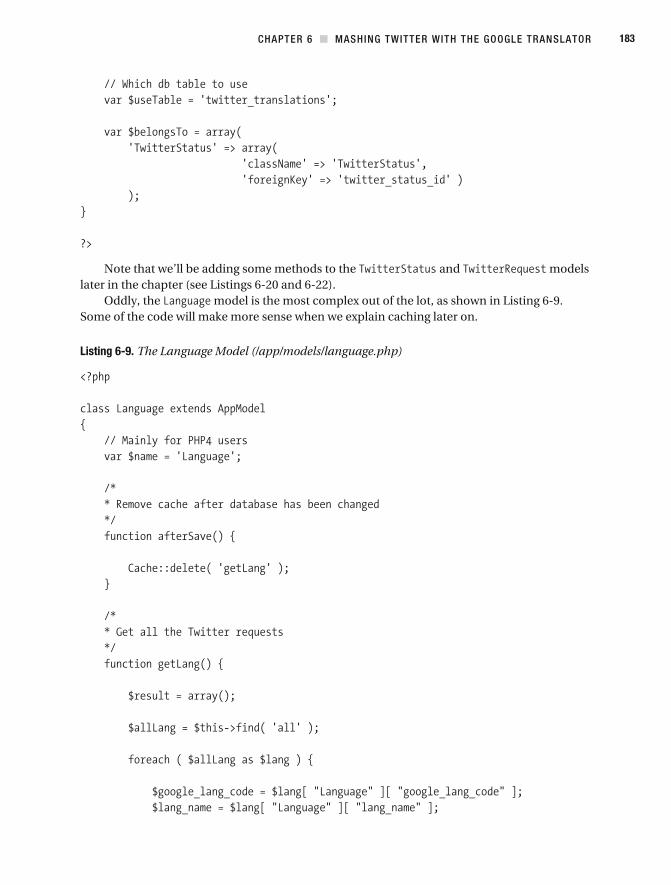
CHAPTER 6 MASHING TWITTER WITH THE GOOGLE TRANSLATOR 183
Note that we’ll be adding some methods to the and models later in the chapter (see Listings 6- 20 and 6- 22).
Oddly, the model is the most complex out of the lot, as shown in Listing 6-9. Some of the code will make more sense when we explain caching later on.
Listing 6-9. The Language Model (/app/models/language.php)
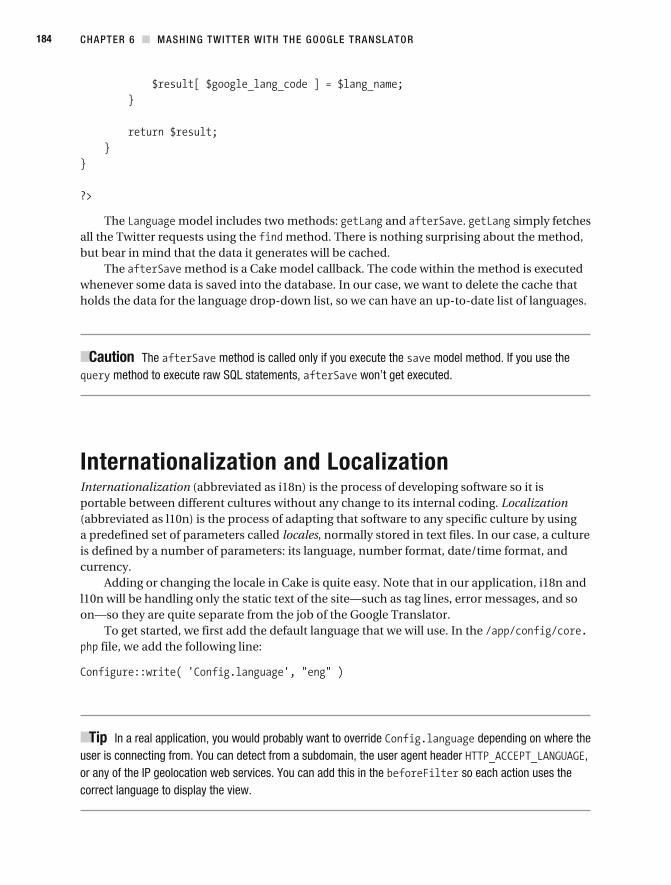
CHAPTER 6 MASHING TWITTER WITH THE GOOGLE TRANSLATOR 184
The model includes two methods: and . simply fetches all the Twitter requests using the method. There is nothing surprising about the method, but bear in mind that the data it generates will be cached.
The method is a Cake model callback. The code within the method is executed whenever some data is saved into the database. In our case, we want to delete the cache that holds the data for the language drop- down list, so we can have an up-to- date list of languages.
Caution The method is called only if you execute the model method. If you use the method to execute raw SQL statements, won’t get executed.
Internationalization and LocalizationInternationalization (abbreviated as i18n) is the process of developing software so it is portable between different cultures without any change to its internal coding. Localization (abbreviated as l10n) is the process of adapting that software to any specific culture by using a predefined set of parameters called locales, normally stored in text files. In our case, a culture is defined by a number of parameters: its language, number format, date/time format, and currency.
Adding or changing the locale in Cake is quite easy. Note that in our application, i18n and l10n will be handling only the static text of the site—such as tag lines, error messages, and so on—so they are quite separate from the job of the Google Translator.
To get started, we first add the default language that we will use. In the file, we add the following line:
Tip In a real application, you would probably want to override depending on where the user is connecting from. You can detect from a subdomain, the user agent header , or any of the IP geolocation web services. You can add this in the so each action uses the correct language to display the view.
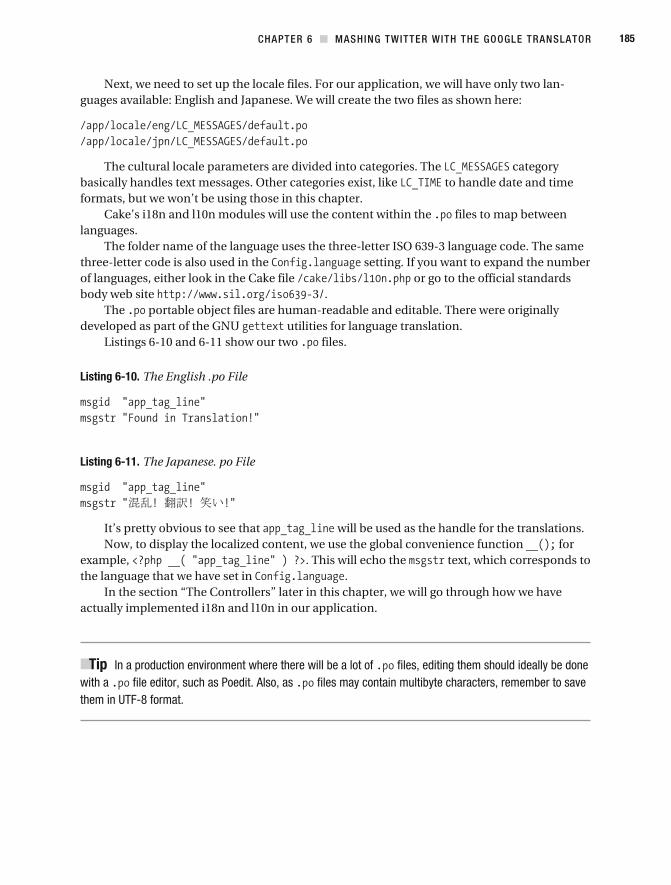
CHAPTER 6 MASHING TWITTER WITH THE GOOGLE TRANSLATOR 185
Next, we need to set up the locale files. For our application, we will have only two lan-guages available: English and Japanese. We will create the two files as shown here:
The cultural locale parameters are divided into categories. The category basically handles text messages. Other categories exist, like to handle date and time formats, but we won’t be using those in this chapter.
Cake’s i18n and l10n modules will use the content within the files to map between languages.
The folder name of the language uses the three- letter ISO 639- 3 language code. The same three- letter code is also used in the setting. If you want to expand the number of languages, either look in the Cake file or go to the official standards body web site 3/.
The portable object files are human- readable and editable. There were originally developed as part of the GNU utilities for language translation.
Listings 6- 10 and 6- 11 show our two files.
Listing 6-10. The English .po File
Listing 6-11. The Japanese. po File
It’s pretty obvious to see that will be used as the handle for the translations.Now, to display the localized content, we use the global convenience function for
example, . This will echo the text, which corresponds to the language that we have set in .
In the section “The Controllers” later in this chapter, we will go through how we have actually implemented i18n and l10n in our application.
Tip In a production environment where there will be a lot of files, editing them should ideally be done with a file editor, such as Poedit. Also, as files may contain multibyte characters, remember to save them in UTF- 8 format.
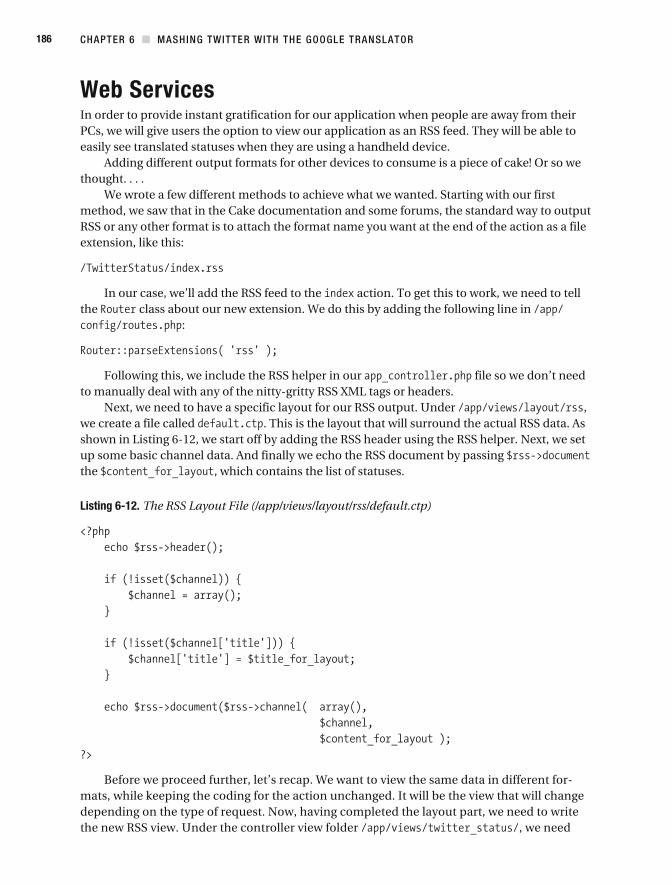
CHAPTER 6 MASHING TWITTER WITH THE GOOGLE TRANSLATOR 186
Web ServicesIn order to provide instant gratification for our application when people are away from their PCs, we will give users the option to view our application as an RSS feed. They will be able to easily see translated statuses when they are using a handheld device.
Adding different output formats for other devices to consume is a piece of cake! Or so we thought. . . .
We wrote a few different methods to achieve what we wanted. Starting with our first method, we saw that in the Cake documentation and some forums, the standard way to output RSS or any other format is to attach the format name you want at the end of the action as a file extension, like this:
In our case, we’ll add the RSS feed to the action. To get this to work, we need to tell the class about our new extension. We do this by adding the following line in
:
Following this, we include the RSS helper in our file so we don’t need to manually deal with any of the nitty- gritty RSS XML tags or headers.
Next, we need to have a specific layout for our RSS output. Under , we create a file called . This is the layout that will surround the actual RSS data. As shown in Listing 6-12, we start off by adding the RSS header using the RSS helper. Next, we set up some basic channel data. And finally we echo the RSS document by passing the , which contains the list of statuses.
Listing 6-12. The RSS Layout File (/app/views/layout/rss/default.ctp)
Before we proceed further, let’s recap. We want to view the same data in different for-mats, while keeping the coding for the action unchanged. It will be the view that will change depending on the type of request. Now, having completed the layout part, we need to write the new RSS view. Under the controller view folder , we need
CHAPTER 6 MASHING TWITTER WITH THE GOOGLE TRANSLATOR 187
to create another folder called . In this folder, we create a file with the same name as the action, . Listing 6-13 shows this file.
Listing 6-13. The RSS View (/app/views/twitter_status/rss/index.ctp)
In Listing 6-13, the method takes the array and loops through each status item through the function , which sets up the RSS XML data tags—like
, , and so on—in a form that the method can use.Finally, we need to add the built- in component, so it can pick out the
correct view:
And that is pretty much the standard way of adding an RSS feed to your data. When you specify the extension, the class router parses the extension. If you don’t tell Cake about the extension and you make an request, you will probably get an error like this:
Once Cake knows about the extension through the class, the takes over and renders the view that corresponds to the extension.
We haven’t quite finished with web services just yet. As we hinted early on, we ran into some trouble with our RSS feed. The problem starts when we add parameters to our URL action requests. For example, if want to view an archive Twitter request in another language, this is the URL we could use:
It’s fine as it is, but if we want to view it in XML format, the URL would need to look like this (note the extension):
CHAPTER 6 MASHING TWITTER WITH THE GOOGLE TRANSLATOR 188
or even like this:
Basically, the class just parses out the extension at the end of the URL. We feel these are just too awkward looking. We want our URLs to look something like this instead:
Basically, we just add instead of .To overcome this problem, we created two alternative methods. The first method is a bit
hackish, while the second one works better.The first method is quite easy. Using the component, we just add the
following code snippet in the method in the :
returns the requested URL, such as . then matches for the ending . If a match is found, we artificially set the
extension variable to . We feel quite uneasy with this method, as we shouldn’t really be setting class variables manually like this. But, hey, it works, and one alternative solution is better than none.
The second method we used to handle the extension is easier and more obvious than the first. We just write a rule in our root file, as follows:
The new rule is shown in bold. It matches anything ending with and rewrites it in the version. So if a user types
it gets translated to
Using this rule and the standard method to add web services, we feel this combination works well.
CachingOur seemingly simple application has gotten a lot more complicated with the need to cache results. To start caching, we need to turn on Cake caching. This is done in the controller
:
CHAPTER 6 MASHING TWITTER WITH THE GOOGLE TRANSLATOR 189
We want to use the Cache helper. We’ll just include it in , so all con-trollers in the future can have access to it. In our file, we simply add the following line:
Caching ViewsCaching is a broad term. In our application, we’re doing different types of caching, one of which is caching the views using Cake. This is where the output is saved, by default to
. To cache a view, the setting is made in the action that corresponds to the view. In the con-
troller, there are two different ways you can do this. One way is to set the member variable, as in this example:
This caches the action for 60 seconds.We can also cache an action within the action function itself, like this:
This caches the current action for 60 seconds.
Caching ModelsCake goes through a lot of processing to build the object- relational mapping part of the MVC structure. To save on the execution time, you can cache the model data by setting the
controller variable to :
The cached model data is stored in the folder.
Caution If you change or add database fields, you must delete the cached data models. Be careful of cached data during your development. Sometimes you forget about your caching and then wonder why your changes are not showing up. Check your browser session cache and caching in Cake.
Caching Twitter and Google TranslationsOnce we get data back from Twitter and Google, that data is fairly permanent. The data we get is saved to the database in the three tables we have created. This is unlike some web caching, where data can be occasionally purged or destroyed.
In our application, the caching works in two levels. When a user requests the index page, Cake first checks to see whether the view is held in cache. If its not, the action is called.
CHAPTER 6 MASHING TWITTER WITH THE GOOGLE TRANSLATOR 190
This then fetches the most recent statuses from the database. This data is essentially saved or cached in the database by the background cron process, which fetches the actual status mes-sages from Twitter.
Caching and the Application LayoutCaching can bring up a lot of unforeseen problems within the application view. There are two main points to be aware of:
tag to wrap content that we don’t want to cache.
When we specify in the controller that we want to cache an action view, Cake will also cache the application layout. As such, we can’t cache any dynamic content that changes within a session, whether in the action view or application layout.
As shown in the application layout in Listing 6-14, we don’t cache our tag line, so we wrap it around the tag to say that it is not cached.
Listing 6-14. Header HTML Code with the nocache Tag (in /app/views/layouts/base.ctp)
Changing LanguagesSince the HTML language selection drop- down list is displayed on every page within the appli-cation layout, we have pushed it out as a Cake element, as shown in Listing 6-15.
Listing 6-15. Language Selection Form (/app/views/elements/lang_drop.ctp)
CHAPTER 6 MASHING TWITTER WITH THE GOOGLE TRANSLATOR 191
The important part here is the tag. We don’t want to cache the HTML drop- down list, because if a user changes the language, the newly selected item in the lan-guage should be selected and not a cached selection. However, we do want to cache the language data that was generated by the SQL find operation from the table list.
Some readers may notice this odd line of code:
When a view is rendered from the cache, the current view object isn’t registered in Cake’s global object register. As a result, some helpers that depend on the view object, such as the form helper, fail. Because of this, we need to manually register the current view object.
This highlights the complexity of caching. And in Cake, when an item is cached, no method in the controller is called. Therefore, we need to rely on session data as a conduit for any dynamic data that we need to pass to the view. As highlighted in the code, when we form the HTML tag, we populate it with data that we saved into the Cake session. The
session variable holds the language data from the table, and holds the current language that the user has selected.
Changing LocalesAs no methods are called in the controller when data is cached, we need to set the new locale in the top part of the base layout file , as shown in Listing 6-16. When a user selects a new language, the cached page is presented while noncached content within the cached content is still being executed.
Caution Adding caching to our application was complex and time- consuming, mainly because we were also using other Cake features such as locales. If you are going to add caching, try to add it early on in your development. This will make your life easier when your application grows.
CHAPTER 6 MASHING TWITTER WITH THE GOOGLE TRANSLATOR 192
Listing 6-16. Setting Locale in the Base View (/app/views/layouts/base.ctp)
The ControllersFor our application, three controllers are used: ,
, and . Let’s look at how each of these controllers works.
The Twittertwister ControllerThe class file is shown in Listing 6-17. This is a base controller for the application. At present, it holds one action called , which changes the viewing language of the application.
Listing 6-17. The TwittertwisterController Class (app/controllers/twittertwister_controller.php)
CHAPTER 6 MASHING TWITTER WITH THE GOOGLE TRANSLATOR 193
This action is used by the language- selection form. Starting from line 12, this action takes the language code that the user has selected and changes the status viewing language on line 14 and the locale on line 21. From line 24 onwards, we redirect the users back to the page where they selected the language change, where they would view the same page they have selected in the new language.
The private method on line 42 is used to change the web site locale. The language code used by Google was incompatible with the ISO 639- 3 three- letter language code used by Cake’s l10n. As a result, we needed to do some language code trans-lation. We simply make a query to the table and get the three- letter code that corresponds with Google’s two- letter code, and then save this into the session. We do this using Cake’s model method . Attach the field name in camel case as a suffix to the keyword. In our case, the field name is , so the method name will be . We then supply the method with the value of the field as an argument.

CHAPTER 6 MASHING TWITTER WITH THE GOOGLE TRANSLATOR 194
The TwitterRequest ControllerThe class is responsible for fetching Twitter statuses from the Twitter public timeline. The controller file is shown in Listing 6-18.
Listing 6-18. The TwitterRequestController Class (app/controllers/twitter_request_controller.php)
CHAPTER 6 MASHING TWITTER WITH THE GOOGLE TRANSLATOR 195
On line 5, we set to cache the action to 60 seconds. We will explain this at the end of this section.
The controller contains two main actions: and . The action on line 10 lists all the Twitter requests in the database. As we are just listing the Twitter requests, we don’t need the other tables that link to it, so we set to . Remember that we have cached this action at the start of the controller to 60 seconds, so we are not regen-erating the same query for different users. One obvious shortcoming with this action is the number of calls that will be returned. As we are making Twitter requests every 60 seconds, it would quickly generate a lot of requests. In fact, it probably won’t take long before it would take more than 60 seconds to list all the status requests.
Line 25 starts with the action. This is essentially an action that we use during development to fetch statuses; however, it can still be used as the URL for a cron job entry. This action makes public timeline calls to Twitter requests every 60 seconds. The view in Listing 6-19 is even simpler. (If you use this in a cron entry, comment out the meta refresh, as that should be the job for cron.)
Listing 6-19. The getTwitterRequests View (app/views/twitter_rquest/get_twitter_requests.ctp)
The action shown on line 35 of Listing 6-18 carries out the task of requesting the public timeline from Twitter. We start on line 38 by calling the method in the model, which is shown in Listing 6-20. On line 14 of this listing, the method simply saves a record into the table by using the model’s method on line 20.
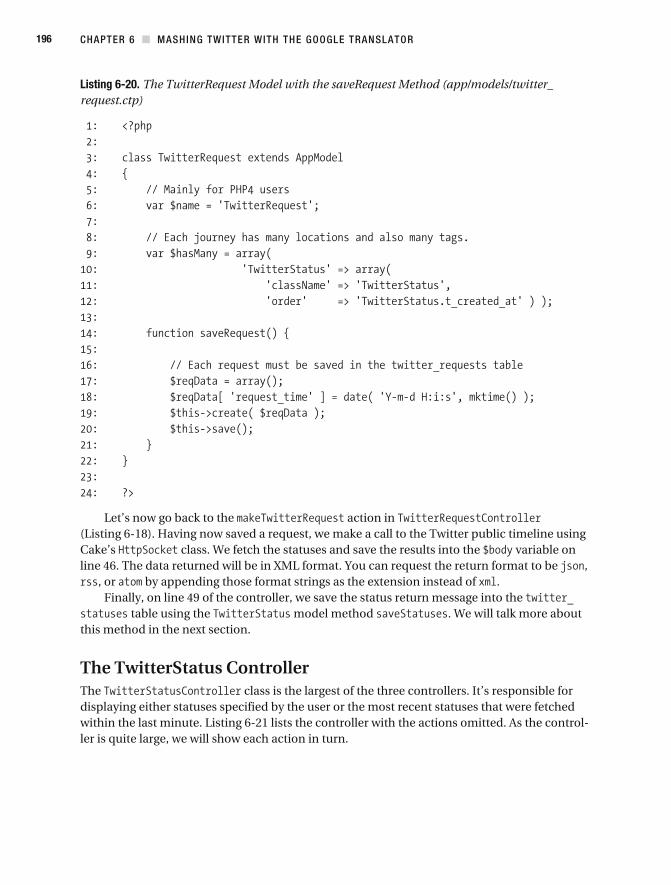
CHAPTER 6 MASHING TWITTER WITH THE GOOGLE TRANSLATOR 196
Listing 6-20. The TwitterRequest Model with the saveRequest Method (app/models/twitter_request.ctp)
Let’s now go back to the action in ( Listing 6-18). Having now saved a request, we make a call to the Twitter public timeline using Cake’s class. We fetch the statuses and save the results into the variable on line 46. The data returned will be in XML format. You can request the return format to be ,
, or by appending those format strings as the extension instead of . Finally, on line 49 of the controller, we save the status return message into the
table using the model method . We will talk more about this method in the next section.
The TwitterStatus ControllerThe class is the largest of the three controllers. It’s responsible for displaying either statuses specified by the user or the most recent statuses that were fetched within the last minute. Listing 6-21 lists the controller with the actions omitted. As the control-ler is quite large, we will show each action in turn.
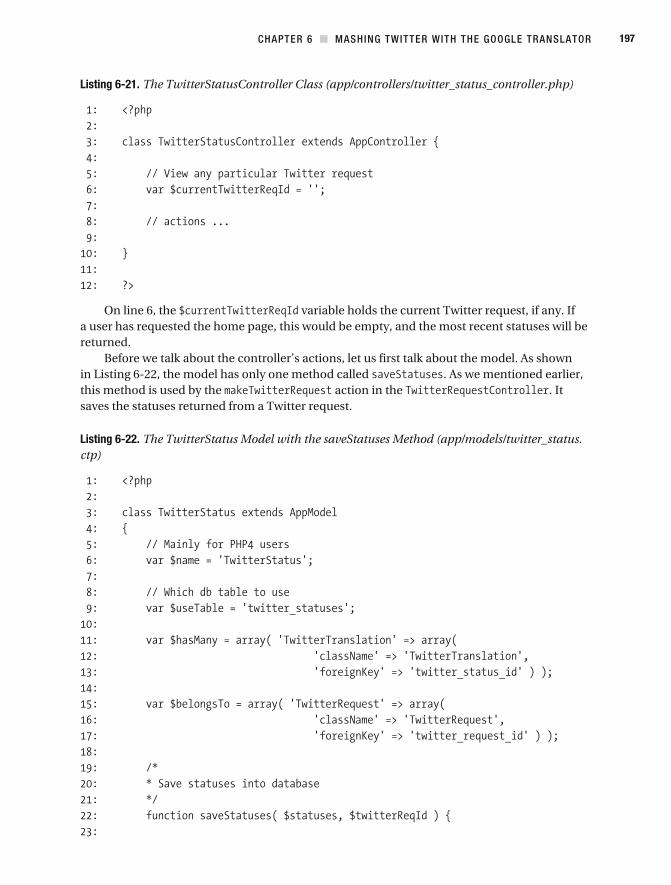
CHAPTER 6 MASHING TWITTER WITH THE GOOGLE TRANSLATOR 197
Listing 6-21. The TwitterStatusController Class (app/controllers/twitter_status_controller.php)
On line 6, the variable holds the current Twitter request, if any. If a user has requested the home page, this would be empty, and the most recent statuses will be returned.
Before we talk about the controller’s actions, let us first talk about the model. As shown in Listing 6-22, the model has only one method called . As we mentioned earlier, this method is used by the action in the . It saves the statuses returned from a Twitter request.
Listing 6-22. The TwitterStatus Model with the saveStatuses Method (app/models/twitter_status.ctp)
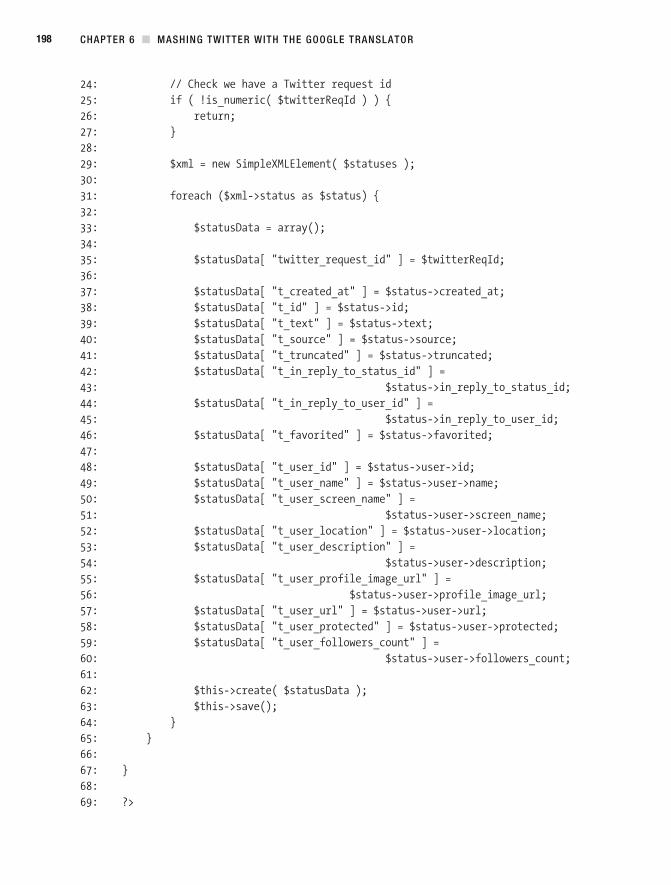
CHAPTER 6 MASHING TWITTER WITH THE GOOGLE TRANSLATOR 198
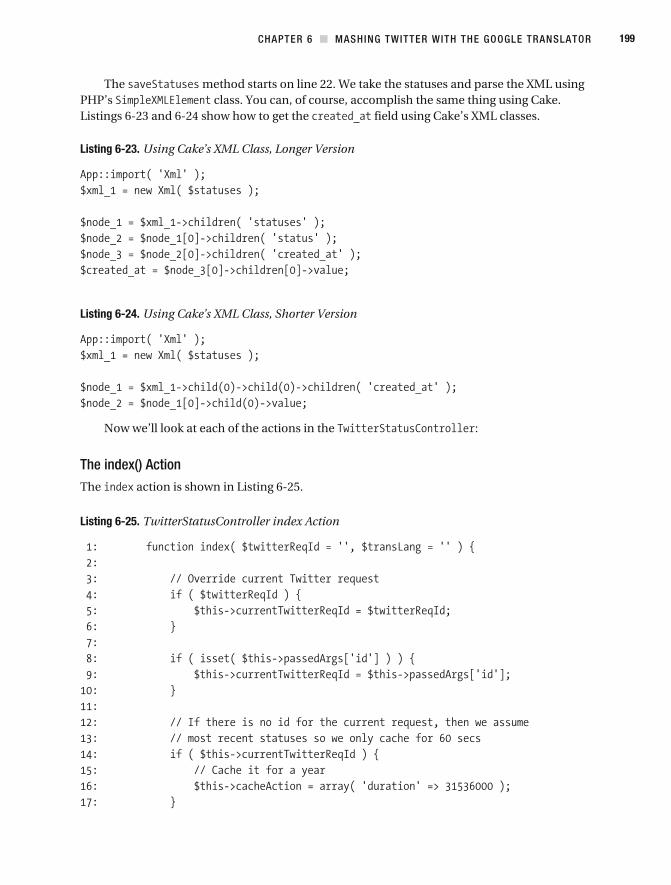
CHAPTER 6 MASHING TWITTER WITH THE GOOGLE TRANSLATOR 199
The method starts on line 22. We take the statuses and parse the XML using PHP’s class. You can, of course, accomplish the same thing using Cake. Listings 6- 23 and 6- 24 show how to get the field using Cake’s XML classes.
Listing 6-23. Using Cake’s XML Class, Longer Version
Listing 6-24. Using Cake’s XML Class, Shorter Version
Now we’ll look at each of the actions in the :
The index() ActionThe action is shown in Listing 6-25.
Listing 6-25. TwitterStatusController index Action
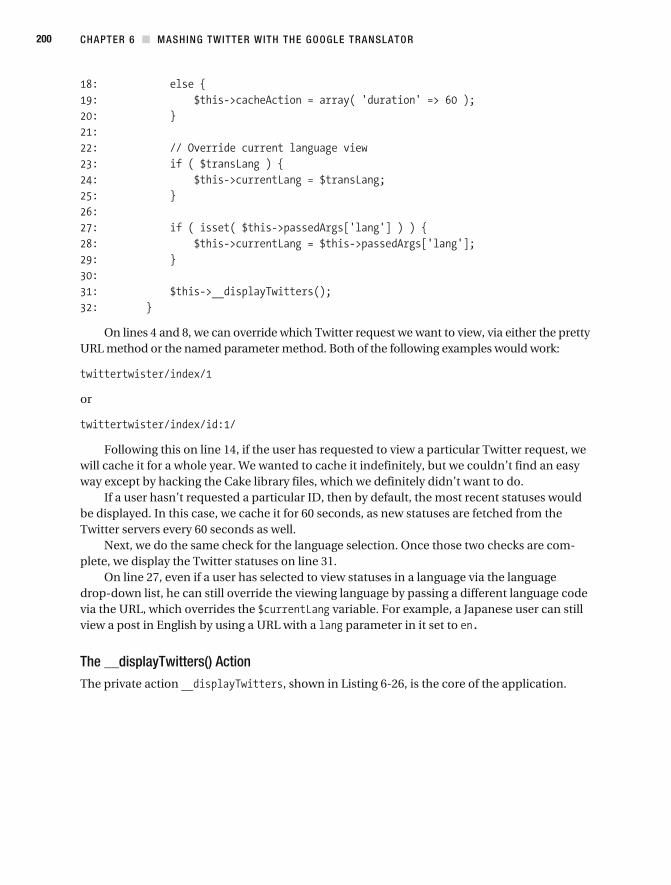
CHAPTER 6 MASHING TWITTER WITH THE GOOGLE TRANSLATOR 200
On lines 4 and 8, we can override which Twitter request we want to view, via either the pretty URL method or the named parameter method. Both of the following examples would work:
or
Following this on line 14, if the user has requested to view a particular Twitter request, we will cache it for a whole year. We wanted to cache it indefinitely, but we couldn’t find an easy way except by hacking the Cake library files, which we definitely didn’t want to do.
If a user hasn’t requested a particular ID, then by default, the most recent statuses would be displayed. In this case, we cache it for 60 seconds, as new statuses are fetched from the Twitter servers every 60 seconds as well.
Next, we do the same check for the language selection. Once those two checks are com-plete, we display the Twitter statuses on line 31.
On line 27, even if a user has selected to view statuses in a language via the language drop- down list, he can still override the viewing language by passing a different language code via the URL, which overrides the variable. For example, a Japanese user can still view a post in English by using a URL with a parameter in it set to
The __displayTwitters() ActionThe private action , shown in Listing 6-26, is the core of the application.
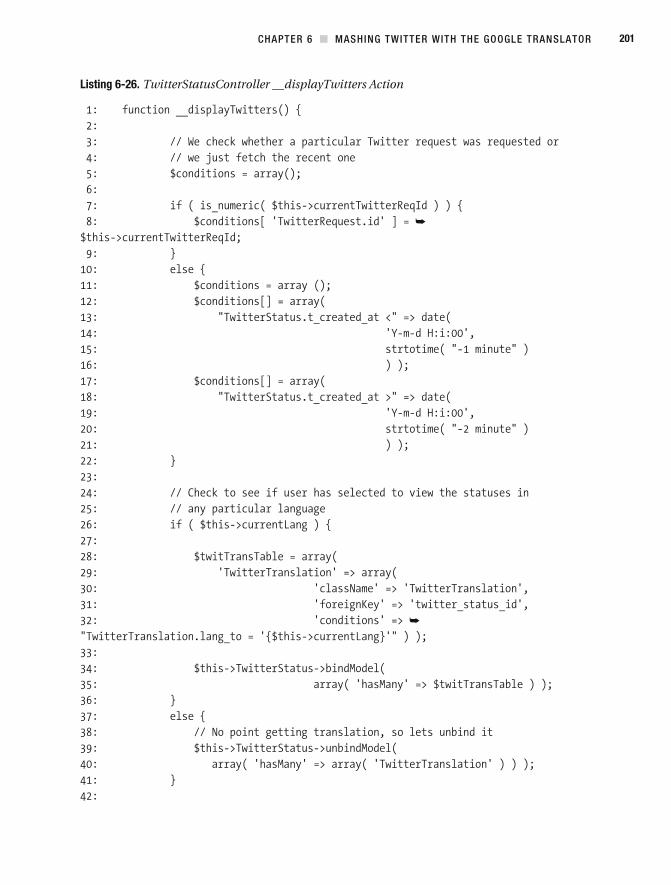
CHAPTER 6 MASHING TWITTER WITH THE GOOGLE TRANSLATOR 201
Listing 6-26. TwitterStatusController __displayTwitters Action
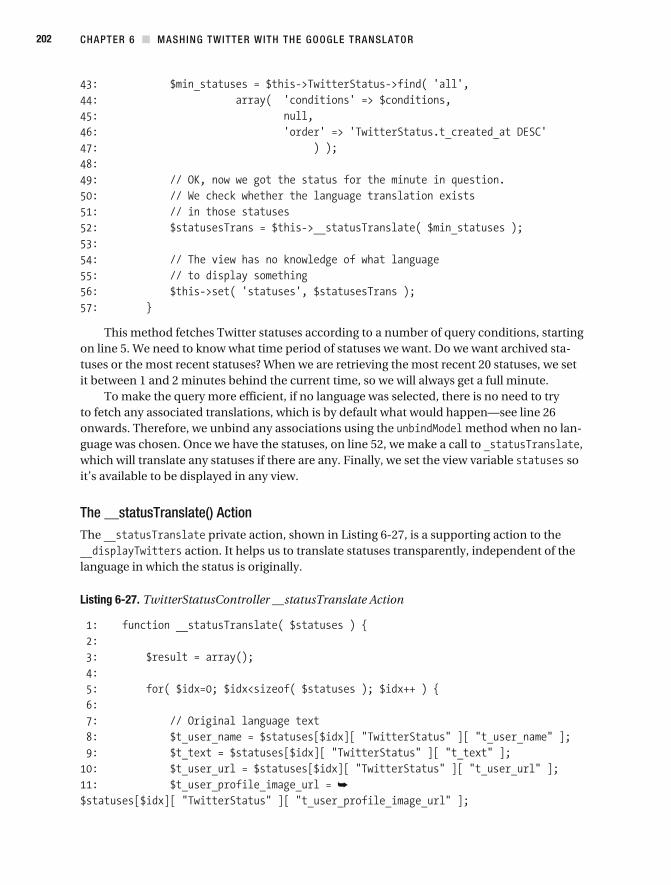
CHAPTER 6 MASHING TWITTER WITH THE GOOGLE TRANSLATOR 202
This method fetches Twitter statuses according to a number of query conditions, starting on line 5. We need to know what time period of statuses we want. Do we want archived sta-tuses or the most recent statuses? When we are retrieving the most recent 20 statuses, we set it between 1 and 2 minutes behind the current time, so we will always get a full minute.
To make the query more efficient, if no language was selected, there is no need to try to fetch any associated translations, which is by default what would happen—see line 26 onwards. Therefore, we unbind any associations using the method when no lan-guage was chosen. Once we have the statuses, on line 52, we make a call to , which will translate any statuses if there are any. Finally, we set the view variable so it’s available to be displayed in any view.
The __statusTranslate() ActionThe private action, shown in Listing 6-27, is a supporting action to the
action. It helps us to translate statuses transparently, independent of the language in which the status is originally.
Listing 6-27. TwitterStatusController __statusTranslate Action
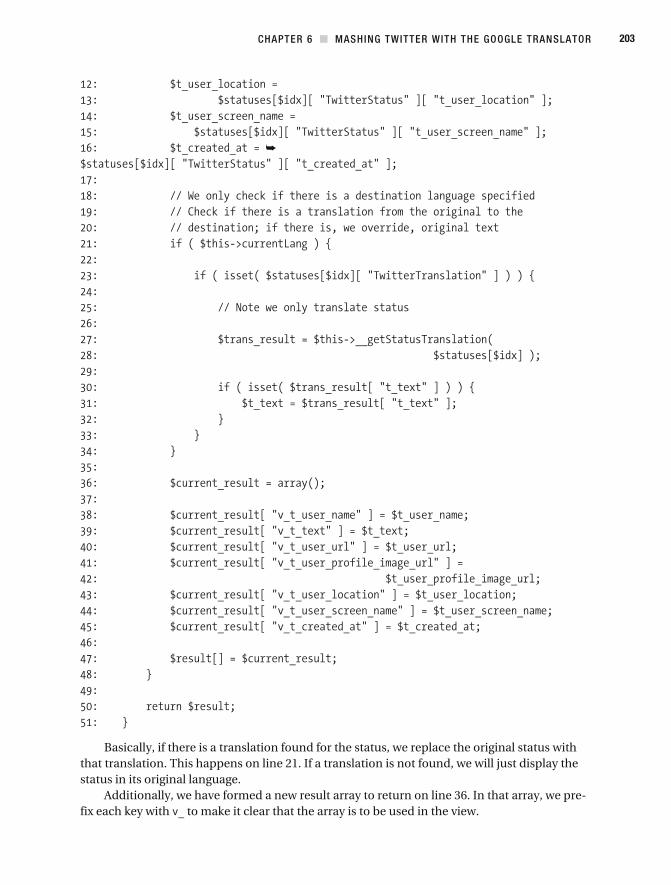
CHAPTER 6 MASHING TWITTER WITH THE GOOGLE TRANSLATOR 203
Basically, if there is a translation found for the status, we replace the original status with that translation. This happens on line 21. If a translation is not found, we will just display the status in its original language.
Additionally, we have formed a new result array to return on line 36. In that array, we pre-fix each key with to make it clear that the array is to be used in the view.
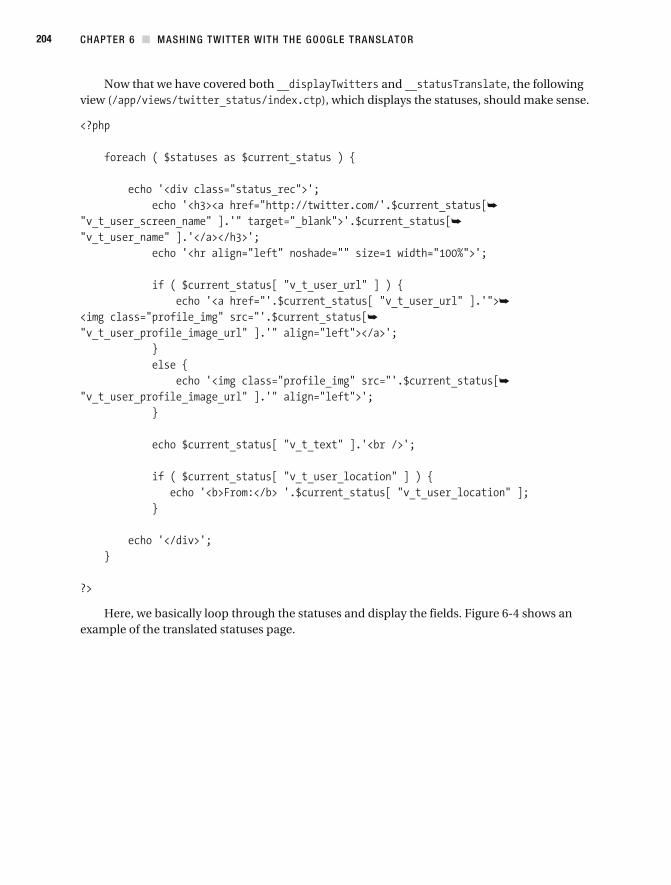
CHAPTER 6 MASHING TWITTER WITH THE GOOGLE TRANSLATOR 204
Now that we have covered both and , the following view ( ), which displays the statuses, should make sense.
Here, we basically loop through the statuses and display the fields. Figure 6-4 shows an example of the translated statuses page.
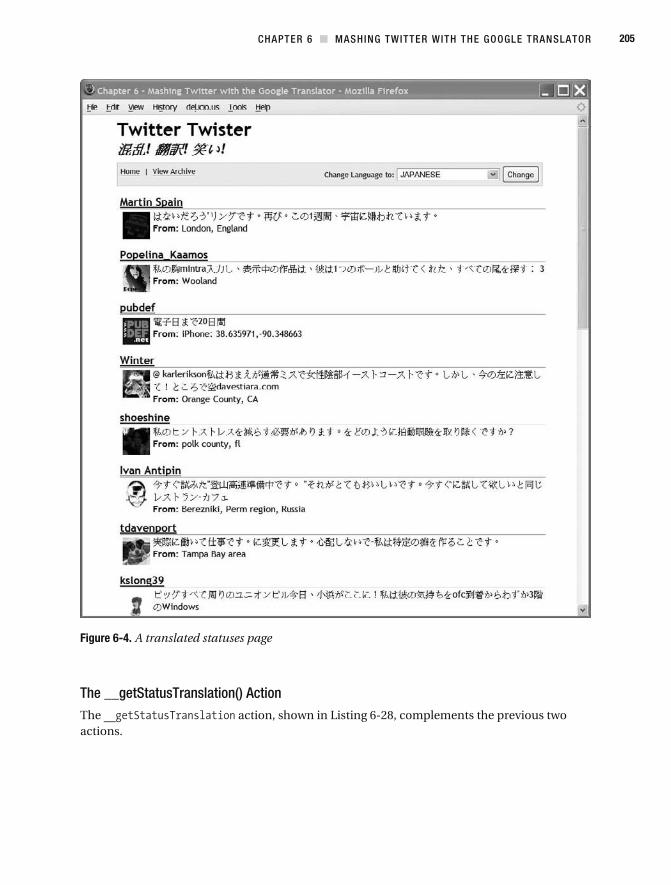
CHAPTER 6 MASHING TWITTER WITH THE GOOGLE TRANSLATOR 205
Figure 6-4. A translated statuses page
The __getStatusTranslation() ActionThe action, shown in Listing 6-28, complements the previous two actions.
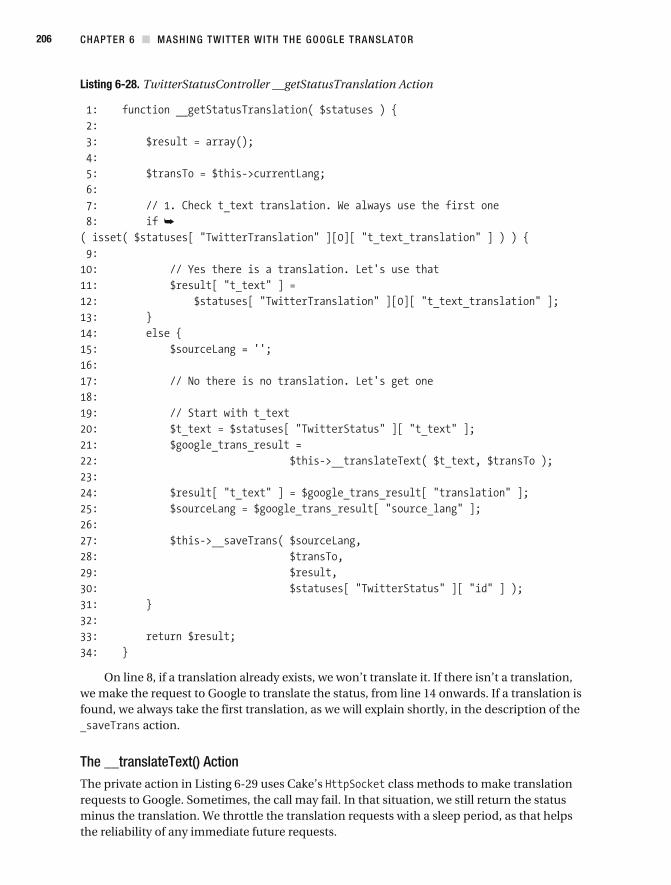
CHAPTER 6 MASHING TWITTER WITH THE GOOGLE TRANSLATOR 206
Listing 6-28. TwitterStatusController __getStatusTranslation Action
On line 8, if a translation already exists, we won’t translate it. If there isn’t a translation, we make the request to Google to translate the status, from line 14 onwards. If a translation is found, we always take the first translation, as we will explain shortly, in the description of the
action.
The __translateText() ActionThe private action in Listing 6-29 uses Cake’s class methods to make translation requests to Google. Sometimes, the call may fail. In that situation, we still return the status minus the translation. We throttle the translation requests with a sleep period, as that helps the reliability of any immediate future requests.
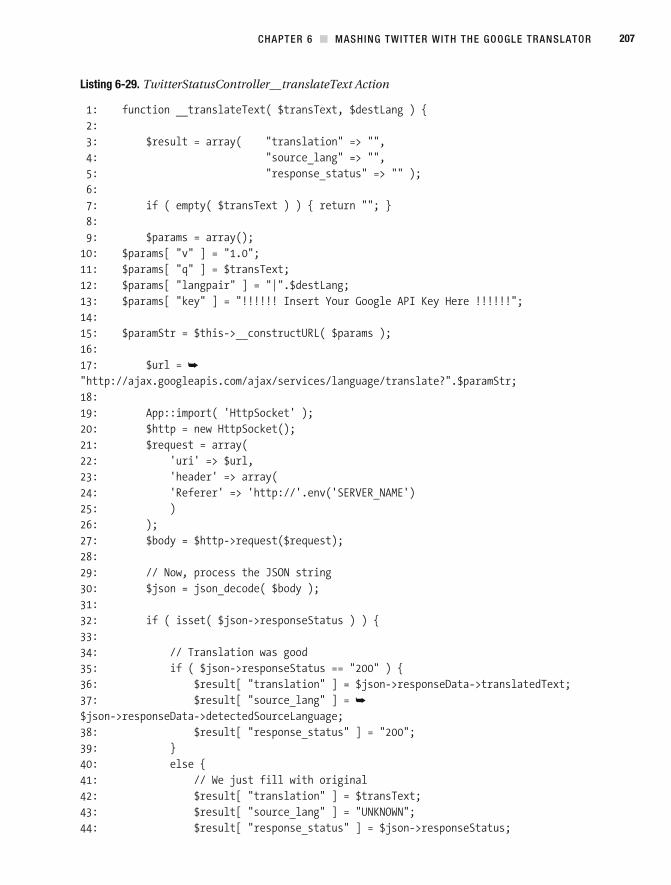
CHAPTER 6 MASHING TWITTER WITH THE GOOGLE TRANSLATOR 207
Listing 6-29. TwitterStatusController__translateText Action

CHAPTER 6 MASHING TWITTER WITH THE GOOGLE TRANSLATOR 208
As this action is used by , which in turn saves it into the database, we may occasionally see the value in the table. In this chapter, we won’t be going into the reasons why some text doesn’t get translated. Our goal is to trans-late some piece of text using Google. If the translation fails for some reason, we still return the data in the same format, as if it were translated. This way, we have a log of the failure of the translation, and the user still gets to see the original text, which we think is better than seeing no status text or an empty translation display.
We start the action off on line 7. If no text is given, we just return an empty string. If a string is given, we form the code to carry out the from line 9 to line 27. We then decode the returned result on line 30 onwards. On line 13, remember to use your own Google API key.
The __saveTrans() ActionThere isn’t much to the action, shown in Listing 6-30.
Listing 6-30. TwitterStatusController__saveTrans Action
CHAPTER 6 MASHING TWITTER WITH THE GOOGLE TRANSLATOR 209
On line 12, we check if there are two or more of the same translation. If not, we enter the translation into the table on lines 24 and 25. Why would there be two or more of the same translation? Well, since we are not translating the statuses in a background process, any user who first brings up the statuses in a specific language would fire up the translation parts of the controller. As we are not using SQL transaction locks, there could easily be the situation where two or more users are requesting the same statuses at roughly the same time. Using transaction locks would hold up the rendering of the page. We don’t feel they are necessary, as we can always write some housekeeping function to clear any duplicate entries. This is better than delaying the translation of the page.
The AppControllerAlong with our three controllers, the global also plays a part in our application. Listing 6-31 shows the contents of the file
Listing 6-31. The Application Base Controller (app/app_controller.php)
CHAPTER 6 MASHING TWITTER WITH THE GOOGLE TRANSLATOR 210
Starting on line 9, we employ a number of view helpers. The cache helper helps us to cache the output view. The form helper is needed for the language selection drop- down list. The HTML helper is used for various HTML tags. And last, the RSS helper deals with the output needed for RSS requests.
We have also used a number of components. The component is used to store the language the user has selected and also the data generated from the language drop- down list.
automatically handles user RSS web service requests by picking the correct layout and view. The will use the RSS layout under the folder. In the view, it will use the in the folder. Note, however, that beginning on line 40, we have used the alternative hack to get our URL working. As we explained earlier, we want to have an RSS URL feed that ends with . This method tricks the into thinking that the request has an extension.
CHAPTER 6 MASHING TWITTER WITH THE GOOGLE TRANSLATOR 211
Continuing our cache theme, on line 21, we are also caching the model using the variable. This will help to speed up the application. The code within the just caches the data from the language drop- down list. We have commented
some code at the end of the method. The finishes with a call to the private method. If a user has
previously selected a language via the top navigation drop- down list, this method makes sure that all the other controllers are aware of the chosen language. We assign the session value to the global value.
SummaryIn this chapter, we have successfully mashed two popular online applications. We have also covered a number of Cake topics, including caching. Its worth highlighting that caching is quite a loose term, with different meanings in different contexts, but the end result is always to save on some resource by not repeating the same action twice.
Additionally, we added i18n and l10n. Note that we will come back to this topic in Chapter 9, where we will add different languages to data that is stored in a database.
Since we have consumed two different web services, it seems only right that we also offer one as well. Adding the RSS web service feature was quite straightforward, except for our requirement that the URLs should end with .
There are quite a number of features you could add to this application. The following are some suggestions:
action could be split into years/months as one page, then days, then hours. Thus, you would only list up to 60 items in any one page. You could then have URLs like .
-guages gradually over a period of time. This would make the archive available via links instead of a drop- down list, so it would be search engine optimization–friendly.
post it to Twitter in the recipient’s own language.
C H A P T E R 7
Unit Testing and Web Testing
As you may have inferred, unit testing is the practice of testing individual units of code, to check that the application code works as expected. To help developers with their testing, CakePHP 1.2 includes integrated unit testing features. In this chapter, we’ll show you how to use these features. We’ll start by looking at a methodology that can provide some insight into the goals of unit testing.
Getting Programming DoneDavid Allen’s productivity book, Getting Things Done: The Art of Stress- Free Productivity (Penguin, 2002), has attracted a lot of interest in the past few years. The methodology, abbrevi-ated GTD, has become especially popular among the tech crowd. It’s the primary subject of Merlin Mann’s 43folders.com web site and many other blogs.
The GTD methodology might be summarized with these principles:
Define what done looks like: Visualize what your end goal is. Envision what it will take to get there. Allow your mind to brainstorm how to get yourself there.
Define what doing looks like: Decide what the next physical action is that will move you closer to your goal. What can you do to move closer to completion, based on your current priorities, resources, and context?
Unit testing helps you define what done looks like for your code. Unit testing gives you a specific goal to aim for as you code. It requires mental exertion up- front, as you decide spe-cifically what your code should do, and then it “signals” to you in clear terms when you’ve reached your goal.
Over the life of your project, unit testing also provides one other GTD- like benefit: it helps you “get it all out of your head.” The GTD methodology encourages you to write down all of your “open loops”—things, large and small, that you want to do or change—to free your mind. As you free your mind of trying to remember everything that’s unfinished in your life, you’ll have more mental energy for creativity.
Similarly, you may have noticed that when you refactor your code, especially in a dynamic, loosely typed language like PHP, you need to keep a lot in your head. You may wonder whether writing new code will break your existing code if you forget something. For example, have you ever had to rename a variable that was strewn throughout your code? Have you ever had to change all your elements to elements? If so, then you know the
213
CHAPTER 7 UNIT TESTING AND WEB TESTING214
feeling. It’s worrisome to refactor your code and wonder if it will still work afterwards. Unit testing provides an alert system and a security net to inform you when you’ve broken some-thing and to catch you if you make a mistake. By freeing your mind from worrying whether you’ll break something as you move forward, unit testing allows you to focus on the more creative aspects of your work.
Now that you have an idea about the benefits of unit testing, let’s see how it works with a Cake application.
Our Case Study: An App Like In/OutIn April 2008, Jason Fried announced that his company, 37signals, uses a simple internal application called In/Out for communicating among team members (see
). In/Out shows what each team member is doing and what each has accomplished. Here, we’ll build a similar application as our case study. We’ll call it Accomplishments, and it will allow team members to create a log of tasks and projects they have accomplished. It won’t have a real authentication system or security. For this example, we’ll assume that it’s being deployed on an intranet or otherwise secured.
Creating the ApplicationWe’ll start with a fresh installation of CakePHP 1.2, which includes integrated unit testing features, though we still need to install the unit testing framework. Figure 7-1 shows the green messages that indicate Cake is ready to use. We’ve set up caching, a MySQL database, and a custom security salt, so the development environment is ready to use.
For the application, we’ll create an table as shown in Listing 7-1.
Listing 7-1. The accomplishments Table Schema
The table includes fields for a primary key, the team member’s name (this table isn’t normalized), a description of up to 140 characters (Twitter style), and created and modified dates.
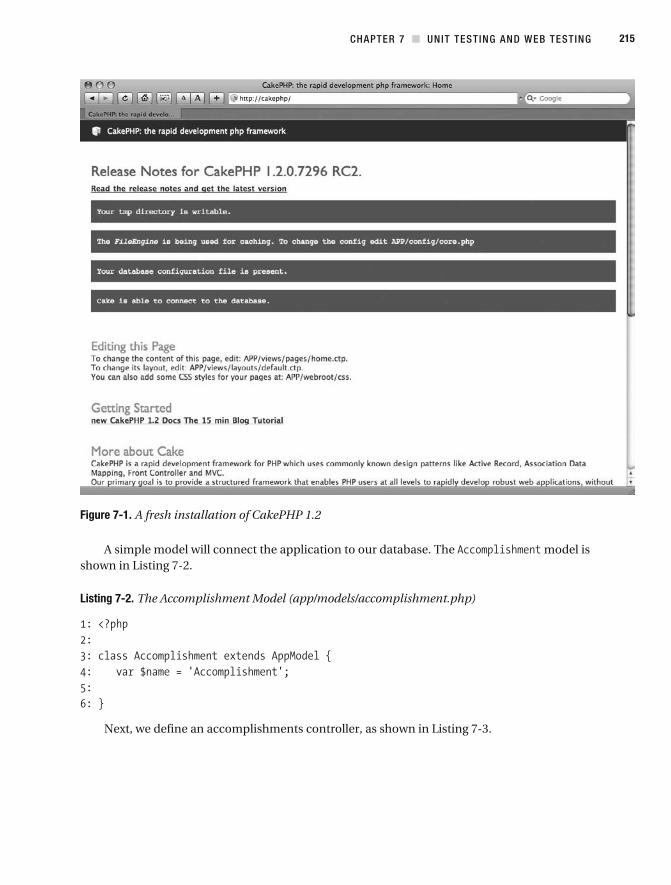
CHAPTER 7 UNIT TESTING AND WEB TESTING 215
Figure 7-1. A fresh installation of CakePHP 1.2
A simple model will connect the application to our database. The model is shown in Listing 7-2.
Listing 7-2. The Accomplishment Model (app/models/accomplishment.php)
Next, we define an accomplishments controller, as shown in Listing 7-3.
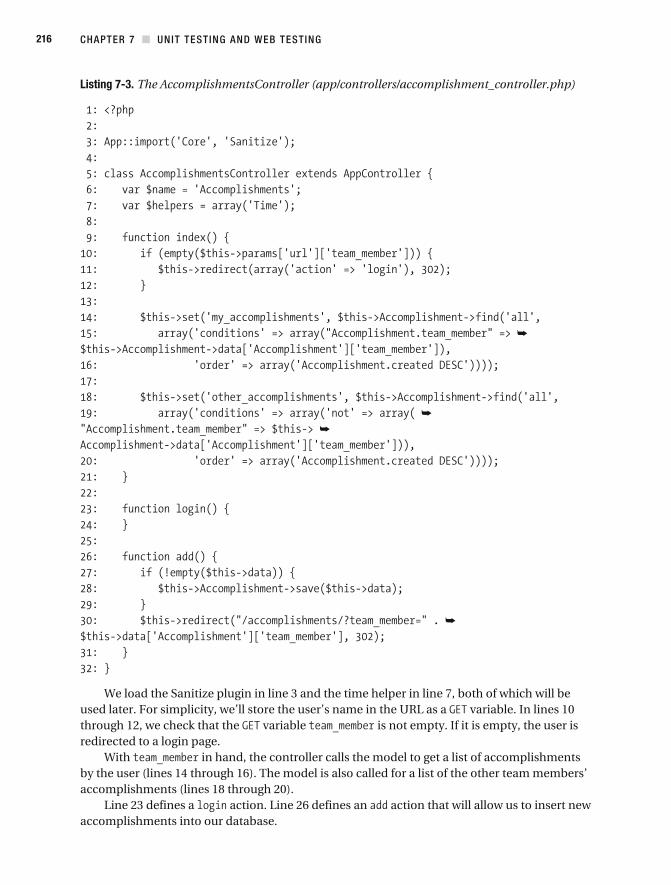
CHAPTER 7 UNIT TESTING AND WEB TESTING216
Listing 7-3. The AccomplishmentsController (app/controllers/accomplishment_controller.php)
We load the Sanitize plugin in line 3 and the time helper in line 7, both of which will be used later. For simplicity, we’ll store the user’s name in the URL as a variable. In lines 10 through 12, we check that the variable is not empty. If it is empty, the user is redirected to a login page.
With in hand, the controller calls the model to get a list of accomplishments by the user (lines 14 through 16). The model is also called for a list of the other team members’ accomplishments (lines 18 through 20).
Line 23 defines a action. Line 26 defines an action that will allow us to insert new accomplishments into our database.
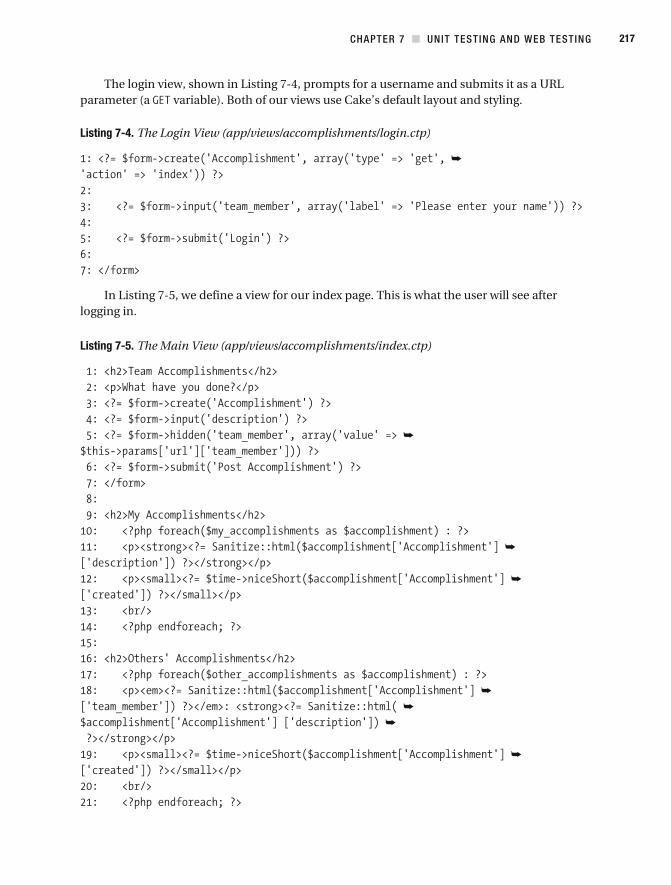
CHAPTER 7 UNIT TESTING AND WEB TESTING 217
The login view, shown in Listing 7-4, prompts for a username and submits it as a URL parameter (a variable). Both of our views use Cake’s default layout and styling.
Listing 7-4. The Login View (app/views/accomplishments/login.ctp)
In Listing 7-5, we define a view for our index page. This is what the user will see after logging in.
Listing 7-5. The Main View (app/views/accomplishments/index.ctp)
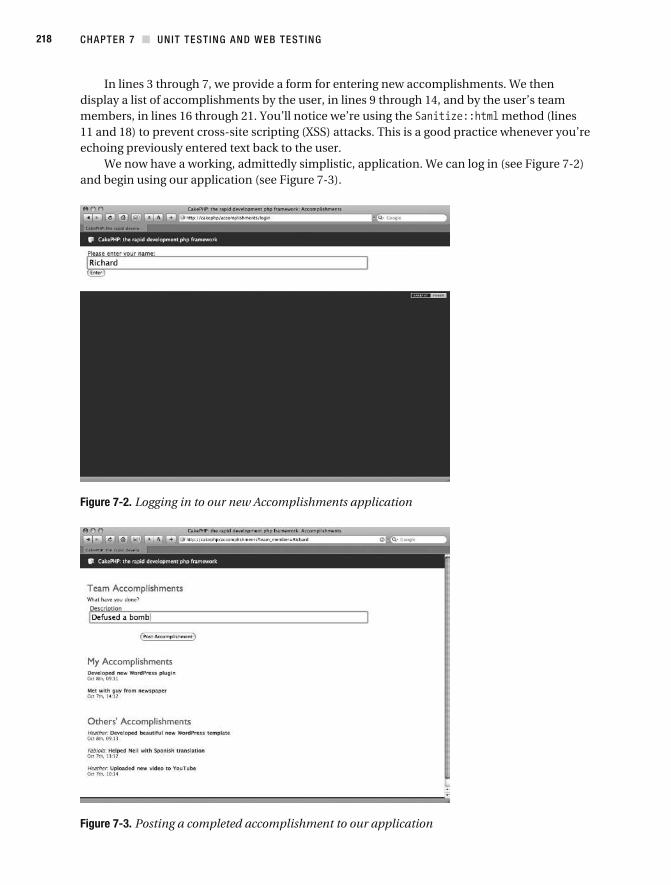
CHAPTER 7 UNIT TESTING AND WEB TESTING218
In lines 3 through 7, we provide a form for entering new accomplishments. We then display a list of accomplishments by the user, in lines 9 through 14, and by the user’s team members, in lines 16 through 21. You’ll notice we’re using the method (lines 11 and 18) to prevent cross- site scripting (XSS) attacks. This is a good practice whenever you’re echoing previously entered text back to the user.
We now have a working, admittedly simplistic, application. We can log in (see Figure 7-2) and begin using our application (see Figure 7-3).
Figure 7-2. Logging in to our new Accomplishments application
Figure 7-3. Posting a completed accomplishment to our application
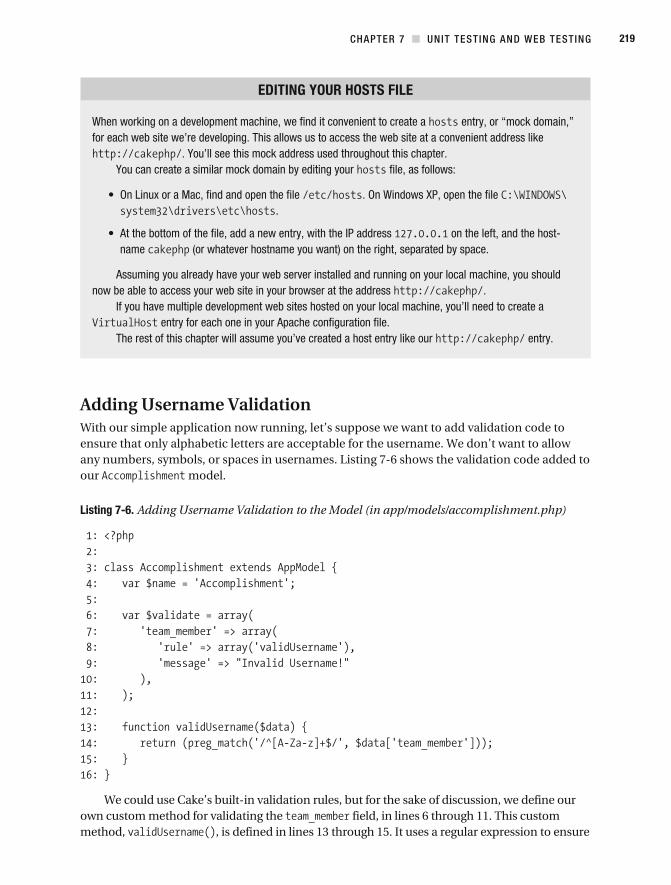
CHAPTER 7 UNIT TESTING AND WEB TESTING 219
EDITING YOUR HOSTS FILE
When working on a development machine, we find it convenient to create a entry, or “mock domain,” for each web site we’re developing. This allows us to access the web site at a convenient address like
. You’ll see this mock address used throughout this chapter.You can create a similar mock domain by editing your file, as follows:
.
on the left, and the host-name (or whatever hostname you want) on the right, separated by space.
now be able to access your web site in your browser at the address .
The rest of this chapter will assume you’ve created a host entry like our entry.
Adding Username ValidationWith our simple application now running, let’s suppose we want to add validation code to ensure that only alphabetic letters are acceptable for the username. We don’t want to allow any numbers, symbols, or spaces in usernames. Listing 7-6 shows the validation code added to our model.
Listing 7-6. Adding Username Validation to the Model (in app/models/accomplishment.php)
We could use Cake’s built- in validation rules, but for the sake of discussion, we define our own custom method for validating the field, in lines 6 through 11. This custom method, , is defined in lines 13 through 15. It uses a regular expression to ensure
CHAPTER 7 UNIT TESTING AND WEB TESTING220
that only uppercase and lowercase letters are allowed. In the real world, this method might con-nect to a centralized company directory web service to look up and validate the username.
Next, we’ll modify our controller to do the validating, as shown in Listing 7-7 (additions shown in bold).
Listing 7-7. The AccomplishmentsController Updated to Validate the team_member Name (app/controllers/accomplishment_controller.php)
CHAPTER 7 UNIT TESTING AND WEB TESTING 221
In line 14, we load the variable into the model. In line 16, we make sure the model validates. If the model does not validate, we know it must be an invalid username (because that’s the only thing we’ve changed), so we set an error message and redirect to the login page (lines 17 and 18). We are performing the validation explicitly in the controller, as opposed to implicitly when the model attempts to save to the database, because we need a valid username before we can display accomplishments.
After adding username validation code, what if we discover that our code is too strict? What if we want to allow usernames with numeric digits? And, as a further complication, what if we don’t want numeric digits at the beginning of the username? Suppose we want to accept a username like , but not . This could quickly become complicated as we try to create an algorithm that will accept the usernames we want to accept and reject the usernames we want to reject. This is where unit testing comes in.
Using Cake’s Unit Testing FrameworkBegin by visiting , the location of Cake’s testing interface. You should see the error message shown in Figure 7-4, indicating that SimpleTest is not yet installed.
Figure 7-4. You’ll see this message if Cake’s test interface, SimpleTest, is not yet installed.

CHAPTER 7 UNIT TESTING AND WEB TESTING222
Installing SimpleTestSimpleTest is the third- party unit testing library (created by Marcus Baker, a developer in London) that powers Cake’s unit testing module. SimpleTest can be obtained from
. As shown in Figure 7-5, the SimpleTest web site also offers a manual, a mailing list, and links to several articles and tutorials.
Figure 7-5. The SimpleTest web site (http://www.simpletest.org)
After downloading and uncompressing SimpleTest, installation is simple. Just copy the folder to either your folder or your folder, depending on
whether you want the SimpleTest library to be available to all your applications or to only this application. In our development environment, this decision will make little difference. We’ll flip a coin and copy to the folder.
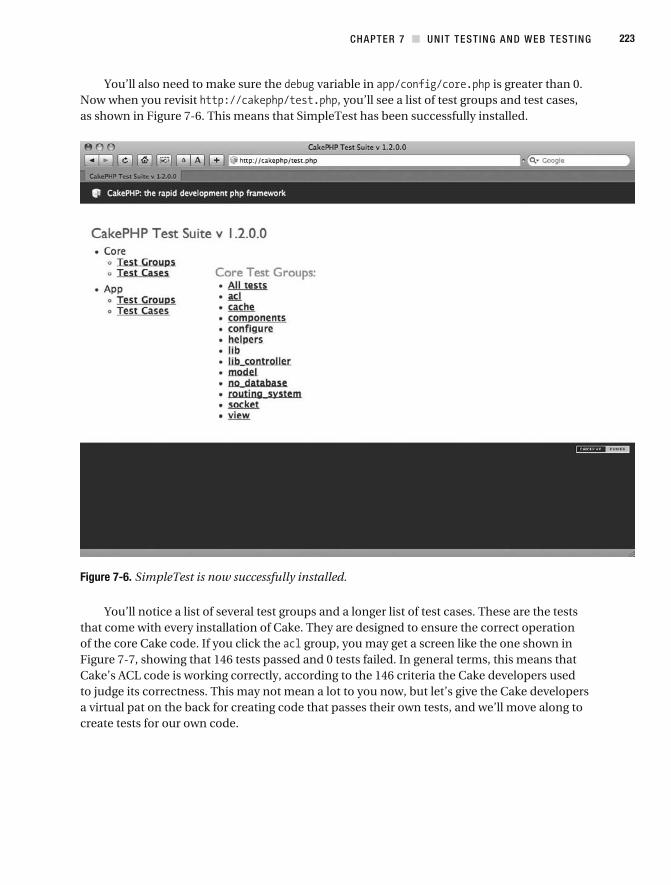
CHAPTER 7 UNIT TESTING AND WEB TESTING 223
You’ll also need to make sure the variable in is greater than 0. Now when you revisit , you’ll see a list of test groups and test cases, as shown in Figure 7-6. This means that SimpleTest has been successfully installed.
Figure 7-6. SimpleTest is now successfully installed.
You’ll notice a list of several test groups and a longer list of test cases. These are the tests that come with every installation of Cake. They are designed to ensure the correct operation of the core Cake code. If you click the group, you may get a screen like the one shown in Figure 7-7, showing that 146 tests passed and 0 tests failed. In general terms, this means that Cake’s ACL code is working correctly, according to the 146 criteria the Cake developers used to judge its correctness. This may not mean a lot to you now, but let’s give the Cake developers a virtual pat on the back for creating code that passes their own tests, and we’ll move along to create tests for our own code.
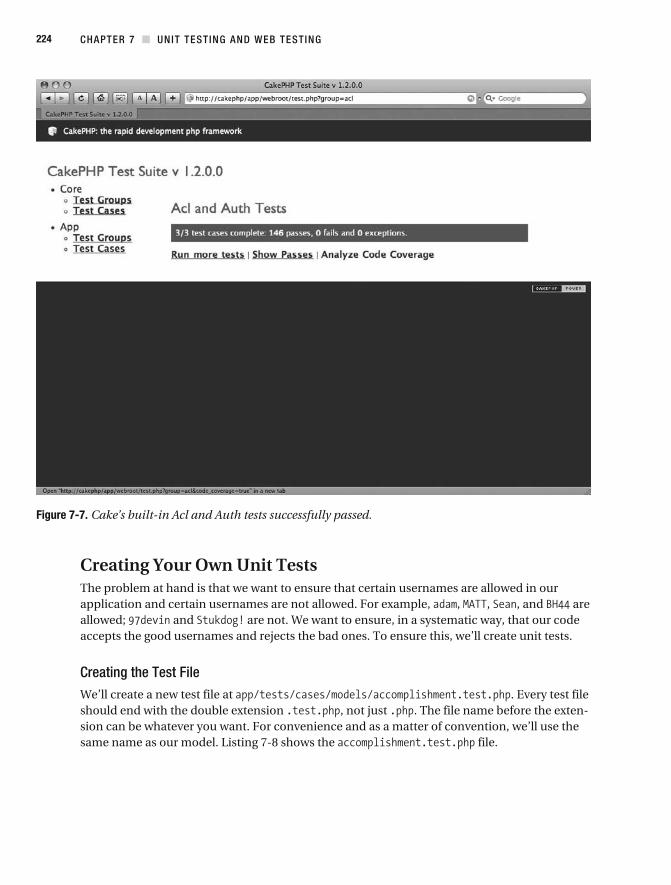
CHAPTER 7 UNIT TESTING AND WEB TESTING224
Figure 7-7. Cake’s built- in Acl and Auth tests successfully passed.
Creating Your Own Unit TestsThe problem at hand is that we want to ensure that certain usernames are allowed in our application and certain usernames are not allowed. For example, , , , and are allowed; and are not. We want to ensure, in a systematic way, that our code accepts the good usernames and rejects the bad ones. To ensure this, we’ll create unit tests.
Creating the Test FileWe’ll create a new test file at . Every test file should end with the double extension , not just . The file name before the exten-sion can be whatever you want. For convenience and as a matter of convention, we’ll use the same name as our model. Listing 7-8 shows the file.
CHAPTER 7 UNIT TESTING AND WEB TESTING 225
Listing 7-8. Our Test Module (app/tests/cases/models/accomplishment.test.php)
In , we define a new class called , which extends the model class (lines 5 through 8). Similarly, your test classes should follow the same naming convention of (although this is not required) and should extend your model’s class.
Notice that we need to explicitly import our model (line 3). The Cake testing module doesn’t make the automagic assumptions that Cake does elsewhere, to avoid muddying the testing environment. The test class also defines a new database configuration (line 7).
Next, we define a class called , which extends (line 10). Your test classes should follow the same naming pattern and extend .
In the class, we define a method called . Each method in a test case class should begin with (as in line 13). The method
begins by instantiating an object of the class (line 14). Then six assertions are performed against the object (lines 16 through 21). These assertions ensure that our method is behaving as expected. For example, if we pass in , , , or , we expect to
CHAPTER 7 UNIT TESTING AND WEB TESTING226
return , so we use the method to ensure it (lines 16 through 19). On the other hand, if we pass in or , we expect to return , so we use the method to ensure it (lines 20 and 21).
Creating a Test FixtureTo test a data model, as we are doing here, we need to create a test fixture. A fixture is a set of data used for testing purposes. It’s called a fixture because it remains fixed across all tests, like the control group in a scientific experiment. Your fixture should use test data that approxi-mates the breadth and variedness of your real data.
Test fixtures are created using PHP code that looks like SQL code. You define a multidi-mensional array to represent the database fields, and another array to represent the database records. The advantage of defining test data in PHP code, as opposed to in your database, is that it is less likely to be changed arbitrarily from the outside. It can also be versioned in a code- versioning system such as Subversion. Listing 7-9 shows a hypothetical test fixture, which would go in , but we’re not going to use this one in our example.
Listing 7-9. A Hypothetical Test Fixture
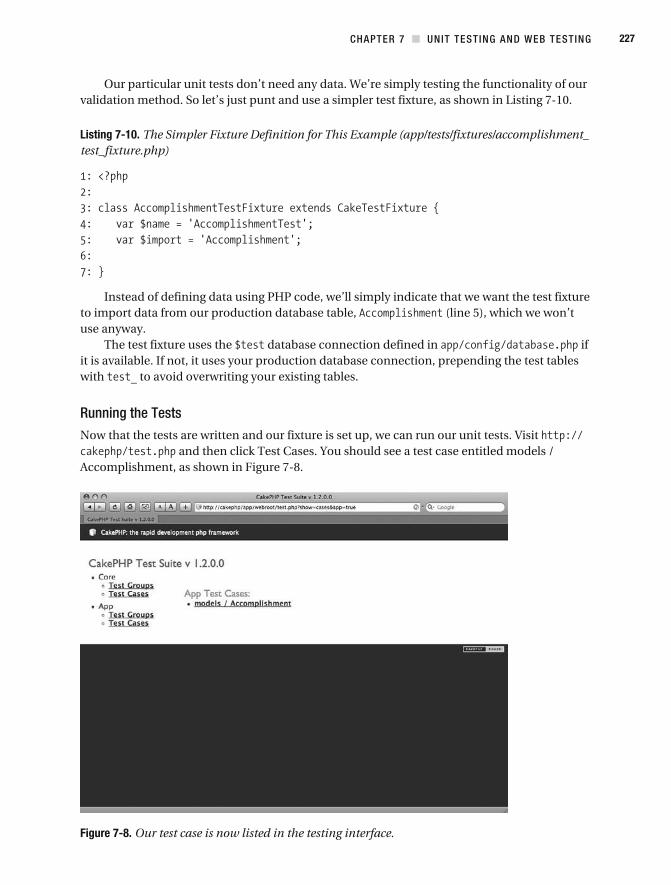
CHAPTER 7 UNIT TESTING AND WEB TESTING 227
Our particular unit tests don’t need any data. We’re simply testing the functionality of our validation method. So let’s just punt and use a simpler test fixture, as shown in Listing 7-10.
Listing 7-10. The Simpler Fixture Definition for This Example (app/tests/fixtures/accomplishment_ test_fixture.php)
Instead of defining data using PHP code, we’ll simply indicate that we want the test fixture to import data from our production database table, (line 5), which we won’t use anyway.
The test fixture uses the database connection defined in if it is available. If not, it uses your production database connection, prepending the test tables with to avoid overwriting your existing tables.
Running the TestsNow that the tests are written and our fixture is set up, we can run our unit tests. Visit
and then click Test Cases. You should see a test case entitled models / Accomplishment, as shown in Figure 7-8.
Figure 7-8. Our test case is now listed in the testing interface.
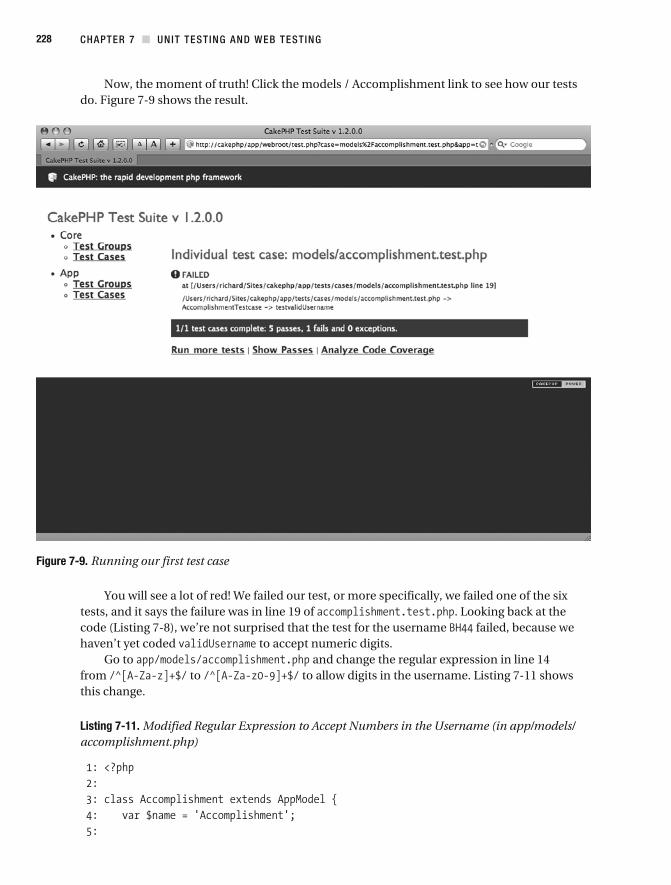
CHAPTER 7 UNIT TESTING AND WEB TESTING228
Now, the moment of truth! Click the models / Accomplishment link to see how our tests do. Figure 7-9 shows the result.
Figure 7-9. Running our first test case
You will see a lot of red! We failed our test, or more specifically, we failed one of the six tests, and it says the failure was in line 19 of . Looking back at the code ( Listing 7-8), we’re not surprised that the test for the username failed, because we haven’t yet coded to accept numeric digits.
Go to and change the regular expression in line 14 from to to allow digits in the username. Listing 7-11 shows this change.
Listing 7-11. Modified Regular Expression to Accept Numbers in the Username (in app/models/accomplishment.php)
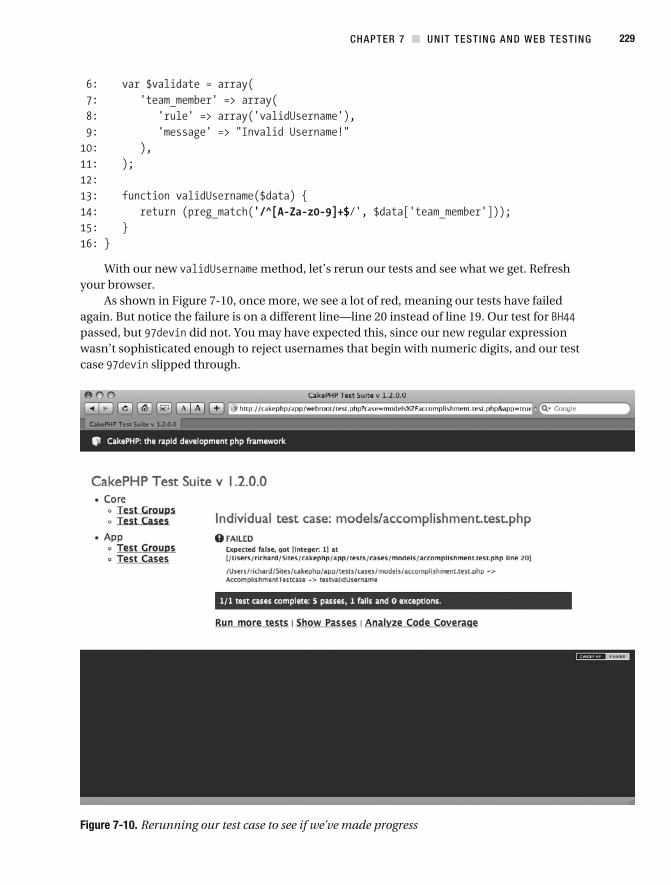
CHAPTER 7 UNIT TESTING AND WEB TESTING 229
With our new method, let’s rerun our tests and see what we get. Refresh your browser.
As shown in Figure 7-10, once more, we see a lot of red, meaning our tests have failed again. But notice the failure is on a different line—line 20 instead of line 19. Our test for passed, but did not. You may have expected this, since our new regular expression wasn’t sophisticated enough to reject usernames that begin with numeric digits, and our test case slipped through.
Figure 7-10. Rerunning our test case to see if we’ve made progress
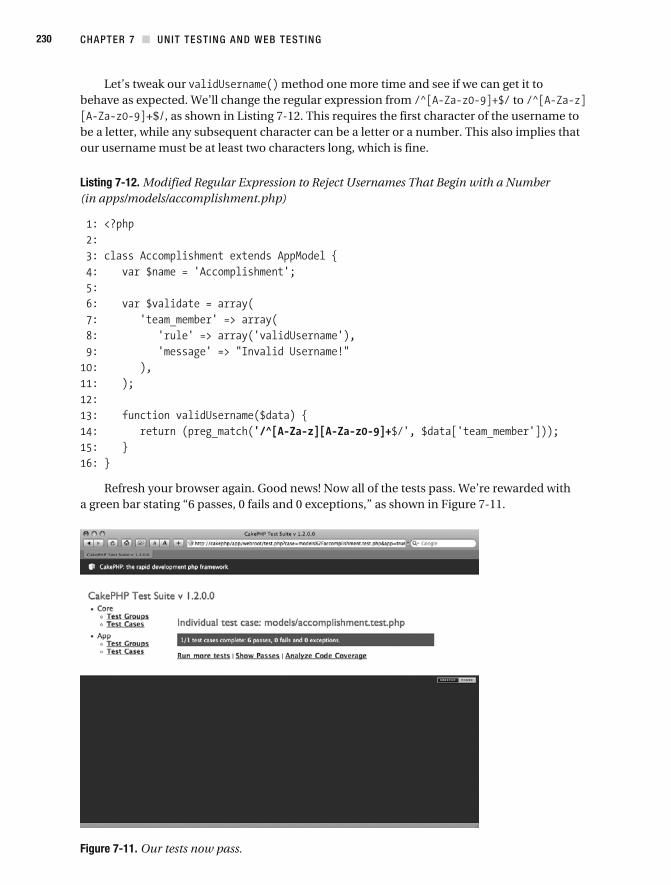
CHAPTER 7 UNIT TESTING AND WEB TESTING230
Let’s tweak our method one more time and see if we can get it to behave as expected. We’ll change the regular expression from to
+$/, as shown in Listing 7-12. This requires the first character of the username to be a letter, while any subsequent character can be a letter or a number. This also implies that our username must be at least two characters long, which is fine.
Listing 7-12. Modified Regular Expression to Reject Usernames That Begin with a Number (in apps/models/accomplishment.php)
Refresh your browser again. Good news! Now all of the tests pass. We’re rewarded with a green bar stating “6 passes, 0 fails and 0 exceptions,” as shown in Figure 7-11.
Figure 7-11. Our tests now pass.
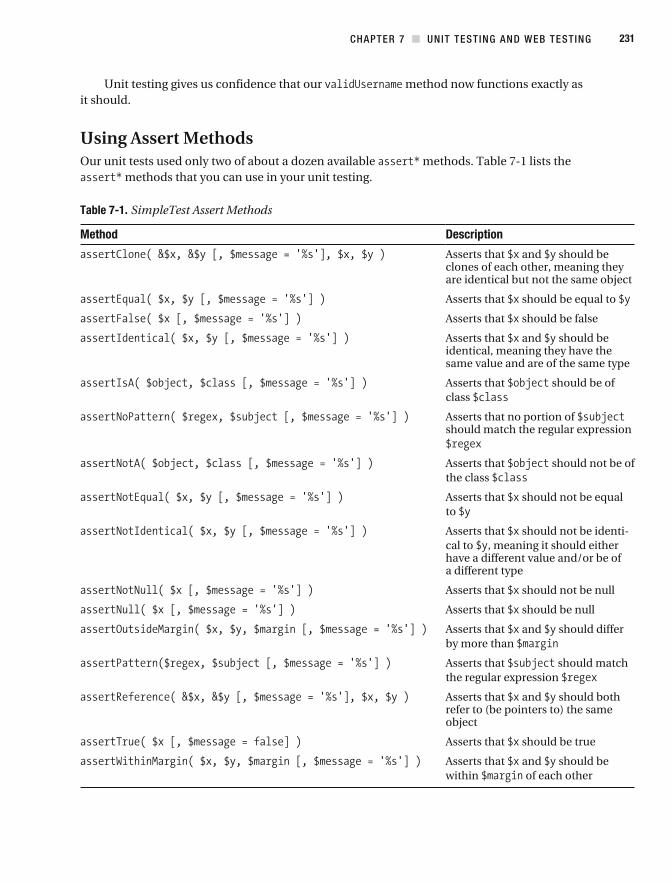
CHAPTER 7 UNIT TESTING AND WEB TESTING 231
Unit testing gives us confidence that our method now functions exactly as it should.
Using Assert MethodsOur unit tests used only two of about a dozen available methods. Table 7-1 lists the
methods that you can use in your unit testing.
Table 7-1. SimpleTest Assert Methods
Method Description
Asserts that and should be clones of each other, meaning they are identical but not the same object
Asserts that should be equal to
Asserts that should be false
Asserts that and should be identical, meaning they have the same value and are of the same type
Asserts that should be of class
Asserts that no portion of should match the regular expression
Asserts that should not be of the class
Asserts that should not be equal to
Asserts that should not be identi-cal to , meaning it should either have a different value and/or be of a different type
Asserts that should not be null
Asserts that should be null
Asserts that and should differ by more than
Asserts that should match the regular expression
Asserts that and should both refer to (be pointers to) the same object
Asserts that should be true
Asserts that and should be within of each other
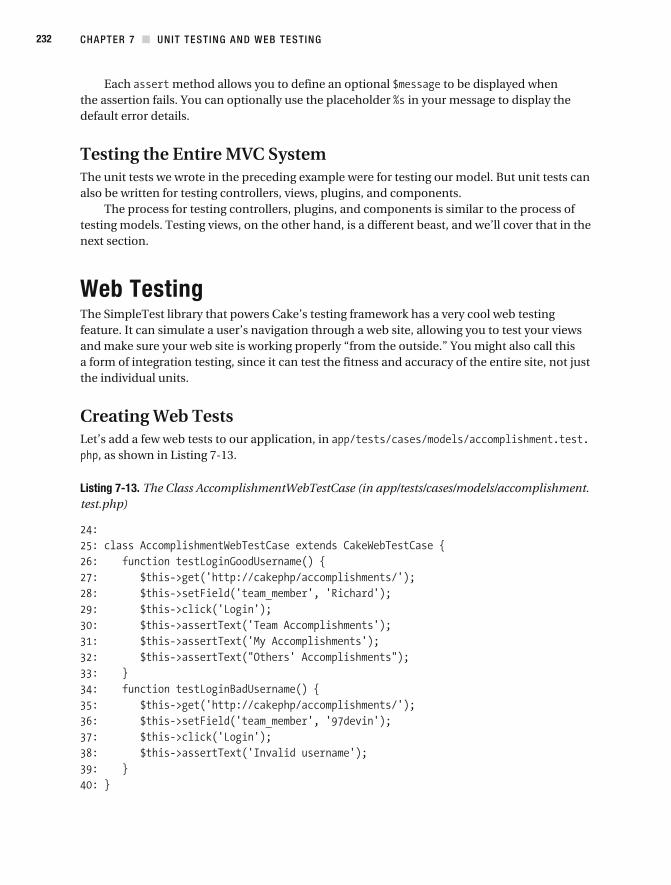
CHAPTER 7 UNIT TESTING AND WEB TESTING232
Each method allows you to define an optional to be displayed when the assertion fails. You can optionally use the placeholder in your message to display the default error details.
Testing the Entire MVC SystemThe unit tests we wrote in the preceding example were for testing our model. But unit tests can also be written for testing controllers, views, plugins, and components.
The process for testing controllers, plugins, and components is similar to the process of testing models. Testing views, on the other hand, is a different beast, and we’ll cover that in the next section.
Web TestingThe SimpleTest library that powers Cake’s testing framework has a very cool web testing feature. It can simulate a user’s navigation through a web site, allowing you to test your views and make sure your web site is working properly “from the outside.” You might also call this a form of integration testing, since it can test the fitness and accuracy of the entire site, not just the individual units.
Creating Web TestsLet’s add a few web tests to our application, in
, as shown in Listing 7-13.
Listing 7-13. The Class AccomplishmentWebTestCase (in app/tests/cases/models/accomplishment.test.php)
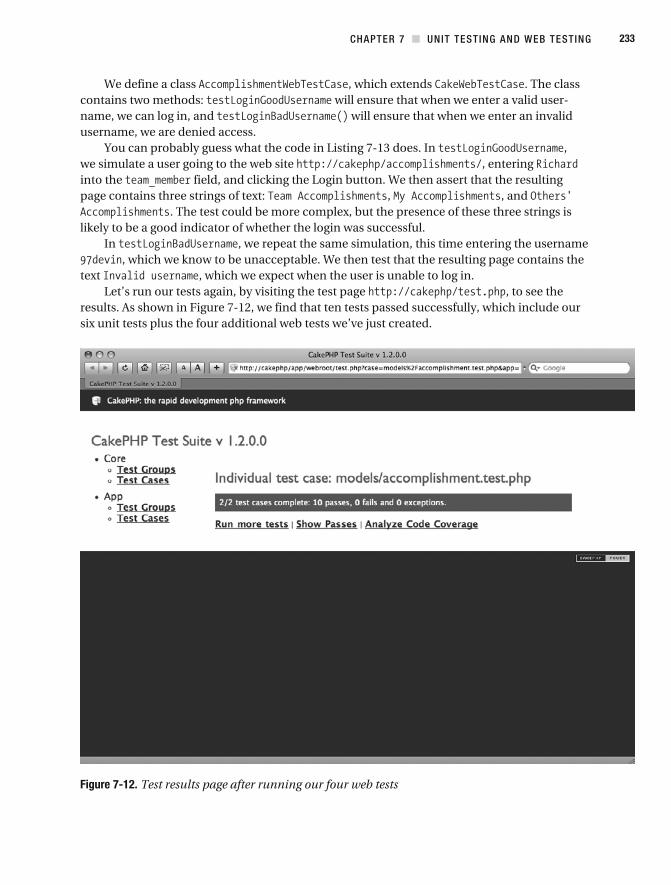
CHAPTER 7 UNIT TESTING AND WEB TESTING 233
We define a class , which extends . The class contains two methods: will ensure that when we enter a valid user-name, we can log in, and will ensure that when we enter an invalid username, we are denied access.
You can probably guess what the code in Listing 7-13 does. In , we simulate a user going to the web site , entering into the field, and clicking the Login button. We then assert that the resulting page contains three strings of text: , , and
. The test could be more complex, but the presence of these three strings is likely to be a good indicator of whether the login was successful.
In , we repeat the same simulation, this time entering the username , which we know to be unacceptable. We then test that the resulting page contains the
text , which we expect when the user is unable to log in.Let’s run our tests again, by visiting the test page , to see the
results. As shown in Figure 7-12, we find that ten tests passed successfully, which include our six unit tests plus the four additional web tests we’ve just created.
Figure 7-12. Test results page after running our four web tests
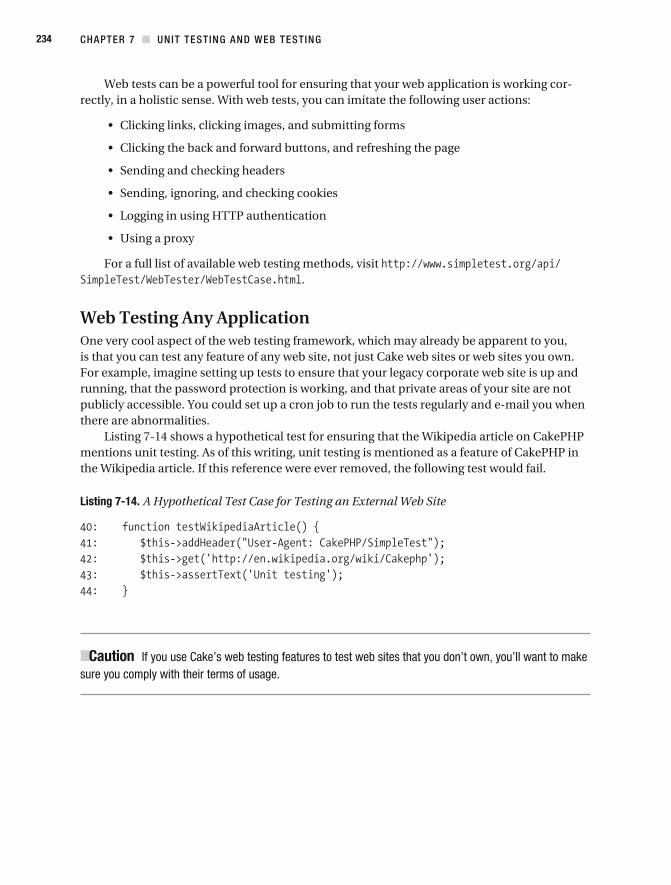
CHAPTER 7 UNIT TESTING AND WEB TESTING234
Web tests can be a powerful tool for ensuring that your web application is working cor-rectly, in a holistic sense. With web tests, you can imitate the following user actions:
For a full list of available web testing methods, visit .
Web Testing Any ApplicationOne very cool aspect of the web testing framework, which may already be apparent to you, is that you can test any feature of any web site, not just Cake web sites or web sites you own. For example, imagine setting up tests to ensure that your legacy corporate web site is up and running, that the password protection is working, and that private areas of your site are not publicly accessible. You could set up a cron job to run the tests regularly and e-mail you when there are abnormalities.
Listing 7-14 shows a hypothetical test for ensuring that the Wikipedia article on CakePHP mentions unit testing. As of this writing, unit testing is mentioned as a feature of CakePHP in the Wikipedia article. If this reference were ever removed, the following test would fail.
Listing 7-14. A Hypothetical Test Case for Testing an External Web Site
Caution sure you comply with their terms of usage.
CHAPTER 7 UNIT TESTING AND WEB TESTING 235
Test-Driven DevelopmentTest-driven development is a form of agile development that requires unit tests to be written before writing application code. Writing the unit tests before the actual code requires devel-opers to think carefully about what the application should do. It also requires thinking about development with an eye to modularity; each unit should do something distinct and uncou-pled from other units. In fact, someone else on your team could be the one to write the unit tests, while you write the code, or vice versa. The ensuing communication and coordination would be healthy.
Your lines of test code could easily outnumber your application code lines if you were to test every aspect of your application. This, of course, is not practical, nor is it smart business practice. You might consider writing tests only for the most important units of your code. What code might potentially cause the most damage if it were left to chance? Write unit tests for that code first. Also, as bugs are reported and fixed, write unit tests that ensure those bugs will not resurface in the future. This sort of testing is called regression testing, because it pre-vents your code from regressing to a prior, bug- laden state.
Imagine if your home appliances were wired directly into the electrical system without using plugs and sockets. Moving a lamp to a new room would be a huge pain. You would need to cut the wire and resplice it. It’s much more convenient to use plugs and sockets. This also allows a separation of concerns; that is, if a lamp stops working, you can plug it into a different socket and see if it’s the lamp or the socket that failed. Likewise, when your code is modular and decoupled, you can easily move it, use it elsewhere, and test it. Unit testing encourages this sort of modularity.
SummaryIn this chapter, we have accomplished the following:
Unit testing can be a powerful practice for ensuring that your application code works as you expect. It can catch errors before you release new code, and save you time and energy by freeing your mind of concern. Cheers to your newfound freedom!
C H A P T E R 8
A Cake Control Panel
Let us first say that there is no such feature as a Cake Control Panel in CakePHP, which is why we are creating one in this chapter.
Once you have developed several web sites, you will start to spot common functions that clients ask for time and again. Here are just some of the features clients typically request:
-ticular features of the site; for example, allow only registered users to access special promotions
If your clients haven’t asked for these functions yet, you can always turn them off tempo-rarily, or maybe increase your income by selling them these extra cool features!
Developing a control panel for yourself makes a lot of sense. The same control panel can be used for different sites. You could say it's another form of the DRY principle.
Security is a basic functionality to have in any web site and also one of the most complex. If you’re going to add a back- end administration area, or a control panel as we are calling it, this will be one of the functions that will be developed first.
In this chapter, we’re just going to start the development of the control panel by writ-ing a web- based front end that will allow a user to manage user security. Feel free to use the code in this chapter as a base for your own projects. We’ll use several different Cake features, including the authentication ( ) and access control list (behavior, which also uses the Tree behavior.
Application RequirementsThe security management function we are building in the control panel will have the following functions:
ordinary users
237
CHAPTER 8 A CAKE CONTROL PANEL238
The Authentication and ACL ComponentsWe’ll start by talking a little about both the and components, and then we’ll show you how we have combined them. We will warn you that although Cake’s authentication compo-nent is easy to use, the access control list component is not that straightforward. However, using it is still much easier than writing the access- control code from scratch.
The Authentication ComponentThe reason for the component is simple. It controls the login process and further controls access to controller actions. You can allow or deny access to certain actions using the compo-nent’s and methods, but not on a per- user basis.
What the component doesn’t do is provide more granular access control between any one user and controller actions. This is where Cake’s component comes in.
To get started with the component, you will first need a table. The one for this chapter’s application is shown in Listing 8-1.
Listing 8-1. The users Table Schema
The first three fields— , , and —are mandatory for the component. The field is a hashed field. We have included the field because we’ll be add-ing user groups as well, so we can categorize users into groups.
The Access Control List ComponentCake’s component is a generic way to control the access rights between one entity and
user groups, and controller actions. For example, you can allow every developer access to a controller action, except for the new junior developer who just joined the team.
The security permissions between entities can be stored either in a text file in or in a database. Here, we’re just going to cover database storage, so we need to
create the tables to store the permissions. One way to create the database tables required by the component is to use the
command to do this automatically. To take this approach, in your command- line environ-ment, go to your folder and run the following command:
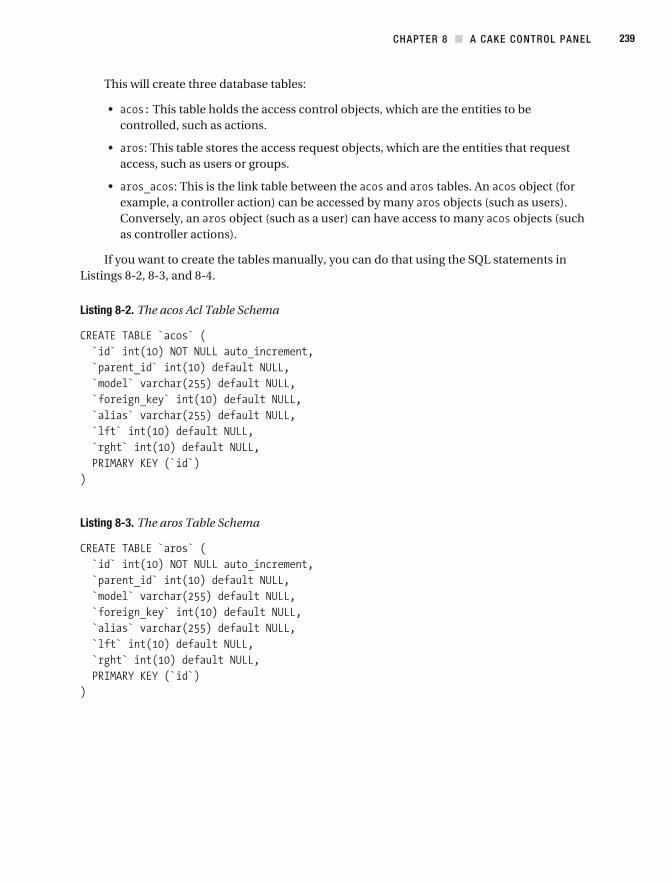
CHAPTER 8 A CAKE CONTROL PANEL 239
This will create three database tables:
This table holds the access control objects, which are the entities to be controlled, such as actions.
: This table stores the access request objects, which are the entities that request access, such as users or groups.
: This is the link table between the and object (for example, a controller action) can be accessed by many objects (such as users). Conversely, an object (such as a user) can have access to many objects (such as controller actions).
If you want to create the tables manually, you can do that using the SQL statements in Listings 8- 2, 8- 3, and 8- 4.
Listing 8-2. The acos Acl Table Schema
Listing 8-3. The aros Table Schema
CHAPTER 8 A CAKE CONTROL PANEL240
Listing 8-4. The aros_acos Table Schema
The and records are stored using Cake’s own Tree behavior, which uses a binary tree data structure to store hierarchical data. One node (a record in our case) can have two children (records) below it, sometimes called the left branch and right branch. In turn, any one record can have a parent. Tables 8- 1, 8- 2, and 8- 3 describe the important fields in each of these tables.
Table 8-1. The acos Table Columns
Column Description
ID of the parent record
Model name of the entity
Foreign key to the model record ID
Unique name to identify the record
ID of the left branch of the record
ID of the right branch of the record
Table 8-2. The aros Table Columns
Column Description
ID of the parent record
Model name of the entity, which is normally or
Foreign key to the model record ID, which is normally the ID of the user or group record
Unique name to identify the record
ID of the left branch of the record
ID of the right branch of the record

CHAPTER 8 A CAKE CONTROL PANEL 241
Table 8-3. The aros_acos Table Columns
Column Description
Foreign key to the record ID
Foreign key to the record ID
Controls access to the action—either 1 or 0
Controls access to the or action—either 1 or 0
Controls access to the action—either 1 or 0
Controls access to the action—either 1 or 0
Component SetupTo start using the and components, we need to declare their use. This is done in the global file, , which is shown in Listing 8-5.
Listing 8-5. Auth and Acl Components in the AppController Class (app/app_controller.php)
We include the two components on line 5. There is also a , which is called before any other action. In it, we specify some settings. The parameter on line 9 is set to . This parameter controls how a user is authorized. Setting it to means we want the component to authenticate the user for us automatically based on the entries in the table. The parameter can also be set to , , , or
, as shown in Table 8-4.
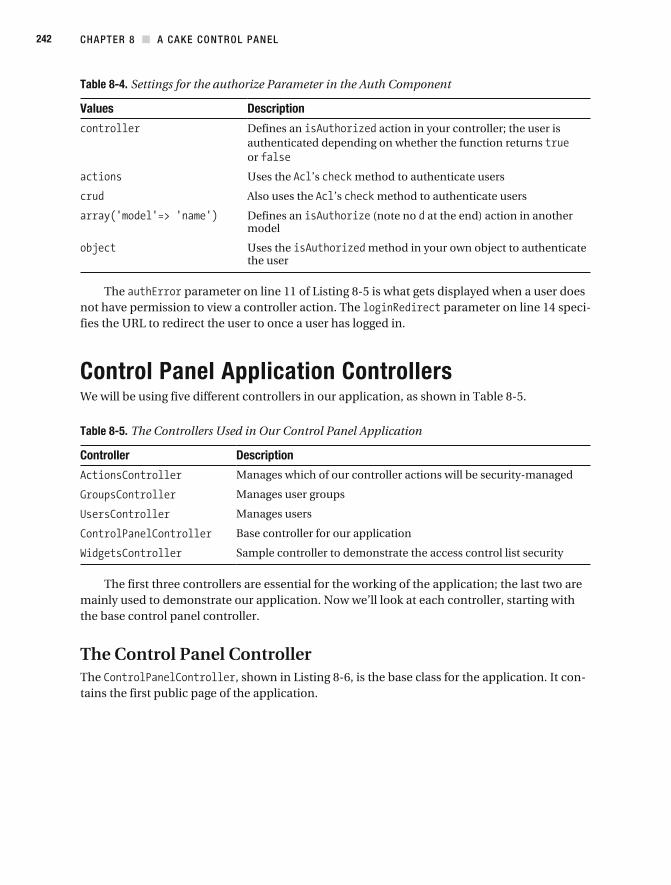
CHAPTER 8 A CAKE CONTROL PANEL242
Table 8-4. Settings for the authorize Parameter in the Auth Component
Values Description
Defines an action in your controller; the user is authenticated depending on whether the function returns or
Uses the ’s method to authenticate users
’s method to authenticate users
Defines an (note no at the end) action in another model
Uses the method in your own object to authenticate the user
The parameter on line 11 of Listing 8-5 is what gets displayed when a user does not have permission to view a controller action. The parameter on line 14 speci-fies the URL to redirect the user to once a user has logged in.
Control Panel Application ControllersWe will be using five different controllers in our application, as shown in Table 8-5.
Table 8-5. The Controllers Used in Our Control Panel Application
Controller Description
Manages which of our controller actions will be security- managed
Manages user groups
Manages users
Base controller for our application
Sample controller to demonstrate the access control list security
The first three controllers are essential for the working of the application; the last two are mainly used to demonstrate our application. Now we’ll look at each controller, starting with the base control panel controller.
The Control Panel ControllerThe , shown in Listing 8-6, is the base class for the application. It con-tains the first public page of the application.
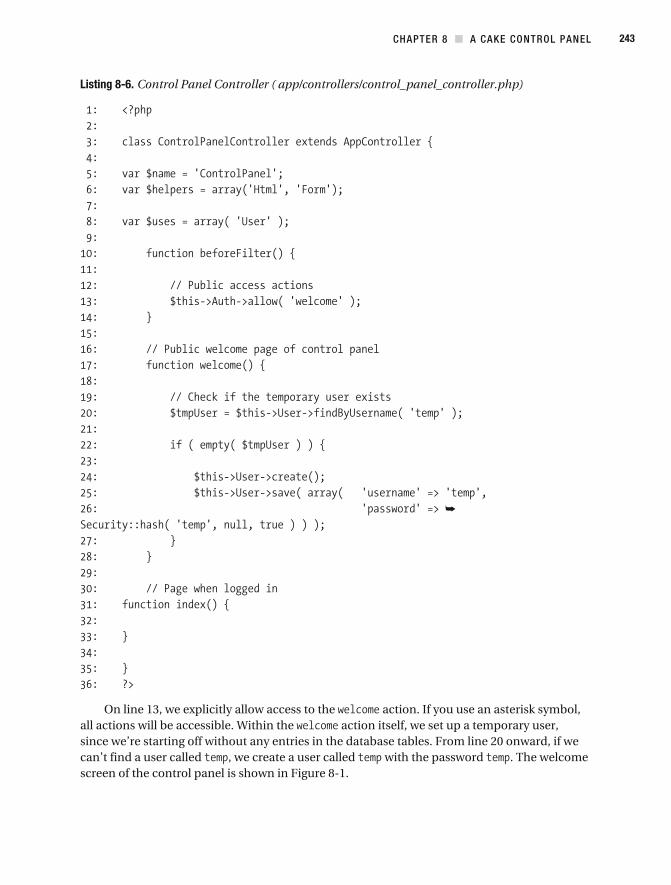
CHAPTER 8 A CAKE CONTROL PANEL 243
Listing 8-6. Control Panel Controller ( app/controllers/control_panel_controller.php)
On line 13, we explicitly allow access to the action. If you use an asterisk symbol, all actions will be accessible. Within the action itself, we set up a temporary user, since we’re starting off without any entries in the database tables. From line 20 onward, if we can’t find a user called , we create a user called with the password . The welcome screen of the control panel is shown in Figure 8-1.
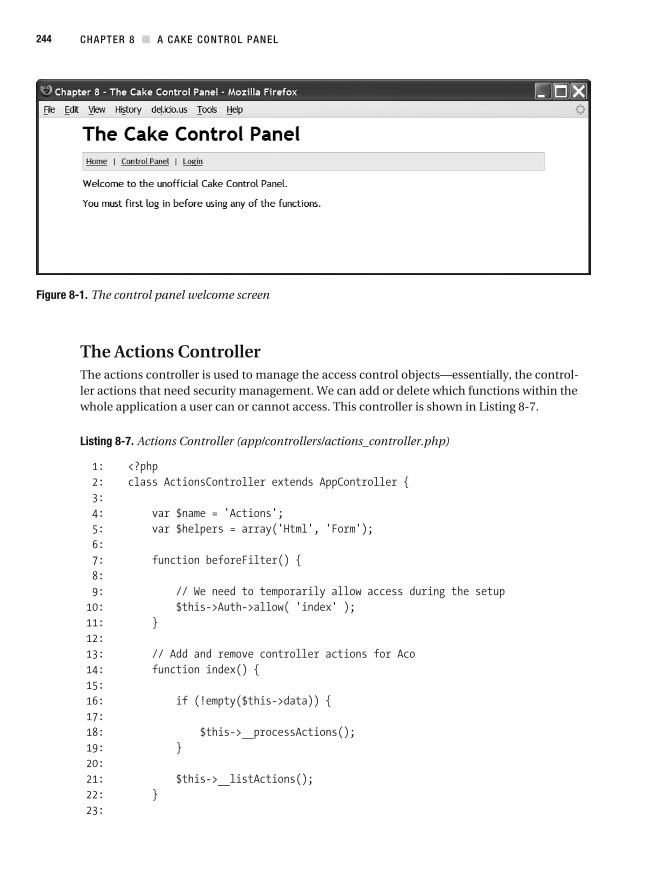
CHAPTER 8 A CAKE CONTROL PANEL244
Figure 8-1. The control panel welcome screen
The Actions ControllerThe actions controller is used to manage the access control objects—essentially, the control-ler actions that need security management. We can add or delete which functions within the whole application a user can or cannot access. This controller is shown in Listing 8-7.
Listing 8-7. Actions Controller (app/controllers/actions_controller.php)

CHAPTER 8 A CAKE CONTROL PANEL 245
CHAPTER 8 A CAKE CONTROL PANEL246
CHAPTER 8 A CAKE CONTROL PANEL 247
The only action in this controller is the action. Figure 8-2 shows the page produced by this listing.
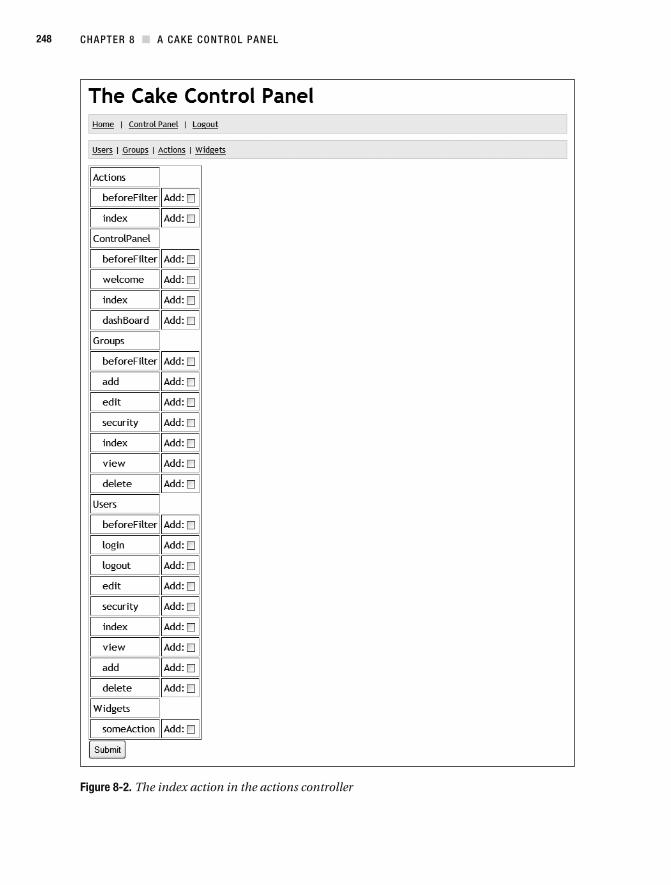
CHAPTER 8 A CAKE CONTROL PANEL248
Figure 8-2. The index action in the actions controller
CHAPTER 8 A CAKE CONTROL PANEL 249
In the Cake component, if you set the parameter to , Cake assumes you have all the CRUD (create, read, update, and delete) actions in your controller: ,
, , , and . Cake will security- manage these actions for you using the fields , , , and in the table. However, when you set the
parameter to , as we have for this application, you can security- manage any actions in your controller. Essentially, the value is more generic than the value in terms of the security.
When the parameter is set to , the table needs to be in a specific format, structured as follows:
There are only two levels. The top level is always occupied by the controllers, and the sec-ond levels form the controller actions that belong to the controller.
generate the entries in the table shown in Figure 8-3.
Figure 8-3. The acos table entries after choosing the someAction action
Now that you’ve seen how the actions controller works, the code in Listing 8-7 will be easier to understand. On line 10, we temporarily allow access to the action; otherwise, we wouldn’t be able to use it.
The action is fairly simple. It has two private methods: and . The action lists the actions available. The code for that starts
on line 93. We use Cake’s and convenience classes to get all the PHP files in the controller folder, and carry out a operation on the content of the files, matching controller names and action names. The following is a sample of the HTML code for the check boxes in Figure 8-2:
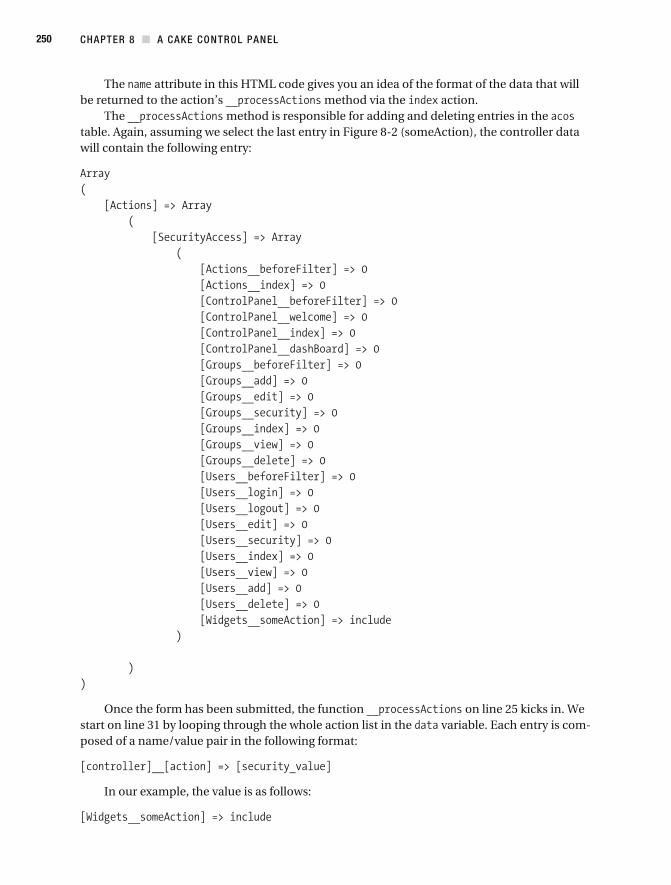
CHAPTER 8 A CAKE CONTROL PANEL250
The attribute in this HTML code gives you an idea of the format of the data that will be returned to the action’s method via the action.
The method is responsible for adding and deleting entries in the
will contain the following entry:
Once the form has been submitted, the function on line 25 kicks in. We start on line 31 by looping through the whole action list in the variable. Each entry is com-posed of a name/value pair in the following format:
In our example, the value is as follows:
CHAPTER 8 A CAKE CONTROL PANEL 251
This tells us that the user wants to add the action in the widgets controller into the table, so the user can allow or deny access to certain users or groups.
On line 38, if the user has selected to delete the entry, we simply find the entry and delete it using the model’s method. If the user has decided to add the entry, we first check whether the controller parent record exists. If it doesn’t, we create one. If it does exist, we need the ID for the action entry. Both entries are shown in Figure 8-3.
From line 141 onward, we fetch all the
exists, we display a Delete check box, as shown in Figure 8-4.
Figure 8-4. The Delete check box option when the acos entry already exists
To summarize, we now have one action called in the widgets controller, which we can security- manage. If we didn’t add that entry in the table, Cake’s component would always deny access to it, unless explicitly overridden by ’s method.
The Groups ControllerThe groups controller is an important element in our application. In Cake’s component, we can control groups of users simply by changing the security on the group itself, rather than changing the security on every individual in that group. This is due to the fact that we can layer groups in a hierarchical fashion. For example, we can have a root administrator, and below that role, a department administrator, followed by department users.
In the groups controller, we have the ability to list groups, add groups, edit groups, delete groups, and control the security access of groups.
We start the development of the controller by using the command to bake the code for the controller, model, and views. The code listing for the class is shown in Listing 8-8.
Listing 8-8. Groups Controller (app/controllers/groups_controller.php)
CHAPTER 8 A CAKE CONTROL PANEL252
CHAPTER 8 A CAKE CONTROL PANEL 253
CHAPTER 8 A CAKE CONTROL PANEL254
When we first ran the application, we found ourselves in a catch- 22 scenario: we couldn’t log in because there were no users, but we had to log in to create a user. Of course, you can
automate processes as much as possible. So initially, we allow access to actions without the user needing to log in. This is done on line 10 in Listing 8-8.
The action beginning on line 32 is mostly based on baked code, with the exception of lines 52 and 53, which generate the parent drop- down list for the current group. This action follows the same pattern as the action beginning on line 13, except on line 48, where we need to read the record into the controller variable to be used in the edit form.
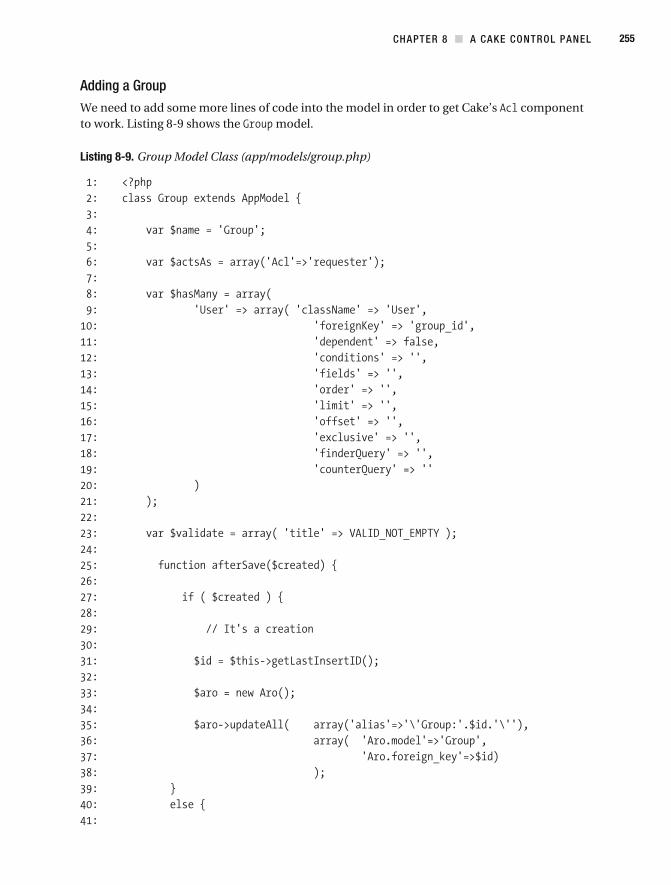
CHAPTER 8 A CAKE CONTROL PANEL 255
Adding a GroupWe need to add some more lines of code into the model in order to get Cake’s component to work. Listing 8-9 shows the model.
Listing 8-9. Group Model Class (app/models/group.php)
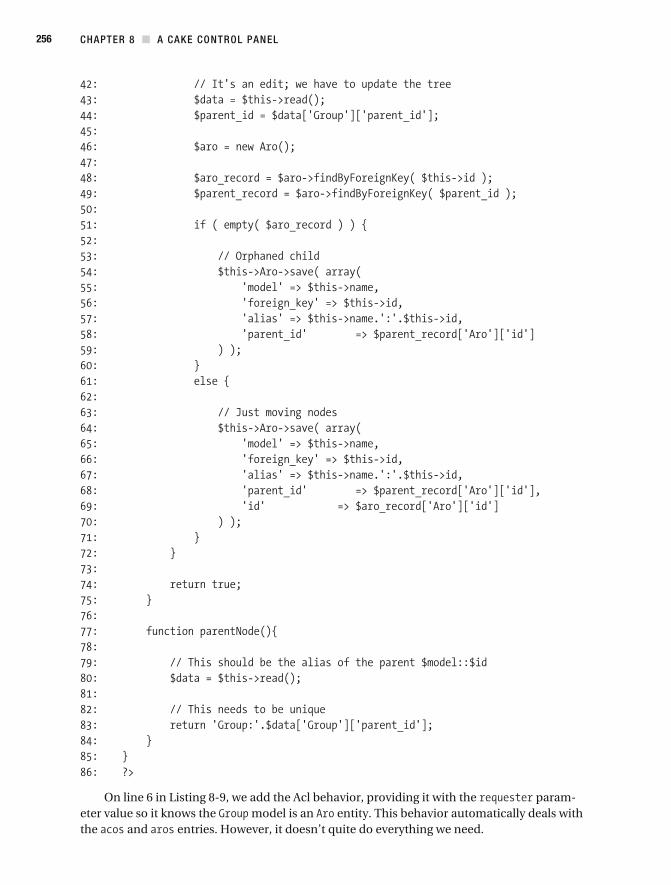
CHAPTER 8 A CAKE CONTROL PANEL256
param-eter value so it knows the model is an entity. This behavior automatically deals with the and entries. However, it doesn’t quite do everything we need.
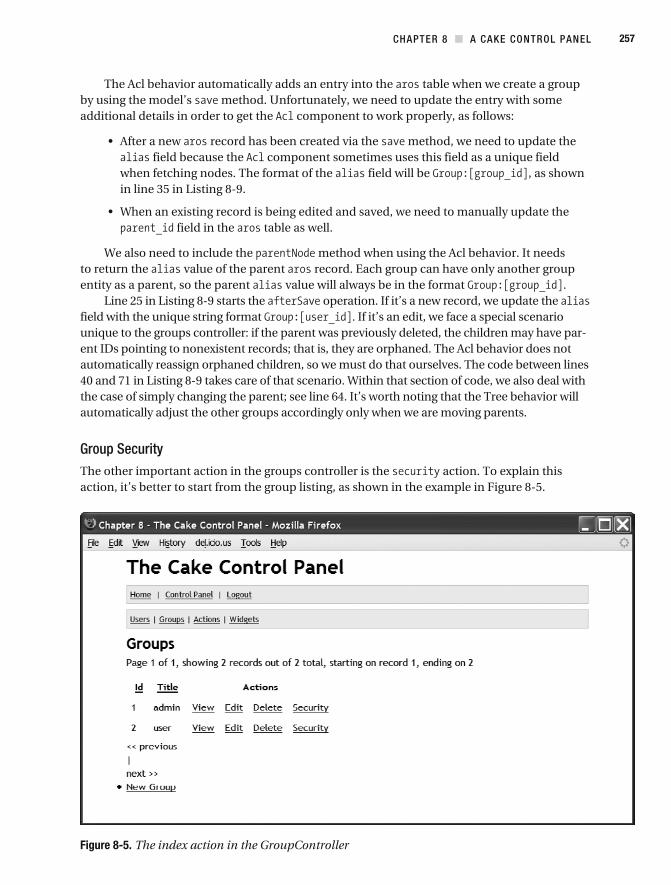
CHAPTER 8 A CAKE CONTROL PANEL 257
table when we create a group by using the model’s method. Unfortunately, we need to update the entry with some additional details in order to get the component to work properly, as follows:
record has been created via the method, we need to update the field because the component sometimes uses this field as a unique field
when fetching nodes. The format of the field will be , as shown in line 35 in Listing 8-9.
field in the table as well.
We also need to include the to return the value of the parent record. Each group can have only another group entity as a parent, so the parent value will always be in the format .
Line 25 in Listing 8-9 starts the operation. If it’s a new record, we update the field with the unique string format . If it’s an edit, we face a special scenario unique to the groups controller: if the parent was previously deleted, the children may have par-
automatically reassign orphaned children, so we must do that ourselves. The code between lines 40 and 71 in Listing 8-9 takes care of that scenario. Within that section of code, we also deal with the case of simply changing the parent; see line 64. It’s worth noting that the Tree behavior will automatically adjust the other groups accordingly only when we are moving parents.
Group SecurityThe other important action in the groups controller is the action. To explain this action, it’s better to start from the group listing, as shown in the example in Figure 8-5.
Figure 8-5. The index action in the GroupController

CHAPTER 8 A CAKE CONTROL PANEL258
In Figure 8-5, you can see a Security link next to a group record. We simply added the new link into the baked view of the action. When users click the Security link, they will be able to control the security settings relating to the group. Figure 8-6 shows the security page.
Figure 8-6. The security action in the GroupController
When you first bring up the security page, it will list all the access control objects that you can security- manage. In our case, it will list only the action. This is handled from line 92 onward in Listing 8-8.
The class has a method called , which generates the hierarchy of the tree. We also need the entire entry in order to know which actions have been granted and which ones have been denied.
Listing 8-8. It’s similar to adding actions in the actions controller. We loop through the selec-
If a user has selected Deny, we use this command:
In both the and methods, we are specifying a security relationship between the record and the record. The is the standard value to use if the param-eter is set to . If it were set to , then you could specify which CRUD action to security- manage. But with the setting (sometimes called actions mode), the CRUD database columns must be all 1 values, all 0 values, or –1 values.
In Listing 8-8, the , , and actions are shown for the sake of completeness. Note that when we use the deletes the record and rearranges the tree accordingly.
CHAPTER 8 A CAKE CONTROL PANEL 259
The Users ControllerThe users controller is essential for managing users. We will have the ability to list users, add users, edit users, delete users, and control the security access of users.
command to bake the code for the controller, model, and views. The code listing for the is shown in Listing 8-10.
Listing 8-10. Users Controller (app/controllers/users_controller.php)
CHAPTER 8 A CAKE CONTROL PANEL260

CHAPTER 8 A CAKE CONTROL PANEL 261
CHAPTER 8 A CAKE CONTROL PANEL262
Much of the code in Listing 8-10 follows the same pattern as the groups controller. On line 10, we temporarily allow access to some actions during the initial setup of the users.
The and actions, on lines 14 and 18, respectively, are just stub functions that are needed in order for the component to automatically log the user in and out.
The action on line 23 is mostly based on baked code. There are two sections worth noting. When a user edits user details, the field is set to blank on line 50. If no pass-word has been supplied in the form, we don’t change the password; we simply check whether it is empty, on line 32. Passwords are hashed, so we never have the plain text of the original password. Therefore, we need to manually empty the field; otherwise, Cake will fill it with the hashed password string. When we update the user details, and the user has provided a new password, the component will automatically hash the password provided.
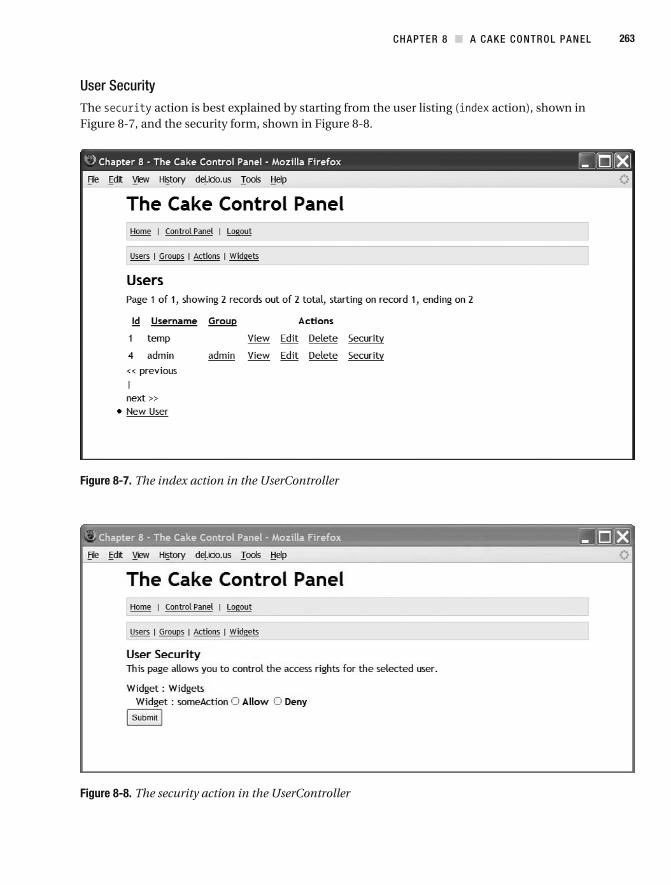
CHAPTER 8 A CAKE CONTROL PANEL 263
User SecurityThe action is best explained by starting from the user listing ( action), shown in Figure 8-7, and the security form, shown in Figure 8-8.
Figure 8-7. The index action in the UserController
Figure 8-8. The security action in the UserController
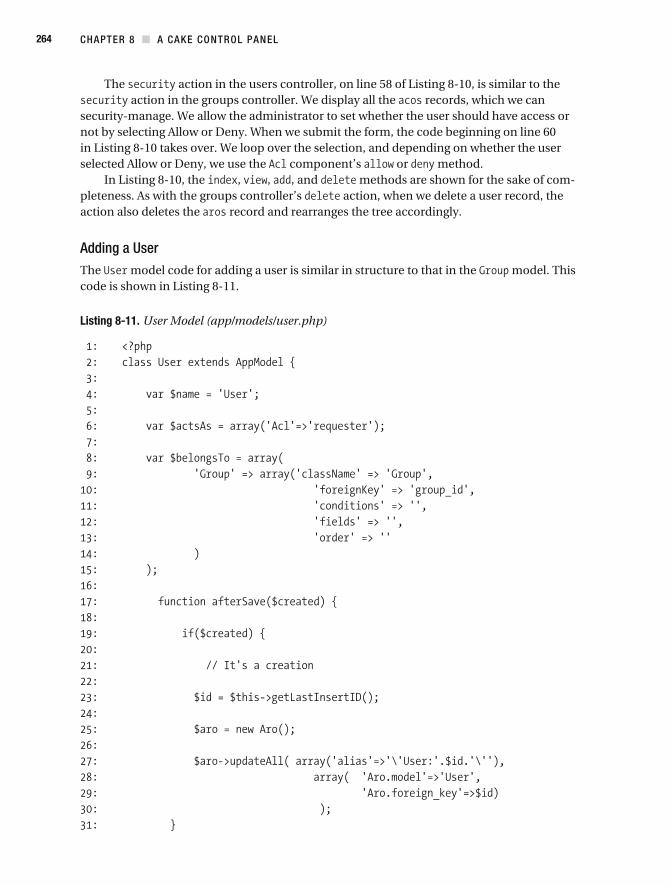
CHAPTER 8 A CAKE CONTROL PANEL264
The action in the users controller, on line 58 of Listing 8-10, is similar to the action in the groups controller. We display all the records, which we can
security- manage. We allow the administrator to set whether the user should have access or
in Listing 8-10 takes over. We loop over the selection, and depending on whether the user component’s or method.
In Listing 8-10, the , , , and methods are shown for the sake of com- action, when we delete a user record, the
action also deletes the record and rearranges the tree accordingly.
Adding a UserThe model code for adding a user is similar in structure to that in the model. This code is shown in Listing 8-11.
Listing 8-11. User Model (app/models/user.php)
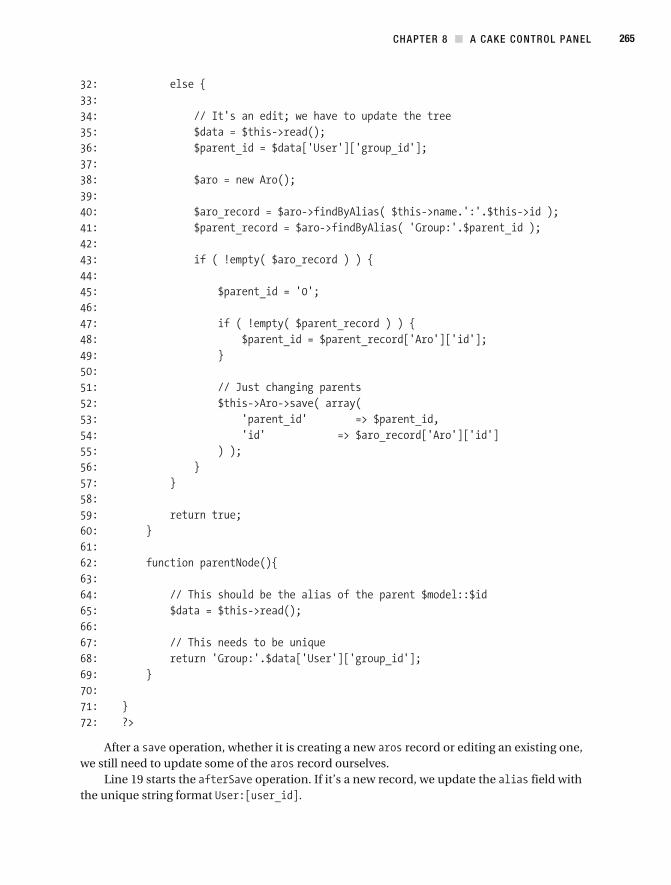
CHAPTER 8 A CAKE CONTROL PANEL 265
operation, whether it is creating a new record or editing an existing one, we still need to update some of the record ourselves.
Line 19 starts the operation. If it’s a new record, we update the field with the unique string format .
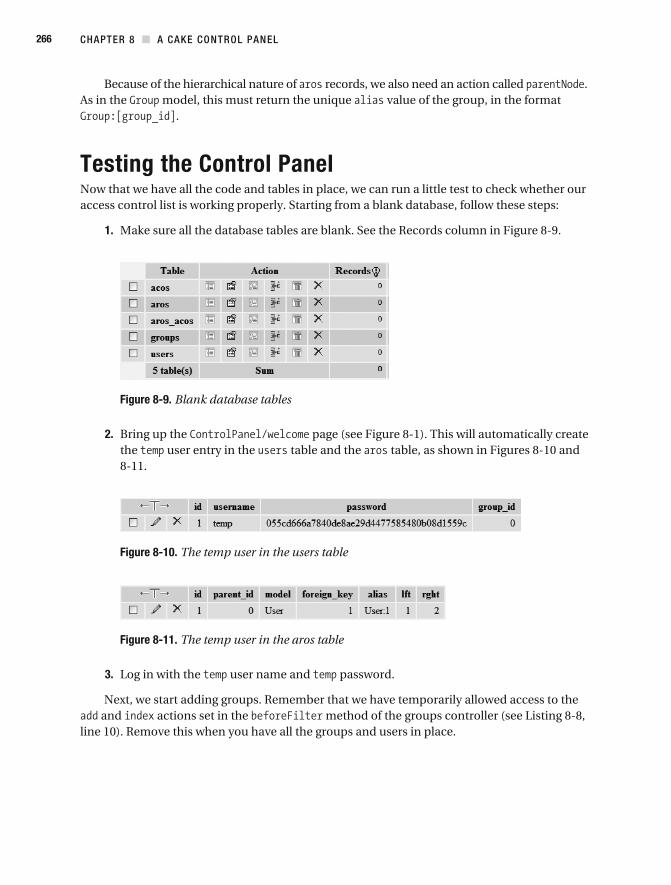
CHAPTER 8 A CAKE CONTROL PANEL266
Because of the hierarchical nature of records, we also need an action called . model, this must return the unique value of the group, in the format
.
Testing the Control PanelNow that we have all the code and tables in place, we can run a little test to check whether our access control list is working properly. Starting from a blank database, follow these steps:
1. Make sure all the database tables are blank. See the Records column in Figure 8-9.
Figure 8-9. Blank database tables
2. Bring up the page (see Figure 8-1). This will automatically create the user entry in the table and the table, as shown in Figures 8- 10 and 8- 11.
Figure 8-10. The temp user in the users table
Figure 8-11. The temp user in the aros table
3. Log in with the user name and password.
Next, we start adding groups. Remember that we have temporarily allowed access to the and actions set in the method of the groups controller (see Listing 8-8,
line 10). Remove this when you have all the groups and users in place.
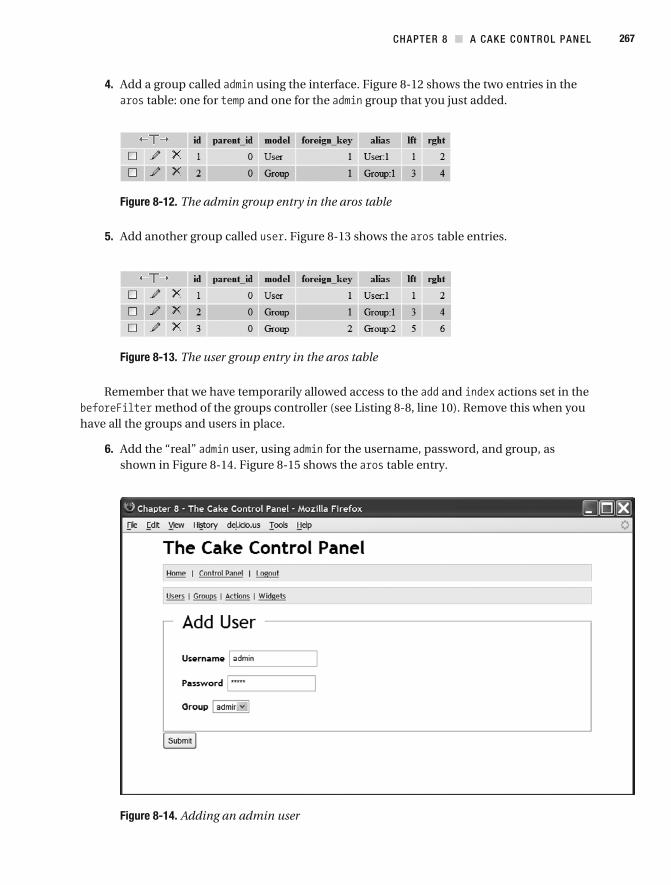
CHAPTER 8 A CAKE CONTROL PANEL 267
4. using the interface. Figure 8-12 shows the two entries in the table: one for and one for the group that you just added.
Figure 8-12. The admin group entry in the aros table
5. . Figure 8-13 shows the table entries.
Figure 8-13. The user group entry in the aros table
Remember that we have temporarily allowed access to the and actions set in the method of the groups controller (see Listing 8-8, line 10). Remove this when you
have all the groups and users in place.
6. user, using for the username, password, and group, as shown in Figure 8-14. Figure 8-15 shows the table entry.
Figure 8-14. Adding an admin user
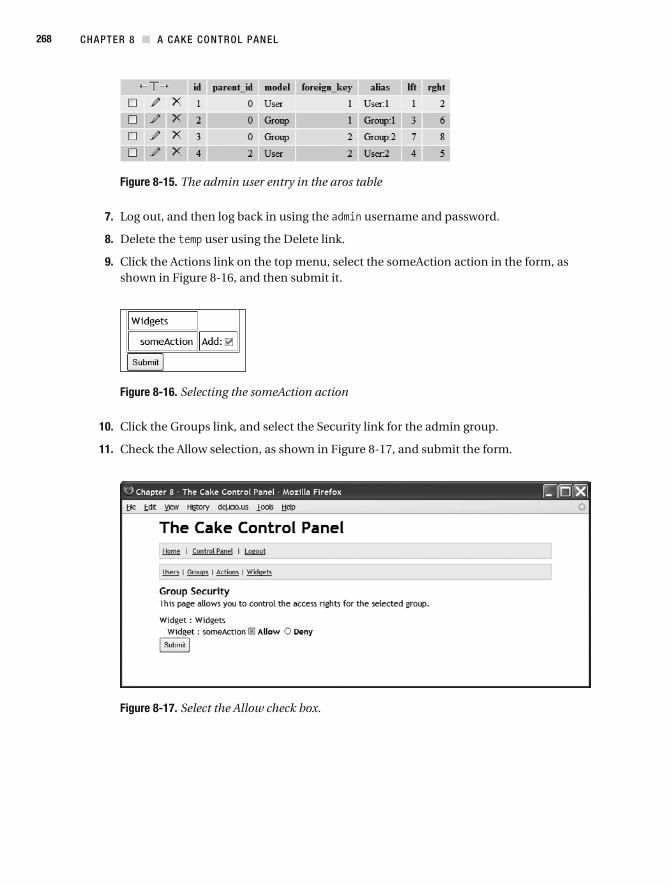
CHAPTER 8 A CAKE CONTROL PANEL268
Figure 8-15. The admin user entry in the aros table
7. Log out, and then log back in using the username and password.
8. Delete the user using the Delete link.
9. shown in Figure 8-16, and then submit it.
Figure 8-16. Selecting the someAction action
10. Click the Groups link, and select the Security link for the admin group.
11.
Figure 8-17. Select the Allow check box.
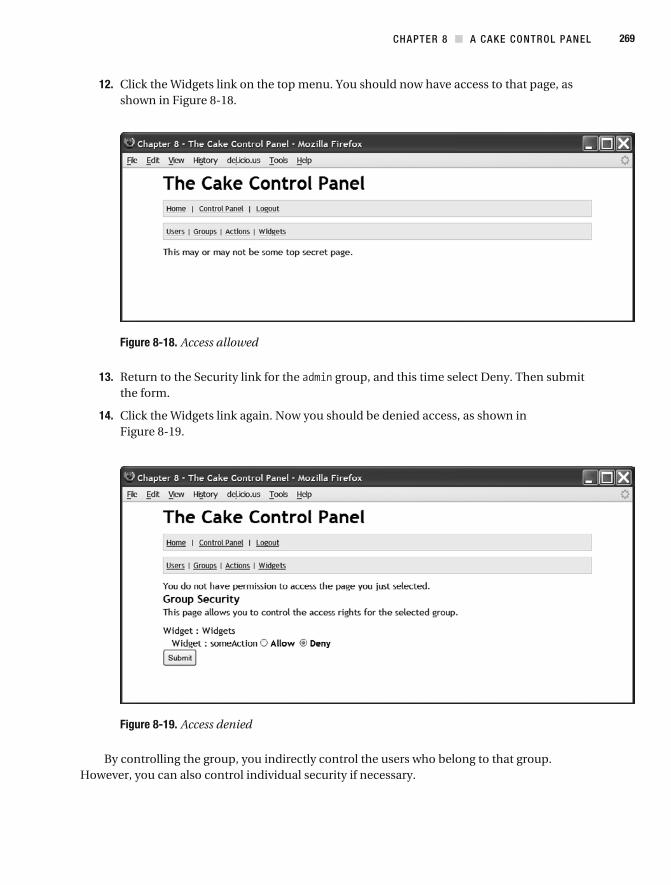
CHAPTER 8 A CAKE CONTROL PANEL 269
12. Click the Widgets link on the top menu. You should now have access to that page, as shown in Figure 8-18.
Figure 8-18. Access allowed
13. Return to the Security link for the group, and this time select Deny. Then submit the form.
14. Click the Widgets link again. Now you should be denied access, as shown in Figure 8-19.
Figure 8-19. Access denied
By controlling the group, you indirectly control the users who belong to that group. However, you can also control individual security if necessary.
CHAPTER 8 A CAKE CONTROL PANEL270
SummaryIn this chapter, we used the idea of a control panel as a starting point for developing basic functions common to web applications. We began that process by using Cake’s compo-nent to develop a web front end to manage user and group security.
complexity is due to its implicit link to other elements in Cake. Using the access control list functionality involves the and in turn uses the Tree behavior. On top of that, you still need to carry out some operations yourself. Furthermore, the component behaves differently depending on the value of the
parameter. But despite this complexity, it’s one of the most flexible security systems you can use. Once the basic system is up and running, it’s much easier to change and adapt your access control list for other scenarios.
There are many other functions you can add to the access control list and to the control panel as a whole. Here are some ideas:
class to list useful statistics about the application. For example, if the control panel is used for an e- commerce application, the dashboard could list the number of products sold, number of new users, and so on.
from the actions listings in the top menu and find out which entry has access or no access to that particular action.
list, security permissions on that list will no longer exist. It would be useful to have a feature that told the user which
entities currently have permissions set on the action before deleting it.
method in the controllers, these groups and users should remain permanent; no user should be able to delete them. You could modify the application so that the method would not affect these special groups and users.
C H A P T E R 9
Translating Stories
In this chapter, we’ll be writing a news story application in which the news stories will be available in other languages. There will also be an admin area, which will give translators the ability to translate stories from a base language (in our case, English) to another language. To protect the admin area, we will build a simple authentication system.
In Chapter 6, we covered Cake’s internationalization features and demonstrated using files to display different languages. Using files is adequate for static text. However, if the data is stored in the database, you need to employ Cake’s built- in Translate behavior. You’ll see how that works in this chapter.
Application StructureTo start off, we need two database tables: and . Naturally, will be used to store the stories, while will be the admin users who will enter stories in different lan-guages. There will also be two controllers to go with the two tables: in
and in . The table schema is shown in Listing 9-1. We will discuss the
table later in the chapter, in the “Logging In” section.
Listing 9-1. The stories Table Schema
The two fields we need to be concerned with are , which holds the story title, and , which holds the actual story itself.To use the Translate behavior, we need an extra table named , which will be used to
store the translation. The schema is shown in Listing 9-2.
271
CHAPTER 9 TRANSLATING STORIES272
Listing 9-2. The i18n Table Schema
This table has the following fields:
: This is the language locale code. We need to decide which language the transla-tion refers to. At present, unlike for language codes, there are no ISO locale standard codes; different software uses slightly different codes. In Cake, you can see the locale codes in the file . For further reading, is a good place to start.
: Since there could be many different tables using the Translate behavior, we need this field to identify the correct table via the model. In our case, our model will be .
: We need the field to identify which record the translation relates to.
: This is the name of the field in the database table that needs translation. In our case, it will be either or .
: This contains the translation text itself.
Using this table, we map one field in one record in our table to different translations. It’s a one-to- many association.
The Translate BehaviorThe Translate behavior provides the model class with a number of functions that assist with language translations in our own tables. It sits between the database and the controllers, transparently dealing with language translations between the two areas.
To use the Translate behavior, we start with a simple statement we insert into our model file:
Note You can add other behaviors to the model by appending the behavior name to the array variable. In our example, if we were going to add the Containable behavior, the variable would look like this: .
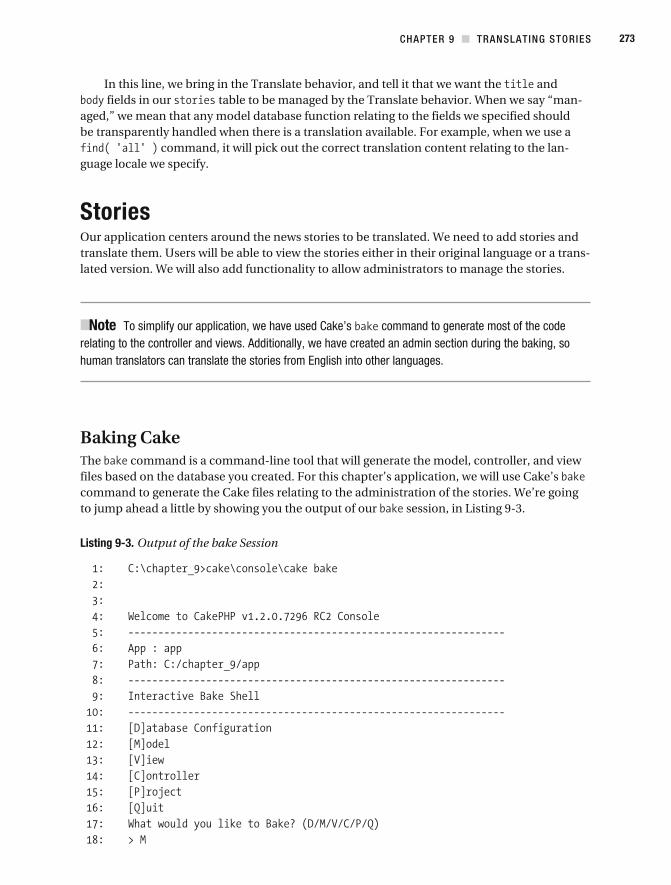
CHAPTER 9 TRANSLATING STORIES 273
In this line, we bring in the Translate behavior, and tell it that we want the and fields in our table to be managed by the Translate behavior. When we say “man-
aged,” we mean that any model database function relating to the fields we specified should be transparently handled when there is a translation available. For example, when we use a
command, it will pick out the correct translation content relating to the lan-guage locale we specify.
StoriesOur application centers around the news stories to be translated. We need to add stories and translate them. Users will be able to view the stories either in their original language or a trans-lated version. We will also add functionality to allow administrators to manage the stories.
Note To simplify our application, we have used Cake’s command to generate most of the code relating to the controller and views. Additionally, we have created an admin section during the baking, so human translators can translate the stories from English into other languages.
Baking CakeThe command is a command- line tool that will generate the model, controller, and view files based on the database you created. For this chapter’s application, we will use Cake’s command to generate the Cake files relating to the administration of the stories. We’re going to jump ahead a little by showing you the output of our session, in Listing 9-3.
Listing 9-3. Output of the bake Session
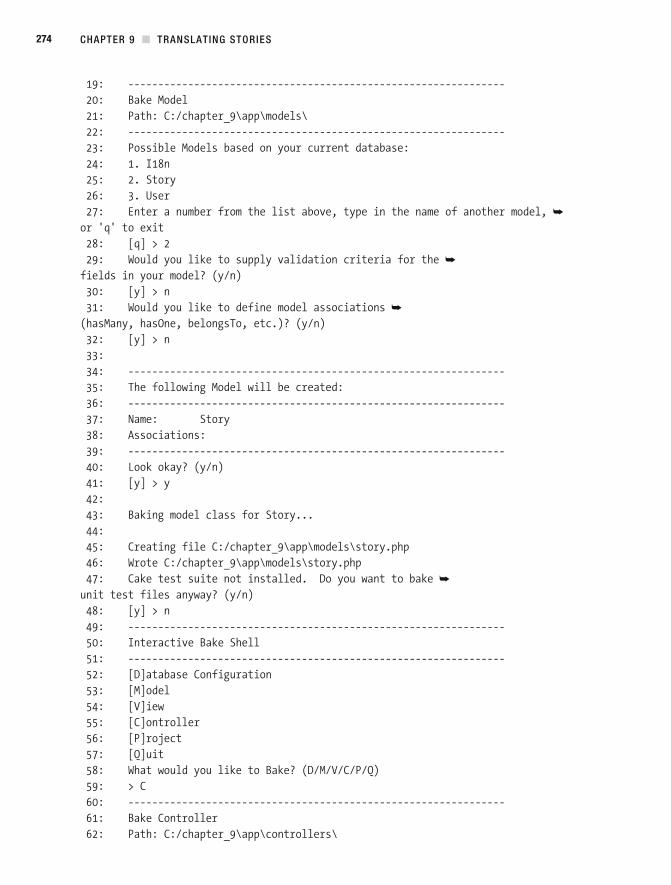
CHAPTER 9 TRANSLATING STORIES274
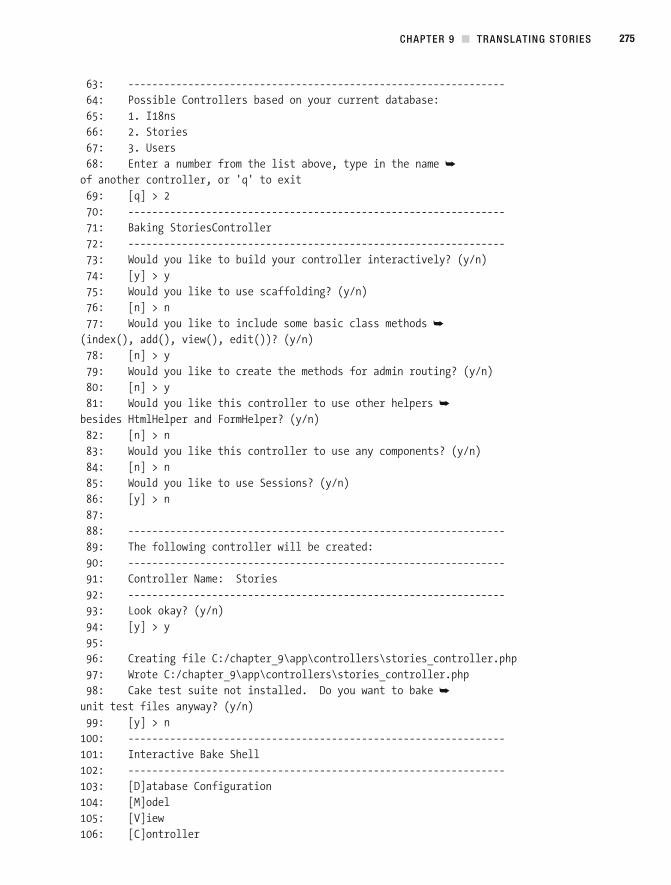
CHAPTER 9 TRANSLATING STORIES 275
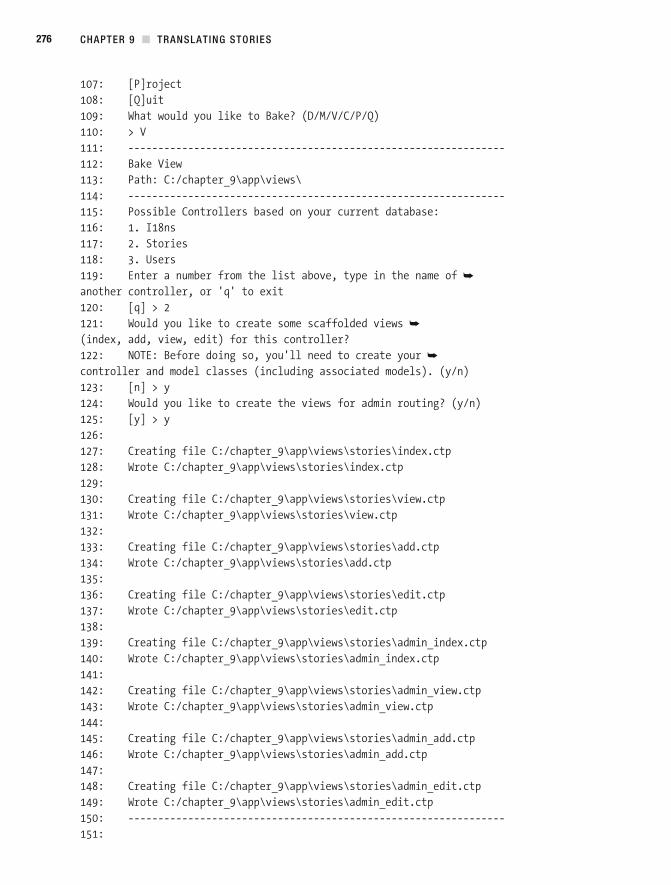
CHAPTER 9 TRANSLATING STORIES276
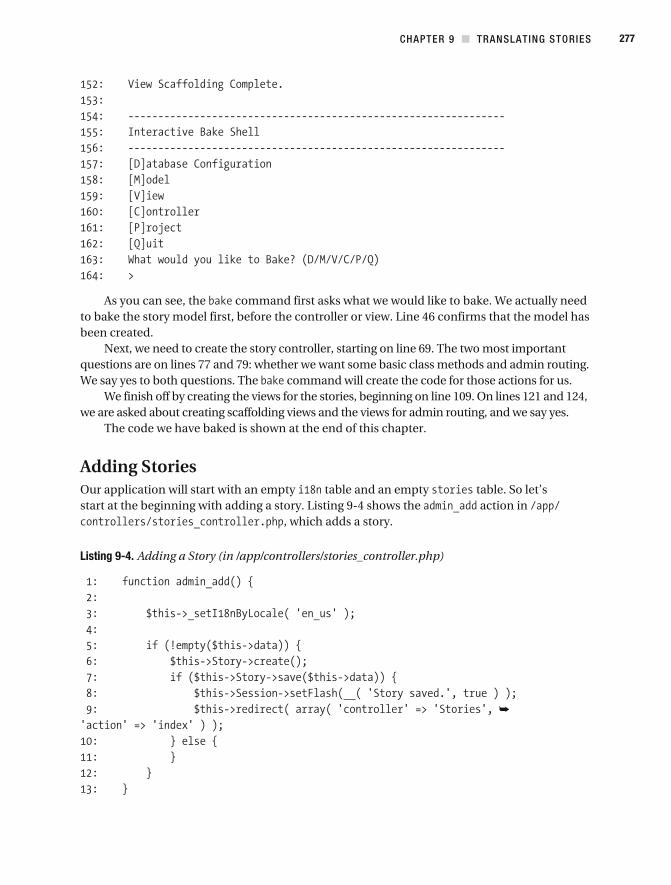
CHAPTER 9 TRANSLATING STORIES 277
As you can see, the command first asks what we would like to bake. We actually need to bake the story model first, before the controller or view. Line 46 confirms that the model has been created.
Next, we need to create the story controller, starting on line 69. The two most important questions are on lines 77 and 79: whether we want some basic class methods and admin routing. We say yes to both questions. The command will create the code for those actions for us.
We finish off by creating the views for the stories, beginning on line 109. On lines 121 and 124, we are asked about creating scaffolding views and the views for admin routing, and we say yes.
The code we have baked is shown at the end of this chapter.
Adding StoriesOur application will start with an empty table and an empty table. So let’s start at the beginning with adding a story. Listing 9-4 shows the action in
, which adds a story.
Listing 9-4. Adding a Story (in /app/controllers/stories_controller.php)
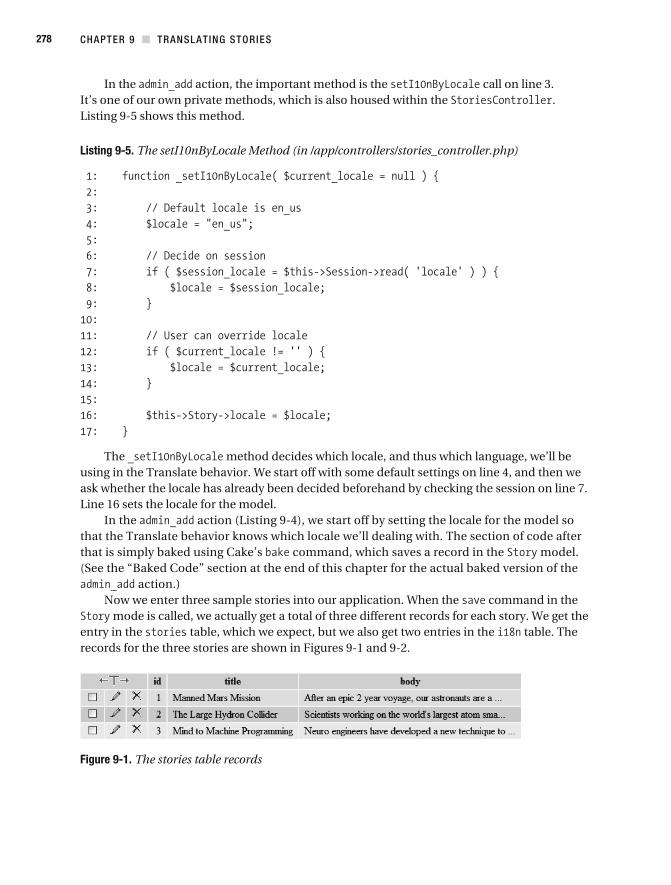
CHAPTER 9 TRANSLATING STORIES278
In the action, the important method is the call on line 3. It’s one of our own private methods, which is also housed within the . Listing 9-5 shows this method.
Listing 9-5. The setI10nByLocale Method (in /app/controllers/stories_controller.php)
The method decides which locale, and thus which language, we’ll be using in the Translate behavior. We start off with some default settings on line 4, and then we ask whether the locale has already been decided beforehand by checking the session on line 7. Line 16 sets the locale for the model.
In the action ( Listing 9-4), we start off by setting the locale for the model so that the Translate behavior knows which locale we’ll dealing with. The section of code after that is simply baked using Cake’s command, which saves a record in the model. (See the “Baked Code” section at the end of this chapter for the actual baked version of the
action.)Now we enter three sample stories into our application. When the command in the
mode is called, we actually get a total of three different records for each story. We get the entry in the table, which we expect, but we also get two entries in the table. The records for the three stories are shown in Figures 9- 1 and 9- 2.
Figure 9-1. The stories table records
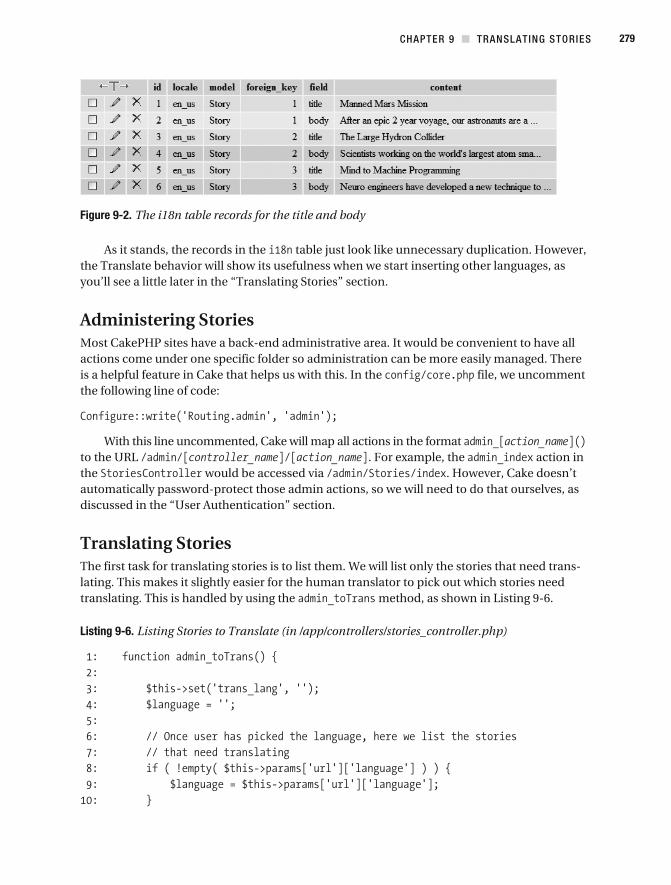
CHAPTER 9 TRANSLATING STORIES 279
Figure 9-2. The i18n table records for the title and body
As it stands, the records in the table just look like unnecessary duplication. However, the Translate behavior will show its usefulness when we start inserting other languages, as you’ll see a little later in the “Translating Stories” section.
Administering StoriesMost CakePHP sites have a back- end administrative area. It would be convenient to have all actions come under one specific folder so administration can be more easily managed. There is a helpful feature in Cake that helps us with this. In the file, we uncomment the following line of code:
With this line uncommented, Cake will map all actions in the format to the URL . For example, the action in the would be accessed via . However, Cake doesn’t automatically password- protect those admin actions, so we will need to do that ourselves, as discussed in the “User Authentication” section.
Translating StoriesThe first task for translating stories is to list them. We will list only the stories that need trans-lating. This makes it slightly easier for the human translator to pick out which stories need translating. This is handled by using the method, as shown in Listing 9-6.
Listing 9-6. Listing Stories to Translate (in /app/controllers/stories_controller.php)
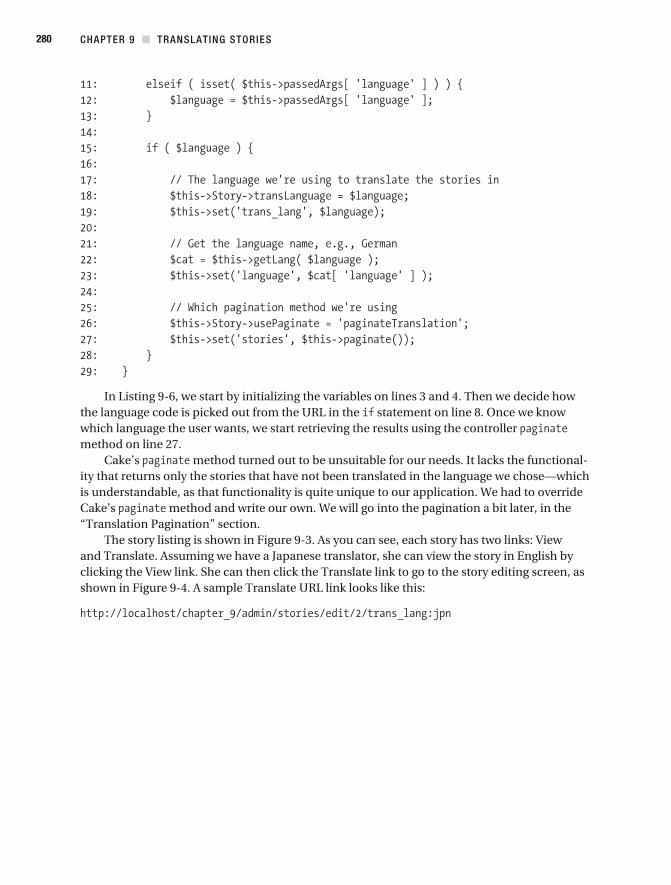
CHAPTER 9 TRANSLATING STORIES280
In Listing 9-6, we start by initializing the variables on lines 3 and 4. Then we decide how the language code is picked out from the URL in the statement on line 8. Once we know which language the user wants, we start retrieving the results using the controller method on line 27.
Cake’s method turned out to be unsuitable for our needs. It lacks the functional-ity that returns only the stories that have not been translated in the language we chose—which is understandable, as that functionality is quite unique to our application. We had to override Cake’s method and write our own. We will go into the pagination a bit later, in the “Translation Pagination” section.
The story listing is shown in Figure 9-3. As you can see, each story has two links: View and Translate. Assuming we have a Japanese translator, she can view the story in English by clicking the View link. She can then click the Translate link to go to the story editing screen, as shown in Figure 9-4. A sample Translate URL link looks like this:
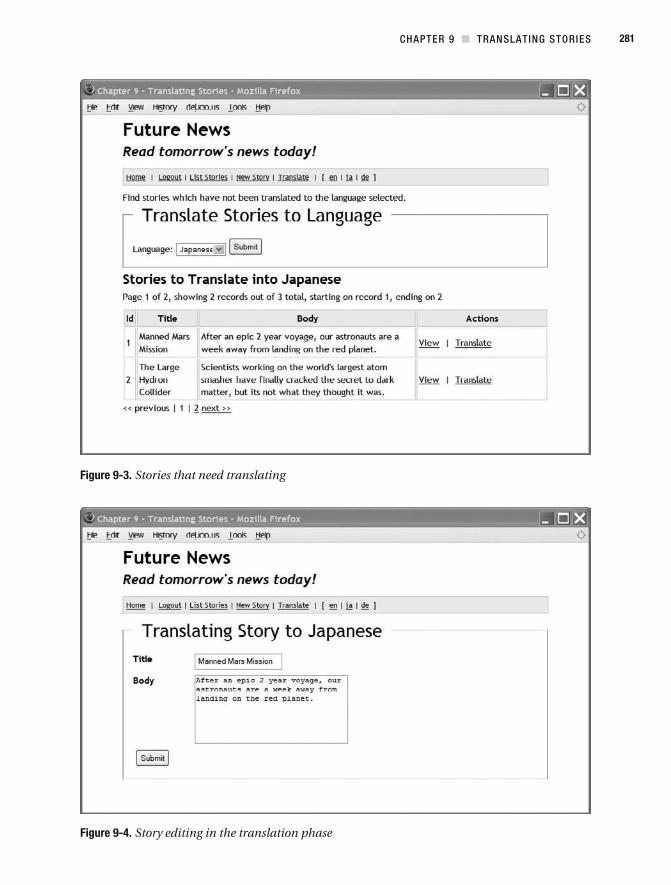
CHAPTER 9 TRANSLATING STORIES 281
Figure 9-3. Stories that need translating
Figure 9-4. Story editing in the translation phase

CHAPTER 9 TRANSLATING STORIES282
For this form, we have simply used the baked view. However, we have added a hidden tag named , which holds the language code in which we want the story to be saved.
After the Japanese translator has translated the story and saved it, the Translate behavior creates two extra records: one for the title in Japanese and another for the body in Japanese. Figures 9- 5 and 9- 6 show how our table looks now. You can see how our translation func-tions are taking place. We have a main story stored in and the language versions of those stories held in . Notice that our story in the table is now in Japanese as well. This is a side effect of the Translate behavior; however, it will display the correct version when the specified locale is used.
Figure 9-5. The stories table after our first translation
Figure 9-6. The i18n table after our first translation
Viewing StoriesWhen a user visits the home page, we list the stories in the language that is automatically selected by the Translate behavior. On the top navigation bar, we inserted three links that allow us to view the stories if the translated stories are available. The code for these links is shown in Listing 9-7. They belong in the layout ( ).
Listing 9-7. Links to Change the Locale (/app/views/layouts/default.ctp)
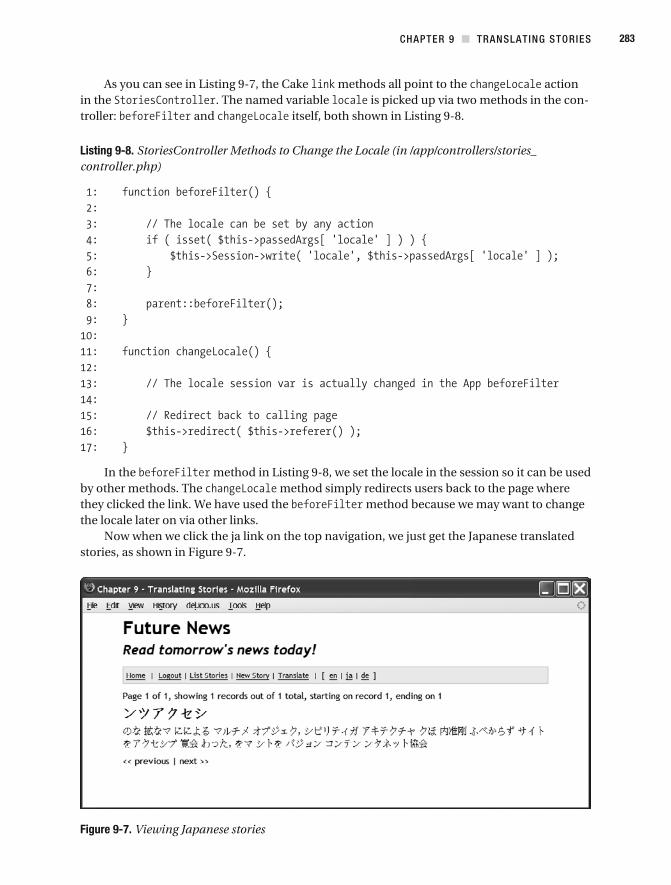
CHAPTER 9 TRANSLATING STORIES 283
As you can see in Listing 9-7, the Cake methods all point to the action in the . The named variable is picked up via two methods in the con-troller: and itself, both shown in Listing 9-8.
Listing 9-8. StoriesController Methods to Change the Locale (in /app/controllers/stories_ controller.php)
In the method in Listing 9-8, we set the locale in the session so it can be used by other methods. The method simply redirects users back to the page where they clicked the link. We have used the method because we may want to change the locale later on via other links.
Now when we click the ja link on the top navigation, we just get the Japanese translated stories, as shown in Figure 9-7.
Figure 9-7. Viewing Japanese stories
CHAPTER 9 TRANSLATING STORIES284
Deleting StoriesDeleting stories is quite a simple affair. When the user clicks the Delete link relating to a story, the story record in the table and the associated records in the table are deleted. This includes all the translations as well. The action code is shown in Listing 9-9.
Listing 9-9. The delete Action (/app/controllers/stories_controllers.php)
Listing StoriesListing of the stories is a basic function. Users need to view stories that interest them. The people who manage and translate the stories also need to list the stories in the database.
We have written two story listing versions. One version will list the stories in the specified locale for public viewing, and the other will list the stories in the admin section.
The controller action for the public story listing is shown in Listing 9-10.
Listing 9-10. Listing Stories for Public Viewing (/app/controllers/stories_controller.php)
Line 3 sets the locale. Since we want only the stories, we turn off any fetching of associa-tive model data in line 5. Line 6 is the workhorse of the action; it fetches the stories using the standard method.
The corresponding view that goes with the action is shown in Listing 9-11. We start off with line 4, which returns pagination information. Lines 8 to 12 simply loop
through the stories and display the title and the body in full. We complete the view by provid-ing pagination previous and next links, starting on line 18.
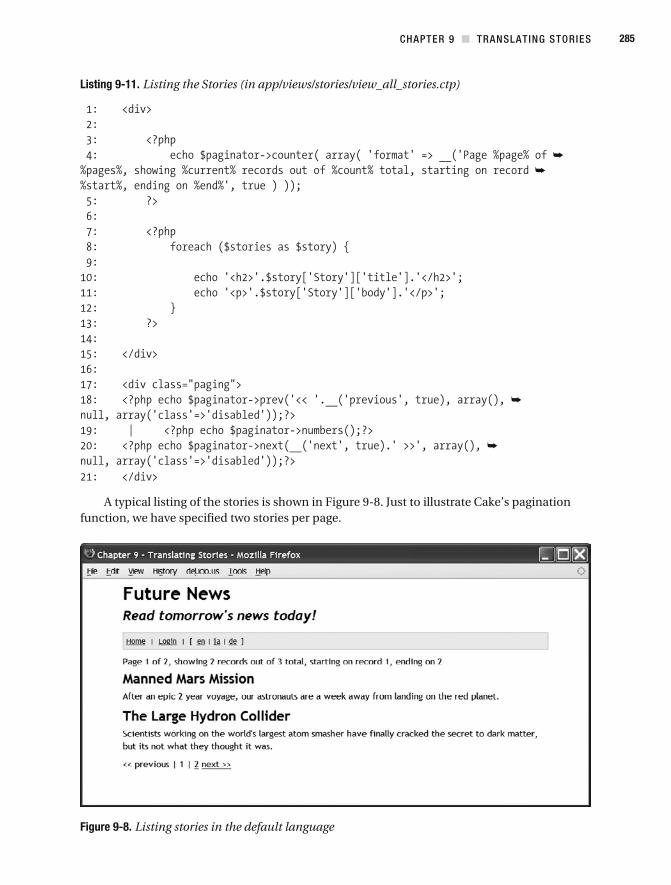
CHAPTER 9 TRANSLATING STORIES 285
Listing 9-11. Listing the Stories (in app/views/stories/view_all_stories.ctp)
A typical listing of the stories is shown in Figure 9-8. Just to illustrate Cake’s pagination function, we have specified two stories per page.
Figure 9-8. Listing stories in the default language
CHAPTER 9 TRANSLATING STORIES286
The listing of the stories in the admin section is very similar to the public listing. In the admin section, we list all the stories in the base language (English, in our case). Additionally, we adopt a traditional table format listing, with each record occupying a single record. There will also be an Actions column, which will contain View, Edit, and Delete links. The code for this controller action is shown in Listing 9-12.
Listing 9-12. Admin Story Listing (in app/controllers/stories_controller.php)
The difference between this listing and the public listing ( Listing 9-10) is in the setting of the locale on line 3. In the admin version, we specifically set the locale to the US English.
The corresponding view is quite straightforward and is composed of two parts. The first part is the view file itself ( ). This file just contains the following lines:
The element that it points to is shown in Listing 9-13.
Listing 9-13. The Admin Story Listing Element (/app/views/elements/admin_list_stories.ctp)
CHAPTER 9 TRANSLATING STORIES 287
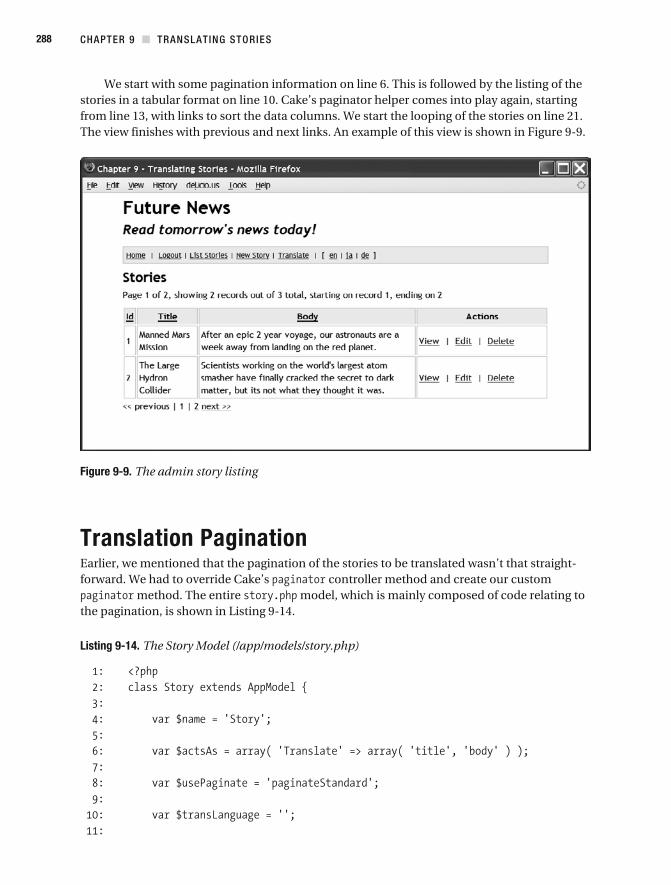
CHAPTER 9 TRANSLATING STORIES288
We start with some pagination information on line 6. This is followed by the listing of the stories in a tabular format on line 10. Cake’s paginator helper comes into play again, starting from line 13, with links to sort the data columns. We start the looping of the stories on line 21. The view finishes with previous and next links. An example of this view is shown in Figure 9-9.
Figure 9-9. The admin story listing
Translation PaginationEarlier, we mentioned that the pagination of the stories to be translated wasn’t that straight-forward. We had to override Cake’s controller method and create our custom
method. The entire model, which is mainly composed of code relating to the pagination, is shown in Listing 9-14.
Listing 9-14. The Story Model (/app/models/story.php)
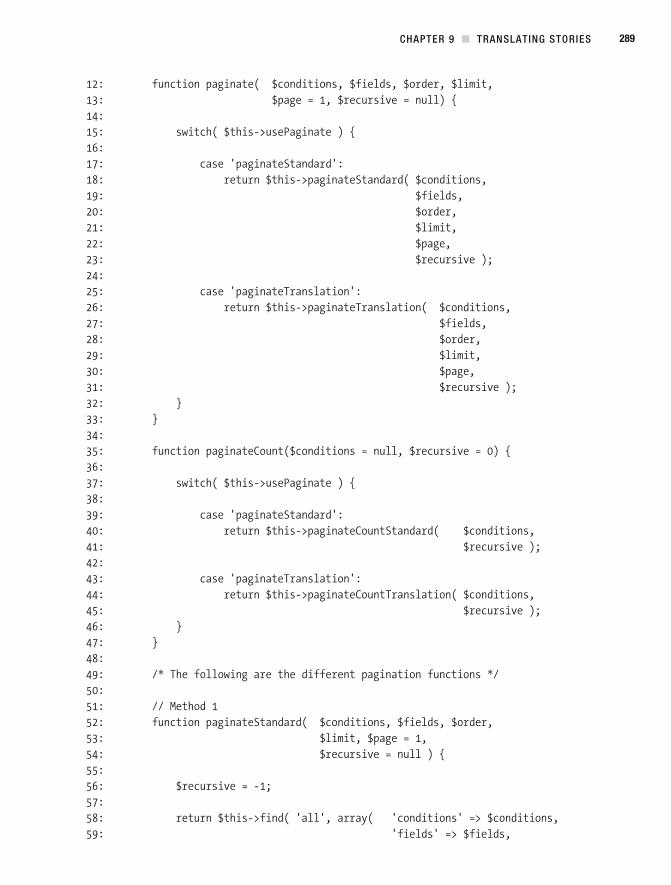
CHAPTER 9 TRANSLATING STORIES 289
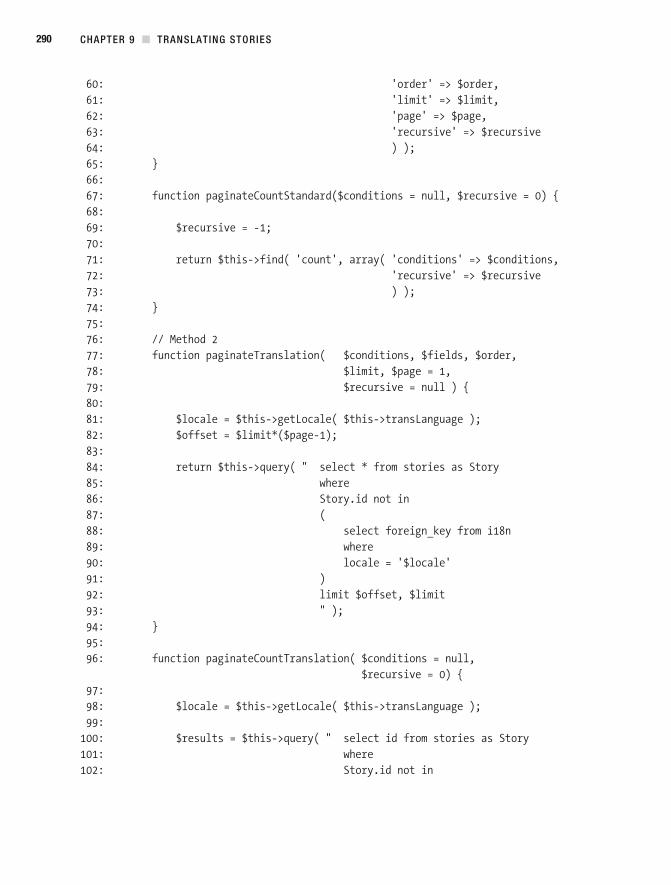
CHAPTER 9 TRANSLATING STORIES290
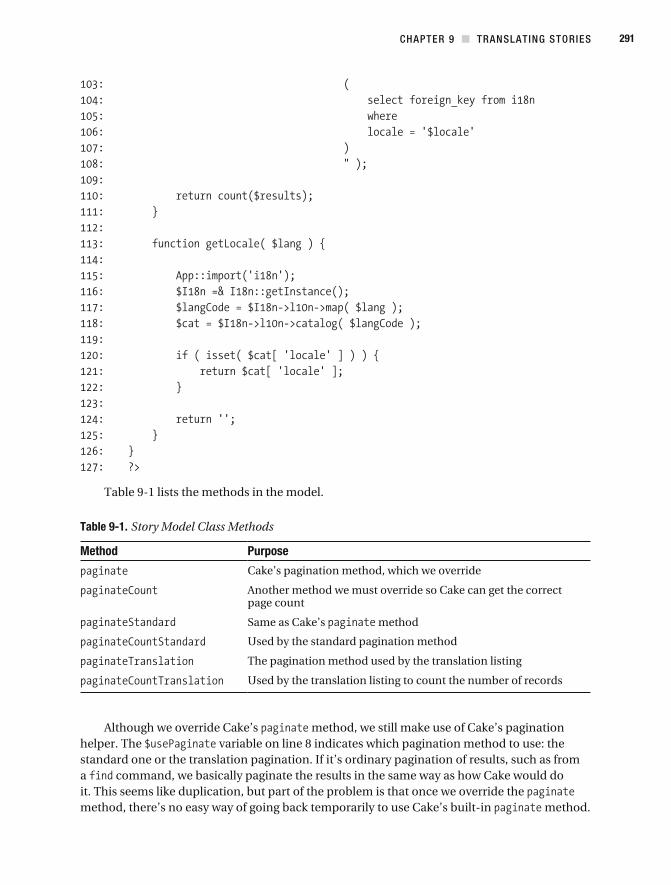
CHAPTER 9 TRANSLATING STORIES 291
Table 9-1 lists the methods in the model.
Table 9-1. Story Model Class Methods
Method Purpose
Cake’s pagination method, which we override
Another method we must override so Cake can get the correct page count
Same as Cake’s method
Used by the standard pagination method
The pagination method used by the translation listing
Used by the translation listing to count the number of records
Although we override Cake’s method, we still make use of Cake’s pagination helper. The variable on line 8 indicates which pagination method to use: the standard one or the translation pagination. If it’s ordinary pagination of results, such as from a command, we basically paginate the results in the same way as how Cake would do it. This seems like duplication, but part of the problem is that once we override the method, there’s no easy way of going back temporarily to use Cake’s built- in method.
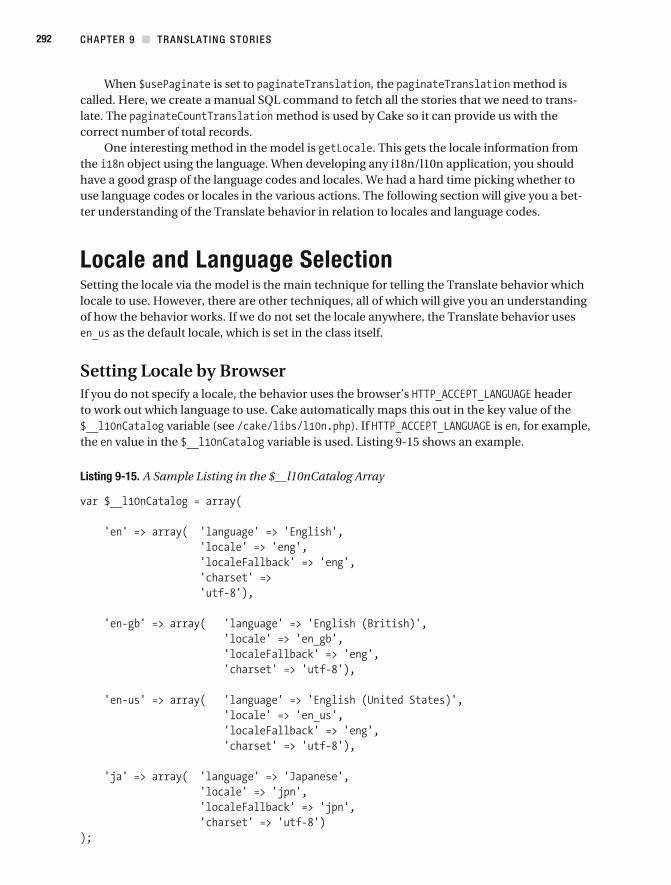
CHAPTER 9 TRANSLATING STORIES292
When is set to , the method is called. Here, we create a manual SQL command to fetch all the stories that we need to trans-late. The method is used by Cake so it can provide us with the correct number of total records.
One interesting method in the model is . This gets the locale information from the object using the language. When developing any i18n/l10n application, you should have a good grasp of the language codes and locales. We had a hard time picking whether to use language codes or locales in the various actions. The following section will give you a bet-ter understanding of the Translate behavior in relation to locales and language codes.
Locale and Language SelectionSetting the locale via the model is the main technique for telling the Translate behavior which locale to use. However, there are other techniques, all of which will give you an understanding of how the behavior works. If we do not set the locale anywhere, the Translate behavior uses
as the default locale, which is set in the class itself.
Setting Locale by BrowserIf you do not specify a locale, the behavior uses the browser’s header to work out which language to use. Cake automatically maps this out in the key value of the
variable (see ). If is , for example, the value in the variable is used. Listing 9-15 shows an example.
Listing 9-15. A Sample Listing in the $__l10nCatalog Array
CHAPTER 9 TRANSLATING STORIES 293
In this method, we use the constant to override the header; however, this method works only in a specific situation. If
is set and Cake has found a match, the value will have no effect. You cannot override the browser value. However, if Cake cannot find a match, the language will be used. This constant uses the three- letter ISO 639- 3 language code standard.
Note If you are interested in the format of , see section 14.4 Accept- Language of the HTTP standard ).
Setting Locale by Language CodeYou can set the locale manually via the two- letter language code. This is done as follows in the
class, which is used by the Translate behavior.
Here, we set the locale to Japanese. To set the locale, we first import the class file in . Next, we get the instance of that class. Calling the method in
sets the locale.
Setting Locale by HandTo give you an idea of the additional ways for setting the locale, here’s an alternate, albeit not recommended, method: if you manually set the header, the method in will pick that as the language to use. Here is an example:
User AuthenticationIn the baking of our application, we were asked whether we also wanted admin features as well. We answered yes, and the command created the actions and the corresponding views for us. Four admin actions were created: , which lists stories with links to edit and delete in each record; and , , and , which add, edit, and delete stories, respectively. However, the baking doesn’t add user functionality or authentica-tion. We’re happy to say that adding user authentication is a straightforward process.
CHAPTER 9 TRANSLATING STORIES294
In Cake, you can easily use the component to add user authentication, as we have shown in the previous chapter. In this chapter, we’re going to show you how authentication can be added manually.
For authentication, we create a user session variable, which tells us whether the user is logged in. Using the command, we check whether the user is accessing any of the admin features by checking the URL for the keyword. If that exists, we then check whether the user session variable has been set. If it has, we do nothing and just let execution continue on to the action. If the user session variable has not been set, we redirect the user to the login screen. This checking is placed in the / file, as shown in Listing 9-16, so it is called automatically on every action.
Listing 9-16. Admin Authentication (in /app/app_controller.php)
Logging InBefore we talk about the action, we need to look at the table. This table’s schema is shown in Listing 9-17.
Listing 9-17. The users Table Schema
CHAPTER 9 TRANSLATING STORIES 295
As we are just creating a simple authentication system, the model is almost empty.
Next, we create the login action in the , as shown in Listing 9-18.
Listing 9-18. The login Action (/app/controllers/user_controller.php)
CHAPTER 9 TRANSLATING STORIES296
When a user logs in, the action in the is called. This action is wholly used for the process of attempting to login the user. The corresponding login view simply holds the login form.
In the action, we first check whether any data is being submitted. Then we try to locate the user’s name. If one is found, we check the password—using MD5 hashing, naturally. If the password is found, we assign the result to the user session variable, set a flash welcome message, and redirect the user back to the home page.
The layout in contains some user session- related code. These are the links that are displayed when a user logs in:
Logging OutLogging a user out of the system is probably the easiest action in the whole application. We simply delete the user session variable, set a flash message, and then redirect the user back to the home page. The logout action is created in the . No view is needed, as we are redirecting the user. It looks like this:
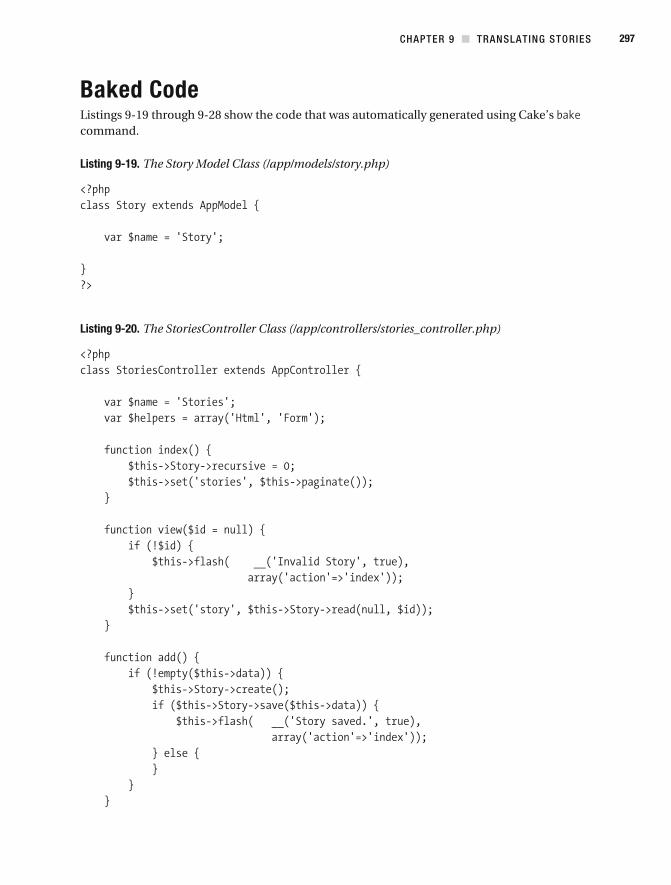
CHAPTER 9 TRANSLATING STORIES 297
Baked CodeListings 9- 19 through 9- 28 show the code that was automatically generated using Cake’s command.
Listing 9-19. The Story Model Class (/app/models/story.php)
Listing 9-20. The StoriesController Class (/app/controllers/stories_controller.php)

CHAPTER 9 TRANSLATING STORIES298
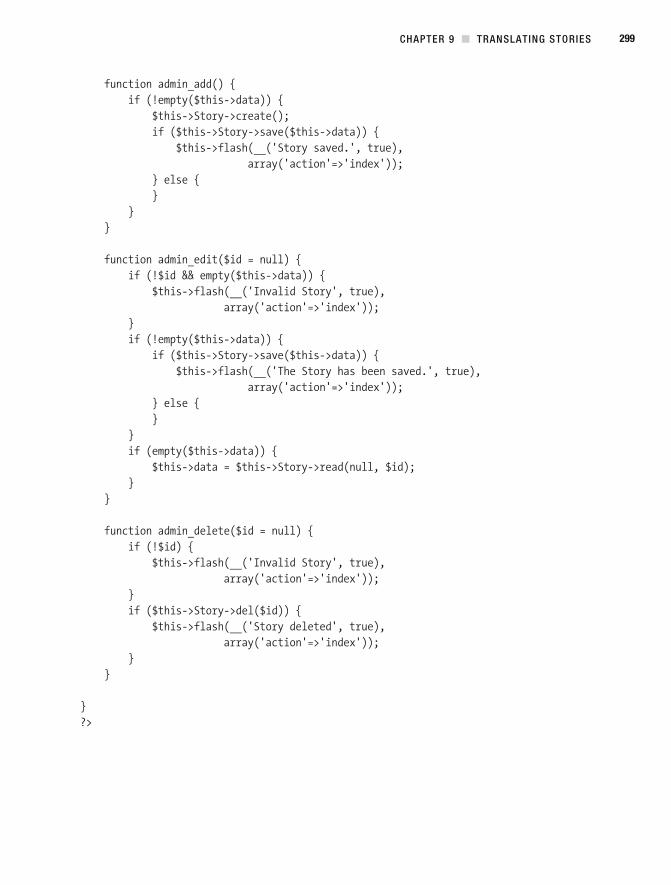
CHAPTER 9 TRANSLATING STORIES 299
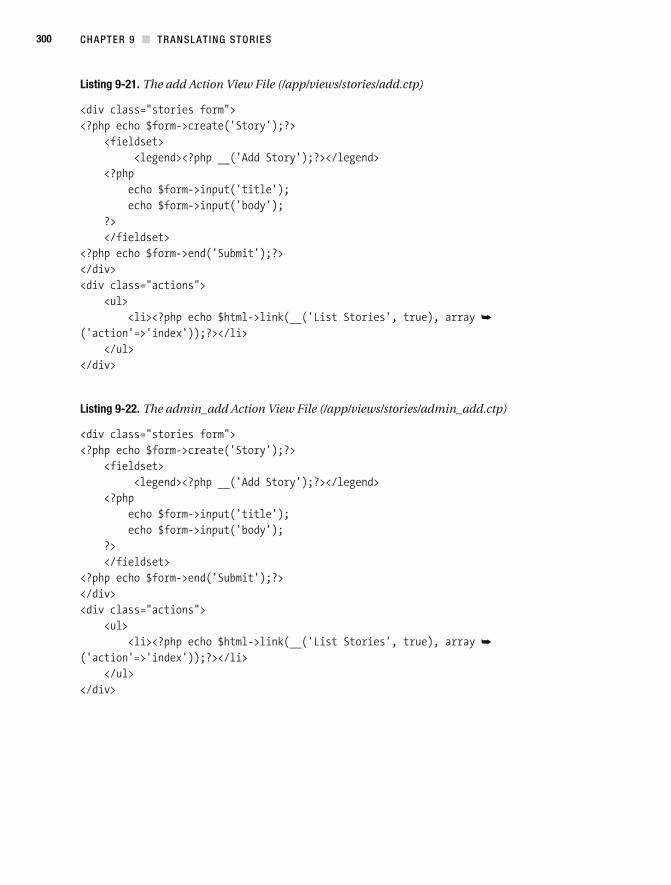
CHAPTER 9 TRANSLATING STORIES300
Listing 9-21. The add Action View File (/app/views/stories/add.ctp)
Listing 9-22. The admin_add Action View File (/app/views/stories/admin_add.ctp)
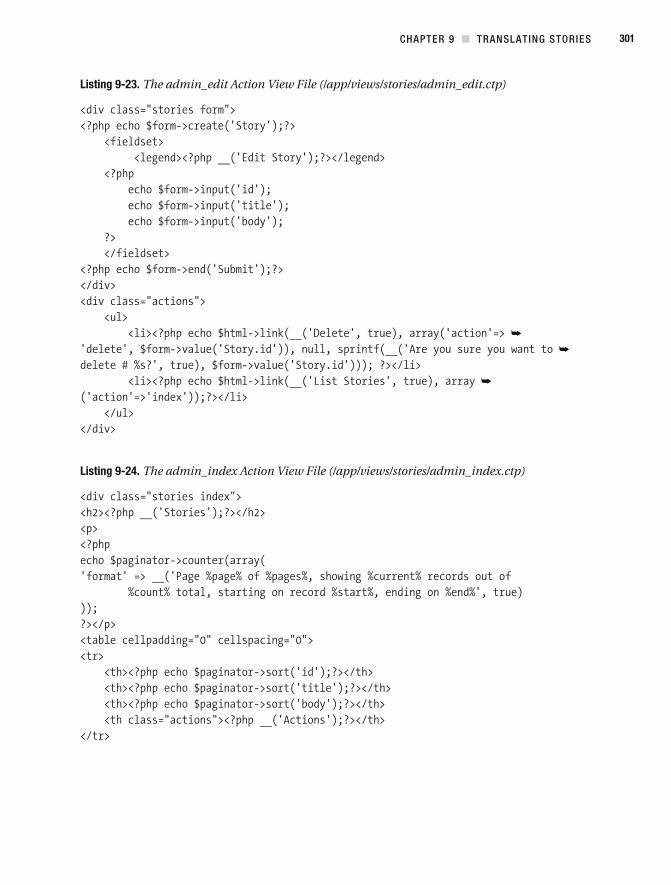
CHAPTER 9 TRANSLATING STORIES 301
Listing 9-23. The admin_edit Action View File (/app/views/stories/admin_edit.ctp)
Listing 9-24. The admin_index Action View File (/app/views/stories/admin_index.ctp)
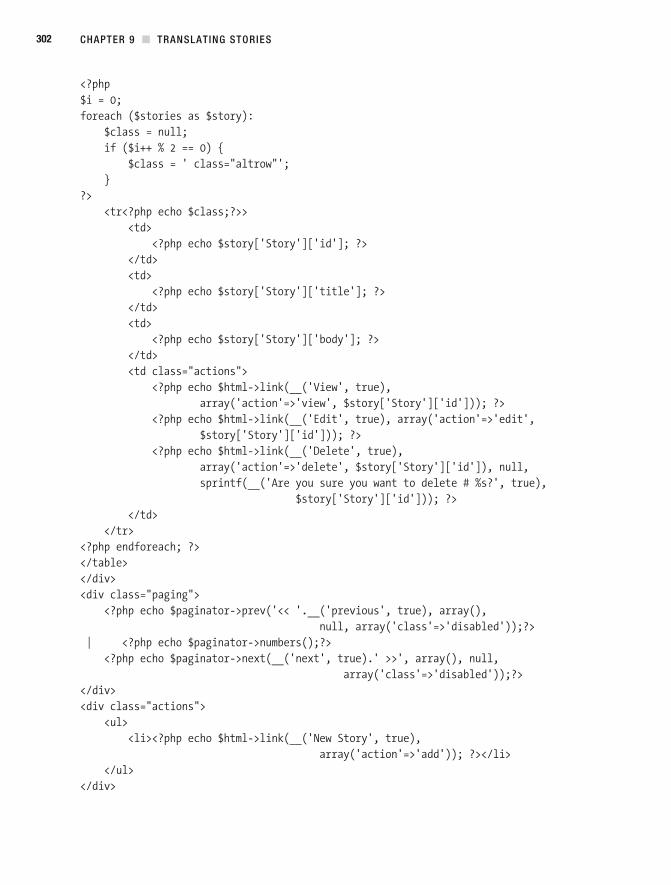
CHAPTER 9 TRANSLATING STORIES302
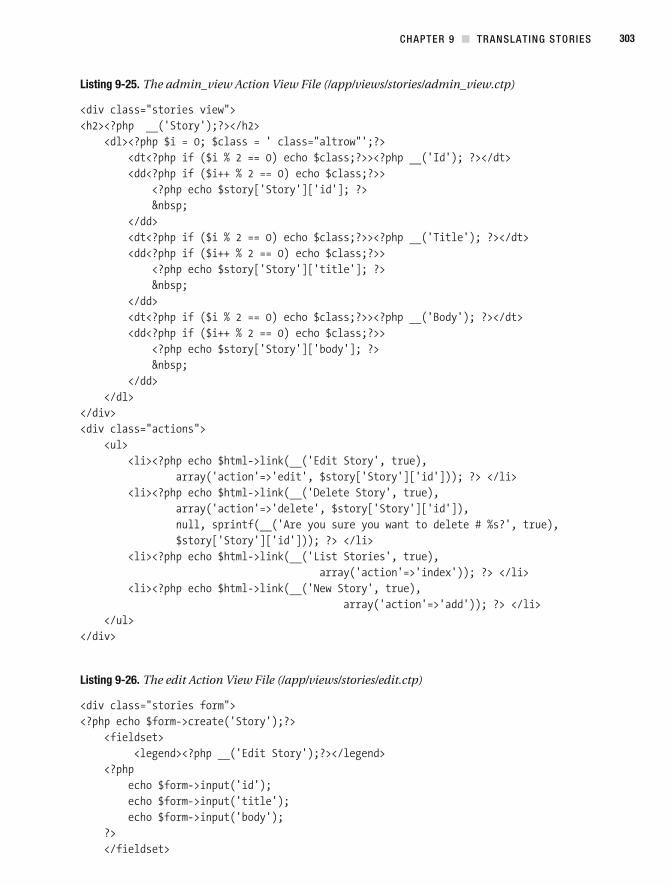
CHAPTER 9 TRANSLATING STORIES 303
Listing 9-25. The admin_view Action View File (/app/views/stories/admin_view.ctp)
Listing 9-26. The edit Action View File (/app/views/stories/edit.ctp)
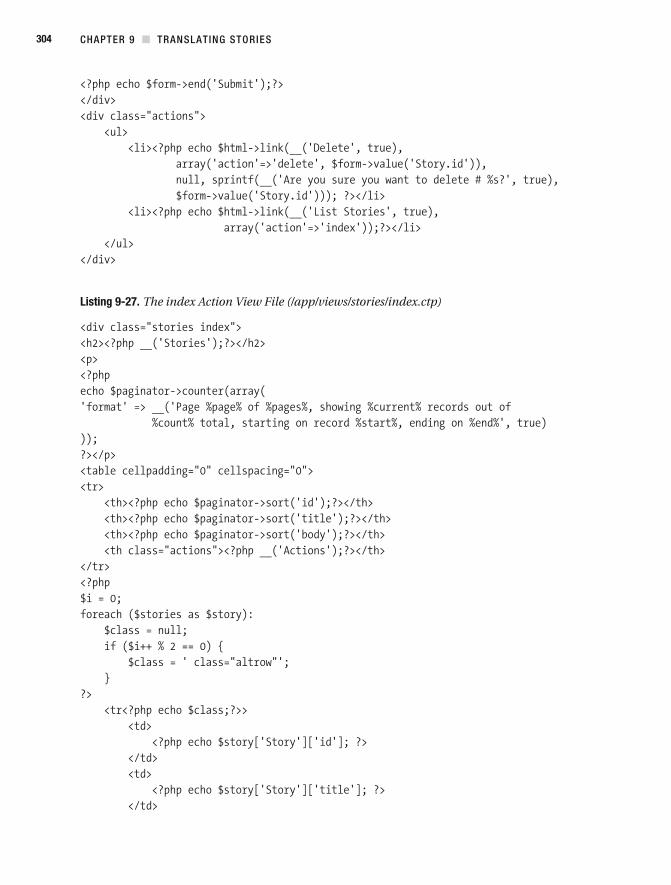
CHAPTER 9 TRANSLATING STORIES304
Listing 9-27. The index Action View File (/app/views/stories/index.ctp)
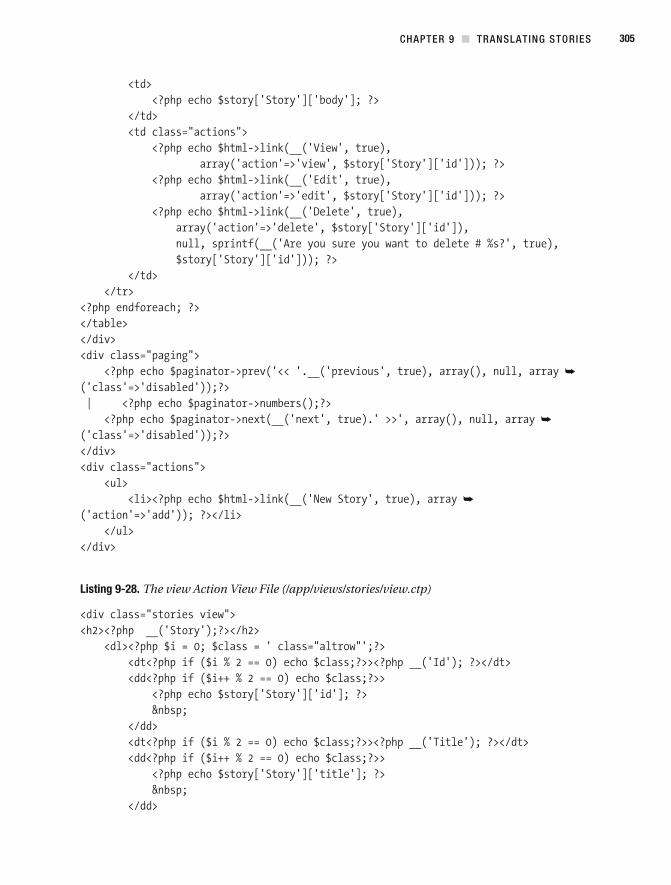
CHAPTER 9 TRANSLATING STORIES 305
Listing 9-28. The view Action View File (/app/views/stories/view.ctp)
CHAPTER 9 TRANSLATING STORIES306
SummaryIn this chapter, we introduced Cake’s Translate behavior. Using Cake’s table, we were able to store the translations of stories held in a database, rather than in a static HTML file.
Next, we created some admin actions using Cake’s command, which generated actions with the prefix. Using those actions, a real human translator will have the abil-ity to translate stories from one language to another.
Within the model, we wrote our own pagination code so the appropriate stories will be paginated depending on the selected language.
Finally, to secure the admin actions, we rolled our own authentication code.
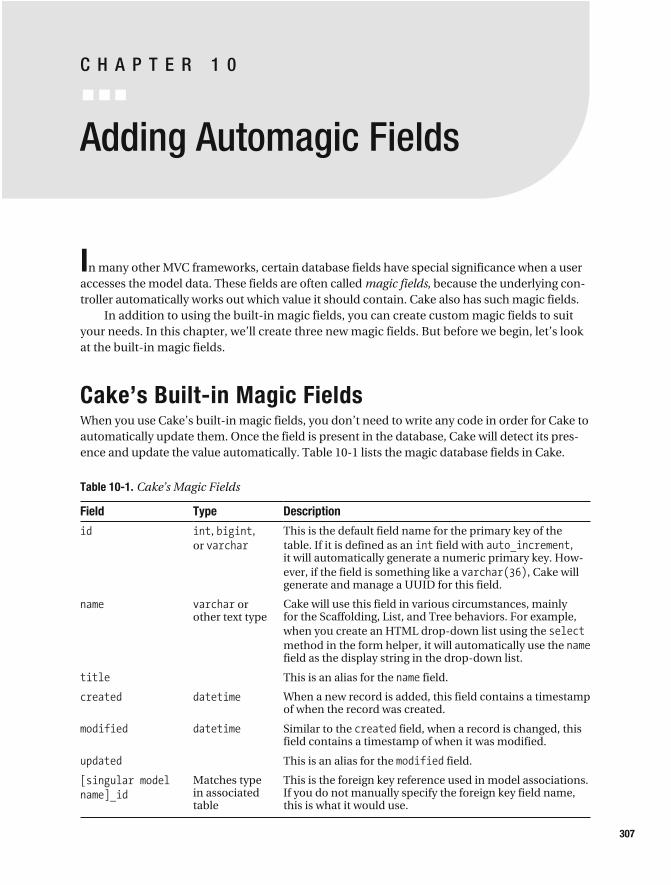
C H A P T E R 1 0
Adding Automagic Fields
In many other MVC frameworks, certain database fields have special significance when a user accesses the model data. These fields are often called magic fields, because the underlying con-troller automatically works out which value it should contain. Cake also has such magic fields.
In addition to using the built- in magic fields, you can create custom magic fields to suit your needs. In this chapter, we’ll create three new magic fields. But before we begin, let’s look at the built- in magic fields.
Cake’s Built- in Magic FieldsWhen you use Cake’s built- in magic fields, you don’t need to write any code in order for Cake to automatically update them. Once the field is present in the database, Cake will detect its pres-ence and update the value automatically. Table 10-1 lists the magic database fields in Cake.
Table 10-1. Cake’s Magic Fields
Field Type Description
, , or
This is the default field name for the primary key of the table. If it is defined as an field with , it will automatically generate a numeric primary key. How-ever, if the field is something like a , Cake will generate and manage a UUID for this field.
or other text type
Cake will use this field in various circumstances, mainly for the Scaffolding, List, and Tree behaviors. For example, when you create an HTML drop- down list using the method in the form helper, it will automatically use the field as the display string in the drop- down list.
This is an alias for the field.
When a new record is added, this field contains a timestamp of when the record was created.
Similar to the field, when a record is changed, this field contains a timestamp of when it was modified.
This is an alias for the field.
Matches type in associated table
This is the foreign key reference used in model associations. If you do not manually specify the foreign key field name, this is what it would use.
307
CHAPTER 10 ADDING AUTOMAGIC F IELDS308
There are other special fields that relate only to particular behaviors. For example, in the Tree behavior, the following three fields are used:
stores the ID of the parent field.
stores the ID of the left- branch record of the tree structure.
stores the ID of the right- branch record of the tree structure.
Writing a Custom BehaviorMagic fields are managed by the model layer through resources called behaviors. Behaviors make it possible to perform automagic methods on database fields as the model runs its vari-ous data- handling methods, such as or .
For instance, upon saving a new record to the table, the model passes all of its data through to any attached behavior classes. This gives the attached behaviors the opportunity to intercept the save process and perform any business logic based on or relating to the inter-cepted data. This may involve cross- table or cross- database updates based on what is being saved. In other words, an automagic update occurs in fields that are not necessarily part of the record being saved.
So, before we get to creating custom magic fields, we need to talk about how to create your own custom behavior.
First, you create a PHP file to be stored in the folder . This file con-tains the code that will drive the behavior. The file name must be in lowercase, and multiple words are separated with underscores. The behavior class name must also be in camel case, with the word appended, and it must extend the class . Here’s how to start a custom behavior class:
The next step is to include the behavior in the model itself. This is done by including the variable in the model, as follows:
A Cake behavior helps you by transparently performing some operation in the background. When the model methods , , and are used, it will trigger other functions (com-monly called callback functions) in your behavior class.
Here are the other functions of the model’s method in a behavior and the sequence in which they are called:
1. Model behaviors’ method
2. Model’s method
3. Model behaviors’ method
CHAPTER 10 ADDING AUTOMAGIC F IELDS 309
So, when a model’s method is called, starting from step 1, the method in all the behaviors that are attached to the model is called before the record is deleted. In step 2, the record is deleted. And finally, in step 3, the method in all the behaviors that are attached to the model is called.
Here are the other functions of the model’s method in a behavior and their order:
1. Model behaviors’ method
2. Model behaviors’ method
3. Model’s method
4. Model behaviors’ method
And the following are the other functions of the model’s method in a behavior and their order:
1. Model behaviors’ method
2. Model’s method
3. Model behaviors’ method
Within your behavior class, there is also a method called . This method is called when the parent model is instantiated. Its syntax is as follows:
The model is passed by reference, which means you can directly manipulate the values in the model. The variable contains the values you passed to the behavior in the model.
Tip Sometimes, you may need to carry out your own SQL queries within a model rather than using the model’s standard CRUD methods. The callbacks would not work as intended, since they would not know the kind of query you have made. However, you can still make use of the behavior by using the method as an entry point into the behavior, since that is called whenever the model is invoked in any way. This is not an ideal solution, since you would need to manually call the methods within the model behavior yourself; however, it does work.
Building Custom Magic FieldsNow that you know how to create a custom behavior, we can start building some magic fields. First, we need to create our behavior, starting with the behavior file itself, which we’ll call
. The behavior file is created as . The skeleton of the file is shown in Listing 10-1. We’ll be adding callback methods to the
class. Note that in our case, the method is empty. You can easily add parameters that you can use to alter the way the behavior works.
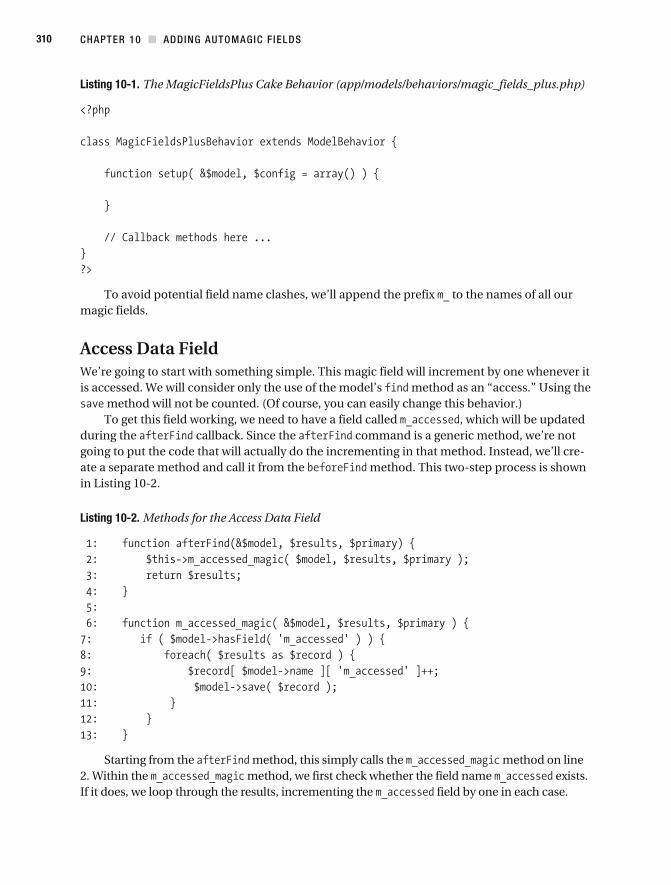
CHAPTER 10 ADDING AUTOMAGIC F IELDS310
Listing 10-1. The MagicFieldsPlus Cake Behavior (app/models/behaviors/magic_fields_plus.php)
To avoid potential field name clashes, we’ll append the prefix to the names of all our magic fields.
Access Data FieldWe’re going to start with something simple. This magic field will increment by one whenever it is accessed. We will consider only the use of the model’s method as an “access.” Using the
method will not be counted. (Of course, you can easily change this behavior.)To get this field working, we need to have a field called , which will be updated
during the callback. Since the command is a generic method, we’re not going to put the code that will actually do the incrementing in that method. Instead, we’ll cre-ate a separate method and call it from the method. This two- step process is shown in Listing 10-2.
Listing 10-2. Methods for the Access Data Field
Starting from the method, this simply calls the method on line 2. Within the method, we first check whether the field name exists. If it does, we loop through the results, incrementing the field by one in each case.
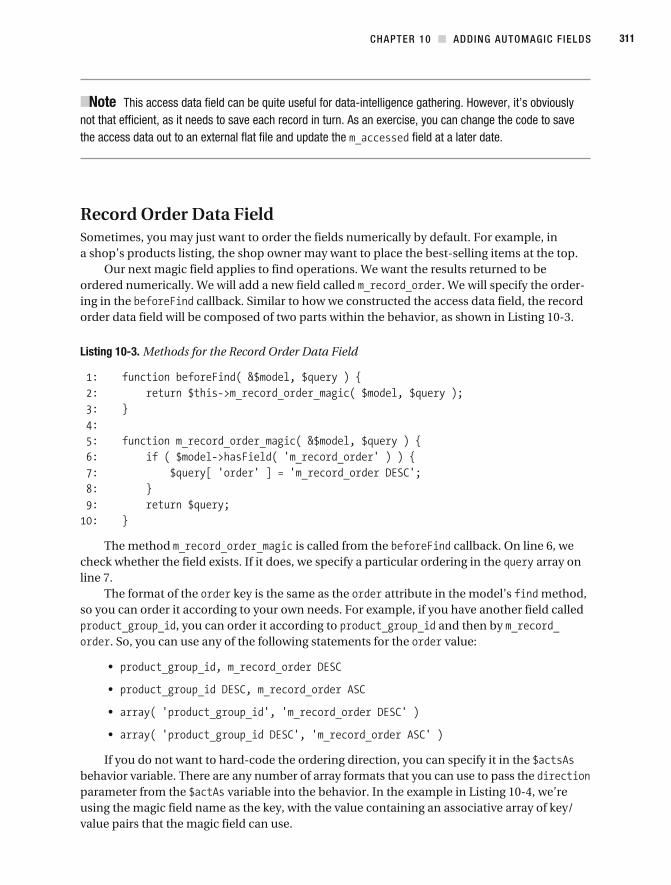
CHAPTER 10 ADDING AUTOMAGIC F IELDS 311
Note This access data field can be quite useful for data- intelligence gathering. However, it’s obviously not that efficient, as it needs to save each record in turn. As an exercise, you can change the code to save the access data out to an external flat file and update the field at a later date.
Record Order Data FieldSometimes, you may just want to order the fields numerically by default. For example, in a shop’s products listing, the shop owner may want to place the best- selling items at the top.
Our next magic field applies to find operations. We want the results returned to be ordered numerically. We will add a new field called . We will specify the order-ing in the callback. Similar to how we constructed the access data field, the record order data field will be composed of two parts within the behavior, as shown in Listing 10-3.
Listing 10-3. Methods for the Record Order Data Field
The method is called from the callback. On line 6, we check whether the field exists. If it does, we specify a particular ordering in the array on line 7.
The format of the key is the same as the attribute in the model’s method, so you can order it according to your own needs. For example, if you have another field called
, you can order it according to and then by . So, you can use any of the following statements for the value:
If you do not want to hard- code the ordering direction, you can specify it in the behavior variable. There are any number of array formats that you can use to pass the parameter from the variable into the behavior. In the example in Listing 10-4, we’re using the magic field name as the key, with the value containing an associative array of key/value pairs that the magic field can use.
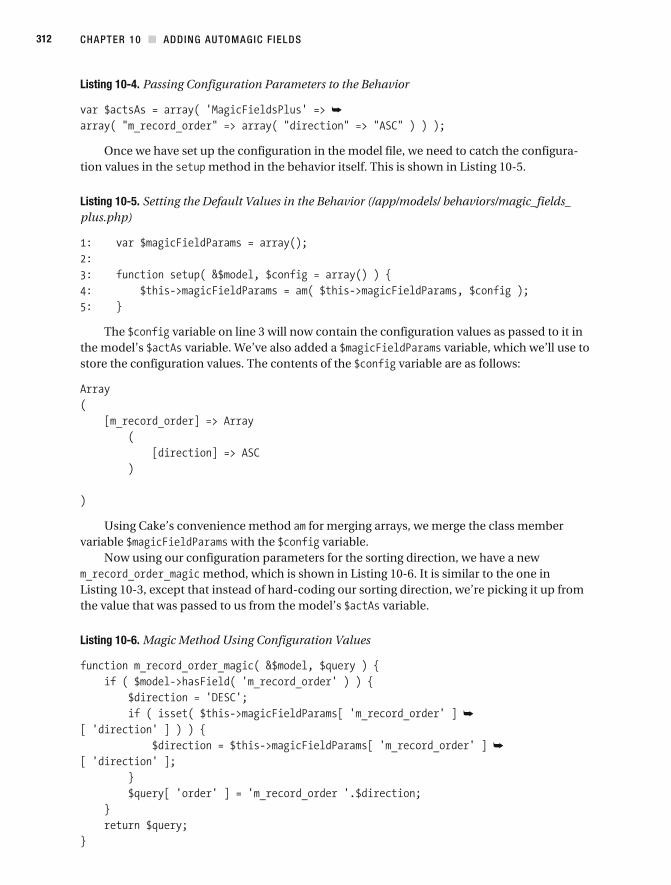
CHAPTER 10 ADDING AUTOMAGIC F IELDS312
Listing 10-4. Passing Configuration Parameters to the Behavior
Once we have set up the configuration in the model file, we need to catch the configura-tion values in the method in the behavior itself. This is shown in Listing 10-5.
Listing 10-5. Setting the Default Values in the Behavior (/app/models/ behaviors/magic_fields_plus.php)
The variable on line 3 will now contain the configuration values as passed to it in the model’s variable. We’ve also added a variable, which we’ll use to store the configuration values. The contents of the variable are as follows:
Using Cake’s convenience method for merging arrays, we merge the class member variable with the variable.
Now using our configuration parameters for the sorting direction, we have a new method, which is shown in Listing 10-6. It is similar to the one in
Listing 10-3, except that instead of hard- coding our sorting direction, we’re picking it up from the value that was passed to us from the model’s variable.
Listing 10-6. Magic Method Using Configuration Values
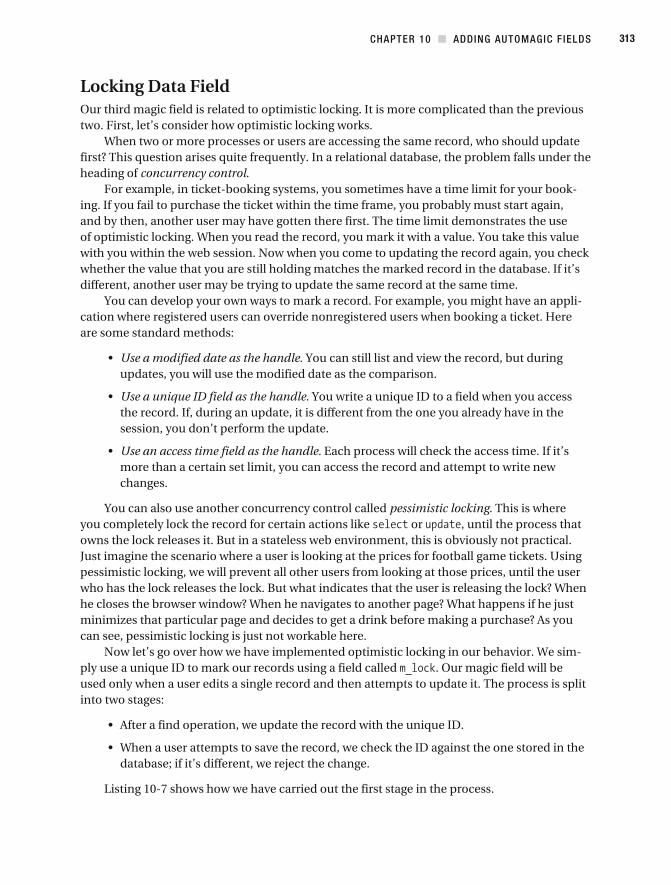
CHAPTER 10 ADDING AUTOMAGIC F IELDS 313
Locking Data FieldOur third magic field is related to optimistic locking. It is more complicated than the previous two. First, let’s consider how optimistic locking works.
When two or more processes or users are accessing the same record, who should update first? This question arises quite frequently. In a relational database, the problem falls under the heading of concurrency control.
For example, in ticket- booking systems, you sometimes have a time limit for your book-ing. If you fail to purchase the ticket within the time frame, you probably must start again, and by then, another user may have gotten there first. The time limit demonstrates the use of optimistic locking. When you read the record, you mark it with a value. You take this value with you within the web session. Now when you come to updating the record again, you check whether the value that you are still holding matches the marked record in the database. If it’s different, another user may be trying to update the same record at the same time.
You can develop your own ways to mark a record. For example, you might have an appli-cation where registered users can override nonregistered users when booking a ticket. Here are some standard methods:
Use a modified date as the handle. You can still list and view the record, but during updates, you will use the modified date as the comparison.
Use a unique ID field as the handle. You write a unique ID to a field when you access the record. If, during an update, it is different from the one you already have in the session, you don’t perform the update.
Use an access time field as the handle. Each process will check the access time. If it’s more than a certain set limit, you can access the record and attempt to write new changes.
You can also use another concurrency control called pessimistic locking. This is where you completely lock the record for certain actions like or , until the process that owns the lock releases it. But in a stateless web environment, this is obviously not practical. Just imagine the scenario where a user is looking at the prices for football game tickets. Using pessimistic locking, we will prevent all other users from looking at those prices, until the user who has the lock releases the lock. But what indicates that the user is releasing the lock? When he closes the browser window? When he navigates to another page? What happens if he just minimizes that particular page and decides to get a drink before making a purchase? As you can see, pessimistic locking is just not workable here.
Now let’s go over how we have implemented optimistic locking in our behavior. We sim-ply use a unique ID to mark our records using a field called . Our magic field will be used only when a user edits a single record and then attempts to update it. The process is split into two stages:
database; if it’s different, we reject the change.
Listing 10-7 shows how we have carried out the first stage in the process.
CHAPTER 10 ADDING AUTOMAGIC F IELDS314
Listing 10-7. Optimistic Locking with a Model Behavior
On line 6, we call our method, which will do the work for the first stage. First, we check whether the field exists, on line 7. Next, we proceed only if there’s just one record. Basically, we assume it’s an edit for now. If it is, we create a unique ID using Cake’s
method.Next, we update the field by running a SQL statement. We are using a man-
ual update because using the command would cause a loop by calling our magic field behavior. Alternatively, you can use the behavior’s and methods to tem-porarily disconnect the behavior from the model, but we just wanted to point out that query commands have no effect on behaviors.
The array now contains the unique ID, which it can use as a hidden field in a form.
In the second stage of the optimistic locking, we carry out the validation. This is where we compare the ID that’s being used on a form and the ID that’s in the database. This code is shown in Listing 10-8.
Listing 10-8. Validating an Optimistic Locking Data Field

CHAPTER 10 ADDING AUTOMAGIC F IELDS 315
On line 3, we first check whether we are editing an existing record. If so, we fetch the record from the database using the model’s method. Once a record is found, we check that record against the one in the model data array. If it is different, we manually set the
error array with an error message and then return , which in turn will prevent the command from going forward.
SummaryMagic fields are database fields that have special meanings within a Cake model. In this chap-ter, we added new, custom magic data fields, which involved building custom Cake behaviors.
This chapter also highlights a particular point. There’s a school of thought in MVC that recommends that developers write fat models and skinny controllers. Any data manipulation, such as finding or saving records, should be done in the model. Controller actions should be skinny managers with surrounding support from components, models, and behaviors. As you’ve seen in this chapter, by using behaviors, you can really cut down on the amount of logic that is performed by the controller.
Some of our magic fields are essentially metadata fields. You might want to move all of them out to a separate metatable. Additionally, you could quickly make the following improvements:
magic field. This can store a type field. If a user is not within this group, access will be denied to that user.
magic field. Use this field to turn the display of the record on or off in the view. For example, you may have an article that you want to display only occasion-ally, such as once every few weeks.
logical to separate them into separate behaviors.
e- commerce application, you might have a field in a product table. This would allow you to place orders based on the best- selling products.
C H A P T E R 1 1
Cake Tags
In this chapter, we’re going to develop our own HTML- based tags to display two Yahoo! maps. The idea for our application stems from our strong opinion on an important aspect in web development: avoiding mixing presentation markup and logic. We’ll start off this chapter by addressing that point. Our discussion isn’t limited to Cake but covers many other languages and frameworks, including Ruby on Rails, Extensible Stylesheet Language Transformations (XSLT), and the Smarty template engine.
Content and Data SeparationThe basic premise is that no programming logic should appear in any presentation files, namely templates. To see what we mean, take a look at the semi- pseudo PHP code in Listing 11-1.
Listing 11-1. Web Programming in the 1990s
317
CHAPTER 11 CAKE TAGS318
Here, we create a MySQL connection on line 4. Then we execute a query on line 10. Next, we loop through the results, mixing HTML markup with the database data to create a particular view.
This code suffers from a number of problems. Suppose that you wanted to change the output format—for example, instead of displaying the data in a tag, you wanted it to appear in an RSS format. In this case, you would need to add another layer of logic between the data and the display. You could do that within the code itself with an statement, as in this example:
Using an statement is OK, but you will run into other problems. For example, when more logic is added, where do you put it? The code will start to get more and more proprietary. No one will understand your structure unless you write good documentation to go with it, and even when you do, other developers may not agree with you or your structure. You also may find that you have not taken other scenarios into account.
You could also create another separate file, as in Listing 11-1, that specifically deals with RSS output. So instead of outputting HTML, you output XML in the RSS format.
The code in Listing 11-1 can be improved by encapsulating some of the code in functions, as shown in Listing 11-2.
Listing 11-2. Using PHP Includes
CHAPTER 11 CAKE TAGS 319
This is better, and using an MVC pattern helps, but developers can still develop propri-etary designs within the controller. And with such proprietary designs, documentation should be written, but sadly, often it is not.
Note As a brief diversion, there’s an entertaining take on the separation of data and content on .
We jump ahead now to the use of MVC in the web development process. In basic terms, the controller delegates incoming requests and funnels them to the appropriate end point, which is normally an action in a class. The model handles the data, and the view is responsible for the return format to the recipient. However, the solution still has a problem: in too many cases, we see developers putting more and more logic into the view. Plus, it’s often difficult to distinguish whether a piece of code relates to the application or to the view—for example, when there is some specific data or code that’s just used for a particular format. And with time pressures, it’s often easier to place it in the view.
Our Cake tags approach is one small step toward addressing the problem. Following from the previous examples, Listing 11-3 shows how Cake tags would do it.
Listing 11-3. Using Cake Tags
Our idea in using tags isn’t new, of course. ColdFusion has used it since the 1990s, and Java has JSP tags. For example, in ColdFusion, you can send an e-mail message using the fol-lowing tag:
View TemplateThe best place to start explaining how we wrote our Cake tags is from the view. In this applica-tion, our Cake tags will be available to use in any view. We’re going to create a sample page in
, Cake’s default home page.
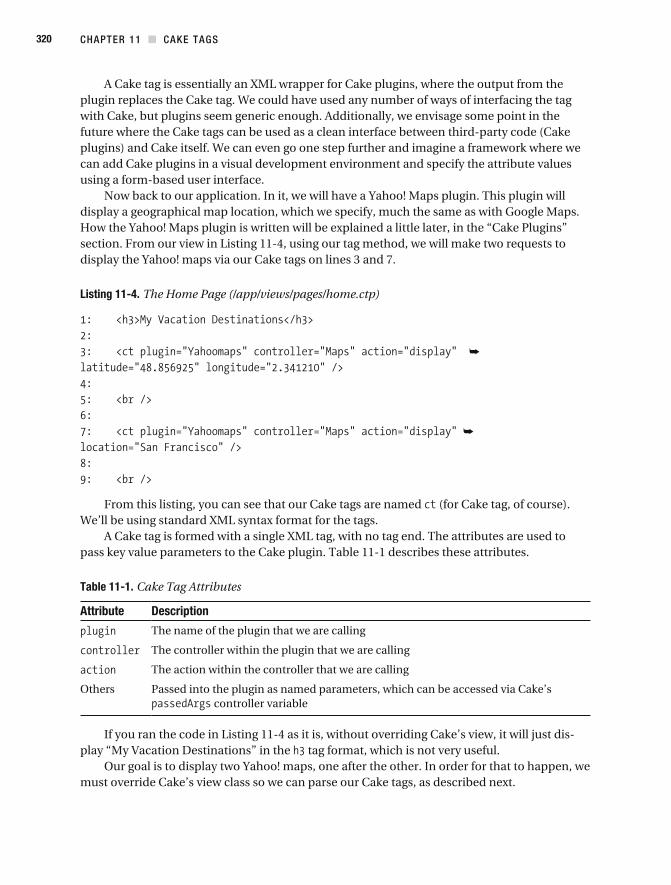
CHAPTER 11 CAKE TAGS320
A Cake tag is essentially an XML wrapper for Cake plugins, where the output from the plugin replaces the Cake tag. We could have used any number of ways of interfacing the tag with Cake, but plugins seem generic enough. Additionally, we envisage some point in the future where the Cake tags can be used as a clean interface between third- party code (Cake plugins) and Cake itself. We can even go one step further and imagine a framework where we can add Cake plugins in a visual development environment and specify the attribute values using a form- based user interface.
Now back to our application. In it, we will have a Yahoo! Maps plugin. This plugin will display a geographical map location, which we specify, much the same as with Google Maps. How the Yahoo! Maps plugin is written will be explained a little later, in the “Cake Plugins” section. From our view in Listing 11-4, using our tag method, we will make two requests to display the Yahoo! maps via our Cake tags on lines 3 and 7.
Listing 11-4. The Home Page (/app/views/pages/home.ctp)
From this listing, you can see that our Cake tags are named (for Cake tag, of course). We’ll be using standard XML syntax format for the tags.
A Cake tag is formed with a single XML tag, with no tag end. The attributes are used to pass key value parameters to the Cake plugin. Table 11-1 describes these attributes.
Table 11-1. Cake Tag Attributes
Attribute Description
The name of the plugin that we are calling
The controller within the plugin that we are calling
The action within the controller that we are calling
Others Passed into the plugin as named parameters, which can be accessed via Cake’s controller variable
If you ran the code in Listing 11-4 as it is, without overriding Cake’s view, it will just dis-play “My Vacation Destinations” in the tag format, which is not very useful.
Our goal is to display two Yahoo! maps, one after the other. In order for that to happen, we must override Cake’s view class so we can parse our Cake tags, as described next.
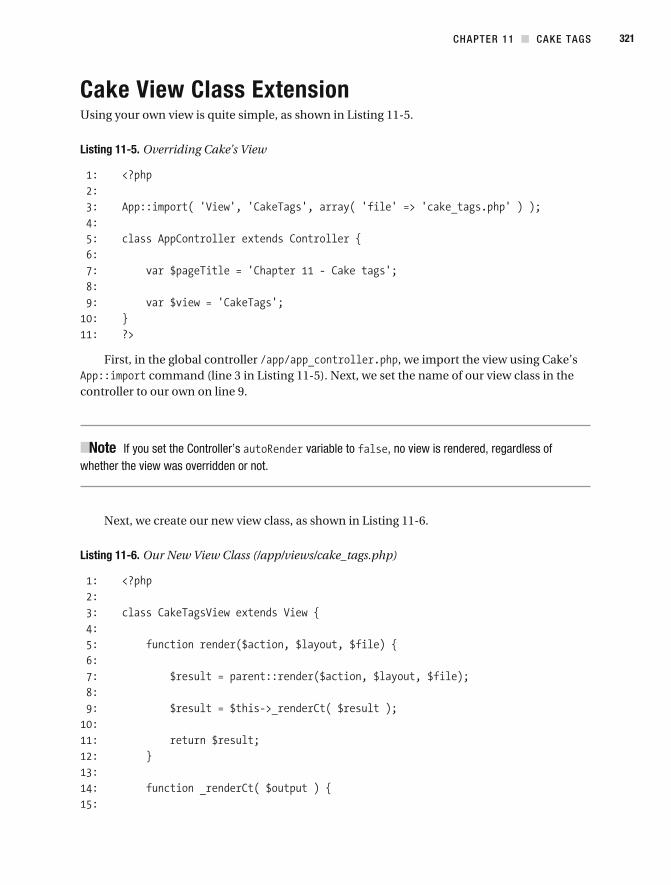
CHAPTER 11 CAKE TAGS 321
Cake View Class ExtensionUsing your own view is quite simple, as shown in Listing 11-5.
Listing 11-5. Overriding Cake’s View
First, in the global controller , we import the view using Cake’s command (line 3 in Listing 11-5). Next, we set the name of our view class in the
controller to our own on line 9.
Note If you set the Controller’s variable to , no view is rendered, regardless of whether the view was overridden or not.
Next, we create our new view class, as shown in Listing 11-6.
Listing 11-6. Our New View Class (/app/views/cake_tags.php)
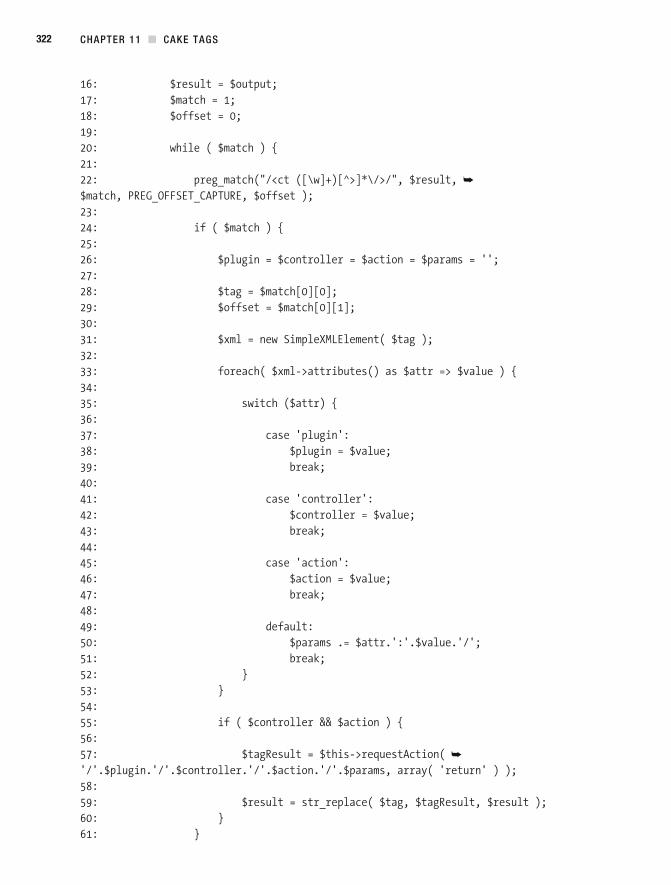
CHAPTER 11 CAKE TAGS322
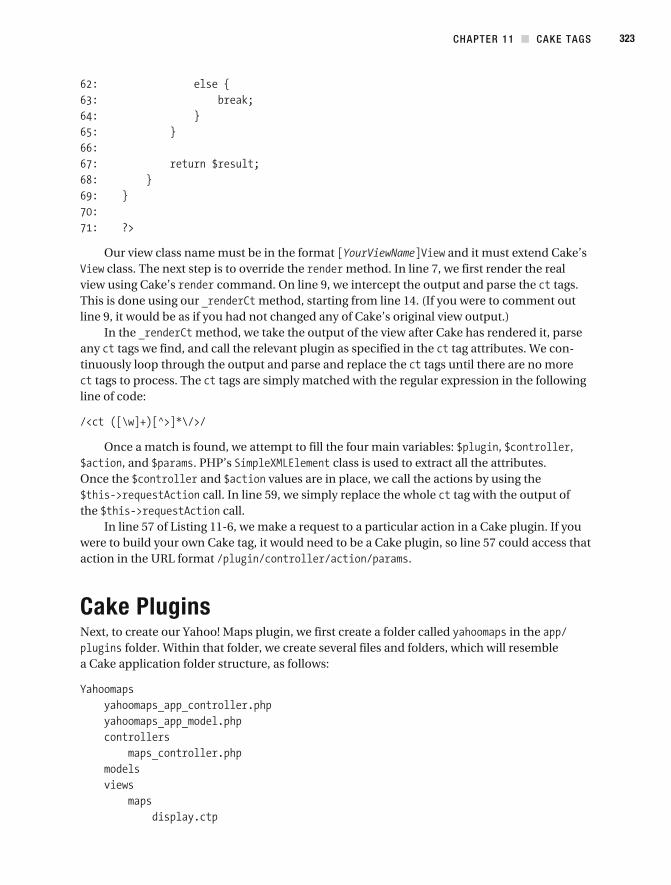
CHAPTER 11 CAKE TAGS 323
Our view class name must be in the format and it must extend Cake’s class. The next step is to override the method. In line 7, we first render the real
view using Cake’s command. On line 9, we intercept the output and parse the tags. This is done using our method, starting from line 14. (If you were to comment out line 9, it would be as if you had not changed any of Cake’s original view output.)
In the method, we take the output of the view after Cake has rendered it, parse any tags we find, and call the relevant plugin as specified in the tag attributes. We con-tinuously loop through the output and parse and replace the tags until there are no more
tags to process. The tags are simply matched with the regular expression in the following line of code:
Once a match is found, we attempt to fill the four main variables: , , , and . PHP’s class is used to extract all the attributes.
Once the and values are in place, we call the actions by using the call. In line 59, we simply replace the whole tag with the output of
the call.In line 57 of Listing 11-6, we make a request to a particular action in a Cake plugin. If you
were to build your own Cake tag, it would need to be a Cake plugin, so line 57 could access that action in the URL format .
Cake PluginsNext, to create our Yahoo! Maps plugin, we first create a folder called in the
folder. Within that folder, we create several files and folders, which will resemble a Cake application folder structure, as follows:

CHAPTER 11 CAKE TAGS324
The two main files we are concerned with are and . The file is shown in Listing 11-7.
Listing 11-7. Map Controller (maps_controller.php)
To be honest, this example isn’t terribly exciting. The method simply acts as a proxy for passing values from the tag to the view. If no or values are passed, we use some default values, which at present are set to London. However, don’t underestimate what you can actually do. Since you can essentially invoke any plugin, control-ler, or action, you can wrap any functionality behind a Cake tag.
CHAPTER 11 CAKE TAGS 325
The other two files, and , are shown in Listings 11- 8 and 11- 9, respectively. These are the global controller and model files, similar to the and files. In Listing 11-8, we need the JavaScript helper to display the Yahoo! Maps API JavaScript files.
Listing 11-8. Yahoo! Maps Controller (yahoomaps_app_controller.php)
Listing 11-9. Yahoo! Maps Model (yahoomaps_app_model.php)
You can achieve more complex operations in other scenarios. Here are some examples:
shopping basket, with the total number of products and a total cost, as follows:
products available as a tree menu:
Twitter public timeline messages in 3D using a Flash 3D display engine called Papervision3D:
Yahoo! MapsAdding Yahoo! Maps is similar to adding Google Maps. We start by including Yahoo!’s JavaScript Map API. Listing 11-10 shows the view.
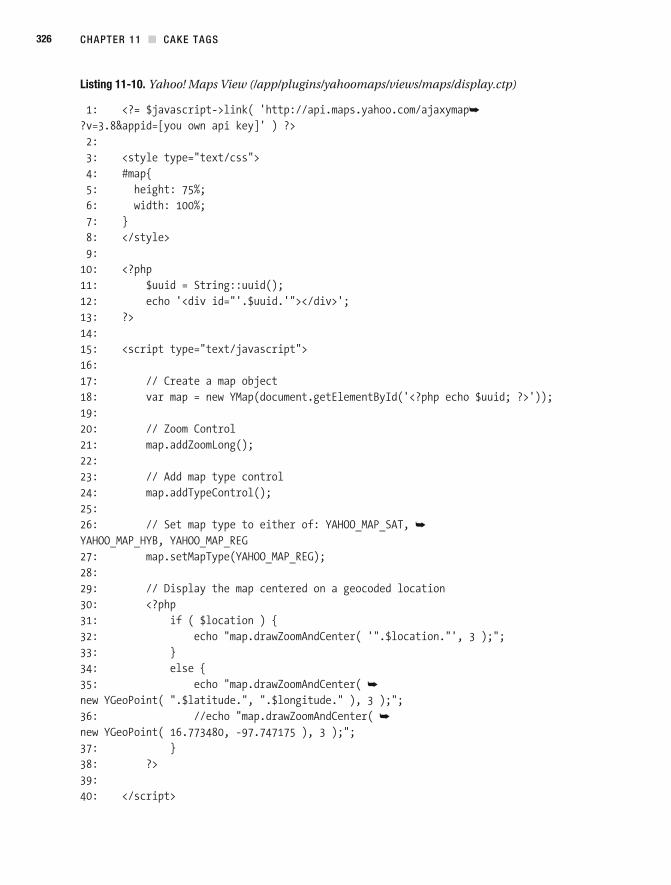
CHAPTER 11 CAKE TAGS326
Listing 11-10. Yahoo! Maps View (/app/plugins/yahoomaps/views/maps/display.ctp)
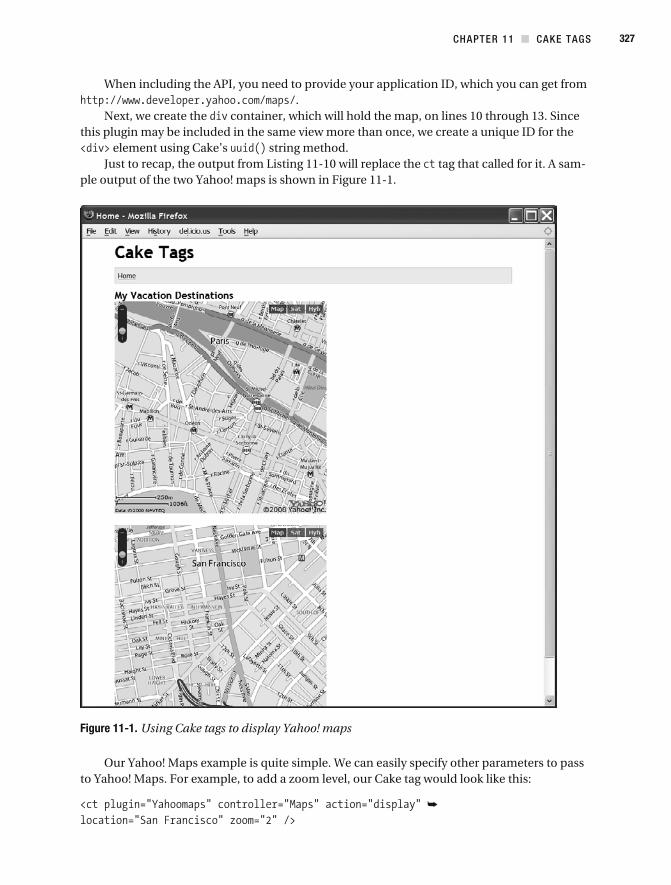
CHAPTER 11 CAKE TAGS 327
When including the API, you need to provide your application ID, which you can get from .
Next, we create the container, which will hold the map, on lines 10 through 13. Since this plugin may be included in the same view more than once, we create a unique ID for the
element using Cake’s string method.Just to recap, the output from Listing 11-10 will replace the tag that called for it. A sam-
ple output of the two Yahoo! maps is shown in Figure 11-1.
Figure 11-1. Using Cake tags to display Yahoo! maps
Our Yahoo! Maps example is quite simple. We can easily specify other parameters to pass to Yahoo! Maps. For example, to add a zoom level, our Cake tag would look like this:
CHAPTER 11 CAKE TAGS328
On line 32 in Listing 11-10, the command would now look like this:
And in the action in Listing 11-10, we would need to capture the zoom value and pass it to the view with the following lines of code:
SummaryIn this chapter, we have shown how you can override Cake’s output. Additionally, we created a Cake plugin that displays Yahoo! maps.
We mentioned early on that the whole Cake tags idea is a small step toward solving the problem of content and data separation. In our view, this is a big problem, because so many modern applications need to talk to other applications. Good separation of these two layers is vital in web development. However, at some stage, you will inevitably need to mix them. The questions will be how much and where. One thing is certain: you should never put any presen-tational markup in the controller. With Cake, use Cake elements and helpers to reduce the size of your views.
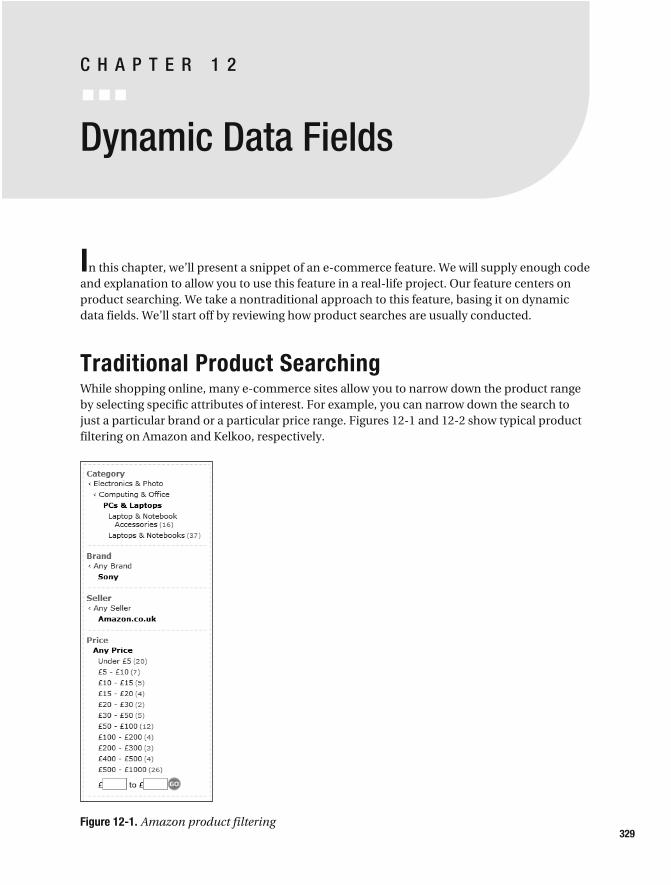
C H A P T E R 1 2
Dynamic Data Fields
In this chapter, we’ll present a snippet of an e- commerce feature. We will supply enough code and explanation to allow you to use this feature in a real- life project. Our feature centers on product searching. We take a nontraditional approach to this feature, basing it on dynamic data fields. We’ll start off by reviewing how product searches are usually conducted.
Traditional Product SearchingWhile shopping online, many e- commerce sites allow you to narrow down the product range by selecting specific attributes of interest. For example, you can narrow down the search to just a particular brand or a particular price range. Figures 12- 1 and 12- 2 show typical product filtering on Amazon and Kelkoo, respectively.
Figure 12-1. Amazon product filtering329
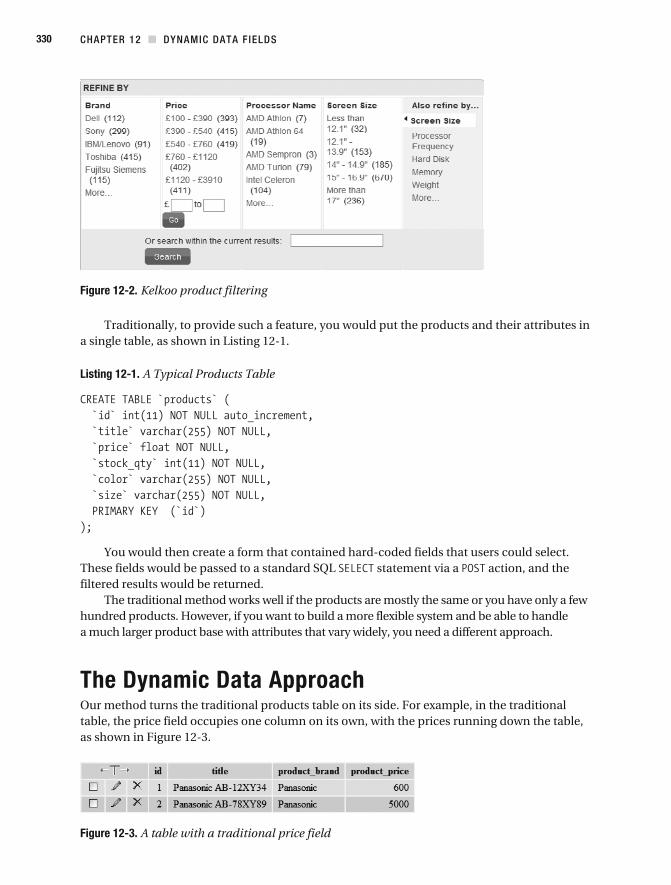
CHAPTER 12 DYNAMIC DATA F IELDS330
Figure 12-2. Kelkoo product filtering
Traditionally, to provide such a feature, you would put the products and their attributes in a single table, as shown in Listing 12-1.
Listing 12-1. A Typical Products Table
You would then create a form that contained hard- coded fields that users could select. These fields would be passed to a standard SQL statement via a action, and the filtered results would be returned.
The traditional method works well if the products are mostly the same or you have only a few hundred products. However, if you want to build a more flexible system and be able to handle a much larger product base with attributes that vary widely, you need a different approach.
The Dynamic Data ApproachOur method turns the traditional products table on its side. For example, in the traditional table, the price field occupies one column on its own, with the prices running down the table, as shown in Figure 12-3.
Figure 12-3. A table with a traditional price field
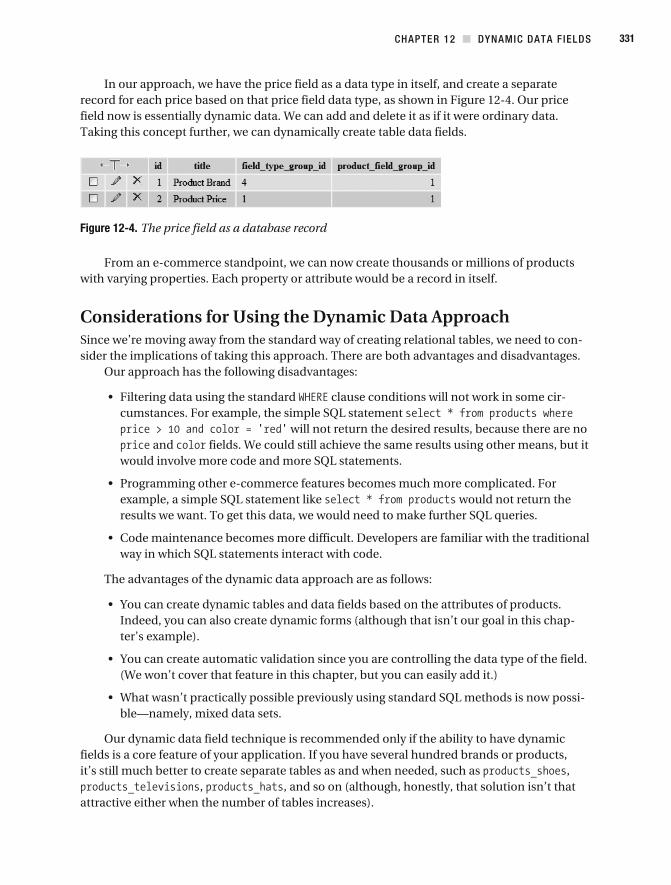
CHAPTER 12 DYNAMIC DATA F IELDS 331
In our approach, we have the price field as a data type in itself, and create a separate record for each price based on that price field data type, as shown in Figure 12-4. Our price field now is essentially dynamic data. We can add and delete it as if it were ordinary data. Taking this concept further, we can dynamically create table data fields.
Figure 12-4. The price field as a database record
From an e- commerce standpoint, we can now create thousands or millions of products with varying properties. Each property or attribute would be a record in itself.
Considerations for Using the Dynamic Data ApproachSince we’re moving away from the standard way of creating relational tables, we need to con-sider the implications of taking this approach. There are both advantages and disadvantages.
Our approach has the following disadvantages:
clause conditions will not work in some cir-cumstances. For example, the simple SQL statement
will not return the desired results, because there are no and fields. We could still achieve the same results using other means, but it
would involve more code and more SQL statements.
example, a simple SQL statement like would not return the results we want. To get this data, we would need to make further SQL queries.
way in which SQL statements interact with code.
The advantages of the dynamic data approach are as follows:
Indeed, you can also create dynamic forms (although that isn’t our goal in this chap-ter’s example).
(We won’t cover that feature in this chapter, but you can easily add it.)
-ble—namely, mixed data sets.
Our dynamic data field technique is recommended only if the ability to have dynamic fields is a core feature of your application. If you have several hundred brands or products, it’s still much better to create separate tables as and when needed, such as ,
, , and so on (although, honestly, that solution isn’t that attractive either when the number of tables increases).
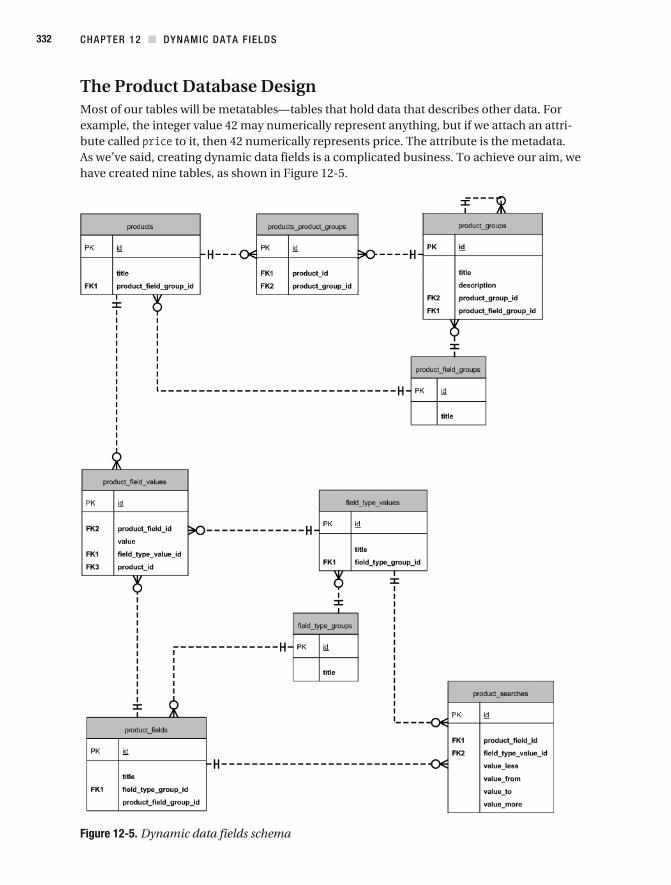
CHAPTER 12 DYNAMIC DATA F IELDS332
The Product Database DesignMost of our tables will be metatables—tables that hold data that describes other data. For example, the integer value 42 may numerically represent anything, but if we attach an attri-bute called to it, then 42 numerically represents price. The attribute is the metadata. As we’ve said, creating dynamic data fields is a complicated business. To achieve our aim, we have created nine tables, as shown in Figure 12-5.
Figure 12-5. Dynamic data fields schema
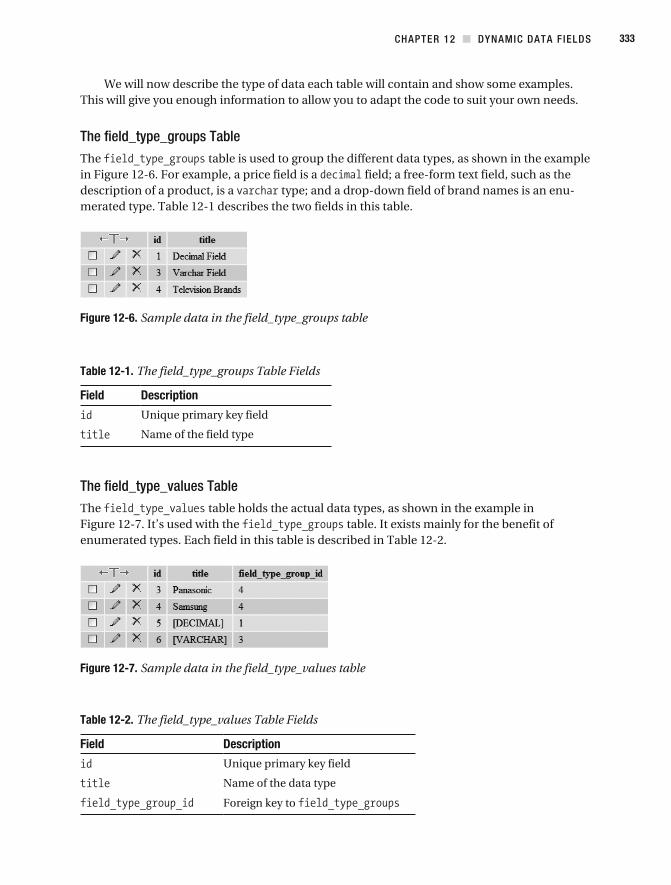
CHAPTER 12 DYNAMIC DATA F IELDS 333
We will now describe the type of data each table will contain and show some examples. This will give you enough information to allow you to adapt the code to suit your own needs.
The field_type_groups TableThe table is used to group the different data types, as shown in the example in Figure 12-6. For example, a price field is a field; a free- form text field, such as the description of a product, is a type; and a drop- down field of brand names is an enu-merated type. Table 12-1 describes the two fields in this table.
Figure 12-6. Sample data in the field_type_groups table
Table 12-1. The field_type_groups Table Fields
Field Description
Unique primary key field
Name of the field type
The field_type_values TableThe table holds the actual data types, as shown in the example in Figure 12-7. It’s used with the table. It exists mainly for the benefit of enumerated types. Each field in this table is described in Table 12-2.
Figure 12-7. Sample data in the field_type_values table
Table 12-2. The field_type_values Table Fields
Field Description
Unique primary key field
Name of the data type
Foreign key to
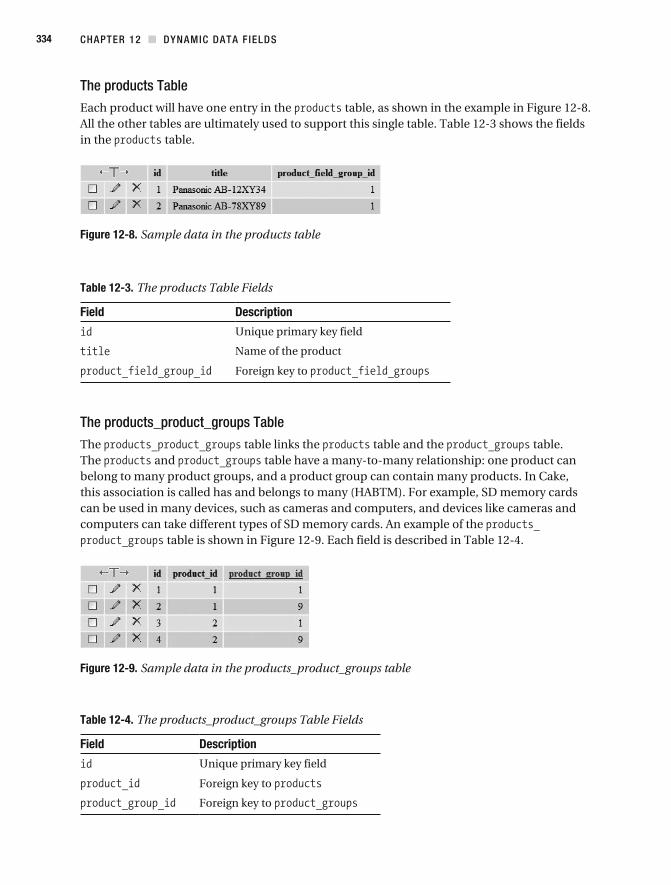
CHAPTER 12 DYNAMIC DATA F IELDS334
The products TableEach product will have one entry in the table, as shown in the example in Figure 12-8. All the other tables are ultimately used to support this single table. Table 12-3 shows the fields in the table.
Figure 12-8. Sample data in the products table
Table 12-3. The products Table Fields
Field Description
Unique primary key field
Name of the product
Foreign key to
The products_product_groups TableThe table links the table and the table. The and table have a many-to- many relationship: one product can
this association is called has and belongs to many (HABTM). For example, can be used in many devices, such as cameras and computers, and devices like cameras and
table is shown in Figure 12-9. Each field is described in Table 12-4.
Figure 12-9. Sample data in the products_product_groups table
Table 12-4. The products_product_groups Table Fields
Field Description
Unique primary key field
Foreign key to
Foreign key to
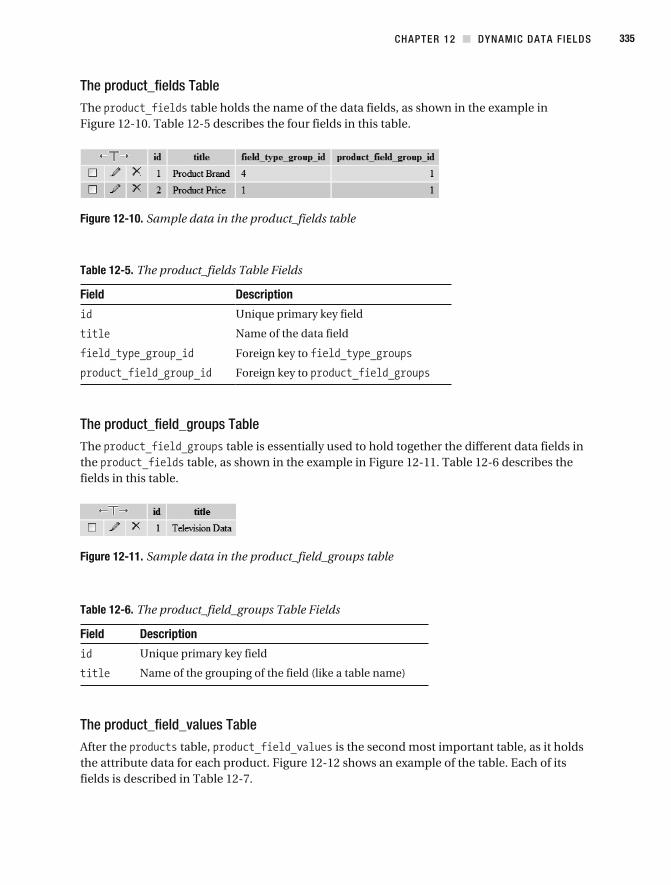
CHAPTER 12 DYNAMIC DATA F IELDS 335
The product_fields TableThe table holds the name of the data fields, as shown in the example in Figure 12-10. Table 12-5 describes the four fields in this table.
Figure 12-10. Sample data in the product_fields table
Table 12-5. The product_fields Table Fields
Field Description
Unique primary key field
Name of the data field
Foreign key to
Foreign key to
The product_field_groups TableThe table is essentially used to hold together the different data fields in the table, as shown in the example in Figure 12-11. Table 12-6 describes the fields in this table.
Figure 12-11. Sample data in the product_field_groups table
Table 12-6. The product_field_groups Table Fields
Field Description
Unique primary key field
Name of the grouping of the field (like a table name)
The product_field_values TableAfter the table, is the second most important table, as it holds the attribute data for each product. Figure 12-12 shows an example of the table. Each of its fields is described in Table 12-7.
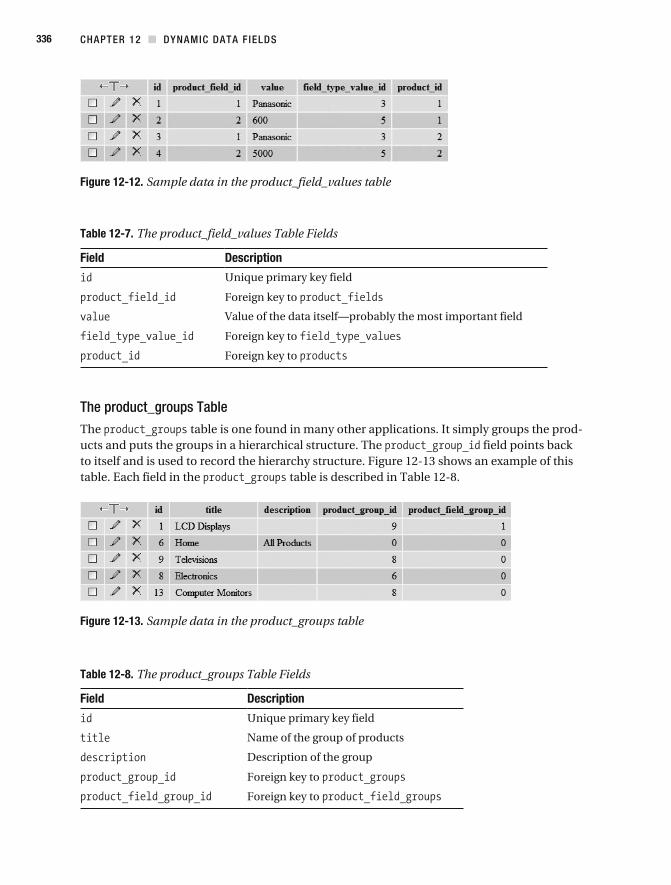
CHAPTER 12 DYNAMIC DATA F IELDS336
Figure 12-12. Sample data in the product_field_values table
Table 12-7. The product_field_values Table Fields
Field Description
Unique primary key field
Foreign key to
Value of the data itself—probably the most important field
Foreign key to
Foreign key to
The product_groups TableThe table is one found in many other applications. It simply groups the prod-ucts and puts the groups in a hierarchical structure. The field points back to itself and is used to record the hierarchy structure. Figure 12-13 shows an example of this table. Each field in the table is described in Table 12-8.
Figure 12-13. Sample data in the product_groups table
Table 12-8. The product_groups Table Fields
Field Description
Unique primary key field
Name of the group of products
Foreign key to
Foreign key to
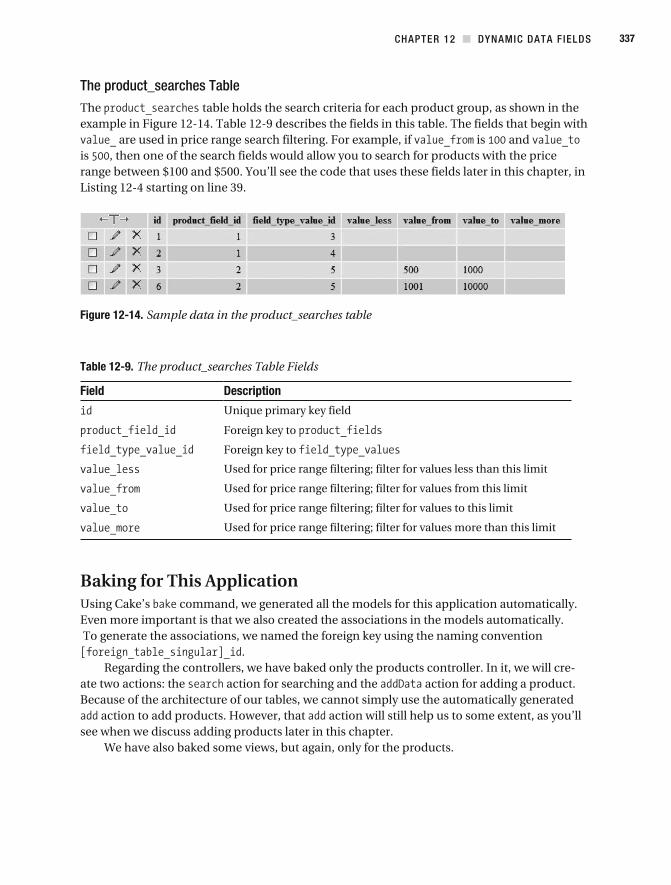
CHAPTER 12 DYNAMIC DATA F IELDS 337
The product_searches TableThe table holds the search criteria for each product group, as shown in the example in Figure 12-14. Table 12-9 describes the fields in this table. The fields that begin with
are used in price range search filtering. For example, if is and is , then one of the search fields would allow you to search for products with the price range between $100 and $500. You’ll see the code that uses these fields later in this chapter, in Listing 12-4 starting on line 39.
Figure 12-14. Sample data in the product_searches table
Table 12-9. The product_searches Table Fields
Field Description
Unique primary key field
Foreign key to
Foreign key to
Used for price range filtering; filter for values less than this limit
Used for price range filtering; filter for values from this limit
Used for price range filtering; filter for values to this limit
Used for price range filtering; filter for values more than this limit
Baking for This Application command, we generated all the models for this application automatically.
Even more important is that we also created the associations in the models automatically. To generate the associations, we named the foreign key using the naming convention
.Regarding the controllers, we have baked only the products controller. In it, we will cre-
ate two actions: the action for searching and the action for adding a product. Because of the architecture of our tables, we cannot simply use the automatically generated
action to add products. However, that action will still help us to some extent, as you’ll see when we discuss adding products later in this chapter.
We have also baked some views, but again, only for the products.
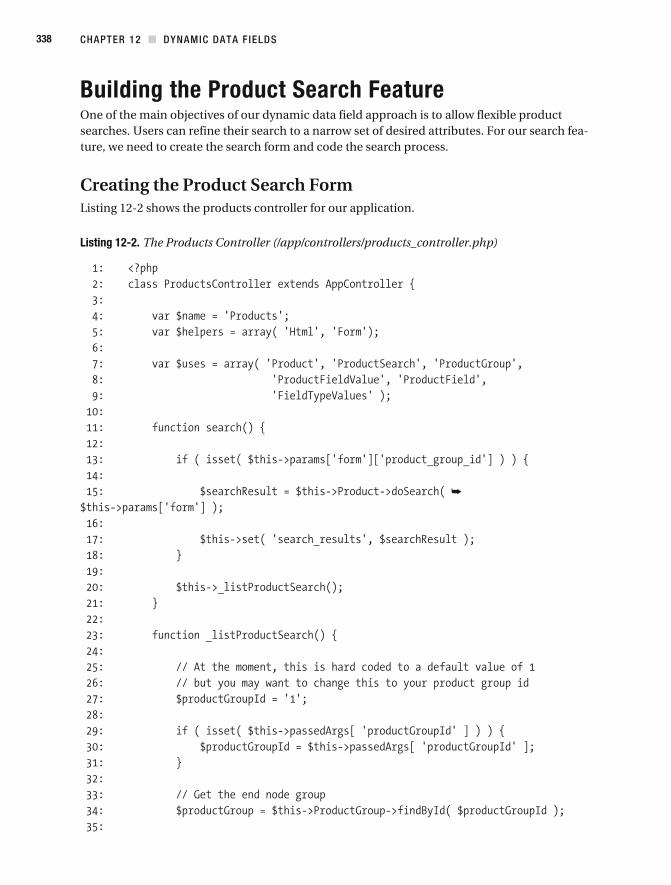
CHAPTER 12 DYNAMIC DATA F IELDS338
Building the Product Search FeatureOne of the main objectives of our dynamic data field approach is to allow flexible product searches. Users can refine their search to a narrow set of desired attributes. For our search fea-ture, we need to create the search form and code the search process.
Creating the Product Search Form Listing 12-2 shows the products controller for our application.
Listing 12-2. The Products Controller (/app/controllers/products_controller.php)
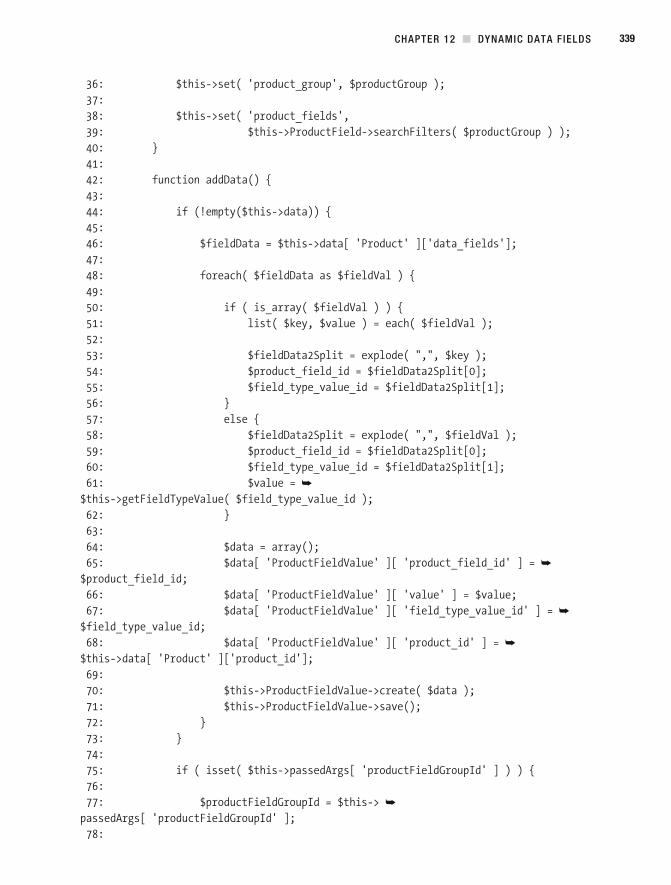
CHAPTER 12 DYNAMIC DATA F IELDS 339
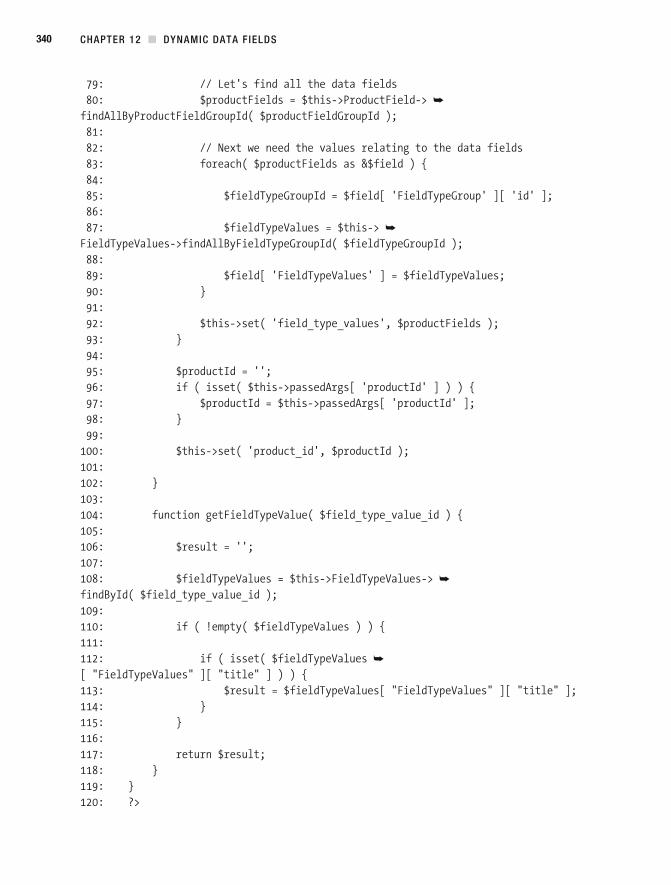
CHAPTER 12 DYNAMIC DATA F IELDS340
CHAPTER 12 DYNAMIC DATA F IELDS 341
We have created a action in the products controller to handle searches, on line 11. Line 20 carries out the task of listing the product search fields in the method. On line 23, we find all the data fields for a particular product group. On line 27, we
. If no value has been specified, then the products with a of will be shown. In practice, this value would be passed to the function via the URL, maybe as a named parameter. For example, you may have a page with different product group types, and one URL might look like this:
This URL would then list all the products with a value of . Once we retrieve the , on line 30, we simply get details about the group for
display in the view. Line 38 does the main work and fetches the product fields. Finding the search fields is carried out by the model, shown in Listing 12-3.
Remember that the search fields are not hard- coded; they are generated dynamically.
Listing 12-3. ProductField Model (/app/models/product_field.php)
CHAPTER 12 DYNAMIC DATA F IELDS342
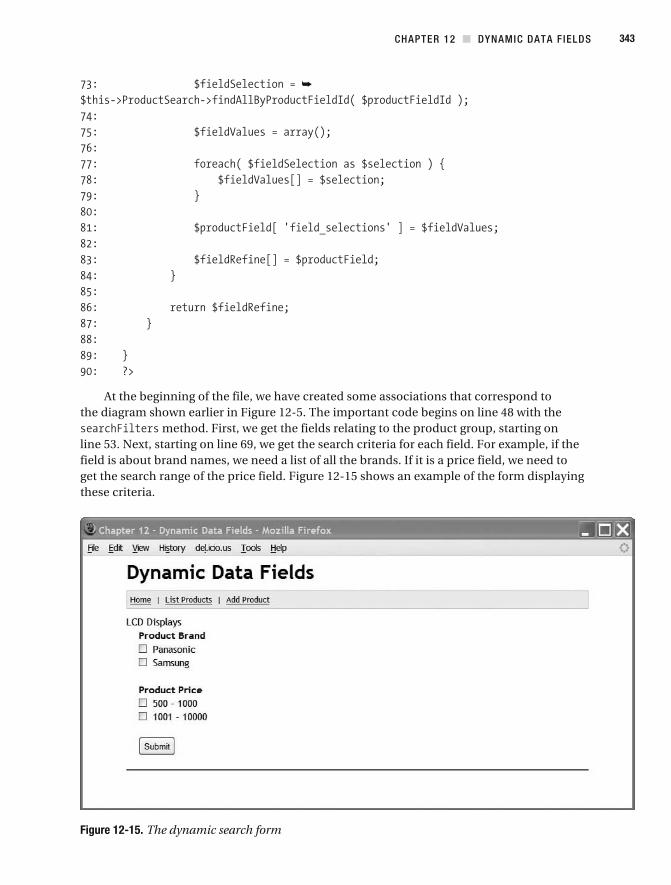
CHAPTER 12 DYNAMIC DATA F IELDS 343
At the beginning of the file, we have created some associations that correspond to the diagram shown earlier in Figure 12-5. The important code begins on line 48 with the
method. First, we get the fields relating to the product group, starting on line 53. Next, starting on line 69, we get the search criteria for each field. For example, if the field is about brand names, we need a list of all the brands. If it is a price field, we need to get the search range of the price field. Figure 12-15 shows an example of the form displaying these criteria.
Figure 12-15. The dynamic search form
CHAPTER 12 DYNAMIC DATA F IELDS344
Let’s now look at the view that corresponds to the search form, which is shown in Listing 12-4. The file is split into two sections: lines 1 through 105 list the search fields relating to the product group, and lines 107 through 140 list the products found.
Listing 12-4. Search Action View (/app/views/products/index.ctp)
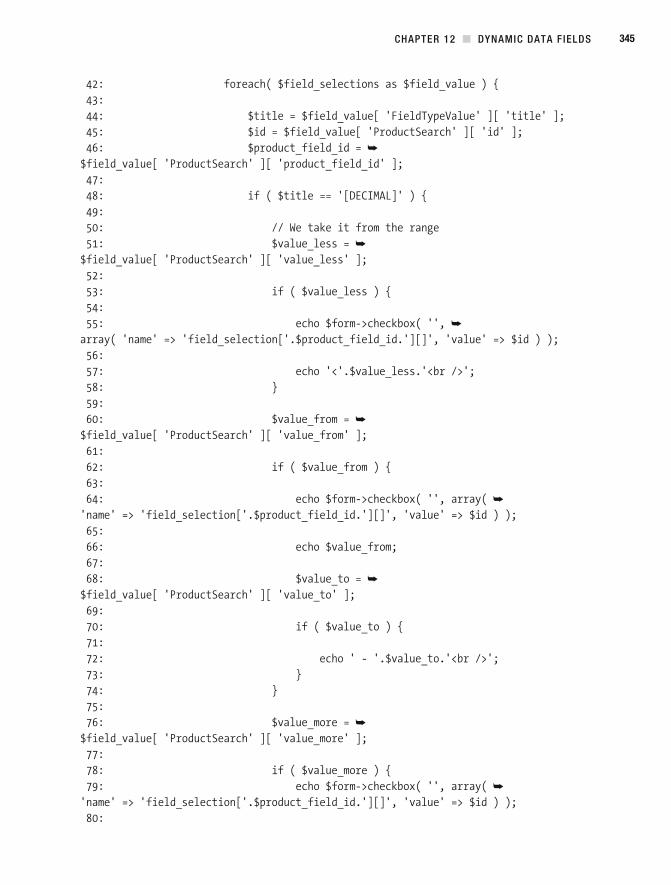
CHAPTER 12 DYNAMIC DATA F IELDS 345
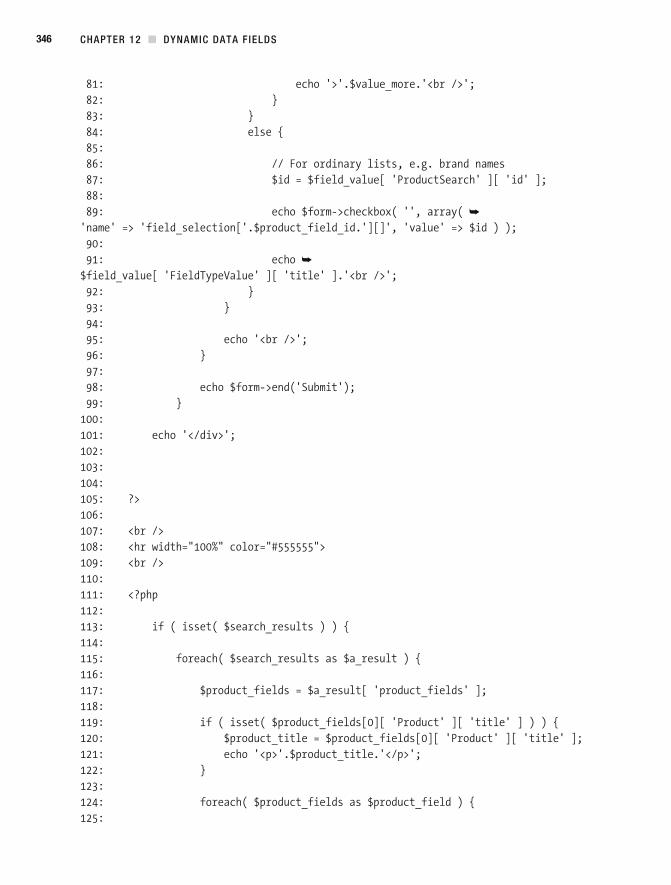
CHAPTER 12 DYNAMIC DATA F IELDS346
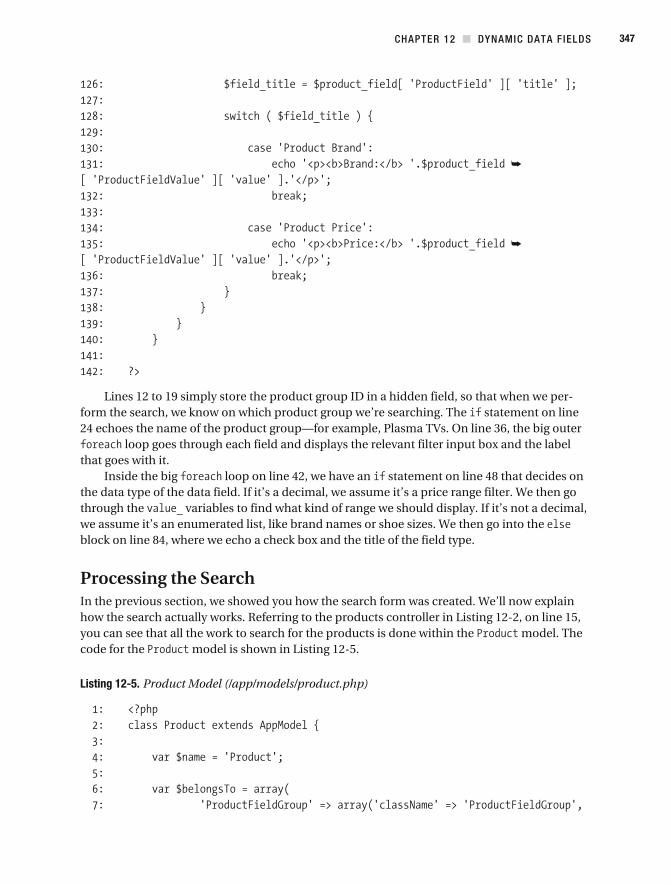
CHAPTER 12 DYNAMIC DATA F IELDS 347
-form the search, we know on which product group we’re searching. The statement on line
loop goes through each field and displays the relevant filter input box and the label that goes with it.
Inside the big loop on line 42, we have an statement on line 48 that decides on the data type of the data field. If it’s a decimal, we assume it’s a price range filter. We then go through the variables to find what kind of range we should display. If it’s not a decimal, we assume it’s an enumerated list, like brand names or shoe sizes. We then go into the block on line 84, where we echo a check box and the title of the field type.
Processing the SearchIn the previous section, we showed you how the search form was created. We’ll now explain how the search actually works. Referring to the products controller in Listing 12-2, on line 15, you can see that all the work to search for the products is done within the model. The code for the model is shown in Listing 12-5.
Listing 12-5. Product Model (/app/models/product.php)
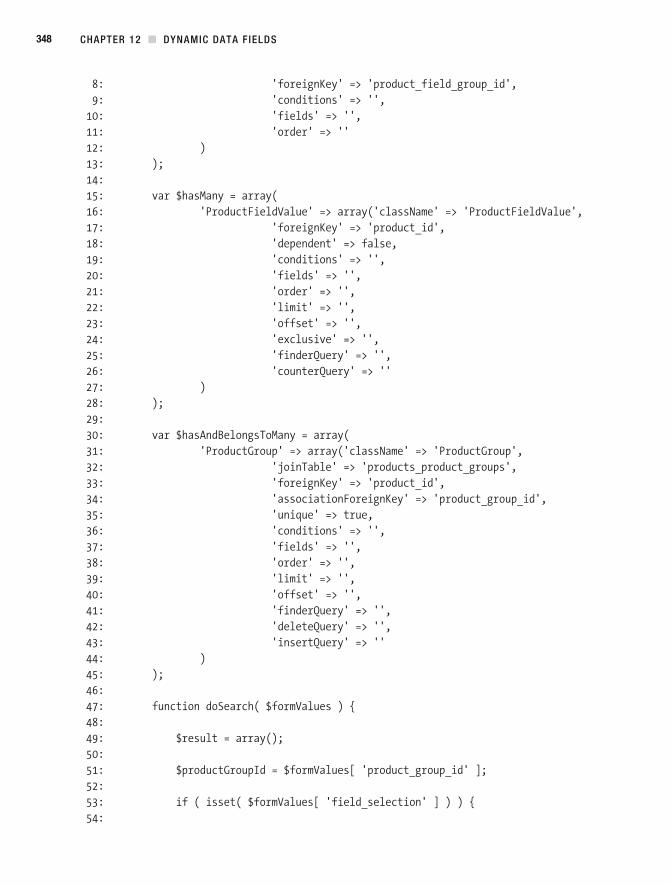
CHAPTER 12 DYNAMIC DATA F IELDS348
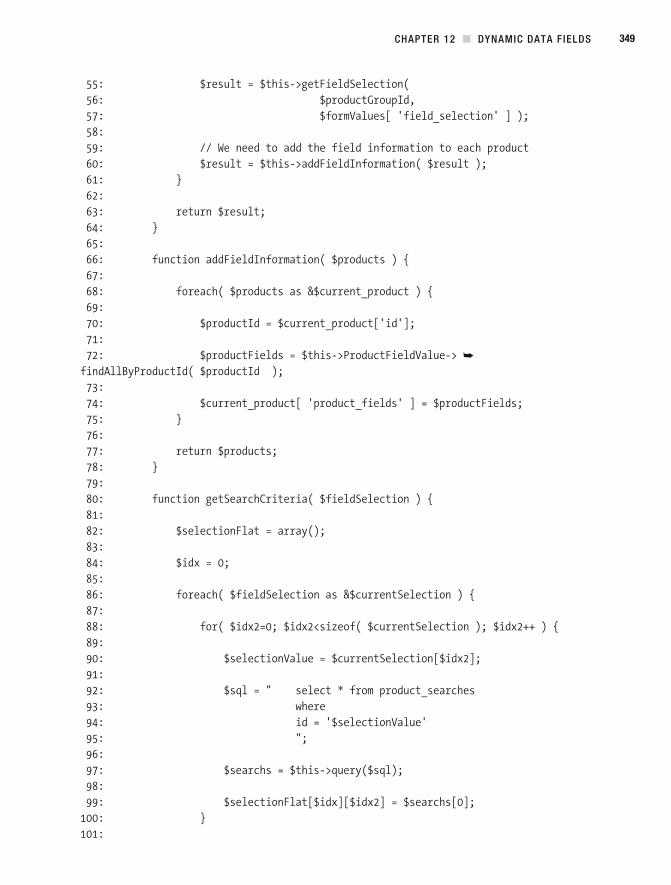
CHAPTER 12 DYNAMIC DATA F IELDS 349
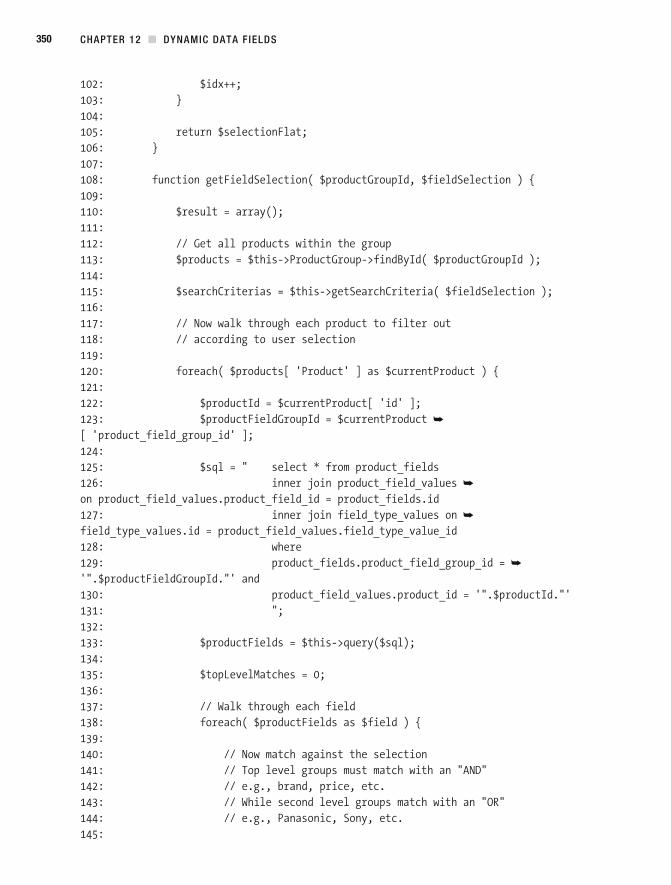
CHAPTER 12 DYNAMIC DATA F IELDS350
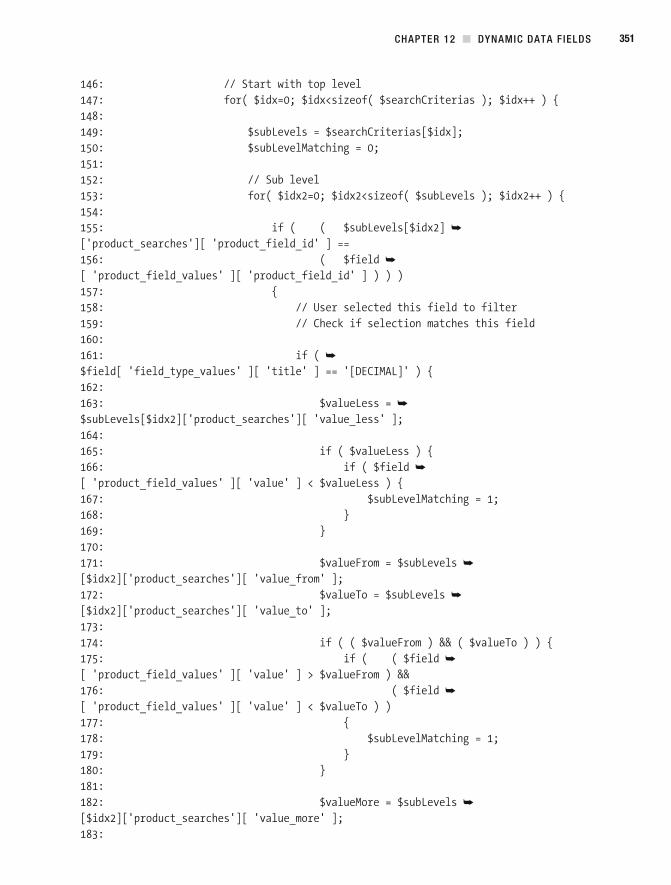
CHAPTER 12 DYNAMIC DATA F IELDS 351
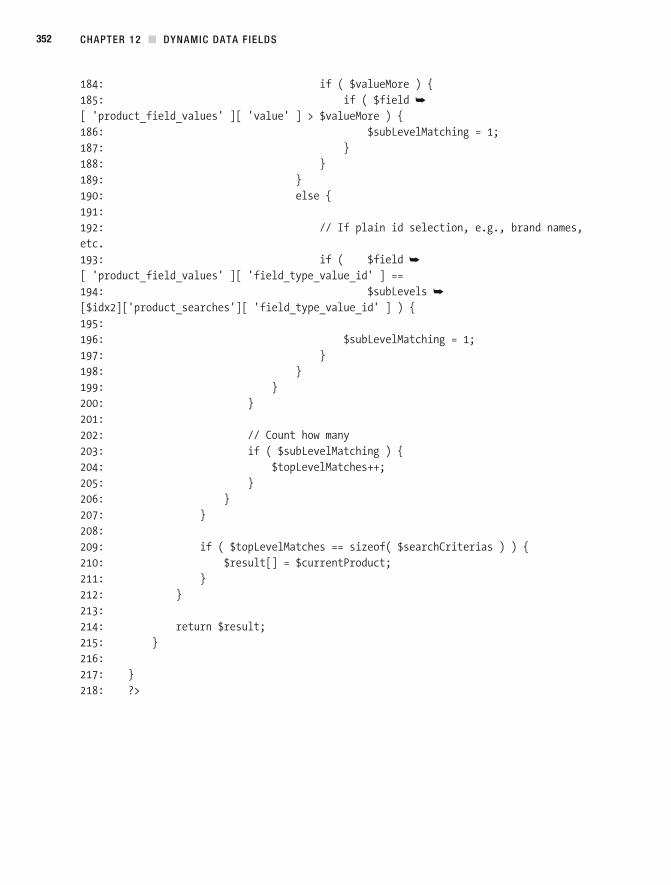
CHAPTER 12 DYNAMIC DATA F IELDS352
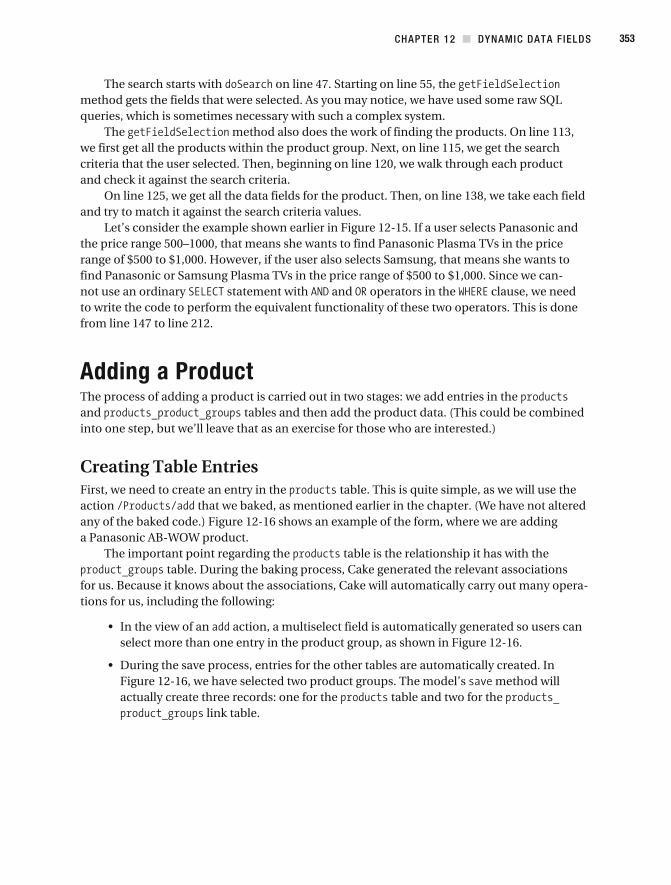
CHAPTER 12 DYNAMIC DATA F IELDS 353
The search starts with on line 47. Starting on line 55, the method gets the fields that were selected. As you may notice, we have used some raw SQL queries, which is sometimes necessary with such a complex system.
The method also does the work of finding the products. On line 113, we first get all the products within the product group. Next, on line 115, we get the search criteria that the user selected. Then, beginning on line 120, we walk through each product and check it against the search criteria.
On line 125, we get all the data fields for the product. Then, on line 138, we take each field and try to match it against the search criteria values.
range of $500 to $1,000. However, if the user also selects Samsung, that means she wants to -
not use an ordinary statement with and operators in the clause, we need to write the code to perform the equivalent functionality of these two operators. This is done from line 147 to line 212.
Adding a ProductThe process of adding a product is carried out in two stages: we add entries in the and tables and then add the product data. (This could be combined into one step, but we’ll leave that as an exercise for those who are interested.)
Creating Table EntriesFirst, we need to create an entry in the table. This is quite simple, as we will use the action that we baked, as mentioned earlier in the chapter. (We have not altered any of the baked code.) Figure 12-16 shows an example of the form, where we are adding
The important point regarding the table is the relationship it has with the
-tions for us, including the following:
action, a multiselect field is automatically generated so users can select more than one entry in the product group, as shown in Figure 12-16.
Figure 12-16, we have selected two product groups. The model’s method will actually create three records: one for the table and two for the
link table.
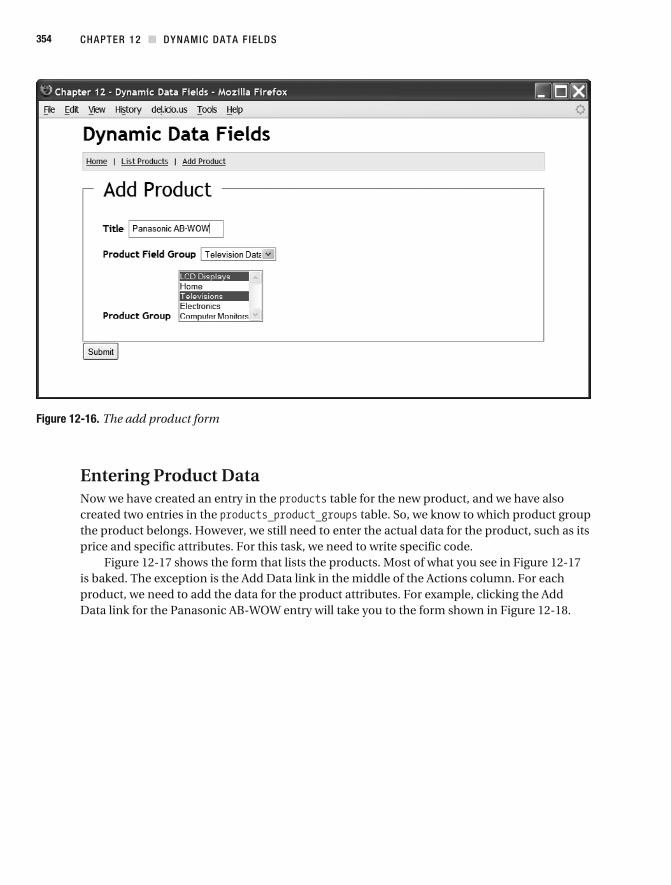
CHAPTER 12 DYNAMIC DATA F IELDS354
Figure 12-16. The add product form
Entering Product DataNow we have created an entry in the table for the new product, and we have also created two entries in the table. So, we know to which product group the product belongs. However, we still need to enter the actual data for the product, such as its price and specific attributes. For this task, we need to write specific code.
Figure 12-17 shows the form that lists the products. Most of what you see in Figure 12-17
product, we need to add the data for the product attributes. For example, clicking the Add
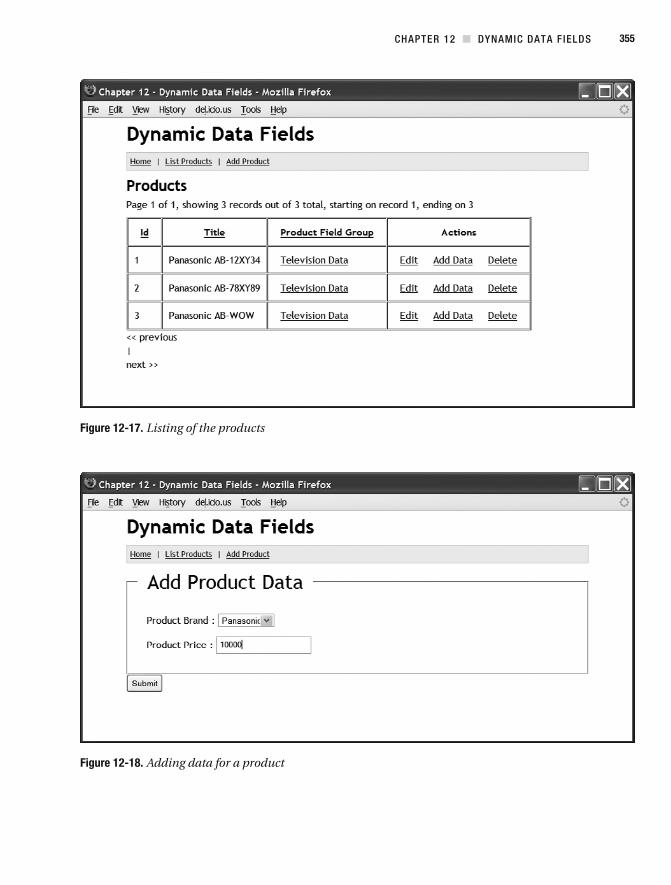
CHAPTER 12 DYNAMIC DATA F IELDS 355
Figure 12-17. Listing of the products
Figure 12-18. Adding data for a product
CHAPTER 12 DYNAMIC DATA F IELDS356
As you can see from the link, there is an action in the products controller (shown earlier in Listing 12-2). We pass into the action two named parameters: and
The code for the action is shown on line 42 in Listing 12-2.When the product data is returned, it goes into the statement on line 44 in Listing 12-2.
To give you a better understanding of the code, the following is an example of the variable as used on line 44:
In this listing, the key has two elements: and . We need the so we know to which product the data is attached. The element con-
tains the product data itself. The numeric order in the element is not important; the important part is the value. If the value is an array (see line 50 in Listing 12-2), then the key is composed of two values in the format . Thus, we have all the information we need about the data: the data itself, the data type, and the field it is. If the value is not an array, then it’s coming from a select list (in our example, the brand names). In this case, we will just have the pair. It won’t have a value, since we already know the value, as it is in the enumerated list. Remember that the data fields are not hard- coded, so they don’t actually exist in the database as real data columns. As far as the database is concerned, these fields are just data.
The view that generated Figure 12-18 is shown in Listing 12-6. The form simply sends the data back to itself in the action. In the products controller in Listing 12-2, the data starts getting processed on line 44 onward.
CHAPTER 12 DYNAMIC DATA F IELDS 357
Listing 12-6. AddData View (/app/views/products/add_data.ctp)
CHAPTER 12 DYNAMIC DATA F IELDS358
SummaryNow that we’re at the end of the chapter, we hope you are still with us. As we said at the begin-ning of the chapter, our design is quite complex because we are essentially trying to do some of the job that the SQL engine usually does for us. Essentially, we have carried out some
to- many association, as well as raw queries using the function. By stepping out of the
This chapter contains the skeleton of an application. You can take the code in numerous directions. For example, in the table, instead of using a single
field to represent a hierarchical tree structure, you could use the preorder tree traversal algorithm (see se). This order-ing method allows you to fetch all products with certain attributes under a complete branch. For example, you can list all televisions between the price range of $500 and $1,000. You can achieve the same result using a single field, but it would involve more code and more SQL statements.
Additionally, you might add a back- end administration area, where administrators can easily manage products, product groups, and search criteria.
C H A P T E R 1 3
Captcha
Nowadays, most developers would not leave any web forms open to unlimited submis-sion. Some safety measure must be put in place to prevent web forms from being used for spamming.
While some people focus on building creative web sites and extending the capability of the Internet, others spend considerable amount of time trying to crack and compromise the information on web sites. Spamming is a huge problem. A recent statistic from Sophos research revealed that during the first quarter of 2008, 96.5 percent of all e-mail was spam ( !
Spambots are everywhere. They simply engage in the process of filling out web forms as if they were customers. For example, a spambot could send thousands of spontaneous e-mail messages by filling out your contact form or your blog comment form, if that form is not protected.
You’ve probably encountered web sites where you’re required to interpret some obfus-cated characters and input them for validation when a web form is submitted. You will most often see this type of protection on high- profile sites like Google’s Gmail and Yahoo! Mail. This fuzzy character output is called a Captcha.
In this chapter, we will briefly look at the various types of Captchas used as a means of protecting web forms. We’ll then focus on the ASCII Art Captcha technique and implement an ASCII Art Captcha component.
Captcha ImplementationsThe term Captcha was coined in 2000 by Luis von Ahn, Manuel Blum, Nicholas J. Hopper, and John Langford. It is a shortened acronym for Completely Automated Public Turing Test to Tell Computers and Humans Apart. The purpose of a Captcha is to prevent automatic form sub-mission by spambots or similar intrusion programs.
In 1950, the brain behind the advent of Captcha, Professor Alan Turing, wrote an article called “Imitation Game” to describe how machines can demonstrate intelligence similar to humans. In 1997, Alta Vista created an early spam- blocking measure. Now Captchas are com-mon. There is even a company (reCAPTCHA, at ) that offers Captcha security as a web service. Figure 13-1 shows an example of a reCAPTCHA Captcha box.
359

CHAPTER 13 CAPTCHA360
Figure 13-1. A reCAPTCHA box
Captcha TypesThere are different types of Captchas and consequently many ways of implementing them. This presents us with many options when it comes to blocking spammers from using robots for submitting web forms. The following list describes some of the common implementations of Captcha designed to completely block automatic programs from web form submission.
Alphanumeric images: The most common Captcha implementation is the appearance of a random selection of distorted images made up of alphanumeric values. As humans, we can easily recognize distorted image characters, but spambots cannot. It’s more chal-lenging for spambots to crack the Captcha when the image characters are overlapping or distorted with lines across the characters.
Picture images: Another Captcha implementation uses a set of various images, such as animal images (a bird, a fish, an elephant, and so on) or furniture (table and chairs, for instance). You’re expected to recognize the objects by their names and enter their names into an input box.
Audio: This technique involves embedding an audio (sound) to pronounce some words or random letters and digits. You’re expected to type the words into an input box. Unfor-tunately, this requires some audio player, which not everyone has. Also, it makes things difficult for people with hearing problems.
Question/answer: A question-and- answer technique involves asking a user a question. If it’s a difficult question, some potential users may be blocked from form submission.
Math problems: Using this technique, you are given a mathematical question (such as 56 minus 30), and you are expected to input the resulting value before you can submit the web form.
ASCII Art: This technique displays a set of fonts that are created from a combination of characters artistically designed to form gigantic versions of some keyboard characters (A–Z, 0–9, @, and so on). This set of fonts is called the ASCII Art characters.
The Captcha implementation presented in this chapter uses ASCII Art, so we’ll take a closer look at that approach.
CHAPTER 13 CAPTCHA 361
ASCII Art CaptchaAlthough most of the standard Captchas on the Internet display graphic characters, users sometimes find it difficult to decipher all the characters correctly, perhaps due to their screen resolution, sight, or both. Many people find it is easier to recognize ASCII Art characters com-pared to their graphic counterparts.
Note ASCII Art is the creation of images by using the strokes of the characters defined by the ASCII Stan-dard as lines and shading. It is a mini- industry in itself. For more information, just search for “ASCII Art” on the Internet. You can start by going to for some enlightening information.
As new ways of protecting web information are evolving, so are techniques for cracking that protection. Spammers are finding ways of decoding them, typically using optical char-acter recognition (OCR) programs. Not many web forms use ASCII Art, so many deciphering spambot programs find it difficult to decode.
Another advantage ASCII Art Captchas have over graphics- based Captchas has to do with external libraries. Some of the graphics- based Captchas rely on PHP extensions (for example, the PHP GD library). The ASCII Art Captchas do not rely on any external library for their opera-tion. They simply rely on your design of the characters.
One of the major characteristics of a Captcha is its look and feel. It includes the overlap-ping of characters and lines that touch the characters. To some extent, this characteristic is dependent on the spacing between characters and the fonts of the individual characters. One of the advantages of using ASCII characters is that you have total control over the look and feel of the characters.
ASCII Art Captchas offer a very strong way of thwarting spambots. First, the spambot would need to decipher which keyboard characters are used to compose a single individual character. A single font character could combine some hash ( ) characters, some pipe ( ) characters, a few ampersands ( ), and so on. Additionally, spambots face the problems of determining the start and end of characters, actual borders or coordinates of each character, and the position of the random text, as well as distinguishing the background noise from the character.
In our ASCII Art Captcha implementation outlined in this chapter, our array of fonts will define all characters of the alphabet from A–Z and the numbers 0–9. With this array of fonts, you can modify the characters to suit your own preferences. Here is an example of a con-structed font character:
This is clearly a letter T. It’s constructed using a combination of the hash ( ) and exclama-tion point ( ) characters.
CHAPTER 13 CAPTCHA362
A Captcha ComponentNow we will take you through implementing an ASCII Art Captcha. This technique will involve the creation of an array of fancy fonts (ASCII Art) using our own custom keyboard character combinations. Our Captcha characters will be randomly drawn from the array of the ASCII Art fonts, distorted, and finally displayed on a simple web form.
The Captcha program will be rolled into a component, so that it can be reused when required in other Cake applications. Table 13-1 describes the properties of the ASCII Art Captcha component.
Table 13-1. The Properties of the Captcha Component
Property Description
Consists of ASCII Art characters. Each character is built by putting together some keyboard characters to form a whole character. You can create your own pattern of characters to replace these fonts. As the name implies, the individual characters of the fonts are determined from the standard alphanumeric values A–Z and 0–9.
Defines a set of characters that includes a dash - ) character stored as an array that is used as the background of ASCII Art characters.
A numeric value that must be greater than zero. It’s used to determine the total number of characters in the CAPTCHA string text.
Of course, you can add to the list of the properties—for example, include background coloring—to intensify security.
The ASCII Art Component ClassOur component class is named . Listing 13-1 shows the properties in this class.
Listing 13-1. The Beginning of the AsciiArtsComponent Class (app/controllers/components/ascii_captcha.php)
The class contains three properties:
is assigned an array of four ASCII characters: . These characters are randomly used to distort the Captcha characters.
is initially assigned an empty array. This property will later contain a list of all the defined ASCII Art characters for A–Z and 0–9.
is assigned an integer , which specifies the total number of characters that will constitute the Captcha.

CHAPTER 13 CAPTCHA 363
Now that we’ve dealt with the component properties, let’s look at the functionality that we’ll implement to build the ASCII Art Captcha. This functionality includes generating random text from the ASCII character fonts, distorting the randomly generated text, and writing the text to the screen.
Next up in our component class is Cake’s function, as shown in Listing 13-2.
Listing 13-2. AsciiArtsComponent’s Startup Method
You should be familiar with the method by now. In this case, it gives the access to the properties of its parent controller, which is the
object. For example, it enables you to access a form object data ta) submitted to a controller within a component.
Next, the method performs a similar task to the method of the controller. This method contains logic that must be run before any component functionality is run. We initialize the property with a set of ASCII Art characters. This property contains an array of the ASCII Art characters that we created from different sets of characters. For example, Listing 13-3 shows the first two elements of the array.
Listing 13-3. AsciiArtsComponent’s Initialize Method
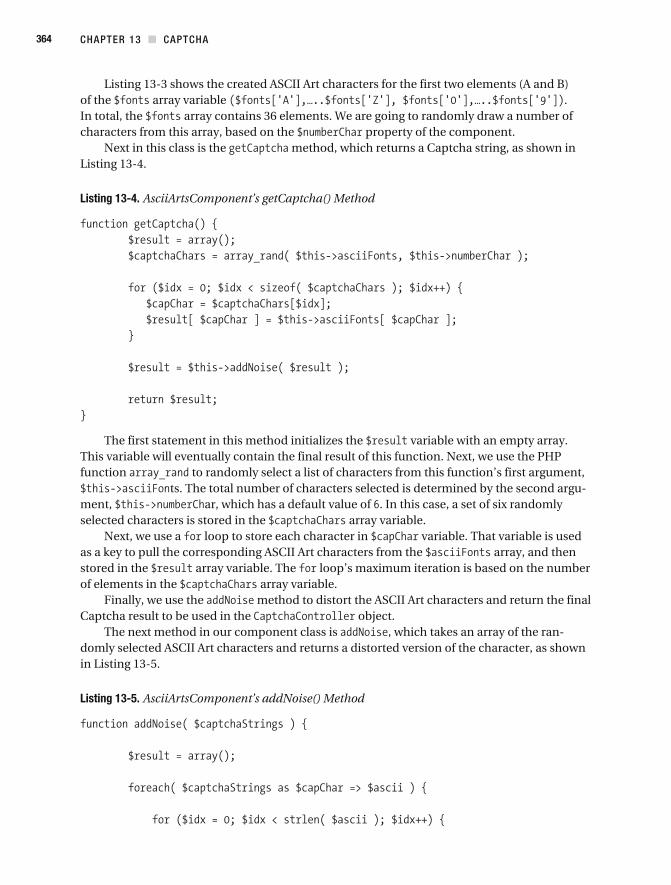
CHAPTER 13 CAPTCHA364
Listing 13-3 shows the created ASCII Art characters for the first two elements (A and B) of the array variable . In total, the array contains 36 elements. We are going to randomly draw a number of characters from this array, based on the property of the component.
Next in this class is the method, which returns a Captcha string, as shown in Listing 13-4.
Listing 13-4. AsciiArtsComponent’s getCaptcha() Method
The first statement in this method initializes the variable with an empty array. This variable will eventually contain the final result of this function. Next, we use the PHP function to randomly select a list of characters from this function’s first argument,
ts. The total number of characters selected is determined by the second argu-ment, ar, which has a default value of . In this case, a set of six randomly selected characters is stored in the array variable.
Next, we use a loop to store each character in variable. That variable is used as a key to pull the corresponding ASCII Art characters from the array, and then stored in the array variable. The loop’s maximum iteration is based on the number of elements in the array variable.
Finally, we use the method to distort the ASCII Art characters and return the final Captcha result to be used in the object.
The next method in our component class is , which takes an array of the ran-domly selected ASCII Art characters and returns a distorted version of the character, as shown in Listing 13-5.
Listing 13-5. AsciiArtsComponent’s addNoise() Method
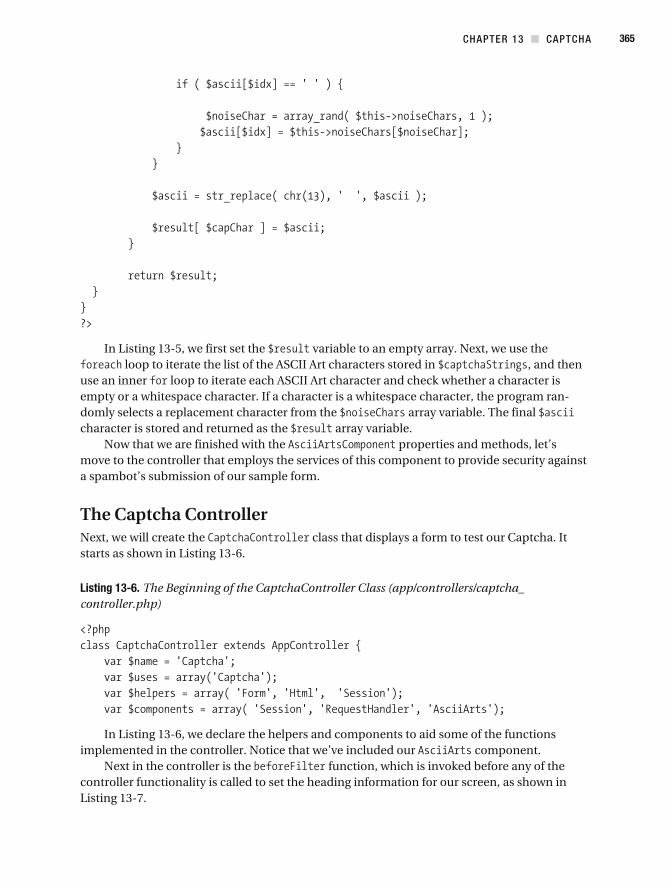
CHAPTER 13 CAPTCHA 365
In Listing 13-5, we first set the variable to an empty array. Next, we use the loop to iterate the list of the ASCII Art characters stored in , and then
use an inner loop to iterate each ASCII Art character and check whether a character is empty or a whitespace character. If a character is a whitespace character, the program ran-domly selects a replacement character from the array variable. The final character is stored and returned as the array variable.
Now that we are finished with the properties and methods, let’s move to the controller that employs the services of this component to provide security against a spambot’s submission of our sample form.
The Captcha ControllerNext, we will create the class that displays a form to test our Captcha. It starts as shown in Listing 13-6.
Listing 13-6. The Beginning of the CaptchaController Class (app/controllers/captcha_ controller.php)
In Listing 13-6, we declare the helpers and components to aid some of the functions implemented in the controller. Notice that we’ve included our component.
Next in the controller is the function, which is invoked before any of the controller functionality is called to set the heading information for our screen, as shown in Listing 13-7.
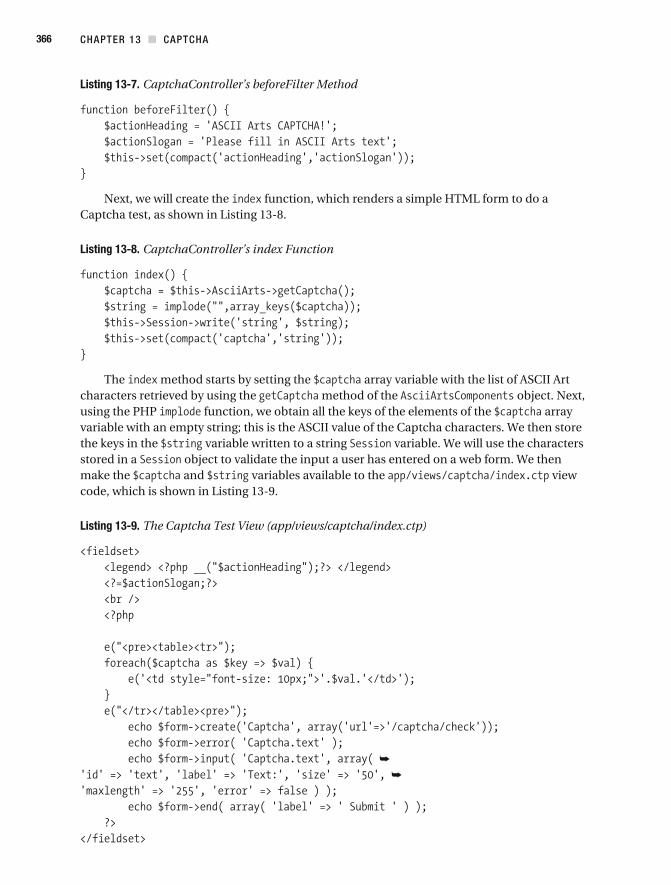
CHAPTER 13 CAPTCHA366
Listing 13-7. CaptchaController’s beforeFilter Method
Next, we will create the function, which renders a simple HTML form to do a Captcha test, as shown in Listing 13-8.
Listing 13-8. CaptchaController’s index Function
The method starts by setting the array variable with the list of ASCII Art characters retrieved by using the method of the object. Next, using the PHP function, we obtain all the keys of the elements of the array variable with an empty string; this is the ASCII value of the Captcha characters. We then store the keys in the variable written to a string variable. We will use the characters stored in a object to validate the input a user has entered on a web form. We then make the and variables available to the view code, which is shown in Listing 13-9.
Listing 13-9. The Captcha Test View (app/views/captcha/index.ctp)
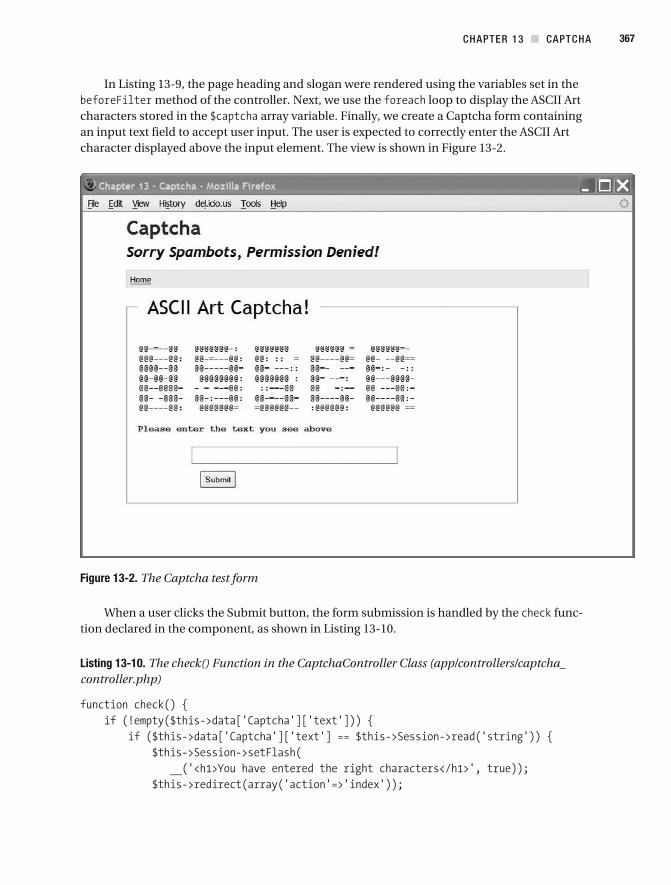
CHAPTER 13 CAPTCHA 367
In Listing 13-9, the page heading and slogan were rendered using the variables set in the method of the controller. Next, we use the loop to display the ASCII Art
characters stored in the array variable. Finally, we create a Captcha form containing an input text field to accept user input. The user is expected to correctly enter the ASCII Art character displayed above the input element. The view is shown in Figure 13-2.
Figure 13-2. The Captcha test form
When a user clicks the Submit button, the form submission is handled by the func-tion declared in the component, as shown in Listing 13-10.
Listing 13-10. The check() Function in the CaptchaController Class (app/controllers/captcha_ controller.php)

CHAPTER 13 CAPTCHA368
In the function, we first check if the submitted data is not empty. If it’s empty, the appropriate error message is stored in the
object, and the Captcha form is displayed with the preset error message. If it’s not empty, we first check if the input value entered by the user is equal to the ASCII Art characters stored in the object. If they are not equal, the error message is set, using the method of the object. Otherwise, the success message is set for display in the Captcha view, as shown in Figure 13-3.
Figure 13-3. The screen showing the success message
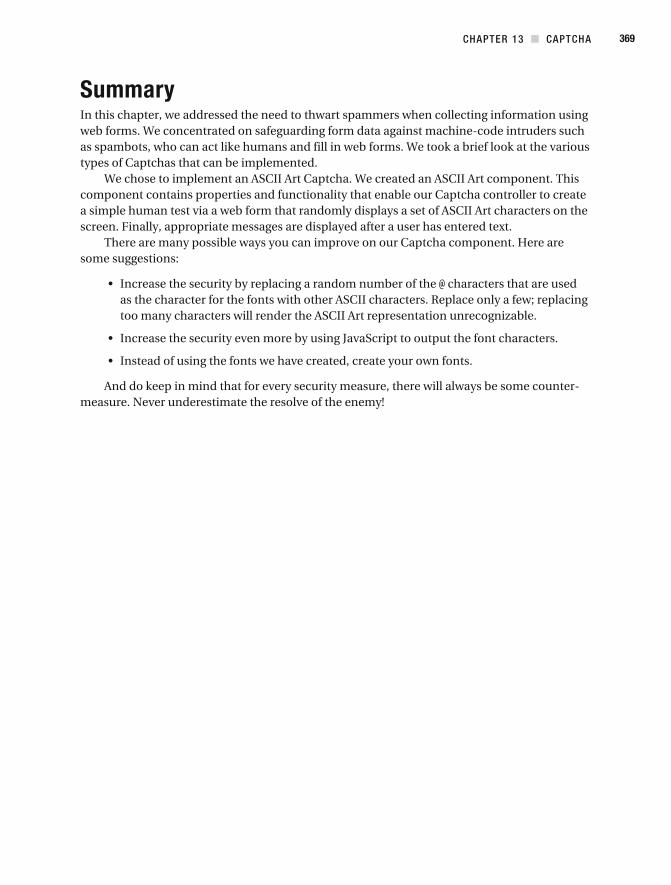
CHAPTER 13 CAPTCHA 369
SummaryIn this chapter, we addressed the need to thwart spammers when collecting information using web forms. We concentrated on safeguarding form data against machine- code intruders such as spambots, who can act like humans and fill in web forms. We took a brief look at the various types of Captchas that can be implemented.
We chose to implement an ASCII Art Captcha. We created an ASCII Art component. This component contains properties and functionality that enable our Captcha controller to create a simple human test via a web form that randomly displays a set of ASCII Art characters on the screen. Finally, appropriate messages are displayed after a user has entered text.
There are many possible ways you can improve on our Captcha component. Here are some suggestions:
characters that are used as the character for the fonts with other ASCII characters. Replace only a few; replacing too many characters will render the ASCII Art representation unrecognizable.
And do keep in mind that for every security measure, there will always be some counter-measure. Never underestimate the resolve of the enemy!
371
Index
Aaccess control, ActionsController and,
244–251access data field, 310Accomplishments (sample application),
214–221unit testing and, 221–232web testing and, 232–234
accomplishments (sample database table), 214
Acl (access control list) component, 19, 238, 264
declaring, 241GroupsController and, 251
Aco class, 258acos database table, 239, 249ActionsController class, 242, 244–251addCart() method, 65, 73addData() method, 337, 356Add Data view, 356add_form() method, 160, 168addListener()method, 134add() method, 15, 16, 337
Accomplishments sample application and, 216
edit() method and, 254JourneysController and, 164online shop sample application and, 73PostsController and, 32, 36product search sample application and,
353retrieve() method and, 168UsersController and, 264
addNoise() method, 364admin_ prefix, 306admin_add() method, 277, 293admin_delete() method, 284, 293admin_edit() method, 293admin_index() method, 279admin_toTrans() method, 279admin_view() method, 293afterDelete() method, 308afterFind() method, 309
access data field and, 310behaviors and, 308
afterSave() method, 184, 257, 265, 309
Ajax_checkAjax() method and, 95, 99event-driven programming and, 134message forum sample web service and,
109, 113, 125Ajax helper, 21Allen, David, 213allow() method, 258
Acl component, 264Auth component, 238, 251
alphanumeric image Captchas, 360am() method, 312API (application programming interface), 86app folder, 5AppController class, 4, 18, 209
components and, 20 241helpers and, 21plugins and, 23
app_controller.php file, 294, 325App:import() method, 25application controllers. See controllersapplication layout, caching, 190application programming interface (API), 86AppModel class, 8, 23app_model.php file, 325aros_acos database table, 239aros database table, 239, 266arrays, utility for converting to objects, 19ASCII Art character Captchas, 361–368AsciiArtsComponent class, 362–365$asciiFonts property, 362assertFalse() method, 226assert methods, 231audio Captchas, 360Auth (authentication) component, 238, 262,
294CRUD methods and, 249declaring, 241
authentication, 50, 293–296authorize parameter, 241, 249, 258automagic fields. See magic fields
Bbake command, 273–277, 297–306
GroupsController and, 251ProductsController, 337UsersController and, 259
beforeDelete() method, 308
INDEX372
beforeFilter() method, 4, 283, 294Auth/Acl components and, 241CaptchaController and, 365Google translation services and, 188, 211message forum sample web service and,
96, 99online shop sample application and, 64,
68–70beforeFind() method, 309
access data field and, 310record order data field and, 311
beforeMessage() method, 115beforeRender() method, message forum
sample web service and, 96, 99beforeSave() method, 308, 309beforeValidation() method, 309behaviors, custom magic fields and, 308blogging (sample application), 29–46
application structure for, 31RSS feed for, 43
Blum, Manuel, 359break helper, 22buildCategories() method, 53, 56, 60business logic, 7
Ccaching
Twitter Twister sample application and, 188–192
when to add, 191cake command, 238cake folder, 5cake tags, 320CakePHP
control panel and, 237core concepts/technologies used by, 2directory structure of, 5features of for web development, 1framework for, downloading/installing, 5fundamentals of, 1–27naming conventions for, 6–8vs. other frameworks, 2
calcTSP() method, 153callback methods, 308Captcha (Completely Automated Public
Turing Test to Tell Computers and Humans Apart), 359–369
CaptchaController class, 363, 365Cart model, 63–67CartsController class, 69–75carts (sample database table), 50, 51, 64case study, In/Out communications applica-
tion and, 214categories, 185CategoriesController class, 56
categories (sample database table), 50, 53Category model, 53, 56changeLanguage() method, 192changeLocale() method, 283_changeSessionLocale() method, 193check() method, 367_checkAjax() method, 95, 99checkout() method, 76class keyword, 8cleanUp() method, 65, 73code samples. See source codeCommand design pattern, 94Completely Automated Public Turing Test to
Tell Computers and Humans Apart (Captcha), 359–369
components, 19, 232. See also Acl compo-nent; Auth component
concurrency control, 313config/core.php file, 279content and data separation, 317control panel (sample application), 237–270
additional features for, 270application controllers and, 242–269Auth/Acl components and, 238–242testing, 266
Controller class, 18controllers, 4, 18
blogging sample application and, 32–45components and, 20control panel sample application and,
242–269message forum sample web service and,
94–125naming conventions for, 6online shop sample application and, 56,
59–63, 67–82testing, 232Twitter Twister sample application and,
192–211Yahoo! Maps sample plugin and, 324
ControlPanelController class, 242controls, Google Maps and, 134convert() method, 20core defines, 7create() method, 11creating
behaviors, 308magic fields, 309–315models, 8RSS, 43tables, 9, 30
CRUD (create, read, update, and delete), 9–13, 53
ActionsController and, 249,GroupController and, 258
INDEX 373
DDATABASE_CONFIG class, 3database connection array, 3databases, for blogging sample application,
29data, separating from content, 317data schemas, 139data validation, 13default page title, setting for an application,
18delete() method, 42
Auth component and, 251behaviors and, 308GroupsController and, 258UsersController and, 264
DELETE method, 87deleting
posts, 42tables, 9
deny() method, 238, 258, 264departments (sample database table), 9description tag, 174directory structure, 5disable() method, 40, 314display() method, 20, 324, 328_displayTwitters() method, 200div tag, 327docs folder, 5documentation, for message forum sample
web service, 125–128Don’t Repeat Yourself (DRY), 25doSearch() method, 353doUpdate() method, 66downloads
Cake framework, 5SimpleTest testing interface, 222text editors, 113
driving directions, travel log application and, 135
DRY (Don’t Repeat Yourself), 25dynamic data fields, 329–358
advantages/disadvantages of, 331product database design and, 332–337
Ee() method, 125e-commerce, 47–83edit() method, 32, 38, 254, 262Email component, 19emptyBasket() method, 66enable() method, 41, 314encapsulation, 3Event.observe method, 146events, Google Maps and, 134execute() method, 94explode() method, 167
FFCKeditor text editor, 113feedback plugin (sample), 23Fielding, Roy, 86field_type_groups table, 333field_type_values table, 333File class, 249files, reading content to screen and, 26findBestJourney() method, 148, 151findById() method, 73, 170findBy() method, 97, 193findLocation() method, 148find() method, 8, 13, 20
access data field and, 310behaviors and, 308language model and, 184locking data field and, 315retrieving journeys and, 168
Folder class, 249fonts property, 362, 363foreach loop, 347form helper, 21$form object, 11, 15forum application. See message forum web
serviceFried, Jason, 214
GGClientGeocoder class, 133GControl class, 134GDirections class, 135
fetching data and, 153plotting journeys via, 156–159
generateFields() method, 164generateTreeList() method, 258geocoding, 133GET method, 86, 87, 173getAll() method, 56, 71getCaptcha() method, 364, 366getCartContent() method, 66getCart() method, 64, 73getCategories() method, 53, 55getChildCategories() method, 53, 55, 60getDepartment() method, 11getFieldSelection() method, 353getJourneyDistance() method, 151, 153getLang() method, 184getLocale method, 292getMessage() method, 109getMiniCart() method, 74_getNeighbours() method, 156_getNextNeighbour() method, 155, 156_getNextNeighbours() method, 155getStatusTranslation() method, 205, 208Getting Things Done (GTD) methodology,
213
INDEX374
getTwitterRequests() method, 195GEvent class, 134GGroundOverlay class, 135global constants, 7global functions, 7GMarket class, 135Google Ajax Language API (aka Google Trans-
lator), 175Google Checkout button, online shop sample
application and, 79Google Maps, 131–136Google translation services, using with Twit-
ter, 173–211caching and, 189detecting languages and, 176
GPolygon class, 135GPolyline class, 135Group model class, 255groups, 251–258, 266GroupsController class, 242, 251–258GTD (Getting Things Done) methodology,
213GTileLayerOverlay class, 135GUnload() method, 133
HHABTM (has and belongs to many), 334$hasMany property, 53“Hello World,” translating, 175helpers, 21home page
for online shop sample application, 69for travel log sample application, 143
Hopper, Nicholas J., 359HTML forms, blogging and, 29HTML helper, 16, 21HTTP protocol, 87HttpSocket class, 175
Google translation requests and, 206Twitter’s public timeline, calling via, 174,
196
Ii18n (sample database table), 271, 277if statement, 318implode() method, 366import() method, 26index() method, 18, 94, 199
ActionsController and, 249CaptchaController and, 366GroupsController and, 258group security and, 258message forum sample web service and,
95, 99PostsController and, 32, 43UsersController and, 264
inheritance, 4
initialize() method, 133, 363In/Out communications application (case
study), 214insertBefore() method, 115interfaces, 3internationalization (i18n), 184isCartEmpty() method, 64ISO language codes, 180, 185, 193, 292
JJavaScript, Google Maps and, 133JavaScript helper, 21JavaScript Object Notation (JSON), 157journey model, 140journeys, 160–172
plotting, 156–159retrieving/editing, 168saving, 160–167viewing, 169–172
journeys table, 138JourneysController class, 138, 160, 164JSON (JavaScript Object Notation), 157JSON web services, 88, 92
Ll10n (localization), 184, 293_langChoice() method, 211Langford, John, 359Language model, 183languages
changing, Twitter Twister sample applica-tion and, 190, 192
detecting, Twitter Twister sample applica-tion and, 176
selecting, news story sample application and, 292
languages database table, 180LC_MESSAGES category, 185LC_TIME category, 185left branch, 240LIKE AGAINST operator, 123link() method, 283List behavior, magic fields and, 307_listActions() method, 249_listProductSearch() method, 341lists() method, 59, 61loadFromWaypoints() method, 156locale codes, 272locales, 184, 292
changing, 191news story sample application and, 292
localization (l10n), 184, 293location model, 140locations
driving directions and, 135finding, 148plotting journeys and, 156–159
INDEX 375
locations table, 138locking data field, 313_locVisited() method, 156logic, separating from presentation, 317login() method, 216, 262, 294logout() method, 262, 296
Mm_ prefix, for magic field names, 310Magento e-commerce application, 47magic fields, 307–315
custom, 308, 309–315m_ prefix for, 310
MagicFieldsPlus behavior file, 309makeTwitterRequest() method, 195Mann, Merlin, 213MapHelper class, 164MarkerManager class, 134_markVisited() method, 156MATCH AGAINST operator, 123mathematical question Captchas, 360menu() method, 56MessageController class, 96message forum web service (sample applica-
tion), 85–129additional features for, 129controller for, 94–125layout for, 91requirements for, 88–91structure of, 91writing documentation for, 125–128
messages (sample database table), 91metatables, 332MfController class, 95MfFetchMessageController class, 97, 99–104MfFetchMessage() method, 109, 126MfFetchMessages() method, 126MfFetchThreadsController class, 105–109MfFetchThreads() method, 127MfMessageFormController class, 110–115MfMessageProcessController class, 100,
116–120MfMessageProcess() method, 127MfSearchProcessController class, 120–125MfSearchProcess() method, 128Model class, 8Model-View-Controller. See MVC design
patternModelBehavior class, 308models, 8–15
blogging sample application and, 31caching, 189creating, 8message forum sample web service and, 96naming conventions for, 6news story sample application and, 272
Twitter Twister sample application and, 181–184
Yahoo! Maps sample plugin and, 325Multibyte class, 175MVC design pattern, 2, 8–19
content/data separation and, 319controllers and, 315plugins and, 22
MySQL, search methods and, 123MySQL database, sample applications and, 5,
29, 50–67
N$name property, 11, 53, 70naming conventions, 6–8
for Cake tags, 320for magic fields, 310for test classes, 225for test files, 224
newline() method, 22news story sample application, 271–306
managing stories in, 273–288structure of, 271
next() method, 106nocache tag, 190, 191noiseChars property, 362Norman, Donald, 137numberChar property, 362
Oobject-oriented programming (OOP), 3objects, utility for converting arrays to, 19onchange events, 146onclick events, 146online shop (sample application), 47–83
flow of, 49Google Checkout button and, 79home page for, 69layout for, 47MySQL database for, 50–67orders and, 75PayPal Submit button and, 82shopping cart and, 63–75user requests and, 67–83
OOP (object-oriented programming), 3optimistic locking, 313Order model, 75OrdersController class, 76–79osCommerce e-commerce application, 47overlays, 134
P$pageTitle property, 67page title, setting default for an application, 18paginate() method, 106, 280, 284, 291paginateCount() method, 291
INDEX376
paginateCountStandard() method, 291paginateCountTranslation() method, 291paginateStandard() method, 291paginateTranslation() method, 291pagination
for message forum sample web service, 105–109
for news story sample application, 288–292
paginator helper, 21parentNode() method, 257paths, 7PayPal Submit button, online shop sample
application and, 82$pdid property, 67permissions, 238pessimistic locking, 313PHP 4+, 3picture image Captchas, 360_plotBestJourney() method, 156plugins, 22
sample application, for Yahoo! Maps, 320, 323–328
testing, 232Poedit file editor, 185polymorphism, 4portable object (.po) files, 185, 271POST method, 86, 87, 173posts, blogging and, 30–45
adding posts, 35deleting posts, 42listing posts, 32message forum sample web service and, 89publishing posts, 41unpublishing posts, 40updating posts, 38
PostsController class, 32, 36, 43presentation, separating from logic, 317prev() method, 106print() method, 22pr() method, 20_processActions() method, 249Product model, 59
Cart model and, 63code for, 347–353
product search (sample application), 329–358adding products to, 353–358building, 338–353processing searches and, 347
product_field_groups table, 335ProductField model, 341product_fields table, 335product_field_values table, 335product_groups table, 336, 353products (sample database table), 50, 53, 59products available, displaying, 325products table, 329–337, 334, 353
ProductsController class, 56, 59–63, 338, 347product_searches table, 337products_product_groups table, 334, 353protocols, 86public timeline, 174, 194, 325PUT method, 87
Qquery() method, 13, 184
RRAD (rapid application development), 2ReadFile class, 26read() method, 13, 52reCAPTCHA, 359record order data field, 311records
concurrency control and, 313retrieving, 9, 11–13
regression testing, 235removeChild() method, 114_renderCt() method, 323render() method, 323representational state transfer (REST), 86, 87,
173requestAction() method, 58, 61, 71, 74RequestHandler component, 19
JSON requests and, 93web service requests and, 187, 210
request() method, 174Request() method, 115requests, in Twitter, 173, 177
Cake models and, 181TwitterRequestController and, 194
resources for further readingASCII Art, 361CakePHP vs. other frameworks, 2Google payment system, 82helpers, 21object inheritance, 4object-oriented programming, 4PayPal, 82PHP, 3
REST protocol, 86, 87, 173result return formats, 88retrieve() method, 168retrieving records, 9, 11–13right branch, 240Router class
JSON web services and, 93web services and, 186, 187
RSS feedscreating, 43Twitter Twister sample application and,
186–188RSS helper, 43RSS view file, 44

INDEX 377
Ssample applications
Accomplishments task completion, 214–221
blogging, 29–46control panel, 237–270feedback plugin, 23message forum web service, 85–129news story, 271–306online shop, 47–83product search, 329–358travel log, 131–172Twitter Twister, 173, 180–211Yahoo! Maps plugin, 320, 323–328
sample code. See source codeSanitize plugin, 216save command, 278save() method, 9, 184, 195
behaviors and, 308product search sample application and, 353
saveJourney() method, 148_save_locations() method, 167saveMessage() method, 11saveRequest() method, 195saveStatuses() method, 196, 197_save_tags() method, 167_saveTrans() method, 206, 208Scaffolding behavior, magic fields and, 307ScreenController class, spillout.php script
and, 26screen_name tag, 174scripts, 25script tag, 107SD memory cards, 334Search Action view, 344–347search feature, for products (sample applica-
tion), 329–358adding products to, 353–358building, 338–353processing searches and, 347
search() method, 337, 341searchFilters() method, 343security, 237–270
Acl/Auth components and, 238groups and, 251, 257permissions and, 238
security() method, 257, 263SELECT statement, 97Session component, 19, 210session helper, 21setCenter() method, 133setFlash() method, 73setI10nByLocale() method, 278set() method, 15, 17, 62setPageTitle() method, 68setup() method, 309$shop database connection array, 3
shopping basket, displaying, 325show() method, 17, 18$sid property, 67SimpleTest unit testing interface, 221–232
downloading/installing, 222web testing and, 232
SimpleXMLElement class, 199SMTP protocol, 86SOAP protocol, 86someAction() method, 251, 258source code, 2
Accomplishments (task completion sample application), 215–233
add_form() method, 161add() method, 16add view, 15App classes, 23AppController class, extending, 4application controllers, 242–247, 251–254,
259–262Auth/Acl components, 241authentication, news story sample appli-
cation and, 294behaviors, 311blogging application, 30–45Captcha protection, 362–368components, 19content and data separation, 317controllers, 24, 94–125, 192–210DATABASE_CONFIG class, 3database tables, 238, 239data structures, 9Department class, 10GDirections class, 135global layout file, 141Google Maps example, 131Group model class, 255“Hello World,” translating, 175helpers, 22home page, for travel log sample applica-
tion, 143journeys (travel log sample application),
139, 156, 161, 164, 168–172JSON layout file, 93JSON strings, 157Language model, 183locales, 191locations (travel log sample application),
139, 148magic fields, 310–315MagicFieldsPlus behavior file, 309MapHelper class, 164message forum sample web service,
89–125Model class, 8news story sample application, 271–306nocache tag, 190
INDEX378
online shop sample application and, 50–82optimistic locking, 313plugin for Yahoo! Maps, 320–328plugins, 23–25product search feature, 338–358records, retrieving, 11–13RSS feeds, 186RSS view file, displaying contents of, 44saveJourney() method, 157show() method, 16spillout.php script, 26tables, creating, 9, 30tags, 140, 167, 319traveling salesman algorithm, 150–156TravelMapprManager class, 146Twitter Twister sample application, 174,
178–180, 185, 190TwitterRequest model, 181TwitterStatus model, 182TwitterTranslation model, 182User model class, 264validation rules, 14web site test, 234
spam, 359spambots, 359–361spillout.php script, 26startAgain() method, 148startup() method, 20, 363statuses, in Twitter, 173
20 most recent, 174, 178Cake models and, 181TwitterRequestController and, 194TwitterStatusController and, 196–209
_statusTranslate() method, 202storeLocation() method, 149StoriesController class, 271, 277–297, 283stories (sample database table), 271, 277, 284
Ttables
creating, 9, 30deleting, 9naming conventions for, 7updating, 9
table tag, 318tag model, 140tags, 317–328
attributes and, 320saving, 167
tags table, 138test.php file extension, 224test classes, naming conventions for, 225test-driven development, 235test files, naming conventions for, 224testing, 213–235
components, 232controllers, 232
plugins, 232regression testing and, 235unit testing and, 221–232web testing and, 232–234
testLoginBadUsername() method, 233testValidUsername() method, 225text helper, 21text tag, 174textarea tag, 113threads, message forum sample web service
and, 89threads (sample database table), 91time helper, 21, 216TinyMCE text editor, 113Translate behavior, 272, 278, 282, 292translate command, 176_translateText() method, 206traveling salesman algorithm, 150–156traveling salesman problem, 131travel log (sample) application, 131–172
interface for, 141–145journeys and, 160–172requirements for, 136structure of, 138
TravelMapprManager class, 146–159Tree behavior, 240, 307, 308Turing, Alan, 359tweets. See statuses, in TwitterTwitter, 173–211
caching and, 189protocols and, 87public timeline of, 174, 325Twitter API and, 173–175
Twitter Twister (sample application), 173additional features for, 211database tables for, 178requirements/structure of, 176–181
TwitterRequestController class, 194TwitterRequest model, 181twitter_requests database table, 178, 182TwitterStatusController class, 196–209twitter_statuses database table, 178, 179, 182TwitterStatus model, 182TwitterTranslation model, 182twitter_translations database table, 179, 182TwittertwisterController class, 180–211
UunbindModel() method, 202unit testing, 221–232
assert methods and, 231benefits of, 213Cake testing interface for, 221–232reasons for using, 235regression testing and, 235running tests and, 227test-driven development and, 235

INDEX 379
updateCart() method, 65, 73updateForm() method, 114Updater() method, 115updating
posts, blogging and, 38tables, 9Twitter and. See statuses, in Twitter
UserController class, authentication and, 295, 296
user interfaces (UIs), for travel log sample application, 141–145
user journey, for online shop sample applica-tion, 49
User model class, 264username validation, 219–233user requests, online shop sample applica-
tion and, 67–83users
authenticating, 293–296managing, 259–266
users (sample database table)control panel sample application and, 238,
266news story sample application and, 271,
294UsersController class, 242, 259–266, 271$uses property, 19, 56, 67$useTable property, 7, 11utilities
FCKeditor text editor, 113Poedit file editor, 185TinyMCE text editor, 113
uuid() method, 314, 327
Vvalidate property, 76_validation() method, 99validation rules, 14validationErrors error array, 315validUsername() method, 219, 225, 229vendors folder, 25View class, 321–323view() method, 195
GroupsController and, 258ProductsController and, 59, 62UsersController and, 264
viewAllStories() method, 284viewArchive() method, 195viewing journeys, 169–172views, 15
naming conventions for, 7overriding, 320
_visitNextCity() method, 156von Ahn, Luis, 359
Wweb development
features of CakePHP for, 1test-driven, 235RAD and, 2
web forms, 11Captcha protection for, 359–369views and, 15
web root configurable paths, 7web service requests, 88, 90web services, 85
JSON, 92message forum sample application and,
85–129Twitter Twister sample application and,
186–188web sites, testing external, 234web testing, 232–234welcome() method, 243WidgetsController class, 242Winer, David, 86write method, 52
XXHR (XMLHttpRequest), 87, 134XML class, 199XML helper, 21XMLHttpRequest (XHR), 87, 134
YYahoo! Maps plugin (sample application),
320, 323–328
Zzoom level, adding, 327