
PowerPoint Intermediate 2013 - Model Schools, NERIC...
21
1 PowerPoint Intermediate 2013 I. Creating a Slide Master A. Using the design feature of PowerPoint essentially sets up similar formatting for all of your slides within a presentation. However, there are times when the default settings of any specific design may not meet the needs of your presentation, or you may want to add a feature or two to the design. PowerPoint allows you to make changes to an overall design or create a design from scratch by utilizing the Slide Master. B. If there are more than 10 slides in your presentation you may want to consider using the slide master feature. If so, it is always best to start a new presentation by opening up the slide master view rather than making changes after you have already set up several of your slides in normal view. That way you only have to add a feature once rather than repeat it on every single slide.
Transcript of PowerPoint Intermediate 2013 - Model Schools, NERIC...

1
PowerPoint Intermediate 2013
I. Creating a Slide Master
A. Using the design feature of PowerPoint essentially sets up similar
formatting for all of your slides within a presentation. However,
there are times when the default settings of any specific design may
not meet the needs of your presentation, or you may want to add a
feature or two to the design. PowerPoint allows you to make changes
to an overall design or create a design from scratch by utilizing the
Slide Master.
B. If there are more than 10 slides in your presentation you may want to
consider using the slide master feature. If so, it is always best to
start a new presentation by opening up the slide master view rather
than making changes after you have already set up several of your
slides in normal view. That way you only have to add a feature once
rather than repeat it on every single slide.

2
1. To create a slide master, open up a new blank presentation. On the Ribbon,
click on the View tab. This will allow you to access all of the view options.
Click on Slide Master. A task pane will open on your left exhibiting a number
of possible slide layouts.
2. Click on the top thumbnail slide within the panel. This is the slide master. It
is paired with the title slide just below it. Whatever you do to the top slide,
will show up on all subsequent slides in your presentation. Click within the
title master style box. Highlight the text and explore formatting by font,
style, color, size, etc. Go ahead and click on the text box below. You can
change the bulleted levels by size, color, style, and effect, as well.
3. Insert a graphic from clip art or a file you have stored. While still in slide
master view, click the Insert tab. To open up a picture file, click on the
picture frame in the Images group. To add clip art, click on the Clip Art
button. The picture will paste directly into the center of your slide. Feel
free to move it to any location on the slide.

3
4. Headers, footers, slide number, the date, and time of day can be added to
the slide master. While in Slide Master View, click on the Insert tab. Find
the Headers and Footers icon and click to open. A dialogue box will appear
with several insert options. In the Footer field box, type the text you wish
to display on each slide. Click - Apply to All.
When you are finished working with the slide master, click the Slide Master tab and find Close Master View at the end of the Ribbon.
Check your slides in Normal view to be sure that all of your changes are
in place.

4
II. Transitions
Transitions add to the professional quality of any presentation as well as boost
creativity and add spice! The following directions will demonstrate how easy it is
to insert both animation and sound transitions to each of your slides in order to
enhance your presentation.
1. Create a quick slide presentation by inserting 3 to 4 slides or by using a
previously created PowerPoint.
2. Choose a design by clicking on the Design tab on the ribbon and scrolling
through the choices.
3. Click on the Animations tab on the Ribbon. This will
open up a secondary toolbar containing a gallery of
animations. Click on the down arrow to the right of
the animation button. This will open up a full gallery
of choices. Hovering over each selection will show a
preview of the animation right on the slide. Choose
an animation by clicking directly on it.
4. Once an animation is selected you will want to assign it a speed. Directly to
the right, within the Timing group, are several buttons that will allow you to
pick a speed and sound for the transition. Next to Duration assign the
transition timing.

5
5. Directly above the Duration field is Sound. Click the down arrow next to
Sound to open up a preview of sound choices. As you hover over each name,
you will hear a preview. Click the sound of your choice.
6. At this point you will need to decide whether to apply these transitions to
the current slide displayed or to all slides within the show. To the right of
Sound and Duration is the option to Advance Slide. The two possibilities
are On Mouse Click or Automatically After: with an area
to insert minutes and/or seconds. On Mouse Click will give
you full control of slide advancement. Automatically After
is useful if the show will be run independently of the
presenter. Click one of these options.
7. The last step is to decide to apply these transitions to the
current slide or to all. The program automatically applies
the selections to the current slide. Click Apply to All if
you wish to use the same transition throughout the show.
Notice on the slide panel to the left that each slide now
contains a tiny star. This symbol indicates that there is a
transition assigned to that particular slide.

6
III. Animation
The Animation tab is found on the Toolbar Ribbon. There have been some
significant changes made to this section of the application from PowerPoint 2007
and 2010, which gives the user plenty of new options for animations of text and
images.
Animation can help make a Microsoft PowerPoint 2013 presentation more dynamic,
and help make information more memorable. The most common types of animation
effects include entrances and exits. You can also add sound to increase the
intensity of your animation effects.
TIP - Many presentation experts recommend using animations and sound effects
sparingly. Animation can be useful in making a presentation more dynamic, and help
to emphasize points, but too much animation can be distracting. Try not to let
animation and sound take the focus away from what you are saying.
Apply entrance and exit animation effects
To add animation to text or an object:
1. Select the text or object that you wish to
animate
2. On the Animations tab, in the Animation
group, click an animation effect from the
gallery. Click the pull down arrow located
under Effect Options or the Add
Animations button to see more choices.
NOTE - In the gallery, entrance effects icons are colored green, emphasis
effects icons are colored yellow, and exit effects icons are colored red.
7
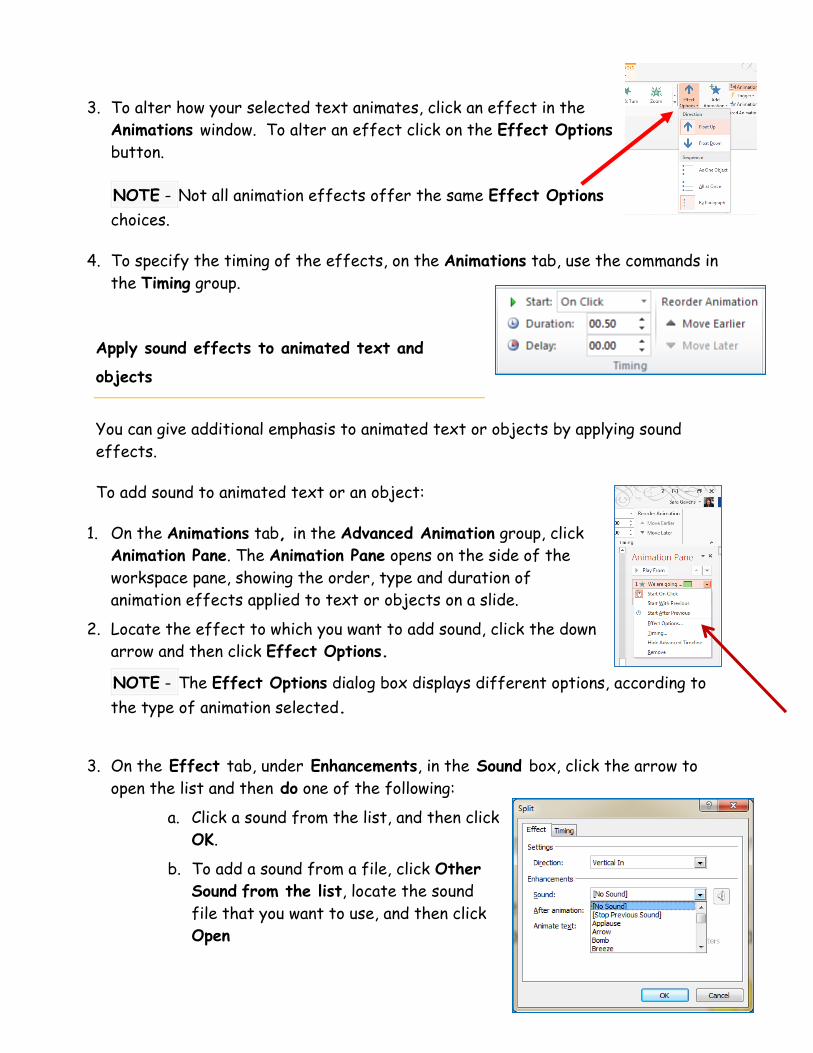
3. To alter how your selected text animates, click an effect in the
Animations window. To alter an effect click on the Effect Options
button.
NOTE - Not all animation effects offer the same Effect Options
choices.
4. To specify the timing of the effects, on the Animations tab, use the commands in
the Timing group.
Apply sound effects to animated text and
objects
You can give additional emphasis to animated text or objects by applying sound
effects.
To add sound to animated text or an object:
1. On the Animations tab, in the Advanced Animation group, click
Animation Pane. The Animation Pane opens on the side of the
workspace pane, showing the order, type and duration of
animation effects applied to text or objects on a slide.
2. Locate the effect to which you want to add sound, click the down
arrow and then click Effect Options.
NOTE - The Effect Options dialog box displays different options, according to
the type of animation selected.
3. On the Effect tab, under Enhancements, in the Sound box, click the arrow to
open the list and then do one of the following:
a. Click a sound from the list, and then click
OK.
b. To add a sound from a file, click Other
Sound from the list, locate the sound
file that you want to use, and then click
Open

8
c. When you click OK or Open, the slide plays a preview of the animation
with the sound added.
d. To change the preview sound volume, click Sound icon and move the
slider up or down. To turn off the preview
sound, select the Mute check box.
4. Repeat for each bullet of text to which you want to add a sound effect.
5. To preview all the animation and sound applied to a slide, in the Animation Pane,
click Play.
Apply a motion path to text or an object
You can add more complex or custom animation motions to text or an object.
Click the object or text to which you want to add a motion path. The path that you
apply is followed by the center of the object or text bullet.
1. On the Animations tab or under the Add Animation
button, under Motion Paths, do one of the following:
a. Click Lines, Arcs, Turns, Shapes or Loops. The path
chosen appears as a dotted line on the selected object
or text object. The green arrow indicates the path’s
beginning and the red arrow indicates its end.
b. Click Custom Path. When you click where you want the
motion path to start, the pointer becomes a pen .
c. To draw a path of connected straight lines: Click
where you want the motion path to begin. Move the
pointer and click where you want that line to end. To
continue the path, click again where you want the next
line to end. Double-click at the motion’s final end
point.
d. To draw an irregular path: Click where you want the motion to start.
Hold down the left mouse button and move the pointer on the path that
you want the motion path to follow. Double-click at the motion’s final end
point.

9
e. To move the entire motion path: Click on any part of the path. Once
the pointer becomes a four-way arrow, drag the motion path where you
want it.
f. The Shapes and Loops paths are closed, meaning the object returns to
its starting point. Whereas the Lines, Arcs, Turns or Custom Path are
open.
1. If you want the object to return to its original location
2. Right-click anywhere on the path and then click Close Path.
3. A linear path is added automatically from the previous end
point to the starting point.
g. To change the shape of a motion path: Right-click the path and then
click Edit Points. Square black handles appear on the path – drag one of
the handles to move that portion of the path.
h. Any part of the path, including the beginning or ending point, can operate
off the slide.
IV. Triggers
Triggers are useful because they allow you to click on the slide during the show to
activate the effect - be it sound or animation.
To set up a trigger follow the steps listed below:
1. Click on the slide on the Slide Panel that has the sound that you wish to add
a specific effect/trigger. If there is another icon such as a graphic that
you want to act as the trigger, it must already be in place.
2. Click on the Animations tab on the Ribbon and then in the Advanced
Animation area, open up the Animation Pane by clicking on the link. Click on
Add Animation.
3. If your image is not yet animated, choose any animation (you can always
change it later) that will now allow you to add a trigger.

10
4. In the Task Pane, click on the arrow next to Timing. Then click
on the Trigger button.
5. Click the radio button next to Start effect on click of: and
then use the pull down menu to choose the picture or .wav file
that will become the trigger. Click OK.
6. A lightning bolt will appear next to the trigger to let you know
its location.
7. Similarly, you can click the trigger icon in the Advanced
Animation group to open up the same process.
8. Test your trigger by going into Show Mode and play that
slide.
9. To remove the trigger from a sound, click on the down arrow next to the
sound effect and choose Remove.
10. Animation Painter

11
V. Inserting Sounds
Sound or music files can be saved on your computer in many formats that can be
used in PowerPoint 2013, such as MP3 or WAV files. You can add these types of
sound files onto any slide in your presentation. However, only WAV type sound files
can be embedded into your presentation.
Note - To have the best success with playing music or sound files in your
presentations, always keep your sound files in the same folder in which you save
your PowerPoint 2013 presentation.
Add a Sound from a File
1. Click on the Insert tab of the ribbon.
2. Click the drop down arrow under the Audio icon on
the right side of the ribbon.
3. Select Audio on my PC...
4. The Insert Audio dialog box will open.
5. Navigate to the folder containing the music file to
insert.
6. Select the music file and click on the Insert
button at the bottom of the dialog box.
7. A sound file icon is placed in the middle of
the slide.
Examine and Test the Sound or Music on
PowerPoint Slide
Once you have inserted the sound or music selection onto the PowerPoint slide, a
sound icon will appear. This sound icon differs slightly from earlier versions of
PowerPoint, as it also contains other buttons and
information.
1. Play/Resume: This button is on the left side.
This button toggles between the two tasks
depending on which one is currently in use.

12
2. Rewind: When the sound or music is in play, pressing this button will rewind
the sound by a quarter-of-a-second increments.
3. Forward: When the sound or music is in play, pressing this button will fast
forward the sound by a quarter-of-a-second increments.
4. Mute/Unmute: Press this button to mute or unmute the sound once it is in
play.
5. Additionally, you will note a timer advances while the sound or music is
playing.
Edit the sound file using the PowerPoint 2013 audio tools.
You may wish to change some of the options for a sound or music file that you have
already inserted into your PowerPoint 2013 presentation.
1. Click on the sound file icon on the slide.
2. The ribbon should change to the contextual menu for sound. If the ribbon
does not change, click on the Playback button below the Audio Tools.
Contextual Menu for Sound or Music
When the sound icon is selected on the slide, the contextual menu changes to
reflect the options available for sound.
Editing options
o trim the audio track
o fade sound in and/or out
Audio options
o volume
o start on click of the sound icon, play automatically and/or across a
specific number of slides
o hide the sound icon on the slide

13
o whether to loop (play continuously) the sound until manually stopped
o rewind after playing
Audio styles
o No Style
o Play in the Background
These changes can be made at any time after the sound file has been inserted into
the presentation.
When you insert an audio clip on a slide, an icon appears that represents the
audio file. While you give your presentation, you can set the audio clip to play
automatically when the slide displays, to start when you click the mouse, or to play
across all slides in the presentation. You can even play media continuously in a loop
until you stop it.
Add an audio clip from Clip Art
1. Click the slide to which you want to add an audio clip.
2. On the Insert tab, in the Media group, click Audio.
3. Click Online Audio, locate the audio clip that you want in the Insert Audio
search field, click on the sound icon, and then click to add it to the slide.
Preview an audio clip on a slide
1. On the slide, select the audio clip icon .
2. Below the icon, click Play.
Set the Playback Options for an Audio Clip
1. On the slide, select the audio clip icon .
2. Under Audio Tools, on the Playback tab, in the Audio Options group, do one
of the following:
To start the audio clip automatically when you show the slide, in the
Start list, click Automatically.
To manually start the audio clip when you click it on the slide, in the
Start list, click On Click.

14
To play an audio clip as you click through the slides in your
presentation, in the Start list, click Play across slides.
To play an audio clip continuously until you stop it, select the Loop
until Stopped check box.
3. When you loop a sound, it plays continuously until you advance to the next
slide.
4. If you add multiple audio clips, they will appear on top of each other, and
each will play in the order in which they were added. If you want each audio
clip to start when you click it, drag the audio clip icons off of each other
after you insert them.
Hide the Audio Clip Icon
Important Use this option only if you set the audio clip to play automatically, or
if you created some other kind of control, such as a trigger, to click to play the
clip. (A trigger is something on your slide, such as a picture, shape, button,
paragraph of text, or text box that can set off an action when you click it.) Note
that the sound icon is always visible unless you drag it off the slide.
1. Click the audio clip icon .
2. Under Audio Tools, on the Playback tab, in the Audio Options group, select
the Hide During Show check box.
Working with Audio
Customizing Play Time of Audio Files
1. Select the icon for the sound file on your slide.
2. From the Animations tab, locate the Effect Options button and
click the More Arrow below it to Show Additional Effect
Options.
The Play Audio dialog box will appear.

15
3. Click the Effect tab, and then from the Stop
playing section, select After. Use the up and
down arrows in the slides field to indicate for how
many slides the audio should play.
Play Music across All Slides
1. Follow steps 1 and 2 above.
2. Select the Timing tab.
3. From the Start drop-down menu select On Click.
4. Click on the Triggers button.
5. From here you have two options.
If you would like the sound to play by clicking anywhere on the screen,
say after a title appears, then select Animate as part of click
sequence. Just be sure if you select this option, that you properly
arrange the sound on the Custom Animation pane so that it begins in
the desired order.
If you do not want the sound to start at a specific time, but rather by
clicking a specific object, select Start effect on click of and then
choose the object that will trigger the sound from the drop-down
menu.
6. If you would like to be able to click the sound icon on your slide during the
presentation to start the audio, select the Audio Settings tab and ensure
that Hide audio icon during slide show is not selected. It will, after all, be
difficult to click the sound icon if you can't see it.
Recording Narration
A working microphone, sound card and speakers are needed for
narration.
You can either record a narration before you run a slide show or record a narration
during a slide show and include audience comments in the recording. If you don't
want narration throughout the presentation, you can record comments only on

16
selected slides or turn off the narration so that it plays only when you want it to
play.
When you add a narration to a slide, a sound icon appears on the slide. As with
any sound, you can either click the icon to play the sound or set the sound to play
automatically.
Before you start recording, PowerPoint 2013 will prompt you to record either just
the slide timings, just the narrations, or both at the same time. You can also set
the slide timings manually. Slide timings are especially useful if you want the
presentation to run automatically with your narration. Recording slide timings will
also record the times of animation steps and the use of any triggers on your slide.
You can turn the timings off when you don't want the presentation to use them.
A. Record a narration before or during a slide show
1. When you record a narration, you run through the
presentation and record each slide. You can pause and
resume recording any time.
2. Ensure your microphone is set up and in working order prior
to recording your slide show.
3. On the Slide Show tab, in the Set Up group, click Record
Slide Show.
4. Select one of the following:
Start Recording from Beginning

17
Start Recording from Current Slide
5. In the Record Slide Show dialog box, select the
Narrations and laser pointer check box, and if
appropriate, select or deselect the Slide and animation timings check box.
6. Click Start Recording.
Tip To pause the narration, in the Recording shortcut
menu, click Pause. And to resume your narration, click
Resume Recording.
7. To end your slide show recording, right click the slide, and then click End
Show.
8. The recorded slide show timings are automatically saved and the slide show
appears in Slide Sorter view with timings beneath each slide.
B. Preview a narration
1. In Normal view, on the slide, click the sound icon .
2. On the ribbon, under Audio Tools, on the Playback tab, in the Preview
group, click Play.
C. Record comments on a slide
1. In Normal view, click the slide that you
want to add a comment.
2. On the Insert tab, in the Media group,
click the arrow under Audio, and then click
Record Audio.
3. To record the comment, click Record, and start speaking.
4. When you are finished recording, click Stop.
5. In the Name box, type a name for the sound, and then click OK.
6. A sound icon appears on the slide.
D. Set the slide timings manually

18
PowerPoint 2013 will automatically record your slide timings when you add narration
or you can manually set the slide timings to accompany your narrations.
1. In Normal view, click the slide that you want to set the timing for.
2. On the Transitions tab, in the Timing group, under Advance Slide, select the
After check box, and then enter the number of seconds that you want the
slide to appear on the screen. Repeat the process for each slide that you
want to set the timing.
Tip If you want the next slide to appear either when you click the mouse or
automatically after the number of seconds that you enter — whichever comes
first — select both the On Mouse Click and the Automatically After check boxes.
E. Turn the slide timings off
Turning off the slide timings does not delete them. You can turn the timings back
on at any time without having to recreate them. However, when the slide timings
are turned off, your slides will not automatically advance when you record a
narration, and you will need to manually advance the slides.
1. In Normal view, on the Slide Show tab, in the Set Up group, click Set Up
Slide Show.
2. Under Advance slides, click Manually.
Tip To turn the timings back on, under Advance
slides, click Using timings, if present.

19
VI. Using SmartArt Graphics
SmartArt Graphics allow you to add diagramming features
easily to your presentation. This is useful if you need to
visually represent a variety of concepts that might not
present itself as well in a plain text format.
A. To add SmartArt, click on the arrow next to
New Slide under the Home menu. Choose
the second slide layout design. You will see
the Content Placeholder in the center of the
slide.
1. Click on the part of the Content Placeholder icon where you see
the green arrow. It will say Insert a SmartArt Graphic when
you hover over it with your mouse. This will open up the
SmartArt Gallery automatically. You also can access the
gallery by clicking the SmartArt button on the Insert tab of
the Ribbon. The Gallery consists of the tri-panel view that
allows you to quickly scroll through all of the options.

20
2. The left panel is referred to as All. It contains all of the
diagram categories included in PowerPoint. These variations are
called: Line, Process, Cycle, Hierarchy, Relationship,
Matrix, and Pyramid.
3. The center panel shows you all of the choices available under a
certain category. There are many to choose from!
4. The panel on the right gives a detailed description and a larger
view of a particular category that has been selected.
5. Select the variant of your choice and click OK.
B. Formatting SmartArt - You can easily format any SmartArt diagram
by utilized the options on the Ribbon under SmartArt Tools. Click on
the slide containing the SmartArt diagram. You will notice that
SmartArt Tools opens up on the Ribbon. Click on the tab and then
take a few moments to explore all the different ways you can format
your slide by selecting the many options available on this tool bar.
C. Animating SmartArt – Refer to the directions for animating images.
If you wish to animate each section individually, be sure to ungroup
the SmartArt graphic prior to assigning effects.

21
VII. Adding Video
Adding video is very simple in PowerPoint 2013. As
long as you have a video clip stored in a file, you
can add it easily to your presentation.
A. Click on the arrow next to New Slide under the Home tab.
B. Choose a slide containing the placeholder icon.
C. Click on the movie reel to open up a dialogue box.
D. Choose the location of the movie file.
E. Click on the file and then on Okay.
TTThhhaaattt’’’sss aaallllll ttthhheeerrreee iiisss tttooo iiittt!!!!!!!!!
FFFeeeeeelll fffrrreeeeee tttooo eeexxxppplllooorrreee fffuuurrrttthhheeerrr ttthhheee mmmaaannnyyy
oooppptttiiiooonnnsss aaavvvaaaiiilllaaabbbllleee iiinnn PPPooowwweeerrrPPPoooiiinnnttt 222000111333...
TTThhheeerrreee iiisss gggrrreeeaaattt dddeeeaaalll mmmooorrreee tttooo dddiiissscccooovvveeerrr!!!