Powerpoint Basics version 2007 (Windows) and …idea.uwosh.edu/nick/PPT2007_2008Basics.pdf · 2....
23
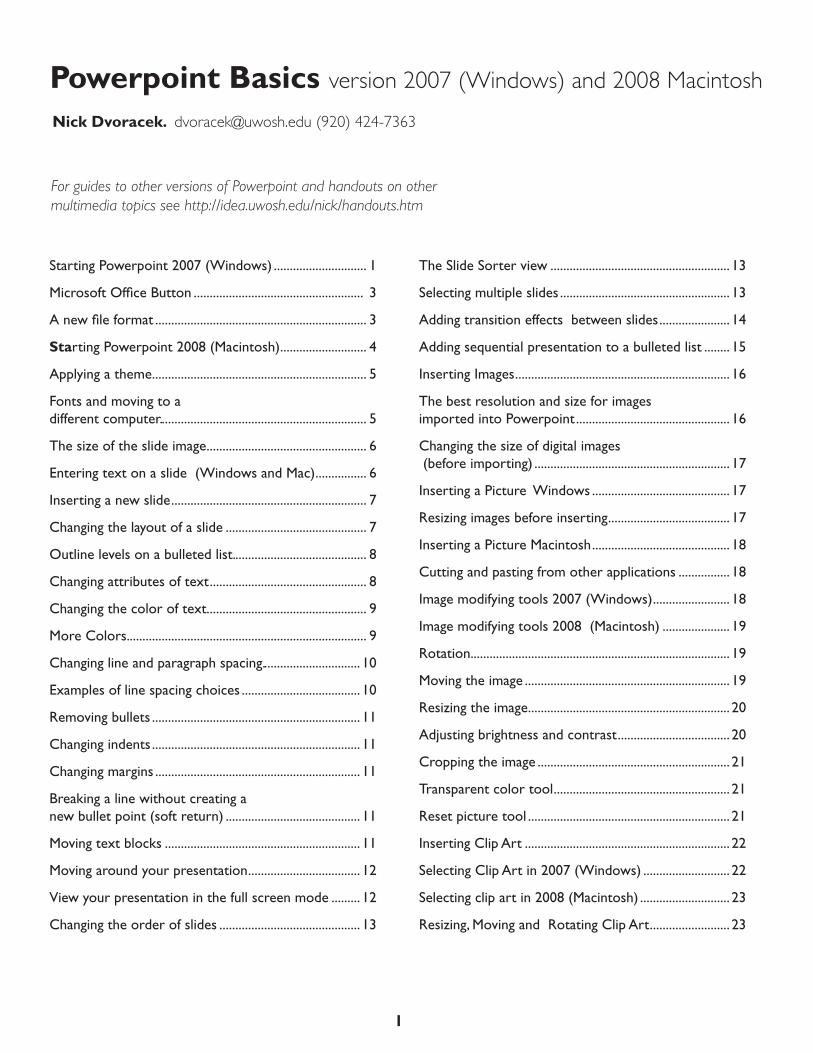
1 Powerpoint Basics version 2007 (Windows) and 2008 Macintosh Starting Powerpoint 2007 (Windows) ............................. 1 Microsoft Office Button ..................................................... 3 A new file format .................................................................. 3 Starting Powerpoint 2008 (Macintosh)........................... 4 Applying a theme................................................................... 5 Fonts and moving to a different computer. ................................................................ 5 The size of the slide image.................................................. 6 Entering text on a slide (Windows and Mac)................ 6 Inserting a new slide ............................................................. 7 Changing the layout of a slide ............................................ 7 Outline levels on a bulleted list.......................................... 8 Changing attributes of text ................................................. 8 Changing the color of text.................................................. 9 More Colors........................................................................... 9 Changing line and paragraph spacing............................... 10 Examples of line spacing choices ..................................... 10 Removing bullets ................................................................. 11 Changing indents ................................................................. 11 Changing margins ................................................................ 11 Breaking a line without creating a new bullet point (soft return) .......................................... 11 Moving text blocks ............................................................. 11 Moving around your presentation................................... 12 View your presentation in the full screen mode ......... 12 Changing the order of slides ............................................ 13 The Slide Sorter view ........................................................ 13 Selecting multiple slides ..................................................... 13 Adding transition effects between slides ...................... 14 Adding sequential presentation to a bulleted list ........ 15 Inserting Images ................................................................... 16 The best resolution and size for images imported into Powerpoint ................................................ 16 Changing the size of digital images (before importing) ............................................................. 17 Inserting a Picture Windows ........................................... 17 Resizing images before inserting...................................... 17 Inserting a Picture Macintosh ........................................... 18 Cutting and pasting from other applications ................ 18 Image modifying tools 2007 (Windows) ........................ 18 Image modifying tools 2008 (Macintosh) ..................... 19 Rotation................................................................................. 19 Moving the image ................................................................ 19 Resizing the image............................................................... 20 Adjusting brightness and contrast ................................... 20 Cropping the image ............................................................ 21 Transparent color tool ....................................................... 21 Reset picture tool ............................................................... 21 Inserting Clip Art ................................................................ 22 Selecting Clip Art in 2007 (Windows) ........................... 22 Selecting clip art in 2008 (Macintosh) ............................ 23 Resizing, Moving and Rotating Clip Art ......................... 23 Nick Dvoracek. [email protected] (920) 424-7363 For guides to other versions of Powerpoint and handouts on other multimedia topics see http://idea.uwosh.edu/nick/handouts.htm
Transcript of Powerpoint Basics version 2007 (Windows) and …idea.uwosh.edu/nick/PPT2007_2008Basics.pdf · 2....
1
Powerpoint Basics version 2007 (Windows) and 2008 Macintosh
Starting Powerpoint 2007 (Windows) 1
Microsoft Office Button 3
A new file format 3
Starting Powerpoint 2008 (Macintosh) 4
Applying a theme 5
Fonts and moving to a different computer 5
The size of the slide image 6
Entering text on a slide (Windows and Mac) 6
Inserting a new slide 7
Changing the layout of a slide 7
Outline levels on a bulleted list 8
Changing attributes of text 8
Changing the color of text 9
More Colors 9
Changing line and paragraph spacing 10
Examples of line spacing choices 10
Removing bullets 11
Changing indents 11
Changing margins 11
Breaking a line without creating a new bullet point (soft return) 11
Moving text blocks 11
Moving around your presentation 12
View your presentation in the full screen mode 12
Changing the order of slides 13
The Slide Sorter view 13
Selecting multiple slides 13
Adding transition effects between slides 14
Adding sequential presentation to a bulleted list 15
Inserting Images 16
The best resolution and size for images imported into Powerpoint 16
Changing the size of digital images (before importing) 17
Inserting a Picture Windows 17
Resizing images before inserting 17
Inserting a Picture Macintosh 18
Cutting and pasting from other applications 18
Image modifying tools 2007 (Windows) 18
Image modifying tools 2008 (Macintosh) 19
Rotation 19
Moving the image 19
Resizing the image 20
Adjusting brightness and contrast 20
Cropping the image 21
Transparent color tool 21
Reset picture tool 21
Inserting Clip Art 22
Selecting Clip Art in 2007 (Windows) 22
Selecting clip art in 2008 (Macintosh) 23
Resizing Moving and Rotating Clip Art 23
Nick Dvoracek dvoracekuwoshedu (920) 424-7363
For guides to other versions of Powerpoint and handouts on other multimedia topics see httpideauwoshedunickhandoutshtm
2
When you launch Powerpoint you are presented with the first slide in the Title layout of a blank presentation in the Normal view
RibbonsThe most notable difference from earlier versions of Powerpoint and all other programs yoursquove ever used is the lack of menus at the top of the screen and the Task Pane and toolbars Replacing them are the Ribbons selected by tabs near the top of the screen which contain all the commands and property settings used to create and modify your presentation
Starting Powerpoint 2007 (Windows)
The exception is the Mystery Meat Microsoft Office Button (see next page)
Some items on the Ribbons have a down pointing triangle which indicates more options are available Clicking will display a menu
Some items on the Ribbons have an arrow in a box Clicking the arrow displays a dialogue box with which properties can be specified
Views Button
Choose between Normal Slide Sorter and Presenta-tion views
Notes window
Notes for yourself when presenting or a place to record a complete narrative if yoursquore posting your presentation on-line
ThumbnailOutline
Choose between viewing Thumbnail images of your slides or viewing the text in an outline format
Save undo and redo
3
Microsoft Office Button
If yoursquore looking for all the things that normally show up under the File menu theyrsquore now located under the unlabeled Microsoft Office Button
A new file format
Both 2007 (Windows) and 2008 (Macintosh) save files in a new file format using the file extension pptx
The main advantage of the new for-mat is that files are significantly smaller
Users of some earlier versions of Powerpoint 2000 XP(2002) and 2003 can download a plug-in that allows them to open the new format There are no converters for earlier Macintosh versions
If you donrsquot know what version of Powerpoint your presentation will be viewed in you can save it in the old format (ppt) The new versions will open the older format
If you know that you will be presenting with Powerpoint 2007 or 2008 the new format will save your presentation with a significantly smaller file size
Windows
Macintosh
4
When you launch Powerpoint 2008 you are also presented with the first slide in the Title layout of a blank presentation in the Normal view
The Macintosh version still has menus and toolbars Only the Drawing toolbar and Formatting Palette are floating palletes The other toolbars appear in a stack at the top of the screen
Starting Powerpoint 2008 (Macintosh)
Views Menu
Choose between Normal Slide Sorter and Presentation views
Notes window
Notes for yourself when presenting or a place to record a complete narrative if yoursquore posting your presentation on-line
ThumbnailOutline Pane
Choose between viewing Thumbnail images of your slides or viewing the text in an outline format
Formatting Palette
shows commonly used commands and propertiesndashchanges to show func-tions yoursquore most like to need depend-ing on what yoursquore doing
Drawing toolbar
Used to create and modify graphics
Standard Toolbar
Contains the most common commands
Gallery
Toggles between showing and hiding the Elements Galleries
Elements Galleries
Clicking on these tabs will reveal collections of things from which you can choose in a bar that extends across the window
5
Applying a theme
Referred to as Templates in previous versions Themes define the colors fonts and graphics common to all slides
Windows
Click on the Design tab Mousing over a selection will preview that template in your main window Click to select the theme
Note that there is a scroll bar to the right to show several more rows of choices
To the right of the scroll bar are menus with which you can choose variations in the color palette font and line and fill effects to customize your theme As with the Theme itself mousing over a selection will preview it in your main window and clicking will select it Any theme and variation will be applied to all slides in the presentation
You can apply a different theme to a selected group of slides by right clicking on the theme and selecting Apply to Selected slides in the menu that pops up
Macintosh
Click on the Slide Themes tab to reveal a selection of Themes Note the arrows to the right to display another selection of themes There is no preview You have to click on a theme to apply it to your presentation to get a better view of what it looks like
When you select the Slide Themes tab a Document Theme section appears in the Formatting Palette which allows you to select variations on color and font for your theme
Fonts and moving to a different computer
If you select a different font to apply to your Theme when you move you presentation to a new computer that computer must have that font installed for your presentation to display properly (If it doesnrsquot it will probably defaut to Arial)
On both Windows and Macintosh the selections presented are only those that are installed with that version of Microsoft Office so if yoursquore moving to another computer with that version of Office yoursquore pretty safe
In Windows you have several other options In the Save dialogue box there is a Tools menu which includes a Save Options command In the dialogue that command brings up is a choice to Embed fonts in the presentation insuring that it will display properly on any Windows Computer so you can use any font in your presentation not just the Office fonts
There is no option to embed fonts with the Macintosh version of Powerpoint
6
Entering text on a slide (Windows and Mac)
Unlike word processors which have one continuous string of text graphics programs like PowerPoint can have numerous completely independent text blocks
Text block for slide title
Text block for slide subtitle
The text ldquoClick to add titlerdquo and ldquoClick to add textrdquo are placeholders They are there just to show you the location size etc of the title and text you will put there
When you move the cursor inside the dotted line that defines the title area it will change to the ldquoI-Beamrdquo similar to what you see in a wordprocessor
When you click the placeholder will disappear a flashing insertion point appears and you can begin typing
The text will appear with the size style color and alignment that was defined in the template
After yoursquove typed the title in order to move to the subtitle move the cursor into that area click in that area to begin typing the subtitle
The size of the slide image
Notice that there are no horizontal or vertical scroll bars on the window with the image of the slide since you are looking at a reduced size version of the entire slide The size will depend on the size of your display
The amount of reduction can be seen in 2007 (Windows) with the Size indicator at the bottom right corner of the screen and in 2008 (Macintosh) in the Zoom indicator window at the right size of the Standard tool bar Full size (100) is 75 by 10 inches the size the slide would be if you printed it Depending on the size of your display in the presentation mode the slide may be greater than 100
nb When you have more slides there will be a vertical scroll bar which will allow you to move around your presentation
Windows
Macintosh
7
Inserting a new slide
Changing the layout of a slide
New slides can be inserted by clicking on the New Slide icon on the Home Ribbon (not the Insert Ribbon) in 2007 (Windows) or on the New Slide icon on the Standard Toolbar in 2008 Macintosh (There is also a New Slide command under the Insert menu in the Macintosh version)
Windows
Macintosh
Windows
Macintosh
The first slide in your presentation had the Title Layout The new slide which you just created will have the Title and Content Layout which allows you to type a bulleted list or insert several types of other content
You can change the slide to other layouts for other purposes such as
middot Title Only or Blank for graphics slides
middot Two Content slides for two columns or an im-age and some text side by side
middot Title or Section Header to indicate major sections of your presentation
Windows
Next to the Insert Slide icon is a Layout menu
Macintosh
Click the Slide Layouts tab to display the Slide Layouts Gallery
If you change the layout of a slide the next slide you insert will have that same layout
8
Outline levels on a bulleted list
In the bulleted list in order to create a new bullet press Return
In order to create a 2nd level bullet press Return then Tab At the end of the item pressing Return will start another 2nd level bullet
To indent to a further level press Return and Tab again
In order to return to a higher level after pressing Return press the Shift and Tab keys together
You can also change the level of an item by clicking anywhere in the line and clicking the PromoteDemote button which is in the center of the Home ribbon in 2007 (Windows) and in the Bullets and Number section of the Formatting Pallette in 2008 (Macintosh)
Macintosh
Windows
Promote to a higher outline level
Demote to a lower outline level
If you find yourself going to the third and lower levels of an outline consider using multiple slides to present these as separate points to make your presentation more focused
Changing attributes of text
Text formatting functions are found in the middle of the Home ribbon in 2007 (Windows) and in several sec-tions of the Formatting Pallete in 2008 (Macintosh)
In order to change the attributes of text it has to be selectedmdashthat is you click and drag over the text you want to change For some functions that apply to whole paragraphs or whole text blocks you can just click anywhere in the text block If you donrsquot have anything selected commands and functions will appear faded out and wonrsquot do anything
9
Macintosh
Macintosh
Windows
Windows
Hue
Sat
urat
ion
Bri
ghtn
ess
Hue
Saturation
Bri
ghtn
ess
Changing the color of text
You can emphasize or highlight certain words or passages by changing the color of the text
The Text Color icon is on the Home Ribbon in 2007 (Windows) and in the Font section of the Formatting Palette in 2008 (Macintosh) The icon is in two parts Clicking the left side with the letter A and the color swatch will change any selected text to the last color used Clicking the right side with the small downward pointing triangle will bring down a menu
The top row are the color scheme of the template The last six are intended as accent colors but may not all provide enough contrast to be readable against the background
The next block provides tints of the color scheme colors These may be provide better contrast against the background
Then are a selection of commonly used colors
Any custom colors you create are added in the next row
You can create those custom colors by selecting More Colors
More Colors
Selecting More Colors in Text Color menu brings up a dialogue box with a palette of colors
New colors can be chosen off the Standard Pallete or mixed with the Custom palette
The pallettes look a little different on the Macintosh but work essentially the same way There are also several other schemes to define colors available on the Macintosh
10
In 2008 (Macintosh) there is an icon in the Alignment and Spacing section that you can click to increase or decrease paragraph spacing
In order to numerically control paragraph spacing under the Format menu select the Paragraph command That will display a dialogue box which will allow to adjust Paragraph Spacing
Changing line and paragraph spacing
Occasionally you might want to separate bullet points with additional spacing Most peoplersquos first instinct is to put extra hard returns but that puts unnecessarily large spaces between point Another common response is to increase line spacing but that puts the same amount of space within a bullet point as it does between bullet points making it difficult to separate one point from another The best response is to use Paragraph Spacing which give you variable spacing between points but leaves normal spacing within a point
LIne spacing adjusted
bull Your first point
bull A second longer point that
wraps to several lines
bull Your third point
Hard returns between points
bull Your first point
bull A second longer point that wraps to several lines
bull Your third point
Paragraph spacing adjusted
bull Your first point
bull A second longer point that wraps to several lines
bull Your third point
Same amount of space within a point as between points Hard to ready
Normal spacing within points but too much between points
Normal spacing within points and just enough between points to separate them
Examples of line spacing choices
In 2007 (Windows) on the Home ribbon there is a Line Spacing icon to the right side of the text formatting section Use that to pull down a menu and select Line Spacing Options That displays a dialogue box which allows you to adjust Paragraph Spacing
11
Removing bullets
Sometimes such as when your text block is a single quotation bullets are inappropriate
A palette to control bullets is found in 2007 (Windows) on the Home Ribbon and in 2008 (Macintosh) in a Bullets and Numbering section of the Formatting Pallette
Select None to remove the bullets
Macintosh
Macintosh
Windows
Windows
Changing indents
Changing margins
Moving text blocks
Breaking a line without creating a new bullet point (soft return)
In order to change the indents you must display the Text Ruler In 2007 (Windows) this is done on the View Ribbon In 2008 (Macintosh) it is done with the Ruler command under the View menu
When you remove the bullet the text block remains as a hanging indent where the second and subsequent lines of a paragraph are indented under the first line
Changing indents is done by sliding the indicators on the left end of the text ruler exactly the way it is done in Word
You can also specify indents numerically by right clicking on a text block and selecting Paragraph from the menu that pops up
Changes the indent of the first line of the paragraph
Moves both at once
Changes the indent of the second and subsequent lines of the paragraph
Occasionally you might want to make a text block wider or narrower
Click in the text block then place the cursor directly over the small circle at the corner The cursor will change to a two headed arrow When you click and drag the text block will change size and the text will rewrap to fit the new margins
Click in the text block then place the cursor directly over the line that defines the borders of the text block The cursor will change to a four headed arrow When you click and drag the text block will move
In order to create a line break without creating a paragraph break (a new bullet point) place the cursor where you want the line break to be hold the Shift key down and press Return
12
Moving around your presentation
View your presentation in the full screen mode
In the Normal View there are several ways to move around your presentation
Click on the thumbnail image or outline of a slide and you will move to that slide
To move rapidly to a particular slide click and drag the box in the scroll bar The title of each slide will pop up as you scroll When you reach the slide you want to go to let go of the mouse button and you will move to that slide
To step forward or backward through your presentation a slide at a time click on the double headed arrows
To view your presentation in the full screen mode click on the Slide Show button on the Views menu
mdashin 2007 (Windows) at the lower right corner of your screen
mdashin 2008 (Macintosh) at the lower left corner of your screen
All the menus toolbars and everything else disappears and your first slide should fill the screen (If you are not on the first slide it will start from the slide you were looking at when you clicked)
To advance to the next slide click the mouse buttonYou can also click the right arrow key to advance and the back arrow key to go backward
When you reach the last slide in the presentation clicking the mouse button again displays a black screen with the message ldquoEnd of slide show click to exitrdquo Clicking again will return you to the Normal View on the first slide
You can also press the Escape key (usually at the top left of the keyboard) at any time to return the slide view at the currently displayed slide
Macintosh
Windows
13
The order of slides can be changed by by clicking and dragging the thumbnails or outline of a slide in the lefthand window in the normal view
To change the order of slides click on a slide and with the mouse button held down drag it in the direction you wish to move
As you drag a line appears between slides
When the line is in the position you wish to change the slide to release the mouse button and the slide moves to the new position
Changing the order of slides
This slide has been selected
and moved to here
When the-mouse button is released the slides are rearranged
The Slide Sorter view
The Slide pane on the left side of the Normal view can only accomodate six or seven thumbnails without scrolling If you need to browse and move or manipulate more slides the Slide Sorter view uses the entire work area to display thumbnails
It is accessed by clicking the middle icon in the Views menu found at the lower right in 2007 (Windows) and in the lower left in 2008 (Macintosh)
Macintosh
Windows
Selecting multiple slides
In order to move set up a transition effect or preset animation for more than one slide at a time you have to select more than one slide at a time
Normally if you click on a slide to select it and then click on a second slide the first slide is deselected and the second one becomes selected
In order to select multiple slides hold down the Control key (Windows) or the Command Key (Macintosh) Then as you click on multiple slides they stay selected
If you inadvertantly select a slide you donrsquot want clicking a second time with the Control or Command key held down will deselect it
You can see more slides at once by zooming out with the Zoom control at the lower right of the screen (Windows) or the Zoom window on the Standard toolbar (Macintosh)
Changing the order of slides in the Slide Sorter view works exactly the same as it doeS in the SlideOutline pane of the Normal view
Windows
Macintosh
14
Windows
Macintosh
Adding transition effects between slides
Numerous effects are available to change the way one slide changes into another These effects can add some polish to your presentation and to indicate major topic changes in your presentation
Stay low-key for most slides and use the more noticable animated effects to indicate major changes in your presentation or highlight important points
You can apply transitions to a single slide in the Normal view or multiple slides with either the SlideOutline pane or the Slide Sorter view In the Slide Sorter view you have to have at least one slide selected in order to select a transition effect
In 2007 (Windows) transitions are on the Animations ribbon In the Normal view when you mouse over a transition it will preview the transition in the main window In the Slide Sorter view you have to actually click to apply the transition to get a preview (if you donrsquot like it just click another or click the Undo icon up by the Microsoft Office Button
In 2008 (Macintosh) there is a Transition tab in the Elements Galleries You have to actually click to apply the transition to get a preview (if you donrsquot like it just click another or click the Undo icon on the Standard Toolbar
You can add a sound and modify the speed of transitions
More choices are available using these scrolling arrows
Cllick this button to add sound or modify the speed of a transition after yoursquove applied it
There are tabs to limit the choices displayed to categories
There may be more transitions in a category than there is room to display Use these arrows to reveal more choices
15
Adding sequential presentation to a bulleted list
You can choose to build up a sequence of bullet points that appear with mouse clicks so the audience remains focused on the point yoursquore currently dealing with rather than reading ahead
When the slide first appears only the title is displayed
The first mouse click displays the first bullet point
The second mouse click displays the second bullet point and all associated subpoints
The next mouse click displays the last point Another click will advance to the next slide
In order to apply sequencing you must be in the Normal view and have clicked into a text area with multiple bullet points
Windows
In 2007 you can choose several effects to sequence your text on the Animate Ribbon just to the left of the transitions
All At Once makes the text block appear as one piece
By 1st Level Paragraphs makes each first level bullet point appear in sequence along with itrsquos associated lower level bullet points Just mousing over the effect will preview it in the main window
Macintosh
In 2008 Under the Slide Show menu select Custom Animation or click on the Star tab at the top of the Formating Palette and it will change to the Custom Animation palette
More sophisticated sequencing is available with the Custom Animation function which gives you more choices on how sequences of text as well as graphics are presented
Keep in mind that indiscriminate motion and sound effects can change the character of your presentation and be a distraction from your spoken presentation Stay low key and save obvious effects to give special emphasis to important points or to indicate major topic changes in your presentation What Microsoft characterizes as ldquoexcitingrdquo can give a carnival-like character to your presentation
Macintosh
Windows
In order to sequence your text block click on the green star Entrance icon and select an effect When you select the effect it will preview in the main window
16
Inserting Images
All of the slide layouts that include a text or content area include six icons with which you can insert several types of images instead of bulllet points
In addition you can insert these types of image on any slide even if you already have text or another image on that slide
If you are putting several images on a slide you may want to begin with a Title Only or Blank slide
In 2007 (Windows) there are icons on the Insert Ribbon to insert images and in 2008 (Macintosh) they are on the Standard Toolbar
Remember the little down pointing triangles indicate a menu of additional options
Macintosh
Macintosh
Windows
Windows
The proper size and resolution for an image placed in Powerpoint is determined primarily by the resolution of the output device that is the data projector that will be used to view the presentation
Almost all data projectors have a resolution of 1024 pixels by 768 pixels
We tend to think of digital images in inches (size) at a certain number of pixels per inch (resolution) For applications where images are going to be displayed on a computer screen like presentations and the web itrsquos usually more efficient to think directly in terms of numbers of pixels
Most scanning programs and image editors will allow you to choose to measure your images in a number pixels instead of inches at so many pixels per inch
Powerpoint completely imports pictures into itrsquos files so In preparing digital images it is preferable to save only as much data as necessary to avoid having unnec-essarily monstrous file sizes
Saving unnecessarily high resolution images can occupy stunning amounts of disk space take some time to be read from the disk during the presentation and can actually create a less sharp image in Powerpoint These extraordinarily large file sizes really become a problem when posting your presentation on-line
Too little resolution will result in a blurry image even if the original scan seemed sharp Powerpoint attempts to round off the edge of the square pixels that make up a digital image
The best scheme is to assume an 1024 x 768 pixel screen or projector If you do run into the lower resolution device you wonrsquot have that much excess data to process
Powerpoint does think in terms of physical size so if you have the option create your images at 10 x 75 inches at 100 dpi which translates into 1000 x 750 pixelsndashclose enough to the ideal that yoursquoll never notice This may save you a step or two when importing pictures
The best resolution and size for images imported into Powerpoint
17
Changing the size of digital images (before importing)
Even inexpensive digital cameras can acquire images as large as 3000 pixels wide This translates into nine times more information than the projector is capable of displaying Powerpoint will display these large images but with no better quality than the a file with only 1000 pixels
Itrsquos fairly easy to make a copy of your image files more appropriate to import into Powerpoint
Web based resize utilities
There are several web sites where you can upload a file and specify a size in pixels to reduce it to and then download the smaller image file
The most reliable Irsquove found are
httpbigwebpagescombigresizehtm (scroll down to specify size in pixels)
httpwwwshrinkpicturescom (largest size is 1000 pixels wide - close enough)
Windows application
Irfanview a great freeware application which includes resizing as well as many other functions is available for download athttp wwwirfanviewcom ResizeResample is under the Image menu
Macintosh application
Preview is an application that comes standard on Macintosh computers The Adjust Size command is under the Tools menu
Inserting a Picture
Click the Picture icon on the Insert ribbon That will open a file dialogue box
Toward the bottom of the dialogue the Files of Type window should display All pictures and list the extension of the file types which Powerpoint can accept
Normally Powerpoint will default to a My Pictures Folder If your pictures are stored somewhere else use the Look in window at the top to navigate to where your image file is located
The default setting is for Powerpoint to display a small preview of every image file in the directory This may take a few seconds if the files are very large
With the icon at the top of the window you can choose to view the files by name only or in a view where it is not previewed until you click on it
Hovering your mouse over an image will display itrsquos file type and file size
Click Insert to import the file
When you choose Insert Picture Microsoft means importing an image file you have somewhere on disk Clip Art refers to images organized with Microsoftrsquos Clip Art Gallery see Inserting Clip Art
Windows
18
Inserting a Picture
Macintosh
In the Macintosh version click on the Picture icon on the Standard tool bar and select Insert Picture from the menu that drops down this will open a file dialogue box
If you choose the columns view in the file dialogue box clicking on an image file will give you a preview in the next column to the right
Click Insert to insert the image
Cutting and pasting from other applications
Pictures (and other objects such as charts) can be selected and copied from other applications such as web browsers and image editing programs and inserted into Powerpoint
Most pictures on the web unless intended for download are small images at low resolution that will be significantly lower quality when enlarged to the full size of a powerpoint slide
The image will be displayed with eight small circles one in each corner and one on each side generally referred to as handles
Handles indicate that the image is ldquoselectedrdquo as well as acting as handles for resizing
Image modifying tools 2007 (Windows)
When the image is selected a Picture Tools tab will appear over the Format tab Clicking on that tab will change the ribbon to the FormatPicture Tools ribbon
19
Image modifying tools 2008 (Macintosh)
When the image is selected the Picture Quick Styles and Effects and Size Rotation and Ordering sections will appear on the Formatting Palette
The image will be displayed with eight small rectangles one in each corner and one on each side generally referred to as handles
Handles indicate that the image is ldquoselectedrdquo as well as acting as handles for resizing
Rotation
Digital cameras save everything as a horizontal (landscape) image no matter what the orientation of the camera when the picture was taken
Click on the green handle and drag right or left to rotate the image
Holding down the Shift key while rotating will restrict rotation to 15deg increments making it easier to rotate exactly 90deg
Moving the image
When you place the cursor over the image it will change to the four headed arrow Clicking holding down the mouse button and dragging will move the picture around
Be careful not to click on one of the handlesndashthat will change the size of the image
20
Resizing the image
Click on the image to select it and display the handles When you place the cursor over one of the handles it will change to a two headed arrow Clicking and dragging the handle will resize the picture
Clicking and dragging one of corner handles will resize the picture proportionately without changing its shape
Clicking and dragging on the top or bottom handle will change the height of the image without changing its width
Clicking and dragging on one of the side handles will change the width of the image without changing its height
If the image overfills the screen when it is imported use the zoom tool a the lower right of the 2007 (Windows) screen or the zoom window on the Standard toolbar in 2007 (Macintosh) to zoom out until you can see the entire image
You can then resize the image to fit the slide
Adjusting brightness and contrast
Occassionally a scanned or digital camera image can be washed out or too dark You can improve the appearance of these images with the brightness and contrast controls Since adjusting one of these usually affects the other you typically have to make adjustments to both brightness and contrast to optimize the quality of an image
In 2007 (Windows) the Brightness and Contrast controls are found at the left of the Format Ribbon in the Picture Tools mode Clicking on Brightness or Contrast will bring down a menu of variations Mousing over these options will preview the effect on the image
Since most pictures require adjustments to both brightness and contrast you can access both by selecting Picture Corrections Options at the bottom of the menu
This will bring up a dialogue box with sliders to control both Brightness and Contrast which will preview as you adjust them
In 2008 (Macintosh) sliders to control Brightness and Contrast are in the Picture section of the Formatting toolbar Their effects will preview as you adjust them
21
Cropping the image
Often an image doesnrsquot match the shape of the space in which you wish to place it or includes more than you wish to display The cropping tool can remove the extraneous areas of the image
In 2007 (Windows) the cropping tool is at the right of the Picture Tools mode of the Formatting ribbon In 2008 (Macintosh) it is in the Picture section of the Formatting toolbar
Select the Crop tool will change the appearance of the handles to thick lines
Placing the cursor over one of the handles and dragging will crop the image
Transparent color tool
The Transparenct Color tool allows you to make one color in the image transparent so the background shows through This can make the image of an object seem to float by itself on the slide rather than being embedded in a rectangle of a different color
In 2007 Windows the Set Transparent Color tool is found at the bottom of a menu displayed by clicking on the Recolor item at the left side of the Picture Tools mode of the Formatting ribbon
In 2008 (Macintosh) itrsquos in the Picture section of the Formatting Toolbar
Select the tool and click on the color you wish to make transparent
Macintosh
Macintosh
Macintosh
Windows
Windows
Windows
Reset picture tool
When any of these effects is applied to an image Powerpoint retains the original file
In 2007 (Windows) the Reset picture tool is at the left of the Picture Tools mode of the Format Ribbon In 2008 (Macintosh) itrsquos in the Picture section of the Formatting toolbar
Clicking on it while a picture is selected will revert that image to the way it was when it was imported
22
Inserting Clip Art In Microsoft office clip art refers rather specifically to graphics organized by Microsofts Clip Gallery or Clip Organizer application or found on Microsoftrsquos web site Graphics from other sources can be inserted but are referred to as Pictures See Inserting a Picture
Microsoft makes an extensive collection of Clip Art available to illustrate your presentation both installed locally and avail-able through their web site
All of the slide layouts that include a text or content area include six icons with which you can insert several types of images instead of bulllet points
In addition you can insert these types of image on any slide even if you already have text or another image on that slide
If you are putting several images on a slide you may want to begin with a Title Only or Blank slide
In 2007 (Windows) there are icons on the Insert Ribbon to insert images and in 2008 (Macintosh) they are on the Standard toolbar
Remember the little down pointing triangles indicate a menu of additional options
Macintosh
Macintosh
Windows
Windows
Selecting Clip Art in 2007 (Windows)
When you select InsertClip Art a Clip Art side bar appears to the right of the main window
The Clip Art sidebar displays all the clip art installed in no particular order All the clip art provided with Microsoft has descriptive terms associated with it Type in a concept and the gallery will display all the pieces associated with that term Images with the small blue globe in the lower left hand corner are on Microsoftrsquos web site and you need to be connected to the internet to access them
Holding the cursor over an item will cause a flag to appear which gives the file size and file type of the image
Images with a wmf extension (Windows) are object oriented graphics They have small file sizes and can be enlarged or reduced to any size without losing sharpness
Images with a jpg or gif extension are made of up of a pattern of dots and will become blurred if enlarged (Photographs are saved as this type of image but other types of graphics may also be in this format )
Click OK and the image will be inserted on the page
23
Selecting clip art (Macintosh)
The clip gallery on the Macintosh is organized into categories but also can be searched by key word
In order to determine the type of file click on the properties button and it will tell you the file size and type
Images of the type pic (Macintosh) are object oriented graphics They have small file sizes and can be enlarged or reduced to any size without losing sharpness
Images with a jpg or gif extension are made of up of a pattern of dots and will become blurred if enlarged (Photographs are saved as this type of image but other types of graphics may also be in this format)
Click Import to put the image on the slide
The Macintosh version only searches the Clip Art gallery thatrsquos actually installed on your computer To access a much larger collection from Microsoftrsquos servers click the Online button This will launch your default web browser and will take you to a page where you can enter search terms to find relevant images (Scroll down to the bottom of the page)
To import them into your presentation you must check the box under the image and click the download link at the upper left When the file (which may contain multiple images if you checked multiple images) downloads find it in your Downloads folder It will have a file name something like ClipArt [XXXX]cil Double click on it and the images will import into your Clip Art Gallery in a category named Favorites
Resizing Moving and Rotating Clip Art
Clip Art is modified exactly the same way Pictures are
Resize by clicking and dragging on the corner or side handles
Move by clicking and dragging the image anywhere except the handles
Rotate by clicking the green handle and dragging
Resizing Moving
- Starting Powerpoint 2007 (Windows)
- Microsoft Office Button
- A new file format
- Applying a theme
- Starting Powerpoint 2008 (Macintosh)
- Fonts and moving to a different computer
- Entering text on a slide (Windows and Ma
- The size of the slide image
- Inserting a new slide
- Changing the layout of a slide
- Outline levels on a bulleted list
- Changing attributes of text
- Changing the color of text
- More Colors
- Changing line and paragraph spacing
- Examples of line spacing choices
- Removing bullets
- Changing indents
- Changing margins
- Breaking a line without creating a new b
- Moving text blocks
- Moving around your presentation
- View your presentation in the full scree
- Changing the order of slides
- The Slide Sorter view
- Selecting multiple slides
- Adding transition effects between slides
- Adding sequential presentation to a bull
- Inserting Images
- The best resolution and size for images
- Changing the size of digital images (bef
- Inserting a Picture
- Inserting a Picture
- Cutting and pasting from other applicati
- Image modifying tools 2007 (Windows)
- Image modifying tools 2008 (Macintosh)
- Rotation
- Moving the image
- Resizing the image
- Adjusting brightness and contrast
- Cropping the image
- Transparent color tool
- Reset picture tool
- Inserting Clip Art
- Selecting Clip Art in 2007 (Windows)
- Selecting clip art (Macintosh)
- Resizing Moving and Rotating Clip Art
-
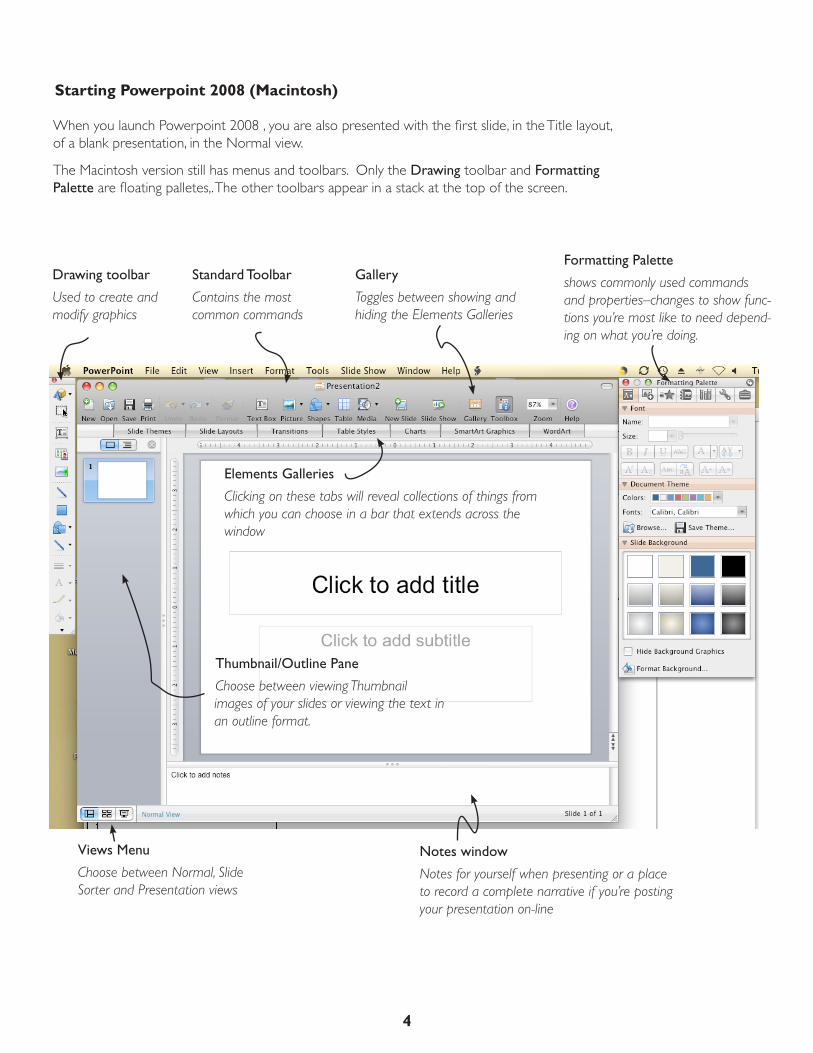
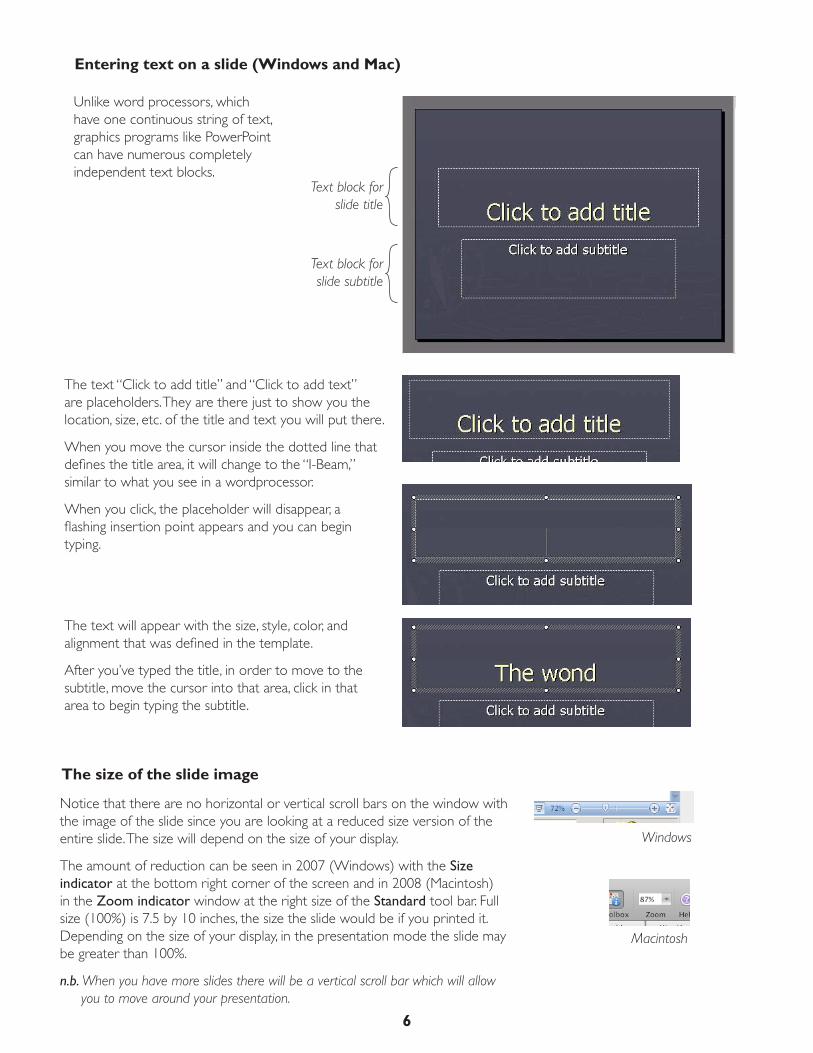
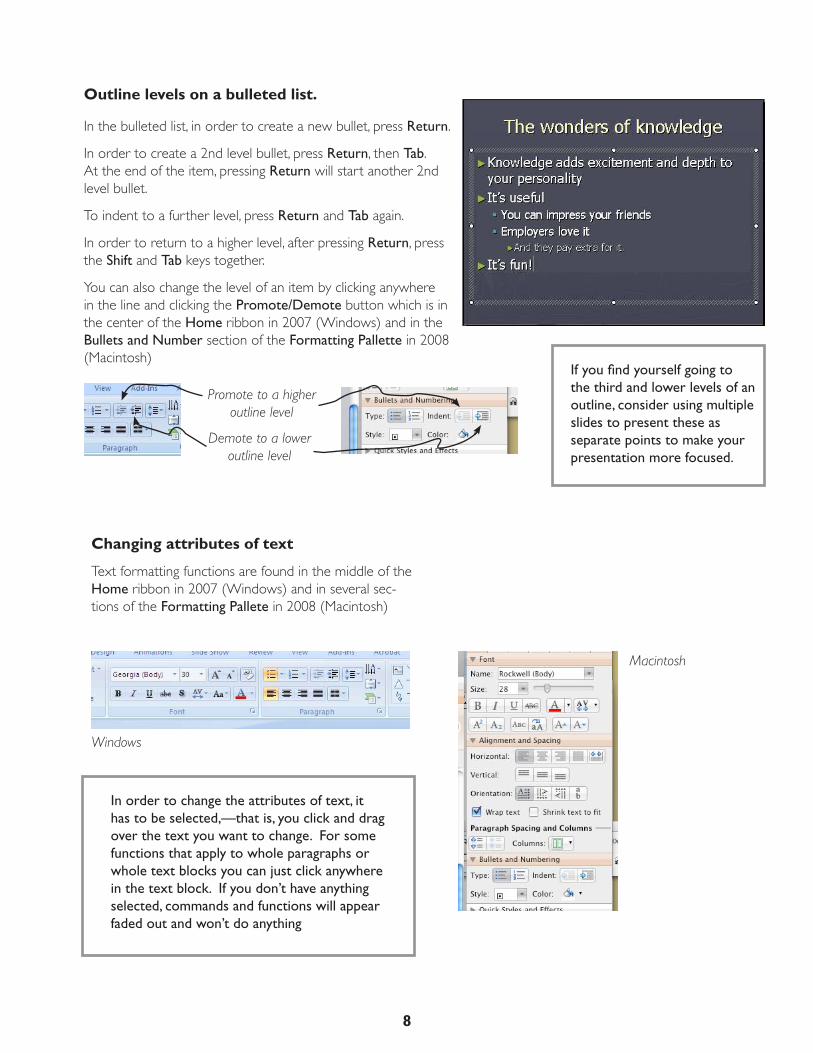
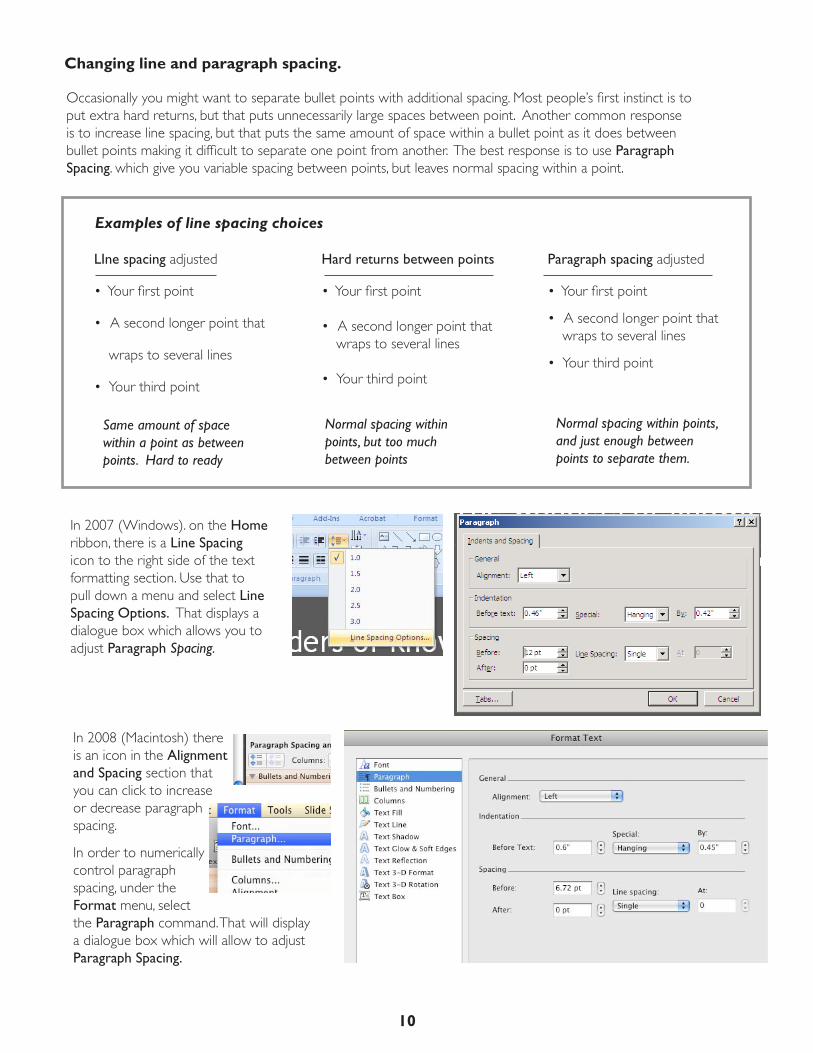
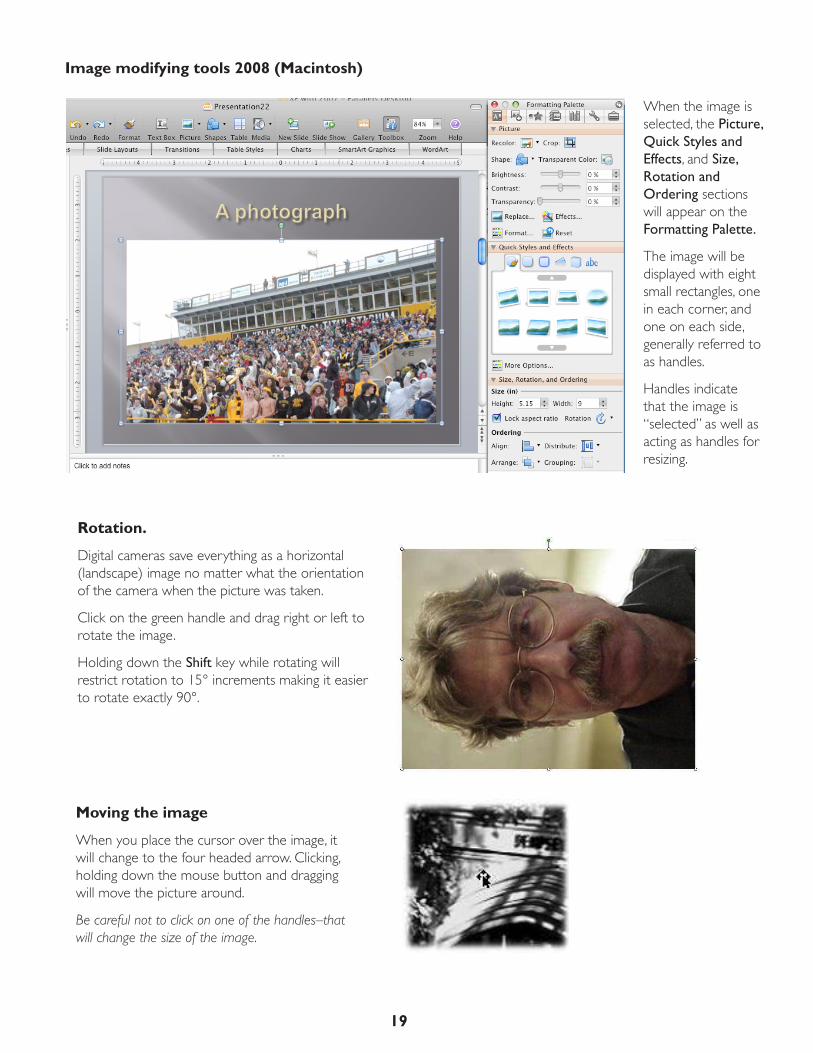