POWERPOINT 2007 ADVANCED - Amazon S3s3.amazonaws.com/Careertec/Manuals and Texts/Office 2007...
107
PowerPoint 2007 Advanced Table of Contents P2K7A0913 Page i POWERPOINT 2007 ADVANCED TABLE OF CONTENTS INTRODUCTION .........................................................................................3 About This Course...................................................................................... iv Using This Manual .......................................................................................v What You’ll Find in Each Unit .................................................................. vi What You’ll Find in Each Lesson .............................................................. vi How to Use the Student Data Files ........................................................... vii How To Proceed ....................................................................................... viii MICROSOFT OFFICE SPECIALIST CERTIFICATION ................... IX How This Course Can Help You Prepare .................................................. ix Exam Requirements ................................................................................... ix UNIT 1 CUSTOM SHOWS AND SLIDE SHOWS ................... 1 LESSON 1 CREATING CUSTOM SLIDE SHOWS IN POWERPOINT 2007..................................................................................................................3 Creating a Custom Slide Show.....................................................................4 Hiding a Slide ............................................................................................ 10 Lesson Review Exercise............................................................................ 14 LESSON 2 DELIVERING SLIDE SHOWS IN POWERPOINT 2007 17 Writing on a Slide...................................................................................... 18 Using Presenter View ................................................................................ 25 Self-running presentations......................................................................... 28 Lesson Review Exercise............................................................................ 32 LESSON 3 - CUSTOMIZING ELEMENTS IN SLIDE MASTER ....... 35 Modifying A Slide Master......................................................................... 36 Adding A Theme To A Slide Master ........................................................ 40
Transcript of POWERPOINT 2007 ADVANCED - Amazon S3s3.amazonaws.com/Careertec/Manuals and Texts/Office 2007...

PowerPoint 2007 Advanced Table of Contents
P2K7A0913 Page i
POWERPOINT 2007 ADVANCED
TABLE OF CONTENTS
INTRODUCTION .........................................................................................3
About This Course...................................................................................... iv
Using This Manual .......................................................................................v
What You’ll Find in Each Unit .................................................................. vi
What You’ll Find in Each Lesson .............................................................. vi
How to Use the Student Data Files ........................................................... vii
How To Proceed ....................................................................................... viii
MICROSOFT OFFICE SPECIALIST CERTIFICATION ................... IX
How This Course Can Help You Prepare .................................................. ix
Exam Requirements ................................................................................... ix
UNIT 1 CUSTOM SHOWS AND SLIDE SHOWS ................... 1
LESSON 1 CREATING CUSTOM SLIDE SHOWS IN POWERPOINT
2007 ..................................................................................................................3
Creating a Custom Slide Show.....................................................................4
Hiding a Slide ............................................................................................ 10
Lesson Review Exercise ............................................................................ 14
LESSON 2 DELIVERING SLIDE SHOWS IN POWERPOINT 2007 17
Writing on a Slide...................................................................................... 18
Using Presenter View ................................................................................ 25
Self-running presentations ......................................................................... 28
Lesson Review Exercise ............................................................................ 32
LESSON 3 - CUSTOMIZING ELEMENTS IN SLIDE MASTER ....... 35
Modifying A Slide Master ......................................................................... 36
Adding A Theme To A Slide Master ........................................................ 40

Table of Contents PowerPoint 2007 Advanced
Page ii P2K7A0913
Lesson Review Exercise ............................................................................ 43
INDEPENDENT PRACTICE ACTIVITY ............................................... 45
UNIT 2 PROTECTING AND DISTRIBUTING
PRESENTATIONS ...................................................................... 49
LESSON 1 SECURING AND PRINTING PRESENTATIONS IN
POWERPOINT 2007 .................................................................................. 51
Password Protecting a Presentation ........................................................... 52
Digitally Signing a Presentation ................................................................ 58
Printing a Presentation ............................................................................... 62
Lesson Review Exercise ............................................................................ 70
LESSON 2 DISTRIBUTING PRESENTATIONS IN POWERPOINT
2007 ............................................................................................................... 73
Publishing a Presentation to the Web ........................................................ 74
E-mailing a Presentation ............................................................................ 80
Packaging a Presentation for CD ............................................................... 83
Lesson Review Exercise ............................................................................ 88
INDEPENDENT PRACTICE ACTIVITY ............................................... 90
INDEX .......................................................................................................... 93
NOTICES ..................................................................................................... 97
Copyright ................................................................................................... 97
Trademark Notices ..................................................................................... 97
Disclaimer .................................................................................................. 97
Version ....................................................................................................... 97

INTRODUCTION
In this introduction, you will find the following information:
About this course
Using this manual
What you’ll find in each unit
What you’ll find in each lesson
How to use the student data files
How to proceed

Introduction PowerPoint 2007 Advanced
Page iv P2K7A0913
ABOUT THIS COURSE
Welcome to the PowerPoint 2007 Advanced course. Upon
completion of this course, you will be able to:
Customize a PowerPoint slide show
Hide a slide in a custom slide show
Identify the options for writing on a slide during a
presentation
Turn on presenter view
Create a self-running presentation
Secure a presentation in PowerPoint 2007
Print a PowerPoint slide show
Distribute a PowerPoint presentation

PowerPoint 2007 Advanced Introduction
P2K7A0913 Page v
USING THIS MANUAL This course is delivered in a self-paced training environment. This
method of delivery is designed to meet the varying needs and
learning styles of adult learners.
The student course manual provided with the course is yours to
keep. This manual will guide you through the course using a step-
by-step approach. Because we believe that it is just as important
for you to learn concepts as it is for you to learn procedures, each
topic begins with a conceptual overview of the feature you are
learning. Then, details and procedures are presented in small, easy-
to-absorb segments. People generally learn best by doing, so most
of the course will consist of step-by-step exercises at the computer.
Our teaching philosophy is reflected in the way we organize the
material in this manual. Following is an orientation to the manual’s
structure.
A Table of Contents followed by this introduction.
Lessons containing Objectives, Discussions, Procedures,
Step-by-Step Exercises, Lesson Review Exercises, and
Independent Practice Activities.
An Index.
Each course is comprised of a number of units and lessons. The
units group together the functions that comprise a given skill set
that you will be learning in the course. Each lesson comprises the
topics that describe how to perform these functions. We feel that
the best approach to maximize your understanding of the concepts
and proficiency in the skill sets is to break the material into
manageable learning bites. This enables you to thoroughly
understand a piece of information before moving on to the next.
You should strive to complete a lesson before ending your training
session to maintain the continuity of the lesson. Ending a session in
the middle of a lesson will cause an interruption in the presentation
of the material.

Introduction PowerPoint 2007 Advanced
Page vi P2K7A0913
WHAT YOU’LL FIND IN EACH UNIT Units are the largest structural component of the course content. A
unit begins with a title page that lists each lesson within the unit.
Within each lesson there are multiple topics that contain conceptual
and explanatory information. The conceptual information takes the
form of text, exhibits, screen shots, lists, and tables.
Each lesson ends with Step-By-Step Exercises and a Lesson
Review Exercise. Units conclude with an Independent Practice
Activity that gives you an opportunity to practice the collective
skills you’ve learned.
WHAT YOU’LL FIND IN EACH LESSON
Lesson
Objectives
This describes what tasks you will be able to
perform by the end of the lesson.
Topics For every objective, there is a corresponding topic.
Discussion
Every topic begins with explanatory text. The
Discussions present the conceptual information
such as when and why you might use the feature.
Notes
Notes provide additional information about a topic
that is not necessary to complete the task. Notes
may include alternative methods for
accomplishing the task, such as keyboard
shortcuts, or helpful tips about the task.
Warnings
Warnings are used to alert you to actions that
may adversely affect the application or current
file.

PowerPoint 2007 Advanced Introduction
P2K7A0913 Page vii
Procedures
The Discussion (and any Notes and Warnings) is
followed by a Procedure that presents general
steps to accomplish a task. This information can
be used for future reference back at your
workplace to assist you to complete similar tasks
using the application. The steps in these
procedures are to be used for reference only and
are not to be carried out during your lesson.
Step-by-
Step
A section of Step-by-Step Exercises follows the
main body of topics in the lesson to enable you to
practice what you have learned in a practical
setting using scenarios and data. You will open
files that have been supplied with the course and
save files you might create during the course.
Task
Each lesson ends with a Lesson Review Exercise,
and each unit ends with an Independent Practice
Activity. These exercises pool the concepts and
procedures taught during the lesson or unit,
allowing you to reinforce the skills you have
learned and assimilate the concepts into a cohesive
whole.
HOW TO USE THE STUDENT DATA FILES Many of the step-by-step and review exercises require that you
open files that have been created for the exercises. These files are
provided for you in a folder called Student Data Folder.
After you open a file, you might be instructed to make changes to
the file. As you work with the file, you will be instructed to save
the modified file using a different name. In doing so, if you make a
mistake, you can simply retrieve the original file from the Student
Data Folder and try again.
Note that when you are ending your session for the day, you should
save your work and exit the application in which you are working.
If you are proceeding on to the next lesson you may remain in the
application.

Introduction PowerPoint 2007 Advanced
Page viii P2K7A0913
HOW TO PROCEED Now that you understand the components that make up a lesson,
you should proceed as follows:
Start by reviewing the title pages of the first unit and lesson,
paying particular attention to the Lesson Objectives. The
objectives provide you with an overview of the skills you will
learn during the first lesson.
Next, go through the corresponding topics for that lesson in
the media-based program.
As you go through the program, follow along by reading the
Discussions (and any Notes and Warnings) for the topic to
gain an understanding of the topic and its application. Also
review the Procedures used to apply the feature.
After you have finished the topics for the first lesson in the
media-based program, complete the Step-by-Step Exercises
and Lesson Review Exercise at the end of the lesson. This
will provide you with hands-on experience in the application
you are learning. Make sure that you observe what is
happening on your screen as you complete the steps.
Repeat the process for the remaining lessons until you
complete the unit. Upon completion of the unit, take the
media-based Post Assessment. Use this to check your
proficiency using the skills learned in the course, and to
identify areas that require additional review and practice.
Upon completion of the Post Assessment, complete the
Independent Practice Activity in your manual. This will
further check your proficiency in a hands-on environment in
the application you are learning.
Enjoy your course!
PowerPoint 2007 Advanced Microsoft Office Specialist Certification
P2K7A0913 Page ix
MICROSOFT OFFICE SPECIALIST CERTIFICATION
A Microsoft Office Specialist is an individual who has passed
exams for certifying his or her skills in one or more of the
Microsoft Office desktop applications. Upon completion of this
courseware, you may be prepared to take an exam for Microsoft
Office Specialist qualification.
HOW THIS COURSE CAN HELP YOU PREPARE This course can help you to prepare for the Microsoft MCAS:
Using Microsoft Office PowerPoint 2007 exam number 77-603.
The series of PowerPoint 2007 courses are designed to help you
prepare for this exam, which is a part of the Microsoft Certified
Application Specialist (MCAS) series. The Windows Vista, Access
2007, Excel 2007, Outlook 2007, and Word 2007 courses have
been designed to help prepare you for their respective exams.
EXAM REQUIREMENTS The chart on the next page summarizes the topics you will need to
master to pass the Microsoft PowerPoint 2007 77-603 exam.
Topics that are covered in this PowerPoint 2007 Advanced course
are bolded. The remaining topics are covered in PowerPoint 2007
Basic.

Microsoft Office Specialist Certification PowerPoint 2007 Advanced
Page x P2K7A0913
PowerPoint 2007 Exam Requirements
Skill Sets Exam Skill Standards
Creating and
Formatting
Presentations
Create new presentations
Customize slide masters
Add elements to slide masters
Create and change presentation elements
Arrange slides
Creating and
Formatting
Slide Content
Insert and format text boxes
Manipulate text
Add and link existing content to
presentations
Apply, customize, modify and remove
animations
Working
with Visual
Content
Create SmartArt diagrams
Modify SmartArt diagrams
Insert illustrations and shapes
Modify illustrations
Arrange illustrations and other content
Insert and modify charts
Insert and modify tables
Collaborating
on and
Delivering
Presentations
Review presentations
Protect presentations
Secure and share presentations
Prepare printed materials
Prepare for and rehearse presentation
delivery

UNIT 1 CUSTOM SHOWS AND SLIDE SHOWS
The following lessons are contained in Unit 1:
Lesson 1 Creating Custom Slide Shows in
PowerPoint 2007
Lesson 2 Delivering Slide Shows in PowerPoint 2007
Lesson 3 Customizing Elements in Slide Master


LESSON 1 CREATING CUSTOM SLIDE SHOWS IN POWERPOINT 2007
In this lesson, you will learn how to:
Customize a PowerPoint slide show
Hide a slide in a custom slide show

Unit 1 Custom Shows and Slide Shows PowerPoint 2007 Advanced
Page 4 P2K7A0913
CREATING A CUSTOM SLIDE SHOW
Discussion
Custom shows are variations of existing shows in which
information is arranged differently to suit a particular audience.
For example, you might have a sales presentation that you give to
sales staff, and a shortened, custom show giving only the
highlights, which you present to managers.
There are two types of custom shows that you can create:
Basic
A basic custom show is a selection of presentation slides that can
be viewed independently of the whole presentation. For example,
you can create a basic custom show for each department in your
organization.
Hyperlinked
A hyperlink is a graphic or underlined text that transfers you to a
file, a location within a file, or a web page when you click on it.
You can create a hyperlink in a presentation slide that transfers you
to a specified slide or group of slides in the presentation. For
example, you can use a hyperlinked custom show to link a table of
contents to the relevant slides in a presentation.
In the Insert Hyperlink dialog box, selecting the Show and return
checkbox will ensure that the presentation returns to the
hyperlinked page once the custom show is complete.
Slide Show tab
To create a custom show you click the Slide Show tab.

PowerPoint 2007 Advanced Lesson 1 Creating Custom Slide Shows in PowerPoint 2007
P2K7A0913 Page 5
Activated Custom Slide Show button and associated menu
In the Start Slide Show group on the Slide Show tab, you click the
Custom Slide Show button and select Custom Shows to access all
available custom shows for the presentation.
You can update, delete, or duplicate a custom show using the Edit,
Remove, or Copy buttons.
Custom Shows dialog box
You then click the New button in the Custom Shows dialog box to
create a new custom show.

Unit 1 Custom Shows and Slide Shows PowerPoint 2007 Advanced
Page 6 P2K7A0913
Define Custom Show dialog box
The Define Custom Show dialog box enables you to specify the
slides that will be part of the custom show.
In the Slides in custom show pane, you can alter the order of the
slides. To do this, you select a slide and use the Up or Down
arrows to move the slide up or down the list.
You can designate a custom show to be the main slide show. When
you click the From Beginning button in the Start Slide Show group
of the Slide Show tab, the main slide show is the show that is
presented.
To run a custom show when it is not the main slide show, you click
the Custom Slide Show button and then select it.
Procedures
Create a new basic custom show
Click the Slide Show tab.
Click the Custom Slide Show button.
Select Custom Shows.
Click the New button.
Enter a Slide show name.
Select and Add slides to the Slides in custom show pane.

PowerPoint 2007 Advanced Lesson 1 Creating Custom Slide Shows in PowerPoint 2007
P2K7A0913 Page 7
Click the OK button.
Click the Close button.
Show a Custom Slide Show
Click the Slide Show tab.
Click the Custom Slide Show button.
Select the custom show that you want to view.
Create a new hyperlinked custom show
Select the text that will become the hyperlink.
Click the Insert tab.
Click the Hyperlink button.
Click the Place in This Document button.
Scroll down Select a place in this document to access the
available custom shows, and then select the desired custom
show.
Select the Show and return checkbox.
Click the OK button.
Designate a custom show as the main slide show
Click the Slide Show tab.
Click the Set Up Slide Show button.
Click the Custom Show radio button.
Select the appropriate show from the Custom Show drop-
down list.
Click the OK button.
Step-by-Step
Objective: Working with custom shows.
Before you begin: Start PowerPoint, and open Easy Nomad
Travel 1 from the Student Data Folder.

Unit 1 Custom Shows and Slide Shows PowerPoint 2007 Advanced
Page 8 P2K7A0913
1. Click the Slide Show tab.
The Slide Show tab appears.
2. Click the Custom Slide Show button in the Start Slide
Show group.
The Custom Slide Show menu appears.
3. Select Custom Shows in the Custom Slide Show menu.
The Custom Shows dialog box appears.
4. Click the New button in the Custom Shows dialog box.
The Define Custom Show dialog box appears.
5. Enter European City Breaks as a Slide show name.
The Custom Show is now named.
6. Select and Add, in turn, slides 1, 8, 9, 10 and 11 to the Slides
in custom show pane.
The Custom Show now includes slides.
7. Click the OK button.
The Define Custom Show dialog box closes and European
City Breaks appears in the Custom Shows dialog box.
8. Click the Close button in the Custom Shows dialog box.
The Custom Shows dialog box is closed.
9. Click the Custom Slide Show button in the Start Slide Show
group of the Slide Show tab.
The Custom Slide Show menu appears.
10. Select European City Breaks.
The European City Breaks Custom Show appears, and then
you are returned to the presentation within PowerPoint.
11. Go to slide 3.
Slide 3 appears.
12. On slide 3, click the Insert tab.
The Insert tab appears.
13. Select the text Sydney Christmas.
The text is selected.
14. Click the Hyperlink button in the Links group.
The Insert Hyperlink dialog box appears.
15. Select Place in This Document in the Link to pane.
The Select a place in this document pane appears.

PowerPoint 2007 Advanced Lesson 1 Creating Custom Slide Shows in PowerPoint 2007
P2K7A0913 Page 9
16. Scroll down through the list under Select a place in this
document to access the available custom shows, and then
select Sydney Christmas.
The Sydney Christmas show is selected.
17. Select the Show and return checkbox.
The presentation will return to the hyperlinked page once the
custom show is finished.
18. Click the OK button.
The hyperlinked custom show is created, and the Insert
Hyperlink dialog box is closed.
19. Click the Slide Show tab.
The Slide Show tab appears.
20. Click the From Beginning button in the Start Slide Show
group.
The presentation is displayed from the beginning.
21. On slide 3, click the Sydney Christmas hyperlink.
The Sydney Christmas custom show is displayed from the
beginning. When that show is over, you are returned to slide
3.
22. Press Esc to exit the slide show.
You are returned to the presentation within PowerPoint.
23. Click the Set Up Slide Show button in the Set Up group of
the Slide Show tab.
The Set Up Show dialog box appears.
24. Select the Custom show radio button in the Show slides
section.
The radio button is selected.
25. Select European City Breaks from the Custom show drop-
down list.
The European City Breaks show is selected.
26. Click the OK button.
The European City Breaks show is now the main slide show.
27. Save the presentation to your personal folder as My Easy
Nomad Travel 1.
The presentation is saved.
Before you move on: Leave the presentation open.

Unit 1 Custom Shows and Slide Shows PowerPoint 2007 Advanced
Page 10 P2K7A0913
Completed Slide 3 with hyperlink
HIDING A SLIDE
Discussion
You can hide a single slide or a number of slides if you decide not
to include them in a slide show presentation. If you change your
mind, you can easily reveal the hidden slides during the slide show.
When a slide is hidden, a box appears around the slide's number on
the Slides tab in the Outline pane.
To reveal a hidden slide during the slide show, you right-click the
current slide and select the Go to Slide menu option on the resulting
Slide Show menu.
PowerPoint 2007 Advanced Lesson 1 Creating Custom Slide Shows in PowerPoint 2007
P2K7A0913 Page 11
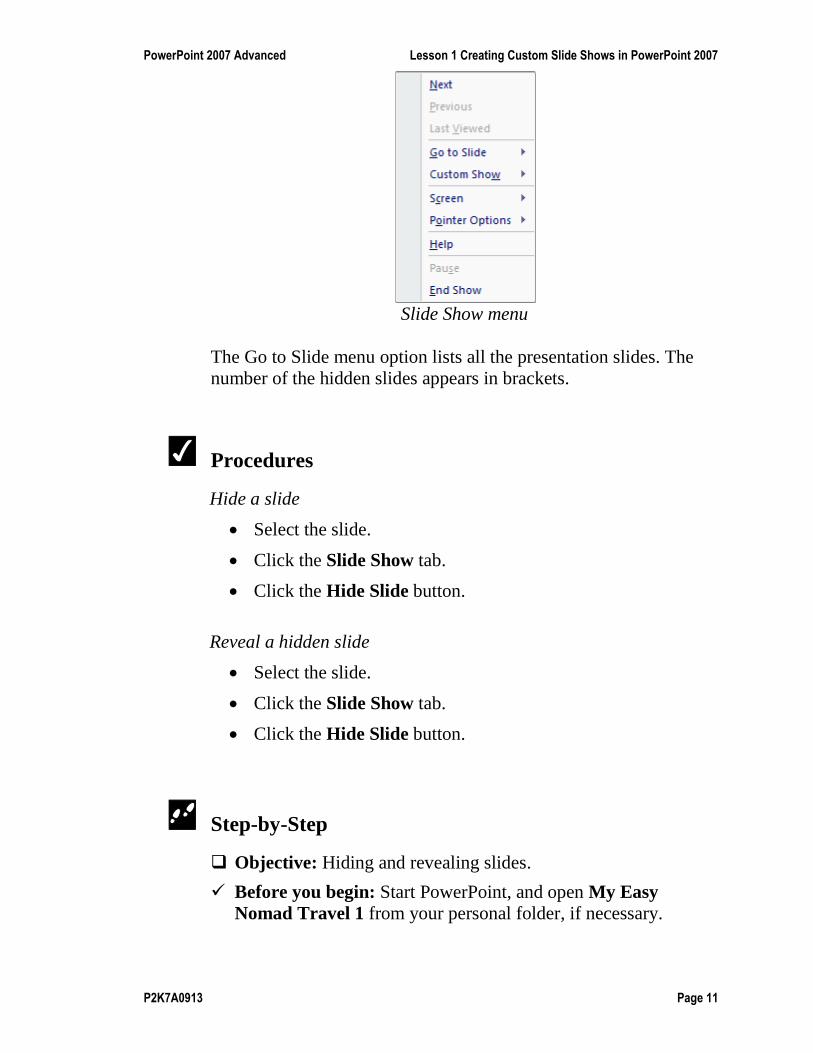
Slide Show menu
The Go to Slide menu option lists all the presentation slides. The
number of the hidden slides appears in brackets.
Procedures
Hide a slide
Select the slide.
Click the Slide Show tab.
Click the Hide Slide button.
Reveal a hidden slide
Select the slide.
Click the Slide Show tab.
Click the Hide Slide button.
Step-by-Step
Objective: Hiding and revealing slides.
Before you begin: Start PowerPoint, and open My Easy
Nomad Travel 1 from your personal folder, if necessary.

Unit 1 Custom Shows and Slide Shows PowerPoint 2007 Advanced
Page 12 P2K7A0913
1. Click the Slide Show tab.
The Slide Show tab appears.
2. Click the Set Up Slide Show button in the Set Up group.
The Set Up Show dialog box appears.
3. Click the All radio button in the Show slides section.
The custom show will no longer be the show that is
presented. All slides, with the exception of those that are
hidden, will display during a slide show.
4. Click the OK button.
The Set Up Show dialog box is closed.
5. Go to slide 2.
Slide 2 appears.
6. Click the Hide Slide button in the Set Up group of the Slide
Show tab.
Slide 2 will no longer appear in the slide show.
7. Click the From Beginning button in the Start Slide Show
group.
Viewing the show verifies that slide 2 no longer appears in
the slide show.
8. Go to slide 5.
Slide 5 appears.
9. Click the Hide Slide button in the Set Up group of the Slide
Show tab.
Slide 5 will now appear in the slide show.
10. Go to slide 6.
Slide 6 appears.
11. Click the Hide Slide button in the Set Up group.
Slide 6 will now appear in the slide show.
12. Go to slide 7.
Slide 7 appears.
13. Click the Hide Slide button in the Set Up group.
Slide 7 will now appear in the slide show.
14. Click the From Beginning button in the Start Slide Show
group.
Viewing the show verifies that slides 5, 6, and 7 now appear
in the slide show. (Slide 2 is still hidden.)

PowerPoint 2007 Advanced Lesson 1 Creating Custom Slide Shows in PowerPoint 2007
P2K7A0913 Page 13
15. Save the presentation to your personal folder as My Easy
Nomad Travel 1.
The presentation is saved.
Before you move on: Close the presentation and exit
PowerPoint.

Unit 1 Custom Shows and Slide Shows PowerPoint 2007 Advanced
Page 14 P2K7A0913
LESSON REVIEW EXERCISE
Task
Objective: Creating a customized hyperlinked slide show,
making that slide show the main slide show, and hiding a slide.
Before you begin: Start PowerPoint and open Meeting 13 from
the Student Data Folder.
1. Click the Slide Show tab.
2. Click the Custom Slide Show button in the Start Slide Show
group.
3. Select Custom Shows in the Custom Slide Show menu.
4. Click the New button in the Custom Shows dialog box.
5. Enter Goals as a Slide show name.
6. Select and Add, in turn, slides 2, 4 and 8 to the Slides in
custom show pane.
7. Click the OK button.
8. Click the Close button in the Custom Shows dialog box.
9. On slide 1, select the text Goals for Next Period.
10. Click the Insert tab.
11. Click the Hyperlink button in the Links group.
12. Select Place in This Document in the Link to pane.
13. Scroll down Select a place in this document to access the
available custom shows, and then select Goals.
14. Select the Show and return checkbox.
15. Click the OK button.
16. Click the Slide Show tab.
17. Click the From Beginning button in the Start Slide Show
group.
18. On slide 1, click the Goals for Next Period hyperlink.
19. View the slide show.
20. Press Esc to exit the slide show.

PowerPoint 2007 Advanced Lesson 1 Creating Custom Slide Shows in PowerPoint 2007
P2K7A0913 Page 15
21. Click the Set Up Slide Show button in the Set Up group of
the Slide Show tab.
22. Click the Custom Show radio button.
23. Click the OK button.
24. On slide 2 (the Welcome slide), click the Hide Slide button
in the Set Up group of the Slide Show tab.
25. Click the From Beginning button in the Start Slide Show
group.
26. View the slide show.
27. Press Esc to exit the slide show.
28. Save the presentation to your personal folder as My Meeting
13.
Before you move on: Close the presentation and exit
PowerPoint.
Completed Slide 1 with hyperlink


LESSON 2 DELIVERING SLIDE SHOWS IN POWERPOINT 2007
In this lesson, you will learn how to:
Identify the options for writing on a slide during a
presentation
Turn on presenter view
Create a self-running presentation

Unit 1 Custom Shows and Slide Shows PowerPoint 2007 Advanced
Page 18 P2K7A0913
WRITING ON A SLIDE
Discussion
PowerPoint 2007 enables you to write on a slide using your mouse
pointer while a presentation is running.
You can underline, circle, or highlight elements to emphasize a
point. Or you can draw lines or arrows to illustrate connections
between elements.
You first click the Slide Show tab on the Ribbon.
On the Slide Show tab, you click the From Beginning button in the
Start Slide Show group to run the presentation.
Slide Show view, Slide Show toolbar
Slide Show toolbar with activated Pen Tool button

PowerPoint 2007 Advanced Lesson 2 Delivering Slideshows in PowerPoint 2007
P2K7A0913 Page 19
In Slide Show view, the presentation slide displays a Slide Show
toolbar in the bottom-left corner of the screen when you hover your
mouse over it.
Items of the Slide Show Toolbar
Item Description
Left arrow
You click the Left arrow button to go to
the previous slide in your presentation.
Pen Tool
PowerPoint enables you to write on your
slides during a slide show. To do this,
you first click Pen Tool to open a menu of
tools you can use. You can then write on
the slide or highlight elements of it using
various tools and colors while the slide
show is running. When you exit the slide
show, you can keep the writing on the
slides, or discard it.
The options in the Pen tool menu are:
Arrow, Ballpoint Pen, Felt Tip Pen,
Highlighter, Ink color, Eraser, Erase All
Ink on Slide, and Arrow Options.
Slide Show Menu
The Slide Show Menu button provides
options that enable you to end the show,
go to a specific slide, and darken or
lighten the screen.
You can also access this menu by right-
clicking anywhere on the slide when the
slide show is running.
Once you've viewed the slide show, you
end it by selecting End Show from the
Slide Show menu.
The options on the Slide show menu are:
Next, Previous, Last Viewed, Go To Slide,
Custom Show, Screen, help, Pause, End
Show.

Unit 1 Custom Shows and Slide Shows PowerPoint 2007 Advanced
Page 20 P2K7A0913
Items of the Slide Show Toolbar
Item Description
Right arrow
You click the Forward button to go to the
next slide in your presentation.
You can use the Slide Show toolbar to navigate through the
presentation, or to write on a slide.
Navigation Shortcut menu
To write on a slide, click the Pen Tool to display the Navigation
Shortcut menu.
Items of the Navigation Shortcut Menu
Item Description
Arrow
You select Arrow to use the mouse
cursor. The Arrow is selected by default.
Ballpoint Pen
You select Ballpoint Pen to draw fine
lines. The color of the ballpoint pen is
blue by default.
Felt Tip Pen
You select Felt Tip Pen to draw thick
lines. The color of the felt tip pen is red
by default.

PowerPoint 2007 Advanced Lesson 2 Delivering Slideshows in PowerPoint 2007
P2K7A0913 Page 21
Items of the Navigation Shortcut Menu
Item Description
Highlighter
You select Highlighter to draw broad,
semitransparent lines. The color of the
highlighter is yellow by default.
Ink Color
You select Ink Color to specify a pen
color. The Ink Color options list the most
suitable colors, based on the presentation's
theme. Alternatively, you can choose a
standard color.
Eraser
You select Eraser from the Pen options
menu to remove the markings.
Erase All Ink on
Slide
You select the Erase All Ink on Slide
option to remove all markings from the
slide.
Arrow Options
You select Arrow Options to define how
the mouse cursor appears onscreen. You
can show or hide the mouse cursor using
the Visible and Hidden options. The
Automatic option – selected by default –
specifies that the mouse cursor remains
hidden until you move the mouse.
The menu includes three pen styles in addition to ink colors and
mouse cursor options.
To draw the lines, you hold down the left mouse button and drag
the mouse cursor across the required section of the slide.
Once you have written on a slide, you can select the Eraser from
the Pen options menu to remove the markings.
Alternatively, you can remove all markings from the slide using the
Erase All Ink on Slide option.

Unit 1 Custom Shows and Slide Shows PowerPoint 2007 Advanced
Page 22 P2K7A0913
Procedures
Write on a slide
In Slide Show view, hover the mouse over the bottom-left
corner of the screen.
Click the Pen Tool button.
Select a pen style and an ink color.
Hold down the left mouse button and drag the dot across the
required section of the slide.
Retain all writing on a slide
Page Down past the last slide in the presentation.
Click to exit the presentation.
Click Keep.
Erase some writing from a slide
In Slide Show view, hover the mouse over the bottom-left
corner of the screen.
Click the Pen Tool button.
Select Eraser.
Hold down the left mouse button, drag Eraser to the writing
to be erased, and click the writing.
Erase all writing from a slide
In Slide Show view, hover the mouse over the bottom-left
corner of the screen.
Click the Pen Tool button.
Select Erase All Ink on Slide.
Erase writing from a slide after the presentation has been saved
Click the Review tab.

PowerPoint 2007 Advanced Lesson 2 Delivering Slideshows in PowerPoint 2007
P2K7A0913 Page 23
Click the down arrow on the Delete button.
Select Delete All Markup on the Current Slide.
Step-by-Step
Objective: Writing on a slide and erasing writing from a slide.
Before you begin: Start PowerPoint, and open Easy Nomad
Travel 2 from the Student Data Folder.
1. Click the Slide Show tab.
The Slide Show tab appears.
2. Click the From Beginning button in the Start Slide Show
group.
The slide show begins with the first slide.
3. Hover the mouse over the bottom-left corner of the first slide
in the slide show.
The Slide Show toolbar appears.
4. Click the Pen Tool in the Slide Show toolbar.
The Navigation Shortcut menu appears.
5. Select Ink Color, and then select the Green Standard Color.
The Pen Tool will write in green.
6. Click the Pen Tool again, and then select Felt Tip Pen.
The Felt Tip Pen will write in green.
7. Move the mouse to the vicinity of Summer Specials and
then hold down the left mouse button and drag the dot
around Summer Specials.
Summer Specials is encircled.
8. Similarly, encircle 2007 and then separately encircle
Jonathan Gold.
2007 and Jonathan Gold are encircled.
9. Page Down to the second slide, and then Page Up to the first
slide, and then click the Pen Tool button.
Eraser and Erase All Ink on Slide are enabled in the
Navigation Shortcut menu.
Unit 1 Custom Shows and Slide Shows PowerPoint 2007 Advanced
Page 24 P2K7A0913
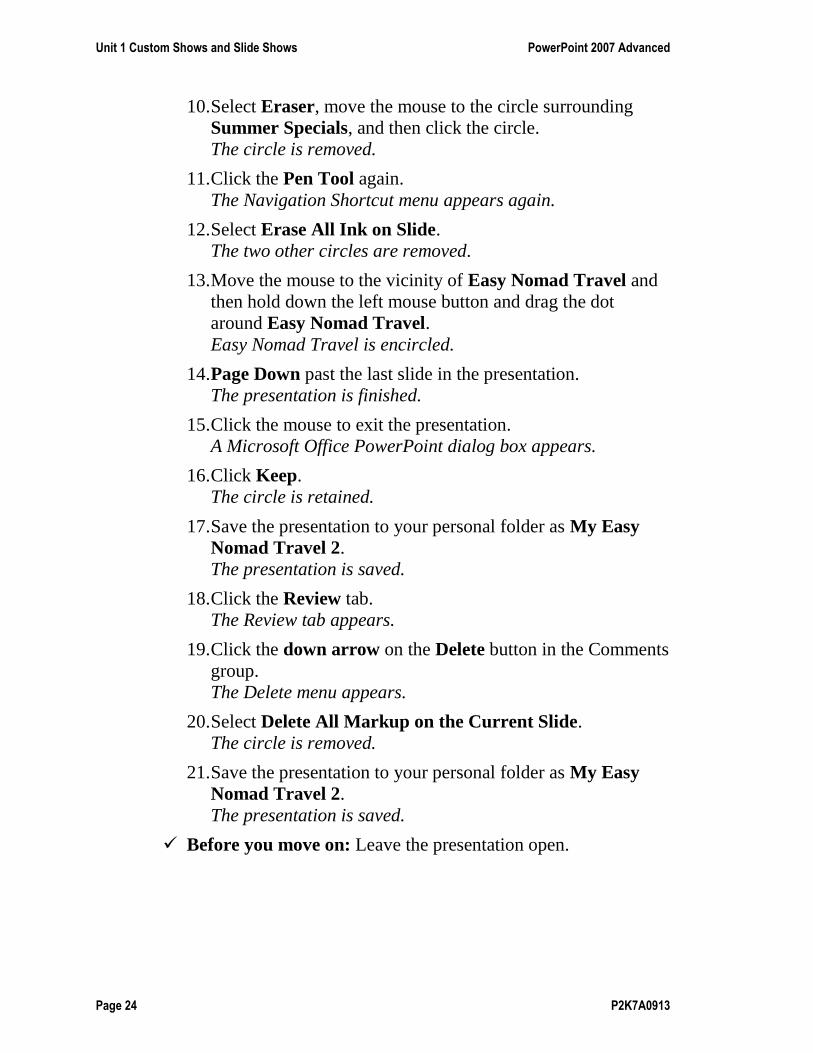
10. Select Eraser, move the mouse to the circle surrounding
Summer Specials, and then click the circle.
The circle is removed.
11. Click the Pen Tool again.
The Navigation Shortcut menu appears again.
12. Select Erase All Ink on Slide.
The two other circles are removed.
13. Move the mouse to the vicinity of Easy Nomad Travel and
then hold down the left mouse button and drag the dot
around Easy Nomad Travel.
Easy Nomad Travel is encircled.
14. Page Down past the last slide in the presentation.
The presentation is finished.
15. Click the mouse to exit the presentation.
A Microsoft Office PowerPoint dialog box appears.
16. Click Keep.
The circle is retained.
17. Save the presentation to your personal folder as My Easy
Nomad Travel 2.
The presentation is saved.
18. Click the Review tab.
The Review tab appears.
19. Click the down arrow on the Delete button in the Comments
group.
The Delete menu appears.
20. Select Delete All Markup on the Current Slide.
The circle is removed.
21. Save the presentation to your personal folder as My Easy
Nomad Travel 2.
The presentation is saved.
Before you move on: Leave the presentation open.

PowerPoint 2007 Advanced Lesson 2 Delivering Slideshows in PowerPoint 2007
P2K7A0913 Page 25
Slide Show view with Easy Nomad Travel circled
USING PRESENTER VIEW
Discussion
The PowerPoint 2007 Presenter View feature enables you to use a
second monitor for a presentation. You can view a slide show on
one monitor while you control it from another.
In Presenter View, the presenter has access to tools that are not
visible to the audience.
Presenter View offers the following features on the presenter's
monitor:
Unit 1 Custom Shows and Slide Shows PowerPoint 2007 Advanced
Page 26 P2K7A0913
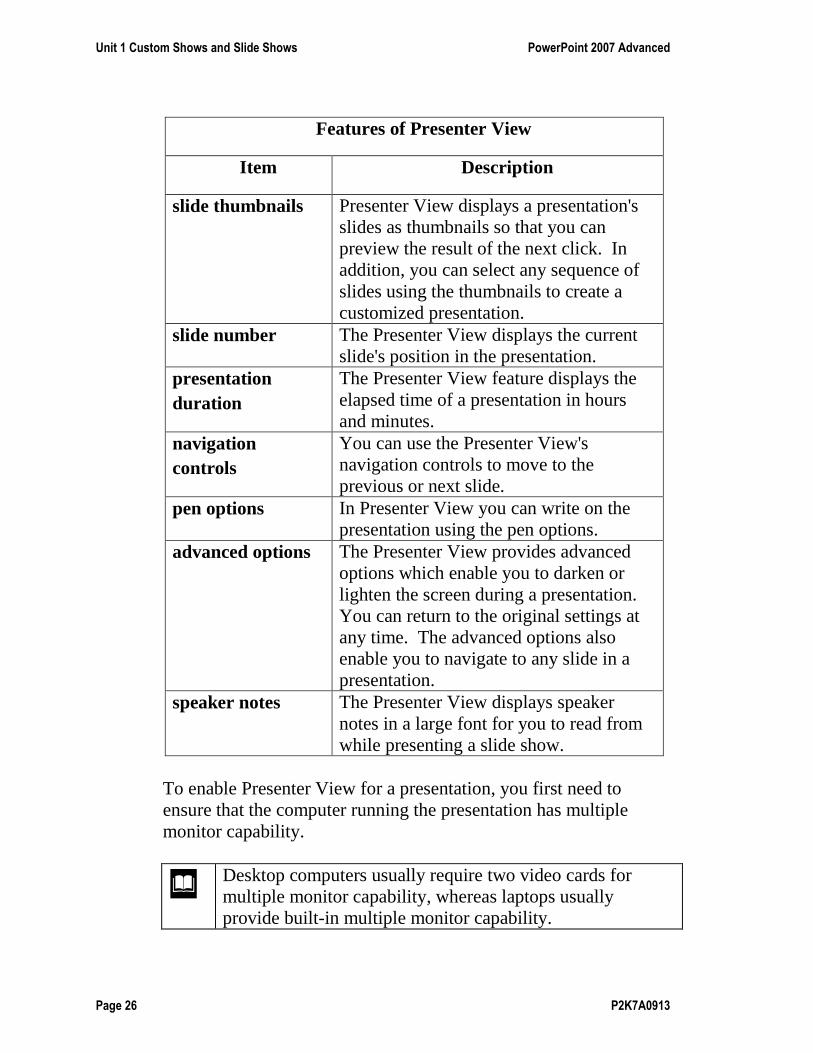
Features of Presenter View
Item Description
slide thumbnails Presenter View displays a presentation's
slides as thumbnails so that you can
preview the result of the next click. In
addition, you can select any sequence of
slides using the thumbnails to create a
customized presentation.
slide number The Presenter View displays the current
slide's position in the presentation.
presentation
duration
The Presenter View feature displays the
elapsed time of a presentation in hours
and minutes.
navigation
controls
You can use the Presenter View's
navigation controls to move to the
previous or next slide.
pen options In Presenter View you can write on the
presentation using the pen options.
advanced options The Presenter View provides advanced
options which enable you to darken or
lighten the screen during a presentation.
You can return to the original settings at
any time. The advanced options also
enable you to navigate to any slide in a
presentation.
speaker notes The Presenter View displays speaker
notes in a large font for you to read from
while presenting a slide show.
To enable Presenter View for a presentation, you first need to
ensure that the computer running the presentation has multiple
monitor capability.
Desktop computers usually require two video cards for
multiple monitor capability, whereas laptops usually
provide built-in multiple monitor capability.

PowerPoint 2007 Advanced Lesson 2 Delivering Slideshows in PowerPoint 2007
P2K7A0913 Page 27
Once you've determined that a computer has multiple monitor
capability, you need to enable it. You can then turn on Presenter
View in PowerPoint.
To enable Presenter View select the Use Presenter View checkbox
in the Monitors group of the Slide Show tab.
Procedures
Enable Presenter View
Click the Slide Show tab.
Select the Use Presenter View checkbox.
Select which monitor you want to display the slide show on
using the Display slide show on drop-down list.
Step-by-Step
Objective: Enabling Presenter View.
Before you begin: Start PowerPoint, and open My Easy
Nomad Travel 2 from your personal folder, if necessary.
1. Make sure that the computer that you are using for the
presentation has multiple monitor capability. (Most desktop
computers require two video cards for multiple monitor
capability, and many laptop computers have multiple monitor
capability built in.)
Presenter View can be used with the computer.
2. Attach a second monitor to the computer.
A second monitor can be used with the presentation.
3. Click the Slide Show tab.
The Slide Show tab appears.

Unit 1 Custom Shows and Slide Shows PowerPoint 2007 Advanced
Page 28 P2K7A0913
4. Select the Use Presenter View checkbox in the Monitors
group.
The Set Up dialog box appears.
5. Select Monitor 2 Generic Pnp Monitor in the Display slide
show on drop-down list, and then click OK.
The audience’s monitor is selected, and the presentation will
now display on two monitors.
6. Save the presentation to your personal folder as My Easy
Nomad Travel 2.
The presentation is saved.
Before you move on: Leave the presentation open.
SELF-RUNNING PRESENTATIONS
Discussion
A self-running presentation is a presentation that doesn't require a
presenter. For example, a presentation can be created to run
unattended in a booth or kiosk, or from a CD.
When creating a self-running presentation, you should consider the
purpose of the presentation and the environment it will be used in.
If a presentation is run in a public kiosk, for example, you may
want to make the controls unavailable to prevent misuse.
You can enable a user to control the pace of a self-running
presentation by including
Hyperlinks
Hyperlinks enable a user to navigate through a presentation, access
information such as tables and graphs, start applications, or connect
to the internet.
Action buttons
Action buttons are commonly-used symbols, such as arrows and
home buttons, which are hyperlinked to enable you to navigate

PowerPoint 2007 Advanced Lesson 2 Delivering Slideshows in PowerPoint 2007
P2K7A0913 Page 29
between slides. You can also use action buttons to play sound or
movie clips.
You can include a narrative sound clip for each slide, which plays
when you open it. To record a narrative, you need a sound card and
microphone.
If you don't want to allow the user to control the pace of a
presentation, you should use automatic timings. This ensures that
the presentation moves through the slides at a specified pace. You
can include narration that is synchronized with the automatic
timings.
To create a self-running presentation, click the Set Up Slide Show
button on the Set Up group of the Slide Show tab.
Set Up Show dialog box

Unit 1 Custom Shows and Slide Shows PowerPoint 2007 Advanced
Page 30 P2K7A0913
The Set Up Show dialog box contains Show type, Show options,
and Advance slides sections for you to define the self-running
presentation.
In the Show type section you specify the type of presentation.
Presentations are set up to be presented by a speaker by default.
Alternatively, you can specify that the presentation is browsed by a
user or at a kiosk.
The Show options section enables you to specify whether the
presentation restarts once it reaches the end, and whether narration
and animation are included. In addition, you can specify the default
pen color for writing during a live presentation.
In the Advance slides section you specify whether the presentation
uses automatic timings or user controls to move forward.
Procedures
Create a self-running presentation
Click the Set Up Slide Show button.
Select a Show type, select one of the Show options, select
how the computer will Advance slides, and then click OK.
Step-by-Step
Objective: Creating a self-running presentation.
Before you begin: Start PowerPoint, and open My Easy
Nomad Travel 2 from your personal folder, if necessary.
1. Click the Slide Show tab.
The Slide Show tab appears.
2. Click the Set Up Slide Show button on the Set Up group.
The Set Up Show dialog box appears.

PowerPoint 2007 Advanced Lesson 2 Delivering Slideshows in PowerPoint 2007
P2K7A0913 Page 31
3. Click the Browsed at a kiosk (full screen) radio button to
select the Show type.
The Show type is selected.
4. Select the Show without narration checkbox as the choice
of Show options.
No narrative is included in the presentation.
5. Click the Use Timings, if Present radio button to select the
way to Advance slides.
The viewer can now advance the slides.
6. Click the OK button.
A self-running presentation is created and the Set Up Show
dialog box is closed.
7. Save the presentation to your personal folder as My Easy
Nomad Travel 2.
The presentation is saved.
Before you move on: Close the presentation and exit
PowerPoint.
Unit 1 Custom Shows and Slide Shows PowerPoint 2007 Advanced
Page 32 P2K7A0913
LESSON REVIEW EXERCISE
Task
Objective: Enabling presenter view, writing on a slide, erasing
writing from a slide, and creating a self-running presentation.
Before you begin: Start PowerPoint and open Meeting 14 from
the Student Data Folder.
1. Make sure that the computer that you are using for the
presentation has multiple monitor capability.
2. Attach a second monitor to the computer.
3. Click the Slide Show tab.
4. Select the Use Presenter View checkbox in the Monitors
group.
5. Select Monitor 2 Generic Pnp Monitor in the Display slide
show on drop-down list, and then click OK.
6. Click the From Beginning button in the Start Slide Show
group.
7. Go to slide 2 and hover the mouse over the bottom-left
corner of the slide.
8. Click the Pen Tool in the Slide Show toolbar.
9. Select Ink Color, and then select the Blue Standard Color.
10. Click the Pen Tool again, and then select Felt Tip Pen.
11. Move the mouse to the vicinity of Jonathan Gold and then
hold down the left mouse button and drag the dot around
Jonathan Gold.
12. Similarly, encircle 2009.
13. Page Down to the third slide, and then Page Up to the
second slide, and then click the Pen Tool button.
14. Select Eraser, move the mouse to the circle surrounding
Jonathan Gold, and then click the circle.
15. Click the Pen Tool again.

PowerPoint 2007 Advanced Lesson 2 Delivering Slideshows in PowerPoint 2007
P2K7A0913 Page 33
16. Select Erase All Ink on Slide.
17. Move the mouse to the vicinity of Annual Meeting and then
hold down the left mouse button and drag the dot around
Annual Meeting.
18. Page Down past the last slide in the presentation.
19. Click the mouse to exit the presentation.
20. Click Keep.
21. Click the Slide Show tab.
22. Click the Set Up Slide Show button on the Set Up group.
23. Click the Browsed at a kiosk (full screen) radio button to
select the Show type.
24. Select the Show without narration checkbox as the choice
of Show options.
25. Click the Using timings, if present radio button to select the
way to Advance slides.
26. Click the OK button.
27. Save the presentation to your personal folder as My Meeting
14.
Before you move on: Close the presentation and exit
PowerPoint.

Unit 1 Custom Shows and Slide Shows PowerPoint 2007 Advanced
Page 34 P2K7A0913
Slide 2 with Annual Meeting encircled

LESSON 3 - CUSTOMIZING ELEMENTS IN SLIDE MASTER
In this lesson, you will learn how to:
Modify a Slide Master
Adding a theme to a Slide Master

Unit 1 Custom Shows and Slide Shows PowerPoint 2007 Advanced
Page 36 P2K7A0913
MODIFYING A SLIDE MASTER
Discussion
A Slide Master is used to apply the same formatting to all slides in
a presentation. In Microsoft PowerPoint 2007, you can use a
Slide Master to give your presentation a consistent appearance.
The three types of Master Views in PowerPoint are: Slide,
Handout, and Notes. These views allow you to apply the same
formatting to various aspects throughout a presentation.
In Slide Master View, you can make changes in any of the slide
areas. You can modify the: Date, Footer, or Number areas, the
Title Area or the Object Area placeholders. Formatting changes
made to a Slide Master will appear in all slides based on that Slide
Master.
To modify the formatting in a Slide Master, you open Slide
Master View. Then, on the Slide Master slide that appears in the
slides pane when in Slide Master View, you select the item (text,
placeholder, etc.) that you want to modify.
To modify the font, you select the text. Then click the Home tab
and select the formatting options from the Font section.
Likewise, to modify bullets or numbering, you select the level of
text in the appropriate placeholder. Then, click the Home tab and
select options from the Bullets or Numbering dropdown lists in
the Paragraph section.
You can also modify the Slide Master by using the
contextual Drawing Tools Format tab that appears when
an item in the work area has been selected.

PowerPoint 2007 Advanced Lesson 3 Customizing Elements in Slide Master
P2K7A0913 Page 37
Slide Master
Area Description
Title Area The Title Area is located at the top of the slide.
You can change the attributes of the title text
(font type, font size, alignment, style, etc.), as
well as the attributes of the Title Area (fill, line,
shadow, placement, etc.). If desired, you can
insert objects such as clip art into the Title Area.
Object Area The Object Area is located below the Title Area
and controls the formatting for the body of all
slides. You can change text attributes (font type,
font size, alignment, style, etc.), as well as the
attributes of the Object Area (fill, line, shadow,
placement, etc.). You can format each text level
with different attributes. If desired, you can insert
objects such as clip art into the Object Area.
Date Area The Date Area is located in the lower left corner
of the slide. You can change the look and position
of the date. You can specify that the date and
time are automatically updated each time the
presentation is opened, or you can enter a fixed
date and time. In addition, you can choose
whether or not to display the time and date on
the title slide.
Footer Area The Footer Area is located in the lower center of
the slide. You can change the look and position of
the footer. You can choose whether or not to
display the footer text on the title slide.
Number Area The Number Area is located in the lower right
corner of the slide. You can change the position
of the slide numbering, as well as the format of
the numbers. You can choose whether or not to
display the slide number on the title slide.

Unit 1 Custom Shows and Slide Shows PowerPoint 2007 Advanced
Page 38 P2K7A0913
Slide Master View with the Slide Master slide selected
You can also apply one or more image files to a Slide
Master. The image will then appear on each slide of the
presentation (useful for logos, trademarks, seals, etc.)
Procedures
Modifying the Slide Master
Click the View tab
Click the Slide Master button in the Presentation Views
section
Select the Slide Master slide (you will apply the
modifications to this slide)
Select the appropriate placeholder or text to modify in the
work area
Click the Home tab

PowerPoint 2007 Advanced Lesson 3 Customizing Elements in Slide Master
P2K7A0913 Page 39
Select the appropriate options from the Font or Paragraph
sections
Or
Click the contextual Drawing Tools Format tab to select
other formatting options
Click Close Master View on the Slide Master tab
Step-by-Step
Objective: Modifying the Slide Master.
Before you begin: Open World 15 from your Student Data
folder. Select slide 1, if necessary.
1. Click the View tab.
The View tab options appear.
2. Click the Slide Master button in the Presentation Views
section.
A Master Slide appears above Slide 1 in the presentation and
the Slide Master contextual tab appears. The presentation is
in Slide Master View.
3. Select the Slide Master slide (in the thumbnails pane. This
will now be slide 1).
The Slide Master slide is selected.
4. Select the text in the Title placeholder.
The text is selected.
5. Click the Home tab.
The Home tab options appear.
6. In the Font section select Antique Olive, Bold, and 36pt
formatting options.
The options are selected.
7. Select the Object Area placeholder.
The entire placeholder is selected.
8. On the Home tab click the Bullets dropdown arrow in the
Paragraph section.
The Bullets dropdown list appears.

Unit 1 Custom Shows and Slide Shows PowerPoint 2007 Advanced
Page 40 P2K7A0913
9. Select any bullet style.
The chosen bullet style replaces the previous style.
Before you move on: Click the Slide Master tab and click
Close Master View. View each slide in the presentation and
note your formatting changes. Save the presentation to your
Personal folder as MyModifications and leave it open.
ADDING A THEME TO A SLIDE MASTER
Discussion
Microsoft PowerPoint 2007 allows users to apply themes (layouts
that contain colors, fonts, and effects) to a presentation. You can
preview, apply, and edit themes by using the Edit Theme section
on the Slide Master tab. The Themes button displays a gallery of
Built-In and Custom themes for you to choose from. You can
customize a theme by using any of the dropdown menu options to
the right of the Themes button: Colors, Fonts, and Effects and
save it to the themes gallery.
Themes gallery

PowerPoint 2007 Advanced Lesson 3 Customizing Elements in Slide Master
P2K7A0913 Page 41
To apply a theme change to Slide Master View and click the
Theme button in the Edit Theme section. Hover over the themes
in the gallery for a preview of each. Then choose from either the
Built-In themes or choose an existing theme that you modified and
saved under Custom. Next, click the desired theme to apply it to
your presentation.
You can also modify an existing theme by applying the
theme to you presentation and making changes in Slide
Master View.
Procedures
Adding a Theme to a Slide Master
Click the View
Click the Slide Master button in the Presentation Views
section
Select the Slide Master slide
Click the Themes button in the Edit Theme section
Click either a Built-In theme or Custom theme from the
gallery
Step-by-Step
Objective: Adding a theme.
Before you begin: MyModifications should be open from the
previous exercise. Select slide 1, if necessary.
1. Click the View tab.
The View tab options appear.
2. Click the Slide Master button in the Presentation Views
section.
The presentation is now in Slide Master View.

Unit 1 Custom Shows and Slide Shows PowerPoint 2007 Advanced
Page 42 P2K7A0913
3. Select the Slide Master slide.
The Slide Master slide is selected.
4. Click Themes in the Edit Theme section.
A gallery of options appears.
5. Locate the Aspect theme and click it.
The Aspect theme is added to the presentation.
6. Click Close Master View on the Slide Master tab.
The Slide Master is updated.
Before you move on: Resave and close the presentation.

PowerPoint 2007 Advanced Lesson 3 Customizing Elements in Slide Master
P2K7A0913 Page 43
LESSON REVIEW EXERCISE
Task
Objective: Create and modify a theme in Slide Master.
Before you begin: Open Meeting 17 from the Student Data
Folder.
1. Switch to Slide Master View.
2. Apply the Flow theme to the presentation.
3. Format the Slide Master title as Arial, 32pt, and Bold.
4. Format the bullets in the Object Area placeholder to a style
of your choice.
5. Close Slide Master View.
6. View each slide of the presentation.
Before you move on: Save the presentation as Meeting 15
Theme to your Personal folder and close the presentation.


PowerPoint 2007 Advanced Unit 1 Independent Practice Activity
P2K7A0913 Page 45
INDEPENDENT PRACTICE ACTIVITY
Task
Objective: Using custom shows and slide shows.
Before you begin: Start PowerPoint and open World 13 from
the Student Data Folder.
1. Make sure that the computer that you are using for the
presentation has multiple monitor capability.
2. Attach a second monitor to the computer.
3. Click the Slide Show tab.
4. Select the Use Presenter View checkbox in the Monitors
group.
5. Select Monitor 2 Generic Pnp Monitor in the Display slide
show on drop-down list, and then click OK.
6. Click the Custom Slide Show button in the Start Slide Show
group.
7. Select Custom Shows in the Custom Slide Show menu.
8. Click the New button in the Custom Shows dialog box.
9. Enter Customers as a Slide show name.
10. Select and Add, in turn, slides 1, 2, 3, 5, 6, 7 and 8 to the
Slides in custom show pane.
11. Click the OK button.
12. Click the Close button in the Custom Shows dialog box.
13. Go to slide 2.
14. Click the Insert tab.
15. Select the text Partnership.
16. Click the Hyperlink button in the Links group.
17. Select Place in This Document in the Link to pane.
18. Scroll down Select a place in this document to access the
available custom shows, and then select Customers.

Unit 1 Custom Shows and Slide Shows PowerPoint 2007 Advanced
Page 46 P2K7A0913
19. Select the Show and return checkbox.
20. Click the OK button.
21. Click the Slide Show tab.
22. Click the From Beginning button in the Start Slide Show
group.
23. On slide 2, click the Partnership hyperlink.
24. Press Esc twice to exit the slide show.
25. Click the Set Up Slide Show button in the Set Up group of
the Slide Show tab.
26. Select the Custom show radio button in the Show slides
section.
27. Select Customers from the Custom show drop-down list.
28. Click the OK button.
29. Go to slide 8.
30. Click the Hide Slide button in the Set Up group of the Slide
Show tab.
31. Go to slide 1.
32. Click the From Beginning button in the Start Slide Show
group.
33. Hover the mouse over the bottom-left corner of the first slide
in the slide show.
34. Click the Pen Tool in the Slide Show toolbar.
35. Select Ink Color, and then select the Green Standard Color.
36. Click the Pen Tool again, and then select Felt Tip Pen.
37. Use the Pen Tool to write Presenter? under Worldwide
Sporting Goods.
38. Page Down past the last slide in the presentation.
39. Click the mouse to exit the presentation.
40. Click Keep.
41. Click the Set Up Slide Show button on the Set Up group.
42. Click the Browsed at a kiosk (full screen) radio button to
select the Show type.

PowerPoint 2007 Advanced Lesson 3 Customizing Elements in Slide Master
P2K7A0913 Page 47
43. Select the Show without narration checkbox as the choice
of Show options.
44. Click the Manually radio button to select the way to
Advance slides.
45. Click the OK button.
46. Save the presentation to your personal folder as My World
13.
Before you move on: Close the presentation and exit
PowerPoint.
Slide 1 with Presenter? added


UNIT 2 PROTECTING AND DISTRIBUTING PRESENTATIONS
The following lessons are contained in Unit 2:
Lesson 1 Securing and Printing Presentations in
PowerPoint 2007
Lesson 2 Distributing Presentations in PowerPoint
2007


LESSON 1 SECURING AND PRINTING PRESENTATIONS IN POWERPOINT 2007
In this lesson, you will learn how to:
Secure a presentation in PowerPoint 2007
Print a PowerPoint slide show
Unit 2 Protecting and Distributing Presentations PowerPoint 2007 Advanced
Page 52 P2K7A0913
PASSWORD PROTECTING A PRESENTATION
Discussion
After you've finalized and saved a presentation in Microsoft
PowerPoint 2007, you should secure the presentation to prevent
anyone else from making changes to it.
The security features you can apply to a PowerPoint presentation
include setting a password to
Open the presentation
To prevent unauthorized access to the final presentation, you set a
password that is required to open the presentation. This password
encrypts the presentation's file settings with a public key.
PowerPoint opens the presentation only when the valid password is
entered by a user. Users can then modify the presentation once it's
opened.
Modify the presentation
You can set a password so that only authorized users can edit the
presentation. Users can still open the presentation, but it will be a
read-only. This security feature doesn't encrypt the file; it only
protects the presentation's content from modification.
When you define a password for a presentation, remember
to use strong passwords that combine uppercase and
lowercase letters, numbers, and symbols. It's important to
remember the password because it can't be retrieved or
reset if you forget it.

PowerPoint 2007 Advanced Lesson 1 Securing and Printing Presentations in PowerPoint 2007
P2K7A0913 Page 53
Microsoft Office menu
You specify a password for a presentation when you save it. So
you first need to open the Save As dialog box. To do this, you click
the Microsoft Office button to open the menu and click the Save As
button to select it.

Unit 2 Protecting and Distributing Presentations PowerPoint 2007 Advanced
Page 54 P2K7A0913
Save As dialog box
The Save As dialog box includes a Tools drop-down menu. Select
General Options from this menu to enter a password. The General
Options dialog box enables you to define file encryptions and file
sharing settings for the presentation, as well as any privacy options
and macro security settings.
General Options dialog box

PowerPoint 2007 Advanced Lesson 1 Securing and Printing Presentations in PowerPoint 2007
P2K7A0913 Page 55
The General Options dialog box has a Password to open text box
and a Password to modify text box. The Privacy options section
contains a Remove automatically created personal information from
this file on save checkbox.
To prevent unauthorized users from opening the presentation, type
a password in the Password to open text box. Then click OK.
The password you specify displays as dots in the text box.
This is an added security feature that prevents anybody else
from reading the password while you are typing it.
The Confirm Password dialog box opens. Retype the password you
provided and click OK. You are then returned to the Save As
dialog box.
After you have set and confirmed the password to open, you need
to save the presentation. If you want the protected version to be the
only one available, you need to save this version over the existing
one. To do this, click the Save button to accept the existing file
name and location.
To delete a password that has been set, you need to open the
presentation and then access the General Options dialog box from
the Save As dialog box.
Procedures
Protect a presentation by adding a password
Click the Microsoft Office button, and then click the Save As
button. (The keyboard alternative to open the Save As dialog
box is Alt+F, A or F12.)
Click the Tools drop-down button.
Select General Options.
Enter a Password to open, and then click OK.
Reenter password to open, and then click OK.

Unit 2 Protecting and Distributing Presentations PowerPoint 2007 Advanced
Page 56 P2K7A0913
Click the Save button.
Click the Yes button.
Open a presentation that has been protected by a password
Mouse
Click the Microsoft Office button.
Click the Open button.
Click the presentation in the Documents folder, and then
click Open.
Enter password to open file, and then click OK.
Keyboard
Press Alt+F.
Press O.
Use the Tab key to select the desired presentation in the
Documents folder.
Press Enter.
Enter password to open file.
Press Enter.
Remove a password from a presentation
Click the Microsoft Office button.
Click the Save As button.
Click the Tools drop-down button.
Select General Options.
Clear the Password to open textbox, and then click OK.
Click the Save button.
Click the Yes button.

PowerPoint 2007 Advanced Lesson 1 Securing and Printing Presentations in PowerPoint 2007
P2K7A0913 Page 57
Step-by-Step
Objective: Protecting a presentation, closing the presentation,
reopening the presentation, and then removing the password.
Before you begin: Start PowerPoint, and open Easy Nomad
Travel 3 from the Student Data Folder.
1. Click the Microsoft Office button.
The Microsoft Office menu appears.
2. Click the Save As button.
The Save As dialog box appears.
3. Change the File name to My Easy Nomad Travel 3.
The file name is changed.
4. Click the Tools drop-down button.
The Tools drop-down menu appears.
5. Select General Options.
The General Options dialog box appears.
6. Enter a Password to open, and then click OK.
The Reenter password to open dialog box appears.
7. Reenter password to open, and then click OK.
The Reenter password to open dialog box is closed.
8. Click the Save button in the Save As dialog box.
The Confirm Save As dialog box appears.
9. Click Yes in the Confirm Save As dialog box.
The Confirm Save As dialog box is closed, and the
presentation is now saved with a password.
10. Click the Microsoft Office button.
The Microsoft Office menu appears.
11. Click the Close button.
The presentation is closed.
12. Click the Microsoft Office button.
The Microsoft Office menu appears.
13. Click the Open button.
The Open dialog box appears.

Unit 2 Protecting and Distributing Presentations PowerPoint 2007 Advanced
Page 58 P2K7A0913
14. Select the presentation in the Student Data Folder, and then
click Open.
The Password dialog box appears.
15. Enter password to open file, and then click OK.
The presentation is opened.
16. Click the Microsoft Office button.
The Microsoft Office menu appears.
17. Click the Save As button.
The Save As dialog box appears.
18. Click the Tools drop-down button.
The Tools drop-down menu appears.
19. Select General Options.
The General Options dialog box appears.
20. Clear the Password to open textbox, and then click OK.
The password is removed from the presentation and the
General Options dialog box is closed.
21. Click Save in the Save As dialog box.
The Confirm Save As dialog box appears.
Before you move on: Leave the presentation open.
DIGITALLY SIGNING A PRESENTATION
Discussion
A digital signature is an electronic stamp that you can add to a
PowerPoint presentation to confirm the authenticity of both the
author and the presentation itself.
Microsoft Office has two types of digital signatures:
Visible digital signature
To add a visible signature, you insert a signature line in the
document and attach either an image of your signature to the line or
manually sign on the line after the document is printed. You can

PowerPoint 2007 Advanced Lesson 1 Securing and Printing Presentations in PowerPoint 2007
P2K7A0913 Page 59
add visible signatures only to other Office applications, such as
Microsoft Word.
Invisible digital signature
When you add an invisible digital signature to a presentation,
Microsoft Office attaches a security certificate, created from your
digital ID, to the presentation. You can create your own digital ID
or you can buy a security certificate from a third-party signature
provider. A certificate from a third-party authority offers a greater
level of assurance than a digital ID because the authority has
verified the presentation and its owner.
You can add only an invisible digital signature to a PowerPoint
presentation. When you've signed the presentation, it becomes
read-only to prevent modifications. Because the signature is based
on the content of the presentation, if you edit the presentation after
you've signed it, you invalidate the signature.
To digitally sign the presentation, you first need to create your
digital ID. To do that, click the Microsoft Office button and select
Prepare - Add a Digital Signature.
Microsoft Office's digital signature feature may not comply with
your country's jurisdiction regarding digital signatures. It gives you
the option to use a third-party signature provider or create your own
digital ID.
Get a Digital ID dialog box
In the Get a Digital ID dialog box, you specify whether you want to
get a digital ID from a Microsoft partner or whether you want to
create your own digital ID.
If you're always going to use your own digital ID to create
the digital signature, you can select the checkbox to ensure
that this message doesn't show again.

Unit 2 Protecting and Distributing Presentations PowerPoint 2007 Advanced
Page 60 P2K7A0913
Create your own ID by specifying the name of your organization
and its location. Your name and e-mail address are added
automatically.
Sign dialog box
The last step for adding a digital signature is to explain why the
presentation is being signed.
You can view a signature's details and find out whether the
presentation has been modified since being signed by selecting
Signature Details.
To delete the signature from the presentation, you select Remove
Signature.
To close the Signatures pane, you click the Close button on the
pane.
Because the presentation is signed, a signature icon appears on the
status bar. The icon displays on the status bar regardless of the
view you're in. You click this icon to open the Signature pane
again. All valid signatures in the presentation are listed in the
Signatures pane.
To manage the signature, you hover the mouse cursor over the
signature and open the drop-down list.
Any edits made going forward will invalidate the signature.

PowerPoint 2007 Advanced Lesson 1 Securing and Printing Presentations in PowerPoint 2007
P2K7A0913 Page 61
Procedures
Add an invisible digital signature to a presentation
Click the Microsoft Office button.
Click the Prepare button.
Select Add a Digital Signature. (The keyboard alternative to
add a digital signature is Alt+F, E, S.)
Click the OK button.
Select Create your own digital ID, and then click OK.
Enter an Organization and Location, and then click Create.
Enter the Purpose for signing this document, and then click
Sign.
Step-by-Step
Objective: Adding an invisible digital signature to a
presentation.
Before you begin: Start PowerPoint, and open My Easy
Nomad Travel 3 from your personal folder, if necessary.
1. Click the Microsoft Office button.
The Microsoft Office menu appears.
2. Click the Prepare button.
The Prepare menu appears.
3. Select Add a Digital Signature.
The Microsoft Office PowerPoint dialog box appears.
4. Click the OK button.
The Get a Digital ID dialog box appears.
5. Select Create your own digital ID, and then click OK.
The Create a Digital ID dialog box appears.
6. Enter Easy Nomad Travel as an Organization and New
York City as a Location, and then click Create.
The Sign dialog box appears.

Unit 2 Protecting and Distributing Presentations PowerPoint 2007 Advanced
Page 62 P2K7A0913
7. Enter Presentation Complete as the Purpose for signing
this document, and then click Sign.
The Sign dialog box is closed, and the signature is added to
the presentation.
8. Save the presentation to your personal folder as My Easy
Nomad Travel 3.
The presentation is saved.
Before you move on: Leave the presentation open.
Sign dialog box with the purpose entered
PRINTING A PRESENTATION
Discussion
When you print a presentation, you can print the entire presentation
or specify certain slides. You can also choose to print notes pages,
outlines, and handouts.
To print the presentation you have opened you need to access
PowerPoint's printing options.

PowerPoint 2007 Advanced Lesson 1 Securing and Printing Presentations in PowerPoint 2007
P2K7A0913 Page 63
Print menu
You click the Microsoft Office button and hover the mouse cursor
over the Print option to open the Print menu. (The keyboard
alternative to open the Print submenu is Alt+F, P.)
The Print submenu has three printing options.
Three Printing Options
Item Description
Print You select Print to open the Print dialog
box, where you can specify options such
as the printer used and the number of
copies printed.

Unit 2 Protecting and Distributing Presentations PowerPoint 2007 Advanced
Page 64 P2K7A0913
Three Printing Options
Item Description
Quick Print You select Quick Print to send the
presentation directly to the default printer
without setting or changing any printing
options.
Print Preview You select Print Preview for a preview of
how the presentation will look when it's
printed. To do this, you select Print
Preview in the Print submenu. (The
keyboard alternative to open Print
Preview is Alt+F, P, V.)
A preview of the currently selected slide
in the presentation appears. The Print
Preview tab replaces all other tabs on the
Ribbon. All options on the Ribbon relate
to printing options only and don't affect
the presentation's properties.
Print Preview tab
If you select Print Preview, the Print Preview tab replaces all other
tabs on the Ribbon. All options on the Ribbon relate to printing
options only and don't affect the presentation's properties.

PowerPoint 2007 Advanced Lesson 1 Securing and Printing Presentations in PowerPoint 2007
P2K7A0913 Page 65
Groups of the Print Preview Tab
Item Description
Print The Print group contains the Print and
Options buttons. You click Print to set
printing options and print the
presentation. You click Options to edit
headers and footers, scale the slides to fit
to the printer's paper size, and set frame
slides and the printing order. You also set
the color scheme in color, black and
white, or grayscale. Grayscale prints
color images in a range of gray tones.
Page Setup You choose what to print in the Page
Setup group. You can switch between
different views to check how slides,
handouts, notes pages, and the outline
view will print. For handouts, you can
choose one, two, three, four, six, or nine
slides to a page. You can also set the
page orientation to landscape to print the
slides in wide format, or to portrait so that
slides are orientated taller rather than
wider. By default, slides orientate to
landscape, and notes and handouts to
portrait.
Zoom The Zoom group contains a Zoom button,
which you click to enlarge the previewed
slide. Once you've zoomed in, you can
use vertical and horizontal scroll bars to
focus on different sections of the slide.
To zoom back out, you click the Zoom
button again.
Preview You click the Next Page and Previous
Page buttons in the Preview group to
navigate through each slide and view how
it will look when printed. You click the
Close Print Preview button to exit Print
Preview.

Unit 2 Protecting and Distributing Presentations PowerPoint 2007 Advanced
Page 66 P2K7A0913
Print dialog box
Any printing options you've set in the Preview pane are the default
options in the Print dialog box. You can change these printing
options. Alternatively, if you didn't set printing options before, you
can now set them.
Various Printing Options
Item Description
Printer The default printer is listed in the Printer
section. You can specify an alternative
printer in the Name drop-down list. You
can also select Print to file to create a
printer-readable version of the
presentation. You click the Properties
button to access options for changing the
selected printer's properties. You click
the Find Printer button to find and use
another printer.

PowerPoint 2007 Advanced Lesson 1 Securing and Printing Presentations in PowerPoint 2007
P2K7A0913 Page 67
Various Printing Options
Item Description
Print range The Print range section contains the
options to print all slides, the currently
selected slides, slides specified in a range,
or a custom show. The All radio button is
selected by default.
Copies You specify how many copies to print in
the Copies section. This section also
enables you to collate your printing. By
selecting Collate, each consecutive slide
prints before the copies of the slide are
printed. You can then print multiple
copies of the presentation without sorting
the printed slides afterwards.
Print what The Print what section enables you to
specify what you want to print – the entire
presentation, notes, or handouts. You can
also specify the printing color to use.
Handouts If you want to print handouts, you specify
how many slides per page to print on each
handout. You do this by setting the Slides
per page option in the Handouts section.
You can also specify how the slides are
ordered on the handouts.
Printing options The various printing options include
scaling the slides to the printer's paper
size, setting frame slides, printing hidden
comments and slides, and setting the
quality of the print job.
Preview In addition to print options, the Print
dialog box includes a Preview button.
You can click this button to open a print
preview of the presentation.
You accept the printing options set in the Print dialog box and click
OK. The presentation is sent to the default printer and is printed.
When you've previewed and printed the presentation, you close the
preview by clicking the Close Print Preview button in the Preview

Unit 2 Protecting and Distributing Presentations PowerPoint 2007 Advanced
Page 68 P2K7A0913
group. (The keyboard alternative for closing the Print Preview is
Esc.)
You then return to the presentation.
Procedures
Print notes in grayscale
Click the Microsoft Office button.
Hover the mouse cursor over the Print option.
Select Print Preview.
Click the down-arrow at the right of the Print What drop-
down menu in the Page Setup group.
Select Notes Pages.
Click the Options button.
Select Color/Grayscale.
Select Grayscale.
Click the Print button. (The keyboard alternative for opening
the Print dialog box is Ctrl+P.)
Click the OK button.
Step-by-Step
Objective: Printing notes in grayscale.
Before you begin: Start PowerPoint, and open My Easy
Nomad Travel 3 from your personal folder, if necessary.
1. Click the Microsoft Office button.
The Microsoft Office menu appears.
2. Hover the mouse cursor over the Print option.
The Print menu appears.

PowerPoint 2007 Advanced Lesson 1 Securing and Printing Presentations in PowerPoint 2007
P2K7A0913 Page 69
3. Select Print Preview.
The Print Preview tab appears, and all other tabs are closed.
4. Click the down-arrow at the right of the Print What
drop-down menu in the Page Setup group.
The Print What drop-down menu appears.
5. Select Notes Pages.
Notes pages will print.
6. Click the Options button in the Print group.
The Options Menu appears.
7. Select Color/Grayscale.
The Color/Grayscale submenu appears.
8. Select Grayscale.
Grayscale is selected, and the menus are closed.
9. Click the Print button in the Print group.
The Print dialog box appears.
10. Select the Slides radio button in the Print range section, and
then enter 2 in the textbox.
Slide 2 is now the only slide that will print.
11. Click the OK button.
The Print dialog box is closed, and slide 2 is printed in Notes
Pages style.
12. Save the presentation to your personal folder as My Easy
Nomad Travel 3.
The presentation is saved.
Before you move on: Close the presentation and exit
PowerPoint.

Unit 2 Protecting and Distributing Presentations PowerPoint 2007 Advanced
Page 70 P2K7A0913
LESSON REVIEW EXERCISE
Task
Objective: Securing and printing a presentation.
Before you begin: Start PowerPoint and open Meeting 15 from
the Student Data Folder.
1. Click the Microsoft Office button.
2. Click the Save As button.
3. Change the File name to My Meeting 15.
4. Make sure that the folder to which your presentation will be
saved is your personal folder.
5. Click the Tools drop-down button.
6. Select General Options.
7. Enter advanced as a Password to open.
8. Click OK.
9. Reenter password to open.
10. Click OK.
11. Click the Save button in the Save As dialog box.
12. Click the Microsoft Office button.
13. Click the Close button.
14. Click the Microsoft Office button.
15. Click the Open button.
16. Select My Meeting 15 in the Student Data Folder, and then
click Open.
17. Enter password to open file.
18. Click OK.
19. Click the Microsoft Office button.
20. Click the Prepare button.
21. Select Add a Digital Signature.
22. Click the OK button.

PowerPoint 2007 Advanced Lesson 1 Securing and Printing Presentations in PowerPoint 2007
P2K7A0913 Page 71
23. Enter advanced as the Purpose for signing this document,
and then click Sign.
24. Click OK.
25. Click the Microsoft Office button.
26. Hover the mouse cursor over the Print option.
27. Select Print Preview.
28. Click the down-arrow at the right of the Print What
drop-down menu in the Page Setup group.
29. Select Outline View.
30. Click the Options button in the Print group.
31. Select Color/Grayscale.
32. Select Grayscale.
33. Click the Print button in the Print group.
34. Select the Slides radio button in the Print range section, and
then enter 1 in the textbox.
35. Click the OK button.
36. Save the presentation to your personal folder as My Meeting
15.
Before you move on: Close the presentation and exit
PowerPoint.


LESSON 2 DISTRIBUTING PRESENTATIONS IN POWERPOINT 2007
In this lesson, you will learn how to:
Distribute a PowerPoint presentation

Unit 2 Protecting and Distributing Presentations PowerPoint 2007 Advanced
Page 74 P2K7A0913
PUBLISHING A PRESENTATION TO THE WEB
Discussion
Microsoft PowerPoint 2007 enables you to distribute your
presentation by
publishing it as a web page
attaching it to an e-mail
packaging it for a CD
PowerPoint enables you to save and publish your finalized
presentation as a web page so that you can share and view the
presentation via the internet or a company intranet.
When you publish a presentation, you can save it locally to your
computer. You then view it using a web browser, such as Internet
Explorer.
Alternatively, you can save the presentation directly to a web
server. You then view the presentation by typing in the URL, or
web site address, in a web browser. Because the presentation will
be publicly accessible in this way, you need to secure it.
A web server is a computer that hosts web sites.
Before you publish a presentation for viewing in a web browser,
you need to save the presentation as either a
Single file web page
If you save the presentation as a single file web page, PowerPoint
integrates the presentation and all supporting files into a single file.
Having one file contain the whole presentation makes it easier to
move it to another computer for display.
Web page
If you save the presentation as a web page, PowerPoint converts the
presentation into a Hypertext Markup Language (HTML) page. It
also creates an associated folder that contains all the supporting

PowerPoint 2007 Advanced Lesson 2 Distributing Presentations in PowerPoint 2007
P2K7A0913 Page 75
files needed to display the presentation as a web page. This
includes files for images, sounds, formatting styles such as bullets,
and background textures. These files are linked to the presentation.
Publishing as a web page in this format is useful if you plan on
showing the presentation on the internet.
Save As menu
To publish a presentation to the company intranet, first save the
presentation as a web page locally to your computer's hard drive.
Then, in the Save As dialog box, specify a location where you want
to save the presentation as a web page.
To change the published presentation's name so that it's
different from the original presentation's name, you type a
new name in the File name text box.

Unit 2 Protecting and Distributing Presentations PowerPoint 2007 Advanced
Page 76 P2K7A0913
Save As dialog box (expanded)
When you've selected Web Page as the file type, the Save As dialog
box expands to show the options to enable you to change the
presentation's title and publish the presentation.
Set Page Title dialog box
You now need to set the presentation's title that will display in the
web browser. You change this default name by clicking the
Change Title button in the Save As dialog box. In the Set Page
Title dialog box, you type the presentation's title in the Page title
text box and click OK.
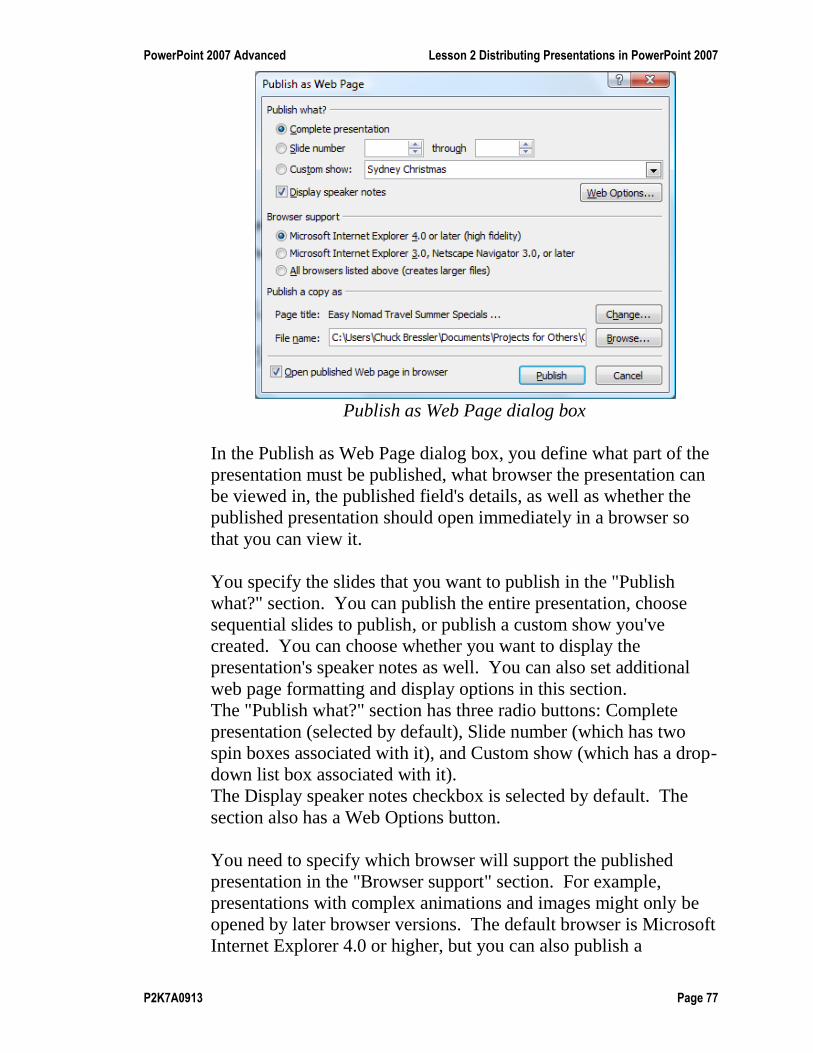
PowerPoint 2007 Advanced Lesson 2 Distributing Presentations in PowerPoint 2007
P2K7A0913 Page 77
Publish as Web Page dialog box
In the Publish as Web Page dialog box, you define what part of the
presentation must be published, what browser the presentation can
be viewed in, the published field's details, as well as whether the
published presentation should open immediately in a browser so
that you can view it.
You specify the slides that you want to publish in the "Publish
what?" section. You can publish the entire presentation, choose
sequential slides to publish, or publish a custom show you've
created. You can choose whether you want to display the
presentation's speaker notes as well. You can also set additional
web page formatting and display options in this section.
The "Publish what?" section has three radio buttons: Complete
presentation (selected by default), Slide number (which has two
spin boxes associated with it), and Custom show (which has a drop-
down list box associated with it).
The Display speaker notes checkbox is selected by default. The
section also has a Web Options button.
You need to specify which browser will support the published
presentation in the "Browser support" section. For example,
presentations with complex animations and images might only be
opened by later browser versions. The default browser is Microsoft
Internet Explorer 4.0 or higher, but you can also publish a

Unit 2 Protecting and Distributing Presentations PowerPoint 2007 Advanced
Page 78 P2K7A0913
presentation that is supported by earlier Internet Explorer versions
and Netscape Navigator.
You specify the published files details in the "Publish a copy as"
section. This section displays the file details you configured in the
Save As dialog box, namely the page title and save location.
Click the Publish button to publish the presentation to the location
specified on the local computer. The Publish as Web Page dialog
box closes and you return to the presentation.
To check how your presentation looks as a published web page,
you browse to its saved location using Windows Explorer.
You can also open the published presentation again in
PowerPoint. But when you open it in PowerPoint, it
displays as a PowerPoint file and not as a web page.
To open Windows Explorer, you hover over All Programs and
expand Accessories. In the Accessories menu, you select Windows
Explorer.
You browse to the Documents folder where the published file is
listed as an HTML document. The file's icon shows a globe and the
PowerPoint symbol. You double-click the presentation to open it.
The presentation opens in the default web browser – Internet
Explorer – and you can click through the presentation in a similar
way to viewing it as a slide show in PowerPoint.
Procedures
Save a presentation as a web page
Click the Microsoft Office button.
Click the Save As button.
Click the down-arrow at the right of the Save as type
drop-down menu.
Select Web Page.
Click the Publish button.

PowerPoint 2007 Advanced Lesson 2 Distributing Presentations in PowerPoint 2007
P2K7A0913 Page 79
Make any appropriate changes to the Publish as Web Page
dialog box, and then click the Publish button.
Step-by-Step
Objective: Saving a presentation as a web page.
Before you begin: Start PowerPoint, and open Easy Nomad
Travel 4 from the Student Data Folder.
1. Click the Microsoft Office button.
The Microsoft Office menu appears.
2. Click the Save As button.
The Save As dialog box appears.
3. Make sure that the folder to which your presentation will be
saved is your personal folder.
The presentation will be saved in the appropriate location.
4. Click the down-arrow at the right of the Save as type
drop-down menu.
The choices of the Save as type drop-down menu are
displayed.
5. Select Web Page.
Web Page appears in the Save as type drop-down, and the
Save As dialog box is expanded.
6. Click the Change Title button.
The Set Page Title dialog box appears.
7. Enter Summer 2007 as the Page title, and then click OK.
The Set Page Title dialog box is closed.
8. Click the Publish button.
The Publish as Web Page dialog box appears.
9. Select the Open published Web page in browser checkbox,
and then click Publish.
The Publish as Web Page dialog box is closed.
10. Save the presentation to your personal folder as My Easy
Nomad Travel 4.
The presentation is saved.

Unit 2 Protecting and Distributing Presentations PowerPoint 2007 Advanced
Page 80 P2K7A0913
Before you move on: Leave the presentation open.
E-MAILING A PRESENTATION
Discussion
PowerPoint enables you to e-mail a presentation directly from
within PowerPoint, without having to first open an e-mail
application.
The presentation is then attached to a new e-mail and the
presentation's file name is used as the default subject line.
Any digital signatures on the presentation are removed.
This is because a signature indicates the presentation's
authenticity and integrity, both of which can be
compromised when using e-mail.
You e-mail presentations using Microsoft Outlook or any e-mail
application that is compatible with the Messaging Application
Programming Interface (MAPI). Each recipient of the e-mail must
also have a MAPI-compliant e-mail application.
MAPI standardizes the way messages are handled by mail-
enabled applications to enable the exchange of both mail
and data.
PowerPoint enables you to e-mail the presentation in a variety of
formats.

PowerPoint 2007 Advanced Lesson 2 Distributing Presentations in PowerPoint 2007
P2K7A0913 Page 81
Various E-mail Formats
Item Description
E-mail PowerPoint enables you to e-mail the
presentation as an attachment in the
standard .pptx PowerPoint 2007 file
format. The recipient can then open the
presentation using PowerPoint and, unless
it's protected with a password, they can
modify it.
E-mail as PDF
Attachment
PowerPoint can convert a presentation to
a Portable Document Format (PDF)
document and attach the PDF file to an e-
mail. The recipient can only open the
presentation as a PDF and can't make any
changes to it. This option appears on the
Send submenu only if you've installed the
free PDF plugin from Microsoft.
E-mail as XPS
Attachment
PowerPoint can convert a presentation to
an XML Paper Specification (XPS)
document and attach it to an e-mail. This
option appears on the Send submenu only
if you've installed the free XPS plugin
from Microsoft.
Internet Fax PowerPoint enables you to fax a
presentation using an Internet fax service.
To use this option, you must first sign up
with a fax service provider. You can then
send and receive faxes over the Internet.
The keyboard alternative to e-mail a presentation is Alt+F, D, E.
A new e-mail opens using the default mail application. The
presentation is attached to the e-mail and the e-mail's subject is the
presentation's file name.
You specify the recipient's e-mail address and complete the body of
the e-mail. Then you click the Send button.
You return to the open presentation in PowerPoint.

Unit 2 Protecting and Distributing Presentations PowerPoint 2007 Advanced
Page 82 P2K7A0913
Send menu
Procedures
Send a presentation via e-mail
Click the Microsoft Office button.
Click the Send button. (The keyboard alternative to open the
Send submenu is Alt+F, D.)
Click an item on the Send menu to select it.

PowerPoint 2007 Advanced Lesson 2 Distributing Presentations in PowerPoint 2007
P2K7A0913 Page 83
Step-by-Step
Objective: Sending a presentation via e-mail.
Before you begin: Start PowerPoint, and open My Easy
Nomad Travel 4 from your personal folder, if necessary.
1. Click the Microsoft Office button.
The Microsoft Office menu appears.
2. Click the Send button.
The Send menu appears.
3. Click E-mail to select it.
The presentation becomes an attachment to an e-mail.
4. Send the e-mail to yourself.
You receive the e-mail as an attachment.
5. Save the presentation to your personal folder as My Easy
Nomad Travel 4.
The presentation is saved.
Before you move on: Leave the presentation open.
PACKAGING A PRESENTATION FOR CD
Discussion
PowerPoint enables you to copy a presentation onto a CD. You can
then easily distribute the presentation, for example by handing it to
clients or launching the presentation from the CD on any computer
with a CD-ROM drive.
When you copy a presentation to CD, PowerPoint converts the
presentation files into compatible file formats that can be run on
any PowerPoint viewer or earlier PowerPoint versions.
Because you may share the CD containing the presentation with
others, you should ensure that any hidden or personal data is
removed from the presentation before you copy it to CD. This

Unit 2 Protecting and Distributing Presentations PowerPoint 2007 Advanced
Page 84 P2K7A0913
includes the presentation's author and any other confidential
information that you don't want to share publicly.
Publish menu
You also need to package the presentation. This means that all
linked files – such as movie or sound clips – are stored together
with the presentation. PowerPoint copies all the presentation files
to a CD in a single operation – you can't go back and add more files
to the presentation once the CD copying process has begun.
You can use Windows Explorer to copy other Microsoft
Office files to the CD.

PowerPoint 2007 Advanced Lesson 2 Distributing Presentations in PowerPoint 2007
P2K7A0913 Page 85
Package for CD dialog box
In the Package for CD dialog box, you can define a name for the
CD containing the presentation.
You review the files and links to be copied to the CD in the Files to
be copied section. This is your last opportunity to add more files
before the presentation is copied.
You can also choose to copy the presentation to a folder.
PowerPoint packages the presentation and corresponding linked
files to a folder in the specified location.
As PowerPoint copies the presentation to CD, it shows the status of
the process. First PowerPoint prepares to burn the CD. Then
PowerPoint copies the files to the CD.
When the presentation is successfully copied to CD, PowerPoint
asks you whether you want to copy the same presentation to
another CD. When you are finished, you return to the Package for
CD dialog box and click the Close button. You're returned to the
presentation.

Unit 2 Protecting and Distributing Presentations PowerPoint 2007 Advanced
Page 86 P2K7A0913
Procedures
Package a presentation for CD
Click the Microsoft Office button.
Click the Publish button. (The keyboard alternative to open
the Publish submenu is Alt+F, U, K.)
Select Package for CD.
Click the OK button.
Enter a name in the Name the CD textbox, and then click
Copy to CD.
Click the Yes button.
Step-by-Step
Objective: Packaging a presentation for CD.
Before you begin: Start PowerPoint, and open My Easy
Nomad Travel 4 from your personal folder, if necessary.
1. Click the Microsoft Office button.
The Microsoft Office menu appears.
2. Click the Publish button.
The Publish menu appears.
3. Select Package for CD.
The Microsoft Office PowerPoint dialog box appears.
4. Click the OK button.
The Package for CD dialog box appears.
5. Enter Summer 2007 in the Name the CD textbox, and then
click Copy to CD.
The Microsoft Office PowerPoint dialog box appears.
6. Click the Yes button.
The files are copied.
7. Save the presentation to your personal folder as My Easy
Nomad Travel 4.
The presentation is saved.

PowerPoint 2007 Advanced Lesson 2 Distributing Presentations in PowerPoint 2007
P2K7A0913 Page 87
Before you move on: Close the presentation and exit
PowerPoint.

Unit 2 Protecting and Distributing Presentations PowerPoint 2007 Advanced
Page 88 P2K7A0913
LESSON REVIEW EXERCISE
Task
Objective: Saving a presentation as a web page and distributing
a presentation.
Before you begin: Start PowerPoint and open Meeting 16 from
the Student Data Folder.
1. Click the Microsoft Office button.
2. Click the Save As button.
3. Make sure that the folder to which your presentation will be
saved is your personal folder.
4. Click the down-arrow at the right of the Save as type
drop-down menu.
5. Select Web Page.
6. Click the Change Title button.
7. Enter Yearly Meeting as the Page title.
8. Click OK.
9. Click the Publish button on the Save As dialog box.
10. Select the Open published Web page in browser checkbox,
and then click Publish.
11. Click the Microsoft Office button.
12. Click the Send button.
13. Click E-mail to select it.
14. Send the e-mail to yourself.
15. Click the Microsoft Office button.
16. Click the Publish button.
17. Select Package for CD.
18. Click the OK button.
19. Enter Yearly Meeting in the Name the CD textbox.
20. Click Copy to CD.

PowerPoint 2007 Advanced Lesson 2 Distributing Presentations in PowerPoint 2007
P2K7A0913 Page 89
21. Click Yes.
22. Save the presentation to your personal folder as My Meeting
16.
Before you move on: Close the presentation and exit
PowerPoint.

PowerPoint 2007 Advanced Unit 2 Independent Practice Activity
INDEPENDENT PRACTICE ACTIVITY
Task
Objective: Securing, printing and distributing presentations.
Before you begin: Start PowerPoint and open World 14 from
the Student Data Folder.
1. Click the Microsoft Office button.
2. Click the Save As button.
3. Change the File name to My World 14.
4. Make sure that the folder to which your presentation will be
saved is your personal folder.
5. Click the Tools drop-down button.
6. Select General Options.
7. Enter complete as a Password to open.
8. Click OK.
9. Reenter password to open.
10. Click OK.
11. Click the Save button in the Save As dialog box.
12. Click the Microsoft Office button.
13. Click the Close button.
14. Click the Microsoft Office button.
15. Click the Open button.
16. Select My World 14 in the Student Data Folder, and then
click Open.
17. Enter password to open file.
18. Click OK.
19. Click the Microsoft Office button.
20. Click the Prepare button.
21. Select Add a Digital Signature.
PowerPoint 2007 Advanced Unit 2 Independent Practice Activity
P2K7A0913 Page 91
22. Click the OK button.
23. Enter complete as the Purpose for signing this document,
and then click Sign.
24. Click OK.
25. Click the Microsoft Office button.
26. Hover the mouse cursor over the Print option.
27. Select Print Preview.
28. Click the down-arrow at the right of the Print What
drop-down menu in the Page Setup group.
29. Select Slides.
30. Click the Options button in the Print group.
31. Select Color/Grayscale.
32. Select Grayscale.
33. Click the Print button in the Print group.
34. Select the Slides radio button in the Print range section, and
then enter 2 in the textbox.
35. Click the OK button.
36. Click the Microsoft Office button.
37. Click the Save As button.
38. Make sure that the folder to which your presentation will be
saved is your personal folder.
39. Click the down-arrow at the right of the Save as type
drop-down menu.
40. Select Web Page.
41. Click the Change Title button.
42. Enter Recreation as the Page title.
43. Click OK.
44. Click the Publish button on the Save As dialog box.
45. Select the Open published Web page in browser checkbox,
and then click Publish.
46. Click the Microsoft Office button.

Unit 2 Independent Practice Activity PowerPoint 2007 Advanced
Page 92 P2K7A0913
47. Click the Send button.
48. Click E-mail to select it.
49. Send the e-mail to yourself.
50. Click the Microsoft Office button.
51. Click the Publish button.
52. Select Package for CD.
53. Click the OK button.
54. Enter Recreation in the Name the CD textbox.
55. Click Copy to CD.
56. Click Yes.
57. Save the presentation to your personal folder as My World
14.
Before you move on: Close the presentation and exit
PowerPoint.

PowerPoint 2007 Advanced Index
INDEX
.pptx, 71
action buttons, 28
advanced options, 26
All radio button, 57
alternative printer, 56
arrow
Down, 6
Up, 6
Arrow, 20
Arrow Options, 21
automatic timings, 29, 30
Ballpoint Pen, 20
Browser support, 67
button
action, 28
Change Title, 66
Close, 50, 75
Close Print Preview, 55, 57
Copy, 5
Custom Slide Show, 5, 6
Edit, 5
Find Printer, 56
Forward, 19
From Beginning, 6, 18
Left arrow, 19
Microsoft Office, 43, 49, 53
New, 5
Next Page, 55
Options, 55
Pen, 19
Preview, 57
Previous Page, 55
Print, 55
Properties, 56
Publish, 68
Remove, 5
Save, 45
Save As, 43
Send, 71
Set Up Slide Show, 29
Slide Show Menu, 19
Zoom, 55
CD, 28, 64, 73, 74, 75
CD-ROM drive, 73
Change Title button, 66
checkbox
Remove automatically created
personal information from this
file on save, 45
Show and return, 4
Use Presenter View, 27
Close button, 50, 75
Close Print Preview button, 55, 57
color scheme, 55
company intranet, 64, 65
Confirm Password dialog box, 45
Copies, 57
Copy button, 5
Custom Shows dialog box, 5
Custom Slide Show, 4
Basic, 4
Hyperlinked, 4
Custom Slide Show button, 5, 6
default printer, 54, 56, 57
Define Custom Show dialog box,
5, 6, 10
desktop, ix
dialog box
Confirm Password, 45
Custom Shows, 5
Define Custom Show, 5, 6, 10
General Options, 44, 45
Get a Digital ID, 49
Insert Hyperlink, 4

Index PowerPoint 2007 Advanced
Page 94 P2K7A0913
Package for CD, 75
Print, 56, 57
Publish as Web Page, 67
Save As, 43, 44, 45, 65, 66
Save As (expanded), 66
Set Page Title, 66
Set Up Show, 29
digital ID, 49
digital signature, 48, 49, 50, 70
Down arrow, 6
Edit button, 5
e-mail, 50, 64, 70, 71
Erase All Ink on Slide, 21
Eraser, 21
fax a presentation, 71
Felt Tip Pen, 20
file encryption, 44
File name text box, 65
file sharing, 44
Find Printer button, 56
footers, 55
Forward button, 19
From Beginning button, 6, 18
General Options dialog box, 44, 45
Get a Digital ID dialog box, 49
Go to Slide menu, 11
grayscale, 55
handouts, 52, 55, 57
headers, 55
hide a slide, 10
Highlighter, 20
HTML, 64, 68
hyperlink, 4, 28
Hypertext Markup Language, 64
Ink Color, 20
Insert Hyperlink dialog box, 4
internet, 28, 64, 65
Internet Explorer, 64, 67, 68
invisible digital signature, 49
Left arrow, 19
linked files, 74, 75
macro security settings, 44
main slide show, 6
MAPI, 70
MCAS, ix
menu
Go to Slide, 11
Microsoft Office, 43
Navigation Shortcut, 20, 25
Prepare, 49
Print, 53
Publish, 74
Save As, 65
Send, 72
Slide Show, 11
Tools drop-down, 44
Messaging Application
Programming Interface, 70
Microsoft Certified Application
Specialist, ix
Microsoft Office, ix
Microsoft Office button, 43, 49, 53
Microsoft Office desktop
applications, ix
Microsoft Office menu, 43
Microsoft Outlook, 70
movie clips, 74
multiple monitor capability, 26, 27
narrative, 29
navigation controls, 26
Navigation Shortcut menu, 20, 25
Netscape Navigator, 68
New button, 5
Next Page button, 55
notes pages, 52, 55, 57
Options button, 55
outlines, 52
package, 74
Package for CD dialog box, 75
packaging, 64
Page Setup, 55
Page title text box, 66

PowerPoint 2007 Advanced Index
P2K7A0913 Page 95
pane
Preview, 56
Signatures, 50
Slides in custom show, 6
paper size, 55, 57
password, 42, 43, 44, 45, 71
Password to modify text box, 45
Password to open text box, 45
PDF, 71
pen options, 26
Pen Tool, 19, 20
Portable Document Format, 71
Prepare menu, 49
presentation duration, 26
Presenter View, 25, 26, 27
Preview, 54, 55, 57
Preview button, 57
Preview pane, 56
Previous Page button, 55
Print, 53
Print button, 55
Print dialog box, 53, 56, 57
Print menu, 53
Print Preview, 54
Print Preview tab, 54, 55
Print range, 57
Print what, 57
Printing, 39, 41, 53, 56, 57
printing options, 52, 53, 54, 55, 56,
57
privacy options, 44
Properties button, 56
publish, 64, 65, 66, 67, 68
Publish a copy as, 68
Publish as Web Page dialog box,
67, 68
Publish button, 68
Publish menu, 74
publishing, 64
Quick Print, 54
radio button
All, 57
Remove automatically created
personal information from this
file on save checkbox, 45
Remove button, 5
reveal a hidden slide, 11
Ribbon, 18, 54
Right arrow, 19
Save As button, 43
Save As dialog box, 43, 44, 45, 65,
66, 68
Save As dialog box (expanded), 66
Save As menu, 65
Save button, 45
scroll bars, 55
security features, 42
self-running presentation, 28, 29
Send button, 71
Send menu, 72
Set Page Title dialog box, 66
Set Up Show dialog box, 29
Set Up Slide Show button, 29
Show and return checkbox, 4
Signatures pane, 50
slide number, 26
Slide Show menu, 11
Slide Show Menu button, 19
Slide Show tab, 4, 5, 18, 27, 29
Slide Show toolbar, 18, 19, 20
slide thumbnails, 26
Slides in custom show pane, 6
sound clip, 29
sound clips, 74
speaker notes, 26
Student Data Folder, vii
tab
Print Preview, 54
Slide Show, 4, 5, 18, 27, 29
text box
File name, 65
Page title, 66

Index PowerPoint 2007 Advanced
Page 96 P2K7A0913
Password to modify, 45
Password to open, 45
third-party signature provider, 49
toolbar
Slide Show, 18, 19, 20
Tools drop-down menu, 44
unauthorized users, 45
Up arrow, 6
URL, 64
Use Presenter View checkbox, 27
visible digital signature, 48
web browser, 64, 66, 68
web page, 4, 64, 65, 67, 68
web server, 64
web site address, 64
Windows Explorer, 68, 74
write on a slide, 18
XML Paper Specification, 71
XPS, 71
Zoom, 55
Zoom button, 55

PowerPoint 2007 Advanced Notices
P2K7A0913 Page 97
NOTICES
COPYRIGHT Copyright 2013 by Career Tech Services. All rights reserved.
Information in this document is subject to change without notice
and does not represent a commitment on the part of Career Tech
Services.
TRADEMARK NOTICES All product names and services identified throughout this book are
trademarks or registered trademarks of their respective companies.
They are used throughout this book in editorial fashion only and for
the benefit of such companies. No such use, or the use of any trade
name, is intended to convey endorsement or other affiliation with
the book.
DISCLAIMER While Career Tech Services takes great care to ensure the accuracy
and quality of these materials, all material is provided without any
warranty whatsoever, including, but not limited to, the implied
warranties of merchantability or fitness for a particular purpose.
VERSION Revised September 2013. Version 9.13.