Power Announcement User Guide v1.7
60
Transcript of Power Announcement User Guide v1.7

2
Po
wer
An
no
un
cem
ent
Use
r G
uid
e v1
.7 |
Dear Customer: Welcome to BLI Messaging and Power Announcement 1.7. If you have been with us through previous versions, we are confident that you are as excited about Power Announcement 1.7 as the entire BLI Messaging team. If new to Power Announcement, please feel free to express how you would like to see the announcement system develop further. Power Announcement 1.7 is a direct result of input from our valued customers and has all the features many have grown comfortable with and several that have been improved. In this version, we have created a new home screen that shows scheduled and recent messages. Click on any of the jobs for additional details. The home screen also features a new quick launch option that allows you to send simple messages to staff, students, or a current selection of students via any combination of the three messaging channels. We have also added in a new list management system that allows an unlimited number of custom lists to be contacted directly from the platform using any message channel or through the backup IVR system for voice calls. For regular messages, we have included an additional filtering capability that will also allow you to send messages to select students, staff members, or custom list contacts without relying on PowerSchool’s current selection. You may also notice that some buttons have changed to be more user friendly and the final message submit screen includes a downloadable list for double checking your scheduled recipients. The parent portal is still integrated with Pearson’s existing parent portal, but we have given the schools more control over which students’ families should have access. Now each school has the option to turn the portal on or off for a specific student or for the entire building from within Power Announcement. We hope you enjoy this new version. Please feel free to contact [email protected] with feedback and to arrange for training. Sincerely, BLI Messaging Team

3
Po
wer
An
no
un
cem
ent
Use
r G
uid
e v1
.7 |
Contents
Getting Started with Power Announcement .................................................................................. 5
Overhead Menu .............................................................................................................................. 8
Emergency Broadcast ................................................................................................................. 9
Built-In User Guide................................................................................................................... 10
Home Screen ................................................................................................................................. 11
Quick Broadcast ........................................................................................................................ 12
Job Status .................................................................................................................................. 13
Upcoming Automated Jobs ....................................................................................................... 14
Version and Version Status ........................................................................................................ 14
User Defaults ................................................................................................................................. 15
General Settings ........................................................................................................................ 16
Email Settings ........................................................................................................................... 16
Voice Settings ............................................................................................................................ 17
Text Settings .............................................................................................................................. 18
Save User Defaults .................................................................................................................... 18
Auto-Login Setup........................................................................................................................... 19
List Management .......................................................................................................................... 20
Custom List Upload .................................................................................................................. 20
Custom List Upload continued ................................................................................................. 21
Template Library............................................................................................................................ 23
Email Template Library ............................................................................................................ 24
Built-In Email Editor ............................................................................................................ 26
Text Message Library ............................................................................................................... 27
Voice Recording Studio ............................................................................................................ 29
Automated Alerts .......................................................................................................................... 31
Automated List Backup ............................................................................................................ 32
Automated Broadcast ................................................................................................................ 34
Automated Voice Call Setup ................................................................................................. 35
Automated Email Setup ........................................................................................................ 36
Automated SMS Text Setup .................................................................................................. 37
Power Announcements – Regular Message Submission .............................................................. 38

4
Po
wer
An
no
un
cem
ent
Use
r G
uid
e v1
.7 |
Choosing Message Recipients .................................................................................................. 39
Selecting Message Category ..................................................................................................... 39
Selecting Messaging Channels ................................................................................................. 40
Filter Lists ................................................................................................................................. 41
General Settings ........................................................................................................................ 42
General Fields ....................................................................................................................... 43
Email Settings ....................................................................................................................... 43
Voice Settings ........................................................................................................................ 44
SMS Settings ......................................................................................................................... 45
New Email ................................................................................................................................ 46
Email Attachments (Optional) .............................................................................................. 47
New Text Message .................................................................................................................... 49
New Voice Message .................................................................................................................. 51
Record a Message by Phone ................................................................................................. 52
Choose File for Voice Calls .................................................................................................. 53
Insert Message Template for Voice Calls .............................................................................. 54
Text-to-Speech Editor for Voice Calls .................................................................................. 55
Message Submit ........................................................................................................................ 57
Reporting ....................................................................................................................................... 58
Message Details ........................................................................................................................ 58
Job Details ................................................................................................................................. 59

5
Po
wer
An
no
un
cem
ent
Use
r G
uid
e v1
.7 |
Getting Started with Power Announcement
While navigating through Power Announcement, the user guide may be one of the greatest resources for learning about Power Announcement. If at any time you have additional questions, you may also contact the Client Services department for assistance. We have several additional quick reference guides should particular areas require more detailed step-by-step directions. This User Guide is designed be a complete overview and contains in-depth explanations of pages throughout Power Announcement. To get started, we will first cover the very basics of Power Announcement.
1) Familiarize yourself with the Power Announcement home page.
1. Send Emergency Message
2. Helpful user guide
3. Home (Main Menu)
4. Menu (Navigate through Power
Announcement)

6
Po
wer
An
no
un
cem
ent
Use
r G
uid
e v1
.7 |
2) Note your Power Announcement logins. These are set to auto-populate so you will not need
to remember them on a daily basis. They are needed when using the backup IVR system. If you requested individual building logins, please make a note of each building’s unique username. To do so, simply change the school from the PowerSchool menu and then go to Power Announcement > Auto-Login Setup.
3) Set up your user defaults by going to Power Announcement > User Defaults. The user
defaults are default values that will be used when you send a message. Any information that is stored in the user profile can also be changed when sending a live message. Each unique Username may also
have unique defaults. See User Defaults for additional details.
4) Set up your Automated List Backup.
a. Select Power Announcement > Automated Alerts. You should see lists for All Students, All Staff, All Students and Staff. To make changes, click edit. Please note: Security settings on Internet Explorer 9, can sometimes prevent these from appearing without first choosing show all at the bottom of your screen.
b. You will need to choose the appropriate list (Students, Staff, or Students and Staff) from the drop down menu, ensure that the fields being pulled (Phone1, Phone2, etc.) are equal to the same number of fields given to us during installation. These fields are mapped on the back end of the program to match with the fields given such as home_phone = Phone1.
c. The PowerSchool login being used must default to the building being set up. Be sure to stagger the times each list is being backed up by a few minutes so they do not attempt to log one another out.
d. If you need any assistance with this, please contact Client Services. This will also be reviewed during training.

7
Po
wer
An
no
un
cem
ent
Use
r G
uid
e v1
.7 |
5) Run a test. Often, there is some data cleanup that may need to be done to ensure the contact
numbers and email addresses are all current. Feel free to contact Client Services with any questions or if you are unsure if the tests were successful.
a. Voice Message should be at least 20 seconds long for best results.
b. It is recommended a repeat hot key option be set. You must tell the end recipient this option is available in the message body.
Sample Test Message:
“This is a test of Sample Public School's new alert messaging system. This is only a test. We will be
using the alert system to notify you in the event of an emergency situation and for other routine school announcements such as school absences, low lunch balances, school closures, and early releases. If you feel you should not be receiving this message please call Sample Public Schools at 1 2 3 1 2 3 1 2 3 4 to be removed. To repeat this message, please press # [or other key if chosen].”
This is a message that many schools have used when testing the system to notify parents of the change. If a number has been entered incorrectly and it contacts someone who would not be an emergency contact for a student then they can call and ask to be removed.
6) Review reporting for Test Messages sent. To do this, click Power Announcement>Reporting
then select the appropriate job title to review further. It is recommended that any failures be downloaded and reviewed further for the first several outgoing messages to ensure proper delivery. All reports may be downloaded and sorted using Excel. If you would like to review your results with us, please contact Client Services.
7) We also strongly encourage you to schedule a training session for Power Announcement. They are free of charge and only require internet access to attend a
GoToMeeting® webinar and a phone for audio. They will cover all the basic functions and uses of the system and are a great opportunity for additional staff members to be introduced to the system. Trainings are offered at the following times:
Monday, Tuesday, Thursday, Friday – 9am, 11am, 1pm, 3pm, and 5pm EST Wednesday – 9am, 11am, and 3pm EST
To schedule a training session, please email [email protected].

8
Po
wer
An
no
un
cem
ent
Use
r G
uid
e v1
.7 |
Overhead Menu
At the top of every page, hanging down from the dark blue Power School banner is an overhead menu containing several icons.
The first icon is for sending a Quick Emergency Broadcast.
The second icon will open a pop-up window that contains the User Guide. The User Guide will open to the page you are currently looking at. It does have a click-able Table of Contents at the top for easy navigation.
The third icon will return you to the Home Page from anywhere within Power Announcement.
The last icon is a drop-down menu. This menu contains links for all of Power Announcement and should be used to navigate throughout the messaging system.

9
Po
wer
An
no
un
cem
ent
Use
r G
uid
e v1
.7 |
Emergency Broadcast
Clicking on from the overhead tab will bring up the Emergency Broadcast Quick launch option. You can also access this from the Menu drop-down.
To begin, type the message in the text box. If able, keep this message under 160 characters as it will also be sent as an SMS text message alert as well.
Next, fill in the addresses below the text box. Email: is the one recipients will see as the from address in their inbox. The Phone: field is the caller ID number recipients see the message being from as well.
Checking Use Default Addresses box will pull data from the current default settings on the account to populate the from fields. Checking Save these as defaults will over-write defaults currently in place under the account’s user defaults.
To send the Emergency broadcast, click Send Emergency Message. 1 The message will be sent to all students’ families and staff members within the building. Parents are not able to opt-out of Emergency broadcasts and all contact fields given to BLI Messaging upon install will be contacted via all contact channels installed.
This is a quick way to send a blanketed message to all PowerSchool contacts via all three messaging channels (text, email, voice) in the event of an actual emergency situation.
1 This message will contain the word Emergency when delivered.
10
Po
wer
An
no
un
cem
ent
Use
r G
uid
e v1
.7 |
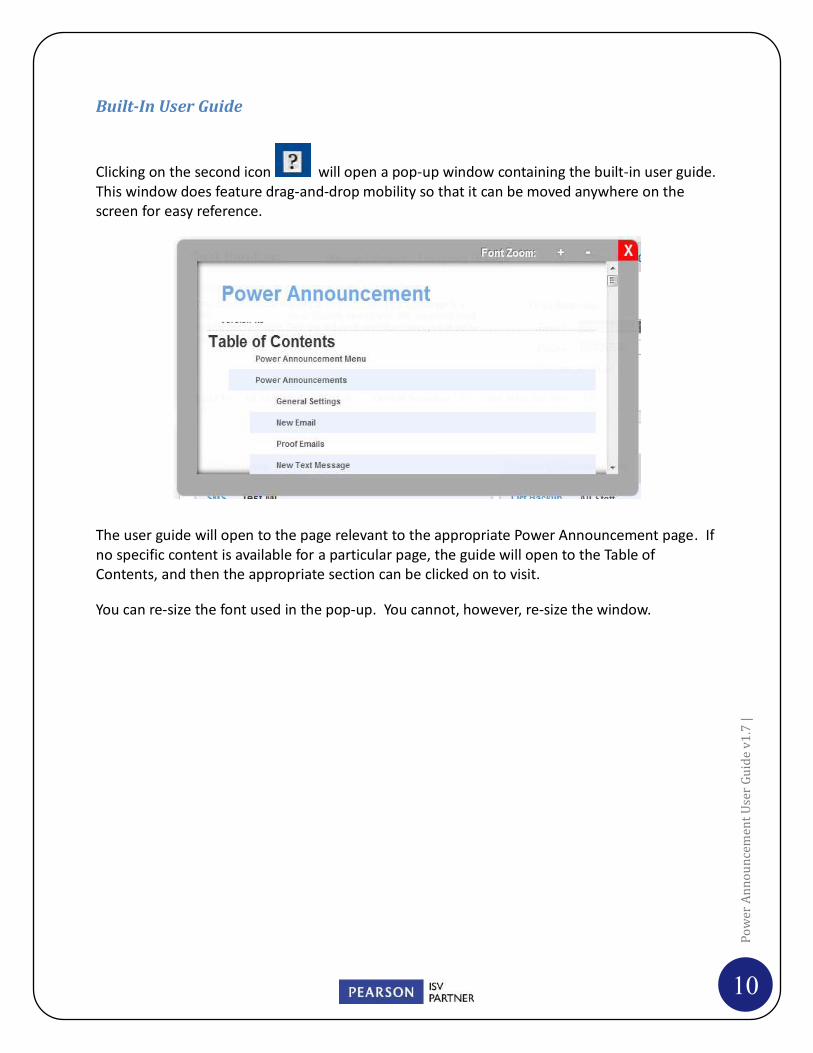
Built-In User Guide
Clicking on the second icon will open a pop-up window containing the built-in user guide. This window does feature drag-and-drop mobility so that it can be moved anywhere on the screen for easy reference.
The user guide will open to the page relevant to the appropriate Power Announcement page. If no specific content is available for a particular page, the guide will open to the Table of Contents, and then the appropriate section can be clicked on to visit.
You can re-size the font used in the pop-up. You cannot, however, re-size the window.

11
Po
wer
An
no
un
cem
ent
Use
r G
uid
e v1
.7 |
Home Screen
The home screen contains a Quick Broadcast option, an overview of the Job Status of current and recent messages, and a snap shot of upcoming Automated Jobs in one location. Each section of the home page is covered in more detail following this page.
The upper portion of the Home Page is the Quick Broadcast. Quick Broadcast allows the same message to be sent to Students, Staff, or a Current Selection via any combination of the three messaging channels.
Recently scheduled and complete messages may be viewed under the Job Status box in the lower left hand portion of the screen. For additional details, click on the Job name to see the list of recipients. To view full reporting, click Reporting from the overhead drop-down menu.
Upcoming Automated Jobs are visible from lower right hand portion of the screen. Click edit to make changes to Automatic Jobs currently set up.
At the bottom of the home screen, the version of Power Announcement installed is visible.

12
Po
wer
An
no
un
cem
ent
Use
r G
uid
e v1
.7 |
Quick Broadcast
Quick Broadcast is designed so message can quickly be sent directly from the home screen using default settings and may be suitable for most messages. For more advanced messaging options, choose the Power Announcement link from the drop-down menu.
First, choose a Message Category.2
Then, choose the Broadcast Channels.
Next, type the message body. Text messages should be limited to 160 characters.
Enter the From Addresses or click to use defaults already in place. 3
Next, select the recipients of the message. 4
Lastly, click Send Quick Broadcast to start sending the message. The message will be sent immediately.
2 The Message Category sets up the filtering of the messages based on parents’ selections in the Parent Portal. For more information, refer to the Parent Portal section of this User Guide. 3 If save these as defaults is chosen, it will over-write those currently stored in the account’s user defaults.
4 If sending a message to a Current Selection, use PowerSchool’s student search prior to beginning your Quick Broadcast. For frequently used current selections, consider saving the search in PowerSchool for easy selection.

13
Po
wer
An
no
un
cem
ent
Use
r G
uid
e v1
.7 |
Job Status
The Job Status reference box provides a snapshot of scheduled and recently completed messages.
Clicking on the Name of the Broadcast provides additional options. The channel used, send date, and lists the recipients.

14
Po
wer
An
no
un
cem
ent
Use
r G
uid
e v1
.7 |
Upcoming Automated Jobs
The Upcoming Automated Jobs reference box displays jobs scheduled, next send time, and provides a direct link to edit, if necessary.
Version and Version Status
The version of Power Announcement installed is visible at the bottom of the home screen.

15
Po
wer
An
no
un
cem
ent
Use
r G
uid
e v1
.7 |
User Defaults
User Defaults are fields that may be set to auto-populate each time a message is sent. The information entered into the User Defaults will auto-populate in message setup, but may also be changed on a per-message basis when creating a new message.
Each unique username may have its own unique defaults. For most school districts, each building has a unique username. For others, the same login is used for the entire district.5
Most fields will be the same for most messages sent from the account. Properly setting and using the default options saves time every time a message is sent.
The User Defaults are broken into four sections: General, Email, Voice, and Text.
5 Login credentials are provided on a per building basis only. If changes are needed to your account logins, contact
[email protected] for assistance.

16
Po
wer
An
no
un
cem
ent
Use
r G
uid
e v1
.7 |
General Settings
Under General Settings, set the time zone to the school’s appropriate time zone.
Email Settings
Under Email Broadcasting, set the account defaults for email messages. The following is a detailed description of each field:
Display Name: The name that appears as in the recipient’s inbox. For example, Apple Grove High School or Apple Grove School District may be used.
Email From: Email address that appears as the From: field in emails. For example, [email protected] or [email protected] may be used.
Reply To: The address that recipients may Reply To. If replies are not desired, it is suggested to default the reply address to [email protected].
Subject: This is the email subject. This may be left blank so an original subject may be entered each time a message is sent. Some districts prefer to default it to A Message from Apple Grove High – and then enter a unique subject after the default entry.
Email Proof6: Email Proof 1 is a required field and all proof addresses entered will receive a copy of messages being sent. If a copy is not desired, simply enter [email protected] as the email address. Email proofs two through five are optional. These may be changed on a per message basis. Many districts set the defaults to the Principal and/or Superintendent and then ask all staff members to include themselves while creating the message.
6 Email Proof addresses will receive messages immediately when they are submitted, even if the message is post-dated. These proof copies will include HTML sample: “Subject” and or Text Sample: “Subject”. The end recipients will not receive the sample text prior to the subject line.

17
Po
wer
An
no
un
cem
ent
Use
r G
uid
e v1
.7 |
Voice Settings
Under Voice Settings, set the account defaults for voice calls. The following is a detailed description of each field:
Stop/Restart Times: This is a safety system to ensure that messages will not accidently send during times not desired. For example, when prescheduling messages, a user may accidently choose A.M. instead of P.M. or vice-versa. This could result in calls being sent at the wrong time and upset student families. Please consider school closure messages in the early morning hours when setting your restart time. For example, a stop time of 9 P.M. and a restart time of 6 A.M. may be preferred. The backup IVR system will also follow these defaults. If you do not wish to use this feature, set a stop time at 11:59 P.M. and restart time at 12:01 A.M.
Restart: This should be set to yes so that any messages reaching the stop time are allowed to restart at the restart time. It is recommended this always be set to yes.
# of Redials: The system calls all the numbers in the list once by default. If a number is busy or the recipient’s voicemail is not set up, the system is unable to leave a message. It is recommended that the number of redials be defaulted to five so that any calls that do not connect are redialed. If a message is left or the system reaches a live person, the number will not be redialed. Only calls that do not connect the first time are redialed.7
Caller ID Number: This is the phone number that appears in the recipient's caller ID when receiving a call. This number must be 10 numeric digits with no other symbols. It is recommended the caller ID number is one that calls may be received at or connects to a voice mail system. Some recipients will see a missed call and may choose to redial the number prior to listening to the message received until they are familiar with the automated call system. The backup IVR system will also use the caller ID number entered here.
Dedup Phone Number: Dedup means delete duplicate. This is used to remove duplicate numbers from a call list prior to dialing. Choose Yes to prevent the system from dialing duplicate numbers for the same message. Choose No to allow the system to call duplicate numbers. This feature is most useful for families with more than one child or if multiple contact fields contain the same number.8
7 If recipients receive multiple calls and should not, check your dedup default settings.
8 Automated messages (lunch balance, attendance, etc.) do not follow this dedup rule so that families with multiple
children receive the message appropriate to each child. Having the same number in multiple fields is not recommended.

18
Po
wer
An
no
un
cem
ent
Use
r G
uid
e v1
.7 |
Text Settings Under Text Settings, set the account defaults for SMS text messages. The following is a detailed description of each field:
Stop/Restart Times: This is a safety system to ensure that messages will not accidently send during times not desired. For example, when prescheduling messages, a user may accidently choose A.M. instead of P.M. or vice-versa. This could result in texts being sent at the wrong time and upset student families. Please consider school closure messages in the early morning hours when setting your restart time. For example, a stop time of 9 P.M. and a restart time of 6 A.M. may be preferred. If you do not wish to use this feature, set a stop time at 11:59 P.M. and restart time at 12:01 A.M.
Restart: This should be set to yes so that any messages reaching the stop time are allowed to restart at the restart time. It is recommended this always be set to yes.
Dedup Cell Phone: Dedup means delete duplicate. This is used to remove duplicate numbers from a text list prior to sending. Choose Yes to prevent the system from texting duplicate numbers for the same message. Choose No to allow the system to text duplicate numbers. This feature is most useful for families with more than one child or if multiple contact fields contain the same number.9
Cell Phone Fields: Cell Phone 1 is a required field. It can be a number specifically for receiving a copy of all sent messages. If a copy is not desired, simply enter 5555555555 as the phone number. Cell Phone two through five are optional. These may be changed on a per message basis. Many districts set the defaults to the Principal and/or Superintendent and then ask all staff members to include themselves while creating the message.
Save User Defaults
Scroll to the bottom of the page and click on to save profile changes. If update profile is not selected, all changes will be lost.
9 Automated messages (lunch balance, attendance, etc.) do not follow this dedup rule so that families with multiple
children receive the message appropriate to each child. Having the same number in multiple fields is not recommended.

19
Po
wer
An
no
un
cem
ent
Use
r G
uid
e v1
.7 |
Auto-Login Setup
Auto-Login Setup should be filled in with numbers in both the Username and Password fields.10 This information should not be changed without approval as it may cause Power Announcement to stop working properly. If not populated, BLI Messaging did not have access to the building during installation or the district has asked for the login to not be entered. Contact [email protected] with your contact information and building name for assistance.
Most commonly, school districts choose to have unique usernames for each building. Some may choose to have one for the district as a whole. For per building logins, all users at a particular building will share the same Power Announcement login credentials. This allows all users at a building to share user defaults, template libraries, automatic backups and broadcasts, and reporting which are unique to each account.
The Auto-Login will automatically populate the username and password throughout the messaging system when needed.11 It is recommended that the username and password be written down and stored for retrieval if the IVR system is needed.12
10 If not populated, BLI Messaging did not have access to the building during installation or the district has asked for
the login to not be entered. Contact [email protected] with your contact information and building name for assistance.
11 If the Auto-Login is not automatically populated while moving throughout Power Announcement, ensure that
cookies are being accepted by the browser. If assistance is needed, please contact support. 12 The backup IVR function will ask for a username and password to be entered. All lists are associated with the
username.

20
Po
wer
An
no
un
cem
ent
Use
r G
uid
e v1
.7 |
List Management
List Management allows custom lists to be uploaded in .csv format to be contacted via Power Announcement’s messaging system and backup IVR system.
Custom List Upload
An unlimited number of .csv files may be uploaded to the system. To upload a list, select the Upload New List button.13 Choose the file to upload and complete the field options. A detailed
13 Custom lists may also be uploaded from the message setup screen. See
Power Announcements – Regular Message Submission continued
Choosing Message Recipients Any combination of lists may be selected under Send this Message to. If choosing All Students or All Staff, only those students or staff members listed under the building currently at will be selected. To contact all contacts at the District level, the PowerSchool School building should be changed to the District. Current selection applies only to students. To contact a selection of students from a particular building, first complete a PowerSchool search for the students. To contact a current selection of students from multiple building, the District school building should also be used.

21
Po
wer
An
no
un
cem
ent
Use
r G
uid
e v1
.7 |
review of the required fields is below:
Choose a file: This button can be selected to browse the computer for the file to upload.
List Name: This is the internal name given to the list for easy recognition.
IVR Code: This is often referred to as the list’s friendly ID. A number one to five digits must be given to each list so that the list may be retrieved when dialing into the backup IVR system.
Custom List Upload continued
Email Headers(s): Each .csv file uploaded must have column headers so the system may determine which column contains the email addresses to contact. If multiple columns are being used for email, enter the headers in comma separated format.
Text Message Headers(s): Each .csv file uploaded must have column headers to the system can determine which column contains the phone numbers to contact for SMS messages. If multiple columns are being used for text messages, enter the headers in comma separated format.
Custom lists may also be created and selected for messaging through Power Announcement. Choose a previously uploaded custom list from the custom list drop-down or choose Add a New List to upload one directly from the message setup screen. For directions on uploading a custom list, see Custom List Upload.
for details.

22
Po
wer
An
no
un
cem
ent
Use
r G
uid
e v1
.7 |
Phone Headers(s): Each .csv file uploaded must have column headers so the system can determine which column contains the phone numbers to contact for voice calls. If multiple columns are being used for voice calls, enter the headers in comma separated format.
Once uploaded, lists may be edited or deleted. To make changes to an existing list’s contacts, update the .csv and upload a new list.

23
Po
wer
An
no
un
cem
ent
Use
r G
uid
e v1
.7 |
Template Library
The Template Library is available to save frequently used email, text, or voice messages for easy retrieval. The template library is accessible directly from the drop-down menu. The initial screen of the template library requires a selection the type of library to begin.
Each of the template libraries are slightly different. Emails are in HTML format and the template library includes a built-in email editor making creation of new templates easier. Text messages are .txt files. Notepad or any word processor may be used to create .txt files for uploading to the text message template library. Voice files may be in either .wav or .txt format. All .wav files are live person recordings of a voice and must be PCM encoded, 16-bit, mono, and at an 8 kHz sample rate. A dial-in, toll-free number is provided to create .wav files in the correct format. The .txt files for voice calls may be created in notepad or any word processor and are used for text-to-speech messages. The following pages describe each of the three template library sections in greater detail.

24
Po
wer
An
no
un
cem
ent
Use
r G
uid
e v1
.7 |
Email Template Library
The Email Template Library allows the viewing, creation, and editing of email templates.
The search function in the upper left allows a search of the file name column. It will search for any sting of characters and is not case sensitive.
Below is a description of each column:
Check boxes: Check boxes are located on the far left to allow the selection of multiple templates for bulk deletion.
Template ID: Template IDs are automatically assigned when a template is created. The Template IDs are all links that when clicked opens the template in the email editor to be edited as desired.
File Name: The file name is the name given to a template by the creator. The template names are all links that when clicked allows the file to be downloaded or viewed.
File Type: All email templates are HTML files.
Upload Date: This is the date and time the template was originally uploaded.
Last Used: This is the date and time that the message was last used in an announcement.
Last Modified: This is the date and time that the file was last edited.
Owner: This is the primary contact name for the account when the template was first uploaded or created to the template library.

25
Po
wer
An
no
un
cem
ent
Use
r G
uid
e v1
.7 |
Email Template Library continued
Shortcuts: Three icons are shown on the far right and when hovered over display their action.
1. Rename allows the file to be renamed. First click the icon, type the new name desired, and then click the green check mark that appears to save.
2. Delete allows for a single template to be deleted. Click the icon and then confirm that the file should be deleted.
3. Replace allows an existing template to be replaced with a new file. Click the file and then browse for the new file to replace the existing template. At the bottom of the Email Template Library are three buttons:
Upload: Clicking the upload button allows an .html file to be chosen and uploaded to the template library from the local user’s computer or server. First click upload, then select choose file to locate the file desired, and finally upload new template for the file to appear in the library.
First, click upload and then select choose file to locate the file desired. Once the file is chosen, the name appears on the screen. To complete the upload, the upload new template button must be selected.
Bulk Delete: Clicking the bulk delete button deletes any templates with a check mark in the far left column.
Create HTML Using Editor: Clicking the create HTML using editor button transfers to the built-in HTML email editor screen.

26
Po
wer
An
no
un
cem
ent
Use
r G
uid
e v1
.7 |
Built-In Email Editor The built-in editor allows the creation of templates directly in Power Announcement. To start, first enter a name for the template into the upper left field. For example, SampleMessage may be used. Many schools begin by creating a template with the school’s logo and letterhead.
Clicking the preview template button at the bottom of the screen opens a new window with a preview of the file being created.
Upload template will save the template and return to the main menu of the email template library.
Back to template library page, cancels all and returns to the main menu of the email template library.

27
Po
wer
An
no
un
cem
ent
Use
r G
uid
e v1
.7 |
Built-In Email Editor continued
The editor is very similar to many word processors and the action of each button is shown when
hovered over.
Frequently used buttons include:
This button is used to Paste from Word® and will retain formatting.
This button is used to upload a Picture. Clicking will open a pop-up and allow browsing of a computer or server for the file desired. Once selected, choose ok, then the picture may be used in the message. It is recommended that prior to uploading a picture, it be edited, resized as needed, and saved for email use. Some email services may display pictures in the size originally uploaded to the HTML editor regardless of resizing within the HTML editor.
This button toggles between the editor to HTML coding for those who like to work directly with HTML coding.
Text Message Library
The Text Message Template Library allows the viewing, uploading, and deleting of text templates.
The search function in the upper left allows a search of the File Name column. It will search for any sting of characters and is not case sensitive.
The following page includes a description of each column.

28
Po
wer
An
no
un
cem
ent
Use
r G
uid
e v1
.7 |
Text Message Library continued
Check boxes: These are used to select multiple templates for the Bulk Delete function at the bottom of the page.
Message ID: The Message IDs are automatically assigned when a template is created.
File Name: The file name is the name of the file uploaded. All file names are links that allow for the file to be downloaded.
File Type: All text messages are .txt files.
Upload Date: This is the date and time the template was originally uploaded.
Last Used: This is the date and time that the message was last used in a broadcast.
Last Modified: This is the date and time that the message was last updated.
Owner: This is the primary contact name for the account when the template was first uploaded or created in the template library.
Shortcuts: Three icons are shown on the far right and when hovered over display their action.
1. Rename allows the file to be renamed. First click the icon, type the new name desired, and then click the green check mark that appears to save.
2. Delete allows for a single template to be deleted. Click the icon and then confirm that the file should be deleted.
3. Replace allows an existing template to be replaced with a new file. Click the file and then browse for the new file to replace the existing template.
Preview: Clicking on a phone icon opens the template as it would appear in a flip-up phone.
29
Po
wer
An
no
un
cem
ent
Use
r G
uid
e v1
.7 |
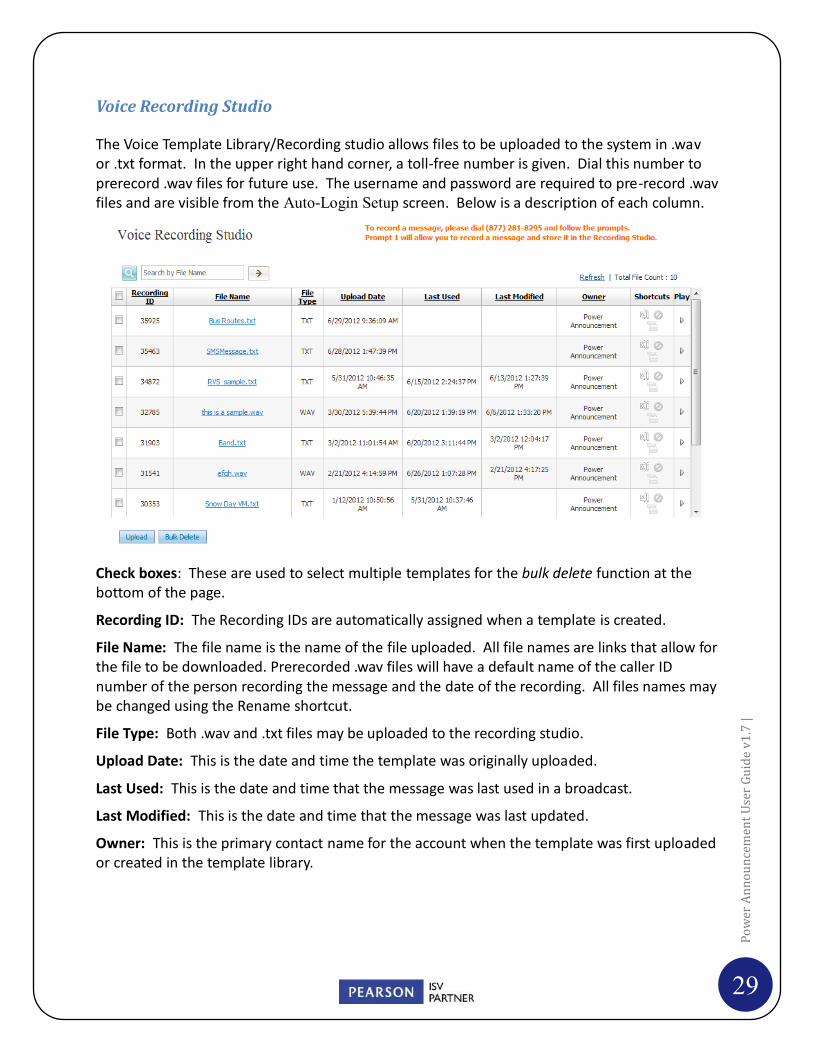
Voice Recording Studio
The Voice Template Library/Recording studio allows files to be uploaded to the system in .wav or .txt format. In the upper right hand corner, a toll-free number is given. Dial this number to prerecord .wav files for future use. The username and password are required to pre-record .wav files and are visible from the Auto-Login Setup screen. Below is a description of each column.
Check boxes: These are used to select multiple templates for the bulk delete function at the bottom of the page.
Recording ID: The Recording IDs are automatically assigned when a template is created.
File Name: The file name is the name of the file uploaded. All file names are links that allow for the file to be downloaded. Prerecorded .wav files will have a default name of the caller ID number of the person recording the message and the date of the recording. All files names may be changed using the Rename shortcut.
File Type: Both .wav and .txt files may be uploaded to the recording studio.
Upload Date: This is the date and time the template was originally uploaded.
Last Used: This is the date and time that the message was last used in a broadcast.
Last Modified: This is the date and time that the message was last updated.
Owner: This is the primary contact name for the account when the template was first uploaded or created in the template library.

30
Po
wer
An
no
un
cem
ent
Use
r G
uid
e v1
.7 |
Voice Recording Studio continued
Shortcuts: Three icons are shown on the far right and when hovered over display their action.
1. Rename allows the file to be renamed. First click the icon, type the new name desired, and then click the green check mark that appears to save.
2. Delete allows for a single template to be deleted. Click the icon and then confirm that the file should be deleted.
3. Replace allows an existing template to be replaced with a new file. Click the file and then browse for the new file to replace the existing template.
Play: Clicking the Play button will play the .wav files.

31
Po
wer
An
no
un
cem
ent
Use
r G
uid
e v1
.7 |
Automated Alerts
The Automated Alerts page includes automated announcements for absent, tardy, or low lunch balances and automated list backups for use through the IVR system. The setup for all automated functions is very similar.
The list backup button (1 above) links to the IVR backup system and allows predefined lists for All Students, All Staff, and All Staff & Students as well as any custom lists desired to be backed up.14 When first visiting the Automated Alerts home screen, the three predefined lists will automatically preload to allow for editing. The backups will not run without first editing to include valid PowerSchool login credentials and selecting a backup schedule.
The broadcast button (2 above) links to the automated messaging system and allows for automated messages to predefined lists of students meeting specified tardy, absent, or low lunch balance criteria.15 The automated messaging system also allows for self-customization. No automated messages will broadcast without first editing to include valid PowerSchool login credentials, a message, and messaging schedule.
14 Creating a custom backup may require a custom query to be written. Limited support is available for custom
queries and may require an additional service fee. For directions or additional details, please contact [email protected].
15 Attendance and lunch balance query customization is included with the installation of Power Announcement. For assistance customizing the queries to meet your needs, please contact [email protected].
1 2

32
Po
wer
An
no
un
cem
ent
Use
r G
uid
e v1
.7 |
Automated List Backup
The three predefined lists available by default are All Students, All Teachers, and All Teachers and Students.16 We recommend creating an Automated List Backup for each of the three lists.
To create a list backup, click Automated Alerts from the main Power Announcement menu. Wait a moment and the three predefined lists will load automatically. Next, choose edit to the right of the list name you wish to setup. If desired, a list backup may also be created by selecting Create New: List Backup as shown on the previous page.
To continue, complete the fields as follows:
List Name: This is the name given to the backup job running and that will display in the list of Automated Alerts.
Choose a List: Choose the appropriate list to be backed up. It is recommended that when editing a default list, another list be chosen then the desired list be selected again to ensure all field names load properly. By default, preloaded lists only backup the first field for each backup type. See Field Names below for an explanation of the field mapping.
PowerSchool Login: Enter a valid PowerSchool admin login that defaults to the same building the backup will run under. Some schools choose to create admin accounts to be used just for automated backups rather than a login belonging to a specific person. The login should be entered in the standard PowerSchool format of username;password.
16 Throughout Power Announcement, any reference to Teachers refers to both Teachers and other Staff Members
entered into PowerSchool.

33
Po
wer
An
no
un
cem
ent
Use
r G
uid
e v1
.7 |
Automated List Backup continued
Backup Days: Check the boxes for the day(s) desired for the backup to run.
Run this on days when school is not in session?: Check this box for the backup to run on days school is not in session (holidays, Summer, weekends, etc.). The calendar is pulled directly from PowerSchool.
Backup Time: This is the time that the backup will start. If using the same login for multiple backups, the times should be staggered amongst the various list backups to avoid logging one another out of the system.
Timezone: Set the desired time zone.
Backup Types: Select the backup type desired. It is recommended to backup all three channels.
Field Names: The field names will automatically populate as Email1, Phone1, Text1, etc. and are mapped to the field names given during install. These should not be changed to the actual PowerSchool field name or the backup will not run correctly.
Automated Report Notifications: Check the appropriate box to receive error alerts or summaries for the Automated List Backup.
Send to These: Enter the email address desired to receive the error alert or summary reports. Only one address may be entered.
Unique ID: Enter a number that will be used by the backup IVR system to identify the list. If each building in the school has a unique username, then each one has the ability to have its own Automated List Backups with the default unique IDs: 1, 2, and 3. If the same username is used by multiple buildings, then every list throughout all buildings must have a unique ID. For example, the district may use the default unique IDs of 1, 2, and 3, but the high school would need custom IDs of 11, 22, and 33 to avoid overwriting the district backups already in place.

34
Po
wer
An
no
un
cem
ent
Use
r G
uid
e v1
.7 |
Automated Broadcast
The three predefined broadcasts available are Absent Students, Tardy Students, and Low Lunch Balance alerts. By default, the absent student list runs a query for all students matching an attendance code of U. The tardy student list runs a query for all students matching an attendance code of T. The low lunch balance list runs a query for all students with a balance1 field equal to $5.00 and whose LunchStatus is not F or E to account for free or reduced lunches. All these are customizable to meet each school buildings specific needs. If not customized during installation, this can be updated at any time by contacting BLI Support.
To create an automated broadcast, click Automated Alerts from the main Power Announcement menu. Then, click Create New: Broadcast. Below is
To continue, complete the fields as follows:
List Name: This is the name that will display as the Broadcast name. It is recommended to choose an easily identifiable name such as Morning Attendance – [Building].
Choose a List: Choose the appropriate list to contact. A query will run automatically to generate the students matching the appropriate criteria each time the broadcast is scheduled.

35
Po
wer
An
no
un
cem
ent
Use
r G
uid
e v1
.7 |
Automated Broadcast continued
PowerSchool Login: Enter a valid PowerSchool admin login that defaults to the same building the broadcast will run under. Some schools choose to create admin accounts to be used just for automated functions rather than a login belonging to a specific person.17 The login should be entered in the standard PowerSchool format of username;password.
Backup Days: Check the boxes for the day(s) desired for the broadcasts to run.
Run this on days when school is not in session?: Check this box for the broadcast to run on days school is not in session (holidays, Summer, weekends, etc.). The calendar is pulled directly from PowerSchool.
Backup Time: This is the time that the broadcast will start. If using the same login for multiple automated broadcasts, the times should be staggered amongst the various broadcasts to avoid logging one another out of the system. For broadcasts to be sent at multiple times throughout the day, multiple broadcasts should be set up.
Timezone: Set the desired time zone.
Message Types: Select the message channel type(s) desired. It is recommended to broadcast to all channels if parents are allowed the option to set preferences from the parent portal. See the additional instructions below appropriate to the individual setup for each type.
Message Category: Select the category appropriate to the type of broadcast being sent.
Automated Report Notifications: Check the appropriate box to receive error alerts or summaries for the Automated List Backup.
Send to These: Enter the email address desired to receive the error alert or summary reports. Only one address may be entered.
Automated Voice Call Setup
To send an automated voice call, first complete all fields as described under Automated Broadcast. Next, check the Voice tab next to Message Type. Then complete the following:
Voice Field Names: These are the fields containing the phone numbers to be contacted and no changes are necessary. Each is mapped to an existing PowerSchool field setup during installation. The Power Announcement fields listed here should not be changed to the actual PowerSchool field name or the broadcast will not send. If provided access through the parent portal, parents can specify which numbers they would like to be contacted for each message category and all fields should be left as is. If only specific PowerSchool fields are desired to be contacted, all others listed may be deleted. For example, if only the Home_Phone field should receive calls and it is mapped to Phone1 then all others may be removed. The field mapping is viewable from Power Announcement installation files or to inquire to the current setup BLI Support may be contacted for assistance. 17 If a login belonging to an existing user is used for the automated broadcast, they will be logged out PowerSchool
each time the automated broadcast is sent.

36
Po
wer
An
no
un
cem
ent
Use
r G
uid
e v1
.7 |
Caller ID #: This is the 10 digit number displayed to call recipients. The number must be 10 digits with no dashes, slashes, spaces or special characters. Example: 8774242987 Message Body: Type in the message desired. Using text-to-speech, this section allows additional information from PowerSchool to be merged in to personalize the message being sent out. On a standard install, students’ first and last names may be merged into the voice call in the following formats: #FirstName# or #LastName#. To request additional merge fields, contact BLI Support. Use this body for all message types, has a check box next to it. This allows the same message to be sent for all message channel types. If using merge fields, do not select this option or the fields will not merge properly as each channel requires a different merge format.
Automated Email Setup
To send an automated email broadcast, first complete all fields as described under Automated Broadcast. Next, check the Email tab next to Message Type. Then complete the following:
Email Field Names: These are the fields containing the email addresses to be contacted and no changes are necessary. Each is mapped to an existing PowerSchool field setup during installation. The Power Announcement fields listed here should not be changed to the actual PowerSchool field name or the broadcast will not send. If provided access through the parent portal, parents can specify which email addresses they would like to be contacted for each message category and all fields should be left as is. If only specific PowerSchool fields are desired to be contacted, all others listed may be deleted. For example, if only the GuardianEmail field should receive emails and it is mapped to Email1 then all others may be removed. The field mapping is viewable from Power Announcement installation files or to inquire to the current setup BLI Support may be contacted for assistance.
From Email: This is the email address display in the recipient’s inbox to show who the email is coming from. This needs to be in valid email format. Example: [email protected] Email Subject: This is the subject line for the message being sent. Typically, schools would use [School Name] Attendance Alert or [School Name] Unexcused Absence.
Message Body: Type the body of the email message here. On a standard install, students’ first and last names may be merged into the email body in the following formats: $$FirstName$$ or $$LastName$$. To request additional merge fields, contact BLI Support.
Use this body for all message types, has a check box next to it. This allows the same message to be sent for all message channel types. If using merge fields, do not select this option or the fields will not merge properly as each channel requires a different merge format.
37
Po
wer
An
no
un
cem
ent
Use
r G
uid
e v1
.7 |
Automated SMS Text Setup
To send an automated SMS message, first complete all fields as described under Automated Broadcast. Next, check the SMS tab next to Message Type. Then complete the following: SMS Field Names: These are the fields containing the phone numbers to be contacted and no changes are necessary. Each is mapped to an existing PowerSchool field setup during installation. The Power Announcement fields listed here should not be changed to the actual PowerSchool field name or the broadcast will not send. If provided access through the parent portal, parents can specify which mobile number they would like to be contacted for each message category and all fields should be left as is. If only specific PowerSchool fields are desired to be contacted, all others listed may be deleted. For example, if only the Mother_Cell field should receive texts and it is mapped to SMS1 then all others may be removed. The field mapping is viewable from Power Announcement installation files or to inquire to the current setup BLI Support may be contacted for assistance.
Message Body: Type the text message here. On a standard install, students’ first and last names may be merged into the SMS message in the following formats: [#FirstName|15#] or [#LastName|15#]. The 15 shown is the maximum number of characters allowed for the merge field desired. The number may be adjusted as needed to account for longer names. To request additional merge fields, contact BLI Support. SMS messages are limited to 160 characters. Use this body for all message types, has a check box next to it. This allows the same message to be sent for all message channel types. If using merge fields, do not select this option or the fields will not merge properly as each channel requires a different merge format.

38
Po
wer
An
no
un
cem
ent
Use
r G
uid
e v1
.7 |
Power Announcements – Regular Message Submission
To send a message to a custom list uploaded to Power Announcement, to filter lists, or to send HTML emails, Power Announcements should be selected from the drop-down menu. This link provides full messaging options rather than the limitations of the quick message.
Once Power Announcements is selected, first choose who to send the message(s) to, what category to send the message as, and choose the type(s) of message channels the message should be sent as.

39
Po
wer
An
no
un
cem
ent
Use
r G
uid
e v1
.7 |
Power Announcements – Regular Message Submission continued
Choosing Message Recipients Any combination of lists may be selected under Send this Message to. If choosing All Students or All Staff, only those students or staff members listed under the building currently at will be selected. To contact all contacts at the District level, the PowerSchool School building should be changed to the District. Current selection applies only to students. To contact a selection of students from a particular building, first complete a PowerSchool search for the students. To contact a current selection of students from multiple building, the District school building should also be used.
Custom lists may also be created and selected for messaging through Power Announcement. Choose a previously uploaded custom list from the custom list drop-down or choose Add a New List to upload one directly from the message setup screen. For directions on uploading a custom list, see Custom List Upload.
Selecting Message Category
After choosing the message recipients, choose the appropriate message category from the drop-down menu. The message categories are customizable. Contact BLI Support for changes.

40
Po
wer
An
no
un
cem
ent
Use
r G
uid
e v1
.7 |
Power Announcements – Regular Message Submission continued
Selecting Messaging Channels
To select the type of message to send, check the box next to the appropriate channel. Additional options are also provided here as follows: Presets: Any time, Preset = Yes is chosen, the system is told a template will be selected and no changes are needed to the message body. If a template is desired, but changes are required, choose Preset = No. Add Attachments to Email: If Yes is chosen here, an additional page will be added to the message setup allowing attachments to be added to the email being sent. Add Key Press Transfers to Announcements: If yes is chosen here, an additional screen will be added to the messaging setup allowing key press options on voice calls. Key press options include Repeat, Stop, and Dial To. See Key Press transfers for additional details.18
The bottom portion of the screen displays the total number of contacts selected, the total number of messages to be sent for each channel, and the total number of fields without contact information entered.19 After the message recipients and channels have been chosen, click the Filter Lists button at the bottom of the screen to filter the recipient lists further or choose Configure Message to begin create the message body. Filter Lists may be selected to create a specific selection of staff members. 18
Key Presses are commonly referred to as Hot Keys. 19
The total number of message is not always equal to the number of contacts as multiple fields may be pulled for each messaging channel. If the number of contacts without contact information appears high, please contact BLI Support for assistance in identifying the students or staff members missing contact information.

41
Po
wer
An
no
un
cem
ent
Use
r G
uid
e v1
.7 |
Power Announcements – Regular Message Submission continued
Filter Lists
If the Filter Lists button is selected, the screen will change to include additional filtering options.
To add a filter use the drop-down and text box to create the parameters desired. The first drop-down menu includes the column headers to filter by and the second drop-down allows a selection of the condition. Type the filter text into the third box and select Add Filter to filter the list as needed.
Multiple filters may be added to narrow a list even further. All contacts with a checkmark next to their row will be contacted. Anytime a checkmark is removed the selection is stored.
Once filtering is complete, click Configure Message to continue to General Message settings.

42
Po
wer
An
no
un
cem
ent
Use
r G
uid
e v1
.7 |
Power Announcements – Regular Message Submission continued
General Settings
The General Settings page will establish the settings for all message types you chose. General Fields will always display and the remainder of the page will only load for the message channels selected on the previous screen. The majority of the settings here are prepopulated from the User Defaults, but may be edited as needed. It is recommended that the User Defaults be set properly for the most frequently used settings to save time. 20
After all General Settings are complete, select Next.
20
See User Defaults for additional instructions on setting defaults.

43
Po
wer
An
no
un
cem
ent
Use
r G
uid
e v1
.7 |
Power Announcements – Regular Message Submission continued
General Fields
To begin, set the message name. This is a name given to the message and will be used for internal tracking only. It will be displayed in Reportingand in the Job Status box on the Power Announcement home screen.
The Broadcast Date and Broadcast Time will default to the current date and time. If no changes are made, the message will begin delivery as soon as Submit is chosen on the final Message Submit screen.
The date and/or time may be set to a future time. The message and contact information will be stored in Power Announcement until the delivery time chosen.21
Email Settings
Display Name: The name that appears as in the recipient’s inbox. For example, Apple Grove High School or Apple Grove School District may be used.
Email From: Email address that appears as the From: field in emails. For example, [email protected] or [email protected] may be used.
21
Since post-dating a message stores the contact information, any changes to contact information between the time the message was created and the time it is delivered will not be applied to pending messages.

44
Po
wer
An
no
un
cem
ent
Use
r G
uid
e v1
.7 |
Power Announcements – Regular Message Submission continued Email Settings continued
Reply to: The address that recipients may Reply To. If replies are not desired, it is suggested to enter a reply address of [email protected].
Subject: Enter the email subject.
Forward: If Yes is chosen, a sentence is added to the email asking the recipient if he/she would like to share the message with a friend. If the recipient clicks the sentence (a link), it will put the body of the message into his/her default browser so he/she can forward to whomever he/she chooses. If No is chosen, the sentence is removed.
Voice Settings
Stop/Restart Times: This is a safety system to ensure that messages will not accidently send during times not desired. This should be setup in the User Defaults and should not need any adjustments unless sending a message outside of default messaging hours on purpose.
Restart: This should be set to yes so that any messages reaching the stop time are allowed to restart at the restart time. It is recommended this always be set to yes.
Number of Redials: This drop-down has the numbers 0-5 and is how many times the system will retry any number that failed on the previous attempt because the line was busy or there is no answer. It will not redial any number that is successfully contacted unless deduping is turned off in the User Defaults.
Caller ID Number: This is the phone number that appears in the recipient's caller ID when receiving a call. This number must be 10 numeric digits with no other symbols.

45
Po
wer
An
no
un
cem
ent
Use
r G
uid
e v1
.7 |
Power Announcements – Regular Message Submission continued
SMS Settings
Short Code: This is the number that shows up in the Recipient's Caller ID when he/she receives your text.22
Stop/Restart Times: This is a safety system to ensure that messages will not accidently send during times not desired. This should be setup in the User Defaults and should not need any adjustments unless sending a message outside of default messaging hours on purpose.
Restart: This should be set to yes so that any messages reaching the stop time are allowed to restart at the restart time. It is recommended this always be set to yes.
General Setting Submission
Click Next once all General Settings are complete to continue to the appropriate message setup.
22 Recipients may save the short code to their contact list as the School name to be identified as the school in
messages.

46
Po
wer
An
no
un
cem
ent
Use
r G
uid
e v1
.7 |
Power Announcements – Regular Message Submission continued
New Email
Use the email editor provided to create your email body. For simple messages, just type the message as desired. The editor is similar to most word processors and any button will show its action when hovered over.
Frequently used buttons include:
This button is used to Paste from Word® and will retain formatting.
This button is used to upload a Picture. Clicking will open a pop-up and allow browsing of a computer or server for the file desired. Once selected, choose ok, then the picture may be used in the message. It is recommended that prior to uploading a picture, it be
edited, resized as needed, and saved for email use. Some email services may display pictures in the size originally uploaded to the HTML editor regardless of resizing within the HTML editor.
This button toggles between the editor to HTML coding for those who like to work directly with HTML coding.

47
Po
wer
An
no
un
cem
ent
Use
r G
uid
e v1
.7 |
Power Announcements – Regular Message Submission continued
New Email continued Besides typing the email into the editor, there are three other options to assist with creating an email. You will find these options across the top of the email editor:
Insert Personal Template: Click this button to select a template from the Personal Email Template Library.
Insert Global Template: Click this button to select a template from the Global Template Library. There are several categories that be selected with multiple templates in each.
Choose File: Click this button to browse a hard drive or server for an HTML file to upload to the editor.
Upload to HTML Editor: Click this button once a file has been selected from a hard drive or server to load into the editor.
Once the body of the email is created, look to the bottom of the screen for additional option. To preview the HTML, select Preview HTML or if desired convert to Text for recipients without HTML supported emails. Then, click the Next button to continue.
Email Attachments (Optional) If add email attachments was chosen, the following screen will appear next:
Multiple files can be uploaded and will appear under list of uploaded attachments once uploaded.23 Click Next to finish completing the email.
23
It is not recommended to exceed 3MB. For email best practices, contact BLI Support.

48
Po
wer
An
no
un
cem
ent
Use
r G
uid
e v1
.7 |
Power Announcements – Regular Message Submission continued
New Email continued
If add email attachments was not chosen originally or has already been completed, the following screen will appear next:
Update the fields displayed to send a sample message to those desired. Email Proof 1 is a required field and all proof addresses entered will receive a copy of messages being sent. If a copy is not desired, simply enter [email protected] as the email address. Email proofs two through five are optional.
Once all changes are complete, click Submit to complete the creation of the email. Pressing Submit here will not actually submit the job but instead completes the setup and moves on to the next message channel chosen. If no other message channel has been chosen, then proceed to Message Submit.

49
Po
wer
An
no
un
cem
ent
Use
r G
uid
e v1
.7 |
Power Announcements – Regular Message Submission continued
New Text Message
There are three ways to enter the text message desired:
Type it directly into the text box.
Click Insert Message Template to choose a text file from the Text Template Library.
Choose File: Click this button to browse a hard drive or server for a .txt to upload to the editor. Once selected, click upload to confirm.
SMS Text messages are limited to 160 characters. A character counter is located in the center of the screen. The number in the parentheses is the total number of messages to be sent after exceeding the first 160 characters. If the message entered exceeds 160 characters, the drop-down menu in the upper left should be moved from Truncate to Split to ensure the entire message is received.
The two options available from the drop-down menu are as follows:
Truncate: The SMS message will end at the 160 character limit. All remaining characters (if any) will not be received as only one message will be sent.
Split: The text entered will be split between as many messages as needed to provide the complete message. Some recipients may not have unlimited messaging plans, so it is recommended the split option only be used conservatively.

50
Po
wer
An
no
un
cem
ent
Use
r G
uid
e v1
.7 |
Power Announcements – Regular Message Submission continued
New Text Message continued
Click Insert Merge Field to open a pop-up that allows PowerSchool fields to be merged into the body of the message. Merge fields may also be manually entered but only those options shown from the Merge Field drop-down are available by default. To request additional fields from the PowerSchool student table to be available, please contact BLI Support.
The Max Characters field above sets the maximum characters that the Merge Field is allowed. This number may be adjusted as necessary to allow for the full field to merge as needed. For example, if merging the students’ first names and its known some exceed 10 characters, the number may be need increased to 15. All text merge fields should be in the following format [#FieldName|10#].
You can click on “Next” once you have completed your message. The following screen will appear next:
Update the fields displayed to send a copy of the message to those desired. Cell Phone 1 is a required field. If a copy is not desired, simply enter 5555555555 as the phone number. Cell Phone two through five are optional.
Once all changes are complete, click Submit to complete the creation of the text. Pressing Submit here will not actually submit the job but instead completes the setup and moves on to the next message channel chosen. If no other message channel has been chosen, then proceed to Message Submit.

51
Po
wer
An
no
un
cem
ent
Use
r G
uid
e v1
.7 |
Power Announcements – Regular Message Submission continued
New Voice Message
There are four ways to submit a voice message to the system.
1. Record a Message by Phone may be selected.
2. Choose File: Click this button to browse a hard drive or server for a .txt or .wav file to upload to the recordings. Once selected, click upload to confirm
3. Click Insert Message Template to choose a .wav or .txt file from the Voice Template Library/Recording Studio.
4. Type the Message desired into the text entry box at the bottom of the screen

52
Po
wer
An
no
un
cem
ent
Use
r G
uid
e v1
.7 |
Power Announcements – Regular Message Submission continued
Record a Message by Phone
To record a message by phone, click the button Record a Message by Phone. Pop-ups must be enabled.
The pop-up will appear with a toll-free phone number and a PIN number necessary to complete the recording. Follow the prompts to record a message. When complete, the pop-up will close and the recorded .wav files will appear under list uploaded recordings.
Two files will be shown:
Live is the message file played when a person answers the call.
Message is the message file played if a Voice Mail or Answering Machine answers the call.
When you record by phone, it duplicates your message and uses it for both files. Both are necessary for a successfully sent message.
53
Po
wer
An
no
un
cem
ent
Use
r G
uid
e v1
.7 |
Power Announcements – Regular Message Submission continued
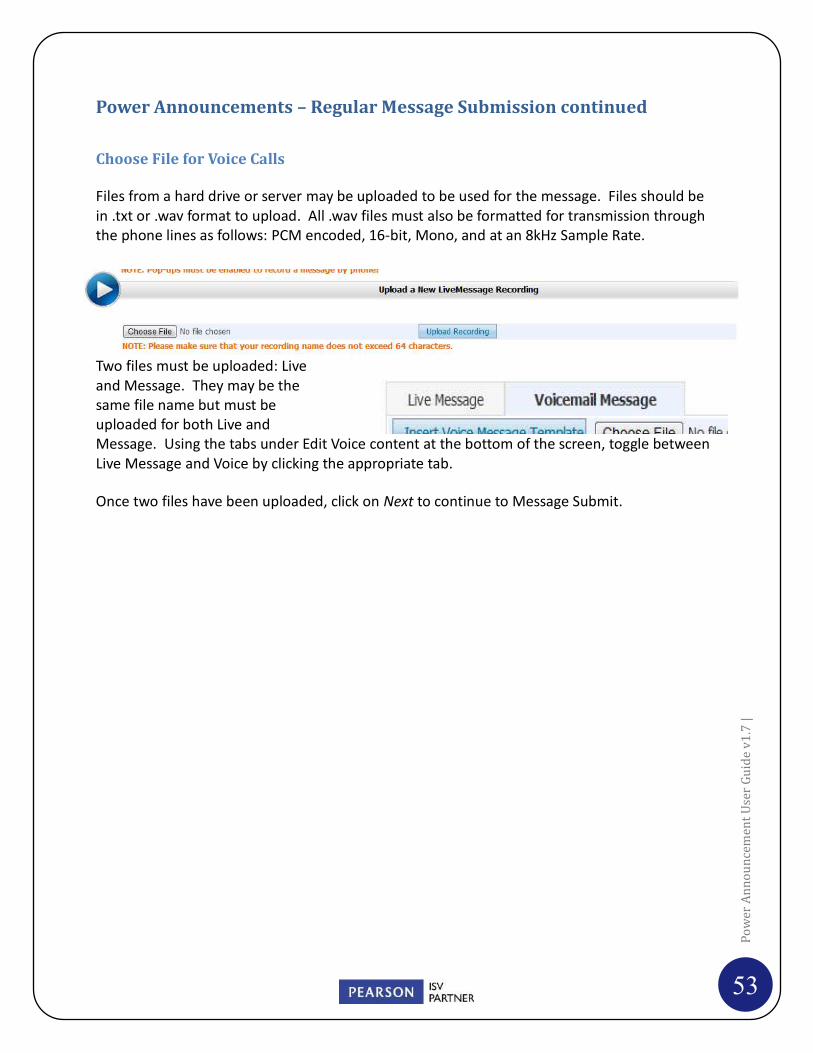
Choose File for Voice Calls
Files from a hard drive or server may be uploaded to be used for the message. Files should be in .txt or .wav format to upload. All .wav files must also be formatted for transmission through the phone lines as follows: PCM encoded, 16-bit, Mono, and at an 8kHz Sample Rate.
Two files must be uploaded: Live and Message. They may be the same file name but must be uploaded for both Live and Message. Using the tabs under Edit Voice content at the bottom of the screen, toggle between Live Message and Voice by clicking the appropriate tab.
Once two files have been uploaded, click on Next to continue to Message Submit.

54
Po
wer
An
no
un
cem
ent
Use
r G
uid
e v1
.7 |
Power Announcements – Regular Message Submission continued
Insert Message Template for Voice Calls
To insert a prerecorded .wav file or .txt file into the message, select Insert [Live/Voice] Message Template.
Upon clicking Insert Message Template, the screen will change to the Voice template library. Choose the appropriate .wav or .txt file desired. Then, click Next at the bottom of the screen to return to the message setup.
If a different message is desired for the live vs. message answers, toggle between the Live Message and Voicemail Message tabs shown in the first picture above. Clicking Insert [Live/Voice] Message Template as needed. Then select the desired file and upon returning to the Message setup screen, click Add. If Add is not selected, the message template chosen will play for both the Live/Voice.
If the file chosen is a .txt for text-to-speech, then the message setup screen will show the text within the editor. If a .wav file is chosen, it will display under the list of uploaded recordings.
Once the files are chosen, click Next to either move to the Key Press transfer screen (optional) or to the final Message Submit screen.
Power Announcements – Regular Message Submission continued
55
Po
wer
An
no
un
cem
ent
Use
r G
uid
e v1
.7 |
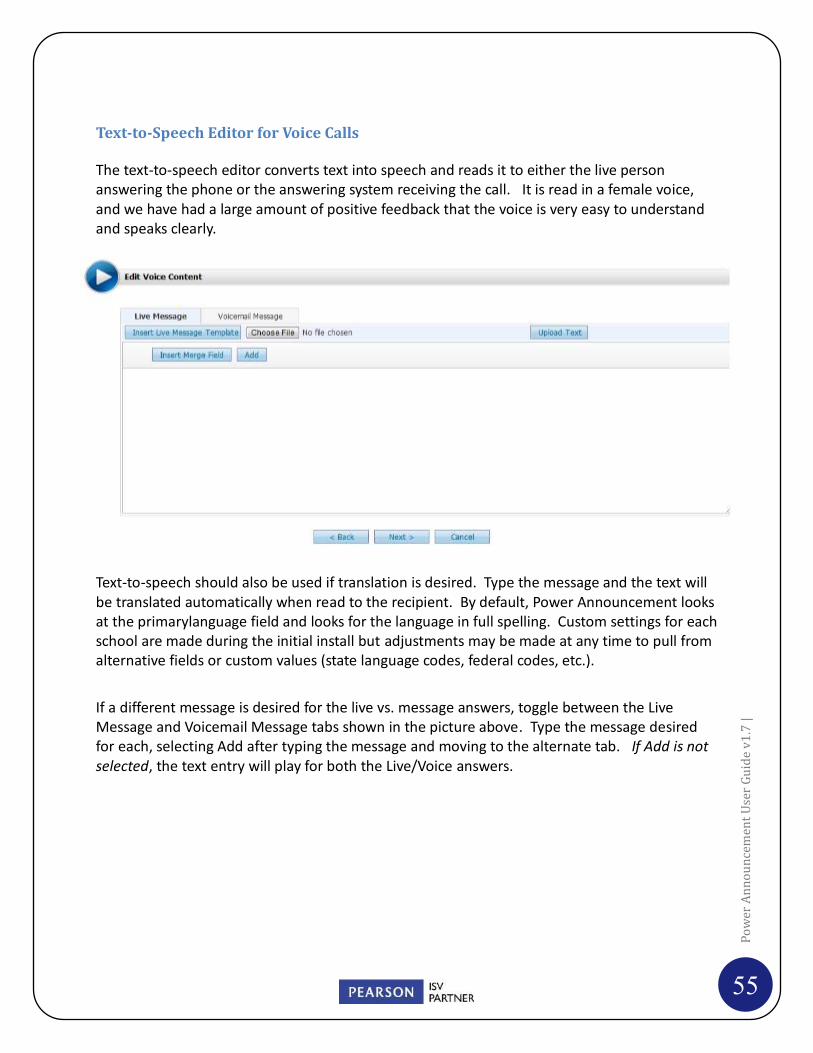
Text-to-Speech Editor for Voice Calls
The text-to-speech editor converts text into speech and reads it to either the live person answering the phone or the answering system receiving the call. It is read in a female voice, and we have had a large amount of positive feedback that the voice is very easy to understand and speaks clearly.
Text-to-speech should also be used if translation is desired. Type the message and the text will be translated automatically when read to the recipient. By default, Power Announcement looks at the primarylanguage field and looks for the language in full spelling. Custom settings for each school are made during the initial install but adjustments may be made at any time to pull from alternative fields or custom values (state language codes, federal codes, etc.).
If a different message is desired for the live vs. message answers, toggle between the Live Message and Voicemail Message tabs shown in the picture above. Type the message desired for each, selecting Add after typing the message and moving to the alternate tab. If Add is not selected, the text entry will play for both the Live/Voice answers.

56
Po
wer
An
no
un
cem
ent
Use
r G
uid
e v1
.7 |
Power Announcements – Regular Message Submission continued Text-to-Speech Editor for Voice Calls continued
Click Insert Merge Field to open a pop-up that allows PowerSchool fields to be merged into the body of the message. Merge fields may also be manually entered but only those options shown from the Merge Field drop-down are available by default. All text-to-speech merge fields
should be in the following format: #FirstName#. To request additional fields from the PowerSchool student table to be available, please contact BLI Support.
Once the message setup is complete, click Next to either move to the Key Press transfer screen (optional) or to the final Message Submit screen.

57
Po
wer
An
no
un
cem
ent
Use
r G
uid
e v1
.7 |
Power Announcements – Regular Message Submission continued
Message Submit
Message Submit is the last step prior to sending a regular broadcast. If the Submit button is clicked here, the announcement will be sent to BLI for processing at the broadcast date and time shown. This page is a complete summary of the announcement(s) created with links and details for each messages type. You can click on the links to download and review each message.
Note: To download and save a message for future use, click the link to save the file to a hard drive, Then, go to the template library (Power Announcement>Template Library) and upload the message into the appropriate library for future use.
Review the Message for accuracy then click one of the following options.
Edit: Click Edit to repeat the steps, without erasing any work, and make any necessary edits.
Submit: Click Submit to send the message. If the date and time were left at default, the messages will immediately begin delivering. If set for a future time, the server will save the job and begin delivering at the date/time selected.
Cancel: Click Cancel to delete the messages and prevent delivery. This cannot be undone!
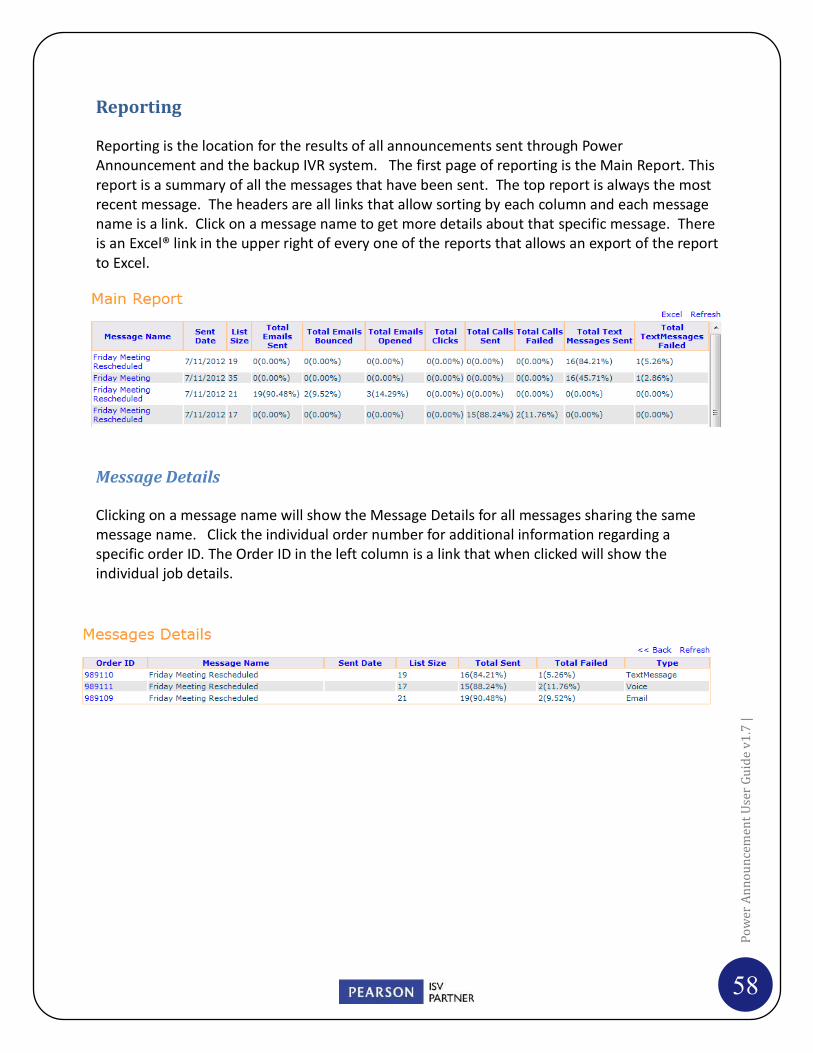
58
Po
wer
An
no
un
cem
ent
Use
r G
uid
e v1
.7 |
Reporting
Reporting is the location for the results of all announcements sent through Power Announcement and the backup IVR system. The first page of reporting is the Main Report. This report is a summary of all the messages that have been sent. The top report is always the most recent message. The headers are all links that allow sorting by each column and each message name is a link. Click on a message name to get more details about that specific message. There is an Excel® link in the upper right of every one of the reports that allows an export of the report to Excel.
Message Details
Clicking on a message name will show the Message Details for all messages sharing the same message name. Click the individual order number for additional information regarding a specific order ID. The Order ID in the left column is a link that when clicked will show the individual job details.

59
Po
wer
An
no
un
cem
ent
Use
r G
uid
e v1
.7 |
Reporting continued
Job Details
This message was an email message. We can see some basic statistics about what happened with this message. Basic statistics are provided regarding the outcome of the message. Reporting is in real time but results of emails sent will continue to update over a 24 hour period to adjust for accurate open and click through percentages.
Any of the percentage results listed are clickable links that will provide a view of the individual recipient and the result. Here we’ve selected bounced to review the reason for the failures:
The bounce reason shows that several of the emails were duplicates addresses and were therefore not contacted. The other two are bad email addresses and the contacts should be contacted to update their contact information. Clicking the Detailed Report Linking in the upper right will provide the full contact information for the bounces. The report may also be exported to Excel® for further review.

60
Po
wer
An
no
un
cem
ent
Use
r G
uid
e v1
.7 |
User Guide v1.7 Revised 7/6/2012