
POSE eCRF Guide Version 12.09 - pose-trial.org · PDF filePOSE eCRF Guidance 3 Version 1.0...
10
POSE eCRF Guidance 1 Version 1.0 12.09.2017 Index 1. Log In ............................................................................................................................................... 2 2. Confidentiality .................................................................................................................................. 2 3. Language .......................................................................................................................................... 2 4. Values ............................................................................................................................................... 2 5. Subject Matrix .................................................................................................................................. 3 6. Add new subject ............................................................................................................................... 3 7. Opening the Data entry mask ........................................................................................................... 4 a) Option A: “Schedule Study Event for…”-Window ..................................................................... 4 b) Option B: Entering Data starting from the subject Matrix ........................................................... 5 c) “Enter or Validate Data for CRFs”-Window................................................................................ 5 8. General information about entering Data ......................................................................................... 6 a) Definitions .................................................................................................................................... 6 b) Asterisk ......................................................................................................................................... 6 c) Discrepancy Note and missing data ............................................................................................. 6 d) Saving Data .................................................................................................................................. 6 e) Handling of errors and mistakes in data-entry ............................................................................. 6 f) Single best answer ........................................................................................................................ 7 9. Entering Data .................................................................................................................................... 8 a) General Information ..................................................................................................................... 8 b) Baseline Assessment (Visit 1) ...................................................................................................... 8 c) Surgery Day (Visit 2) ................................................................................................................... 8 d) Follow-up on POD 30 (Visit 3) .................................................................................................... 8 10. Mark CRF complete ......................................................................................................................... 9 a) Changing data after marking CRF complete ................................................................................ 9
Transcript of POSE eCRF Guide Version 12.09 - pose-trial.org · PDF filePOSE eCRF Guidance 3 Version 1.0...

POSE eCRF Guidance
1 Version 1.0 12.09.2017
Index 1. Log In ............................................................................................................................................... 2 2. Confidentiality .................................................................................................................................. 2 3. Language .......................................................................................................................................... 2 4. Values ............................................................................................................................................... 2 5. Subject Matrix .................................................................................................................................. 3 6. Add new subject ............................................................................................................................... 3 7. Opening the Data entry mask ........................................................................................................... 4
a) Option A: “Schedule Study Event for…”-Window ..................................................................... 4 b) Option B: Entering Data starting from the subject Matrix ........................................................... 5 c) “Enter or Validate Data for CRFs”-Window ................................................................................ 5
8. General information about entering Data ......................................................................................... 6 a) Definitions .................................................................................................................................... 6 b) Asterisk ......................................................................................................................................... 6 c) Discrepancy Note and missing data ............................................................................................. 6 d) Saving Data .................................................................................................................................. 6 e) Handling of errors and mistakes in data-entry ............................................................................. 6 f) Single best answer ........................................................................................................................ 7
9. Entering Data .................................................................................................................................... 8 a) General Information ..................................................................................................................... 8 b) Baseline Assessment (Visit 1) ...................................................................................................... 8 c) Surgery Day (Visit 2) ................................................................................................................... 8 d) Follow-up on POD 30 (Visit 3) .................................................................................................... 8
10. Mark CRF complete ......................................................................................................................... 9 a) Changing data after marking CRF complete ................................................................................ 9

POSE eCRF Guidance
2 Version 1.0 12.09.2017
1. Log In Make sure to follow the following steps:
a. Open your browser (OpenClinica recommends using the latest version of Chrome, Firefox or Internet Explorer) and connect to link https://pose-trial.org/OpenClinica/
b. Fill in the username and password fields and press “login” c. In case it was your first login you will be asked to choose a new password as well as a
password challenge question and answer
d. Fill in the required fields and press “Change Password” e. You will then be directed to the database website and be able to enter data
2. Confidentiality Username and password are personal: transferring or giving them to any other person would be violation to the POSE Standard Operating Procedure 3. Language Please be sure to fill in the data in English language. 4. Values All entered values with a decimal behind the comma must be entered with a “dot” not “comma” (e.g. 8.11). Dates should be entered in the format DD-MMM-YYYY (e.g. 31-Aug-2017). The easiest way is to choose the date from the calendar icon next to the text field:
Press the Calendar Icon in order for the calendar to open.

POSE eCRF Guidance
3 Version 1.0 12.09.2017
5. Subject Matrix
- By choosing “Subject Matrix” in the Navigation bar you will get an overview of all added subjects
- First column is the Study Subject ID - Second, third and fourth columns show symbols for the current data entry status of the specific
Study Subject for Visit 1, 2 and 3
- Blue symbol means data entry for this visit has not been scheduled yet
- Yellow symbol means data entry for this visit has been started - Green symbol means data entry has been finished (for more information see chapter 10.
“Mark CRF complete”)
- With the arrows you can change to the next page with study subjects 6. Add new subject
- In order to add a new subject press “Add Subject” or “Tasks” and then “Add Subject” in the navigation bar.
or
POSE eCRF Guidance
4 Version 1.0 12.09.2017
XXX-XXX-XXX
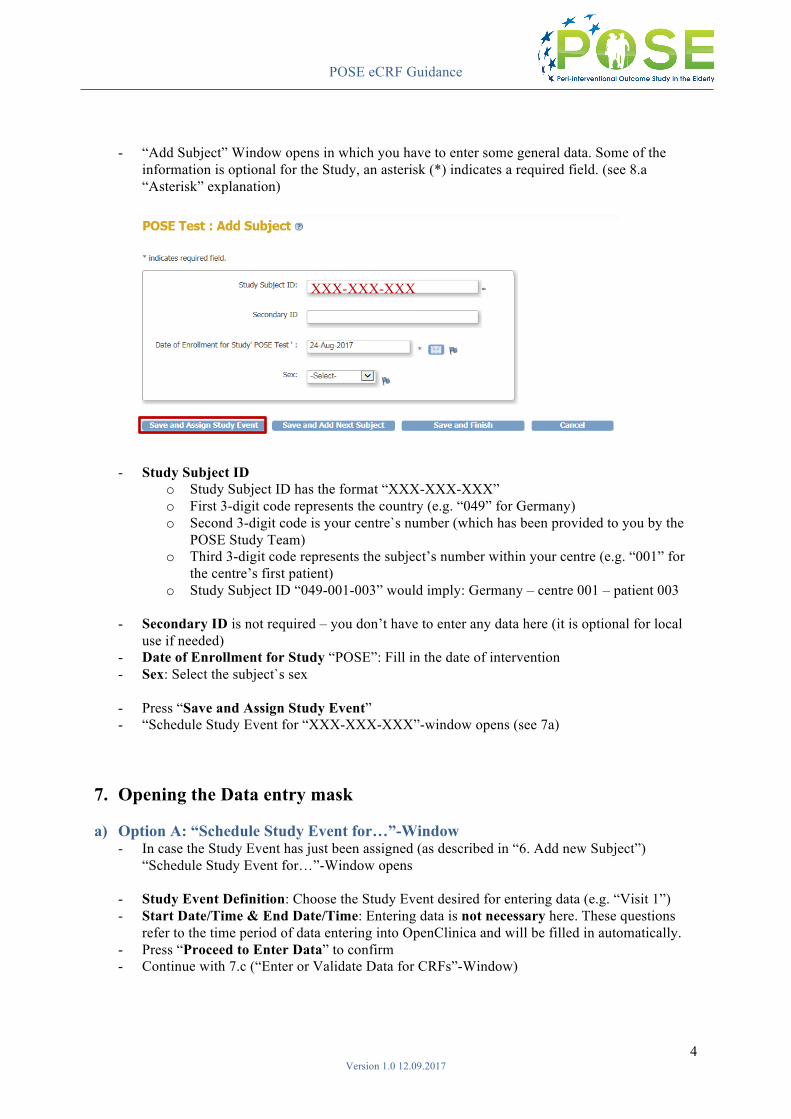
- “Add Subject” Window opens in which you have to enter some general data. Some of the information is optional for the Study, an asterisk (*) indicates a required field. (see 8.a “Asterisk” explanation)
- Study Subject ID
o Study Subject ID has the format “XXX-XXX-XXX” o First 3-digit code represents the country (e.g. “049” for Germany) o Second 3-digit code is your centre`s number (which has been provided to you by the
POSE Study Team) o Third 3-digit code represents the subject’s number within your centre (e.g. “001” for
the centre’s first patient) o Study Subject ID “049-001-003” would imply: Germany – centre 001 – patient 003
- Secondary ID is not required – you don’t have to enter any data here (it is optional for local
use if needed) - Date of Enrollment for Study “POSE”: Fill in the date of intervention - Sex: Select the subject`s sex
- Press “Save and Assign Study Event” - “Schedule Study Event for “XXX-XXX-XXX”-window opens (see 7a)
7. Opening the Data entry mask a) Option A: “Schedule Study Event for…”-Window
- In case the Study Event has just been assigned (as described in “6. Add new Subject”) “Schedule Study Event for…”-Window opens
- Study Event Definition: Choose the Study Event desired for entering data (e.g. “Visit 1”) - Start Date/Time & End Date/Time: Entering data is not necessary here. These questions
refer to the time period of data entering into OpenClinica and will be filled in automatically. - Press “Proceed to Enter Data” to confirm - Continue with 7.c (“Enter or Validate Data for CRFs”-Window)

POSE eCRF Guidance
5 Version 1.0 12.09.2017
b) Option B: Entering Data starting from the subject Matrix
- Choose “Subject Matrix” in the navigation bar
- An overview of all recorded subjects opens - Move the mouse cursor over the table element of the desired Study Subject ID (table row) and
desired Study Event (table column) - Click for more options - Press “View/Enter Data” (in the little window that has opened)
c) “Enter or Validate Data for CRFs”-Window
- This window opens after executed option A or B - Choose the “Enter Data”-Button from “Actions” (see picture below) - The window for entering Data opens automatically
POSE eCRF Guidance
6 Version 1.0 12.09.2017
8. General information about entering Data a) Definitions
- Please make sure to check any unknown terms and definitions in the glossary on our website b) Asterisk An asterisk (*) behind an input box indicates a required field – If no data is entered here and no “discrepancy note” is added, you won’t be able to save any of the page’s data.
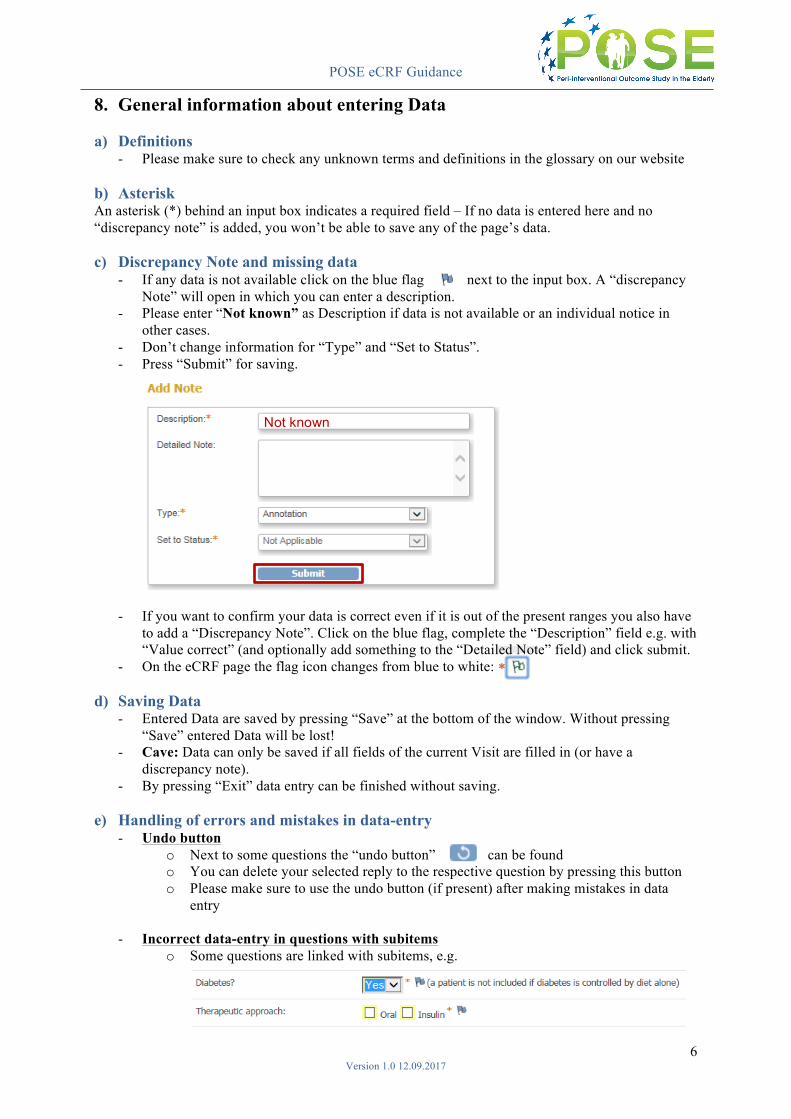
c) Discrepancy Note and missing data
- If any data is not available click on the blue flag next to the input box. A “discrepancy Note” will open in which you can enter a description.
- Please enter “Not known” as Description if data is not available or an individual notice in other cases.
- Don’t change information for “Type” and “Set to Status”. - Press “Submit” for saving.
- If you want to confirm your data is correct even if it is out of the present ranges you also have to add a “Discrepancy Note”. Click on the blue flag, complete the “Description” field e.g. with “Value correct” (and optionally add something to the “Detailed Note” field) and click submit.
- On the eCRF page the flag icon changes from blue to white: d) Saving Data
- Entered Data are saved by pressing “Save” at the bottom of the window. Without pressing “Save” entered Data will be lost!
- Cave: Data can only be saved if all fields of the current Visit are filled in (or have a discrepancy note).
- By pressing “Exit” data entry can be finished without saving. e) Handling of errors and mistakes in data-entry
- Undo button o Next to some questions the “undo button” can be found o You can delete your selected reply to the respective question by pressing this button o Please make sure to use the undo button (if present) after making mistakes in data
entry
- Incorrect data-entry in questions with subitems o Some questions are linked with subitems, e.g.
Not known

POSE eCRF Guidance
7 Version 1.0 12.09.2017
In case you click “Yes”, the question of “Therapeutic approach” appears.
o In case you have clicked “Yes” to the question of “Diabetes?” and you intend to change your reply to “No” = No Diabetes
o Please make sure to first delete your selection of “Oral” and “Insulin” (in some cases
by pressing the undo button)
o And secondly change your reply to “No”
“Therapeutic approach” will automatically disappear
- Error messages when saving data o If you forgot to enter data, you will receive an error message after clicking the „save“
button. You can jump to this field by clicking on the red error message. o If you have entered incorrect data, e.g. outside the pre-set ranges, you will also receive
an error message. (Add a Discrepancy Note (see 8.b) to confirm your data is correct.) f) Single best answer
- Single best answer means only one answer is selectable, no multiple answers are possible.
Wrong reply
1. Delete selection of „Oral“ and „Insulin“
2. Change reply to „No“
POSE eCRF Guidance
8 Version 1.0 12.09.2017
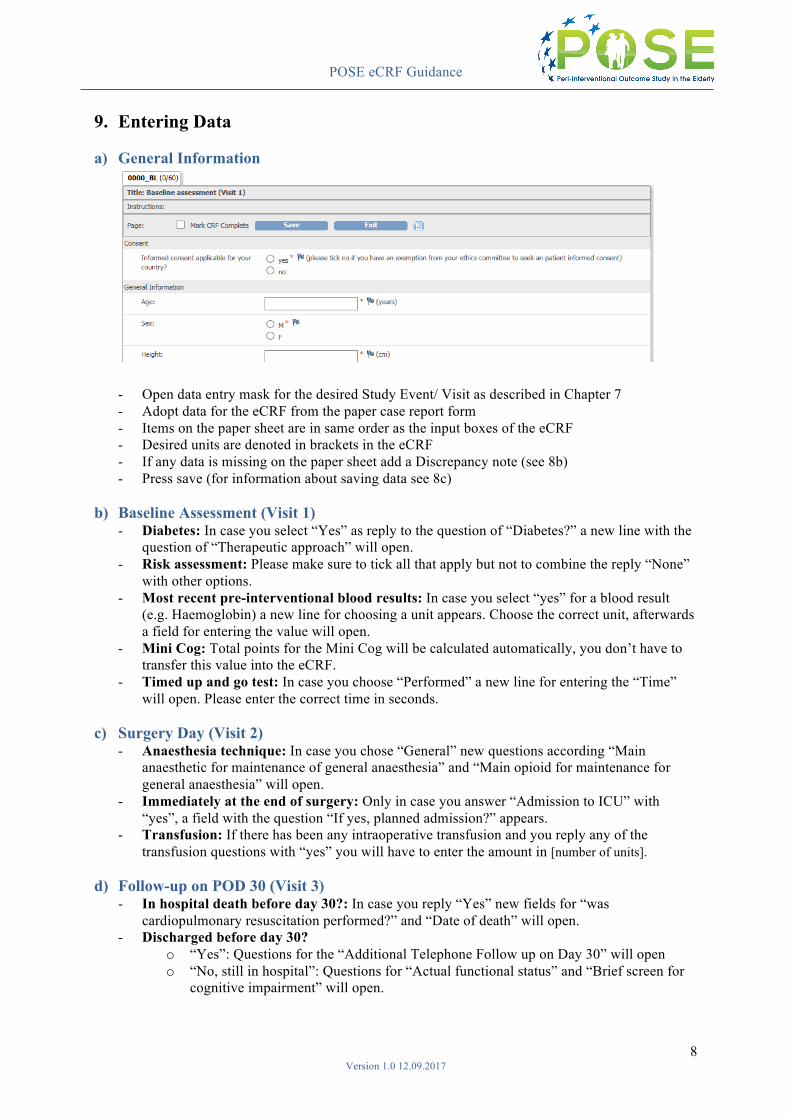
9. Entering Data a) General Information
- Open data entry mask for the desired Study Event/ Visit as described in Chapter 7 - Adopt data for the eCRF from the paper case report form - Items on the paper sheet are in same order as the input boxes of the eCRF - Desired units are denoted in brackets in the eCRF - If any data is missing on the paper sheet add a Discrepancy note (see 8b) - Press save (for information about saving data see 8c)
b) Baseline Assessment (Visit 1) - Diabetes: In case you select “Yes” as reply to the question of “Diabetes?” a new line with the
question of “Therapeutic approach” will open. - Risk assessment: Please make sure to tick all that apply but not to combine the reply “None”
with other options. - Most recent pre-interventional blood results: In case you select “yes” for a blood result
(e.g. Haemoglobin) a new line for choosing a unit appears. Choose the correct unit, afterwards a field for entering the value will open.
- Mini Cog: Total points for the Mini Cog will be calculated automatically, you don’t have to transfer this value into the eCRF.
- Timed up and go test: In case you choose “Performed” a new line for entering the “Time” will open. Please enter the correct time in seconds.
c) Surgery Day (Visit 2)
- Anaesthesia technique: In case you chose “General” new questions according “Main anaesthetic for maintenance of general anaesthesia” and “Main opioid for maintenance for general anaesthesia” will open.
- Immediately at the end of surgery: Only in case you answer “Admission to ICU” with “yes”, a field with the question “If yes, planned admission?” appears.
- Transfusion: If there has been any intraoperative transfusion and you reply any of the transfusion questions with “yes” you will have to enter the amount in [number of units].
d) Follow-up on POD 30 (Visit 3)
- In hospital death before day 30?: In case you reply “Yes” new fields for “was cardiopulmonary resuscitation performed?” and “Date of death” will open.
- Discharged before day 30? o “Yes”: Questions for the “Additional Telephone Follow up on Day 30” will open o “No, still in hospital”: Questions for “Actual functional status” and “Brief screen for
cognitive impairment” will open.

POSE eCRF Guidance
9 Version 1.0 12.09.2017
10. Mark CRF complete
- Don’t mark CRF complete if data entry for this Visit is not completely finished! - After making sure that data entry for a Study Subject`s visit is complete you can “Mark CRF
complete” by choosing “Mark CRF Complete” before pressing “Save” at the bottom or top of the data entry mask
- This will change the status of the eCRF from “data entry started” to “Complete”.
à - The symbol in the Subject Matrix will change from an orange coloured pen (data entry started)
to a green coloured checkmark (CRF marked complete). (See 5. Subject Matrix)
- Afterwards it will only be possible to make any changes by adding a discrepancy note.
a) Changing data after marking CRF complete - Changing data after marking CRF as completed should be an exception
- Choose the green symbol (means CRF is marked complete) of the Study subject`s visit and
then “View/Enter Data”
- “Enter or Validate Data for CRFs”-Window opens - Choose the following symbol from “Actions”
- Data Entry mask opens - For changing any data you will have to add a “Discrepancy Note”
- Example: In Case you want to change the patients Age please change the information in the
data entry field and afterwards click on the blue flag next to the field
- “Add Discrepancy Note”-Window opens - Please enter the reason for changing data after marking CRF as completed in the
“Description”-field and press “Submit & Close”.
Corrected age Click on blue flag in order to add a discrepancy note

POSE eCRF Guidance
10 Version 1.0 12.09.2017
- The colour of the flag has turned to withe - Press Save - Afterwards data has been successfully changed
Reason for changing data after marking CRF complete


![Fdi 0214 ecrf[1]](https://static.fdocuments.in/doc/165x107/568c52ab1a28ab4916b79c8a/fdi-0214-ecrf1.jpg)

