PortaUM Administrator Guide - PortaOne
34
PORTA ONE ® www.portaone.com Administrator Guide Maintenance Release 13 UM Porta u nified m essaging
Transcript of PortaUM Administrator Guide - PortaOne

PORTAONE®
www.portaone.com
Administrator GuideMaintenance Release 13
UMPortau n i f i e d m e s s a g i n g

PortaUM Administrator Guide
Copyright notice & disclaimers
Copyright © 2001-2006 PortaOne, Inc. All rights reserved. PortaUM Administrator Guide V.1.13.1, November 2006 Please address your comments and suggestions to: Sales Department, PortaOne, Inc. Suite #400, 2963 Glen Drive, Coquitlam BC V3B 2P7 Canada. Changes may be made periodically to the information in this publication. Such changes will be incorporated in new editions of the guide. The software described in this document is furnished under a license agreement, and may be used or copied only in accordance with the terms thereof. It is against the law to copy the software on any other medium, except as specifically provided in the license agreement. The licensee may make one copy of the software for backup purposes. No part of this publication may be reproduced, stored in a retrieval system, or transmitted in any form or by any means, electronic, mechanical, photocopied, recorded or otherwise, without the prior written permission of PortaOne, Inc. The software license and limited warranty for the accompanying products are set forth in the information packet supplied with the product, and are incorporated herein by this reference. If you cannot locate the software license, contact your PortaOne representative for a copy. All product names mentioned in this manual are for identification purposes only, and are either trademarks or registered trademarks of their respective owners.
(c) 2001-2006 PortaOne, Inc. All rights Reserved. www.portaone.com
1

PortaUM Administrator Guide
Table of Contents
Preface ............................................................................................................................ 3 Hardware and software requirements ................................................................. 4 Installation ..................................................................................................................... 5 What’s new in Maintenance Release 13? ........................................................... 5
1. System Concepts ..........................................................................6 PortaUM’s role in your VoIP network ................................................................... 7 PortaUM components................................................................................................. 8 Call process.................................................................................................................... 9 Supported services.................................................................................................... 11
2. Setting up and Using UM Services ......................................... 13 Setting up UM services............................................................................................ 14 Using UM services ..................................................................................................... 27 Auto Attendant ........................................................................................................... 28
(c) 2001-2006 PortaOne, Inc. All rights Reserved. www.portaone.com
2

PortaUM Administrator Guide
Preface This document provides a general overview of PortaUM (Unified Messaging System), a platform for the delivery of enhanced business and residential communications services. PortaUM handles voice, fax, and regular email messages as objects in a single mailbox, which users can access via a web interface or by telephone.
Where to get the latest version of this guide
The hard copy of this guide is updated at major releases only, and does not always contain the latest material on enhancements occurring between minor releases. The online copy of this guide is always up-to-date, and integrates the latest changes to the product. You can access the latest copy of this guide at www.portaone.com/support/documentation/
Conventions
This publication uses the following conventions: Commands and keywords are given in boldface Terminal sessions, console screens, or system file names are displayed
in fixed width font Caution indicates that the described action might result in program malfunction or data loss.
NOTE: Notes contain helpful suggestions about or references to materials not contained in this manual.
Timesaver means that you can save time by performing the action described in the paragraph. Tips provide information that might help you solve a problem.
(c) 2001-2006 PortaOne, Inc. All rights Reserved. www.portaone.com
3

PortaUM Administrator Guide
Hardware and software requirements Should you decide to use a Cisco gateway for processing UM calls, please note that PortaUM requires a dedicated Cisco AS 5300/5350. No Cisco gateway is required if you wish to run the IVR embedded into PortaUM.
Cisco requirements
128M RAM, 16M flash for AS5300 (32M for AS5350), E1 or T1 voice ports, sufficient number of DSPs, IOS 12.3.13 (or the latest available from the 12.3 branch). AS5300 comes with 4 or 8 T1/E1s. You will not need more than 4 of them, due to the DSP resource limitation for AS5300. For a T1 configuration, the maximum voice resource will be 96, and for E1 — 120.
Client system recommendations
OS: Windows 95-XP, UNIX or Mac OS Java Virtual Machine Support (JRE 1.4.2_01 or later) Browser: Internet Explorer 6.0 or higher, Netscape 7.1 / Mozilla 1.6
or higher, supporting DOM and with JavaScript enabled Spreadsheet processor (MS Excel) Display settings: o Min Screen Resolution: 1024 x 768 o Color Palette: 16 bit color (minimum)
NOTE: To view downloaded CDR files in Windows, proceed as follows in order to match the PortaBilling default list separator: My Computer -> Control Panel -> Regional Settings -> Number -> List Separator type “,”.
(c) 2001-2006 PortaOne, Inc. All rights Reserved. www.portaone.com
4

PortaUM Administrator Guide
Installation PortaUM is provided via a jump-start installation CD. This CD contains installation media for FreeBSD (6.0-stable branch, with the latest security bug fixes), supplementary packages necessary for convenient system administration and maintenance, and PortaUM software packages. PortaUM installation and configuration are automated and integrated within the main installation process. This allows you to install a completely functional PortaUM server from scratch in less than 15 minutes! In order to complete the installation process, your Cisco UM gateway must be configured according to the configuration guidelines. For detailed installation instructions, please refer to the PortaUM Installation Guide.
What’s new in Maintenance Release 13? This release includes several new features and improvements:
• Administrator controlled mailbox size quota for PortaUM users
(c) 2001-2006 PortaOne, Inc. All rights Reserved. www.portaone.com
5

System Concepts
1. System Concepts
(c) 2001-2006 PortaOne, Inc. All rights Reserved. www.portaone.com
6

System Concepts
PortaUM’s role in your VoIP network
SIP phone
SIP phone
Router
ATA186
SoftPhone
SoftPhone
Router
NAT
NAT
ITSP'sNetwork
Internet
Phone
Phone
Cisco GW
PSTN
UMPorta
SIPPorta
PortaUM (Unified Messaging system) is one of the key components of PortaSwitch, a software-based communication service and subscriber management platform that directly addresses the needs of modern communication network providers seeking new revenue streams from tools that unify voice, data, and fax traffic within a single network, and which enable diversification of their current offer of services.
Porta Billing
Porta SIP
Porta UM
Phone
ANI/DNISCallback
Administrator interface
Web Self-care
Bank/Online payment
processor
Terminationto PSTN
Pre-paid cardsCustomized IVR
Unified MessagingPhone & Web
Interface
End User
Admin
PSTN
Residential IP
PSTN
Termination partner A
Termination partner B
@
IPPBX
IPCentrex
PortaUM handles voice, fax, and regular email messages as objects in a single mailbox, which users can access via a web interface or by telephone.
(c) 2001-2006 PortaOne, Inc. All rights Reserved. www.portaone.com
7

System Concepts
PortaUM components
SIP UAM
WI
IMAP Server
Radius
Periodical Notification
Recorder/Player
Java Applet
Subscriber Interface Plug-in
Media Server (Cisco GW or built-in)
External email server (e.g. Google mail)
TCL, VXML &
Voice Prompt
Library
Admin Interface
MediaDownstream
PSTN or VoIP
DB Server (MySQL) Porta Billing100
Recorded Messages (MIME Attachments)
Email Storage
WebMail
SMTP (Exim)
Internet
HTTP Server
PortaUM consists of the following main components
• Media server / VXML platform. This component is used to record messages and receive faxes, as well as send them to the PortaUM machine for processing and storing. It also provides users with IVR (interactive voice response), allowing them to listen to and manage recorded messages using a SIP phone. Starting with PortaUM Maintenance Release 11, this component can be implemented by:
o using an external Cisco AS53XX gateway, or o using IVR tools built into the PortaUM server itself.
• A web server, used to provide the user with web-based access to his mailbox. The web server is also used, along with special CGI scripts, by the VXML platform to retrieve recorded messages from the PortaUM machine on demand.
• An IMAP server, used as the main storage for messages. • A database server, providing storage for the user’s custom settings
and voice prompts. • An SMTP server, used to receive incoming messages from the
VXML platform and other SMTP servers, as well as to send outgoing messages created by the user on the web interface.
• A mail filter, used to convert audio and graphic attachments in messages received from the VXML platform in a format compatible with the Microsoft Windows operating system.
(c) 2001-2006 PortaOne, Inc. All rights Reserved. www.portaone.com
8

System Concepts
Call process
SIP UA <-> SIP UA
SIP phone A
Unified Messaging
SIP phone BOffline or
Not Answering
1 4 5
6
2 3
Porta SIP Porta UM
Porta Billing
• User A dials 121 in an attempt to reach user B. A’s SIP user agent sends an INVITE request to the SIP server (1).
• The SIP server performs authorization in the billing (2). For example, if A dialed 121, the billing will inform the SIP server that the actual number is 12027810009, and that this number belongs to B (3).
• The SIP server checks the registration database, but it appears that this account is not online at the moment. If B has Unified Messaging services enabled, the call will be redirected to the voicemail system, and A can leave a message for him (6). The same thing would happen if B were online, but did not answer his phone (4), (5).
SIP UA -> PSTN
PSTN
SIP phone A
Phone C
GW-NY-01
1
4
7
2
9
8
3
5 6
Porta SIP
Porta Billing
Unified Messaging
Porta UM
This is another important aspect of SIP telephony. Your subscribers not only want to make outgoing calls, they also want other people to be able
(c) 2001-2006 PortaOne, Inc. All rights Reserved. www.portaone.com
9

System Concepts
to call them on their SIP phone regardless of where they are at the moment. In order to allow this, you will need to secure a range of phone numbers from your telecom operator, and make sure that calls made to these numbers on the PSTN network are routed to your gateway via the telephony interface.
• User C wishes to call user A. He dials A’s phone number; since C is in the USA, he dials it in North American format, i.e. 2027810003.
• The call is routed through the telecom network to gateway GW-NY-01. When the incoming call arrives on the gateway (1), it starts a special TCL application to handle this call. This application does several things: o Converts the phone number to E.164 format, so that
2027810003 becomes 12027810003. o Performs authorization in the billing (2), i.e. checks whether A
is allowed to receive incoming telephony calls from GW-NY-01 and, if you charge for incoming calls, what is the maximum allowed call time based on A’s current balance (3). One important point is that authorization must happen without a password check, since the application does not know the valid password for the SIP account.
o Starts the outgoing call to 12027810003. o When the call is established, it starts the timer, and will
disconnect the call if the maximum call duration is exceeded. o The gateway is configured so that it knows that calls to
1202781…. numbers should be sent to the PortaSIP server. Thus it sends an INVITE to the PortaSIP (4).
• PortaSIP receives the INVITE, but without authorization information. Thus the PortaSIP server performs authentication based on the IP address (5), (6). Since this call comes from a trusted node, i.e. gateway GW-NY-01, it is authorized.
• The SIP server checks its registration database, but it appears that this account is not online at the moment. If A has Unified Messaging services enabled, the call will be redirected to the voicemail system, and C can leave a message for him (9). The same thing would happen if A were online, but did not answer his phone (7), (8).
(c) 2001-2006 PortaOne, Inc. All rights Reserved. www.portaone.com
10

System Concepts
Supported services
Leaving voice messages for a PortaUM user
PortaUM gives your SIP customers an automatic answering machine whenever they are not online or do not answer within a certain (configurable) time period. This service works when a call comes from PSTN, as well as when it comes from another SIP customer. See the Call Process section above for detailed call flow descriptions.
Sending faxes to a PortaUM user
In addition to voice messages, your UM-enabled SIP customers will be able to receive faxes on their “answering machine”. When a call is forwarded, PortaUM automatically detects the start of fax transmission and switches into fax receiving mode.
Sending email messages to a PortaUM user
PortaUM also allows your SIP customers to have regular email accounts, where they can receive regular emails.
Retrieving voice and email messages using a SIP phone
Your SIP customers will be able to retrieve their messages using a SIP phone. To do this, they must dial a special number, which transfers them to the PortaUM IVR menu. This menu allows them to listen to recorded messages. Additionally, for SIP phones that support a message waiting indicator (MWI), PortaUM can automatically manage the SIP phone’s MWI status, so that the user is notified when he has new messages in PortaUM.
Retrieving voice messages, email messages and faxes using a web browser
Users can retrieve their messages and send regular email messages using a standard web browser. The advanced Java applet built into the interface allows users not only to listen to voice messages, but also to compose new voice messages (a microphone is required). It is also possible to access the system using any email client that supports the IMAP or POP3 protocols.
Forwarding messages to an external email server
When a new message arrives in the PortaUM message storage, a full copy of the message, or just a short notification, can be sent to the user’s other email address (e.g. corporate mail server or private gmail account), depending on the user’s preferences.
(c) 2001-2006 PortaOne, Inc. All rights Reserved. www.portaone.com
11

System Concepts
Managing personal PortaUM settings using a SIP phone
In addition to retrieving messages, your SIP customers can manage their personal PortaUM settings, such as greetings, from a SIP phone using the PortaUM IVR menu.
Managing personal PortaUM settings using a web browser
Users are also able to manage their personal PortaUM settings by logging into the PortaUM web interface. The advanced Java applet built into the interface allows users to record personal greetings (a microphone is required).
Managing your current balance
User of PortaUM can listen to the current state of his account by using PortaUM IVR menu. There is also IVR menu that enables vouchers to be recharged to add funds to user’s account.
(c) 2001-2006 PortaOne, Inc. All rights Reserved. www.portaone.com
12

Setting up and Using UM Services
2. and
Services
Setting upUsing UM
(c) 2001-2006 PortaOne, Inc. All rights Reserved. www.portaone.com
13

Setting up and Using UM Services
Setting up UM services
Initial configuration of PortaBilling
Before proceeding with UM setup, please perform initial system configuration according to the Setting up SIP Services chapter in the PortaSIP User Guide. At this point, all of your destinations, tariffs, products, customers and vendors should already be in the system.
Create special UM destinations
Your subscribers can access UM by two different methods: • Dialing a special UM number from their SIP phone. Usually this is
a non-E.164 number, so it will not overlap with any real phone number the customer might wish to call, e.g. *98. Another option for accessing UM is for the end user to dial his own phone number.
• Calling a certain number from the PSTN network. This should be a valid phone number allocated to you by a local telco and accessible to anyone on the PSTN network. If you do not have such a number, your customers will not be able to check their voicemail from a regular phone.
In both cases, such calls should be clearly identified as UM calls in your system. So you need to create destinations which describe these phone numbers. Note that in order for the Play Current Balance (*11) and Recharge Voucher (*12) features to work you are to add these two special destinations.
1. In the Management section of Admin-Index, choose Destinations.
2. Click on the Add button.
3. Enter your on-net UM number under Prefix, and N/A for
the country and country subdivision. Put a comment in the Description column that clearly identifies this as a special prefix assigned to UM.
4. Click Save.
(c) 2001-2006 PortaOne, Inc. All rights Reserved. www.portaone.com
14

Setting up and Using UM Services
5. Add a destination for the PSTN UM number if you have one. 6. Add Play Current Balance destination (optional). 7. Add a destination for Recharge Voucher (optional).
Create nodes
Now you have to enter your PortaUM server and UM gateway (used as the platform for VXML) as nodes. PortaBilling requires some key information about your network equipment, such as IP address, h323-id, Radius shared secret, and so on.
1. In the Management section of the Admin-Index page, choose Nodes. 2. In the Node Management window, click Add icon. 3. Fill in the New Node form:
o Node name – A short descriptive name for your UM server or gateway (this will be used in the select menus).
o H323-ID – h323-id (recommended: hostname.domainname)
(c) 2001-2006 PortaOne, Inc. All rights Reserved. www.portaone.com
15

Setting up and Using UM Services
o H323 Password – If you plan to send calls from the UM gateway to your Cisco gateways where the default Cisco remote IP authentication script will be used, enter cisco here.
o NAS-IP-Address – IP address of the UM gateway or PortaUM server.
o Auth. Translation rule – You can just leave this empty. o Manufacturer – Select PortaOne. o Type – Node type; select PortaUM. o Domain – Enter the UM email domain, e.g. um.mydomain.com.
This parameter is very important, since without it authentication requests from PortaUM cannot be processed correctly.
o Radius Client – Check this, since both PortaUM and the UM gateway will need to communicate with the billing.
o Radius Key – Enter the radius shared secret here; must be the same key as you entered during PortaUM installation.
o Radius Source IP – See the Node ID, NAS IP address, and Radius source IP section in the PortaBilling Administrator Guide for more information. Unless your PortaUM server uses multiple network interfaces, the value here should be the same as the NAS-IP-Address.
4. Click Save&Close.
NOTE: There is some propagation delay between the database and the Radius server configuration file, but no more than 15 minutes.
(c) 2001-2006 PortaOne, Inc. All rights Reserved. www.portaone.com
16

Setting up and Using UM Services
Create a tariff
You have already created all the necessary tariffs (for your customers and vendors) when setting up SIP services. Only one thing remains to be done, i.e. creating a special UM tariff which will be used for routing calls to the UM gateway.
1. In the Management section of the Admin-Index, choose Tariffs. 2. On the Tariff Management page, choose Add. 3. Fill in the New Tariff form:
o Name – A short name for the tariff object. This is the name you will see later in the select menus.
o Type – Since you need to create a tariff for routing calls to the UM gateway, make sure you choose Routing here.
o Currency – Since this is a “fake” tariff, just choose the same currency as your Base Currency.
o Off-Peak Period – Just leave this field is empty.
(c) 2001-2006 PortaOne, Inc. All rights Reserved. www.portaone.com
17

Setting up and Using UM Services
o Off-Peak Description – A description of the off-peak period. Automatically provided by the off-peak period wizard, so you do not have to fill in this field.
o Destination Group Set – Do not choose any value in the select menu.
o Free Seconds, Post Call Surcharge, Login Fee, Connect Fee, Formula – Leave all these parameters empty.
o Short Description – A short tariff description; enter “PortaUM routing” or something similar. This field is mandatory.
o Description – An extended tariff description. 4. Click Save&Close.
Enter rates
Modifying tariffs for SIP users
First of all, you should make sure that your customers are allowed to call voicemail. In order to do so, you should add a rate for calling the special voicemail number into the tariffs used for your SIP subscribers.
(c) 2001-2006 PortaOne, Inc. All rights Reserved. www.portaone.com
18

Setting up and Using UM Services
1. On the Tariff Management page you will see a list of the available tariffs. Click the Edit Rates icon next to the name of a tariff. When you are in Tariff Management for a particular tariff, click on Edit Rates in the toolbar.
2. On the Edit Rates screen, click Add. 3. Fill in the required information:
o Destination – The destination prefix for voicemail which you created earlier.
o Interval 1 – First billing unit in seconds. o Interval N – Next billing unit in seconds. o Price 1 – Per minute price for the first interval. If you plan to
provide free calls to voicemail, enter 0 here. o Price N – Per minute price for the next interval. If you plan to
provide free calls to voicemail, enter 0 here. o Off-peak Interval 1 – First billing unit in seconds for off-peak
time. o Off-peak Interval N – Next billing unit in seconds for off-peak
time. o Off-peak Price 1 – Per minute price for first interval in off-peak
time. o Off-peak Price N – Per minute price for next interval in off-
peak time.
NOTE: Off-peak fields appear only if an off-peak period has been defined for the tariff.
o Effective from – If you want the rate to take effect sometime in the future, you can either type in a date manually, or use the calendar (click on the DD-MM-YYYY link).
NOTE: When using the calendar, you can specify that the date entered be in a different time zone than your current one. PortaBilling will then automatically adjust the time.
o Formula – You can define a complex rating formula for calls to this destination. For UM calls you do not need complex routing, so just leave this empty.
o The Hidden, Forbidden or Discontinued flags are optional. 4. Click the Save button in the toolbar or the icon on the left side
of the row. 5. Click Close to return to the Tariff Management screen. 6. Repeat steps 1-5 to add rates for the UM prefix for all tariffs where
you would like customers to have voicemail.
(c) 2001-2006 PortaOne, Inc. All rights Reserved. www.portaone.com
19

Setting up and Using UM Services
Rates for the UM routing tariff
1. On the Tariff Management page you will see a list of the available tariffs. Click the Edit Rates icon next to the name of the UM routing tariff.
2. On the Edit Rates screen, click Add. 3. Fill in the required information:
o Destination – The destination prefix for voicemail which you created earlier.
o Route Category – Leave “Default” here. o Preference – Enter 10 in this field. This is the highest routing
priority, since calls to voicemail should always be routed to the UM gateway.
o Huntstop – Check this box, since no other route for UM is used except a direct call to the UM gateway.
o Interval 1, Interval N – Enter 1 in both fields. o Price 1, Price N – Enter 0 in both fields (UM is our own
gateway, so termination costs are zero). o Effective from – Leave immediately in this field. o The Hidden, Forbidden or Discontinued flags are optional.
(c) 2001-2006 PortaOne, Inc. All rights Reserved. www.portaone.com
20

Setting up and Using UM Services
4. Click the Save button in the toolbar or the icon on the left side of the row.
5. Click Close to return to the Tariff Management screen.
Modify products
You already created all the necessary products for your customers when setting up SIP services. Only one thing remains to be done, i.e. ensuring that these products are allowed to use UM services. If a product’s accessibility includes the PortaUM server, then accounts with this product are permitted to login into UM (via webmail, voicemail, or from their email client).
1. In the Management section of the Admin-Index page, choose
Products. 2. On the Product Management page, click on the name of the
corresponding product. 3. Click on the Accessibility tab to edit this product’s accessibility. 4. After the Accessibility tab has been selected, click on the Add
icon. 5. In the accessibility entry window, select the node which represents
your Porta UM server, and choose the appropriate tariff. (The actual tariff is not really important, since users will not be making any calls
(c) 2001-2006 PortaOne, Inc. All rights Reserved. www.portaone.com
21
Setting up and Using UM Services
on the PortaUM server. It is best to choose the same tariff which is used to charge outgoing SIP calls.)
6. Click Save to save this accessibility entry. 7. Click Close to return to the Product Management page. 8. Repeat steps 2-7 to modify accessibility for all products which will
include UM services.
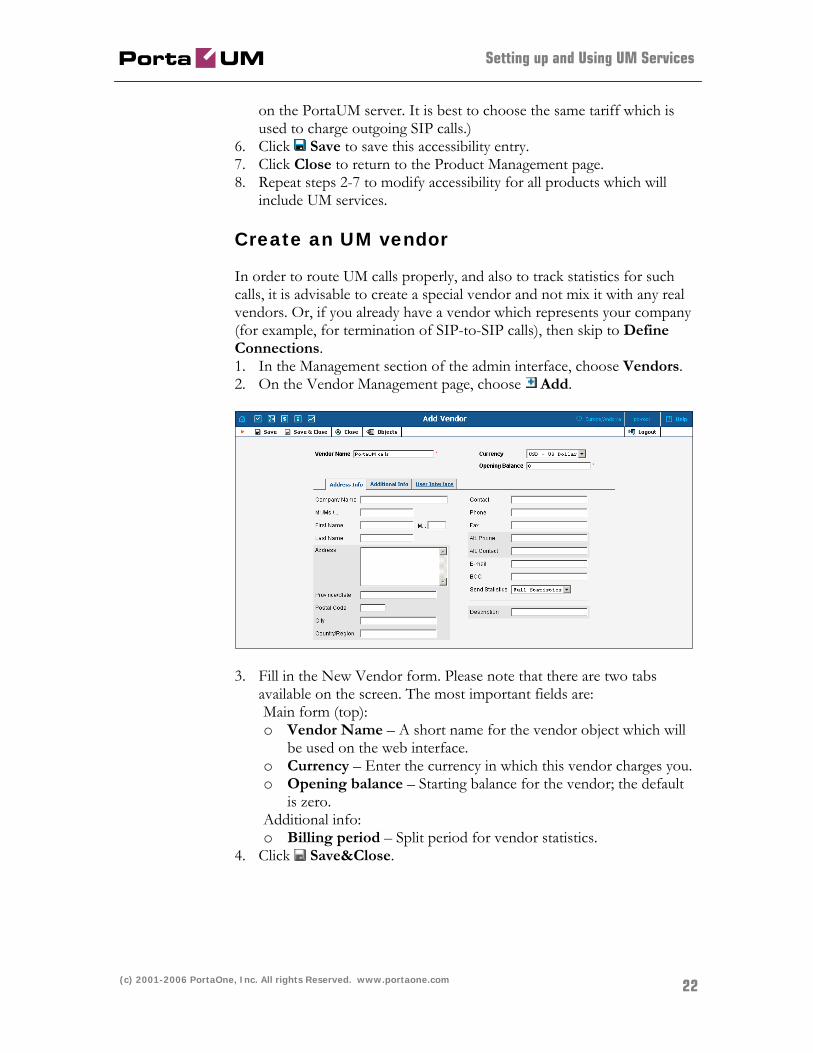
Create an UM vendor
In order to route UM calls properly, and also to track statistics for such calls, it is advisable to create a special vendor and not mix it with any real vendors. Or, if you already have a vendor which represents your company (for example, for termination of SIP-to-SIP calls), then skip to Define Connections. 1. In the Management section of the admin interface, choose Vendors. 2. On the Vendor Management page, choose Add.
3. Fill in the New Vendor form. Please note that there are two tabs available on the screen. The most important fields are: Main form (top): o Vendor Name – A short name for the vendor object which will
be used on the web interface. o Currency – Enter the currency in which this vendor charges you. o Opening balance – Starting balance for the vendor; the default
is zero. Additional info: o Billing period – Split period for vendor statistics.
4. Click Save&Close.
(c) 2001-2006 PortaOne, Inc. All rights Reserved. www.portaone.com
22

Setting up and Using UM Services
Define connections
Vendors are your termination partners or providers of incoming toll-free lines. 1. In the Management section of the admin interface, choose Vendors. 2. Click on the Connections icon next to the name of the vendor you
created in the previous step.
3. Choose the VoIP to Vendor connection type by clicking on the
corresponding tab. 4. Press Add to add a new connection. 5. Fill in the connection information. Type the address of the UM
gateway in the Remote IP field. Choose the Porta UM tariff you created earlier from the select menu in the Tariff column. Enter a comment in the Description, and in Capacity give the number of simultaneous calls your UM gateway can handle.
6. Fill in the Description field with “PORTA UM”. This description is used by PortaBilling to determine routing to PortaUM.
7. Click Save. 8. Click Close in order to exit to the Vendor Management screen.
(c) 2001-2006 PortaOne, Inc. All rights Reserved. www.portaone.com
23

Setting up and Using UM Services
Create accounts
Creating new accounts
1. If you are not already there, go to the Customers screen (the one containing a list of customers). It should look like the screenshot below.
2. Next to the customer name, click on the icon (the one in the
Accounts column). This will take you to the account management for that customer.
3. Click on Account New. 4. Fill in the Add Account form:
(c) 2001-2006 PortaOne, Inc. All rights Reserved. www.portaone.com
24

Setting up and Using UM Services
o Account ID – The SIP ID, i.e. the phone number, which will be used to log into the SIP server and receive incoming calls.
o Product – Choose the product which you would like your account to have.
o Blocked – You may create the account as blocked, but this is rarely done with SIP service accounts.
o Opening balance – The initial balance on the account.
Account info tab
o Account type – Select credit for postpaid and debit for prepaid service.
o Credit limit – For a credit account, specify the credit limit. If you leave this field empty, this means there is no credit limit for this account (but a customer credit limit may still apply).
o VoIP password – This password is used for SIP services as well. The Account ID and this password will be used to authenticate logins to the SIP server.
o Email – Enter the account owner’s email address here. If he ever forgets his password for the web self-care, he will be able to reset it, and a new password will be sent to this email address. You can also leave this field empty.
o Batch – A management unit for accounts. The batch name is alphanumeric. You can type a new name here, or use an existing name in order to generate more accounts for the same batch.
Additional Info tab
o Preferred language – This is a custom attribute which is transferred to the IVR, such as a debit card application. Since this attribute is not used by PortaUM, you may leave the default value (English).
o UM enabled – Check if this account has Unified Messaging (e.g. voicemail) services enabled.
Life Cycle tab
o Activation date – Account activation date. o Expiration date – Account expiration date. o Life time – Relative expiration date: the account will expire on
“first usage date” + “life time” days. If you do not want to use this feature, leave the field blank.
User Interface tab
o Login – Account login to the web self-care pages. This can be the same as the Account ID.
o Password – The password for the web self-care pages.
(c) 2001-2006 PortaOne, Inc. All rights Reserved. www.portaone.com
25

Setting up and Using UM Services
o Time zone – When an account owner (prepaid card user) accesses the web self-care pages to see a list of his calls, the time can be shown in the time zone most appropriate for him.
5. Click Save&Close. You will see a confirmation screen saying that a new account has been created.
Enabling UM services for an existing account
1. If you are not already there, go to the Customers screen (the one containing a list of customers). It should look like the screenshot below.
2. Next to the customer name, click on the icon (the one in the Accounts / Subcustomers column). This will take you to the account management for that customer.
3. Type the account ID in the Account ID field and click on the Show Accounts button.
4. Click on the Additional Info tab. 5. Click on the UM Enabled checkbox to activate UM services for this
account. 6. Click Save&Close.
(c) 2001-2006 PortaOne, Inc. All rights Reserved. www.portaone.com
26
Setting up and Using UM Services
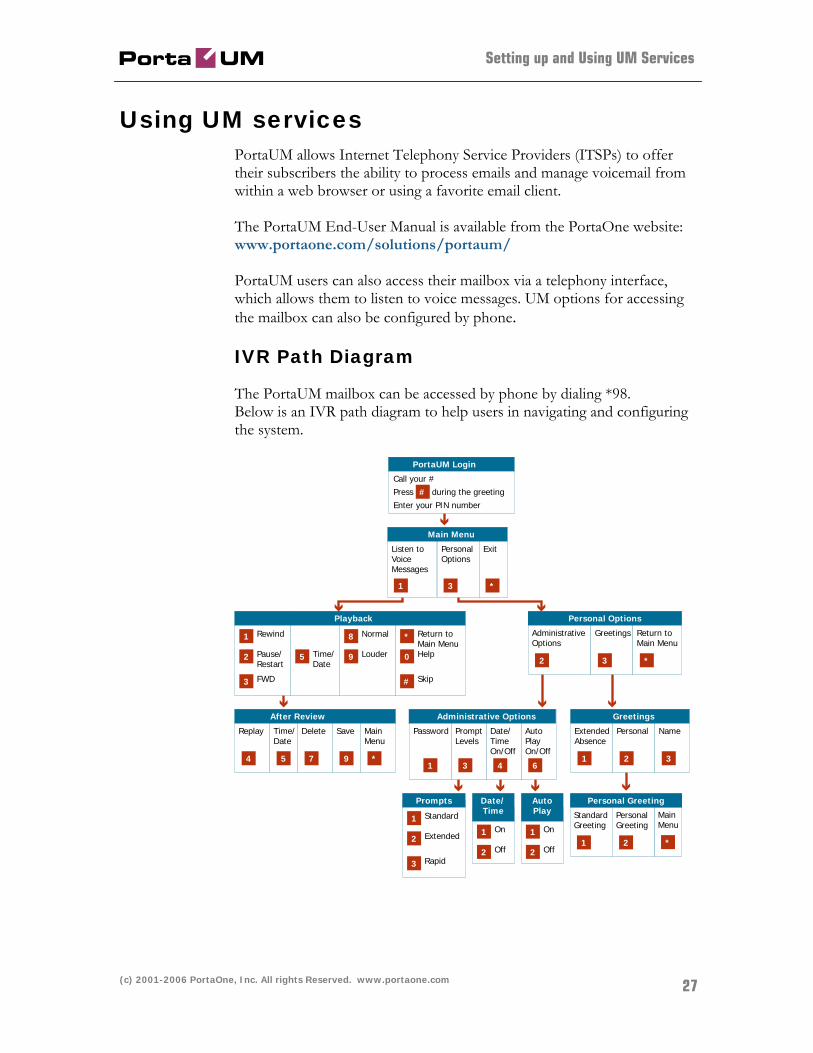
Using UM services PortaUM allows Internet Telephony Service Providers (ITSPs) to offer their subscribers the ability to process emails and manage voicemail from within a web browser or using a favorite email client. The PortaUM End-User Manual is available from the PortaOne website: www.portaone.com/solutions/portaum/ PortaUM users can also access their mailbox via a telephony interface, which allows them to listen to voice messages. UM options for accessing the mailbox can also be configured by phone.
IVR Path Diagram
The PortaUM mailbox can be accessed by phone by dialing *98. Below is an IVR path diagram to help users in navigating and configuring the system.
PortaUM Login
Call your #Press during the greetingEnter your PIN number
Main Menu
Listen to Voice Messages
Personal Options
Exit
Personal Options
Administrative Options
Greetings Return to Main Menu
Greetings
Extended Absence
Personal Name
Administrative Options
Auto Play On/Off
Date/ Time On/Off
Prompt Levels
Password
Prompts Personal GreetingDate/Time
After Review
Replay Time/ Date
Delete Save Main Menu
Main Menu
Standard Greeting
Personal Greeting
Playback
Rewind
Pause/ Restart
FWD
Return to Main MenuHelp
Skip
Standard
Extended
Rapid
Normal
Louder
On
Off
AutoPlay
On
Off
Time/ Date
#
1 3 *
2 3 *
1 2 36431
4 5 7 9 *
*1 2
1
2
3
*
0
#
1
2
3
8
9
1
2
1
2
5
(c) 2001-2006 PortaOne, Inc. All rights Reserved. www.portaone.com
27
Setting up and Using UM Services
Auto Attendant PortaUM Auto Attendant is a flexible utility designed to greet callers and transfer them either to an existing PortaSwitch account, or to your current phone system. Basic concept - PortaUM Auto Attendant (AA) is composed of a set of menus. - All the menus are identical in every respect, except for the ROOT
menu, which is always present and cannot be deleted, and whose name cannot be changed.
- When a caller dials the system, AA will answer the call with the Intro prompt from the ROOT menu.
- After this, the Menu prompt will be played, and AA will listen to the user’s input.
- The user’s input will trigger execution of the following available actions:
o Default – Plays the default prompt from the current menu. o Transfer – Transfers the call to a given telephone number or
extension. o Transfer to E164 number – Transfers the call to a given
number applying no translation rules. o Transfer to extension – Transfers the call to a number
entered by the caller from his phone. o Transfer to voicemail – Switches to voicemail mode (this is
the only way to receive fax in AutoAttendant mode). o Menu – Starts interpreting (executing) the selected menu; the
user can choose from any of the available menus. - The user may select whether the corresponding prompt is to be
played prior to the action. - A call menu flow chart is displayed in the diagram below:
(c) 2001-2006 PortaOne, Inc. All rights Reserved. www.portaone.com
28

Setting up and Using UM Services
Menu List mode
Auto Attendant can be selected from the Options menu. The main screen lists all the menus available in the system. To modify one of the existing menus, select its name from the list. To add a new menu, select Add from the action panel.
(c) 2001-2006 PortaOne, Inc. All rights Reserved. www.portaone.com
29

Setting up and Using UM Services
Menu Edit mode
After selecting one of the existing menus, please allow all the prompts to load in your browser; this may be viewed on the status indicator in the action pane.
The fields of the Menu Edit screen are explained below: Name A logical name for the menu, i.e. Sales for a sales department. Active Time definition for when the current menu is active. To set the menu as always active, select the Always button on the right. PortaUM also provides users with a Period Wizard, a flexible tool for defining a time period of any complexity.
Period Definition Wizard
Via a series of screens, the user may select a time interval, day of the week, day of the month, and month; multiple selections are allowed.
(c) 2001-2006 PortaOne, Inc. All rights Reserved. www.portaone.com
30

Setting up and Using UM Services
The following example shows how to create a period starting at 6 pm every day and lasting until 6 am the next morning. Another interval is used on weekends. We will also include some holidays, e.g. January 1 and December 24-26. In the first screen, select 6 pm in the From column and 6 am in the Until column. Now select the Next button. The two text areas on the right side of the screen provide the user with a display of the current period definition. The top text area displays a verbal definition of the period: From 6:00pm until 6:00am, while the bottom one contains the same information in a format which can be parsed by PortaBilling: hr{6pm-5am}. This sets up the first period; in order to continue, skip the following screens by pressing the Skip or Next button, until the Period definition completed message is displayed. Click Add to create another period definition, and the wizard will return to the first screen. Now for weekends: by pressing the Skip or Next button, go to the second screen and select Weekend, or hold the <Ctrl> key and select Saturday and Sunday from the list. Now use the Next button, skipping forward until the Period definition completed message is displayed. Click Add to create another period definition. To include January 1st in the period definition, skip to the Day of the Month screen and select 1. Now click the Next button. Select January and click Next, skipping forward until the Period definition completed message is displayed. Follow the same steps to select the December 24-26 interval. Hold the <Ctrl> key to select multiple entries. To review your work, look at the top text area. The following should be displayed: From 6:00pm until 6:00am any day of any month OR Sunday and Saturday of any month OR 1 of January OR 24-26 of December If the definition is correct, select Finish. Intro, Menu, Default These three fields work similarly to the voicemail recording feature.
(c) 2001-2006 PortaOne, Inc. All rights Reserved. www.portaone.com
31

Setting up and Using UM Services
- Record. Select to start recording your voice prompt. (You will need to connect a microphone to your computer’s sound card to use this feature.) After the existing prompt has been recorded over, the Undo icon becomes available, allowing rollback to the previous state. The blinking
Play icon indicates that the existing prompt is being overwritten, but changes have not been saved yet.
- Stop. Select this to stop recording or playback of the recorded message.
- Play. Select this to play back the recorded prompt. When selected, this icon will turn into - Pause. Each of the icons above may appear in grayscale, meaning it cannot be accessed because some other task is active. To give your Auto Attendant a professional sound, we recommend using a professional speaker and a digital recording studio when recording voice prompts. To upload a prompt, select the Browse… button on the right side. The native audio file format for the system is the following: Type: NeXT/Sun (Java) file .au Format: G.711 u-Law Attributes: 8,000 Hz, 8-bit, Mono PortaUM uses SOX - Sound eXchange, a universal sound sample translator for prompts uploaded into native UM format. Here is a short list of supported audio file formats:
Type Description .aiff AIFF files used on Apple IIc/IIgs and SGI. .au SUN Microsystems AU files.
.gsm GSM 06.10 Lossy Speech Compression
.mp3 MP3 Compressed Audio .ogg Ogg Vorbis Compressed Audio. .raw Raw files (no header). .wav Microsoft .WAV RIFF files.
Event Table
Column Description Event Not Active – When the current menu is not active (see
(c) 2001-2006 PortaOne, Inc. All rights Reserved. www.portaone.com
32

Setting up and Using UM Services
the active period definition above). 0-9, #, * – User selection on telephone keypad. Timeout – No selection received from user. Fax – Fax CNG tone detected (works in Cisco-less PortaUM setup only).
Action o Default – Play the default prompt from the current menu.
o Transfer – Transfer the call to a given telephone number or extension.
o Transfer to E.164 number – Transfer the call to a given telephone number exactly (no translation rules will be applied).
o Transfer to extension – Transfer the call to a number entered by the caller from his phone.
o Transfer to voicemail – Switch to voicemail mode.
o Menu – Start interpreting (executing) the selected menu; the user can choose from any of the available menus.
Play before action
Check this box if the corresponding prompt is to be played before an action is performed.
File File name and path.
(c) 2001-2006 PortaOne, Inc. All rights Reserved. www.portaone.com
33


![Porta Switch TM - PortaOne: BSS, billing, OCS & Softswitch ......service="hotspot" [admin@Mikrotik] > /radius print Flags: X – disabled # SERVICE CALLED-ID DOMAIN ADDRESS SECRET](https://static.fdocuments.in/doc/165x107/60abe01452e3691b1137cead/porta-switch-tm-portaone-bss-billing-ocs-softswitch-servicehotspot.jpg)