Pondless Waterfall Vault Inc Installation Instructions … in U.S.A. for: Aquascape, Inc. St....
8
1 Aquascape’s Pondless ® Waterfall Vault is packed with features that a professional installer will truly appreciate. The Pondless ® Waterfall Vault is sized for small to mid-sized projects. • An extra wide opening provides easy access and large interior fits a wide range of pump sizes. The Pondless ® Waterfall Vault is capable of handling pumping flow rates up to 12,500 gallons per hour. • The Pondless ® Waterfall Vault is designed to inte- grate with the AquaBlox ® modular water storage tanks. The vault comes standard for use with the Small AquaBlox ® . An optional Pondless ® Waterfall Vault Extension (Item#49001) can be used when creating deeper basins using the Large AquaBlox ® . • Easy to camouflage! Built-in water level inspection port allows the lid to be buried out of sight. Congratulations on the purchase of the AquascapePRO ® Pondless ® Waterfall Vault Item #49001 - Optional Pondless ® Waterfall Vault Extension Made in U.S.A. for: Aquascape, Inc. St. Charles, IL 60174 • Brampton, ON L6T 5V7 www.aquascapeinc.com Pondless ® Waterfall Vault Installation Instructions & Owner’s Manual • Step-by-Step Installation Instructions for the Pondless ® Waterfall Vault ® Jolie Products, Inc
Transcript of Pondless Waterfall Vault Inc Installation Instructions … in U.S.A. for: Aquascape, Inc. St....

1
Aquascape’s Pondless® Waterfall Vault is packed with features that a professional installer will truly appreciate. The Pondless®
Waterfall Vault is sized for small to mid-sized projects.
•Anextrawideopeningprovideseasyaccessandlargeinteriorfitsawiderangeofpumpsizes.ThePondless®
WaterfallVaultiscapableofhandlingpumpingflowratesupto12,500gallonsperhour.
•ThePondless® WaterfallVaultisdesignedtointe-gratewiththeAquaBlox® modularwaterstoragetanks.ThevaultcomesstandardforusewiththeSmallAquaBlox®. An optional Pondless®WaterfallVaultExtension(Item#49001)canbeusedwhencreatingdeeperbasinsusingtheLargeAquaBlox®.
•Easytocamouflage!Built-inwaterlevelinspectionportallowsthelidtobeburiedoutofsight.
Congratulations on the purchase of the AquascapePRO®
Pondless® Waterfall Vault
Item#49001-OptionalPondless® Waterfall VaultExtension
Made in U.S.A. for: Aquascape, Inc. St. Charles, IL 60174 • Brampton, ON L6T 5V7www.aquascapeinc.com
Pondless®
Waterfall Vault
Installation Instructions & Owner’s Manual
• Step-by-Step Installation Instructions for the Pondless® Waterfall Vault
®
Jolie
Prod
ucts,
Inc
2
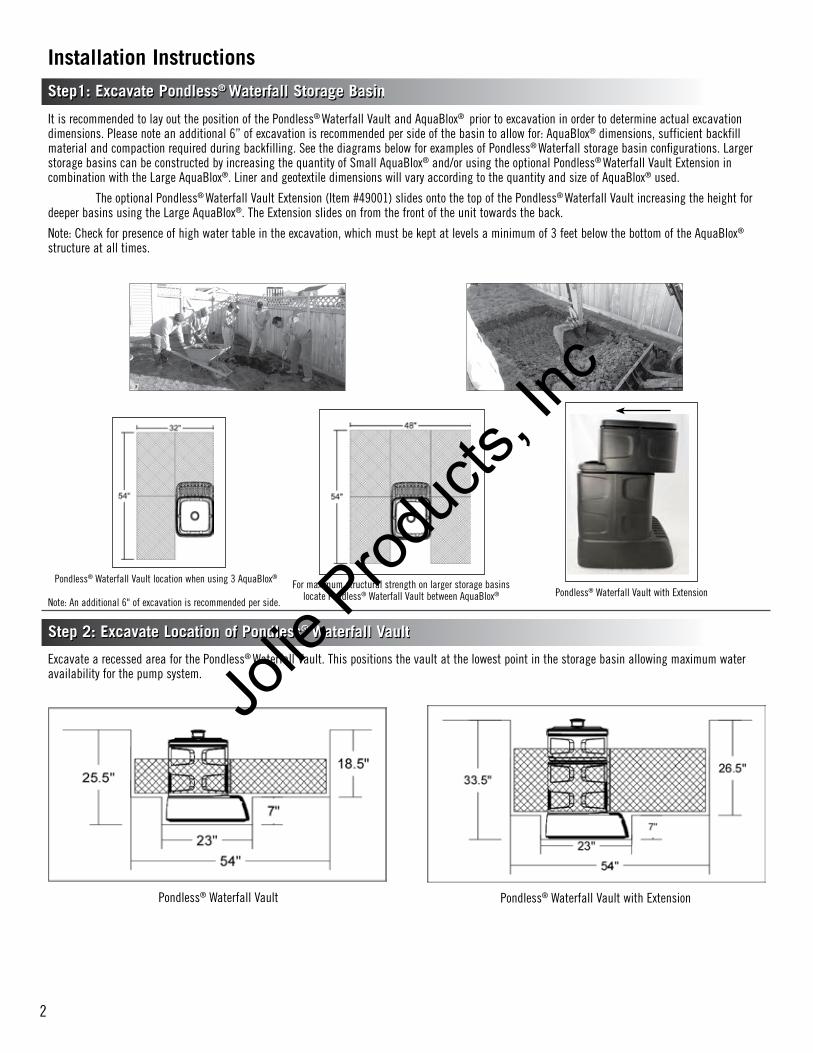
Installation Instructions
ItisrecommendedtolayoutthepositionofthePondless® WaterfallVaultandAquaBlox® priortoexcavationinordertodetermineactualexcavationdimensions. Pleasenoteanadditional6”ofexcavationisrecommendedpersideofthebasintoallowfor:AquaBlox® dimensions, sufficient backfill materialandcompactionrequiredduringbackfilling.SeethediagramsbelowforexamplesofPondless® Waterfallstoragebasinconfigurations.LargerstoragebasinscanbeconstructedbyincreasingthequantityofSmallAquaBlox®and/orusingtheoptionalPondless® WaterfallVaultExtensionincombinationwiththeLargeAquaBlox®.LinerandgeotextiledimensionswillvaryaccordingtothequantityandsizeofAquaBlox® used.
The optional Pondless® WaterfallVaultExtension(Item#49001)slidesontothetopofthePondless® WaterfallVaultincreasingtheheightfordeeperbasinsusingtheLargeAquaBlox®.TheExtensionslidesonfromthefrontoftheunittowardstheback.
Note:Checkforpresenceofhighwatertableintheexcavation,whichmustbekeptatlevelsaminimumof3feetbelowthebottomoftheAquaBlox® structure at all times.
Step1: Excavate Pondless® Waterfall Storage Basin
Excavatea recessed area for the Pondless® Waterfall Vault.Thispositionsthevaultatthelowestpointinthestoragebasinallowingmaximumwateravailabilityforthepumpsystem.
Step 2: Excavate Location of Pondless® Waterfall Vault
Pondless® Waterfall Vault Pondless®WaterfallVaultwithExtension
Note:Anadditional6"ofexcavationisrecommendedperside.
Pondless®WaterfallVaultlocationwhenusing3AquaBlox® Formaximumstructuralstrengthonlargerstoragebasinslocate Pondless®WaterfallVaultbetweenAquaBlox® Pondless®WaterfallVaultwithExtension
Jolie
Prod
ucts,
Inc
3
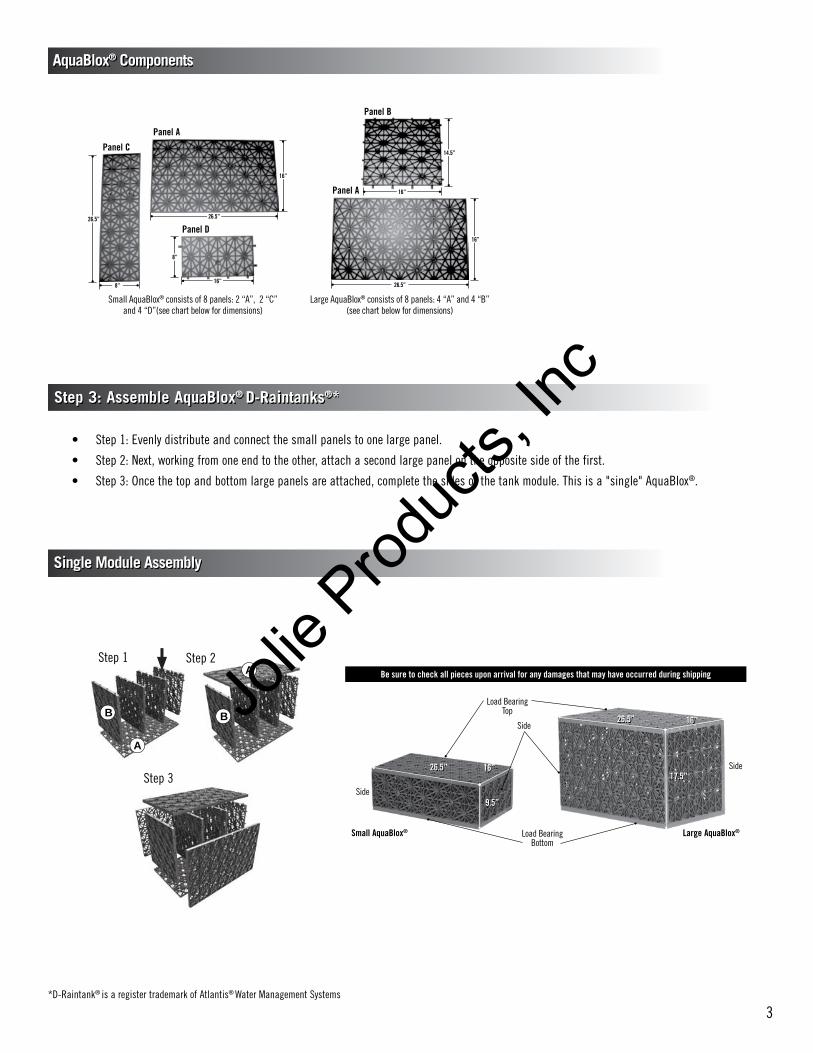
Step1:Evenlydistributeandconnectthesmallpanelstoonelargepanel.•
Step2:Next,workingfromoneendtotheother,attachasecondlargepanelontheoppositesideofthefirst.•
Step3:Oncethetopandbottomlargepanelsareattached,completethesidesofthetankmodule.Thisisa• "single"AquaBlox®.
Single Module Assembly
Be sure to check all pieces upon arrival for any damages that may have occurred during shipping
26.5” 16”
17.5”26.5” 16”
9.5”
LoadBearingTop
Side
LoadBearingBottom
Small AquaBlox® Large AquaBlox®
Side
Side
B
A
A
B
Step 1 Step 2
Step3
8”
SmallAquaBlox®consistsof8panels:2“A”,2“C”and4“D”(seechartbelowfordimensions)
Panel D
Panel A
LargeAquaBlox®consistsof8panels:4“A”and4“B”(seechartbelowfordimensions)
Panel C
Panel A
Panel B
26.5”
16”
26.5”
8”
16”
14.5”
16”
26.5”
16”
AquaBlox® Components
Step 3: Assemble AquaBlox® D-Raintanks®*
*D-Raintank® isaregistertrademarkofAtlantis® WaterManagementSystems
Jolie
Prod
ucts,
Inc
4
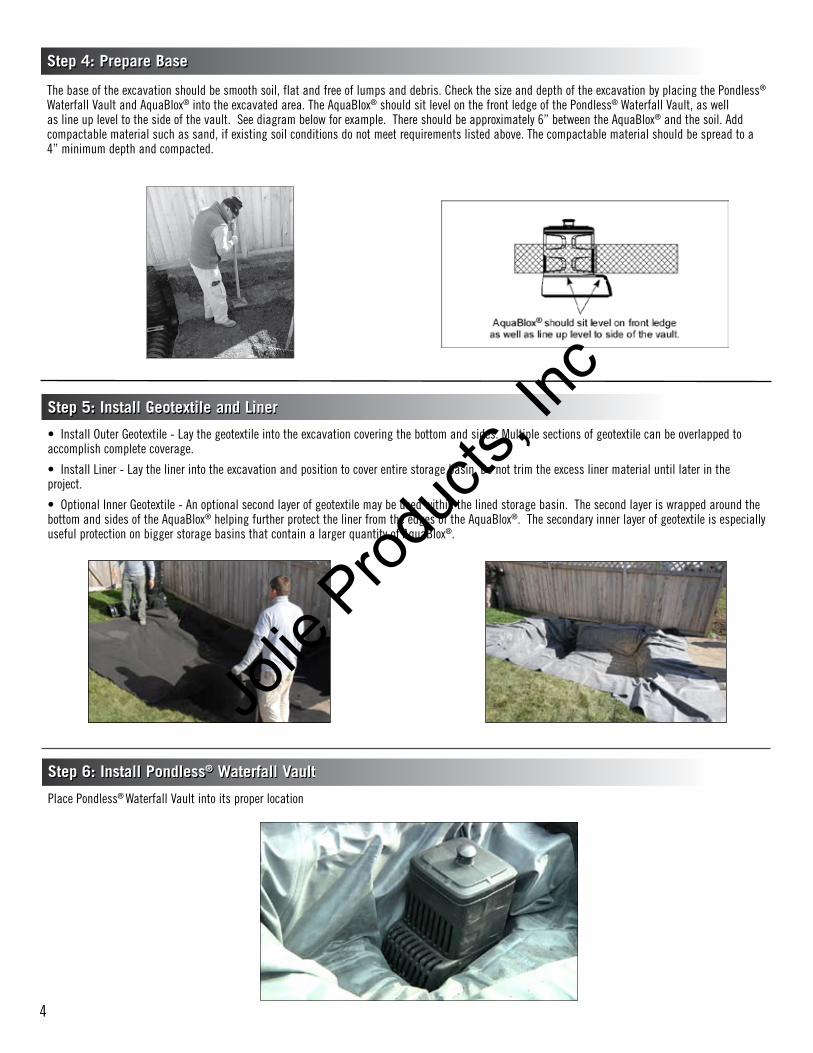
Place Pondless® Waterfall Vault into its proper location
Step 6: Install Pondless® Waterfall Vault
Thebaseoftheexcavationshouldbesmoothsoil,flatandfreeoflumpsanddebris.CheckthesizeanddepthoftheexcavationbyplacingthePondless® WaterfallVaultandAquaBlox®intotheexcavatedarea.TheAquaBlox®shouldsitlevelonthefrontledgeofthePondless® Waterfall Vault, as well aslineupleveltothesideofthevault.Seediagrambelowforexample.Thereshouldbeapproximately6”betweentheAquaBlox® and the soil. Add compactablematerialsuchassand,ifexistingsoilconditionsdonotmeetrequirementslistedabove.Thecompactablematerialshouldbespreadtoa4”minimumdepthandcompacted.
Step 4: Prepare Base
•InstallOuterGeotextile-Laythegeotextileintotheexcavationcoveringthebottomandsides.Multiplesectionsofgeotextilecanbeoverlappedtoaccomplishcompletecoverage.
•InstallLiner-Laythelinerintotheexcavationandpositiontocoverentirestoragebasin.Donottrimtheexcesslinermaterialuntillaterintheproject.
•OptionalInnerGeotextile-Anoptionalsecondlayerofgeotextilemaybeusedwithinthelinedstoragebasin.ThesecondlayeriswrappedaroundthebottomandsidesoftheAquaBlox®helpingfurtherprotectthelinerfromtheedgesoftheAquaBlox®.ThesecondaryinnerlayerofgeotextileisespeciallyusefulprotectiononbiggerstoragebasinsthatcontainalargerquantityofAquaBlox®.
Step 5: Install Geotextile and Liner
Jolie
Prod
ucts,
Inc
5
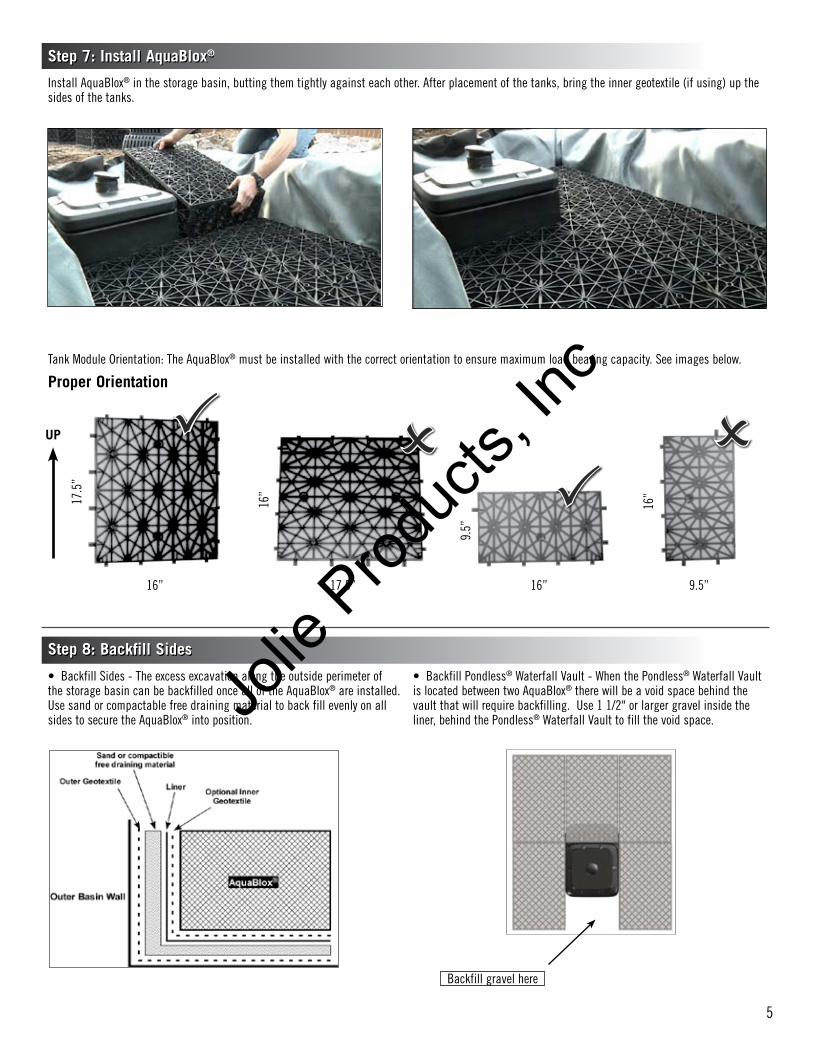
InstallAquaBlox®inthestoragebasin,buttingthemtightlyagainsteachother.Afterplacementofthetanks,bringtheinnergeotextile(ifusing)upthesides of the tanks.
•BackfillSides-TheexcessexcavationalongtheoutsideperimeterofthestoragebasincanbebackfilledoncealloftheAquaBlox® are installed. UsesandorcompactablefreedrainingmaterialtobackfillevenlyonallsidestosecuretheAquaBlox® into position.
TankModuleOrientation:TheAquaBlox®mustbeinstalledwiththecorrectorientationtoensuremaximumloadbearingcapacity.Seeimagesbelow.
Proper Orientation
17.5”
16”
9.5”
16”
16”
9.5”
16”
17.5
”
UP
Step 7: Install AquaBlox®
Step 8: Backfill Sides
•BackfillPondless® Waterfall Vault - When the Pondless® Waterfall Vault islocatedbetweentwoAquaBlox®therewillbeavoidspacebehindthevaultthatwillrequirebackfilling.Use11/2"orlargergravelinsidetheliner, behind the Pondless®WaterfallVaulttofillthevoidspace.
Backfillgravelhere
Jolie
Prod
ucts,
Inc

6
•ThePondless®WaterfallVaultandextensionincludesone3-inchholetoruntheplumbingfromthepumptothestartofthewaterfall.ThePVCflexpipecanbetrimmedtotheproperlengthandinsertedthroughtheholeinthesideofthePondless®WaterfallVault.AdditionalplumbingholescanbedrilledthroughthePondless® Waterfall Vault if needed. A second drill point is located on the opposite side of the the Pondless® Waterfall Vault as well astheextensionforaccuracywhendrillinganadditionalplumbinghole.Largerpumpsusing3-inchplumbingwillrequiretheuseofthePondless® WaterfallVaultextensionandLargeAquaBlox®.ConsultyourAquascapePRO®ProductCatalogforpumpselectionandtheproperCheckValveAssemblyrequiredtocompletethepump'splumbing.
•PVCflexpipeplumbingcanwithstandextremeweatherconditionssoitisunnecessarytodigadeeptrench.Thepipecantransitionovertheedgeofthebasinandbecoveredwithbouldersandbackfilledwithsoil.ToeliminateafrozenandpotentiallybrokenPVCflexpipe,thepipeshouldbeslopingdown from the top of the waterfall to the Pondless®Waterfallstoragebasintohelpdrainasmuchwaterfromthelineaspossiblewhenthepumpisremovedforwinterstorage.
Step 9: Install Pump and Plumbing
AnoptionaloverflowcanbeinstalledusingtheOverflowKit(Item#30209)tomanageanyexcesswaterenteringthebasin.Installinganoverflowsystemis recommended on Pondless®Waterfallsthatwillbereceivingcapturedrainwater(RainXchange®Systems)asameansofreplenishingwaterinthestoragebasin.PleasecontactyourlocalAuthorizedAquascapePRO®DistributororAquascape'sCustomerCareDepartmentformoreinformation.
Step 10: Install Optional Overflow
Jolie
Prod
ucts,
Inc
7
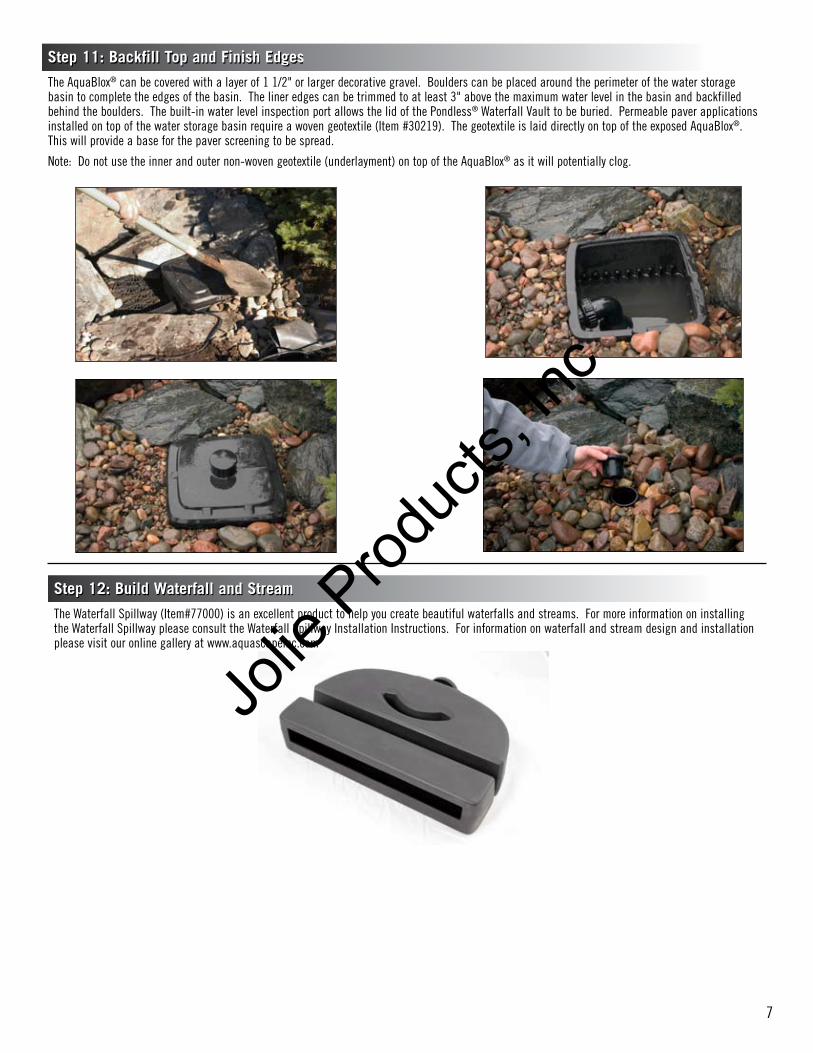
Step 11: Backfill Top and Finish Edges
TheAquaBlox®canbecoveredwithalayerof11/2"orlargerdecorativegravel.Boulderscanbeplacedaroundtheperimeterofthewaterstoragebasintocompletetheedgesofthebasin.Thelineredgescanbetrimmedtoatleast3"abovethemaximumwaterlevelinthebasinandbackfilledbehindtheboulders.Thebuilt-inwaterlevelinspectionportallowsthelidofthePondless®WaterfallVaulttobeburied.Permeablepaverapplicationsinstalledontopofthewaterstoragebasinrequireawovengeotextile(Item#30219).ThegeotextileislaiddirectlyontopoftheexposedAquaBlox®. Thiswillprovideabaseforthepaverscreeningtobespread.
Note:Donotusetheinnerandouternon-wovengeotextile(underlayment)ontopoftheAquaBlox®asitwillpotentiallyclog.
Step 12: Build Waterfall and Stream
TheWaterfallSpillway(Item#77000)isanexcellentproducttohelpyoucreatebeautifulwaterfallsandstreams.FormoreinformationoninstallingtheWaterfallSpillwaypleaseconsulttheWaterfallSpillwayInstallationInstructions.Forinformationonwaterfallandstreamdesignandinstallationpleasevisitouronlinegalleryatwww.aquascapeinc.com
Jolie
Prod
ucts,
Inc

8
Aquascape warrants that the Pondless® Waterfall Vault will be free of manufacturing defect for the lifetime of the product if properly installed and maintained. If upon Aquascape’s inspec-tion, the Pondless® Waterfall Vault shows evidence of a manufacturing defect, Aquascape’s liability is limited, at Aquascape’s option, to the repair of the defect, or the replacement of the defective product. There are no warranties either expressed or implied, including the implied warranties of merchantability and fitness for a particular purpose, which extend beyond the warranties contained in this document. Aquascape shall not be liable for any incidental, consequential or other damages arising under any theory of law whatsoever.
LIFETIMEWARRANTY
©2011Aquascape,Inc.•AllWorldwideRightsReserved
Jolie
Prod
ucts,
Inc