Polly · 2017-10-16 · • No deje la silla de comer cerca de paredes, ... delante hasta alcanzar...
19
Polly Highchair Owner's Manual Manual del propietario Read all instructions BEFORE assembly and USE of product. KEEP INSTRUCTIONS FOR FUTURE USE. Lea todas las instrucciones ANTES de armar y USAR este producto. CONSERVE LAS INSTRUCCIONES PARA USO FUTURO. IS0091.3ES ©2017 Artsana USA, INC. 3/17 www.chiccousa.com
-
Upload
nguyentruc -
Category
Documents
-
view
214 -
download
0
Transcript of Polly · 2017-10-16 · • No deje la silla de comer cerca de paredes, ... delante hasta alcanzar...

PollyHighchair
Owner's ManualManual del propietario
Read all instructions BEFOREassembly and USE of product. KEEP INSTRUCTIONS FOR FUTURE USE.
Lea todas las instrucciones ANTES de armar y USAR este producto. CONSERVE LAS INSTRUCCIONES PARA USO FUTURO.
IS0091.3ES ©2017 Artsana USA, INC. 3/17www.chiccousa.com

2 3
WARNINGFailure to follow these warnings and the
assembly instructions could result in serious injury or death.
• PLEASE SAVE OWNER'S MANUAL FOR FUTURE USE.
• ADULT ASSEMBLY REQUIRED. • NEVER LEAVE CHILD UNATTENDED.
Always keep child in view while in the highchair.
• FALL HAZARD: Children have suffered severe head injuries including skull fractures when falling from high chairs. Falls can happen suddenly if child is not restrained properly.
• Always use restraints, and adjust to fit snugly.
• Tray is not designed to hold child in chair.
• Stay near and watch child during use.• Secure your child at all times with the
restraint system provided, in either the reclining or upright position.
• The tray is not designed to hold your child in the highchair.
• It is recommended that the highchair be used in the upright position only by children capable of sitting upright unassisted.
• Always lock the wheels when the child is sitting in the highchair, or when the highchair is open but not in use. Always place the highchair on a horizontal, stable surface. Never place the highchair near stairs or steps. Do not move chair with child in it.
• Do not use this highchair for more than one child at a time and do not leave other children playing unattended near the highchair.
• Do not use the highchair if any part is broken, torn, or missing.
• Ensure that all components are correctly fitted and adjusted before use.
• Do not place any heavy bags, packages, or other items on the highchair tray. They may cause the chair to tip over.
• To avoid the danger of suffocation, remove all plastic covers before using the highchair. Immediately destroy the plastic cover to keep it away from babies and children.
• Do not leave the highchair near walls, curtains, or windows, where the child can become tangled, or where a child may be able to use its feet to push against the highchair.
• To avoid the risk of fire, never leave the highchair near sources of strong heat such as open fires, electric heaters, and gas stoves. If the chair is exposed to direct sunlight, wait for it to cool down before placing your child in it.
• This highchair is recommended for children up to 36 months old, or for children who weigh less than 40 lbs (18.1kg).
• Do not use accessories, spare parts, and components other than those supplied by Chicco.
ADVERTENCIASi no se siguen estas advertencias y las instrucciones de
montaje,podría resultar en lesiones graves o muerte.
• CONSERVE EL MANUAL DE PROPIETARIO PARA USO FUTURO.
• SE REQUIERE UN MONTAJE ADULTO.
• NUNCA DEJE AL NIÑO DESATENDIDO. Cuando el niño esté en silla de alta, vigílelo en todo momento.
• PELIGRO DE CAÍDA: Los niños han sufrido lesiones graves de la cabeza, incluso fracturas del cráneo, al caerse desde las sillas altas. Las caídas pueden ocurrirse repentinamente si el niño no se sujeta correctamente.
• Use siempre el sistema de seguridad y ajústelo para que esté apretado.
• La bandeja no está diseñada para sujetar al niño en la silla.
• Manténgase cerca y vigile al niño durante el uso.
• Asegure a su niño en todo momento con el sistema de seguridad provisto, en la posición reclinada o vertical.
• La bandeja no ha sido diseñada para soportar a su niño en la silla alta.
• Se recomienda que solamente niños capaz de sentarse en posición vertical sin ayuda usen la silla alta en la posición vertical.
• Fije siempre las ruedas cuando el niño esté sentado en la silla de comer estacionaria o cuando la silla de comer esté abierta pero no en uso. Coloque siempre la silla de comer en una superficie horizontal y estable. Nunca la coloque cerca de escalones o escaleras. No mueva la silla alta con el niño sentado en ella.
• No use esta silla de comer para más de un niño a la vez, ni deje a otros niños jugar cerca de la silla de comer sin supervisión.
• No use la silla de comer si le falta alguna pieza, o bien, si alguna pieza está rota o desgastada.
• Asegúrese de que todos los componentes estén correctamente instalados y ajustados antes de usar.
• No coloque ninguna bolsa, paquete u otro artículo pesado sobre la charola de la silla de comer, ya que podrían causar que la silla de comer se voltee.
• Para evitar el peligro de asfixia, quite todas las cubiertas de plástico antes de usar la silla de comer. Destruya inmediatamente la cubierta de plástico para mantenerla fuera del alcance de bebés y niños.

54
ADVERTENCIASi no se siguen estas advertencias y las instrucciones de
montaje,podría resultar en lesiones graves o muerte.
• No deje la silla de comer cerca de paredes, cortinas ni ventanas, en las cuales el niño se pueda enredar, o donde pueda usar los pies para empujar contra la silla de comer.
• Para evitar el riesgo de incendios, nunca deje la silla de comer cerca de fuentes de calor intenso, como llamas abiertas, calentadores eléctricos o estufas de gas. Si la silla se expone directamente a la luz solar, espere a que se enfríe antes de sentar al niño en ella.
• Esta silla de comer se recomienda para niños de hasta 36 meses de edad, o para niños que pesan menos de 40 libras.
• No use accesorios, piezas de repuesto ni componentes diferentes a los suministrados por Chicco.
How to Assemble/Open the HighchairCómo Ensamblar y Abrir la Silla de Comer
1. Fix the legs to the highchair frame as shown. Rear legs: Keep the two locking buttons located at the base of the frame pressed down and insert the legs. The parts are correctly locked only when the two locking buttons come out from the holes on the legs, and an audible click is heard, signalling that the legs are securely fitted (diagram 1A). 1B. Front legs: keep the two locking buttons, located at the base of the frame, pressed down and insert the legs into the structure. The parts are locked only when the two locking buttons come out from the holes on the legs, and an audible click is heard, signalling that the legs are securely fitted (diagram 1B).
1CLICK
CLICK
A.
B.
WARNINGWhen opening the highchair, ensure that your child, or other children, are at a safe distance. Ensure that during these operations, the movable parts of the highchair do not come into contact with your child. The ends of the front and rear legs have a different shape to avoid errors in the assembly phase.
ADVERTENCIACuando abra la silla de comer, asegúrese de que su hijo, u otros niños, se encuentren a una distancia segura. Cerciórese de que durante estas operaciones, las piezas móviles de la silla de comer no tengan contacto con el niño. Los extremos de las patas delanteras y traseras tienen forma diferente para evitar errores de ensamblaje.

6 7
How to Assemble/Open the HighchairCómo Ensamblar y Abrir la Silla de Comer
1. Fije las patas al armazón de la silla de comer como se muestra. Patas traseras: mantenga oprimidos los dos botones de sujeción, ubicados en la base del armazón, e inserte las patas. Las piezas están aseguradas correctamente sólo cuando los dos botones de sujeción salen de los agujeros de las patas y se escucha un clic, indicando que las patas están bien ajustadas (diagrama 1A). 1B. Patas delanteras: mantenga oprimidos los dos botones de sujeción, ubicados en la base del armazón, e inserte las patas en la estructura. Las piezas están aseguradas sólo cuando los dos botones de sujeción salen de los agujeros y se escucha un clic, indicando que las patas están bien ajustadas (diagrama 1B).
1CLICK
CLICK
A.
B.
WARNINGWhen opening the highchair, ensure that your child, or other children, are at a safe distance. Ensure that during these operations, the movable parts of the highchair do not come into contact with your child. The ends of the front and rear legs have a different shape to avoid errors in the assembly phase.
ADVERTENCIACuando abra la silla de comer, asegúrese de que su hijo, u otros niños, se encuentren a una distancia segura. Cerciórese de que durante estas operaciones, las piezas móviles de la silla de comer no tengan contacto con el niño. Los extremos de las patas delanteras y traseras tienen forma diferente para evitar errores de ensamblaje.
2 2. Stand at the back of the highchair and hold the two side joints, then press the open/close buttons. At the same time, open the Highchair legs using your foot, until an audible click is heard, signalling that the legs are locked in the openposition (diagram 2).
2. Párese detrás de la silla de comer y sujete las dos uniones laterales. Enseguida oprima los botones de abrir / cerrar. Al mismo tiempo abra las patas de la silla de comer usando su pie, hasta que escuche un clic, indicando que las patas están aseguradas en la posición abierta (diagrama 2).
CLICK
How to Assemble/Open the HighchairCómo Ensamblar y Abrir la Silla de Comer

8 9
CLICK
CLICK
3. Raise the seat by holding the upper part of the backrest and pull it upward, until the desired height is reached (diagram 3). The Highchair can be adjusted to 7 height positions.
3. Eleve el asiento sujetando la parte superior del respaldo y estirándolo hacia delante hasta alcanzar la altura deseada (diagrama 3). La silla de comer se puede ajustar a 7 posiciones.
3
How to Assemble/Open the HighchairCómo Ensamblar y Abrir la Silla de Comer
4. Lower the seat and leg rest with your hands (diagram 4). The seat is fixed to the frame by a fastening device.
4. Baje el asiento y el reposapiernas con las manos (diagrama 4). El asiento está fijo al armazón mediante un dispositivo de sujeción.
4
How to Assemble/Open the HighchairCómo Ensamblar y Abrir la Silla de Comer
10 11
5 5. Press the side adjustment buttons and lower the leg rest in a vertical position (diagram 5).
5. Oprima los botones laterales de ajuste y baje el reposapiernas en posición vertical (diagrama 5).
How to Assemble/Open the HighchairCómo Ensamblar y Abrir la Silla de Comer
How to Assemble/Open the HighchairCómo Ensamblar y Abrir la Silla de Comer
6. Insert the footrest, turn it until the use position is reached, and lock it into position (diagram 6A). The footrest can be adjusted to 3 positions. Remove the footrest and fit it at the desired height (diagram 6B & 6C). Turn the footrest until the new desired use position is obtained, and lock it into position.
The child can now be seated in the Highchair.
6. Inserte el reposapiés, gírelo hasta alcanzar la posición de uso, y atórelo en su lugar (diagrama 6A). El reposapiés se puede ajustar a 3 posiciones. Quite el reposapiés y ajústelo a la altura deseada (diagrama 6B y 6C). Gire el reposapiés hasta obtener la posición de uso deseada y atórelo en su lugar.
Ahora el niño se puede sentar en la silla de comer.
6A
6B
6C
12 13
How to Assemble/Open the HighchairCómo Ensamblar y Abrir la Silla de Comer
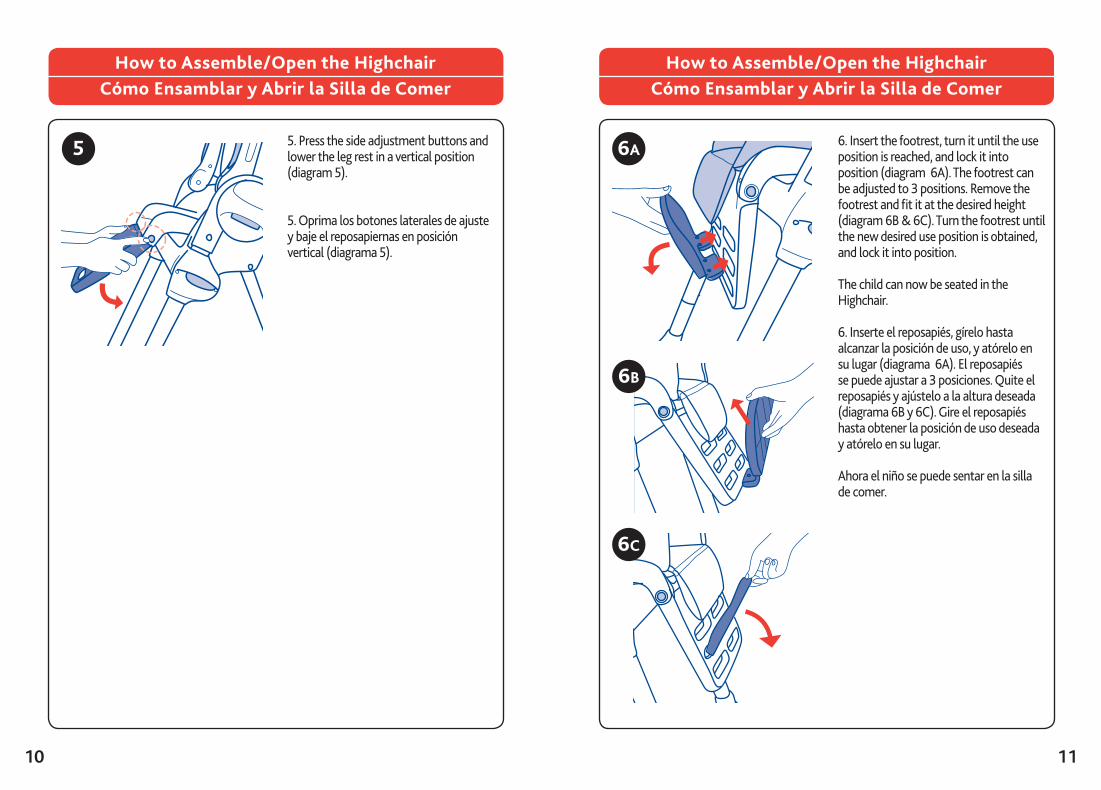
7. Lower the armrests by pressing the two buttons located at the bottom of the armrests (diagram 7).
7. Baje los apoyabrazos oprimiendo los dos botones ubicados en la parte fondo de los apoyabrazos (diagrama 7).
7
CLICK
8. Insert the Crotch Bar into the cooresponding opening on the tray. Make sure the tether does not hinder the Crotch Bar from snapping into place. The design of the Crotch Bar allows it to only be assembled one way.
8. Inserte la barra de la entrepierna en la abertura correspondiente de la bandeja (D). Asegúrese de que la atadura no dificulte la sujeción de la barra de la entrepierna en su lugar. El diseño de la barra de la entrepierna solo permite que se la ensamble de una manera.
How to Assemble/Open the HighchairCómo Ensamblar y Abrir la Silla de Comer
8
WARNINGIMPORTANT FOR YOUR CHILD’S SAFETY - Always fit the crotch bar to the tray before fitting the tray to the Highchair. Once the crotch bar has been fitted, it must never be removed.
ADVERTENCIAINFORMACIÓN IMPORTANTE PARA LA SEGURIDAD DE SU HIJO – Ajuste siempre la correa rígida de la entrepierna a la charola antes de colocar la charola en la silla de comer. Una vez que se haya ajustado la correa rígida de la entrepierna, nunca se debe quitar.

14 15
Fitting/Adjusting the TrayAjuste de la Charola
9 9. The tray can now be fitted to the Highchair. The tray can be adjusted to 4 positions. Line up the tray guides with armrests and push down tray.
9.Ahora la charola se puede colocar en la silla de comer. La charola se puede ajustar a 4 posiciones. Alinee las guías de la bandeja con brazos y empuje hacia abajo la bandeja.
CLICK
CLICK
10. Move the tray until the desired position is reached and release the button. If the tray is not automatically locked on the armrests, move the tray until a click is heard, signalling that the tray is locked (diagram 10). Pull up on both sides of the tray to make sure it is locked.
10. Mueva la charola hasta alcanzar la posición deseada y suelte el botón. Si la charola no se fija automáticamente en los apoyabrazos, muévala hasta escuchar un clic, indicando que la charola está fija (diagrama 10). Levante ambos lados de la bandeja para asegurarse de que esté bloqueada.
10
Fitting/Adjusting the TrayAjuste de la Charola
WARNINGAlways ensure that the tray is locked correctly to the armrests before use.
ADVERTENCIAAse-gúrese siempre de que esté correctamente asegurada a los apoyabrazos antes de usar.
16 17
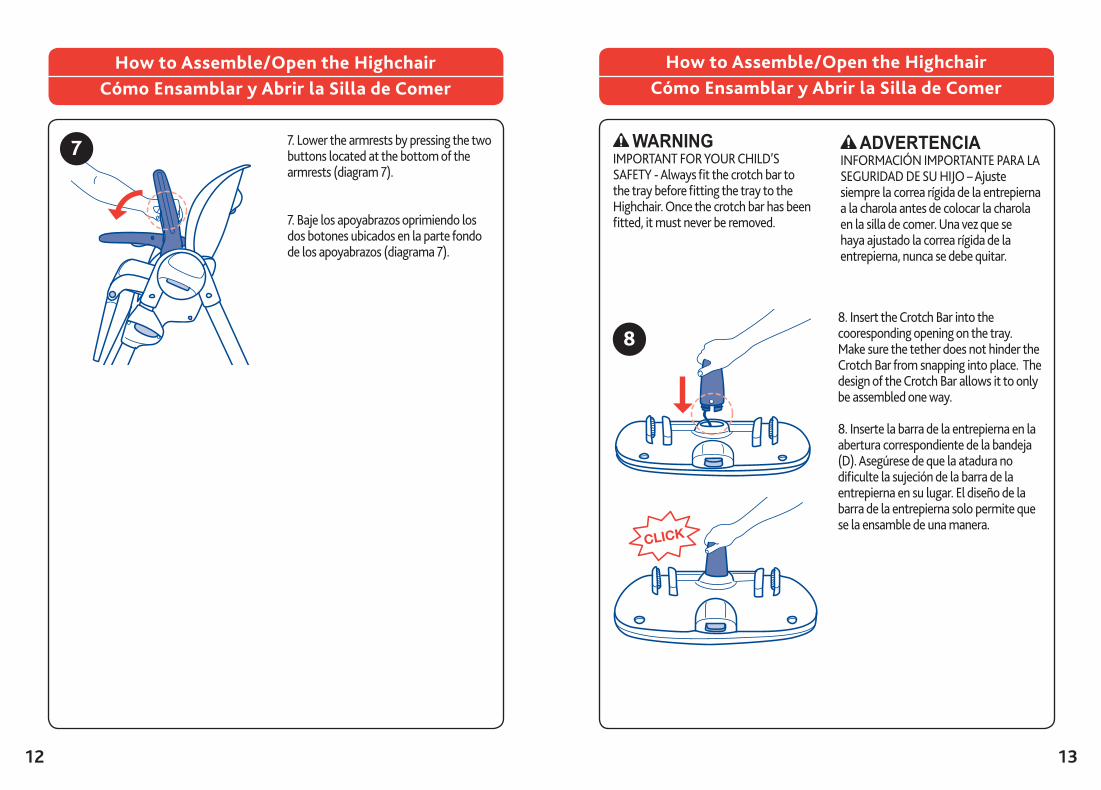
11. To remove the tray, you must squeeze the release button under the tray, then pull up or off.
11. Para quitar la bandeja, debe apretar el botón de liberación bajo la bandeja y tire hacia arriba o hacia fuera.
11
Fitting/Adjusting the TrayAjuste de la Charola
Storing the TrayAlmacenamiento de la Charola
CLICK
CLICK
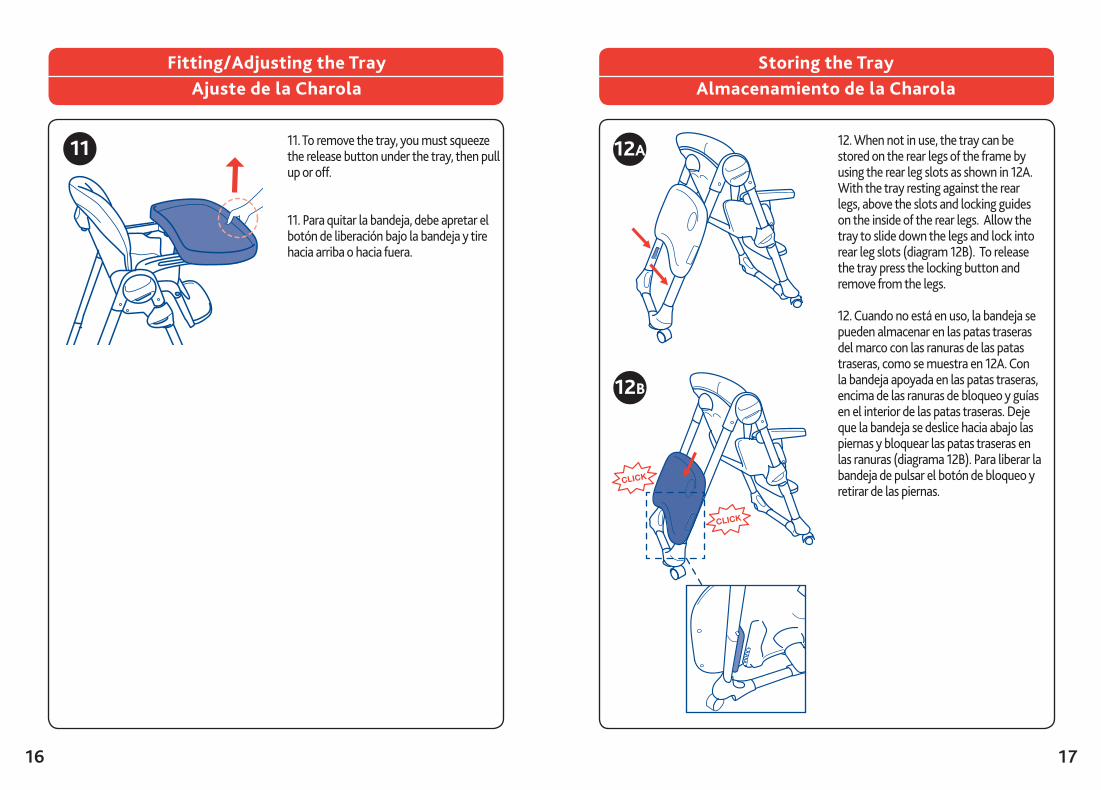
12. When not in use, the tray can be stored on the rear legs of the frame by using the rear leg slots as shown in 12A. With the tray resting against the rear legs, above the slots and locking guides on the inside of the rear legs. Allow the tray to slide down the legs and lock into rear leg slots (diagram 12B). To release the tray press the locking button and remove from the legs.
12. Cuando no está en uso, la bandeja se pueden almacenar en las patas traseras del marco con las ranuras de las patas traseras, como se muestra en 12A. Con la bandeja apoyada en las patas traseras, encima de las ranuras de bloqueo y guías en el interior de las patas traseras. Deje que la bandeja se deslice hacia abajo las piernas y bloquear las patas traseras en las ranuras (diagrama 12B). Para liberar la bandeja de pulsar el botón de bloqueo y retirar de las piernas.
12B
12A
18 19
13
CLICK
CLICK
Using the Tray CoverUso de la cubierta de la charola
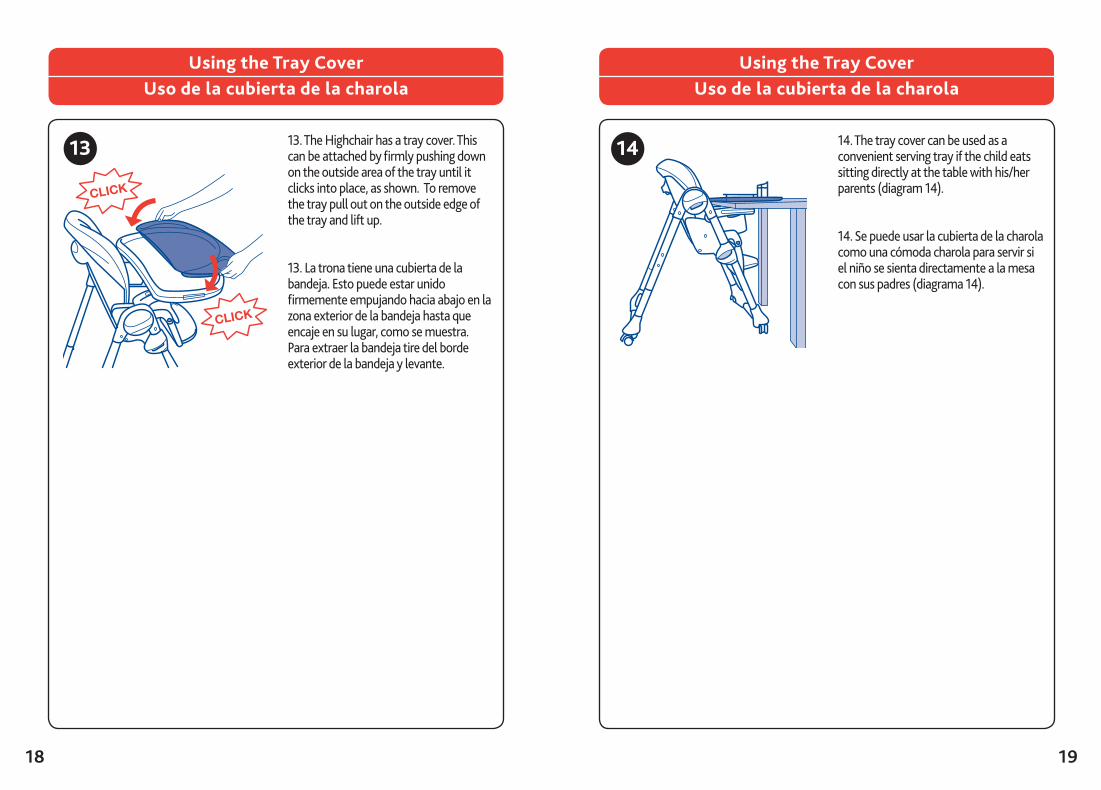
13. The Highchair has a tray cover. This can be attached by firmly pushing down on the outside area of the tray until it clicks into place, as shown. To remove the tray pull out on the outside edge of the tray and lift up.
13. La trona tiene una cubierta de la bandeja. Esto puede estar unido firmemente empujando hacia abajo en la zona exterior de la bandeja hasta que encaje en su lugar, como se muestra. Para extraer la bandeja tire del borde exterior de la bandeja y levante.
Using the Tray CoverUso de la cubierta de la charola
14. The tray cover can be used as a convenient serving tray if the child eats sitting directly at the table with his/her parents (diagram 14).
14. Se puede usar la cubierta de la charola como una cómoda charola para servir si el niño se sienta directamente a la mesa con sus padres (diagrama 14).
14

20 21
15A. Fit the highchair cover to the highchair seat. Thread the shoulder straps, waist belt and crotch strap through the corresponding openings (diagram 15A). Make sure the shoulder straps are at the appropriate height position and the waist belt is pulled through the seat fabric. Repeat steps 15A, 15B, 15C and 15D with second cover (included only on certain models).
15A. Coloque la cubierta en el asiento de la silla alta. Pase los cinturones para hombros, cinturón de las arandelas y la correa de la entrepierna por las aberturas correspondientes (diagrama 15A). Asegúrese de que los cinturones para hombros estén a la altura adecuada y de que el cinturón inferior se haya extraído de la tela del asiento. Repita los pasos 15A, 15B, 15C y 15D con la segunda cubierta (incluida sólo en ciertos modelos).
15A
How to use the safety harnessUso de los cinturones de seguridad
15B15B. Attach the shoulder harness to the waist belt clip. Hold the waist belt clip stationary and line up the arrows on the shoulder harness clip and waist belt clip. Push the shoulder harness clip down into the waist belt clip (twisting motion), it will click into place.
15B. Amarre el cinturón para hombros algancho del cinturón inferior. Sostenga elgancho del cinturón inmóvil y alinee las flechas de los ganchos del cinturón para hombros y del cinturón inferior. Presione el gancho del cinturón para hombros hacia abajo y dentro del gancho del cinturón inferior (con movimiento rotativo) y se fijará en su lugar al escuchar un clic.
How to use the safety harnessUso de los cinturones de seguridad

22 23
How to use the safety harnessUso de los cinturones de seguridad
15C15C. Insert the waist belt clip into the crotch strap buckle, it will click into place. The harness straps can be adjusted to better fit your child (diagram 15D).
15C. Inserte el gancho del cinturón inferior en la hebilla de la correa de la entrepierna, se fijará en su lugar al escuchar un clic. Los cinturones para hombros se pueden ajustar para que se adapten mejor a su niño (diagrama 15D).
15D
The highchair has a 5-point safety harness.
16. Release the safety harness, push in on the center button.
La silla de comer tiene un arnés de seguridad de 5 puntos.
16. Suelte el arnés de seguridad, presione el botón central.
16
How to use the safety harnessUso de los cinturones de seguridad
WARNINGThe use of the safety harness and fabric crotch strap is necessary to guarantee the safety of your child. The tray alone does not guarantee the safety of your child. Always use the SAFETY HARNESS!
ADVERTENCIAEl uso del arnés de seguridad y de la correa rígida de la entrepierna es necesario para garantizar la seguridad de su hijo. La charola por sí sola no garantiza la seguridad de su hijo. ¡Use siempre el ARNÉS DE SEGURIDAD!

24 25
17. Place the child in the highchair and secure child with the safety harness (diagram 17). The safety harness can be adjusted to two height positions.
17. Coloque al niño en la silla de comer y asegúrelo con el arnés de seguridad (diagrama 17). El arnés de seguridad se puede ajustar a dos posiciones de altura.
17
How to use the safety harnessUso de los cinturones de seguridad
WARNINGIMPORTANT FOR YOUR CHILD’S SAFETY - Always fit the rigid crotch strap to the tray before fitting the tray to the Highchair. Once the rigid crotch strap has been fitted, it must never be removed.
ADVERTENCIAINFORMACIÓN IMPORTANTE PARA LA SEGURIDAD DE SU HIJO – Ajuste siempre la correa rígida de la entrepierna a la charola antes de colocarla charola en la silla de comer. Una vez que se haya ajustado la correa rígida de la entrepierna, nunca se debe quitar.
CLICK
CLICK
The Highchair can be adjusted to 7 height positions.
18. To raise the seat: Hold the upper part of the backrest and pull it upward, until the desired height is reached (diagram 18).
La silla de comer se puede ajustar a 7 posiciones.
18. Para elevar el asiento: Sujete la parte superior del respaldo y estírelo hacia arriba hasta alcanzar la altura deseada (diagrama 18).
18
Adjusting the Height of the HighchairAjuste de la Altura de la Silla de Comer
WARNINGDo not adjust the height with child in product.
ADVERTENCIANo ajuste la altura cuando el niño esté en el producto.
26 27
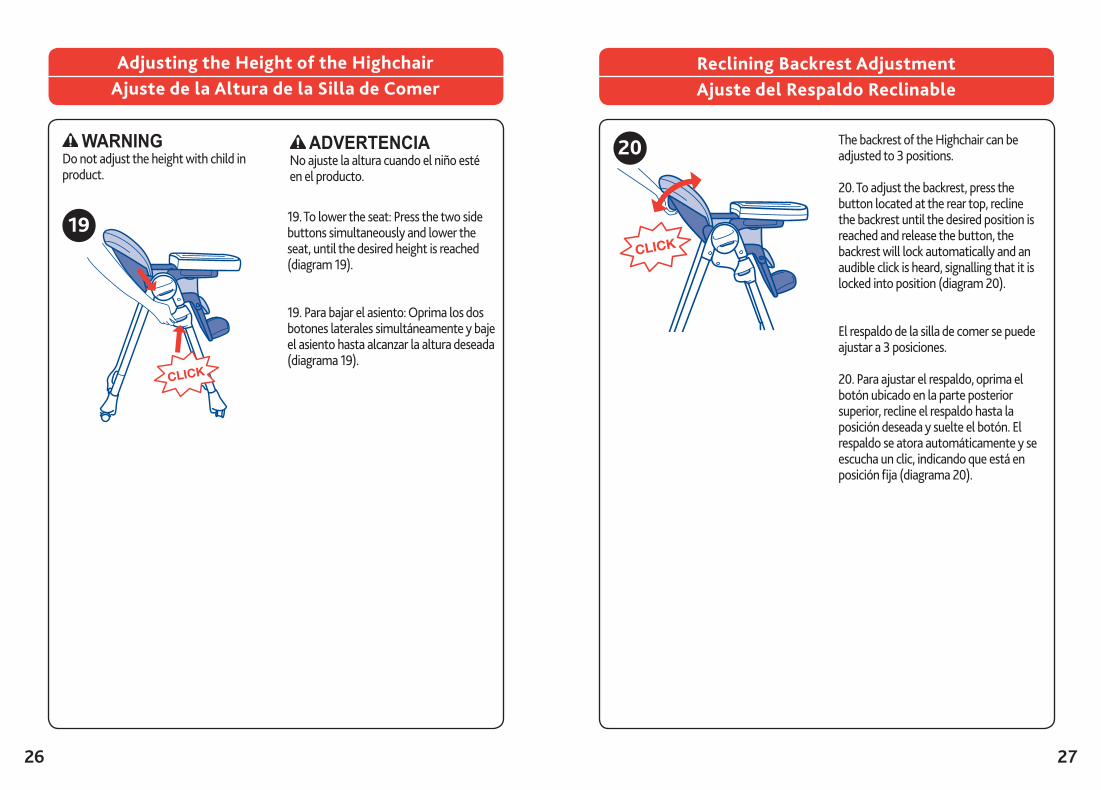
19. To lower the seat: Press the two side buttons simultaneously and lower the seat, until the desired height is reached (diagram 19).
19. Para bajar el asiento: Oprima los dos botones laterales simultáneamente y baje el asiento hasta alcanzar la altura deseada (diagrama 19).
19
Adjusting the Height of the HighchairAjuste de la Altura de la Silla de Comer
CLICK
WARNINGDo not adjust the height with child in product.
ADVERTENCIANo ajuste la altura cuando el niño esté en el producto.
Reclining Backrest AdjustmentAjuste del Respaldo Reclinable
The backrest of the Highchair can be adjusted to 3 positions.
20. To adjust the backrest, press the button located at the rear top, recline the backrest until the desired position is reached and release the button, the backrest will lock automatically and an audible click is heard, signalling that it is locked into position (diagram 20).
El respaldo de la silla de comer se puede ajustar a 3 posiciones.
20. Para ajustar el respaldo, oprima el botón ubicado en la parte posterior superior, recline el respaldo hasta la posición deseada y suelte el botón. El respaldo se atora automáticamente y se escucha un clic, indicando que está en posición fija (diagrama 20).
20
CLICK
28 29
Leg RestReposapiernas
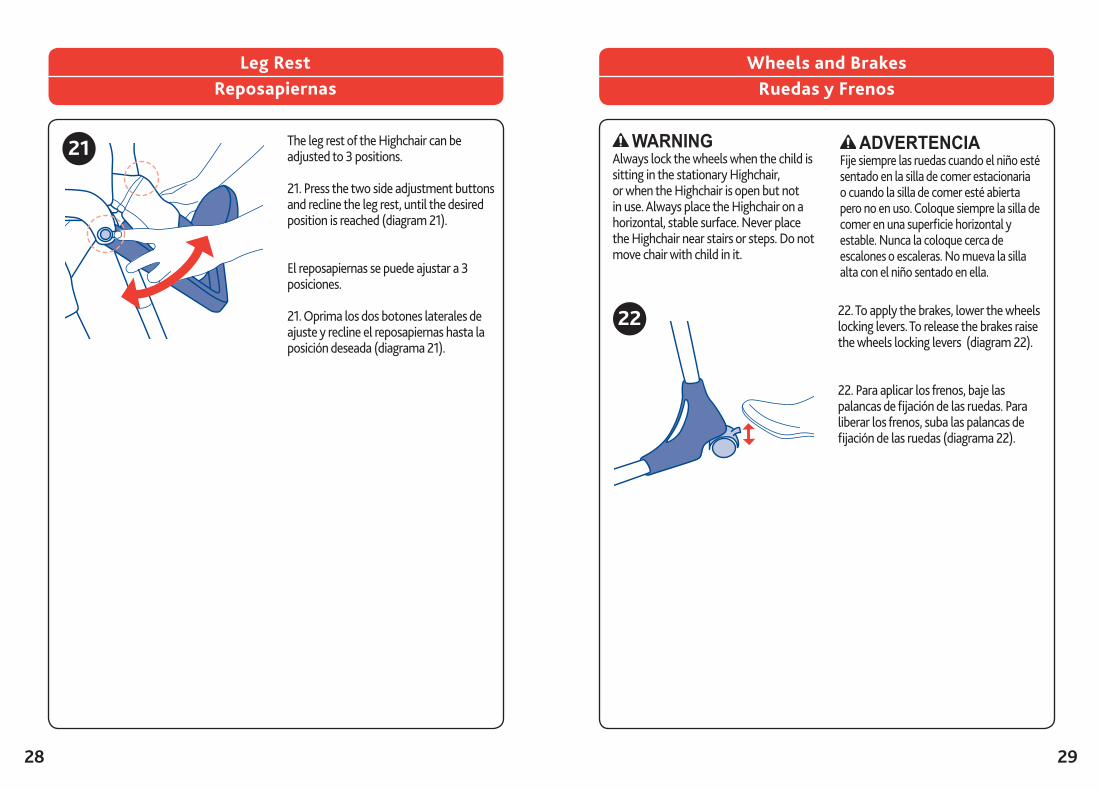
21 The leg rest of the Highchair can be adjusted to 3 positions.
21. Press the two side adjustment buttons and recline the leg rest, until the desired position is reached (diagram 21).
El reposapiernas se puede ajustar a 3 posiciones.
21. Oprima los dos botones laterales de ajuste y recline el reposapiernas hasta la posición deseada (diagrama 21).
Wheels and BrakesRuedas y Frenos
22 22. To apply the brakes, lower the wheels locking levers. To release the brakes raise the wheels locking levers (diagram 22).
22. Para aplicar los frenos, baje las palancas de fijación de las ruedas. Para liberar los frenos, suba las palancas de fijación de las ruedas (diagrama 22).
WARNINGAlways lock the wheels when the child is sitting in the stationary Highchair, or when the Highchair is open but not in use. Always place the Highchair on a horizontal, stable surface. Never place the Highchair near stairs or steps. Do not move chair with child in it.
ADVERTENCIAFije siempre las ruedas cuando el niño esté sentado en la silla de comer estacionaria o cuando la silla de comer esté abierta pero no en uso. Coloque siempre la silla de comer en una superficie horizontal y estable. Nunca la coloque cerca de escalones o escaleras. No mueva la silla alta con el niño sentado en ella.

30 31
Closing the HighchairCierre del la Silla de Comer
23 23. Put the backrest in a vertical position and the leg rest in a down position (diagram 23).
23. Coloque el respaldo en posición vertical y el reposapiernas en posición baja (diagrama 23).
WARNINGWhen opening the highchair, ensure that your child, or other children, are at a safe distance. Ensure that during these operations the movable parts of the highchair do not come into contact with your child. If it is fitted, remove the tray before starting any closing operations.
ADVERTENCIACuando abra la silla de comer, asegúrese de que su hijo, u otros niños, se encuentren a una distancia segura. Cerciórese de que durante estas operaciones, las piezas móviles de la silla de comer no tengan contacto con el niño. Si está instalada, quite la bandeja antes de comenzar a cerrar la silla alta.
CLICK24
25
Closing the HighchairCierre del la Silla de Comer
24. Raise the armrest in a vertical direc-tion by pressing the buttons located on the lower part of the arm rests, until an audible click is heard (diagram 24).
24. Eleve el apoyabrazos en dirección vertical oprimiendo los botones ubicados en la parte inferior de los apoyabrazos, hasta escuchar un clic (diagrama 24).
25. Lower the seat by pressing the two side buttons at the same time, as shown in the diagram 25.
25. Baje el asiento oprimiendo los dos botones laterales al mismo tiempo, como se muestra en el diagrama 25.

3332
26 26. Press the buttons at the center of the side joints and, at the same time, close the legs of the Highchair using your foot (diagram 26A).
26. Oprima los botones al centro de las uniones laterales y, al mismo tiempo, cierre las patas de la silla de comer usando su pie (diagrama 26A).
Closing the HighchairCierre del la Silla de Comer
WARNINGCheck that the frame is closed and the wheels are locked and positioned in a way that the frame can stand for storage.
ADVERTENCIAVerifique que la estructura se encuentre cerrada y que las ruedas estén bloqueadas y posicionadas de manera que la estructura pueda mantenerse parada para guardarla.
Care and Maintenance The cleaning and maintenance of this product must be carried out on a regular basis by the user. The cleaning and maintenance of the Highchair must only be carried out by an adult.
CLEANINGYou can remove the seat pad for cleaning. To do so, unfasten the restraint harness and pull the seat pad upward. You can spot clean the seat pad with a damp cloth and mild detergent. Do not machine wash seat pad. Do not use bleach wipes or spray on the pad or plastics. Do not use bleach.
MAINTENANCE Lubricate only when necessary using a dry silicone based lubricant. Clean all plastic parts periodically using a soft damp cloth and mild detergent. Do not use bleach. Check the wheels periodically for signs of wear or damage and keep them clean of dust or sand. Prolonged exposure to sunlight will cause the fabric to fade. Serving tray insert can be washed in the dishwasher. Main tray can be wiped clean using a soft damp cloth and mild detergent. Do not use bleach. Important for your child's safety do not remove the crotch bar from the tray.
El usuario debe realizar la limpieza y el mantenimiento de este del la Silla de regularmente. Las operaciones de limpieza y mantenimiento deben ser efectuadas exclusivamente por un adulto.
LIMPIEZA Puede quitar el cojín del asiento para limpiarlo. Para hacerlo, suelte el arnés de sujeción y estire el cojín del asiento hacia arriba. Puede limpiar el asiento con un paño húmedo y detergente suave. No lave a máquina la colchoneta del asiento. No use toallas desinfectantes ni spray sobre la colchoneta o los plásticos. No use cloro.
MANTENIMIENTO Lubrique sólo cuando sea necesario utilizando un lubricante seco con base de silicona. Limpie todas las piezas de plástico periódicamente utilizando un paño húmedo y detergente suave. No use cloro. Revise periódicamente las ruedas en busca de señales de desgaste o daño, y manténgalas limpias, sin polvo ni arena. La exposición prolongada a la luz solar causa desteñido de la tela. El inserto para servir de la charola se puede lavar en el lavaplatos. La charola principal se puede limpiar utilizando un paño húmedo y detergente suave. No use cloro. Importante: por la seguridad de su niño, no quite la barra de la entrepierna de la bandeja.
Cuidado y mantenimiento
3534
For More InformationPour plus d’information
For USA customers :If you have any questions or comments about this product, or are missing any of the parts. Please do not return this product to the store. Contact us in one of the following ways:
Si tiene preguntas o sugerencias sobre este producto, o falta alguna de las partes, no devuelva este producto a la tienda. Comuníquese con nosotros por alguno de los siguientes medios:
@
(877)-424-4226
1826 William Penn WayLancaster, PA 17601
www.chiccousa.com

www.chiccousa.comwww.chicco.ca