Polaris ILS Acquisitions - MBLN• Polaris supplies a pre-written import profile named...
80
IS OPEN THE LIBRARY Polaris ILS Acquisitions 5.1 Training
Transcript of Polaris ILS Acquisitions - MBLN• Polaris supplies a pre-written import profile named...

IS OPENTHE LIBRARY
Polaris ILS Acquisitions5.1 Training

Getting started with acquisitions• Acquisitions workflow overview• Fiscal year records• Fund records
• Creating funds and subfunds• Adding and transferring money in funds• Fund Explorer
• Supplier records• EDI (Electronic Data Interchange)• Web selection tools
• 970 grids• Linking to supplier databases
• Importing order records from web selection tools• On order item templates• Purchase order templates• On order bibliographic templates
2

Getting started with acquisitions
3
• Toolbar—starting point and navigation tool for all Polaris activities– Polaris toolbar (Polaris shortcut bar)– Workform toolbar– Line item toolbar
• SL—selection list• SLLI—selection list line item• PO—purchase order• POLI—purchase order line item• IN—invoice• INLI—invoice line item• 970—MARC tag that holds acquisition order data for Polaris• EDI—Electronic Data Interchange• Enriched EDI—shelf ready materials—the vendor completely processes
purchased materials and returns fully cataloged MARC records with embedded holdings data
• POA—Purchase Order Acknowledgment• ASN—Advanced Shipping Notice• Deep Linking—the ability to search the PowerPAC for holdings from a web
selection tool

Acquisitions workflow overview
4
Set up:Fiscal year and fund recordsSupplier records*PO templates*On-order bibliographic templates*On-order item templates*Profiles for Web based selection tools
*optional
Download MARC recordswith or without 970s from a web selection tool
Adding POLIs1. Manually add titles2. Use an existing record
in the database3. Z39.504. Titles to Go (subscription) Purchase Order
MARC Recordsadded to database
Import records into Polaris and create a record set
Bulk add items from record set to create SLLIs on a SL
Copy SLLIs to POLIs on a POBulk add items
from record set to create POLIs on a PO
Acquisitions workflow overview
5
Purchase Orders Release PO: Checks PO for duplicatesCreates on-order items if desiredSend PO to supplier via EDI, fax, email or mailFunds are encumbered
Receive order acknowledgement and invoice via EDI or paper
Shipment arrives
Claim any unreceived itemsCancel any claimed or unreceived itemsFunds are disencumbered
For non-EDI orders,use Rapid Receipt to automatically receive and invoice line items. If not received complete, the POLIs will need to be split and received items copied to the invoice
For EDI orders, invoices are generated automatically for full shipments. Partial shipment invoices can be generated separately. Option may be set to automatically receive line items or use an ASN
Pay for received itemsDisencumber and expend money from funds
Use Receive Shipmentworkform to check in and receive shelf-ready materials

6
Fiscal year records
• To create a new Fiscal Year record, from the Polaris toolbar, click on the New icon and select Fiscal Year
• An unlimited number of fiscal year records may be created• Fiscal years may overlap• Fiscal year processing must be performed on an individual fiscal
year• An unlimited number of funds and levels of subfunds may be linked
to a fiscal year

7
Creating funds and subfunds
• To create a new Fund record—from the Fiscal Year record, click Tools / Create Fund
• Fund records are connected to a Fiscal Year record• Staff may set up an unlimited number of funds • Fund types include regular, donation and deposit• Be certain the fund structure is set up correctly before adding
money• The Donor view of a fund record must be filled out if a fund type of
Donation has been selected
HintFunds may be strategically located within the fund hierarchy for summary purposes.

8
Creating funds and subfunds
• To create a new Subfund—from the Parent Fund, click Tools / Create Subfund
• Funds with no money should be suppressed from the drop lists on SLLIs, POLIs and INLIs by un-checking the Display box
• To be able to transfer money to and from a fund, the Transfers box must be checked
HintCreate a Word document or use Post-its on a wall to work out the correct fund structure before entering it into Polaris.

9
Adding and transferring money in funds
• Use the workform icons to adjust a fund balance or transfer money
• All fund transactions are listed on the General Information view of a fund record
• Staff can adjust fund balances by using the Adjust Fund Balance icon
• When transferring money:– Funds must be within the same fiscal year and transfers must be
allowed in the funds– Transactions appear in the fund record for both the source and
destination funds
HintWhen transferring money, start on the Fund record money is being transferred from. The Fund record the money is being transferred to must be closed.

10
Adding and transferring money in funds
• Staff may edit multiple funds by going to Acquisitions/Funds/Multi-Fund Editor on the Polaris toolbar
• This web-based utility allows staff to define beginning allocations and limits for funds
• No funds are displayed if the user does not have the appropriate permissions
Hint:If the fund already has a beginning allocation, it cannot be replaced. Staff must open the individual fund and apply a supplemental allocation.

11
Adding and transferring money in funds
• To view Fund Explorer, from the Fiscal Year record go to Links / Fund Explorer
• Clicking on the desired level on the left will give staff a summary of that fund and any attached subfunds on the right
HintStaff can also see Fund Explorer from any Fund record, but will only see that fund and its attached subfunds.

12
Supplier records
• To create a new Supplier record, from the Polaris toolbar click the New icon and select Supplier
• The supplier record holds addresses, default currency, EDI information and the default claiming cycles for a vendor
• If there are multiple accounts with one supplier, there must be a separate supplier record for each account number
HintUse the Copy to button to enter an address on multiple views of the Supplier record.

13
Supplier records
• Default claiming and auto cancellation time frames are set up on the third view for firm, donation and gift PO types
• Monographs may be claimed up to 5 times with differing claim wait periods
• Claiming for subscriptions and standing order PO types are set up in the Serials Holding record for that title
HintBe sure to check the Cancel notice and Claim notice boxes if you would like to get a paper notice from Polaris--cancelling and claiming will work even with the boxes unchecked if you do not want the paper notices.

EDI (Electronic Data Interchange
14
• These suppliers can receive POs via Polaris EDI and in return will provide electronic purchase order acknowledgements and electronic invoices
• An ASN (Advanced Shipping Notice) may also be received electronically for Baker & Taylor and Ingram
• Customers can contact their Polaris Implementation or Site Manager to submit an enhancement request for other suppliers
– Audio Book Services– Baker & Taylor– Brodart– Children’s Plus– Findaway World– Gale-Cengage Learning– Ingram Library Services– Library Bound– Library Services Centre– MicroMarketing. LCC
– Midwest Library Services– Midwest Tape– CVS Midwest Tape– Quality Books– Rainbow Books– Recorded Books– Scholastic Library Publishing– United Library Service (ULS)– Whitehots, Inc.– Yankee Book Peddler
• Compliant EDI suppliers:

Web selection tools
• Staff may set up grids to support Polaris defined 970 tags• 970s contain order/distribution data such as location, quantity,
collection, fund, price, material type, non-public notes and/or a copy level code
• 970 tags allow Polaris to build SLLI or POLI segment level information automatically
• Please contact your supplier for assistance when creating 970 gridsWeb selection tools
• Compliant Web Selection Tools:
– Midwest Tapes– CVS Midwest Tapes– Quality Books– Yankee Book Peddler
– Baker & Taylor– Brodart– Ingram Library Services– Library Bound

16
970 grids
– $l – location– $q – quantity– $f – fund– $c – collection
• The following are subfields that can be used when creating 970 grids
– $p – price– $m – material type– $n – non-public note
• Gather the following information to set up your grids:– Branch abbreviations– Fund full name or alternative name– Collection abbreviations– Material type name or code

17
970 grids• An alternative to the previous grid set up is available—use a $h, a
copy level code• The copy level code will match to a specific on order item template
allowing the library to be more granular when creating on order item records
• The $h must match the name in the on order item template
• If using a $h, collection and material typesubfields do not have to be used ($c and $m)

18
Linking to supplier databases
• To link to a Supplier Database, from the Polaris toolbar, click Utilities / Acquisitions Processing / Link to Suppler Databases
• These are direct links to a supplier’s website• Staff do not have to go outside of Polaris to access these websites• Additional URLs may be added in System Administration
19
Importing order records from web selection tools
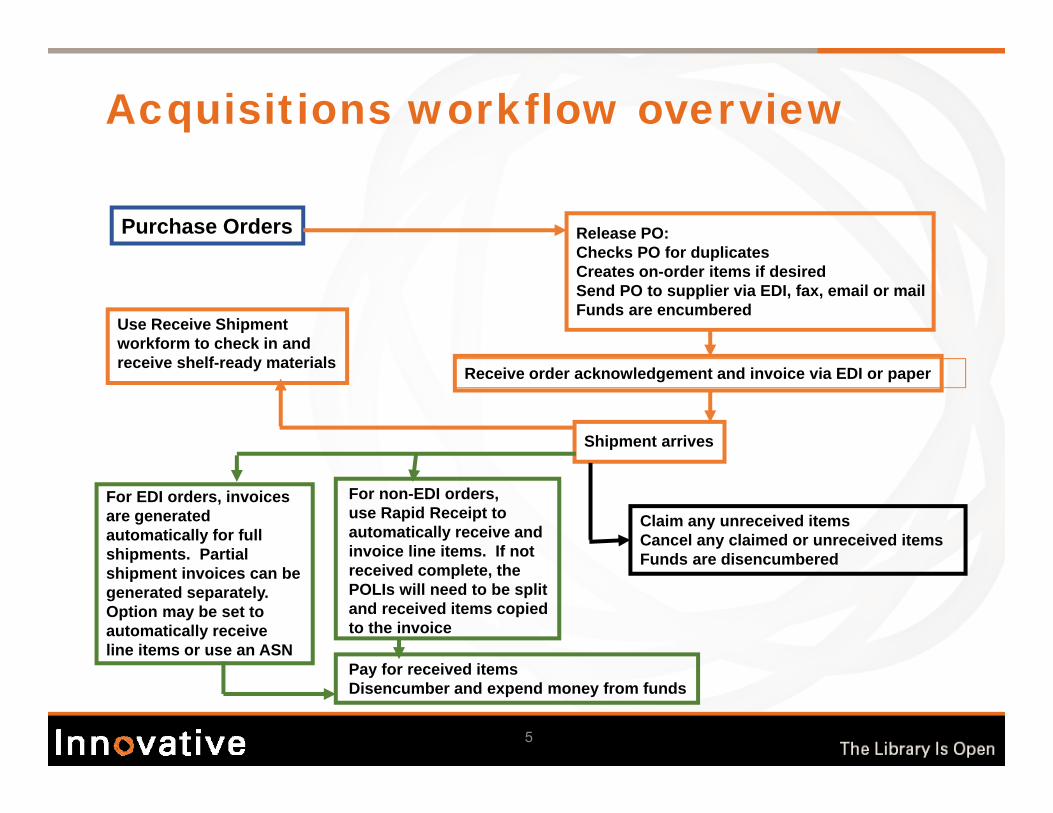
• Polaris supplies a pre-written import profile named “Acquisitions Bibs: For bib records from vendor selection tools (read only)”
• Above is an example of an import profile that may be used to bring in media order records with 970s
HintYou will need multiple import profiles for acquisitions to handle different types of MARC records from different suppliers. Copy an existing profile as a place to begin and make the changes needed.

20
Importing order records from web selection tools
• MARC validation and authority control is not done• Duplication detection is being performed using profile defined
duplicate detection rules• If a suspected duplicate is found, the incoming record will be
rejected but specific MARC tags (970) will be added to the record in the database
HintYou may also auto-delete specific MARC tags from the supplier records one of two ways. 1. Point to the system defined deletion tags in System Administration or create profile defined deletion tags.

21
On order item templates
• To create a new on-order Item Template, from the Polaris toolbar, click on the New icon and select Item Template or copy and edit an existing Item Template
• If on order item templates are created, Polaris can automatically create on order item records that will display in the PAC
• Item records are generated when the PO is released• The template name must begin with “on order” or “on-order”• Create a template for every branch, collection, material type
combination that is ordered
Matching process to create on-order item records when a PO is released
PO Line Item / On Order Item TemplateDestination - Assigned Branch
Material Type - Material TypeCollection - Collection

22
On order item templates
• An additional option is available to create on order item records• A $h may be used in a 970 tag with a copy-level code• When a PO is released, the $h is matched to part of the name in
the on order item template
HintThe contents of the $h is not visible in the PO

23
Purchase order templates
• Purchase order templates save work by allowing staff to fill in default data when creating manual purchase orders
• To save a new PO as a template, from the new PO, select File/Save As Template
• To add POLI defaults to the PO template, from the POLI view of the PO, click the Add Line Item icon on the line item toolbar
• There is no limit to the number of PO templates that may be set up• PO templates do not work with the bulk add process
HintYou can search for and edit an existing PO template by going to Acquisitions/ Templates/Purchase Orders on the Shortcut bar.

24
On order bibliographic templates
• When typing in a title to order and the POLI is saved, by default Polaris will create a book
• Set up on order bibliographic templates for materials other than a regular book format, so that bibs will display in the PAC with the correct TOM (Type of Material)
• These templates are only used when staff manually type a title to a POLI or INLI and the item is not a book
• The template name must begin with “on order” or “on-order”
HintThere are several ways to create on order Bibliographic Templates—copy and edit an existing bib template, or save a bib record as a template and then edit it. Create an on order bib template for each format you order other than a regular book.

Selection Lists• Manually creating selection lists• Bulk creating selection lists• Copying a selection list to a PO
25

Selection lists
• Staff may use selection lists to:‒ Assemble a list of titles for
review‒ Approve or reject individual
titles‒ Check for duplicates‒ Merge selection lists‒ Copy to a PO
• System Administrators can give different levels of permissions to various staff:– Some staff can have access to selection lists, but can only select
copies for their own branch– Full permissions can be given to others to create SLs, add titles,
and make decisions regarding selections
26

27
Manually creating selection lists
• To create a new Selection List, from the Polaris toolbar, click on the New icon and select Selection List
• To create a new SLLI on as Selection List, click the Add Line Item icon on the line item toolbar
• Just like POs, there are multiple ways to add a title – Type in the ISBN and hit Enter– Use the Find Tool and search for a record that exists in the database
or bring a new one in via Z39.50– Type in the title

28
Manually creating selection lists
• When a title is typed in from scratch, a bib record is not generated until it is copied to a PO
• If a title is brought in via Z39.50, it will have a provisional status until copied to a PO
• Add a material type and price—adding a supplier is optional• Add segments for destinations, collections and funds• The requester field may be edited

29
Bulk creating selection lists
• After downloading order records from a web selection tool, be sure to use the correct import profile when bringing the records into Polaris
• To search for the bibliographic record set, on the Polaris toolbar go to Cataloging/Record sets—you will need the name of the record set defined in the import profile
• To copy a Bibliographic Record Set to a Selection List, from the Record Set, go to Tools / Add all records to / New or existing SL
• One default SLLI segment is built per the settings in the Add to New Selection List dialog box
HintGo to Utilities/Importing/ Import Jobs Queue to review the import report.

30
Bulk creating selection lists
• To retrieve the SL, from the Polaris toolbar go to Acquisitions/ Selection Lists
• If 970s were not used, the SLLIs will have to be updated individually if changes are needed
• If 970 grids are used in the web selection tool, selection list line item segments will be populated automatically

31
Copying a selection list to a PO
• An entire SL may be copied to a PO• Individual or selected titles may be copied to a PO• Only specific or all decision statuses except rejected can be copied
to a PO • SLLIs can be copied to a new or an existing pending PO• To copy all decision statuses except rejected to a PO, from the SL
click the Copy to PO icon
HintTo modify the decision status on a SL—use the Approve icon at the top of the SL or Modify Decision icon on the line item toolbar.

32
Copying a selection list to a PO
• Above is an example of copying SLLIs to a new PO• During the copy process, duplication detection includes duplicate
segments within and across other SLs, duplicate lines and segments across POs and bibliographic records in the database
• If duplicates are found, a report may be printed out to make a decision regarding the duplicates
• The SLLI decision changes from approved to processed when copied to a PO

Purchase orders• Manually creating purchase orders
• Adding purchase order line items • Adding and updating POLI segments• Titles to Go
• Bulk creating purchase orders• Releasing purchase orders• Purchase order acknowledgements• Updating POLI statuses
33

34
Manually creating purchase orders
• To create a new Purchase Order, from the Polaris toolbar, click on the New icon and select Purchase Order
• If PO templates have been created, select the appropriate template
• Attach a supplier if you are not using a PO template• You may define your own PO number or have numbers
automatically assigned per settings in System Administration

35
Adding purchase order line items
• To create a new POLI, from the POLI view of a PO, click the New icon on the line item toolbar
• The General view will hold the title and its distribution• Use the second view of a POLI, Instructions to Supplier view, to add
public or non-public notes• Non-public notes will automatically be added to the non-public note
field in the on order item record and will print on a workslip

36
Adding purchase order line items
• There are multiple ways to add a title to a manual PO:– Type in the ISBN and hit Enter– Use the Find button to go to a Find Tool and search for a record that
exists in the database or bring a new one in via Z39.50– Type in the title
• When typing in a brief title and the POLI is saved, by default Polaris creates a book—use the correct on-order bibliographic template to ensure the title will display correctly to patrons in the PAC
HintA default may be set in System Administration to display/not display brief records created in acquisitions

37
Adding purchase order line items
• When a title has been attached, fill in material type and price• The unit price should be the list price of the book as this gets put
in the on order item record and is the price the patron will be charged should they lose the item
• Apply a discount if desired—Polaris rounds to the fourth place
HintMaterial type is not required, but is an important match point when creating on order item records.

38
Adding and updating POLI segments
• The segment information specifies quantity, destination, collection and funding for copies ordered
• Staff may fill in/edit segment information by selecting from drop down lists
• To create an additional POLI segment, click the Down Arrow on the line item toolbar or just click in the next segment
• Hold requests may be placed from here for newly ordered titles
HintTo quickly copy POLI segment information to the next POLI, click the dropdown arrow next to the New icon / Copy Segment Data or use Ctrl+N

39
Titles to Go
• Titles To Go uses Web services to query a vendor’s database to see if a title is available
• Once the supplier has been enabled, type in the ISBN and hit enter in the POLI– A search is launched to the PO’s vendor if there is no match in the local
database– If a match is found with the vendor, the title is automatically pulled into the PO
and availability displayed • Titles To Go is a subscription service through Polaris
– Polaris activates the license– Polaris consults with the customer, including contacting the vendor if there are
any problems– Polaris explains what is pulled into the POLI as each vendor may vary
• Compliant vendors‒ Baker & Taylor‒ Brodart‒ Ingram‒ United Library
Service

40
Bulk creating purchase orders
• After downloading order records from a web selection tool, be sure to use the correct import profile when bringing the records into Polaris
• To search for the bibliographic record set, on the Polaris toolbar go to Cataloging/Record sets—you will need the name of the record set defined in the import profile
• A date and time stamp will be added to the end of the record set
HintGo to Utilities/Importing/Import Jobs Queue to review the import report

41
Bulk creating purchase orders
• To copy a Bibliographic Record Set to a PO, from the Record Set, click Tools / Add all records to / New or Existing purchase order
• If 970s were not added to the bib records, one default POLI segment may be created when titles are added to a PO by filling in the Line Default Data in the Add to New PO dialog box
HintIf not using 970s, group carts by collection in web selection tools—this will lessen the amount of editing that will have to be done.

42
Bulk creating purchase orders
• If 970s are used, all segments are automatically built• There may be multiple 970s—each representing a different
branch/collection/fund/material type combination—a segment will be built from each 970
• After a bib is copied to a PO, a $9 with a date and time stamp are added to each 970—this prevents the 970 from being used again
• If a $h is used (copy level code), a collection and material type are not needed ($c and $m)

43
Bulk creating purchase orders
• If 970s are used, the purchase order is ready to release• If problems are encountered, review the Bulk Add to PO report• If 970s are not used, POLIs may need to be individually updated• The Subfield 9 Cleanup Utility may be used to deleted embedded
fields (970, 949, 852) from bib records

44
Releasing purchase orders
• To release a PO, from the PO, click the Release Order icon• The following events occur when a PO is released:
– The PO’s pending status changes to released for firm, gift and donation PO types
– Funds are expended if the PO is prepaid or depository funds are used
– An invoice is created if the PO is prepaid or depository funds are used
– Funds are encumbered if the materials will be paid upon receipt– On-order items are generated if staff respond “yes” to the prompt– A claim alert date is calculated if claiming has been set up– A duplicate check is performed for matching POLI segments on other
POs—duplicate ISBN, destination and collection
HintThe PO number and suffix can be edited any time before the PO is released.

45
Releasing purchase orders
• The Purchase Order Release Alert box pops up if ISBNs are missing or the display in PAC is turned off
• Staff will be reminded if the supplier accepts EDI orders• On order item records can be created• Materials can be paid for upon receipt of invoice or prepaid• The PO may be printed and/or transmitted to the supplier via EDI
HintTo send a PO via EDI, go to File/Send on the PO.

46
Purchase order acknowledgements
• If an order is sent via EDI, an Electronic Purchase Order Acknowledgement (ePOA) may be received, depending on the supplier
• To view a ePOA report, go to Utilities / Reports and Notices / Acquisitions / Electronic PO Acknowledgement
• Select an Organization, enter a date range and the supplier’s SAN without the hyphen
• POLI statuses may be updated per this report• Staff must manually cancel any POLIs reported cancelled by the
supplier

47
Updating POLI statuses
• To modify the status on all segments connected to a title, from the POLI, click on Tools / Modify Status
• To modify a specific segment of a POLI, from the POLI, highlight the desired segment, and click the Modify Segment Status icon on the line item toolbar
• Line item statuses may be manually updated per the response from the supplier
• The following statuses may be used:‒ Backordered‒ Exceptional condition‒ Never published‒ Not yet published‒ Out of print‒ Return requested‒ Returned

Receiving and invoicing• Manual receiving and invoicing options• Creating a new manual invoice• Rapid Receipt• Receiving on the PO or POLI and copying to an
invoice• Balancing invoices
• Distributing charges • Header charges
• Paying invoices• Printing invoices and workslips• Misc. invoices• Creating an invoice without a PO• Credits
48

Manual receiving and invoicing options
49
• Use Rapid Receipt. This allows staff to receive and invoice at the same time. The actual price paid may be edited during Rapid Receipt, but all copies ordered must be received in the shipment. Carefully watch the Rapid Receipt window for the quantity ordered to make sure all have been received.
• Receive on the PO or POLI and copy received titles to an invoice. Staff must remember to edit prices on individual INLI later.
• Use a combination of the two. Use Rapid Receipt for all titles that are received complete and split POLIs that are not received complete. The received copies can then be copied to the invoice where their price may be edited if needed.
HintTitles may also be manually received from an invoice. Prompts for holds will be seen if one or more holds on different titles are present.

50
Creating a new manual invoice
• Manual invoices can be created several different ways:– Paid upon receipt invoices can be generated using Rapid Receipt
and/or by copying line items from a PO or segments of a POLI to an invoice
– Prepaid invoices can be generated when a PO is released– An invoice can be created without a PO– Misc. invoices can be used to enter debits or credits
• To create a new Invoice, from the Polaris toolbar, click on the New icon and select Invoice
• Click the Find button to use the Find Tool to select a Supplier

51
Rapid Receipt
• To use Rapid Receipt, click the Rapid Receipt icon at the top of the Invoice
• Items may be received in one of three ways:– POLI ID number– ISBN – Search for the title
HintUse a scanner to scan the ISBN from the item into the Rapid Receipt window.

52
Rapid Receipt
• When the title has been pulled into the Rapid Receiptdialog box:– Confirm the bibliographic
data and adjust the price if needed
– Click the Save/Next button– When the rapid receipt
window is saved, the link to the POLI is made, the order status changes to Received and linked on-order items are updated to In-process
– All the copies ordered of a title must be received to use Rapid Receipt

53
Rapid Receipt
• As Rapid Receipt is used, the titles appear on the invoice, Invoice Line Items view
• Double click to open individual INLIs if additional edits need to be made
• Unit price, discount, destination, collection and fund may be edited on an Open invoice
HintWhen manually receiving, prompts for holds are displayed.

54
Receiving on the PO or POLI and copying to an invoice
• Materials can be received on a PO or an invoice• The POLI’s status changes from on order to received in the client; linked on-order
items are updated to in-process in the PAC• It is possible to receive:
– An entire PO– Whole line items– Part of a line item– Part of a line item segment
• To receive all copies ordered on a POLI, from the POLI view of a PO, highlight the line(s) to be received and click the Receive Line Items icon on the line item toolbar
HintWhen selecting multiple titles to receive, staff will be prompted if multiple holds are present.
55
Receiving on the PO or POLI and copying to an invoice
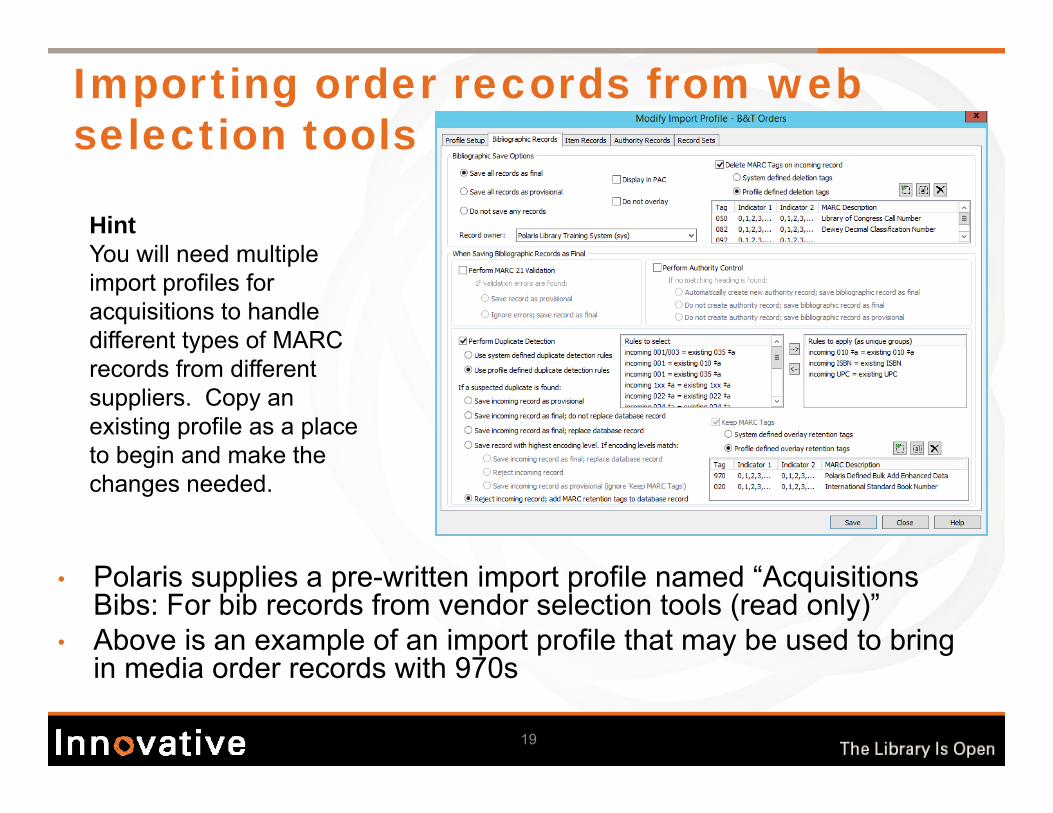
• To receive part of a POLI segment, click on the desired segment of the POLI and click the Receive Segment icon on the line item toolbar--fill in the correct number received
• After receiving the correct number of copies, the segment is split between the copies received and the ones that remain on order
• It is also possible to undo receipt of a POLI received in error from the PO or POLI

56
Receiving on a PO or POLI and copying to an invoice
• The received items are ready to be copied to the invoice• Titles that are received complete can be selected on the PO line item view
of the PO—click the Copy lines to Invoice or PO icon on the line item toolbar
• Partially received titles must be copied from the POLI--click the segments you would like to copy to an invoice and click the Copy lines to Invoice or PO icon on the line item toolbar
• Received items can be copied to a new or an existing invoice

57
Receiving on the PO or POLI and copying to an invoice
• Fill in the New Invoice dialog box if creating a new invoice• Type in the invoice number if copying to an invoice that already
exists• Search for the invoice (Acquisitions/Invoices on the Toolbar) or link
to the invoice from the PO or POLI

58
Balancing invoices – distributing charges
• To distribute charges across all line items of an Invoice, click the Distribute Charges icon at the top of the Invoice
• The adjusted amount is added to the charges tab of each invoice line item
• Additional charges must be distributed individually• The money will come out of the fund(s) attached to the title

59
Balancing invoices – header charges
• If funds have been defined for charges such as cataloging services, header charges can be applied on the General view of an invoice
• Select an individual charge type, dollar amount and fund for each charge—click the Add button to apply the charge
• The Other charge type may be renamed in System Administration per the library’s needs

60
Paying invoices
• To pay an Invoice, click the Pay Invoice icon at the top of the Invoice• The invoice number and suffix may be edited prior to paying the invoice• The status of the invoice changes from open to paid• All linked funds are disencumbered and expended• All line items on the invoice must be received to pay an invoice• The check, voucher number and date of the invoice can be edited on the
Payment History view with a right-mouse click
HintA default payment action (check or voucher) may be set in System Administration.

61
Printing invoices and workslips
• To print an invoice, click the drop down next to the printer icon at the top of the invoice and select Invoice Voucher (Summary) or Invoice Voucher (Full)
• To print workslips, select all titles on the invoice, right-mouse click / Print / PO line item workslips
• Workslips can also be printed from the purchase order

62
Undoing invoice payment
• To undo payment, click the Undo Payment icon at the top of an invoice • Undo payment reverses the expenditures in any linked funds, re-
encumbers the amounts in the linked funds and resets the invoice status to Open
• After corrections are made, the invoice is repaid• The History view will list all transactions associated with the invoice

63
Misc. invoices
• Misc. invoices can be used to track library expenditures and are not linked to specific bibliographic records
• To create a new Miscellaneous Invoice, from the Polaris toolbar, click on the New icon and select Invoice--select Miscellaneous as the type of invoice
• Click the Add line item icon on the line item toolbar to begin a new INLI• Type in a description of the item in the Title box of the INLI—a
bibliographic record is not created• A supplier is not necessary on the invoice, but each INLI must have a
price, quantity, and fund
HintMisc. invoices can be applied as debits or credits by clicking the Pay invoice or Credit invoice icon at the top of the workform.

64
Creating an invoice without a PO
• These invoices are created the same way as manual POs • This works with Regular, Blanket Order and Approval Plan invoices• Invoice Line Items may be added by typing in a brief bib, an ISBN
search, using the Find Tool to add an existing bib record or adding a new bib record via Z39.50
• Quantity is entered at the point the INLI segment is received• Item records may even be created by right-mouse clicking on the titles in
the Invoice Line Item view of the invoice and selecting Create/Item records
HintMisc. invoices and creating an invoice without a PO are workflow options for standing orders or when books are purchased directly.

65
Credits
• Credits can be applied to:– An entire invoice– A single or multiple line items within an invoice– A segment within an invoice line item
• The credit is tied to a specific title and the money is credited back to the attached fund
• A check or voucher number and date can be recorded and the transaction is added to the payment history of the invoice
• Credits may also be distributed across an invoice that needs to be paid• Misc. invoices may also be used for credits

EDI receiving and invoicing
• EDI invoicing options• Auto-receive• Hold partial shipment invoices
• System Administration EDI invoice defaults• EDI invoices• Hold partial shipment invoices• ASN (Advance Shipping Notice)• Preparation for EDI testing
66

Auto-receive
67
• Disabled:– All titles will have to be manually received. – Use the ASN to receive all items in a box from Baker & Taylor and
Ingram.– Sites that use Enriched EDI for the majority of their ordering will not
turn on auto-receive. They will use the Check In Shelf Ready Materials workform
• Enabled:– If all copies of a title ordered have not been received, the INLIs will
need to be adjusted individually.– Recommend turning on hold partial shipment invoices in conjunction
with auto-receive. This allows staff to pull in EDI invoices that need to be paid and POLIs are split correctly.
– Titles may continue to be auto-received even if using ASN functionality for certain Suppliers.

Hold partial shipment invoices
68
• Disabled: – All invoices will be brought into Polaris regardless of the
number of copies ordered compared to the number of copies received.
– If all copies of a title ordered have not been received, the INLIs will need to be adjusted.
• Enabled:– Partial shipment invoices will be held on the Polaris server.– Staff may retrieve these invoices at any time and when
manually pulled in, POLIs are split correctly.– If using the ASN, these invoices will remain on the server until
the ASN shipment has been received.

69
System Administration EDI invoice defaults
• Set up EDI invoice defaults in System Administration– Enter email addresses for the staff who should receive the invoice
log email for EDI invoices– A workflow choice should be made regarding the check box
‘Update linked PO line item to received’ (auto-receive)– An option may also be set to hold partial shipment invoices on
your Polaris server until the title has been received complete
HintAdditional charges may automatically be applied to one defined header fund if this is the library’s practice.

70
EDI Invoices
• An email will be sent to the defined staff members when invoice information is available
• The EDI email will contain:– Invoices brought all the way
into Polaris– Invoices that are being held on the server– Titles with holds– Exceptions (errors) if present
• Search for the EDI invoice by going to Acquisitions/Invoices on the Polaris shortcut bar
• When the EDI invoice has been reviewed and balanced to the library’s standard, it can be paid

71
Hold partial shipment invoices• To pull in the EDI invoice
manually, from the Polaris Shortcut Bar, go to Acquisitions/EDI Services/Process EDI Invoices
• To search for a held invoice, enter the invoice number, supplier SAN or date range and click Go.
• To actually generate the invoice in Polaris, right mouse click on the invoice and select Generate Selected Invoices--POLIs will be split correctly
• When multiple EDI invoices are needed to completely receive a POLI, the invoices will automatically be pulled in when the number ordered equals the number invoiced

72
ASN (Advanced Shipping Notice)• For libraries that handle orders before receiving them, materials
may be received in bulk by scanning the barcode on the outside of the box
• ASN functionality is turned on in an individual supplier record• Auto-receive can still be used for other EDI compliant vendors• Materials must be received via ASN first for the EDI invoice to
come into Polaris
HintCompliant vendors include:Baker & Taylor Ingram Library Services

73
ASN (Advanced Shipping Notice)
• To access the Receive ASN shipments workform, from the Polaris Shortcut Bar, go to Acquisitions / EDI Services / Receive ASN shipments
• Staff can scan in the barcode, enter the supplier’s SAN or set a date range
74
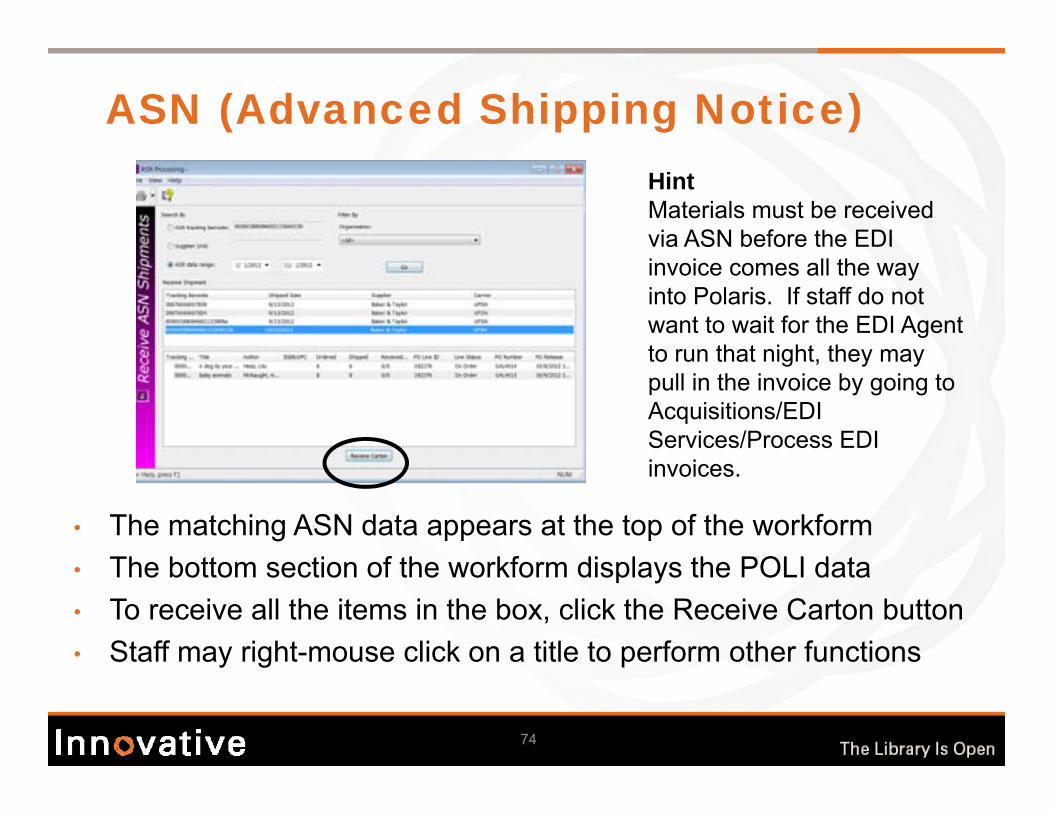
ASN (Advanced Shipping Notice)
• The matching ASN data appears at the top of the workform• The bottom section of the workform displays the POLI data• To receive all the items in the box, click the Receive Carton button• Staff may right-mouse click on a title to perform other functions
HintMaterials must be received via ASN before the EDI invoice comes all the way into Polaris. If staff do not want to wait for the EDI Agent to run that night, they may pull in the invoice by going to Acquisitions/EDI Services/Process EDI invoices.

Preparation for EDI testing
75
• What must be in place to begin EDI testing– Supplier: Confirmation their EDI setup for your accounts is
complete– Polaris Acquisitions: A purchase order with a status of
“Pending” for each supplier you will be testing, which includes:• Linked fund(s)• Supplier record for the account the purchase order is under• On order item templates

Managing purchase orders• Canceling items• Claim alert list• Claiming items from the claim alert list
76

77
Canceling items
• When an item is canceled:– Funds are disencumbered– The status is changed to canceled– Related on-order items are deleted– The display in PAC box is unchecked if there are no other associated
items of bib level holds– If prepaid, the INLIs are credited and an unexpend transaction
occurs in the funds
HintIt is possible to cancel all items on a PO, one or multiple POLIs, a POLI segment or part of a segment.

78
Canceling items• If holds are attached to the title and no other item can satisfy the
hold:‒ Hold requests may be retained (the title will be reordered)‒ Hold requests may be cancelled (the patron will receive a cancellation
notice) • The cancel notice box must be checked in the supplier record to
generate a paper notice for the supplier• Cancellation notices are printed out from Reports and Notices• To manually cancel a
segment within a POLI, highlight the desired segment and click the Cancel icon on the line item toolbar

79
Claim alert list
• Claiming must be set up on the Supplier record, PO and POLI to use the claim alert list
• A process is run at night and items that have reached the claim limit will appear on the claim alert list
• To access the claim alert list, from the Polaris Toolbar, go to Acquisitions / Claim Alert List
• A claimed title will reappear on the claim alert list as it moves through the claiming cycle
HintRead the claim alert list in reverse order. This is a list of pending claims for POLIs ordered at the Amsterdam Free branch.

80
Claiming items from the claim alert list
• To claim an item on the Claim Alert List, highlight the desired item and click the Claim icon on the line item toolbar
• A running history of the claim may be recorded on the claim record• The claim notice box must be checked in the Supplier record to generate
a paper notice• Claims are printed out from Reports and Notices


![Technical Bulletin - Polaris - Polaris 9300 Sport & Polaris 9300xi Sport[1]](https://static.fdocuments.in/doc/165x107/553b235d4a7959d8258b463f/technical-bulletin-polaris-polaris-9300-sport-polaris-9300xi-sport1.jpg)