Polar Plots Manual A4
46
Polar Plots and Circular Statistics Last updated 23 June 2014 Jeff Jenness
-
Upload
welsinsin-kevin-sin -
Category
Documents
-
view
232 -
download
0
Transcript of Polar Plots Manual A4

7/23/2019 Polar Plots Manual A4
http://slidepdf.com/reader/full/polar-plots-manual-a4 1/46
Polar Plots and Circular Statistics
Last updated 23 June 2014Jeff Jenness

7/23/2019 Polar Plots Manual A4
http://slidepdf.com/reader/full/polar-plots-manual-a4 2/46
Manual: Polar Plots ArcGIS ExtensionLast Modified: June 23, 2014
About the Author
Jeff Jenness is an independent GIS consultant specializing in developing analytical applications for a wide variety oftopics, although he most enjoys ecological and wildlife-related projects. He spent 16 years as a wildlife biologist withthe USFS Rocky Mountain Research Station in Flagstaff, Arizona, mostly working on Mexican spotted owl research.Since starting his consulting business in 2000, he has worked with universities, businesses and governmentalagencies around the world, including a long-term contract with the United Nations Food and Agriculture Organization(FAO) for which he relocated to Rome, Italy for 3 months. His free ArcView tools have been downloaded from hiswebsite and the ESRI ArcScripts site over 190,000 times.

7/23/2019 Polar Plots Manual A4
http://slidepdf.com/reader/full/polar-plots-manual-a4 3/46
Manual: Polar Plots ArcGIS ExtensionLast Modified: June 23, 2014
NAME: Polar Plots and Circular Statistics
Install File: PolarPlots.exe
Last modified: June 23, 2014
TOPICS: Polar plot, Rose plot, Circular Statistics, Angular Deviation, Angular Variance, Mean
Resultant Length
AUTHOR:
Jeff Jenness
Wildlife Biologist, GIS Analyst
Jenness Enterprises
3020 N. Schevene Blvd.
Flagstaff, AZ 86004 USA
Email: [email protected]
Web Site: http://www.jennessent.com)
Phone: 1‐928‐607‐4638
Description: This extension includes two tools. Both tools are available at the ArcView (aka
ArcGIS Basic) license level.
1. The Shapes to Segments tool converts polygon or polyline features into polyline
features of individual vertex‐to‐vertex segments, with options on various geometric
attributes to calculate (starting and ending coordinates, length, azimuth).
2. The Polar Plots tool creates a graphic in the MXD layout illustrating the distribution
of direction values in a polyline feature class (such as those generated in the Shapes
to Segments tool) or table. The Polar Plots tool also has an option to calculate basic
circular descriptive statistics on data.
Output: One tool produces polyline feature classes and the other tool produces a graphic
plot in the MXD Layout.
Requires: ArcGIS 9.1 or better, at any license level.
Revision History on p. 45.
Recommended Citation Format: For those who wish to cite this extension, the author
recommends something similar to:
Jenness, J. 2014. Polar Plots and Circular Statistics: Extension for ArcGIS. Jenness
Enterprises. Available at: http://www.jennessent.com/arcgis/Polar_Plots.htm
Please let me know if you cite this extension in a publication ( [email protected]). I will
update the citation list to include any publications that I am told about.

7/23/2019 Polar Plots Manual A4
http://slidepdf.com/reader/full/polar-plots-manual-a4 4/46
Manual: Polar Plots ArcGIS ExtensionLast Modified: June 23, 2014
4
Table of Contents
TABLE OF CONTENTS ...................................................................................................................... 4
INSTALLING THE POLAR PLOTS AND CIRCULAR STATISTICS EXTENSION ..................................................... 5
For ArcGIS 9.x ........................................................................................................................................................... 5
For ArcGIS 10.0 ........................................................................................................................................................ 5
Viewing the Tools ...................................................................................................................................................... 8
UNINSTALLING THE POLAR PLOTS AND CIRCULAR STATISTICS EXTENSION .............................................. 10
For ArcGIS 9.x. ........................................................................................................................................................ 10
For ArcGIS 10.0 ...................................................................................................................................................... 10
TROUBLESHOOTING ...................................................................................................................... 12
If Any of the Tools Crash ......................................................................................................................................... 12
“Object variable or With block variable not set” Error: ............................................................................................. 12
RICHTX32.OCX Error (also comct332.ocx, comdlg32.ocx, mscomct2.ocx, mscomctl.ocx, msstdfmt.dll errors): .. 12
ISSUES WITH DIRECTIONAL DATA .................................................................................................... 16
Azimuths and Geodesic Curves ............... ............... ............... ............... ............... ............... ................ ............... ..... 16
Graphically Representing Directional Data ............................................................................................................. 17
Analyzing Directional Data: Circular Statistics ......... ............... ............... ............... ............. ................. ............... ..... 20
Mean Direction and Mean Resultant Length ................................................................................................. 21
Variance and Standard Deviation: ................................................................................................................. 22
Other Methods to Analyze Directional Data ............................................................................................................ 24
Classification of Aspect Values ...................................................................................................................... 24
Deviations from a Bearing ............................................................................................................................. 24
Sine and Cosine Transformations .................................................................................................................. 24
SPECIAL CONSIDERATIONS FOR ASPECT ............................................................................................ 26
How Aspect is Calculated .............. ............... ............... .............. ............... ................ ............... ............... ................. 26
Is this the best method to calculate aspect?.................................................................................................. 27
Issues with Aspect ................................................................................................................................................... 27
Solar Insolation: An alternative to Aspect ............... ............... .............. ............... ............... ............... ............... ....... 28
ESRI’s Solar Radiation Tool ............................................................................................................................ 28
Hillshade ........................................................................................................................................................ 30
USING THE TOOLS ........................................................................................................................ 31
Convert Shapes to Segments ................................................................................................................................. 31
Generate Circular Plots ........................................................................................................................................... 34
Plot Style ........................................................................................................................................................ 35
Data Source Options: ..................................................................................................................................... 35
Plot and Title Options: ................................................................................................................................... 37
Reference Line and Label Options: ................................................................................................................ 40
Calculate Descriptive Circular Statistics .................................................................................................................. 43
REVISIONS .................................................................................................................................. 45
REFERENCES ................................................................................................................................ 46

7/23/2019 Polar Plots Manual A4
http://slidepdf.com/reader/full/polar-plots-manual-a4 5/46
Manual: Polar Plots ArcGIS ExtensionLast Modified: June 23, 2014
5
Installing the Polar Plots and Circular Statistics Extension
For
ArcGIS
9.x
First close ArcGIS if it is open. Tools do not install properly if ArcGIS is running during the
installation.
Install the Polar Plots
and
Circular
Statistics
extension by double‐clicking on the file
PolarPlots.exe and following the instructions. The installation routine will register the
PolarPlots.dll with all the required ArcMap components.
The default install folder for the extension is named “Polar_Plots” and is located inside the
folder “Program Files\Jennessent”. This folder will also include some additional files and this
document.
For ArcGIS 10.0
Note: This function will only work if you have ArcGIS 10 installed.
1. First close ArcGIS if it is open. The tools do not install properly if ArcGIS is running
during the installation.
2. Install the Polar Plots
and
Circular
Statistics
extension by double‐clicking on the file
PolarPlots.exe and following the instructions. This installation routine will install the
PolarPlots.dll and several ancillary files on your hard drive, but will not register the tool
with ArcGIS.
3. Use Windows Explorer to open your installation folder. If you used the default values,
then this folder will be located at “Program Files\ Jennessent\Polar_Plots\”. This folder
will also include some additional files and this manual.
4. For Windows XP: Double‐click the file “Make_Batch_Files.exe” to create registration
and unregistration batch files that are properly formatted to your system.

7/23/2019 Polar Plots Manual A4
http://slidepdf.com/reader/full/polar-plots-manual-a4 6/46
Manual: Polar Plots ArcGIS ExtensionLast Modified: June 23, 2014
6
a. Double‐click the new batch file “Register_Polar_Plots_Tool.bat” to register
the tool with ArcGIS 10.0.
b. If the registration is successful, then you should see a “Registration
Succeeded” notice.

7/23/2019 Polar Plots Manual A4
http://slidepdf.com/reader/full/polar-plots-manual-a4 7/46
Manual: Polar Plots ArcGIS ExtensionLast Modified: June 23, 2014
7
5. For Windows Vista or Windows 7: Right‐click the file “Make_Batch_Files.exe”, and then
choose “Run as Administrator” to create registration and unregistration batch files that
are properly formatted to your system.
6. Right‐click the new batch file “Register_Polar_Plots_Tool.bat”, and then choose
“Run as Administrator” to register all the tools with ArcGIS 10.0.
7. If the registration is successful, then you should see a “Registration Succeeded”
notice.

7/23/2019 Polar Plots Manual A4
http://slidepdf.com/reader/full/polar-plots-manual-a4 8/46
Manual: Polar Plots ArcGIS ExtensionLast Modified: June 23, 2014
8
Note: For the concerned or curious, the batch file Register_Polar_Plots_Tool.bat
contains a single line of text that looks similar to the following:
"C:\Program Files (x86)\Common Files\ArcGIS\bin\ESRIRegAsm.exe" /p:Desktop"C:\Program Files (x86)\Jennessent\Polar_Plots\PolarPlots.dll" /f:"C:\ProgramFiles (x86)\Jennessent\Polar_Plots\PolarPlots.reg"
It directs the ESRI installer ESRIRegAsm to register the extension DLL PolarPlots.dll within
ArcGIS, using GUID and Class ID values from the registry file PolarPlots.reg (also located
in your installation directory). Both Register_Polar_Plots_Tool.bat and PolarPlots.reg
may be opened and viewed using standard text editors such as Notepad or WordPad.
Viewing
the
Tools
This tool is installed as an extension in ArcMap, but it is a type of extension that is
automatically loaded. You will not see this extension in the “Extensions” dialog available in
the ArcGIS “Tools” menu. It is not dependent on any other extensions or any ArcGIS license
level.
This extension does not include a separate toolbar so you will need to manually put the tools
in an existing toolbar.
To do this, open your “Customize” tool by either:
1) Double‐clicking on a blank part of the ArcMap toolbar, or
2) For ArcGIS 9, click the “Tools” menu, then “Customize”, or
3) For ArcGIS 10, click the “Customize” menu, then “Customize Mode”
In the “Customize” dialog, click the “Commands” tab and scroll down to select “Jenness
Enterprises”:

7/23/2019 Polar Plots Manual A4
http://slidepdf.com/reader/full/polar-plots-manual-a4 9/46
Manual: Polar Plots ArcGIS ExtensionLast Modified: June 23, 2014
9
Finally, simply drag the Convert Shapes to Segments and/or the Polar Plot commands out of
the Customize dialog up into any of the existing ArcGIS toolbars.

7/23/2019 Polar Plots Manual A4
http://slidepdf.com/reader/full/polar-plots-manual-a4 10/46
Manual: Polar Plots ArcGIS ExtensionLast Modified: June 23, 2014
10
Uninstalling the Polar Plots and Circular Statistics Extension
For
ArcGIS
9.x.
1) Close ArcGIS if it is open.
2) Click the Start button.
3) Open your Control Panel.
4) Double‐click “Add or Remove Programs”.
5) Scroll down to find and select “Polar Plots and Circular Statistics”.
6) Click the “Remove” button and follow the directions.
For ArcGIS 10.0
1) Close ArcGIS if it is open.
2) Use Windows Explorer to open your installation folder. If you used the default
values, then this folder will be located at “Program Files\ Jennessent\Polar_Plots\”.
This folder will also include some additional files and this manual.
3) Find the file Unregister_Polar_Plots_Tool.bat. IF YOU DO NOT SEE THIS FILE, use
the Make_Batch_Files.exe tool to create the batch file. Refer to Step 4 in “Installing

7/23/2019 Polar Plots Manual A4
http://slidepdf.com/reader/full/polar-plots-manual-a4 11/46
Manual: Polar Plots ArcGIS ExtensionLast Modified: June 23, 2014
11
the Polar Plots and Circular Statistics Extension” above for instructions on how to
use this tool.
4) For Windows XP: Double‐click the file Unregister_Polar_Plots_Tool.bat to
unregister the tool with ArcGIS 10.0.
For Windows Vista and Windows 7: Right‐click the file
Unregister_Polar_Plots_Tool.bat
and
select
“Run
as
Administrator”
to
unregister
the
tool with ArcGIS 10.0.
If the unregistration is successful, then you should see an “Unregistration
Succeeded” notice.
5) Click the Start button.
6) Open your Control Panel.
7) Double‐click “Add or Remove Programs”.
8) Scroll down to find and select “Polar Plots and Circular Statistics 10”.
9) Click the “Uninstall” button and follow the directions.
Note: For the concerned or curious, the batch file Unregister_Polar_Plots_Tool.bat contains something similar to the following single line of text:
"C:\Program Files\Common Files\ArcGIS\bin\ESRIRegAsm.exe" /p:Desktop /u"C:\Program Files\Jennessent\Polar_Plots\PolarPlots.dll"
It directs the ESRI installer ESRIRegAsm to unregister the DLL PolarPLots.dll within ArcGIS.
Unregister_Polar_Plots_Tool.bat may be opened and viewed using standard text editors
such as Notepad or WordPad.

7/23/2019 Polar Plots Manual A4
http://slidepdf.com/reader/full/polar-plots-manual-a4 12/46
Manual: Polar Plots ArcGIS ExtensionLast Modified: June 23, 2014
12
Troubleshooting
If
Any
of
the
Tools
Crash
If a tool crashes, you should see a dialog that tells us what script crashed and where it
crashed. I would appreciate it if you could copy the text in that dialog, or simply take
screenshots of the dialog and email them to me at [email protected]. Note: Please
make sure that the line numbers are visible in the screenshots! The line numbers are
located on the far right side of the text. Use the scrollbar at the bottom of the dialog to
make the line numbers visible.
“Object
variable
or
With
block
variable
not
set”
Error:
If you open ArcMap and immediately see the error dialog appear with one or more error
messages stating that “Object variable or With block variable not set”, then 90% of the time
it is because ArcGIS was running when you installed the extension. The “Object” variable
being referred to is the “Extension” object, and ArcGIS only sets that variable when it is
initially opened.
The solution is usually to simply close ArcGIS and restart it. If that does not work, then:
1) Close ArcGIS
2) Reinstall the extension
3) Turn ArcGIS back on.
RICHTX32.OCX
Error
(also
comct332.ocx,
comdlg32.ocx,
mscomct2.ocx, mscomctl.ocx, msstdfmt.dll errors):
If you see a line in the error dialog stating:
Component 'RICHTX32.OCX' or one of its dependencies not correctly registered: a fileis missing or invalid
Or if you see a similar error stating that one or more of the files comct332.ocx,
comdlg32.ocx, mscomct2.ocx, mscomctl.ocx or
msstdfmt.dll
are missing or invalid, then
simply follow the instructions for RICHTX32.OCX below, but substitute the appropriate file
for RICHTX32.OCX .
This error is almost always due to the fact that new installations of Windows 7 and Windows
Vista do not include a file that the extension expects to find. For example, the file
“richtx32.ocx” is actually the “Rich Text Box” control that appears on some of the extension
dialogs. The other OCX files refer to other common controls that might appear on the
various extension dialogs.
The solution is to manually install the missing file (richtx32.ocx) yourself. Here is how to do
it:
1) Open Windows Explorer and locate the file richtx32.ocx in your extension
installation file.
2) If you are running a 32‐bit version of Windows, then copy richtx32.ocx to the
directory
C:\Windows\System32\
If you are running a 64‐bit version of Windows, then copy richtx32.ocx to the
directory
C:\Windows\SysWOW64\

7/23/2019 Polar Plots Manual A4
http://slidepdf.com/reader/full/polar-plots-manual-a4 13/46
Manual: Polar Plots ArcGIS ExtensionLast Modified: June 23, 2014
13
3) Open an “Elevated Command Prompt” window. This is the standard Windows
Command Prompt window, but with administrative privileges enabled. You need
these privileges enabled in order to register the OCX with Windows. Note: The
Elevated Command Prompt opens up in the “..\windows\system32” directory, not
the “..\Users\[User Name]” directory. The window title will also begin with the word
“Administrator:”
a. Method 1: Click the “Start” button, then “All Programs”, then “Accessories” and
then right‐click on “Command Prompt” and select Run as Administrator.
b. Method 2: Click the “Start” button, and then click on the “Search Programs and
Files” box. Type “cmd” and then click CONTROL+SHIFT+ENTER to open the
Command window with Administrator privileges.
For more help on opening an Elevated Command Prompt, please refer to:
http://www.sevenforums.com/tutorials/783‐elevated‐command‐prompt.html

7/23/2019 Polar Plots Manual A4
http://slidepdf.com/reader/full/polar-plots-manual-a4 14/46
Manual: Polar Plots ArcGIS ExtensionLast Modified: June 23, 2014
14
http://www.winhelponline.com/articles/158/1/How‐to‐open‐an‐elevated‐
Command‐Prompt‐in‐Windows‐Vista.html
Or simply do a search for “Elevated Command Prompt”.
4) Register the file richtx32.ocx using the Windows RegSvr function:
a. If using a 32‐bit version of Windows, type the line
regsvr32.exe c:\windows\system32\richtx32.ocx
b. If using a 64‐bit version of Windows, type the line
regsvr32.exe %windir%\syswow64\richtx32.ocx
c. Click [ENTER] and you should see a message that the registration succeeded.

7/23/2019 Polar Plots Manual A4
http://slidepdf.com/reader/full/polar-plots-manual-a4 15/46
Manual: Polar Plots ArcGIS ExtensionLast Modified: June 23, 2014
15

7/23/2019 Polar Plots Manual A4
http://slidepdf.com/reader/full/polar-plots-manual-a4 16/46
Manual: Polar Plots ArcGIS ExtensionLast Modified: June 23, 2014
16
Issues with Directional Data
Many characteristics of wildlife habitat and behavior include a directional component.
Animal movement may tend to angle toward or away some landscape feature, and the
strength of the attraction or repulsion effect may change with proximity to that object.
Aspect (i.e. the azimuth the landscape faces in the direction of steepest slope) is an
intuitively valuable habitat variable because north‐facing slopes are typically cooler and
more mesic while south‐facing slopes are generally warmer and more xeric (at least in the
northern hemisphere!). Habitats can be dramatically different depending on which side of a
hill you stand on.
Direction can be difficult to analyze statistically because of its circular nature. The difference
between 1 degree and 360 degrees is the same as the difference between 1 degree and 2
degrees, making it difficult to plug into a typical statistical model. This article will discuss
some issues we often face with directional data plus some basic ideas to describe and
analyze it. Many of the concepts can also be applied to other periodic data such as time, but
this article will focus on direction.
An additional complication is that sometimes we consider direction as a single value (the
“forward” direction) and sometimes we count both the forward and reverse directions. In
wildlife analysis, direction is usually treated as a single value. We are interested in where an animal is going and why it chooses to go in the direction it does. Or we are interested in the
general aspect of a habitat block, and what that means to our species of interest. In some
cases, however, we need to consider both the direction and its opposite value. Analysis of
geologic fracture lines on the landscape should be considered to go in both directions.
Analysis of trails or paths should be treated similarly, except in the rare case of one‐way
trails.
Azimuths and Geodesic Curves
In most cases the direction or azimuth value is easy to define. The aspect at a point can be
derived with a little math from a DEM (see “Special Considerations for Aspect” on p. 26) or
with a compass. The azimuth of a movement segment is simply the azimuth from the
starting to the ending points of that segment.
Complications arise if we are interested in azimuths over long distances. The straight‐line
segment over a long distance is best approximated by a geodesic curve representing the
great circle distance (i.e. “As the crow flies”) between two points. The problem here is that,
with a few rare exceptions, azimuth values change constantly over the course of a geodesic
curve. Consider the geodesic curve connecting New York City, USA to Moscow, Russia:

7/23/2019 Polar Plots Manual A4
http://slidepdf.com/reader/full/polar-plots-manual-a4 17/46
Manual: Polar Plots ArcGIS ExtensionLast Modified: June 23, 2014
17
The line from New York starts at a bearing of 34°, continues in a straight line the entire way,
but arrives in Moscow on a bearing of 130°.
For movement segments less than a few hundred miles, and sufficiently far away from the
poles, the difference between starting and ending azimuths tends to be negligible. For long
distances and for analysis near the poles, however, we should be aware of this phenomenon
and be careful about how we define our directional values.
Graphically
Representing
Directional
Data
Because of the circular nature of directional data, we typically use circular plots to display
the distribution. Most of these circular plots are variations on the standard histogram,
except wrapped in a circle so that the maximum possible X‐axis value wraps back to touch
the minimum possible value.
One of the more famous and historically interesting of these is the Rose Plot or Rose
Diagram, named as such because the histogram bins resemble flower petals. This type of
diagram was originally popularized by nurse and statistician Florence Nightingale, who used
it to show seasonal patterns in soldier mortality (see
http://en.wikipedia.org/wiki/Florence_Nightingale for the source of the famous image
below). Nightingale actually called these diagrams “coxcombs” because they resemble the
comb of a rooster.

7/23/2019 Polar Plots Manual A4
http://slidepdf.com/reader/full/polar-plots-manual-a4 18/46
Manual: Polar Plots ArcGIS ExtensionLast Modified: June 23, 2014
18
Nightingale’s plots showed variation by season, but this method also works very well for
displaying directional data. For example, given a set of trails in the San Francisco Bay area,
we can use a rose plot to illustrate the general Northwest/Southeast orientation of those
trails:
Common variations on the traditional rose plot include symbolizing the histogram bins as
“Peaks and Valleys”, and putting the bins on the outside of the circle rather than the inside.

7/23/2019 Polar Plots Manual A4
http://slidepdf.com/reader/full/polar-plots-manual-a4 19/46
Manual: Polar Plots ArcGIS ExtensionLast Modified: June 23, 2014
19
When only a few direction values need to be displayed, you can simply show the bearings in
a circular plot.
Another interesting method is a pie chart‐type image where the “slices” are shaded
according to the proportion of the data that faces that particular direction:

7/23/2019 Polar Plots Manual A4
http://slidepdf.com/reader/full/polar-plots-manual-a4 20/46
Manual: Polar Plots ArcGIS ExtensionLast Modified: June 23, 2014
20
Although this last method is less effective at showing the shape of the distribution as other
methods, it is still an interesting style of illustration because it is so visually intuitive. In the
image above, it is easy to see that the observed roost locations predominately face toward
the southeast. This extension provides methods to create all the plot types illustrated
above (see p. 34 for a description of the tool). Additional software tools can be found with a
Google search. Fisher (1995:15‐30) also discusses alternative methods for graphing circular
data.
Analyzing
Directional
Data:
Circular
Statistics
Before beginning this section, I want to emphasize two important points that people very
often make mistakes with:
1) Do not calculate the mean direction using the arithmetic mean! This is especially
frustrating because the arithmetic mean is sometimes correct and sometimes wildly incorrect. For example, the mean direction of 90° and 180° is 135°, which
coincidentally is equal to the arithmetic mean 90
1352
. But what is the
mean direction of 359° and 1°? They are both pointing almost due north ( 1°), and
clearly the true mean direction is exactly due north. However, the arithmetic mean
gives us 180° 359
1802
, which is due south and exactly the opposite of the
correct answer. The correct way to calculate the mean direction is described below.
2) If you apply a Sine or Cosine transformation, make sure to convert the values to
radians first! Most analytical software and programming languages have sine and
cosine functions, but these functions usually assume the values are in radians, not degrees. There are exactly 2π (~6.28) radians in a circle. This means that the
software will assume that a difference of 3.14 (i.e. π) units is equivalent to going
halfway around the circle. If your data are in degrees, then the software will
interpret a change in 2° to be roughly equivalent to going a third of the way around
the circle. Fortunately it is easy to convert to radians using the following formula:
3 14159265358979
180 180
.DegreesDegreesRadians
Degrees to Radians:

7/23/2019 Polar Plots Manual A4
http://slidepdf.com/reader/full/polar-plots-manual-a4 21/46
Manual: Polar Plots ArcGIS ExtensionLast Modified: June 23, 2014
21
It is possible that your software has a function that allows you to calculate sines and
cosines from degrees (many calculators do), but even in this case you must
remember to set the switch correctly.
Fortunately there are well‐established methods available for analyzing circular or periodic
data such as movement direction or aspect. The circular nature of the data lead to very
specific and interesting approaches to calculating measures of central tendency and
dispersion (see p. 43 for how to use this extension to calculate circular statistics). Some of
the basic descriptive statistics are:
Mean Direction and Mean Resultant Length
2 2 2
1 1
1
1
1
2
0 0
0
2 0 0
0 02
0 02
cos sin
tan ,
tan
tan ,
,
,
n n
i i
i i
C S R C S
S C S C
S C C
S C S C
S C
S C
R R
Where: Direction in Radians
Mean Direction:
Resultant Length:
Mean Resultant LenR
R n
gth:
The equations for mean direction look a little confusing, but the logic is actually very
intuitive. It is simply a process of vector addition, where each direction value is a single
vector. Vector addition essentially connects all the direction vectors into a path, and the
mean direction is just the direction to the last point on the path.
For example, consider a scenario with 4 direction values at 45°, 75°, 120° and 220°:
We connect the 4 bearings in a path (vector addition just adds up the ∆X and ∆Y
components of each vector, which is the same as treating each bearing as a segment in a
path). It does not matter what order we connect the vectors in; they will always end up at
the same point. The Mean Direction is the bearing from the start of the path to the end of
the path.

7/23/2019 Polar Plots Manual A4
http://slidepdf.com/reader/full/polar-plots-manual-a4 22/46
Manual: Polar Plots ArcGIS ExtensionLast Modified: June 23, 2014
22
On a side note, this is also the way to calculate the mean direction of an actual observed
movement path. If you have a series of locations from a GPS collar on an elk, for example,
and you wonder what average direction the animal moved over the day, then that average
direction is simply the direction from the first GPS location of the day to the last.
The Mean Resultant Length R is the basis for several values of dispersion (analogous to
variance or standard deviation), and is calculated as the straight‐line distance from the
starting point to the ending point of the path divided by the number of segments (if the
segments are unit vectors, where each vector has a length of 1) or by the total length of the
path if the segments have variable lengths.
Notice that the mean resultant length has a potential range of 0 to 1. If all the vectors
pointed in exactly the same direction, the resultant length would then be equal to the total
path length and the mean resultant length would be equal to 1. This is the scenario with the
minimum possible variance or dispersion in the vectors. The more the path wanders
around, the shorter both the resultant length and the mean resultant length will be. If the
path ended back at the origin, then both values would be equal to 0.
Variance and Standard Deviation:
Mardia and Jupp (2000), Fisher (1995) and Batschelet (1981) describe circular statistics
analogous to variance and standard deviations, based on the mean resultant length R .
2
2
1
2 1
2
2 1
ln
R
s R
v R
s s R
Circular Variance: V (Mardia & Jupp, Fisher)
Angular Variance: (Batschelet)
Circular Standard Deviation: In Radians (Mardia & Jupp, Fisher)
Angular Deviation: In Radians (Batschelet)

7/23/2019 Polar Plots Manual A4
http://slidepdf.com/reader/full/polar-plots-manual-a4 23/46
Manual: Polar Plots ArcGIS Extension
Last Modified: June 23, 2014
23
The
Circular
Standard
Deviation
and
Angular
Deviation
are
both
in
units
of
Radians,
but
these can easily be converted to Degrees.
180
Degrees Radians
Radians
to
Degrees:
Batchelet
points
out
that
circular
standard
deviation
and
the
angular
deviation
tend
to
be
close
to
each
other
for
most
values
of
R .
However,
as
R
tends
toward
0,
circular
standard
deviation tends toward while
angular
deviation tends toward a maximum value of 2.
Batchelet,
citing
Seyfarth
and
Barth
(1972),
presents
a
geometric
derivation
of
angular
deviation
which
also
provides
a
visual
sense
of
what
the
concept
means.
Given
a
unit
circle
with
Radius
=
1,
and
with:
Point
A
defined
as
on
the
circle
horizontal
from
the
Origin
O
Point C defined as
R distance along segment OA (remember that R will always be
between
0
and
1)
Point
B
defined
as
on
the
circle
vertical
from
Point
C
Then
s
(angular
deviation)
is
just
the
length
of
the
line
connecting
points
A
and
B.
The
angular
deviation
can
therefore
be
calculated
by
applying
the
Pythagorean
theorem
to
BCO
and ABC :
2 2 2
2 2
22 2
2
22 2
2
2 2
1
1
1
1
1
1 1 1
1 2 1
2 2
2 1
2 1
:
:
:
BCO
AB
R
R
R
C
R R R
R R
R s
s
s
R
R
R
R
x
x
x
x
R
From the Pythagorean Theorem on
From the Pythagorean Theorem on
Substituting for

7/23/2019 Polar Plots Manual A4
http://slidepdf.com/reader/full/polar-plots-manual-a4 24/46
Manual: Polar Plots ArcGIS ExtensionLast Modified: June 23, 2014
24
Based on this illustration, it is easy to see that 0s when 1R , and that 2s when
0R
Note: A mean resultant length R near 1 always implies a tightly focused set of directions,
but a mean resultant length near 0 does not necessarily imply a high amount of variation or
dispersion. All it implies is that the directions balance each other out. This can occur with a
uniform distribution of directions, in which case there truly would be high dispersion. It can also occur, however, if you have a number of bearings in one direction and an equal number
in the opposite direction. For example, perhaps you have a bird with distinct and separate
roost and forage locations. Every day the bird travels to the forage location and then returns
to the roost location. In this scenario, the bird only goes in two distinct and opposite
directions (to the forage location, and then back to the roost location). The bird’s
movement directions are highly focused and predictable, but the mean resultant length
would be 0 and consequently the variance would be high. As with most situations, plotting
the distribution of the data is a good way to understand what is really happening.
Just as with standard statistics, there are a number of circular distributions and sophisticated
analytical techniques available. These go beyond the scope of this newsletter article, but
please refer to Jammalamadaka and SenGupta (2001), Mardia and Jupp (2000), Zar (1999;
see especially ch. 26 and 27), Fisher (1995) and Batschelet (1981) for some good texts on
circular statistics, distributions (i.e. the Fisher, Von Mises and Wrapped Normal
distributions), circular hypothesis testing and other analytical techniques. There is also a
good circular statistical package for R, originally based on Jammalamadaka and SenGupta’s
text. As of June, 2012, the manual for this package can be viewed at
http://cran.wustl.edu/web/packages/circular/circular.pdf.
Other
Methods
to
Analyze
Directional
Data
If we want to include direction as one of several independent predictor variables in a
traditional statistical analysis, then we must transform the value into something approaching
a linear measure. There are a few straightforward ways to do this, although any
transformation will probably violate some of the assumptions of most traditional statistical
tests.
Classification of Aspect Values
Probably the easiest transformation is to simply group your direction values into general and
intuitive ranges (for example, “N” = 315 – 45, “E” = 45 – 135, “S” = 135 – 225, and “W” = 225
‐ 315), creating a categorical dataset which may be appropriate for some analyses.
Deviations from a Bearing
A simple and basic transformation is to convert your direction values into deviations from a
direction of interest. For example, if you felt that the object of your study was likely to be
affected by the north‐ vs. south‐facing aspect phenomenon, then you might define your
direction values in terms of “Deviation from North” where each value would reflect the
distance, in degrees, from due North. Your full set of transformed values would range from
0 to 180 (see figure below). This option has the advantage of maintaining a constant interval
between units, such that the difference in direction between 0 and 1 degree is the same as
the difference between 90 and 91 degrees.
Sine and Cosine Transformations
Aspect values are often converted to sine and cosine values, essentially decomposing them
into north‐south and east‐west components. Remember to convert your direction values to
radians before doing this transformation! Sine values range from ‐1 (at due west) to 1 (at

7/23/2019 Polar Plots Manual A4
http://slidepdf.com/reader/full/polar-plots-manual-a4 25/46
Manual: Polar Plots ArcGIS ExtensionLast Modified: June 23, 2014
25
due east), while cosine values range from ‐1 (at due south) to 1 (at due north). Note that
this method does not maintain a constant interval between units. The sine and cosine
values change by a variable amount depending on the direction, such that a change in sine
corresponding to a change of 1 degree = 0.00015 when going from 90 to 91 degrees, but
increases by more than 2 orders of magnitude to 0.017 when going from 180 to 181
degrees. This issue may be important in your statistical analysis if your method assumes
that your data are interval‐level.
Trimble and Weitzman (1956) and Beers et al. (1966) suggest an interesting alternative
combining two of the approaches above, rescaling aspect values based on an optimum
bearing (135° for Trimble & Weitzman, and a general equation for any aspect of interest for
Beers et al.) then taking the sine of the rescaled values, then adding 1, which they put to
extensive use in site productivity research for timber stands. Beers et al.’s general equation
is:
90 1
1
Transformed Aspect Code, in Degrees
Where:
The aspect which is to be assigned the highest numerical value on the transform scale
sin
cos
Max
Max
Max
A
A A
A A
A
Note: Beers et al.’s equation presumes that you can calculate the sine or cosine of a value in
degrees. Many calculators can do this, but many programming languages require your
values to be in radians. If you need to convert your values, the Degrees‐to‐Radians
conversion formula is on p. 20 of this manual.

7/23/2019 Polar Plots Manual A4
http://slidepdf.com/reader/full/polar-plots-manual-a4 26/46
Manual: Polar Plots ArcGIS ExtensionLast Modified: June 23, 2014
26
Special Considerations for Aspect
How Aspect is Calculated
Aspect is calculated from the directional East‐West and North‐South gradients at a particular
point. There are various methods for estimating these directional gradients from a 3x3 set
of elevation points, but in general aspect is defined as the direction of maximum slope.
Given that G = east‐to‐west gradient and H
= north‐to‐south gradient, then aspect is
calculated as follows:
180
2atan ,H G
Mathematical Direction (in degrees)
The “atan2” function is a method of calculating the arctangent 1tan using two values (∆X
and ∆Y), and it has a possible range representing a full circle (‐π to +π radians, or ‐180° to
+180°). The standard arctangent function can only produce values ranging from
2
to
2
,
or ‐90° to +90°. This atan2 function is the same one used to calculate mean direction above,
and is calculated as follows:
1
1
1
0 0
0 0
0 0
0 02
0 02
0 0
tan ,
tan ,
, tan ,
,
,
,
y y x x
y y x
x
y y x y x
x
y x
y x
y x
atan2 :
Undefined i.e. no movement
Mathematical direction is different than compass direction. In the mathematical polar
coordinate system, 0° is equivalent to due east and polar directions increase in a counter‐
clockwise direction. Compass direction starts at north and increases in a clockwise direction.
Therefore we must convert the mathematical direction to a compass aspect according to the
following rules:
if Mathematical Direction > 90° then Aspect = (450 – Direction)
Otherwise Aspect = (90 – Direction)
ArcGIS uses Horn’s method (Horn 1981, Burrough and McDonnell 1998)to calculate the east‐
west (G) and north‐south (H) gradients from a 3x3 array of elevation points. The figure
below shows the 8 elevation values that are used to calculate aspect at the central cell XX
(note that the formula does not use the elevation value at the central cell):
Z1 ---- Z2 ---- Z3| | || | || | |Z4 ---- XX ---- Z6| | || | || | |Z7 ---- Z8 ---- Z9

7/23/2019 Polar Plots Manual A4
http://slidepdf.com/reader/full/polar-plots-manual-a4 27/46
Manual: Polar Plots ArcGIS ExtensionLast Modified: June 23, 2014
27
In Horn’s Method, the north‐south gradient is calculated from all three columns in the 3x3
array, with the central column weighted twice as high as the two outer columns. The east‐
west gradient is calculated in a similar manner.
3 6 9 1 4 7
1 2 3 7 8 9
2 2
8
2 2
8
Z Z Z Z Z Z G
x
Z Z Z Z Z Z H y
East‐West Gradient
North‐South Gradient
Is this the best method to calculate aspect?
Interestingly, Jones (1998) compared several slope and aspect algorithms on a mathematical
surface in which the true exact slope and aspect at any point could be calculated. He found
that Horn’s method did better than most methods, but was marginally worse than a method
called the 4‐cell method. He then tested all methods on a true landscape DEM and found
that the rankings among methods were consistent, so Horn’s method still came in 2nd place.
Another tidbit: Michael Hodgson ( 1995) published a paper using the same mathematical
surface that Jones (1998) did, in which he demonstrates that the area represented by
computed slope and aspect is actually larger than the raster DEM cell size. 8‐cell algorithms
(such as Horn’s method) more accurately reflect values for an area approximately twice the
cell size, while 4‐cell algorithms (such as the 4‐Cell method) reflect an area approximately
1.6X the original cell area.
In sum, a method called the 4‐cell method is simpler, slightly quicker to calculate, more
precise and marginally more accurate than Horn’s method.
For those who are interested, the author offers a free ArcGIS extension that will calculate
slope and aspect using a variety of methods including both Horn’s method and the 4‐cell
method (see http://www.jennessent.com/arcgis/surface_area.htm). This extension does
not require Spatial Analyst.
Issues
with
Aspect
As a consequence of determining aspect from East‐West and North‐South components,
aspect can be difficult to calculate from geographically‐projected (latitude/longitude) data.
The equations above all work for 3x3 arrays in which the elevation locations are all equally
spaced along both the X‐ and Y‐axes. However, this is not the case with latitude / longitude
data. Raster cells that are square in unprojected space actually form trapezoids when
viewed on the actual surface of the planet.

7/23/2019 Polar Plots Manual A4
http://slidepdf.com/reader/full/polar-plots-manual-a4 28/46
Manual: Polar Plots ArcGIS ExtensionLast Modified: June 23, 2014
28
In this case, we cannot treat the cell size as a single constant value. The methods to correct
for
latitude/longitude
data
go
beyond
the
scope
of
this
article
but
are
described
in
Jenness
(2011; see especially p. 40 ‐49 of the manual at
http://www.jennessent.com/downloads/DEM%20Surface%20Tools%20for%20ArcGIS.pdf ).
For those who are interested, the author’s free ArcGIS extension DEM Surface Tools will
automatically correct for latitude/longitude data (see
http://www.jennessent.com/arcgis/surface_area.htm).
Solar
Insolation:
An
alternative
to
Aspect
Aspect has a well‐established history in habitat analysis. It is both easy to measure and a
good predictor of certain habitat characteristics. However, in some cases we are really
interested in how much direct sunlight hits an area (insolation), which is a function of aspect,
slope, nearby topography, landscape reflectivity and atmospheric effects, and as such may
be a more important driver of habitat characteristics than aspect alone. In such cases, it may be worthwhile to estimate insolation directly rather than use aspect as a surrogate.
There are a few approaches you can take:
ESRI’s Solar Radiation Tool
As of version 9.2 of ArcGIS and Spatial Analyst, ESRI has included a tool in the ArcToolbox to
calculate solar radiation for specific points on the landscape, or over the entire landscape.

7/23/2019 Polar Plots Manual A4
http://slidepdf.com/reader/full/polar-plots-manual-a4 29/46
Manual: Polar Plots ArcGIS ExtensionLast Modified: June 23, 2014
29
This
function
incorporates
both
direct
and
diffuse
radiation
and
shadows
from
nearby
topography. It includes several useful options, including:
1) Outputs either the amount of energy hitting the ground (in Watts per Hour), or the
total number of hours in which the ground is exposed to the sun.
2) Can be calculated for specific dates, seasons or years.
3) Has optional parameters where you can specify the general atmospheric conditions
in your area of interest.
4) Has optional parameters where you can specify how intensively it examines the local
topography before determining the amount of radiation hitting an area.
In general, this is a wonderful and exciting new tool. I have noticed two minor drawbacks to
the tool:
1) It is slow on large grids, and on occasion I have needed to let it run for hours or days.
2) I do not believe that it incorporates reflectivity off the landscape. This would be
hard to model, of course, and would depend on exactly how reflective your
landscape is (snow reflects very differently from lava rocks, for example).
Despite these two minor drawbacks, I expect that this tool will become very valuable for
habitat analysis.

7/23/2019 Polar Plots Manual A4
http://slidepdf.com/reader/full/polar-plots-manual-a4 30/46
Manual: Polar Plots ArcGIS ExtensionLast Modified: June 23, 2014
30
Hillshade
For those who do not have access to the Solar Analyst, you can use the hillshade function
available in many GIS packages get a reasonable estimate for the relative amount of sunlight
that hits the landscape at a single point in time. Values will typically range from 0 (meaning
no sunlight hits the landscape) to 255 (meaning the angle of the landscape is facing the sun
directly). Hillshades are difficult to calculate if your DEM is in geographic coordinates, but
the author offers a free ArcGIS tool to do this (see http://www.jennessent.com/arcgis/surface_area.htm) which does not require Spatial
Analyst.

7/23/2019 Polar Plots Manual A4
http://slidepdf.com/reader/full/polar-plots-manual-a4 31/46
Manual: Polar Plots ArcGIS ExtensionLast Modified: June 23, 2014
31
Using the Tools
Convert Shapes to Segments
This function decomposes a complex feature into a set of individual segments, making it
easier to analyze the directional characteristics of those segments. For example, a single
polyline might represent the entire movement history of an animal during its migration.
Because it is a single object in the database, it is difficult to decompose into a form suitable
for directional analysis.
This function generates a polyline feature class representing the vertex‐to‐vertex segments
from the features of a polygon or polyline feature class. Each polyline will represent a single
straight‐line segment. You have the option to generate segments for all features, or only the
selected set of features.
This function offers several options to calculate additional data describing each segment,
including the starting and ending coordinates, the azimuth of the segment and the reverse
azimuth of the segment.
If your data are in latitude/longitude coordinates, then you also have the option to calculate
both the starting and ending azimuths of each segment plus the reverse starting and ending
azimuths. If this last option is confusing, recall that great circle geodesic curves almost
always change their bearing constantly over the length of the curve (see “Azimuths and
Geodesic Curves” on p. 16).
Click the Shapes to Segments button to open the “Features to Segments” dialog:

7/23/2019 Polar Plots Manual A4
http://slidepdf.com/reader/full/polar-plots-manual-a4 32/46
Manual: Polar Plots ArcGIS ExtensionLast Modified: June 23, 2014
32
Select the layer to convert, any attribute fields you want to transfer to your new feature
class, whether to do all or selected records, any additional attributes describing the
geometry of each segment, and where to save your new feature class. Click ‘OK’ and the
tool will create the segment feature class and add it to your ArcMap document.
The tool will also generate a report describing what it did.

7/23/2019 Polar Plots Manual A4
http://slidepdf.com/reader/full/polar-plots-manual-a4 33/46
Manual: Polar Plots ArcGIS ExtensionLast Modified: June 23, 2014
33

7/23/2019 Polar Plots Manual A4
http://slidepdf.com/reader/full/polar-plots-manual-a4 34/46
Manual: Polar Plots ArcGIS ExtensionLast Modified: June 23, 2014
34
Generate
Circular
Plots
This tool will generate 6 types of circular plots, with numerous options regarding colors,
labels, titles and reference lines.
The tool will generate the plot as a graphic in the MXD Layout and therefore you must have
the layout active when you generate the plot. If you try to generate the plot while the Map
view is active, the tool will offer to switch you to the layout view automatically.
The graphic can be copied and pasted to other software packages (Microsoft Word and
PowerPoint, for example). However, for best results I recommend exporting the graphic into
a standard image file using the standard ArcGIS Export functions.
The graphic will actually be a “Grouped” graphic where each component is a separate
graphic. If you create your graphic plot and want to modify any single portion of it, simply:
1) Select the plot graphic using the ArcGIS “Select Elements” tool
2) Right‐click on the graphic and choose “Ungroup”
3) Select the individual element you want to edit using the “Select Elements” tool
4) Right‐click on it and choose “Properties”.
Note: The “Bearings” plot type is only intended for cases with less than a few hundred
bearings. This graphic takes a long time to draw and can be miserable to work with if you
have more than a few hundred bearings.

7/23/2019 Polar Plots Manual A4
http://slidepdf.com/reader/full/polar-plots-manual-a4 35/46
Manual: Polar Plots ArcGIS ExtensionLast Modified: June 23, 2014
35
Click the Polar Plots button to open the Polar Plot Parameters dialog:
There are a lot of options on this dialog, so they are broken down into subsets and are
accessed by clicking the subset button. For example, the “Show Data Source” button open s
up the data source options and lets you pick the dataset to plot, plus specify the source for
azimuth and weight values.
Plot Style
The “Plot Style” section is always visible and shows the six plot style options available. To
see a larger example of any of the plot styles, click the “Show Example” button. This larger
example also has most of the plot, title, reference line and label options pointed out:
Data Source Options:
Click the “Show Data Source” button to open the Data Source options:

7/23/2019 Polar Plots Manual A4
http://slidepdf.com/reader/full/polar-plots-manual-a4 36/46
Manual: Polar Plots ArcGIS ExtensionLast Modified: June 23, 2014
36
Data Source: The list includes all feature classes and tables in your current focus map.
Note:
This
version
of
the
tool
does
not
work
with
raster
datasets. If you wish to plot
the distribution of a raster dataset (of aspect values, for example), there are two
approaches you might try:
1) Convert the raster to a point feature class, then select the points that lie within your area of interest, and then run this tool on the selected points.
2) Convert the raster to an Integer‐type raster (which has an associated attribute table
containing “Value” and “Count” fields), then export the attribute table to a
standalone table, and then run the tool on the attribute table. Use the “Value” field
as the source of azimuth values, and the “Count” field as the source of weight
values.
Azimuth Source: If your data source is a Table, Point Feature Class or Polygon Feature
Class, then you must set your source of azimuth values to an attribute field in the
attribute table. If your data source is a Polyline Feature Class, then you may derive your
azimuth values direction from the polyline features. In this case, azimuth is defined as
the azimuth
from
the
starting
point
to
the
ending
point
of
the
polyline.
If the
polyline
is
in latitude/longitude coordinates, then this tool uses the starting azimuth value (see
“Azimuths and Geodesic Curves” on p. 16 for an explanation of starting vs. ending
azimuth values).
Weight Source: If your direction values have different weights (for example, if your data
source is a polyline feature class of segments and each segment might be a different
length), then you may choose to weight your direction values by some attribute value. If
your data source is a polyline feature class, then you also have the option to weight each
polyline by the length of that polyline.

7/23/2019 Polar Plots Manual A4
http://slidepdf.com/reader/full/polar-plots-manual-a4 37/46
Manual: Polar Plots ArcGIS ExtensionLast Modified: June 23, 2014
37
Analyze All vs. Selected Records: If any of your records are selected, then you have the
option to only analyze that selected set.
Add Reverse Azimuths: If your dataset represents a phenomena in which both
directions should be plotted (such as geologic fracture lines on the landscape), then this
option will plot both the observed azimuth value for each record plus the azimuth in the
reverse direction. In a plot with reversed azimuths, every bin value will be reflected by a
bin of the exact same length going in the opposite direction.
Exclude Negative Values: Depending on your data, negative values may reflect genuine
directions (counter‐clockwise from north) or they may be a flag that the value is an
invalid azimuth. For example, aspect‐generating algorithms often produce a ‐1 value if
the raster cell is flat (i.e. if it has no aspect). This option lets you exclude any negative
values from the analysis.
Plot and Title Options:
These options allow you to set the symbolization for the plot, plus optionally add and
symbolize primary and secondary titles.
Click the “Show Plot and Title Options” button to show the plot color and title options:
7/23/2019 Polar Plots Manual A4
http://slidepdf.com/reader/full/polar-plots-manual-a4 38/46
Manual: Polar Plots ArcGIS ExtensionLast Modified: June 23, 2014
38
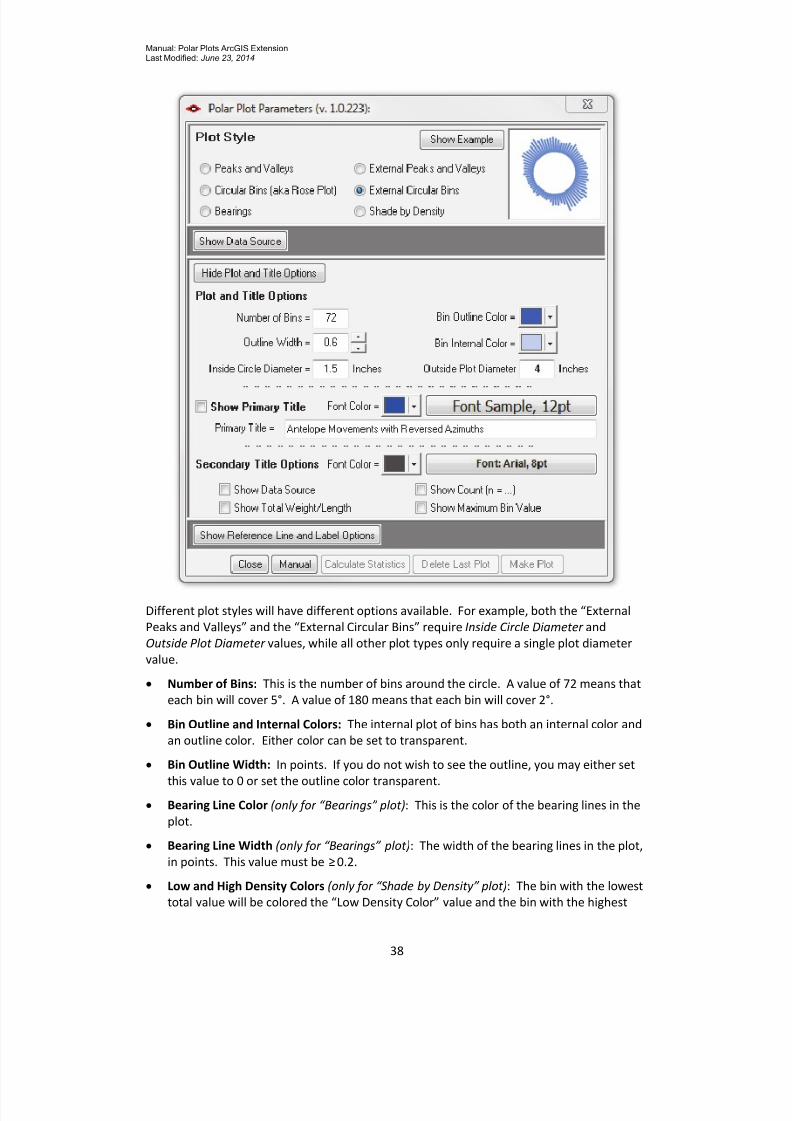
Different plot styles will have different options available. For example, both the “External
Peaks and Valleys” and the “External Circular Bins” require Inside Circle Diameter and
Outside Plot Diameter values, while all other plot types only require a single plot diameter
value.
Number of Bins: This is the number of bins around the circle. A value of 72 means that
each bin will cover 5°. A value of 180 means that each bin will cover 2°.
Bin Outline and Internal Colors: The internal plot of bins has both an internal color and
an outline color. Either color can be set to transparent.
Bin Outline Width: In points. If you do not wish to see the outline, you may either set
this
value
to
0
or
set
the
outline
color
transparent.
Bearing Line Color (only for “Bearings” plot): This is the color of the bearing lines in the
plot.
Bearing Line Width (only for “Bearings” plot): The width of the bearing lines in the plot,
in points. This value must be ≥0.2.
Low and High Density Colors (only for “Shade by Density” plot): The bin with the lowest
total value will be colored the “Low Density Color” value and the bin with the highest

7/23/2019 Polar Plots Manual A4
http://slidepdf.com/reader/full/polar-plots-manual-a4 39/46
Manual: Polar Plots ArcGIS ExtensionLast Modified: June 23, 2014
39
value will be colored the “High Density Color”. Intermediate bins will be colored
according to a color ramp from the low to high color.
Plot Diameter (only for “Peaks and Valleys”, “Circular Bins”, “Bearings” and “Shade by
Density” plots): This is the diameter of the circle, in inches, that contains all the data. It
does not include any labels outside this circle.
Inside Circle
Diameter
(only
for
“External
Peaks
and
Valleys”
and
“External
Circular
Bins”
plots): This is the diameter of the inner circle, in inches, which forms the base of the plot
bins.
Outside Plot Diameter (only for “External Peaks and Valleys” and “External Circular Bins”
plots): This is the diameter of the circle, in inches, that contains all the data. It does not
include any titles outside this circle.
Primary Title: Check this option and specify a title if you wish to add a title to your
graphic. You may also specify the font style, size and color.
Secondary Titles: All secondary titles will use the same font style, size and color. You
have the option to add any or all of 4 secondary titles:
o Data Source, including both the dataset and the source of azimuth values.
o Count of values analyzed. This may be either the total number of records or the
number of selected records depending on your choice. If you chose to add reverse
azimuth values, then the count will be doubled. If you chose to exclude negative
values, then the count will only include the azimuths ≥0.
o Total Weight/Length: If you weighted your azimuth values, then this option will
show the weighting source and the total cumulative weight. If you did not weight
your azimuth values, then this option will add the line “Values Not Weighted” to
your plot.

7/23/2019 Polar Plots Manual A4
http://slidepdf.com/reader/full/polar-plots-manual-a4 40/46
Manual: Polar Plots ArcGIS ExtensionLast Modified: June 23, 2014
40
o Maximum Bin Value (this applies to all plot types except for “Shade by Bearing”
plots): This is the maximum bin value. If you weighted your azimuth values, then
this will be the largest cumulative weight in a bin. Otherwise this will be the
maximum number of azimuth values in a bin.
Reference Line and Label Options:
These options allow you to optionally add, symbolize and label reference lines.
Click the “Show Reference Line and Label Options” button to show the various options:

7/23/2019 Polar Plots Manual A4
http://slidepdf.com/reader/full/polar-plots-manual-a4 41/46
Manual: Polar Plots ArcGIS ExtensionLast Modified: June 23, 2014
41
Reference lines are divided into Primary and Secondary reference lines. These two types can
by symbolized differently. For example, you may want to set your primary reference lines in
a darker color and with a thicker line than your secondary reference lines. Primary reference
lines will always be drawn as a solid line, but secondary reference lines may optionally be
drawn as solid lines, dots, dashes or mixed dots and dashes.
Both primary and secondary reference lines are drawn for both azimuths and values.
Azimuth reference lines extend out from the center as rays, while Value reference lines are
drawn as progressively‐larger circles.
Primary Azimuth reference lines are only drawn at the North, East, South and West
directions.
The Primary Azimuth Outer Circle is drawn at the maximum bin value.
The Primary Azimuth Inner Circle is only available in the External Peaks and Valleys and
the External Circular Bins plot types, and is drawn at the base of the bins.
Any number ≥3 Secondary Reference Line Bearings may be added. A value of 12 means
that secondary reference lines will be drawn every 30°. A value of 15 will produce
reference lines every 24°, and a value of 18 will produce lines every 20°.

7/23/2019 Polar Plots Manual A4
http://slidepdf.com/reader/full/polar-plots-manual-a4 42/46
Manual: Polar Plots ArcGIS ExtensionLast Modified: June 23, 2014
42
Any number ≥1 Secondary Reference Circles may be added. This option applies to all
plot types except for “Shade by Bearing” plots. This is the number of circles between the
0‐level and the maximum bin level. A value of 1 will put a single circle halfway between
0 and the maximum bin level.
Azimuth Labels are the numeric Degree values around the outside of the Peaks and
Valleys, Circular Bins, Bearings and Shade by Density plot types, or around the inside of
the External Peaks
and
Valleys and External
Circular
Bins plot types. These azimuth
labels will be drawn at all primary and secondary reference azimuths.
Inner Labels show the bin value at all of the secondary reference circle levels. These
inner labels may be drawn on any or all of the North, East, South and West axes. This
option applies to all plot types except for “Shade by Bearing” plots. If no secondary
reference circles are drawn, then the Inner Label options will be disabled. Note: There
is no option to add the bin value at the maximum circle level. However, there is an
option to add this maximum bin value to the title.

7/23/2019 Polar Plots Manual A4
http://slidepdf.com/reader/full/polar-plots-manual-a4 43/46
Manual: Polar Plots ArcGIS ExtensionLast Modified: June 23, 2014
43
Calculate
Descriptive
Circular
Statistics
This tool calculates the basic set of circular stats describing central tendency and dispersion
described on p. 20, including the Mean Direction, Resultant Length, Mean Resultant Length,
Circular Variance, Circular Standard Deviation (in Radians and Degrees) , Angular Variance
and Angular Deviation ( in Radians and Degrees).
These Circular Statistics are available in the same tool that generates the polar plots. Click
the Polar Plots button to open the Polar Plot Parameters dialog:
Click the “Show Data Source” button to open the Data Source options section:
Select the dataset to analyze, the azimuth source and optionally a weighting source, and
then click the “Calculate Statistics” button at the bottom of the dialog. The tool will give you
the statistics in a separate window:

7/23/2019 Polar Plots Manual A4
http://slidepdf.com/reader/full/polar-plots-manual-a4 44/46
Manual: Polar Plots ArcGIS ExtensionLast Modified: June 23, 2014
44

7/23/2019 Polar Plots Manual A4
http://slidepdf.com/reader/full/polar-plots-manual-a4 45/46
Manual: Polar Plots ArcGIS ExtensionLast Modified: June 23, 2014
45
Revisions
Version 1.0.225 (July 6, 2012):
Initial Release
Version 1.0.237 (September 12, 2012):
Fixed an error in which it would not work with non‐Polyline feature classes, instead giving you a
message stating that the specified feature class was not a polyline feature class.
Also updated the Calculate Statistics function so it would tell you how many features or rows it
analyzed.
Version 1.0.250 (September 20, 2013):
Added Von Mises Kappa measure of concentration to statistics.
Modified analysis count (in plot and in statistics report) to show correct number if any records were
excluded from the analysis (negative values, null features, missing azimuth or weight values, etc.).
A few cosmetic changes.
Fixed an error that produced the message “Invalid procedure call or argument” at line 1328 of
frmLayerID.frm when the “Add Reverse Azimuths” button was clicked when no data sources were
available in the map.
Version 1.0.253 (June 23, 2014):
Modified “Features to Segments” tool to clear up a mysterious bug that caused ArcGIS to
shut down completely in some cases. Also modified tool to run faster in general, and
especially with two‐vertex polylines.

7/23/2019 Polar Plots Manual A4
http://slidepdf.com/reader/full/polar-plots-manual-a4 46/46
Manual: Polar Plots ArcGIS ExtensionLast Modified: June 23, 2014
References
Batschelet, Edward. 1981. Circular statistics in biology . London; New York: Academic Press.
Beers, Thomas W., Peter E. Dress, and Lee C. Wensel. 1966. “Notes and Observations: Aspect
Transformation in Site Productivity Research.” Journal of Forestry 64 (10): 691–692.
Burrough, Peter A, and Rachael A McDonnell. 1998. Principles of geographical information systems.
Oxford: Oxford University Press.
Fisher, N. I. 1995. Statistical analysis of circular data. Cambridge [England]; New York: Cambridge
University Press.
Hodgson, M. 1995. What Cell Size Does the Computed Slope/aspect Angle Represent? Vol. 61.
Photogrammetric Engineering and Remote Sensing. Bethesda, MD, ETATS‐UNIS: American
Society for Photogrammetry and Remote Sensing.
Horn, B.K.P. 1981. “Hill Shading and the Reflectance Map.” Proceedings of the IEEE 69 (1): 14– 47.
doi:10.1109/PROC.1981.11918.
Jammalamadaka, S. Rao, and A SenGupta. 2001. Topics in circular statistics. River Edge, N.J.: World
Scientific. http://site.ebrary.com/id/10255767.
Jenness, Jeff. 2011. DEM Surface Tools: An ArcGIS Extension for Analyzing Raster Elevation Datasets.
Jenness Enterprises. http://www.jennessent.com/arcgis/surface_area.htm.
Jones, Kevin H. 1998. “A Comparison of Algorithms Used to Compute Hill Slope as a Property of the
DEM.” Computers & Geosciences 24 (4) (May 15): 315–323. doi:10.1016/S0098‐
3004(98)00032‐6.
Mardia, K. V, and P. E Jupp. 2000. Directional statistics. New York: Wiley.
Seyfarth, Ernst ‐August, and Friedrich G. Barth. 1972. “Compound Slit Sense Organs on the Spider Leg:
Mechanoreceptors Involved in Kinesthetic Orientation.” Journal of Comparative Physiology
A: Neuroethology, Sensory, Neural, and Behavioral Physiology 78 (2) (June 1): 176–191.
doi:10.1007/BF00693611.
Trimble, G. R., and Sidney Weitzman. 1956. “Site Index Studies of Upland Oaks in the Northern
Appalachians.” Forest Science 2 (3): 162–173.
Zar, Jerrold H. 1999. Biostatistical Analysis. 4th ed. Pearson Education.
.
‐‐‐‐‐‐‐‐‐‐‐‐‐‐‐‐‐‐‐‐‐‐‐‐‐‐‐‐‐‐‐‐‐‐