POLAR PHYSICAL EDUCATION SYSTEM by Polar Electro Oy Professorintie 5 FIN-90440 KEMPELE Tel +358 8...
33
Manufactured by Polar Electro Oy Professorintie 5 FIN-90440 KEMPELE Tel +358 8 5202 100 Fax +358 8 5202 300 www.polar.fi 17930047.00 ENG A POLAR PHYSICAL EDUCATION SYSTEM User Manual Polar E40™
Transcript of POLAR PHYSICAL EDUCATION SYSTEM by Polar Electro Oy Professorintie 5 FIN-90440 KEMPELE Tel +358 8...

Manufactured byPolar Electro OyProfessorintie 5FIN-90440 KEMPELETel +358 8 5202 100Fax +358 8 5202 300
www.polar.fi
17930047.00 ENG A
POLAR PHYSICAL EDUCATION SYSTEM
User Manual Polar E40™

ENGLISH 3
Dear Teacher,
Use a heart rate monitor to: • exercise at an ideal pace.• maximize the benefits of exercise in a limited amount of time.• provide your students with objective information. Are they on the right track with exercising? Are they improving?• provide your students with immediate feedback.
Please read this manual for a better understanding of how to use the Polar E40 heart rate monitor in your teaching and how to make the most of the features this product has to offer.
Congratulations on your purchase of the Polar E40 heart rate monitor.
Help your students reach their full potential. Make a vital difference in their lives - a difference that can help make a positive impact on their wellness for a lifetime.
For your students, Polar technology means a better understanding of how their cardiovascular systems work and how they can become more responsible for their own wellness.
For you, Polar technology provides instant, continual and objective feedback about the progress of each student on a personalized basis.
The Polar E40 heart rate monitor is easy to use and an ideal teaching tool for many reasons: • It shows exercise duration, time spent in target heart rate zone, and average, as well as maximum heart rates after each exercise session.• It has an easy-to-use, two-button functionality.• It has a large easy-to-read display.

4 ENGLISH
QUICK GUIDE
Exercise: Monitors information
during exercise.
Summary:Shows the data recorded during
the exercise session.
DATEBLACK
DURATIONBLACK
IN ZONEBLACK
AVG. HRBLACKMAX HRBLACK
CALORIESBLACK
Totals:Shows cumulative
exercise data.
TOT. TIMEBLACK
TOT. KCALBLACKCOUNTBLACK
PER WEEKBLACK
RESET ALLBLACK
Settings:Changes alarm, time of day, and other settings.
LIMIT SETBLACK
SOUND SETBLACK
WATCH SETBLACK
USER SETBLACK
UNIT SETBLACK
Press BLACK
Press RED RED RED RED
Press BLACK
Press BLACK
EXERCISE
Press BLACK

ENGLISH 5
CONTENTS
1. INTRODUCTION TO THE POLAR E40 HEART RATE MONITOR ............................................. 6 1.1 Product Set ............................................ 6 1.2 Wrist Unit Buttons and Symbols ............... 7 1.3 Before Using the Wrist Unit ..................... 9
2. EXERCISING ................................................ 11 2.1 Wear the Transmitter ............................. 11 2.2 Start Exercise and View Data .................. 12 2.3 Stop Exercise and Review Summary ....... 14
3. VIEW SAVED EXERCISE INFORMATION ......... 16 3.1 Summary File ....................................... 16 3.2 Totals File ............................................ 16
4. HOW TO CHANGE SETTINGS ........................ 18 4.1 Heart Rate Limits Settings ..................... 18 4.2 Sound Setting ...................................... 19 4.3 Watch Settings ..................................... 19 4.4 User Settings ........................................ 20 4.5 Unit Setting ......................................... 21
5. TARGET HEART RATE ZONE ......................... 22
6. CALORIE CALCULATION ............................... 23
7. CARE AND MAINTENANCE ........................... 24
8. PRECAUTIONS ............................................. 27 8.1 Interference During Exercise .................. 27 8.2 Minimizing Possible Risks when Exercising ............................................ 28
9. FREQUENTLY ASKED QUESTIONS ................ 29
10. TECHNICAL SPECIFICATIONS ....................... 31
11. LIMITED POLAR INTERNATIONAL GUARANTEE ................................................ 33
12. DISCLAIMER ................................................ 34
6 ENGLISH
1. INTRODUCTION TO THE POLAR E40 HEART RATE MONITOR
1.1 Product SetThe Polar E40 heart rate monitor set consists of the following items:
The wrist unit displays heart rate and exercise time. It can be worn as a wristwatch.
The transmitter must be worn while exercising. The electrodes, which are on the back of the transmitter, detect heart rate continuously and transmit the signal to the wrist unit.
The elastic strap holds the transmitter around the chest.
Polar UpLink Tool™ software can easily be used for editing settings, defining target heart rate zones and transferring them to the wrist unit. The software is included on CD in the product set and can also be downloaded at www.polar.fi.
To use the UpLink Tool, a computer with a sound card and dynamic loudspeakers or headphones is needed.

ENGLISH 7
1.2 Wrist Unit Buttons and Symbols
RED button• Starts and stops heart rate measurement • Enters the displayed menu and setting • Returns to the main mode in the Summary and Totals file• Accepts the settings • Switches off the alarm and snooze
Note: By pressing and holding the RED button, the wrist unit returns to the Time of Day display from any menu, except when recording an exercise session.
BLACK button• Moves to the following mode or display • Increases the selected value • Puts the alarm on snooze for 10 minutes
By pressing and holding the BLACK button • In the Exercise mode: the target zone alarm can be switched ON/OFF• In the Time of Day display: the keylock can be switched ON/OFF • In the Totals file: an individual value can be reset

8 ENGLISH
The flashing heart symbol indicates heart rate measurement. The heart rate is displayed in beats per minute (bpm).
The sound symbol indicates that • the target zone alarm is on (Exercise mode).• the Alarm is on (Time of Day display). Pressing the BLACK button snoozes the alarm for ten minutes, while pressing the RED button stops the alarm.
The fitness bullets indicate time spent in the target heart rate zone. For further information, see chapter 2.2 Start Exercise and View Data.
The watch symbol indicates the time of day in the Exercise mode.
Heart rate is displayed as a percentage of maximum heart rate (HRmax%).
Weekday indicators MON = Monday, TUE = Tuesday, WED = Wednesday, THU = Thursday, FRI = Friday, SAT = Saturday, SUN = Sunday
The keylock symbol indicates that the buttons are locked in the Time of Day display. Pressing and holding BLACK locks the buttons. The following text will scroll on the display: HOLD TO LOCK, LOCKED. Pressing and holding BLACK again unlocks the buttons. HOLD TO UNLOCK, UNLOCKED scrolls on the display.
The battery symbol indicates that the wrist unit battery is low. For further information, see chapter 7 Care and Maintenance.

ENGLISH 9
1.3 Before Using the Wrist UnitActivate the wrist unit by pressing any button twice. Once activated, it cannot be switched off. SETTINGS is displayed. Set basic settings by using UpLink Tool software. Then, press and hold the RED button until the wrist unit displays Time of Day.
Alternatively set basic settings with the wrist unit as follows:
Note: • Digits run faster by pressing and holding the BLACK button. Release the button at the desired value.• If you prefer not to record calories, enter nil for personal information.• If you prefer to record calories, enter personal information (weight, height, age, gender) into the wrist unit. For more information on calories, see chapter 6 Calorie Calculation.
1. Activate the wrist unit by pressing any button twice. 2. SETTINGS is displayed. Press the RED button to go to Basic Settings. 3. TIME MODE?: Select 12 h or 24 h time mode by pressing the BLACK button. 12 h: the time is displayed from 1 to 12 AM or PM. In the date setting the month is set first and then the day.
24 h: the time is displayed from 0 to 23 hours. In date setting, the day is set first, then the month. Press the RED button to accept your selection. TIME OF DAY is displayed. • When 12 h time mode is in use, press the BLACK button to select AM or PM. Then press the RED button. • Press the BLACK button to set the hours. Then press the RED button. • Press the BLACK button to set the minutes. Then press the RED button.4. SET DATE: • Press the BLACK button to set the MONTH or DAY. Then press the RED button. • Press the BLACK button to set the DAY or MONTH. Then press the RED button. • Press the BLACK button to set the YEAR. Then press the RED button. 5. UNITS for weight and height: Press the BLACK button to select pounds and feet (lb/ft) or kilograms and centimeters (kg/cm). Then press the RED button.

10 ENGLISH
6. WEIGHT: Press the BLACK button to set weight. Then press the RED button. 7. HEIGHT: Press the BLACK button to set height. Then press the RED button. Note: In lb/ft, set value for feet first, then inches. 8. AGE: Press the BLACK button to set age. Then press the RED button. 9. SEX: Press the BLACK button to select FEMALE or MALE. Then press the RED button.
The wrist unit displays SETTINGS OK and displays Time of Day in 3 seconds.
The basic settings can be edited in Settings mode. For further information, see chapter 4 How to Change Settings.
ENGLISH 11
2. EXERCISING
Wear the transmitter in order to measure heart rate. The wrist unit records exercise information (duration, time spent in target heart rate zone, average and maximum heart rate) during exercise.
2.1 Wear the Transmitter
1. Attach one end of the transmitter to the elastic strap. 2. Adjust strap length to fit snugly and comfortably. Secure the strap around your student’s chest, just below the chest muscles, and buckle the strap to the transmitter. 3. Advise your students to lift the transmitters off their chests and to moisten the two grooved electrode areas on the back. Make sure the wet electrode areas have total skin contact and that the Polar logo is in a central, upright position. 4. Have your students wear the wrist unit like a watch.
Additional Tips for Working with Children:1. With small children or children with concave chests, etc., you might find you get a better heart rate reading if you put the transmitter across their backs. 2. Have your students put the transmitter on and adjust the straps, over their t-shirts. Then they can slide the straps down and wiggle them up under their shirts.3. It may be possible to wear the transmitter over a t-shirt as long as the area under the electrodes is thoroughly wet. If the wrist unit does not pick up heart rate, the transmitter will have to be worn directly on the skin.

12 ENGLISH
Press the BLACK button to browse the following information during exercise:
Heart rate (bpm or HRmax%) If the numbers are flashing, heart rate is outside the target heart rate zone.
Heart rate limits (bpm or HRmax%)
Exercise duration (hh:mm ss)
2.2 Start Exercise and View DataWhen starting to exercise, have your students stayat least 3 feet / 1 meter apart to allow the wrist unit tolock onto its wearer’s heart rate signal. This helpsminimize interference when the students come closetogether during exercise. For further information oninterference, see chapter 8 Precautions.
Advise your students to press the RED button to record exercise data. The heart rate and a framed heart symbol will appear in a few seconds.
The frame around the heart symbol indicates the heart rate is coded.
A heart symbol without a frame indicates a non-coded heart rate transmission. Heart rate measurement functions also in non-coded mode, especially if there are no sources of interference nearby.
Note: If the display reads 00/--, heart rate is not being received. Have your students bring their wrist units up to their chest near the transmitter’s Polar logo. The wrist unit starts searching for the heart rate signal again. The display refreshes in about 5 seconds.
ENGLISH 13
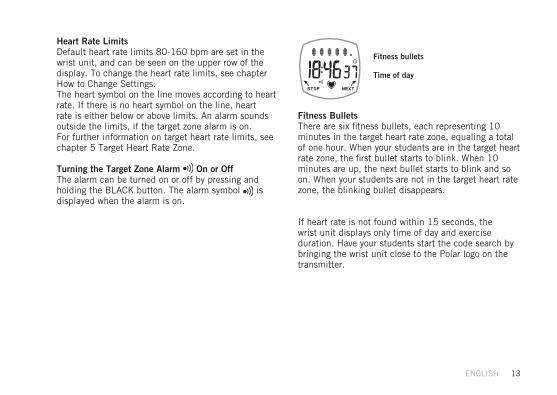
Heart Rate Limits Default heart rate limits 80-160 bpm are set in the wrist unit, and can be seen on the upper row of the display. To change the heart rate limits, see chapter How to Change Settings. The heart symbol on the line moves according to heart rate. If there is no heart symbol on the line, heart rate is either below or above limits. An alarm sounds outside the limits, if the target zone alarm is on. For further information on target heart rate limits, see chapter 5 Target Heart Rate Zone.
Turning the Target Zone Alarm On or Off The alarm can be turned on or off by pressing and holding the BLACK button. The alarm symbol is displayed when the alarm is on.
Fitness bullets
Time of day
Fitness Bullets There are six fitness bullets, each representing 10 minutes in the target heart rate zone, equaling a total of one hour. When your students are in the target heart rate zone, the first bullet starts to blink. When 10 minutes are up, the next bullet starts to blink and so on. When your students are not in the target heart rate zone, the blinking bullet disappears.
If heart rate is not found within 15 seconds, the wrist unit displays only time of day and exercise duration. Have your students start the code search by bringing the wrist unit close to the Polar logo on the transmitter.
14 ENGLISH
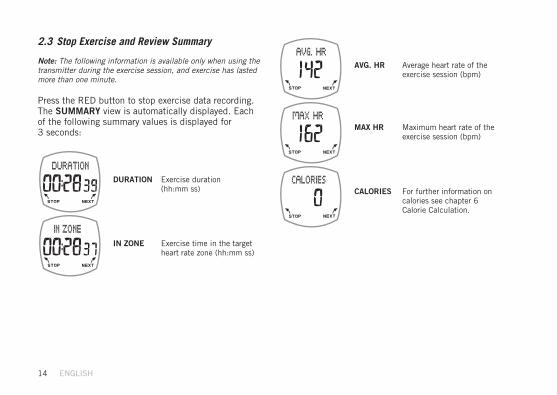
IN ZONE Exercise time in the target heart rate zone (hh:mm ss)
AVG. HR Average heart rate of the exercise session (bpm)
MAX HR Maximum heart rate of the exercise session (bpm)
CALORIES For further information on calories see chapter 6 Calorie Calculation.
2.3 Stop Exercise and Review Summary
Note: The following information is available only when using the transmitter during the exercise session, and exercise has lasted more than one minute.
Press the RED button to stop exercise data recording. The SUMMARY view is automatically displayed. Each of the following summary values is displayed for 3 seconds:
DURATION Exercise duration (hh:mm ss)

ENGLISH 15
After Exercise Summary, the wrist unit returns to the Time of Day display. Skip Exercise Summary by pressing the RED button. The information may be checked later. For further information, see chapter 3 View Saved Exercise Information.

16 ENGLISH
3. VIEW SAVED EXERCISE INFORMATION
3.1 Summary File Review the latest exercise information in the Summary file.
Note: The exercise information is saved in the Summary and Totals files only if the exercise session has lasted more than one minute.
1. In the Time of Day display, press the BLACK button. SUMMARY is displayed. 2. Press the RED button to review data. DATE is displayed. Note: If EMPTY is displayed, no exercise information has been recorded in the File.3. Scroll with the BLACK button to view the following exercise information:
DATE Exercise session date DURATION Exercise session duration IN ZONE Exercise time in target heart rate zone AVG. HR Average heart rate of the exercise session MAX HR Maximum heart rate of the exercise session CALORIES Calories expended during the exercise session (shows 0 if calorie calculation is off)
4. Press the RED button. SUMMARY is displayed.
Proceed to the Totals file by pressing the BLACK button (TOTALS is displayed), or return to the Time of Day display by pressing and holding the RED button.
3.2 Totals File Review cumulative exercise information in the Totals file.
1. Starting from the Time of Day display, press the BLACK button twice. TOTALS is displayed. 2. Press the RED button to review data. TOT. TIME is displayed. Note: If EMPTY is displayed, no exercise information has been recorded in the File.3. Scroll with the BLACK button to view the following exercise information:
TOT. TIME Total exercise time and start date.TOT. KCAL Total calorie expenditure (shows 0 if calorie calculation is off) and start date. COUNT Total number of exercise sessions and start date.
ENGLISH 17
PER WEEK Average frequency of exercise sessions per week (starting Monday 00:00.00). RESET ALL Resets all information in the Totals file.
To reset all information, press the RED button. RESET flashes on the display. Select RESET or NO RESET with the BLACK button. Confirm with the RED button. RESET ALL is displayed.
4. Press and hold the RED button until the wrist unit returns to the Time of Day display.
Note: An individual Total value can also be reset in the Totals file. Press the BLACK button to review the TOTALS file and find the value you want to reset. Press and hold the BLACK button until the wrist unit displays RESET?. Continue pressing and holding the BLACK button until the value is reset to zero. The start date is reset to current.

18 ENGLISH
4. HOW TO CHANGE SETTINGS
The settings can easily be changed using UpLink Tool software. Alternatively, they can be configured in the wrist unit as follows:
1. In the Time of Day display, press the BLACK button until SETTINGS is displayed. 2. Press the RED button. LIMIT SET is displayed. 3. Press the BLACK button to browse LIMIT SET, SOUND SET, WATCH SET, USER SET or UNIT SET. 4. Press the RED button to enter the desired setting.
Note: You can return to the Time of Day display at any stage by pressing and holding the RED button.
4.1 Heart Rate Limits Settings The wrist unit calculates your student’s personal target heart rate limits based on age. Target heart rate limits can also be set manually. For further information on determining personal target heart rate limits, see chapter 5 Target Heart Rate Zone.
Starting from the Time of Day display, repeat steps 1-4. 5. LIMITS is displayed. Press the BLACK button to select heart rate limits in beats per minute (HR) or as a percentage of maximum heart rate (HRmax%). Press the RED button. 6. HIGH LIMIT is displayed. Set the higher limit value with the BLACK button. Then press the RED button. 7. LOW LIMIT is displayed. Set the lower limit value with the BLACK button. Then press the RED button. 8. LIMIT SET is displayed. Press the BLACK button to proceed to SOUND SET. Then press the RED button.

ENGLISH 19
4.2 Sound Setting Starting from the Time of Day display, repeat steps 1-4. 5. SOUND SET is displayed. Select sound ON or OFF with the BLACK button, then press the RED button. 6. Press the BLACK button to proceed to WATCH SET. Then press the RED button.
4.3 Watch Settings
Note: The time and date can be displayed in two ways. Select 12h (month, day, year) or 24h (day, month, year) time mode.
Alarm Setting Starting from the Time of Day display, repeat steps 1-4. 5. ALARM is displayed. Select ALARM ON or OFF with the BLACK button. Press the RED button. ALARM OFF: Proceed to Time Setting step 6. ALARM ON: • When in 12 h time mode: Select AM or PM with the BLACK button, then press the RED button. • Set the hours for the alarm with the BLACK button and press the RED button. • Set the minutes with the BLACK button. Then press the RED button to proceed to Time Setting step 6.
Time Setting Starting from the Time of Day display, repeat steps 1-4. 5. TIME is displayed. 6. Select 12 h or 24 h time mode with the BLACK button. Then press the RED button. 7. Only when 12 h time mode is in use: Select AM or PM with the BLACK button. Then press the RED button. 8. Set the hours with the BLACK button. Then press the RED button. 9. Set the minutes with the BLACK button. Then press the RED button to proceed to Date Setting step 6.
20 ENGLISH
Date Setting 10. MONTH or DAY is displayed. 11. Set MONTH or DAY with the BLACK button. Then press the RED button. 12. Set DAY or MONTH with the BLACK button. Then press the RED button. 13. Set YEAR with the BLACK button. Then press the RED button. 14. Press the BLACK button to proceed to USER SET. Then press the RED button.
4.4 User Settings
Note: • If you prefer not to record calories, enter nil for personal information.• To use calorie calculation, see chapter 6 Calorie Calculation.
Starting from the Time of Day display, repeat steps 1-4. 5. WEIGHT (LBS/KG) is displayed. Set the weight with the BLACK button. Then press the RED button. 6. HEIGHT: Set height with the BLACK button. Then press the RED button. Note: In lb/ft, set feet first, then inches.7. AGE: Set the age with the BLACK button. Then press the RED button. 8. SEX: Select FEMALE or MALE with the BLACK button. Then press the RED button. 9. Press the BLACK button to proceed to UNIT SET. Then press the RED button.

ENGLISH 21
4.5 Unit Setting Starting from the Time of Day display, repeat steps 1-4. 5. UNIT is displayed. Select LB/FT or KG/CM with the BLACK button. Then press the RED button. 6. Return to the Time of Day display by pressing and holding the RED button.

22 ENGLISH
5. TARGET HEART RATE ZONE
The target heart rate zone is a range between the lower and upper heart rate limits expressed as percentages of the maximum heart rate (%HRmax) or as beats per minute (bpm). HRmax is the highest number of heartbeats per minute during maximum physical exertion.
Where you have set the age of your student on the wrist unit, the limits are calculated using the following formulas: 220 - the age of the student = HRmax.65 x HRmax = lower limit.85 x HRmax = upper limit
For general activities, the zone between 65% and 85% of HRmax has a positive effect without being too strenuous on the heart and aerobic fi tness of children.
The limits can be changed using UpLink Tool software or manually in the Settings menu.
You can also set the target heart rate zone as 130-170 bpm, which is an average zone for all children based on the estimated maximum heart rate of 200 bpm. In this case you do not have to change the limits for each student even if their ages vary. The limits can be set by using UpLink Tool software or manually.
ENGLISH 23
6. CALORIE CALCULATION
Polar E40 can also measure calorie expenditure during the exercise session. The function is off as default but can be turned on with the UpLink Tool, or by setting the student’s personal information (i.e. weight, height, age and gender) in the wrist unit. To measure calories correctly, set the student’s personal data as accurately as possible. Using the UpLink Tool, calorie calculation can be turned off again.
When calorie calculation is on, the calorie information is displayed during exercise and saved for later study. Calories are displayed in Cal or kcal depending on the unit setting.
Calorie consumption is calculated in a similar manner for children and adults. The higher the heart rate and activity intensity, the more calories are expended.
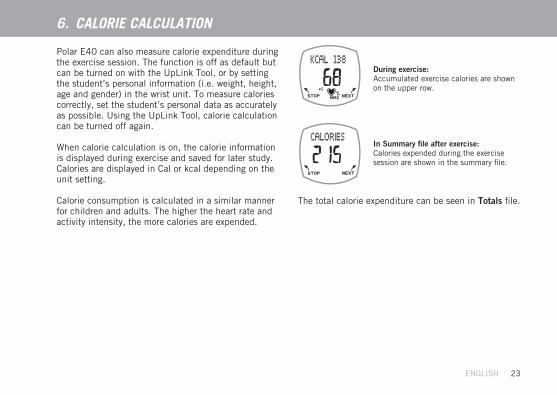
During exercise: Accumulated exercise calories are shown on the upper row.
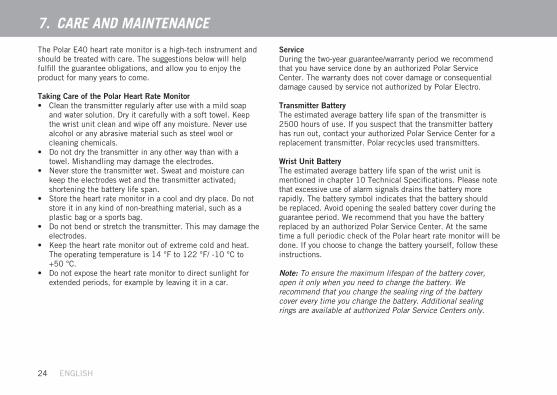
In Summary file after exercise: Calories expended during the exercise session are shown in the summary file.
The total calorie expenditure can be seen in Totals file.
24 ENGLISH
7. CARE AND MAINTENANCE
The Polar E40 heart rate monitor is a high-tech instrument and should be treated with care. The suggestions below will help fulfill the guarantee obligations, and allow you to enjoy the product for many years to come.
Taking Care of the Polar Heart Rate Monitor • Clean the transmitter regularly after use with a mild soap and water solution. Dry it carefully with a soft towel. Keep the wrist unit clean and wipe off any moisture. Never use alcohol or any abrasive material such as steel wool or cleaning chemicals. • Do not dry the transmitter in any other way than with a towel. Mishandling may damage the electrodes. • Never store the transmitter wet. Sweat and moisture can keep the electrodes wet and the transmitter activated; shortening the battery life span. • Store the heart rate monitor in a cool and dry place. Do not store it in any kind of non-breathing material, such as a plastic bag or a sports bag. • Do not bend or stretch the transmitter. This may damage the electrodes. • Keep the heart rate monitor out of extreme cold and heat. The operating temperature is 14 °F to 122 °F/ -10 °C to +50 °C. • Do not expose the heart rate monitor to direct sunlight for extended periods, for example by leaving it in a car.
Service During the two-year guarantee/warranty period we recommend that you have service done by an authorized Polar Service Center. The warranty does not cover damage or consequential damage caused by service not authorized by Polar Electro.
Transmitter Battery The estimated average battery life span of the transmitter is 2500 hours of use. If you suspect that the transmitter battery has run out, contact your authorized Polar Service Center for a replacement transmitter. Polar recycles used transmitters.
Wrist Unit Battery The estimated average battery life span of the wrist unit is mentioned in chapter 10 Technical Specifications. Please note that excessive use of alarm signals drains the battery more rapidly. The battery symbol indicates that the battery should be replaced. Avoid opening the sealed battery cover during the guarantee period. We recommend that you have the battery replaced by an authorized Polar Service Center. At the same time a full periodic check of the Polar heart rate monitor will be done. If you choose to change the battery yourself, follow these instructions.
Note: To ensure the maximum lifespan of the battery cover, open it only when you need to change the battery. We recommend that you change the sealing ring of the battery cover every time you change the battery. Additional sealing rings are available at authorized Polar Service Centers only.

ENGLISH 25
You will need the following:Battery: CR 1632Dust-free pad that won’t scratch the face of the wrist unitSmall Phillips or standard head screwdriverPlastic tweezers
7. After a battery replacement, the wrist unit enters reset mode. The display fills with digits. Check that all digits are displayed.8. Remove the old sealing ring and clean the ring cavity.9. Place the sealing ring in the cavity. The register mark of the ring has to be in the slot at the lower part of the cavity. Make sure that the ring is firmly in place.10. Wipe off finger prints on the battery and clean the surface of the back cover facing the sealing ring with a soft, lint-free cloth.11. Put the back cover in place and press it with your finger.12. Put the screws in their holes and tighten them slightly from opposite corners. Do not tighten them completely to ensure even closing of the case. Do not force the screws or damage the existing threads.13. Having checked that the back cover is firmly in place, tighten the screws securely from opposite corners.14. After a battery replacement, the wrist unit is either in time mode or sleep mode if you have not pressed any buttons. If the wrist unit is in sleep mode, activate it by pressing any button twice to go to basic settings mode. If you press any button within 1 minute of a battery replacement, the wrist unit goes to basic settings. For more information on basic settings see page 9.15. Wearing the transmitter, test that the wrist unit functions properly. If heart rate measurement does not start or all digits do not appear to be operating normally, reset the wrist unit by pressing and holding both buttons until the display is filled with digits. Then test again. If this does not resolve the problem, return the unit to an authorized Polar Service Center.
1. Put the wrist unit on the clean, dust- free pad, face down.2. Open the back cover by removing the four screws with the screwdriver.3. Bend the hook of the battery holder with the screwdriver away from the battery (see picture 1).4. Insert a small screwdriver in the battery holder gap and pry the battery out of its position.5. Remove the old battery with plastic tweezers (see picture 2).6. Insert the new battery with the plastic tweezers in the battery housing with the minus (-) side up and close the battery holder.Note: Do not use metal tweezers because they short-circuit the battery.Grease and dirt from bare fingers weaken the contact. Make sure your hands are clean.
2.
1.

26 ENGLISH
Note: • If you have set the alarm before the battery symbol is displayed, the alarm will still activate until the battery runs out. If you try to reset the alarm the wrist unit displays Low. You cannot reset the alarm until the battery is replaced. • All sounds are disabled when the battery is low to optimize battery lifespan.• In cold conditions, the low battery indicator may appear, but will disappear once in normal temperature.• Keep the batteries away from children. If swallowed, contact a doctor immediately.• Batteries should be properly disposed of according to local regulations.
ENGLISH 27
8. PRECAUTIONS
8.1 Interference During Exercise
Electromagnetic Interference Disturbances may occur near high voltage power lines, traffic lights, overhead lines of electric railways, electric bus lines or trams, televisions, car motors, bike computers, some motor driven exercise equipment, cellular phones, or when you walk through electric security gates. Exercise Equipment Several pieces of exercise equipment with electronic or electrical components such as LED displays, motors, and electrical brakes may cause interfering stray signals. To tackle these problems, relocate the wrist unit as follows: 1. Remove the transmitter from your student’s chest and continue using the exercise equipment normally. 2. Relocate the wrist unit you find an area in which it displays no stray reading or does not flash the heart symbol. Interference is often worst right in front of the display panel of the equipment, while the left or right side of the display is relatively free of disturbance. 3. Put the transmitter back on your student’s chest and keep the wrist unit in this interference-free area as long as possible. 4. If the heart rate monitor still does not work around the exercise equipment, the piece of equipment may be electrically too noisy for wireless heart rate measurement.
Crosstalk When in non-coded mode the wrist unit picks up transmitter signals within 3 feet/1 meter. Simultaneous non-coded signals from more than one transmitter may cause an incorrect readout.
Using The Polar Heart Rate Monitor in a Water Environment Polar E40 heart rate monitor is water resistant and can be worn when swimming. The heart rate monitor is not, however, a diving instrument. To maintain water resistance, the buttons must not be pressed under water.
Interference in a water environment may be due to the following: • Pool water with high chlorine content and seawater are very conductive. The transmitter electrodes may short-circuit, preventing ECG signals from being detected by the transmitter. • Jumping into water or strenuous muscle movement during competitive swimming may cause the transmitter to shift to a location on the body where it is not possible to pick up ECG signals. • The ECG signal strength is individual, and may vary depending on an individual’s tissue composition. The percentage of people who have problems in heart rate measuring is considerably higher in water than in other environments.

28 ENGLISH
8.2 Minimizing Possible Risks when ExercisingExercising may include some risk. Before beginning a regular activity, we recommend that you answer the following questions concerning your health. If the answer is yes to any of these questions, we recommend consulting a doctor before starting any activity.
• Have you been physically inactive for the past 5 years?• Do you have high blood pressure or high blood cholesterol?• Do you have symptoms of any disease?• Are you taking any blood pressure or heart medication?• Do you have a history of breathing problems?• Are you recovering from a serious illness or medical treatment?• Do you use a pacemaker or another implanted electronic device?• Do you smoke?• Are you pregnant?
Note that in addition to exercise intensity, medication for heart, blood pressure, psychological conditions, asthma, breathing etc. as well as some energy drinks, alcohol and nicotine may affect heart rate.
It is important to be sensitive to your body’s responses during exercise. If you experience unexpected pain or excessive fatigue when exercising, it is recommended you stop the exercise or continue at a lighter intensity.
Notice to individuals with pacemakers, defibrillators or other implanted electronic devices. Individuals who have a pacemaker use the Polar heart rate monitor at their own risk. Before starting use, we always recommend a maximal exercise stress test under a doctor’s supervision. The test is to ensure the safety and reliability of the simultaneous use of the pacemaker and the Polar heart rate monitor.
If you are allergic to any substance that comes into contact with your skin or you suspect an allergic reaction due to using the product, check the materials mentioned in chapter 10 Technical Specifications. To avoid skin reactions to the transmitter, wear it over a shirt. However, the shirt must be wet under the electrodes to ensure flawless operation.
Note: The combined impact of moisture and intense abrasion may cause a black color to come off the transmitter’s surface, which might stain light-colored clothes especially.
ENGLISH 29
9. FREQUENTLY ASKED QUESTIONS
What should I do if... ...I don’t know where I am in the menu? Press and hold the RED button until the time of day is displayed.
...there is no heart rate reading (00/ --) or the heart symbol flashes irregularly?1. Make sure the electrodes of the transmitter are wet and that the transmitter is worn as instructed. The strap must be snug enough. 2. Make sure the transmitter is clean.3. Make sure no sources of electromagnetic radiation are in close vicinity to the Polar wrist unit, such as TV sets, cell phones, CRT monitors etc.4. Make sure no other heart rate transmitter is within the reception range (3 feet / 1 meter).5. Cardiac arrhythmia may cause irregular readings, or a cardiac event may have altered your ECG waveform. In these cases, consult your physician.
...there is interference between the heart rate monitors of two students?The two students may have exactly the same heart rate transmission code. Separate the two by at least 3 feet / 1 meter and have them continue exercising as before.OrSeparate the students and have at least one of them stop the recording and remove his or her transmitter for 30 seconds. Put the transmitter back on and restart the recording. This will cause the wrist unit to search for a new code.
Note: To minimize interference between monitors, have your students stand at least 3 feet / 1 meter apart when they start their recordings. This allows the wrist unit to lock onto a single heart rate signal and transmission code.
...heart rate reading becomes erratic or extremely high? Strong electromagnetic signals can cause erratic readings. Move away from possible sources of disturbance such as high-voltage power lines, traffic lights, overhead lines of electric railways or trams, car motors, bike computers, some motor-driven exercise equipment (like fitness testers) or cell phones.
If moving away does not help and the heart rate reading remains erratic, slow down speed and check the pulse manually. If it corresponds to the high reading on the display, it may be a sign of cardiac arrhythmia. Most cases of arrhythmia are not serious, but consult a doctor nevertheless.
...the display is blank? The Polar E40 heart rate monitor is in battery saving mode when it is dispatched from the factory. To activate it, press any button twice. For further information, see chapter 1.3 Before Using the Wrist Unit.
...the display is fading? The first sign of an expired battery is the low battery symbol .Have the batteries checked. For more information, see chapter 7 Care and Maintenance. After a battery replacement, you only need to set the time of day and date in the Basic Settings. Then press and hold the RED button to return to the Time of Day display.

30 ENGLISH
...the buttons do not react? Reset the wrist unit by pressing and holding both buttons. The display should fill with digits. By pressing any button, the wrist unit goes to Basic Settings (SETTINGS is displayed). When you have completed the Basic Settings, the wrist unit returns automatically to the Time of Day display. If this does not work, have the batteries checked. For more information, see chapter 7 Care and Maintenance.
...the wrist unit battery needs changing? We recommend that all service be done by an authorized Polar Service Center. The two-year International Guarantee/Warranty does not cover damage or consequential damage caused by service not authorized by Polar Electro. Polar Service Center will test the wrist unit for water resistance after battery replacement and make a full periodic check. Alternatively, you can replace the battery yourself. For more information, see chapter 7 Care and Maintenance.
ENGLISH 31
10. TECHNICAL SPECIFICATIONS
Polar E40 heart rate monitor is designed to • help achieve personal fitness goals • indicate the level of physiological strain and intensity during an exercise sessionNo other use is intended or implied.
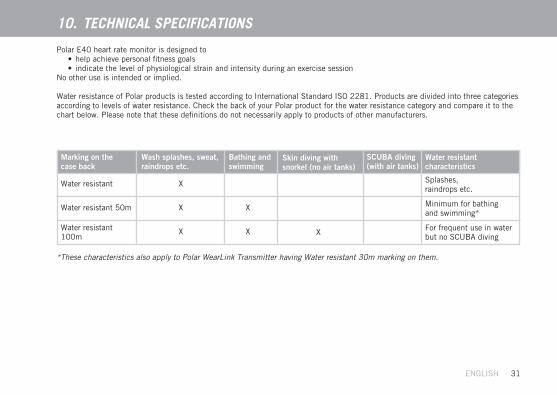
Water resistance of Polar products is tested according to International Standard ISO 2281. Products are divided into three categories according to levels of water resistance. Check the back of your Polar product for the water resistance category and compare it to the chart below. Please note that these definitions do not necessarily apply to products of other manufacturers.
Marking on the case back
Water resistant
Water resistant 50m
Water resistant 100m
Wash splashes, sweat, raindrops etc.
X
X
X
Bathing and swimming
X
X
Skin diving with snorkel (no air tanks)
X
SCUBA diving (with air tanks)
Water resistant characteristics
Splashes, raindrops etc.
Minimum for bathing and swimming*
For frequent use in water but no SCUBA diving
*These characteristics also apply to Polar WearLink Transmitter having Water resistant 30m marking on them.

32 ENGLISH
Transmitter Battery type: Built-in Lithium Cell Battery life: Average 2500 hours of use Operating temperature: 14 °F to 122 °F/-10 °C to +50 °C Material: Polyurethane Waterproof
Elastic Strap Buckle material: Polyurethane Fabric material: Nylon, polyester, and natural rubber including a small amount of latex
Limit ValuesChronometer 23 h 59 min 59 sHeart rate limits 30-199 bpmTotal time 0-9999 h 59 min 59 sTotal calories 0-999999 (Cal/Kcal)Total exercise count 65 535
Wrist Unit Battery type: CR 1632Battery life: Average 2 years (Exercise 1h/day, 7 days/week)Operating temperature: 14 °F to 122 °F/-10 °C to +50 °C Accuracy of heart rate measurement: ± 1% or ± 1 bpm, whichever is larger, definition applies to steady state conditions Watch accuracy error: better than ± 0.5 seconds/ day at 77 °F/ 25 °C Wrist strap material: Thermoplastic Polyurethane (TPU) Wrist strap buckle andstrap tongue material: Polyoxymethylene (POM) Back cover material: Stainless steel complying with the nickel release regulations of the EU (EU Directive 94/27/EU and its amendment 1999/C 205/05).
Heart rate is displayed as the number of heartbeats per minute (bpm) or as a percentage of maximum heart rate (HRmax%).
SYSTEM REQUIREMENTSPolar UpLink Tool• PC• Windows® 98/98SE/ME/2000/XP• Sound card• Dynamic loudspeakers or headphones

ENGLISH 33
• This limited Polar international guarantee is issued by Polar Electro Inc. for the consumers who have purchased this product in the USA or Canada. This limited Polar international guarantee is issued by Polar Electro Oy for the consumers who have purchased this product in other countries.• Polar Electro Inc. / Polar Electro Oy guarantees to the original consumer/ purchaser of this product that the product will be free from defects in material or workmanship for two years from the date of purchase. • Please keep the receipt or International Guarantee Card, which is your proof of purchase!• The guarantee does not cover the battery, damage due to misuse, abuse, accidents or non-compliance with the precautions; improper maintenance, commercial use, cracked or broken cases and elastic strap.• The guarantee does not cover any damage/s, losses, costs or expenses, direct, indirect or incidental, consequential or special, arising out of, or related to the product. During the guarantee period the product will be either repaired or replaced at an authorized service center free of charge.• This guarantee does not affect the consumer’s statutory rights under applicable national or state laws in force, or the consumer’s rights against the dealer arising from their sales/ purchase contract.
11. LIMITED POLAR INTERNATIONAL GUARANTEE
This CE marking shows compliance of this product with Directive 93/42/EEC.
This crossed out wheeled bin marking shows that Polar products are electronic devices and are in the scope of Directive 2002/96/EC of the European Parliament and
0537
of the Council on waste electrical and electronic equipment (WEEE). These products should thus be disposed of separately in EU countries. Polar encourages you to minimize possible effects of waste on the environment and human health also outside the European Union by following local waste disposal regulations and, where possible, utilize separate collection of electronic devices.
Copyright © 2005 Polar Electro Oy, FIN-90440 KEMPELE, Finland.
Polar Electro Oy is a ISO 9001:2000 certified company.
All rights reserved. No part of this manual may be used or reproduced in any form or by any means without prior written permission of Polar Electro Oy.
The names and logos marked with a ™ symbol in this user manual or in the package of this product are trademarks of Polar Electro Oy. The names and logos marked with a ® symbol in this user manual or in the package of this product are registered trademarks of Polar Electro Oy, except that Windows is a registered trademark of Microsoft Corporation.
34 ENGLISH
12. DISCLAIMER
• The material in this manual is for informational purposes only. The products it describes are subject to change without prior notice, due to the manufacturer’s continuous development program.• Polar Electro Inc. / Polar Electro Oy makes no representations or warranties with respect to this manual or with respect to the products described herein. • Polar Electro Inc. / Polar Electro Oy shall not be liable for any damages, losses, costs or expenses, direct, indirect or incidental, consequential or special, arising out of, or related to the use of this material or the products described herein.
This product is protected by one or several of the following patents:FI55293, FI88223, US5491474, DE4215549, GB2257523B, FR92.06120, HK113/1996, FI 96380, WO 95/05578, JP 3568954, US 5611346, EP 665947, DE 69414362, FI110303, WO96/20640, EP 0748185, US6104947, FI100452, WO96/20641, EP 0804120, US5840039, FI111514, WO97/33512, US 6277080, GB2326240, DE 19781642T1, US6714812, FI114202, US 6537227, EP 1055158, US5719825, US58048027.Other patents pending.
Manufactured by:Polar Electro OyProfessorintie 5
FIN-90440 KEMPELETel +358 8 5202 100Fax +358 8 5202 300
www.polar.fi


![DEP 5202 IT in Education [Presentation Package]](https://static.fdocuments.in/doc/165x107/568131ab550346895d981847/dep-5202-it-in-education-presentation-package.jpg)


![P3014 [5202]-Ext.-1 M.A. (Part - I) (For External) MARATHI ...collegecirculars.unipune.ac.in/sites/examdocs/September 2017/M.A ( MARATHI ) EXTERNAL...[5202]Ext.-1 2 did not write that](https://static.fdocuments.in/doc/165x107/5e2a34eba731ce6d1c27f109/p3014-5202-ext-1-ma-part-i-for-external-marathi-2017ma-marathi.jpg)