
PNOmation WiFi hook up.pdf - QRS Music Technology … Shift (let go) then the number 3 (info). ......
25
© QRS Music Technologies, Inc. 2014 Page 1 of 15 CSPNONET/0415 Putting PNOmation on your network as a client Networking PNOmation
Transcript of PNOmation WiFi hook up.pdf - QRS Music Technology … Shift (let go) then the number 3 (info). ......

© QRS Music Technologies, Inc. 2014 Page 1 of 15 CSPNONET/0415
Putting PNOmation on
your network as a client
Networking
PNOmation

© QRS Music Technologies, Inc. 2014 Page 2 of 15 CSPNONET/0415
1 What You Need
If you do not have one of the following call 800‐247‐6557
1. A QRS Remote Control - You can use any of the remotes we have
sold over our life time. Make sure you have battery’s installed. If they are installed correctly the remotes buttons will light up when any button is pushed.
2. Fetch your Home Wi-Fi’s SSID and Password (Passwords are case sensi ve so it needs to be spot on)
SSID:
Password:
Security Type: WEP or WPA (if your password is a name or number that you created that is easy
to remember your security it is likely to be WPA. If it is a HEX number (numbers 0-9 and capital letters A-F) it is likely to be WEP but not always)
3. A Tablet, Smart Phone or Laptop with Wi-Fi capabilities, one you currently use now would work great.

© QRS Music Technologies, Inc. 2014 Page 3 of 15 CSPNONET/0415
2 Update Your System
What Version do you have?
The fastest way to determine your version - touch the QRSPWR button on the top right corner of your QRS App
If you have version 5.53 or higher go to the next page. If not go to our website and download the latest update and follow the instructions.
Point the remote control at the Pin Light Box’s Button. Press Shift (let go) then the number 3 (info). You will see the second light blink at you when you press a button on the remote and it is seen by the system. You should then hear the voice prompts come out of your speakers. The voice prompts will tell you what network mode you are in “Standalone” or “Networked” plus tell you what your IP address is as well as the version of software.
To download the update instruction's copy and paste the link below: https://private.filesanywhere.com/qrsinc/fs/v.aspx?v=8a7266c089a175acab9a

© QRS Music Technologies, Inc. 2014 Page 4 of 15 CSPNONET/0415
3 Verify You Hear Voice Prompts
1. If the first pin light is amber, tap the button on the Pin Light Box—this will turn the power on and turn the light green , insuring the speaker is on.
2. Point the remote control at the Pin Light Box’s Button. Press Shift (let go) then the number 3 (for “info”). You will see the second light from left blink at you when you press a button on the remote meaning it seen by the system. You should then hear the voice prompts come out of your speakers (the sixth light will flicker amber when voice prompts are present). If not—do it again and verify that pin light 6 blinks. If it does then there may be an issue with your speaker setup or your system requires the media patch update.
3. The voice prompt volume settings may also be set low. To change the voice prompt volume using the remote we have to adjust the master volume while the voice prompts are active. So Press Shift (let go) then the number 3 (for “info”) then immediately following continuously tap “master volume up”
4. The voice prompts will tell you what network mode you are in “Standalone” or “Networked” plus tell you what your IP address is as well as the version of software.
Pin Light 2 will blink green when IR signal is received.
Pin Light 6 will blink amber when a voice prompt is output.

© QRS Music Technologies, Inc. 2014 Page 5 of 15 CSPNONET/0415
4 Identify Your Wi-Fi Adaptor
TP_Link ASUS Netgear WiFi
Extender
QRS has used several different third party vendors WiFi travel routers and extenders to provide access to the PNOmation user interface through a customers WiFi device.. Originally the piano was configured to allow the customer access to the piano in a “standalone” mode then if the customer chose, to provide them their own means of putting the piano on their home network. All of the devices we provided work very well in “Standalone” mode. Changes in how we back up systems, deliver music and upgrades - now require and the customers preferred to have their pianos on their own home network.
The earlier devices we provided, for the most part, acted as a solid network client (in “network” mode) if you took the time to set them up. The operative word was time. It turned out it was easier/faster and less expensive for the customer to purchase their own Powerline, or Airport Express, or WiFi extender than fool with the travel routers we provided. QRS would provide a credit for any customer still in warranty toward a different device. For the last year we have been providing either a TPLink Powerline or Netgear WiFi extender and the networking issues and time have mostly disappeared.
So review the device you have and determine what would be the best plan for your network. We are currently recommending and phone supporting the Netgear WiFi extender although your IT team or requirements may offer other options. Especially if you have Apple or Sonos products in your home. Give us a call if you have any questions.

© QRS Music Technologies, Inc. 2014 Page 6 of 15 CSPNONET/0415
5 Here are your choices:
Option 1: Using the PNOmation’s Netgear AC750
If you have one of the other routers we provided with the player system we encourage you to move to either of the options listed below or trade out for a Netgear then go to step 6
Option 2: Using your own WiFi Adaptor, many of you would like to use other manufacturers devices such as Apples Airport Express, or Sonos adaptor to bring the background to your stereo. We are happy to support you in this endeavor.
Option 3: Using an Ethernet over Power Line adaptor - Simplest—Fastest. It does not require a password, but does require an open wall power outlet behind your homes router. The power circuit of the router should be on the same breaker box as the PNOmation system. This is not shipped with your system.
Option 4: Run an Ethernet cable directly to the piano. Usually not possible unless your still building your home. This is the best option if possible.
Decide How you want
to hook it up

© QRS Music Technologies, Inc. 2014 Page 7 of 15 CSPNONET/0415
6 Setup the extender on
your homes network
Unplug the Ethernet cable if the Netgear device is attached to the piano.
Flip the switch to Ext for extender.
Go to your WiFi device and check to see if your homes network signal is strong by the piano. If your homes WiFi signal is not strong, we will have to move the Netgear extender to another room closer to your router to set it up. Don’t worry we will move it back once set. Your piano is not required to set up the Netgear WiFi Extender.
When we are done this light will be green if the Netgear is on the customers network.
We are going to flip this switch to extender mode

© QRS Music Technologies, Inc. 2014 Page 8 of 15 CSPNONET/0415
7 Log into the QRSPNO
Network
1. Turn on your Wi-Fi device. (iPad, Computer, Tablet—you can use your phone but the screen is typically to small and annoying for a setup)
2. Go to “Settings” then select “Wi-Fi” .
3. Turn it on.
4. It should scan for available networks one of the networks will be QRSPNOxxxx_2GEXT or Netgear6100_2GEXT
5. Select the network.
6. Wait for a check mark confirming your connection.
7. Once connected either a Netgear Geni screen will appear or if it does not go to “Safari” or your web browser, clear the address bar and type in www.mywifiext.net
Settings
Home Screen
QRSPNO xxxx
2
4
5
QRSPNO xxxx
QRSPNO xxxx
3 6

© QRS Music Technologies, Inc. 2014 Page 9 of 15 CSPNONET/0415
8 open The Piano’s Wi-Fi
Adaptor’s setup
1. Open your Web Browser
2. Clear the address bar
3. Enter www.mywifiext.net
4. Then touch “Go”
5. The Netgear Geni screen will appear.
www.mywifiext.net
1. The Netgear Geni will present you with a list of WiFi networks that are in your home/facility.
2. You will want to select the network that you typically log into when surfing the net. IT CAN NOT BE A GUEST NETWORK.
3. Touch the radio button associated with that network and select “continue”
© QRS Music Technologies, Inc. 2014 Page 10 of 15 CSPNONET/0415
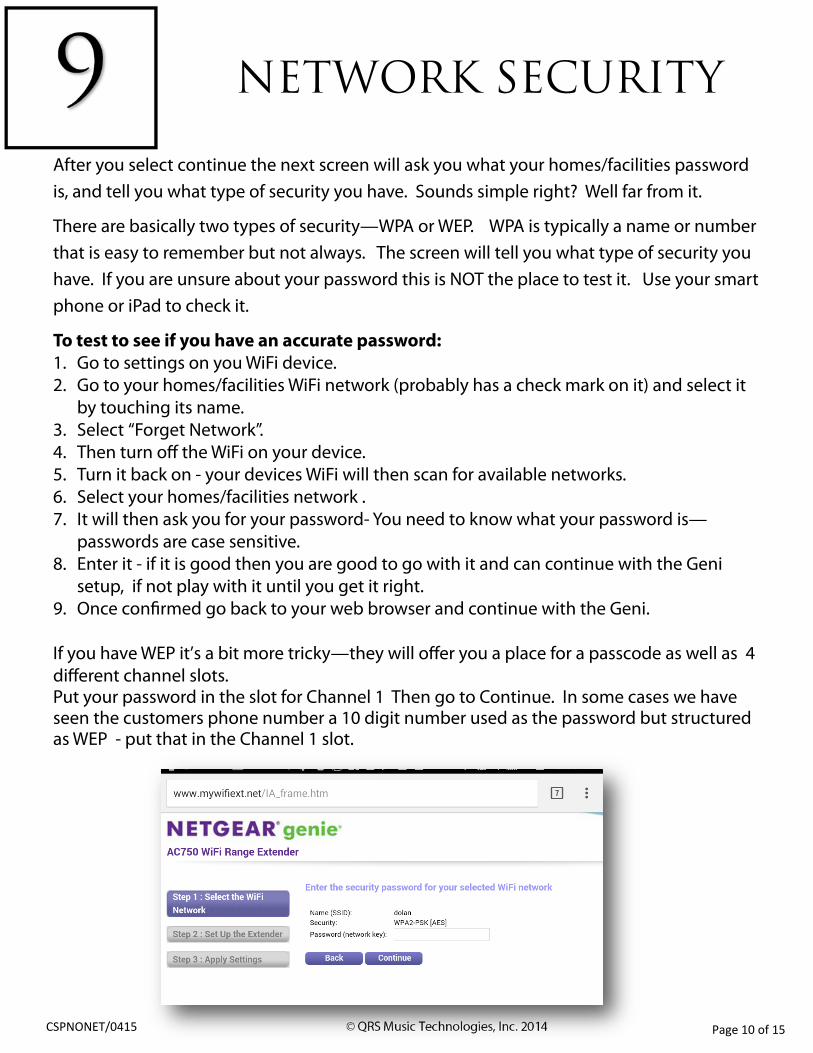
9 Network Security
After you select continue the next screen will ask you what your homes/facilities password is, and tell you what type of security you have. Sounds simple right? Well far from it.
There are basically two types of security—WPA or WEP. WPA is typically a name or number that is easy to remember but not always. The screen will tell you what type of security you have. If you are unsure about your password this is NOT the place to test it. Use your smart phone or iPad to check it.
To test to see if you have an accurate password: 1. Go to settings on you WiFi device. 2. Go to your homes/facilities WiFi network (probably has a check mark on it) and select it
by touching its name. 3. Select “Forget Network”. 4. Then turn off the WiFi on your device. 5. Turn it back on - your devices WiFi will then scan for available networks. 6. Select your homes/facilities network . 7. It will then ask you for your password- You need to know what your password is—
passwords are case sensitive. 8. Enter it - if it is good then you are good to go with it and can continue with the Geni
setup, if not play with it until you get it right. 9. Once confirmed go back to your web browser and continue with the Geni. If you have WEP it’s a bit more tricky—they will offer you a place for a passcode as well as 4 different channel slots. Put your password in the slot for Channel 1 Then go to Continue. In some cases we have seen the customers phone number a 10 digit number used as the password but structured as WEP - put that in the Channel 1 slot.
© QRS Music Technologies, Inc. 2014 Page 11 of 15 CSPNONET/0415
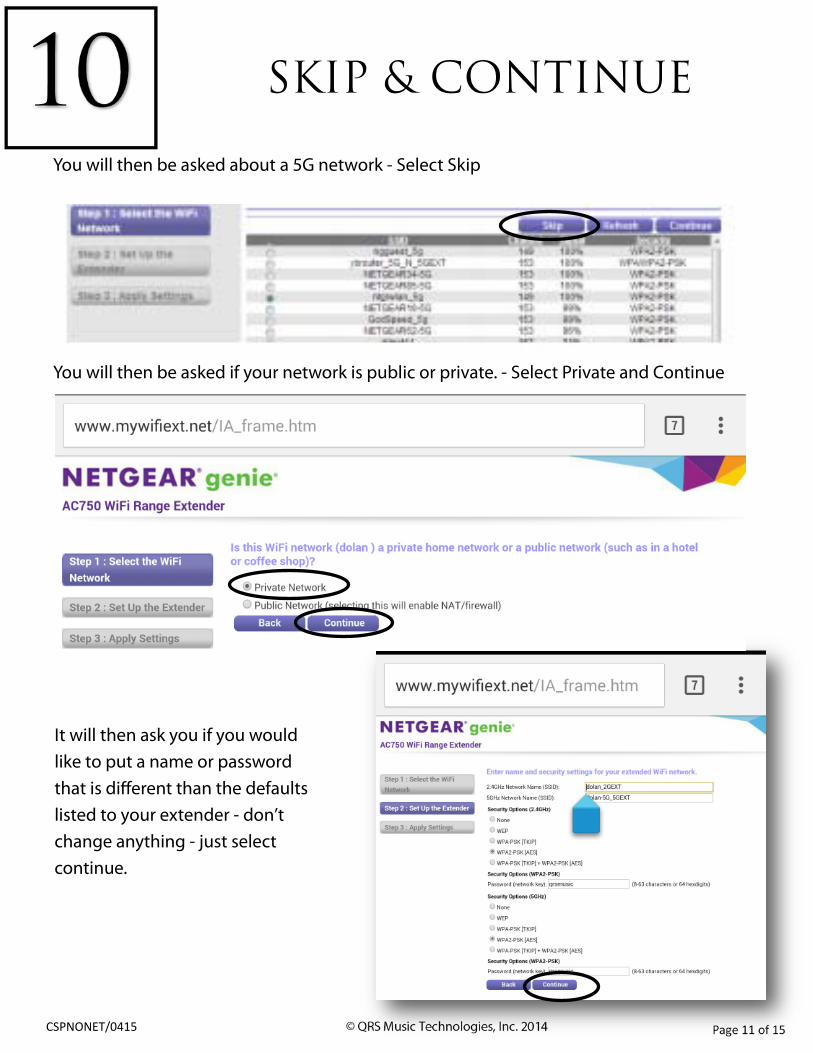
10 Skip & Continue
You will then be asked about a 5G network - Select Skip
You will then be asked if your network is public or private. - Select Private and Continue
It will then ask you if you would like to put a name or password that is different than the defaults listed to your extender - don’t change anything - just select continue.

© QRS Music Technologies, Inc. 2014 Page 12 of 15 CSPNONET/0415
11 Put PNOmation in
network mode
Take your remote control and point it at the IR receiver and press “shift” then “7” (voice prompt will say “function”) then press “9” then “9” again then “1” ( you do not have to hold the shift button down while you push the other buttons). You should hear a voice prompt say “Function—Nine– Nine—One” If you do not hear the voice prompts try again. Push any of the numbers on the remote while pointing the remote at the button on the Pin Light Box, a voice prompt will repeat it. If it does not go to step 3.
If the network cable is installed, the third light on the Pin lite box will turn amber if not it will continue to blink until you do.
This Pin Light will turn from
green to orange when the
system is in network mode. Press shift - 7 (“Function”)- 9- 9- 1

© QRS Music Technologies, Inc. 2014 Page 13 of 15 CSPNONET/0415
1. Log into your homes network— the network you just put your pianos Wi Fi adaptor on.
2. Then open your web browser.
3. Clear the address bar.
4. Type in your new IP Address. The IP address displayed is only an example. If you do not know your IP use your remote control and select “shift” “3”
5. The QRS App should appear.
6. Create a short cut on your home screen if you would like.
Find your homes
network 12 Dolan Dolan

© QRS Music Technologies, Inc. 2014 Page 14 of 15 CSPNONET/0415
13 Using Option 2
Power line Adaptor
1. Plug one node of the power line adaptor directly into a wall outlet behind your homes router. First light will turn green representing power
2. Plug an Ethernet cable into the power line adaptor and then into the router.
3. Plug the other node of the power line adaptor into the extension cord under your piano. The first light will turn green representing power and the second light will turn a steady green representing that it sees the other node. If it does not see the other node you can push a find button on the node itself.
4. Unplug the Ethernet cable from the existing WiFi adaptor and plug it into the power line adaptor. The third line will blink saying it is sending and receiving data. The pianos voice prompts will say network off then turn back on and give you a network IP address
5. A voice prompt should announce your new IP address. If you do not hear it use the remote and select “Shift” “3” To announce it again
6. Log into your homes Wi-Fi network
7. Open your web browser
8. In the address bar enter the new IP address
9. PNOmation should open up
10. Create a shortcut and you are ready to go
11. Do NOT connect either power line adapter into a surge protector or an outlet strip.

© QRS Music Technologies, Inc. 2014 Page 15 of 15 CSPNONET/0415
1. After Log In go to the main menu and touch System Setup
2. Then touch Service
3. Then touch View Settings
4. Then touch Email and Send Logs
5. Go back to main menu and touch System Setup again
6. Touch Other Setups
7. Touch OS Update
8. Turn on Auto Update
9. If you have not done so yet activate your trial
10.Go to System Setup
11. Touch Trial Activation
12.Fill in information
13.Activate trial
Setup your cloud and
updates 14
© QRS Music Technologies, Inc. 2014 Page 16 of 15 CSPNONET/0415
Trouble Shooting 15 Known Issues:
Hooking up to an ATT U-Verse using Option 1 - ATT U-Verse blocks the use of many devices. Use a Power Line - it will save you hours of time.
Comcast provided WiFi Routers use the same default address as the TP-Link—192.168.0.254—hence you will lose internet if you hook up the TP-Link. Please use the Netgear device. If using a Power Line make sure you are not going through a surge protector or power strip.
Password recall is not accurate. This is a huge problem that will cause hours of time lost. We strongly urge you to test the password using your own smart phones WiFi to test it first. Section 9
Customer has an easy to remember password that is a number like a 10 digit phone number but when you go through the Netgear setup, it detects the password as being a WEP type. Then it gives you a space for a passcode and 4 channel spaces for passwords. If this occurs assume it is Channel 1s password and not the passcode.
The Pianos Voice Prompt gives you 0.0.0.0 as an IP. First check to make sure the netgear device has a green light above the N in the Netgear logo that means it is communicating with the customers router. If not, it will have to be reset and put back on. If it is green then verify the processor to Netgear Ethernet cable is attached. If the Ethernet cable is attached then we will reset the network

© QRS Music Technologies, Inc. 2014 Page 17 of 15 CSPNONET/0415
function on the pianos processor by pointing the remote control at the PLx and in sequence push “shift” 7991 You’ll hear the voice prompts say “Network Off” then after a minute or so “Network Connected IP xxx.xxx.xxx.xxx”
Log into your homes/facilities network then open your web browser and enter that IP address into the address bar.
Trouble Shooting 16

© QRS Music Technologies, Inc. 2014 Page 18 of 15 CSPNONET/0415
Setting up your TPLink
Note: If your TPLink has Green Lights on it—Do Not Attempt

© QRS Music Technologies, Inc. 2014 Page 19 of 15 CSPNONET/0415
17 open The TPLinks Wi-Fi
Adaptor’s setup
1. Open your Web Browser
2. Clear the address bar
3. Enter 192.168.0.254
4. Then touch “Go”
5. The TP-Link set up screen will open

© QRS Music Technologies, Inc. 2014 Page 20 of 15 CSPNONET/0415
Begin the quick setup 18 1. Touch “Quick Setup”
located on the left panel
2. Select “Next”
3. You will notice you are currently in “AP” mode
We are ultimately going to end up in “Client” mode but we will start first with “Bridge” mode –this will save time if we happen to make a password mistake.
4. Select “Bridge”
5. Select “Next”
1
2
4
5

© QRS Music Technologies, Inc. 2014 Page 21 of 15 CSPNONET/0415
Find your homes
network 19 1. Select “Survey”
A list of networks that are available to hook up to will be displayed
2. Select the “Connect” button next to the network you would like to connect to.
This network can not be a “guest” network.
1
2

© QRS Music Technologies, Inc. 2014 Page 22 of 15 CSPNONET/0415
Bridge Connect To
Network 20
1. Select the type of security your system has
2. If it is a number like a phone number or a name that is easily remembered you more than likely have “WPA”
3. Select “WPA”
4. Enter your password remember it is case sensitive.
5. Select “Next”
6. A pop up screen may come up telling you that your channel needs to match your routers.
7. Change the channel
8. Select “Next”

© QRS Music Technologies, Inc. 2014 Page 23 of 15 CSPNONET/0415
1. A screen asking about security will come next.
2. This asks if you would like to secure access to the Wi-Fi adaptor. We recommend disable.
3. Select “Next”
4. A nice little congratulations note appears
5. Select “Reboot”
6. A confirmation screen will appear—Select “ok”
Find your homes
network 21

© QRS Music Technologies, Inc. 2014 Page 24 of 15 CSPNONET/0415
Identify your pianos
new IP address 22
Pin Light 6 will blink amber when a voice prompt is output.
Pin Light 2 will blink green when IR signal is received.
Point the remote control at the Pin Light Box’s Button. Press Shift (let go) then the number 3 (info). You will see the second light blink at you. You should then hear the voice prompts tell you what your new IP address is.

© QRS Music Technologies, Inc. 2014 Page 25 of 15 CSPNONET/0415
1. Log back into your WiFi Adaptor by going to your web browser and typing in 192.168.0.254
2. Select “Quick Setup”
3. Select “Next”
4. Select “Client”
5. Select “Next”
6. Screen will ask you to Reboot.
7. Select “Reboot”
8. Select “Ok” to confirm you want to reboot.
9. Done
Put System in Client
Mode 23


