PLAY BOOK - Amazon Web Services
52
TANK DUEL ~ PLAY BOOK TABLE O F CONTENTS PLAY BOOK GMT Games, LLC • P.O. Box 1308, Hanford, CA 93232-1308 • www.GMTGames.com 16.0 Tutorial ............................................................................2 17.0 Advanced and Optional Rules.....................................19 18.0 Scenarios .......................................................................22 19.0 Solitaire Rules...............................................................35 20.0 Solitaire Example of Play ............................................41 21.0 Card Index ....................................................................46 22.0 Designer Notes ..............................................................48 Commander: Mike Bertucelli ~ Gunner: Jason Carr ~ Loader: Joe Aguayo
Transcript of PLAY BOOK - Amazon Web Services

Tank Duel ~ Play Book
T A B L E O F C O N T E N T S
PLAY BOOK
GMT Games, LLC • P.O. Box 1308, Hanford, CA 93232-1308 • www.GMTGames.com
16.0 Tutorial ............................................................................217.0 Advanced and Optional Rules.....................................1918.0 Scenarios .......................................................................2219.0 Solitaire Rules ...............................................................35
20.0 Solitaire Example of Play ............................................4121.0 Card Index ....................................................................4622.0 Designer Notes ..............................................................48
Commander: Mike Bertucelli ~ Gunner: Jason Carr ~ Loader: Joe Aguayo

2 Tank Duel ~ Play Book
© 2019 GMT Games, LLC
16.0 TutorialIntroductionThis tutorial has been created with the goal of giving you a sense of Tank Duel’s gameplay by describing a series of turns in a 2 tanks versus 2 tanks battle using the Hold the High Ground scenario. It is recommended to have the Tank Boards set up and cards readily available as they will be referenced often. The tuto-rial will occasionally reference a segment from the Rulebook and/or Player aid, so keep those nearby as well.
Occasionally, instructions are provided on how to use this tutorial more effectively. These instructions are contained in boxes, like these.
This tutorial assumes that four players are each controlling one tank. If using this tutorial by yourself play as if there are four players playing.
Set UpDecide which players will play on the Soviet side and which players will play on the German side. Players on the Soviet side should sit next to one another with the German side sitting across from them. The Soviet side takes the Tank Boards labeled T-34/76 M43 (with ID# I, controlled by Joe) and T-34/76 M43 (ID# II, controlled by Jason); the German side takes a Pzkpfw IV Ausf G (ID# I, controlled by Mike) and a StuG III Ausf. G (ID# II, controlled by Harold). Each Tank Board has a colored flag with a ID number on it. Take the corresponding Tank Boards and place them on the table. Your Tank Board will help you track all the information needed to play a game of Tank Duel.Place Move Level and Fire Level counters on the spaces des-ignated for them on the General Track of each Tank Board (StuGs and other tank destroyers have multiple Fire and Move Levels. Ignore Fire and Move Levels designated for Damaged and Immobilized in this set up). Fire and Move Levels affect which cards a tank can use. For example, a tank with a Move Level of 7 can use Move cards of value 7 or lower to execute

3Tank Duel ~ Play Book
© 2019 GMT Games, LLC
the Move action. Likewise a tank with a Fire Level of 6 can use Fire cards of value 6 or lower to execute the Fire action. Cards with a higher value than your tank’s corresponding level are generally not playable. In some cases this limit can be overcome with the use of Order Icons (OIs), which will be described later in the tutorial.Place a Range counter, black side up, at 800m on each tank’s Range box as instructed in the Hold the High Ground scenario setup. This indicates your tank is 800m from an imaginary point in the center of the battlefield, from here on referred to as 000m.Each Soviet tank places 1 APCR counter in the Special Ammo box found on their Tank Board, each German tank starts the scenario with 2 APCR counters. These counters represent spe-cial APCR (Armor-Piercing Composite Rigid) shells that, when loaded, increase the odds of penetrating an enemy tank’s armor during a Fire action.Place counters for corresponding crew members in the available spaces on each of the Tank Boards. Place an Elite Commander
in the PzKpfw IV Ausf. G (I), and a Seasoned Commander in each of the other German and Soviet tanks. The Elite Com-mander confers an additional card during the Draw Phase for the player controlling the PzKpfw IV Ausf. G (I). Make sure that these counters are placed front side up as the back side indicates wounded crew members. Finally, place the Flank, Spotted, Acquisition, VP and Kill Medal counters nearby as we will use them later. The remaining counters will not be used and can be returned to the box.Normally, you would set up the Battle Deck as described in section 4.2.5 of the Rulebook. For this Tutorial you will be asked to take specific cards from the Battle Deck to make up each player’s hand of cards. To facilitate the Tutorial, place any Battle Cards with “(Alternate)” or “(City)” printed at the bottom back in the box, and arrange the remaining cards in numerical order, with 1 at the top, and 100 at the bottom. There should be exactly 100 cards. Then, place the Shuffle card at the bottom and set the Game End card nearby. Place 3 of the Hill cards nearby —these have a Road printed on the back—and have the On Fire
Everything set up for the Tutorial. Note that there is other information on the Tank Board that has not yet been mentioned. This tutorial will cover that information as it comes up in play.

4 Tank Duel ~ Play Book
© 2019 GMT Games, LLC
and Broken cards available. Last, the Damage Deck should be arranged in numerical order with the shuffle at the bottom, and placed within reach of all players.In this Tutorial we are playing the Hold the High Ground Sce-nario, which has a few extra rules. There are hills located at 400m on both sides of the battlefield that must be held for VPs. Starting your turn on a hill will earn you 1 VP. If your side alone has tanks on a hill at the end of the scenario, you will earn an additional 10 VPs. We need to get to those hills! (See Scenario information on pg. 25.)
Tutorial Turn StructureEvery turn of the game follows the same structure, outlined below and in section 3.1 of the Rulebook.
Rule references are contained within brackets (e.g., [6.0] means section 6.0 of the Rulebook). Encircled numbers (e.g., ) correspond to the matching section of the Player Aid for easy reference. Sometimes, we’ll tell you where you can find more information about a specific rule in the Rulebook—feel free to skip these and come back to read those rules sections later. We will explain all the rules you need as we go through the Tutorial.
DRAW PHASE [6.0] INITIATIVE PHASE [7.0] TANK PHASE [8.0]Administration Step [8.1]
1. Discard Initiative Card2. Score scenario specific VPs3. Smoke Check4. On Fire Check5. Morale Check
Action Step [8.2] Tank Action [8.3] Field Actions [8.4]
Discard Step [8.5] REINFORCEMENT PHASE [9.0]
LET’S START THE BATTLE! A game of Tank Duel is played in rounds comprised of the following 4 phases executed in order: Draw, Initiative, Tank, and Reinforcement. The Draw, Initiative, and Reinforcement Phases are played simultaneously by all play-ers. The Tank Phase, which is comprised of the Administration, Action, and Discard Steps, is resolved one tank at a time in the order determined during the Initiative Phase.
Round 1DRAW PHASE During the Draw Phase, each player is dealt Battle Cards (BC) up to their hand size, which is 4 cards, +2 cards per tank they control, +1 card per tank they control in a red Range box, and +1 for an Elite Commander. Some game effects may reduce Hand Size (for example: On Fire cards and Broken cards).
When referencing cards, this tutorial will use the following format, “Title” (card #).
Give the following cards to each player:
Joe (T34/76 M43 #I):Flank 6 (12), Move 5/ Fire 5 (35), Building (66), Woods (76), Move 8 (95), Move 8 (96)
Jason (T34/76 M43 #II):Flank 5 (11), Fire 2 (27), Leadership/Fire 3 (31), Move 4/Fire 4 (34), Tactics (44), Move 1 (48)

5Tank Duel ~ Play Book
© 2019 GMT Games, LLC
Mike (PzKpfw IV Ausf. G #I):Leadership (3), Mud/Fire 2 (17), Move 3 (53), Move 6 (63), Woods (72), Woods (79), Move 7 (94)
Harold (StuG III Ausf. G #II):Fire 1 (25), Leadership/Fire 3 (30), Move 6/Fire 6 (38), Rubble (67), Woods (75), Woods (78)
Note that Mike was dealt 7 cards instead of 6 cards because his Elite Commander gives a +1 card bonus to Hand Size. If this had been a 2 player game, with each player controlling 2 tanks, each player would have a base Hand Size of 4 cards plus 2 for each tank they control so he would have 9 cards.
Read section 4.2.7 of the Rulebook if you would like more information about Hand Size.
When all players have their cards in hand, play proceeds to the Initiative Phase.
INITIATIVE PHASE During this phase players are bidding for tank order in the up-coming Tank Phase; in other words: which tank gets to execute its Tank Phase first? Remember that players are bidding for the order their tanks will act in, so they will make a bid for each tank they control.
Players bid for Initiative by choosing one BC for each tank they control and placing it face down on the corresponding Tank Board’s Initiative Card box. Although the Battle Number is the only value considered for resolving Initiative, be aware that the lower Battle Numbers generally accompany the stronger, more useful card effects.
Read section 7.0 of the Rulebook for more information about Initiative Cards.
After all the tanks have been assigned a facedown card, play-ers reveal their Initiative Cards and place them in the Initiative Card box on the Tank Board so that their opponents can read the Battle Number. Players will execute all of the steps of their Tank Phase in Initiative Order from lowest Battle Number (1) to highest Battle Number (100).For our Tutorial, players have chosen the Initiative Cards shown below and will execute the steps of the Tank Phase in the order described below. Place the following cards face up in their cor-responding Initiative Card boxes (cards are listed from lowest to highest Battle Number).
Jason (T34/76 M43 #II): Move 1 (48)
Mike (PzKpfw IV Ausf. G #I): Move 6 (63)
Harold (StuG III Ausf. G #II): Woods (75)
Joe (T34/76 M43 #I): Move 8 (96)
Having played the lowest numbered Initiative Card, Jason’s T34/76 M43 (II) must complete its entire Tank Phase before play proceeds to the next tank in Initiative Order.
6 Tank Duel ~ Play Book
© 2019 GMT Games, LLC
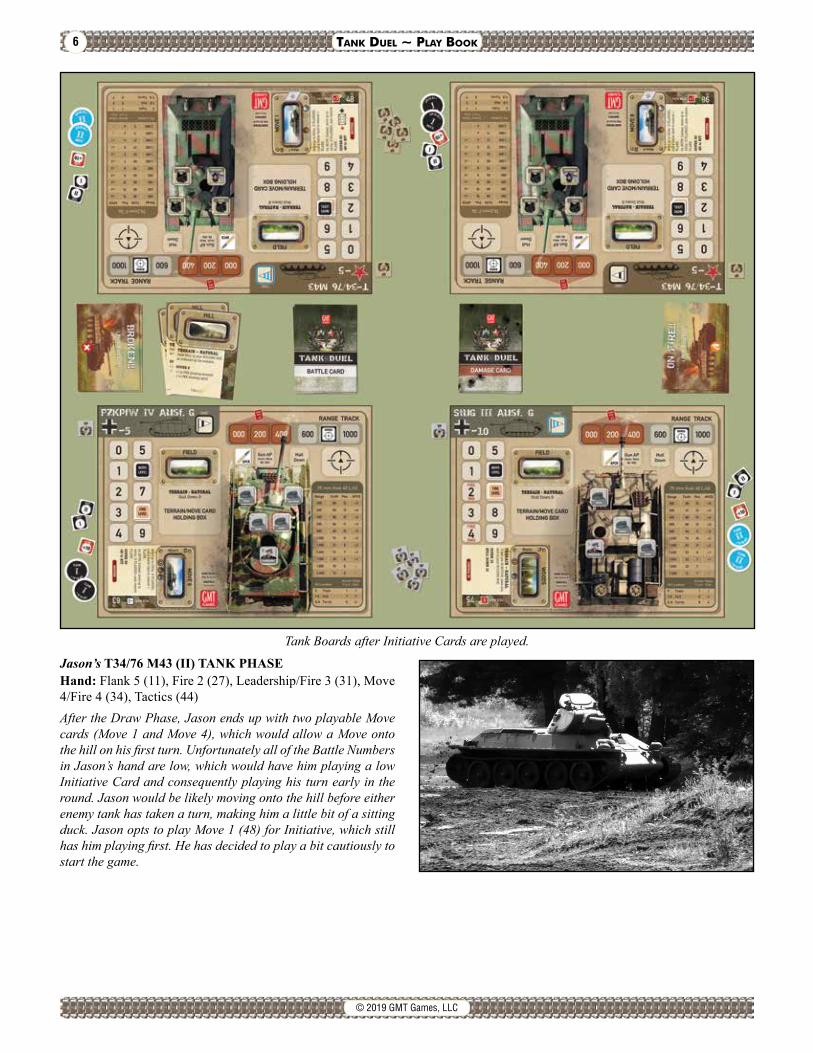
Jason’s T34/76 M43 (II) TANK PHASEHand: Flank 5 (11), Fire 2 (27), Leadership/Fire 3 (31), Move 4/Fire 4 (34), Tactics (44)After the Draw Phase, Jason ends up with two playable Move cards (Move 1 and Move 4), which would allow a Move onto the hill on his first turn. Unfortunately all of the Battle Numbers in Jason’s hand are low, which would have him playing a low Initiative Card and consequently playing his turn early in the round. Jason would be likely moving onto the hill before either enemy tank has taken a turn, making him a little bit of a sitting duck. Jason opts to play Move 1 (48) for Initiative, which still has him playing first. He has decided to play a bit cautiously to start the game.
Tank Boards after Initiative Cards are played.
7Tank Duel ~ Play Book
© 2019 GMT Games, LLC
Administration Step There are five items to complete during the Administration Step.1. Discard Initiative Card. Jason confirms that his Initiative
Card is the lowest valued card on the table then moves it to the discard pile—in this case, since the discard pile is empty, Jason starts a discard pile and discards his Initiative Card face down. Later in the round, having an empty Initiative Card box will indicate to the players that this tank has already completed its Tank Phase.
2. ScorescenariospecificVPs.Jason checks to see if his tank meets the scenario specific conditions for scoring VPs. In the Hold the High Ground scenario, having a Hill card in your Holding Box at the beginning of your Tank Phase awards 1 VP. Jason’s T34/76 M43 (II) does not have a Hill card in its Holding Box and so does not hold the hill. No VPs; Jason continues to item 3.
3. Smoke Check. Jason’s T34/76 M43 (II) is not in Smoke. Continue to item 4.
4. On Fire Check. Jason’s T34/76 M43 (II) is not On Fire. Continue to item 5.
5. Morale Check. Jason’s Crew is not Broken. That completes the (uneventful) Administration Step, and Jason continues to the Action Step.
Action Step During the Action Step players take 1 Tank Action and any number of Field Actions.
Read section 8.3 in the Rulebook for more information about Tank Actions.
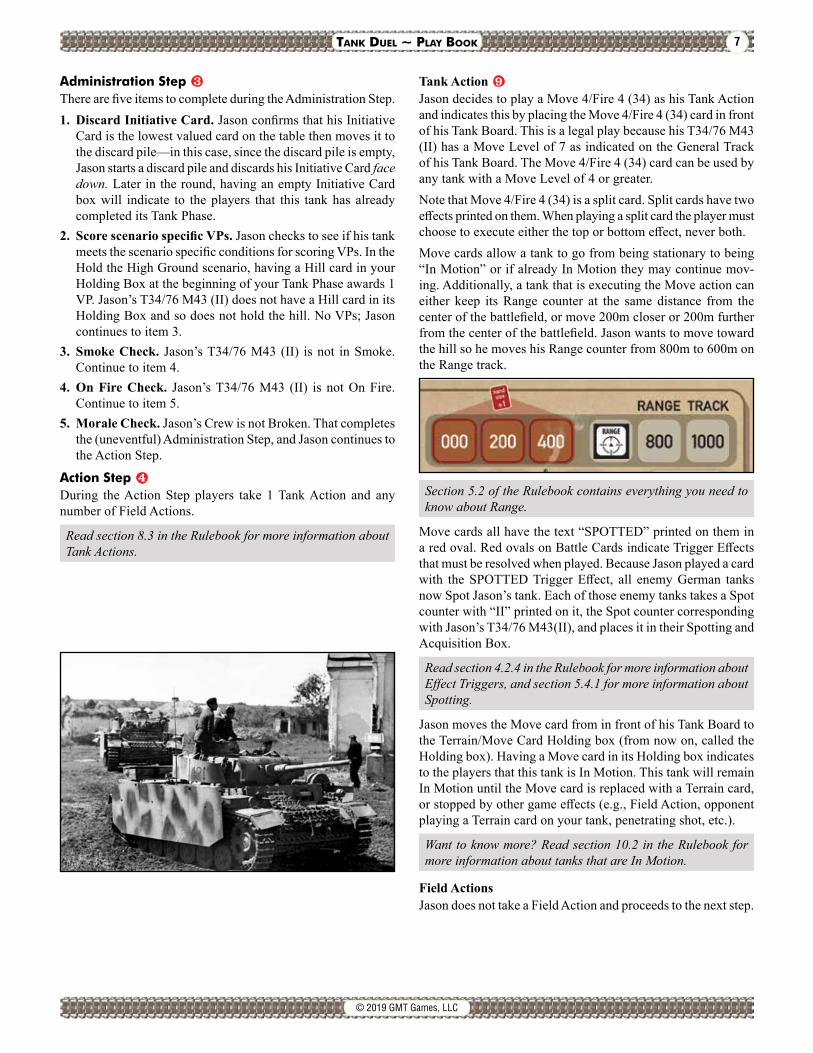
Tank Action Jason decides to play a Move 4/Fire 4 (34) as his Tank Action and indicates this by placing the Move 4/Fire 4 (34) card in front of his Tank Board. This is a legal play because his T34/76 M43 (II) has a Move Level of 7 as indicated on the General Track of his Tank Board. The Move 4/Fire 4 (34) card can be used by any tank with a Move Level of 4 or greater.Note that Move 4/Fire 4 (34) is a split card. Split cards have two effects printed on them. When playing a split card the player must choose to execute either the top or bottom effect, never both.Move cards allow a tank to go from being stationary to being “In Motion” or if already In Motion they may continue mov-ing. Additionally, a tank that is executing the Move action can either keep its Range counter at the same distance from the center of the battlefield, or move 200m closer or 200m further from the center of the battlefield. Jason wants to move toward the hill so he moves his Range counter from 800m to 600m on the Range track.
Section 5.2 of the Rulebook contains everything you need to know about Range.
Move cards all have the text “SPOTTED” printed on them in a red oval. Red ovals on Battle Cards indicate Trigger Effects that must be resolved when played. Because Jason played a card with the SPOTTED Trigger Effect, all enemy German tanks now Spot Jason’s tank. Each of those enemy tanks takes a Spot counter with “II” printed on it, the Spot counter corresponding with Jason’s T34/76 M43(II), and places it in their Spotting and Acquisition Box.
Read section 4.2.4 in the Rulebook for more information about Effect Triggers, and section 5.4.1 for more information about Spotting.
Jason moves the Move card from in front of his Tank Board to the Terrain/Move Card Holding box (from now on, called the Holding box). Having a Move card in its Holding box indicates to the players that this tank is In Motion. This tank will remain In Motion until the Move card is replaced with a Terrain card, or stopped by other game effects (e.g., Field Action, opponent playing a Terrain card on your tank, penetrating shot, etc.).
Want to know more? Read section 10.2 in the Rulebook for more information about tanks that are In Motion.
Field ActionsJason does not take a Field Action and proceeds to the next step.

8 Tank Duel ~ Play Book
© 2019 GMT Games, LLC
Discard Step Jason discards Flank 5 (11) from his hand.By opening a spot in his hand, Jason hopes to increase his odds of drawing a Terrain card during next round’s Draw phase.Now that Jason’s tank’s Discard Step is done, play proceeds with the next tank in Initiative Order. Mike’s PzKpfw IV Ausf. G (I) has a Move 6 (63) in its Initiative Card box, which is the lowest of the remaining Initiative Cards on the table so he will execute his Tank Phase next.
Mike’s PzKpfw IV Ausf. G (I) TANK PHASEHand: Leadership (3), Mud/Fire 2 (17), Move 3 (53), Woods (72), Woods (79), Move 7 (94)It turns out that going second in the turn order was a good thing. Since Jason’s tank is currently In Motion, Mike has some options for disrupting Jason’s tank.
Administration Step 1. Discard Initiative Card. Mike played Move 6 (63) as his
Initiative Card making him second to act in the round.2. ScorescenariospecificVPs.Mike’s PzKpfw IV Ausf. G (I)
does not hold the hill. Continue to item 3.3. Smoke Check. Mike’s PzKpfw IV Ausf. G (I) is not in
Smoke. Continue to item 4.4. On Fire Check. Mike’s PzKpfw IV Ausf. G (I) is not On
Fire. Continue to item 5.5. Morale Check. Mike’s crew is not Broken. Continue to
Action Step.
After Jason’s turn. Note the sideways Battle Card discard pile, face down.

9Tank Duel ~ Play Book
© 2019 GMT Games, LLC
Action Step Remember, during the Action Step players take 1 Tank Action and any number of Field Actions!
Mike is about to perform a Field Action. Read section 8.4 of the Rulebook for more information about Field Actions.
Field Action As mentioned above, Jason’s tank has a Move card in its Holding Box which means that his tank is In Motion. Among other things, being In Motion allows opposing tanks to place Terrain cards onto the moving tank’s Holding Box. Mike decides to play the Mud portion of Mud/Fire 2 (17) as his Field Action, replacing the Move 4 (34) card in Jason’s Holding Box with the Mud/Fire 2 (17) card. Discard the Move 4/Fire 4 (34) card. Jason’s tank is no longer In Motion and is now in Mud.Jason could have played his Tactics card to cancel Mike’s play but decides to keep it for later, in case there’s a more important opportunity to use it. We will talk more about Tactics cards later. Mike’s turn is briefly interrupted so that Jason can resolve the Trigger Effect of the Mud/Fire 2 (17) card that was played on his tank. Mud/Fire 2 (17) has the Trigger Effect text “BOG 10” in red letters. This means that Jason must immediately Pull a BC. In general when the game asks you to Pull a BC, it is asking you to draw the next card from the top of the Battle Deck and either look for a numeric value or particular icon on that card to determine the outcome of an event. In this specific case, if the Battle Number of the Pulled card is 10 or less, his tank will become Bogged. Jason Pulls a BC and it’s the Fire 2 (28). For the purpose of this trigger we are only concerned with the Battle Number, which is 28, and is not 10 or less. Jason’s T34/76 M34 (II) does not become Bogged and he discards the Fire 2 (28) card.
Read section 10.3.8 of the Rulebook for more information about Bogged tanks.
Mike doesn’t have another Fire card in his hand, but he’s defi-nitely set up a shot for his teammate later in the round.
Tank Action Finally, Mike takes a Tank Action and plays a Move 3 (53) + Woods (72) combo.
Review section 8.3 of the Rulebook to learn about playing mul-tiple Battle Cards in a Tank Action. Player Aid is a handy reference for which cards are allowed to be played together, and any special effects those combinations may have.
Mike places both the Move 3 (53) and the Woods (72) in front of his Tank Board as his action, then resolves the cards in order.In this case, Mike is playing a Move 3 (53) to move 200m closer to the center of the battlefield. Mike places his Range counter on 600m. As explained during Jason’s move, the Move 3 (53) card has a red SPOTTED trigger, so enemy tanks will place a Spot I counter in their Spotting and Acquisition Box. Place the Move 3 (53) card into Mike’s Holding Box.Next Mike resolves the Woods (72). Looking at the Player Aid
, we see that a tank must be In Motion for the play of a Ter-rain card to be legal. The Move card played just a second ago is in Mike’s Holding Box, so the play of the Terrain card is legal. Place the Woods card in the Holding Box and discard the Move 3 (53) card. The Woods card has a Trigger Effect of CONCEAL 30. Mike Pulls a BC and if the Battle Number is 30 or less, he is Concealed, and enemy tanks will lose their Spots on him. Unfortunately he Pulled an 89! All enemy tanks keep Mike’s tank Spotted. Mike discards the Pulled card, Mud/Fire 9 (89).
Discard Step No discard.Mike decides to keep his remaining cards. A Move 7, Woods, and a Leadership card, which should prove useful in upcoming turns.

10 Tank Duel ~ Play Book
© 2019 GMT Games, LLC
Harold’s StuG Ausf. G III (II) TANK PHASEHand: Fire 1 (25), Leadership/Fire 3 (30), Move 6/Fire 6 (38), Rubble (67), Woods (78)Thanks to Mike’s play earlier in the round, Jason’s T34/76 M43 (II) is going to be a much easier target for Harold’s Stug III. Harold has some good cards to take advantage of the current situation.
Administration Step 1. Discard Initiative Card. Harold played Woods (75) as his
Initiative Card making him next to act in the round.2. ScorescenariospecificVPs.Harold’s StuG Ausf. III G (II)
does not hold the hill. Continue to item 33. Smoke Check. StuG Ausf. III G (II) is not in Smoke.
Continue to item 4.4. On Fire Check. StuG Ausf. III G (II) is not On Fire. Continue
to item 5.5. Morale Check. Harold’s crew is not Broken. Continue to
Action Step.
Action Step Harold decides to resolve his Tank Action without any Field Actions.
Tank Action Harold decides to take a shot at Jason’s tank. He can do so be-cause he has a Fire card in his hand and he currently has Jason’s tank Spotted. We know this because Harold has a Spot counter in his Spotting and Acquisition Box with Jason’s tank number on it.
The first thing Harold does is announce his Fire action by playing his Fire 1 (25) and Leadership/Fire 3 (30) cards simultaneously in front of his tank and declaring his target. Harold also declares that he is
playing the Leadership/Fire 3 (30) card for the Leadership por-tion of the card. Note that the Fire 1 (25) card has the SPOTTED
The situation after Mike’s turn. Every tank has an enemy Spotted, and Jason’s stuck in some Mud.
11Tank Duel ~ Play Book
© 2019 GMT Games, LLC
keyword, all enemy tanks now spot Harold’s tank and place the corresponding Spot II counter in their Spotting and Acquisition Box. Harold then calculates the Range of his shot. In this case we can see that Harold is at 800m from the center of the battle-field and Jason is at 600m from the center of the battlefield on the opposite side. Adding the Ranges together, Harold arrives at a Range of 1400m from Harold’s tank to Jason’s tank.
Since Harold played a Fire card, the target of the Fire action has an opportunity to play a Tactics card. In this case Jason does exactly that, playing the Tactics (44) card in front of him.Harold could play a Tactics card in response, if he had one and chose to do so, to cancel the effect of the Tactics card played against him.
Play can go back and forth this way until players no longer have Tactics cards to play or choose to pass. Harold does not have a Tactics card and so we continue with the Fire action resolution.Harold now calculates his To Hit Number by taking the base To Hit Number, adding together all positive modifiers then subtract-ing all negative modifiers (see Rules 11.1.3.C and Player Aid
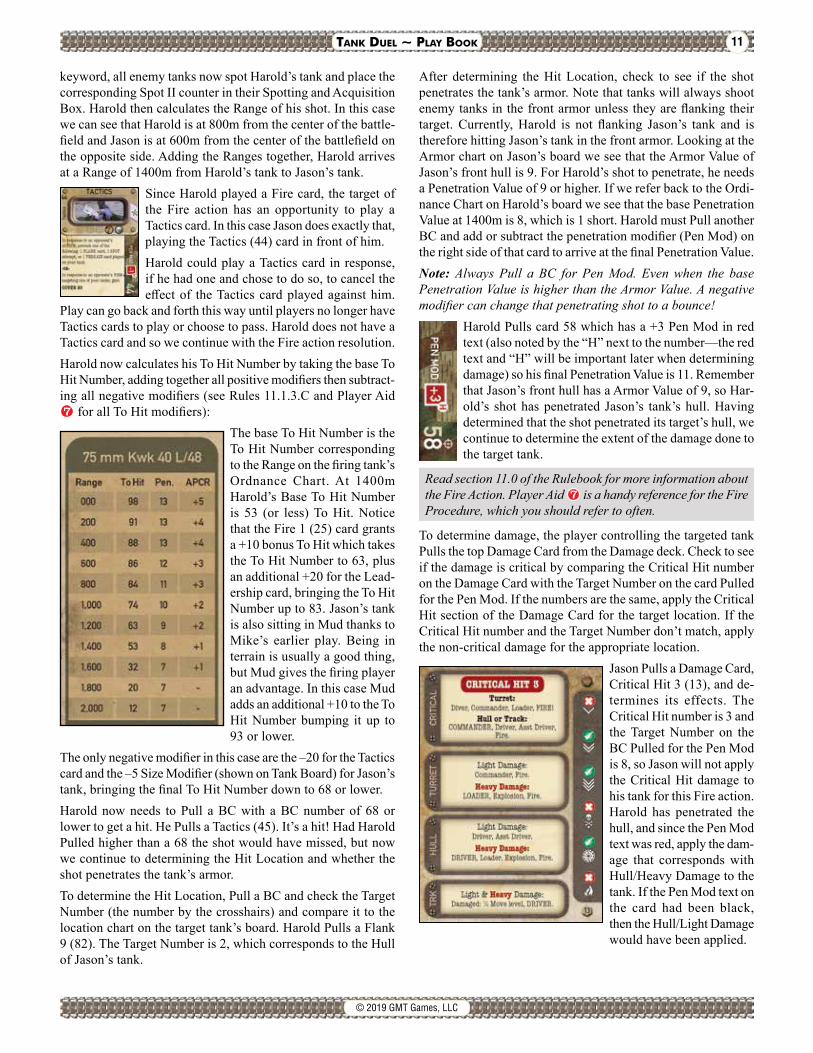
for all To Hit modifiers):The base To Hit Number is the To Hit Number corresponding to the Range on the firing tank’s Ordnance Chart. At 1400m Harold’s Base To Hit Number is 53 (or less) To Hit. Notice that the Fire 1 (25) card grants a +10 bonus To Hit which takes the To Hit Number to 63, plus an additional +20 for the Lead-ership card, bringing the To Hit Number up to 83. Jason’s tank is also sitting in Mud thanks to Mike’s earlier play. Being in terrain is usually a good thing, but Mud gives the firing player an advantage. In this case Mud adds an additional +10 to the To Hit Number bumping it up to 93 or lower.
The only negative modifier in this case are the –20 for the Tactics card and the –5 Size Modifier (shown on Tank Board) for Jason’s tank, bringing the final To Hit Number down to 68 or lower.Harold now needs to Pull a BC with a BC number of 68 or lower to get a hit. He Pulls a Tactics (45). It’s a hit! Had Harold Pulled higher than a 68 the shot would have missed, but now we continue to determining the Hit Location and whether the shot penetrates the tank’s armor.To determine the Hit Location, Pull a BC and check the Target Number (the number by the crosshairs) and compare it to the location chart on the target tank’s board. Harold Pulls a Flank 9 (82). The Target Number is 2, which corresponds to the Hull of Jason’s tank.
After determining the Hit Location, check to see if the shot penetrates the tank’s armor. Note that tanks will always shoot enemy tanks in the front armor unless they are flanking their target. Currently, Harold is not flanking Jason’s tank and is therefore hitting Jason’s tank in the front armor. Looking at the Armor chart on Jason’s board we see that the Armor Value of Jason’s front hull is 9. For Harold’s shot to penetrate, he needs a Penetration Value of 9 or higher. If we refer back to the Ordi-nance Chart on Harold’s board we see that the base Penetration Value at 1400m is 8, which is 1 short. Harold must Pull another BC and add or subtract the penetration modifier (Pen Mod) on the right side of that card to arrive at the final Penetration Value. Note: Always Pull a BC for Pen Mod. Even when the base Penetration Value is higher than the Armor Value. A negative modifier can change that penetrating shot to a bounce!
Harold Pulls card 58 which has a +3 Pen Mod in red text (also noted by the “H” next to the number—the red text and “H” will be important later when determining damage) so his final Penetration Value is 11. Remember that Jason’s front hull has a Armor Value of 9, so Har-old’s shot has penetrated Jason’s tank’s hull. Having determined that the shot penetrated its target’s hull, we continue to determine the extent of the damage done to the target tank.
Read section 11.0 of the Rulebook for more information about the Fire Action. Player Aid is a handy reference for the Fire Procedure, which you should refer to often.
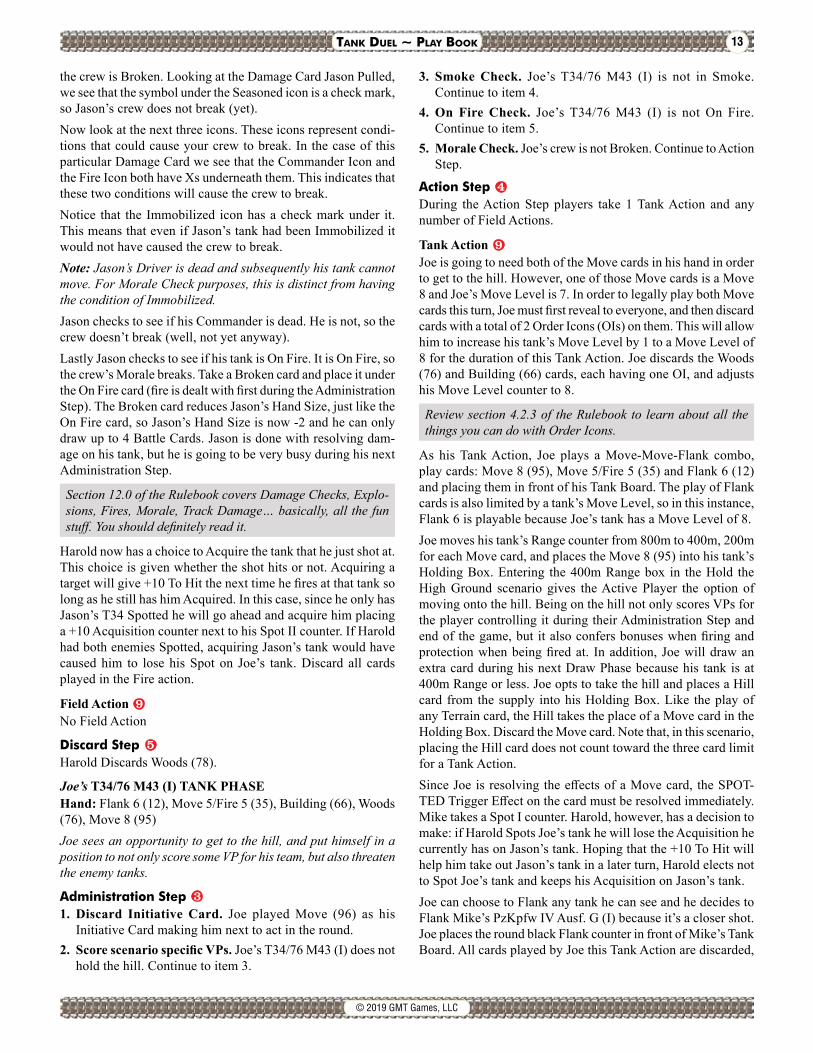
To determine damage, the player controlling the targeted tank Pulls the top Damage Card from the Damage deck. Check to see if the damage is critical by comparing the Critical Hit number on the Damage Card with the Target Number on the card Pulled for the Pen Mod. If the numbers are the same, apply the Critical Hit section of the Damage Card for the target location. If the Critical Hit number and the Target Number don’t match, apply the non-critical damage for the appropriate location.
Jason Pulls a Damage Card, Critical Hit 3 (13), and de-termines its effects. The Critical Hit number is 3 and the Target Number on the BC Pulled for the Pen Mod is 8, so Jason will not apply the Critical Hit damage to his tank for this Fire action. Harold has penetrated the hull, and since the Pen Mod text was red, apply the dam-age that corresponds with Hull/Heavy Damage to the tank. If the Pen Mod text on the card had been black, then the Hull/Light Damage would have been applied.

12 Tank Duel ~ Play Book
© 2019 GMT Games, LLC
Read and apply damage to the crew and the tank in the order it is written on the card.
Crew member titles spelled in all capital letters (e.g., “DRIV-ER”) means that the crew member is KIA; regular mixed case (e.g., “Driver”) means that they are wounded. Jason’s Dam-age Card specifies that his Driver is KIA. Remove the Driver counter from Jason’s tank. Harold scores 2 VP, the VP value of the Driver, and takes a VP counter from the supply and places it on the 2 space of his General Track. Since no one is driving Jason’s tank now, it can not move until another member of his crew occupies the Driver’s seat.Loader is typed in mixed case, so he is wounded. Flip the Loader counter to its wounded side.When events, such as Explosion or Fire, are spelled in mixed case, Pull a BC to determine if the Explosion or Fire occurs. If the matching Effect Icon is present on the BC then resolve the Explosion or Fire, otherwise ignore it and continue reading the Damage Card. If the Explosion or Fire is written in all capital letters, then it takes place without the need for Pulling a BC.
Jason sees that Explosion is typed in mixed case, so Jason Pulls a BC and checks for Explosion Icon. Jason Pulls a Woods (74) card which does not have an Explosion Icon!Likewise, Fire is typed in mixed case so it resolved like the Explosion above except now a Fire Icon will trigger the Fire event. Jason Pulls BC (24) which does have a Fire Icon. Jason’s tank is now On Fire. To indicate that his tank is On Fire, Jason takes an On Fire card and places it in his Initiative Card box. Note that Jason’s Hand Size is reduced by 1 by the On Fire card, bringing it down to 5 during the next Draw Phase. The On Fire card will also remind Jason to resolve an On Fire Check during his Administration Step in subsequent turns.The last thing done while resolving damage is checking the crew’s Morale. Look at the Morale Icons on the right side of the Damage Card. From top to bottom the first three icons repre-sent crews of varying quality. Green, Seasoned, Elite. A crew’s quality level is based on their Commander, look at your CMD counter to determine crew quality. If the Morale Icon on the card corresponding to your crew’s quality has a check mark under it, then the crew does not break. If that icon has an X under it then
The situation after Harold’s turn. Jason’s situation went from bad to worse, as he now has to deal with a Fire and a Broken crew.
13Tank Duel ~ Play Book
© 2019 GMT Games, LLC
the crew is Broken. Looking at the Damage Card Jason Pulled, we see that the symbol under the Seasoned icon is a check mark, so Jason’s crew does not break (yet).Now look at the next three icons. These icons represent condi-tions that could cause your crew to break. In the case of this particular Damage Card we see that the Commander Icon and the Fire Icon both have Xs underneath them. This indicates that these two conditions will cause the crew to break.Notice that the Immobilized icon has a check mark under it. This means that even if Jason’s tank had been Immobilized it would not have caused the crew to break.Note: Jason’s Driver is dead and subsequently his tank cannot move. For Morale Check purposes, this is distinct from having the condition of Immobilized.Jason checks to see if his Commander is dead. He is not, so the crew doesn’t break (well, not yet anyway).Lastly Jason checks to see if his tank is On Fire. It is On Fire, so the crew’s Morale breaks. Take a Broken card and place it under the On Fire card (fire is dealt with first during the Administration Step). The Broken card reduces Jason’s Hand Size, just like the On Fire card, so Jason’s Hand Size is now -2 and he can only draw up to 4 Battle Cards. Jason is done with resolving dam-age on his tank, but he is going to be very busy during his next Administration Step.
Section 12.0 of the Rulebook covers Damage Checks, Explo-sions, Fires, Morale, Track Damage… basically, all the fun stuff. You should definitely read it.
Harold now has a choice to Acquire the tank that he just shot at. This choice is given whether the shot hits or not. Acquiring a target will give +10 To Hit the next time he fires at that tank so long as he still has him Acquired. In this case, since he only has Jason’s T34 Spotted he will go ahead and acquire him placing a +10 Acquisition counter next to his Spot II counter. If Harold had both enemies Spotted, acquiring Jason’s tank would have caused him to lose his Spot on Joe’s tank. Discard all cards played in the Fire action.
Field Action No Field Action
Discard Step Harold Discards Woods (78).
Joe’s T34/76 M43 (I) TANK PHASEHand: Flank 6 (12), Move 5/Fire 5 (35), Building (66), Woods (76), Move 8 (95)Joe sees an opportunity to get to the hill, and put himself in a position to not only score some VP for his team, but also threaten the enemy tanks.
Administration Step 1. Discard Initiative Card. Joe played Move (96) as his
Initiative Card making him next to act in the round.2. ScorescenariospecificVPs. Joe’s T34/76 M43 (I) does not
hold the hill. Continue to item 3.
3. Smoke Check. Joe’s T34/76 M43 (I) is not in Smoke. Continue to item 4.
4. On Fire Check. Joe’s T34/76 M43 (I) is not On Fire. Continue to item 5.
5. Morale Check. Joe’s crew is not Broken. Continue to Action Step.
Action Step During the Action Step players take 1 Tank Action and any number of Field Actions.
Tank Action Joe is going to need both of the Move cards in his hand in order to get to the hill. However, one of those Move cards is a Move 8 and Joe’s Move Level is 7. In order to legally play both Move cards this turn, Joe must first reveal to everyone, and then discard cards with a total of 2 Order Icons (OIs) on them. This will allow him to increase his tank’s Move Level by 1 to a Move Level of 8 for the duration of this Tank Action. Joe discards the Woods (76) and Building (66) cards, each having one OI, and adjusts his Move Level counter to 8.
Review section 4.2.3 of the Rulebook to learn about all the things you can do with Order Icons.
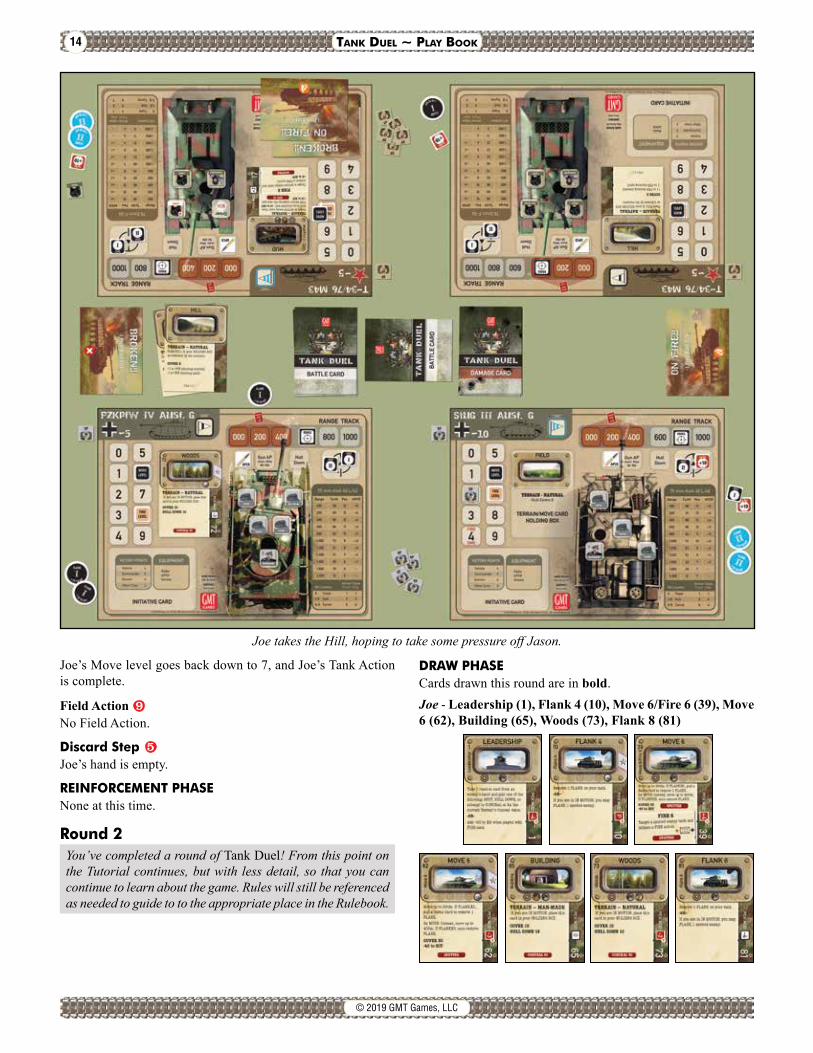
As his Tank Action, Joe plays a Move-Move-Flank combo, play cards: Move 8 (95), Move 5/Fire 5 (35) and Flank 6 (12) and placing them in front of his Tank Board. The play of Flank cards is also limited by a tank’s Move Level, so in this instance, Flank 6 is playable because Joe’s tank has a Move Level of 8.Joe moves his tank’s Range counter from 800m to 400m, 200m for each Move card, and places the Move 8 (95) into his tank’s Holding Box. Entering the 400m Range box in the Hold the High Ground scenario gives the Active Player the option of moving onto the hill. Being on the hill not only scores VPs for the player controlling it during their Administration Step and end of the game, but it also confers bonuses when firing and protection when being fired at. In addition, Joe will draw an extra card during his next Draw Phase because his tank is at 400m Range or less. Joe opts to take the hill and places a Hill card from the supply into his Holding Box. Like the play of any Terrain card, the Hill takes the place of a Move card in the Holding Box. Discard the Move card. Note that, in this scenario, placing the Hill card does not count toward the three card limit for a Tank Action.Since Joe is resolving the effects of a Move card, the SPOT-TED Trigger Effect on the card must be resolved immediately. Mike takes a Spot I counter. Harold, however, has a decision to make: if Harold Spots Joe’s tank he will lose the Acquisition he currently has on Jason’s tank. Hoping that the +10 To Hit will help him take out Jason’s tank in a later turn, Harold elects not to Spot Joe’s tank and keeps his Acquisition on Jason’s tank.Joe can choose to Flank any tank he can see and he decides to Flank Mike’s PzKpfw IV Ausf. G (I) because it’s a closer shot. Joe places the round black Flank counter in front of Mike’s Tank Board. All cards played by Joe this Tank Action are discarded,
14 Tank Duel ~ Play Book
© 2019 GMT Games, LLC
Joe’s Move level goes back down to 7, and Joe’s Tank Action is complete.
Field Action No Field Action.
Discard Step Joe’s hand is empty.
REINFORCEMENT PHASENone at this time.
Round 2You’ve completed a round of Tank Duel! From this point on the Tutorial continues, but with less detail, so that you can continue to learn about the game. Rules will still be referenced as needed to guide to to the appropriate place in the Rulebook.
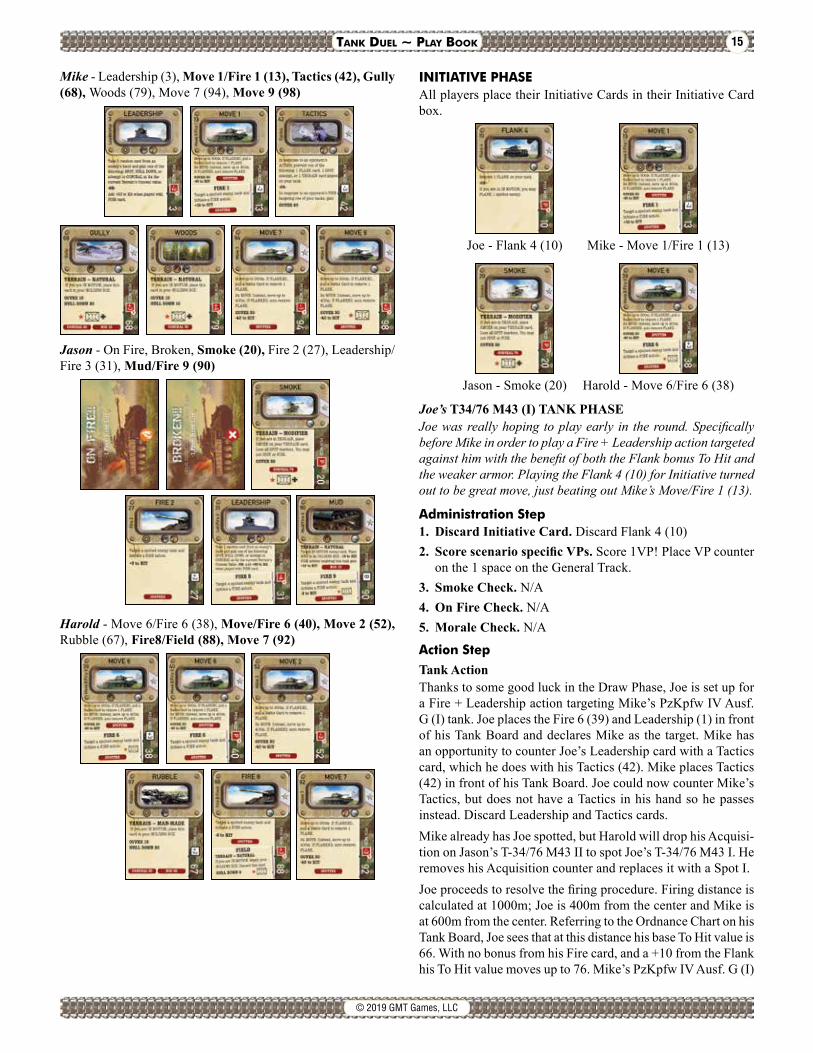
DRAW PHASE Cards drawn this round are in bold.Joe - Leadership (1), Flank 4 (10), Move 6/Fire 6 (39), Move 6 (62), Building (65), Woods (73), Flank 8 (81)
Joe takes the Hill, hoping to take some pressure off Jason.
15Tank Duel ~ Play Book
© 2019 GMT Games, LLC
Mike - Leadership (3), Move 1/Fire 1 (13), Tactics (42), Gully (68), Woods (79), Move 7 (94), Move 9 (98)
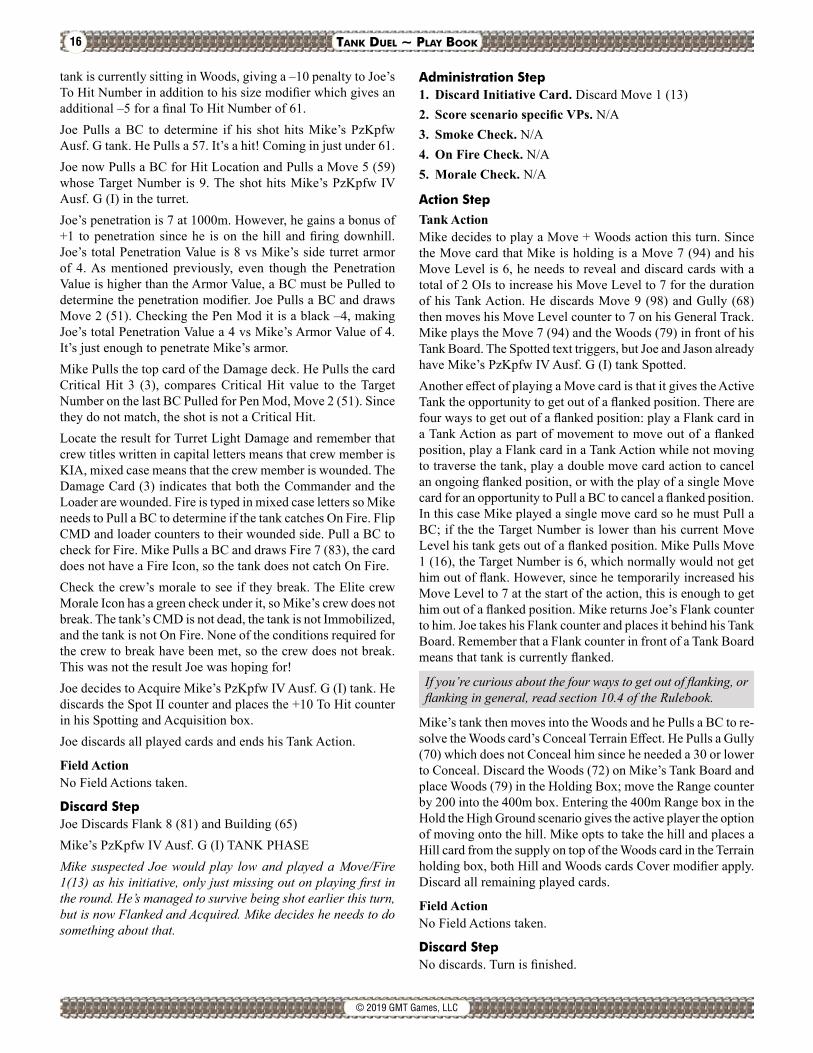
Jason - On Fire, Broken, Smoke (20), Fire 2 (27), Leadership/Fire 3 (31), Mud/Fire 9 (90)
Harold - Move 6/Fire 6 (38), Move/Fire 6 (40), Move 2 (52), Rubble (67), Fire8/Field (88), Move 7 (92)
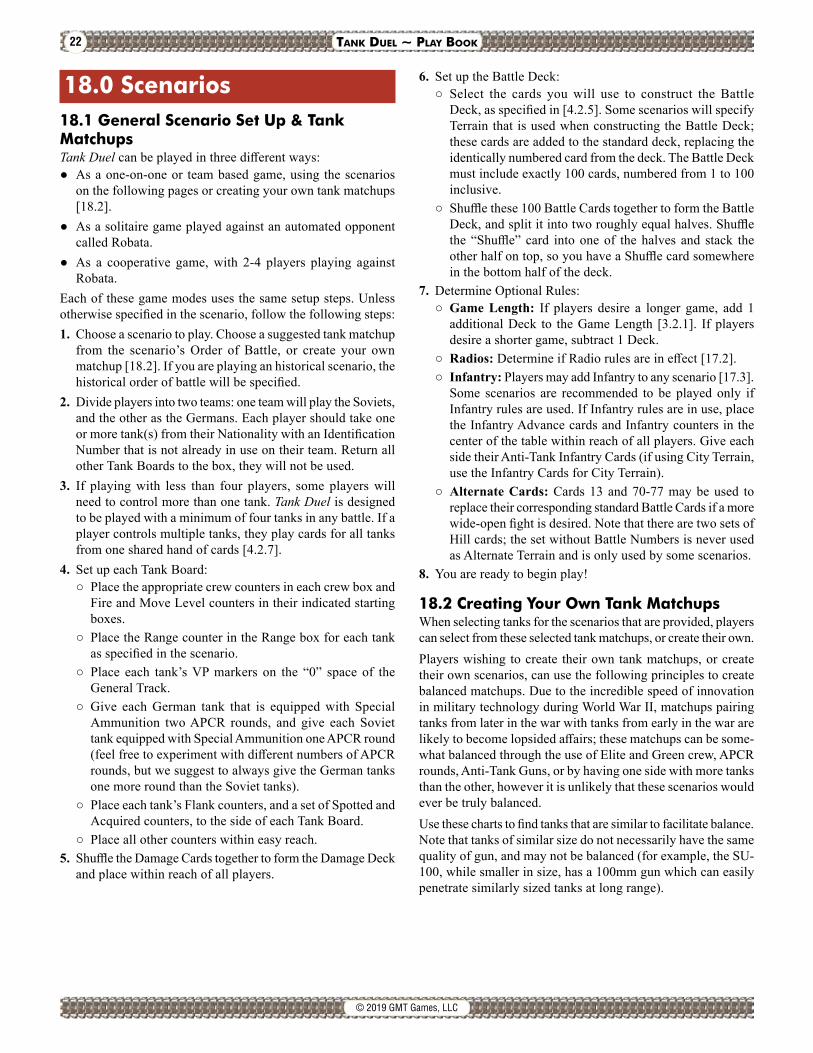
INITIATIVE PHASEAll players place their Initiative Cards in their Initiative Card box.
Joe - Flank 4 (10) Mike - Move 1/Fire 1 (13)
Jason - Smoke (20) Harold - Move 6/Fire 6 (38)
Joe’s T34/76 M43 (I) TANK PHASEJoe was really hoping to play early in the round. Specifically before Mike in order to play a Fire + Leadership action targeted against him with the benefit of both the Flank bonus To Hit and the weaker armor. Playing the Flank 4 (10) for Initiative turned out to be great move, just beating out Mike’s Move/Fire 1 (13).
Administration Step1. Discard Initiative Card. Discard Flank 4 (10)2. ScorescenariospecificVPs. Score 1VP! Place VP counter
on the 1 space on the General Track.3. Smoke Check. N/A4. On Fire Check. N/A5. Morale Check. N/A
Action StepTank ActionThanks to some good luck in the Draw Phase, Joe is set up for a Fire + Leadership action targeting Mike’s PzKpfw IV Ausf. G (I) tank. Joe places the Fire 6 (39) and Leadership (1) in front of his Tank Board and declares Mike as the target. Mike has an opportunity to counter Joe’s Leadership card with a Tactics card, which he does with his Tactics (42). Mike places Tactics (42) in front of his Tank Board. Joe could now counter Mike’s Tactics, but does not have a Tactics in his hand so he passes instead. Discard Leadership and Tactics cards.Mike already has Joe spotted, but Harold will drop his Acquisi-tion on Jason’s T-34/76 M43 II to spot Joe’s T-34/76 M43 I. He removes his Acquisition counter and replaces it with a Spot I.Joe proceeds to resolve the firing procedure. Firing distance is calculated at 1000m; Joe is 400m from the center and Mike is at 600m from the center. Referring to the Ordnance Chart on his Tank Board, Joe sees that at this distance his base To Hit value is 66. With no bonus from his Fire card, and a +10 from the Flank his To Hit value moves up to 76. Mike’s PzKpfw IV Ausf. G (I)
16 Tank Duel ~ Play Book
© 2019 GMT Games, LLC
tank is currently sitting in Woods, giving a –10 penalty to Joe’s To Hit Number in addition to his size modifier which gives an additional –5 for a final To Hit Number of 61.Joe Pulls a BC to determine if his shot hits Mike’s PzKpfw Ausf. G tank. He Pulls a 57. It’s a hit! Coming in just under 61.Joe now Pulls a BC for Hit Location and Pulls a Move 5 (59) whose Target Number is 9. The shot hits Mike’s PzKpfw IV Ausf. G (I) in the turret.Joe’s penetration is 7 at 1000m. However, he gains a bonus of +1 to penetration since he is on the hill and firing downhill. Joe’s total Penetration Value is 8 vs Mike’s side turret armor of 4. As mentioned previously, even though the Penetration Value is higher than the Armor Value, a BC must be Pulled to determine the penetration modifier. Joe Pulls a BC and draws Move 2 (51). Checking the Pen Mod it is a black –4, making Joe’s total Penetration Value a 4 vs Mike’s Armor Value of 4. It’s just enough to penetrate Mike’s armor.Mike Pulls the top card of the Damage deck. He Pulls the card Critical Hit 3 (3), compares Critical Hit value to the Target Number on the last BC Pulled for Pen Mod, Move 2 (51). Since they do not match, the shot is not a Critical Hit.Locate the result for Turret Light Damage and remember that crew titles written in capital letters means that crew member is KIA, mixed case means that the crew member is wounded. The Damage Card (3) indicates that both the Commander and the Loader are wounded. Fire is typed in mixed case letters so Mike needs to Pull a BC to determine if the tank catches On Fire. Flip CMD and loader counters to their wounded side. Pull a BC to check for Fire. Mike Pulls a BC and draws Fire 7 (83), the card does not have a Fire Icon, so the tank does not catch On Fire.Check the crew’s morale to see if they break. The Elite crew Morale Icon has a green check under it, so Mike’s crew does not break. The tank’s CMD is not dead, the tank is not Immobilized, and the tank is not On Fire. None of the conditions required for the crew to break have been met, so the crew does not break. This was not the result Joe was hoping for!Joe decides to Acquire Mike’s PzKpfw IV Ausf. G (I) tank. He discards the Spot II counter and places the +10 To Hit counter in his Spotting and Acquisition box.Joe discards all played cards and ends his Tank Action.
Field ActionNo Field Actions taken.
Discard StepJoe Discards Flank 8 (81) and Building (65)Mike’s PzKpfw IV Ausf. G (I) TANK PHASEMike suspected Joe would play low and played a Move/Fire 1(13) as his initiative, only just missing out on playing first in the round. He’s managed to survive being shot earlier this turn, but is now Flanked and Acquired. Mike decides he needs to do something about that.
Administration Step1. Discard Initiative Card. Discard Move 1 (13)2. ScorescenariospecificVPs. N/A3. Smoke Check. N/A4. On Fire Check. N/A5. Morale Check. N/A
Action StepTank ActionMike decides to play a Move + Woods action this turn. Since the Move card that Mike is holding is a Move 7 (94) and his Move Level is 6, he needs to reveal and discard cards with a total of 2 OIs to increase his Move Level to 7 for the duration of his Tank Action. He discards Move 9 (98) and Gully (68) then moves his Move Level counter to 7 on his General Track. Mike plays the Move 7 (94) and the Woods (79) in front of his Tank Board. The Spotted text triggers, but Joe and Jason already have Mike’s PzKpfw IV Ausf. G (I) tank Spotted.Another effect of playing a Move card is that it gives the Active Tank the opportunity to get out of a flanked position. There are four ways to get out of a flanked position: play a Flank card in a Tank Action as part of movement to move out of a flanked position, play a Flank card in a Tank Action while not moving to traverse the tank, play a double move card action to cancel an ongoing flanked position, or with the play of a single Move card for an opportunity to Pull a BC to cancel a flanked position. In this case Mike played a single move card so he must Pull a BC; if the the Target Number is lower than his current Move Level his tank gets out of a flanked position. Mike Pulls Move 1 (16), the Target Number is 6, which normally would not get him out of flank. However, since he temporarily increased his Move Level to 7 at the start of the action, this is enough to get him out of a flanked position. Mike returns Joe’s Flank counter to him. Joe takes his Flank counter and places it behind his Tank Board. Remember that a Flank counter in front of a Tank Board means that tank is currently flanked.
If you’re curious about the four ways to get out of flanking, or flanking in general, read section 10.4 of the Rulebook.
Mike’s tank then moves into the Woods and he Pulls a BC to re-solve the Woods card’s Conceal Terrain Effect. He Pulls a Gully (70) which does not Conceal him since he needed a 30 or lower to Conceal. Discard the Woods (72) on Mike’s Tank Board and place Woods (79) in the Holding Box; move the Range counter by 200 into the 400m box. Entering the 400m Range box in the Hold the High Ground scenario gives the active player the option of moving onto the hill. Mike opts to take the hill and places a Hill card from the supply on top of the Woods card in the Terrain holding box, both Hill and Woods cards Cover modifier apply. Discard all remaining played cards.
Field ActionNo Field Actions taken.
Discard StepNo discards. Turn is finished.

17Tank Duel ~ Play Book
© 2019 GMT Games, LLC
Jason’s T-34/76 M43 II TANK PHASEJason’s going to have to make some decisions.
Administration Step1. Discard Initiative Card. Discard Smoke (20).2. ScorescenariospecificVPs. N/A3. Smoke Check. N/A4. On Fire Check. Jason’s tank is On Fire.a. Jason needs four OIs to put out a Fire during the Administration
Step, but he only has one at the moment, on the Mud/Fire 9 (90) card. That leaves him with the choice to either Bail Out of the tank to save his crew, but give his opponent VPs for the tank only, or attempt to put out the Fire. In this case Harold would gain the VPs because his tank caused the Fire and Broken crew. Jason decides to Pull a BC to see if the Fire is put out. To do so, Jason Pulls a BC and looks for the Extinguisher Icon. There are three possible outcomes in this situation: if the BC that was Pulled has an Extinguisher Icon, then the Fire is successfully put out. If a Fire Icon is present on the BC that was Pulled, then the Fire goes out of control and forces an Escape attempt procedure with a check for survivors. If neither an Extinguisher or Fire Icon appears on the BC Pulled, then the Fire continues to burn and must be dealtwith during the Tank Phase.
Jason Pulls a Move/Fire 1 (14) which has an Extinguisher Icon. Jason has successfully put out the Fire. If Jason had not successfully put out the Fire and it did not go out of control, he would have been forced to use his Tank Phase to put out the Fire. Return the On Fire card to the supply. Discard the Move/Fire 1 (14) card.
5. Morale Check. The crew’s morale is Broken.a. Jason needs four OIs to rally his crew and discard the red
Broken card. As mentioned above, he only has one OI. Jason must perform a Morale Check. This is done by Pulling a Damage Card and evaluating its Morale Icons.
Jason Pulls a Damage Card (11). Since Jason’s Commander is Seasoned he checks the symbol under the Seasoned Moral Icon. It is a checkmark. None of the bottom three Morale Icons have an X by them so the crew rallies and is no longer Broken. If Jason’s crew had not rallied, he would be forced to Bail Out. Return the red Broken card to the supply and discard Damage Card (4). Since Jason no longer has red cards on his Tank Board, he may take a Tank Action as normal.
Action StepTank ActionJason has a couple of options for this Tank Action. If he wants to move, he will first have to get his Assistant Driver into the Driver’s seat on the Tank Board. As a Tank Action Jason can discard any card to move the Assistant Drive r into the Driver’s seat. His other choice, since you don’t need a Driver to shoot, is to take a Fire action.
Jason decides to shoot, playing a Fire 2 (27) + Leadership (31) action targeting Mike’s PzKpfw IV Ausf G. Jason is already Spotted by both opponents so the Spotted text does not yield any additional effects. The Range to Mike’s tank is 1000m. Accord-ing to the Ordnance Chart, Jason’s base To Hit is 66. Adding up all of his positive modifiers Jason gets +5 for the Fire card and +20 for the Leadership bringing him up to 91. Mike could play a Tactics card to cancel the effects of Leadership but does not have one so he passes. Now we calculate negative modifiers, Jason is sitting in Mud giving him –10, and Mike is in Woods + Hill further lowering Jason’s To Hit by another –15 and his tank size is –5 bringing the final To Hit Number back to 61.Jason needs to Pull a BC equal to or lower than 61 to hit Mike and Pulls a Move 3 (55). It’s a hit! Pulling a BC for Hit Loca-tion, Jason Pulls Move 5 (36). The Target Number 6 corresponds with the turret on Mike’s PzKpfw IV Ausf. G (I) Hit Location box. Checking for penetration, Jason Pulls a Flank 3 (9). The Pen Mod is a red +4. Jason adds +4 to the base penetration of 7 at 1000m for a total of 11 – 1 for shooting at Mike on the Hill for a total of 10. We then compare that to Mike’s PzKpfw IV Ausf. G (I) front turret armor which is 6, and confirm that the shot penetrates.Checking for damage on Mike’s PzKpfw IV Ausf. G (I), Mike Pulls a Damage Card and draws the Damage Card Critical Hit 9 (9). Comparing the Critical Hit number on the Damage Card with the Target Number on the card Pulled for the Pen Mod, Flank 3 (9), we have a match! Resolve the Critical Hit portion of the Damage Card instead of the normal Turret Damage Result.The Critical Hit damage first indicates a Gun hit. Gun hit perma-nently reduces Fire Level by 3. Move the Fire Level counter on Mike’s PzKpfw IV Ausf. G (I) Tank Board down 3 spaces to 5. His Gunner is wounded, flip the Gunner counter to its wounded side. The Loader is also wounded, but since the Loader was al-ready wounded he is instead KIA. Remove the loader from the Mike’s PzKpfw IV Ausf. G (I) Tank Board. Jason scores 2 VP and places a VP counter on the 2 space on his General Track. Explosion is written in mixed case, so Pull a BC and check for an Explosion Icon. Mike Pulls BC Gully (69) which has an Explosion Icon. Mike’s tank Explodes and Mike’s crew must now attempt to Escape!
To prepare for Mike’s Escape attempt, read section 12.6 of the Rulebook.
Mike can choose the order that the crew attempts to Escape, Pull-ing a BC for each crew member, or two BCs for each wounded crew member. An Explosion Icon on a BC Pulled for a crew member attempting to escape an Explosion results in that crew member being KIA. Mike Pulls a BC for his Driver. He Pulls a Move 4 (56) which does not have an Explosion Icon; his Driver successfully Escapes. Mike then Pulls a BC for his Assistant Driver. He Pulls a Flank 7 (80) which does not have an Explosion Icon; his Assistant Driver successfully Escapes. The Gunner is wounded so Mike has to Pull two BCs for his Escape attempt. If at least one card has an Explosion Icon, then the Gunner is KIA. Mike Pulls a Move 6 (64) and a Move 5 (61). The Move 5 (61) has an Explosion Icon, so Mike’s Gunner is KIA. Remove the

18 Tank Duel ~ Play Book
© 2019 GMT Games, LLC
Gunner from Mike’s PzKpfw IV Ausf. G (I) Tank Board. Jason receives 4 more VP for the Gunner (according to the values in Mike’s Initiative Card box) bringing Jason to 6 VPs. The Com-mander is also wounded. Mike Pulls a Woods (71) and a Flank 2 (8). The Woods (71) card has an Explosion Icon, so the Com-mander is KIA. Remove the Commander from Mike’s PzKpfw IV Ausf. G (I) Tank Board. Remember that although only one Explosion Icon was required for the commander to be KIA, you must still Pull two BCs in an Escape attempt for a wounded crew member. Jason receives 5 more VPs for the Commander and 4VP for the tank itself. Jason ends the turn with 15 VPs!During the Reinforcement Phase, Mike will reset his Tank Board, but until then his tank is out of the game. Mike discards the Woods (79) from his Holding Box and half of his cards randomly—Mike discards the Leadership (3) from his hand.
Section 12.7 of the Rulebook covers Destroyed and Aban-donded Tanks.
Because Mike’s tank has been taken out, both Russian tanks lose their Spot I counters and the T34/76 M43 I loses its Acquisition counter. Remove corresponding counters from their boards.Discard all BCs used this action and discard the Damage Card.
Field ActionNone
Discard StepNone. Keeping Mud (90) for its OI.
Harold’s StuG III Ausf. G TANK PHASESeeing that Joe is on the hill and will gain an easy VP every turn if he stays there, Harold decides that he is going to attempt to take Joe’s tank out this turn.
Administration Step1. Discard Initiative Card. Discard Move 6 (38).2. ScorescenariospecificVPs.N/A3. Smoke Check. N/A4. On Fire Check. N/A5. Morale Check. N/A
Action StepTank ActionHarold wants to fire at Joe, but because Joe is on the hill, Harold needs some extra penetration if he’s going to get through Joe’s armor. Normally Harold would have to take a whole Tank Ac-tion to load an APCR round, but instead Harold decides to take a Fire action and Quick-Load an APCR round. Harold plays his Move/Fire 6 (40) to initiate a fire action targeting Joe’s T-34/76 M43 I tank. He then reveals and discards the Move 7 (92), Fire 8/Field (88), Move 2 (52) for their 3 OIs to Quick-Load an APCR round. Harold takes an APCR counter from his board and place it in the Gun AP box. Discard cards Move 7 (92), Fire 8/Field (88), and Move 2 (52).
In about the same amount of time it took Harold to Quick-Load his APCR, you could read section 11.1.2 of the Rulebook to learn all about Quick-Loading Special Ammunition.
Now Joe could play a Tactics card but passes since he is not holding a Tactics card. Harold’s final To Hit is 53 (We’ve cal-culated the To Hit values up to now. See if you end up with the same value we did.) Harold Pulls a BC to check if the shot hits and Pulls the Shuffle card.When a Shuffle is Pulled during a Tank Action, put it aside and finish the Tank Action with the remaining cards in the deck. When you’ve completed the action start the shuffle procedure. If you run out of cards before finishing the action, do the shuffle procedure then finish the action.
Rules section 4.2.6 tells you how to Shuffle the Battle Deck.
Harold Pulls another BC to check if the shot hits. This time it’s a Move 4 (32): that’s a hit. Harold then Pulls for Hit Location and draws a Woods (77), which corresponds to Joe’s turret. Harold then Pulls for Pen Mod. He draws a Fire 2 (26) which has a Pen Mod of red +1. Harold’s base penetration is 9, + 1 for the Pen Mod, + 2 for APCR, – 1 for firing uphill. The final Penetration Value of 11. Joe’s front armor is 9 so the shell goes through.Joe Pulls the top Damage Card, Critical Hit 1 (1). The Critical Hit Number does not match the Target Number of the Pen Mod BC, Fire 2 (26) so we go to Turret Heavy Damage. The cor-responding damage reads, CATASTROPHIC HIT in all caps. A Catastrophic Hit means the tank Explodes and there are no survivors (do not resolve any Escape attempts!). A huge plume of smoke rises from the hill! Faint giggles are heard coming from Harold’s direction. Harold scores VP for the tank and all of the crew. That brings Harold’s score up 14 VPs, to a total of 16 VPs. He takes a x10 counter from the supply to track and places it on the 1 space of the General Track to show that he has 10 VP and also places the other VP counter on the 6 space of the General Track to show that he has a total of 16 VP. Harold takes a German kill medal from the supply and places it on his board.Joe now needs to reset his tank like Mike did above.Reshuffle the deck: take the discard pile along with the remain-ing cards in the Battle Deck, shuffle, split in half, insert shuffle in one half, shuffle that half place on table, shuffle other half, place on top.
Field ActionNone.
Discard StepNone. Keeps Rubble (67)
This is the end of the tutorial. If you want to continue playing, go on to the Reinforcement Phase and reset the Destroyed tanks. Good luck, Commander!

19Tank Duel ~ Play Book
© 2019 GMT Games, LLC
17.0 Advanced & Optional RulesPlayers may include the following Advanced and Optional rules according to scenario instructions or when constructing their own scenarios [18.2]. It is recommended that players are familiar with the base rules before including these
17.1 Anti-Tank GunsSome Scenarios include Anti-Tank Guns in the Order of Battle. The Active Player can fire these guns as a Field Action by re-vealing and discarding Battle Cards from their hand showing Order Icons equal to or greater than the OI cost printed on the Anti-Tank Gun. Anti-Tank Gun fire is resolved using the same fire procedure as Fire Actions [11.1.3] with the following dif-ferences:● Anti-Tank Guns do not require an enemy to be Spotted before
it can be fired upon.● After revealing and discarding Order Icons to fire an Anti-
Tank Gun, the Active Player may reveal and discard any Flank card from their hand in order for that Fire action to use the side armor rating of the targeted enemy tank.
● If the targeted enemy player plays an uncancelled Tactics card [13.0], they may choose either to cancel a Flank card played in this manner, or subtract 20 from the To Hit Number.
Designer Note: The play of a flank card does not necessarily indicate that the AT Guns are positioned to the side or rear of an enemy, rather that the tank had maneuvered in such a way that their side or rear armor was exposed.
Each Anti-Tank Gun has a Range box which holds a Range counter to indicate that Anti-Tank Gun’s Range as specified in the Scenario, and a To Hit chart used when firing the Anti-Tank Gun. Anti-
Tank Guns may not move or change Range during the Sce-nario.
17.2 [Optional] RadiosIf a tank does not have a Radio, the controller of that tank may not participate in any table talk about the cards in their hand, the actions they plan to perform on their turn, or the tactical position of their tank or their teammates’ tanks. This includes collabo-ration during the resolution of Command cards allowing the exchange of cards between hands, or discard and draw of cards.
17.3 [Optional] InfantryPlayers may agree to add Infantry to any scenario. Some scenarios may specify that they are recommended to be played with Infantry rules.
When using Infantry, players may take a Field Action to per-form an Infantry Advance [17.3.2] or make an Infantry Attack [17.3.3]. Players may only take one Infantry Field Action per Tank Action (so Infantry may either Advance or Attack, but not both in the same Action Step).If using Infantry rules, place enough Infantry Advance cards on the table so each player can see where the Infantry are positioned, and set aside an Infantry counter for each card. Additionally, players should distribute Anti-Tank Infantry cards matching the Terrain cards that have been included in the Scenario: there is one set of Infantry cards for City Terrain and one for Non-City Terrain. These cards remain on the table to be referenced by players and are not part of any player’s hand.
Designer Note: The Infantry Rules in Tank Duel are abstract, as with movement. They are intended to convey the back-and-forth of an advancing line of infantry. You definitely don’t want to find your tank alone behind enemy lines!
(17.3.1) Infantry CardsInfantry Range is tracked using the Infantry Advance cards, and Infantry Attacks are resolved using the Anti-Tank Infantry cards.
(17.3.1.1) Infantry Advance CardsInfantry Advance cards are used to track the current posi-tion of each Nation’s Infantry relative to the center of the battlefield. The Soviet and German Infantry counters show the Range at which their Infantry will Fire at enemy tanks.
Infantry are moved using the Infantry Advance Field Action [17.3.2]. When moving Infantry, be careful that all the Infantry cards are updated.Example: The German Infantry counter is on the Infantry Advance Card at 200m. That means the German Infantry have pushed 200m onto the Soviet side of the battlefield.
(17.3.1.2) Anti-Tank Infantry CardsAnti-Tank Infantry cards are referenced during the Infantry Attack Field Action. Each Anti-Tank Infantry card includes a To Hit chart with different To Hit Numbers depending on Infantry and Enemy Range, as well as a Weapon Selection chart used when resolving a Fire Action for Infantry. The Weapon Selection chart shows two weapons, with the stronger weapon printed below

20 Tank Duel ~ Play Book
© 2019 GMT Games, LLC
the weaker weapon, as well as the Penetration Values for each weapon.There are separate Anti-Tank Infantry cards for City Terrain and Non-City Terrain, with different modifiers for firing.
(17.3.2) Infantry AdvanceAn Infantry Advance moves Infantry towards the opponent’s side of the battlefield. To perform an Infantry Ad-
vance, a player must play a Battle card with an Infantry icon on the card. For an Infantry Advance (but not an Infantry Attack), which Nation’s symbols accompany the Infantry icon does not matter.To resolve an Infantry Advance, first players will push enemy Infantry back towards 000m. If the enemy Infantry counter is not on the Infantry Advance card, players may place their Infantry counter on the Infantry card or advance their counter to the next Range box. Infantry may never move to less than 000m Range, or greater than 400m Range.When performing an Infantry Advance:● First, attempt to move the enemy Infantry counter to the next
lowest Range box on the Infantry Advance card. If the enemy Infantry counter moves out of the 200m Range box, remove it from the card.
● Otherwise, if the enemy Infantry counter is not on the Infantry Advance card, place the Infantry counter matching the Active Player’s Nation in the 200m Range box or advance it to the next Range box on the Infantry Advance card.
Example: The Soviet Infantry are at 000m and their Infantry counter is not on the Infantry Advance card. The German player performs an Infantry Advance, so the German player places the German Infantry counter on the 200m space of the Infantry card. The German Infantry are now 200m onto the Russian side of the battlefield.
(17.3.3) Infantry AttackAn Infantry Attack uses Infantry to attack an enemy tank, either with an anti-tank weapon or in hand-to-hand combat. To perform an Infantry Attack, a player must reveal and discard a Battle Card with an Infantry icon on the card which matches their Nation (red star for the Soviets, black cross for the Germans). Infantry Attacks do not require an enemy to be Spotted before it can be attacked.Play Note: There are fifteen Battle Cards showing the German and Soviet Infantry icon, and five Battle Cards which show only a Russian Infantry icon. This gives a slight advantage to the Soviet player when performing Infantry Attacks, due to their greater number of Infantry.
A player may only attack enemy tanks which are at 600m or less from the center of the battlefield (400m or less in City Terrain). Infantry Attacks follow their own attack procedure (while similar to the Fire Action Procedure, there are several differences, so follow each step carefully):
Infantry Attack Procedurea. Declare Target: Declare an enemy tank that is not In Motion,
and is at a Range of 600m or less (including any enemy tank at negative Range; enemy must be at 400m or less in City Terrain), as the target of the attack. The Active Player may declare that the Infantry makes a Flank attack by revealing and discarding Battle Cards showing at least 3 additional OIs (not including OIs used for the Infantry Attack).
b. Declare Anti-Tank or Hand-to-Hand: The Active Player must decide if the Infantry attack with an Anti-Tank weapon or attempt to destroy the tank with Hand-to-Hand fighting. Each option uses a different method of resolving the attack. Once this attack is declared, the targeted enemy player may play a Tactics card [13.0], which if uncancelled can be used to cancel a Flank attack, reverting it to a regular attack against front armor, or for a –20 To Hit modifier per usual.
Example: Playing as the Germans, Joe declares an Infantry Attack against a Soviet T-34/85 in Woods Terrain. Joe reveals a Gully (68) card showing a German/Soviet Infantry Icon, and reveals and discards a Command (4) and Flank 6 (12) card to use the 3 OIs on those cards for a Flank attack. Then Joe decides to attempt his attack using an Anti-Tank weapon. The Soviet player declines to play a Tactics card.
c. Determine Base To Hit: Find the column on the Infantry Card corresponding to the Range box which the enemy tank occupies, and the row corresponding to the Range box the Infantry counter occupies. If the Active Player’s Nation’s Infantry counter is not on the Infantry Advance card, use a Range of 000m. This number occupying this column and row is the base To Hit Number.
d. Modify this Base To Hit Number: Apply the following modifiers to get the Final To Hit Number:i. Add the target’s current Cover to the To Hit Number.ii. The target tank’s Size Modifier.iii. –20 if an uncancelled Tactics card was played (see step
b of this procedure).e. Determine if the Target is Hit: Pull 1 Battle Card. If the
Battle Number is equal to or less than the Final To Hit Number, the target is hit. If the target is not hit, end the Infantry Attack immediately. If the target is hit and are using an Anti-Tank Weapon, remember this Battle Number as it is used to determine which weapon the Infantry use.
Example: Continuing our example, Joe determines his To
Hit Number. The Soviet T-34/85 is occupying the 400m

21Tank Duel ~ Play Book
© 2019 GMT Games, LLC
Range box and in Woods terrain. The German Infantry are at Range 200, so his base chance to hit is 20. The Cover from the Terrain that the Soviet tank occupies (10) is added to the To Hit Number, along with the T-34/85’s size modifier (0) so Joe’s Final To Hit Number is 30. Joe Pulls a Battle Card and checks the Battle Number: 16! Joe remembers that his Battle Number was 16 for the next step of the procedure.
f. Determine Weapon and Resolve Attack: If Attack is Using an Anti-Tank Weapon:i. Determine Weapon: Compare the Battle Number
from step e to the Weapon Chart on the Infantry Card: if the Battle Number is less than half of the Final To Hit Number, the attack uses the more powerful weapon indicated on the chart, otherwise use the less powerful weapon.
Any time a Soviet player is performing an Infantry Attack and receives the Anti-Tank Rifle (ATR) result, they may decide to change to a Hand-to-Hand (HtH) attack, as indicated on the Infantry card. If the Soviet player decides to resolve a Hand-to-Hand attack instead of using an Anti-Tank Rifle, resolve the Hand-to-Hand instructions below instead of continuing this procedure (“If Attack is Hand-to-Hand”).
ii. Determine Hit Location: Pull 1 Battle Card. Compare the Target Number on the Battle Card to the enemy tank’s Hit Location chart to determine the Hit Location.
iii. Determine Infantry Weapon Penetration Value: Check Infantry Weapon Chart for the Penetration Value of the weapon determined above.
iv. Determine Enemy Armor Value: Check Enemy Armor Chart for the Armor Value of the enemy. Use the front armor unless a Flank attack was declared in step a above.
v. Determine if the Target is Penetrated: Pull 1 Battle Card and add the “Pen Mod” at the bottom right of the card to the Modified Penetration Value. If the Pen Mod is “P” the shot automatically penetrates the enemy armor; if the Pen Mod is “B” the shot automatically fails to penetrate the enemy armor. If the modified Penetration Value is equal to or greater than the Armor Value of the enemy, the shot has penetrated the enemy tank. Otherwise, end the Infantry Attack. If the Pen Mod is red, resolve Heavy Damage in the Damage Check, if the Pen Mod is black resolve Light Damage.
vi. Determine Damage: Perform a Damage Check [12.1] and a Morale Check [12.4].
Example: Our example from before continues with Joe checking what weapon his successful Infantry Attack will use. His Battle Number was 16, so he compares that with his Final To Hit Number of 30. Since 16 is not less than half of the Final to Hit Number, Joe’s Infantry will fire a Panzershrek, not the more powerful Panzerfaust. After Pulling a Battle Card and determining that his Attack will hit the Turret of the T-34/85, Joe compares the Panzershrek’s Penetration Value (15) with the side Turret armor of the T-34/85 (9; remember, Joe used OIs
to Flank!). Joe Pulls another Battle Card and adds the Penetration Modifier to the Panzershrek’s 15; in this case the Battle Card shows +1 to the Pen Mod and the Panzershrek penetrates the Turret! So, Joe notes that the Battle Card’s Pen Mod is printed in black, and will resolve Light Damage during the Damage Check.
If Attack is Hand to Hand, Pull 2 Battle Cards:■ If both cards show an Explosion icon, the target Explodes
[12.2].■ If only one Pulled card has an Explosion icon, and the
target tank has an Open Hatch, the Commander is KIA; Pull a Damage Card and resolve a Morale Check [12.4] (but do not resolve any Critical Hits or Damage Checks).
■ Any other result is an unsuccessful attack.After completing these steps, discard all cards used in the In-fantry Attack and any checks.
(17.3.4) Buttoning UpA tank may seek additional protection from an Infantry Attack by closing all the hatches on the tank. This is known as ‘Buttoning Up’. A tank that is But-
toned Up is less vulnerable to Infantry attacks, but suffers a penalty to Fire and Spot actions.A player may Button Up their tank or open their hatch as part of the Administration Phase [8.1]. When a tank is Buttoned Up, place a Buttoned Up counter on top of the Commander; remove this counter when a tank opens its hatch. When a tank is But-toned Up, apply a –10 penalty to any Fire Actions. A tank that is Buttoned Up may not use OI during a Spot attempt [8.3.5.i ].
17.4 Line of SightSome scenarios specify special Line of Sight (LOS) rules due to Terrain. LOS rules will specify which Range boxes a tank can see from a given Range box, or how far from its current Range a tank can see. A tank without LOS to an enemy tank may not Spot (or Acquire, Flank, or Fire upon) that tank until it gain LOS. Whenever a tank moves, immediately determine if it has lost LOS to any enemy tanks, or whether any enemy tanks have lost LOS to the moving tank. If a tank is ever un-able to trace LOS to an opponent tank, immediately remove all Spotted, Acquired, and Flanked counters for that tank from its Tank Board. If a tank ever gains LOS to an enemy tank that is In Motion, it is immediately Spotted.
22 Tank Duel ~ Play Book
© 2019 GMT Games, LLC
18.0 Scenarios18.1 General Scenario Set Up & Tank MatchupsTank Duel can be played in three different ways:● As a one-on-one or team based game, using the scenarios
on the following pages or creating your own tank matchups [18.2].
● As a solitaire game played against an automated opponent called Robata.
● As a cooperative game, with 2-4 players playing against Robata.
Each of these game modes uses the same setup steps. Unless otherwise specified in the scenario, follow the following steps:1. Choose a scenario to play. Choose a suggested tank matchup
from the scenario’s Order of Battle, or create your own matchup [18.2]. If you are playing an historical scenario, the historical order of battle will be specified.
2. Divide players into two teams: one team will play the Soviets, and the other as the Germans. Each player should take one or more tank(s) from their Nationality with an Identification Number that is not already in use on their team. Return all other Tank Boards to the box, they will not be used.
3. If playing with less than four players, some players will need to control more than one tank. Tank Duel is designed to be played with a minimum of four tanks in any battle. If a player controls multiple tanks, they play cards for all tanks from one shared hand of cards [4.2.7].
4. Set up each Tank Board:○ Place the appropriate crew counters in each crew box and
Fire and Move Level counters in their indicated starting boxes.
○ Place the Range counter in the Range box for each tank as specified in the scenario.
○ Place each tank’s VP markers on the “0” space of the General Track.
○ Give each German tank that is equipped with Special Ammunition two APCR rounds, and give each Soviet tank equipped with Special Ammunition one APCR round (feel free to experiment with different numbers of APCR rounds, but we suggest to always give the German tanks one more round than the Soviet tanks).
○ Place each tank’s Flank counters, and a set of Spotted and Acquired counters, to the side of each Tank Board.
○ Place all other counters within easy reach.5. Shuffle the Damage Cards together to form the Damage Deck
and place within reach of all players.
6. Set up the Battle Deck:○ Select the cards you will use to construct the Battle
Deck, as specified in [4.2.5]. Some scenarios will specify Terrain that is used when constructing the Battle Deck; these cards are added to the standard deck, replacing the identically numbered card from the deck. The Battle Deck must include exactly 100 cards, numbered from 1 to 100 inclusive.
○ Shuffle these 100 Battle Cards together to form the Battle Deck, and split it into two roughly equal halves. Shuffle the “Shuffle” card into one of the halves and stack the other half on top, so you have a Shuffle card somewhere in the bottom half of the deck.
7. Determine Optional Rules:○ Game Length: If players desire a longer game, add 1
additional Deck to the Game Length [3.2.1]. If players desire a shorter game, subtract 1 Deck.
○ Radios: Determine if Radio rules are in effect [17.2].○ Infantry: Players may add Infantry to any scenario [17.3].
Some scenarios are recommended to be played only if Infantry rules are used. If Infantry rules are in use, place the Infantry Advance cards and Infantry counters in the center of the table within reach of all players. Give each side their Anti-Tank Infantry Cards (if using City Terrain, use the Infantry Cards for City Terrain).
○ Alternate Cards: Cards 13 and 70-77 may be used to replace their corresponding standard Battle Cards if a more wide-open fight is desired. Note that there are two sets of Hill cards; the set without Battle Numbers is never used as Alternate Terrain and is only used by some scenarios.
8. You are ready to begin play!
18.2 Creating Your Own Tank MatchupsWhen selecting tanks for the scenarios that are provided, players can select from these selected tank matchups, or create their own.Players wishing to create their own tank matchups, or create their own scenarios, can use the following principles to create balanced matchups. Due to the incredible speed of innovation in military technology during World War II, matchups pairing tanks from later in the war with tanks from early in the war are likely to become lopsided affairs; these matchups can be some-what balanced through the use of Elite and Green crew, APCR rounds, Anti-Tank Guns, or by having one side with more tanks than the other, however it is unlikely that these scenarios would ever be truly balanced.Use these charts to find tanks that are similar to facilitate balance. Note that tanks of similar size do not necessarily have the same quality of gun, and may not be balanced (for example, the SU-100, while smaller in size, has a 100mm gun which can easily penetrate similarly sized tanks at long range).

23Tank Duel ~ Play Book
© 2019 GMT Games, LLC
Suggested Tank MatchupsThese matchups have been tested and found to be enjoyable by our team of playtesters. We recommend using these as a start-ing point when creating your own tank matchups! These can be expanded to include any number of tanks, and can be mixed-and-matched as desired.
PzKpfw III Ausf. J vs T-34/76 M40PzKpfw IV Ausf. G and/or StuG III Ausf. G vs T-34/76 M43PzKpfw V Ausf. A (Panther) and/or vs T-34/85 M44 and/or KV 85 M43 and/or SU-100 M 44 PzKpfw VI Ausf. E (Tiger)Panzerjager Tiger (P) (Ferdinand) and/or vs IS-2m M44 and/or KV-85 M43 and/or SU-100 M44 PzKpfw VI Ausf. E (Tiger)PzKpfw VI Ausf. E (Tiger) with Elite Crew vs Three T-34/76 M43 with Green CrewsTwo PzKpfw V Ausf. A (Panther) and/or vs Two KV-85 M43 and one SU-100 M44 PzKpfw VI Ausf. E (Tiger) and one PzKpfw IV Ausf. G and/or StuG III Ausf. G
Tanks by Year
1940:T-34/76 M401941:PzKpfw III Ausf. J1942:PzKpfw IV Ausf. G StuG III Ausf. GT-34/76 M431943:PzKpfw V Ausf. A (Panther) PzKpfw VI Ausf. E (Tiger)Panzerjager Tiger (P) (Ferdinand)KV-85 M431944:T-34/85 M44SU-100 M44IS-2m M44
Tanks by SizeFrom small to large:StuG III Ausf. GT-34/76 M40PzKpfw III Ausf. JT-34/76 M43PzKpfw IV Ausf. G SU-100 M44T-34/85 M44PzKpfw V Ausf. A (Panther) KV-85 M43PzKpfw VI Ausf. E (Tiger)IS-2m M44Panzerjager Tiger (P) (Ferdinand)
In general, adding Infantry and/or Anti-Tank Guns to a battle makes it more likely that tanks will remain at stand-off Range, so Infantry and Anti-Tank Guns should not be used with matchups requiring close ranges for penetration. The opposite effect is achieved by adding City Terrain and limited Line-of-Sight to a matchup (see Scenario 4 and 6 for examples).

24 Tank Duel ~ Play Book
© 2019 GMT Games, LLC
Scenario 1: Merging Forces
The war rages on as a new day dawns on the Eastern Front. Each day sees new engagements, one fight blurring into the last. This is but one of many tank battles that will happen today. Will you emerge victorious, or will today be another day you hope to forget?
Overview: This scenario is recommended for first time players, or as the basis for creating your own scenario. There are no special victory rules for this scenario. All optional rules may be included.
Order of Battle: For new players, we recom-mend each German player prepare a PzKpfw IV Ausf. G, and each Soviet player prepare a T-34/76 M43. Experienced players can choose from any suggested matchup, or create their own [18.2].Starting Range: Tanks start at 800m except tanks with Heavy Damage printed in their equipment box, which start at 1000m.Battle Deck: First time players should use the standard 1-100 Battle Cards. Experienced players may wish to use the alternate terrain for a more wide-open fight.Special Scenario Rules: None.Victory Points: Players score standard Victory Points for KIA Crew [14.1] and Eliminated tanks [14.2].Scenario Victory Points:None.
Robata can be used with this scenario.There is no Mission Priority for Robata. Continue to the next action.
Infantry Cards
Alternate Cards

25Tank Duel ~ Play Book
© 2019 GMT Games, LLC
Scenario 2: Hold the High Ground
Scenario Card (Hill)
Infantry Cards
Alternate Cards
It’s not much of a hill really, more of a crest. But the no-mans land in-between this ridge and the next has been named the Valley of Death by some of the more morbid men. The order has come down from above, that we must control this valley. There’s only one way forward - Hold the High Ground!
Overview: On each side of the battlefield, there are Hills at 400m. You have been commanded to hold the hills on your side and to deny the enemy the ability to hold the hills on theirs. It’s not pos-sible for all the tanks to make it up onto the high ground, so players will need to work together to secure their positions. Special VPs are awarded for holding a Hill at the start of your Tank Phase, and if your Nation is the only one on a Hill at the end of the game.Order of Battle: Choose from any suggested matchup, or create your own [18.2].Starting Range: Tanks start at 800m except tanks with Heavy Damage printed in their equipment box, which start at 1000m.Battle Deck: Standard 1-100 cards. Players may wish to use the alternate terrain for a more wide-open fight.Scenario Cards: Place the Hill Scenario cards in easy reach of all players. Use one fewer Hill Scenario card than the number of tanks to a minimum of 3 cards and a maximum of 7 cards.
Do not shuffle these cards into the Battle Deck at any time! Any time a Hill Scenario card would be discarded, return it to the center of the table.Special Scenario Rules: When a tank enters the 400m Range box (positive or negative), it may choose to go up onto a Hill, or stay off of the hills and remain in the 400m box (playing any other ter-rain if desired). A tank that goes onto a Hill takes one of the available Scenario Hill cards from the table and places it in its Holding Box. It is now on that Hill. If no Hill Scenario cards are available, the tank may not go onto a Hill.Placing the Hill Scenario card into a tank’s Hold-ing Box does not count against the three card play limit during a Tank Action; it happens after the Tank Action is complete. If the last card played during a Tank Action is a “Terrain - Natural” Ter-rain card, the player may place the Hill Scenario card and the Terrain card into the tank’s Holding Box. Thus a player may have both a “Terrain - Natural” Terrain card and a Hill Scenario card in their Holding Box at the same time. This tank will receive the benefits (or penalties) of both cards. A player may move without changing Range and choose to stay on the Scenario Hill card, all move rules would apply with the “Terrain - Natural” restriction. Victory Points: Players score standard Victory Points for KIA Crew [14.1] and Eliminated tanks [14.2].Scenario Victory Points: A tank scores 1 VP dur-ing the Administration Step if it has a Scenario Hill card in its Holding Box. At the end of the Game, if only one Nationality has any tanks on a Hill, they score 10 points (total, not per tank). In the event of a tie, the Nationality with more tanks on the Hills wins. If still tied, the Nationality with more Kill Medals wins.
Robata can be used with this scenario.Robata Mission Priority:● IfitisthefinalDeckofthegame,andtheactiveRobata
TankisnotoccupyingaHill,treattheMissionPriorityasifnoRobataTankisonaHill(seenextstep).
● IftheactiveRobataTankisnotoccupyingaHill,andnootherRobataTank isoccupyingaHill,andat leastoneHillisavailable,movetowardsaHill(200mif1success,
400mif2successes).IftheRobataTankmovesintothe400mRangebox,placeanavailableHillcard(ifany)intotheRobataTank’sholdingbox,alongwith therevealedNaturalTerrainwiththehighestCover.
● If theRobataTank is already occupying aHill, itmaymovebutwillnotchangeRangeorremovetheHillfromitsHoldingBox,onlyFlankandplaceNaturalTerrainintoitsHoldingBox.
● Otherwise,continuetothenextaction.
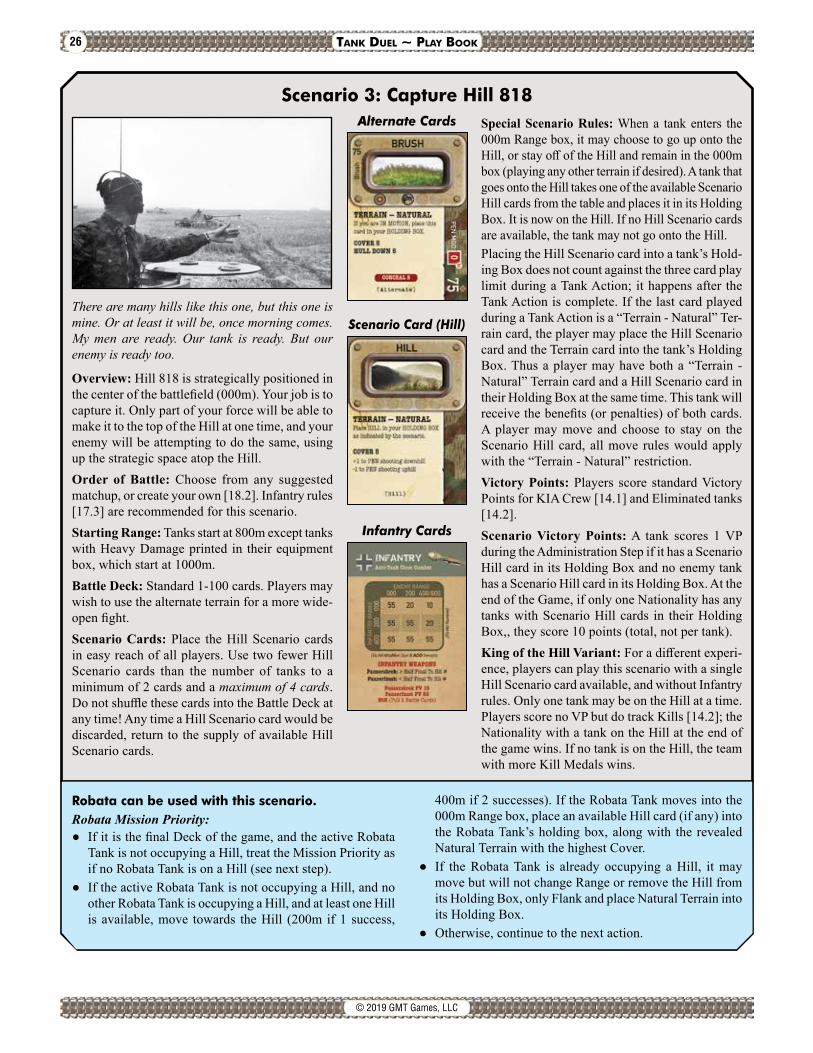
26 Tank Duel ~ Play Book
© 2019 GMT Games, LLC
Scenario 3: Capture Hill 818
Scenario Card (Hill)
Infantry Cards
Alternate Cards
There are many hills like this one, but this one is mine. Or at least it will be, once morning comes. My men are ready. Our tank is ready. But our enemy is ready too.
Overview: Hill 818 is strategically positioned in the center of the battlefield (000m). Your job is to capture it. Only part of your force will be able to make it to the top of the Hill at one time, and your enemy will be attempting to do the same, using up the strategic space atop the Hill.Order of Battle: Choose from any suggested matchup, or create your own [18.2]. Infantry rules [17.3] are recommended for this scenario.Starting Range: Tanks start at 800m except tanks with Heavy Damage printed in their equipment box, which start at 1000m.Battle Deck: Standard 1-100 cards. Players may wish to use the alternate terrain for a more wide-open fight.Scenario Cards: Place the Hill Scenario cards in easy reach of all players. Use two fewer Hill Scenario cards than the number of tanks to a minimum of 2 cards and a maximum of 4 cards. Do not shuffle these cards into the Battle Deck at any time! Any time a Hill Scenario card would be discarded, return to the supply of available Hill Scenario cards.
Special Scenario Rules: When a tank enters the 000m Range box, it may choose to go up onto the Hill, or stay off of the Hill and remain in the 000m box (playing any other terrain if desired). A tank that goes onto the Hill takes one of the available Scenario Hill cards from the table and places it in its Holding Box. It is now on the Hill. If no Hill Scenario cards are available, the tank may not go onto the Hill.Placing the Hill Scenario card into a tank’s Hold-ing Box does not count against the three card play limit during a Tank Action; it happens after the Tank Action is complete. If the last card played during a Tank Action is a “Terrain - Natural” Ter-rain card, the player may place the Hill Scenario card and the Terrain card into the tank’s Holding Box. Thus a player may have both a “Terrain - Natural” Terrain card and a Hill Scenario card in their Holding Box at the same time. This tank will receive the benefits (or penalties) of both cards. A player may move and choose to stay on the Scenario Hill card, all move rules would apply with the “Terrain - Natural” restriction. Victory Points: Players score standard Victory Points for KIA Crew [14.1] and Eliminated tanks [14.2].Scenario Victory Points: A tank scores 1 VP during the Administration Step if it has a Scenario Hill card in its Holding Box and no enemy tank has a Scenario Hill card in its Holding Box. At the end of the Game, if only one Nationality has any tanks with Scenario Hill cards in their Holding Box,, they score 10 points (total, not per tank).King of the Hill Variant: For a different experi-ence, players can play this scenario with a single Hill Scenario card available, and without Infantry rules. Only one tank may be on the Hill at a time. Players score no VP but do track Kills [14.2]; the Nationality with a tank on the Hill at the end of the game wins. If no tank is on the Hill, the team with more Kill Medals wins.
Robata can be used with this scenario.Robata Mission Priority:● IfitisthefinalDeckofthegame,andtheactiveRobata
TankisnotoccupyingaHill,treattheMissionPriorityasifnoRobataTankisonaHill(seenextstep).
● IftheactiveRobataTankisnotoccupyingaHill,andnootherRobataTankisoccupyingaHill,andatleastoneHillisavailable,move towards theHill (200mif1success,
400mif2successes).IftheRobataTankmovesintothe000mRangebox,placeanavailableHillcard(ifany)intotheRobataTank’sholdingbox,alongwith therevealedNaturalTerrainwiththehighestCover.
● If theRobataTank is already occupying aHill, itmaymovebutwillnotchangeRangeorremovetheHillfromitsHoldingBox,onlyFlankandplaceNaturalTerrainintoitsHoldingBox.
● Otherwise,continuetothenextaction.
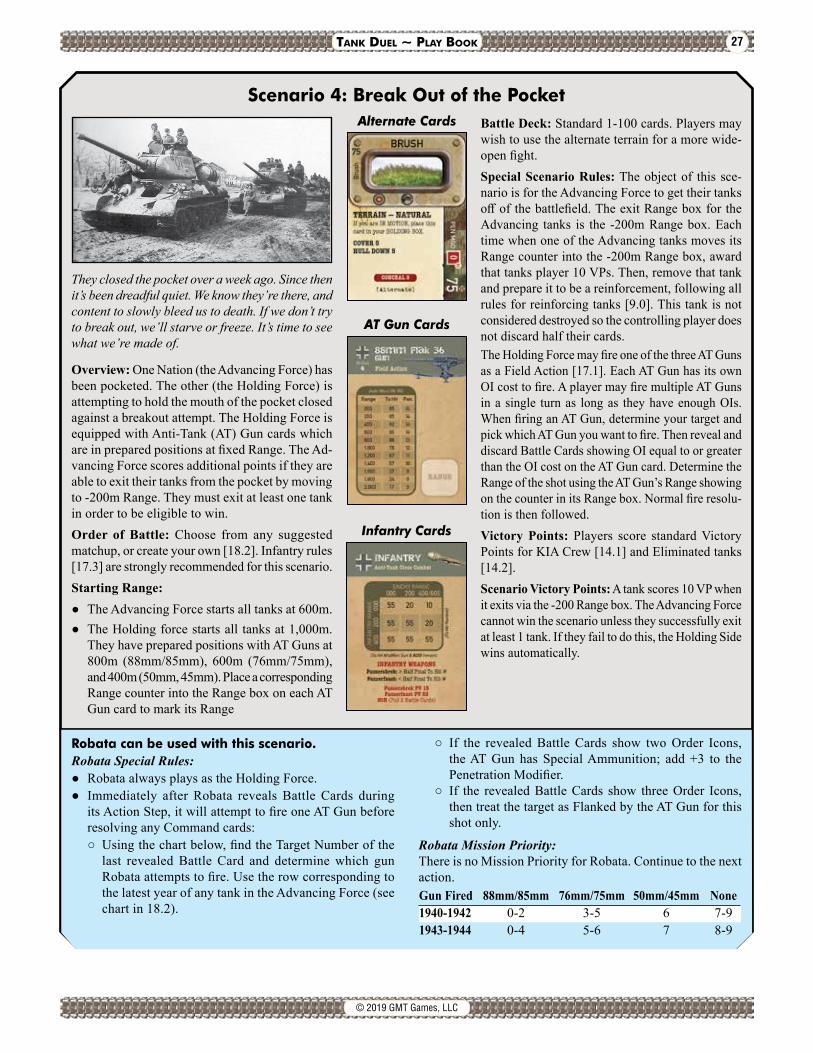
27Tank Duel ~ Play Book
© 2019 GMT Games, LLC
Scenario 4: Break Out of the Pocket
Infantry Cards
They closed the pocket over a week ago. Since then it’s been dreadful quiet. We know they’re there, and content to slowly bleed us to death. If we don’t try to break out, we’ll starve or freeze. It’s time to see what we’re made of.
Overview: One Nation (the Advancing Force) has been pocketed. The other (the Holding Force) is attempting to hold the mouth of the pocket closed against a breakout attempt. The Holding Force is equipped with Anti-Tank (AT) Gun cards which are in prepared positions at fixed Range. The Ad-vancing Force scores additional points if they are able to exit their tanks from the pocket by moving to -200m Range. They must exit at least one tank in order to be eligible to win.Order of Battle: Choose from any suggested matchup, or create your own [18.2]. Infantry rules [17.3] are strongly recommended for this scenario.Starting Range: ● The Advancing Force starts all tanks at 600m.● The Holding force starts all tanks at 1,000m.
They have prepared positions with AT Guns at 800m (88mm/85mm), 600m (76mm/75mm), and 400m (50mm, 45mm). Place a corresponding Range counter into the Range box on each AT Gun card to mark its Range
Battle Deck: Standard 1-100 cards. Players may wish to use the alternate terrain for a more wide-open fight.Special Scenario Rules: The object of this sce-nario is for the Advancing Force to get their tanks off of the battlefield. The exit Range box for the Advancing tanks is the -200m Range box. Each time when one of the Advancing tanks moves its Range counter into the -200m Range box, award that tanks player 10 VPs. Then, remove that tank and prepare it to be a reinforcement, following all rules for reinforcing tanks [9.0]. This tank is not considered destroyed so the controlling player does not discard half their cards. The Holding Force may fire one of the three AT Guns as a Field Action [17.1]. Each AT Gun has its own OI cost to fire. A player may fire multiple AT Guns in a single turn as long as they have enough OIs. When firing an AT Gun, determine your target and pick which AT Gun you want to fire. Then reveal and discard Battle Cards showing OI equal to or greater than the OI cost on the AT Gun card. Determine the Range of the shot using the AT Gun’s Range showing on the counter in its Range box. Normal fire resolu-tion is then followed.Victory Points: Players score standard Victory Points for KIA Crew [14.1] and Eliminated tanks [14.2].Scenario Victory Points: A tank scores 10 VP when it exits via the -200 Range box. The Advancing Force cannot win the scenario unless they successfully exit at least 1 tank. If they fail to do this, the Holding Side wins automatically.
Robata can be used with this scenario.Robata Special Rules:● RobataalwaysplaysastheHoldingForce.● Immediately afterRobata revealsBattleCards during
itsActionStep,itwillattempttofireoneATGunbeforeresolvinganyCommandcards:○ Usingthechartbelow,findtheTargetNumberofthelast revealedBattleCard and determinewhich gunRobataattemptstofire.UsetherowcorrespondingtothelatestyearofanytankintheAdvancingForce(seechartin18.2).
○ If the revealedBattleCards show twoOrder Icons,theATGun hasSpecialAmmunition; add+3 to thePenetrationModifier.
○ If the revealedBattleCards show threeOrder Icons,thentreatthetargetasFlankedbytheATGunforthisshotonly.
Robata Mission Priority: ThereisnoMissionPriorityforRobata.Continuetothenextaction.
AT Gun Cards
Alternate Cards
Gun Fired 88mm/85mm 76mm/75mm 50mm/45mm None1940-1942 0-2 3-5 6 7-91943-1944 0-4 5-6 7 8-9
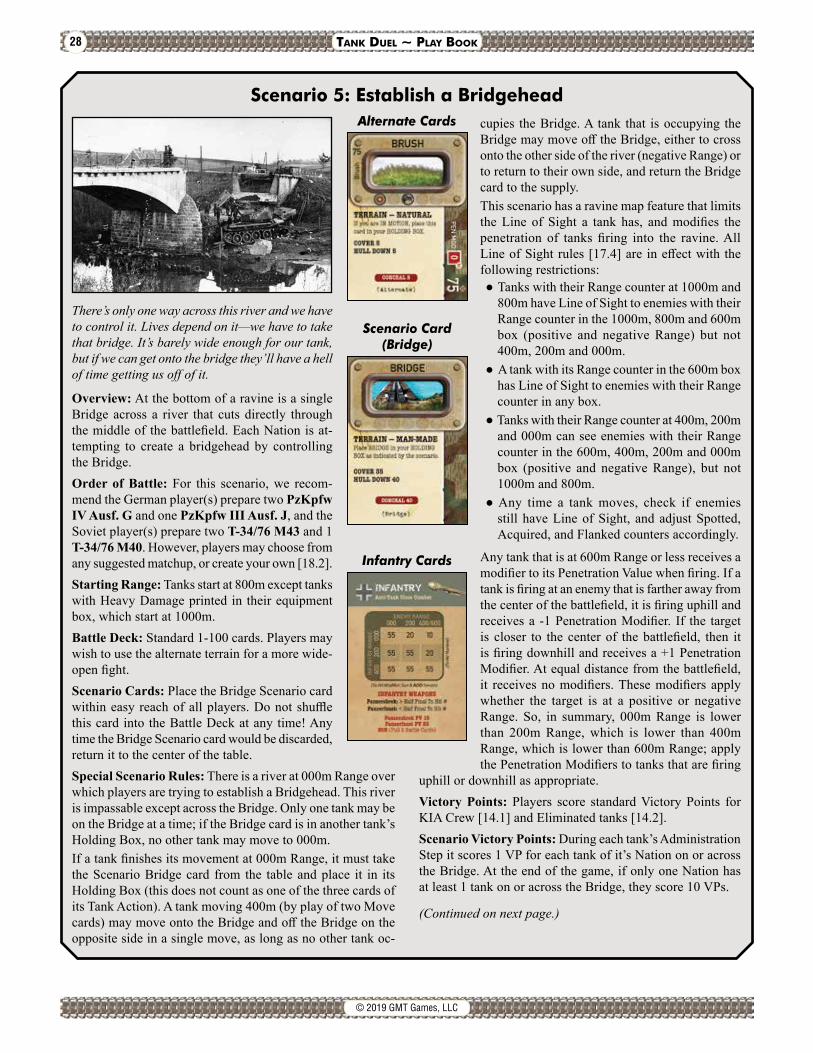
28 Tank Duel ~ Play Book
© 2019 GMT Games, LLC
Scenario 5: Establish a Bridgehead
Infantry Cards
Alternate Cards
There’s only one way across this river and we have to control it. Lives depend on it—we have to take that bridge. It’s barely wide enough for our tank, but if we can get onto the bridge they’ll have a hell of time getting us off of it.
Overview: At the bottom of a ravine is a single Bridge across a river that cuts directly through the middle of the battlefield. Each Nation is at-tempting to create a bridgehead by controlling the Bridge.Order of Battle: For this scenario, we recom-mend the German player(s) prepare two PzKpfw IV Ausf. G and one PzKpfw III Ausf. J, and the Soviet player(s) prepare two T-34/76 M43 and 1 T-34/76 M40. However, players may choose from any suggested matchup, or create your own [18.2]. Starting Range: Tanks start at 800m except tanks with Heavy Damage printed in their equipment box, which start at 1000m.Battle Deck: Standard 1-100 cards. Players may wish to use the alternate terrain for a more wide-open fight.Scenario Cards: Place the Bridge Scenario card within easy reach of all players. Do not shuffle this card into the Battle Deck at any time! Any time the Bridge Scenario card would be discarded, return it to the center of the table.Special Scenario Rules: There is a river at 000m Range over which players are trying to establish a Bridgehead. This river is impassable except across the Bridge. Only one tank may be on the Bridge at a time; if the Bridge card is in another tank’s Holding Box, no other tank may move to 000m.If a tank finishes its movement at 000m Range, it must take the Scenario Bridge card from the table and place it in its Holding Box (this does not count as one of the three cards of its Tank Action). A tank moving 400m (by play of two Move cards) may move onto the Bridge and off the Bridge on the opposite side in a single move, as long as no other tank oc-
cupies the Bridge. A tank that is occupying the Bridge may move off the Bridge, either to cross onto the other side of the river (negative Range) or to return to their own side, and return the Bridge card to the supply.This scenario has a ravine map feature that limits the Line of Sight a tank has, and modifies the penetration of tanks firing into the ravine. All Line of Sight rules [17.4] are in effect with the following restrictions:● Tanks with their Range counter at 1000m and
800m have Line of Sight to enemies with their Range counter in the 1000m, 800m and 600m box (positive and negative Range) but not 400m, 200m and 000m.
● A tank with its Range counter in the 600m box has Line of Sight to enemies with their Range counter in any box.
● Tanks with their Range counter at 400m, 200m and 000m can see enemies with their Range counter in the 600m, 400m, 200m and 000m box (positive and negative Range), but not 1000m and 800m.
● Any time a tank moves, check if enemies still have Line of Sight, and adjust Spotted, Acquired, and Flanked counters accordingly.
Any tank that is at 600m Range or less receives a modifier to its Penetration Value when firing. If a tank is firing at an enemy that is farther away from the center of the battlefield, it is firing uphill and receives a -1 Penetration Modifier. If the target is closer to the center of the battlefield, then it is firing downhill and receives a +1 Penetration Modifier. At equal distance from the battlefield, it receives no modifiers. These modifiers apply whether the target is at a positive or negative Range. So, in summary, 000m Range is lower than 200m Range, which is lower than 400m Range, which is lower than 600m Range; apply the Penetration Modifiers to tanks that are firing
uphill or downhill as appropriate.Victory Points: Players score standard Victory Points for KIA Crew [14.1] and Eliminated tanks [14.2].Scenario Victory Points: During each tank’s Administration Step it scores 1 VP for each tank of it’s Nation on or across the Bridge. At the end of the game, if only one Nation has at least 1 tank on or across the Bridge, they score 10 VPs.
(Continued on next page.)
Scenario Card (Bridge)

29Tank Duel ~ Play Book
© 2019 GMT Games, LLC
Scenario 5: Establish a Bridgehead (continued)
Robata can be used with this scenario.Robata Special Rules:This scenario must be played with 3 tanks of each Nationality. Robata must prepare two identical tanks, along with one other tank which is smaller than the other two tanks (see chart in 18.2). Some suggested combinations:
In this mission, Robata will always first attempt to target player tanks that have crossed the river, then player tanks on the Bridge, then per the usual Target Selection Priority.The larger tanks Robata controls will never move past 600m Range. Once they have reached this Range, they will only move to find greater Cover, or Flank.
Robata Mission Priority: ● If the Active Robata Tank is the smaller tank Robata
controls:○ If the Active Robata Tank is occupying the Bridge,
attempt to go Hull Down, first with a Leadership card, then via Robata’s Hull Down Action. If already Hull Down, attempt a Robata Smoke Action. Robata will never move off of the Bridge.
○ If the Bridge is occupied by any other tank, there is no Mission Priority for this round. Continue to the next action.
○ Otherwise, move towards the Bridge, stopping on the Bridge if possible.
● If the Active Robata Tank is one of the larger tanks Robata controls:○ If any enemy tank is on the Bridge or across the river,
Fire if at least LQ shot.○ If not at 600m Range, move towards 600m Range.○ If at 600m Range, there is no Mission Priority for this
round. Continue to the next action.
Soviet German 2x T-34/76 M43 2x PzKpfw IV Ausf. G and 1x T-34 M40 and 1x StuG III Ausf G. 2x T-34/85 M44 2x PzKpfw V Ausf. A (Panther) and 1x T-34 M40 and 1x PzKpfw III Ausf. J 2x IS-2 M44 2x Panzerjager Tiger (P) (Ferdinand) and 1x T-34/85 M44 and 1x PzKpfw V Ausf. A (Panther)

30 Tank Duel ~ Play Book
© 2019 GMT Games, LLC
Scenario 6: Streets of Steel
The house to house fighting was unimaginable. Soldiers covered with dirt and grit, peeking through blown out walls and windows while tanks rattle buildings with every shot and explosion. This is the most dangerous place for a tank: their giant bodies barely fitting between rubble and ruins, with no space to maneuver and ambushes around every corner.
Overview: A ferocious battle rages in the city streets, corners, and square. Due to the cramped conditions in the city, tanks have extremely limited Line of Sight. Each Nation is seeking to control the large City Square in the middle of the city; tanks on the edge of the square have clear Line of Sight to other tanks on the edge of the square.Order of Battle: Players may choose from any suggested matchup, or create your own [18.2]. Infantry rules [17.3] are strongly rec-ommended for this scenario. Starting Range: All tanks start at 800m.Battle Deck: City Deck 1-100 cards (see “Scenario Cards” below). No alternate cards may be used.Scenario Cards: This scenario uses the 18 City Battle Cards, labelled “(City)” and numbered 17-19 and 65-79. Replace the corresponding default Battle Cards in the Battle deck with all 18 City cards.Place a City Street Scenario card in each tank’s Hold-ing Box. This replaces the printed Field as the default Terrain for this scenario and should remain in each tank’s Holding Box the entire scenario; be careful not to discard it! Other Terrain may be played on top of the City Street Scenario Card, and replaces the effect of the City Street as long as it remains on top of the City Street Scenario Card.
Place the City Square Scenario cards (CSSC) in the center of the table in easy reach of all players. Use one fewer CSSC card than the number of tanks to a minimum of 3 cards and a maximum of 6 cards. Do not shuffle these cards into the Battle Deck at any time! Any time a CSSC would be discarded, return it to the supply.These Terrain cards use the following special rules:● The City Terrain cards have 2 Bog Effect
Trigger values on them. The lower number is used when a tank moves into the Terrain using 1 move card and the second when the tank moves into the Terrain using 2 Move cards.
● The Factory Terrain card has 1/2 Fire Level on the card. As long as a tank remains in this Terrain its current Fire level is reduced by 1/2 rounded down.
Special Scenario Rules: There is a City Square extending to 400m Range on both sides of the battlefield. When a tank moves to the 400m Range box it may either approach the City Square or move into the City away from the Square. Tanks may move to 200m or 000m Range without approaching the City Square. If the tank approaches the City Square, place one of the available CSSC into its Holding Box (this does not count as one of the three cards of its Tank Action). A tank may not enter the City Square (there is no cover in the Square and a tank would immediately be destroyed). If a tank moves out of the 400m Range box with a CSSC in its Holding Box (or is destroyed), return the CSSC to the supply. A tank may still move without changing Range and retain the CSSC
in its Holding Box (for example, to attempt to remove an enemy Flank counter).The buildings around the City Square block Line of Sight [17.4]. The maximum Line of Sight is 600m, except for enemy tanks which both occupy a CSSC; these tanks can see each other across the square (at 800m Range). Mud cards may not be played as Terrain.
Scenario Card (City Square)
Infantry Cards
City Cards

31Tank Duel ~ Play Book
© 2019 GMT Games, LLC
Scenario 6: Streets of Steel (continued)
Robata can be used with this scenario.Robata Special Rules:In this mission, Robata will always first attempt to target player tanks that have a CSSC in their Holding Box, then per the usual Target Selection Priority.Robata tanks which have a CSSC in their Holding Box will never change Range, however they may still execute a Move action if it would result in removing an enemy Acquired coun-ter, or would remove or attempt to remove an enemy Flank counter, or gain a Flank counter.
Robata will never move 400m in a single Move Action unless its Personality is Bold or Aggressive.
Robata Mission Priority: ● If Robata has more tanks with a CSSC in its Holding Box
than the player, there is no Mission Priority, continue to the next action.
● Otherwise, the Active Tank will move towards the 400m Range box (containing the City Square), taking a CSSC if possible.
Line of Sight Examples: ● Enemy tanks that do not have a CSSC in their Holding
Box can see each other at 600m Range or less (only).● Enemy tanks that both have a CSSC in their Holding
Box can see each other at 800m (only). If one of them moves off of the CSSC and is at more than 600m Range from the other, then they would not be able to see each other.
Victory Points: Players score standard Victory Points for KIA Crew [14.1] and Eliminated tanks [14.2].Scenario Victory Points: During each tank’s Adminis-tration Step it scores 1 VP if it has a CSSC in its Hold-ing Box. At the end of the game, award 10 points to the Nation with the most tanks with CSSCs in their Holding Boxes (award no points if tied).They

32 Tank Duel ~ Play Book
© 2019 GMT Games, LLC
Historical Scenario 1: Fog of Counteroffensive
January 1945. East Prussia. Expanding the bridgehead north of Pultusk, the Soviet 35th Rifle Corps makes sustained progress into the positions of the 129th Infantry Division despite a driving snow storm. South of that storm, the Soviet 48th Army and 2nd Shock army supported by a Soviet battalion of I-S2 tanks engage forward elements of the German 7th Infantry as dense fog obscures the battlefield. A counterattack by the German 507th Heavy Tank Battalion with its contingent of Tigers is launched. Order of Battle: This scenario can be played with 2-8 players, with a player controlling multiple tanks if needed. Use an equal number of tanks for each Nation. Place a Snow Storm/Fog counter in front of each tank, “LT CONDITIONS” side up.● Soviets: Two IS-2m, Seasoned Commanders.
May additionally use up to two T-34/85s, Seasoned Commanders, if needed due to player count, or if desired. Each T-34/85 receives two APCR rounds.
● Germans: Two Tigers, Seasoned Commanders. May additionally use a Panther with an Elite Commander, and if a fourth tank is needed or desired, a Panther with an Seasoned Commander. Each German tank receives four APCR rounds.
Infantry rules [17.3] are strongly recommended for this scenario.Starting Range: All tanks start at 600m.Battle Deck: Standard 1-100 cards. As the terrain of East Prussia was varied and included open fields as well as dense forest, players may wish to use the alternate terrain for a more wide-open fight.
Scenario Cards: Place two SNOW STORM/FOG cards in the middle of the table within view of all players.Special Scenario Rules: Snow Storm/Fog condi-tions are in effect for this scenario at all times:● Each tank’s maximum Move Level is reduced
to 5 for the entire scenario.● There is a –10 To Hit Modifier for all Fire
actions, in addition to any other To Hit Modifiers.
● There is a 600m maximum Line of Sight [17.4] for all tanks. In Light Conditions, tanks may use this 600m Line of Sight; when a tank enters Heavy Conditions their Line of Sight is reduced to 200m.
● When a tank is in Heavy Conditions, it receives Cover 50, in addition to any cover from Terrain and/or Smoke cards.
● A tank may only play a Terrain card if at least one of the Move cards played during a Move action (or the Move card in its Holding Box, if it is In Motion) has an Action Level of 4 or lower.
● At the start of each tank’s Administration Step, Pull a Battle Card to determine if it is in Light Conditions or Heavy Conditions, as indicated on the SNOW STORM/FOG card. The tank remains in these conditions until the tank’s next Administration Step, when they perform this check again. Flip the Snow Storm/Fog counter for that tank to show the matching conditions. The new Line of Sight is effective immediately; adjust any Spotted, Acquired, and Flank counters as needed. Additionally, if the Active Tank is In Motion, it is immediately Spotted by any tanks within Line of Sight.
Victory Points: Players score standard Victory Points for KIA Crew [14.1] and Eliminated tanks [14.2].Scenario Victory Points: NoneAftermath: The Tiger 507th Heavy Tank Battalion went on to knock out more than 20 IS-2s at nearly point blank range.
Robata can not be used with this scenario.
Fog Cards
Infantry Cards

33Tank Duel ~ Play Book
© 2019 GMT Games, LLC
Historical Scenario 2: Hungary for Oil
March,1945. Hungary. Germany launches its last major tank offensive on the Eastern Front: Opera-tion Spring Awakening. Objectives: secure the Na-gykanizsa oil fields, encircle and destroy two Soviet armies. The 6th Panzer Army leads the northern spearhead, first to the Danube River, then drive south between Lake Balaton and Lake Valencei.Only months earlier, tank companies of its 9th SS Panzer Division “Hohenstaufen”, badly mauled by the US 101st Airborne in the forests of the Ar-dennes, have been refit and sent east to collide with the Soviet 18th Tank Corps in positions prepared in depth. Long alerted to the build-up of German armor, lines of defense thick with Russian anti-tank guns are a tank killing ground, designed to halt a patchwork of Panthers, StuG IIIs companies along with Tigers in a second assault. Armor of the I SS Panzer Corps drives to establish a bridgehead over the Sio canal before the inevitable counterattack by armies of the 3rd Ukrainian Front with its mobile Russian T-34s, IS-M44s and upgraded tank destroyers, Su-100s.At Start Order of Battle: This scenario can be played with 2-7 players. Use all the tanks below with a player controlling multiple tanks if needed. Decide which German player will control an extra tank when it enters as a reinforcement.● Soviets: Two T-34/76s, and two Su-100s, Seasoned
Commanders. 85mm M39 Anti-Tank Gun, 76.2mm M39 Anti-Tank Gun, and 45mm M37 Anti-Tank Gun.
● Germans: Two Panthers, Seasoned Commanders. One StuG III, Green Commander. An additional German tank may reinforce the battle (see “Reinforcing Order of Battle” below).
Infantry rules [17.3] are required for this scenario.
Reinforcing Order of Battle:● Soviet: Before reinforcing an Eliminated
T-34/76 (only), Pull a Battle Card: if its Target Number is 0-4, reinforce an IS-2m M44, with a Seasoned Commander, instead of a T-34/76. If this IS-2 is destroyed, it is automatically reinforced with another IS-2, without performing this check.
● German: At the beginning of each Draw Phase, perform the following until the Germans successfully reinforce:
Pull a Battle Card. Using its Target Number, reinforce the tank indicated below:○ 0 or 1: Panther with Elite Commander to the
battle at 800m, controlled by any German player.
○ 2 - 5: Tiger with Seasoned Commander to the battle at 800m, controlled by any German player.
○ 6: StuG III with Green Commander to the battle at 800m, controlled by any player.
○ 7-9: Nothing happens.Any reinforcement enters immediately, at 800m, with 2 APCR rounds. If the reinforcement was not successful, check again at the beginning of
the next Draw Phase.Starting Range: All tanks start at 800m. The Soviet 85mm M39 Anti-Tank Guns and 76.2mm M39 Anti-Tank Guns are in a prepared position at 200m, and the M39 Anti-Tank Gun is at 000m.Battle Deck: Standard 1-100 cards. Alternate terrain is not recommended.Game Length: Play through the Battle Deck 6 times.Scenario Cards: Place two Deep Mud Condition cards in the middle of the table, within easy view of all players. Place all seven Road scenario cards, and the Bridge scenario card, nearby and within easy reach of players.
(Continued on next page.)
AT Gun Cards
Infantry Cards

34 Tank Duel ~ Play Book
© 2019 GMT Games, LLC
Historical Scenario 2: Hungary for Oil (continued)Special Scenario Rules: Deep Mud Conditions: ● Soviet tanks have their Move Level reduced
by 3.● German tanks have their Move Level reduced
by 4.● Tanks may not Flank during Deep Mud
Conditions.● Double the To Hit Modifiers and Bog Effect
value of any Mud cards played during Deep Mud Conditions.
● Deep Mud Conditions are in effect from the start of the Scenario. Immediately after constructing the fourth, fifth, and sixth Battle Deck, Pull a Battle Card and use its Target Number to determine if Deep Mud Conditions end. End Deep Mud Conditions if:○ It is the fourth deck, and the Target Number
is 7 to 9. ○ It is the fifth deck, and the Target Number
is 5 to 9.○ It is the sixth deck, and the Target Number
is 3 to 9. If Deep Mud Conditions end, do not make this
check again.Road cards:● Road cards, when played on a tank, cancel
Deep Mud Conditions for all tanks of that Nation (but see Lead Tank Restrictions).
● Road cards start the scenario in a common supply, unavailable to be played on a tank. Once per Action Step, a player may reveal and discard 2 OIs as a Field Action to take a Road card from the supply and place it on the table in front of the tanks of their Nation. This Road card is now available to be played as part of a Terrain action on any tank of that Nation (not just the tank controlled by the player who revealed and discarded the OIs).
● A player may play an available Road card on their tank during their Tank Action, following the rules for playing another Terrain card. Play of a Road card does not count as one of the three cards played for a Tank Action. The Road card replaces that tank’s default Terrain; other Terrain cards may be played on top a Road card, with cumulative effects.
● A Mud card played on top of a Road card cancels the effect of that Road card until that tank moves out of the Mud.
● If a tank is Eliminated with a Road card in its Holding Box, remove the Road card from the game (do not return it to the supply; it may not be used since a burning wreck is blocking the road). In this way it is possible for enough Road cards to be removed to make flanking impossible and Deep Mud Conditions unavoidable, unless they end.
Lead Tank Restrictions: ● If only one tank of a Nation has a Road card
in its Holding Box, it becomes the Lead Tank, and Lead Tank Restrictions apply to all tanks of its Nation. Lead Tank Restrictions cancel Deep Mud Conditions (tanks move in column along the road), except for the following:○ No tank may Flank while it is the Lead Tank
or in column. ○ Other tanks form a column behind the Lead
Tank, and may not move to any Range farther from their side of the battlefield than the Lead Tank (they may, however, share a Range with the Lead Tank).
○ If a tank is already at a Range farther from their side of the battlefield than the Lead Tank, it is under Deep Mud Conditions until the Lead Tank is at equal Range or closer to the center of the battlefield, at which point it must join the column.
● If two tanks of a Nation have Road cards in their Holding Boxes, cancel both Deep Mud Conditions and Lead Tank Restrictions for all tanks of that Nation.
● Any changes between Deep Mud Conditions, Lead Tank Restrictions, and normal movement take place immediately; if a tank is destroyed with a Road card in its Holding Box, or a player plays a Road card on a tank, immediately adjust the current Conditions to match the new number of Road cards in play for that Nation.
German Infantry Transport: German infantry are being transported by German armor to the front. The German players may not perform an Infantry Advance or Infantry Attack until any one of their tanks begins its Administration Step at 200m or less.
(Continued on next page.)
Deep Mud Cards
Road Cards

35Tank Duel ~ Play Book
© 2019 GMT Games, LLC
Historical Scenario 2: Hungary for Oil (continued)Destroying Prepared Positions: If a German tank or Infantry begins the Reinforcement Phase at the same Range as one or more Soviet Anti-Tank Guns, destroy the prepared positions and permanently remove all of the Anti-Tank Guns at that Range from the game. Award Victory Points for any positions removed in this way (see “Scenario Victory Points” below).Establishing a Bridgehead: If a German tank moves to the -1000 Range box, they may place the Bridge scenario card into their Holding Box (this does not count as one of the three cards for a Tank Action). Occupation of the Bridge represents the historical crossing by German forces over the Sio Canal in an attempt to establish a bridgehead and begin an envelopment of Russian forces. The first German tank to have this Bridge card in its Holding Box at the beginning of the Reinforcement Phase receives 10 VPs. Remove that tank and prepare it to be a reinforcement, following all rules for reinforcing tanks [9.0]. This tank is not considered destroyed so the controlling player does not discard half their cards. If a second German tank exits the battlefield this way, the game ends immediately with a decisive German Victory.Victory Points: Players score standard Victory Points for KIA Crew [14.1] and Eliminated tanks [14.2].
Scenario Victory Points: During the Initiative Phase, award 10 VPs to each German tank at or less than “000” Range. Award 10 VPs to the first German tank to exit the battlefield via the bridgehead. If a second German tank exits the battlefield, the game ends immediately with a decisive German Victory.The German players may receive one-time VP awards for eliminating Soviet prepared positions, as follows:● 10 VPs for eliminating the prepared positions at 000m.● 15 VPs for eliminating the prepared positions at 200m
(award the VPs one time for both guns at this position, not 15 VPs for each gun at this position).
At game end, award the Soviets 5 VPs per German tank destroyed over and above the number of Soviet tanks lost.Aftermath: After initial success, Operation Spring Offensive, Germany’s last attempt to stem the tide of Soviet armies sweep-ing through Hungary, failed. Determined Soviet resistance, mud and more mud foiled any prospect of the once rapid German advances of the past. The modest German bridgehead over the Sio canal was defended briefly before a cautious withdrawal. In ten days of the offensive’s launch, Russian coun-terattacks set German forces in full retreat toward Vienna. On 5th of May 1945, the 9th SS Panzer Division “Hohenstaufen” surrendered to the Americans.
Robata can not be used with this scenario.

36 Tank Duel ~ Play Book
© 2019 GMT Games, LLC
19.0 Solitaire RulesTank Duel is playable by a single player (or cooperatively by multiple players) controlling all of the tanks for one Nation, and these Solitaire Rules governing the behavior of the tanks for the opposing Nation. The Solitaire Rules modify the rules presented in the Rulebook and take precedence over those rules, as well as any scenario specific rules, in the event of any conflict. Unless otherwise specified, assume the multiplayer rules are in effect. Solitaire Examples of Play are presented in the playbook [20.0].
Important: These Solitaire rules assume that players are familiar with the base rules, and build upon them. If you have not completed the Tutorial and/or played several rounds of Tank Duel, we suggest playing open handed with the multi-player rules until they are familiar to you.
Play Note: Non-player tanks will sometimes take risky or unexpected actions. While players are free to ‘override’ these decisions, it is recommended to allow the Non-player tanks to follow the priorities outlined in the rules below and see how their play develops over time.
19.1 Solitaire ComponentsIn addition to the components used in multiplayer games, use the following components to control Robata and track its status.
Peril counters: Each Robata Tank calculates its Peril at the beginning of its Initiative Phase. These counters are provided for convenience and can be used to mark a Robata Tank’s Peril Level on its
General Track. Peril is a measure of danger that the tank has been exposed to, and changes the behavior of the tank.Robata Action cards: Each Robata Tank has a Robata Action card used to determine what action a Robata Tank performs during its Action Step. All of these cards are shuffled together at the start of the game to create a draw pile, then each Robata tank is dealt one of these cards from the bottom of the deck. Always discard Robata cards to the top of this deck and deal Robata cards from the bottom of the deck, to prevent yourself from being able to peek ahead at the next Robata card.
Fully Operational or in PerilHigh/Low
Quality Shot
Primary Actions
Secondary Actions
Personality
Enemy High/Low Quality Shot
Robata Player Aid Reference (F)
Each Robata Action card has two sides: a “Fully Operational” side, and an “In Peril” side, as well as a personality which reflects how that card will direct the Robata tank. When a Robata Tank is In Peril, immediately flip its Robata Action card to the “In Peril” side. When a Robata Tank is no longer In Peril, place its
Robata Action card on the top of the Robata Action card draw pile, Fully Operational side up, and draw the bottom card from the pile as its new Robata Action card.
Play Note: The different “personalities” of the Robata Action cards give variability to the actions Robata will take—but players should feel free to use only the “Alert” cards to create a more predictable Robata opponent.
Solo Move cards: Used to track wheth-er a Robata Tank is In Motion. Robata Tanks never place Move cards in their Holding Box; any time they end an ac-tion In Motion, place a Solo Move card in the Robata Tank’s Holding Box. Solo Move cards are never discarded; instead when they would be discarded they are returned to the supply.
19.2 DefinitionsRobata: The Solitaire processes controlling Non-player tanks is known throughout these rules as “Robata”. Tanks that are controlled by Robata are referred to as “Robata Tanks”.
Designer Note: “Robata” is the Slavic root word for “Robot”. In these rules, Robata does not play the game as humans do, but follows a set of instructions designed to emulate a player. This lowers the overhead when managing multiple Non-player tanks, and provides for a more challenging experience.
Bailout Target: The value of a Robata Tank’s Move or Fire Level, whichever is lower.Can Flank: A Robata Tank Can Flank if one or more of the Battle Cards revealed during its Action Step is a Flank card and the Active Robata Tank has an unused Flank counter.Choose Randomly: When instructed to “choose randomly”, as-sign the probabilities as evenly as possible and Pull a Battle Card, using the Target Number to determine a selection. In cases with an odd number of choices, multiple draws may be necessary.Effective:An action is Effective if it can be executed by Robata, whether or not it succeeds [19.8.3]. If an action has no eligible target, or if Robata would not execute or attempt any of the priorities for that action, then the action is not Effective.Facing Armor: Every tank “sees” the front or side armor of every player tank. If a tank has one of its Flank counters in front of another tank, it sees the side armor of that tank, otherwise it sees the front armor.High/Low Quality Shot: A shot that Robata considers to be of high/low chance of damaging a player tank. High and Low Quality Shots are defined on the Robata Action Card for Robata Tanks and player tanks. A High or Low Quality Shot consists of a To Hit Number and a Penetration differential. Both must be met or exceeded for Robata to have a High or Low Quality shot. When calculating if Robata or a player has a High or Low Quality shot, only consider Spotted tanks.

37Tank Duel ~ Play Book
© 2019 GMT Games, LLC
To determine if Robata has a High or Low Quality shot, find the base To Hit Number at current Range, and apply modifiers for Flank, any Acquired counter, the enemy Size Modifier, and enemy Cover. During the Action Step only, also apply the most favorable modifier from among revealed Fire cards and the modi-fier from a Leadership card, if any. Never subtract from a Robata Tank’s To Hit Number due to a Robata Tank being in Motion.When checking if Robata meets the Penetration differential, subtract the target’s highest Facing Armor from Robata’s Penetration against the target at the current Range, including any loaded APCR round and modifier from Terrain. This is the Penetration differential.If both the Modified To Hit number and Penetration differential are equal to or greater than the values on the Robata Action card, then Robata meets the requirements for a High or Low Quality shot.
Important: Robata will never fire when In Motion, so do not apply the penalty To Hit to Robata’s checks for High/Low Quality Shots. Player tanks that are In Motion still use the Cover printed on their Move card as normal.
Example: A T-34 Robata Tank at 1000m is checking if it has a High Quality Shot against a Panzer IV. The Robata Tank’s Base To Hit at 1000m is 66 and its Penetration Value is 7. Robata subtracts 5 from its To Hit because of the Panzer’s Size Mod. but there are no other modifiers. The Panzer’s highest Facing Armor is its Hull, which has an Armor Value of 7. The Pen-etration differential is 0. So, Robata compares this to the High Quality Shot shown on the face up side of the Robata Action card, which says a High Quality Shot needs a To Hit of at least 60, and a Penetration differential of at least –1. The T-34 has a High Quality Shot.Reach: A Robata Tank can Reach a condition if that condition is false and moving 200m (or 400m if the Success Check [19.8.3] had 2 successes and the Robata Tank has not yet moved) will cause the condition to be true. For Terrain, Robata can Reach Terrain if one or more of the Battle Cards revealed during its Action Step is a Terrain card with positive Cover.Remove: A Robata Tank can Remove a condition if that condi-tion is true and moving 200m (or 400m if the Success Check [19.8.3] had 2 successes and the Robata Tank has not yet moved) will cause the condition to be false.
19.3 Solitaire SetupSelect a scenario to play. Setup for a Solitaire game uses the same setup as a 2 player game of Tank Duel with the following modifications in addition to any scenario specific modifications:1. Place an “Alert” Robata Action card next to each Robata
Tank, with the “Fully Operational” side up. Shuffle the remaining Robata Action cards to form the Robata Action card draw pile and place them nearby.
2. Place a Peril counter on the ‘0’ space of the General Track for each Robata Tank.
3. Give each Robata Tank equipped with Special Ammunition 1 APCR round.
4. Place the Move cards with “Solo” printed in the bottom center of the card nearby, for use by Robata Tanks.
5. Play through the Battle Deck as specified for the number of tanks in the game, plus 1 additional time [3.2.1].
6. If a human player controls multiple tanks, they should play from a single hand of cards, with a corresponding Hand Size [4.2.7].
19.4 General Solitaire RulesRobata uses several modifications from the basic Tank Duel rules that apply to gameplay generally. These rules are considered to be in effect at all times.
Important: Any time Robata is instructed to perform one out of a numbered list of possible options, treat these options as priorities and resolve the first effective priority where the Active Robata Tank meets all the conditions. If Robata is instructed to perform a bulleted or lettered list, perform all of the steps that apply until instructed to terminate the procedure.
(19.4.1) Robata’s Hand of CardsRobata does not have a hand of cards and does not play cards for Tank or Field Actions. Robata will follow a fixed procedure to determine the best course of action, and will reveal cards from the Battle Deck to determine success or to find a necessary card for play (e.g., during the Initiative Phase).
(19.4.2) PerilPeril is the pressure applied on Robata Tanks to get out of harm’s way. Peril is calculated at the beginning of a Robata Tank’s Ini-tiative Phase to determine whether the tank spends that turn In Peril. A tank that is In Peril will behave differently than a tank that is Fully Operational. To calculate Peril, add and subtract these modifiers, starting from 0, to get a Robata Tank’s Peril Level (to a minimum of 0):● +1 for each player tank that has the Active Robata Tank
Spotted.● +1 for each level of Acquisition that an player tank has for
the Active Robata Tank.● +2 if the Active Robata Tank has a Mine or Mud card in its
Holding Box.● +2 for each player tank that has the Active Robata Tank
flanked.● +2 if the Active Robata Tank is Bogged.● –1 for each player tank that the Active Robata Tank has
Spotted.● –1 for each level of Acquisition that the Active Robata Tank
has for any player tank.● –2 for each player tank that the Active Robata Tank has
flanked.
Example: A Robata Tank is starting its Initiative Phase. Player tank 1 has the Active Robata Tank Spotted (+1) and Acquired +20 (+2). Player tank 2 has the Active Robata Tank Spotted (+1) and flanked (+2). The Active Robata Tank is not in a Mine or Mud Terrain and is not Bogged, so those modifiers do not

38 Tank Duel ~ Play Book
© 2019 GMT Games, LLC
apply. It has 2 Player tanks Spotted (–2), 1 Player tank flanked (–2), and no Player tanks Acquired (–0). So the Peril Level for the Active Robata Tank is 2.
(19.4.3) Order IconsRobata does not use Order Icons for any reason. Actions that normally require OIs to resolve are resolved by Robata using alternate procedures, or ignored.
Important: Robata never uses OIs. If an action that normally allows a player to spend OIs is not explicitly addressed in Ro-bata’s procedures, then Robata will never execute that effect!
(19.4.4) Tactics ReactionsRobata does not play Tactics cards. Robata will attempt a Tactics reaction whenever a player:● Plays a Tactics card.● Attempts a Fire, Flank, or Spot action.● Plays a Terrain card as a Field Action.● Fire an Anti-Tank Gun.● Performs an Infantry Attack.
To resolve a Tactics reaction, Pull a Battle Card. If the Target Number on the Pulled Battle Card is equal to or lower than the number of Battle Decks that have already been played through plus 1 (to a maximum of 3), or if the Pulled card is a Tactics card, then the Tactics reaction is a Success. This success has the same effect as if Robata played a Tactics card. The player may play an additional Tactics card to cancel the Robata’s Tactics reaction, which would trigger another Pull from the Battle Deck, and so on until either the Player declines to play a Tactics card, or Robata fails to Pull a success from the Battle Deck.Example: Mike Fires at Robata Tank 2 during the second Deck of the game. Robata attempts a Tactics reaction and Pulls a Battle Card. The Target Number on that Battle Card is 3; because 1 deck has been played through (Mike is on the second deck), the Tactics reaction is a failure. If the Target Number had been a 0, 1 or 2, the Tactics reaction would have succeeded.
Important: Robata will always have a chance of succeeding at a Tactics reaction, even during the first deck of the game. This means that a player will never know for sure whether or not their action will succeed!
(19.4.5) SpottingAny time Robata would attempt a Spot Action [19.9.4] or gain a Spotted counter, check if the Spotting Robata Tank would lose an Acquisition counter. If so, the Robata Tank will only choose to attempt the Spot Action or gain a Spotted counter if the target is not Spotted by any other Robata Tank.If a player tank’s action would cause multiple Robata Tanks to gain Spotted counters simultaneously, first resolve Robata Tanks without Acquisition counters, then resolve the remaining Robata Tanks from lowest to highest Identification Number.
(19.4.6) Special AmmunitionThere is no limit to the number of APCR rounds that Robata Tanks may use, provided that they are equipped with Special
Ammunition. When a Robata Tank expends its APCR round, place it back into that tank’s Special Ammo box.
(19.4.7) Playing Terrain Cards on Player TanksWhen Robata is instructed to resolve any revealed Terrain cards during the Tank Phase, Robata will attempt to play revealed Ter-rain cards on player tanks that are In Motion. Robata will only play Brush, Field, Mine, and Mud cards on player tanks. Robata will play a Terrain card on every moving player tank until all Terrain cards are played. Use the Target Selection Priority [19.5] to determine the order in which to play Terrain cards on mov-ing player tanks. If multiple eligible Terrain cards are revealed, prefer Mine, then Mud, then Field, then Brush.
(19.4.8) Eliminated Robata TanksWhen a Robata Tank is Eliminated, follow all procedures for Eliminated tanks, skipping any card discard (because Robata has no hand of cards). Flip the Eliminated Robata Tank’s Robata Action card back to the “Fully Operational” side.
(19.4.9) Shuffle/Game End CardsIf a Shuffle card is revealed during a Robata Tank’s Initiative Phase [19.6.2] or Primary or Secondary Action Step [19.8.2], finish revealing cards for Robata before shuffling the Battle Deck. If the deck is exhausted while revealing cards, shuffle the deck, including a Shuffle or Game End card, before revealing additional cards.If a Game End card is revealed during a Robata Tank’s Initiative Phase, end the game immediately. If a Game End card is revealed during a Robata Tank’s Tank Phase, complete that tank’s Tank Phase, reshuffling the Battle Deck without any Shuffle or Game End card if necessary, and then end the game.
(19.4.10) Drawing from Robata’s HandIf a card ever instructs a player to draw cards from Robata’s hand (e.g., by a Leadership card), draw a card from the Battle Deck instead.
(19.4.11) [Optional] InfantryPlayers may optionally use Infantry rules while playing against Robata. When executing the following instructions, Robata uses any Infantry Icon, not just Infantry Icons belonging to its Nation.Robata will resolve an Infantry Advance or Infantry Attack at the beginning of its Tank Action, after revealing Battle Cards but before resolving any revealed cards, if any of the revealed Battle Cards show an Infantry Icon of either Nation:● If the player’s Infantry counter is on the Infantry Advance
card, Robata will perform an Infantry Advance.● If neither the player’s nor the Robata Tank’s Infantry counter
is on the Infantry Advance card:○ If only one of the revealed Battle Cards has an Infantry
Icon, Robata will perform an Infantry Advance.○ If two or more of the revealed Battle Cards have an Infantry
Icon, Robata will perform an Infantry Attack. In addition, if at least 3 OIs are showing on the revealed Battle Cards, treat this Infantry Attack as a flank attack.

39Tank Duel ~ Play Book
© 2019 GMT Games, LLC
● If the Robata Tank’s Infantry counter is in the 200m box on the Infantry Advance card:○ If only one of the revealed Battle Cards has an Infantry
Icon, Robata will perform an Infantry Attack. In addition, if at least 3 OIs are showing on the revealed Battle Cards, treat this Infantry Attack as a flank attack.
○ If two or more of the revealed Battle Cards have an Infantry Icon, Robata will perform an Infantry Advance.
● If the Robata Tank’s Infantry counter is in the 400m box on the Infantry Advance card, Robata will perform an Infantry Attack. In addition, if at least 3 OIs are showing on the revealed Battle Cards, treat this Infantry Attack as a flank attack.
When using Infantry rules, a Robata Tank will Button Up [17.3.4] at the end of a Robata Tank’s Administration Step if it is within Range of enemy Infantry (400m if City Terrain, otherwise 600m). Any time a Buttoned Up Robata Tank checks for a High or Low Quality Shot, and switching to Open Hatch would create a High or Low Quality Shot that Robata would otherwise not have, Robata will immediately remove the Buttoned Up counter from its Tank Board.
19.5 Robata PrioritiesRobata will often have to choose between multiple options when resolving Command cards, or choose between multiple targets when taking actions. In these cases, apply the corresponding priorities on the Robata Player Aid Card.
19.6 Robata Sequence of Play(19.6.1) Draw PhaseRobata has no hard of cards. Only the players draw during the Draw Phase.
(19.6.2) Initiative PhasePlayers complete their Initiative Phase before resolving Robata’s Initiative Phase. Robata always resolves the Initiative Phase in order of each Robata Tank’s Identification Number, from low-est to highest.
(19.6.3) Tank PhaseAs in a multiplayer game, turn order during the Tank Phase follows Initiative Order.Robata does not perform Field or Tank Actions during its Tank Phase per the multiplayer rules. Rather, a Robata Tank first re-solves an Administration Step [19.8.1], then selects a Primary Action from its Robata card [19.8.2]. Then the Robata Tank may select a Secondary Action from its Robata Card, but is not guaranteed to do so. Finally, Robata ends the Tank Phase by performing a Cleanup Step [19.8.4].
19.7 Initiative Phase ProcedureAfter selecting the Initiative Card for all player controlled tanks, perform the Initiative Phase for each Robata Tank, in order from lowest to highest Identification Number. For each Robata Tank, resolve the following procedure completely before proceeding to the next Robata Tank.PROCEDURE: Reveal 3 Battle Cards from the Battle Deck, maintaining order. Resolve each revealed Command card [19.5]. If the Target Number of the first revealed Battle Card is less than or equal to the Active Robata Tank’s Peril Level [19.4.2], then it is In Peril. Flip its Robata Action card to the “In Peril” side.Robata selects one of the 3 revealed Battle Cards to be the Initiative Card for the Active Robata Tank:1. If it is In Peril, use the revealed Battle Card with the lowest
Battle Number.2. If any revealed Battle Card has a Battle Number lower than
10, choose the Battle Card with the lowest Battle Number.3. If any revealed Battle Card has a Battle Number greater than
90, choose the Battle Card with the highest Battle Number.4. If it has a target Spotted and
○ any Spotted target’s lowest facing Armor Value is equal to or less than its Penetration Value at the current Range to that target
○ OR it has a High Quality Shot○ Then choose the Battle Card with the lowest Battle
Number.5. Otherwise, choose the Battle Card with the highest Battle
Number.Finally, discard the remaining Battle Cards, and continue with the next Robata Tank until all Robata Tanks have an Initiative Card.
19.8 Tank PhaseTurn order during the Tank Phase follows Initiative Order. A Robata tank turn is outlined in detail in the following sections.
(19.8.1) Administration StepRobata resolves the Administration Step for Robata Tanks in the same manner as a player, with three differences:● When resolving the On Fire Check, if the Active Robata
Tank’s Commander is KIA, determine if the Robata Tank’s Crew Bails Out:○ Pull a Battle Card. If the Target Number is equal or higher
than the Active Robata Tank’s Bailout Target, then its crew bails out [12.6.1].
● If the Crew does not Bail Out, Robata always automatically extinguishes a fire and automatically rallies a Broken crew.
● After completing its Administration Step, a Robata Tank with KIA Crew will immediately conduct a Change Crew Assignments Action for Free [8.3.5.iv].
If using optional Infantry rules, check if the Active Tank But-tons Up [19.4.11].

40 Tank Duel ~ Play Book
© 2019 GMT Games, LLC
Designer Note: Robata’s Administration Step is intentionally designed to give Robata Tanks an edge against the player by automatically extinguishing fire and rallying its crew.
(19.8.2) Primary and Secondary Action Step ProcedurePROCEDURE: Robata reveals Battle Cards from the top of the Battle Deck to resolve the Action Step. Reveal 3 Battle Cards modified as follows:● If the Active Robata Tank is at 400m Range or less, reveal
one additional Battle Card.● If the Active Robata Tank has a Veteran crew reveal one
additional Battle Card.● If the Active Robata Tank has a Green crew, reveal one fewer
Battle Card.● If the Active Robata Tank’s Commander is KIA, reveal one
fewer Battle Card.
Do not discard these Battle Cards until instructed. When in-structed by the Robata rules to use “revealed” Battle Cards, use only these cards and not any cards that were Pulled from the deck to resolve checks or effects.If using optional Infantry rules and at least one revealed Battle Card shows an Infantry Icon of either Nation, determine if Robata will execute an Infantry Advance or Infantry Attack [19.4.11].Resolve each revealed Command card [19.5].Play revealed Terrain cards on player tanks [19.4.7]. Replace each Terrain as it is played with a new Battle Card from the Battle Deck. The new card takes the place of the played Terrain card in the card order. If a new Terrain card is revealed during this procedure, it is eligible to be played on a player tank, if any player tank is still In Motion.The Active Robata Tank will always attempt a single Primary Action, and then will determine if it performs a single Second-ary Action, according to its Robata Action card. To perform a Primary Action, check each action listed in the Primary Action section of the card until one of the action’s conditions are met. Perform that action per the corresponding Action Procedure (19.9).
Important: Robata will always attempt to perform one (and only one) Primary Action and one (and only one) Secondary Action.
After completing that action, check each action listed in the Secondary Action section of the card, executing the first action that is Effective. It is possible that none of the Secondary Ac-tions will be Effective, in which case no Secondary Action is performed. Once Robata has attempted a Primary Action and attempted to resolve a Secondary Action, continue to the Action Cleanup Step [19.8.4]
(19.8.3) Success ChecksSuccess Checks are performed whenever Robata attempts a Fire or Move Action. When instructed to resolve a Success Check:● Determine the Robata Tank’s Activation Level:
○ For a Move action use the Move Level.○ For a Fire action use the Fire Level.
● Compare the Activation Level to the Target Number of the first revealed Battle Card; if the Activation Level is equal to or higher than the Target Number, the check is a success. Either way, continue to the next step.
● Compare the Activation Level to the Target Number of the second revealed Battle Card; if half of the Activation Level (result rounded up) is equal to or higher than the Target Number, the check is a success.
● As a result of the check, you will have 0, 1, or 2 successes, which will be used to resolve the Action attempted.
Example: A Robata Tank is resolving a Move Action. First it determines its Activation Level is 7, because its Move Level is 7 and it is attempting a Move Action. Next, Robata performs a Success Check against the first revealed Battle Card, which has a Target Number of 6. Since this is lower than the Robata Tank’s Activation Level, the first check is a success. Whether or not the first check is a success, Robata performs a second Success Check using half of its Activation Level (result rounded up), which is 4. That means the second Battle Card would have to have a Target Number of 4 or less for the check to succeed, which it does. Thus Robata has 2 successes to use to resolve its Move action.
(19.8.4) Robata Action Cleanup StepPROCEDURE: After performing its Action Step, a Robata Tank always resolves an Action Cleanup Step. Robata will complete all of these steps:● If one or more Command cards was revealed and not resolved
during the Action Step, resolve these Command cards now.● If the Robata Tank fired, attempt to Acquire its target:
1. If the Robata Tank’s unmodified To Hit Number for its target is greater than 85, do not Acquire the target.
2. If the Robata Tank would give up a Spotted counter by Acquiring, and no other Robata tank has the target Spotted, do not Acquire the target.
3. Otherwise, Acquire the target.● Discard all revealed Battle Cards not in Holding or Initiative
Card boxes.● If the Robata tank is In Peril, discard its Robata Action card
to the top of the Robata Action card draw pile, and draw a replacement from the bottom of the pile.
● Continue with the next tank in Initiative Order.

41Tank Duel ~ Play Book
© 2019 GMT Games, LLC
19.9 Robata Primary and Secondary ActionsThis section details how to resolve each Action Robata is in-structed to take on the Robata Action card.
(19.9.1) Robata Move ActionPROCEDURE: Perform each step of this procedure, stopping when instructed to resolve another procedure.A. Using the revealed Battle Cards, perform a Success Check
[19.8.3]. If the Success Check has no successes, immediately terminate this procedure and continue to the Secondary Action.
For each success, resolve Movement According to the Robata movement flowchart on the Robata Player Aid (Robata Tanks are not considered Spotted until all movement is finished). Some scenarios specify special movement rules for Robata. If possible, implement that movement rule instead.
B. If the Robata Tank is flanked and the Success Check had 2 successes, remove one enemy Flank counter. If the Success Check had 1 success, check for Flank removal as if Robata played a single Move card [10.1.4].
C. If any revealed Battle Card is a Flank card, remove 1 enemy Flank counter, or if Robata is not flanked, Flank a Spotted player tank.
D. If any revealed Terrain cards have Cover, place the revealed Terrain card with the highest Cover into Robata’s Holding Box. If there are multiple revealed Terrain cards which share the highest Cover, choose the Terrain card with the lowest Battle Number. Resolve any Effect Triggers.
E. If the Robata Tank does not play a Terrain card into its Holding Box, place a Solo Move card in its Holding Box instead.
F. Finally, continue to the Secondary Action.
(19.9.2) Robata Fire ActionPROCEDURE: Perform each step of this procedure, stopping when instructed to resolve another procedure.A. Using the revealed Battle Cards, perform a Success Check
[19.8.3]. If the Success Check has no successes, immediately terminate this action and continue to the Secondary Action.
B. Determine the target for the Active Tank’s Fire Action [19.5]. First, determine a target from among High Quality targets, then from among Low Quality targets.
C. If the Active Robata Tank is In Motion, it stops moving [10.2.2] immediately, without discarding a card. This is a free action.
D. Determine the Robata Tank’s To Hit Number. In addition to the normal modifiers, apply the following modifiers:a. If one or more of the revealed Battle Cards is a Fire card,
apply the most favorable modifier from these cards to the To Hit Number.
b. If one or more of the revealed Battle Cards is a Leadership card, apply the Leadership card’s To Hit Modifier to the To Hit Number.
E. Resolve the Fire Procedure for the Robata Tank [11.1.4]. If the Success Check had two successes, choose the lowest armor for the Hit Location (turret if tied), otherwise determine the Hit Location as if a single Fire card was played.
F. Finally, continue to the Secondary Action.
(19.9.3) Robata Leadership ActionPROCEDURE: When instructed to resolve a Leadership ac-tion, resolve the following for each revealed Leadership Card, stopping when instructed to resolve another procedure.A. Player discards one card randomly.B. If the Robata Tank has a Terrain Card with Conceal in its
Holding Box and is spotted by any player tank, attempt Conceal per Leadership Card. Continue to the Secondary Action.
C. Gain a Spot counter for a player tank, then continue to the Secondary Action.
D. If the Robata Tank has a Terrain card with Hull Down in its Holding Box, gain Hull Down. Continue to the Secondary Action.
E. If none of these are true, the Leadership Action is not Effective.
(19.9.4) Robata Spot ActionPROCEDURE: When instructed to resolve a Spot action re-solve the following, stopping when instructed to resolve another procedure.A. Determine which player tank is the target for the Spot action
[19.5].B. Pull 2 Battle Cards. If either card shows a Binoculars Icon,
Robata Spots the target.C. Continue to the Robata Action Cleanup Step [19.8.4].
(19.9.5) Robata Hull Down ActionResolve Hull Down attempts per the multiplayer rules [10.3.6].
(19.9.6) Robata Load APCR ActionWhen instructed to Load APCR, the Active Robata Tank auto-matically loads an APCR round if it is equipped with Special Ammunition and no APCR round is already loaded (otherwise, this action is not effective). Robata tanks that are equipped with Special Ammunition do not have a limit to the number of APCR rounds they may use this way.
(19.9.7) Robata Smoke ActionA Robata Tank without a Smoke Dispenser may never attempt a Smoke Action. If this is the case, the action is not Effective.Smoke is the only action which Robata may attempt as either a Primary or Secondary Action, depending on whether Robata is In Peril. To resolve a Smoke Action, check if any revealed Battle card is a Smoke card. If so, place it into the Active Robata Tank’s Holding Box, on top of any terrain that is currently in the box. If the Robata Tank is In Motion, discard any Move card in the Holding Box before placing a Smoke card into the Holding Box.Then resolve the Smoke card. Continue to the Secondary Action, or if Smoke is resolved as a Secondary Action, continue to the Robata Action Cleanup Step [19.8.4].

42 Tank Duel ~ Play Book
© 2019 GMT Games, LLC
20.0 Solitaire Example of PlayThis Solitaire Example of Play is adapted from Dave Ratynski’s excellent series of InsideGMT blog posts. Many thanks to Dave—without his hard work, this Example of Play would not exist!
This Example of Play follows a similar structure to the Tutorial presented at the beginning of this Playbook. Unlike the Tutorial, the Example of Play assumes familiarity with the basic Tank Duel rules. It is strongly recommended that players play through the Tutorial before attempting to follow along with this Example of Play. This example uses the Hold the High Ground scenario.
SetupFor this example, we will have three tanks for each Nation; the player will control the three Soviet tanks, while the Non-player system, known as Robata [19.0], will control the three German tanks.Soviets (Jason): T-34/85 (ID #I) with Seasoned crew, SU-100 (ID #II) with Green crew, T-34/76 (ID #III) with Green crew.Germans (Robata): Panzer IV G (ID #I), Stug III (ID #II), Panther (ID #III), all with Seasoned crews.Set up the game per the scenario instructions (pg. 25), using the default Terrain. Normally, you would set up the Battle Deck as described in section 4.2.5 of the Rulebook. For this example you will be asked to take specific cards from the Battle Deck to make up the player’s hand of cards, and for Robata’s Battle Card draws. To facilitate the example, place any Battle Cards with “(Alternate)” or “(City)” printed at the bottom back in the box, and arrange the remaining cards in numerical order, with 1 at the top, and 100 at the bottom. There should be exactly 100 cards. Then, place the Shuffle card at the bottom. Next, prepare the Robata Action cards. Take the cards marked “Alert” and place one beside each Robata Tank with the “Fully Operational” side up. Shuffle the other Robata Action cards (Fully Operational side up) and place them within easy reach. Also find the Move cards with “(Solo)” printed at the bottom and keep them nearby.Games against Robata use the standard game length [3.2] plus one additional deck. So, for a six-tank game, we will play five decks. This example of play will not cover the entire game. This example of play does not include Robata’s Infantry or Anti-Tank Gun rules.
Round 1DRAW PHASEJason draws up to his Hand Size [4.2.7]; since he is controlling three tanks, with two Green crews, his hand is eight cards. Robata does not have a hand of cards! So, Robata skips the the Draw Phase entirely. Jason draws Leadership (3), Flank 4 (10), Move 6/Fire 6 (39), Move 3 (55), Move 4 (58), Move 6 (63), Flank 7 (80), Mud (89).
INITIATIVE PHASERobata handles Initiative a bit differently than a player [19.7]. When playing with Robata, the player goes first and determines Initiative for their tanks as usual, then Robata selects Initiative Cards for each Robata Tank. Starting with the lowest numbered Robata Tank, reveal three Battle Cards from the Battle Deck, and consult the Robata Player Aid to select an Initiative Card for each Robata Tank.Jason selects an Initiative Card for each of his tanks; he decides to hold the Flank and Leadership cards, so he gives the T-34/85 the Move 6/Fire 6 (39), the SU-100 the Move 4 (58), and the T-34/76 the Move 6 (63). Next Robata selects an Initiative Card for each Robata Tank. Starting with the lowest numbered Robata Tank (the Panzer IV), reveal three Battle Cards from the Battle Deck, placing them in front of the Panzer IV. It is extremely important not to change the order of these cards! The order is used to resolve numerous effects for Robata. Following the steps on the Robata Player Aid
, three Battle Cards are revealed: Move 6 (38), Move 7 (93), and Move 2 (50). If any of these were Command cards, Robata would resolve them now, but since none are, Robata continues to check if it is In Peril.
A Robata Tank that is In Peril [19.4.2] will act dif-ferently than one that is not In Peril, including se-lecting an Initiative Card. To determine if a Ro-bata Tank is In Peril, determine its Peril Level by
adding the modifiers on the Robata Player Aid . Adding these up for the Panzer IV, its Peril Level is 2 (the only modifier that applies is the +2 for being in Field Terrain). Now compare the Target Number of the first revealed Battle Card—Move 6 (38)—to the Robata Tank’s Peril Level. If the Target number is less than or equal to the Peril level for that tank, the Tank is In Peril. In this case, the Panzer IV is not In Peril.Next, Robata chooses one of the revealed Battle Cards to be the Initiative Card for the Panzer IV. Since one of the Battle Cards has a Battle Number greater than 90—Move 7 (93)—Robata selects the Battle Card with the highest Battle Number. Place the Move 7 (93) into the Panzer IV’s Initiative Card box and discard the remaining revealed Battle Cards: Move 6 (38) and Move 2 (50).We repeat these steps for the StuG III and Panther, summarized below. Follow along on the Robata Player Aid :StuG III: Reveal Flank 1 (7), Move 4/Fire 4 (33), Tactics (43); not In Peril. Because there is a revealed Battle Card with a Battle Number less than 10, select Flank 1 (7). Discard Move 4/Fire 4 (33), Tactics (43).Panther: Reveal Move 1 (47), Building (65), Move 3 (54); not In Peril. There is no Battle Card with a Battle Number less than 10, nor higher than 90, and the Panther has no targets Spotted, so select the highest numbered Battle Card, the Building (65). Discard the Move 1 (47) and Move 3 (54).Now that every tank has an Initiative Card, we move to the Tank Phase.

43Tank Duel ~ Play Book
© 2019 GMT Games, LLC
TANK PHASEThe Tank Phase is still played in Initiative Order, however Robata does not play cards to perform Tank Actions and Field Actions. Instead it will execute a single Primary Action, and a single Secondary Action (if possible). Player tanks will execute their Tank Phase in the same manner as in a multiplayer game.Initiative Order for this Round is: StuG III, T-34/85, SU-100, T-34/76, Panther, Panzer IV.Robata goes first with the StuG III, and begins by performing it’s Administration Step. A Robata Tank’s Administration Step is the same as a player tank’s, and the instructions to resolve any choices Robata needs to make are included on the Robata Player Aid . In our case, The StuG III has nothing to do for the Administra-tion Step except discarding its Initiative Card, so it continues to the Action Step.The Robata Action Step is the heart of the Robata system. It consists of three parts: the Primary Action, the Secondary Action, and the Cleanup Step. First Robata determines the StuG III’s Primary Action. To do this, we refer to the StuG III’s Robata Action Card.
The Robata Action Card has a Personal-ity in the top right corner—in this case, Alert—which gives a general idea of how Robata might choose to act. In the top left corner, the card indicates whether Robata is In Peril or Fully Operational. This card always starts on the Fully Operational side, and is flipped to its In Peril side when a Robata Tank fails its Peril Check during the Initiative Phase.
The card also includes High Quality and Low Quality Shot descriptions, used by Robata for various actions, and Enemy High and Low Quality Shot descriptions, used when Robata is moving. Below these are the meat of the Robata Action Card—the Primary and Secondary Action.So, back to the StuG III: Robata now must complete an Action Step [19.8.2] for the StuG III. It starts by again revealing three Battle Cards from the Battle Deck. Normally, Robata reveals only three cards during the Action Step, but the Robata Player Aid lists several modifiers that can cause Robata to reveal more, or less, than three cards. In this case, none of these modifiers apply, and Robata reveals only three Battle Cards: Fire 7/Field (85), Mud/Fire 2 (17), and Move 4 (56).
Following the steps for the Action Step on the Player Aid, we resolve any revealed Command cards (there are none), then resolve each revealed Terrain card. There is one revealed Ter-rain card, so Robata will attempt to play it on a target [19.4.7]. Fortunately for Jason, none of his tanks are In Motion, so Ro-bata cannot play this card on any tank. So, Robata continues to determine its Primary Action. To do this, we look at the Robata Action Card’s Primary Action section.Robata will check each option on this card, in order, until it finds one it can execute. Let’s look at the options: Robata can execute the Mission Priority, defined by the scenario (more on this in a moment), Fire at a High Quality target, Move to at-tempt to Flank or find Cover, play a Leadership card if any of the revealed Battle Cards are Leadership cards, Fire at a Low Quality target, or Move without flanking or Cover. The first one of these conditions that Robata can execute is the Primary Action for the StuG III.So first, let’s go check the Mission Priority for the Hold the High Ground scenario (pg. 25). The relevant part for the StuG III is this: “If the Active Robata Tank is not occupying a Hill, and no other Robata Tank is occupying a Hill, and at least one Hill is available, move towards the Hill (200m if 1 success, 400m if 2 successes). If the Robata Tank moves into the 400m Range box, place an available Hill card (if any) into the Robata Tank’s holding box, along with the revealed Natural Terrain with the highest Cover.”That’s a mouthful, but what it means is that Robata will move the Active Robata Tank towards the Hill as long as it doesn’t already have a Robata Tank on the Hill, and there is at least one Hill card available. Both of these are true, so the Robata Tank decides to Move.Unlike a player, Robata has no hand of cards, just these three revealed Battle Cards. Since Robata doesn’t use those cards to decide what to do, there is no guarantee it would have a Move card to play! Instead, Robata follows a movement procedure outlined on the Robata Player Aid [19.9.1]. The first instruc-tion is to perform a Success Check [19.8.3].Normally, a player would play one or two Move cards to move their tank 200m or 400m, but Robata cannot do this: instead, Robata will use the revealed Battle Cards to determine if it moves ‘once’ or ‘twice’ according to how many successes it gets in its Success Check. Robata will perform a Success Check any time a Robata Tank Moves or Fires.Following the steps on the Player Aid, Robata makes a Success Check:● First, determine the Activation Level: the StuG III is moving,
so it uses its Move Level of 6 as the Activation Level.● Next, compare the Activation Level to the Target Number of
the first Battle Card. The Activation Level is 6 and the Target Number of the first Battle Card is 5. Because the Activation Level is equal to or higher than the Target Number, the StuG III gets its first success. But we’re not done!
● Now, perform the same comparison with the second Battle Card, using half of the Activation Level (round up, if needed).

44 Tank Duel ~ Play Book
© 2019 GMT Games, LLC
In this case, half of 6 is 3, which is not equal to or higher than the Target Number on the second Battle Card, so the StuG III does not get a second success.
So, the StuG III will move with one success. Returning to the Move Action procedure, each success is resolved, one at a time, using the Movement Flowchart unless Robata is executing the Mission Priority. For this scenario that means “move towards the Hill (200m if 1 success, 400m if 2 successes).” With 1 success, the StuG III moves 200m towards the Hill and moves its Range counter from the 800m box to the 600m box.
Since Robata didn’t play a Move card, take one of the set aside “Solo” Move cards and place it into the StuG III’s Holding Box, and resolve the SPOT-TED trigger on the card—all of Jason’s tanks Spot the StuG III. These cards are exactly like a regular Move card with two exceptions. First, Robata never suf-fers a -40 to Hit penalty for a Fire action while In Motion, because Robata will always stop moving before shooting.
Second, these cards are always returned to the supply of Solo Move cards after they are removed from a Robata Tank’s Hold-ing Box. They are never shuffled into the Battle Deck.Now that Robata has resolved the Mission Priority, continue to follow the Move Action procedure from the Player Aid. The StuG III is not flanked, so that step is skipped. Additionally, none of the revealed Battle Cards is a Flank card so that step cannot be resolved (and would not be able to be resolved anyway, because the Robata Tank has no target Spotted). The next instruction, however, is more interesting: “If one or more of the revealed Battle Cards are a Terrain card with Cover, place that card into the Active Tank’s Holding Box.” Two of the Battle Cards are Terrain cards—Fire 7/Field (85) and Mud (17)—but they do not have Cover, so the StuG III will stay In Motion. That completes the Primary Action, now Robata will decide if the StuG III attempts a Secondary Action. Looking at the Robata Action Card, the first instruction is to Spot an enemy tank. This is resolved according to the Spot Action procedure [19.9.4].The StuG III has to decide what enemy tank it attempts to Spot. The Target Selection Priority says to choose the target with the greatest chance to Hit. Since the StuG III is at the same distance from all targets, and all the enemy tanks are in Field Terrain, the only difference between them is size. The T-34/85 is a bit bigger and has a Size Modifier of 0. So, the StuG III will attempt to Spot the T-34/85.Robata resolves Spot attempts by Pulling two Battle Cards and checking if either card has the Binoculars Icon (always two, even if the first card has Binoculars). Robata Pulls Fire 8 (86) and Tactics (42), neither of which have Binoculars. The Spot attempt fails, and Robata has finished its Secondary Action.Finally Robata resolves the Action Cleanup Step [19.8.4]. No Command cards are revealed, and Robata did not Fire, so those steps are skipped. Robata discards the revealed Battle Cards; this
turn, none of them were removed, but it is possible that some of them will be played on enemy tanks or on the Active Robata Tank. Only discard the cards that remain unplayed and revealed. Since the Stug III is not In Peril, that is the end of the StuG III’s turn. Robata does not play the Discard Step, so that is skipped.
Play Note: Player turns are summarized to keep this Example of Play to a reasonable length. If you need more detail for how Player turns work, see the Tutorial at the beginning of this Playbook.
PLAYER TANK PHASENow it’s Jason’s turn in Initiative Order. All of Jason’s tanks will go before Robata takes another turn. The T-34/85 performs its Tank Phase first. After discarding its Initiative Card, the T-34/85 attempts to Spot the Panther, discarding a Flank 7 (80), and fails, Pulling a Command (4). As a Field Action, the T-34/85 plays the Mud/Fire 9 (89) on the moving StuG III. This initiates a Tactics Reaction [19.4.4].Since Robata does not have a hand of cards, it cannot play a Tactics card. Instead, any time it would be able to play a Tactics card (these situations are listed on the Robata Player Aid), Ro-bata Pulls a Battle Card. If the Battle Card is a Tactics card, or if the Battle Number on the Battle Card is equal to or lower than the number of decks that have been played through plus 1, the Tactics Reaction is a success, and Robata is considered to have played a Tactics card. Robata Pulls a Leadership/Fire 3 (29), and the Tactics Reaction fails. Discard the Move card from the StuG III’s Holding Box (return it to the supply, not the discard pile!), and place the Mud/Fire 9 (89) into its Holding Box. Now, Robata resolves the BOG 10 trigger on the card, Pulling a Move 1/Fire 1 (14). The StuG III does not Bog. Jason decides not to discard a Battle Card and ends the T-34/85’s turn. Now Jason turns to the SU-100. He wants to move his T-34/76 up, and has only one Move card. The Leadership card is very valuable for use during a Fire action, so the SU-100 will attempt to Spot. After completing the Administration Step, Jason discards the Flank (10) and attempts to Spot the Panther. Bad luck strikes again, as the Pull is a Fire 7/Field (84). That ends the SU-100’s turn.Finally Jason gets to Move with his T-34/76. After the Admin-istration Step, Jason plays the Move 3 (55) he has been holding and moves the T-34/76 from 800m to 600m. With no Terrain card in hand, Jason places this Move card in the T-34/76’s Holding Box and resolves the SPOTTED trigger. All Robata tanks Spot the T-34/76.
PANTHER TANK PHASEBack to Robata’s tanks. The Panther is next and has nothing to do during the Administration Step except discard the Building (65) it had used as its Initiative Card. The Action Step starts with revealing three Battle Cards (no modifiers apply): Mud (18), Move 2 (52), and Command (5). This is an exceptionally good draw for the Panther. The first thing it will do is resolve the Command card.Command cards are resolved by following the Command Card Priorities on the Robata Player Aid . Since this Command card
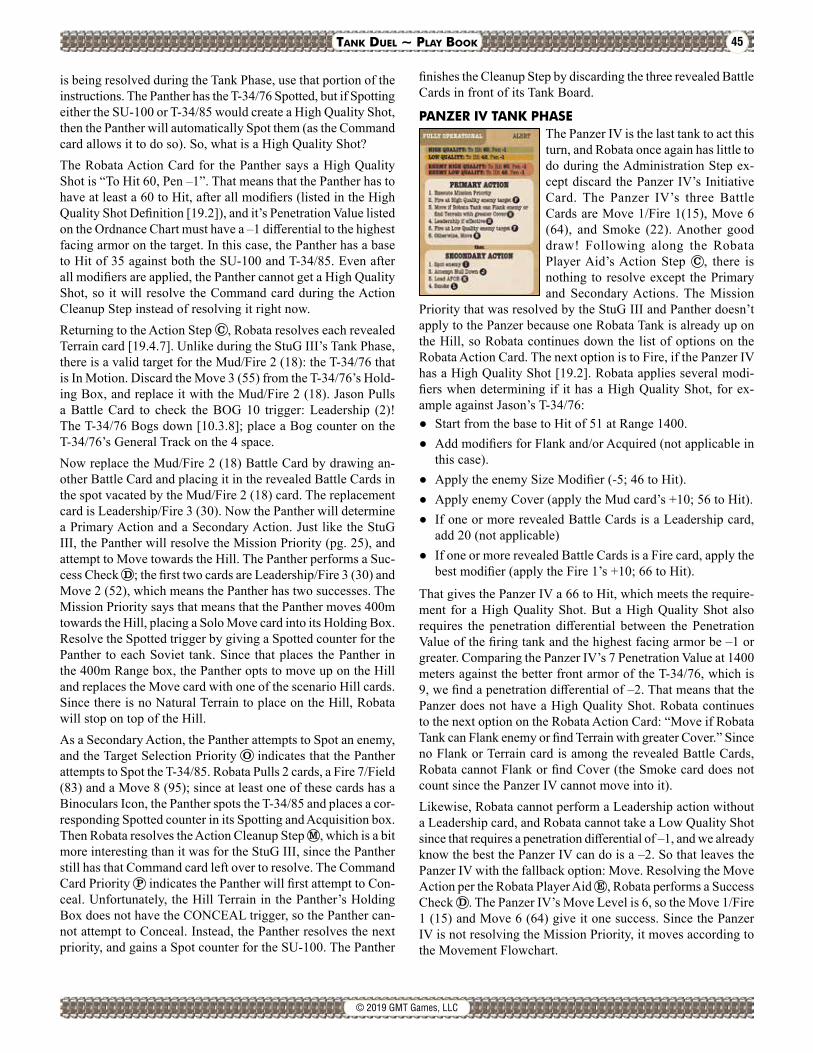
45Tank Duel ~ Play Book
© 2019 GMT Games, LLC
is being resolved during the Tank Phase, use that portion of the instructions. The Panther has the T-34/76 Spotted, but if Spotting either the SU-100 or T-34/85 would create a High Quality Shot, then the Panther will automatically Spot them (as the Command card allows it to do so). So, what is a High Quality Shot?The Robata Action Card for the Panther says a High Quality Shot is “To Hit 60, Pen –1”. That means that the Panther has to have at least a 60 to Hit, after all modifiers (listed in the High Quality Shot Definition [19.2]), and it’s Penetration Value listed on the Ordnance Chart must have a –1 differential to the highest facing armor on the target. In this case, the Panther has a base to Hit of 35 against both the SU-100 and T-34/85. Even after all modifiers are applied, the Panther cannot get a High Quality Shot, so it will resolve the Command card during the Action Cleanup Step instead of resolving it right now.Returning to the Action Step , Robata resolves each revealed Terrain card [19.4.7]. Unlike during the StuG III’s Tank Phase, there is a valid target for the Mud/Fire 2 (18): the T-34/76 that is In Motion. Discard the Move 3 (55) from the T-34/76’s Hold-ing Box, and replace it with the Mud/Fire 2 (18). Jason Pulls a Battle Card to check the BOG 10 trigger: Leadership (2)! The T-34/76 Bogs down [10.3.8]; place a Bog counter on the T-34/76’s General Track on the 4 space.Now replace the Mud/Fire 2 (18) Battle Card by drawing an-other Battle Card and placing it in the revealed Battle Cards in the spot vacated by the Mud/Fire 2 (18) card. The replacement card is Leadership/Fire 3 (30). Now the Panther will determine a Primary Action and a Secondary Action. Just like the StuG III, the Panther will resolve the Mission Priority (pg. 25), and attempt to Move towards the Hill. The Panther performs a Suc-cess Check ; the first two cards are Leadership/Fire 3 (30) and Move 2 (52), which means the Panther has two successes. The Mission Priority says that means that the Panther moves 400m towards the Hill, placing a Solo Move card into its Holding Box. Resolve the Spotted trigger by giving a Spotted counter for the Panther to each Soviet tank. Since that places the Panther in the 400m Range box, the Panther opts to move up on the Hill and replaces the Move card with one of the scenario Hill cards. Since there is no Natural Terrain to place on the Hill, Robata will stop on top of the Hill.As a Secondary Action, the Panther attempts to Spot an enemy, and the Target Selection Priority indicates that the Panther attempts to Spot the T-34/85. Robata Pulls 2 cards, a Fire 7/Field (83) and a Move 8 (95); since at least one of these cards has a Binoculars Icon, the Panther spots the T-34/85 and places a cor-responding Spotted counter in its Spotting and Acquisition box. Then Robata resolves the Action Cleanup Step , which is a bit more interesting than it was for the StuG III, since the Panther still has that Command card left over to resolve. The Command Card Priority indicates the Panther will first attempt to Con-ceal. Unfortunately, the Hill Terrain in the Panther’s Holding Box does not have the CONCEAL trigger, so the Panther can-not attempt to Conceal. Instead, the Panther resolves the next priority, and gains a Spot counter for the SU-100. The Panther
finishes the Cleanup Step by discarding the three revealed Battle Cards in front of its Tank Board.
PANZER IV TANK PHASEThe Panzer IV is the last tank to act this turn, and Robata once again has little to do during the Administration Step ex-cept discard the Panzer IV’s Initiative Card. The Panzer IV’s three Battle Cards are Move 1/Fire 1(15), Move 6 (64), and Smoke (22). Another good draw! Following along the Robata Player Aid’s Action Step , there is nothing to resolve except the Primary and Secondary Actions. The Mission
Priority that was resolved by the StuG III and Panther doesn’t apply to the Panzer because one Robata Tank is already up on the Hill, so Robata continues down the list of options on the Robata Action Card. The next option is to Fire, if the Panzer IV has a High Quality Shot [19.2]. Robata applies several modi-fiers when determining if it has a High Quality Shot, for ex-ample against Jason’s T-34/76:● Start from the base to Hit of 51 at Range 1400.● Add modifiers for Flank and/or Acquired (not applicable in
this case).● Apply the enemy Size Modifier (-5; 46 to Hit).● Apply enemy Cover (apply the Mud card’s +10; 56 to Hit).● If one or more revealed Battle Cards is a Leadership card,
add 20 (not applicable)● If one or more revealed Battle Cards is a Fire card, apply the
best modifier (apply the Fire 1’s +10; 66 to Hit).
That gives the Panzer IV a 66 to Hit, which meets the require-ment for a High Quality Shot. But a High Quality Shot also requires the penetration differential between the Penetration Value of the firing tank and the highest facing armor be –1 or greater. Comparing the Panzer IV’s 7 Penetration Value at 1400 meters against the better front armor of the T-34/76, which is 9, we find a penetration differential of –2. That means that the Panzer does not have a High Quality Shot. Robata continues to the next option on the Robata Action Card: “Move if Robata Tank can Flank enemy or find Terrain with greater Cover.” Since no Flank or Terrain card is among the revealed Battle Cards, Robata cannot Flank or find Cover (the Smoke card does not count since the Panzer IV cannot move into it).Likewise, Robata cannot perform a Leadership action without a Leadership card, and Robata cannot take a Low Quality Shot since that requires a penetration differential of –1, and we already know the best the Panzer IV can do is a –2. So that leaves the Panzer IV with the fallback option: Move. Resolving the Move Action per the Robata Player Aid , Robata performs a Success Check . The Panzer IV’s Move Level is 6, so the Move 1/Fire 1 (15) and Move 6 (64) give it one success. Since the Panzer IV is not resolving the Mission Priority, it moves according to the Movement Flowchart.

46 Tank Duel ~ Play Book
© 2019 GMT Games, LLC
There are two important definitions used when resolving this flowchart: First, Reach. Robata can Reach a condition if it is capable
of moving, using the successes from the Success Check, to cause that condition to become true. If the condition was already true, Robata cannot Reach that condition!
Second, Remove. Remove is just the opposite of Reach. These terms are defined officially in the Solitaire Rules Definitions [19.2].
Since the Panzer IV has one Success, resolve the flowchart one time. Following the diamonds, Robata will first check if there is any enemy tank with a High Quality Shot against the Panzer IV. To check this, use the Enemy High Quality definition on the Robata Action Card. For now, since no enemy tanks have the Panzer IV Spotted, it is impossible for any of them to have a High Quality Shot. The next diamond asks if the Panzer IV can reach a High Quality Shot. With one success, Robata checks if the Panzer IV would have a High Quality Shot at 600m Range. The T-34/76 is still the best target for the Panzer IV with a 61 base to Hit at 1200m. Adding the modifiers, as above (+10 for mud, -5 for Size Modifier) leaves the Panzer IV with a 66 to Hit. Do not apply modifiers from Leadership/Fire cards when determining a High Quality Shot during movement, since the Panzer IV would have a new set of cards by the time it could fire, in the next Game Round.That 66 to Hit, plus the 8 Penetration Value at 1200m, is enough to create a High Quality Shot! Resolving the Movement Flow-chart’s instructions, the Panzer IV moves 200m, from 800m to 600m, setting up a High Quality Shot. Place the Solo Move card into the Holding Box and resolve the SPOTTED trigger. Between the Panther and the Panzer IV, things are looking grim for the T-34/76. Return to the Move Action Procedure : the Panzer IV is not flanked, and no Flank cards are available for Robata; likewise no Terrain cards are among the revealed Battle Cards, so Robata moves on to the Secondary Action for the Panzer IV.The Panzer IV does not have all the enemy tanks Spotted, so it selects Spot as its Secondary Action. The Target Selection Prior-ity indicates the target should be the highest chance to Hit, and the T-34/85 is the highest chance to Hit among unspotted targets, so Robata pulls two Battle Cards to attempt to Spot the T-34/85: Flank 8 (81) and Tactics (44). The Flank 8 (81) has the Binoculars Icon, so the Panzer IV spots the T-34/85. The Panzer IV resolves the Action Cleanup Step, which is uneventful, by discarding the revealed Battle Cards.
REINFORCEMENT PHASEThere are no destroyed tanks, so no reinforcements are needed.
This example of play has illustrated most of the features of Robata, but let’s skip ahead to the next Game Round, where the Panther has the lowest Initiative Card, and is ready to Fire at the T-34/76.
PANTHER TANK PHASEThe Panther got a very low Initiative Card, a Flank 2 (8), which means it takes its Tank Phase first. Robata quickly completes its Administration Step and discards its Initiative Card. Robata reveals Battle Cards for the Panther’s Action Step—note that Robata reveals an extra card because the Panther is in a red Range Box at 400m—and flips over Building (66), Move 4/Fire 4 (34), Fire 2 (27), Move 1/Fire 1 (16). With no Command cards, Robata proceeds directly to determining the Panther’s Primary Action.The Mission Priority doesn’t apply since the Panther is already on the Hill, so the Panther will attempt a High Quality Shot against the T-34/76. The Panther has a 77 to Hit at 1000m, plus 10 for the Mud and 10 for the Fire 1 card that is revealed. Subtracting 5 for the T-34/76’s Size Modifier means that the Panther has a 92 to Hit. Pretty good. From its perch on the Hill, the Panther gets a +1 Pen Mod, making it’s Penetration Value 14: compared against the 9 of the T-34/76’s front Hull and Turret Armor, the Panther expects to turn the T-34/76 into a colander.Since this is a High Quality Shot, the Panther resolves the Fire Action procedure . First, the Panther determines the target of the Fire action; for Fire actions Robata chooses first from among all High Quality targets, then among Low Quality targets. Robata has a High Quality Shot against the T-34/76, but quickly checks to make sure it’s the best to Hit among High Quality targets. It is.Next Robata performs a Success Check using the Panther’s Fire Level of 8. With the Building (66) and Move 4/Fire 4 (34) as the first two revealed Battle Cards, the Panther gets two successes. That means Robata will be able to choose the location of the hit if the shot hits the T-34/76. If the Panther was In Motion, it would now stop moving immediately, for free, without taking an action. Now, the Panther Fires! Use the Fire Procedure , and resolve each step.Jason has an opportunity to play a Tactics card, but does not have one. Robata’s to Hit Number is 92; Robata pulls a Battle Card and gets a Flank 6 (12). That’s a Hit! Robata chooses the Hit Location because of the Panther’s two successes, and since the Hull and Turret have the same Armor Value (9), Robata se-lects the Turret, hoping for an Ammo Hit. Robata Pulls another Battle Card for the Pen Mod and gets a Move 9 (98) with a +3 Pen Mod and Heavy Damage. With a total Penetration Value of 17, the Panther punches a neat hole in the T-34/76’s turret. Time to find out what kind of Damage is done.Jason Pulls a Damage Card and gets Critical Hit 4 (14). Checking the result for Turret Heavy Damage, the T-34/76’s Commander is KIA, and he has to check for Explosion and Fire. Quite the damaging shot!
Now you know everything you need to play Tank Duel against Robata. Good luck, and good hunting!
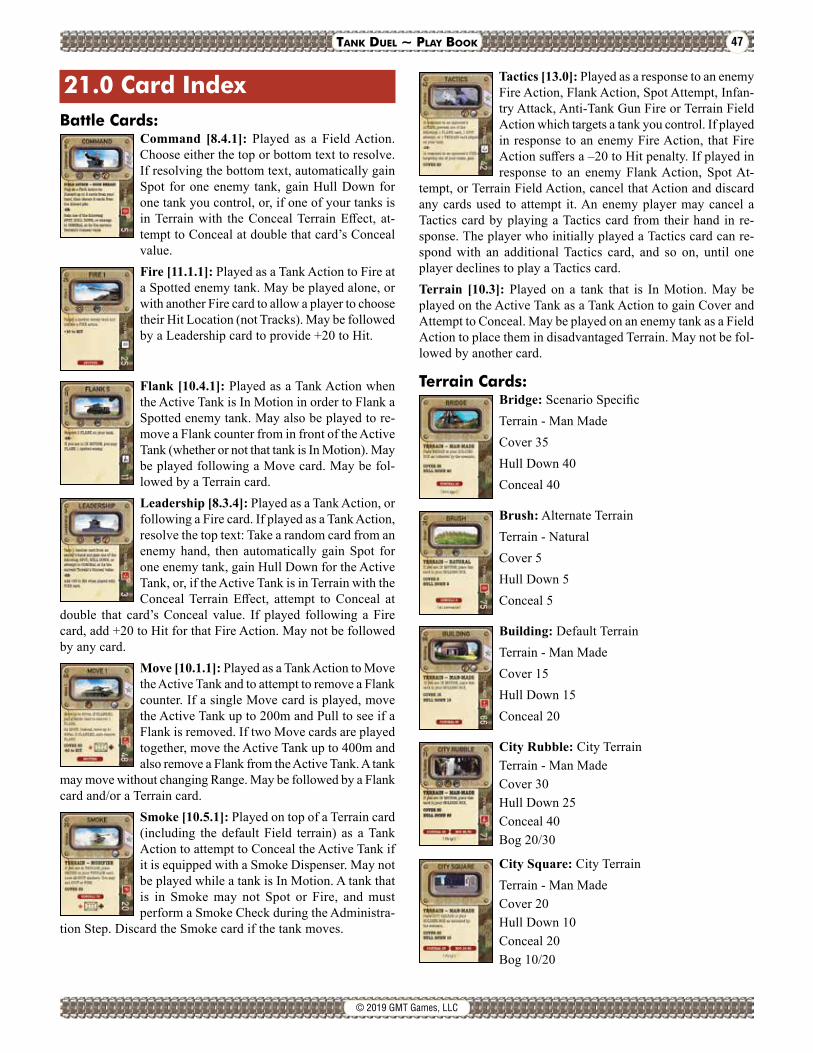
47Tank Duel ~ Play Book
© 2019 GMT Games, LLC
21.0 Card IndexBattle Cards:
Command [8.4.1]: Played as a Field Action. Choose either the top or bottom text to resolve. If resolving the bottom text, automatically gain Spot for one enemy tank, gain Hull Down for one tank you control, or, if one of your tanks is in Terrain with the Conceal Terrain Effect, at-tempt to Conceal at double that card’s Conceal value.Fire [11.1.1]: Played as a Tank Action to Fire at a Spotted enemy tank. May be played alone, or with another Fire card to allow a player to choose their Hit Location (not Tracks). May be followed by a Leadership card to provide +20 to Hit.
Flank [10.4.1]: Played as a Tank Action when the Active Tank is In Motion in order to Flank a Spotted enemy tank. May also be played to re-move a Flank counter from in front of the Active Tank (whether or not that tank is In Motion). May be played following a Move card. May be fol-lowed by a Terrain card.Leadership [8.3.4]: Played as a Tank Action, or following a Fire card. If played as a Tank Action, resolve the top text: Take a random card from an enemy hand, then automatically gain Spot for one enemy tank, gain Hull Down for the Active Tank, or, if the Active Tank is in Terrain with the Conceal Terrain Effect, attempt to Conceal at
double that card’s Conceal value. If played following a Fire card, add +20 to Hit for that Fire Action. May not be followed by any card.
Move [10.1.1]: Played as a Tank Action to Move the Active Tank and to attempt to remove a Flank counter. If a single Move card is played, move the Active Tank up to 200m and Pull to see if a Flank is removed. If two Move cards are played together, move the Active Tank up to 400m and also remove a Flank from the Active Tank. A tank
may move without changing Range. May be followed by a Flank card and/or a Terrain card.
Smoke [10.5.1]: Played on top of a Terrain card (including the default Field terrain) as a Tank Action to attempt to Conceal the Active Tank if it is equipped with a Smoke Dispenser. May not be played while a tank is In Motion. A tank that is in Smoke may not Spot or Fire, and must perform a Smoke Check during the Administra-
tion Step. Discard the Smoke card if the tank moves.
Tactics [13.0]: Played as a response to an enemy Fire Action, Flank Action, Spot Attempt, Infan-try Attack, Anti-Tank Gun Fire or Terrain Field Action which targets a tank you control. If played in response to an enemy Fire Action, that Fire Action suffers a –20 to Hit penalty. If played in response to an enemy Flank Action, Spot At-
tempt, or Terrain Field Action, cancel that Action and discard any cards used to attempt it. An enemy player may cancel a Tactics card by playing a Tactics card from their hand in re-sponse. The player who initially played a Tactics card can re-spond with an additional Tactics card, and so on, until one player declines to play a Tactics card.Terrain [10.3]: Played on a tank that is In Motion. May be played on the Active Tank as a Tank Action to gain Cover and Attempt to Conceal. May be played on an enemy tank as a Field Action to place them in disadvantaged Terrain. May not be fol-lowed by another card.
Terrain Cards:Bridge: Scenario SpecificTerrain - Man MadeCover 35Hull Down 40Conceal 40
Brush: Alternate TerrainTerrain - NaturalCover 5Hull Down 5Conceal 5
Building: Default TerrainTerrain - Man MadeCover 15Hull Down 15Conceal 20
City Rubble: City TerrainTerrain - Man MadeCover 30Hull Down 25Conceal 40Bog 20/30
City Square: City TerrainTerrain - Man MadeCover 20Hull Down 10Conceal 20Bog 10/20
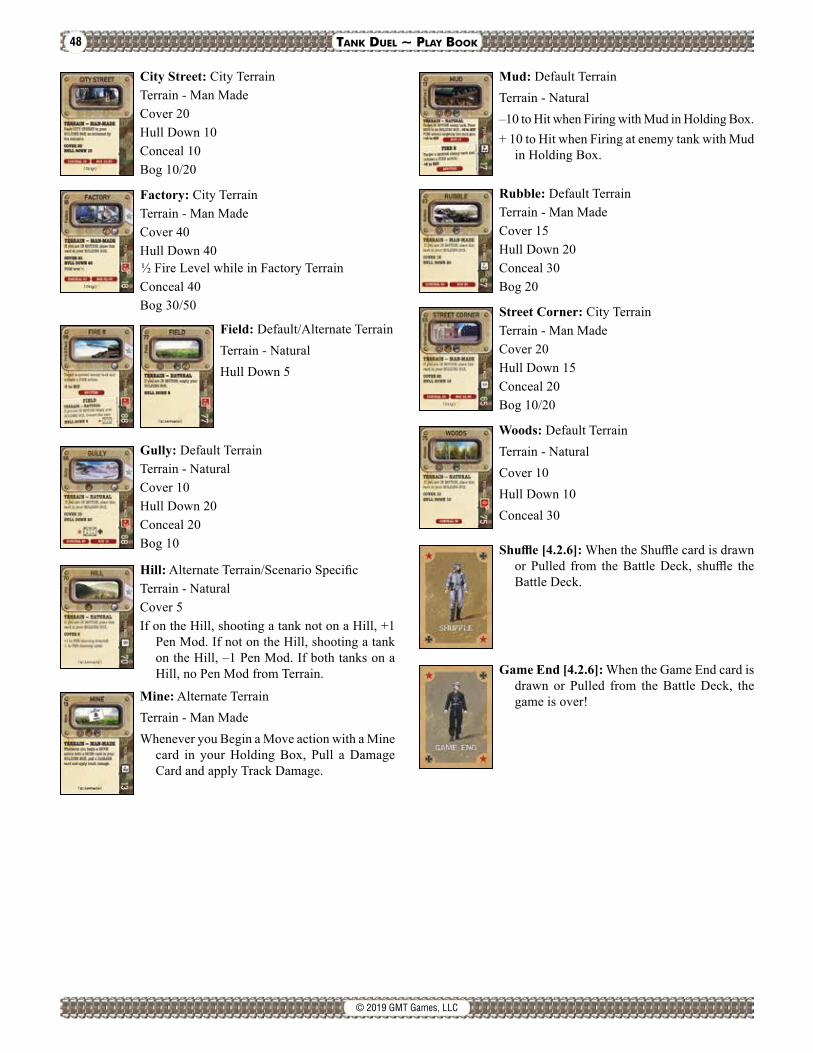
48 Tank Duel ~ Play Book
© 2019 GMT Games, LLC
City Street: City TerrainTerrain - Man MadeCover 20Hull Down 10Conceal 10Bog 10/20
Factory: City TerrainTerrain - Man MadeCover 40Hull Down 40½ Fire Level while in Factory TerrainConceal 40Bog 30/50
Field: Default/Alternate TerrainTerrain - Natural
Hull Down 5
Gully: Default TerrainTerrain - NaturalCover 10Hull Down 20Conceal 20Bog 10
Hill: Alternate Terrain/Scenario SpecificTerrain - NaturalCover 5If on the Hill, shooting a tank not on a Hill, +1
Pen Mod. If not on the Hill, shooting a tank on the Hill, –1 Pen Mod. If both tanks on a Hill, no Pen Mod from Terrain.
Mine: Alternate TerrainTerrain - Man MadeWhenever you Begin a Move action with a Mine
card in your Holding Box, Pull a Damage Card and apply Track Damage.
Mud: Default TerrainTerrain - Natural–10 to Hit when Firing with Mud in Holding Box.+ 10 to Hit when Firing at enemy tank with Mud
in Holding Box.
Rubble: Default TerrainTerrain - Man MadeCover 15Hull Down 20Conceal 30Bog 20
Street Corner: City TerrainTerrain - Man MadeCover 20Hull Down 15Conceal 20Bog 10/20
Woods: Default TerrainTerrain - NaturalCover 10Hull Down 10Conceal 30
Shuffle[4.2.6]: When the Shuffle card is drawn or Pulled from the Battle Deck, shuffle the Battle Deck.
Game End [4.2.6]: When the Game End card is drawn or Pulled from the Battle Deck, the game is over!

49Tank Duel ~ Play Book
© 2019 GMT Games, LLC
22.0 Designer NotesI have developed many games for GMT and I’m so excited to now share with you my first game that I have designed, Tank Duel. I want to begin by thanking my wife and granddaughter. Without their patience, I would have never had enough time to complete this project. Thank you both, and I love you girls very much.Tank Duel started as a collaboration between Harold Buchanan and myself. While playing World of Tanks, we discussed the possibilities of making a quick playing tank game. A short time later at Strategic Con in Los Angeles, Harold brought a semi playable prototype of the game. We then were off and running with the design process of Tank Duel. A year or so into the design, Harold decided he had other design interests and was stepping away from Tank Duel. I’m grateful for the time spent and opportunity to have worked with Harold on Tank Duel. Harold is a good friend and hopefully we can work on a game in the future. After I took over the game, I knew I wanted to put together a really good design team. My first order of business was to find a developer. I immediately thought of Joe Aguayo. We have been friends for many years and having played many games together I knew he was a great gamer and would be able to give valuable input to the development of Tank Duel. I’m very appreciative and thankful for all the time and hard work Joe put into the development of Tank Duel.I was so blessed to have two developers for this game. Jason Carr came on as a second developer and morphed into the lead developer. Jason and I met at GMT West, it was his first time attending the weekend at the warehouse. I was running a demo of Tank Duel and he wanted to play the game. I soon realized what a good gamer he was when after a couple turns he immediately had a grasp of the rules and mechanics of Tank Duel. Jason ap-proached me and expressed how much he enjoyed the game. During the conversation he said he would like to be involved with the design team in any capacity. Of course, I instantly thought YES!! GMT Design teams are all volunteer armies, so when someone offers their time and talent, you jump on it. Jason was able to arrange a great group of playtesters. He also took on the challenge of writing the rule book. Having a good relationship between designer and developer is so important, especially with the daunting task of writing a rule book. After receiving many questions and requests about a solitaire system for Tank Duel, I knew that I needed to come up with something. Having been the developer for Navajo Wars and Comancheria which are great solitaire games (if I do say so myself, LOL) I had a good idea of what was needed. Jason ap-proached me and asked if he could take a crack at coming up with a solitaire system for Tank Duel. I informed him that we would need to do it with the components that we already have in the multi-player version. He was able to come back with a solid backbone for a solitaire system and together we were able to produce an enjoyable and challenging solitaire system. This game would not be the same without all the hard work
and dedication that Jason has put into it. One of the benefits of designing a game are the friendships that are made all the way.James Vitti approached me with interest of researching and creating our historical scenarios. I want to thank him for all the time he devoted to that project and I’m really happy with what he produced. I also want to thank the following people:
Kurt KeckleyJordan KehrerMichael LahlJohn LeggatBruce MansfieldAllen MartinBernie RoesslerJohn SnyderJerome WeisenJeremy White
Each helped out in various ways in the design of Tank Duel. And a special thanks to all of the playtesters.Also, a very special thanks to Joel Toppen for designing the Vassal module.My vision for Tank Duel, was to design a game that portrays the feeling of armor warfare on the Eastern Front during WWII. My main goal was to give the players the feeling of being inside of an armored fighting vehicle. I want the player to have some of the feelings that the crew of a WWII Tank must have had dur-ing an encounter. The feeling of claustrophobia, desperation, anticipation, panic and critical decisions. I did not design the game to be an exact tank simulation. When historical accuracy came into conflict with game play, I almost always sided on playability, while trying to maintain as much accuracy as pos-sible. When players finish playing a game of Tank Duel, the post game chatter talk was not about technical numbers, such as penetration and thickness of armor, etc. The discussions were, “I couldn’t believe you pulled that shot off” or “I would have had you, but…” and “If we hadn’t of knocked out that last tank with a miracle shot, we would have lost”. That’s when I knew I was on to something, when the talk was about the narrative of the game and not the mechanics. Tank Duel lends itself to the theater of the mind with the abstract nature of the game so paint the picture of the battle as you see it, and remember to aim straight and fire first. Lastly, thank you for your interest and purchase of the game. I hope you enjoy playing Tank Duel as much as I enjoyed design-ing it for you.
Mike Bertucelli, Designer

50 Tank Duel ~ Play Book
© 2019 GMT Games, LLC
Designer Emeritus NotesMike and I share an interest in tanks. Mike got me addicted to World of Tanks on the PC between development cycles on Lib-erty or Death. During one of these matches I had a crazy idea for a card driven tank game. Not unlike Avalon Hill’s Tobruk, maneuver was highly abstracted but fire combat was resolved in great detail. Each tank would be represented by a tank card where we track great detail. Card play would be influenced by Avalon Hill’s Up Front where tactical opportunities and limita-tions were represented by a hand of cards from a common deck.My math brain took over and I jumped into the trigonometry, data and ballistics tests. My intent was to define the relative values of the tanks with some accuracy and academic rigor. Anyone who has ever been through that exercise can tell you that the data is inconsistent at best. Additionally, any model doesn’t survive the simple chaos of a tank turned at a 17° angle to square. The bad data and the complex model bothered me through the process.Mike came to LA to a Strategicon. We met and I brought the first prototype. I accepted an 80% solution on the technical aspects. My intent was to provide a working prototype and see how Mike reacted to it. Mike loved it. We spoke daily for the next week exchanging ideas. One of my favorite bits of feedback from Mike was my prototype had American tanks and we needed to start on the tank front—the Eastern front! He was right.Mike and I pushed forward with the development and I con-tinued to be frustrated with the technical problems. The more we investigated the more problems we found. Mike had the right idea and I just couldn’t accept it. Mike said rather than beat our (my) heads up against the wall, let’s shape the game with the data wargamers are used to: Panzer, ASL, and other tactical WW2 tank games that wargamers already have become comfortable with. Use them to test and influence and shape the attributes of the tanks.The other challenge I had with Tank Duel after about three months of development (that is common to my personal design process) is I had already moved on to an alternate set of models. It is a curse and it makes it hard for me to finish a game design but my brain keeps iterating. I was now designing a card game that was simply a deck for each tank and played in about 10 minutes. At that point I knew it was time to turn Tank Duel over to Mike. It was a great game, fun to play, provided interesting choices, and Mike loved it. He also had a solid perspective on the data that would result In a great game and no anxiety for me. Over dinner at Consimworld Expo I told Mike and Gene I was out and Mike was running point. They were both great about it.Mike calls me from time to time to bounce ideas off of me. I love it and give him as much honest feedback as he will have. He has made a great set of choices and the game has benefited greatly from his stewardship. Plus, I think it’s cool that he kept the name Tank Duel. I am proud to have been associated with the game even for a short time.
Harold BuchananSan Diego, California
Developer NotesUnlike many of the designers and developers I’ve been blessed to work with at GMT, I am a relative newcomer to the wargaming hobby. I have been a ‘gamer’ for about 15 years, but the clos-est thing to a wargame I’d ever played prior to meeting Mike Bertucelli was Twilight Struggle. That changed in October of 2016, when my friend Michael Lahl invited me down to Hanford to go to this weird wargaming event hosted by GMT Games. I was between jobs (involuntarily) and had a little extra time on my hands, so I tagged along.That weekend, I was introduced to the wide world of wargam-ing—and GMT Games, of course—but more than that, I was introduced to the people. Meeting Gene was wonderful, and a group of gamers let me join them for a game of Virgin Queen, which sort of blew my mind. But, meeting Mike and playing Tank Duel were the experiences that I remember best from that weekend. I was immediately excited about Tank Duel—I had many ideas, some of which are in the game you’re now hold-ing—and Mike listened to all of them, whether they were good or bad.About a week later, I was ‘on the team’ and a few months later I was officially a developer. I won’t lie; developing a game was sort of a bucket list item for me (well, I didn’t know what a developer was exactly, but “working on games” was top of the bucket list). Mike was patient while I learned the ropes. He would get on Vassal with me and show me other games so I wasn’t ignorant of what others had done. This is how I learned to play Enemy Coast Ahead, Comancheria, Navajo Wars, Fighting Formations, and the COIN Series of games.Mike was kind enough to consider the crazy idea I had for how to make the game work solitaire (honestly I had gotten sick of playing it by myself) which I thought of at 3 AM, and had no idea how to turn into a real game. Mike’s experience with other solitaire games was a boon here, and he really owned making Robata an excellent gaming experience. Working on the system taught me how hard design really is, and made me a better developer. Mike was also patient and kind when I decided I wanted to work on Gandhi, the latest COIN volume. He had to know up front that it would make Tank Duel take longer, doubly so when Mike stepped away from being Gandhi’s developer and handed me the reins. It was an honor to take over the COIN series for Mike (still is, by the way), and his kindness in letting me grow and explore new things allowed us to make Gandhi an incredible game.Still, there was work to be done on Tank Duel. We took the long road, but the game is better for it. So, what you are holding is not just the product of a development team, but the journey that we took together, pushing each other to a higher quality standard and finding new and interesting avenues of storytelling and gaming for folks to enjoy. I hope you enjoy it, and I hope you get as excited at blowing up your friends as I do. Because, at the end of the day, isn’t that what gaming is all about?
Jason Carr, Developer

51Tank Duel ~ Play Book
© 2019 GMT Games, LLC
Notes about the Historical ScenariosThe rumble of a Daimler-Benz Maybach HL230. Answered by the guttural throb of the Kharkiv model V2 from the Kharkiv Locomotive Factory. From the first shuffle of the Battle Deck that ignites a game of Mike Bertucelli’s Tank Duel: Enemy in the Crosshairs, I experienced a rush of adrenaline tempered by well-drilled trust in the prowess of the mechanical behemoth upon which my life and that of my crew depended across the battlefields of Eastern Europe. Be it a German Panther or re-lentless Tiger; an iteration of the Russian IS-2m or SU-100, no matter the tank, what ultimately fired my imagination was Tank Duel’s elegant card-driven mechanic that animates the functional beauty in the slope of turret armor or the squat beetle-like efficiency of a tank destroyer. Nervy moments, when your opponent has won the initiative to reveal a succession of cards; you brace, spotted and exposed, waiting for a possible hit and the ensuing carnage that might befall you and your crew. Or the shell bounces!In a few plays, Tank Duel scaled to my teenage memories of exploring Avalon Hill’s PanzerBlitz (1970), East Front tank battles conducted with, then, realistic armor silhouettes and chits of burning vehicles. It’s numbered “Situations”, each an enticing tactical puzzle framed as an historical engagement, tested my skill maneuvering Soviet or German tank platoons. From Tank Duel’s open hatch I scan for threats from within the equivalent of four PanzerBlitz hexes; flanked by the other tanks/players of my platoon. From that initial shuffle of the Battle Deck I maneuvered into the historical possibilities of Tank Duel. I sent Mike and his development team rough attempts at matching tanks on offer from the German Pz IVG to the Soviet KV-85 with verified orders of battle by unit from the historical record gleaned from my personal library.And from the start my forays into crafting historical scenarios (including the two in Tank Duel’s Playbook) were generously welcomed and encouraged. Gradually, I began to think in Tank Duel as I scoured historical accounts, sifting through the personal memoirs of tank commanders or descriptions by accomplished historians of armored warfare. I searched for that telling detail, one that would make for a simulation that would test players’ “heat of battle” command decisions. Both historical scenarios, “Fog of Counteroffensive” and “Hungary for Oil,” add a third opposing force, relentless and uncaring, to the clash of German and Soviet armor: a driving rainfall or wind whipped snow. To create card mechanics for Deep Mud or a Snow Storm, I would discover with Mike’s guidance, best emerged from the structural integrity of his game’s design. How is a Fire or Flank card impacted by a quagmire? How might you maintain Target Acquisition for a Tiger tank yet blinded by snow? Introduc-ing forces of Nature by design upend theoretical tank design and tactical balance. Crafting an historical CDG drama in the language of Mike’s Tank Duel is like composing a haiku poem, albeit armor plated.
Inside Tank Duel’s abstracted battlefield, drawing into cards like Fire 2, Move 5, Woods, Flank 6, Tactics or Command, all framed by symbols for Explosions, Fire, Binoculars or targeted Battle Numbers, all together, take on a synergy that could result in a kill shot to survival after a retreat to safe cover. During the playtesting phase, these same cards became triggers for evocative storytelling. Our reports back to Mike and design team read as gritty battlefield accounts, intense and sometimes painful as players turned tank commanders struggle to protect crew members, sometimes failing in a fiery inferno. Ultimately, designing the historical scenarios, “Hungry for Oil” and “Fog of Counteroffensive,” is my attempt to remain true to Tank Duel’s dedication to that visceral storytelling so that players might discover personal accounts of endurance or triumph inside the vast sweep of the tank battles on the Eastern Front.
James Vitti, Historical Scenario Designer
ReferencesBattleground Prussia: The Assault on German’s Eastern Front 1944-45 (2012), Pritt Butar, Osprey Publishing, England. German Tanks of World War II (1988), Dr. S. Hart; Dr. R. Hart, Beacon Press, England.Hitler’s Panzers: Lightning Attacks that Revolutionized Warfare (2009), Dennis Showlater, Berkley, New York. Panzer Leader (1952) Heinz Guderian, Dutton Press, England.Panzer: A Revolution in Warfare 1939-1945 (1989), Roger Edwards, Brockhampton, Press, England. Panzer Destroyer: Memoirs of a Russian Tank Destroyer (2010) Vasiliy Krysov, Pen and Sword, England.Tanks Warfare on the Eastern Front 1941-42 (2013), Robert A. Forczyk, Stackpole Books, New York. Tanks Warfare on the Eastern Front 1943-45 (2016), Robert A. Forczyk, Pen and Sword, England.

52 Tank Duel ~ Play Book
© 2019 GMT Games LLCP.O. Box 1308, Hanford, CA 93232 www.GMTGames.com
KIA CREW EFFECT REFERENCECREW POSITION EFFECT IF KIA
Driver The tank may not Move until the Driver position is occupied [8.3.5.iv]. If the Assistant Driver is driving, subtract 1 from the Move Level; if any other Crew member is driving subtract 2 from the Move Level.
Gunner The tank may not Fire until the Gunner position is occupied. Subtract 1 from the tank’s Fire Level if anyone other than the Gunner is firing.
Loader Subtract 1 from the Fire Level until the Loader position is occupied.
Commander The tank’s Controlling Player subtracts 1 from their Hand Size [4.2.7]. Subtract 1 from the tank’s Move Level and Fire Level. Remove all Spotted and Acquired counters from the tank’s Spotting and Acquisition Box.
Commander/Gunner The tank may not Fire until the Commander/Gunner position is occupied. The tank’s Control-ling Player subtracts 1 from their Hand Size [4.2.7]. Subtract 1 from the tank’s Move Level and 2 from the tank’s Fire Level. Remove all Spotted and Acquired counters from the tank’s Spotting and Acquisition Box.
Assistant Driver No Effect
If Explosion or Out of Control Fire: Pull 1 Battle Card for each Crew Member (2 if Wounded). If any Pulled card has an icon matching the reason for Escape Attempt (Fire or Explosion), Crew Member is KIA [12.6.2].
INFANTRY RULES REFERENCEINFANTRY ADVANCE [17.3.2]Play a Battle Card with an Infantry Icon from either Nation to move the enemy Infantry counter to perform an Infantry Advance:
• Attempt to move the enemy Infantry counter to the next lowest Range box on the Infantry Advance card. If the enemy Infantry counter moves out of the 200m Range box, remove it from the card.
• Otherwise, if the enemy Infantry counter is not on the InfantryAdvance card, place the Infantry counter matching the Active Player’s Nation in the 200m Range box or advance it to the next Range box on the Infantry Advance card.
INFANTRY ATTACK [17.3.3]Play a Battle Card with an Infantry Icon matching the the player’s Nation to perform an Infantry Attack.
INFANTRY ATTACK MODIFIERS [17.3.3.d]When resolving the Fire Procedure for Infantry Attacks, apply the following modifiers (only):
• Add the target’s current Cover to the To Hit Number.• The target tank’s Size Modifier.• –20 if an uncancelled Tactics card was played.
HAND-TO-HAND PROCEDURE [17.3.3.f]After determining if an Attack is a Hit, if resolving a Hand-to-Hand Attack, use the following procedure:
Pull 2 Battle Cards:• If both cards show an Explosion icon, the target Explodes [12.2].• If only one Pulled card has an Explosion icon, and the target tank has an Open Hatch, the Commander is KIA; Pull a
Damage Card and resolve a Morale Check [12.4] (but do not resolve any Critical Hits or Damage Checks).• Any other result is an unsuccessful attack.