
Plan Sponsor Website Guide - Amazon Web Services · Plan Sponsor Website Guide Accessing Your...
26
Plan Sponsor Website Guide ► Accessing Your Account ......................................................................................................... p 1 ► Summary ................................................................................................................................ p 2 ► Your Participants .................................................................................................................... p 3 ► Participant Loans .................................................................................................................... p 6 ► Participant Withdrawals .......................................................................................................... p 8 ► Plan Asset Details................................................................................................................... p 9 ► Plan Information.................................................................................................................... p 10 ► Reporting .............................................................................................................................. p 11 ► Payroll Change Notification Report ...................................................................................... p 12 ► Payroll Processing ................................................................................................................ p 13
Transcript of Plan Sponsor Website Guide - Amazon Web Services · Plan Sponsor Website Guide Accessing Your...

Plan Sponsor Website Guide
► Accessing Your Account ......................................................................................................... p 1
► Summary ................................................................................................................................ p 2
► Your Participants .................................................................................................................... p 3
► Participant Loans .................................................................................................................... p 6
► Participant Withdrawals .......................................................................................................... p 8
► Plan Asset Details................................................................................................................... p 9
► Plan Information.................................................................................................................... p 10
► Reporting .............................................................................................................................. p 11
► Payroll Change Notification Report ...................................................................................... p 12
► Payroll Processing ................................................................................................................ p 13

Accessing Your Account
To access the new plan sponsor website, visit www.captrustadvisors.com/freedom401k Click on the "Freedom401k® Login" button, then click the "Plan Sponsor Login" link.
On the next screen, enter your User ID/Email and Password and click Login. If you are not registered as a Plan Sponsor, contact your Relationship Manager for your default login credentials. If you forget your password, click on the “I forgot my Password” link and follow the instructions to reset your account.

Summary
As soon as you log in to your account, you’ll see a summary of your plan. It’s presented in a quick view format, with information such as current plan balance, and YTD contributions.
‘I want to’ Section The website will feature quick links that allow you to easily navigate to the areas that interest you most. You can also navigate to these sections using a combination of the first and second tier menus.

Your Participants
From the Participants screen, you have a number of useful tools at your fingertips.
Searching for Existing Participants
To access account information for an existing participant, you can simply press the Retrieve Participants button. This will list all participants in your plan. Alternatively, you can enter the Last Name or Social Security Number of a participant and press the Retrieve Participants button. By clicking on the name of the participant, a drop-down of available options will appear based on the setup of your plan. Options may include:
View as Participant. This option allows you to navigate through the participant website for a single participant in view-only mode.
Participant Information. This option allows you to view and update participant information manually.
Loans & Withdrawals. Select this option to model a loan or distribution for a participant. You can also view pending loans and distributions.
Account Activity. Launch this screen to view participant account activity and specific transactional data at a participant level for a specified period you define.
Statements. Using this option, you can view and print a PDF version of the participant’s prior quarterly statements. The last four quarterly statements are generally accessible from this screen.

Your Participants
Edit an Existing Participant
Most often, employee census data will be updated through the regular payroll process. However, there may be times when an immediate change in between payroll cycles, or after a terminated participant has dropped off of the payroll files is needed. You have the ability to manually edit a participant’s information, such as change of mailing address or termination date. First, search for the existing employee, then click on their name to access a dropdown list and select Participant Information. From here you may edit the participant’s personal & employee details; you may also view their salary and hours, beneficiaries, contribution rate, and investment elections. To enter a termination date, update the Status dropdown and enter the End Type and End Date, click Next and confirm the changes.

Your Participants
Add a New Participant
Most often, new employees will be added through the regular payroll process. However, there may be times when an immediate addition in between payroll cycles is helpful. To manually add a new employee or participant, select the Add New Participant button and, from the drop-down, select the Manual option. A useful wizard will appear stepping you through the information needed to successfully add a new employee or participant to the plan. An asterisk (*) will denote all required data elements. When you have entered all of the necessary information, press the Add Participant button.

Participant Loans
If your plan allows for loans, you can view outstanding loan details and model a loan from the Loans tab. Modeling a participant loan is easy. Simply click on the Model a Loan button and follow the helpful wizard. You will be asked to enter a few key loan parameters, such as amount of loan and number of payments, and the system will do the rest.
Participant Loans
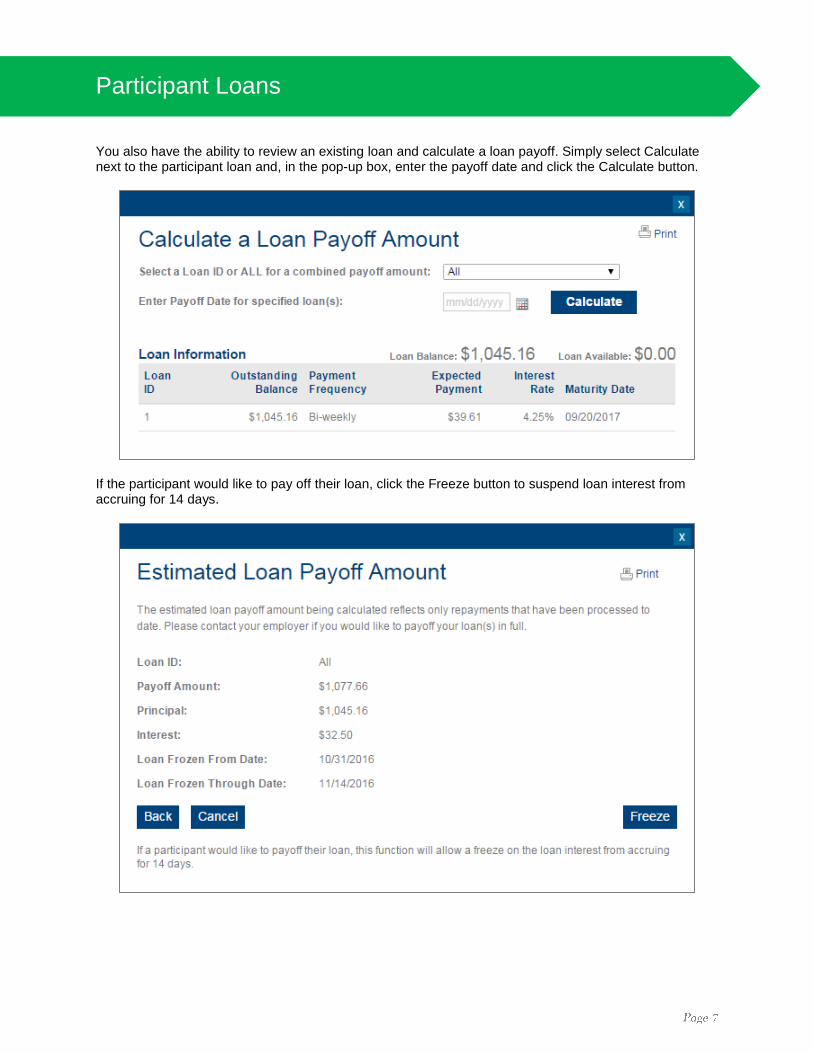
You also have the ability to review an existing loan and calculate a loan payoff. Simply select Calculate next to the participant loan and, in the pop-up box, enter the payoff date and click the Calculate button.
If the participant would like to pay off their loan, click the Freeze button to suspend loan interest from accruing for 14 days.

Plan Withdrawals
The Withdrawals section will provide you with a list of pending withdrawal requests and the history of all participant withdrawals. Click the “Show Filter” to search for specific withdrawals. Withdrawal history may be downloaded to a spreadsheet.

Plan Assets Details
From the Plan Assets tab, you will be able to view the assets of the plan by Investments or Contribution Type. Click on the Year to Date Contributions or Plan Holding Accounts tab to view additional details. Use the drop-down on the right to change your view or expand sections to access more information as desired.

Plan Information
Plan information provides you with access to plan documents and forms. The Investment Options section contains a list of all investment options, including links to the fund fact sheet and prospectus. Under Contacts, you will find information for your plan and Relationship Manager.

Reporting
From the main menu bar, select the Reporting tab to access system generated reports, run and view on-demand reports, or request and view a trust report. You can also run customized reports from the Custom Reports tab.
Standard Reports
There are a number of reports that are systematically generated and accessible to you through the Standard Reports screen. Certain reports, such as the Loan Amortization Schedule report, are generated following a certain event. Other reports, such as the Address Change Detail Report, are produced on a set frequency. Many of these reports can be downloaded in both a PDF and an Excel format for your convenience.
On-Demand Reports
Through the Standard Reports tab, you can request a number of reports on-demand for a specified date range. Once requested, on-demand reports are generally available on the Standard Reports screen within 10 minutes of requesting the report. Reports requested after the recordkeeping system begins its nightly update at 10pm CST will be available the next day.
Trust Reports
This section provides details on beginning balance and ending balance, including change in activity. This report can be produced at both a plan and participant level, on a trade date, confirm date or payroll date basis. A report will automatically be generated and posted to the Trust Reports tab within 7 days following quarter-end. This quarterly report contains a plan level summary based on trade date. It is important to note that the system generated report may not include trailing activities (e.g., dividends) that are posted after quarter-end with a trade date backdated to the recently closed quarter.
Custom Reports
This tab allows you to request custom reports of both plan and participant level data.

Payroll Change Notification Report
The Payroll Change Notification Report (PCNR) captures the activity in the retirement plan that can impact payroll. Activity in the report includes:
Deferral rate/amount changes, including auto enrollment and new auto escalation rates New loans Loan paid in full Hardship suspension begin dates
The PCNR is available to you in a number of ways. There is a daily version that is systematically posted to the Standard Reports tab regardless of whether or not there are any changes. In addition, the report can be generated on-demand at any time. Lastly, your Relationship Manager can schedule this report to generate based on a specific schedule based on your payroll frequency or the timing related to the effective date of deferral rate changes.
Payroll Processing
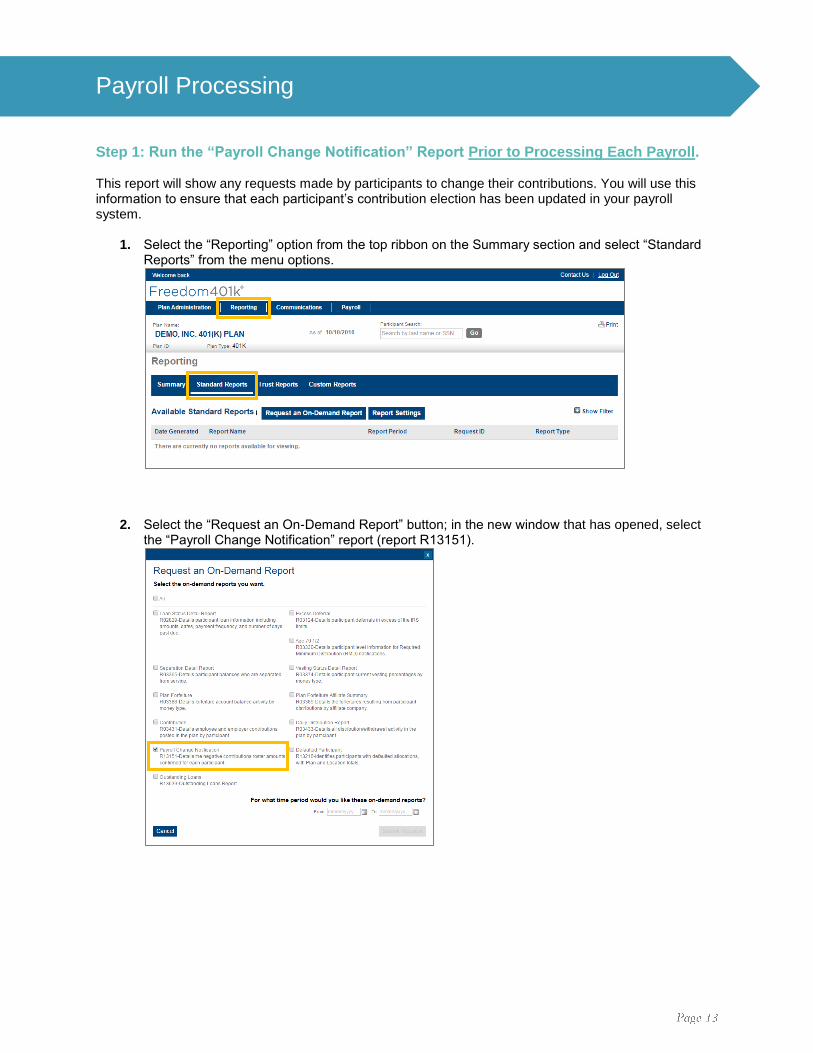
Step 1: Run the “Payroll Change Notification” Report Prior to Processing Each Payroll. This report will show any requests made by participants to change their contributions. You will use this information to ensure that each participant’s contribution election has been updated in your payroll system.
1. Select the “Reporting” option from the top ribbon on the Summary section and select “Standard Reports” from the menu options.
2. Select the “Request an On-Demand Report” button; in the new window that has opened, select
the “Payroll Change Notification” report (report R13151).

Payroll Processing
3. Enter a date range that encompasses the period of time you wish to review.
a. If your plan allows for deferral rate changes at any time, this will simply be the period that has occurred since your last pay cycle.
b. If your plan does NOT allow for deferral rate changes at any time, and this is NOT an allowable deferral rate change date, then you will run the report only for the period that has occurred since your last pay cycle.
c. If your plan does NOT allow for deferral rate changes at any time, but this IS an allowable deferral rate change date, then you will run the report for the entire period beginning with the first day following the last allowable deferral rate change. For example, if your plan allows for deferral rate changes on January 1 and July 1, and you are running the payroll for the first pay following July 1, you will want to run the PCNR report from the date that you cut off the January 1 change requests through the current date.
4. Select “Submit Request” to run the report.
5. You will be taken back to the “Standard Reports” page where you will be shown your Request ID
number for tracking; refresh the screen in approximately 1-2 minutes and your report will be available (which can be located by finding your “Request ID”).
6. Review this report to collect all contribution updates that have been made during the date range
you requested; use this data to update your payroll system.
Step 2: Upload Your Payroll File Using the Payroll section available through the main menu bar, you can import a file using a custom routine specifically designed to read your individual payroll file format. Below is a step-by-step guide to assist you with uploading your payroll.
1. Select the “Payroll” option from the Summary page.
2. Select the “Imported Payrolls” tab and then select the “Import Payroll”.
Payroll Processing
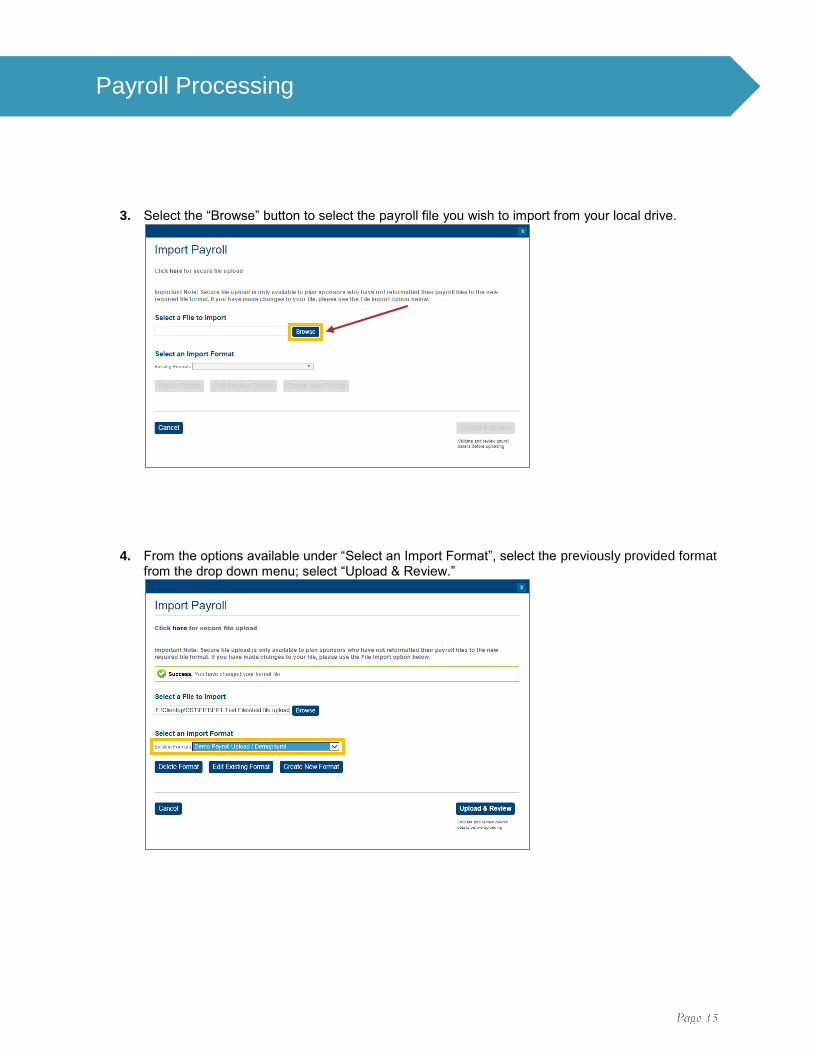
3. Select the “Browse” button to select the payroll file you wish to import from your local drive.
4. From the options available under “Select an Import Format”, select the previously provided format from the drop down menu; select “Upload & Review.”

Payroll Processing
5. The Review and Submit window allows the system to identify any discrepancies in the amounts included in your file. If control totals were listed on your file, the system may automatically populate these amounts in the Imported column. Otherwise, you may manually enter the amounts in the Imported column fields. Once you have validated that there are no differences, click the “Continue” button.
6. On the Review Payroll Details screen any discrepancy between the data included in the import file and our records will be listed under the Review Employees section. You have the ability to filter by type (i.e. errors and/or warnings) from the drop down menu.
Click on the participant’s name to review the details of the errors and/or warnings to resolve before you submit for processing. If there are no errors or warnings, click the “Submit” button and skip ahead to the “Fund the Payroll Contributions” section (Step 4).

Payroll Processing
Step 3: Resolve Errors and Warnings Errors and Warnings are a result of payroll file data not matching data in the recordkeeping system or payroll items that require action. Please note that you must review and resolve all errors and warnings before submitting your payroll.
ERRORS: The red signs indicate hard errors, which will cause the affected participant to be dropped from the payroll process. These errors should be fixed to ensure all participant information is accurate and the payroll roster is processed for the full amount.
WARNINGS:The yellow signs are warnings and indicate items which should be reviewed but may not require correction. Warnings will not result in the affected participant being dropped from the payroll roster.
Note: To view the instructions to resolve common error and warnings as well as a table of errors and warnings, please see your Plan Sponsor Payroll Troubleshooting Guide.
Viewing Errors and Warnings
1. Click the drop down box labeled View and select “Employees with errors or warnings”.
2. Click on the participant’s name to bring up the error or warning.

Payroll Processing
3. Correct the error (in this example change the EE Deferrals amount to $0.00). Click “Re-Validate”
to ensure the error is cleared, then press the “Save Updates” button.
4. Verify the computed amount and ensure the difference matches what was modified. Press the “Submit” button. Note: Review Employees section should show no employees with messages once all errors or warnings have been resolved.

Payroll Processing
5. Once the errors have been resolved, press the Submit button. This will then take you back to the Import Payroll section. There you will see the Success alert.
6. Please Note: If a participant’s record must be removed from your file (via Edit Payroll) or was dropped (not included) on your upload, you will still need to enter their hours and compensation. To do this choose the “Participants” tab on the menu bar. Search for the participant that was on your payroll file. From the drop-down list that appears with his/her name and select “Participant Information”.
7. Choose the “Compliance” tab and click “View/Update detail” next to the appropriate Compensation and/or Hours types loaded for this employee.

Payroll Processing
8. Confirm the employee’s compensation and/or hours for the payroll date are accurate. Update as needed.
Step 4: Fund the Payroll Contributions.
Once the file has been successfully imported you will need to complete the submission by completing the funding step. Click the expand button next to the payroll and select “Edit Payroll” from the Actions drop-down.

Payroll Processing
1. Make your edits. Here you can modify the payroll date, remove/add participants, modify contributions or add/remove columns. Click “Continue” to proceed to the next step.
2. Select funding method. From this screen, you can select the appropriate method you are using to fund your payroll. If available, you may also choose to fund all or a portion of the payroll from assets in the plan holding accounts. Once the appropriate funding has been selected, press “Continue” to proceed to the next step.

Payroll Processing
3. Fund your payroll. Enter the portion of the payroll to be funded. Please note, the system will not let you move to the next screen until the funding allocation matches the payroll totals. Once you have entered your funding amounts, press “Continue” to proceed.

Payroll Processing
4. Verify & submit. Verify funding allocation totals. You may also enter an email address in order to receive an email confirmation that the payroll has been submitted. Click “Submit” to complete the payroll submission.
Once the payroll is successfully transmitted a success message will appear and your file status will update to Completed.

Payroll Processing
Funding via ACH Pull – Quick Fund Method Another option available for a plan sponsor who is configured for ACH pull is to skip the Edit Payroll step and instead use the Fund option that is available through the Action drop-down to the right of File Status. This option should only be utilized if the plan sponsor is funding the entire payroll via ACH pull; meaning, the plan sponsor does NOT intend to use dollars in the Holding Accounts to off-set payroll. In this scenario the Fund Your Import Payroll process is reduced from 4 to 2 steps as illustrated in the screen shot below.
Click the Actions drop down and select Fund.
1. Fund your payroll. Enter the Funding Amount and click Continue.

Payroll Processing
2. Verify & Submit. Verify funding allocation totals. You may also enter an email address in order to receive an email confirmation that the payroll has been submitted. Click “Submit” to complete the payroll submission.
Once the payroll is successfully transmitted a success message will appear and your file status will update to Completed.
If you have any questions or would like any assistance, please do not hesitate to contact your Relationship Manager at 248.620.8100.


