Pistol Lesson Plans Table of Contents - Georgia 4-H · PDF filePistol . Lesson Plans Table of...
64
Pistol . Lesson Plans Table of Contents ................................................ Lesson 1 : Introduction to the Pistol 1 ................................ Lesson 2: Dry Firing and Live Firing on Target Backs 17 .................................... Lesson 3: Shooting for Groups on Blank Targets 27 .............................. Lesson 4: Sight Picture and Sight Adjustment for Pistols 33 ...................................... Lesson 5: Pistols. Revolvers and Ammunition 41 .......................................... Fact Sheet: Determining Eye Dominance 51 ................................... Fact Sheet: Non-threatening Hands-on Instruction 53 ...................................... Fact Sheet: Pistol and Rifle Range Commands 55 .................................... Fact Sheet: Rifle and Pistol Shooting Procedures 57 ....................... Fact Sheet: Analyzing Groups for Form Faults in Pistol Shooting 59 .................................................... Fact Sheet: Trigger Squeeze 61
Transcript of Pistol Lesson Plans Table of Contents - Georgia 4-H · PDF filePistol . Lesson Plans Table of...
Pistol . Lesson Plans Table of Contents
. . . . . . . . . . . . . . . . . . . . . . . . . . . . . . . . . . . . . . . . . . . . . . . . Lesson 1 : Introduction to the Pistol 1
. . . . . . . . . . . . . . . . . . . . . . . . . . . . . . . . Lesson 2: Dry Firing and Live Firing on Target Backs 17
. . . . . . . . . . . . . . . . . . . . . . . . . . . . . . . . . . . . Lesson 3: Shooting for Groups on Blank Targets 27
. . . . . . . . . . . . . . . . . . . . . . . . . . . . . . Lesson 4: Sight Picture and Sight Adjustment for Pistols 33
. . . . . . . . . . . . . . . . . . . . . . . . . . . . . . . . . . . . . . Lesson 5: Pistols. Revolvers and Ammunition 41
. . . . . . . . . . . . . . . . . . . . . . . . . . . . . . . . . . . . . . . . . . Fact Sheet: Determining Eye Dominance 51
. . . . . . . . . . . . . . . . . . . . . . . . . . . . . . . . . . . Fact Sheet: Non-threatening Hands-on Instruction 53
. . . . . . . . . . . . . . . . . . . . . . . . . . . . . . . . . . . . . . Fact Sheet: Pistol and Rifle Range Commands 55
. . . . . . . . . . . . . . . . . . . . . . . . . . . . . . . . . . . . Fact Sheet: Rifle and Pistol Shooting Procedures 57
. . . . . . . . . . . . . . . . . . . . . . . Fact Sheet: Analyzing Groups for Form Faults in Pistol Shooting 59
. . . . . . . . . . . . . . . . . . . . . . . . . . . . . . . . . . . . . . . . . . . . . . . . . . . . Fact Sheet: Trigger Squeeze 61

Basic Pistol Lesson 1
Introduction to the Pistol William F. Stevens. John Kvasnicka. Ronald A. Howard Jr . and Marilvn Bergurn*
Objectives Participating youth and adults will:
1. Understand the fundamentals of safety. 2. Recogmze and identify the parts of pistols and their
functions. 3. Understand proper sight alignment. 4. Understand and practice trigger control. 5 . Understand range commands. 6. Understand basic shooting procedures. 7. Have fun while learning.
Roles for Teen and Junior Leaders Demonstrate or review equipment and! functions. Present parts of the lesson. Tutor participants having difficulty with parts of the lesson. Assist with sight alignment exercise. Assist with trigger control exercise. Lead discussions summarizing the lesson.
Parental Involvement
See Roles for Teen and Junior Leaders. Arrange for or coordinate transportation to meeting place. Arrange for or coordinate refreshments. Act as assistant instructors for the lesson. Supervise activities of teen and junior leaders.
* Conservation Affairs Manager for Federal Cartridge Company, Anoka, MN, Executive Director, Minnesota Deer Ilunter's Association: 4-H and Youth Development Specialist, Texas Agricultural Extension Service; and National h f l e Association Field Representative to Minnesota, North Dakota and South Dakota.
4-H Shooting Sports Guide
Best Time to Teach Any time of year, but before any live f ~ n g with pistols is attempted
Best Location Classroom or range
Time Required About 1 hour
Materials/Equipment - fhp chart or chalkboard with writing materials
- sight blocks
- cardboard cutouts of front and rear sights
- paper towel tubes
- sights attached with Velcro strips to PVC pipe
- pistols
- targets
- backstop
- eye and ear protection
References The Basics ~JPistolShooting.
National Rifle Association, Washington, DC. 1991.
Shooiitg FUNdametitaL$. 'Training Video. Consult your state shooting sports coor- dinator or Daisy Manufactur-
ing.
Revised 06-02

Teaching Outline
Presentation Application I. Introduction ORIENT participants to facility and ESTABLISH ground rules for
A. Introduce facility and rules using it. BE SURE that everyone understands that discipline on range
1. Food and dnnk wdl be strictly enforced and what penalties for fdure to comply wdl be.
2. Time schedule 3. Disciphe and courtesy 4. Safety
Eye protection Ear protection Common sense Responsibility
5. Range etiquette 6. Firing line
B. Review basic safety rules 1. Muzzle control 2. Action open 3. Finger off trigger
11. Orientation to pistol
A. Basic parts 1. Stock or grip 2. Action 3. Barrel
B. Stock or gnp 1. Handle
support control
C. Action 1. Operating parts of
pistol
ASK participants to state rules of safe ffurearrns handling they feel are most important. LIST their suggestions on pad or chalkboard. SUMMAR.IZE to these three vital rules and state REASONS.
USE visual aids, models or an unloaded pistol with action open to POINT OUT parts.
DISCUSS each part and its function.
POINT OUT action of pistols being used or demonstrated. SHOW each part clearly as it is DISCUSSED.
2. Bolt or breechblock holds projectile in place may cock action
DEMONSTRATE function of trigger using a mouse-trap pistol. ejects spent RELATE trigger control to self-control. STRESS that fwed shot is cartridge controlled by laws of physics. IT cannot be recalled.
3. Trigger releases mechanical parts of action causing pistol to fire firing pin or hammer aircharge may cock action in some pistols
Revised 06-02 4-H Shooting Sports Guide

4. Safety mechanism mechanical device to
DEMONSTRATE operation of safety mechanism on pistols being
block operation of used. EMPHASIZE that they can fad and are only an AID to otherwise safe gun-handhg practices.
action - trigger only - firing pin block
- hammer blocks potential for failure
shooter ultimately responsible for safety - muzzle pointed
in safe drrection - personally check
safety of any shot before firing
Barrel 1. Primary function-
launching tube for projectile
2. Chamber holds cartridge or pellet in firing position its specific cartridges or pellets only
3. Muzzle
Use paper towel tube to ILLUSTRATE a pistol barrel. PASS AROUND section of pistol barrel or use Illustration to show various parts and their functions. STRESS importance of matching ammunition to chambering.
STRESS muzzle control again here.
where the projectile exits points toward impact site
4. Bore cylindrical hole between the chamber and muzzle contains and guides projecde diameter specific to caliber
5. Rifhng DESCRIBE rifling using a barrel or Illustrations. RELATE spin on
spiral lands (ridges) bulletto throwing a football with a spiral to keep it going straight.
and grooves rotating projecde on its long axis stabilizing fight path
6. Sights DEMONSTRATE sight function using sights on a tube and altering alignment.
reference points
&gn eye to barrel a l i p g barrel with intended point of ILLUSTRATE or DEMONSTRATE any types of sights available. impact types of sights - partridge style - electronic sights
Revised 06-02 4-H Shooting Sports Guide
- telescopic sights - laser sight
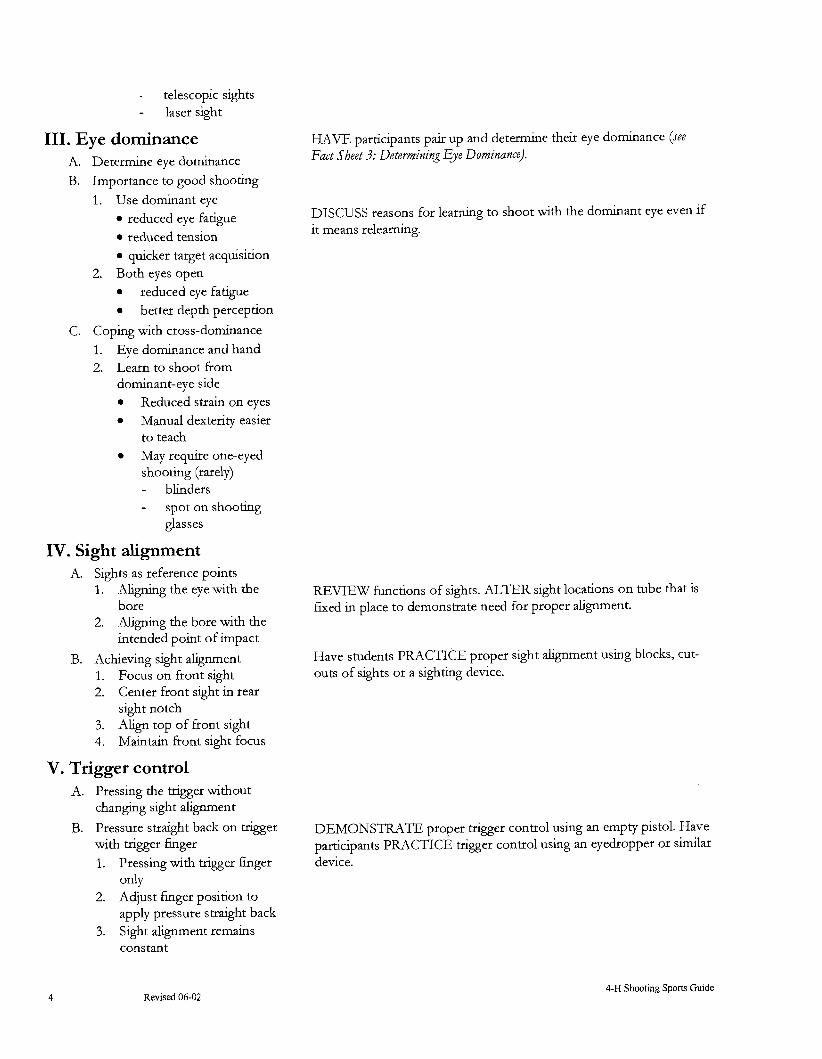
111. Eye dominance A. Determine eye dominance
B. Importance to good shooting
1. Use dominant eye reduced eye fatigue reduced tension quicker target acquisition
2. Both eyes open reduced eye fatigue better depth perception
C. Coping with cross-dominance
1. Eye dominance and hand 2. Learn to shoot from
dominant-eye side Reduced strain on eyes Manual dexterity easier to teach May require one-eyed shooting (rarely) - blinders - spot on shooting
glasses
HAVE participants pair up and determine their eye dominance (see Fad Sheet 3: Determining Eye Dominance).
DISCUSS reasons for learning to shoot with the dominant eye even if it means relearning.
IV. Sight alignment A. Sights as reference points
1. A l i p g the eye with the REVIEW functions of sights. ALTER sight locations on tube that is bore fured in place to demonstrate need for proper alignment.
2. Al ipng the bore with the intended point of impact
B. Achieving sight alignment Have students PRACTICE proper sight alignment using blocks, cut-
1. Focus on front sight outs of sights or a sighting device. 2. Center front sight in rear
sight notch 3. Ahgn top of front sight 4. Maintain front sight focus
V. Trigger control A. Pressing the trigger without
changing sight alignment
B. Pressure straight back on trigger DEMONSTRATE proper trigger control using an empty pistol. Have with trigger finger participants PRACTICE trigger control using an eyedropper or slrnilar 1. Pressing with trigger finger device.
only 2. Adjust fmger position to
apply pressure straight back 3. Sight alignment remains
constant
Revised 06-02 4-H Shooting Sports Guide
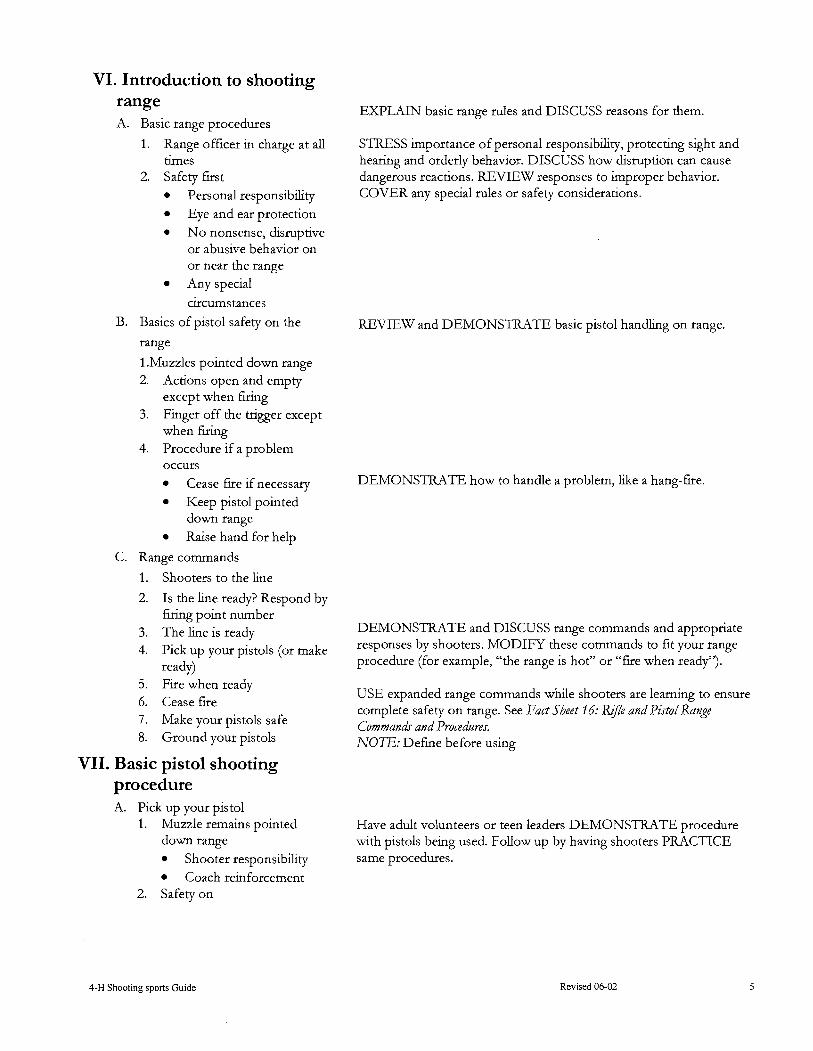
VI. Introduction to shooting range A. Basic range procedures
1. Range officer in charge at all times
2. Safety first
Personal responsibdity Eye and ear protection No nonsense, dsruptive or abusive behavior on or near the range Any special
circumstances
B. Basics of pistol safety on the
range
1 .Muzzles pointed down range 2. Actions open and empty
except when firing 3. Finger off the trigger except
when firing 4. Procedure if a problem
occurs Cease fire if necessary Keep pistol pointed down range Raise hand for help
C. Range commands
1. Shooters to the h e
2. Is the h e ready? Respond by f i g point number
3. The line is ready 4. Pick up your pistols (or make
ready) 5. Fire when ready 6. Cease fire 7. Make your pistols safe 8. Ground your pistols
VII. Basic pistol shooting procedure A. Pick up your pistol
1. Muzzle remains pointed down range
Shooter responsibility
EXPLAIN basic range rules and DISCUSS reasons for them.
STRESS importance of personal responsibdity, protecting sight and hearing and orderly behavior. DISCUSS how disruption can cause dangerous reactions. REVIEW responses to improper behavior. COVER any special rules or safety considerations.
REVIEW and DEMONSTRATE basic pistol handhg on range.
DEMONSTRATE how to handle a problem, hke a hang-fire.
DEMONSTRATE and DISCUSS range commands and appropriate responses by shooters. MODIFY these commands to fit your range procedure (for example, "the range is hot" or "fire when ready").
USE expanded range commands wlde shooters are learning to ensure complete safety on range. See Fact Sheet 16: Rifle and Pistol Range Command and Proadttres. NOTE: Defme before using
Have adult volunteers or teen leaders DEMONSTRATE procedure with pistols being used. Follow up by having shooters PRACTICE same procedures.
Coach reinforcement 2. Safety on
4-H Shooting sports Guide Revised 06-02

location of safety explain "safe" or "on"
explain "fire" or "off' 3. Action open 4. Finger off trigger
B. Loading or unloadtng firearm
1. Loadtng process Open chamber Place projectile in chamber Close action
2. Reverse process to unload 3. Control of ammunition
ensure correct caliber all live ammunition under control
coach or instructor distributes ammunition EXPLAIN use of dummy ammunition in rim fire or center fire
4 Charging air pistols handguns during %-firing sessions. 5. Use of dummy ammunition
C. Assume shooting position 1. Take proper gr~p 2. Arms extended 3. Muzzle resting on bench or
table
D. Safety off
E. Ahgn sights 1. Pistol resting on bench 2. Obtain sight alignment
F. Raise pistol 1. Maintain sight alignment Have assistants or teen leaders GUIDE each shooter through shooting
2. Raise arms and pistol as unit process using empty pistols and "shooting7' at backstop.
G. Fire when ready 1. Maintain sight alignment 2. Press trigger 3. Follow through
H. Cease fire 1. Immediate response
necessary 2. Finger off trigger
I. Make pistol safe 1. Open action 2. Remove all ammunition
J. Ground pistol 1. Pistol on bench 2. Action open and exposed
VIII. Coach/pupil method A. Shooters learning together DEMONSTRATE coach-pupil method with teen leader pairs/
1. Reinforcing proper technique assistants.
Revised 06-02 4-H Shooting Sports Guide

2. Learning by doing 3. Backed up by range staff DISCUSS benefits and REVIEW responsibilities of coaches and range
B. Roles of coach assistants. 1. Watch all safety procedures 2. Watch muzzle control 3. Assist with pistol grip 4. Control ammunition
Loads pistol in begmning Assist with loadmg later
C. Adult or teen leader at every PAIR coach/pupil teams and ASSIGN adult or teen leader to each
fLt-ing point as a back up. pair.
IX. Summary A. Facllity
B. Safety
C. Pistol parts and their functions
D. Sight alignment
D. Trigger control
E. Range procedure
F. G. .Shooting Procedure
H. Dry firing
REVIEW main points of lesson by askmg participants questions designed to bring those points to mind. PREPARE them for next session with a brief preview of what will be taught.
4-H Shooting Sports Guide Revised 06-02
Lesson Narrative
Instmctor note: Since every fachty is a little different from all the others, you will need to customize the introduction to that facility. Note locations of bathrooms and rules or regulations that are specific to the site. Whlle we must establish clear ground rules for participation, we must not project an atmosphere of domination, fear or unfriendhess. Please remember that young people are here to learn from a qualified, caring and concerned leader. Anything other than that image will decrease your ability to communicate with the kids and assist them in learning. Personal introductions and introductions of sponsors, club or range leaders, etc., are both appropriate and appreciated. Try to create an atmosphere of trust and mutual respect that will minimize problems throughout the instructional process and provide the foundation for strong intergenerational friendshps.
Welcome to the &st session of the series on pistol shooting. Introduce yourself, any assistants, teen or junior leaders who are helping you and any sponsors or members of the club or facdity. If time and numbers permit, have the kids (and parents) introduce themselves. In any event, plan on using name tents so you can personahe the &scussions.
In this session we will learn about the fachty and review a few of the rules and regulations for safety. We will begin learning the parts of a pistol and how they operate, what sight alignment is and why it is important and how to control the trigger. These things are vital if you are going to shoot a pistol safely and well. We will be meeting for about an hour today. We are guests of the people here, and we are all expected to behave as guests.
We want to keep the sessions as informal as possible, so please feel free to ask questions if you do not understand something.
A Few Rules of the Road Shooting is a safe and wholesome sport. In order to keep it that way, all shooters must abide by some basic rules of behavior. You must pay attention and behave in an adult manner on the shooting line, in the classroom and at all other times you are involved in meetings. Unsafe, abusive or distractive behavior cannot and will not be tolerated. Should you choose to behave in such a fashon, the instructors wlll ask you to leave. If you repeat the offense, they may bar you from the program for the day or the rest of the year. These rules may seem harsh, but they are necessary if we all want to keep shooting safe, fun and fair. In most cases, self-discipline and courtesy can be related to safety. Shooting demands concentration. When shooters are learning, they can be distracted easily. If that results in a poor score or a missed shot it is unfortunate. If it results in an accident, it could be fatal. Safety starts with common sense. It also involves takmg personal responsibility for your actions on and off the £iring line. Bullets or pellets cannot be recalled and their flight paths
Revised 06-02 4-H Shooting Sports Guide
A firearm should NEVER be pointed at anythmg you do
1 not want to shoot.
cannot be changed. You must control them before they leave the muzzle. Some of the procedures may seem odd or uncomfortable at first but they are designed to make you a safe and accurate shooter. We will all practice using them.
For personal safety, the use of shooting glasses is required any time live firing is taking place. You only have one set of eyes issued to you, and they must last for your entire life. Investing in a pair of shooting glasses and developing the habit of wearing them, when you shoot can protect your eyes from accidents.
Any time that you are using firearms other than air guns, you must use either earmuffs or earplugs. There are many styles ranging in price from a few cents (disposable foam plugs) to a few dollars (custom fitted plugs and some muffs). On the hgh end of the spectrum are electronic muffs that amplify sound until the hgh frequency sound of a shot being fired shuts off the microphones. You do not need to go to that extreme, but you must wear ear protection at every shoot. Remember that damage to your hearing is cumulative and it cannot be repaired. Wear your hearing protection to prevent the damage.
We wdl learn a number of range commands during the course. Range commands are to be obeyed immediately and without question. Every shooter must watch for any unsafe condtion. Call "Cease fire" if you see one. The authority of the range officer is absolute. Every one on the range and in the observation area must comply with his or her commands.
Only shooters and their coaches will be permitted on the firing line. No horseplay or foolishness will be tolerated. Firearms on the k g h e must be handled only as directed by the range officer and they must be kept safe (empty with the actions open and lying on the mats) u n d the range is declared ready for live firing. All muzzles must be kept pointed down range and in a safe direction at all times.
The Basic Rules of Firearms Safety Firearms safety should be stressed at all times. It is based on self-control and muzzle control. We will reinforce the three basic rules of safety throughout the project. You need to learn them, understand them and practice them at all times.
First, since the muzzle indicates the direction a projectile will travel, the muzzle must be controlled at all times. A firearm should NEVER be pointed at a n y b g you do not want to shoot. In other words, the muzzle should always be pointed in a safe direction.
There are many stories of "unloaded" guns going off and injuring or killing someone. Unless the firearm falls on someone, that is impossible. Firearms that are assumed to be unloaded, however, can be extremely dangerous. All firearms should be considered loaded until you have seen for yourself that they are completely empty. In order
Revised 06-02
4-H Shooting Sports Guide

to ease all tensions on the range, all actions will be kept open with the loadtng port exposed to view except during live finng. Make a habit of keeping the action open and the firearm unloaded except when preparing to fire a shot.
Finally, keep your finger off the trigger except when you are actually in the act of shooting. Develop the habit of resting your trigger finger on the frame above the trigger guard.
Make a habit of keeping the action open and the firearm unloaded escep t when preparing to fire a shot.
Develop the habit of resting your trigger finger on the frame above the
Safety is no accident. In fact safety is somethg that all of us must work trigger guard. to maintain all the time. Complying with these three simple rules WLU make the firing line and learning to shoot a safe and positiv; experience.
1. Keep the muzzle pointed in a safe direction at all times.
2. Keep the action open and exposed so other shooters can see it is open.
3. Keep finger off the trigger until you are in the act of shooting.
Orientation to the Pistol L&e most firearms, pistols are composed of three major components. The grip of a pistol is equivalent to the stock on most firearms (although a few pistols have a forearm, too). Pistols also have an action
mu debt and a barrel. Each part performs an important function. The stock or frmdeht I hunmwr
,-- grip serves as a handle to hold or control the pistol. This ensures muzzle will remain pointed in the intended direction.
The action of the pistol includes those parts that load, cock and fire the h l arm. In other words, the action is the mechanical part of the pistol. The
bolt or breechblock seals the rear of the chamber and holds the projectile in place for firing. In bolt-action pistols, the bolt may also cock the trigger mechanism. The trigger mechanism releases the firing pin, hammer or air charge. On some revolvers and semi-automatic pistols (double actions) the trigger may cock the hammer, too. Until the trigger is pulled, the firearm is under the conscious control of the shooter. Once it is pulled, the mechanical, chemical and physical forces take over very rapidly to deliver the projectile to its target.
The safety mechanism is a device that aids the shooter in keeping the firearm from hnng until he or she intends to do so. Like other mechanical devices, safeties do not always function properly. They are subject to failure at any time. As a result, do not depend upon them to prevent accidental firing. Instead, the shooter should be the ultimate safety by keeping the muzzle of firearm under control. The safety should be used as a supplement to proper firearm handling.
The barrel is a launchmg tube for the firearm. The rear of the barrel is designed to fit a particular cartridge or pellet. Here the projectile and/or cartridge are held in place inside the chamber. When a round is in the chamber, the pistol is loaded. The opposite end of the barrel is the muzzle, which points in the direction that the projectile wdl go when the pistol is fired.
4-H Shooting Sports Guide 10 Revised 06-02
When both front and rear sights are present, the rear sight is normally near the chamber and the fiont sight is usually very close to the muzzle. The primary function of the sights is to serve as reference points that permit the eye to be aligned with the bore of the pistol. Once the eye, the sights and the bore of the pistol are a b e d as a unit, the shooter can control the sight picture to direct the projectile to its target. The sights help the eye and the bore to be hected at the same point.
The inside of the barrel is bored to a specific dameter or caliber. Almost all pistols have rifled barrels. The rifling is a spiral set of ridges (or lands) and grooves. Rifling causes the bullet to rotate around its long axis, making it more stable in flight. The rotating bullet, like the spinning of a football in flight, tends to fly true to its course.
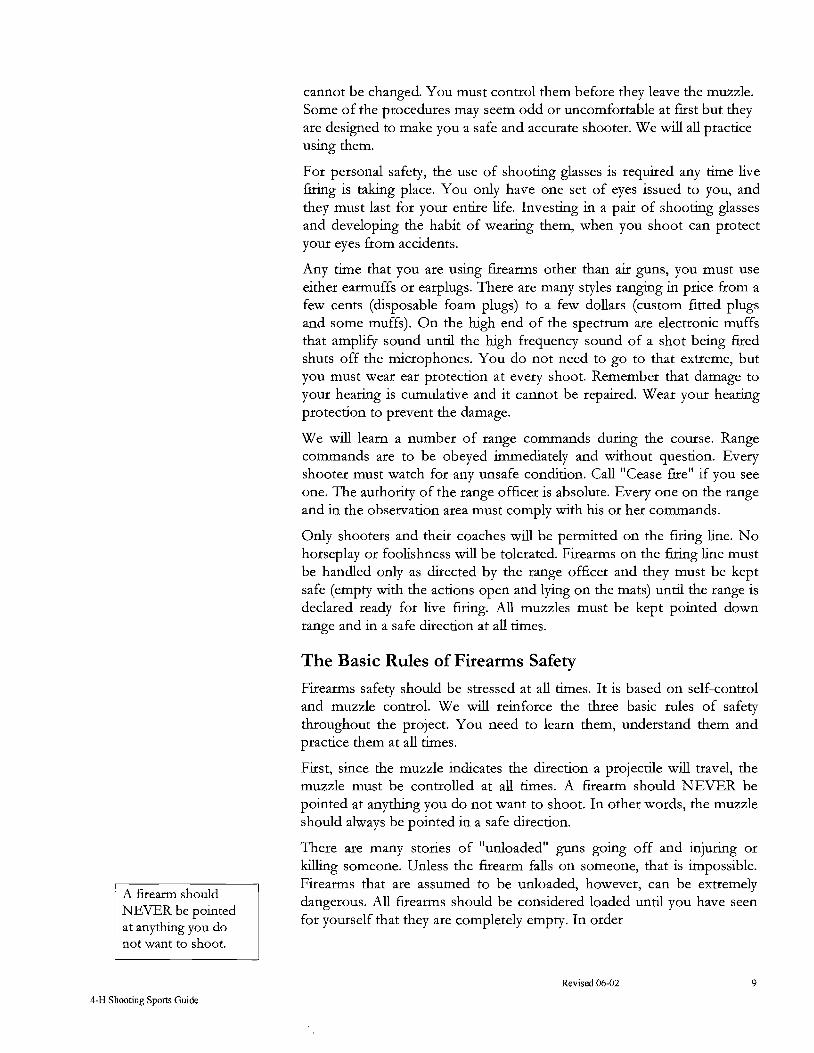
Eye Dominance Learning to shoot well is much easier when the shooter uses the dominant eye for sighting. Nearly everyone has a dominant eye, just as they have a dominant hand and a dominant foot. Select a partner and stand squarely facing that partner two to three arm-lengths apart. One member of each pair needs to be an observer. The other member will be the "shooter." Shooters should extend their arms forward with the hands in front of the waist and place the thumb on top of the other one. Keeping the thumbs in place, cross the fingers of the top hand over the fingers of the bottom hand to form a small triangle. Now, with both eyes open, extend the arms to eye height and look at the observer's nose through the opening. The observer should note which eye they see looking back through the triangular opening. Then, keeping the nose centered in the opening, the shooter should slowly bring the hands back to h s or her face. The opening will come to the dominant eye. The observer should watch for switchmg between the eyes as the hands move toward the face. The shooter should stand square to the observer without leaning, canting the head or squinting one eye. Try it a couple times to confirm your observation, then switch roles and repeat the process.
How many of you came to your left eye? Right eye? You should shoot with the dominant eye, regardless of whether it is on the same side as your dominant hand. Using the dominant eye reduces tension and eye fatigue and helps in seeing the target clearly and quickly. Keeping both eyes open increases depth perception as well. Those whose eye and hand dominance is on opposite sides are cross dominant. You should shoot from the dominant eye side, even though it feels clumsy and uncomfortable. Your hands and feet are much easier to train than your eyes. Even if you are already shooting from the "off-eye1' side, you will improve more rapidly by switching to the dominant side.
4-H Shooting Sports Guide Revised 06-02
A few people are ambidextrous, A similar number are ambi-eyed, that is, their eyes switch dominance when an obstacle is placed in front of them. Shooters with this situation can use a shield, a spot on their shooting glasses or some similar barrier to assure the same eye is used every time they shoot, Even persons with a specific eye dominance may find a barrier device helpful. Be sure you remember which eye is your dominant one so you can use that side in your shooting.
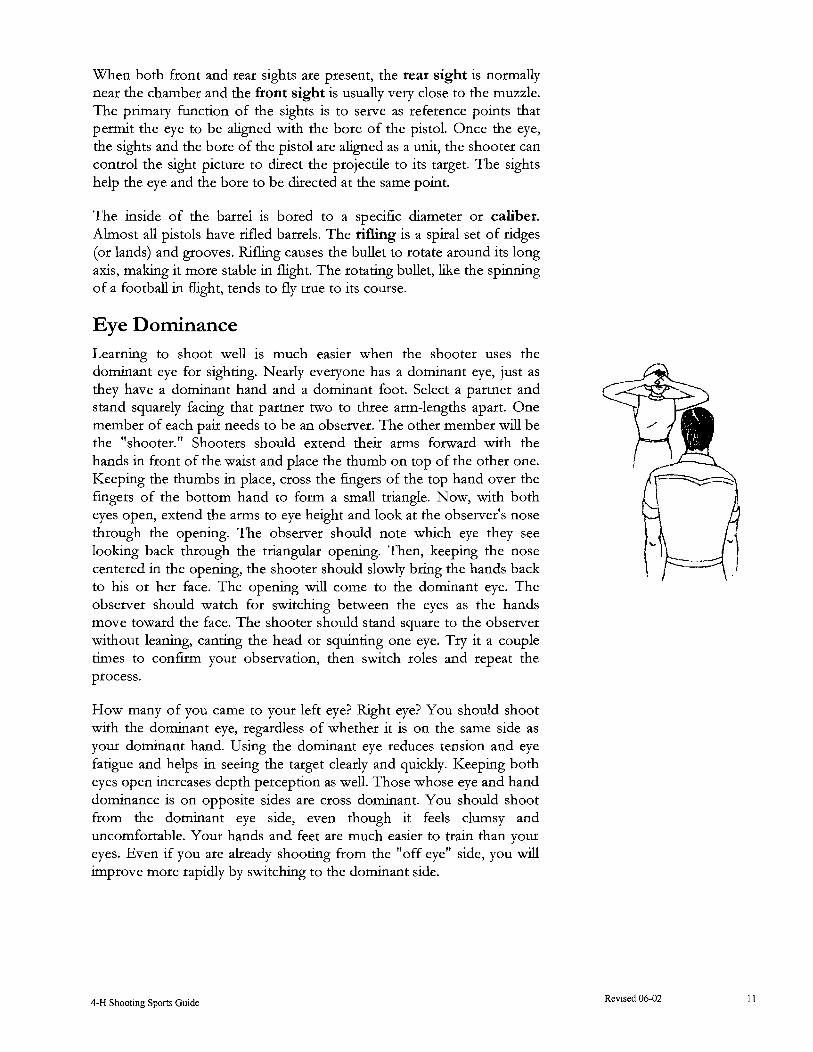
Sight Alignment The basic function of the sights is to a@ the eye with the barrel. The sights must be consistently aligned with the eye before they can be adjusted to align properly with the barrel. We will be using partridge- style sights. They have a squared rear notch and a rectangular front sight. The front sight (where your eye should be focused) is centered in the rear notch. There should be the same amount of light showing through on either side of the front sight. The top of the front sight should be even with the top of the rear sight. If the front sight is above the top of the rear sight, the pistol will impact above the intended point. If the front sight drops into the square notch of the rear sight, the pistol will impact below the point of aim. Proper sight alignment is critical to consistency, sight adjustment and accuracy.
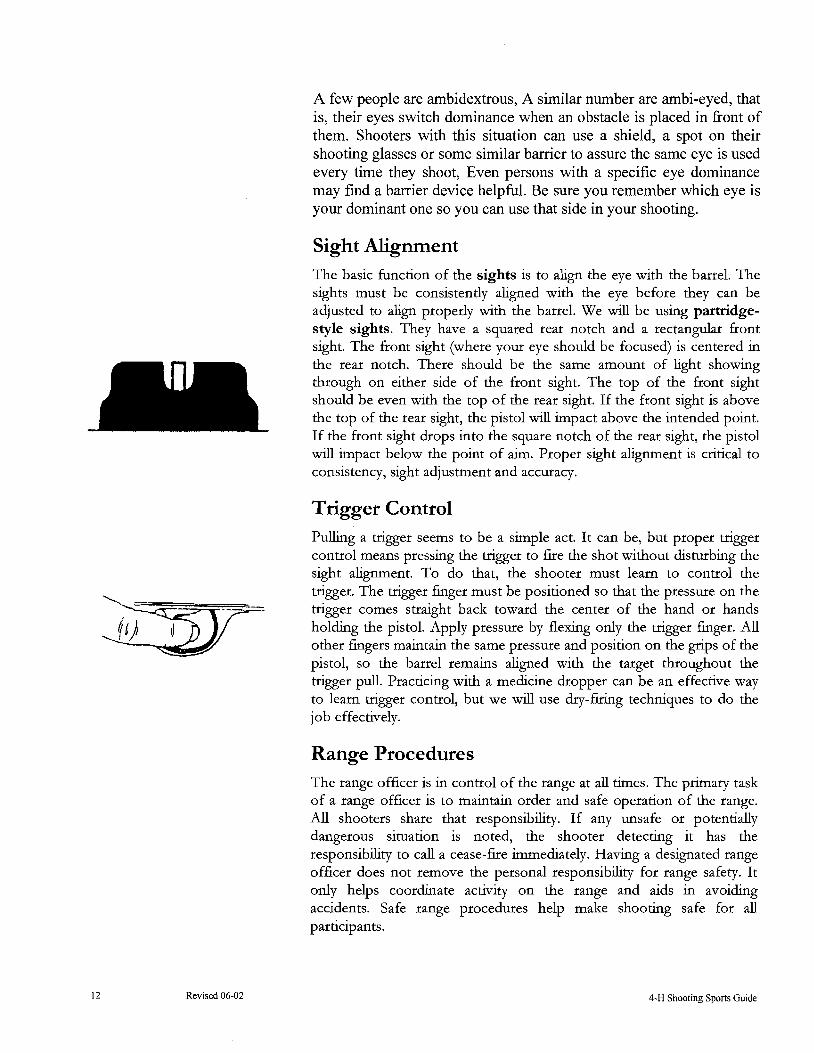
Trigger Control Pulling a trigger seems to be a simple act. It can be, but proper trigger control means pressing the trigger to fire the shot without disturbing the sight alignment. To do that, the shooter must learn to control the trigger. The trigger finger must be positioned so that the pressure on the trigger comes straight back toward the center of the hand or hands holding the pistol. Apply pressure by flexing only the trigger finger. All -. other fingers maintain the same pressure and position on the gnps of the pistol, so the barrel remains aligned with the target throughout the trigger pull. Practicing with a medicine dropper can be an effective way to learn trigger control, but we will use dry-firing techniques to do the job effectively.
Range Procedures The range officer is in control of the range at all times. The primary task of a range officer is to maintain order and safe operation of the range. All shooters share that responsibility. If any unsafe or potentially dangerous situation is noted, the shooter detecting it has the responsibility to call a cease-fire irnrnedlately. Having a designated range officer does not remove the personal responsibhty for range safety. It only helps coordinate activity on the range and aids in avoidmg accidents. Safe range procedures help make shooting safe for all participants.
Revised 06-02 4-H Shooting Sports Guide
Shooting is fun and among the safest of sports. The dedication to safety, concentration and responsibhty of inhvidual shooters keep it that way. Shooting responsibility must be taken seriously. We intend to demonstrate that responsibility on the range and in our personal shooting. We expect you to do the same. No foolishness or nonsense w d be permitted on the range or in the observation areas. Mmor infractions may bring a warning or the range officer may eject the offender from that shooting session. Repeated safety, behavior or other violations of responsibhty w d be justification for ejection from the program. That may seem harsh. It is not. It merely underscores the importance shooters place on safety.
Safety on the Range Safety on the range starts in the mind of the shooter. It requires an appropriate attitude as well as knowledge. The three basic rules of pistol safety were stressed earlier. Muzzle control action, open and empty, and finger off the trigger rules will be enforced at all times. Obedience to range commands and orderly behavior on and near the range will also be stressed. Most other procedures relate to management of the shooters and the range facdity.
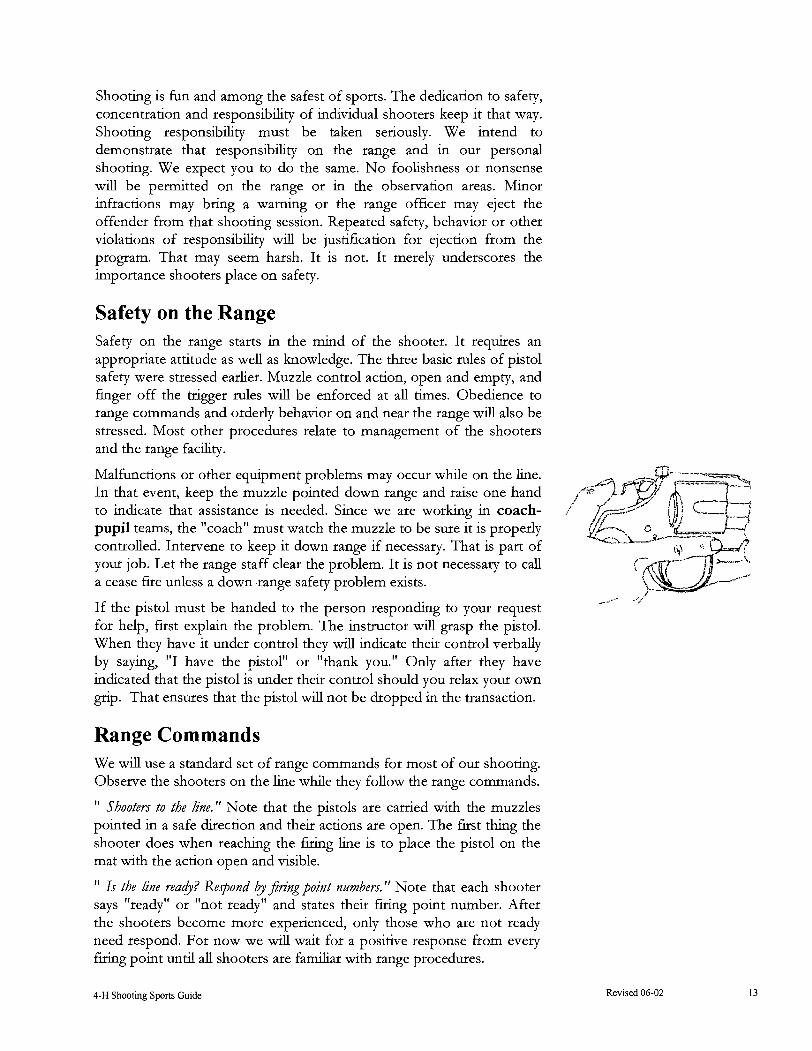
Malfunctions or other equipment problems may occur while on the line. In that event, keep the muzzle pointed down range and raise one hand to indicate that assistance is needed. Since we are workmg in coach- pupil teams, the "coach" must watch the muzzle to be sure it is properly controlled. Intervene to keep it down range if necessary. That is part of your job. Let the range staff clear the problem. It is not necessary to call a cease fire unless a down-range safety problem exists.
If the pistol must be handed to the person responding to your request for help, first explain the problem. The instructor w d grasp the pistol. When they have it under control they will indicate their control verbally by saying, "I have the pistol" or "thank you." Only after they have inhcated that the pistol is under their control should you relax your own gnp. That ensures that the pistol will not be dropped in the transaction.
Range Commands We w d use a standard set of range commands for most of our shooting. Observe the shooters on the line whde they follow the range commands.
" Shooters to the line." Note that the pistols are carried with the muzzles pointed in a safe duection and their actions are open. The first thing the shooter does when reachmg the firing h e is to place the pistol on the mat with the action open and visible.
" Is the line readj? Repond b_yj?ingpoint nmbers." Note that each shooter says "ready" or "not ready" and states their firing point number. After the shooters become more experienced, only those who are not ready need respond. For now we wdl wait for a positive response from every firing point until all shooters are familiar with range procedures.
4-H Shooting Sports Guide Revised 06-02

"The line is rea4. " T h s means that the range officer has determined that all shooters are ready to prepare for shooting. The command also means that the range is live or hot. No one should be down range.
" Fire when m4. " Shooters may fire at their own discretion as long as the range remains active. No ammunition is loaded until t h~s command is gven.
" Ceasejre!" The cease fire command means that all shooting must stop imediateb. Even a shot that is in the process of being fired should be held if possible. If the cease fire is an interruption for some range problem, shooters must wait for the range officer to gve a fire when ready command before resuming.
" Make your pistols snfe. "If the shooter has not already done so, all ammunition must be removed from the pistol and the action must be locked open. Note that the muzzles remain pointed down range at all times.
" Groundyourpistols. " Once the pistols have been made safe, they are placed on the mat with the muzzle down range and the action open and exposed for inspection.
Shooting Procedure In the beginning, we wdl use an expanded set of range commands. Doing that increases safety consciousness and reinforces proper shooting technique. Follow the shooters on the line through the shooting sequence.
"Shooters (or relq nmber [#I]) to the line." Shooters will proceed to the firing line with their coaches. Coaches wdl carry the pistols or the pistols will be grounded at the firing line.
" Is the h e red@? Reqond b_yjn'ngpoint number. " Each shooter or coach should respond by saying "finng point (#) ready" or "not ready." If any point is not ready, the range officer wdl check them again. Once all points are ready, he or she will open the range.
"The line is ready.." Ths means that the range is open and preparing for firing. No one should be down range.
" Pick: up yourpistols. '"e shooters wiU pick up their pistols, keeping them pointed down range and wait for an additional command. Note that the action is open, the pistol is pointed down range and the safety remains in the "on" position.
Revised 06-02
" Loadyourpistoh. "A projectile or round is placed in the chamber, and the action is closed. Remember that any closed action means the firearm is loaded and ready to fire. If an air gun is being used, chargmg it with air is part of the loading sequence.
4-H Shooting Sports Guide
"Asmeyoz l r shootingposition. " The coach will assist the shooter in talung a proper gnp. Both arms are extended at an angle, allowing the muzzle of the pistol to touch the mat, bench or table.
"Safeties o f " This helps to insdl the use of the mechanical safety where one is present. Many instructors will have the coach load the pistol, switch the safety to the "off' position and place the pistol in the shooter's hands for the first few shots. When that is done, the shooter signals control over the pistol by saying "thank you." The coach signals when preparing to release it by saying "you're welcome."
"Align yozlr sights. " With the pistols still t o u c h g the shooting bench, align the front sight in the rear sight notch.
"Raise yozlr pistols. "Iceeping the sights aligned, raise the pistol to its shooting position. The pistol and arms should rise as a unit, with the eyes locked on the front sight and the sight alignment maintained.
"Fire when rea4. " The shooter places the aligned sights on the target and presses the trigger without disturbing the sight alignment. Sight alignment is held until the projectde hits the backstop. This is known as follow through.
"CeaseJire!" This command always demands immedtate attention and an immediate response. It requires you to stop shooting and make your pistol safe immediately. D o not resume firing until told to do so by the range officer.
"Make yozlrpistols saf "Open the action and remove any ammunition wMe keeping the muzzle pointed down range. On pistols with a mechanical safety, the safety should be placed in the "on" position.
"Grozmdyozlr pistols. " With the action open, the pistol empty and the muzzle pointed down range, place the pistol on the mat with the open action exposed to view. If your relay is finished, step back one step from the bench to signal that your pistol is cleared and grounded.
This firing sequence will become a practiced process after a wMe. Once it has been mastered, the range officer will shorten the command structure and allow indtvidual shooters more freedom and responsibhty.
Summary We have learned about the facilities here and reviewed the basics of firearms safety. We focused on self-control, muzzle control, keeping the action open and keeping the finger off the trigger except during a shot. We have seen that a pistol, like other firearms, is made up of a stock, an action and a barrel. We saw how the various parts operate. We saw why sight alignment is important, what proper sight alignment is and how to control the trigger during a shot so that the sight alignment is not dtsturbed. In addition, we practiced safe range procedures and dry fired pistols to develop shooting form more fully. Next time we wdl begm live firing.
4-H Shooting Sports Guide Revised 06-02

Summary Activities 1. Review the parts of the pistols being used, having those who identify
the parts explain what they do and the importance of those parts to pistol shooting safety and accuracy.
2. Review pistol safety and the three basic rules of shooting safety.
3. Using blocks or a sighting device, have participants demonstrate how the sights of a pistol should be a w e d and dscuss the errors associated with misaligned sights.
4. Discuss and review trigger control and its importance to proper shooting form.
5. Discuss the reasons for using range commands and appropriate responses to various hypothetical situations.
Sharing and Exhibit Ideas 1. Illustrate the parts of the pistol you are using. Label the parts and
describe their functions in your shooting journal or on a poster.
2. Develop a game board on identification of pistol parts or functions.
3. Enter the items you have learned in this session in your shooing journal, making them available for review during the course of this program.
4. Make a set of instructional posters illustrating the basic rules of pistol safety.
5. Make a set of posters or signs outlitllng range commands and proper responses to them. Post them near the firing line.
6. Make or Illustrate somedung that interests you particularly in the content of this lesson.
4-H Shooting Sports Guide
Revised 06-02
Basic Pistol Lesson 2
Dry Firing and Live Firing on Target Backs William F. Stevens, John Kvasnicka, Ronald A. Howard Jr, and Marilyn Bergum* ----
Objectives Participating youth and adults will:
1. Understand and practice dry firing.
2. Understand and practice live firing at target backs.
3. Understand and practice using a proper stance and grip.
4. Practice safe range and shooting procedures.
5. Have fun while learning.
Roles for Teen and Junior Leaders Review pistol orientation.
Demonstrate proper pistol shooting form.
Demonstrate range procedures and commands.
Assist "coaches" in helping shooters with problems.
Tutor shooters with particular difficulties.
Act as range officers or assistants.
Assist with the trigger control exercise.
Parental Involvement See Roles for Teen and Junior Leaders above.
Control or monitor one or two shooting stations, assisting range officers and instructors.
Provide or coordmate transportation to and from the range.
Provide or coordinate refreshments.
Assist with developing exhibits or fihg out shooting journal entries.
* Conservation Affairs Manager for Federal Cartridge Company, Anoka, MN; Executive Director, Minnesota Deer Hunter's Association; 4-H and Youth Development Specialist, Texas Agricultural Extension Service; and National Rifle Association Field Representative to Minnesota, North Dakota and South Dakota1
Best Time to Teach Any time of year, but prior to live firing
Best Location Any safe shooting range
Time Required About 1 hour (may be repeated as many times as necessary)
- pistols - adequate backstop - blank paper or pistol targets - eye and ear protection - shooting bench - rug, mat or pad for bench - chairs or bench for shooters - narrow cardboard box - knife - tape or other target mounting materials
- pen, pencil or h e felt-tip pen - eye droppers
References The Basics $Pistol Shooting.
National Rifle Association, Washington, D.C. 1991.
Revised 06-02 4-H Shooting Sports Guide I
Teaching Outline
Presentation I. Review of previous lesson
A. Facilities B. Basic rules of pistol safety
C. Pistol parts and function
D. Sight alignment
E. Trigger control
F. Range commands
G. Eye and ear protection
H. Shooting procedures
11. Pistol Shooting positions A. Supported shooting position
1. Seated at bench 2. Pistol supported on rest 3. Grip resting on table
B. Stance for two-handed standmg position 1. Standing facing target 2. Feet shoulder-width apart 3. Nearly touching shooting
bench or table 4. At least 1 m (3 feet) apart
C. Two-handed gnp 1. Thumb-lock grip
heel of gnp placed in web of shooting hand thumb along side of grip fingers around grip trigger finger along trigger guard bracing or supporting hand - fmgers on fingers - thumbonthumb gnp consistent, firm but relaxed arms evenly extended - elbows rotated down - relaxed arms shoulder
high 2. Palm-rest gnp
shooting hand as above
supporting hand cupped under base of gnp and
Application ASIC participants to REVIEW what they learned in last session. Use their review as base h e for introducing safety on range.
DEMONSTRATE and have all shooters PRACTICE using supported shooting position from bench.
DEMONSTRATE and have all shooters PRACTICE a two-handed shooting position and stance.
DEMONSTRATE thumb-lock gnp and have each pair of shooters PRACTICE it using safe (open and empty) pistols. SHOW that it may be used with either eye from same side. USE "strong" and "weak" carefully.
REMIND shooters that "firm but relaxed" gnp is really firm.
DEMONSTRATE elbow rotation and arm position.
DEMONSTRATE and have shooters PRACTICE palm-rest position.
CAUTION: This gnp is not recommended for use with semi- automatic pistols.
Revised 06-02 4-H Shooting Sports Guide
fingers arm of shooting hand pushing forward slightly arm of cupped hand slightly bent and p u h g back slightly
111. Dry Firing A. Going through the shooting sequence
without ammunition
1. Avoid tension and noise of live firing
greater concentration on learning how to shoot develop feel for trigger
- develop smooth- ness
- develop consistent sight alignment
2. Use dummy ammunition
IV. Dry firing at target backs A. Reasons for using blank targets
1. Less distraction 2. Concentration on sight a-ent 3. Concentration on trigger control
B. "Coaches" and range assistants watch form and safety 1. Muzzle control 2. Focus on front sight 3. Trigger control 4. Follow through
C. Dry firing by command 1. Assume pistol shooting position 2. Expanded range commands 3. Expanded shooting procedures 4. Repeat several times 5. Reverse roles and repeat
sequence
V. Live firing at target backs A. Define live firing
1. Actually firing a projectile 2. Point of impact obvious 3. Indicates where muzzle was
pointed
DEMONSTRATE push-pull tension in arms using this method.
BE SURE NO LIVE AMMUNITION is present on range for dry- firing exercises.
CONDUCT a dry firing exercise. DISCUSS purpose of using the wrong side of target. REINFORCE idea that we are worhng on form.
MAINTAIN constant and immediate ability to control each firing point throughout exercise.
CONSULT previous lesson and Fad Sheet 17: Pistol and Rifle Shooting Proadtrres.
DEMONSTRATE live firing process with junior or teen leaders.
USE pistols that shooters will be using.
4-H Shooting Sports Guide Revised 06-02

B. Ammunition being used 1. Discuss type
rim fire center fire pellet
2. "Coaches" control ammunition
C. Shooting for groups 1. Objectiveis to shootgroups 2. How to shoot groups
proper sight alignment good trigger control consistent hold on target center
3. "Coaches" and assistants watch form and safety
muzzle control
focus on front sight trigger control
D. Demonstrate proper loading procedures 1. Refer to owner's manual 2. Reinforce safety rules
E. Live firing at target backs 1. Assume proper pistol shooting
position 2. Dry fire by command 3. Live fire by command 4. Live fire on shooter's
dscretion 5. Reverse roles and repeat
sequence
VI. Evaluating groups A. Review shooting for groups
1. Consistency 2. Sight alignment 3. Trigger control 4. Center of mass hold
B. Fire a carefully held, five-shot
group 1. Small groups
adequate mastery of basics ready to move on to target faces location not important
2. Large or inconsistent groups
BE SURE coaches understand their role in controlling ammunition.
STRESS importance of shooting groups, not group location on target.
REVIEW these elements once more.
WINTAIN constant and irnrnedate control over every firing point with adult or experienced teen leader.
USE coach/pupil pair made up of teen leaders or parents to DEMONSTRATE l o a h g and un loahg with pistols being used in session.
CONSULT Fact Sheet 17: Pistol and Rifle Shooting Procedtrres for addtional information.
ASIC what factors control size of groups being fired? STRESS factors outltned.
Have each shooter FIRE a five-shot string and ANALYZE each one for group size. D O NOT worry about group location or a l tehg sight settings.
Have shooters with large groups REVIEW keys to good shooting form and FIRE another string from supported position.
4-H Shooting Sports Guide Revised 06-02

continue using supported position keep pressure OFF shooter Take eveq re caution to KEEP PRESSURE OFF shooter.
by staying with target ISOLATE them for review if needed to reduce pressure.
backs 3. Allow shooters to proceed as
they are ready
VII. Summary A. Sight alignment
1. Front sight in focus 2. Front sight centered in rear 3. Tops of front and rear sights
even 4. Need for practice
B. Trigger control 1. Fire without c h a n p g sight
alignment 2. Follow through
C. Range safety and procedure
D. Dry firing at target backs 1. Concentration on shooting
fundamentals 2. Practice without shootkg
E. Live firing on target backs 1. Focus on form 2. Shooting groups
Use questions to GUIDE a review of materials covered thus far. STRESS main ideas: self-control, muzzle control and sight alignment.
Note that we wdl continue live firing next session. ASIC for any questions.
4-H Shooting Sports Guide Revised 06-02
Lesson Narrative
Imtmctor's note: Review any specific rules and regulations related to using the facllity and note the locations of bathrooms and other needed fachties.
In the last session, we learned about the parts of pistols, how they operate and how to handle them properly. We also discussed and practiced proper behavior on the range and the set of range commands we will be using. We learned about the importance of personal protective gear for the eyes and ears. Most importantly, we learned about personal responsibility for safety. What are the basic pistol safety rules? A l w q keep the muzzle under control and pointed in a safe dwection. Always keep the pistol empty and the action open except when actually finng on the range. A l w y keep fingers off the trigger except when actually firing a shot. All the other rules we could put together for safe pistol shooting build on these three.
What are the basic parts of a pistol and what do they do? Pistols are built around a frame, whlch serves as the receiver of the pistol. The stock or grip provides an area for holdng and controlling the pistol. The action includes all the moving parts .that load and fire the arm. The barrel contains and directs the projecde and the propellant gases. Common pistol actions include hinge, bolt, revolver and semi-automatic actions.
What is meant by sight alignment, and how should pistols sights be aligned?
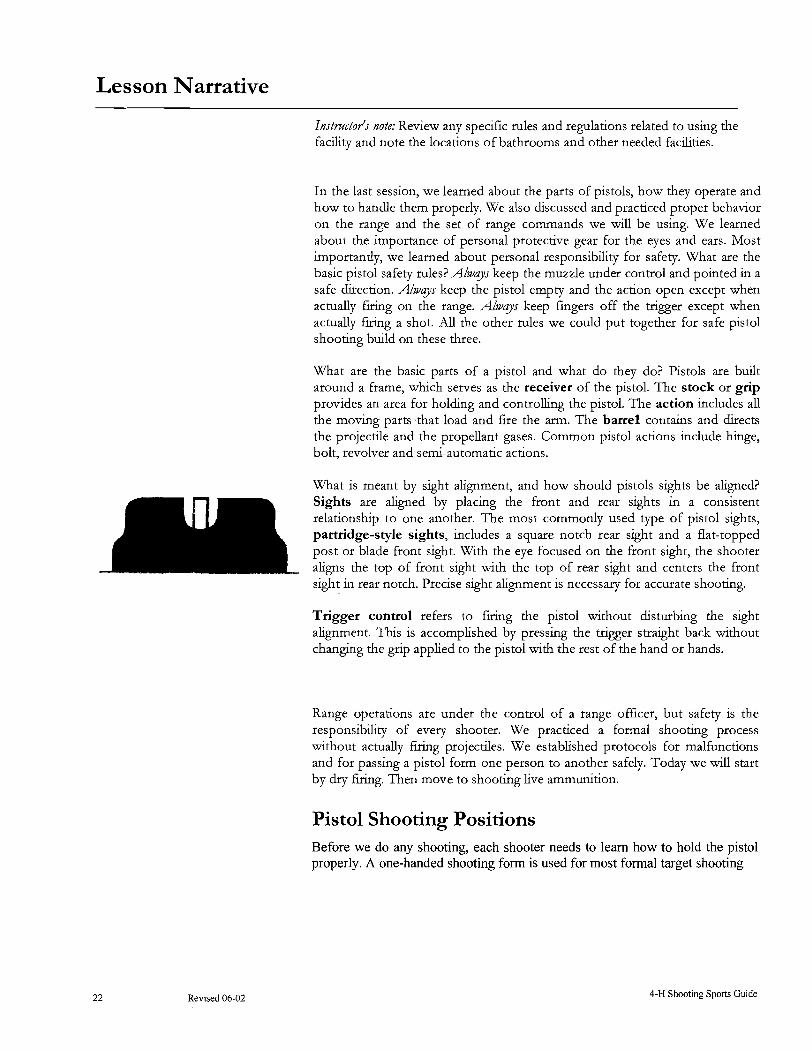
L Sights are aligned by placing the front and rear sights in a consistent
post or blade front sight. With the eye focused on the front sight, the shooter
- aligns the top of front sight with the top of rear sight and centers the front sight in rear notch. Precise sight alignment is necessary for accurate shooting.
Trigger control refers to firing the pistol without dsturbing the sight alignment. This is accomplished by pressing the trigger straight back without changing the gnp applied to the pistol with the rest of the hand or hands.
Range operations are under the control of a range officer, but safety is the responsibility of every shooter. We practiced a formal shooting process without actually firing projectiles. We established protocols for malfunctions and for passing a pistol form one person to another safely. Today we wdl start by dry firing. Then move to shooting live ammunition.
Pistol Shooting Positions Before we do any shooting, each shooter needs to learn how to hold the pistol properly. A one-handed shooting form is used for most formal target shooting
Revised 06-02 4-H Shooting Sports Guide
with handguns. We will use a supported position to help develop the basics of pistol shooting form. Once they have been developed, you wrll be ready to move to a two-handed standmg position, then a one-handed position. Watch carefully as these positions are demonstrated. You may want to sketch each one in your journal or notebook with comments to help you remember how to use each of them
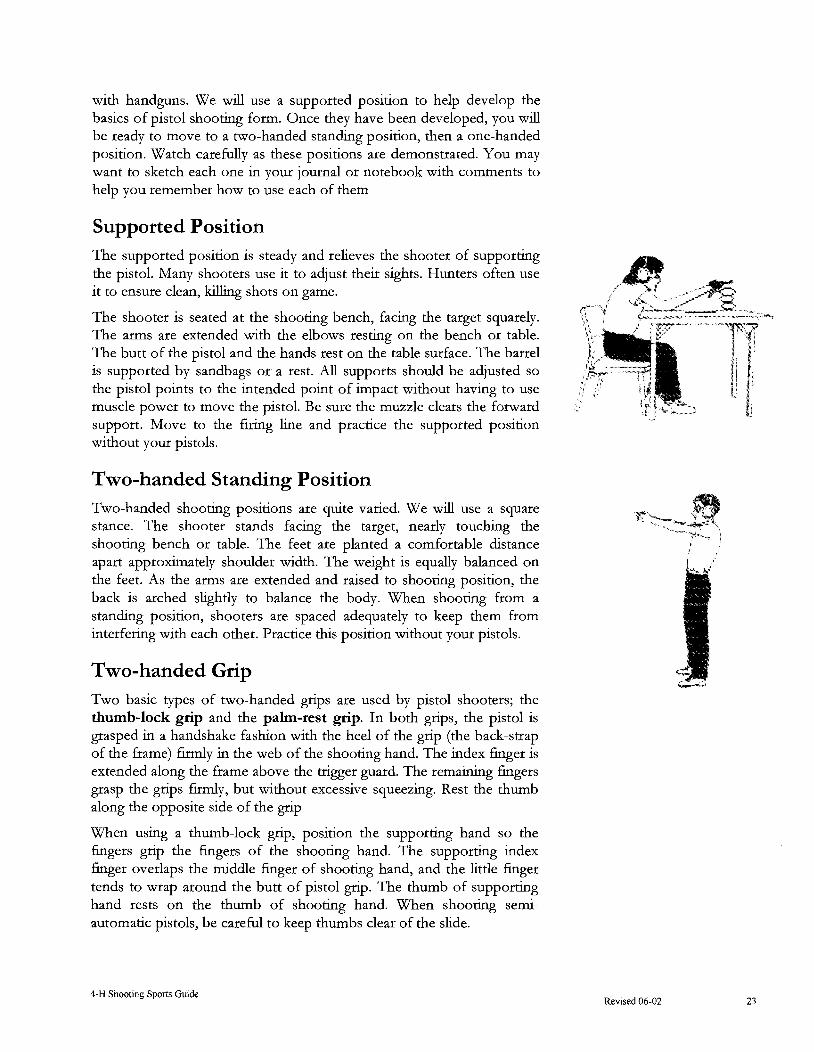
Supported Position The supported position is steady and relieves the shooter of supporting the pistol. Many shooters use it to adjust their sights. Hunters often use it to ensure clean, kLUing shots on game.
The shooter is seated at the shooting bench, facing the target squarely. The arms are extended with the elbows resting on the bench or table. The butt of the pistol and the hands rest on the table surface. The barrel is supported by sandbags or a rest. All supports should be adjusted so the pistol points to the intended point of impact without having to use muscle power to move the pistol. Be sure the muzzle clears the forward support. Move to the firing line and practice the supported position without your pistols.
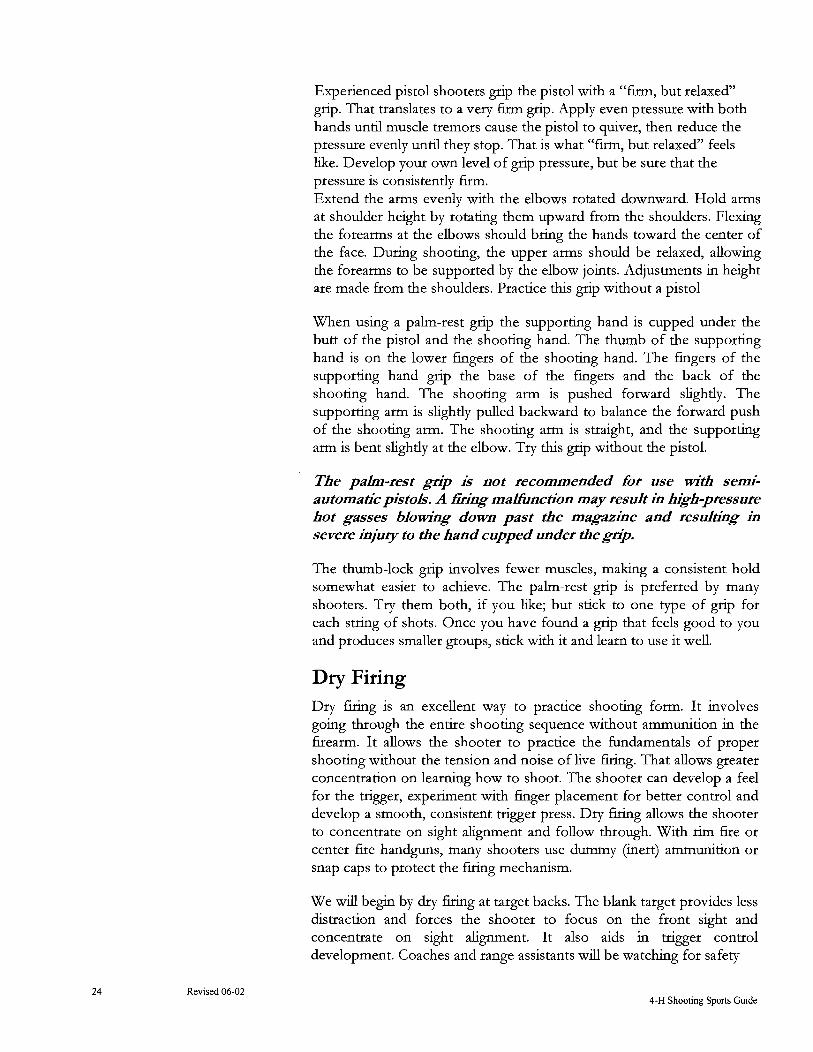
Two-handed Standing Position Two-handed shooting positions are quite varied. We will use a square stance. The shooter stands facing the target, nearly touchmg the shooting bench or table. The feet are planted a comfortable distance apart approximately shoulder width. The weight is equally balanced on the feet. As the arms are extended and raised to shooting position, the back is arched slightly to balance the body. When shooting from a standing position, shooters are spaced adequately to keep them from interfering with each other. Practice thls position without your pistols.
Two-handed Grip Two basic types of two-handed grips are used by pistol shooters; the thumb-lock grip and the palm-rest grip. In both gnps, the pistol is grasped in a handshake fashion with the heel of the grip (the back-strap of the frame) firmly in the web of the shooting hand. The index finger is extended along the frame above the trigger guard. The remaining fingers grasp the grips firmly, but without excessive squeezing. Rest the thumb along the opposite side of the gnp
When using a thumb-lock gnp, position the supporting hand so the fingers gnp the fingers of the shooting hand. The supporting index finger overlaps the middle finger of shooting hand, and the little finger tends to wrap around the butt of pistol grip. The thumb of supporting hand rests on the thumb of shooting hand. When shooting semi- automatic pistols, be careful to keep thumbs clear of the slide.
4-H Shooting Sports Guide Revised 06-02
Experienced pistol shooters grip the pistol with a "h, but relaxed" gnp. That translates to a very firm grip. Apply even pressure with both hands unal muscle tremors cause the pistol to quiver, then reduce the pressure evenly unal they stop. That is what "firm, but relaxed" feels hke. Develop your own level of grip pressure, but be sure that the pressure is consistently firm. Extend the arms evenly with the elbows rotated downward. Hold arms at shoulder height by rotating them upward from the shoulders. Flexing the forearms at the elbows should bring the hands toward the center of the face. During shooting, the upper arms should be relaxed, allowing the forearms to be supported by the elbow joints. Adjustments in height are made from the shoulders. Practice h s gnp without a pistol
When using a palm-rest grip the supporting hand is cupped under the butt of the pistol and the shooting hand. The thumb of the supporting hand is on the lower fingers of the shooting hand. The fingers of the supporting hand grip the base of the fingers and the back of the shooting hand. The shooting arm is pushed forward slightly. The supporting arm is slightly pulled backward to balance the forward push of the shooting arm. The shooting arm is straight, and the supporting arm is bent slightly at the elbow. Try this grip without the pistol.
The palm-rest gn$ is not recommended for use with semi- automatic pistols. A firikg mafinction may result in h&h-pressure hot gasses blomng down past the magazine and resulting in severe injury to the hand cupped under the g+.
The thumb-lock grip involves fewer muscles, making a consistent hold somewhat easier to achieve. The palm-rest gnp is preferred by many shooters. Try them both, if you hke; but stick to one type of grip for each string of shots. Once you have found a grip that feels good to you and produces smaller groups, stick with it and learn to use it well.
Dry Firing Dry firing is an excellent way to practice shooting form. It involves going through the entire shooting sequence without ammunition in the firearm. It allows the shooter to practice the fundamentals of proper shooting without the tension and noise of live firing. That allows greater concentration on learning how to shoot. The shooter can develop a feel for the trigger, experiment with finger placement for better control and develop a smooth, consistent trigger press. Dry hting allows the shooter to concentrate on sight alignment and follow through. With rim fire or center fire handguns, many shooters use dummy (inert) ammunition or snap caps to protect the h g mechanism.
We will begin by dry firing at target backs. The blank target provides less lstraction and forces the shooter to focus on the front slght and concentrate on sight alignment. It also aids in trigger control development. Coaches and range assistants wd be watching for safety
Revised 06-02 4-H Shooting Sports Guide

and form during the dry-firing exercises. Remember, muzzles must always point down range. Your eyes should be focused on the front sight. Your sights must be carefully and consistently aligned. Point the aligned sights at the middle of the target back and press the trigger, keeping the sights aligned through the shot. We will let each shooter dry fire several shots, first on command, then on their own.
Live Firing at Target Backs Let's review the fundamentals of good two-handed pistol shooting form. The stance is a comfortable and erect one with the head relaxed and normally upright. The feet are square with the firing h e and a comfortable distance apart. The elbows are nearly vertical, and the arms are fully extended. The two-handed gnp features the fingers of the off- hand overlapping those of the shooting hand (with the exception of the trigger finger), and the off-thumb resting on the dominant thumb.
With the arms extended and the muzzle resting on the padded shooting T-T
bench, the sights are aligned properly. Focus on the front sight. Once the sights are properly aligned, the pistol is rotated into shooting 1 position from the shoulders. The sights are centered on the blank target, 1 and the pistol is fired. I
! i The trigger is pressed straight back without disturbing the sight 1
alignment, and the pistol is held on the target u n d the projectile h t s the i i backstop. Holding your position on the target u n d the shot s e e s it is
called "follow through." I I f i
Coaches and range assistants need to watch for all of these elements i i i i
during the shooting sequence. Be particularly aware of any potentially ? .,.--\-,,,,--...-,-.,-,, ~ ~ -,-,. ~e~ ---, dangerous situations as we fire thls first group step-by-step. Coaches wdl
i control the ammunition and switch the safety off during this activity. We wdl use the same firing sequence used in the dry-finng exercise with the exception of leadmg the pistol. Be sure the muzzle remains pointed down range at all times.
Is everyone ready? First relay to the line. Coaches, verify that the pistols are safe. Is the line ready? Respond by firing point numbers. The h e is ready. Pick up your pistols. Load one round. Charge your pistols. Set the safety off. Assume a proper and £irm gnp. Align the sights with the muzzle resting on the padded bench and the eyes focused on the front sight. Raise the arms to shooting position with the sights remaining aligned. Center the sights on the blank target. Press the trigger, keeping the sights aligned u n d the bullet hits the backstop. Open the action, set the safety on and lower the pistol to the bench. Go ahead and fire three or four more shots. Coaches, if your shooters show signs of fatigue, have them stop shooting. Remember, we are trying to shoot groups at the target back, not hit some precise point on the target. Make your pistols safe. Ground your pistols. Reverse roles between the coaches and pupils and repeat thls exercise. Several repetitions should be made.
4-H Shooting Sports Guide Revised 06-02
Summary Sight alignment is an essential element in good shooting. It involves focusing the eye on the front sight and placing the front and rear sights in a consistent relationship to one another. We keep the tops of the front and rear sights even and allow equal amounts of space on either side of the front slght in the rear notch. Sight alignment can be practiced with an empty pistol, and practice aids proper sight alignment.
Trigger control is also a practiced skill. The trigger must be pressed u n d the pistol fires without dsturbing the slght alignment. Holding the sight alignment after the shot is fired is vitally important. That after-hold is known as follow through. L~ke sight alignment, trigger control and follow through can be practiced by dry firing.
We practiced range procedures with two exercises. First, we dry fired the pistols at blank targets. That allowed us to check form and practice in an environment where concentration on form was easy. Then we fired several groups at target backs using live ammunition.
Next time we d continue shooting at target backs, learn some different stances and gnps and develop more consistency in shooting groups with the pistol.
Summary Activities 1. Have shooters discuss the differences between the groups they
"shot" while dry firing and those fired during the live firing session. Ask why those groups differ in size and dscuss some of those reasons.
2. Review the elements of good shooting form, having participants dscuss parts they find easy or difficult. Challenge them to practice the form at home without firing.
3. Suggest a series of dry-firing exercises to practice at home. Ask the shooters not to shoot any live ammunition, but to concentrate on dry firing to develop their shooting form.
Sharing and Exhibit Ideas 1. Record your experiences and the new things you learned in this
session in your shooting journal or notebook.
2. Demonstrate proper pistol shooting form for your parents or another interested adult.
3. Illustrate basic pistol shooting form in a series of posters to be used in pistol instruction.
Revised 06-02 4-H Shooting Sports Guide
Basic Pistol Lesson 3
Shooting for Groups on Blank Targets William F. Stevens, John Kvasnicka, Ronald A. Howard Jr., and Marilyn Bergum*
Objectives
Participating youth and adults wd:
1. Know and demonstrate proper stance and gnps 2. Shoot groups effectively using a center-of-mass hold on a blank
target or target back.
3. Demonstrate and practice safe range and shooting procedures.
4. Have fun while learning.
Roles for Teen and Junior Leaders
Review pistol orientation.
Demonstrate proper pistol shooting form.
Demonstrate range procedures and commands.
Assist "coaches" in helping shooters with problems.
Tutor shooters with particular difficulties.
Act as assistant range officers.
Assist shooters needmg to repeat the triangulation exercise.
Assist shooters needmg to repeat the trigger control exercise
Parental Involvement
See Roles for Teen and Junior Leaders above.
Control or monitor one or two shooting stations, assisting range officers and instructors.
Arrange for or provide transportation to the range.
Arrange for or provide refreshments.
Assist with developing exhibits or &g out shooting journal entries.
* Conservation Affairs Manager for Federal Cartridge Company, Anoka, MN; Executive Director, Minnesota Deer Hunters Association; 4-H and Youth Development Specialist, Texas Agricultural Extension Service; and National Rifle Association Field Representative to Minnesota, North Dakota and South Dakota.
4-H Shooting Sports Guide
Best Time to Teach Any time of year but should follow dry and live firing on target backs lesson
Best Location Any safe shooting range
Time Required Approximately 1 hour
Materials/Equipment - pistols - appropriate ammunition - adequate backstop - blank paper or pistol targets
(backs) - eye and ear protection - shooting bench with pad - chairs or bench for support - narrow cardboard box (less than pistol length)
- knife - tape - pen, pencil or fine felt-tip pen - eye droppers
References The Basics of Pistol Shooting.
National Rifle Association, Washington, DC. 1991. Fact Sheet 19: Tnder Squeeye
Revised 06-02
Teaching Outline
Presentation Review of previous lessons A. Safety rules
1. Muzzle control 2. Open and empty 3. Finger off trigger
B. Importance of eye and ear protection
C. Stance and grip 1. Feet and posture 2. Head erect 3. Hand position and grip
D. Sight alignment 1. Front sight focus 2. Consistent alignment
E. Trigger control
F. Range commands
G. Shooting procedures
11. Review the dry-firing exercise A. Press trigger to refresh feel
B. Align sights and press trigger
C. Align sights, raise to shooting position and press trigger
D. Point aligned sights at target back and press trigger
111. Review the live-firing exercise A. Objectives of using blank
targets
1. Shooting groups 2. Developing shooting
form
B. Means of reaching objectives 1. Proper sight alignment 2. Good trigger control 3. Consistent hold on
center of paper
C. Shooting procedure I. Follow standard
shooting procedures 2. Coach only critical items
one at a time
priority items
Application ASK participants to REVIEW each of these factors. USE their points to begm quick but thorough review of safety and shooting considerations.
DEMONSTRATE proper shooting position.
Have participants REVIEW range commands and shooting procedures.
Have each shooter REPEAT these actions to refresh their memories and sense of feel for actions involved.
REVIEW l i v e - f i g objectives and procedures. ASK shooters to o u t h e each step in procedure.
REMIND instructors to MAINTAIN constant and immedate control on each f i g point. REFER to Fact Sheet 17: Pistol and Rzze Shooting Procedttres for detds. CAUTION coaches NOT to over-instruct and to AVOID fatigue.
28 Revised 06-02 4-H Shooting Sports Guide

consistency with teaching
3. Avoid excessive shooting and fatigue
D. Repeat firing at target backs Have each shooter FIRE a five-shot string and ANALYZE each one for
E. Each shooter fires five-shot group size.
string 1. Analyze groups
ready to shtft to regular target
adequate mastery of basics
2. Smallgroups 3. Large groups Have shooters with large groups REVIEW keys to good shooting and
review basics FIRE another string from a supported position. If necessary, REPEAT appropriate exercised while keeping pressure off shooter. use supported
shooting position
keep pressure off shooter by using target back
Let shooters LEAD a review of lesson responding to leading questions you ask.
IV. Summary A. Stance
B. Grip 1. Thumb-lock 2. Palm rest
C. Review sight alignment
D. Review trigger control
E. Review requirements for shooting good groups
F. Review range procedures as ASK for any questions and prepare them for next session.
needed
4-H Shooting Sports Guide Revised 06-02 29
Lesson Narrative
This shooting session continues development of the basics of sound pistol shooting. Safety is always important to shooters. Remember, you are responsible for safety with your pistol. Muzzles will always be pointed in a safe direction - down range when on the firing line. Pistols wdl be kept empty with the actions open and exposed to view except when actually firing. The trigger finger is only placed inside the trigger guard when the shooter is getting ready to fire. All persons on or near the range will use adequate eye and ear protection. We expect responsible and adult behavior. No nonsense will be tolerated.
Sound pistol shooting b e p s with a proper stance and grip. We will use either two-handed standmg position or a supported shooting position for all shooters. The stance should be comfortable and relaxed, square to the target. The head should be erect and relaxed. The gnp should be firm in either the thumb-lock or palm-rest positions.
Proper sight alignment involves focusing the eye on the front sight and consistently aligning the front and rear sights. Trigger control allows the shooter to squeeze the trigger and fire a shot without dsturbing the sight alignment. Holdmg the sight alignment through the shot acheves a proper follow through. These are the principles we have practiced in dry firing and live finng in earlier sessions. We will continue to use them today. Remember that practice alone does not make perfect. Perfect practice makes perfect.
We will continue to use the same basic range commands and firing procedures practiced in the last session. Does anyone have a question about those commands or what they mean?
Dry-firing Review Check your pistols to make sure they are safe, bring them to the shooting h e and ground them with the muzzles pointed down range. Assume a suitable shooting position. Is the h e ready? Respond by firing point number, please. The h e is ready. Cock your pistols. Dry fire the pistol to refresh your memory of the trigger feel. Align the sights and dry fire once more. Align the sights, raise the pistol to firing position and dry fire again. Finally, point the aligned sights at the center of the target back and dry fire one more time. Make your pistols safe. Ground your pistols and step back from the £iring line.
Live-firing Review Now, let's review the live-£iring process by firing a shot on command. Coaches will load the pistols and hand them to the shooters. Remember to keep the pistol under control and pointed down range
Revised 06-02 4-H Shooting Sports Guide

at all times. Do not relax your grip on the pistol until the other person gves verbal acknowledgement that he or she has it under control. Blank targets are used to increase concentration on proper shooting form and shooting groups. Those objectives require three elements: proper and consistent sight alignment, good trigger control (including follow through) and a consistent hold on the center of the target back. "Coaches" will control all ammunition, and everyone wdl be watchmg both form and safety. Are there any questions?
First relay to the line. Is the line ready? Respond by £iring point number, please. The line is ready. Shooters, pick up your pistols, verify that they are safe and pass them to your coaches. Coaches, load and charge the pistols with one round. Place the safety in the "on" position, and pass them to the shooters. Remind them that the safety is on and wait for a verbal signal before releasing the pistol.
Instmctor note: Instructors differ on the use of the safety in this context. Some feel it is an unnecessary distraction since the pistol is being single loaded for each shot. Others feel it is essential as preparation for field use of the firearm.
Shooters, switch the safety to the "fire" position. With the proper gnp and the muzzle resting on the table, align the sights, keeping the front sight sharply in focus. Raise your arms to the firing position and center the aligned sights on the target back. Press the trigger, taking care to keep the sights aligned and centered on the target. Follow through with that hold until the projectile hits the backstop. Switch the safety to the "on" position and; lower the muzzle to the table or bench. Make the pistol safe and ground it.
Call the next relay to the line and repeat the process. This exercise should be repeated several times with each shooter. Correct all form faults, t a h g multiple faults one at a time and in priority. Stress what needs to be done, not what is being done wrong. BEWARE of excessive shooting. Stop for reviews or discussion to give shooters a break, and quit for the day before group sizes start to expand because of fatigue. Analyze a series of groups for each shooter. If group sizes are inconsistent or erratic, review the fundamentals of good form or repeat the triangulation and trigger control exercises. Address obvious form faults as needed. This requires hgh ratio of adults or accomplished teen leaders to young people.
Summary Exercise Good shooting requires consistency. The stance and grip must be consistent. The sight alignment must be precise. Trigger control must not hsturb the sight alignment throughout the shot. The hold on the target must be consistent. We shot quite a bit in th~s session. Let's shoot one more group of five shots, concentrating on shooting a good group. Remember to follow the basics of good shooting as you fire
4-H Shooting Sports Guide

Coaches and instructors should analyze each of these groups. Shooters finng fairly small groups have demonstrated adequate mastery of the basics to move on to shooting at standard targets. Those who are still shooting large or inconsistent groups may need to use a supported shooting position, repeat the triangulation or trigger control exercises or practice with the target backs in another session. If time permits and frustration is not evident, that may be done now. Otherwise, this lesson should be repeated until the shooter is comfortable with the basics. Pushing them on to standard targets may hurt their progress.
Summary In this session we reviewed shooting positions, the fundamentals of sound pistol shooting and safety. We reviewed sight alignment, trigger control and the requirements for shooting good, consistent groups. These elements were practiced during dry firing and live firing. Continue practicing the dry firing exercises at home. Next time we wdl continue live firing.
Summary Activities 1. Fire a final five-shot group for analysis. Determine if shooters are ready to work on sight pictures and standard targets or if they need to repeat thts session to tighten groups further.
2. Question participants to see what they learned. Try to involve all shooters in the process. Give teens and range assistants an opportunity to comment.
Sharing and Exhibit Ideas 1. Demonstrate the position and grip options learned in this session to
an interested adult. 2. Construct instructional posters on the positions and grip types for
use with later classes. 3. Compare your group sizes using different grips or positions. Note
the results in your shooting journal or notebook and discuss the reasons you can see for those dfferences.
4. Develop a poster of range commands or another type of safety poster for use on the range.
5. Make something that can be used in the supported shooting position.
6. Make, demonstrate or display something that you found interesting or useful in thts lesson.
Revised 06-02 4-H Shooting Sports Guide

Basic Pistol Lesson 4
Sight Picture and Sight Adjustment for Pistols William F. Stevens, John Kvasnicka, Ronald A. Howard. And Marilyn Bergum*
Objectives Participating youth and adults wd: 1. Demonstrate an understanding of sight picture 2. Demonstrate the abhty to shoot groups using consistent
and proper shooting form. 3. Demonstrate a sound two-handed shooting technique -
from the stand position. 4. Demonstrate an understanding of how to adjust sights to
move and scoring ability using standard bulls-eye targets. 5. Improve scoring abihty using standard bulls-eye targets. 6. Have fun while learning
Roles for Teen and Junior Leaders Demonstrate sight picture. Demonstrate sight adjustment. Assist shooters with sight adjustments. Act as ranger office or assistants.
Score and evaluate targets. Demonstrate use of a scoring gauge.
Parental Involvement See Roles for Teen and Junior Leaders above. Control or monitor one or two shooting stations, I assisting range officers and instructors. I Arrange for or coorhate transportation to the range. I Arrange for or coordinate refreshments. I Assist with developing exhibits or filling out shooting journal entries. Assist and support shooters having specific problems.
* Consencation Affairs Manager for Federal Cartridge Company, Anoka, MN; Executive Director, Minnesota Deer Hunters Association; 4-H and Youth Development Specialist, Texas Agricultural Extension Service; and National Rifle Association Field Representative to Minnesota, North Dakota and South Dakota.
Best Time to Teach Any time of year, when shooters are able to shoot consistent groups at target backs (repeat as needed)
Best Location Safe shooting area
- pistols - ammunition - targets - eye and ear protection - scoring gauge - adequate backstop - shooting bench or table with pad - dummy or inert ammunition
- manufacturer's ammunition and ballistics catalogs
References The Basics of PisiolShooting.
National Rifle Association, Washington, DC. 1991.
Shooting FLNdamentalb. Training video. Contact your state coordinator or Daisy Manufacturing
Fact Sheet 18: Anabeng Groqhfor Form Faults in Pistol Shooting.
4-H Shooting Sports Guide

Teaching Outline
Presentation I. Review of previous lessons
A. Safety considerations B. Range commands C. Shooting procedure and
fundamentals D. Grip and stance E. Live firing at target backs F. Shooting backs
11. Sight Picture A. Define sight picture
1. Ahgned sights in relation to a target
2. Elements of a proper sight picture
focus on front sight rear sight and target slightly out of focus
B. Types of sight pictures 1. Center of sight pictures
tomcenter of front 1
sight on point of impact hold on center of target
2. Six o'clock hold "pumpkin on a post" set buus eye on center of front sight
3. Both acceptable, but stick with one type
1II.Live firing at target faces
A. Shooting bulls eye target on command 1. Follow range procedures
fact sheet 2. Follow shooting
procedures fact sheet B. Fire remaining shots at
shooter Qscretion 1. Fire only five to ten
shots 2. Focus on h g groups
consistent sight alignment consistent sight picture
C. Reverse roles and repeat
Application Lead a REVIEW to REINFORCE main points in these areas. EXPAND on any areas that are weak.
SHOOT at least one group on target backs to settle group.
STRESS role of sight alignment in accurate shooting. NOTE that errors in sight alignment are more serious than errors in sight picture,
ILLUSTRATE sight picture with dtagrams or models to show concept.
ILLUSTRATE both types of holds and discuss the advantages of each one. STRESS sticking with one type of hold to avoid
Have each relay FIRE fust shot of five- to ten-shot string on I command.
REINFORCE focus on front sight and priority of sight alignment over sight picture.
34 Revised 06-02 4-H Shooting Sports Guide
D. Repeat the exercise several times with more standard range commands 1. Watch for constant groups 2. Provide support for shooters
who need to use a supported position
IV. Developing consistent sight picture
A. Precise shooting requires consistent sight alignment 1. Alignment errors magnt fied
by distznce to target 2. Precision comes from
consistent action 3. Practice essential for
consistency B. Triangulation exercise
1. Mount pistol in vise or set in notches in a small box
2. Align pistol with blank target
move box or vise to position sights
fix box or vise in place 3. Have participant align sights 4. Have participant direct the
marker to the aligned sights with verbal directions
5. Mark location through center of marker
6. Repeat at least three times
size of group shows precision in sight alignment
group sizes of quarter to dime size adequate
large groups show inconsistent sight alignment
7. Discuss and repeat exercise if needed
V. Sight adjustment A. Objective is to match point of
aim and point of impact B. Move sights to align with the
bore C. Rear sight adjustment
1. Most common 2. Move rear sight in the
direction you want the point of impact to move
BE PREPARED for some shooters to fire from supported position.
ILLUSTRATE properly aligned sights using models or drawings.
Use triangulation exercise to demonstrate proper sight alignment. CRITIQUE each shooter's sight alignment, but DO NOT embarrass any shooter who has difficulty. REVIEW and DEMONSTRATE proper sight alignment using visual aids. PROVIDE a private area where shooters having difficulty can REPEAT exercise with assistants or teen leaders.
DEMONSTRATE sight adjustment using models or Illustrations.
DEMONSTRATE how moving rear sight in direction hlts need to move makes proper correction. STRESS using center of group as reference point.
4-H Shooting Sports Guide Revised 06-02

use center of group for reference point note &stance and direction from desired point of impact move sights in the desired hection
shoot group with same sight picture adjust to center of bull by trial and error
D. Front sight adjustment 1. Less commonly needed 2. Move front sight toward the
current point of impact (chase the hits with the sight)
E. Adjust sights to place group center in center of b d s eye
VI. Shoot ten shots for scoring A. Scoring
1. scoring in concentric bands 2. Highest band touched is
scored 3. Lines between bands part of
higher scoring area 4. Scored from center out
center is scored as "10" each ring one point less shots outside scoring area are scored as "0"
B. Use of scoring gauge 1. Inward scoring gauge 2. Outward scoring gauge
VII. Summary A. Sight alignment and sight picture B. Sight adjustment C. Scoring
STRESS recordmg change in impact for each unit of change in sights.
NOTE that front sight adjustment is MUCH less common. Have each shooter ADJUST their sights, taking turns at bench. FIRE ten-shot string for scoring purposes.
ILLUSTRATE proper scoring of target.
Have each shooter SCORE their last target, and then CHECK them for scoring accuracy.
DEMONSTRATE use of scoring gauges.
SUMMARIZE lesson-using questions to draw comments from shooters.
4-H Shooting Sports Guide

Lesson Narrative
Before moving on to the new material in thls session, let's review some of the things we learned earlier. Eye and ear protection is essential to personal safety. Three basic pistol shooting safety rules are:
1 . A l w y s keep the muzzle under control and pointed down range.
2. A l w y s keep the action open and exposed with the pistol empty except when it is actually being fired.
3. A l w y s keep the finger off the trigger except when actually firing the pistol.
Basic range commands and shooting procedures are famihar to you now. You know your personal responsibdity for shooting safety and the role of the range officers and instructors.
You have learned that good shooting involves consistent practice of a few fundamentals. You have established a sound stance and grip, and you are developing more stamina and strength in your shooting form. You have learned how to align sights properly and consistently and how \ to control the trigger. You have practiced these things both on the range i and at home by dry firing and live firing on target backs. Adding sight i
picture and the ability to adjust sights is the objective of this session. 1 !
Shooting at Target Backs 1 1
Before we start shooting at target faces, let's refresh our shooting form and feel by finng a series of shots at a target back. Concentrate on your form and remember that perfect practice makes perfect. Focus on the front sight and align the sights precisely. Hold on the center of the target 1
1,-, ---- back, using the same hold each time. Press the trigger through the shot, t
-----_ trying not to disturb the sight alignment. Hold the aligned sights on the
i center of the target until the pellet strikes the backstop. Do not worry about shot placement, concentrate on shooting a nice, tight group. p s e the standard shooting procedure.]
Sight Picture Sight picture is the next step in good shooting. It includes sight alignment and the position of the aligned sights relative to the target. The eyes should remain focused on the front sight, with both the target and the rear sight slightly blurry.
Two types of sight pictures or "holds" are commonly used by pistol shooters. The center-of-mass hold places the point of impact at the top center of the front sight. The sight is held where the shooter intends the point of impact to be. The six o'clock hold centers the entire bulls eye on the top of the front sight, like a pumpkin sitting on a post. Many shooters hke to see a hair's breadth of white between the bottom of the bull and the bottom of the bull and the top of the sight. The point of
4-H Shooting Sports Guide Revised 06-02
impact is the center of the bull when the bull is sitting on the sight. other types of sight pictures are acceptable, but you should stick with one type to avoid confusion. Practice developing sight pictures with the models or sighting devices provided.
Shooting at Target Faces With the concept of sight picture firmly in mind, let's move to the range and shoot some bulls eye targets. Each shooter d fire about ten shots, using the same sight picture. Do not worry where the group is located on the target. We wdl learn how to adjust the sights shortly. On command, fire the first shot using our standard shooting procedures. You may fire the remaining shots at your own Qscretion. (The firing procedure should be repeated several times, alternating roles between the pupil and the coach. Be prepared to use supported shooting positions for those shooters who need the extra support.)
Improving Sight Alignment Precise shooting requires precise, consistent sight alignment. Errors in sight picture are less critical than errors in sight alignment. Alignment errors are magnified by the distance from the pistol to the target. Concentrate on keeping the sight alignment crisp.
A triangulation exercise is an excellent way to practice and improve sght alignment. Make a pistol safe and leave the action open. Firmly fix the pistol in place so it points at a blank target or piece of paper. Align the sights, and direct the person down range to move a marker until it forms a proper sight picture with the aligned sights. The other person will mark through a tiny hole in the center of the marker. Repeat the procedure at least three times. The size of the group indicates the combined precision of your sight alignment and sight picture. Consistent sight alignment will result in a small group. If the group is too large, review the principles of sight alignment and sight picture before going on to shooting at regulation targets.
Sight Adjustment Sight adjustment is the process of moving the sights into an alignment with the bore so the point of aim and point of impact are in the desired relationship. The sights are moved into alignment with the bore and the trajectory curve of the projectile.
Most pistols allow the shooter to adjust the rear sight. The basic rule for adjusting the rear sight is to move the sight in the direction you want the hits to move. If the group is to the right of the point of aim,. the rear sight must be moved to the left. The center of a group is used as a reference point for sight adjustment because it is an average for all of the
4-H Shooting Sports Guide

the shots fired. The distance and direction from the desired point of impact is measured on both the vertical (elevation) and horizontal (windage) directions.
An example may help to clarify the point. On h s target a nice, tight group is centered a little over 7.6 centimeters (3 inches) to the left and about 5 centimeteds (2 inches) low. Raising the sight two full turns and moving it to the right three full turns moved the group center to a new location 1 centimeter (0.4 inch) low and 3.6 centimeters (1.5 inches) to the left. The windage adjustment for this range seems to move the group about 1.3 centimeters (0.5 inch) per turn. Moving it three more full turns to the right should put the group center on the center of the bull. The elevation adjustment moved the point of impact 4 centimeters (1.6 inches) for two turns. Raising the sight an additional half turn should put the group center where you want it. Shoot another group to confirm the setting and make any minor adjustments that may be needed. Be sure to record the sight setting changes for your pistol at this range in your shooting journal. Recording those numbers eliminates a lot of trial and error.
Target pistols normally have adjustable rear sights, but some pistols have an adjustable front sight. Adjusting the front sight is based on the same principle as the rear one. The main difference is that the front sight should be adjusted toward the point of impact. Experienced shooters refer to this as "chasing the hits."
Let's adjust our sights, based upon the group locations we have been shooting. Make the amount and drcection of adjustment you h k you need when the make-ready period is announced. As usual, we wdl be using our standard shooting procedures. You may fire as many rounds as necessary to accomplish your corrections as long as the range remains hot. Raise a hand if you and your coach need assistance. When you are satisfied with the sight setting, make your pistol safe and ground it. Reverse roles and repeat the process. When both shooters have fhshed and the pistols are safe and grounded, step back off the h e .
Assistants and teen leaders should circulate throughout this exercise assisting all shooters who need help. If approximate sight adjustment values are known, share them before the shooters start working on the sight settings. Shooters must be shooting good groups before this exercise can be effective.
Shooting for Scores Standard pistol targets have concentric bands of score values that surround a central scoring circle. The innermost circle is scored as a "10". Each successive ring has a value one less than the one inside it. The outermost scoring band is scored as a "4". Shots that fad to touch any of
4-H Shooting Sports Guide Revised 06-02
the scoring bands are scored as "0". Lines dtviding the scoring bands are part of the hgher value band. Shots that touch the h e receive the hgher score. Shots that are hard to interpret are evaluated with a scoring gauge. The gauge "plugs" the bullet hole and references its location to another ring. It is essential when those close shots are scored. A dtfferent gauge is used for each caliber of pistol used in competition. We are going to shoot a 10-shot match and score the targets. Write your name on the target and hang it on the carriers. Each relay will shoot a 10- shot string following the range officer's commands. Score your targets and have your partner check the scoring. If you have questionable shots, ask one of the teen leaders or assistants for help. We will continue shooting for improved scores over the next several meetings.
Summary In addition to reviewing previous instruction, we learned how to develop a consistent sight picture. We fired groups, then learned how to adjust the sights to set the point of aim and the point of impact in the desired relationship. We also shot a 10-shot match and learned how to score our targets. Next time we will look at other h d s of handguns and handgun ammunition. We will also continue to shoot for improved scores.
Summary Activities 1. Display a series of groups or dustrations of groups with a variety of
group sizes and locations. Ask participants whether the shooter should adjust the sights, and if so, how much adjustment is needed in whch duection.
2. Have the entire group score a set of pistol targets, using either projected visuals, enlarged posters or a set of actual targets.
3. Review all shooting journals and assist shooters with entries for this session. Be sure information on sight adjustment is entered.
Sharing and Exhibit Ideas 1. Shoot a series of groups adjusting the sights a given amount and
direction. With each group illustrate how sight adjustment can move the point of impact relative to the point of aim.
2. Post a series of targets, showing improvement in shooting skill. List the dates and the thmgs you learned or practiced to improve.
3. Display your shooting journal or notebook.
4. Show someone how to score a pistol target using a scoring gauge.
5. Look up the rules of any pistol shooting game and describe the game to the club or another interested person.
Revised 06-02 4-H Shooting Sports Guide
Basic Pistol Lesson 5
Pistols, Revolvers and Ammunition Ronald A. Howard Jr., William F. Sevens and John Kvasnicka#
Objectives Participating youth and adults wd:
1. Understand how to clear and operate assorted types of pistols.
2. Understand and dstinguish among various pistol actions. I 3. Distinguish handgun ammunition and understand safety
considerations for handgun ammunition.
Roles for Teen and Junior Leaders Demonstrate operation of various pistol actions.
Assist shooters with operation of pistol actions.
Monitor materials being passed around and being sure all participants have an opportunity to see them.
Supervise a shooting station where handguns are being fired.
Assist with a shooting demonstration
Parent a1 Involvement See Roles for Teen and Junior Leaders above.
Arrange for or provide transportation.
Arrange for or provide refreshments.
Arrange for or provide equipment or materials for the program.
* 4-H and Youth Development Specialist, Texas Agricultural Extension Service; Conservation Affairs Manager for Federal Cartridge Company, Anoka, MN; and Executive Director, Minnesota Deer Hunters Association.
4-H Shooting Sports Guide
Best Time to Teach Any time of year; after sight picture and other pistol shooting fundamentals have been introduced
Best Location Indoor or outdoor classroom or range
Time Required About 1 hour; exploring games wiU extend teachmg time needed
- handguns of various designs, models and manufacturers including: single-action revolver, double-action revolver, semi-automatic pistol, break-action pistol or illustration and bolt-action pistol or illustration
- selected rim fire and center-fire ammunition
- fired cases or dummy rounds (rim fire and center-fire)
- targets of appropriate size and
type - eye and ear protection - illustrations of handgun
actions - illustrations of handgun
ammunition - manufacturers' ballistics and
ammunition charts - manufacturers' handgun
catalogs
References The Basics af Pistol Shooting.
National Rifle Association, Washington, DC. 1991.
State hunter education manuals. Contact state hunter education coordinator for availability.
Handguns and Ammunition far Hunting. Hunting and wildlife lesson plan. National 4-H Shoodng Sports Program. Contact your state 4-H shooting sports coordinator.
Revised 06-02 41

Teaching Outline Instmctors Note: Once the shooters have begun live firing, each meeting should allow time for shooting practice or include some type of shooting event or activity. When to schedule instruction sessions in relation to shooting sessions, and the amount of instruction. is at the dtscretion of the instructors.
Presentation I. Introducing other pistol types
A. Revolvers 1. General structure
frame
barrel action @arts that load, fire, and unload the fun)
2. Single action
requires manual cocking for each shot may use internal safety devices wise to carry on empty chamber generally loaded through loadmg gate
3. Double action may be used single action may be cocked and fired by trigger press alone
cylinder usually exposed for loading and unloading
B. Pistols 1. Semi-automatic pistols
energy from fired round used to eject, cock and load for next shot magazine fed - magazine - magazine release external safeties - grip safety - other safeties - demonstrate operation frame barrel
slide
grips 2. Bolt-action pistol
Application DISPLAY or ILLUSTRATE various types of handguns available today.
ORIENT participants to their basic operation and safety. If possible, let each young person HANDLE each type, learning how to clear, load, unload and fire it.
Pay special attention to SAFETIES and checking for LOADED chambers.
If no pistols of thls types are available, USE rifles, shotguns or models in conjunction with illustrations.
Revised 06-07. 4-H Shooting Sports Guide

similar to bolt-action rifles usually single shot speciahed uses - sdhouette shooting - varmint hunting - big game hunting
3. Break-action pistols similar to break action rifles and shotguns
usually single shot speciahed uses - sdhouette shooting - hunting
- survival arm C. Black powder handguns
1. Muzzleloading pistols single shot or multiple barrels
2. Cap-and-ball revolvers revolver with cylmders loaded like muzzleloader importance of grease sealer over balls USE dummy or inert ammunition and large or projected
11. Ammunition illustrations to let hds get a hands-on look at various types of ammunition.
A. Au gun ammunition
1. BBs
"round" steel projectiles
.I77 caliber
d damage rifled barrels
2. Pellets
three sizes common
- .I77 caliber
- 5mm
- .22 caliber
several designs
air pistol competitions use standard .I77 pellets SHOW a diagram or other dustration of a rim fire cartridge.
B. Rim fire ammunition POLNT OUT components as you DISCUSS them.
1. .22 caliber most common
2. Components
rimmed case
priming compound
powder
bullet or shot capsule
3. Used in small bore shooting of all types and in Olympic pistol events SHOW an dustration of a center-fire cartridge and discuss each
C. Center-fire ammunition component.
4-H Shooting Sports Guide Revised 06-02
USE a factory catalog to dustrate the types of cartridges and variety of chamberings avdable. POINT OUT restrictions to certain types and calibers for specific shooting events.
1. Numerous calibers and chamberings
varies with intended use paper target shooting - .38 Special (.357) - 9mm - 1omm - .45 SCP
sdhouettes - 7 mm to .44 Magnum hunting - .224 to .458 in many
chamberings - varies with game,
distance and regulations. 2. Basic structure
case (rimmed, rimless or) primer
powder bullet (many different styles
and designs) D. Fitting handguns to your use DISCUSS any special interests young people have. AVOID
1. Rules and regulations discussion on personal protection. Refer them to a course on that 2. Power and regulations topic. 3. Handgun design 4. Using available information
111. Summary REVIEW the process completed thus far in the basic pistol course. USE discovery methods to let them reach conclusions. A. Learned basics of range behavior
B. Learned basic pistol shooting techniques
C. Learned variety and uses EMTHASIZE personal commitment and responsibhty. D. Rest up to you
Revised 06-02 4-H Shooting Sports Guide
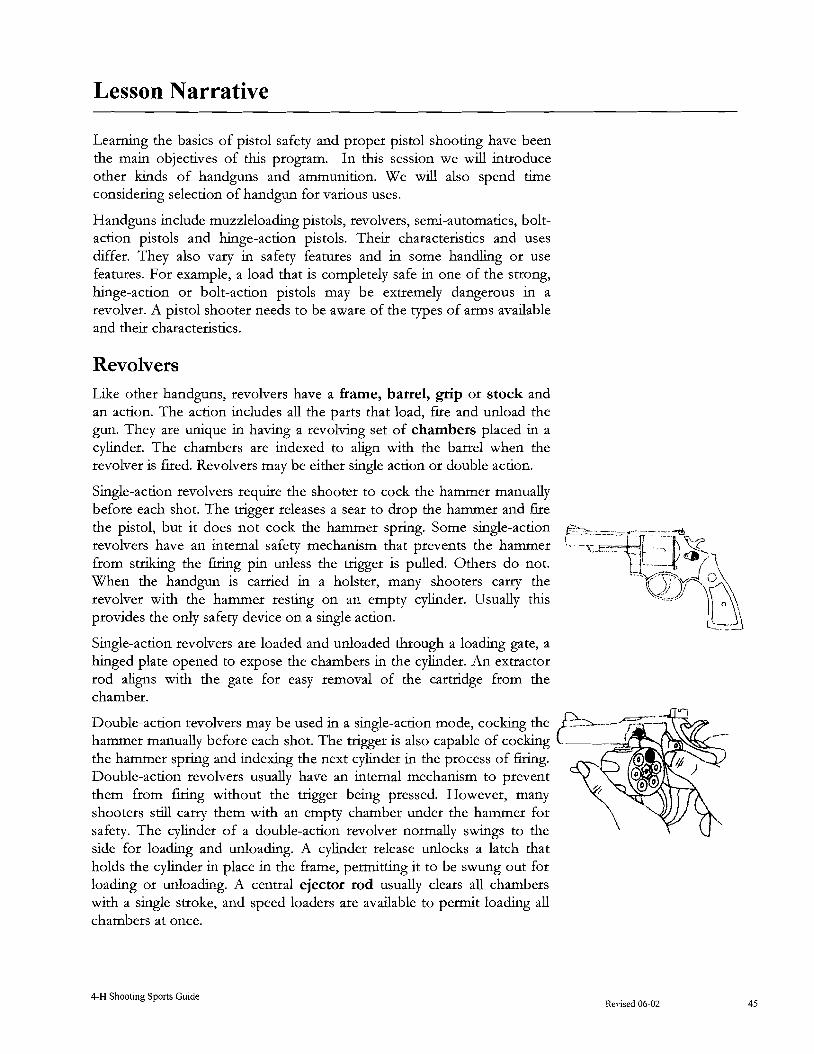
Lesson Narrative
Learning the basics of pistol safety and proper pistol shooting have been the main objectives of this program. In h s session we will introduce other ktnds of handguns and ammunition. We WIU also spend time considering selection of handgun for various uses.
Handguns include muzzleloading pistols, revolvers, semi-automatics, bolt- action pistols and hinge-action pistols. Their characteristics and uses Iffer. They also vary in safety features and in some handhg or use features. For example, a load that is completely safe in one of the strong, hmge-action or bolt-action pistols may be extremely dangerous in a revolver. A pistol shooter needs to be aware of the types of arms available and their characteristics.
Revolvers Lke other handguns, revolvers have a frame, barrel, grip or stock and an action. The action includes all the parts that load, fire and unload the gun. They are unique in having a revolving set of chambers placed in a cylinder. The chambers are indexed to align with the barrel when the revolver is fired. Revolvers may be either single action or double action.
Single-action revolvers require the shooter to cock the hammer manually before each shot. The trigger releases a sear to drop the hammer and fire the pistol, but it does not cock the hammer spring. Some single-action revolvers have an internal safety mechanism that prevents the hammer from striking the firing pin unless the trigger is pulled. Others do not. When the handgun is carried in a holster, many shooters carry the revolver with the hammer resting on an empty cylinder. Usually h s provides the only safety device on a single action.
Single-action revolvers are loaded and unloaded through a loading gate, a hinged plate opened to expose the chambers in the cylinder. An extractor rod aligns with the gate for easy removal of the cartridge from the chamber.
Double-action revolvers may be used in a single-action mode, cocktng the f?- hammer manually before each shot. The trigger is also capable of cocking (- the hammer spring and indexing the next cyhder in the process of finng. Double-action revolvers usually have an internal mechanism to prevent them from firing without the trigger being pressed. However, many shooters sdll carry them with an empty chamber under the hammer for safety. The cylinder of a double-action revolver normally swings to the side for loading and unloadmg. A cyhder release unlocks a latch that holds the cylinder in place in the frame, permitting it to be swung out for loadmg or unloading. A central ejector rod usually clears all chambers with a single stroke, and speed loaders are available to permit loading all chambers at once.
4-H Shooting Sports Guide Revised 06-02

Semi-automatic or Self-loading Pistols Semi-automatic pistols use energy from a fired round to eject the spent round, cock the firing mechanism and load another round from the magazine. Most models use a clip magazine that is housed inside the
barrel did+ frame of the grip. A magazine release allows it to be removed. In addtion to a frame, barrel, fire control mechanism and gnp, semi-automatics have a slide. The slide is the moveable part of the action. It may be external to the barrel or housed in the rear portion of the receiver. Slides usually lock open when the pistol is empty unless a slide release is operated to close it.
I \ \ -Vrgdp Semi-automatic or self-loadmg pistols are used extensively in target - s d m ' \ 0 \\ ?i, shooting. They may be either single-action (hammer cocked manually) or
double-action (pulling trigger cocks the hammer) on the first shot. They - - -~
normally have one or more mechanical safety devices. Some of them are internal. Others are located on the frame, usually just under the slide. Sdl others are moveable parts of the gnp, requiring pressure on the safety to unlock the firing mechanism. Lke all mechanical safety devices, these are used only as an adjunct to proper firearm handltng.
Bolt-action Pistols Bolt-action pistols are very much like shortened bolt-action rifles. Each one has a receiver. All other parts (action, barrel and stock) attach to it. Bolt-action pistols are extremely strong and may be chambered for high- pressure rifle cartridges as well as standard pistol cartridges. Most bolt- action pistols are single-shot designs, and they feature rifle-styles slidmg safeties.
Most bolt-action pistols are used in sdhouette shooting or hunting. High velocity cartridges are often used in hunting varmints. Big bore cartridges are used in most big game hunting. These pistols are not suitable for standard pistol target shooting because their rate of fire is too low for the timed and rapid firing stages.
Hinge-action or Break-action Pistols Like bolt-action pistols, these models are essentially shortened rifles (or shotguns). The frame or breechblock acts as a receiver and the other parts attach to it. Rather than using a top or tang lever, hinge-action pistols use an extended trigger guard as a lever to release the breech-locking mechanism. All these pistols are single-shot deslgns. They are extremely strong and versaale. Chamberings can be altered by mounting a different barrel fitted to the same frame. A reboundmg or half cock hammer acts as a mechanical safety.
These handguns are used extensively in sdhouette shooting and in hunting situations. Many are also included in survival gear.
Revised 06-02 4-H Shooting Sports Guide

Muzzleloading Pistols and Cap-and-Ball Revolvers Muzzleloading pistols feature either single-shot or multiple-barrel designs. They are loaded in the conventional muzzleloader fashon by pouring a measured powder charge into the barrel, then seating a patched ball on the charge. Both flintlock and cap lock pistols are available. Most use a half-cock feature as a safety device.
Cap-and-ball revolvers provided a transition between muzzleloadmg pistols and those firing fixed ammunition. The cylinder is essentially a series of "muzzleloader" chambers, each with a percussion cap, powder charge and ball. Each cylinder is loaded from its muzzle end (not through the pistol's muzzle), just like a muzzleloader. A ram on the pistol is used to seat the balls on the powder. The chambers are sealed with cup grease or some similar sealant before being fired. That prevents the flash from igmting the other charges and setting off a chain reaction.
Ammunition for Pistols Pistol ammunition ranges in size from .I77 BBs and pellets to .458 bullets in a .45-70 case. BBs are nearly spherical steel balls. They are used in air guns with smoothbores, but using them in high quality rifled barrels may result in damage to the rifling. The alternatives air pistols are soft lead pellets. Most pellets are hollow-bodied projectiles. The most common sizes are .I77 caliber, 5 mm and .22 caliber. Air rifle and air pistol events permit the use of only .I77 caliber pellets, but others are useful for practice or shooting pleasure.
Fixed ammunition may be either rim fire or center-fire. The .22 caliber long rifle cartridge is the most commonly used rim fire ammunition in pistol shooting. It is composed of a metal case with a folded rim, a priming compound between the rim folds, a powder charge and a bullet. Some types of .22 rim fire ammunition contain a shot charge or capsule rather than a .22 caliber bullet. The .22 rim fire is used in all small-bore pistol shooting and in the international or Olympic pistol events.
The array of center-fire pistol cartridges is much larger. Bullet diameters from .224 to .458 caliber are available. The chambering and caliber are selected to meet the intended use. Most big bore paper target shooting is done with pistols having bore diameters between .357 caliber (such as the .38 Special) and .45 caliber (such as the .45 ACP). Service cartridges like the 9mm and 10mm are also used in some types of target shooting, particularly in combat shooting events.
High power silhouette shooting uses a wide range of pistol chamberings. For consistent results, most shooters use bullets in the 7 mm to .44 caliber class. Many of those cartridges were developed as wildcats (non- commercial chamberings) specifically for long-range silhouette shooting or handgun hunting.
4-H Shooting Sports Guide Revised 06-02
Hunting pistols also show a great deal of variety. On the small side are a number of center-hre .22 caliber rounds. The upper h t in commercially available American handguns is the .45-70 chambering. Cartridge and firearm selection varies with the game being hunted, &stance and the regulations applied to handgun hunting.
The basic anatomy of center-fire cartridges applies to pistols as well as rifles. Cases may be rimmed, where the rim of the case is larger than the diameter of the case body. They may also be nrnless, with the rim lameter equal to the diameter of the case at the head and an extractor groove milled into the case. Some cases are even rebated, meaning that the rim is slightly smaller than the diameter of the case at the head. The cartridge also includes a primer, a powder charge and a bullet. Center-fire cartridges frequently contain jacketed bullets. Lead bullets may include a half jacket or a @ding metal gas check at the base. The jacket or gas check material is harder than lead and helps to prevent lead fouling in the bore of the pistol.
Fitting Handguns to Your Use Selecting a handgun is a complex decision-making process. The intended use is a primary consideration. Hunting or silhouette handguns can be single-shot models, but those intended for serious target shooting or international competitive shooting need to be capable of shooting several rounds in rapid succession. Semi-automatics dominate that field. Revolvers are reliable tools that may be used in either type of shooting with some sacrifice in efficiency for both purposes.
The intended use also influences the chambering that should be selected. Olympic competition uses only .22-rim fire ammunition, so no center-fire cartridges may be sued. American target shooting uses only a selected array of pistols from .22 rim fire to .45 ACP. Handgun silhouette shooters use .22 rim fired for small-bore events and a wide array of handguns for big-bore events. Rapid fire is not a consideration, but accuracy and adequate down-range momentum are vitally important.
Handgun hunters need to meet the energy and bullet mass demands of quick, clean kills on the intended game. They also must meet the rules and regulations that might be set forth by the wildhfe agency. Reliability, accuracy, dependabhty and down-range energy are much more important considerations than rate of fire.
Handgun design is a critically important feature to consider. A handgun that does not fit or an action types that is not comfortable or suitable for the purpose is a poor investment. A prospective purchaser should use all the information available from manufacturers, the sporting press and other shooters in selecting a handgun for his or her purposes.
4-H Shoot~ng Sports Guide
Summary In thls session, we focused on the nature of handguns and ammunition. We discussed some considerations for selecting a handgun for personal use. As we continue with handgun shooting, we will reinforce the basics of good marksmanship, safety, range behavior and sportsmanship that have been established. Becoming a good pistol shot is a challenging goal that requires good shooting form. Shooting safety resides in the mind of the person behmd the firearm. What you do with this experience, your success as a shooter and sportsman and your safety on the range and in the field are up to you.
Summary Activities 1. Allow shooters to fire all the types of handguns available with a
variety of chamberings if adequate range space is avatlable.
2. Hold a "fun shoot' where a variety of novelty targets are used to stimulate both accurate shooting and fun with pistol shooting.
3. Arrange to have shooters observe or participate in a formal pistol- shooting event.
4. Hold a consumer-judging event where the participants select from a series of handguns and/or chamberings based on several sets of criteria. Have them gve reasons for their placings and selections.
5. Hold an identification quiz where participants try to identify the handguns, components, ammunition and other equipment used throughout the program.
6. Keep providing an opportunity to shoot and to develop handgun- shooting slulls.
Sharing and Exhibit Ideas 1. Design a set of posters that illustrate types of handguns and handgun
ammunition.
2. Share your understandmg of handguns and handgun shooting with another interested person.
3. Start a collection of handgun ammunition.
4. Study the handguns available for some purpose. Select one that would fit your needs and interests, and then explain why that combination of make, model, action type and chambering was selected.
5. Display your shooting notebook or journal, indicating the things you have learned about handgun shooting.
6. Study a handgun shooting game. Outline the rules and the procedures used in that game. Share that information with the rest of the handgun-shooting group.
4-H Shooting Sports Guide Revised 06-02

Revised 06-02 4-H Shooting Sports Guide
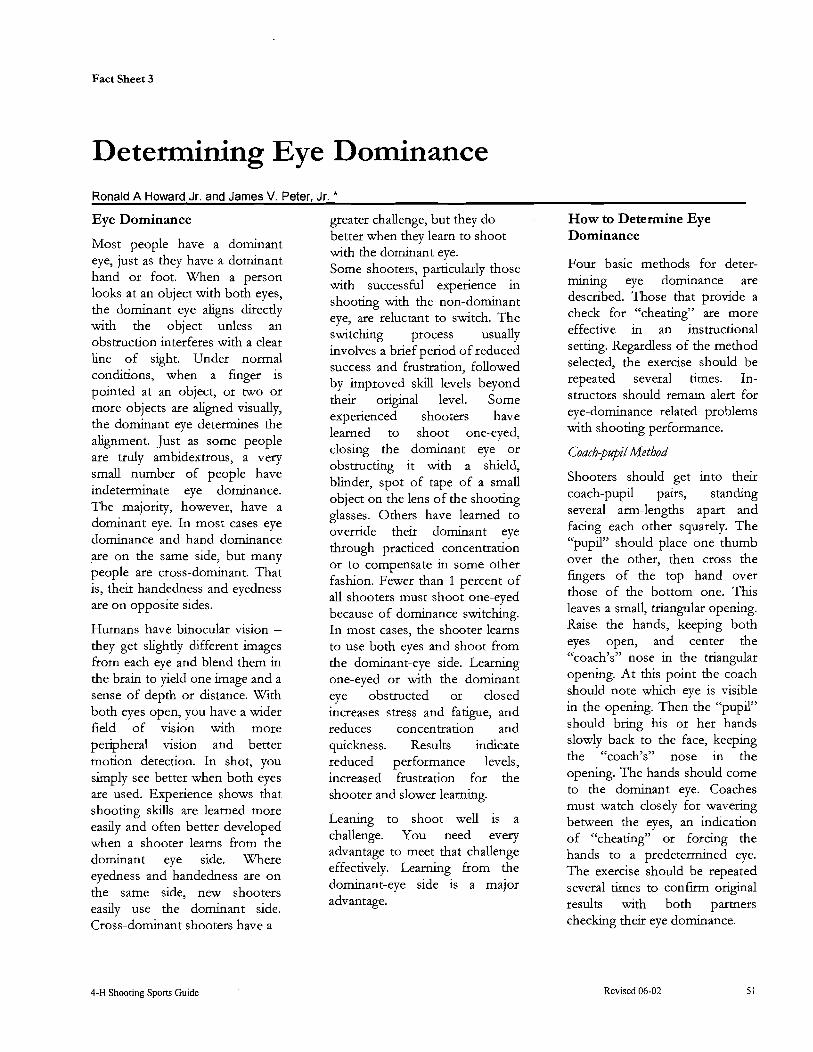
Fact Sheet 3
Determining Eye Dominance Ronald A Howard Jr. and James V. Peter, Jr. *
Eye Dominance
Most people have a dominant eye, just as they have a dominant hand or foot. When a person looks at an object with both eyes, the dominant eye aligns directly with the object unless an obstruction interferes with a clear line of sight. Under normal conditions, when a finger is pointed at an object, or two or more objects are aligned visually, the dominant eye determines the alignment. Just as some people are truly ambidextrous, a very small number of people have indeterminate eye dominance. The majority, however, have a dominant eye. In most cases eye dominance and hand dominance are on the same side, but many people are cross-dominant. That is, their handedness and eyedness are on opposite sides.
Humans have binocular vision - they get slightly different images from each eye and blend them in the brain to yield one image and a sense of depth or distance. With both eyes open, you have a wider field of vision with more peripheral vision and better motion detection. In shot, you simply see better when both eyes are used. Experience shows that shooting skiis are learned more easily and often better developed when a shooter learns from the dominant eye side. Where eyedness and handedness are on the same side, new shooters easily use the dominant side. Cross-dominant shooters have a
greater challenge, but they do better when they learn to shoot with the dominant eye. Some shooters, particularly those with successful experience in shooting with the non-dominant eye, are reluctant to switch. The switching process usually involves a brief period of reduced success and frustration, followed by improved skill levels beyond their origmal level. Some experienced shooters have learned to shoot one-eyed, closing the dominant eye or obstructing it with a shield, blinder, spot of tape of a small object on the lens of the shooting glasses. Others have learned to override their dominant eye through practiced concentration or to compensate in some other fashion. Fewer than 1 percent of all shooters must shoot one-eyed because of dominance switching. In most cases, the shooter learns to use both eyes and shoot from the dominant-eye side. Learning one-eyed or with the dominant eye obstructed or closed increases stress and fatigue, and - reduces concentration and quickness. Results indicate reduced performance levels, increased frustration for the shooter and slower learning.
Leaning to shoot well is a challenge. You need every advantage to meet that challenge effectively. Learning from the dominant-eye side is a major advantage.
How to Determine Eye Dominance
Four basic methods for deter- mining eye dominance are described. Those that provide a check for "cheating" are more effective in an instructional setting. Regardless of the method selected, the exercise should be repeated several times. In- structors should remain alert for eye-dominance related problems with shooting performance.
Coach-ptlpiI Method
Shooters should get into their - coach-pupil pairs, standmg several am-lengths apart and facing each other squarely. The "pupil" should place one thumb over the other, then cross the fingers of the top hand over those of the bottom one. This leaves a small, triangular opening. Raise the hands, keeping both eyes open, and center the "coach's" nose in the triangular opening. At h s point the coach should note whch eye is visible in the opening. Then the "pupil" should bring his or her hands slowly back to the face, keeping the "coach's" nose in the opening. The hands should come to the dominant eve. Coaches
J
must watch closely for wavering between the eyes, an indication of "cheating" or forcing the hands to a predetermined eye. The exercise should be repeated several times to confirm original results with both partners checkmg their eye dominance.
4-H Shooting Sports Guide Revised 06-07.

Option: Shooters could cup their hands together, leaving small openings between the bases of the little fingers and the thumbs. A card or a sheet of notebook paper with a small hole centered in it could also be used.
Distant-object Method
Use any of the methods of making an aiming device outlined above. Center a distant object in the opening. Make sure both eyes stay open and face the object squarely.
Finger-point Method
With a pointing method, a distant object or a partner is used. The finger is pointed naturally at the object with both eyes open and the face square to the object. The eyes are covered or closed alternately. When the dominant eye is closed or covered the finger appears to jump away from the orignal location.
Tube Method
ICaleidoscopes, toilet paper tubes and s d a r objects can be used with many young people to determine eye dominance. When the person is not aware of being tested for eye dominance, the tube will almost always be
brought to the dominant eye. This also occurs with spotting scopes, telescopes and s d a r tools where one-eyed viewing is needed. Troubleshooting for Coaches and Instructors
Some shooters w d bring the opening back to their own noses because they are looking at the paper or their hands rather than at the target. Those who use the finger-point method will see two fingers if they focus on their hand rather than on the target. If inconclusive results are obtained, try another method. Make note of that shooter, however, and watch for evidence of switching dominance in the act of shooting. Consistently missing to one side of the target usually indicates an eye-dominance related problem.
A Note of Caution
Vision problems can have a serious impact on shooting abhty. Often they go undetected by the shooter or those around them. Unless you are an ophthalmologist or optometrist, avoid "diagnosing" vision problems, but be aware of the types of problems a shooter with
vision problems may face. Discuss any potential problems you observe with the shooter and his or her parents. LLke teachers who notice reading problems or other vision related difficulties, the shooting instructor may notice things that even the shooter misses.
Finally, be sure that all shooters are wearing adequate eye
protection while they are on or near the firing line. S o ~ e people recommend the use of shooting glasses even for archers. Eyes are precious and vision is vital to shooting. Let's do our part in protecting them.
4-H Shooting Sports Guide
Revised 06-02
Fact Sheet 4
Non-threatening Hands-on Instruction James V. Peter, Jr.*
A major element of shooting is question of anxiety or her hips. The posture of your stance. When working with impropriety. hands when contacting the shooters, particularly beginners, Respectful, non-threatening student can also ease anxiety. instructors frequently must use treatment of shooters b e p s with Except in an unsafe situation their hands to position them or demonstration. Use a junior where imrnedlate and decisive correct their form. Even though leader or an assistant to action is required, it is seldom close contact with the shooter is demonstrate how instructors will necessary to "grab" a student or essential for effective instruction, handle shooters to correct their the fxearm. When your hands are the instructor must be careful to posture or position. By t e h g the held relatively rigd with the avoid any action that could shooter what you are about to do fmgers straight and the thumbs appear improper or cause the you can further reduce his or her resting on the top of the hands, student anxiety. A few simple anxiety. Tell the shooter you are they are much less threatened. actions can ensure a working going to push his or her torso Pressure from the palms of relationship between instructor forward, raise an elbow, flattened hands (fingers not or coach and student without any reposition a hand or turn his or curled) can accomOplish most
positioning and controhg needs.
CH Shooting Sports Guide Revised 06-02

Revised 06-02 4-H Shooting Sports Guide

Fact Sheet 16
Pistol and Rifle Range Commands William F. Stevens, John Kavsnicka and Ronald A. Howard, Jr.*
Basic range control procedures are farmliar to most rifle or pistol shooters. After shooters become famtliar with range operations, behavior and etiquette use the conventional range commands. When new shooters are learning, however, modifications can enhance safety and provide better control. The following procedure is effective and we recommend it to you. Range commands are in bold type. Coach, shooter or range assistant actions and comments are listed in normal type. Options or temporary parts of the command are indicated by brackets [ ] Parentheses ( ) enclose alternative or additional commands that can be used with begmning shooters. Refer to Fact Sheet 13 for addtional information.
Shooters (Relay {state number)) to the line.
Shooter-coach pairs move to the firing line with their rifles or pistols empty, actions open and exposed to view, muzzles pointed in a safe drection and fingers off the trigger. Range staff will also check each rifle or pistol on its way to the range.
Is the line ready? Respond by firing point number, please.
Each shooter or coach will reply with "ready" or "not ready" and state h s or her firing point number. Any firing point not
responding wiU be queried drectly to determine their situation and whether they need assistance. Once the h e is ready, the range officer will declare its status.
The line is ready. [The range (line) is clear, you may handle your firearms (pistols, rifles).]
OR Pick up your firearm (pistol, rifle). Keep the muzzle down range, the action open, the safety on and the finger off the trigger.
Shooters pick up rifles or pistols, verify the condition, make any preparations with the empty rifle necessary for the shooting takmg place and await further instructions. "Coaches" and range assistants observe muzzle control and maintain control over all ammunition. See the Fact Sheet 17: Pistol and Rifle Shooting Procedtlres for further information.
Load your firearm (rifle, pistol).
Safeties off.
Assume a comfortable (proper) firing position.
Align your sights. (Focus on the front sight and obtain proper sight alignment.)
[Raise your pistol (rifle) to firing position. (Keep the front sight in focus and maintain your sight alignment.)]
Obtain a proper sight picture. (Maintain your focus on the front sight and proper sight alignment.)
Fire when ready.
Squeeze (Press) the trigger. (Maintain your front sight focus, sight alignment and sight picture until the projectile {bullet, ball or pellet) hits the backstop.)
Cease fire.
The cease fire command must be obeyed immediately, even if a shot is nearly ready. It is complex and wiU need step-by-step reinforcement u n d it is nearly reflexive.
Make your firearm (rifle, pistol) safe. [Keep the muzzle pointed down range.
Open the action and make sure all ammunition is removed from the firearm. Place the safety in the "on" or "safe" position.]
Ground your firearm (rifle, pistol), leaving the action open and score targets.
F i r e m s may not be handled until the range has been declared clear once more.
Conventional Range Commands
Relay M (shooters, relay p ] match rY] to the line.
* Conservation Affairs Manager for Federal Canridge Company, Anoka, MN; Executive Director, Minnesota Deer Hunters Association; and 4-H and Youth Development Specialist, Texas Agricultural Extension Service.
4-H Shooting Sports Guide Revised 06-02

The preparation period begins now.. .The preparations period has ended
This command declares that the range is clear and unloaded firearms may be handled, adjusted or otherwise made ready. They may NOT be loaded.
Is the line ready?
Any shooter not ready must indcate he or she in not prepared to begin their relay. If any shooter is not ready, the range officer will announce that the line is not ready and repeat the process after a brief pause.
The line is ready.
Thts command indcates that all shooters have completed their preparations and are ready to begin the relay.
Ready on the right. Ready on the left. Ready on the firing line.
This command announces that the firing line is active. In some events, the shooter may insert a magazine or load after the "ready on the right" command.
Commence firing. (Fire when ready, fire at will, the range is hot.)
Live firing may commence. The first two terms are more commonly used. Their use is encouraged to promote consistency.
Cease firing. [Unload, open the action, ground your firearm.]
The initial command carries the implication of all the others, but they are used explicitly in some shooting events.
Change (score or score and paste) targets. (The range is clear, you may change targets.)
Shooters may proceed down range to replace, retrieve or score targets. Firearms may not be handled until the range has been declared clear once more.
Several addtional commands may be used.
The firing line is clear. You may handle your guns.
Thts is equivalent to the "make ready" command.
Police firing points.
This command is used when shooters need to pick up their fired brass and other materials around the f i n g points, often at the end of one or more relays.
As you were.
This command rescinds the one immedately preceding it. It returns control to the previous level, for example, if the range officer has announced "the h e is ready," "as you were" would indcate that it is not ready.
Carry on.
This command allows shooters to proceed with the actions takmg place before some interruption occurred.
Make your firearms (pistols, rifles) safe.
The range officer may include or expand this command. The firearm should be unloaded, magazines removed and actions or cyhders opened and plainly exposed to view. Muzzles must continue to point down range.
Ground your firearms (rifles, pistols).
The safe firearm must be placed on the shooting mat, bench or other safe surface. It may not be picked up or handled without specific instruction from the range officer.
Each action is the same as for bepn ing shooters above. Do not rush to move to the "standard" range commands. The beginning shooter wdl benefit from the verbal reinforcement of the positive actions they should be taking. Move to the conventional commands after you are completely satisfied that the fundamentals of firing a shot and range safety are insded in the shooters.
Revised 06-02 4-H Shooting Sports Guide

Fact Sheet 17
Rifle and Pistol Shooting Procedures Ronald A. Howard, Jr., William F. Stevens and John Kvasnicka*
Begmning shooters must learn a Actions open and exposed to ' ammunition provided is protocol for handling firearms on view for visual inspection. A appropriate to the firearm being the h e . Instructors or coaches closed action means "loaded and used. When dry h n g , should use an expanded ready to fire." Thts, too, is a absolutely no live ammunition procedure to establish and shooter's responsibility a\with should be on the firing lule, or in reinforce safe and responsible reinforcement from their coach the possession of anyone on the fwearms handling. Once those and all range staff. firing line. Ammunition must be - processes have become conditioned reflexes, control may revert to the basic range control commands. The protocols outlined here are designed to produce safe and responsible shooters. Numbered items are the basic commands. All items in bold print should be explicitly mentioned during the shooting process for beginning shooters.
1. Pick up your firearm [rifle, pistol]. Several elements are implicit in thls process.
Keep muzzles in a safe direction. That means down range while on the firing h e and away from people (usually straight up) at all other times. Take time to teach a proper position. Muzzle control is the shooter's personal responsibihty with the coach and range personnel reinforcing it constantly and having immediate access to each shooter.
Check firearms to be sure they are empty. Verify that each firearm is empty. Control of all ammunition by range assistants or coaches is essential during the early stages of instruction.
-
Keep fingers off the trigger until in the act of firing. Und keeping the finger along the trigger guard becomes a habit, all range staff must watch this carefully.
Safeties on. The location and operation of the safety must be thoroughly explained. Defme what is meant by "safe" or "on" and "fire" or "off." mote: Instructors debate the importance of using the safety during range instruction. Many feel it is unnecessary since the firearm is only loaded when a shot is going to be fired. They consider using the safety unnecessary and potentially confusing. Many others feel use of the safety reinforces proper firearms handltng and prepares the shooter for field shooting.]
2. Load [and charge] your firearm. Safe loading, unloading and chargmg (air rifles) must be thoroughly demonstrated and explained. Even when coaches will be loading the firearm, reinforce the process step by step early in instruction. Each coach and shooter must be sure the
distributed through range staff or coaches untd shooters can handle their own.
Place one round in the changer. If air guns are used, remind shooters that the skirt of the pellet goes to the rear, at least for the first few shooting sessions.
Close and lock the action. Reverse this sequence to unload a firearm.
Charge the arm [rifle, pistol] with air. To ensure consistent performance, explicit instructions may be needed in the early stages of instruction.
3, Assume a proper shooting position. The coach and range staff should assist each shooter into a proper shooting position, oriented and positioned for effectiveness. Each point in the position should be checked to give the shooter advantage. During the early stages of instruction the position, including foot position orientation to the target, stance, gnp and other form elements should be
-
* 4-H and Youth Development Specialist, Texas Agricultural Extension Service; Conservation Affairs Manager for Federal Cartridge Company, Anoka, MN; and Executive Director, Minnesota Deer Hunters Associations.
4-H Shooting Sports Guide Revised 06-02
developed gradually and in sequence.
4. Safety off.
5. Align your sights. In the beginning, consider this a two- step process.
Focus your vision on the front sight. Align the front and rear sights.
6. Fire when ready. The ftring process is complex and should be considered in a step-by-step fashion for begnning shooters. Often the first shot is fired "by commands."
Obtain sight alignment and sight picture.
Squeeze the trigger (press the trigger straight back) while keeping the sights aligned, focusing on the front sight and maintaining your sight picture.
Maintain the sight alignment and sight picture through the shot until the projectile strikes the backstop.
7. Cease fire. The cease fire command is also complex and requires step-by-step reinforcement.
Cease fire. [Reinforce immediate response.]
Make your firearms [pistols, rifles] safe.
Open all actions.
Remove all ammunition.
Ground all firearms [rifles, pistols] with the actions open and visible for inspection.
Take one step back from the firing line.
Revised 06-02 4-H Shooting Sports Guide

Fact Sheet 18
Analyzing Groups for Form Faults in Pistol Shooting Ronald A. Howard Jr.*
The NRA instructional manual, The Basics of Pistol Shooting, is an excellent teachmg tool for pistol instructors. Appendix D lists some common shooting errors and illustrates their impact on group location and pattern and suggestions for correcting errors. It refers to right-handed shooters but states that left-handers wdl show a mirror image of the illustrated error. Some instructors experience dfficulty in translating the illustrations. The following -
chart is written in ambidextrous terms as a supplement to Appendur D. Two-handed shooting adds potential for form faults, although they will often mimic those illustrated.
When workmg with students, instructors should try to sue ambidextrous du-ections and illustrations when possible. When workmg with bepning shooters refrain from pointing out errors.
Stress the elements of good shooting form to correct the error. Reinforcing good basic shooting form is a much more effective teachmg strategy. It does not clutter the shooter's thoughts with thmgs that must be avoided, but provides a simple set of sound, practiced fundamentals.
The vast majority of the shooting faults and associated group location problems result from difficulties during the follow through. Many involve the shooter anticipating recoil or attempting to control it by grabbing the pistol, pushing it into the recoil, "chokmg" the gnp with excessive pressure or related problems. These problems often result from excessive shooting without adequate breaks, fatigue, shooting big bore pistols with heavy recoil before developing adequate basics, failure to use eye
* 4-H and Youth Development Specialist, Texas Agricultural Extension Service.
and ear protection (noise, muzzle flash, or gas blow-back) or poor concentration. Dry firing and ball and dummy exercises are recommended for correcting -
most of these form faults. Hundreds of dry-fued shots can establish the proper form, making it a habit when live firing is taking place. fur pistols are also excellent tools for correcting form in both pistol and rifle shooters. They are extremely sensitive to form faults and will assist the shooter in correcting many of them. They are noiseless, relatively free of recoil, modest in mass and shoot relatively slow projectiles that demand a strong follow through. They are inexpensive and adaptable to a wide variety of shooting ranges, including boxes stuffed with crumpled newspaper.
4-H Shooting Sports Guide Revised 06-02
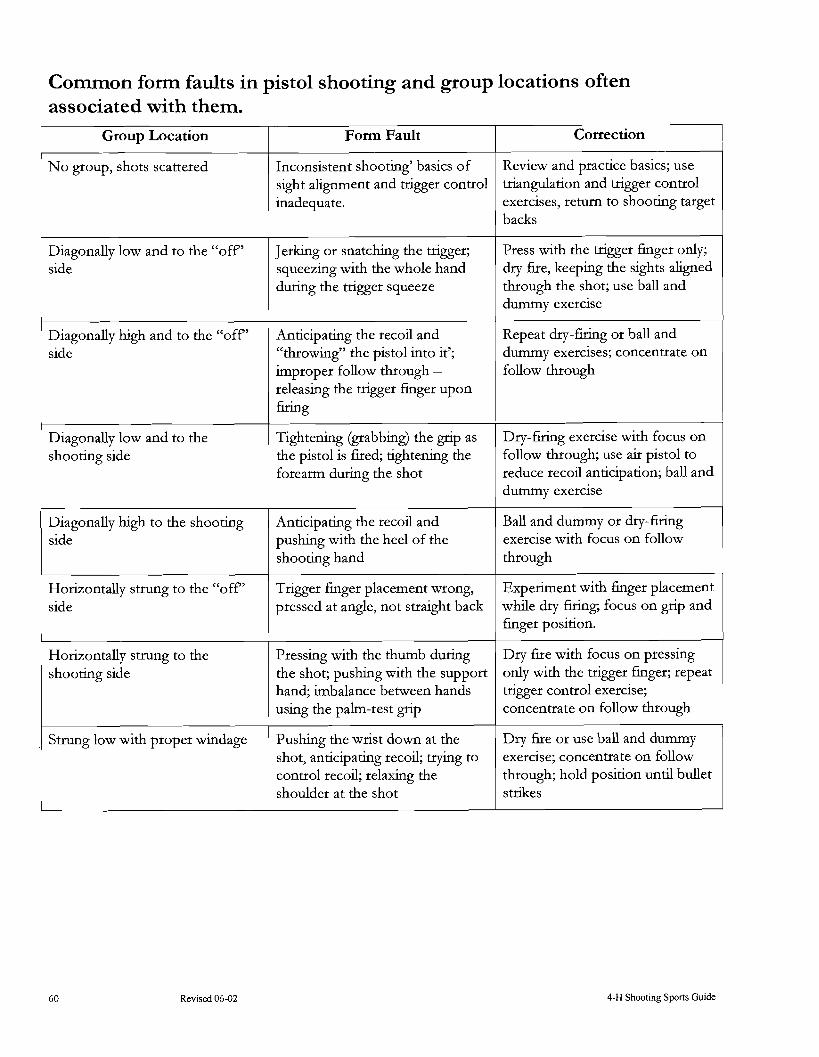
Common forrn faults in pistol shooting and group locations often associated with them.
~ r o u ~ Location
No group, shots scattered
Diagonally low and to the "off' side
Diagonally hgh and to the "off' side
Diagonally low and to the shooting side
Diagonally high to the shooting side
Form Fault
Inconsistent shooting' basics of sight alignment and trigger control inadequate.
Jerking or snatching the trigger; squeezing with the whole hand during the trigger squeeze
1
Anticipating the recoil and "throwing" the pistol into itY; improper follow through - releasing the trigger finger upon firing
kghtening ('grabbing) the gnp as the pistol is fired; tightening the forearm during the shot
I Anticipating the recoil and pushing with the heel of the shooting hand
Correction
Review and practice basics; use triangulation and trigger control exercises, return to shooting target backs
Press with the trigger finger only; dry h e , keeping the sights aligned through the shot; use ball and dummy exercise
Repeat dry-firing or ball and dummy exercises; concentrate on follow through
Dry-firing exercise with focus on follow through; use air pistol to reduce recoil anticipation; ball and dummy exercise
Ball and dummy or dry-firing exercise with focus on follow through
-
Horizontally strung to the "off' side
Trigger finger placement wrong, pressed at angle, not straight back
Experiment with finger placement while dry firing; focus on grip and - . .
1 Horizontally strung to the I I
1 shooting side
( h g e r poslaon. I Pressing with the thumb during the shot; pushing with the support hand; imbalance between hands using the palm-rest grip
Dry fire with focus on pressing only with the trigger finger; repeat trigger control exercise; concentrate on follow through
I Strung lowwith proper windage Pushing the wrist down at the shot, anticipating recoil; trying to control recoil; relaxing the shoulder at the shot
Dry fire or use ball and dummy exercise; concentrate on follow through; hold position until bullet strikes
Revised 06-02 4-H Shooting Sports Guide

Fact Sheet 19
Trigger Squeeze Ronald A. Howard Jr.*
Proper trigger control involves moving the trigger mechanism to fire a shot without dsturbing sight alignment or sight picture. Rifle and pistol shooters commonly refer to this process as "squeezing the trigger." Although "squeeze" may imply a prolonged pressure rather than a swift movement, it may carry some unintended messages for the shooter. Squeezing a rifle or pistol trigger must be an isolated action. It requires that pressure be exerted straight back on the trigger by the trigger finger alone. Squeezing with the rest of the hand or attempting to force the shot into the desired area by snatchng or jerking the trigger is a serious form fault that may be dfficult to cure. Using the entire hand or the thumb in the trigger squeezing process can have a serious impact on group size and location. Although it affects both rifle and pistol shooting, its impact on pistol marksmanship is much more evident. The coach or instructor must be conscious
of the potential problem and be prepared to treat it.
Thumbing or squeezing the grips can be diagnosed by reviewing the location of groups on the target. Dry-fLt-ing or ball and dummy exercises may reveal the problem more graphcally. Practice can cure the tendency to grab, grasp or thumb; but the problem is easier to prevent than to cure.
Be sure to explain what trigger squeeze is and is not to n2ve shooters. It may help to use other terms for the process. Many coaches like to use "press" since it conveys the same sense of prolonged pressure, but does not imply action by the remainder of the hand. Caution former rmlitary shooters to avoid using the analogy of squeezing a lemon or other item with the entire hand. The amount of gnp pressure should remain consistent from shot to shot and during the shot.
* 4-H and Youth Development Specialist, Texas Agricultural Extension Service.
A simple exercise can help in teaching trigger control Have each shooter hold their shooting hand in a relaxed manner but in the position it would assume to hold a pistol. Ask them to practice removing the tip of their trigger finger back toward the wrist without moving the thumb or the other fingers. This exercise helps to develop a smooth trigger squeeze while avoidmg extra muscular activity and tiny dsturbances in sight alignment and sight picture. It has the advantage of requiring absolutely no equipment.
The more traditional, eye dropper technique is also excellent if thumb movement is carefully avoided during the squeeze. The eye dropper could even be mounted in a pine stock if desired.
4-H Shooting Sports Guide Revised 06-02

Revised 06-02 4-H Shooting Sports Guide