PIRO INSTALLER 10_10.pub - QHT Inc
28
BIASI PiroWood Cast Iron Boiler • For wood only. • The heating system and installation of this boiler MUST be installed by a qualified licensed Heating Contractor. • Do not store or use gasoline or any other flammable liquids or vapors in the vicinity of this or any other heating system. “Save These Instructions” Installer: Please read these instructions carefully before proceeding with the installation of the boiler. If these instructions are not followed exactly, a fire or explosion may be caused with serious property damage or loss of life and serious injury. NOTE: Installation manual must be posted near the boiler and maintained in legible condition for reference by the owner or service person. Installer Instructions Solid Fuel Add-on Boiler Manufactured by: BIASI S.p.A. Verona, Italy Distributed By: QHT, INC. QUINCY HYDRONIC TECHNOLOGY, INC. 3560 LAFAYETTE ROAD BLDG. 2, UNIT A PORTSMOUTH, NH 03801 PHONE: 603-334-6400 FAX: 603-334-6401 Rev. 10/11/10
Transcript of PIRO INSTALLER 10_10.pub - QHT Inc

BIA
SI P
iroW
ood
Cas
t Iro
n B
oile
r
• For wood only. • The heating system and
installation of this boiler MUST be installed by a qualified licensed Heating Contractor.
• Do not store or use gasoline or any other flammable liquids or vapors in the vicinity of this or any other heating system.
“Save These Instructions”
Installer: Please read these instructions carefully before proceeding with the
installation of the boiler. If these instructions are not followed exactly, a fire or explosion may be caused with serious property damage or loss of life and serious injury.
NOTE: Installation manual must be posted near the boiler and maintained in legible condition for reference by the owner or service person.
Installer Instructions
Solid Fuel Add-on Boiler
Manufactured by: BIASI S.p.A. Verona, Italy
Distributed By:
QHT, INC. QUINCY HYDRONIC TECHNOLOGY, INC.
3560 LAFAYETTE ROAD BLDG. 2, UNIT A
PORTSMOUTH, NH 03801 PHONE: 603-334-6400
FAX: 603-334-6401
Rev. 10/11/10

2
Section 1 Safety instructions and important information 4,5
Section 2 PiroWood boiler description and trim kit 6
Section 3 PiroWood boiler design 7
Section 4 Procedure in event of power failure 8
Section 5 Transporting 9
Section 6 Minimum clearances 9
Section 7 Installation considerations 10
Section 8 Assembling the casing 11
Section 9 Assembling the fan 12
Section 10 Chimneys 12
Section 11 Flue gas outlet 13
Section 12 Firing Wood 13
Section 13 Starting the PiroWood boiler 14
Section 14 Refueling the boiler 15
Section 15 Extended shutdown 15
Section 16 PiroWood boiler piping and wiring considerations 16
Section 16 Continued…….. 17
Section 17 PiroWood boiler piping with Un-pressurized tank 18,19
Section 18 PiroWood boiler piping with Pressurized tank 20
Section 18 Continued….. 21
Section 18 Continued….. 22
Section 19 The heat value of wood 23
Section 20 Troubleshooting 24
Section 21 Useful References 25
Section 22 PiroWood warranty 27

3
Dear Customer, Thank you for buying a BIASI PiroWood Gasifier Boiler. The PiroWood’s system is a cast iron, solid fuel, hot water boiler, using the BIASI famous negative pressure Gasification design. This boiler is rugged and engineered for maximum safety and heating efficiency, as well as designed to operate with zero smoke in the house. We realize that it is not possible to answer all the questions about the BIASI PiroWood Boiler System in this manual. Reading this installation manual does not make the reader an expert in all aspects of installation and operation, and does not replace the need for a qualified, licensed heating contractor. We urge you to contact your installing contractor or distributor if you are in question about any aspect of your boilers performance. Our main concern is that you are satisfied with your boiler’s performance. All BIASI Boiler blocks are built in accordance with ASME Boiler Pressure Vessel Code, and bear the “H” stamp. PiroWood Boilers have been tested to UL, CSA, and EPA standard requirements. The BIASI PiroWood Boiler block has a limited lifetime warranty (refer to back of manual). Again I thank you for purchasing the BIASI PiroWood Gasifier Boiler. If you have any questions or comments, please don’t hesitate to contact us immediately . Our goal is 100% customer satisfaction.
Sincerely, Jim Quincy
QHT Inc. Quincy Hydronic Technology

4
Section 1 Safety instructions and important information 1.1 General safety rules Explosive or flammable materials • Do not store flammable materials or liquids near the
boiler. • Abide by minimum distances to combustible
materials. • Never open lower door while boiler is operating. Risk of poisoning • Insufficient air supply may cause dangerous
combustion gas leaks. • Never close off or reduce the size of air inlet or outlet
vents. • The boiler must not be operated while the pipe or
boiler is obstructed. Installation, Operation • PiroWood Boiler must be installed in conditioned
space along side the oil/gas fired boiler or buffer tank. • Only have the boiler installed by a qualified heating
contractor familiar with solid fuel appliances. • Do not modify any parts that carry flue gas. • Do not operate the boiler without water • Always keep system openings (doors, maintenance
covers, fill openings) closed during operation. • Only use properly seasoned wood. • Do not cover or reduce the size of ventilation
openings in doors, windows and walls. • All PiroWood Boilers must be installed into a tile-
lined flue with a min. size of 8”x8”x 15’ high. • Do not connect this unit to a chimney flue servicing
another appliance. If installing into a Metal Chimney, MUST have min diameter flue of 7”x12’ high or taller. Maintenance and servicing • Recommendation : sign a maintenance and inspection
contract with an approved heating contractor and have the appliance serviced annually.
• The flue gas system of the boiler must be in accordance with local approvals and code for solid fuel boilers.
• Check daily for creosote build up. • Have the entire flue system cleaned once a year by a
qualified chimney sweep. • The operator is responsible for the general and
environmental safety of the system. • Read and follow the safety instructions in the
“Cleaning and maintenance” section. • Use only Biasi spare parts. Combustion/ Room air • Keep combustion/ room air free of aggressive
materials (e.g. ones that contain halogenated hydrocarbons, chlorine or fluorine compounds). This will help you prevent corrosion.
• Prevent heavy accumulation of dust. • The combustion / room air must maintain a minimum
temperature of at least 60˚. • Caution: Hot surfaces; keep children
away. Do not touch during operation.
1.2 Important information This operators manual is to ensure safety of the PiroWood Boiler and its user. Please read carefully!!! 1.3 PiroWood Boilers intended use The Biasi PiroWood solid fuel boiler is a heating boiler for wood firing in single and multi family homes. In order to ensure proper use, please observe the details on the rating plate and the specifications to ensure proper use of this boiler. 1.4 Note: Always observe all local codes and standards during operation. 1.5 Operation tips • The boiler may only be operated by adults who are
familiar with the instructions and boiler operation. • Hot surfaces demand that children are kept away
from unit and not to be left unsupervised during boiler operation.
• Do not use any fluids to boost or start a fire. • Never open lower door when boiler is operating. • Except to start fire, never open door without fan
running. • Ashes should be placed in a steel container and
moved outdoors, do not place any waste in the steel container.
• Keep all flammable items at minimum of 24-48 inches away from boiler at all times.
• Do not place flammable objects on the boiler. • Only clean surface of boiler with non flammable
cleaners. • Do not store any flammable materials in the boiler
room (e.g. petroleum, oil). • Do not use any flammable liquids for heating. • While the boiler is operating, do not exceed the
rated output of the boiler (overheating). • Operate the boiler at maximum temperature of
200˚F and check it during operation. • Operate the boiler with a minimum return
temperature of 160˚F. Ensure that this temperature limit is adhered to with a suitable set-up.
• The minimum boiler water temperature must be above 160˚F, because with a lower temperature , creosote can produce. This has negative consequences for the proper operation of the boiler and its life span.
• The boiler operator must follow the operating instructions.

5
1.5 Continued... • The boiler operator may only start up the boiler,
take the boiler out of operation, and clean it. All other work must be performed by an authorized service company.
• The service technician is obligated to inform the boiler operator about the correct, safe operation of the boiler.
• In case of danger or explosion, fire, escaping combustible gases or vapors ( e.g. vapors that arise when gluing linoleum, PVC, etc.), do not operate the boiler.
• NOTE: Never open boiler combustion door (lower) when fan is running
1.6 Air supply Danger: Risk of fatal injury from lack of oxygen in boiler room! Warning: System damage and risk of injury in case of incorrect start-up! • Make sure there is adequate fresh-air ventilation by
providing air vents to the outside. • Point out to the system operator that those air vents
must remain open.
1.7 Disposal Disposal of any packaging or product materials must be disposed of in an environmentally responsible manner at authorized disposal sites.
1.8 WARNING: Risk of fire Do Not:
• Burn garbage, gasoline, naphtha, propane, engine oil, or
other inappropriate materials.
• Fire the Pirowood during a power failure. Use a wood
stove during a power failure, not a wood boiler.
• Operate with flue draft exceeding .12 inches of water
column
• Store fuel or other combustible material within marked
installation clearances.
• Operate with fuel loading or ash removal doors open.
• Adjust the safety or control devices without consulting
with the instructions of the manufacturer of the boiler.
• Overload the combustion chamber.
• Use chemicals or fluids to start a fire.
Note: Inspect and clean flues and chimney regularly.
• Operate the (gas, oil, electric) boiler periodically to ensure that it will operate satisfactory when needed.
• Boiler doors and seals must be kept in good condition. • DO NOT relocate or by-pass any of the safety controls
in the original boiler installation. • Cleaning of the heat exchanger, flue pipe, chimney and
draft inducer if used, is especially important at the end of the heating season to minimize corrosion during the summer months cause by accumulated ash.
• Do not burn anything other then wood in this boiler. • Do not connect to any chimney or vent serving a gas
appliance. 1.9 Canada (only) • The operation of an existing gas boiler must be verified
for acceptable operation before and after installation of the Pirowood by a gas fitter who is recognized by a regulatory authority.
• Installation must comply with requirements of CAN/CSA-B365, Changes to installation should comply with CSA B139 (OIL FIRED), C22.1 (FOR ELECTRIC), OR CAN/CGA-B149.1 or CAN/CGA-B149.2(FOR GAS-FIRED)
1.11 Boiler water • If you have an old system with cast iron radiators,
thoroughly flush the system (without boiler connected) to remove sediment.
• Do not use petroleum-based cleaning or sealing compounds in boiler system.
• Use only propylene glycol which are specifically formulated for hydronic systems.
• Continual fresh make-up water will reduce boiler life. Mineral buildup in heat exchanger reduces heat transfer and reduces efficiency, and could cause failure. Addition of oxygen carried in by make-up water can cause internal corrosion in system components. Leaks in boiler or piping must be repaired at once to prevent damage from make-up water.
Section 1 Continued…..
1.12 Procedure in the event of a runaway fire or chimney fire If the Boiler-Fire is out of control (or creosote in chimney has caught fire) Do the Following: • Switch off power to boiler • Turn-up thermostats in house • DO NOT dose the fire with water as injury from steam
could occur
1.10 Identification The BIASI PiroWood Boiler is identified by: • The ETL Name Plate is
installed on the top panel of the boiler casing.
• The ASME Plate is fastened to the Loading door of the boiler casting.

6
22
Section 2 PiroWood Boiler description and trim kit
1. 1 1/2” NPT supply tapping 12. Gasification Chamber
2. Loading Door 13. Mobile Smoke Plate
3. Door Handle/ Knob 14. Casing
4. Combustion Air Distributor 15. Immersion well tapings
5. Primary Air Regulator 16. By-Pass
6. Combustion Air Intake 17. Breaching “6”
7. Secondary Air Regulator 18. Fan
8. Combustion Chamber Door 19. Insulation
9. Flame Inspection Window 20. Smoke box
10. Ash Container 21. Cleanout Door
11. Combustion Chamber 22. 1 1/2” Flange (Return Outlet)
• (1) ¾”PRV • (1) ½” BOILER DRAIN • (1) ½”IMMERSION WELL • (1) ¾” STUBBY WELL • (2 )L4006B AQUASTATS • (1) HYDROLEVEL 3150 CONTROL • (1) HYDROLEVEL 3150 SENSOR (12” SHORT) • (1) ¾” HYDROLEVEL IMMERSION WELL • (1) 1 1/2”X4” NIPPLE
• (2) 1 1/12”X 3/4” TEE • (1) 1 1/12”X 2” NIPPLE • (1) ¾” ELBOW • (1) ¾”X 3” NIPPLE • (1) PiroWood Manual • (1) TIMER • (1) SINGLE J BOX • (1) 3/4”x 1/4” BUSHING • (1) TRIDICATOR (SHORT SHANK)
PiroWood Boiler Trim Kit Items and Packaging

7
Section 3 PiroWood Boiler design
The PiroWood Boilers are hot water generators that burn wood gas at very high combustion temperatures exceeding 2000˚F enabling efficiency to approach 85% steady state. The combustion chamber is kept at negative pressure with a high vacuum radial fan.. They feature a high quality and extremely thick EN GJL200 cast-iron body. The large heat exchange surface, the pins in the flue gas path and the burner made from refractory material ensure exceptional resistance to corrosion and very high efficiency that remains constant over time (self-cleaning effect). The boilers can independently serve central heating systems or preferably be combined with a central heating system directly or indirectly, when connected to a thermal storage (pressurized or unpressurized) tank. The doors can be changed to open in either direction (left or right) and come from the factory set to open to the right.
Primary air (which determines the boiler’s heat output) enters the load chamber through side openings uniformly distributed over the length of the chamber. The volume of primary air drawn in is controlled by a gravity shutter that closes automatically when the fan is switched off. Primary air mixes with the gasses generated by the drying of the wood fuel (pyrolysis). The gas mixture then flows down through an opening in the floor of the load chamber directly into the combustion chamber where it feeds the flame. Secondary air is drawn into the flame nozzle through direct ducts to improve the burn quality and reduce emissions. In fact, the addition of secondary air not only reduces CO emissions but also ensures complete combustion, promoting the conversion of CO into CO2 and minimizing the amount of unburned fuel waste left in the PiroWood Boiler’s combustion chamber.
How gasification works: Hot gases from the combustion chamber are channeled into the finned heat exchanger on the lower section of the combustion chamber. Inside the heat exchanger, a special stainless steel ash container removes any solid particles (ash) carried out of the combustion chamber so they can be removed quickly and easily during cleaning. The hot exhaust flows over the finned surfaces of the heat exchanger, transferring heat to the water. At the end of the finned heat exchanger the exhaust heat is extracted and drawn into the smoke box where it is channeled to the exhaust breeching at the top of the boiler. The exhaust continues to release heat to the boiler through this last section of the exhaust path, since the rear section of the boiler has pins designed to maximize heat exchange before exhaust gases leave the boiler.
How exhaust heat is collected:

8
PiroWood boiler
Oil/Gas Boiler
Auxiliary “Dump Zone” Utilizing Natural Thermal Circulation During Power Failure
6"Ø
Breach
Note: Must be vented
into separate flue.
Increase Size of
Expansion Tank to
Accommodate
Piro wood.
Pressure
reducing
valveBackflow
preventor
Water supply
Circ. A
Circ. B
Flow
Check
¾” Ø
¾ “ Ø
Wiring Legend110 VAC
PiroWood Boiler piped in
parallel to Oil/ Gas Boiler
DHW
Tank
In Event of
Power Failure
“OPEN CHECK
VALVES”
Flow
Check
110 VAC
N.O. 1" Ø
Zone Valve
DUMP ZONE RADIATOR
Min size is 12K MBH at 180F
¾” Pipe Diameter
Section 4 Procedure in event of power failure
Should your electricity go off during the heating season, there are several procedures that should be followed in order that you may continue to safely operate your heating system. These procedures apply to the solid-fuel boiler, as the gas or oil-fired boiler, if any, will be completely inoperative, the PiroWood will not provide much heat to the system during power failure. 1. Locate any “flow-check” valves in the system as shown below, completely unscrew
the knob on the top of all these valves. (This will allow a certain amount of heated water to circulate by convection throughout the house, preventing the pipes from freezing and keeping the house partially heated).
Note: This does not apply to gravity systems, as they have no flow-check valves, and will continue to operate normally without electricity.
2. Note: In the event of a power failure, DO NOT open the loading door if fan is not running.
3. It is important to remember that the heating system cannot dispose of a great deal of fuel without a circulator running.
PIPING NOTES: 1. This drawing is meant to show system piping concept only. The installer is responsible for all equipment &
detailing required by local codes. 2. Discharge of Pressure Relief Valve must be piped without valves to within 3” of the floor. 3. Where required, Low Water Cutoff must be installed in the Supply piping of the oil/gas boiler 4. Make-up water must be supplied to the PiroWood Boiler.
Weighted
Gravity fed zone
Note: Dump zone can only be made inoperative by a deliberate manual action.
Pipe Size should be > 3/4
inch (18 mm), room temperature of 65ºF (18ºC), and mean water temperature of 180ºF (82ºC).
Note: A hot-water circulation loop that would dissipate at least 10% of the estimated rated heat output of the solid-fuel boiler when circulation is reduced because of an electrical power failure. Dump zone loop must be above the PiroWood boiler.

9
Once the packaging has been removed, cut the straps and remove the casing in such a way as to avoid damaging it.
• If hoisting equipment is available, suitable for the weight of the boiler, use the eyebolts provided on the body to lift it
• If no suitable hoisting equipment is available, handle the boiler manually, as follows:
• Remove the fastening screws for the baseboard and take it off, so as to al-low the pallet to be tilted
• Insert a suitably sized bar through the two eyebolts and lift the boiler body.
Caution: • Use safety equipment.
Section 5 Transporting
Section 6 Boiler-room requirements
The room where the PiroWood Boiler is in-stalled must be heated and must always com-ply with the technical standards and the local codes. Do Not install the PiroWood : • Outdoors, as they are not designed for
this type of installation • In an unheated room • In rooms with exhaust fans • In houses with heat recovery ventilation
systems (HRV) an outside source of ven-tilation air is needed for the boiler room. Such as a fan-in-a-can.
• Do not install the PiroWood boiler in a open garage unless there is a boiler room
Minimum clearances from the boiler to combusti-ble walls and ash-removal doors.
Section 6.1 Minimum clearances Must be Installed on non combustible floor or cinder blocks extending at least 16" in front and 8" on either side of the PiroWood. These clearances are from combustible and non-combustible materials. Note: Minimum distance around the boiler is 60” from front, 12” from the side, and 26” from the back.
Section 6.1 Construction of cement pad on combustible floor Construction of cement block pad under PiroWood should extend at least 8” to each side of the boiler and extend at least 2” on either side of the chimney connector
Allow for the space required to access the safety / control devices and to perform the maintenance and loading operations.
26”
Note: Danger can exist if minimum clearances are not followed
12
12

10
Section 7 Boiler-room considerations
Note: This boiler is not to be connected to a chimney servicing another appliance • The heating system should be flushed,
cleaned of any slime and deposits, vented and tested for water tightness.
• The heating system should be equipped with a larger expansion tank of sufficient size to handle the volume of both boilers and piping.
• The PiroWood Boiler should be equipped with its own make-up water.
Model Number Output (BTU/HR)
Width Height (H)
Length (L)
WATER CONTENT (U.S.-Gal)
Min. Draft
(in WC)
Overall-Weight (lbs)
PiroWood-5 78,800 28” 47” 35.5” 18 .08 902
PiroWood-7 107,600 28” 47” 43.5” 23 .08 1144
Model H1 H W L
PiroWood 5 10” 17.5” 17” 16”
PiroWood 7 10” 17.5” 17” 24”
Combustion chamber sizing
L
PiroWood 5 4”Ø 13” Long
PiroWood 7 4”Ø 21” Long
Size of wood (maximum)
(L)
(H)
1/2” Immersion well for operating L4006B 3/4” Immersion well for
overheat L4006B
1 1/2” Boiler Supply Tapping
3/4” Tapping for PRV
1/2” Tapping for Boiler Drain
1 1/2” Boiler Return Tapping
34.5”
6” Flue
1 1/2” X 3/4” Tee’s

11
Section 8 Assembling the casing and controls
• Remove the panels making up the casing and the insulation for the boiler body from the cardboard box.
• Apply the insulation (1) around the boiler body.
• Install PRV in tapping (5) and pipe discharge to floor.
• Install immersion well for low limit aquastat for circulator L4006B in tapping(6)
• Install immersion well for overheat aquastat in tapping(7).
• Attach the side panels (2) to the studs at the rear, and secure them with the nuts (3)
• Fit the front crossbar (4) to the side panels (2).
• Fasten the front panel (9) to the side panels (2) using the 6 screws supplied with the boiler.
• Install the fan thermostat and fasten it to the location (10) on the top of the smoke box. The fan thermostat is enclosed in a 2”x4” utility box.
• Install the fans wind-up timer (12) on casing.
• Note: Timer is installed in a 2’x4” utility box.
• Install service switch to power controls. • Insert overheat (7) and low limit (6)
aquastat and immersion well in tapping show.
• Install nipple and tee provided in tapping (11) as shown for mounting hydrostat..
• Install the hydrostat immersion well in the 3/4” branch on the tee, mount the control on the flange of immersion well.
Once the electrical connections are complete: • Fasten the rear panel (8) to the side
panels (2), using the screws supplied. • Fit the top panel (9). IMPORTANT: When assembly has been completed, the installer must ensure the TECHNICAL RATING PLATE is attached to top panel of casing, so that it is legible when the appliance is installed.
Overheat aquastat(7)
Low limit aquastat for circulator (L4006B) (6)
Pressure relief valve (5)
Fan thermostat
(10)
Hydrostat Hi-Limit switching relay with low water cutoff (11)
(12) (8)
(9)

12
Section 10 Chimneys 10.1 Introduction When installing the PiroWood, check that the flue:
Supplies the negative pressure required for the new boiler (see the table of technical specifications below). • Is suitable for the 400F to 500F temperature of the
products of combustion, and has been calculated and constructed according to the required standards; recommended by NFPA
• The joints are sealed with RTV silicon sealant. • Is as straight as possible, airtight, insulated and is
not blocked or choked; • Is fitted with a cleanout door
10.2 Downdrafts Downdrafts can result from improper chimney height, nearby buildings, tree that are taller then the chimney, and too large of a flue. To help minimize this problem, the top of the chimney must be at least three feet above the point at which it passes through the roof and two feet above the highest point of the roof. In addition, the chimney should be at least as high or higher than the tallest section of any adjacent roof. 10.3 Chimney construction Fire insurance underwriters favor and sometimes require masonry construction for chimneys because tile-lined masonry chimneys are strong and not likely to crack from high temperatures. Insulating your chimney flue liner will create a consistent natural draft by keeping the temperature of the flue gasses higher then the atmospheric temperature around the chimney. Insulation will also reduce creosote deposits by reducing the moisture condensation from the flue gases. Notes: • PiroWood MUST be connected to its own separate
flue. • It must NOT be installed in a chimney flue which is
connected to a fireplace or a flue connected to another appliance.
• The recommended low heat, tile lined, masonry chimney should have a minimum 8”x 8” flue and be at least 15 feet tall.
• A H.T. metal chimney is recommended and should have a stainless 7”ø steel liner min 12’ high installed as per manufacturers instructions.
• The exhaust pipe connector must be minimum 24 gauge and 6”ø black or blued steel. It is suggested to point the male end of the pipe downward to prevent leaking creosote.
• All flue pipe joints must be sealed with a RTV H.T. sealant.
10.4 Chimney cleaning Check your chimney and flue pipe at least twice during the heating season. check it more frequently if you are new to wood or believe that there is soot or creosote build up. A small amount of smoke can infiltrate the room when you refuel the boiler. However, if this happens increasingly you may have a chimney blockage. To find out the cause, look into the chimney from above or below. If neither option is convenient, then use a mirror and a flashlight to look up the flue utilizing the clean out door as an access point. To clean your chimney, you can contact a professional chimney sweep or use several do-it-yourself cleaning methods. The most efficient device for scrubbing your chimney flue is a wire chimney brush that is designed for cleaning solid fuel flues. These brushes are available in standard sizes for both rectangular and round flues. Chemical chimney cleaners such as “chimney sweep” are available. These products are added to the hot fire in order to break down the creosote. We do not know how their long term effects on a chimney or boiler, but we have been advised that any chemical salt added to the fire may cause corrosion in insulated metal chimneys, boilers, and stovepipes. In addition, these products can be harmful to your health.
Section 9 Assembling the fan
9.1 Installing fan Once having removed the fan from the packaging, proceed as follows: • Unscrew the fastening screws (1) and
separate the protective casing (2) from the fan assembly(3).
• Fasten the fan assembly (3) to the smoke box, complete with gasket, and secure it using the screws (4).
• Apply the protective casing (2) to the fan assembly (3).
• Secure the casing (2) with the screws (1).
9.2 Install capacitor Wiring from capacitor to fan: • BLUE wire from capacitor to BROWN wire on fan.
• BROWN wire from capacitor to Black wire on fan..

13
Danger: Danger of fatal accident due to escaping carbon monoxide (CO) can be avoided by only burning wood in this boiler (Failure to do so can cause boiler to silt up and CO gasses to escape). Warning: Harm to yourself or the boiler can be avoided by NOT using plastics, household waste, chemically-treated wood, old paper, chips, bark or chipboard waste for firing. Do not use with a automatic stoker.
12.1 Wood Burning and Moisture We recommend that there is no more then 20% humidity in the wood that will be burned. If there is more then 20% humidity there is risk of harming the lifetime of the boiler by creating a build-up of tar and soot, and also may affect the performance of the unit. Note: The hotter the fire, the less creosote is deposited. Wood must be seasoned at least six months; however, it is preferable to season it for a year to eighteen months. Seasoned wood will not only reduce creosote but will also produce more heat. Some seasoned hardwoods will yield 20-25% more heat.
12.2 Selecting your wood Please select well–seasoned wood for burning, seasoned wood will often show cracks radiating outward from the heartwood toward the bark, like wheel spokes. A cord of wood measures 4’x4’x8’. If you buy a cord of wood, cut it to length and split it, you will find this will help the seasoning process. Often the best time to buy wood is late winter, early spring. Green wood can usually be purchased at lower price. If you are to cut and split your own wood, you would want to let the wood sit for 18 months, after you cut down the tree let it lie awhile with the leaves still attached to allow the leaves to wither and help draw out some moisture. Note: Check the heat value of wood in section 13 for wood with highest heat value. 12.3 Storing your wood Store your wood outside of the minimum clearances recommended on the drawings on page 9. Generally wood should be stored in the basement or barn, garage where insects wont bother the house and you can keep control of the humidity of the area. If fans are installed within fuel storage area, they should not create negative pressure in the room where the Pirowood boiler is located. Establish a routine for storage of wood. 12.4 Ash removal Once a month or time to time check the ash pan under the grates and remove and dump ashes if full into a metal container. Replace the ash pan and close the ash door. After refueling, take the ash container and leave it outside the house.
Section 11 Flue gas outlet 11.1 Flue The chimney and flue must be made in compliance with building
codes and resistant to high temperature, condensate and mechanical stress, and that are airtight. 11.2 Notes The Pirowood takes in the combustion air from the area where the
boiler is installed, which MUST FEATURE ventilation openings as required by NFPA standards.
• The flue must ensure the minimum negative draft between .08”
and maximum .12“ of water column as specified in table on
page 10. If you have excessive draft, it can be adjusted by
installing a stove pipe damper in the exhaust pipe of the boiler.
• Note: Use a draft gauge to ensure adequate draft in the
exhaust pipe.
• The joints should be installed with male ends facing down and
sealed using materials that can resist temperatures of at least
700°F. Material of the chimney connector must be minimum 24
gauge black or blued steel.
• Undersized or incorrectly sized flues (1) and exhaust pipes
(2) will cause problems of condensation, which will affect
combustion and plug the flue.
11.3 Combustion air needs
A separate source of combustion air may be
necessary if: 1. The PiroWood Boiler does not draw steadily,
smells, experiences smoke roll-out burns poorly or back-drafts whether or not there is combustion present.
2. Any of the above symptoms are alleviated by opening a window slightly on a calm day.
3. The house or basement is equipped with a well-sealed vapor barrier insulation envelope tight fitting windows and/or has any powered devices that exhaust house air.
4. There is excessive condensation on windows in the winter.
5. A ventilation system is installed in the house.
11.4 Sources of combustion air • A mechanical “Fan in
a Can”. • A natural make-up air
duct system with heat trap.
Section 12 Firing wood
6”
24 Gauge
Weekly cleaning may be necessary in mild weather, even thought monthly cleaning may be enough in the coldest months. A small intense fire is preferable to a large smoldering fire to reduce the amount of creosote deposition.
Make-up air grille

14
13.2 Initial air regulator settings Set the primary air (1) and secondary air (2) regulators on the intermediate notch (second) to prepare the boiler for the first start up. • Through burnings you will notice that slight adjustments
may be needed for accurate air flow through the chamber. Make adjustments by turning regulators slightly.
• The maximum air adjustment for primary and secondary air notch 4.
Section 13 Starting the PiroWood Boiler
13.1 Preliminary checks Before commissioning the boiler, check that: • The on-off devices in the water circuit are open. • The boiler has been filled with water and air has been
vented. • The electrical connections have been completed correctly. • The flues and combustion air intake openings have been
installed and connected correctly. • The primary air and secondary air registers are both set to
notch 2, do not exceed notch 4. Caution: Do not alter these registers for any reason
13.4 Failed ignition In case of failed ignition: • Check that the wood has not bridged above burner plate,
and the wood is placed depth-wise in the chamber, in an orderly fashion and with out being jammed in.
• Use complete loads of wood to maximize run time. • Complete loads means the loading door is opened less
frequently. • Repeat steps in 13.3
13.3 To ignite and load boiler for the first time: • Do not use chemicals to start fire. • Move the main system switch to the “on” position • Set the room thermostat so that it is activated. (around 70
degrees F) • Open the loading door (3) and insert the stainless steel
burner nozzle (4) in the special housing on the burner. • Place kindling dry wood and small pieces of paper (6) on
the bottom of the chamber (5) and load the boiler with firewood.
• Ignite paper and then close the loading door (3). • Turn the timer switch to the 15 min mark to allow fire to
build. • Make sure the flame is visible through the window (7). • Set the boiler thermostat between 180-200 degrees F. The boiler will remain on until the set temperature is
reached. • Smoke flap (8)
4 3
6 5
8
3
7

15
Section 14 Refueling the boiler 14.1 Cautions • Use extreme caution when refueling the boiler. If
the door is opened too quickly, the unburned hot gases may ignite and cause a back puff. This is especially true with very dry wood.
• Keep ash and fuel doors closed if not refueling boiler.
• DO NOT tamper with hydrostat controller. • DO NOT overload the boiler. • Damage or injury will result if wood is not loaded
carefully generally level with bottom of flue gas damper.
• If loaded in-correctly there is a risk of fire or injury. • Not to be used with an automatic stoker unless so
certified. Note: Never load wood above the bottom of flue gas damper. 14.2 Re-firing To re-fire the boiler, turn on the start up timer, to pull any wood gas from loading chamber, then open the door and perform sequence in section 14.3
14.3 Reloading chamber To reload wood in the firebox, first turn on timer switch then Carefully open the top fire door one inch to allow the gasses to go down to the combustion chamber allowing the fire to calm. While loading, the door can be left fully open and logs can be added by swinging the flue gas damper open. Logs should be 1” or 2” shorter than the firebox in the boiler and should be of such diameter as not to “bridge” or jam in the firebox. Logs of 3” to 6” in diameter should be used whenever possible. This will produce an even burning and efficient fire. The logs should be stacked and lined up horizontally so the burning wood can settle easily. Add the largest wood to top of charge. After you have filled the firebox to the desired level, close the loading door securely. 14.4 Routine cleaning: Caution: Before starting any cleaning operations wait for the boiler to cool down. Check daily for creosote build up. If cleaning is necessary, PiroWood is running to cool, the hotter the fire, the less creosote is deposited, and that weekly cleaning may be necessary in mild weather, even though monthly cleaning may be enough in coldest months. A small intense fire is preferable to a large smoldering fire to reduce the amount of creosote deposition.
Section 15 Extended shutdown 15.1 Extended shutdown If the boiler is not used for an extended period, the following operations must be performed: • Close the ball valves connected to the Pirowood
Boiler. • Remove the ash and clean the flue gas path. Warning: • Empty the system or add Non– Toxic antifreeze
fluids to the heat system if there is danger of freezing.
• A container with powdered lime should be placed inside the boiler to absorb humidity.
15.2 Maintenance Periodical maintenance is a legal requirement and is essential for the safety, efficiency and life of the PiroWood Boiler. It must be performed by a licensed heating contractor at least once a year so as to clean the entire flue gas path : loading/combustion chamber, smoke box and flues.
15.3 External Cleaning: The casing can be cleaned using cloths dipped in soap and water. For hard-to-remove stains, dip the cloth in a mixture of 50% water and denatured alcohol or other specific products. Once finished cleaning, carefully dry the PiroWood Boiler. • Do not use abrasive products, petrol or
trichloroethylene. • Always make sure there are NO hot coals
underneath the ash. • Use suitable safety equipment. • The boiler is supplied without accessories, as
cleaning can be performed using normal household utensils that can be purchased at shops that sell products for stoves and fireplaces.
WARNING - Risk of Fire: must be repeated • Do on operate with fuel loading or ash removal doors
open. • Do not store fuel or other combustible material
within marked installation clearances. • Inspect and clean flues and chimney regularly.

16
16.4 NOTE: In a case where the thermostat is calling for heat and
boiler fire is out or otherwise unable to meet the heating demands of the house, circulator B will operate to release the stored heat in the tank to the house. This has the advantage of helping prevent the water in the system from freezing if the house temperature drops below 32F. If the circulator is deactivated, the system must be drained if subfreezing interior temperatures are anticipated! As an alternative to draining the system, a mixture of heating system, anti-freeze (propylene glycol) and water can be used in place of normal water in the system. Such a mixture should only be added after the system is thoroughly checked for leaks. Note: In these applications, it is recommended to use a unpressurized tank to reduce the volume of anti-freeze.
Note: Follow recommended piping and wiring diagrams so there is no manual adjustments of any controls other than thermostats to switch from one fuel to another.
Note: PiroWood boiler must be installed without changing the function of the controls or rewiring the original boiler. A wiring interconnection is permitted. The electrical system of both boilers shall be powered from a single branch circuit without exception.
16.1 Thermal storage or buffer tanks Before choosing a particular system for your
installation, consider the possibility of using a thermal storage tank arrangement to improve the system efficiency of the PiroWood Boiler. By absorbing the output “Burst” which last three to five hours, the tank will store heat from PiroWood for the burn time of a firebox load of wood. It will release heat to the distribution system when the house calls for heat. Such an arrangement is one of the most efficient methods of operating wood fired systems. Tank sizing is dependant on type of heating system, size of firebox, efficiency ETC. On average, for every 10 MBH of boiler output, it is recommended to supply 40 Gallons of water. On average PiroWood 5 Boiler needs 330 Gallons, while the PiroWood 7 Boiler needs 450 Gallons of storage water for thermal storage. We strongly recommend a thermal storage tank with all of our solid fuel systems.
Section 16 PiroWood Boiler piping and wiring considerations
16.2 PiroWood as only boiler The PiroWood Boiler can be used as the only boiler in
your radiant slab system, preferably with buffer tank (min 115 Gal.). Of course, the disadvantage of the installation is that there will be no automatic back-up system for times when the PiroWood will be unattended. For automatic switch-over from wood to oil or gas, a tandem hookup of the PiroWood with a second oil or gas boiler is recommended (see Section 17). The obvious advantage of this set-up is the cost saving involved in the elimination of the conventional boiler, controls and piping required. It should be noted that the PiroWood Boiler is extremely efficient when fired with wood combined with a 350-550 Gal thermal storage tank. People use the PiroWood Boiler in conjunction with direct vent gas or electric space heaters located in the living spaces. PiroWood must be installed in heated space.
16.3 Typical installation for stand-alone Pirowood
1. The supply tapping goes to the heating systems primary piping. Coming off the boiler, install the nipple, a tee for the hydrostat high limit switching relay.
2. In the heating systems supply piping, install an air purger and expansion tank sized to handle the water in the distribution system as well as the PiroWood Boiler.
3. Pipe the make-up water into the PiroWood Boiler through a Watts 1156F fill valve (pressure reducing valve) into the lower rear ½” tapping at the bottom of the boiler.
4. Install circulator A into boilers return line which will be pulling return water from the heating systems primary piping.
5. Circulator B bypasses PiroWood, collects heat from the tank if the tank is warmer than PiroWood.
6. A “Hydrostat” triple aquastat with lo water cut-off controls the fan and circulator. Fan thermostat and wind-up timer installed on the PiroWood Boiler control this high-limit switching relay.
Note: Minimum clearance distance around the boiler is 60” from front, 24” from the side, and 36” from the back

17
PIPING NOTES: 1. This drawing is meant to show system piping and controls concept only. 2. The installer is responsible for all equipment & detailing required by local codes. 3. Discharge of Pressure Relief Valve must be piped without valves to within 3” of the floor. 4. Where required, Low Water Cutoff must be installed in the Supply piping of the oil/gas boiler. 5. DO NOT interfere with the normal delivery of heated water from the original boiler to the system. 6. Make sure that excessive pressure will not be developed in any portion of the boiler or system through
properly sizing the expansion tank.
NOTE: All wiring and piping must be done in accordance with applicable state, local and national codes. Use only copper conductors and weighted check valves.
Section 16 Continued……..
PiroWood Fan
Triple aquastat L7248 or Hydrolstat

18
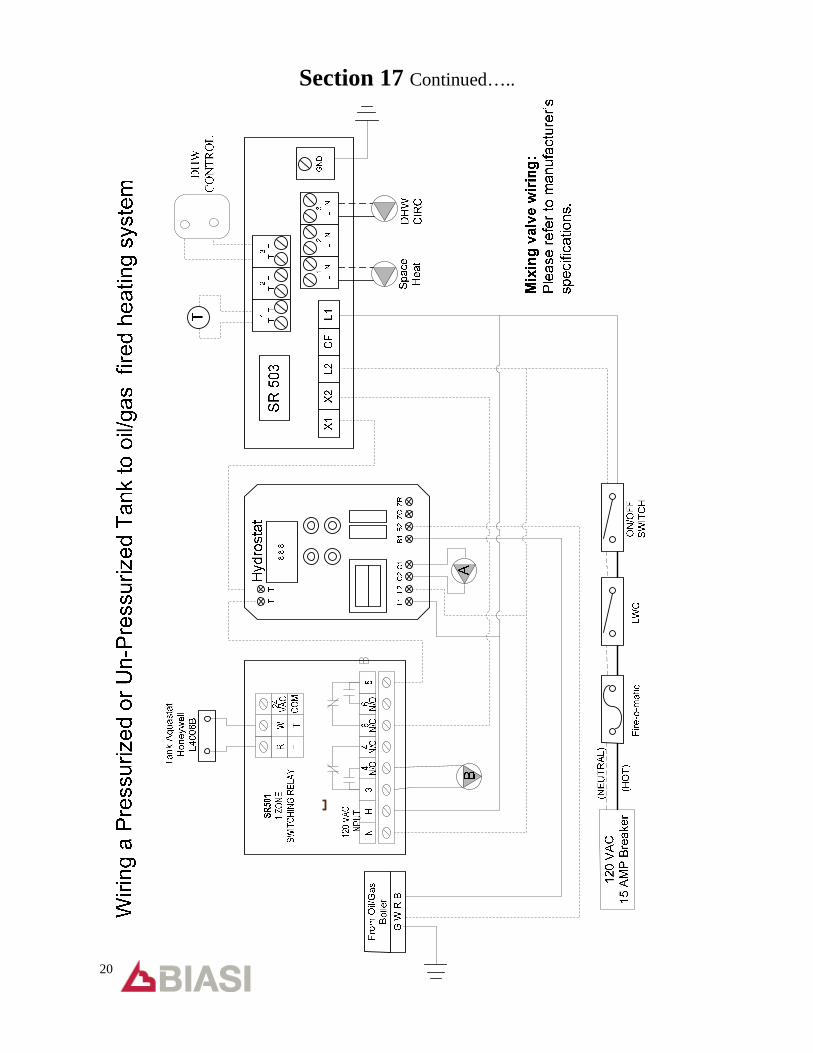
17.1 Using a un-pressurized tank The un-Pressurized Storage Tank with a built-in heating coil is a simple solution to store heat produced by the PiroWood gasification boiler to use at a latter time. The storage tank (s) are filled with 300 gallons or up to 550 gallons of water stored at atmospheric pressure. Typically, the tank will have one to three suspended coils which may be used for solar, domestic hot water, or hydronic heating system. These highly efficient, smooth copper heat exchanger (s) immersed in the tank water transfer heat from the PiroWood Boiler water allowing it to operate at maximum efficiency or release the heat to the heating system when the thermostat calls. Unpressurized thermal storage tanks can be installed anywhere, are much less expensive and are more highly insulated than pressurized storage tanks. Depending on the amount of storage, the PiroWood need only be fired 2 or 3 times a day or every day or two depending on time of the year. In the modern American baseboard, hydronic system, the heating temperature in the house is controlled by circulating water of a fairly high temperature to baseboard radiation. The thermostat for the zone or the indirect tank aquastat is connected to a relay which starts the circulator and the burner until the call for heat is satisfied. When the PiroWood and Tank are installed, a primary connection line is installed between the supply and return manifolds servicing the house. The PiroWood and Tank secondary pipe lines are routed through closely spaced pipe tees from the primary connection line through the tank to the PiroWood and on to the heating system. The gas or oil boiler are also connected through closely space tees to the primary connection line to act as backup. The foregoing illustration shows a un-pressurized tank with one coil piped in conjunction with a Biasi B10 oil/gas fired boiler, please note, that by-pass circulator B is enabled when the tank temperature is above 150F
Section 17 PiroWood Boiler piping with un-pressurized tank and Oil/Gas Boiler
17.3 Piping a un-pressurized tank 1. Insure that the existing system has flow checks or
electric zone valves in the supply lines to the various heating zones, and that the Space heat and DHW circulators are mounted on the return line going back to the Oil/Gas boiler. If not, they must be installed in these locations.
2. On the oil boiler supply pipe install two closely spaced pipe tees and connect the primary supply line to the PiroWood supply. The system water returns in through the second tee in series through the tanks coil back to the PiroWood return to be re-heated.
3. Install a tee with a 3/4”branch coming out of the supply tapping of the PiroWood Boiler for the dump zone.
4. Pipe from this tee through a flow-check and bypass and bypass tee to the primary connection line.
5. Note: The additional gallons from the PiroWood Boiler, a larger expansion tank should be added to increase tank capacity.
6. Install a tee with a 3/4” branch coming out of the return tapping of the PiroWood Boiler for the dump zone. Install circulator between boiler return tee and the tank tee.
7. Install piping, flow-check and circulator in line from the by-pass tee installed between the buffer tank and the PiroWood supply pipe
8. See PiroWood wiring schematic for Hydrostat on section 16
Note: Aquastat settings for the existing oil/gas boiler should be as follows:
High Limit – 150F Low Limit - 120F But these settings can be raised if the PiroWood Boiler
isn’t fired for extended periods of time. Note: Follow recommended piping and wiring
diagrams so there is no manual adjustments of any controls other than thermostats to switch from one fuel to another.
Note: PiroWood boiler must be installed without changing the function of the controls or rewiring the original boiler. A wiring interconnection is permitted. The electrical system of both boilers shall be powered from a single branch circuit without exception.
17.2 Sequence of operations 1. When wood boiler temperature is higher than the temperature of the buffer tank, circulator A is turned on and circulator B is turned off through the SR-501. 2. When the by-pass line temperature is higher than the temperature setting on the L4006B (160 Deg.F) the by-pass circulator will supply heat to the heating system. 3. When the by-pass line falls below 160 Deg F the by-pass circulator turns off. 4. Set oil/gas fired boiler high-limit to 150 Deg F to provide automatic back-up.
Note: Minimum clearance distance around the boiler is 60” from front, 24” from the side, and 36” from the back

19
PiroWood piping to un-pressurized storage tank.
PiroWood wiring to un-pressurized storage tank.
Section 17 Continued…..
For discussion purpose only
PiroWood Fan
150
165
Triple aquastat
SR-501
20
Section 17 Continued…..

21
Pip
ing
two
Un
-Pre
ssu
rized
Tan
ks T
hro
ugh
Piro
Woo
d
Section 17 Continued…..

22
Section 18 PiroWood boiler piping with Pressurized tank and Oil/Gas Boiler
18.1 Piping a pressurized tank The Pressurized Storage Tank, with or without,
built-in heating coil is another way to store heat produced by the PiroWood , gasification boiler to use at a later time. The pressurized tank (s) are filled with 200 gallons to 600 gallons of boiler water stored at 12 to 15 PSI. The water from distribution system, the PiroWood and auxiliary boiler flow through the thermal storage tank as in one single closed loop system. By eliminating heat exchanger (s) required in the un-pressurized tank, the full efficiency of the PiroWood is preserved as the differential between the boiler and the coil and the unpressurized tank water is eliminated. 18.2 Type of tank to be used
The Pressurized storage tanks should be listed and labeled by ASME as they operate above 15 PSI. Most states require ASME certified equipment. The tanks also are very large and can’t be site assembled like the un-pressurized tanks. Furthermore, substantially larger expansion tank (s) need to be provided. Generally, the size of the expansion tank for a 500 gallon, pressurized tank would be 40 to 50 gallons for the tank and 5 to 10 gallons for the distribution system. It is preferable to supply two expansion tanks so if one should become waterlogged, the second would carry some of the expansion load. 18.3 Piping the domestic hot water
To heat Domestic Hot Water, it is preferable to suspend a coil in the pressurized tank to allow the potable water to be heated in series on the way to the indirect DHW tank. This gives the DHW a bit of priority. 18.4 Piping the heating system Using primary secondary piping the heated water from the PiroWood is circulated to the distribution system. Return water from the distribution system is piped through the tank where it collects some heat before returning back to the PiroWood. If the PiroWood is cooler than 140F heat is delivered to the distribution system from the tank.
18.5 The sequence of operation is as follows: The inducer fan on the PiroWood is started by
the Hydrostat control and the boiler circulator is switched on when the boiler reaches 180F set-point on the L4006B control. The set point control delays circulation to the tank and/or the heating system and will reduce the formation of creosote in the PiroWood. An optional differential controller supplied with the tank manages the operation of the boiler and bypass circulators ensuring that the higher tank temperature is not re-circulated back through the PiroWood. Should neither the PiroWood or the Tank be able to satisfy a call for heat, the auxiliary oil/gas boiler will be started to handle the load.
18.4 Continued…. Since the specifics of the distribution
system vary from installation to installation, the following procedure provides an example of one specific installation which can be used as model for actual situations.
Note: Follow recommended piping and wiring diagrams so there is no manual adjustments of any controls other than thermostats to switch from one fuel to another.
Note: PiroWood boiler must be installed without changing the function of the controls or rewiring the original boiler. A wiring interconnection is permitted. The electrical system of both boilers shall be powered from a single branch circuit without exception.
Note: Minimum clearance distance around the boiler is 60” from front, 24” from the side, and 36” from the back

23
Section 18 Continued…..
PiroWood wiring to pressurized storage tank.
PiroWood piping to pressurized storage tank.
For discussion purpose only
Triple aquastat
PiroWood Fan

24
Section 19 The heat value of wood The following chart compiled by the United States Forest Products Laboratory indicates the amount of heat available per cord of wood from a few representative tree species. Other good to very good species would include apple, walnut, pecan, dogwood, cypress, sycamore and gum. The latter two are hard to split, as is elm.
Available Heat Per Cord
Species Green Wood Air-Dry Percent More Heat For Air-Dry Wood
Ash 16.5 20.0 21
Aspen (Popple, Poplar) 10.3 12.5 25
Beech, American 17.3 21.8 26
Birch, Yellow 17.3 21.3 23
Douglas Fir, Heartwood 13.0 18.0 38
Elm. American 14.3 17.2 20
Hickory, Shagbark 20.7 24.8 19
Maple, Red 15.0 18.8 24
Maple, Sugar 18.4 21.3 16
Oak, Red 17.9 21.3 19
Oak, White 19.2 22.7 18
Pine, Easter White 13.1 13.3 10
Pine, Southern yellow 14.2 20.5 44
In Millions of BTU/ HR

25
Problem Cause Corrective action
There is a smell of fumes.
− Fumes are escaping into the air − Clean and check the tightness of the flue gas path − Check that the loading and combustion chamber doors
close correctly
- Fan − Check the wiring (make sure fan is on) − Replace fan if not working
− Ignition and / or loading of the boiler − Follow the procedure described in this manual
The boiler has reached the set temperature but the radiators are still cold.
− Air in the system − Vent the system
− System components − Check the following: Check valves, pumps, room thermostats. Take necessary action where required
− Float valve in the open expansion vessel − Check operation and replace if necessary
The boiler does not reach the set temperature
− Wood poorly loaded in the chamber, or insufficient load
− Restack the wood properly or reload boiler
− Flue gas path and/ or boiler dirty − Clean the flue gas path − Clean the boiler
− The capacity required by the system is higher then the output supplied by the boiler
− Set the primary air and secondary air registers on the top notch (from notch 2 to notch 3)
Flue gas emissions dark in color
− Flue blocked − Boiler dirty − Ash tray full
− Clean the flue gas path − Clean the boiler − Empty and clean the ash tray
− Air adjustment
− Check the correct positions of the primary and secondary air knobs
− Check chimney draft
− Draft regulator − Check correct operation and replace if necessary
− Unseasoned wood − Use seasoned wood (12-20% UR)
− Load wood − Follow the procedure described in this manual
Section 20 Troubleshooting

26
Section 21 Useful References

FIRST YEAR-WARRANTY FOR PIROWOOD SERIES RESIDENTIAL HOT WATER BOILERS: Quincy Hydronic Technology warrants that its cast-iron boiler and casing are free from defects in material and workmanship for one year from the date of installation. If the boiler is found to be defective within this period, Quincy Hydronic Technology will replace the boiler block or casing. LIFETIME WARRANTY-WARRANTY FOR THE CAST IRON BOILER BLOCKS OF THE PIROWOOD SERIES RESIDENTIAL BOILERS: BIASI warrants that the cast-iron sections and nipples of the Biasi PiroWood boilers are free from defects in material and workmanship for the lifetime of the original single family home installation. If the PiroWood boiler block is then found to be defective, QHT and BIASI will replace the original cast iron boiler block. These warranties are subject to the condition that a heating contractor whose principal occupation is the sale and installation of heating equipment must have installed the boiler. PARTS, WHICH ARE COVERED, consists of all materials supplied by Biasi, identified by QHT's part numbers in its literature. Other parts supplied in the casing, trim kit or in the burner pack carry their own warranty and each manufacturer has responsibility for its own products. NOTE: ANY PART, WHICH IS REPLACED UNDER WARRANTY, CARRIES ONLY THE UNEXPIRED PORTION OF THE ORIGINAL WARRANTY. OWNER RESPONSIBILITIES: 1. Provide for proper installation, which includes pressure relief and
pressure reducing valves and high limit safety controls on closed systems.
2. Provide qualified periodic service to prolong proper operation and service.
3. Insure that boiler is installed with approved burner and that installation conforms to all codes and ordinances.
4. This warranty does not apply to boilers, which are subject to misuse, abuse, neglect, alteration, accident, excessive temperature, excessive pressure, or corrosive water or atmosphere.
5. Owner will be responsible for return of faulty components to QHT Inc. Portsmouth, NH, freight pre-paid.
QHT and Biasi will not be responsible for:
1. Components that are part of the boiler and heating system, but were not manufactured by Biasi or QHT as part of the boiler.
2. The workmanship of the installers of PiroWood boilers. Furthermore, this warranty does not assume any liability for unsatisfactory performance caused by improper installation.
3. Any costs for labor to remove or replace the faulty component. 4. Improper burner application or adjustments, control settings, care or
maintenance. 5. Any damage associated with corrosion or leakage due to the use of
"non-barrier", plastic pipe in the heating system. *THIS WARRANTY DOES NOT EXTEND TO ANYONE EXCEPT THE FIRST PURCHASER AT RETAIL AND ONLY WHEN THE BOILER IS IN THE ORIGINAL INSTALLATION SITE. *IMPLIED WARRANTIES OF FITNESS FOR A PARTICULAR PURPOSE AND MERCHANTABILITY SHALL BE LIMITED TO THE DURATION OF THE EXPRESSED WARRANTY. BIASI AND QHT EXPRESSLY DISCLAIM AND EXCLUDE ANY LIABILITY FOR CONSEQUENTIAL OR INCIDENTAL DAMAGES FOR BREACH OF ANY EXPRESSED OR IMPLIED WARRANTY. THIS WARRANTY GIVES YOU SPECIFIC LEGAL RIGHTS, AND YOU MAY HAVE OTHER RIGHTS THAT VARY FROM STATE TO STATE. For prompt warranty service, notify the installer, who, in turn, will notify the distributor from whom he purchased the boiler. If this does not result in corrective action, contact BIASI through Quincy Hydronic Technology (Address Below) with details in support of the warranty claim. All claims must be processed through proper trade channels. Contact with Biasi directly is not recommended for rapid claim settlement.
QHT INC. Quincy Hydronic Technology
3560 Lafayette Rd. Portsmouth, NH, 03801
Tel. (603) 334-6400
NAME STREET
CITY STATE ZIP
BOILER SERIAL NO. DATE OF INSTALL
NAME OF INSTALL CO. STREET
CITY STATE ZIP
PIROWOOD BOILER SIZE (EX. 4 SECTION)
HOW DID YOU HEAR ABOUT BIASI? DEALER/INSTALLER WEBSITE FRIEND/NEIGHBOR
OTHER
PLACE STAMP HERE
BIASI BOILER WARRANTY REGISTRATION IMPORTANT., Registration required. To gain complete warranty
protection, fill in and mail this card immediately.
QHT INC. 3560 Lafayette Rd
Portsmouth, NH 03801
CU
T O
N T
HIS
LIN
E
Section 22 PiroWood Warranty

Email: Web:
Telephone: Fax:
[email protected] www.qhtinc.com 800-501-7697 603-334-6401
Quincy Hydronic Technology Inc. Portsmouth, NH 03801
PiroWood Boiler Manufactured by:
BIASI S.p.A Verona, Italy