Pioneer Smart Controller Manual ver 3.0 30-12-2017 ... · Pioneer Smart Controller and Mobile are...
23
CONTROL YOUR PIONEER MINISPLIT FROM ANYWHERE (USER MANUAL) SMART CONTROLLER
Transcript of Pioneer Smart Controller Manual ver 3.0 30-12-2017 ... · Pioneer Smart Controller and Mobile are...

CONTROL YOUR PIONEER MINISPLIT FROM ANYWHERE
(USER MANUAL)
SMART CONTROLLER
Unpacking & Plugging In- Installation of Pioneer Smart Controller in Pioneer AC
Step1: Power off your AC from the mains circuit breaker and open the Front Panel of your Air Conditioner.
Step 2: Inside the front panel, you will find a docking station as shown in the red border below. Remove its screw and take it off.
1
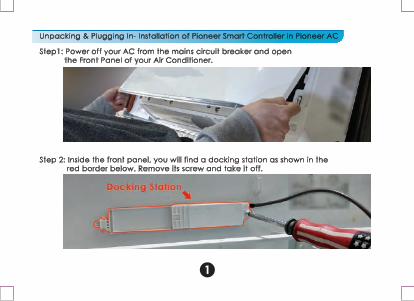
Unpacking & Plugging In- Installation of Pioneer Smart Controller in Pioneer AC (Cont)
Step 3: Open the lid cover of the docking station. Unplug the Docking Station’s cable connector by simply pulling it out.
Step 4: Pull out the existing PCB. Store the removed PCB as it is no longer required with the Pioneer Smart Controller.
2

Unpacking & Plugging In- Installation of Pioneer Smart Controller in Pioneer AC (Cont)
Step 5: Open the Pioneer Smart Controller box and take out the smart PCB and the connecting cable.
Step 6: Attach the Pioneer connecting cable with Pioneer smart controller PCB by simply plugging it inside the PCB connector.
3

Unpacking & Plugging In- Installation of Pioneer Smart Controller in Pioneer AC (Cont)
Step 7: Fix the Pioneer Smart Controller and cable inside the docking station by pressing it in the preset space.
Step 8: Close the lid of docking station and screw it back at its original location.
4

Unpacking & Plugging In- Installation of Pioneer Smart Controller in Pioneer AC (Cont)
Step 9: Connect the cable of newly installed Smart PCB to the AC cable coming out from the display panel.
You’re Done with the Installation. Close the front panel of your Pioneer Air Conditioner.
5

•Make sure Wi-Fi is turned ON in your Smart Phone•Make sure you have internet access on your Smart Phone
Your Smart Phone
Your Wi-Fi Router•Make sure you have working internet connection on your Wi-Fi Router•Make sure there is no proxy server or authentication server configured on your internet connection•Make sure there is no captive portal on your Wi-Fi Router
Important : Make sure IP isolation or client isolation is turned OFF on your Wi-Fi Router
Wi-Fi Router
Your Pioneer AC •Make sure your Pioneer Smart Controller is installed inside the front panel of your AC as described in the previous section•Power ON your Pioneer Air Conditioner
STEP 1B: PRIOR TO APP INSTALLATION
6
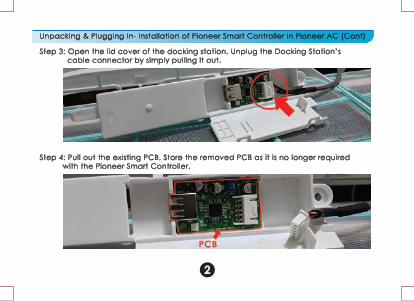
• Go to the App Store / Play Store• In “search” section type “Cielo Home”• Once “Cielo Home” App is displayed, press the Install button• Open the App after installation is complete
•You can either create a new user account or use the App as an existing user• As an existing user, enter user name and password; Tap on “Login” button• If you are a new user, Tap on “Register” button and fill in the information
Login Screen
Cielo Home AppSTEP 2A: APP INSTALLATION
STEP 2B: LOGIN / REGISTER
7

Note: Pioneer Smart Controller registration process is meant to connect the Pioneer Smart Controller to your home Wi-Fi network through the Cielo Home App
To begin registration:
Step 1: After successful login, you are at the Home Screen
Step 2: Go to your phone settings
STEP 3A: REGISTER PIONEER SMART CONTROLLER - FOR iOS USERS
Step 1 Step 2
8

Note: Pioneer Smart Controller registration process is meant to connect the Pioneer Smart Controller to your home Wi-Fi network through the Cielo Home App
Step 3: Go to your phone’s Wi-Fi settings
Step 4: Connect your phone to Pioneer Smart Controller Wi-Fi (Cielo_BI01_XXXXXX)
Note: If you can not find a Wi-Fi that starts with Cielo_BIXX_XXXXXX, Power off the AC from the mains and power it on again after few seconds OR press LED button on your mini split remote control 7 times within one minute. Now connect to the Wi-Fi that starts with Cielo_BIXX_XXXXXX
Step 5: Go back to Cielo Home App
STEP 3A: REGISTER PIONEER SMART CONTROLLER - FOR iOS USERS (Cont)
Steps 3, 4, 5
9

Step 6: Tap “+” on the Home Screen
Step 7: Wait for your phone to fetch the list of available Wi-Fi networks
STEP 3A: REGISTER PIONEER SMART CONTROLLER - FOR iOS USERS (Cont)
Fetching Network List
Step 6 Step 7
10

Step 8: Select your Home Wi-Fi network from the list (Please ensure that there is NO Captive Portal or port blocking on your selected network)
Step 9: Enter the password of your home Wi-Fi Network
STEP 3A: REGISTER PIONEER SMART CONTROLLER - FOR iOS USERS (Cont)
Wi-Fi ListEnter Wi-Fi
Network Password
Step 8 Step 9
11

Step 10: On this screen, type device name of your choice. (For example, Bedroom, Lounge, Office, etc.) Next, select “manufacturer” as Pioneer and your“remote model number” from the list
• On the next screen, “Allow Location Access” for enhanced functionality
Your registration process is complete. Pioneer Smart Controller will now appear on your home screen.
STEP 3A: REGISTER PIONEER SMART CONTROLLER - FOR iOS USERS (Cont)
Step 10
12
Note: Pioneer Smart Controller Registration
process is meant to connect the Pioneer Smart
Controller to your home Wi-Fi Network through
Cielo Home App.
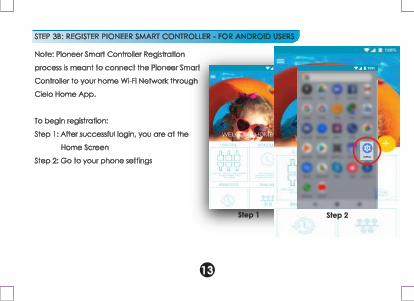
To begin registration:
Step 1: After successful login, you are at the
Home Screen
Step 2: Go to your phone settings
STEP 3B: REGISTER PIONEER SMART CONTROLLER - FOR ANDROID USERS
Step 1 Step 2
13
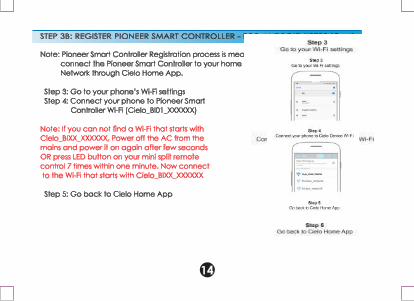
Note: Pioneer Smart Controller Registration process is meant to connect the Pioneer Smart Controller to your home Wi-Fi Network through Cielo Home App.
Step 3: Go to your phone’s Wi-Fi settings Step 4: Connect your phone to Pioneer Smart Controller Wi-Fi (Cielo_BI01_XXXXXX)
Note: If you can not find a Wi-Fi that starts with Cielo_BIXX_XXXXXX, Power off the AC from the mains and power it on again after few seconds OR press LED button on your mini split remote control 7 times within one minute. Now connect to the Wi-Fi that starts with Cielo_BIXX_XXXXXX
Step 5: Go back to Cielo Home App
STEP 3B: REGISTER PIONEER SMART CONTROLLER - FOR ANDROID USERS (Cont)
Step 3, 4, 5
14

Step 6: Tap “+” on the Home Screen
Step 7: Wait for your phone to fetch the list of available Wi-Fi networks
STEP 3B: REGISTER PIONEER SMART CONTROLLER - FOR ANDROID USERS (Cont)
Step 6 Step 7
Fetching Network List
15

Step 8: Select your Home Wi-Fi network from the list (Please ensure that there is NO Captive Portal or port blocking on your selected network)
Step 9: Enter the password of your home Wi-Fi Network
STEP 3B: REGISTER PIONEER SMART CONTROLLER - FOR ANDROID USERS (Cont)
Step 8, 9
Enter Wi-Fi Network Password
16

Step 10: On this screen, type device name of your choice. (For example, Bedroom, Lounge, Office, etc.) Next, select “manufacturer” as Pioneer and your “remote model number” from the list
Your registration process is complete. Pioneer Smart Controller will now appear on your home screen.
STEP 3B: REGISTER PIONEER SMART CONTROLLER - FOR ANDROID USERS (CONT)
Step 10
17

Your home screen shows the real-time statusof all your connected Pioneer Smart Controllers.If you have only one Pioneer Smart Controller, a single device will be displayed.
A registered Pioneer Smart Controller displays2 types of status, shown as outlined circles:
Note: In cases where the Pioneer Smart Controller is not appearing online, pleaserefer to the Troubleshooting section at the end of this manual.
Device is onlineDevice is offline
--
GreenRed
STEP 4A: YOUR HOME SCREEN
18
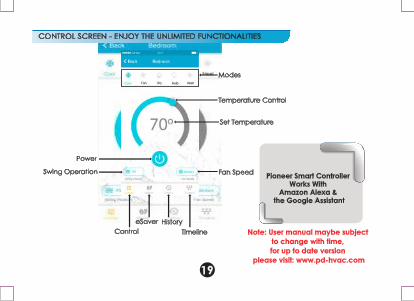
Temperature Control
Modes
Swing Operation Fan Speed
Power
Set Temperature
ControleSaver History
Timeline
CONTROL SCREEN - ENJOY THE UNLIMITED FUNCTIONALITIES
Note: User manual maybe subject to change with time, for up to date version
please visit: www.pd-hvac.com
Pioneer Smart Controller Works With
Amazon Alexa & the Google Assistant
19

Case 1:Pioneer Smart Controller and Mobile are on same Wi-Fi network - Simply tap on wrench symbol to enter device settings. Press the change Wi-Fi button. List of available Wi-Fi will appear. Enter password of selected Wi-Fi. Your new Wi-Fi settings are done.
Case 2:Pioneer Smart Controller and Mobile are on different Wi-Fi network - Go to your Mobile Settings screen and connect your Mobile with same Wi-Fi network as Pioneer Smart Controller. The remaining process is same as given in case 1.
Note: In case your mobile couldn't connect to same Wi-Fi network as Pioneer Smart Controller, press LED button on your mini split remote control 7 times within one minute. Now follow the instruction as given in case 3.
Case 3:Pioneer Smart Controller is in AP (Access Point) mode - Connect mobile with Pioneer Smart Controller Wi-Fi i.e. Cielo BIXX_XXXXXX in Mobile Wi-Fi settings. Go back to Cielo home App. Simply tap on wrench symbol to enter device settings. Press the change Wi-Fi button. List of available Wi-Fi will appear. Enter password of selected Wi-Fi. Your new Wi-Fi settings are done.
TROUBLESHOOTING: CHANGING WI-FI NETWORK OF PIONEER SMART CONTROLLER
20

1. Cielo WiGle Inc. warrants to the owner of the enclosed product that the product contained in this box (“Product”) will be free from defects in materials and workmanship for a period
of one (1) years from the date of delivery, following the original retail purchase (the “Warranty Period”).
2. If the Product fails to conform to this Limited Warranty during the Warranty Period, Cielo WiGle Inc. will, at its sole discretion, either repair or replace any defective Product or
component.
3. Repair or replacement may be made with a new or refurbished product or components, at Cielo WiGle Inc.’s sole discretion.
4. If the Product or a component incorporated within it is no longer available, Cielo WiGle Inc. may replace the Product with a similar product of similar function, at Cielo WiGle Inc.’s
sole discretion.
This is your sole and exclusive remedy for breach of this Limited Warranty.
5. Any Product that has either been repaired or replaced under this Limited Warranty will be covered by the terms of this Limited Warranty for the longer of ninety (90) days from the
date of delivery or the remaining Warranty Period. This Limited Warranty is non-transferable from the original purchaser to subsequent owners and the Warranty Period will not be
extended in duration or expanded in coverage for any such transfer.
6. WARRANTY CONDITIONS; HOW TO GET SERVICE IF YOU WANT TO CLAIM UNDER THIS LIMITED WARRANTY
Before being able to claim under this Limited Warranty, the owner of the Product must (a) notify Cielo WiGle Inc. of the intention to claim by visiting our website during the Warranty
Period and providing a description of the alleged failure, and (b) comply with Cielo WiGle Inc.’s return shipping instructions.
7. WHAT THIS LIMITED WARRANTY DOES NOT COVER
This warranty does not cover the following (collectively “Ineligible Products”): Products marked as “sample” or sold “AS IS”; or Products that have been subject to: (a) modifications,
alterations, tampering, or improper maintenance or repairs; (b) handling, storage, installation, testing, or use not in accordance with the User’s Guide or other instructions provided by
Cielo WiGle Inc. ; (c) abuse or misuse of the Product; (d) breakdowns, fluctuations, or interruptions in electric power or the telecommunications network; or (e) Acts of God, including
lightning, flood, tornado, earthquake, or hurricane. This warranty does not cover consumable parts, unless damage is due to defects in materials or workmanship of the Product, or
software (even if packaged or sold with the product). Unauthorized use of the Product or software can impair the Product ‘s performance and may invalidate this Limited Warranty.
8. DISCLAIMER OF WARRANTIES
EXCEPT AS STATED ABOVE IN THIS LIMITED WARRANTY, AND TO THE MAXIMUM EXTENT PERMITTED BY APPLICABLE LAW, CIELO WIGLE INC. DISCLAIMS ALL EXPRESS,
IMPLIED, AND STATUTORY WARRANTIES AND CONDITIONS WITH RESPECT TO THE PRODUCT, INCLUDING THE IMPLIED WARRANTIES OF MERCHANTABILITY, AND FITNESS FOR A
PARTICULAR PURPOSE. TO THE MAXIMUM EXTENT PERMITTED BY APPLICABLE LAW. CIELO WIGLE INC. ALSO LIMITS THE DURATION OF ANY IMPLIED WARRANTIES OR CONDITIONS TO THE
DURATION OF THIS LIMITED WARRANTY.
9. LIMITATION OF DAMAGES
IN ADDITION TO THE ABOVE WARRANTY DISCLAIMERS, IN NO EVENT WILL CIELO WIGLE INC. BE LIABLE FOR ANY CONSEQUENTIAL, INCIDENTAL, EXEMPLARY, OR SPECIAL DAMAGES,
INCLUDING ANY DAMAGES FOR LOST DATA OR LOST PROFITS, ARISING FROM OR RELATING TO THIS LIMITED WARRANTY OR THE PRODUCT, AND CIELO WIGLE INC.’S TOTAL CUMULATIVE
LIABILITY ARISING FROM OR RELATED TO THIS LIMITED WARRANTY OR THE PRODUCT WILL NOT EXCEED THE AMOUNT ACTUALLY PAID FOR THE PRODUCT BY THE ORIGINAL PURCHASER.
LIMITED PRODUCT WARRANTY FOR END USERS
21

10. LIMITATION OF LIABILITY
THE CIELO WIGLE INC. ONLINE SERVICES (“SERVICES”) PROVIDE YOU INFORMATION (“PRODUCT INFORMATION”) REGARDING YOUR CIELO WIGLE INC.’S PRODUCTS OR OTHER
PERIPHERALS CONNECTED TO YOUR PRODUCTS (“PRODUCT PERIPHERALS”). THE TYPE OF PRODUCT PERIPHERALS THAT MAY BE CONNECTED TO YOUR PRODUCT MAY CHANGE FROM TIME
TO TIME WITHOUT LIMITING THE GENERALITY OF THE DISCLAIMERS ABOVE. ALL PRODUCT INFORMATION IS PROVIDED FOR YOUR CONVENIENCE, “AS IS”, AND “AS AVAILABLE”. CIELO WIGLE
INC. DOES NOT REPRESENT, WARRANT, OR GUARANTEE THAT PRODUCT INFORMATION WILL BE AVAILABLE, ACCURATE, OR RELIABLE OR THAT PRODUCT INFORMATION OR USE OF THE
SERVICES OR PRODUCT WILL PROVIDE SAFETY IN YOUR HOME. YOU USE ALL PRODUCT INFORMATION, THE SERVICES, AND THE PRODUCT AT YOUR OWN DISCRETION AND RISK. YOU WILL BE
SOLELY RESPONSIBLE FOR, AND CIELO WIGLE INC. DISCLAIMS ANY ASSOCIATED DAMAGES, INCLUDING TO YOUR WIRING, FIXTURES, ELECTRICTY, HOME, PRODUCT, PRODUCT
PERIPHERALS, COMPUTER, MOBILE DEVICE, AND ALL OTHER ITEMS AND PETS IN YOUR HOME, RESULTING FROM YOUR USE OF THE PRODUCT INFORMATION, SERVICES, OR PRODUCT.
PRODUCT INFORMATION PROVIDED BY THE SERVICES IS NOT INTENDED AS A SUBSTITUTE FOR DIRECT MEANS OF OBTAINING THE INFORMATION.
11.VARIATIONS THAT MIGHT APPLY TO THIS LIMITED WARRANTY
Some jurisdictions do not allow limitations on how long an implied warranty lasts or exclusions/limitations on incidental or cons equential damages, so some of the limitations set out
above may not apply to you.
Technical SpecificationsSupplierPIONEERParker Davis HVACInternational, Inc.Doral, Florida 33172USA
Pioneer Smart Controller for Air-Conditioners & Heat PumpsModel: BI-01Operating Voltage: 5V DCOperating Power: 0.5WPeak Power: 2WRadio: 2.4 Ghz Wireless ModuleWireless Module: IEEE 802.11 b/g/nProcessor: ARM 32bitPlacement: Inside the Air Conditioner
Contains FCC ID: 2ADUIESP-12-FThis device is compatible with part 15 of the FCC Rules.Operation is subjected to the following two conditions: (1) This device may not cause harmful interference, and (2) this device must accept any interference received, including interfernce that may cause undesired operation.
For any queries, visitwww.pd-hvac.com
LIMITED PRODUCT WARRANTY FOR END USERS (CONTINUED)
22